A staircase is basically a built-in canvas you walk on every day, so a little paint can completely change the mood of your whole space. Here are my favorite stair painting ideas—from classic, timeless looks to artsy, unexpected finishes that feel like a personal signature.
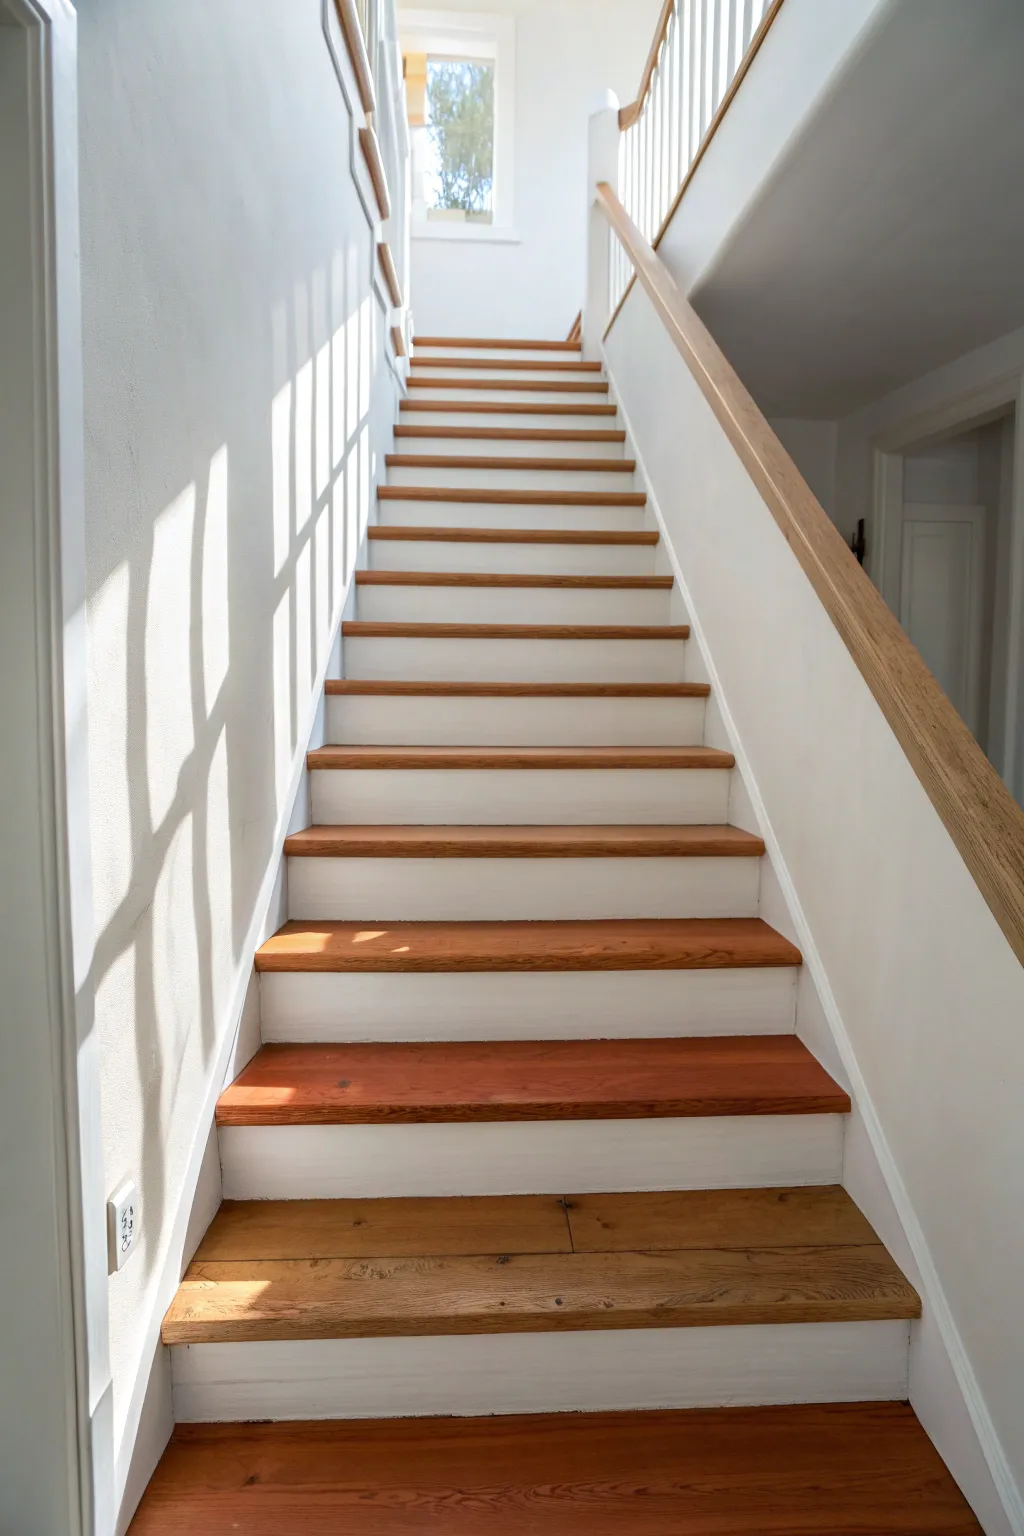
Classic Two-Tone Treads and Risers
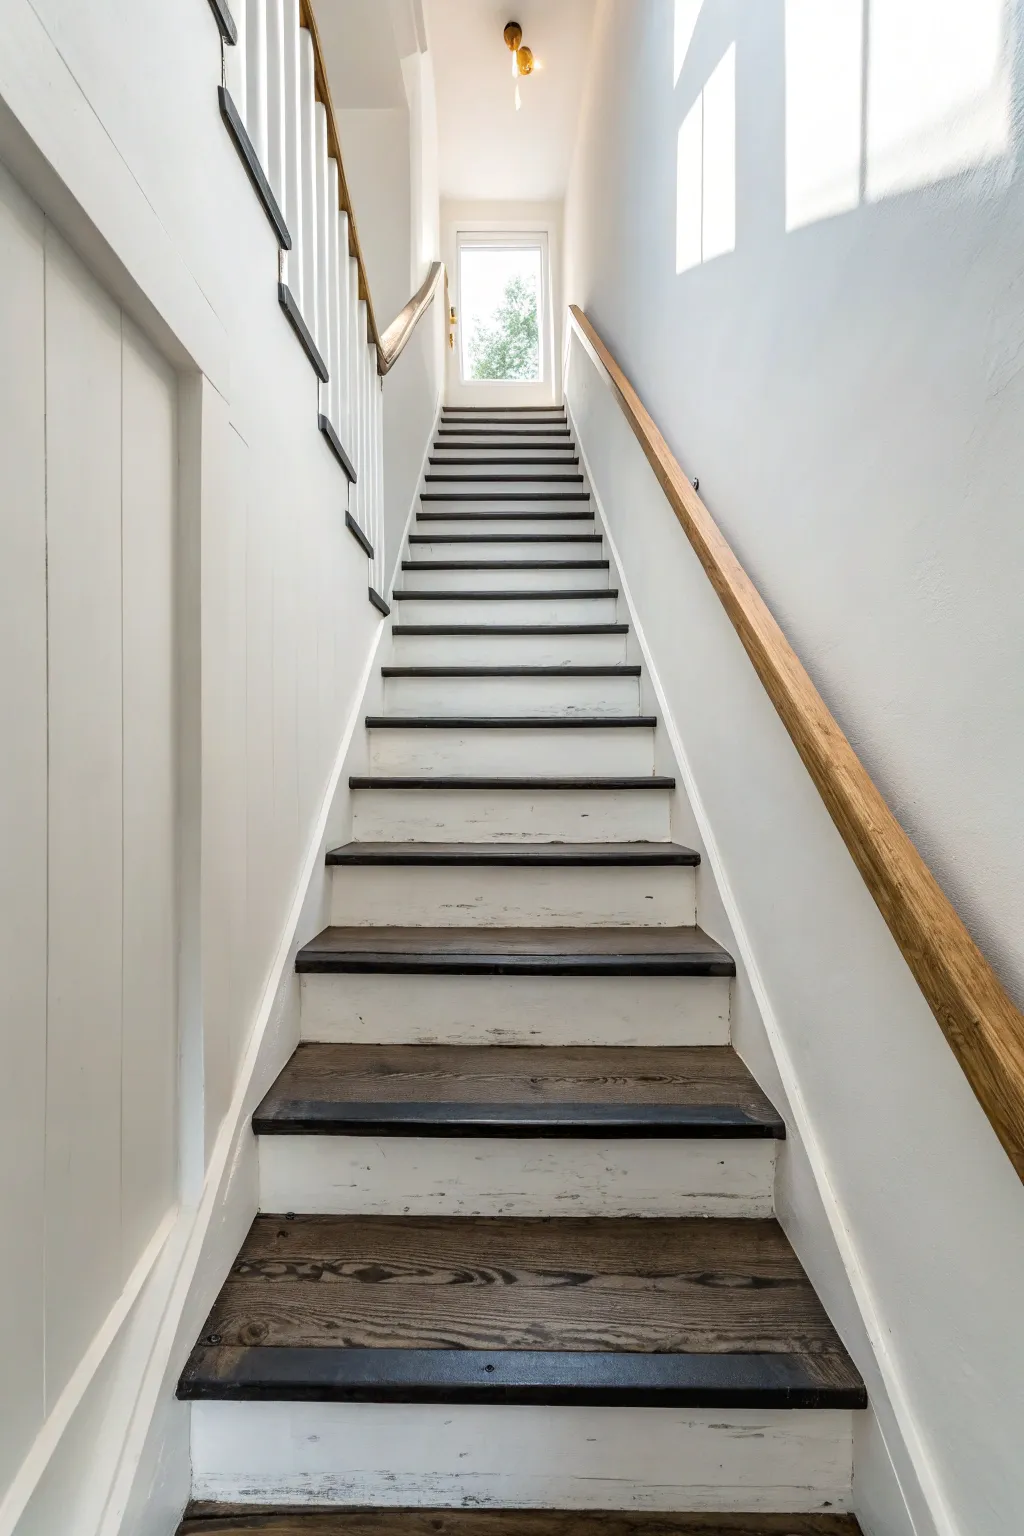
Transform a plain staircase into a stunning farmhouse feature with this classic combination of dark, rich wood treads and bright, distressed white risers. The contrast highlights the natural grain of the wood while keeping the hallway feeling open and airy.
Detailed Instructions
Materials
- 80-grit and 120-grit sandpaper
- Orbital sander
- Wood filler (stainable)
- Painter’s tape (multi-surface)
- Dark walnut wood stain (oil-based)
- Staining pads or lint-free rags
- Pre-stain wood conditioner
- White semi-gloss enamel paint (trim paint)
- High-quality angled sash brush (2 inch)
- Small foam roller
- Clear polyurethane floor finish (satin or matte)
- Tack cloths
- Drop cloths
- Vacuum
Step 1: Preparation and Stripping
-
Protect the area:
Lay down drop cloths at the top and bottom of the stairs. If your stairs are currently carpeted, remove all carpet, padding, tack strips, and staples. Use pliers to pull out stubborn staples to ensure a smooth surface. -
Sand the treads aggressively:
Using an orbital sander with 80-grit sandpaper, strip the existing finish off the stair treads. You need to get down to the raw wood to ensure the new stain absorbs evenly. Move to 120-grit for a smoother finish once the old sealant is gone. -
Clean and fill:
Vacuum the stairs thoroughly to remove all dust. Inspect the wood for any deep gouges or nail holes. If you find any, fill them with stainable wood filler. Let the filler dry completely, then hand sand those spots flush with 120-grit paper. -
Scuff the risers:
The risers (the vertical parts) don’t need to be stripped to raw wood if you are painting them. Simply give them a good scuffing with 120-grit sandpaper to provide ‘tooth’ for the new paint primer to adhere to. -
Final dust removal:
This is crucial: wipe down every surface—treads, risers, and surrounding trim—with a tack cloth. Any remaining dust will ruin your smooth finish.
Skip Step Strategy
Stain every other tread on the first day (steps 1, 3, 5, etc.). This leaves half the stairs usable so you don’t trap yourself upstairs while the stain dries overnight.
Step 2: Staining the Treads
-
Apply conditioner:
Brush on a coat of pre-stain wood conditioner to the raw treads. This helps prevent blotchiness, especially on softer woods like pine. Let it penetrate for about 15 minutes, then wipe off any excess. -
Tape off edges:
Apply painter’s tape to the bottom edge of the risers and the stringers (the side trim) to protect them from the dark stain. Take your time pressing the tape down firmly to prevent bleed-through. -
Apply the stain:
Dip a staining pad or lint-free rag into your dark walnut stain. Wipe it onto the tread, going with the grain. I usually work on every other step so I can still walk up and down while they dry. -
Wipe and dry:
Allow the stain to sit for 5-10 minutes depending on how dark you want the color. Wipe away all excess stain with a clean rag. Let the treads dry for at least 24 hours.
Uneven Stain Color?
If the stain looks blotchy, the previous finish wasn’t fully removed. Use a chemical stripper on those spots, sand again, and restain to blend it seamlessly.
Step 3: Painting the Risers
-
Reverse the tape:
Once the treads are bone dry, remove the old tape. Now, apply fresh painter’s tape to the stained treads to protect them from the white paint. Press the edge down firmly with a putty knife for a crisp line. -
Prime the risers:
If your risers were previously dark or unpainted wood, apply a high-quality stain-blocking primer. Use an angled brush for the corners and a small foam roller for the flat centers to avoid brush marks. -
Paint first coat:
Apply your white semi-gloss enamel to the risers and side trim. The semi-gloss finish is durable and easier to clean scuff marks off later. Let this coat dry according to the can’s instructions. -
Distress (Optional):
To achieve the rustic look in the photo, lightly sand areas of high wear on the risers after the first coat dries, letting a bit of the wood or undercoat peek through. This adds instant character. -
Final paint coat:
Apply a second coat of white paint for solid coverage. Remove the painter’s tape slowly while the paint is still slightly tacky to prevent peeling the edge.
Step 4: Sealing and Finishing
-
Seal the treads:
Stir your polyurethane gently (don’t shake, or you’ll get bubbles). Apply a thin, even coat to the stained treads using a natural bristle brush or a foam applicator. -
Sand between coats:
Once dry, very lightly hand-sand the treads with fine 220-grit sandpaper to knock down any raised grain. Wipe away the white dust with a tack cloth. -
Final topcoats:
Apply 2-3 more coats of polyurethane. Stairs take a lot of abuse, so multiple thin layers are better than one thick one. Allow the final coat to cure for 48 hours before walking on it with shoes.
Enjoy the classic beauty of your newly refreshed staircase for years to come


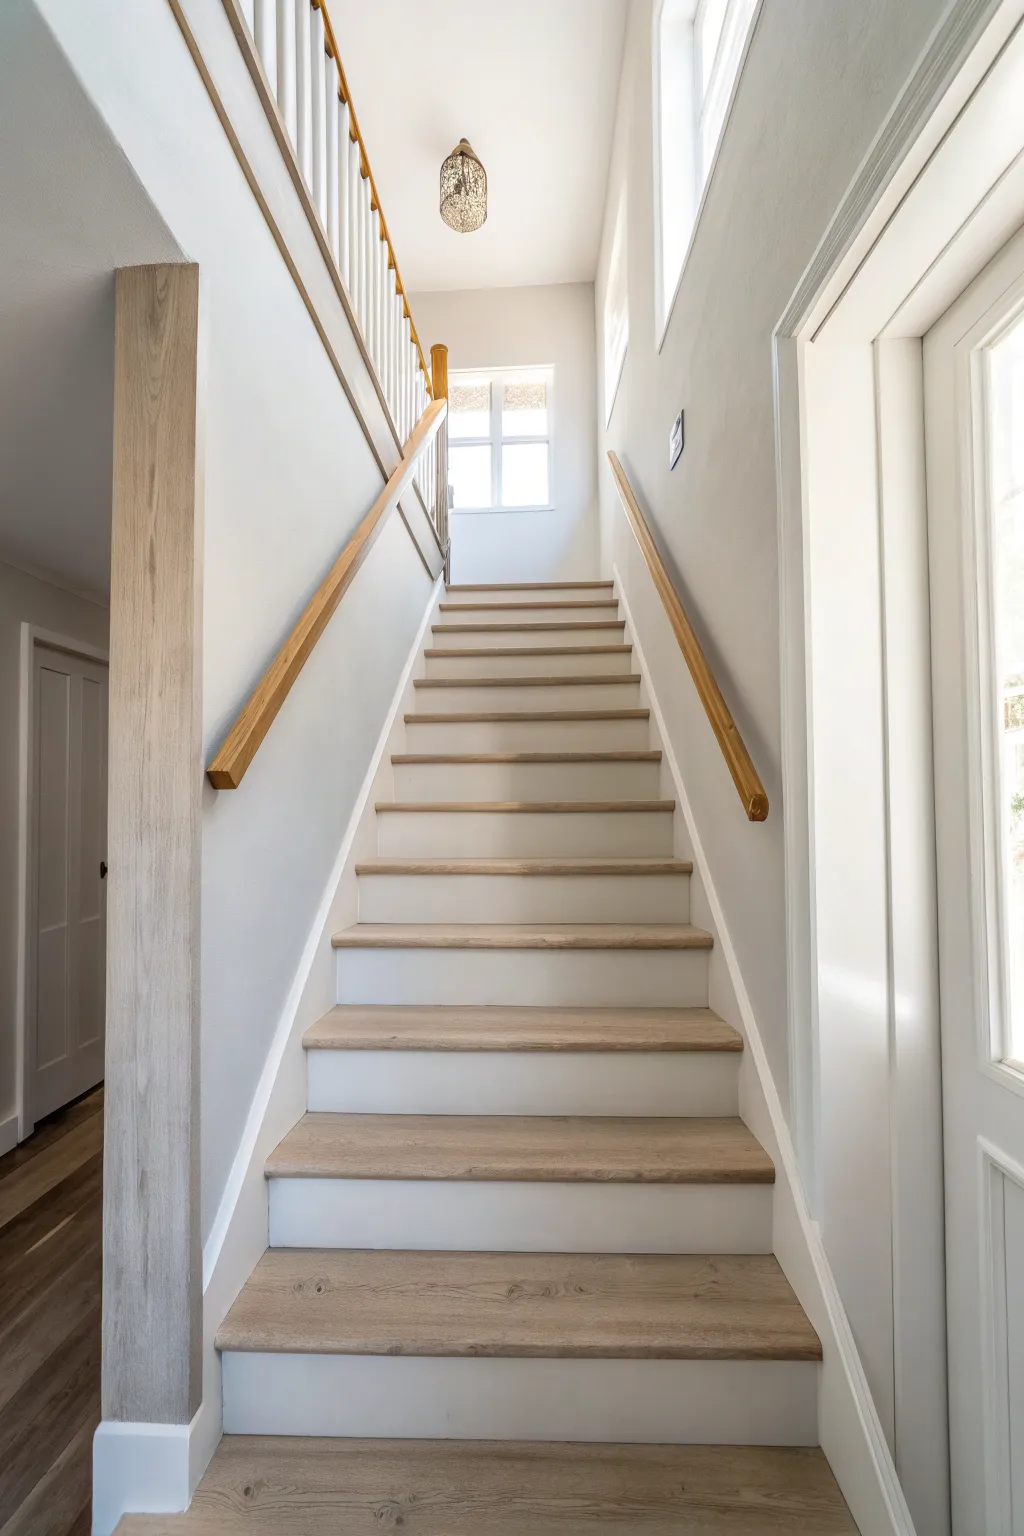
All-White Airy Stair Refresh
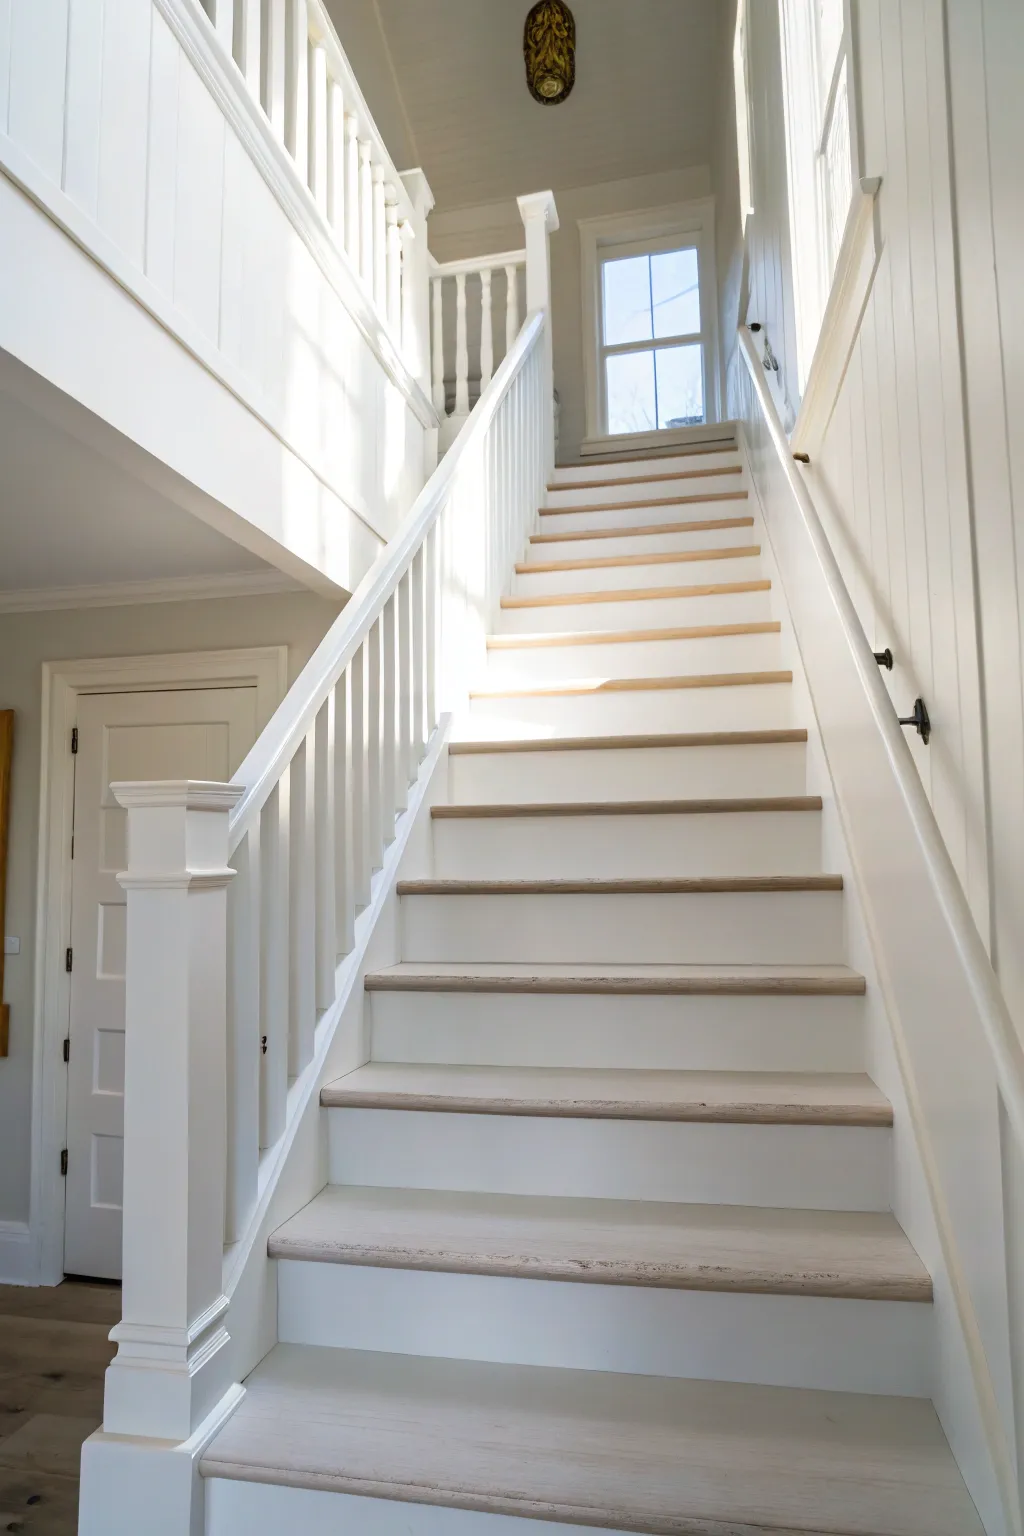
Transform a dark, dated staircase into a beacon of light with this crisp, monochromatic refresh. By combining bright white paint on the risers and structure with bleached, washed treads, you create an open, airy feel that maximizes natural light.
Step-by-Step Guide
Materials
- Orbit sandical sander
- 80-grit, 120-grit, and 220-grit sandpaper
- Painter’s tape
- Wood bleach (two-part A/B formula)
- White semi-gloss enamel paint (trim/cabinet grade)
- White wash pickling stain
- Water-based matte polyurethane
- High-quality angled sash brush
- Foam roller
- Tack cloths
- Drop cloths
- Respirator and safety goggles
Step 1: Preparation & Sanding
-
Assess and clean:
Begin by removing any existing carpet, staples, or runners. Vacuum the stairs thoroughly and wipe them down with a degreaser to remove years of grime, which ensures your sanding will be effective. -
Strip the finish:
Using an orbital sander with 80-grit paper, sand down the treads to bare wood. This is the hardest part, but crucial. You need to remove all existing varnish or stain. Use a detail mouse sander or a scraping tool for the corners where the big sander can’t reach. -
Refine the surface:
Once the old finish is gone, switch to 120-grit sandpaper to smooth out the grain. Wipe away dust frequently. -
Scuff the painted areas:
For the risers, spindles, and stringers (the sides), you don’t need to strip to bare wood if they are already painted. Scuff sand them with 120-grit paper to give the new paint a surface to grip. -
Final smooth sanding:
Finish the treads with a quick pass of 220-grit sandpaper for a furniture-grade smooth finish, then thoroughly clean everything with a tack cloth to remove every speck of dust.
Anti-Slip Trick
Mix a small amount of clear anti-slip additive powder into your final coat of polyurethane. It adds invisible traction to the treads without ruining the smooth aesthetic.
Step 2: Painting the Structure
-
Tape off the treads:
Protect your freshly sanded treads by applying painter’s tape deeply into the corners where the tread meets the riser and stringer. -
Prime bare spots:
If you sanded through to bare wood on the risers or spindles, spot prime those areas with a high-quality bonding primer to prevent bleed-through. -
Paint the spindles:
Start painting from the top down to avoid drips ruining lower work. Use a sash brush for the intricate spindles. I find it helpful to paint in sections so you don’t miss any angles. -
Paint stringers and risers:
Apply the white semi-gloss enamel to the vertical risers and the side stringers. A small foam roller works wonders on flat riser surfaces for a brush-stroke-free finish. -
Apply second coat:
Once the first coat is dry (check your paint can for times), apply a second coat for full, opaque coverage. Peel up the tape while the paint is still slightly tacky to keep lines crisp.
Step 3: Treating the Treads
-
Bleach the wood (optional):
If your wood has strong red or yellow undertones (like red oak), apply a two-part wood bleach according to package instructions. This neutralizes the color. Neutralize the bleach with vinegar and water if required, then let dry completely. -
Apply white wash:
Brush on a white wash pickling stain. Work on one tread at a time. Apply the stain, let it sit for 2-3 minutes, and then wipe off the excess with a clean rag. This leaves pigment in the grain while keeping the wood look. -
Assess the tone:
Step back and check the color. If you want a more opaque ‘driftwood’ look, repeat the white wash process once more after the first layer dries. -
Seal the treads:
Apply a coat of water-based matte polyurethane. Water-based is essential here because oil-based poly will yellow over time and ruin the clean white look. -
Sand between coats:
Lightly hand-sand with 220-grit paper after the first coat of poly dries to knock down any raised grain. Remove dust with a tack cloth. -
Final topcoats:
Stairs take a beating, so apply at least two more coats of the matte poly, allowing proper dry time between each layer.
Modern Contrast
Instead of white-washing the handrail, sand it down and stain it a deep charcoal or matte black. This creates a stunning anchor point that contrasts with the airy steps.
Enjoy the incredible brightness and feeling of space this simple palette change brings to your hallway


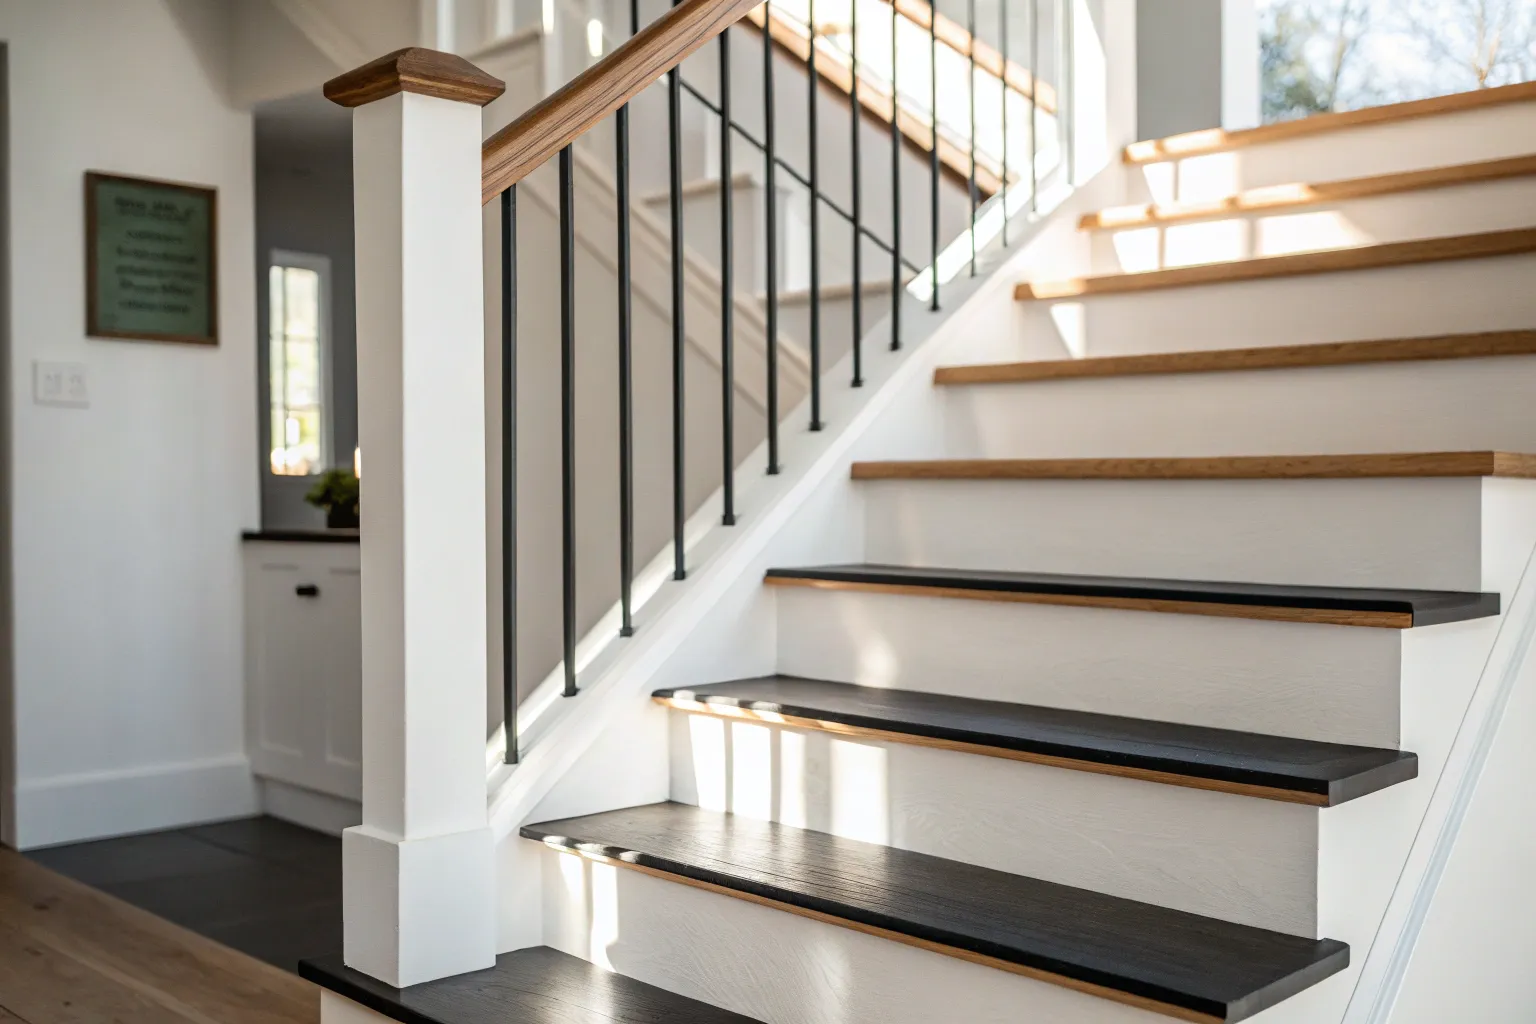
High-Contrast Black-and-White Look
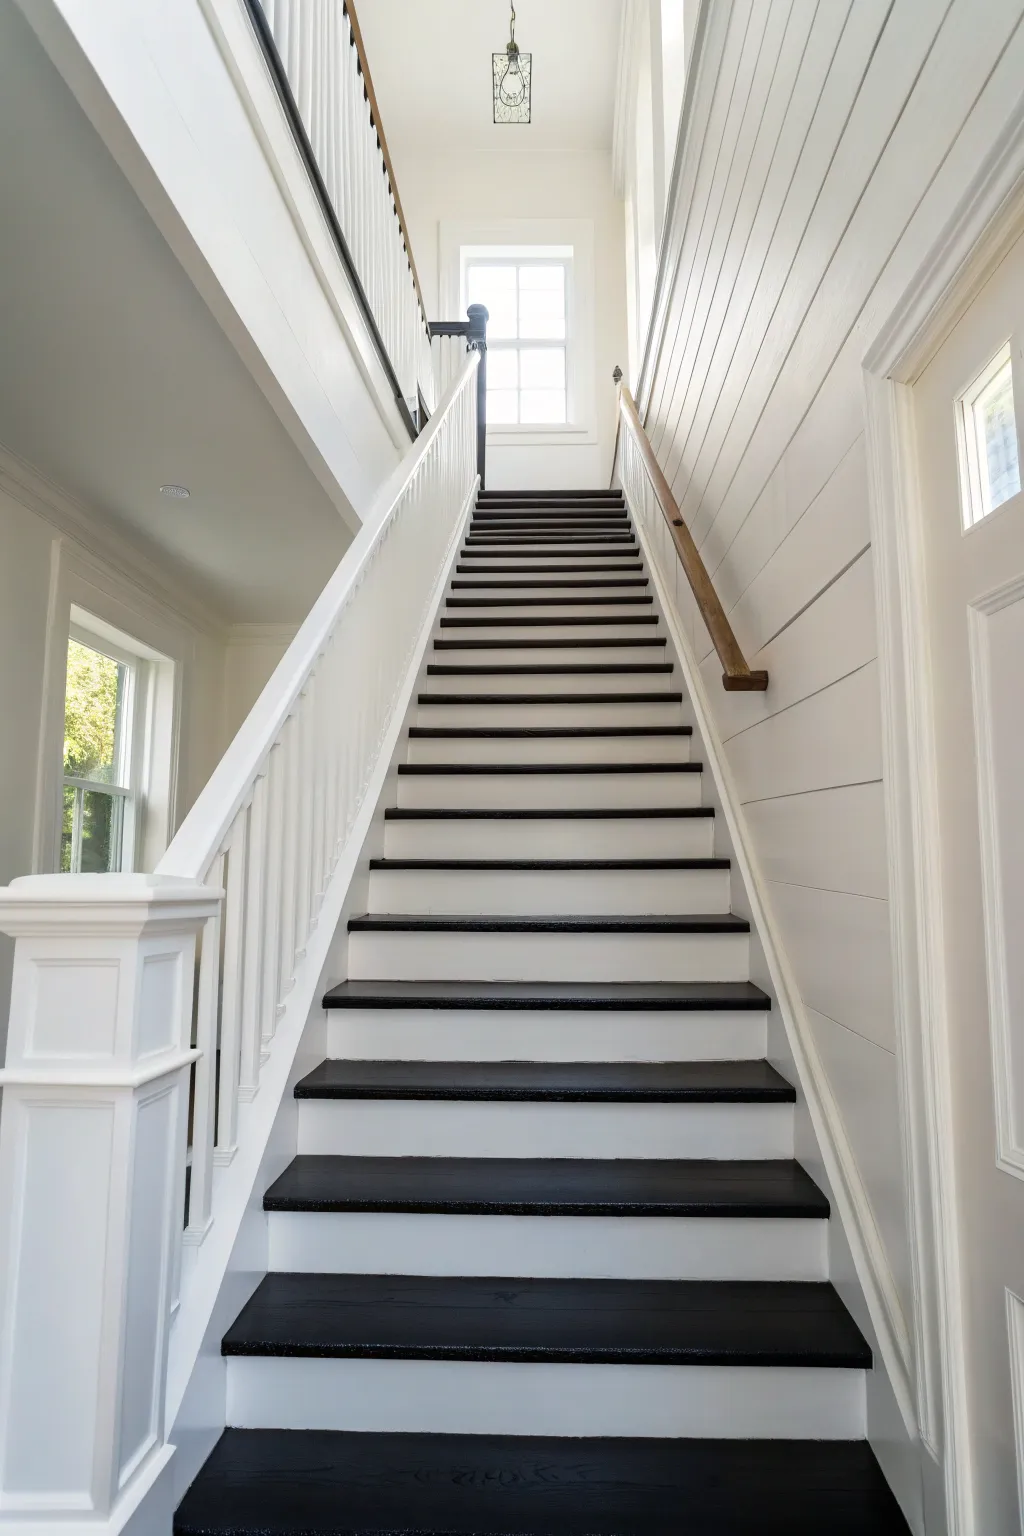
This stunning staircase transformation embraces a classic, monochromatic palette by contrasting crisp white woodworking with dramatic black treads. The result is a clean, architectural look that feels both historic and modern, perfect for brightening an entryway while grounding the space.
Step-by-Step
Materials
- High-quality wood primer (oil-based for raw wood, or bonding primer for previously finished surfaces)
- Semi-gloss porch and floor enamel (in pure black)
- Semi-gloss or satin trim paint (in pure bright white)
- Medium-grit sandpaper (120-grit)
- Fine-grit sandpaper (220-grit)
- Tack cloth
- Painter’s tape (frog tape works well for sharp lines)
- Liquid deglosser (optional but recommended for previously finished stairs)
- Angled sash brush (2-inch)
- Small foam roller and tray
- Drop cloths
- Heavy-duty cleaner or TSP substitute
- Wood filler and putty knife
Step 1: Preparation and Cleaning
-
Assess the surface:
Begin by inspecting your stairs specifically for loose nails, old staples from carpet, or significant gouges. Use pliers to remove metal bits and fill any holes with wood filler, letting it dry completely according to package instructions. -
Clean thoroughly:
Scrub the entire staircase—treads, risers, spindles, and handrails—with a heavy-duty cleaner or TSP substitute. This removes oils, dirt, and built-up grime that could prevent paint adhesion. -
Sand for adhesion:
Using 120-grit sandpaper, toughly sand all surfaces to scuff the existing finish. You aren’t trying to strip it to bare wood, just removing the gloss so the new primer has something to grab onto. -
Degloss (optional):
For extra insurance, especially on slippery varnished areas, wipe down the sanded surfaces with a liquid deglosser. This prepares the chemical bond for the new paint. -
Remove dust:
Vacuum the stairs thoroughly, starting from the top and working down into every corner. Follow up by wiping everything with a tack cloth to catch the remaining fine dust particles.
Uneven Edges?
If paint bleeds under tape, let it dry fully. Scrape gently with a razor blade to remove the excess, then touch up with a tiny artist brush for a crisp line.
Step 2: Priming the Foundation
-
Tape off surrounding areas:
Apply painter’s tape carefully along the floor at the base of the stairs and the walls adjoining the stringers to protect your floors and paint job. -
Apply primer:
Brush a coat of high-quality primer onto the treads, risers, spindles, and stringer. An oil-based primer is robust for treads, but a strong water-based bonding primer is easier to clean up and usually sufficient for risers and spindles. -
Inspect and refine:
Once the primer is fully dry, run your hand over the surfaces. If the grain raised or you feel rough spots, give it a very light pass with 220-grit sandpaper and wipe away the dust.
Add Texture
Install shiplap or beadboard paneling on the wall alongside the staircase (as seen in the photo) before painting to enhance the farmhouse aesthetic.
Step 3: Painting the Bright White Elements
-
Start with spindles:
Begin painting the intricate spindles and newel posts with your white trim paint first. It’s easier to paint these tedious parts before worrying about the flat surfaces. -
Paint stringers and risers:
Using a 2-inch angled sash brush, cut in the edges of the risers (the vertical parts) and the stringer (the side trim). Use the foam roller for the flat face of the riser to get a smooth, brush-stroke-free finish. -
Apply second white coat:
Allow the first coat to dry completely. Apply a second coat to all white areas to ensure full opacity and durability. -
Let white cure and tape:
Wait at least 24-48 hours for the white paint to cure hard. Then, extremely carefully apply painter’s tape to the bottom of the white risers where they meet the treads to create that sharp separation line.
Step 4: Creating the Black Contrast
-
Cut in the treads:
Open your black porch and floor enamel. Use an angled brush to carefully paint the edges and corners of the treads where the roller won’t reach. -
Roll the treads:
Use a small foam roller or a short-nap roller to apply the black paint to the main surface of the tread. I like to paint every other step so I can still walk up and down while they dry. -
Paint the handrail:
While the treads used floor enamel, paint the handrail using the black enamel as well for a matching, durable finish that withstands hand oils. -
Second coat for treads:
Inspect the black coverage after the first coat dries. Apply a second coat to the treads and handrail for the deepest, richest black color. -
Remove tape:
Ideally, remove the tape while the final coat of black paint is slightly tacky (not wet, but not fully cured) to prevent peeling up the paint edge. -
Final touch-ups:
Check your lines. If any black bled onto the white risers, use a tiny artist’s brush and white paint to correct the line once the black is fully dry.
Step back and admire how this bold contrast creates an elegant focal point in your home.


Moody Dark Staircase Statement
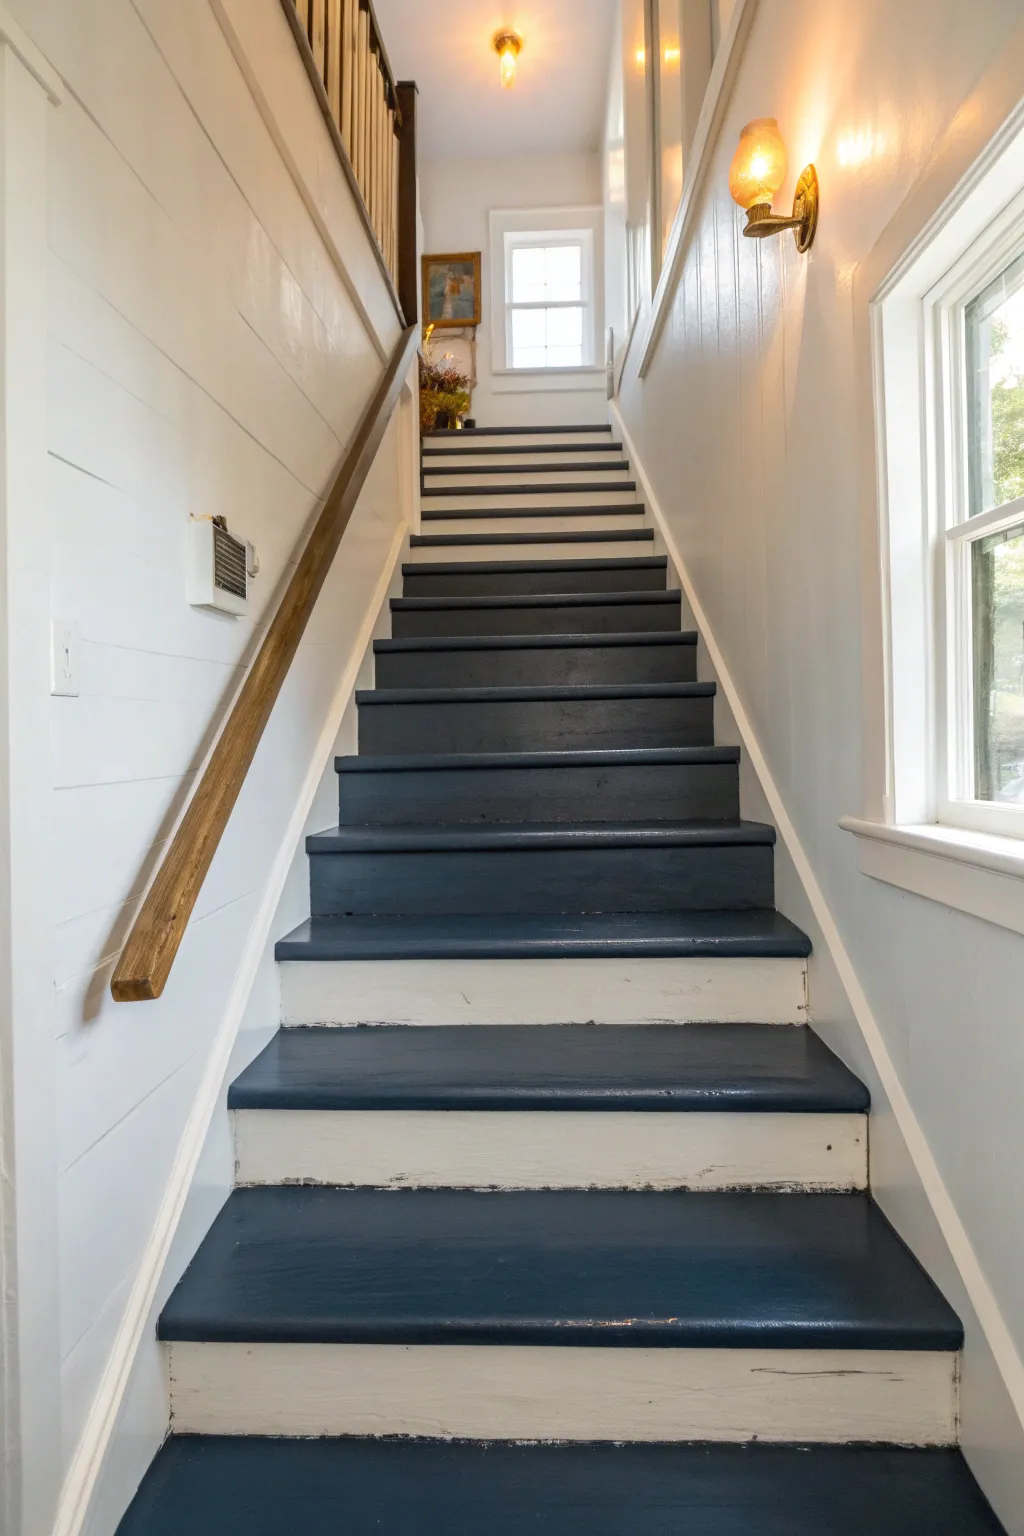
Transform a standard staircase into a striking architectural feature with this high-contrast design. By pairing deep, moody navy treads with crisp white risers, you create a sophisticated look that grounds the space while keeping it bright and airy.
How-To Guide
Materials
- High-quality floor enamel paint (Deep Navy Blue)
- High-quality semi-gloss trim paint (Bright White)
- Wood filler
- Sandpaper (80, 120, and 220 grit)
- Orbital sander (optional but recommended)
- Painters tape (delicate surface)
- Angled sash brush (2 inch)
- Mini foam roller and tray
- Tack cloth
- Primer (bonding primer highly recommended)
- Cleaner/degreaser
Step 1: Preparation
-
Clear and Clean:
Remove any carpet runners, staples, or nails carefully from the stairs. Vacuum the entire area thoroughly and wash the wood down with a strong degreaser to remove years of foot traffic grime. -
Fill Imperfections:
Inspect the treads and risers for deep gouges or nail holes. Overfill these spots slightly with wood filler, as it tends to shrink when drying. -
Sand the Surfaces:
Once the filler is dry, sand everything smooth. Even if the wood is in good condition, you need to scuff sand the entire surface (treads and risers) with 120-grit sandpaper to ensure the new paint adheres properly. -
Final Dusting:
Vacuum up all the sanding dust. Wipe every corner and crevice with a tack cloth to pick up the microscopic dust particles that a vacuum might miss.
Step 2: Priming
-
Prime the Wood:
Apply a coat of high-quality bonding primer to both the treads and risers. This is crucial for durability on a high-traffic area like stairs. -
Smooth the Grain:
After the primer dries completely, run a 220-grit sandpaper lightly over the surfaces to knock down any raised grain or brush strokes, then wipe clean again.
Anti-Slip Secret
Mix a small amount of clear anti-slip additive into the final coat of navy paint for the treads. It adds traction without changing the color, making the stairs safer for socks.
Step 3: Painting the Risers
-
Cut In the White:
Start with the risers (the vertical parts). Use your angled sash brush to carefully paint the edges where the riser meets the tread and the wall. -
Roll the Center:
Use a mini foam roller to fill in the flat surface of the riser. This ensures a smooth finish without brush marks. -
Second Coat:
Allow the first coat to dry according to the manufacturer’s instructions, then apply a second coat of bright white semi-gloss for full coverage. -
Dry Time:
Wait at least 24 hours for the white paint to cure sufficiently before applying tape. I like to give it extra time here to ensure the tape doesn’t pull up any fresh paint later.
Number Your Risers
For a vintage look, stencil house numbers or significant dates onto the white risers in the same navy blue used on the treads before sealing the project.
Step 4: Painting the Treads
-
Tape the Risers:
Apply delicate surface painter’s tape to the bottom of each white riser where it meets the tread to protect your fresh work. -
Cut In the Navy:
Using a clean angled brush, carefully paint the corners and edges of the tread with your deep navy floor enamel. -
Fill the Tread:
Use a clean mini roller to apply the navy paint to the main walking surface of the tread. Work from the top stair down so you don’t paint yourself into a corner. -
Apply Second Coat:
Once the first coat is dry to the touch, apply a second coat of navy. Floor enamel is thick, so two coats are usually sufficient for a deep, rich color. -
Remove Tape:
While the final coat of navy paint is still slightly tacky (not fully dry), carefully peel up the painter’s tape at a 45-degree angle to ensure a crisp line. -
Alternate Steps Method:
If you need to use the stairs during this process, paint every other tread first. Let them dry for a day or two, then paint the remaining treads. -
Final Cure:
Allow the paint to cure for at least 72 hours before walking on it with shoes or allowing pets on the stairs.
Enjoy the dramatic entrance your newly painted staircase creates every time you walk through the door
BRUSH GUIDE
The Right Brush for Every Stroke
From clean lines to bold texture — master brush choice, stroke control, and essential techniques.
Explore the Full Guide
Soft Neutral Stair Palette
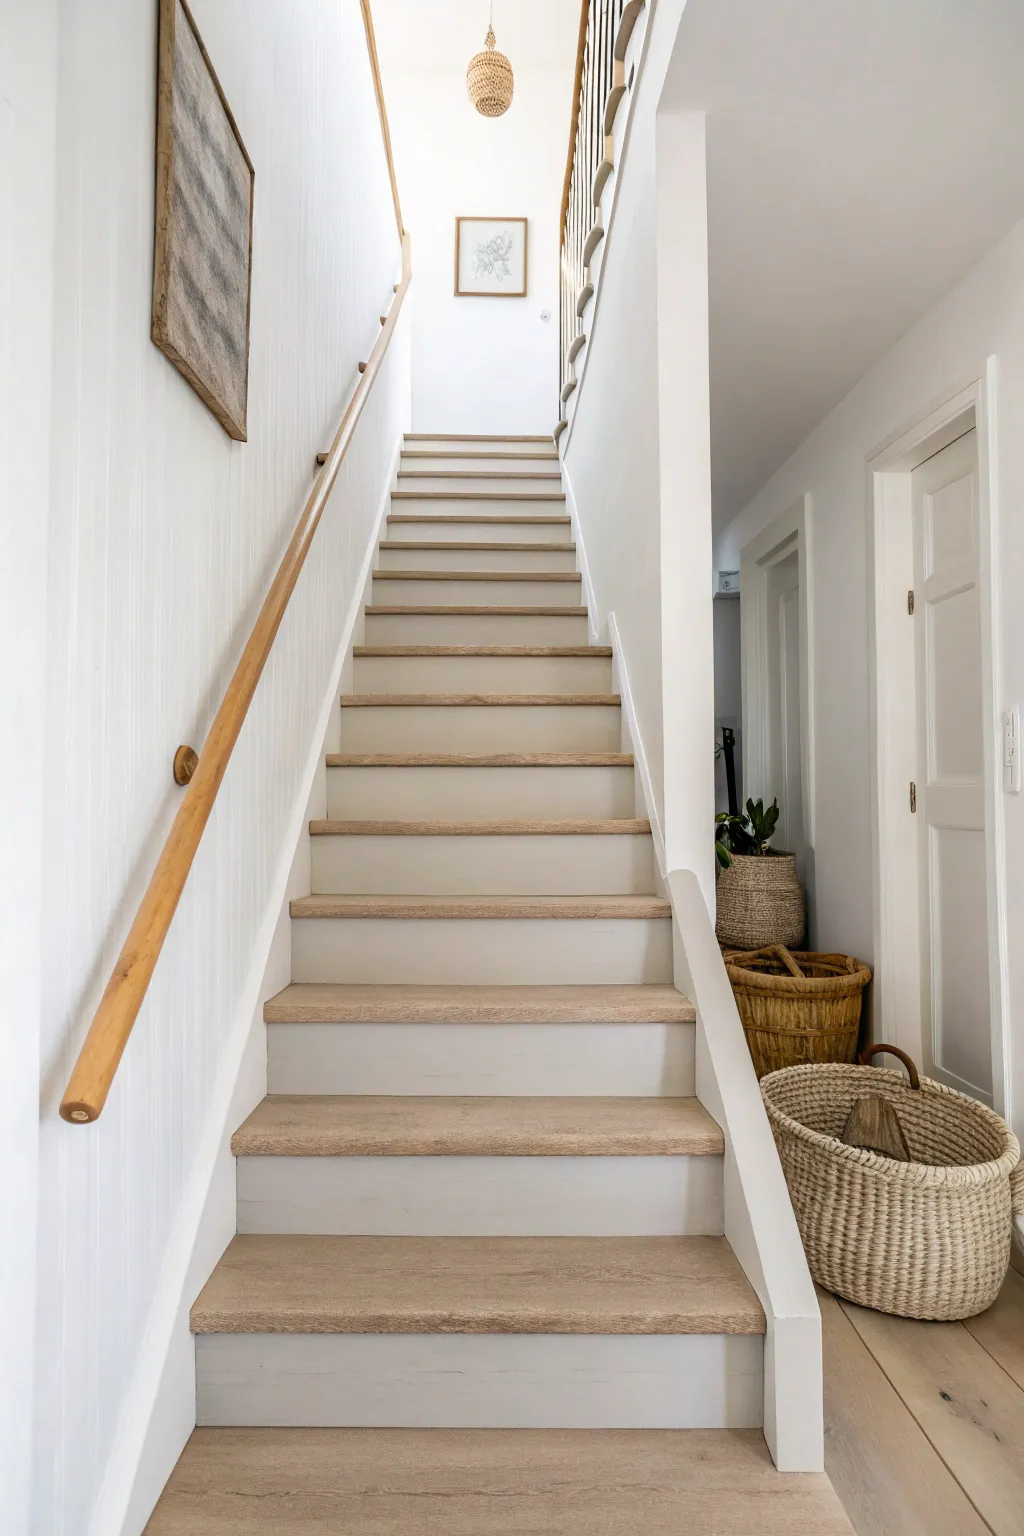
Transform a dark or dated staircase into an airy, welcoming focal point with this soft neutral palette. This project combines crisp, white painted risers with natural, bleached-effect wood treads to create a timeless, light-filled aesthetic.
Detailed Instructions
Materials
- Orbital sander
- 80, 120, and 220-grit sanding discs
- Wood bleach (two-part kit)
- White semi-gloss enamel paint (trim paint)
- Angled sash brush (2-inch)
- Mini foam roller
- Matte water-based polyurethane sealer
- Painter’s tape (delicate surface)
- Tack cloth
- Respirator mask
- Vacuum
Step 1: Preparation & Stripping
-
Remove hardware:
Begin by removing any carpet runners, staples, or nails. If possible, remove the handrail temporarily to make sanding easier, though you can work around it if necessary. -
Coarse sanding:
Using your orbital sander and 80-grit paper, sand down the treads to remove the existing finish. Move methodically across the grain to strip away old varnish or stain. -
Refine the surface:
Switch to 120-grit sandpaper to smooth out the rough scratches left by the coarse paper. Follow this immediately with 220-grit for a furniture-grade smoothness. -
Detail work:
Use a detail sander or folded sandpaper to get into the tight corners where the tread meets the riser and stringer. This manual step ensures no dark edges remain. -
Clean thoroughly:
Vacuum every speck of dust, paying close attention to corners. Wipe the entire staircase down with a tack cloth to ensure a debris-free surface.
Pro Tip: Skip the Stain
To get that raw, Scandinavian look, avoid oil-based poly, which yellows over time. Stick strictly to water-based sealers to keep the wood tone cool and neutral.
Step 2: Bleaching the Treads
-
Mix the bleach:
Following the manufacturer instructions on your two-part wood bleach kit, mix the solution in a glass or plastic container. Wear your respirator and gloves for this step. -
Apply bleach solution:
Brush the bleach liberally onto the raw wood treads. Ensure even coverage to prevent splotchiness. -
Neutralize:
Once the wood has lightened to your desired tone (usually after drying overnight), neutralize the chemical reaction with a vinegar and water solution as directed by your specific bleach kit. -
Final light sand:
Bleaching raises the wood grain, making it feel fuzzy. I like to do a very light pass with 220-grit sandpaper by hand to knock down the grain without removing the color.
Step 3: Painting & Sealing
-
Tape off treads:
Once the treads are bone dry and dust-free, apply delicate surface painter’s tape along the edges where the tread meets the riser. -
Prime the risers:
Apply a high-quality bonding primer to the risers and the side stringers (the trim running up the wall). Let this dry completely. -
Paint the edges:
Using an angled sash brush, cut in the white semi-gloss paint along the edges and corners of the risers. -
Roll the risers:
For a smooth, brush-mark-free finish, use a mini foam roller to paint the flat surfaces of the risers. Apply 2-3 coats for full opacity. -
Seal the treads:
Stir your matte water-based polyurethane gently (do not shake). Apply a thin, even coat to the wood treads using a high-quality synthetic brush. -
Build protection:
Allow the first coat to dry, then lightly sand with 320-grit paper. Apply a second and third coat of sealer to ensure the stairs can withstand heavy foot traffic. -
Remove tape:
Carefully peel away the painter’s tape while the final paint coat is still slightly tacky to achieve a crisp, clean line.
Troubleshooting: Bleed Through
If you see pink or yellow tanins bleeding through your white riser paint, stop. Apply a coat of shellac-based primer specifically meant for knot-sealing before continuing.
Enjoy the fresh, open feeling your newly brightened staircase brings to the entire entryway
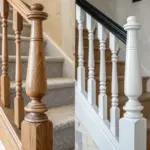
Painted Handrail and Spindle Update
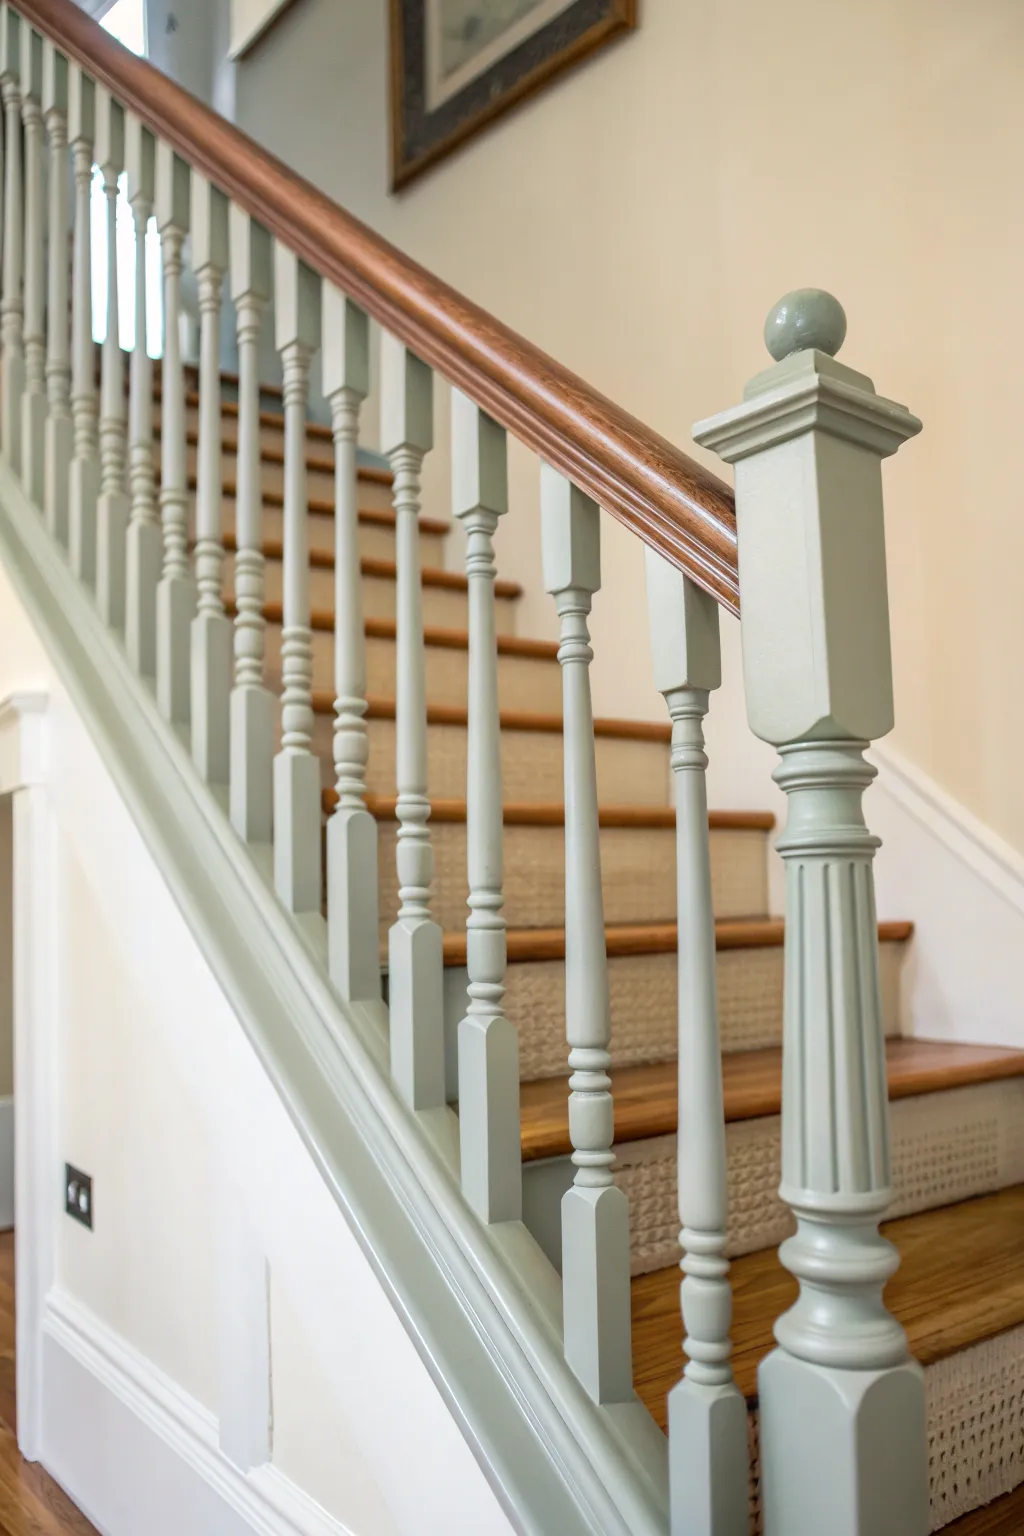
Transform a tired staircase into a sophisticated focal point by pairing a rich, darkly stained handrail with muted sage-green spindles and trim. This two-tone approach balances traditional warmth with modern color for a clean, custom look.
Step-by-Step Guide
Materials
- Sandpaper (120 and 220 grit)
- Liquid deglosser/sander
- Painter’s tape (high-quality, delicate surface)
- Wood stain (dark walnut or mahogany)
- Stain-blocking primer
- Sage green satin or semi-gloss enamel paint
- Polyurethane topcoat (satin finish)
- Angle sash brush (1.5 to 2 inch)
- Small foam roller
- Drop cloths
- Tack cloth
- Rags for staining
Step 1: Preparation & Sanding
-
Protect the area:
Lay down drop cloths to cover the flooring and the stairs themselves. If you are keeping an existing runner, you must cover it meticulously with plastic sheeting and tape, though removing it yields the best results. -
Clean and degloss:
Wipe down the handrail, newel post, spindles, and skirt board with a TSP substitute or a liquid deglosser. This removes oils and helps the new finish adhere without aggressive stripping. -
Sand the handrail:
The handrail needs to be taken down to raw wood if you plan to re-stain it. Use 120-grit sandpaper to remove the old finish, maneuvering carefully around the curves. Follow up with 220-grit for a smooth surface. -
Scuff sand paintable parts:
For the spindles, newel post, and skirt board, you don’t need to reach bare wood. Just give them a scuff sand with 120-grit paper to create ‘tooth’ for the primer. -
Remove dust:
Vacuum the entire staircase thoroughly. Use a tack cloth to wipe every single spindle and crevice to ensure no dust remains.
Sticky Situation?
If the tape pulls up flecks of your new stain, touch it up with a Q-tip dipped in stain, then dab a tiny bit of poly over it once dry.
Step 2: Staining the Handrail
-
Tape off boundaries:
Apply painter’s tape exactly where the spindles meet the underside of the handrail to protect them from stain drips. -
Apply the stain:
Using a clean rag or foam brush, apply a rich coat of dark walnut or mahogany stain to the handrail. Work in manageable sections to keep a wet edge. -
Wipe excess:
After letting the stain penetrate for the manufacturer’s recommended time (usually 5-15 minutes), wipe away the excess with a clean, lint-free cloth. -
Seal the handrail:
Once the stain is fully dry, apply 2-3 coats of satin polyurethane. Lightly sand with high-grit sandpaper between coats for a professional, furniture-grade feel.
Step 3: Painting the Spindles & Trim
-
Tape the handrail:
Now that the handrail is dry, tape off the wood sections to protect them from the paint. Press the tape edges firmly to prevent bleed. -
Prime the woodwork:
Apply a high-quality stain-blocking primer to the spindles, newel post, and skirt board. This is crucial for covering old varnishes and preventing tannin bleed-through. -
Sand the primer:
After the primer cures, do a very quick, light sanding with fine-grit paper to knock down any brush marks or raised grain. -
Paint the difficult areas:
Using your angle sash brush, start painting the sage green enamel on the intricate turnings of the spindles and the detailed top of the newel post. -
Paint flat surfaces:
Use a small foam roller on the flat faces of the newel post and the long skirt board for a streak-free finish. I find this speeds up the process significantly. -
Apply second coat:
Allow the first coat to dry completely, then apply a second coat for full, opaque coverage and richness of color. -
Remove tape:
Carefully peel away the painter’s tape while the final coat is still slightly tacky to ensure a crisp, clean line between the paint and the stained wood.
Add Subtle Texture
For a vintage look, consider glazing the recesses of the spindle turnings with a darker glaze before the final clear coat on the painted sections.
Step back and admire how this elegant color combination revitalizes your home’s entryway

PENCIL GUIDE
Understanding Pencil Grades from H to B
From first sketch to finished drawing — learn pencil grades, line control, and shading techniques.
Explore the Full Guide
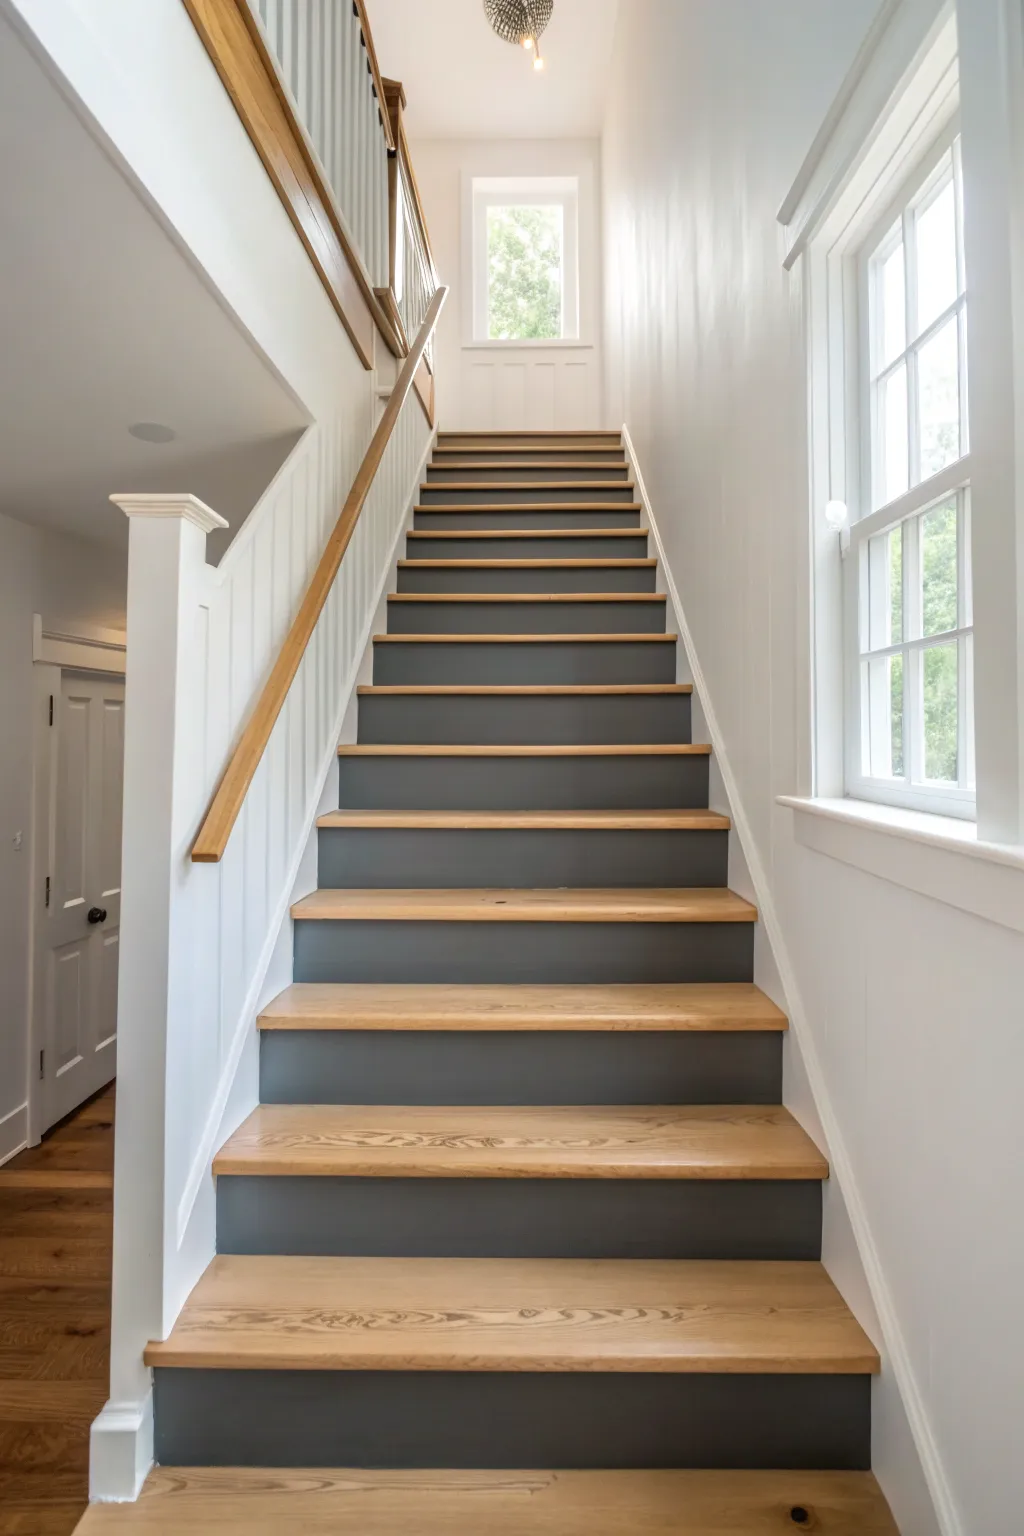
Match Stairs to Wall Color for Continuity
Achieve a sleek, modern aesthetic by matching your stair risers perfectly to your wall color, creating a seamless flow that visually opens up the space. This project combines natural wood textures with clean white paint for a timeless, airy look.
Step-by-Step Tutorial
Materials
- High-quality painter’s tape (like FrogTape)
- Sanding block (120-grit and 220-grit)
- Orbital sander (optional but recommended)
- Wood filler
- Primer suitable for wood
- Interior semi-gloss or satin paint (white to match walls)
- Interior wood stain (light oak or similar)
- Polyurethane sealer (matte or satin)
- Angled brush (2-inch)
- Mini foam roller
- Drop cloths
- Tack cloth
Step 1: Preparation & Repairs
-
Clear and Clean:
Remove any existing carpet, staples, or tacks from the stairs. Vacuum thoroughly to remove all dust and debris. -
Fill Imperfections:
Inspect the treads and risers for nail holes or deep scratches. Apply wood filler generously, overfilling slightly to account for shrinkage. -
Sand the Steps:
Once the filler is dry, sand the treads down to raw wood using 120-grit sandpaper. This is where an orbital sander saves time, but ensure you get into the corners by hand. -
Smooth the Risers:
Sand the risers (the vertical parts) lightly to scuff the surface and create a tooth for the new paint to adhere to. -
Final Sanding Pass:
Go over the treads again with 220-grit sandpaper for an ultra-smooth finish ready for staining. Wipe everything down with a tack cloth to remove every speck of dust.
Sticky Situation
If paint bleeds under the tape onto your wood treads, don’t panic. Wrap a putty knife in a damp rag and gently scrape the wet paint off, or use a razor blade for dried drips.
Step 2: Painting the Risers & Walls
-
Tape the Treads:
Apply painter’s tape carefully along the edge where the tread meets the riser. Press the tape edges firmly to prevent bleed-through. -
Prime the Risers:
Apply a coat of primer to the risers and stringers (the side trim). Let it dry completely according to the can’s instructions. -
Cut In Edges:
Use your angled brush to paint the corners and edges of the risers with your white paint. I like to work from the top step down to avoid brushing against wet paint. -
Roll the Flat Surfaces:
Use the mini foam roller to paint the flat center sections of the risers. This ensures a smooth, brush-mark-free finish. -
Apply Second Coat:
Once the first coat is dry, apply a second coat for full opacity. Remove the tape while the final coat is still slightly tacky to keep lines crisp. -
Match the Walls:
Paint the adjacent wall with the exact same paint color and sheen used on the risers. This creates the continuous visual effect shown in the image.
Step 3: Staining the Treads
-
Tape the Risers:
Once the risers are fully cured (wait at least 24 hours), tape over the painted riser edges to protect them from stain. -
Apply Stain:
Stir your stain thoroughly. Apply it to the treads using a clean brush or rag, working with the grain of the wood. -
Wipe Excess:
After allowing the stain to penetrate for a few minutes, wipe away the excess with a clean, lint-free cloth. This controls the color depth. -
Dry and Repeat:
Let the stain dry completely. If you want a darker tone, apply a second coat using the same method. -
Seal with Polyurethane:
Apply a coat of polyurethane sealer to the treads. Use long, even strokes and avoid overworking the product to prevent bubbles. -
Sand and Finish:
Lightly hand-sand the first coat of sealer with 220-grit paper once dry. Wipe clean, then apply a second and final coat for durability.
Level Up
Install a simple motion-sensor LED strip under the lip of each tread nose. It adds a modern glow at night and highlights your crisp, clean paint job.
Enjoy the clean, architectural feel your new staircase brings to the entryway
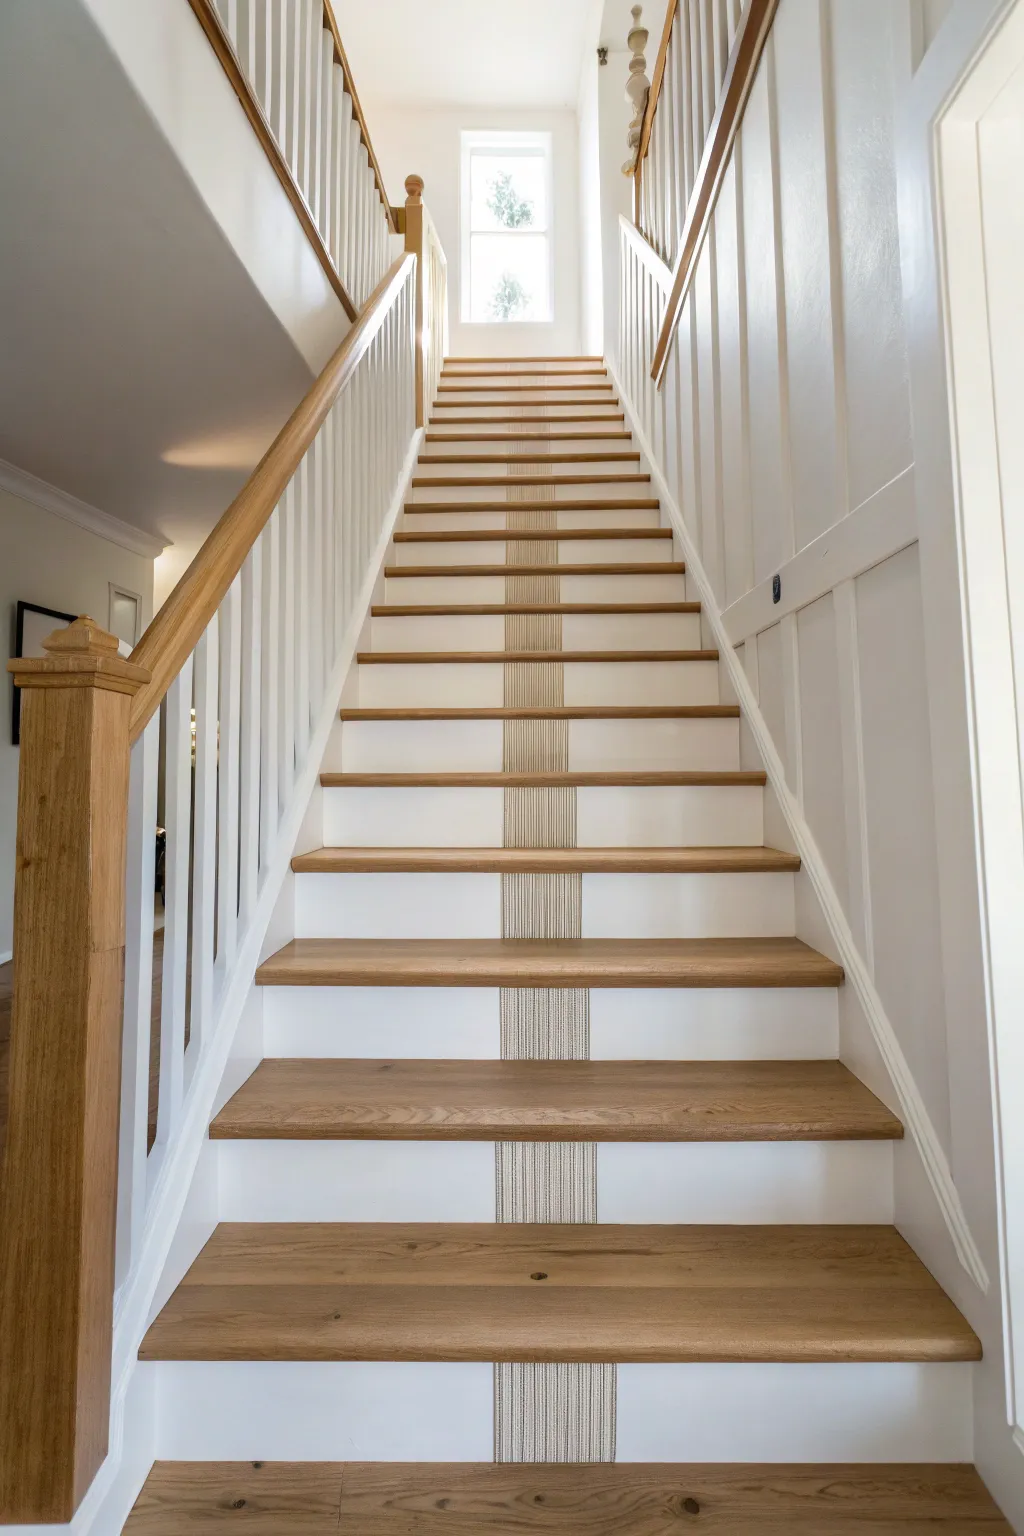
Alternating Riser Colors
Transform a tired staircase into a bright, timeless feature by contrasting crisp white risers with warm, natural wood treads. This project brightens up hallways significantly and adds a clean, architectural finish that feels both modern and traditional.
Step-by-Step Guide
Materials
- High-quality painter’s tape (1.5 – 2 inch, green or blue)
- Orbital sander with 80, 120, and 220 grit discs
- Detail sander or sanding block for corners
- Stainable wood filler
- Putty knife
- Tack cloth and vacuum
- Primer (oil-based recommended for foot traffic)
- Semi-gloss or satin enamel trim paint (bright white)
- Wood stain (color to match existing floors or preference)
- Polyurethane floor finish (satin or matte)
- Angled sash brush (2 inch)
- Small foam roller set
Step 1: Preparation & Sanding
-
Clean the surface:
Before starting any sanding, remove any carpet, staples, or tack strips. Vacuum the stairs thoroughly and wipe them down with a degreaser to remove years of furniture polish or grime. -
Fill imperfections:
Inspect the treads and risers for deep scratches or nail holes. Apply stainable wood filler to the treads and regular wood filler to the risers using a putty knife. Let it dry completely. -
Heavy sanding:
Using an orbital sander with 80-grit paper, sand the treads down to bare wood. This is the hardest part, so take breaks. You need to remove all old varnish and stain for an even finish. -
Finish sanding treads:
Progress to 120-grit and then 220-grit sandpaper on the treads. The surface should feel silky smooth to the touch. -
Sand the risers:
Scuff sand the risers with 120-grit sandpaper. Since these will be painted, you don’t need to strip them to bare wood, just create enough tooth for the primer to adhere. -
Deep clean:
Vacuum up every speck of dust. Follow up with a tack cloth to grab the fine particles that the vacuum missed. Dust is the enemy of a smooth finish.
Bleeding Tape Lines?
If paint bleeds onto your stained treads, wrap a putty knife in a damp rag and gently scrape the wet paint away immediately, or carefully use a razor blade once dry.
Step 2: Staining the Treads
-
Tape off areas:
Apply painter’s tape to the bottom edge of the risers (where they meet the tread) and the wall stringers to protect them from stain drips. -
Apply stain:
Stir your chosen stain well. Apply it in the direction of the wood grain using a rag or brush. Work on one tread at a time. -
Wipe excess:
After letting the stain penetrate for roughly 5-15 minutes (depending on desired darkness), wipe off the excess specifically with a clean lint-free rag. -
Dry time:
Allow the stain to dry for at least 24 hours. Check manufacturer instructions as high humidity can extend this time.
Every Other Step Trick
Need to use the stairs during the project? Stain and finish every other tread first. Once dry, do the remaining ones. This leaves a walking path available.
Step 3: Painting Risers & Trim
-
Tape the treads:
Once the stain is 100% dry, tape off the back and sides of the wooden treads precisely where they meet the risers. -
Prime the risers:
Apply a coat of high-quality bonding primer to the risers and the side stringers (the trim running up the wall). I like to use a brush for corners and a small foam roller for the flat surfaces to avoid brush marks. -
Sand primer:
Once dry, lightly sand the primed surfaces with 220-grit paper to knock down any raised grain or bumps. -
Paint first coat:
Apply your bright white semi-gloss enamel. Start from the top stair and work your way down so you don’t lean against wet paint. -
Paint second coat:
After the first coat dries, apply a second coat for full opacity. Remove the tape immediately after finishing the second coat while the paint is still slightly wet to ensure a razor-sharp line.
Step 4: Sealing & Protection
-
Seal the treads:
Apply a coat of polyurethane to the stained treads. Use a high-quality synthetic bristle brush and long, even strokes. -
Buff between coats:
Allow the first coat to dry, then lightly sand with 220-grit paper. Wipe away dust with a tack cloth. -
Final coats:
Apply two more coats of polyurethane, repeating the light sanding process in between. Do not sand the final coat. -
Cure time:
Let the stairs cure for at least 48 hours before walking on them with socks, and a full week before shoes or heavy traffic.
Now you have a stunning, durable staircase that brightens your home and showcases the natural beauty of the wood


Painted Stair Runner Illusion
Achieve the high-end look of a Sisal or woven runner without the worry of stains or slipping by painting it directly onto your stairs. This technique uses a clever combing method to create vertical striations that mimic the texture of natural fiber.
How-To Guide
Materials
- Sander and fine-grit sandpaper (180-220 grit)
- Wood filler (if repairing old stairs)
- Painters tape (high quality, 1-2 inch width)
- Measuring tape and pencil
- Primer (bonding primer highly recommended)
- White semi-gloss enamel paint (for risers/trim)
- Base color floor paint (e.g., beige or tan)
- Glaze medium
- Accent color paint (darker grey or taupe)
- Flogging brush or a stiff-bristle combing tool
- Small angled sash brush
- Mini foam roller
- Clear polyurethane topcoat (satin or matte finish)
Step 1: Preparation & Base Coat
-
Clean and sand:
Begin by thoroughly cleaning the stairs to remove any dirt or wax. Sand the treads and risers scrupulously with fine-grit sandpaper to ensure the paint adheres properly. -
Repair imperfections:
Fill any nail holes or deep scratches with wood filler. Once dry, sand these spots smooth and wipe away all dust with a damp tack cloth. -
Apply primer:
Coat the risers and the center of the treads (where the runner will go) with a bonding primer. If your existing wood treads are stained and you want to keep the outer edges natural as shown, careful taping is required now to protect those wood tones. -
Paint the risers:
Apply two coats of white semi-gloss enamel to the risers and the side stringers. Allow full drying time between coats according to the manufacturer’s instructions. -
Lay the base color:
Paint the entire runner area (tread and riser center) with your solid base color, likely a beige or light tan. This will be the ‘background’ of your woven fabric look.
Wobbly Lines?
If you struggle to pull straight lines freehand, clamp a straight-edge guide to the tread temporarily, or use a wide tiling comb which forces the ‘threads’ to stay parallel.
Step 2: Creating the Pattern
-
Measure the width:
Determine the width of your runner. A standard width is around 27 inches, which leaves roughly 4 inches of exposed wood on either side, depending on your stair width. Mark the center point of each tread to reassure symmetry. -
Tape the boundaries:
Run long strips of painter’s tape from the top step all the way down to define the left and right edges of your runner. Press the tape edges down firmly to prevent bleed-under. -
Mix the glaze:
Mix your darker accent paint with clear glaze medium. I usually start with a 1:4 ratio of paint to glaze; you want it translucent enough to stay workable for a few minutes. -
Apply glaze to one section:
Working on just one riser and tread at a time, brush the glaze mixture vertically onto the painted runner area. Ensure full coverage but don’t let it pool. -
Drag for texture:
Immediately while the glaze is wet, drag your flogging brush or dry stiff-bristled brush vertically through the glaze. Keep your hand steady and pull from back to front in one continuous motion to create straight, fine striations. -
Repeat the process:
Move to the next step and repeat. Be careful not to smudge the previously finished step. Wipe your dragging brush on a rag frequently to prevent glaze buildup. -
Add darker accents (optional):
For more depth, you can drag a slightly darker shade through the pattern sporadically while wet, or wait for the first layer to dry and repeat the process with a deeper tone to build visual complexity.
Level Up: Faux Border
Before the final clear coat, tape off a 1-inch border inside the runner edge and paint it a solid dark color to mimic the fabric binding found on real runners.
Step 3: Finishing Touches
-
Remove the tape:
Carefully peel away the long strips of painters tape while the final glaze layer is still slightly tacky. Pulling at a 45-degree angle away from the paint usually gives the cleanest line. -
Touch up edges:
Inspect the edges where the runner meets the white trim or wood tread. Use a small artist’s brush to tidy up any bleed-through or uneven spots. -
Seal the work:
Once the paint effect has cured for at least 24 hours, apply two to three coats of clear polyurethane. A matte or satin finish looks most like natural fabric and provides essential durability for high traffic. -
Final cure:
Allow the stairs to cure fully before walking on them with shoes. This can take a few days, so plan on using socks only for a little while.
Step back and enjoy the soft, sophisticated look of your new runner that will never bunch up or need vacuuming
Ombre Riser Gradient
Elevate your staircase with a sophisticated gradient that draws the eye upward, blending the warmth of natural wood with a modern, monochromatic palette. This subtle ombré effect transitions from deep charcoal to soft grey, adding depth and architectural interest to a standard flight of stairs.
Detailed Instructions
Materials
- High-quality interior satin or semi-gloss trim paint (White base)
- High-quality interior satin or semi-gloss trim paint (Dark Charcoal/Black base)
- Small plastic mixing cups (one for each riser)
- Measuring spoons or small syringe for precise paint mixing
- Stir sticks
- 2-inch angled sash brush
- High-density foam mini roller
- Painter’s tape (FrogTape recommended)
- Wood filler (if needed)
- Fine-grit sandpaper (220-grit)
- Tack cloth
- Drop cloths
- Screwdriver (if removing hardware)
- Label maker or masking tape for labeling cups
Step 1: Preparation & Clean Up
-
Clear the area:
Remove any carpet runners, staples, or nails from the risers. If your stairs are currently carpeted, pull up the carpet and padding, then carefully pry out all tack strips. -
Fill imperfections:
Inspect each riser for deep scratches, nail holes, or gouges. Fill these spots with wood filler and allow it to dry completely according to the manufacturer’s instructions. -
Sand the surface:
Using 220-grit sandpaper, lightly scuff the surface of every riser. You aren’t trying to strip the wood bare, but rather creating a ‘tooth’ for the new paint to grip. Sand the wood treads if you plan to refinish them as well. -
Clean thoroughly:
Vacuum up the sanding dust, getting into the corners with a crevice tool. Wipe everything down with a tack cloth to ensure the surface is perfectly smooth and dust-free. -
Protect the treads:
Apply painter’s tape carefully along the underside of the stair nosing (the lip of the tread) and the top of the treadmill where it meets the riser. Press the tape edges down firmly with a putty knife or credit card to prevent bleed-through.
Step 2: Mixing the Gradient
-
Calculate your ratios:
Count your stairs. To create a smooth transition, you need a different paint mix for each step. The bottom step will be 100% dark paint. The top step will be your lightest shade (or white). Determine the ratio shift for the steps in between. -
Prepare mixing cups:
Set out a plastic cup for every riser you need to paint. I find it incredibly helpful to label them 1 through 15 (or however many stairs you have) so I don’t mix them up later. -
Mix the bottom shade:
Pour your pure dark charcoal paint into Cup #1. This will be your anchor color at the bottom of the staircase. -
Create the mid-tones:
For the subsequent cups, progressively add more white paint to your charcoal base. For example, Cup #2 might be 90% dark/10% white, Cup #3 is 80/20, and so on. Use measuring spoons for accuracy if you aren’t comfortable eyeballing the color shift. -
Mix the top shade:
Your final cup should be your lightest grey or pure white, depending on how dramatic you want the fade to be. Stir every cup thoroughly until the color is uniform.
Paint Math Hack
Mix a large batch of the middle color first (50/50 mix). Use this as a base for the middle steps to save time, then add dark or light to adjust for the ends.
Step 3: Painting the Risers
-
Cut in the edges:
Starting with the bottom step and Cup #1, dip your angled sash brush and carefully paint the perimeter of the riser. Get into the corners and along the taped edges without overloading the brush. -
Roll the center:
Use the high-density foam roller to fill in the main face of the riser. This helps avoid brush strokes and gives a smooth, factory-like finish. Blend the rolled area into your cut-in edges while the paint is still wet. -
Repeat upward:
Move to the second step with Cup #2. Repeat the cutting-in and rolling process. Step back occasionally to ensure the color transition looks gradual and correct as you move up the flight. -
Apply a second coat:
Allow the first coat to dry for at least 2-4 hours (check your paint can). Once dry to the touch, apply a second coat using the same specific cup for each specific stair to ensure full, opaque coverage. -
Remove tape:
While the second coat is still slightly tacky (not fully cured), carefully peel off the painter’s tape at a 45-degree angle. This prevents the dried paint from peeling up with the tape. -
Final touch-ups:
Inspect your work. If any paint bled onto the wood treads, gently scrape it away with a fingernail or a damp cloth if it’s fresh. Allow the risers to cure for at least 24 hours before heavy foot traffic.
Level Up: Texture
Add beadboard paneling or trim molding to the risers before painting. The ombré effect over a textured surface creates incredible shadow lines and depth.
Step back and admire how a simple shift in shade transforms your staircase into a stunning vertical focal point
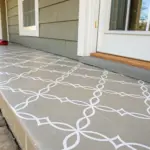
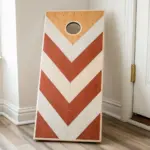
Geometric Tape Pattern on Risers
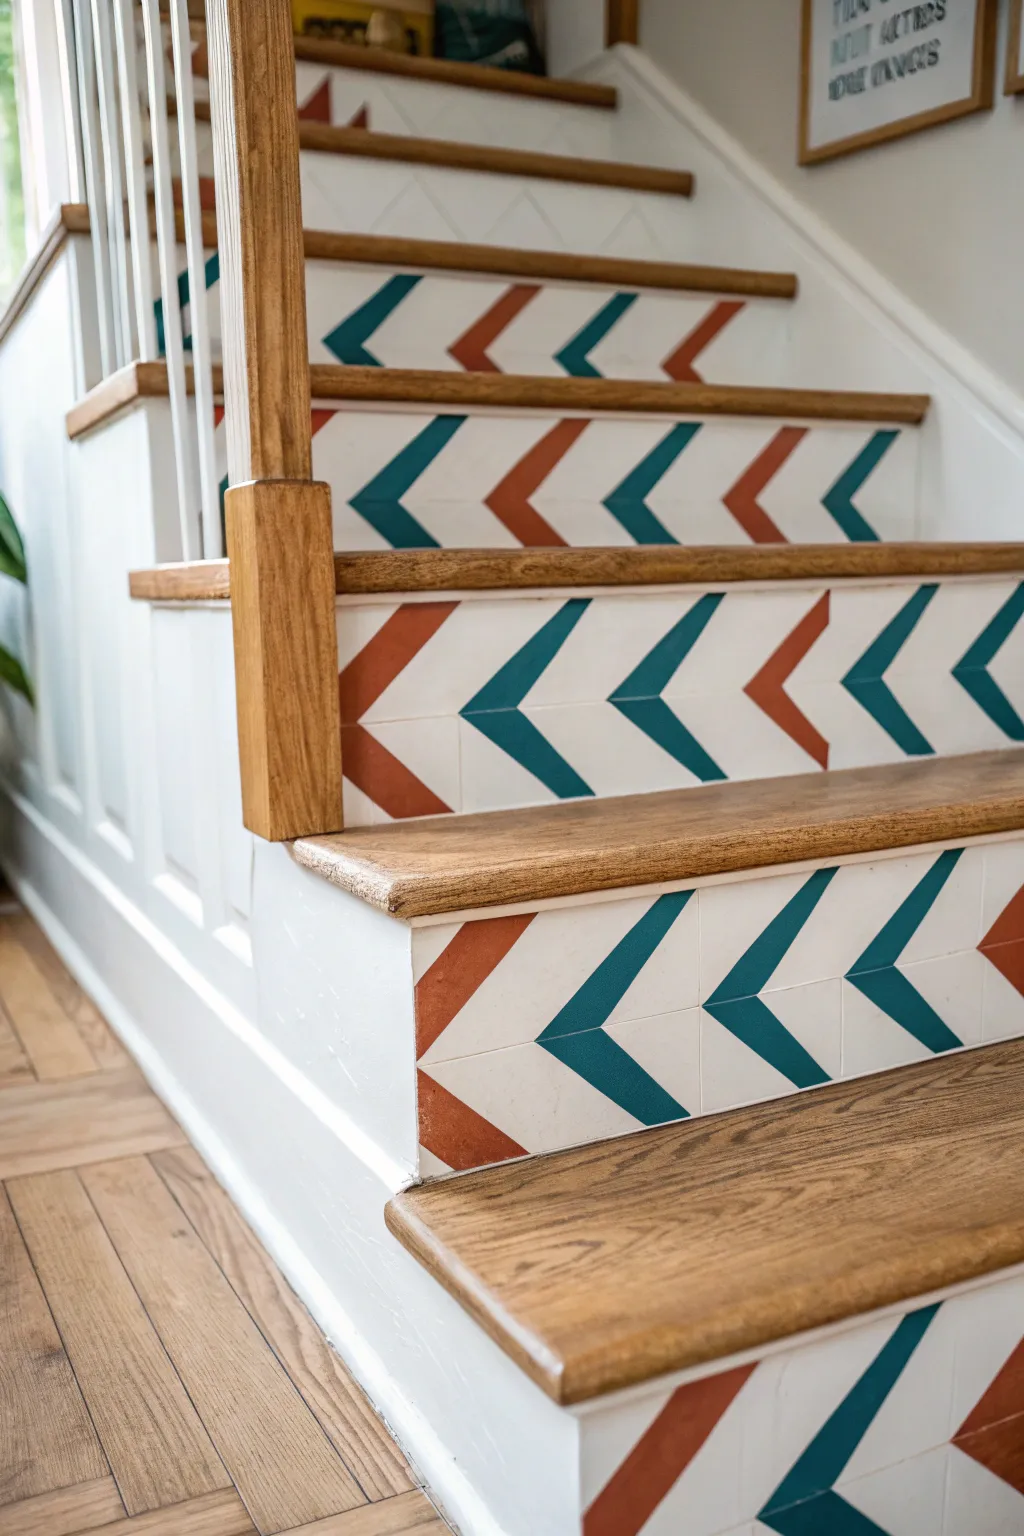
Transform plain stair risers into a stunning focal point with this vibrant geometric chevron pattern. Combining crisp white with deep teal and warm terracotta arrows creates a modern, bohemian look that energizes your entryway without overwhelming the space.
How-To Guide
Materials
- Semi-gloss white paint (base coat)
- Deep teal latex paint (e.g., Benjamin Moore Aegean Teal)
- Terracotta or burnt orange latex paint
- High-quality painter’s tape (1-inch width)
- Ruler or measuring tape
- Pencil
- Small angled sash brush (1.5 inch)
- Mini foam roller and tray
- Utility knife or X-Acto knife
- Clean rag and mild cleaner
- Sandpaper (fine grit, 220)
- Clear polycrylic sealer (optional)
Step 1: Preparation
-
Clean surface:
Begin by thoroughly cleaning the stair risers. Use a mild cleaner and a rag to remove any scuffs, dust, or grease, ensuring the paint will adhere perfectly. -
Sand lightly:
Once dry, give the risers a quick scuff-sand with 220-grit sandpaper. This creates a slightly rough texture for the new paint to grab onto. -
Base coat application:
Apply two coats of semi-gloss white paint to the risers using a mini foam roller for a smooth finish. Allow complete drying time between coats according to your can’s instructions. -
Cure time:
This is crucial: Let the white base coat cure for at least 24 to 48 hours before applying any tape. Taping too soon can peel up your fresh base layer.
Bleeding Lines?
If paint bleeds under the tape, wait for it to fully dry. Then, place a fresh piece of tape over the colored area and touch up the white line precisely with a small brush.
Step 2: Creating the Grid
-
Measure the center:
Find the vertical center of your first riser and mark it lightly with a pencil. This will be the anchor point for your chevron V-shape. -
Mark vertical intervals:
Decide on the width of your chevrons. In the finished project, the arrows look to be about 4-5 inches wide. Mark vertical guidelines across the riser at these equal intervals to ensure symmetry. -
Define the grid:
Using a ruler, lightly draw the diagonal lines to form the chevron ‘V’ shapes across the riser. You are essentially drawing the skeleton of the pattern so you know exactly where to tape.
Pro Tip: Cardboard Template
Instead of measuring every single angle, cut one perfect chevron shape from stiff cardboard. Use this template to quickly trace your pencil outlines on every riser.
Step 3: Taping the Pattern
-
Apply tape lines:
Apply painter’s tape along the OUTSIDE edges of your pencil marks for the colored sections. You want to mask off the areas that should remain white. -
Trim the corners:
Where the tape strips meet at the point of the ‘V’, use a utility knife to carefully trim the excess tape. I like to overlay the tape pieces and slice through both layers for a perfectly sharp point. -
Seal the tape:
Press the tape edges down firmly with a credit card or your thumbnail. For ultra-crisp lines, lightly brush a tiny amount of the *white base paint* over the tape edge first; this seals any gaps so the colored paint won’t bleed under.
Step 4: Painting and Finishing
-
Paint the first color:
Using your small angled brush, fill in the designated chevron sections with the deep teal paint. Apply thin, even coats to avoid drips. -
Paint the second color:
Switch to a clean brush and fill in the remaining sections with the terracotta paint, alternating colors as shown in the design pattern. -
Second coat:
Allow the first coat to dry to the touch, then apply a second coat of color for full opacity and richness. -
Remove tape:
Remove the painter’s tape while the final coat of paint is still slightly tacky, not completely dry. Pull the tape slowly at a 45-degree angle away from the painted edge. -
Touch ups:
Inspect the lines once the tape is gone. Use a tiny artist’s brush and a steady hand to fix any small bleeds or uneven spots with the appropriate color. -
Protect the work:
Because stairs see a lot of foot traffic (and occasional toe kicks), apply a coat of clear water-based polycrylic over the risers once the paint has fully cured to protect your beautiful design.
Step back and admire how this simple geometric upgrade brings a custom, designer feel to your home’s staircase
Stenciled Motifs on Stair Risers

Transform a plain wooden staircase into a stunning architectural feature with this delicate stenciling project. By applying a repeating geometric floral motif in soft taupe over crisp white risers, you can achieve a custom, high-end look that mimics expensive tile work.
Step-by-Step Guide
Materials
- High-quality bonding primer
- Semi-gloss white interior latex paint
- Taupe or warm beige stencil paint (acrylic or latex)
- geometric floral stencil (approx. 6-inch height)
- Painter’s tape (low tack)
- High-density foam roller or stencil brush
- Small artist’s brush for touch-ups
- Paper towels
- Fine-grit sandpaper (220-grit)
- Cleaning cloth and TSP substitute
- Spray adhesive (optional but recommended)
Step 1: Preparation and Base Coat
-
Clean the surface:
Begin by thoroughly cleaning the stair risers with a TSP substitute to remove any grease, scuffs, or grime. This step is crucial for paint adhesion, especially on high-traffic areas like stairs. -
Sand the risers:
Lightly sand the existing surface of the risers with 220-grit sandpaper. You don’t need to strip the paint entirely, just roughen the surface enough to create a ‘tooth’ for the new primer. -
Protect the treads:
Carefully apply painter’s tape along the edge where the riser meets the wooden tread above and below it. Press the tape down firmly to prevent bleed-through onto your stained wood. -
Prime the risers:
Apply a coat of high-quality bonding primer to the risers. Let this dry completely according to the manufacturer’s instructions before moving on. -
Apply the base color:
Paint the risers with your chosen semi-gloss white paint. I prefer semi-gloss here because it’s durable and easier to wipe clean than flat paint. Apply two coats for full coverage, allowing adequate drying time between layers.
Step 2: Stenciling the Design
-
Measure and mark the center:
Find the exact center of your first riser and mark it lightly with a pencil. Do the same on your stencil sheet. aligning centers ensures the pattern looks symmetrical on every step. -
Prepare the stencil:
Lightly mist the back of your stencil with repositionable spray adhesive. Let it get tacky for a minute before positioning it on the riser. This helps hold the intricate details flat against the surface. -
Position the stencil:
Align the center mark of the stencil with the center mark on the riser. Press the stencil firmly against the wood, smoothing it out from the center toward the edges. -
Load the roller:
Pour a small amount of taupe paint onto a paper plate. Load your foam roller and then roll it off onto paper towels until it feels almost dry. This ‘dry rolling’ technique is the secret to crisp lines. -
Apply the paint:
Lightly roll over the stencil using low pressure. Build up the color in thin layers rather than trying to get full opacity in one pass, which causes bleeding. -
Remove and repeat:
Carefully peel back the stencil while the paint is still slightly damp. Move the stencil to the left or right, aligning the registration marks (usually parts of the previous design) to continue the pattern across the riser. -
Handle the edges:
When you reach the sides of the stairs, you may need to bend the flexible stencil into the corner. Use your fingers to hold it tight while you dab paint into the corner with a stencil brush. -
Clean periodically:
After every few stairs, or if you notice paint buildup affecting the sharpness of the design, wash the stencil gently and let it dry before continuing.
Less is More
The biggest mistake is using too much paint. Your roller should be so dry that it barely leaves a mark on a paper towel before it touches the wall.
Step 3: Finishing Touches
-
Inspect and touch up:
Once all risers are stenciled and dry, inspect your work. Use a small artist’s brush and white paint to correct any smudges or bleed-under that might have occurred. -
Remove the tape:
Slowly peel away the painter’s tape from the treads. Pulling at a 45-degree angle away from the fresh paint helps ensure a clean separation. -
Seal the work (Optional):
For extra durability against scuffs, apply a clear, water-based polyurethane sealer over the risers. A matte or satin finish works best to keep the look natural but protected.
Paint Bleed Fix
If paint bleeds under the stencil, don’t wipe it while wet. Let it dry completely, then use a small craft brush and your base white paint to ‘erase’ the error.
Enjoy the rhythmic beauty of your new staircase every time you head up to the second floor.
Hand-Painted Floral Vine Up the Stair Edge
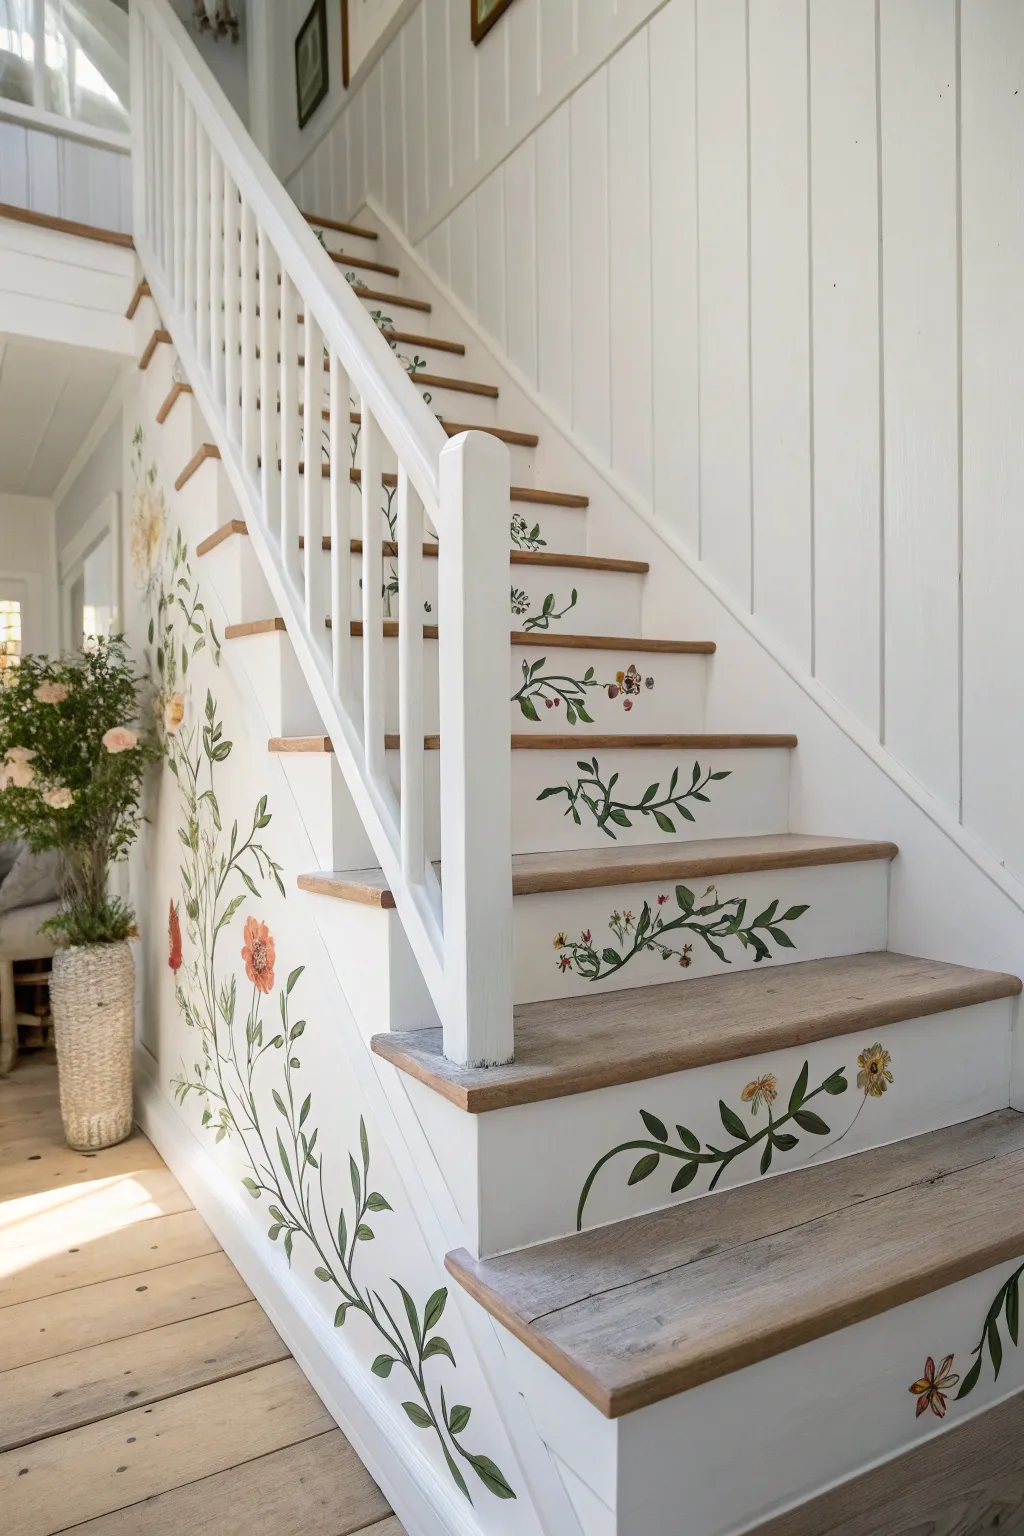
Transform a plain staircase into a whimsical garden path with these hand-painted floral vines that climb up the risers and along the skirt board. This project adds an organic, custom art element to your home, creating a beautiful visual flow that mimics nature reclaiming architecture.
Detailed Instructions
Materials
- High-quality acrylic craft paints (forest green, sage green, olive green, cream, terracotta orange, muted red, pale yellow)
- Small synthetic round brushes (sizes 2, 4, and 6)
- Liner brush (size 0 or 00 for fine stems)
- Painter’s tape (low-tack delicate surface)
- Pencil and eraser
- Tracing paper or reference photos of wildflowers
- Water container and paper towels
- Clear water-based polyurethane sealer (satin or matte finish)
- Clean cloth and mild cleaner
Step 1: Preparation and Base
-
Clean the surfaces:
Before putting brush to wood, ensure your canvas is ready. Thoroughly clean the stair risers and the side skirt board with a mild cleaner to remove dust, scuffs, and oils, as paint won’t adhere well to dirty surfaces. -
Mask the edges:
Carefully apply painter’s tape to the wooden treads to protect them from accidental splatters. Press the edges down firmly with a credit card or your thumbnail to prevent paint bleed. -
Prime white areas:
If your risers are scuffed or not already a crisp white, give them a fresh coat of semi-gloss white paint. A clean, bright background will make your botanical colors pop.
Uneven Lines?
If your vine stems look shaky, don’t stress. Go back with your background white paint and ‘cut in’ along the edges of the green stem to thin it out and smooth the wobbles.
Step 2: Drafting the Design
-
Sketch the main stems on the skirt board:
Start with the large side panel (skirt board). Using a light pencil touch, draw long, meandering lines to represent the main vines. Let them curve naturally upwards, varying the spacing so it doesn’t look too uniform. -
Map out the riser vines:
Moving to the stair risers, pencil in individual vine segments. Position them horizontally across the riser, but give them a slight wave. Imagine a single vine visually ‘connecting’ as your eye moves up the stairs. -
Add leaf placement:
Sketch small oval or teardrop shapes along your vine lines to indicate where clusters of leaves will go. Don’t worry about detailing them yet; just mark their positions to balance the composition. -
Mark flower spots:
Scatter small circles lightly where you want your blooms. Place them sparingly—too many flowers can look cluttered. Aim for asymmetrical clusters.
Add a Buzz
To add life to your garden, paint a tiny bumblebee or a small butterfly on just one or two steps. It breaks the pattern and rewards careful observation.
Step 3: Painting the Foliage
-
Paint the main stems:
Mix forest green with a touch of olive. Using your liner brush (size 0), paint over your pencil lines for the stems. I like to twist the brush slightly as I pull it to create varying line thickness, just like real stems. -
Block within the leaves:
Switch to a size 4 round brush. Mix a sage green color and fill in the leaf shapes. Use a single stroke method: press the brush down at the base of the leaf and lift up as you reach the tip. -
Add depth to leaves:
While the sage green is still slightly damp, dip the very tip of your brush into a darker forest green and paint the vein or one side of the leaf. This wet-on-wet technique creates a soft, natural gradient. -
Add lighter highlights:
Once the greens are dry, mix a little cream into your sage green. Use the size 2 brush to add tiny highlights to the tips of the leaves where ‘sunlight’ would hit.
Step 4: Adding Blooms and Details
-
Paint flower bases:
For the blooms, use terracotta orange mixed with a little red. Paint small, irregular shapes for the flower heads. Think of wild poppies or cosmos—imperfect shapes look more organic. -
Layer flower petals:
After the base coat dries, add definition with a deeper red for shadows near the center of the flower and a pale orange for the outer petal edges. -
Add flower centers:
For the centers, dab tiny dots of pale yellow and forest green using the very tip of your smallest brush or a toothpick. This texture mimics pollen. -
Connect flowers to vines:
Use your liner brush and the green stem mixture to paint tiny, thin stems connecting the floating flower heads back to the main vine branches.
Step 5: Protection and Finishing
-
Erase guidelines:
Ensure all paint is 100% bone dry (wait at least a few hours or overnight). Gently erase any visible pencil marks with a white vinyl eraser. -
Apply clear coat:
Stairs see a lot of foot traffic and scuffs. Apply two thin coats of water-based polyurethane sealer over your painted artwork. Let the first coat dry completely before adding the second. -
Remove tape:
While the final coat of sealer is still slightly tacky (not fully cured), carefully peel off the painter’s tape at a 45-degree angle to ensure a crisp line.
Enjoy the feeling of walking through a meadow every time you head upstairs
Color-Drenched Stairs, Walls, and Trim
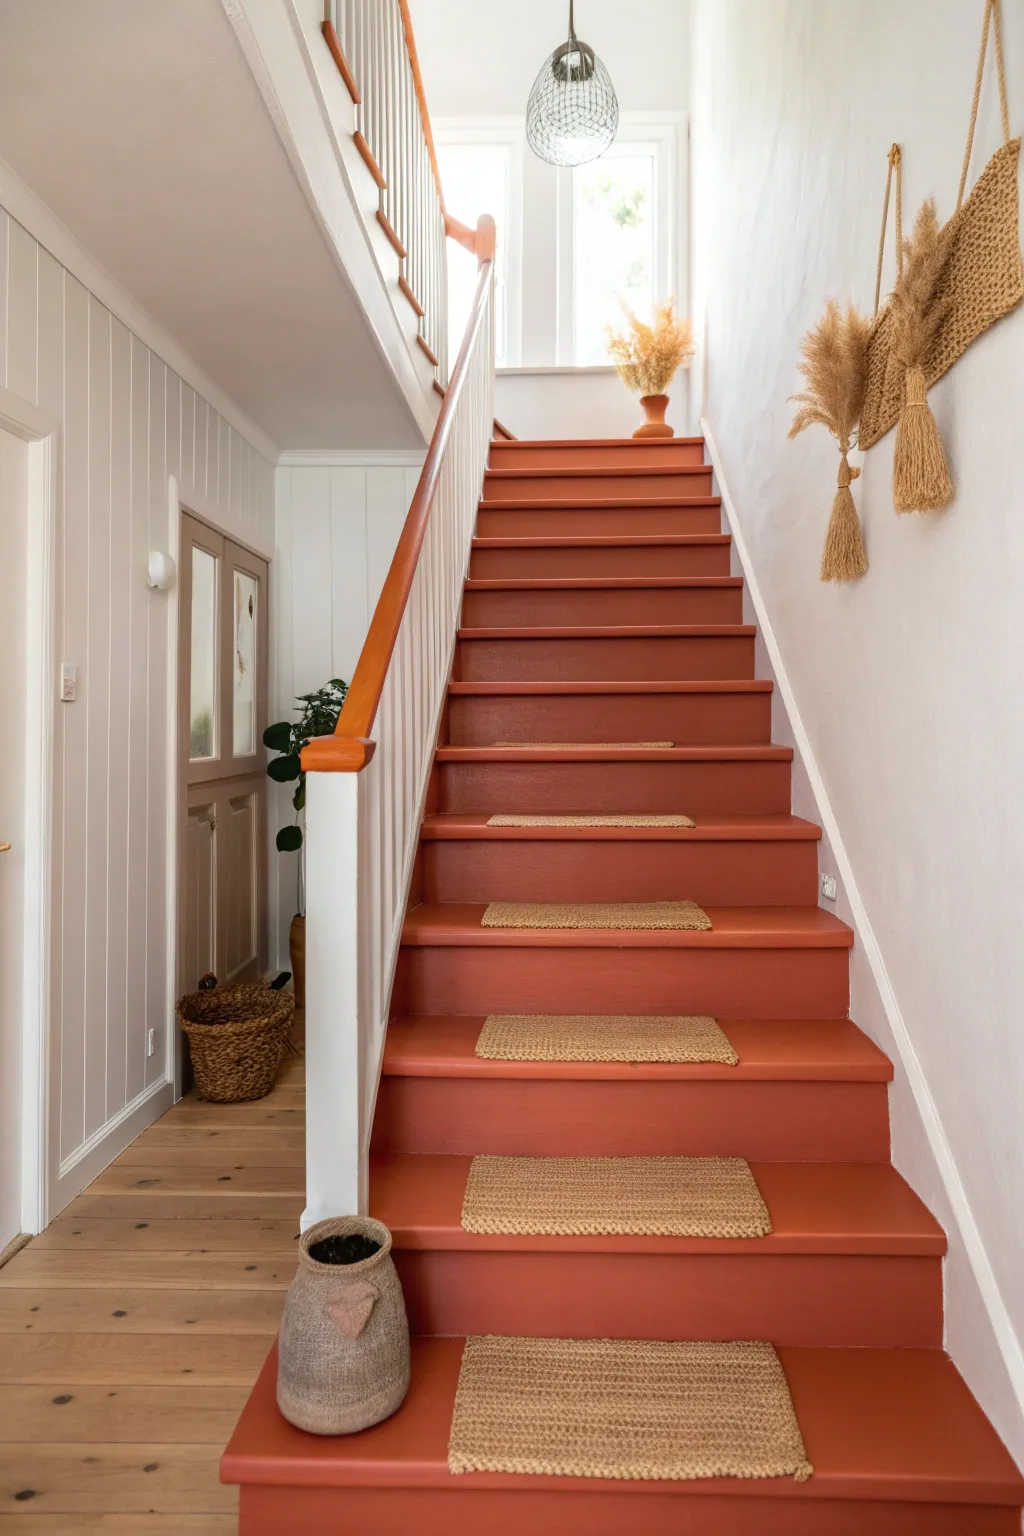
Transform a tired staircase into a stunning focal point with this bold, color-drenched approach. By painting the treads, risers, and handrail in a warm terracotta hue while keeping the balusters crisp white, you create an inviting pathway that feels both earthy and modern.
Step-by-Step Guide
Materials
- High-quality floor/porch paint (terracotta/rust color)
- White semi-gloss trim paint
- Primer (bonding primer specific for floors)
- Natural woven stair mats/treads
- Double-sided carpet tape
- Sandpaper (80-grit and 120-grit)
- Tack cloth
- Painter’s tape (high adhesion)
- Wood filler
- Angled sash brush (2-inch)
- Mini foam roller and tray
- Small artist brush
- Cleaning supplies (degreaser)
Step 1: Preparation & Repairs
-
Clear and clean:
Remove any existing carpet, staples, or runners from the stairs. Thoroughly vacuum every crevice and wash the surfaces with a heavy-duty degreaser to remove oils and dirt. -
Fill imperfections:
Inspect the wood for gouges or nail holes. Fill these with wood filler, overfilling slightly to account for shrinkage. -
Sand heavily:
Sand the treads, risers, and handrail initially with 80-grit sandpaper to strip old varnish and level the filler. Follow up with 120-grit for a smooth finish suitable for painting. -
Remove dust:
Vacuum up the sanding dust extensively. Wipe down the entire staircase with tack cloth to ensure absolutely no debris remains.
Step 2: Priming & White Details
-
Masking edges:
Tape off the walls along the stringer and any floor areas you want to protect. Precision here makes the final lines much sharper. -
Prime the wood:
Apply a coat of high-quality bonding primer to all surfaces—treads, risers, spindles, and rails. Let this cure according to the manufacturer’s instructions. -
Paint the spindles:
Start with the white paint first. Using an angled sash brush, paint the balusters (spindles) and the vertical stringer trim. Two coats are usually needed for full opacity. -
Paint the newel posts:
Continue the white paint onto the vertical newel posts at the bottom and top of the stairs, keeping the handrail reserved for the accent color. -
Dry and tape:
Allow the white paint to dry completely—ideally for 24 hours. Then, carefully tape off the base of the white spindles where they meet the treads to protect your fresh work.
Sticky Situation
If paint peels when removing tape, score the edge gently with a razor blade first. This breaks the paint seal and ensures a crisp, clean line without lifting the new finish.
Step 3: Applying the Terracotta Color
-
Cut in the edges:
Open your terracotta floor paint. Use your angled brush to carefully ‘cut in’ the corners of the treads and risers, getting right up to the taped spindles. -
Roll the risers:
Use a mini foam roller to paint the vertical risers. This ensures a smooth, brush-mark-free finish. Work from the top step down to avoid backing yourself into a corner. -
Paint the treads:
Paint the horizontal treads next. I like to paint every other step first if the stairs need to remain in use during the drying process, but painting them all at once gives the most seamless finish. -
Coat the handrail:
While the stairs dry, paint the handrail in the same terracotta shade. Use long, smooth strokes along the grain of the wood. -
Second coat:
Once the first coat is dry to the touch (usually 4-6 hours for floor paint), apply a second coat to the treads, risers, and handrail for depth and durability. -
Detail work:
Remove the painter’s tape while the second coat is still slightly tacky to prevent peeling. Use a small artist brush to fix any tiny bleeds or missed spots.
Tread Wisely
Add a packet of anti-slip additive to your final coat of paint on the treads. It adds invisible texture that prevents slipping without changing the color’s richness.
Step 4: Finishing Touches
-
Maximize cure time:
Let the paint cure for at least 48 to 72 hours before walking on it with shoes. Heavy traffic too soon can mar the finish. -
Prepare the mats:
Position your natural woven stair treads comfortably in the center of each step. Measure the distance from the edges to ensure they are perfectly aligned. -
Secure the mats:
Apply heavy-duty double-sided carpet tape to the back of each mat. Press them firmly onto the cured painted treads to secure them in place.
Enjoy the warm glow of your newly revitalized staircase every time you head upstairs
Gallery-Style Painted Risers With Mini Art Panels
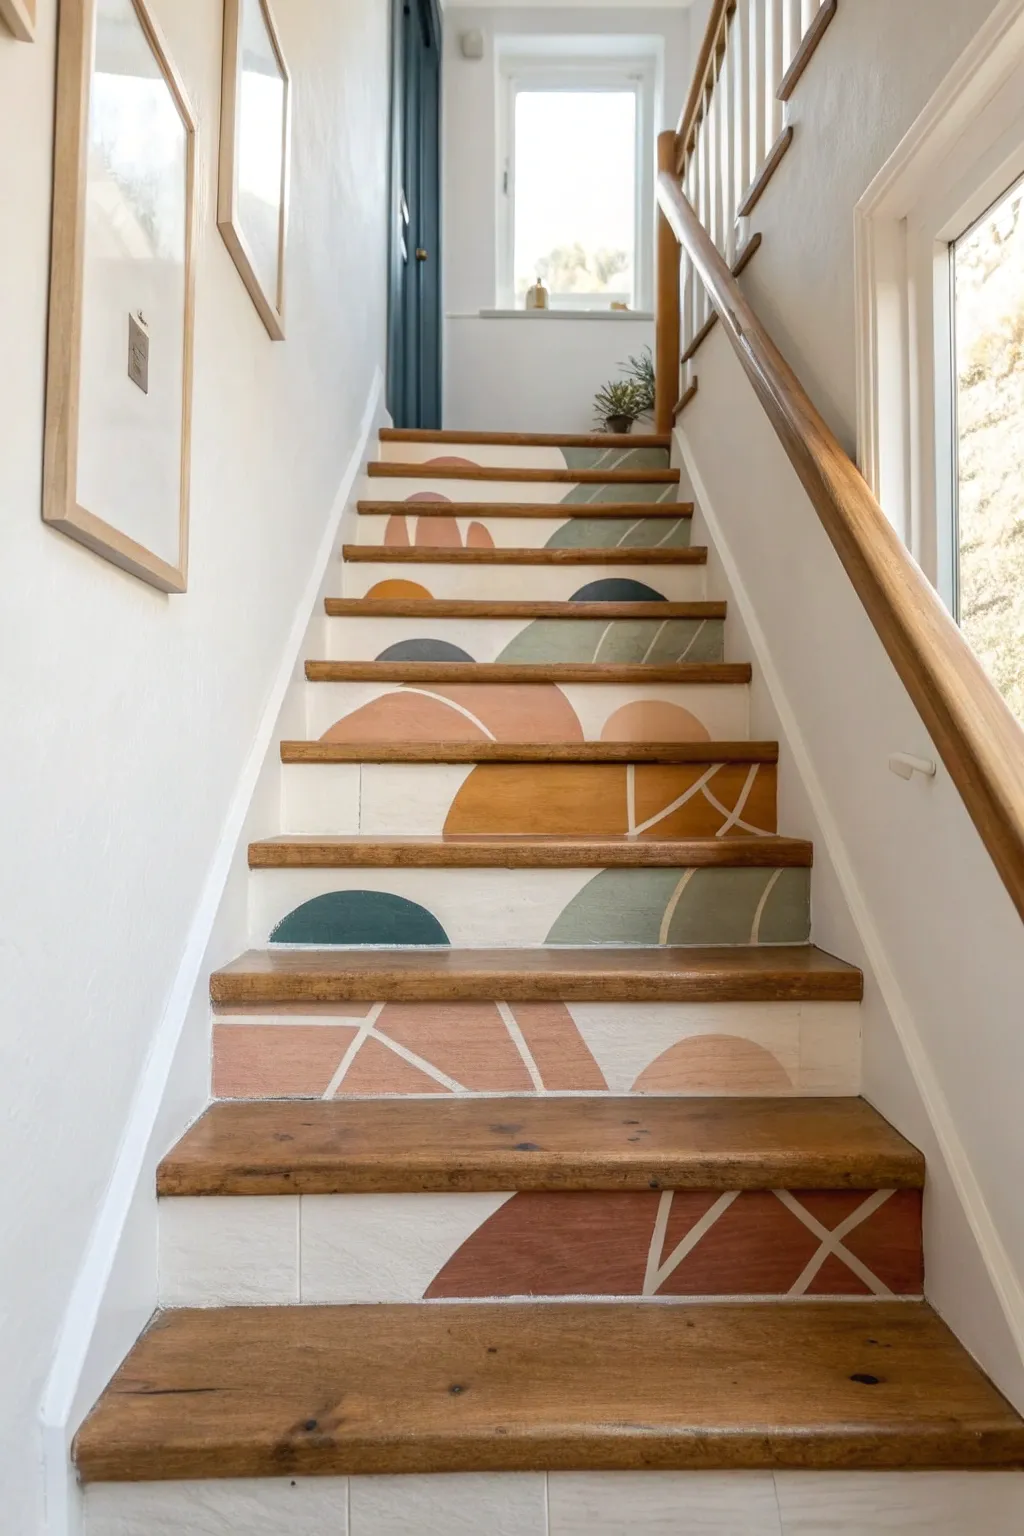
Transform your staircase into a cascading gallery of modern art with this abstract mural concept. Using warm earth tones and soft, organic shapes that flow seamlessly from one riser to the next helps create a unified visual journey up the steps.
Step-by-Step
Materials
- Interior emulsion or furniture paint (white base)
- Sample pots of latex or acrylic paint (rust red, mustard yellow, sage green, teal blue, pale peach)
- Painter’s tape (frog tape recommended)
- Fine-grit sandpaper (180-220 grit)
- Sugar soap or TSP cleaner
- Small foam roller and tray
- Angled sash brush (1.5 inch)
- Assorted small flat artist brushes like shaders or flats
- Pencil
- Ruler or straight edge
- Clear matte varnish (polyurethane based)
Step 1: Preparation & Base Coat
-
Clean the surface:
Begin by thoroughly cleaning the stair risers with sugar soap or a TSP solution to remove any scuffs, grease, or residue. This step is crucial for paint adhesion. -
Light sanding:
Once dry, lightly scuff the existing finish on the risers with fine-grit sandpaper. You aren’t trying to strip it bare, just creating a ‘key’ for the new paint to grip onto. -
Protect the treads:
Apply painter’s tape carefully along the underside of the stair nosing and the top of the tread below. Press the edges down firmly with a credit card to prevent paint bleed. -
Apply the background:
Using a small foam roller, apply a crisp white base coat to every riser. I find two thin coats are always better than one thick one to avoid drips. Allow full drying time between coats.
Clean Lines Hack
If painting the negative ‘white lines’ over the color feels risky, use thin graphic art tape (chart tape) applied before painting colors, then peel it off to reveal the white base below.
Step 2: Planning the Design
-
Sketch broadly:
Visualize the staircase as a single vertical canvas. Lightly sketch your abstract shapes—arches, half-circles, and organic blobs—spanning across the risers. -
Connect the levels:
Ensure that some shapes ‘continue’ visually from one stair to the next. For example, the top of an arch on step 3 should correspond to the bottom of the shape on step 4. -
Identify line work:
Mark out where you want the thin white negative space lines to go. These lines break up the solid color blocks and add that geometric, ‘gallery’ feel.
Step 3: Painting the Shapes
-
Start with the lightest colors:
Begin painting your larger shapes using your lightest colors first, such as the pale peach and mustard yellow. Use your angled sash brush for big areas. -
Define the edges:
Switch to a flat artist brush to carefully cut in the curved edges of your shapes. Keep a steady hand and rotate the brush to follow the curve. -
Add mid-tones:
Move on to your sage green and rust red sections. If two colors touch, allow the first shape to dry completely before painting its neighbor to avoid muddy blending. -
Apply the dark accents:
Fill in the smallest, darkest shapes—like the teal semi-circles or deep charcoal accents—last. These anchor the design visually. -
Creating the negative lines:
For the thin white lines cutting through the colored shapes, you can either paint carefully around them or, for sharper results, paint the color solid and then go back over it with a fine liner brush and your white base paint.
Level Up: Texture
Mix a small amount of texture medium or baking soda into the earth-tone paints to give the shapes a tactile, plaster-like finish that mimics relief sculpture.
Step 4: Finishing Touches
-
Check for consistency:
Step back to the bottom of the stairs to view the mural as a whole. Touch up any wobbly lines or patchy areas with a small detail brush. -
Remove tape:
Carefully peel off the painter’s tape while the final coat is still slightly tacky. Pulling slowly at a 45-degree angle helps ensure a crisp line. -
Seal the artwork:
Once fully cured (wait at least 24 hours), apply two coats of clear matte varnish specifically meant for floors or high-traffic areas to protect your art from scuffs.
This vibrant update brings creative energy to a functional space, turning every trip upstairs into a walk through an art installation


Have a question or want to share your own experience? I'd love to hear from you in the comments below!