A long canvas is such a fun format because it practically begs your composition to move—either soaring upward on a tall, narrow panel or stretching out in a panoramic sweep. Here are my favorite ideas that really lean into that elongated shape so your painting feels made for it, not squeezed into it.
Vertical Sunset With Water Reflection
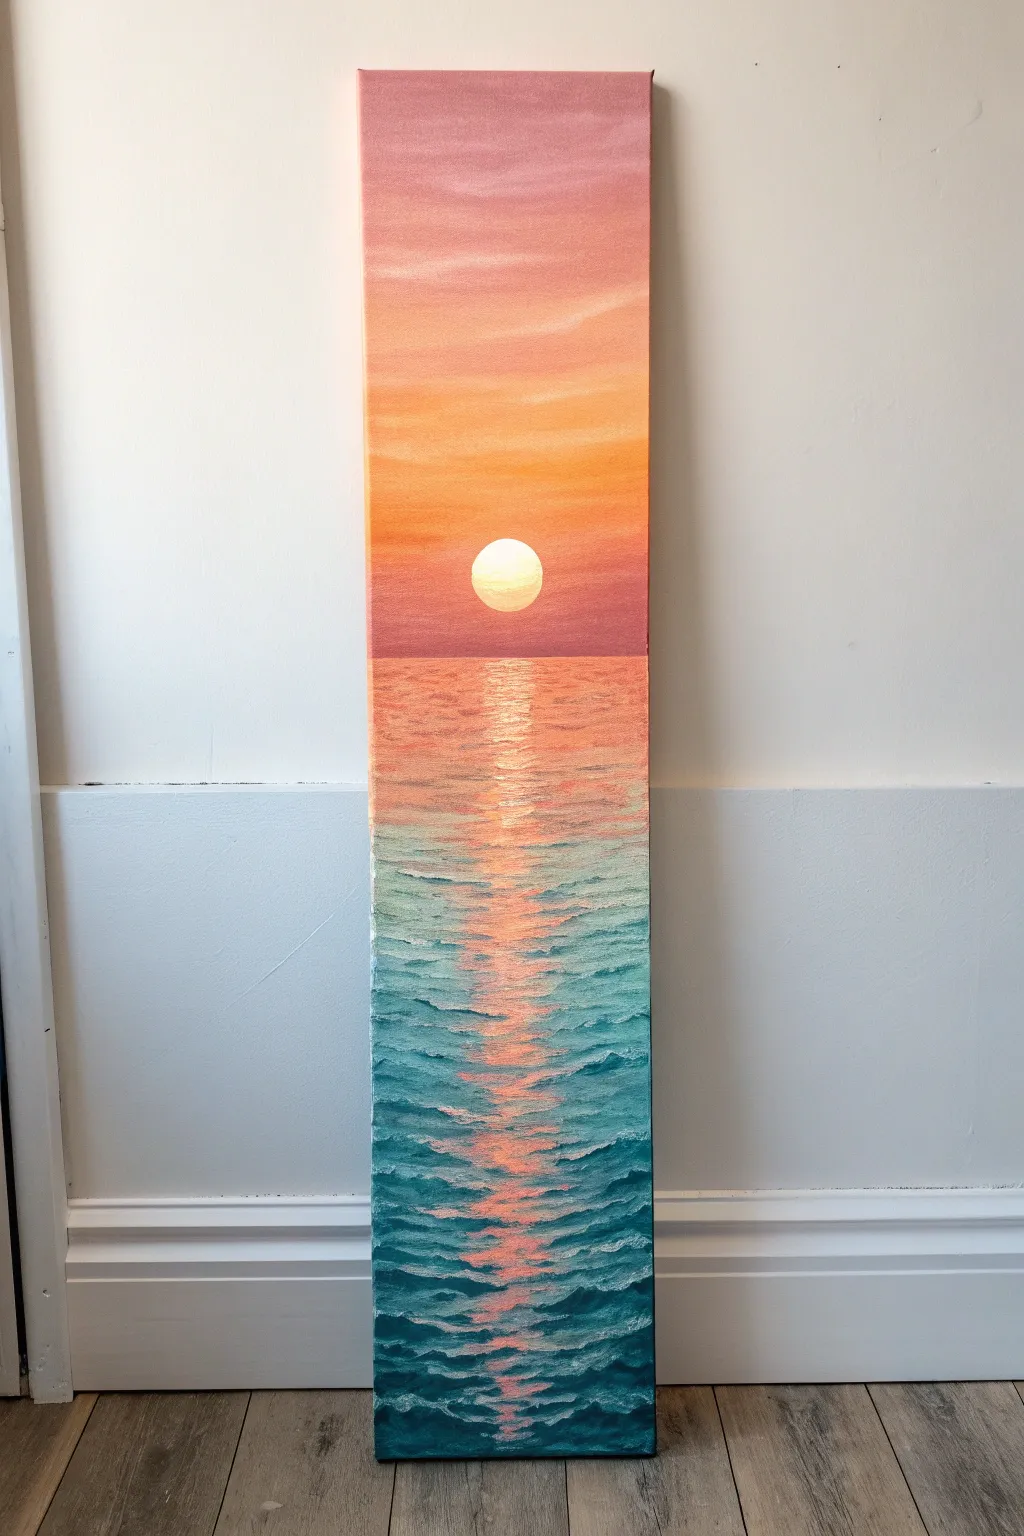
Capture the serene beauty of a setting sun with this vibrant acrylic painting project designed for a long, narrow canvas. You will learn to blend a warm, gradient sky and create realistic water texture that reflects the glowing light.
Step-by-Step
Materials
- Long vertical canvas (e.g., 10×30 or 12×36 inches)
- Acrylic paints (Titanium White, Cadmium Yellow, Orange, Alizarin Crimson, Phthalo Blue, Phthalo Green)
- Large flat brush (2-inch)
- Medium flat brush (1-inch)
- Small round or detail brush
- Palette knife (optional for texture)
- Cup of water and paper towels
- Palette or mixing plate
Step 1: Painting the Sky Gradient
-
Prime the sky area:
Visualize a line dividing your canvas in half horizontally. Using your large flat brush, apply a thin coat of Titanium White across the entire top half. keeping the paint wet will help your colors blend smoothly in the next steps. -
Apply the top pink layer:
Mix a soft pink using White and a touch of Alizarin Crimson. Brush this horizontally across the very top edge of the canvas, blended downward about 3-4 inches. -
Blend in the orange tones:
Clean your brush and pick up some Orange mixed with a little White. Apply this below the pink section, using long horizontal strokes to seamless blend the two colors where they meet. -
Deepen the horizon:
As you move toward the middle of the canvas (the horizon line), mix a deeper red-orange using Alizarin Crimson and Orange. Paint this band right above the horizon line, ensuring it stays darker than the section above it. -
Create the sun:
While the sky paint is still slightly tacky or dry, use a clean finger or a small round brush with pure Titanium White to paint a perfect circle in the lower third of the sky section. Add a tiny touch of yellow to the white if you want a warmer glow. -
Add subtle clouds:
Using a dry brush with a tiny amount of white paint, lightly whisk in some horizontal streaks across the orange and pink sections to suggest faint, high-altitude clouds.
Step 2: Creating the Ocean Base
-
Establish the horizon line:
Use a ruler or steady hand to paint a straight distinct line across the middle of the canvas using a mix of Crimson and a tiny touch of Blue to create a deep purple-red shadow at the water’s edge. -
Paint the reflection zone:
Directly under the sun, paint a vertical column of warm colors. Start with light pinks and oranges near the horizon and let them fade out as you go lower. This will be the base for the sun’s reflection. -
Mix the teal water color:
Combine Phthalo Blue, Phthalo Green, and White to create a vibrant teal. This will be the primary color for the lower waves. -
Fill the water sides:
Paint the left and right sides of the bottom half with your teal mix, leaving the center column (where the reflection is) somewhat open and blended with pinks. -
Darken the bottom:
Add more Phthalo Blue and a touch of Crimson to your teal mix to create a dark navy. Paint the bottom 4-5 inches of the canvas with this dark tone to create depth in the foreground.
Uneven Horizon Line?
If your horizon line feels wavy or crooked, place a strip of painter’s tape across the dry sky section before painting the water. Peel it off later for a crisp, perfect edge.
Step 3: Detailing the Waves and Reflection
-
Start the wave ripples:
Switch to a smaller flat brush. Load it with the teal mixture and paint short, horizontal dashes starting from the bottom, working upward. I prefer to make these strokes curved slightly upwards at the ends to mimic ripples. -
Layer the reflection colors:
In the center column, use pure Orange and Pink to paint horizontal dashes across the water. Interleave these with the teal strokes so the colors look woven together. -
Add high highlights:
Mix Titanium White with a tiny bit of Yellow. With a detail brush, paint thin, sharp horizontal lines directly under the sun in the center of the water. These should be brightest near the horizon and fade as they span downward. -
Add wave shadows:
Using your darkest navy mix, paint thin shadows underneath the teal wave crests, especially in the bottom third of the painting. This three-dimensional effect makes the choppy water look realistic. -
Final blending touch:
If the transition between the pink reflection and the blue water looks too harsh, use a clean, dry brush to very lightly feather the edges where the two colors meet. -
Paint the canvas edges:
Don’t forget to wrap the painting around the sides of the canvas. Extend the sky gradient and the water colors onto the deep edges for a finished, professional look.
Pro Tip: Glowing Sun
To make the sun really glow, glaze a very thin, transparent layer of Zinc White over the sun and the immediate surrounding sky once the base layers are 100% dry.
Hang your vertical masterpiece in a narrow wall space to bring a permanent sunset into your home

Tall Tree Trunks in a Misty Forest
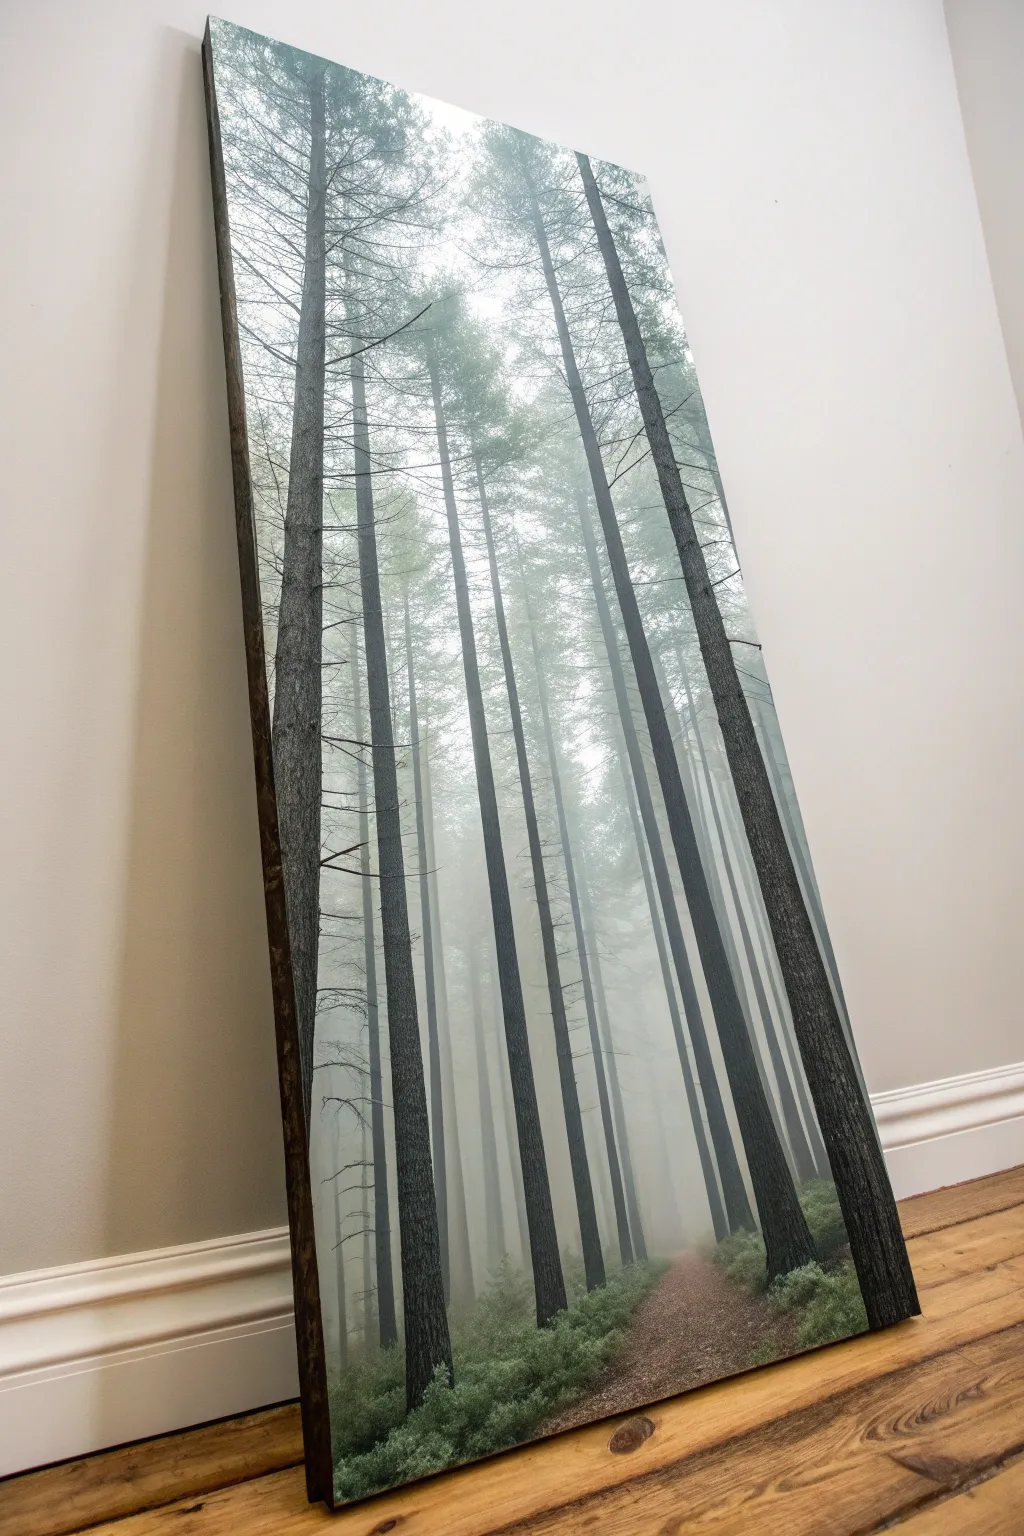
Capture the serene grandeur of nature with this elongated vertical painting featuring soaring tree trunks disappearing into a gentle fog. This project relies on soft blending and vertical movement to create an atmospheric piece that draws the eye upward.
How-To Guide
Materials
- Tall, narrow canvas (e.g., 12×36 or 10×30 inches)
- Acrylic paints: Titanium White, Mars Black, Burnt Umber, Sap Green, Phthalo Green
- Large flat blending brush (2-inch)
- Medium flat brush
- Small round detail brush
- Palette knife
- Glazing medium or water spray bottle
- Sea sponge or stipple brush
- Palette for mixing
Step 1: Setting the Atmosphere
-
Prepare the Foggy Base:
Begin by mixing a very large amount of light grey. Combine mostly Titanium White with a tiny speck of Mars Black and a touch of Sap Green to warm it slightly. The goal is an almost-white, misty pale grey. -
Apply the Gradient:
Using your large flat blending brush, cover the entire canvas. Start with pure white at the very top center where the light source is strongest. -
Blend Downward:
While the white is still wet, introduce your pale grey mixture starting from the edges and the bottom third. Use horizontal sweeping strokes to blend the grey up into the white, creating a soft transition that looks like pervasive fog. -
Add Depth at the Bottom:
Mix a slightly darker grey-green for the bottom 10% of the canvas. Blend this upwards into the lighter fog, establishing the forest floor area where the mist is denser and shadows gather.
Fog Too Solid?
If your mist looks flat, mist the canvas with water while the paint is wet and use a dry, soft brush to circular blend the edges creates a smokier effect.
Step 2: Painting the Distant Trees
-
Mix Ghostly Tree Colors:
Create a ‘ghost’ color for the furthest trees. This should be a grey that is only 10-15% darker than your background fog color. Translucency is key here. -
Paint Faint Trunks:
Using a flat brush held vertically, paint thin, straight lines starting from the bottom and fading out before they reach the top. These should look like shadows in the mist. -
Layer Mid-Distance Trees:
Darken your grey mix slightly with a bit more Burnt Umber and Black. Paint a second set of trunks. These should be slightly wider and extend higher up the canvas than the first set. -
Create Atmospheric Perspective:
As you paint these background layers, I find it helpful to lightly dry-brush white paint over the top sections of the trunks to make them look like they are receding into the high fog.
Step 3: The Foreground Giants
-
Mix Dark Bark Color:
Prepare a dark, rich mixture for the main foreground trees using Mars Black, Burnt Umber, and a hint of Phthalo Green. It should look nearly black but have organic warmth. -
Establish the Main Trunks:
Choose 3-5 spots for your primary trees. Using a medium flat brush, paint bold vertical lines that extend from the very bottom all the way off the top edge of the canvas. Vary their thickness; the one closest to the viewer should be the widest. -
Add Bark Texture:
Take a pallet knife with a small amount of lighter grey-brown paint. Gently scrape it vertically down the sides of the dark trunks to suggest rough bark texture without painting every detail. -
Paint Delicate Branches:
Switch to your small round detail brush. With thinned dark paint, add very fine, brittle branches extending from the main trunks. Keep them sparse and mostly in the upper half of the composition. -
Fade the Canopy:
Use a dry brush with a tiny bit of white paint to lightly glaze over the top sections of the dark trunks, simulating the mist wrapping around the upper canopy.
Add a Pop of Life
Paint a tiny silhouette of a deer or a person in a bright red jacket on the path. This provides scale and a focal point for the eye.
Step 4: Ground Cover and Finishing Touches
-
Stipple the Undergrowth:
Mix a muted green using Sap Green, Burnt Umber, and White. Use a sea sponge or stipple brush to dab texture along the bottom edge, creating low bushes and moss. -
Create the Path:
Mix a reddish-brown color. In the bottom center, paint a narrow, winding shape that disappears quickly into the fog, suggesting a walking trail. -
Highlight the Foliage:
Add a touch more white and yellow to your green mix. Lightly stipple highlights onto the tops of the bushes, focusing on areas near the path. -
Final Mist Glaze:
If the contrast feels too sharp, mix a very watery glaze of Titanium White and glazing medium. Wash it over specific areas to push them further back into the distance. -
Darken the Framework:
Paint the heavy outer edges of the canvas black or dark brown to frame the image without needing an external frame.
Hang your vertical masterpiece in a narrow space to create a stunning window into a quiet forest


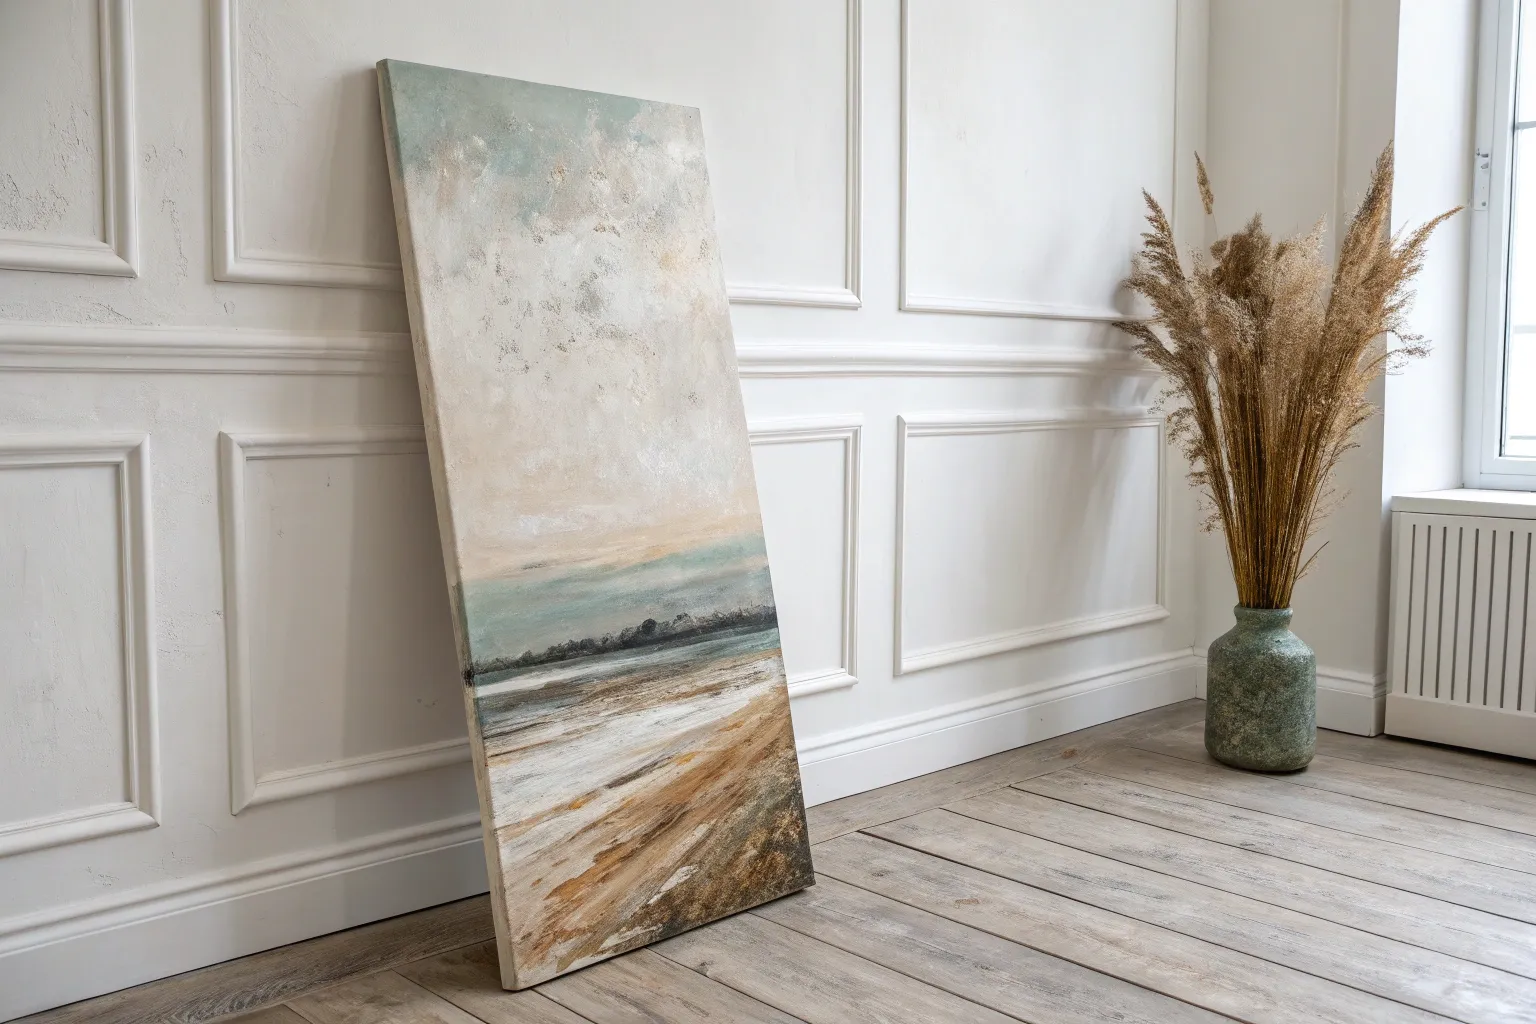
Stacked Landscape Layers From Ground to Sky
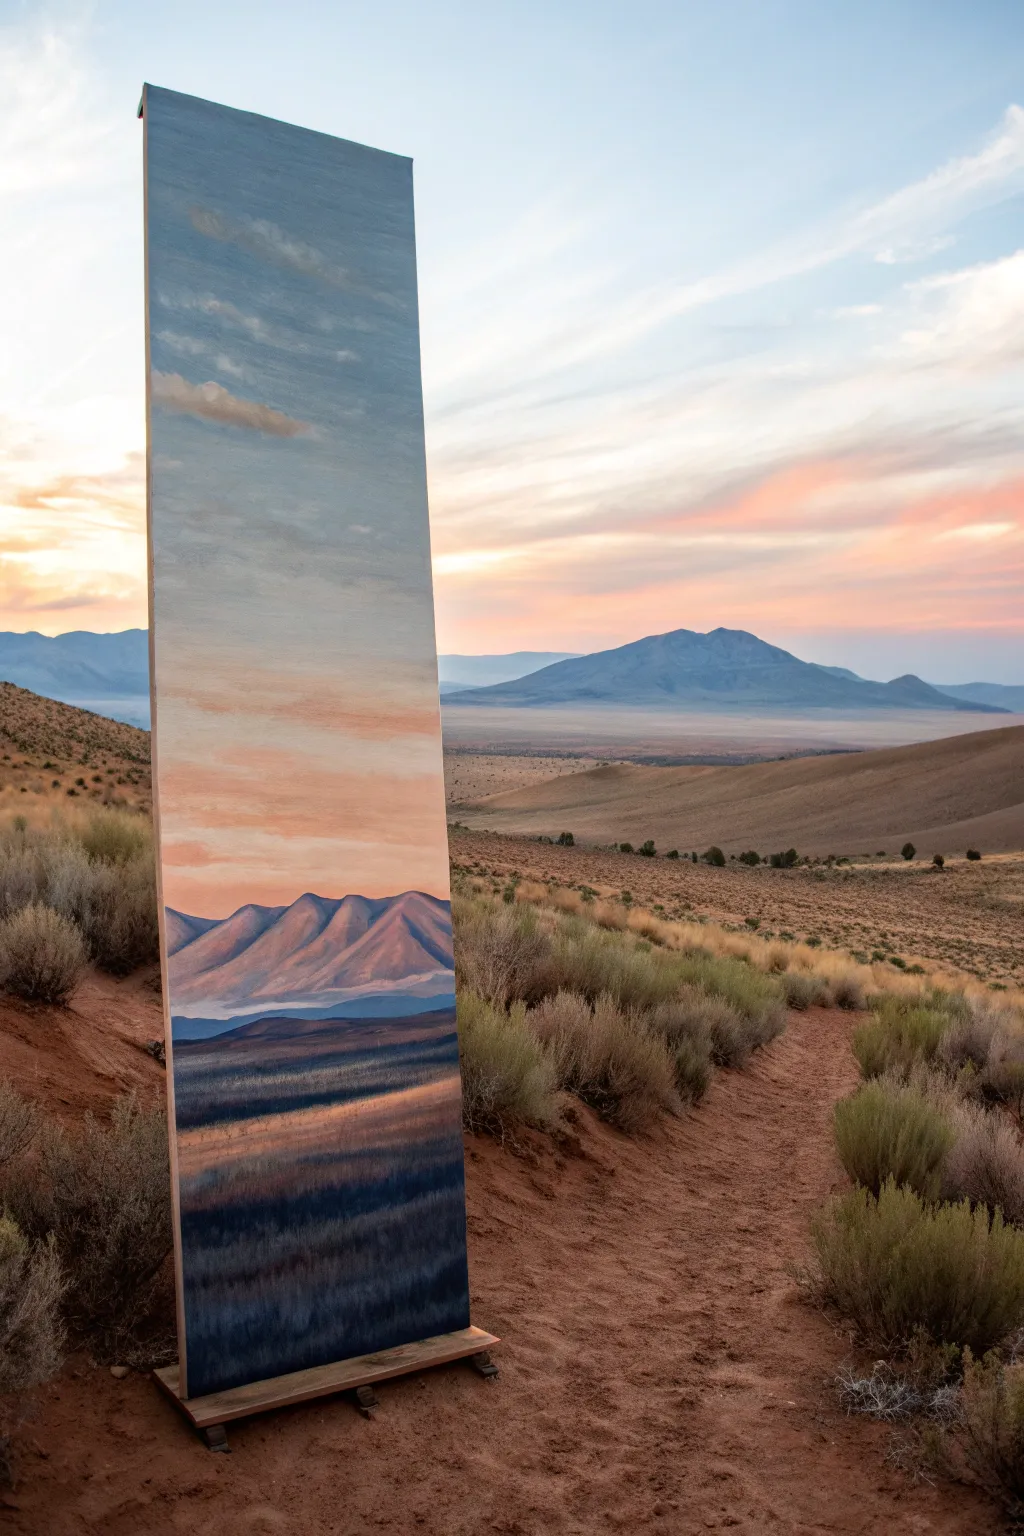
This striking project involves creating a tall, narrow landscape painting designed to blend seamlessly with its natural surroundings. By capturing the full vertical spectrum from earthy grasses to distant mountains and expansive clouds, you create a captivating layer that interacts with the real world behind it.
Detailed Instructions
Materials
- Tall, narrow canvas or wooden panel (approx. 12″ x 48″ or custom built)
- Wooden easel or custom display stand for outdoor stability
- Acrylic or oil paints (Titanium White, Ultramarine Blue, Alizarin Crimson, Yellow Ochre, Burnt Sienna, Burnt Umber)
- Variety of brushes: large flat brush (2-inch), medium filbert, lush scenery brush, and fine liner
- Outdoor easel setup or pochade box
- Palette and palette knife
- Solvents or water (depending on paint medium)
- Rags or paper towels
- Viewfinder (optional)
Step 1: Preparation and Sketching
-
Choose your location:
Scout a location with distinct vertical layers: interesting foreground texture, a clear middle ground feature like a mountain, and an active sky. Position your canvas vertically to mirror the slice of the view you intend to paint. -
Prime the surface:
If using raw wood, apply two coats of gesso to seal the surface. For a smoother finish, sand lightly between coats. A slightly tinted ground (like a wash of burnt sienna) can help unify the colors later. -
Block in composition:
Using a thin wash of a neutral color like Burnt Umber, sketch the horizon lines. Since the canvas is tall, divide your composition carefully: give about 40% to the sky, 20% to the mountains, and 40% to the foreground to match the reference style. -
Establish values:
Before adding color, rough in your darks and lights. The foreground grasses should generally be darker, while the distant mountains will be lighter and hazier due to atmospheric perspective.
Atmospheric Depth
To make mountains look far away, mix a little of your sky color into the mountain color. This ‘atmospheric perspective’ pushes them back into the distance naturally.
Step 2: Painting the Sky and Mountains
-
Mix the sky gradient:
Prepare a gradient of blues. Start with a deeper blue (Ultramarine + White) for the top of the canvas and transition to a warmer, paler blue or peach tone near the horizon line to mimic the sunset or sunrise glow. -
Apply the sky background:
Use your large flat brush to sweep these colors horizontally across the top section. Blend the transition area while the paint is wet for a seamless fade. -
Add cloud movement:
Using a filbert brush, scumble in soft white and grey clouds. Keep the edges soft to suggest movement and distance. Remember that clouds get smaller and flatter as they approach the horizon. -
Paint the distant peaks:
Mix a cool violet-grey for the mountains. The further back the mountain, the more blue and pale it should be. Paint the silhouette against the sky, keeping the edges relatively crisp but not razor-sharp. -
Add mountain dimension:
Apply highlights to the mountain ridges using a slightly warmer, lighter tone. Observe where the light hits the real mountains and mimic that directionality on your canvas.
Color Harmony
If colors look disjointed, apply a very thin glaze of a single color (like liquid white or a transparent gold) over the whole dry painting to unify the tone.
Step 3: Foreground and Details
-
Layer the middle ground:
Between the mountains and the immediate foreground, paint the rolling foothills. Use warmer earth tones here—Yellow Ochre mixed with a touch of green or brown—to separate this layer from the cool blue mountains. -
Block in foreground darks:
For the bottom third, start with a dark underpainting of Burnt Umber and deep green. This provides depth for the grasses you will layer on top. -
Create grass texture:
Using a fan brush or an old, splayed bristle brush, flick upward strokes of lighter green, gold, and tan over the dark base. Vary the height and direction to make it look natural. -
Integrate light and shadow:
Glaze deep horizontal shadows across the field to suggest undulating terrain. I find that adding a few horizontal streaks of golden light creates that magic hour effect seen in the photo. -
Refine the transition:
Ensure the bottom edge of the painting feels heavy and grounded, gradually becoming lighter and more ethereal as the eye moves upward to the sky. -
Final adjustments:
Step back and compare your painting to the landscape. If the real sky has shifted, stick to your original lighting decision to maintain consistency. Add final highlights to the cloud tops and grass tips.
Once dry, place your tall panel in the landscape to see how your captured moment communicates with the ever-changing environment behind it


Panoramic Horizon Over Calm Water
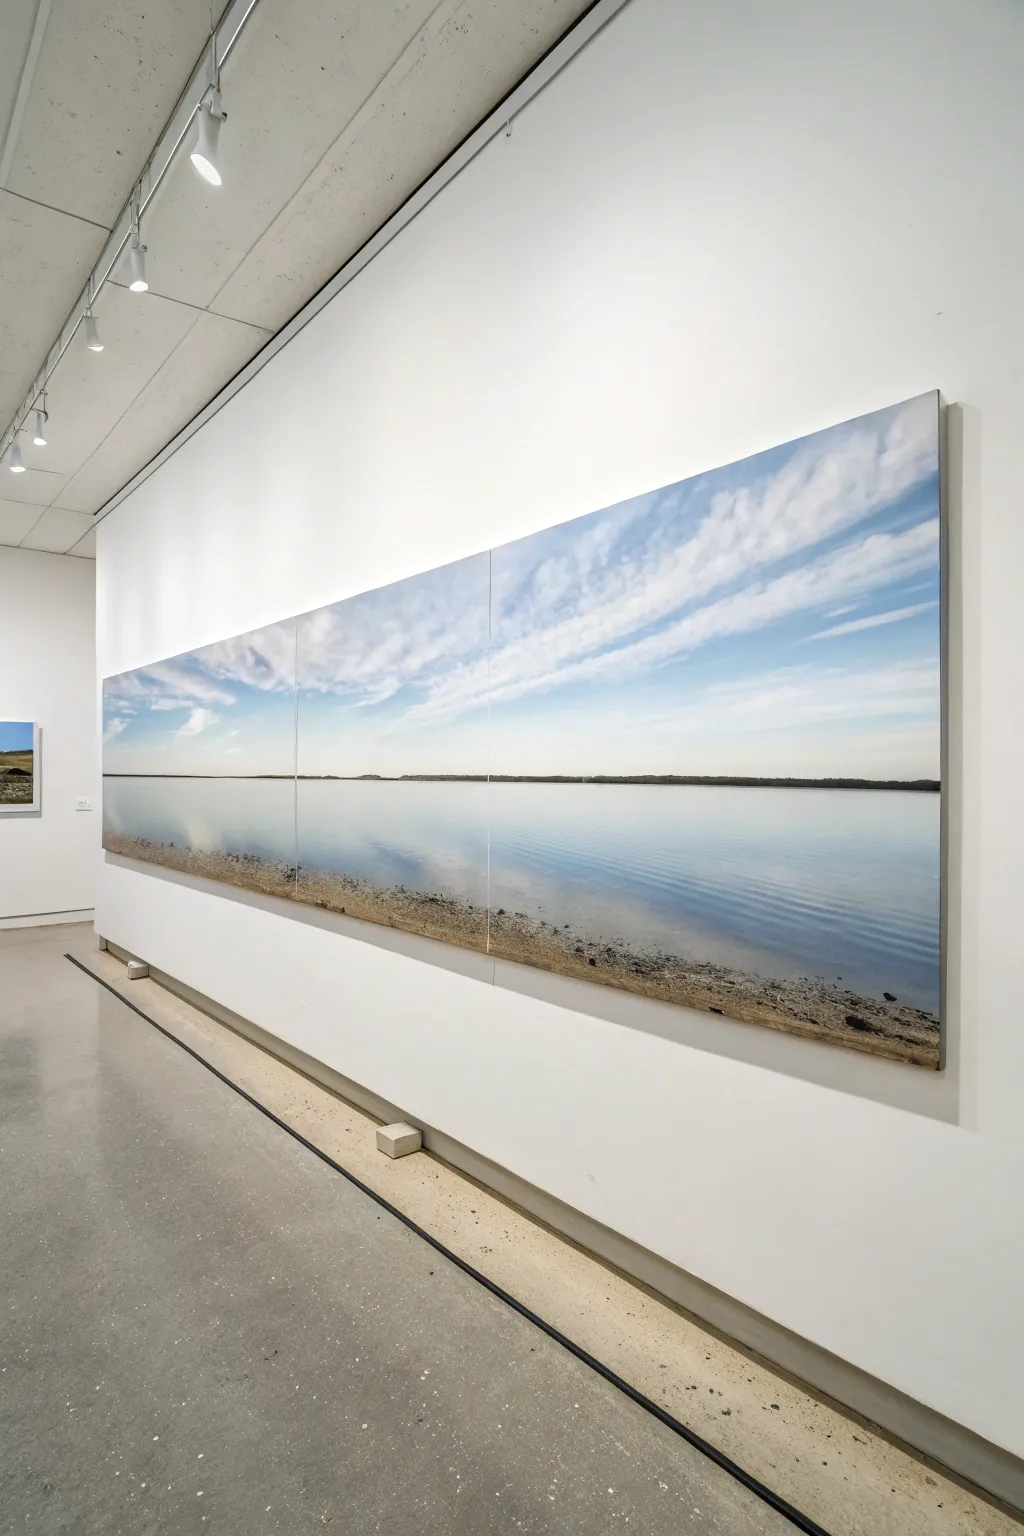
Bring the calming vastness of a lakeside horizon into your space with this impressive multi-panel project. By splitting a panoramic scene across three canvases, you achieve a modern, grand-scale artwork that captures the serene interplay of sky, water, and shoreline.
Step-by-Step Tutorial
Materials
- 3 tall rectangular stretched canvases (e.g., 24×48 inches each)
- Acrylic paints (Titanium White, Phthalo Blue, Ultramarine Blue, Raw Umber, Yellow Ochre, Burnt Sienna)
- Large flat brush (2-3 inch) for blending
- Medium filbert brush
- Small round detail brush
- Palette knife
- Slow-drying blending medium or retarder
- Large T-square or long ruler
- Masking tape
- Easel or large wall space for mounting
Step 1: Preparation and Layout
-
Arrange the canvases:
Place your three canvases side-by-side on your easel or work wall. Leave a very small gap (about 1/4 inch) between them to simulate how they will hang, but keep them close enough to draw a continuous line. -
Establish the horizon:
Decide on your horizon line. For this composition, place it relatively low—about one-third of the way up from the bottom. Use a T-square and a pencil to lightly draw this continuous straight line across all three panels. -
Prime the surface:
Apply a thin wash of white mixed with a touch of blue to the sky area and a slightly darker blue-grey wash to the water area to kill the bright white of the canvas.
Keep It Wet
For smooth sky blends, misty water, and soft clouds, use an acrylic retarder medium. This extends paint drying time, allowing oil-paint-like blending.
Step 2: Painting the Sky
-
Mix sky gradients:
Prepare a large amount of Titanium White and varying shades of Phthalo Blue. I like to keep three distinct puddles: pure white, very pale blue, and a medium sky blue. -
Apply the upper sky:
Starting at the top edge of all three canvases, brush on the medium blue. Mix in some blending medium to keep the paint wet longer, which is crucial for a smooth gradient. -
Blend downward:
Work your way down toward the horizon, gradually adding more white to your brush. The goal is an almost white blue right at the horizon line. -
Create cloud streaks:
While the blue is still slightly tacky, use a clean, dry filbert brush with pure Titanium White to sweep in long, diagonal cloud formations. Angle them inward from the outer top corners toward the center to create perspective.
Step 3: Creating the Water
-
Block in reflected colors:
The water acts as a mirror. Paint the area just below the horizon with almost pure white (reflecting the bright horizon sky), transitioning into a deeper blue as you move closer to the bottom edge. -
Add surface ripples:
Using a flat brush, add horizontal strokes of slightly darker blue across the water area. Keep these strokes perfectly horizontal to maintain the illusion of flat, calm water. -
Indicate reflections:
Where you plan to put the distant landmass, drag a small amount of dark paint vertically downward into the water, then slice across it horizontally with a dry brush to blur it.
Horizon Check
If your horizon line looks crooked across the panels, use low-tack painter’s tape to establish a hard line, paint up to it, then peel it off while wet.
Step 4: The Distant Landmass
-
Paint the tree line:
Mix a dark, dull green using Phthalo Blue, Yellow Ochre, and a touch of Burnt Sienna. With a small flat brush, tap in a very thin, uneven strip right on the horizon line. -
Vary the height:
Make the land strip slightly thicker in some areas and almost invisible in others to suggest distant groves of trees versus open flatland.
Step 5: Foreground Shoreline
-
Establish the shoreline base:
Mix Raw Umber, Burnt Sienna, and White to create a sandy beige. Apply this to the bottom 4-5 inches of the canvas, using uneven strokes to mimic organic ground. -
Texture the sand:
Use a palette knife or a coarse bristle brush to stipple darker browns and greys over the beige base. This creates the look of pebbles and rough sand. -
Add shoreline debris:
With a detail brush, paint small, irregular dark spots for rocks and driftwood scattered along the water’s edge. Focus more detail on the bottom edge since it is ‘closest’ to the viewer. -
Blend the water’s edge:
Use a glaze of watery blue to wash over the transition where the sand meets the water, making the water look like it is shallow and lapping over the shore.
Step 6: Final Touches
-
Check continuity:
Step back and look at the seams between the canvases. Ensure your horizon line, cloud streaks, and shoreline elements flow logically from one panel to the next. -
Paint the edges:
Don’t forget the sides of the canvases (gallery wrap style). Paint the image continuously around the sides so the artwork looks complete even when viewed from an angle. -
Varnish:
Once fully dry (give it a few days), apply a satin or gloss varnish to unify the sheen and protect the deep blues.
Now you have a serene, expansive landscape that transforms your wall into a window overlooking the water
BRUSH GUIDE
The Right Brush for Every Stroke
From clean lines to bold texture — master brush choice, stroke control, and essential techniques.
Explore the Full Guide
Long Mountain Range in Atmospheric Perspective
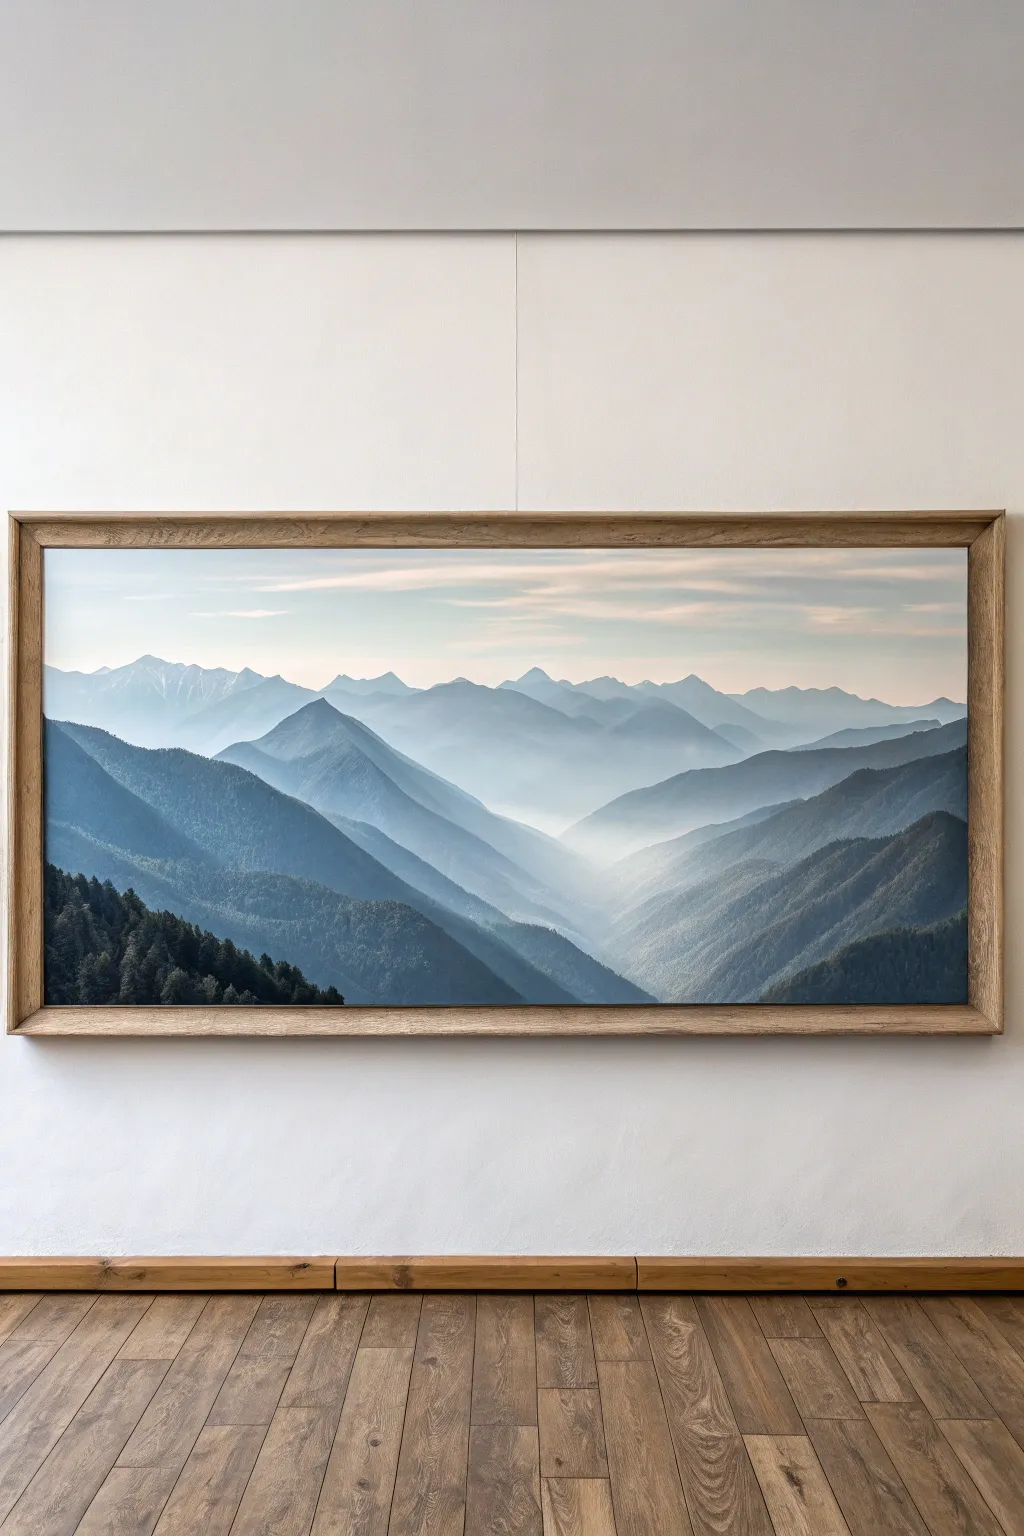
This serene, long-format landscape captures the tranquility of a mountain range fading into the distance. By mastering atmospheric perspective and soft blending, you will create depth that draws the viewer’s eye straight into the misty valley.
Detailed Instructions
Materials
- Long, horizontal canvas (e.g., 20×60 or 24×72 inches)
- Acrylic paints: Titanium White, Paynes Grey, Phthalo Blue, Burnt Umber, Deep Green
- Slow-drying medium or retarder
- Large flat brush (2-inch)
- Medium filbert brushes (size 8 and 12)
- Small round brush for details
- Palette knife
- Water spray bottle
- Paper towels
- Pale timber floating frame (optional)
Step 1: Setting the Sky and Horizon
-
Prepare the Surface:
Begin by priming your canvas with a coat of gesso if it isn’t pre-primed. Once dry, mist the entire surface lightly with water to help your acrylics flow smoothly across the long format. -
Mix the Sky Gradient:
Create a very pale blue-grey mix using a large amount of Titanium White with the tiniest dot of Paynes Grey and Phthalo Blue. Prepare a second mix that is pure white with a hint of warmth (a tiny touch of Burnt Umber). -
Paint the Sky:
Using your large flat brush, paint the top third of the canvas with the blue-grey mix. While wet, blend the warmer white mix into the lower section of the sky, creating a soft gradient that mimics the early morning light. -
Paint Distant Peaks:
Mix a very pale hazy blue by adding slightly more pigment to your sky color. Using a medium filbert brush, paint the faint outline of the furthest mountain ridge right against the sky, keeping edges soft to suggest distance.
Fixing “Muddy” Mist
If your mist looks grey or muddy instead of glowing, let the dark paint dry completely first. Then apply the mist as a separate, thin layer of pure white glaze over the top.
Step 2: Building the Middle Ground
-
Deepen the Color:
For the next layer of mountains closer to the viewer, mix a slightly darker, cooler blue-grey. Add a drop of retarder to your paint to keep it workable for longer. -
Define the Ridges:
Paint the shapes of the middle-ground mountains. Ensure these peaks overlap the distant ones. I like to keep the tops of these ridges sharper but soften the bottom edges where they meet the valley floor to simulate mist. -
Create the Mist Effect:
While the paint is still tacky, use a clean, dry filbert brush to gently scumble white paint into the valleys between the mountains. Blend this upwards slightly into the base of the mountains you just painted. -
Add Subtle Warmth:
Mix a tiny amount of Burnt Umber into your blue-grey mix to desaturate it further. Use this to paint the transitional ridges on the right side, suggesting light hitting the slopes. -
Layering the Valley:
Continue working downwards, making each successive mountain layer progressively darker and more detailed. The ‘V’ shape formed by the interlocking ridges is crucial for guiding the eye.
Step 3: Foreground and Details
-
Mix Foreground Greens:
Prepare a deep, rich color for the closest mountains. Mix Phthalo Blue, Deep Green, and a touch of Paynes Grey. It should look almost black but retain a green undertone. -
Paint the Closest Slopes:
Block in the large, dark masses on the bottom left and right corners. These act as a frame for the misty center. -
Texture the Foreground:
Switch to a smaller filbert brush. Using the dark green mix, dab the paint onto the foreground slopes to create a rough, tree-like texture rather than a smooth finish. -
Detail Individual Trees:
Use a small round brush to paint tiny vertical strokes along the ridge of the nearest bottom-left mountain. These silhouette spruces or pines add a sense of scale to the massive landscape. -
Final Mist Glaze:
Once the dark foreground is dry, check if the central valley needs more atmosphere. You can apply a very watery glaze of white paint (10 parts water to 1 part paint) into the deepest part of the valley to intensify the glow. -
Varnish and Frame:
Allow the painting to cure for at least 24 hours. Apply a matte or satin varnish to protect the surface, then install it in a simple light timber floating frame to match the reference style.
Add a Lake Reflection
To level up, turn the lowest misty valley point into a serene alpine lake by adding faint, vertical mirror distortions of the dark mountains into that white space.
Step back and admire how the simple gradient of colors transforms your long canvas into a deep, unending horizon
Ocean Wave Rhythm Across a Wide Canvas
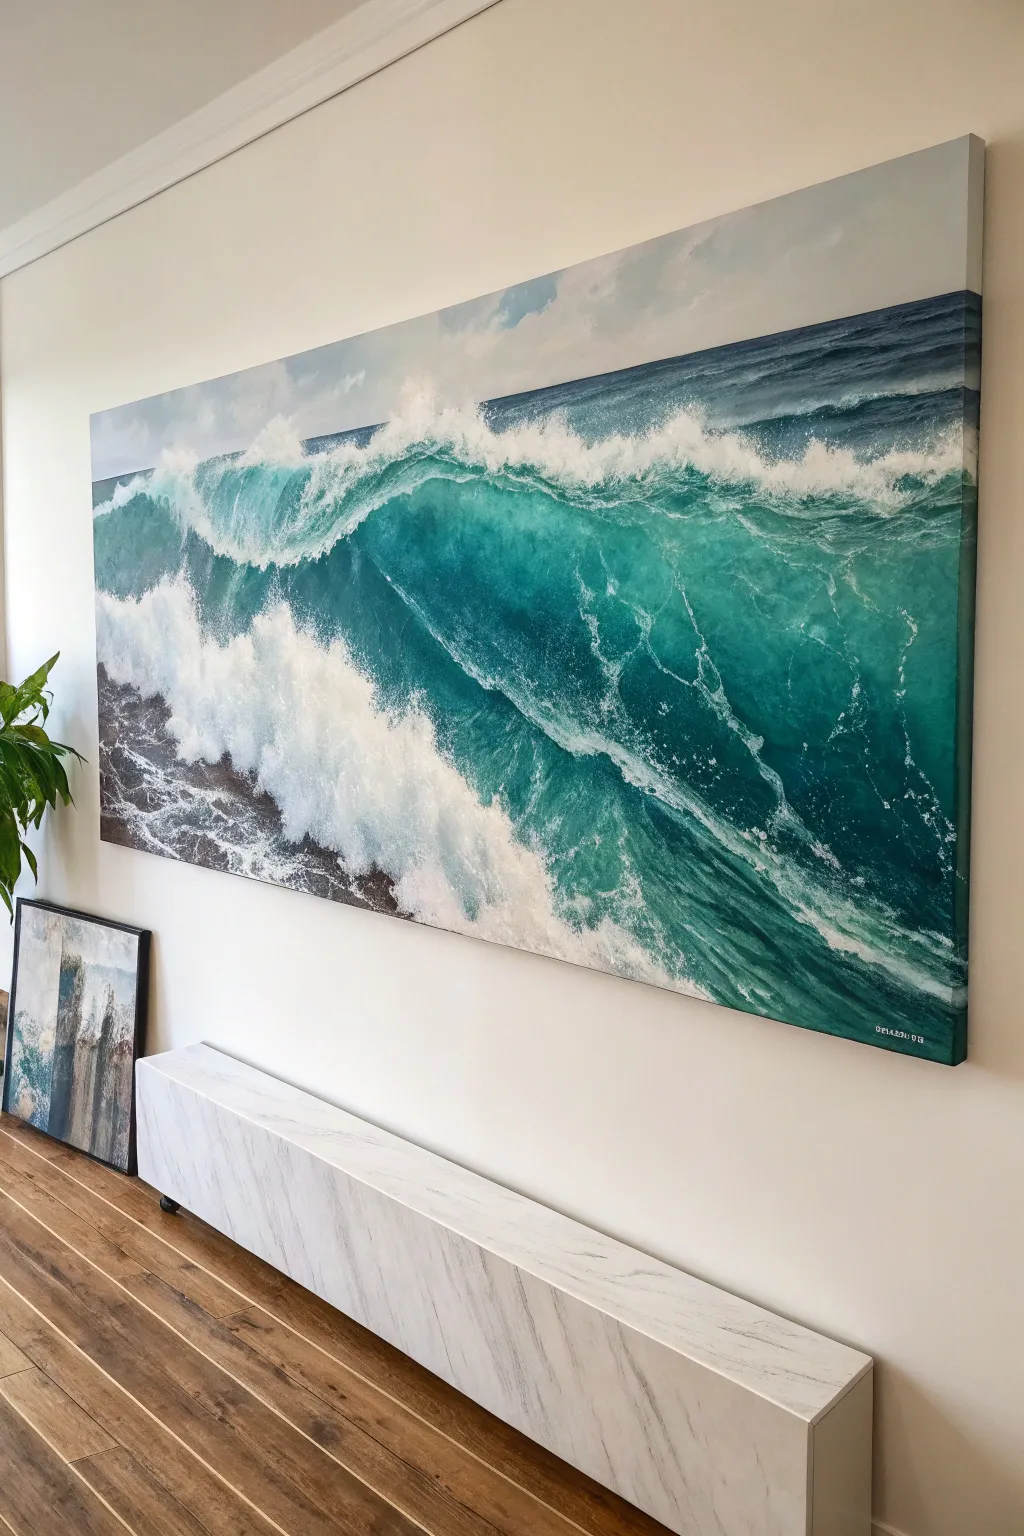
This project tackles a stunningly wide panoramic canvas featuring a dynamic, crashing ocean wave in rich teal and turquoise tones. You will learn to layer translucent glazes and build up thick, textured foam to create a sense of movement and depth that transforms any wall.
Step-by-Step Tutorial
Materials
- Large panoramic canvas (e.g., 24×60 inches or larger)
- Acrylic paints (Phthalo Blue, Phthalo Green, Titanium White, Paynes Grey, Burnt Umber, Turquoise)
- Glazing medium or slow-drying medium
- Large flat brushes (2-3 inch)
- Assorted round and filbert brushes
- Fan brush
- Sea sponge
- Palette knife
- Water spray bottle
- Easel or large flat work surface
Step 1: Setting the Scene
-
Prime the Surface:
Even if your canvas came pre-primed, apply an extra coat of gesso to ensure a smooth, non-absorbent surface. This helps the large washes of blue flow better later on. -
Map the Horizon:
Using a light wash of watered-down Phthalo Blue and a round brush, sketch the horizon line about one-third down from the top. It doesn’t need to be perfectly straight, as waves distort the view. -
Sketch the Wave Form:
Outline the major crest of the wave. Draw a large, diagonal sweeping curve starting from the bottom left and rising towards the right, creating that classic curling lip.
Step 2: Blocking in Color
-
Paint the Sky:
Mix Titanium White with a tiny touch of Paynes Grey and Phthalo Blue for a muted, stormy sky. Apply this to the top section using long, horizontal strokes with a large flat brush, keeping it softer near the horizon. -
Deep Ocean Base:
Mix Phthalo Blue and Phthalo Green with a little Paynes Grey. Apply this dark, rich teal to the main body of the wave (the ‘tube’ part). Keep the color darkest at the top of the wave just under the crest. -
Foreground Whites:
Roughly block in the areas of white foam at the bottom left and along the crashing lip using pure Titanium White. Don’t worry about detail yet; just establish where the light hits. -
Distant Water:
Fill the space between the horizon and the main wave with a lighter, gray-blue mix. Use horizontal strokes to imply calmer, distant swells.
Master the Motion
Always paint your brushstrokes in the direction the water is moving. Curved strokes for the wave face and flat strokes for distant water make a huge difference in realism.
Step 3: Creating Translucency and Depth
-
Glazing the Wave:
Mix a glaze using glazing medium and Phthalo Green with a touch of Turquoise. Apply this transparent layer over the middle section of the wave. This mimics the light shining through the thinner water. -
Deepening Shadows:
While the glaze is wet, I like to blend a mix of Paynes Grey and Phthalo Blue into the deepest curve of the wave and the bottom right corner to enhance the visual curve. -
Adding Veins:
Use a fine liner brush and thinned white paint to create the ‘veins’ of foam stretching across the face of the wave. Follow the curve of the water—these lines should wrap around the form like a net.
Foam Looks Too Flat?
If your white foam looks like solid blocks, layer it! Paint a greyish-blue shadow layer first for the foam, let it dry, and then add your bright white highlights on top.
Step 4: The Crash and Splash
-
Texture with Sponges:
Dampen a natural sea sponge and dip it into thick Titanium White. Dab it vigorously along the crest where the wave is breaking to create an aerated, misty texture. -
Building the Spray:
Switch to a dry fan brush with just a little white paint on the tips. Tap and flick the brush upwards along the top edge of the wave to create fine mist and spray flying off the back. -
Defining the Foreground Foam:
Return to the bottom left corner where the wave has already crashed. Use a palette knife to scrape thick white paint over the dark underpainting, creating the look of churning, frothy water. -
Adding Rocks (Optional):
If you want the rocky shoreline visible on the left, use Burnt Umber mixed with Paynes Grey. Paint rough, jagged shapes peeking through the sea foam.
Step 5: Final Details
-
Highlighting the Lip:
Use pure white paint on a small filbert brush to sharpen the very top edge of the wave lip, making it the brightest point of the painting. -
Softening Transitions:
Use a clean, dry blending brush to gently soften any harsh edges in the mist or sky, ensuring the atmosphere feels unified. -
Final Glaze Check:
Once everything is dry, assess the teal color. If it needs more vibrancy, apply one final, very thin glaze of Phthalo Green over the translucent center area. -
Sealing the Artwork:
Allow the painting to cure for at least 72 hours before applying a gloss varnish. The gloss finish mimics the wetness of water and deepens the darks.
Step back and admire the powerful energy of the ocean you have brought into your room

PENCIL GUIDE
Understanding Pencil Grades from H to B
From first sketch to finished drawing — learn pencil grades, line control, and shading techniques.
Explore the Full Guide
Minimal Wildflower Stems on a Tall Panel
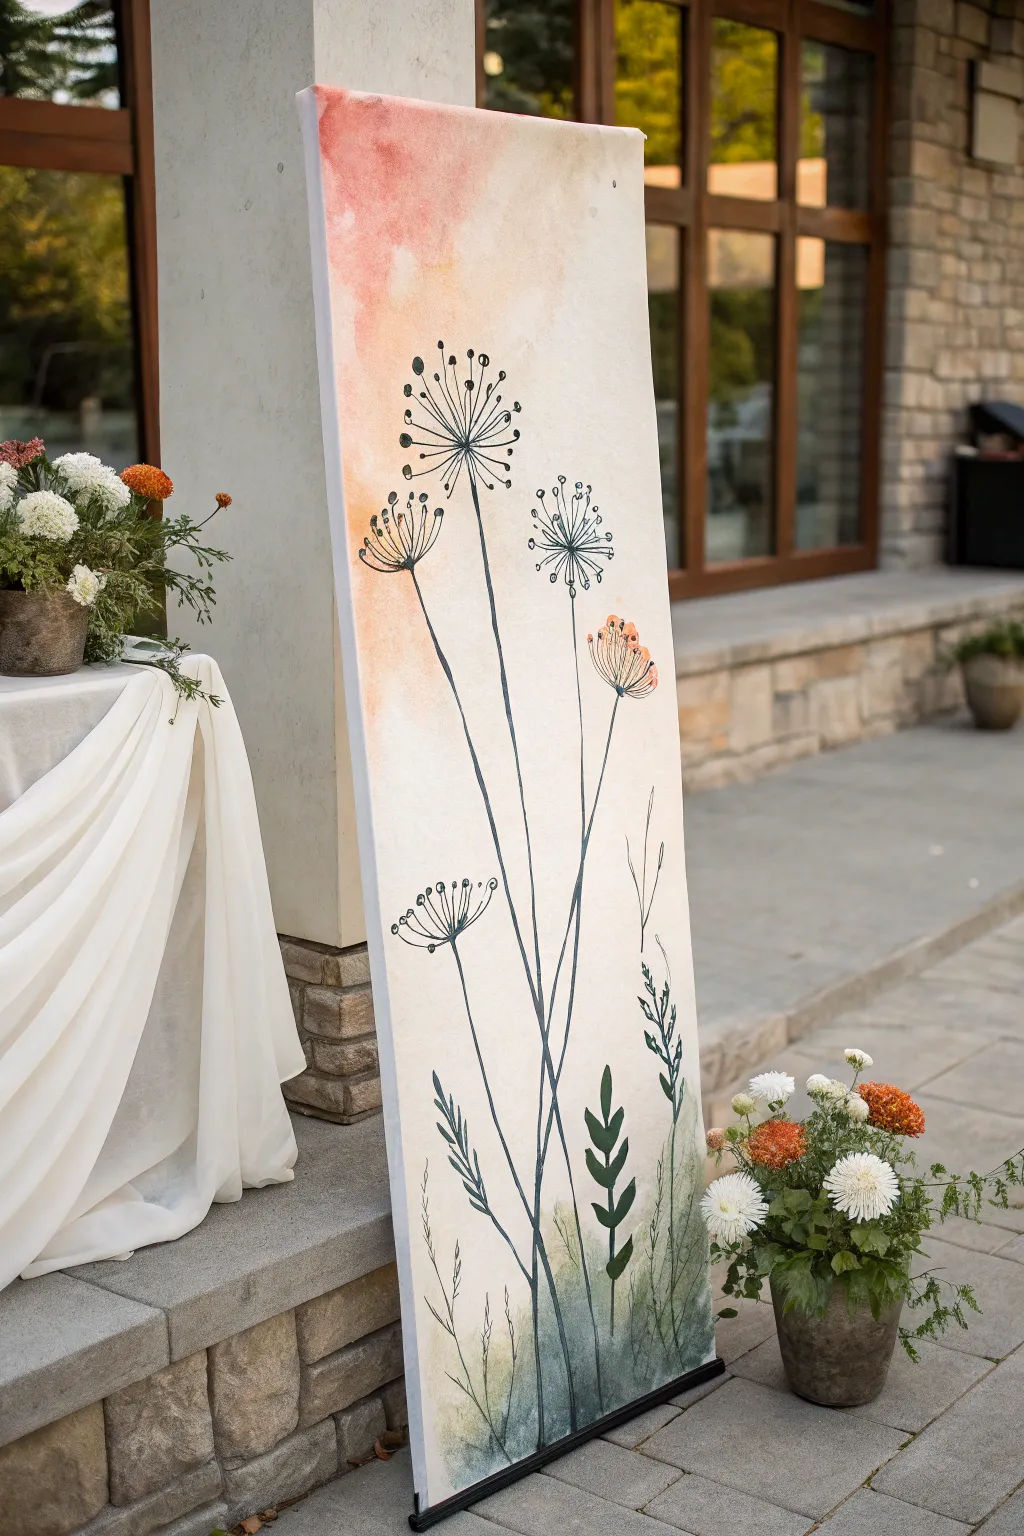
Embrace the verticality of a tall canvas with this serene botanical study featuring delicate line-drawn stems against a soft, dreamy wash. Combining watercolor techniques with precise ink work creates a modern, minimalist piece perfect for brightening narrow wall spaces or entryways.
Step-by-Step Guide
Materials
- Tall, narrow stretched canvas (e.g., 12″ x 36″ or similar)
- Acrylic paints (White, Burnt Sienna, Yellow Ochre, Deep Green, Black)
- Watercolor medium or flow improver
- Large flat brush or sponge applicator
- Fine liner brush (size 0 or 00)
- Round brush (size 4 or 6)
- Water container
- Paper towels
- Palette or mixing plate
- Spray bottle with water
Step 1: Creating the Atmosphere
-
Prepare the wash:
Since standard acrylics dry fast, mix a generous amount of white paint with a touch of Burnt Sienna and a few drops of Yellow Ochre. Add water and watercolor medium until you have a milky, translucent consistency. -
Wet the canvas:
Before painting, mist the entire canvas surface lightly with your spray bottle. This helps the paint flow and creates that soft, watercolor-like bleed effect we want for the background. -
Apply the warm gradient:
Using the large flat brush or sponge, apply your warm peach-beige mix starting from the top left corner. Let the color fade out naturally as you move down and to the right, leaving the center relatively pale. -
Add earthy depth:
While the top is still damp, mix a very watery grey-green using a tiny bit of Black and Deep Green. Apply this loosely at the very bottom edge of the canvas, letting it wick upwards slightly to ground the composition. -
Dry generally:
Let this background layer dry completely. I prefer to let it sit for at least an hour to ensure the surface is stable for the fine lines coming next.
Uneven Lines?
If your long intricate stem lines are breaking or looking jagged, your paint is likely too thick. Add a drop of flow improver or water to make it ink-like for smoother, longer strokes.
Step 2: Sketching the Stems
-
Mix the stem color:
Create a dark, charcoal-navy shade by mixing Black with a little Deep Green and White. You want a color that looks like graphite but has the permanence of paint. The consistency should be inky and fluid. -
Map the main lines:
Using your fine liner brush, paint three to four long, sweeping vertical lines. Vary their heights significantly—make one reach almost to the top, while others sit lower. Let the lines be slightly shaky or curved to mimic natural growth. -
Thicken the base:
Go back over the bottom third of your stems, slightly thickening the line work where the plant would be sturdiest near the ground.
Step 3: Floral Details
-
Draw the seed heads:
At the top of your tallest stems, paint small circles or semi-circles. From these centers, radiate fine straight lines outward like the spokes of a wheel to create the dandelion or allium structure. -
Add the seeds:
At the end of each radiating spoke, dap a tiny dot of your dark paint. These represent the seeds or pollen tips and give the flower its characteristic silhouette. -
Create lower blooms:
For the shorter stems, draw flattened oval shapes instead of full spheres, suggesting flowers that are tilting or seen from the side. Use the same radiating line technique but keep them contained within a semi-circle. -
Add subtle color:
Wash your brush and pick up a very faint, watered-down orange (mix Burnt Sienna and White). Gently dab this inside the seed heads of one or two flowers to add a whisper of warmth without overpowering the line work.
Add Metallic Flair
For a luxe touch, go over the tiny seed dots at the ends of the flowers with a gold paint pen or metallic bronze acrylic. It catches the light beautifuly on a tall panel.
Step 4: Foliage and Finish
-
Paint the ferns:
Load your round brush with a solid Deep Green. Near the base of the stems, paint simple fern-like leaves. Use a press-and-lift motion: press down to make the leaf wide, then lift as you pull away to make a sharp tip. -
Add grassy accents:
Switch back to the fine liner and mix a lighter, sage green. Add a few wispy, grass-like strokes rising from the bottom, overlapping the dark stems slightly to create depth. -
Ground the bottom:
To blend the painted plants into the background, gently sponge a very watery green wash over the bottom 2 inches of the canvas, softening the start of the stems so they look like they are emerging from mist. -
Final assessment:
Step back and look at the balance. If the top feels too empty, add a few tiny floating ‘seeds’ drifting away from the main flower heads using your finest brush. -
Seal:
Once fully dry (give it overnight), apply a matte varnish spray to protect the delicate lines and keep the background looking soft and non-reflective.
Hang your tall panel in a bright spot and enjoy the peaceful tranquility it brings to your space
Vertical Moonrise With Glowing Light Trail
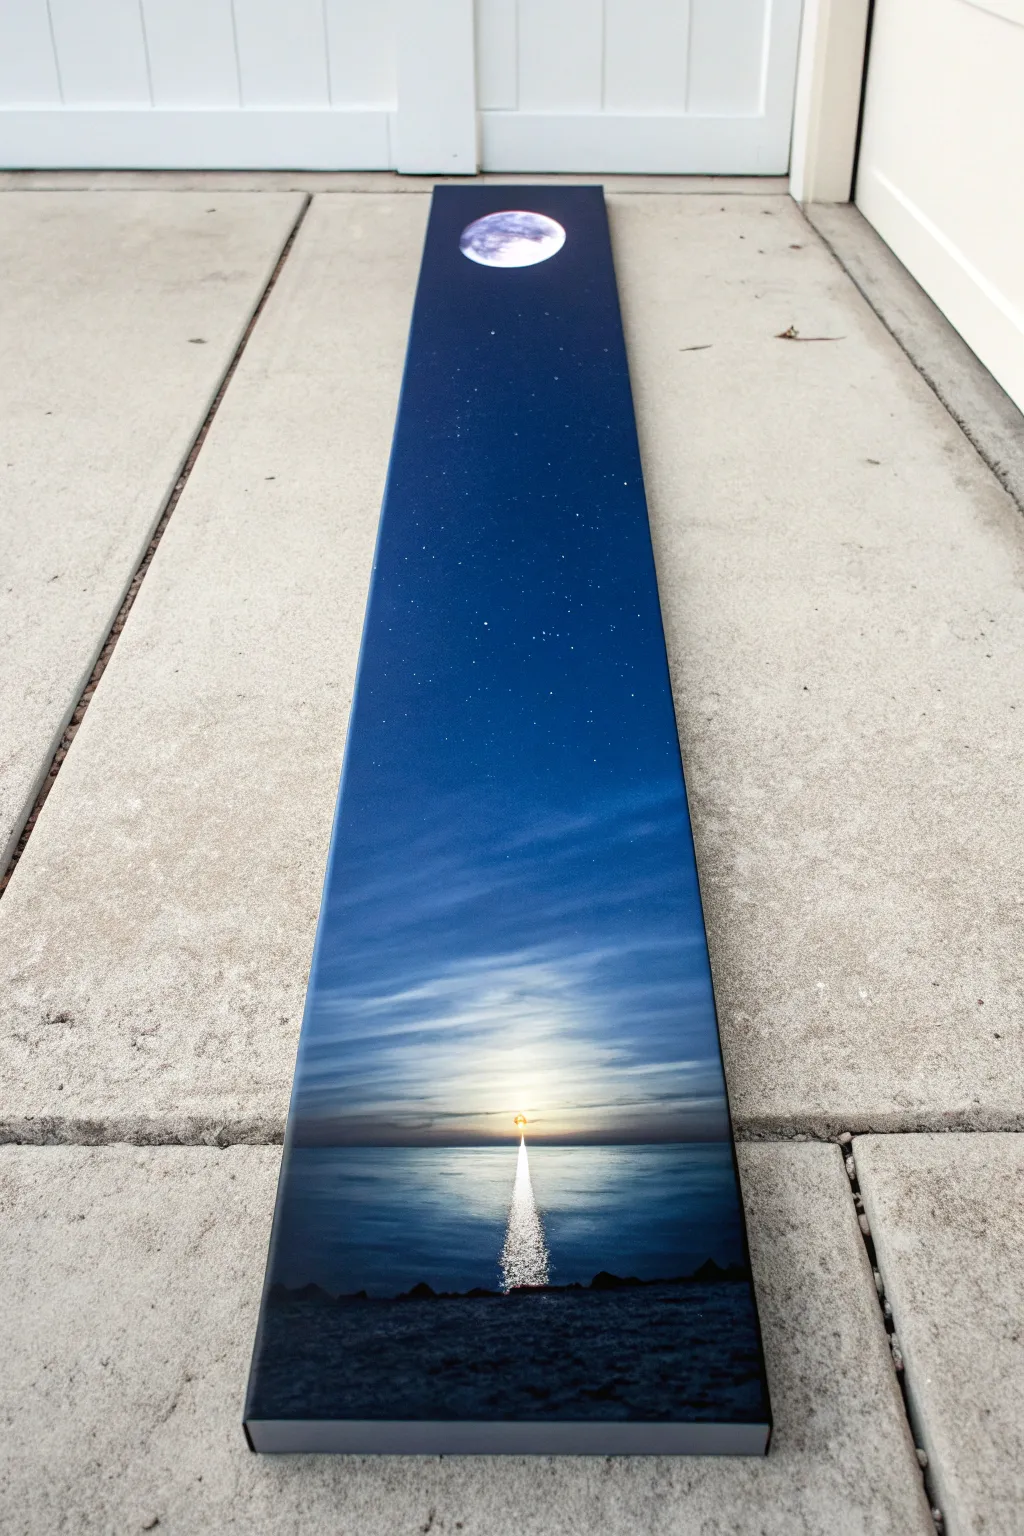
This striking vertical canvas captures the serene transition from a starry night sky to a glowing horizon reflection. The elongated format dramatically emphasizes the distance between the moon above and the water below, creating a unique focal point for any narrow wall space.
Step-by-Step Tutorial
Materials
- Long vertical stretched canvas (e.g., 10×40 or 12×48 inches)
- Acrylic paints: Phthalo Blue, Ultramarine Blue, Titanium White, Mars Black, Burnt Umber, Yellow Ochre
- Large flat brush (2-3 inch) for blending
- Medium flat brush
- Small round detail brush (size 0 or 1)
- Old toothbrush (optional for stars)
- Cup of water and rag
- Palette or mixing plate
- Ruler or painter’s tape (for horizon line)
Step 1: Creating the Gradient Sky
-
Establish the Horizon:
Begin by deciding where your water meets the sky. For this composition, place your horizon line about one-quarter of the way up from the bottom edge. You can use a strip of painter’s tape to keep this line perfectly straight and crisp while you work on the sky. -
Mix the Deepest Sky:
On your palette, mix a large amount of Phthalo Blue with a touch of Mars Black. You want a very deep, rich midnight blue. Apply this color to the top third of the canvas using your large flat brush, ensuring you paint around the top and side edges for a finished look. -
Transition to Mid-Tones:
Mix pure Phthalo Blue with a little Ultramarine Blue. Begin painting below the dark section, blending upwards into the wet black-blue mixture. Use long, horizontal strokes to ensure a smooth transition without harsh lines. -
Lighten the Atmosphere:
As you move down toward the middle of the canvas, start adding small amounts of Titanium White to your blue mixture. The color should gradually shift from deep space to a lighter atmospheric blue. -
Paint the Horizon Glow:
Near the tape line, mix Titanium White with a tiny speck of Yellow Ochre and a touch of the light blue. Paint this right above the tape, blending it upward into the blue sky. This creates the glowing effect of a rising or setting light source. -
Add Wispy Clouds:
While the sky is still slightly tacky, use a dry brush with a small amount of the horizon color to streak in faint, horizontal clouds just above the horizon. Keep them sheer and subtle.
Blending Tip
Work quickly when blending the large sky section. Acrylic dries fast, so keep a misting bottle handy to keep the paint wet and workable for smooth gradients.
Step 2: Celestial Details
-
Paint the Moon:
Near the very top of the canvas, use your small round brush and pure Titanium White to paint a circle. It doesn’t need to be huge; keeping it small emphasizes the scale of the painting. I find it helpful to trace a small coin if I’m unsteady. -
Add Moon Texture:
Once the white circle is dry, mix a tiny bit of grey-blue using white and your sky color. Dab in gentle shadows on the moon’s face to create craters and dimension. -
Create the Starfield:
Dip an old toothbrush into watered-down white paint. Test it on a scrap paper first, then gently flick the bristles to spray tiny stars across the dark upper section of the canvas. Concentrate them at the top where the sky is darkest.
Level Up: Glow
Mix a tiny amount of fluorescent paint or glow-in-the-dark medium into the moon and the distinct reflection line for a piece that truly shines at night.
Step 3: The Water and Reflection
-
Base the Water:
Remove the horizon tape. Mix a dark teal using Phthalo Blue, a touch of Mars Black, and a tiny bit of Burnt Umber. Paint the water area horizontally, getting darker as you move toward the bottom corners. -
Define the Horizon Line:
Use your medium flat brush to carefully neaten the horizon line where the water meets the sky. It should be straight but soft, not a razor-sharp cut. -
Start the Reflection:
Using pure Titanium White on a small brush, start placing the reflection directly under the light source at the horizon. Make horizontal dashes that get wider as they move down the canvas toward the viewer. -
Intensify the Shimmer:
Layer more white dashes in the center of your reflection path. Let the paint break up on the canvas texture to mimic sparkling light dancing on waves. The reflection should be brightest at the center and fade out at the edges. -
Add Water Movement:
Mix a slightly lighter version of your dark water color. Paint thin horizontal streaks in the dark water areas to suggest ripples and movement, avoiding the bright white reflection path.
Step 4: Foreground Elements
-
Paint the Shoreline:
Mix Mars Black with Burnt Umber for a very dark, near-black silhouette color. At the very bottom of the canvas, paint an uneven, rocky shoreline. Vary the height of the rocks to create visual interest. -
Detail the Rocks:
Highlight the tops of a few rocks with a dark grey mixture (black plus a dot of white). This implies that the moonlight is just barely catching the edges of the shore. -
Final Glaze:
Once completely dry, you can apply a very thin glaze of clear gloss medium over the water area only. This enhances the depth of the dark colors and gives the water a permanent ‘wet’ look.
Hang your elongated masterpiece in a narrow hallway or between windows to maximize its dramatic vertical effect


Desert Cactus Silhouette on a Tall Canvas
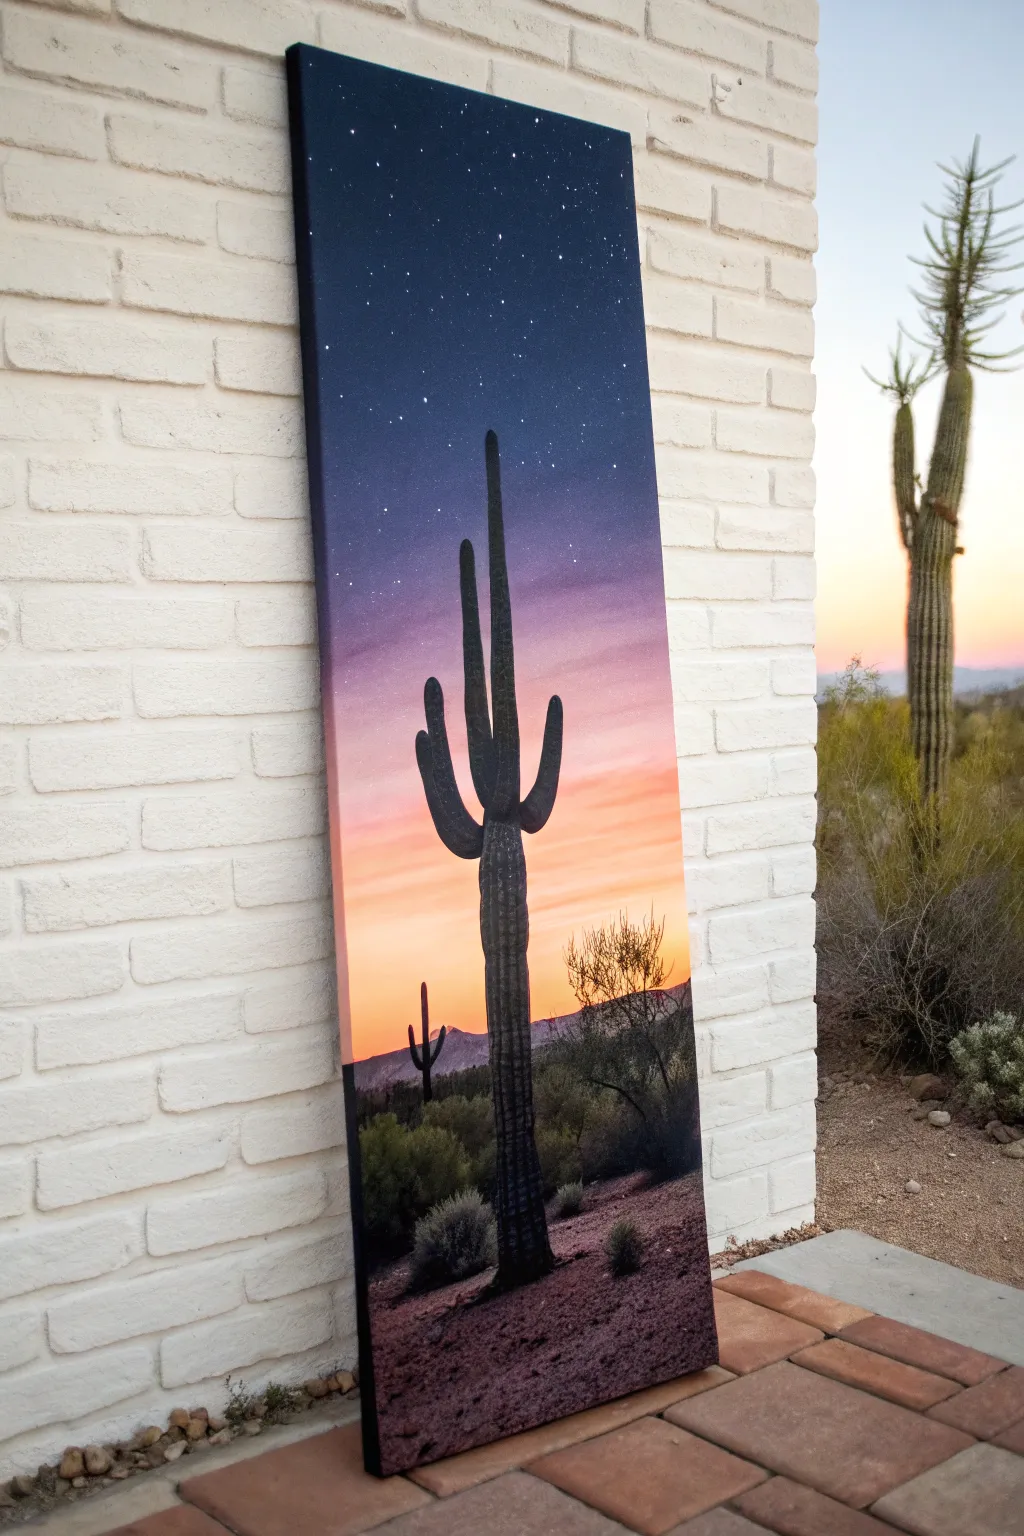
Capture the serene beauty of a desert twilight with this tall, vertical canvas project. You will paint a stunning gradient sky that fades from a starry night into a warm sunset, creating the perfect backdrop for a striking saguaro silhouette.
Step-by-Step Guide
Materials
- Tall vertical canvas (e.g., 10×30 or 12×36 inches)
- Acrylic paints: Navy Blue, Purple, Magenta, Orange, Yellow, Titanium White, Mars Black
- Large flat brush (1-2 inch) for blending background
- Medium round brush
- Small liner brush or detail brush
- Old toothbrush (for the stars)
- Palette or paper plate
- Cup of water and paper towels
- Pencil or white charcoal pencil
Step 1: Painting the Sunset Gradient
-
Prepare your palette:
Squeeze out generous amounts of your sky colors: Navy Blue, Purple, Magenta, Orange, Yellow, and White. It’s better to have too much paint than to run out while blending a gradient. -
Start at the top:
Using your large flat brush, apply the Navy Blue paint to the top third of the canvas. Make sure to paint the edges of the canvas too for a finished look. -
Introduce the purple:
Without washing your brush completely, pick up some Purple paint. Apply this below the blue, brushing back and forth horizontally where the colors meet to blend them seamlessly. -
Blend downwards:
Continue this process moving down the canvas. Rinse your brush slightly, then pick up Magenta. Blend it into the bottom edge of the purple section, keeping your strokes horizontal and smooth. -
Add warmth:
Transition into Orange below the pink/magenta layer. The colors should start looking vibrant like a real sunset. If the blend looks muddy, clean your brush before switching to warm colors. -
Finish the horizon:
Paint the bottom section with Yellow, blending it upwards into the Orange. Leave the very bottom inch or two somewhat dark or mixed with a touch of brown/black for the ground, though we will cover it later. -
Dry completely:
Let the entire background dry thoroughly. This is crucial before adding the stars or silhouette so the colors don’t smear.
Muddy Skies?
If your gradient colors turn brown while blending, wash your brush thoroughly between warm (yellow/orange) and cool (blue/purple) sections. Let layers dry and re-glaze if needed.
Step 2: Adding Stars and Landscape
-
Create the stars:
Water down a small amount of White paint until it’s fluid. Dip an old toothbrush into it, point the bristles at the top blue section of the canvas, and use your thumb to flick the bristles, creating a spray of tiny stars. -
Sketch the horizon:
Using a pencil, lightly draw a low horizon line about 4-5 inches from the bottom. Sketch a few uneven bumps to represent distant hills or mountains. -
Paint the ground:
Mix a dark brownish-black color. Fill in the ground area below your horizon line using a medium brush. Stipple (tap) the brush to create the texture of sand and small rocks. -
Rough out the vegetation:
While the ground paint is wet, use the tip of your brush to flick tiny strokes upwards along the horizon line. This creates the illusion of distant scrub bushes and grasses.
Add Dimension
Highlight the cactus edge on the sunset side with a very thin line of light grey or pale orange paint. This ‘rim light’ separates the silhouette from the dark ground.
Step 3: Painting the Cactus Silhouettes
-
Outline the main cactus:
Using a pencil or white charcoal, lightly sketch your large saguaro cactus. Position it partially off-center. Draw the main trunk and two main arms curving upwards. -
Fill the silhouette:
Switch to Mars Black paint and a medium round brush. carefully fill in the shape of your cactus. Ensure your edges are crisp against the colorful sky. -
Add texture and dimension:
I like to mix a tiny drop of white into my black to make a dark charcoal grey. Use a detail brush to paint subtle vertical lines up the cactus trunk, suggesting ribs and texture, mostly on the side facing the ‘sunset’. -
Paint a distant cactus:
To create depth, paint a second, much smaller cactus silhouette in the background near the horizon line. Keep this one solid black with no detail. -
Ground the cactus:
Where the cactus meets the ground, use small tapping motions with your black paint to simulate bushes or rocks at the base, anchoring it into the landscape. -
Add foreground details:
Use your smallest liner brush to paint tiny, twiggy bushes in the immediate foreground at the very bottom. This adds realism to the desert floor. -
Final touches:
Step back and look at your painting. If any stars got on the black silhouette, paint over them with black. Ensure the sides of the canvas are painted to match the front.
Hang this vertical piece in a narrow hallway or between windows to bring a slice of the desert evening into your home
Abstract Gradient Column With Color Shifts
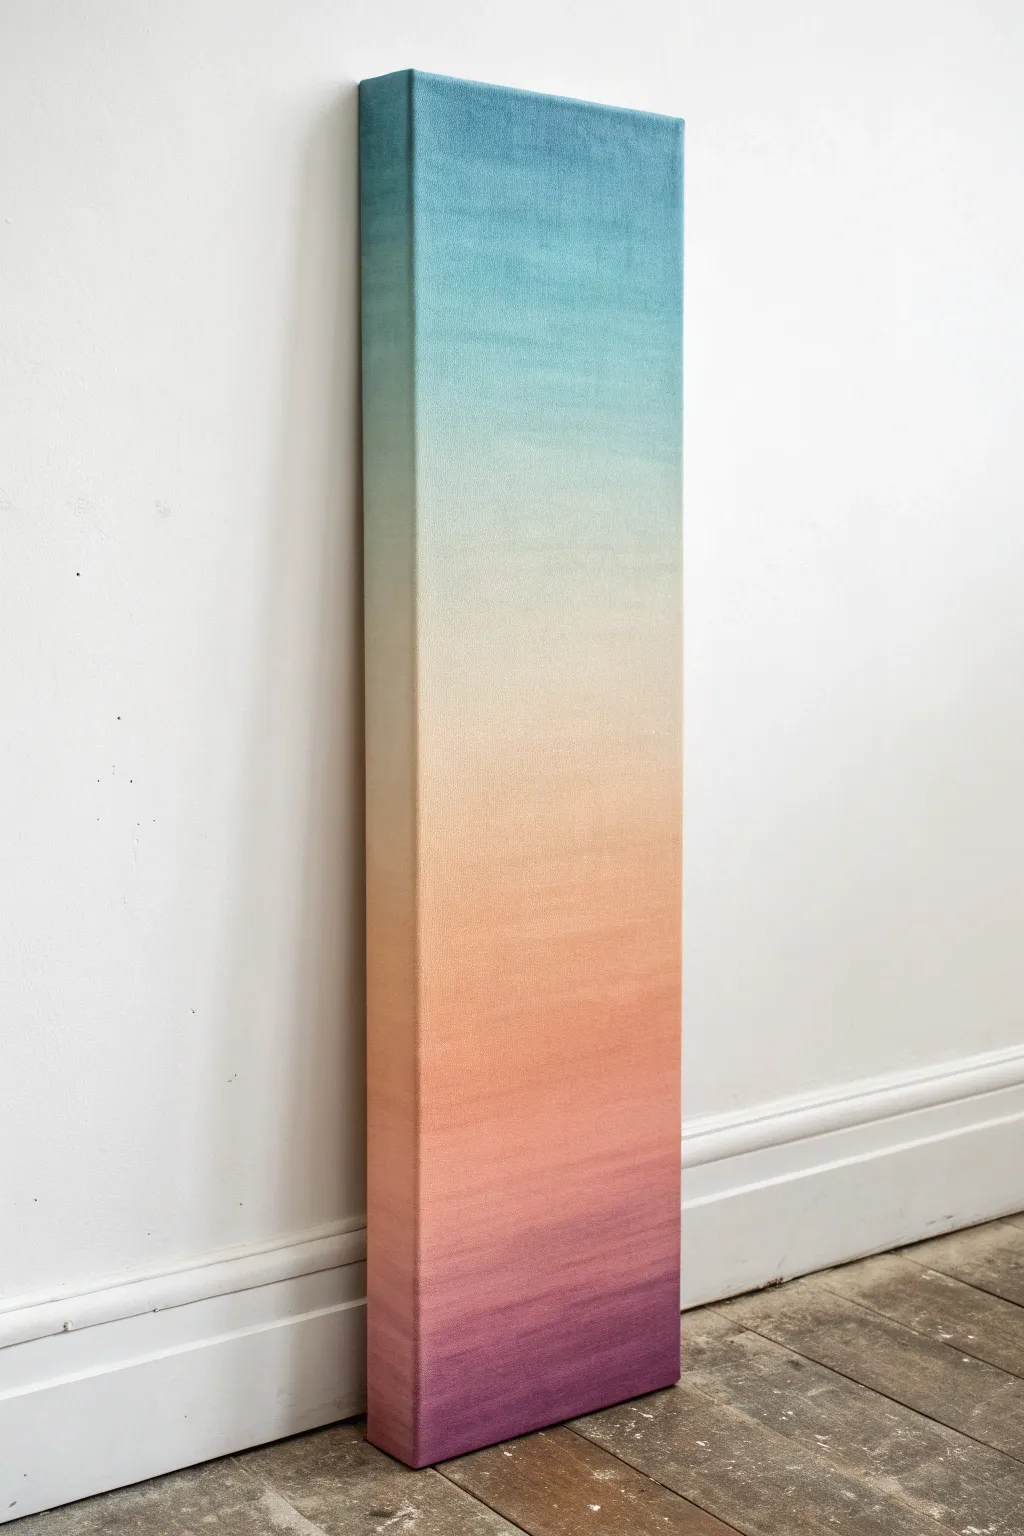
Capture the serenity of a day’s cycle in a single, striking column of color. This beginner-friendly project uses smooth blending techniques to create a meditative gradient that transitions effortlessly from cool teal skies to warm magenta horizons.
Step-by-Step Tutorial
Materials
- Tall gallery-wrapped canvas (6×36 inch or similar proportions)
- Acrylic paints (Teal, Titan Buff or Cream, Soft Peach, Coral, Magenta, Deep Violet)
- White Gesso (optional, for priming)
- Large flat synthetic brushes (2-3 inches wide)
- Blending brush or soft mop brush
- Spray bottle with water (misting)
- Palette paper or large mixing tray
- Paper towels or rag
- Easel or flat drop cloth workspace
Step 1: Preparation & Base Coat
-
Workspace setup:
Since this is a tall canvas, ensure you have plenty of vertical space if using an easel, or a long flat surface covered with a drop cloth. Lay out your paints in the order of the gradient: Teal, Cream, Coral, Magenta, Violet. -
Prime the surface:
Apply a coat of white gesso if your canvas isn’t pre-primed. This helps the paint glide more smoothly, which is crucial for gradients. Let it dry completely. -
Map your zones:
Lightly mark the side edge of the canvas with a pencil to divide it into four rough sections: Top separate section for Teal, upper middle for the Cream transition, lower middle for Coral/Pink, and the bottom base for Violet.
Fixing Muddy Colors
If colors turn grey while blending teal and peach, let that layer dry fully. Apply a thin layer of white over the ‘mud’ zone, let it dry, then re-blend fresh colors on top.
Step 2: Blocking Colors
-
Apply the top color:
Load a large flat brush with Teal paint. Start at the very top edge and paint downwards, covering the top quarter of the canvas. Don’t forget to paint the top and side edges as you go for a finished look. -
Establish the middle light:
Clean your brush thoroughly or switch to a fresh one. Apply the Titan Buff or Cream color in the second quarter, leaving a small gap between it and the wet Teal paint above. -
Lay down the warmth:
Moving downwards, apply your Coral or Soft Peach mixture to the third quarter of the canvas. Again, leave a small inch-wide gap between this and the Cream section. -
Anchor the bottom:
Fill the final bottom section with your darkest mix of Magenta and Deep Violet. Ensure the paint is applied generously; acrylics blend best when they are still wet and workable.
Step 3: The Blending Phase
-
Mist the canvas:
Lightly spritz the entire canvas with water from your spray bottle. You want a fine mist, not dripping water, just enough to keep the acrylics open longer. -
Merge Teal into Cream:
Using a clean blending brush, work the area between the Teal and Cream. Use back-and-forth horizontal strokes, pulling a little Teal down into the Cream, then wiping the brush and pulling Cream up into the Teal. -
Refine the upper transition:
If the transition looks muddy, add a touch of white to your brush to smooth out the middle area where the blue meets the yellow tones. -
Blend the warm center:
Move to the gap between the Cream and Coral. This area should look soft and hazy. Use gentle horizontal sweeping motions to marry the two colors. -
Create the sunset hues:
Work the Coral down into the Magenta/Violet base. This transition can be more dramatic. Allow the brush strokes to remain slightly horizontal to mimic atmospheric layers. -
Check the edges:
Step back and look at the sides of the canvas. Ensure your gradient wraps around the corners seamlessly so the painting looks good from all angles. -
Second pass for depth:
Once the first layer is tacky but not fully dry, I like to go back with fresh paint on the very top (Teal) and very bottom (Violet) to intensify the saturation.
Level Up: Texture
Before painting, mix fine sand or modeling paste into your bottom violet color. This adds physical weight and texture to the base, making the smooth sky above feel even airier.
Step 4: Final Touches
-
Smooth the texture:
Take a large, dry soft brush (a makeup brush works great for this) and very gently whisk it over the surface of the wet paint to remove heavy brush marks. -
Dry completely:
Allow the canvas to dry flat in a dust-free area for at least 24 hours. Acrylics can darken slightly as they dry. -
Varnish choice:
For this soft, ethereal look, a matte varnish is best. Gloss can create glare that hides the subtle color shifts. Apply two thin coats of matte varnish.
Hang your gradient column vertically to add a window of endless light to any room in your home
Triptych Landscape Spanning Three Tall Panels
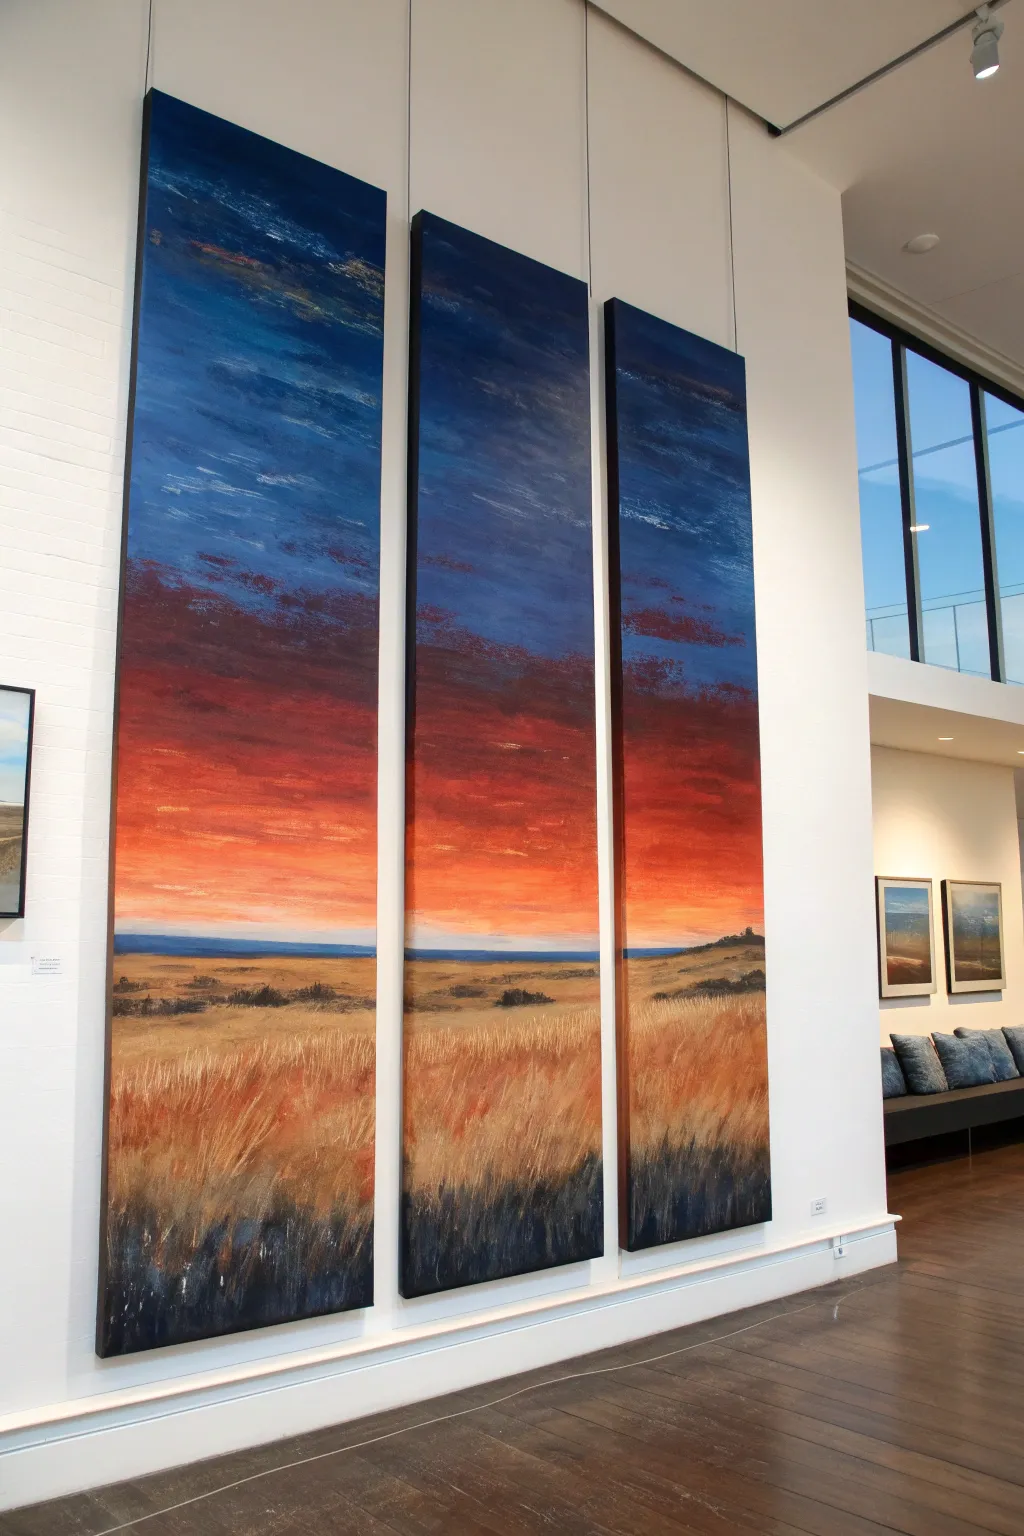
Transform a blank wall into a window with this stunning three-panel landscape painting. By splitting a continuous sunset scene across three tall, narrow canvases, you create a modern, dramatic focal point that captures the vastness of the sky and the warmth of the earth.
Step-by-Step Guide
Materials
- 3 tall, narrow canvases (e.g., 12×48 inches each)
- Acrylic paints (primary blue, ultramarine, burnt sienna, yellow ochre, cadmium red, titanium white, black)
- Wide flat brushes (2-3 inch)
- Medium filbert brushes
- Fan brush
- Palette knife
- Large palette or mixing tray
- Easel or flat working surface
- Masking tape (optional for edges)
- Water container and rags
Step 1: Preparation and The Sky Gradient
-
Arrange the canvases:
Place your three canvases side-by-side on your workspace or easel, leaving a very small gap between them (about a half-inch). This ensures your horizon lines and cloud formations will flow continuously across the triptych. -
Mix the deep blues:
Start by mixing a dark, rich blue for the very top of the sky using ultramarine blue with a touch of black and burnt sienna to deepen it without making it look flat. -
Paint the upper sky:
Using a wide flat brush, apply this dark blue to the top third of all three canvases, painting horizontally right across the breaks in the canvas. -
Create the transition zone:
Mix a lighter blue using ultramarine and titanium white. Blend this into the bottom edge of your dark blue section while the paint is still wet to create a soft gradient. -
Add the cloud layer:
Switch to a deep reddish-purple tone by mixing blue, red, and a little burnt sienna. Paint jagged, horizontal cloud shapes just below your blue sky, allowing the texture of the brush to show through. -
Build the sunset vibrancy:
Mix a vibrant orange-red using cadmium red and yellow ochre. Apply this below the purple clouds, blending slightly where they meet to create a glowing effect. -
Finalize the horizon glow:
Near the horizon line (about the bottom third of the canvas), paint a bright, pale band of yellow and white. This represents the last light of the sun and should be the brightest part of the sky.
Continuous Flow
When painting across the gap, don’t stop the brush stroke at the edge. Paint literally across the air gap onto the next canvas to ensure lines match perfectly.
Step 2: The Terrain and Foreground
-
Establish the horizon:
Paint a thin, dark blue-grey line straight across all three panels to mark the distant horizon. Ensure this line is perfectly level to maintain the illusion of depth. -
Basecoat the fields:
Mix a muted muddy yellow using yellow ochre, white, and a touch of burnt sienna. Block in the middle ground area, which represents the distant fields. -
Add distant foliage:
Using a smaller brush, dab in dark olive green and brown tones along the horizon and middle ground to suggest distant bushes or tree lines. Keep these shapes loose and indistinct. -
Underpaint the foreground:
For the tall grass in the foreground, start with a base layer of dark brown and burnt sienna at the very bottom of the canvases. -
Layer the tall grass:
Load a fan brush or a dry flat brush with yellow ochre and white. Use quick, upward flicking motions to create the texture of tall, dry grasses rising from the dark bottom edge. -
Intensify the grass texture:
Add variety by mixing in some reddish-orange tones to the grass, reflecting the sunset colors above. I like to let the brush run dry here to create a scratchy, organic texture. -
Darken the immediate foreground:
At the very bottom edge of the canvases, glaze over with deep blue and black to ground the painting and create a silhouette effect for the closest blades of grass. -
Add finishing highlights:
Use a palette knife or small brush to add touches of pure white or pale yellow to the edges of the clouds and the tips of the grass where the light hits strongest. -
Paint the canvas edges:
Once the front is dry, paint the deep sides of the canvas (the gallery wrap) black or a dark neutral gray to give the triptych a polished, framed look without needing actual frames.
Level Up: Texture
Mix impasto gel or modeling paste into your foreground grass paint. This adds physical ridges that catch the light, making the grass look 3D.
Hang your panels with two to three inches of space between them to let the artwork breathe and command the room
Panoramic City Skyline at Dusk
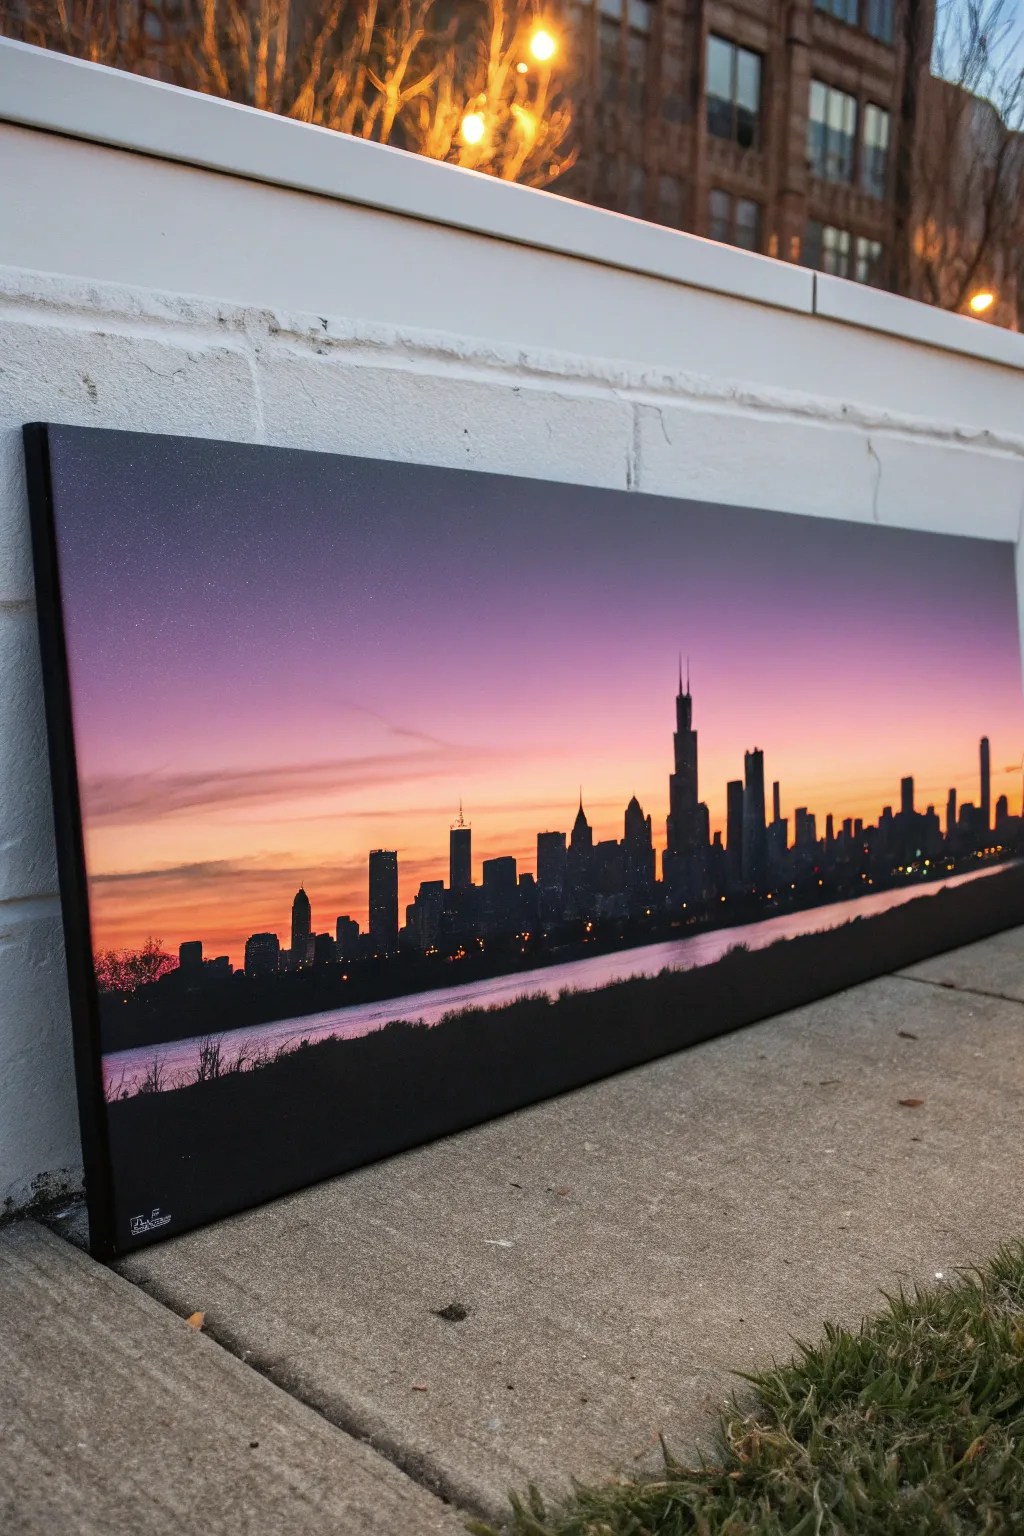
Capture the romantic transition of day into night with this striking panoramic artwork featuring a sharp city skyline against a vibrant gradient sky. The long, horizontal format makes this piece perfect for mounting above a sofa or headboard, bringing urban sophistication into your living space.
Step-by-Step
Materials
- Long rectangular stretched canvas (e.g., 12×36 or 10×30 inches)
- Acrylic paints: Titanium White, Cadmium Yellow, Orange, Magenta/Deep Pink, Purple, Phthalo Blue, Mars Black
- Large flat brush (2-3 inches) for background blending
- Medium flat brush (1 inch)
- Small round detail brush (size 0 or 1)
- Flat angled shader brush
- Ruler or painter’s tape
- Palette or paper plate
- Cup of water and paper towels
- Reference photo of a city skyline (Chicago used here)
Step 1: Painting the Gradient Sky
-
Prepare the canvas:
Begin by ensuring your canvas is clean and taut. If your canvas isn’t pre-primed, apply a coat of white gesso and let it dry completely to ensure the colors pop vividly later on. -
Determine the horizon line:
Decide where your water line will be. For this composition, mark a light pencil line about one-quarter of the way up from the bottom edge. This low horizon emphasizes the expansive sky. -
Apply the darkest sky color:
Load your large flat brush with Phthalo Blue mixed with a touch of Purple. Paint horizontal strokes across the very top quarter of the canvas, ensuring even coverage. -
Transition to purple:
Without cleaning the brush entirely, dip into your Purple paint. Blend this into the bottom edge of the blue section, working your way down. The colors should marry on the canvas to create a smooth ombre effect. -
Add the pink hues:
Clean your brush thoroughly. Mix Magenta with a tiny bit of White to increase opacity. Paint this band below the purple, brushing upward slightly into the purple to soften the transition between cool and warm tones. -
Create the golden horizon:
Clean the brush again. Mix Orange and Cadmium Yellow with a little White. Apply this vibrant mixture right above your pencil horizon line, blending upward into the pink. This simulates the glowing light of the setting sun. -
Paint the water reflection:
Using the same colors from your sky, reverse the gradient below the horizon line. Start with the yellow-orange mix just below the line, then fade quickly into purple and dark blue at the bottom edge. Use horizontal, slightly wavy strokes to suggest ripples. -
Creating faint clouds:
While the sky paint is tacky but not wet, use a dry, clean brush with a tiny amount of dark purple paint. lightly drag it horizontally across the pink and orange sections to create wispy, low-hanging clouds. Keep these subtle.
Step 2: Designing the Skyline
-
Block in the landmass:
Once the background is 100% dry, load a medium flat brush with Mars Black. Paint a solid strip across the horizon line to establish the base of the city. Ensure the bottom edge of this strip is straight, but the top can be uneven. -
Outline the skyscrapers:
Using your reference photo and a small round brush with thinned black paint, lightly sketch the outlines of the major buildings. Pay attention to varying heights—include one or two dominant towers to anchor the composition. -
Fill the silhouettes:
Switch to your flat angled brush and solid Mars Black paint. Fill in the building outlines carefully. I like to use the sharp edge of the brush to get crisp, vertical lines for the sides of the skyscrapers. -
Add architectural details:
For iconic buildings with antennas or spires, switch back to your smallest detail brush. Use quick, confident upward strokes to pull the black paint into thin points. -
Create depth with lighter blacks:
Mix a tiny drop of blue into your black paint to create a ‘cool black’. Use this to paint a few smaller, lower buildings in front of the main skyline. This subtle shift helps separate the foreground from the background.
Blending Struggles?
If your acrylics are drying too fast to blend smooth gradients, mist the canvas lightly with a spray bottle of water or mix a slow-drying medium into your paints.
Step 3: Final Details
-
Add city lights:
Dip the tip of your detail brush into pure Yellow or Orange paint. Dot tiny random specs of light near the base of the buildings and up the sides of the larger towers. Don’t overdo it; less is more here. -
Reflect the city:
Mix a dark grey-purple wash (lots of water). Lightly glaze vertical strokes in the water area directly beneath the tallest buildings to suggest their reflection on the surface. -
Paint the foreground bank:
Using solid black, paint a rough, organic shape along the bottom edge of the canvas to represent the near riverbank or shore. Add small upward flicks to suggest grasses or reeds in silhouette. -
Paint the edges:
Don’t forget the sides of your canvas! Paint the top edge blue, the bottom black, and continue the gradient around the sides for a professional, frameless finish. -
Varnish and protect:
Allow the painting to cure for at least 24 hours. Apply a coat of gloss or satin varnish to unify the sheen and protect the colors from fading over time.
Level Up: Starry Night
Once the sky is dry, load a stiff brush with white paint and flick the bristles to splatter tiny stars across the deep blue upper section for a magical twilight feel.
Hang your panoramic masterpiece in a well-lit spot to let the vibrant sunset colors warm up your entire room
Vertical Waterfall With Mist and Splash Texture
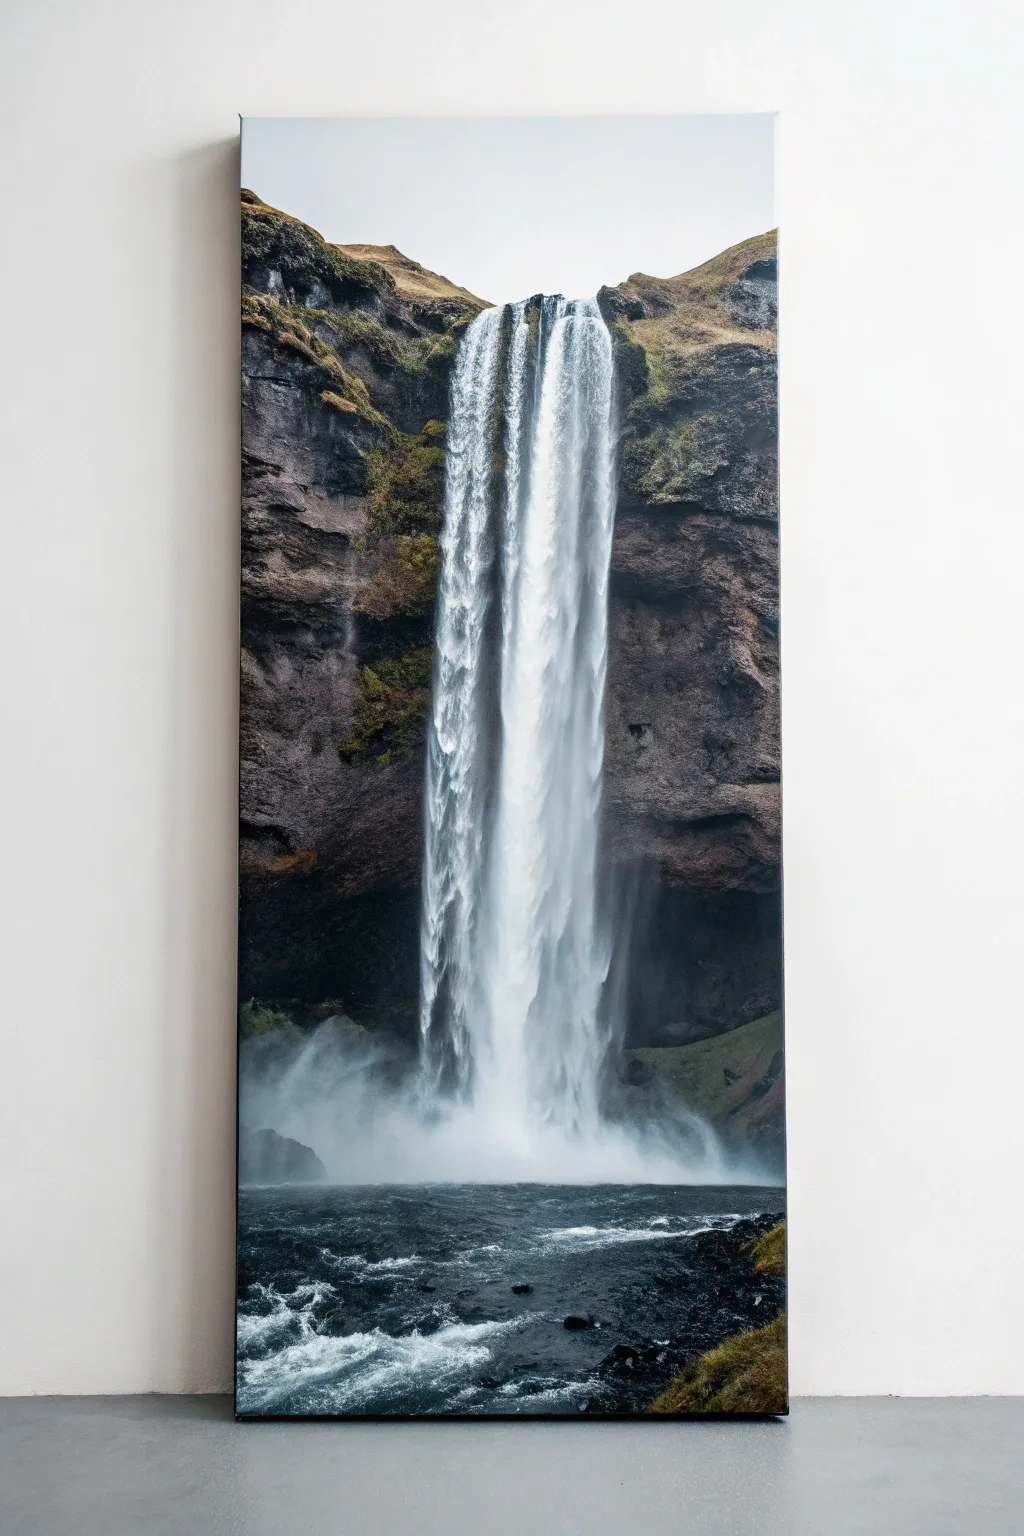
Capture the raw power and serene beauty of nature with this towering waterfall composition. Using a vertical canvas emphasizes the sheer drop of the water, allowing you to create dramatic movement through texture and blending.
Step-by-Step Tutorial
Materials
- Tall vertical canvas (12×36 or similar ratio)
- Heavy body acrylic paints: Titanium White, Mars Black, Burnt Umber, Raw Sienna, Payne’s Grey, Hooker’s Green, Phthalo Blue
- Large flat brush (2-inch)
- Medium filbert brush
- Small round detail brush
- Fan brush (bristle)
- Palette knife
- Water spray bottle
- Slow-drying blending medium
- Reference photo of Skógafoss or similar distinct waterfall
Step 1: Setting the Scene
-
Prime and Prep:
Begin by applying a thin coat of Gesso if your canvas isn’t pre-primed. Once dry, tone the entire canvas with a wash of watered-down Payne’s Grey and Burnt Umber. This neutral, dark undertone will give depth to the cliffs later. -
Sketch the Composition:
Using a small round brush and diluted white paint, sketch the basic layout. Mark two steep cliff sides converging near the top, and draw a vertical column down the center for the waterfall. Don’t worry about details yet; just get the placement right. -
Block in the Sky:
Mix Titanium White with a tiny touch of Payne’s Grey for an overcast sky. Paint the very top section above the falls, blending downward so it fades slightly where the water begins.
Mist looks too solid?
If your mist looks like a solid white wall, wait for it to dry, then apply a thin glaze of your dark background color over it. Try the scumbling technique again more lightly.
Step 2: Building the Cliffs
-
Darkest Darks:
Mix a deep, dark brown using Mars Black and Burnt Umber. Identify the deepest shadows and crevices in the cliff faces on both sides of the drawing. Apply this color boldly with a medium filbert brush. -
Mid-tone Rocks:
Create a rocky grey-brown by adding a little White and Raw Sienna to your dark mix. Paint the main surface areas of the rocks, leaving the deep shadows exposed. Use a stippling motion to suggest rough stone texture. -
Adding Mossy Greens:
Mix Hooker’s Green with Burnt Umber and a touch of yellow. Apply this sparingly on the rock ledges and top plateaus where vegetation would naturally cling. I find that dabbing this on with an old, scruffy brush creates the best organic texture. -
Rock Highlights:
With a palette knife, scrape a lighter grey mix across the highest points of the rocks. This ‘scumbling’ technique catches the canvas texture, mimicking the jagged surface of volcanic rock.
Step 3: The Waterfall
-
Underpainting the Water:
For the water column, mix Titanium White with a very small amount of Phthalo Blue and Payne’s Grey. Paint the entire vertical strip of the waterfall, pulling your brush straight down from top to bottom. -
Establishing Flow:
Switch to a clean, damp large flat brush. While the paint is tacky, drag it vertically down the length of the falls again to smooth out brushstrokes and create distinct vertical lines. -
Brightest Whites:
Load a smaller brush with pure heavy body Titanium White. Add opaque streaks starting from the top lip of the falls. These represent the thickest, fastest-moving channels of water. -
Creating the Mist:
At the bottom third of the canvas, the water turns to mist. Use a dry fan brush with a tiny amount of white paint. Use circular, scrubbing motions to create a cloud-like fog at the base, blurring the hard edges of the falling water.
Add scale
Paint a tiny silhouette of a person standing at the base of the falls in the foreground. This instantly shows the viewer just how massive and tall the waterfall truly is.
Step 4: Foreground and Details
-
The River Base:
Paint the bottom section of the river with a dark mix of Phthalo Blue and Black. The water here is turbulent and deep. -
River Surface Texture:
Using a palette knife and pure white, slice horizontally across the dark river water to create whitecaps and foam. Keep these lines jagged and random. -
Enhancing the Splash:
Return to the mist area. Use a spray bottle to lightly mist the wet white paint, allowing it to drip slightly or bloom, creating an authentic watery spray effect. -
Final Contrast Check:
Step back and assess your values. If the cliffs look flat, glaze a transparent layer of black and blue into the deepest shadows to push them back. -
Varnish and Seal:
Once the painting is completely cured (at least 24 hours), apply a satin or gloss varnish to make the dark colors rich and the water look wet.
Hang your new masterpiece in a narrow space or hallway to maximize the dramatic vertical effect
Koi Pond Ripples in an Elongated Composition
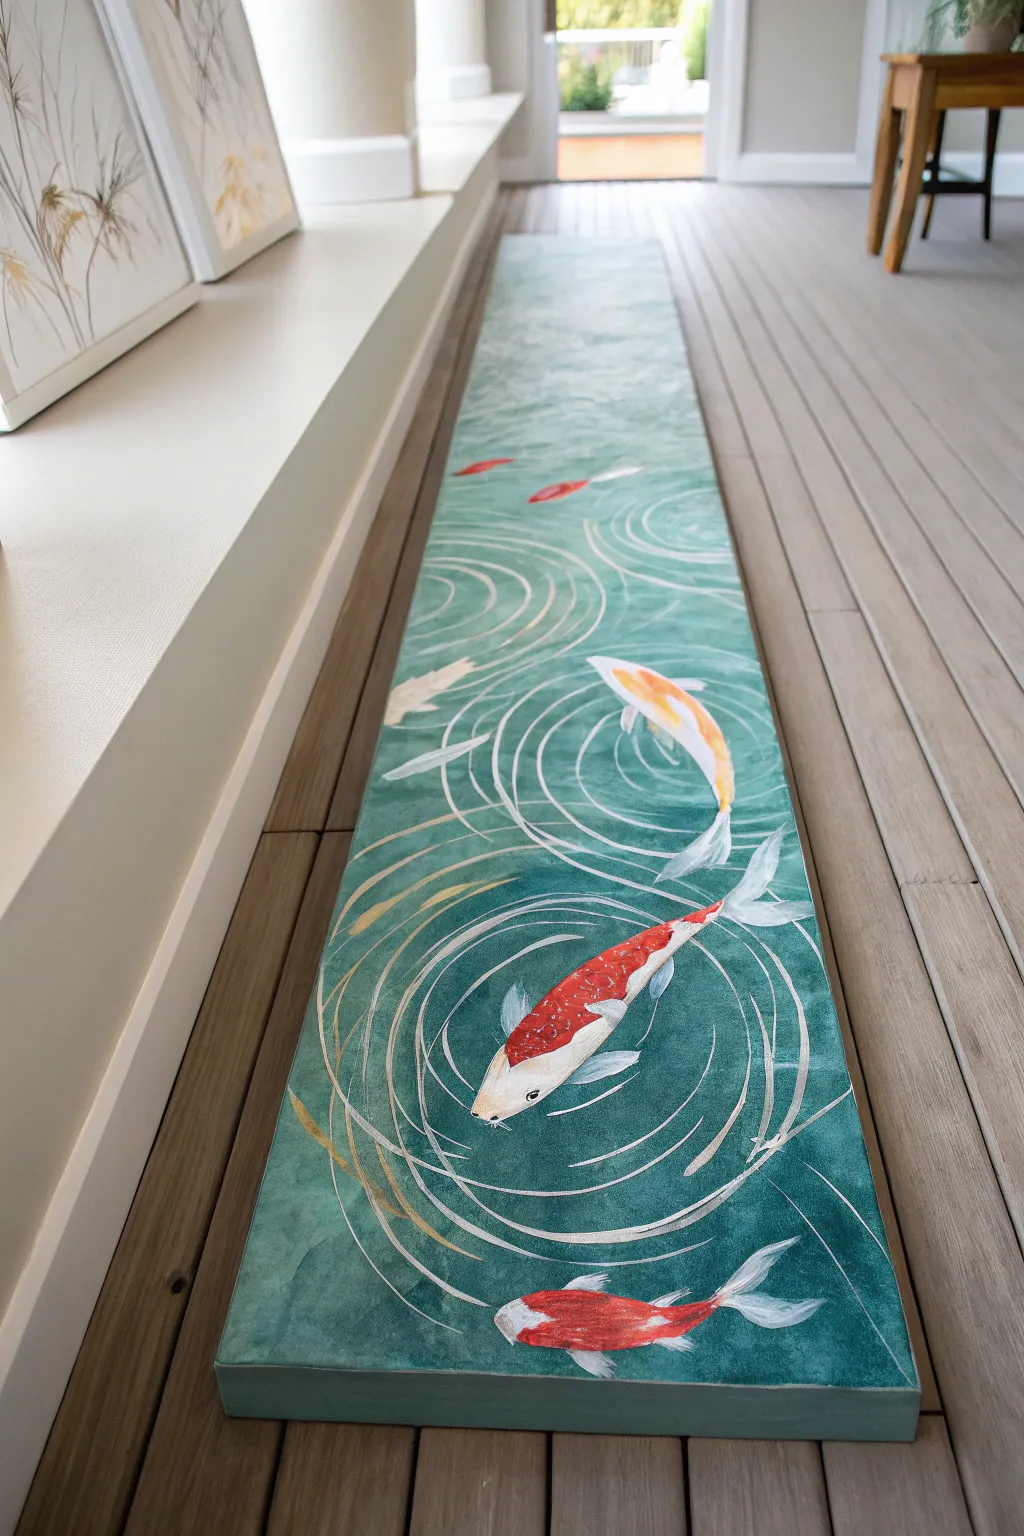
Transform a long, narrow strip of canvas into a tranquil water feature for your floor or wall with this immersive koi pond painting. The elongated format perfectly captures the graceful movement of fish swimming upstream, creating a stunning visual flow.
Detailed Instructions
Materials
- Long, narrow stretched canvas or heavy-duty primed floor cloth (approx. 12″ x 60″)
- Acrylic paints: Phthalo Green, Phthalo Blue, White, Black, Cadmium Red, Cadmium Orange, Yellow Ochre
- Wide flat brush (2-3 inch) for background
- Medium filbert brush for fish bodies
- Fine liner brush for details and whiskers
- Small round brush for ripples
- Chalk or pastel pencil (white) for sketching
- Mixing palette
- Water container and paper towels
- Clear acrylic varnish (satin or gloss)
Step 1: Setting the Scene
-
Prepare the canvas:
Ensure your long canvas is clean and primed. If you are using raw canvas suitable for a floor cloth, prime it with two coats of gesso, sanding lightly between coats for a smooth painting surface. -
Mix the water base:
Create a deep, murky teal color by mixing Phthalo Green with a touch of Phthalo Blue and a tiny bit of Black to deepen it. This will be the darkest depth of your pond. -
Paint the background gradient:
Using your wide flat brush, cover the entire canvas with your teal mix. While it’s still wet, blend in slightly lighter shades of green (mixed with a little White) towards the center to suggest light penetrating the water. -
Add water texture:
Before the base layer fully dries, use a dry brush technique with a lighter, minty green to gently sweep horizontal streaks across the surface. This adds subtle movement and prevents the water from looking flat. -
Let it cure:
Allow this background layer to dry completely. I prefer to let this sit for at least an hour to ensure the next layers don’t muddy the water color.
Fixing Flat Water
If the water looks too flat, mix a glaze of dark blue and glazing medium. Brush it over the deep corners to create a vignette effect, forcing focus to the lighter center.
Step 2: Sketching and Blocking
-
Map out the composition:
Using a white chalk or pastel pencil, lightly sketch the outlines of your koi fish. Space them out vertically along the runner to guide the viewer’s eye from one end to the other. -
Block in white bases:
Paint the silhouettes of the fish with opaque White acrylic. This underpainting is crucial because bright reds and oranges are often transparent and will look dull if painted directly over the dark green background. -
Sketch the ripple guide lines:
With your chalk, lightly draw concentric circles radiating outward from where each fish breaks the surface or turns. Keep these lines loose and organic.
Pro Tip: Fluid Lines
For the smoothest ripples, thin your white paint with a few drops of water or flow improver until it has the consistency of ink. This stops the brush from dragging.
Step 3: Bringing the Koi to Life
-
Paint the orange koi:
Mix Cadmium Orange with a touch of Yellow Ochre. Paint the body of the upper fish, leaving patches of the white base showing for natural patterning if desired. -
Paint the red and white koi:
For the prominent central fish, use Cadmium Red mixed with a tiny bit of Orange for vibrancy. Paint the specific red patches on its back, keeping the head and tail fins white. -
Paint the submerged fish:
For the fish lower in the canvas or appearing deeper, mix your fish colors with a tiny bit of the background green water color. This “glazing” effect wipes out some contrast and pushes them deeper visually. -
Add definition:
Use a darker grey or thinned black with your fine liner brush to outline the gill plates and add small dots for eyes. Keep the lines very thin. -
Detail the fins:
Paint the tail and pectoral fins with a translucent white. Use the liner brush to add faint, delicate streaks of grey to show the fin spines.
Step 4: Creating Movement
-
Paint the primary ripples:
Mix a very pale, almost white green. Using a small round brush, paint the strongest ripple rings closest to the fish bodies. Press down at the start of the stroke and lift up at the end to taper the line. -
Add secondary ripples:
Create larger, fainter rings further out. You can water down your paint slightly here to make the ripples look more transparent and subtle. -
Enhance with highlights:
Use pure White on your finest brush to add sharp, crisp highlights on the tops of the closest ripples and on the wet backs of the fish where they breach the surface. -
Add underwater shadows:
Mix a dark green-black glaze (paint with lots of water or glazing medium). Paint a soft shadow on the “pond floor” underneath and slightly to the side of each fish to create a sense of floating depth. -
Seal the artwork:
Once the painting is fully cured (give it 24 hours), apply two coats of clear acrylic varnish. This protects the paint and gives the water a permanent, wet-look sheen.
Step back and admire how your new floor canvas brings a peaceful, flowing energy to your hallway or room
Climbing Vines Designed for a Narrow Panel
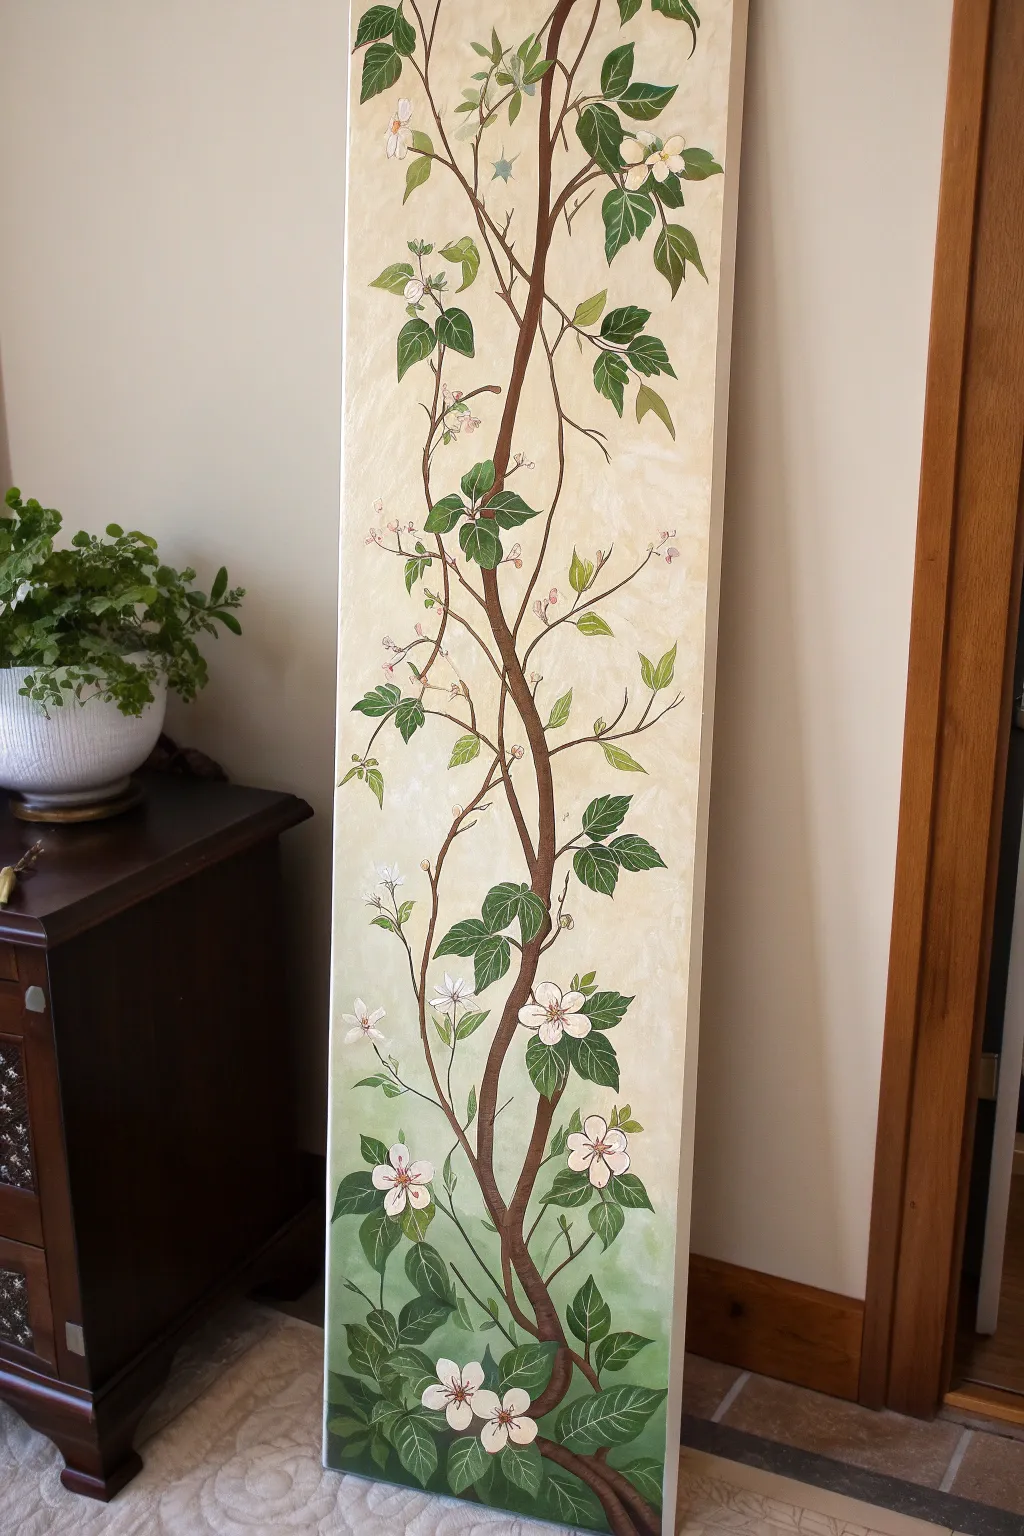
Embrace the elegance of vertical space with this tall, narrow canvas painting featuring a delicate climbing vine intertwined with soft white blossoms. The gentle gradient background transitions from creamy beige to earthy green, grounding the design while drawing the eye upward.
Step-by-Step Tutorial
Materials
- Tall, narrow canvas (e.g., 10×30 or 12×36 inches)
- Acrylic paints: Titanium White, Unbleached Titanium (cream), Burnt Umber, Raw Sienna, Sap Green, Hooker’s Green, Alizarin Crimson (trace amounts)
- Large flat wash brush (1-inch or bigger)
- Round brushes (sizes 2, 4, and 6)
- Angle shader brush (optional but helpful for leaves)
- Palette and water container
- Paper towels
- Pencil or chalk for sketching
Step 1: Preparing the Gradient Background
-
Mix the base colors:
On your palette, prepare two main pools of color. For the top, mix a large amount of Titanium White with a touch of Unbleached Titanium to create a warm, creamy off-white. For the bottom, mix Sap Green with a little White and a tiny dot of Burnt Umber to create a muted, earthy moss green. -
Apply the top section:
Using your large flat brush, apply the cream mixture to the top two-thirds of the canvas. Use horizontal strokes for a smooth finish, or criss-cross strokes if you prefer a subtle texture. -
Apply the bottom section:
While the top is still slightly wet if possible, apply the muted green mixture to the bottom third of the canvas. Paint right down to the bottom edge. -
Blend the transition:
Where the green meets the cream, use a clean, slightly damp brush to blend the two colors. Work the brush back and forth horizontally to create a soft, misty transition rather than a hard line. Let the background dry completely before proceeding.
Step 2: Sketching and Painting the Vine Structure
-
Sketch the main vine:
Lightly sketch the path of the main vine using a pencil or chalk. Start wide at the bottom center and wind your way up to the top, creating a gentle S-curve that wanders across the canvas width. -
Add secondary branches:
Draw smaller offshoot branches stemming from the main vine. These should be thinner and straighter, acting as supports for leaves and future flowers. -
Paint the main stem:
Load a size 6 round brush with Burnt Umber. Paint the main thick stem, following your sketch. Twist the brush slightly as you lift off at the top to taper the end naturally. -
Add highlights to the wood:
While the brown is tacky or dry, mix a little lighter brown using Raw Sienna and White. Add thin, broken lines along one side of the vine to suggest light hitting the bark. -
Paint the smaller twigs:
Switch to a size 2 liner or round brush. Using a thinned mixture of Burnt Umber, paint the delicate offshoot branches. Keep your hand loose to prevent them from looking stiff.
Wobbly Lines?
If your vine branches feel shaky or too thick, mix a tiny drop of water into your brown paint. Thinner paint flows off the brush smoother, allowing for crisp, long lines without stopping.
Step 3: Creating Foliage and Flowers
-
Block in the lower leaves:
Start at the bottom where the leaves are densest. Mix Hooker’s Green with a touch of Burnt Umber for a deep shadow green. Paint the basic leaf shapes using a size 4 brush, focusing on the clusters near the base. -
Add upper, lighter leaves:
As you move up the vine, lighten your green mix with yellow or white. Paint the mid-section leaves, making them slightly smaller and more sparse than the bottom ones. -
Detail the leaf veins:
Once dry, use your smallest brush with a very pale green (almost white) to paint fine veins on the larger leaves. This adds crispness and detail. -
Paint the flower silhouettes:
Mix a soft pinkish-white using Titanium White and a tiny speck of Alizarin Crimson. Paint simple five-petal shapes scattered along the vine. Don’t worry about perfect symmetry; nature is imperfect. -
Define the flower centers:
Mix a darker center color, perhaps a rosy pink or a deeper mauve. Dab this color into the center of each flower, blending it slightly outward into the petals. -
Add flower stamens:
Using your smallest brush and pure white or pale yellow, paint tiny dots or fine lines in the very center of the darker flower middles to represent pollen or stamens. -
Paint tiny buds:
Near the top of the vine, add small teardrop shapes in pink and white to represent unopened flower buds. Connect these to the main stem with hair-thin brown lines. -
Add final highlights:
Step back and assess the composition. Add touches of pure white to the tips of the most prominent petals and the top edges of a few leaves to make them pop against the background.
Level Up: Texture
For a dimensional effect, use a palette knife to apply modeling paste to the flower petals before painting them. This will physically raise the blooms off the canvas surface.
Hang your vertical garden masterpiece in a narrow wall space to bring a breath of fresh air into the room
Vertical Galaxy With Layered Light Streaks
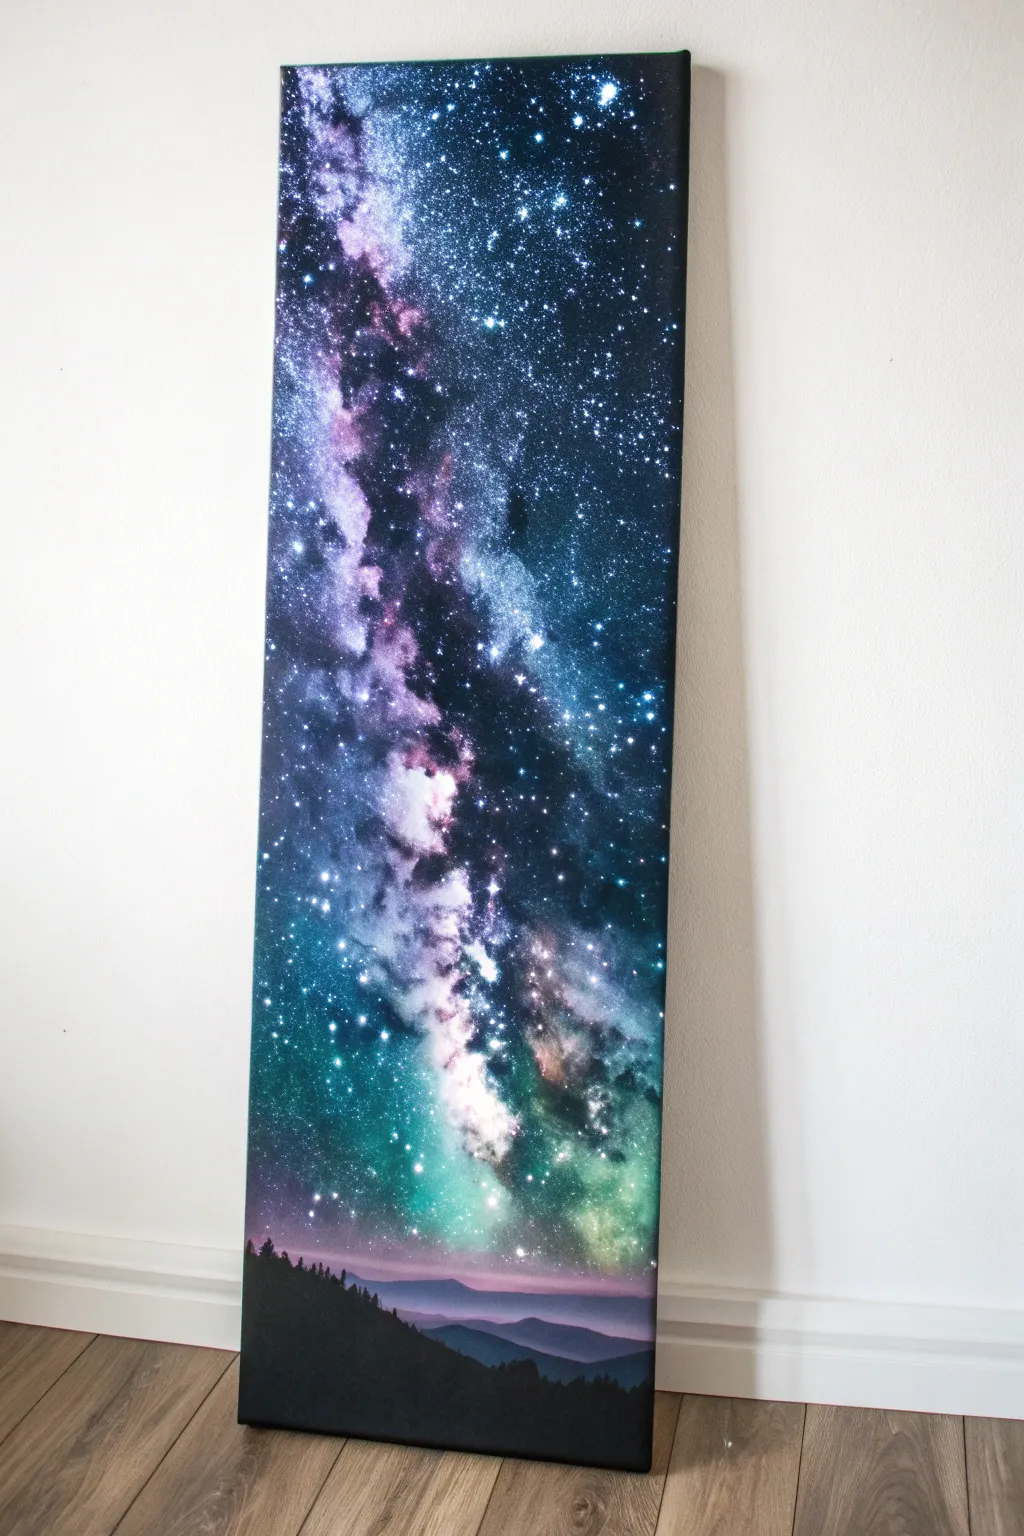
Capture the infinite depth of the cosmos on a unique vertical canvas that draws the eye upward. This project combines rich acrylic blending techniques with silhouette painting to create a stunning slice of the night sky.
Step-by-Step
Materials
- Tall vertical canvas (e.g., 10×30 or 12×36 inches)
- Acrylic paints (Black, Titanium White, Dioxazine Purple, Phthalo Blue, Teal/Turquoise, Magenta/Deep Pink)
- Large flat brush or sponge applicator
- Medium round brush
- Small detail brush
- Old toothbrush (for stars)
- Palette or paper plate
- Cup of water and paper towels
Step 1: Setting the Atmosphere
-
Prepare the gradient base:
Start by squeezing out your black, purple, blue, teal, and a touch of magenta onto your palette. You want a gradient that is darkest at the very top and gets lighter and more colorful towards the bottom third. -
Paint the upper darkness:
Using a large flat brush or a damp sponge, cover the top third of the canvas with black mixed with a little deep blue. While it’s still wet, blend in pure purple just below it, ensuring no harsh lines exist between the colors. -
Introduce the mid-tones:
Continue moving down the canvas, blending the purple into a Phthalo blue. Keep your brush strokes somewhat loose and cloudy rather than perfectly horizontal; a dabbing motion helps create texture. -
Create the horizon glow:
As you reach the bottom third (leaving space for the black hills later), mix teal and white to create a bright, glowing area. Blend this upwards into the blue and purple sections to simulate the light pollution often seen near the horizon. -
Add deep space pockets:
While the background is still slightly tacky, use a smaller brush to add pure black patches along the edges and corners of the colored sections to create depth and contrast.
Starry Night Secret
If you spatter too big a blob of white for a star, don’t wipe it! Let it dry, paint over it with black, and retry. Wiping creates a smear that ruins the gradient background.
Step 2: Building the Galaxy
-
Draft the Milky Way shape:
Mix a light lavender using purple and white. Using a dry brush or sponge, gently dab a diagonal, cloudy path stretching from the bottom center up towards the top left corner. -
Intensify the core:
Layer a brighter mixture of white and a tiny bit of magenta into the center of your lavender path. This creates the ‘glowing core’ of the galaxy band. -
Blend the edges:
Soften the edges of your Milky Way band with a clean, slightly damp brush so it looks like gas and dust rather than a solid stripe. The transition into the background black/blue needs to be smoky. -
Enhance color variation:
Glaze thin layers of teal and pink over parts of the white galaxy band. Paint transparently here; you want to tint the white clouds, not cover them completely. -
Highlight the brightest spots:
Add pure white accents to the most intense parts of the nebula clouds, using a scumbling motion (scrubbing a mostly dry brush) to keep texture high.
Step 3: Creating the Stars
-
Prepare the spatter mix:
Mix white paint with a few drops of water until it has the consistency of ink or heavy cream. This is crucial for getting fine, round dots rather than blobs. -
Flick the stars:
Dip an old toothbrush into the thinned white paint. Hold it over the canvas and run your thumb across the bristles to spray a fine mist of stars across the entire sky. -
Concentrate the star clusters:
Apply more spatters over the light milky way band to represent dense star clusters. Keep the dark outer edges a bit sparser. -
Paint larger stars:
Using your smallest detail brush, hand-paint a few larger stars. Place them randomly, focusing a few bright ones near the galaxy band. -
Add the gleam:
For the largest stars, paint a tiny cross or use a toothpick to drag the wet paint outward slightly, creating a twinkling lens flare effect.
Level Up: Glow in the Dark
Mix phosphorescent medium into your final white star splatters. By day, it looks like a normal painting; by night, the Milky Way will faintly glow.
Step 4: Grounding Scene
-
Outline the distant mountains:
Mix a dark grey-purple color. Paint a low, rolling mountain ridge near the bottom of the canvas. This layer should look far away, so keep the edges soft and hazy. -
Paint the foreground ridge:
Load your brush with pure black. Paint a closer, sharper hill shape that covers the bottom of the grey mountains. This establishes the immediate foreground. -
Add the tree line:
Using the tip of a small flat brush or a fan brush held vertically, tap in tiny vertical lines along the top edge of the black hill to suggest distant pine trees. -
Refine the silhouettes:
Vary the height of the trees to look natural. Make sure the bottom of the canvas is solid black to anchor the composition. -
Final drying time:
Allow the entire painting to dry completely, checking for any accidental smudges in the deep black areas.
Now you have a breathtaking window into space ready to hang on a narrow wall.
Topographic Lines Across a Long Canvas
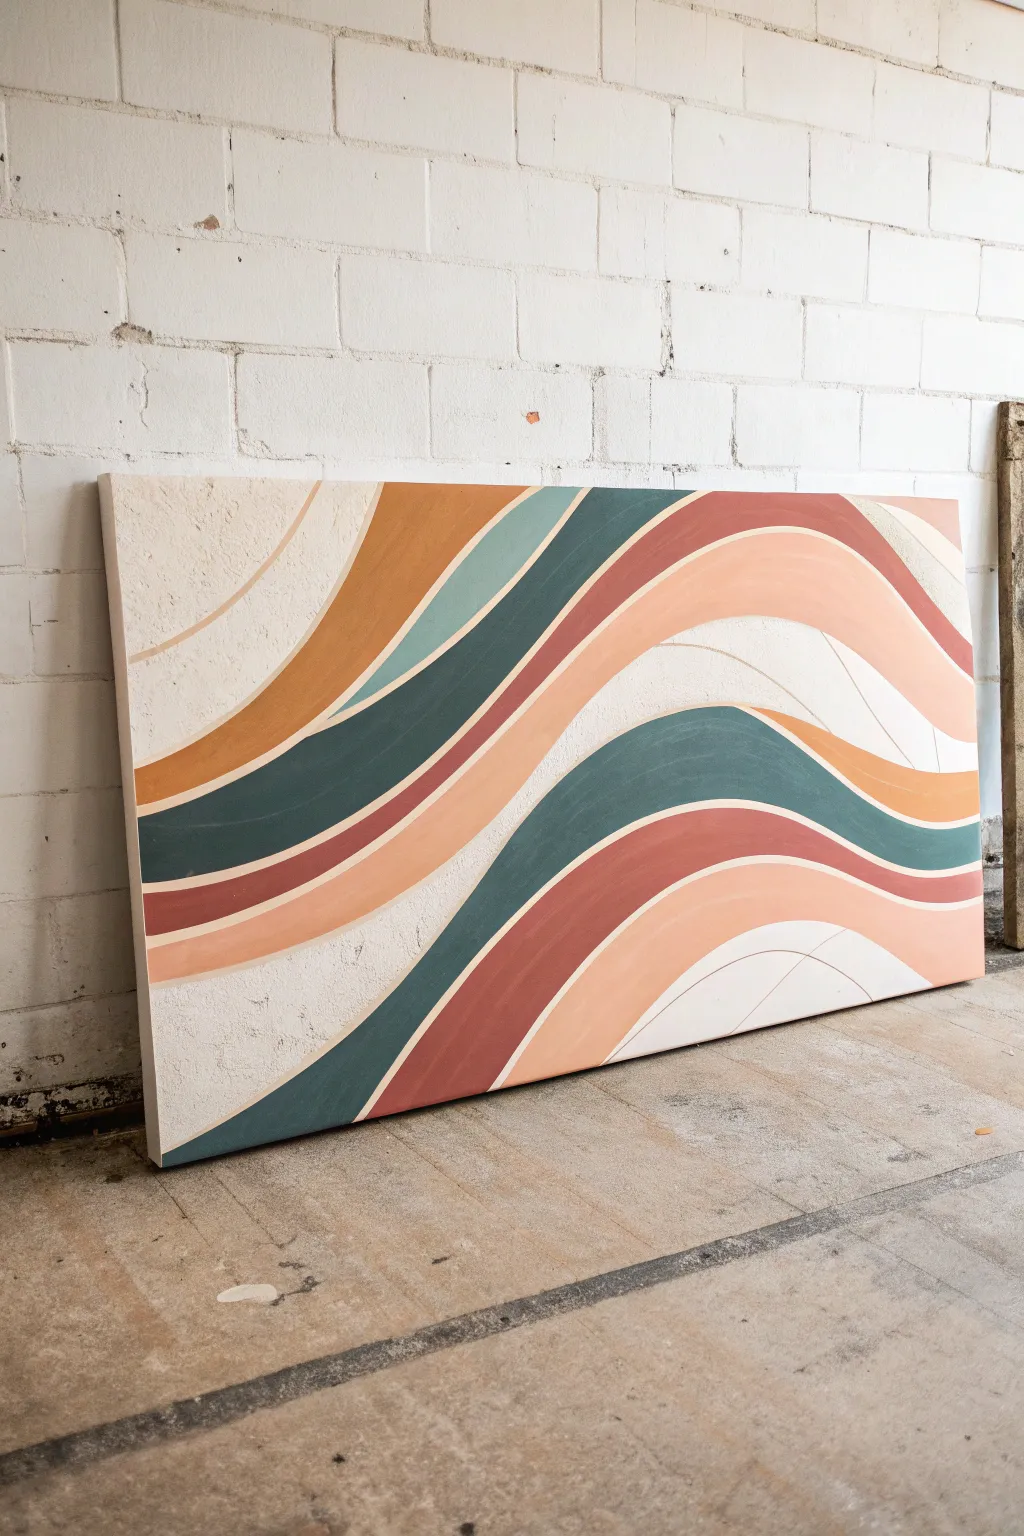
This tutorial guides you through creating a striking, wide-format painting featuring flowing waves of earthy terracotta, deep teal, and warm mustard. The design mimics flowing topographic lines, adding a modern and organic feel to any space.
How-To Guide
Materials
- Large, rectangular stretched canvas (e.g., 24″ x 48″)
- Gesso primer
- Texture paste or sand additive (optional)
- Acrylic paints: Terra cotta, Deep Teal, Mustard Yellow, Dark Rust, Sage Green, and Titanium White
- Pencil and eraser
- Assorted flat brushes (1-inch, 2-inch, and angled)
- Painter’s tape or masking tape (optional for edges)
- Palette or mixing plate
- Cup of water and paper towels
Step 1: Preparing the Base
-
Prime the Surface:
Start by applying a generous coat of white gesso to your entire canvas to ensure a smooth, receptive surface for the paint. -
Add Texture:
To achieve that subtle, sandy grit visible in the cream sections, mix a small amount of texture paste or fine sand into your white acrylic paint. Apply this mixture unevenly across the canvas for a tactile base layer. -
Let it Cure:
Allow the textured base to dry completely. This might take a few hours depending on the thickness of your texture paste.
Steady Hand Pro Tip
Improve your line work by mixing a flow improver or a few drops of water into your paint. It helps the brush glide smoothly for long, uninterrupted curves.
Step 2: Mapping the Design
-
Sketch the Waves:
Using a light pencil, draw large, sweeping curves across the canvas. Start from the left edge and flow towards the right, letting the lines dip and rise naturally. -
Define the Bands:
Draw parallel lines following your initial curves to create bands of varying widths. Some bands should be thick and bold, while others can be thin accent stripes. -
Create Negative Space:
Designate several wide areas to remain plain white or cream. In these spaces, sketch very faint, thin lines that will remain unpainted pencil marks or be traced with a fine brush later for delicate detail.
Step 3: Blocking in Color
-
Mix Your Palette:
Prepare your colors on the palette. Mix a deep teal by adding a touch of black to blue-green, and soften your terracotta with a bit of white for the lighter bands. -
Paint the Darkest Bands:
Start with the Deep Teal. Using a steady hand and a flat brush, fill in the designated dark wave, following the curve smoothly. I find it easiest to paint the edges of the shape first before filling the center. -
Apply the Warm Tones:
Next, paint the Rust and Terra Cotta bands adjacent to the teal. Ensure the colors touch cleanly without blending, maintaining a crisp line between hues. -
Add the Mustard Accents:
Fill in the yellow-orange sections. These brighter bands add a pop of warmth and balance the cooler greens. -
Incorporate the Sage:
Paint the softer Sage Green bands. These serve as a transitional color between the dark teal and the warm earth tones.
Level Up: Gold Leaf
For a luxe touch, apply gold leaf along the thinnest accent lines. The metallic shine contrasts beautifully against the matte earth tones.
Step 4: Refining and Detailing
-
Clean Up Edges:
Once the main blocks of color are dry, go back with a small angled brush to sharpen any wobbly lines where colors meet. -
Paint the Fine Lines:
In the white ‘negative space’ areas, use a very fine liner brush and thinned-down paint (either a soft beige or gray) to trace the delicate topographic lines you sketched earlier. -
Add Cream Highlights:
Use an off-white or cream color to paint the remaining background bands, carefully cutting in next to the colored waves to make them pop. -
Check for Opacity:
Step back and look at your coverage. If see canvas texture showing through the darker colors, apply a second coat for a solid, opaque look. -
Paint the Canvas Sides:
Don’t forget the edges of the canvas. Continue the lines over the side for a wrapped gallery look, or paint the sides a solid neutral color. -
Seal the Work:
Once completely dry (give it overnight), apply a matte varnish to protect the painting and unify the sheen of the different colors.
Hang your finished masterpiece horizontally to expand the visual space of your room

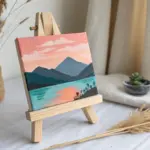
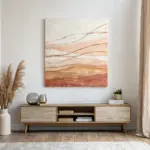

Have a question or want to share your own experience? I'd love to hear from you in the comments below!