
Half and half paintings are one of my favorite ways to make a simple idea look instantly dramatic—two worlds sharing one canvas. You get to play with contrast, color, mood, and storytelling without needing a super complicated drawing.
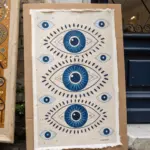
Sun and Moon Face in One Circle

Balance warmth and cool tones with this striking half-and-half celestial painting on raw canvas. This project combines geometric precision with soft, earthy watercolors or diluted acrylics to create a harmonious sun and moon face united in a single circle.
Detailed Instructions
Materials
- Unprimed canvas or thick raw cotton fabric (approx. 16×20 inches)
- Acrylic paints (Terracotta/Rust, Golden Yellow, Warm White, Charcoal Grey, Black)
- Fabric medium (optional, if using regular acrylics)
- Round watercolor brushes (sizes 4 and 8)
- Fine liner brush (size 0 or 1)
- Compass or a large round plate (for tracing)
- Ruler
- Pencil and eraser
- Masking tape or painter’s tape
- Water cup and palette
Step 1: Preparation & Sketching
-
Prepare the fabric edge:
Begin by ripping your canvas or fabric to size rather than cutting it with scissors. This technique creates that lovely fraying, raw edge seen in the reference photo. Pull gently at loose threads until the fringe looks even on all sides. -
Establish the centerline:
Measure the width of your fabric and lightly mark the precise vertical center with a pencil. Use a ruler to draw a faint line from top to bottom; this will be the boundary between your day and night sides. -
Outline the central circle:
Place your compass point on the center line (or center your round plate) and draw a large circle. This circle will house both the sun and moon faces. -
Sketch the celestial features:
Lightly sketch the facial features inside the circle. Aim for a sleeping, peaceful expression with a closed eye, a small nose resting on the center line, and gentle lips. Ensure the face is symmetrical before adding the cheek blush details solely to the sun side. -
Draw the sun rays:
On the left side only, use a ruler to sketch triangular rays extending outward from the circle’s edge. Vary the sizes slightly for visual interest, alternating between longer and shorter triangles. -
Add decorative borders:
Draw the rectangular border that frames the sun side. Then, add the small horizontal hatch marks near the top and bottom of the center line on the moon side for that geometric touch.
Bleeding Lines?
If paint bleeds on the raw fabric, use much less water. The brush should be damp, not dripping. You can also paint a clear layer of medium first to seal the fibers.
Step 2: Painting the Sun Side
-
Mix the terracotta wash:
Mix your rust or terracotta acrylic paint with a fair amount of water (or fabric medium). You want a consistency similar to heavy cream so it soaks into the fabric rather than sitting on top. -
Paint the background:
Carefully paint the background space around the sun rays on the left side. Use a size 8 brush for larger areas, switching to a smaller brush to get sharp points around the triangle rays. Stop exactly at the center vertical line. -
Fill the sun rays:
Clean your brush and mix a golden yellow wash. Paint the triangular rays. If you overlap the terracotta slightly, that’s okay, but try to keep the edges crisp. -
Define the sun face:
Paint the left half of the face inside the circle with a very pale, warm wash (white with a drop of yellow/orange). Add a rosy circle for the cheek using a diluted pink or rust tone.
Step 3: Painting the Moon Side
-
Create the moon texture:
For the right side of the circle, you want a textured, cratered look. Mix a watery charcoal grey. Simply dab the paint onto the fabric in random blotches to mimic lunar craters, leaving some raw fabric showing through for highlights. -
Paint the moon outline:
Use a slightly darker grey to outline the right semi-circle, giving the moon definition against the unpainted background.
Pro Tip: Masking
Apply a strip of masking tape directly along the vertical center line before painting the terracotta side. This ensures a razor-sharp division between the painted sun and the raw moon side.
Step 4: Final Details
-
Line work for the face:
Using your fine liner brush and black paint (thinned slightly for flow), carefully trace over the pencil lines for the eyes, nose, and mouth. One continuous, confident stroke usually looks best here. -
Add the stars:
On the terracotta background, use white paint to add a few small dots and an eight-pointed star in the upper corner. -
Detail the border decorations:
Paint the small geometric hatch marks on the center line using black or dark grey paint. -
Erase guidelines:
Once the paint is completely dry—I usually give it at least an hour—gently erase any visible pencil marks, particularly the center line in the unpainted areas.
Hang your finished tapestry with wooden magnetic rails or simply pin it up to enjoy the balance of day and night in your space


Ocean Split: Calm vs. Stormy
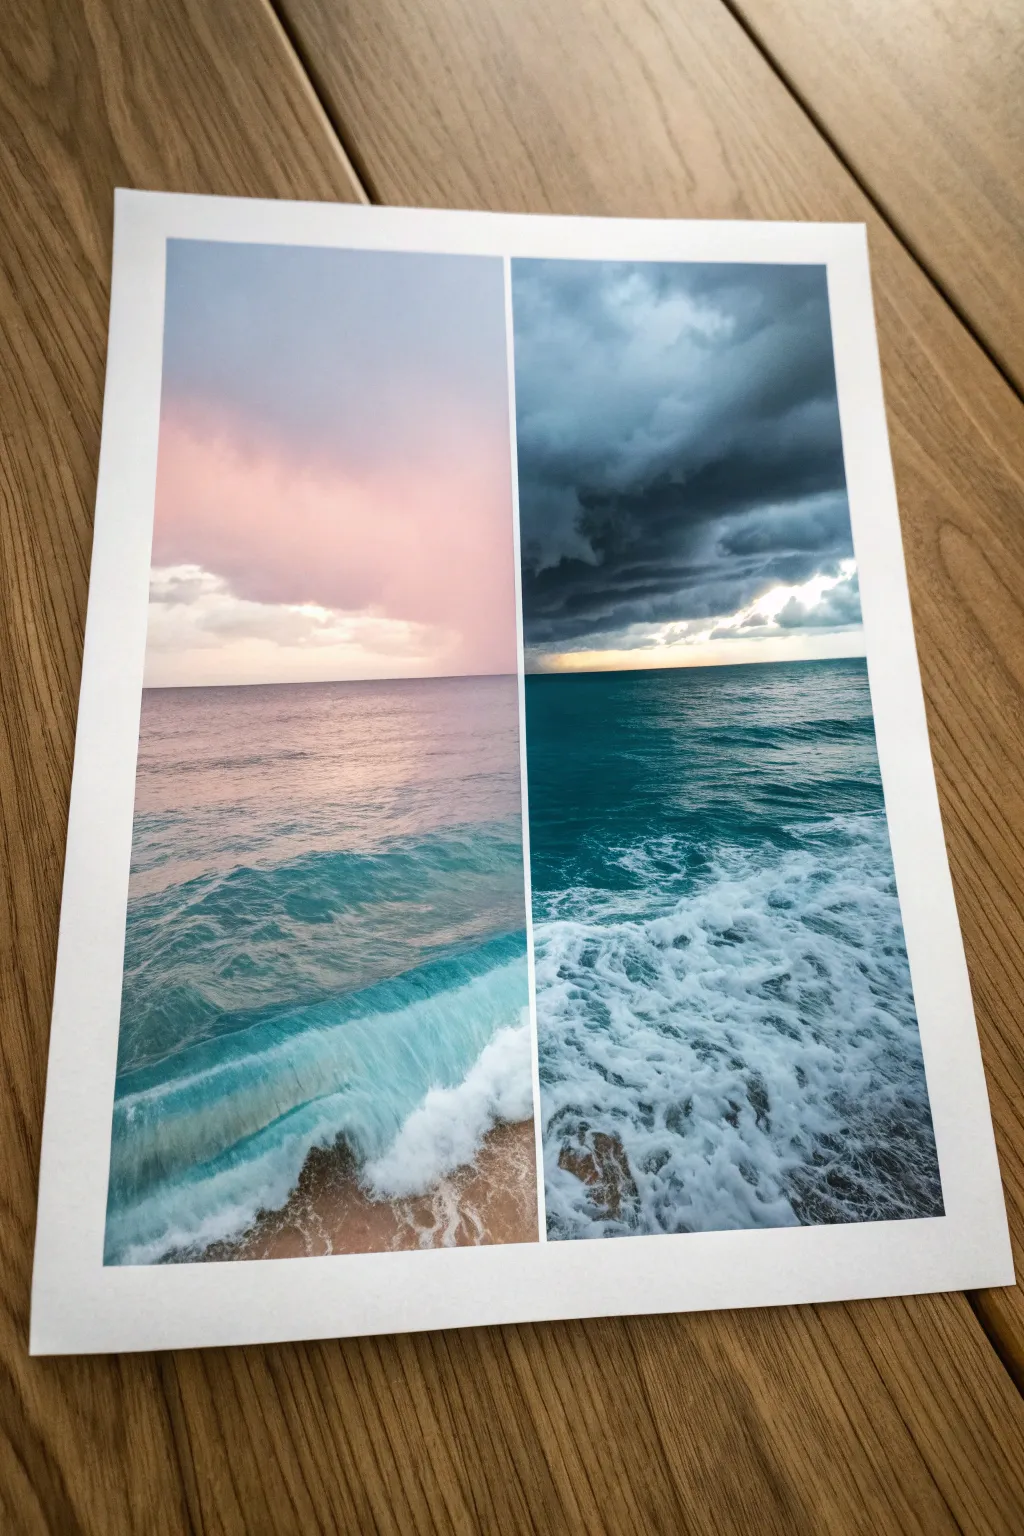
Capture the dual nature of the sea with this striking split-canvas composition, contrasting a serene, candy-colored sunset with dramatic, brooding storm clouds. This project teaches you essential seascape techniques, from soft sky blending to creating realistic, churned-up ocean foam.
Step-by-Step Guide
Materials
- Heavyweight watercolor paper or mixed media canvas pad
- Painter’s tape or masking tape
- Acrylic paints (Titanium White, Phthalo Blue, Turquoise, Payne’s Grey, Magenta/Pink, Yellow Ochre, Burnt Umber)
- Flat shader brushes (medium and large)
- Small round detail brush
- Fan brush (optional)
- Palette knife
- Cup of water and paper towels
Step 1: Preparation and Sky gradients
-
Divide the surface:
Begin by placing a strip of masking tape vertically down the exact center of your paper. Press the edges down firmly to prevent paint from bleeding underneath, ensuring a crisp white line later. -
Map the horizon:
Lightly sketch a horizontal line across both sections about one-third of the way up from the bottom. This will serve as your horizon line for the ocean. -
Block in the calm sky:
On the left side, start at the top with a mix of pale blue and white. As you move down, blend in soft pinks and a touch of magenta while the paint is still wet to create a smooth, twilight gradient. -
Add sunset glow:
Near the horizon line on the left, mix white with a tiny dot of yellow ochre or gold. Blend this upwards into the pinks to mimic the glowing light just before the sun disappears. -
Paint the storm sky base:
Move to the right panel. Start at the top with a dark mix of Payne’s Grey and Phthalo Blue. Bring this down about halfway, keeping the strokes somewhat uneven. -
Create turbulent clouds:
While the dark base is wet, dab in lighter grey and white mixes using a scruffy brush motion. Focus on creating heavy, rolling shapes that look ominous. -
Brighten the storm horizon:
Leave a small strip of light right above the horizon on the stormy side using white mixed with a touch of yellow. This high contrast highlights the drama of the dark clouds above.
Step 2: Ocean Bases and Waves
-
Base coat the calm water:
On the left, paint the water area with a gradient of turquoise mixed with white. The water should be darker near the horizon and get significantly lighter and more transparent as it nears the sand. -
Establish the stormy sea:
On the right, fill the ocean section with a deep, saturated teal. Mix Phthalo Blue with a little green and a touch of black or grey to make the water look deep and dangerous. -
Paint the sand:
At the very bottom of the left panel, paint a triangular wedge of wet sand using Burnt Umber mixed with plenty of white. I find adding a tiny bit of red helps warm it up. -
Form the gentle wave:
On the left side, use a clean flat brush to paint a curved line of lighter turquoise where the wave is beginning to crest. Blend the bottom edge of this line down into the transparent water. -
detail the rolling wave:
Add a crisp white line along the top of your cresting wave. Use a dry brush to drag a little white downwards, suggesting the movement of the water starting to crash.
Bleeding Tape?
If paint leaked under your center tape, don’t panic. Wait for it to dry fully, then use a white paint marker or thick white acrylic with a ruler to re-paint the dividing line perfectly straight.
Step 3: Texture and Finishing Details
-
Create calm sea foam:
Where the water meets the sand on the left, use a round brush to tap in lacy patterns of white foam. Keep these delicate and not too opaque. -
Build stormy waves:
Switch to the right side. Using a fan brush or an old, splayed brush, tap pure white paint vigorously over the bottom third of the water to create churning, chaotic foam. -
Add surface depth:
On the stormy side, use a small brush to paint dark blue, choppy horizontal lines in the mid-ground water. This simulates rough swells in the distance. -
Highlight the chaos:
Go back over your stormy foam with some thick dabs of white paint to create texture. The foam should look 3D and bubbly compared to the smooth water on the left. -
Final blending and reveal:
Check your horizon lines to ensure they match up visually. Once the painting is completely dry, slowly peel off the center tape at a 45-degree angle to reveal the clean divide.
Add Metallic Touches
Mix a tiny amount of iridescent medium or pearlescent paint into the white used for the calm wave crest. It makes the water catch the light and shimmer like real tropical ocean spray.
Step back and admire how the clean white line emphasizes the powerful mood shift between your two oceans


Wavy Border: Two Skies Blending
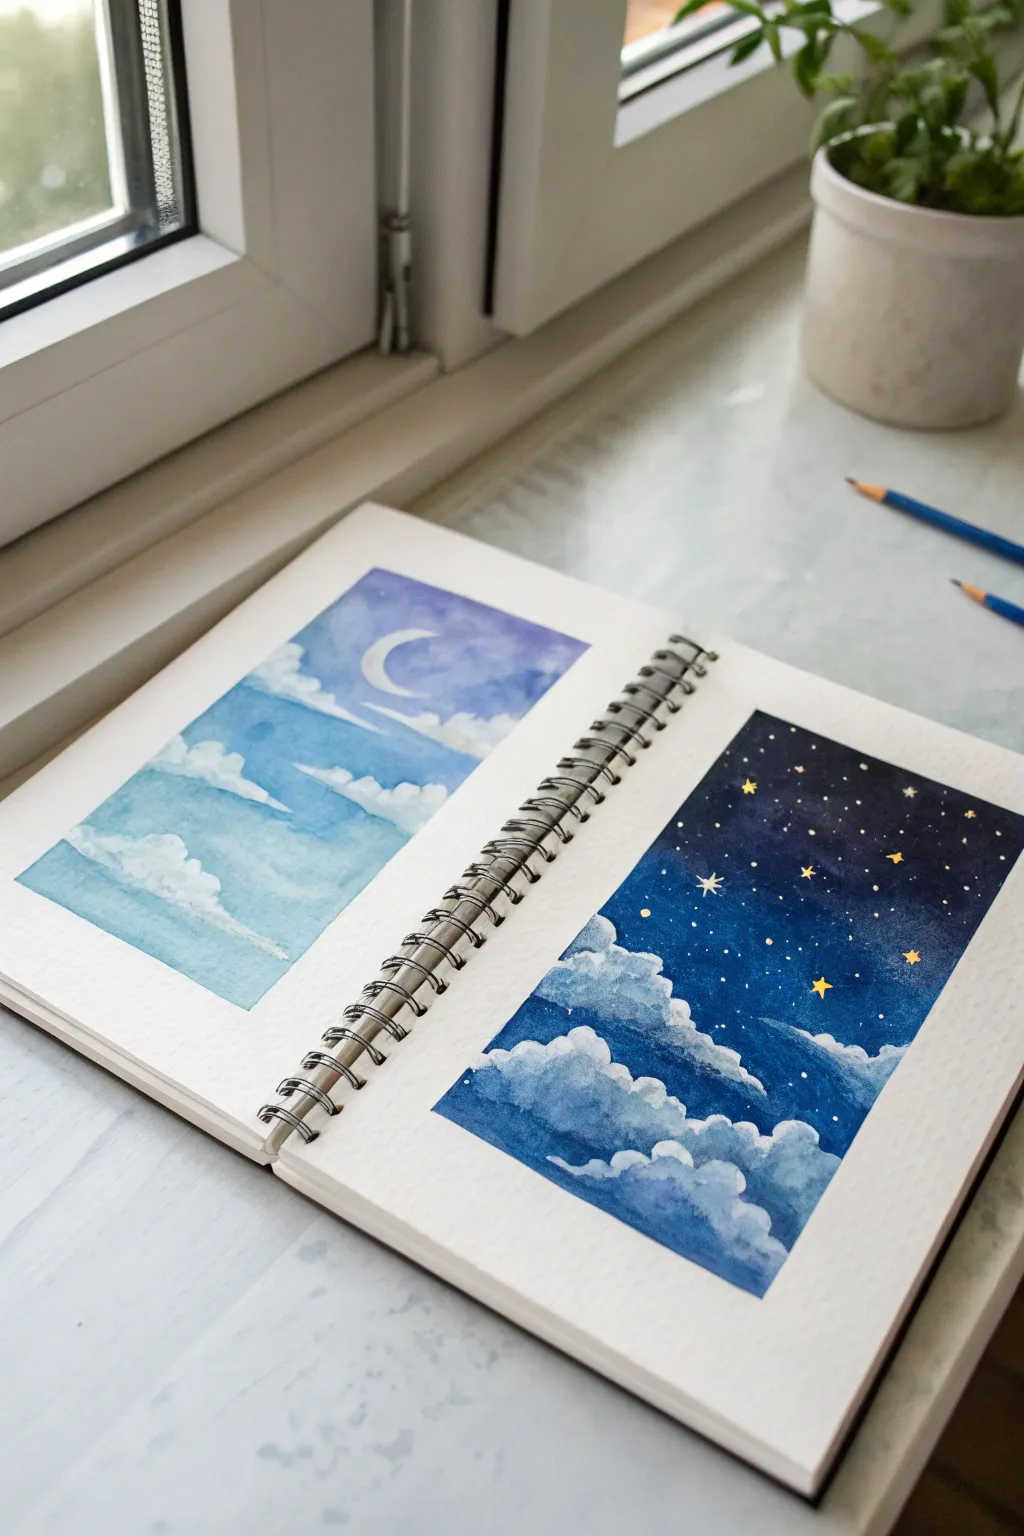
Capture the ethereal shift from dusk to midnight with this stunning two-page watercolor spread. By mirroring the composition across the sketchbook binding, you create a beautiful dialogue between a soft, moonlit evening and a dramatic, starry night.
Step-by-Step Tutorial
Materials
- Watercolor sketchbook (cold press paper recommended)
- Watercolor paints (Cerulean Blue, Ultramarine, Dioxazine Purple, Indigo/Payne’s Gray)
- White opacity medium (gouache, Posca pen, or gel pen)
- Gold ink or metallic watercolor paint
- Masking tape
- Round watercolor brushes (sizes 4 and 8)
- Fine liner brush (size 0 or 00)
- Paper towels
- Two jars of water
Step 1: Preparation & Masking
-
Tape the borders:
Begin by carefully taping off a rectangular border on both the left and right pages of your open sketchbook. Leave about an inch of white space around the edges for a clean, professional frame. -
Protect the spine:
Don’t forget to run a strip of tape vertically down the center spiral binding—or leave a small gap—to ensure your paint doesn’t seep into the rings or bleed across pages.
Step 2: Left Page: Soft Moonlit Evening
-
Sketch the moon:
With a very light pencil touch, draw a small crescent moon in the upper center of the left panel. Mask it out with masking fluid if you have it, or simply paint carefully around it later. -
Mix the sky gradient:
Prepare a watery mix of Cerulean Blue and a touch of Dioxazine Purple. You want a soft, periwinkle hue that suggests early evening light. -
Paint the upper sky:
Using your size 8 brush, apply a wet wash starting from the top. As you move down, dilute the paint with more water to create a gradient that fades as it reaches the bottom half. -
Lifting clouds:
While the wash is still damp but not soaking wet, use a clean, thirsty brush or a crumpled tissue to lift out horizontal irregular shapes. These will be your soft, high-altitude clouds. -
Defining cloud shadows:
Once the paper is dry, mix a slightly stronger blue-grey. Paint underneath the lifted white areas to give the clouds volume and dimension, softening the bottom edges with clean water. -
Finalizing the moon:
If you masked the moon, rub the gum away. Paint a very pale, watery grey on the shadowed side of the crescent to give it form, leaving the lit side pure white.
Tape Tearing Paper?
If your tape is sticking too aggressively, blast it with a warm hairdryer for a few seconds before peeling. The heat softens the adhesive for a clean removal.
Step 3: Right Page: Deep Starry Night
-
Mix the night palette:
For the right panel, you need richness. Mix a heavy load of Indigo, Payne’s Gray, and Ultramarine Blue. The consistency should be darker and less watery than the left page. -
Paint the night gradient:
Start at the very top with your darkest mix. As you paint downward, lighten the pressure, but maintain a deep saturation until you reach the bottom third of the box. -
Create cumulus shapes:
Stop the dark wash abruptly in a bumpy, cloud-like pattern near the bottom. Clean your brush and use plain water to drag the bottom edge of that dark paint down, creating soft cloud tops. -
Building cloud volume:
Mix a medium-strength shadowed blue. Paint the bodies of the bottom clouds, leaving the tops distinct and white against the dark sky. Layer this shadow color to create fluffy, billowing shapes. -
Adding texture:
Drop small hints of pure water into the drying cloud shadows to create ‘blooms’ or cauliflower textures that mimic vapor.
Level Up: Connecting Elements
Try extending a single cloud formation lightly across the center spine gap. This visual bridge physically connects color palettes of the two different times of day.
Step 4: Details & Stars
-
Splatter the stars:
Once the dark sky is totally bone-dry, load a brush with white gouache. Tap the handle against another brush to splatter fine white dots across the indigo area. -
Painting large stars:
Use a white gel pen or fine brush with opaque white to manually dot a few larger, specific stars. Add tiny cross shapes to make them twinkle. -
Gilded accents:
I love adding a magical touch here: take your gold ink or metallic paint and add a few select golden stars among the white ones on the night side to make it pop. -
The reveal:
Wait until everything is completely dry—impatient peeling tears paper! Slowly peel the tape away at a 45-degree angle to reveal your crisp, clean borders.
Close your sketchbook knowing you’ve captured the passage of time on a single spread


Have a question or want to share your own experience? I'd love to hear from you in the comments below!