
If you’re craving Día de los Muertos face painting inspiration, you’re in for the most satisfying mix of classic La Catrina elegance and playful calavera details. I pulled together ideas that range from quick, beginner-friendly designs to full-face showstoppers that feel like wearable art.
Classic La Catrina Full-Face Skull
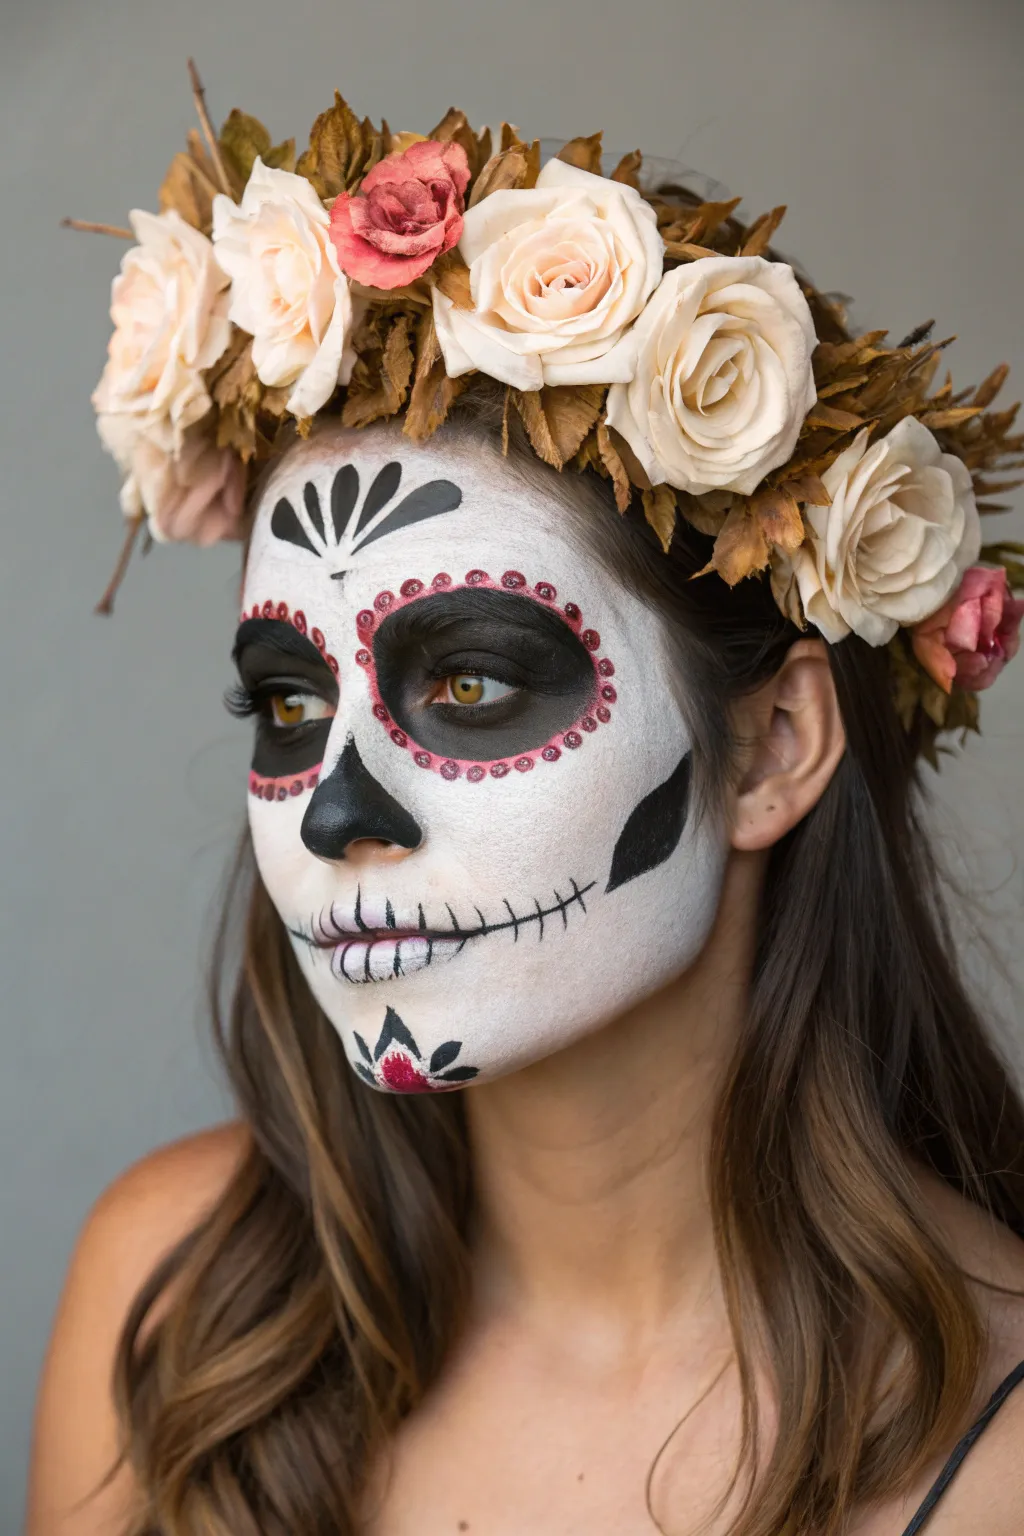
This elegant take on the traditional sugar skull features a soft, porcelain-white base contrasted with deep, shadowy eyes and delicate stitching details. The look is crowned with a romantic arrangement of pale roses and dried leaves, creating a hauntingly beautiful balance between life and death.
Step-by-Step
Materials
- White cream makeup or face paint (highly pigmented)
- Black cream makeup or gel eyeliner
- Translucent setting powder
- Deep berry or red lip liner pencil
- Makeup sponges (wedges and a beauty blender)
- Fine detail brushes (sizes 0 and 00)
- Small flat shader brush
- Medium fluffy blending brush
- Fake flower crown with cream roses and dried foliage
Step 1: Base and Eyes
-
Prep the canvas:
Begin with a clean, moisturized face to ensure the heavy makeup doesn’t cling to dry patches. If you have sensitive skin, a primer is a great idea here. -
Apply the white base:
Use a damp sponge to stipple white cream makeup all over the face. Aim for opaque, even coverage but avoid the immediate eye area where the black circles will go. -
Set the foundation:
Gently press translucent powder over the white base using a powder puff. This prevents smudging and gives that bone-like matte finish. -
Outline the eye sockets:
With a black eyeliner pencil or a small brush with black paint, draw large circles around your eyes. Follow the natural curve of your eyebrows and extend down onto the tops of your cheekbones. -
Fill in the darkness:
Fill the outlined circles completely with black face paint or gel liner. Use a flat shader brush to pack on the color for density. -
Blend the edges:
Use a clean blending brush to slightly soften the edges of the black circles so they don’t look too harsh against the white skin.
Stay crisp
Keep a Q-tip dipped in micellar water handy. If your black lines smudge into the white, you can quickly erase the mistake without ruining the whole base.
Step 2: Intricate Details
-
Add the petal border:
Using a fine detail brush and the berry-colored lip liner or paint, create small, evenly spaced dots around the perimeter of the black eye sockets. These mimic the scalloped edges often seen on sugar skulls. -
Sculpt the nose:
Draw an inverted ‘V’ shape on the tip of the nose using black paint. Fill this in completely to simulate the nasal cavity of a skull. -
Draft the mouth:
Draw a thin horizontal line extending from the corners of your mouth outwards toward the jawline using your fine brush and black paint. -
Stitch the lips:
Paint vertical lines across your lips and the extended horizontal line. Make the lines in the center slightly longer and taper them as they move outward. -
Create the forehead detail:
Paint a stylized spiderweb or flower design in the center of the forehead using black ink. Start with a central teardrop shape and fan out curved petals or web lines from there. -
Add chin flourish:
Mirror the forehead design on the chin with a smaller, simplified fan shape or flower motif in black. -
Highlight the decorative elements:
I like to take a tiny bit of difference here; add a small touch of the berry color into the center of the chin design to tie it back to the eye details. -
Contour the hollows:
Lightly shade under the cheekbones using a grey eyeshadow or diluted black paint to add skeletal depth without overwhelming the white base. -
Final setting spray:
Mist the entire face with a setting spray to lock the design in place for the duration of your event. -
Crown yourself:
Place the flower crown on your head, positioning it so the roses frame the forehead design perfectly.
Patchy black paint?
If the black eye sockets look streaky, pat a matte black eyeshadow over the cream paint. This sets the cream and creates a velvety, pitch-black void effect.
You now embody a timeless symbol of celebration and memory, ready for the festivities


Traditional Calavera With Colorful Filigree

Brighten up the traditional sugar skull look with this delicate, nature-inspired design featuring classic filigree and bold black accents. The bright white base provides the perfect canvas for the vivid red flowers, scrolling green vines, and sunny yellow details that frame the face beautifully.
Detailed Instructions
Materials
- High-quality white face paint (water-activated or grease)
- Black face paint or cream liner
- Face paint palette: Red, Green (emerald), Yellow, Orange
- Makeup sponges or kabuki brush
- Fine detail brushes (round #1 and #2)
- Flat brush (medium)
- Translucent setting powder
- Small eyeshadow brush
- Water cup and paper towels
Step 1: Base and Structure
-
Prep and prime:
Start with a clean, dry face. Tie back hair securely to keep it away from the forehead and cheeks. Apply a very thin layer of moisturizer if your skin is dry, but let it absorb fully before painting. -
Apply the white base:
Using a damp sponge or kabuki brush, load up your white face paint. Pat it evenly across the entire face, avoiding the immediate eye area and the tip of the nose. Aim for an opaque, solid finish rather than a streaky wash. -
Set the base:
Once the white paint is tacky or dry, lightly dust translucent setting powder over the face. I find this really helps prevent the detail colors from blending into the white background later. -
Create the eye sockets:
Using a flat brush and black paint, outline a large circle around each eye, incorporating the eyebrow area. Fill these circles in completely with black. Keep the edges relatively clean but don’t worry about perfection, as we will frame them next. -
Paint the skeletal nose:
With a smaller brush and black paint, fill in the tip of the nose. Draw a ‘U’ shape on top and two points extending up the bridge to mimic a nasal cavity void.
Step 2: The Eye Details
-
Yellow petal outlines:
Using a round brush and yellow paint, create a scalloped border around the black eye sockets. Think of these as small flower petals radiating outward. -
Add dimension to petals:
For extra depth, mix a tiny bit of orange into your yellow or use pure orange on the very tips of the petals. Rinse your brush thoroughly afterward. -
Outline the border:
Take a fine detail brush with emerald green paint or teal. Carefully outline the inner edge of the yellow petals where they meet the black eye socket to create a sharp separation.
Smudge Control
If black paint falls onto your white base, wait for it to dry completely. Then use a dry Q-tip to flick the flake off. Wiping it wet will just create a gray smear.
Step 3: Floral Filigree Work
-
Forehead centerpiece:
In the center of the forehead, paint a vertical motif using green and red. It should resemble a sprouting plant or stylized fleur-de-lis. Use smooth, sweeping strokes for the leaves. -
Side forehead vines:
On the temples, use a fine brush with green paint to draw curling vines. Add small teardrop shapes and swirls (filigree) that curve toward the center of the face. -
Cheekbone flowers:
Paint a small, simple red flower with a yellow center on the upper cheekbone, near the hairline. Connect this to your green vine work with a thin stem. -
Chin floral accent:
Replicate a larger red flower on the chin area. Add jagged green leaves at the base of the flower and flowing green scrolls extending along the jawline. -
Paisley cheek details:
In the hollow of the cheek, paint a sideways teardrop or paisley shape. Outline it in red, fill the center with yellow, and add a small orange accent inside for a gradient effect.
Glitter Glam
While the paint is still slightly wet, press cosmetic-grade glitter onto the red flower petals or the black eye sockets. This adds texture and catches the light beautifully.
Step 4: Final Touches
-
The skeletal mouth:
Using your finest brush and black paint, draw a thin horizontal line extending from the corners of the mouth towards the ears. Keep this line crisp. -
Stitching the lips:
Paint vertical tick marks across the lips and the extended line to create the classic ‘stitched’ teeth look. Make the lines shorter near the ends and longer in the center. -
Red teardrop accent:
Add a small, inverted red teardrop directly in the center of the forehead/brow area, just above the nose cavity. -
Refine the filigree:
Go back over your green vines. If they look too flat, add tiny dots or thorns along the curves for texture. -
Final check:
Step back and check for symmetry. Use a Q-tip with makeup remover to clean up any stray smudges on the unpainted skin areas like the neck or ears.
Now you are ready to celebrate with a stunning and artistic tribute to this colorful tradition


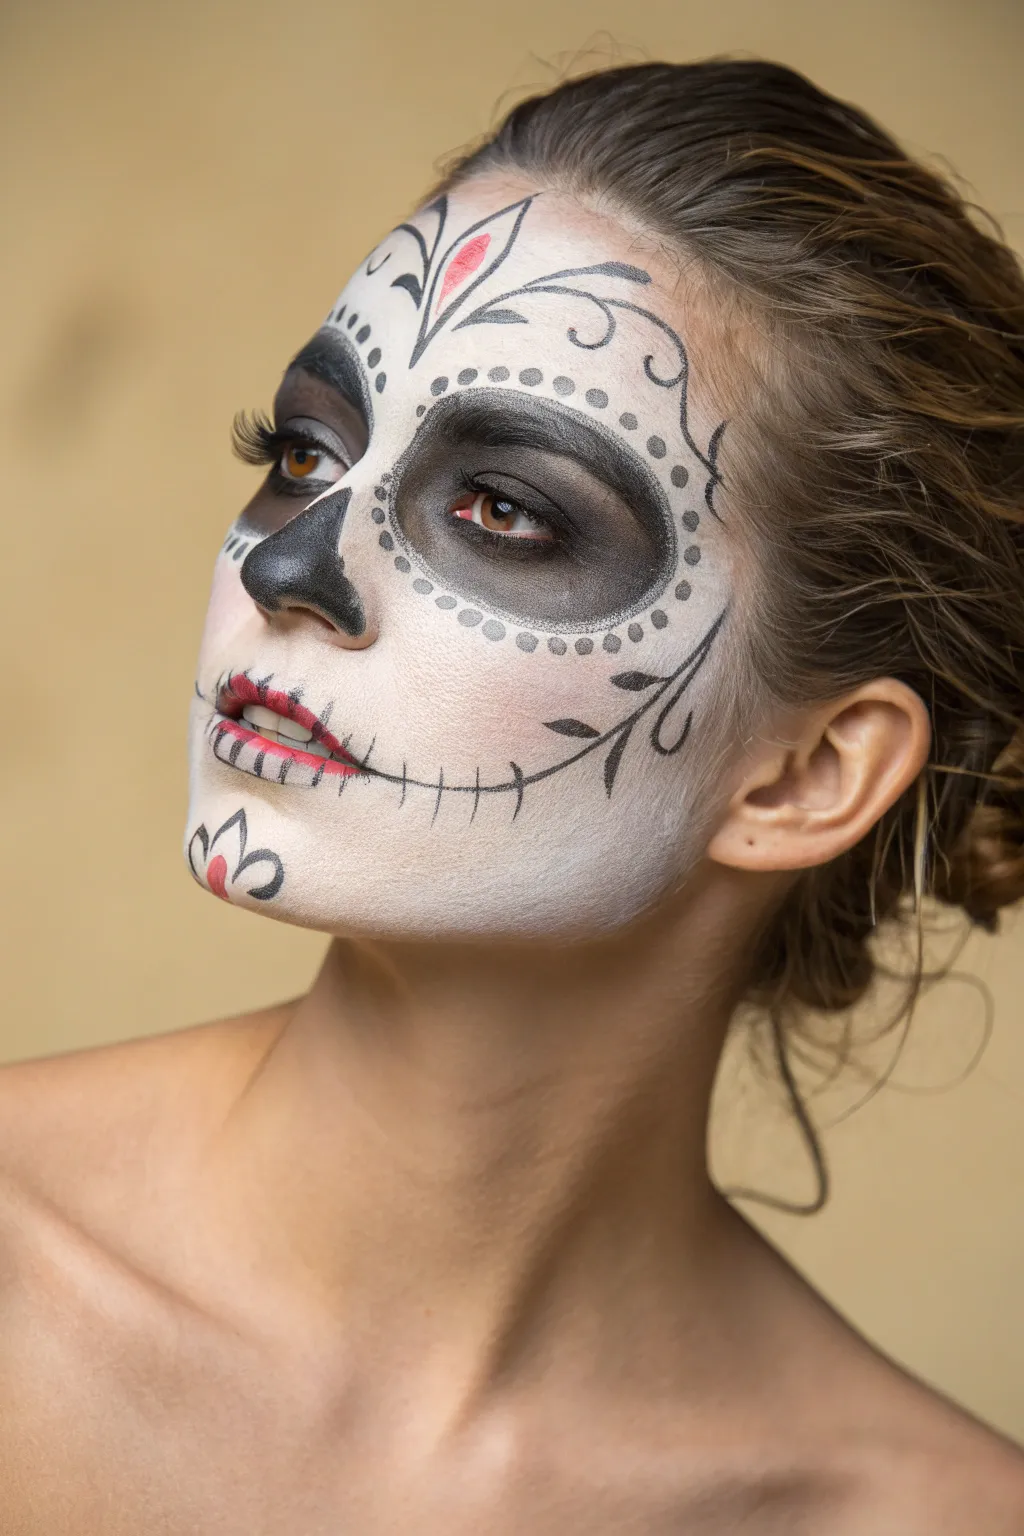
Black-and-White Sugar Skull Chic
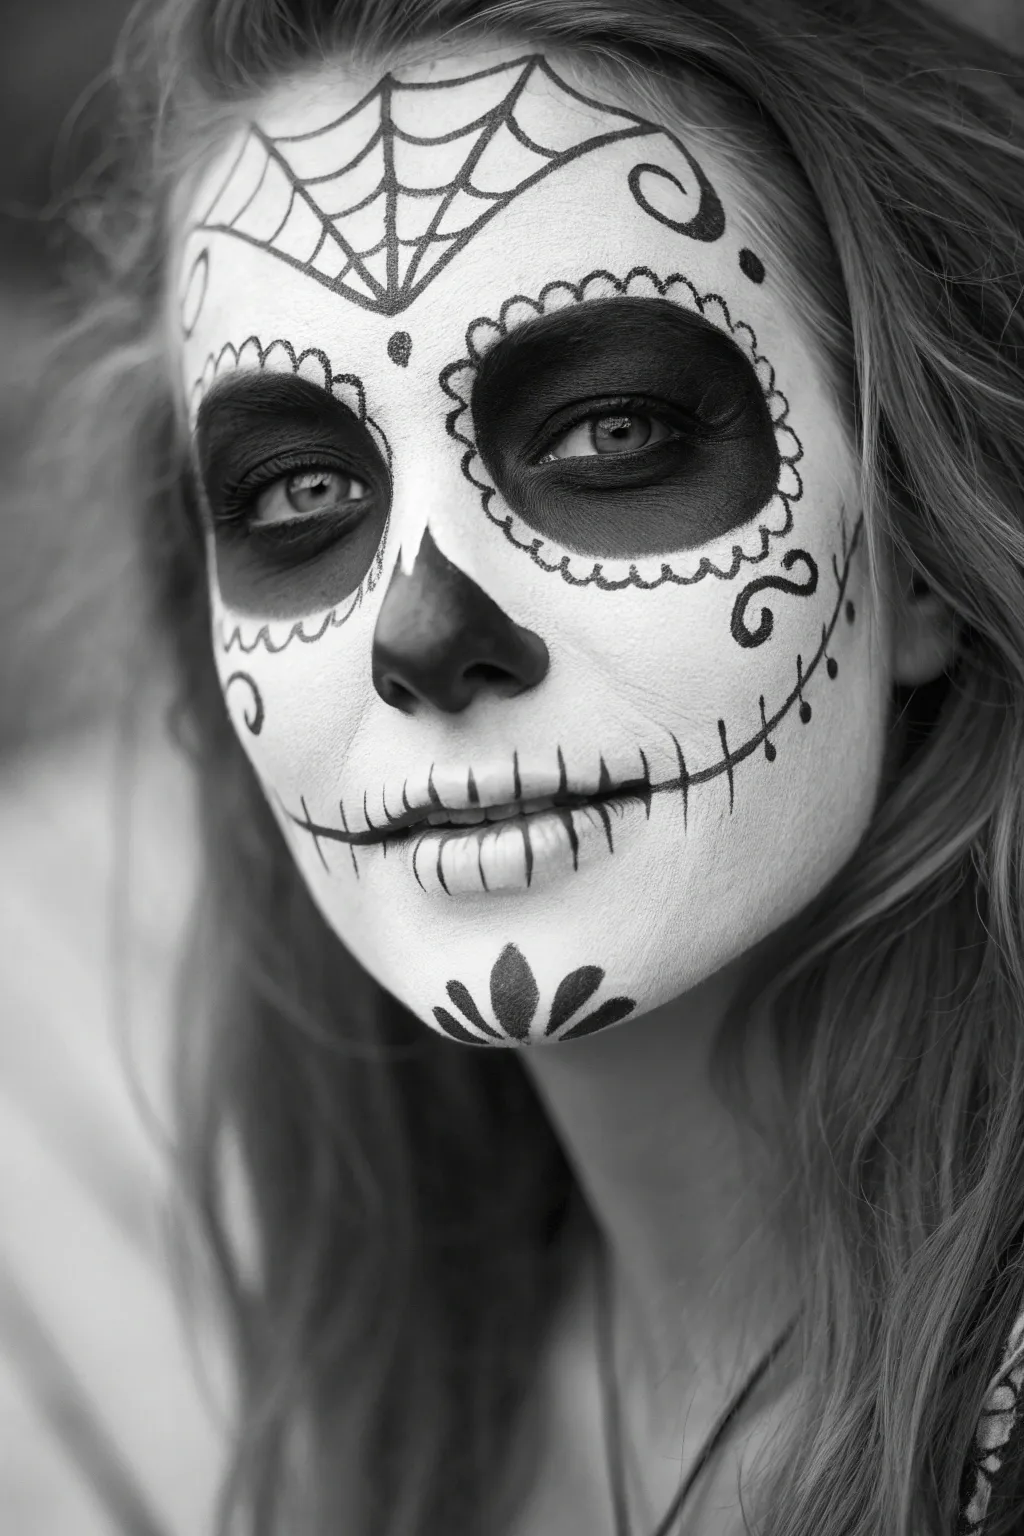
Capture the haunting elegance of Dia de los Muertos with a striking black-and-white design that relies on sharp contrast and delicate linework. This look features a classic spiderweb forehead, deep hollowed eyes, and stitched mouth details for a chillingly beautiful finish.
Step-by-Step Guide
Materials
- White cream face paint (Clown White or similar)
- Black cream face paint or gel liner
- Setting powder (translucent)
- Makeup sponge or beauty blender
- Medium flat brush
- Fine detail brush (liner brush)
- Black eyeshadow
- Small fluffy blending brush
Step 1: Base & Eyes
-
Prime the canvas:
Begin with a clean, dry face. Using a dampened sponge, apply an even, opaque layer of white cream paint over your entire face, stopping just at the jawline and leaving the eye sockets bare. -
Smooth perfection:
Pat the sponge over the white base to remove streaks. Once smooth, generously apply translucent setting powder to lock the white in place so it doesn’t smear while you work. -
Map the sockets:
With a medium flat brush and black paint, outline large circles around your eyes. These should extend up to the eyebrows and down onto the cheekbones. -
Fill the void:
Fill in the eye circles completely with black paint. Take care near the waterline, but don’t worry about perfect edges yet. -
Soften the gaze:
I like to pat black eyeshadow over the wet black paint. This sets the cream and creates a velvety, matte finish that absorbs light beautifully.
Smudge Control
If black paint smears onto the white base, don’t wipe it! Wait for it to dry, then dab a bit of white paint over the mistake to cover it cleanly.
Step 2: Nose & Mouth
-
Sculpt the nose:
Using a smaller brush, paint the tip of the nose black. Create a ‘spade’ shape by extending two small points slightly up the bridge of the nose. -
Extend the smile:
Draw a thin black line extending horizontally from the corners of your mouth out toward your ears, following the natural curve of your cheek. -
Stitch it up:
With a fine liner brush, paint vertical stitch lines across the lips and the extended smile line using quick, light strokes. -
Refine the stitches:
Make the stitches slightly longer in the center of the lips and shorter as they move outward to mimic the curvature of teeth.
Step 3: Detailed Embellishments
-
Petal borders:
Using the detail brush, paint small scallops or flower petals around the outer edge of the black eye sockets. Keep them small and uniform. -
Web weaving:
On the forehead, paint a spiderweb design. Start with vertical lines radiating from the hairline toward the space between your brows, then connect them with swooping horizontal arcs. -
Chin floral:
Paint a small, stylized flower or leaf design on the chin using three to five teardrop shapes pointing downward. -
Cheek accents:
Add a swirling flourish or scroll design on the cheekbones, just below the eye petals, to fill the negative space. -
Final shading:
Use a small fluffy brush with a tiny amount of black eyeshadow to lightly shade under the cheekbones for a hollowed, skeletal effect.
Glitter Glam
Before the black eye paint dries fully, press black or silver cosmetic glitter onto the eyelids for a sparkling, textured finish.
Step back and admire your beautifully monochromatic and spooky transformation


Marigold Glow La Catrina Palette
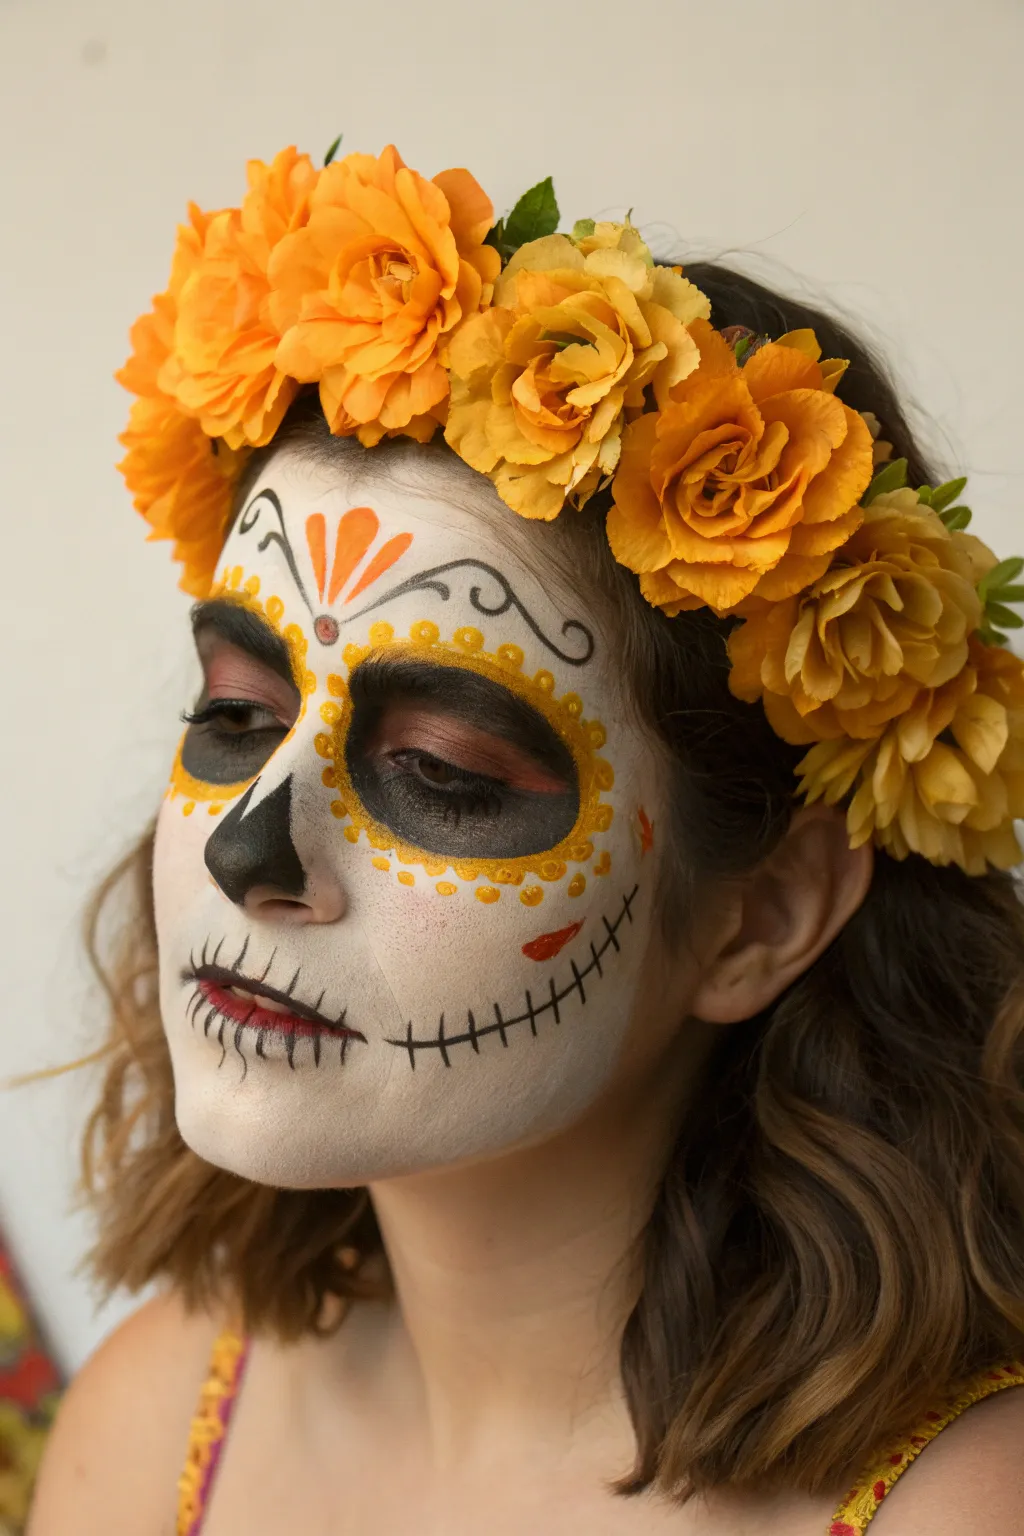
Capture the warmth of autumnal marigolds with this elegant Day of the Dead look, featuring soft white skin, striking skeletal accents, and a crown of vibrant orange blooms. This design balances the traditional spookiness of a skull with a gentle, glowing color palette perfect for celebrations.
Step-by-Step Tutorial
Materials
- White cream makeup or water-activated face paint
- Translucent setting powder
- Black face paint or gel liner
- Orange face paint
- Yellow face paint
- Makeup sponge
- Medium flat brush
- Fine detail brush or liner brush
- Small round brush
- Red-brown eyeshadow (optional for contour)
- Black eyeshadow (for setting)
- Faux marigold flower crown
Step 1: Setting the Base
-
Prep the canvas:
Start with clean, dry skin. Tie hair back securely so it doesn’t interfere with the painting process. -
Apply the white base:
Using a dampened makeup sponge, apply a thin, even layer of white face paint over the entire face. Don’t worry about complete opacity; a slightly translucent look works well here. -
Set the base:
Gently press translucent setting powder over the white paint using a powder puff or fluffy brush to prevent creasing and add longevity. -
Map out the eye sockets:
With a flat brush, outline large circles around the eyes, going up to the eyebrows and down to the tops of the cheekbones.
Step 2: Defining Features
-
Fill the eyes:
Fill the circles with black face paint. I like to keep the center of the eyelid slightly lighter or use a deep reddish-brown shadow there for a bit of dimension before blending into black edges. -
Create the nose:
Draw an upside-down heart shape or spade on the nose tip with black paint. Extend the top points slightly up the bridge and fill it in completely. -
Scallop the eyes:
Using a small round brush and yellow paint mixed with a tiny bit of orange, paint small scalloped semi-circles around the outer edge of the black eye sockets. -
Add detail dots:
Place a small orange dot inside each yellow scallop to create depth and texture resembling marigold petals. -
Highlight the center:
In the center of the forehead, paint three teardrop shapes fanning upwards using orange paint, looking like a stylized flower bud. -
Adding flourishes:
With your fine detail brush and black paint, draw delicate swirls extending from the forehead design and near the temples for an ornate touch.
Patchy White Base?
If the white looks streaky, pat it with your sponge rather than dragging. Let the first layer dry completely before dabbing on a second thin layer for better coverage.
Step 3: Skeletal details
-
Draft the mouth:
Paint the lips black, extending a thin line outward from the corners of the mouth toward the jawline on both sides. -
Stitch the smile:
Using the fine liner brush, paint short vertical lines across the extended mouth line to create the classic stitched skeletal grin. -
Add cheek accents:
Paint a small, red or deep orange teardrop shape on the cheekbone to balance the colors. -
Contour the hollows:
Use a fluffy brush and a grey or taupe eyeshadow to lightly contour under the cheekbones, giving the face a more sunken, skeletal appearance. -
Final touches:
Check for symmetry and sharpen any lines with your fine brush. Place the marigold crown on the head to complete the transformation.
Add Some sparkle
Glue small amber or clear rhinestones into the center of the forehead design or inside the eye scallops to catch the light and add glamour to the traditional skull.
With your marigold crown in place, you are ready to honor the spirits with grace and beauty
BRUSH GUIDE
The Right Brush for Every Stroke
From clean lines to bold texture — master brush choice, stroke control, and essential techniques.
Explore the Full Guide
Petal Eye Sockets With Soft Blending
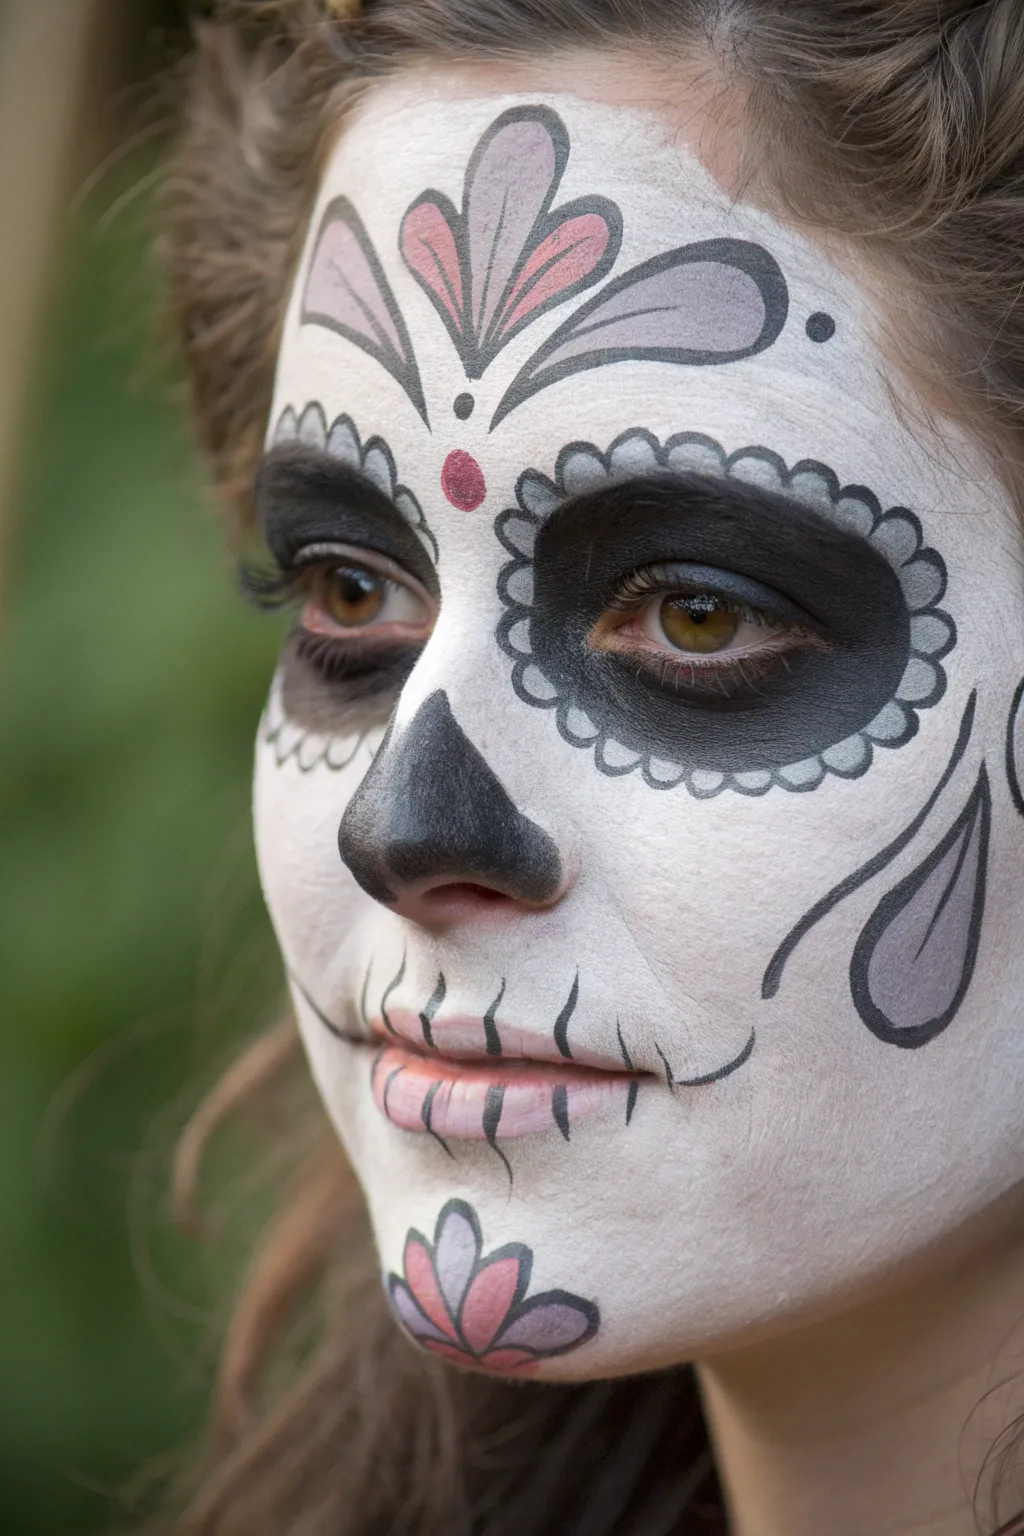
Achieve a hauntingly beautiful sugar skull look featuring scalloped eye sockets and a delicate floral forehead design. This style bridges the gap between traditional skeleton makeup and feminine artistry with its soft gray shading and rose accents.
Detailed Instructions
Materials
- White cream face paint (water-activated or oil-based)
- Black cream face paint or gel liner
- Gray eyeshadow or contour powder
- Soft pink or dusty rose face paint
- Muted purple face paint
- Medium flat synthetic brush
- Fine detail liner brush (0 or 00)
- Fluffy blending eyeshadow brush
- Makeup sponge
Step 1: Base and Shading
-
Prime the canvas:
Begin with a clean, dry face. Load a damp sponge with white face paint and apply an even layer over the entire face, avoiding the immediate eye area where the black will go. Dab gently to build opacity rather than dragging. -
Set the base:
Allow the white base to dry completely. If you are using a creamier product, lightly dust it with translucent setting powder to prevent smudging during the next steps. -
Draft the eye sockets:
Using a light gray eyeshadow and a fluffy brush, faintly trace large circles around your eyes, encompassing the eyebrows and the tops of your cheekbones. -
Fill the void:
Take your black face paint on a flat brush and fill inside the traced circles. Paint over your eyelids and eyebrows—if your brows are thick, you might want to glue them down first, though standard cream paint often covers well enough. -
Blend the edges:
Before the black paint dries fully, take a clean blending brush or sponge tip and soften the outer edges so they aren’t harsh lines, preparing them for the petal border.
Step 2: Detailed Line Work
-
Create the nose cavity:
Load a medium brush with black paint. Paint an upward-pointing ‘V’ shape on the tip of the nose, extending the sides around the nostrils to create a skeletal cavity look. -
Outline the petals:
Switch to your fine liner brush with black paint. Carefully draw a scalloped edge—a series of small connected ‘U’ shapes—around the entire perimeter of your black eye sockets. -
Shade the petals:
Using a small brush and gray eyeshadow, lightly shade the inside of each scalloped petal ‘U’ shape to give them dimension and a ruffled 3D effect. -
Draft the chin flower:
On the center of the chin, use your fine brush to outline a three-petaled lotus shape. The center petal should be the tallest. -
Draft the forehead design:
Mirroring the chin, outline a large floral motif on the center of the forehead. Draw a central teardrop shape pointing up, flanked by two curving leaves on each side.
Keep it Symmetrical
When painting the petal outlines around the eyes, step back from the mirror every few strokes. It’s easier to correct asymmetry early than after you’ve filled them in.
Step 3: Color and Final Touches
-
Fill the pink petals:
Using the dusty rose paint, fill in the central teardrop on the forehead and the central petal on the chin. I find a small angular brush works best for staying inside these lines. -
Add purple accents:
Fill the outer leaves on the forehead and chin designs with the muted purple paint. The color should be soft, not neon. -
Outline forehead elements:
Outline your colored forehead shapes with the fine liner brush and black paint. Add a small black dot at the base of the design and another dot just above the space between your eyebrows. -
Paint the mouth:
Draw a thin black line extending from the corners of your mouth toward your jawline slightly. Draw vertical stitches across your lips and the extended line. -
Detail the stitches:
Use a light hand to taper the ends of the vertical stitches so they look like fine threads rather than thick bars. -
Add cheek flourishes:
On the hollow of the cheek, paint a black teardrop shape that curves upward, similar to a paisley design, to accentuate the cheekbone. -
Final shading pass:
With the gray eyeshadow and blending brush, add subtle contouring under the cheekbones and around the temples to give the skull shape depth without overwhelming the white base.
Smudged Black Paint?
If black paint migrates onto the white base, wait for it to dry completely. Then, use a damp Q-tip to lift the fleck off before dabbing fresh white paint over the spot.
Step back and admire the elegant balance of floral beauty and skeletal structure you have created
Bold Heart Nose and Cupid Bow Accents

This elegant sugar skull design balances bold black accents with soft pink hearts and delicate linework for a look that is both striking and sweet. The standout features are the prominent heart drawing squarely on the nose and the lovely cupid’s bow details on the chin.
Step-by-Step
Materials
- White face paint (water-activated or cream)
- Black face paint (water-activated for lines, cream for sockets)
- Pink face paint (matching the rose accessory)
- High-density makeup sponge
- Medium round brush (size 4 or 6)
- Fine liner brush (size 0 or 1)
- Small eyeshadow brush (optional for blending)
- Pink fabric rose hair clip
Step 1: Base and Eyes
-
Create the white canvas:
Begin by dampening your sponge and loading it with white face paint. Pat it evenly across the entire face, covering the forehead to the chin, but leaving the eye sockets and the very tip of the nose bare. Building up thin layers prevents cracking. -
Define the eye sockets:
Using a medium round brush and black paint, outline large circles around the eyes. These should extend up to the eyebrows and down to the top of the cheekbones. -
Fill the sockets:
Fill in the circles completely with black paint. For a smoother finish near the waterline, switch to a smaller brush or be very gentle with the larger one. Ensure the coverage is opaque. -
Add the petal border:
Load a small round brush with pink paint. Paint small, scalloped humps all around the outer edge of both black eye sockets to create a flower petal effect. -
Outline the petals (optional):
If you want extra definition, wait for the pink to dry, then use your finest liner brush with black paint to carefully outline the top edge of each pink petal.
Symmetry Hack
Stand directly in front of a mirror and map out key points (like the center of the forehead heart and nose tip) with a tiny dot of white eyeliner before painting.
Step 2: The Heart Nose and Cheeks
-
Paint the nose heart:
This is a key feature: paint the tip of the nose black. Instead of a traditional triangle, shape the top edge into a double curve to form a heart shape upside down, extending slightly up the bridge. -
Place cheek hearts:
Using the pink paint and a medium brush, paint a distinct heart shape on the center of each cheek. Position them so the point of the heart aims downward. -
Detail the forehead center:
Paint a matching pink heart in the very center of the forehead, just above the eyebrows. -
Add forehead flourishes:
With black paint and a liner brush, draw a long, curved vine extending from the center forehead heart out toward the temples. I like to add little leaf-like strokes along the vine. -
Paint upper swirls:
Above the eye sockets on the forehead, paint two symmetrical S-shaped swirls using thin black lines. Add a small dot or circle at the inner curl of the swirl.
Step 3: Mouth and Chin
-
Draw the mouth extension:
Using your fine liner brush and black paint, draw a thin line extending from the corners of the lips outward across the cheeks, following the natural smile line. -
Create the stitched look:
Paint vertical tick marks along the lips and the extended smile line. Keep the lines in the center of the lips slightly longer and taper them shorter as you move outward. -
Add chin flourishes:
On the sides of the jawline, roughly below the cheek hearts, paint a small black scroll or swirl shape that curves inward toward the mouth. -
Detail the chin center:
At the very bottom of the chin, paint three pink tear-drop or petal shapes fanning out from the center point. -
Final dots:
Using the blunt end of your brush dipped in pink paint, add tiny decorative dots near the cheek hearts and chin designs. -
Accessorize:
Finish the look by clipping a large pink rose into the hair on one side to match the paint tones.
Fixing Smudges
If black paint bleeds into the white base, wait for it to fully dry. Then, use a damp Q-tip to lift the mistake before dabbing fresh white paint over the spot.
Now you have a beautifully balanced sugar skull design ready for celebration

PENCIL GUIDE
Understanding Pencil Grades from H to B
From first sketch to finished drawing — learn pencil grades, line control, and shading techniques.
Explore the Full Guide
Classic Teeth Grin With Clean Line Spacing

This elegant sugar skull design balances bold black features with delicate scalloped edges and floral accents. The striking contrast between the deep eye sockets and bright turquoise detailing creates a captivating look perfect for Dia de los Muertos celebrations.
Detailed Instructions
Materials
- White face paint (water-activated or cream)
- Black face paint
- Turquoise or light teal face paint
- Red face paint (small amount)
- Small round brush (size 1 or 2)
- Medium round brush (size 4 or 5)
- Flat foundation brush or sponge
- Setting powder (translucent)
- Small cup of water
- Paper towels
Step 1: Base & Structure
-
Prep the canvas:
Begin with a clean, dry face. Ensure any moisturizer is fully absorbed to prevent the paint from slipping. -
Apply the white base:
Using a damp sponge or flat foundation brush, apply an even layer of white face paint over the entire face. I find patting the sponge creates a smoother, streak-free finish than dragging it. -
Outline the eye sockets:
With a medium round brush and black paint, draw large circles around both eyes. These should extend above the eyebrows and down onto the upper cheekbones for a classic skull proportion. -
Fill the eyes:
Fill in the circles completely with black paint. Be careful near the waterline and inner corners; take your time here to get solid coverage. -
Sculpt the nose:
Paint the tip of the nose black using the medium brush. Instead of a simple triangle, create an inverted ‘spade’ shape or double-hump shape on the bridge to mimic a nasal cavity.
Step 2: Eyes & Forehead Details
-
Create the turquoise scallops:
Switch to a clean small round brush loaded with turquoise paint. Paint small, connecting half-circles (scallops) all the way around the black eye sockets. Try to keep them uniform in size. -
Outline the scallops:
Once the turquoise is dry, use a very fine brush with black paint to carefully outline the outer edge of the turquoise scallops. This makes the color pop significantly. -
Start the forehead centerpiece:
In the center of the forehead, paint a black teardrop shape pointing downward. Above this, create a stylized heart or V-shape with curling ends. -
Add forehead flourishes:
Extend two long, elegant black swirls curving outward from the center design toward the temples. Add small dots or smaller swirls to fill the space if needed. -
The bindi accent:
Place a small, red teardrop shape directly in the center of the forehead design, just above the eyebrows, acting as a focal point.
Clean Lines Secret
For the crispest lines on the scalloped edges, use a liner brush with long bristles. The length absorbs hand tremors better than short bristles.
Step 3: Mouth, Chin & Finishing Touches
-
Draw the main smile line:
Using a thin brush and black paint, draw a continuous line from one cheek hollow, across the lips, to the other cheek hollow. Curve it slightly upwards at the ends. -
Paint the lips:
Fill in the inner part of the lips lightly with black or mix a grey tone to shadow them, blending it into the main horizontal line. -
Stitch the mouth:
Paint short vertical lines across the main mouth line to create the ‘teeth’ or sutures. Make the lines shorter near the center of the lips and taller as they move outward onto the cheeks. -
Cheekbone shading:
Add a decorative black swirl or flourish on the cheekbones, incorporating it into the end of the stitched mouth line to contour the face. -
Chin flower base:
On the center of the chin, paint a turquoise flower with three or five pointed petals blooming upward. -
Detail the chin flower:
Outline the turquoise petals with thin black lines. Add a small dot to the center of the flower for depth. -
Final shading touches:
Add a few small black dots along the temple area or jawline to balance the negative space. -
Set the makeup:
Lightly dust translucent setting powder over the white areas (avoiding the black) to prevent smudging throughout the celebration.
Fixing Smudges
If black paint drips onto the white, wait for it to dry completely. Flake it off gently with a clean spoolie or dry Q-tip, then dab white over it.
You are now ready to showcase an intricately beautiful design that honors tradition
Hollow Cheek Contour Skull Illusion
Blend haunting beauty with delicate details in this sophisticated take on a classic Día de los Muertos look. This design moves away from harsh black lines, using soft shading and precise petal work to create a skull that feels both elegant and ghostly.
Step-by-Step Tutorial
Materials
- White cream makeup or face paint (water-activated)
- Black cream makeup or face paint
- Red face paint or lip liner
- Translucent setting powder
- Makeup sponge or beauty blender
- Large powder brush
- Fine detail brush (size 0 or 00)
- Medium round brush
- Flat shader brush
- Black eyeshadow (matte)
- Grey eyeshadow (matte)
Step 1: Base and Shading
-
Priming the Canvas:
Start with a clean, dry face. Using a damp sponge, apply an even layer of white face paint across the entire face, blending down slightly onto the neck. Keep the coverage opaque but not cakey. -
Setting the Base:
Before moving on, gently press translucent setting powder over the white base using a large powder brush. This prevents the cream makeup from shifting and creates a smooth surface for painting. -
Initial Eye Sockets:
Using a flat shader brush and black face paint, fill in the eye sockets. Follow the natural orbital bone to create a large, rounded circle around each eye, extending up through the eyebrow. -
Softening the Edges:
While the black paint is still slightly tacky, use a clean blending brush to smudge the edges outward slightly. Pack matte black eyeshadow over the cream paint to set it and deepen the darkness. -
Creating the Hollow Cheek:
Instead of a hard line, use grey eyeshadow on a fluffy brush to contour underneath the cheekbone. Start at the hairline and sweep towards the corner of the mouth, fading the color out as you go to simulate a skeletal indentation.
Stay Symmetrical
Draw faint guide points with a light grey eyeliner pencil before committing to the black paint. This ensures your eye sockets and petals remain even on both sides.
Step 2: Nose and Mouth
-
Sculpting the Nose:
Paint the tip of the nose black in an inverted spade or heart shape. Extend two small points upwards onto the bridge of the nose to mimic the nasal cavity. -
Defining the Nostrils:
Ensure the black paint goes slightly into the nostrils for a seamless look, then set this area with black eyeshadow. -
Painting the Lips:
Apply red face paint or a red lip liner to the center of the lips, feathering the color out slightly so it doesn’t look like a solid lipstick application. -
Stitched Smile:
Using a fine detail brush and black paint, draw a thin horizontal line extending from the corners of the mouth towards the ears. Add vertical stitch marks along the lips and the extended line. -
Adding Depth:
Lightly smudge the vertical stitch lines with a tiny amount of grey shadow to make them look embedded in the skin rather than just floating on top.
Step 3: Detailed Embellishments
-
Petal Outline:
With your fine liner brush and black paint, create a series of small, U-shaped scallops around the outer edge of the black eye sockets. Keep them uniform in size. -
Dotting the Details:
Place a single dot of grey or diluted black paint inside each scallop petal for shading. Then, add a ring of small black dots just outside the petal border. -
Forehead Florals:
In the center of the forehead, paint a stylized floral shape or lily using long, teardrop strokes. Outline the shape in black and fill the center with a touch of red. -
Vine Scrollwork:
I prefer to use a very wet brush for this step to get sharp lines. Paint delicate, swirling vines extending from the temples and sides of the eye sockets towards the hairline. -
Leaf Accents:
Add small, simple leaf shapes along the vines. Keep the pressure light at the start of the stroke and press down to widen the leaf, then lift off for a sharp point. -
Chin Detail:
Mirror the forehead design by painting a small, inverted flower or fleur-de-lis shape on the point of the chin using black outlines and a red fill. -
Final Touches:
Review your symmetry and add any final dots or flourishes to balance the design. If needed, sharpen any black lines that may have faded during the blending process.
Add Some Glam
Apply self-adhesive rhinestones to the center of the forehead flower or around the eye sockets for a sparkling, 3D effect that catches the light.
Now you are ready to celebrate with a beautifully haunting look that honors tradition with artistic flair


Forehead Rosette and Center Jewel Focus
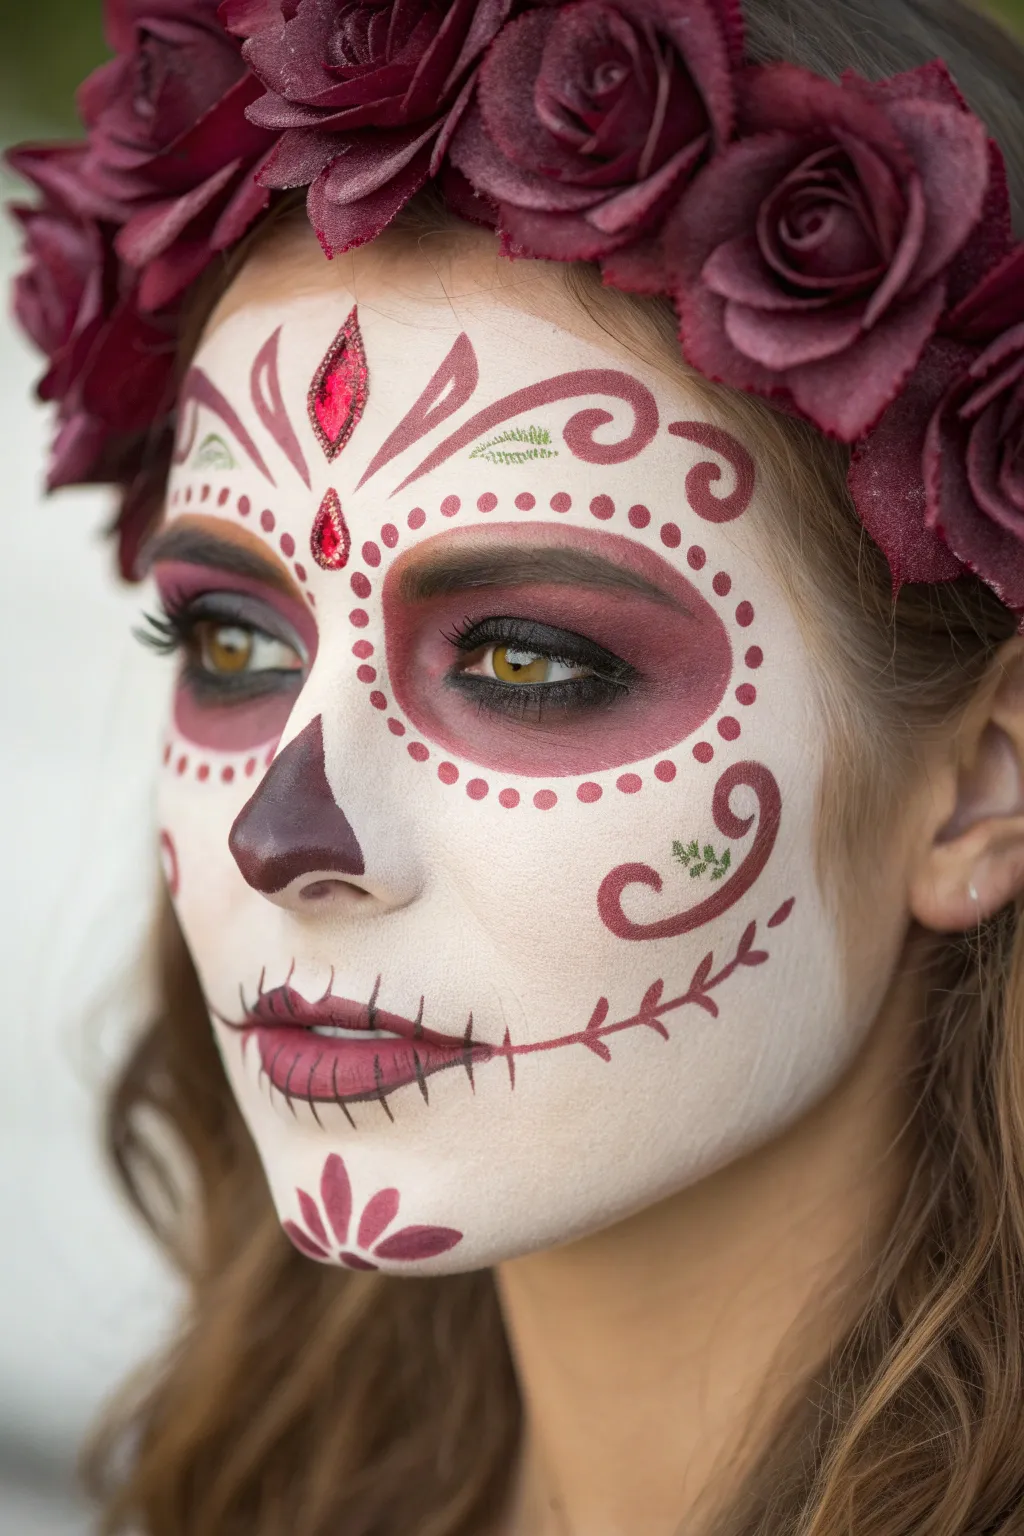
This elegant take on the traditional sugar skull features a flawless porcelain-white base accented by rich burgundy tones and intricate scrollwork. The focal point is a striking forehead design with jewel-like details that perfectly complements the crown of deep red roses.
Step-by-Step
Materials
- High-density white face paint (water-activated or cream)
- Translucent setting powder
- Deep burgundy face paint or eyeliner
- Black eyeliner pencil or gel liner
- Burgundy eyeshadow
- Face glitter gel (red)
- Red craft rhinestones or self-adhesive gems
- Green face paint (optional for leaves)
- Flat foundation brush
- Fine detail brush (size 0 or 00)
- Fluffy eyeshadow blending brush
- Makeup sponge
- Crown of faux dark red roses
Step 1: The Porcelain Canvas
-
Prep the skin:
Begin with clean, dry skin. Tie back hair to keep it away from the face. If the model has dry skin, apply a very light layer of moisturizer and let it fully absorb before starting. -
Apply the white base:
Using a slightly damp makeup sponge or flat foundation brush, apply the white face paint over the entire face. Work in thin, even layers rather than one thick gloopy one to prevent cracking. -
Refine coverage:
Pay special attention to the areas around the nose and mouth. Ensure the white extends slightly past the jawline to create a mask-like effect, but leave the eye sockets bare for now. -
Set the base:
Once the white paint is mostly dry, lightly dust translucent setting powder over the face. This locks the white in place and provides a smooth, non-sticky surface for the detailed line work.
Step 2: Shadows and Sockets
-
Outline the eye socket:
Using a fluffy brush and burgundy eyeshadow, map out the large circles around the eyes. These should encompass the eyebrows and extend down to the upper cheekbone. -
Fill the eye area:
Fill in the circles with the burgundy powder or paint. I find that starting with a powder base makes blending easier, then you can deepen the color with paint closer to the lash line. -
Deepen the crease:
Apply black eyeliner or dark brown shadow into the eyelid crease and along the lash line to add dimension and depth to the ‘hollow’ look. -
Dot details:
Dip a fine brush or the back of a brush handle into the burgundy paint. Create a ring of small, evenly spaced dots surrounding the perimeter of both eye sockets.
Pro Tip: Staying Power
To ensure germs stick all night, use a tiny dot of eyelash glue instead of just pressing them into wet paint. Apply the glue to the gem, wait 10 seconds for tackiness, then place.
Step 3: Forehead Florals & Jewels
-
Paint the central petal:
Directly in the center of the forehead, paint a tall, diamond-shaped petal outline in burgundy. Fill the center with red glitter gel or adhere a red rhinestone for a jewel effect. -
Add side scrolls:
Using your finest detail brush and burgundy paint, draw symmetrical sweeping scrolls extending outward from the center jewel towards the temples. Keep the pressure light at the end of the stroke for a tapered tail. -
Create the lower jewel:
Just above the space between the eyebrows, paint a smaller teardrop shape pointing downward. Fill this with red glitter or another gem to mirror the top design. -
Add leaf accents:
If desired, paint tiny green leaf shapes nestled near the scrolls using small flicks of a brush. This adds an organic touch to the filigree.
Troubleshooting: Milky colors
If your burgundy paint looks pink or milky over the white base, wait for the white to be bone dry. Mix your burgundy with less water for a more opaque, potent color payoff.
Step 4: Nose and Mouth Details
-
Sculpt the nose:
Paint the tip of the nose with black or very dark burgundy paint. Create an inverted ‘spade’ shape, extending slightly up the bridge, leaving a small gap near the nostrils if preferred for breathing comfort. -
Paint the lips:
Color the lips with a deep burgundy lipstick or paint. Blot them slightly so they aren’t too glossy. -
Draw the stitched smile:
Using a fine liner brush and black or dark brown paint, draw a thin line extending outward from the corners of the mouth towards the ears, curving slightly upward. -
Add vertical stitches:
Paint short vertical lines across the lips and the extended smile line to create the classic skeleton teeth effect. Keep these lines fairly thin and varied in length.
Step 5: Finishing Touches
-
Cheek filigree:
On the cheeks, paint large, decorative swirls using the burgundy paint. Start from the ear area and curl inward towards the cheekbone. -
Chin floral:
Paint a small fan-shaped flower or three-petal design on the center of the chin to balance the forehead art. -
Vine details:
Connect the mouth stitches to the cheek swirls with a fragile vine line featuring tiny maroon leaves. -
Final check:
Step back and check for symmetry. Use a Q-tip with makeup remover to sharpen any smudged edges. -
Crown it:
Place the crown of dark red roses on the head, positioning it low on the forehead to frame the painted design perfectly.
You now have a hauntingly beautiful visage ready for celebration
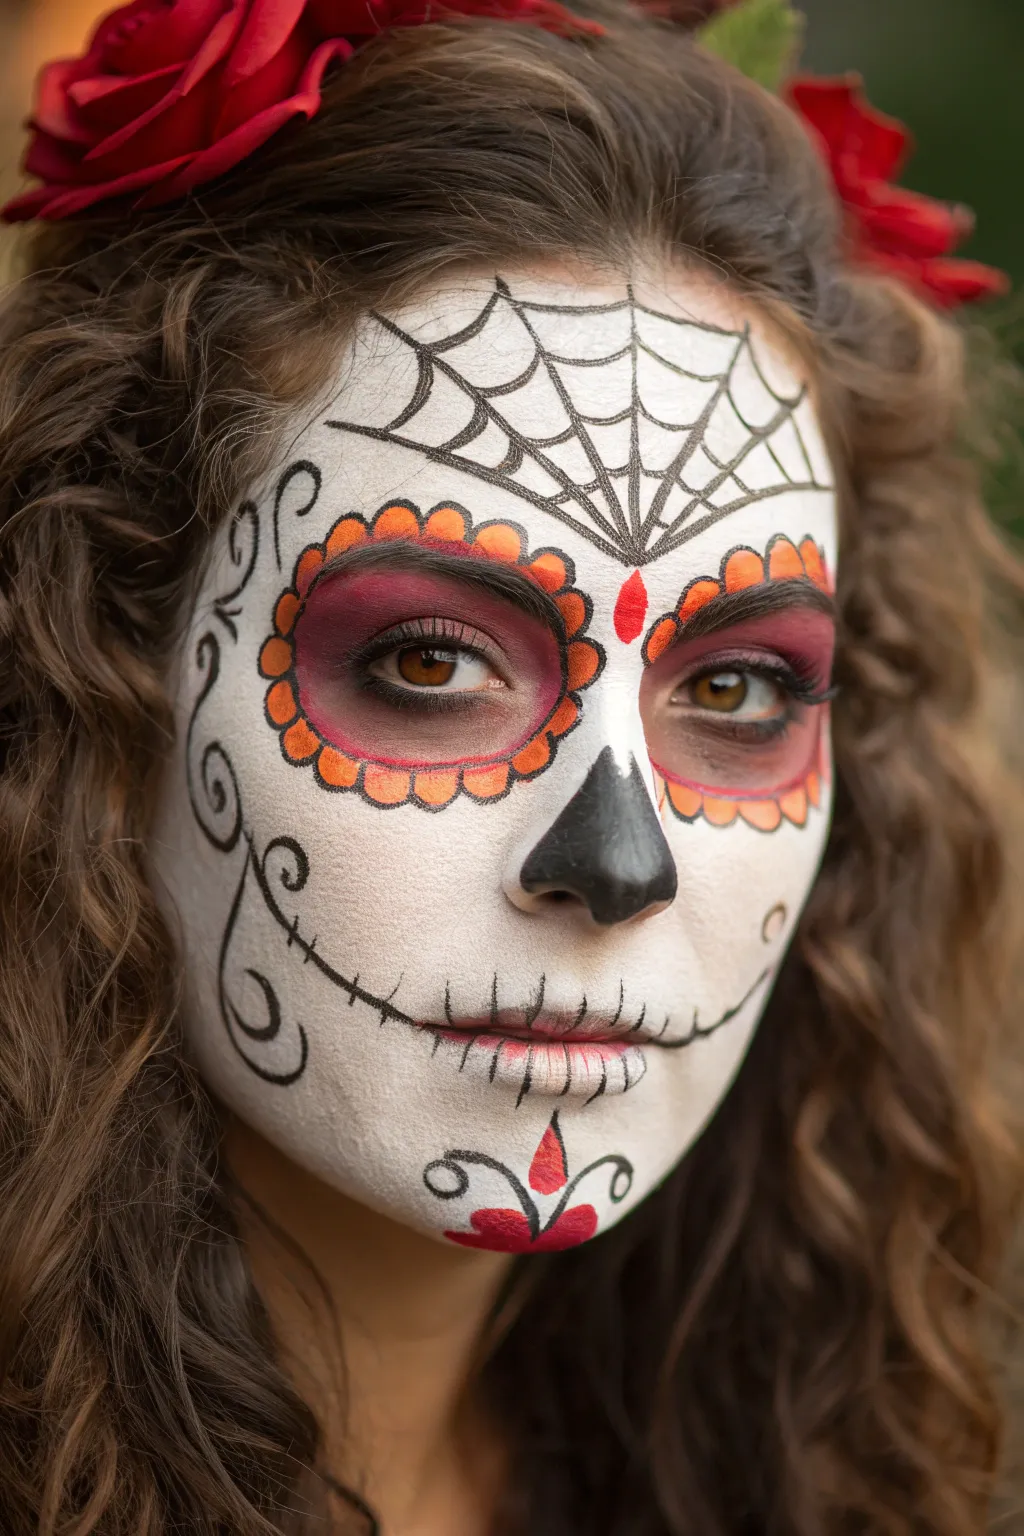
Rhinestone Halo Around the Eyes

This elegant take on classic sugar skull makeup combines crisp white foundations with delicate black lining and a crowning touch of rhinestone glamour. The design features a distinctive spiderweb forehead detail and intricate petal-like flourishes that frame the face beautifully.
Detailed Instructions
Materials
- White face paint (water-activated or cream)
- Black face paint or gel liner
- Red face paint
- Flat foundation brush or sponge
- Fine detail brush (size 0 or 00)
- Medium round brush
- Black eyeshadow
- Rhinestones (clear/silver)
- Small gold/bronze studs or sequins
- Eyelash glue or skin-safe cosmetic adhesive
- Setting powder
- Tweezers (for gem placement)
Step 1: Creating the Base Canvas
-
Prep and prime:
Start with a clean, dry face. Tie back hair to keep the forehead area completely clear for painting. -
Apply the white foundation:
Using a sponge or flat foundation brush, apply an even layer of white face paint over the entire face. Avoid the immediate eye sockets and the tip of the nose, as these will be painted black later. -
Set the base:
Lightly dust translucent setting powder over the white paint to prevent smudging and create a matte surface for the detailed line work.
Step 2: The Dark Features
-
Define the eyes:
Use black face paint and a medium brush to fill in large circles around the eyes. Follow the natural orbital bone as a guide, ensuring the circles are large enough to encompass the eyebrows. -
Set the black paint:
Pat black eyeshadow over the wet black paint. This sets the cream and ensures an intense, opaque darkness. -
Sculpt the nose:
Paint the nose tip black, creating a spade or inverted heart shape. Extend two small points upwards onto the bridge of the nose for that skeletal look. -
Create the mouth:
Draw horizontal lines extending from the corners of the mouth outward toward the jawline. Add vertical stitch lines across the lips and the extended lines to create the skeletal teeth effect.
Gem Grip Tip
For maximum hold, wait 30 seconds for the eyelash glue to get tacky before pressing the rhinestone onto your skin. It prevents sliding.
Step 3: Intricate Linework
-
Draft the spiderweb:
With a fine detail brush and black paint, draw a spiderweb design in the center of the forehead. Start with vertical lines radiating upward, then connect them with scalloped curves. -
Add forehead flourishes:
Paint swirling, vine-like lines on either side of the forehead web. I like to add a teardrop shape in the center of the forehead using red paint for a pop of color. -
Cheek detailing:
On the cheeks, paint black floral swirls and leaf shapes extending from the ear area towards the center of the face. -
Chin accents:
Paint a small flower motif on the chin using petal shapes. Add a tiny red dot or rhinestone in the center of this flower.
Glitter Glaze
Mix a tiny bit of loose cosmetic glitter into your black eye paint before applying it. This creates a galaxy-like depth to the hollows of the eyes.
Step 4: The Bling Factor
-
Outline the eyes:
Using a fine brush, carefully paint small, hollow circles or dots in white or silver all around the black eye sockets to create a lace-like border. -
Prepare the gems:
Pour out your rhinestones and gold studs onto a clean surface so they are easy to grab. -
Apply the halo:
Dip the back of a brush in lash glue and dot it along the outer perimeter of the eye sockets, just outside the black area. Use tweezers to place small silver rhinestones on each glue dot. -
Add golden accents:
Along the curve of the black eye socket—inside the rhinestone halo—glue down small gold or bronze studs for extra texture and warmth. -
Highlight the forehead:
Place additional rhinestones along the outer edge of the face, following the hairline from the temple up to the forehead web. -
Final touches:
Add a few scattered gems along the jawline to balance the sparkle from the top half of the face.
You now have a stunning, light-catching look ready for celebration
Spiderweb Forehead With Elegant Swirls
This striking sugar skull design balances bold features with delicate linework, centered around a dramatic spiderweb on the forehead. The look combines a classic white base with deep maroons and vibrant oranges for a warm, autumnal feel.
Step-by-Step
Materials
- White face paint (water-activated or cream)
- Black face paint (detail consistency)
- Orange face paint
- Deep red or maroon eyeshadow/face paint
- Setting powder (translucent)
- Makeup sponge or foundation brush
- Fine liner brush (size 0 or 1)
- Small round brush (size 2 or 3)
- Flat shader brush
- Artificial red roses (optional hair accessory)
Step 1: Setting the Canvas
-
Prep the skin:
Start with a clean, dry face. Tie hair back securely to keep it away from the forehead and temples. -
Apply the white base:
Using a slightly damp sponge loaded with white face paint, cover the entire face. Use stippling motions (dabbing) rather than dragging to get an even, opaque finish without streaks. -
Refine coverage:
Work carefully around the eye sockets—leave large circles around the eyes bare for now, as we will fill these with color later. -
Set the base:
Lightly dust the white areas with translucent setting powder using a fluffy brush. This prevents the white from smearing into your other colors.
Step 2: The Burning Eyes
-
Fill the eye sockets:
Take a flat shader brush and fill the empty circles around your eyes with deep red or maroon paint. Blend it out past your eyebrows and underneath the lower lash line for a sunken, dramatic effect. -
Deepen the crease:
I like to smudge a little black eyeshadow or paint into the crease and outer corners of the red circle to add depth and dimension. -
Outline the sockets:
Using a small round brush and orange paint, create a scalloped edge (like flower petals) all around the red eye sockets. -
Define the petals:
Once the orange is dry, switch to your fine liner brush with black paint. Carefully outline each orange petal, giving them a crisp definition. -
Inner rim detail:
Still using the fine liner and black, trace the inner edge of the petals where they meet the red socket. Add small shading lines inside the petals if you want extra texture.
Smudge Control
If black paint mistakes happen, wait for it to dry completely. Flake it off gently with a dry cotton swab, then dab a tiny bit of white paint over the spot to conceal.
Step 3: Forehead & Nose
-
Paint the nose:
Using black paint, color the tip of the nose. Create a spade shape—an upside-down heart with a point extending slightly up the bridge of the nose. -
Start the spiderweb:
Locate the center point between your eyebrows. Paint five to seven straight black lines radiating upward and outward across the forehead using your fine liner brush. -
Connect the web:
Connect these radiating lines with curved, scalloped strokes, drooping slightly downward like draped silk to form the web pattern. -
Add the center gem:
Just above the space between your eyebrows, at the base of the web, paint a small red teardrop shape to mimic a jewel.
Glitter Glam
Before the black paint dries on the web or nose, tap a tiny bit of black cosmetic glitter over it. It adds a subtle, spooky sparkle that catches the light beautifully.
Step 4: Mouth & Chin details
-
Draft the smile:
Paint a thin black line extended from the corners of the mouth outward toward the cheeks, curving slightly upward at the ends. -
Stitch the lips:
draw vertical black stitches across the lips and the extended smile line. Make the center stitches slightly longer and taper them shorter as you go outward. -
Cheek swirls:
On the cheeks, paint delicate black scrollwork or swirls. Start from the ear area and curl inward towards the jawline to frame the face. -
Chin ornament:
Paint a decorative element on the chin. Create a small red shape (like a heart or flower bud) in the center, flanked by two black swirls curving outward. -
Final touches:
Double-check your symmetry. If any black lines look too light, go over them one last time for maximum contrast.
Pin some large red roses into your hair to perfectly frame your haunting new look
Half-Face Sugar Skull Mask Look
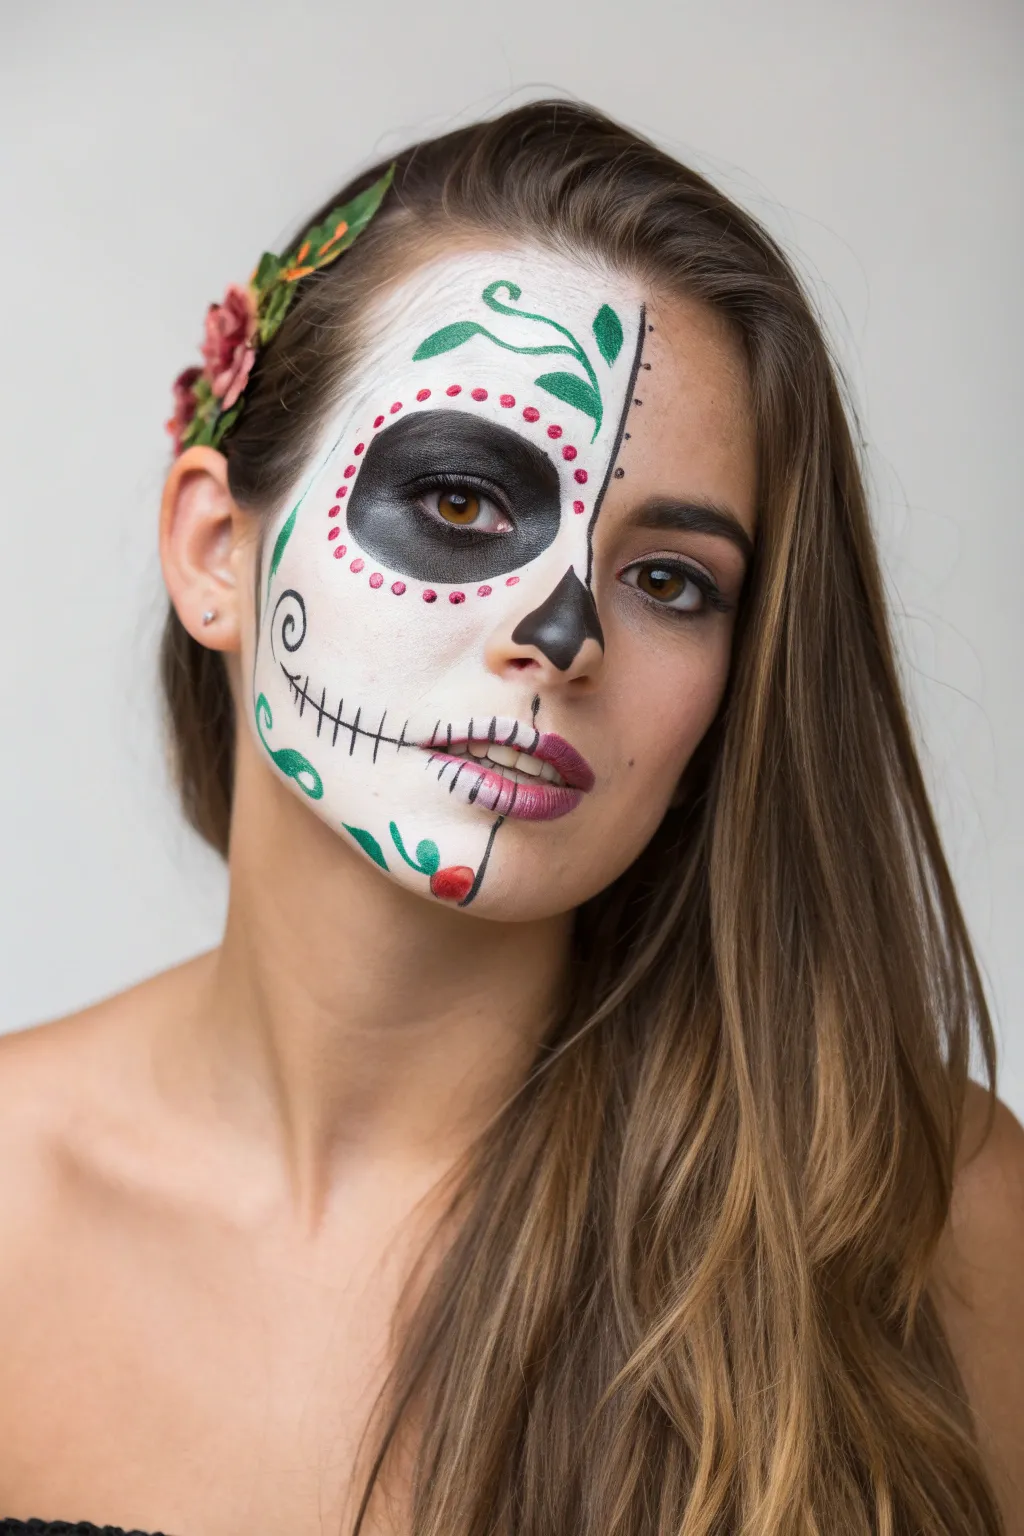
Embrace the duality of life and death with this striking half-face sugar skull design. This look combines elegant green vine details and classic skull features on one side while leaving the other natural, creating a beautiful and haunting contrast perfect for Dia de los Muertos.
Step-by-Step Guide
Materials
- White face paint (water-activated or cream)
- Black face paint or black gel eyeliner
- Red face paint
- Green face paint
- Flat foundation brush or sponge
- Fine detail brush (liner brush)
- Medium round brush
- Small blending brush
- Translucent setting powder
- Small decorative flower clip (red or green)
Step 1: Base and Structure
-
Define the boundary:
Start by visualizing a line running distinctively down the center of your face. Using a flat brush or the edge of a sponge, apply white face paint to cover the entire left side of your face, stopping precisely at the midline of your nose, lips, and forehead. -
Build opacity:
Apply a second layer of white paint if necessary to get a solid, opaque bone-like finish. Use a patting motion with your sponge to avoid streaks. -
Create the eye socket:
Load a medium round brush with black face paint. Draw a large circle around your left eye, extending up to the eyebrow and down to the top of the cheekbone. -
Fill the socket:
Fill in the entire circle with black paint. Take care around the lash line; I suggest closing your eye gently to paint the lid completely without irritation. -
Sculpt the nose:
Paint the left side of your nose tip black to simulate a nasal cavity. Create a teardrop shape that points upward, stopping exactly at the center bridge of your nose.
Step 2: Intricate Black Details
-
Outline the mouth:
Using your fine liner brush and black paint, draw a thin line extending from the corner of your mouth outward across your cheek, curving slightly upward towards the ear. -
Stitch the lips:
Paint short, vertical hatch marks along the extended line and directly over your lips on the painted side. Space them evenly to create the skeletal teeth effect. -
Add the chin vine:
Starting near the jawline, paint a thin black stem that curls upward toward the cheek. Add a small, tight spiral at the end for an organic feel. -
Add the cheek swirl:
Paint another decorative black swirl on the cheekbone, just below the eye socket, curling inward towards the nose. -
Detail the forehead division:
Along the central vertical line of your forehead, use the very tip of your fine brush to dab tiny black dots. This softens the transition between the painted and unpainted sides.
Stay Sharp
Keep a Q-tip with makeup remover nearby. If your fine lines get too thick, wipe away the excess immediately while the paint is wet to keep edges crisp.
Step 3: Color and Flourishes
-
Paint the eye dots:
With a small round brush and bright red paint, create a ring of small petals or dots surrounding the black eye socket. Keep them evenly spaced for a symmetrical flower effect. -
Draw the forehead vines:
Switch to green face paint. From the center of your forehead, paint a flowing vine that arches over the eye socket. Add two or three simple leaf shapes attached to the vine. -
Add chin greenery:
Add a small green curved leaf or vine next to the black swirl you painted earlier on the chin area to balance the design. -
Paint the chin flower:
Place a single red dot or small bud shape at the end of the green vine on your chin to tie the color palette together. -
Set the makeup:
Lightly dust the white areas with translucent setting powder to prevent smudging. Be careful not to dull the black or colored details too much. -
Final touches:
Clip your decorative flower into your hair on the painted side, positioning it just above your ear to frame the face.
Add Dimension
Use a grey eyeshadow to lightly shade the white paint at your temples and under the cheekbone. This makes the skull look 3D rather than flat.
Now you have a stunning, asymmetric look that honors tradition with artistic flair
Side-Swept Half-Face With Floral Cascade
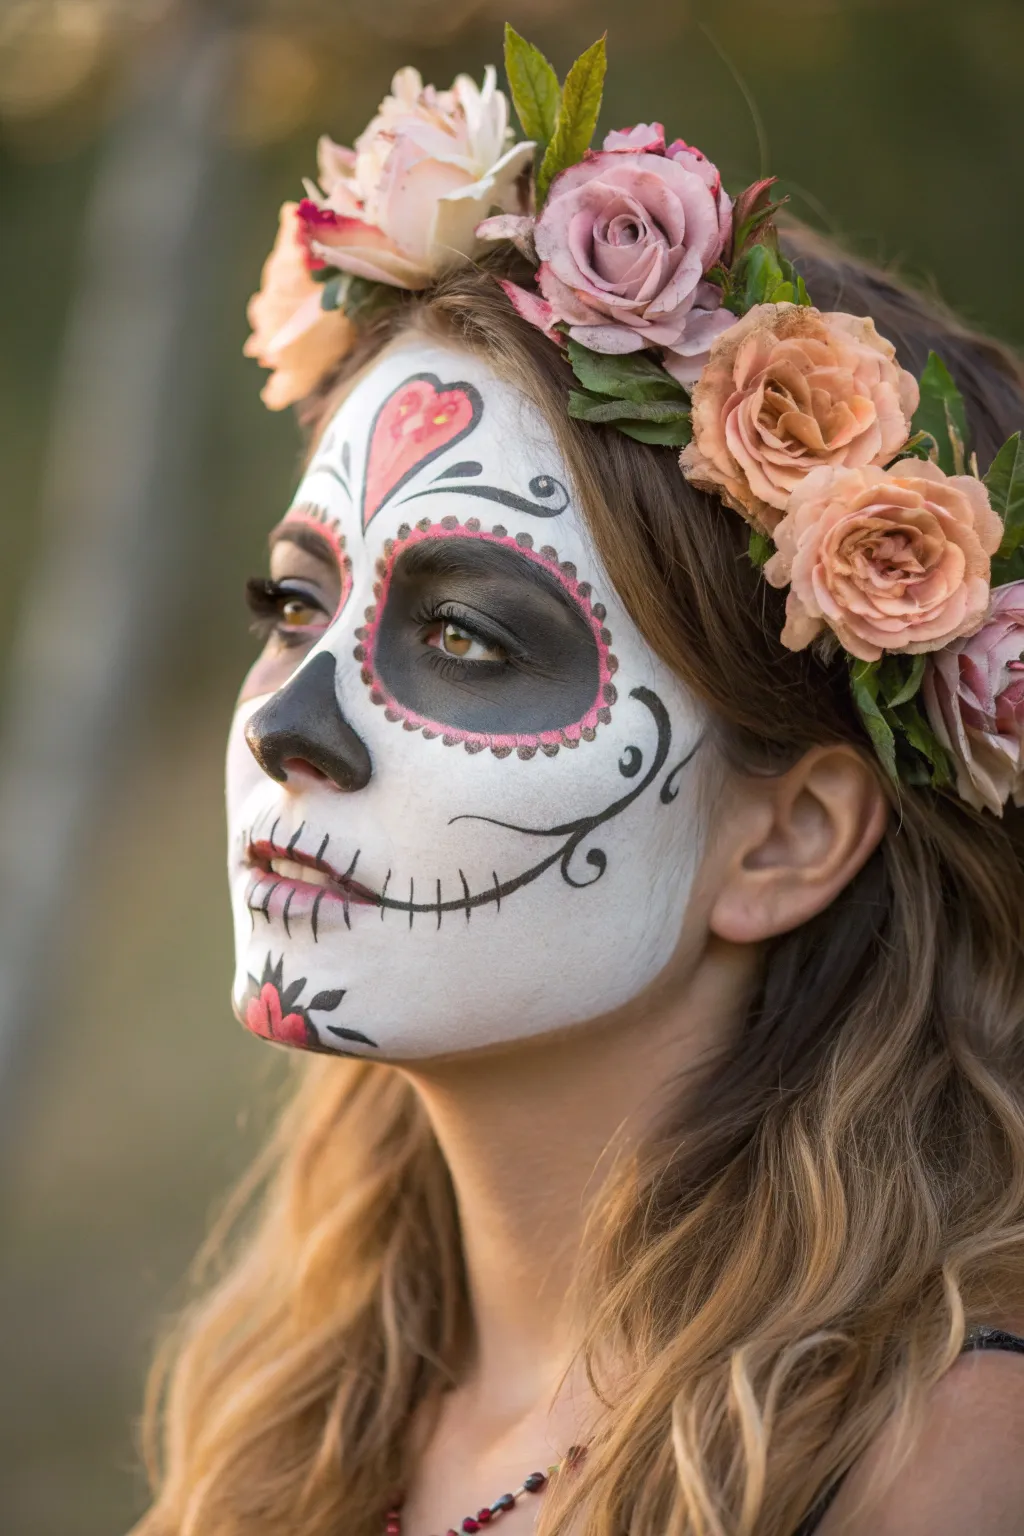
Embrace a softer, romantic take on the traditional Calavera with this design that pairs classic skull features with warm, earthy floral tones. This look balances stark black outlines with delicate pink accents and a lush rose crown for a truly enchanting aesthetic.
Step-by-Step
Materials
- White face paint (water-activated or cream)
- Black face paint or gel liner
- Red and pink face paint
- Flat foundation brush or sponge
- Fine detail brush (liner brush)
- Medium round brush
- Black mascara
- Artificial rose crown (dusty pink and peach tones)
- Translucent setting powder
- Optional: Makeup setting spray
Step 1: The Porcelain Base
-
Prep and prime:
Start with a clean, dry face. Tie back hair to keep it away from the painting area. If you possess oily skin, a light layer of primer will help the makeup adhere longer. -
Apply the white base:
Using a damp sponge or flat foundation brush, apply an even layer of white face paint over the entire face, avoiding the immediate eye area and the tip of the nose. Build coverage gradually; two thin layers are better than one thick, crack-prone layer. -
Set the foundation:
Once the white paint is dry to the touch, lightly dust translucent setting powder over the face with a fluffy brush to prevent smudging as you work on details.
Step 2: Defining the Skull Structure
-
Outline the eyes:
With a medium round brush and black paint, draw large circles around both eyes. These should extend up to the eyebrows and down to the top of the cheekbones. -
Fill the sockets:
Fill in the circles completely with black paint. For a softer look, you can blend the edges slightly or keep them crisp for a graphic style. Be careful near the lash line. -
Sculpt the nose:
Using a smaller brush, paint an inverted ‘M’ or spade shape on the tip of the nose in black. Fill it in completely to leave a hollow skeletal effect. -
Draft the mouth:
Draw horizontal black lines extending out from the corners of the mouth towards the jawline using a fine liner brush. Keep the line thin and slightly curved upwards at the ends. -
Stitch the smile:
Paint vertical ‘stitch’ lines across the lips and the extended smile lines. Make the center stitches slightly longer and taper them smaller as you move outward.
Pro Tip: Symmetry Hack
Struggling with matching eye circles? Use the rim of a small plastic cup or a cookie cutter to very lightly stamp an outline guide into your white base before painting black.
Step 3: Adding Romantic Details
-
Create the forehead heart:
Paint a heart shape in the center of the forehead using red or pink paint. Outline it with a thin black line once the color sets. -
Petal perfection:
Using a small round brush loaded with pink paint, create small scallop shapes around the outer edge of the black eye sockets. These mimic flower petals framing the eyes. -
Highlight the petals:
I like to add a tiny dot of white or a lighter pink inside each petal scallop to give them dimension and make the color pop. -
Cheek swirls:
With your finest liner brush and black paint, draw a decorative swirl starting from the ear and curving onto the cheekbone. Add smaller teardrop shapes or dots along the curve for elegance. -
Chin embellishment:
Paint a small floral motif or a simple red flower bud with black leaves on the center of the chin to balance the forehead design. -
Forehead flourishes:
Add symmetrical black swirls or teardrop shapes flanking the red heart on the forehead to fill the negative space.
Troubleshooting: Patchy Black
If the black paint looks streaky over the white, don’t keep layering wet paint. Let it dry completely, then pat—don’t drag—a second coat on top for solid opacity.
Step 4: Finishing Touches
-
Define the eyes:
Apply black mascara to your top and bottom lashes to help them blend into the dark eye sockets. -
Final set:
Mist the face lightly with a setting spray to lock the design in place for long wear. -
Crown the look:
Place the floral crown on your head, positioning it so the blooms sit forward on the hairline, framing the painted details perfectly.
With your crown in place and paint set, you are ready to celebrate with this stunningly elegant tribute
Couples’ Coordinated Calavera Designs

Celebrate Dia de los Muertos with this harmonious matching look that blends masculine lines with feminine vibrancy. While his design features stark black-and-white contrast with a romantic forehead detail, hers incorporates warm autumnal tones and delicate glitter accents for a truly complementary set.
Detailed Instructions
Materials
- White cream makeup (water-activated face paint)
- Black cream makeup or gel liner
- Red cosmetic glitter
- Pink/Magenta face paint
- Orange face paint
- Red face paint
- Makeup sponges (wedges and round)
- Fine detail brushes (size 0 and 00)
- Flat shading brush
- Black eye pencil
- Setting powder (translucent)
- Flower crown (faux roses)
Step 1: The Base Layer
-
Prep the canvas:
Begin with clean, dry skin on both models. Apply a very thin layer of everyday moisturizer to help the paint glide, but skip this step if the skin is naturally oily. -
Apply the white base:
Using a slightly damp makeup sponge, pick up the white face paint. Stipple—or dab repeatedly—the paint over the entire face for both looks, avoiding the immediate eye area. For him, extend down the jawline; for her, keep the coverage smooth and opaque. -
Set the foundation:
To prevent smudging during the detailed work, lightly dust translucent setting powder over the white base using a fluffy brush. This is crucial for longevity.
Stay Smudge-Free
For the crispest black lines over white paint, use a gel eyeliner pot instead of water-activated paint. It’s opaque, glides smoothly over texture, and is waterproof.
Step 2: His Design: Stark Contrast
-
Socket definition:
Load a flat brush with black paint. Outline large, somewhat squared-off eye sockets that extend up to the eyebrows and down onto the cheekbones. Fill these in completely black. -
Nose cavity:
Paint the bottom half of the nose black, creating a distinct ‘M’ shape or two upside-down teardrops on the bridge to simulate a skeletal cavity. -
Cheek contouring:
Using a sponge or a blending brush with a small amount of black shadow or paint, lightly contour under the cheekbones to create a hollowed-out skull effect, fading the black into the white skin. -
Skeletal mouth:
Draw a thin horizontal line extending from the corners of the mouth towards the ears. Draw vertical lines across the lips and the extended line to create teeth. I find tapering the lines as you move outward looks most realistic. -
Decorative scrolling:
Using a fine liner brush and black paint, add ornate scrollwork above the eyebrows and on the chin. Keep the lines crisp and symmetrical. -
Detailing the eyes:
Add small scalloped edges around the black eye sockets using a fine detail brush for a lacy, traditional look. -
The romantic accent:
Paint a small, inverted red heart in the center of the forehead, between the scrollwork. While the paint is tacky, dab on red cosmetic glitter for texture.
Step 3: Her Design: Colorful Elegance
-
Colorful sockets:
Instead of black, trace the eye sockets with a mix of pink and orange paint. Blend these colors softly so they transition into the white skin. -
Darkening the center:
Apply black eyeliner or paint to the eyelids and verify the waterline is dark to create depth inside the colorful socket area. -
Petal details:
Using a small round brush, paint small ‘U’ shapes or petals around the perimeter of the eye sockets in orange and red tones. -
Nose tip:
Paint a cute, smaller triangular shape on the tip of the nose using black paint, keeping it more petite than the male version. -
Forehead Florals:
Paint a webbed, floral design on the center of the forehead using fine black lines, incorporating a small red heart similar to his for continuity. -
Vibrant embellishments:
Add dots of yellow or gold paint inside the scalloped petals around the eyes and along the chin designs to bring warmth to the face. -
Stitched smile:
Draw the mouth lines similar to his, but add small flourishes or swirls at the ends of the cheek lines for a softer, feminine touch. Paint the lips a deep berry or red before drawing the vertical stitches. -
Chin swirls:
Mirror the forehead design by adding delicate black swirls and a small flower motif on the chin. -
Final touches:
Place the flower crown securely on the head, ensuring the blooms frame the face paint without obscuring the forehead details.
Add Dimension
Use a matte grey eyeshadow to lightly shade inside the ‘teeth’ lines and under the scrollwork. This creates a 3D shadow effect that makes the design pop off the face.
Step out together and let this stunning, coordinated artwork be the highlight of your celebration
Butterfly Accents on a Sugar Skull Base
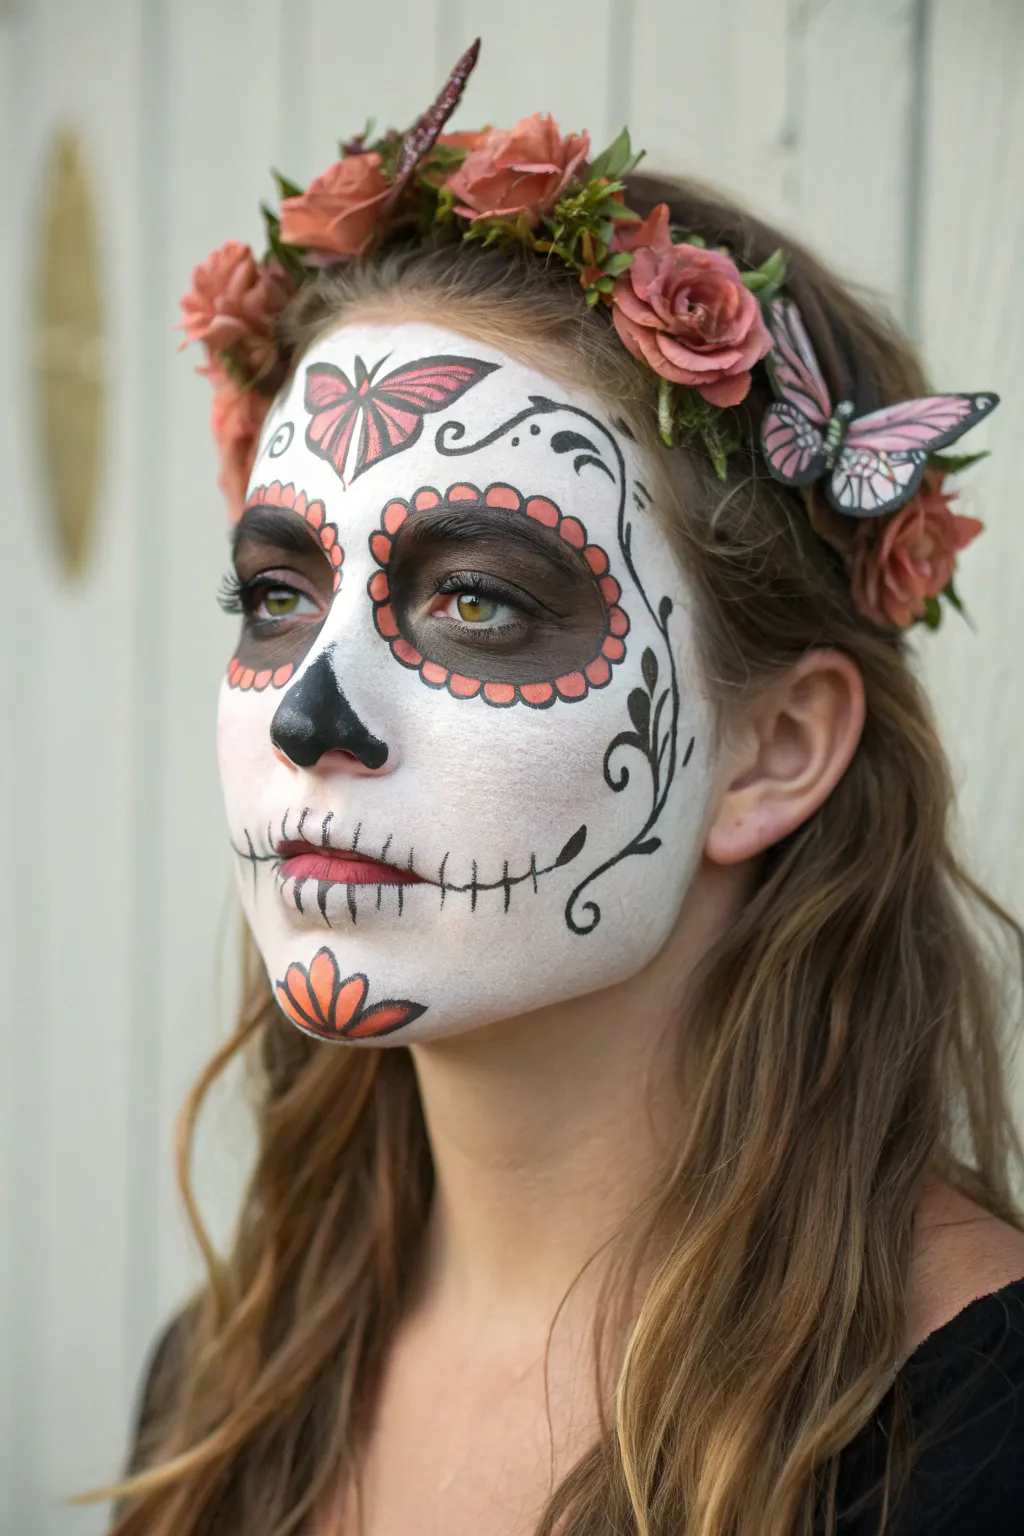
This elegant face paint design merges the traditional sugar skull aesthetic with the delicate beauty of a monarch butterfly, symbolizing the souls of the departed. The look features a clean white base, warm coral-red accents, and intricate black detailing topped with a romantic floral crown.
Step-by-Step Tutorial
Materials
- White cream face paint (water-activated preferred)
- Black face paint or gel liner
- Coral-red or terracotta face paint
- Flat foundation brush or sponge
- Medium round brush
- Fine liner brush
- Black eyeshadow
- Large powder brush
- Setting powder
- Faux flower crown with butterfly clips
Step 1: Base and Eyes
-
Prep the canvas:
Begin with clean, dry skin. To ensure the white paint adheres smoothly without patches, apply a very light layer of primer or moisturizer first. -
Create the white foundation:
Using a dampened sponge or flat foundation brush, apply the white face paint all over the face. Leave the eye sockets and the very tip of the nose bare. -
Build opacity:
Once the first layer is tacky but not fully dry, stipple on a second coat of white to get that solid, porcelain skull look. I find stippling prevents streaks. -
Set the base:
Lightly dust translucent setting powder over the white paint using a large fluffy brush to prevent smudging while you work on the details. -
Darken the sockets:
Fill in the eye sockets (the areas you left bare) with black face paint. Use a medium round brush to create a rounded, skull-like shape that extends up to the eyebrows and down onto the cheekbone. -
Set the black:
Once the black paint is dry, pack black eyeshadow over it. This deepens the color and prevents creasing in the eyelids.
Patchy White Base?
If the white looks streaky, don’t drag the brush. Use a damp sponge and press (stipple) the paint onto the skin regardless of the layer.
Step 2: Adding Color and Depth
-
Paint the eye petals:
Using the coral-red paint and a small round brush, create a scalloped edge around the black eye sockets. Think of these as small flower petals bordering the darkness. -
Define the nose:
Paint the tip of the nose black. Instead of a simple triangle, create an inverted spade shape with a small notch at the top center for an authentic bone structure look. -
Create the forehead butterfly:
In the center of the forehead, paint the silhouette of a butterfly using the coral-red paint. Keep the shape simple for now. -
Add chin details:
Paint a similar floral motif on the chin using the coral paint. Create three larger petals fanning upwards from the jawline.
Step 3: Fine Lines and Finishing Touches
-
Outline the petals:
Switch to your fine liner brush and black paint. Carefully outline each coral petal around the eyes to make them pop against the white base. -
Detail the forehead butterfly:
Outline the coral butterfly shape on the forehead with black. Add internal lines to mimic monarch wing veins and a small black body in the center. -
Add filigree swirls:
Using the very tip of your fine liner brush, paint delicate black swirls extending from the forehead butterfly towards the temples. Keep your hand steady and use light pressure. -
Cheek ornamentation:
Draw sweeping vines and teardrop leaf shapes on the cheeks, curving from the ear towards the mouth to contour the face artfully. -
Outline the chin flower:
Outline the coral petals on the chin with black, adding a small teardrop shape in the center of the middle petal. -
Create the stitched mouth:
Paint a thin black line extending horizontally from the corners of the lips towards the jaw. Then, paint vertical ‘stitch’ lines across the lips and the extended line. -
Color the lips:
Carefully fill in just the center of the lips with the coral-red paint, blending it slightly outward before it hits the stitch marks. -
Attach the crown:
Place the floral crown on the head. Arrange the hair loose and wavy beneath it for softer framing. -
Add butterfly clips:
Clip the faux butterflies into the hair or onto the crown itself, positioning them asymmetrically to mimic butterflies landing.
Sharper Lines
For the crispest black lines, water down your black paint slightly to an ink-like consistency. This helps the brush glide smoothly.
Now you are ready to celebrate with a stunning tribute that balances elegance with tradition
Papel Picado Pattern Borders
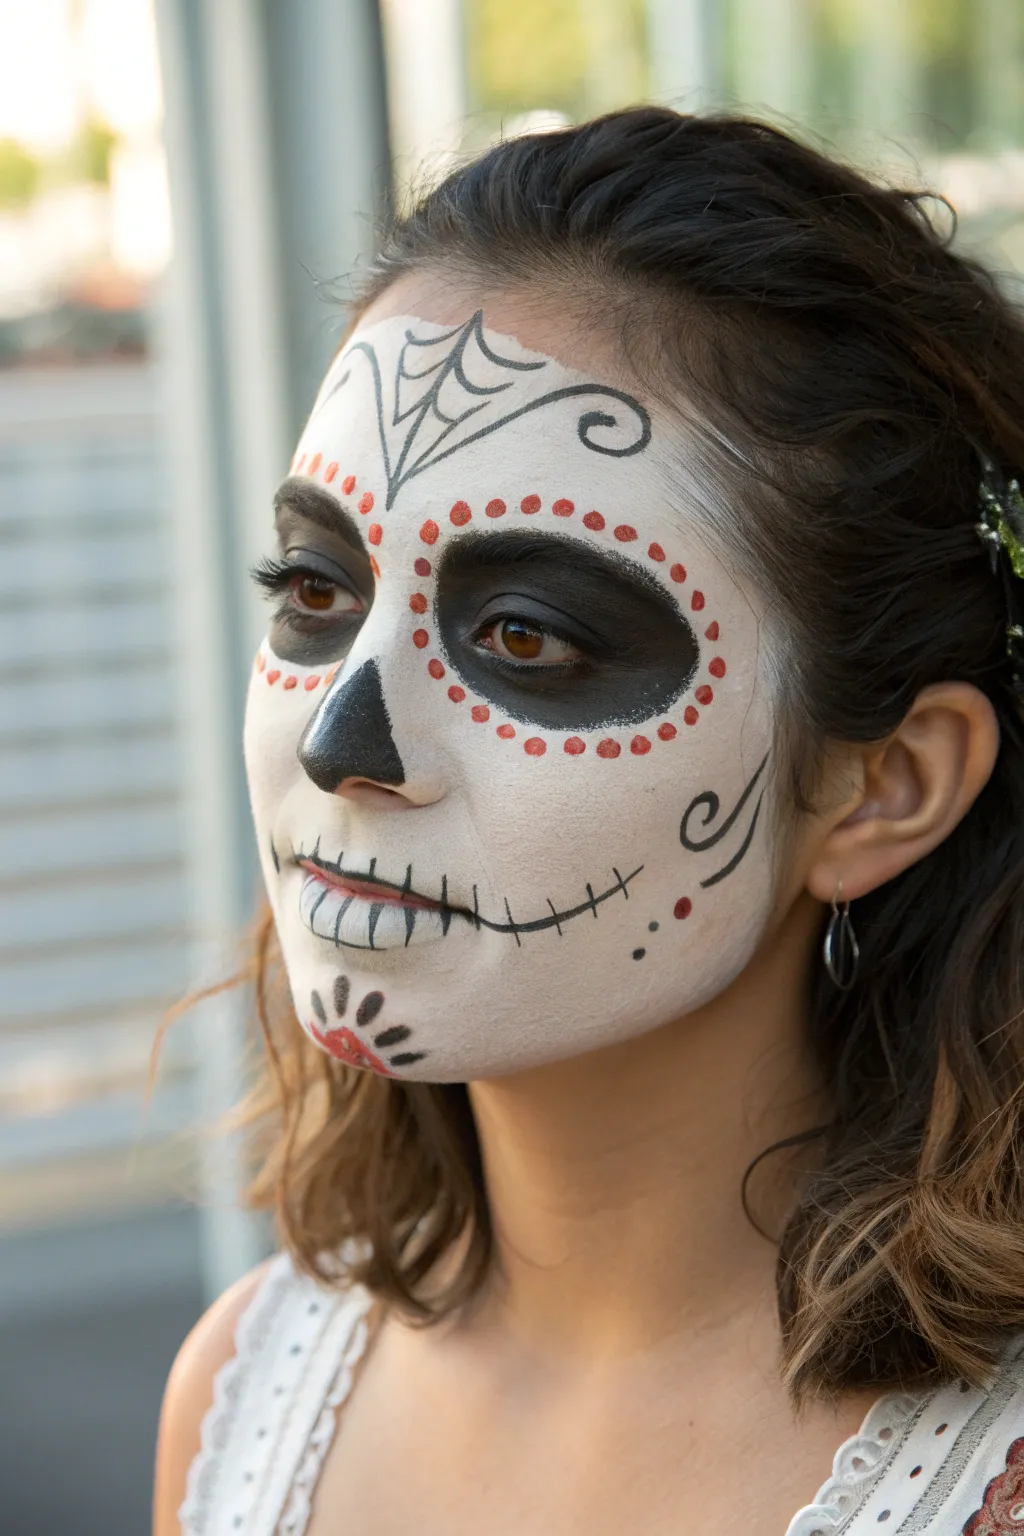
This Day of the Dead face paint design balances traditional skull elements with softer, feminine details like red dotted borders and sweeping linework. The result is a classic Sugar Skull look that feels both haunting and elegant, perfect for honoring the holiday.
Detailed Instructions
Materials
- White face paint or cream makeup (high coverage)
- Black face paint (water-activated preferred)
- Red face paint
- Makeup sponge or foundation brush
- Setting powder (translucent)
- Medium round brush
- Fine liner brush (size 0 or 00)
- Small dotting tool or the back of a brush handle
- Q-tips and makeup remover (for clean up)
Step 1: Base and Structure
-
Prep the canvas:
Start with a clean, dry face. Tie back hair to keep it away from the forehead and temples. -
Apply the white base:
Using a slightly damp makeup sponge, apply the white face paint all over the face. Use a patting or stippling motion to get even, opaque coverage rather than streaks. -
Define the negative space:
Leave the immediate eye area (lids and under-eye) bare; this prevents the white from greying out the black we’ll add later. -
Set the base:
Lightly dust translucent setting powder over the white paint to prevent creasing and create a dry surface for the detailed linework. -
Create the sunken eyes:
Using a medium round brush and black paint, fill in the eye circles. Follow the natural bone structure of the orbital socket, extending slightly above the eyebrow and well below the lower lash line for a hollowed look. -
Sculpt the nose:
Paint a black spade shape or inverted ‘V’ on the nose tip. I find it helpful to start the point high on the bridge and widen it towards the nostrils.
Step 2: Intricate Linework
-
Drafting the forehead web:
Switch to your fine liner brush. Start at the center of the forehead hair line and draw a central vertical line down toward the brows. Add two curved lines branching out to the left and right. -
Connecting the web:
Draw scalloped, U-shaped lines between your main structural lines to create the spiderweb effect. Keep your hand steady and let the brush tip drag lightly. -
Adding the flourishes:
At the ends of the outer web lines, add a small, elegant swirl curling inward. -
The stitched mouth:
Draw a thin black line extending from the corners of the mouth outward toward the jaw. Paint vertical stitch marks across the lips and the extended lines. Make the stitches slightly longer in the center and shorter at the edges. -
Cheek details:
On the cheekbones, paint a delicate swirl shape that flows upward toward the ears. Add a few tiny dots tapering off the end of the design. -
Chin embellishment:
Paint a small semi-circle or fan shape at the very center of the chin using black lines.
Patchy White Base?
If the white looks streaky, let the first layer dry completely before dabbing on a second layer. Don’t drag the sponge, as this lifts the paint underneath.
Step 3: Adding Color
-
Dotted eye border:
Dip a dotting tool or the back of a thin brush into red paint. Carefully place evenly spaced dots around the perimeter of the black eye sockets. -
Chin flower detail:
Fill the interior of your chin fan shape with red paint, or add red petals radiating from the black semi-circle. -
Forehead accents:
If desired, add a few tiny red dots within the center of the forehead web pattern to tie the color scheme together. -
Final touches:
Check for any smudges. Use a Q-tip with a tiny bit of white paint to clean up the edges of the black designs if they became fuzzy.
Pro Tip: Symmetry
To keep the eye circles even, mark four small guide dots (top, bottom, left, right) around each eye before connecting them into a full circle.
Finish by letting the paint dry completely before adding any costume accessories to complete your look
Modern Neon Pop Sugar Skull Remix

Embrace a vibrant twist on tradition with this striking sugar skull design, featuring bright neon pinks and teals against a pristine white base. The look combines bold floral motifs with classic skeletal stitching for a stunning, high-contrast finish.
How-To Guide
Materials
- High-quality white face paint (water-activated or cream)
- Black face paint (liner consistency)
- Neon pink face paint
- Bright teal/turquoise face paint
- Lime green face paint
- Black eyeshadow (matte)
- Flat foundation brush or sponge
- Various round brushes (size 1 for details, size 4 for filling)
- Small blending fluffy brush
- Setting spray or translucent powder
Step 1: Base and Eyes
-
Prime and whitelist:
Start by cleaning the face thoroughly. Use a damp sponge or flat foundation brush to apply an even, opaque layer of white face paint across the entire face, avoiding the immediate eye area. -
Set the base:
Lightly dust the white paint with translucent powder to prevent cracking or smudging while you work on the details. -
Darken the sockets:
Using black face paint, fill in large circles around the eyes, covering the eyebrows and extending below the under-eye area. Keep the edges relatively clean but don’t worry about perfection yet. -
Set the black:
Pat black eyeshadow over the wet black paint to lock it in and create a deeply matte, velvety finish.
Clean Lines Secret
For the sharpest petal outlines, load your brush with inky, water-thinned black paint. Roll the tip on a palette to make it needle-sharp before touching the skin.
Step 2: Petal Framework
-
Draft the petals:
With a size 4 round brush and neon pink paint, create a scalloped border around the black eye sockets. Using a stamp-and-drag motion helps create uniform petal shapes. -
Add teal accents:
On the inner corners or alternating petals, use your bright teal paint to add variety to the eye border. -
Outline the petals:
Switch to a thin liner brush with black paint. Carefully outline the pink and teal scalloped edges to make the colors pop against the white base. -
Sculpt the nose:
Paint the tip of the nose black in a classic spade or inverted heart shape. Extend two small points slightly up the bridge of the nasal bone.
Add Some Glam
Press self-adhesive rhinestones or stick-on gems into the center of the forehead flower or around the eye sockets for a sparkling 3D effect.
Step 3: Floral Details
-
Forehead centerpiece:
In the center of the forehead, paint a vertical floral sprig. Start with a pink central bud, then add two green leaves branching outward and upward. -
Chin blossom:
Paint a half-flower on the chin using teal for the petals and a dab of yellow or orange for the center. Outline it thinly in black. -
Cheek vines:
On the right cheek, paint a swirling lime green vine that curves upward from the jawline towards the ear. -
Cheek accents:
Add a teardrop shape in pink and teal near the cheekbone to balance the design.
Step 4: Fine Lines and Finishing
-
Mouth extension:
Draw black lines extending from the corners of the mouth towards the ears, curving slightly upward to follow the cheekbone. -
Vertical stitching:
Paint short, vertical vertical hash marks across the lips and the extended smile lines to create the skeletal teeth effect. -
Spiderweb detailing:
Using your thinnest liner brush (I find a size 0 works best here), add delicate black wisps and dots above the forehead flower and around the temple area. -
Refine contrast:
Check your black outlines. If any pink or teal has overlapped the black, touch up the lines to ensure crisp separation. -
Final set:
Give the entire face a light mist of setting spray to ensure the neon colors stay vibrant and the black doesn’t bleed.
Enjoy your strikingly colorful and modern take on this beautiful holiday tradition


Have a question or want to share your own experience? I'd love to hear from you in the comments below!