Whenever I’m craving a quick win in the studio, I reach for a mini black canvas—it’s basically instant drama with half the effort. The trick is letting the black do the heavy lifting as negative space, so your bright subject feels crisp, glowy, and totally doable in one sitting.
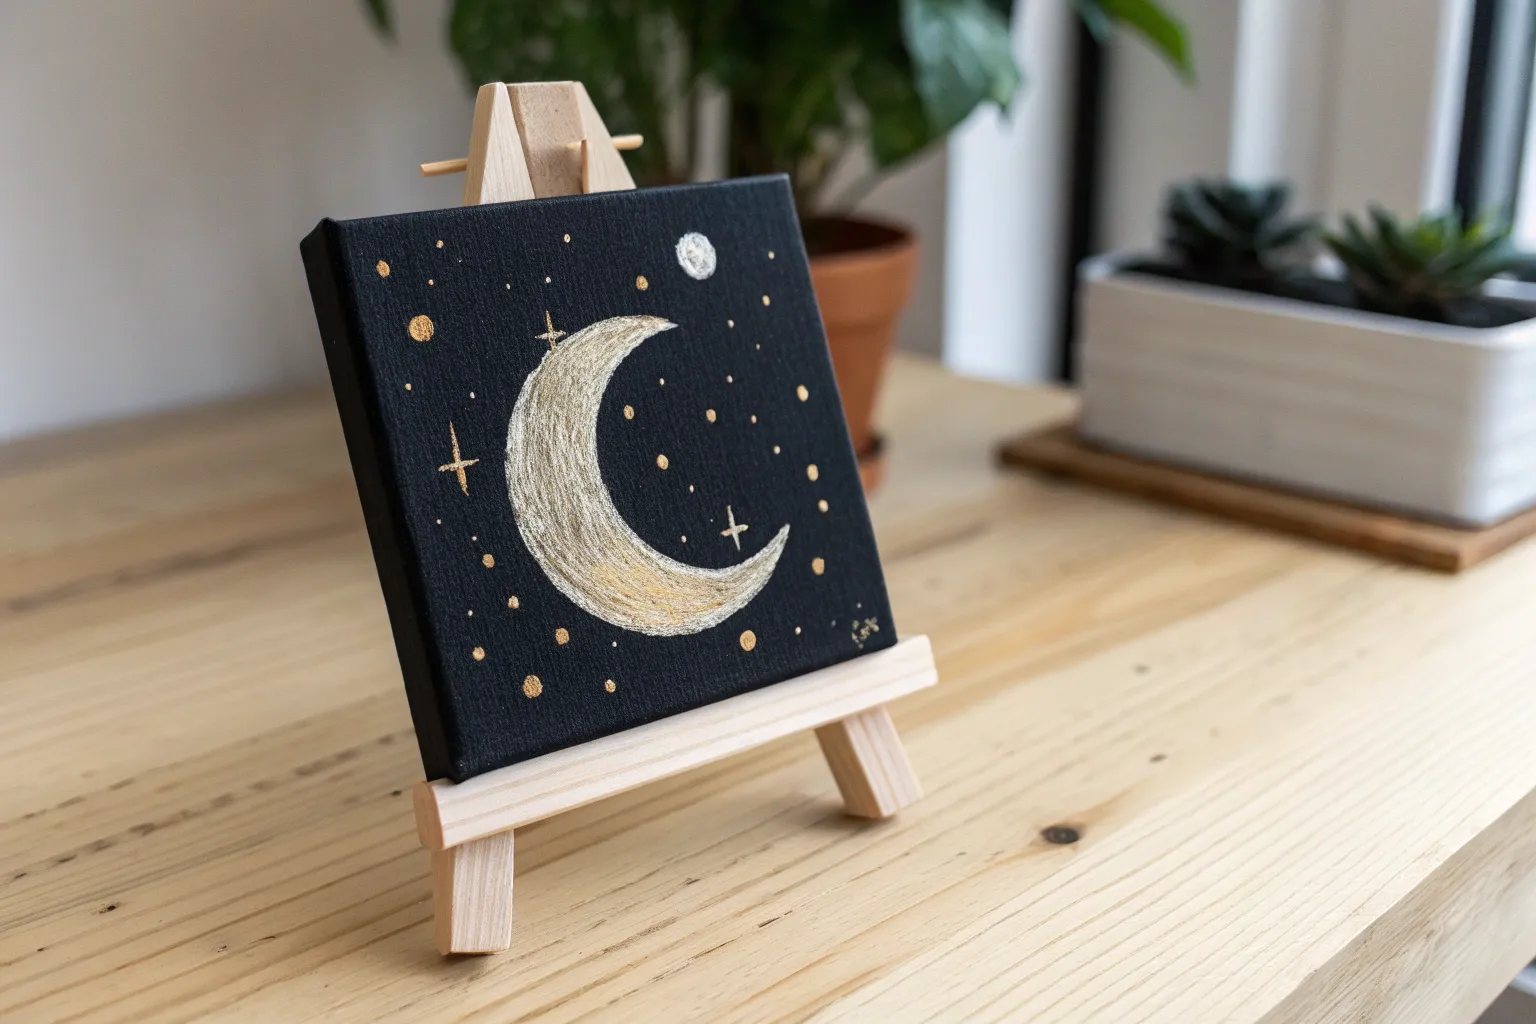
Tiny Moon and Pine Silhouette
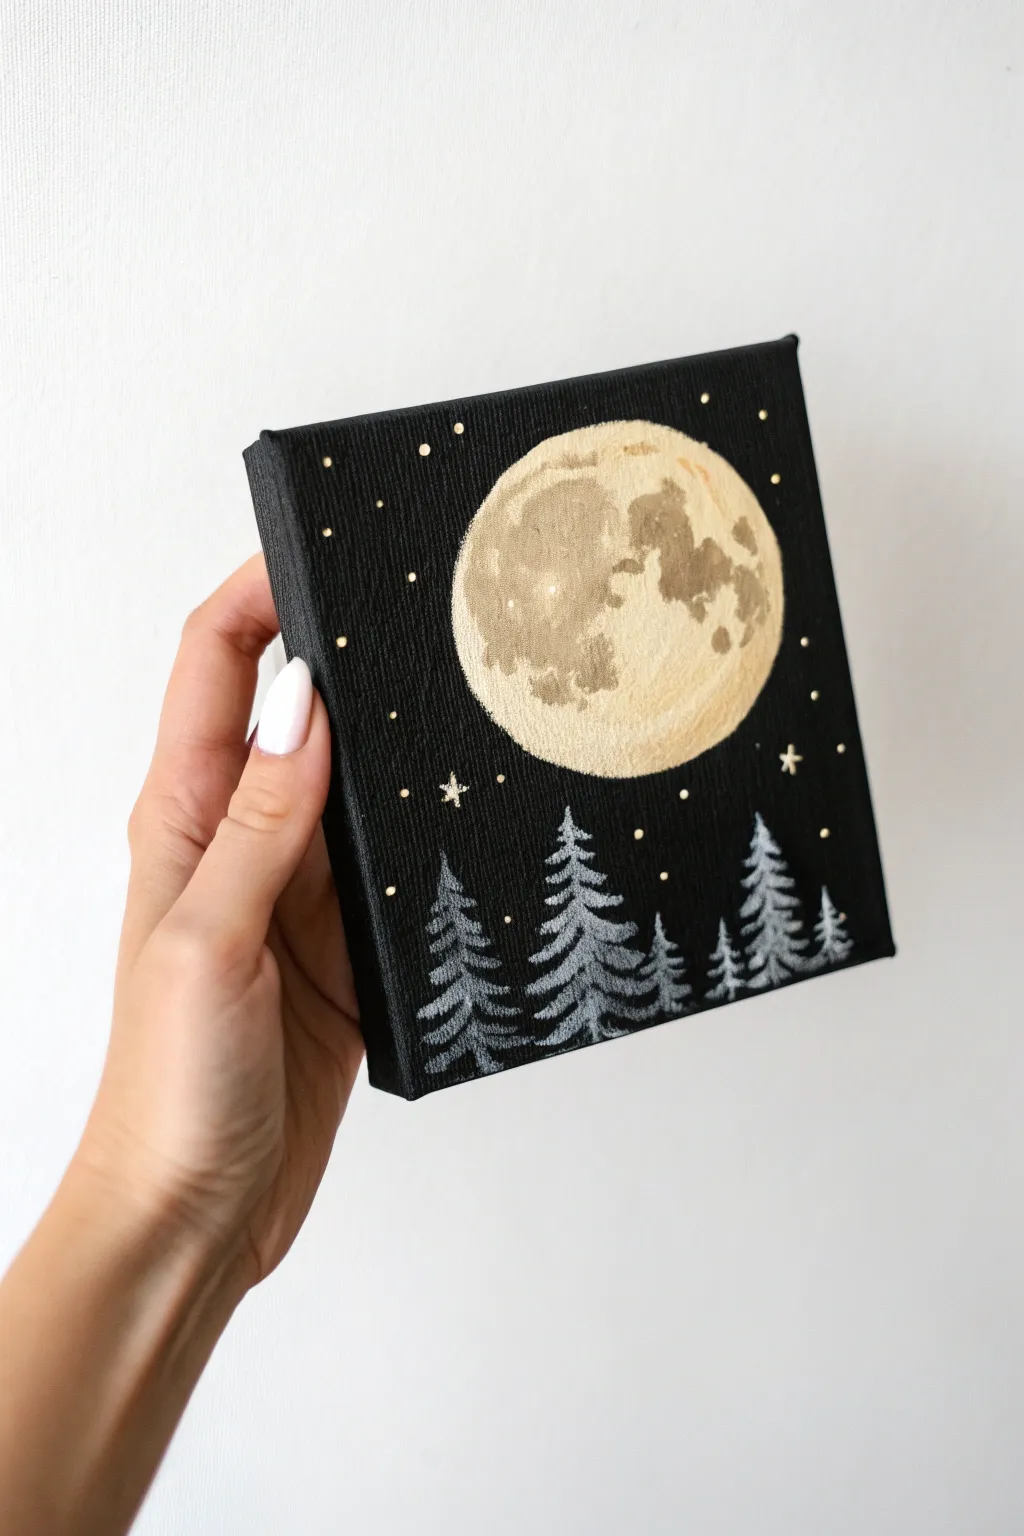
Capture the magic of a silent night with this striking mini canvas painting. Using simple techniques to create a detailed moon and shimmering trees, this project turns a tiny black square into a vast, glowing landscape.
Step-by-Step Guide
Materials
- Mini stretched canvas (e.g., 4×4 or 6×6 inch)
- Black acrylic paint (matte)
- Titanium White acrylic paint
- Unbleached Titanium or Cream acrylic paint
- Raw Umber or light brown acrylic paint
- Gold metallic paint (optional accent)
- Wide flat brush (for base coat)
- Small round brush (size 1 or 2)
- Detail liner brush (size 0 or 00)
- Small piece of sponge or stiff brightness brush
- Palette or paper plate
- Cup of water and paper towels
Step 1: Setting the Night Sky
-
Prime the canvas:
Begin by painting your entire mini canvas with a solid coat of black acrylic paint. Don’t forget to paint the sides of the canvas as well for a finished, professional look. -
Apply a second coat:
Once the first layer is touch-dry, apply a second coat of black to ensure complete opacity. You don’t want the white canvas texture showing through the night sky. -
Map the moon:
Mix a small amount of Unbleached Titanium (cream) with a touch of white. Using your round brush, paint a solid circle in the upper center of the canvas. It doesn’t need to be perfectly round—moons have character. -
Build opaque layers:
Acrylics can be translucent, especially light colors over black. You will likely need 2-3 coats of your cream base on the moon to get a solid, bright circle. Let it dry completely between layers.
Moon Shape Fix
Struggling to paint a round circle freehand? Find a bottle cap or small coin that hints roughly inside the canvas boundaries, trace it lightly with a white pencil, and fill it in.
Step 2: Texturing the Moon
-
Create the crater mix:
Mix a small amount of Raw Umber (light brown) with your cream color to create a beige tone. This will be the shadow color for the moon’s surface. -
Sponge on texture:
Using a small piece of sponge or a dry, stiff brush, dab the beige mixture onto the moon. Focus on the edges and create irregular patches in the middle to mimic the ‘seas’ or maria of the moon. -
Add deep shadows:
While the previous layer is still slightly damp, take a tiny bit of unmixed light brown on your brush and gently stipple it into the darkest crater areas for added depth. -
Highlight the surface:
Clean your brush and pick up pure Titanium White. Gently dab highlights onto the upper left curve of the moon and the edges of your craters to make them pop. -
Soft blending:
I find that using a dry, clean brush to very lightly sweep over the textured areas helps soften harsh edges, making the moon look glowing rather than just painted.
Level Up: Metallic Glow
Mix a tiny amount of metallic gold or iridescent medium into your moon highlight color. When the light hits the finished painting, the moon will have a magical, genuine shimmer.
Step 3: Growing the Forest
-
Mix the tree color:
Create a silvery-grey color by mixing Titanium White with a tiny drop of black. It should be bright enough to stand out against the background but not pure white. -
Plan tree placement:
Visualize where your trees will go. You want a variety of heights. Place the tallest tree slightly off-center and shorter ones towards the edges. -
Paint the trunks:
Using your detail liner brush, paint thin, vertical lines for the tree trunks. Start from the bottom edge and flick upward to create a tapered top. -
Start the branches:
Starting at the top of a trunk, use the tip of your small round brush or liner to dab small horizontal dashes. Make them very small at the apex of the tree. -
Widen the base:
Work your way down the trunk, making the horizontal dashes progressively wider. Use a slight downward curve on the strokes to mimic heavy pine boughs. -
Layering trees:
For a sense of depth, you can paint ‘background’ trees using a slightly darker grey mix, tucking them behind or between the brighter foreground trees.
Step 4: Starlight Details
-
Dot the stars:
Dip the very tip of your liner brush (or a toothpick) into slightly watered-down white or metallic gold paint. Gently dot stars into the black sky, varying their spacing. -
Add focal stars:
Select two or three spots to paint larger stars. Paint a tiny cross shape (+) and then an even smaller ‘x’ shape over it to create a twinkling effect. -
Final touches:
Step back and assess your forest. If the trees look too flat, add tiny touches of pure white for snow highlights on the tips of the branches. -
Varnish (Optional):
Once fully dry (give it at least 24 hours), you can seal your mini masterpiece with a matte or satin varnish to protect the paint.
Place your tiny nocturnal landscape on a miniature easel or shelf to add a touch of quiet wonder to your room


Mini Starry Night Sky Gradient
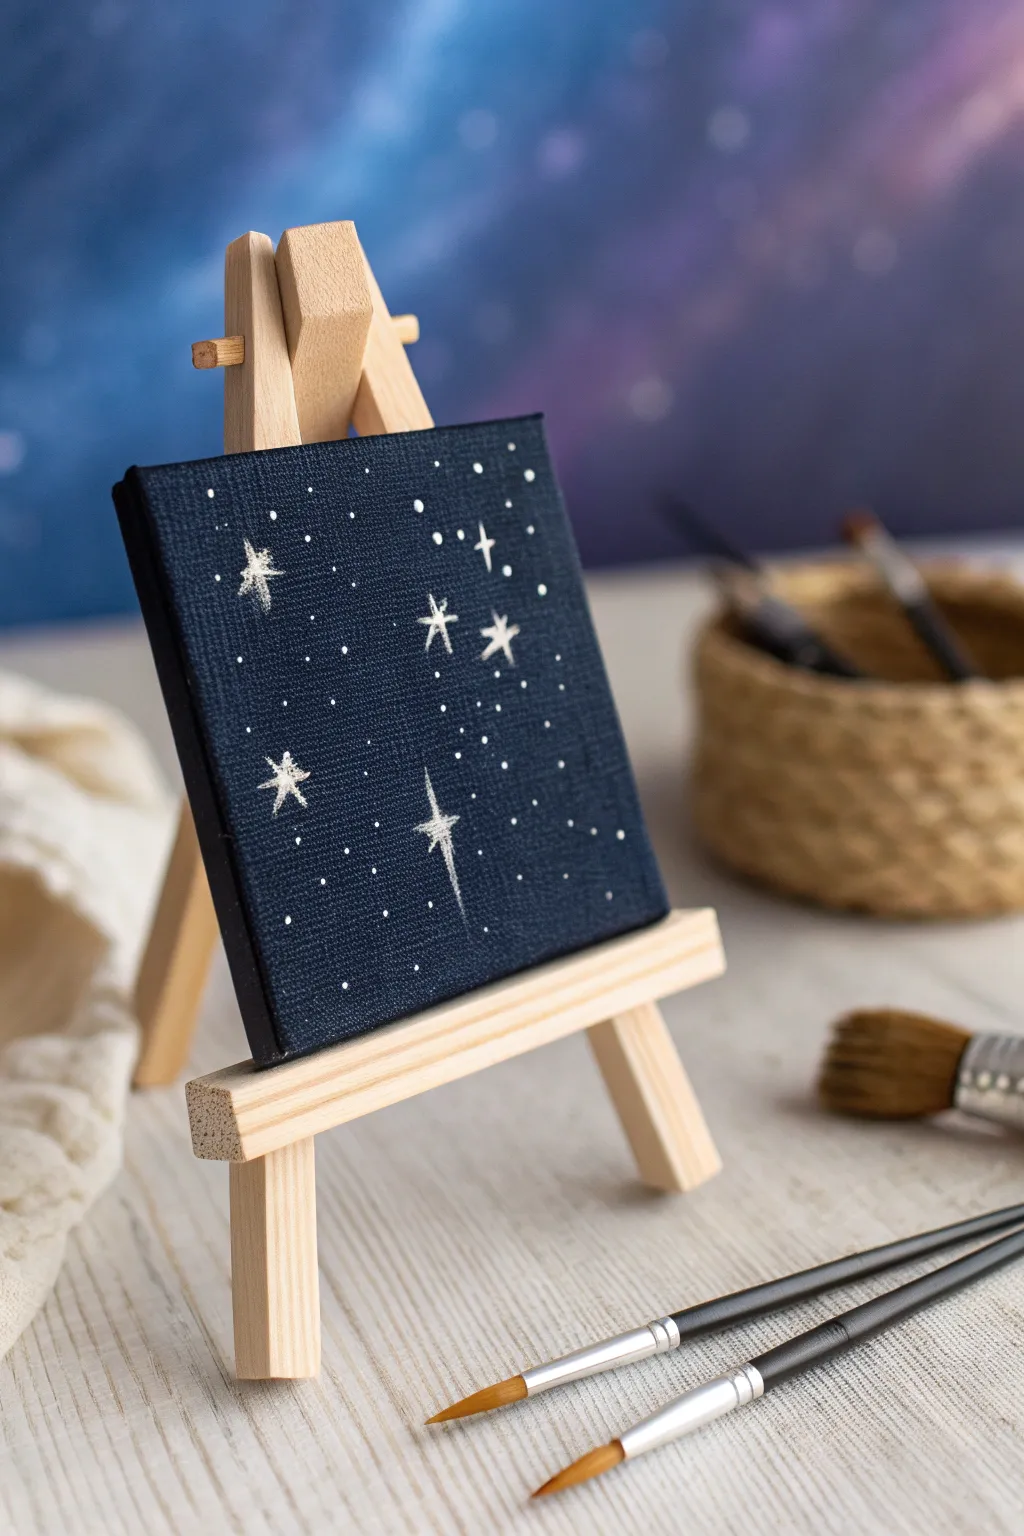
Capture the quiet beauty of a starry night on a tiny scale with this charming mini canvas project. Using a deep midnight blue base and delicate white accents, you will create a simple yet elegant piece of galaxy-inspired art perfect for desk decor.
Step-by-Step Tutorial
Materials
- Mini stretched canvas (approx. 3×3 or 4×4 inches)
- Mini wooden easel
- Acrylic paint: Midnight Blue or Navy Blue
- Acrylic paint: Titanium White
- Small flat synthetic brush (size 4 or 6)
- Fine liner or detail brush (size 0 or 00)
- Palette or small mixing dish
- Cup of water
- Paper towels
Step 1: Setting the Night Sky
-
Prepare your canvas:
Set up your workspace by placing the mini canvas on a flat surface or mounting it directly onto the mini easel for better stability while you work. -
Mix the base color:
Squeeze out a generous amount of midnight blue acrylic paint onto your palette. If you only have black and primary blue, mix them until you achieve a very deep, rich navy tone. -
Apply the first coat:
Using the flat brush, cover the entire front surface of the canvas with the dark blue paint. Ensure your strokes are smooth and run in the same direction for an even finish. -
Don’t forget the edges:
Rotate the canvas and paint the sides deeply as well. Painting the edges gives the mini artwork a polished, professional look from all angles. -
Let it dry completely:
Allow the base coat to dry for about 15-20 minutes. If the white canvas texture is still peeking through, apply a second coat for full opacity.
Step 2: Painting the Stars
-
Prepare your white paint:
Place a small dot of Titanium White paint on your palette. I find adding a tiny drop of water helps the paint flow better off a detail brush for smoother lines. -
Start with the large stars:
Dip just the tip of your fine liner brush into the white paint. Choose 3-5 spots on the canvas for your ‘hero’ stars spread out asymmetrically. -
Form the star shape:
For these main stars, paint a vertical line first, tapering the ends so they are sharp. Then, cross it with a slightly shorter horizontal line. -
Add stylized details:
On one or two of the largest stars, you can elongate the bottom vertical tail slightly to create a shimmering effect. -
Create medium stars:
Using slightly less pressure, paint smaller cross shapes in the empty spaces. These should lack the long tails and just look like tiny ‘plus’ signs. -
Add distant starlight:
Reload your brush with a small amount of paint. Gently touch the tip to the canvas to create random dots representing distant stars. -
Vary dot sizes:
Make some dots tiny and others slightly larger by varying the pressure. Group a few dots together to suggest constellations or clusters. -
Refine the composition:
Step back and look at the spread of your stars. Fill in any large empty voids with a tiny speck or two to balance the night sky. -
Clean up stray marks:
If you accidentally made a star too thick, wait for it to dry completely, then carefully touch it up with a dab of the midnight blue background color. -
Final drying:
Let the white stars dry completely. Since the dots are raised slightly with paint, give it a good 30 minutes before handling. -
Display your work:
Place your finished starry night masterpiece back onto the mini easel to display.
Starry Point Tip
For ultra-crisp star points, wipe your detail brush into a sharp point after every few strokes. A overloaded brush creates blobby stars instead of twinkling ones.
Shaky Hands?
If painting tiny crosses is difficult, use the tip of a toothpick dipped in white paint. It acts like a tiny stamp for perfect, controlled star dots.
Now you have a tiny window into the cosmos ready to brighten up any small corner of your room


Pocket Galaxy Swipe
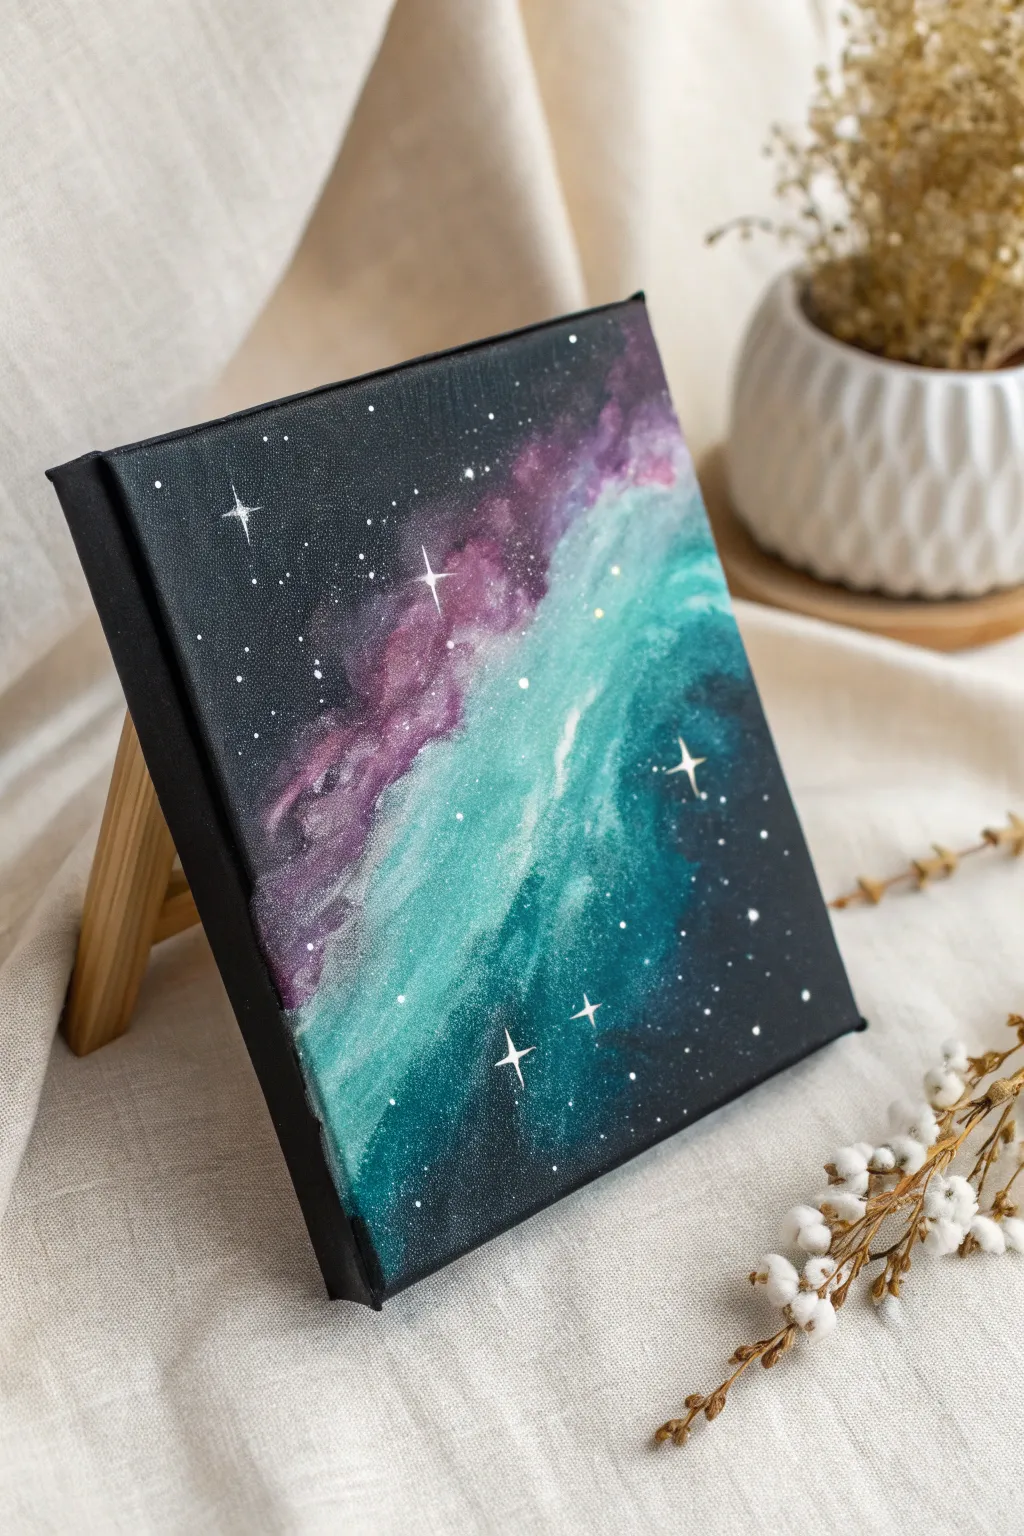
Capture the ethereal beauty of the cosmos on a tiny scale with this mesmerizing nebula painting. Using a black canvas as your void, you’ll blend vibrant purples and teals to create a drifting galactic cloud illuminated by delicate starlight.
Detailed Instructions
Materials
- Mini square black canvas (4×4 or 6×6 inches)
- Acrylic paints: Titanium White, Magenta or Violet, Teal or Turquoise, Black
- Small painting sponge or kitchen sponge cut into cubes
- Fine detail brush (size 00 or 000)
- Old toothbrush or stiff bristle brush
- Palette or paper plate
- Cup of water
- Paper towels
Step 1: Setting the Celestial Scene
-
Prepare the base:
Even though the canvas is black, adding a fresh, thin coat of black acrylic paint ensures a uniform finish and helps the colors blend slightly better if applied while still just barely tacky. -
Mix your mid-tones:
On your palette, create a transition shade by mixing a tiny dot of black into your violet paint to deepen it. Do the same for your teal. You want colors that aren’t neon-bright but have some depth. -
Start the nebula sponge:
Dip a corner of your sponge into the deep violet mix. Dab off the excess on a paper towel until the texture is dry and cloudy, not wet and gloopy. -
Apply the first color cloud:
Gently sponge a diagonal band starting from the top right corner area, drifting toward the middle. Keep the pressure light to create a soft, smoky edge rather than hard shapes. -
introduce the teal:
Using a fresh sponge or a clean side, pick up your deep teal mix. Sponge this color alongside and slightly overlapping the violet, continuing the diagonal movement toward the bottom left. -
Blend the transition:
While the paints are still workable, lightly dab over the area where the violet and teal meet to create a seamless gradient. If the colors get muddy, let it dry for a minute and add a fresh layer of pure color on top.
Step 2: Illuminating the Galaxy
-
Highlight mixing:
Mix a small amount of Titanium White with your violet to make a pastel lavender. Do the same with teal to make a pale mint color. -
Brightening the core:
Take your sponge with the pastel lavender and dab it narrowly down the center of the purple section. This creates the illusion of a glowing core within the gas cloud. -
Teal highlights:
Repeat the process with the pastel mint color, concentrating it in the brightest parts of the teal section. I like to keep these highlights irregular so the nebula looks organic. -
Final white definition:
For the most intense glow, lightly sponge tiny amounts of pure white into the very center of your brightest colored patches. This adds immense depth and contrast against the black background. -
Softening edges:
If your nebula edges look too sharp against the black canvas, take a sponge with a tiny bit of black paint and gently dab over the outer perimeters to fade the color back into the void.
Muddy Colors?
If your purple and teal turn grey where they overlap, stop blending immediately. Let the layer dry completely, then sponge fresh color on top to re-establish vibrancy.
Step 3: The Starfield
-
Prepare splatter paint:
Mix a small puddle of white paint with a few drops of water until it has the consistency of thin ink or heavy cream. -
Create distant stars:
Dip an old toothbrush into the thinned white paint. Test it on paper first, then run your thumb across the bristles to flick a fine mist of stars across the entire canvas. -
Paint major stars:
Using your finest detail brush and un-thinned white paint, dot a few larger, distinct stars randomly around the composition. -
Draw the star crosses:
Select 3 or 4 of your larger dots to turn into twinkling stars. Paint a thin vertical line through the center of the dot, tapering the ends to sharp points. -
Finish the twinkle:
Paint a horizontal line crossing the vertical one, making it slightly shorter than the vertical line. Add a tiny dot in the center where the lines cross for extra brightness. -
Final dry:
Allow the entire piece to dry completely before handling or sealing, as the white splatter can take a little longer to set than the thin sponged layers.
Add Sparkle
Mix a tiny pinch of white or iridescent glitter into your final splatter paint mix. It subtle, but adds a literal twinkle to your stars when the light hits the canvas.
Place your mini masterpiece on a small easel to show off your personal slice of the universe


Simple Mountain Under a Moon
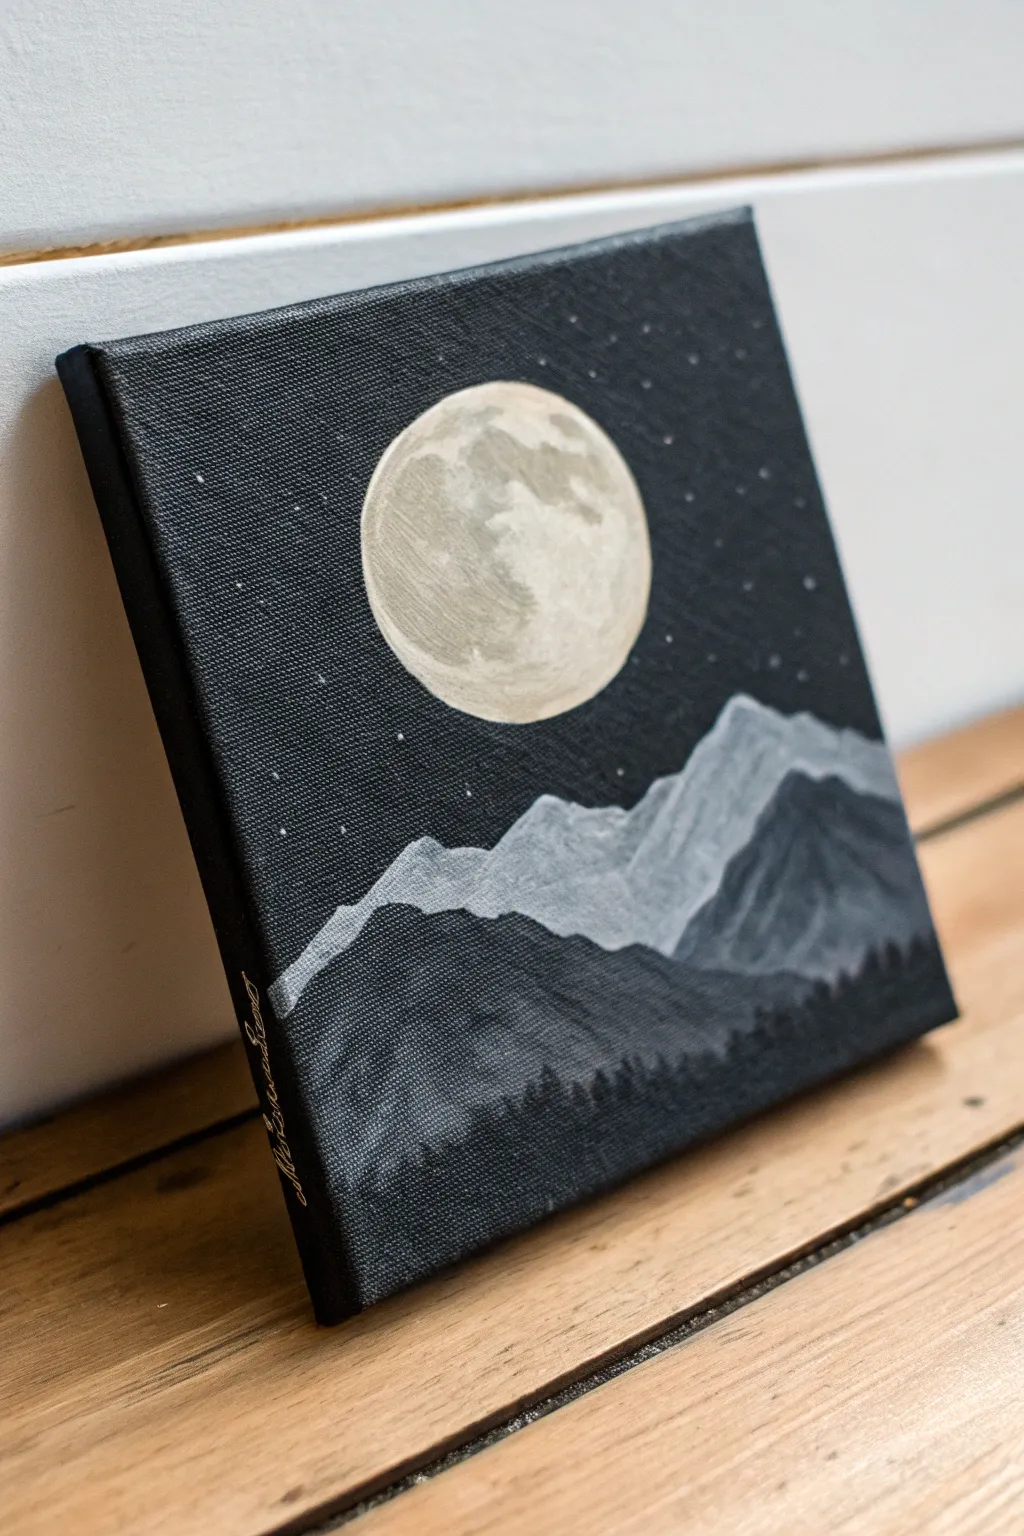
Capture the serenity of a quiet night with this striking black canvas painting. Using only black and white paint, you’ll create depth through layers of grey, building a luminous moon overseeing jagged peaks and a silent forest.
Step-by-Step Tutorial
Materials
- Small square black canvas (or white canvas painted black)
- Acrylic paint: Titanium White
- Acrylic paint: Mars Black (or Lamp Black)
- Small flat brush (size 4 or 6)
- Small round brush (size 1 or 2)
- Detail liner brush (size 0 or 00)
- Palette or paper plate
- Cup of water and paper towels
- pencil (optional)
Step 1: Setting the Scene
-
Prep the canvas:
If you aren’t starting with a pre-primed black canvas, give your white canvas a solid coat of black acrylic paint. Ensure full coverage, vividness is key here. Let this base coat dry completely before proceeding. -
Map the moon:
Decide on the placement of your moon. Using a white chalk pencil or very lightly with a regular pencil, sketch a circle in the upper center, slightly offset to the left. It should be relatively large to serve as the focal point. -
Base coat the moon:
Mix a very light grey using mostly white with a tiny dot of black. Fill in your moon circle. It doesn’t need to be perfectly opaque yet; a slightly uneven texture actually helps mimic the lunar surface later.
Stars Too blobby?
If your brush is making large blobs instead of tiny stars, use a toothpick or the head of a sewing pin dipped in paint. Alternatively, flick a toothbrush for a fine mist.
Step 2: Painting the Mountains
-
Mix your mountain grey:
Create a mid-tone grey on your palette. This should be significantly darker than the moon but lighter than the black background. You want enough contrast so it pops against the black sky. -
Outline the peaks:
With your small flat brush or round brush, paint a jagged line across the middle of the canvas to define the mountain ridgeline. Vary the heights to create interesting peaks and valleys. -
Fill the mountain body:
Fill in the area below your ridgeline with this mid-tone grey. Don’t worry about the bottom edge being neat, as it will be covered by the forest later. -
Add snow caps:
Taking pure white or a very pale grey, use a small brush to paint the illuminated side of the mountains. Imagine the light coming from the moon above—highlight the top ridges and the slopes facing the moon. -
Create shadow depth:
Mix a darker grey (mostly black with a touch of white) and paint the opposite side of the peaks, away from the moonlight. This play of light and shadow gives the mountains their three-dimensional jagged look. -
Blend the transitions:
While the paint is slightly tacky, gently soften the boundary between the highlighted snow and the shadowed rock using a clean, slightly damp brush. This makes the mountain surface easier to read visually.
Step 3: Detailing the Moon
-
Add lunar craters:
Return to your moon circle. Mix a very watered-down grey wash. Dab this lightly onto the moon’s surface in irregular splotches to create the illusion of craters and maria (the dark plains on the moon). -
Highlight the rim:
Take pure white on your smallest brush and carefully trace the edge of the moon that faces away from the center of the canvas, making it crisp. Leave the other edges slightly softer to help it glow. -
Feather the interior:
I like to use a dry brush technique here. Wipe most of the white paint off your brush and lightly scumble (scrub) over the lighter parts of the moon to add texture without covering your grey crater details.
Make it Glow
Mix a tiny drop of glow-in-the-dark acrylic medium into your white paint for the moon and stars. The painting will reveal a secret magic when the lights go out.
Step 4: The Forest and Stars
-
Paint the forest base:
Mix a dark charcoal grey—almost black, but just barely visible against the true black background. Paint a hill shape covering the bottom third of the canvas, overlapping the base of your mountains. -
Stipple the tree line:
Using the tip of a small round brush or a fan brush turned vertically, tap mostly black paint along the top edge of your dark hill. Create tiny vertical distinct points that resemble the tops of pine trees. -
Vary tree heights:
Make sure your tree line isn’t perfectly straight. Cluster some taller trees together and leave some areas lower to mimic a natural forest silhouette. -
Add the stars:
Dip your smallest liner brush or a toothpick into thinned white paint. Gently dot tiny stars into the black sky area. Keep them random and avoid making patterns. -
Create distance variance:
Make some stars slightly larger and brighter than others to create depth in the sky. Avoid putting stars inside the dark part of the moon. -
Final touches:
Check your mountain edges. If the sky black needs tidying up near the peaks, use your black paint to cut back in and sharpen the ridges. -
Sign it:
Once everything is dry, sign your name in gold or white along the side edge or bottom corner.
Display this moody little landscape on a shelf or desk where you need a moment of calm
BRUSH GUIDE
The Right Brush for Every Stroke
From clean lines to bold texture — master brush choice, stroke control, and essential techniques.
Explore the Full Guide
White Daisies That Pop
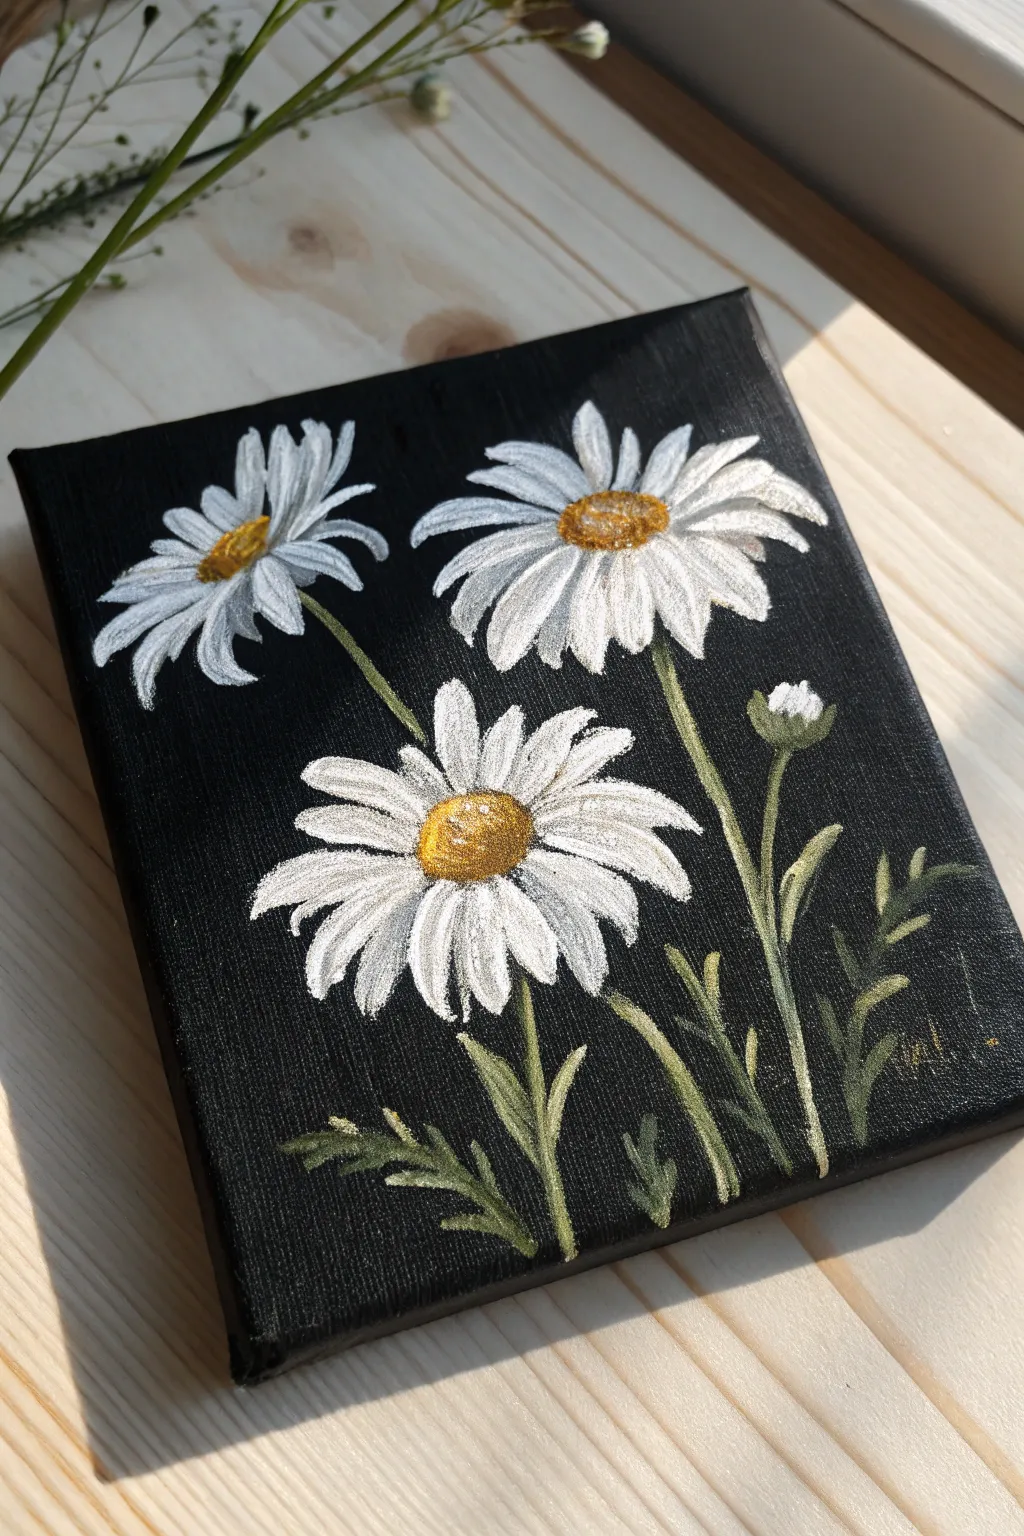
The high contrast of bright white petals against a deep black background makes these daisies jump right off the canvas. This miniature painting captures the delicate texture of wildflowers with simple strokes and subtle shading.
Detailed Instructions
Materials
- Mini stretched canvas (black primed, or white primed painted black)
- Acrylic paints: Titanium White, Mars Black, Cadmium Yellow Medium, Yellow Ochre, Burnt Umber, Sap Green, White mixing medium (optional)
- Small flat brush (size 2 or 4)
- Fine liner brush (size 0 or 00)
- Round brush (size 2)
- Palette or paper plate
- Cup of water
- Paper towels
Step 1: Setting the Background
-
Prep the canvas:
If your canvas isn’t already black, apply two smooth coats of Mars Black acrylic paint. Let the first coat dry completely before adding the second to ensure an opaque, matte finish. Even if you bought a black canvas, a fresh coat of paint often looks richer. -
Plan the composition:
Visualize three main flower heads: one large one low and center, one angled to the right near the top, and a smaller one angled to the left. You can lightly sketch their centers using a white charcoal pencil or very diluted white paint.
Brush Control Pro-Tip
For sharp petal tips, slightly wet your brush before loading the paint. This thins the consistency just enough to allow the bristles to snap to a point when you lift off the canvas.
Step 2: Base Layers
-
Paint the centers:
Mix Cadmium Yellow with a tiny touch of Yellow Ochre. Using a round brush, dab in oval shapes for the flower centers. They shouldn’t be perfect circles; giving them a slightly flattened or domed shape adds perspective. -
Start the stems:
Mix Sap Green with a drop of white to lighten it against the black background. Using your fine liner brush, pull thin, slightly curved lines downward from your planned flower heads. Create a few intersecting stems for visual interest. -
Add foliage base:
Using the same lightened green mix, paint small, fern-like leaves coming off the lower stems. Keep these loose and organic rather than stiff and symmetrical.
Step 3: Creating the Petals
-
Mix your petal shade:
Pure white can sometimes look flat. I like to mix a tiny bit of grey or blue into Titanium White for the first layer of petals to create depth. -
Paint the first petal layer:
Using a small flat brush or filbert brush, press down near the yellow center and flick outward. This creates a petal that is wider at the base and tapers slightly at the tip. -
Direction matters:
Ensure the petals radiate outward from the centers. For the side-facing flowers, shorten the petals on the ‘far’ side to create a foreshortened perspective. -
Layering for opacity:
Once the first layer is dry, load your brush with pure Titanium White. Paint a second layer of petals right over the first, but leave small gaps so the darker under-layer shows through as shadow. -
Add texture strokes:
With the very tip of your fine liner brush and pure white paint, add thin, bright streaks down the center of individual petals. This mimics the ribbed texture of daisy petals.
Level Up: Metallic Pop
Mix a tiny amount of metallic gold paint into your yellow centers or use a gold paint pen to add tiny dots for pollen texture that catches the light.
Step 4: Developing the Details
-
Shadow the centers:
Mix Burnt Umber with a little Yellow Ochre. Dab this darker color onto the bottom-left edge of the yellow flower centers to create a 3D dome effect. -
Highlight the centers:
Take a tiny dot of pure Titanium White and tap it onto the top-right of the yellow centers. This ‘shine’ makes them look wet and lively. -
Refine the stems:
Go back over your green stems with a slightly lighter green mix on the side representing the light source (usually the top or right side) to make them look cylindrical. -
Add a bud:
Paint a small oval of green on a lone stem. Once dry, add just a peek of white at the very top to signify a daisy bud about to open. -
Paint grassy accents:
Using the fine liner brush, flick swift, upward strokes of muted green around the base of the flowers to simulate grass blades and fill empty negative space.
Step 5: Final Touches
-
Deepen the contrast:
If you accidentally painted over too much black background, you can carefully cut back in with black paint between the petals to sharpen their edges. -
Brightest highlights:
Do one final pass with thick, unthinned white paint on the petal tips that catch the most light. This texture creates the ‘pop’ effect. -
Varnish:
Allow the painting to dry for at least 24 hours. Apply a gloss varnish to make the black background look deep and velvety, or a matte varnish for a softer look.
Now you have a stunning botanical study that proves less is often more with high-contrast art
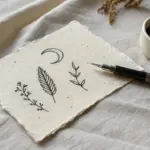
One Feather in White Ink Style
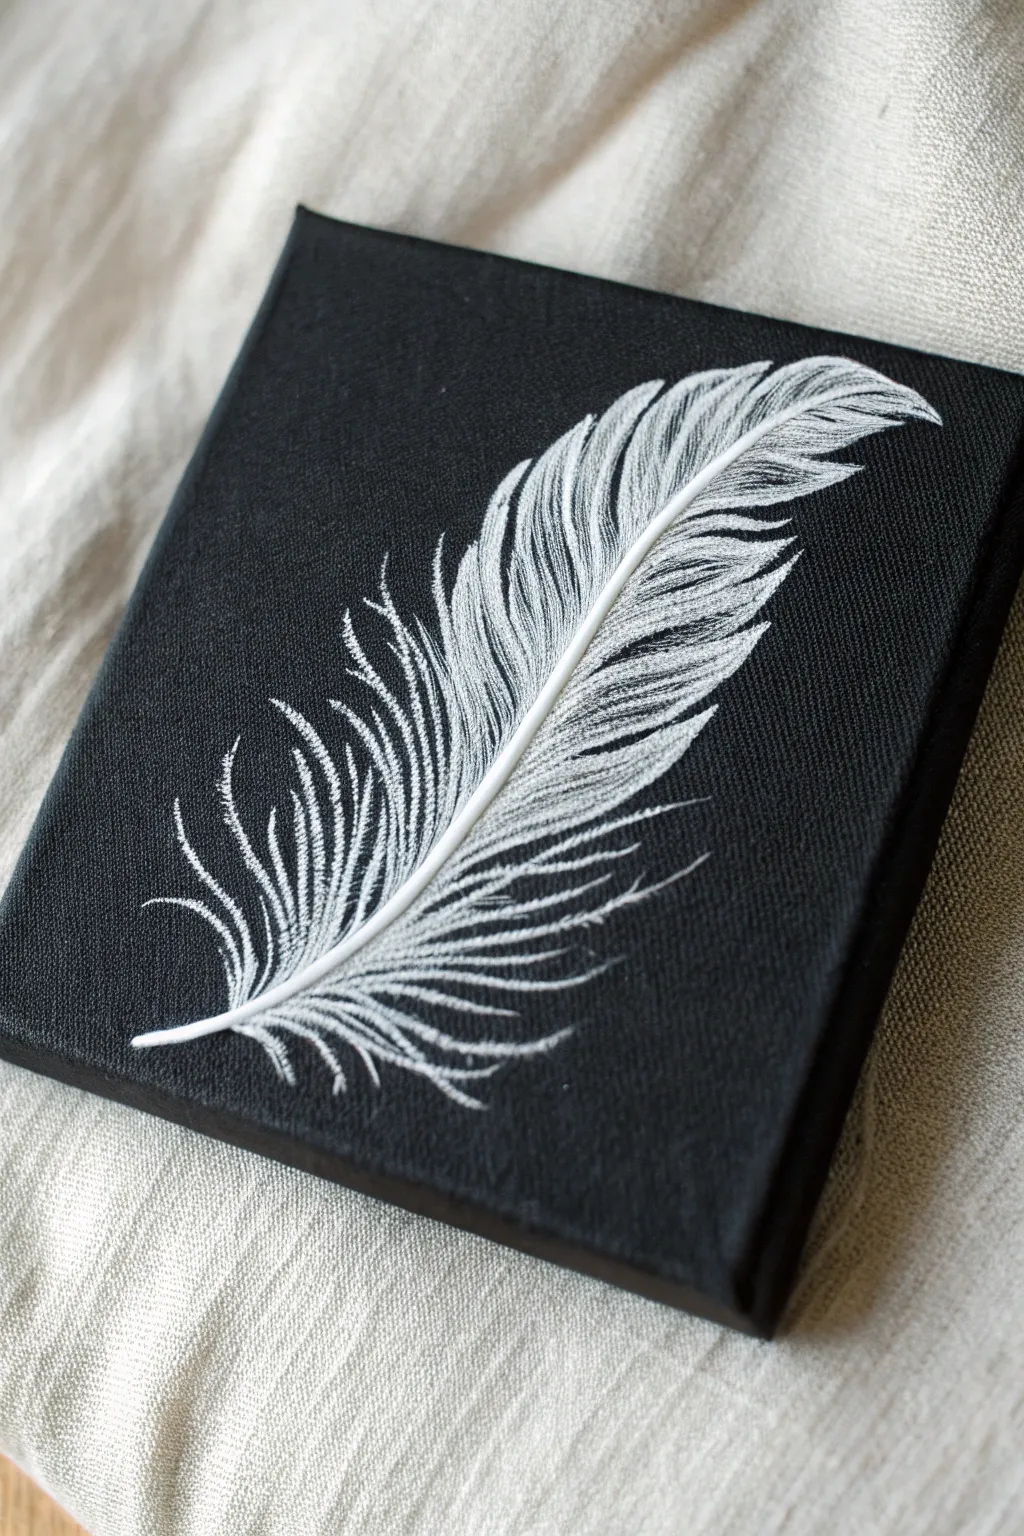
Capture the delicate softness of a single feather against a stark, dramatic background with this simple yet stunning project. The high contrast of white ink or paint on a black canvas creates an elegant, modern piece that looks deceptively complex but relies on basic strokes.
How-To Guide
Materials
- Mini black canvas (approx. 4×4 or 6×6 inch)
- White gel pen (opaque, fine tip) OR Extra-fine round paintbrush (size 000)
- White acrylic paint (high flow or ink-like consistency)
- White charcoal pencil (optional, for sketching)
- Cup of water
- Paper towel
- Graphite paper (optional, for transferring design)
Step 1: Preparation & Sketching
-
Clean surface:
Ensure your black canvas is free of dust or lint. A quick wipe with a dry microfiber cloth works wonders. -
Plan the placement:
Visualize a diagonal line running from the bottom left to the top right. This will be the spine of your feather, known as the rachis. -
Draft the spine:
Using a white charcoal pencil, very lightly draw a curved line for the spine. Press gently so the line is barely visible; you just need a guide, not a permanent mark. -
Mark the width:
Lightly sketch the general oval shape of the feather around the spine. It should be wider near the bottom and taper to a point at the top.
Ink Flow Tip
For the finest lines, use a white gel pen for the outer wisps and acrylic paint for the solid spine. The pen offers more control for hair-thin details.
Step 2: Painting the Spine
-
Prepare your white:
If using acrylics, thin your white paint slightly with a drop of water to improve flow. If using a gel pen, scribble on scrap paper to get the ink flowing smoothly. -
Draw the main stem:
Paint or draw over your charcoal spine line. Start from the bottom (the quill) where it should be thickest, and taper it thinner as you curve upward. -
Define the quill:
Make sure the very bottom tip of the stem is solid and opaque white. I like to apply a second coat here once dry to make it pop against the black canvas. -
Let it set:
Allow this central line to dry completely before moving on to the delicate barbs, so you don’t smudge the spine.
Step 3: Creating the Barbs
-
Start at the bottom:
Begin near the base of the feather on the left side. Create short, wispy strokes that curve outward and upward from the spine. -
Leave some gaps:
At the very bottom, leave spaces between the strokes to mimic the downy, fluffy part of a feather where the strands separate. -
Build the middle section:
As you move up the spine to the middle section, make your strokes longer. Group them tightly together to create a solid white shape, but keep the tips feathery. -
Vary the pressure:
Press harder at the spine and lift your brush or pen quickly at the end of the stroke. This ‘flick’ motion creates the tapered, hair-like tips. -
Add separation:
Intentionally leave one or two small V-shaped gaps in the middle of the feather body. This adds realism, showing where the feather has naturally split. -
Repeat on the right:
Mirror the process on the right side of the spine. Remember that feathers aren’t perfectly symmetrical; the right side can be slightly narrower or shaped differently. -
Detail the top:
As you reach the top tip, shorten your strokes significantly. They should hug close to the spine and point heavily upward.
Metallic Touch
Mix a tiny amount of pearl medium or silver metallic paint into your white for the final highlights. It gives the feather a subtle, luxurious shimmer.
Step 4: Adding Texture & Contrast
-
Layer for brightness:
Once the first layer of barbs is dry, go back over the central spine area. Add a second layer of white to the parts closest to the stem. -
Create depth:
Leave the outer tips of the feather slightly more transparent or ‘scratchy.’ This gradient from solid white center to wispy edges creates volume. -
Final stray hairs:
Add a few very faint, stray lines breaking away from the main shape, especially near the bottom. These tiny imperfections make the feather look organic. -
Clean up:
If any charcoal marks are still visible, gently erase them or dab them away with a barely damp cotton swab.
Hang your monochrome masterpiece on a gallery wall or prop it on a desk for a touch of minimalist elegance

PENCIL GUIDE
Understanding Pencil Grades from H to B
From first sketch to finished drawing — learn pencil grades, line control, and shading techniques.
Explore the Full Guide
Dandelion Puff and Floating Seeds
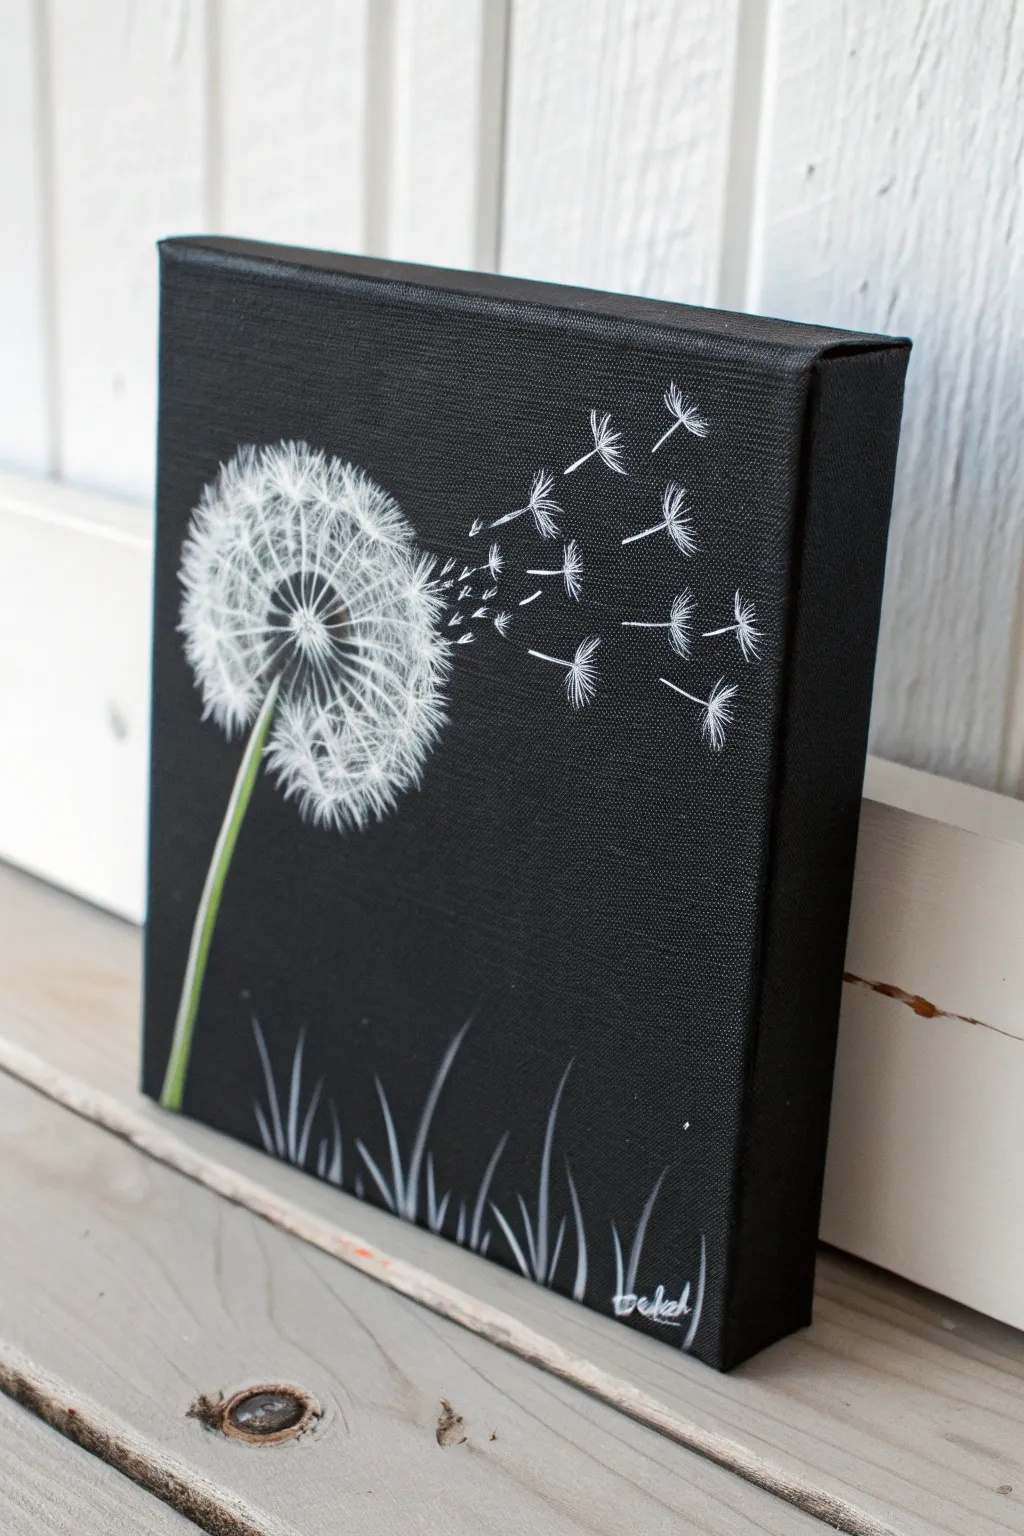
Capture the delicate beauty of a wish being made with this striking high-contrast painting. Using a black canvas makes the white dandelion fluff pop dramatically, creating a modern and elegant piece of mini art.
Step-by-Step Guide
Materials
- Small stretched canvas (black gessoed or painted black)
- White acrylic paint (heavy body is best)
- Light green acrylic paint (or yellow and blue to mix)
- Fine liner brush (size 00 or 000)
- Small round brush (size 1 or 2)
- Cup of water
- Paper towels
- Palette or paper plate
Step 1: Setting the Scene
-
Prepare the canvas:
If your canvas isn’t already black, give it two solid coats of black acrylic paint. Let the first coat dry completely before applying the second to ensure deep, opaque coverage. -
Stem placement:
Using a small round brush and light green paint, start about one-third of the way up the left side of the canvas. Paint a slender, slightly curved line moving diagonally downward toward the bottom left corner to create the stem. -
Stem highlights:
While the green is still slightly wet, mix a tiny dot of white into your green. Add a very thin highlight line along the right side of the stem to give it volume and dimension. -
Grass foundation:
Switch to your fine liner brush and load it with watered-down white paint. The consistency should be inky. -
Painting grass blades:
At the very bottom edge of the canvas, flick the brush upward in short, quick strokes to create simple silhouettes of grass blades. Vary their heights and angles for a natural look.
Step 2: The Dandelion Center
-
Drawing the center point:
Identify the top of your green stem. Just slightly above it, visualize a center point where all the seeds will radiate from. Make a tiny, faint dot with white paint if you need a guide. -
Core structure:
Using the fine liner brush and white paint, draw very short, thin lines radiating outward from that center point, like the spokes of a wheel, but keep them clustered tight near the middle. -
Mid-layer fluff:
Move slightly further out from the center. Paint a second ring of fine lines, overlapping the first set slightly but extending further. These should look like delicate starbursts.
Inky Paint Trick
Add a few drops of water to your white paint until it flows like ink. This helps the liner brush create super crisp, thin lines without dragging or skipping.
Step 3: Building the Puffball
-
Outer perimeter:
Imagine a circle defining the outer edge of the dandelion puff. Use the fine liner to paint the outermost seeds. These are tiny ‘Y’ or ‘T’ shapes connected to long, very thin filaments pointing back toward the center. -
Filling the volume:
Between the core and the outer edge, fill in the rest of the sphere. Paint fine filaments with tiny white tufts on the ends. Overlap them to create density. -
Creating transparency:
Don’t make the brushstrokes too solid. Leave plenty of black background showing through, especially near the edges, to maintain that airy, fluffy texture. -
Intensifying the white:
Where the fluff would be thickest (usually near the center and the bottom left of the sphere), go back and add brighter, more opaque white strokes to suggest highlights.
Make a Wish
Add a tiny touch of metallic silver or iridescent glitter paint to just the tips of the floating seeds for a magical, shimmering effect.
Step 4: Flying Seeds
-
Planning the drift:
Visualize a gentle breeze blowing from left to right. Decide where your loose seeds will float. -
Detaching seeds:
On the right side of the main flower head, paint a few seeds that are just starting to break free. Connect them loosely or leave a tiny gap. -
Floating away:
Further to the right, paint individual seeds floating in the ‘wind’. Start by painting a small ‘X’ or star shape for the fluffy parachute part. -
Adding tails:
From the center of each ‘X’, draw a single, curved filament trailing behind, pointing back toward the main flower. -
Varying size:
Make the floating seeds different sizes and rotate them slightly so they look like they are tumbling in the air. -
Final touches:
Using your thinnest brush, add a few tiny stray dots or speckles near the floating seeds to represent pollen or broken bits of fluff catching the light. -
Sign your work:
Once dry, sign your name in the bottom corner with the white liner brush or a white gel pen.
Hang your mini canvas on a wall or prop it on a shelf to enjoy a moment of peaceful nature
Mini Candle With a Glow Halo
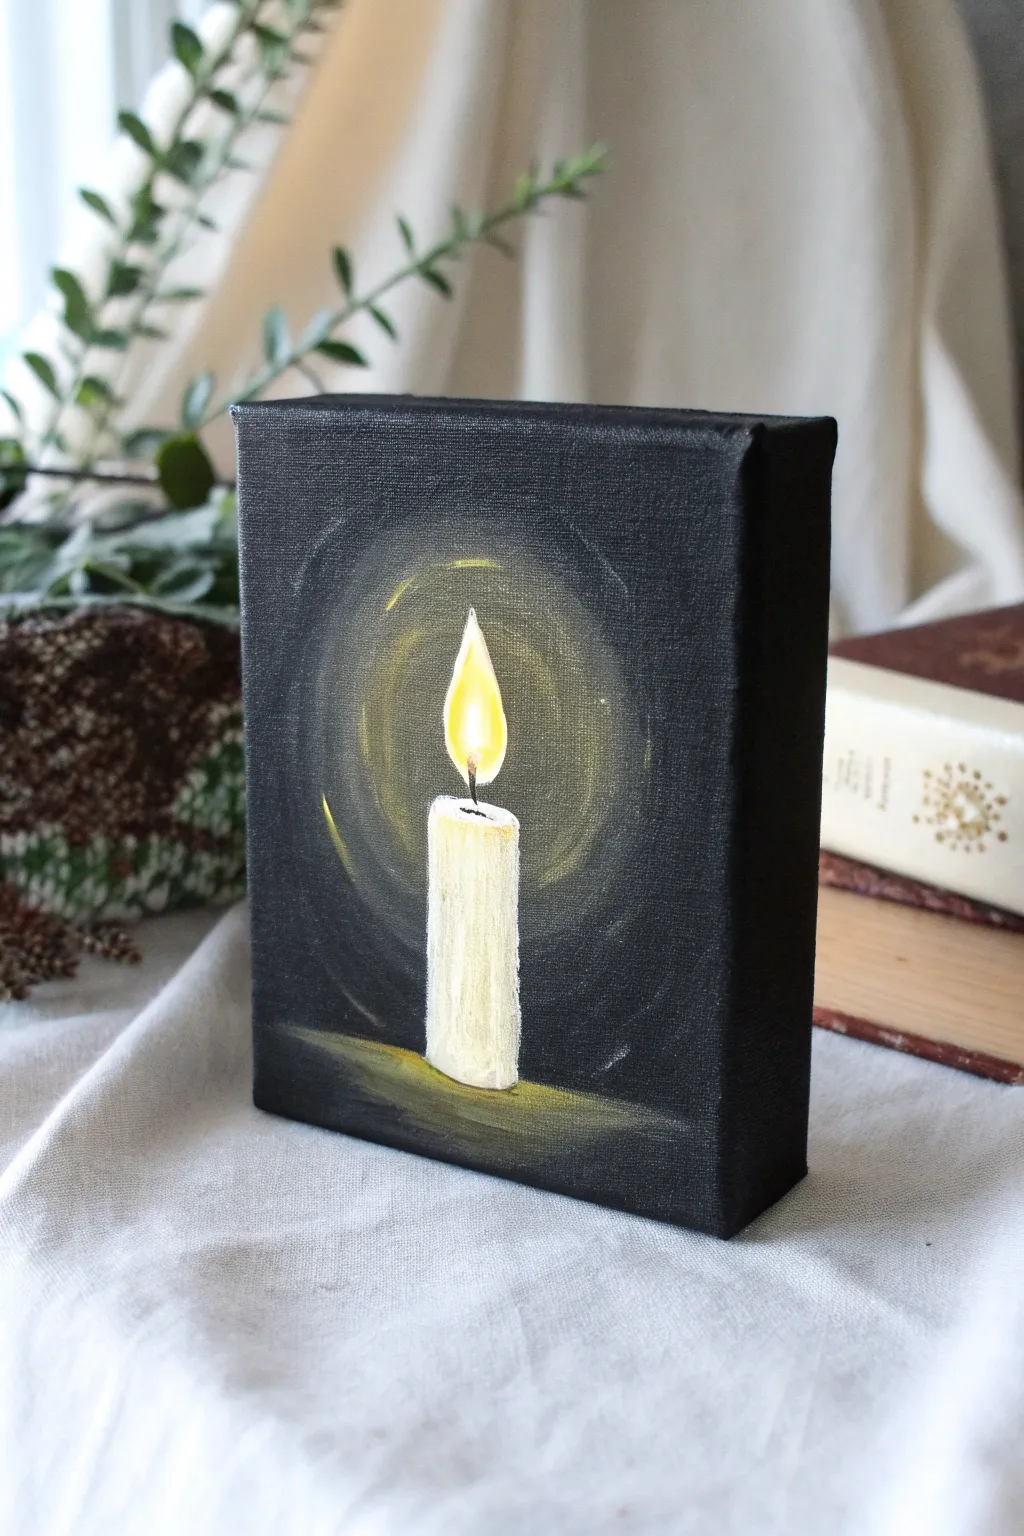
Capture the serenity of a single flickering flame with this striking mini canvas project. Using the black background to your advantage, you’ll learn how to build up luminous layers to create a convincing and warm glow effect.
Step-by-Step Tutorial
Materials
- Mini black stretched canvas (approx. 4×6 or 5×7 inches)
- Acrylic paints: Titanium White, Cadmium Yellow, Yellow Ochre, Burnt Umber, Black (for touch-ups)
- Small flat brush (size 4 or 6)
- Detail round brush (size 0 or 1)
- Filbert brush or small blending brush
- Cup of water
- Palette or paper plate
- Paper towels
Step 1: Setting the Scene
-
Prepare the canvas:
Ensure your black canvas is clean and dust-free. If you are using a standard white canvas, paint the entire surface—including the sides—with two coats of black acrylic paint and let it dry completely before starting. -
Map out the candle:
Using a very diluted mixture of white paint and water, lightly sketch the vertical rectangle for the candle body in the center of the canvas. Keep it faint so it’s easy to paint over later. -
Position the flame:
Mark the position of the wick just above the candle body, and lightly outline a teardrop shape for the flame above it. Don’t worry about being perfect; this is just a guide.
Step 2: Painting the Candle Glow
-
Create the outer halo:
Mix a small amount of Yellow Ochre with plenty of water or glazing medium to make it translucent. With a filbert brush, gently scrub a large circle around where the flame will be. -
Add the inner glow:
While the previous layer is dry, mix Cadmium Yellow with a touch of white. Dry-brush this brighter color closer to the flame, creating a smaller, tighter circle inside your first halo. -
Refine the edges:
Use a dry, clean brush to gently feather the edges of your yellow paint outwards, softening the transition into the black background so there are no harsh lines. -
Enhance the brightness:
Add a very faint wash of white mixed with yellow right at the center of the halo area, intensified directly behind where the flame will sit.
Dry Brushing Tip
For the halo, wipe most paint off your brush onto a paper towel first. The brush should feel almost dry to create that soft, smoky transparency.
Step 3: Creating the Wax Candle
-
Base coat the candle:
Mix Titanium White with a tiny speck of Yellow Ochre to create a warm off-white. Using your flat brush, fill in the rectangle shape of the candle body. -
Add texture:
Don’t smooth the paint perfectly; vertical brushstrokes help mimic the texture of wax trails. Let the black canvas show through slightly at the very edges to suggest roundness. -
Shadowing the wax:
Mix a little Burnt Umber into your off-white. Apply this shadow color lightly along one side of the candle and near the bottom to give the object weight and dimension. -
Determine the top:
Paint a shallow oval at the top of the rectangle using your brightest white mixture to show the melted pool of wax. This establishes the perspective.
Make It Flicker
Instead of a perfect straight teardrop, give the flame painting a slight curve or ‘S’ shape to make it look like it is dancing in a draft.
Step 4: The Flame and Details
-
Paint the flame base:
Using your detail brush, fill in the teardrop flame shape with straight Cadmium Yellow. I find it helpful to start from the bottom and flick the brush upward for a tapered tip. -
Highlight the flame:
To make it shine, paint a smaller white teardrop inside the yellow one, closer to the bottom center of the flame where the heat is most intense. -
Add the wick:
With the detail brush and Burnt Umber (or Black), paint a very thin line connecting the melted wax pool to the bottom of the flame. -
Table reflection:
Mix a dull yellow-brown shade. Use horizontal strokes under the candle to create a soft reflection on the ‘table’ surface, fading it out as it moves away from the light source. -
Final highlights:
Add a tiny rim of pure white to the front edge of the top oval of wax. This catches the light and makes the candle look truly 3D. -
Clean up:
If any yellow halo paint looks too messy, use black paint to carefully tidy up the outer edges of the background.
Step back and enjoy the warmth this little painting brings to your space


Bright Butterfly on Black
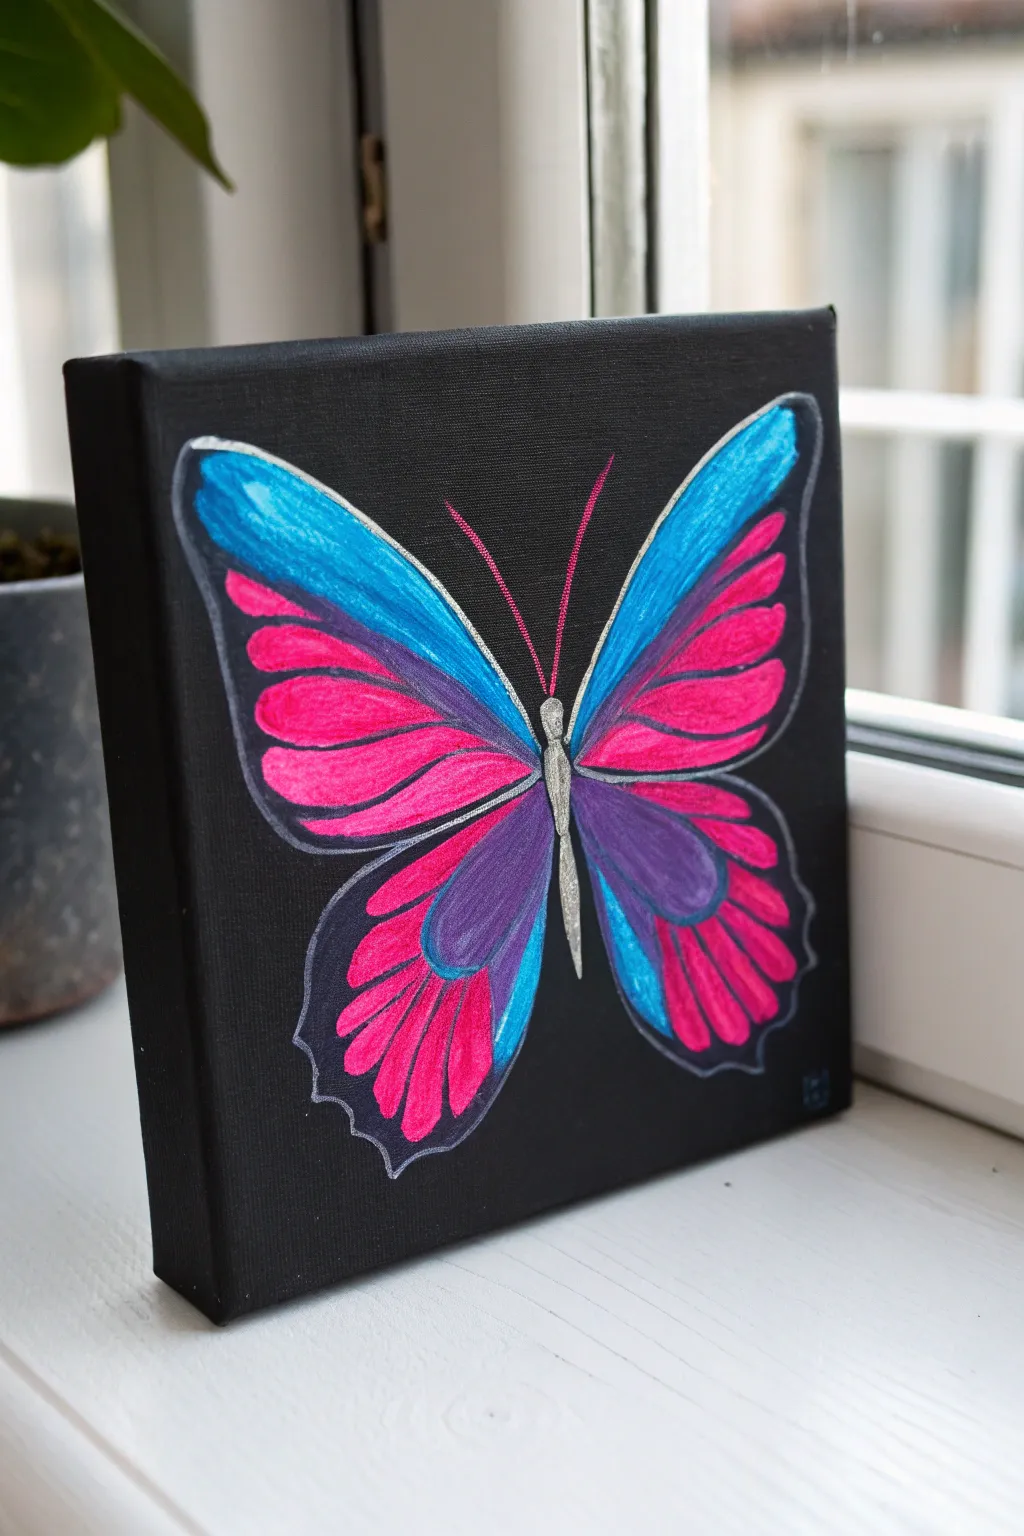
Transform a mini square canvas into a vibrant display of nature with this striking butterfly painting. The stark black background makes the vivid pink, cyan, and purple wings pop, creating a bold and modern piece of miniature art.
How-To Guide
Materials
- Mini black canvas (approx. 6×6 inch)
- White colored pencil or chalk pencil for sketching
- Acrylic paints (Magenta/Neon Pink, Cyan Blue, Deep Purple, Silver Metallic)
- Fine detail brushes (sizes 0 and 00)
- Small flat brush (size 2-4)
- Silver paint marker or metallic silver gel pen
- Cup of water
- Paper towels
- Palette or small plate
Step 1: Sketching the Outline
-
Establish the center:
Begin by lightly marking the vertical center of your black canvas with a white colored pencil. This doesn’t need to be perfectly measured, but it helps ensure your butterfly sits comfortably in the middle. -
Draw the body:
Sketch a slender, elongated oval shape along your center mark for the butterfly’s body. Add a small round circle at the top for the head. -
Outline the upper wings:
Starting from the upper back of the body, draw two large, sweeping curves that extend outward and upward toward the top corners. Bring them back down to meet the middle of the body, shaping them like rounded triangles. -
Add the lower wings:
From the point where the upper wings end, draw two smaller, more rounded shapes extending downward. These should curve gently and meet near the bottom tip of the body. -
Define the segments (Optional):
Lightly sketch the internal tear-drop shapes inside the wings where the pink colors will go. This ‘paint-by-numbers’ approach makes the coloring phase much easier.
Fixing Opacity Issues
If your bright colors look dull on the black canvas, paint a layer of white primer exactly where the color will go first. Let it dry, then paint the bright color on top.
Step 2: Blocking in Color
-
Paint the upper wing edges:
Load your small flat brush with cyan blue. Paint the thick, curved leading edge of the top wings. You may need two coats to get full opacity on the black canvas. -
Fill the primary pink sections:
Switch to your magenta or neon pink paint. Fill in the large, segmented sections in the middle of both the upper and lower wings. Leave small gaps between these sections so the black canvas shows through as separation lines. -
Add the purple accents:
Using a smaller brush, apply deep purple paint to the inner sections of the wings, closest to the butterfly’s body. Blending this slightly where it meets color can create a soft gradient, though solid blocks of color look striking too. -
Lower wing details:
On the bottom wings, add touches of cyan blue along the outer edges, mirroring the blue on the top wings but keeping the lines thinner. -
Painting the body:
Use metallic silver paint to fill within the body outline. Use a very fine brush here to keep the shape sleek and separate from the wings.
Step 3: Detailing and Outlining
-
Let it dry completely:
Pause here and ensure all your base colors are totally dry to the touch. If the paint is wet, your metallic lines will smudge. -
Outline the segments:
Using a silver paint marker or a very fine brush with thinned silver paint, carefully trace around the pink and purple segments. This creates that ‘stained glass’ effect. -
Define the outer wings:
Run a continuous silver line along the very outer perimeter of all four winds. I find that rotating the canvas as I draw helps keep my hand steady on these long curves. -
Draw the antennae:
With your finest brush or silver pen, flick two delicate, curved lines extending from the head. You can add a tiny dot of pink paint to the tip of each antenna for a dash of whimsy. -
Clean up sketch lines:
Once the artwork is fully dry, take a slightly damp Q-tip or a soft eraser and gently remove any visible white pencil marks from the initial sketch.
Pro Tip: Metallic Pop
Use a silver Posca pen or gel pen instead of a brush for the outlines. It offers much better control for consistent line width and creates a shiny, crisp finish.
Place your finished canvas on a small easel or a sunny windowsill to catch the light on the silver accents
Three Tiny Cacti With Highlights
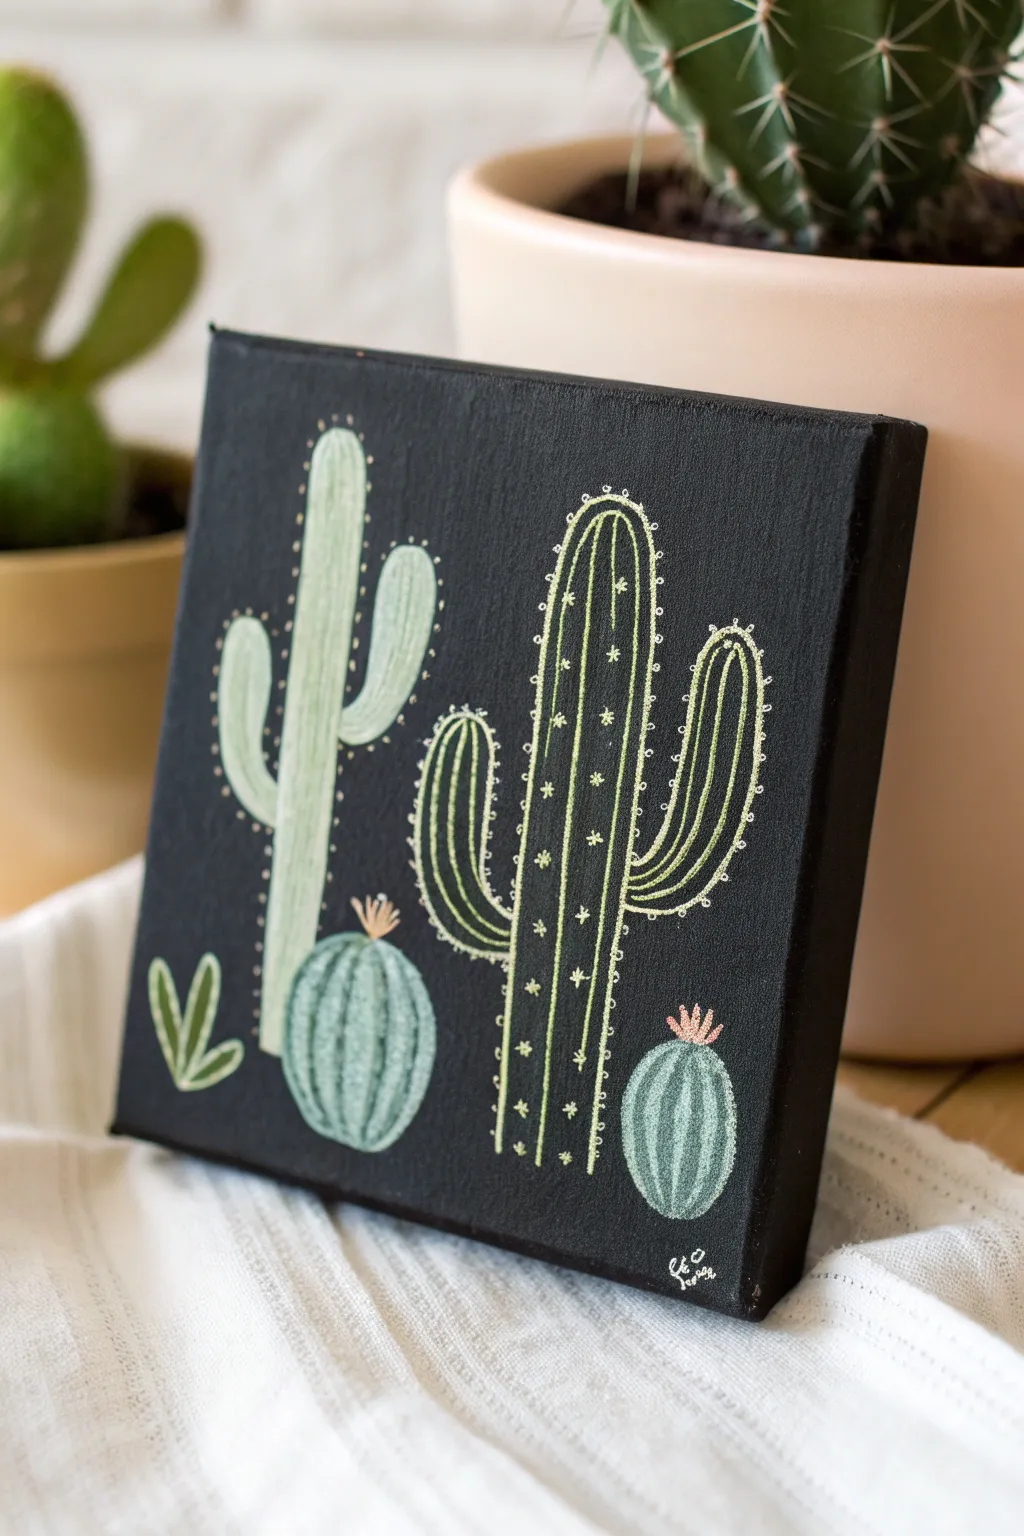
Embrace the striking contrast of pale greens against a deep black background with this simple yet elegant line art project. This project uses fine liners and acrylic paint to create a clean, modern aesthetic perfect for small spaces.
Step-by-Step
Materials
- Mini black canvas (approx. 4×4 or 5×5 inches)
- White or ivory chalk pencil (for sketching)
- Posca paint pens (Extra Fine tip 0.7mm): Pastel Green, White, Mint Green
- Posca paint pen or acrylic paint: Light Coral/Pink (for flowers)
- Fine detail paintbrush (if not using pens)
- Matte varnish spray (optional)
- Ruler (optional)
Step 1: Planning and Sketching
-
Prepare the Surface:
Ensure your black canvas is clean and free of dust. If you are painting a white canvas black, make sure to apply two coats of heavy body black acrylic and let it dry completely to create a smooth, non-porous base. -
Sketch the Base Round Cacti:
Using a white chalk pencil, lightly sketch two small circles near the bottom of the canvas. Place one slightly left of center and the other near the bottom right corner. These will be your barrel cacti. -
Outline the Tall Cactus:
Draw a tall, thin oval shape slightly to the left side, starting just above the left barrel cactus. Add two arms: one curving upward on the left side and another slightly higher on the right side. -
Sketch the Saguaro:
To the right of the first tall cactus, sketch a larger, thicker saguaro shape. Give this one a central column and two prominent arms curving upward in a classic ‘U’ shape. -
Add the Tiny Plant:
In the far bottom left corner, sketch a very simple three-leaf plant shape, resembling small bunny ears, to balance the composition.
Step 2: Filling and Defining
-
Fill the Left Cactus:
Using a Mint Green or pale sage paint pen, color in the entire body of the first tall cactus (the one on the left). Apply the paint smoothly to get opaque coverage. You may need a second coat after the first dries. -
Fill the Barrel Cacti:
Color in the two round barrel cacti at the bottom using a slightly darker or different shade of green if available, or stick to the same mint green for a uniform look. Let this base layer dry completely. -
Outline the Saguaro:
For the large right-side saguaro, switch to a very fine lime green or yellowish-green pen. Instead of filling it in solid, draw distinct vertical contour lines that follow the shape of the cactus arms and trunk. -
Create Ribs on the Saguaro:
Draw parallel lines inside the outline of the prominent saguaro. Leave black space between these green lines to create the illusion of ribs. Connect the lines with small ‘U’ shapes at the tips of the arms. -
Detail the Barrel Cacti:
On the dry solid green circles, use a lighter green or off-white fine pen to draw vertical curved lines. These represent the ribs of the barrel cactus. -
Detail the Left Tall Cactus:
On the solid mint green cactus, use a slightly darker green or grey-green fine liner to add faint vertical texture lines, giving it a bit of dimension without overwhelming the pale color.
Uneven Lines?
If your paint pen lines look shaky or uneven, wait for the paint to dry fully, then use a black fine-point marker or black paint to carefully ‘erase’ and reshape the edges from the outside.
Step 3: Highlights and Spines
-
Add Dots to the Outline:
Using a white or very pale cream extra-fine pen, carefully place tiny dots along the outer edges of the left tall cactus. These represent the spines catching the light. -
Create Starburst Spines:
On the large, ribbed saguaro (the right one), draw tiny asterisks or starburst shapes along the vertical green lines. Keep them small and spaced out evenly. -
Highlight the Barrel Spines:
Add tiny dashes or dots along the rib lines of the bottom barrel cacti using your white pen. This mimics the prickly texture effectively. -
Outline the Small Plant:
Trace the small three-leaf plant in the bottom left corner with a bold lime green line. Draw a single line down the center of each leaf for a simple graphic look.
Level Up: Metallic Pop
Swap the white highlight dots for a metallic gold or silver paint pen. The metallic sheen against the matte black canvas adds an elegant, luxurious touch to the simple illustration.
Step 4: Finishing Touches
-
Paint the Blooms:
Using a light coral or pink paint pen, add small spikes to the tops of the two barrel cacti. Draw 3-4 tiny lines radiating upward to look like enclosed flower buds. -
Clean Up Marks:
Once everything is completely dry (I usually give it about 15 minutes to be safe), use a damp cotton swab or a clean eraser to gently remove any visible chalk sketch lines. -
Sign and Seal:
Add your signature or initials in the bottom right corner with white ink. If desired, finish with a matte spray varnish to protect the paint without adding unwanted glare to the black background.
Place your mini masterpiece on a shelf near a real plant for a charming botanical display
Gold Mandala Dot Ring
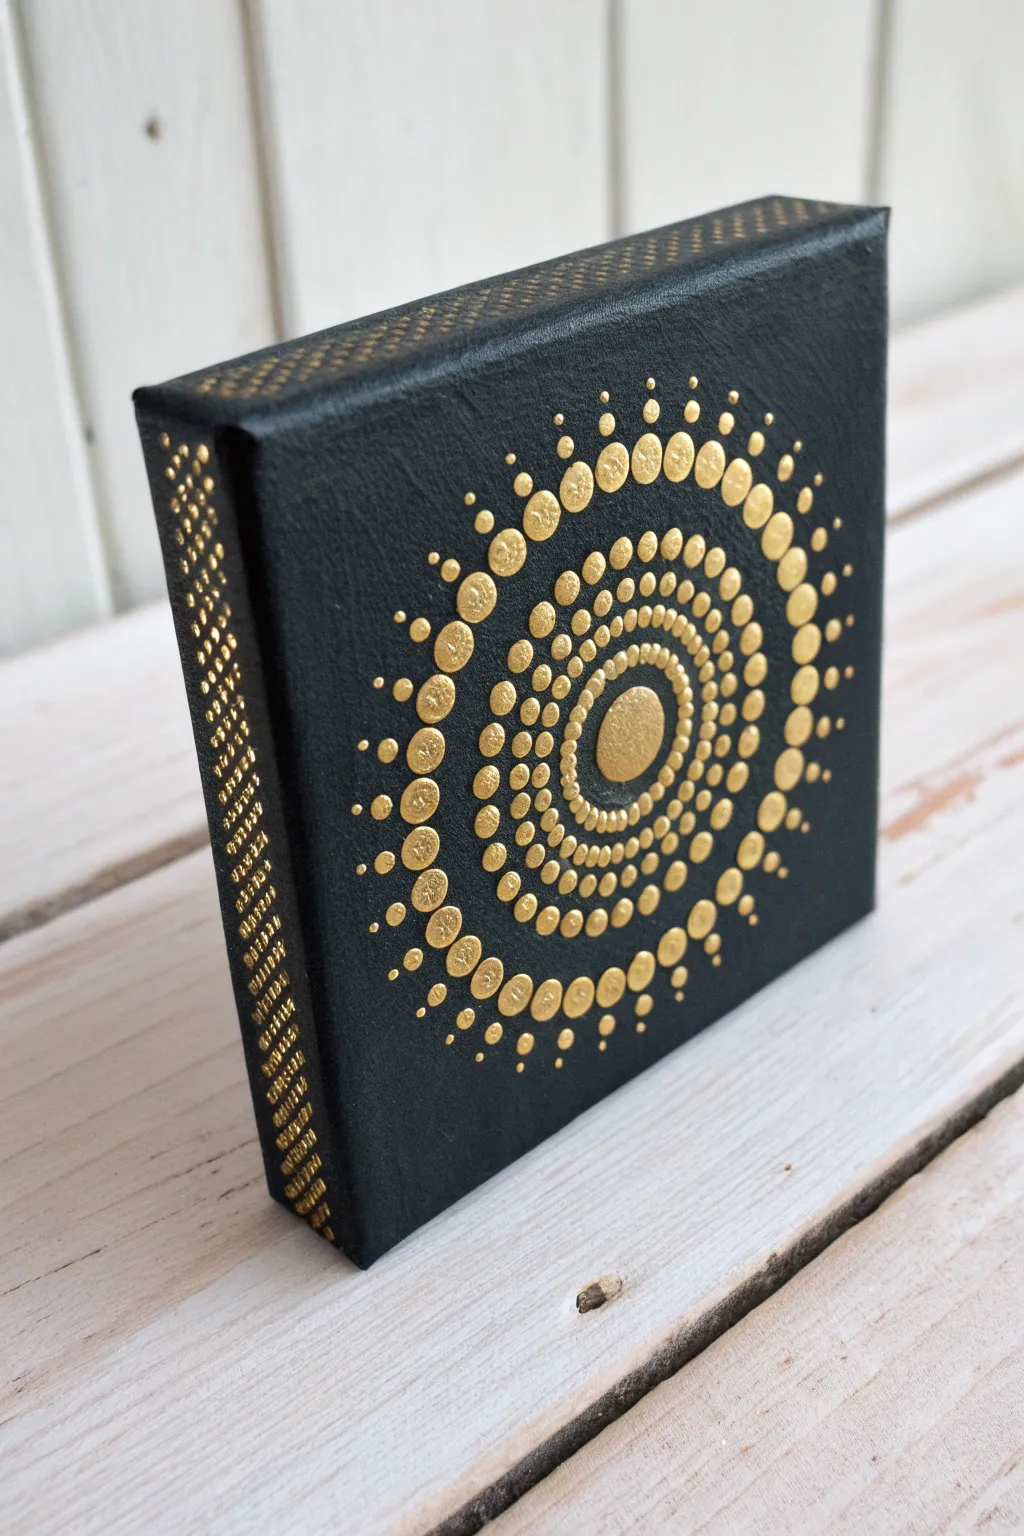
Transform a mini black canvas into a radiant piece of art using simple dotting techniques. This elegant gold-on-black design creates a striking sunburst effect that wraps right around the edges for a polished, professional finish.
Step-by-Step Guide
Materials
- Mini stretched square canvas (approx. 4×4 inches)
- Black acrylic paint (matte or satin)
- Metallic gold acrylic paint (high opacity)
- Set of dotting tools (various sizes) or improvised tools like pencil erasers and brush handles
- Paintbrush (flat, for the base coat)
- Paint palette or disposable plate
- Ruler
- Chalk or a white charcoal pencil
- Damp paper towels
Step 1: Preparation & Base Coat
-
Prep the surface:
Even if your canvas came pre-primed black, apply a fresh coat of black acrylic paint to the entire front and all four sides. This ensures a deep, rich background that will make the gold pop. -
Dry completely:
Let this base coat dry fully. If the canvas texture is still very rough showing through, you might opt for a second coat for smoother dot application. -
Find the center:
Using a ruler, lightly mark an ‘X’ from corner to corner with chalk or a white charcoal pencil to find the exact center of the canvas. This is crucial for symmetry.
Paint Consistency Check
Metallic paints can be thick. Mix in a drop of pouring medium or water to get a melted chocolate consistency. This prevents ‘peaks’ on your dots.
Step 2: Creating the Mandala
-
The central anchor:
Load a large-sized dotting tool (or the flat eraser end of a pencil) with metallic gold paint. Place firmly in the exact center mark to create your main focal dot. -
First ring:
Switch to a very small tool. Place tiny dots immediately around the central circle, spacing them closely so they almost touch the center but remain distinct. -
Second ring expansion:
Move up one tool size. Create a second ring of dots. Try to place these dots in the ‘valleys’ between the dots of the previous ring to maintain a tight radial pattern. -
Third ring:
Increase tool size again. Continue the pattern, ensuring the spacing remains consistent. If you notice gold paint peaking, give the tool a slight swirl as you lift to flatten the dot. -
Walking the dots:
For the fourth ring, use a medium tool to place a main dot, then use a tiny tool to ‘walk’ smaller dots around it if you want intricate detail, or simply continue with a standard ring of larger dots as seen in the reference. -
Outer large ring:
Select your second-largest tool. Create a ring of bold, substantial dots. These act as the ‘frame’ for the interior burst. -
Graduated fade:
For the outer radiating effect, place a medium dot above each large dot from the previous step. Then, place a slightly smaller dot above that distinct one. -
Finishing the rays:
Continue this line outwards with progressively smaller tools until the dots become tiny specks fading into the black background corners.
Fixing a Wonky Dot
Mess up a dot? Don’t wipe it! Let it dry completely, paint over it with black, let that dry, and then re-dot perfectly.
Step 3: Edge Decoration
-
Start the side pattern:
Turn the canvas to work on one side edge. You can continue the mandala pattern over the edge, or create a standalone border design. -
Create spacing guides:
Visually divide the edge length. Place a small dot at the top edge, middle, and bottom edge to guide your straight lines. -
Fill the rows:
Using a small tool, create straight vertical rows of dots down the side of the canvas. I find it easiest to work from the front face toward the back to keep the lines straight. -
Repeat on all sides:
Rotate the canvas carefully (watch your wet top surface!) and repeat the edge dotting on the remaining three sides. -
Final clean up:
Once fully dry, use a damp Q-tip or a soft cloth to gently wipe away any visible chalk guide lines.
Display this striking piece on a miniature easel or hang it as part of a geometric wall collage.
Cherry Splash Close-Up
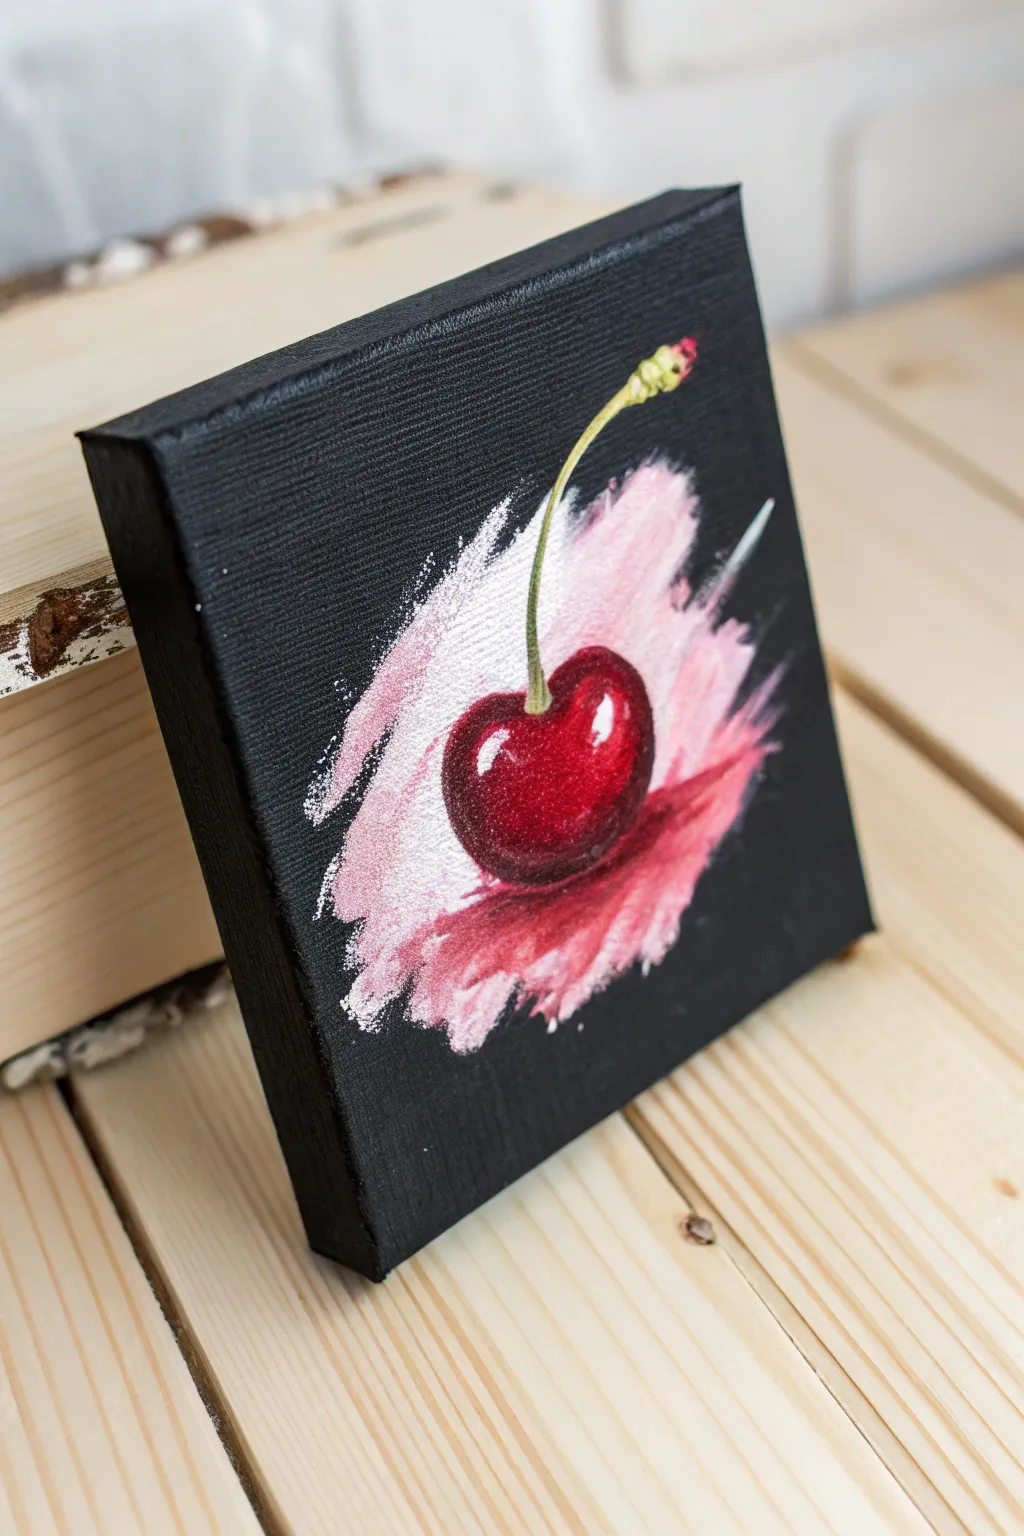
This striking mini canvas project features a glossy, realistic red cherry that pops vibrantly against a deep black background. The dynamic white and pink splash behind the fruit adds energy and movement, creating a perfect balance between realism and abstraction.
Detailed Instructions
Materials
- Small square stretched canvas (e.g., 4×4 or 6×6 inch)
- Black acrylic paint (heavy body preferred)
- Titanium White acrylic paint
- Cadmium Red or Alizarin Crimson acrylic paint
- Burnt Umber or a deep violet acrylic paint
- Yellow Ochre or Sap Green (for the stem)
- Small flat brush (size 4 or 6)
- Fine liner brush (size 0 or 00)
- Small round brush (size 2)
- Palette or paper plate
- Cup of water and paper towels
Step 1: Preparation & Background
-
Base coat:
Begin by painting the entire canvas surface with black acrylic paint. Ensure you cover the textural weave of the canvas completely. -
Edge wrapping:
Don’t forget to paint the sides of the canvas black as well. This creates a gallery-wrapped look that means you won’t need a frame later. -
Dry completely:
Let this black base layer dry thoroughly. If the canvas white still shows through, apply a second coat and let it dry again. -
Mixing the splash color:
On your palette, mix a small amount of Titanium White with a tiny touch of red to create a very pale pink. Keep a pile of pure white ready nearby. -
Creating the splash:
Using a small flat brush, apply the white and pale pink mixture in the center of the canvas. Use quick, diagonal strokes. -
Feathering edges:
Allow the brushstrokes to be ‘messy’ and textured at the edges, creating a dry-brush effect where the black background shows through the paint streaks. Let this dry completely.
Wet-on-Wet Blending
Work quickly when shading the cherry. Blending the dark shadow into the red while both paints are wet creates the smoothest, most realistic gradient.
Step 2: Painting the Cherry
-
Outline the shape:
With a round brush and your primary red shade, paint a heart-shaped circle in the center of the white splash. -
Base red layer:
Fill in the cherry shape with a solid coat of red. You want this to be opaque, so you might need two coats if the white splash shows through too much. -
Adding shadow:
Mix a little black or deep violet into your red to create a maroon shadow color. Apply this along the bottom curve of the cherry and deep into the divot where the stem will go. -
Blending the gradient:
While the paint is still slightly wet, gently blend the shadow color up into the mid-tone red so there isn’t a harsh line. -
Cast shadow:
Underneath the cherry, dry-brush a little of the red-maroon mixture onto the white splash background to ground the fruit. -
Stem base:
Mix a light green using yellow ochre and a touch of black or blue. Using the fine liner brush, paint a curved line extending upward from the cherry’s center divot. -
Stem tip:
Add a small, thicker nub at the top of the stem where it would have connected to the branch. Add a tiny dot of red on the very tip for realism.
Water Droplets
Add tiny white highlights and dark shadows in small oval shapes on the cherry skin to create realistic-looking water droplets.
Step 3: Highlights & Details
-
Main highlight:
Mixing pure white with a tiny dot of water for flow, paint a bright, sharp highlight on the upper right curve of the cherry. This indicates glossiness. -
Secondary reflection:
Add a softer, smaller highlight on the lower left side, which represents light reflecting off the surface below. -
Stem highlight:
Add a very thin line of light yellow or white along one side of the green stem to give it volume. -
Final splash texture:
If painting the cherry covered too much of your background splash, you can carefully add a few fresh strokes of white around the edges of the fruit now. -
Sealing:
Once absolutely dry, I like to apply a gloss varnish to the cherry part only, making it look permanently wet and juicy.
Display this little gem on a miniature easel or group several fruit paintings together for a colorful kitchen vignette
Iridescent Bubble Cluster
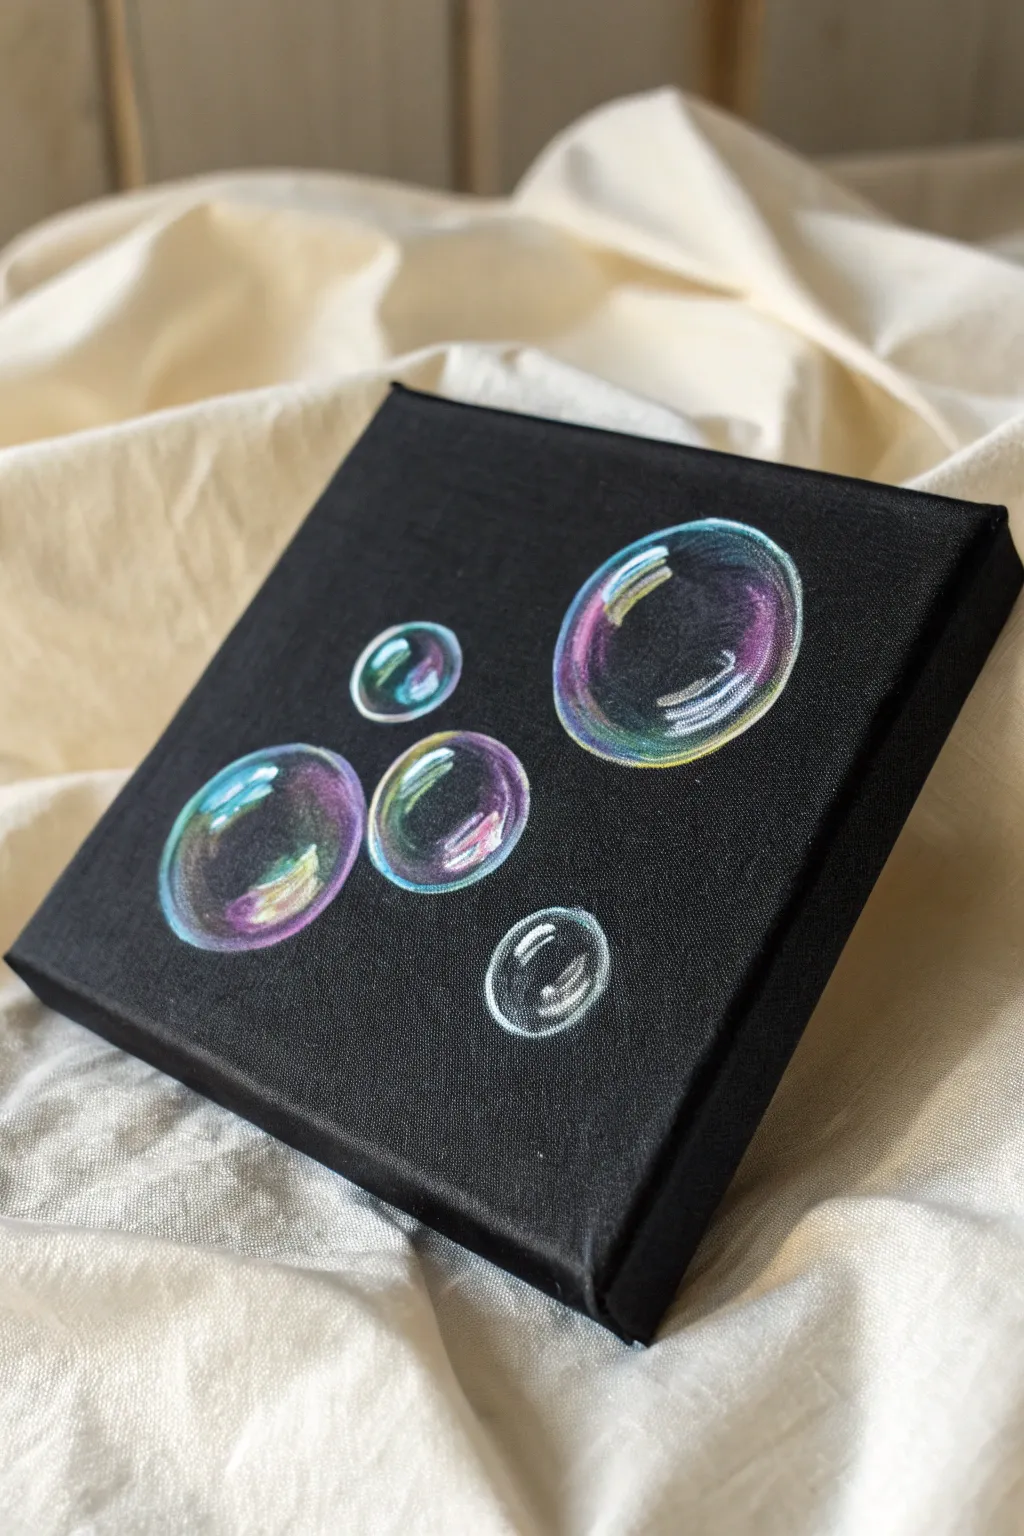
Capture the delicate shimmer of soap bubbles floating in the dark with this striking mini canvas project. Using colored pencils on a black background creates an intense contrast that makes the iridescent colors truly pop.
Step-by-Step Tutorial
Materials
- Small square stretched black canvas (e.g., 4×4 or 6×6 inch)
- White colored pencil (soft core works best)
- Set of colored pencils (specifically: light blue, purple, pink, yellow, teal)
- White gel pen or fine tip white acrylic marker
- Pencil sharpener
- Circle template or various small round objects (like bottle caps) for tracing
- Fixative spray (optional)
Step 1: Drafting the Composition
-
Choose your layout:
Decide on the placement of your bubbles. For a natural look, aim for an odd number of bubbles—five works perfectly on a small canvas. Arrange them in a loose cluster rather than a straight line. -
Trace lightly:
Using your white colored pencil with very light pressure, trace five circles of varying sizes onto the black canvas. If you don’t have a template, common household items like coins or bottle caps work well. -
Establish the outline:
Go over your tracings again, but keep the line weight varied. You don’t want a solid, thick white outline all the way around; instead, let the line fade in and out slightly to suggest transparency.
Use Soft Pencils
Hard pencils struggle on canvas texture. Use soft-core pencils (like Prismacolor Premier) to lay down creamy, opaque color that covers the black weave easily.
Step 2: Adding Color Reflections
-
Start with the cool tones:
Begin with a light blue pencil. Shade along the inner edge of your largest bubble, following the curve. Keep the pressure light to medium so the black canvas texture shows through slightly. -
Introduce purples:
Select a purple or violet pencil. Blend this color right next to the blue sections you just created, overlapping them slightly to create a seamless gradient along the bubble’s curve. -
Warm up the spectrum:
Add touches of pink and yellow on the opposite side of the cool tones. I like to place the yellow near the bottom or side edge to mimic light hitting the soap film’s thinnest point. -
Repeat for all bubbles:
Work through the remaining four bubbles, varying the color placement on each one. Don’t make them identical clones; shifting the colors makes the cluster look more organic. -
Intensify the brightness:
Go back over your colors with a slightly heavier hand in the centers of the colored sections to make the pigment more opaque and vibrant against the black.
Make it 3D
Paint a very faint, curved gray shadow on the canvas underneath and to the right of each bubble to make them look like they are floating above the surface.
Step 3: Highlights and Details
-
Create the main reflection:
Using your white colored pencil, draw a curved, window-like reflection on the upper left side of each bubble. This often looks like a distorted rectangle or ‘window pane’ shape. -
Add secondary highlights:
On the bottom right interior of the bubbles (opposite the main highlight), adds soft white scumbling. This represents the light reflecting through the back of the sphere. -
Crisp up the edges:
Sharpen your white pencil to a fine point. Add thin, sharp lines along the very outer rim of the bubbles near the colored sections to define the sphere’s edge. -
The gel pen pop:
Take your white gel pen or acrylic marker and add tiny, pure white dots or lines inside the brightest part of your window reflections. This high-contrast ‘specular highlight’ is what makes the surface look wet and glossy. -
Final clean up:
Check for any smudges on the black background. If you see stray pigment, you can often lift it carefully with a kneaded eraser or by lightly dabbing with a damp cotton swab.
Now you have a mesmerizing little study of light and transparency ready to display
Minimal City Skyline Lights
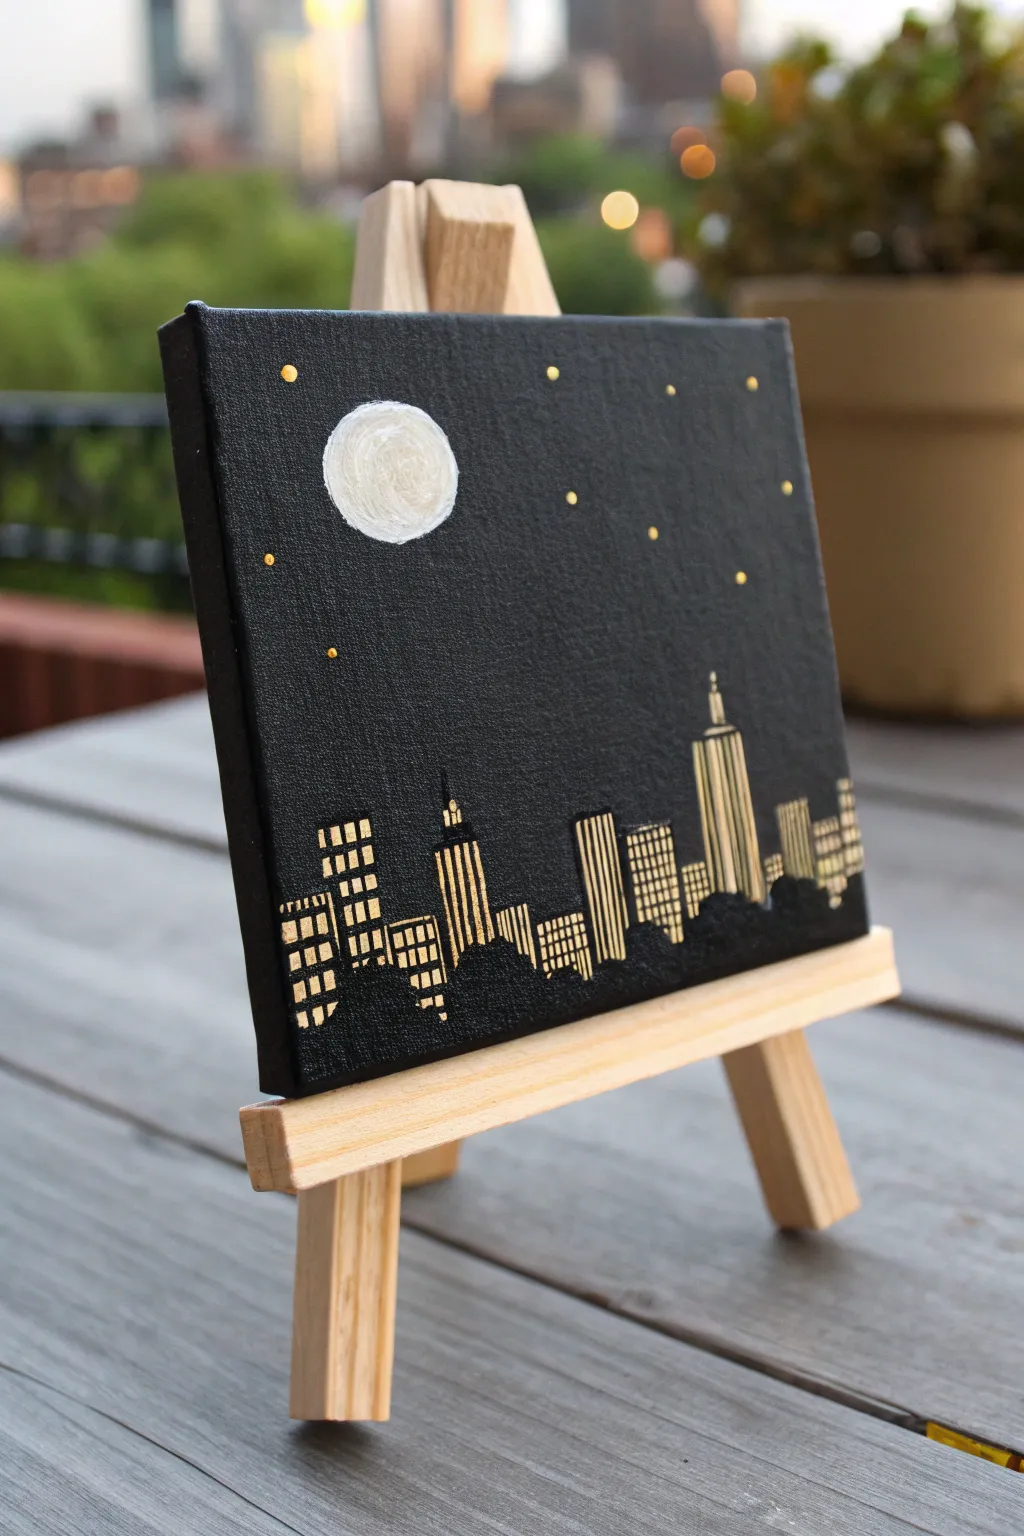
Capture the glittering magic of an urban evening with this simple yet striking mini canvas project. Using metallic gold paint against a stark black background creates immediate contrast and drama, perfect for a modern minimalist look.
Detailed Instructions
Materials
- Mini stretched canvas (4×4 or 5×5 inch)
- Black acrylic paint (matte finish is best)
- Metallic gold acrylic paint (or a gold paint pen)
- White acrylic paint
- Flat brush (medium size for background)
- Fine detail brush (liner brush or size 0 round)
- Small circle sponge dauber or stencil (optional for moon)
- Mini wooden easel for display
- Paper plate or palette
- Cup of water and paper towels
Step 1: Setting the Night Scene
-
Prime the canvas:
Begin by covering your entire mini canvas with a coat of black acrylic paint. While some canvases come pre-primed black, adding your own coat ensures a rich, matte finish that makes the gold pop later. -
Paint the edges:
Don’t forget the sides! Paint the edges of the canvas black as well so the artwork looks finished from every angle when sitting on the easel. -
Let it dry completely:
Allow the black base coat to dry fully. This is crucial because if the black is wet, it will mix with your gold and white, turning them muddy gray.
Wobbly Lines?
If painting straight lines with a brush is difficult, use a metallic gold paint pen (fine tip) for the buildings. It offers much more control than a brush.
Step 2: Creating the Moon and Stars
-
Position the moon:
Dip a small round brush or a sponge dauber into white paint. Place your moon in the upper-left quadrant of the sky. Instead of a perfectly flat circle, dab the paint slightly to create texture resembling craters. -
Add lunar depth:
If the white feels too stark, mix a tiny dot of black into your white to make a very pale grey and dab it gently over parts of the dried white moon for dimension. -
Dot the stars:
Using the handle end of a small brush or the very tip of a fine brush, dip into the metallic gold paint. Place small, random dots across the upper half of the canvas to represent distant stars. -
Vary star placement:
Keep the stars irregular and sparse; avoid placing them in neat rows to maintain a natural night sky look.
Make it Sparkle
Mix a tiny pinch of loose iridescent glitter into your white moon paint while it’s wet to give the moonlight a magical, shimmering texture.
Step 3: Building the Skyline
-
Plan your buildings:
Visualize where your tallest skyscrapers will go. In this design, the tallest structure sits slightly to the right to balance the moon on the left. -
Start the gold outlines:
Load your fine liner brush with metallic gold paint (or prime your gold paint pen). Draw vertical lines to define the edges of your first tall building. -
Create window grids:
Fill the space between your vertical lines with rows of small horizontal dashes or squares. These don’t need to be perfect; slight irregularity looks more artistic. -
Add varying heights:
Move across the canvas, adding buildings of different heights. I like to group a few shorter, wider buildings next to the taller skyscrapers. -
Detail the rooftops:
Add small antennas or spires to the tops of a few buildings using just the very tip of your brush to give the skyline character. -
Leave negative space:
Remember not to paint the buildings solid gold. The black background showing through represents the unlit parts of the structure.
Step 4: Grounding the Scene
-
Add a silhouette foreground:
Using black paint, paint a low, undulating shape along the very bottom of the canvas, overlapping the bottom of your gold buildings slightly. -
Create texture:
Stipple (stab your brush up and down) along the top edge of this black shape to simulate treetops or a shrub line in front of the city. -
Refine the edges:
Ensure the connection between the tree line and the buildings looks natural, covering any messy bottom edges of your gold grid work. -
Final touches:
Check your stars and window lights. If any gold seems dim, carefully go over those spots with a second layer of gold for maximum shine. -
Display:
Once fully dry, place your mini masterpiece onto the wooden easel.
Place your easel near a lamp to catch the reflection on the metallic paint
Glowing Forest Path Center Light
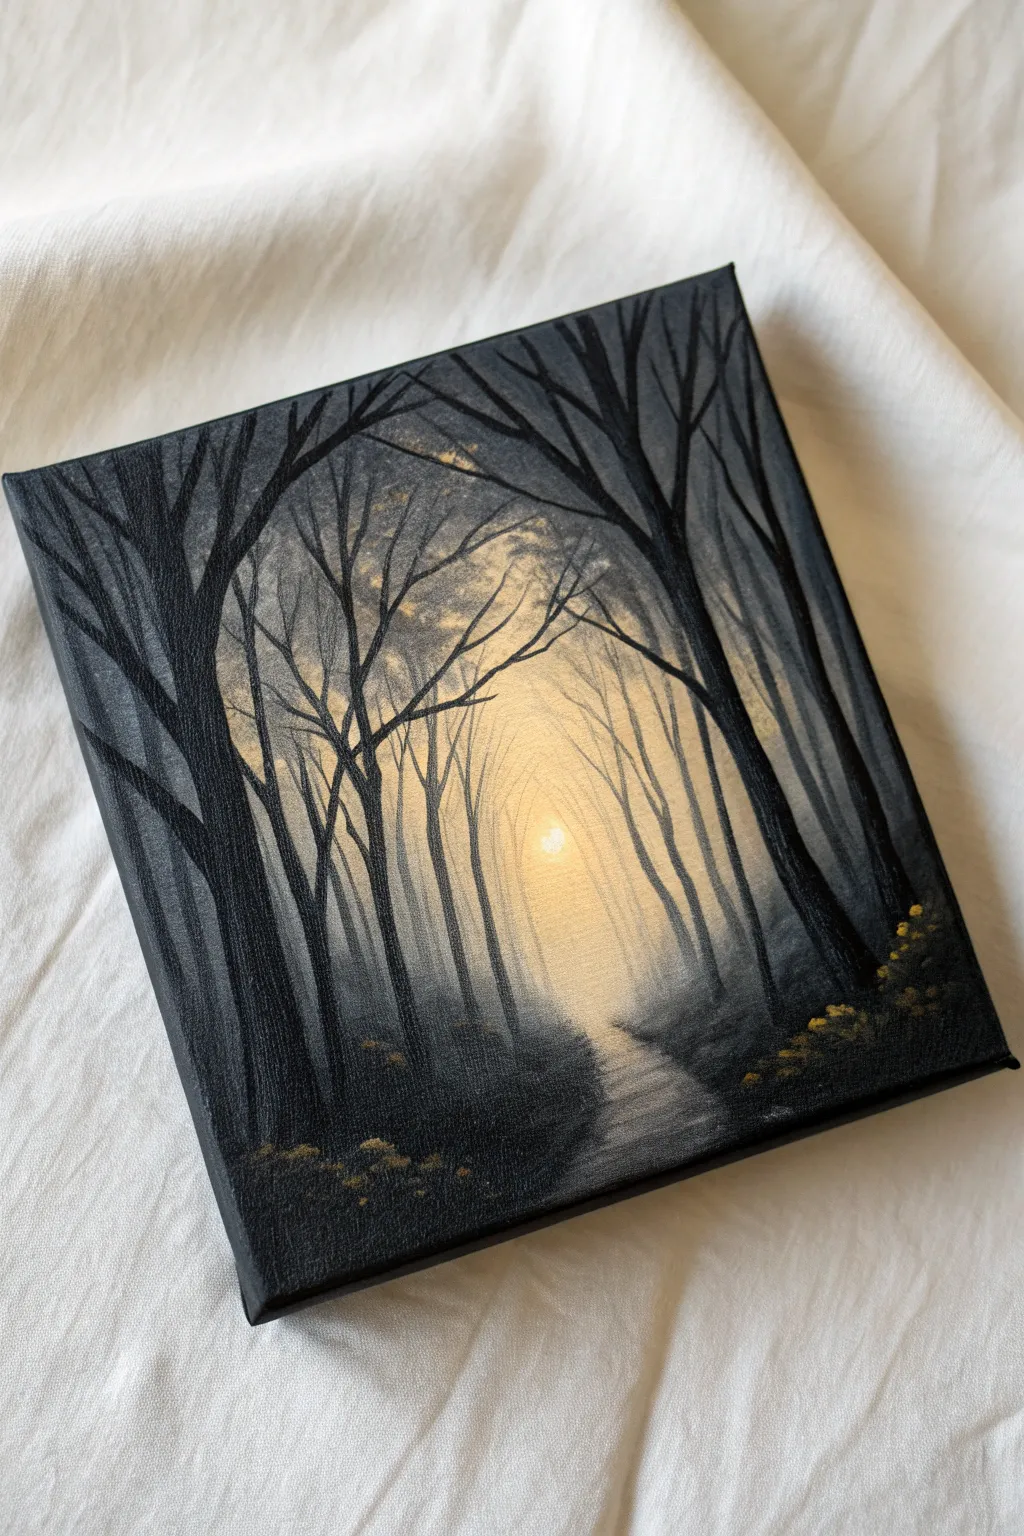
Capture the mystic beauty of a foggy forest with this moody mini canvas project. Using layers of light over a dark background, you’ll create a stunning depth that draws the viewer straight into the glowing center.
How-To Guide
Materials
- Mini stretched canvas (4×4 or 6×6 inches)
- Black acrylic paint (or use a pre-primed black canvas)
- Acrylic paints: Titanium White, Yellow Ochre, Burnt Umber, Neutral Grey
- Paintbrushes: 1-inch flat brush, small round brush (size 0 or 1), filbert brush
- Water cup and paper towels
- Palette or mixing plate
Step 1: Setting the Scene
-
Prepare the base:
If your canvas isn’t already black, cover the entire surface, including the sides, with a solid coat of black acrylic paint. Let this base layer dry completely before moving on. -
Establish the light source:
Mix Titanium White with a tiny dot of Yellow Ochre to create a pale, creamy yellow. Using your finger or a dry filbert brush, gently dab a small circle in the lower-middle center of the canvas where the sun will be. -
Create the initial glow:
While the sun circle is still tacky, use a clean, dry brush to gently blend the edges outward into the black background. You want a soft, hazy transition, not a hard line.
Fog Too Heavy?
If your mist obscures the black trees too much, wait for it to dry and repaint the tree trunks with fresh black to bring them back to the foreground.
Step 2: Building Atmosphere
-
Paint the background mist:
I like to mix a mid-tone grey using black and white, adding a touch of yellow ochre to warm it up. Apply this color in vertical strokes around the central light, fading it out as you move toward the canvas edges. -
Introduce the path:
Using the same warm grey mixture but slightly lighter, paint a narrow, winding shape starting from the bottom center, leading up toward the light source. Keep your strokes horizontal here to suggest flat ground or water reflection. -
Define the distant trees:
Mix a dark grey color. Using a small round brush with very little paint, sketch faint, thin vertical lines in the background within the hazy area. These should be barely visible, suggesting trees far off in the fog. -
Add mid-ground silhouettes:
Darken your grey mixture slightly. Paint slightly thicker, more defined tree trunks closer to the foreground, specifically flanking the path of light. -
Intensify the central light:
Going back to your creamy yellow mix, add another layer specifically in the very center of the sun and the brightest part of the path to make the light pop against the drying grey layers.
Step 3: Foreground Elements
-
Paint the main trees:
Load a small round brush with pure black paint. Paint two large, prominent trees on the left and right sides of the canvas. These should extend from the bottom edge all the way off the top. -
Branch out:
From your main black trunks, pull out thin branches that reach inward and upward, creating an archway effect over the central light. Use the very tip of your brush for delicate lines. -
Create ground texture:
Stipple pure black paint along the bottom edge and corners to ground the trees and create shadowy bushes or undergrowth. -
Highlight the path:
Mix white with a tiny bit of water to make it translucent. Glaze over the center of your path with horizontal strokes to simulate the bright reflection of the light on a wet surface.
Golden Hour Touch
Add a tiny drop of orange to your yellow mix for the final center glaze to create a warmer, sunset-like atmosphere instead of pale moonlight.
Step 4: Final Details
-
Add golden highlights:
Mix Yellow Ochre with a touch of white. Gently tap this color onto the lower branches or ground covering near the light source where the sun would hit. -
Detail the foreground foliage:
Using the tip of your brush, dab small dots of Yellow Ochre and dark grey in the bottom corners to suggest small wildflowers or fallen leaves catching the dim light. -
Refine the branches:
Check your tree silhouettes against the light background. If any branches look too transparent, go over them again with solid black paint. -
Final glow check:
If the fog looks too dark, lightly dry brush a very small amount of white over the area between trees to enhance the misty effect.
Place your finished mini canvas on a small easel or shelf to enjoy the serene mood you have created
Constellation Map With Metallic Stars
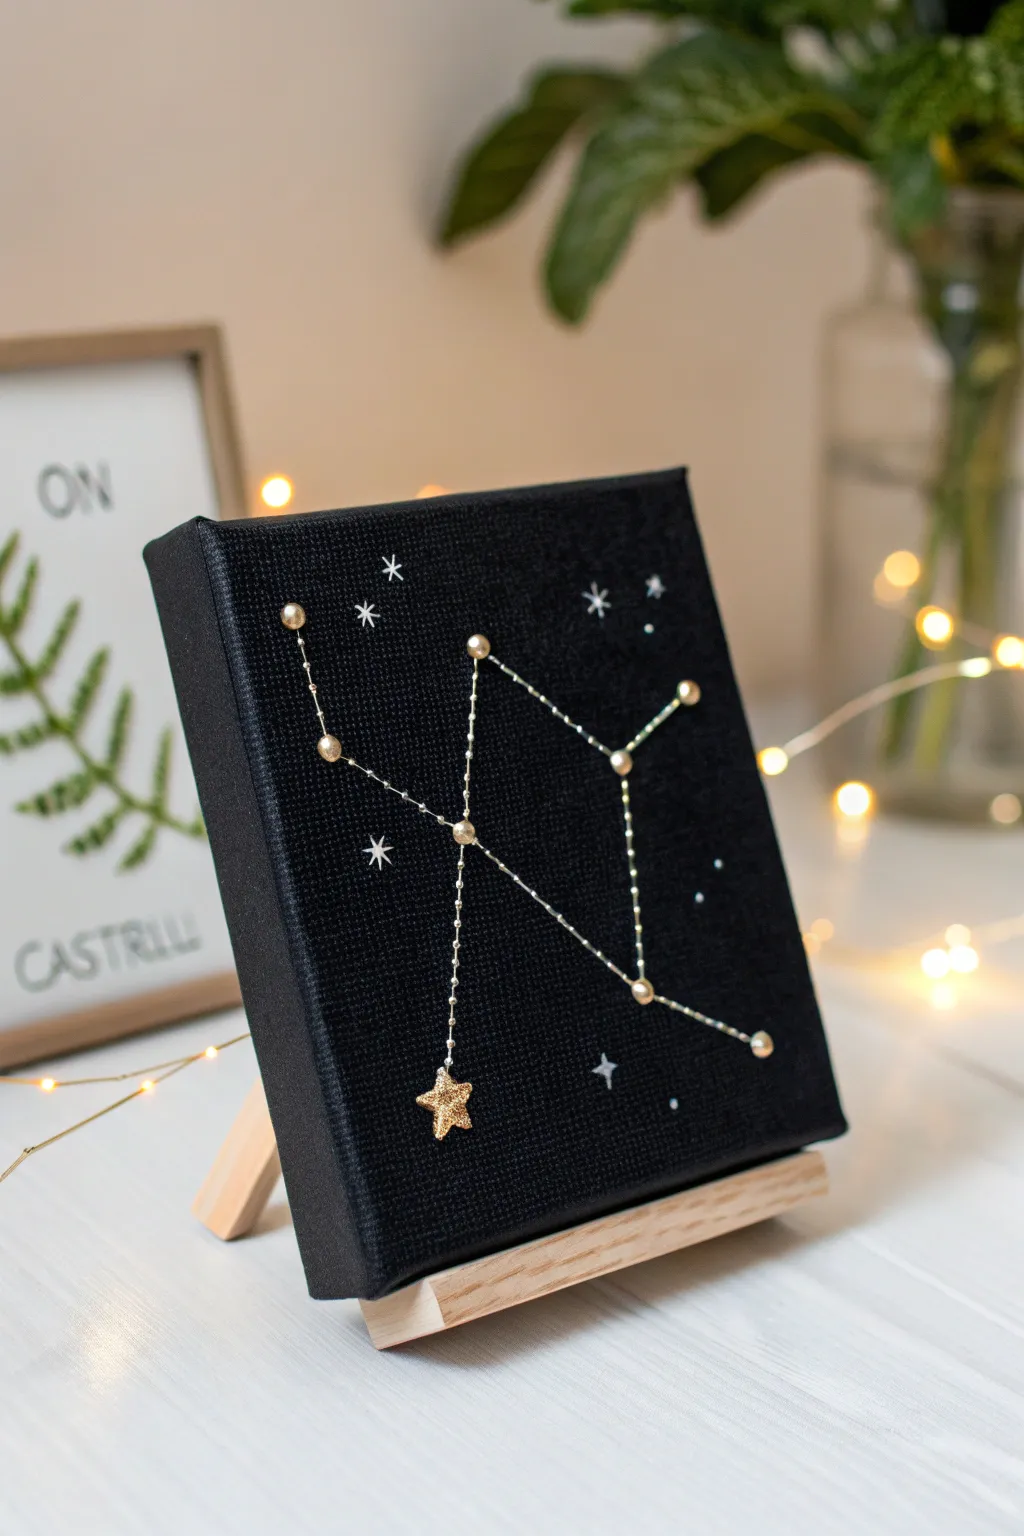
Bring the night sky into your home with this elegant and minimalist mixed-media project. By combining embroidery techniques with painting on a deep black background, you’ll create a dimensional Virgo constellation that catches the light beautifully.
Step-by-Step
Materials
- Mini stretched canvas (4×6 or 5×7 inches)
- Black acrylic paint
- Flat paintbrush
- Gold beads (small, round)
- Small gold star charm or sequin
- Silver metallic thread or embroidery floss
- Embroidery needle
- White or silver gel pen (fine tip)
- Pencil
- Ruler
- Clear craft glue or super glue (optional)
Step 1: Preparation
-
Prime the canvas:
Begin by painting your entire mini canvas with a layer of black acrylic paint. Ensure you cover the sides as well for a polished, gallery-wrapped look. -
Apply a second coat:
Let the first layer dry completely, then add a second coat to ensure the surface is opaque and rich. I like to use criss-cross brush strokes here to minimize texture lines. -
Dry thoroughly:
Allow the canvas to dry fully before moving on; wet paint can smudge when you start plotting your stars.
Keep it tight
To prevent the heavy beads from sagging, pull the thread quite tight. You can also add a drop of super glue under each bead to freeze it in place.
Step 2: Plotting the Stars
-
Map out the design:
Using a pencil, very lightly mark dots where the main stars of the constellation will go. Reference a map of Virgo (as shown) or your chosen zodiac sign. -
Verify placement:
Step back and check proportions. The ‘legs’ of the constellation should be well-spaced, with the lowest point reserved for the special star charm. -
Poke guide holes:
Use your embroidery needle to carefully poke holes through the canvas at each pencil mark. Place the canvas on a piece of scrap cardboard or foam while doing this to avoid bending the frame.
Step 3: Adding the Sparkle
-
Thread the needle:
Cut a length of silver metallic thread and tie a sturdy knot at one end. Thread your needle. -
Anchor the first bead:
Bring the needle up from the back of the canvas through the first hole. Thread a small gold bead onto it, then pass the needle back down through the same hole. -
Secure the bead:
Pull the thread tight so the bead sits flush against the canvas surface. Tie a small knot on the back to secure it if needed, or simply maintain tension as you move to the next. -
Connect the stars:
Move to the next hole. Instead of cutting the thread, you create the visible connection lines by stitching from one star point to the next on the front side. -
Stitch the pattern:
Continue this process—come up through a hole, add a bead, go back down, then stitch a straight line to the next hole. Following the constellation lines is key here. -
Attach the star charm:
When you reach the lowest point of the constellation (Spica in Virgo), stitch on your larger gold star charm instead of a round bead to make it the focal point. -
Tie off:
Once all main stars are connected and beaded, secure your thread on the back of the canvas with a double knot and trim the excess.
Dull needle?
Canvas fabric is tough. If you’re struggling to push the needle through, use a thimble or pre-poke the holes with a pushpin before stitching.
Step 4: Finishing Touches
-
Draw distant stars:
Take your white or silver gel pen and draw small 4-point or 8-point stars randomly in the empty space around the constellation. -
Vary the sizes:
Make some drawn stars larger and others just tiny specks to create depth and the illusion of a vast galaxy. -
Reinforce knots:
If you are worried about the threads slipping, dab a tiny amount of clear craft glue over the knots on the back of the canvas. -
Display:
Place your finished piece on a miniature wooden easel for display.
Now you have a stunning celestial artwork that makes a perfect personalized gift for any astrology lover
Palette-Knife Aurora Slice

Capture the magic of the northern lights on a miniature scale with this striking black canvas project. The bold teal aurora swirls against the deep void of space create a high-contrast piece that feels modern and celestial.
Step-by-Step Guide
Materials
- Mini black stretched canvas (4×4 or similar size)
- Acrylic paints: Black, Teal/Viridian Green, Titanium White, Metallic Emerald or Shimmer Medium (optional)
- Palette knife (flat edge)
- Small flat synthetic brush
- Fine detail brush or toothpick
- Palette or paper plate
- Water cup and paper towels
Step 1: Setting the Scene
-
Prep the Surface:
Even though the canvas is already black, apply a fresh base layer of black acrylic paint if your canvas looks uneven or gray. This ensures a rich, deep background for your stars to shine against. -
Define the Horizon:
Visualize where you want your band of light to appear. For this composition, aim to fill the bottom 40-50% of the canvas, leaving the top half open for the night sky. -
Mix Your Aurora Color:
On your palette, squeeze out your teal or viridian green. Mix in just a touch of white to make it opaque enough to show up on the black, but keep it deep and saturated.
Uneven Streaks?
If palette knife textured streaks look messy, wait for the paint to become tacky (about 5 mins) and specificially drag a dry, soft brush horizontally over it to soften the ridges.
Step 2: Creating the Aurora
-
Load the Knife:
Pick up a generous bead of your teal mixture along the flat edge of your palette knife. You want enough paint to glide, not scratch. -
First Sweep:
Starting from the left edge, about halfway down the canvas, drag the knife horizontally across to the right. Apply firm, even pressure to create a solid band of color. -
Adding Dimension:
While the first layer is wet, mix a lighter version of your teal by adding more white. I like to add a tiny bit of shimmer medium here for an extra glow. -
Layering Light:
Swipe this lighter tint over parts of your initial dark band, but use a lighter hand. Let the darker color peek through underneath to create depth and movement. -
Create Texture:
Use the clean edge of your knife to gently scrape or streak through the wet paint horizontally. This creates those wispy, ethereal lines characteristic of the aurora. -
Wrap the Edges:
Don’t forget the sides! Continue your horizontal strokes around the left and right edges of the canvas so the artwork looks finished from every angle. -
Refine the Lower Shadow:
If your green band feels too thick at the bottom, take a clean brush with a little black paint and blend upwards from the bottom edge, creating a fade-out effect.
Level Up: Color Shift
Mix a tiny amount of interference blue or purple into your white stars. They will look white in the jar but shimmer with color when light hits them from different angles.
Step 3: Painting the Stars
-
Dry Time:
Let the green section dry completely before moving on to the stars. The thick paint from the palette knife may take a little longer than usual. -
Prepare White Paint:
Thin down a small amount of Titanium White paint with a drop of water until it has an inky consistency. -
Place Major Stars:
Using your fine detail brush or the tip of a toothpick, carefully dot the ‘major’ stars in the black upper section. Scatter them randomly. -
Create Distant Stars:
For tinier, distant stars, use the very tip of a toothpick to make microscopic specks of white. Vary the spacing so it looks organic, not grid-like. -
Add Star Bursts:
Select two or three of your largest white dots. With your finest brush, carefully pull four tiny lines outward from the center (up, down, left, right) to create a twinkling cross shape. -
Green Reflection Stars:
Place a few tiny white dots within the darker black shadows at the very bottom of the canvas, suggesting stars reflecting on a dark landscape or water.
Step 4: Finishing Touches
-
Check Contrast:
Step back and assess your painting. If the stars look too dim, carefully re-dot the centers with thick, un-thinned white paint needed. -
Varnish:
Once absolutely fully dry (give it at least 24 hours due to the texture), apply a gloss varnish to make the black background look deep and the teal pop.
Display this cosmic slice on a tiny easel or hang it as part of a galaxy-themed gallery wall


Have a question or want to share your own experience? I'd love to hear from you in the comments below!