If you’ve got a plain tee, a tired tote, or some old denim begging for a glow-up, fabric paint is the easiest way to turn it into something you actually want to wear. Here are my favorite fabric paint ideas—starting with the classics and building into the fun, weird, “how did you do that?” stuff.
Easy Line-Art Tote Doodles
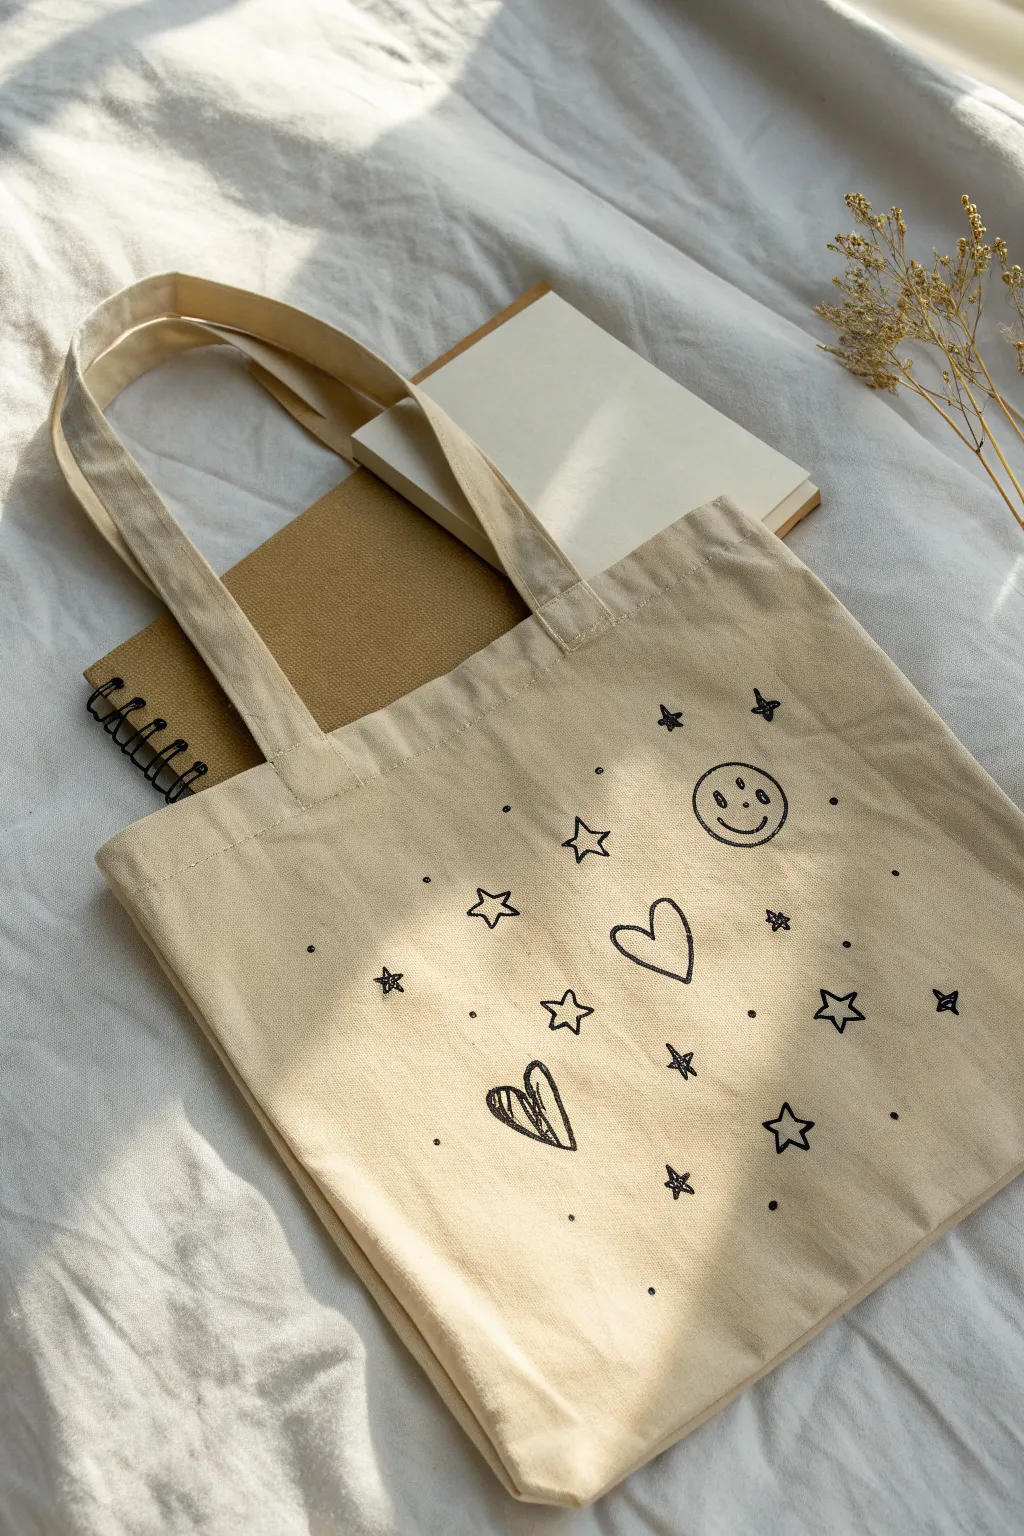
Transform a plain canvas tote into a charming, celestial-inspired accessory with nothing more than a few simple doodles. This project embraces the imperfect, hand-drawn aesthetic featuring scattered stars, hearts, and a friendly smiley face for a look that is effortlessly cool.
Step-by-Step Tutorial
Materials
- Plain beige canvas tote bag
- Black fabric marker (fine tip)
- Black fabric marker (medium tip, optional)
- Iron and ironing board
- Piece of cardboard (to fit inside the bag)
- Pencil and eraser (optional for sketching)
Step 1: Preparation
-
Prepare the fabric:
Start by giving your canvas tote a quick iron to remove any deep creases or wrinkles. A smooth surface ensures your marker lines won’t unexpected skip or bleed. -
Insert the barrier:
Slide a piece of cardboard inside the tote bag. This is crucial—it prevents the ink from bleeding through the front layer and staining the back of the bag while you work.
Ink Control
Work from the top of the bag down to the bottom. This prevents your hand from accidentally smudging wet ink on parts you’ve already drawn.
Step 2: Drawing the Key Elements
-
Map your layout (optional):
If you’re nervous about freehanding, use a pencil to lightly sketch the placement of your main icons. Aim for a random, scattered arrangement rather than rows. -
Draw the smiley face:
Using your fabric marker, draw a circle near the upper right quadrant. Add two small dots for eyes and a simple U-shape for the smile. Don’t worry about making a perfect circle; the wonkiness adds charm. -
Create the central heart:
In the center area, draw a classic open heart outline. Keep the lines relatively thin and relaxed. -
Add the scribbled heart:
Toward the bottom left, draw a second heart. Instead of leaving it open, use loose, scribbly lines to fill the interior, adding visual weight and texture to the design. -
Draw the open stars:
Scatter about 3 to 4 open, five-pointed stars across the bag. To keep the doodle style, draw them in one continuous line if possible, or just outline the shape simply.
Add Color
For a retro 90s twist, use neon fabric puff paint to trace over just one or two shapes, or add pastel yellow fills inside the open stars.
Step 3: Adding Details and Filler
-
Add solid stars:
In the gaps between your larger shapes, draw smaller stars. For these, color them in solid black to create contrast against the open outlined shapes. -
Draw ‘sparkle’ stars:
Create a few ‘sparkle’ shapes by drawing a simple cross, then adding a smaller diagonal cross through the center. These should look like twinkling distant stars. -
Fill the empty space:
Step back and look at the composition. Identify large empty areas that feel unbalanced. -
Add the confetti dots:
Gently tap the tip of your marker to create small dots throughout the design. I find this really ties the whole composition together like cosmic dust. -
Review line weight:
Go over any lines that look too faint. The scribbled heart should act as the boldest element, but the smiley face and central heart should also be clearly defined.
Step 4: Finishing Touches
-
Let the ink set:
Allow the bag to sit undisturbed for at least one hour to ensure the ink is completely dry to the touch. -
Heat set the design:
Once dry, heat set your artwork according to your marker’s instructions. Usually, this involves ironing the design (with a cloth over it) or tumbling it in the dryer on high heat. -
Remove cardboard:
Finally, take the cardboard barrier out of the bag. Your custom tote is now ready to carry your books and journals.
Now you have a totally unique, custom-illustrated bag perfect for your next library run or coffee shop trip


Geometric Shapes With Tape Lines
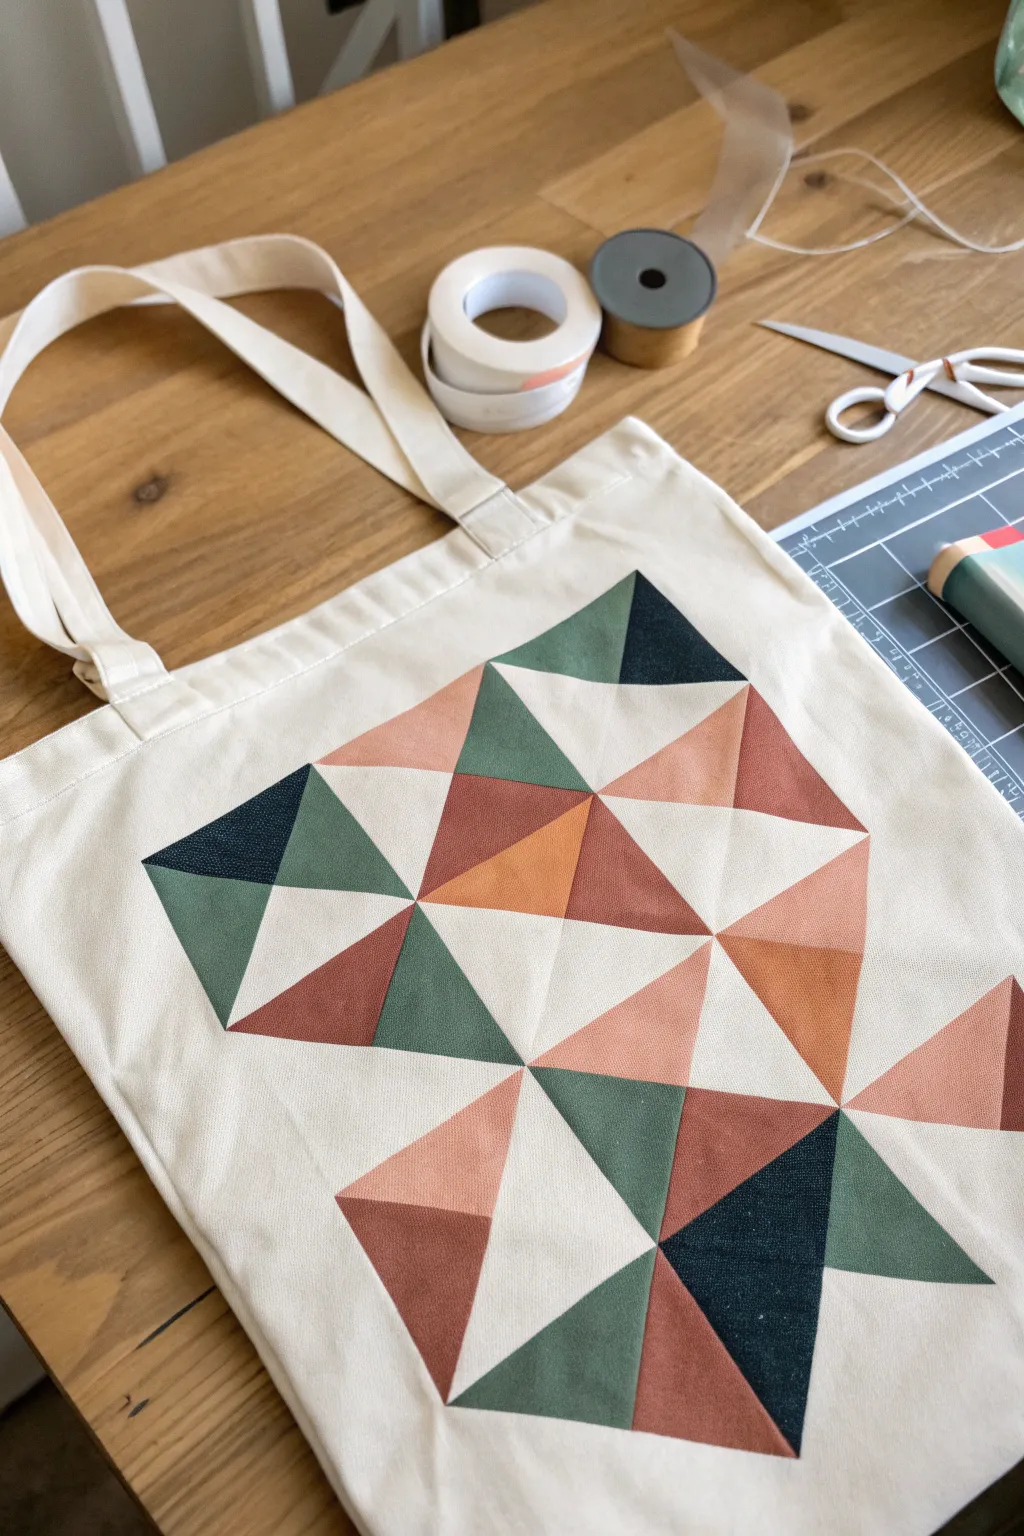
Transform a plain canvas tote into a piece of modern art with this geometric painting project. Using simple masking techniques, you create sharp, crisp lines and a striking pattern of interlocking triangles in warm, earthy tones.
Step-by-Step Guide
Materials
- Canvas tote bag (pre-washed)
- Fabric paint (terra cotta, rust orange, dark green, moss green, navy blue)
- Painter’s tape or masking tape (various widths are helpful)
- Flat paintbrushes (medium sized)
- Cardboard insert or cutting mat
- Iron
- Press cloth
Step 1: Preparation and Planning
-
Pre-wash the fabric:
Always start by washing and drying your tote bag without fabric softener to remove any sizing chemicals that might prevent the paint from adhering properly. -
Insert a barrier:
Slide a piece of sturdy cardboard or a thick cutting mat inside the tote bag. This is crucial as it prevents the paint from bleeding through to the back side of the bag while you work. -
Iron the surface:
Give the canvas a quick press with your iron to ensure the surface is perfectly flat and wrinkle-free, which helps the tape stick better.
Step 2: Creating the Grid
-
Tape the perimeter:
First, decide how large you want your design to be. Use long strips of tape to mask off the outer square boundary of your design area. -
Create the main diagonals:
Apply long strips of tape diagonally across your square from corner to corner to start breaking up the space. -
Form the triangle grid:
Continue adding tape strips to subdivide the large shapes into smaller triangles. The goal is random geometric harmony, so don’t worry about perfect symmetry. -
Seal the edges:
Run your fingernail or a credit card firmly along the edges of every piece of tape. This pressure seal is key to preventing paint from seeping under and ruining your crisp lines.
Bleeding Lines?
If your tape isn’t sticking well to coarse canvas, paint a thin layer of clear acrylic medium along the tape edges first to seal them before adding color.
Step 3: Painting
-
Plan your palette:
Pour small amounts of your earth-toned paints onto a palette. I like to keep a scrap piece of fabric nearby to test color combinations before committing to the bag. -
Paint the first set of shapes:
Select a color like the deep rust and fill in non-adjacent triangles. Avoid painting two shapes that share a side right now, as the wet paint might bleed. -
Apply thin layers:
Use a flat brush to apply the paint in thin, even coats. Brush away from the tape edge toward the center of the shape to minimize bleeding. -
Switch colors:
Rinse your brush thoroughly and move to the greens and blues, filling in other scattered triangles around the grid. -
Wait and rotate:
Allow the first coat to dry to the touch (usually 15-20 minutes). If the fabric weave is still showing through heavily, add a second thin coat.
Add Metallic Flair
Replace one of the colors (like the darkest blue) with a metallic gold or copper fabric paint for a modern, luxe twist on the geometric pattern.
Step 4: Refining and Sealing
-
Remove tape carefully:
Once the paint is tacky but not fully dry, gently peel back the tape at a 45-degree angle. Pulling while slightly damp often helps keep the paint edge from cracking. -
Touch up lines:
Inspect your lines. If any paint bled under the tape, use a tiny detailed brush and a bit of white paint (or the tote’s background color) to carefully correct it. -
Allow full drying:
Let the bag sit undisturbed for at least 24 hours to ensure the paint cures completely. -
Heat set the design:
Set your iron to the cotton setting (no steam). Place a press cloth over your painted design and iron over it for 3-5 minutes to permanently set the pigment into the fibers.
Now you have a stylish, custom-designed tote ready for your next market run or library trip

Galaxy Jeans and Constellations
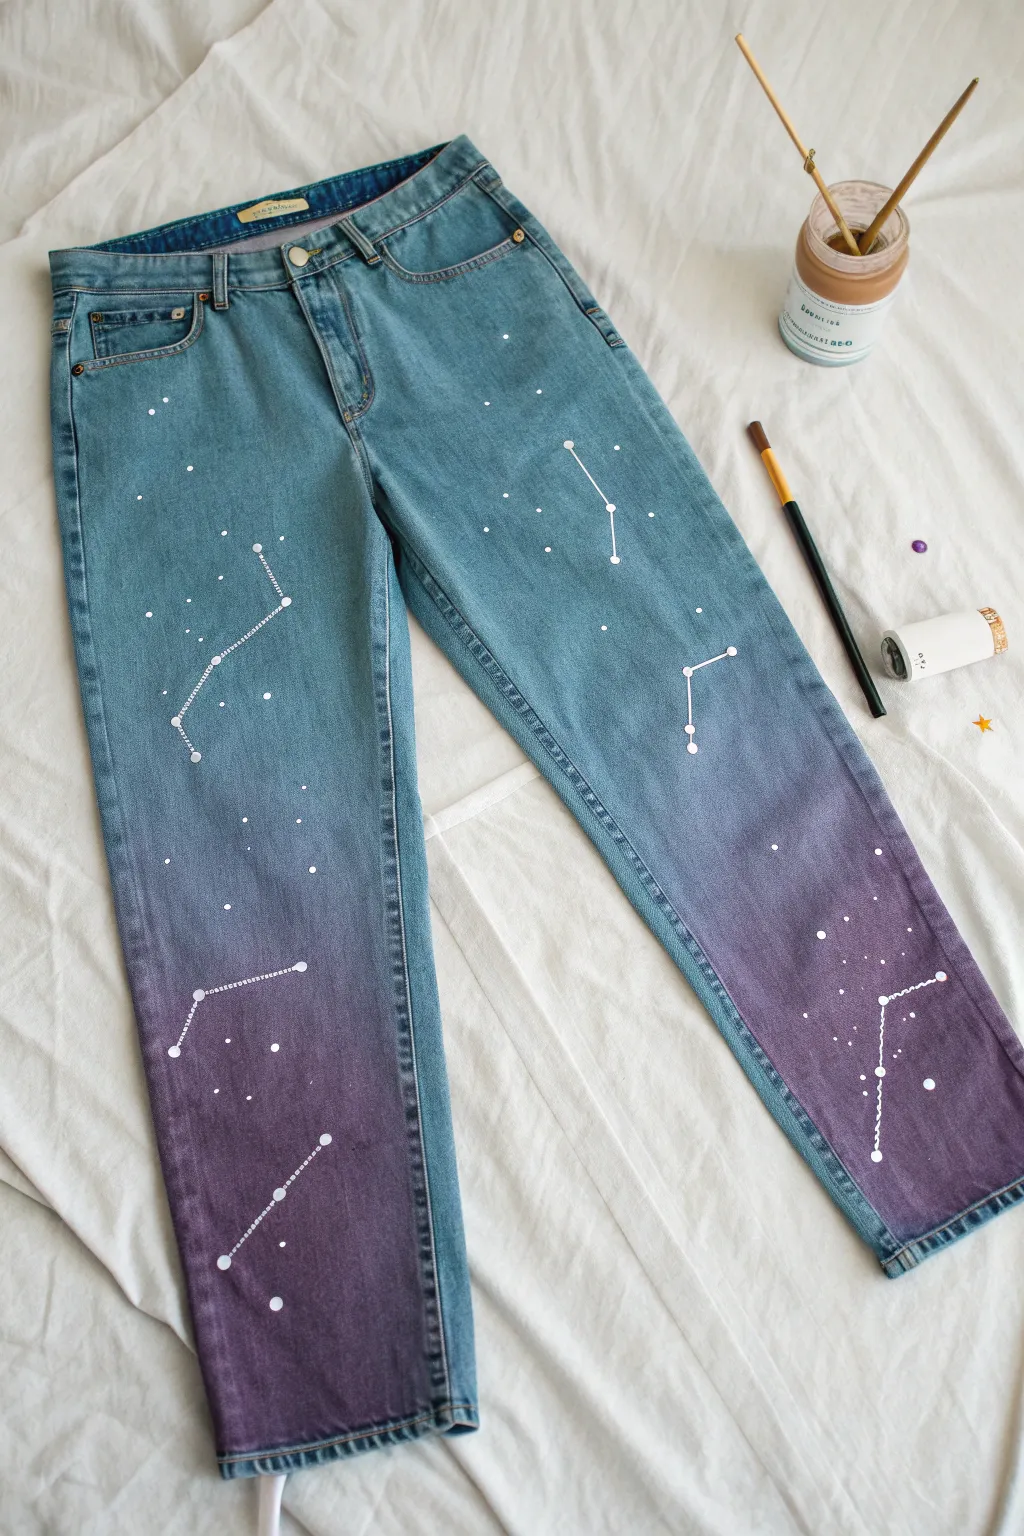
Transform a plain pair of denim into a wearable night sky with this dreamy galaxy-inspired project. By combining simple dip-dyeing techniques with hand-painted constellations, you’ll create a custom piece that features a beautiful gradient from classic blue to deep cosmic purple.
Step-by-Step
Materials
- Light wash denim jeans (straight or skinny leg)
- Purple fabric dye (liquid or powder)
- White opacity fabric paint
- Large plastic bucket or bin
- Rubber gloves
- Fine detail paintbrush (size 0 or 00)
- Small round paintbrush (size 2)
- Ruler or straight edge
- Chalk or fabric pencil
- Cardboard scraps
Step 1: Creating the Gradient Base
-
Prepare the workspace:
Cover your floor or table with a plastic drop cloth to prevent staining. Set up your large bucket and fill it with hot water according to your fabric dye instructions. -
Mix the dye bath:
Wearing your rubber gloves, add the purple fabric dye to the hot water. Stir thoroughly with a dedicated stirring stick or spoon until the powder or liquid is completely dissolved and the color is consistent. -
Wet the jeans:
Before dyeing, dampen the bottom half of your jeans with plain water. This helps the dye absorb evenly and encourages a smooth transition between the blue denim and the purple dye. -
Dip the hems:
Lower the jeans into the dye bath, submerging them up to the knee area. Hold them there for about 10-15 minutes to establish the darkest, most saturated shade of purple at the bottom. -
Create the fade:
Slowly lift the jeans out of the dye bath a few inches every few minutes. By pulling them out gradually, less dye hits the upper sections, creating that soft ombré fade effect. -
Rinse and wash:
Once you are happy with the gradient, rinse the dyed portion under cold running water until it runs clear. Wash the jeans separately in the machine on a gentle cycle and let them air dry completely before painting.
Oops, skipped a spot?
If the dye looks blotchy, re-wet the jeans and dip the uneven area back into the dye bath for just a minute to smooth the color saturation.
Step 2: Painting the Stars
-
Insert barriers:
Slide pieces of cardboard inside the legs of the dry jeans. This provides a hard surface for painting and prevents the white paint from bleeding through to the back of the leg. -
Plan your constellations:
Using a ruler and white chalk, lightly mark out the geometric shapes of your favorite constellations. I like to print out a star chart for reference to keep the shapes somewhat accurate. -
Mark the major stars:
With the small round brush (size 2), dab dots of white fabric paint at the corners or intersections of your chalk lines. These represent the brightest stars in the constellation. -
Connect the lines:
Switch to your fine detail brush. Connect the major star dots with thin, continuous white lines. If your hand shakes, try breaking the line into tiny dashes for a stylized look. -
Add background stars:
Dip the handle end of a paintbrush into the white paint and gently dot random spots around the denim. Vary the pressure to create different sized stars for depth. -
Highlight the fade:
Make sure to extend some scattered stars up into the un-dyed blue section and down into the deep purple section. This helps integrate the painted design across the color gradient. -
Clean up markings:
Once the paint is fully dry to the touch, gently wipe away any visible chalk guidelines with a slightly damp cloth. -
Heat set the design:
To ensure your artwork survives the wash, heat set the paint. Place a thin cloth over the design and iron on medium heat (no steam) for about 3-5 minutes per section.
Go Extra Sparkly
Mix a tiny amount of silver glitter medium into your white paint for stars that actually shimmer when they catch the sunlight.
Now you have a stunning pair of custom galaxy jeans ready to take center stage in your wardrobe


Tropical Leaves on a Tee
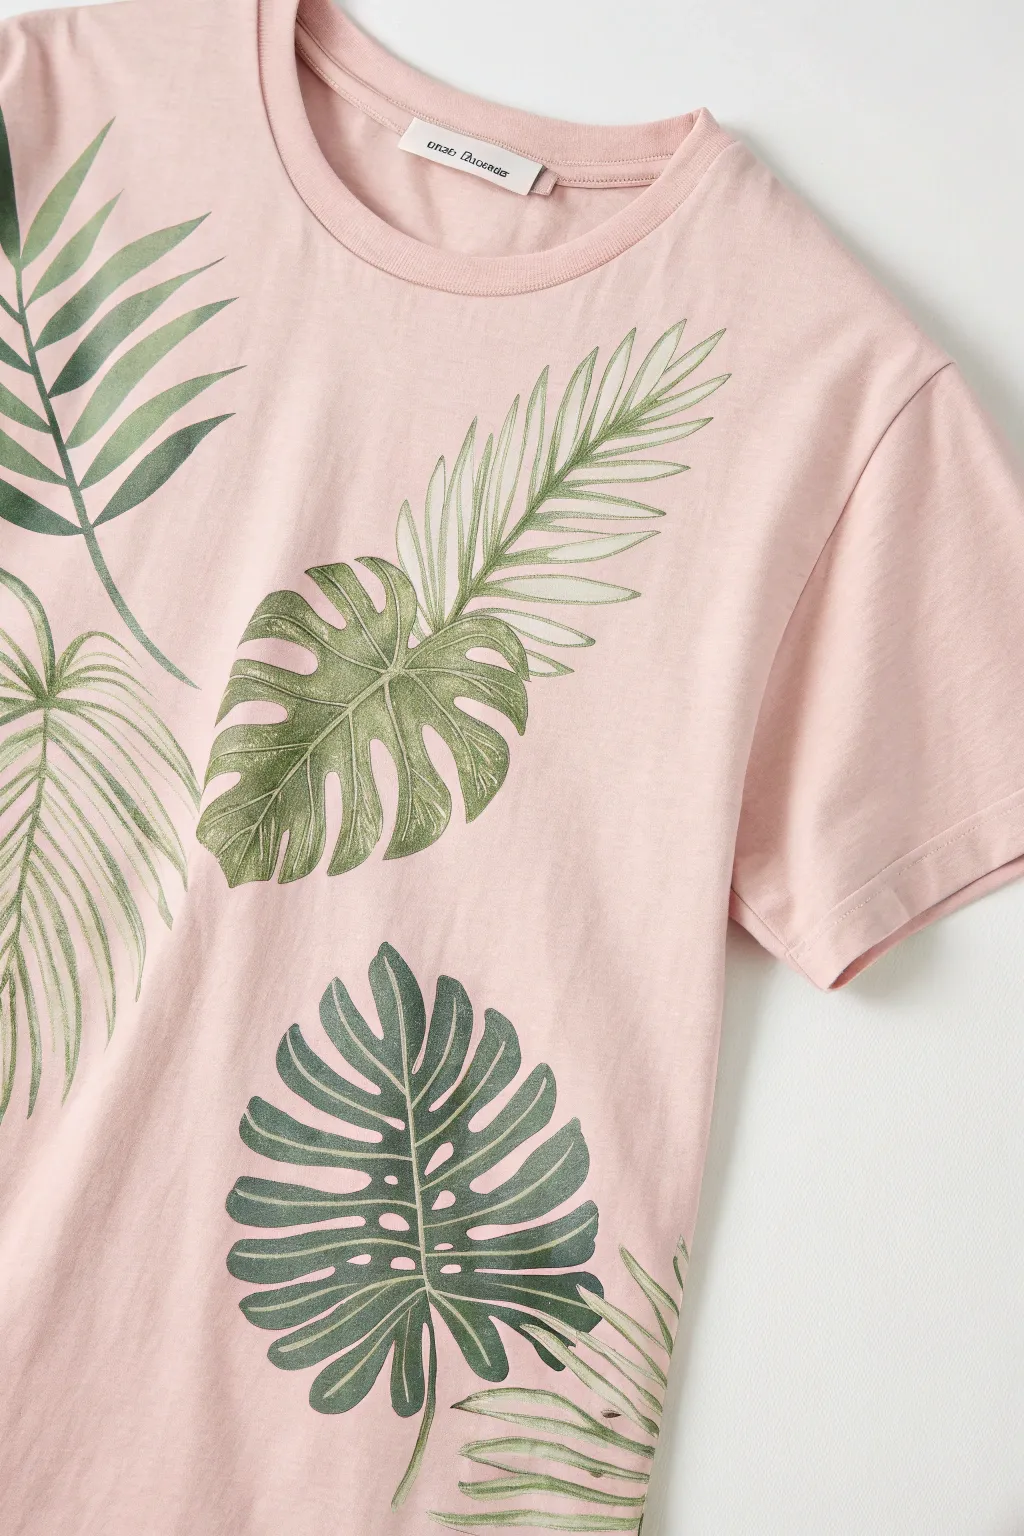
Transform a plain pink tee into a lush, botanical statement piece with this fabric painting project. The final look features airy, sketched-style tropical leaves that feel organic rather than stiff or heavy.
Step-by-Step Tutorial
Materials
- Light pink cotton t-shirt (pre-washed)
- Fabric paint (dark green, sage green, white)
- Fabric medium (if using acrylics)
- Fine liner brush (size 0 or 1)
- Flat shader brush (size 4 or 6)
- Cardboard insert
- Pencil or disappearing fabric marker
- Paper plate or palette
- Reference images of monstera and palm leaves
Step 1: Preparation & Sketching
-
Prepare the fabric:
Insert a piece of cardboard inside the shirt to prevent paint from bleeding through to the back. Smooth out the fabric so it is flat and taut. -
Plan the layout:
Visualize where your leaves will go. Aim for a diagonal composition, flowing from the top shoulder down across the torso for a natural drape. -
Sketch the Monstera:
Using a pencil, lightly outline the heart-shaped base of a large Monstera leaf. Add the characteristic deep slits and oval holes. -
Sketch the Palms:
Draw long, curved stems for the palm leaves. From these stems, sketch thin, feathery fronds extending outward. -
Review the composition:
Step back and check your spacing. Ensure the leaves overlap slightly in places to create depth and visual interest.
Watercolor Effect
To get that soft, faded look inside the leaves, dampen the fabric slightly with a spray bottle before applying your base layer of diluted paint.
Step 2: Painting the Base Layers
-
Mix your greens:
On your palette, mix a sage green by combining green with a touch of white. Keep a darker hunter green separate. -
Dilute the paint:
Mix a small amount of water or fabric medium into your sage green. We want a translucent, almost watercolor-like consistency, not a heavy opaque plastic feel. -
Fill the Monstera leaves:
Using the flat shader brush, gently wash the sage green mixture into the Monstera outlines. Leave some areas very light or even unpainted to act as highlights. -
Paint the Palm fronds:
Switch to a smaller round brush. Flick the brush outward from the stem to create the feathery palm leaves, keeping the pressure light at the tips. -
Create variation:
While the paint is wet, dip just the tip of your brush into a slightly darker green and blend it into the base of the leaves where shadows would naturally fall. -
Let it dry:
Allow this initial layer to dry to the touch, usually about 15-20 minutes, before adding details.
Step 3: Detailing & Veining
-
Prepare the detail color:
Load your fine liner brush with the undiluted dark green paint. This needs to be opaque enough to stand out against the light pink fabric. -
Outline the Monstera:
Carefully trace the outer edges of the Monstera leaves. Keep the line thin and organic—it doesn’t need to be perfect. -
Add the veins:
Draw a central vein down the middle of the Monstera leaf, then branch out with curved lines toward the edges. -
Detail the Palm stems:
Strengthen the main stem line of the palm leaves with the dark green. Add very fine, hair-like strokes within the fronds for texture. -
Add white highlights:
I like to take a tiny bit of white paint on a dry brush and lightly whisk it over the lightest parts of the leaves to make them pop. -
Final inspection:
Check for any gaps or areas that need a little more definition. Add small dots or stray marks near the leaves to enhance the illustrative style. -
Heat set:
Once fully dry (wait 24 hours), iron the design from the reverse side (no steam) to seal the paint into the fibers.
Add Some Sparkle
Mix a tiny amount of gold fabric medium or metallic gold paint into your top coat for a subtle shimmer that catches the sunlight.
Wear your new botanically inspired tee with your favorite denim for a fresh, nature-loving look
BRUSH GUIDE
The Right Brush for Every Stroke
From clean lines to bold texture — master brush choice, stroke control, and essential techniques.
Explore the Full Guide
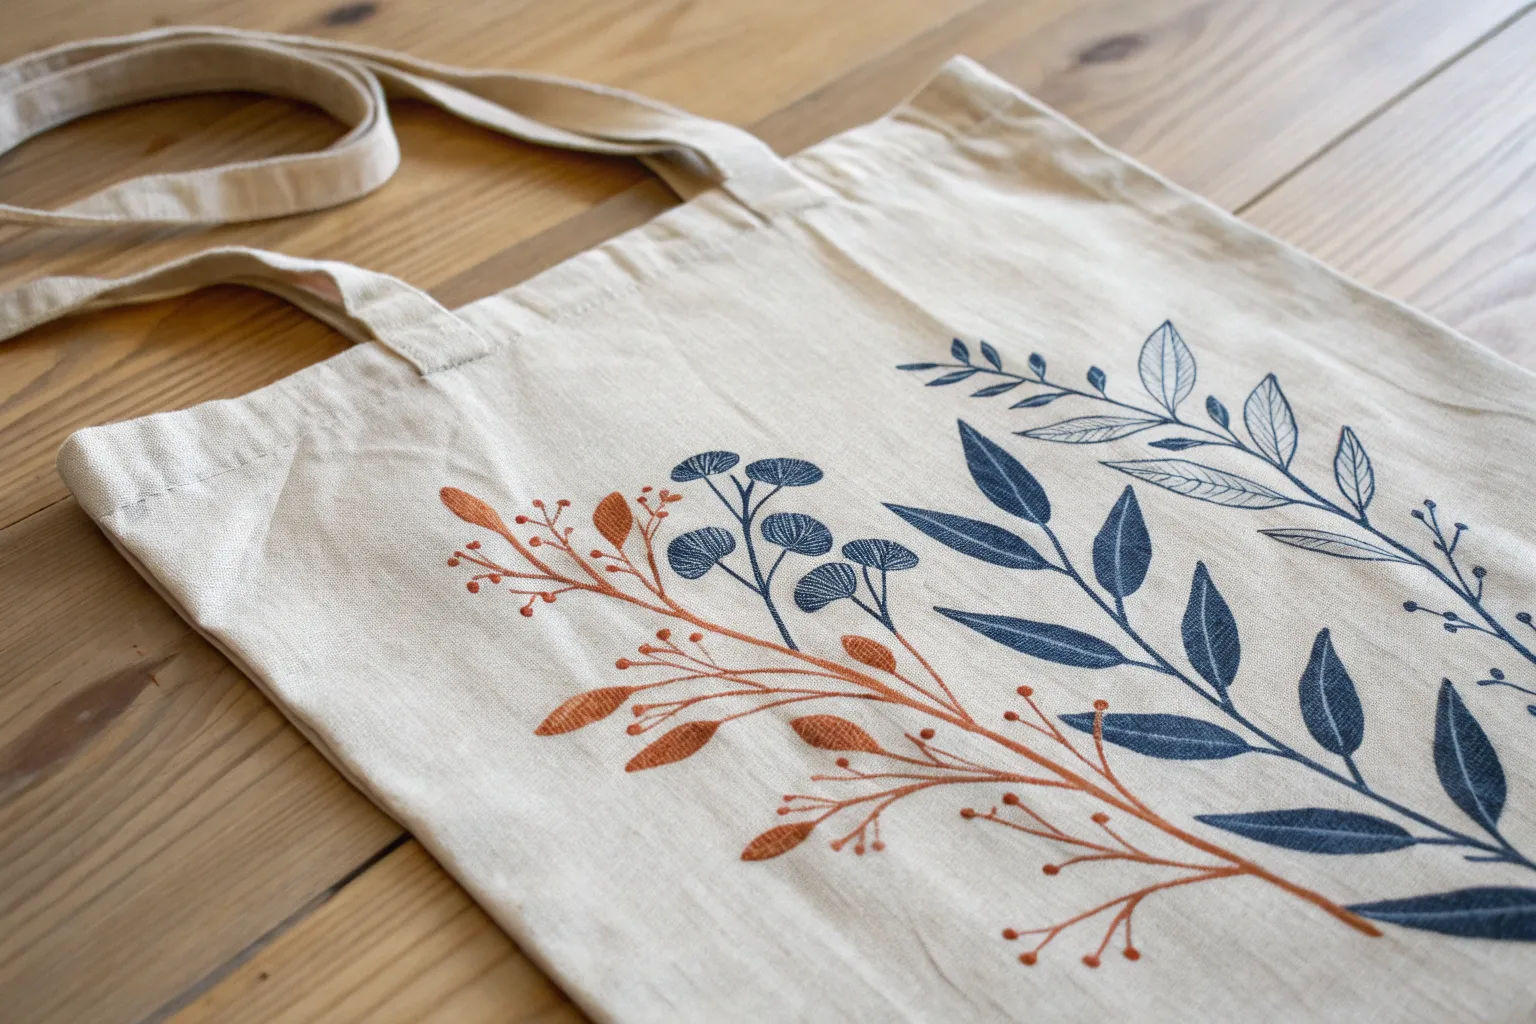
All-Over Mini Motif Pattern
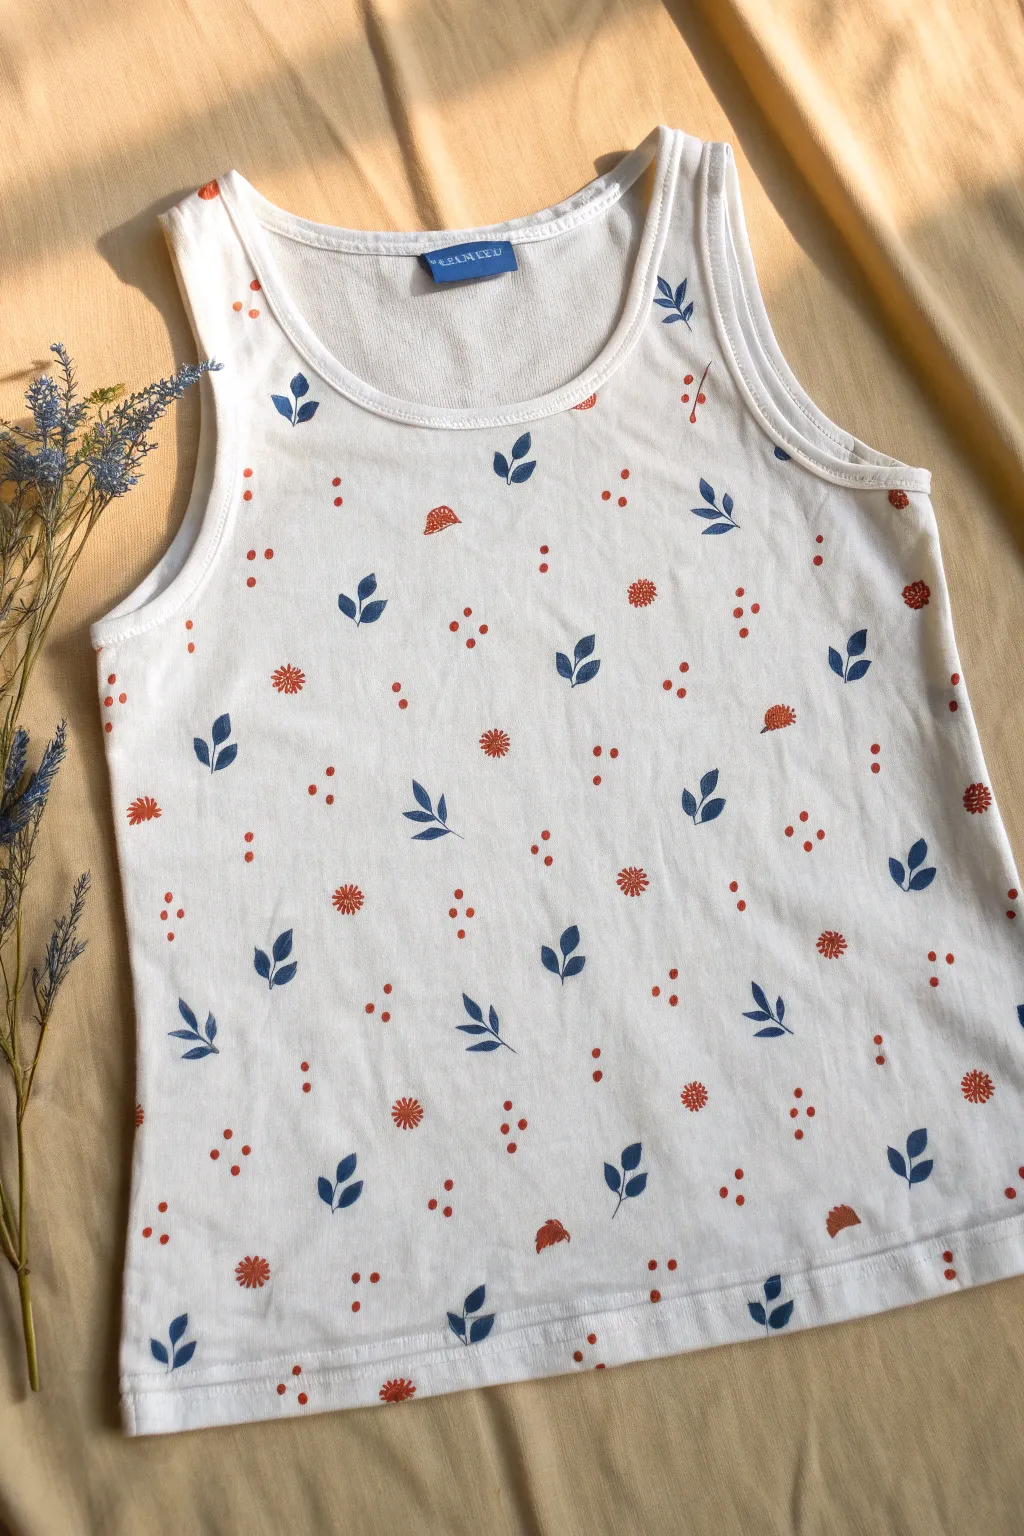
Transform a plain white tank top into a charming summer staple using a delicate, all-over mini motif pattern. This project features hand-painted blue leaves and rusty red florals scattered seemingly at random for an organic, breezy look.
How-To Guide
Materials
- White cotton rib-knit tank top
- Fabric paint (Navy Blue)
- Fabric paint (Rust Red or Terracotta)
- Small round paintbrush (Size 0 or 1)
- Small flat paintbrush (Size 2)
- Cardboard insert
- Iron (for heat setting)
- Ironing board or pressing cloth
- Scrap paper for practice
Step 1: Preparation and Practice
-
Pre-wash your garment:
Before laying down a single drop of paint, wash and dry your tank top without using fabric softener. This removes any factory sizing chemicals that might prevent the paint from adhering properly to the fibers. -
Insert a barrier:
Cut a piece of cardboard to fit inside the torso of the tank top. Slide it inside carefully to stretch the fabric slightly flat and prevent paint from bleeding through to the back layer. -
Practice your motifs:
On a piece of scrap paper, practice the key shapes: a two-leaf stem using blue paint, and small starbursts or dots using the red. Getting a feel for how much paint your brush holds is crucial before touching the fabric.
Oops! Blob of paint?
If you accidentally drip a heavy blob, don’t wipe it! Turn it into a larger flower or an abstract mushroom cap to hide the mistake naturally.
Step 2: Painting the Blue Foliage
-
Load the blue paint:
Dip your fine round brush into the navy blue fabric paint. You want the brush saturated but not dripping. -
Create the first leaf set:
Start near the shoulder seam. Paint a small, curved central stem about half an inch long. From this stem, paint two simple pointed oval leaf shapes—one on the left, one on the right. -
Vary the direction:
Move a few inches down and over suitable spot. Paint another leaf cluster, but angle this one differently. I find that rotating the cardboard insert itself makes it easier to vary the angles naturally. -
Scatter the leaves:
Continue painting these small blue two-leaf motifs across the entire front of the shirt. Maintain spacing of about 2 to 3 inches between them, keeping the placement random rather than grid-like. -
Check for gaps:
Step back and look at the shirt from a distance. Fill in any large empty white spaces with additional blue leaves, remembering to leave room for the red elements later. -
Let the blue dry:
Allow the blue paint to dry to the touch, which usually takes about 15 to 20 minutes depending on the humidity. This prevents smudging while you work on the next color.
Level Up: Embroidered Touch
Once the paint is dry, add texture by stitching French knots in the center of the red flowers or outlining a few blue leaves with embroidery floss.
Step 3: Adding Red Accents
-
Paint the small florals:
Switch to your rust red paint and a clean small brush. In the spaces between the blue leaves, paint small starburst flowers. Do this by making 5-8 tiny outward strokes from a center point. -
Add abstract mushrooms:
If you notice the semi-circle shapes in the original design, recreate these by painting a small red half-circle mound. You can gently stipple the bottom edge to give it texture. -
Incorporate the dots:
Using the very tip of your brush (or the handle end for perfect circles), place clusters of two or three red dots in the remaining negative spaces. This acts as ‘confetti’ to tie the pattern together. -
Review the balance:
Ensure the red and blue elements feel evenly distributed. Don’t be afraid to paint right up to the seams or the neckline binding to make the fabric look like a continuous print. -
Dry completely:
Let the entire painted front dry for at least 24 hours. If you plan to paint the back of the tank, wait for the front to be fully dry before flipping it over and repeating the process.
Step 4: Finishing Up
-
Heat set the design:
Once the paint is fully cured, turn the shirt inside out (or use a pressing cloth over the design). Set your iron to the cotton setting with no steam. -
Iron carefully:
Press the iron over the painted areas for 3-5 minutes, keeping the iron moving constantly to avoid scorching the fabric. This process seals the paint into the fibers so it won’t wash out. -
Final wash:
Wait another 72 hours before washing the garment in a machine to ensure maximum durability for your new hand-painted design.
Now you have a custom, boutique-style tank top ready for warm weather adventures
Monochrome on Dark Fabric
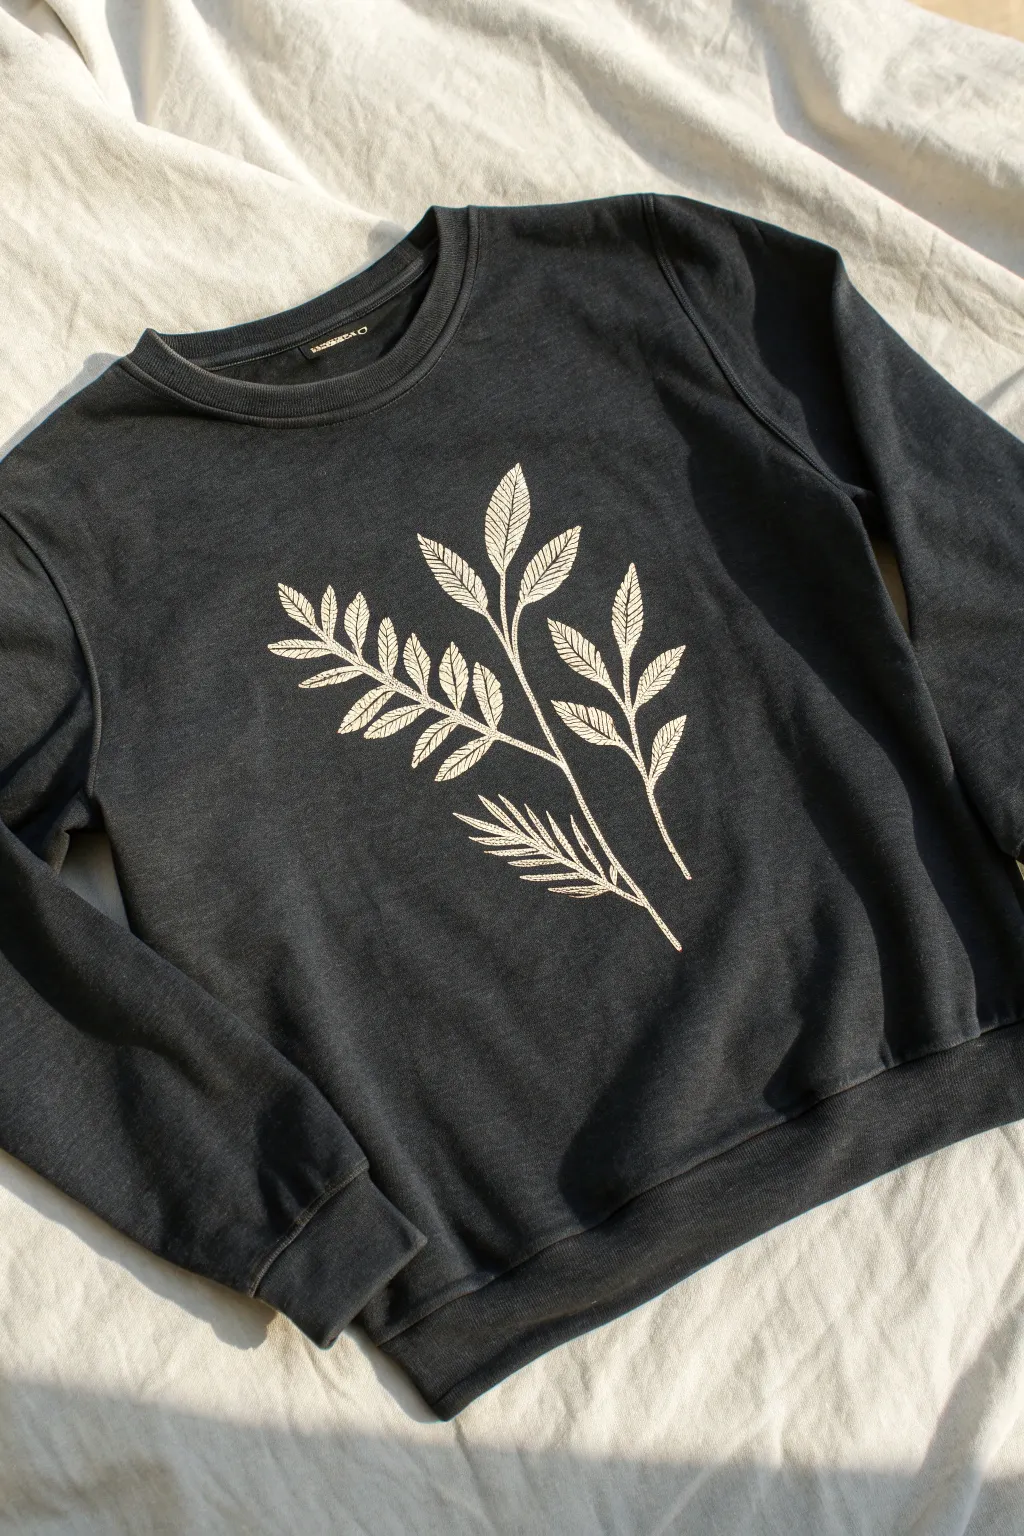
Transform a basic dark pullover into a boutique-worthy piece with this elegant botanical design. The crisp contrast of cream or pale metallic gold ink against charcoal fabric creates a sophisticated, nature-inspired look that is surprisingly simple to achieve.
Step-by-Step Tutorial
Materials
- Dark charcoal grey crewneck sweatshirt (pre-washed)
- Fabric screen printing ink (Cream or Pale Metallic Gold)
- Speedball soft rubber brayer
- Linoleum block or soft carving rubber (approx. 8×10 inches)
- Linoleum carving tools (V-gouge and U-gouge)
- Pencil and tracing paper
- Piece of glass or Plexiglas (for rolling ink)
- Cardboard insert for inside the shirt
- Iron and pressing cloth (for heat setting)
Step 1: Designing the Block
-
Draft your botanical:
Begin by sketching a fern-like branch design on paper. Aim for three main stems that radiate outward slightly, similar to the reference image. -
Refine the leaves:
Draw small, pointed oval leaves along the stems. Don’t worry about perfect symmetry; organic variation makes the print look more natural. -
Transfer the design:
Place your tracing paper over the sketch and trace the lines heavily with a soft pencil. Flip the tracing paper onto your carving block and rub the back to transfer the graphite image. -
Define the veins:
Go over the transferred lines on the block with a permanent marker to ensure you don’t lose the details while carving.
Patchy Ink?
If the print looks too faint, apply a second layer of ink to the block and re-stamp immediately. Using screen printing ink usually gives better coverage than standard acrylics.
Step 2: Carving the Stamp
-
Outline the shapes:
Using a fine V-gouge tool, carefully carve along the outline of every stem and leaf. This ‘ditch’ prevents you from accidentally slicing into the design later. -
Add texture details:
Switch to your finest carving tip. Inside each leaf, carve a central vein and tiny diagonal lines radiating outward toward the leaf edges to mimic the texture shown in the photo. -
Clear background material:
Use a wider U-gouge to remove all the rubber material surrounding your design. You want the background to be recessed enough that it doesn’t pick up ink. -
Trim the block:
Cut away excess rubber around the outer perimeter of your design with a craft knife so you can easily see where you are placing the stamp. -
Test print:
I always do a quick test print on scrap fabric or paper first. This reveals any high spots in the background that need a bit more trimming.
Metallic Twist
Mix a tiny amount of metallic gold fabric medium into your cream ink. It adds a subtle shimmer that catches the light without looking like glitter.
Step 3: Printing the Fabric
-
Prepare the workspace:
Slide a piece of cardboard inside the sweatshirt. This creates a flat printing surface and prevents ink from bleeding through to the back. -
Position the shirt:
Lay the sweatshirt flat on a table, smoothing out any wrinkles. Decide exactly where you want the fern to sit—centering it on the chest usually looks best. -
Charge the ink:
Squeeze a line of fabric screen printing ink onto your glass palette. Roll the brayer back and forth until the ink sounds sticky, like velcro separating. -
Ink the block:
Roll the brayer evenly over your carved block. Apply a thin, consistent layer of ink to the raised surface of the design. -
Place the stamp:
Carefully flip the block over and place it onto the fabric. Once it touches the shirt, do not shift or slide it. -
Apply pressure:
Press down firmly on the back of the block. Use the heel of your hand or a clean brayer to apply even pressure across the entire surface to ensure a solid transfer. -
Reveal the print:
Lift one corner of the block slightly to check transfer, then peel the block straight up and away from the fabric. -
Dry completely:
Let the shirt sit undisturbed until the ink is fully dry to the touch. This usually takes at least 24 hours depending on humidity.
Step 4: Finishing
-
Heat set the ink:
Place a pressing cloth or piece of parchment paper over the dry design. Iron on the highest setting suitable for your fabric for 3-5 minutes to make the ink permanent.
Now you have a custom, nature-inspired sweatshirt perfect for crisp autumn days

PENCIL GUIDE
Understanding Pencil Grades from H to B
From first sketch to finished drawing — learn pencil grades, line control, and shading techniques.
Explore the Full Guide
Painted Sneakers With Clean Edges
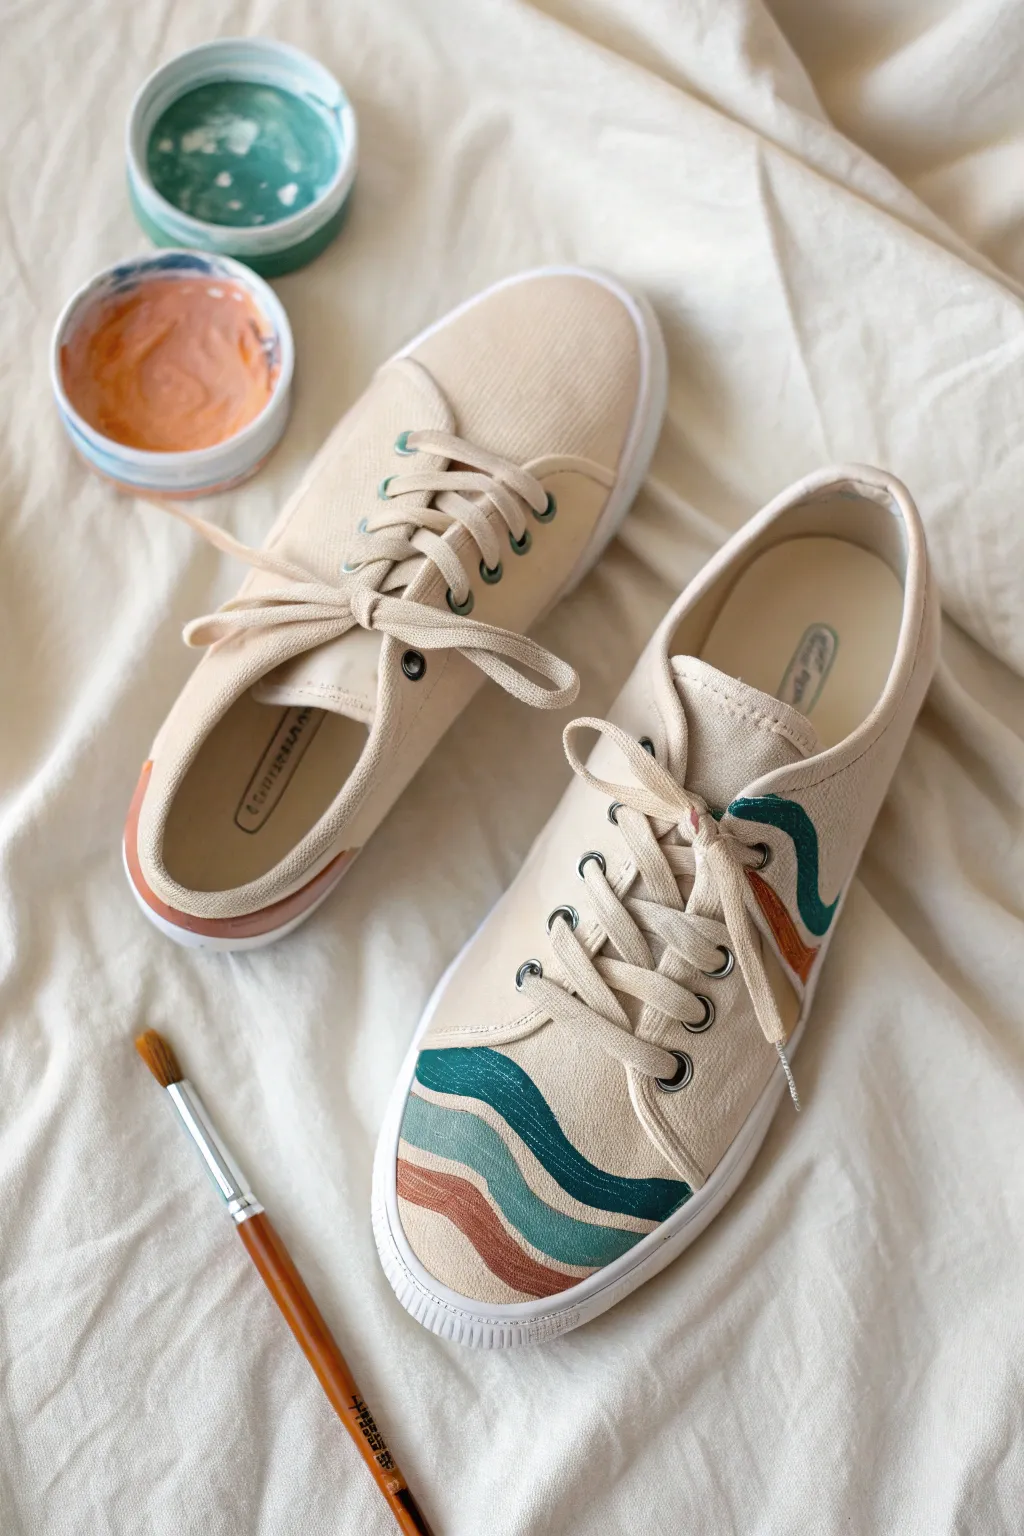
Transform a basic pair of canvas sneakers into wearable art with this modern, abstract design. Featuring smooth, flowing waves in a trendy palette of teal, sage, and terracotta, these hand-painted shoes prove that subtle details can make a major impact.
How-To Guide
Materials
- Plain canvas sneakers (cream or beige)
- Fabric paint (Deep teal, sage green, terracotta orange)
- Small flat shader paintbrush
- Fine liner paintbrush
- Pencil or disappearing ink fabric marker
- Painter’s tape or masking tape
- Small paint palette or ceramic dish
- Clean water cup
- Paper towels
Step 1: Preparation and Planning
-
Clean the surface:
Before you begin, ensure your sneakers are clean and free of dust. If they are brand new, wipe them down with a slightly damp cloth to remove any factory sizing, which helps the paint adhere better. -
Remove laces:
Unlace the sneakers completely. This prevents accidental paint splatters on the laces and gives you unobstructed access to the tongue and eyelet areas. -
Protect the soles:
Apply painter’s tape carefully along the rubber sidewall (foxing) where the canvas meets the sole. Press the edge of the tape down firmly with your fingernail to prevent paint from bleeding underneath. -
Sketch the design:
Using a pencil or a disappearing ink fabric marker, lightly sketch your wave pattern onto the toe cap area. Draw three distinct wavy bands that curve organically across the front. -
Extend the design:
Continue the wave motif on the side of the shoe near the heel collar, sketching a similar flowing shape to create balance in the design.
Smooth Operator
For ultra-crisp edges between colors, let each wave dry completely before painting the neighboring color. This prevents accidental blending.
Step 2: Painting the Waves
-
Prepare your palette:
Squeeze a small amount of deep teal, sage green, and terracotta paint into your palette. If the fabric paint feels too thick, you can thin it very slightly with a drop of water, but don’t over-dilute it. -
Outline the first wave:
Starting with the top wave on the toe cap, use your fine liner brush and the deep teal paint. Carefully trace the top and bottom pencil lines of that specific wave section to create crisp boundaries. -
Fill in the teal:
Switch to the small flat brush to fill in the space between your outlines. Use smooth strokes in the direction of the wave to keep the texture consistent. -
Paint the middle wave:
Rinse your brushes thoroughly. For the middle section, stick with your sage green or lighter blue-green shade. Outline the shape first, then fill it in, ensuring it gently touches the teal line above without blending into it. -
Add the bottom wave:
Repeat the process with the terracotta orange paint for yesterday’s bottom wave. I find steadying my hand against the table surface helps keep these lower lines neat near the sole tape. -
Paint the side detail:
Move to the side of the shoe. Replicate the color pattern—teal on top, sage in the middle, terracotta below—following the curves you sketched earlier.
Fuzzy Lines?
If paint bleeds into the canvas grain, use a white or beige paint pen to carefully ‘erase’ and tidy up the outer boundaries of your design.
Step 3: Finishing Touches
-
Check for opacity:
Allow the first coat to dry for about 20 minutes. If the canvas texture is still showing through too much, apply a second thin layer of paint to each color block. -
Clean up edges:
Inspect your lines. If any edges look jagged, use the fine liner brush and a tiny bit of paint to smooth them out. A steady hand is key here. -
Remove the tape:
Once the paint is tacky but not fully hardened, carefully peel off the painter’s tape from the soles. Pulling it off at a 45-degree angle usually gives the cleanest line. -
Clean rubber soles:
If any paint seeped onto the rubber, use a damp cotton swab or a little rubbing alcohol to wipe it away immediately. -
Heat set the paint:
Let the shoes dry for at least 24 hours. To make the design permanent and washable, blast the painted areas with a hair dryer on high heat for a few minutes. -
Re-lace and wear:
Once fully cured, lace your sneakers back up. You now have a custom pair of kicks ready for the street.
Enjoy walking around in your new custom footwear knowing no one else has a pair quite like them
Scarf Border Pattern
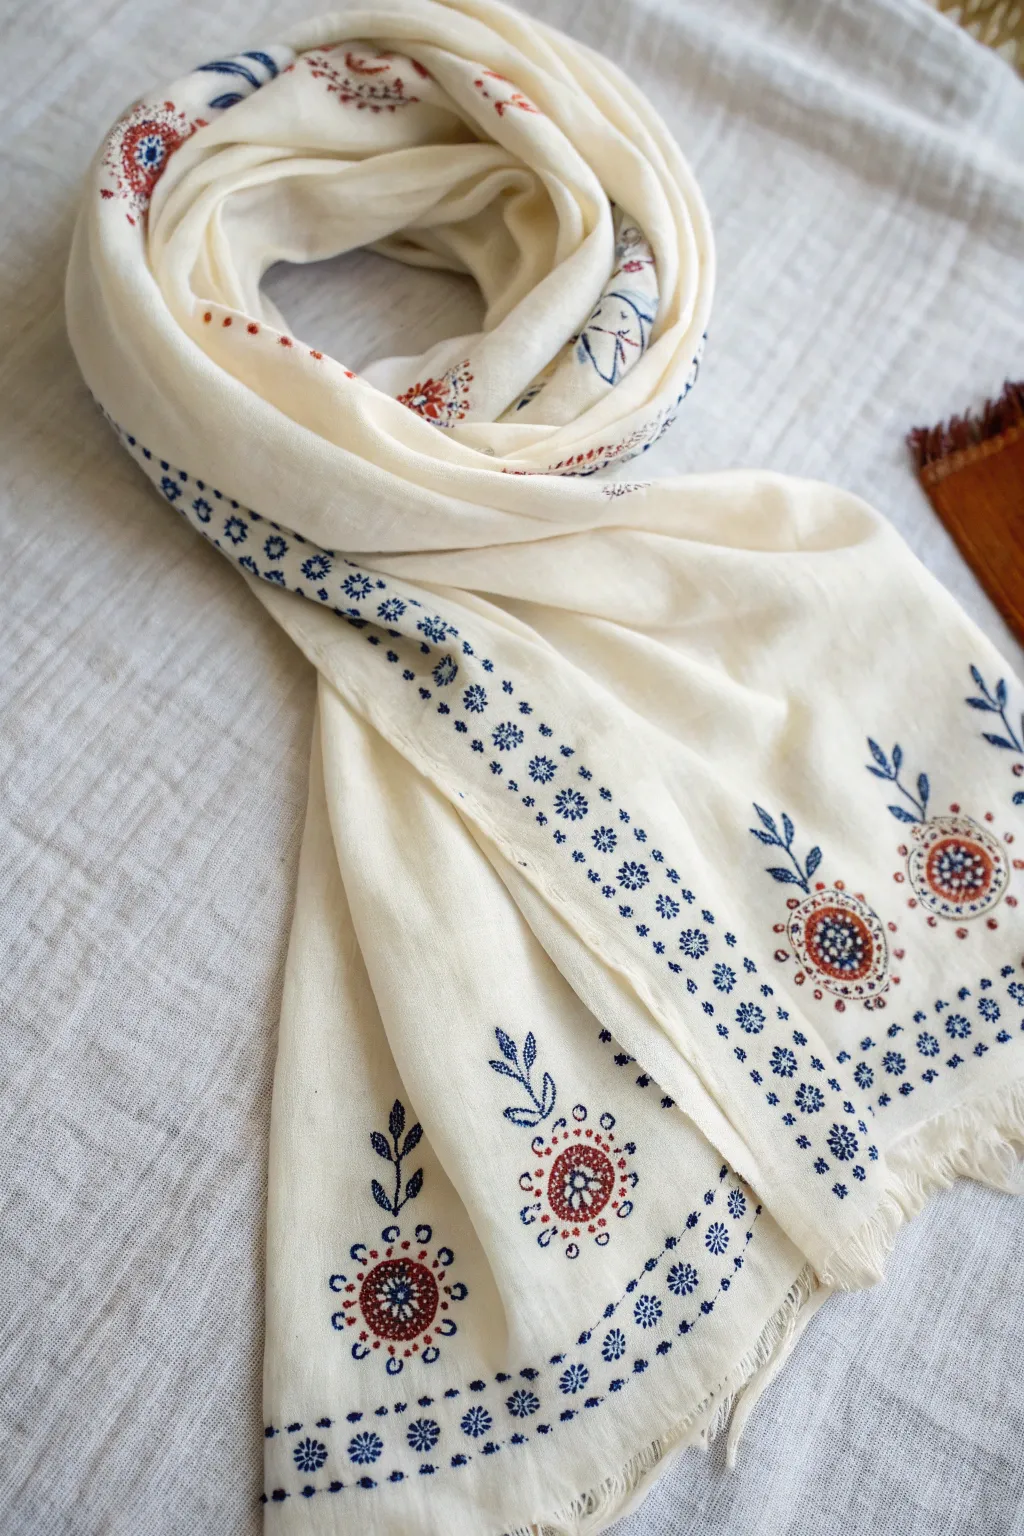
Transform a plain cream scarf into a boutique-worthy accessory with this delicate block printing project. Featuring a rhythmic border of indigo geometric shapes and rustic floral medallions, this design balances intricate detail with a hand-touched feel.
Step-by-Step Guide
Materials
- Lightweight cream scarf (cotton or linen blend)
- Fabric paint (indigo blue, rust/terracotta)
- Foam block or linoleum block for carving
- Carving tools (V-gouge and U-gouge)
- Pencil and tracing paper
- Small foam pouncer or sponge brush
- Fine-detail paintbrush (size 0 or 1)
- Iron and pressing cloth
- Ruler or measuring tape
Step 1: Design & Carving
-
Draft the border motif:
Sketch a small, eight-pointed geometric flower or ‘snowflake’ shape, about 1/4 inch in diameter. This will be your repeating border element. -
Transfer to block:
Transfer your small geometric design onto a small piece of carving block. Since it’s a simple shape, you can draw it directly onto the rubber. -
Carve the border stamp:
Using a V-gouge, carefully carve away the negative space around your star shape, leaving the design raised. Test the stamp on scrap paper to ensure clean lines. -
Create the floral center:
For the larger floral motif, draw a circle about 1 inch wide. Inside, sketch a second concentric circle and a small dot in the very center. This will be the rust-colored flower head. -
Carve the floral stamp:
Carve the floral center on a separate block. Pay attention to the ring of tiny dots shown in the reference; use the tip of your smallest gouge or a needle tool to poke these small holes into the rubber surface so they remain unpainted.
Uneven Stamping?
If your stamp prints look patchy, place a folded towel or piece of felt under the fabric. This soft padding helps the stamp make better contact with the fabric texture.
Step 2: Printing the Border
-
Prepare the fabric:
Lay your scarf flat on a protected work surface. Smooth out any wrinkles. If the fabric is thin, place a piece of cardboard underneath the area you are working on to prevent bleed-through. -
Load the blue paint:
Squeeze a small amount of indigo fabric paint onto a palette. Dab your foam pouncer into the paint and then lightly tap it onto your small geometric stamp. I prefer a light coating to keep the edges crisp. -
Stamp the outer row:
Starting at one corner, stamp a row of figures along the very edge of the scarf. Space them closely, leaving just a millimeter or two between each impression. -
Create layers:
Stamp a second row directly above the first, aligning the shapes so they sit directly on top of the previous row. Repeat for a third row to create a thick, decorative band. -
Repeat all sides:
Continue this three-row border process along the entire short edge of the scarf (or all sides if you prefer a fully framed look).
Step 3: Adding the Florals
-
Position the flowers:
Measure about 2 inches up from your blue border. Use a ruler to lightly mark spacing for your floral motifs, keeping them about 3-4 inches apart. -
Stamp the centers:
Clean your pouncer or use a fresh one with the rust/terracotta paint. Load your round floral stamp and press it firmly onto your marked spots. Life straight up to avoid smearing. -
Paint the stems:
Switch to your fine detail brush and the indigo paint. Hand-paint a thin, curved stem extending from the bottom of each rust circle down toward the border. -
Add leaves:
Paint two small leaves branching off the stem on the left side, and one on the right (or vary it slightly for an organic look). Use quick, light strokes to mimic the folk-art style. -
Detail the flower head:
Using the very tip of your brush and the indigo paint, add tiny radiating lines or small dots around the outer edge of the rust circle to integrate the colors.
Double Sided Magic
Mix a fabric medium into your paint to keep it soft, and stamp the reverse side of the floral motifs in a ghost image (lighter shade) for detail that shows when worn.
Step 4: Finishing Touches
-
Dry completely:
Let the scarf sit undisturbed for at least 24 hours to allow the paint to cure fully. -
Heat set:
Once dry, place a pressing cloth over the design and iron on the setting appropriate for your fabric type for 3-5 minutes to make the design permanent.
Wrap yourself in your new creation and enjoy the lightweight, custom-patterned warmth.


Have a question or want to share your own experience? I'd love to hear from you in the comments below!