If you’re craving that Roaring 20s energy on your sketchbook page, you’re in for a treat. These ideas are all about Jazz Age style—sleek outfits, swinging movement, and those irresistible Art Deco shapes.
Classic Flapper Full-Body Pose
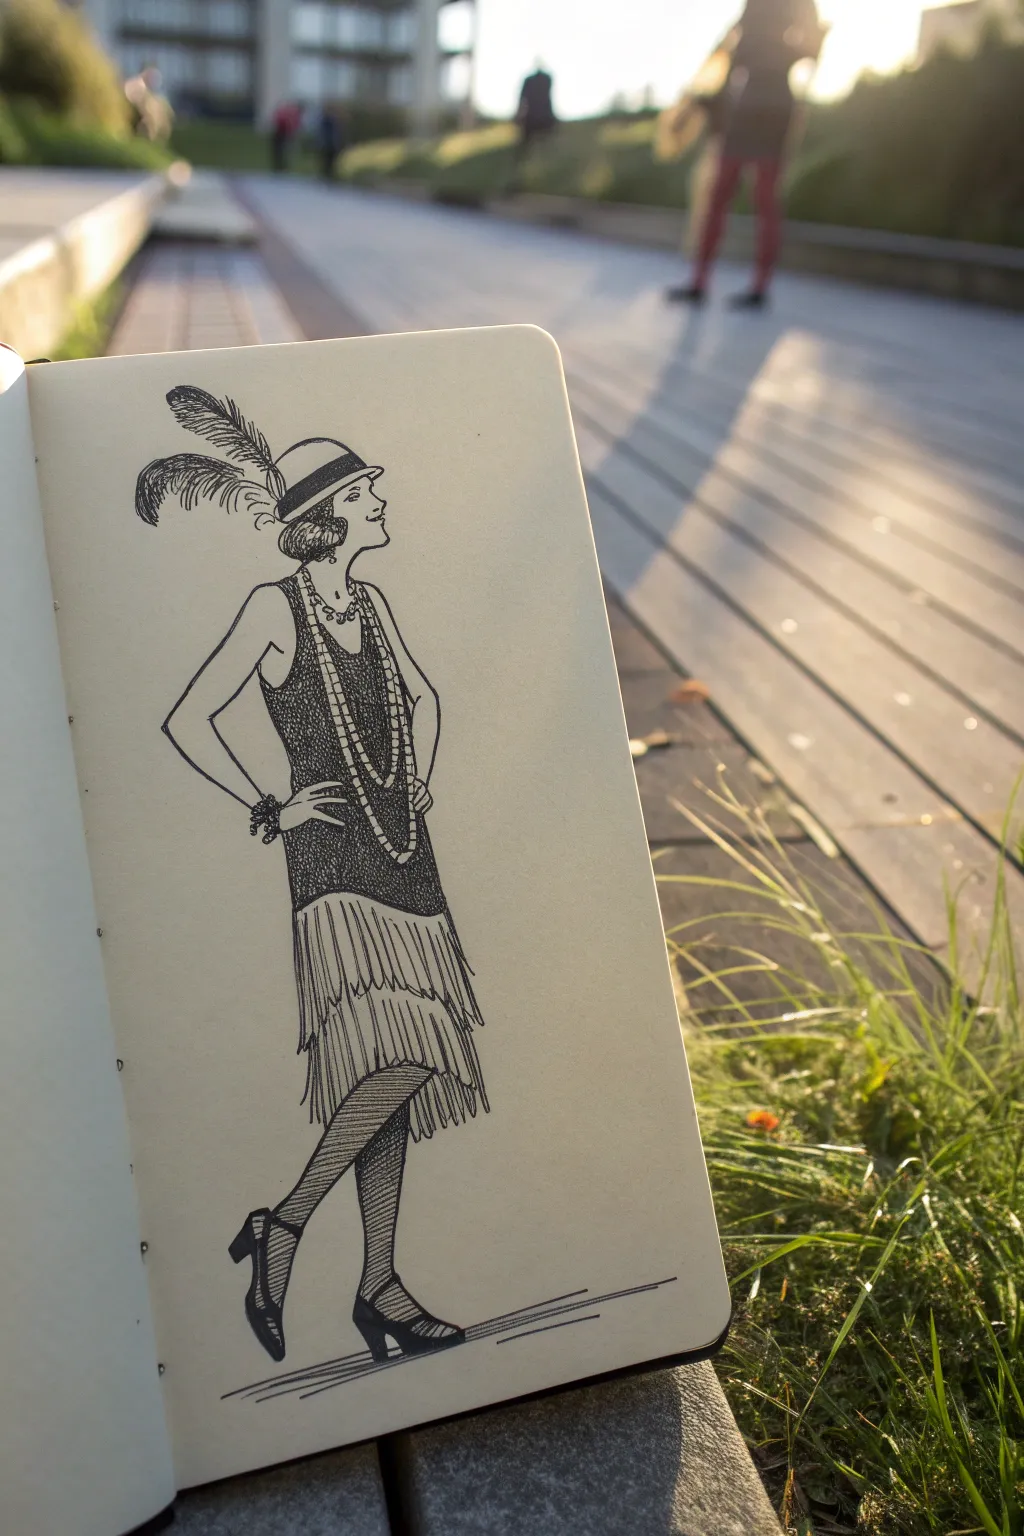
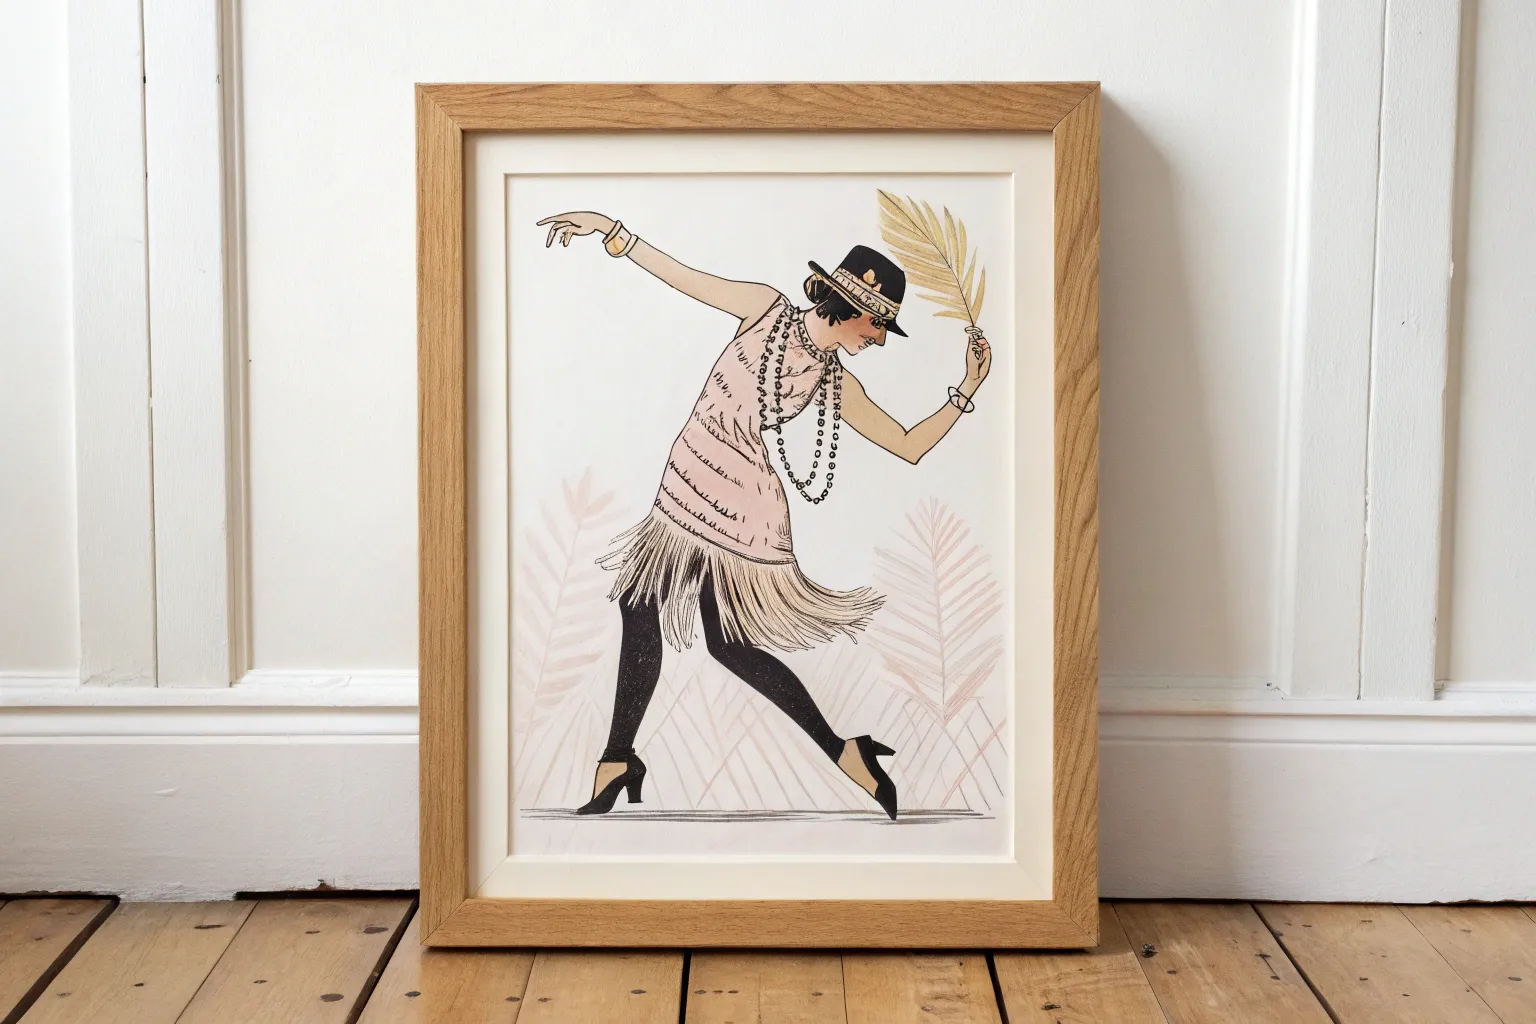
Capture the exuberant spirit of the Jazz Age with this stylized ink drawing of a classic 1920s flapper. This tutorial guides you through building the pose, adding period-accurate fashion details, and finalizing with crisp ink lines for a vintage illustration look.
Step-by-Step
Materials
- Sketchbook with smooth paper (mixed media or cartridge paper recommended)
- HB or 2H Graphite Pencil (for initial sketching)
- Kneaded Eraser
- Fine Liner Pens (sizes 0.1, 0.3, and 0.5mm)
- Ruler (optional for horizon lines)
Step 1: Establishing the Pose
-
Draw the line of action:
Start with a light, sweeping curve that represents the spine. Since she is looking back over her shoulder, this line should have a gentle ‘S’ curve to suggest movement and attitude. -
Block in the head and torso:
Sketch a simple oval for the head, tilting it slightly upward. Below that, draw a rectangular shape for the torso. Keep the waist dropped low, as that was the silhouette of the era. -
Map out the limbs:
Use stick figures or simple cylinders to map out the arms and legs. One hand rests on the hip to create a negative space triangle, while the legs should convey a walking or dancing stride. -
Refine the forms:
Flesh out the stick figure structure lightly with your pencil. Pay attention to the calf muscles and the elegant curve of the neck.
Uneven Ink Lines?
If your hand shakes, embrace it! A slightly jittery line adds character to the fringe and feathers, making the movement feel more energetic and less stiff.
Step 2: Adding 1920s Fashion Details
-
Sketch the Cloche Hat:
Draw a deep, bell-shaped hat sitting low on the forehead. Add a band around the crown and sketch the basic shape of two large plumes extending from the back. -
Define the dress silhouette:
Outline the sleeveless bodice. Mark a low waistline well below the natural hips. Below this line, pencil in vertical guides where the fringe skirt will go. -
Accessorize:
Draw long strands of pearl necklaces draped to the waist. Add a chunky bracelet on the wrist resting on the hip. Don’t forget the T-strap character shoes with a modest heel. -
Detail the feathers:
Refine the feathers on the hat, giving them a curved, organic shape that follows the motion of the figure.
Step 3: Inking and Texture
-
Outline the main body:
Switch to a 0.3mm pen. Carefully trace your pencil lines for the skin and the main structure of the dress. Make the line slightly thicker on the underside of the arms for weight. -
Inking the dress bodice:
Use a 0.1mm pen to texture the bodice. Create a dense stippling or tiny looping scribbles to mimic a beaded or sequined fabric texture. This contrasts nicely with the skin. -
Creating the fringe:
Draw the fringe skirt using quick, vertical strokes. Leave some gaps and make the lines slightly irregular to show movement rather than a solid block. -
Drawing the pearls:
Carefully draw small circles for the long necklace. I find it helpful to draw the string line first in pencil and then place the ink circles along it. -
Texturing the feathers:
Use short, flicking strokes with your finest pen (0.05 or 0.1mm) to create the barbs of the feather, following the central spine of the plume. -
Adding fishnets and shoes:
For the stockings, draw diagonal cross-hatching lines on the legs. Ink the shoes solid black to anchor the figure, leaving a small white highlight for shine. -
Final touches:
Add facial profile details—a small nose and lips. Finally, draw a few speed lines at the feet to ground the figure on the page. -
Cleanup:
Wait at least 10 minutes to ensure the ink is completely dry, then gently erase all underlying pencil marks with your kneaded eraser.
Level Up: Art Deco Background
Frame your flapper with a geometric Art Deco border using gold metallic marker or sharp angles to really sell the 1920s aesthetic.
Now you have a stylish piece of history captured in your sketchbook, ready to dance off the page


Charleston Kick Dance Sketch
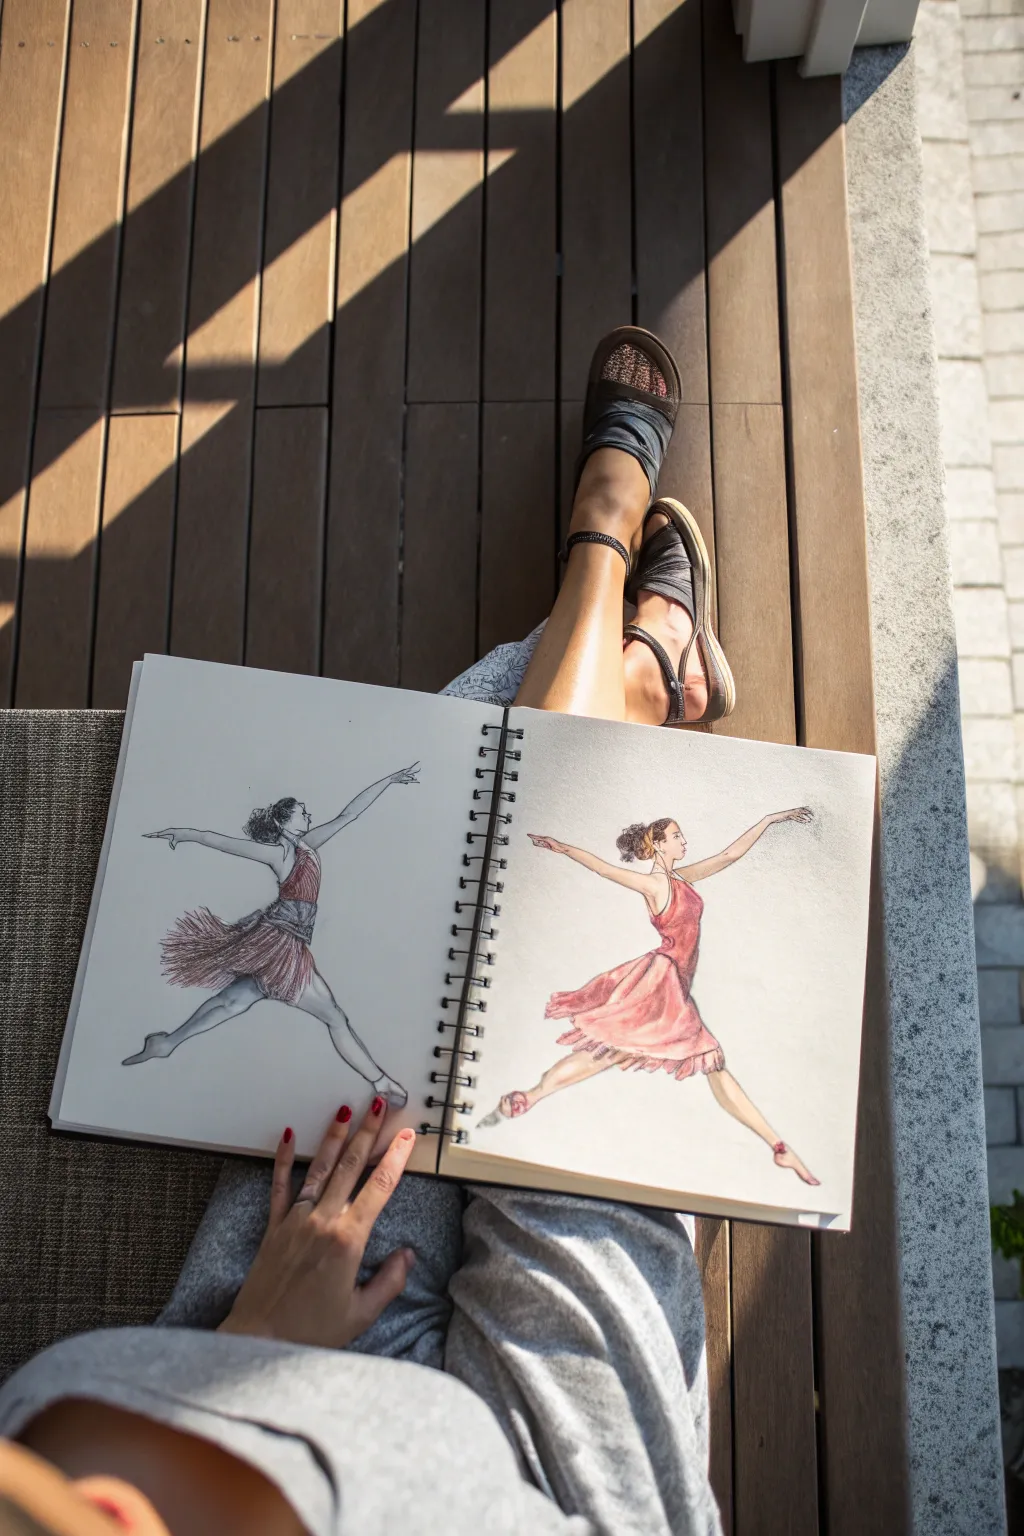
Capture the spirited energy of the Roaring Twenties with this dual-sketch study of a dancer in motion. Using a combination of graphite, ink, and watercolor, you’ll create two complementary poses that celebrate the era’s dynamic fashion and freedom of movement.
How-To Guide
Materials
- Wire-bound mixed media sketchbook (A4 or similar size)
- Graphite pencils (HB, 2B, 4B)
- Fine liner pen (black, 0.3mm and 0.5mm)
- Watercolor paint set (reds, pinks, skin tones)
- Round watercolor brush (size 4 or 6)
- Kneaded eraser
- Cup of water and paper towels
Step 1: Planning the Poses
-
Establish the Left Gesture:
Begin on the left page. Lightly sketch a sweeping ‘S’ curve with an HB pencil to define the spine and extended leg of the first dancer. She should be leaping, with her leading leg bent and trailing leg extended back. -
Establish the Right Gesture:
On the right page, mirrored to the first, sketch the second pose. This dancer is landing or holding a pose with her left leg extended forward and arms outstretched. Use light, loose lines to capture the flow of movement. -
Build the Forms:
Flesh out the stick figures into anatomical shapes. Pay attention to the tilt of the heads and the extension of the arms. Keep the hands expressive, almost reaching towards the edges of the page. -
Draft the Costumes:
Sketch the flapper-style dresses. For the left dancer, draw fringes that follow the motion of the jump, swinging backward. For the right dancer, sketch a soft, flowing skirt that drapes over the hips. -
Refine the Details:
Add facial features very lightly—just suggestions of eyes, nose, and mouth. Define the hair in a short, bobbed style typical of the 1920s, perhaps with a headband.
Step 2: Inking and Shading (Left Page)
-
Outline the Contour:
Using the 0.3mm fine liner, carefully trace the outline of the left dancer’s body. Use broken lines for the fringe to suggest movement and texture. -
Hatch the Shading:
Switch to a 2B pencil or the pen for shading. Apply hatching lines on the legs and underside of the arms to create volume. Focus on the muscle definition in the calves and thighs. -
Detail the Fringe:
With the 0.5mm pen, darken the fringe skirt. Use quick, flicking strokes to mimic the texture of the fabric swinging in the air. Add density near the waist. -
Deepen Shadows:
Use a 4B pencil to add contrast to the hair and the darkest folds of the dress. This graphite shading will contrast nicely with the ink.
Capture the Swing
For the left dancer’s fringe, don’t draw individual strands. Instead, draw the overall shape the fringe makes as it flies backward, then fill it with texture.
Step 3: Painting and Washing (Right Page)
-
Mix Skin Tones:
Mix a watery, pale skin tone using your watercolors. Apply a wash over the exposed skin areas of the right dancer—arms, legs, face, and neck. -
Paint the Dress:
Load your brush with a diluted red or deep pink. Paint the bodice of the dress, letting the color pool slightly at the waist. I prefer to pull the color downwards into the skirt for a gradient effect. -
Layer the Skirt:
While the first layer is still damp, add a slightly darker pink to the folds of the skirt. Use the tip of the brush to create ruffles at the hemline. -
Add Warmth to Skin:
Once the base skin tone is dry, glaze a tiny bit of reddish-brown on the knees, elbows, and cheeks to give the figure life and warmth. -
Define Hair and Shoes:
Paint the hair a dark brown or black. Add small touches of pink to the feet to suggest ballet slippers or dancing shoes. -
Final Outline:
After the paint is completely dry, selectively outline the right figure with the 0.3mm pen. Don’t outline everything; just accentuate the chin, shoulders, and hands to bring focus.
Smudged Pencil Work?
Graphite smudges easily on sketchbook paper. Place a clean sheet of scrap paper under your drawing hand to protect your work while you detail the opposite page.
Close your sketchbook knowing you’ve captured a timeless moment of rhythm and grace


Dancing Couple on a Jazz Floor
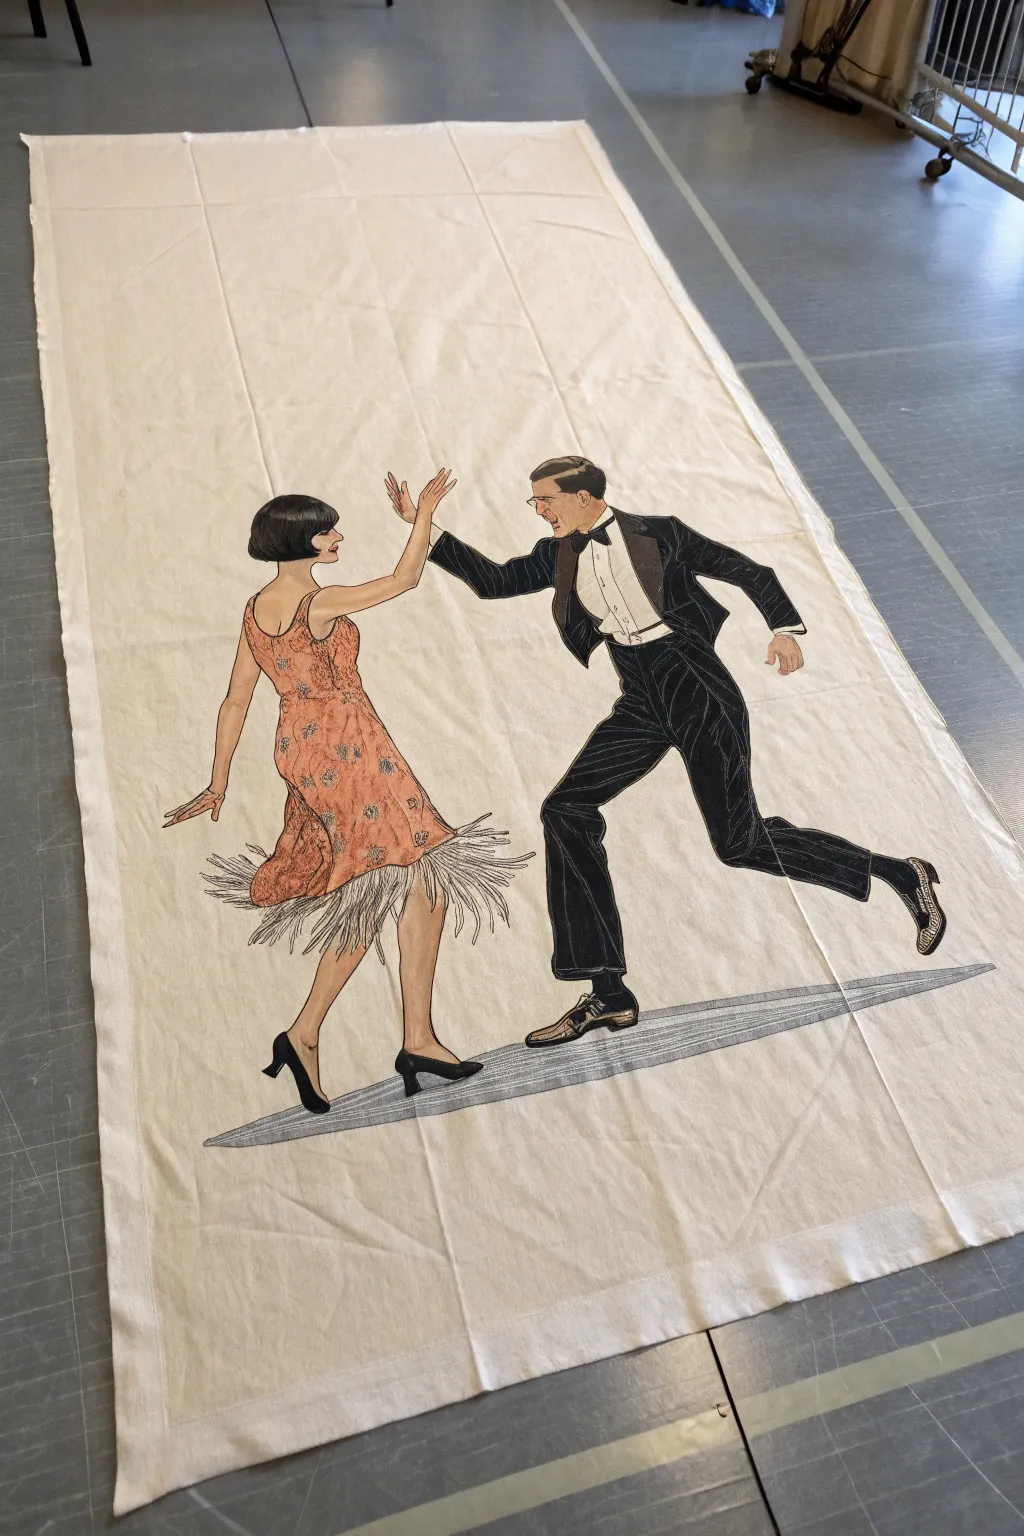
Capture the exuberant energy of the Jazz Age with this large-scale fabric painting project, featuring a stylish couple mid-Charleston. This tutorial guides you through creating a stunning Art Deco-inspired floor runner or wall hanging using fabric paints on simple canvas drop cloth.
Step-by-Step Guide
Materials
- Large canvas drop cloth or heavy cotton fabric (approx. 4ft x 8ft)
- Fabric paints (black, white, peach/flesh tone, coral/orange, grey)
- Fabric medium (if using standard acrylics)
- Assorted paintbrushes (fine liner, medium flat, and large wash brush)
- Pencil or chalk for sketching
- Iron and ironing board
- Painter’s tape or masking tape
- Reference image of 1920s dancers
- Carbon paper (optional for tracing)
Step 1: Preparation and Sketching
-
Prep the Surface:
Begin by washing and drying your canvas drop cloth to remove any sizing, which helps the paint adhere better. Once dry, iron it thoroughly to create a completely smooth surface; wrinkles will make the fine lines difficult to paint. -
Map the Composition:
Lay the canvas flat on a hard floor. Using a pencil or tailor’s chalk, lightly map out the general position of the figures. Place them centrally but slightly offset to create a sense of movement. -
Sketch the Figures:
Draw the detailed outlines of the dancing couple. Focus on the sharp angles of the man’s tuxedo and the fluid, swinging lines of the woman’s dress. If you aren’t confident drawing freehand, project an image onto the fabric or use large sheets of carbon paper to transfer a printed design.
Clean Lines Tip
For the long, straight lines of the floor graphic, place masking tape down first. Paint over the edge of the tape, let it dry slightly, and peel it back for a razor-sharp edge.
Step 2: Painting the Figures
-
Paint Skin Tones:
Mix a flesh tone using peach, white, and a tiny dot of brown. Carefully fill in the faces, arms, and legs. Two thin coats are often better than one thick coat to prevent cracking. -
Define the Hair:
Use a small flat brush and black fabric paint to fill in the bobbed hair on the woman and the slicked-back hair on the man. Leave tiny slivers of the canvas showing to act as natural highlights. -
Fill the Tuxedo:
Paint the man’s suit with solid black. Be very careful around the white shirt area and the lapels. I find using a flat angled brush helps create crisp edges on the collar and cuffs. -
Detail the Shirt:
Use white paint for the man’s shirt front. Once dry, use a very fine liner brush with watered-down black or grey paint to add the buttons, pleats, and bow tie outlines. -
Paint the Dress Base:
Mix a coral or salmon shade for the flapper dress. Paint the main bodice area, stopping where the fringe begins. Keep the paint application somewhat sheer to mimic delicate fabric. -
Add Dress Patterns:
Once the coral base is dry, use a fine brush to add small floral or geometric motifs in a lighter peach or metallic silver for extra Roaring 20s flair.
Level Up: Metallic Pop
Mix metallic gold fabric medium into the paint for the dress pattern and the man’s tuxedo studs. It catches the light beautifully when the canvas hangs.
Step 3: Fringe and Footwork
-
Create the Fringe:
This is a key texture step. Using a liner brush loaded with white and light grey paint, create rapid, sweeping strokes downward from the hem of the dress. Overlap the strokes to simulate movement and density. -
Paint the Shoes:
Detail the woman’s T-strap heels in black and the man’s two-tone spectator shoes. Use distinct blocks of black and white for his shoes to emphasize the vintage style. -
Outline the Figures:
Using a fine liner brush and black paint, carefully outline the entire illustration. This ‘illustration style’ outline makes the figures pop against the neutral background and cleans up any fuzzy paint edges.
Step 4: Finishing Touches
-
Add the Shadows:
Mix a very watery grey wash. Paint subtle shadows under the arms and fabric folds to give dimension without overpowering the flat illustration style. -
Create the Floor Graphic:
Draw a long, sharp triangle or shard shape underneath their feet to represent a spotlight or stylized floor. Use a ruler to get the lines straight. -
Texture the Floor:
Fill this floor shape with streaky grey lines. Don’t paint it solid; use dry-brush strokes running horizontally to suggest a polished wood floor or a beam of light. -
Heat Set the Paint:
Allow the entire piece to cure for at least 24 hours. Once dry, place a scrap cloth over the painted areas and iron on a high heat setting (without steam) to permanently set the fabric paint.
Hang your finished masterpiece to bring a touch of vintage glamour to your living space

Noir-Inspired Speakeasy Entrance Scene
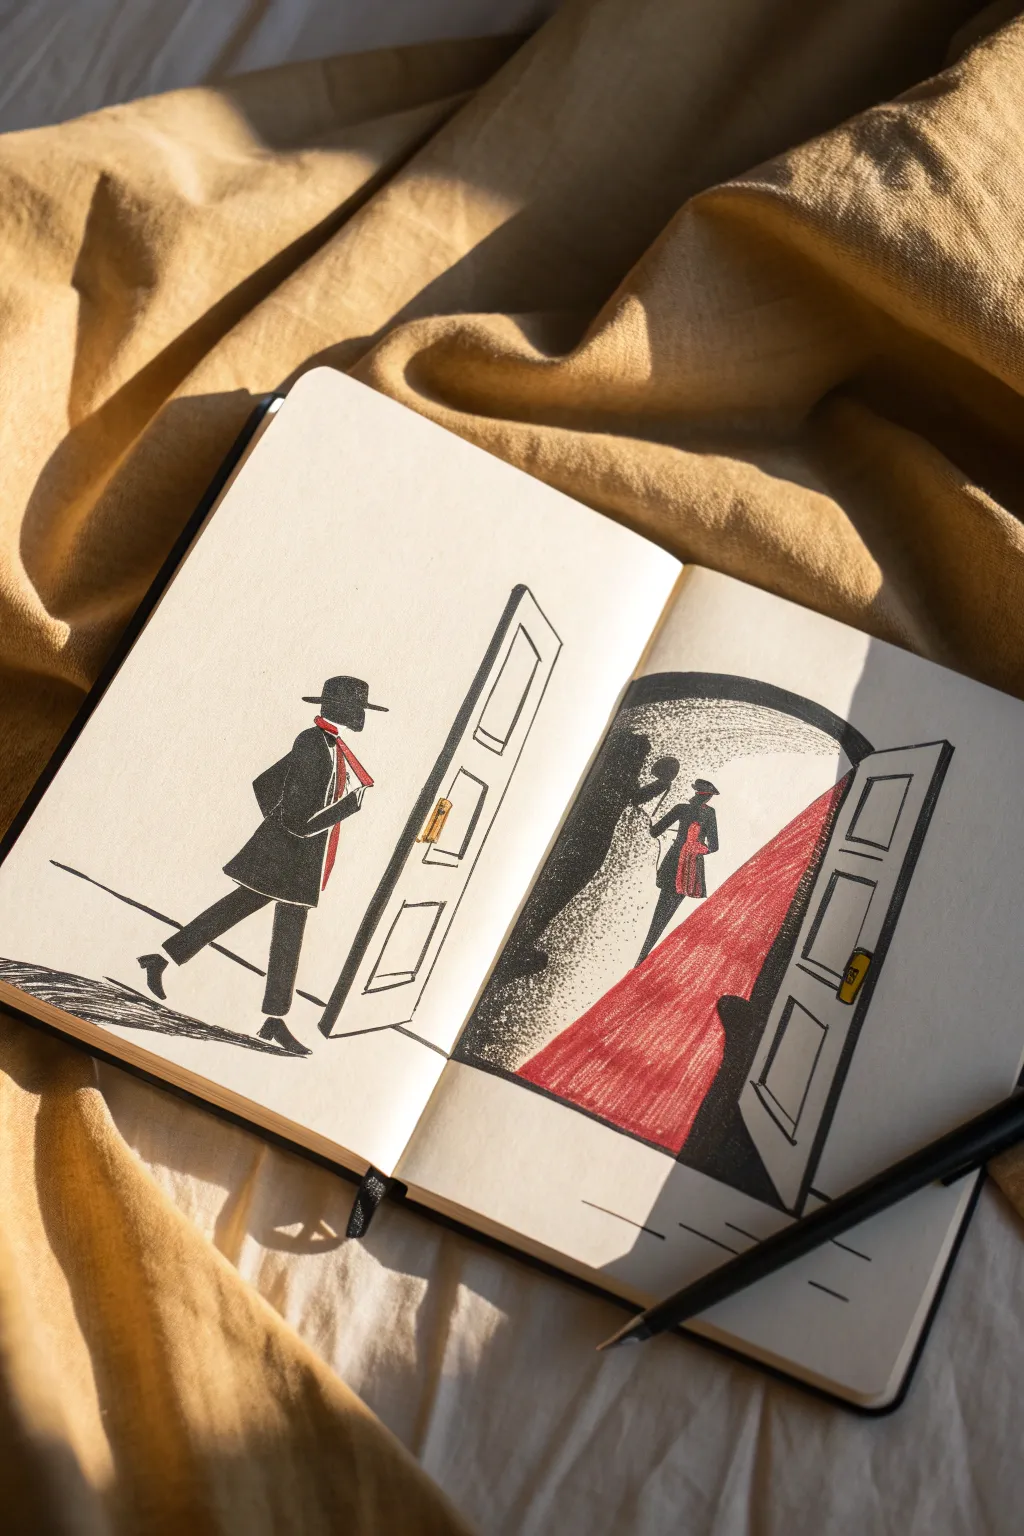
Capture the mystery of a roaring twenties night out with this clever double-page graphic illustration. Using bold shadows and a vibrant red carpet accent, you’ll create a seamless narrative that invites the viewer to step through the door.
Step-by-Step Tutorial
Materials
- Hardbound sketchbook (smooth paper preferred)
- Black drawing ink or high-quality black markers (fine and broad tips)
- Red colored pencil or marker
- Yellow/Gold gel pen or paint marker
- HB Pencil
- Eraser
- Ruler
Step 1: Setting the Scene
-
Establish the horizon:
Open your sketchbook to a fresh spread. Lightly draw a horizontal line across the bottom third of the left page, representing the sidewalk. Extend this line just slightly onto the right page to ensure continuity. -
Draft the doorframe:
On the right edge of the left page, sketch a tall, slanted rectangle to represent the open door. Angle the top and bottom lines downward towards the spine to create perspective. -
Mirror the entrance:
On the left edge of the right page, draw the receiving doorframe. This one should be much darker and larger, forming an archway shape that suggests a dimly lit interior. -
Sketch the silhouette figure:
On the left page, outline a walking figure wearing a trench coat and fedora. Keep the shapes simple and geometric—a blocky coat, stick-straight legs, and a sharp hat brim. -
Position the interior figure:
Inside the archway on the right page, sketch a smaller, distant figure. This character should be in a similar pose but facing away, creating the illusion that the first figure has already entered.
Uneven Blacks?
If your large black areas look streaky, switch to black gouache or India ink for the fill. Markers can struggle with large spaces unless you use high-quality alcohol-based ones.
Step 2: Inking the Noir Elements
-
Fill the primary figure:
Using your broad black marker or ink, color in the trench coat, hat, and pants of the main figure on the left. Leave small white gaps for the collar and scarf area to define the form. -
Create the cast shadow:
Draw an elongated, jagged shadow stretching from the figure’s feet towards the bottom left corner. Use messy, horizontal strokes to give it a gritty texture. -
Outline the first door:
Go over the door outlines on the left page with a fine-tip pen. Add inner rectangles to create the panel detailing. Keep lines crisp. -
Ink the speakeasy entrance:
On the right page, fill in the heavy arched doorway with solid black. Leave the center open for the red carpet area and the inner wall texture. -
Texture the inner walls:
For the wall area inside the archway, switch to a stippling technique or very rough, dry shading. I find that tapping the pen rapidly creates a great ‘concrete’ wall effect. -
Ink the distant figure:
Carefully fill in the silhouette of the smaller figure on the right page. Be precise here, as the small scale leaves less room for error. -
Define the second door:
Draw the opposing door on the far right edge in perspective, heavily outlining the frame to distinguish it from the bright interior.
Step 3: Adding Color & Detail
-
Apply the red carpet:
Take your red pencil or marker and fill the path leading into the speakeasy on the right page. Use directional strokes that follow the perspective lines to enhance depth. -
Accent the scarves:
Add a pop of red to the scarf of the main figure on the left and the distant figure on the right. This small detail visually connects the two characters. -
Gild the hardware:
Using a gold gel pen or paint marker, draw the door handles and lock plates on both doors. This tiny metallic touch adds immediate elegance. -
Ground the scene:
Add simple, straight black lines on the ground of the right page to suggest floorboards or tiles next to the carpet. -
Refine edges:
Check your solid black areas. If the marker coverage looks streaky, add a second layer to ensure a deep, opaque noir finish. -
Clean up:
Once the ink is completely dry, gently erase any remaining pencil guidelines, being careful not to smudge the red pencil areas.
Add Atmosphere
Use a white gel pen to add rain streaks across the dark doorway or street section. This adds instant moodiness and fits the classic film noir aesthetic perfectly.
Close your book and reopen it to watch your character seamlessly step into the roaring twenties underground

PENCIL GUIDE
Understanding Pencil Grades from H to B
From first sketch to finished drawing — learn pencil grades, line control, and shading techniques.
Explore the Full Guide
Collage Page of Roaring 20s Icons
Capture the glitz and glamour of the Jazz Age with this elegant sketchbook page featuring iconic 1920s motifs. Using simple black ink on kraft paper creates a vintage, timeless aesthetic perfect for journaling or scrapbooking.
Step-by-Step Tutorial
Materials
- Spiral-bound sketchbook with tan or kraft paper
- Fine liner pens (black, sizes 01 and 05)
- Brush pen or black marker for larger fills
- Pencil (HB for sketching)
- Eraser
- Ruler
- Optional: 1920s-themed rubber stamps and black ink pad
- Optional: White gel pen for highlights
Step 1: Planning and Layout
-
Prepare your workspace:
Open your sketchbook to a fresh double-page spread. Ensure the surface is flat and you have good lighting to see your pencil lines clearly on the tan paper. -
Rough sketching:
Lightly sketch the placement of your main elements using an HB pencil. Aim for a balanced composition: place the large flapper figure on the left-center of the right page, and reserve the bottom right corner for the vintage car. -
Adding decorative borders:
Sketch a string of party lights across the top of the right page. Make the line swoop naturally. These don’t need to be perfect; a hand-drawn look adds character.
Step 2: Drawing the Main Figure
-
Outline the silhouette:
Start defining the flapper girl’s outline. Focus on the elongated, elegant posture typical of fashion illustrations from this era. Draw the cloche hat low on her head. -
Detailing the dress:
Draw the dress straps and the drape of the fabric. The dress should be sleek and calf-length. Use your fine liner to stipple or draw small irregular shapes to create a sequined texture on the dress. -
Inking the figure:
Once happy with the pencil lines, go over the figure with a 01 fine liner. Be sure to capture the delicate hand holding the fan aloft. -
Filling in darks:
Use a brush pen or thicker marker to fill in the dark gray or black areas of the dress, leaving small specks of tan paper showing through to mimic sparkle or texture.
Use Stamps for Precision
If drawing complex items like the vintage car feels daunting, use rubber stamps for the key icons and hand-draw the connecting elements to blend them in.
Step 3: Adding Iconic Elements
-
Draw the fan:
Create the large fan in the flapper’s hand. Draw radiating lines from a central point near her fingers, connecting them with scalloped edges. -
Illustrate the vintage car:
In the bottom right, sketch a classic 1920s coupe. Focus on the distinct wheel arches and flat windshield. Use heavy black shading on the underside and tires to ground the vehicle. -
Second fan detail:
Draw a semi-circle fan shape lying on the unseen ‘table’ surface near the car. Fill it with intricate floral or lace-like doodles using your finest pen tip. -
Background character:
Add a smaller, less detailed figure in the background (top right) to create depth. A simple silhouette of a man in a tuxedo or another dancer works well.
Go Multimedia
Glue actual lace, feathers, or tiny pearl stickers onto the page to add tactile dimension and enhance the 1920s flapper vibe.
Step 4: Finishing Touches on the Left Page
-
Musical motifs:
On the facing left page, sketch a partial musical instrument, like a cello or double bass. Let it run off the edge of the page to suggest a larger scene. -
Typography:
Add some cursive text or calligraphy. Words like ‘Jazz’ or ‘Soiree’ fit perfectly. Keep the lines fluid and varied in thickness.
Step 5: Final Inking and Polishing
-
Ink the decorations:
Go back to the top of the page and ink the string lights. Fill in the bulbs with black or draw filaments inside them. -
Add hanging details:
Draw hanging beads or tassels on the left side of the right page to frame the composition. These vertical lines contrast nicely with the flowing figure. -
Erase pencil lines:
Wait for all ink to dry completely to avoid smudging. Gently accept the pencil sketch with a quality eraser. -
Add texture:
If you have a stamp pad or a textured sponge, you can lightly dab a flower or geometric shape in the top corner for an authentic print look.
Now you have a stylish art journal spread that perfectly encapsulates the elegance of the Roaring Twenties

Have a question or want to share your own experience? I'd love to hear from you in the comments below!