Yoga paintings are such a sweet mix of calm energy and bold visual contrast—exactly the kind of project you can sink into and breathe with. I love how a simple pose can carry a whole mood when you pair it with a dreamy background and a few meaningful symbols.
Warrior Pose on a Windy Hill
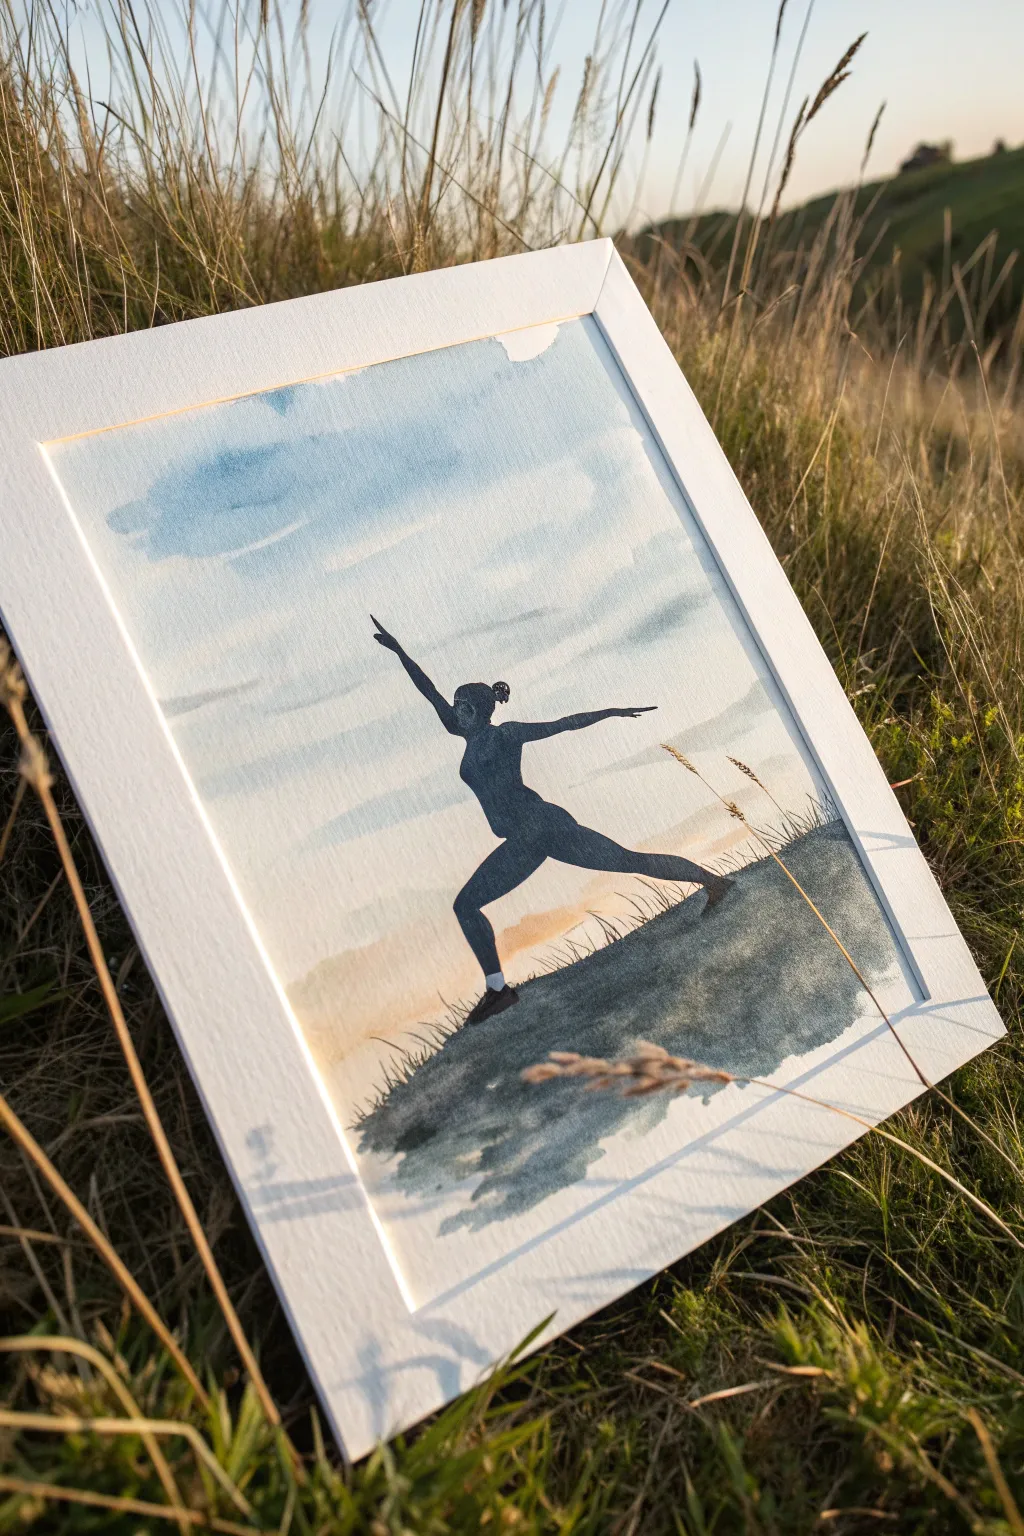
Capture the serenity and strength of a yoga practice with this atmospheric watercolor project. By combining a simple silhouette with a soft, layered landscape, you will create a peaceful scene that celebrates balance and movement.
Step-by-Step Guide
Materials
- Cold press watercolor paper (approx. 300 gsm)
- Watercolor paints (Indigo, Payne’s Gray, Yellow Ochre, Burnt Sienna, Cerulean Blue)
- Small round brush (size 2 or 4) for details
- Large flat or round wash brush
- Pencil and eraser
- Masking tape
- Paper towels
- Two cups of water
- White mat or cardstock frame
Step 1: Preparation and Sketching
-
Secure the paper:
Tape your watercolor paper down to a hard board or table on all four sides. This prevents the paper from buckling when we apply wet washes later. -
Outline the hill:
Lightly sketch a sloping line across the bottom third of the paper to represent the hillside. It doesn’t need to be perfectly straight; a subtle curve adds naturalism. -
Draft the figure:
Sketch the yoga figure in the center. Start with a stick figure to get the proportions of the Warrior pose right—extended arms, bent front knee, and straight back leg—then flesh out the body shape. Keep pencil lines very faint so they don’t show through the paint.
Bleeding Lines?
If paint bleeds into the figure area, blot it immediately with a clean, dry tissue. Let it dry, then gently lift the stain with a damp stiff brush before repainting.
Step 2: Painting the Sky
-
Wet the sky area:
Using clean water on your large brush, wet the entire area above the hill line, carefully painting around your pencil sketch of the figure. The paper should be glisten, but not hold puddles. -
Apply the blue wash:
Load your brush with a watery mix of Cerulean Blue. Starting at the top left corner, drop the color into the wet paper, letting it diffuse naturally. Leave some areas white to suggest drifting clouds. -
Add warmth loosely:
While the sky is still damp, mix a very faint wash of Yellow Ochre or a touch of Burnt Sienna. Dab this near the horizon line on the right side to suggest a warm sunset glow. -
Create cloud shadows:
Mix a tiny amount of Payne’s Gray into your blue. Add faint streaks horizontally across the sky to create depth in the clouds. Let this layer dry completely before moving on.
Step 3: Painting the Hill
-
Base layer for the ground:
Mix a muted green using Indigo and a touch of Yellow Ochre. Apply a wash to the hill area below your pencil line. -
Add texture and depth:
While the hill wash is still wet, drop in more concentrated Indigo or Payne’s Gray near the bottom edge and along the ridge line. This creates the dark, shadowy look of grass at twilight. -
Suggest grass blades:
Switch to your small round brush. Using a thick, dark mixture of Indigo, flick tiny, quick upward strokes along the top edge of the hill to create the silhouette of tufted grass. -
Let it dry completely:
Ensure the background is bone dry before painting the main figure, or the black paint will bleed into the sky.
Make it Sparkle
Splatter tiny droplets of white gouache or acrylic onto the dried sky area to create a starry night effect, turning the scene from dusk to evening.
Step 4: The Warrior Silhouette
-
Outline the figure color:
Mix a very saturated, dark color using Indigo and Payne’s Gray. It should be the consistency of heavy cream. Carefully outline the edges of your yoga figure first. -
Fill the shape:
Fill in the rest of the body with the dark mix. Work relatively quickly so the paint dries evenly without harsh lines. -
Refine the hands and feet:
Use the very tip of your smallest brush to sharpen the fingers and the curve of the feet. This precision makes the silhouette recognizable. -
Ground the figure:
Add a small shadow underneath the feet on the hill using the same dark color, blending it slightly into the hill texture so the figure looks planted, not floating.
Step 5: Final Touches and Framing
-
Details:
If you want to suggest socks or shoes like the reference image, leave a tiny sliver of white paper at the ankles, or go back with a white gel pen once dry. -
Remove tape:
Once the painting is 100% dry, carefully peel off the masking tape at a 45-degree angle away from the painting to reveal clean edges. -
Add the mat:
Place your finished artwork inside a simple white mat or cardstock frame to simulate the professional presentation shown in the photo.
Now you have a tranquil piece of art that serves as a beautiful reminder to breathe and find your center
Downward Dog With Simple Shadows
Capture the strength and grace of this dynamic yoga pose using a monochromatic watercolor technique. This project focuses on mastering a single rich color to create a striking silhouette against textured paper, complete with a grounding shadow.
How-To Guide
Materials
- Cold press watercolor paper (300 gsm)
- Indigo or Payne’s Grey watercolor paint
- Round watercolor brush (size 4 or 6)
- Small detail brush (size 0 or 1)
- Pencil (HB or H)
- Kneaded eraser
- Palette or mixing dish
- Jar of water
- Paper towel
Step 1: Sketching the Form
-
Define the ground line:
Start by lightly sketching a horizontal line near the bottom third of your paper. This will serve as the floor for your figure and help you orient the pose correctly. -
Draft the torso and arms:
Begin sketching the figure’s upper body. Draw the inverted V-shape of the arms pressing into the ground, leading up to the shoulders and head. Keep the head tucked between the arms. -
Extend the legs:
Sketch the supporting leg extending straight back and down from the hips. Then, draw the lifted leg extending upwards towards the sky, creating a smooth line from the hands all the way to the pointed toe. -
Refine the silhouette:
Review your sketch to ensure the proportions look natural. The silhouette should flow seamlessly. Use your kneaded eraser to lighten the pencil lines until they are barely visible, acting only as a faint guide.
Uneven drying?
If you see ‘cauliflowers’ or blooms in the paint, it means you added water to a drying section. Wait for it to dry fully, then apply a second, darker coat over the whole shape to hide it.
Step 2: Painting the Silhouette
-
Mix your paint:
Prepare a puddle of Indigo or Payne’s Grey on your palette. Aim for a ‘milk’ consistency—rich and dark, but fluid enough to flow easily off the brush. -
Outline the head and hands:
Using your smaller detail brush, carefully paint the outline of the hands on the ground and the head. I find starting with these smaller details helps anchor the rest of the painting. -
Fill the upper body:
Switch to your medium round brush. Load it with paint and fill in the arms and torso. Work fairly quickly to keep a ‘wet edge,’ which prevents unwanted drying lines from forming in the middle of the shape. -
Paint the legs:
Continue the wash of color down the supporting leg and up the extended leg. Pay close attention to the foot shapes—the grounded foot should look flat, while the lifted foot is pointed. -
Refine edges:
While the paint is still damp but not soaking wet, use the tip of your brush to smooth out any ragged edges along the silhouette to create a crisp, clean look. -
Let it dry:
Allow the silhouette to dry completely. The paper should feel room temperature to the touch, not cool.
Use masking tape
Tape your paper down to a board before painting. This prevents the paper from buckling when wet and gives you a nice clean border if you decide to frame the piece later.
Step 3: Adding Texture and Shadows
-
Deepen the color:
If your first layer dried too light, mix a slightly thicker ‘cream’ consistency of the same paint. Glaze a second layer over the silhouette to achieve that deep, opaque navy blue. -
Mix a shadow wash:
Add water to your existing paint puddle to dilute it significantly. You want a very transparent, watery wash for the cast shadow. -
Paint the cast shadow:
Using one smooth horizontal stroke, paint a line directly beneath the hands and foot. Let the brush skip slightly over the paper’s texture to create a natural, rough effect. -
Add texture marks:
Before the shadow dries completely, you can drop in tiny dots of slightly darker pigment near the contact points (hands and foot) to show weight. -
Final assessment:
Step back and check the balance. If the shadow line looks too harsh, soften the edges slightly with a clean, damp brush.
Once dry, this minimalist piece serves as a peaceful reminder of balance and flexibility for your space


Chakra Colors Along the Spine
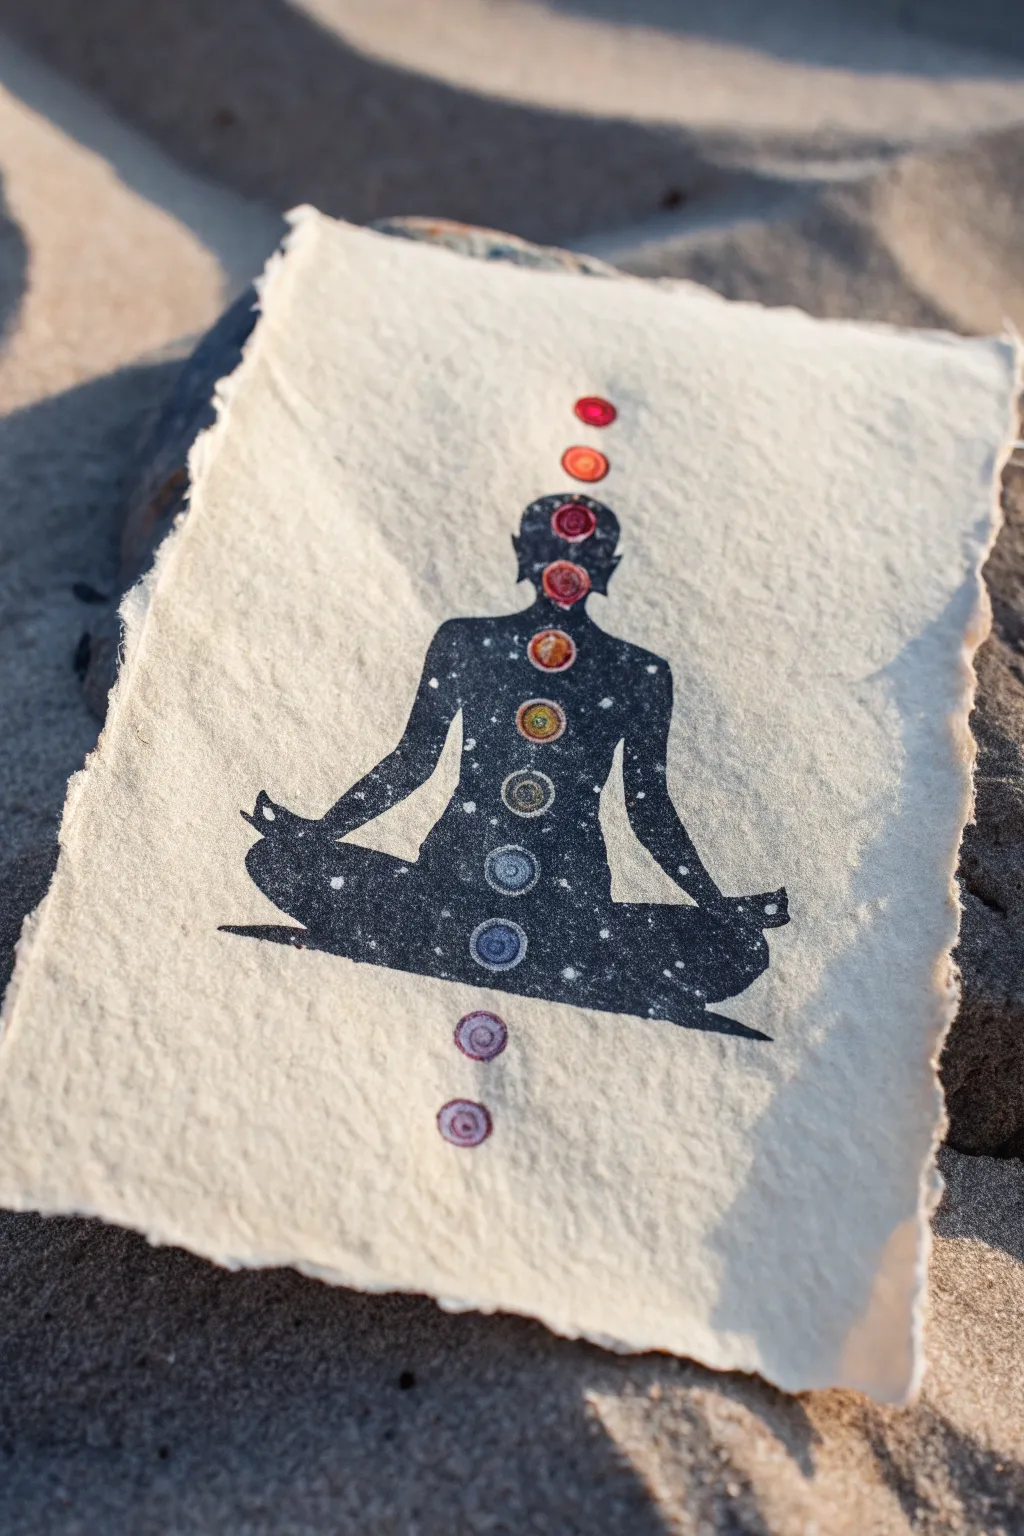
Capture the serenity of alignment with this mixed-media chakra art piece featuring a starry silhouette on beautifully textured handmade paper. The contrast between the rough, organic edges of the paper and the sharp, celestial figure creates a stunning grounded-yet-spiritual aesthetic.
Step-by-Step Guide
Materials
- Heavyweight handmade cotton rag paper (deckled edge)
- Black acrylic paint or black gesso
- Small round brushes (sizes 0 and 2)
- Metallic or pearl acrylic paints (optional)
- White acrylic ink or diluted white acrylic paint
- Old toothbrush or stiff bristle brush
- Colored pencils or fine liner pens (chakra colors: red, orange, yellow, green, blue, indigo, violet)
- Pencil for sketching
- Carbon transfer paper (optional)
- Workable fixative spray (optional)
Step 1: Preparation & Silhouette
-
Paper Selection:
Begin by selecting a piece of heavy, handmade paper with a prominent deckled edge. The rough texture is crucial for the final look, so avoid smooth cardstock. -
Outline the Figure:
Using a very light pencil, sketch a simple silhouette of a person in a seated meditation pose (Lotus or Easy Pose). If drawing isn’t your strong suit, print a template and use carbon paper to lightly trace the outline onto your textured surface. -
Blocking in Black:
Load a size 2 brush with black acrylic paint or black gesso. Carefully fill in the silhouette, working from the center outward toward your pencil lines. -
Refining Edges:
Switch to a smaller size 0 brush to tidy up the edges of the shoulders, arms, and knees. Because the paper is bumpy, you may need to dab the paint into the recesses rather than dragging the brush. -
Second Coat:
Allow the first layer to dry completely. Apply a second coat of black to ensure an opaque, deep void that will make the stars pop later.
Bleeding Lines?
Handmade paper is very absorbent. If your paint bleeds, thicken it with a little gel medium, or seal the sketch area with clear gesso before painting the black silhouette.
Step 2: The Cosmic Texture
-
Preparing the Stars:
Dilute a small amount of white acrylic paint with water until it reaches an ink-like consistency, or simply use white acrylic ink. -
Splatter Technique:
Cover the background paper around the silhouette with scrap paper to protect it. Dip an old toothbrush into the white mixture. -
Creating the Galaxy:
Hold the toothbrush over the black silhouette and run your thumb across the bristles to flick tiny specks of ‘stars’ onto the black paint. Vary the density to create clusters. -
Adding Larger Stars:
Use your finest brush or a toothpick to manually place a few slightly larger white dots for prominent stars.
Step 3: Chakra Alignment
-
Mapping the Centers:
Once the black paint is bone dry, lightly mark a vertical line of seven dots up the center of the spine with a pencil, plus two or three extending above the head and below the body if desired. -
Painting the Base Circles:
Using a tiny detail brush, paint small filled circles in white over your pencil marks. This white base layer is essential to make the chakra colors vibrant against the black background. -
Applying Color:
Once the white dots are dry, paint over them with the traditional chakra spectrum: Red (root), Orange (sacral), Yellow (solar plexus), Green (heart), Blue (throat), Indigo (third eye), and Violet (crown). -
Adding Detail Rings:
To mimic the image’s style, use colored pencils or a very fine brush to draw concentric rings inside the colored dots. I like to add a touch of gold or silver here for a bit of shimmer. -
Wait and Dry:
Let the entire piece dry for several hours. The thick paper might absorb moisture differently, so patience helps prevent warping. -
Final Seal:
If you used colored pencil on top of the paint, a light mist of workable fixative will keep the pigment from smudging.
Make It 3D
For the chakra points, use puffy dimensional fabric paint or adhere tiny flat-backed rhinestones in the corresponding colors to add real texture to the spine alignment.
Place your finished piece on a small easel or float-frame it to show off those beautiful rough edges


Sun Salutation in a Mini Pose Series
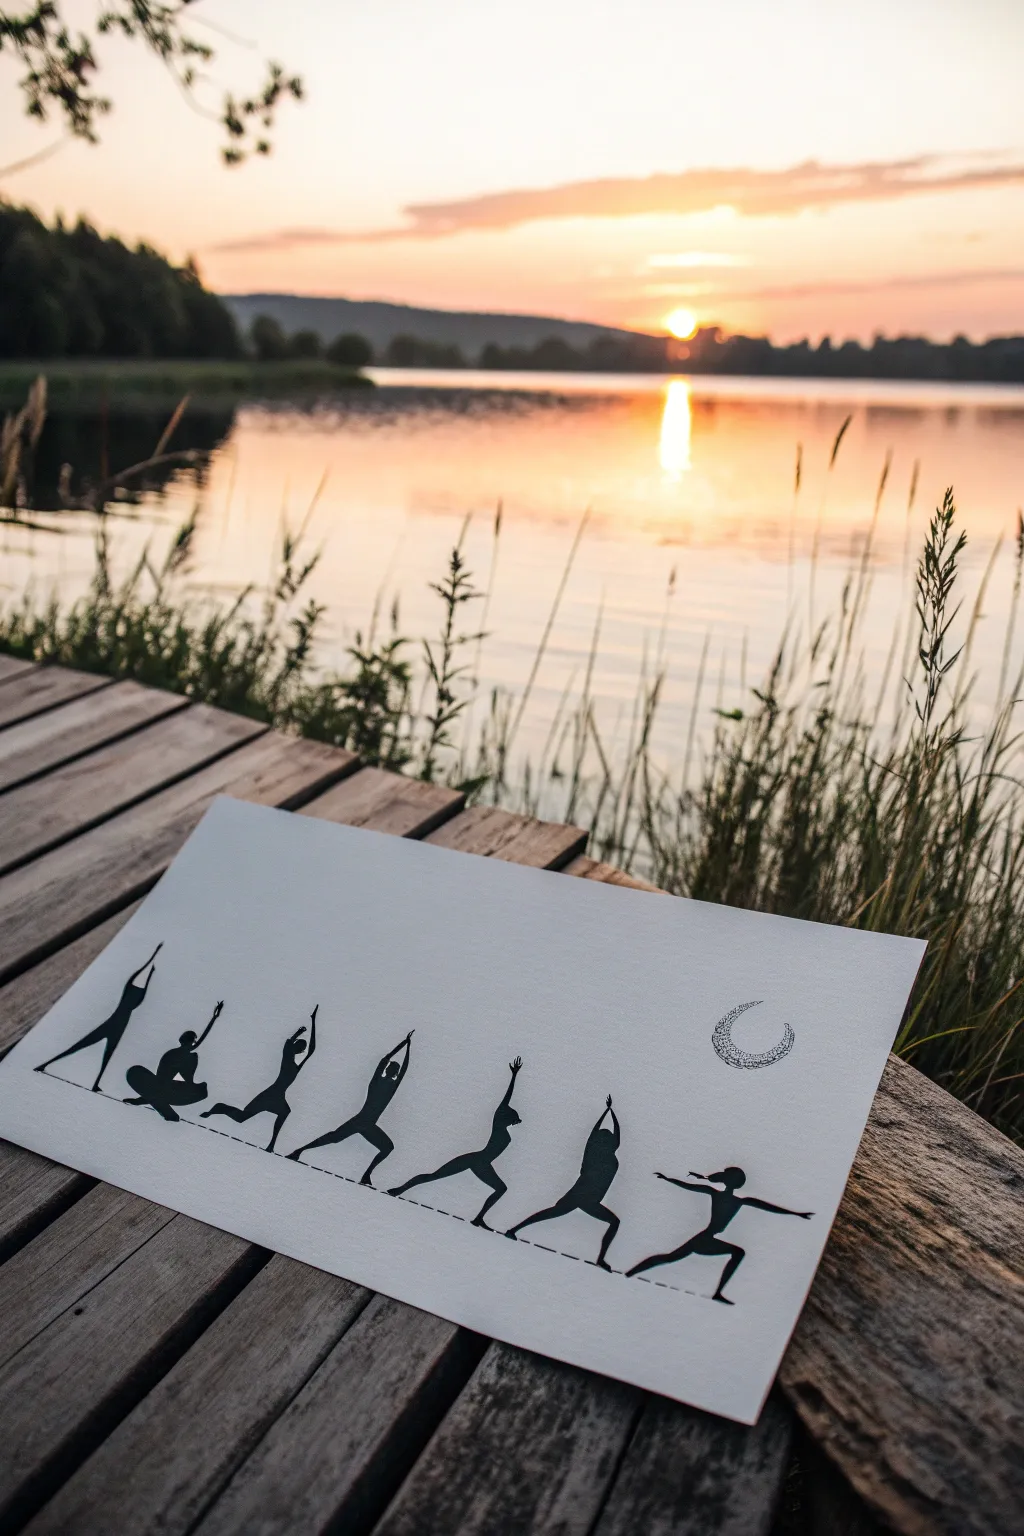
Capture the serenity of a lakeside practice with this minimalist silhouette painting featuring a sequence of yoga poses. Using stark black ink against crisp white paper creates a striking, modern look that honors the classic Sun Salutation flow.
Step-by-Step Guide
Materials
- High-quality watercolor paper or heavy cardstock (white)
- Black waterproof ink or high-pigment black gouache
- Fine liner pens (sizes 005, 01, and 03)
- Small round brush (size 0 or 1)
- Pencil (HB or H)
- Eraser
- Ruler
- Reference images of yoga poses
Step 1: Planning the Sequence
-
Select your flow:
Decide on the 7-8 poses you want to depict. A classic Sun Salutation or a creative flow works best; aim for a mix of standing, bending, and lunging poses to create visual rhythm. -
Establish the ground line:
Using a ruler and pencil, lightly draw a straight horizontal line across the bottom third of your paper. This ensures all figures are grounded on the same plane. -
Sketch the figures:
Lightly sketch your stick figures first to get the spacing right. I find it helpful to mark the head positions first to keep the heights consistent, then flesh out the limbs. -
Refine the forms:
Go back over your stick figures and add volume to create full silhouettes. Pay attention to the negative space between arms and legs so the poses remain readable once filled in.
Clean Lines Tip
If your hand shakes during outlining, try exhaling as you draw each line. It steadiest your muscles and creates smoother strokes.
Step 2: Inking the Silhouettes
-
Outline the poses:
Switch to your 01 or 03 fine liner pen. Carefully trace the outer edges of your penciled figures. Keep your hand steady and lift the pen often to avoid smudging. -
Fill in the shapes:
For the larger body areas, use a small round brush dipped in black ink or gouache to fill the interiors. This provides a rich, solid black that markers sometimes struggle to achieve. -
Refine the details:
Use your finest pen (005) to sharpen tiny details like fingers, toes, or the curve of a ponytail. Crisp edges are the secret to professional-looking silhouettes. -
Add the ground dash:
Instead of a solid line, create a dashed line beneath the feet using your 01 pen. This suggests a mat or ground without weighing down the composition.
Step 3: Celestial Detail
-
Sketch the moon:
In the upper right corner, lightly sketch a crescent moon shape. You can trace a small coin or bottle cap if you struggle with freehand circles. -
Stipple the texture:
Using the 005 pen, fill the moon shape with tiny dots (stippling). Place dots closer together near the edges for shading and further apart in the center to create a glowing texture.
Golden Hour Glow
Apply a very light wash of watercolor in warm sunset tones (orange/pink) over the background before inking for a different vibe.
Step 4: Finishing Touches
-
Let it dry completely:
Wait at least 15-20 minutes for the ink to fully set. Using an eraser too soon is the quickest way to ruin the crisp black lines. -
Erase guidelines:
Gently erase all visible pencil marks, being careful around the stippled moon and the solid black ink areas. -
Final inspection:
Check for any uneven edges or spots where the white paper shows through the black ink. Touch up these areas with your fine liner for a perfect finish.
Place your finished artwork in a simple frame to inspire your next practice session
BRUSH GUIDE
The Right Brush for Every Stroke
From clean lines to bold texture — master brush choice, stroke control, and essential techniques.
Explore the Full Guide
Mandala Background Behind a Calm Pose
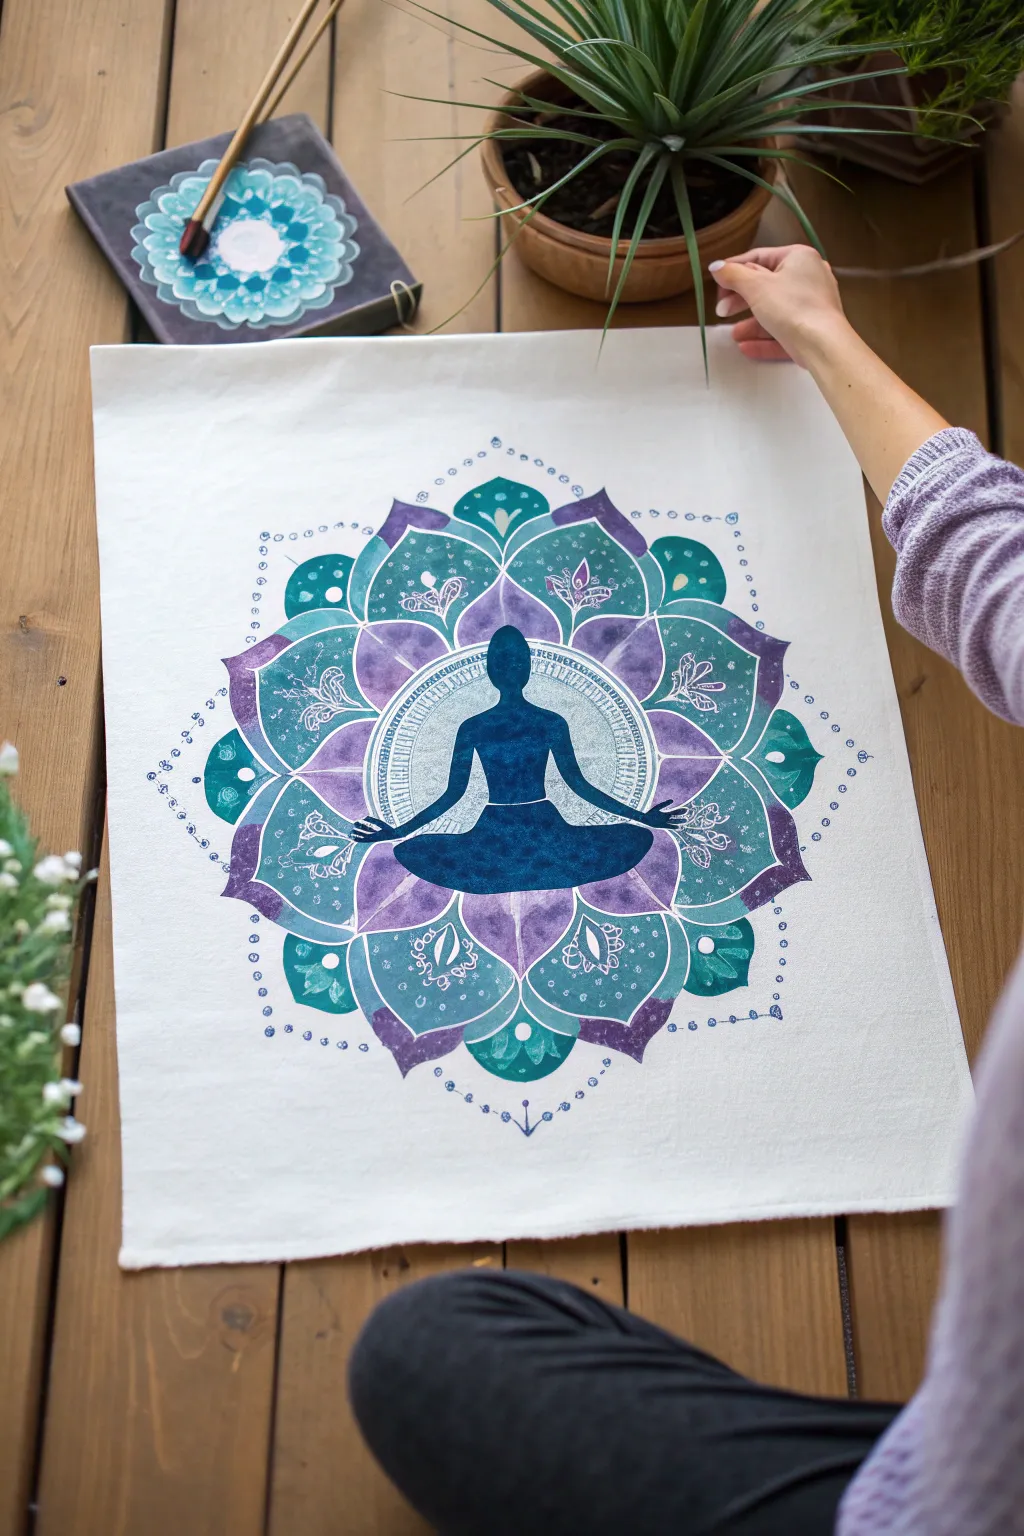
This calming art piece combines the centered energy of a yoga silhouette with the expansive beauty of a cool-toned mandala. Painted on fabric or canvas, the design radiates outward in layers of teal and violet, creating a perfect focal point for a meditation space or yoga studio.
Step-by-Step
Materials
- Large white cotton canvas or heavy fabric sheet (approx. 18×24 inches)
- Acrylic paints (teal, turquoise, purple, violet, dark navy blue, white)
- Fabric medium (if using standard acrylics on fabric)
- Large flat brush (1-inch)
- Medium round brush (size 6 or 8)
- Fine detail brush (size 0 or 1)
- Pencil and eraser
- Large circular object or compass for tracing
- Ruler
- Stencil with floral or paisley motifs (optional but helpful for details)
- Palette for mixing
Step 1: Planning and Sketching
-
Prepare the fabric surface:
Lay your canvas or fabric flat on a protected surface. If the fabric is wrinkled, iron it smooth first to ensure clean lines. Tape the corners down to prevent shifting while you work. -
Mark the center point:
Using a ruler, measure to find the exact center of your canvas and make a small dot with your pencil. This will anchor both your silhouette and the radiating mandala rings. -
Draw the main circles:
Use a compass or trace around household objects (like plates or bowls) to lightly draw three concentric circles radiating from the center. The innermost circle will frame the yoga figure. -
Sketch the yoga silhouette:
In the very center circle, lightly sketch the outline of a person in a seated meditation pose (Sukhasana). Focus on the curves of the shoulders and the grounding shape of the crossed legs to get the proportions right. -
Outline the mandala petals:
Around the central circle, draw large, pointed petal shapes that extend outward. Sketch a second layer of larger petals behind the first set to create depth and expansion.
Uneven Petals?
Don’t stress about symmetry. If one petal looks wonky, simply thicken the white outline between the petals to correct the visual shape
Step 2: Painting the Base Colors
-
Mix your base colors:
Prepare palette puddles of teal, purple, and turquoise. If you are painting on fabric that will be washed, mix fabric medium into your acrylics according to the bottle instructions. -
Paint the central silhouette:
Using the dark navy blue paint and a medium round brush, carefully fill in the yoga silhouette. Keep the edges crisp and opaque to create a strong contrast against the lighter background layers. -
Fill the inner halo:
Paint the area immediately surrounding the silhouette with a very diluted, watery wash of light purple or grey. This creates a soft ‘halo’ effect that makes the dark figure pop. -
Paint the first petal layer:
Fill the first ring of petals with varied shades of purple. I like to alternate between a slightly reddish-purple and a blue-violet to give the ring some visual vibration. -
Paint the outer petal layer:
For the largest outer petals, use your teal and turquoise shades. You can blend a little white into the wet paint near the center of each petal to create a subtle gradient effect. -
Add the background corners:
If you defined a square or outer diamond shape, paint the spaces between the outer petals with a contrasting deep teal or blue to square off the design.
Pro Tip: Watercolor Effect
To get that soft, dreamy look in the colored petals, dilute your acrylics with water (glazing) on the fabric, letting colors bleed slightly.
Step 3: Adding Details and Finish
-
Create the white outlines:
Once the base colored layers are fully dry (give it at least 20 minutes), mix a thin, ink-like consistency of white paint. Use your fine detail brush to outline each petal, separating the color blocks clearly. -
Paint inner petal details:
Inside the large teal petals, paint delicate white paisley or floral motifs. You can freehand these organic shapes or use a small stencil and a dry brush to dab the white paint on for a uniform look. -
Detail the purple ring:
Add smaller decorative elements to the purple petals, such as dots, small triangles, or lines radiating from the center. Repetition is key here to achieve the meditative mandala look. -
Add the outer dots:
Dip the non-brush end (the handle) of your paintbrush into white paint. Use this ‘dotting tool’ to stamp a ring of evenly spaced dots around the entire outer perimeter of the design. -
Refine the central circle:
Add a ring of small hatch marks or tiny geometric shapes around the inner circle that frames the silhouette, creating a detailed border. -
Final touches:
Step back and look at the whole piece. If the silhouette looks patchy, add a second coat of navy blue. Erase any visible pencil marks once the paint is bone dry.
Hang your finished tapestry in a quiet corner to remind yourself to find balance throughout the day
Galaxy Sky With Star Splatter
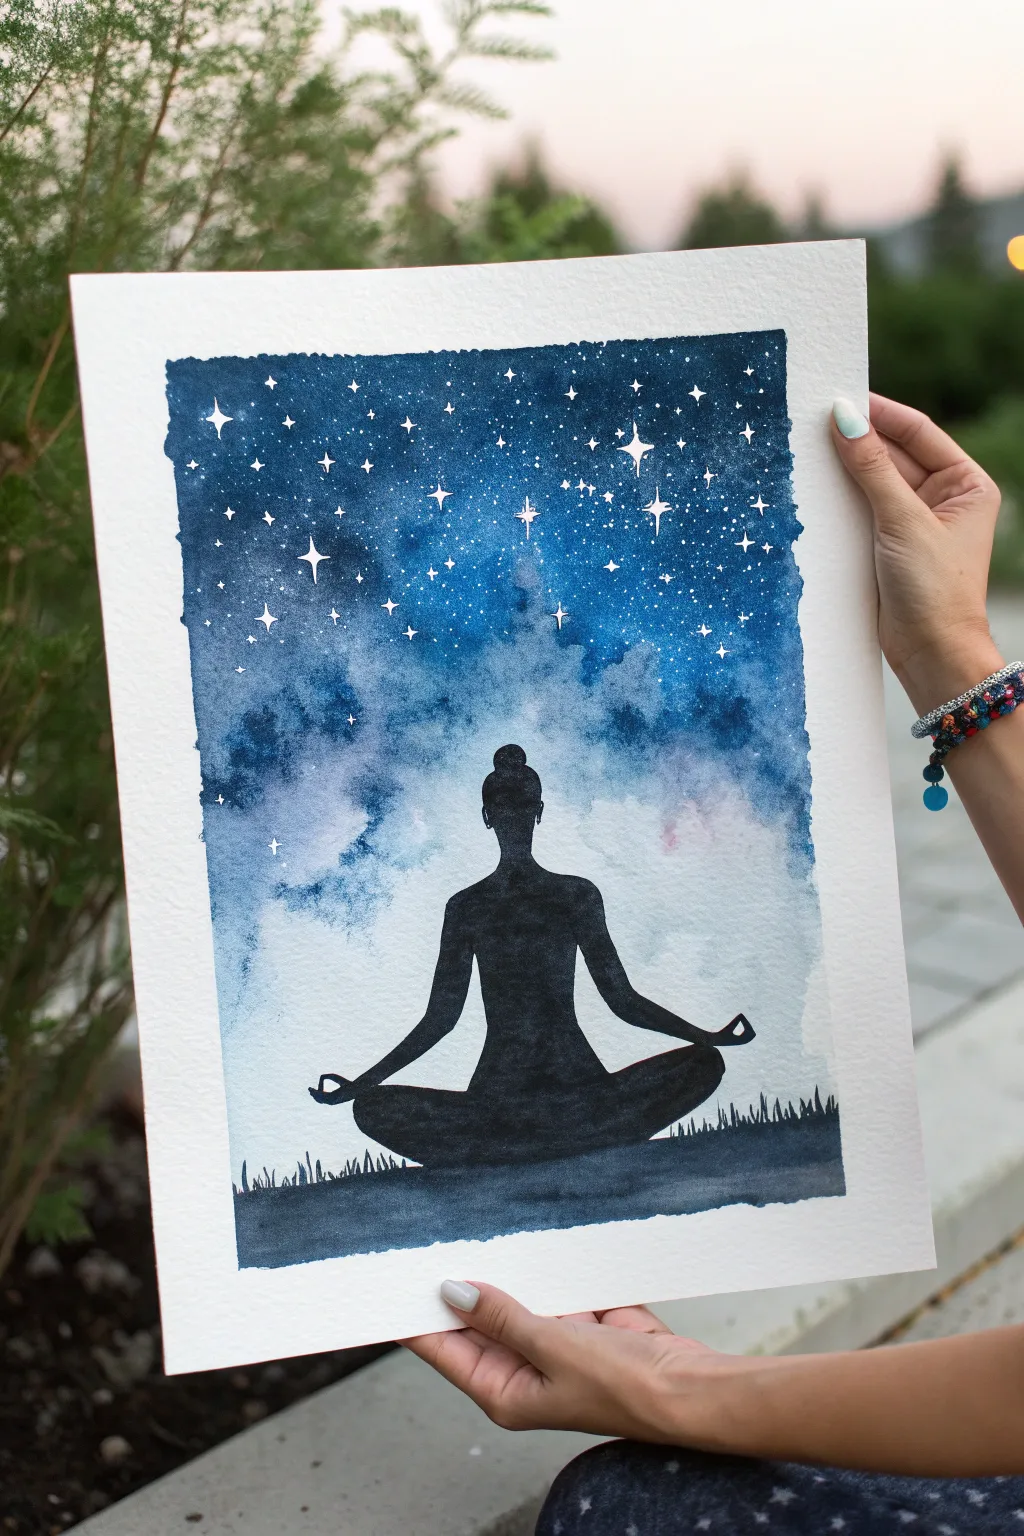
Capture the peaceful essence of meditation with this striking watercolor project featuring a yoga silhouette against a deep, star-filled galaxy. The contrast between the dark indigo sky and the sharp black foreground creates a captivating sense of depth and tranquility.
Detailed Instructions
Materials
- Cold press watercolor paper (300 gsm)
- Painter’s tape or masking tape
- Watercolor paints (Indigo, Payne’s Gray, Prussian Blue, Violet, Black)
- White gouache or white gel pen
- Round watercolor brushes (size 8 for washes, size 2 for details)
- Pencil and eraser
- Clean water containers
- Paper towels
- Salt (optional for texture)
Step 1: Preparation and Sketching
-
Secure the paper:
Tape down all four edges of your watercolor paper to a board or table to prevent buckling and create a clean white border. -
Draft the horizon:
Lightly sketch a low horizon line about one-fifth of the way up from the bottom of the page. -
Sketch the silhouette:
Draw the outline of the yoga figure in the center. Focus on the simple shapes: an oval for the head, sloping shoulders, and the triangular base of the crossed legs. Don’t worry about face details; this will be a solid silhouette. -
Masking fluid option:
If you have masking fluid, apply it carefully over the yoga figure to keep it pristine white while you paint the sky. If not, simply paint carefully around your pencil lines later.
Bleeding Lines?
If black paint bleeds into the sky, wait for it to dry completely. Then, use white gouache to touch up the edge, essentially ‘erasing’ the mistake.
Step 2: Painting the Galaxy Sky
-
Wet-on-wet technique:
Using your large round brush, apply clean water to the sky area only, avoiding the figure and the ground. The paper should be glistening but not pooling. -
Apply the darkest blues:
Start at the very top edge with your darkest pigment—Indigo or a mix of Prussian Blue and Black. Let the color flow downward. -
Transitioning colors:
As you move down the paper, switch to Prussian Blue and touches of Violet. Allow the water to blend the edges naturally. -
Creating the nebula effect:
Near the figure’s head and shoulders, lift some pigment with a thirsty (damp, clean) brush or leave areas of the paper white to create misty, cloud-like lighter patches. -
Adding texture:
While the paint is still wet, drop in concentrated dots of Payne’s Gray or Indigo into the wet corners to deepen the night sky effect. -
Let it dry completely:
This is crucial. The paper must be bone dry before moving to the next step to prevent bleeding.
Step 3: Adding the Stars
-
Splatter stars:
Mix white gouache with a tiny bit of water until it has a creamy consistency. tap a loaded brush over the sky area to create a field of distant stars. -
Detailing bright stars:
Use a fine liner brush or a white gel pen to draw larger, four-pointed distinct stars in the upper darker section of the sky. -
Constellation touches:
Add tiny clusters of dots in the lighter nebula areas to suggest depth.
Pro Star Tip
For realistic stars, vary the size of your splatter. Tap the brush harder for big stars and gently roughly the bristles for fine mist-like star dust.
Step 4: Painting the Silhouette
-
Prepare the black:
Mix a very opaque, thick black using watercolor (mix black with indigo for depth) or use black gouache for a matte finish. -
Fill the figure:
Carefully paint inside your pencil outline for the yoga figure. Keep your hand steady to ensure crisp edges against the colorful background. -
Ground the scene:
Paint the ground area below the horizon line with the same deep black mixture. -
Add grass details:
Using your smallest brush, flick tiny upward strokes along the horizon line to simulate blades of grass silhouetted against the sky. -
Final touches:
Allow everything to dry, then carefully peel away the tape at a 45-degree angle to reveal your crisp white border.
Step back and admire the calm atmosphere you’ve created with just watercolors and a simple silhouette

PENCIL GUIDE
Understanding Pencil Grades from H to B
From first sketch to finished drawing — learn pencil grades, line control, and shading techniques.
Explore the Full Guide
Water Reflection Yoga Scene
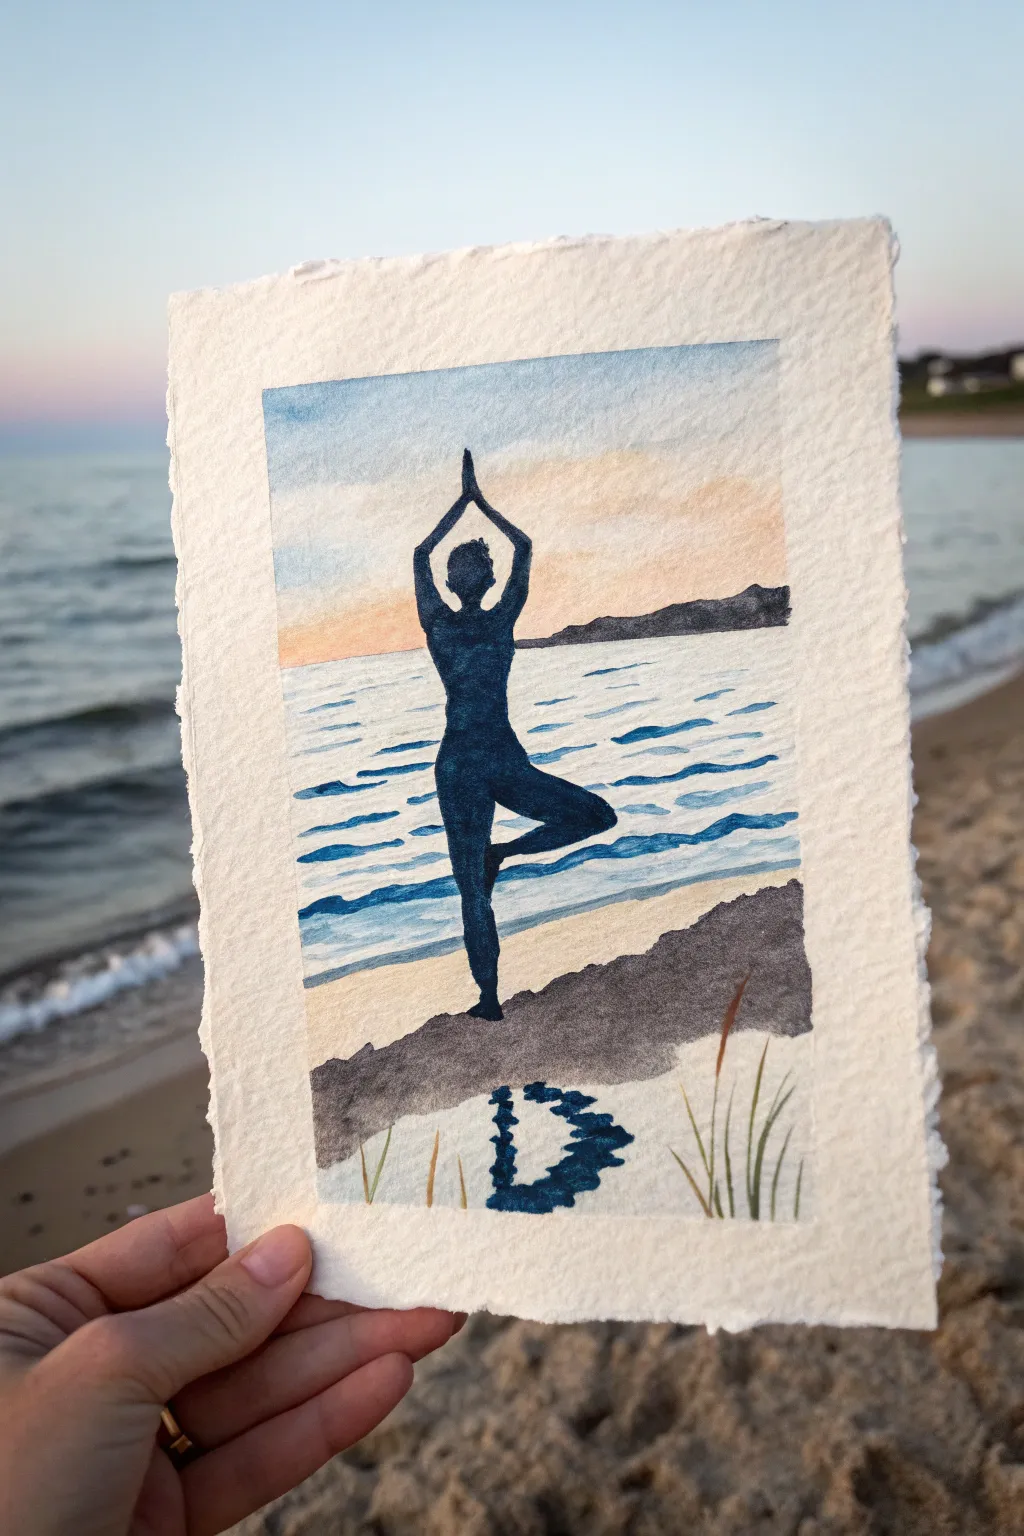
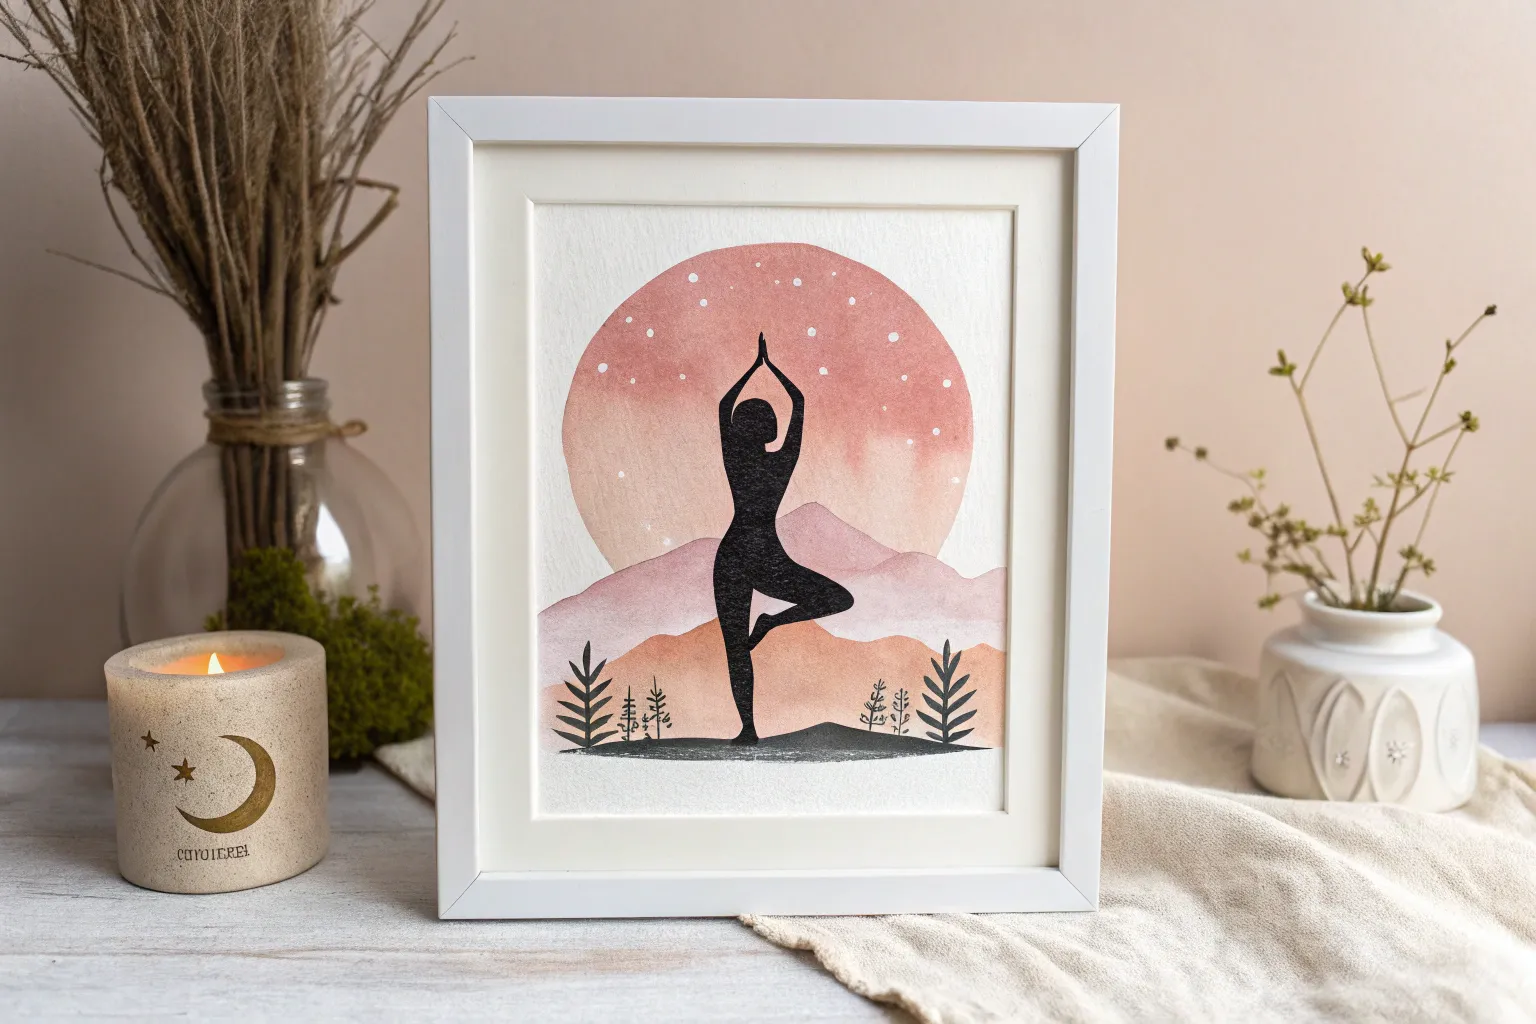
Capture the peaceful essence of a beach yoga session with this tranquil watercolor painting. Featuring a striking silhouette in Tree Pose against a soft sunset sky, this project uses simple layering techniques to create depth between the water, sand, and figure.
Step-by-Step
Materials
- Cold press watercolor paper (deckle edge preferred)
- Watercolor paints (Indigo, Burnt Sienna, Yellow Ochre, Ultramarine Blue, Alizarin Crimson)
- Round watercolor brushes (Size 2, 4, and 8)
- Masking tape or painter’s tape
- Pencil and eraser
- Jar of clean water
- Paper towels
- Palette for mixing
Step 1: Sketching and Preparation
-
Define the borders:
Begin by lightly marking a rectangular border on your paper with a pencil. Leave a generous margin around the edges to let the textured paper shine, just like in the reference photo. -
Sketch the horizon:
About one-third of the way down from the top border, draw a straight horizontal line for your horizon. Just below that, sketch a slightly uneven line for the distant shoreline. -
Outline the figure:
In the center foreground, lightly sketch the silhouette of the yoga pose. Focus on the triangular shape of the bent leg in Tree Pose and the arms meeting overhead. Don’t worry about details; the outline is all you need. -
Mark the sand line:
Draw a diagonal line sloping downward from left to right near the bottom third of the paper to separate the water from the beach.
Pro Tip: Crisp Edges
For the sharpest silhouette against the sunset, insure the background sky and water are 100% bone dry before painting the figure. This prevents the dark indigo from bleeding outward.
Step 2: Painting the Sky and Water
-
Create the sky gradient:
Wet the sky area with clean water. Starting at the top, drop in a very pale wash of Ultramarine Blue. As you move down towards the horizon, blend in a touch of diluted Alizarin Crimson or pink, transitioning into a warm Yellow Ochre near the horizon line. -
Paint the distant water:
For the water, mix a light wash of Ultramarine Blue. Paint horizontal strokes, leaving small white gaps of paper to represent light glinting on the waves. -
Deepen the waves:
While the first water layer is still damp but not soaking, mix a slightly stronger blue (Ultramarine with a touch of Indigo) and add thin, horizontal ripple lines, concentrating them closer to the foreground to show perspective. -
Paint the distant land:
Once the sky is completely dry, mix a dark grey-purple using Indigo and Burnt Sienna. Paint the distant hilly shoreline right on the horizon line.
Step 3: The Beach and Silhouette
-
Base layer for sand:
Dilute Yellow Ochre with plenty of water to create a creamy sand color. Paint the beach area, sweeping the brush diagonally to match the shoreline. -
Shadows on the sand:
While the sand is wet, drop in a mix of Burnt Sienna and a tiny bit of finish purple along the bottom edge and near where the figure stands to create texture and shadow. -
Painting the silhouette:
This is the most critical step. Mix a thick, saturated pigment of Indigo with very little water. Carefully fill in your pencil sketch of the yoga figure. Use your smallest brush (size 2) for the fingers and toes to keep edges crisp. -
Adding the shadow:
Using a slightly diluted version of your Indigo mix, paint the cast shadow beneath the figure. Imagine the light source is behind the figure, so the shadow should stretch forward onto the sand. -
Detailed grass:
In the bottom right corner, use the tip of your size 2 brush to flick upward rapidly with green-brown paint (mix Yellow Ochre and Indigo) to create a few wispy blades of beach grass. -
Final touches:
Assess the water. If it looks too flat, dry-brush a few dark blue lines (Indigo) over the waves to add contrast and movement.
Troubleshooting: Muddy Colors
If your sand color looks dirty where it meets the blue water, you likely painted them while both were wet. Let the blue water layer dry completely before painting the yellow sand next to it.
Now step back and admire the calm atmosphere you have captured on paper
Breath-Inspired Inhale/Exhale Brush Lines
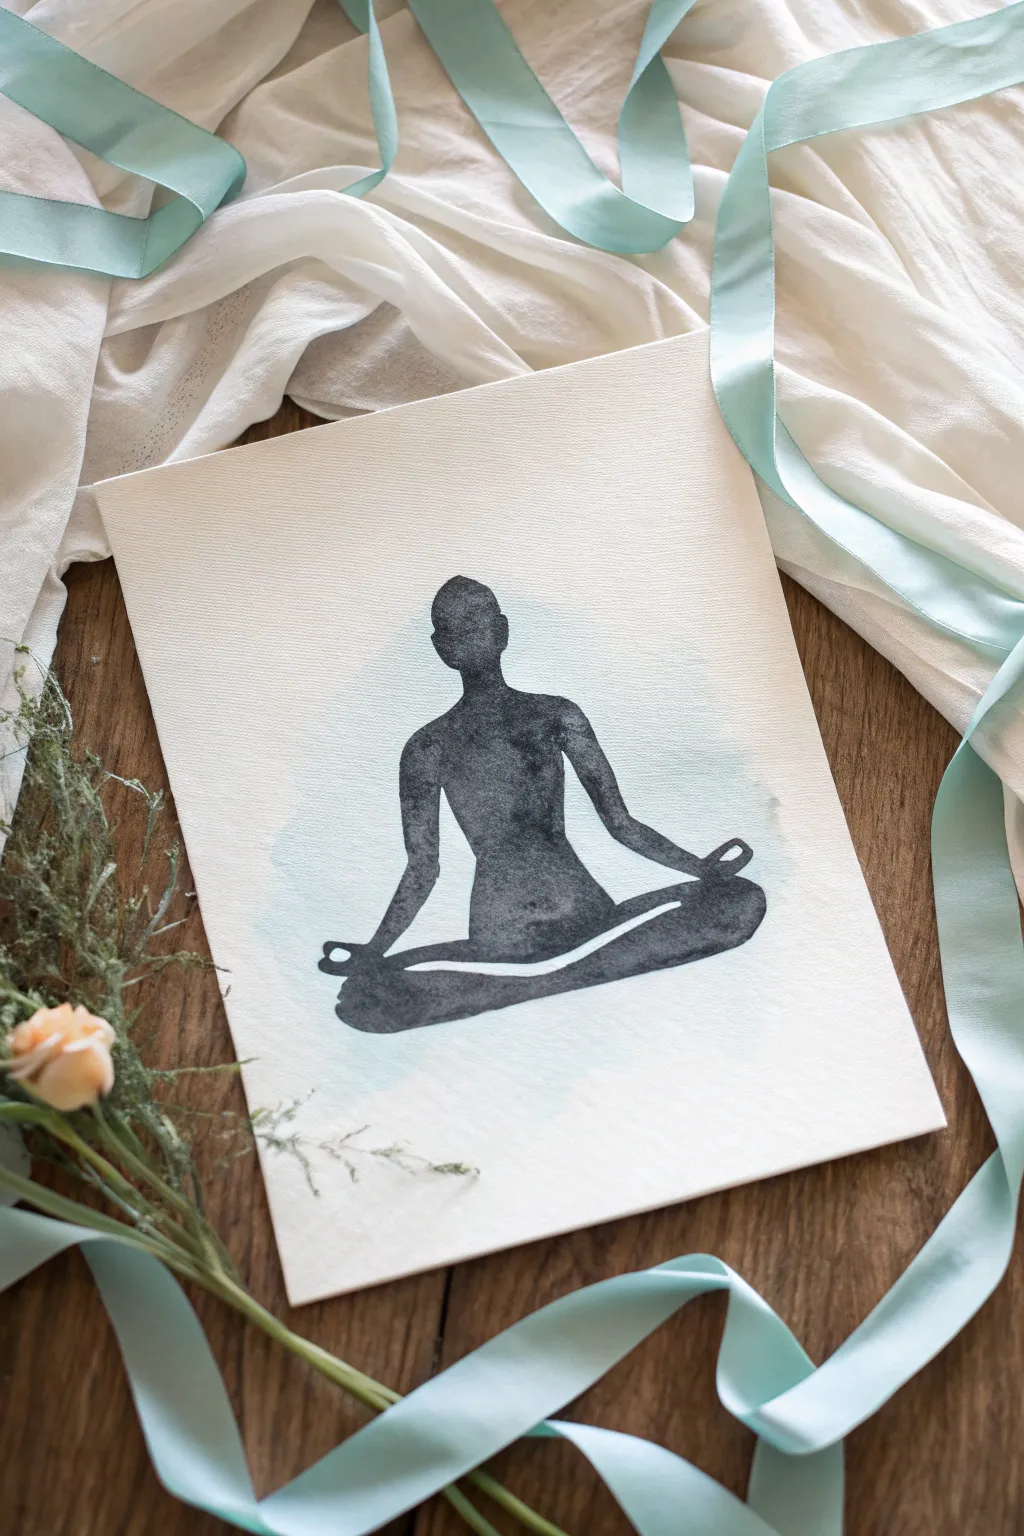
Capture the stillness of meditation with this elegant, minimalist watercolor project. Featuring a dark, textured silhouette against a subtle wash of teal, this piece embodies tranquility and makes for beautiful, centering wall art.
Step-by-Step Tutorial
Materials
- Cold press watercolor paper (A4 or slightly smaller)
- Watercolor paints: Black (or Payne’s Gray) and Teal (or Turquoise)
- Round watercolor brushes (Size 4 and Size 8)
- Pencil (HB or H)
- Eraser
- Clean water jar
- Paper towels
- Masking tape (optional)
Step 1: Preparation & Sketching
-
Prepare your workspace:
Ideally, tape down your watercolor paper to a hard board using masking tape. This prevents the paper from buckling when we apply the wet washes later. -
Lightly outline the figure:
Using your pencil, draw a simple outline of a person sitting in the lotus position. Start with an oval for the head, then curve down for the shoulders and torso. -
Refine the pose:
Sketch the arms resting on the knees. For the hands, create the Gyan Mudra shape by touching the index finger to the thumb, extending the other three fingers slightly. -
Add the legs:
Draw the crossed legs at the bottom, creating a wide, stable base for your figure. Keep your pencil lines extremely light so they won’t show through the paint later. -
Erase excess lines:
Gently clean up your sketch with an eraser until only a faint guide remains. You want just enough visibility to paint within the lines.
Pro Tip: Texture Magic
While the black silhouette is still wet, sprinkle a few grains of table salt on the torso area. It absorbs pigment as it dries, creating a stunning cosmic texture.
Step 2: Creating the Atmosphere
-
Mix the background wash:
Dilute a small amount of teal or turquoise paint with plenty of water. You want a very pale, transparent consistency for this step. -
Apply the aura:
Using your larger Size 8 brush, paint a loose, organic shape behind where the figure will sit. It doesn’t need to be perfect; a soft, cloud-like wash works best. -
Soften edges:
While the teal paint is still wet, rinse your brush and use clean water to soften the outer edges of the wash so they fade gently into the white of the paper. -
Let it dry completely:
This step is crucial. The background wash must be bone dry before you start painting the figure, or the black paint will bleed into the teal.
Level Up: Metallic Touch
Once the painting is totally dry, trace the very outer rim of the silhouette with a fine gold gel pen or metallic watercolor for a glowing, spiritual effect.
Step 3: Painting the Silhouette
-
Mix your dark tone:
Prepare a rich, dark mixture using black or Payne’s Gray. It shouldn’t be solid opaque ink; keep it watery enough to allow for some watercolor texture to show through. -
Start with the head:
Using the smaller Size 4 brush for better control, carefully fill in the head shape first. -
Flow into the shoulders:
Continue painting downwards into the neck and shoulders. I like to keep the brush loaded with paint to ensure a smooth, continuous flow without dry streaks. -
Emphasize the texture:
As you fill the torso, vary the water-to-paint ratio slightly. Adding a tiny drop of water into the wet paint on the paper creates beautiful ‘blooms’ and texture. -
Paint the arms and hands:
Carefully navigate the thinner areas of the arms and the delicate mudra hand gesture. Switch to the tip of your brush for the fingers.
Step 4: Finishing Touches
-
Fill the legs:
Fill in the crossed legs at the bottom. Since this is a larger area, you can switch back to the larger brush if you prefer. -
Leave a negative space highlight:
This is the trickiest part: leave a thin sliver of unpainted white paper along the top of the crossed leg (the one in front). This negative space defines the leg’s form within the silhouette. -
Review and refine:
Check your edges. If any part of the silhouette looks jagged, smooth it out carefully with a damp brush while the paint is still workable. -
Dry thoroughly:
Allow the painting to dry completely flat. Do not remove the tape until the paper is no longer cool to the touch. -
Remove tape:
Peel the tape away slowly at a 45-degree angle to reveal your crisp, clean paper borders.
This peaceful artwork serves as a gentle visual reminder to pause and breathe deeply whenever you view it


Butterflies Around a Meditative Figure
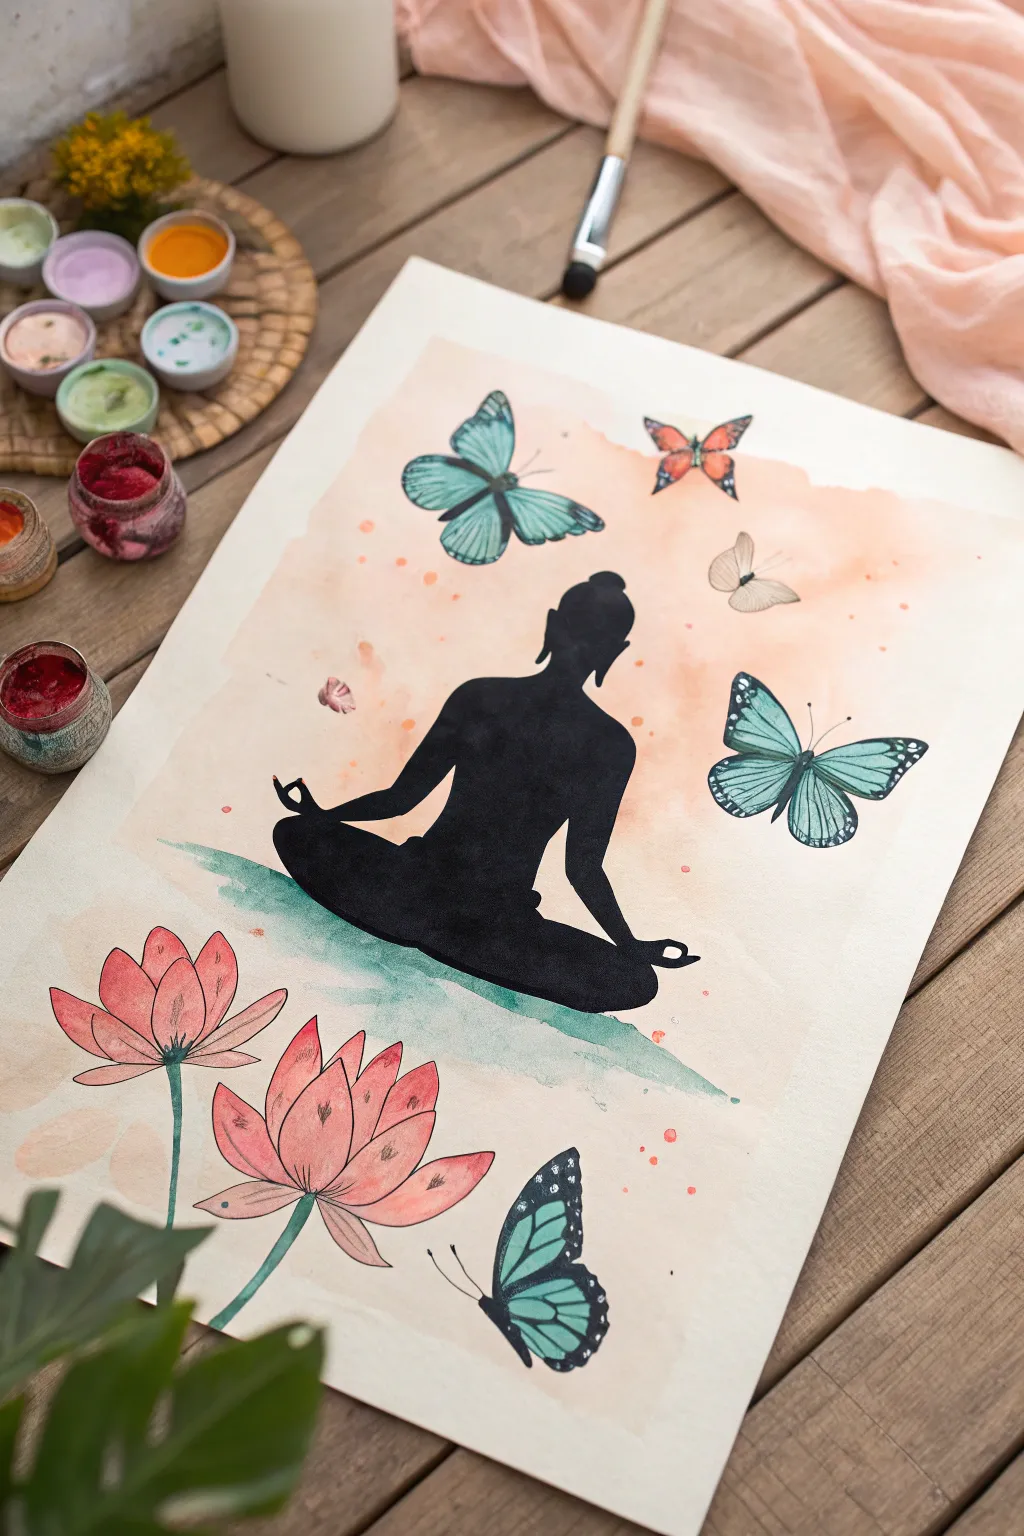
This peaceful composition combines the stark contrast of a black silhouette with the delicate, airy nature of watercolor butterflies and lotus flowers. The soft peach background creates a warm, inviting glow that perfectly complements the meditative theme.
Detailed Instructions
Materials
- Cold-pressed watercolor paper (140lb/300gsm)
- Watercolor paints (Peach, teal/turquoise, pink, light orange, green)
- Black waterproof ink or black gouache
- Synthetic round brushes (sizes 2, 6, and 8)
- Pencil and kneaded eraser
- Masking fluid (optional)
- Palette for mixing
- Two jars of water
- Paper towels
Step 1: Planning & Sketching
-
Prepare your paper:
Tape your watercolor paper down to a flat board using masking tape. This prevents the paper from buckling when you apply the washes later. -
Outline the silhouette:
Lightly sketch the central figure in a lotus pose using a pencil. Focus on capturing the curve of the shoulders and the distinct bun hairstyle. Don’t press too hard, as you want the lines to be barely visible. -
Position the elements:
Sketch the placement of the oversized lotus flowers at the bottom left and the butterflies floating around the figure. Vary the sizes and angles of the butterflies to create a sense of movement.
Uneven wash?
If your peach background dries with hard edges you didn’t want, soften them with a clean, damp brush while the paint is still slightly tacky to blend them out.
Step 2: The Background Wash
-
Mix the background color:
Create a very watery, diluted mix of peach or light salmon on your palette. You want this to be subtle, acting as an atmosphere rather than a solid wall of color. -
Apply the wash:
Using your largest round brush, paint a loose, organic shape around the central figure area. It doesn’t need to fill the whole page to the edges; leaving white space creates a nice vignette. -
Add texture:
While the wash is still wet, splatter a few drops of a slightly more concentrated peach or light orange into the wet areas to create soft blooms and texture. -
Ground the figure:
Mix a watery teal green and swipe a loose, fading stroke horizontally beneath where the figure will sit. This creates a shadow and grounds the silhouette so it isn’t floating.
Level Up: Metallic Aura
Use gold watercolor paint or gold leaf to add a halo around the figure’s head or to gild the edges of the butterfly wings for a spiritual, glowing effect.
Step 3: Painting the Silhouette
-
Fill the silhouette:
Once the background is completely dry, switch to your black ink or black gouache. Use a size 6 brush to carefully fill in the meditative figure. -
Refine the edges:
Switch to a smaller size 2 brush to get crisp edges around the fingers in the mudra position and the curves of the neck and ears. Solid, opaque coverage is key here.
Step 4: Botanicals & Butterflies
-
Paint the lotus petals:
Mix a soft pink with plenty of water. Paint each lotus petal individually, starting from the tip and pulling the color down toward the base. -
Add petal details:
While the pink is still slightly damp, drop a tiny bit of darker reddish-pink at the tips or veins of the petals to add dimension. -
Paint the butterfly wings:
For the teal butterflies, use a vibrant turquoise paint. Fill in the wing shapes, but leave the very edges strictly for the black outline later. For the orange butterfly, use a soft coral mix. -
Create the white butterfly:
For the pale butterfly near the head, use a very watery grey or cream wash, keeping it translucent to look ethereal. -
Detail the lotus stems:
Use a deep green to paint the long, slender stems of the lotus flowers, connecting them to the bottom edge of the paper.
Step 5: Final Inking Details
-
Outline the wings:
Once the wing colors are bone dry, use a fine brush with black ink (or a fineliner pen) to draw the veins and borders of the butterfly wings. -
Add butterfly spots:
Carefully add the characteristic white spots on the black borders of the teal butterflies. You can use white gouache or a white gel pen for this sharp detail. -
Define the lotus:
Use a very fine line to sketch the veins on the lotus petals and outline the stems if you want a more illustrative look, or leave them soft for a painterly effect. -
Final touches:
Add tiny antennae to the butterflies and erase any visible pencil lines around the scene once everything is 100% dry.
Now you have a tranquil piece of art that radiates calm and mindfulness
Pose Made of Leaves and Vines
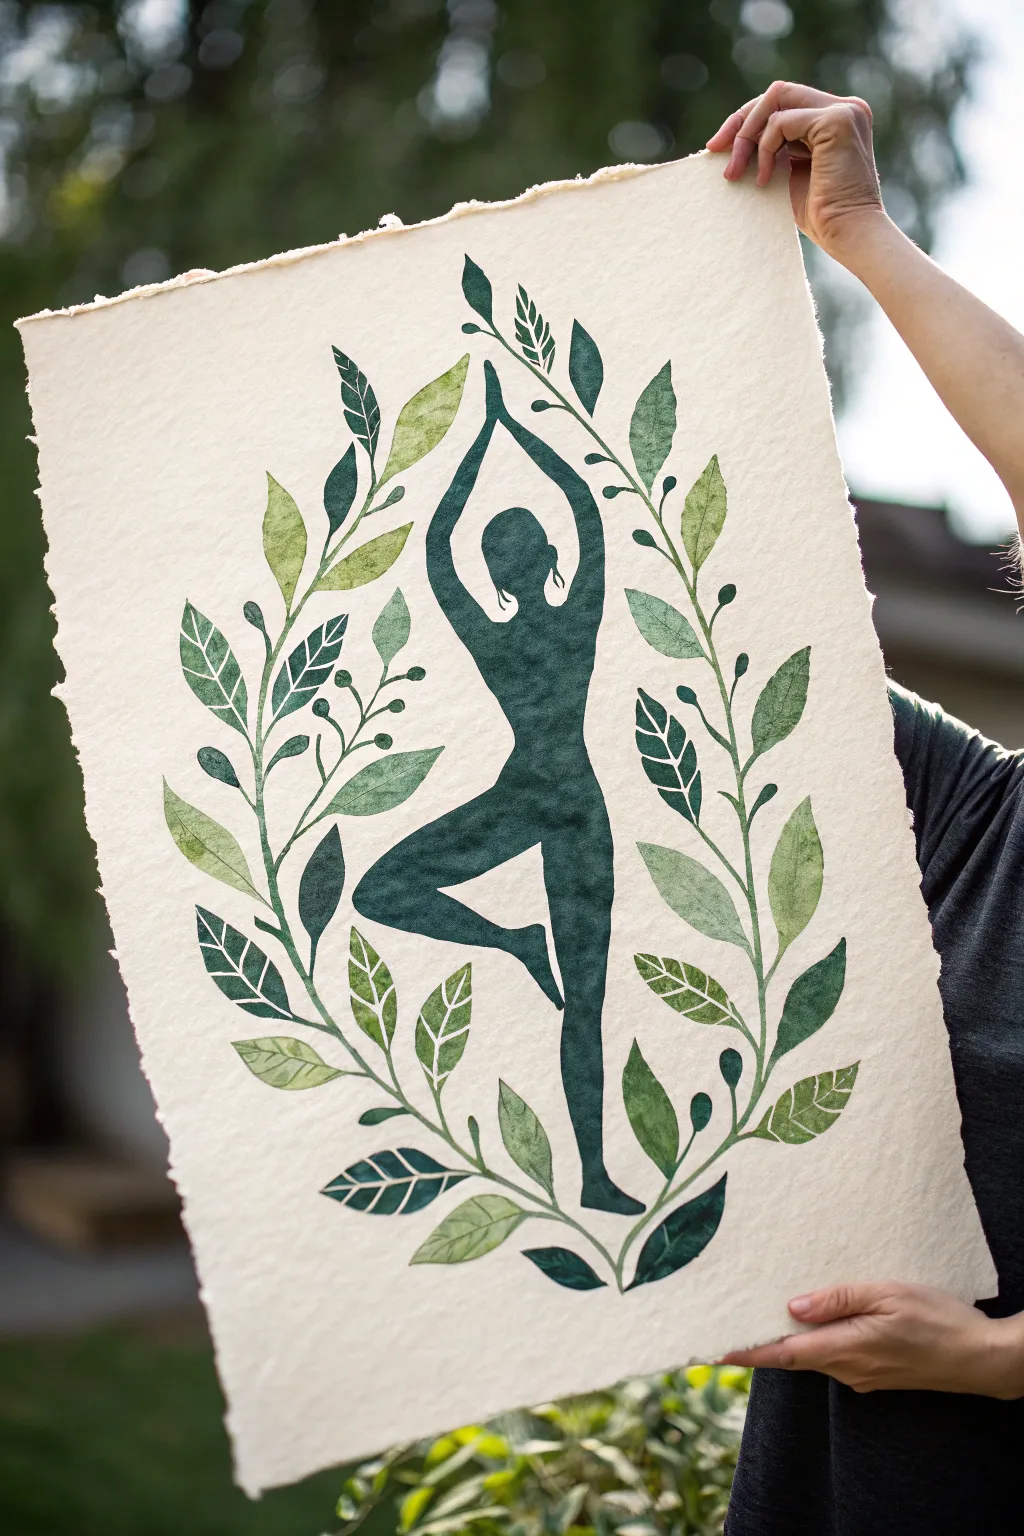
Celebrate the harmony of nature and movement with this botanical painting featuring a central yoga silhouette framed by a lush laurel of leaves. The organic texture of handmade paper combined with deep greens creates a piece that feels both grounded and serene.
Step-by-Step Guide
Materials
- A3 sized handmade or watercolor paper with deckled edges
- Watercolor paints (Sap Green, Hooker’s Green, Indigo, Olive Green)
- Pencil (HB or H)
- Kneaded eraser
- Round watercolor brushes (Size 2, 4, and 8)
- Masking fluid (optional)
- Palette for mixing
- Jar of water & paper towels
Step 1: Planning and Sketching
-
Paper selection:
Begin by selecting a high-quality sheet of handmade paper. The rough texture and uneven, deckled edges are crucial for achieving the organic look shown in the reference. -
Center layout:
Lightly mark the vertical center of your paper. Sketch the central figure in ‘Tree Pose’ (Vrksasana). Focus on the fluidity of the form—arms raised and meeting at the top, one leg bent and resting on the inner thigh of the standing leg. -
Vine framework:
Draw two primary curved lines acting as stems that start at the bottom center (under the foot) and curve upwards to envelop the figure, almost touching at the top. This creates the oval boundary for your composition. -
Leaf placement:
Sketch individual leaves growing from the main stems. Vary their angles and sizes—some pointing inward towards the yogi, others outward. Add diversity by including small berries or buds on thin stems interspersed between the larger leaves. -
Refine the sketch:
Go over your pencil lines with a kneaded eraser, lifting most of the graphite so only a faint ‘ghost’ image remains. This prevents dark pencil marks from showing through the translucent watercolor later.
Bleeding edges?
Handmade paper is thirsty! If paint bleeds too much, the sizing might be weak. Use less water, or apply a clear watercolor ground to the paper surface before painting.
Step 2: Painting the Silhouette
-
Mix the body color:
Create a deep, rich teal-green for the central figure. I like to mix Hooker’s Green with a touch of Indigo and Payne’s Grey to get that silhouette-darkness without it being purely black. -
Outline and fill:
Using a size 4 brush, carefully outline the head and arms of the figure first. Work downwards to fill the body. Keep the paint relatively saturated so the texture of the paper creates a natural, mottled effect as it dries. -
Edge control:
Ensure the edges of the silhouette are crisp. If the paper is very textured, you might need to dab the paint gently into the recesses of the paper grain to get a solid shape.
Gilded Touch
Once fully dry, use gold leaf or metallic watercolor paint to highlight the veins on the darkest leaves or to add a golden aura around the yogi’s head.
Step 3: Painting the Botanical Border
-
Prepare green variations:
On your palette, prepare three distinct puddles of green: a light Olive Green for young leaves, a standard Sap Green for mid-tones, and your dark silhouette mixture for deep accents. -
First leaf layer:
Start with the lighter Olive Green. Paint scattered leaves around the vine, varying the saturation by adding more or less water. Aim for a semi-transparent look where the paper grain shows through. -
Stem work:
Using a size 2 brush and a mid-tone green, paint the main curving stems connecting the leaves. Use long, fluid strokes to avoid jerky lines. -
Adding dimension:
Switch to your darker green mix. Paint leaves that are ‘behind’ or adjacent to the lighter ones. This contrast between the pale, watery leaves and the dark, saturated ones gives the wreath depth. -
Leaf detailing:
For the two-tone leaves seen in the reference, paint half of a leaf with water first, drop in pigment, and then paint the other half with a slightly darker shade, leaving a tiny hairline gap of white paper in the middle as a vein. -
Berries and buds:
Add the small rounded berries or buds using the Indigo or darkest green mix. These small dark dots act as visual punctuation marks around the composition.
Step 4: Finishing Touches
-
Review contrast:
Step back and look at the balance. If the silhouette feels too light compared to the dark leaves, add a second glaze of the dark teal-green over the body once the first layer is 100% dry. -
Final clean up:
Check for any stray pencil marks that are visible and gently erase them. Assessments of the white space are key; ensure the gap between the figure and leaves feels breathable and balanced.
Allow the painting to dry flat overnight to prevent the heavy paper from buckling before framing your peaceful creation
Negative Space Yoga in a Bold Color Block
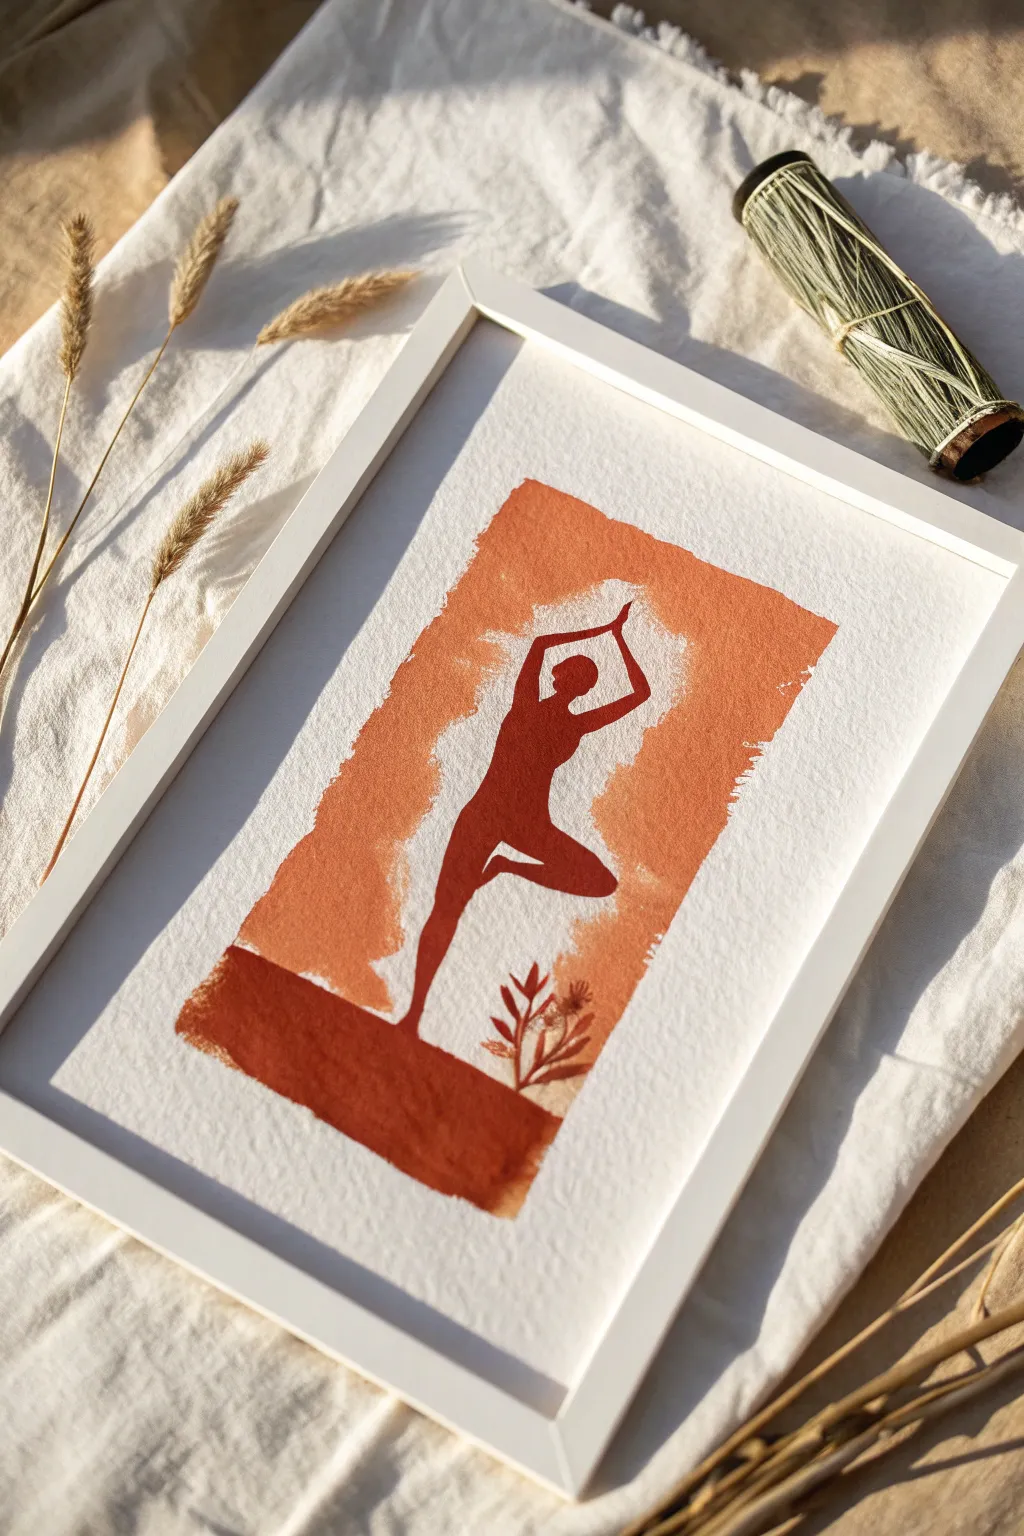
Capture the serenity of the Tree Pose with this striking negative space project that plays with warm, earthy tones. By using simple masking techniques, you can achieve a crisp, professional silhouette surrounded by a beautifully textured, rustic color block background.
Detailed Instructions
Materials
- High-quality watercolor paper (cold press creates nice texture)
- Painter’s tape or masking tape
- Liquid masking fluid (drawing gum)
- Small old paint brush (for masking fluid)
- Pencil and eraser
- Orange-brown watercolor or gouache paint (terracotta shade)
- Dark red-brown watercolor or gouache paint (burnt sienna/umber mix)
- Medium flat wash brush
- Small detail brush (optional for touch-ups)
- Paper towels
- White frame for finishing
Step 1: Preparation and Sketching
-
Secure the paper:
Tape your watercolor paper down to a hard board or table on all four sides. This prevents buckling when wet but also creates that clean white border you see in the final piece. -
Sketch the pose:
Lightly sketch the outline of a figure in ‘Tree Pose’ (Vrksasana). Focus on the silhouette rather than internal details. The figure should be centered, with arms raised above the head in a prayer position and one leg bent at the knee. -
Add the botanical detail:
Near the standing foot, lightly sketch a small botanical sprig or plant shape. This adds an organic touch to the base of the composition. -
Define the color block area:
Lightly mark a rectangular boundary around your figure. This doesn’t need to be ruled; a rough, painterly edge is part of the charm, but having a general guide helps keep the composition balanced.
Pro Tip: Masking Fluid Saver
Don’t shake your masking fluid bottle before use, as bubbles will create tiny holes in your mask where paint can seep through. Instead, stir it gently with a stick.
Step 2: Masking
-
Protect the silhouette:
Dip your old brush into a bit of dish soap before dipping it into the masking fluid—this helps clean it later. Carefully fill in the entire yoga figure silhouette with the masking fluid. -
Mask the plant:
Apply the masking fluid to the small plant sketch at the bottom as well. Be precise with your edges, as this determines the sharpness of your final white space. -
Let it cure:
Allow the masking fluid to dry completely. It should feel transparent and rubbery to the touch. Do not rush this step, or you risk smearing the mask when painting.
Step 3: Painting the Color Block
-
Mix the terracotta wash:
Prepare a watery mix of your orange-brown paint. You want a consistency that flows easily but still holds rich pigment. -
Paint the upper block:
Using the flat wash brush, paint the upper rectangular area around the masked figure. Don’t worry about painting over the masked figure—go right over it! Leave the edges rough and uneven for that textured look. -
Create the ground layer:
While the top section is still slightly damp or just dry, mix your darker reddish-brown shade. Paint a horizontal block across the bottom, slightly overlapping the orange section and covering the feet of the figure. -
Dry thoroughly:
Let the paint dry completely. The paper must be bone dry before you attempt to remove the mask.
Level Up: Texture Play
Sprinkle a pinch of coarse salt onto the wet terracotta background paint. Once dry, brush the salt off to create specialized bloom textures that look like aged stone.
Step 4: The Reveal
-
Remove the mask:
Gently rub your finger or a rubber cement pickup tool over the masked areas to peel away the rubbery fluid. Peel slowly to avoid tearing the paper surface. -
Erase guidelines:
Once the mask is gone, gently erase any visible pencil lines that remain in the white silhouette areas. -
Add the red shadow:
This is a crucial detail: to give the figure dimension against the white paper, fill in the white silhouette with a dark reddish-brown paint, similar to the ground color. Wait, actually, look closely at the reference—the figure is painted *inside* the negative space with a solid dark color. -
Correction: Filling the Silhouette:
My mistake in the previous logic! The reference shows a dark silhouette against a light background. Let’s adjust: carefully paint the *inside* of the revealed white figure with your dark brownish-red paint. Use a steady hand and a small brush. -
Paint the plant details:
Using the same dark red-brown color and a fine liner brush, paint delicate leaves and stems over the white space you preserved at the bottom, connecting it to the dark ground. -
Fill the ground block:
Ensure the bottom block of dark paint is solid and opaque, anchoring the figure. It should look like a sturdy platform.
Step 5: Finishing Touches
-
Review edges:
Check the edges of your painted rectangle. If you want them rougher (deckled look), you can dry-brush a little more paint outward. -
Remove tape:
Peel off the border tape slowly, pulling it away from the painting at a 45-degree angle to ensure a crisp white margin. -
Frame it:
Place your dried artwork into a clean white frame to echo the white negative space within the painting.
Hang your new artwork in your practice space to inspire balance and calm each day
Abstract Flow Painting Around a Moving Pose
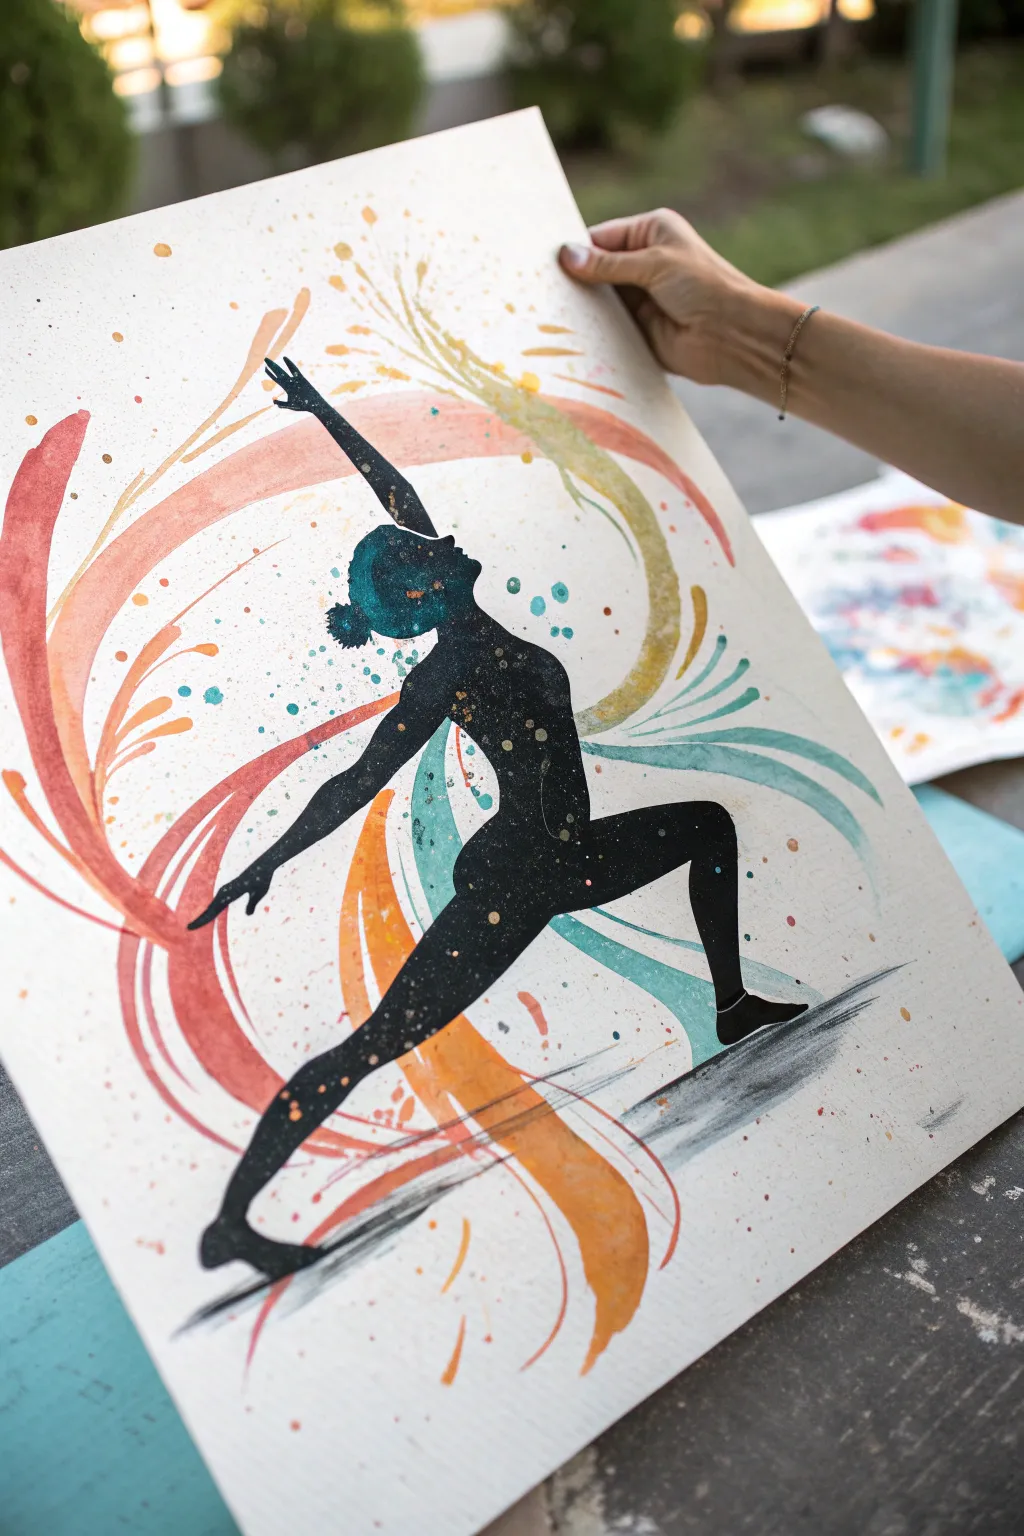
Capture the energy of movement with this striking mixed-media piece that combines a stark black silhouette with vibrant, swirling watercolor strokes. The juxtaposition of the solid figure against the loose, flowing background symbolizes the balance between strength and flexibility inherent in yoga practice.
Step-by-Step Tutorial
Materials
- High-quality watercolor paper (cold press, 300gsm)
- Black acrylic paint or black gouache (opaque)
- Watercolor paints (shades of coral, orange, teal, and gold)
- Round watercolor brushes (sizes 6 and 10)
- Fine detail brush (size 0 or 1)
- Pencil and eraser
- Masking fluid (optional, but helpful)
- Palette for mixing
- Water cups and paper towels
- Old toothbrush (for splatters)
Step 1: Sketching the Asana
-
Plan your composition:
Visualize where you want your figure to stand. The pose shown here is a variation of a high lunge or Warrior pose with arms extended upwards. Place the figure slightly off-center to allow room for the swirling energy lines. -
Draft the skeleton:
Using a light pencil touch, sketch a simple stick figure to get the proportions right. Focus on the long line from the back foot through the spine to the fingertips. -
Flesh out the silhouette:
Draw the outline of the body over your stick figure. Pay attention to the curve of the back, the bend of the knee, and the tilt of the head. Don’t worry about facial features or clothing details, as this will be a solid silhouette. -
Refine the edges:
Clean up your sketch lines. The outline needs to be crisp because it will separate the black interior from the colorful exterior.
Step 2: Painting the Abstract Background
-
Mix your palette:
Prepare watery pools of your watercolor paints. You’ll want a warm gradient (corals, reds, oranges) and a cool accent color (teal or turquoise). Keep the colors distinct on your palette. -
Start the main swoop:
Load your larger round brush with a coral or red hue. Starting from the bottom left, paint a broad, sweeping curve that moves upward and behind the figure’s back leg. Let the brush vary in pressure to create thick and thin sections. -
Add secondary swirls:
While the first stroke is still damp, pick up an orange or yellow tone. Paint a parallel swirl that intertwines with the first one, allowing the colors to bleed slightly where they touch. -
Introduce the cool tone:
Switch to your teal or turquoise paint. Add strokes that emanate from the front of the figure (near the chest and front leg), creating a visual counter-balance to the warm colors. These strokes represent breath and energy radiating outward. -
Create movement lines:
Use the tip of your brush to add thinner, more precise lines that follow the direction of the main swirls. These act as ‘speed lines’ to enhance the feeling of motion. -
Add the splatter effect:
Here I prefer to cover the silhouette area loosely with a scrap paper to protect it. Dip an old toothbrush or a loaded paintbrush into your paint, then flick the bristles to create dynamic splatters around the swirls. Use both warm and cool colors for this. -
Let it dry completely:
This is crucial. The background needs to be bone-dry before you add the black silhouette to prevent the black paint from bleeding into your beautiful swirls.
Bleeding Lines?
If black paint bleeds into the background, the paper was too wet. Wait for it to dry, then use white gouache to tidy the edge before repainting the black line.
Step 3: Filling the Silhouette
-
Outline with black:
Using your fine detail brush and opaque black acrylic or gouache, carefully trace the pencil outline of your yoga figure. Keep your hand steady to create a smooth edge. -
Fill in the body:
Switch to a slightly larger brush to fill in the rest of the body shape with solid black. Ensure the coverage is opaque; you may need a second coat if using watercolor, which is why acrylic is often easier here. -
Ground the figure:
paint a few loose, horizontal strokes of diluted black or grey under the feet. This creates a shadow and prevents the figure from looking like it is floating in mid-air. -
Add the ‘galaxy’ texture (Optional):
If you want the stardust look seen in the inspiration piece, mix a tiny amount of teal or white gouache. Flick just a tiny bit of this onto the *black* body while it’s dry, or dab it gently with a sponge to create a subtle texture inside the silhouette. -
Final touches:
Once everything is dry, erase any visible pencil marks near the edges. Review the background and add a few final dots of gold or bright orange if the composition needs more sparkle.
Pro Tip: Masking
For super crisp edges, apply masking fluid over your pencil sketch of the figure *before* painting the background swirls. Peel it off later to reveal clean white paper to paint black.
Step back and admire the energetic balance you’ve created on the page
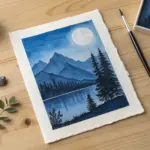
Double Exposure Pose With Mountain Landscape
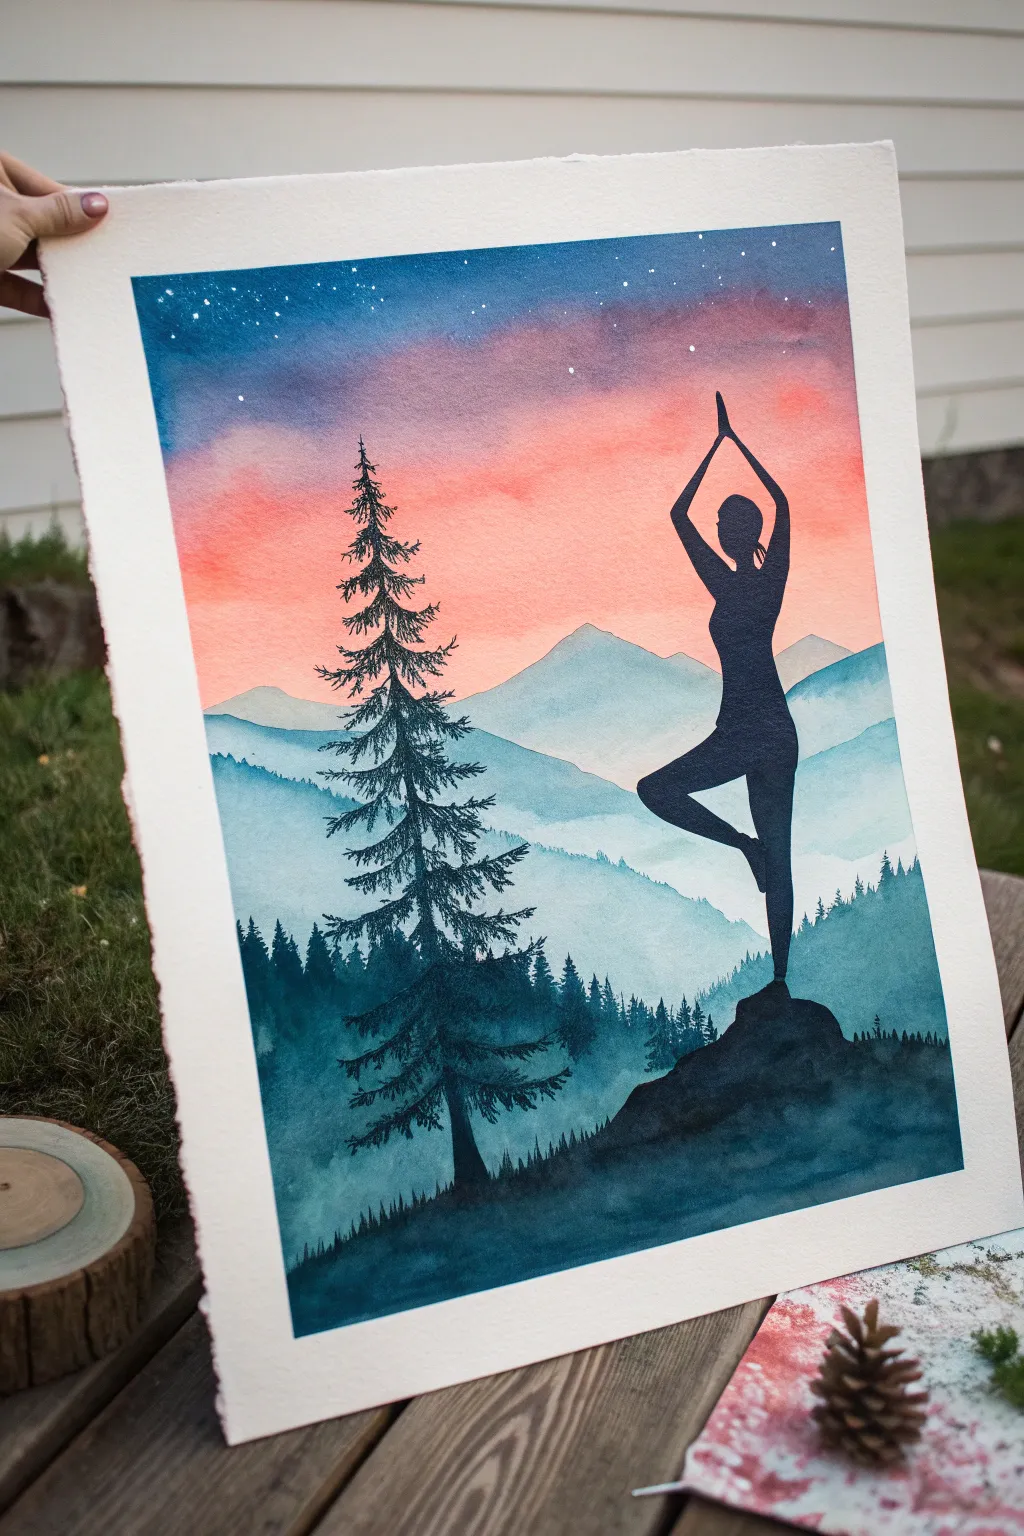
Merge the serenity of yoga with the grandeur of nature in this breathtaking watercolor landscape. The vibrant sunset gradient creates a perfect backdrop for the dual silhouettes of a grounding pine and a yogi finding balance in Tree Pose.
Detailed Instructions
Materials
- Cold press watercolor paper (minimum 140lb)
- Painter’s tape or masking tape
- Watercolor paints (Indigo, Phthalo Blue, Alizarin Crimson, Cadmium Orange/Yellow)
- White gouache or white gel pen
- Round brushes (sizes 4, 8, and 12)
- Fine liner brush (size 0 or 00)
- Pencil and eraser
- Jars of clean water
Step 1: Preparation & Sky Wash
-
Secure the paper:
Tape down all four edges of your watercolor paper to a board or table. This prevents buckling and creates a crisp white border later. -
Sketch the layout:
Lightly sketch the horizon line for the mountains and the rough placement of the pine tree on the left. Draw the outline of the yoga figure standing on a rock on the right side. Keep lines faint so they don’t show through the lighter sky colors. -
Wet the sky area:
Using a large clean brush, apply clean water to the upper two-thirds of the paper, stopping just where the first mountain range begins. -
Paint the night sky:
Start with a deep Indigo or dark blue at the very top edge while the paper is wet, letting it bleed downwards. -
Create the gradient:
Rinse your brush and pick up a purple or violet mix. Blend this into the bottom of the blue band, smoothing the transition. -
Add sunset warmth:
Move lower into a pinkish-red (Alizarin Crimson) and finally into a soft orange or peach near the horizon line. I like to tilt the board slightly to help the colors merge naturally. -
Let it dry complete:
Allow this layer to dry completely before touching the stars or mountains. Use a hairdryer on low heat if you’re impatient.
Step 2: Misty Mountains
-
First mountain layer:
Mix a watery, pale blue-grey. Paint the furthest mountain range outline right against the sunset sky. Drag the color downwards, fading it out with clear water to create mist. -
Second mountain layer:
Once the previous layer is dry, mix a slightly darker, more saturated blue. Paint the next range of mountains slightly lower, overlapping the first. -
Continue the layers:
Repeat this process for 2-3 more layers, making each mountain range progressively darker and more teal-green as you move toward the foreground bottom. -
Add distant texture:
For the closer mountain layers, use the tip of your brush to tap in tiny vertical strokes along the ridge-lines, suggesting distant pine forests.
Uneven Gradients?
If your sky stripes don’t blend, re-wet the entire sky area gently with a large soft brush and tilt the paper back and forth to encourage the pigments to mix.
Step 3: Silhouettes & Stars
-
Paint the foreground rock:
Mix a very concentrated Indigo or Payne’s Grey (almost black). Paint the solid silhouette of the rocky outcrop at the bottom right where the figure stands. -
Fill the yoga figure:
Using a smaller round brush (size 4), carefully fill in the yoga silhouette with the same dark mixture. Ensure the edges are sharp, highlighting the shapes of the arms and leg. -
Paint the pine tree trunk:
Switch to a liner or small round brush to draw the central trunk of the large pine tree on the left. -
Add pine branches:
Use a stippling motion or small, jagged strokes to create the needle texture on the branches. Start narrow at the top and get wider and denser near the base. -
Refine the foreground:
Connect the tree base and the rock with a dark, grassy foreground layer at the very bottom of the paper. Add tiny vertical flicks for grass blades. -
Add stars:
Once everything is bone dry, create stars. You can flick white gouache from a stiff brush for a random effect, or use a white gel pen to dot precise stars into the dark blue section of the sky. -
The reveal:
Wait for final drying, then slowly peel off the masking tape at a 45-degree angle to reveal your clean edges.
Crisp Silhouettes
For the sharpest yoga pose lines, wait until the background is 100% dry. Use a synthetic brush with a good point, not a soft natural hair brush, for better control.
Now you have a tranquil piece of art that captures the balance between human movement and the natural world


Have a question or want to share your own experience? I'd love to hear from you in the comments below!