If you’ve got a bed frame that feels a little tired, paint can turn it into the main character of your whole bedroom. I’m sharing my favorite painted bed frame ideas—from classic, cozy upgrades to artsy statement looks you can totally pull off at home.
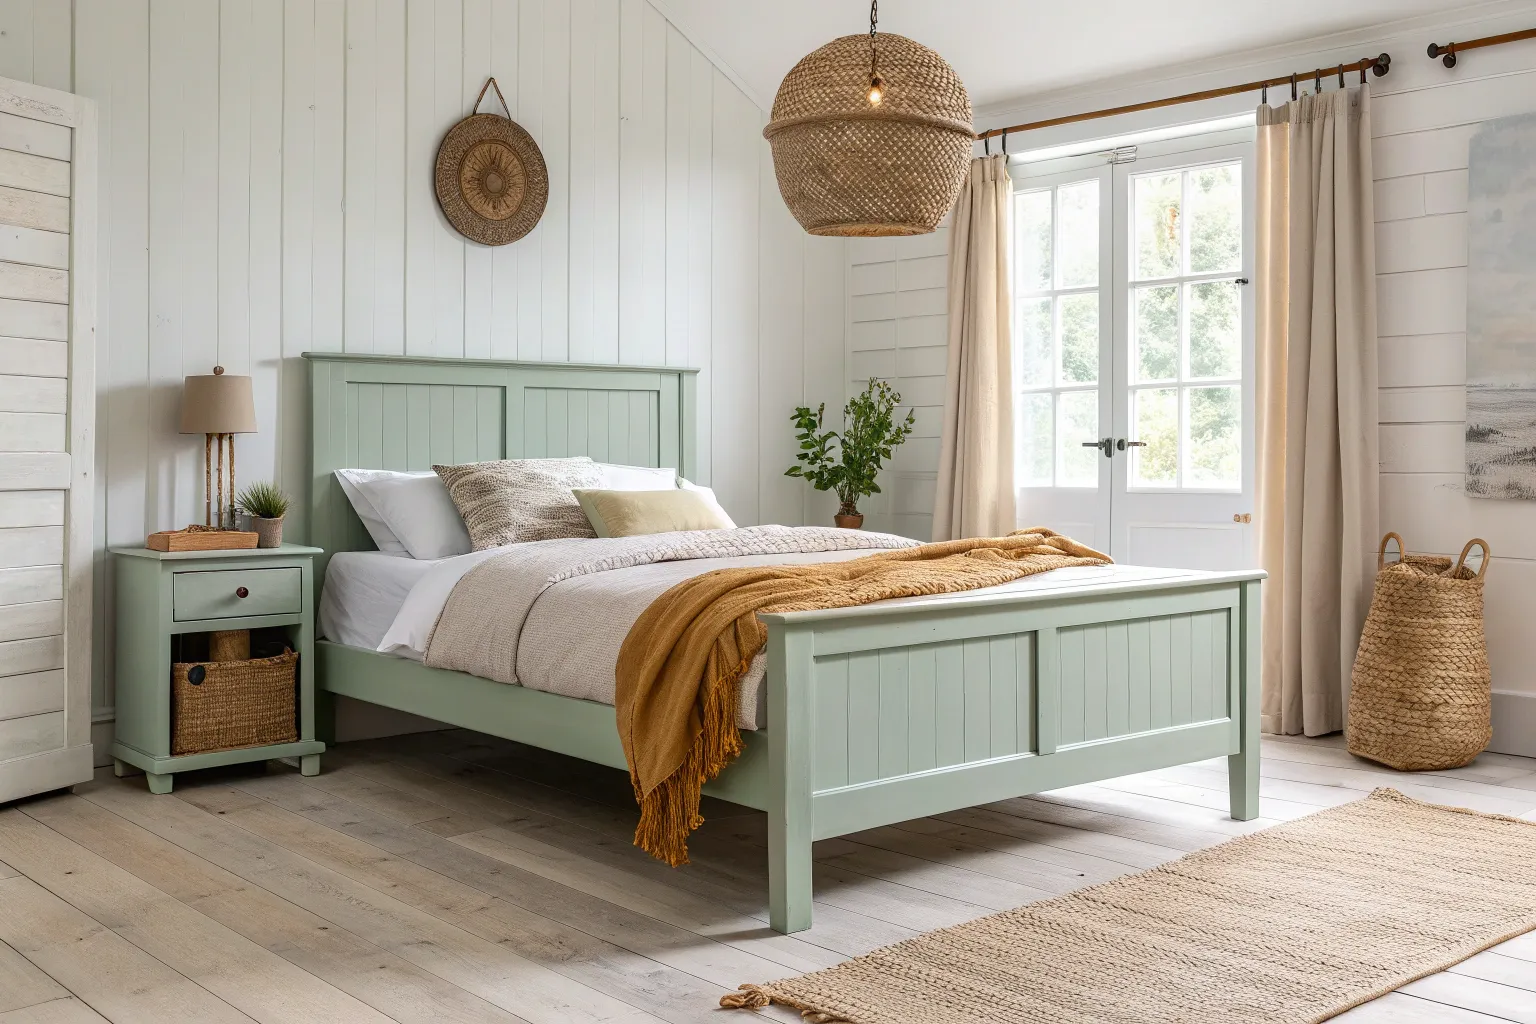
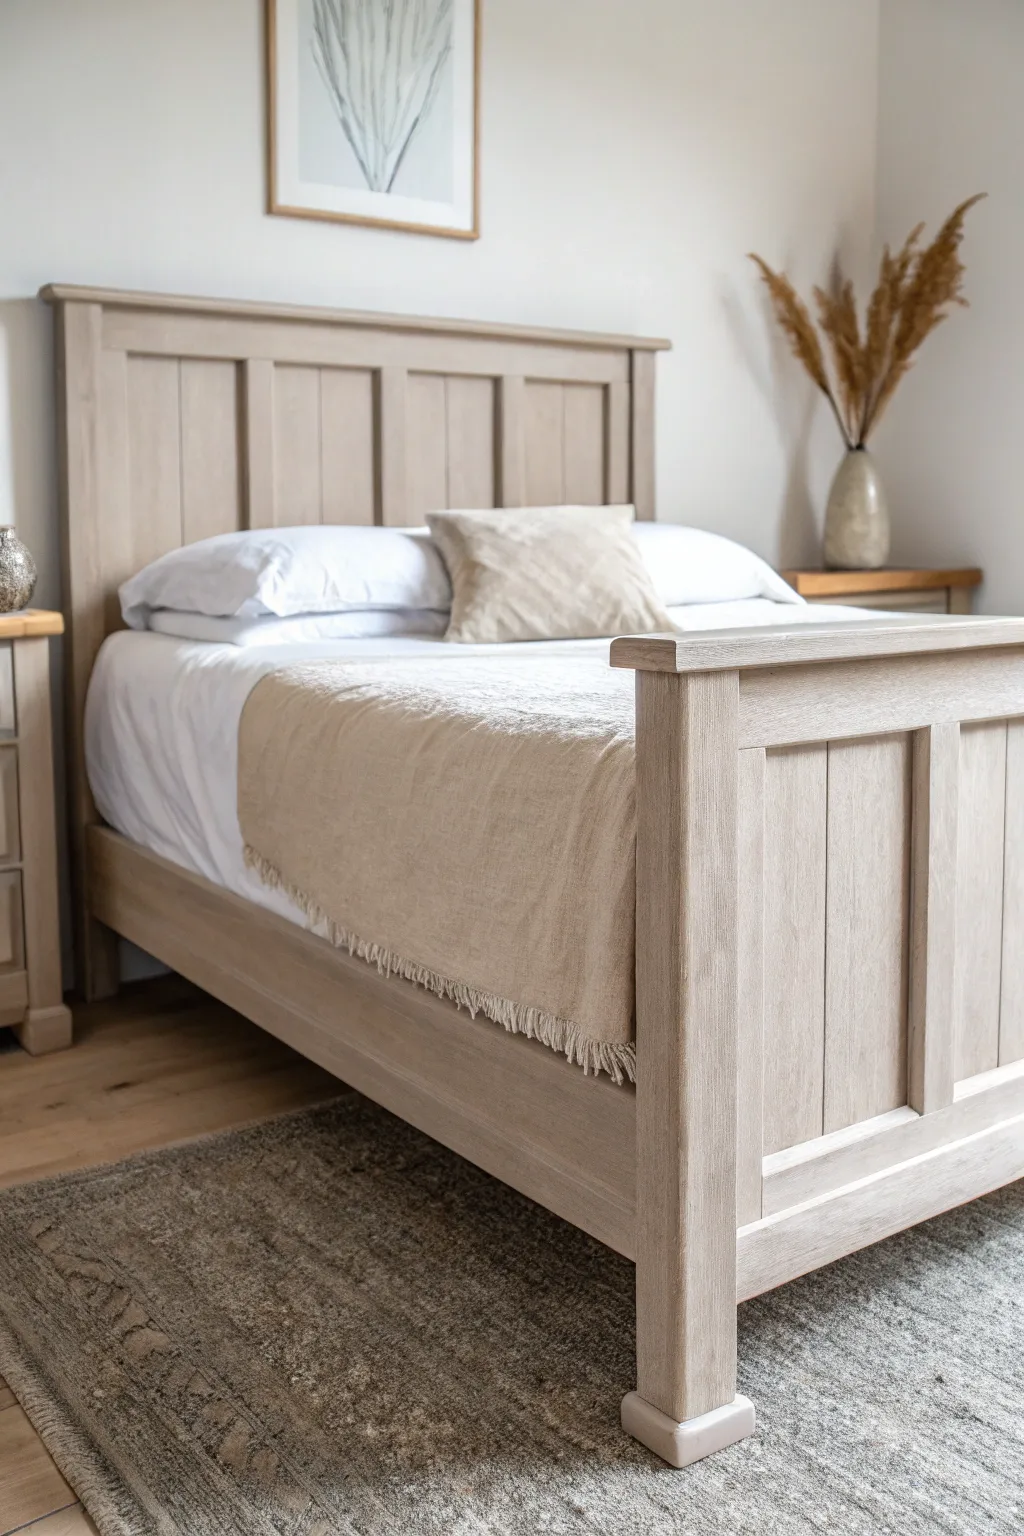
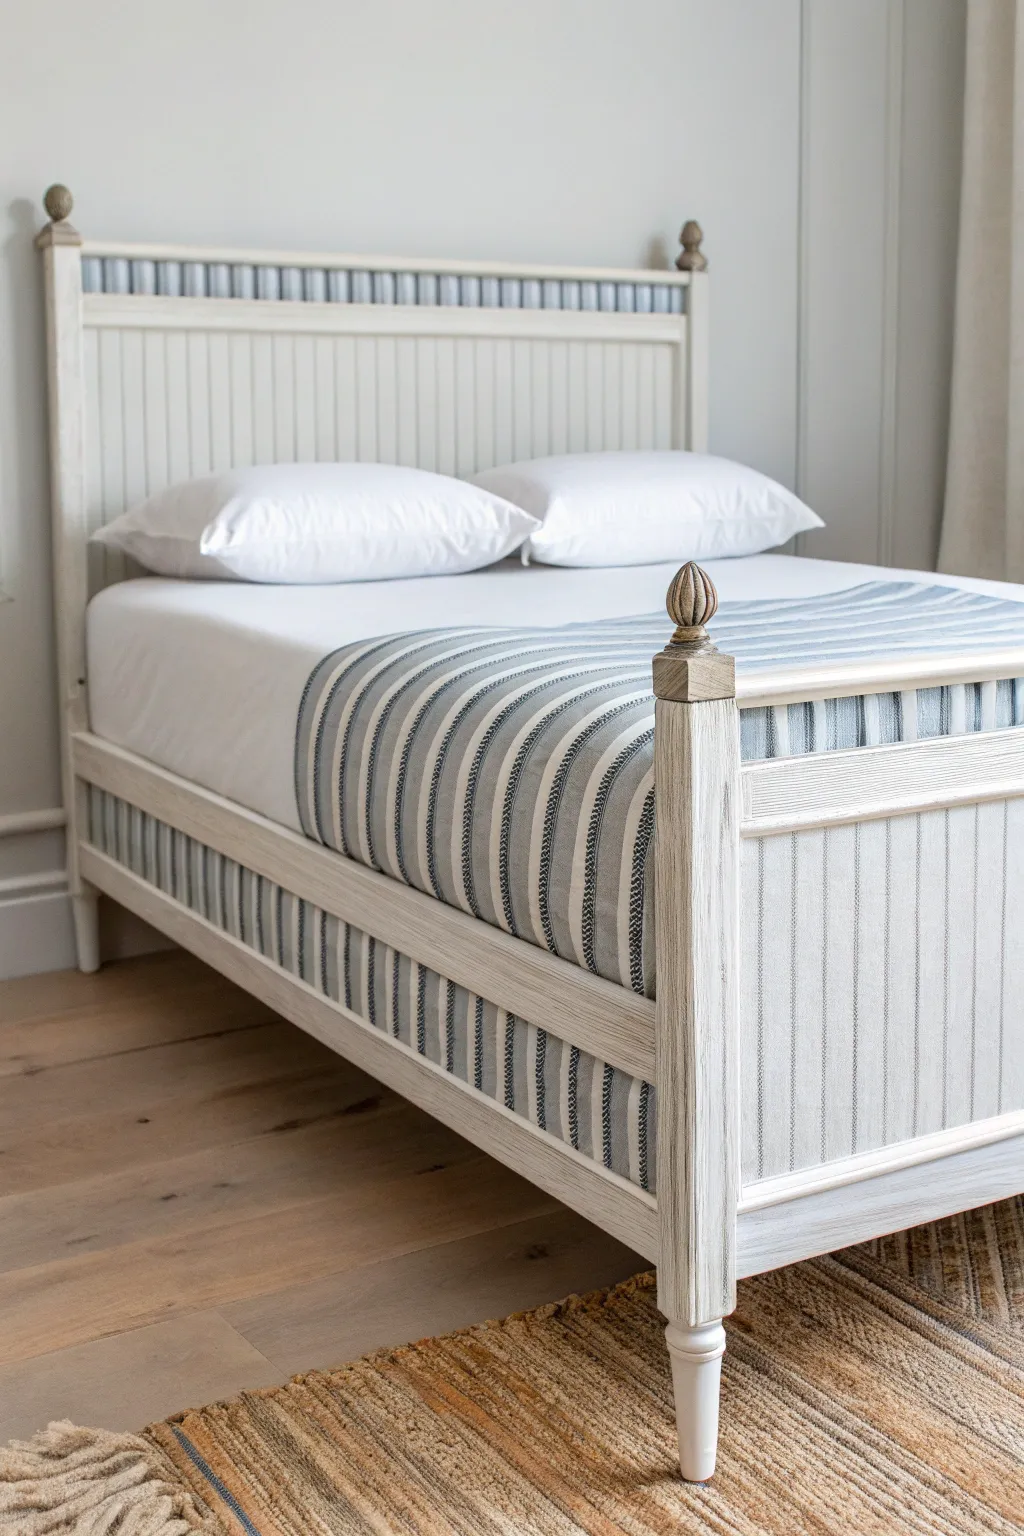
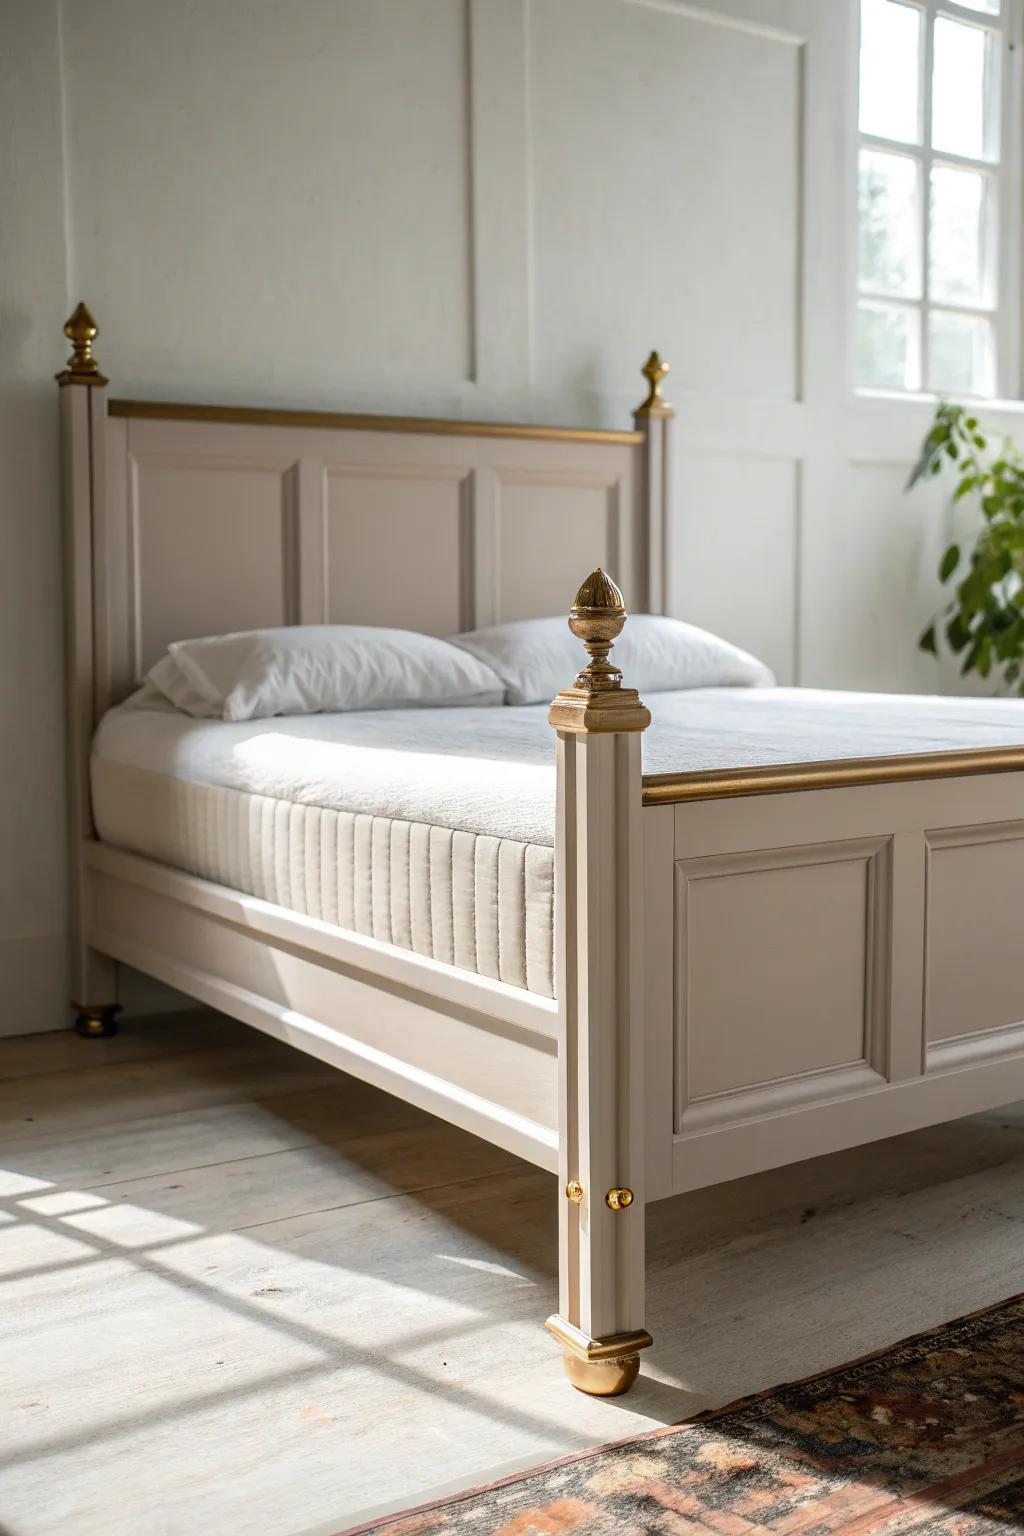
Crisp White Cottage Refresh
Transform a tired wooden bed frame into a serene centerpiece with this bright, airy makeover. By applying a smooth, creamy white finish, you can instantly evoke the cozy and clean atmosphere of a classic coastal cottage.
Detailed Instructions
Materials
- Wooden bed frame (headboard, footboard, and rails)
- High-quality furniture cleaner or TSP substitute
- Medium-grit sandpaper (120-grit)
- Fine-grit sandpaper (220-grit)
- Tack cloths
- High-adhesion stain-blocking primer (water-based)
- Premium cabinet/furniture enamel paint (Warm White or Cream)
- 2-inch angled sash brush (synthetic bristles)
- 4-inch foam roller or flocked roller
- Drop cloths
- Painter’s tape
- Screwdriver/drill (for disassembly)
- Wood filler (optional)
Step 1: Preparation & Sanding
-
Disassemble the Frame:
Begin by removing the mattress and box spring. Carefully unscrew the side rails from the headboard and footboard to break the bed down into manageable pieces. Place all hardware in a labeled bag so nothing gets lost. -
Clean Thoroughly:
Wipe down every surface with a heavy-duty furniture cleaner or a TSP substitute. This removes oils, dust, and old wax that could prevent paint adhesion. -
Fill Imperfections:
Inspect the wood for deep scratches or gouges. Fill them with wood filler, slightly overfilling the hole to account for shrinkage, and let it dry completely. -
Scuff Sanding:
Using 120-grit sandpaper, thoroughly sand all surfaces. You aren’t trying to remove all the old finish, but rather to rough it up to create a ‘tooth’ for the primer to grip. -
Dust Removal:
Vacuum up the bulk of the sanding dust. Follow up by wiping everything down with a tack cloth to capture even the finest particles.
Smoother Finishes
Add a paint conditioner (like Floetrol) to water-based enamel. It extends drying time slightly, allowing brush strokes to level out and disappear.
Step 2: Priming
-
Tape Off:
If there are any metal brackets or areas you don’t want painted, cover them carefully with painter’s tape. -
Cut In Corners:
Open your stain-blocking primer. Use your angled sash brush to apply primer into the recessed panels, corners, and detailed molding first. -
Roll the Flat Surfaces:
While the brushed areas are still wet, use the foam roller to apply primer to the large, flat sections of the headboard and footboard. This helps smooth out brush marks. -
Dry and Sand:
Allow the primer to dry according to the can’s instructions. Once dry, lightly sand the surfaces with 220-grit sandpaper to knock down any bumps. -
Clean Again:
Wipe away the white primer dust with a fresh tack cloth. A clean surface is crucial for a smooth topcoat.
Step 3: Painting & Reassembly
-
First Coat – Detail Work:
Stir your white enamel paint gently to avoid bubbles. Just like with priming, start by brushing the paint into the routed grooves, panel edges, and corners. -
First Coat – Rolling:
Immediately follow up with your roller on the flat panels and posts. Apply a thin, even coat; thick coats tend to drip and take longer to cure. -
Drying Time:
Let the first coat dry completely. I prefer to wait overnight if possible to ensure the paint hardens sufficiently before the next layer. -
Light Sanding:
Very gently run the 220-grit sandpaper over the painted surface. This ultra-light sanding ensures the final coat feels professionally smooth. -
Second Coat:
Apply the second coat using the same brush-then-roll technique. Watch for drips along the vertical slats or posts and catch them while wet. -
Curing:
Allow the final coat to cure for at least 48 hours before reassembling. While dry to the touch sooner, full hardness prevents the paint from chipping during assembly. -
Reassemble:
Carefully put the bed frame back together, tightening the bolts securely. Add your mattress and bedding back to complete the look.
Texture Twist
For a rustic look, use a dry brush technique with a slightly darker grey paint on the edges after the white dries to highlight the architectural details.
Enjoy the fresh, peaceful ambiance your newly brightened bed frame brings to the bedroom


Matte Black Modern Contrast
Achieve a sophisticated, modern aesthetic in your bedroom by updating a plain wooden bed frame with a sleek matte black finish. This high-contrast look anchors the room and pairs beautifully with light, airy linens for that perfect minimalist vibe.
Step-by-Step Guide
Materials
- Wooden bed frame (headboard, footboard, rails)
- Medium grit sandpaper (120-grit)
- Fine grit sandpaper (220-grit)
- Tack cloth or microfiber rags
- Painter’s tape
- Premium bonding primer (stain-blocking)
- Matte black furniture paint (chalk or mineral style works best)
- Synthetic bristle brush (2-inch)
- Small foam roller and tray
- Matte polyurethane or wax topcoat
- Drop cloths
- Screwdriver or Allen wrench (for disassembly)
Step 1: Preparation & Disassembly
-
Clear your workspace:
Begin by clearing a large area, preferably a garage or a well-ventilated room. Lay down drop cloths to protect your flooring from sanding dust and paint drips. -
Disassemble the bed:
Using your screwdriver or Allen wrench, take the bed frame apart completely. It is much easier to paint rails and headboards when they are laying flat or standing independently rather than assembled. -
Clean the surfaces:
Wipe down every piece of the frame with a damp cloth and a mild degreaser (like TSP or dish soap) to remove oils and dirt. Let everything dry completely. -
Initial sanding:
Scuff sand all surfaces with 120-grit sandpaper. You don’t need to remove the old finish entirely; just create a rough texture for the primer to grip. -
Dust removal:
Use a tack cloth to meticulously pick up all sanding dust. Any leftover dust will create tiny bumps in your final smooth black finish. -
Protect hardware:
If there are metal brackets or bolts you can’t remove, cover them precisely with painter’s tape to keep them paint-free.
Step 2: Priming for Durability
-
Apply the primer:
Stir your bonding primer well. A grey-tinted primer is helpful when going black, but white works too. Apply a thin, even coat using your brush for corners and the foam roller for flat areas. -
Check for drips:
While the primer is wet, keep an eye out for drips along the edges of the heavy frame pieces and smooth them out immediately. -
Let it cure:
Allow the primer to dry according to the can’s instructions, usually about 2-4 hours. It shouldn’t feel tacky to the touch. -
Light sanding:
Once dry, lightly glide over the primed surface with 220-grit sandpaper. This knocks down any raised wood grain or brush marks. Wipe away the dust again.
Smooth Operator Tip
For a factory-smooth finish, water down your paint slightly (about 10%) on the final coat. This helps it self-level and minimizes roller texture.
Step 3: Painting & Sealing
-
First coat of black:
Pour your matte black paint into the tray. Start with the intricate areas, like the spindles on the headboard, using the synthetic brush. I find it easier to tackle these difficult spots first so you can smooth out brush strokes later. -
Roll the flat surfaces:
Switch to your foam roller for the side rails and the flat panels of the headboard and footboard. Apply thin coats to avoid texture buildup. -
Drying time:
Let the first coat dry for at least 4-6 hours. It might look streaky or uneven at this stage, but don’t worry—coverage improves significantly with the next layer. -
Second coat:
Apply a second coat using the same method. If the black isn’t completely opaque yet, a third light coat may be necessary for that deep, solid look shown in the photo. -
Seal the finish:
Matte paint can be prone to scuffs. Protect your work by applying a dead-flat matte polyurethane or clear furniture wax. Apply in long, smooth strokes and let dry overnight. -
Reassembly:
Once the topcoat has cured for at least 24 hours (longer is better to prevent sticking), remove the tape and reassemble your bed frame in the bedroom.
Texture Twist
Instead of full opaque black, try a “shou sugi ban” inspired look by using a semi-transparent black stain on raw wood to let the grain texture show through.
Enjoy the dramatic transformation of your bedroom with your new statement piece


Soft Greige for a Calm, Modern Look
Transform a plain or dated wooden bed frame into a serene sanctuary centerpiece with this soft greige finish. This project achieves a beautiful balance between rustic warmth and modern minimalism by using a wash technique that lets the subtle wood texture peek through.
Step-by-Step Tutorial
Materials
- Wooden bed frame (raw or previously finished)
- Orbital sander
- Sandpaper discs (80, 120, and 220-grit)
- Tack cloth or microfiber rags
- wood conditioner (water-based)
- Grey-beige (greige) chalk paint or milk paint
- Water for diluting
- Plastic mixing container
- Stir stick
- High-quality synthetic bristle brush (2-inch)
- Clean, lint-free cotton rags
- Matte water-based polyurethane sealer
- Fine sanding sponge
- Drop cloths
- Painter’s tape
Step 1: Preparation and Sanding
-
Set up your workspace:
Begin by moving the bed frame to a well-ventilated area like a garage or open room. Lay down drop cloths to protect your floor. If you can’t dismantle the bed, use painter’s tape to protect any adjacent walls or floorboards. -
Clean surface layers:
Wipe down the entire frame with a damp cloth to remove surface dust and cobwebs before you start sanding. This keeps your sandpaper from clogging up instantly. -
Initial heavy sanding:
Load your orbital sander with 80-grit sandpaper. Sand the entire frame to strip away the old varnish, lacquer, or dark stain. Move slowly and evenly to avoid creating gouges in the wood. -
Refining the surface:
Switch to 120-grit sandpaper and go over the whole piece again. This smooths out the rough scratches left by the 80-grit paper. Pay special attention to the corners and detailed panels. -
Final smooth sanding:
Finish the sanding process with 220-grit paper for a silky smooth feel. The goal is to reach raw, bare wood so the new wash can soak in properly. -
Remove all dust:
Vacuum the bed frame thoroughly using a brush attachment. Follow up by wiping everything down with a tack cloth to ensure absolutely no dust remains in the grain. -
Apply wood conditioner:
Brush on a layer of water-based wood conditioner. This is a step I like to include because it prevents blotchiness, especially on softwoods like pine. Let it dry according to the manufacturer’s instructions.
Step 2: Creating the Greige Wash
-
Mix your paint:
Pour your greige chalk paint into a plastic container. Gradually add water to create a wash consistency. Aim for a ratio of about 1 part paint to 1 part water, until it resembles heavy cream or melted ice cream. -
Test the color:
Apply a small amount of your wash to an inconspicuous spot, like the back of a leg. If it’s too opaque, add more water; if it’s too sheer, add a touch more paint. -
Apply the first section:
Working in small sections (like one panel or leg at a time), brush the diluted paint onto the wood. Follow the direction of the wood grain with long, even strokes. -
Wipe back excess:
Immediately after applying, take a clean cotton rag and gently wipe off the excess paint. The harder you press, the more wood grain you’ll reveal. This ‘wipe-on, wipe-off’ technique creates that signature washed look. -
Continue around the frame:
Repeat the brush and wipe method across the rest of the bed frame. Keep a wet edge to avoid overlap marks where the paint dries too quickly. -
Assess coverage:
Let the first coat dry for about an hour. If you want a more solid color, repeat the wash process with a second light coat. For the look in the image, one thorough coat is usually sufficient.
Uneven Results?
If the wash looks blotchy, sand that spot back to raw wood and re-apply. Always wipe the rag in one long motion from edge to edge to prevent ‘stop marks’ in the middle of a panel.
Step 3: Sealing and Finishing
-
Light sanding:
Once the paint is fully dry (wait at least 4 hours), very gently run a fine sanding sponge over the surface. This knocks down any raised wood grain caused by the water in the paint. -
Clean again:
Wipe away the fine dust from the sanding sponge with a tack cloth. -
Apply first coat of sealer:
Stir your matte water-based polyurethane gently (don’t shake it, or bubbles will form). Apply a thin, even coat over the entire frame using a clean synthetic brush. -
Dry and recoat:
Allow the first coat of sealer to dry for 2-4 hours. Lightly sand again if the surface feels rough, then apply a second and final coat of sealer for durability. -
Final cure:
Let the bed frame cure for at least 24 hours before reassembling or placing the mattress back on. Full curing can take a few days, so treat it gently at first.
Level Up: Liming Wax
For extra depth, skip the sealer and use white liming wax instead. Rub it into the grain after the grey wash dries. It highlights the texture and seals the wood in one step.
Now you have a stunning, restorative piece of furniture ready to anchor your bedroom design.


Classic Navy Statement Frame
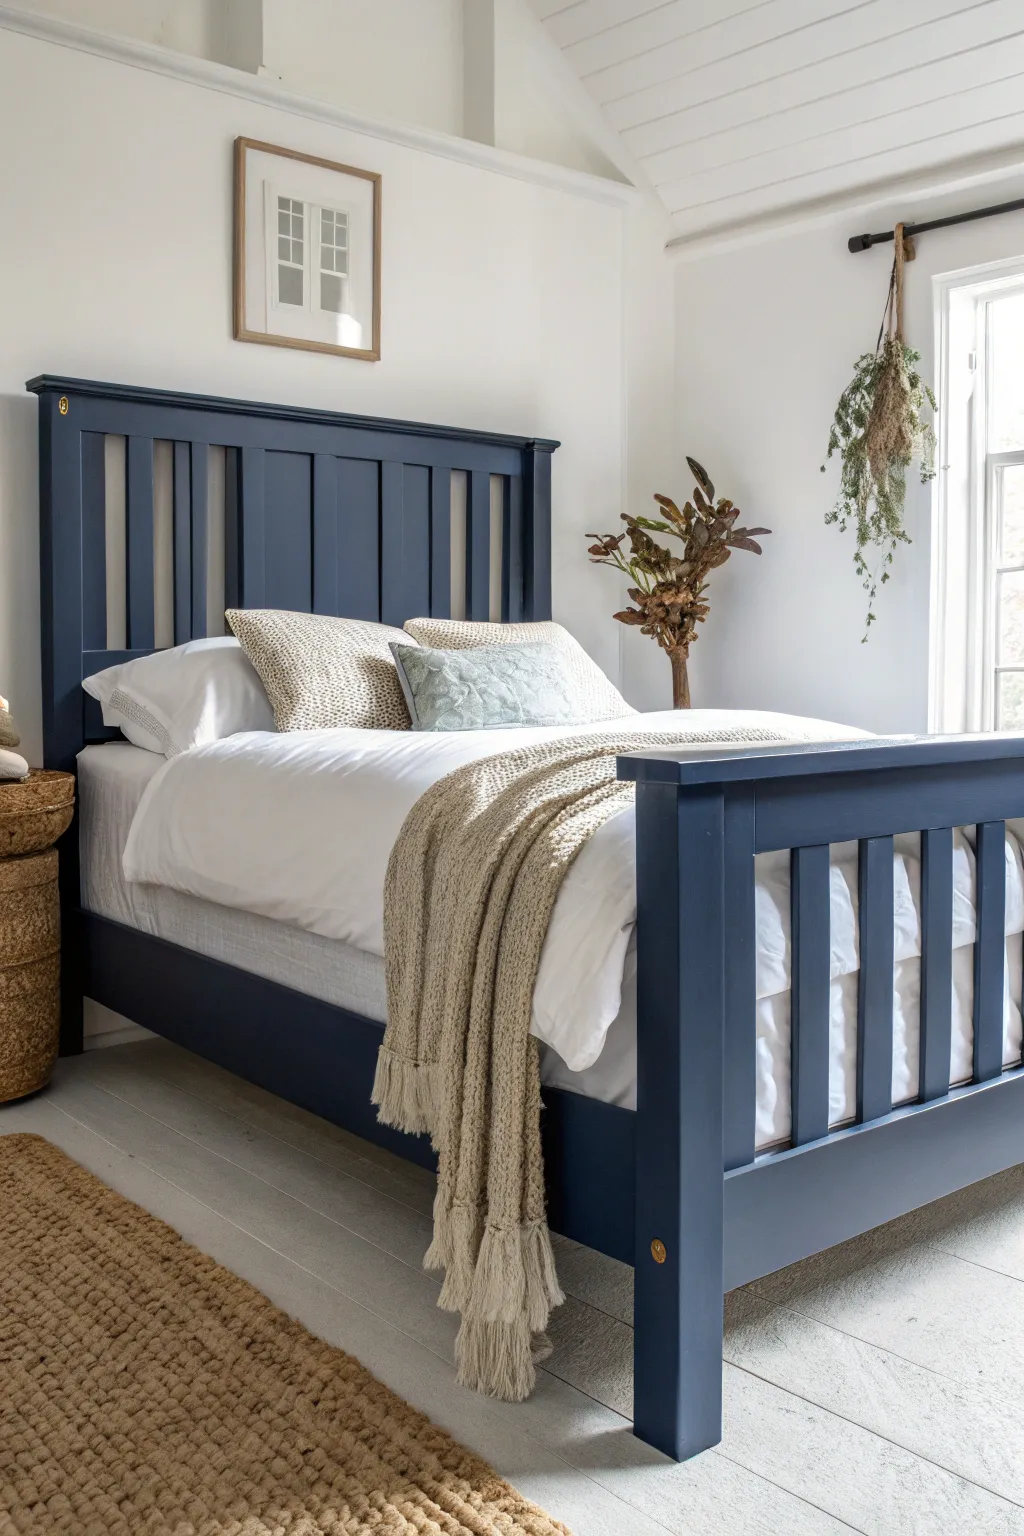
Transform a basic wooden bed frame into a sophisticated centerpiece with a coat of rich, dark navy paint. This project proves that a simple color change can lend a classic, high-end feel to your furniture without needing to buy new.
Step-by-Step
Materials
- Wooden bed frame (slatted style preferred)
- Navy blue furniture paint (satin or eggshell finish)
- Medium-grit sandpaper (120-grit)
- Fine-grit sandpaper (220-grit)
- Tack cloth
- High-quality angled sash brush (1.5-2 inch)
- Small foam roller and tray
- Primer (stain-blocking)
- Drop cloths
- Screwdriver or drill (for disassembly)
- Painter’s tape
- Wood filler (optional)
- Clear protective topcoat (matte or satin water-based poly)
Step 1: Preparation and Disassembly
-
Clear the area:
Start by removing the mattress, bedding, and slats from your bed frame. Move the frame to a well-ventilated area, laying down drop cloths to protect your flooring. -
Disassemble the frame:
Using your screwdriver or drill, take the bed frame apart. It is much easier to paint individual rails, the headboard, and the footboard separately than when fully assembled. -
Clean the surface:
giving every piece a good wipe down with a mild degreasing cleaner to remove dust, oils, or furniture polish buildup. Let everything dry completely. -
Fill imperfections:
Inspect the wood for deep scratches or dings. If you find any, fill them with wood filler. I like to overfill slightly as it shrinks when drying. -
Sand the filler:
Once the filler is dry, sand it smooth so it’s flush with the surrounding wood.
Step 2: Sanding and Priming
-
Scuff sand the wood:
Using 120-grit sandpaper, thoroughly scuff sand all surfaces. You don’t need to remove the old finish entirely, just roughen it up so the new paint has something to grip. -
Remove dust:
Wipe away all sanding dust. A tack cloth is your best friend here to ensure absolutely no debris remains. -
Tape off hardware:
If there are metal brackets or screw holes you don’t want to paint, cover them carefully with painter’s tape. -
Apply primer:
Brush or roll on a coat of stain-blocking primer. This is crucial for dark colors to ensure even coverage later. Don’t worry if it looks streaky; just aim for coverage. -
Wait and smooth:
Let the primer dry according to the can’s instructions. Once dry, lightly run 220-grit sandpaper over it to knock down any raised grain or brush strokes.
Fixing Sticky Surfaces
If the paint feels tacky days later, high humidity is likely the culprit. Place a dehumidifier or fan in the room and wait another 24-48 hours before putting linens back on.
Step 3: Painting the Navy Finish
-
Cut in the corners:
Start with your angled sash brush. Paint the difficult nooks, crannies, and -
Roll the flat surfaces:
While the brushed areas are still wet, switch to your foam roller for the larger, flat sections of the headboard and rails. This helps achieve a smooth, factory-like finish without brush marks. -
Apply the first coat:
Continue until all pieces have one full coat. Navy is dark, so don’t panic if the coverage isn’t 100% opaque yet. Thin, even coats are superior to thick, gloppy ones. -
Let it dry:
Allow this first coat to dry fully—usually 2 to 4 hours depending on your paint brand. -
Apply the second coat:
Apply your second coat of navy paint using the same brush-then-roll technique. This coat should provide that rich, deep opacity you’re looking for. -
Touch up:
Inspect the pieces under good light. If you see any holidays (missed spots), apply a third light coat just in those areas.
Pro Tip: Gold Accents
For a designer touch, use a tiny artist’s brush and Metallic Gold gilding wax to highlight just the small decorative recessed circles on the post caps, like in the photo.
Step 4: Sealing and Assembly
-
Prepare for topcoat:
Wait at least 24 hours for the paint to cure slightly before sealing. Ensure the surface is dust-free again. -
Apply protective finish:
Using a clean brush or a fresh roller, apply a water-based polyurethane topcoat. A satin finish works beautifully with navy, giving it a soft sheen without being too glossy. -
Reassemble:
Once the sealer has cured (ideally 48 hours for heavy use), remove the painter’s tape and reassemble your bed frame in the bedroom.
Enjoy the dramatic and cozy atmosphere your new navy bed frame brings to the bedroom
BRUSH GUIDE
The Right Brush for Every Stroke
From clean lines to bold texture — master brush choice, stroke control, and essential techniques.
Explore the Full Guide
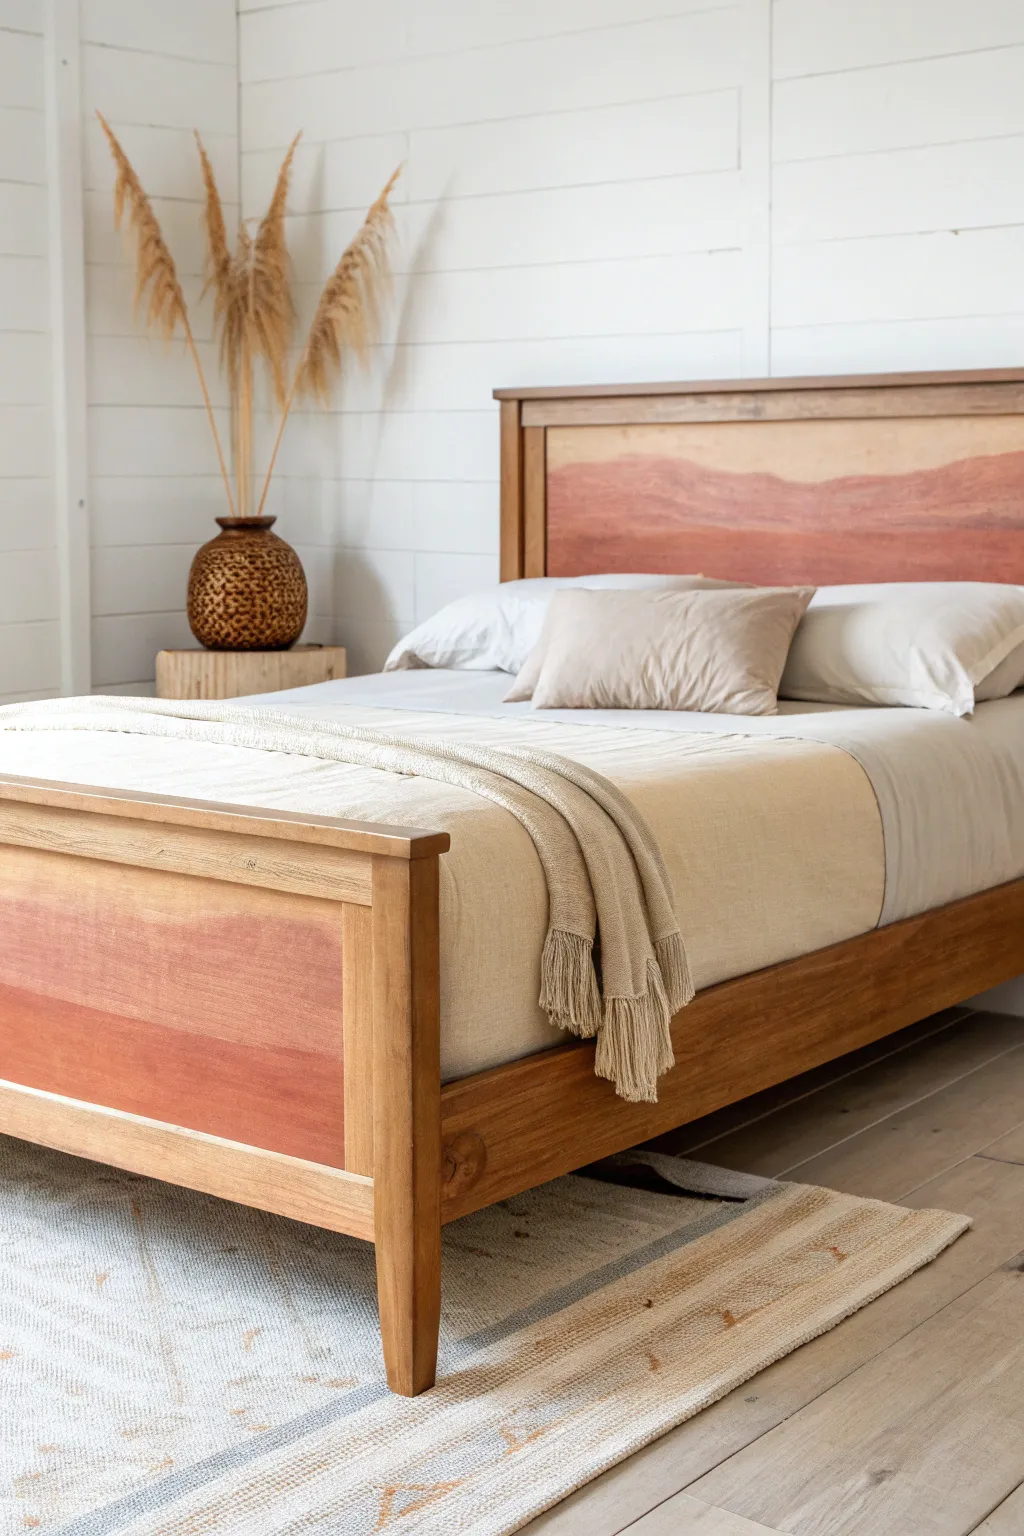
Warm Terracotta for an Earthy Bedroom
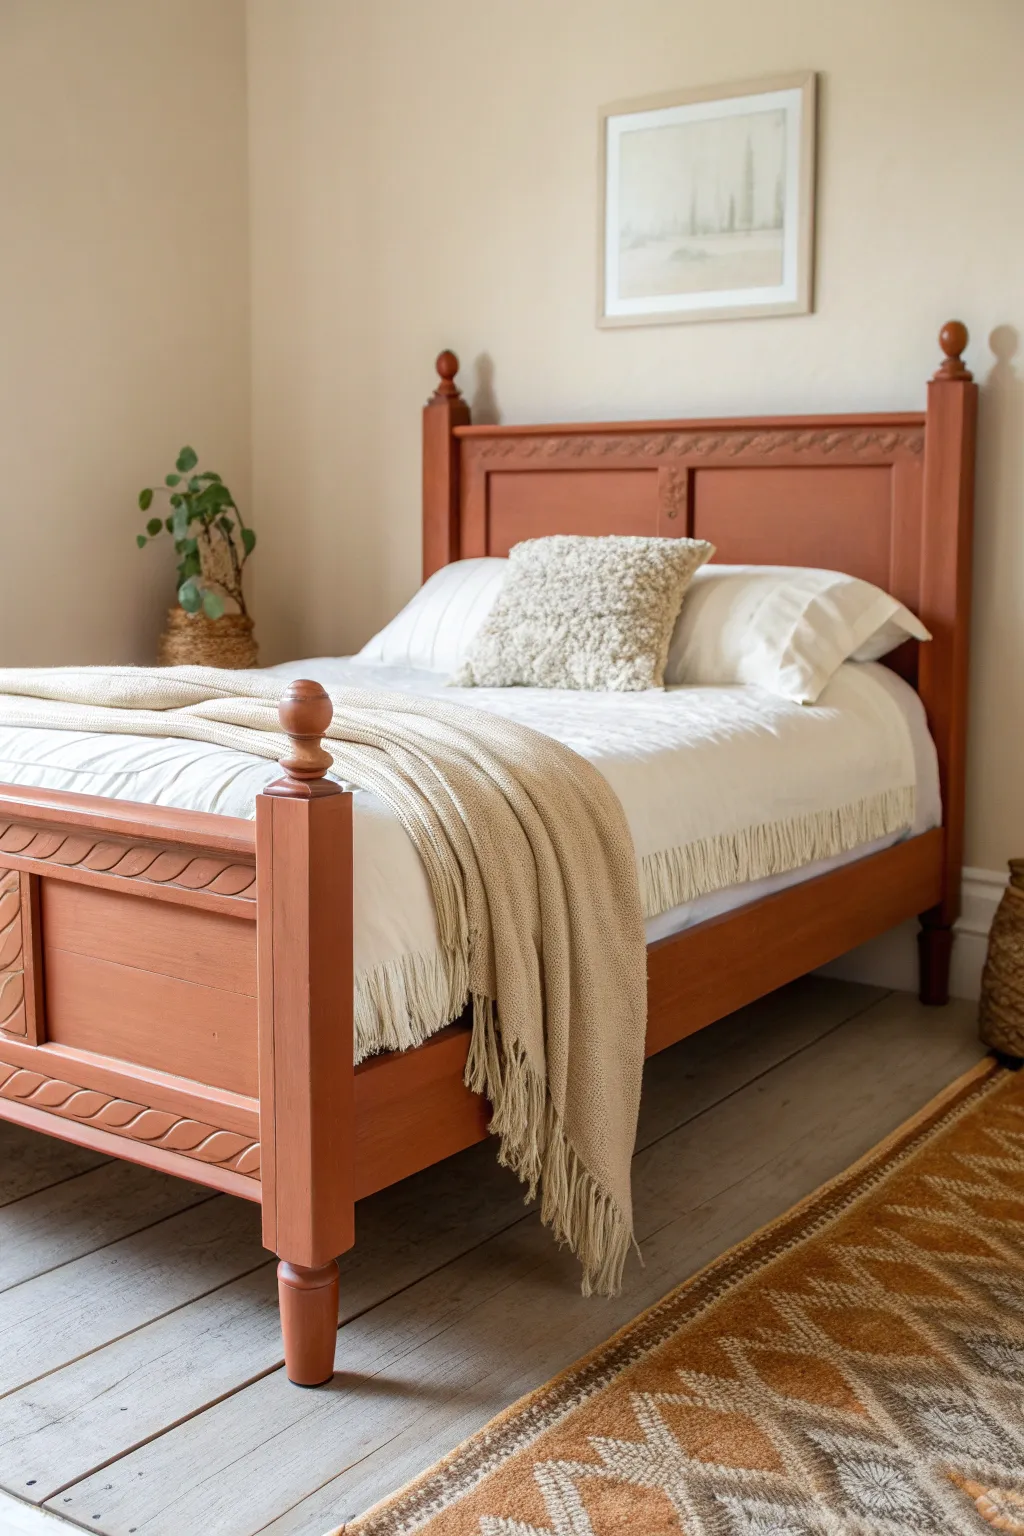
Transform a standard wooden bed frame into a cozy centerpiece with this warm terracotta finish. The rich, clay-like tones bring an immediate sense of grounding and warmth to any bedroom, creating a tranquil retreat that feels both modern and timeless.
Step-by-Step
Materials
- Wooden bed frame (with carved details preferable)
- Sanding block or sandpaper (120 and 220 grit)
- Clean tack cloths
- Painter’s tape
- Primer suitable for wood (stain-blocking recommended)
- Terracotta or warm clay-colored furniture paint (chalk or mineral paint works best)
- 2-inch synthetic angled sash brush
- Small artist brush for carvings
- Small foam roller and tray
- Matte or satin clear topcoat (polyurethane or wax)
Step 1: Preparation
-
Clean the frame:
Begin by removing the mattress and bedding. Give the entire bed frame a thorough wiping down with a mild degreaser or soapy water to remove years of dust and oils. Let it dry completely. -
Sand the surfaces:
Scuff sand the entire piece using 120-grit sandpaper. You don’t need to strip it to bare wood, but you do need to remove any glossy sheen to help the paint adhere. Focus on flat areas like legs and rails. -
Detail sanding:
Fold your sandpaper or use a flexible sanding sponge to get into the carved rope details on the headboard and footboard. Ensure you rough up these crevices without smoothing away the texture. -
Remove dust:
Vacuum up the sanding dust, then wipe every inch of the frame with a tack cloth to ensure a perfectly clean surface. -
Tape off edges:
If you cannot disassemble the bed, use painter’s tape to protect the floor around the legs and any metal hardware rails that hold the mattress.
Fixing Bleed-Through
Seeing pink or yellow stains appearing through your paint? That’s tannin bleed. Stop painting immediately, apply a shellac-based primer over the spots, let dry, and then resume painting.
Step 2: Priming
-
Apply primer:
Apply a coat of stain-blocking primer. This is crucial if your bed frame is made of dark wood or pine, as it prevents tannins from bleeding through your beautiful terracotta color later. -
Priming details:
Use your brush to stipple primer into the carved grooves first, then smooth out the flat areas with the foam roller for an even finish. -
Light sanding:
Once the primer is fully dry (check the can for times), lightly run 220-grit sandpaper over the flat surfaces to knock down any bumps. Wipe away the dust.
Step 3: Painting
-
First coat – Details:
Stir your terracotta paint thoroughly. Dip your sash brush and start by painting the intricate carvings and corners. Work the paint into the recesses but watch for drips pooling in the corners. -
First coat – Flats:
While the details are still wet, switch to your foam roller for the large flat panels of the headboard and side rails. This helps achieve a smooth, brush-stroke-free finish. -
Let it dry:
Allow the first coat to dry according to the manufacturer’s instructions. Chalk and mineral paints dry quickly, but don’t rush it. -
Second coat:
Apply a second coat using the same method—brushing details first, then rolling flats. This coat is where the true richness of the terracotta color will emerge. I find two coats are usually sufficient, but spot-check for transparency. -
Refining:
Check for any drips or heavy brush marks while the paint is still tacky and lightly smooth them out with a dry brush if necessary. If you missed any deep crevices in the carving, use a small artist brush to touch them up.
Add Subtle Depth
Mix a tiny drop of dark brown paint with glaze and brush it into the carved grooves. Wipe off the excess with a damp cloth to leave shadow in the details, highlighting the craftsmanship.
Step 4: Protection
-
Choose your finish:
For a bed frame, a durable topcoat is essential. Stir your matte or satin polyurethane gently to avoid bubbles. -
Apply topcoat:
Apply a thin, even layer of topcoat over the entire frame. Use a clean brush for the carvings and a roller for flats to ensure you don’t yellow the paint with thick globs. -
Final cure:
Let the bed frame cure for at least 24-48 hours before putting the mattress back on. This prevents the heavy mattress from sticking to or denting the fresh finish.
Enjoy the deep, comforting atmosphere your new terracotta bed frame brings to the room
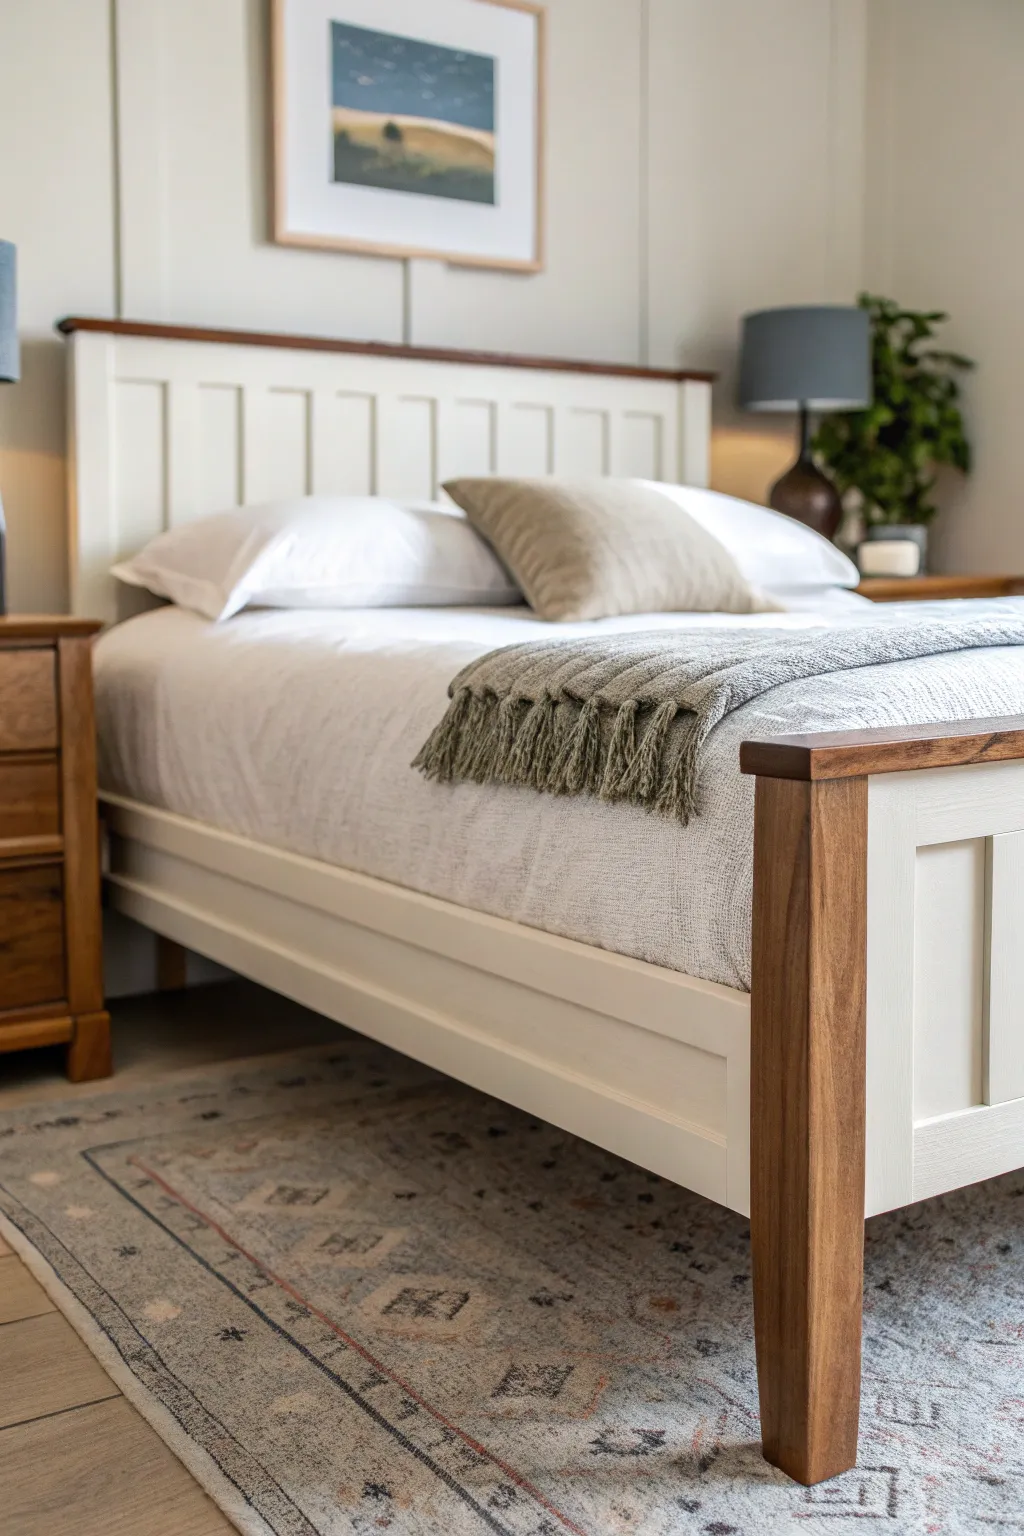
Two-Tone Frame: Painted Rails, Wood Headboard
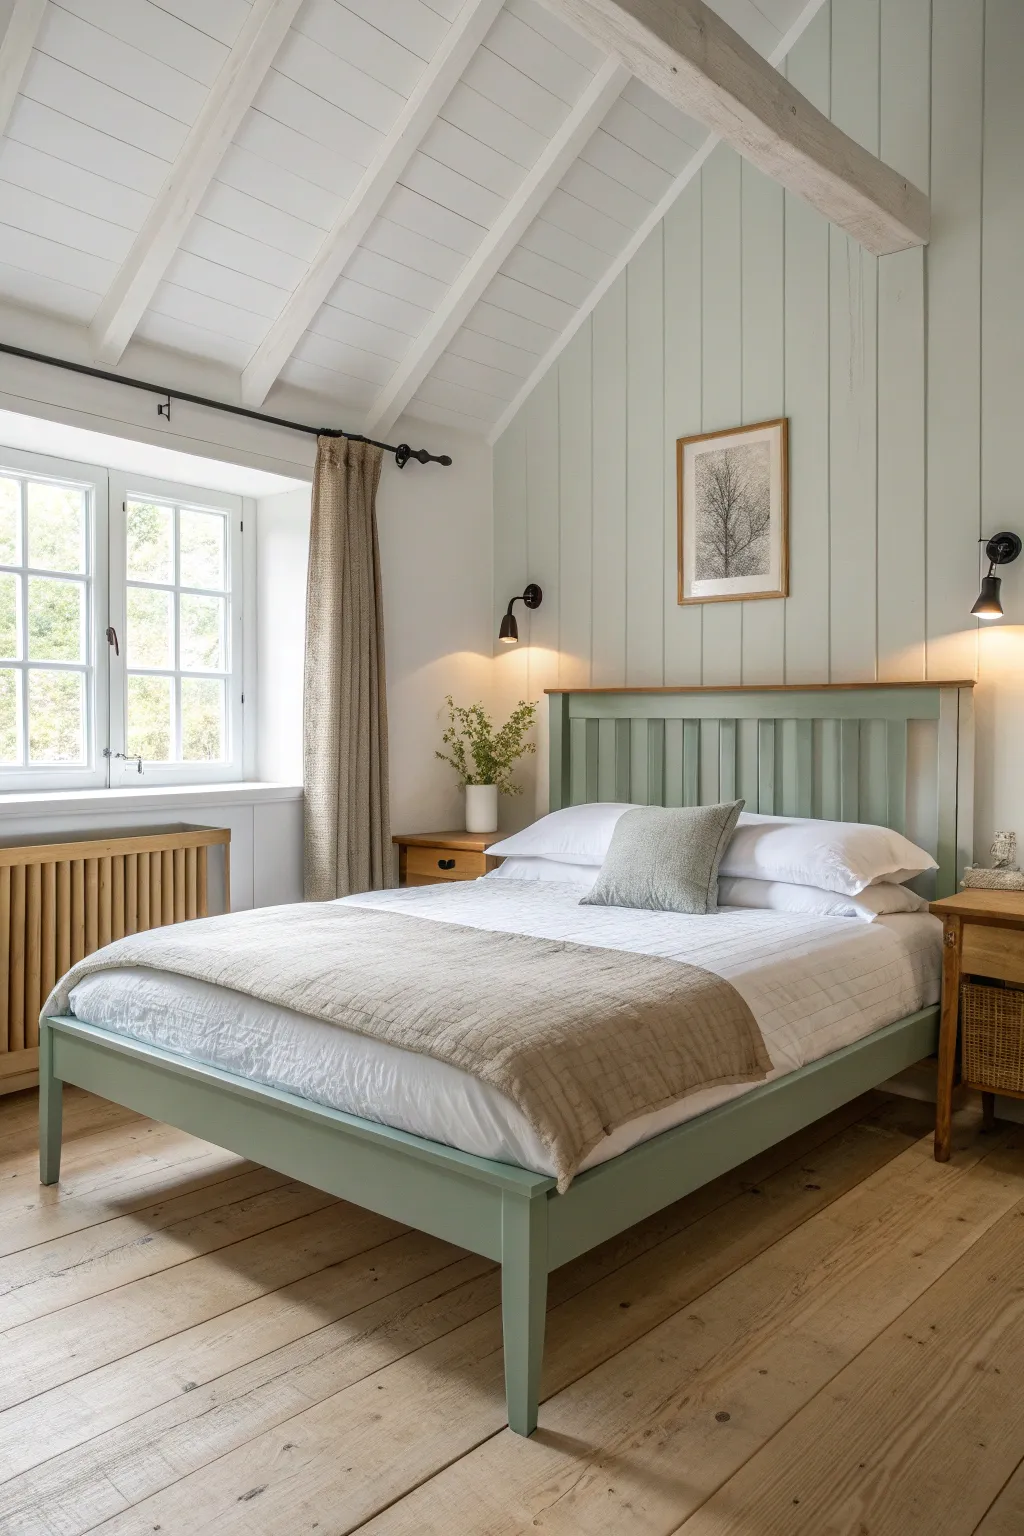
This project transforms a standard wooden bed frame into a serene focal point by combining a calming sage green paint with the warmth of natural wood. The result is a grounded, sophisticated look that perfectly balances cottage charm with modern simplicity.
How-To Guide
Materials
- Unfinished or previously finished wooden bed frame
- High-quality furniture paint (Sage Green/Eucalyptus tone)
- Stain-blocking primer
- Sandpaper assortment (120, 180, and 220-grit)
- Orbital sander (optional but recommended)
- Painter’s tape (high adhesion)
- Tack cloths
- Clear matte or satin polyurethane topcoat
- 2-inch angled synthetic brush
- Small foam roller and tray
- Drop cloths
- Screwdriver or Allen key (for disassembly)
Step 1: Preparation & Sanding
-
Clear and Clean:
Begin by removing the mattress and bedding. Wipe down the entire frame with a damp cloth and mild degreaser to remove dust and oils, which ensures your finish adheres properly. -
Disassemble the Bed:
Take the bed apart if possible. Separating the headboard, footboard, and side rails makes sanding and painting significantly easier and prevents paint buildup in the joints. -
Initial Sanding:
Using an orbital sander or sanding block with 120-grit paper, scuff sand all surfaces you intend to paint. The goal isn’t to remove all old finish, but to create a rough texture for the primer to grip. -
Reveal the Raw Wood:
For the top rail of the headboard (the part remaining wood), sand aggressively with 100-grit then 120-grit paper to completely remove the old varnish or stain. You want bare, clean timber here. -
Smooth the Raw Wood:
Switch to 180-grit and then 220-grit sandpaper on the exposed wood rail. Sand until it feels buttery smooth to the touch, going with the grain. -
Clean Up Dust:
Vacuum up the bulk of the sawdust, then wipe every piece down thoroughly with a tack cloth to capture fine particles.
Paint Bleeding Under Tape?
If paint seeped onto your wood rail, don’t panic. Wrap a putty knife in a damp rag and gently scrape it while wet. If dry, carefully sand away the bleed with fine sandpaper.
Step 2: Protecting & Priming
-
Tone the Wood (Optional):
If your raw wood rail looks too pale, apply a light coat of enhancing stain or wood conditioner now. Let it dry completely according to the can’s instructions. -
Seal the Wood Accents:
Apply two coats of clear matte polyurethane to the raw wood top rail. Sand lightly with very fine 220-grit paper between coats for a professional feel. Let this cure fully (usually 24 hours) before taping. -
Tape Off:
Once the clear coat is hard, carefully apply painter’s tape exactly along the seam where the wood rail meets the vertical slats. Press the tape edge down firmly with a credit card to prevent bleed-through. -
Prime the Frame:
Apply a coat of stain-blocking primer to all areas destined for paint. Use a brush for grooves and slats first, followed by a foam roller for flat surfaces to minimize brush strokes. -
Check for Imperfections:
Once the primer is dry, look for drips or rough patches. Quickly smooth these out with 220-grit sandpaper and wipe clean.
Seal Tape Edges
For a razor-sharp line, brush a tiny amount of your clear coat over the tape edge before painting the green. This seals the gap so only clear coat bleeds under, keeping the paint line perfect.
Step 3: Painting & Finishing
-
First Coat of Color:
Stir your sage green furniture paint well. Using your angled brush, paint the difficult spots first—the corners, recessed areas of the slats, and detailed molding. -
Roll the Flat Areas:
While the brushed areas are still wet (if possible), use the foam roller to cover the wider flat sections of the headboard panel and side rails. This technique, called ‘tipping off,’ creates a texture-free finish. -
Dry and Assess:
Allow the first coat to dry for the time recommended by the manufacturer. Don’t rush this; tacky paint will drag if you recoat too soon. -
Second Coat:
Apply a second coat using the same method. I tend to use a slightly lighter hand on the second coat to ensure the finish lays down perfectly smooth. -
Remove Tape:
This is crucial: peel off the painter’s tape while the final coat of paint is still slightly wet. Pull the tape away from the paint line at a 45-degree angle to get a crisp, sharp edge without chipping. -
Seal the Paint:
If your furniture paint isn’t an all-in-one formula, apply a clear topcoat over the green sections for added durability against bumps and scrapes. -
Reassemble:
Wait at least 48 hours for the paint to cure and harden before reassembling the bed frame and replacing the mattress.
Enjoy the peaceful atmosphere your newly revitalized bed frame brings to the room

PENCIL GUIDE
Understanding Pencil Grades from H to B
From first sketch to finished drawing — learn pencil grades, line control, and shading techniques.
Explore the Full Guide
Distressed Farmhouse Edges
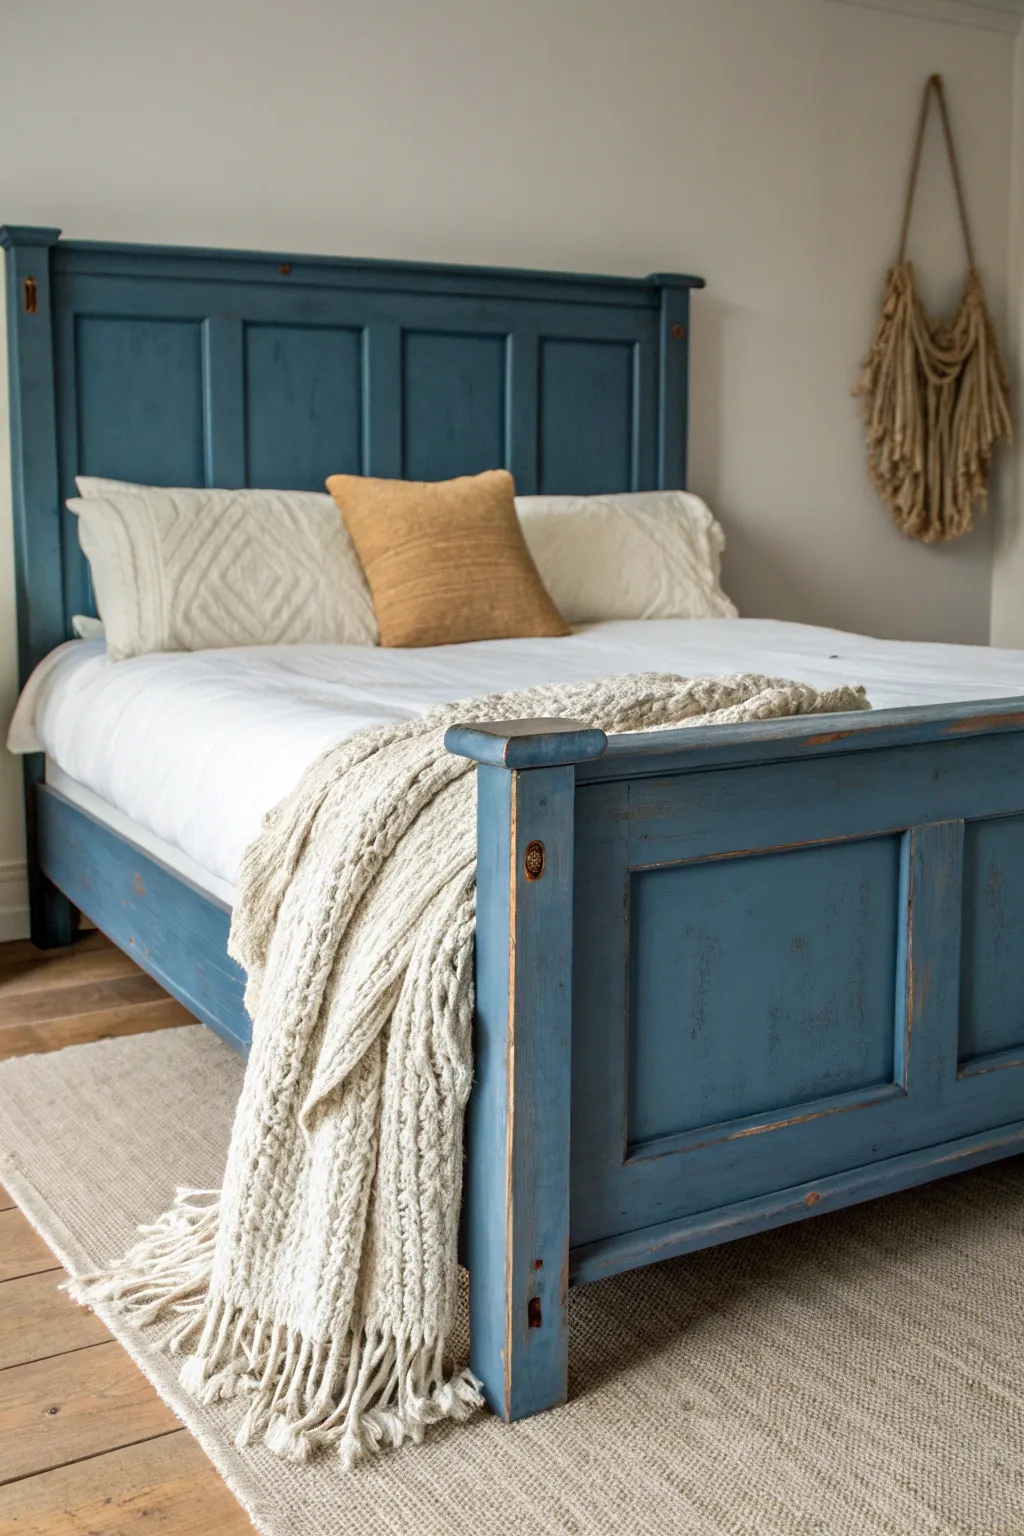
Transform an ordinary wooden bed frame into a rustic centerpiece with this heavily distressed finish. The blend of deep, dusty blue paint with exposed natural wood edges creates that perfectly aged, lived-in farmhouse aesthetic.
Step-by-Step
Materials
- Wooden bed frame (unfinished or previously finished)
- Sandpaper (80, 120, and 220 grit)
- Sanding block or orbital sander
- Primer (stain-blocking)
- Chalk-style paint or matte latex paint (Dusty Blue/Slate Blue)
- Clear furniture wax or matte polyurethane
- Dark antique wax (optional for depth)
- Paintbrushes (natural bristle for chalk paint, synthetic for latex)
- Clean, lint-free rags
- Tack cloth
- Drop cloths
- Vacuum with brush attachment
Step 1: Preparation & Sanding
-
Clean the Surface:
Begin by thoroughly cleaning the entire bed frame to remove dust, oils, or old furniture polish. A mixture of water and gentle dish soap works well, but ensure you wipe it dry immediately. -
Scuff Sanding:
Using 120-grit sandpaper, scuff the entire surface of the wood. You aren’t trying to strip it bare yet, just providing substantial ‘tooth’ for the paint to adhere to. -
Identify Distressed Areas:
Look at the high points, like the tops of the posts, the sharp corners of the panels, and the edges of the footboard. These are natural wear spots. I like to sand these areas slightly more aggressively now to expose the wood grain underneath. -
Dust Removal:
Vacuum up all the sanding dust using a brush attachment. Follow up by wiping everything down with a tack cloth to ensure a perfectly clean surface.
Step 2: Painting the Base
-
Selective Priming:
If your wood has heavy knots or dark tannins (like mahogany or pine), apply a stain-blocking primer. If you want more wood grain to show through later, you can skip priming the areas you plan to sand heavily. -
First Coat Application:
Apply your first coat of dusty blue chalk-style or matte paint. Don’t worry about perfect opacity here; long, smooth strokes following the grain are best. -
Proper Drying:
Let this first coat dry completely according to the manufacturer’s instructions. Chalk paint dries quickly, usually within 30-60 minutes. -
Second Coat Coverage:
Apply a second slightly thicker coat for solid coverage. Ensure the recessed areas of the panels and molding details are well-coated. -
Full Cure:
Allow the paint to dry fully, preferably overnight, to ensure it won’t peel or gum up during the distressing phase.
Oops! Sanded Too Much?
If you accidentally sand off too much paint, don’t panic. Just dry-brush a tiny amount of original paint back over the bare spot, let it dry, and lightly re-distress.
Step 3: Creating the Distressed Look
-
Edge Distressing:
Take a 120-grit sanding block to the edges you identified earlier. Apply firm pressure and sand through the blue paint until the raw wood shows through clearly. -
Panel Detailing:
Sand the raised molding around the rectangular panels on the footboard and headboard. The goal is to make the frame look like it has been rubbed against for decades. -
Random Surface Wear:
Use a finer 220-grit paper to randomly scuff flat areas in the center of the panels. Do this lightly to create color variation without stripping the paint entirely. -
Knock Down Texture:
Run a piece of 220-grit sandpaper lightly over the entire painted surface to smooth out brush strokes and create a buttery soft feel. -
Final Cleanup:
Wipe away all the fine blue dust created by the distressing process using a fresh tack cloth.
Wax Resist Method
Before painting, rub a candle or beeswax block on edges you want distressed. The paint won’t stick there, and ‘distressing’ becomes as easy as wiping it off later.
Step 4: Sealing and Protecting
-
Wax or Poly Application:
Apply a clear furniture wax with a round brush or a lint-free rag. Work in small sections, rubbing the wax into the porous chalk paint. -
Optional Aging:
If the exposed wood looks too ‘new,’ lightly dab a bit of dark antique wax over the raw edges and buff it out immediately. This mimics old, oxidized wood. -
Buffing:
Once the wax has hazed over (usually 10-15 minutes), buff the entire piece vigorously with a clean cotton cloth to create a soft, durable sheen.
Step back and admire how this timeless finish brings warmth and character to your bedroom
High-Gloss Lacquer-Look Frame
Transform a standard wooden bed frame into a sleek, modern centerpiece with a brilliant mirror-like finish. This project focuses on building up layers of high-gloss enamel to create that coveted lacquer-look sheen that bounces light around the room.
Step-by-Step
Materials
- Wooden bed frame (unfinished or previously painted)
- Medium and fine-grit sandpaper (120, 220, and 320-grit)
- Tack cloths
- High-quality bonding primer (oil-based recommended for smoothness)
- High-gloss enamel paint (white)
- Flotrol or similar paint conditioner
- High-density foam rollers (4-inch size)
- High-quality synthetic angular sash brush (2-inch)
- Painter’s tape
- Drop cloths
- Wood filler (if repairing heavy damage)
- Respirator mask (if using oil-based products)
Step 1: Preparation & Repairs
-
Disassemble the frame:
Start by taking the bed frame apart if possible. Remove the mattress, slats, and separate the headboard, footboard, and side rails to make painting all angles easier. -
Clean thoroughly:
Wipe down every inch of the wood with a degreasing cleaner to remove oils, dust, and grime that could interfere with adhesion. -
Fill imperfections:
Inspect the surfaces for deep scratches or dents. Fill these with wood filler, waiting for it to dry completely before proceeding. -
Sand the surface:
Sand the entire frame with 120-grit sandpaper to scuff the existing finish or smooth out raw wood. This creates ‘tooth’ for the primer to grip. -
Remove dust:
Vacuum up the sanding dust, then wipe the surface firmly with a tack cloth. Any remaining dust will leave bumps in your glossy finish.
Tip: The Wet Edge
Keep a ‘wet edge’ while painting. Never go back and brush over paint that has started to get tacky, or you will ruin the smooth gloss texture.
Step 2: Priming for Smoothness
-
Apply the first coat of primer:
Using a foam roller for flat areas and a brush for corners, apply a thin, even coat of high-quality bonding primer. Avoid heavy application to prevent drips. -
Sand the primer:
Once the primer is fully dry, lightly sand it with 220-grit sandpaper. This step is crucial for knocking down any texture or brush marks. -
Clean again:
Wipe away the fine primer dust with a fresh tack cloth. The surface should feel silky smooth to the touch before painting.
Step 3: Applying the High-Gloss Finish
-
Prepare the paint:
Mix your high-gloss enamel with a paint conditioner like Floetrol according to the manufacturer’s instructions. This helps the paint level out, reducing brush strokes significantly. -
Paint the details first:
Use the angular sash brush to paint the slats on the headboard and any intricate corners. I like to work wet-to-wet, so brush these areas quickly before moving to the flat surfaces. -
Roll the flat surfaces:
Immediately follow up with the foam roller on the large flat panels of the headboard and footboard. Roll slowly to avoid creating air bubbles in the enamel. -
Let it cure:
Allow this first coat to dry for at least 24 hours. High-gloss paint takes longer to set, and rushing this can ruin the finish. -
Sand between coats:
Very lightly sand the first coat with 320-grit sandpaper. You aren’t trying to remove paint, just polishing the surface to ensure the next layer bonds perfectly flat. -
Wipe down:
Use a tack cloth one more time to ensure absolutely zero dust particles remain on the surface. -
Apply the second coat:
Apply the second coat of enamel using the same method—brush details, then roll flats. This coat builds the deep shine. -
Assess and repeat if needed:
Check the finish after drying. For that ultra-deep lacquer look, a third thin coat (with sanding in between) often makes the difference between ‘painted’ and ‘factory finish’. -
Final cure:
Let the bed frame cure for 3-5 days before reassembling. The paint needs to harden fully so the mattress slats don’t stick to the frame.
Level Up: Polished Shine
For a mirror finish, once fully cured (after 2-3 weeks), buff the flat surfaces with automotive polishing compound and a microfiber cloth.
Once fully cured, reassemble your bed and enjoy the sleek, reflective elegance of your new lacquer-style frame


Dry-Brushed Details on Carvings
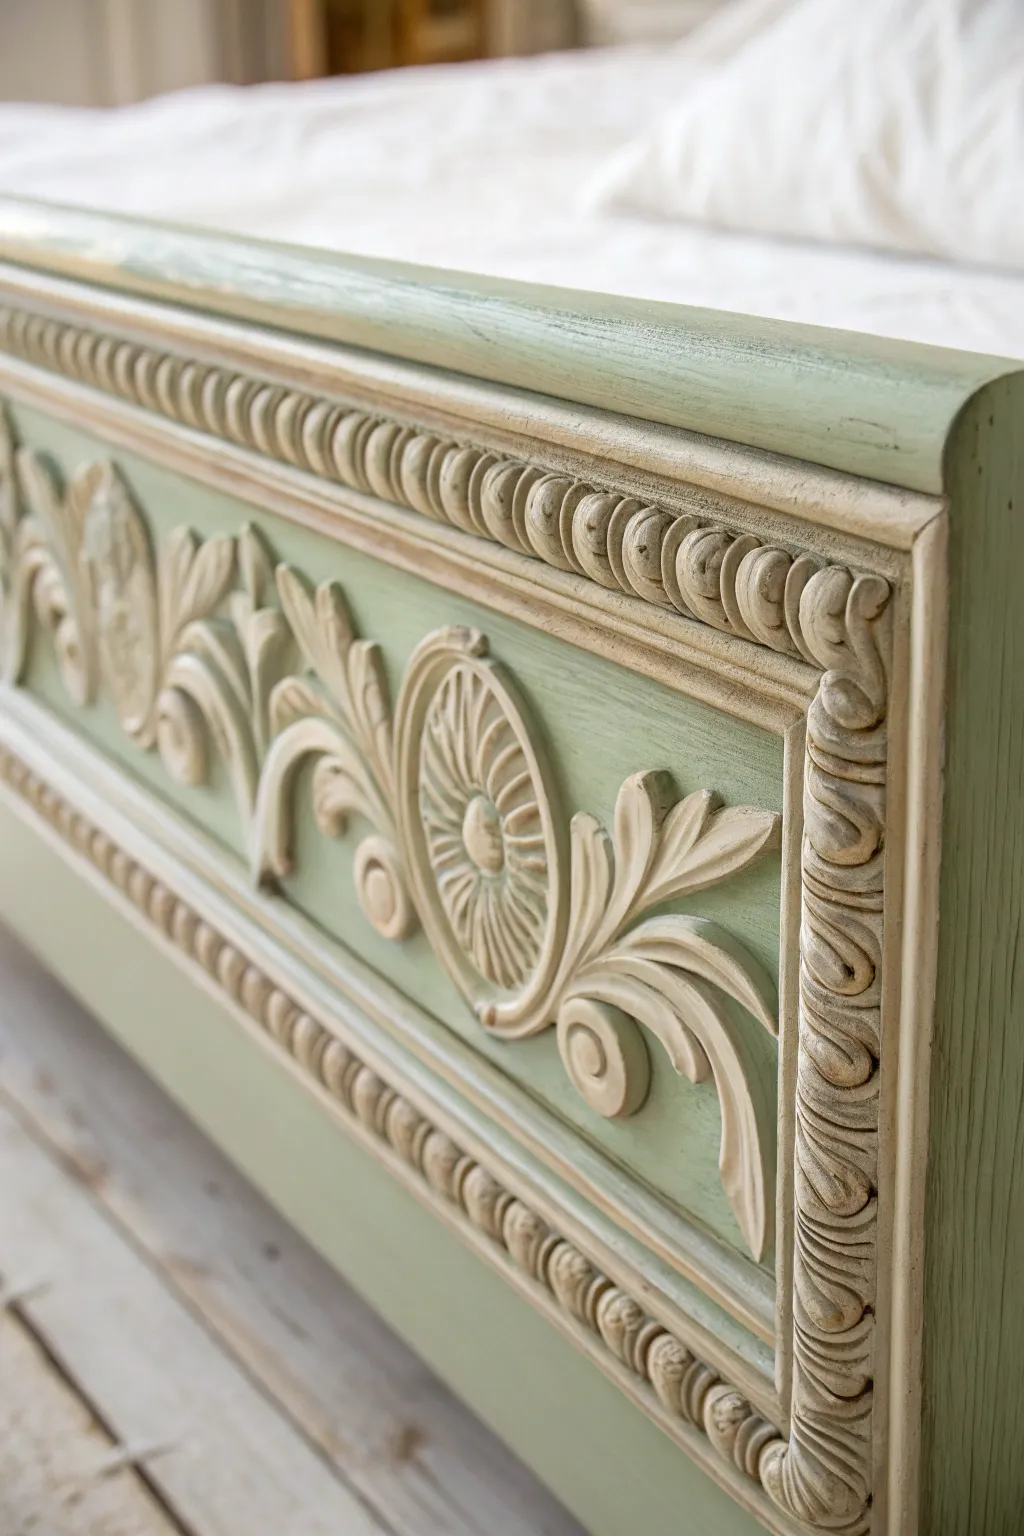
Transform a heavily carved wooden bed frame into a French country masterpiece using a subtle two-tone layering technique. This project highlights intricate woodwork by layering a muted sage green base with creamy, dry-brushed highlights for a dimensional, aged look.
Step-by-Step Guide
Materials
- Wooden bed frame with carved details
- Sandpaper (120 and 220 grit)
- Tack cloth
- High-quality primer (if painting over raw wood or dark stain)
- Chalk-style or matte mineral paint (Sage Green)
- Chalk-style or matte mineral paint (Creamy White/Off-White)
- Medium-sized synthetic oval brush (for base coat)
- Small round natural bristle brush (for dry brushing)
- Chip brush (optional, for distressing)
- Clear furniture wax
- Wax brush or lint-free cloth
- Cardboard or paper plate (for off-loading paint)
Step 1: Preparation and Base Coat
-
Clean the Surface:
Begin by thoroughly cleaning the entire bed frame with a degreasing cleaner to remove old oils, dust, or furniture polish, which ensures your paint adheres perfectly. -
Scuff Sanding:
Lightly sand the existing finish with 120-grit sandpaper; you aren’t removing the old finish entirely, just creating a ‘tooth’ for the new paint to grip. -
Dust Removal:
Wipe away all sanding residue with a tack cloth, paying special attention to the deep crevices in the carvings where dust likes to hide. -
Prime if Necessary:
If you are working with a dark wood bleed-through prone wood like mahogany, apply a coat of stain-blocking primer and let it dry completely. -
Base Coat Application:
Using your medium synthetic oval brush, apply the Sage Green paint over the entire piece. -
Work into Crevices:
Be intentional about pushing the bristles into the carved details, floral motifs, and recessed borders so no original wood shows through. -
Second Coat:
Allow the first coat to dry according to the manufacturer’s instructions (usually 1-2 hours), then apply a second coat for full opacity.
Too Heavy-Handed?
If you accidentally apply too much white paint, simply wipe it back quickly with a damp cloth while wet, or dry-brush a little of the original Sage Green over the mistake once it dries.
Step 2: The Dry-Brushing Technique
-
Prepare the Highlight Color:
Dip just the very tips of your small round natural bristle brush into the Creamy White paint. -
Off-Load the Paint:
Rub the brush vigorously onto a piece of cardboard or a paper plate until the brush appears almost dry and produces a scratchy, faint mark; this is the most critical step. -
Highlight the High Points:
Holding the brush at a low angle, lightly drag it across the raised areas of the carvings. -
Feathering the Edges:
Apply the white pigment to the ‘beaded’ trim and the tops of the floral scrolls, letting the brush skip naturally over the surface texture. -
Build Slowly:
Here I prefer to work in very light layers; it is much easier to add more white highlight than to cover it up if you apply too much at once. -
Add Depth to Flat Areas:
On the flat panels surrounding the carvings, use long, lighter sweeping motions with the dry brush to create subtle streaks that mimic wood grain or age. -
Refining the Look:
Step back periodically to check for balance, adding a touch more highlight to the most prominent curves of the moulding to make them pop.
Add an Aged Patina
For a darker antique look, apply a dark brown glaze or dark wax into the deepest crevices of the carvings before sealing with clear wax. This adds instant history.
Step 3: Protection and Finish
-
Final Sanding (Optional):
If the texture feels too rough, gently pass over the painted areas with 220-grit sandpaper to smooth the finish without removing the color. -
Wax Application:
Load a wax brush with clear furniture wax and massage it into the paint using circular motions. -
Buffing:
Wait for the wax to haze over (about 15-20 minutes), then buff firmly with a lint-free cloth to achieve a soft, protective sheen.
Step back and admire how the simple addition of dry-brushing has revealed the beautiful craftsmanship of your furniture.
Stencil Pattern on the Headboard Panel
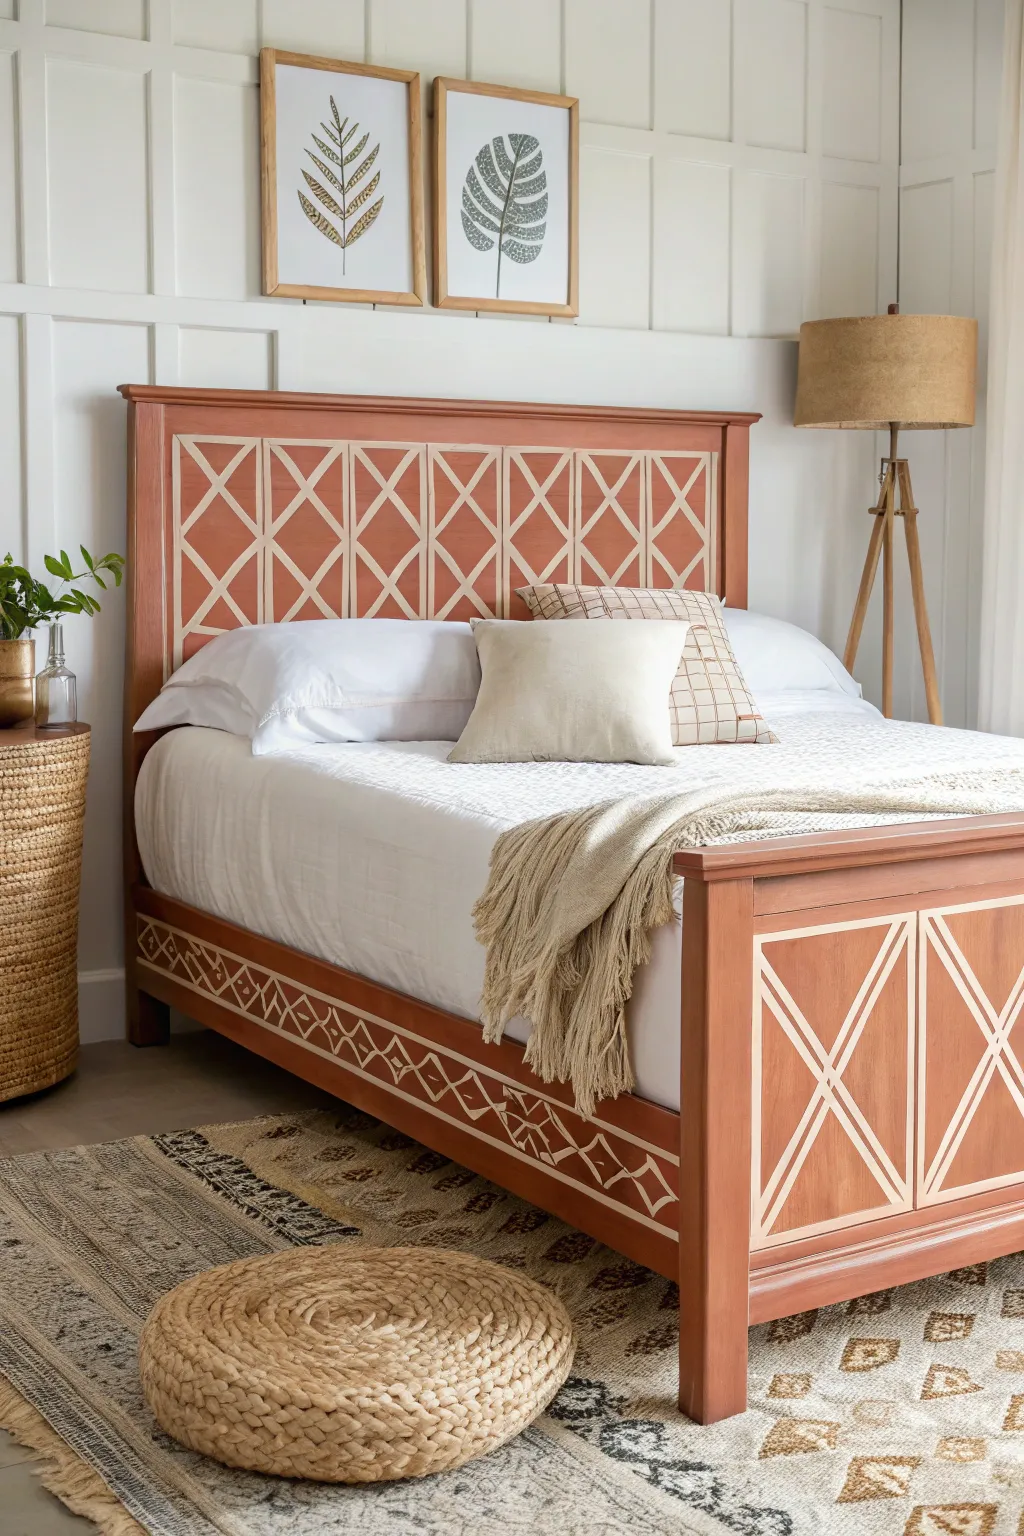
Transform a plain wooden bed frame into a bohemian masterpiece featuring a striking geometric pattern. By combining a warm terracotta base with creamy accents, this project creates a custom, high-end look on a budget.
How-To Guide
Materials
- Bed frame (sanded and prepped)
- Latex or chalk paint (Terracotta/Reddish-brown shade)
- Latex or chalk paint (Cream/Off-white shade)
- Geometric diamond stencil (large format)
- Painter’s tape
- Paint rollers (foam high-density)
- Small artist brushes (for touch-ups)
- Stencil adhesive spray
- Sandpaper (220-grit)
- Primer (if working with dark or previously finished wood)
- Matte polyurethane clear coat
- Measuring tape
- Paper towels
Step 1: Preparation & Base Coat
-
Clean and sand:
Begin by removing the mattress and thoroughly cleaning the bed frame to remove any oils or dust. Scuff-sand the entire surface with 220-grit sandpaper to give the new paint something to grip. -
Prime the surface:
If your bed frame has a dark stain or shiny finish, apply a coat of high-quality bonding primer. Let this dry completely according to the manufacturer’s instructions. -
Apply the base color:
Paint the entire bed frame with your chosen terracotta color. This warm, earthy tone serves as the background for the entire piece. Use long, smooth strokes or a roller for even coverage. -
Second coat:
Once the first coat is dry to the touch, apply a second coat of the terracotta paint to ensure full opacity and richness of color. -
Let it cure:
Allow the base coat to cure for at least 24 hours. This is crucial because if the paint is soft, the stencil adhesive might peel it up later.
Bleed-Proof Lines
Before rolling on the cream color, seal the stencil edges by rolling a very light layer of the BASE (terracotta) color first. This fills any gaps so the cream paint lines are crisp.
Step 2: Stenciling the Headboard
-
Plan the layout:
Measure the recessed panel of your headboard. Locate the center point and mark it lightly with a pencil. Your stencil pattern should radiate from the center for symmetry. -
Prepare the stencil:
Spray the back of your geometric diamond stencil with a light mist of stencil adhesive. Let it get tacky for a minute before positioning it on the headboard. -
Position the stencil:
Align the center of your stencil design with the center mark on the headboard. Press firmly to ensure all the fine bridges of the stencil are flat against the wood. -
Load the roller:
Pour a small amount of cream paint onto a paper plate or tray. Load a dense foam roller, then roll most of the paint off onto a paper towel until the roller feels almost dry. -
Apply the stencil paint:
Roll over the stencil with light pressure. I find that building up the color in thin layers prevents bleed-under much better than one thick coat. -
Remove and repeat:
Carefully peel back the stencil while the paint is still slightly damp. Reposition the stencil to continue the pattern across the panel, aligning it with the previously painted design. -
Fill the edges:
When you reach the edges of the recessed panel, use painter’s tape to mask off the raised frame. Bending the stencil into corners can be tricky, so press firmly and use a stippling brush if the roller doesn’t reach.
Step 3: Side Rails & Footboard
-
Stencil the side rails:
Apply a simpler version of the pattern or a single row of diamonds along the side rails of the bed frame. Ensure the height of the pattern is centered on the rail. -
Stencil the footboard panel:
Repeat the main geometric pattern on the footboard’s recessed panel, just as you did for the headboard, ensuring the center alignment matches the headboard. -
Touch up lines:
Once all stenciling is dry, inspect your work. Use a small artist brush and the terracotta base paint to meticulously correct any areas where the cream paint might have bled under the stencil.
Distressed Vibe
For a rustic look, lightly sand the dried stencil pattern with fine-grit sandpaper before sealing. This reveals bits of the terracotta underneath for an aged effect.
Step 4: Protection & Finish
-
Clean surface:
Gently wipe down the entire bed frame with a tack cloth to remove any stray dust particles before sealing. -
Seal the deal:
Apply a clear matte polyurethane topcoat over the entire bed frame. This protects your hard work from scratches and wear, especially on the footboard. -
Final cure:
Let the topcoat cure for at least 48 hours before putting the mattress and bedding back on to ensure the finish is hard and durable.
Step back and admire how a simple repeated pattern has turned your sleeping space into a stylish sanctuary
Hand-Painted Thin Stripes for Tailored Style
Transform a plain wooden bed frame into a tailored masterpiece with this faux-inlay ticking stripe technique. The combination of a whitewashed wood grain and crisp blue stripes mimics high-end upholstery fabric for a classic, sophisticated look.
Step-by-Step Tutorial
Materials
- Wooden bed frame (unfinished or stripped)
- White chalk paint or milk paint
- Soft blue acrylic or latex paint (e.g., French Blue or Chambray)
- Painter’s tape (various widths: 1/4 inch and 1 inch prefered)
- Fine-grit sandpaper (220-grit)
- Medium-grit sandpaper (120-grit)
- Wide flat paintbrush (2-3 inch)
- Small artist detail brush (flat, straight edge)
- Ruler or measuring tape
- Clear matte polycrylic sealer
- Lint-free rags
- Pencil
Step 1: Preparation & Base Coat
-
Clean and sand surfaces:
Begin by thoroughly cleaning the bed frame with a degreaser if it’s old, then sand the entire surface with 120-grit sandpaper to remove any glossy finish and create a tooth for the paint. -
Create the whitewash mix:
Mix your white chalk paint with water in a 1:1 ratio. You want a consistency closer to heavy cream than thick paint, allowing some wood grain to peek through. -
Apply the whitewash:
Brush the watered-down white paint onto the frame, working in sections. Before it dries completely, gently wipe it back with a lint-free rag to achieve that soft, weathered look. -
Dry and smooth:
Allow the base coat to dry for at least 4 hours. Once dry, lightly sand everything with 220-grit sandpaper for a buttery smooth finish.
Bleeding Lines?
If paint bleeds under the tape, wait for it to extend dry completely. Then, use a small artist brush and the base white color to touch up and ‘erase’ the jagged edges.
Step 2: Planning the Stripes
-
Define the striped zones:
Identify the panels where you want the stripes to go—typically the recessed panels of the headboard and footboard, and along the flat side rails. Use pencil marks to define your boundaries. -
Measure the center:
Find the exact center of your first panel. Mark a vertical line lightly with a pencil. This ensures your pattern stays symmetrical. -
Apply the primary tape lines:
Place a strip of 1-inch painter’s tape directly over your center mark. This will become a white space. -
Create the stripe pattern:
Working outward from the center, place strips of tape side-by-side. To get the specific look in the photo, alternate widths or use spacers. I find using a piece of spare tape as a spacer is the easiest way to keep gaps consistent. -
Seal the tape edges:
This is crucial for crisp lines: Brush a very thin layer of your *white base color* over the edges of the tape. This prevents the blue paint from bleeding underneath.
Step 3: Painting the Detail
-
Paint the blue stripes:
Using the soft blue paint, fill in the exposed wood gaps between your tape strips. Use a smaller flat brush to avoid overloading the paint. -
Second coat application:
Once the first coat is dry to the touch, apply a second thin coat of blue for solid coverage. -
Remove tape carefully:
While the second coat is still slightly tacky (do not wait for it to fully cure), peel back the tape at a 45-degree angle to reveal your clean lines. -
Add hand-painted details:
To mimic the ‘stitched’ look seen in the photo, take your ultra-fine artist brush and add tiny, dashed lines within the wider dark stripes if desired, or leave them solid for a bolder look.
Faux Fabric Texture
Before the blue paint dries, drag a dry, stiff-bristled brush vertically through the paint. This creates subtle striations that mimic the weave of linen fabric.
Step 4: Finishing Touches
-
Distress the stripes:
Once the blue paint is fully dry (overnight is best), very lightly sand over the stripes with high-grit sandpaper. This softens the stark contrast and makes it look like worn fabric. -
Dark wax accents (optional):
If you want more depth on the finials or corners, lightly brush a tinted glaze or dark wax into the crevices and wipe away the excess immediately. -
Seal the frame:
Apply two coats of clear matte polycrylic sealer over the entire bed frame to protect your handiwork from scratches and wear.
Enjoy the serene, tailored atmosphere your new custom bed frame brings to the room
Ombre Fade from Footboard to Headboard
Transform a plain wooden bed frame into a warm, inviting masterpiece with this desert-inspired ombre effect. Using diluted paints or colored stains, you can create a soft, rhythmic landscape that mimics the rolling hills of a sunset horizon right on your headboard and footboard.
Step-by-Step
Materials
- Wooden bed frame with flat recessed panels
- Sandpaper (120 and 220 grit)
- Clean tack cloth
- Masking tape or painter’s tape
- Water-based paints (terracotta, burnt sienna, peach, cream)
- Water for diluting (or glazing medium)
- Wide flat synthetic brush (2-3 inches)
- Medium round brush for details
- Clean rags or lint-free shop towels
- Clear matte polyurethane sealant
Step 1: Preparation & Surface Design
-
Sand the panels:
Begin by sanding the recessed panels of both the headboard and footboard. Start with 120-grit to remove any old shiny varnish, then finish with 220-grit for a smooth base. The wood needs to be raw enough to absorb the color wash. -
Clean the surface:
Wipe away all sanding dust thoroughly using a tack cloth. Any remaining dust will create gritty textures in your smooth landscape. -
Tape the edges:
Apply painter’s tape carefully around the inner frame where the panel meets the structural wood. This ensures your painted landscape helps stay contained within the panel and doesn’t bleed onto the main frame. -
Plan your horizon lines:
Lightly sketch wavy, organic horizon lines across the panels with a pencil. Aim for three to four distinct layers, varying the height to mimic rolling hills or distant mountains.
Step 2: Creating the Paint Wash
-
Mix your washes:
In separate containers, mix your acrylic paints with water. I usually aim for a 1:1 or 2:1 water-to-paint ratio. You want the consistency of heavy cream so it acts like a semi-transparent stain rather than an opaque coat. -
Test the opacity:
Brush a small amount of your mixture onto a scrap piece of wood or an inconspicuous spot. The wood grain should subtly show through the color.
Bleeding Lines?
If paint bleeds under the tape, wait for it to dry fully. Then, gently scrape the excess off the unpainted wood with a razor blade or sand it back carefully with folded sandpaper.
Step 3: Painting the Landscape
-
Paint the darkest bottom layer:
Start at the very bottom of the panel with your darkest color, such as a deep burnt sienna or rust. Use the wide flat brush to apply the wash, following the grain of the wood horizontally. -
Wipe for texture:
Wait about 30 seconds for the wood to absorb the pigment, then gently wipe the surface with a lint-free rag. This pushes color into the grain and removes excess paint for a stained look. -
Painting the middle range:
Move to the next section up, switching to your terracotta or medium peach tone. Carefully paint up to the pencil line of your bottom layer. It’s okay if they slightly overlap; it mimics shadows. -
Feathering the edges:
While the paint is still damp, use a slightly dry brush to soften the transition line between the bottom dark layer and this new middle layer. You don’t want a hard, cartoony outline. -
Apply the lightest layer:
For the top hill section, use your lightest cream or pale peach wash. Apply it gently, wiping it back almost immediately so it barely tints the wood, allowing the most natural grain to show. -
Sky transition:
For the remaining space at the top of the panel, you can either leave the natural wood exposed or apply a heavily diluted white wash to suggest a hazy sky. -
Repeat on the second panel:
Recreate the process on the other board (headboard or footboard). Don’t worry about identical symmetry; organic variations make the piece feel more authentic.
Add Metallics
For a magical touch, run a very thin line of gold leaf paint along just the top edge of the ‘hills’ to catch the light, mimicking the sun hitting the landscape at golden hour.
Step 4: Sealing and Finishing
-
Let it cure:
Allow the paint washes to dry completely. Since the paint is watered down, this might take only 1-2 hours depending on humidity, but overnight is safest. -
Remove the tape:
Carefully peel back the painter’s tape at a 45-degree angle to reveal your crisp edges against the unpainted frame. -
Apply the first coat of sealer:
Stir your matte polyurethane gently (don’t shake, or you’ll get bubbles). Apply a thin, even coat over the entire panel using a clean synthetic brush. -
Light sand and second coat:
Once the first coat is dry, lightly sand with high-grit paper if it feels rough (grain raise is common with water-based products). Wipe clean and apply a second, final coat of sealer for durability.
Step back and admire how the warm tones of your new landscape bring a cozy, grounded energy to the bedroom space
Geometric Color Blocking on a Flat Headboard
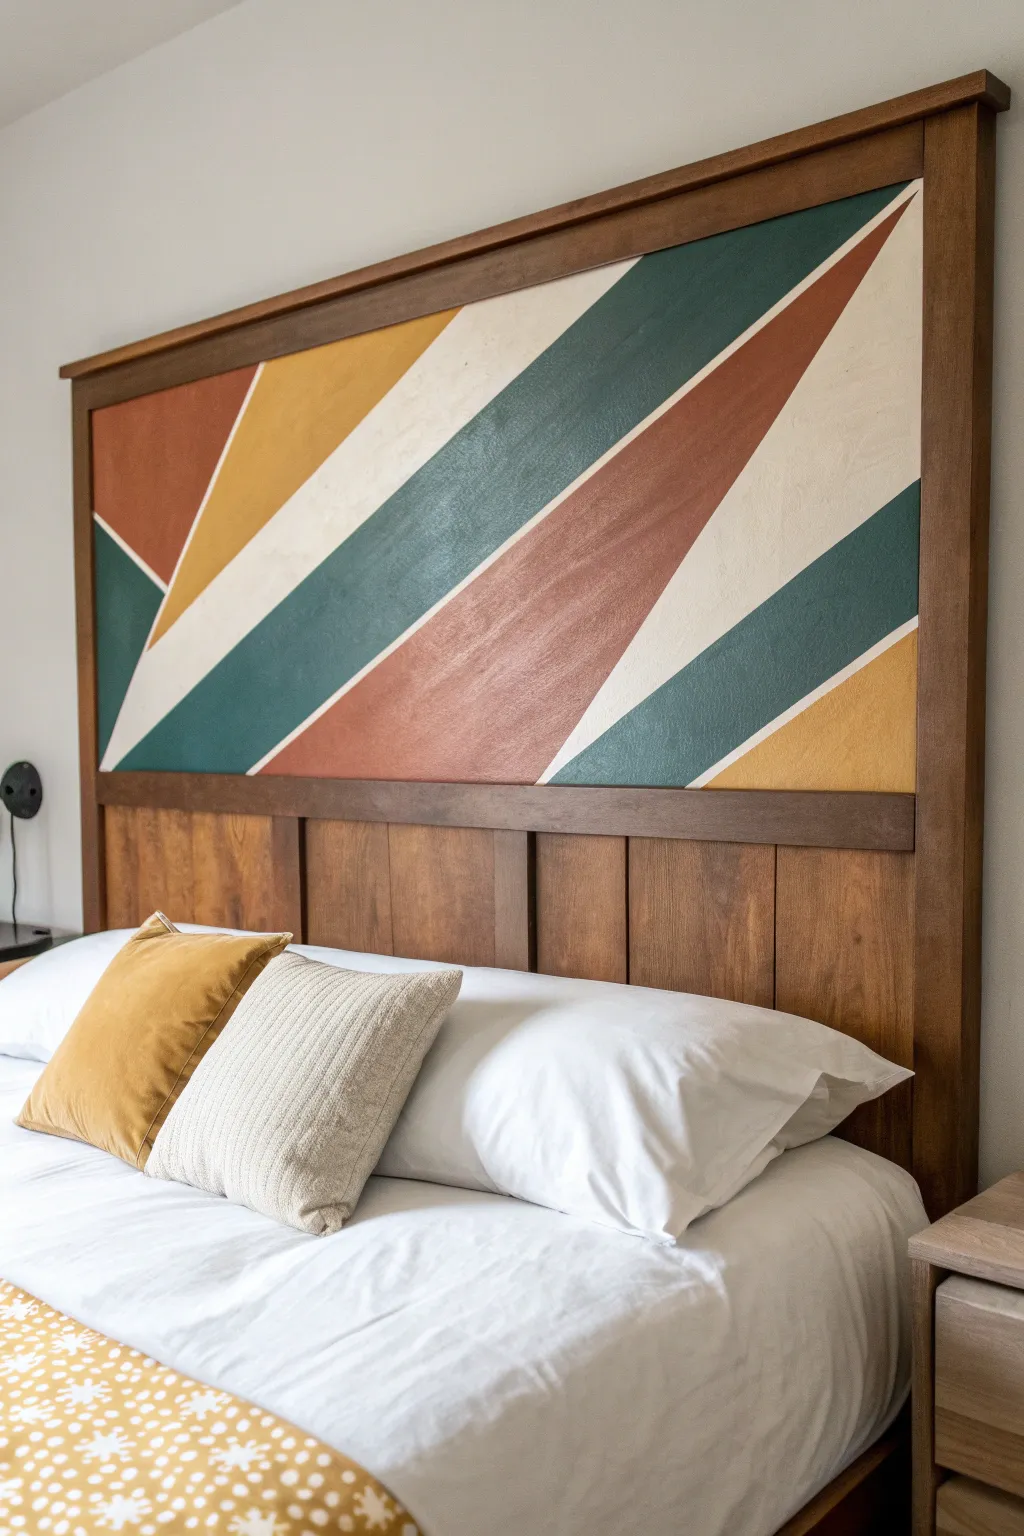
Transform a plain flat-panel headboard into a stunning focal point with this bold, geometric design inspired by mid-century modern aesthetics. Using crisp painter’s tape lines and a warm, earthy color palette, you can create a custom piece of art right on your furniture.
Step-by-Step Tutorial
Materials
- Wooden headboard with a flat central panel
- Sandpaper (120 and 220 grit)
- Clean tack cloths
- Primer suitable for wood (if painting over raw wood or dark stain)
- Painter’s tape (high-quality delicate surface tape recommended)
- Latex or chalk paint in four colors: Deep Teal, Terra Cotta, Mustard Yellow, and Cream
- Small foam rollers (4-inch)
- Small angled sash brush (1.5-inch)
- Clear matte polyurethane topcoat
- Ruler or straight edge
- Pencil
Step 1: Preparation & Base Coat
-
Clean surface:
Begin by thoroughly cleaning the headboard panel to remove any dust, oils, or furniture polish that could prevent paint adhesion. -
Light sanding:
Scuff the surface of the flat panel lightly with 120-grit sandpaper. You aren’t trying to strip it entirely, just creating ‘tooth’ for the paint to grab onto. -
Wipe down:
Remove all sanding dust with a tacky cloth or a damp rag. Let it dry completely before moving forward. -
Prime the panel:
Apply a coat of primer to the flat panel area only. This ensures your colors will pop and creates a uniform surface, especially if the original wood is dark. -
Paint the background:
Once the primer is dry, paint the entire panel with your Cream color. This will serve as the lightest stripes in the final design and ensures you have a solid base. -
Second coat:
Apply a second coat of Cream paint for solid coverage. Allow this base layer to cure for at least 24 hours so the tape doesn’t peel it up later.
Step 2: Taping the Design
-
Establish the main diagonal:
Using your straight edge, lightly draw a pencil line from the top right corner area down toward the bottom left to established your primary angle. -
Apply tape lines:
Apply your painter’s tape over your pencil marks. Create 4-5 major diagonal sections across the board. Remember, the wood showing between the colors in the final look is actually the tape itself. -
Add intersecting lines:
Create the triangle shapes by adding two or three shorter tape lines that intersect perpendicular to your main diagonal lines. -
Seal the edges:
I always like to run a credit card or flat edge firmly over all the tape strips to ensure a tight seal against the wood. -
Prevent bleed:
To get perfectly crisp lines, lightly brush a very thin layer of your base Cream paint over the edges of the tape. This seals any tiny gaps with the base color so the subsequent colors won’t bleed under.
Clean Lines Secret
If you don’t have base color to seal tape edges, use matte finish Mod Podge instead. It dries clear and creating an invisible barrier against paint bleed.
Step 3: Painting & Finishing
-
Assign colors:
Plan which sections get which color. Aim for balance—don’t put two large Terra Cotta sections right next to each other. -
Apply first color:
Using a small foam roller, apply your Deep Teal to its designated sections. Use a light hand to avoid pushing paint under the tape. -
Apply remaining colors:
Continue with the Mustard Yellow and Terra Cotta sections, using a fresh or washed roller for each color family. -
Second coats:
Allow the first coat to dry to the touch, then apply a second coat to ensure the colors are rich and opaque. -
Peel wet:
This is crucial: peel the tape off slowly at a 45-degree angle while the final coat of paint is still slightly wet. This prevents the paint from drying into a film that pulls away with the tape. -
Touch ups:
If any tiny bleeds occurred, wait for everything to be bone dry, then use a tiny artist’s brush and your Cream paint to tidy up the lines. -
Topcoat:
Finish by applying a clear matte polyurethane over the entire painted panel to protect your artwork from scratches and wear.
Tape Peeling Panic
If paint lifts when removing tape, your layers were likely too thick or dry. Score the edge gently with a craft knife before continuing to peel.
Step back and admire how a simple weekend paint project has completely elevated the energy of your bedroom
Faux Wood Grain Over a Painted Base
Achieve the high-end look of mixed materials by adding a rich, faux wood finish to the structural posts of a painted bed frame. This technique mimics the warmth of walnut against crisp cream panels, transforming a standard all-wood or laminate frame into a custom designer piece.
Step-by-Step
Materials
- Bed frame (solid wood or veneer)
- Sandpaper (120-grit and 220-grit)
- Painter’s tape (high quality)
- Primer (bonding primer)
- Interior furniture paint (Cream/Off-White)
- Faux glaze medium
- Gel stain or heavy-body acrylic paint (Walnut or Dark Oak color)
- Chip brush or wood graining tool
- Small foam roller
- Sealant (Polycrylic or clear wax)
- Tack cloth
- Drop cloths
Step 1: Preparation & Mapping
-
Disassemble and clean:
If possible, take the bed apart to work on the headboard and footboard flat. Clean all surfaces thoroughly with a degreaser to remove oils or existing furniture polish. -
Initial sanding:
Scuff sand the entire bed frame with 120-grit sandpaper. You aren’t trying to strip it bare, just creating ‘tooth’ for the new finish to stick to. -
Remove dust:
Wipe everything down with a tack cloth to ensure absolutely no dust remains before you start taping. -
Strategic taping:
Decide which parts will be ‘wood’ and which will be painted. In the image, the top rails, side posts, and feet are wood-toned, while inner panels are white. Apply painter’s tape precisely along the seams where these sections meet.
Glaze Drying Too Fast?
If the glaze gets sticky before you finish graining, mist it lightly with water (if water-based) or add more extender. Work in smaller sections.
Step 2: The Painted Base
-
Prime the panels:
Apply a coat of bonding primer to the sections designated for the cream paint. Let this dry completely according to the can’s instructions. -
First coat of cream:
Using a small foam roller for a smooth finish, apply your cream or off-white furniture paint to the primed areas. Use a small angled brush to get into the grooves of the shiplap-style panels. -
Sand between coats:
Once dry, lightly sand the painted areas with 220-grit paper to smooth out any brush strokes, then wipe clean. -
Final paint coat:
Apply a second coat of the cream paint for full opacity. Allow this to cure fully—I usually give it 24 hours just to be safe—before moving to the faux wood sections.
Step 3: Creating the Faux Wood Grain
-
Reverse taping:
Once the cream paint is fully hard, remove the old tape. Now, carefully tape over the *newly painted* cream edges to protect them from the faux wood glaze. -
Base color for wood:
Paint the ‘wood’ sections (posts and rail) with a dark beige or tan base coat. This lighter color will shine through the grain to create depth. -
Mix the glaze:
Mix 4 parts clear glazing medium with 1 part dark brown acrylic paint or gel stain. You want a translucent mixture that stays wet long enough to manipulate. -
Apply the glaze:
Working in sections (one post at a time), brush on the dark glaze mixture generously. -
Create the grain:
While the glaze is wet, drag a dry chip brush through it in long, continuous vertical strokes. The rough bristles will remove some glaze, revealing the tan base underneath to look like wood grain. -
Add detail steps:
Occasionally wiggle the brush slightly or start a stroke from a different point to simulate natural imperfections in timber. -
Top rail technique:
For the horizontal top rail, make sure your grain strokes run horizontally (left to right) to mimic how a real piece of lumber would be constructed. -
Dry and assess:
Let the glaze dry. If the effect is too subtle, you can add a second, very thin layer of glaze to darken specific areas like corners or knots.
Level Up: Texture
Use a specialized ‘rocker’ graining tool on the wide flat posts to create distinct faux knots for a more rustic, farmhouse timber appearance.
Step 4: Sealing the Look
-
Remove tape:
Peel off the painter’s tape while the final glaze layer is tacky (not fully dry) to ensure a crisp line without peeling up paint. -
Protect the finish:
Once everything is bone dry (give it at least 24 hours), apply a clear Polycrylic topcoat in a satin or matte finish over the entire bed frame to protect your handiwork.
Step back and admire how a simple paint job has given your bedroom a sophisticated, custom-furniture focal point
Metallic Accents on Trim and Hardware Areas
Transform a standard wooden bed frame into a regal centerpiece by combining a soft, neutral base coat with brilliant metallic highlights. This project focuses on applying gold leaf or metallic paint to key architectural details like finials and trim to create a sophisticated, high-end look.
How-To Guide
Materials
- Wooden bed frame (cleaned and sanded)
- High-quality furniture primer
- Soft beige or cream latex satin paint
- Liquid gold leaf or high-pigment metallic gold paint
- Painter’s tape (various widths)
- Medium and fine grit sandpaper (120 and 220 grit)
- Tack cloth
- Small angled sash brush
- Fine detail artist brushes
- Foam roller and tray
- Drop cloths
- Clear polycrylic sealer (satin finish)
Step 1: Preparation and Base Coat
-
Clean the Frame:
Begin by thoroughly cleaning the entire bed frame with a degreasing cleaner to remove oils and dust. -
Sand for Adhesion:
Scuff sand all surfaces with 120-grit sandpaper; you don’t need to remove old finish entirely, just create a ‘tooth’ for the new paint to grab. -
Remove Dust:
Wipe away all sanding residue using a tack cloth or a damp rag, ensuring no dust remains in the corners or molding details. -
Tape Off Hardware:
If there are metal brackets or bolts you can’t remove, meticulously cover them with painter’s tape. -
Apply Primer:
Brush on a coat of high-quality furniture primer, paying special attention to the routed panels and turned posts. -
Smooth the Primer:
Once the primer is fully dry, lightly sand with 220-grit paper to knock down any brush strokes or raised grain. -
Paint the Base Color:
Apply the first coat of your beige or cream satin paint using a foam roller for flat areas and an angled brush for corners. -
Apply Second Coat:
After the recommended drying time (usually 4-6 hours), apply a second coat for full, opaque coverage and let it cure for at least 24 hours before adding accents.
Bleeding Gold Lines?
If gold seeps under tape, wait for it to dry fully. Then, gently scrape the excess away with a sharp craft knife or touch up with the base wall color.
Step 2: Adding the Gold Accents
-
Tape for Crisp Lines:
Use high-quality painter’s tape to mask off the areas surrounding the trim you plan to gild; press the edges down firmly to prevent bleed-through. -
Paint the Top Rail:
Apply your liquid gold leaf or metallic paint along the very top edge of the headboard and footboard rail, using a steady hand. -
Accent the Finials:
Using a small artist brush, carefully paint the turned finials atop the posts; I find rotating the brush rather than the brush handle helps get into the grooves. -
Detail the Post Caps:
Extend the gold paint down to the square capital block immediately beneath the finial to create a cohesive look. -
Highlight the Feet:
Paint the very bottom turned feet of the bed posts in gold, creating a grounded, dipped-leg effect. -
Add Decorative Dots:
If your bed frame has decorative buttons or hardware covers near the base, carefully dab them with gold to match the finials. -
Remove Tape:
Peel away the painter’s tape while the gold paint is still slightly tacky to avoid pulling up dry flakes of metallic leaf. -
Touch Up:
Use a tiny brush and your base beige color to correct any gold smudges or uneven lines. -
Seal the Finish:
Apply two coats of clear satin polycrylic over the entire frame, being gentle over the metallic areas to ensure they don’t dull.
Brilliance Boost
For the brightest shine, use an oil-based liquid gold leaf rather than standard metallic acrylic paint. The reflection is far superior.
Now you have a stunning, hotel-worthy bed frame that anchors your bedroom with a touch of luxury
Speckled Terrazzo-Inspired Finish
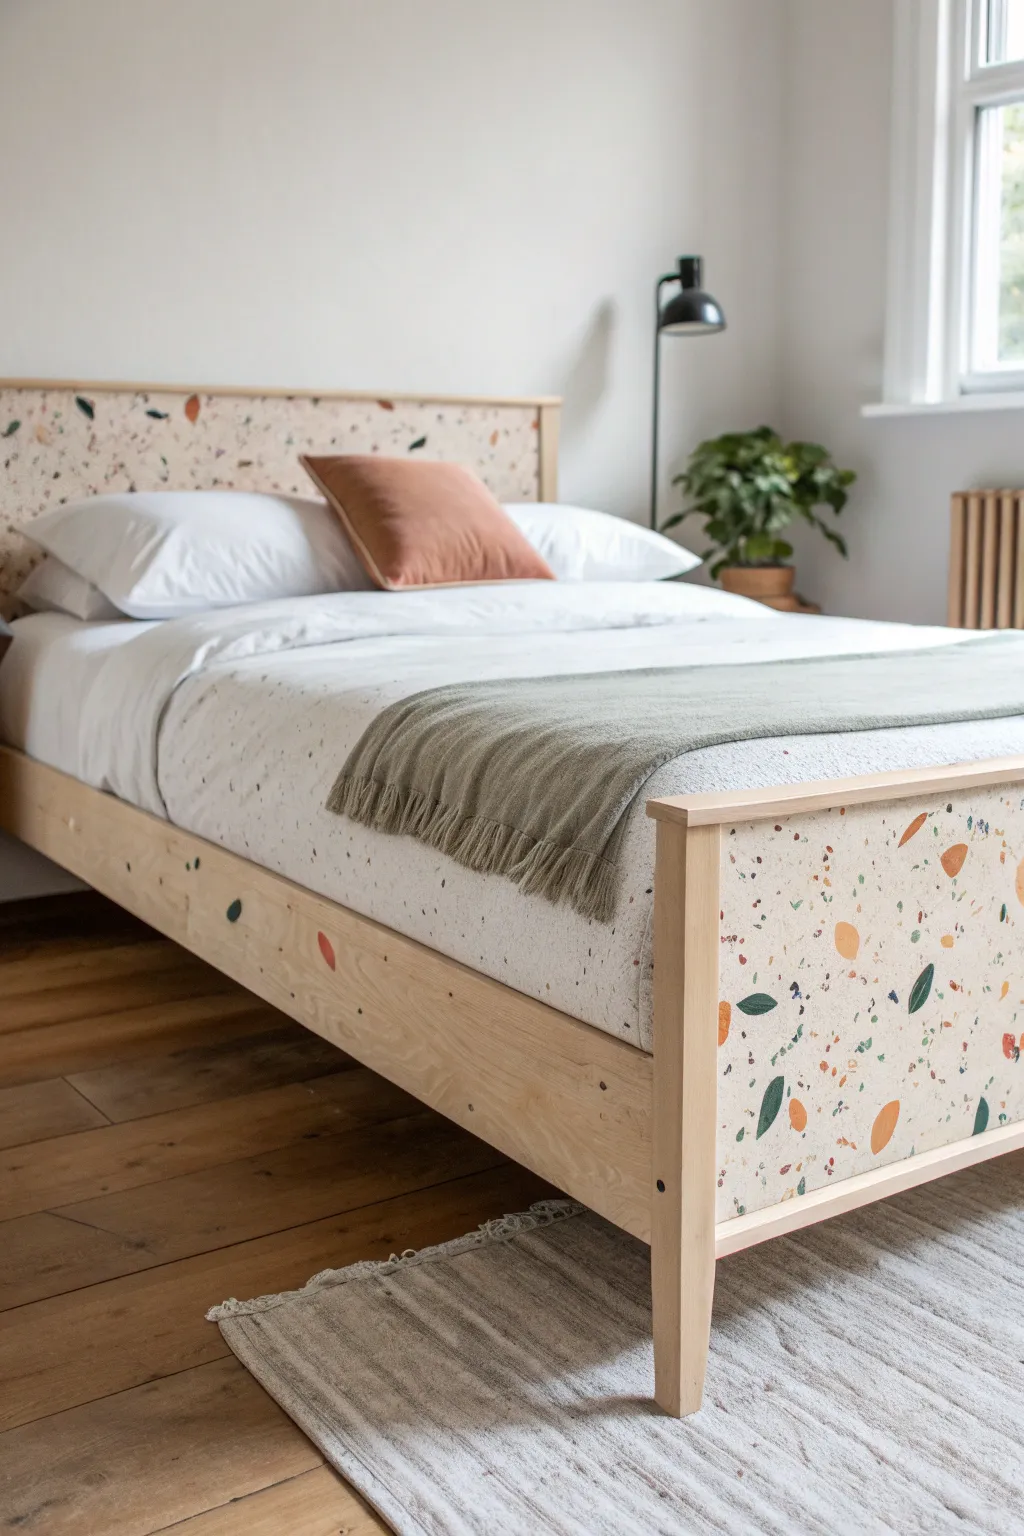
Bring the timeless charm of Italian flooring to your bedroom with this hand-painted terrazzo effect. This project transforms a plain wooden bed frame into a modern statement piece featuring organic shapes in earthy, muted tones.
Detailed Instructions
Materials
- Unfinished wooden bed frame (or existing frame to sand down)
- Sandpaper (120 and 220 grit)
- Primer (wood safe)
- Cream or off-white latex or acrylic paint (base coat)
- Acrylic paints (terracotta orange, deep teal/forest green, mustard yellow, light grey)
- Assorted paintbrushes (medium flat brush, small round detail brush)
- Old toothbrush or stiffness bristle brush
- Painter’s tape
- Clear matte polyurethane topcoat
- Drop cloth
- Palette or paper plate
Step 1: Preparation & Base Coat
-
Prepare the surface:
Begin by removing the mattress and bedding. If your bed frame is already finished with a varnish or gloss, sand the headboard and footboard panels thoroughly with 120-grit sandpaper to remove the sheen. Wipe away all dust with a damp cloth. -
Tape the edges:
Use painter’s tape to mask off the wooden rails and legs if you want to keep them natural wood, as seen in the photo. Press the tape down firmly to prevent paint bleed. -
Prime the panels:
Apply a coat of primer to the areas you intend to paint. This ensures your base color adheres well and hides the wood grain for a smoother, stone-like appearance. Let it dry completely. -
Apply the background color:
Paint the primed panels with your cream or off-white base color. Use a high-quality brush or a mini foam roller for a smooth finish without brushstrokes. Apply two coats, allowing adequate drying time between each.
Uneven Splatter?
If your toothbrush splatter comes out in big globs rather than mist, blot the excess paint onto a paper towel first. The brush should be damp with paint, not dripping wet.
Step 2: Creating the Terrazzo Pattern
-
Plan your palette:
Pour small amounts of your acrylic colors (terracotta, teal, mustard) onto your palette. I like to keep a scrap piece of paper nearby to test color combinations before committing to the furniture. -
Paint large shapes first:
Using a medium flat brush, start painting the largest ‘chips’ of stone. Create organic, irregular shapes—some triangles with soft corners, some bean shapes, some rough squares. Distribute these randomly across the panel. -
Vary the colors:
Switch colors frequently as you add these large shapes. Aim for a balanced mix where no single color dominates one specific area. Don’t overthink the placement; randomness is key to the terrazzo look. -
Add medium details:
Switch to a smaller brush and add medium-sized shapes in the gaps between your larger ones. These should be smaller fragments, roughly the size of a coin. -
Layering the look:
It is okay if a few shapes touch or slightly overlap, but generally, you want ‘grout’ space (the cream background) visible between most of your painted stones. -
Introduce the speckles:
Now for the texture. Dip an old toothbrush or a stiff bristle brush into watered-down grey or black paint. Use your thumb to flick the bristles, spraying a fine mist of tiny dots over the entire surface. -
Add colored speckles:
Repeat the flicking technique with your main colors (terracotta and teal). This mimics the tiny aggregate found in real terrazzo and ties the whole design together. -
Hand-paint tiny fragments:
If the splatter feels too sparse in areas, use your smallest detail brush to manually paint tiny, jagged specks to fill in any awkward empty spaces.
Design Balance Tip
Step back frequently! View the headboard from across the room every 10 minutes. It’s easier to spot empty zones or color clusters from a distance than up close.
Step 3: Finishing Touches
-
Dry thoroughly:
Allow the paint to cure fully. Since you have layers of acrylic and splatter, give it at least 24 hours to ensure everything is hardened. -
Remove the tape:
Carefully peel back the painter’s tape at a 45-degree angle. Do this slowly to ensure you don’t pull up any of your fresh paint. -
Seal the deal:
Protect your artwork with a clear matte polyurethane topcoat. This is essential for a bed frame, as it will protect against scuffs and scratches from pillows or movement. -
Spot sand (optional):
If the splatter created any rough peaks, do a very light pass with extra-fine sandpaper (220-grit or higher) before applying a second coat of sealer for a buttery smooth finish. -
Final assembly:
Once the sealer is non-tacky and fully cured, replace your mattress and style with solid colored bedding that complements your new terrazzo tones.
Now you have a custom, artful bed frame that serves as the perfect centerpiece for a relaxing bedroom retreat
Storybook Mural on the Headboard
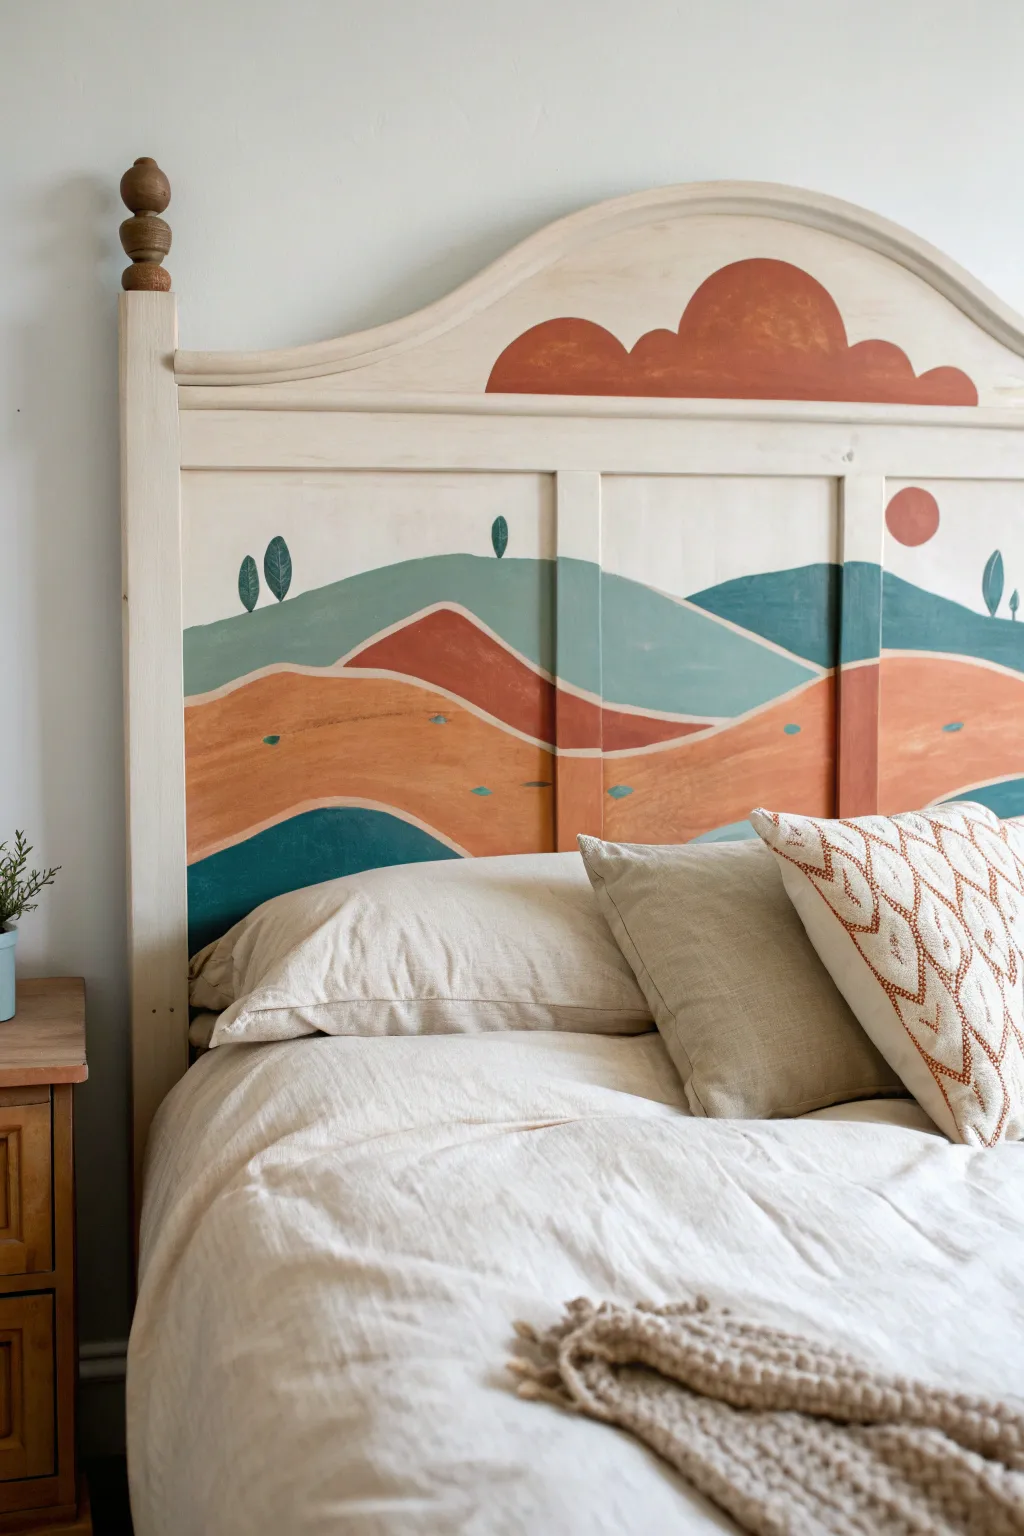
Transform a plain wooden headboard into a dreamy focal point with this charming storybook mural. Featuring rolling hills, stylized cypress trees, and a warm earthy palette, this project brings a touch of folk art magic to any bedroom.
Step-by-Step Guide
Materials
- Wooden headboard (pre-existing or DIY)
- Sandpaper (120 and 220 grit)
- Primer suitable for wood
- Chalk or acrylic craft paints in: Cream, Terracotta/Rust, Sage Green, Deep Teal, and Mustard Yellow
- Assorted paintbrushes (1-inch flat brush, medium round brush, fine liner brush)
- Pencil and eraser
- Painters tape
- Clear matte polyurethane or wax sealant
- Damp cloth
- Mixing palette or paper plate
Step 1: Preparation & Base Coat
-
Clean and prep:
Start by removing the headboard from the bed frame if possible, as laying it flat makes painting much easier. Wipe it down thoroughly with a damp cloth to remove dust and oils. -
Sand the surface:
Lightly scuff sand the entire surface with 120-grit sandpaper. You don’t need to strip it to bare wood, just create enough ‘tooth’ for the primer to stick. Wipe away the dust. -
Apply primer:
Brush on a coat of high-quality wood primer. Let this dry completely according to the can’s instructions. -
Paint the background:
Apply your base color—a soft cream or off-white—over the entire headboard. Work in smooth, long strokes following the wood grain. I generally do two coats to ensure solid coverage.
Step 2: Planning the Landscape
-
Sketch the horizon lines:
Using a pencil, lightly draw the rolling hills. Start about halfway down the headboard. Creates sweeping, curved lines that overlap slightly to mimic distance. -
Add detail elements:
Sketch in the smaller details: the half-circle sun shapes at the top (or tucked behind hills) and the small vertical shapes where the trees will go. Don’t worry about perfection; the charm is in the hand-drawn look.
Uneven Lines?
If your hand feels shaky painting curves, use a flexible sewing ruler or a piece of heavy cardstock as a guide. Curve the cardstock on the wood and trace against it for smoother hills.
Step 3: Painting the Hills
-
Paint the first hill layer:
Start with the ‘middle ground’ hills. Mix a sage green and use a medium flat brush to fill in these shapes. Follow the curve of your pencil line carefully for a crisp edge. -
Add the foreground:
Paint the closest hills in your terracotta or rust color. Apply the paint slightly thicker here to give it texture. Take your time around any vertical slats or molding on your specific headboard. -
Fill in the background hills:
Use the deep teal color for the furthest hills or shadowy valleys. Painting these darker tones helps create depth in the landscape. -
Refine the edges:
Once the main blocks of color are dry to the touch, use a smaller round brush to tidy up the lines where different colors meet. If the paint looks streaky, add a second coat.
Level Up: Texture
Mix a teaspoon of baking soda into your acrylic paint for the hills. This creates a plaster-like, matte texture that adds incredible depth and an old-world fresco feel to the mural.
Step 4: Adding Storybook Details
-
Paint the sun shapes:
Fill in your sun or cloud shapes at the top using the rust or terracotta paint. This balances the color from the bottom of the mural. -
Create the trees:
With a fine liner brush and deep teal paint, add the cypress trees. These are simple shapes—just a small vertical line for the trunk and an oval or teardrop shape for the foliage. -
Add texture marks:
To enhance the folk-art feel, add tiny dashes or dots in contrasting colors on the hills. For example, add small teal dashes on the rust hill to suggest grass or rocks. -
Paint the finials:
If your headboard has posts or finials, consider painting them a solid dark wood tone or bronze to frame the artwork nicely.
Step 5: Finishing Up
-
Let it cure:
Allow the entire mural to dry for at least 24 hours. Acrylics dry fast, but they need time to harden before sealing. -
Seal the artwork:
Apply a clear matte polyurethane or furniture wax over the painted areas. This protects your hard work from scratches and oils from pillows. -
Reassemble:
Once the sealer is dry and not tacky, reattach the headboard to your bed frame and style with neutral bedding.
Now you have a peaceful, custom landscape to drift off under every night


Have a question or want to share your own experience? I'd love to hear from you in the comments below!