If you’ve got an old rocking chair that feels tired (or a plain one that’s just begging for personality), paint can turn it into a total statement piece. Here are my favorite DIY painted rocking chair ideas—from classic makeovers you can knock out in a weekend to artsy details that feel like a one-of-a-kind studio project.
Classic Solid-Color Makeover
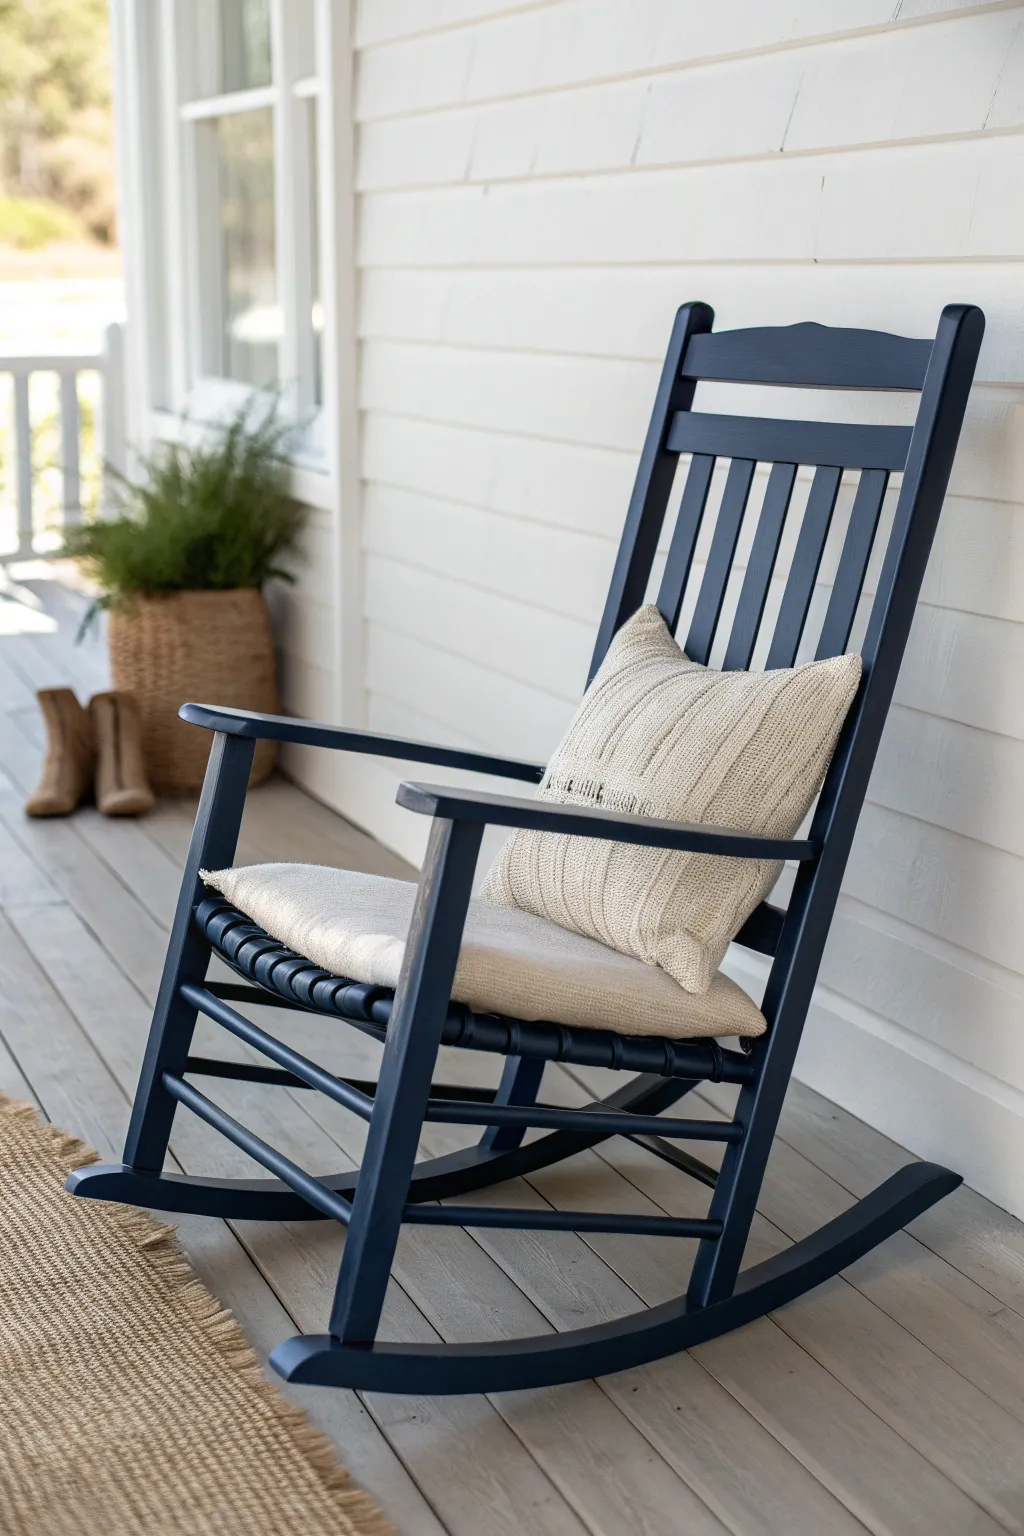
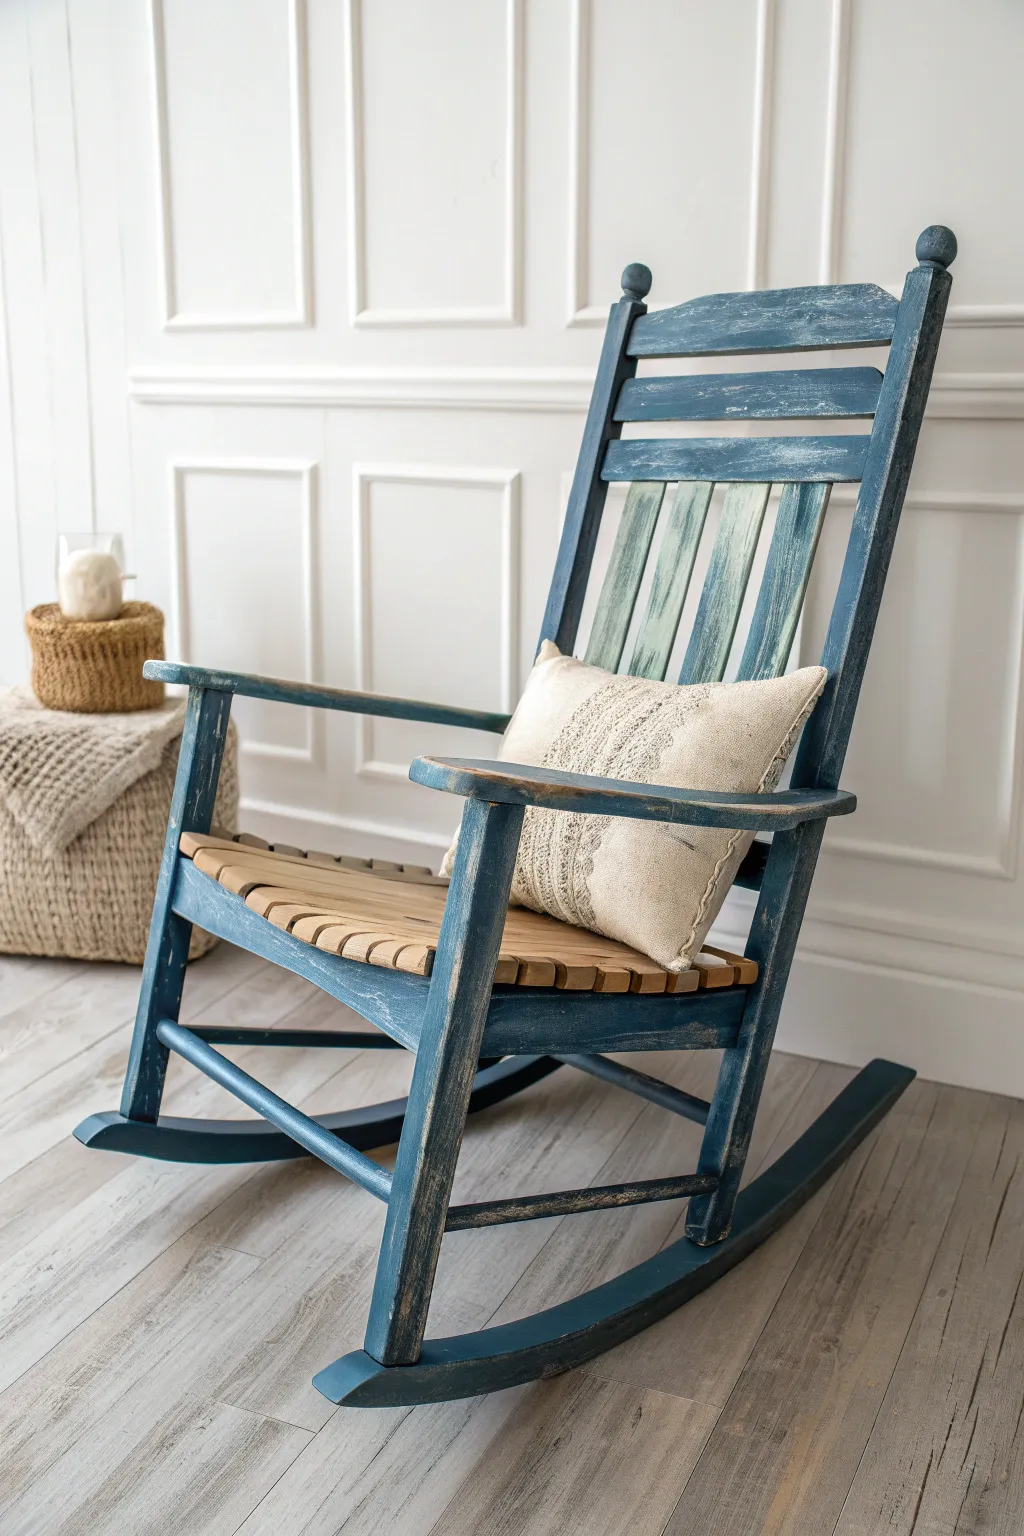
Give an old rocking chair a sophisticated new lease on life with this deep navy makeover. The rich, solid color creates a stunning contrast against light siding and neutral cushions giving your porch an instant classic upgrade.
Detailed Instructions
Materials
- Wooden rocking chair
- Medium-grit sandpaper (120-grit)
- Fine-grit sandpaper (220-grit)
- Tack cloth or microfiber rags
- Wood filler (if repairs are needed)
- High-quality primer (oil-based or stain-blocking recommended)
- Exterior satin or semi-gloss latex paint (Deep Navy Blue)
- 2-inch angled sash brush
- Small foam roller (optional for flat slats)
- Drop cloth
- Painter’s tape (if needed for hardware)
Step 1: Preparation
-
Clean and assess:
Begin by thoroughly cleaning the rocking chair with warm soapy water to remove years of dirt, grease, and porch pollen. Let it dry completely before inspecting for any loose joints or deep scratches. -
Fill imperfections:
If you find deep gouges or cracks, apply a small amount of wood filler. Smooth it over with a putty knife and allow it to dry according to the package instructions. -
Sand the surfaces:
Using the 120-grit sandpaper, go over the entire chair. You don’t need to remove all the old finish, but you must tough it up to give the primer something to grip. I find that sanding sponges work best for the round spindles. -
Wipe away dust:
Dust is the enemy of a smooth finish. Use a tack cloth or a damp microfiber rag to remove every speck of sanding dust from the crevices and corners.
Sticky Situation?
If the paint feels tacky days later, high humidity is likely the culprit. Bring the chair into a climate-controlled room with a dehumidifier for 48 hours to help the paint cure fully.
Step 2: Priming
-
Apply the first coat of primer:
Stir your primer well. Using your angled brush, apply a thin, even coat of stain-blocking primer. Start from the bottom legs and work your way up to avoid dripping on finished areas. -
Check for drips:
As you work, keep an eye out for drips, especially around the spindles and corners where paint tends to pool. Smooth them out immediately. -
Let dry and lightly sand:
Allow the primer to dry fully. Once dry, run a piece of 220-grit sandpaper lightly over the surfaces to knock down any raised grain or brush marks. Wipe clean again with a tack cloth.
Coastal Charm
For a nautical twist, use a stencil to paint a small white anchor or star on the top center of the headrest, or wrap the armrests in natural jute twine for extra texture.
Step 3: Painting
-
Flip the chair:
Here is a trick I love: turn the chair upside down or on its side to start painting. This allows you to reach the underside of the seat, rockers, and lower stretchers without contorting your body. -
Paint the undercarriage:
Apply your deep navy paint to the bottom sections. Use long, even strokes with your brush, following the grain of the wood. -
Right side up:
Flip the chair onto its feet. Paint the seat slats, armrests, and the backrest. If the slats are wide and flat, a small foam roller can speed this part up and leave a nice finish. -
Dry and assess:
Let this first coat dry for at least 4-6 hours (or as directed by your paint can). It might look streaky or patchy—that is totally normal at this stage. -
Sand between coats:
For that professional furniture factory feel, give the first coat a very gentle sanding with fine-grit paper. This ensures the next coat bonds perfectly. -
Apply the final coat:
Apply the second coat of navy paint, paying special attention to coverage on the spindles and the curve of the rockers. The color should now look deep, rich, and opaque. -
Cure time:
Let the chair cure for at least 24 to 48 hours before placing it outside or sitting on it. Paint may feel dry to the touch quickly, but it needs time to harden against humidity.
Step 4: Detailed Styling
-
Add a seat cushion:
Select a thin, neutral beige seat pad that fits the seat dimensions. Tie it securely to the back spindles to prevent it from sliding. -
Layer with texture:
Finish the look by placing a textured knit pillow in a light oatmeal or cream color against the backrest to contrast with the dark navy paint.
Enjoy your relaxing mornings on the porch with your beautifully refreshed rocking chair

Crisp White With Natural Wood Seat
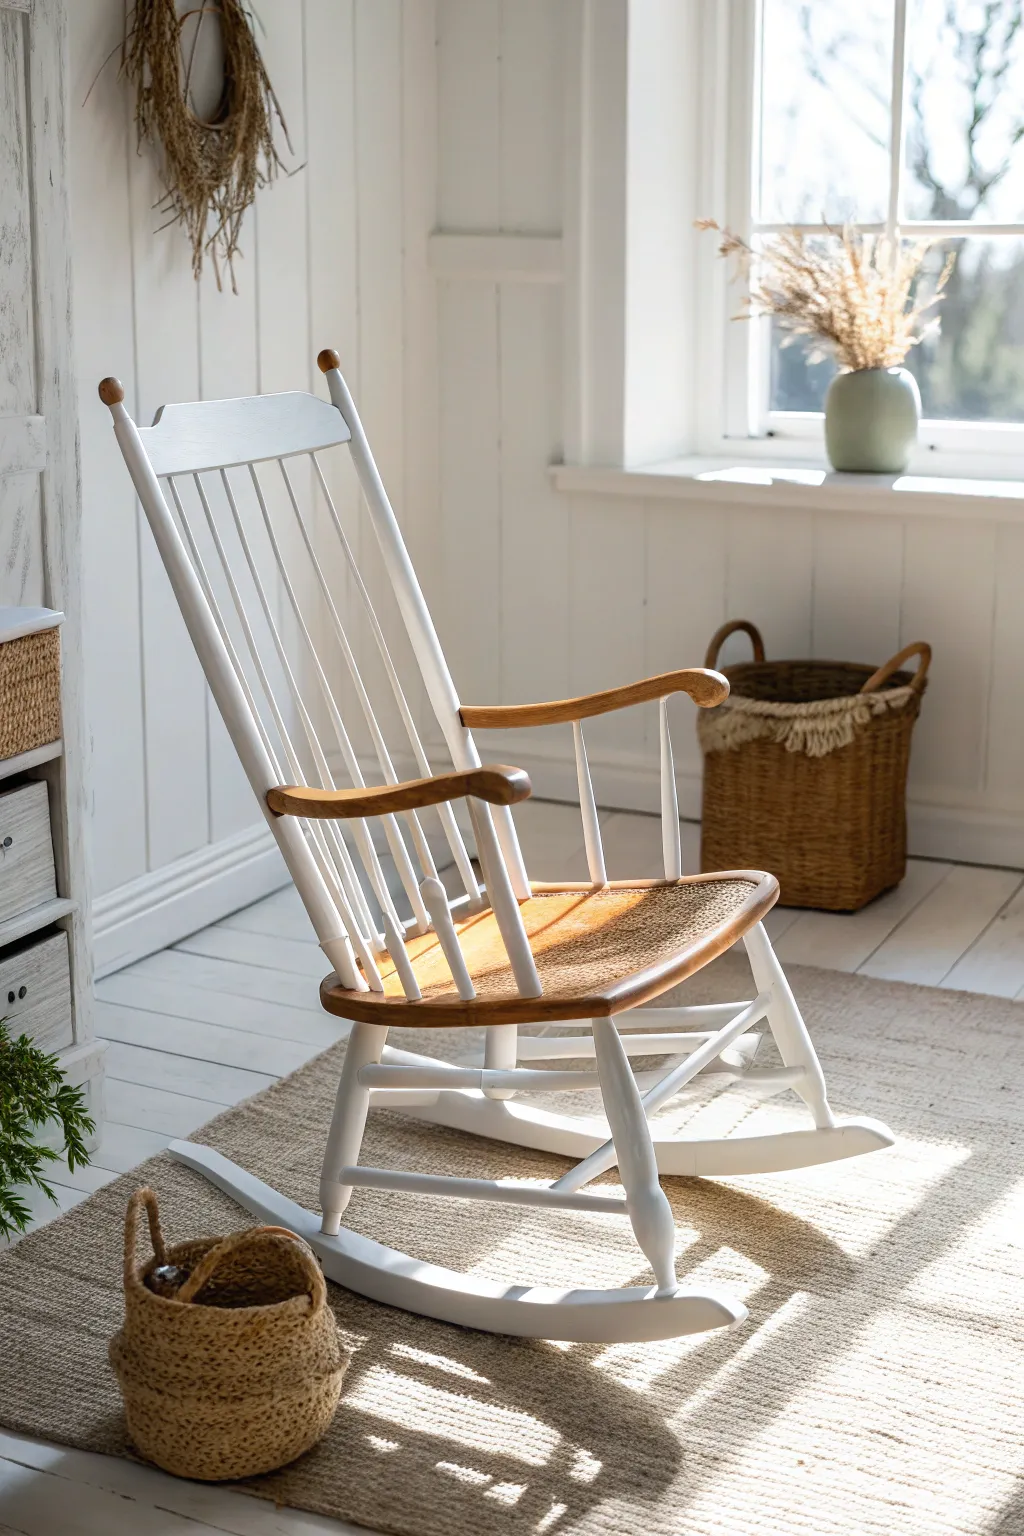
Transform a dated or worn rocking chair into a light-filled statement piece by combining bright white paint with the warmth of exposed wood. This two-tone approach highlights the chair’s classic silhouette while keeping the overall look modern and airy.
Step-by-Step Tutorial
Materials
- Wooden rocking chair (ideally with a cane or rush seat)
- Sandpaper (80, 120, and 220 grit)
- Detail sander (optional but helpful)
- Painter’s tape (high-quality)
- Wood stain (light oak or honey tone)
- Water-based polyurethane (matte or satin)
- Stain-blocking primer
- High-quality furniture paint (Pure White)
- Angled sash brush (2 inch)
- Small artist brush
- Tack Cloths
- Plastic drop cloth
Step 1: Preparation & Sanding
-
Assess the existing finish:
Examine your chair to determine if the existing finish is varnish, paint, or wax. Clean the entire piece thoroughly with a degreaser to remove years of furniture polish and grime. -
Protect the seat:
If your chair has a woven rush or cane seat like the example, cover it entirely with plastic and tape off the edges meticulously. You want zero paint or dust getting into those natural fibers. -
Strip the natural areas:
Focus your heavy sanding on the areas you intend to keep natural: the armrests, the seat frame rim, and the decorative top finials. Use 80-grit sandpaper to strip them back to raw wood. -
Scuff sand the rest:
For the spindles, legs, and back slats that will be painted white, you don’t need to strip to bare wood. Just give them a scuff sand with 120-grit paper to give the primer something to grip. -
Smooth the natural wood:
Return to your exposed wood sections (arms and finials) and work your way up to 220-grit sandpaper until they feel silky smooth to the touch. -
Clean up dust:
Vacuum the entire chair thoroughly, getting into every crevice of the spindles. Wipe everything down with a tack cloth to catch the remaining fine dust.
Bleed-Through Blues?
If stubborn yellow stains persist through water-based primer, switch to a shellac-based primer spray for those specific spots. It seals in tannins permanently.
Step 2: Staining & Sealing
-
Mask the natural zones:
This might feel backward, but it’s cleaner. Once the raw wood is clean, tape off the areas *adjacent* to the raw wood that will eventually be painted. -
Apply stain:
Using a lint-free cloth, apply your light oak or honey stain to the sanded arms, finials, and seat rim. Let it penetrate for a few minutes before wiping off the excess. -
Seal the natural wood:
Once the stain is dry, apply two thin coats of water-based polyurethane to these areas. I find this creates a nice hard shell that’s easy to tape over later. -
Reverse mask:
Allow the poly to cure fully (at least 24 hours). Then, carefully apply painter’s tape *over* your freshly finished wood parts to protect them from the upcoming white paint.
Add Subtle Age
For a less ‘factory-new’ look, lightly distress the edges of the white paint with 220-grit sandpaper to reveal just a hint of the wood underneath.
Step 3: Priming & Painting
-
Prime the frame:
Apply a coat of stain-blocking primer to all remaining surfaces. This is crucial for preventing tannins from the old wood bleeding through your crisp white finish. -
Check for bleed-through:
Inspect the dry primer. If you see pink or yellow spots, spot-prime those areas again before moving to paint. -
Apply the first coat:
Brush on your furniture paint using long, smooth strokes. Watch for drips around the spindles; they love to pool in the corners. -
Sand between coats:
Once dry, lightly run a fine-grit sanding sponge over the paint to knock down any brush ridges or raised grain. -
Apply additional coats:
Apply a second (and potentially third) coat of white paint for full, opaque coverage. Thin coats dry harder and look better than one thick, goopy coat. -
Seal the paint:
If your furniture enamel doesn’t have a built-in topcoat, apply a layer of clear water-based poly over the white sections for durability. -
The reveal:
While the final coat is still slightly tacky (not fully hard), carefully peel away the tape from the natural wood arms and seat. This prevents the tape from pulling up dried paint chips. -
Final touch-ups:
Use your small artist brush to fix any tiny areas where paint might have crept under the tape or where you missed a spot near the joints.
Now you have a beautifully refreshed chair that perfectly balances rustic warmth with clean, modern brightness


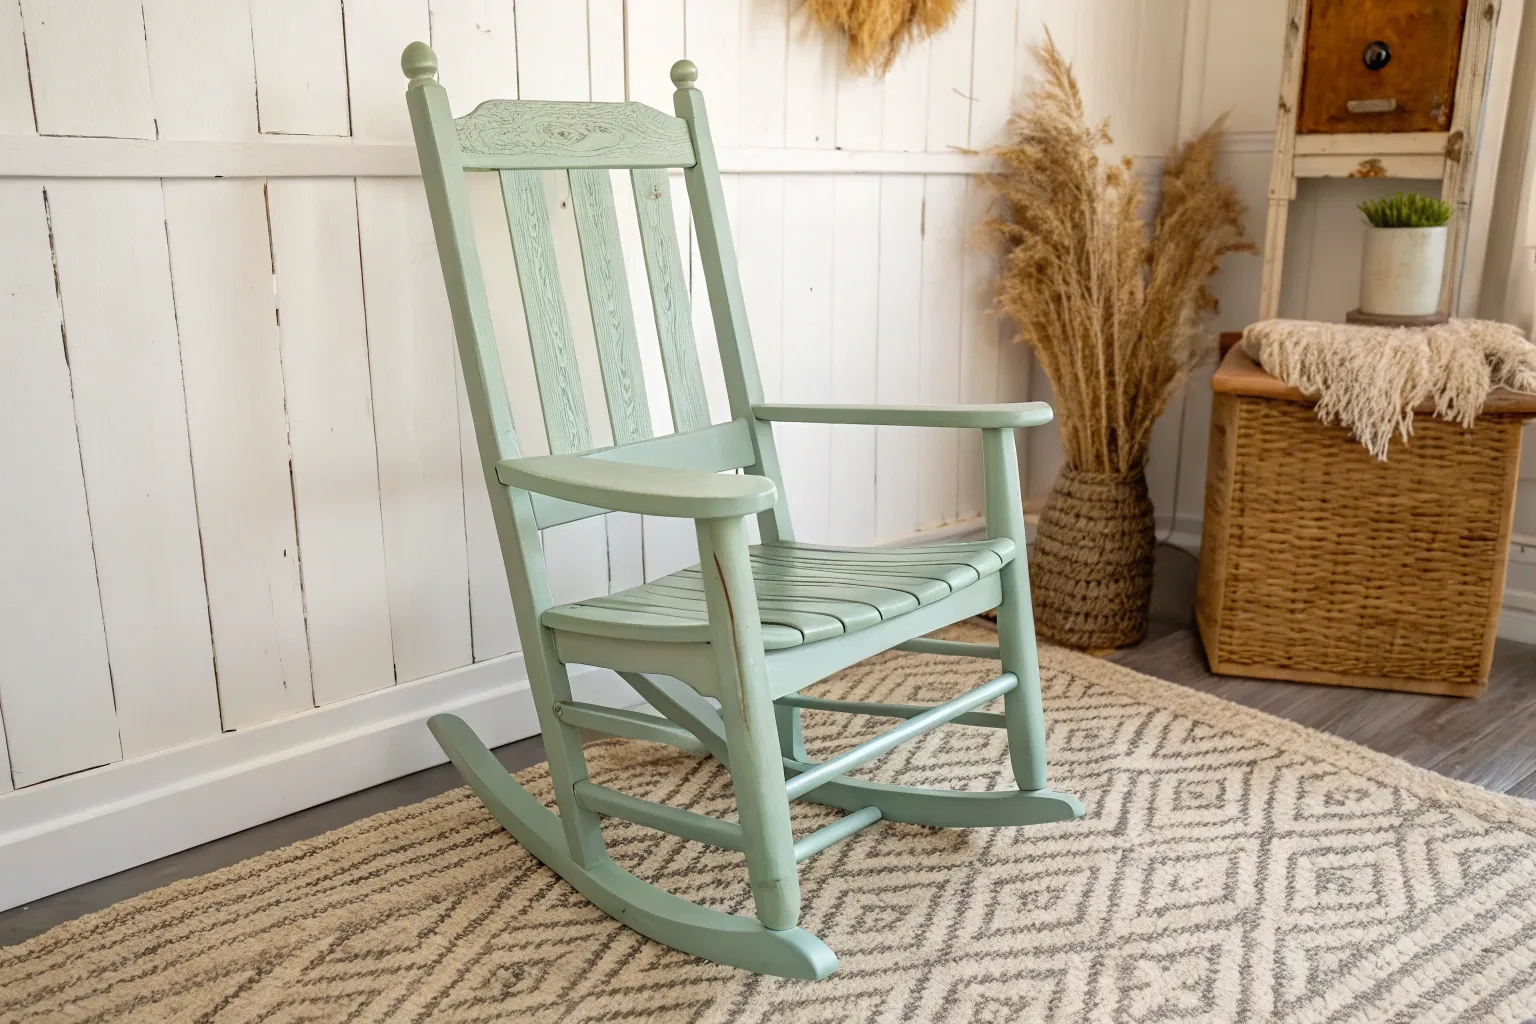
Two-Tone Frame and Runners
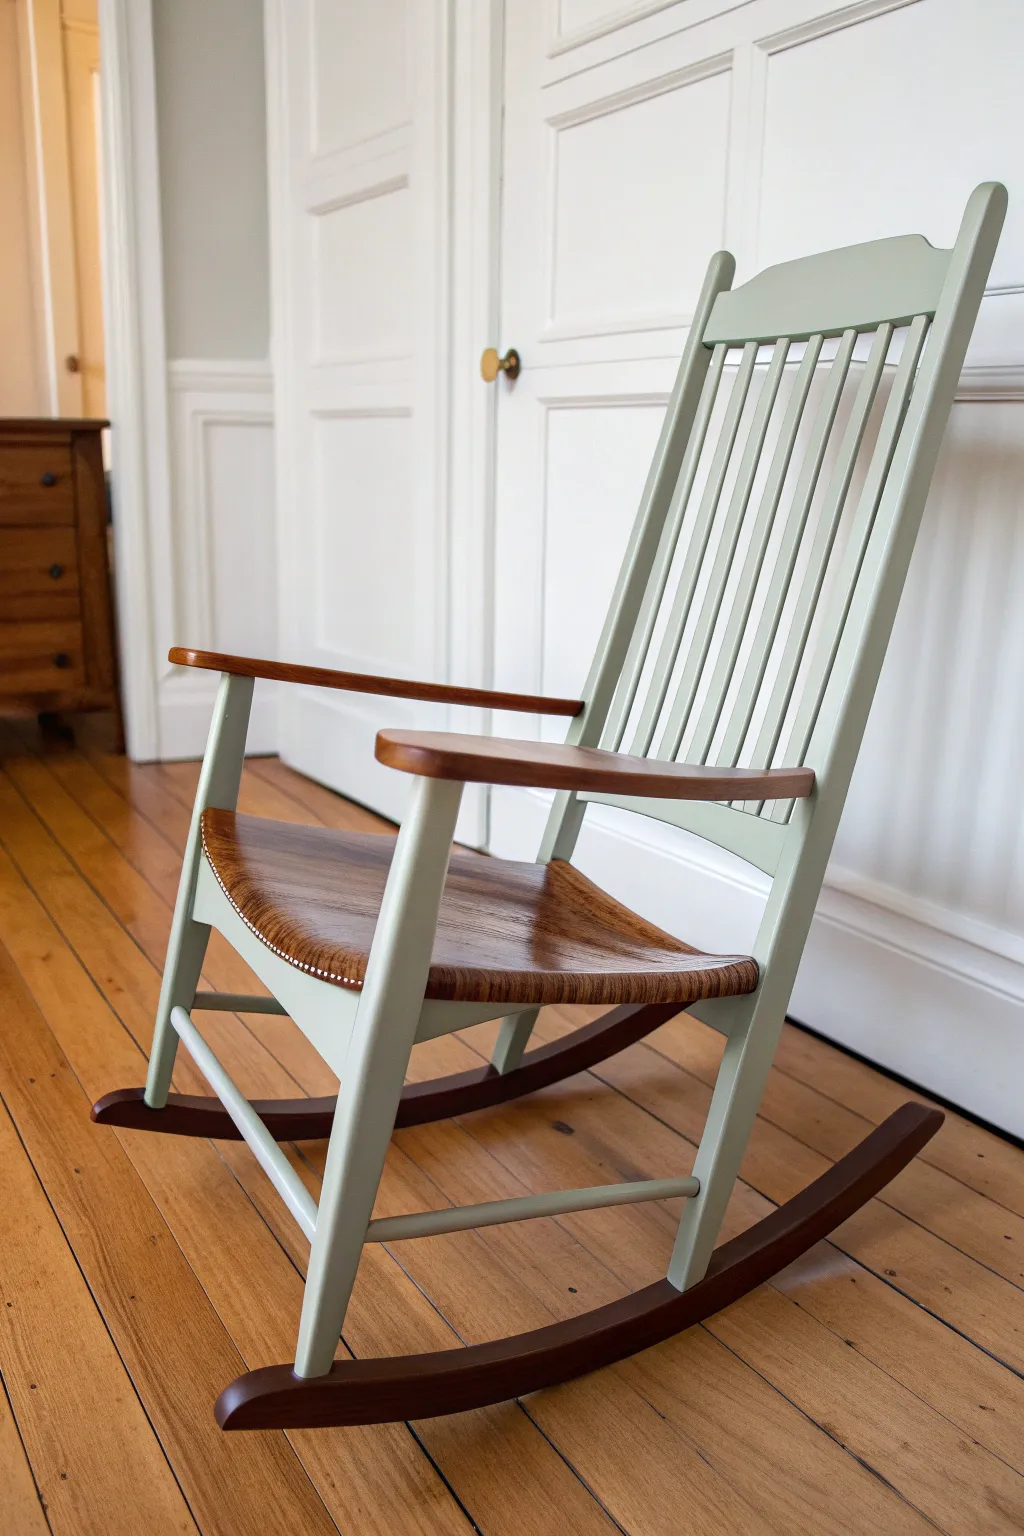
This elegant update combines the warmth of natural wood with a soft, muted sage paint for a sophisticated two-tone look. By carefully masking off the seat, arms, and runners, you create a timeless piece that highlights the chair’s craftsmanship without hiding its beautiful grain.
Detailed Instructions
Materials
- Solid wood rocking chair
- Orbital sander with 120 and 220 grit discs
- Paint stripper (like Citristrip) and plastic scraper
- Painter’s tape (high quality)
- Medium-dark wood stain (walnut or chestnut)
- Sage green chalk paint or mineral paint
- Polycrylic topcoat or furniture wax
- Staining pads or lint-free rags
- Synthetic oval paint brush (2-inch)
- Small artist brush for touch-ups
- Tack cloth
- Cardboard or drop cloth
- Screwdriver (if disassembling)
Step 1: Preparation & Stripping
-
Assess the chair:
Examine the chair to see if the arms or runners can be easily unscrewed. If they can, remove them labeled with tape; this makes the two-tone process significantly easier. If not, don’t worry, we will rely on careful taping. -
Clean surfaces:
Wipe down the entire chair with a degreaser or mild soap solution to remove years of furniture polish and oils. -
Strip the clear coat:
If the existing finish is thick or glossy, apply a layer of chemical stripper to the areas you intend to stain (seat, arms, runners). Let it sit according to the manufacturer’s time, then gently scrape away the gunk with a plastic scraper. -
Clean residue:
Use mineral spirits and steel wool to remove any lingering stripper residue from the wood grain.
Bleeding Lines?
If paint bled onto the stained wood, gently scrape it away with a razor blade or sand that specific spot lightly with fine grit paper, then re-dab a tiny bit of stain with a Q-tip.
Step 2: Sanding & Staining
-
Sand the wood parts:
Using an orbital sander with 120-grit paper, sand the seat, arms, and runners down to raw wood. Move to 220-grit for a super smooth finish. I like to dampen the wood slightly to raise the grain before the final sanding pass. -
Scuff sand the paint areas:
For the spindles, backrest, and legs (the parts being painted), you don’t need to strip to bare wood. Just give them a thorough scuff sand with 120-grit paper to give the paint something to grip. -
Remove dust:
Vacuum the entire chair and wipe it down with a tack cloth to ensure absolutely no dust remains. -
Apply stain:
Using a staining pad or rag, apply your chosen medium-dark stain to the raw wood sections. Wipe with the grain. Let it penetrate for a few minutes before wiping away excess. Let this dry completely, usually overnight. -
Seal the stain:
Apply one light coat of polycrylic over the stained areas now. This protects the wood in case paint accidentally drips on it later.
Customize the Seat
For added comfort and texture, consider stapling a layer of batting and a neutral linen fabric over the central wooden seat area before doing your final clear coats.
Step 3: Painting & Finishing
-
Masking time:
This is crucial. Use high-quality painter’s tape to meticulously wrap the base of the spindles, the edges of the seat where it meets the frame, and the connection points of the arms. Press the tape edges down firmly with a fingernail. -
Painting base coat:
Stir your sage green paint well. Apply a thin first coat to the frame, spindles, and legs. Don’t overload your brush to avoid drips on the vertical spindles. -
Inspect and dry:
Let the first coat dry for the recommended time (usually 2-4 hours). Look for any missed spots or drips. -
Apply second coat:
Apply a second coat for full opacity. The sage green should look rich and even now. -
Remove tape:
I prefer to peel the tape off while the paint is still slightly tacky, not bone dry, to keep the lines crisp. Pull the tape away at a 45-degree angle. -
Detail work:
Use a tiny artist brush to fix any spots where paint bled under the tape or where you missed a crevice. -
Final protection:
Apply 2-3 coats of polycrylic over the entire chair—both painted and stained parts—lightly sanding with ultra-fine sandpaper between coats for a professional factory finish.
Place your newly refreshed rocker in a sunlit corner and enjoy the rhythm of your hard work


High-Gloss Modern Pop Color
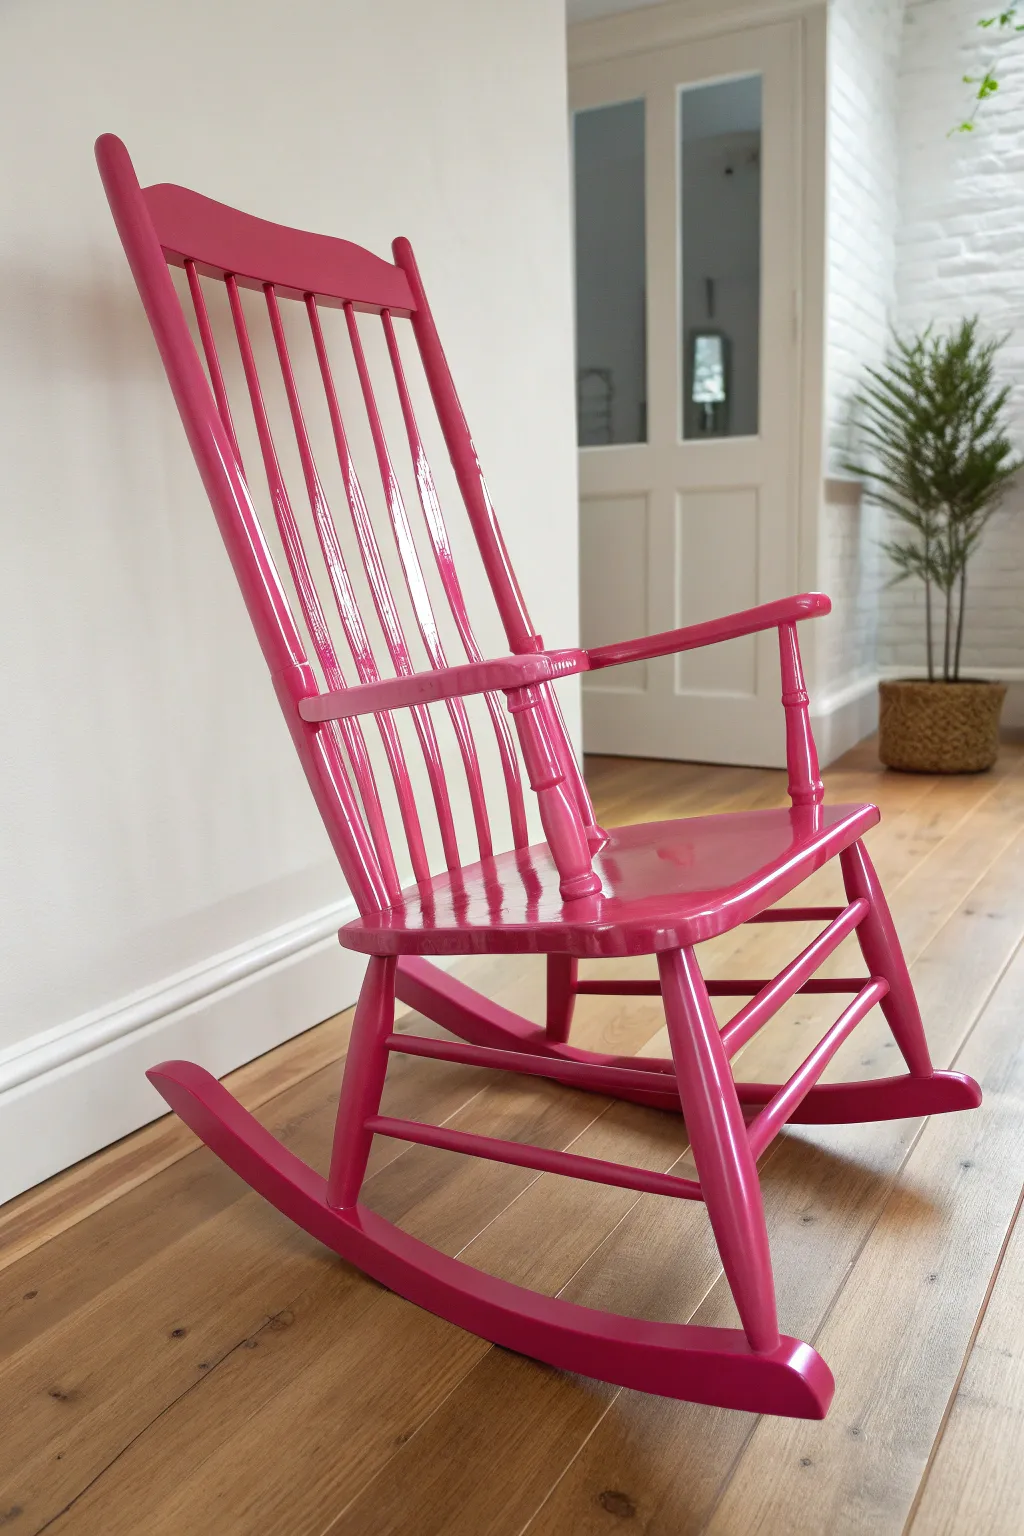
Transform a traditional wooden rocker into a bold statement piece with a vibrant coat of high-gloss hot pink paint. This project blends classic furniture lines with a modern pop-art finish that demands attention and instantly energizes any corner of your home.
Step-by-Step Guide
Materials
- Wooden rocking chair (Windsor style preferred)
- Medium and fine grit sandpaper (120 and 220 grit)
- Tack cloth
- High-quality oil-based primer
- High-gloss enamel paint (Hot Pink or Magenta)
- 2-inch angled sash brush (synthetic bristles)
- Small artist brush for tight corners
- Drop cloth
- Painters tape
- Mild degreaser or TSP substitute
- Respirator mask (for oil-based fums)
- Clean lint-free rags
- Wood filler (if repairing old scratches)
Step 1: Preparation & Sanding
-
Assess and Clean:
Before you begin, inspect the chair for any loose spindles or deep gouges. Give the entire chair a thorough scrub with a mild degreaser or TSP substitute to remove decades of furniture polish, oil, and grime that will prevent paint adhesion. -
Initial Sanding:
Using 120-grit sandpaper, sand the entire chair. You don’t need to strip it down to bare wood, but you must scuff up the existing glossy varnish to create a ‘tooth’ for the primer. -
Tackle the Spindles:
I find that sanding spindles is easiest if you wrap the sandpaper around the dowel and twist. Be diligent here; missed spots on round surfaces are common points of peeling later. -
Dust Removal:
Vacuum the chair thoroughly to remove the bulk of the sanding dust. -
Tack Cloth Wipe:
Follow up the vacuuming by wiping every surface with a tack cloth. This step is crucial for a high-gloss finish, as any speck of dust will show through the shine.
Step 2: Priming for Durability
-
First Coat of Primer:
Apply a thin, even coat of oil-based primer. Oil-based primers stick best to old varnishes and block tannins from bleeding through your bright pink topcoat. -
Watch for Drips:
Keep an eye on the underside of the seat and the spindles while priming. Smooth out any drips immediately before they tack up. -
Dry and Sand:
Allow the primer to dry completely according to the can’s instructions. Once dry, lightly sand everything with 220-grit sandpaper to smooth out brush strokes. -
Clean Again:
Wipe the chair down with a fresh tack cloth to remove the fine white dust from sanding the primer.
Sticky Situation?
If the paint feels tacky days later, humidity is likely the culprit. Move the chair to an air-conditioned room or use a dehumidifier. Avoid fans directly on wet paint to prevent dust.
Step 3: Creating the High-Gloss Finish
-
Stir the Enamel:
Open your high-gloss hot pink enamel. Stir gently but thoroughly; avoid shaking the can, which introduces air bubbles that ruin a glass-like finish. -
Invert the Chair:
Flip the chair upside down onto a drop cloth. Start painting the bottom of the rockers, legs, and underside of the seat first. This ensures you don’t miss hard-to-reach spots. -
Flip and Continue:
Turn the chair right-side up. Begin painting the top rail and work your way down the spindles. Maintain a ‘wet edge’ by working quickly and blending fresh paint into wet paint. -
Spindle Strategy:
Paint the spindles one by one, using vertical strokes. Check all sides of the round dowels to ensure full coverage without overloading your brush. -
Seat and Arms:
Paint the seat and armrests last using long, smooth strokes that follow the wood grain. These are the most visible surfaces, so take your time to minimize brush marks. -
Drying Time:
Let the first coat cure for at least 24 hours. High-gloss enamels often have longer open times and need patience. -
Light Sanding:
Very lightly scuff the first coat with 220-grit sandpaper or fine steel wool to knock down any nibs. Wipe clean with a tack cloth. -
Final Coat:
Apply a second coat of the hot pink enamel just as you did the first. Pay extra attention to the finish on the seat and arms for that liquid-plastic look. -
Cure:
Let the chair cure undisturbed for several days before sitting in it to prevent the paint from remaining tacky or denting.
Color Block It
For a funkier twist, tape off the bottom 4 inches of the legs and rockers. Leave them natural wood or paint them a contrasting color like gold or navy for a ‘dipped’ effect.
Once fully cured, place your vibrant new rocker in a sunny spot and enjoy the energetic splash of color it brings to the room
BRUSH GUIDE
The Right Brush for Every Stroke
From clean lines to bold texture — master brush choice, stroke control, and essential techniques.
Explore the Full Guide
Matte Black Statement Rocker
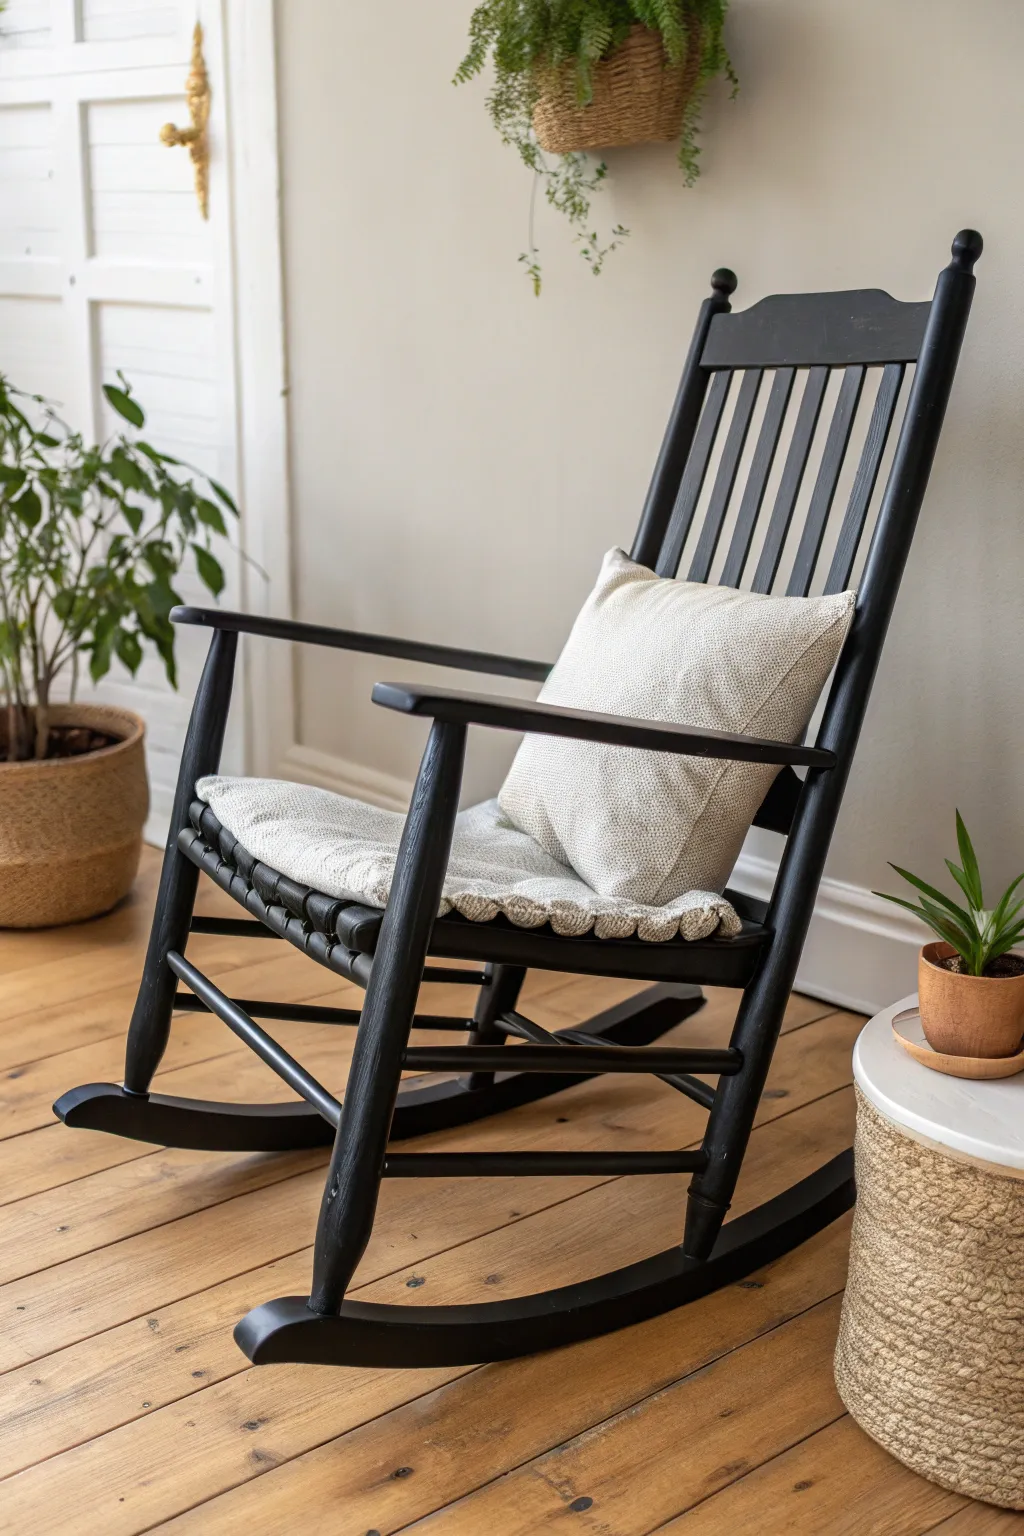
Transform a traditional wooden rocking chair into a bold, modern statement piece with a sleek matte black finish. This project proves that sometimes the simplest color choice creates the most dramatic impact, giving new life to a thrifted find.
Step-by-Step
Materials
- Wooden rocking chair (unfinished or previously finished)
- Sandpaper (80, 150, and 220 grit)
- Clean tack cloths or lint-free rags
- Degreaser cleaner (like TSP or simple dish soap)
- Wood filler (if repairing cracks)
- Painter’s tape
- High-quality stain-blocking primer
- Matte black furniture paint (chalk paint or mineral paint works best)
- Synthetic oval brush (2-inch)
- Small artist brush for tight corners
- Matte polyscrylic or wax topcoat
- Drop cloth
Step 1: Preparation & Cleaning
-
Assess the Chair:
Begin by inspecting your rocking chair for any loose spindles or deep scratches. If the chair feels rickety, add wood glue to the joints and clamp it until dry before starting any finish work. -
Clean Thoroughly:
Wipe down the entire chair with a degreaser or TSP substitute. Old furniture often has layers of wax, oil, or polish that will ruin your paint job if not removed first. Let it dry completely. -
Initial Sanding:
Using 80-grit sandpaper, scour the surface to remove any old flaky varnish. You don’t need to strip it to bare wood, just scuff it enough to create ‘teeth’ for the primer. -
Fill Imperfections:
If there are deep gouges or holes, apply a small amount of wood filler. Overfill slightly, as it shrinks when drying. -
Smooth the Surface:
Once the filler is dry, sand the filled areas and the rest of the chair with 150-grit paper to smooth everything out. Follow up with a quick pass of 220-grit for an ultra-smooth base. -
Remove Dust:
This is crucial: wipe every inch of the chair with a tack cloth. Any leftover dust will show up prominently in a black finish.
Step 2: Priming & Painting
-
Apply Primer:
Paint a coat of stain-blocking primer. Even though you are painting it black, old wood tannins can bleed through and create weird glossy patches or discoloration. I prefer a grey primer for dark topcoats if available. -
Smooth the Primer:
After the primer cures, run a 220-grit sanding sponge lightly over the surface to knock down any brush strokes or raised grain. Wipe clean with a tack cloth. -
First Coat of Black:
Stir your matte black paint thoroughly. Using a high-quality synthetic brush, apply the first coat in thin, even strokes. Don’t worry about full opacity yet; thin layers are stronger than thick ones. -
Detail Work:
Use a small artist brush to get into the crevices where the spindles meet the seat and the rockers. This prevents drips from pooling in those tight corners. -
Second Coat:
Once the first coat is dry to the touch (check your paint can for times), apply a second coat. Watch for drips along the vertical spindles and smooth them out immediately. -
Optional Third Coat:
Depending on your paint brand, a third light coat might be necessary for that rich, deep onyx look.
Fixing Streaky Black Paint
Black shows everything. If your finish looks streaky, lightly sand with a fine grit sponge, wipe clean, and apply a final coat thinned slightly with water for better self-leveling.
Step 3: Sealing & Styling
-
Choose Your Sealer:
To maintain that flat, modern look, choose a dead-flat or matte topcoat. Wax offers a beautiful hand-rubbed feel, while polycrylic offers more durability against scratches. -
Apply Topcoat:
Brush on your clear coat quickly and lightly. Do not overwork it, as this can cause cloudiness over black paint. If using wax, buff it in with a lint-free rag. -
Cure Time:
Let the chair sit unused for at least 24-48 hours. Paint takes time to harden fully, and sitting on it too soon can leave texture marks. -
Add Textiles:
Soften the severe black lines by adding a textured seat cushion and a lumbar pillow in neutral creams or grey tones.
Distressed Edge Option
For a farmhouse vibe, use 220-grit sandpaper to gently rub the edges of the arms and rockers after painting but before sealing. This reveals a sliver of wood for a vintage look.
Now you have a stunning, sophisticated focal point ready for your reading nook or living room
Soft Ombre Fade on the Legs
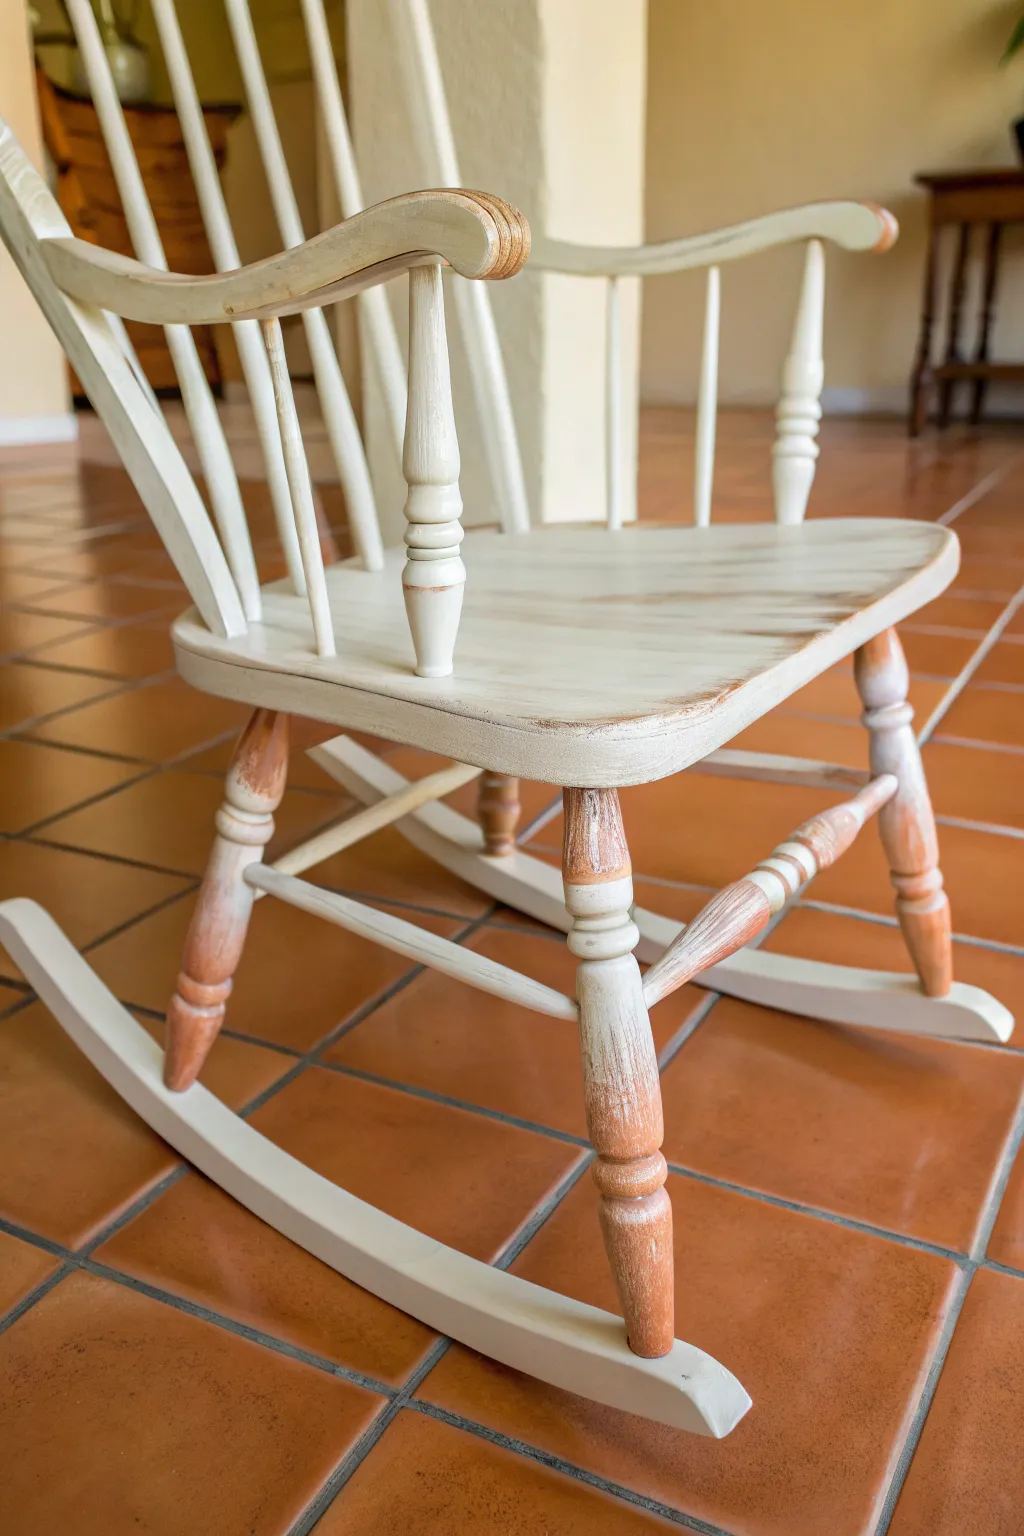
Transform a dated rocking chair into a cozy statement piece with this reverse-ombre technique. By carefully revealing the natural wood tone beneath a creamy topcoat, you achieve a grounded, rustic look that blends seamlessly from painted finish to raw timber.
Step-by-Step Tutorial
Materials
- Wooden rocking chair (unpainted or stripped)
- Medium-grit sandpaper (120-150 grit)
- Fine-grit sandpaper (220 grit)
- Tack cloth or microfiber rags
- Chalk-style paint (Cream or Off-White)
- High-quality synthetic paintbrush (2-inch)
- Small detail brush
- Spray bottle with water
- Clear matte polycrylic or furniture wax
- Painter’s tape (optional)
- Drop cloth
Step 1: Preparation & Cleaning
-
Assess the Surface:
Before painting, ensure your chair is clean and the wood tone underneath is one you actually like roughly. If the chair has an existing dark varnish or shiny finish, give the entire piece a thorough scuff sanding with medium-grit sandpaper to help the new paint adhere. -
Wipe Down:
Remove all sanding dust using a tack cloth or a slightly damp microfiber rag. Any lingering dust will create a gritty texture in your paint finish, so be meticulous here. -
Protect the Area:
Lay down your drop cloth. Since you’ll be working heavily on the legs near the floor, ensure you have plenty of space to move around the chair.
Uneven Fade Fix
If your gradient looks too choppy or distinct, dampen a lint-free rag slightly and rub the transition line. Chalk paint reactivates with water, allowing you to smudge the line soft again.
Step 2: Painting the Base Coat
-
Start at the Top:
Dip your synthetic brush into the cream chalk paint. Begin painting the headrest, spindles, and back of the chair first. Apply a solid, even coat, working your way down to the seat. -
Paint the Seat:
Cover the seat completely. Chalk paint is forgiving, so brush strokes don’t need to be perfect, but try to follow the grain of the wood for the smoothest look. -
Upper Legs Technique:
Paint the upper portions of the legs and the upper stretchers solidly. As you move about halfway down the legs, lighten your pressure on the brush drastically. -
Create the Feathered Edge:
Stop painting solidly about 6-8 inches from the bottom of the legs. Instead, use a ‘dry brush’ technique here—wipe most of the paint off your brush onto a paper towel, then lightly flick the brush downward, letting the paint trail off into nothingness. -
Mist and Blend:
I like to keep a spray bottle handy for this part. Lightly mist the transition area where the solid paint meets the bare wood. Use your brush to soften the line, creating a gradient rather than a hard stop. -
Repeat for Stretchers:
Do the same for the lower connection dowels (stretchers). Paint the centers more solidly, but feather the paint out as it gets closer to the legs, or leave the bottoms of the stretchers entirely exposed depending on your preference. -
Dry Time:
Allow this first coat to dry completely, typically 1-2 hours depending on humidity.
Step 3: Distressing the Ombre
-
Sand for the Fade:
Once dry, take your medium-grit sandpaper to the transition area on the legs. Sand aggressively near the bottom to expose more wood, and gently as you move upward into the solid paint. -
Enhance the Ombre:
The goal is to have the bottom few inches be mostly raw wood, fading into a distressed wood/paint mix, and finally into solid cream paint. Keep stepping back to check that all four legs look balanced. -
General Distressing:
To make the ombre look intentional and not like a mistake, distress other high-traffic areas. Gently sand the edges of the seat, the handrests, and the turning details on the back spindles. -
Expose the Seat Grain:
Sand the center of the seat with long horizontal strokes to let the wood grain peek through the cream paint, mimicking years of wear.
Add Warmth
To enrich the exposed wood on the legs without darkening the paint, apply a tiny amount of antique or dark wax strictly to the raw wood sections. Buff well for a rich, aged honey tone.
Step 4: Sealing and Finishing
-
Final Dusting:
The heavy sanding will create a lot of powder. Vacuum the chair thoroughly and follow up with a tack cloth to remove every speck of dust. -
Seal the Wood:
It is crucial to seal the exposed wood at the bottom to protect it from moisture. Apply a clear matte polycrylic or furniture wax over the entire chair. -
Buffing (If Waxing):
If you used wax, allow it to cure for the recommended time and then buff it with a soft cloth to achieve a subtle sheen.
Now you have a beautifully custom rocker that perfectly bridges the gap between rustic charm and modern farmhouse style

PENCIL GUIDE
Understanding Pencil Grades from H to B
From first sketch to finished drawing — learn pencil grades, line control, and shading techniques.
Explore the Full Guide
Simple Stripes on the Back Slats

Transform a plain wooden rocking chair into a cozy coastal statement piece by adding durable, striped fabric panels to the back and seat. This project combines simple woodworking with basic upholstery techniques for a custom look that brings vibrant color and comfort to any corner.
Detailed Instructions
Materials
- Wooden rocking chair (with open back/seat frame)
- Heavyweight canvas or upholstery fabric (striped pattern)
- White semi-gloss paint
- Primer
- Sandpaper (120 and 220 grit)
- Staple gun
- Heavy-duty staples (3/8 or 1/2 inch)
- Fabric scissors
- Measuring tape
- Paintbrush or sprayer
- Hammer or tack lifter (for removing old material)
- Clean tack cloth
Step 1: Preparation & Painting
-
Strip the chair:
Begin by removing any existing cane seating, fabric, or cushions from the rocking chair frame. Use a tack lifter or pliers to pull out old staples or splines, ensuring the wood channels or rails are completely clean and smooth. -
Clean and sand:
Wipe down the entire chair to remove dust and grime. Sand the wood thoroughly, starting with 120-grit paper to remove old finish imperfections, then switching to 220-grit for a smooth surface ready for paint. -
Prime the frame:
Apply a coat of high-quality primer to the entire wooden structure. This is crucial for blocking stains and ensuring your white topcoat adheres properly. Let it dry completely according to the can’s instructions. -
Apply the white coat:
Paint the chair with semi-gloss white paint. I prefer using a sprayer for a factory-finish look, but a high-quality brush works fine too. Apply thin, even coats to avoid drips. -
Apply a second coat:
Once the first coat is dry to the touch, lightly sand with very fine sandpaper if needed, wipe clean, and apply a second coat of white paint for full opacity. Allow the paint to cure fully—ideally for 24 hours—before attaching fabric.
Tension Trick
Use upholstery webbing pliers or ask a friend to pull the fabric tight while you staple. Maximum tension prevents sagging over time.
Step 2: Creating the Fabric Panels
-
Measure the openings:
Measure the width and length of both the backrest and the seat opening. You need the exact width of the span, plus enough extra length to wrap around the rails securely. -
Cut the fabric:
Cut your striped fabric to size. For width, cut exactly to the inner width of the frame minus about 1/4 inch so the fabric doesn’t rub the sides. For length, add at least 6–8 inches to your measurement to allow for wrapping around rails. -
Create hemmed edges:
Fold the long side edges of your fabric under by 1/4 inch and sew a straight stitch or use heavy-duty fabric glue. This prevents fraying and gives the exposed sides a polished, professional look. -
Align the pattern:
Before attaching, hold your fabric pieces against the chair to ensure your stripes are straight and centered. The visual impact relies on vertically aligned stripes.
Step 3: Attaching the Upholstery
-
Secure top rail:
Start with the backrest. Wrap the top edge of the fabric over the top rail, pulling it to the back or underneath where staples won’t be visible. Staple the center first to anchor it. -
Finish top staples:
Working outward from the center staple, pull the fabric taut and staple toward the corners, spacing staples about 1 inch apart. Ensure the fabric stays square to the frame. -
Stretch to the bottom:
Pull the fabric down tightly to the bottom rail of the backrest. Wrap the fabric underneath the rail. Getting good tension is key here so the back doesn’t sag when you lean on it. -
Staple the bottom:
While maintaining strong tension, staple the bottom edge to the underside of the rail, again starting from the center and working outward. -
Start the seat:
Repeat the process for the seat. Attach the fabric to the rear seat rail first, wrapping it underneath and stapling securely. -
Complete the seat:
Pull the fabric forward tightly over the front rail. Wrap it under and staple it in place. Sit in the chair gently to test the tension and add reinforcement staples if needed. -
Trim excess fabric:
Use sharp scissors to trim away any excess bulk of fabric near the staple lines for a neat finish underneath the chair.
Add a Headrest
Fabricate a small, rectangular pillow using leftover striped fabric and attach it to the top rail with Velcro strips for extra comfort.
Enjoy the gentle rhythm of your newly refreshed rocker in a sunny corner of your home
Checked Seat for Vintage Charm
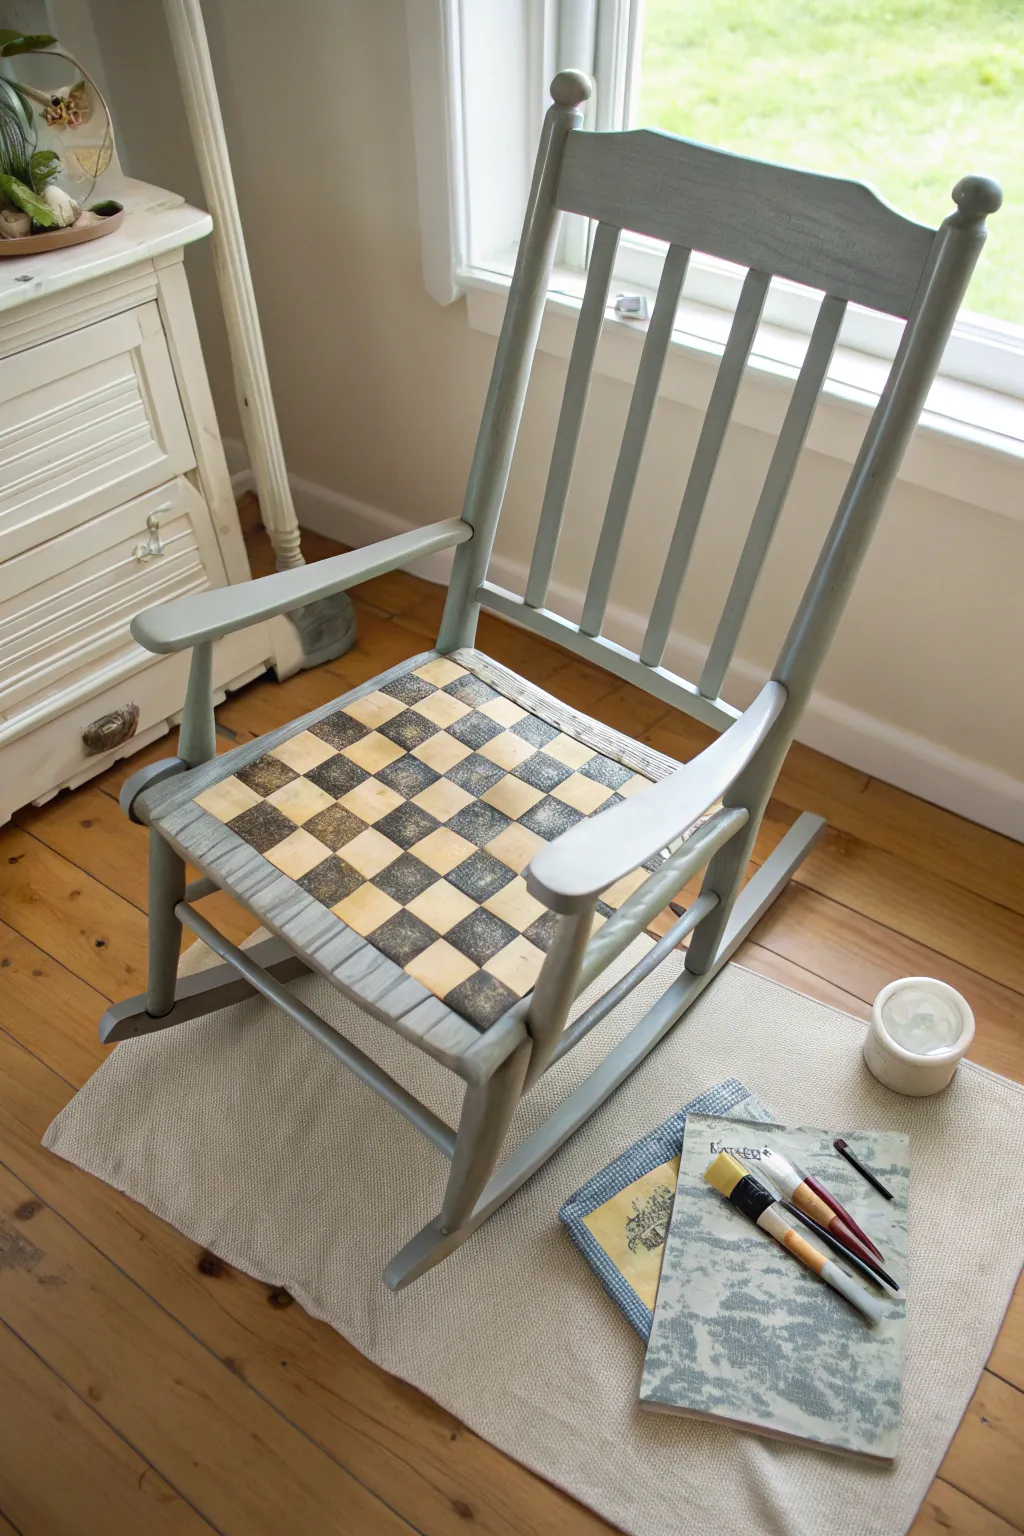
Transform a plain wooden rocker into a whimsical conversation piece with this vintage-inspired checkerboard seat project. The muted grey-blue frame beautifully offsets the hand-painted checks, creating a look that feels both timeless and uniquely artistic.
Step-by-Step Guide
Materials
- Wooden rocking chair (unfinished or sanded)
- Chalk paint or latex paint (soft grey-blue)
- Acrylic paint (black or dark charcoal)
- Acrylic paint (cream or off-white)
- Sandpaper (120 and 220 grit)
- Painter’s tape (1-inch width)
- Ruler or measuring tape
- Pencil
- Small flat artist brush
- Medium paintbrush (for main chair)
- Clear matte polyurethane or wax topcoat
- Damp cloth
- Tack cloth
Step 1: Preparation & Base Coat
-
Clean the surface:
Begin by wiping down the entire rocking chair with a damp cloth to remove dust and grime. If the chair has an existing shiny finish, you’ll need to sand it lightly with 120-grit sandpaper to help the new paint adhere. -
Smooth the edges:
Run your hand over the spindles and armrests. Use 220-grit sandpaper to smooth out any rough spots or splinters, ensuring a comfortable seat later on. -
Remove sanding dust:
Wipe the chair thoroughly with a tack cloth to capture every bit of sawdust. This is crucial for a smooth final finish. -
Paint the frame:
Using your medium paintbrush, apply the grey-blue chalk paint to the entire chair frame, including the legs, rockers, spindles, and back. Leave the seat area unpainted for now if possible, or paint it a solid base color if you prefer a different look beneath the checks. -
Apply a second coat:
Allow the first coat to dry completely according to the paint can’s instructions. Apply a second coat to ensure full coverage, watching for drips around the spindles.
Steady Hand Trick
Rest your pinky finger on a dry section of the chair while painting the squares. This anchors your hand and acts as a pivot point for straighter lines.
Step 2: Creating the Checkerboard
-
Measure the seat:
Once the frame is dry, find the center point of the seat. Decide on the size of your squares; 1.5 to 2 inches is usually a good scale for a standard chair seat. -
Draw the grid:
Using a ruler and a pencil, lightly draw a grid pattern directly onto the seat. Start from the center and work your way out to the edges to keep the pattern symmetrical. -
Mark the dark squares:
To avoid confusion while painting, place a tiny ‘x’ or dot lightly in pencil inside every square that needs to be painted the darker color. -
Paint the light squares:
Using the small flat artist brush, fill in the light-colored squares with your cream or off-white acrylic paint. I find it easier to outline the square first and then fill the center. -
Create texture:
Don’t aim for perfect opacity. A slightly streaky or dry-brush application adds to the vintage, hand-worn aesthetic seen in the photo. -
Paint the dark squares:
Once the light squares are touch-dry, switch to your black or charcoal paint. Carefully fill in the marked squares. -
Distress the checks:
For that authentically aged look, take a piece of 220-grit sandpaper and very gently scuff the dried checkerboard pattern. Focus on the edges where wear would naturally occur.
Uneven Grid?
If your grid lines look wobbly, don’t erase! Paint over the pencil lines with the darker color to visually correct the straightness during the painting phase.
Step 3: Finishing Touches
-
Seal the seat:
The seat will see the most wear, so protection is vital. Apply a coat of clear matte polyurethane over the checkerboard design. -
Seal the frame:
Continue applying the sealer to the rest of the painted chair frame. This unifies the sheen and protects the grey-blue paint from chipping. -
Second seal coat:
After the first layer of sealer dries, apply a second thin coat to the seat specifically for extra durability. -
Final cure:
Let the chair sit undisturbed for at least 24-48 hours before sitting on it to allow the finish to cure and harden completely.
Enjoy the cozy, nostalgic atmosphere this charming rocker brings to your favorite corner


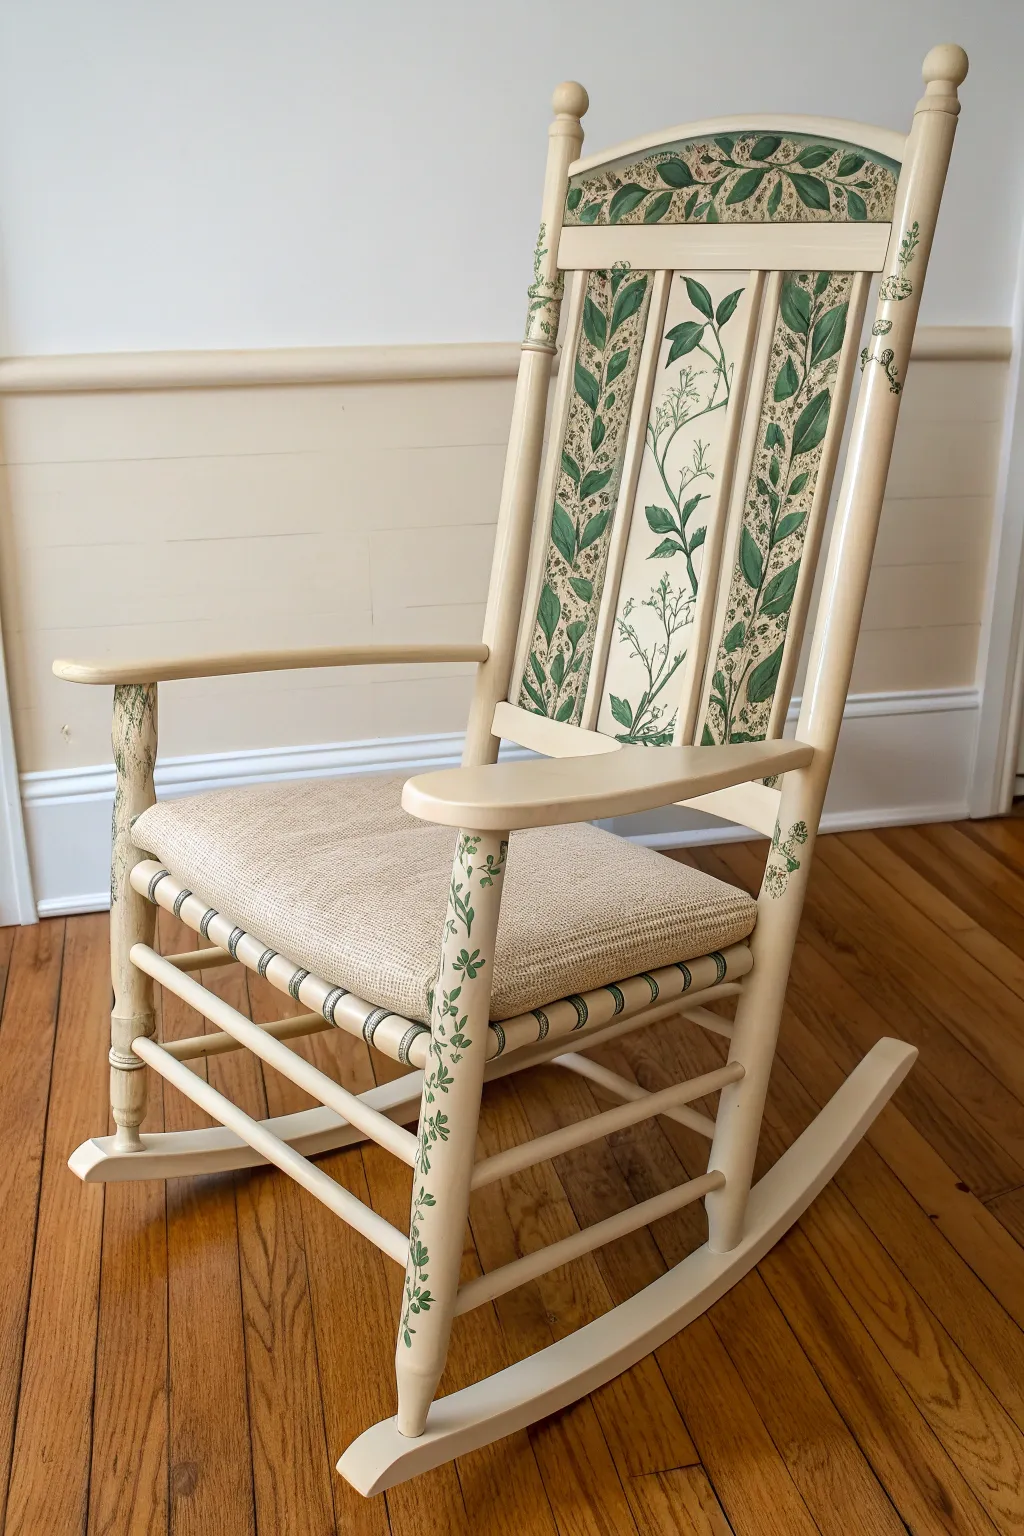
Stenciled Florals Along the Arms

Transform a tired rocking chair into a garden-inspired masterpiece featuring delicate green floral patterns climbing up the slats and seat. This project combines crisp off-white paint with sage green accents and stenciling for a look that feels both vintage and freshly modern.
Step-by-Step
Materials
- Wooden rocking chair
- Sander or sandpaper (120 and 220 grit)
- Tack cloth
- Primer (bonding primer recommended)
- Off-white chalk or mineral paint (base color)
- Sage green chalk or mineral paint (accent color)
- Floral stencil (vine or botanical pattern)
- Stencil brush or small sponge dauber
- Painter’s tape
- Small artist brush (for touch-ups)
- Clear protective topcoat (polycrylic or wax)
- Paintbrushes (synthetic bristle)
Step 1: Preparation and Base Coat
-
Clean the Surface:
Begin by thoroughly cleaning the rocking chair with a degreaser or mild soap and water to remove oils and dirt. Let it dry completely. -
Sand for Adhesion:
Scuff sand the entire chair using 120-grit sandpaper. You don’t need to strip it to bare wood, but you need to rough up the old finish so the new paint sticks. -
Remove Dust:
Wipe away all sanding dust using a tack cloth or a damp lint-free rag. -
Apply Primer:
Brush on a coat of high-quality bonding primer. This is crucial for durability, especially on the arms and seat where wear happens most. -
Paint the Base Color:
Apply your off-white chalk or mineral paint to the entire chair, except for the armrests if you plan to keep them distinct. Use long, smooth strokes. -
Second Coat:
Allow the first coat to dry according to the can’s instructions, then apply a second coat for full, opaque coverage. -
Paint the Accents:
Using the sage green paint, carefully paint top of the armrests and the horizontal support bar on the backrest. I like to use painter’s tape here to ensure a crisp line where the green meets the white.
Step 2: Stenciling the Details
-
Position the Stencil:
Place your floral stencil vertically on one of the backrest slats. Secure it firmly with painter’s tape so it doesn’t shift. -
Load the Brush:
Dip your stencil brush or sponge into the sage green paint, then offload almost all the paint onto a paper towel. The brush should feel nearly dry. -
Stipple the Design:
Lightly tap (stipple) the paint over the stencil openings. Do not brush back and forth, as this pushes paint under the edges. -
Repeat on Slats:
Carefully lift the stencil and move it to the next slat. Repeat the process until all vertical slats on the backrest are covered in the floral pattern. -
Stencil the Lower Bar:
Align the stencil horizontally along the lower backrest support bar (the white section below the slats) and apply the pattern there as well. -
Stencil the Seat:
Apply the same stencil pattern to the seat of the chair. You can arrange the vines to look like they are growing across the surface randomly or in a uniform direction. -
Check Edges:
Once the paint is dry, check for any bleed-through. Use a small artist brush and your off-white base paint to tidy up any fuzzy edges.
Bleed-Through Blues?
If paint bleeds under the stencil, ‘erase’ it immediately with a damp Q-tip. For dry mistakes, just dab a tiny bit of the base white paint over the error with an artist brush.
Step 3: Finishing Touches
-
Light Sanding:
For a smoother feel, very lightly run 220-grit sandpaper over the flat surfaces, just enough to knock down any raised paint texture. -
Apply Topcoat:
Seal your work with a clear, water-based polycrylic. Apply a thin, even layer over the entire chair. -
Extra Protection:
Apply two additional coats of sealer to the seat and armrests, as these high-traffic areas need extra defense against scratches. -
Final Cure:
Let the chair cure for at least 24-48 hours before sitting on it to ensure the finish has hardened completely.
Add Dimension
Mix a tiny drop of dark grey into your sage green and stencil just the very bottom of the leaves to create a subtle shadow effect.
Enjoy your beautifully renewed rocking chair on the porch or in a cozy corner.
Botanical Vine Wrapped Around Spindles
Transform an ordinary wooden rocking chair into an enchanting garden seat with this delicate vine-wrapped design. The soft cream base paired with trailing green leaves creates a timeless, cottage-core aesthetic perfect for a nursery or sunroom.
How-To Guide
Materials
- Wooden rocking chair
- Sandpaper (120 and 220 grit)
- Tack cloth
- Primer (stain-blocking)
- Cream or off-white chalk paint
- Green acrylic paints (olive, sage, and forest green)
- Lighter green or white acrylic paint for highlights
- Small round brushes (sizes 2 and 4)
- Stencil (optional, for the back panel lattice effect)
- Clear matte or satin polycrylic sealer
- Painter’s tape
Step 1: Preparation and Base Coat
-
Clean the surface:
Start by thoroughly cleaning the rocking chair with a degreasing cleaner to remove old polish, oils, or dust. -
Sand the wood:
Scuff sand the entire chair with 120-grit sandpaper to give the primer something to grip. Follow up with 220-grit for a smooth finish, then wipe everything down with a tack cloth. -
Apply primer:
Brush on a coat of stain-blocking primer. This is crucial for older chairs to prevent wood tannins from bleeding through your light paint later. -
Paint the base color:
Apply your cream chalk paint. Use long, even strokes with the wood grain. I usually find two coats provide the best coverage, letting each coat dry completely in between.
Vine Flow Trick
When painting vines on legs, always paint the direction of growth moving UPWARD from the floor, as real plants grow towards the sun.
Step 2: Painting the Botanical Details
-
Map out the vines:
Using a very light pencil, sketch a winding line up the front legs and back supports. This guideline will be the ‘spine’ of your vine. -
Mix your greens:
On your palette, mix a primary olive green with a touch of sage to create a natural, organic leaf color. Keep the darker forest green separate for shading. -
Paint the stems:
With a size 2 round brush and your mixed green, trace over your pencil lines to create the thin stems. Keep your hand loose to avoid stiff, unnatural curves. -
Add the leaves:
Using a size 4 brush, press down and lift up to create teardrop-shaped leaves along the stem. Vary the direction and spacing so it doesn’t look too uniform. -
Create the back panel design:
For the flat back panels, paint larger, denser clusters of leaves. You can create a ‘trellis’ look by painting faint vertical lines first, then painting vines weaving through them. -
Layer with darks:
Once the base green is dry, take your forest green and add thin veins or shadows near the base of the leaves to add depth. -
Add highlights:
Dip just the tip of your brush in the lightest green or white and touch the tops of the leaves where the light would naturally hit.
Add Hidden Critters
For a whimsical surprise, paint a tiny ladybug, bee, or butterfly resting on one of the leaves near the seat or armrest.
Step 3: Finishing Touches
-
Paint decorative accents:
If your chair has carved details or turnings (like on the spindles), accentuate them with subtle rings of green paint or a light wash to tie the design together. -
Let the artwork cure:
Allow the painted details to dry for at least 24 hours. Acrylic details need to be fully set before sealing to prevent smearing. -
Seal the chair:
Apply a clear polycrylic topcoat. Use a matte finish if you want a vintage look, or satin for a bit of sheen. Apply 2-3 coats for durability, especially on the arms and seat.
Enjoy your beautifully customized rocker as a cozy spot to relax and unwind
Coastal Blues With Sandy Dry Brush
Transform an ordinary wooden rocking chair into a weathered coastal treasure with this layered finish. By combining deep navy tones with distressed edges and sandy highlights, you’ll capture the relaxed, sun-bleached vibe of a beach house porch.
Step-by-Step Tutorial
Materials
- Wooden rocking chair (unfinished or stripped)
- Medium and fine-grit sandpaper (120 and 220 grit)
- Tack cloth
- Deep teal or navy chalk-style paint
- Light sage green or seafoam chalk-style paint
- Cream or antique white chalk-style paint
- Painter’s tape
- 2-inch synthetic bristle brush
- Chip brush (for dry brushing)
- Clear furniture wax or matte polyurethane
- Lint-free rags
Step 1: Preparation & Base Coat
-
Dissassemble the Seat:
If your rocker has a removable slatted seat like the one shown, carefully unscrew or pop it out. If it’s built-in, use painter’s tape to meticulously mask off any seat slats you want to keep as natural wood. -
Clean and Scuff:
Give the entire chair a good scuff sanding with 120-grit sandpaper to help the paint adhere. Wipe away all dust with a tack cloth so your surface is perfectly clean. -
Apply the Navy Base:
Stir your deep teal or navy chalk paint well. Using your synthetic bristle brush, apply a solid coat to the entire frame, legs, rockers, and the outer frame of the backrest. -
Paint the Top Slats:
For the upper horizontal slats on the backrest, continue with the navy paint, ensuring you get into the crevices where the slats meet the vertical posts. -
Dry and Repeat:
Let the first coat dry completely (usually about 2 hours). Apply a second coat of the navy to ensure rich, opaque coverage, then let it dry overnight.
Too much paint?
If you accidentally apply too much cream paint during the dry-brushing phase, simply use a damp rag to wipe it back immediately before it sets, or sand it down heavily once dry.
Step 2: Creating the Driftwood Effect
-
Tape Off Vertical Slats:
The vertical back slats in this project feature a lighter, multi-toned effect. If you accidentally got navy paint on them, sand it back lightly. Ensure your navy frame is dry before working near it. -
Layer the Sage Green:
Dip your chip brush into the light sage green paint and offload most of it onto a paper towel until the brush is almost dry. -
Dry Brush Vertical Slats:
Lightly drag the dry brush up and down the vertical slats. You want the wood grain to show through, creating a washed look rather than a solid paint job. -
Add Cream Highlights:
Once the sage is touch-dry, repeat the dry-brushing technique with the cream paint. Focus these highlights on the center of the slats to mimic sun-fading.
Step 3: Distressing & Finishing
-
Distress the Edges:
Using 220-grit sandpaper, gently sand the edges of the rockers, armrests, and the tops of the back posts. Your goal is to reveal the natural wood underneath the navy paint at natural wear points. -
Heavy Distressing:
For a more rustic look like the example, press harder with the sandpaper on the front of the legs and the hand-holds of the arms, creating larger patches of exposed wood. -
Dust Off:
Wipe the entire chair down with a clean, dry cloth to remove all sanding dust. This step is crucial before sealing. -
Wax On:
I prefer using clear furniture wax for this step. Apply a thin layer over the painted surfaces with a lint-free rag or wax brush. -
Buff to Sheen:
After the wax has hazed over (about 15-20 minutes), buff it vigorously with a clean rag to create a soft, durable sheen. -
Treat the Seat Slats:
If you kept the seat slats natural, apply a coat of clear matte polyurethane or wax to protect the wood while maintaining its raw appearance. Reattach the seat once everything is dry.
Add depth
For an even older, antiqued look, apply a small amount of dark brown wax into the corners and crevices after the clear wax layer. This mimics accumulated age and grime.
Now you have a stunning, history-filled piece ready for relaxing afternoons
Color-Dipped Legs and Runners
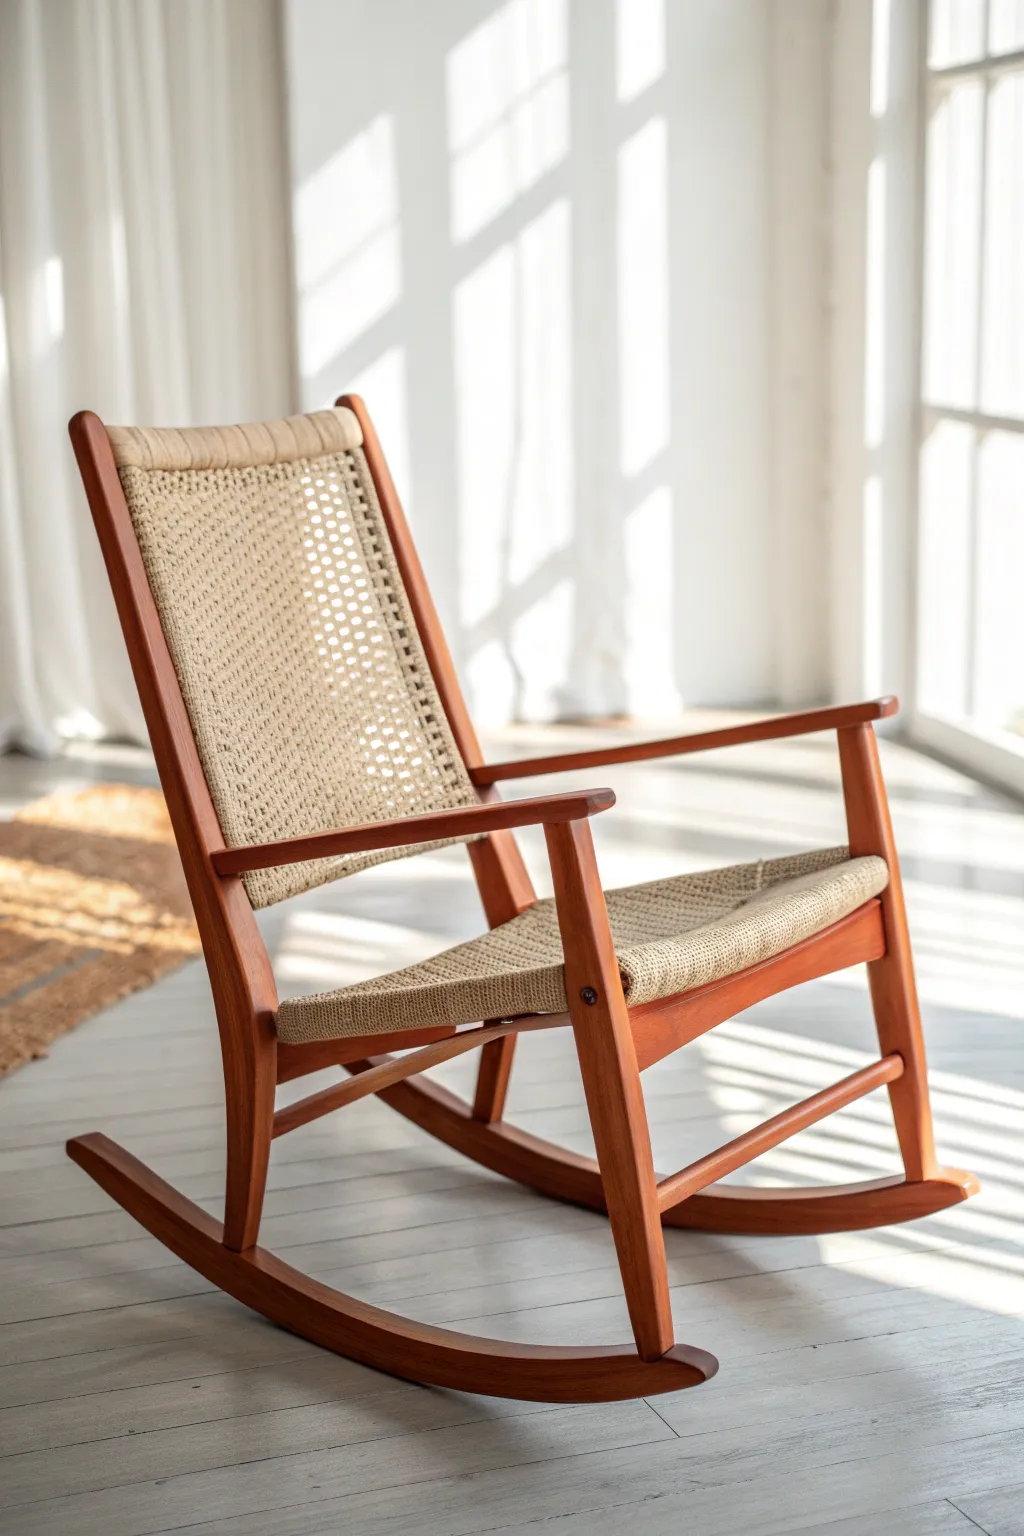
Transform a classic mid-century style woven rocking chair with a modern, unfinished-meets-painted aesthetic. This technique involves masking off the intricate woven seating to apply a clean, dipped paint effect on just the lower legs and runners for a striking visual contrast.
Detailed Instructions
Materials
- Danish cord rocking chair (or similar wooden rocker)
- Painter’s tape (high quality, low-tack)
- Drop cloth or plastic sheeting
- Sandpaper (120 and 220 grit)
- Tack cloth
- Primer (wood bonding primer)
- Semi-gloss or satin furniture paint (white or cream)
- Angled sash brush
- Small foam roller
- Measuring tape
- Pencil
Step 1: Preparation & Masking
-
Assess the existing finish:
Examine your rocking chair’s current finish. If it has a glossy varnish, you’ll need to do more sanding. On this project, we are working with stained wood that needs to be clean and dry. -
Measure the dip line:
Decide how high you want the ‘dipped’ effect to go. A good rule of thumb is just below the seat rail or halfway down the vertical legs. Use your measuring tape to mark this height on all four legs with a pencil. -
Create a level line:
Connecting your pencil marks, wrap painter’s tape carefully around each leg. Ensure the tape is perfectly horizontal to create that crisp ‘dipped’ illusion. -
Protect the upper chair:
This is crucial: Use plastic sheeting or heavy paper to completely cover the woven cord seat, backrest, and the upper wood portions. The tape line you just created acts as the anchor for this protection. -
Seal the tape edge:
Run your fingernail or a credit card firmly along the bottom edge of the tape. I like to do this twice to prevent any paint from bleeding underneath.
Seal the Edge
Before painting your color, paint a thin line of the original clear varnish (or clear matte medium) over the tape edge. This seals any gaps so your color line is razor sharp.
Step 2: Sanding & Priming
-
Scuff sand the legs:
Using 120-grit sandpaper, lightly sand the legs and runners below your tape line. You don’t need to strip the wood completely, just create enough ‘tooth’ for the primer to stick. -
Smooth with fine grit:
Follow up quickly with 220-grit sandpaper to ensure the surface is smooth to the touch. -
Clean surface:
Wipe away all sanding dust using a tack cloth. Any remaining dust will leave a gritty finish in your paint. -
Apply primer coat:
Brush on a thin coat of high-quality bonding primer. Focus on the runners where the chair touches the floor, as this area gets the most wear. -
Let primer cure:
Allow the primer to dry completely according to the manufacturer’s instructions. Do not rush this step.
Step 3: Painting & Finishing
-
First coat of paint:
Apply your chosen furniture paint using an angled sash brush for curves and corners, and a small foam roller for the flat sides of the runners. Keep the coat thin. -
Paint away from the tape:
When painting near the tape line, brush *away* from the tape rather than towards it. This helps further prevent bleed-through. -
Sand between coats:
Once the first coat is dry, very lightly run 220-grit sandpaper over it to knock down any bumps, then wipe clean. -
Apply final coats:
Apply a second (and third if necessary) coat of paint until you achieve solid, opaque coverage. -
Remove tape while damp:
This is the secret to a perfect line: Peel off the painter’s tape while your final coat is still slightly tacky/damp, not fully dry. Pull the tape away at a 45-degree angle. -
Touch ups:
Inspect your lines. If there was tiny bleeding, you can carefully scrape it away with a fingernail or use a tiny artist’s brush to correct it before the paint hardens fully.
Metallic Accent
For a luxe touch, define the transition between the wood and the paint with a thin strip of gold leafing or copper tape right at the dip line.
Step back and admire how this simple paint technique completely refreshes the silhouette of your chair
Geometric Blocks for a Bold Graphic Look
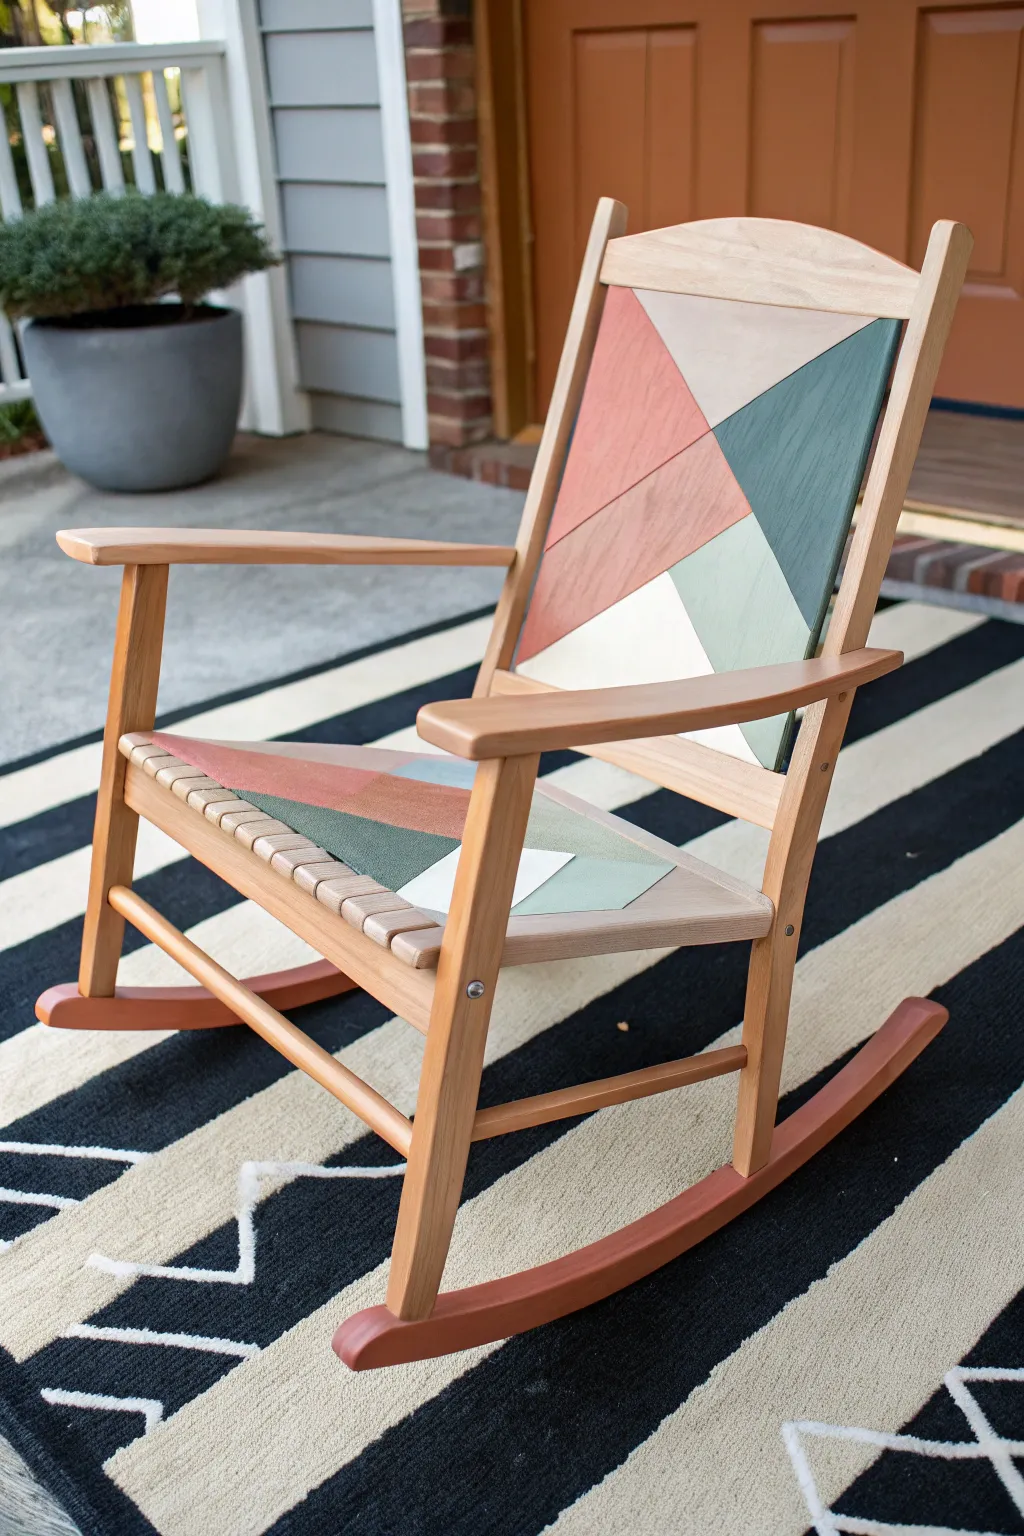
Transform a plain or tired rocking chair into a modern statement piece with this bold geometric upgrade. By painting sharp, angular blocks of color onto the seat and back panels, you create a custom look that feels both retro and contemporary.
Step-by-Step Guide
Materials
- Rocking chair with removable seat/back panels (or suitable surface)
- Sandpaper (120 and 220 grit)
- Painter’s tape (high quality for sharp lines)
- Primer spray or brush-on
- Chalk paint or acrylic outdoor paint (terracotta, sage green, cream, blush pink, white)
- Small foam rollers
- Angled artist brushes
- Clear matte polyurethane sealer
- Screwdriver or hex key (for disassembly)
- Pencil and ruler
Step 1: Prep and Prime
-
Disassemble the chair:
Begin by carefully removing the backrest and seat panels from the rocking chair frame. Keep all screws and hardware organized in a labeled baggie so nothing gets lost during the painting process. -
Sand the surfaces:
Lightly sand the wooden panels that will receive the design using 120-grit sandpaper to remove any existing glossy finish. Follow up with 220-grit for a smooth base. -
Clean the wood:
Wipe down the panels with a damp tack cloth or microfiber towel to remove all sanding dust. The surface needs to be completely debris-free for the tape to seal properly. -
Apply primer:
Coat the panels with a high-quality wood primer. I prefer using a spray primer for an even finish without brush strokes. Let this dry completely according to the can’s instructions.
Bleeding Lines?
If paint bleeds under the tape, wait for it to dry completely. Then, lay tape over the error and use the correct color to touch up the crisp line.
Step 2: Designing the Geometry
-
Sketch the layout:
Using a pencil and ruler, lightly draw your geometric design directly onto the primed white panels. Focus on creating large triangles and trapezoids that intersect. -
Plan your colors:
Mark each section with a tiny letter (like ‘G’ for green, ‘T’ for terracotta) to map out your color scheme before you start painting. This prevents accidental neighboring blocks of the same color. -
Tape the first boundary:
Apply painter’s tape along the pencil lines for your first color section. Press the edges of the tape down firmly with a credit card or fingernail to prevent paint bleed.
Seal the Tape Edge
Before painting your color, brush a tiny amount of the base color (or clear matte medium) over the tape edge to lock it down and ensure razor-sharp lines.
Step 3: Painting the Blocks
-
Paint the first section:
Using a small foam roller or brush, fill in your first geometric shape. Apply thin, even coats rather than one thick one to ensure durability. -
Remove tape while wet:
Carefully peel back the painter’s tape while the paint is still slightly wet. This helps ensure a crisp line and prevents the paint from peeling up with the tape later. -
Wait for drying:
Allow this first section to dry completely before you attempt to tape over it for the adjacent shapes. Patience here is key to crisp lines. -
Tape adjacent sections:
Once the first color is fully cured, apply tape over the painted edge to define the next shape. Press firmly again to seal the seam. -
Continue the pattern:
Repeat the taping and painting process for the remaining colors—sage green, blush, and cream—working across the panel until the geometric puzzle is complete. -
Touch up details:
Inspect your lines after all tape is removed. Use a small angled artist brush to fix any minor bleeds or uneven edges for a perfect finish.
Step 4: Assembly and Protection
-
Seal the artwork:
Protect your design with two to three coats of clear matte polyurethane. If this chair is going on a porch, ensure the sealer is rated for outdoor UV exposure. -
Refinish the frame (optional):
While panels dry, inspect the wooden chair frame. If it needs a refresh, light sanding and a fresh coat of clear varnish or oil will bring back the wood’s warmth. -
Reassemble the chair:
Once everything is fully cured (give it at least 24 hours), reattach the seat and back panels to the frame using the hardware you saved earlier.
Now you have a stunning, custom piece of furniture ready for relaxing afternoons on the porch
Confetti Dashes for a Playful Nursery Rocker
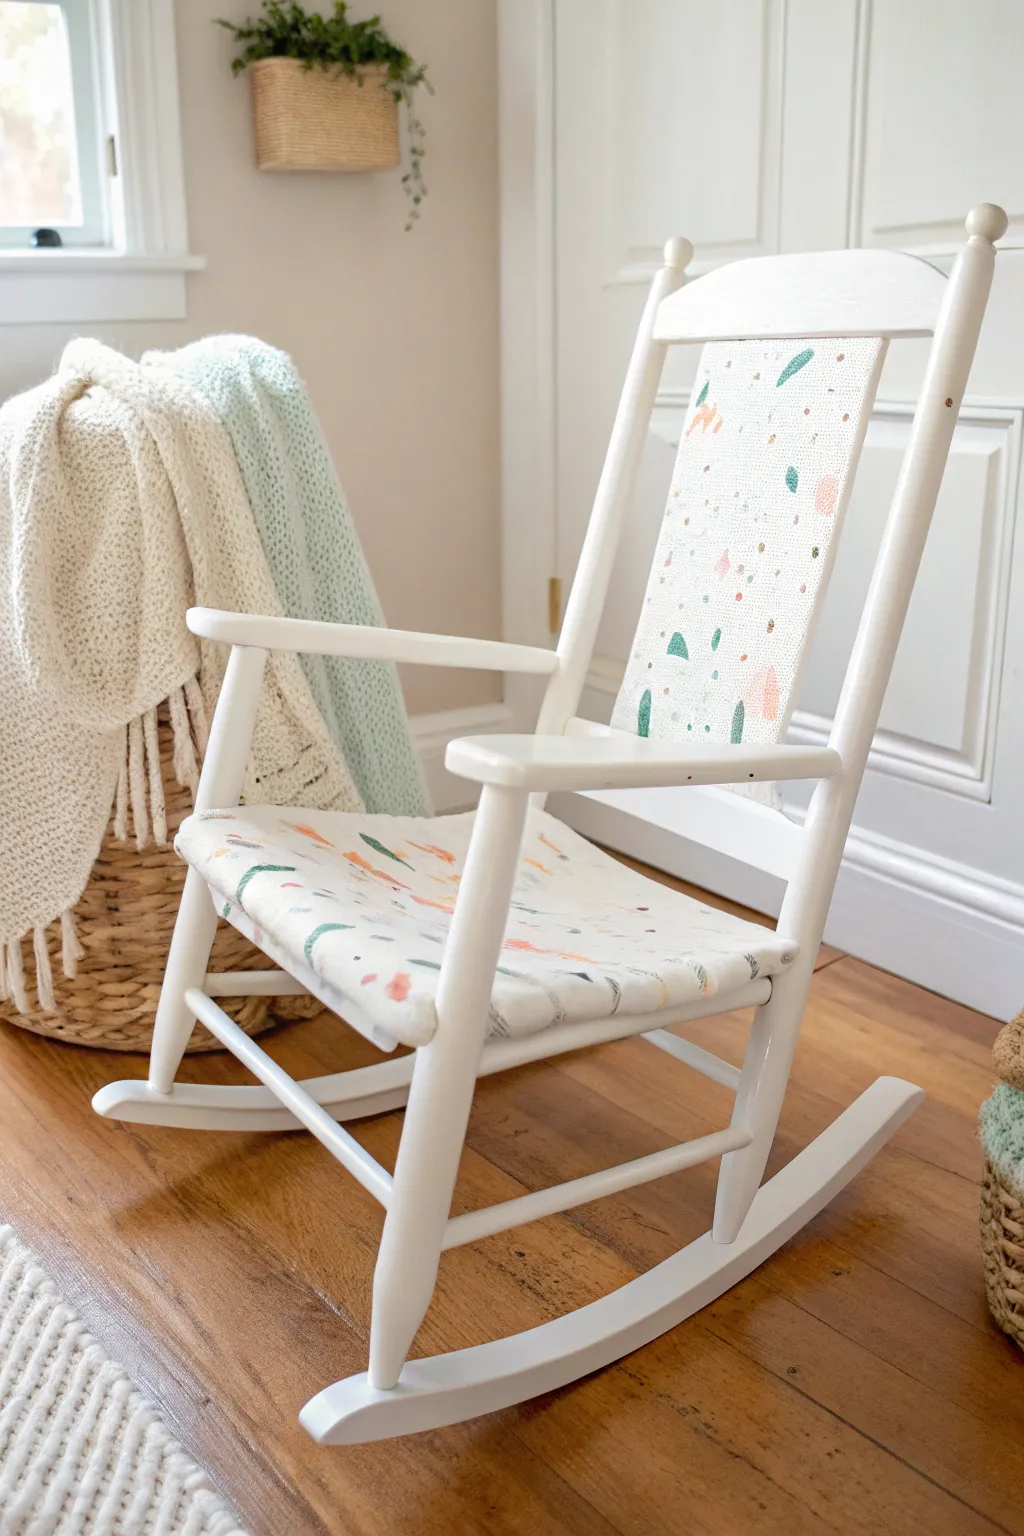
Transform a plain wooden children’s rocking chair into a playful statement piece with this fresh update. By combining crisp white paint with a hand-painted fabric design inspired by terrazzo tiles, you create a custom look that adds a splash of muted color to any nursery or playroom.
Step-by-Step
Materials
- Wooden children’s rocking chair (vintage or new)
- Sanding block or sandpaper (120 and 220 grit)
- White primer (spray or brush-on)
- White satin or semi-gloss furniture paint
- Heavyweight white cotton canvas or duck cloth (enough to cover seat and back)
- Fabric medium
- Acrylic craft paints (sage green, peach, blush pink, light gold/mustard)
- Small flat paintbrushes and angled shaders
- Staple gun and heavy-duty staples
- Fabric scissors
- Old screwdriver and pliers (for removing old fabric)
- Clear spray sealer (optional, for fabric protection)
Step 1: Prepping the Frame
-
Remove old upholstery:
Begin by stripping the chair down to its bones. If your chair has existing cushions or fabric, use a flathead screwdriver or staple remover to pry up the old staples. Use pliers to pull them completely out so the wood surface is smooth. -
Clean and sand:
Clean the entire wooden frame with soapy water to remove years of grime. Once dry, scuff sand the entire piece with 120-grit sandpaper to remove any glossy finish, then follow up with 220-grit for a smooth base. Wipe away all dust with a tack cloth. -
Prime the wood:
Apply a coat of high-quality primer. If you are painting over dark wood, you might need two coats to prevent bleed-through. Let this dry completely according to the manufacturer’s instructions. -
Paint the finish coats:
Apply your white furniture paint using long, smooth strokes to minimize brush marks. I find that turning the chair upside down first helps reach those tricky spots under the rockers. Apply 2-3 thin coats rather than one thick one, allowing proper drying time between each layer.
Paint Bleeding?
If acrylics bleed into the fabric grain, your mix is too watery. Use less water or slightly more paint. Using a canvas that is primed or has a tighter weave also helps crisper lines.
Step 2: Creating the Confetti Fabric
-
Measure and cut:
While the chair dries, measure the seat and backrest openings. Cut your white canvas to size, adding at least 2-3 inches of excess on all sides to allow for stapling ease. -
Mix your paints:
Prepare your palette by mixing each acrylic color with fabric medium. A 2:1 ratio of paint to medium usually works well to keep the fabric soft and washable rather than stiff. -
Paint larger shapes first:
Start with your largest shapes—the sage green ovals and peach blobs. Scatter them randomly across the fabric, ensuring they are spaced out nicely but facing different directions for an organic terrazzo look. -
Layer medium accents:
Switch to a smaller brush and add the blush pink shapes. Nest some of these near the larger shapes, but try not to let them touch wet paint to avoid muddying the colors. -
Add confetti details:
Using a small detail brush, add the smallest accents: the gold dots, tiny dashes, and small green specks. This ‘confetti’ layer ties the whole pattern together and fills in the negative space. -
Heat set the design:
Allow the painted fabric to cure for 24 hours. Once dry, iron the backside of the fabric on a medium-high setting (no steam) to heat-set the fabric medium, making the design permanent.
Pro Tip: Planning The Pattern
Before painting your final fabric, practice your confetti pattern on a scrap piece of paper or cardboard. This helps you figure out the perfect spacing and color balance without risking your canvas.
Step 3: Assembly
-
Position the backrest:
Lay your painted fabric over the backrest frame. Center your pattern where you want it. Start by placing one staple in the center of the top rail, then pull the fabric taut and place one staple in the center of the bottom rail. -
Secure the back fabric:
Work your way out from the center staples toward the corners, pulling firmly as you go to ensure no wrinkles form. Secure the sides last. -
Upholster the seat:
Repeat the process for the seat cushion. If your chair has a drop-in seat, wrap the fabric around the insert and staple it underneath. If stapling directly to the frame, keep the tension high so the seat doesn’t sag when sat upon. -
Trim excess:
Use sharp fabric scissors to trim away the excess canvas as close to the staple line as possible for a neat finish. -
Cover the staples (optional):
If the staple line is visible and unsightly, use a hot glue gun to attach a matching white gimp braid or ribbon over the staples for a professional, seamless edge. -
Add protection:
For extra durability in a heavy-use zone, mist the fabric lightly with a spray-on fabric protector like Scotchgard to repel future spills.
Now you have a charming, custom piece of furniture ready for story time
Storybook Mural on the Side Panels
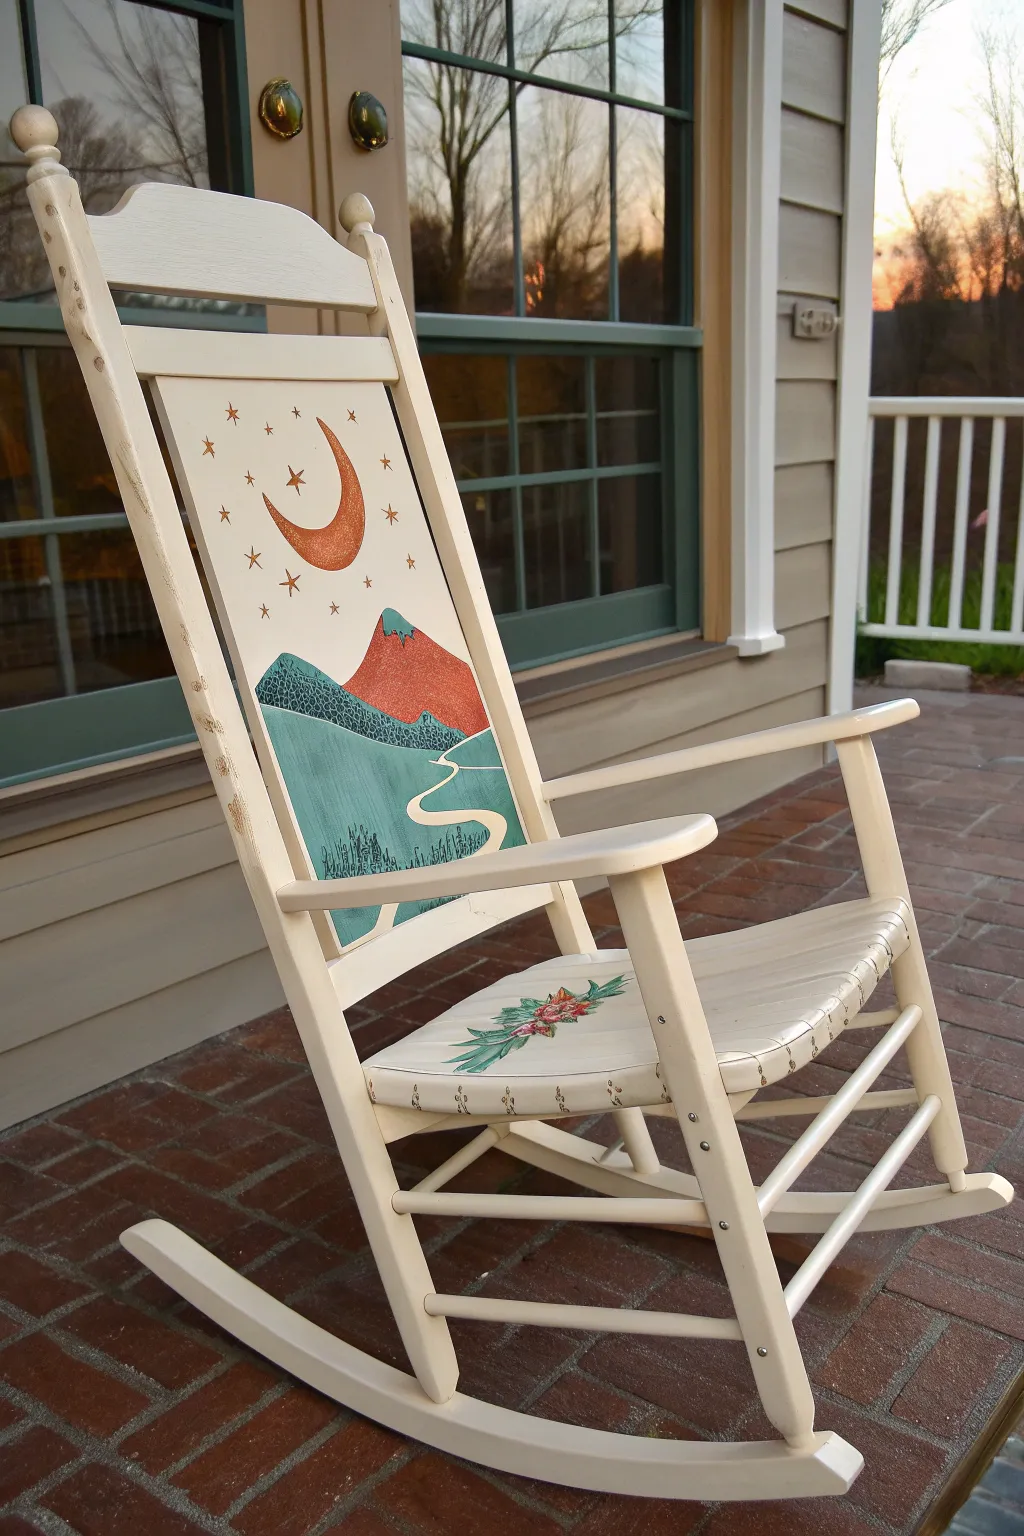
Transform a plain wooden rocker into a dreamy piece of furniture with this whimsical landscape design featuring rolling hills, a winding river, and a celestial night sky. The soft cream base and folk-art style painting create a cozy, nostalgic feel perfect for a nursery or reading nook.
How-To Guide
Materials
- Wooden rocking chair (unfinished or pre-sanded)
- Sandpaper (120 and 220 grit)
- Primer (suitable for wood)
- Cream or off-white latex furniture paint
- Acrylic craft paints (burnt orange, teal blue, sage green, cream, metallic gold)
- Assorted paintbrushes (1-inch flat, medium flat shader, small round detail brush)
- Pencil and eraser
- Painter’s tape
- Clear matte or satin polyurethane sealer
Step 1: Preparation and Base Coat
-
Prepare the surface:
Begin by removing any old finish or rough spots on your rocking chair using 120-grit sandpaper. Follow up with 220-grit for a smooth finish, wiping away all dust with a tack cloth. -
Prime the chair:
Apply a high-quality wood primer to the entire chair. This ensures your cream topcoat adheres properly and prevents wood tannins from bleeding through the light paint. -
Apply the base color:
Paint the entire chair with two to three coats of cream or off-white furniture paint. Allow the paint to dry completely between coats according to the manufacturer’s instructions.
Step 2: Drafting the Back Panel Scene
-
Sketch the horizon:
On the central back panel, lightly use a pencil to sketch rolling hill lines. Start about one-third of the way up from the bottom. -
Draw the mountains:
Sketch a large, prominent mountain peak slightly off-center to the right, sitting behind your rolling hills. -
Outline the river:
Create a winding path or river starting narrow near the mountains and widening as it curves toward the bottom right corner of the panel. -
Add celestial details:
In the upper third of the panel, sketch a large crescent moon on the left side and scatter small stars around the sky area.
Clean Lines Hack
If you struggle with steady hands, use a paint marker for the stars and the fine details on the grass instead of a brush.
Step 3: Painting the Landscape
-
Paint the mountains:
Fill in the large mountain peak with a warm burnt orange acrylic paint. Depending on opacity, you may need two coats for a solid, bold color. -
Color the hills:
Use teal blue for the distant hills on the left side. I find a flat shader brush works best here to get crisp edges against the mountain. -
Paint the foreground:
Paint the lower grassy areas in a sage green tone, carefully painting around the winding river path you sketched earlier. -
Detail the river:
Fill in the river path with a very light blue or simply leave it the base cream color if there is enough contrast with the green banks. -
Texture the hills:
Once the base colors are dry, use a small round brush with dark blue paint to add small, repetitive texture marks—like tiny U-shapes or dashes—over the teal hill to simulate distant forests. -
Add mountain snow:
Paint jagged snow caps on the peak of the orange mountain using teal or light blue paint for a stylized contrast. -
Paint grass details:
Using a fine liner brush and dark green or black paint, add small vertical strokes in the foreground to represent tall tufts of grass.
Level Up: Texture
Mix a tiny amount of baking soda into the orange mountain paint to give the peak a rough, stone-like texture that stands out.
Step 4: Celestial and Seat Details
-
Paint the moon:
Fill in the crescent moon shape with the same burnt orange used for the mountain to tie the color palette together. -
Add stars:
Using a small detail brush and metallic gold or dark brown paint, carefully go over your pencil star sketches. Mix 5-point stars with simple dot stars for variety. -
Decorate the seat:
If desired, paint a small floral motif on the seat of the chair using the same sage green and burnt orange palette. A simple cluster of leaves and a central flower works perfectly. -
Enhance the edges:
For a rustic look, lightly distress the edges of the chair frame with sandpaper to reveal a bit of the wood underneath, focusing on areas that would naturally wear. -
Seal the artwork:
Protect your handiwork by applying two coats of clear matte or satin polyurethane over the entire chair, paying special attention to the painted pictorial panel.
Enjoy the gentle rhythm of rocking in your new piece of functional art
Faux Inlay Pattern for a Wow Finish
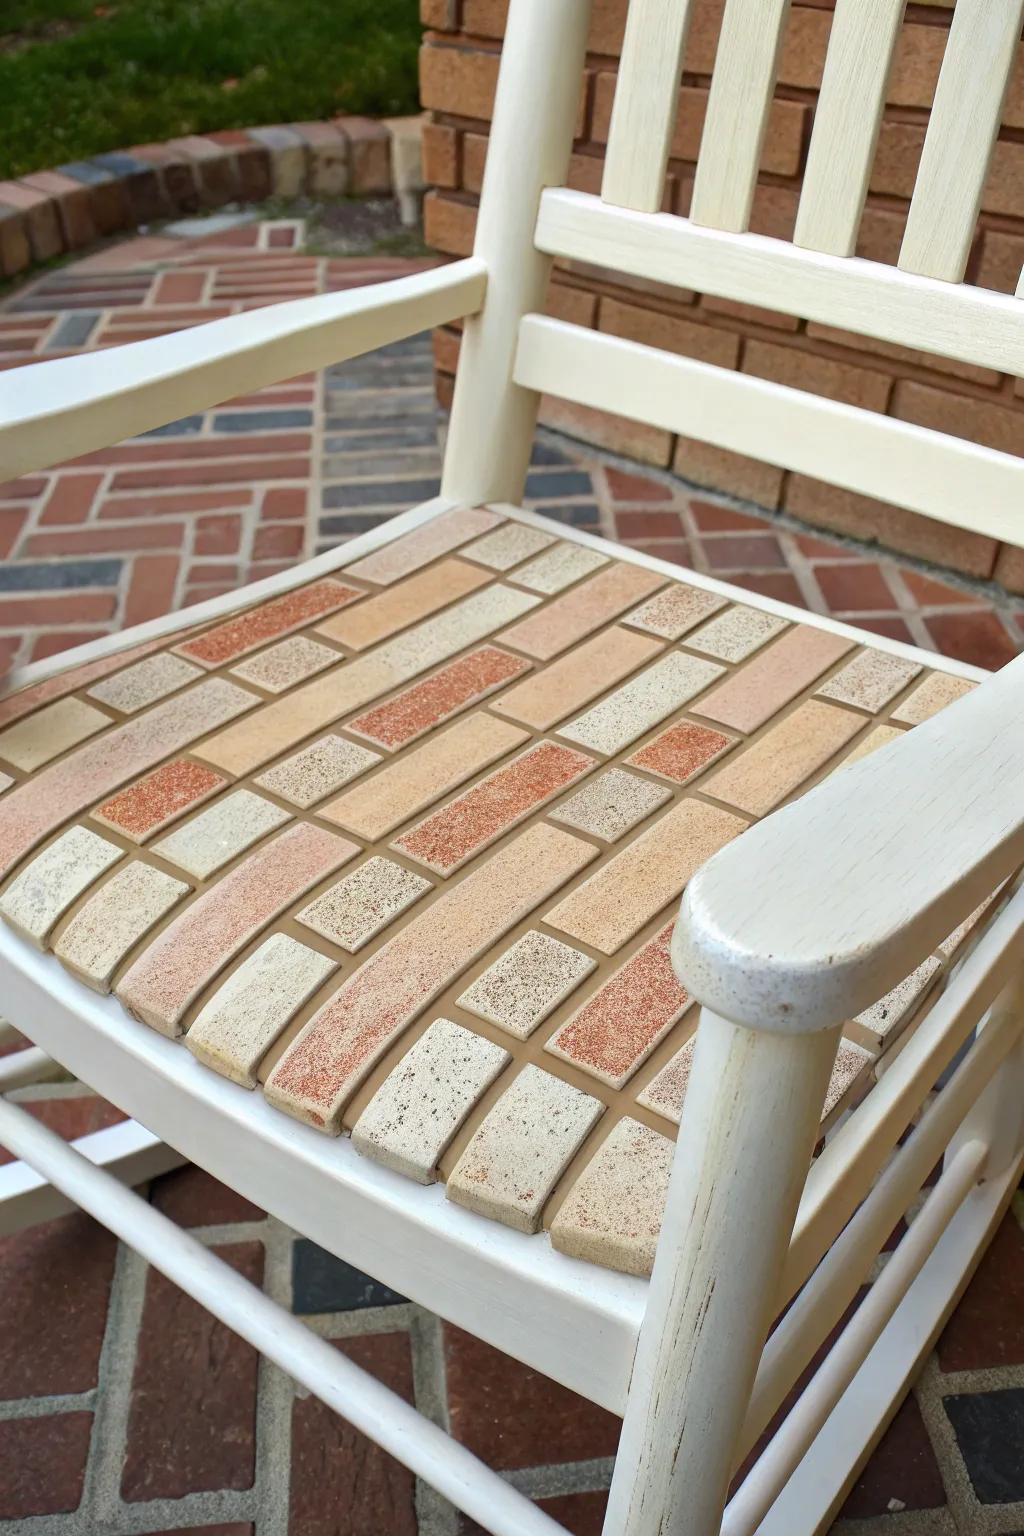
Transform a plain wooden rocking chair seat into a stunning faux stone masterpiece using clever masking and sponge painting techniques. This trompe-l’œil effect mimics the texture and warmth of natural pavers without the weight, adding a sophisticated, earthy touch to your porch furniture.
How-To Guide
Materials
- Wooden rocking chair (prepped and primed)
- Creamy white chalk or latex paint (base color)
- Assorted acrylic craft paints (terracotta, beige, tan, grey, burnt umber)
- Painter’s tape (1/4 inch or thin masking tape)
- Natural sea sponges
- Small flat artist brushes
- Sanding block (fine grit)
- Polyurethane sealer (satin or matte finish)
- Ruler or straight edge
- Pencil
Step 1: Base Preparation & Layout
-
Apply the Grout Color:
Start by painting the entire seat surface with your chosen ‘grout’ color. The image uses a warm, neutral tan or light beige. Apply two solid coats and let it dry completely, waiting at least 24 hours to ensure the tape won’t peel up the paint later. -
Plan Your Pattern:
Visualize a running bond or offset brick pattern. Using a pencil and a ruler, lightly mark out a grid on the seat. The ‘bricks’ in the example are roughly 2 inches by 5 inches, but adjust the scale to fit your chair’s seat dimensions. -
Tape the Horizontal Lines:
Apply strips of 1/4 inch painter’s tape across the full width of the seat, following your horizontal stylistic lines. Press the edges down firmly with a credit card or your fingernail to prevent paint bleed. -
Tape the Vertical Joints:
Cut smaller pieces of tape to create the vertical separations between the bricks. Place them in a staggered fashion to create that classic bricklayer look. Ensure these vertical pieces overlap the horizontal tape tightly.
Step 2: Creating the Stone Texture
-
Prepare Your Palette:
On a paper plate, pour out puddles of your stone colors: cream, terracotta, beige, and grey. Keep them separate at first. -
Sponge the Base Stones:
Dampen a sea sponge and wring it out completely. Dip into your lightest cream color and dab off excess on a paper towel. Lightly pounce the sponge over random brick sections, covering about 60% of the surface. -
Add Terracotta Warmth:
Using a fresh corner of the sponge or a new one, pick up the terracotta paint. Pounce this color onto different random bricks, and lightly layer it over some of the cream ones for variety. The goal is random distribution. -
Layer in Neutrals:
Repeat the sponging process with your tan and grey paints. I like to twist the sponge as I work to avoid a repetitive stamp pattern. Let the colors overlap slightly to create depth and that realistic speckled stone look. -
Detail the Edges & Shadows:
For added dimension, dip a small angled brush into a watered-down brown or dark grey. Lightly glaze the bottom and right edges of each distinct brick shape (right over the tape is fine) to create a subtle 3D shadow effect. -
Splatter for Texture (Optional):
Load an old toothbrush with thinned black or dark brown paint. Run your thumb over the bristles to flick tiny specks across the seat. This mimics the grit found in real stone pavers.
Natural Variation
Don’t aim for duplicate bricks. Real stone varies wildly. Intentionally leave some ‘bricks’ very light and saturate others heavily with the terracotta color to trick the eye.
Step 3: Finishing Touches
-
The Reveal:
Once the paint is tacky but not fully dry (usually about 20-30 minutes), carefully peel away the tape. Pull at a 45-degree angle. This reveals your crisp ‘grout’ lines underneath. -
Touch Up Grout Lines:
If any paint bled under the tape, use your small brush and the original base grout color to tidy up the lines. You want sharp, clean separation. -
Clean Up the Chair Frame:
Check the white frame of the chair for any rogue paint splatters. Wipe them away with a damp cloth or touch up with the white frame paint if they have dried. -
Seal the Surface:
Since this is a seat, durability is key. Apply at least three coats of a high-quality satin or matte polyurethane. Allow ample drying time between coats according to the can’s instructions. -
Final Cure:
Let the chair cure for several days before placing a cushion on it or sitting down. This ensures the finish hardens completely and won’t feel sticky.
Bleeding Lines?
If paint seeps under the tape, don’t panic. Once dry, use a small artist’s brush and your base grout color to ‘erase’ the mistake and straighten the line.
Step back and admire how a little paint and patience turned a plain seat into a conversation piece that looks surprisingly like real masonry


Have a question or want to share your own experience? I'd love to hear from you in the comments below!