If carving feels messy (or just not your vibe), painting a pumpkin is the cutest, easiest way to get that festive fall energy. I love how a simple painted pumpkin can turn into anything—sweet, silly, glam, or totally unexpected—without needing advanced skills.
Classic Cute Jack-o’-Lantern Faces
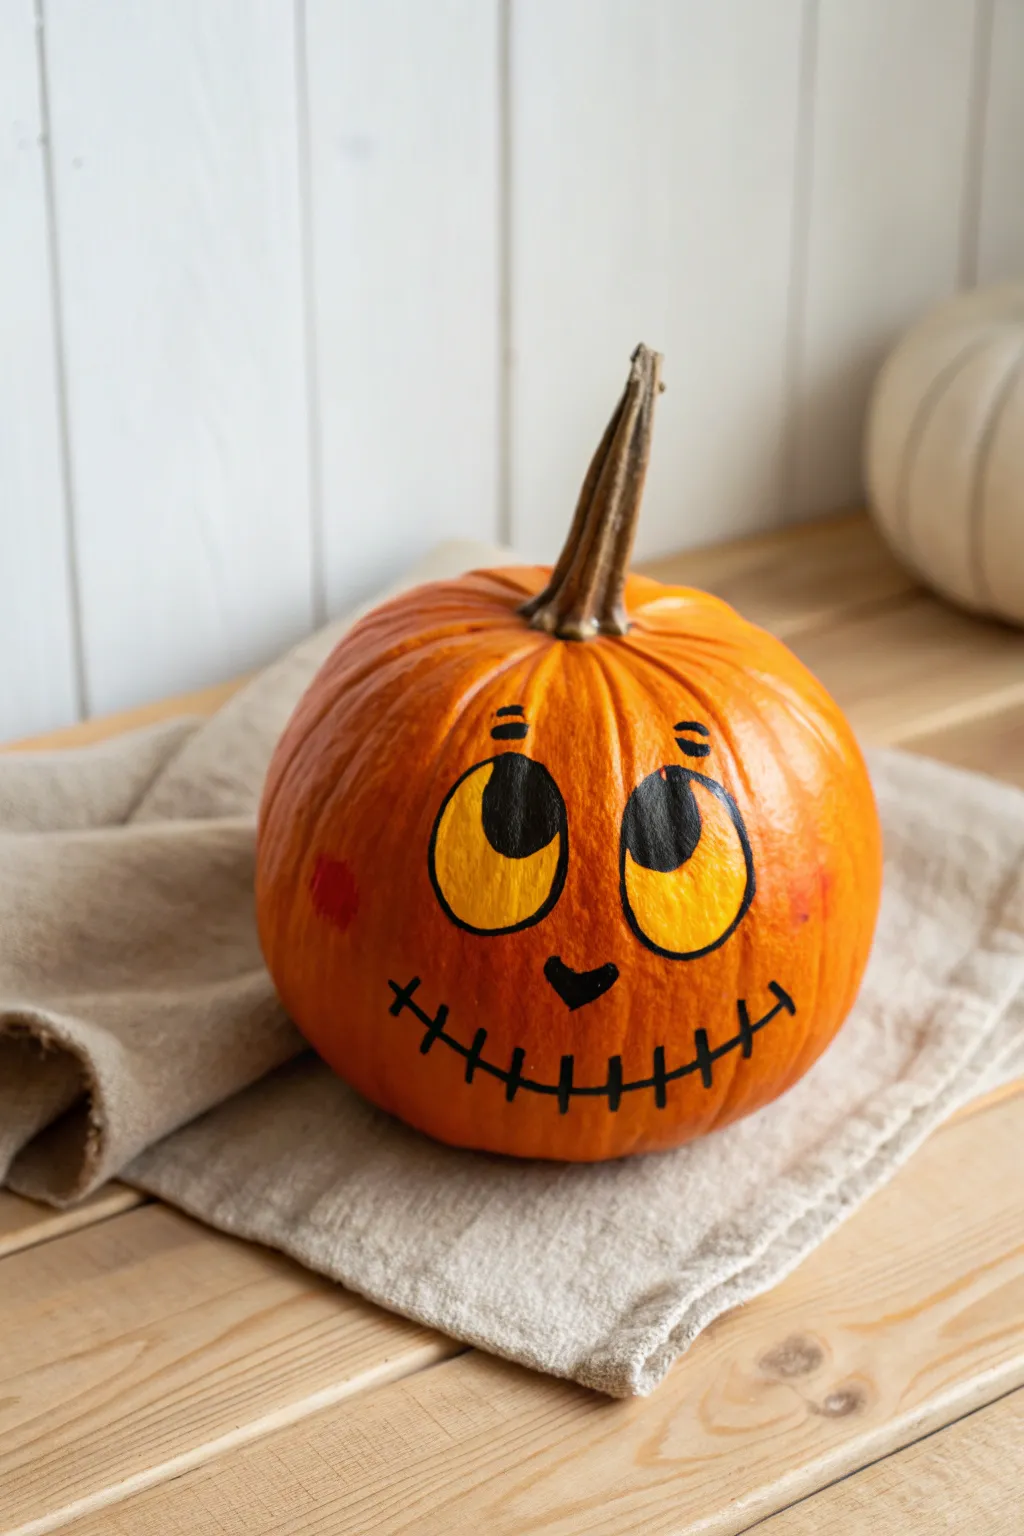
This friendly Jack-o’-Lantern brings a cheerful spirit to your Halloween decor without the mess of carving. With its oversized wondering eyes and exaggerated stitched smile, this painted character has a sweet, folk-art charm that’s perfect for porches or tabletops.
Step-by-Step Tutorial
Materials
- Medium-sized orange pumpkin (clean and dry)
- Black acrylic paint
- Bright yellow acrylic paint
- Red or pink acrylic paint (or blush)
- Round paintbrush (medium size)
- Fine liner brush (for details)
- Pencil or chalk (for sketching)
- Cup of water
- Paper towels
- Palette or paper plate
Step 1: Planning the Face
-
Clean surface:
Begin by wiping down your pumpkin with a damp cloth to remove any dirt or dust, ensuring the paint will adhere smoothly. -
Dry completely:
Let the pumpkin surface dry fully before you pick up any tools; moisture can make the acrylic paint slip. -
Initial sketch:
Using a pencil or a piece of chalk, lightly sketch two large oval shapes for the eyes about midway up the pumpkin. -
Mapping the nose:
Draw a small, soft heart shape or rounded triangle right in the center, just below the eye line. -
Smile placement:
Sketch a long, curved line for the mouth, extending fairly wide across the face to create that classic grin.
Paint Slipping?
If the acrylic paint is beading up on the pumpkin skin, try lightly sanding the area with fine-grit sandpaper to give the surface some tooth.
Step 2: Painting the Eyes
-
Yellow base:
Fill in the large oval eye shapes with bright yellow acrylic paint perfectly following your sketched lines. -
Second coat:
Since yellow can be translucent, allow the first layer to dry and apply a second coat for vibrant, opaque coverage. -
Outline the eyes:
Once the yellow is dry to the touch, use your fine liner brush and black paint to carefully outline the yellow ovals. -
Adding pupils:
Inside the yellow ovals, paint large black circles positioned near the top-center to create a look of looking upwards. -
Highlighting:
For a spark of life, add a tiny white dot or a small swipe of lighter color inside the black pupil if you desire extra depth, though solid black works well too. -
Eyebrows:
Paint short, thick black dashes floating just above the eyes to give the pumpkin an inquisitive expression.
Make eyes pop
Mix a tiny dot of white into your yellow paint for the final coat. This increases opacity and makes the eyes stand out brightly against the orange.
Step 3: Adding the Details
-
Painting the nose:
Fill in your small heart-shaped nose sketch with solid black paint. -
Tracing the mouth:
Go over your main smile line with the black paint using a steady hand. -
Creating stitches:
Paint vertical hatch marks across the main smile line, spacing them relatively evenly to create the stitched appearance. -
Curving the ends:
At the very ends of the smile, add slightly longer or curved cross-hatches to frame the grin. -
Rosy cheeks:
Dip a dry brush into a tiny amount of red or pink paint (or even cosmetic blush) and blot most of it off on a paper towel. -
Applying blush:
In a circular motion, gently stipple the color onto the pumpkin skin just outside the corners of the mouth. -
Final touches:
Check your black outlines for any uneven spots and touch them up with the fine brush if needed. -
Sealing (Optional):
If this pumpkin is going outside, I usually recommend spraying it with a clear acrylic sealer to protect your artwork from the rain.
Place your charming creation on a sturdy surface and enjoy the whimsical personality it adds to your room


Goofy One-Eyed Monster Pumpkins
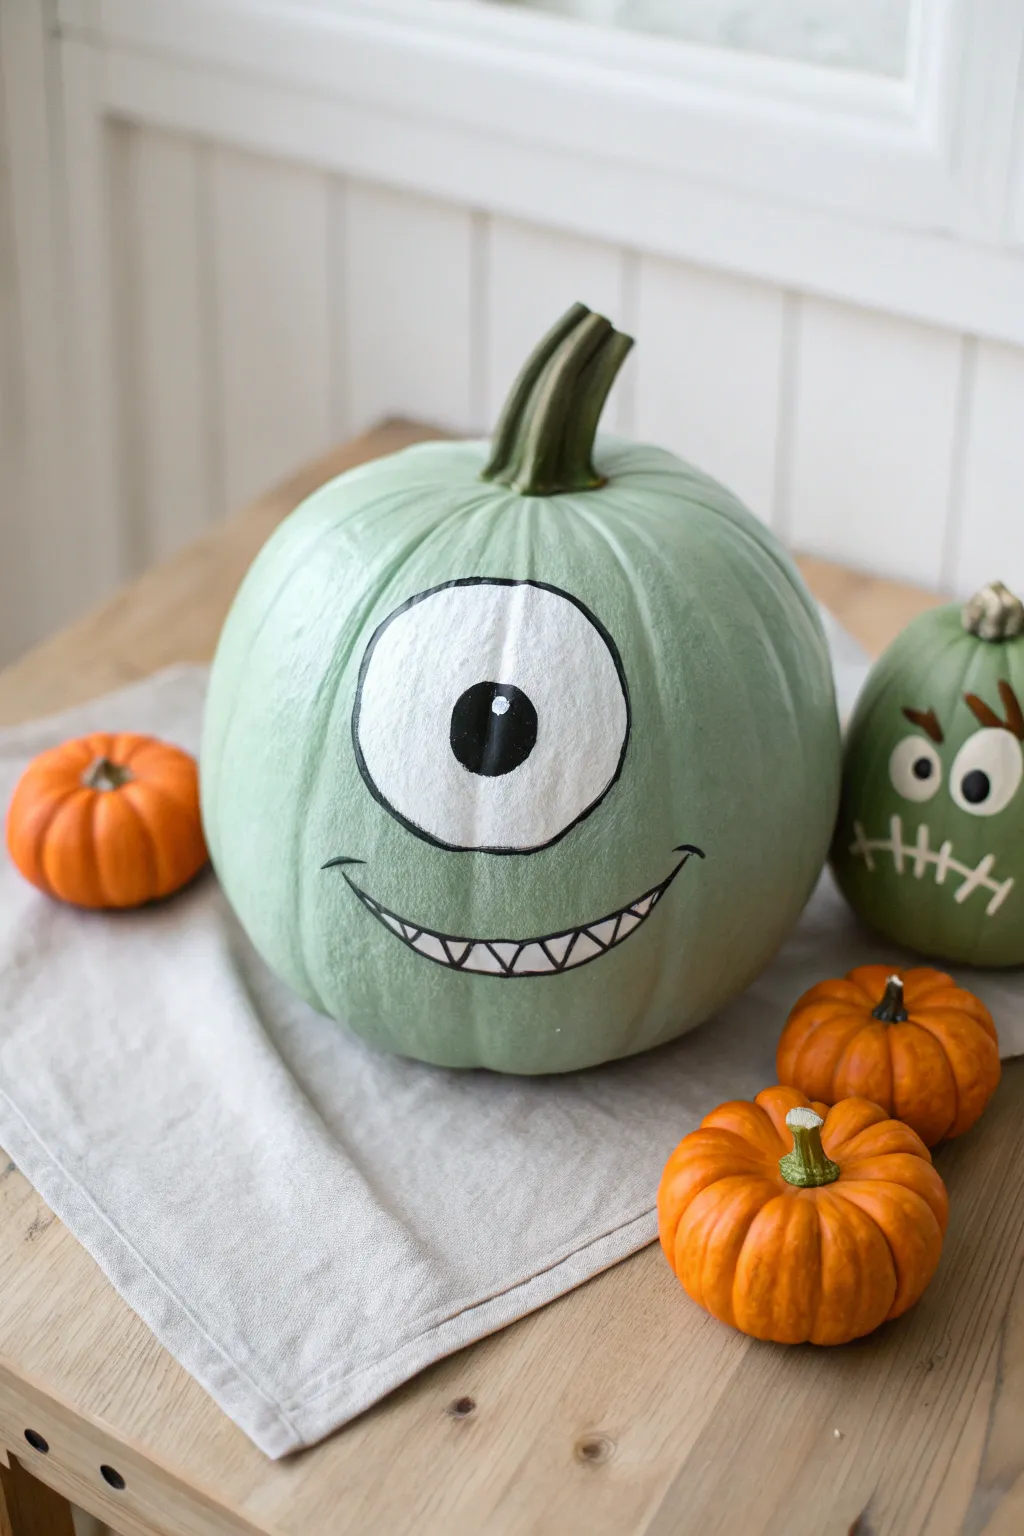
Transform a standard pumpkin into a friendly cyclops with this charmingly simple painting project. The soft sage green base and cartoonish features make for a decoration that is spooky-sweet rather than scary.
Detailed Instructions
Materials
- Medium-sized round pumpkin (real or faux)
- Sage green acrylic craft paint (chalk finish works best)
- White acrylic paint
- Black acrylic paint
- Medium flat paintbrush (1-inch width)
- Small round detail brush
- Pencil
- Paper plate or palette
- Cup of water and paper towels
Step 1: Base Coating
-
Clean surface:
Before you unscrew a single cap of paint, wipe your pumpkin down with a damp cloth to remove any field dirt or dust. A clean surface ensures the paint sticks properly without peeling later. -
First coat green:
Squeeze a generous amount of sage green paint onto your palette. Using the medium flat brush, apply a smooth, even coat over the entire pumpkin, working your way around the curves. -
Stem care:
Be careful around the base of the stem. You can choose to paint the stem green or leave it natural brown for contrast; leaving it natural usually looks a bit more polished. -
Dry completely:
Let this first layer dry fully. Acrylics dry fast, but thick layers on waxy pumpkin skin can take 20-30 minutes. It should feel dry to the touch. -
Second coat:
Apply a second coat of sage green. This is crucial for opacity, especially if you are painting over a bright orange pumpkin. Let this dry completely before moving on.
Paint Slipping?
If the paint streaks or beads up on a real pumpkin’s waxy skin, mix a tiny drop of clear liquid dish soap into your acrylic paint. This breaks the surface tension for smoother coverage.
Step 2: Drawing the Face
-
Outline the eye:
Using a pencil, lightly sketch a large circle in the upper center of the pumpkin’s best side. Don’t worry about it being a geometric perfect circle; a slightly organic shape adds character. -
Fill the eye:
Switch to a clean flat brush and fill this circle with white acrylic paint. You will smooth out your pencil lines as you paint the edges. -
Layering white:
White paint is notoriously translucent. I usually find I need at least two or three thin coats to get a bright, opaque white over the green base. Allow drying time between each layer. -
Sketch the mouth:
Once the white eye is drying, use your pencil to lightly sketch a wide, curved smile below the eye. Draw a secondary curved line connecting the corners to create an open mouth shape. -
Draw teeth:
Inside the mouth shape, sketch a zigzag line across the middle to create the upper and lower teeth.
Glow in the Dark
Swap the standard white paint for glow-in-the-dark acrylics for the eye. Charge it under a lamp, and your monster will watch over the porch after sunset.
Step 3: Detailing
-
Outline features:
Load your small round detail brush with black paint. Carefully trace over the pencil outline of the large white eye. Keep your hand steady and use the very tip of the brush. -
Create the pupil:
Paint a solid black circle in the center of the white eye. Make it fairly large to give the monster a cute, wide-eyed appearance. -
Highlight the eye:
Dip the non-brush end (the handle) of your paintbrush into white paint and dot a tiny highlight onto the black pupil. This brings the character to life instantly. -
Outline the mouth:
Using the detail brush and black paint again, trace the outer curve of the smile. Keep the line thickness consistent with the eye outline. -
Paint the teeth:
Trace the zigzag ‘teeth’ line inside the mouth. You don’t need to fill the teeth in with white; leaving them the background green color simplifies the look and adds a fun stylized effect. -
Add smile lines:
Paint small, short curved lines at the very corners of the mouth to accentuate the cheeks and make the smile look friendlier.
Set your monster out on the porch to greet trick-or-treaters with a goofy grin


Friendly Frankenstein Patch Pumpkins
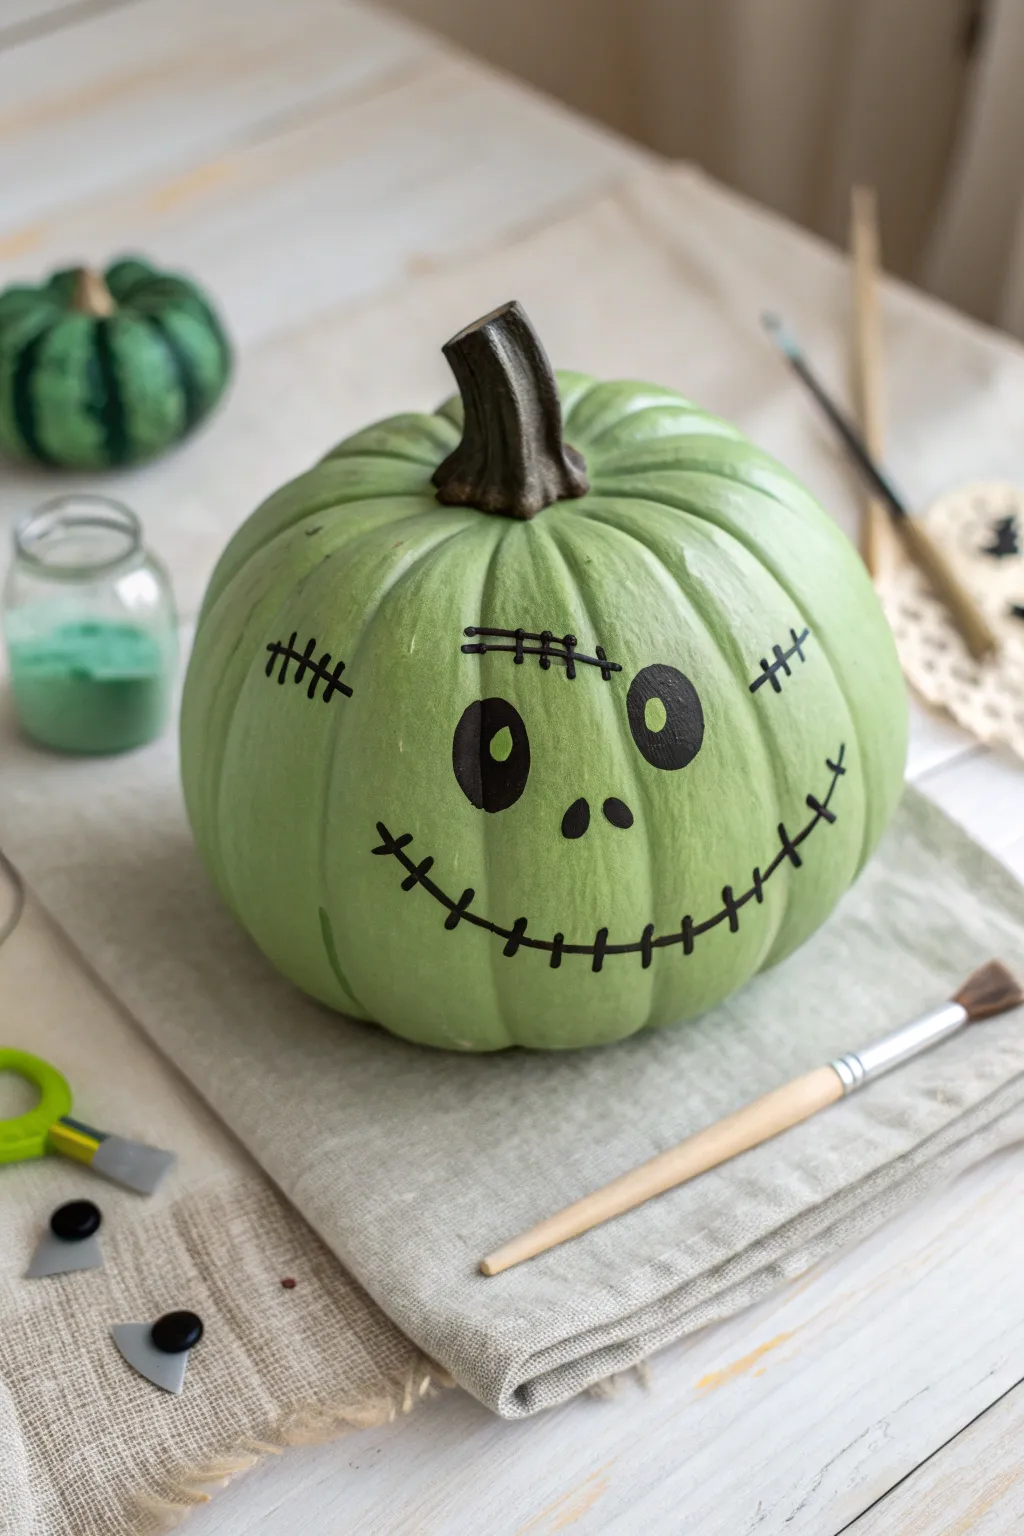
Transform a classic orange gourd into a friendly monster with this simple yet striking painted design. The soft sage green base and bold black stitches create a charmingly spooky look that’s perfect for a front porch display without scaring away the little ones.
Step-by-Step Guide
Materials
- Medium-sized pumpkin (real or faux)
- Sage or mint green acrylic paint
- Black acrylic paint
- White acrylic paint (optional for highlights)
- Wide flat brush
- Medium round brush
- Small detail brush
- Pencil for sketching
- Paper plate or palette
- Cup of water
- Paper towels
Step 1: Base Coat Application
-
Clean surface:
Before dipping your brush, make sure your pumpkin is clean and completely dry. Wipe it down with a damp cloth to remove any dirt or dust that might prevent the paint from sticking smoothly. -
Mix your monster green:
Pour a generous amount of sage green acrylic paint onto your palette. If the green looks too dark, mix in a tiny drop of white to soften it; you want a muted, pastel monster tone rather than a bright lime color. -
Apply the first layer:
Using your wide flat brush, paint the entire surface of the pumpkin, working from the top down. Don’t worry if the orange skin peeks through a bit on this first pass. -
Dry and repeat:
Let the first coat dry completely (about 15-20 minutes). Touching wet paint will just lift it off. Apply a second coat to get that opaque, solid green coverage. I find two coats usually does the trick, but add a third if needed. -
Paint the stem:
While the body dries, carefully paint the stem. You can leave it natural if it’s dark, or paint it a dark brownish-black to contrast sharply with the pale green.
Step 2: Face Sketching
-
Plan the placement:
Once the green base is bone dry, lightly sketch the face features using a pencil. Start by marking where the eyes will go—make them asymmetrical for that quirky Frankenstein vibe. -
Draw the mouth:
Sketch a wide, curved smile line across the lower half of the pumpkin. Extend it far up the sides to make the grin look huge and friendly. -
Add the scars:
Draw a few straight lines for scars: one on the forehead and perhaps one on the cheek. Keep the pressure light so you don’t dent the paint.
Uneven Coverage?
If the green paint streaks, use a sponge brush instead of bristles for the final coat. Dab the paint on rather than dragging it to create a diverse, textured ‘skin’ effect.
Step 3: Painting Features
-
Fill the eyes:
Switch to your medium round brush and load it with black acrylic paint. Carefully fill in the eye shapes you sketched. One eye can be a simple oval, and the other can be slightly larger or rounder. -
Add eye highlights:
While the black is still wet, you can carefully dab a tiny dot of the original green paint inside the pupil, or wait until it’s dry and add a small white dot to make the eyes look ‘alive’ and shiny. -
Paint the nose:
Paint two small, teardrop-shaped nostrils in the center of the face, right between the eyes and the mouth line. -
Trace the smile:
Using a smaller brush or the tip of your round brush, trace over your main smile line with black paint. Keep your hand steady and try to make the line thickness consistent. -
Stitch the mouth:
Cross the main smile line with short, vertical hash marks to create the classic ‘stitched’ mouth look. Space them out evenly, about an inch apart. -
Create the brow scar:
Paint the long horizontal scar line you planned on the forehead. Make this line slightly thicker than the stitches on the mouth. -
Stitch the scar:
Add smaller vertical hash marks across the forehead scar line, similar to the mouth but perhaps a bit messier to look like a rough patch job. -
Cheek details:
Repeat the stitching process for the smaller scar on the cheek. A few quick crossed lines create a nice texture here. -
Final touches:
Step back and look at your creation. If any black lines look too thin, go over them one last time to make them bold and comic-book style.
Sealing the deal
To keep Frankie fresh outdoors, spray the finished dry pumpkin with a clear matte acrylic sealer. This prevents rain or heavy dew from running your hard work.
Set your friendly monster out on the porch to greet trick-or-treaters with a goofy grin


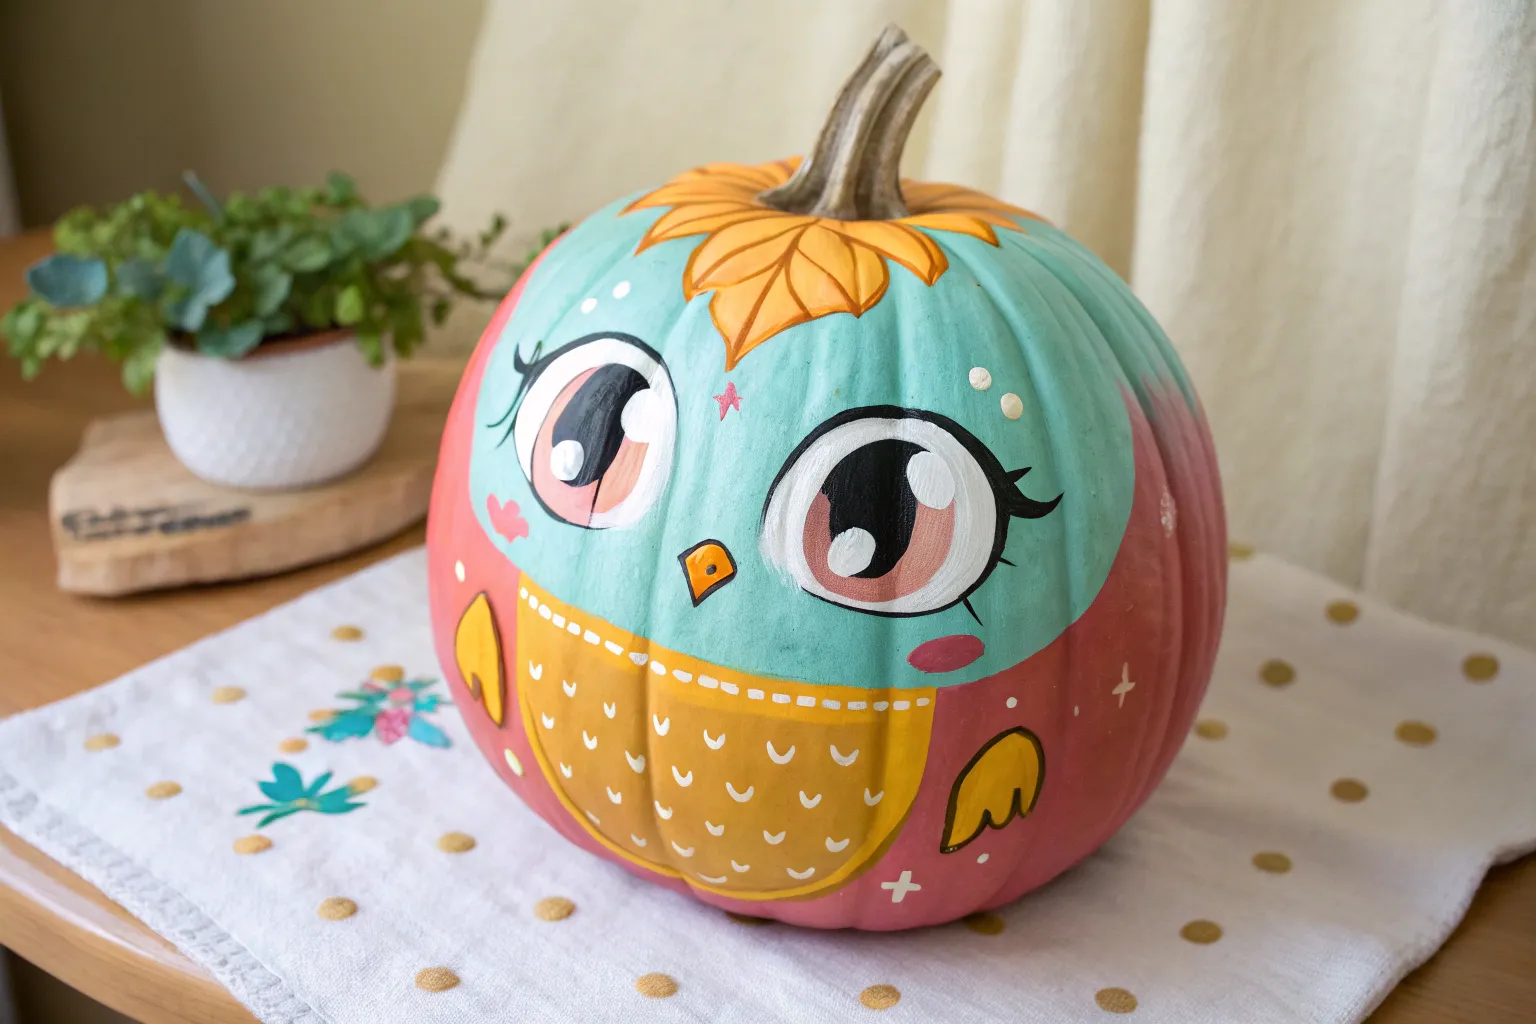
Sweet Vampire Smiles and Tiny Fangs
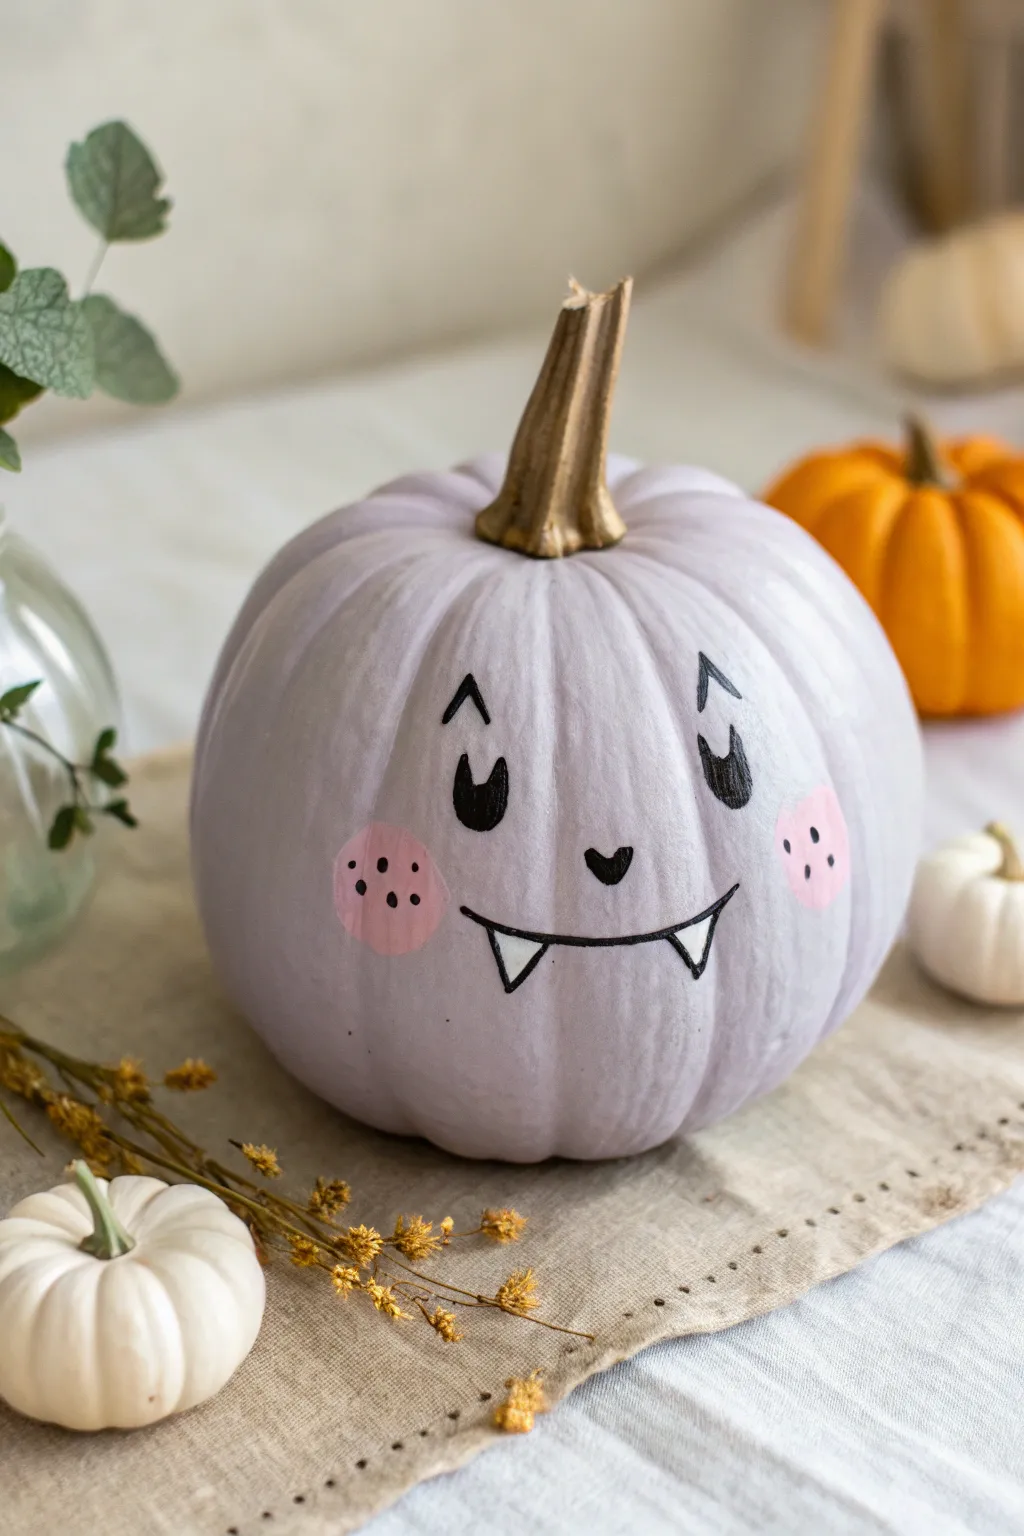
Transform a traditional pumpkin into a sweet, not spooky, character with this charming pastel vampire design. The soft lavender base and rosy cheeks give this little dracula a friendly personality that’s perfect for kid-friendly Halloween decor.
How-To Guide
Materials
- Small or medium-sized pumpkin (real or faux)
- Lavender acrylic paint (matte finish recommended)
- Light pink acrylic paint
- Black acrylic paint or a black paint pen
- Flat paintbrush (medium size)
- Small round paintbrush or sponge dabber
- Fine detail brush or ultra-fine paint pen
- Paper towels
- Water cup
- Palette or paper plate
Step 1: Setting the Base
-
Clean the surface:
Wipe down your pumpkin with a slightly damp paper towel to remove any dirt or dust. A clean surface ensures the paint sticks smoothly and doesn’t pill later on. -
Apply the first coat:
Using your medium flat brush, apply an even coat of lavender acrylic paint over the entire pumpkin. Brush from the top stem down to the bottom for vertical strokes that follow the pumpkin’s ribs. -
Let it dry completely:
Allow the first layer to dry for about 15-20 minutes. Don’t rush this part; painting over wet paint will just lift the previous layer. -
Apply a second coat:
Paint a second layer of lavender to achieve full opacity. The goal is to hide the orange skin completely so the pastel purple looks solid and creamy. -
Preserve the stem:
Be careful around the stem area. I like to keep the natural brown stem unpainted as it adds a nice organic contrast to the pastel body, but you can paint it gold if you’re feeling fancy.
Smudged Paint?
If you accidentally smudge black paint, let it dry completely. Then, dap a tiny bit of lavender over the mistake to erase it before redrawing.
Step 2: Creating the Vampire Face
-
Draft the features:
Creating facial symmetry can be tricky, so lightly pencil in where you want the eyes, nose, and mouth to go before committing with paint. -
Paint the cheeks:
Dip a sponge dabber or a small round brush into the light pink paint. Stamp two soft circles on the lower sides of the face area for the rosy cheeks. -
Let the cheeks set:
Wait for the pink paint to dry to the touch so your black details don’t smudge into it later. -
Outline the eyes:
Using a fine detail brush or a black paint pen, draw two curved arches for the eyes. Make the lines thick and confident. -
Add eye details:
Add small, triangular eyelashes to the outer corners of the eyes and a small curved line above each eye for the eyebrows. Keep the expression tilted slightly inward for a ‘mischievous but cute’ look. -
Paint the nose:
Directly in the center, between the eyes and slightly lower, paint a tiny inverted heart or triangle for the nose using black paint. -
Draw the mouth smile:
Paint a wide, shallow ‘U’ shape connecting the area between the two pink cheeks. This serves as the main smile line. -
Add the fangs:
From the main smile line, draw two small triangular fangs pointing downward. Leave the inside of the triangles the lavender background color—no need to fill them with white unless you want extra pop. -
Detail the cheeks:
Once the pink cheeks are fully dry, use your finest brush or pen to add three tiny black freckles or dots inside each pink circle. -
Clean up lines:
Inspect your black lines. If any look shaky, go back over them carefully with your paint pen to smooth out the edges and ensure the black is pitch dark.
Add Some Glam
Paint the stem with metallic gold or add a dusting of clear glitter over the wet lavender paint for a vampire that sparkles in the light.
Now you have an adorable pastel character ready to greet your guests with a fang-tastic smile
BRUSH GUIDE
The Right Brush for Every Stroke
From clean lines to bold texture — master brush choice, stroke control, and essential techniques.
Explore the Full Guide
Witchy Pumpkins With Painted Hats
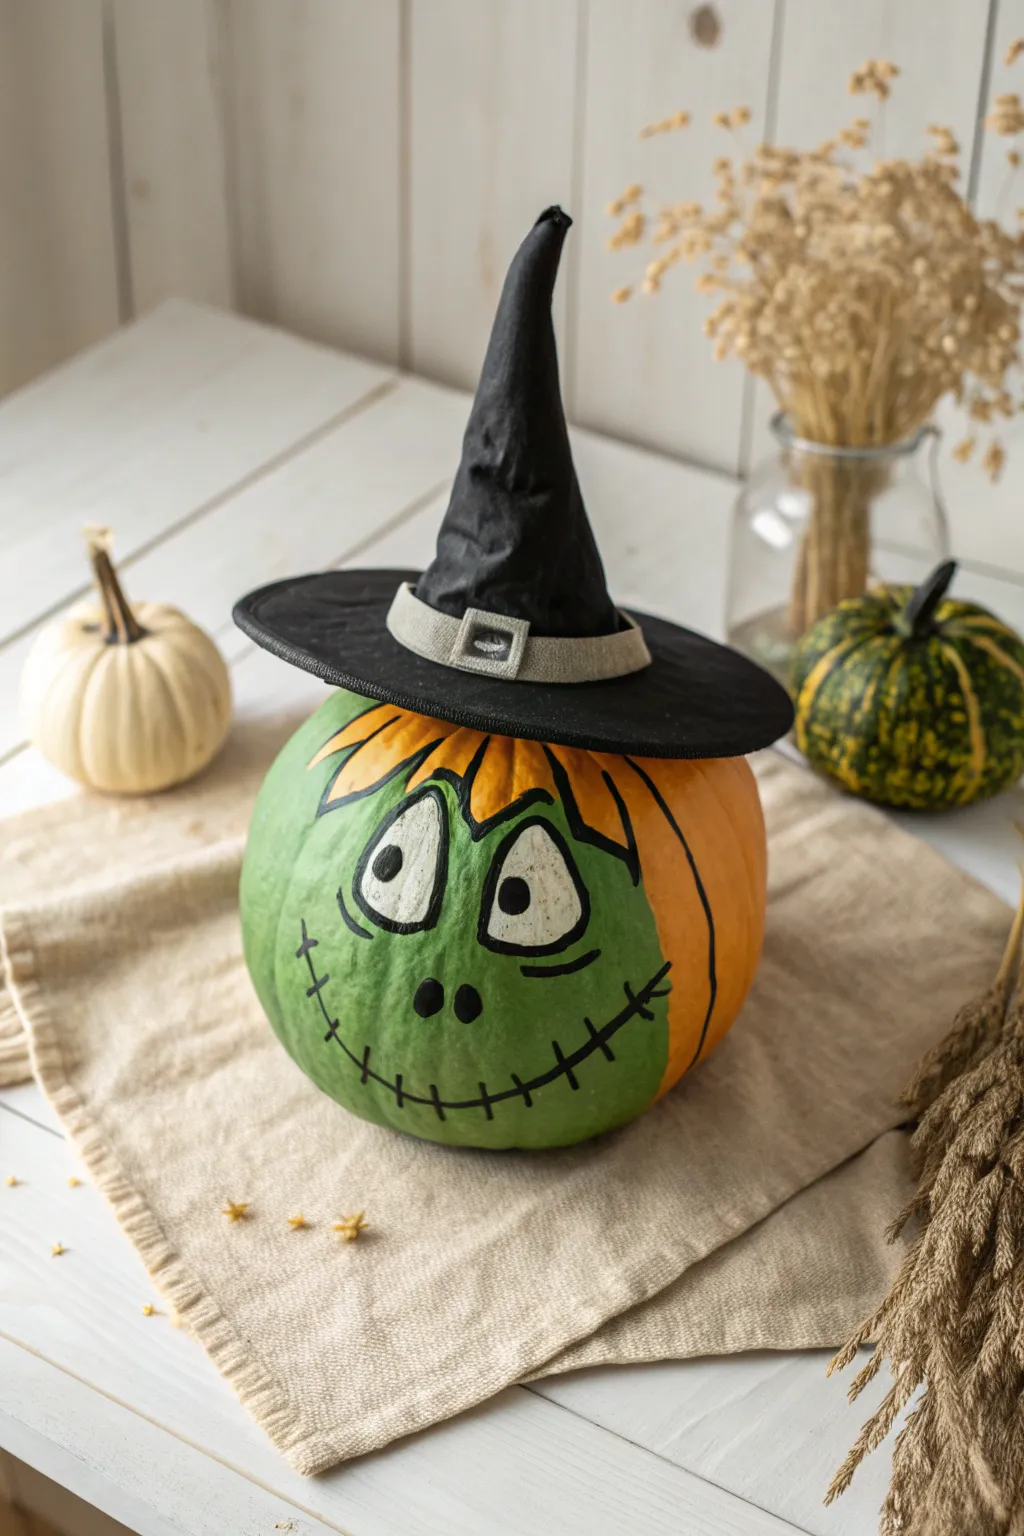
Transform a standard round pumpkin into a spooky yet charming witch character with a two-tone face and a classic hat. This design uses bold outlines and contrasting colors to create a cartoonish, expressive look that stands out on any porch.
Step-by-Step Guide
Materials
- Medium-sized round pumpkin (orange)
- Acrylic craft paints: Lime Green, Black, White, Light Orange/Yellow
- Paintbrushes: Medium flat brush, fine liner brush
- Black construction paper or stiff felt (for the hat)
- Grey felt or craft paper (for the hat band)
- Glue gun or strong craft glue
- Pencil or marker for sketching
- Sealer/Mod Podge (optional)
Step 1: Painting the Face
-
Clean and prep:
Wipe down your pumpkin with a damp cloth to remove any dirt or oils. Let it dry completely so the paint adheres properly. -
Sketch the outline:
Using a pencil or light marker, draw a large circle on the front of the pumpkin where the face will go. It doesn’t need to be perfect; a slightly lopsided circle adds character. -
Apply the green base:
Fill in your circle outline with lime green acrylic paint. You may need two coats to get solid coverage over the orange skin, letting the first coat dry before applying the second. -
Add hair details:
At the top of your green circle, paint jagged, triangular shapes using a light orange or yellow-orange mix. These serve as the witch’s bangs peeking out from under her future hat. -
Outline the bangs:
Once the ‘hair’ paint is dry, take your fine liner brush and black paint to outline the jagged hair shapes, giving them a sharp, comic-book style. -
Define the face edge:
Using the same black paint, carefully trace the outer edge of the green circle to separate the face from the rest of the orange pumpkin.
Fixing paint streaks
If the green paint looks streaky, sponge it on rather than brushing. This creates a textured, even layer that covers the orange skin much better.
Step 2: Adding Facial Features
-
Paint the eyes:
Paint two large white ovals near the top of the green area. Make them slighty tilted toward each other for a worried or manic expression. -
Outline the eyes:
Use your fine liner brush and black paint to outline the white ovals. I find varying the line thickness slightly makes it look more hand-drawn and artistic. -
Add pupils:
Place a small black dot in the center of each white eye. Keep them relatively small to enhance the wide-eyed look. -
Create the nose:
Paint two small, vertical tear-drop shapes in black right in the center of the face for nostrils. -
Draw the mouth:
Paint a wide, curved black line for the smile. Extend it far across the face, almost reaching the edges of the green circle. -
Add stitches:
Cross the main mouth line with several short, vertical hatch marks to create a stitched-mouth appearance. -
Under-eye details:
Add small curved lines under the eyes to give the witch tired bags or wrinkles, adding to her weary personality.
Step 3: Crafting the Hat
-
Cut the brim:
Cut a large circle out of black construction paper or stiff felt. Cut a smaller hole in the center so it can rest on the pumpkin’s stem (or just glue it flat if the stem is short). -
Form the cone:
Roll a piece of black paper into a cone shape. Twist the tip slightly to give it a crooked, worn look rather than a perfect point. -
Assemble the hat:
Glue the cone onto the center of your brim circle. Hot glue works best here for a quick hold. -
Make the band:
Cut a strip of grey felt or paper. Glue it around the base of the cone where it meets the brim. -
Add the buckle:
Draw a small square buckle on the grey band with a black marker or paint to finish the accessory. -
Attach to pumpkin:
Place the finished hat on top of the pumpkin. You can secure it with a dab of glue or just let it balance if you plan to reuse the hat later.
Make it defined
Use a black permanent marker instead of paint for the fine outlines and stitches. It offers way more control than a brush for beginners.
Place your green witch next to some dried wheat or mini pumpkins for a perfect autumn vignette
Black Cat Silhouette Pumpkins
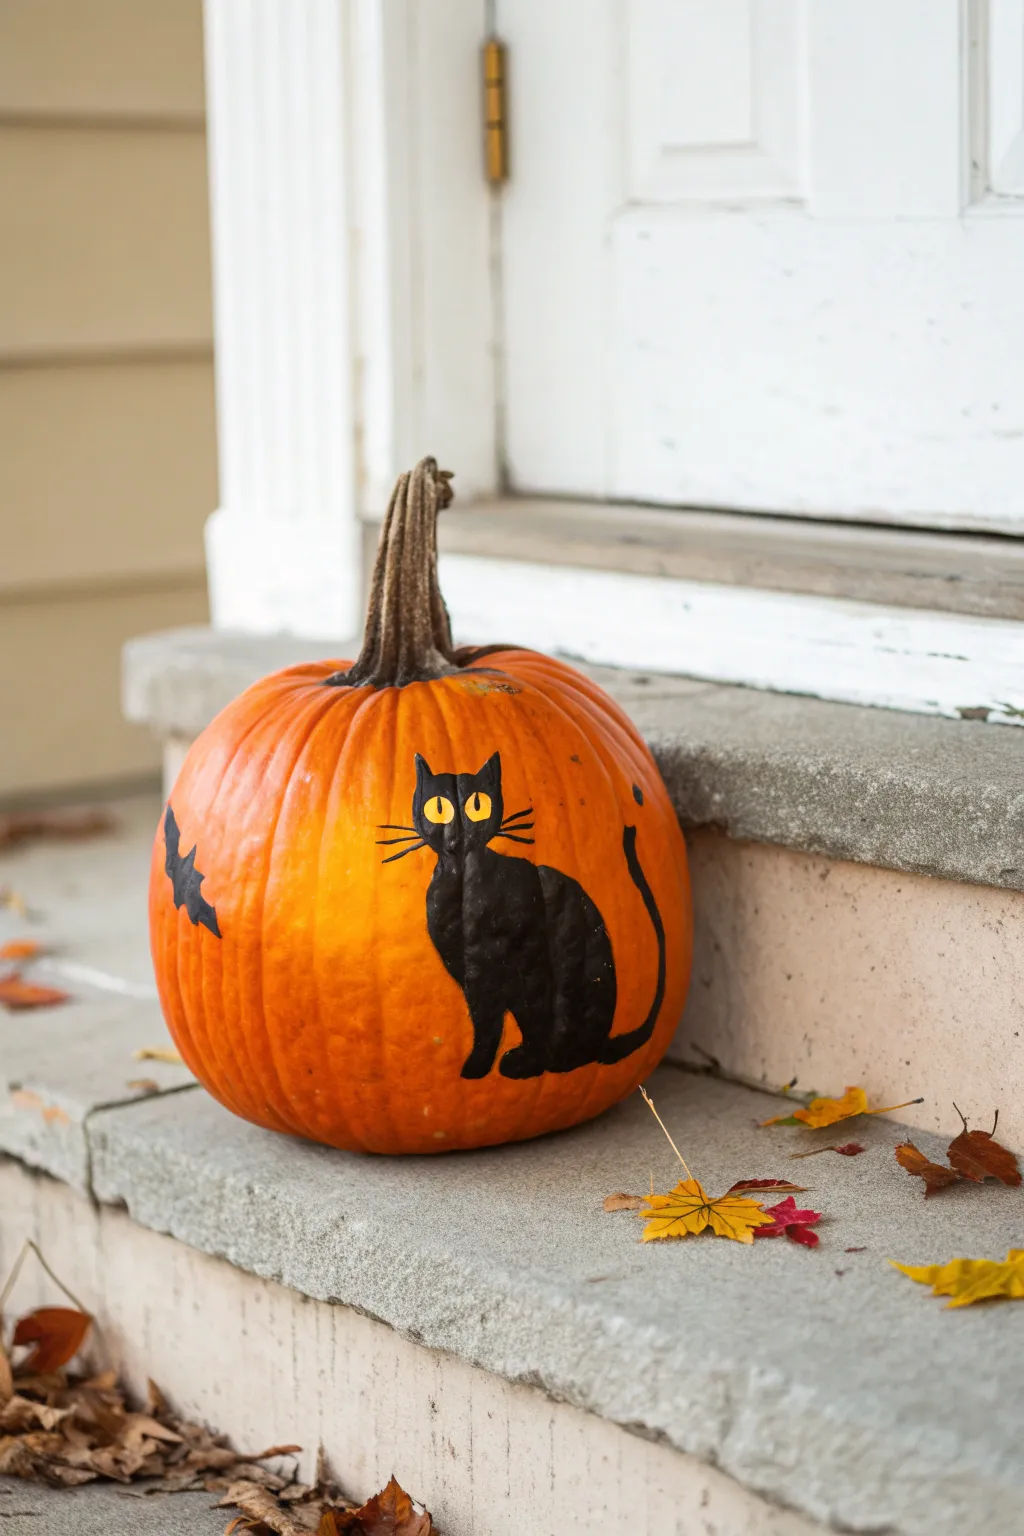
Bring classic Halloween charm to your porch with this simple yet striking painted pumpkin featuring a sleek black cat and fluttering bats. The high-contrast silhouette design stands out beautifully against the bright orange rind, making it an eye-catching piece of seasonal decor without the mess of carving.
Detailed Instructions
Materials
- Medium-sized round orange pumpkin
- Mild soap and water
- Soft cloth or paper towels
- Rubbing alcohol
- Pencil or white chalk pencil
- Black acrylic craft paint (outdoor formula recommended)
- Yellow acrylic craft paint
- Small flat paintbrush
- Fine-point round detail brush
- Small liner brush (optional for whiskers)
- Clear acrylic sealer spray (matte or satin finish)
Step 1: Preparation
-
Clean surface:
Begin by washing your pumpkin thoroughly with mild soap and water to remove any dirt or field grime. Rinse well. -
Dry completely:
Wipe the pumpkin dry with a soft cloth. Let it air dry for another 30 minutes to ensure no moisture remains in the rind’s texture. -
Degrease area:
Wipe the area where you intend to paint with a cotton ball dipped in rubbing alcohol. This removes natural oils and helps the paint adhere much better.
Smooth Stroke Secret
If your paint feels sticky or drags on the pumpkin’s skin, mix in a tiny drop of water. This improves flow for sharper silhouette edges.
Step 2: Drafting the Design
-
Sketch the body:
Using a pencil or white chalk pencil, lightly sketch the outline of a seated cat. Start with a pear shape for the body. -
Add the head:
Draw a rounded circle on top of the body shape, adding two triangular ears perking up from the top. -
Outline the tail:
Sketch a long, sinuous tail curbing up from the base of the body. I like to make the tail curve upwards to follow the pumpkin’s natural roundness. -
Add spooky details:
Sketch a small bat silhouette flying off to the left side of the cat to balance the composition.
Step 3: Painting the Silhouette
-
Fill the outline:
Load your small flat brush with black acrylic paint. Carefully fill in the main body of the cat, smoothing out your brushstrokes as you go. -
Define the edges:
Switch to a round detail brush to refine the edges of the ears and the curve of the paws at the base. -
Paint the tail:
Using the round brush, carefully paint the tail section. Apply gentle pressure to interpret the varying thickness of the tail. -
Paint the bat:
Fill in the bat silhouette with the black paint using your detail brush, making sure to keep the wing points sharp. -
Let it dry:
Allow the black paint to dry completely. This usually takes about 20-30 minutes depending on humidity. Inspect for streaking and apply a second coat if the orange rind shows through.
Oops, Smudged It!
Don’t panic if you paint outside the lines. While the paint is wet, quickly wipe it away with a damp Q-tip or a wet bit of paper towel.
Step 4: Adding Details
-
Paint the eyes:
Once the black paint is bone dry, dip a small clean detail brush into yellow paint. Paint two small, slanted oval shapes on the cat’s face for eyes. -
Wait for yellow layer:
Allow the yellow eye paint to dry. Put on a second coat of yellow if the black background is making the color look dull. -
Add pupils:
Using your finest brush or a toothpick dip, place a thin vertical black line in the center of each yellow eye to create the slit pupil. -
Draw whiskers:
With a liner brush and slightly watered-down black paint (ink consistency), flick three quick lines outward from each side of the face to create whiskers. -
Seal the work:
Once the entire design is fully dry (wait at least 1-2 hours), take the pumpkin outside and spray it lightly with clear acrylic sealer to protect your artwork from the elements.
Place your creation on the doorstep surrounded by colorful leaves for the perfect autumn vignette

PENCIL GUIDE
Understanding Pencil Grades from H to B
From first sketch to finished drawing — learn pencil grades, line control, and shading techniques.
Explore the Full Guide
Bold Polka Dot Spider Pumpkins
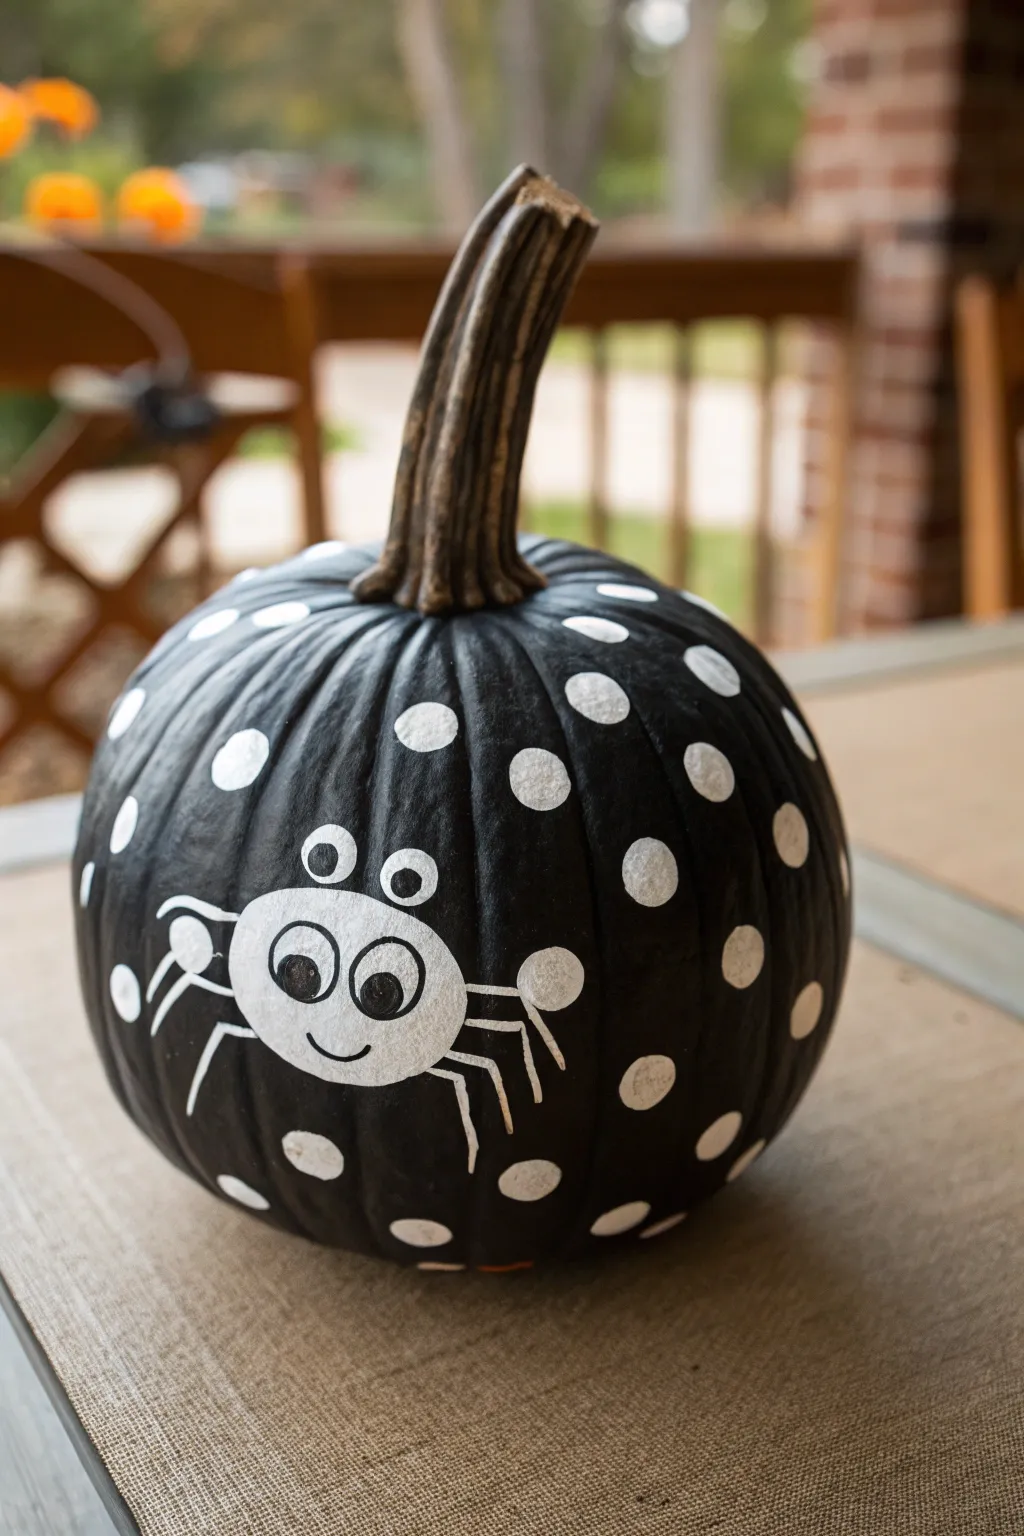
Transform a standard pumpkin into a standout decoration with a sleek matte black base and whimsical white details. This project combines classic Halloween spooky vibes with a modern graphic punch, featuring a friendly hand-drawn spider among playful polka dots.
How-To Guide
Materials
- Medium-sized pumpkin (real or faux)
- Matte black acrylic paint
- White acrylic paint
- Black paint pen (fine or medium tip)
- Wide flat paintbrush (approx 1-2 inch)
- Medium round paintbrush (size 6 or 8)
- Small round sponge dobber (optional)
- Cup of water and paper towels
- Pencil (optional)
Step 1: The Dark Foundation
-
Prep your canvas:
Begin by wiping the pumpkin clean with a damp cloth to remove any dirt or oils. If you are using a real pumpkin, ensure the stem area is clean and dry to help the paint adhere properly. -
Apply the base coat:
Squeeze a generous amount of matte black acrylic paint onto your palette or plate. Using the wide flat paintbrush, cover the entire surface of the pumpkin with long, smooth vertical strokes. -
Navigate the curves:
Work carefully around the base of the stem. You want a crisp edge where the paint meets the stem, leaving the natural brown stem unpainted for a nice contrast. -
Wait and evaluate:
Allow the first coat to dry completely for about 20-30 minutes. If the original orange color is still peeking through, apply a second coat of black to achieve a solid, opaque finish.
Step 2: Adding the Polka Dots
-
Load your white paint:
Clean your brush or switch to a medium round brush. Dip it into white acrylic paint, ensuring it’s not too watery so the dots stay opaque. -
Start dotting:
Paint white circles randomly all around the pumpkin. They should be roughly the size of a large coin. If you have a round sponge dobber, you can use that for perfectly uniform circles, but hand-painted ones add charm. -
Control the spacing:
Keep the spacing somewhat loose and organic. Make sure to leave a large, clear negative space on the ‘front’ side of the pumpkin where the spider will live. -
Refine the edges:
Go back over your white dots if they look streaky against the black background. A second layer of white often makes them pop much brighter. -
Let it set:
Allow the white dots to dry fully before moving on to the spider. Wet paint can smear easily during the next steps.
Stamp Master
Don’t trust your freehand circles? Use the flat end of a wine cork dipped in white paint. It creates perfect, consistent polka dots instantly.
Step 3: Drawing the Spider
-
Outline the body:
In the open black space you reserved, use a medium round brush with white paint to create a wide oval shape for the spider’s body. -
Add the head:
Above the main oval, paint two smaller circles right next to each other, slightly overlapping the body, to serve as the spider’s eye sockets. -
Fill it in:
Fill the body and head shapes in solidly with white paint. Let this dry completely—I like to give this part extra time so the black marker doesn’t drag through wet paint later. -
Draw the legs:
Using a smaller brush with white paint (or a white paint pen for better control), carefully paint four spindly legs extending out from each side of the body. -
Bend the knees:
Give the legs character by painting them in segments: a short segment going up or out, and a longer segment angling down. Vary the angles to make it look like it’s crawling.
Glow Up Idea
Mix glow-in-the-dark additive into your white paint for the spider and dots. By day plain white, by night a glowing spooky creature.
Step 4: Character Details
-
Outline the features:
Once the white spider body is bone dry, take your black paint pen. Draw a thin outline around the white oval body and the eye circles to sharpen the edges. -
Create the eyes:
Inside the two white circles on top, draw two large black pupils using the paint pen. Have them look in a specific direction (like to the side) for a goofy expression. -
Add a smile:
Draw a small, curved black line on the main body oval just below the eyes to give your spider a happy smirk. -
Detail the legs:
Use the black paint pen to add thin lines along the white spider legs if you want to give them more definition, or leave them purely white for high contrast. -
Final touches:
Check your polka dots one last time. If any black paint accidentally smudged onto them, touch them up with a tiny bit of white paint.
Now you have a graphic, modern pumpkin that is sure to stand out on your porch this season
Harlequin Diamond Pattern Pumpkins
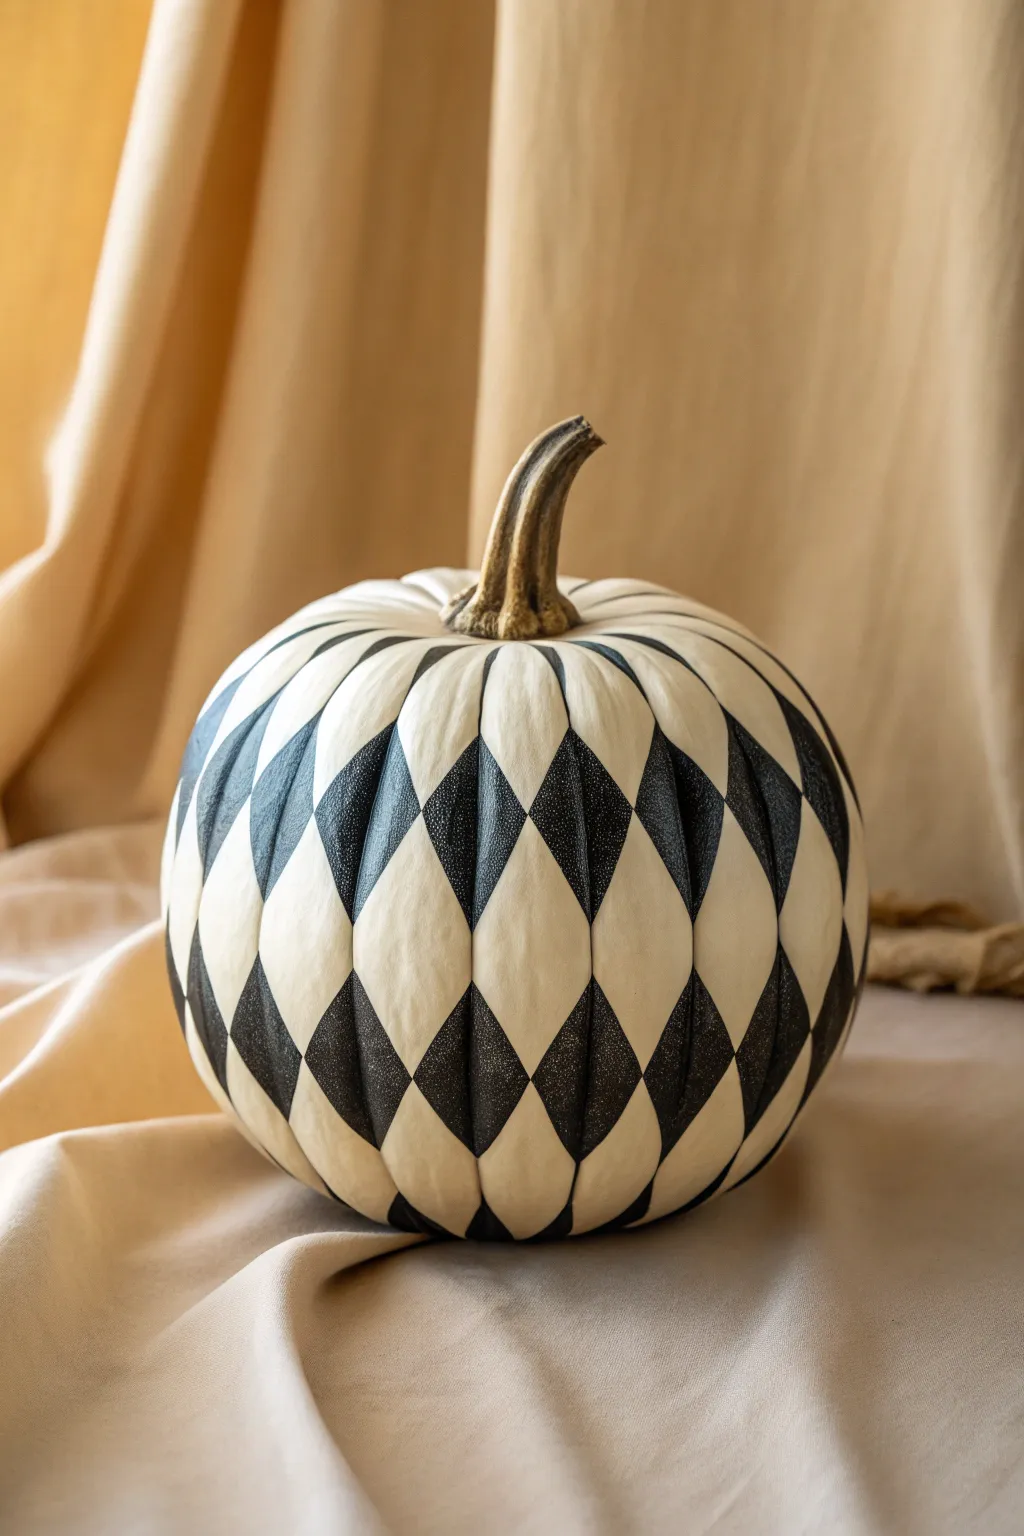
Transform a classic white pumpkin into a sophisticated statement piece with this striking harlequin pattern. The elongated black diamonds play perfectly with the natural curves of the gourd for a high-contrast, modern finish.
Step-by-Step
Materials
- Medium-sized white faux or real pumpkin (with deep ribs)
- Black acrylic paint (matte or satin finish)
- White chalk paint or acrylic paint (optional, for base)
- Pencil or flexible measuring tape
- Fine liner brush (size 0 or 1)
- Small flat brush (size 4 or 6)
- Painters tape (narrow width) or drafting tape
- Cup of water
- Paper towels
- Eraser
Step 1: Preparation and Base
-
Clean surface:
Begin by wiping down your pumpkin with a damp cloth to remove any dust or dirt. If using a real pumpkin, ensure it is completely dry before proceeding. -
Prime the base (optional):
If your white pumpkin looks a bit yellow or dull, I like to apply a quick coat of white chalk paint first. This gives you a pristine, matte canvas that makes the black pop later. -
Identify vertical ribs:
Observe the natural ribs of the pumpkin. These vertical grooves act as the natural grid for your diamond pattern, so get familiar with their spacing. -
Mark horizontal guides:
Using a pencil, lightly mark horizontal rings around the pumpkin. Start at the widest part of the pumpkin (the equator) and add lines above and below, spaced about 2-3 inches apart depending on how tall you want your diamonds.
Wobbly Lines?
If your hand is shaky, try resting your pinky finger on a dry part of the pumpkin for stability. You can also use thin washi tape to mask the straight edges.
Step 2: Drafting the Pattern
-
Mark diamond points:
On your central horizontal line (the equator), mark a dot in the center of every *other* vertical rib section. -
Mark alternating points:
Move to the horizontal line directly above the equator. Mark dots in the rib sections that you skipped in the previous step. Repeat this alternating process for the line below the equator. -
Connect the dots:
Lightly sketch lines connecting your dots to form diamond shapes. The tips of the diamonds should align vertically along the deep grooves between ribs, while the wide centers sit on the rounded parts. -
Refine the shape:
Go back over your sketch. Curved lines often look better than straight ruler lines here, as they follow the pumpkin’s spherical form.
Step 3: Painting the Design
-
Outline in black:
Load your fine liner brush with black acrylic paint. Carefully trace the pencil outline of a single diamond. -
Establish the edges:
Keep your hand steady and ensure the points of the diamonds taper sharply. Sharp corners are the secret to a professional look. -
Fill the centers:
Switch to your small flat brush to fill in the body of the diamond. Use smooth, vertical strokes to minimize texture. -
Work in non-adjacent sections:
Paint diamonds that don’t touch each other first. This prevents wet paint from smearing into a neighboring white space while you work. -
Manage the grooves:
When painting near the deep vertical creases, use the very tip of your brush to push paint into the groove without getting it on the ‘white’ side of the pattern. -
Dry and repeat:
Let the first set of diamonds dry for about 15-20 minutes. Then, proceed to fill in the remaining diamonds to complete the checkerboard effect.
Glam It Up
For a magical twist, mix fine glitter into your black paint or seal the final piece with a high-gloss varnish to make it look like ceramic.
Step 4: Finishing Touches
-
Second coat:
Once the black paint is fully dry, inspect it for streakiness. A second coat ensures that solid, opaque velvety look. -
Clean up lines:
If any black paint strayed outside the lines, use a clean brush with a tiny bit of white paint to touch up the edges and sharpen the diamond points. -
Erase guidelines:
Gently erase any visible pencil marks remaining in the white sections once the paint is completely cured. -
Seal the stem:
Leave the stem natural for contrast, or give it a light dry-brushing of gold if you want extra glamour.
Place your masterpiece on a mantle or table runner for an instantly elegant autumn vibe


Marbled Swirl Pumpkins
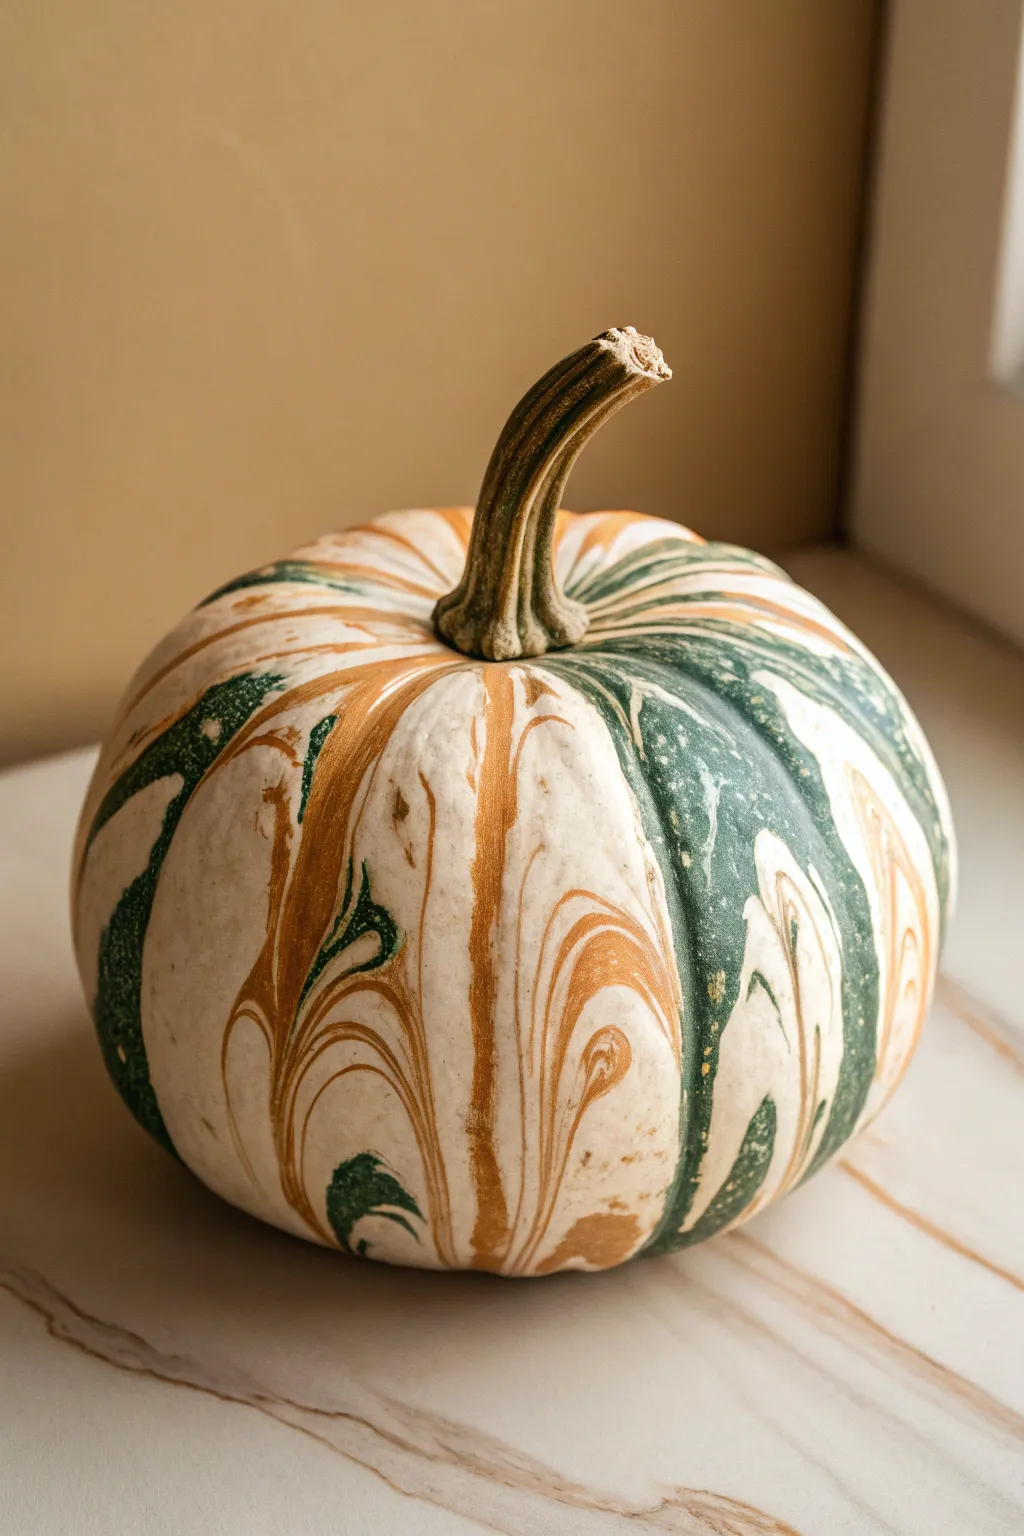
Give your autumn décor a sophisticated upgrade with this stunning marbling technique that looks like polished stone. This project transforms a simple white pumpkin into an elegant centerpiece featuring mesmerizing swirls of metallic copper and deep forest green.
Step-by-Step Guide
Materials
- Faux or real white pumpkin (medium size)
- Deep container or bucket (large enough to dunk the pumpkin)
- Metallic copper enamel spray paint
- Forest green enamel spray paint
- White primer spray paint (if using a real orange pumpkin)
- Painter’s tape
- Plastic drop cloths or garbage bags
- Rubber gloves
- Stir stick or skewer
- Clear sealant spray (gloss finish)
Step 1: Preparation
-
Clean surface:
Begin by thoroughly wiping down your pumpkin with a damp cloth to remove any dirt or oils. -
Prime (optional):
If you are using a real orange pumpkin, spray it with a coat of white primer first to ensure the colors pop against a clean, neutral background. -
Protect the stem:
Wrap the entire stem carefully with painter’s tape. You want to preserve that natural, textured look to contrast with the sleek marbled finish. -
Setup work area:
Lay down plastic drop cloths outside or in a very well-ventilated area. This project can get messy, and spray paint fumes are strong. -
Prepare water bath:
Fill your deep container with room temperature water. Leave about 4-5 inches of space at the top so the water doesn’t overflow when you submerge the pumpkin.
Paint Sinking?
If your paint sinks to the bottom instead of floating, your water is likely too cold. Refill the bucket with lukewarm or room-temperature water.
Step 2: Creating the Marble Effect
-
Spray first color:
Shake your metallic copper spray paint can vigorously. Spray generous bursts directly onto the center of the water’s surface. -
Add second color:
Immediately spray the forest green paint into the center of the copper ring floating on the water. Work quickly so the paint stays wet. -
Repeat rings:
Continue alternating sprays of copper and green, building up a ‘bullseye’ of paint rings on the surface. -
Create the swirl:
Take a skewer or stir stick and gently drag it through the paint layers. Don’t overmix; just a few strokes will create those beautiful, organic veins. -
Gear up:
Put on your rubber gloves now to protect your hands from the oil-based enamel. -
The dip:
Hold the pumpkin by the base (or by the taped stem if sturdy enough) and slowly dip it straight down into the water. -
Roll and submerge:
As you push it down, slightly rotate the pumpkin to catch the swirling paint film on the sides. -
Clear surface:
Before pulling the pumpkin out, use your hand or a piece of cardboard to swipe away the remaining paint on the water surface. This prevents a double-layer of film from ruining the pattern as you lift it out. -
Lift:
Pull the pumpkin out of the water quickly and smoothly.
Add Sparkle
Before the paint film fully dries on the pumpkin, lightly dust wet areas with ultra-fine gold glitter to enhance the copper veins.
Step 3: Finishing Touches
-
Initial dry:
Set the pumpkin on a covered surface to dry. The water beads will roll off eventually, but don’t wipe them or you’ll smear the design. -
Inspect coverage:
If there are large blank spots you dislike, you can repeat the dipping process on just that specific side once the first layer is dry to touch. -
Remove tape:
Once the paint is fully dry (usually about 24 hours for oil-based paints), carefully peel the painter’s tape off the stem. -
Seal (optional):
To make that shine last, I like to finish with a quick coat of clear gloss sealant, which protects the design from scratches.
Enjoy your customized, high-end autumn decoration that looks like it came from a boutique store
Glitter Fade Ombre Pumpkins
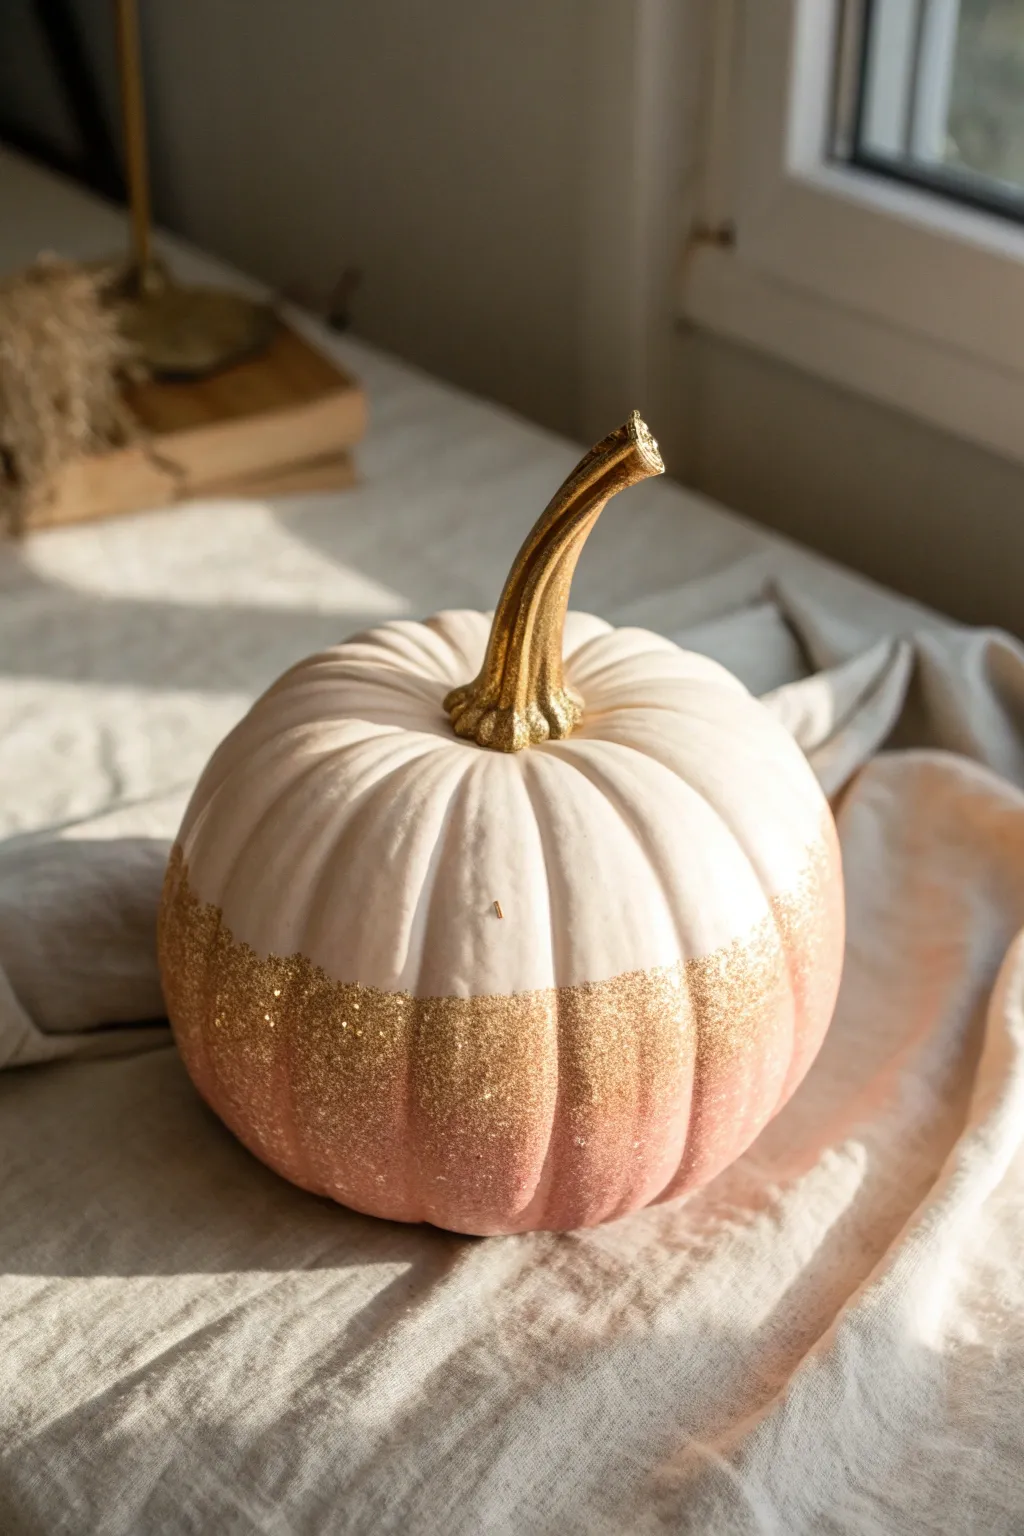
Transform a plain pumpkin into a chic centerpiece with this stunning two-tone glitter fade technique. The soft blush and gold ombre creates an elegant, high-end look that catches the autumn sunlight beautifully.
Detailed Instructions
Materials
- Faux or real pumpkin (medium size)
- Matte white acrylic paint or spray paint
- Soft blush pink acrylic paint
- Gold metallic acrylic paint
- Fine gold glitter
- Chunky gold glitter mix
- Mod Podge or craft glue
- Foam brushes
- Small detail brush
- Paper plate or palette
- Drop cloth or newspapers
- Clear sealant spray (glossy)
Step 1: Base Preparation
-
Clean surface:
Begin by wiping down your pumpkin with a damp cloth to remove any dust or dirt. If using a real pumpkin, ensure it is completely dry before proceeding. -
Protect the stem:
Carefully wrap painter’s tape around the base of the stem to keep it clean while you paint the body of the pumpkin. -
Apply base coat:
Coat the entire body of the pumpkin with matte white paint. Use a foam brush for smooth coverage, working the paint into the deep crevices. -
Dry and repeat:
Allow the first coat to dry completely for about 20-30 minutes. Apply a second coat of white if the original orange or plastic color is still peeking through.
Sticky Situation?
Work over a folded piece of paper when glittering. This lets you easily funnel excess glitter back into the jar for zero waste.
Step 2: Creating the Ombre Effect
-
Mix the blush tone:
On your palette, mix a small amount of blush pink paint with a drop of white to soften the hue. You want a very gentle transition color. -
Paint the bottom:
Paint the bottom third of the pumpkin with the pink mixture. Don’t worry about a perfect line at the top edge yet. -
Blend the transition:
While the pink paint is still wet, use a clean, slightly damp sponge or foam brush to dab along the top edge of the pink section, fading it upward into the white. -
Dry thoroughly:
Let this ombre paint layer dry completely. This creates the color base for your glitter later.
Level Up: Color Shift
Swap the blush pink for a soft lilac or mint green to match different decor themes while keeping the same elegant gold fade.
Step 3: Adding the Glitz
-
Prepare the adhesive:
Pour Mod Podge or craft glue onto a plate. You’ll want to work in sections so the glue doesn’t dry out before you add the sparkle. -
Apply glue to bottom:
Brush a thick layer of glue onto the bottom quarter of the pumpkin, covering the pinkest area heavily. -
Create the fade line:
Lightly feather the glue upward past the heavy bottom section, stopping right where the pink fades into white. The glue should be thinner here. -
Sprinkle fine glitter:
Take your fine gold glitter and sprinkle it heavily onto the bottom-most section for full coverage. -
Create the glitter gradient:
As you move up the pumpkin, sprinkle the glitter more sparsely. I like to hold my hand higher up to let the glitter fall gently for a diffused look. -
Add chunky texture:
While the glue is still tacky, press small amounts of chunky gold glitter sporadically near the bottom and middle of the fade to add dimension. -
Shake off excess:
Gently tap the pumpkin to remove loose glitter particles. Let the adhesive cure for at least an hour.
Step 4: Finishing Touches
-
Paint the stem:
Remove the tape from the stem. Using a small detail brush and metallic gold paint, coat the stem thoroughly. -
Add stem sparkle:
While the gold stem paint is wet, sprinkle a pinch of fine gold glitter just at the base where the stem meets the pumpkin. -
Seal the work:
Once everything is fully dry, take the pumpkin outside and spray it with a clear glossy sealant. This sets the glitter so it won’t shed all over your table.
Now you have a sophisticated statement piece ready to shine on your mantel or dining table
Botanical Stencil Garden Pumpkins
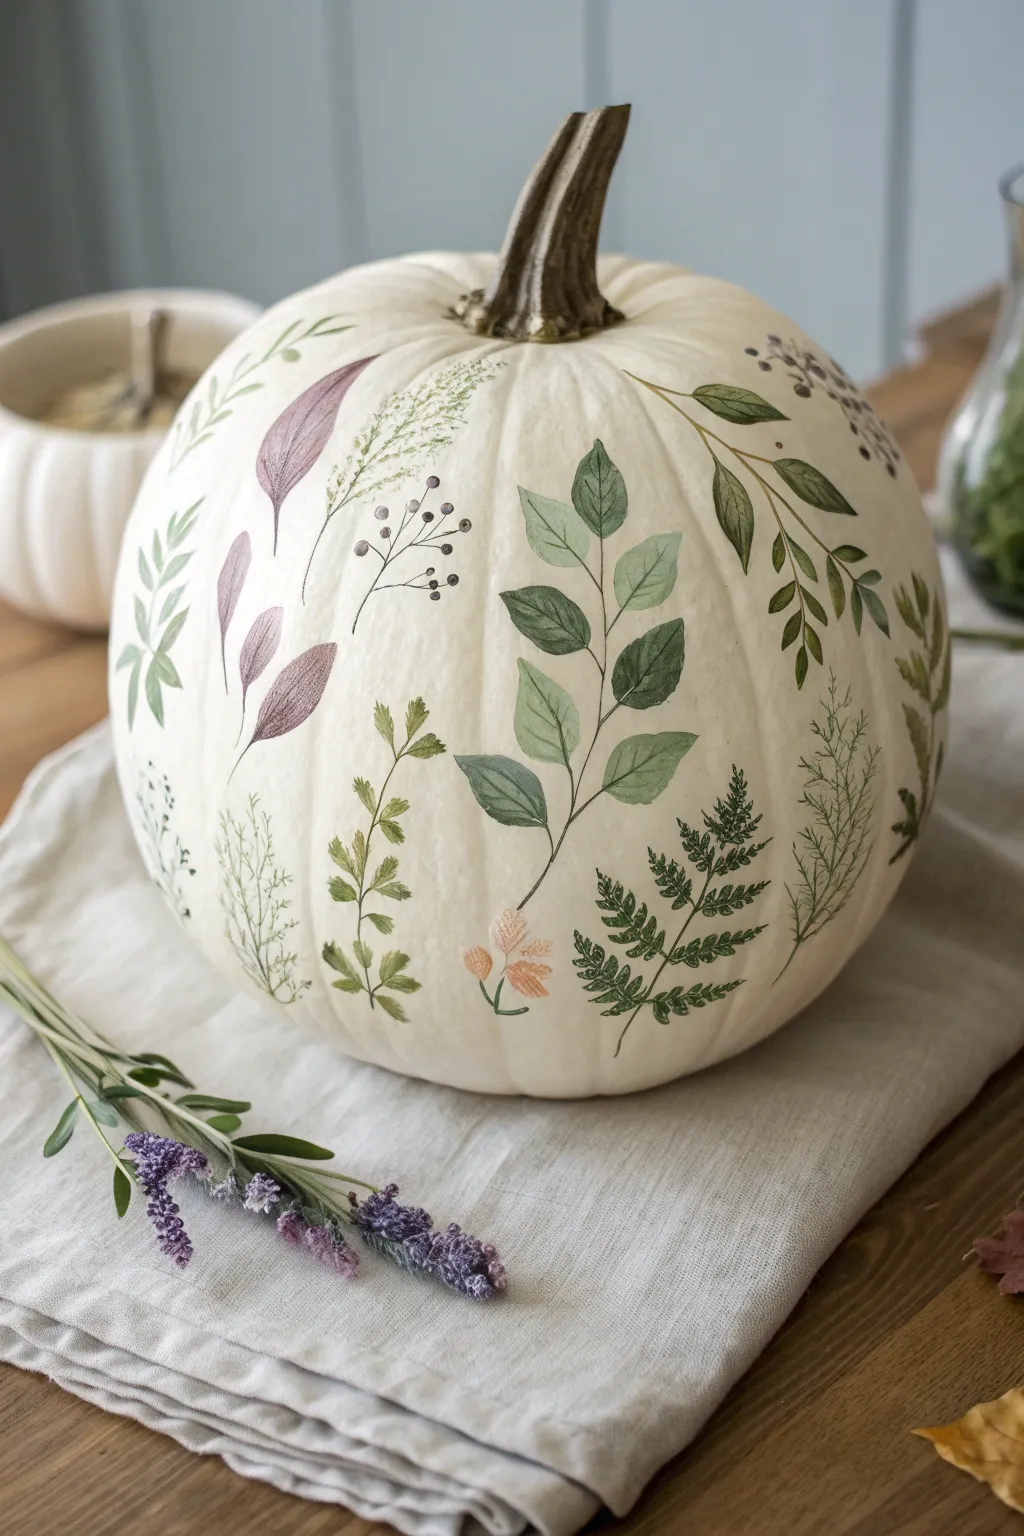
Transform a classic white pumpkin into an elegant autumn centerpiece featuring delicate botanical motifs. This project combines the simplicity of stenciling with the soft, organic look of watercolor painting for a sophisticated harvest decoration.
Step-by-Step
Materials
- Faux or real white pumpkin (large size)
- Botanical stencils (ferns, leaves, sprigs)
- Matte acrylic craft paints (sage green, forest green, soft mauve, burnt orange, brown)
- Stencil brushes (various sizes)
- Fine detail liner brush (size 0 or 00)
- Paper plate or palette
- Paper towels
- Painter’s tape (optional)
- Matte spray sealer (optional)
Step 1: Preparation and Planning
-
Clean surface:
Begin by wiping down your pumpkin with a barely damp cloth to remove any dust or oils. If you are using a real pumpkin, ensure it is completely dry before starting. -
Plan placement:
Before painting, hold your stencils against the pumpkin to visualize the arrangement. Aim for a natural, flowing pattern where some vines climb upward while others drape gently.
Curve Control
Stenciling on a round object is tricky! Snip small slits into the blank plastic border of your stencil. This allows the stencil to flex and wrap around the pumpkin’s curve without buckling.
Step 2: Creating the Foliage
-
Secure stencil:
Hold a leafy branch stencil firmly against the pumpkin’s curve. Because pumpkins are round, you may need to use small pieces of painter’s tape to hold the edges down, or simply work in small sections. -
Load the brush:
Dip your stencil brush into a sage green paint, then offload most of the paint onto a paper towel until the brush is almost dry. This ‘dry brush’ technique prevents paint from bleeding under the stencil. -
Apply base leaves:
Gently tap—do not drag—the brush over the stencil openings. Keep the pressure light to create a soft, slightly translucent effect that mimics nature. -
Add depth:
While the stencil is still in place, dip barely the tip of your brush into a darker forest green. Tap lightly at the base of the leaves or stems to add shadow and dimension. -
Lift and repeat:
Carefully peel back the stencil to reveal your design. Reposition the stencil on another side of the pumpkin, varying the angle to keep the look organic.
Step 3: Adding Variety
-
Introduce mauve tones:
Switch to a different leaf shape stencil. I like to mix a tiny drop of brown into soft mauve paint for a muted, dried-flower look. Stencil these distinct, broad leaves in scattered locations. -
Layering ferns:
Select a fern stencil for texture. Using a deep green, stencil delicate fronds near the bottom, allowing them to overlap slightly with your previous light green leaves once dry. -
Create berry sprigs:
For the tiny berry branches, use a very thin liner brush freehand if your stencil doesn’t have fine enough details. Paint thin brown lines radiating out, then dot the ends with grey or brown paint. -
Add miniature details:
Fill in empty spaces with small sprigs of greenery or tiny fern shoots. Use the edge of your stencil brush or the liner brush to create wispy, grass-like strokes. -
Paint accent florals:
Using a pale burnt orange or peach color, gently stencil or hand-paint small flower buds near the base of the larger green stems.
Bleeding Lines?
If paint seeps under the stencil, don’t panic. Wait for it to dry completely, then use a small, stiff brush dipped in white acrylic paint (matching the pumpkin) to clean up the edges.
Step 4: Finishing Touches
-
Refine edges:
Once the main designs are dry, use your fine liner brush and the corresponding paint color to touch up any bridges left by the stencil, connecting leaves to stems for a seamless look. -
Connect the garden:
Paint very thin, faint vine lines connecting some of the isolated elements, making the design feel like a cohesive garden rather than floating stickers. -
Final dry:
Allow the pumpkin to dry completely for at least an hour. -
Seal (optional):
If this pumpkin will sit on a porch, mist it lightly with a matte spray sealer to protect your artwork from moisture.
Step back and admire your beautiful, nature-inspired pumpkin art
Spa Day Face Mask Pumpkins
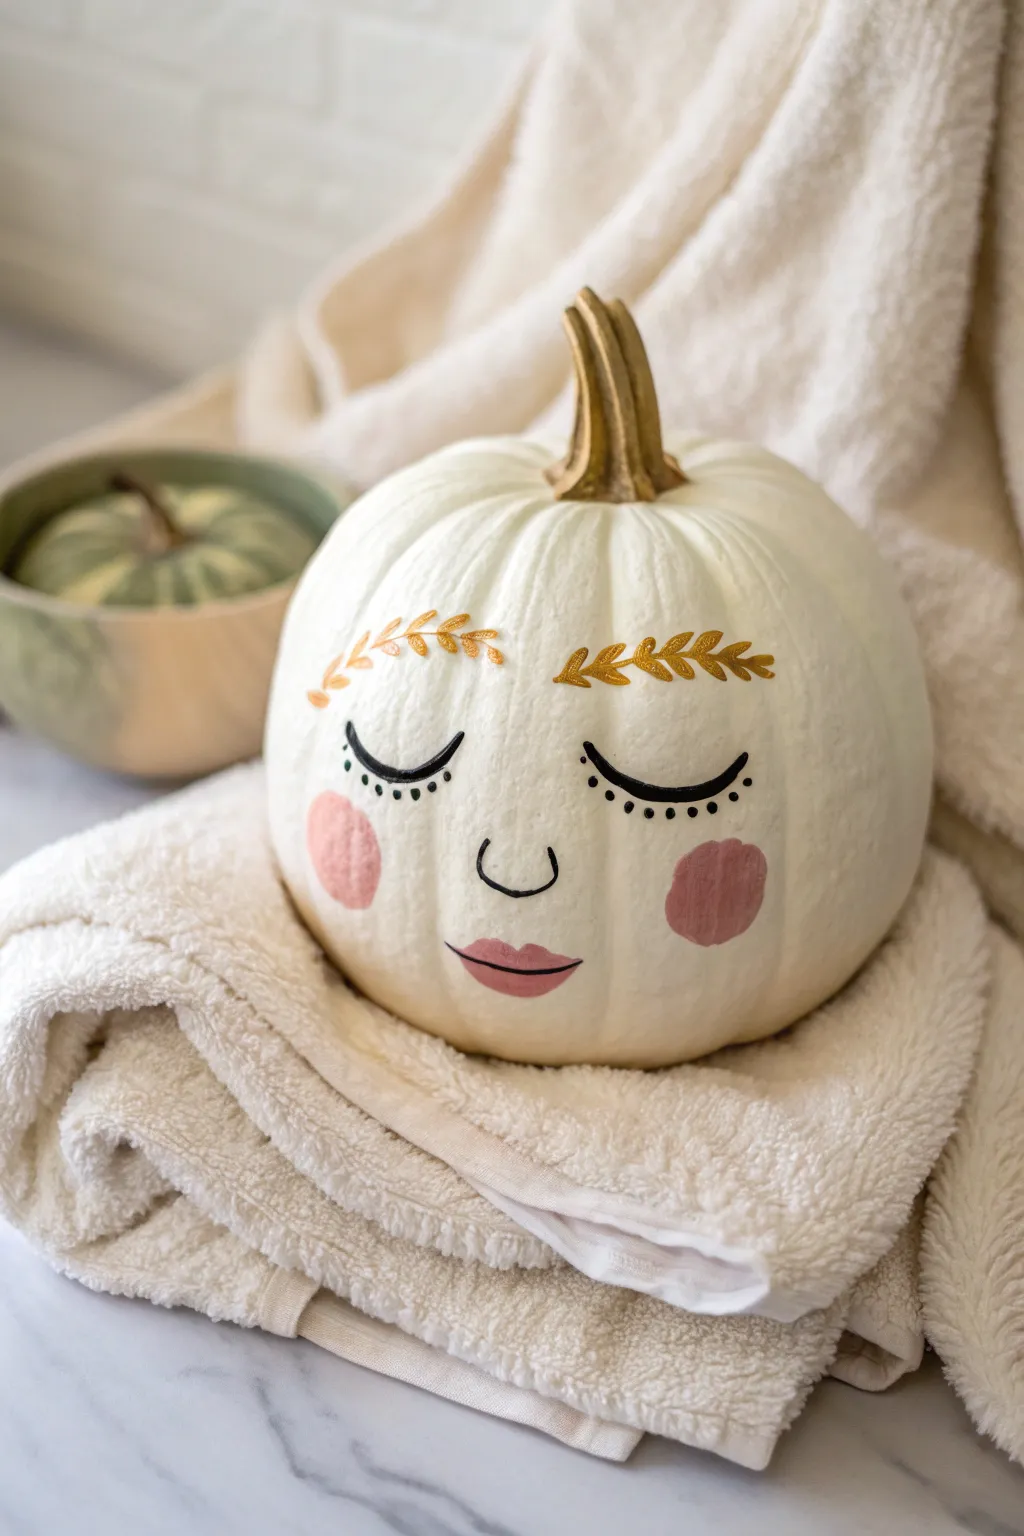
Transform a simple white pumpkin into a symbol of relaxation with this delicate and charming face design. Featuring gold leafy eyebrows, soft rosy cheeks, and peaceful closed eyes, this easy-to-paint project brings a calm energy to your autumnal decor.
Step-by-Step Tutorial
Materials
- White craft pumpkin (or a real pumpkin painted cream/white)
- Gold metallic paint or gold paint marker
- Soft pink acrylic paint (matte finish)
- Black acrylic paint or fine-point black paint pen
- Small round paintbrush (size 2 or 4)
- Fine liner brush (size 0 or 00)
- Round sponge dauber or makeup sponge
- Pencil for sketching
- Glaze or sealant (optional)
Step 1: Preparation & Base
-
Clean the surface:
If using a real pumpkin, wash and dry it thoroughly. If using a craft pumpkin, simply wipe it down with a damp cloth to remove any dust or manufacturing residue. -
Paint the stem:
Using your gold metallic paint and a small round brush, coat the entire stem. You may need two coats for a rich, solid gold finish. Let this dry completely before handling the pumpkin further. -
Sketch the face:
Lightly trace the facial features onto the pumpkin’s surface with a pencil. Mark two large arches for the eyes, a small U-shape for the nose, and the outline of the lips. Sketch the path where the leaf eyebrows will go to ensure symmetry.
Step 2: Painting Features
-
Create the cheeks:
Dip your round sponge dauber or a small makeup sponge into the soft pink paint. Dab off excess paint onto a paper towel until the sponge is almost dry. -
Apply the blush:
Gently press the sponge onto the cheek area below the eye arches. Use a circular bouncing motion to create soft, round circles. I like to keep the edges slightly diffused rather than perfectly sharp for a softer look. -
Paint the lips:
Using the small round brush and the same pink paint (or a slightly darker shade if you prefer), fill in the lip shape. Start with the cupid’s bow on top and sweep down to the corners. -
Detail the lips:
Add a very thin line in the center of the lips with a slightly darker pink or brown to separate the top and bottom lip, giving it dimension. -
Outline the eyes:
Take your fine liner brush with black paint, or a black paint pen, and carefully trace the large downward arches for the closed eyelids. Keep the pressure steady for a smooth line. -
Add eyelashes:
along the bottom of the eyelid curve, paint 5-7 small dots to represent stylized lashes. Alternatively, you can paint short, flicking lines, but the dots give it a unique, illustrative style. -
Draw the nose:
Paint a very small, simple ‘U’ shape in the center of the face, right between the cheeks, using the black paint. Keep it minimal. -
Paint the eyebrow stems:
Switch back to your gold metallic paint or marker. Draw a curved line above each eye, arching slightly upward. -
Add the leaves:
Along the gold stem line, paint small v-shapes or teardrops to create a laurel leaf pattern. Angle the leaves outward towards the temples.
Uneven Cheeks?
If one cheek circle ends up darker than the other, let it dry completely, lightly sand it down with fine-grit sandpaper, and re-apply the paint using the sponge dauber.
Step 3: Finishing Touches
-
Touchups:
Check for any uneven lines or smudges. Use a tiny bit of white paint to clean up edges around the eyes or lips if necessary. -
Clean pencil lines:
Once the paint is 100% dry, gently erase any visible pencil sketch marks. -
Seal (Optional):
If this pumpkin will be outside or handled frequently, apply a matte spray sealant to protect the paint.
Add a “Face Mask”
Paint the pumpkin a soft cucumber green first, leaving two circles around the eyes white to look like a real spa face mask treatment.
Place your finished pumpkin on a fluffy towel to complete the relaxing spa vignette
Night Sky Constellation Pumpkins
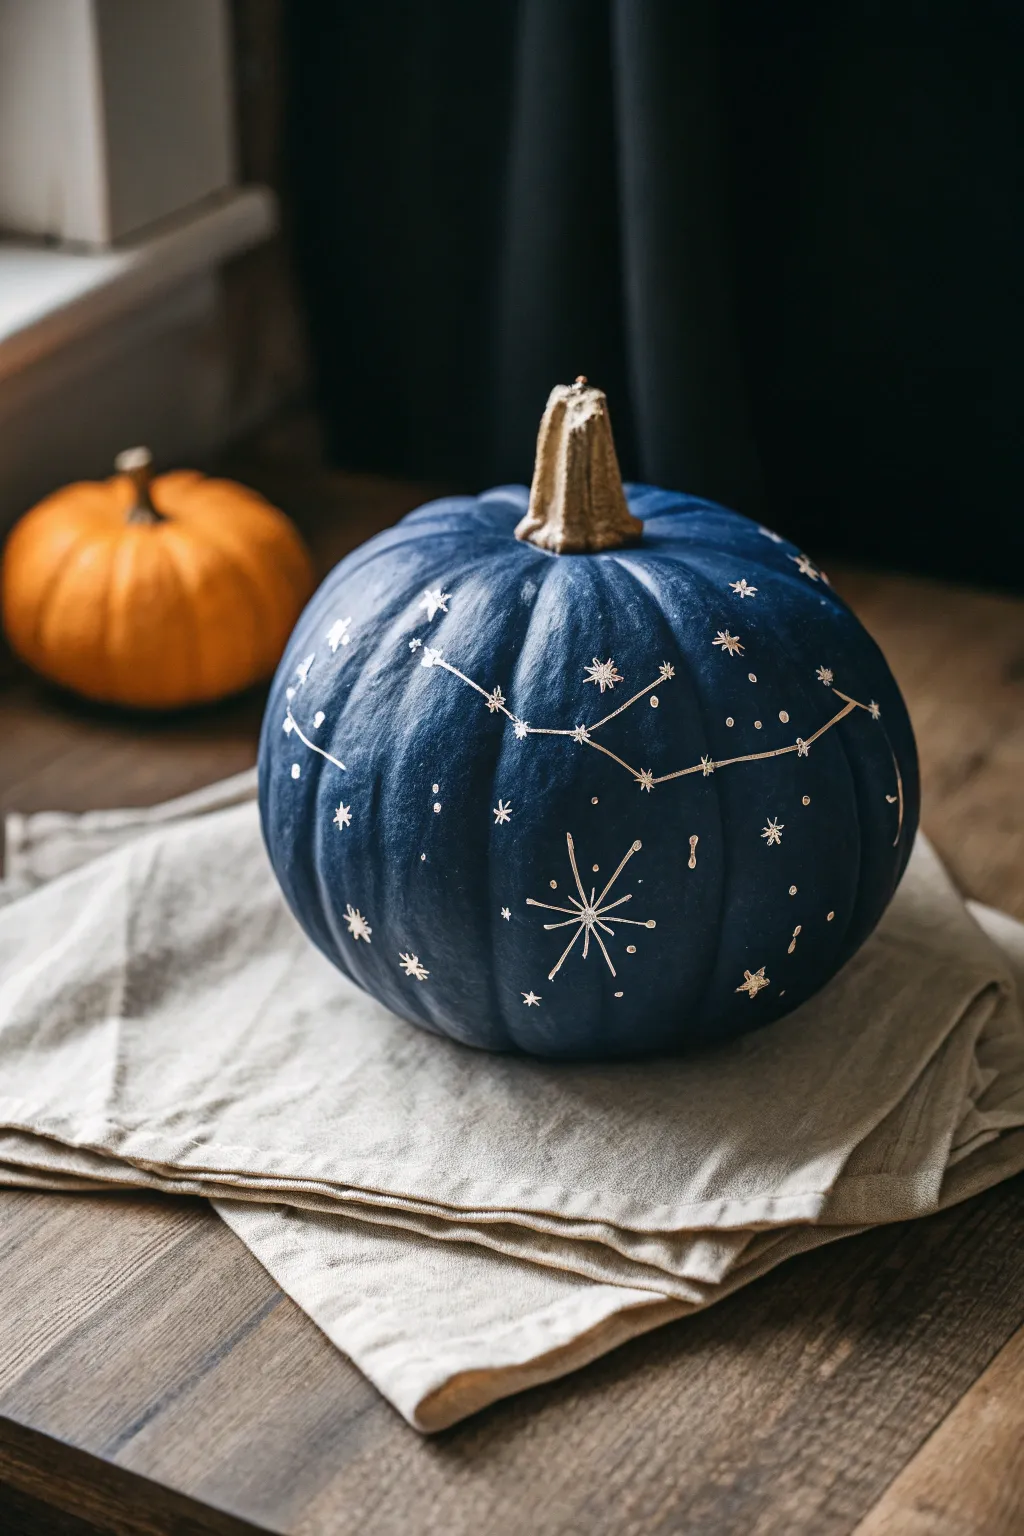
Transform a simple gourd into a sophisticated piece of celestial decor with this elegant night sky pumpkin. Featuring a deep matte navy base and delicate metallic gold constellations, this project brings the wonder of the cosmos right to your autumn table setting.
Step-by-Step
Materials
- Medium-sized pumpkin (real or faux)
- Deep midnight blue drop acrylic paint (matte finish)
- Metallic gold acrylic paint or gold leaf paint
- Gold paint pen (fine tip)
- Gold paint pen (medium tip)
- Flat paintbrush (1-inch width)
- Small round detail brush
- Pencil or white chalk pencil
- Newspaper or drop cloth
- Paper towels
- Optional: Matte spray sealer
Step 1: Preparation & Base Coat
-
Clean surface:
Begin by thoroughly wiping down your pumpkin with a damp cloth to remove any dirt or oils, then dry it completely with a paper towel. Paint adheres much better to a clean, dry surface. -
Protect workspace:
Lay down newspaper or a drop cloth on your work area to catch any drips. -
First coat of blue:
Using the 1-inch flat brush, apply a layer of deep midnight blue acrylic paint over the entire surface of the pumpkin, skipping the stem for now. Use long, vertical strokes following the natural ribs of the pumpkin. -
Dry and repeat:
Allow the first coat to dry for about 20-30 minutes. If the orange skin is still showing through, apply a second coat for full, opaque coverage. -
Paint the stem:
While the blue body dries, carefully paint the stem using the metallic gold paint and the small round brush. Create a crisp line where the stem meets the pumpkin body. -
Second stem coat:
Gold paint can sometimes be translucent, so apply a second layer to the stem once the first is dry to achieve that solid, gilded look seen in the photo.
Starry Splatter
For a dreamy Milky Way effect, dip a stiff toothbrush in thinned gold paint and run your thumb over the bristles to flick tiny specks across the pumpkin before drawing constellations.
Step 2: Designing the Cosmos
-
Plan constellations:
Look up simple constellation charts online—features like The Big Dipper, Cassiopeia, or Cygnus work well. Using a pencil or faint white chalk pencil, lightly mark where your main stars will sit on the pumpkin’s surface. -
Draw star points:
Take your medium-tip gold paint pen and press down firmly to create distinct dots over your pencil marks. These will serve as the anchors for your constellations. -
Connect the stars:
Switch to the fine-tip gold paint pen. Draw thin, straight lines connecting the dots to form the constellation shapes. I like to keep a loose hand here so the lines don’t look too rigid. -
Add variety dots:
Using the medium tip pen again, scatter random dots across the empty blue spaces to represent distant stars. Vary the pressure to create dots of different sizes for a more natural effect.
Step 3: Adding Celestial Details
-
Create starbursts:
Select a few open areas for larger starbursts. Draw a simple cross with a fine tip pen, then add diagonal lines crossing through the center to make an eight-pointed star. -
Enhance with small crosses:
Fill in smaller gaps with tiny four-pointed stars or simple crosses using the fine-tip pen. This adds depth to your galaxy without overcrowding it. -
Highlight the constellations:
Go back over the main constellation stars (the dots) with a tiny dab of metallic gold paint on your detail brush to make them pop and catch the light more than the connecting lines. -
Review and refine:
Step back and look at the overall balance. If a spot looks too empty, add a small cluster of three dots or a tiny starburst. -
Seal (Optional):
If you plan to display the pumpkin outside, apply a light coat of matte spray sealer once all paint is completely dry to protect your artwork from moisture.
Crystal Accents
Use strong craft glue to attach tiny adhesive rhinestones or flat-backed Swarovski crystals over the main “stars” of your constellations for extra sparkle.
Place your finished celestial masterpiece on a neutral linen napkin to let the gold details truly shine
Mini Pumpkin Character Collection
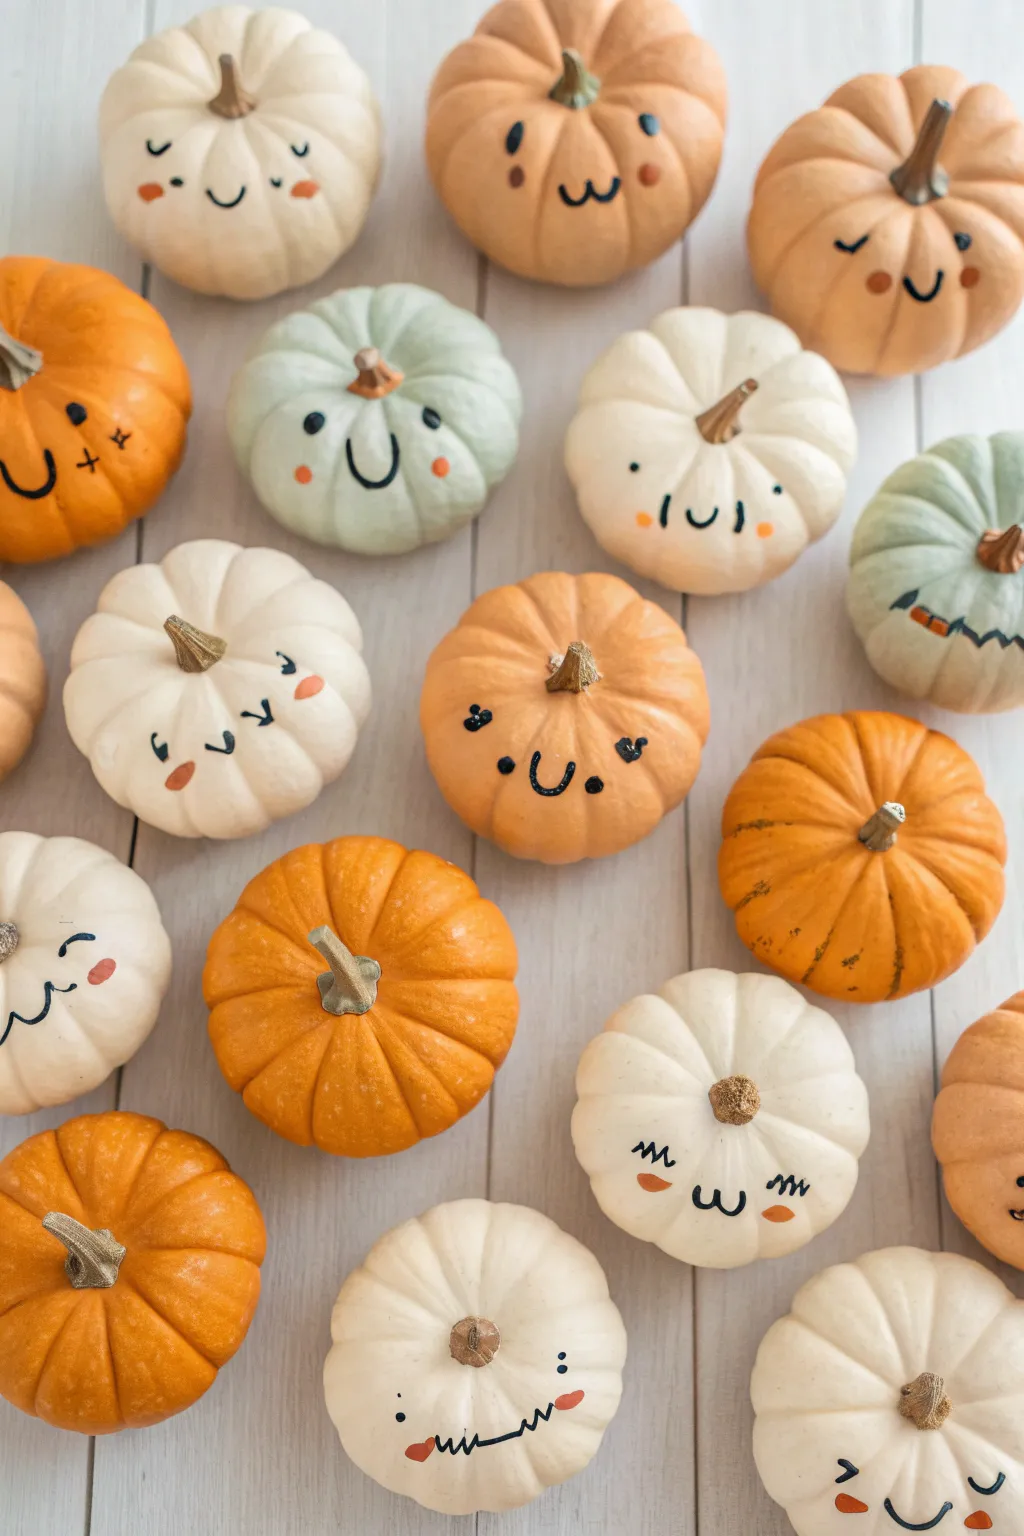
Transform a simple pile of miniature gourds into an adorable crowd of personalities with just a few strokes of paint. This project embraces the natural colors of the pumpkins—creamy whites, classic oranges, and soft sage greens—while adding whimsical, minimalist expressions that bring them to life.
Detailed Instructions
Materials
- Assorted mini pumpkins (white, orange, and pale green)
- Black acrylic paint or a black paint pen (fine tip)
- Pink acrylic paint or a pink paint pen
- Fine detail paintbrush (00 or 000 size) if using bottled paint
- Damp cloth or paper towel
- Matte finish sealant spray (optional)
- Pencil (optional for sketching)
Step 1: Preparation & Planning
-
Clean the Canvases:
Begin by gently wiping down each mini pumpkin with a damp cloth to remove any dirt or field dust. Let them dry completely so the paint adheres properly to the skin. -
Check the Stems:
Look over your pumpkins and remove any loose bits from the stems, but try to keep the stems intact as they add character. If a stem is broken, don’t worry—that pumpkin can just be a slightly grumpier character. -
Plan the Faces:
Before committing to paint, decide which expressions suit which pumpkin shape. Rounder pumpkins look great with wide, happy smiles, while taller ones might suit a surprised ‘o’ mouth. I sometimes lightly sketch the face with a pencil first to get the spacing right.
Oops, Smudged It?
Work quickly! If the paint is still wet, a damp Q-tip is your best eraser. If it’s started to dry, wait until it’s fully hard, then gently scrape the mistake off with a toothpick.
Step 2: Painting the Expressions
-
Start with Eyes:
Using your black paint pen or fine brush, start drawing the eyes. Simple dots work perfectly for a classic look. Place them slightly wider apart than you think for maximum cuteness. -
Winking Variations:
For variety, paint a few pumpkins with winking eyes. Draw a small, curved arc (like a sideways ‘u’) for the closed eye, keeping the open eye a simple dot. -
Sleeping Faces:
Create a peaceful, sleeping character by drawing two small downward curves (like wide ‘u’ shapes) or two upward arches with tiny eyelashes. -
Adding Mouths:
Paint the mouths using thin, deliberate strokes. A tiny ‘u’ shape creates a sweet smile, while a ‘w’ shape creates a ‘cat face’ look. A straight horizontal line can look quirky or neutral. -
Special Details:
On a few pumpkins, add extra personality marks. Tiny diagonal lines under the eyes can mimic blushing or whiskers, and small ‘x’ shapes can work for eyes on a dizzy character. -
Let the Black Dry:
Allow the black detailing to dry for at least 15-20 minutes. This prevents smudging when you add the finishing touches.
Step 3: Finishing Touches
-
Apply Rosy Cheeks:
Using pink paint, add small oval or circular blushes underneath the eyes. This simple step is key to achieving that ‘kawaii’ aesthetic. -
Mix Up Cheek Shapes:
Don’t limit yourself to just dots. Try small horizontal dashes of pink or tiny hearts for cheeks on your favorite pumpkins. -
Refine Clean Lines:
If any lines look shaky, you can carefully scratch away excess dry paint with a fingernail or a toothpick to clean up the edges. -
Leave Some Blank:
Leave a handful of beautiful orange pumpkins completely unpainted. Mixing plain pumpkins in with the characters creates a balanced, sophisticated display rather than a cluttered one. -
Seal (Optional):
If you plan to display these outdoors, give them a light mist of matte sealant spray to protect the faces from moisture.
Placement Magic
Draw the features lower on the pumpkin than you’d expect. Placing eyes and mouth on the lower third of the gourd makes the ‘forehead’ look bigger, which instantly increases cuteness.
Arranging your new pumpkin friends in a group brings an instant smile to anyone who walks by


Have a question or want to share your own experience? I'd love to hear from you in the comments below!