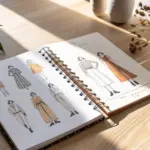
Painting on clothes is my favorite way to turn everyday basics into wearable art that actually feels like you. If you’ve got a plain jacket, jeans, or tee begging for personality, these painting clothes ideas will get you started (and keep you painting).
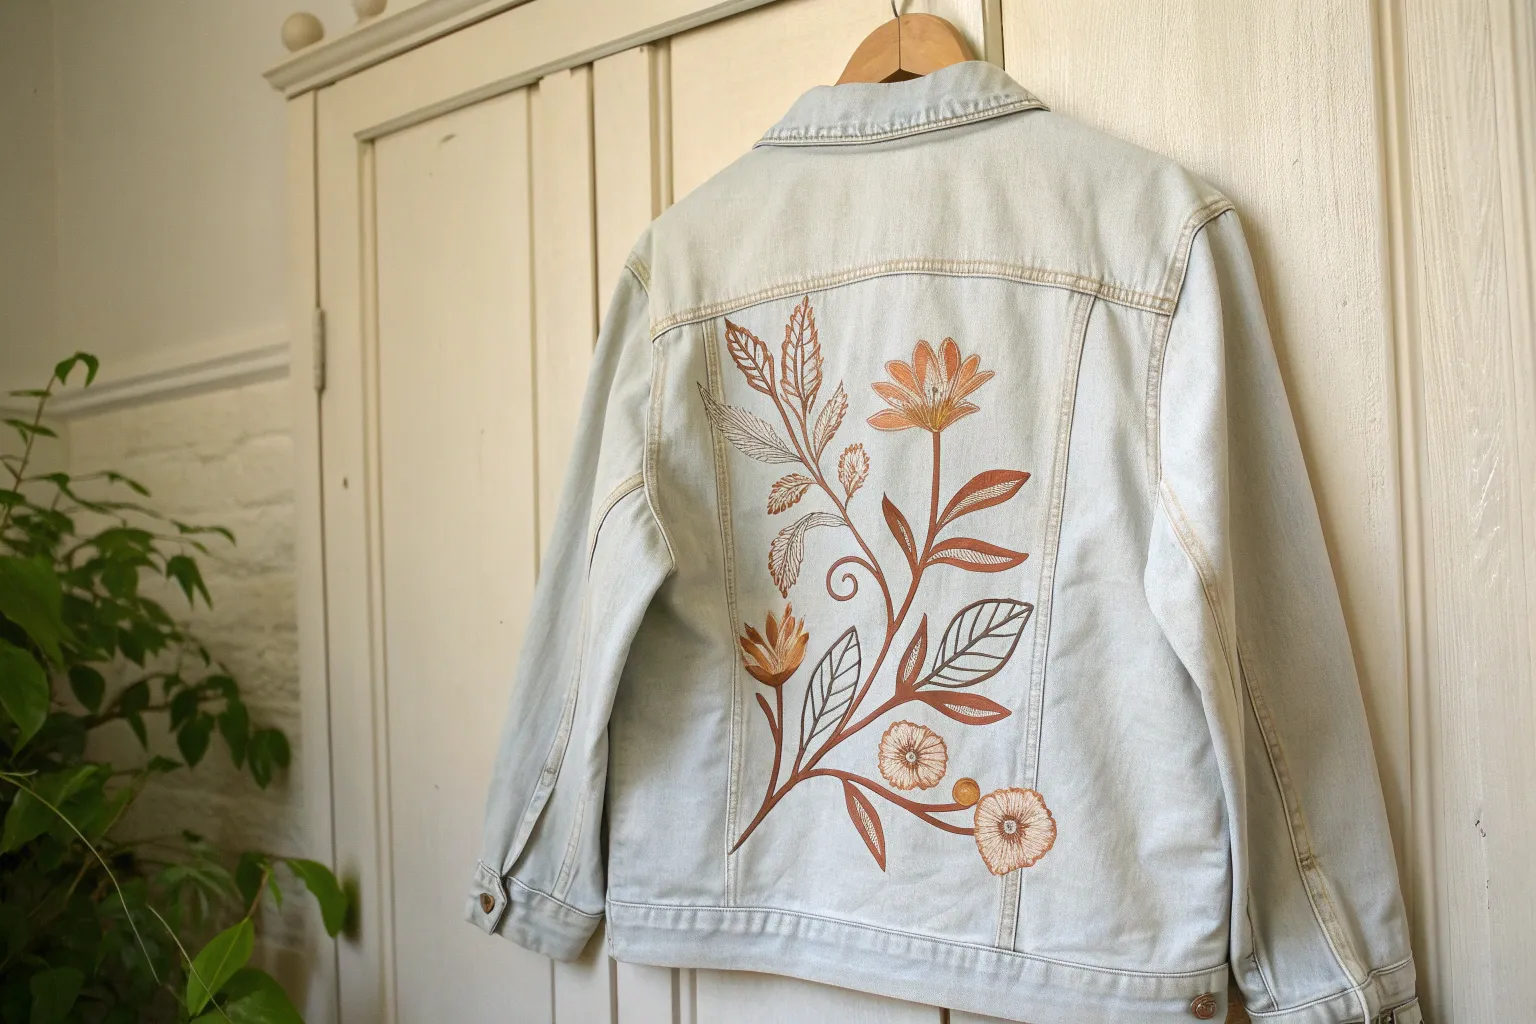
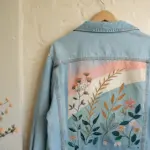
Floral Back-Of-Jacket Statement
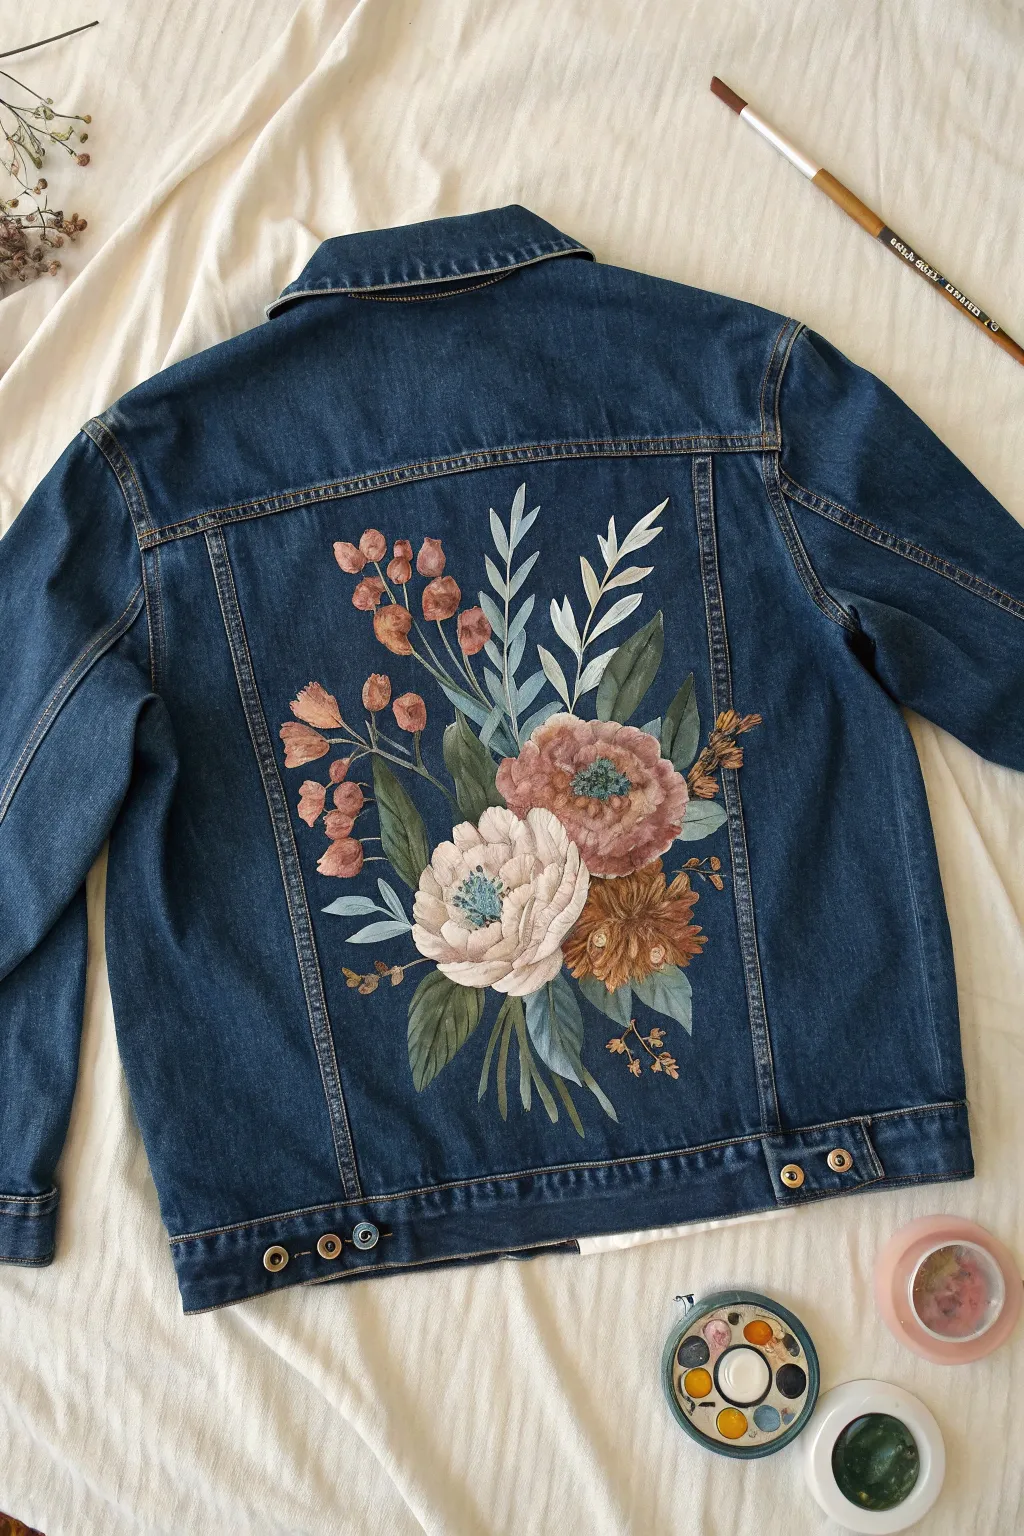
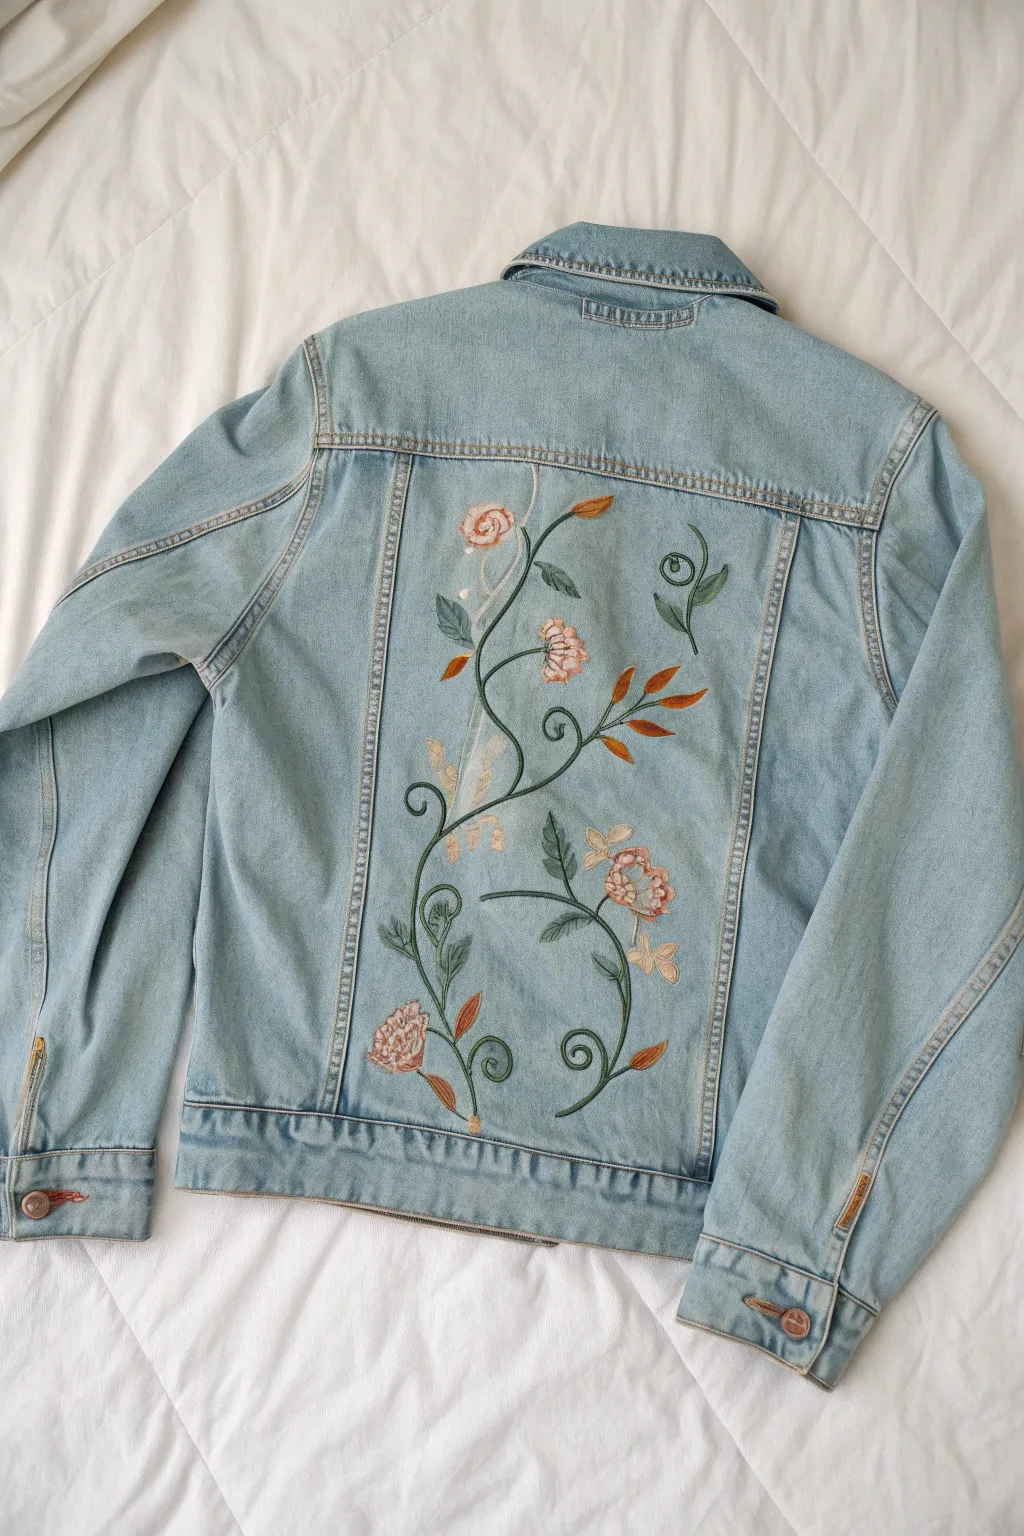
Transform a plain denim jacket into a wearable masterpiece with this soft, painterly floral design. Featuring a central arrangement of creamy white and dusty rose peonies surrounded by muted eucalyptus and berries, this project adds vintage charm to any outfit.
Step-by-Step Tutorial
Materials
- Denim jacket (pre-washed and dried)
- White fabric paint or gesso (for priming)
- Acrylic paints or fabric paints (Colors: Titanium White, Burnt Sienna, Raw Umber, Olive Green, Phthalo Blue, Alizarin Crimson, Yellow Ochre)
- Fabric medium (if using standard acrylics)
- Set of paintbrush (Round sizes 2, 4, 8 and a small liner brush)
- Palette or paper plate
- Chalk or white transfer paper
- Iron and parchment paper (for heat setting)
Step 1: Preparation & Sketching
-
Prepare the fabric canvas:
Lay your jacket flat on a hard surface. If the denim is stretchy or thin, slide a piece of cardboard inside the jacket to prevent the paint from bleeding through to the front side. -
Draft the composition:
Visualize the center point of the back panel. Using a piece of chalk or white transfer paper, lightly sketch the large central blooms first: a large circle for the white peony at the bottom-left and another for the dusty rose flower just above it slightly to the right. -
Add foliage placeholders:
Sketch long, sweeping stems extending upwards and outwards from the center flowers. Mark positions for the smaller brown flower clusters and the berry sprigs on the left. -
Prime the painting area:
To ensure your colors pop against the dark blue denim, mix white paint with a little fabric medium. Paint a thin, solid silhouette of your entire floral cluster. Let this white base layer dry completely before adding color.
Stiff Image Fix
If the painted area feels too stiff or plastic-like, you likely used too much paint without enough fabric medium. For future layers, mix in more medium to keep the fabric flexible.
Step 2: Painting the Main Blooms
-
Mix the dusty rose palette:
Combine Alizarin Crimson with a touch of Burnt Sienna and plenty of White to create a muted dusty pink. Paint the upper flower with loose, curved strokes to mimic petals, leaving the center darker. -
Create the creamy white peony:
For the lower large flower, use Titanium White with a tiny dot of Yellow Ochre for warmth. Paint wide, cupped petals overlapping each other, ensuring the white base coat is fully covered. -
Detailed shading for depth:
Mix a diluted grey-brown wash. Gently apply this shadow color at the base of the white petals where they overlap, giving the flower a three-dimensional, cupped appearance. -
Paint the rust-colored accent flowers:
Mix Burnt Sienna with Yellow Ochre. Paint the cluster of mum-like flowers to the right of the main bouquet using short, jabby brushstrokes to create a fluffy texture. -
Add flower centers:
Using a small number 2 brush, dab a mix of dark blue and green into the center of the white and pink flowers. Add tiny dots of yellow or gold on top of the dark center so it looks like pollen.
Step 3: Foliage & Details
-
Mix the eucalyptus green:
Combine Olive Green, Phthalo Blue, and White to achieve that cool, muted sage color seen in the leaves. Adjust the amount of white to get variations in lightness. -
Paint broad leaves:
Using a size 4 or 8 round brush, paint the larger leaves at the bottom and sides. Press the brush down to widen the stroke and lift up as you reach the tip to create a point. -
Add delicate ferns:
Switch to a lighter mix of blue-white for the fern-like sprigs reaching upward. Use the tip of your brush to make quick, slender dashes along a central stem. -
Paint the berries:
Mix a terracotta color using Burnt Sienna and a little White. Paint small circles along the thin stems on the left side of the bouquet. Add a tiny white highlight dot to each berry for shine. -
Refine stems and connections:
Use your liner brush with a dark green-brown mix to connect all floating flowers and leaves to the central cluster. Keep lines thin and elegant. -
Final highlights:
Go back over your main flowers and largest leaves with pure white or very light pastel mixes. Add fine lines to the edges of petals and leaf veins to sharpen the details against the denim.
Pro Tip: Watercolor Look
To get that soft, watercolor aesthetic on denim, dilute your paints slightly with water (just a drop!) and fabric medium. Layer semi-transparent washes rather than thick opaque blobs.
Step 4: Finishing Touches
-
Let it cure:
Allow the paint to dry completely. Although it might feel dry to the touch in an hour, I prefer to leave it overnight to ensure the layers beneath are fully set. -
Heat set the design:
Place a piece of parchment paper over the painted area. Set your iron to medium heat (no steam) and press it over the design for 3-5 minutes, moving constantly. This locks the paint into the fibers.
Enjoy wearing your custom floral art and wait for the compliments to roll in


Minimal Line Art on a T-Shirt
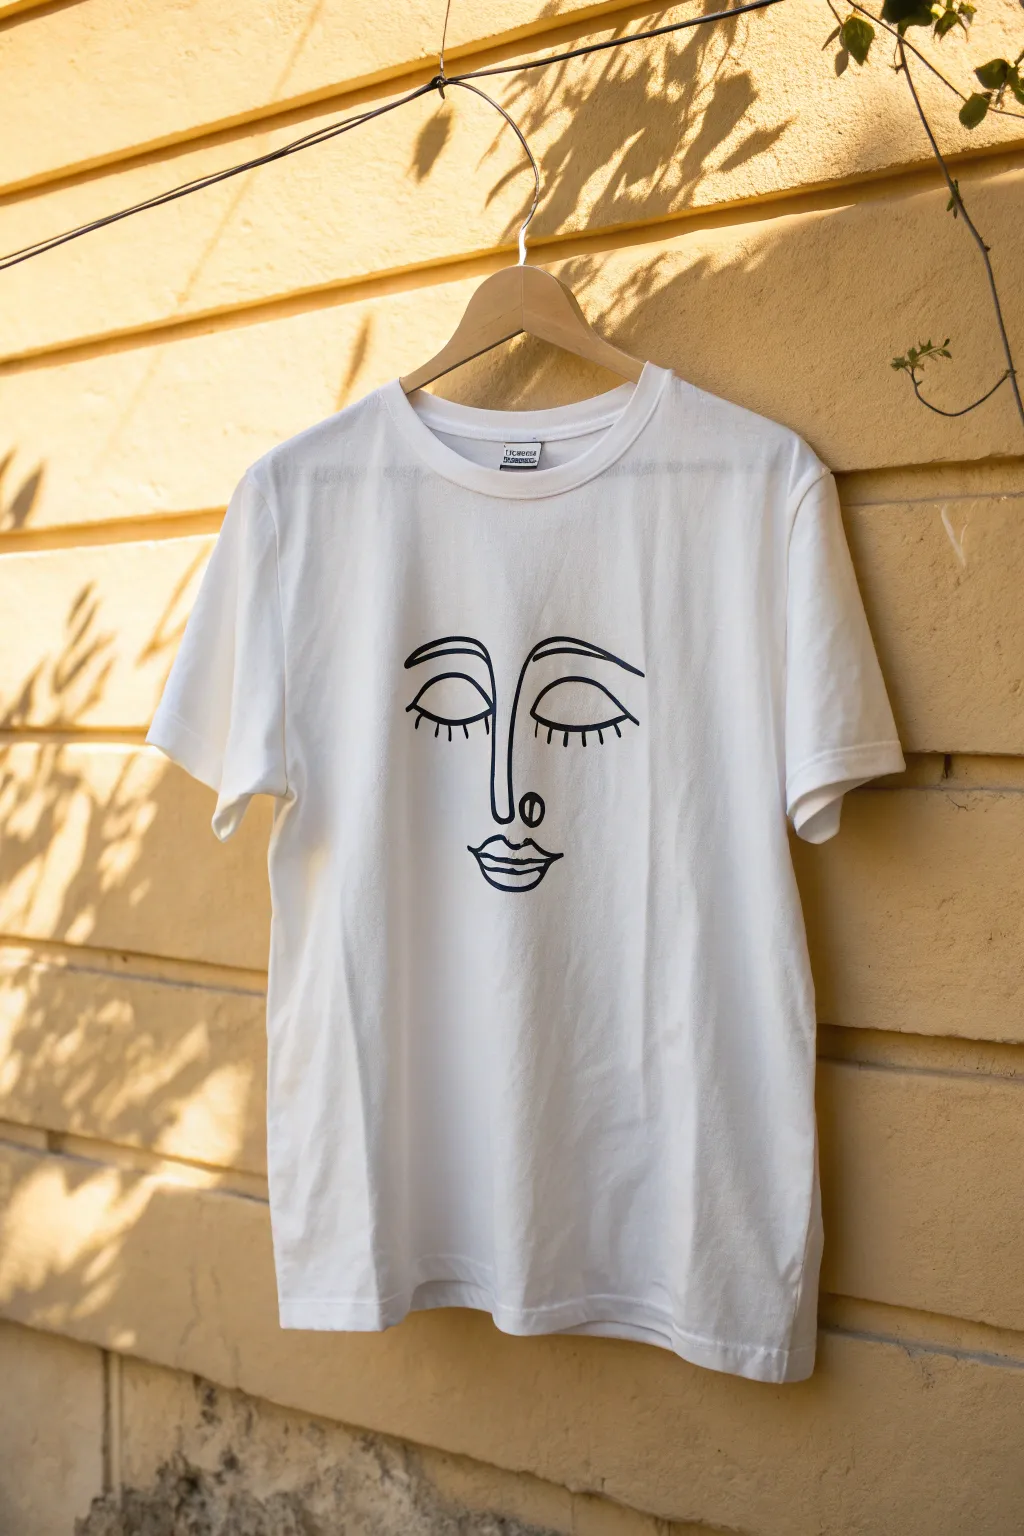
Transform a plain white tee into a piece of wearable art with this elegant, minimalist line drawing. The design features a serene, abstract face created with bold, continuous-style black lines for a modern boutique look.
Step-by-Step Guide
Materials
- White cotton t-shirt (pre-washed)
- Black fabric paint or fabric markers (medium tip)
- Fine liner brush (if using paint)
- Cardboard insert or shirt board
- Pencil or disappearing fabric marker
- Iron (for heat setting)
- Protective sheet or thin cloth
- Ruler (optional for centering)
Step 1: Preparation
-
Pre-wash the fabric:
Before starting any fabric painting project, wash and dry your t-shirt without fabric softener. This removes factory sizing chemicals that can prevent the paint from adhering properly. -
Insert the barrier:
Place a piece of cardboard or a dedicated shirt board inside the t-shirt. This is crucial as it creates a flat, stable surface for drawing and prevents the ink from bleeding through to the back of the shirt. -
Smooth the surface:
Use your hands to smooth out any wrinkles over the cardboard area. If the shirt is very wrinkly, give it a quick press with an iron to ensure your lines will be crisp and straight.
Step 2: Drafting the Design
-
Find the center:
Locate the center of the chest area where you want the face to sit. I like to start about 3-4 inches down from the collar seam for perfect placement. -
Sketch the nose bridge:
Using your pencil or disappearing marker, lightly draw a long, vertical line for the nose. Curve it slightly at the top where it will meet the brow, and hook it gently at the bottom. -
Add the eyebrows:
Draw two arched lines above the nose line. One eyebrow should connect directly to the top of the nose line, creating a continuous flow, while the other floats mirroring it on the left side. -
Draft the closed eyes:
Sketch two downward-curving crescents below the brows to represent closed eyelids. Keep them symmetrical and spaced evenly from the nose bridge. -
Detail the lashes:
Add small, short vertical dashes along the bottom edge of the eyelid curves. Spacing them out slightly gives that sleeping, peaceful aesthetic. -
Create the nose detail:
At the bottom of the nose line, draw a small circle just to the right of the center line. This abstract detail adds character to the minimalist style. -
Outline the lips:
Below the nose, sketch the lips. Start with the center line of the mouth, then add a cupid’s bow for the top lip and a fuller curve for the bottom lip.
Unwanted Bleeding?
If the fabric marker starts bleeding into the cotton fibers, stop immediately and use a hair dryer to dry the ink instantly. Switch to a thicker fabric paint for cleaner edges.
Step 3: Painting the Lines
-
Test your flow:
Before touching the shirt, test your fabric marker or paint flow on a scrap piece of fabric or paper towel to ensure no unexpected blobs occur. -
Trace the nose and brow:
Start tracing over your pencil lines with the black fabric paint. Being confident with your strokes helps avoid shaky lines; try to keep the pressure consistent. -
Define the eyes:
Carefully trace the eyelid curves. Use the very tip of your brush or marker to flick the eyelashes downwards, lifting the pressure at the end of each lash for a tapered look. -
Inking the lips:
Trace the mouth shape. You might want to thicken the line slightly on the bottom lip curve to add visual weight to the lower part of the face. -
Finalize details:
Go over the small circle near the nose and double-check line thickness. If any lines look too thin or faint, carefully re-trace them to build up opacity.
Pro Tip: Anchor Points
Keep your pinky finger resting on a clean, dry part of the shirt while you draw. This acts as an anchor to stabilize your hand for smoother, less shaky lines.
Step 4: Finishing Touches
-
Let it dry:
Allow the paint to air dry completely. This usually takes at least 24 hours, but check your specific product’s instructions. -
Remove the sketch:
If you used a pencil, gently erase any visible guide marks once the paint is fully dry. If you used a disappearing ink pen, they may have already vanished or will wash out later. -
Heat set the design:
To make the design permanent, place a thin cloth over the painted area and iron on a high, dry setting (no steam) for about 3-5 minutes, keeping the iron moving.
Now you have a chic, custom-designed tee perfect for pairing with your favorite denim or tucking into a skirt.


Cute Pocket Motif on Jeans
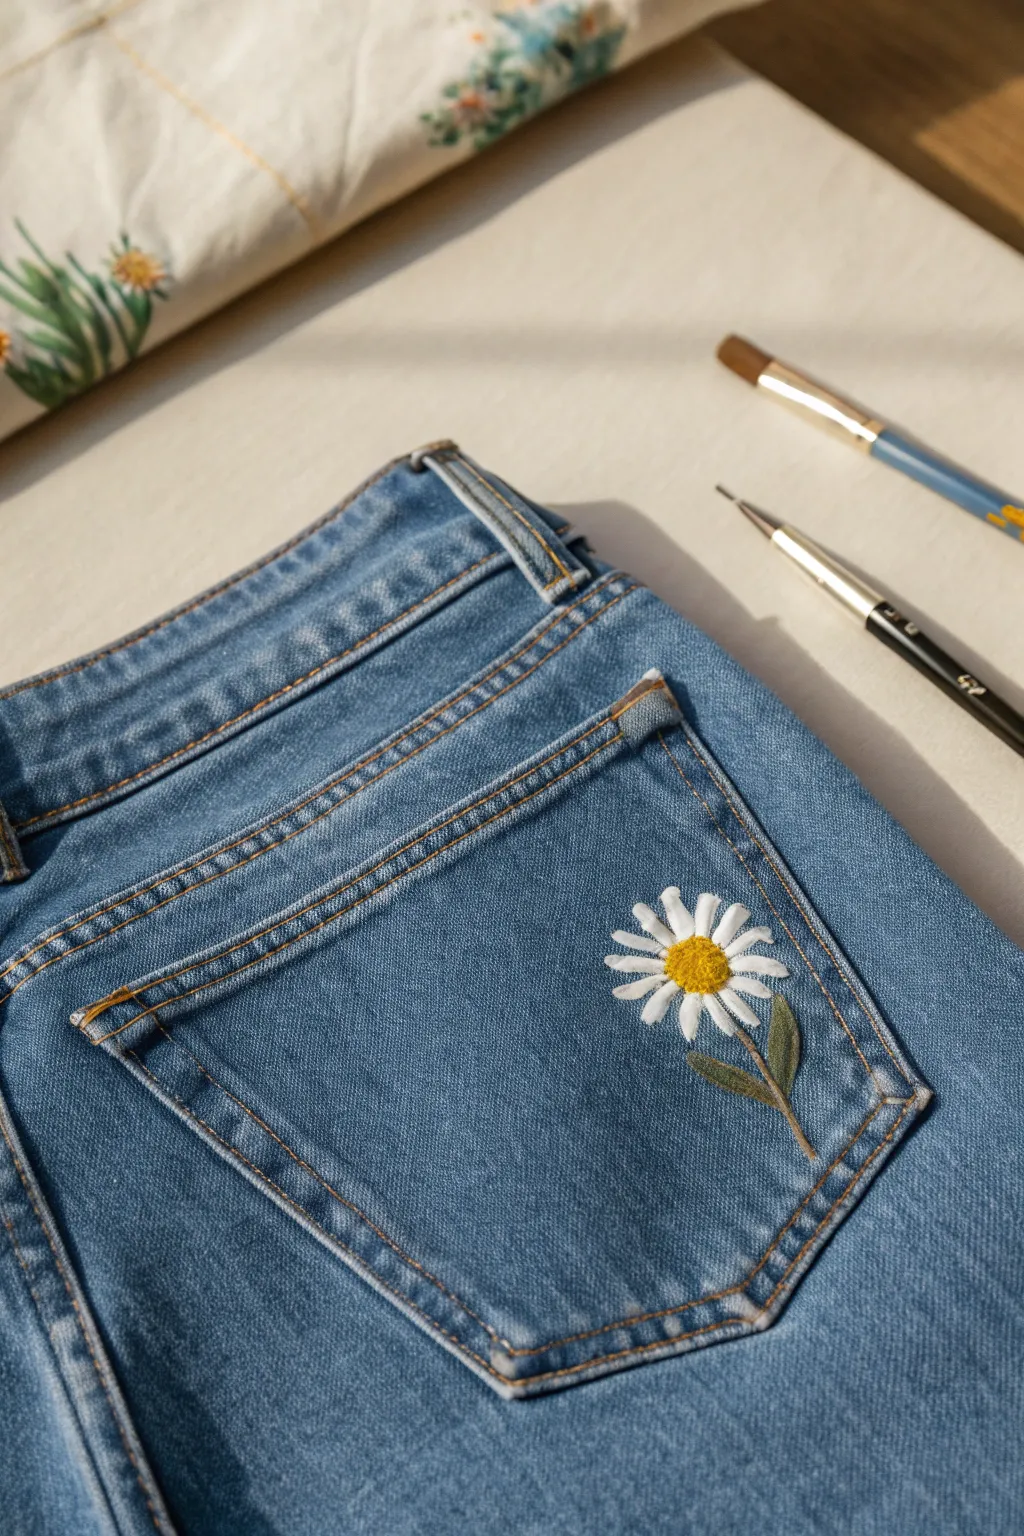
Transform a plain pair of jeans into a sweet, custom statement piece with this lovely painted daisy motif. This project focuses on adding a single, detailed flower to the back pocket for a subtle but stylish touch that brightens up any denim wash.
Step-by-Step Tutorial
Materials
- Denim jeans (clean and dry)
- White fabric paint
- Yellow fabric paint (golden yellow shade)
- Green fabric paint (olive or sage green shade)
- Small flat brush (size 2 or 4)
- Fine liner brush (size 0 or 00)
- Pencil or white chalk pencil
- Piece of cardboard (to fit inside pocket)
- Iron (for heat setting)
- Press cloth or parchment paper
Step 1: Preparation & Sketching
-
Protect the fabric:
Before you begin, slide a small piece of cardboard inside the back pocket of your jeans. This is crucial as it creates a flat painting surface and prevents the paint from bleeding through to the actual seat of the pants. -
Position your flower:
Decide exactly where you want your daisy. The bottom right corner of the pocket, leaning slightly inward, offers a nice balanced composition. -
Sketch the center:
Using a pencil or white chalk pencil, lightly draw a small oval shape to represent the flower’s center. Don’t worry about perfection; daisies are organic shapes. -
Outline the petals:
Sketch the petals radiating outward from the center oval. Make them long and narrow, slightly irregular in length to look natural. Aim for about 12-15 petals. -
Draft the stem and leaves:
Draw a thin, slightly curved line extending down from the flower for the stem. Add two small, slender leaves branching off near the bottom.
Step 2: Painting the Daisy
-
Base coat the petals:
Dip your small flat brush into the white fabric paint. Paint the petals using smooth strokes, starting from the tip of the petal and pulling the brush toward the center. This naturally creates a tapered look. -
Refine the petal edges:
Go back over your strokes to ensure the white is opaque. If the denim is dark, you might need a second coat after the first one dries slightly to make the white truly pop. -
Paint the center base:
Clean your brush and switch to the golden yellow paint. Fill in the center oval completely. I find that dabbing the paint here rather than stroking creates a nice texture. -
Add dimension to the center:
While the yellow is still slightly wet, mix a tiny dot of brown or darker orange if you have it (or just use more yellow) and stipple it along the bottom edge of the center oval to create a shadow effect. -
Paint the stem:
Using the fine liner brush and your green paint, carefully trace the stem line. Use a light hand to keep the line delicate. -
Fill in the leaves:
Switch back to the small flat brush for the leaves. Paint them green, using a slight curve to give them movement rather than making them stiff and straight. -
Add highlights:
Once the green is dry, mix a tiny bit of white with your green. Add a very thin highlight line on the upper edge of the leaves and stem to give them volume.
Petal Perfection Tip
Don’t stress about perfect symmetry. Real daisies have overlapping, messy petals. Making some petals slightly shorter or curved adds realism.
Step 3: Finishing Touches
-
Final petal details:
With your fine liner brush and a little bit of grey or watered-down black (very sheer), add tiny, subtle lines between some of the petals to separate them visually if they blended together too much. -
Let it dry completely:
Allow your artwork to air dry flat for at least 24 hours. Do not rush this step, or the paint may smear during the setting process. -
Heat set the paint:
Set your iron to the cotton setting with no steam. Place a press cloth or parchment paper over the painted pocket. -
Iron the design:
Iron over the protected design for 3-5 minutes, moving the iron constantly. This cures the fabric paint so your jeans will be machine washable.
Texture Level Up
For a 3D effect, mix fabric puff additive into your yellow center paint. After heat setting with a hairdryer, the center will puff up like pollen.
Now you have a charming piece of wearable art that looks straight out of a boutique window


Painted Collar and Cuff Details
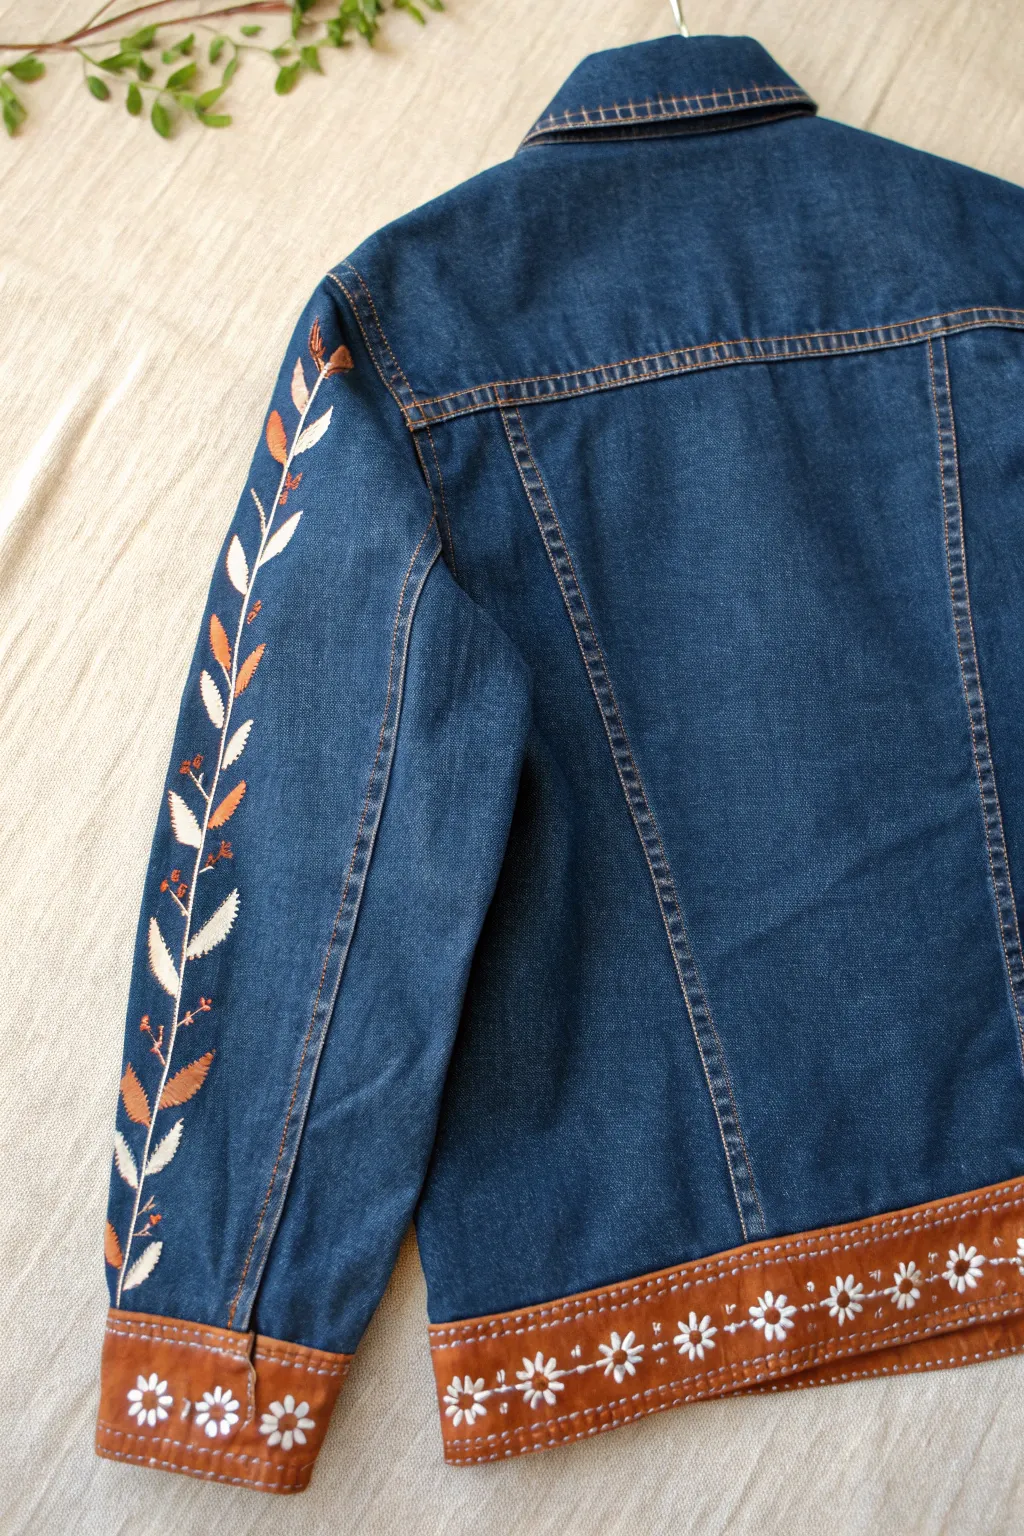
Transform a basic denim jacket into a bohemian statement piece with clever fabric painting techniques. This project combines delicate vine work on the sleeves with a bold, faux-leather painted effect on the cuffs and hem.
Step-by-Step Guide
Materials
- Denim jacket (washed and dried)
- Fabric paint (white, burnt sienna/cognac brown, dark brown)
- Textile medium (optional, if using acrylics)
- Fine liner brush (size 0 or 00)
- Flat shader brush (1/2 inch)
- Small round brush (size 2)
- White tailor’s chalk or disappearing fabric pen
- Ruler or measuring tape
- Painter’s tape
- Cardboard or palette paper
- Iron and cloth for heat setting
Step 1: Planning and Preparation
-
Prepare the fabric:
Ensure your denim jacket is pre-washed without fabric softener to help the paint adhere properly. Lay it flat on a large work surface. -
Mark the faux leather zones:
Using a ruler and white chalk, measure a band about 2-3 inches wide along the bottom hem of the jacket. Do the same for the cuffs. Apply painter’s tape along the top line of these measurements to create a crisp edge. -
Sketch the vine:
Lightly sketch a winding central stem line going up the center of the sleeve using your chalk. Mark small ticking lines where you want the leaves to sit, alternating sides.
Fixing Bleeds
If paint bleeds under the tape, wait for it to dry completely. Then, use a stiff brush with a tiny bit of water to scrub the error, or paint over it with a mix of blue and black to match the denim.
Step 2: Painting the Faux Leather Bands
-
Mix the base color:
Mix your burnt sienna or cognac brown fabric paint. If it feels too stiff, add a drop of water or textile medium to help it seep into the denim weave. -
Apply the first coat:
Using the flat shader brush, paint the entire hem and cuff area below your tape line. Use firm strokes to push the paint into the denim texture. -
Refine the edges:
Pay distinct attention to the seams and stitching on the jacket; ensure the paint gets into the grooves for a solid, leather-like look. -
Dry and repeat:
Let this base layer dry completely. Apply a second coat to make the brown color fully opaque and rich. -
Add texture details:
Once the brown is dry to the touch, mix a tiny amount of dark brown paint with water to make a glaze. Lightly streak this over the brown handy work to simulate natural leather grain. -
Peel the tape:
Carefully peel away the painter’s tape while the paint is still slightly tacky to reveal a sharp line.
Level Up: Texture
To make the ‘leather’ cuffs look even more realistic, mix a gloss medium into your final coat of brown paint. This gives it a slight sheen that contrasts beautifully with the matte denim.
Step 3: Painting the Sleeve Vines
-
Paint the stem:
Using your fine liner brush and white paint, carefully trace over your chalked stem line on the sleeve. I find it easier to pull the brush toward me for steadier lines. -
Start the white leaves:
Switch to your small round brush. Paint elongated tear-drop shapes for the leaves on one side of the stem using white paint. Use one smooth stroke: press down, pull, and lift to create a point. -
Add contrast leaves:
Clean your brush and switch to the cognac brown color. Paint the alternating leaves on the other side of the stem, mirroring the shape of the white ones. -
Detail the berries:
Using the liner brush and the brown paint, add tiny clusters of dots or ‘berries’ near the base of some leaves for extra visual interest.
Step 4: Adding the Daisy Details
-
Mark flower spacing:
On the dried brown ‘leather’ bands, use chalk to mark small dots where the centers of your daisies will go, keeping them evenly spaced. -
Paint petals:
Using a small round brush loaded with white paint, create simple 5 or 6-petal flowers around your chalk marks. Keep the strokes short and simple. -
Connect the flowers:
Use the fine liner brush and white paint to draw a very thin horizontal line connecting the daisies, mimicking an embroidered stitch. -
Add faux stitching:
Along the top edge of the brown painted band (where the tape was), use the liner brush to paint small, dashed white likes. This mimics the look of topstitching on leather.
Step 5: Finishing Up
-
Final drying:
Allow the jacket to dry for at least 24 hours. The paint needs to cure fully before heat setting. -
Heat set:
Place a thin cotton cloth over your painted areas and iron on a medium heat setting (no steam) for 3-5 minutes per section to make the design permanent and washable.
Wear your new custom jacket with pride knowing you created a completely unique design
BRUSH GUIDE
The Right Brush for Every Stroke
From clean lines to bold texture — master brush choice, stroke control, and essential techniques.
Explore the Full Guide
Daisy Chain Along the Hem
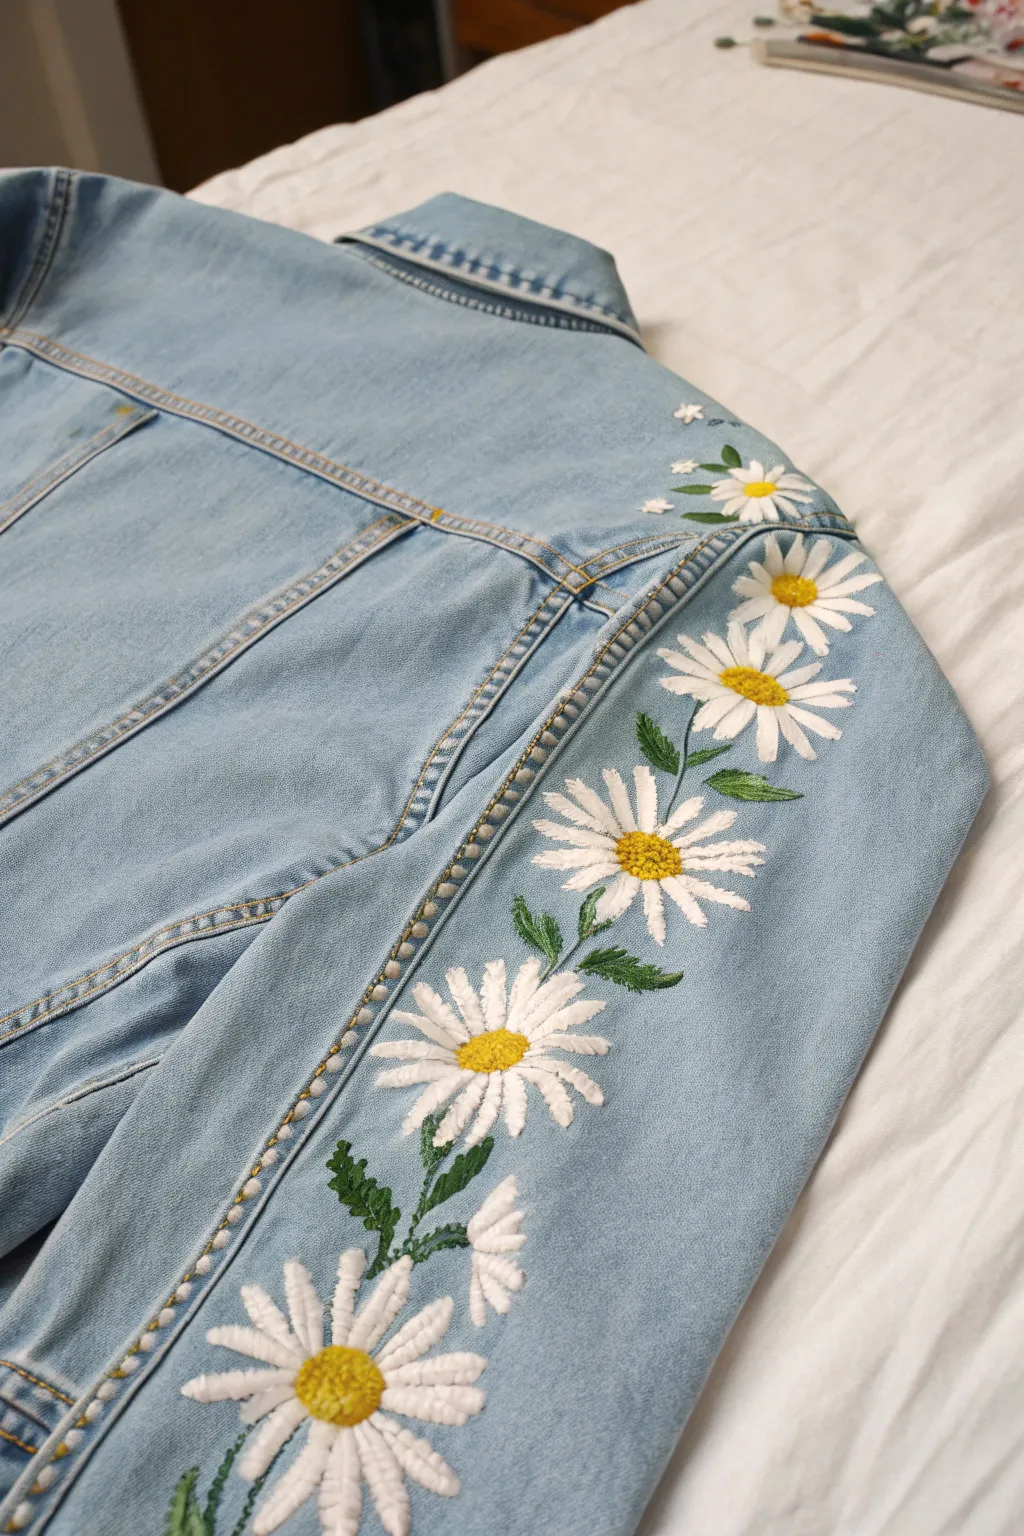
Transform a classic denim jacket into a blooming statement piece with this elegant trailing daisy design. The raised, textured petals and vibrant yellow centers cascade down the sleeve, adding a soft, handmade touch to sturdy denim.
How-To Guide
Materials
- Denim jacket (light or medium wash works best)
- White embroidery floss (6-strand)
- Yellow embroidery floss (6-strand)
- Green embroidery floss (various shades for depth including sage and emerald)
- Embroidery needle (size 5-7)
- Water-soluble fabric pen or chalk
- Embroidery hoop (small to medium size)
- Scissors
- Thimble (optional but recommended for denim)
Step 1: Planning and Sketching
-
Assess the placement:
Lay your jacket flat on a table. The design flows from the shoulder seam down the length of the sleeve. Visualize a gentle ‘S’ curve or a straight line following the seam, depending on your preference. -
Mark the flower centers:
Using your water-soluble pen, dot the locations for the main daisy centers. Space them out irregularly— some close together, some further apart—to mimic a natural growth pattern. -
Draw the petals:
Sketch long, slender petals radiating from each center dot. Aim for 12-16 petals per flower. Don’t worry about them being perfect; natural variation adds charm. -
Add connecting greenery:
Draw faint lines connecting the flowers. Add small leaves branching off the stems, tucking them into the negative spaces between the blossoms.
Save Your Fingers
Denim is tough to stitch through! Use a sharp chenille needle (size 22 or 24) and wear a thimble to push the needle through layers without soreness.
Step 2: Stitching the Daisies
-
Prepare your hoop:
Secure the fabric in your embroidery hoop. Since you are working on a sleeve, be careful not to catch the underside of the fabric. You’ll need to move the hoop frequently as you work down the arm. -
Thread the needle:
Cut a length of white floss. Use all 6 strands for a fluffy, raised look that stands out against the thick denim texture. Knot the end securely. -
Satin stitch the petals:
Bring your needle up at the outer tip of a petal and down near the center. Repeat this, placing stitches side-by-side until the petal shape is filled. I like to make the center stitch slightly longer than the side stitches to create a tapered leaf shape. -
Create dimension:
Ensure your stitches lie flat and parallel. For wider petals, you might need 3-4 stitches; for thinner ones, 2 might suffice. Continue until all white petals on the first flower are complete. -
Fill the center:
Switch to your yellow floss (using all 6 strands). Fill the center circle with French knots. Wrap the thread around the needle twice before inserting it back into the fabric close to where you came up. -
Pack the knots tightly:
Cluster the French knots together densely to create a raised, bumpy texture that mimics a real flower center. A single daisy might need 8-12 knots depending on size. -
Repeat down the line:
Move your hoop and repeat the petal and center process for every daisy sketched on your sleeve.
Step 3: Adding Greenery and Details
-
Stitch the stems:
Thread your needle with green floss. Use a stem stitch or split stitch to trace the lines connecting the flowers. This creates a sturdy, continuous line. -
Embroider the leaves:
For the leaves, use a fishbone stitch or a simple satin stitch similar to the petals. Vary the shades of green if you have them to add visual depth to the foliage. -
Add tiny buds:
Near the top shoulder area, stitch a few small white ‘lazy daisy’ loops or single French knots to represent unopened buds or tiny filler flowers. -
Clean up the back:
Once all stitching is done, turn the sleeve inside out. Securely knot all loose threads and trim the excess. Since this is clothing, ensure knots are tight so they simulate wear. -
Remove markings:
Dip a cloth in warm water or use a spray bottle to dissolve the blue fabric pen marks. Let the jacket air dry completely.
Make It Sparkle
Intersperse a few tiny pearlescent beads or sequins among the leaves for a subtle dew-drop effect that catches the light when you move.
Wear your new floral jacket with pride, knowing each petal was crafted by hand
Celestial Night-Sky Jeans
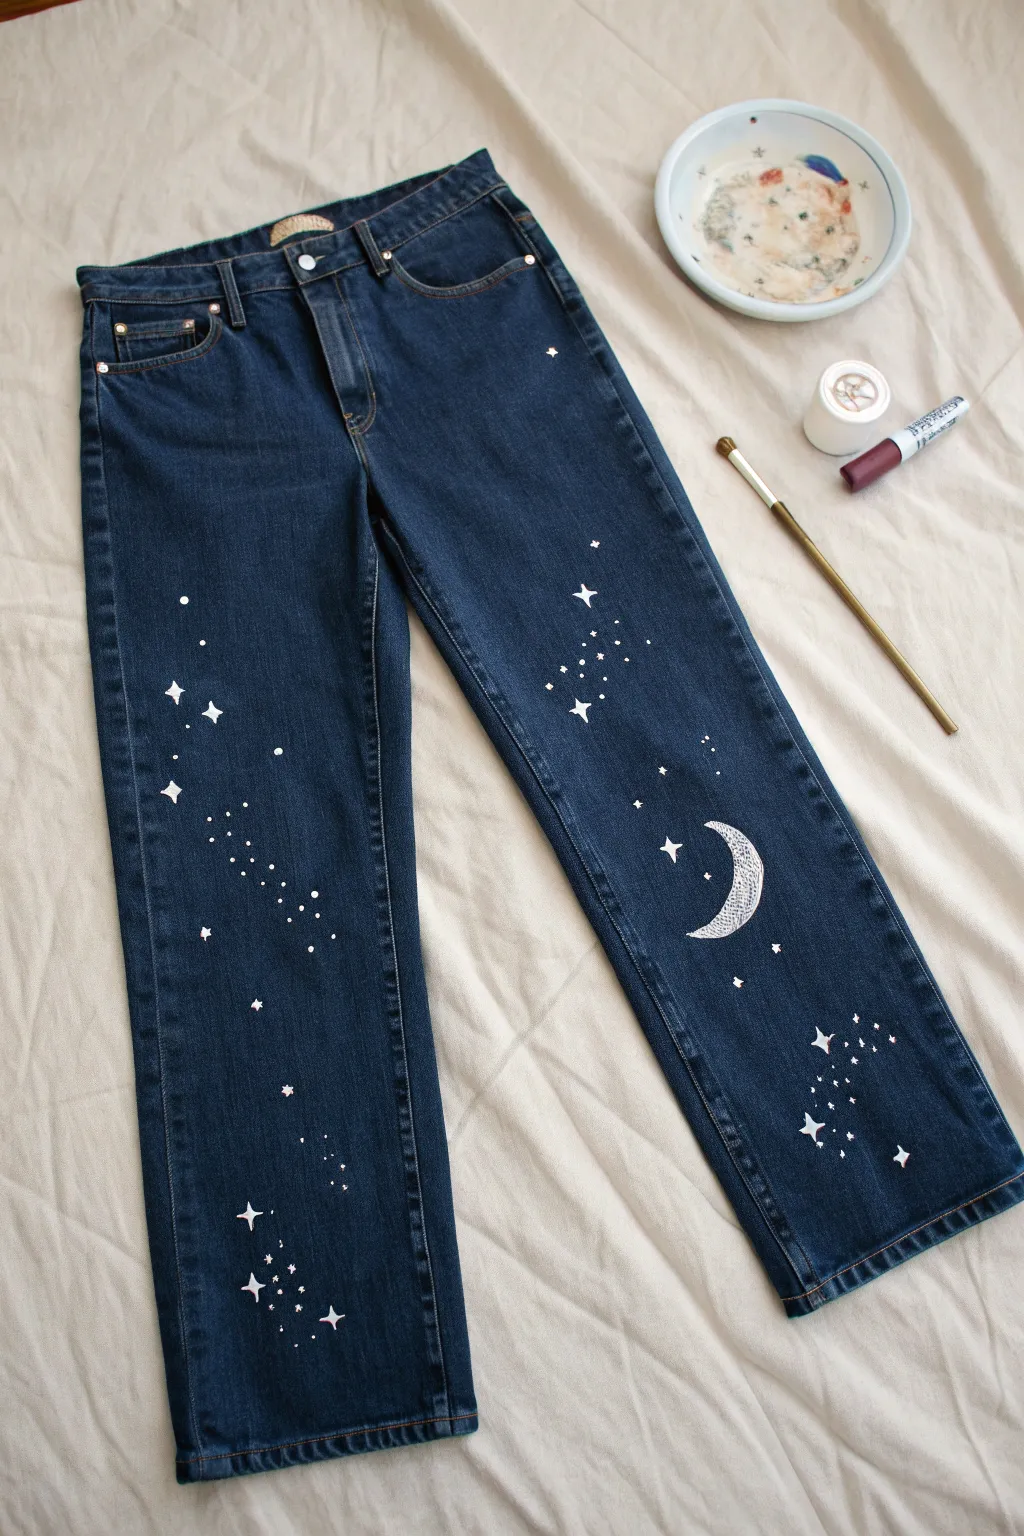
Transform a simple pair of dark denim into a dreamy, wearable night sky with this delicate painting project. Using fabric-safe paints and white markers, you’ll create scattered constellations, sparkling stars, and a serene crescent moon that stands out beautifully against the indigo background.
Detailed Instructions
Materials
- Dark wash straight-leg or mom jeans (pre-washed)
- White fabric paint (soft body)
- Fine-point round paintbrush (size 0 or 1)
- White fabric marker or paint pen (fine tip)
- Cardboard or parchment paper (to insert inside legs)
- Small mixing palette or dish
- Iron (for heat setting)
- Pressing cloth or thin towel
Step 1: Preparation & Setup
-
Pre-wash the Denim:
Before you begin, ensure your jeans have been washed without fabric softener. This removes any sizing chemicals from the manufacturing process and helps the fabric paint adhire properly to the fibers. -
Insert Inner Protection:
Flatten the jeans out on your work surface. Slide a piece of thick cardboard or several layers of parchment paper inside each pant leg. This is crucial to prevent paint from bleeding through to the back of the denim. -
Prepare Your Palette:
Squeeze a small amount of white fabric paint onto your palette. If the paint feels too thick or paste-like, I like to mix in a tiny drop of water to improve the flow, but don’t make it too runny or it will bleed.
Step 2: Painting the Major Elements
-
Draft the Moon:
Locate a spot on the lower thigh or knee area of the right leg. Using your white fabric marker or a very dry brush, lightly sketch the outline of a crescent moon. Keep the lines faint so you can correct the shape if needed. -
Fill the Moon Shape:
Dip your fine-point brush into the white fabric paint. Carefully fill in the crescent moon shape. For a textured, crater-like look similar to the photo, use a stippling motion (tiny dots) rather than smooth strokes. -
Add Large Stars:
Identify 3-4 key focal points on each leg for your largest stars. Use the brush to paint four-pointed stars: paint a vertical line first, then a horizontal line crossing through the center, tapering the ends to sharp points. -
Create Medium Stars:
In the spaces between the large stars, paint smaller, diamond-shaped stars. These are just small four-pointed shapes without the elongated tails of the larger ones.
Fixing Mistakes
If you drip paint or make a shape you dislike, wipe it immediately with a damp cotton swab. If it stains, turn that mistake into a larger star or a cluster of galaxy dots to hide it.
Step 3: Creating the Constellation Effect
-
Cluster the Tiny Dots:
This is where the magic happens. Dip the very tip of your brush or use the fabric marker to create clusters of tiny dots. Group these tightly together in meandering ‘Milky Way’ streams that flow vertically down the leg. -
Vary Dot Sizes:
To make the galaxy look realistic, ensure your dots aren’t all uniform. Press harder for some and barely touch the fabric for others to create depth. -
Connect the Constellations:
Look for groups of medium stars you’ve already painted. If you wish, use the finest tip of your marker or brush to draw very thin lines connecting them, mimicking real constellations. -
Balance the Design:
Step back and look at the jeans as a whole. Ensure you have a nice balance of empty negative space and star clusters. The design should feel organic and scattered, not like a grid. -
Add Micro-Details:
Go back in with your finest tool—likely the paint pen—and add the tiniest specks of ‘distant stars’ around the edges of your main star clusters to soften the transition into the dark denim.
Level Up: Sparkle
Mix a tiny amount of silver fabric glitter into your white paint for the moon, or adhere small flat-back rhinestones to the centers of the largest stars for a 3D effect.
Step 4: Finishing Touches
-
Second Coat (Optional):
Once the first layer is dry to the touch (usually 15-20 minutes), check the opacity of your moon and large stars. If the dark denim is showing through too much, apply a second thin layer of white paint. -
Let it Cure:
Allow the painted jeans to dry completely flat. Most fabric paints require 24 hours of air-drying before they are ready for heat setting. -
Heat Set the Design:
Turn the jeans inside out. Place a pressing cloth over the painted areas (on the inside) and iron on a cotton setting (no steam) for 3-5 minutes per section. This locks the pigment into the fibers.
Wear your new celestial denim with pride and enjoy the starry night wherever you go

PENCIL GUIDE
Understanding Pencil Grades from H to B
From first sketch to finished drawing — learn pencil grades, line control, and shading techniques.
Explore the Full Guide
Abstract Color-Block Jacket Panels
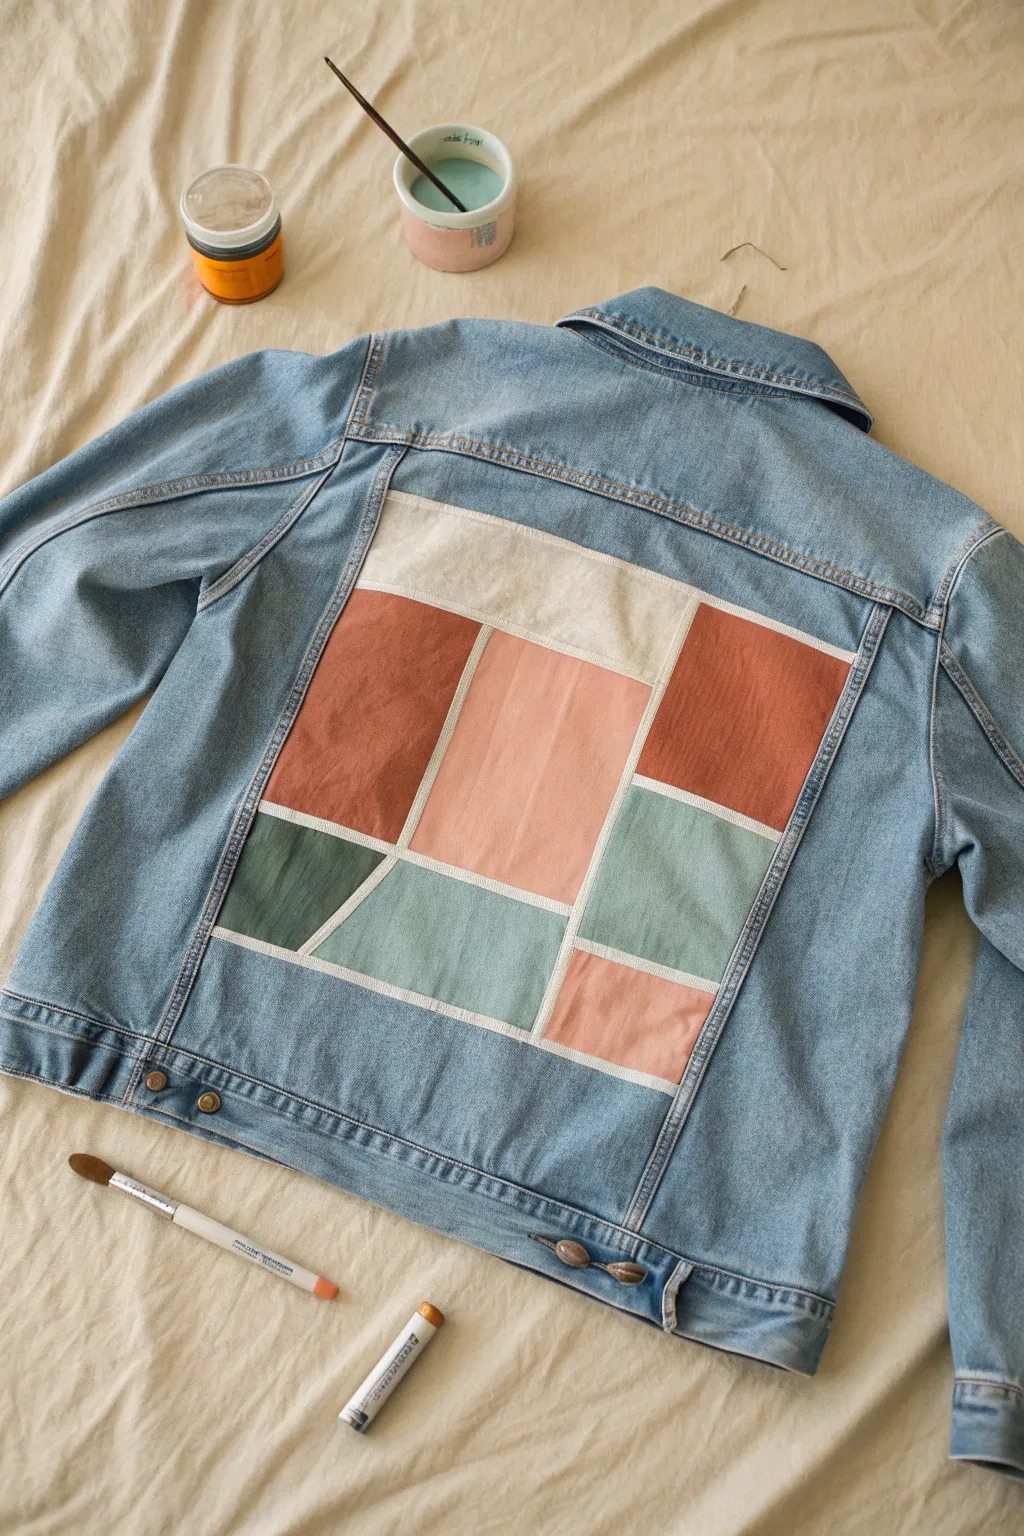
Transform a plain denim jacket into a piece of wearable modern art with this color-blocking technique. The muted, earthy palette creates a sophisticated grid design that looks professionally printed rather than hand-painted.
Step-by-Step Tutorial
Materials
- Light wash denim jacket
- Fabric medium or textile medium
- Acrylic paints (rust, sage green, pale peach, cream, muted teal)
- White fabric paint (for priming)
- Painter’s tape or masking tape (various widths)
- Flat shader brushes (medium and large)
- Small angled brush
- Palette or paper plate
- Iron and ironing board
- Cardboard insert
Step 1: Preparation & Priming
-
Prepare the surface:
Wash and dry your denim jacket without using fabric softener to remove any sizing chemicals. Iron the back panel completely flat to ensure your geometric lines stay straight. -
Insert protection:
Slide a piece of sturdy cardboard inside the jacket, positioning it directly behind the back panel. This creates a hard surface for painting and prevents paint from bleeding through to the front of the jacket. -
Tape the main border:
Apply painter’s tape along the seams of the jacket’s central back panel. Press the edges down firmly with your fingernail or a credit card to create a tight seal against the denim texture. -
Prime the panel:
Paint the entire rectangular panel inside your tape lines with a coat of white fabric paint. This white base layer is crucial—it neutralizes the blue denim so your final colors appear vibrant and true to tone. -
Let it cure:
Allow this white base layer to dry completely. It should be dry to the touch before you attempt to add any more tape.
Clean Lines Secret
Always peel your tape while the paint is still slightly damp! If you wait until the paint is bone dry, it can form a skin that lifts off with the tape, ruining your crisp edges.
Step 2: Designing the Grid
-
Map the white lines:
Using narrow painter’s tape (or standard tape cut into thin strips), create your grid design directly over the white primer. The tape strips will represent the white lines in the final design. -
Create main sections:
Start by placing a large rectangular section slightly off-center using your tape. I like to visualize the Rule of Thirds here to keep the composition balanced but dynamic. -
Subdivide the space:
Add intersecting tape lines to break the remaining space into smaller squares and rectangles. Ensure you have a mix of large and small shapes for visual interest. -
Seal the tape:
Paint a very thin layer of white paint over the edges of your new tape lines. This brilliant trick seals the tape edge; if any paint bleeds under, it will be white and invisible, keeping your final color lines razor-sharp.
Stiff Paint Fix
If your painted area feels too stiff like cardboard after drying, you likely didn’t use enough fabric medium. Lightly sand the area with fine-grit sandpaper to soften it before heat setting.
Step 3: Adding Color
-
Mix your medium:
Mix your acrylic paints with fabric medium according to the bottle instructions (usually 1:1 or 2 parts paint to 1 part medium). This ensures the paint stays flexible and doesn’t crack on the fabric. -
Paint the large blocks:
Start with the rust/terracotta color. Apply it to two non-adjacent sections using a flat shader brush. Use smooth, vertical strokes for even coverage. -
Apply the peach tones:
Fill the central, largest vertical rectangle with the pale peach/salmon color. This lighter color acts as a focal point for the design. -
Add cool tones:
Paint the remaining lower sections with your sage green and muted teal mixtures. Be careful near the tape edges not to push paint underneath—brush away from the tape edge when possible. -
Fill the neutrals:
Paint the top horizontal block with the cream or off-white mixture. You may need two coats for this lighter color to look opaque. -
Second coats:
Let the first layer dry for about 20-30 minutes, then apply a second coat to any colors that look streaky or uneven.
Step 4: Finishing Touches
-
The reveal:
Once the paint is tacky but not fully hardened (about an hour later), carefully peel away the tape. Pull the tape slowly at a 45-degree angle to reveal the crisp white lines underneath. -
Touch-ups:
Use a tiny angled brush and a bit of white paint to clean up any spots where the color might have bled slightly across the lines. -
Heat set:
Allow the jacket to dry for at least 24 hours. Then, place a clean cloth over the design and iron on a medium heat setting (no steam) for 3-5 minutes to permanently set the design.
Enjoy styling your new custom jacket with its unique, gallery-worthy back panel
Loose Brushstroke Ombre on a Hoodie
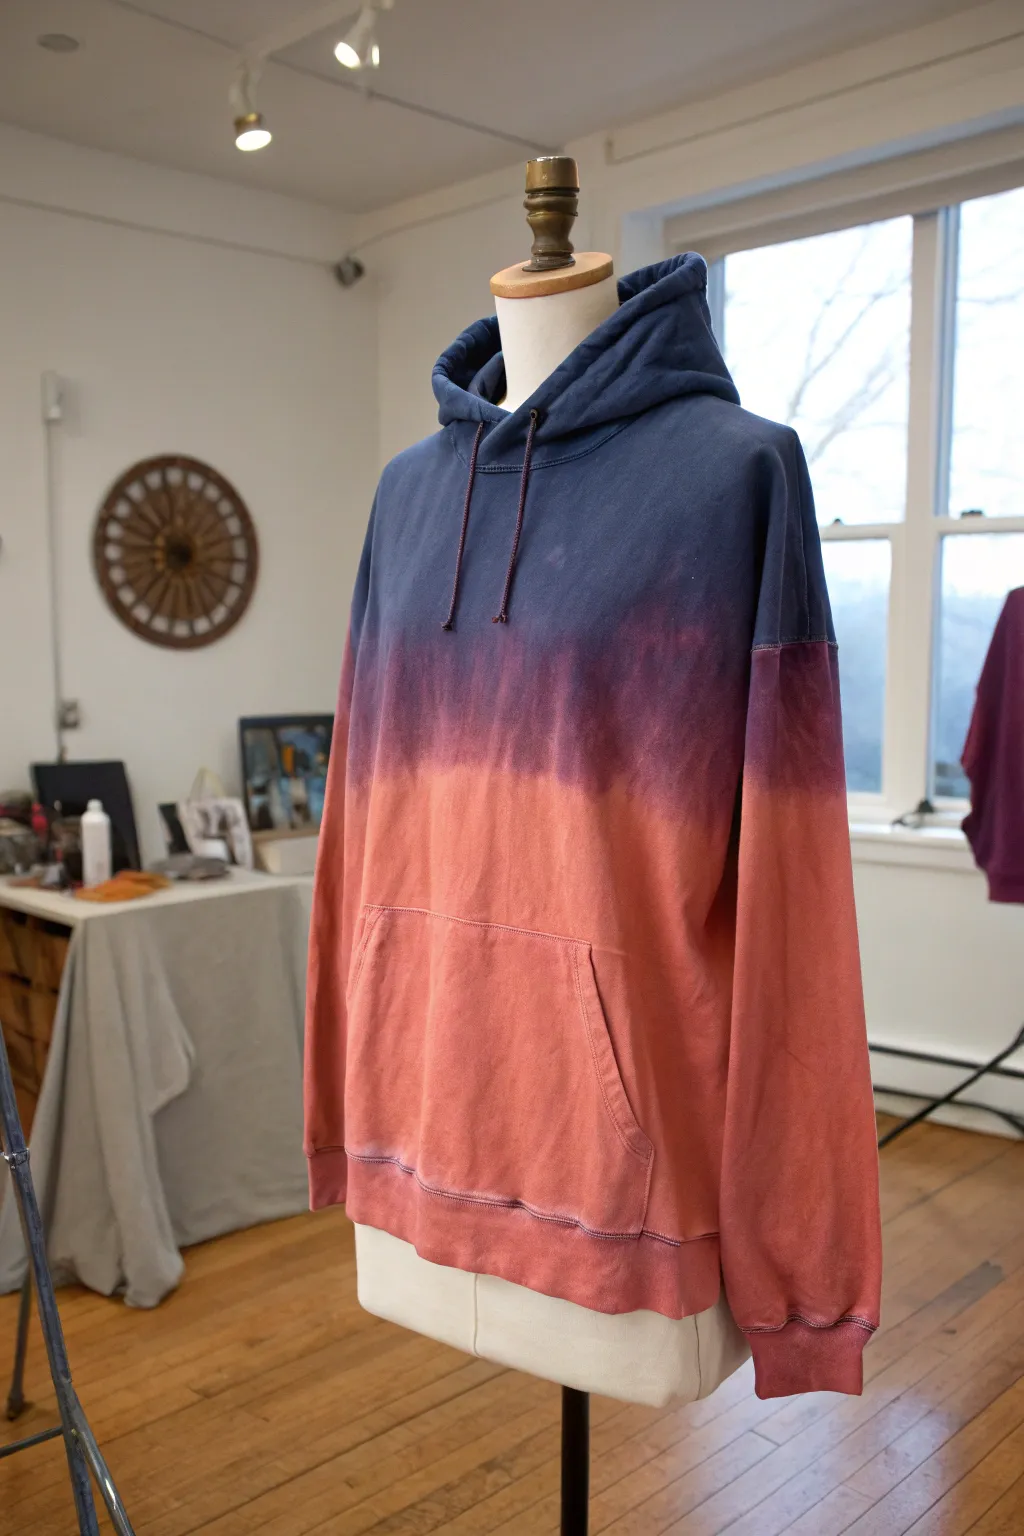
Transform a basic white or light-colored hoodie into a piece of wearable art with this stunning, hand-painted ombre effect. The gradient shifts seamlessly from deep navy to rich plum and finally into a soft terracotta, mimicking a twilight sky.
Step-by-Step
Materials
- White or light grey cotton hoodie (mostly cotton blend preferred)
- Fabric medium
- Acrylic fabric craft paints (Navy Blue, Deep Plum, Terracotta/Coral)
- Various flat paintbrushes (1-inch and 2-inch)
- Large piece of cardboard (to fit inside the hoodie)
- Spray bottle with water
- Paper towels or rag
- Plastic drop cloth or newspaper
Step 1: Preparation
-
Pre-wash the hoodie:
Before painting, wash and dry your hoodie without using fabric softener. This removes sizing and chemicals that might prevent the paint from adhering properly. -
Insert the barrier:
Slide a large piece of cardboard inside the body of the hoodie. This is crucial to stop the paint from bleeding through to the back side while you work. -
Protect your sleeves:
If you have extra cardboard, slide smaller strips into the sleeves, or simply ensure they are lying flat and separated from the main body fabric. -
Mix your paints:
Mix each of your three acrylic colors (Navy, Plum, Terracotta) with fabric medium in separate containers. Follow the ratio on your fabric medium bottle, usually 1:1 or 2:1 paint to medium.
Wet Brush Hack
Keep a separate cup of water just for wetting your brush between colors. A slightly damp brush drags the paint smoother than a dry one.
Step 2: Painting the Gradient
-
Wet the fabric slightly:
Use your spray bottle to lightly mist the entire front styling area with water. Damp fabric helps the colors blend more naturally than dry fabric. -
Apply the top layer:
Starting at the hood and shoulders, apply the Navy Blue mixture using a 2-inch brush. Paint downwards until you reach the chest area, just above the armpits. -
Feather the edge:
As you reach the bottom of the blue section, use lighter, feathery strokes. Don’t create a hard line; you want an irregular edge for blending. -
Apply the bottom layer:
Skip the middle for a moment. Paint the bottom third of the hoodie, including the pouch pocket, with the Terracotta color. Work your way up toward the middle. -
Blend the pocket carefully:
Ensure you paint inside potential folds of the pocket so white gaps don’t show when the fabric moves. -
Apply the middle color:
Fill the remaining middle section with the Deep Plum color. Paint right up to the wet edges of the blue and terracotta sections. -
Create the upper transition:
With a clean, damp brush, work the boundary between the Navy and Plum. Use horizontal strokes to gently drag the blue down into the plum and the plum up into the blue. -
Create the lower transition:
Repeat the blending process between the Plum and Terracotta sections. I find that spritzing a tiny bit more water here helps the orange and purple merge into a sunset gradient. -
Paint the sleeves:
Recreate the gradient on the sleeves, matching the height of the colors on the body (Blue at shoulder, Plum at elbow, Terracotta at cuff). -
Check for gaps:
Look closely at seams, the hood rim, and cuffs. Dab extra paint into these thick areas to ensure full coverage.
Starry Night Effect
Once the gradient is dry, flick a toothbrush loaded with white paint over the navy section to create a subtle galaxy star effect.
Step 3: Finishing Up
-
Allow to dry completely:
Let the hoodie dry flat for at least 24 hours. The paint needs to fully cure before the next step. -
Heat set the paint:
Once dry, turn the hoodie inside out (or place a scrap cloth over the paint) and iron on a medium-high setting without steam for 3-5 minutes per section to lock in the color. -
Final Wash:
Wait 72 hours before washing the hoodie on a gentle, cold cycle to soften the painted fabric feel.
Wear your twilight masterpiece proudly and enjoy the cozy warmth of your custom design


Sleeve Garden: Vines and Wildflowers
Transform the back panel of a simple denim jacket into an elegant garden scene using embroidery. This project features climbing dark green vines, soft peach and pink blooms, and delicate curling tendrils that create a flowy, organic aesthetic perfect for upcycling denim.
How-To Guide
Materials
- Light wash denim jacket
- Embroidery hoop (8-10 inch)
- Embroidery needles (sizes 5-9)
- Embroidery floss in Dark Forest Green
- Embroidery floss in Sage Green
- Embroidery floss in Peach/Coral
- Embroidery floss in Rust/Terracotta
- Embroidery floss in Off-White/Cream
- Water-soluble fabric marker or transfer paper
- Scissors
Step 1: Planning and Sketching
-
Prepare the canvas:
Lay your denim jacket flat on a hard surface, smoothing out the back panel between the vertical seams. This central rectangle will be your frame. -
Map out the main vines:
Using your water-soluble marker, draw a large, S-curved vine starting from the bottom right and reaching towards the top left. Add a secondary, opposing curve starting near the bottom left. -
Add floral placements:
Sketch circles along your vine lines where you want the main rose-style flowers to sit. The original design uses about 4-5 main blooms spaced irregularly. -
Detail the tendrils:
Draw spirals and curly-cues branching off the main stems. These loopy tendrils give the design its whimsical, fairy-tale vibe. -
Mark leaf positions:
Add small dashes or leaf shapes along the stems. Include some elongated leaves near the top right and some rounded, smaller leaves near the bottom.
Needle Knowledge
Denim is tough! Use a sharp embroidery needle (size 5-7) rather than a blunt tapestry needle to pierce the thick fabric easily without hurting your fingers.
Step 2: Stitching the Greenery
-
Hoop the fabric:
Place your embroidery hoop on the lower section of the design to start. Ensure the denim is taut but not stretched so tight that it warps the jacket’s heavy fabric. -
Outline the stems:
Thread your needle with 3-4 strands of Dark Forest Green floss. Use a stem stitch or a whipped backstitch to create smooth, flowing lines over your main vine drawings. -
Stitch the spirals:
For the delicate curling tendrils, switch to fewer strands (2 strands) of the same dark green. Use a small backstitch to navigate these tight curves smoothly. -
Fill the leaves:
Using Sage Green floss, fill in the leaf shapes. A satin stitch works beautifully here for a smooth finish, or use a fishbone stitch for a more textured, realistic leaf look. -
Add accent leaves:
For the rust-colored leaves seen in the design, switch to your Rust/Terracotta floss. Use a satin stitch to create these slender, pointed leaves that contrast with the green.
Level Up: 3D Texture
Add small beads or sequins into the center of the flowers for a subtle sparkle, or use a bullion knot for the flower buds to make them pop off the fabric.
Step 3: Blooming the Flowers
-
Base the roses:
Start the main flowers using the Peach/Coral floss. You can create a woven wheel rose by stitching five spokes and weaving the thread over and under them. -
Layer the petals:
If you prefer a more illustrative look like the photo, use long-and-short stitches to fill the outer petals, curving your stitches toward the center of the bloom. -
Detail the centers:
Add depth to the flowers by stitching small French knots in the center using a slightly darker pink or the Rust floss. -
Add white highlights:
Thread your needle with a single strand of Off-White floss. Add tiny straight stitches on the tips of the petals to simulate light hitting the flowers. -
Stitch the buds:
Create smaller buds near the top of the vines using a satin stitch in peach, cupped by two small green stitches at the base.
Step 4: Finishing Touches
-
Inspect the work:
Move your hoop as needed to complete the entire design. Check for any gaps in your vine lines or loose threads on the back. -
Rinse the markings:
Once all stitching is complete, dampen the area with cool water or dab with a wet cloth to dissolve the blue marker lines. -
Secure the back:
Since jackets get worn, ensure all knots on the inside are very secure. I like to add a tiny dab of fabric glue to the knots on the reverse side for extra durability. -
Final press:
Let the jacket dry completely. Then, iron the back of the embroidery (inside the jacket) on a warm setting to flatten the stitches and set everything in place.
Now you have a stunning, one-of-a-kind statement piece ready to wear for the season
Doodle Patchwork on a Plain Tee
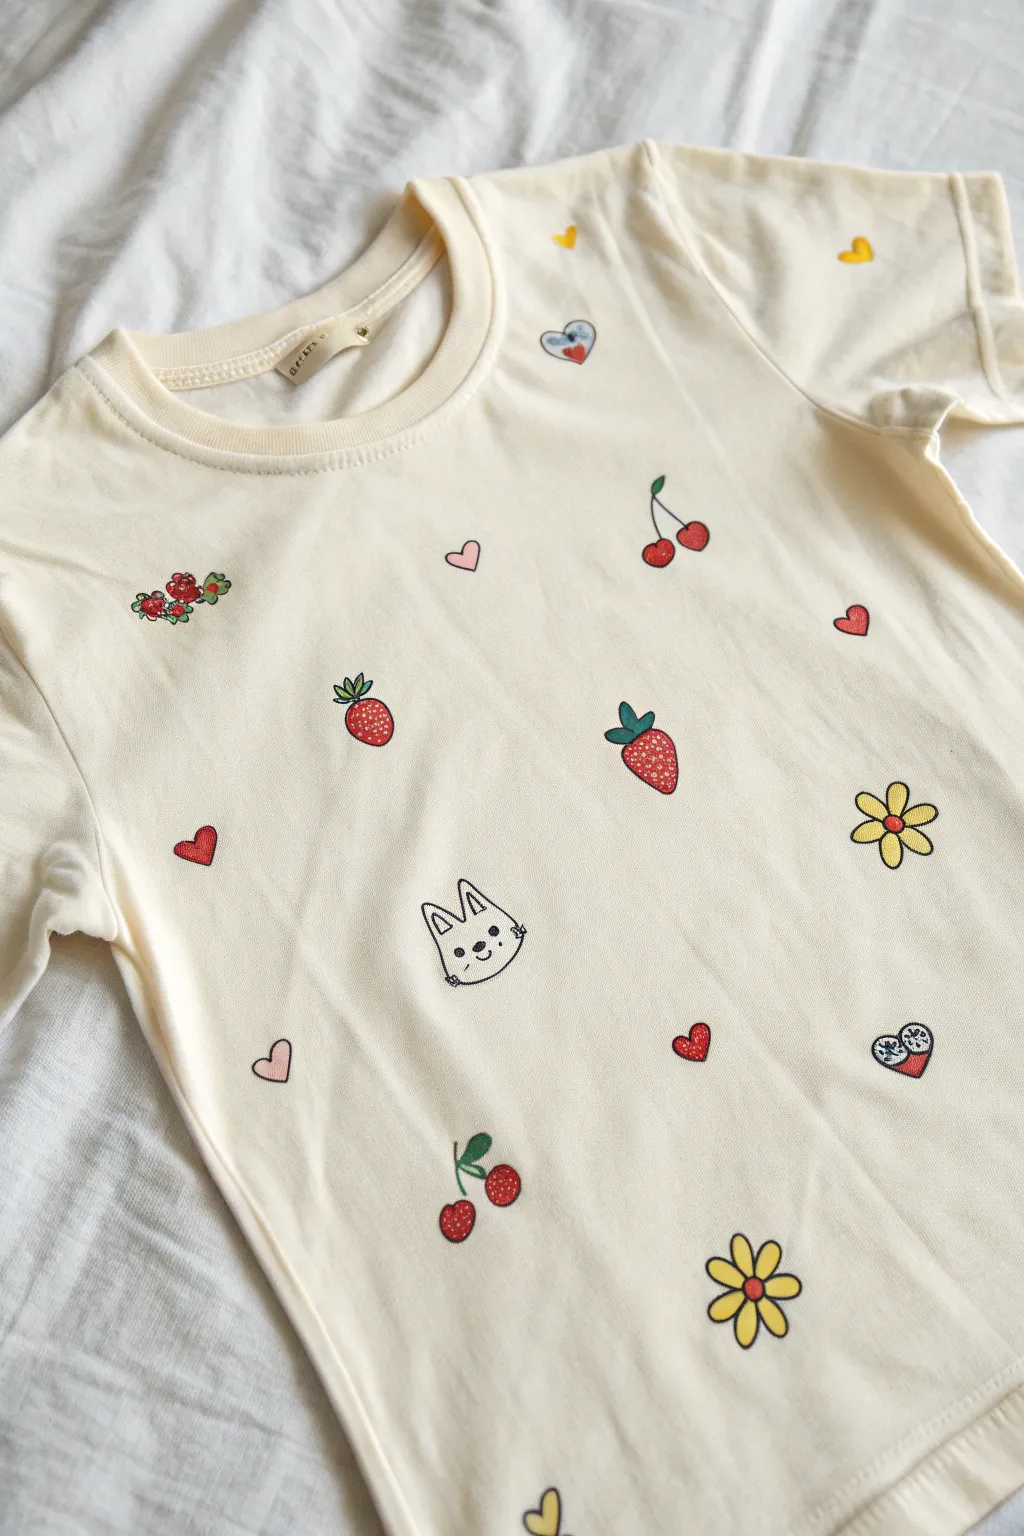
Transform a basic cream t-shirt into a charming piece of wearable art with this scattered doodle design. Featuring sweet motifs like strawberries, cherries, hearts, and a cute bunny, this project uses fabric markers or paints to create a trendy, hand-drawn look.
Detailed Instructions
Materials
- Cream or off-white cotton t-shirt
- Fabric markers (fine tip and brush tip)
- Fabric paint (optional, for opaque coverage)
- Iron
- Cardboard insert
- Pencil or disappearing ink fabric pen
Step 1: Preparation & Planning
-
Wash and dry:
Begin by washing and drying your t-shirt without fabric softener to remove any sizing chemicals that might prevent the ink from adhering properly. -
Prepare your surface:
Slide a piece of cardboard inside the shirt to stretch the fabric slightly smooth and prevent ink from bleeding through to the back layer. -
Plan the layout:
Using a pencil or disappearing ink pen, lightly sketch out the placement of your icons. Aim for a random, scattered ‘confetti’ pattern rather than a grid, leaving ample negative space between each doodle.
Step 2: Drawing the Fruit Motifs
-
Sketch strawberries:
Draw small strawberry shapes scattered across the shirt. Focus on the classic inverted triangle shape with rounded corners. -
Color the berries:
Fill in the body of the strawberries with a bright red fabric marker. For visual interest, vary the sizes slightly. -
Add strawberry details:
Once the red ink is dry to the touch, use a black fine liner to add tiny dots for seeds and outline the berry. Draw green leafy tops with three or four distinct points. -
Draw cherries:
Create pairs of small circles for cherries. Color them deep red or pinkish-red. -
Connect the cherries:
Draw thin, curved green stems connecting the cherry pairs. Add leaves to some stems for variety.
Placement Pro Tip
To ensure your design is flattering, put the shirt on and mark key areas (like the center chest) with tape before you lay it flat to draw.
Step 3: Adding Charming Characters & Florals
-
Create the bunny:
Near the center or lower third, draw a simple bunny head outline in black. Keep it minimal with pointy ears, wide-set dot eyes, and a small ‘x’ or curved line for the mouth. -
Draw daisies:
Sketch five-petal flower shapes. Color the petals a sunny yellow and the center a contrasting red or orange. -
Outline the flowers:
Use your black fine-tip marker to outline each petal and the center circle to give it that crisp, sticker-like appearance. -
Add the cluster motif:
Draw a small cluster of tiny red berries or flowers with green leaves near the shoulder area to balance the composition.
Level Up: Embroidered Accents
After heat-setting, add texture by embroidering over just the outlines of the bunny or the stems of the cherries using a simple backstitch for a mixed-media 3D effect.
Step 4: Fillers & Finishing Touches
-
Scatter hearts:
Fill in empty gaps with small hearts. Mix up the styles: make some solid red, some pale pink outlines, and perhaps a blue-grey one with a tiny detail inside. -
Review the balance:
Step back and look at the shirt from a distance. If there are large empty spots, add a tiny yellow heart or a small cherry doodle. -
Let it dry:
Allow the ink to dry completely, usually for at least 24 hours. Check your fabric marker instructions for specific drying times. -
Heat set:
Turn the t-shirt inside out and iron the reverse side of the design on a cotton setting (no steam) for several minutes to permanently set the ink.
Now you have a custom, boutique-style tee ready for summer outings
Monochrome Tattoo-Flash Jacket Art
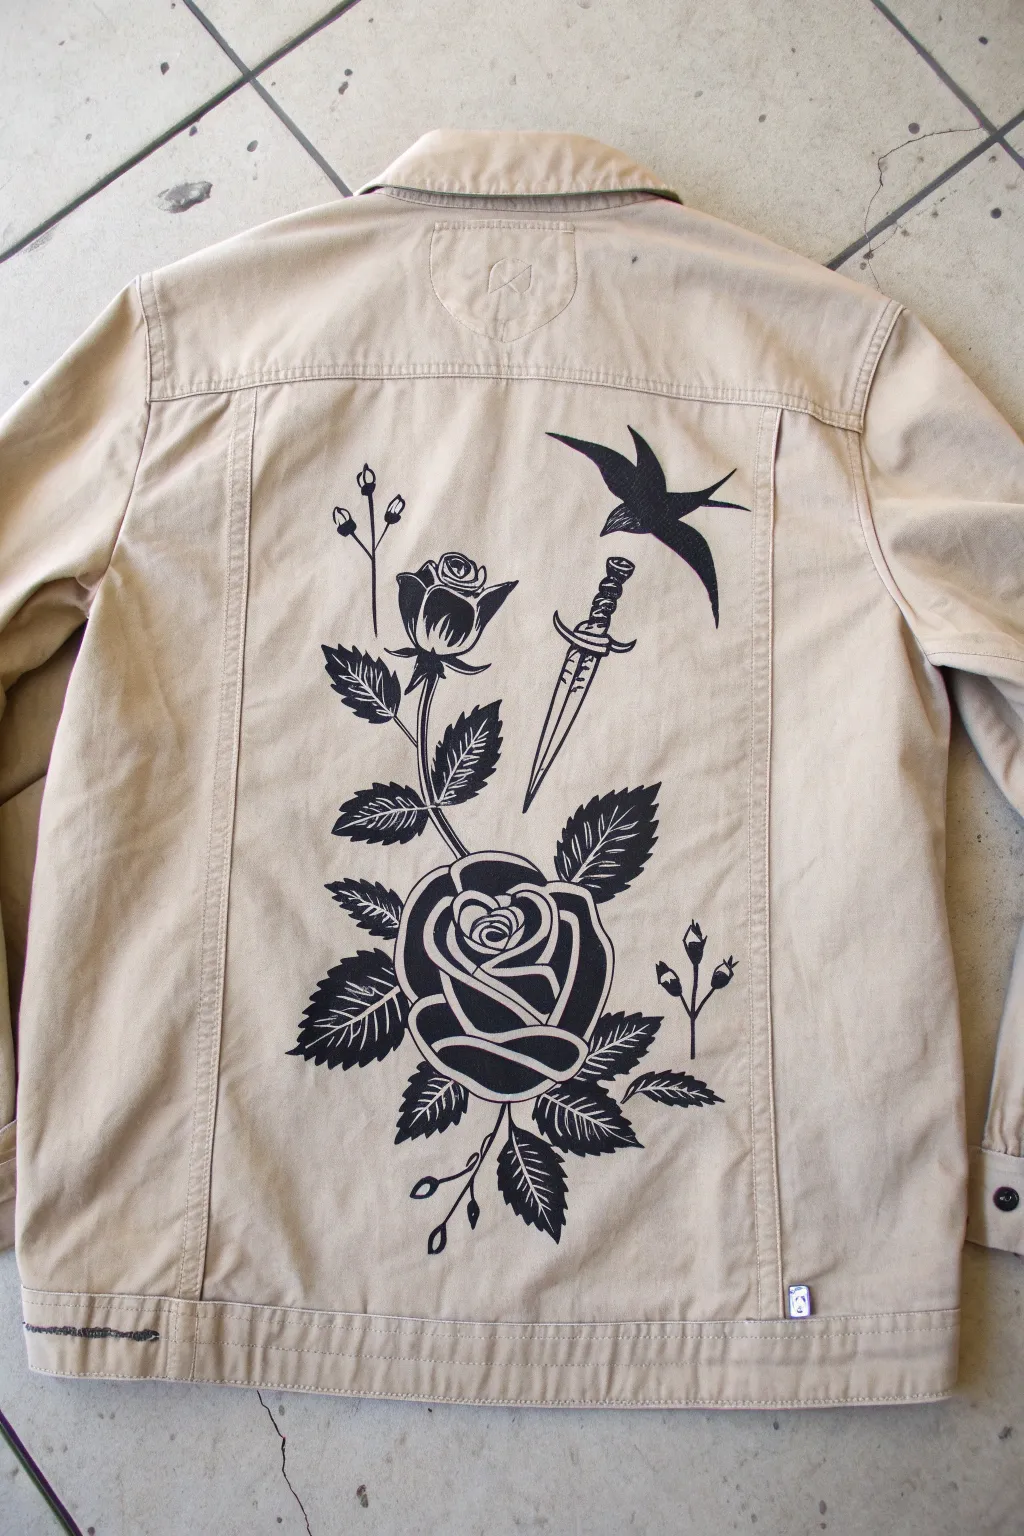
Transform a plain canvas jacket into a piece of wearable art with this bold, monochrome design inspired by traditional tattoo flash. Using high-contrast black fabric paint, you will recreate the timeless imagery of roses, a dagger, and a swallow for a rugged, vintage aesthetic.
Step-by-Step Tutorial
Materials
- Light tan or beige denim jacket (washed and dried)
- Black fabric paint (highly opaque)
- Fabric medium (optional, if using acrylics)
- Fine liner brush (size 0 or 00)
- Small round brush (size 2 or 4)
- Flat shader brush (size 6)
- Water-soluble fabric marker or chalk pen
- Cardboard insert for jacket
- Iron and ironing cloth (paper or thin fabric)
- Printed reference image or stencil paper
- Masking tape
Step 1: Preparation and Sketching
-
Prepare the surface:
Begin by washing your jacket without fabric softener to remove any sizing chemicals, which ensures the paint adheres properly. Once dry, slide a piece of sturdy cardboard inside the jacket, positioning it directly behind the back panel to prevent paint bleeding through to the front. -
Plan the composition:
Roughly map out where the main elements will go on the back panel. The large rose creates the anchor at the bottom center, while the dagger and smaller rose stem angle upwards to the left. The swallow should fly in from the top right corner. -
Sketch the main outlines:
Using your fabric marker, lightly draw the outline of the large bottom rose first. Focus on the spiral shape of the petals. Don’t worry about the shading details yet; just get the exterior shape of the flower and the main leaves surrounding it. -
Add the vertical elements:
Extend a stem upwards from the main rose and sketch the smaller rose bud at the top. Next, draw the dagger floating diagonally to the right of the stem. Ensure the dagger’s handle has those distinct curved guards and a wrapped grip texture. -
Draw the swallow and details:
Sketch the silhouette of the swallow in the upper right. Finish the drawing phase by adding the smaller details: the scattered rose buds on thin stems and the jagged edges of the rose leaves.
Uneven Fabric Texture?
Denim ridges can make straight lines bumpy. Paint in the direction of the fabric weave (diagonal) for smoother lines, and do a second pass on key outlines to fill gaps.
Step 2: Painting the Outlines
-
Load your liner brush:
Dip your fine liner brush into the black fabric paint. The consistency should be fluid but opaque; if it’s too thick, the lines will drag, so mix in a tiny drop of water if necessary. -
Trace the primary lines:
Starting from the top to avoid smudging, carefully trace over your sketch lines. Outline the swallow, the dagger, and the stems first. Use confident, smooth strokes rather than short, sketchy ones to mimic the clean look of a tattoo. -
Outline the florals:
Move down to the roses and leaves. Outline the petal shapes and the serrated edges of the leaves. Keep your hand steady, resting your wrist on a dry area of the jacket or a bridge stick if needed.
Pro Tip: Sharp Edges
For the sharpest “tattoo needle” points on your shading lines, lift the brush swiftly off the fabric at the end of the stroke, like a plane taking off, to taper the line perfectly.
Step 3: Filling and Shading
-
Fill the silhouette:
Switch to your flat shader brush or round brush. Completely fill in the body of the swallow with solid black paint. This high-contrast element acts as a visual counterweight to the complex rose below. -
Paint the leaves:
For the leaves, start by painting one half of the leaf solid black, leaving the central vein unpainted. Then, paint angled, sharp lines (hatching) on the other side of the leaf to suggest veins and texture. -
Detail the dagger:
Paint the handle of the dagger black, leaving tiny slivers of the tan jacket showing through to act as highlights on the grip. Outline the blade heavily but keep the center empty for now. -
Create rose depth:
This is the most crucial step for the ‘tattoo’ look. On the large rose petals, paint the areas where shadows would fall solid black. I find it helpful to squint at the reference image to see the main shapes of the shadows. -
Add petal definition:
Use your fine liner brush to add stylized shading lines inside the petals. These should be short, tapered strokes that follow the curve of the pteal, creating the illusion of a curled edge. -
Refine the centerpiece:
Focus on the very center of the rose. Ensure the lines are crisp and distinct so the petals don’t merge into a black blob. The tan fabric showing through acts as your ‘white’ ink. -
Finalize decorative buds:
Fill in the small sepals (the green parts) of the tiny buds with solid black, and draw the stems with a single, confident stroke of your liner brush.
Step 4: Finishing Touches
-
Check for consistency:
Step back and look at the jacket as a whole. Thicken any outer lines that look too thin compared to the rest of the design. The outer border lines of tattoo art effectively hold the design together. -
Clean up edges:
If you have any jagged paint edges or splashes, carefully fix them. Small mistakes can often be scratched off gently with a fingernail once semi-dry, or painted over with a mix of white and brown paint to match the denim (though prevention is better!). -
Allow to cure:
Let the jacket dry flat for at least 24 hours. Do not rush this, as thick fabric paint needs time to bond with the denim fibers. -
Heat set the design:
Once fully dry, place a thin cloth or parchment paper over the design. Iron on a high heat setting (no steam) for 3-5 minutes, moving the iron constantly. This locks the paint in so it won’t wash out.
Wear your new custom piece with pride, knowing you’ve mastered the art of fabric illustration.
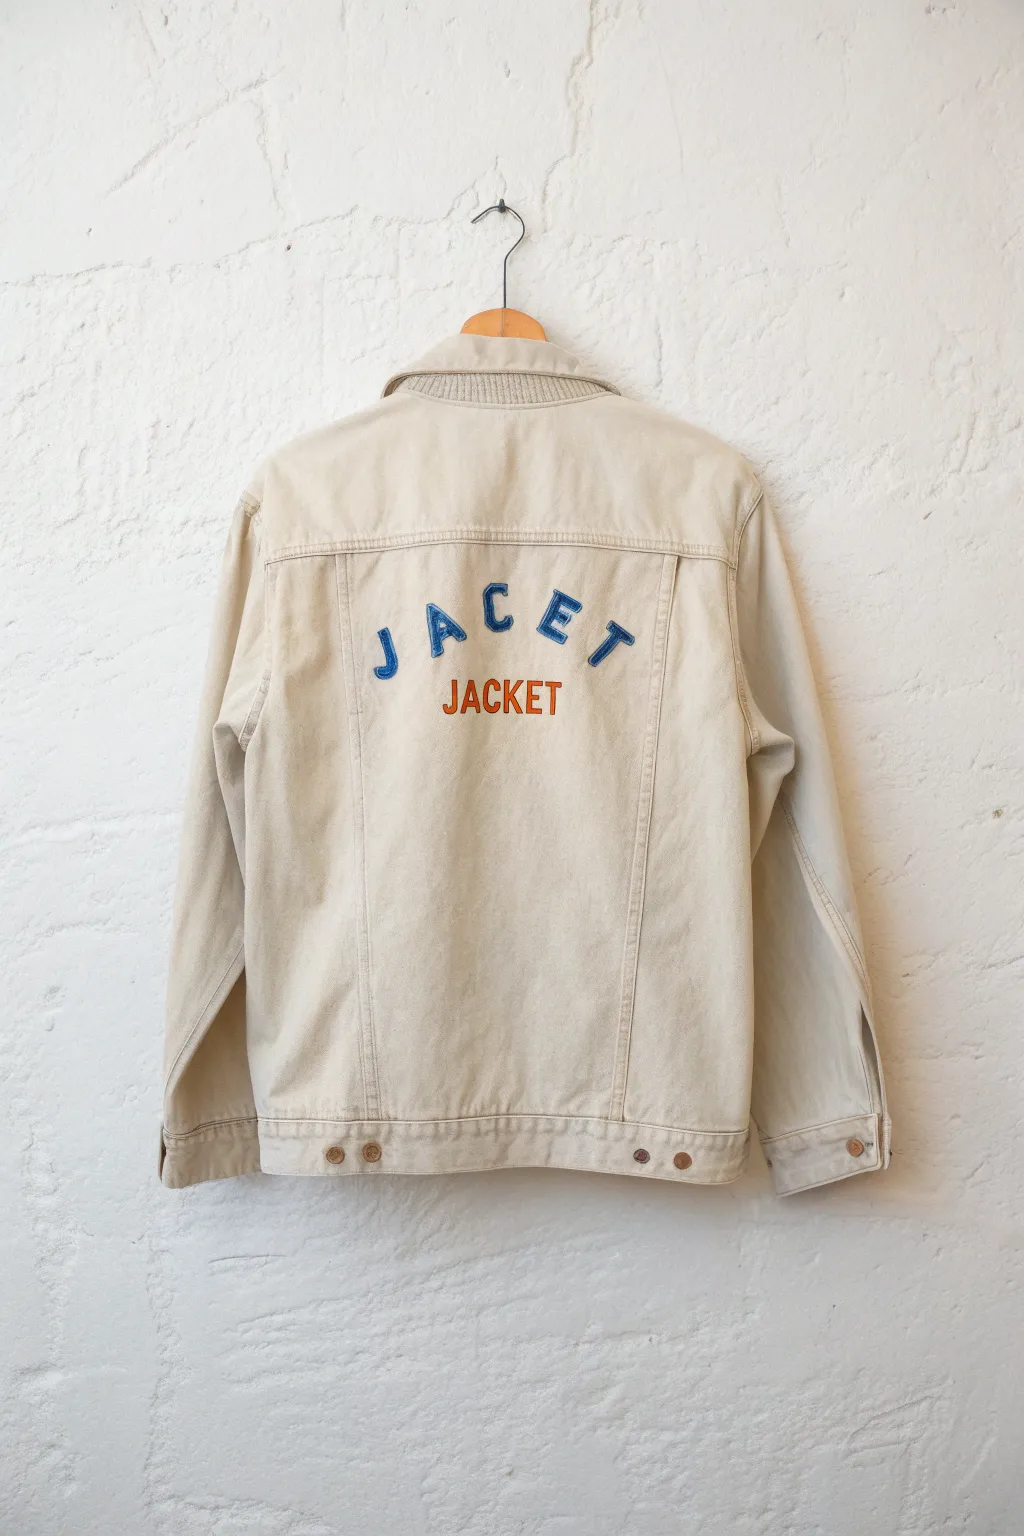
Painted Typography on the Back
Embrace a touch of irony with this typography-focused project that takes a classic denim silhouette and adds a playful, self-referential twist. This design features bold, collegiate-style lettering paired with sans-serif subtitles for a look that is both vintage-inspired and modern.
Step-by-Step Guide
Materials
- Light-wash or cream denim jacket
- Fabric medium
- Acrylic paint (Royal Blue, Burnt Orange, White)
- Adhesive stencil vinyl or freezer paper
- Craft knife and cutting mat
- Small flat shader paintbrush
- Fine liner paintbrush
- Iron and ironing board
- Cardboard insert
- Painter’s tape
- Computer and printer (for templates)
Step 1: Preparation & Design
-
Wash the jacket:
Before anything else, wash and dry your denim jacket without using fabric softener. This removes factory sizing or chemicals that might repel the paint. -
Create your template:
On your computer, draft the word ‘JACET’ in a bold, slightly rounded serif font. Arch the text slightly to follow the yoke of the jacket. Below it, draft ‘JACKET’ in a simpler, straight sans-serif font. -
Print and trace:
Print your design to ensure the sizing works on the back panel of your specific jacket. Once sizing is confirmed, trace the design onto your adhesive vinyl or freezer paper. -
Cut the stencil:
Using a sharp craft knife on a cutting mat, carefully cut out the letters. Keep the negative space (the surrounding paper) intact, as this will be your primary stencil. -
Prepare the fabric canvas:
Slide a piece of thick cardboard inside the jacket to prevent paint from bleeding through to the front. Smooth out the back panel completely.
Bleeding Edges?
If paint seeps under the stencil, don’t panic. Wait for it to dry completely, then use a stiff brush dipped in rubbing alcohol to gently scrub away the excess mistake before heat-setting.
Step 2: Painting the Base Layer
-
Mix your blue:
Prepare your main color by mixing acrylic paint with fabric medium according to the bottle’s ratio (usually 2:1 or 1:1). Create a rich Royal Blue tone. -
Adhere the stencil:
Position your ‘JACET’ stencil on the upper back panel. If using freezer paper, iron it down glossy-side down until adhered. If using vinyl, press it firmly to eliminate air bubbles. -
Apply the first coat:
Using a flat shader brush, dab the blue paint gently onto the fabric. Use an up-and-down motion rather than brushing side-to-side to prevent paint from seeping under the stencil edges. -
Build opacity:
Let the first layer dry to the touch (about 20 minutes) and apply a second coat for solid, opaque coverage. -
Remove stencil:
While the paint is slightly tacky but mostly dry, carefully peel away the stencil to reveal crisp edges.
Step 3: Adding Details & Subtitles
-
Hand-paint the outline:
I like to use a very fine liner brush here to give the letters dimension. Mix a slightly lighter blue (add a drop of white to your original mix) and carefully outline the left side of each blue letter to create a subtle highlight or shadow effect. -
Mix the orange:
Prepare your second color, a vibrant Burnt Orange, mixing it with the fabric medium. -
Stencil the subtitle:
Apply the stencil for the smaller ‘JACKET’ text located beneath the blue arch. Ensure it is centered. -
Paint the orange text:
Fill in the ‘JACKET’ letters with your orange mix. Since these letters are smaller, use a smaller brush and be patient with the corners. -
Refine edges:
Once the stencils are removed and paint is dry, inspect your edges. Use a tiny brush with the appropriate color to fix any fuzzy lines.
Pro Tip: Seal It
Seal your blue letters with a thin layer of clear fabric medium first. This creates a barrier that prevents the colored paint from bleeding into the denim grain later.
Step 4: Finishing Touches
-
Let it cure:
Allow the jacket to dry flat for at least 24 hours. Do not rush this step. -
Heat set the design:
Turn the jacket inside out or place a pressing cloth over the painted area. Iron on a medium-high setting (no steam) for 3-5 minutes to permanently set the paint into the fibers.
Wear your new customized jacket with pride, knowing you’ve turned a basic staple into a conversation piece
Landscape Panel on a Denim Jacket
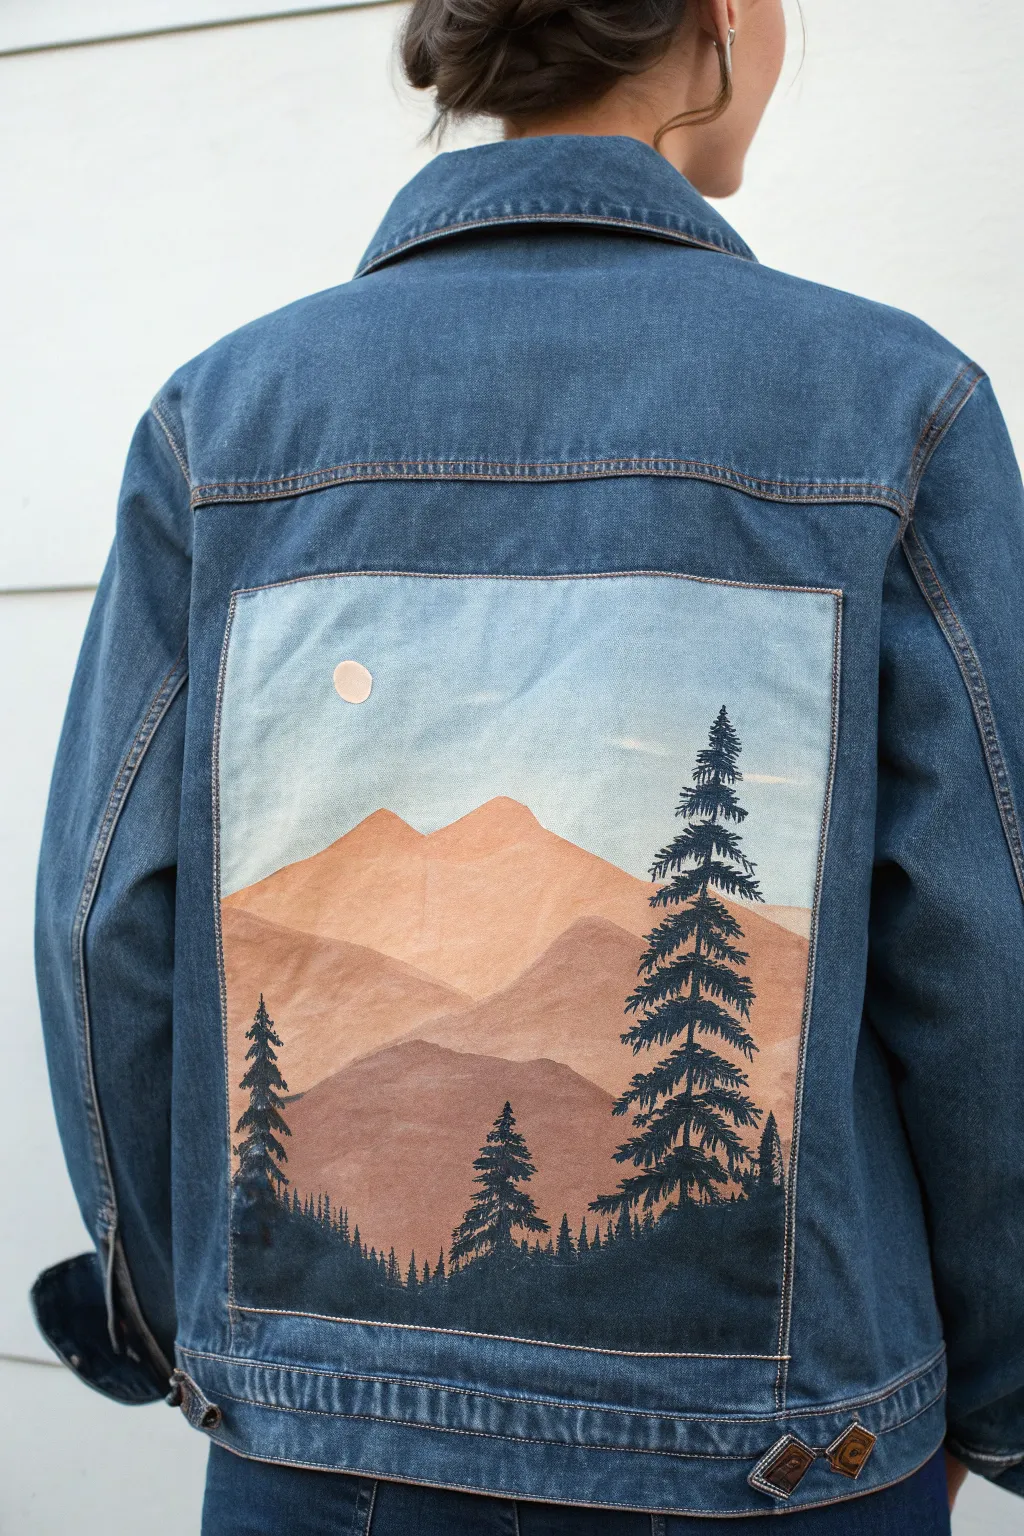
Transform a classic denim jacket into a wearable canvas with this serene mountain landscape. The design features a layered range of warm, terracotta-hued mountains against a crisp blue sky, framed perfectly by dark, evergreen silhouettes.
Step-by-Step Tutorial
Materials
- Denim jacket (clean and pre-washed)
- White fabric paint or gesso (for priming)
- Fabric medium
- Acrylic paints (Titanium White, Light Blue, Burnt Sienna, Yellow Ochre, Raw Umber, Black, Dark Green)
- Masking tape or painter’s tape
- Flat shader brushes (medium and large)
- Fine liner brush or rigger brush
- Palette or mixing plate
- Cardboard insert
- Hairdryer (optional, to speed up drying)
- Iron (for heat setting)
Step 1: Preparation & Priming
-
Prepare the workspace:
Slip a piece of thick cardboard inside the jacket, positioning it directly behind the back panel where you plan to paint. This prevents paint from bleeding through to the front of the jacket and gives you a firm surface to work on. -
Tape off the boundaries:
Use masking tape to create a crisp, rectangular border for your artwork. Press the edges of the tape down firmly to ensure no paint seeps underneath, creating clean lines akin to a framed photo. -
Mix the primer:
Mix white acrylic paint with a generous amount of fabric medium (usually a 1:1 ratio, but check your bottle’s instructions). Alternatively, use a specifically formulated white fabric paint for better opacity. -
Apply the base coat:
Paint the entire rectangular area inside the tape with your white mixture. Create a solid, opaque white background. This crucial step ensures the landscape colors will be vibrant rather than absorbed by the dark indigo denim. -
Let it dry completely:
Allow the white base layer to dry fully. It should be dry to the touch before you proceed. I sometimes use a hairdryer on a cool setting here to speed things up if I’m impatient.
Step 2: Painting the Sky & Mountains
-
Paint the sky gradient:
Mix a very pale blue using Titanium White and a tiny drop of Light Blue and fabric medium. Paint the upper third of the box, subtly blending it to be slightly lighter near the horizon line. -
Add the moon:
While the sky is drying, use a small round brush to dab a small off-white or pale cream circle in the upper left quadrant for the moon. -
Mix mountain colors:
Prepare a palette of warm earth tones. You’ll need three distinct shades: a light peach/terracotta for the back mountains, a medium reddish-brown for the middle, and a darker brown for the foreground. -
Paint the furthest peaks:
Using the lightest peach shade, paint the most distant mountain range. Create jagged, uneven peaks that overlap the sky slightly. Don’t worry about the bottom edge; it will be covered. -
Layer the middle range:
Once the first range is tacky or dry, use the medium reddish-brown shade to paint a second mountain range below the first. Ensure the peaks are positioned differently than the first layer to create depth. -
Paint the foreground hills:
Apply the darkest brown shade for the lowest, closest hills. This layer should reach down close to the bottom of the taped area, leaving just a sliver for the very bottom tree line. -
Smooth the transitions:
Assess your layers. If the paint looks streaky, apply a second thin coat to the mountain shapes to get that solid, graphic look shown in the example.
Uneven Edges?
If paint bled under the tape, wait for it to fully dry. Then, use a stiff brush with a tiny bit of rubbing alcohol to scrub the excess, or carefully scrape it away with an X-Acto knife.
Step 3: Adding the Pine Trees
-
Mix a deep forest green:
Combine Dark Green with a bit of Black to create a very deep, near-black pine color. Add fabric medium to ensure the paint flows smoothly for fine details. -
Draft the main trees:
Using a fine liner brush, paint vertical lines to mark the trunks of the three large foreground trees on the right side and the smaller ones on the left. -
Detail the branches:
Starting from the top of each trunk, use a stippling or dabbing motion to create pine branches. Make the branches wider as you move down the trunk. -
Fill the horizon:
Along the very bottom edge of your painting, dab in a silhouette of a distant forest line using the same dark mixture, connecting the bases of your larger trees. -
Remove the tape:
carefully peel away the masking tape while the paint is still slightly tacky to reveal your sharp, clean edges. Pull the tape away from the painted area at a 45-degree angle. -
Heat set the design:
Once the painting is 100% dry (ideally after 24 hours), cover the design with a scrap piece of cotton fabric or parchment paper and iron it on a medium-high setting (no steam) for 3-5 minutes to make it washable.
Going 3D
Add texture to the moon or the pine trees by mixing a little embroidery floss into the design. A few french knots on the trees can simulate texture or cones.
Enjoy wearing your custom piece of wearable art on your next outdoor adventure
Drippy Paint Edge Effect
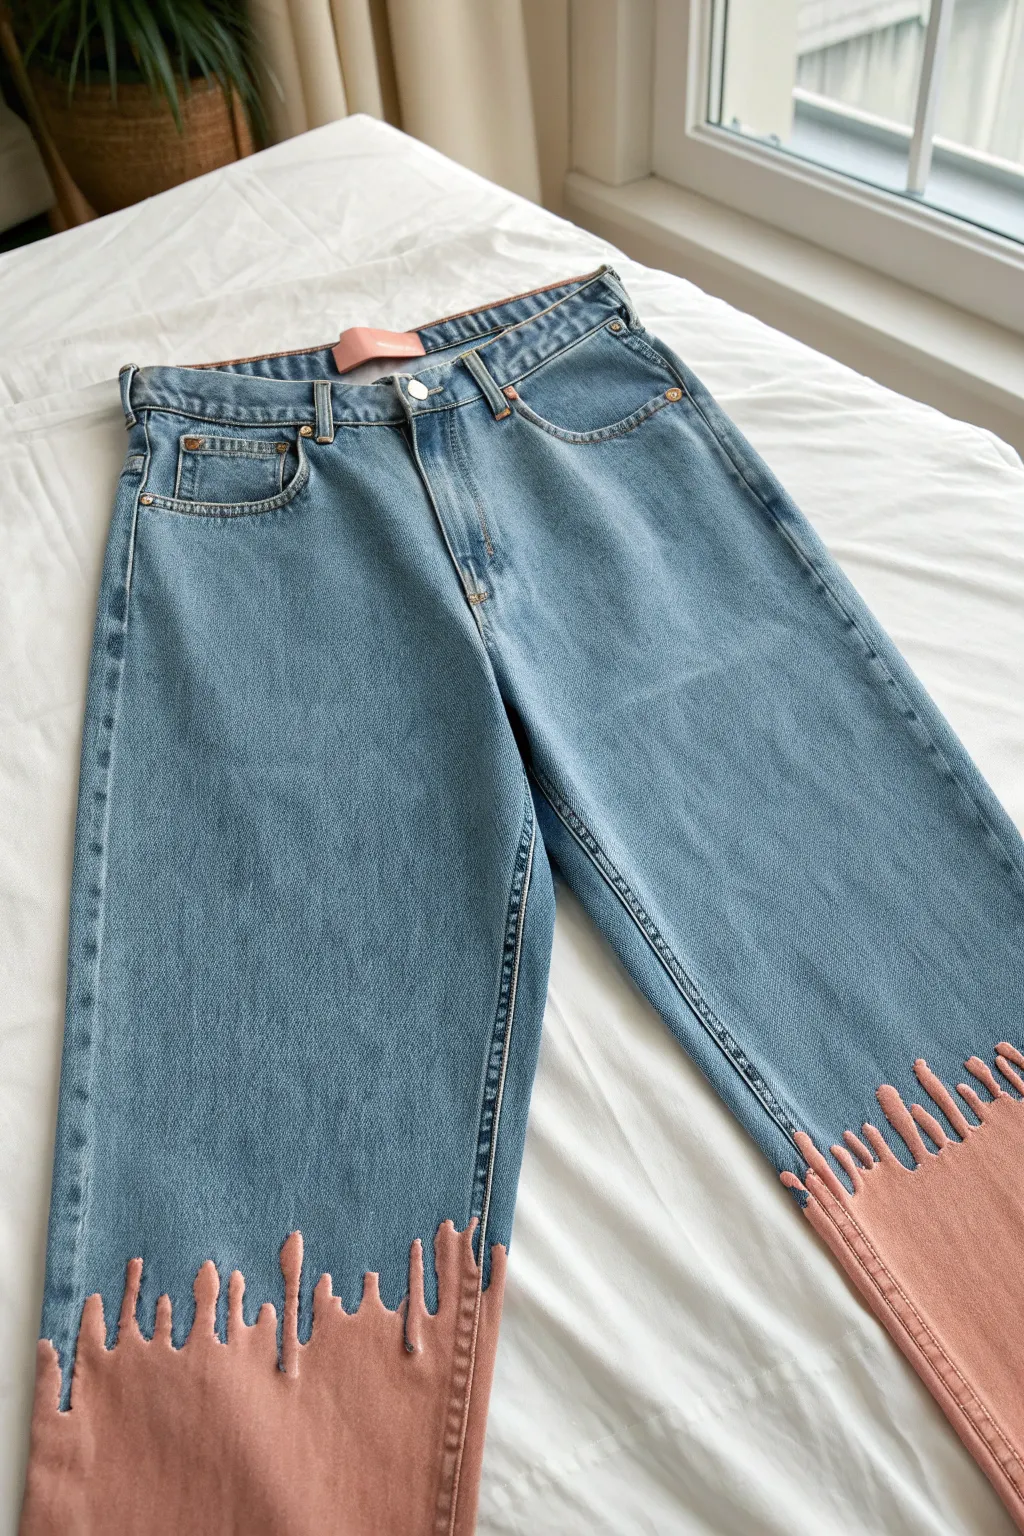
Transform a standard pair of jeans into a statement piece with this clever illusion effect. By painting the hem to look like it has been dipped in melting ice cream or thick paint, you add a playful, surreal touch to your wardrobe.
Step-by-Step
Materials
- Light wash denim jeans
- Fabric medium
- Acrylic paint (Dusty Rose or Salmon Pink)
- White fabric pencil or chalk
- Small flat paintbrush
- Medium filbert paintbrush (rounded tip)
- Cardboard or stiff paper
Step 1: Preparation
-
Prep the workspace:
Lay your jeans flat on a large, clean surface. Smooth out any wrinkles, particularly around the leg openings where you’ll be working. -
Insert barriers:
Cut two pieces of cardboard to fit inside the pant legs. Slide one into each leg, positioning it right at the bottom hem. -
Check barrier placement:
Ensure the cardboard extends well past where you plan your highest drip to be. This prevents paint from bleeding through to the back side of the leg.
Smooth Moves
To get super smooth curves on your drips, try using a makeup sponge cut into a teardrop shape. Dip it in paint and stamp the rounded tips first.
Step 2: Drafting the Design
-
Mark the base line:
Decide how high up the leg the solid pink section should go before the drips start. Use your white fabric pencil to lightly sketch a horizontal guide line about 4-5 inches from the bottom hem. -
Sketch the drips:
Draw the drip outlines above your guide line. Vary the heights significantly—some should be short nubs, while others extend up several inches. -
Shape the drips:
Focus on the tips of the drips. They should be beautifully rounded and bulbous, mimicking the natural look of thick liquid running down. -
Connect the drips:
Draw the connections between the drips as curved ‘U’ shapes. Avoid sharp V-shapes, as viscous liquid creates curves. -
Review the composition:
Step back and look at both legs. You don’t want them to be perfectly symmetrical, but they should look balanced.
Step 3: Painting
-
Mix your paint:
Mix your acrylic paint with fabric medium according to the bottle’s instructions (usually 1:1 or 2:1). This ensures the paint stays flexible and doesn’t crack. -
Outline the edges:
Using a small flat brush, carefully paint along the pencil outlines you created. This establishes a crisp, clean edge for your drip design. -
Fill the lower section:
Switch to a slightly larger brush. Fill in the entire area below the drips, painting all the way down to the hem edge. -
Refine the drip tips:
Use the filbert brush (which has a rounded tip) to fill in the tops of the drips. The shape of the brush helps create that perfect curve. -
Let it dry:
Allow the first coat to dry completely. Acrylics on denim often soak in, so the color might look uneven at first. -
Apply second coat:
Apply a second layer of paint to make the pink opaque and vibrant. Be careful to stay exactly inside your lines. -
Check for gaps:
Denim has a texture, so look closely for tiny white spots where the paint missed a groove in the fabric weave. Dab extra paint into these spots.
Dimension Boost
Add a tiny white highlight line on the upper left side of each drip ‘head’ and a darker pink shadow underneath the curves to create a 3D effect.
Step 4: Finishing Touches
-
Paint the hem edge:
Don’t forget the very bottom edge of the jeans. Paint the thickness of the folded hem so no blue denim shows when you walk. -
Dry thoroughly:
Let the jeans sit for at least 24 hours to cure fully. I like to leave them in a well-ventilated area. -
Heat set:
Once fully dry, place a thin cloth over the painted area and iron on a medium heat setting without steam. This seals the paint permanently.
Wear your new drippy denim with confidence knowing you’ve created a totally unique piece of wearable art
Stencil-Like Repeats for an All-Over Pattern
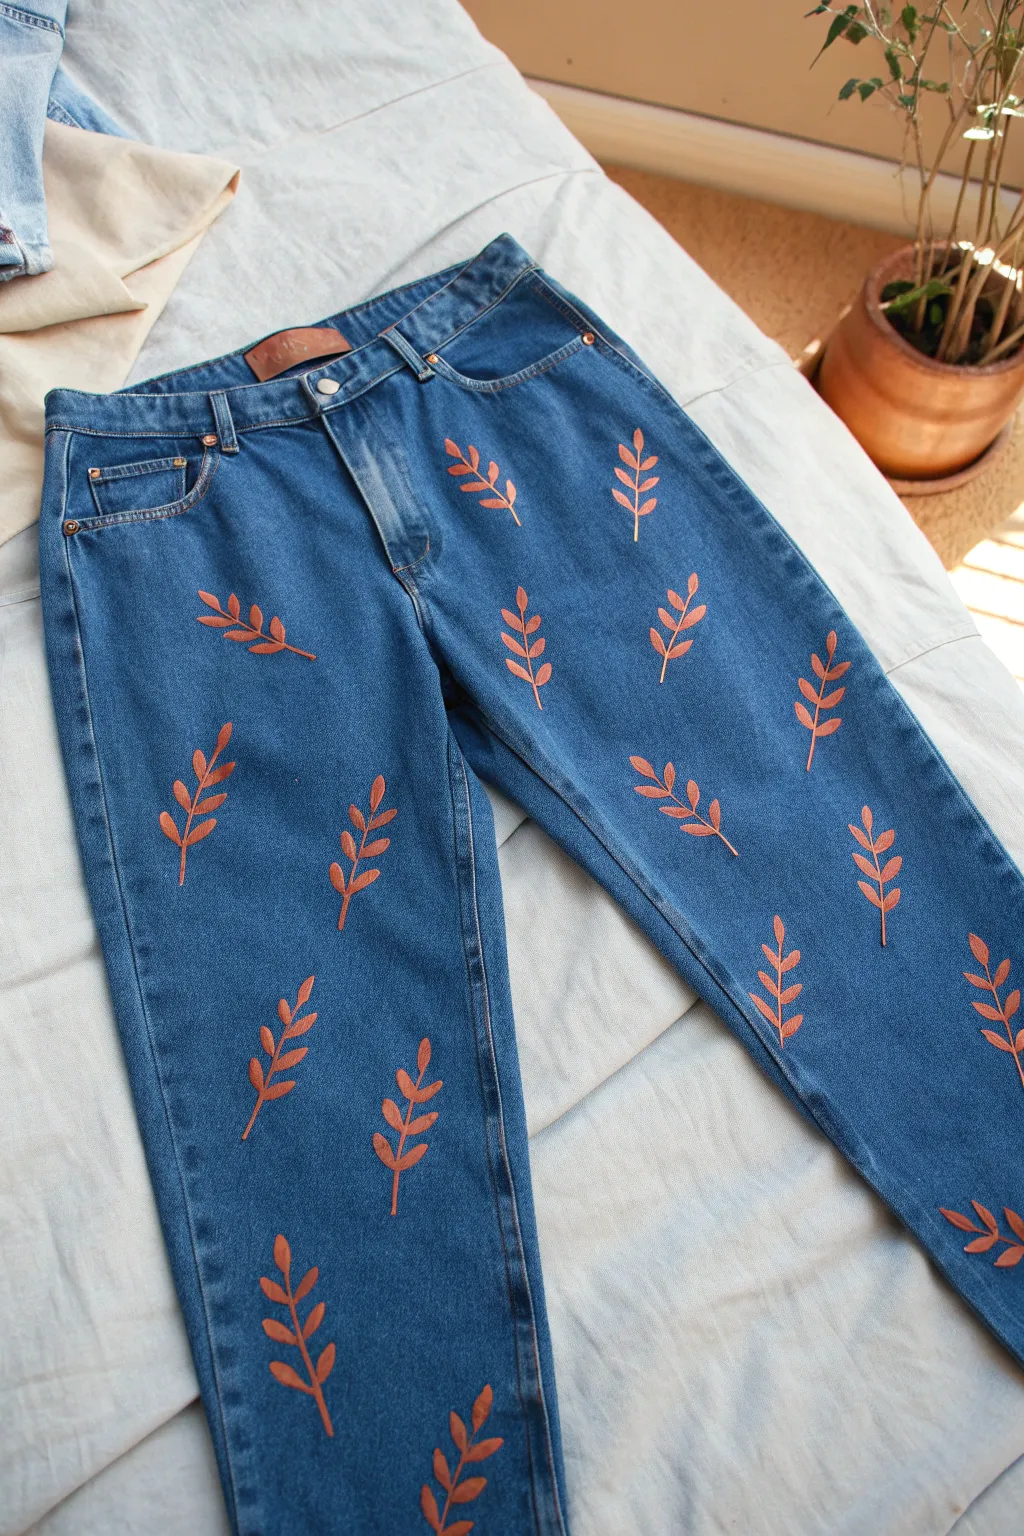
Transform a basic pair of denim into a botanical statement piece with this repeating leaf motif. The warm, earthy terracotta tones create a stunning contrast against classic blue jean fabric, mimicking a high-end printed textile.
How-To Guide
Materials
- Pair of light or medium wash denim jeans (pre-washed)
- Fabric paint (terracotta or burnt sienna color)
- Mylar sheet or stencil acetate
- Craft knife and cutting mat
- Fine-point permanent marker
- Stencil adhesive spray (repositionable)
- Small foam pouncer or stencil brush
- Piece of cardboard (to fit inside pant legs)
- Painter’s tape
- Iron and ironing board
Step 1: Planning and Prep
-
Prepare the workspace:
Lay your jeans flat on a clean, hard surface. To prevent paint from bleeding through to the back of the legs, slide a piece of cardboard inside each pant leg, smoothing out any wrinkles in the fabric. -
Design the motif:
Draw a simple, stylized leafy branch on a piece of scratch paper. Keep the design around 2-3 inches long with distinct, separated leaves to make stenciling easier. -
Transfer to acetate:
Place your Mylar sheet or acetate over your drawing. Trace the design using a fine-point permanent marker. -
Cut the stencil:
Using a sharp craft knife on a cutting mat, carefully cut out the leaf shapes and the central stem. Be sure to leave small ‘bridges’ of acetate connecting the leaves to the background if your design requires it, though a simple branch usually doesn’t need them. -
Apply adhesive:
Flip the stencil over and lightly mist the back with repositionable stencil adhesive spray. Let it become tacky for about 60 seconds before using.
Bleeding Edges?
If paint is bleeding, your brush is too wet. Offload more paint onto a paper towel before hitting the fabric. The brush should feel almost dry to the touch.
Step 2: Painting the Pattern
-
Test the first print:
Position your stencil on a scrap piece of fabric or inconspicuous area first. Press it down firmly, especially around the cut edges. -
Load the brush:
Dip your foam pouncer into the fabric paint, then dab most of it off onto a paper towel. You want a very ‘dry’ brush to prevent paint from seeping under the stencil edges. -
Apply the paint:
Use an up-and-down dabbing motion (not brushing side-to-side) to apply the paint through the stencil. Several thin coats are better than one thick, goopy coat. -
Start the layout:
Begin at the top thigh area of the jeans. Place your first stencil. I like to angle them slightly differently or flip the stencil over occasionally to make the pattern feel more organic. -
Establish the grid:
Visually space out where your next leaves will go. Aim for a staggered, brick-like pattern rather than a perfect grid. Leave about 4-5 inches of space between each motif. -
Repeat the process:
Move the stencil to the next spot, press firmly, and dab. If paint builds up on the stencil, wipe it off with a damp cloth and re-apply adhesive if necessary. -
Working down the leg:
Continue working your way down one pant leg. As the leg narrows, pay attention to the seams; you can let parts of the stencil wrap around the side, or stop just short of the seam. -
Handle pockets and seams:
When painting near pockets or the fly, use painter’s tape to mask off buttons, rivets, or areas you want to keep paint-free. -
Paint the second leg:
Repeat the entire process on the other leg. Try to check that the density of the pattern matches the first leg so they look balanced.
Step 3: Finishing Touches
-
Touch up edges:
Once you lift the stencil for the final time, inspect your work. If any edges look fuzzy or didn’t catch enough paint, use a very fine detail brush to carefully sharpen the leaf tips. -
Allow to dry:
Let the jeans dry completely flat for at least 24 hours. Don’t rush this step or the paint won’t cure properly. -
Heat set the design:
Turn the jeans inside out. Set your iron to the cotton setting (no steam). Iron over the painted areas from the backside for 3-5 minutes to permanently set the fabric paint.
Make It 3D
Add depth by mixing a slightly lighter shade of terracotta and stenciling just the tips of the leaves a second time for a subtle gradient effect.
Wear your new custom denim with pride, knowing you’ve created a totally unique pattern
Glow-Style Highlights for Night Pop
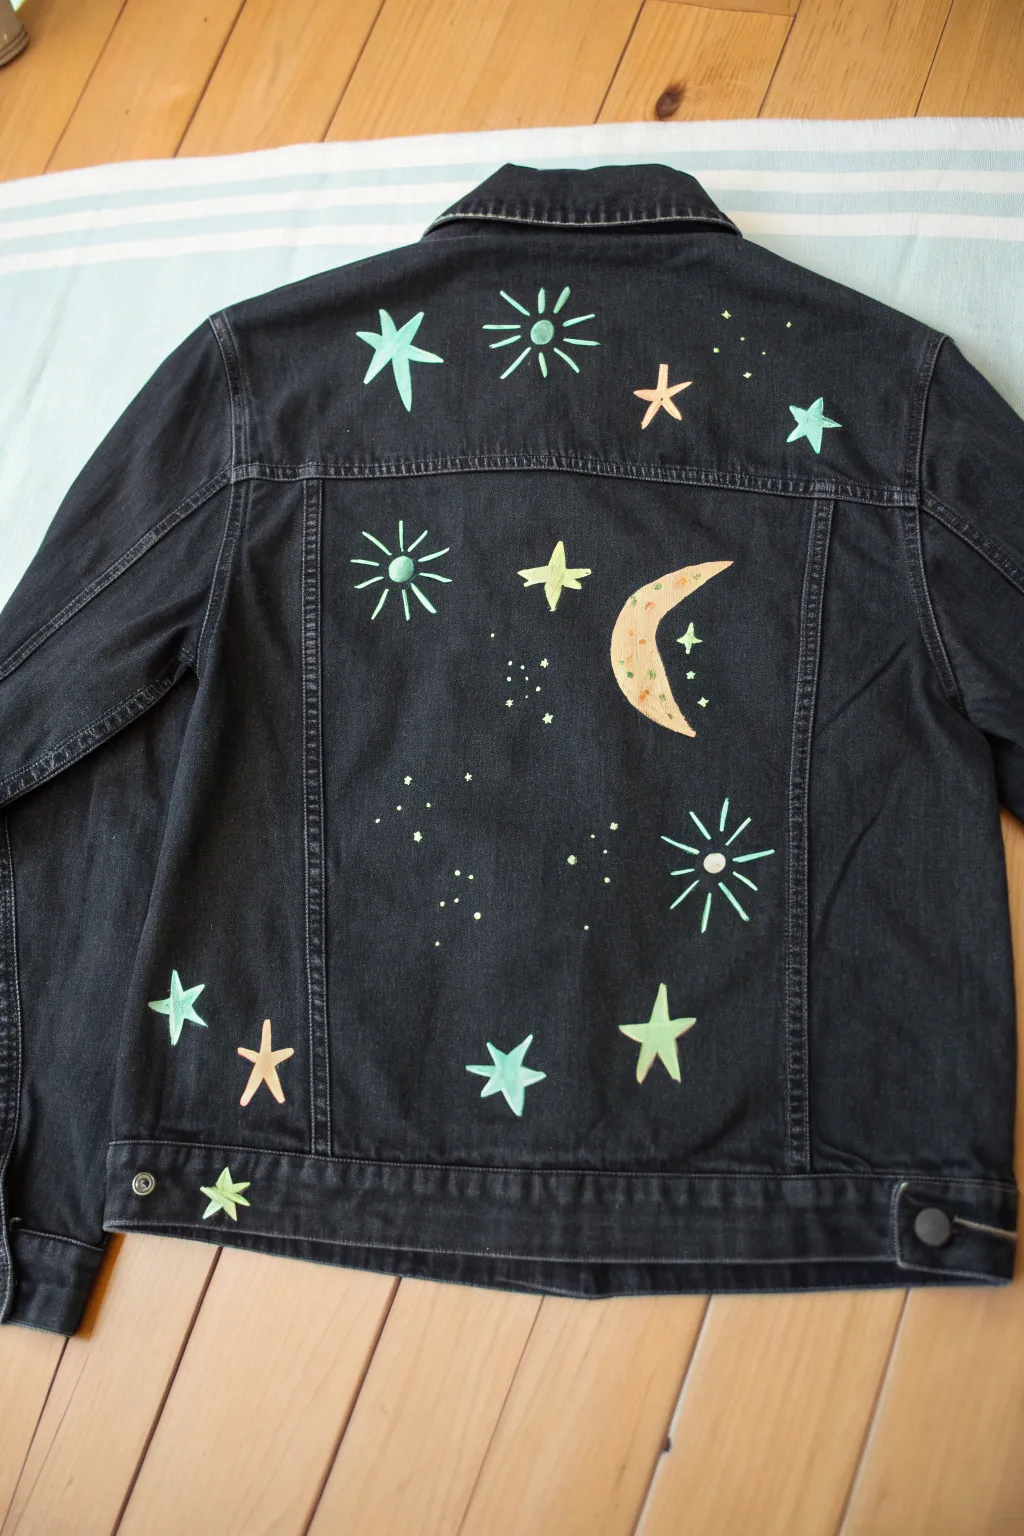
Transform a basic black denim jacket into a starry night sky with these simple, hand-painted celestial motifs. The pastel colors pop beautifully against the dark fabric, creating a soft, glowing effect that looks custom-made.
Step-by-Step
Materials
- Black denim jacket (washed and dried)
- White fabric paint or gesso (for priming)
- Fabric medium (if using acrylics)
- Acrylic paints: Mint green, pale yellow, peach/coral, white
- Fine detail brushes (sizes 0 and 1)
- Small flat brush (size 4)
- Chalk or white specific fabric pencil
- Cardboard insert
- Iron and cloth (for heat setting)
Step 1: Preparation & Layout
-
Prepare the surface:
Begin by sliding a piece of thick cardboard inside the jacket. This creates a sturdy surface to paint on and prevents any paint from bleeding through to the front side of the denim. -
Plan the composition:
Using a piece of chalk or a white fabric pencil, lightly sketch your celestial design directly onto the back panel. Start with the largest element, the crescent moon, placing it slightly off-center in the middle panel. -
Add major stars:
Sketch a few large five-pointed stars around the moon. Place one near the top left shoulder, one near the bottom right, and a few scattered in the main panel to anchor the design. -
Add sunbursts:
Draw three distinct sunburst shapes—a central circle with radiating lines. Position one on the upper yoke, one on the left middle panel, and one on the lower right. -
Fill with scatter:
Fill the empty negative spaces with tiny dots and small diamond shapes to represent distant stars.
Pro Tip: Brighter Colors
Don’t skip the white base coat! Painting pastels directly on black denim results in muddy, invisible colors. The white primer acts like a spotlight underneath.
Step 2: Painting the Base Layer
-
Prime the shapes:
Using a small flat brush and white fabric paint, fill in every sketched shape. Dark denim absorbs color, so this white base layer is crucial for making the final pastel colors pop vividly. -
Let it dry:
Allow the white base coat to dry completely. If the denim texture is still showing through heavily, apply a second thin coat of white and let it dry again.
Step 3: Applying Color
-
Paint the mint stars:
Mix a soft mint green. Use your detail brush to paint over the white base of the large five-pointed stars. I like to keep the edges crisp for a graphic look. -
Color the moon:
Paint the crescent moon shape with a peach or coral tone. Use smooth strokes following the curve of the moon. -
Detail the sunbursts:
For the sunbursts, use mint green for the radiating lines and the center circle. You can add a tiny dot of white in the very center of the circle for a highlight. -
Paint secondary stars:
Select a few smaller stars, like the one beneath the collar and the one near the hem, and paint them with the pale yellow shade for variety. -
Add dot details:
Using the very tip of a fine brush or a dotting tool, dab white paint over the tiny background dots you sketched earlier to create the ‘galaxy’ dust effect. -
Texture the moon:
Once the peach base on the moon is dry, use a dry-brush technique to lightly dab small spots of yellow and darker orange onto it, giving it a cratered texture.
Level Up: Glow in the Dark
Mix phosphorescent medium into your final topcoat of mint and yellow paint. Your stars will charge up in sunlight and actually glow when the lights go out.
Step 4: Finishing Touches
-
Clean up edges:
Inspect your shapes. If any colour went outside the lines, you can carefully touch it up with a tiny bit of black paint to mask the mistake. -
Reinforce brightness:
If any colors look dull after drying, apply a second coat of the pastel paint to ensure opacity. -
Cure the paint:
Allow the jacket to dry for at least 24 hours. To make it washable, cover the design with a thin cloth and iron it on medium heat (no steam) for about 3-5 minutes to heat-set the paint.
Wear your new cosmic jacket with pride and shine bright even on dark nights


Have a question or want to share your own experience? I'd love to hear from you in the comments below!