There’s something extra special about making art side-by-side as mother and daughter—it turns a simple canvas into a shared memory. Here are some cozy, meaningful mother-daughter canvas painting ideas you can create together, whether you’re total beginners or you’ve both got paint on your hands all the time.
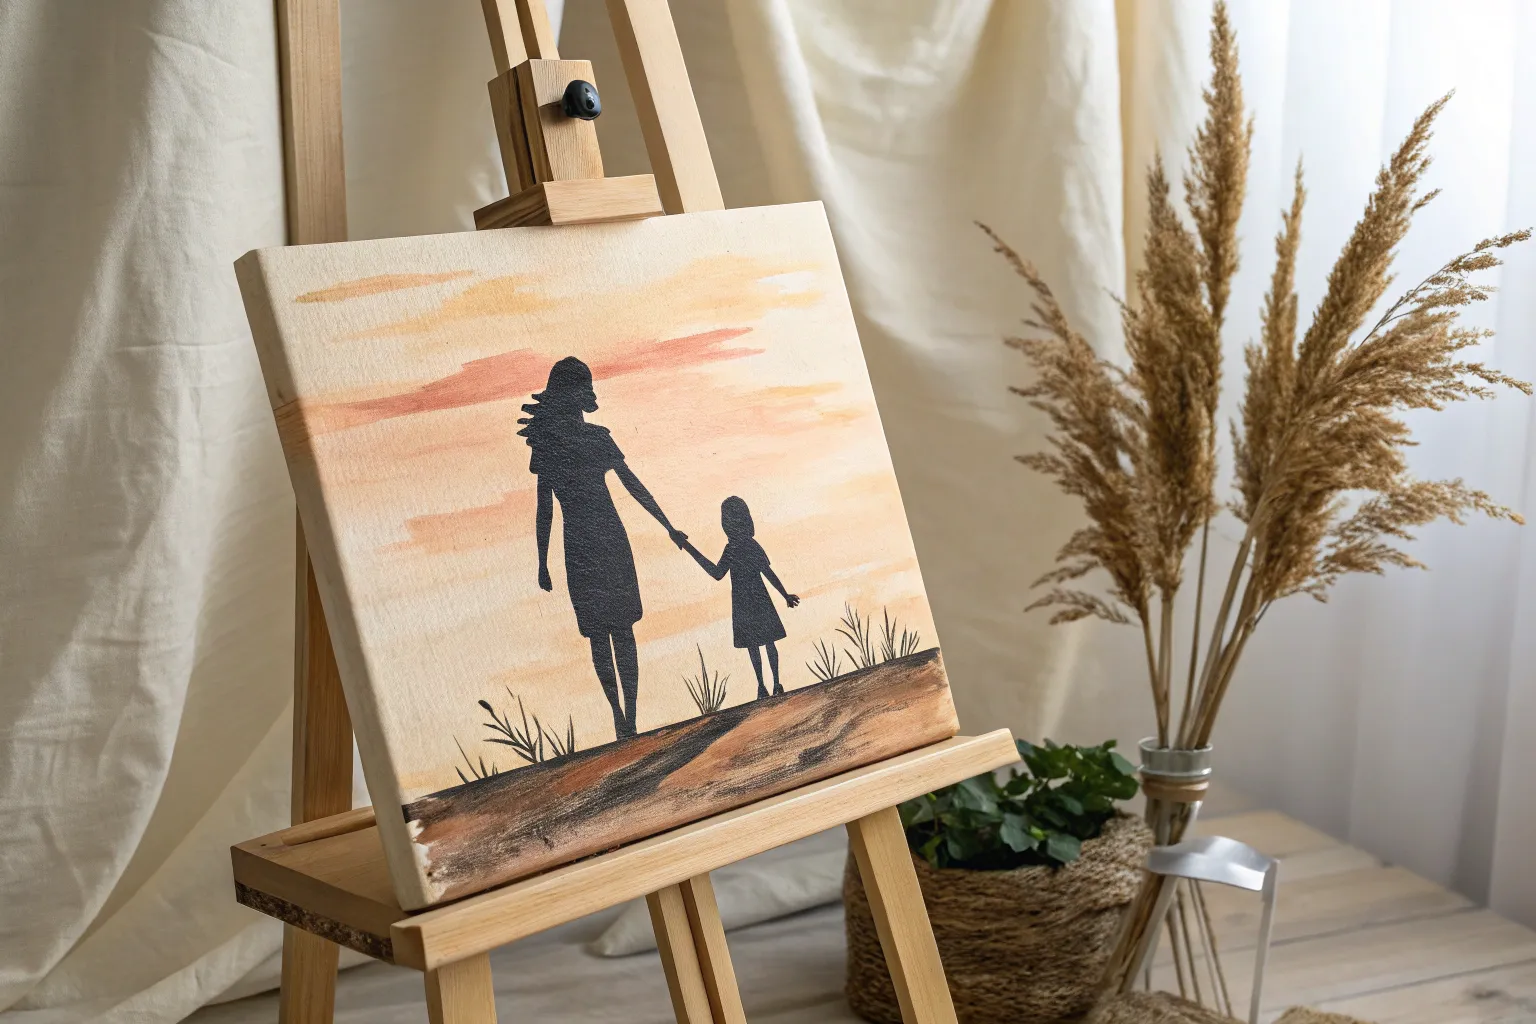
Sunset Silhouette Holding Hands
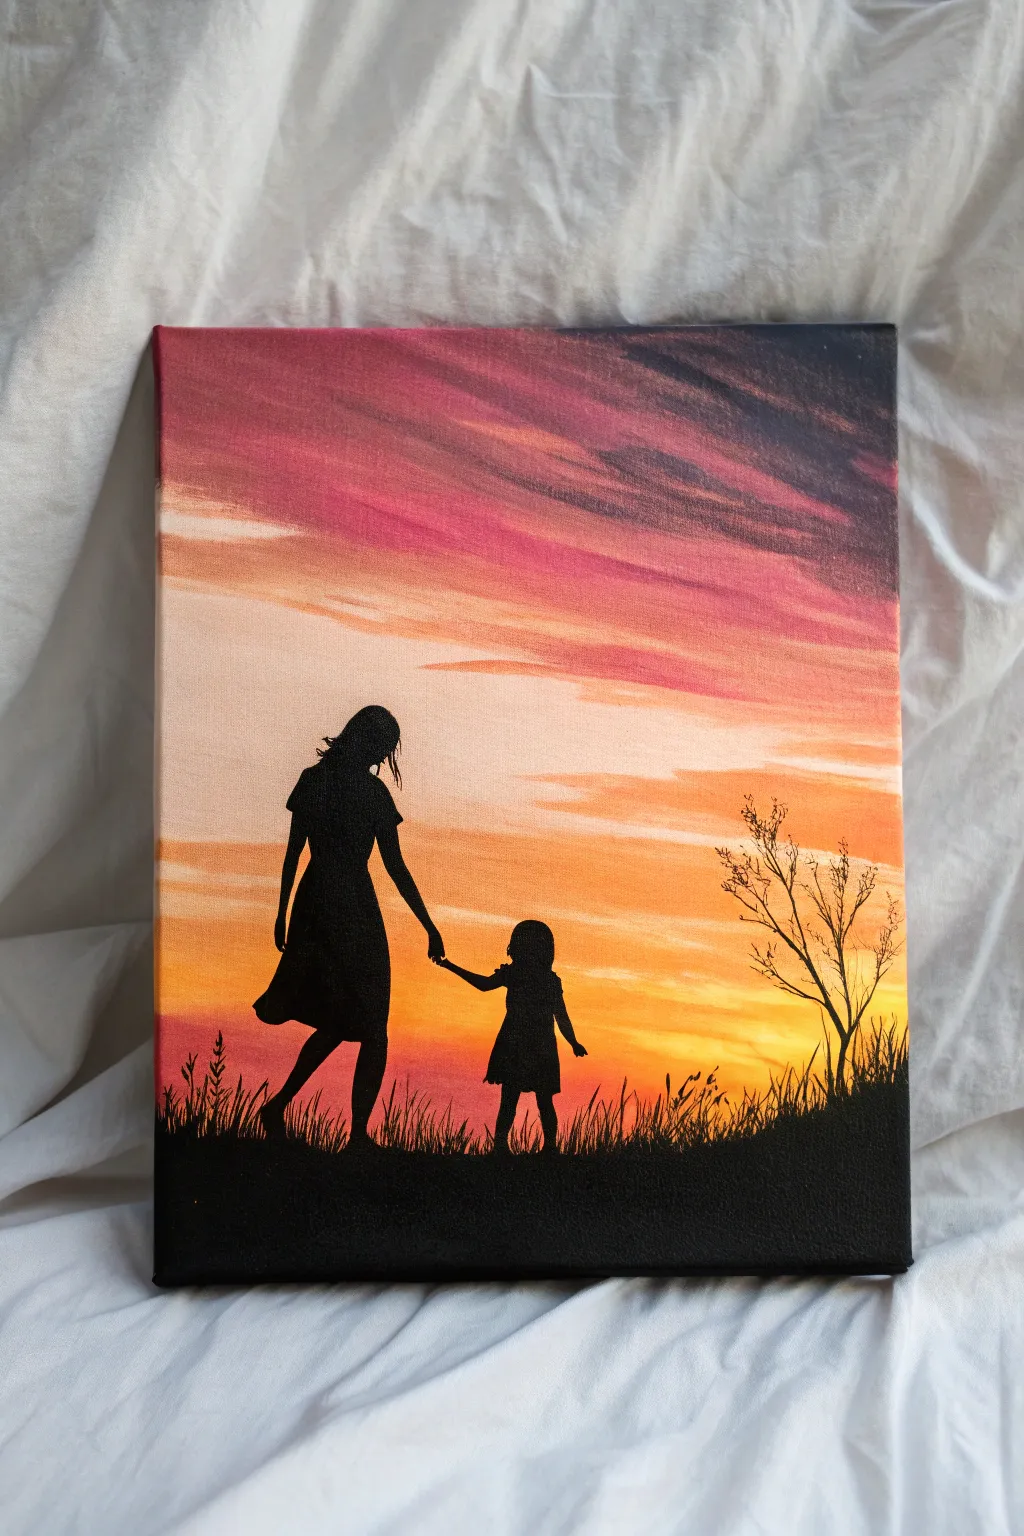
Capture the tender bond between a mother and daughter silhouetted against a breathtaking twilight sky. This acrylic painting project relies on smooth blending techniques to create a vibrant, glowing sunset background that makes the bold black figures pop.
Step-by-Step Guide
Materials
- Rectangular stretched canvas (e.g., 11×14 or 16×20 inches)
- Acrylic paints (Titanium White, Cadmium Yellow, Orange, Magenta or Pink, Violet, Carbon Black)
- Wide flat paintbrush (1-2 inch) for the background
- Medium round brush
- Small liner brush or detail brush
- Palette or paper plate
- Cup of water
- Paper towels
- Pencil and eraser
- Optional: Printed silhouette reference image
Step 1: Painting the Sunset Sky
-
Prime the canvas:
Start by quickly brushing a very thin, watery coat of white acrylic paint over the entire canvas. This ‘wet-on-wet’ base helps your colors blend much smoother later on. -
Apply the top layer:
Mix a deep violet with a tiny touch of black to get a dark evening sky color. Using your wide flat brush, paint the top 2-3 inches of the canvas with horizontal strokes. -
Transition to pink:
Add magenta or deep pink directly below the violet while the paint is still wet. Use long horizontal sweeps to blend the bottom edge of the purple into the top edge of the pink, creating a soft gradient. -
Add warmth:
Clean your brush slightly (but not fully) and pick up orange paint. Apply this band below the pink, blending upwards into the previous color to soften any harsh lines. -
Paint the horizon:
Finish the sky by painting the remaining bottom area with bright yellow, blending it into the orange above. Ensure the yellow section covers where your grass line will eventually be. -
Add cloud texture:
While the sky is still tacky, use a smaller dry brush with a tiny amount of purple-grey paint to whisk in thin, horizontal cloud streaks across the pink and orange sections. Keep these strokes light and feathery. -
Dry completely:
Let the background dry fully before moving on. This is crucial—if the sky is wet, your pencil sketch will drag and the black silhouette paint will muddy.
Step 2: Creating the Silhouettes
-
Sketch the figures:
Lightly sketch the outline of the mother and daughter holding hands. Focus on the pose—a walking stance with dresses flowing slightly backwards suggests movement. -
Fill the mother figure:
Using pure Carbon Black and a medium round brush, fill in the mother’s shape. Be careful around the edges to keep them crisp and sharp against the colorful background. -
Detail the child:
Switch to a smaller brush to fill in the child’s silhouette. Pay attention to the size difference; she should reach roughly the mother’s hip or waist height. -
Connect the hands:
Use your smallest liner brush to paint the connection between their hands. A very thin line often looks more delicate and realistic than a thick blob. -
Paint the ground:
With the wide brush and black paint, fill in the bottom 2 inches of the canvas to create the ground. Make the top edge of this ground line slightly uneven to mimic terrain.
Muddy Sky Fix
If colors are turning brown while blending, stop and rinse your brush completely. Dry it well, then use fresh paint to re-blend the transition area.
Step 3: Adding Nature Details
-
Paint grass blades:
Using the liner brush or the edge of a flat brush, flick quick, upward strokes of black from the ground line. Vary the height and angle of the grass blades for a natural look. -
Create the tree outline:
On the right side of the canvas, paint a thin, spindly tree trunk rising from the grass. Let the branches fork and extend upwards into the orange sky area. -
Refine the branches:
Add tiny twigs extending from the main tree branches. I find that holding the brush very loosely near the end of the handle helps create those jagged, organic twig shapes. -
Add subtle foliage:
Dab the tip of your small brush gently on the ends of the branches to suggest sparse leaves or buds, keeping the silhouette effect consistent. -
Final touches:
Check your silhouettes for any pinholes where the light shines through the black paint and touch them up. Ensure the bottom edge of the canvas is fully covered in black.
Crisp Silhouette Trick
Add a tiny drop of water to your black paint. It should be the consistency of heavy cream or ink. This helps the paint flow smoothly for sharp, crisp edges.
Hang this heartwarming piece where the sunset colors can brighten up your room


Mother and Daughter Hug Outline
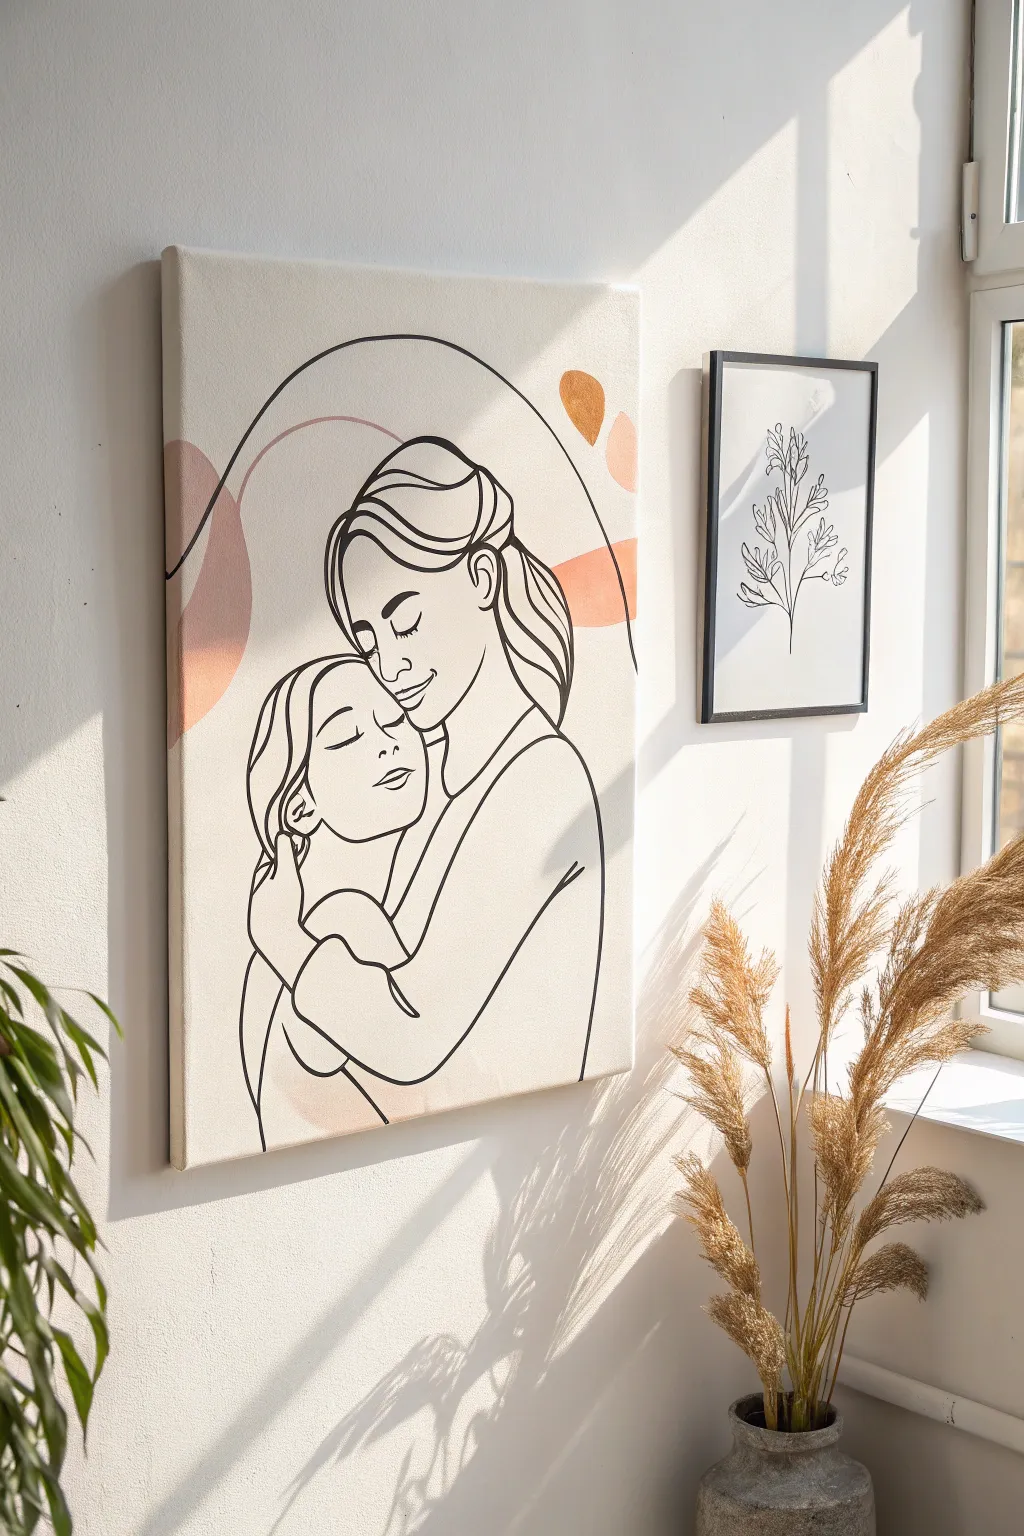
Capture the warmth of a mother-daughter bond with this minimalist line art canvas that blends clean contours with soft, abstract shapes. The result is a trendy, gallery-worthy piece that feels both personal and high-end, perfect for contrasting modern interiors with a touch of sentimentality.
Step-by-Step
Materials
- Rectangular stretched canvas (e.g., 16×20 or 18×24 inches)
- Acrylic paints: Titanium White, Burnt Sienna, Yellow Ochre, Deep Red/Crimson
- Flat synthetic paintbrush (1-inch width)
- Round synthetic paintbrush (size 2 or 3 for fine lines)
- Black acrylic paint or a broad black acrylic paint marker (medium tip)
- Pencil and eraser
- Palette or paper plate
- Tracing paper or a projector (optional for transferring the design)
- Ruler
Step 1: Setting the Background
-
Prime with warmth:
Begin by painting your entire canvas with a very light wash of warm white. Mix a tiny dot of Yellow Ochre into your Titanium White to create a creamy, off-white base rather than a stark hospital white. Let this dry completely. -
Mix pastel tones:
Prepare your abstract shape colors on your palette. For the muted terracotta, mix Burnt Sienna with a generous amount of White. For the soft peach, mix a tiny bit of Deep Red and Yellow Ochre into White. Aim for soft, earthly pastels. -
Sketch the arch:
Lightly sketch a large, imperfect arch or semi-circle shape that spans the upper two-thirds of the canvas. This doesn’t need to be mathematically perfect; a slightly organic curve adds to the boho feel. -
Paint abstract blobs:
Using your flat brush, paint organic, blob-like shapes near the edges of your arch guidelines. Place a darker terracotta shape on the upper right and a larger, softer peach shape on the left side. Keep the edges smooth but irregular. -
Layer transparency:
If you want a watercolor effect with your acrylics, water down your paint slightly for these shapes so the canvas texture shows through. Allow the background shapes to dry fully before moving on.
Steady Hands Hack
Rest your painting hand on a maulstick or a clean, dry ruler bridged across the canvas. This keeps your palm off the wet surface while stabilizing your fine line work.
Step 2: Creating the Line Art
-
Draft the figures:
Using a pencil, lightly sketch the mother and daughter figures. If you aren’t confident in freehand drawing, print a reference photo, trace the main outlines onto tracing paper, and transfer it to the canvas. -
Refine the pose:
Focus on the connection points: the cheek-to-cheek contact, the closed eyes, and the embrace. Keep the drawing simple—omit small details like eyelashes or individual strands of hair. Think in terms of continuous, flowing lines. -
Plan your line weight:
Before painting, decide where you want thicker lines (like the curve of the back or hair) and where you want delicate lines (like the facial features). This variation adds depth. -
Load the liner brush:
Mix your black acrylic paint with a tiny drop of water to improve its flow. It should be the consistency of heavy cream so it glides without skipping. Alternatively, shake your black acrylic paint marker well. -
Start from the top:
Begin tracing your pencil lines starting with the hair and working downward. This prevents your hand from smudging wet paint as you work. -
Execute the faces:
Use a steady hand for the facial profiles. Since these are the focal points, take a deep breath and try to paint the profile in one or two smooth strokes rather than short, sketchy dashes. -
Add the arch line:
Paint the thin black line that forms the arch over the figures. Notice in the inspiration image how the line breaks where it meets the figures; stop your line just before it touches the hair or shoulder. -
Connect the embrace:
Complete the arms and hands holding each other. Keep the hands stylized and simple—too much detail here can distract from the emotional connection of the faces. -
Clean up edges:
Once the black lines are dry, use your off-white base color and a small brush to touch up any areas where the pencil sketch is still visible or where a line went stray. -
Seal the work:
Finish by applying a matte varnish over the entire piece. This unifies the sheen of the different paints and protects your line work from fading.
Make it Metallic
Swap the pastel terracotta shapes for gold or copper leaf. Adding metallic foil to the abstract background shapes gives the piece a luxurious, light-catching texture.
Hang your new artwork in a spot with good natural light to highlight the delicate contrast between the bold lines and soft background shapes


Heart Balloon Hand-Off
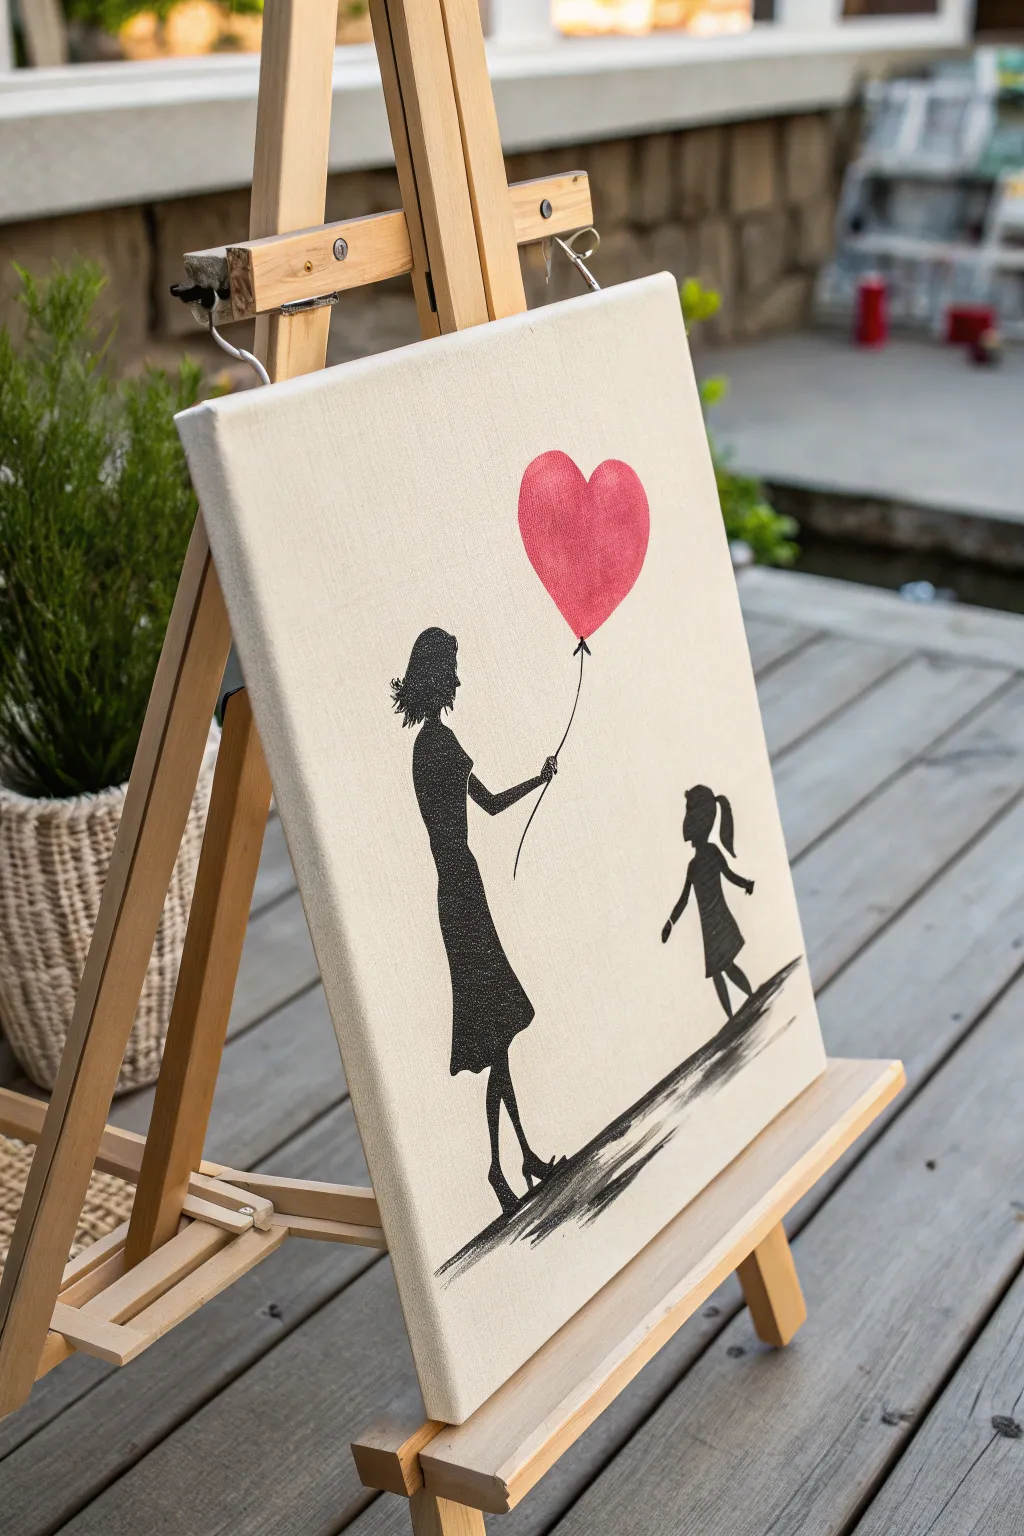
Capture the tender bond between mother and child with this minimalist silhouette painting. Featuring a striking red heart balloon passed between two figures, the stark contrast of black on canvas creates a timeless, heartwarming piece.
How-To Guide
Materials
- Stretched canvas (11×14 or similar size)
- Black acrylic paint
- Red acrylic paint
- Pencil and eraser
- Fine liner brush (size 0 or 00)
- Flat shader brush (size 4 or 6)
- Round brush (size 2)
- Black fine-tip permanent marker (optional)
- Carbon transfer paper (optional)
- Mixing palette
- Water cup and paper towels
Step 1: Preparation & Sketching
-
Prepare your canvas:
Ensure your canvas is clean and free of dust. If you prefer a smoother surface for detailed silhouette work, you can apply a very thin coat of gesso and sand it lightly once dry, though the raw canvas texture works beautifully for a rustic look. -
Map out the composition:
Visualize where the figures will stand. The mother should be on the left third of the canvas, and the child on the right third. Leave ample space in the upper center for the balloon. -
Sketch the ground line:
Lightly draw a sloped line near the bottom of the canvas representing the ground. It doesn’t need to be perfectly straight; a slight angle adds dynamic movement to the scene. -
Outline the mother:
Sketch the silhouette of the mother on the left. Focus on the profile: messy bun or short hair, a fitted bodice, a flowing knee-length skirt, and high heels. I find it easiest to break the body into simple shapes first—an oval for the head, a rectangle for the torso. -
Outline the daughter:
Sketch the child on the right, facing the mother. Draw a simple ponytail, a triangular dress shape, and legs in a walking or running pose. Her arms should be outstretched as if reaching for the mother. -
Add the balloon:
Draw a large, plump heart shape floating above and slightly between the two figures. Make it substantial in size to be the focal point of color. -
Connect with the string:
Draw a curved line connecting the balloon’s knot to the mother’s hand. The curve should suggest the balloon has a slight lift.
Clean Lines
If you struggle with painting tiny details like facial profiles or fingers, use a black ultra-fine point permanent marker instead of paint for better control.
Step 2: Painting the Silhouettes
-
Start with the outlines:
Using your fine liner brush and black acrylic paint slightly thinned with water, carefully trace over your pencil outlines for the mother and child. A steady hand is key here. -
Fill in the figures:
Switch to a flat shader brush or round brush to fill in the bodies with solid black paint. Work slowly near the edges to keep them crisp. -
Refine the details:
Go back with the fine liner or a very fine marker to sharpen tiny details like the nose, chin, hair strands, and the heels of the shoes. These small points define the silhouette. -
Paint the ground:
Using a dry-brush technique, paint the ground line. Dip your brush in black, wipe most of it off on a paper towel, and make quick, horizontal strokes below the feet to create a textured shadow effect rather than a solid block. -
Double-check opacity:
Let the black paint dry. If the white canvas shows through, apply a second coat to ensure the silhouettes are completely opaque and bold.
Step 3: Adding the Heart
-
Base coat for the balloon:
Mix a vibrant red acrylic paint. Carefully outline the heart shape with a round brush and then fill it in. Don’t worry about shading yet; just get a solid base color down. -
Add texture (optional):
To mimic the look in the image, you can keep the red slightly semi-transparent or scumble it (scrub it on with a dry brush) to give it a watercolor-like or textured appearance. -
Paint the string:
Using your thinnest liner brush (or a fine-tip black marker), draw the string connecting the balloon to the hand. Do this in one confident stroke to avoid shakiness. -
Final touches:
Erase any visible pencil marks once the paint is fully dry. Step back and check if the connection between the hand and the string looks natural.
Make it Yours
Personalize the silhouettes by changing the hairstyles to match your own family, or add a second child silhouette if you have more little ones.
Hang this lovely piece in a prominent spot to remind you of the simple joys of motherhood


Wildflower Crowns Portrait
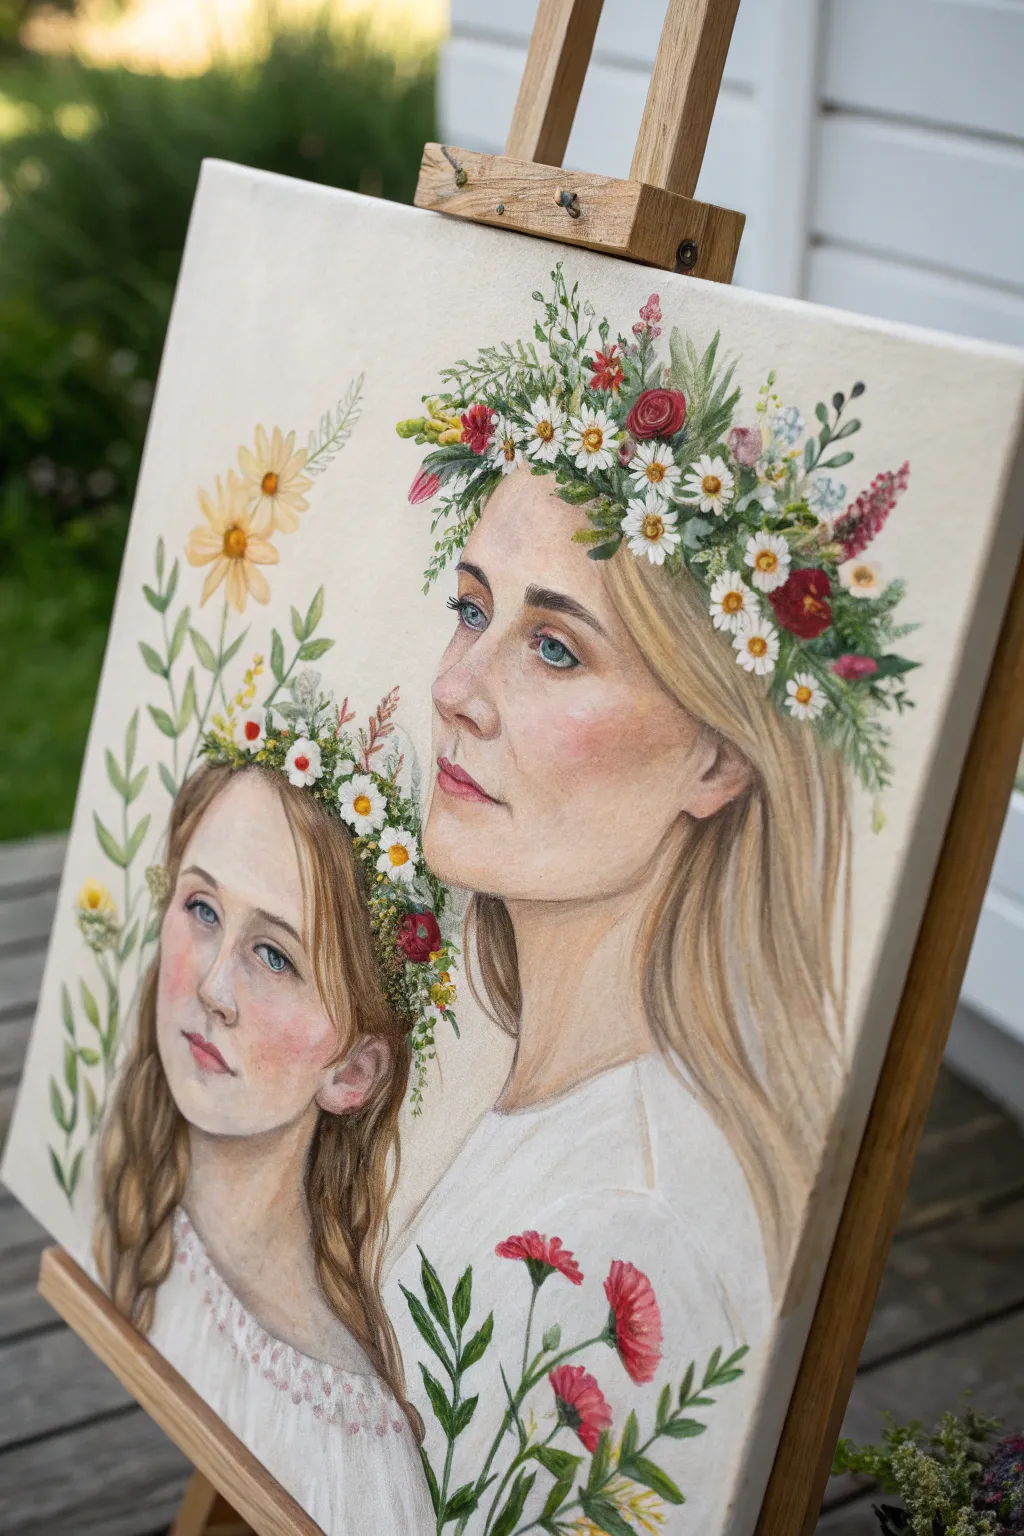
Capture the timeless bond between mother and daughter with this delicate, illustrative portrait featuring elaborate floral crowns. Using a mixed-media approach on canvas, you will create soft skin tones and vibrant botanical details that frame the subjects in natural beauty.
How-To Guide
Materials
- Primed canvas or canvas board (16×20 inches recommended)
- Graphite pencil (HB or 2B) for sketching
- Kneaded eraser
- Acrylic paints (Titanium White, Yellow Ochre, Burnt Sienna, Alizarin Crimson, Sap Green, Ultramarine Blue, Cadmium Yellow)
- Set of soft synthetic brushes (Round sizes 0, 2, 6; Flat size 8)
- Watercolor pencils (optional, for fine details)
- Matte medium or glazing liquid
- Palette and water container
- Reference photo of mother and daughter in profile
Step 1: Planning and Sketching
-
Prepare the canvas:
Begin by applying a very subtle wash of Titanium White mixed with a tiny drop of Yellow Ochre to the entire canvas. This breaks the stare of the stark white fabric and gives the portrait a warm, vintage undertone. -
Draft the composition:
Using a light hand and your HB pencil, sketch the outlines of the mother and daughter. Position the mother slightly higher and behind the daughter to create a classic tiered composition. Focus on getting the profile angles and eye placement correct before worrying about details. -
Sketch the crowns:
Draw the basic shapes of the floral crowns. Don’t draw every petal yet; just block in the masses where the greenery and main blooms will sit on their heads, ensuring the volume looks natural against the hair. -
Refine facial features:
Go back in and firm up the lines for the eyes, noses, and lips. Keep your pencil lines delicate, as heavy graphite can muddy the light paint layers we will apply later.
Step 2: Painting the Portraits
-
Mix skin tones:
Create a base skin tone using White, Yellow Ochre, and a touch of Alizarin Crimson. For shadows, mix a separate puddle adding a tiny bit of Burnt Sienna and Ultramarine Blue to cool it down. -
Apply the base coat:
Using a size 6 round brush, paint the faces and necks with the base skin tone. Keep the paint thin—almost like a watercolor wash—by using a little water or matte medium. This allows the canvas texture to show through slightly. -
Add facial dimension:
While the base is still slightly tacky, blend in the shadow tone under the chin, around the eye sockets, and along the jawline. Soften the edges with a clean, damp brush. -
Paint the eyes and lips:
Switch to your size 0 or 2 brush. Use a mix of Alizarin Crimson and White for the lips, and carefully fill in the irises with your chosen blue or green hues. Add a tiny dot of pure White for the catchlight in each eye to bring them to life. -
Creating the hair:
Mix a hair color (Yellow Ochre and Burnt Sienna for blonde/brown) and stroke in the direction of hair growth. I find it works best to paint the darker undertones first, then layer lighter highlights on top once dry. -
Add the rosy cheeks:
Create a very dilute glaze of Alizarin Crimson. Gently circular motions apply this to the apples of the cheeks for that fresh, youthful flush seen in the photo.
Glazing Magic
To get that soft, glowing skin effect, mix your acrylics with glazing liquid. It makes the paint translucent, allowing you to build up color slowly without harsh lines.
Step 3: Floral Details and Finishing
-
Block in greenery:
Mix Sap Green with a little Yellow or Blue to get varied green shades. Using the size 2 brush, paint the leaves and stems of the crowns. Let some sprigs extend wildly outwards to create a natural, unkempt look. -
Paint the main blooms:
Add the larger flowers first—the red roses and white daisies. Use opaque paint here to make them pop against the hair. -
Add delicate filler flowers:
Using the tip of your smallest brush, dot in clusters of small white baby’s breath or yellow buds. Vary the pressure to create different petal sizes. -
Foreground florals:
Don’t forget the flowers at the bottom of the canvas. Paint stems rising up from the bottom edge, holding red carnations and greenery that overlap the figures slightly, adding depth to the scene. -
Textural details:
If you have watercolor pencils, use them now to add sharp definition to the eyelashes, individual hairs, and veins in the leaves. This mixed-media touch adds a crisp, illustrated quality. -
Paint the clothing:
paint the dresses with a soft White. Use a very light grey or cream to suggest folds and embroidery texture on the daughter’s neckline without overworking it. -
Final highlights:
Add final touches of pure Titanium White to the centers of the daisies and the brightest points of the hair.
Personalize the Blooms
Research the birth flowers for the mother and daughter’s birth months and incorporate those specific blooms into the painted crowns for hidden meaning.
Step back and admire how the floral elements beautifully crown your painted tribute to motherhood, creating a keepsake that will last for years
BRUSH GUIDE
The Right Brush for Every Stroke
From clean lines to bold texture — master brush choice, stroke control, and essential techniques.
Explore the Full Guide
Faceless Watercolor Mother-Daughter Pair
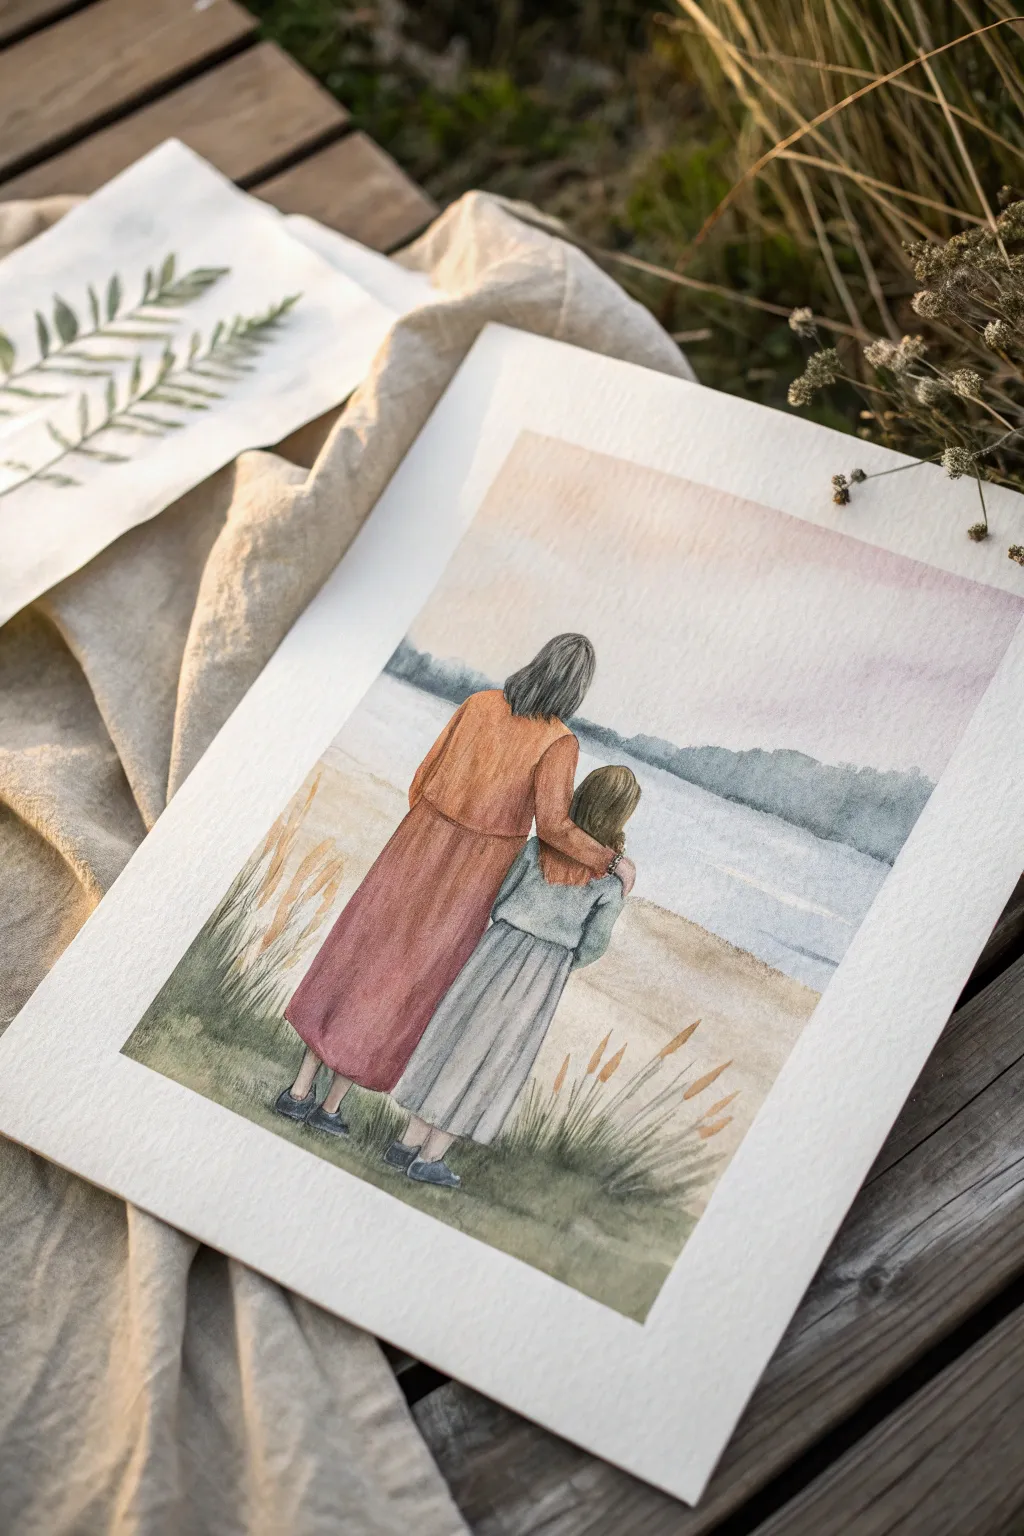
Capture a tender, quiet moment between mother and daughter with this soft watercolor illustration. This project focuses on gentle washes and muted earthy tones to create a peaceful, faceless portrait that evokes emotion without needing detailed features.
Step-by-Step Guide
Materials
- Cold press watercolor paper (300 gsm)
- Pencil (HB or H) and kneaded eraser
- Watercolor paints: Burnt Sienna, Yellow Ochre, Ultramarine Blue, Alizarin Crimson, Payne’s Grey, Sap Green
- Round brushes: Sizes 2, 6, and a larger wash brush
- Water cups and paper towels
- Masking tape (optional, to secure paper)
Step 1: Sketching the Composition
-
Simple Outline:
Begin by lightly sketching the two figures from behind using an HB pencil. Place the mother on the left and the daughter on the right, nestled slightly under the mother’s arm. Focus on the main shapes of their coats and skirts rather than details. -
Define the Embrace:
Refine the connection between the figures. Sketch the mother’s arm resting gently across the daughter’s shoulders. Keep the heads simple ovals; hair details will be added later with paint. -
Horizon Line:
Draw the horizon line about two-thirds up the page. It should be straight but soft. Add faint indications of a distant treeline above the water and some grassy foreground shapes at their feet. -
Lighten the Sketch:
Gently roll a kneaded eraser over your drawing. You want the graphite lines to be barely visible so they don’t show through the transparent watercolor layers.
Step 2: Painting the Background
-
Sky Wash:
Wet the sky area with clean water first. Drop in a very dilute mix of Alizarin Crimson and a touch of Yellow Ochre to create a warm, sunset glow. Let the colors bleed softly upwards into white paper. -
Distant Water:
While the sky is drying, mix a pale wash of Ultramarine Blue with plenty of water for the lake. Paint horizontal strokes, leaving some white gaps to suggest shimmering light on the water’s surface. -
Treeline Silhouette:
Mix Ultramarine Blue with a little Payne’s Grey to create a cool, muted blue-grey. Once the sky and water are damp (not soaking), tap in the distant treeline along the horizon. Let the bottom edge blur slightly into the water for a misty effect. -
Sandy Beach:
Use a wash of Yellow Ochre mixed with a tiny bit of Burnt Sienna for the beach area. Apply this loosely around the figures’ feet, extending toward the water.
Bleeding Colors?
If the figures’ clothes are bleeding into the background, ensure the background is 100% dry before painting the subjects. A hair dryer on low heat speeds this up.
Step 3: Figures and Clothing
-
Mother’s Coat – Base:
Mix a warm, rusty orange using Burnt Sienna and a touch of Alizarin Crimson. Paint the mother’s coat, working from the shoulders down. Let the color pool naturally at the bottom hem. -
Daughter’s Sweater:
For the child’s top, create a soft sage green by mixing Sap Green with a little Payne’s Grey and water. I like to keep this wash quite light to contrast with the mother’s bolder coat. -
The Skirts:
Paint the mother’s skirt in a deeper version of the coat color, perhaps adding a little purple or blue to shadow it. For the daughter’s skirt, use a diluted grey wash, painting vertical strokes to suggest pleats. -
Shadows and Folds:
Once the base clothing layers are dry, mix slightly darker versions of each color. Add shadows under the mother’s arm, along the sides of the torsos, and in the folds of the skirts to create dimension.
Level Up: Texture
Sprinkle a tiny pinch of salt onto the wet sand or water wash. When it dries and you brush it off, it creates a unique, grainy texture perfect for shorelines.
Step 4: Hair and Final Details
-
Suggesting Hair:
Using a size 2 brush and a mix of Burnt Umber and Payne’s Grey, paint the hair. Use sweeping, confident strokes that follow the curve of the head. Leave tiny slivers of white paper for highlights. -
Grounding Shadows:
Mix a dark grey-green. Paint small, irregular shadows directly beneath their shoes to ground the figures so they aren’t floating. Add simple shapes for the shoes. -
Foreground Grasses:
Using a rigger brush or the tip of your size 2, flick upward strokes of Sap Green and Burnt Sienna in the foreground. Vary the height and direction to make the grass look natural. -
Dry Grass Accents:
Add a few taller stalks of dried grass in golden ochre tones near the figures to frame the bottom composition. -
Final Assessment:
Step back and look at the tonal balance. If the horizon line faded too much, glaze a thin layer of blue-grey over it to re-establish the distance.
Frame your gentle watercolor piece in a simple wood frame to complement the organic tones
Butterfly Release Moment
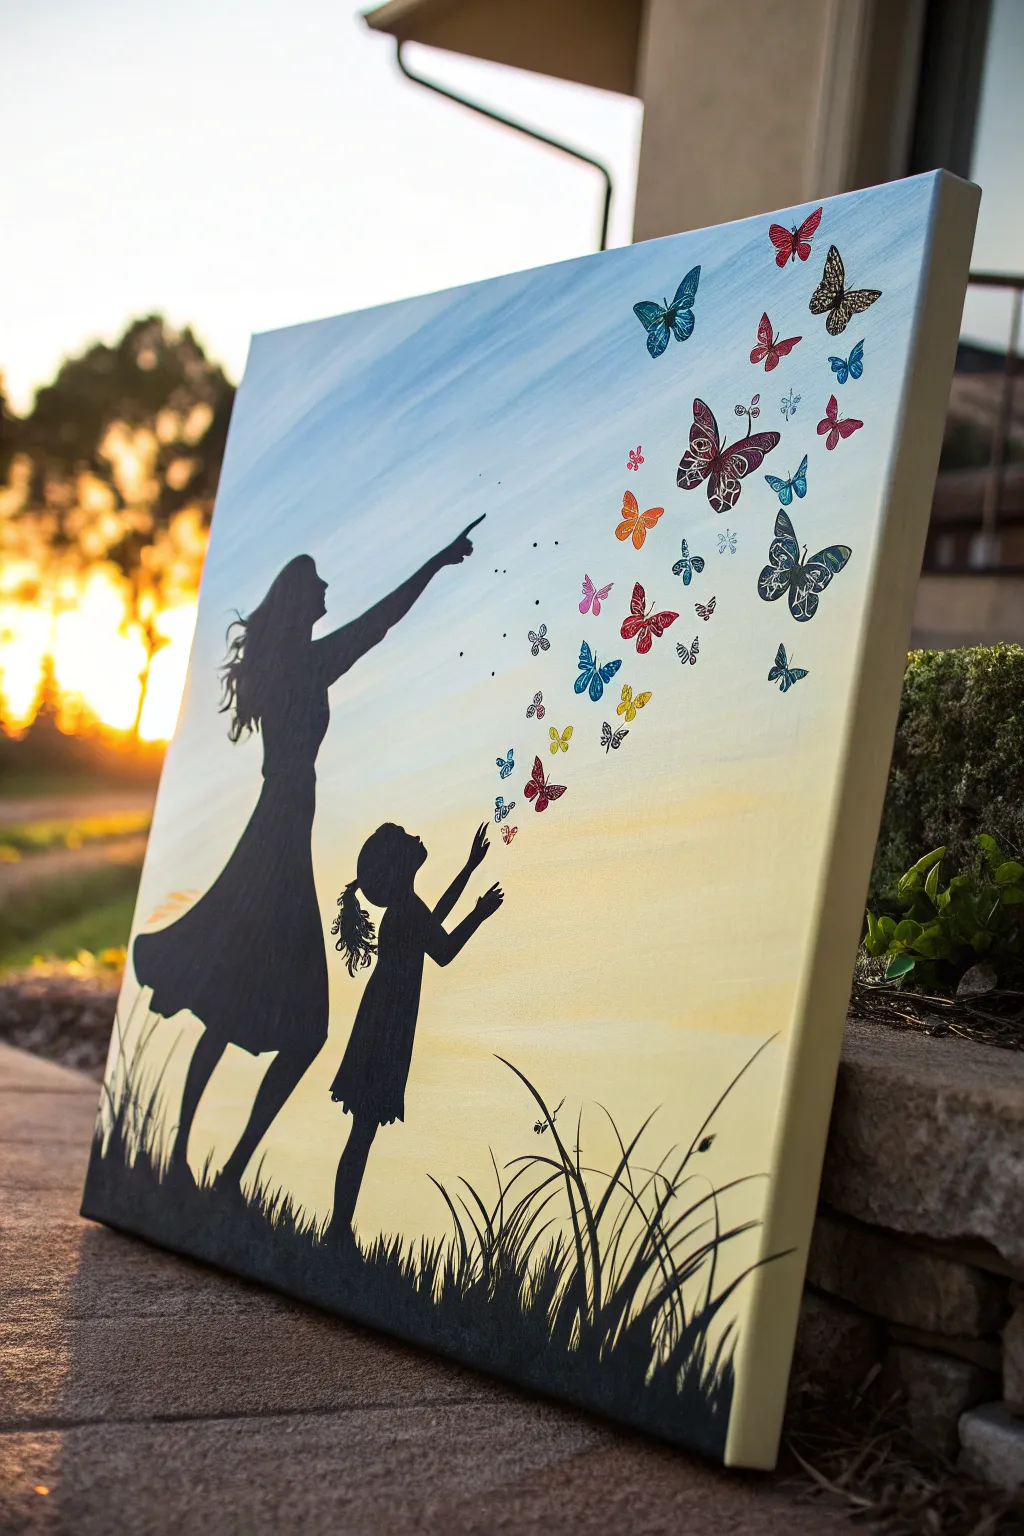
This heartwarming canvas captures a magical moment between mother and daughter as they release a cloud of vibrant butterflies into the sunset. The contrast between the striking black silhouettes and the soft, gradient background creates a timeless piece of art perfect for a family home.
Step-by-Step Guide
Materials
- Rectangular stretched canvas (e.g., 16×20 inches)
- Acrylic paints: Black, White, Sky Blue, Pale Yellow, Orange, plus various bright accent colors for butterflies
- Wide flat brush (1-inch or larger)
- Medium round brush
- Fine detail brush (liner brush)
- Pencil and eraser
- Carbon transfer paper (optional)
- Printed silhouette template (optional)
- Palette or paper plate
- Cup of water and paper towels
Step 1: Painting the Sunset Background
-
Prepare the gradient colors:
Squeeze out your sky colors onto the palette: Sky Blue, White, Pale Yellow, and a touch of Orange. I like to keep a good amount of white handy to soften the transitions between these zones for a dreamy look. -
Paint the upper sky:
Starting at the top left corner using your wide flat brush, apply the Sky Blue paint mixed with a little White. Use long, diagonal strokes that sweep downwards towards the right side of the canvas. -
Create the mid-sky transition:
While the blue is still wet, clean your brush and pick up White mixed with a very small amount of Blue. Blend this into the bottom edge of your existing blue section, moving diagonally across the middle of the canvas to lighten the sky. -
Add the golden horizon:
Mix Pale Yellow with White and apply it to the bottom third of the canvas. Blend upwards into the lighter blue section while the paints are wet to create a seamless, soft graduation. -
Warm up the sunset:
Add the tiniest hint of Orange to your yellow mix near the bottom left edge where the sun would naturally be setting. Blend this softly so there are no harsh lines, just a warm glow. -
Allow to dry completely:
Let the background dry fully before moving on. The canvas should feel room temperature to the touch; if it’s cold, it’s still damp.
Uneven Background?
If your gradient looks streaky, let it dry completely. Then, mix a very watery, transparent wash of the dominant color and glaze over the entire area to unify it.
Step 2: Creating the Silhouettes
-
Sketch or transfer the figures:
Lightly sketch the outlines of the mother and daughter using a pencil. If you prefer precision, print out a silhouette template, place carbon paper underneath, and trace the design directly onto the dry canvas. -
Block in the shapes:
Using a medium round brush and pure Black acrylic paint, fill in the main bodies of the figures. Ensure the paint is opaque; you may need a second coat after the first one dries to completely hide the background gradient. -
Refine the edges:
Switch to a smaller brush to clean up the edges of the dresses and arms. The mother’s arm should be extended high pointing diagonally, while the daughter reaches up with both hands. -
Add hair details:
Use your fine detail brush (liner brush) to flick tiny strands of hair outward from the silhouette heads. This creates the illusion of movement and wind. -
Paint the grass:
Along the very bottom edge, paint a solid black strip. While wet, use the liner brush to pull quick, upward strokes to create tall, grassy blades that overlap the figures’ feet.
Add Some Shimmer
Use metallic gold or pearlescent acrylic paint for the wing patterns on the butterflies. It catches the light beautifully when hung on the wall.
Step 3: The Flight of Butterflies
-
Plan the flight path:
Visualize a diagonal swoosh starting from the figures’ hands and expanding toward the top right corner. You can make tiny pencil dots to mark where the main butterflies will go. -
Paint butterfly base shapes:
Using various bright colors (reds, blues, pinks, oranges), paint the solid wing shapes of the butterflies. Vary the sizes—larger ones near the top right, smaller ones closer to the hands to show distance. -
Create patterned wings:
For the feature butterflies, once the base color is dry, use a fine brush with White or Black paint to add intricate patterns like dots, lines, or lace-like details on the wings. -
Add the silhouette butterflies:
Intersperse the colorful butterflies with smaller, solid black butterflies. This adds depth and ties the swarm visually back to the main figures. -
Paint the ‘sparkle’ dots:
Dip the non-brush end of your paintbrush into black or dark blue paint. Dot small specks in the empty spaces between the butterflies to represent distant specks or magical dust.
Step back and admire the uplifting scene you’ve created, ready to hang a little piece of joy on your wall

PENCIL GUIDE
Understanding Pencil Grades from H to B
From first sketch to finished drawing — learn pencil grades, line control, and shading techniques.
Explore the Full Guide
The Swing Under a Big Moon
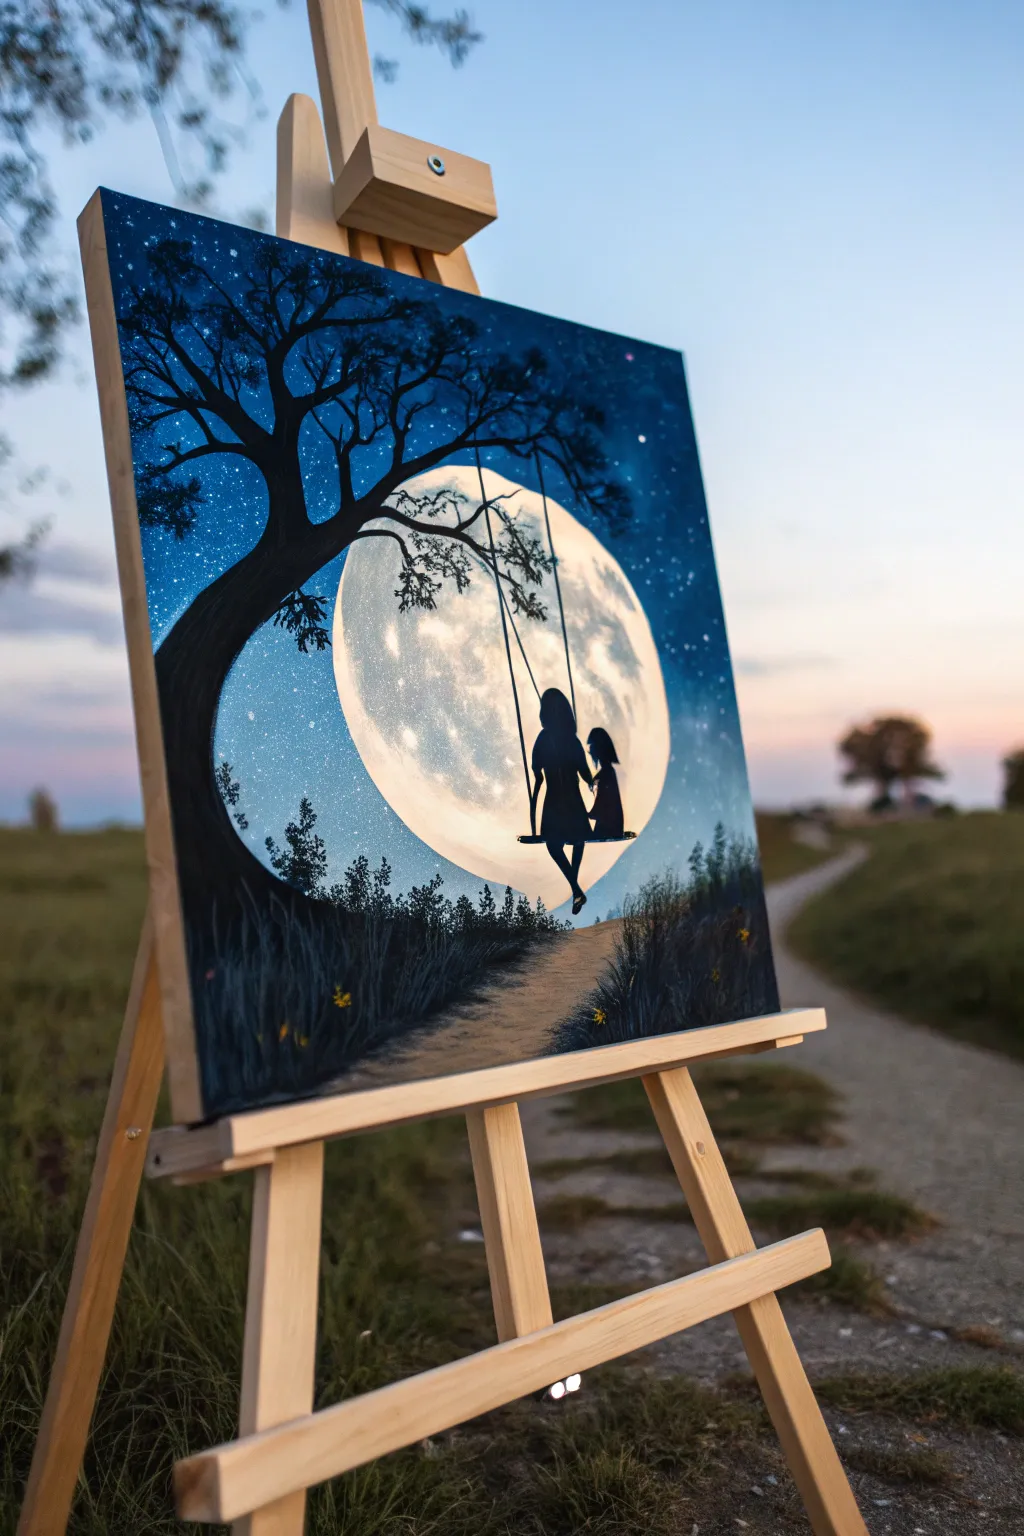
Capture a tender moment frozen in time with this striking acrylic painting featuring a mother and daughter on a swing. The sharp silhouettes against a massive, glowing moon create a dramatic yet peaceful scene that’s perfect for celebrating family bonds.
Step-by-Step Tutorial
Materials
- Stretched canvas (e.g., 16×20 inches)
- Acrylic paints (Phthalo Blue, Ultramarine Blue, Titanium White, Mars Black, Sap Green)
- Large flat brush or sponge applicator
- Medium round brush
- Small liner brush or detail brush
- Old toothbrush (for stars)
- Circular object or compass (for the moon template)
- Pencil
- Palette and water cup
- Paper towels
Step 1: Setting the Celestial Scene
-
Outline the moon:
Begin by deciding the placement of your giant moon. Use a large circular object like a dinner plate or a compass to lightly trace a large circle right in the center of your canvas. -
Paint the moon base:
Fill in the circle with Titanium White. It doesn’t need to be perfectly opaque yet, but getting a solid base layer down helps the glowing effect later. -
Create the night sky gradient:
While the moon dries, start painting the sky. Mix Phthalo Blue with a touch of Black for the corners to create a deep vignette effect. As you move toward the moon, switch to pure Phthalo Blue, then mix in some Titanium White as you get close to the circle’s edge to create a glowing halo. -
Blend the transition:
Work quickly while the paint is wet to seamless blend the dark outer sky into the lighter blue halo surrounding the moon. I find using a clean, slightly damp brush helps smooth out the gradient perfectly. -
Detail the moon’s surface:
Mix a very light grey using White and a tiny dot of Black. Using a dry brush technique or a scrunched-up paper towel, gently dab texture onto the white moon to create craters and shadows. Keep the texture subtle and concentrated more heavily on one side. -
Starry spatter:
Thin down some Titanium White paint with water until it’s inky. Dip an old toothbrush into it and flick the bristles with your thumb to spray tiny stars across the blue sky areas, avoiding the moon itself and the bottom third of the canvas.
Uneven Moon Edge?
If your sky paint accidentally overlaps your perfect moon circle, wait for it to dry completely. Then, re-paint the edge of the moon with opaque white to clean up the crisp circular line.
Step 2: Painting the Landscape
-
Establish the ground line:
Using Black mixed with a little Sap Green, paint a rolling hill silhouette at the bottom of the canvas. Curve the hill slightly so it looks like a natural slope. -
Add the pathway:
Mix a muted beige using White, a drop of Yellow (or unmixed Ochre if you have it), and a tiny bit of Black. Paint a winding path leading from the bottom center up toward the hill’s crest, getting narrower as it recedes. -
Detail the grass:
Using a small fan brush or a liner brush, flicks short, upward strokes of your Black/Green mix along the horizon line and the edges of the path to simulate tall grass blades. -
Add subtle highlights:
Mix a slightly lighter grey-green and add a few highlights to the tips of the grass and the edges of the path where the moonlight would hit.
Step 3: The Silhouettes
-
Paint the tree trunk:
With pure Mars Black and a round brush, paint a thick, curving tree trunk entering from the left side. Let the trunk arch over the top of the moon. -
Branching out:
Extend thinner branches from the main trunk. Allow them to be jagged and organic, crossing over the moon’s face to create depth. Use your liner brush for the finest twig tips. -
Add leaves:
Stipple or dab small clusters of black leaves onto the branches using an old, splayed brush or a sponge. Don’t overdo it; you want the moon to shine through the canopy. -
Draft the figures:
Using a pencil or chalk, lightly sketch the outline of the mother and daughter sitting on a swing board directly over the moon area. This ensures your proportions are correct before committing with paint. -
Paint the swing ropes:
Use your liner brush and black paint (thinned slightly for flow) to paint two long, straight lines hanging from a sturdy branch down to your sketched figures. -
Fill the figures:
Carefully fill in the silhouettes of the figures and the swing seat with solid Mars Black. Pay attention to the profiles—the shape of the hair and the posture convey the emotion. -
Final touches:
Add tiny details like hand-holding between the figures or loose hair strands to make the silhouette feel more natural.
Add Moonlight Glow
Mix a transparent glaze of white and water. Lightly brush it over the edges of the tree trunk and the tops of the figures to make them look like they are being backlit by the moon.
Step back and admire the peaceful atmosphere you have created with just contrast and light
Tree of Life With Hearts in the Leaves
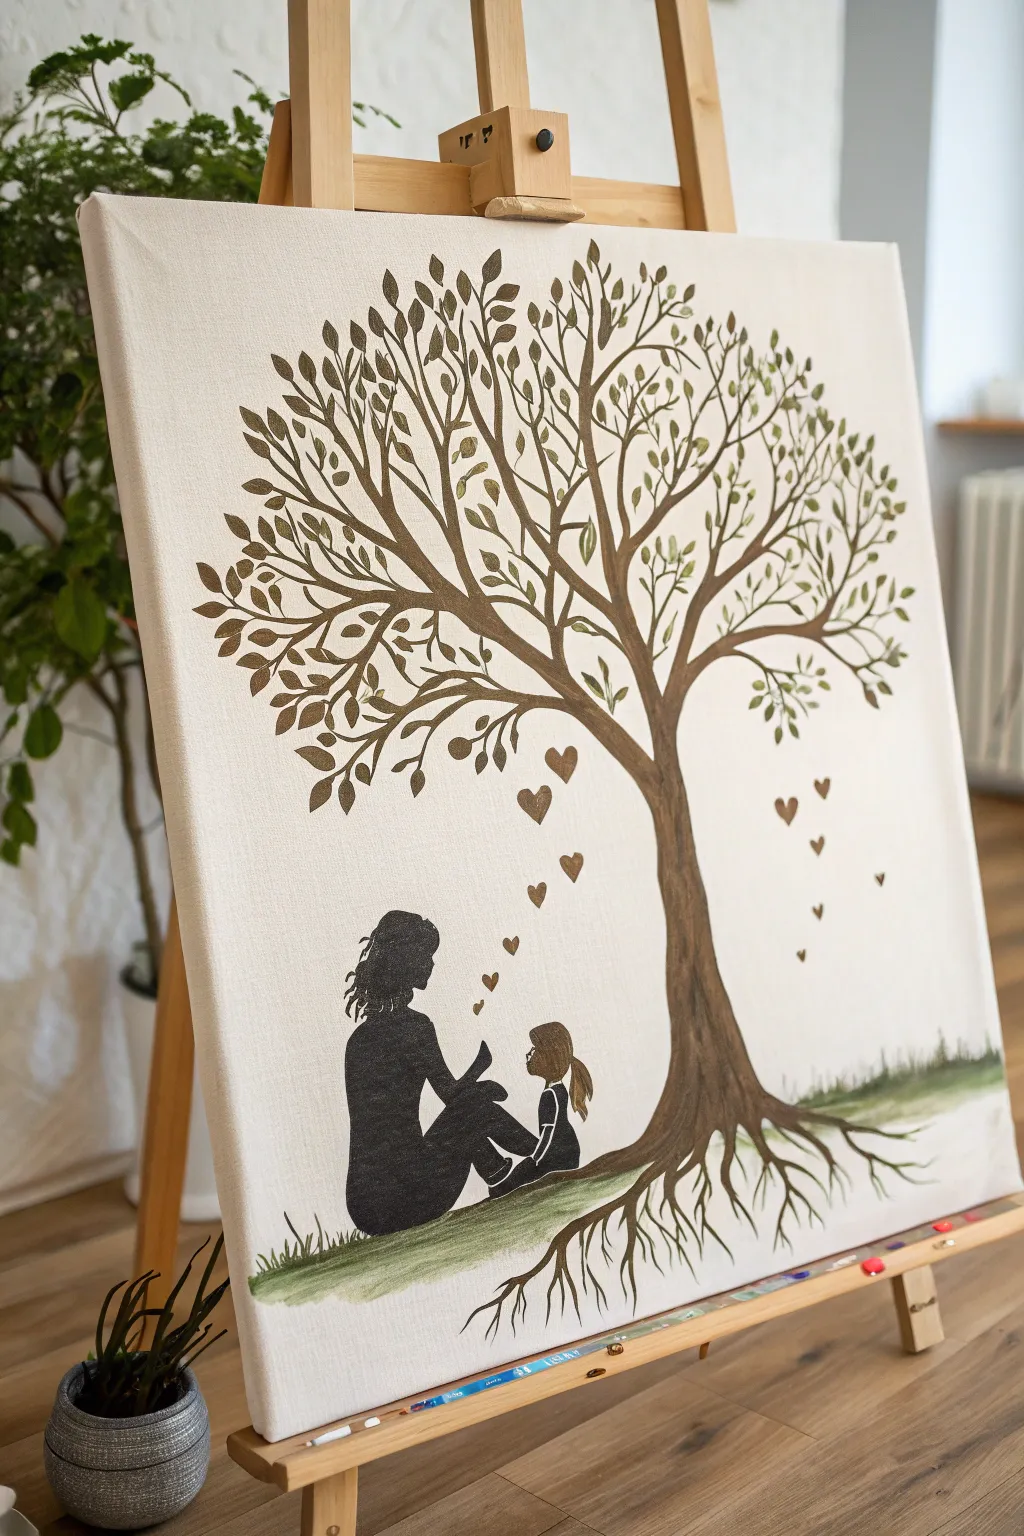
This heartwarming painting features a graceful tree of life with bronze-touched leaves sheltering the silhouettes of a mother and daughter. Small floating hearts bridge the gap between the figures and the canopy, symbolizing the love growing between them.
Step-by-Step Guide
Materials
- Rectangular stretched canvas (e.g., 16×20 inches)
- Acrylic paints: Dark brown, bronze/metallic gold, olive green, black, white
- Pencils (HB or softer for sketching)
- Round brushes (sizes 2, 4, and 8)
- Detail liner brush (size 00 or 0)
- Palette or paper plate
- Paper towels and water cup
Step 1: Painting the Tree Structure
-
Sketch the outline:
Begin by lightly sketching the main trunk slightly off-center to the right. Draw the branches spreading outward to cover the top two-thirds of the canvas, ensuring the limbs taper as they reach the edges. -
Add roots:
Extend lines downwards from the trunk to form a complex root system. Let these roots fan out and grip an imaginary ground line, creating a sense of stability. -
Base coat the trunk:
Load a size 8 round brush with dark brown paint. Fill in the trunk and the thickest parts of the main branches, using long, smooth strokes that follow the direction of growth. -
Branch details:
Switch to a size 4 brush to paint the medium-sized branches. Add a touch of water to your paint if it feels too thick, which helps achieve sharper, more tapered points. -
Create fine twigs:
Use your smallest liner brush to add delicate twigs extending from the branch ends. These should be very thin and numerous, providing plenty of attachment points for your leaves. -
Define the roots:
Paint the root system with the same dark brown. Ensure the roots taper into fine points as they go deeper into the ‘ground’ area at the bottom right.
Uneven Silhouettes?
If silhouette edges look ragged, wait for the black paint to dry completely. Then, use a fine-tip black permanent marker to trace and smooth out the outline for a crisp finish.
Step 2: Adding Foliage and Ground
-
Mix leaf colors:
Prepare two shades for the leaves: a solid olive green for the base and a metallic bronze or gold mixed with a tiny drop of brown for the highlights. -
Base leaves:
Using the tip of a size 4 round brush, press and lift to create simple almond-shaped leaves scattered across the branches. I prefer to keep these somewhat sparse initially so the structure remains visible. -
Metallic accents:
Once the green leaves are tacky or dry, paint slightly smaller bronze/gold leaves near them, or overlapping slightly. This gives the tree a beautiful shimmering effect. -
Paint the ground:
Mix olive green with a little white to create a soft, grassy color. Use a damp brush to sweep a horizontal wash across the bottom, going right over the lower sections of the roots to make them look embedded. -
Add grass texture:
With a liner brush and the original olive green, flick small vertical strokes upward from the ground line to simulate blades of grass.
Leaf Variation
Don’t paint every leaf the same size! Varying pressure on your brush creates a mix of large and small leaves, making the canopy look much more organic and natural.
Step 3: Silhouettes and Love Hearts
-
Sketch the figures:
Lightly draw the outline of the mother and daughter sitting on the grass. Position them to the left of the trunk, facing each other, with the mother’s legs extended and the child sitting cross-legged. -
Fill the mother silhouette:
Using black paint and a size 4 brush, carefully fill in the mother’s shape. Pay attention to the hair texture—dab the brush to create wavy edges rather than a smooth helmet shape. -
Fill the child silhouette:
Fill in the child’s figure with black. Leave a tiny negative space (unpainted canvas) where the child’s arm meets the body to define the sleeve or posture. -
Paint falling hearts:
Mix a soft brown or bronze color. Paint a vertical trail of small hearts ‘falling’ from the branches down toward the figures, varying their sizes slightly. -
Add floating hearts:
Scatter a few more small bronze hearts on the right side of the tree for balance, making them look like falling leaves. -
Final touches:
Check the opacity of your black silhouettes; if they look streaky, apply a second coat of black once the first is completely dry.
Hang this sentimental piece in a family room where its metallic accents can catch the light


Mama Bear and Cub Energy
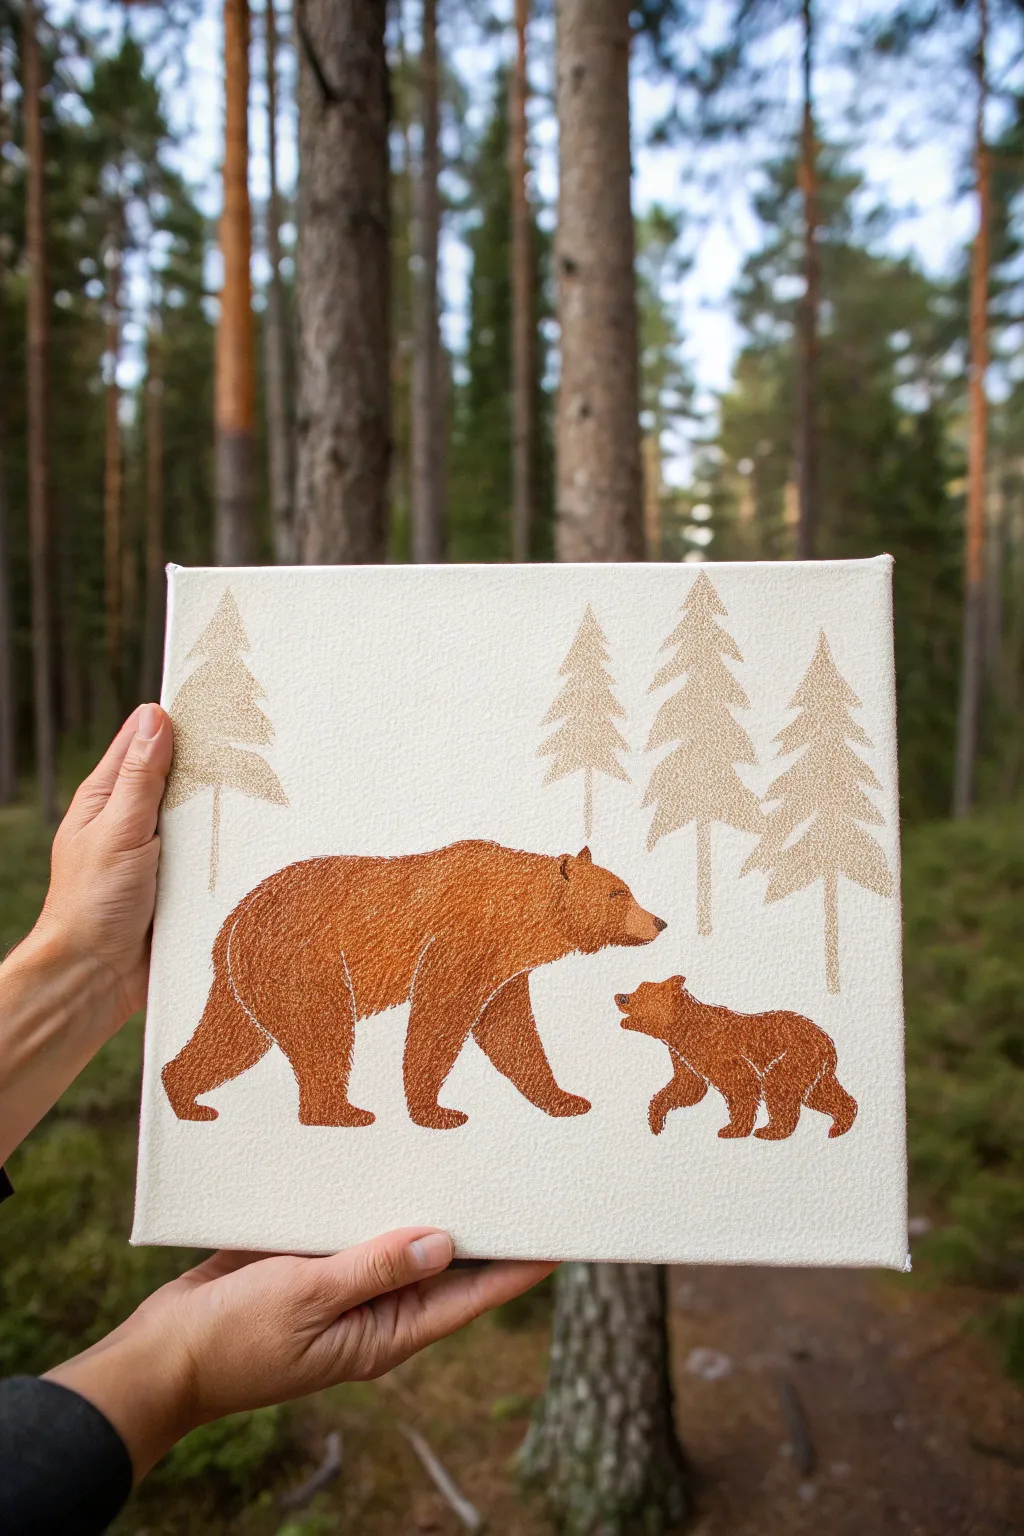
Capture the tender bond between parent and child with this textured mixed-media canvas. Using a clever combination of stenciling and simple embroidery-style painting strokes, this piece brings a mama bear and her cub to life against a subtle forest backdrop.
Step-by-Step Tutorial
Materials
- Small square canvas (e.g., 8×8 or 10×10 inches)
- Acrylic paints: Burnt Sienna, Raw Umber, Metallic Gold/Champagne, Cream
- Small round detail brush (size 0 or 1)
- Stencil brush or small sponge
- Pine tree stencil (or cardstock to cut your own)
- Pencil
- Palette paper or plate
- Paper towels
Step 1: Setting the Scene
-
Prepare the canvas:
Start with a clean, white canvas. If you want a warmer tone, apply a wash of cream paint watered down significantly, covering the entire surface and letting it dry completely. -
Design the forest:
Position your pine tree stencils across the upper half of the canvas. Arrange them at varying heights to create depth, keeping the area below clear for the bears. -
Stipple the trees:
Dip a dry stencil brush or sponge into the Metallic Gold or Champagne paint. Dab off most of the excess on a paper towel until the brush is almost dry. -
Apply tree texture:
Gently tap the paint over the stencil using an up-and-down motion. This creates a soft, textured look rather than a solid block of color. Repeat for all four trees. -
Check and lift:
Carefully lift the stencil straight up to avoid smudging. Let the metallic paint dry for at least 15 minutes.
Step 2: Sketching the Bears
-
Outline the mama bear:
Using a pencil, lightly sketch the outline of the large bear on the left side of the canvas. Focus on the humped shoulder and the rounded rump. -
Outline the cub:
Sketch the smaller cub on the right, facing the mama bear. Ensure the size difference is significant to show the parent-child relationship. -
Refine the shapes:
Clean up your sketch lines. Don’t worry about fur details yet; just get the solid silhouette of the bodies correct.
Clean Lines Pro Tip
For the stenciled trees, use a repositionable spray adhesive on the back of the stencil. This prevents paint bleed-under better than tape.
Step 3: Painting the Fur Texture
-
Mix the base color:
On your palette, mix Burnt Sienna with a tiny touch of Cream to create a warm, reddish-brown hue. -
Start the fur strokes:
Using your smallest detail brush, begin painting the mama bear. Instead of filling it in solid, use short, directional dashes to mimic fur or embroidery stitches. -
Follow the form:
Ensure your strokes follow the curve of the bear’s body—curving down the legs and around the shoulder hump to create volume. -
Fill the mama bear:
Continue covering the entire shape with these short strokes, leaving tiny microscopic gaps occasionally to let the background peek through for texture. -
Paint the cub:
Repeat the process for the cub using the same color and stroke technique. Keep the strokes smaller here to match the cub’s size. -
Add shadows:
Mix a little Raw Umber into your brown. I like to add this darker shade to the bottom of the feet and under the belly with the same short strokes. -
Add highlights:
Clean your brush and pick up pure Burnt Sienna or a slightly lighter orange-brown. Add a few strokes on the tops of the backs and heads where the light hits. -
Final details:
Use the dark Raw Umber to carefully dot the nose and eye on both bears. Keep these features very subtle and small.
Stitched Effect
If you want real texture, use embroidery floss for the bears! Poke holes along your pencil lines and satin stitch the animals directly onto the canvas.
Display this charming woodland scene in a nursery or living area to celebrate family togetherness
Two-Part Canvas: One Heart, Two Halves
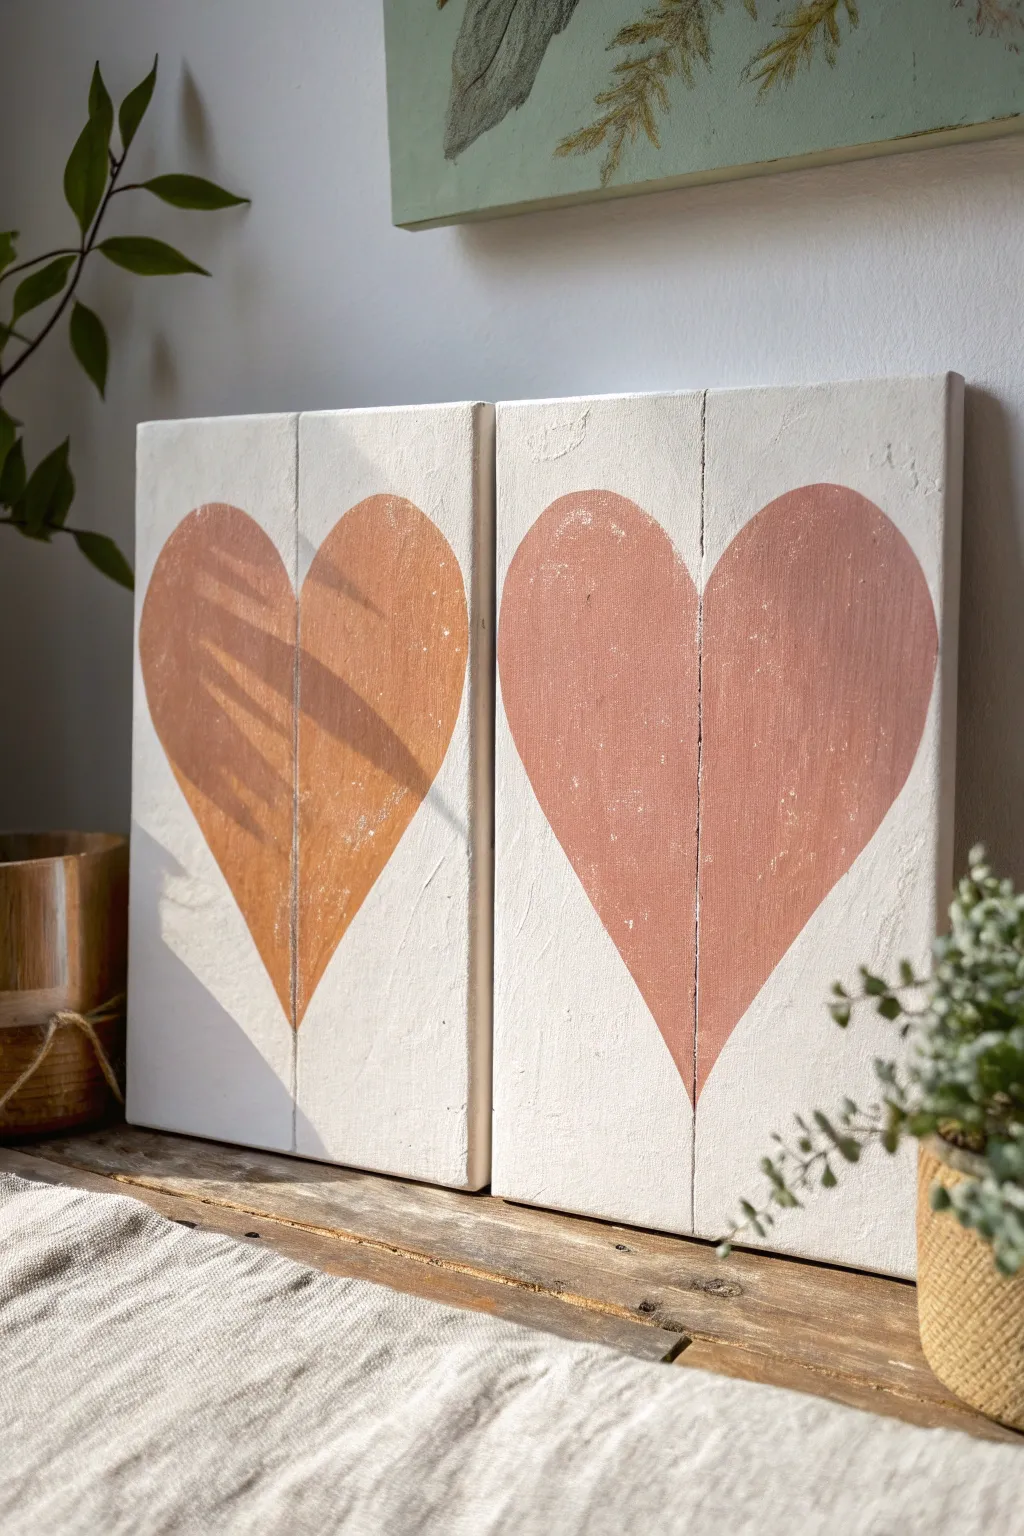
This rustic and sentimental project brings two separate canvases together to form a warm, cohesive design, perfect for a mother-daughter painting session. Using a soft, distressed finish and earthy tones, these two hearts complement each other beautifully whether displayed side-by-side or in separate rooms.
Step-by-Step
Materials
- Two rectangular stretched canvases (same size, vertical orientation)
- White acrylic paint or gesso
- Terra cotta or dusty rose acrylic paint
- Medium flat synthetic paintbrush
- Large flat utility brush or chip brush (for background)
- Pencil
- Large sheet of paper or cardstock (for stencil template)
- Scissors
- Sandpaper (fine to medium grit)
- Painter’s tape or artist tape
- Matte sealant spray (optional)
Step 1: Preparation & Background
-
Prepare the workspace:
Lay down a drop cloth or old newspapers to protect your table. Place your two canvases side-by-side on the surface, pushing them together so the inner edges touch tightly. -
Prime the canvases:
Using your large utility brush, apply a thick, somewhat uneven coat of white acrylic paint or gesso over both canvases. Don’t worry about perfect smoothness; brushstrokes add texture. -
Create a faux-plank effect (Optional):
To mimic the wooden look in the inspiration image, you can use the edge of a ruler or a dull pencil to gently score a vertical line down the center of each wet canvas. This creates a subtle groove that looks like separate wood planks. -
Let the background dry:
Allow the white base coat to dry completely. This is crucial before moving on to the stencil step to prevent smudging or paint lifting.
Uneven Edges?
If your hand is shaky, apply painter’s tape along the outside of your pencil lines. Press the edges firmly to seal, preventing paint bleed.
Step 2: Creating the Stencil
-
Draft the heart shape:
Take a large piece of paper that covers the width of one canvas. Fold it in half vertically and cut out a half-heart shape. Unfold it to reveal a symmetrical heart. -
Size match:
Hold your paper heart against one canvas to ensure it fills the space nicely—it should leave a border of white space around the edges but dominate the center. -
Trace the design:
Place the paper cut-out centrally on the first canvas and lightly trace the outline with a pencil. Repeat this exact placement on the second canvas so the hearts are identical in position. -
Alternative method: The split heart:
If you prefer the hearts to look like one large heart split across the gap, place the canvases touching each other, lay a giant stencil across both, and trace. However, the example shows two complete, individual hearts, which is easier for beginners.
Step 3: Painting the Hearts
-
Mix your color:
Squeeze out your terra cotta or dusty rose paint. If the color feels too vibrant, I sometimes mix in a tiny drop of brown or white to mute it down for that earthy, vintage look. -
Outline the shape:
Using your medium flat brush, carefully paint along the inside of your pencil line to establish a crisp edge for the heart. -
Fill in the center:
Fill the rest of the heart with smooth strokes. Try to paint vertically, following the direction of the canvas, to maintain a clean grain look. -
Apply a second coat:
Once the first layer is dry to the touch, apply a second coat if the white background is showing through too much, though a little transparency adds to the rustic charm. -
Paint the second canvas:
Repeat the painting process on the second canvas, trying to match the color saturation and brushstroke style of the first one.
Add Texture
Mix a teaspoon of baking soda into your acrylic paint before applying the heart. This creates a gritty, stone-like texture that looks amazing when distressed.
Step 4: Distressing & Finishing
-
Dry thoroughly:
Let both paintings dry completely. They should be cool to the touch and not tacky before you attempt to distress them. -
Distress with sandpaper:
Take a small block of sandpaper and gently scuff the surface of the painting. Focus on the edges of the canvas and random spots within the heart to reveal small flecks of the white layer beneath. -
Scrape technique (Alternative):
For a more chipped-paint look, you can use the edge of a palette knife or an old credit card to scrape away tiny bits of paint while it’s still slightly tacky, though sanding is safer for beginners. -
Clean off dust:
Wipe the canvases down with a dry, lint-free cloth or a dry paintbrush to remove all the paint dust created by the sanding process. -
Seal the artwork:
To protect your work without adding unwanted shine, spray a light coat of matte sealant over the entire surface of both canvases.
Place your finished canvases together on a shelf or mantelpiece to enjoy the sweet connection between the two pieces
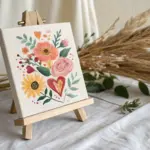
Fingerprint Flower Bouquet Together
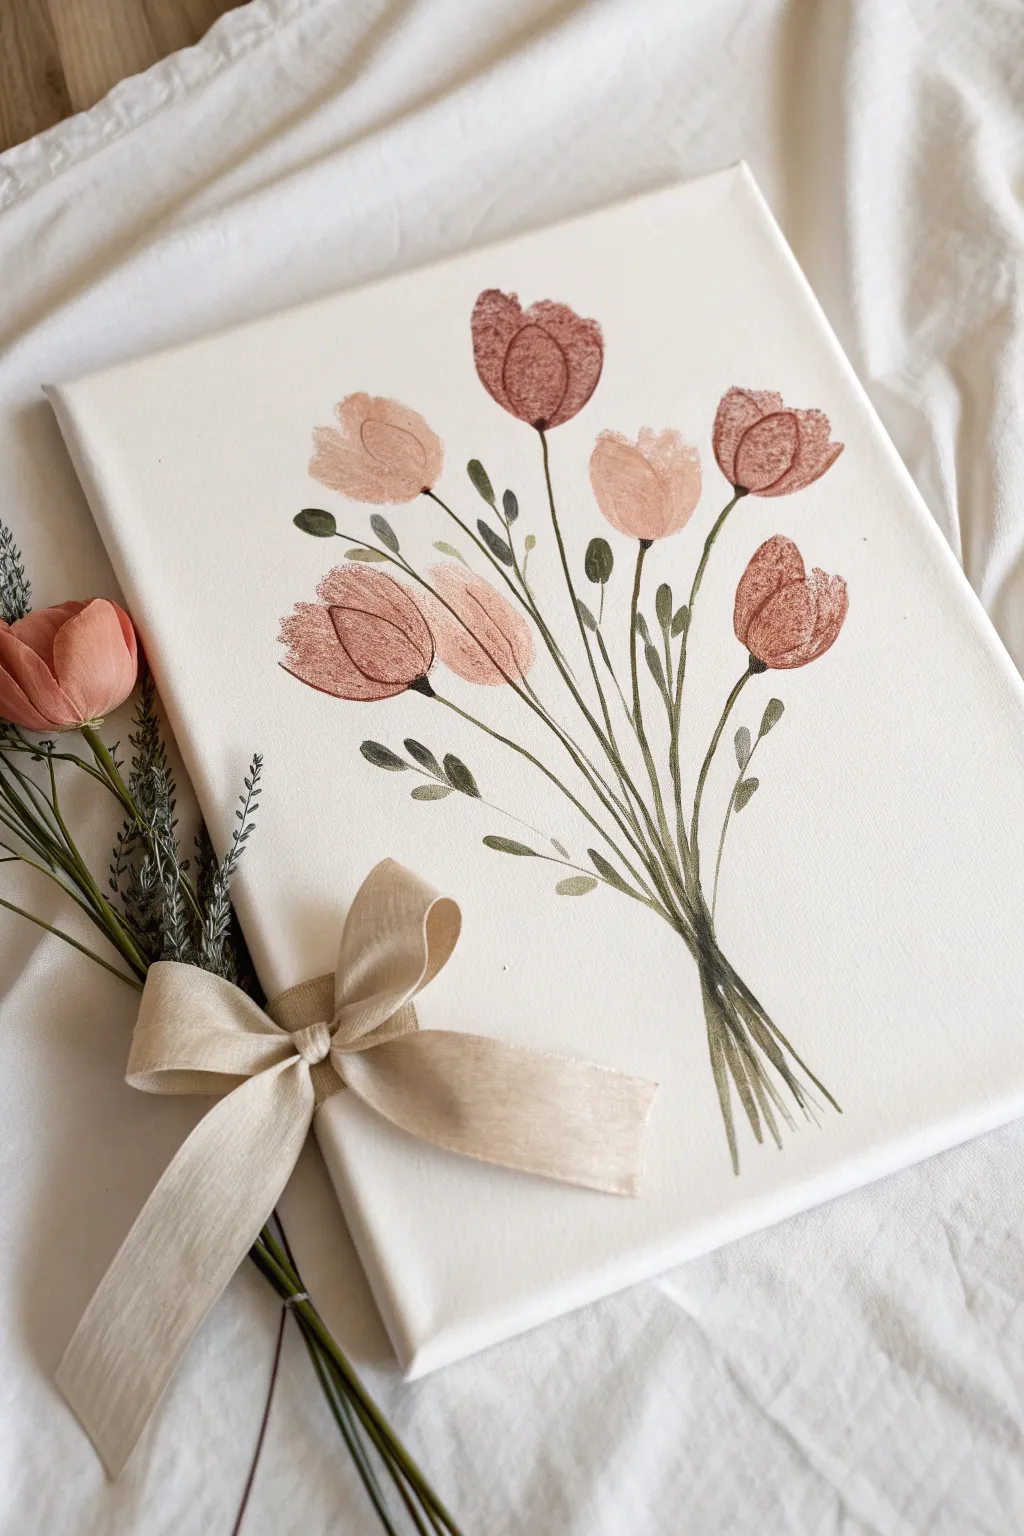
Create a sentimental keepsake that captures a moment in time using just your hands and a bit of paint. This lovely, minimalist bouquet relies on thumbprints to create soft, textured tulip-like blooms that look surprisingly sophisticated when gathered together.
Detailed Instructions
Materials
- Stretched canvas (8×10 or 11×14 inches)
- Acrylic paints (muted pink, terracotta, warm white, sage green, olive green)
- Fine liner brush (size 00 or 1)
- Palette or paper plate
- Paper towels
- Pencil (optional)
Step 1: Planning the Composition
-
Lightly sketch spacing:
Before dipping into paint, visualize where your flowers will go. You want a fan shape, starting from a clustered point at the bottom center and spreading outward toward the top. If you’re nervous, lightly mark tiny dots with a pencil where the center of each flower head should sit. -
Prepare your palette:
Squeeze out your flower colors—muted pinks and terracotta tones work beautifully for a vintage look. Mix a little white into your terracotta to create a third, softer peach shade for variety.
Smudged Prints?
If a print smears, don’t wipe it! Let it dry completely, paint over it with the background white color, and try again. Wiping wet paint usually leaves a visible stain.
Step 2: Creating the Blooms
-
Apply the first print:
Dip your thumb (or your child’s thumb) into the terracotta paint. Press it gently onto the palette first to remove excess globs; you want a thin, textured layer. -
Form the flower shape:
Press your thumb onto the canvas at a slight angle to the left. Immediately re-ink lightly and press again, overlapping the bottom of the first print but angling this one to the right. This ‘V’ shape creates a perfect tulip profile. -
Build the bouquet:
Continue adding flowers using this two-print technique. Vary the heights—some stems should be tall and reaching for the top corners, while others nestle lower in the bunch. -
Switch colors:
Wipe your thumb clean and switch to the muted pink shade. Add these lighter blooms interspersed among the darker ones to create depth. I find it helps to step back occasionally to ensure the arrangement looks balanced. -
Add accent buds:
For smaller, unopened buds, use a pointer finger or pinky finger instead of a thumb. Use just a single vertical print for these rather than the V-shape. -
Let the blooms dry:
Allow the flower heads to dry completely before starting the stems. This prevents your hand from smudging the work while you paint the greenery.
Step 3: Adding Greenery
-
Mix stem colors:
On your palette, mix olive green with a tiny touch of brown to get a realistic, earthy stem color. You can also have a lighter sage green ready for highlights. -
Paint the main stems:
Using your fine liner brush with the olive mix, paint a thin line from the bottom of each flower head down to a single convergence point at the bottom center of the canvas. -
Create the crossover:
As you near the bottom ‘gathering point,’ let the lines cross over each other naturally. Don’t worry about them being perfectly straight; a little wobble makes them look organic. -
Extend the stems:
Allow the lines to continue past the convergence point, flaring out slightly at the very bottom to look like cut flower ends. -
Add leaves:
Along the main stems, paint small, elongated oval leaves. Use a simple ‘press and lift’ motion with your brush: press down to widen the stroke, then lift as you pull away to create a sharp point. -
Fill empty spaces:
Look for large gaps between flowers. Paint thin, free-standing stems that end in small leaves or tiny green buds to make the bouquet look full and lush. -
Add final details:
Once the flower heads are fully dry, you can use the very tip of your liner brush with a slightly darker shade of the flower color to outline the edges of the petals loosely, defining the shape further.
Clean Edges
For sharper petals, use a damp Q-tip to gently shape the edges of the thumbprint while the paint is still wet, removing any fuzziness for a cleaner silhouette.
Hang your collaborative masterpiece in a well-lit spot to enjoy the unique texture created by your own handprints


Have a question or want to share your own experience? I'd love to hear from you in the comments below!