When you’re painting faces on men, I’ve found the best designs are the ones that lean into strong features—brows, cheekbones, and that crisp jawline. Below are my go-to face paint ideas for men that feel bold, wearable, and seriously fun to paint.
Classic Tribal-Inspired Side Sweep
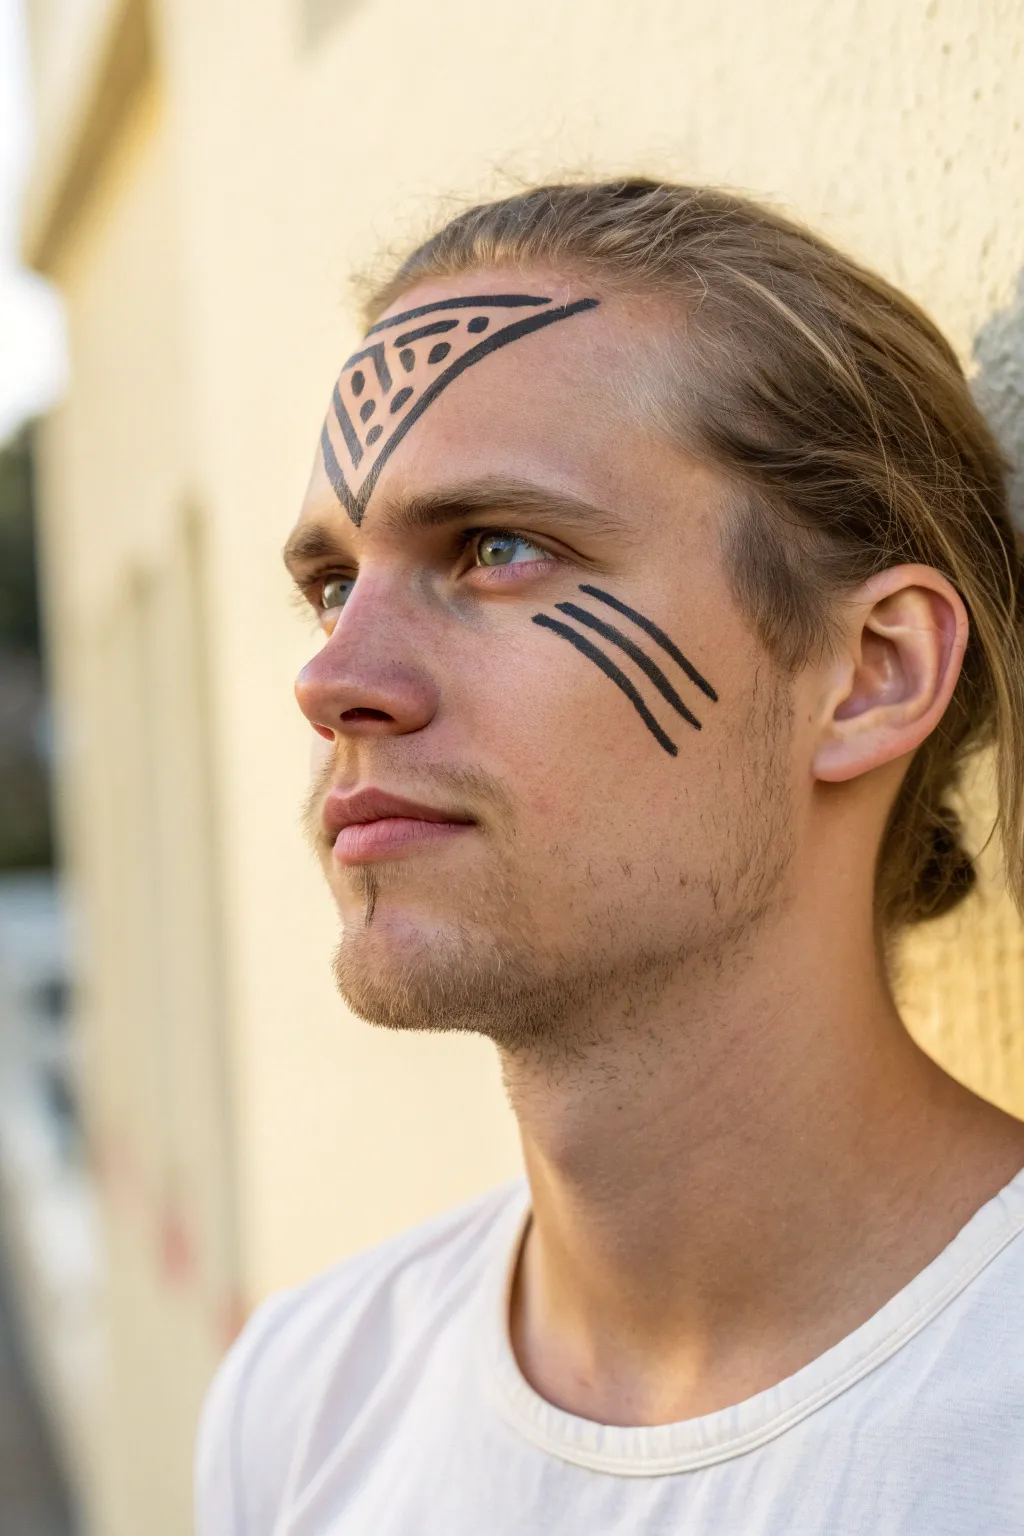
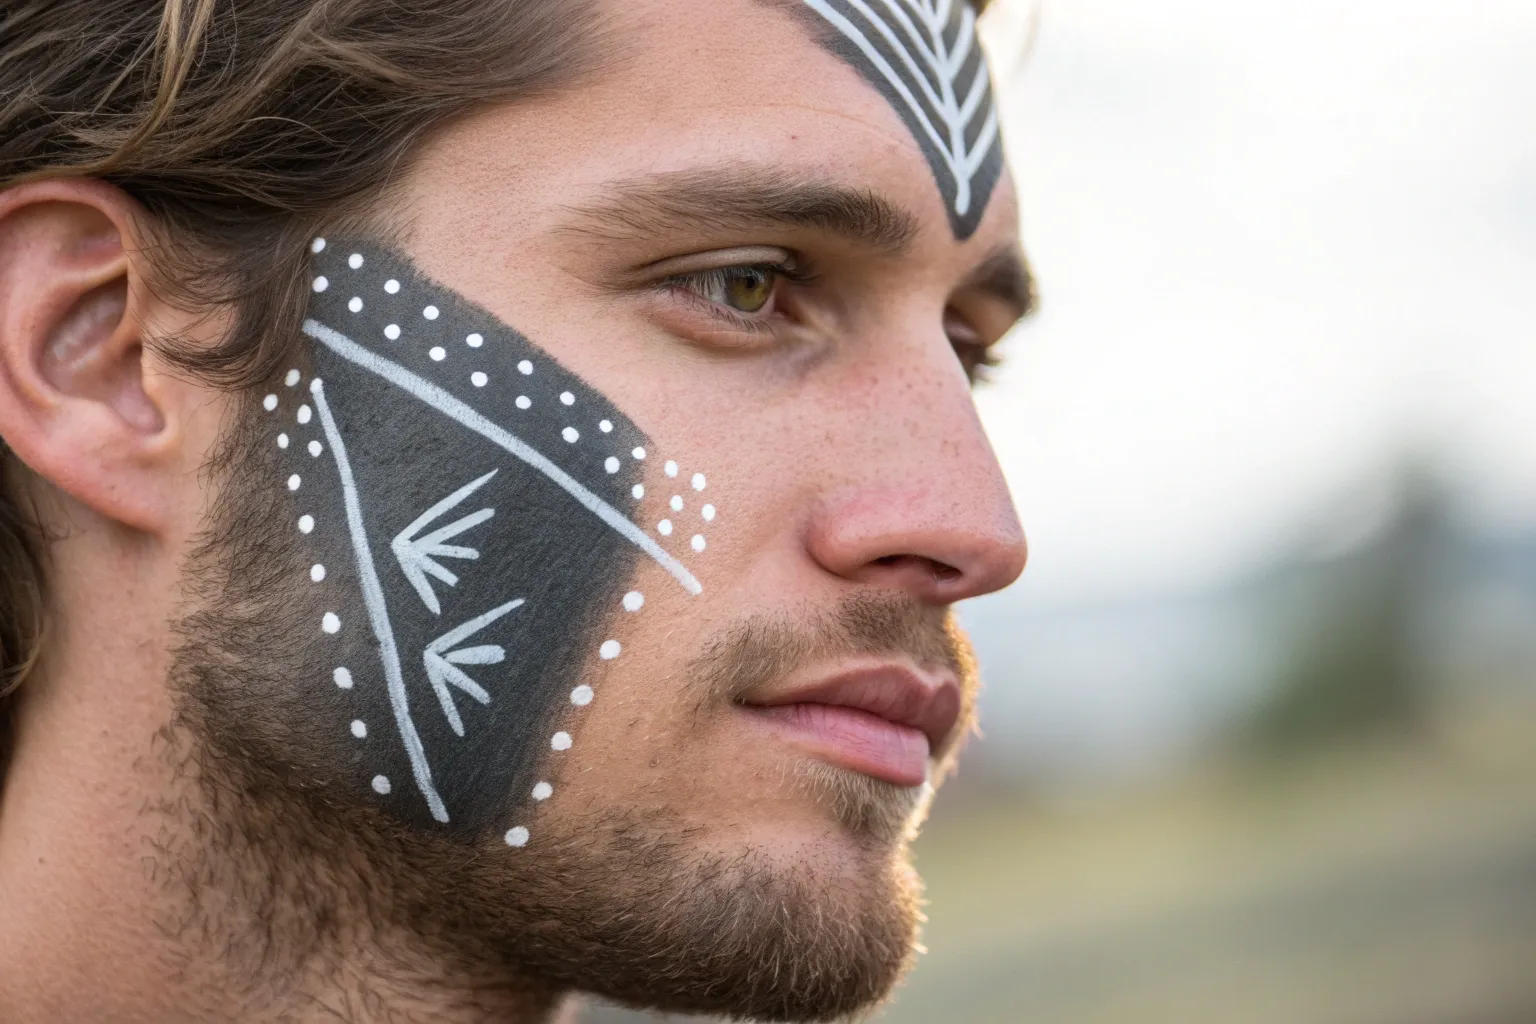
This striking, minimalist design combines sharp geometric lines with a tribal aesthetic to create a bold look. Featuring a detailed forehead triangle and sweeping cheek accents, it is perfect for festivals or costume parties where you want to stand out without masking your entire face.
Detailed Instructions
Materials
- Black face paint (water-activated cake or cream)
- Fine liner brush (size 0 or 00)
- Small angled brush (optional)
- Small cup of water
- Makeup setting spray or translucent powder
- Cotton swabs (for cleanup)
- Makeup remover wipes
Step 1: Preparation
-
Clean the canvas:
Start with a clean, dry face. Ensure there are no oils or heavy moisturizers on the forehead or cheek areas, as this can cause the paint to slip. -
Activate your paint:
Dip your fine liner brush into water and swirl it into your black face paint cake until it reaches an inky, milky consistency. It shouldn’t be too drippy or too thick.
Step 2: The Forehead Triangle
-
Outline the main shape:
Begin on the forehead, slightly off-center or aligned with the brow bone. Paint a large inverted triangle shape, keeping the top line slightly curved to follow the natural contour of the forehead. -
Create the inner border:
Draw second triangle inside the first one, leaving about a quarter-inch gap between the lines. Keep your hand steady and rest your pinky on the temple for stability if needed. -
Add the chevron divider:
Inside the smaller triangle, paint an inverted ‘V’ shape horizontally across the middle, separating the top section from the bottom point. -
Section the top area:
In the top section created by the specific ‘V’ line, draw two small vertical lines to create geometric compartments. -
Detail with dots:
Using the very tip of your brush, place three to four distinct dots inside the central geometric compartments you just created. -
Fill the bottom peak:
In the bottom point of the triangle, add a series of small, vertical dashes or hatch marks to fill the space texturally.
Fixing shaky lines
If your lines look wobbly, don’t wipe it all off. Wait for the black paint to dry completely, then use a tiny brush with skin-tone concealer to carve out and sharpen the edges.
Step 3: Cheek and Chin Accents
-
Position the cheek lines:
Move to the cheekbone on the same side as the triangle. Visualize three parallel lines starting high on the cheekbone and slanting down towards the ear. -
Paint the top strip:
Paint the first line just under the outer corner of the eye. Press the brush down firmly at the start and lift off gently at the end to taper the line. -
Add the middle strip:
Paint a second line parallel to the first, keeping the spacing consistent. I like to make this one slightly longer than the top one. -
Finish the cheek:
Add the third and final line below the middle one, slightly shorter again, creating a dynamic, sweeping effect. -
Center the chin line:
Find the center of the bottom lip. Paint a single, thin vertical line extending from just under the lip down onto the chin, about one inch in length.
Make it metallic
For a cooler, futuristic look, swap the matte black paint for a metallic silver or gunmetal grey liquid liner. It catches the light beautifully.
Step 4: Finishing Touches
-
Clean up edges:
Dip a cotton swab in a little makeup remover or water to sharpen any lines that became too thick or fuzzy. -
Set the design:
Once the paint is fully dry (it should lose its sheen), lightly mist the face with setting spray to prevent smudging throughout the day.
Wear your new tribal markings with confidence and enjoy the bold statement you’ve created


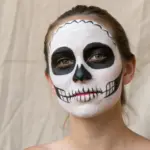
Half Skull Jawline Illusion
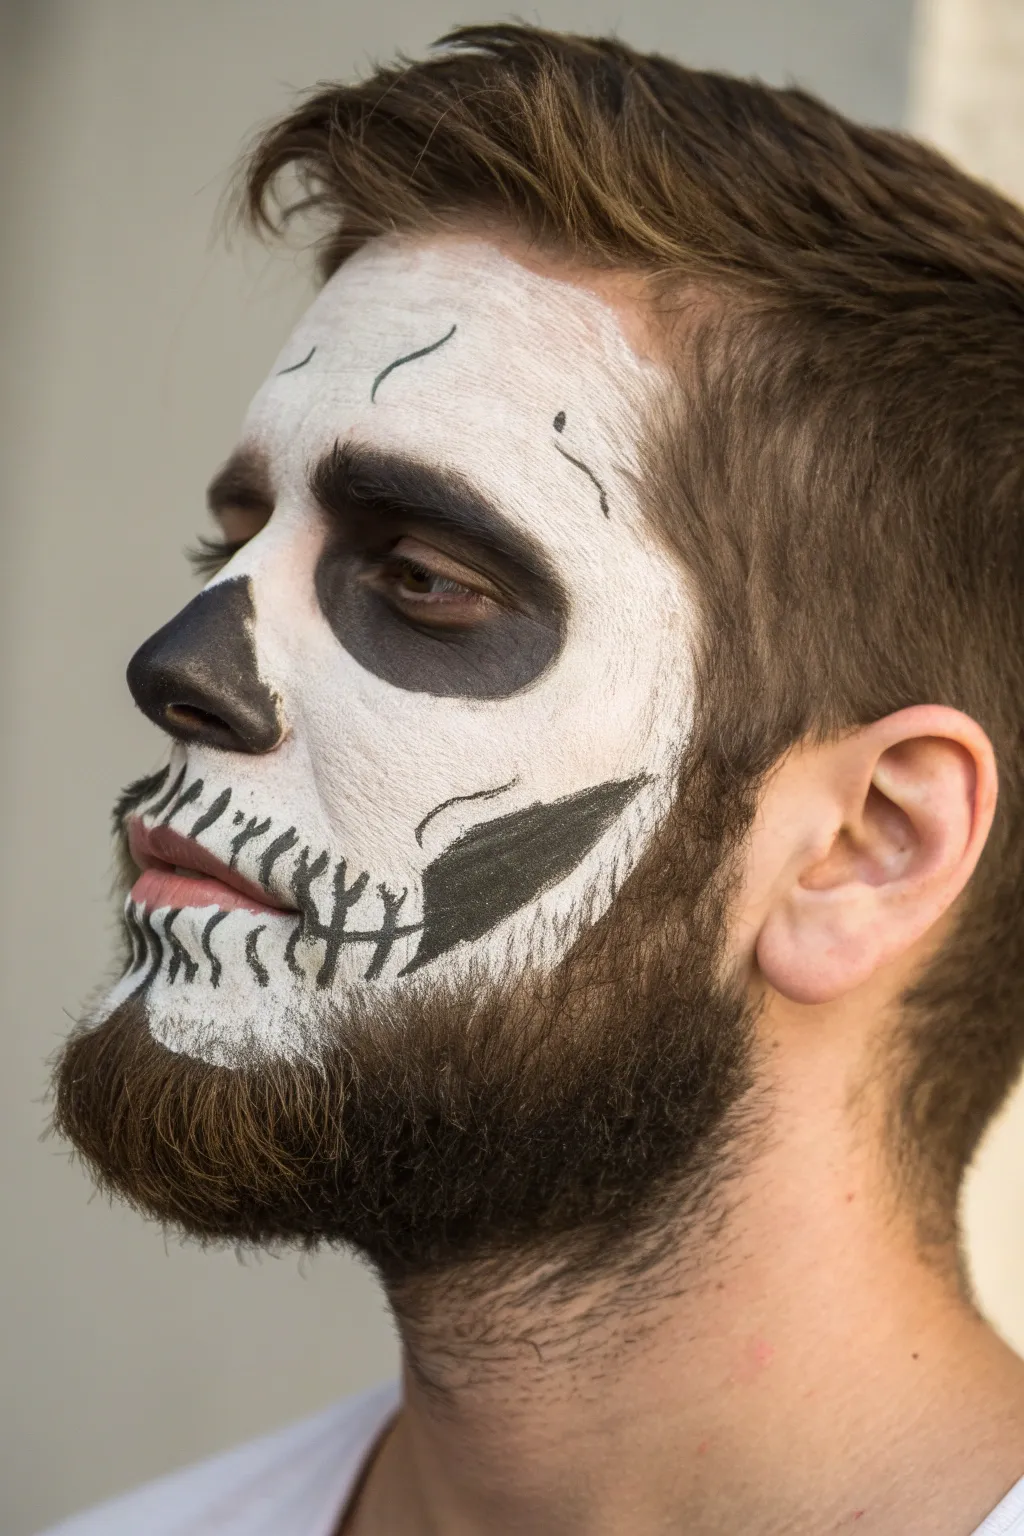
This striking face paint design cleverly uses your natural beard line to create a gritty, realistic half-skull effect. By blending the skeletal features into facial hair, you achieve a rugged, textured look that stands out from standard skeleton makeup.
Step-by-Step Guide
Materials
- White face paint (water-activated or cream)
- Black face paint (water-activated or cream)
- Flat foundation brush or makeup sponge
- Medium round brush
- Fine detail brush
- Setting powder or spray (optional)
- Makeup remover wipes
Step 1: Base Application
-
Clean and Prep:
Start with a clean, dry face. If you have a beard, comb it neatly downwards. This design works best by stopping abruptly at the beard line rather than painting over it entirely. -
Outline the Shape:
Using a wet brush with a tiny amount of white paint, faintly sketch the boundaries of your mask. Outline around the hairline, down the side of the face, and trace along the upper edge of your beard and mustache. -
Fill the White Base:
Load a sponge or flat brush with white face paint. Pat the paint onto your forehead, cheeks, and nose, stopping right at your charcoal outline. -
Blend the Edges:
For a more worn look, you don’t need the white base to be perfectly opaque everywhere. Let some skin texture show through on the forehead, but keep the center of the face bright. -
Dry the Base:
Allow the white layer to set for a few minutes. I like to let this dry briefly so the black details we add next don’t turn grey and muddy.
Step 2: Creating Depth
-
Draft the Eye Sockets:
With a medium round brush and black paint, outline large, slightly droopy circles around your eyes. The shape should follow your natural orbital bone but extend slightly lower. -
Fill the Eyes:
Fill in the eye sockets entirely with black paint. Ensure you get close to the lash line, though you can leave the waterline bare for comfort. -
Paint the Nose:
Paint the tip of your nose black. Instead of a simple triangle, create an ‘M’ shape at the top to mimic the nasal cavity bone structure. -
Define the Hollows:
Locate the hollow of your cheekbone. Paint a sharp, elongated black triangle here, pointing towards the corner of the mouth to simulate the missing jaw bone. -
Contour the Edges:
Lightly smudge some black paint along the hairline and temples using a dry sponge to give the skull a curved, 3D appearance.
Uneven White Base?
If the white looks streaky, switch to a stippling motion (rapid tapping) with a sponge rather than dragging strokes. This builds opaque coverage without lifting the layer underneath.
Step 3: Skeletal Details
-
Draw Forehead Cracks:
Using your finest detail brush and black paint, draw thin, wavy lines on the forehead. Start thick and flick the brush at the end to taper the line into a crack. -
Outline the Teeth:
Draw a horizontal line extending from the corners of your mouth across your cheeks. Then, paint vertical lines crossing it to represent teeth roots. -
Detail the Lips:
Paint short vertical lines over your actual lips. Connect these lines to the cheek teeth you just drew. -
Add Root Depth:
At the top of each ‘tooth’ line on the cheek, add a tiny ‘Y’ shape or a small smudge to make the roots look embedded in the bone. -
Integrate the Beard:
Where the white paint meets your beard, use a small brush to feather white strokes slightly downward into the hair line. This makes the transition look like bone fracturing into the jaw. -
Refine the Eyes:
Take a tiny amount of white paint and add subtle highlights to the brow ridges just above the black eye sockets to make them pop forward. -
Final Polish:
Check for any patchy areas in the black paint and touch them up. If available, dust translucent powder over the white areas to lock the makeup in place.
Shade It Up
Use a grey eyeshadow and a fluffy brush to shade inside the teeth lines and around the temple cracks. This adds incredible 3D realism without needing advanced painting skills.
Now you have a rugged, spooky look that perfectly accommodates your facial hair for the night


Sports Stripe War Paint
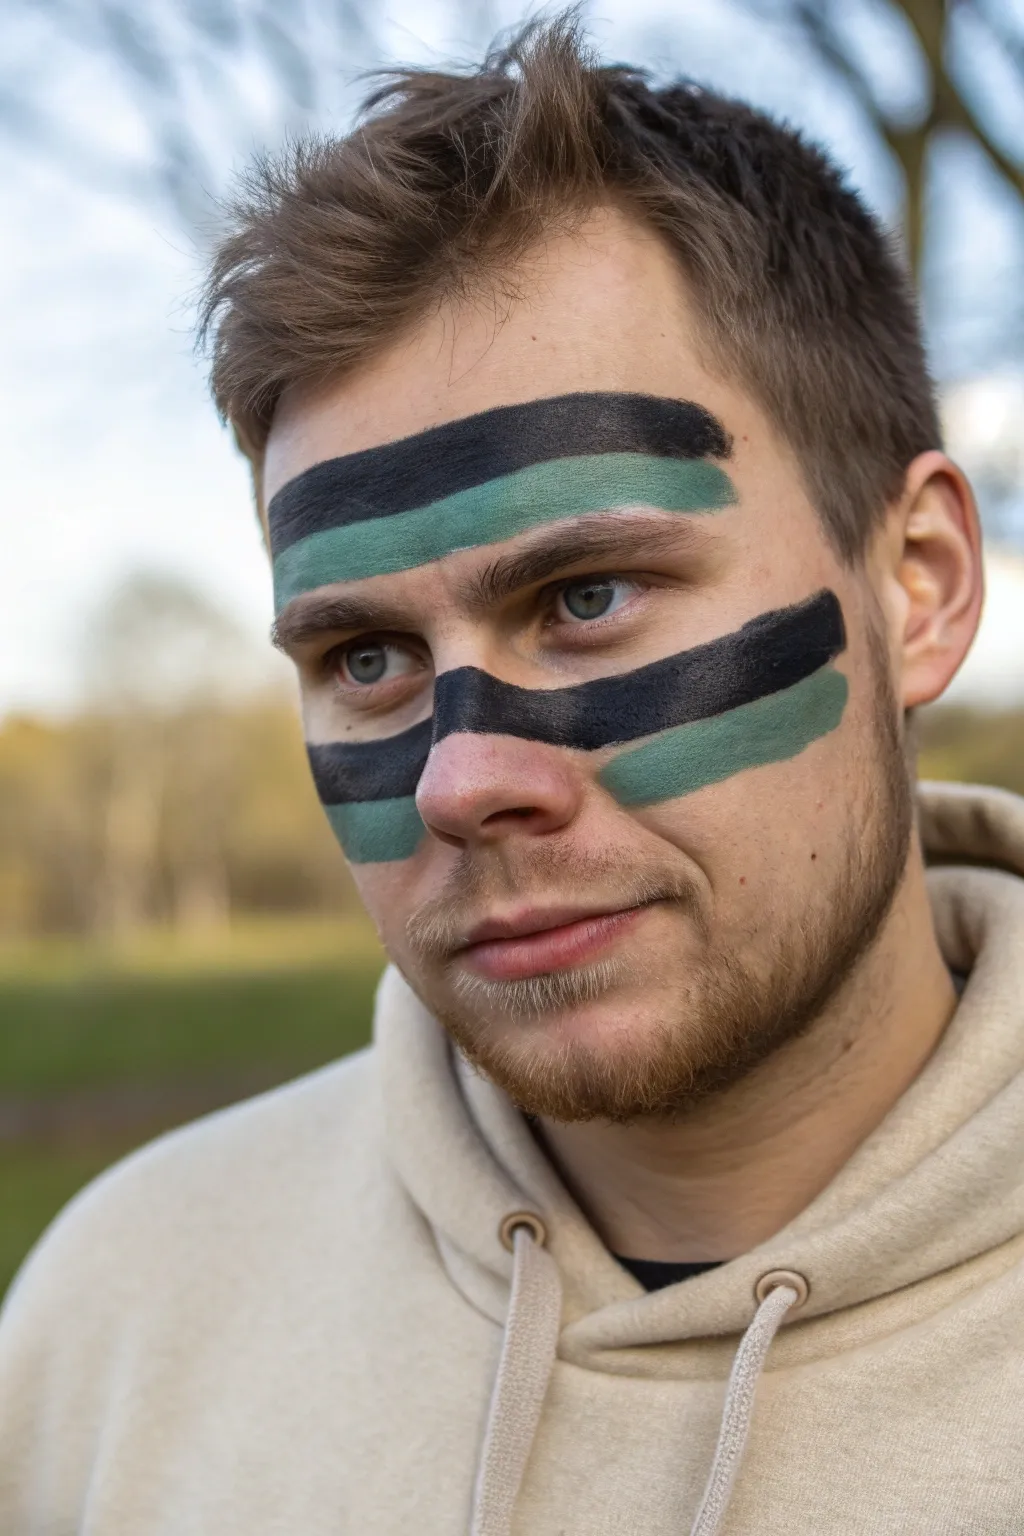
Achieve a rugged, battle-ready look with this dual-tone sports stripe design. Combining bold black with muted forest green creates a classic camouflage aesthetic perfect for game day or themed events.
Step-by-Step
Materials
- Black face paint (cream or water-activated)
- Forest green or olive green face paint
- Flat shader brush (medium width, approx. 1/2 inch)
- Micellar water or makeup wipes (for cleanup)
- Small blending sponge (optional)
- Setting spray (optional)
Step 1: Forehead Base
-
Positioning:
Visualize a horizontal band running across the middle of your forehead. You want to place this high enough to clear your eyebrows but low enough to avoid the hairline. -
Black Stripe Outline:
Load your flat brush with black paint. Start in the center of the forehead and draw a straight horizontal line towards the left temple. Repeat for the right side. -
Thickening the Black:
Go back over this line, pressing the brush flat against the skin to create a band about half an inch thick. Keep the edges relatively rough for a natural, rugged look. -
Green Stripe Application:
Clean your brush thoroughly or switch to a fresh one. Load it with the forest green paint. -
Joining the Colors:
Apply the green paint directly underneath the black forehead stripe. Try to make them touch without blending the colors into a muddy mess; a clean abutment looks best. -
Extending the Green:
Extend this green line to match the length of the black one above it. I find it helpful to make this green stripe slightly thinner than the black one for visual balance.
Smudge Control
If the black and green bleed into each other, let the first color dry completely (1-2 mins) before applying the second color next to it.
Step 2: Cheek Stripes
-
Cheek Mapping:
Locate the high point of your cheekbones. The second set of stripes will run right across this prominence, bridging over the nose. -
Nose Bridge:
Start with black paint again. Paint a stripe straight across the bridge of your nose. It should be positioned so the bottom edge sits just where your nose bone starts to slope downward. -
Extending to Cheeks:
Continue that black line from the nose outward onto the cheeks on both sides. Aim for the top of the cheekbone, angling slightly upwards towards the ears. -
Defining Ends:
Let the ends of the black stripe trail off naturally or finish them with a blunt, squared edge depending on your preference. In the photo, they are somewhat blunt. -
Lower Green Layer:
Load up the green paint again. Just like on the forehead, paint a green stripe directly beneath the black one spanning across the cheeks. -
Under-Nose Bridge:
Carefully connect the green stripe across the nose, sitting right under the black line. This area can be tricky, so use the edge of the brush for precision. -
Opacity Check:
Step back and check the mirror. If the skin is showing through too much, dab a second layer of paint over any patchy areas. -
Edge texture:
For that authentic ‘war paint’ feel, you don’t want the ends to be perfect geometric rectangles. Use a slightly dry brush to feather the outer edges just a tiny bit.
Step 3: Finishing Touches
-
Clean Up:
Dip a cotton swab or the corner of a wipe in micellar water. Crisp up any lines that got too messy, specifically around the eye area. -
Set the Paint:
If you plan on sweating or wearing this for hours, mist a light layer of setting spray over the face to lock the pigment in place.
Pro Tip: Texture
For a grittier look, apply the paint with your finger instead of a brush. It creates uneven pressure and a more authentic warrior vibe.
Now you are painted up and ready to face the competition with your fresh colors


Camo Smudge Mask
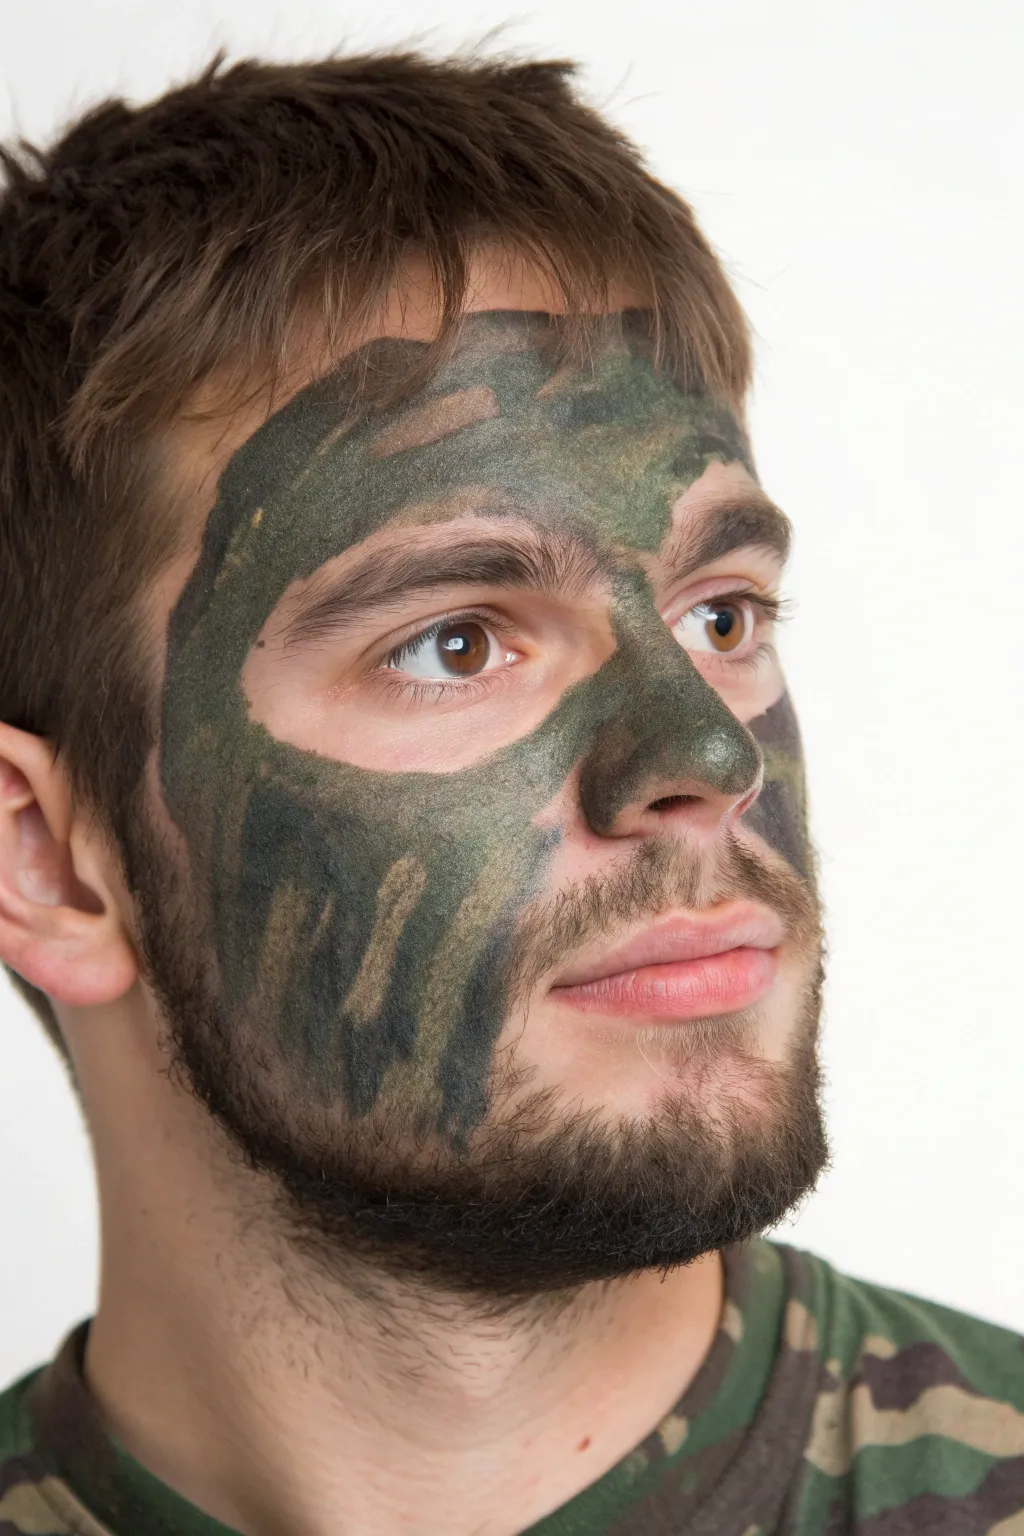
Achieve a rugged, field-ready look with this classic camouflage face paint design. This style focuses on practical concealment by breaking up facial contours with a heavy application of earthy greens and browns, creating a mask-like effect.
Detailed Instructions
Materials
- Dark green camouflage face paint stick or cream
- Dark brown face paint
- Black face paint
- Flat application sponge
- Clean fingers (for smudging)
Step 1: Base Layer Application
-
Prepare the skin:
Start with a clean, dry face. If you have facial hair, avoid applying thick paint directly into the beard line, as it can be difficult to remove later. -
Map the mask area:
Visualize a mask shape that covers your forehead, nose, and cheeks. Unlike full-face camo, you will keep the immediate eye area and the mouth relatively clean. -
Apply the dominant green:
Take your dark green face paint stick or cream. Begin on the forehead, drawing thick, uneven bands horizontally across the brow. -
Cover the nose:
Extend the green paint down the bridge of the nose, covering the tip fully. This helps reduce the shine on one of the face’s most prominent features. -
Fill the cheeks:
Apply broad strokes of green on the cheekbones, extending outward toward the hairline and down toward the jawline, creating a solid base color. -
Leave negative space:
Don’t aim for perfect opacity yet; leave small gaps or thinner areas where the brown and black can be introduced later.
Step 2: Disruptive Patterning
-
Add brown contours:
Switch to your dark brown paint. Apply this color in irregular blotches over the green, focusing on the edges of the forehead and the hollows of the cheeks. -
Intertwine the colors:
Draw diagonal or curved brown lines that cut through the green sections. The goal is to break up large blocks of a single color. -
Introduce black accents:
Using the black paint sparingly, add smaller streaks or spots. Place these near the hairline and around the edges of the nose paint to create depth. -
Deepen the shadows:
Apply a touch of black along the lower cheek area where a beard might start, blending it slightly upwards into the green.
Uneven Coverage?
If the paint looks too patchy, warm the paint stick against your skin for a few seconds or on the back of your hand before applying to make it glide smoother.
Step 3: Blurring and Finishing
-
Smudge the transitions:
This is the most crucial step for the ‘smudge’ look. Use your fingers to aggressively rub the boundaries where different colors meet. -
Create a muddy texture:
I prefer to use a circular motion here, which blends the pigments into a new, muddy olive-brown tone in certain areas while keeping distinct colors in others. -
Soften the edges:
Run your finger along the outer perimeter of the design (on the forehead and cheeks) to fade the paint out, rather than having a hard, crisp line. -
Check for shine:
Look in the mirror for any shiny spots of skin showing through within the mask area. Dab a bit of matte green or brown over these spots. -
Clean up sensitive areas:
Use a damp cloth to wipe away any accidental smudges on the eyelids or lips to ensure the mask remains comfortable.
Go Tactical
For a hyper-realistic look, incorporate real dirt or ash from a campfire into the wet paint to add grit and texture for a survivalist aesthetic.
You now have a field-ready camouflage mask that breaks up facial symmetry effectively
BRUSH GUIDE
The Right Brush for Every Stroke
From clean lines to bold texture — master brush choice, stroke control, and essential techniques.
Explore the Full Guide
Spartan-Inspired Battle Scar
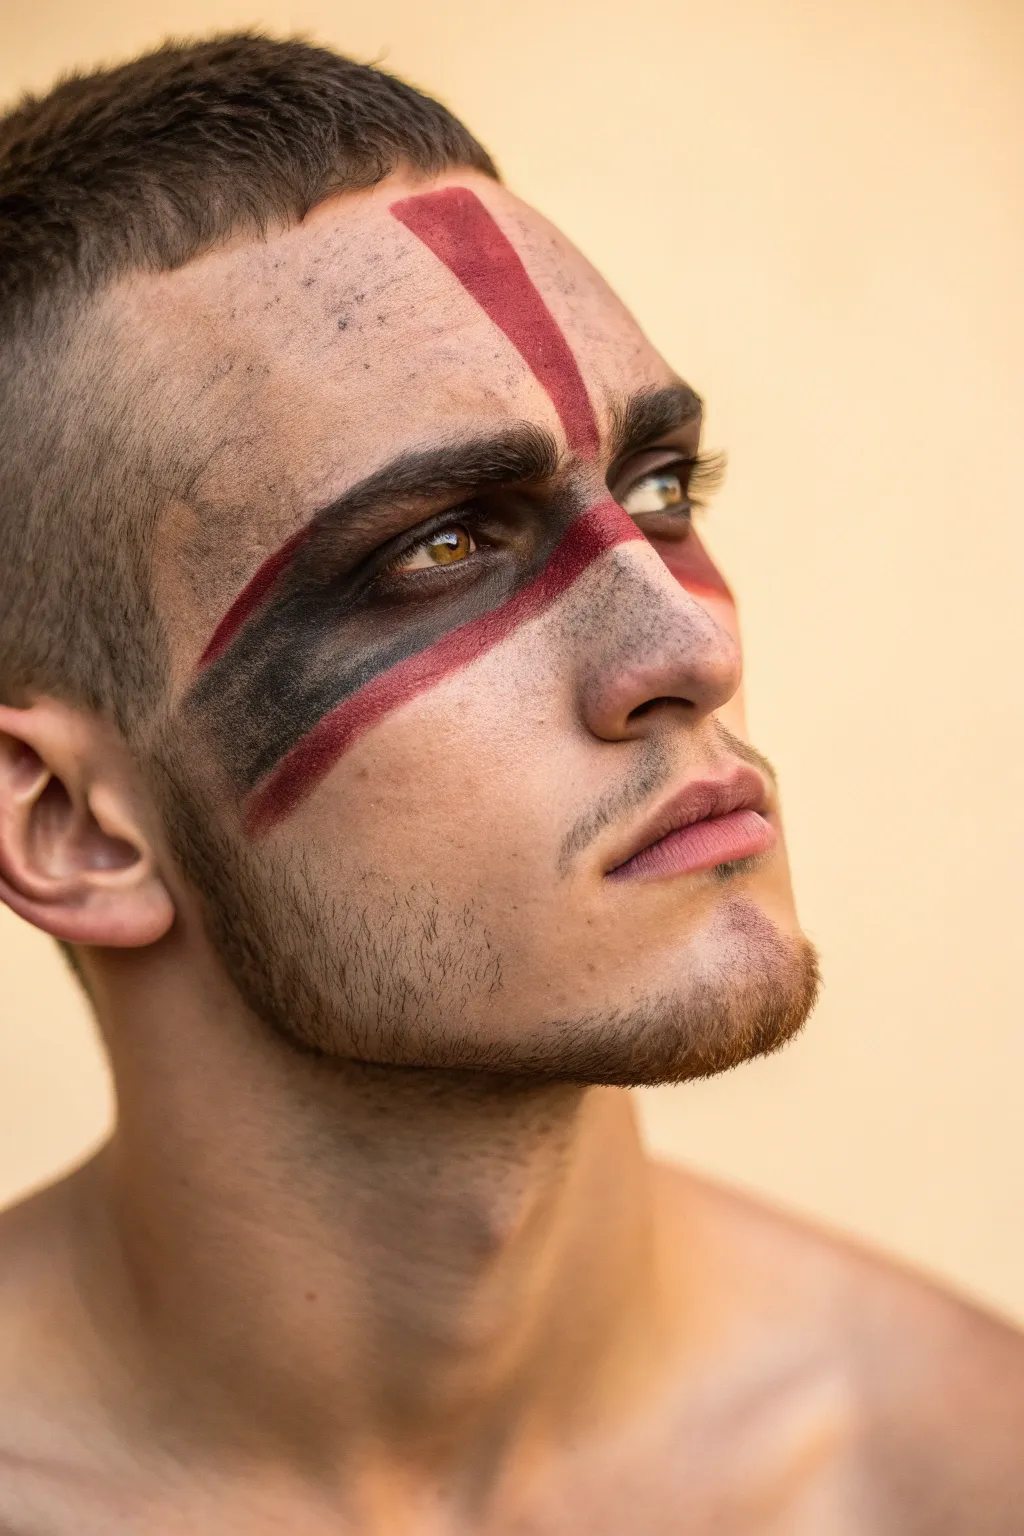
Channel the fierce energy of ancient battlefields with this striking face paint design. This look combines gritty realism with bold graphic lines, mimicking the appearance of war paint smeared alongside battle grit and soot.
Step-by-Step Tutorial
Materials
- Matte black face paint (water-activated or cream)
- Deep crimson red face paint
- Charcoal gray eyeshadow or powder pigment
- Flat shader brush (medium width)
- Small angled brush
- Stipple sponge or coarse texture sponge
- Translucent setting powder
- Makeup setting spray
- Small blending sponge
Step 1: Setting the Base Grime
-
Skin preparation:
Start with a clean, dry face. If the subject has oily skin, apply a very light dusting of translucent powder to ensure the paint adheres well without slipping. -
Creating the dirty texture:
Dip a stipple sponge lightly into charcoal or black powder pigment. Tap off the excess on your hand first—you want a sheer application. -
Applying the grit:
Gently dab the sponge across the forehead, temples, and upper cheeks. Focus on the areas where the main paint stripes will go to create a ‘lived-in’ dirty background rather than pristine skin. -
Adding depth:
Using a fluffy brush and a tiny bit of dark gray shadow, contour lightly under the cheekbone and at the temples to hollow out the face slightly for a more rugged appearance.
Patchy Paint?
If the black paint looks streaky over the eye, pat a matching black eyeshadow over the wet paint. This sets the cream and creates an opaque, solid blackout effect.
Step 2: The Primary Black Band
-
Loading the black paint:
Load your medium flat brush with matte black face paint. Ensure the consistency is creamy but not too watery to prevent dripping. -
Mapping the eye stripe:
Start at the outer corner of the eye. Draw a thick line extending backwards towards the hairline, following the natural angle of the cheekbone. -
Connecting the bridge:
Continue the line from the inner corner of the eye, moving across the bridge of the nose. Keep this section slightly thinner than the outer section. -
Filling the lid:
Carefully fill in the entire eyelid area to connect the inner and outer lines, creating a solid mask-like band across the right eye. -
Distressing the edges:
Before the paint fully sets, take a dry sponge or your finger and lightly smudge the bottom edge of the black stripe downwards to soften the line and make it look worn.
Step 3: The Crimson War Markings
-
Preparing the red:
Clean your flat brush or switch to a fresh one. Load it with deep crimson red paint. I prefer a blood-red shade over bright fire engine red for a more realistic grit. -
The vertical forehead strike:
Place your brush near the hairline on the forehead. Pull a confident stripe downward at a slight angle so it intersects with the black eye band near the nose bridge. -
Defining the intersection:
Where the red meets the black, press specifically to ensure the red pigment sits on top or blends slightly for a muddy effect, rather than disappearing underneath. -
The lower check accent:
Starting from under the eye (below the black band), draw a second red stripe parallel to the black one, running along the cheekbone towards the ear. -
Smudging the red:
Use a small, clean blending sponge to drag the edges of the red paint slightly. This mimics the look of paint that has been wiped or sweated during combat.
Gladiator Glow
Mix a tiny drop of baby oil or mixing medium into the red paint for the forehead stripe. This makes that specific wound look fresh and wet against the matte black.
Step 4: Final Rugged Details
-
Adding texture splatter:
Take an old toothbrush or a stiff stipple sponge with watery black paint. Flick a tiny amount of specks across the forehead and nose bridge for extra texture. -
Darkening the waterline:
For intensity, carefully line the lower waterline of the painted eye with a black pencil liner to remove any visible skin gaps. -
Enhancing facial hair:
If the model has facial hair, use a spoolie brush with a touch of black face paint to darken the beard patchy areas, adding to the unkempt warrior aesthetic. -
Setting the look:
Lightly dust the painted areas with translucent powder to remove shine. You want a matte, dusty finish, not a glossy one. -
Final seal:
Close the eyes and mist the entire face with a strong hold setting spray to prevent the design from smudging during wear.
Now you are ready to command attention with a look that speaks of ancient strength and survival
Predator Eye Claw Marks
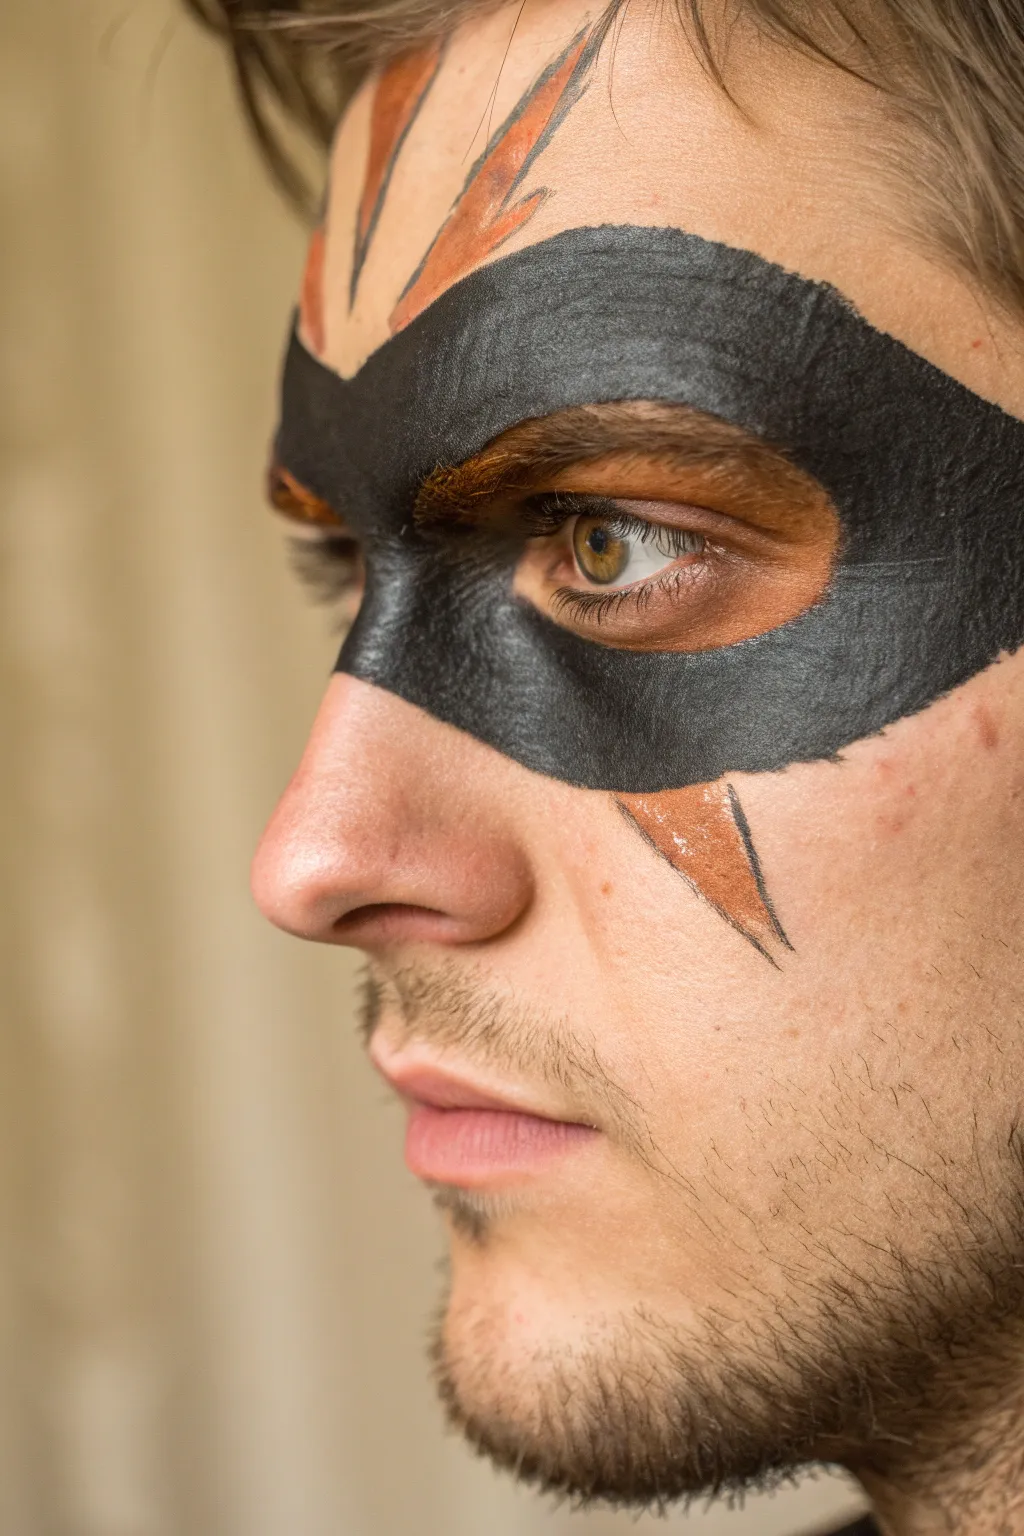
Unleash a fierce, instinctual look with this bold design that combines a classic bandit mask silhouette with tribal-inspired claw marks. The striking contrast between the matte black eye band and the metallic copper accents creates a look that is both intense and sophisticated.
Step-by-Step
Materials
- Matte black face paint (water-activated cake or cream stick)
- Metallic copper or bronze face paint
- Medium flat brush (for large coverage)
- Fine liner brush (for outlines)
- Small angled brush (for details)
- Black eyeliner pencil (optional, for waterlines)
- Setting spray or translucent powder
- Water cup and paper towels
Step 1: Laying the Foundation
-
Clean and Prime:
Start with a freshly washed and dried face. If the skin is oily, a light dusting of translucent powder can help the paint grip better, ensuring the sharp lines stay crisp. -
Map the Mask Outline:
Using a fine liner brush loaded with thinned black paint, lightly trace the perimeter of the main eye mask. Start at the nose bridge, curve under the eye socket to the temple, and bring the top line across the brow bone. -
Fill the Black Base:
Switch to a medium flat brush to fill in the outlined mask area. Use smooth, horizontal strokes to ensure even coverage. I like to keep the paint slightly creamy, not too watery, to get that solid opacity in one coat. -
Refine the Edges:
Go back over the edges of your black mask with the fine brush to ensure they are sharp and deliberate. The shape should angle upwards slighty at the temples for a more aggressive stance.
Cracking Paint?
If the black mask starts cracking when you smile, you likely applied the paint too thickly. Use a slightly damp brush to reactivate and smooth out the thick areas.
Step 2: Adding the Copper Accents
-
Outline the Forehead Claws:
Taking your fine liner brush and the metallic copper paint, draw three upward-pointing triangular spikes above the black mask on the forehead. Imagine them radiating from the center of the brow. -
Fill the Upper Details:
Fill in these forehead shapes with the copper paint. If your metallic paint is sheer, let the first layer dry completely before dabbing on a second layer for maximum shine. -
Add the Cheek Spike:
Paint a downward-pointing triangle on the cheekbone, emerging from the bottom edge of the black mask. This mimics a fang or a claw mark dragging downward. -
Inner Eye Detail:
Carefully dab a small amount of copper paint right at the inner corner of the eye, blending it slightly into the black for a subtle, fiery transition.
Step 3: Defining Key details
-
Outline the Copper:
Once the copper sections are dry, use your finest liner brush with black paint to outline the copper spikes. Keep the line extremely thin to define the shape without overpowering the color. -
Texture the Edges:
For a rougher, more organic look, use a mostly dry brush to feather slightly darker copper or brown paint near the base of the forehead spikes. -
Tightline the Eyes:
To make the gaze truly piercing, use a black eyeliner pencil to color the upper and lower waterlines of the eyes, connecting the skin to the mask seamlessly. -
Sharpen the Cheek Point:
Ensure the bottom tip of the cheek triangle comes to a very sharp, precise point. Use a damp cotton swab to clean up the tip if it became blunt during painting.
Go 3D
For a realistic scar effect, apply a thin layer of rigid collodion under the copper claw marks before painting to create an indented skin texture.
Step 4: Texturing and Setting
-
Create Texture:
To give the black mask a leather-like texture consistent with the image, take a clean, dry sponge and press it very gently against the black paint while it is tacky. Don’t smudge, just press and lift. -
Highlight the Metals:
If you have a lighter gold paint, add a tiny streak down the center of the copper triangles to simulate light hitting a metallic surface. -
Check Symmetry:
Step back and look in the mirror. While tribal markings don’t need to be perfectly symmetrical, the visual weight should feel balanced on both sides. -
Final Set:
Mist the entire face with a setting spray from arm’s length. This will lock in the design and prevent the metallic pigments from migrating onto the black areas.
Now you have a formidable, warrior-inspired look that commands attention without requiring a full-face application

PENCIL GUIDE
Understanding Pencil Grades from H to B
From first sketch to finished drawing — learn pencil grades, line control, and shading techniques.
Explore the Full Guide
Glitchy Tech Mask
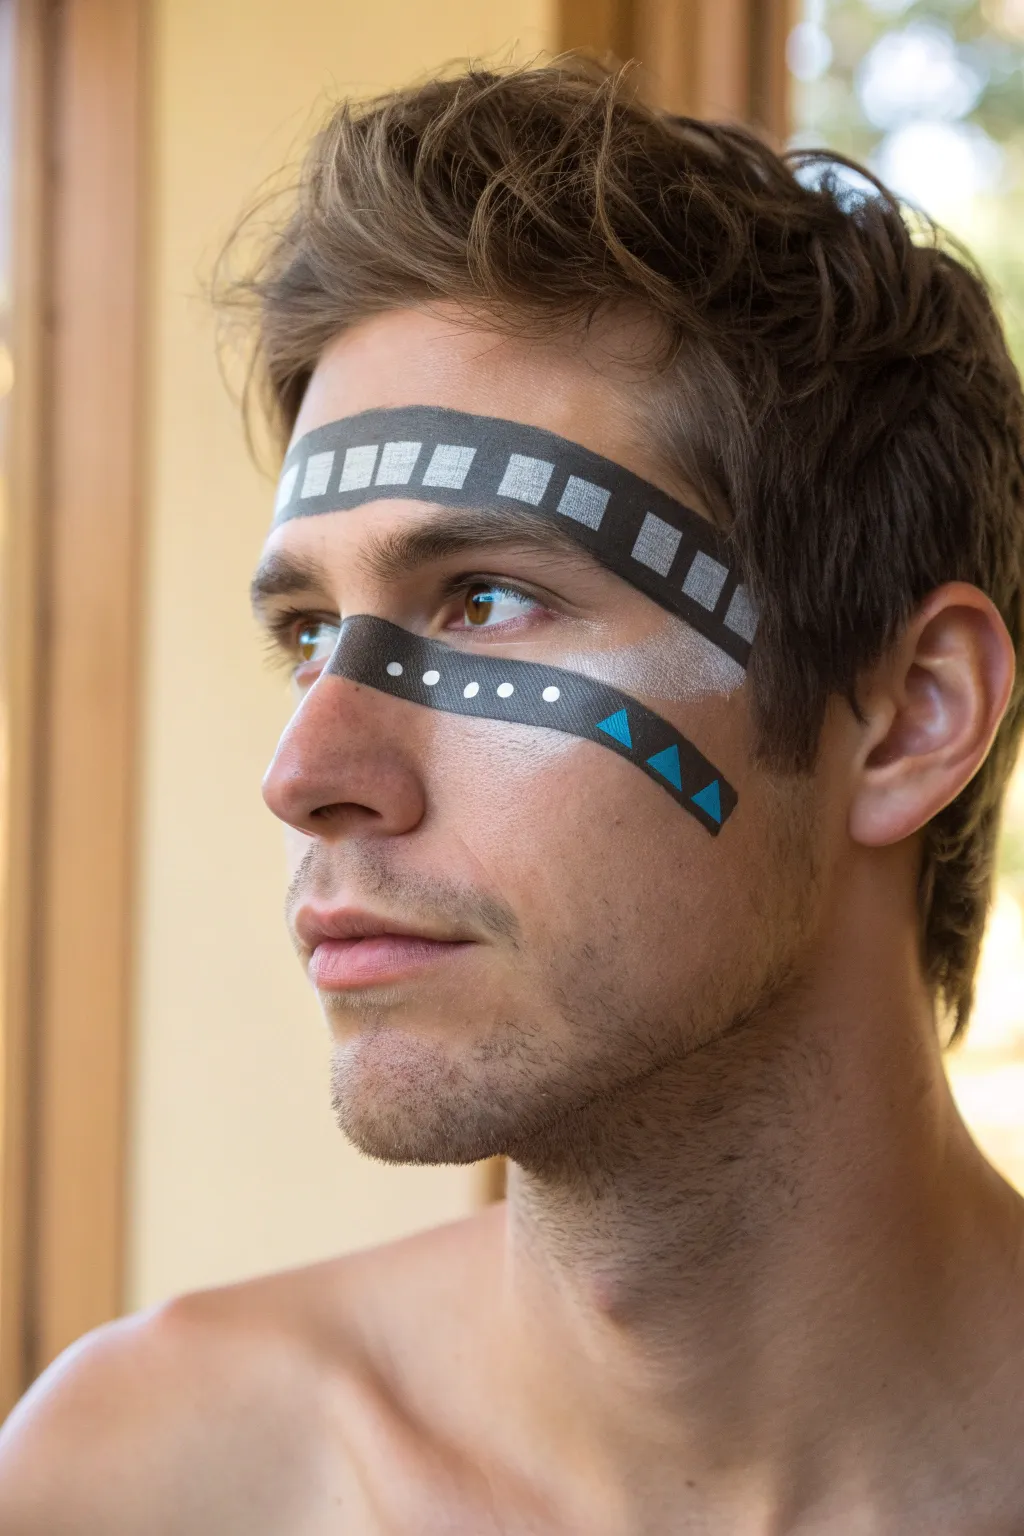
Channel a cyberpunk aesthetic with this geometric, digital-inspired design. Utilizing sharp lines and contrasting textures, this look mimics the visual of a corrupted data display or a futuristic tribal marking.
Detailed Instructions
Materials
- Matte black face paint (water-activated or cream)
- Silver metallic face paint
- White or light grey face paint
- Teal or cyan blue face paint
- Flat angled brush (medium)
- Flat angled brush (small)
- Fine detail brush (liner)
- Small dotting tool or toothpick
- Adhesive tape (optional, for crisp lines)
- Setting spray (optional)
Step 1: Forehead Band Setup
-
Establish the curve:
Begin by cleaning the forehead to remove oils. Load your medium flat angled brush with black paint. -
Paint the upper border:
Starting near the left temple, paint a smooth, arching line across the forehead, stopping past the center of the right eyebrow. Aim for a confident stroke. -
Paint the lower border:
Create a parallel line about an inch below the first one, following the curvature of the brow bone. -
Fill the background:
Use the same brush to fill in the space between your two lines with solid black paint. Apply a second coat if needed for full opacity.
Wobbly Lines?
If you struggle with freehand straight lines, use surgical tape or a business card as a stencil. Hold it against the skin and paint over the edge.
Step 2: Digital Blocks
-
Load silver paint:
Switch to a clean small flat angled brush and load it with metallic silver face paint. Make sure the consistency is creamy, not too watery. -
Stamp the squares:
Starting from the right side of the forehead band, press the flat edge of the brush onto the dried black base to create square shapes. -
Create the rhythm:
Continue stamping silver squares moving toward the left temple. Leave a small gap of black space between each silver block to mimic a film strip or data feed. -
Sharpen edges:
If your stamped shapes look fuzzy, use the fine liner brush with a tiny bit of black paint to clean up the gaps between the silver squares.
Circuit Board Upgrade
Extend fine black lines vertically from the forehead band. Add tiny dots at the ends to resemble circuit board nodes.
Step 3: Cheek Geometry
-
Base highlight:
Take a large soft brush or your finger and smudge a sheer layer of white or silver paint on the cheekbone area where the second band will go. -
Outline the cheek strip:
Load your medium flat brush with black again. Paint a band starting from the bridge of the nose, extending diagonally down across the cheekbone. -
Fill and taper:
Fill this band in solid black. As you move toward the ear, taper the shape slightly so it feels aerodynamic. -
Add circular data points:
Pick up your dotting tool (or the back of a brush handle). Dip it into white or light grey paint. -
Dot the line:
Press a series of evenly spaced dots along the upper half of the black cheek band, starting from the nose and stopping halfway.
Step 4: Color Accents
-
Prepare the teal:
Clean your small flat angled brush thoroughly and load it with the vibrant teal or cyan paint. -
Paint triangle details:
On the outer tail of the cheek band, paint small triangles pointing inward. Use the sharp edge of the brush to keep points crisp. -
Align the triangles:
Place these triangles on the lower half of the black band, creating an alternating rhythm with the white dots above. -
White underscore:
Using a dry brush technique with white paint, gently drag a faint, sheer line underneath the black cheek band to emphasize the bone structure. -
Final check:
Step back and check for symmetry and opacity. I usually do a final steady-hand pass on the black edges to make them razor-sharp.
This sleek, futuristic design turns your face into a canvas of digital art, perfect for sci-fi events or modern costume parties
Minimal Geometric Eye Mask
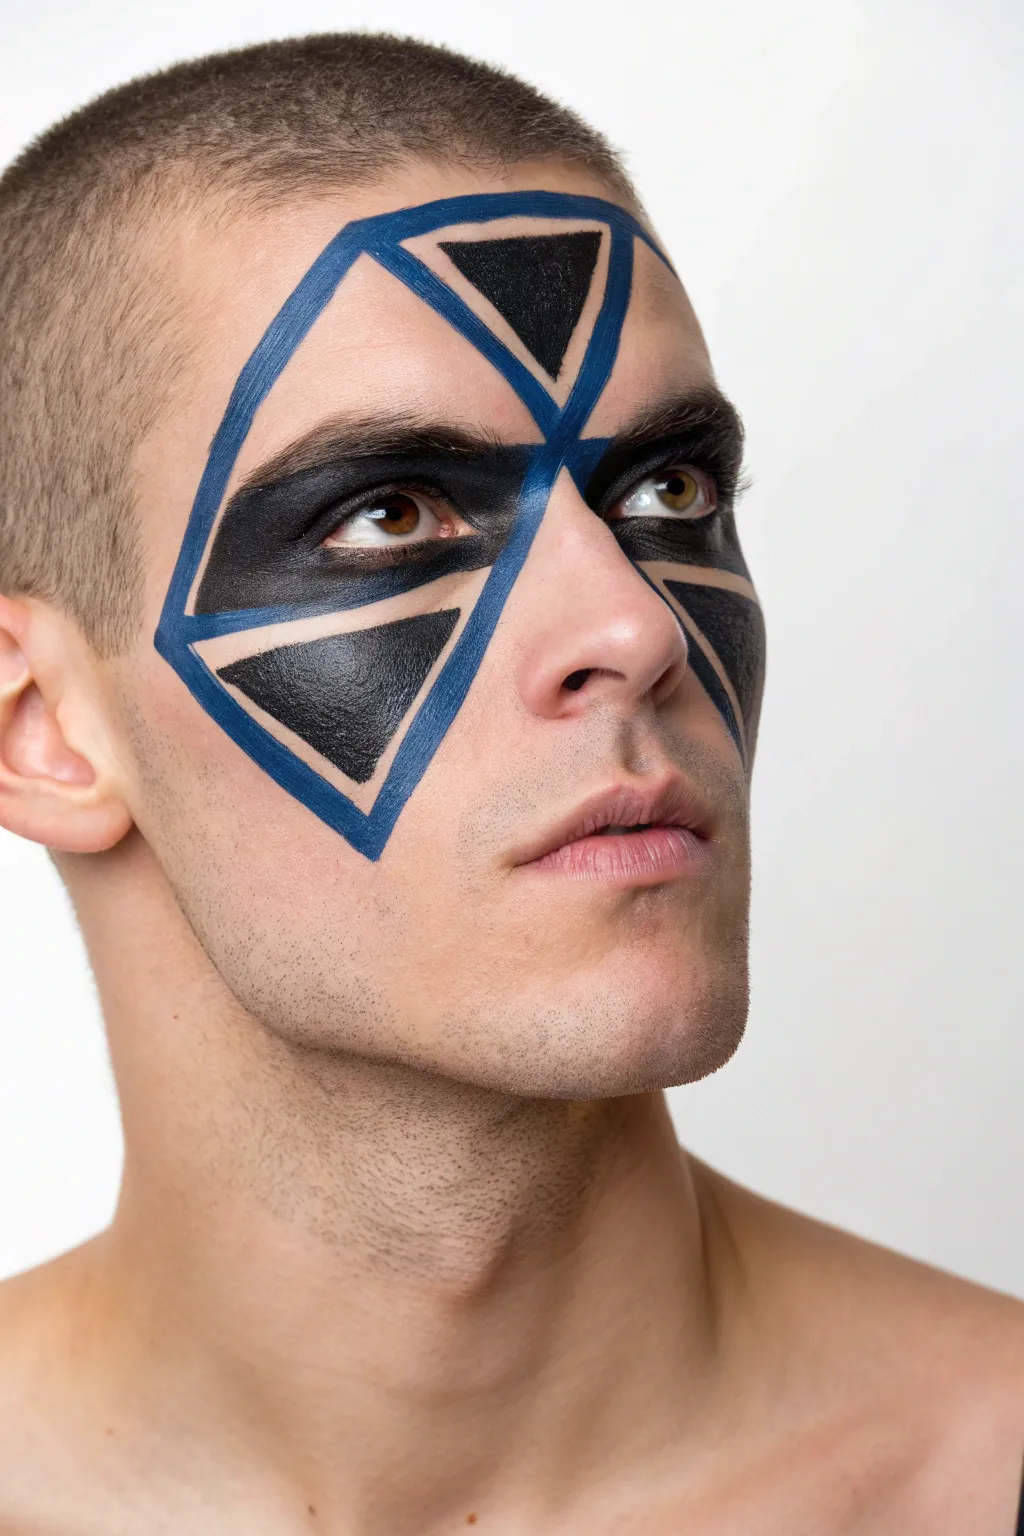
Transform your look with this sharp, angular design that blends tribal influences with modern minimalism. The striking contrast between deep black triangles and a crisp cobalt blue framework creates an intense, architectural focal point around the eyes.
Step-by-Step
Materials
- High-density face paint (Black)
- High-density face paint (Cobalt Blue or Royal Blue)
- Fine liner brush (size 0 or 00)
- Flat angled brush (small, approx. 1/4 inch)
- Micellar water or makeup remover
- Cotton swabs
- Setting spray (matte finish)
- Translucent setting powder (optional)
Step 1: Drafting the Blue Framework
-
Clean and prep:
Start with a clean, dry face. Ensure the eye area is free of oils or moisturizer to help the paint adhere sharply. If you have oily skin, a light dusting of translucent powder helps create a matte base. -
Establish the center point:
Load your fine liner brush with the cobalt blue paint. Add a tiny drop of water if needed to get an ink-like consistency. Place a small dot right at the bridge of the nose, aligned with the sheer duct, to serve as your central anchor. -
Draw the main diagonal cross:
From your center anchor, draw a diagonal line extending upwards towards the middle of the forehead. Then, draw a second diagonal line crossing the first, creating an ‘X’ shape centered on the bridge of the nose. -
Define the outer boundaries:
Extend the lower arms of your ‘X’ down past the cheekbones, angling them so they frame the nose. Keep these lines straight and crisp. -
Map the diamond shape:
Connect the four tips of your ‘X’ to create a large, rotated diamond (rhombus) shape. The top point should sit high on the forehead, the side points near the temples, and the bottom point on the cheek. -
Create the internal divisions:
You should now have a large blue diamond with a cross in the middle. Go over your blue lines again with the liner brush to thicken them slightly, ensuring the width is consistent—about 3-4mm wide.
Clean Lines Only
If your hand shakes, rest your pinky finger on the cheek or chin as a stabilizer while painting the long straight lines. Breath out slowly while drawing.
Step 2: Filling the Black Segments
-
Outline the triangles:
Switch to your black face paint. Using a clean fine liner brush, trace the *inside* edges of the empty triangular spaces formed by your blue framework. Leave a tiny sliver of skin uniform between the blue line and where your black fill will begin if you want extra separation, though in this design, they touch directly. -
Fill the forehead triangle:
Use the small flat angled brush loaded with black paint to fill in the top triangle on the forehead. Keep your strokes horizontal and smooth to avoid streaks. -
Fill the right eye area:
Carefully fill in the triangle over the right eye. Close the eye gently to paint the eyelid, ensuring the paint covers the lash line completely. -
Fill the left eye area:
Repeat the process on the left eye. Be particularly careful near the tear duct; I prefer to use the very tip of the liner brush here for precision. -
Fill the cheek triangles:
Fill in the remaining triangular sections on the cheeks. Keep the edges sharp against the blue borders. -
Refine the lash line:
Ask the model (or look in a mirror) to open eyes and look up. Carefully fill in the lower lash line area with black so no skin shows through when the eyes are open.
Step 3: Finishing and Setting
-
Sharpen the edges:
Dip a cotton swab in micellar water. Carefully drag it along the *outer* edges of the blue framework to clean up any fuzzy lines or accidental smudges. -
Second coat check:
Inspect the black areas. If any look patchy or gray, dab a second layer of black paint over those spots for true opacity. -
Final symmetry check:
Step back and check the symmetry. If one side looks thicker, add a tiny amount of blue line weight to balance it out. -
Seal the look:
Once fully dry, close your eyes and mist the entire face with a matte setting spray. This prevents the heavy black pigment from creasing or transferring.
Add Dimension
For a 3D effect, add a thin line of white paint along the top edge of the blue framework. It creates a ‘highlight’ that makes the mask look like a physical object.
Now you have a bold, precise geometric mask that commands attention without saying a word


Cracked Stone Statue Look
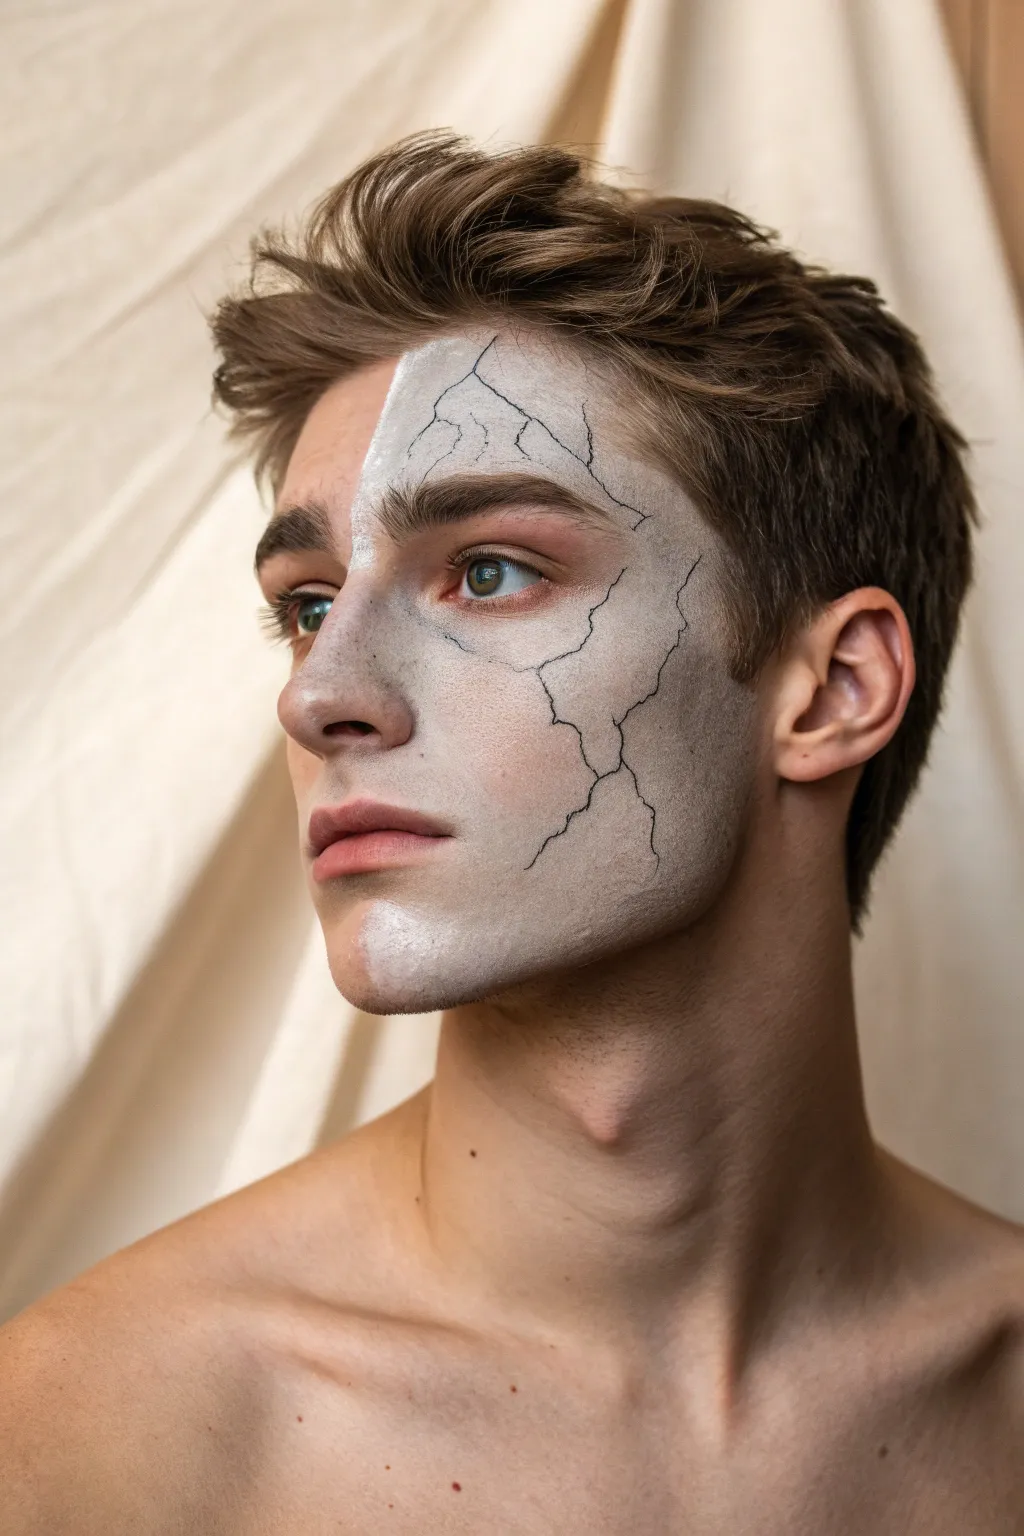
Transform yourself into a walking work of art with this striking cracked stone makeup design. By painting only half the face, you create a compelling contrast between warm, living skin and cold, weathered marble that is perfect for artistic photoshoots or conceptual costumes.
Step-by-Step
Materials
- White cream makeup or theatrical face paint
- Grey cream makeup (or black/white to mix)
- Black liquid eyeliner or fine detail brush with black face paint
- Translucent setting powder
- Makeup sponge (wedge or beauty blender)
- Small fluffy blending brush
- Fine detail brush (liner brush)
Step 1: Base Application
-
Prep the skin:
Start with clean, dry skin. Tie back your hair to keep your forehead clear. If you have facial hair, you can either paint over it for a texture contrast or work around it, though this look works best on a clean-shaven face. -
Define the boundary:
Visualize a line splitting your face down the center. I like to start slightly off-center on the forehead and curve down through the nose bridge, lip, and chin to make the split feel more organic than a ruler-straight line. -
Apply the white base:
Load a makeup sponge with white cream makeup. Stipple the paint onto the left side of your face (or whichever side you choose), covering the forehead, eye area, cheek, nose, and jawline completely. -
Blend the edge:
Along the center line where the paint meets bare skin, use the sponge to create a sharp, distinct edge, or soften it slightly depending on your preference. For this specific look, keep the edge relatively crisp. -
Add stone texture:
Process a small amount of grey paint on your palette. Lightly dab the dirty sponge over the white base to create a mottled, uneven texture. You don’t want a flat grey; you want the depth of natural stone.
Uneven Texture
Don’t aim for a perfectly smooth white base. Dabbing with a coarse sponge creates a porous look that mimics real limestone or sandstone.
Step 2: Contour and Shading
-
Contour the stone:
Using a small fluffy brush and a darker grey shade, contour the painted side just like you would natural skin. Add shadows under the cheekbone, at the temple, and along the jawline to give the ‘statue’ dimension. -
Deepen the eye socket:
Apply a medium-grey shadow into the crease of the eye and under the lower lash line. This hollowing effect mimics the carved look of a classical sculpture. -
Highlight the high points:
Go back in with pure white paint on the brow bone, the top of the cheekbone, and the bridge of the nose. This reinforces the marble effect. -
Set the base:
Gently press translucent setting powder over the entire painted area. This allows the cream makeup to dry down so it won’t smudge when we add the cracks later.
Mossy Overgrowth
Stipple small patches of dull green paint into the cracks or shadowed areas to look like an ancient statue that has been left in the garden.
Step 3: Cracking the Surface
-
Map the main cracks:
Take a fine detail brush loaded with black face paint or a liquid eyeliner pen. Start a few ‘major’ fault lines. Good placement is usually coming from the hairline down towards the eye, or up from the jawline. -
Keep lines shaky:
Crucial tip: do not draw straight lines. Make your hand tremble intentionally as you draw to create jagged, unpredictable fissures that look realistic. -
Branch out:
From your main heavy lines, draw smaller, thinner tributaries branching off. These should be very delicate—barely touching the skin with the brush tip. -
Vary line weight:
Ensure some parts of the crack are thicker (representing a deep split) and taper off into nothingness. The variety in thickness is what sells the illusion. -
Connect the features:
Let some cracks travel over prominent features like the brow bone or cheekbone, as these are stress points where real stone would naturally fracture.
Step 4: Final Details
-
Add depth to cracks:
Mix a tiny bit of white with your black to get a dark grey. Carefully trace along one side of the larger cracks to create a highlight, making the fissure look three-dimensional. -
Clean the edges:
Use a Q-tip with a little makeup remover to clean up the unpainted side of your face if any grey migrated across the center line. -
Check the hairline:
Blend the grey paint slightly into the hairline so there isn’t a visible gap of skin color where the hair starts. -
Final set:
Give the finished work a final light dusting of powder or a spray of setting spray to lock those delicate cracks in place.
Now you are ready to stand perfectly still and surprise anyone who thinks you are just part of the architecture
Topographic Map Contours
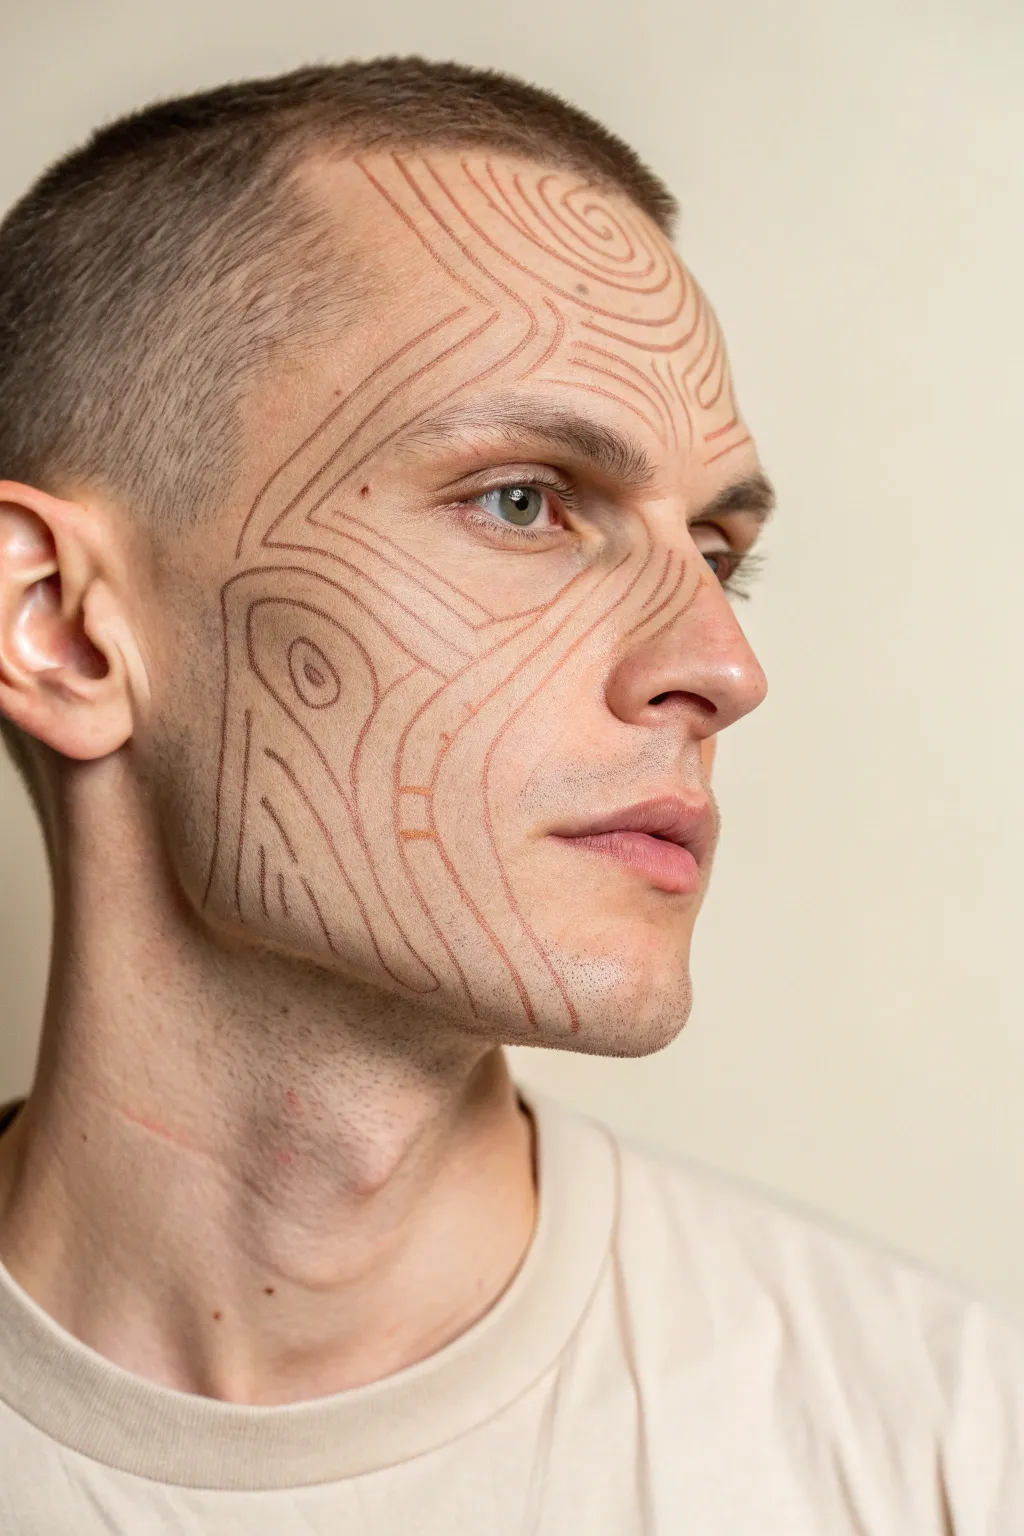
Transform facial features into an abstract landscape with this minimalist topographic contour design. Using precise linework in earthy terracotta tones creates a sophisticated, organic look that mimics map elevations or wood grain patterns.
Step-by-Step Guide
Materials
- Fine-point eyeliner pencil (terracotta, rust, or warm brown)
- Micellar water or makeup remover
- Cotton swabs (Q-tips)
- Setting spray (matte finish)
- Translucent setting powder
- Small fluffy brush
Step 1: Preparation & Mapping
-
Clean canvas:
Begin with a freshly washed and dried face. Avoid heavy moisturizers or oils on the areas where you plan to draw, as these can cause the pencil to slide or smudge. -
Identify high points:
Look in the mirror and locate the natural high points of your face: the cheekbone, the temple, and the brow bone. These will be the ‘summits’ of your topographic map. -
Establish the anchor line:
Draw your first primary line starting from the center of the cheek, curving up towards the temple. Use a steady hand and medium pressure to ensure the reddish-brown tone is visible but not harsh.
Fixing Smudges
If you smudge a line, don’t wipe it! Let it dry/set for a moment, then dab lightly with a concealer closest to your skin tone to ‘cut’ the line back into shape.
Step 2: Drafting the Contours
-
Create the cheek focus:
Draw a small, enclosed circle or oval on the flat part of the cheekbone. This acts as the peak of your elevation map. -
Ripple outwards:
Carefully draw a second line surrounding the first clear oval. Maintain a consistent gap of about 2-3 millimeters between the lines. -
Extend to the jaw:
Continue adding concentric lines that flow downwards from the cheekbone towards the jawline. As you move lower, allow the lines to straighten out slightly, mimicking a slope. -
Temple spiral:
Move up to the forehead and temple area. Start a new focal point with a small swirl or curve just above the eyebrow tail. -
Connect the zones:
Draw long, sweeping lines that connect the cheek pattern to the temple pattern. These lines should curve around the outer corner of the eye without touching it. -
Variable spacing:
To make the map look realistic, vary the distance between lines slightly. Tighter lines suggest steep terrain, while wider spaces suggest flat ground.
Level Up: Gloss Map
For an editorial look, skip the powder. Instead, trace over your negative space (the skin between lines) with a clear gloss for a sweaty, high-fashion texture.
Step 3: Refining the Landscape
-
Forehead flow:
Extend the lines from the temple across the forehead. Let them curve naturally with the shape of the skull rather than drawing straight across. -
The nose bridge:
Bring a few lines down from the brow onto the side of the nose bridge. This integrates the design with the center of the face. -
Cross-hatching details:
Add tiny perpendicular hash marks between just a few selected lines. This mimics the tick marks sometimes seen on elevation maps and adds technical detail. -
Check symmetry:
Step back from the mirror. You don’t need perfect symmetry, but the visual ‘weight’ of the lines should feel balanced. -
Clean up errors:
Dip a cotton swab in micellar water to sharpen any smudged edges or erase lines that became too thick. I find spinning the swab as I lift it removes pigment cleanly.
Step 4: Setting the Texture
-
Soften the shine:
This look works best with a matte finish. Lightly tap a small amount of translucent powder over the design using a fluffy brush. -
Lock it in:
Close your eyes and mist the face with a matte setting spray. This prevents the warmth of your skin from melting the fine lines. -
Final inspection:
Once dry, look for any gaps in the pencil pigment and gently fill them in if necessary.
Now you have a striking, architectural design that highlights your bone structure
Cosmic Split-Face Portal
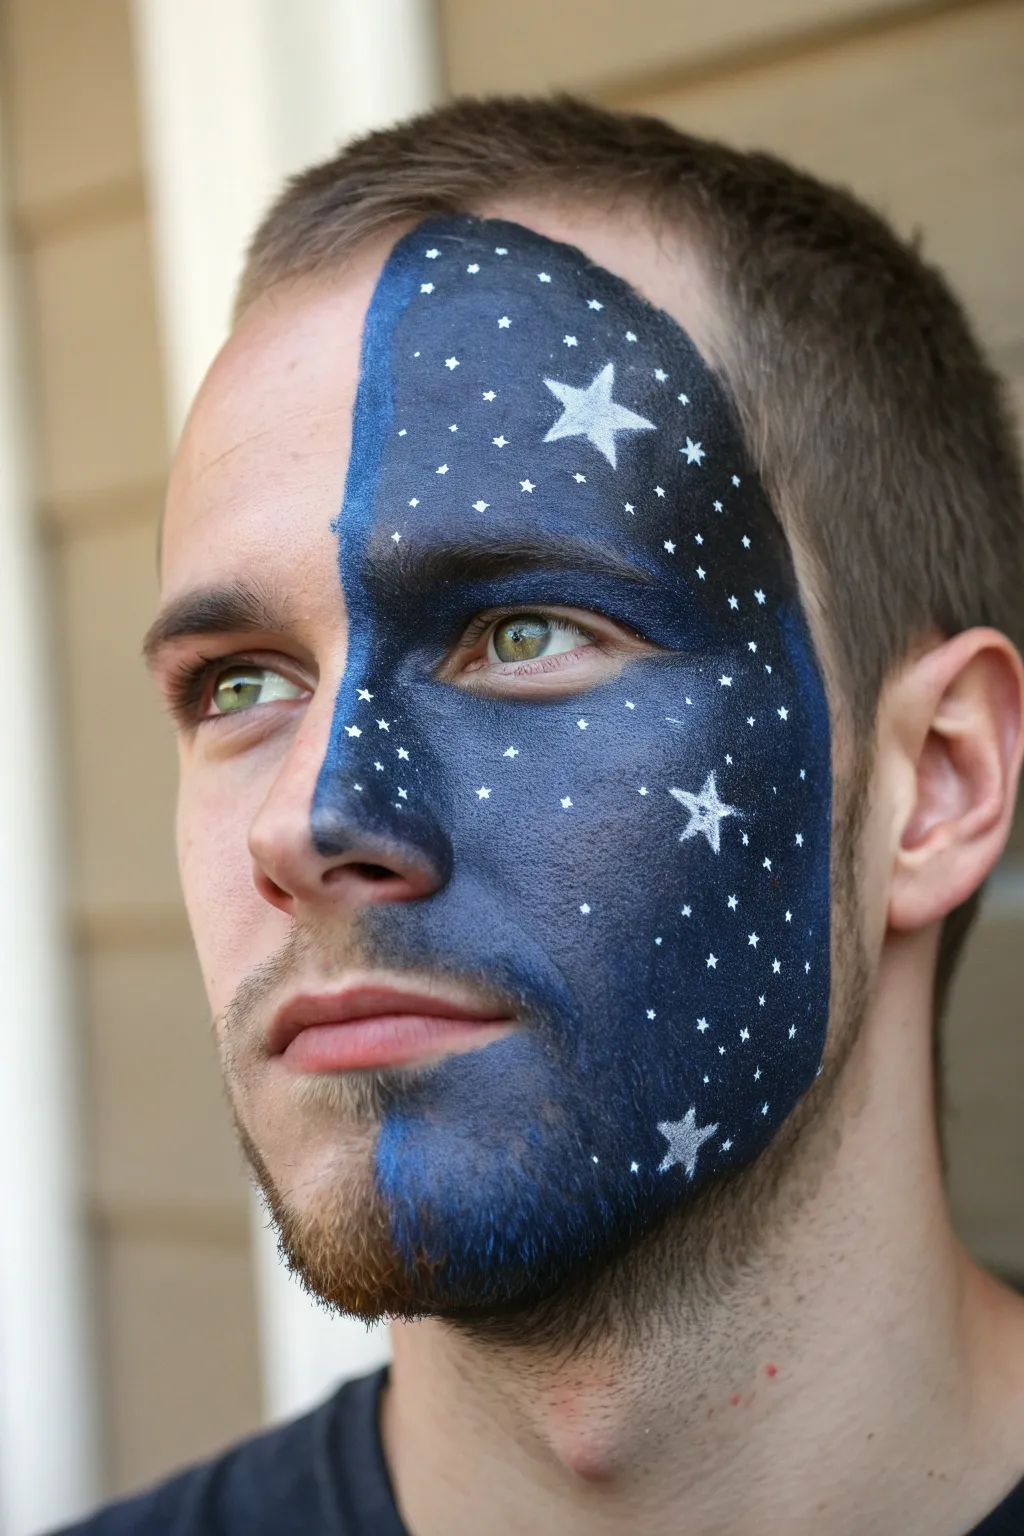
Transform one half of your face into a window to deep space with this striking half-face design. The contrast between natural skin and the deep, star-speckled indigo creates a surreal look that feels like a tear in reality.
How-To Guide
Materials
- Water-activated face paint (Dark Blue, Black, White)
- High-density face painting sponge (petal or half-moon shape)
- Flat brush (medium size)
- Round brush (size 2 or 3 for stars)
- Fine detail brush (size 0 or 1)
- Spray bottle with water
- Cotton swabs or makeup wipes (for clean-up)
Step 1: Setting the Boundary
-
Define the Center Line:
Begin by moistening your flat brush with dark blue paint. Starting at the top of the forehead, draw a vertical line straight down the center of the face. -
Navigate Features:
Carefully trace down the bridge of the nose, over the philtrum (the groove above the lip), and down the center of the chin. Keeping this line crisp is crucial for the split effect. -
Map the Perimeter:
Outline the rest of the shape along the hairline, down past the temple, and along the jawline on the left side of the face to create a defined container for your galaxy.
Patchy Beard Paint?
Is the paint not sticking to facial hair? Try using a cream-based makeup or greasepaint for the beard area instead of water-activated paint, then set it with translucent powder.
Step 2: Creating the Void
-
Load the Sponge:
Spray your sponge lightly with water and load it heavily with the dark blue face paint. Make sure the consistency is creamy, not dripping. -
Base Application:
Stipple the blue paint onto the skin using a dabbing motion. Start from the hairline and work inward, ensuring fully opaque coverage. -
Handle Difficult Areas:
Use the edge of the sponge or your flat brush to carefully fill in the eye socket, upper eyelid, and around the nostril. Close the eye to get full coverage on the lid. -
Beard Considerations:
If painting over facial hair, I find it helpful to press the sponge firmer and wiggle it slightly to work the pigment past the hair and onto the skin beneath. -
Adding Depth:
Load a clean corner of your sponge with black paint. Lightly dab this over the outer edges (temple, jawline) and blend it inward into the blue. -
Smoothing the Transition:
While the paint is still slightly damp, use the sponge to blend the black and blue together, creating a gradient that looks like deep, multidimensional space rather than a flat color.
Step 3: Starlight Details
-
Prepare White Paint:
Clean your workstation and activate your white face paint. The consistency should be slightly thinner, like ink, to allow for sharp points on the stars. -
The Hero Star:
Using the round brush, paint a prominent five-pointed star on the forehead. Start with a simple cross, then an X, and connect the points with curved lines. -
Secondary Stars:
Add two or three smaller four-pointed stars (just a cross shape with tapered ends) on the cheek and jawline to balance the composition. -
Cluster Creation:
Switch to your finest detail brush. Dot tiny clusters of stars around the eye area and temple. Vary the pressure to create different sized dots. -
Nebula Effect:
Group some of the tiny dots closer together in bands to mimic the look of the Milky Way stretching across the face. -
Clean Up:
Dip a cotton swab in water or makeup remover and run it along that initial center line to sharpen the division between the painted and unpainted skin. -
Final Check:
Inspect the painted eyebrow area; if the natural hair is showing through too much, tap a little extra dark blue over it to conceal the texture.
Level Up: UV Glow
Mix UV-reactive neon blue into your base or fleck on UV white paint for the stars. Under blacklight, the galaxy side will glow while the unpainted side disappears.
Step back and admire how the sharp split creates a stunning optical illusion suitable for any cosmic traveler


Have a question or want to share your own experience? I'd love to hear from you in the comments below!