A painted step stool is one of my favorite tiny projects because it’s useful every single day and still gets to be a little piece of art. If you’ve got a plain wooden stool sitting around, these ideas will help you turn it into something you actually want to leave out on display.
Classic Solid Color Refresh
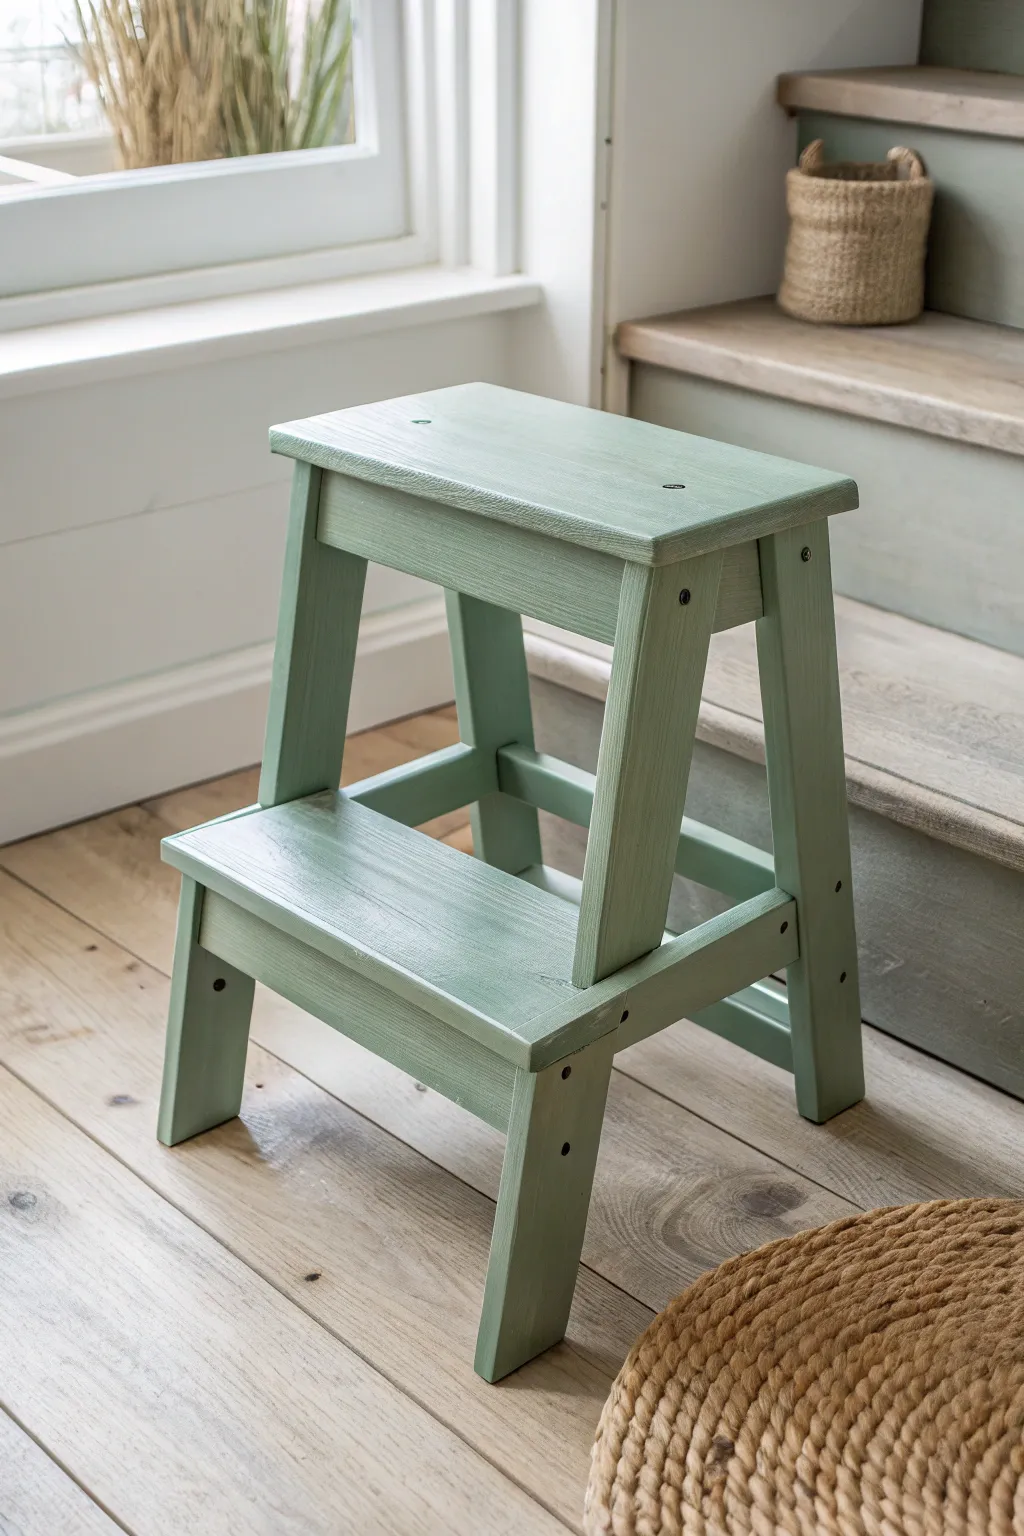
Sometimes less really is more, as proven by this understated yet elegant sage green step stool transformation. This project focuses on achieving a clean, smooth finish that highlights the structural beauty of the piece while bringing a calming pop of color to any room.
How-To Guide
Materials
- Wooden step stool (unfinished or previously finished)
- Medium-grit sandpaper (120-grit)
- Fine-grit sandpaper (220-grit)
- Tack cloth or microfiber rag
- Primer (bonding primer if painting over existing finish)
- Sage green latex or chalk-style paint (matte or eggshell finish)
- 2-inch angled synthetic paintbrush
- Small foam roller (optional for flat surfaces)
- Clear matte polyurethane topcoat
- Drop cloth
- Screwdriver (if tightening is needed)
- Wood filler (optional)
Step 1: Preparation
-
Clean and Inspect:
Before you begin, wipe down the entire stool with a damp cloth to remove surface dust and cobwebs. Check for any wobbly joints; now is the time to tighten any loose screws with your screwdriver. -
Fill Imperfections:
If your stool has deep gouges or nail holes you want to hide, apply a small amount of wood filler. Smooth it over with a putty knife and let it dry completely according to the package instructions. -
Initial Sanding:
Using the 120-grit sandpaper, give the entire stool a thorough sanding. You don’t need to strip it to bare wood, but you do need to remove any glossy sheen to give the new paint something to grip. -
Refine the Surface:
Switch to the finer 220-grit sandpaper for a quick pass to smooth out any scratches from the coarser paper. This ensures your final finish will be touchably soft. -
Remove Dust:
This step is crucial: use a tack cloth or a slightly damp microfiber rag to pick up every speck of sanding dust. Any leftover dust will create tiny bumps in your paint finish.
Step 2: Priming and Painting
-
Apply Primer:
Brush on a thin, even coat of primer. Pay special attention to the corners and underneath the steps. Priming prevents stains from bleeding through and ensures true color payoff. -
Check for Drips:
As the primer starts to set, scan the legs and edges for any drips and smooth them out with your brush immediately. Let the primer dry fully before moving on. -
Mix Your Green:
Stir your sage green paint thoroughly. If you are using chalk paint, it can sometimes settle at the bottom, so ensure the pigments are well blended. -
First Coat of Color:
Apply the first coat of sage green. I find it easiest to start with the stool flipped upside down to get the tricky underside areas first, then flip it right-side up to finish the steps and outer legs. -
Watch the Grain:
Brush in the direction of the wood grain for the most professional look. If painting the flat steps, you can use a small foam roller for a super smooth finish, followed immediately by a light brush stroke (back-brushing) to match the texture of the legs. -
Dry and Sand Lightly:
Allow the first coat to dry completely. Once dry, run a piece of ultra-fine sandpaper or a crumpled brown paper bag over the surface to knock down any raised grain. -
Second Coat:
Apply a second coat of green paint. This coat should provide full, opaque partial coverage if you’re aiming for the solid look shown in the inspiration photo. -
Detailed Inspection:
While the second coat is still wet, check the recessed screw holes and joints where paint tends to pool. Dab away excess with the corner of your brush.
Paint Peeling?
If paint peels immediately, the surface likely wasn’t cleaned well enough or was too glossy. Sand the peeling spot down to bare wood, re-clean with a degreaser, prime specifically that spot, and repaint.
Step 3: Protection
-
Cure Time:
Let the final coat of paint cure for at least 24 hours. Painting over distinct layers too quickly can lead to a tacky finish that never quite hardens. -
Apply Topcoat:
Using a clean brush, apply a coat of clear matte polyurethane. A matte finish preserves the modern, rustic feel of the sage color without making it look plastic or shiny. -
Seal the Feet:
Don’t forget the bottom of the legs. Sealing the very bottom prevents moisture from wicking up into the wood if the floor is mopped later. -
Final Light Sanding:
Between polyurethane coats, do one last very light scuff sand with high-grit paper (320-grit or higher) to remove any dust nibs for a factory-smooth feel. -
Second Seal Layer:
Apply a second and final thin coat of sealant. Step stools get heavy foot traffic, so this extra layer is essential for durability.
Level Up: Two-Tone Treat
For a unique twist, leave the treads (the flat steps) bare wood or stain them a dark walnut, while painting only the legs and frame in the sage green for a beautiful modern farmhouse contrast.
Enjoy your beautifully refreshed step stool, ready to offer a helping hand or just look lovely in the corner


Two-Tone Seat and Steps
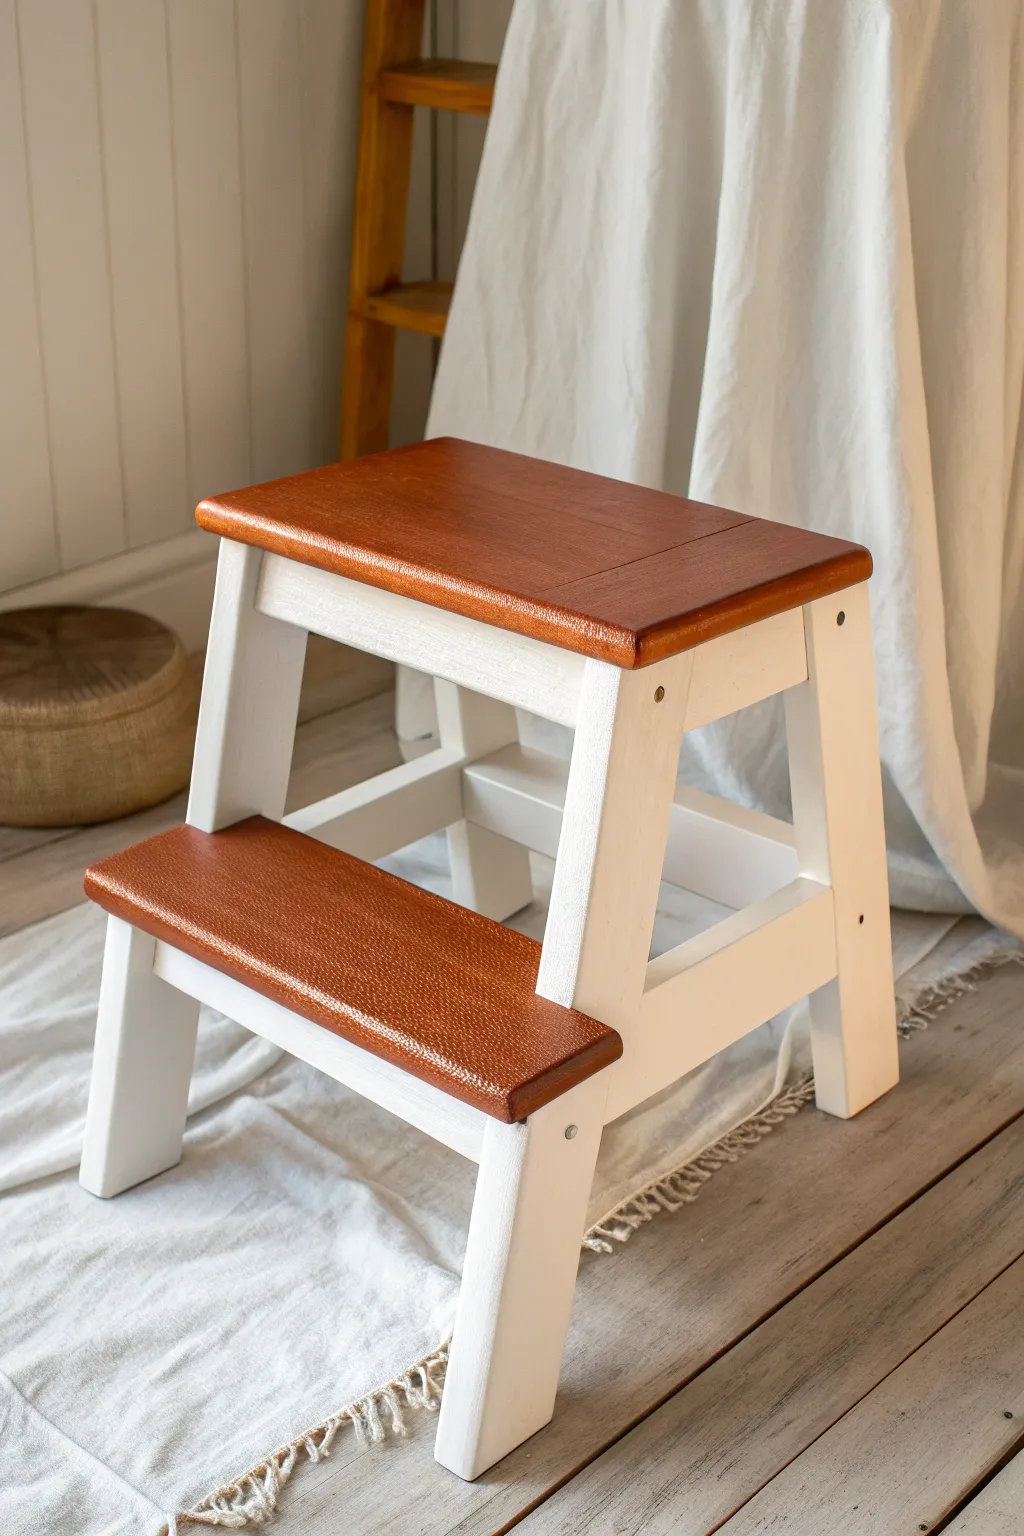
This project transforms a plain wooden step stool into a timeless piece of furniture by combining crisp white paint with warm, natural wood tones. The contrast between the painted frame and the stained treads creates a high-end, custom look that fits beautifully into farmhouse or traditional decor.
Step-by-Step
Materials
- Unfinished wooden step stool
- Medium-grit sandpaper (120-grit)
- Fine-grit sandpaper (220-grit)
- Painter’s tape (high quality)
- Wood stain (warm mocha or walnut shade)
- White primer
- White furniture paint (satin or semi-gloss finish)
- Polyurethane topcoat (satin or matte)
- Clean lint-free rags
- Synthetic bristle paintbrush
- Tack cloth
- Small foam brush
Step 1: Preparation & Sanding
-
Assess the wood:
Begin by inspecting your unfinished stool for any rough patches or splinters. If the stool is pre-assembled, check deep into the corners where glue might have squeezed out, as this will prevent stain from soaking in later. -
Initial sanding:
Sand the entire stool with 120-grit sandpaper. Focus heavily on the top surfaces of the steps where you plan to stain, ensuring the grain is open and ready to accept color. -
Refine the surface:
Follow up with 220-grit sandpaper all over to create a buttery smooth finish. This is crucial for the painted areas to look professional and not grainy. -
Clean up dust:
Wipe the entire piece down thoroughly with a tack cloth to remove every speck of sawdust. Any leftover dust will create bumps in your paint finish.
Bleeding Lines?
If stain bled onto the area meant for paint, don’t panic. Let it dry, sand that specific spot back down to bare wood, and dab a little shellac-based primer over it to block the stain before painting.
Step 2: Staining the Treads
-
Tape off the frame:
Apply painter’s tape carefully around the edges of the steps where the wood meets the frame. Press the edges of the tape down firnly with your fingernail or a credit card to prevent bleed-through. -
Apply the stain:
Stir your wood stain well. Using a foam brush or a clean rag, apply the stain to the top and edges of the two steps. Work in the direction of the wood grain. -
Wipe away excess:
Let the stain sit for about 5-10 minutes (check your specific can’s instructions), then wipe away all excess liquid with a clean lint-free rag. Wiping evenly is key to avoiding blotchy areas. -
Evaluate color depth:
If you prefer a richer, darker tone like the one in the photo, allow the first coat to dry completely and then apply a second coat using the same method. -
Seal the stain:
Once the stain is fully dry (usually 24 hours), apply a thin coat of polyurethane to the stained steps only. This protects the wood while you work on the paint later.
Add Texture
For a rustic farmhouse vibe, lightly distress the edges of the white painted legs with sandpaper before sealing to let a bit of the natural wood peek through.
Step 3: Painting the Frame
-
Reverse taping:
Once the sealed steps are 100% dry to the touch, remove the old tape. Now, carefully tape over the stained wood edges to protect them from the white paint. -
Apply primer:
Using a synthetic bristle brush, apply a coat of white primer to the legs and support bars. I like to flip the stool upside down for this step to ensure I don’t miss the undersides of the rungs. -
Sand the primer:
After the primer dries, lightly scuff it with the 220-grit paper. This knocks down any raised grain or brush strokes, ensuring your topcoat looks like factory-finish furniture. -
First coat of paint:
Apply your first coat of white furniture paint. Use long, smooth strokes and watch for drips forming near the joints and corners. -
Second coat:
Allow the first coat to dry according to the manufacturer’s time, then apply a second coat for full opacity and a crisp, solid white look. -
Remove tape:
Peel off the painter’s tape while the final coat of paint is still slightly tacky. Pulling it off at a 45-degree angle helps prevent the paint from peeling up with the tape.
Step 4: Final Protection
-
Seal the entire piece:
To ensure your stool can handle foot traffic, apply 2-3 coats of polyurethane over the entire piece—both the painted frame and the stained steps. -
Sand between topcoats:
For the smoothest possible feel underfoot, use a very fine sanding sponge or 400-grit paper to lightly sand between coats of polyurethane, wiping away dust each time. -
Final cure:
Let the stool cure for at least 48 hours before standing on it to ensure the finish hardens completely.
Now you have a durable, custom-designed step stool ready to help you reach new heights in style


Bold Stripes on the Steps
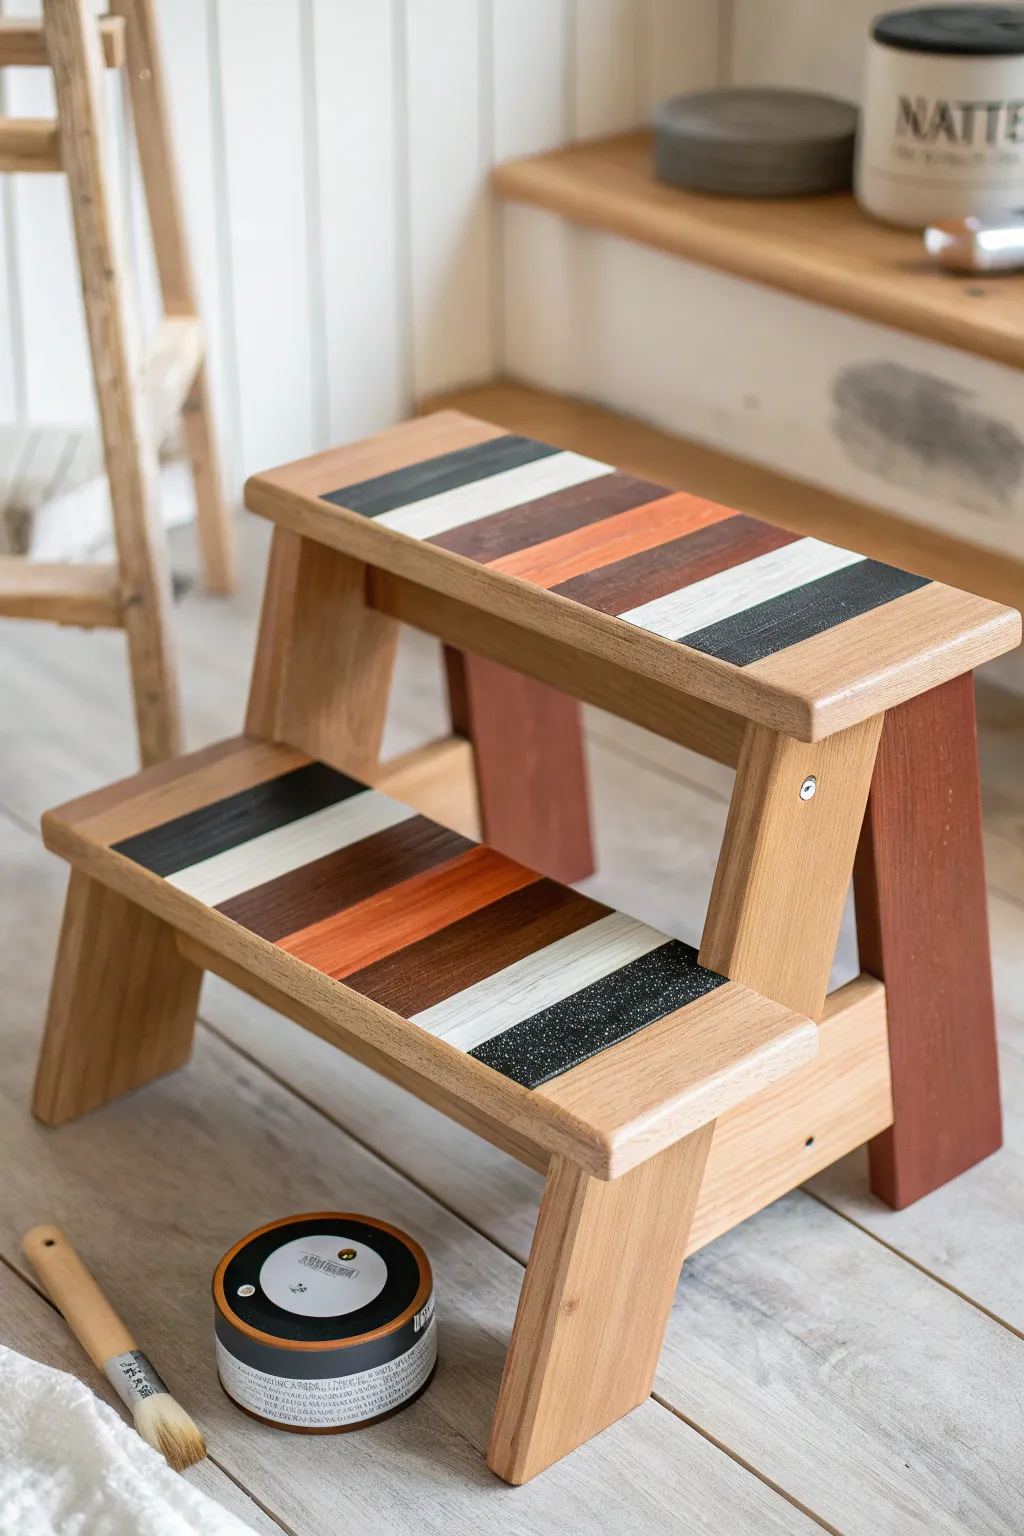
Transform a plain wooden IKEA-style step stool into a striking piece of functional decor with bold, alternating stripes. This project combines the natural warmth of exposed wood with a sophisticated palette of black, white, and varying wood stain tones for a modern, geometric look.
How-To Guide
Materials
- Unfinished wooden Two-step Stool (like IKEA BEKVÄM)
- Painter’s tape (high-quality, varied widths preferred)
- Sandpaper (120 and 220 grit)
- Clean tack cloth or rag
- Matte black acrylic or chalk paint
- White acrylic or chalk paint
- Dark walnut wood stain (or gel stain)
- Red-brown wood stain (like Mahogany or Cherry)
- Foam brushes or small synthetic bristle brushes
- Polyurethane sealer (clear matte or satin)
- Ruler or measuring tape
- Pencil
Step 1: Preparation & Planning
-
Initial Sanding:
Begin by sanding the entire step stool with 120-grit sandpaper to remove any rough patches or existing weak finish. Follow up with 220-grit for a super smooth surface. -
Clean Surfaces:
Wipe down the entire stool with a tack cloth or a slightly damp rag to remove every speck of dust. This is crucial for crisp paint lines. -
Measure the Stripes:
Decide on the pattern layout. The image uses stripes of varying widths. Use a ruler and pencil to lightly mark where each stripe will go on both step surfaces.
Tape Sealing Trick
Before painting your bold color, brush a tiny bit of clear matte medium or sealer over the edge of the tape. This fills gaps and ensures your lines stay razor sharp.
Step 2: Staining the Wood Tones
-
Tape for Stains:
Since stain bleeds more than paint, tape off the areas that will eventually be painted black or white, leaving only the sections for the wood stain exposed. -
Apply Dark Walnut:
Using a foam brush or rag, apply the dark walnut stain to its designated stripes. Wipe off excess stain after a minute for lighter coverage or leave it longer for depth. -
Apply Red-Brown Stain:
Apply the mahogany or cherry-toned stain to the middle stripe sections. Aim for a distinct contrast between this warm red tone and the cooler dark walnut. -
Stain the Legs (Optional):
Looking at the reference, the back legs are stained a reddish-brown while the front remain natural. Apply stain to the back legs now if you want that two-tone base effect. -
Allow to Cure:
Let the stained sections dry completely according to the manufacturer’s instructions. This usually takes longer than paint, often overnight.
Scrapbook Paper Hack
Instead of painting complex patterns, you can use Mod Podge to adhere strips of heavy-duty decorative scrapbook paper to the steps, then seal heavily with poly.
Step 3: Painting the Bold Stripes
-
Re-Tape for Paint:
Once the stain is bone dry, remove old tape. Now, carefully tape over the stained areas to protect them. Press the tape edges down firmly with a credit card to prevent bleed-through. -
Paint White Stripes:
Apply your white paint to the designated thin stripe sections. I find that two thin coats usually provide better coverage than one thick, gloopy coat. -
Paint Black Stripes:
Apply the matte black paint to the outer stripe sections and the central accent stripe. Use a steady hand near the edges of the steps. -
Create Texture (Optional):
For the speckled look seen on the front black stripe in the photo, you can lightly flick a toothbrush with white paint over the wet black paint, or simply rely on the wood grain texture showing through a thinner coat of black. -
Remove Tape Immediately:
Peel off the painter’s tape while the paint is still slightly tacky. Pulling at a 45-degree angle away from the painted edge helps ensure a crisp line.
Step 4: Assembly & Finishing
-
One Last Sand:
If you have any raised ridges where the paint meets the stain, very lightly scuff that ridge with 220-grit paper to level it out. -
Seal the Steps:
Apply a coat of clear matte polyurethane over the entire stool, especially the steps. These surfaces see foot traffic, so protection is key. -
Second Sealer Coat:
Let the first coat dry, lightly sand with fine grit, and apply a second coat of sealer for maximum durability. -
Tip for Assembly:
If you painted the pieces before assembling the stool (which is easier), assemble it now. If it was already built, just let it cure. -
Add Tension Pads:
Stick felt pads to the bottom of the legs to protect your floors and prevent the stool from sliding.
Enjoy your customized stool which now serves as both a handy helper and a piece of art


Personalized Name on the Seat
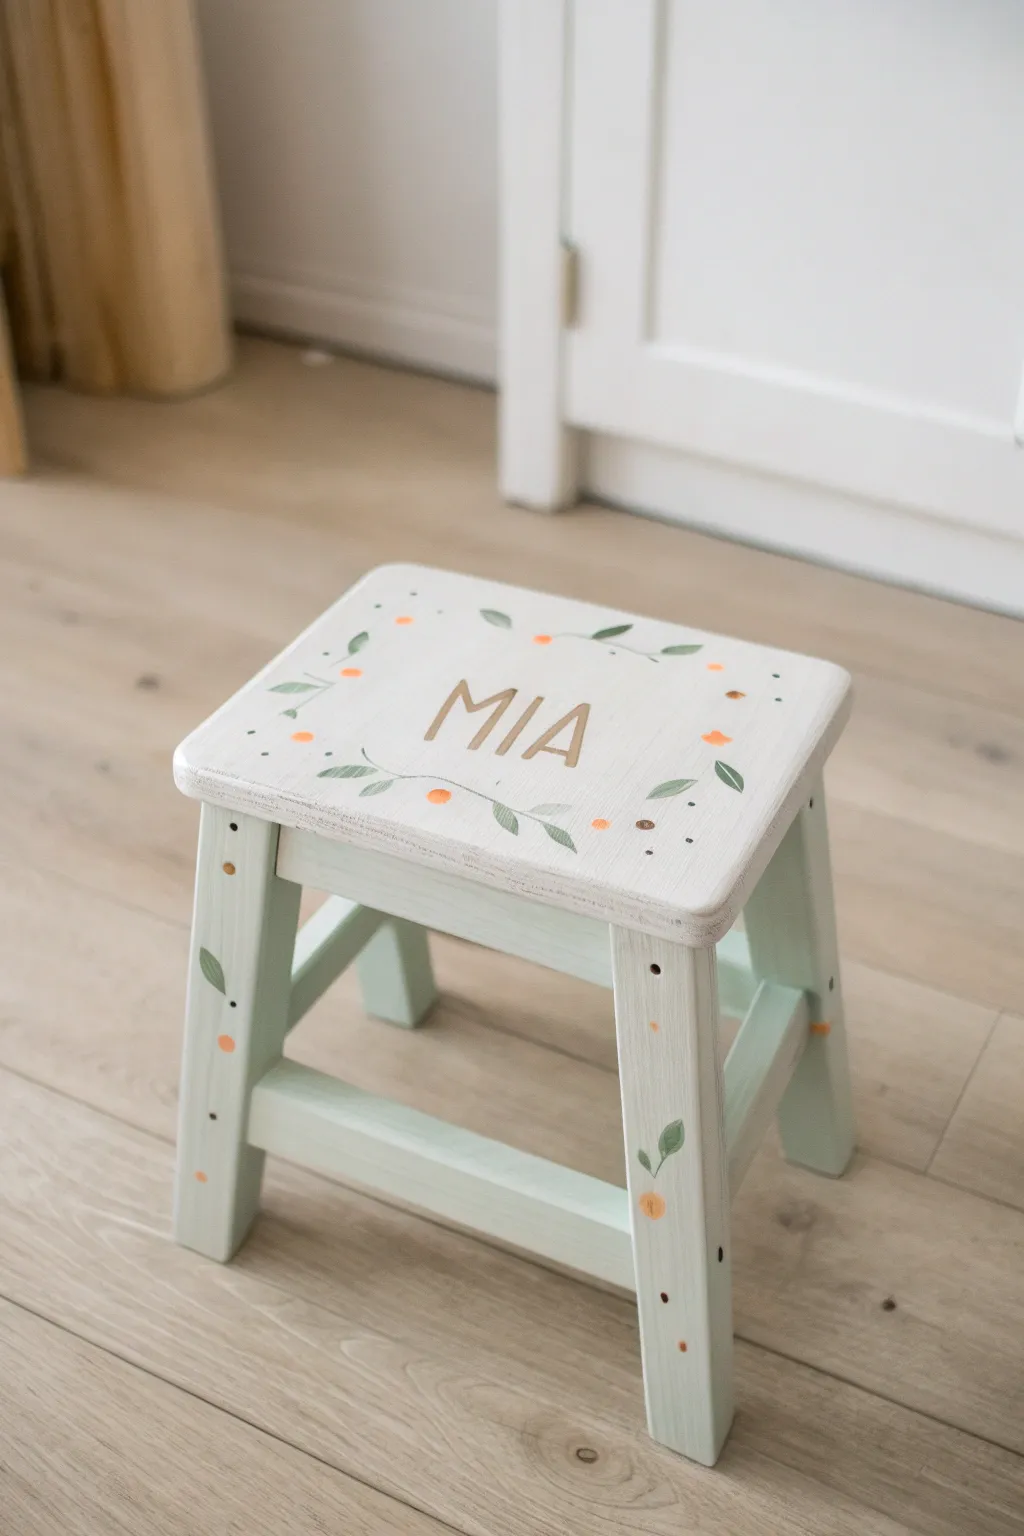
This charming project transforms a plain wooden stool into a personalized keepsake featuring delicate botanical vines and warm orange berries surrounding a custom name. The soft mint green legs and whitewashed top create a gentle, whimsical aesthetic perfect for a child’s bedroom or nursery.
Detailed Instructions
Materials
- Unfinished wooden step stool
- Sandpaper (medium and fine grit)
- White acrylic paint or chalk paint
- Soft mint green acrylic paint (legs)
- Gold metallic paint (for the name)
- Sage green acrylic paint (for leaves)
- Orange acrylic paint (for berries)
- A fine dark brown paint marker or tiny brush
- Wide flat brush
- Small round detail brush
- Pencil and eraser
- Letter stencils (optional)
- Clear matte varnish or sealant
Step 1: Preparation & Base Coat
-
Sand the surface:
Begin by sanding the entire stool to ensure a smooth painting surface. If the wood is raw, start with medium grit and finish with fine grit. Wipe away all dust with a tack cloth or damp rag. -
Paint the legs:
Using a flat brush, paint the legs and cross-support bars with the soft mint green paint. Apply thin, even coats to avoid drips. -
Repeat leg coverage:
Let the first coat dry completely, then apply a second coat of mint green to ensure solid, opaque coverage. -
Paint the seat top:
Paint the top surface of the seat with white paint. For the look in the photo, you don’t need it to be perfectly stark white—a slightly warmer off-white looks lovely. -
Distress the edges (optional):
Once the white paint is dry, I like to take a bit of fine sandpaper and gently rub the edges of the seat to let a tiny bit of wood show through for a rustic feel.
Clean Lines Pro-Tip
For the crispest letter edges, use a flat-edged brush (shader brush) rather than a round one. Press the flat edge down to create straight lines instantly.
Step 2: Designing the Name
-
Center the lettering:
Measure the center of the seat top. Using a pencil, lightly sketch out the name ‘MIA’ (or your chosen name) in a simple, clean sans-serif font. -
Use stencils if needed:
If you don’t feel confident freehanding the letters, use letter stencils to trace the name lightly in pencil first. -
Paint the letters:
Dip a small flat or round brush into the metallic gold paint. Carefully fill in your pencil sketch. The gold adds a subtle shine that catches the light. -
Add a second gold coat:
Metallic paints can sometimes be sheer, so let the letters dry and apply a second coat of gold for richness.
Step 3: Painting the Botanicals
-
Sketch the vine placement:
Lightly draw a curved line around the name with your pencil to act as the main stem of the vine. Keep it loose and organic. -
Add the leaves:
Using your small round brush and sage green paint, create small almond-shaped leaves along your pencil stem. Vary the spacing so it doesn’t look too uniform. -
Paint the berries:
Once the green leaves are dry, use the tip of a brush handle or a very small brush to dot on small orange berries scattered among the leaves. -
Add decorations to the legs:
Don’t forget the legs! Paint a few falling leaves and orange berries down the vertical supports of the stool to tie the design together. -
Create fine details:
Use a very fine brush or a brown paint pen to add tiny dots or ‘seeds’ around the vines on the seat and legs for texture. -
Draw stem connections:
With the finest brush available or a pen, draw very thin, dark lines connecting the berries and leaves to the main invisible vine path.
Level Up: Texture
Mix a tiny bit of baking soda into the orange berry paint. This will give the berries a slight 3D raised texture when they dry, adding tactile interest.
Step 4: Finishing Touches
-
Clean up sketch lines:
Wait until all paint is absolutely bone dry, then gently erase any visible pencil marks from your initial sketches. -
Apply varnish:
Protect your artwork by applying a coat of clear matte varnish over the entire stool. This is crucial for a step stool that might get scuffed by little feet. -
Final cure:
Let the varnish cure according to the manufacturer’s instructions before allowing anyone to step or sit on the stool.
This personalized piece is now ready to become a cherished part of a little one’s daily routine
BRUSH GUIDE
The Right Brush for Every Stroke
From clean lines to bold texture — master brush choice, stroke control, and essential techniques.
Explore the Full Guide
Simple Floral Border Around the Top
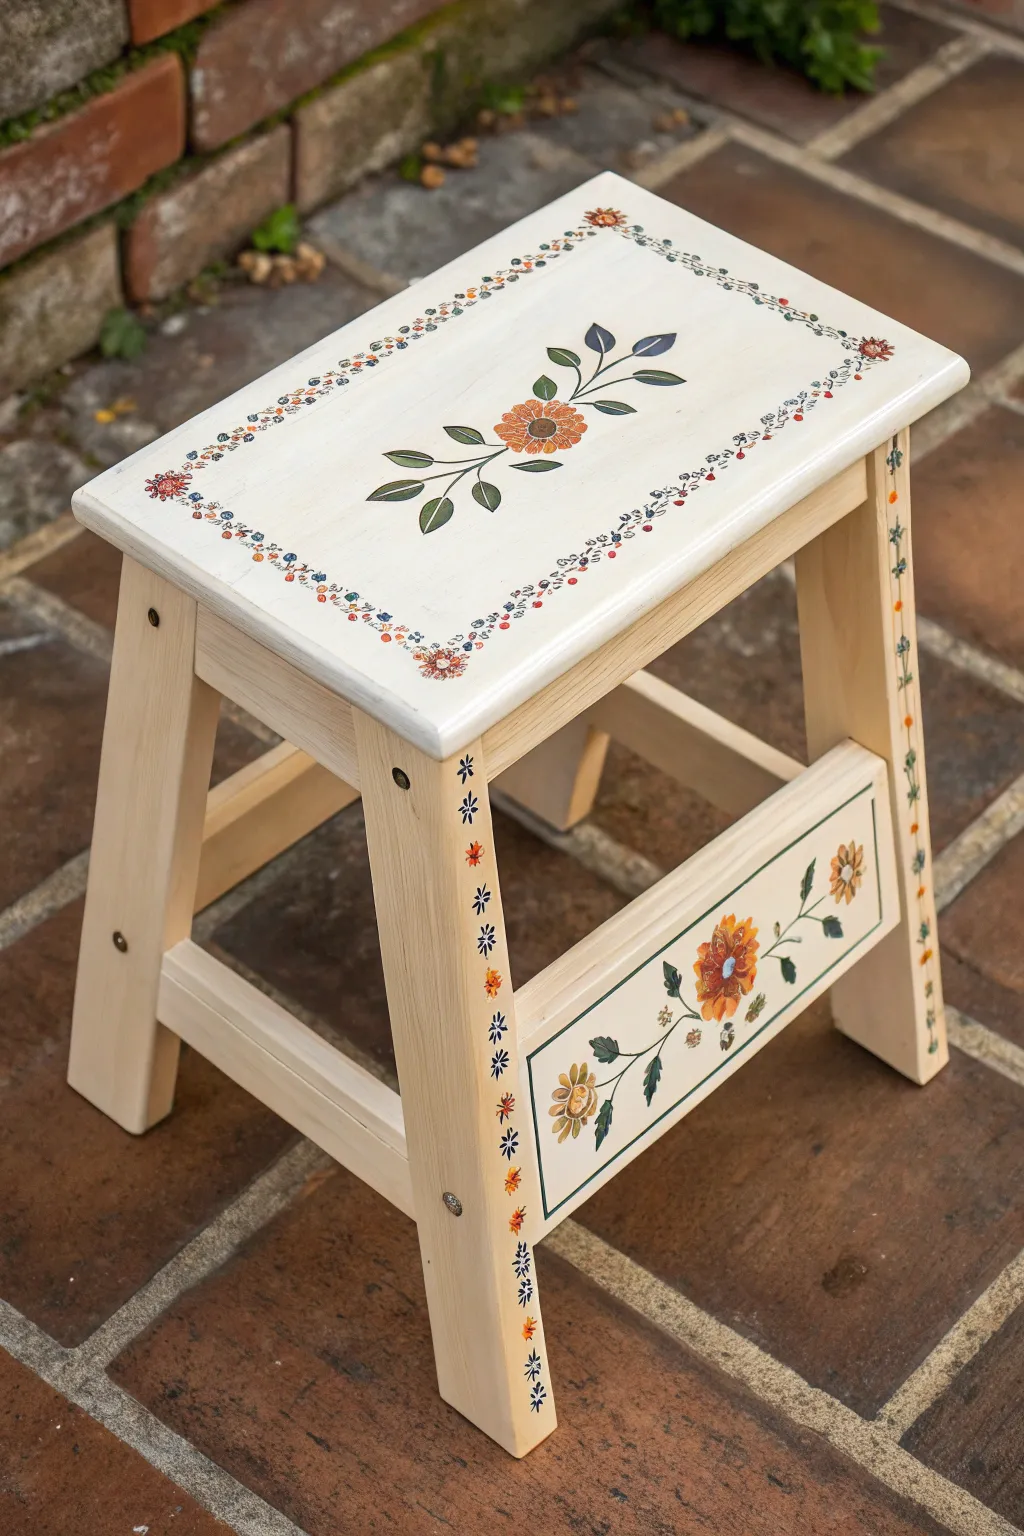
This charming project transforms a plain wooden step stool into a blooming garden accent with soft cream tones and detailed floral motifs. The combination of a central focal flower, a dainty perimeter vine, and decorated legs creates a cohesive, heirloom-quality piece perfect for a kitchen, bathroom, or plant stand.
How-To Guide
Materials
- Unfinished wooden step stool
- Sandpaper (120 and 220 grit)
- Tack cloth
- Off-white or cream acrylic paint (base coat)
- Acrylic craft paints: Deep orange, yellow, olive green, earthy brown, deep blue
- Flat paintbrush (1-inch width)
- Round paintbrushes (sizes 2, 4, and 0 for details)
- Pencil
- Ruler
- Tracing paper (optional)
- Clear matte or satin polycrylic sealer
Step 1: Preparation and Base Coat
-
Sand the surface:
Begin by sanding the entire unfinished stool with 120-grit sandpaper to remove any rough patches or splinters. Follow up with 220-grit sandpaper for a smooth finish, focusing especially on the top seat and the front panel where your main artwork will go. -
Clean dust:
Wipe down the entire stool thoroughly with a tack cloth to remove all sanding dust. Even a little dust can create a bumpy texture in your paint. -
Apply base color:
Using a 1-inch flat brush, apply a coat of off-white or cream acrylic paint to the entire stool. Let this coat dry completely. -
Apply second coat:
Apply a second coat of the cream paint to ensure solid, opaque coverage. If you want a perfectly smooth surface for painting details, you can lightly sand with 220-grit paper once this coat is fully dry.
Step 2: Painting the Top Seat
-
Mark the center:
Find the center of the stool seat using a ruler and lightly mark it with a pencil. This will anchor your central floral design. -
Sketch the central flower:
Lightly sketch a large, single bloom in the center. Draw a circular center, surrounded by varied petals. Extend two main stems outward—one going up, one down—and add tear-drop shaped leaves along the stems. -
Paint the central bloom:
Fill in the flower petals using a deep orange paint mixed with a touch of yellow for warmth. Use a size 4 round brush. Paint the center of the flower with yellow. -
Add leaves and stems:
With an olive green shade, carefully paint the leaves and the thin stems connecting them to the flower. I like to twist the brush slightly at the end of the leaf stroke to get a sharp point. -
Create the border guide:
Measure about 1 inch inward from the edge of the seat on all four sides. Lightly sketch a continuous vine line or use faint pencil dots to guide your painting. -
Paint the border vine:
Using your smallest round brush (size 0) and deep blue or brown paint, create the delicate vine structure along your guide marks. Keep the line thin and organic. -
Add border details:
Along the vine, alternate painting tiny tri-clusters of blue dots and small red/orange single flowers. Repeat this pattern around the entire perimeter.
Clean Lines Trick
For the rectangle borders on the front panel, use painter’s tape to mask off the area. It ensures perfectly straight lines without needing a steady hand.
Step 3: Decorating Legs and Front Panel
-
Define the front panel:
On the front crossbar, paint a thin rectangular border in dark green or black to frame the area, leaving a margin of cream color around the outside. -
Paint panel florals:
Inside the front panel frame, paint a trailing vine of larger flowers similar to the top but slightly varied—perhaps one orange bloom and one yellow bloom, connected by flowy green stems. -
Paint leg details:
On the front-facing legs, paint a vertical line of small floral motifs. Use a simple pattern: a small asterisk-style flower in blue, followed by a tiny orange bud, repeating down the length of the leg. -
Add final details:
Go back to your main flower on the seat. Add tiny brown dots to the yellow center for texture and outline the petals very faintly if needed for definition.
Design Symmetry
If your hand-painted borders look uneven, don’t worry. Varied spacing adds charm. If it bothers you, use a small stencil for the repeating border motifs.
Step 4: Sealing and Finish
-
Check for mistakes:
Look over the whole piece. If you have any smudges, now is the time to carefully touch them up with your base cream color. -
Let paint cure:
Allow the painted designs to dry for at least 24 hours. The paint needs to be fully cured before sealing. -
Apply sealer:
Apply a coat of clear matte or satin polycrylic sealer over the entire stool to protect your artwork from scuffs and moisture. -
Final coat:
Once dry, apply a second coat of sealer to the top seat and the steps, as these areas will see the most wear.
Place your finished stool in a sunny corner to show off those beautiful garden details
Leafy Botanical Pattern on the Legs
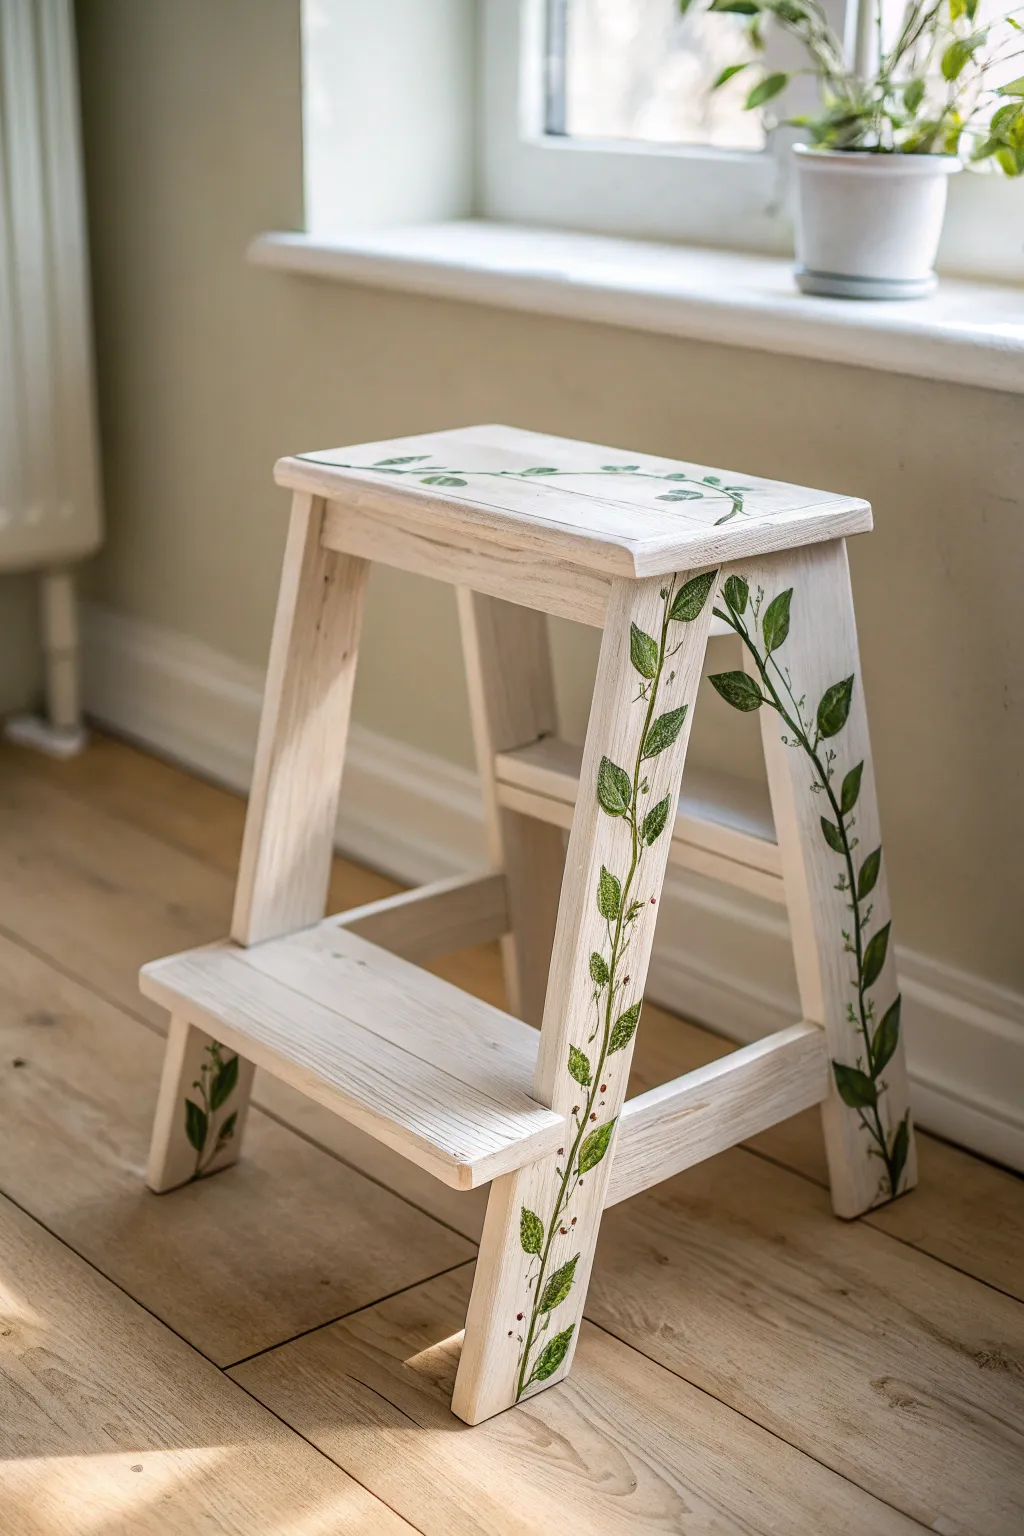
Transform a plain wooden step stool into a charming garden accent with this delicate trailing vine design. The soft white background perfectly highlights the organic flow of greenery climbing up the legs, bringing a breath of fresh air to any corner of your home.
Step-by-Step Tutorial
Materials
- Unfinished wooden step stool
- Sandpaper (120 and 220 grit)
- Tack cloth or damp rag
- Primer (water-based suitable for wood)
- Chalky finish paint or matte acrylic paint (White or Cream)
- Acrylic craft paints (Dark Hunter Green, Leaf Green, Olive Green, Brown)
- Small round brushes (sizes 2 and 4)
- Fine liner brush (size 0 or 00)
- Clear matte polycrylic sealer or wax
- Pencil
- Painter’s tape (optional)
Step 1: Preparation & Base Coat
-
Sand the surface:
Begin by sanding the entire stool with 120-grit sandpaper to remove any rough patches or existing finish. Follow up with 220-grit for a smooth surface. Wipe away all dust with a tack cloth. -
Apply primer:
Paint a thin, even coat of primer over the entire stool. This ensures your white base coat adheres well and doesn’t soak into the wood grain. Let this layer dry completely according to the manufacturer’s instructions. -
Paint the base color:
Using a wide brush, apply your white or cream chalky finish paint. Use long strokes following the grain of the wood. -
Distress (optional):
If you want the semi-sheer, washed-out look seen in the photo, you might stop at one coat. For solid coverage, apply a second coat after the first is dry. Lightly sand edges if you prefer a rustic vibe.
Step 2: Sketching the Design
-
Plan the vine path:
Take a pencil and very lightly sketch a wavy, meandering line starting from the bottom of one leg. Visualize how a real vine grows—it shouldn’t be a straight line. -
Extend the vine:
Continue your pencil line up the leg, curving it gently. When you reach the top step, let the vine trail horizontally across a section of the seat. -
Mark leaf placement:
Along your vine stem, make small tick marks where you want your leaves to sit. Vary the spacing slightly to keep it looking natural rather than symmetrical.
Practice Makes Perfect
Before painting on the stool, practice your leaf strokes on a piece of cardboard. Press down for the belly of the leaf and lift up for the tip.
Step 3: Painting the Greenery
-
Paint the main stem:
Mix a small amount of brown with your dark green to create an earthy stem color. Using your fine liner brush, trace over your pencil line with a steady hand. Vary the pressure slightly to make some parts of the stem thicker than others. -
Outline the leaves:
Switch to a small round brush (size 2). Using your darker green, paint the outline of the leaves. Pointed oval shapes work best for this specific botanical style. -
Fill the leaves:
Dip your brush into a lighter olive green without fully cleaning off the dark green. Fill in the leaf shapes. This color blending on the brush creates lovely natural dimension. -
Add vein details:
Once the filled leaves are dry to the touch, use your fine liner brush and the darkest green shade to add delicate central veins to each leaf. -
Create tiny buds:
For extra detail, use a reddish-brown color to dot tiny berries or buds along the stem near the leaf joints, just like in the inspiration photo.
Fixing Wobbly Lines
If a vine stem gets too thick or messy, don’t wipe it! Let it dry, then use a small brush with your base white color to ‘erase’ and reshape the line.
Step 4: Finishing Touches
-
Check for gaps:
Step back and look at the flow. If a section looks too bare, paint a small curling tendril coming off the main stem using your liner brush. -
Dry completely:
Let your artistic work cure for at least 24 hours. This is crucial before sealing to prevent smearing. -
Seal the project:
Apply a clear matte polycrylic sealer over the entire stool. I prefer using a spray sealer for the first coat to avoid dragging a brush over the fresh art. Two to three coats will protect your work from scuffs and footprints.
Enjoy your beautifully customized step stool that brings a touch of nature indoors

PENCIL GUIDE
Understanding Pencil Grades from H to B
From first sketch to finished drawing — learn pencil grades, line control, and shading techniques.
Explore the Full Guide
Geometric Color Blocking
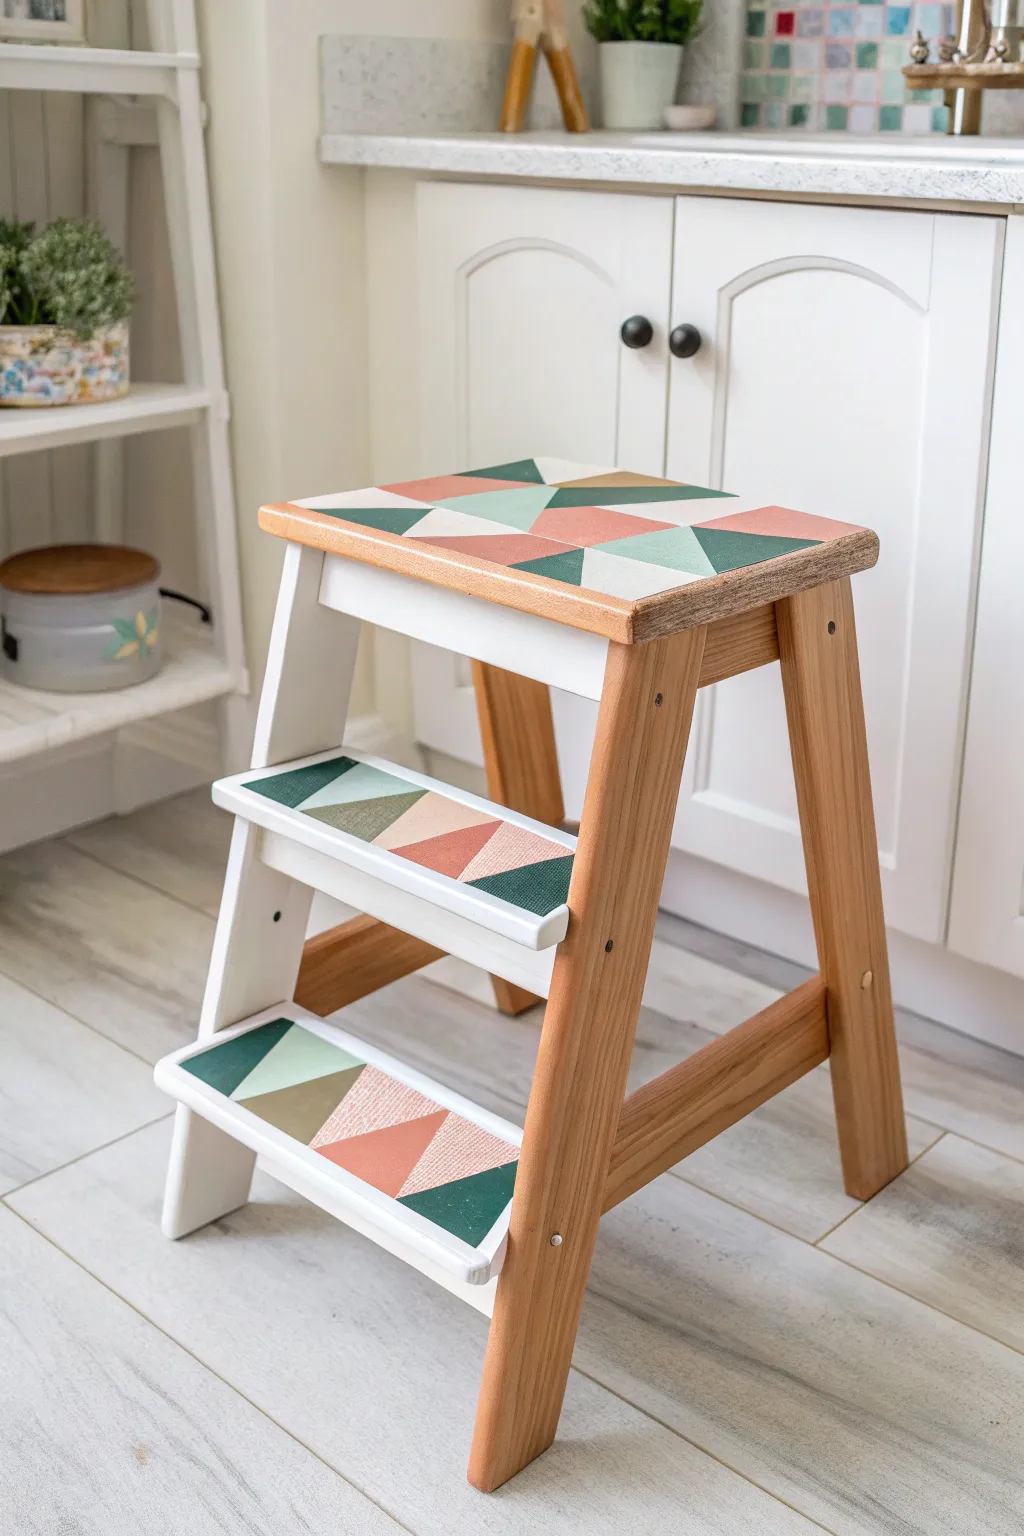
Transform a plain wooden step stool into a modern statement piece with this vibrant geometric makeover. By combining crisp white accents with earthy triangles of sage, terracotta, and deep green, you’ll create a functional item that doubles as decor.
Detailed Instructions
Materials
- Wooden step stool (like the IKEA Bekvam)
- Sandpaper (120 and 220 grit)
- Painter’s tape (high quality)
- White primer
- White chalk paint or acrylic paint
- Acrylic craft paints (sage green, forest green, terracotta, light pink, beige)
- Small flat artist brushes
- Foam roller
- Clear matte polyurethane or polycrylic sealer
- Ruler and pencil
- Craft knife
Step 1: Preparation
-
Dissassemble or clean:
If your stool is new in the box, paint the pieces before assembly for easier access. If it’s already built, give it a good clean with a damp cloth to remove dust and oils. -
Sand the surfaces:
Lightly sand the entire stool with 120-grit sandpaper to rough up the surface. This is crucial for paint adhesion, especially if the wood has a previous finish. -
Smooth it out:
Follow up with 220-grit sandpaper for a buttery smooth finish, then wipe away all sanding dust with a tack cloth or damp rag. -
Tape off the natural wood areas:
Decide which parts will remain natural wood. In this project, the legs and side supports are left unpainted. Apply painter’s tape carefully to protect these areas where they meet the steps.
Tape Trouble?
If paint peeled up with your tape, your base coat likely wasn’t cured. Lightly sand the damaged spot, re-prime, and touch up with a small brush.
Step 2: Base Painting
-
Prime the steps:
Apply a coat of white primer to the steps and risers. This blocks tannins from bleeding through and ensures your colors pop. -
Apply base white:
Using a foam roller, paint the steps and risers with two coats of white chalk or acrylic paint, allowing proper drying time between coats.
Pro Tip: Crisp Corneers
Use a craft knife to gently score the paint along the tape edge before peeling. This breaks the seemingly dry paint film and prevents clean lines from tearing.
Step 3: Creating the Geometric Pattern
-
Mark the grid:
Once the white base is fully dry, use a ruler and pencil to lightly draw a grid on the top of each step. This doesn’t need to be perfect, but it helps guide your tape placement. -
Tape the first set of triangles:
Apply painter’s tape diagonally across your grid sections to create varied triangles. You won’t be able to paint every shape at once because the wet edges would touch, so start with a scattered selection of non-touching shapes. -
Seal the tape edges:
I like to brush a tiny amount of the base white paint over the tape edges first; this seals them and prevents color bleed, ensuring crisp lines later. -
Paint the first colors:
Fill in the exposed triangles with your first round of colors—sage green, terracotta, and beige. Use a flat artist brush for precision. -
Remove and dry:
Peel off the tape while the paint is still slightly tacky to avoid pulling up dried paint, then let these shapes dry completely. -
Tape the second set:
Once the first batch is dry, apply new tape to define the remaining triangles. The edge of your dried paint will now act as a guide for some lines. -
Paint remaining sections:
Fill in the new triangles with your contrasting colors like forest green and light pink to complete the pattern block. -
Touch ups:
After removing the final tape, inspect your lines. Use a tiny detail brush to fix any small bleeds or uneven edges with the appropriate color.
Step 4: Finishing
-
Protect the design:
Since step stools see heavy foot traffic, protection is key. Apply 2-3 coats of clear matte polycrylic over the painted steps. -
Seal the wood:
Don’t forget the natural wood legs! Apply a coat of the same clear sealer or a wood wax to protect them from scuffs and dirt. -
Final assembly:
If you painted the pieces separately, assemble the stool now according to the manufacturer’s instructions.
Now you have a custom, geometric step stool that is durable enough for daily use and stylish enough to leave out on display
Rainbow Ombré Fade on the Sides
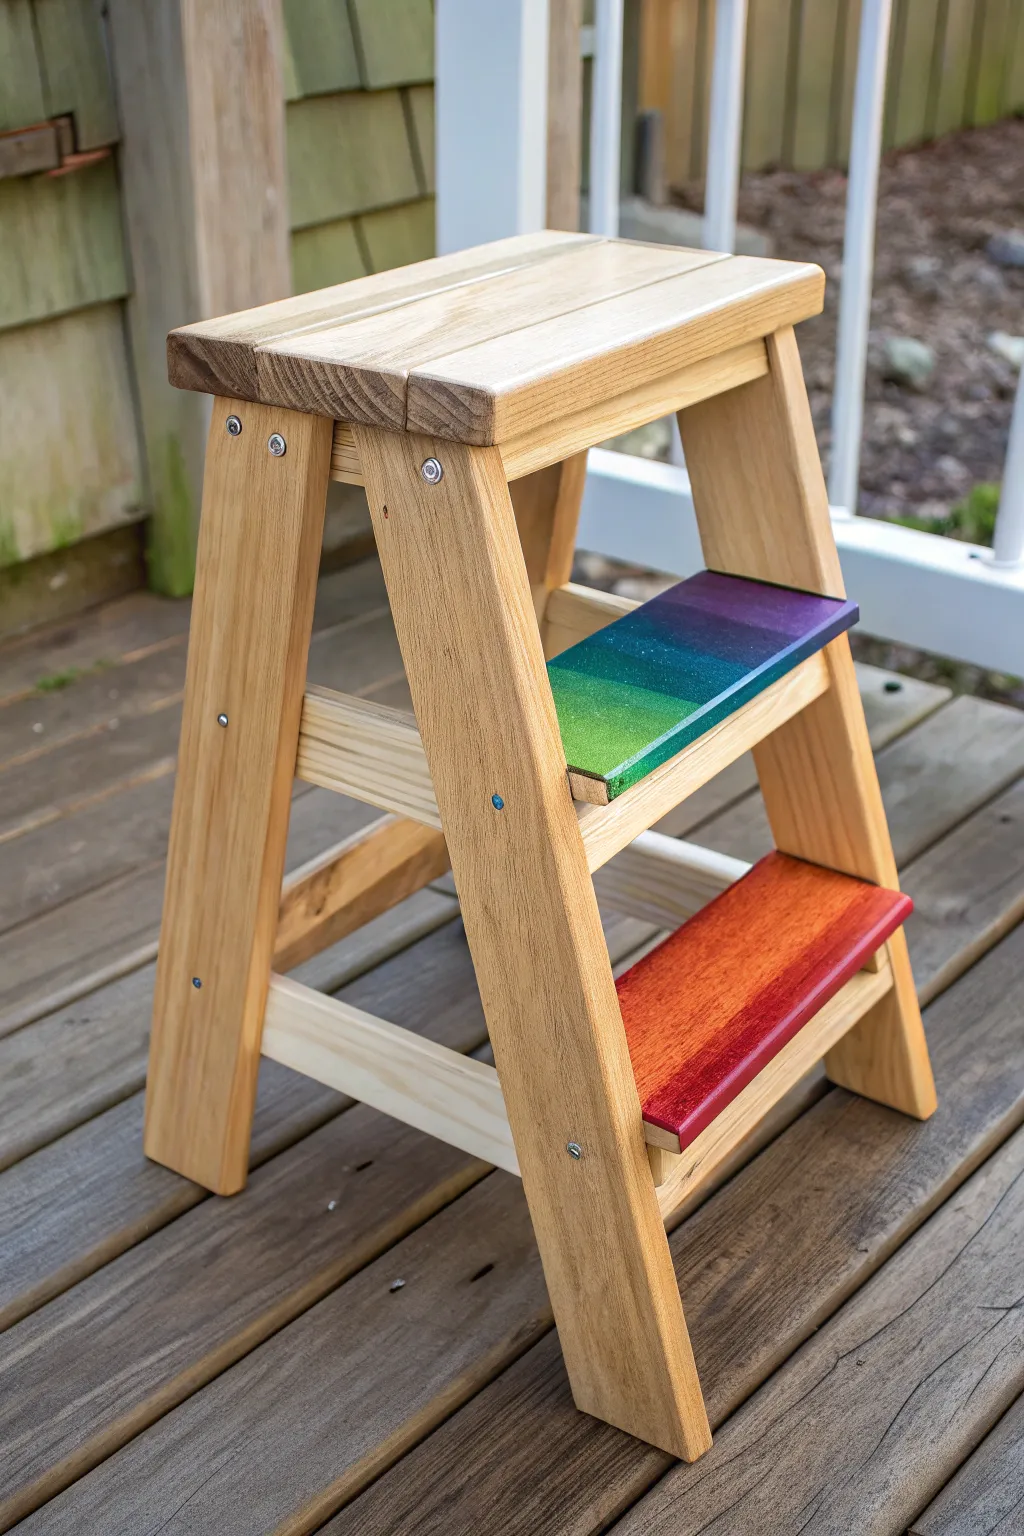
This project transforms a standard wooden step stool into a functional piece of art by adding a vibrant, surprising pop of color to just the step edges. The natural wood structure remains grounded and rustic, while the steps themselves feature a beautiful, galaxy-like gradient from deep purple to teal and warm red.
Step-by-Step Tutorial
Materials
- Unfinished wooden step stool (IKEA Bekväm or similar)
- Sandpaper (120 and 220 grit)
- Painter’s tape
- Acrylic craft paints (Deep Purple, Navy Blue, Teal, Green, Red, Orange)
- Small foam brushes or soft synthetic bristle brushes
- Clear polyurethane topcoat (satin or semi-gloss)
- Clean rags or tack cloth
- Screwdriver (if assembling from scratch)
Step 1: Preparation and Masking
-
Sand the surface:
Begin by giving the entire stool a quick sand with 220-grit sandpaper to remove any rough spots or factory finish. Wipe away all dust with a tack cloth or slightly damp rag. -
Disassemble for easier painting:
If your stool is already assembled, I highly recommend removing the two step treads. This makes painting the edges much cleaner and prevents accidental smudges on the legs. -
Tape off the wood:
Apply painter’s tape to the top and bottom surfaces of the step treads, leaving only the side edges exposed. Press the tape down firmly with a credit card to seal the edges and prevent paint bleed.
Bleeding Lines?
If paint seeped under the tape, don’t panic. Wrap a small piece of fine sandpaper around a block and gently sand the top surface edge until the sharp line is restored.
Step 2: Painting the Gradient Steps
-
Base coat the top step:
On the smaller top step, apply a base layer of your teal paint to the entire edge. This helps the subsequent colors blend more smoothly. -
Apply the purple section:
While the base is still slightly tacky or just after drying, paint the right third of the top step’s edge with deep purple. -
Add the green section:
Paint the left third of the top step with a vibrant green shade. -
Blend the middle:
In the center section where the green and purple meet, introduce your teal and navy blue. Use a clean foam brush to lightly dab and feather the wet paints into each other, creating a seamless transition from green to teal to blue to purple. -
Paint the bottom step:
For the larger bottom step, apply a rich red paint to the majority of the edge. On the far left side, blend in a touch of orange to create a slight warmth variation. -
Second coat:
Allow the first layer to dry completely. Apply a second coat to deepen the colors, repeating the blending process on the top step to ensure the gradient looks smooth and not blocky. -
Add a glitter effect (Optional):
The example image shows a subtle texture. You can achieve this by lightly sponging a very small amount of metallic or glitter glaze over the dried gradient for a ‘galaxy’ look.
Add Texture
Before the final seal, use an old toothbrush to flick tiny specks of white paint onto the dark gradient. This creates a stunning starry night effect.
Step 3: Sealing and Assembly
-
Remove the tape:
Carefully peel back the painter’s tape while the final coat is barely dry to the touch. Pulling at a 45-degree angle helps keep the paint line crisp. -
Seal the painted edges:
Apply a clear polyurethane topcoat specifically to the painted edges to protect them from scuffs and shoes. -
Seal the natural wood:
Apply the same clear polyurethane or a wood wax to the rest of the stool to protect the natural grain and give it a finished sheen. -
Reassemble the stool:
Once everything is fully cured (give it 24 hours just to be safe), reattach the steps to the legs using the original hardware. -
Final inspection:
Check all screws for tightness and ensure the stool sits level on the floor before use.
Now you have a custom piece that brings a hidden splash of color to any room


Stencil-Style Mandala on the Seat
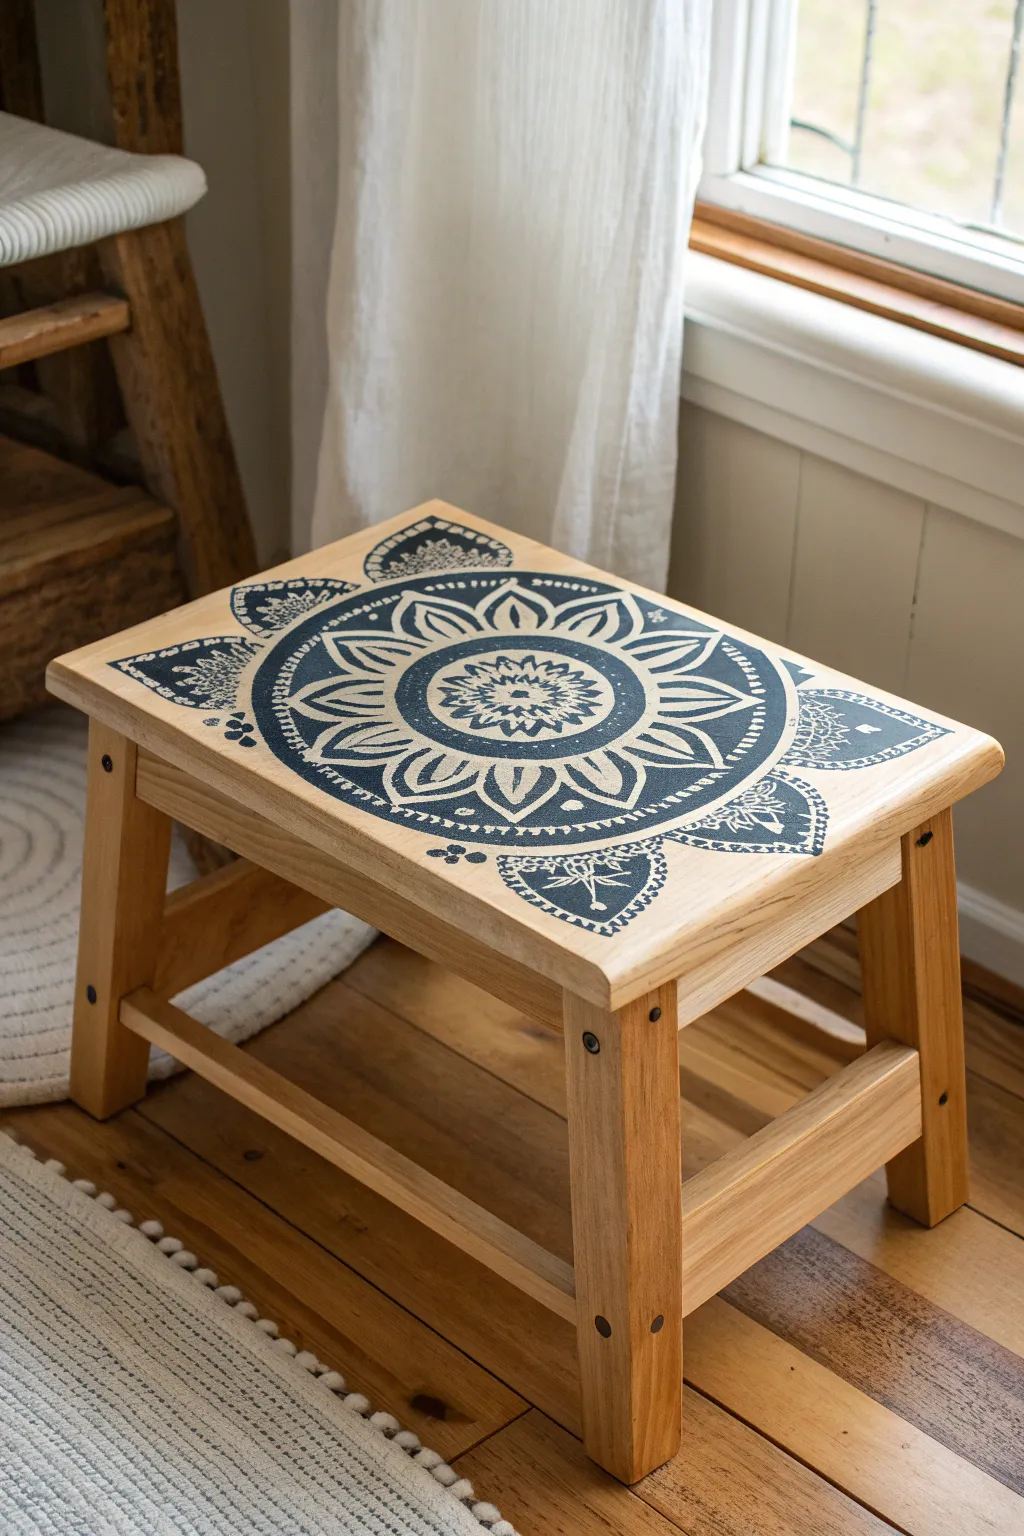
Transform a plain wooden step stool into a striking piece of functional art with this simple yet elegant stenciling project. The rich, dark mandala design contrasts beautifully against the natural wood grain, creating a modern bohemian look perfect for any corner of your home.
Step-by-Step
Materials
- Unfinished wooden step stool (rectangular seat)
- Fine-grit sandpaper (220-grit)
- Tack cloth or lint-free rag
- Large mandala stencil (approx. 10×12 inches/to fit seat)
- Painter’s tape or stencil adhesive spray
- Stencil brush (short, stiff bristles)
- Midnight Blue or Charcoal chalk paint
- Paper plate or palette
- Matte clear polyurethane sealer (water-based)
- Wide foam brush
Step 1: Preparation
-
Sand the Surface:
Begin by lightly sanding the entire surface of the stool seat with 220-grit sandpaper. Even if the wood feels smooth, this helps open the grain slightly for better paint adhesion and removes any invisible oils. -
Clean the Wood:
Wipe away every speck of sanding dust using a tack cloth or a slightly damp lint-free rag. Let the wood dry completely for about 15 minutes if you used moisture. -
Plan Stencil Placement:
Lay your mandala stencil onto the seat dry. Center the main circular motif carefully. If your stencil is larger than the stool, decide which parts of the pattern you want to overhang the edges versus sit on the flat surface.
Bleeding Lines?
If paint seeps under the stencil, don’t panic. Once dry, use a small piece of sandpaper folded into a point to gently sand away the excess paint back to bare wood.
Step 2: Applying the Design
-
Secure the Stencil:
Once positioned, secure the stencil firmly. I like to use a light mist of stencil adhesive spray on the back for the best seal, but painter’s tape on the corners works well too. -
Load the Brush:
Pour a small amount of Midnight Blue or Charcoal chalk paint onto your paper plate. Dip your stencil brush in, then offload almost all the paint onto a clean spot on the plate until the brush feels nearly dry. -
Start Stenciling:
Using a vertical pouncing motion (tapping up and down), begin applying paint through the stencil. Start from the center of the design and work your way outward. -
Keep Layers Light:
Apply the paint in very thin layers. It’s better to do two light coats than one heavy coat, as heavy paint will bleed under the stencil edges. -
Check the Edges:
Pay special attention to the detailed edges of the mandala petals. Use a slightly smaller brush if needed to get crisp lines in the intricate corners. -
Handle the Overhang:
If your design extends to the very edge of the seat, press the stencil down firmly over the lip of the wood and stipple color right up to the curve, but avoid dragging paint down the sides unless that’s your intended look. -
Peel and Reveal:
While the paint is still tacky (not fully dry), carefully lift the stencil straight up. Do not drag it. This prevents the paint from peeling off with the plastic sheet. -
Touch Up:
Inspect your design. If any lines are fuzzy or there were small gaps, use a very fine liner brush and a tiny bit of paint to correct the geometry manually.
Go Geometric
Instead of a mandala, use painter’s tape to create crisp geometric triangles or stripes on the seat for a modern, minimalist alternative without buying a stencil.
Step 3: Finishing
-
Dry Time:
Let the painted design cure completely. Since chalk paint dries quickly, 1-2 hours is usually sufficient, but check your specific paint’s instructions. -
Light Sanding (Optional):
For a slightly distressed, lived-in look, very gently pass your 220-grit sandpaper over the dried design once. This integrates the paint into the wood grain. -
Seal Surface:
Dip a wide foam brush into your matte clear polyurethane. Apply a thin, even coat over the entire seat, moving in the direction of the wood grain. -
Second Coat:
Allow the first coat of sealer to dry for roughly two hours. Lightly sand with high-grit paper if it feels rough, then apply a second final coat of sealer for durability. -
Final Cure:
Let the stool sit unused for at least 24 hours to ensure the protective finish has hardened enough to handle footsteps or sitting.
Now you have a custom piece of furniture that adds a crafted touch to any room
Mountain and Forest Scene Wrap
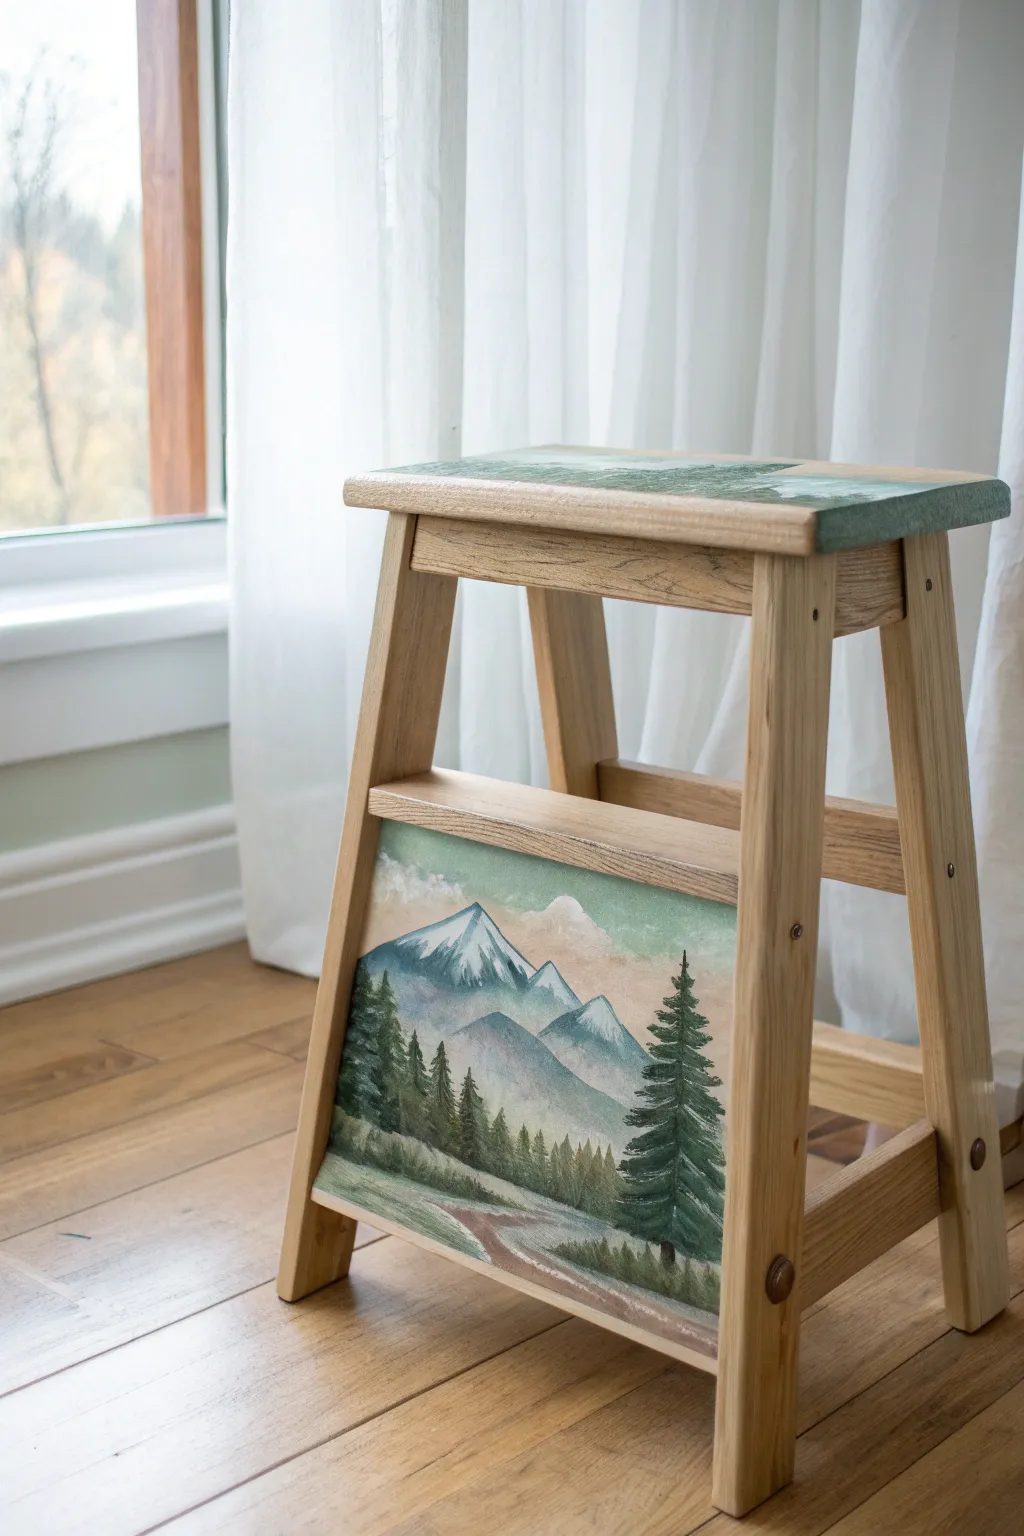
Transform a plain wooden utility into a window to the wilderness with this serene mountain landscape design. Soft, misty peaks and crisp pine trees wrap around the stool, bringing a calming touch of nature into any room.
Step-by-Step Guide
Materials
- Unfinished wooden step stool (IKEA Bekväm or similar)
- Sandpaper (120 and 220 grit)
- Acrylic craft paints (Titanium White, Slate Blue, Forest Green, Burnt Umber, Sage Green, Beige, Gray)
- Set of synthetic brushes (1-inch flat, medium filbert, fine liner)
- Palette or paper plate
- Water cup and paper towels
- Painters tape
- Matte or satin clear Polycrylic sealer
Step 1: Preparation and Base Layer
-
Disassemble or Prep:
If your stool is new and flat-packed, paint the pieces before assembly for easier access. If it’s already built, just ensure it’s clean. -
Sand Surfaces:
Lightly sand the step surfaces and risers with 220-grit sandpaper to remove any rough grain or existing finish, creating a smooth canvas for your paint. -
Prime the Background:
Mix a small amount of Beige with Titanium White to create a soft, creamy sky color. -
Apply Sky Gradient:
Paint the upper two-thirds of the bottom riser panel and the top seat with this mixture. While the paint is still wet, blend in a tiny touch of Slate Blue near the very top for an atmospheric effect. -
Paint the Ground:
Use a light Sage Green to paint the bottom third of the panel, creating a soft ground layer where your trees will eventually stand.
Keep it Misty
To make distant mountains look realistic, mix a tiny bit of your sky color into the mountain blue. This ‘atmospheric perspective’ makes them recede visually.
Step 2: Painting the Mountains
-
Outline Peaks:
Using a filbert brush and Slate Blue mixed with a little Gray, sketch the triangular outlines of your mountain range. Vary the heights to keep it looking natural. -
Fill the Mountains:
Fill in the mountain shapes with your blue-gray mix. You can add a drop of water to the paint to make it slightly translucent, which helps push the mountains into the distance. -
Shadow and highlight:
Decide which way the light is coming from (usually the left or right). Add a slightly darker gray to the shadowed side of each peak. -
Add Snow Caps:
Once the gray is dry, take pure Titanium White on a smaller brush and drag it down from the peaks on the sunlit side. Use a ‘dry brush’ technique—wiping most paint off the brush first—to give the snow a textured, rugged look.
Step 3: Adding the Forest and Foreground
-
Background Trees:
Mix Forest Green with a little White to make a hazy, distant green. Paint a line of small, indistinct tree shapes at the base of the mountains. -
Foreground Trees:
Switch to pure Forest Green. On the right side of the panel, paint a large, prominent pine tree. Use a fan brush or the corner of a flat brush to dab branches downward, starting narrow at the top and widening at the base. -
Add Depth to Trees:
Mix a tiny bit of Black or Dark Blue into your green and dab it onto the undersides of the branches for shadow. -
Highlight Branches:
I like to add very subtle touches of Sage Green to the tops of the branches to simulate sunlight hitting the needles. -
Paint the Path:
Using Burnt Umber mixed with White, paint a winding path starting wide at the bottom center and narrowing as it goes toward the mountains.
Hidden Details
Personalize the scene by hiding tiny details in the landscape, like a painted bird in the sky, a tiny tent, or your family’s initials carved into a tree.
Step 4: Finishing Touches
-
Detail Work:
Use your fine liner brush to add wispy grasses along the path edge using varied shades of green and beige. -
Wrap it Around:
If you painted on the flat panel, carry the design slightly over the edges or onto the legs for a cohesive, wrapped look. -
Dry Completely:
Let the paint cure for at least 24 hours to ensure all moisture has evaporated from the wood. -
Seal for Protection:
Apply 2-3 coats of Polycrylic sealer, sanding lightly with a high-grit paper between coats. This is crucial for a step stool that will see foot traffic.
Now you have a functional piece of furniture that doubles as a charming work of art for your home
Outer Space Night-Sky Stool
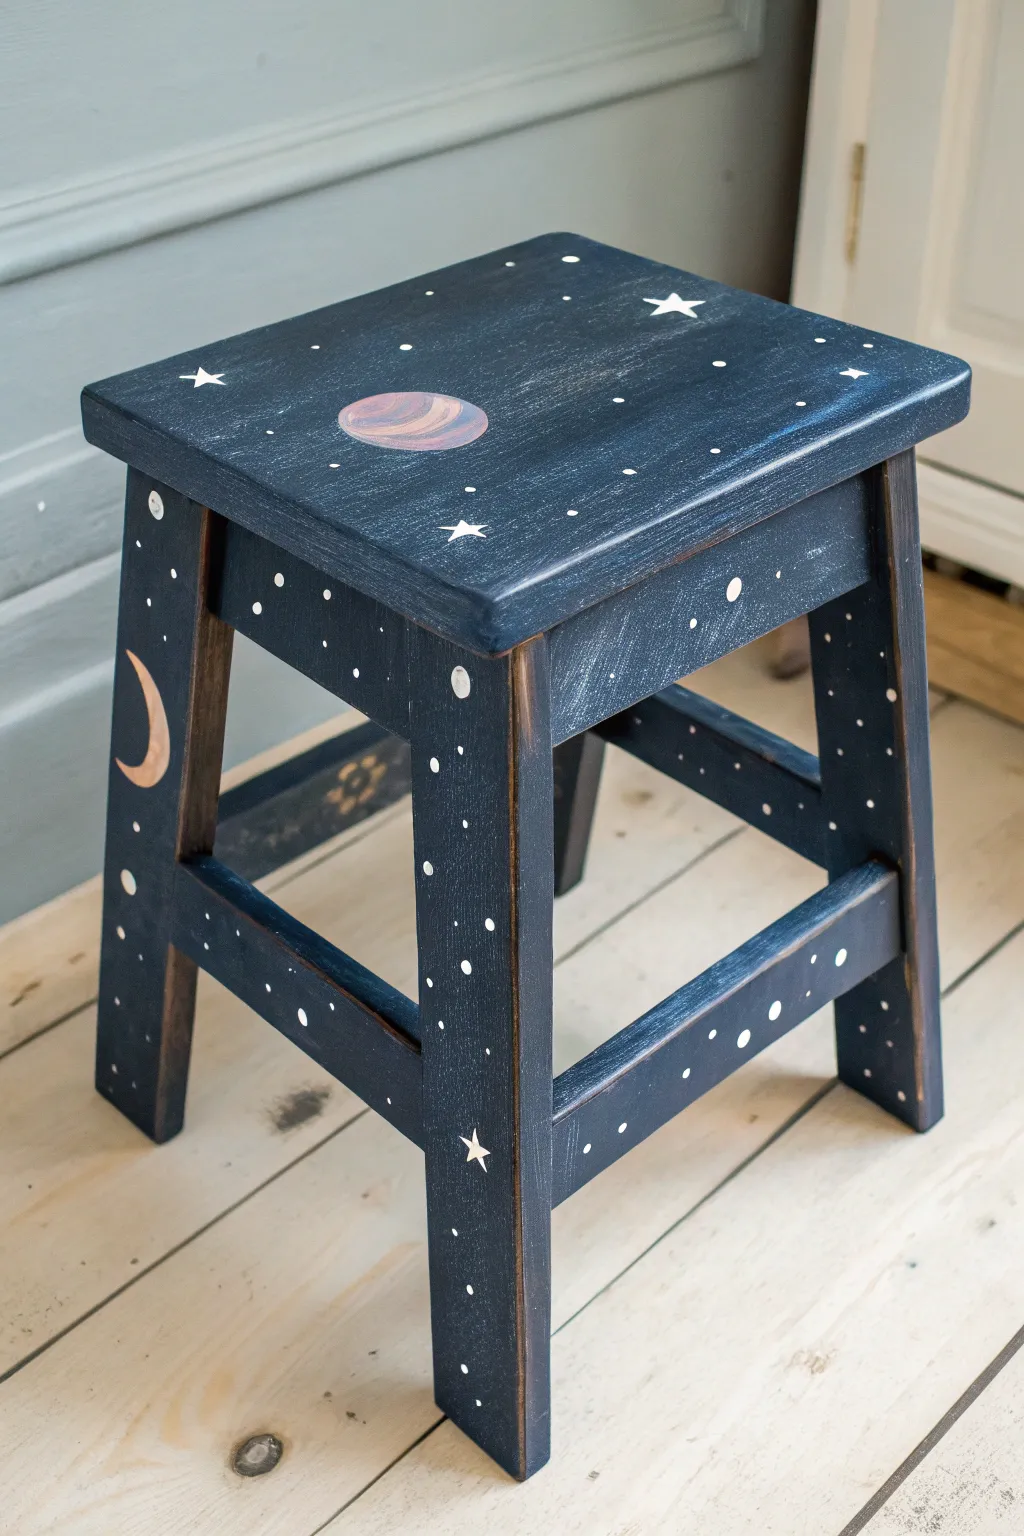
Transform a plain wooden stool into a dreamy galaxy with this celestial-themed project. The deep blue wash and distressed edges give it a vintage, well-loved look that perfectly complements the simple hand-painted planets and stars.
Detailed Instructions
Materials
- Unfinished wooden step stool
- Sandpaper (medium and fine grit)
- Dark navy blue acrylic paint or chalk paint
- White acrylic paint
- Light peach or soft metallic copper acrylic paint
- Paintbrushes (1 large flat brush, 1 small detail round brush)
- Water cup and paper towels
- Clear matte polyurethane sealant or furniture wax
- Pencil
Step 1: Preparation and Base Coat
-
Sand the surface:
Begin by giving the entire wooden stool a quick sanding with medium-grit sandpaper to remove any rough patches. Wipe away all dust with a damp cloth or paper towel. -
Create a paint wash:
Mix your dark navy blue paint with a small amount of water. You want a consistency that stains the wood rather than coating it thickly, allowing some wood grain to peek through. -
Apply the first coat:
Using the large flat brush, apply the diluted navy paint to the entire stool, including the legs and crossbars. Brush in the direction of the wood grain for a natural look. -
Assess coverage:
Let the first coat dry for about 20 minutes. If the blue feels too translucent, apply a second thin coat to deepen the color, but avoid making it fully opaque. -
Distress the edges:
Once the blue paint is completely dry, take your sandpaper to the edges and corners of the seat and legs. Gently sand away the paint to reveal the raw wood underneath, creating a rustic frame for your artwork.
Uneven paint wash?
If your blue wash looks blotchy, lightly dampen the wood with a wet sponge before applying the paint. This helps the color glide on more evenly and prevents dark spots.
Step 2: Painting the Galaxy
-
Sketch the major elements:
Lightly sketch the position of the planet on the seat and the crescent moon on one of the legs using a pencil. Keep the shapes simple. -
Paint the moon:
Dip your clean detail brush into the light peach or copper paint. Fill in the crescent moon shape on the leg, using smooth strokes to keep the edges crisp. -
Paint the planet base:
On the seat, paint the circle of the planet using the same peach/copper tone. It may need two coats to stand out against the dark blue background. -
Add planet details:
While the planet is drying, mix a tiny bit of white with your peach paint. Add faint, curved stripes across the planet’s surface to give it a spherical, gas-giant appearance. -
Create the larger stars:
Using pure white paint and your finest brush tip, paint a few five-pointed stars scattered across the seat and down the legs. Keep them small—about the size of a fingernail or smaller. -
Add medium stars:
Paint simple solid white dots of varying sizes around the five-pointed stars. I like to group a few together to mimic constellations. -
Create the stardust effect:
Dip the very tip of a stiff brush (or an old toothbrush) into watered-down white paint. Run your thumb across the bristles to flick tiny speckles across the stool surface for a distant star effect. -
Refine the artwork:
Check your white stars. If the blue background is showing through too much, carefully dab a second layer of white on the brightest stars.
Glow in the dark
Mix glow-in-the-dark pigment powder into your white paint for the stars. During the day it looks normal, but at night, the constellations will softly illuminate the room.
Step 3: Protection and Finish
-
Allow to cure:
Let all the detailed paintwork dry completely, preferably overnight, to ensure the colors won’t smear during sealing. -
Apply sealant:
Brush on a coat of clear matte polyurethane or apply clear furniture wax. This protects your galaxy from scuffs and moisture. -
Final buffing:
If using wax, buff the surface with a soft cloth after it dries to create a smooth, satin sheen.
Now you have a unique piece of furniture that invites little ones to reach for the stars
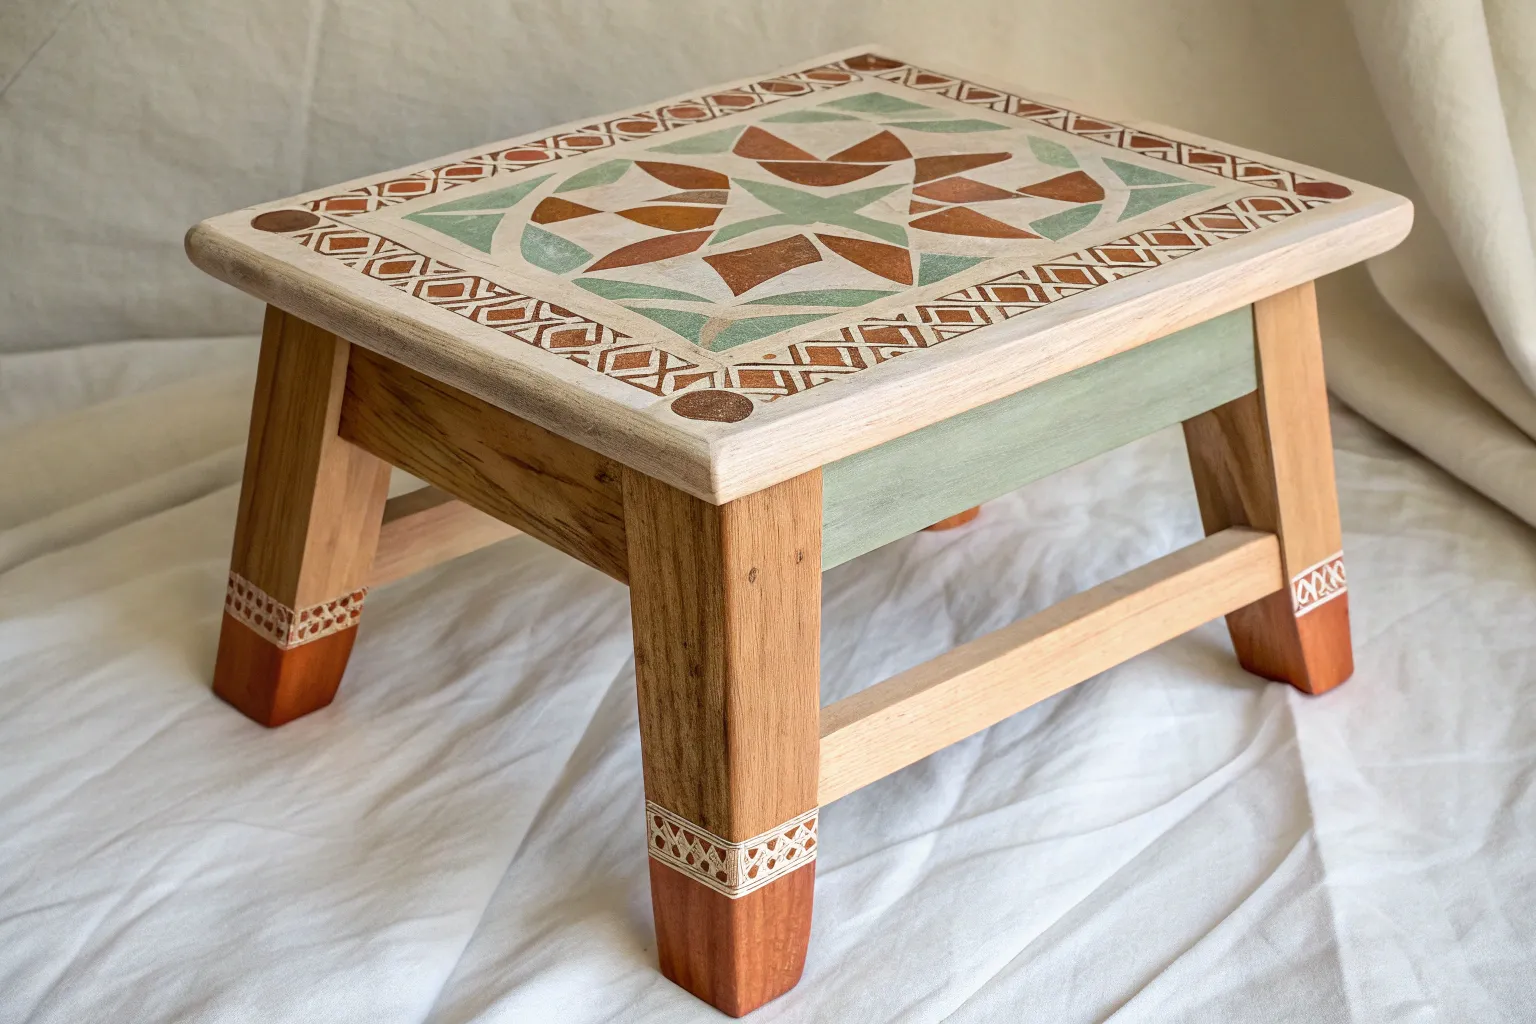
Faux Tile Pattern on the Risers

Transform a plain wooden step stool into a colorful statement piece with the look of hand-painted Mediterranean tiles. This project achieves a high-end, tiled aesthetic using clever decoupling or stenciling techniques on both the risers and treads.
Detailed Instructions
Materials
- Wooden step stool
- Sandpaper (120 and 220 grit)
- White chalk paint or primer
- Assorted patterned tile stencils (approx. 4×4 inch)
- Acrylic craft paints (terra cotta, deep blue, sage green, cream)
- Stencil brushes (various sizes)
- Painter’s tape
- Matte Mod Podge (if using paper/napkins)
- Printed tile patterns on paper (alternative to stencils)
- Clear polycrylic sealer (matte or satin finish)
- Small artist brushes for touch-ups
Step 1: Preparation
-
Clean surface:
Begin by wiping down your wooden stool with a damp cloth to remove any dust or oils. Let it dry completely. -
Light sanding:
Scuff sand the areas where you plan to add the patterns—specifically the risers (the vertical face of the steps) and the center of the treads. Use 120-grit sandpaper just to rough up the surface for better adhesion. -
Wipe away dust:
Use a tack cloth or a slightly damp rag to remove all the sanding dust. -
Tape off edges:
Apply painter’s tape around the edges of the areas you want to paint to protect the natural wood finish. For the treads, create a rectangular border in the center where the ’tiles’ will sit.
Step 2: Creating the Base
-
Prime the design areas:
Apply a coat of white chalk paint or primer inside your taped-off squares and rectangles. This white background is crucial for making your colors pop, just like real ceramic tile. -
Apply second coat:
Once the first coat is dry to the touch, add a second coat of white to ensure full opacity. You shouldn’t see any wood grain through the white sections. -
Smooth the base:
After the white paint cures, lightly sand it with 220-grit paper for a silky smooth surface that mimics fired ceramic.
Pro Tip: Sharp Lines
To prevent paint bleed, seal the stencil edges with a thin layer of your base white paint first. This fills gaps so your colors stay crisp.
Step 3: Painting the Faux Tiles
-
Plan your layout:
Decide which patterns go where. Alternating floral and geometric designs creates that eclectic, collected look. Mixing cooler blues with warm terra cotta tones works beautifully here. -
Position the stencil:
Place your first stencil over the white painted area. Secure it firmly with painter’s tape so it doesn’t shift while you work. -
Load the brush:
Dip your stencil brush into your chosen acrylic paint, then offload most of it onto a paper towel. The brush should be almost dry to prevent paint bleeding under the stencil. -
Apply the paint:
Use a dabbing or swirling motion to apply the paint through the stencil. Build up the color in light layers rather than one heavy glob. -
Add detail colors:
For multi-colored tiles, carefully use smaller brushes or tape off sections of the stencil to apply different colors (like the orange centers in blue flowers). -
Repeat the process:
Move to the next section. I like to let adjacent ’tiles’ dry for a few minutes before placing a new stencil next to them to avoid smudging. -
Hand-paint borders:
once the stenciling is dry, remove the tape. Use a fine liner brush and a steady hand to paint thin lines separating the ’tiles’ to simulate grout lines or individual tile edges. -
Side panel details:
Don’t forget the side panels of the stool structure. Adding a vertical row of faux tiles here adds immense charm and depth to the piece.
Troubleshooting: Smudged Paint
If paint bleeds under the stencil, don’t panic. Let it dry completely, then touch it up with a small brush and your white base color.
Step 4: Finishing Touches
-
Distress (Optional):
If you want an aged, rustic look, very gently sand over the painted designs with 220-grit paper. Focus on the edges where wear would naturally occur. -
Clean up:
Remove all remaining painter’s tape. If any paint bled onto natural wood areas, scrape it away gently with a fingernail or use a tiny bit of sandpaper. -
Seal the riser:
Apply a coat of clear polycrylic sealer to the vertical risers. A matte finish looks most like unglazed tile, while satin mimics glazed ceramic. -
Seal the treads:
For the steps themselves, apply at least three coats of polycrylic. These surfaces take foot traffic, so they need extra durable protection.
Now you have a charming, custom piece that brings a touch of Mediterranean warmth to any corner of your home


Have a question or want to share your own experience? I'd love to hear from you in the comments below!