If you love pumpkins but you’re not into the spooky, scary vibe, you’re in the right mindset for these girly pumpkin ideas. I’m talking soft colors, sweet details, and artsy little upgrades that make a pumpkin feel more like decor you’d actually keep out all season.
Classic Blush Painted Pumpkin
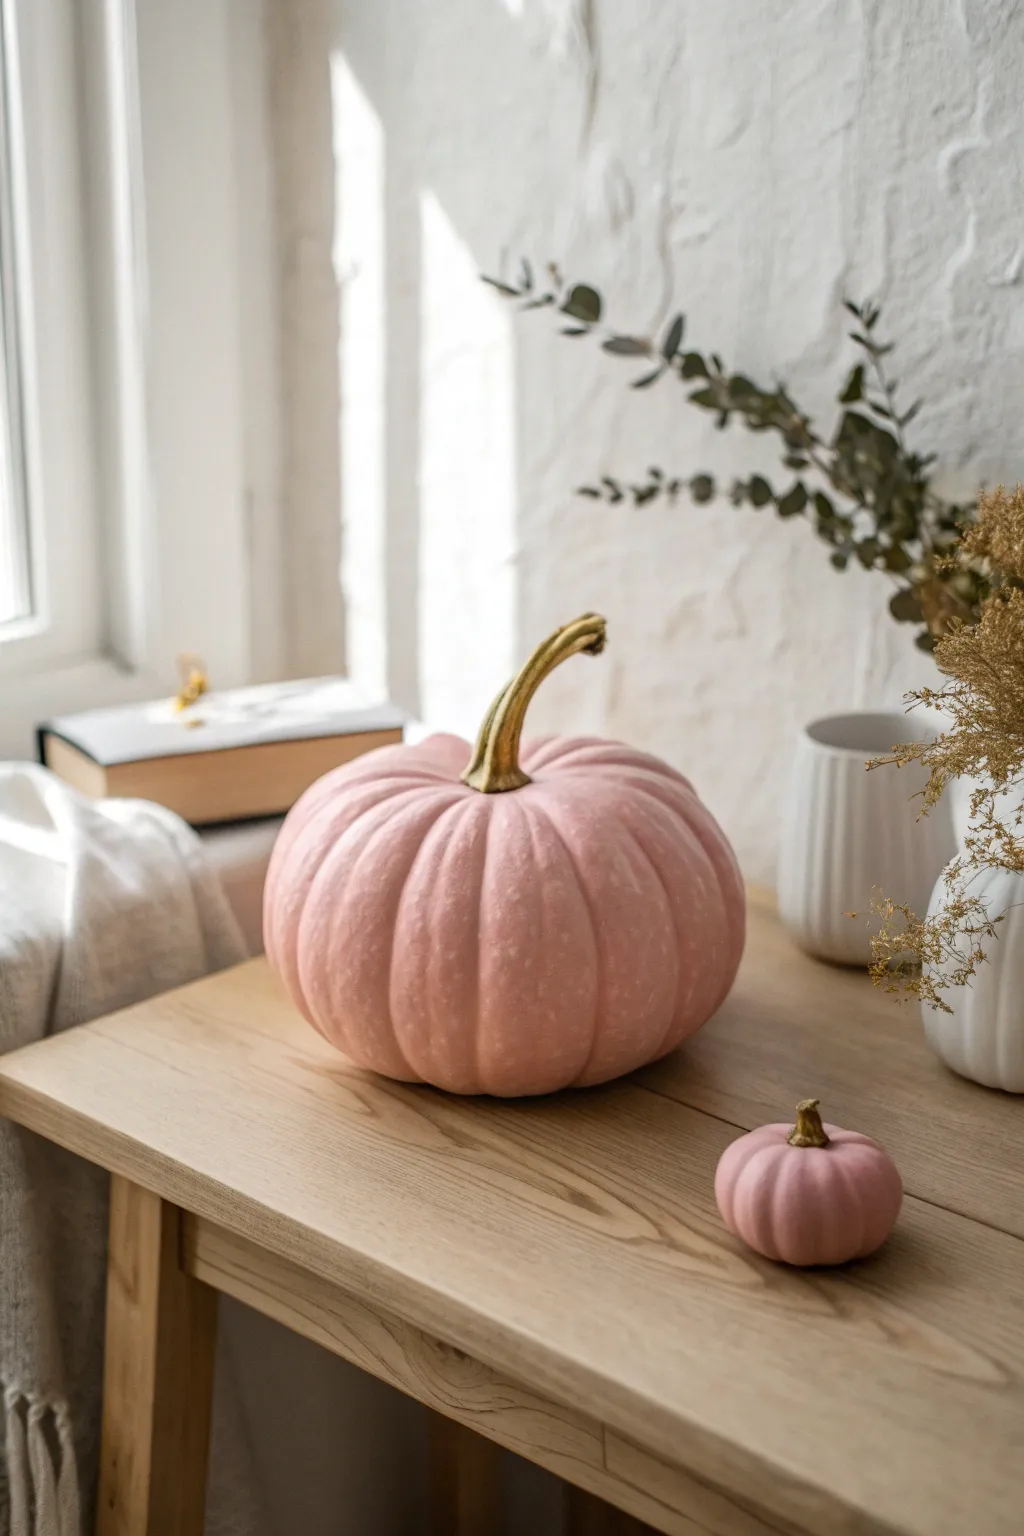
Transform ordinary faux or fresh gourds into elegant decor pieces with this soft, matte blush finish accented by glamorous gold stems. This modern twist on autumn decor brings a sophisticated, feminine touch to any space without feeling overly sweet.
Step-by-Step Guide
Materials
- Faux craft pumpkin (medium size)
- Miniature faux pumpkin
- Chalk-finish acrylic paint (soft blush pink)
- Metallic gold paint (liquid leaf or acrylic)
- White chalk paint (for mixing/priming)
- Medium flat synthetic brush
- Small detail brush
- Palette or paper plate
- Drop cloth or newspaper
- Paper towels
Step 1: Preparation & Base Coat
-
Clean the surface:
Before you begin, wipe down your pumpkins with a slightly damp paper towel to remove any manufacturing dust or oils that might prevent the paint from adhering properly. -
Protect your workspace:
Lay down your newspaper or drop cloth to catch any drips, as chalk paint can sometimes be a bit messier than standard acrylics. -
Mix your shade:
On your palette, pour out your blush pink chalk paint. If the color looks too saturated straight from the bottle, mix in a small amount of white chalk paint until you achieve that perfect dusty, muted rose tone shown in the image. -
Apply the first coat:
Using your medium flat brush, apply a thin, even layer of the pink paint over the entire body of the large pumpkin, avoiding the stem for now. -
Get into the grooves:
Make sure to push the bristles into the deep crevices and ribs of the pumpkin so no orange or white base color peeks through. -
Paint the mini pumpkin:
While the large pumpkin dries, repeat the base coat process on the miniature pumpkin, ensuring full coverage. -
Let it dry completely:
Allow both pumpkins to dry for at least 30-45 minutes. Chalk paint dries fast, but you want a solid foundation before adding more layers.
Paint Striaking?
If brush strokes are too visible, lightly sand the pumpkin with high-grit sandpaper between coats, or use a foam pouncer instead of a brush for the final layer.
Step 2: Refining the Finish
-
Apply a second coat:
Once dry to the touch, apply a second coat of your blush mixture. This coat provides the opaque, velvety matte finish that makes this project look high-end. -
Check for texture:
Use light, vertical strokes that follow the curve of the pumpkin to minimize brush marks and create a smooth, porcelain-like appearance. -
Touch up the bottom:
Don’t forget to flip the pumpkins gently once the tops are dry to paint the underside, ensuring a professional look from every angle. -
Create subtle variation:
For a more natural look, I sometimes dry-brush a tiny bit of plain white paint on the highest points of the ribs to create a soft highlight. -
Final drying time:
Let this second coat cure fully, perhaps for an hour, to ensure the finish is durable.
Add Subtle Sparkle
While the pink paint is still slightly wet, lightly dust a very fine, translucent glitter over the top curve for a magical, frosted morning effect.
Step 3: The Golden Stem
-
Switch brushes:
Grab your small detail brush for the precision work on the stem. -
Apply gold base:
Carefully paint the stem of the large pumpkin with metallic gold paint. Start from the top of the stem and work your way down. -
Define the base:
When you reach where the stem meets the pink pumpkin body, create a clean line. You don’t need tape; just use a steady hand to trace around the base of the stem. -
Paint the mini stem:
Repeat the gold application on the tiny stem of the miniature pumpkin. -
Add dimension:
If your gold paint is a bit flat, add a tiny dot of brown paint into the gold and dab it into the twisted grooves of the stem to add antique depth. -
Final cure:
Allow the metallic paint to set completely before handling or styling your new centerpiece.
Arrange your duo near a window to let the natural light show off that velvety texture


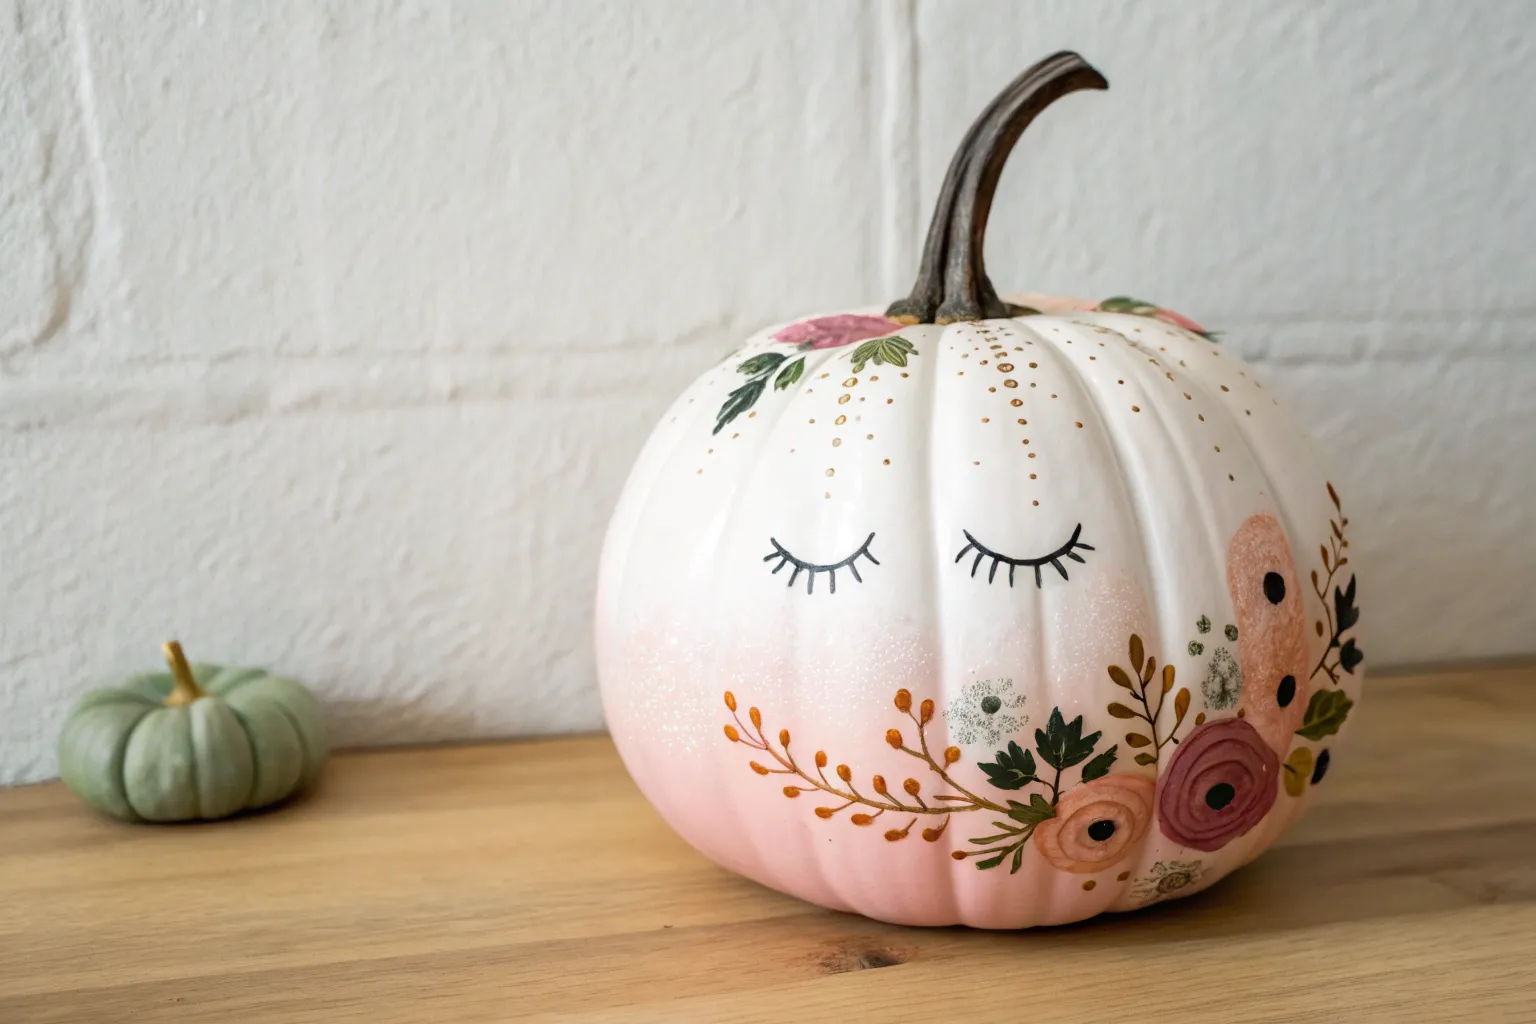
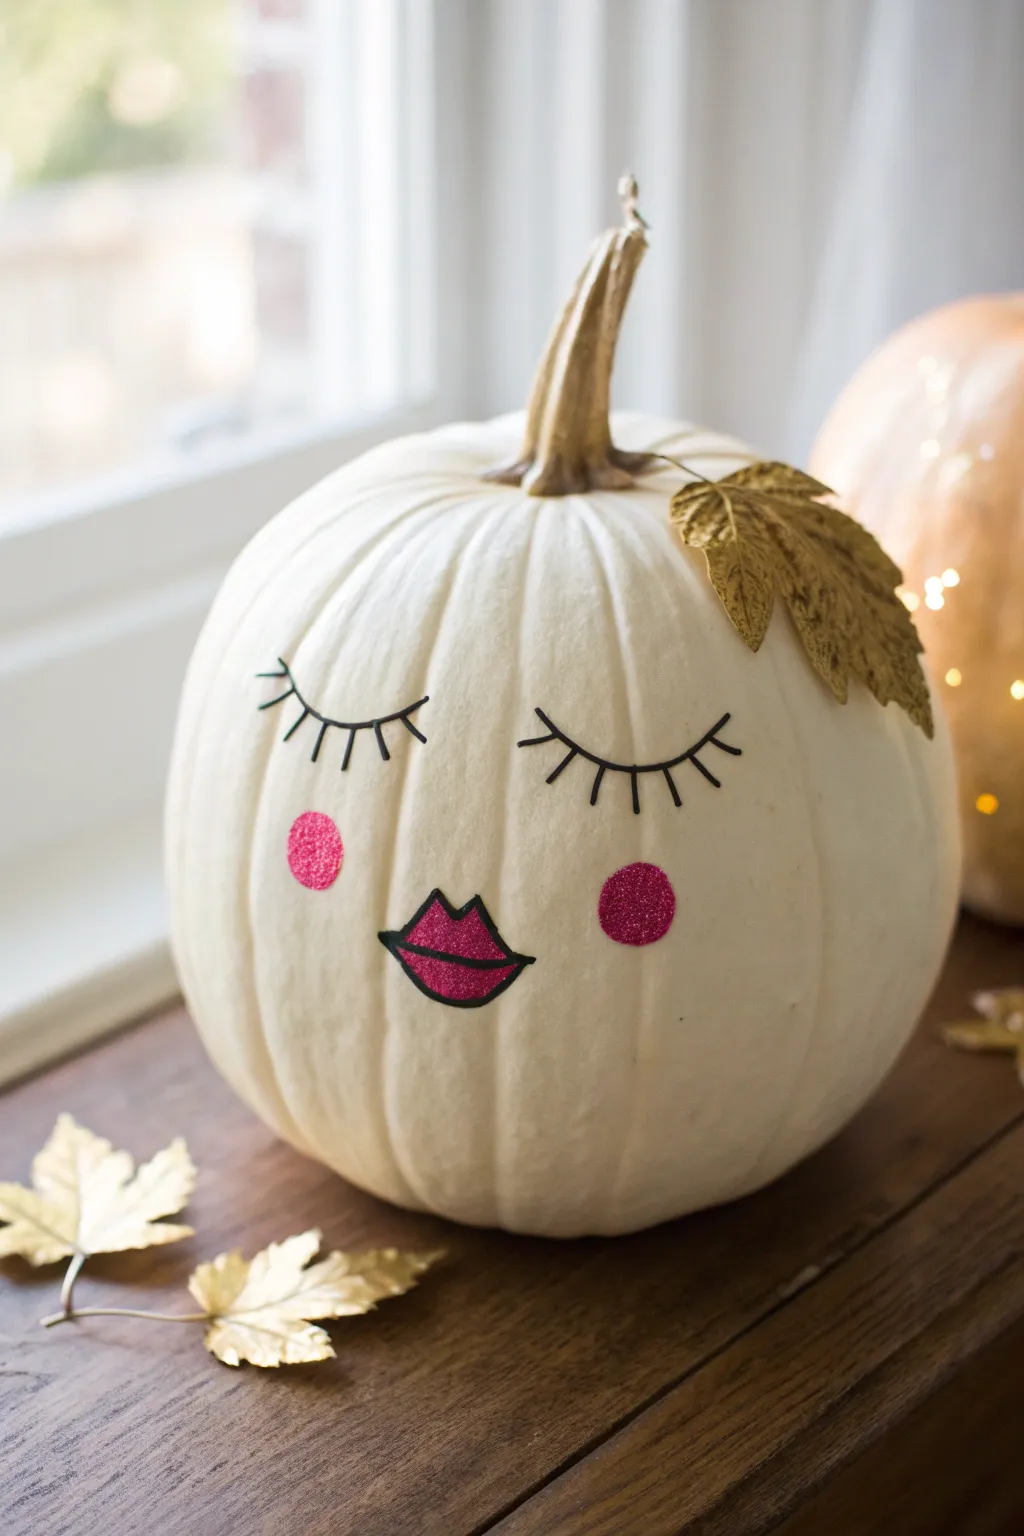
Eyelashes Face Pumpkin

Transform a simple white gourd into a charming character with just a few strokes of paint and a steady hand. This minimalist, sleepy-faced design brings a soft and whimsical touch to your autumn decor without the mess of carving.
Step-by-Step Tutorial
Materials
- Small to medium white pumpkin (real or faux)
- Black acrylic paint or a black paint pen (fine tip)
- Pink acrylic paint
- Small round paintbrush
- Pencil with a good eraser
- Paper towel or cloth
- Matte sealer spray (optional)
Step 1: Preparation and Planning
-
Clean surface:
Begin by wiping down your pumpkin with a damp cloth to remove any dirt or dust. Allow it to dry completely so your paint adheres properly. -
Find facial placement:
Examine your pumpkin to find the ‘front.’ Look for a relatively smooth side where the ribs of the pumpkin aren’t too deep, which makes painting straight lines easier. -
Sketch the eyes:
Using a pencil, very lightly sketch two wide U-shapes for the closed eyelids. Position them roughly in the uppper-middle section of the pumpkin. -
Mark the cheeks:
Lightly draw two circles below and slightly outside the edges of the eyes for the rosy cheeks. -
Draft the mouth:
Center a small, gentle U-shape between the cheeks for the smile. Add two tiny dots for the nose just above the mouth if desired.
Uneven Surface?
If your pumpkin is very bumpy, avoid using a rigid paint pen. A soft bristle liner brush will glide over the ridges much better without skipping.
Step 2: Painting the Features
-
Outline the eyelids:
With your black paint pen or a fine brush dipped in black paint, carefully trace over your pencil lines for the eyelids. I find it helpful to anchor my pinky finger on the pumpkin for stability. -
Add the lashes:
Draw short, straight lines extending downward from the eyelid curve. Make the center lashes slightly longer than the ones on the edges for a fluttering effect. -
Paint the nose and mouth:
Trace the small smile and the two nose dots with the black paint or pen. Keep these lines thin and delicate to maintain the cute aesthetic. -
Dry the black paint:
Let the black features dry completely for at least 10-15 minutes. This is crucial to prevent smudging when you work on the cheeks next. -
Prepare pink paint:
Dispense a small amount of pink acrylic paint. If the pink is too bright, mix in a tiny drop of white to soften it into a pastel tone. -
Fill the cheeks:
Using the small round brush, paint the circular cheeks. Use a stippling motion (dabbing up and down) to get nice texture, or smooth strokes for a solid look. -
Refine edges:
Check the edges of your pink circles. If your pumpkin has deep ridges, use the tip of the brush to gently push paint into the crevices so the circle doesn’t look broken.
Step 3: Finishing Touches
-
Check for errors:
Inspect the face for any pencil marks that are still visible. Once the paint is 100% dry, gently erase the visible graphite. -
Touch ups:
If the pink blush looks translucent, apply a second thin coat of pink paint for better coverage. -
Seal the work:
If you plan to display the pumpkin outside or want it to last for years, apply a light coat of matte sealer spray over the painted face.
Add Some Glam
For a bit of sparkle, apply a thin layer of glitter glue over the pink cheeks or add a tiny rhinestone at the corner of each eye.
Place your adorable pumpkin in a cozy window spot to enjoy the autumn vibes


Glossy Lips Glam Pumpkin
Transform a plain white pumpkin into a beauty queen with this charming and flirtatious design. Featuring glittering details, dramatic lashes, and a gilded stem, this sleepy-faced character adds a touch of elegant whimsy to your fall decor.
Step-by-Step Guide
Materials
- White craft pumpkin (medium size)
- Gold metallic acrylic paint
- Paintbrush (medium flat brush)
- Faux maple leaves
- Pink glitter cardstock
- Red glitter cardstock
- Black wire (18-20 gauge) or black pipe cleaners
- Black permanent marker or paint pen
- Scissors
- Hot glue gun and glue sticks
- Pencil
Step 1: Gilding the Greens
-
Paint the stem:
Start by painting the pumpkin’s stem with gold metallic acrylic paint. You may need two coats to fully cover the original color, allowing it to dry completely between layers. -
Prepare the leaf:
Take a faux maple leaf and coat it thoroughly with the same gold paint. Don’t forget to paint the stem of the leaf as well for a seamless look. -
Shape the leaf:
While the paint is still slightly tacky, gently curve the leaf so it isn’t perfectly flat. This gives it a more natural, windswept appearance once attached. -
Attach the accessory:
Once dry, use a dab of hot glue to secure the gold leaf near the base of the pumpkin stem, angling it slightly downward as if it’s tucked behind an ear.
Glue Gun Globs?
If hot glue oozes out from behind the wire lashes, wait for it to cool fully. Then, use an X-Acto knife or tweezers to carefully trim the excess without damaging the paint.
Step 2: Creating the Face
-
Draft the features:
Lightly sketch the position of the eyes and mouth with a pencil directly onto the pumpkin surface. Aim for the middle third of the pumpkin to keep the face proportional. -
Cut the cheeks:
Using pink glitter cardstock, cut out two perfect circles about the size of a quarter. A large circle paper punch works wonders here if you have one handy. -
Craft the lips:
Sketch a classic lip shape onto the back of the red glitter cardstock. Draw a distinct ‘cupid’s bow’ on top and a full bottom lip. -
Cut out the lips:
Carefully cut out the lip shape with sharp scissors to ensure clean edges. -
Outline the lips:
Use a black permanent marker or paint pen to draw a bold outline around the edge of your red glitter lips. Draw a horizontal line across the center to separate the top and bottom lip. -
Adhere the features:
Hot glue the pink cheeks and the red lips onto the pumpkin, using your pencil marks as a guide. Press firmly for a few seconds to set the glue.
Step 3: Lashes & Finishing Touches
-
Shape the lash line:
Cut two pieces of black wire, each about 3-4 inches long. Gently bend them into a soft ‘U’ curve to form the closed eyelids. -
Cut the lashes:
Cut 10-12 smaller pieces of wire, roughly 0.5 inches long each. These will become the individual eyelashes. -
Assemble the eyes:
Lay your curved wire pieces on a heat-safe surface. Carefully hot glue the small lash pieces onto the curved wire, spacing them out evenly. -
Alternative method:
If working with wire feels too fiddly, you can simply draw the eyes and lashes directly onto the pumpkin with a thick black paint pen, though I prefer the 3D texture the wire provides. -
Clean up glue strings:
Before attaching to the pumpkin, meticulously pull away any fine hot glue strings from your wire eye assemblies. -
Mount the eyes:
Apply tiny dots of hot glue to the back of the wire assemblies and press them onto the pumpkin above the cheeks.
Add a Beauty Mark
Give her more personality by adding a tiny black rhinestone as a beauty mark above the lip, or use crystal gems for earrings.
Place your glamorous pumpkin near a window or lamp to let the gold leaf and glitter catch the light beautifully


Big Bow Pumpkin
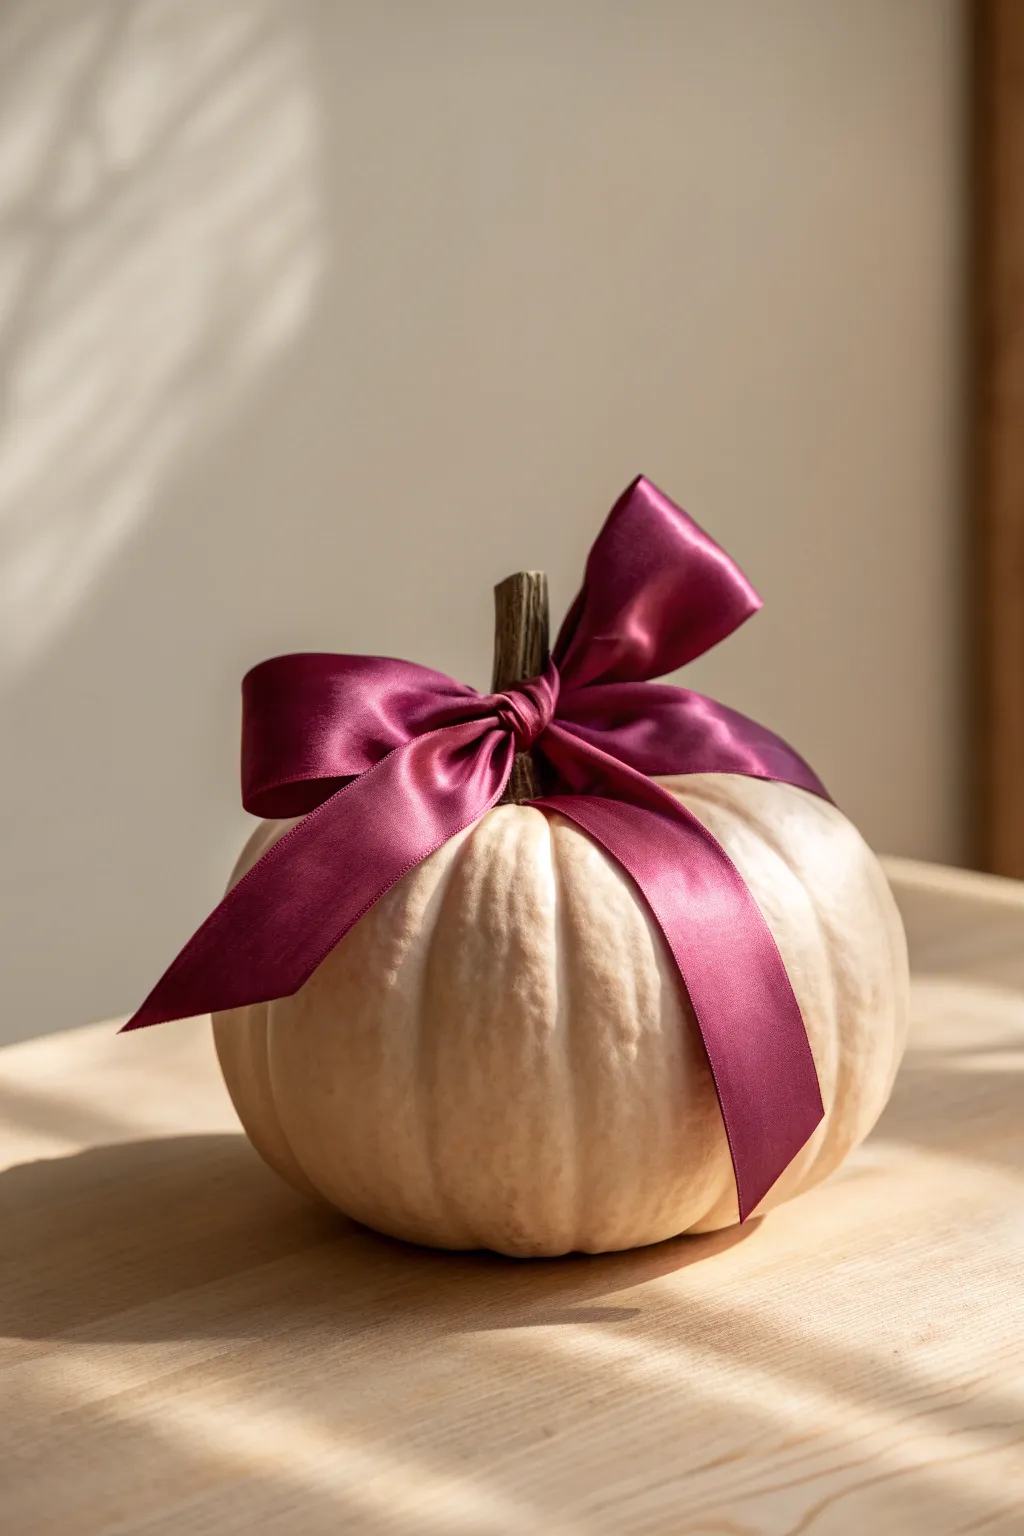
Elevate your autumn decor with this sophisticated take on a pumpkin, featuring a monochromatic cream base and a luxurious, oversized satin bow. This project is incredibly quick but delivers a high-impact, feminine aesthetic.
Step-by-Step
Materials
- White or cream pumpkin (real or faux)
- 2-inch wide satin ribbon (burgundy or maroon)
- Sharp fabric scissors
- Fray check or clear nail polish
- Measuring tape (optional)
- Microfiber cloth
Step 1: Preparation
-
Clean the surface:
Before you begin, wipe down your pumpkin with a damp microfiber cloth to remove any dust or dirt from the fields. -
Dry thoroughly:
Ensure the pumpkin is completely dry so you don’t trap moisture against the stem, which can cause early rotting. -
Measure the ribbon:
Unspool your satin ribbon. For a generous bow like the one pictured, pull out roughly 24 to 30 inches of ribbon. -
Cut the length:
Snip the ribbon at your measured mark using sharp fabric scissors to ensure a clean edge without snags.
Slippery Ribbon?
If the satin knot keeps sliding loose, place a tiny dot of hot glue on the pumpkin stem before tying to anchor the first wrap. This keeps it secure.
Step 2: Tying the Bow
-
Find the center point:
Find the middle of your ribbon length and place this center point directly behind the pumpkin stem. -
Bring ends forward:
Pull both loose ends of the ribbon forward, wrapping them snugly around the base of the stem. -
Cross the ribbon:
Cross the left side over the right side at the front of the stem to create your initial tension. -
Create the first loop:
Form a loop with the bottom ribbon strand. Hold this loop firmly at the center knot area. -
Wrap the center:
Take the top ribbon strand and wrap it over and around the loop you just created, pulling it through the hole to form the second loop. -
Secure the knot:
Pull both loops outward simultaneously to tighten the center knot. Don’t pull too hard yet; just get the shape formed.
Step 3: Styling and Finishing
-
Adjust the loops:
Gently tug on the loops to make them full and voluminous. I find fluffing them slightly with my fingers helps them stand up better. -
Align the placement:
Rotate the entire tied bow so it sits jauntily at a slight angle on the stem, rather than perfectly distinct, for a more organic look. -
Trim the tails:
Examine the hanging tails. Trim the ends at a sharp 45-degree angle. They should drape down the side of the pumpkin naturally. -
Check length balance:
Ensure one tail falls slightly longer or that they match, depending on your preference, but keep them long enough to touch the pumpkin’s shoulder. -
Seal the edges:
Apply a tiny dot of fray check or clear nail polish to the raw cut edges of the ribbon to prevent unraveling over time. -
Final smooth:
Run your fingers down the tails one last time to smooth out any twists, ensuring the satin catches the light beautifully.
Add Sparkle
For a glamorous upgrade, glue a vintage brooch or a rhinestone button onto the center knot of the bow to hide the tie and add glitz.
Enjoy the elegant simplicity of your new stylish decor piece
BRUSH GUIDE
The Right Brush for Every Stroke
From clean lines to bold texture — master brush choice, stroke control, and essential techniques.
Explore the Full Guide
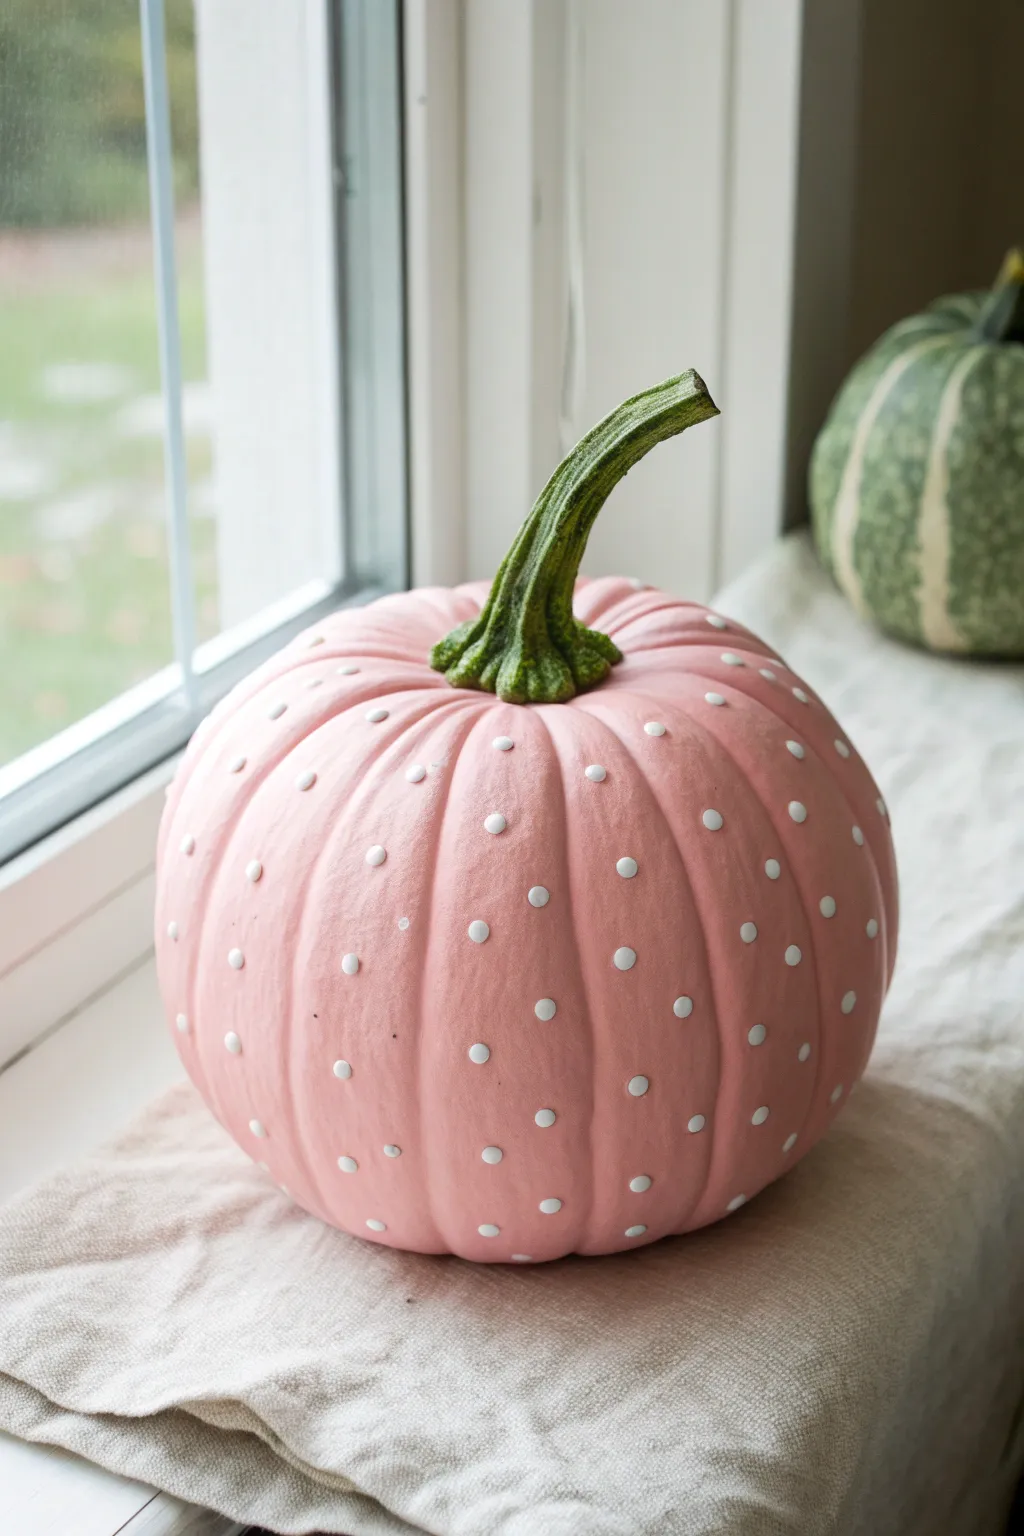
Chic Polka Dot Pumpkin
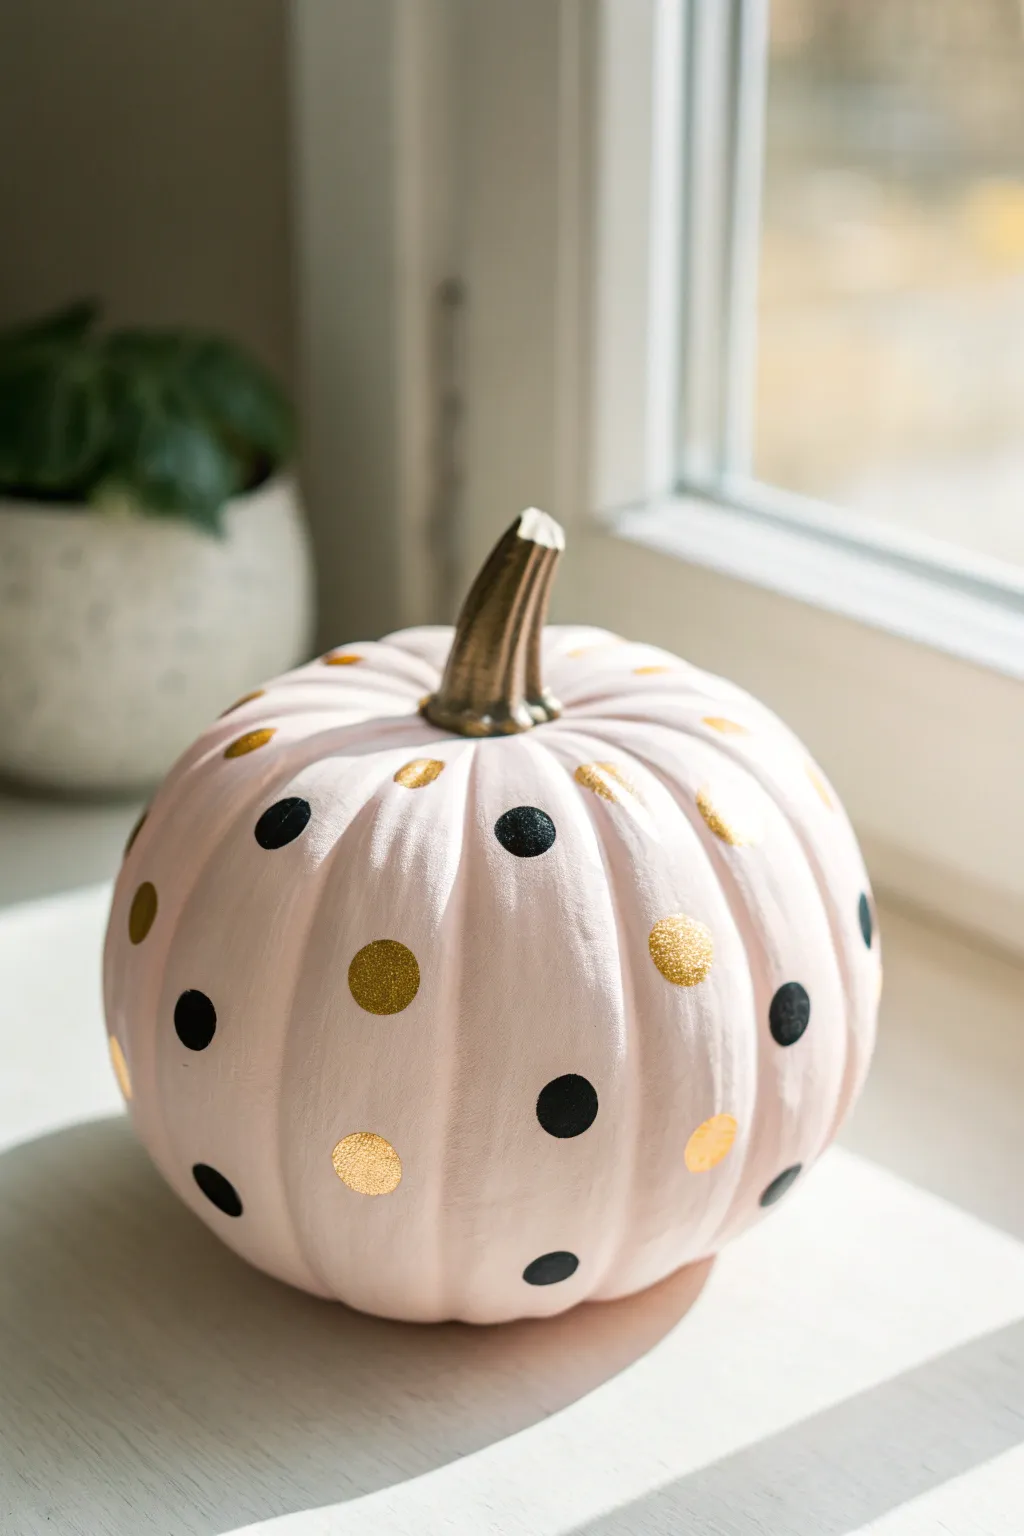
Transform a simple faux pumpkin into a sophisticated piece of fall decor with this chic blush and metallic design. The combination of matte pink, stark black, and shimmering gold creates a playful yet elegant aesthetic perfect for a feminine autumn vignette.
Step-by-Step Tutorial
Materials
- Faux pumpkin (smooth surface works best)
- Matte spray paint or craft paint (blush pink or pale rose)
- Gold leaf adhesive size (or tacky glue)
- Gold leaf sheets
- Soft gilding brush or fluffy makeup brush
- Black acrylic paint
- Round sponge pouncers (small size)
- Liquid gold gilding paint (for the stem)
- Small flat brush
- Clear matte sealer (optional)
- Paper plate or palette
Step 1: Base Coat & Stem
-
Prepare the surface:
Wipe down your faux pumpkin with a slightly damp cloth to remove any dust or oils that might prevent the paint from adhering properly. -
Apply the base color:
Paint the entire pumpkin with your blush pink paint. If using spray paint, do light, even coats in a well-ventilated area. If using acrylics, use a foam brush for a smooth finish without bristle marks. -
Let it cure:
Allow the base coat to dry completely. I prefer to let this sit for at least an hour to ensure the surface is hard enough to handle without leaving fingerprints. -
Add a second coat:
Examine the pumpkin for streaks. Apply a second coat of pink if the original color of the pumpkin is still peeking through. -
Gild the stem:
Using a small flat brush and liquid gold gilding paint, carefully paint the stem. The metallic sheen adds an immediate high-end look.
Step 2: Creating the Polka Dots
-
Plan your pattern:
Visualize a diamond pattern for your dots to keep them evenly spaced, rather than random. You can lightly mark placement with a pencil if you’re nervous about freehanding. -
Prepare the black paint:
Squeeze a small amount of black acrylic paint onto your palette or paper plate. -
Stamp black dots:
Dip a round sponge pouncer into the black paint, dab off the excess on a paper towel, and press firmly onto the pumpkin surface. Create roughly half of your total dots in black. -
Clean the tool:
Wash and dry your sponge pouncer thoroughly, or switch to a fresh one for the next step to avoid muddy colors. -
Apply adhesive for gold dots:
Using a clean pouncer or a small brush, apply clear gold leaf adhesive circles in the empty spaces between your black dots. -
Wait for tackiness:
Allow the adhesive to sit until it becomes tacky but not wet. This usually takes about 10–15 minutes depending on the brand. -
Apply gold leaf:
Gently press a sheet of gold leaf over the tacky adhesive circles. Don’t worry if it looks messy at this stage; covered is better than perfect. -
Burnish the gold:
Use a soft, dry brush to gently rub the gold leaf. The excess leaf will flake away, leaving perfectly crisp gold circles where the adhesive was applied. -
Touch up edges:
If any dot edges look ragged, use a very fine detail brush with a tiny bit of pink paint to clean up the perimeter. -
Seal the project:
To prevent the gold leaf from tarnishing over time, spray a light coat of clear matte sealer over the entire pumpkin once everything is fully dry.
Clean Circles Tip
Twist the sponge pouncer slightly as you lift it off the pumpkin surface. This breaks the suction and usually leaves a much sharper, cleaner edge on your paint circle.
Messy Gold Leaf?
If gold leaf is sticking where you don’t want it, your fingers might be oily. Wear cotton gloves or handle the leaf only with the backing paper to keep the surrounding paint clean.
Place your finished pumpkin near a window to catch the light and show off that beautiful shimmer
Simple Floral Pumpkin
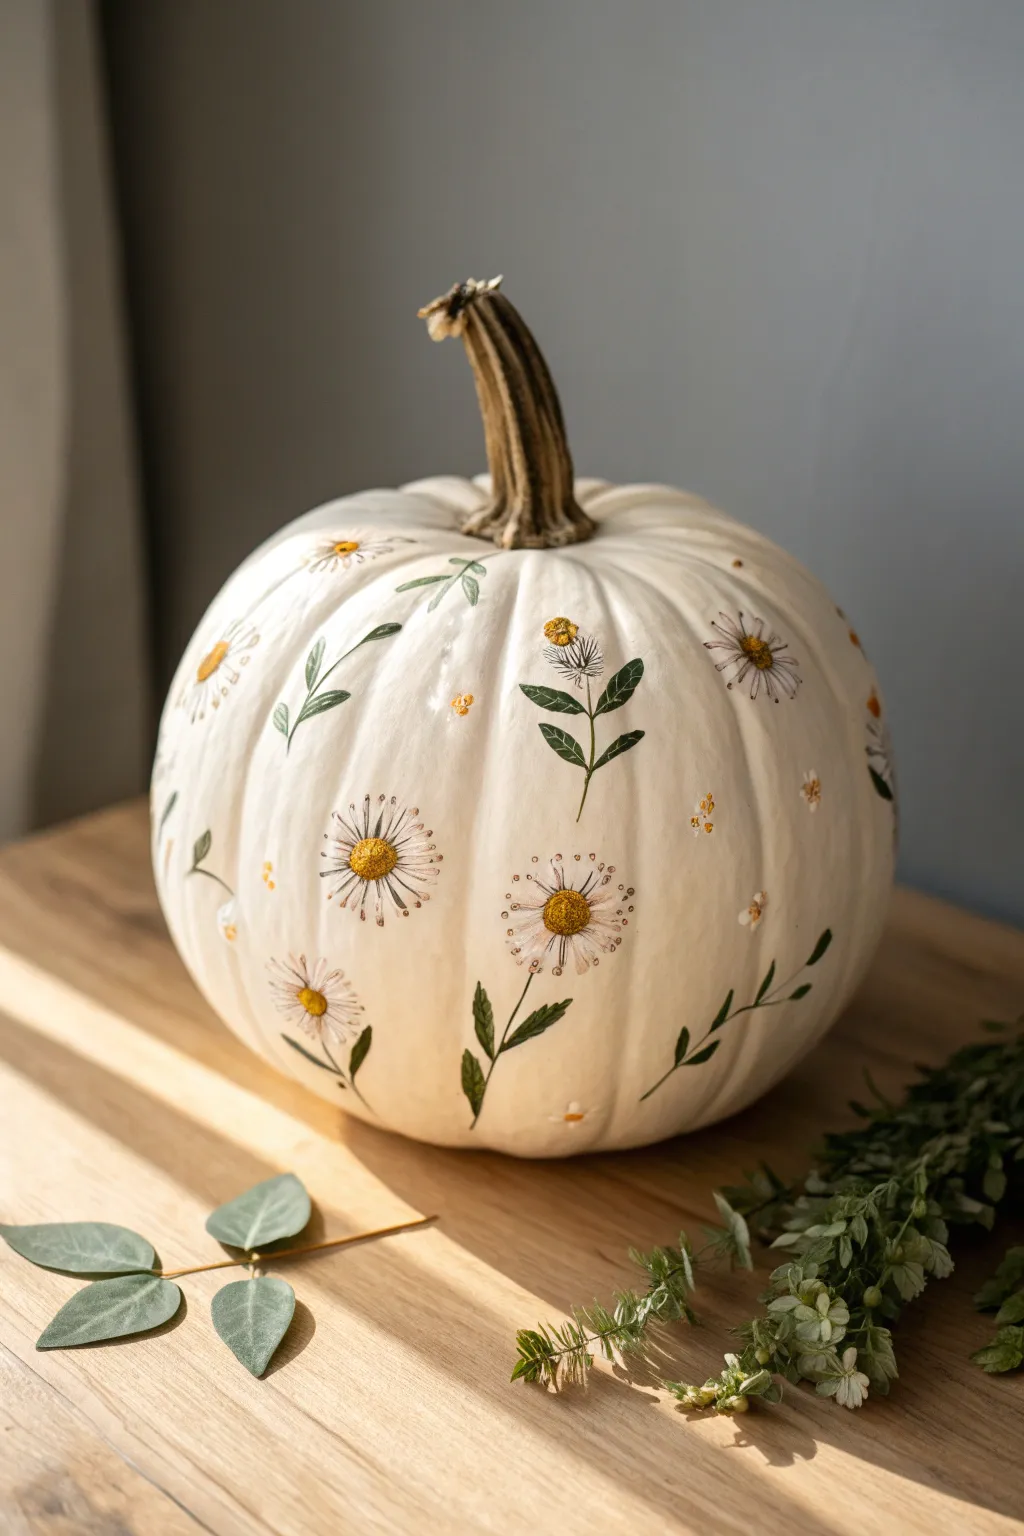
Transform a simple white pumpkin into a botanical masterpiece with delicate hand-painted daisies and greenery. This elegant, cottagecore-inspired design brings a soft, feminine touch to your fall decor without the need for carving.
Detailed Instructions
Materials
- White craft pumpkin (medium size)
- Acrylic paints (olive green, forest green, dark brown, white, mustard yellow, pale yellow)
- Fine detail paintbrushes (sizes 0 and 00)
- Small round paintbrush (size 2)
- Pencil (optional, light H grade)
- Matte spray sealant
- Palette or small plate
- Paper towels
- Cup of water
Step 1: Planning and Surface Prep
-
Clean surface:
Begin by wiping down your pumpkin with a slightly damp cloth to remove any dust or manufacturing oils. Let it dry completely. -
Visualize placement:
Look at the pumpkin’s natural ridges. Plan to place your main daisy stems primarily within the valleys, allowing the leaves to curve over the ridges for a natural, flowing look. -
Sketch stems (optional):
If you’re nervous about freehanding, use a very light pencil to sketch a few curved lines where your main flower stems will go. Keep the marks faint so they don’t show through the paint later.
Step 2: Painting the Greenery
-
Mix leaf shades:
On your palette, mix a primary olive green. Create a second shad by adding a tiny dot of brown to make a darker forest green for depth. -
Paint main stems:
Using your size 0 brush and the olive green, paint thin, fluid lines for the stems. Vary the lengths, making some short and others tall and sweeping. -
Add leaves:
Switch to the size 2 round brush. To create the leaves, press the belly of the brush down near the stem and lift as you pull away to create a tapered point. Paint leaves in pairs or alternating patterns up the stems. -
Detail the leaves:
While the green is still slightly tacky, use the darker forest green mix on your smallest brush to add a thin vein down the center of larger leaves. -
Add stray foliage:
Paint a few tiny, floating leaves or small unconnected stems around the pumpkin to fill empty spaces without cluttering the design.
Petal Pro Tip
For realistic petals, don’t just paint white. Mix in a tiny drop of pink or beige to some petals, so the pure white highlights really pop against them.
Step 3: Creating the Daisies
-
Paint flower centers:
Mix mustard yellow with a touch of brown. Using the size 2 brush, dab imperfect oval or circle shapes at the tops of your stems. These are the centers of your daisies. -
Texture the centers:
I like to use the very tip of a slightly dried brush to stipple a lighter yellow onto the top half of each center, creating a fuzzy, 3D pollen effect. -
Start the petals:
Load your size 0 brush with white paint. Be sure the consistency is fluid but opaque—add a drop of water if it’s too thick. -
Paint petal strokes:
Press the brush down near the yellow center and pull outward. Keep the petals thin and wispy rather than perfectly round blobs. Vary their lengths for a wilder look. -
Layering petals:
Once the first layer of petals feels dry to the touch, add a second layer of slightly shorter, brighter white strokes in between the first set to build volume. -
Add shading:
Mix a very watered-down grey or pale brown wash. Carefully tuck a tiny bit of this shadow color at the base of the petals where they meet the yellow center.
Level Up: 3D Texture
Embroider the look! Instead of just paint, glue actual dried pressed flowers onto the surface or use puffy paint for the centers to add tactile dimension.
Step 4: Fine Details and Finishing
-
Add filler flowers:
Using the handle end of a paintbrush or a dotting tool, dip into the pale yellow paint. Add clusters of three tiny dots randomly around the larger daisies. -
Define the stamens:
With your smallest brush (size 00) and dark brown paint, add tiny little ticks or dots around the perimeter of the yellow flower centers to define them. -
Highlight stems:
Run a very thin line of a lighter green mix along the left side of your main stems to suggest a light source hitting the plant. -
Final inspection:
Rotate the pumpkin and check for any spots that need a second coat of opacity, particularly on the white petals. -
Seal the work:
Once the paint is fully cured (give it at least an hour), take the pumpkin outside and mist it lightly with a matte spray sealant to protect your beautiful handiwork.
Now you have a charming, garden-inspired pumpkin that will last throughout the entire autumn season

PENCIL GUIDE
Understanding Pencil Grades from H to B
From first sketch to finished drawing — learn pencil grades, line control, and shading techniques.
Explore the Full Guide
Gold Stem and Drips
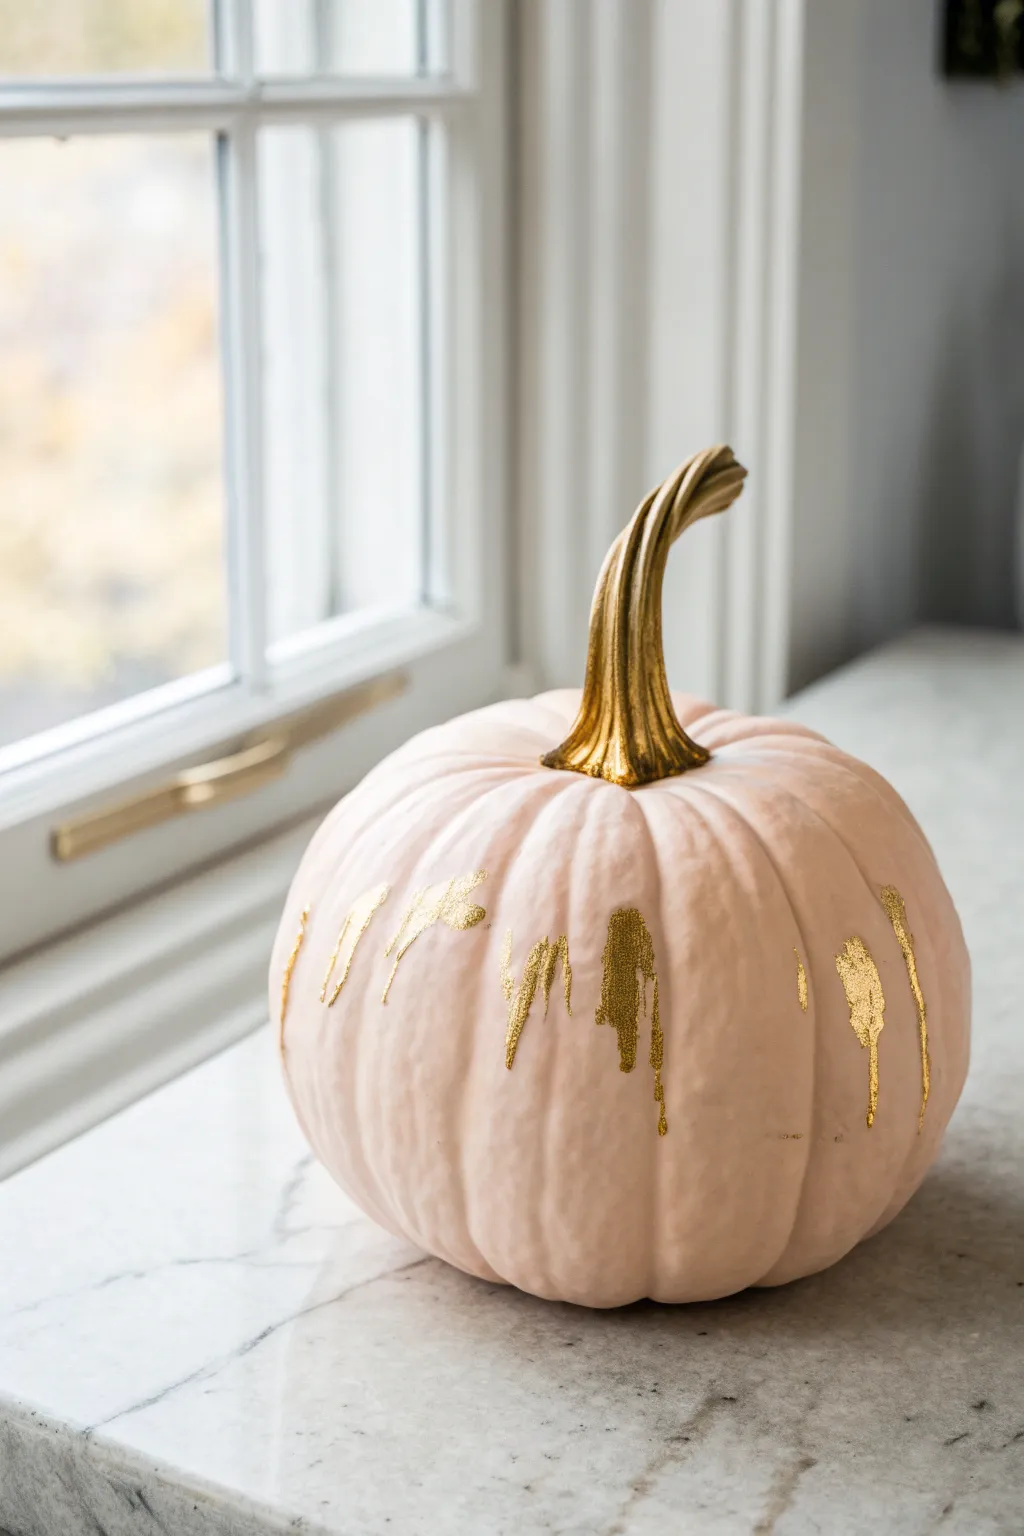
Transform a simple pumpkin into a chic statement piece with soft colors and luxurious gold accents. This tutorial guides you through achieving that perfectly matte blush base and adding stylized gold drips for an elegant finish.
How-To Guide
Materials
- Medium-sized pumpkin (real or faux)
- Matte pale pink acrylic craft paint or chalk paint
- Liquid gold leaf or high-metallic gold acrylic paint
- Medium flat paintbrush (for base coat)
- Small round paintbrush (for drips)
- Small flat brush (for stem)
- Painter’s tape (optional)
- Drop cloth or newspaper
- Palette or small disposible cup
Step 1: Base Preparation
-
Clean surface:
Begin by wiping down your pumpkin thoroughly. If it’s real, use a mild soap and water solution to remove any dirt or oils, then dry it completely. For a faux pumpkin, a quick wipe with a damp cloth is sufficient. -
Protect the stem:
Since we want the stem to be a distinct gold color later, you can wrap a small piece of painter’s tape around the very base of the stem where it meets the pumpkin skin. This keeps your pink paint lines clean. -
First coat of pink:
Squeeze a generous amount of pale pink matte paint onto your palette. Using the medium flat brush, apply the first coat to the entire body of the pumpkin. Don’t worry if it looks streaky; lighter colors often need layering. -
Let it dry:
Allow the first coat to dry completely. This usually takes about 20-30 minutes for acrylics, or slightly less for chalk paint. It must be dry to the touch before proceeding. -
Second coat:
Apply a second coat of pink paint, using vertical strokes that follow the natural grooves of the pumpkin. This helps potential brushstrokes blend in with the pumpkin’s texture. -
Inspect coverage:
Check for any uneven spots or the original orange color showing through. I often find a third thin coat is necessary for that truly flawless, porcelain-like finish seen in the photo.
Liquid Leaf Tip
If using liquid gold leaf, work quickly and in a ventilated area. It dries much faster than acrylic and has a fume, but the shine is unbeatable.
Step 2: Gilding the Details
-
Paint the stem:
Once the pink base is fully dry, remove the painter’s tape. load your small flat brush with liquid gold leaf or metallic gold paint. Carefully paint the entire stem, working your way from the top down to the base. -
Refine the stem base:
Use the edge of your brush to create a crisp line where the gold stem meets the pink skin. The gold should look like it’s growing naturally out of the top. -
Plan the drips:
Visualize where you want your gold drips to fall. The image shows them starting about a third of the way down the pumpkin, not directly from the stem, which gives it a modern, abstract look. -
Start the drip shapes:
Dip your small round brush into the gold paint. Choose a ridge on the pumpkin and press the brush down to create the rounded top of a drip. -
Drag downward:
Gently drag the brush downward about an inch or two, lifting pressure as you reach the end to create a tapered tail. The drip should follow the vertical indentations of the pumpkin. -
Vary the lengths:
Move around the pumpkin, adding drips at varying heights and lengths. Avoid making them perfectly uniform; irregular placement looks more artistic. -
Add secondary drips:
Place a few smaller, shorter drips near the larger ones to create clusters. This mimics the natural way liquid would run down the surface. -
Thicken the paint:
For a bit of texture, you can dab a little extra gold paint at the top (the ‘head’) of the drip so it looks slightly raised and three-dimensional. -
Clean up edges:
Inspect your gold marks. If any edges look too ragged, use a very fine detail brush with a tiny bit of the pink base color to tidy up the perimeter once the gold is dry. -
Final cure:
Let the gold paint cure completely according to the manufacturer’s instructions, especially if using liquid gold leaf which can remain tacky if handled too soon.
Add Sparkle
While the gold paint on the drips is still wet, sprinkle a tiny pinch of fine champagne-colored glitter onto them for extra texture and shimmer.
Place your elegant creation near a window to catch the light on those metallic details
Glitter-Dipped Pumpkin
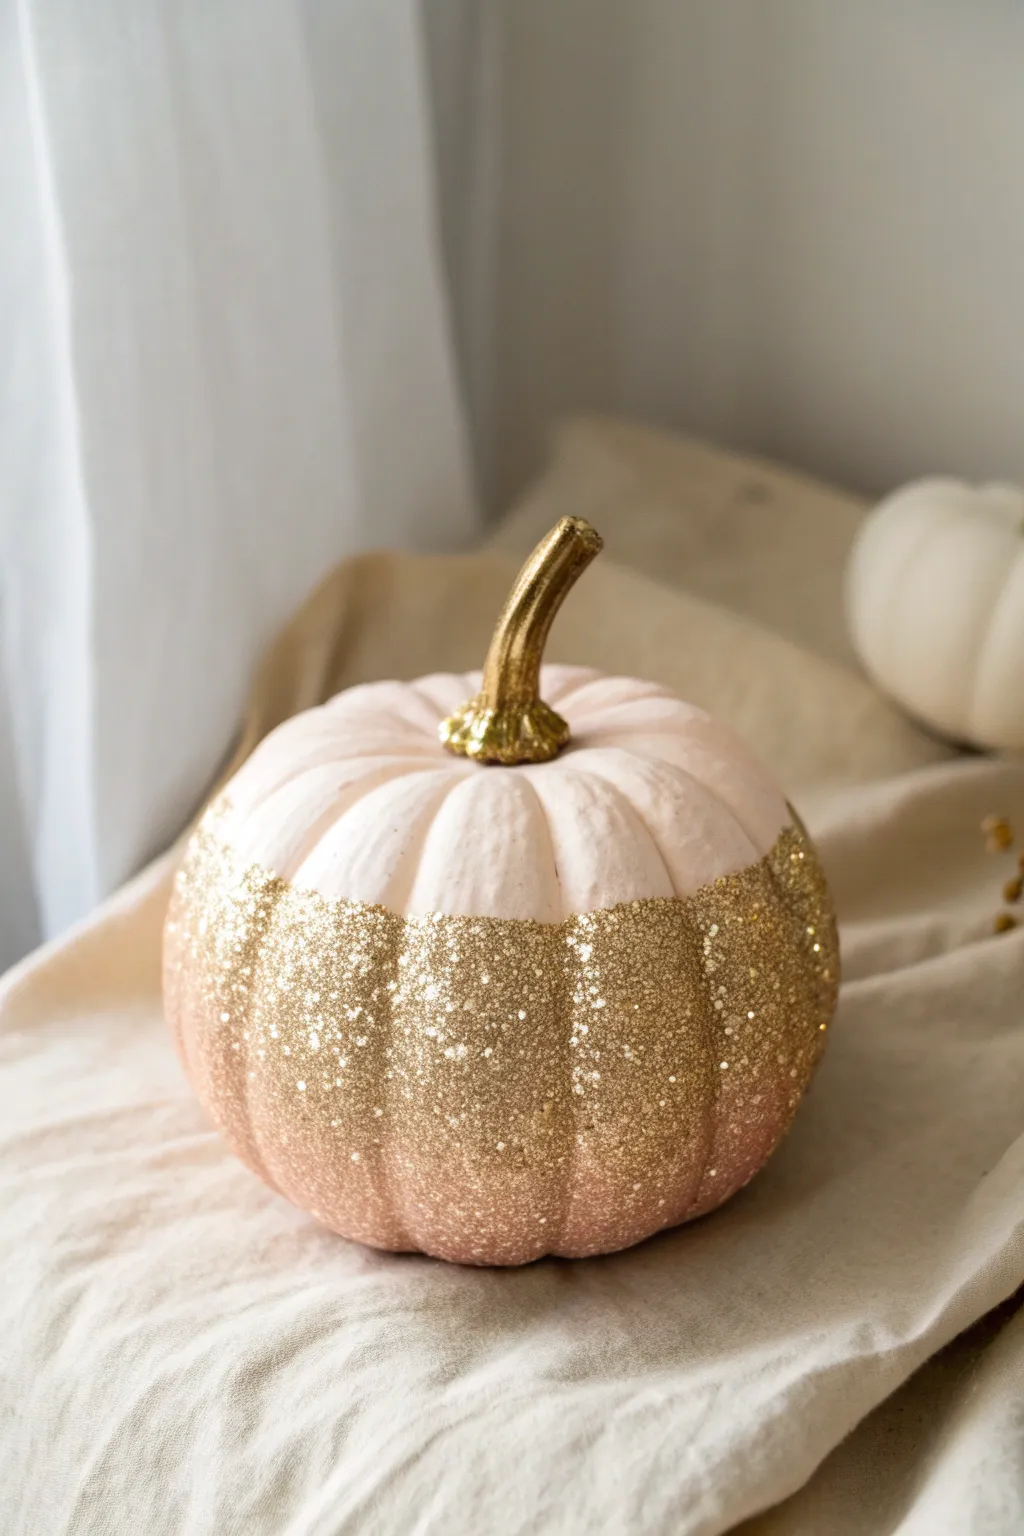
Transform a plain pumpkin into a chic fall centerpiece with this glamorous, glittering design. The soft blush pink contrasts beautifully with the textured gold base, creating a sophisticated look perfect for modern autumn decor.
Step-by-Step
Materials
- Faux pumpkin (white or cream)
- Pale pink craft paint (matte or satin finish)
- Gold craft paint (metallic finish)
- Mod Podge or craft glue
- Fine gold glitter
- Chunky gold glitter
- Paintbrushes (medium foam brush and small detail brush)
- Painter’s tape or masking tape (optional)
- Disposable bowls or paper plates
- Newspaper or drop cloth
Step 1: Base Painting
-
Prepare your workspace:
Lay down newspaper or a drop cloth to protect your table from paint and stray glitter. -
Clean the pumpkin surface:
Wipe down your faux pumpkin with a slightly damp cloth to remove any dust or manufacturing residue, ensuring the paint adheres smoothly. -
Remove the stem (if possible):
If your pumpkin has a removable stem, take it out now to make painting easier; otherwise, you can carefully paint around it later. -
Paint the pumpkin pink:
Using a foam brush, coat the entire pumpkin in your pale pink paint. Use vertical strokes following the pumpkin’s ribs for a clean finish. -
Let the first coat dry:
Allow the paint to dry completely to the touch before assessing if you need a second coat. -
Apply a second coat:
I usually find that a second layer is necessary to get that lovely, opaque pastel finish without streaks. -
Paint the stem:
Using a small detail brush and your metallic gold paint, carefully cover the stem. Several thin coats work better here than one thick glob.
Step 2: Glitter Application
-
Mix your glitters:
In a disposable bowl, create a custom glitter blend by mixing mostly fine gold glitter with a pinch of chunky glitter for added dimension. -
Determine the glitter line:
Decide how high you want the gold dip to go. About halfway or slightly lower usually provides the best balance. -
Apply the tape guide (optional):
For a sharp line, apply painter’s tape around the circumference. For the organic, slightly uneven look shown in the image, you can freehand the next step. -
Brush on the adhesive:
Coat the bottom half of the pumpkin generously with Mod Podge or craft glue. Work relatively quickly so the glue doesn’t dry before the glitter hits it. -
Feather the glue edge:
If you aren’t using tape, lightly feather the top edge of the glue upward so the line isn’t too harsh. -
Pour the glitter:
Holding the pumpkin over a catch-tray or paper plate, pour your glitter mixture over the glue, turning the pumpkin to ensure full coverage. -
Press the glitter in:
Gently pat the glitter with your dry hand to help it settle right into the adhesive base. -
Shake off excess:
Give the pumpkin a gentle tap to remove loose glitter particles that haven’t stuck. -
Dry partially:
Let the glue set for about 15 minutes before handling or moving on to sealing.
Clean Lines
If freehanding the glue line feels tricky, place the pumpkin on a lazy susan. Spin it slowly while holding your brush steady at one height for an even line.
Step 3: Finishing Touches
-
Apply a sealant coat:
To prevent shedding, carefully dab a thin layer of Mod Podge over the glittered area. Do not brush back and forth, or you’ll move the glitter. -
Touch up the stem:
Check the gold paint on the stem. If you missed any spots near the base, touch them up now with your small brush. -
Final drying time:
Set the pumpkin aside in a well-ventilated area to dry completely, typically overnight, before displaying.
Ombré Effect
Create a fade by sprinkling the glitter heavily at the base and lighter as you move up, letting the pink show through near the transition line.
Now you have a stunning, sparkling decoration ready to brighten up any corner of your home


Pink Spiderweb Lines
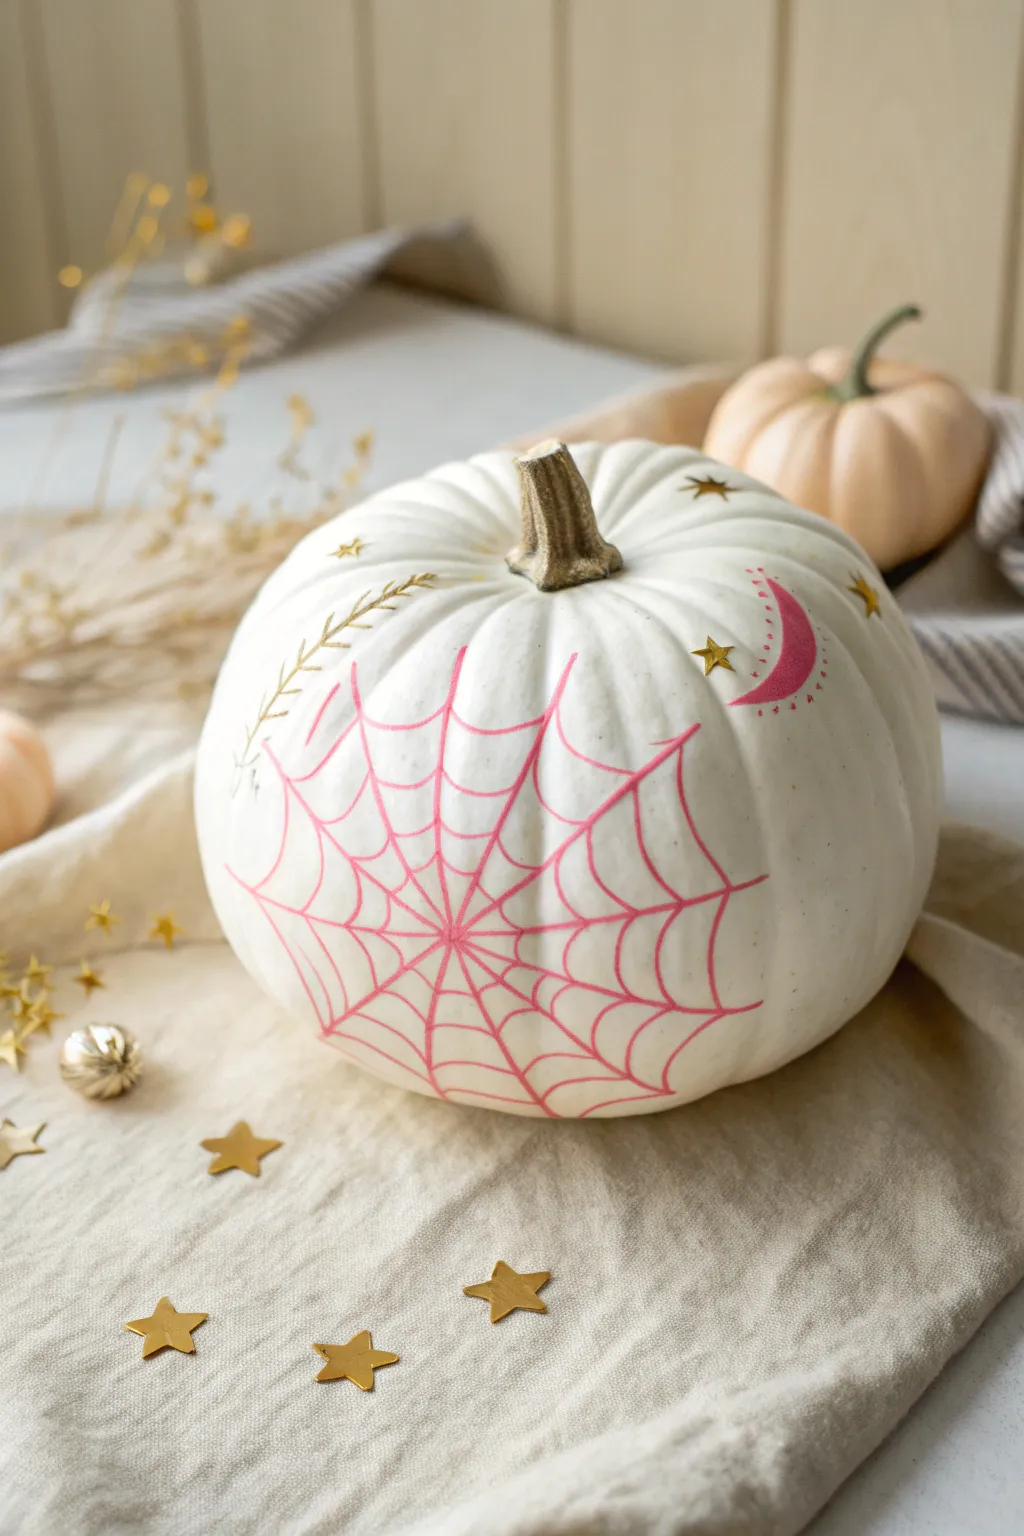
Transform a simple white pumpkin into a whimsical piece of décor with this delicate, celestial design. Featuring a vibrant pink spiderweb, moon accents, and touches of gold, this project perfectly balances spooky and sweet.
Step-by-Step Guide
Materials
- Medium-sized white faux pumpkin (or a real white pumpkin, cleaned and dried)
- Pink posca paint pen (medium tip)
- Gold metallic paint pen (fine tip)
- Pencil (light grade like HB)
- Soft eraser
- Gold star confetti or sequins (optional)
- Small craft stars (optional)
- Strong craft glue (optional for stars)
Step 1: Planning and Prepping
-
Clean surface:
Begin by wiping down your pumpkin with a slightly damp cloth to remove any dust or oils that might repel the paint pens. Let it dry completely. -
Design placement:
Visualize where your main elements will go. The spiderweb will be the largest feature, centered on one side, while the moon and sprigs frame it. -
Sketch the web center:
Using a pencil very lightly, mark a small dot where the center of the spiderweb will sit. Aim for the lower-middle section of the pumpkin rather than dead center for a more dynamic look. -
Draft the radial lines:
Sketch lines radiating outward from your center dot like wheel spokes. Draw about 7 to 9 lines, extending them upward and outward across the pumpkin’s ribs.
Star-Studded Tip
Can’t draw perfect stars? Use a small star stamp or a stencil and the gold paint pen to get uniform shapes every single time.
Step 2: Painting the Pink Web
-
Prime the paint pen:
Shake your pink paint pen well and press the nib down on a scrap piece of paper until the ink flows smoothly. -
Trace the spokes:
Go over your pencil spokes with the pink marker. Use steady, confident strokes from the center outward. -
Connect with scallops:
Starting near the center, draw curved lines connecting the spokes to create the web pattern. These should dip inward toward the center, like little hammocks. -
Work outward:
Continue adding rows of these scalloped connecting lines, spacing them wider apart as you move away from the center hub. I find rotating the pumpkin as I draw makes this easier on the wrist. -
Check consistency:
Review your lines. If any look too thin, go over them a second time once the first layer is dry to make the pink color pop against the white background.
Upgrade the Stem
Paint the pumpkin stem entirely gold or dip it in decoupage glue and gold glitter to match the metallic details on the side.
Step 3: Adding Galaxy Details
-
Sketch the moon:
To the right of the web, lightly sketch a crescent moon shape with your pencil. Ensure the curve complements the roundness of the pumpkin. -
Fill the moon:
Color in the crescent moon with the pink paint pen. You may need two coats for a solid, opaque finish. -
Add moon details:
Once the pink moon is dry, use a fine tip pink pen or the very edge of your marker to add tiny dots radiating from the moon’s outer curve. -
Draw gold sprigs:
Switch to your gold metallic pen. On the left side of the web, draw a long, curved stem. Add small ‘v’ shapes along the stem to create a stylized botanical branch. -
Scatter gold stars:
Draw small five-point stars or four-point ‘sparkles’ using the gold pen. Scatter them randomly around the web and moon to fill empty white space. -
3D Star Accents (Optional):
For extra texture, glue on a few physical gold star sequins or confetti pieces near the drawn stars. Place them sparingly to keep the look elegant. -
Final Cleanup:
Wait at least 15 minutes for all paint to cure fully. Then, gently use your soft eraser to remove any visible pencil guidelines.
Place your celestial pumpkin on a cozy throw blanket to enjoy those enchanting autumn vibes
Creepy-Cute Ghost Pattern
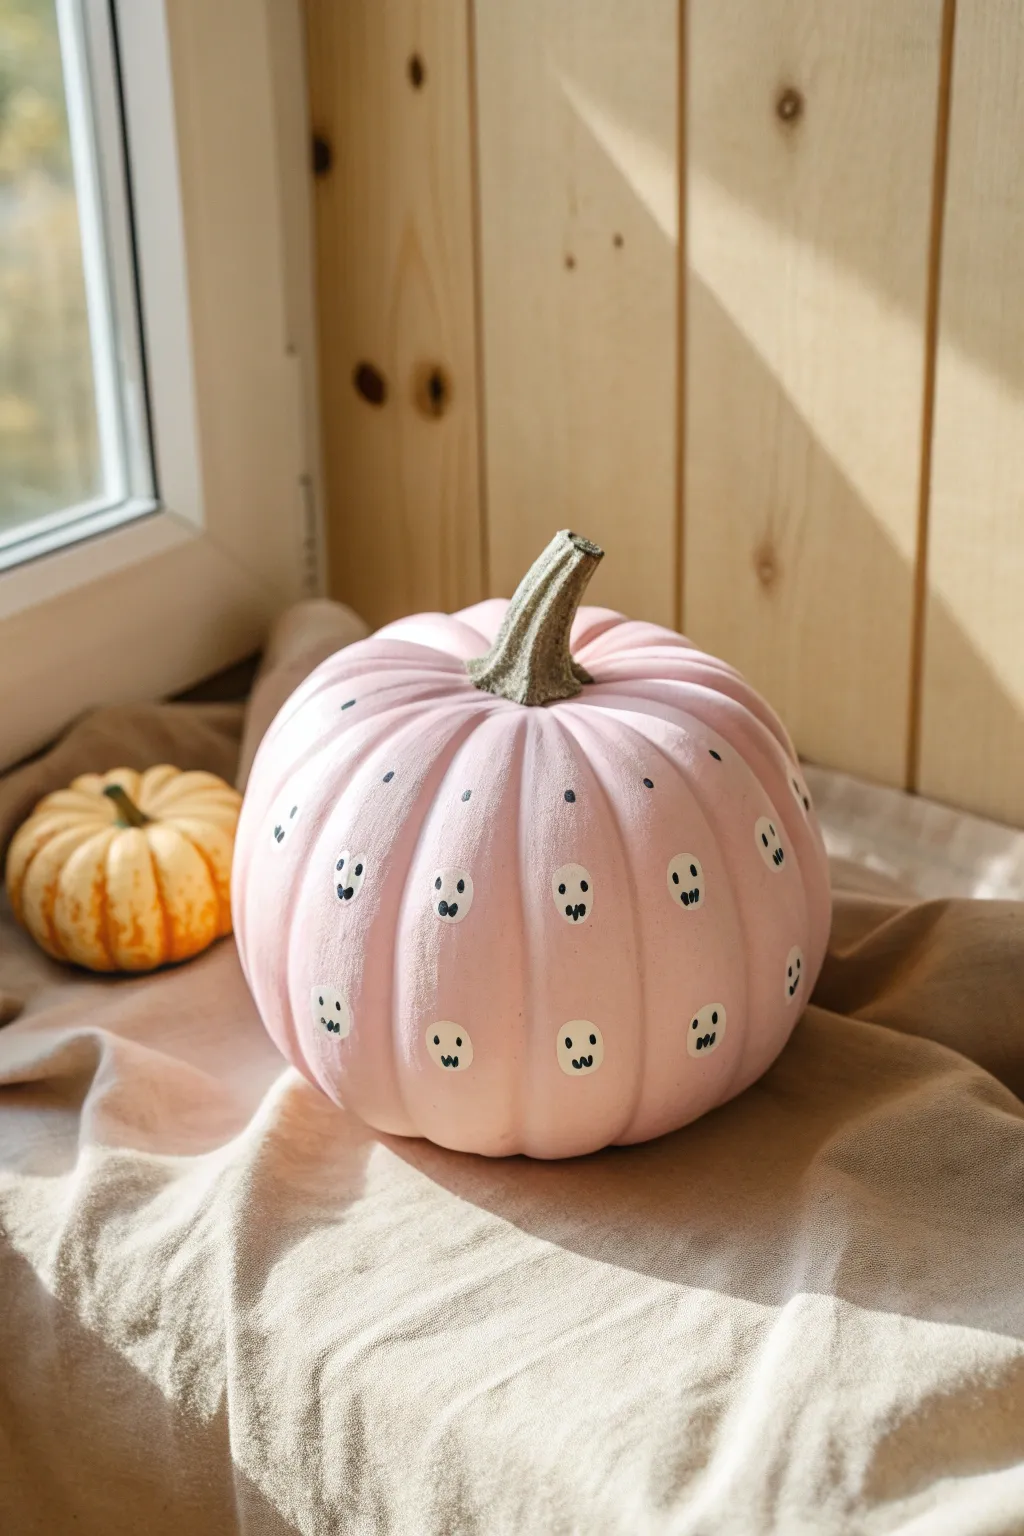
This adorable project combines soft, girly aesthetics with just a touch of spooky spirit. You’ll transform a standard pumpkin into a blush-pink statement piece covered in a repetitive, minimalist ghost pattern that pops against the pastel background.
Step-by-Step Tutorial
Materials
- Medium-sized pumpkin (real or faux)
- Light pink acrylic paint (matte finish)
- White acrylic paint
- Black acrylic paint or black Sharpie marker
- Medium flat paintbrush
- Small round detail brush
- Painter’s tape (optional)
- Spray sealant (matte or satin)
Step 1: Base Coat Preparation
-
Clean the surface:
Start by wiping down your pumpkin with a damp cloth to remove any dirt or dust. If you are using a real pumpkin, make sure it is completely dry before moving on, as moisture can trap under the paint. -
Protect the stem:
Since we want to keep the natural, rustic look of the stem, carefully wrap it with painter’s tape to shield it from stray brushstrokes. -
Apply the first pink layer:
Using your medium flat brush, apply a generous coat of light pink acrylic paint to the entire body of the pumpkin. Don’t worry if it looks streaky at first; acrylic builds up well. -
Let it dry totally:
Allow this base layer to dry completely. This usually takes about 20–30 minutes, or you can speed it up with a hair dryer on a cool setting. -
Add a second coat:
Apply a second layer of pink paint to ensure opaque, even coverage. I find that brushing in the direction of the pumpkin’s natural ribs helps hide brushstrokes best. -
Inspect and touch up:
Check for any uneven spots or peeking orange skin. If necessary, add a third light coat to get that perfect matte, bubblegum finish.
Step 2: Painting the Ghost Shapes
-
Plan your placement:
Visualize where your ghosts will go. Aim for a grid-like pattern, placing one ghost in the center of each ‘rib’ of the pumpkin, spaced evenly from top to bottom. -
Start the ghost silhouettes:
Dip your small round brush into white paint. Gently press the brush down to create the rounded top of the ghost’s head. -
Elongate the shape:
Drag the paint downward slightly to create a short, thumbprint-like oval. These ghosts are minimalist, so they don’t need intricate wavy bottoms; a simple oval or tombstone shape works perfectly. -
Build the pattern:
Continue painting these white ovals across the pumpkin. Try to stagger them slightly if the ribs curve, keeping roughly 2-3 inches of vertical space between each ghost. -
Refine opacity:
White paint over pink can sometimes look translucent. Once the first white layer is dry, dab a second coat of white directly on top to make the ghosts bright and crisp.
Fixing Mistakes
Smudged a ghost face? Don’t panic. Let the black paint dry completely, then paint a layer of white over the mistake. Once dry, try the face again.
Step 3: Adding the Spooky Details
-
Prepare detailed black paint:
Load a very fine detail brush with a tiny amount of black paint. If you aren’t confident with a brush, a black paint pen or Sharpie works wonderfully here too. -
Dot the eyes:
On your first dry white oval, place two small, vertical ovals near the top for the eyes. They should be close together to get that cute, surprised look. -
Add the mouth:
Paint a slightly larger vertical oval centered below the eyes for the mouth. It should resemble a tiny scream. -
Repeat the faces:
Go through and add faces to all your white shapes. Varying the size of the mouth slightly gives each ghost a unique little personality. -
Add background dots:
Using the back end of a small paintbrush dipped in black paint (or a dotting tool), place tiny black dots randomly in the pink spaces between the ghosts to fill the voids. -
Seal the deal:
Once everything is bone-dry, give the pumpkin a light misting of spray sealant. This stops the paint from chipping, especially if you set it outside.
Glow Up
Mix glow-in-the-dark medium into your white paint for the ghosts. By day it looks pastel, but at night your spooky friends will actually glow green.
Place your cute new creation on a windowsill or porch to welcome the season with style
Pastel Candy Corn Pumpkin
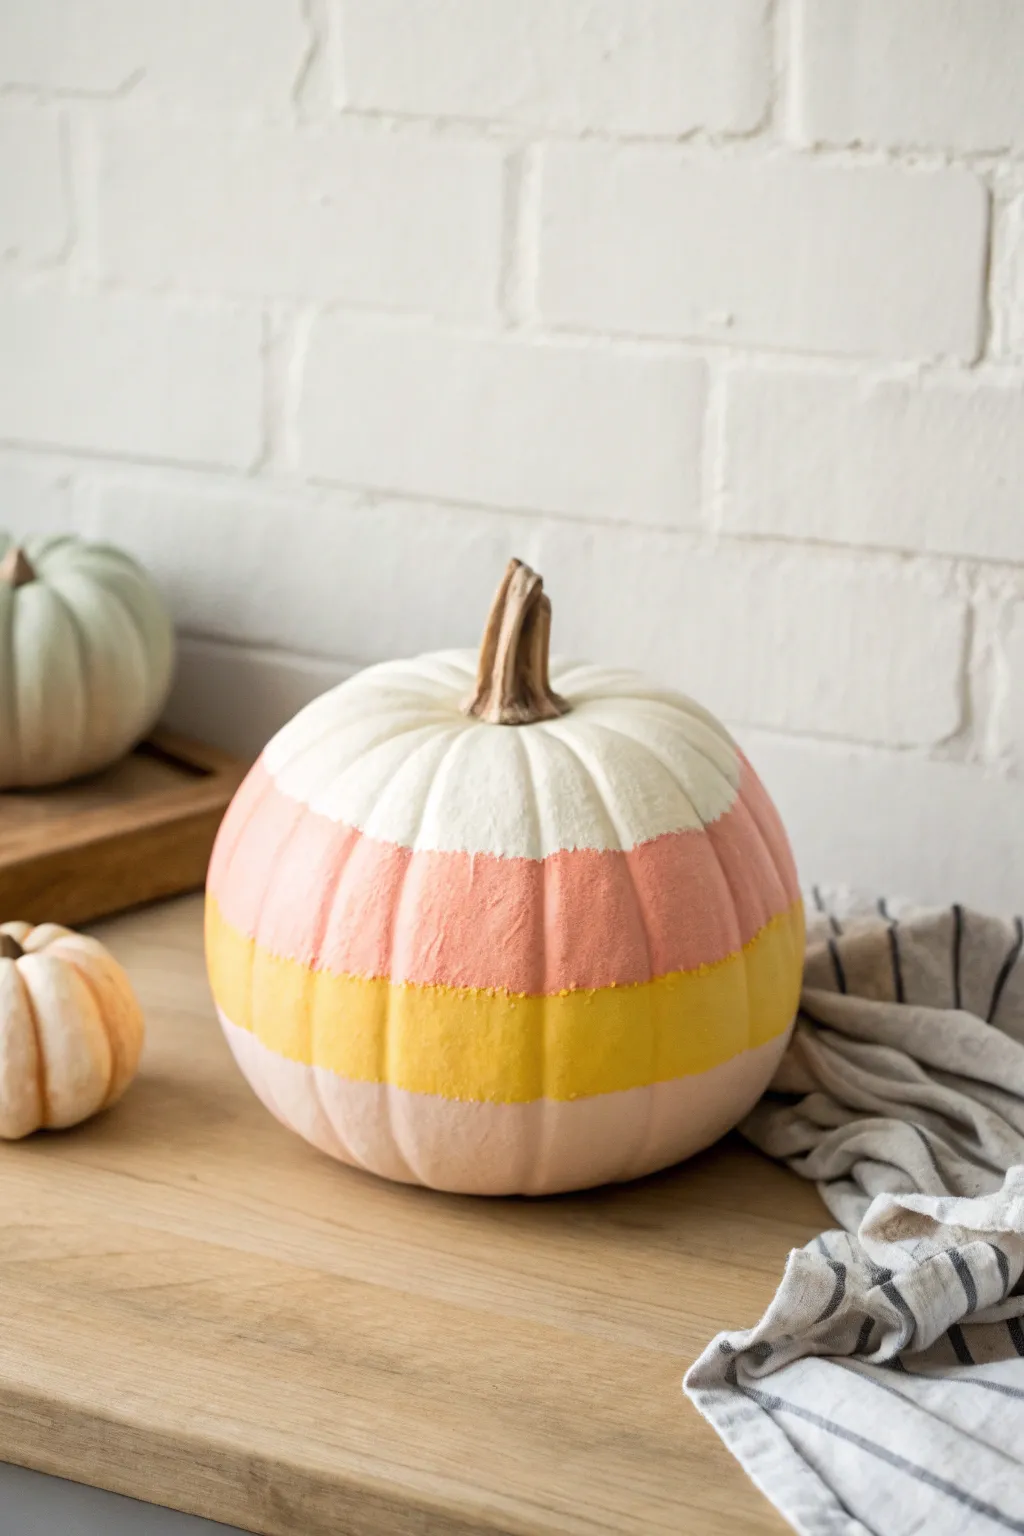
Give your Halloween decor a softer, sweeter touch with this adorable pastel candy corn painted pumpkin. Unlike the traditional stark orange, this version uses gentle pinks and yellows for a dreamy, feminine autumn vibe.
Step-by-Step Guide
Materials
- White or cream-colored craft pumpkin (faux or real)
- Acrylic craft paint: Soft Pink or Peach
- Acrylic craft paint: Butter Yellow or Mustard Yellow
- Acrylic craft paint: Cream or Off-White
- Medium-width flat flat paintbrush
- Painter’s tape or Washi tape (optional)
- Small detail brush
- Paper plate or palette
- Water cup and paper towels
- Matte finish sealer (spray or brush-on)
Step 1: Preparation & Base Coat
-
Clean surface:
Begin by wiping down your pumpkin with a damp cloth to remove any dust or dirt. If using a real pumpkin, dry it thoroughly. -
Prime the surface:
If your pumpkin is orange or a dark color, apply a base coat of white primer or cream acrylic paint over the entire surface. This ensures your pastel top colors pop. Let this dry completely before moving on. -
Plan your stripes:
Visualize the pumpkin divided into three or four horizontal sections. The pumpkin in the photo uses a four-stripe pattern: Cream top, Pink upper-middle, Yellow lower-middle, and a faint Pink bottom. -
Tape lines (optional):
If you struggle with straight lines, apply painter’s tape horizontally around the pumpkin to mark off your intended sections. Press the edges down firmly into the pumpkin’s grooves.
Step 2: Painting the Sections
-
Paint the top section:
Dip your flat brush into the Cream or Off-White paint. Start at the base of the stem and paint down to your first imaginary (or taped) line. -
Getting into the grooves:
Make sure to push the bristles into the vertical ribs of the pumpkin so no base color shows through near the stem. -
Paint the bottom base:
While the top dries, paint the very bottom section of the pumpkin with your Soft Pink. Painting the top and bottom first helps define your middle space. -
Rest and dry:
Allow these two sections to dry to the touch, usually about 15-20 minutes.
Straight Lines on Curves
Painting straight horizontal lines on a round, ribbed pumpkin is tricky. Don’t stress perfect lines; the ribs naturally distort them. Step back often to check the visual balance.
Step 3: Adding the Color Bands
-
Apply the pink stripe:
Using a clean flat brush, paint a wide band of Soft Pink directly below the white top section. It should cover the upper-middle portion of the pumpkin’s belly. -
Feathering edges:
I like to create a slightly soft edge rather than a hard line. You can achieve this by using a somewhat dry brush where the pink meets the white. -
Apply the yellow stripe:
Load your brush with the Butter Yellow paint. Fill in the remaining middle section, right below the pink band and above the bottom pink base. -
Refining the meeting points:
Carefully paint along the line where the yellow meets the pink. While precision is nice, a slightly organic, hand-painted look adds charm. -
Second coats:
Pastel acrylics can sometimes be sheer. Once the first layer is dry, apply a second coat to the pink and yellow sections for full opacity.
Add Subtle Texture
Mix a tiny pinch of baking soda into your acrylic paint before applying. This creates a matte, velvety texture that mimics the surface of real sugar candy.
Step 4: Finishing Touches
-
Detail work:
Use your small detail brush to touch up any areas inside the deep grooves where two colors meet, ensuring the transition looks clean all the way down the rib. -
Stem maintenance:
Take a look at the stem. If you accidentally got paint on it, wipe it off with a damp rag or paint over it with a contrasting brown or metallic gold for a chic update. -
Full dry time:
Let the entire pumpkin sit undisturbed for at least an hour until the paint is fully cured. -
Seal the project:
Finish by applying a clear matte sealer. This protects the paint from chipping and gives the pumpkin a unified, professional matte finish similar to the reference photo.
Enjoy displaying your sweet and stylish pumpkin as part of a lovely autumn centerpiece
Soft Leopard Print Pumpkin
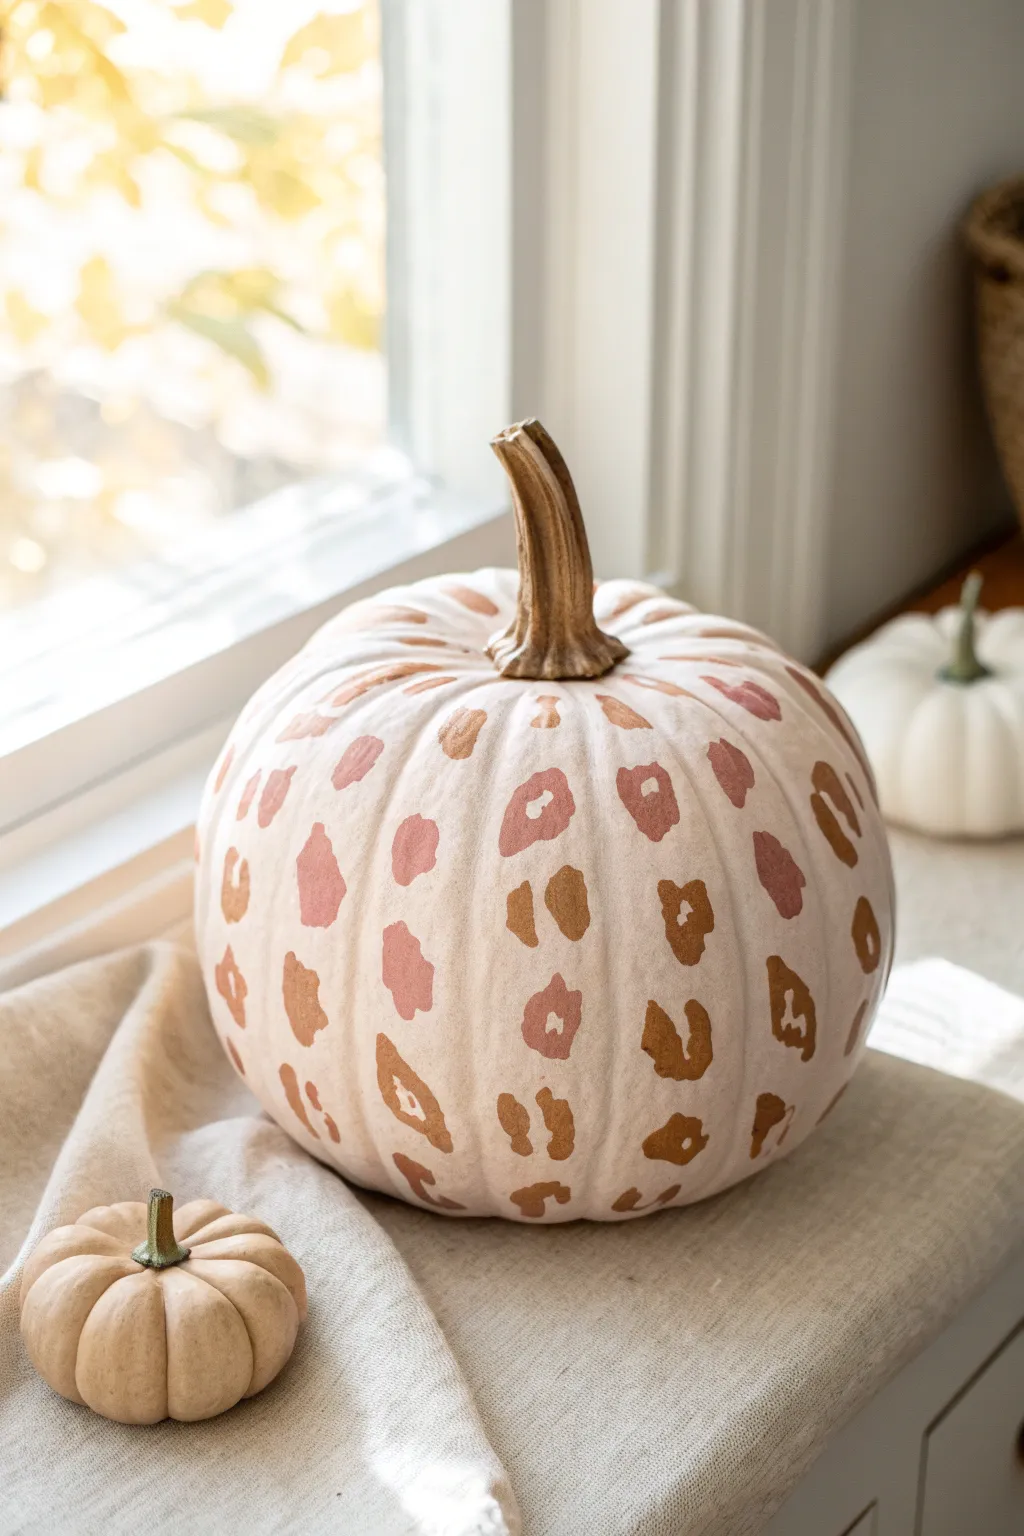
Move over traditional orange; this sophisticated leopard print pumpkin brings a touch of glam to your autumn decor. With its creamy base and soft, neutral-toned spots, this design perfectly balances a wild pattern with a gentle, feminine color palette.
Step-by-Step
Materials
- Large faux craft pumpkin (or a real pumpkin, cleaned and dried)
- Cream or ivory acrylic paint (matte finish)
- Soft pink or dusty rose acrylic paint
- Metallic gold or bronze acrylic paint
- Tan or light brown acrylic paint
- Wide flat paintbrush (synthetic bristles)
- Medium round paintbrush (size 4 or 6)
- Small liner or detail brush (size 1 or 2)
- Paper plate or palette
- Cup of water and paper towels
- Matte spray sealer (optional)
Step 1: Base Preparation
-
Clean surface:
Begin by wiping down your pumpkin with a damp cloth to remove any dust or oils. If you are using a real pumpkin, ensure it is completely dry before proceeding. -
Prime the stem:
Using masking tape, carefully tape off the base of the stem to keep it clean. If your stem looks plastic-y, you might want to give it a quick coat of dark brown paint first for realism. -
Apply base coat:
Load your wide flat brush with the cream or ivory paint. Apply a smooth, even coat over the entire surface of the pumpkin, following the vertical ridges. -
Cover the crevices:
Pay special attention to the deep grooves of the pumpkin ribs, ensuring the original orange or plastic color is fully obscured. -
Dry and repeat:
Let the first coat dry completely, which usually takes about 20-30 minutes. Apply a second or third coat until you have an opaque, flawless finish.
Natural Imperfection
Don’t try to make the spots symmetrical! A shaky hand actually helps create realistic, organic looking animal print edges.
Step 2: Creating the Spots
-
Mix your spot colors:
Dispense small amounts of the dusty rose, metallic gold, and tan paint onto your palette. You want distinct colors that complement each other. -
Paint the inner spots:
Using the medium round brush, paint irregular, organic blob shapes scattered across the pumpkin. Alternate between the pink, tan, and gold colors randomly. -
Vary the sizes:
Keep the shapes relatively small—about the size of a thumbprint—and ensure they aren’t perfect circles. Wiggle your brush slightly as you press down to create natural edges. -
Spacing matters:
Leave varying amounts of space between the spots. Some should be clustered a bit closer, while others can float freely. -
Let spots set:
Allow these base spots to dry to the touch so the subsequent layers don’t muddy the colors.
Glam It Up
For extra sparkle, brush a thin layer of glitter glue or Mod Podge over just the metallic gold spots after the paint dries.
Step 3: Adding Leopard Detail
-
Prepare the outline color:
You will need a slightly darker shade for the outlines. If your tan paint isn’t dark enough, mix a tiny drop of brown into the gold or tan to create contrast. -
Paint the brackets:
Dip your small detail brush into the darker/metallic hue. Paint loose ‘C’ shapes or brackets around the edges of your colored spots. -
Incomplete outlines:
Avoid circling the spot completely. Instead, paint two or three broken lines around the perimeter of each color blotch. -
Add stray marks:
To fill empty negative space, paint small, solid irregular dots or tiny dashes of the darker color in the creamy areas between the main leopard spots. -
Check rotation:
I always rotate the pumpkin frequently during this step to ensure the pattern looks balanced from all angles, including near the base and stem. -
Refine the stem:
Remove the masking tape from the stem. If needed, dry brush a little gold or cream onto the stem ridges to tie it into the pumpkin’s color scheme. -
Final seal:
Once all paint is perfectly dry, take the pumpkin to a ventilated area and apply a light mist of matte spray sealer to protect your design from chipping.
Place your finished pumpkin near a window or soft lamp to let those metallic accents catch the light beautifully
Heart-Eye Carved Pumpkin
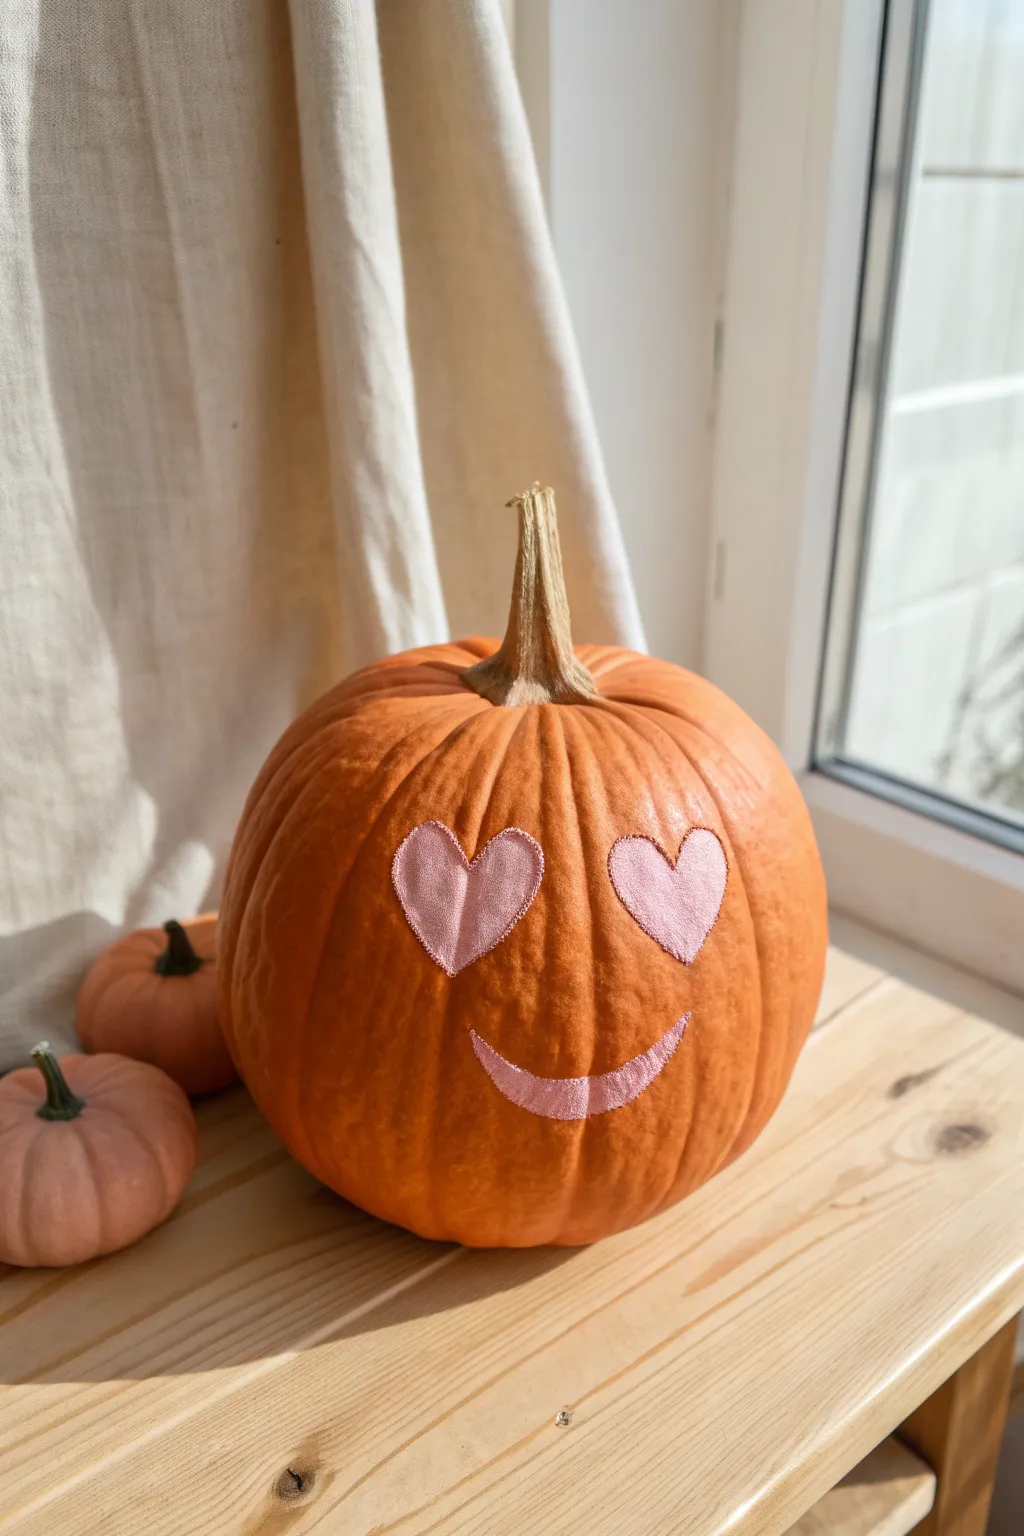
Add a touch of sweetness to your autumn decor with this adorable, blushing pumpkin. Featuring soft pink heart-shaped eyes and a gentle smile painted directly onto the skin, this no-carve project is perfect for creating a warm, friendly vibe without the mess of scooping guts.
Step-by-Step
Materials
- Medium-sized orange pumpkin (smooth surface is best)
- Pale pink acrylic craft paint
- Small flat paintbrush (size 4 or 6)
- Fine detail paintbrush (size 0 or 1)
- White chalk pencil or watercolor pencil
- Paper towel or damp cloth
- Clear matte sealer spray (optional)
Step 1: Preparation & Sketching
-
Clean the surface:
Since you are painting directly onto the skin, start by wiping down your pumpkin with a damp cloth to remove any dirt or oils. Dry it thoroughly. -
Find the perfect face:
Rotate the pumpkin to find the smoothest ‘face’ area. Avoid deep ridges or blemishes where you plan to paint the eyes. -
Outline the left eye:
Using a white chalk pencil, lightly sketch a heart shape on the left side. Angle the bottom point slightly inward toward where the nose would be. -
Outline the right eye:
Sketch a matching heart on the right side. Try to keep them roughly symmetrical, angling the bottom point inward again. -
Add the smile:
Draw a wide, simple U-shaped curve below the eyes for the mouth. Keep the line thin for now as a guide. -
Check symmetry:
Step back and look at your sketch. If the hearts look uneven, just wipe the chalk away with a damp paper towel and redraw until you are happy.
Chalk It Up
Using a chalk pencil instead of graphite or marker makes mistakes vanish instantly with a damp cloth, leaving no ghostly gray smudges behind.
Step 2: Painting the Design
-
Load the brush:
Squeeze a small amount of pale pink acrylic paint onto a palette or paper plate. Load your small flat brush, ensuring the bristles are coated but not dripping. -
Outline the first heart:
Carefully trace the outline of the left heart with the edge of your flat brush to establish a crisp border. -
Fill the center:
Fill in the rest of the heart using smooth strokes. The orange skin might show through the first coat, but don’t worry about full coverage yet. -
Paint the second heart:
Repeat the outlining and filling process for the right heart eye. -
Paint the smile:
Switch to a slightly smaller brush if needed, or turn your flat brush sideways to paint the smile line. Make it slightly thicker in the center and tapered at the ends. -
Let the first coat dry:
Allow the paint to dry completely to the touch. This usually takes about 15-20 minutes depending on humidity. -
Apply the second coat:
Go over the hearts and mouth with a second layer of pink paint. This builds opacity and makes the color pop against the bright orange background. -
Check for gaps:
Look closely at the texture of the pumpkin skin. Dab a little extra paint into any deep pores or grooves that the brush missed.
Make It Sparkle
While the second coat of pink paint is still wet, sprinkle a fine dusting of iridescent glitter onto the hearts for a magical, shimmering finish.
Step 3: Finishing Touches
-
Clean up edges:
If any paint went outside the lines, use a damp Q-tip or a fingernail to gently scrape away the excess while it’s semi-dry. -
Refine the shape:
I like to use my fine detail brush now to sharpen the points of the hearts or smooth out the curve of the smile for a polished look. -
Remove sketch lines:
Once the paint is fully cured and hard, gently wipe away any visible white chalk pencil marks with a dry cloth. -
Optional sealing:
If this pumpkin will be outside on a porch, spray a light coat of matte clear sealer over the painted face to protect it from moisture.
Now you have a charming, heart-eyed character ready to brighten up your windowsill display
Dreamy Ombre Pumpkin
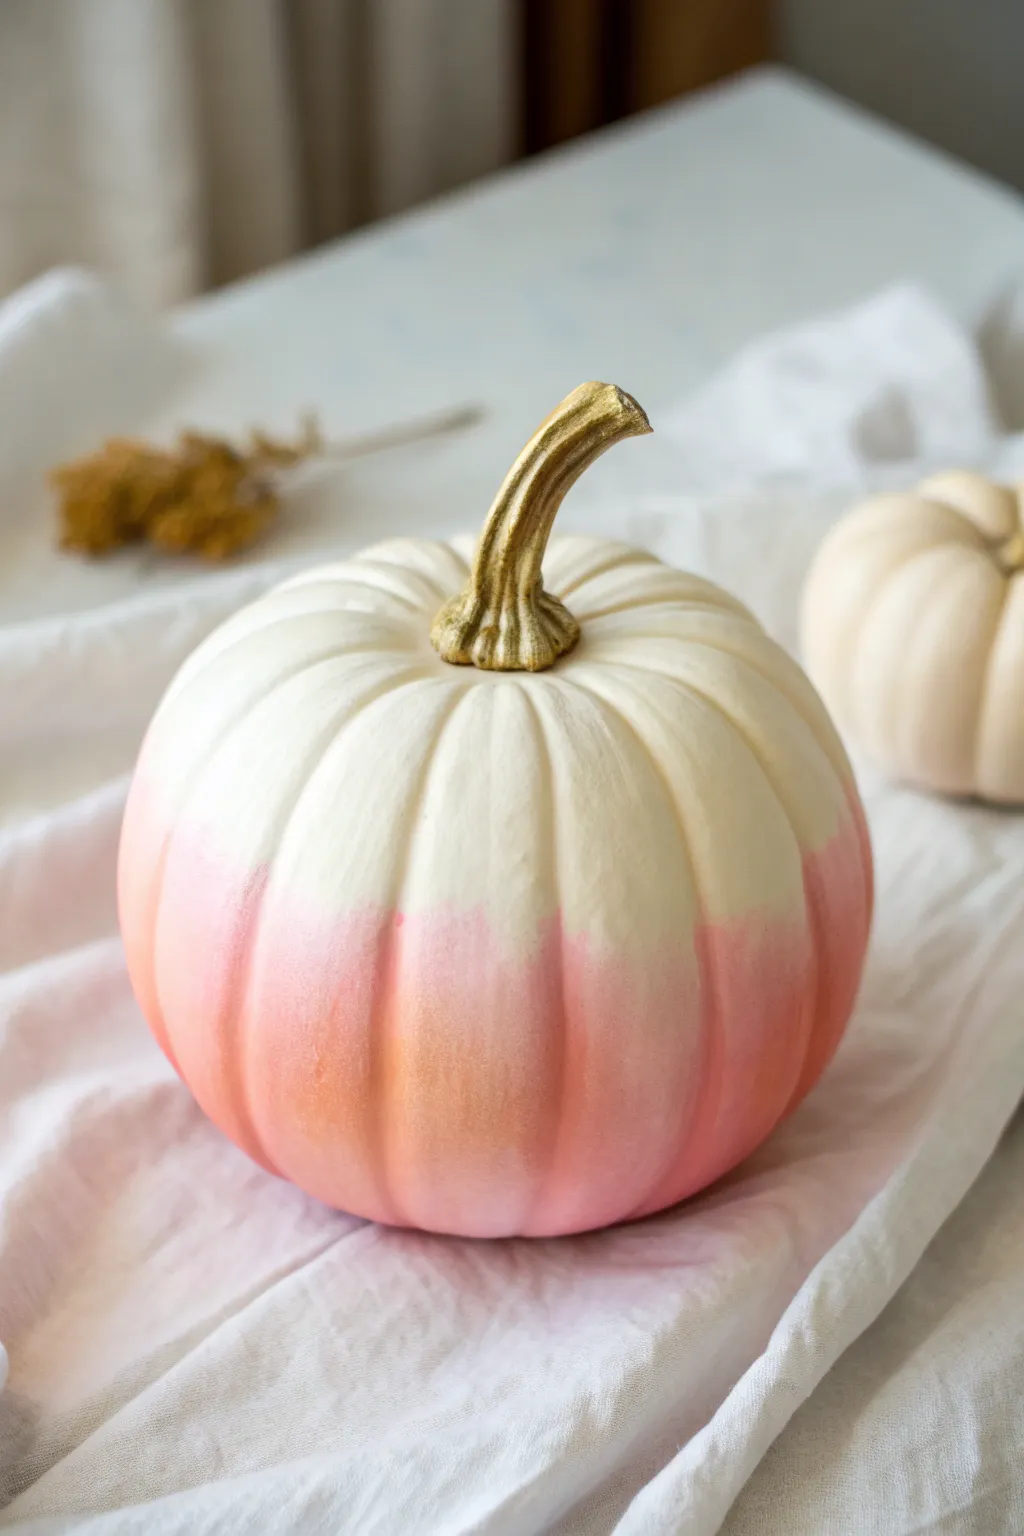
Transform a simple gourd into a soft, ethereal decoration with this dreamy ombre technique. The gentle fade from crisp white to blush pink creates a sophisticated, girly aesthetic that is perfect for elegant fall centerpieces.
Step-by-Step Tutorial
Materials
- Faux or fresh pumpkin (medium size)
- Matte white acrylic paint or spray paint (if pumpkin isn’t already white)
- Soft pink acrylic paint
- Gold metallic paint (liquid gilding or acrylic)
- Makeup sponges or foam wedges
- Small flat paintbrush
- Paper plate or palette
- Painter’s tape (optional)
- Sealant spray (matte finish)
Step 1: Preparation & Base Coat
-
Clean surface:
Begin by wiping down your pumpkin with a slightly damp cloth to remove any dust or oils. If you are using a fresh pumpkin, make sure it is completely dry before proceeding. -
Prime the base:
If your pumpkin is orange or a different color, coat the entire surface with matte white paint. You may need two coats for full opacity. If your pumpkin is already a pristine white craft pumpkin, you can skip this step. -
Dry completely:
Allow the white base coat to dry fully. It is crucial that this layer is stable before you start blending colors on top of it.
Fixing Blotchy Blends
If your gradient looks too harsh, don’t panic. Mix a tiny drop of white paint into your pink, dip a sponge, and dab it specifically over the transition line to soften it instantly.
Step 2: Creating the Ombre Effect
-
Prepare the pink paint:
Squeeze a generous amount of soft pink acrylic paint onto your paper plate. You want enough ready so you don’t have to pause while blending. -
Load the sponge:
Dab the flat bottom of a makeup sponge into the pink paint. Blot it slightly on a clean part of the plate to remove excess globs; you want an even texture, not a thick blob. -
Apply the bottom layer:
Start dabbing the sponge firmly around the very bottom base of the pumpkin. This area should be solid pink with high saturation. -
Work upwards:
Gradually dab your way up the side of the pumpkin. As you move higher, use less pressure and re-load your sponge less frequently to start thinning the color. -
Create the fade:
When you reach the midway point of the pumpkin, stop reloading the sponge entirely. Use the remaining dry paint on the sponge to create a faint, misty transition line into the white. -
Soften the line:
Take a clean, slightly damp makeup sponge (with no paint on it) and gently dab along the upper edge of the pink area. I find this helps blur any harsh lines for a truly seamless gradient. -
Layering:
Once the first layer is dry, go back and add a second coat of pink just at the very bottom to deepen the contrast and make the fade more dramatic.
Step 3: Gilded Details
-
Protect the pumpkin:
You can carefully apply painter’s tape around the base of the stem if you are worried about unsteady hands, though free-handing usually works fine here. -
Paint the stem:
Using a small flat brush, apply gold metallic paint to the entire stem. Use vertical strokes that follow the natural grooves of the stem for better coverage. -
Reach the crevices:
Dab the tip of your brush into the small crevices where the stem meets the pumpkin body to ensure no original specific stem color peeks through. -
Add texture:
For a richer look, let the first coat dry and lightly drag a second layer of bright gold over the raised ridges of the stem. -
Final seal:
Once all paint is visibly dry, take the pumpkin to a well-ventilated area and give it a light mist of matte sealant to protect the paint job from scratches.
Sparkle Upgrade
While the pink paint is still wet at the very bottom, lightly sprinkle extra-fine iridescent glitter on the base. It adds a magical shimmer without overpowering the soft look.
Place your lovely ombre creation on a mantle or tablescape to enjoy the soft pop of color
Pearl Stud Pumpkin
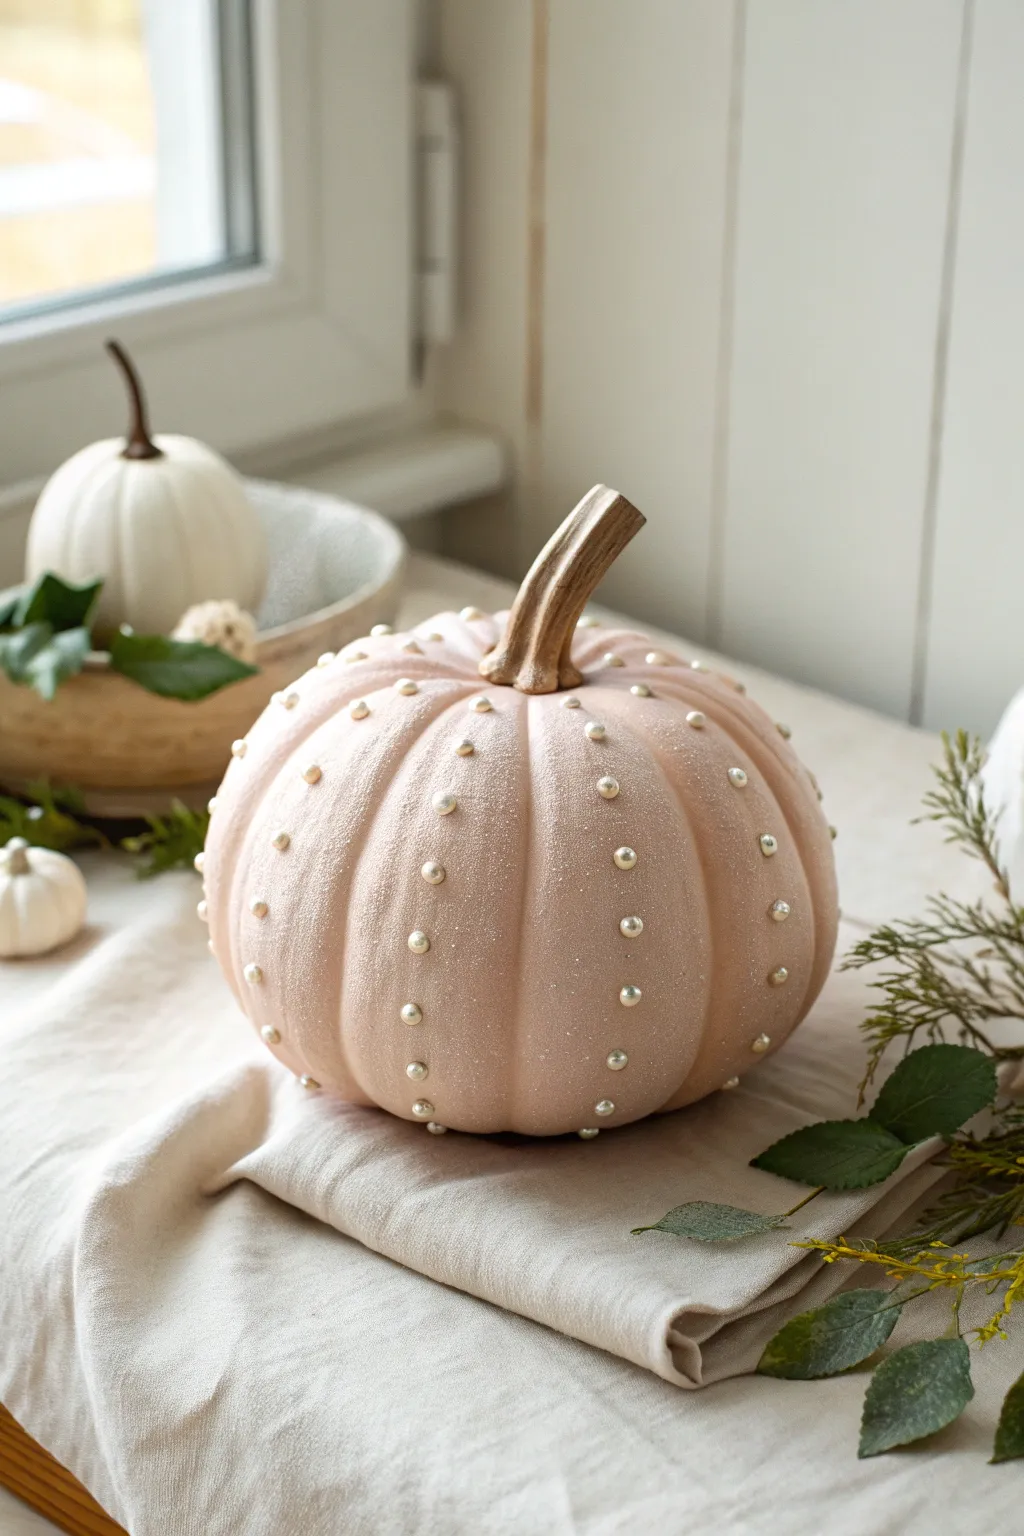
Transform a simple faux pumpkin into an elegant autumn centerpiece with soft blush paint and delicate pearl accents. This sophisticated project combines muted tones with classic jewelry-inspired details for a truly chic seasonal display.
Detailed Instructions
Materials
- Faux craft pumpkin (medium size)
- Blush pink or pale peach acrylic craft paint
- Matte or satin finish paint sealer (spray or brush-on)
- Flat craft paintbrush (1-inch width)
- Small foam pouncer or detail brush
- Flat-backed pearl cabochons (assorted sizes: 4mm, 6mm)
- Strong craft glue (e.g., E6000 or a precise hot glue gun)
- Gold or metallic bronze acrylic paint (for the stem)
- Tweezers (for precise pearl placement)
- Paper plate or palette
- Paper towels
Step 1: Preparing the Base
-
Clean surface:
Begin by wiping down your faux pumpkin with a slightly damp paper towel to remove any dust or manufacturing residue. Let it dry completely. -
Base coat:
Squeeze your blush pink paint onto a palette. Using the flat brush, apply a smooth, even coat of paint over the entire pumpkin body, avoiding the stem for now. -
Drying time:
Allow this first coat to dry fully. This usually takes about 20-30 minutes depending on the thickness of the paint. -
Second coat:
Apply a second coat of blush pink to ensure opaque coverage. If you can still see the original orange or white color through the paint, a third thin coat may be necessary. -
Seal the paint:
Once the pink base is completely dry, apply a layer of matte or satin sealer. This protects the paint from scratching when you attach the pearls later.
Step 2: Stem Detailing
-
Base stem color:
Taking your gold or metallic bronze paint and a smaller brush, carefully paint the stem. Paint all the way down to where the stem meets the pumpkin body. -
Add dimension:
While the metallic paint is still slightly wet, I like to mix a tiny drop of brown into the gold to darken the crevices of the stem for a realistic, aged look. -
Clean edges:
If any gold paint got onto the pink pumpkin skin, quickly wipe it away with a damp cotton swab or paint over it with a touch of pink once dry.
Sticky Situation
If pearls keep sliding down vertical surfaces before the glue sets, lay the pumpkin on its side, working on one section at a time. Let gravity help you keep them in place while they dry.
Step 3: Applying the Pearls
-
Plan placement:
Visualize the vertical ribs of the pumpkin as your guide lines. You will be placing pearls along these natural ridges. -
Start at the top:
Begin near the stem on one of the ridges. Squeeze a tiny dot of strong craft glue onto the back of a pearl or directly onto the pumpkin. -
Place first pearl:
Using tweezers, gently place the pearl onto the glue dot. Press down lightly for a few seconds to ensure it adheres. -
Establish spacing:
Move down the ridge about 1 to 1.5 inches. Place your next pearl here. Consistent spacing is key to the polished look. -
Continue the line:
Work your way down the entire vertical ridge until you reach the bottom of the pumpkin. Repeat this process for every other ridge initially to check spacing. -
Fill remaining ridges:
Once you are happy with the spacing, fill in the remaining vertical ridges with pearls, maintaining the same vertical distance between each bead. -
Vary sizes (optional):
For a more organic look, you can alternate between slightly larger pearls near the center and smaller ones near the top and bottom, though uniform sizes create a cleaner modern aesthetic. -
Check adhesion:
Go around the pumpkin and give each pearl a very gentle nudge to ensure none are loose. Add a tiny bit more glue under edges if needed. -
Cleanup strings:
If you used hot glue, wait until everything is cold and brittle, then use a soft brush or your fingers to whisk away any fine glue strings.
Glam Upgrade
Mix a very fine iridescent glitter into your final clear sealant coat before apply the pearls. This gives the pumpkin a sugared, magical texture that catches the light beautifully.
Place your finished pearlescent pumpkin near a window to let natural light highlight the delicate sheen and beadwork
Dessert Drip Pumpkin
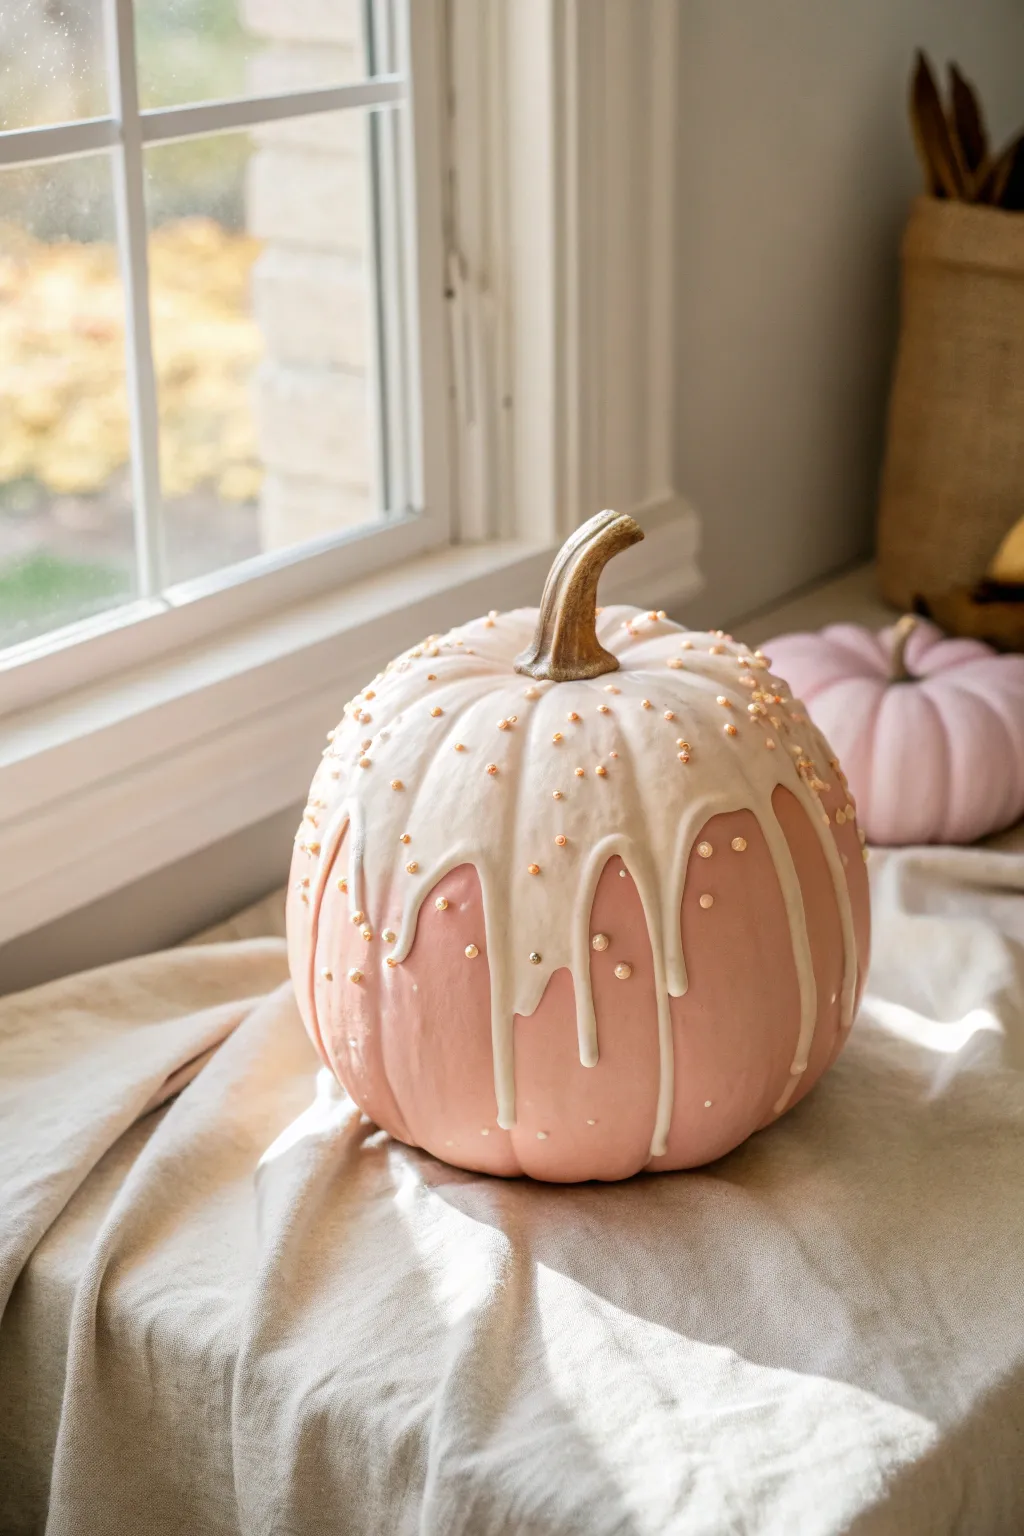
Treat your autumn decor to something sugary-sweet with this delightful dessert-inspired pumpkin project. Featuring a soft blush base, a decadent creamy drip, and scattered sugar pearls, it looks good enough to eat but is designed to last all season.
Step-by-Step Tutorial
Materials
- Faux craft pumpkin (medium size)
- Soft pink chalk paint or acrylic matte paint
- Creamy white acrylic paint (full body or high flow)
- White school glue or pouring medium
- Squeeze bottle or piping bag
- Gold or pearl craft beads/faux sprinkles
- Metallic gold paint
- Small paintbrush
- Foam paint brush
- Paper plate or cup for mixing
- Drop cloth or parchment paper
Step 1: Base Coat
-
Prepare your workspace:
Lay down parchment paper or a drop cloth to protect your surface from paint drips later on. Place your faux pumpkin in the center. -
Apply the first coat of pink:
Using a foam brush, cover the entire pumpkin with your soft pink chalk paint. Working from top to bottom ensures even coverage. -
Let it dry completely:
Allow the first coat to dry fully. Chalk paint dries relatively fast, usually within 30-45 minutes, but patience is key for a smooth finish. -
Add a second coat:
Apply a second layer of pink paint to ensure the original orange or white color of the pumpkin is completely hidden and the color is opaque. -
Paint the stem:
Using a smaller detail brush, paint the stem in a metallic gold color. This adds a chic contrast to the matte pink body. I like to let this dry while I mix the drip medium.
Step 2: Creating the Drip
-
Mix your drip medium:
In a paper cup, mix your creamy white acrylic paint with a pouring medium or white school glue. You want a ratio of about 2:1 paint to medium. -
Check consistency:
Stir until the mixture is the consistency of thick melted ice cream. It needs to flow but not run instantly down the sides. -
Fill the applicator:
Pour your white mixture into a squeeze bottle or a piping bag with a small hole cut at the tip. This gives you maximum control over the drips. -
Test a small drip:
Do a quick test drip on a scrap piece of paper or the very bottom of the pumpkin to ensure the paint isn’t too runny. -
Apply the top pool:
Squeeze a generous amount of the white mixture around the base of the gold stem, creating a thick pool of ‘frosting’ at the very top. -
Create the drips:
Gently squeeze the bottle while guiding it down a groove of the pumpkin. Stop squeezing and lift up to let gravity pull the paint down naturally. -
Vary the lengths:
Continue around the pumpkin, making some drips long and others short for a natural, organic look. Don’t overthink it; irregularity looks more realistic.
Drip Too Runny?
If your ‘frosting’ is sliding too fast, mix in a tiny bit of baking soda to the paint. This thickens the texture and adds a realistic fluffiness.
Step 3: Sprinkles & Finishing
-
Timing the sprinkles:
Wait about 5-10 minutes for the drip paint to tack up slightly but still be wet. If it’s too runny, the beads will slide right off. -
Place larger pearls:
Hand-place the larger gold or pearl beads into the white drip areas, pressing them gently into the thick paint so they adhere. -
Add smaller details:
Scatter smaller microbeads or faux sprinkles over the top and down the sides of the drips. Let some fall naturally onto the pink areas just below the drip line. -
Clean up stray beads:
If any beads landed in spots you don’t like, simply nudge them off with a toothpick before the paint sets. -
Final drying time:
Let the pumpkin sit undisturbed overnight. The thick layer of drip paint takes significantly longer to dry than the base coat.
Pro Tip: Gravity Helper
Don’t just squeeze downward. Squeeze a blob at the top of a ridge, then actively stop squeezing and let gravity do the work for a natural tapered end.
Place your finished pumpkin near a window to catch the light on those shimmering pearl details
Strawberry-Inspired Pumpkin
Transform a simple pumpkin into a sweet, strawberry-inspired décor piece with soft pink hues and delicate white details. This project combines matte elegance with playful charm, perfect for adding a feminine touch to your autumn display.
How-To Guide
Materials
- Medium-sized pumpkin (real or faux)
- Matte pale pink acrylic paint or chalk paint
- Soft green acrylic paint (olive or sage tones)
- White puffy paint or dimensional fabric paint
- Medium flat paintbrush
- Small round paintbrush
- Painter’s tape
- Paper towel or damp cloth
- Clear matte sealer spray (optional)
Step 1: Preparation & Base Coat
-
Clean the surface:
Begin by wiping down your pumpkin with a damp cloth to remove any dirt or oils that might prevent the paint from adhering properly. -
Protect the stem:
Wrap painter’s tape carefully around the base of the stem to keep it clean while you paint the body of the pumpkin. -
First pink coat:
Using your medium flat brush, apply a thin, even layer of pale pink paint over the entire pumpkin surface. -
Let it dry:
Allow the first coat to dry completely for about 30 minutes; rushing this step can cause the paint to lift when you add the second layer. -
Second pink coat:
Apply a second coat of pink paint to ensure full, opaque coverage, smoothing out any visible brushstrokes as you go. -
Dry thoroughly:
Set the pumpkin aside to dry fully for at least an hour until the surface is matte and dry to the touch.
Keep it Raised
Using dimensional or “puffy” fabric paint instead of regular acrylic creates that little raised texture that makes the seeds pop visually.
Step 2: Stem & Detail Work
-
Remove tape:
Gently peel away the painter’s tape from the stem. -
Paint the stem:
If your stem needs a color refresh, use the small round brush and sage green paint to carefully coat the stem, blending slightly at the base for a natural look. I like to dry-brush a tiny bit of brown near the top for realism. -
Plan your dots:
Visualize a grid pattern or a random scatter for your dots, keeping in mind the natural ridges of the pumpkin as a guide. -
Test the applicator:
Before touching the pumpkin, squeeze a small amount of white puffy paint onto a paper towel to ensure the flow is smooth and to remove any air bubbles. -
Start dotting:
Begin applying small, pinhead-sized dots of puffy paint near the top of the pumpkin, following a vertical ridge line downward. -
Maintain spacing:
Continue adding rows of dots along each ridge or valley, trying to keep roughly an inch of space between them for a balanced look. -
Fill the gaps:
Once the main ridges are done, fill in the areas between ridges with additional dots to create an even, all-over pattern. -
Refine the shape:
If any dots form a peak or ‘Hershey’s Kiss’ shape, gently tap the pumpkin on the table or use a damp finger to flatten the tip slightly while wet. -
Final drying time:
Let the puffy paint dry completely, which usually takes about 4 hours, ensuring the dots are hard and securely attached. -
Seal (optional):
For extra durability, especially if displaying outdoors, lightly mist the entire pumpkin with a clear matte sealer spray.
Gradient Glam
Create an ombre effect by mixing a darker pink for the bottom of the pumpkin and gradually lightening the paint as you move toward the stem.
Place your sweet creation on a sunny windowsill or table centerpiece and enjoy the soft pop of pink all season long
Collage-Style Fashion Pumpkin
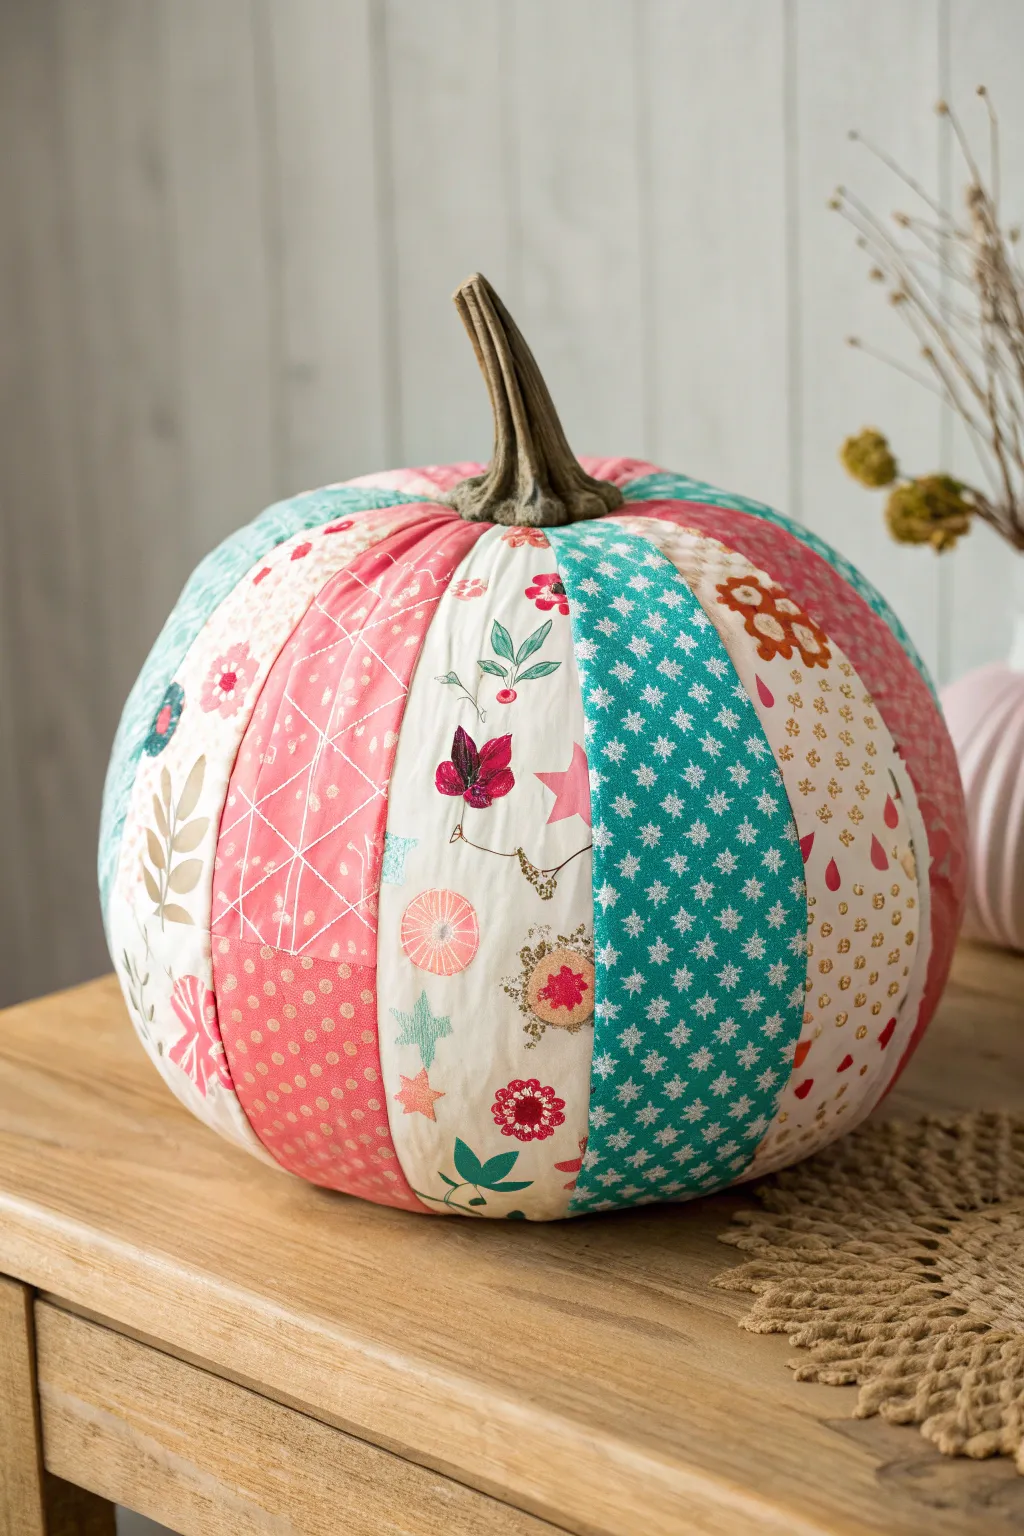
Transform a plain faux pumpkin into a charming, cottage-core decoration using strips of patterned fabric. This decoupage project creates a soft, quilted look without sewing a single stitch, blending floral, geometric, and dotted prints for a cozy finish.
Step-by-Step Tutorial
Materials
- Faux pumpkin (white or cream works best)
- Assorted patterned cotton fabrics (teal stars, pink geometric, floral prints)
- Mod Podge (Matte finish)
- Fabric scissors or rotary cutter
- Foam brush
- Pencil
- Ruler or measuring tape
- Plastic cup (for prop)
- Hot glue gun (optional, for stem)
Step 1: Preparation & Cutting
-
Clean surface:
Wipe down your faux pumpkin with a damp cloth to remove any dust or oils. Let it dry completely to ensure the glue adheres properly. -
Select fabrics:
Choose 4-6 coordinating fabric prints. The example uses a mix of teal with white stars, white with floral motifs, pink geometrics, and cream with gold dots. -
Measure segments:
Measure the curved length of your pumpkin from the stem base to the bottom center. Add about 1 inch to this measurement for overlap. -
Create a template:
Most faux pumpkins have recessed grooves. Place a scrap piece of paper over one ‘slice’ or ridge of the pumpkin and trace the shape with a pencil to make a template. -
Refine template:
Cut out your paper template, adding a 1/4 inch margin on the sides so the fabric strips will slightly overlap each other later. -
Cut fabric strips:
Using your template, cut out fabric strips from your chosen patterns. You will need enough strips to cover every ridge of the pumpkin, alternating patterns for variety.
Step 2: Decoupage Application
-
Remove stem:
If possible, carefully pop off or unscrew the pumpkin stem. If it’s molded on, you’ll simply work carefully around it. -
Apply base glue:
Select your first pumpkin ridge. Apply a generous layer of Mod Podge directly onto the pumpkin surface using the foam brush. -
Position first strip:
Lay your first fabric strip over the glued area. Center it on the ridge, smoothing it from the top down to the bottom. -
Smooth imperfections:
Use your fingers to press out any air bubbles or wrinkles. The fabric has some stretch on the bias, so I like to gently tug the edges to get it to lay flat. -
Apply top coat:
Brush another layer of Mod Podge visibly over the top of the fabric strip to seal it. Don’t worry about the milky look; it dries clear. -
Continue adding strips:
Move to the adjacent ridge. Apply glue, place the next patterned fabric strip, and ensure the edges slightly overlap the previous strip so no original pumpkin shows through. -
Finish the bottom:
Detailed pleating creates bulk at the bottom, so trim the fabric points if they overlap too much underneath, gluing them down flat.
Wrinkle Rescue
If stubborn wrinkles appear while the glue is wet, use a damp finger to gently massage the fabric in circles. This relaxes the weave and helps it conform to the curve.
Step 3: Finishing Touches
-
Dry completely:
allow the pumpkin to dry for several hours. This is crucial as wet fabric is fragile. -
Inspect seams:
Check for any lifting edges. If you find a loose spot, sneak a little extra Mod Podge under the fabric with a small brush and press down. -
Reattach stem:
Once fully dry, glue the stem back in place. If the original stem looks plastic, consider wrapping it in twine or painting it dark brown for a realistic look.
Fabric Choice Tip
Avoid heavy upholstery fabrics or stiff linens. Lightweight 100% quilting cotton is ideal because it is flexible and absorbs the Mod Podge quickly for a smooth bond.
Display your colorful patchwork creation on a mantle or table to add a bright, handmade touch to your seasonal decor


Have a question or want to share your own experience? I'd love to hear from you in the comments below!