If you’ve got a styrofoam tray or foam plate lying around, you’re holding a surprisingly awesome little printmaking tool. I love styrofoam art because it’s low-pressure, super affordable, and it gives you that satisfying “reveal” every time you pull a print.
Easy Allover Pattern Tiles
Transform simple styrofoam scraps into custom stamps to create this warm, terracotta-hued geometric art piece. The result is a stunning textile-inspired canvas that mimics the look of traditional woodblock printing without the heavy carving tools.
Step-by-Step Guide
Materials
- Small styrofoam sheets or blocks (recycled packaging works well)
- White stretched canvas or canvas board
- Terracotta or rust-colored acrylic paint
- Ballpoint pen or dull pencil
- Small foam roller or sponge brush
- Craft knife
- Ruler
- Paper plate or palette
- Scrap paper for testing
Step 1: Designing the Stamps
-
Prepare your blocks:
Cut your styrofoam into manageable rectangular ’tiles’ using a craft knife. For the main motif seen here, you’ll need a block roughly 3×4 inches, and narrower strips for the border patterns. -
Plan the geometric pattern:
Using a ballpoint pen, gently sketch a diamond and triangle grid onto the face of your main styrofoam block. Press firmly enough to indent the foam, but be careful not to tear the surface. -
Deepen the lines:
Go over your sketched lines a second time, pressing deeper to create clear channels. These indented areas will remain white, while the raised surface will hold the paint. -
Create texture details:
Add small dots or dashes inside your geometric shapes by poking the foam with the pen tip. This adds that authentic, hand-carved look to the final print. -
Carve the border strips:
On your narrower styrofoam strips, carve repeating zig-zag lines and rows of simple dots to replicate the border designs seen in the reference image.
Blurred Lines?
To fix blurry prints, use less paint. A ‘dry’ roller is better. If lines are vanishing, re-trace the foam grooves deeper with your pen to prevent paint from filling them.
Step 2: Printing the Design
-
Prepare the paint:
Squeeze a generous amount of terracotta acrylic paint onto a paper plate. Roll your foam roller through it until it is evenly coated but not dripping. -
Conduct a test print:
Roll a thin layer of paint onto your carved stamp and press it firmly onto scrap paper. This helps check if your indented lines are deep enough to stay clean. -
Start the center motif:
Re-load the main geometric block with paint. Position it carefully on your canvas—I usually start near the top or center to anchor the design—and press down evenly with the palm of your hand. -
Apply the zigzag borders:
Using the narrow strip stamp, print rows of zig-zags below your main motif. Leave a small gap of white space between the printed sections to keep the design airy. -
Add the dotted lines:
Take your dot-patterned strip (or simply use the end of a paintbrush dipped in paint) to create rows of dots separating the zig-zag bands. -
Build the pattern downwards:
Continue alternating between your zig-zag stamps and dot details, moving down the canvas. Try to keep the spacing consistent, but embrace slight imperfections as they add character. -
Create the diagonal texture:
For the section with the diagonal dotted grid (the ‘cross-stitch’ look), use a stamp with a repetitive ‘X’ or dotted diamond pattern to fill a wider band across the canvas. -
Finish the bottom edge:
Conclude the design with a final heavy zig-zag border and a row of larger dots at the very bottom to visually ground the composition. -
Touch up if needed:
If any stamped areas look too faint, you can carefully dab a little extra paint with a small brush, though the faded, textured look is often desirable for this style. -
Allow to cure:
Let the canvas dry completely flat for at least 24 hours before displaying it upright.
Fabric Medium Tip
If printing on a tote bag or pillow instead of canvas, mix textile medium into your acrylics. This keeps the paint flexible so it won’t crack when the fabric moves.
Now you have a piece of custom wall art that radiates warmth and handcrafted charm


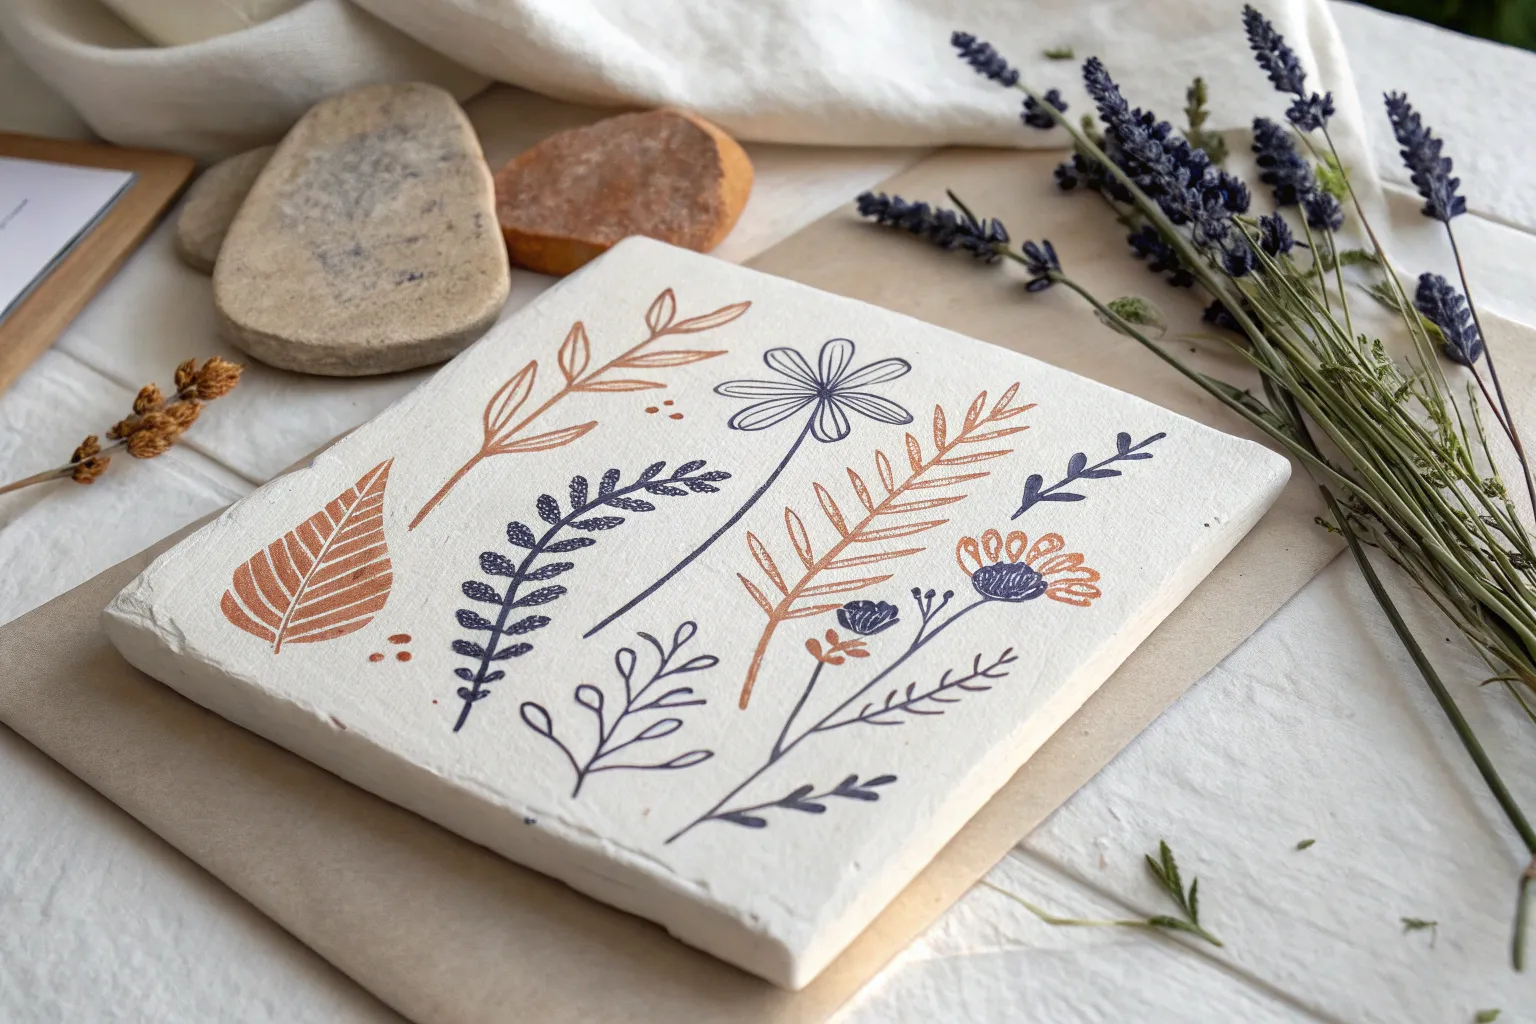
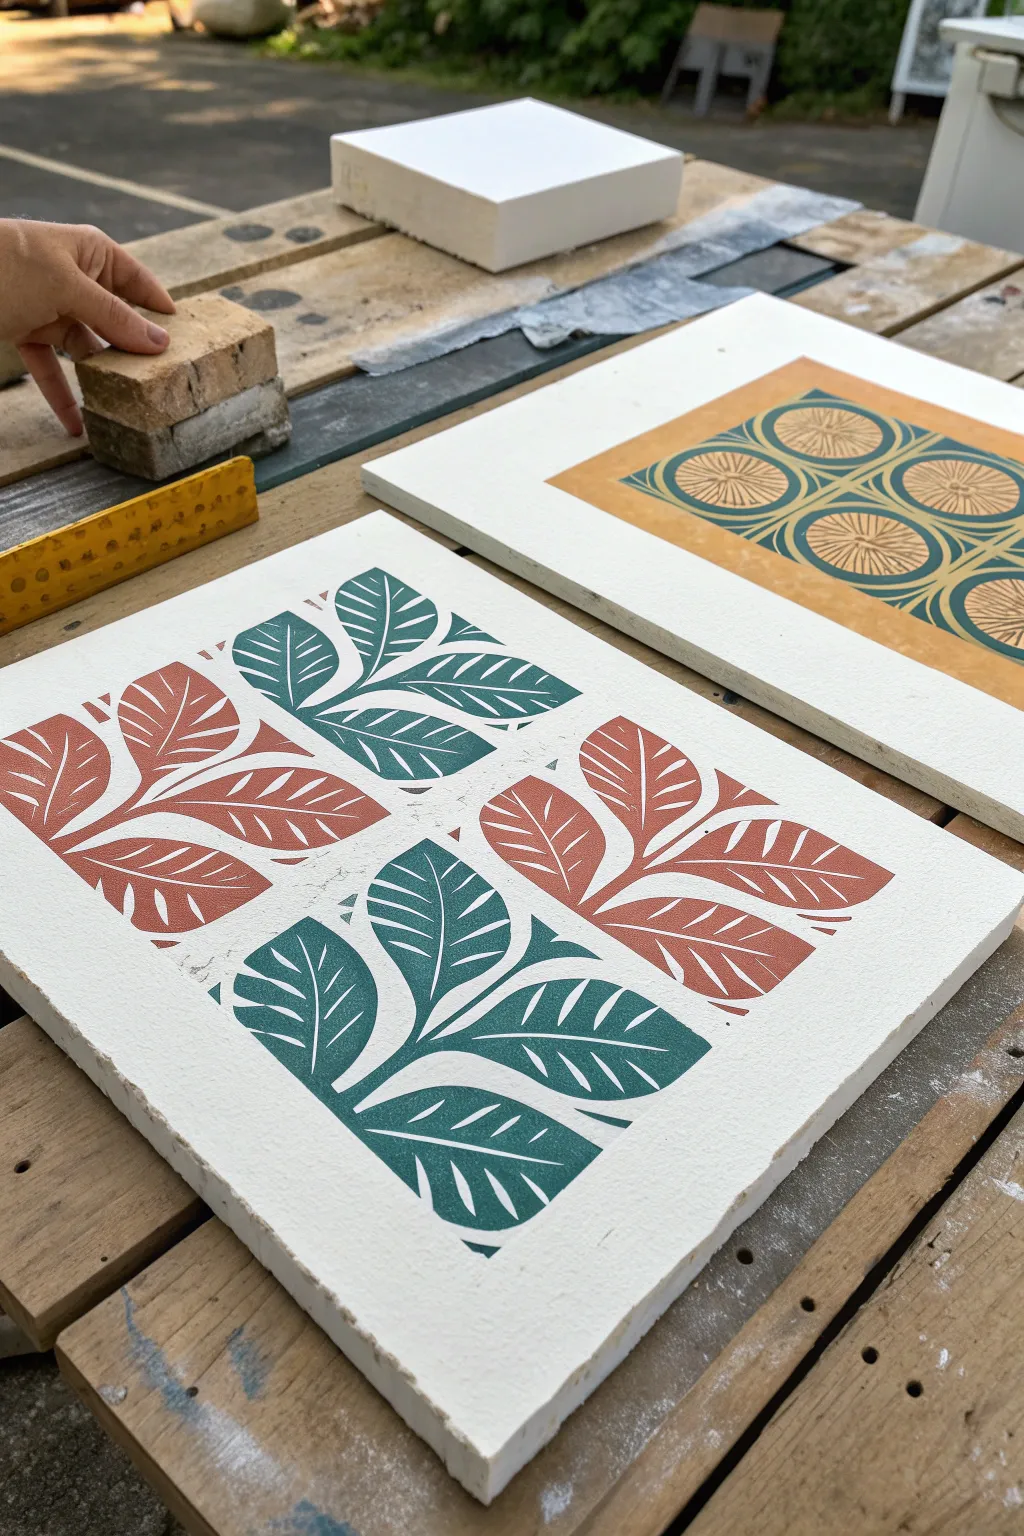
Quick Floral Repeat Print
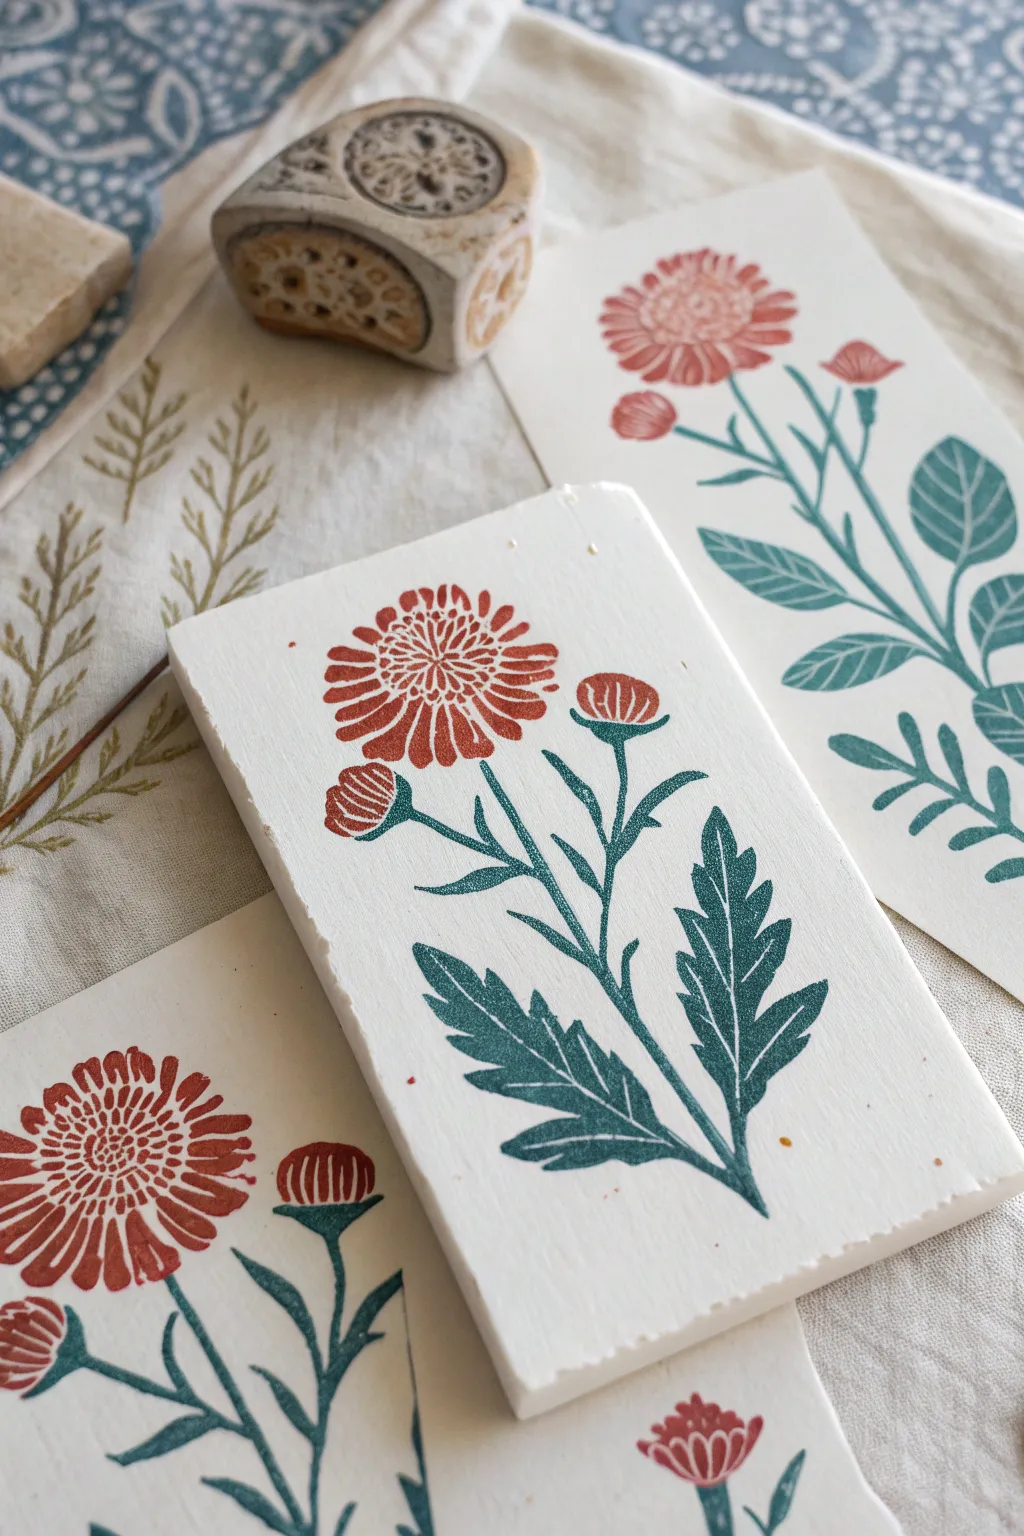
Transform a simple sheet of styrofoam into a beautiful, folk-art inspired botanical stamp. This project captures the charm of traditional linocut printing without the need for sharp carving tools, resulting in a slightly textured, rustic finish perfect for greeting cards or wall art.
Detailed Instructions
Materials
- High-density styrofoam sheet or flat produce tray (washed)
- Dull pencil or ballpoint pen
- Brayer (rubber roller) or foam brush
- Block printing ink or heavy body acrylic paint (Rust red/orange, Teal/green)
- Paper for printing (printmaking paper or heavy cardstock)
- Tracing paper (optional)
- Craft knife or scissors
- Palette or flat surface for inking
Step 1: Preparing the Plate
-
Cut the Base:
Begin by cutting a rectangular piece of styrofoam to your desired size. A standard 4×6 inch rectangle works well for a focal flower design basically like the one pictured. -
Check the Surface:
Ensure the surface is completely flat and smooth. If you are recycling a produce tray, trim away the curved edges so the block lies perfectly flat on your workspace. -
Draft the Stem:
Using a dull pencil, lightly sketch the central stem curve directly onto the foam. Don’t press hard yet; just establish the flow of the plant from bottom to top.
Step 2: Designing the Flower
-
Sketch the Bloom:
Draw a large circle near the top for the main flower head. Add two smaller circles branching off the sides for the budding flowers. -
Detail the Petals:
Inside the main circle, draw radiating petals. Start from a small central point and draw long, slender oval shapes extending outward to the circle’s edge. Vary their lengths slightly for a natural look. -
Add Leaf Shapes:
Sketch broad, serrated leaves attached to the main stem. The design features jagged edges on the leaves, similar to a dandelion or thistle leaf. -
Define the Veins:
Draw a central vein line down the middle of each leaf.
Clean Lines
Unlike rubber stamps, styrofoam won’t hold super fine details. Keep your design bold and simple. If your lines look fuzzy, re-trace them with the pen to compress the foam deeper.
Step 3: Carving the Foam
-
Deepen the Lines:
Using a dull pencil or a ballpoint pen, go over your sketch lines with firm, consistent pressure. You want to compress the foam to create a distinct groove. -
Check Depth:
Run your finger over the lines. You should feel a definite indentation. This recessed area will remain white (or the color of your paper) when printed. -
Add Texture:
Press small dots or tiny lines into the center of the main flower head to mimic pollen or seeds. -
Clean Up:
Inspect your ‘carved’ plate. Any stray marks or shallow dents might show up in the print, so smooth down unwanted texture with the back of a spoon if needed.
Ghost Prints
Don’t re-ink immediately after the first print. Press the block onto a second sheet of paper for a ‘ghost print’—a lighter, more textured version that looks wonderfully vintage.
Step 4: Inking and Printing
-
Prepare the Colors:
Squeeze out a blob of rust-orange ink and a blob of teal-green ink onto your palette. Roll your brayer through the ink to charge it evenly. -
Apply the Green:
Carefully apply the teal ink to the stem and leaf areas of your foam block. If using a large roller, you might need to use a smaller foam brush or paintbrush to keep the green off the flower petals. -
Apply the Clay Red:
Apply the rust-colored ink to the flower heads. Be careful where the colors meet; a little blending is okay and adds character, but try to keep them relatively distinct. -
Position the Paper:
Place your printing paper on a flat surface. Pick up the inked foam block by the edges, turn it over, and align it carefully over the paper. -
Press:
Lower the block onto the paper. Press down firmly with the palm of your hand. I like to rub in circular motions over the entire back of the styrofoam to ensure ink transfer. -
Peel and Reveal:
Hold one corner of the paper down and gently lift the styrofoam block away to reveal your print. -
Dry:
Set the print aside to dry completely before handling. Block printing ink can stay tacky for a while, so patience is key here.
Once you master this technique, try creating a repeating pattern on fabric or wrapping paper for a custom handmade touch


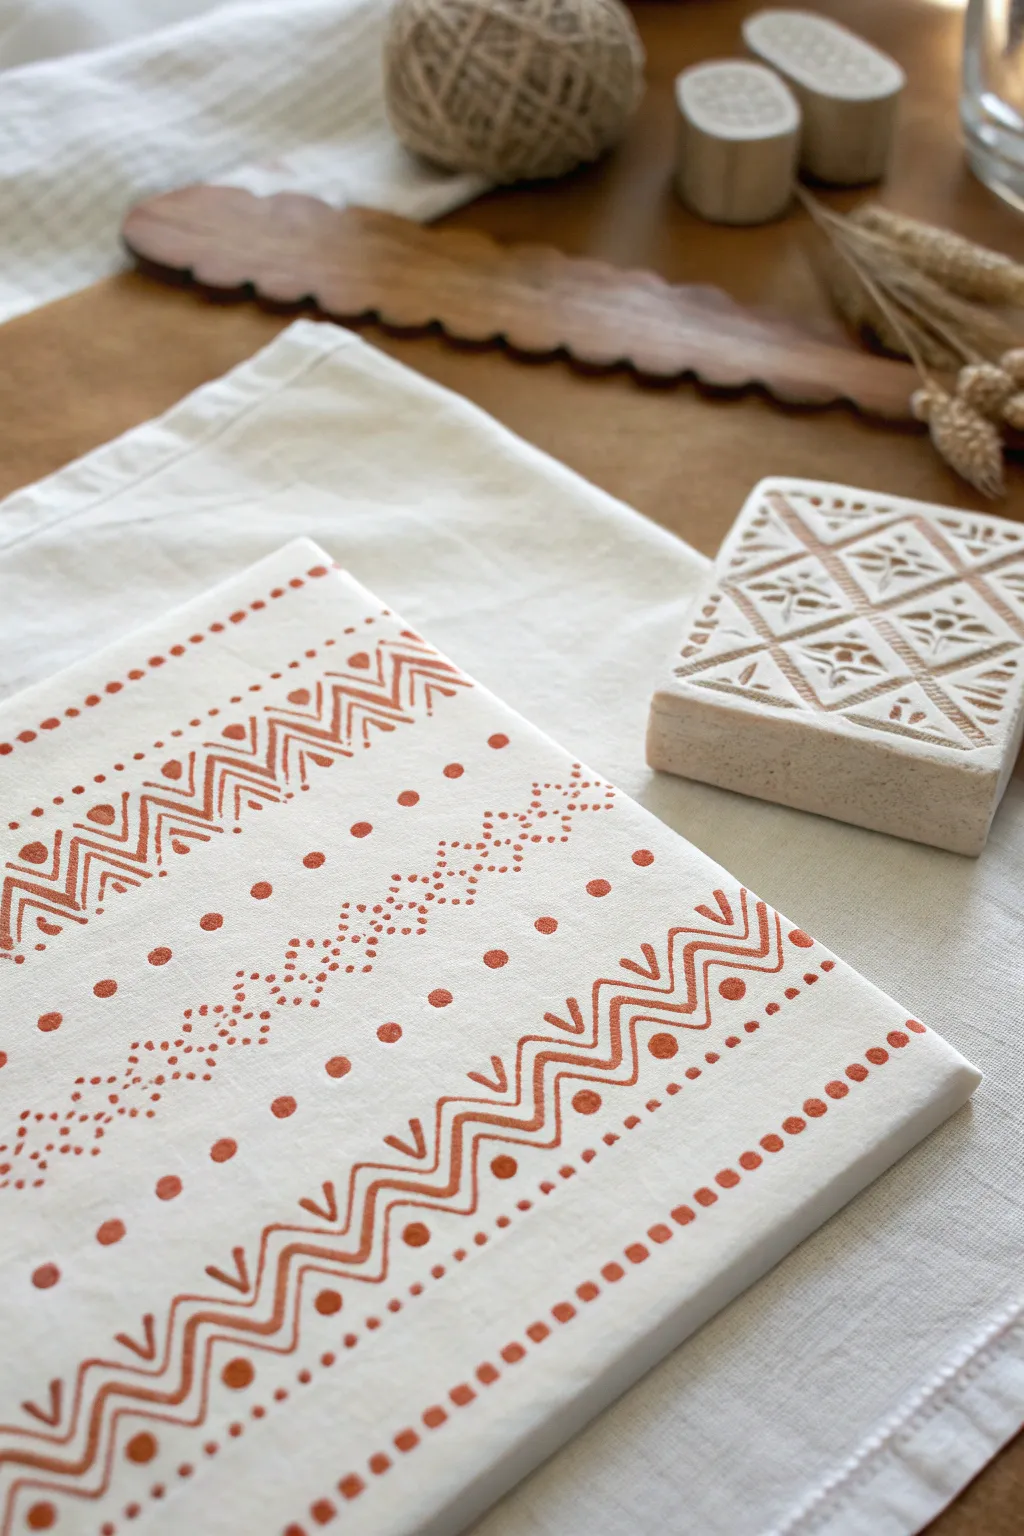
Two-Color Split Roll on One Block
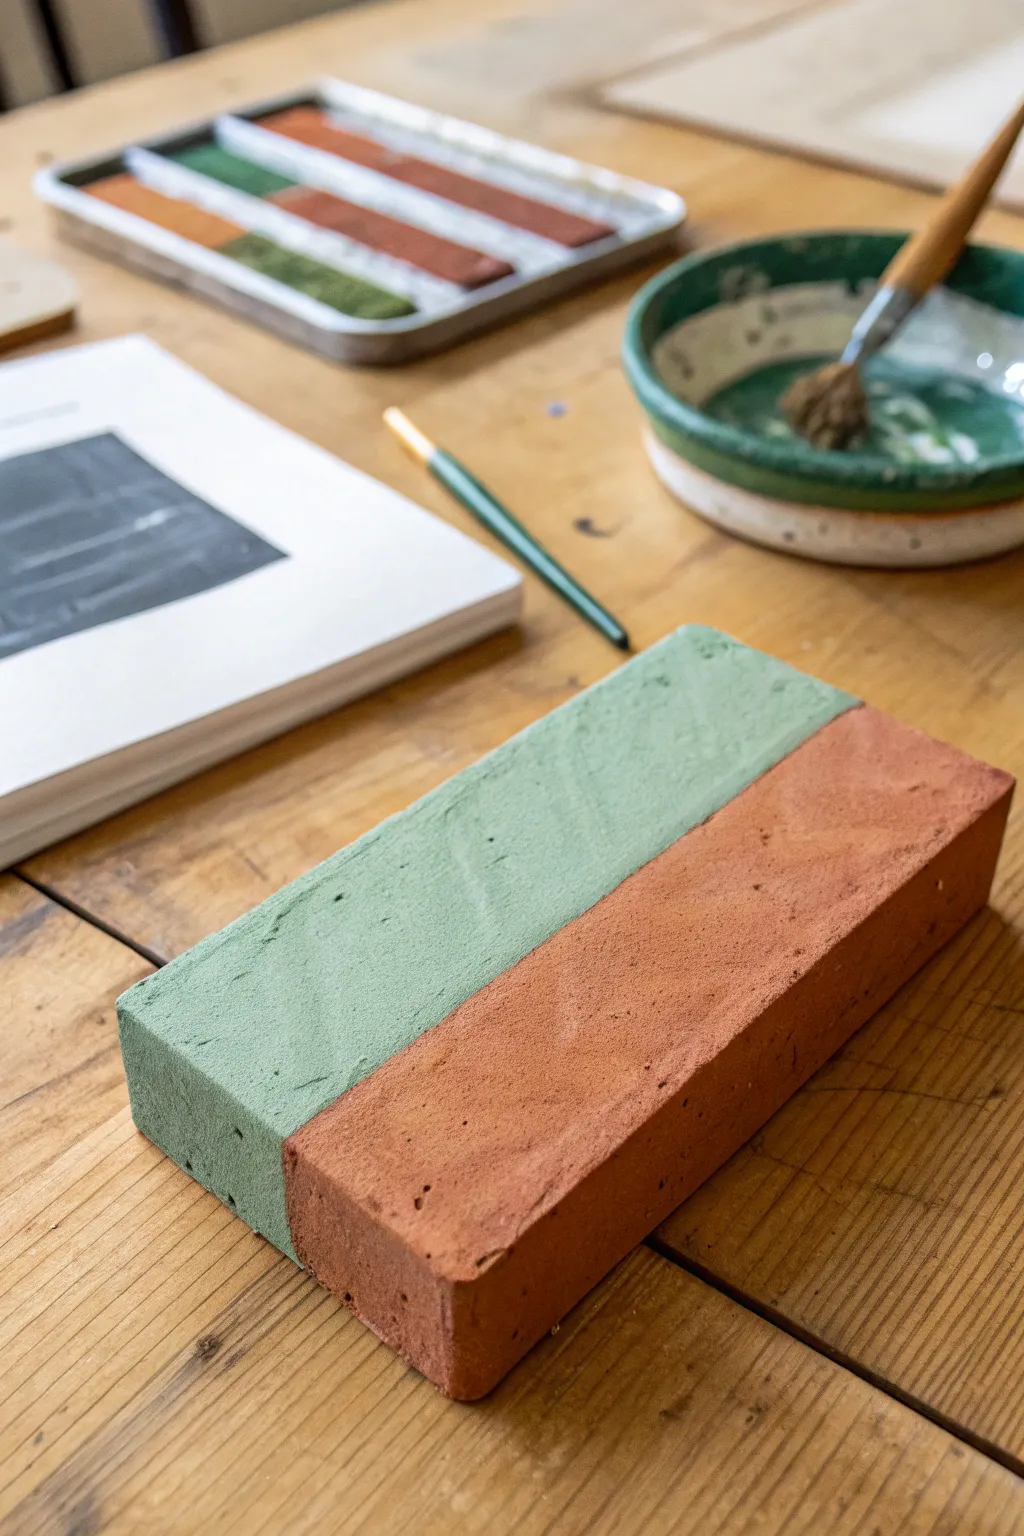
This project creates a striking, dual-colored printing block by applying two distinct paint colors directly onto a single piece of rectangular Styrofoam. The result is a clean, modern color-block aesthetic that’s perfect for creating geometric prints with a unique, split-tone finish.
Step-by-Step Guide
Materials
- Rectangular block of high-density Styrofoam or polystyrene foam
- Acrylic craft paint (Sage Green)
- Acrylic craft paint (Terracotta or Rust Orange)
- Painter’s tape or masking tape
- Small foam roller or flat paintbrush
- Paper plate or painting palette
- Newspaper or drop cloth for surface protection
- Fine-grit sandpaper (optional)
Step 1: Surface Preparation
-
Clean the Block:
Begin by ensuring your Styrofoam block is clean and free of loose dust or debris. Wipe it gently with a dry cloth if needed. -
Smooth Edges (Optional):
If your block has rough, sawed edges, lightly sand them with fine-grit sandpaper to create a smoother surface for painting. I find this helps the paint look more professional later. -
Mark the Center:
Using a pencil, make a small mark on the side of the block to indicate the exact center line where the two colors will meet. -
Tape the Boundary:
Apply a strip of painter’s tape across the block at your center mark. Press the edges of the tape down firmly to prevent paint from bleeding underneath.
Step 2: First Color Application
-
Prepare Sage Green:
Pour a small amount of sage green acrylic paint onto your palette or paper plate. -
Load the Brush:
Dip your foam roller or flat brush into the green paint, ensuring an even coating without overloading it. -
Paint the Upper Half:
Apply the green paint to the exposed half of the block. Use long, smooth strokes to create an even texture. -
Cover the Sides:
Don’t forget to paint the sides of the block corresponding to the green section for a fully finished look. -
Let it Dry:
Allow the green paint to dry completely. This usually takes about 15-20 minutes depending on the thickness of the coat.
Clean Lines
Burnish the edge of your painter’s tape with a fingernail or credit card before painting. This seals the edge tight and stops acrylics from seeping under.
Step 3: Second Color Application
-
Remove Initial Tape:
Once the green paint is fully dry to the touch, carefully peel off the painter’s tape. -
Protect the Green:
Apply a new strip of painter’s tape directly over the edge of the dried green paint. Align it precisely with the painted edge to ensure a sharp line. -
Prepare Terracotta Paint:
Pour your terracotta or rust orange paint onto a clean section of your palette. -
Apply the Orange:
Paint the remaining unpainted half of the block with the terracotta color, using the same smooth stroke technique as before. -
Finish the Sides:
Ensure the sides of the block matching the terracotta section are also painted. -
Wait for Drying:
Allow this second color to dry partially but not completely before removing the tape for the cleanest edge.
Texture Play
Before the paint dries, gently dab a crumpled paper towel over the wet surface to create a stone-like, porous texture on the foam.
Step 4: Final Touches
-
Reveal the Line:
Gently peel back the second strip of tape at a 45-degree angle to reveal the crisp line between the green and orange sections. -
Touch Ups:
Inspect the meeting point of the two colors. If any paint bled through, use a very small detail brush to correct the line. -
Final Cure:
Let the entire block sit untouched for at least an hour to ensure the acrylic paint cures and hardens for durability.
Now you have a beautifully prepped dual-tone block ready for display or stamping projects

Layered Printing with Two Foam Blocks
Master the art of multi-block printing using simple Styrofoam sheets to create a sophisticated, repeating botanical design. This project results in crisp, two-color prints that look surprisingly professional, perfect for framing or handmade cards.
Step-by-Step Guide
Materials
- Two thick Styrofoam blocks (approx. 1 inch thick)
- Water-based block printing ink or acrylic paint (terracotta red and teal/deep green)
- Brayer (rubber roller)
- Startched white fabric or heavy printmaking paper
- Ballpoint pen or dull pencil
- Ruler
- Craft knife
- Palette or glass pane for rolling ink
Step 1: Preparing the Design Blocks
-
Size your blocks:
Cut your two Styrofoam blocks to be exactly the same size using a ruler and craft knife. A square format, roughly 6×6 or 8×8 inches, works beautifully for this alternating pattern. -
Draft the leaf motif:
On a piece of scratch paper cut to the same size as your blocks, sketch out a diagonal leaf branch design. The stem should start from one corner and extend towards the opposite one. -
Transfer or draw onto foam:
Place your sketch over the first foam block and trace firmly with a ballpoint pen to indent the foam. Alternatively, draw freehand directly onto the foam if you feel confident. -
Deepen the lines:
Go over your indented lines directly on the foam with the pen again. Press firmly to create deep grooves; these recessed areas will remain white, while the raised surface will hold the color. -
Create the second block:
Repeat the drawing process on the second block. You can use the exact same design for symmetry or a slightly different leaf variation for visual interest.
Step 2: Inking and Printing
-
Prepare the terracotta ink:
Squeeze a line of terracotta-colored block printing ink onto your palette. Use the brayer to roll it out until it sounds ‘tacky’ and has a velvety texture. -
Ink the first block:
Roll the ink evenly over your first foam block. Ensure the surface is fully coated but avoid pushing ink down into the recessed grooves you drew. -
Position the first print:
Place your paper or fabric on a flat, clean surface. Carefully press the inked block onto the top-left quadrant of your printing area. -
Apply pressure:
Press down firmly with the palm of your hand or a clean brayer over the back of the block to transfer the ink. Peel the block away gently to reveal the print. -
Print the diagonal counterpart:
Re-ink the same terracotta block and print it again, this time in the bottom-right quadrant, diagonal to your first print. -
Clean and switch colors:
Wash your brayer and palette thoroughly, or prepare a fresh space for the second color. Roll out the teal or deep green ink just as you did before. -
Ink the second block:
Take your second clean foam block and coat it evenly with the teal ink. Check that the coverage is opaque. -
Fill the empty spaces:
Align this block in the top-right quadrant. I find it helpful to hover closely before committing to the placement to ensure the margins look even. -
Complete the grid:
Print the teal block one final time in the bottom-left quadrant to complete the four-square checkerboard pattern. -
Let it cure:
Allow the print to dry completely. Block printing ink can take longer than standard acrylics, so give it at least 24 hours before handling or framing.
Mismatched Corners?
If your corners didn’t align perfectly, use a small brush with matching paint to carefully touch up the center junction where the four squares meet.
Smoother Prints
For a less textured ‘noise’ in the solid colored areas, lightly sand the surface of the styrofoam with fine-grit sandpaper before drawing your design.
This technique opens up endless possibilities for creating custom botanical wall art with simple materials
BRUSH GUIDE
The Right Brush for Every Stroke
From clean lines to bold texture — master brush choice, stroke control, and essential techniques.
Explore the Full Guide
Big Patchwork Art Made from Foam Tiles
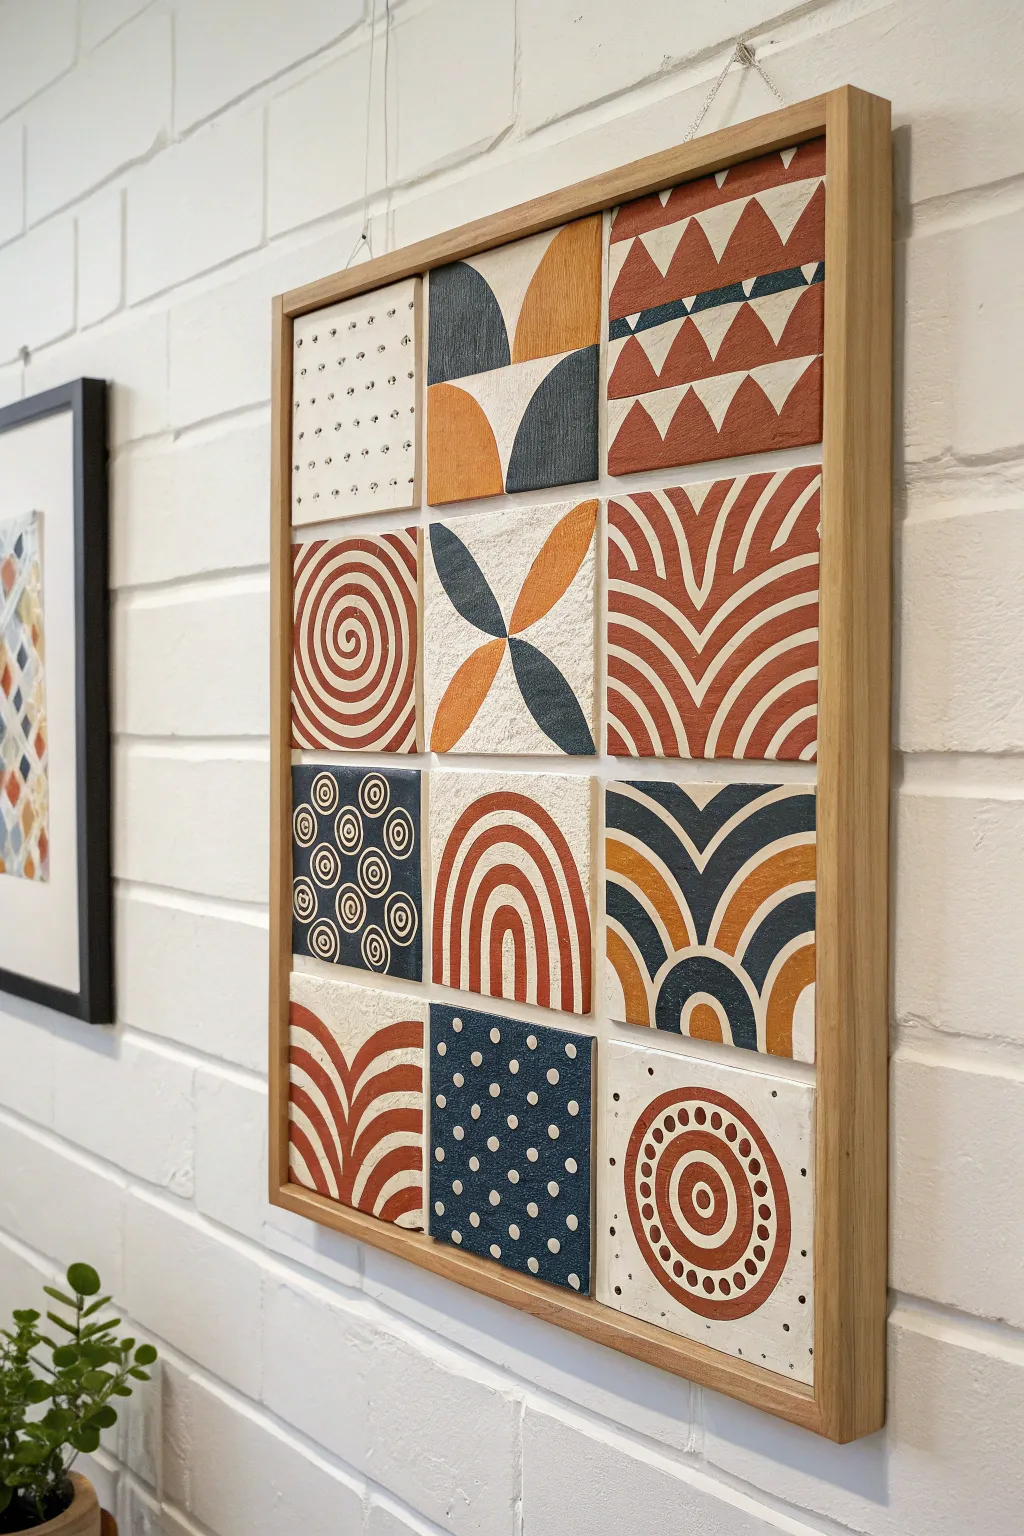
Transform simple foam squares into a stunning, gallery-worthy statement piece with this geometric patchwork project. Combining earthy terracotta and deep navy tones with striking patterns creates a modern, textured wall hanging that looks far more expensive than its humble materials suggests.
Step-by-Step
Materials
- 12 square styrofoam or polystyrene tiles (approx. 6×6 inches / 15×15 cm)
- Acrylic craft paints: Terracotta (burnt orange), Navy Blue, Cream/Off-White
- Gesso or acrylic primer suitable for foam
- Wide flat paintbrush (synthetic bristles)
- Medium round paintbrush
- Small fine-liner detail brush
- Ruler and pencil
- Wooden frame (to fit the 3×4 grid arrangement)
- Strong craft glue or construction adhesive (styrofoam-safe)
- Clear matte acrylic sealer spray (optional)
- Sandpaper blocks (fine grit)
Step 1: Preparation and Base Coating
-
Prepare the foam surface:
Begin by inspecting your styrofoam tiles. If they have rough edges, gently sand them with a fine-grit sanding block to create a smooth, clean square. Wipe away any dust with a dry cloth. -
Prime the tiles:
Apply a generous coat of Gesso or foam-safe primer to the front and sides of all 12 tiles. Foam is porous and ‘thirsty,’ so this step is crucial to prevent the paint from soaking in unevenly. -
Let the primer cure:
Allow the primer to dry completely. If the surface still feels too rough or the texture of the foam is too visible for your liking, apply a second coat and let it dry. -
Paint the background colors:
Separate your tiles into groups based on your intended design. Paint the base color for each tile using the wide flat brush. For the design shown, paint most tiles a solid Cream/Off-White, and paint at least one tile a solid Navy Blue background. -
Dry and repeat:
Allow the first coat of acrylic paint to dry. Acrylics dry quickly on primer, but I like to give it an extra 20 minutes to be safe. Apply a second coat to ensure opaque, solid coverage.
Step 2: Pattern Design and Painting
-
Sketch the grid layout:
Lightly sketch your geometric designs onto the dried base coats using a pencil and ruler. For the circular patterns (like the spirals or target shapes), you can trace round household objects like cups or lids to get perfect circles. -
Draft the freehand curves:
For the organic patterns, such as the curved stripes or leaf shapes, sketch the outlines freehand. Don’t worry about perfection; the hand-painted look adds to the charm. -
Paint the Terracotta shapes:
Using your medium round brush, start filling in the Terracotta sections. Focus on the bold arches, the geometric triangles at the top right, and the large spiral. Use steady strokes to keep edges crisp. -
Add the Navy accents:
Switch to Navy Blue paint. Fill in the darker geometric elements like the flower petals in the center tile, the semi-circles, and the bold navy arches. Be careful where navy meets white; go slow. -
Paint the negative space designs:
For the Navy tile with white dots (bottom center), use the handle end of a paintbrush or a dotting tool dipped in Cream paint to stamp consistent polka dots in a grid pattern. -
Create fine details:
Use the small fine-liner brush for delicate work, like the small dots on the top-left tile or the thin lines bordering the triangles. This precision work makes the patchwork feel cohesive. -
Refine the edges:
Once the main patterns are dry, check your edges. If any paint bled or lines look wobble, use the base color (Cream) on a small brush to touch up and ‘erase’ mistakes.
Foam Texture Trick
To hide the foam’s ‘beaded’ texture completely, apply a thin layer of lightweight spackle over the tiles before priming. Sand smooth for a finish that looks like ceramic.
Step 3: Assembly and Framing
-
Seal the artwork:
Take the tiles outside or to a well-ventilated area and spray them lightly with a clear matte sealer. This protects the paint from dust and handling marks. -
Arrange the composition:
Lay out the tiles on a flat surface in a 3×4 grid to finalize the arrangement. Ensure the colors are balanced—for example, don’t cluster all the heavy navy patterns in one corner. -
Prepare the backing board:
If your frame has a backing board, clean it. Arrange your tiles on the board, ensuring they fit snugly inside the frame measurements. -
Glue the tiles down:
Apply a dab of styrofoam-safe construction adhesive or strong craft glue to the back of each tile. Press them firmly onto the backing board or directly into the frame backing. -
Final framing:
Place the mounted tiles into the wooden frame. Secure the back of the frame, ensuring the artwork sits flush and secure.
Make It 3D
Vary the thickness of your foam tiles! Use 1-inch foam for some squares and 1/2-inch for others to create a topographical, sculptural effect.
Hang your new geometric masterpiece in a bright spot to let the patterns pop.


Have a question or want to share your own experience? I'd love to hear from you in the comments below!