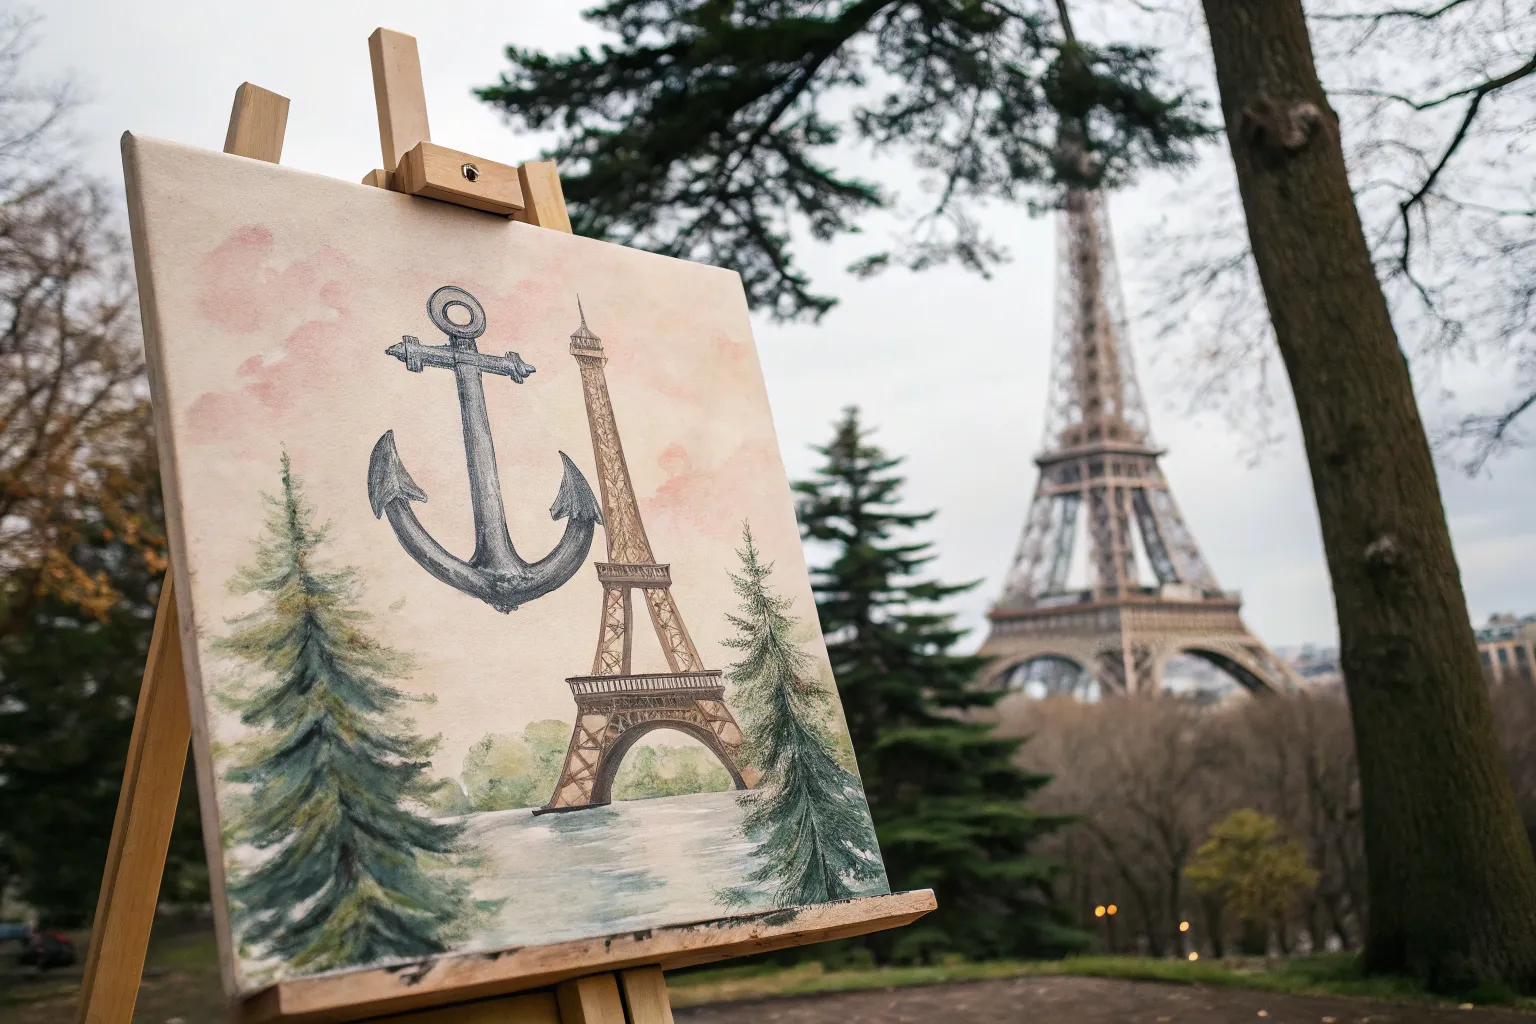
When I need a painting idea that feels instantly romantic and doable, I reach for Paris scenes—they’re iconic, forgiving, and packed with mood. Below are my favorite Paris painting ideas, starting with the classics you’re probably craving and sliding into more playful, artsy twists.
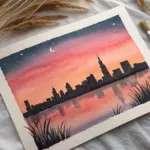
Eiffel Tower at Sunset

Capture the romance of the City of Light with this vibrant watercolor project. You’ll create a glowing sunset gradient as a backdrop for a striking, high-contrast silhouette of the Eiffel Tower.
Step-by-Step Guide
Materials
- Cold press watercolor paper (deckled edge optional)
- Watercolor paints (violet, rose/peach, warm yellow, orange)
- Black waterproof fine liner pens (sizes 0.1, 0.3, and 0.5)
- Black gouache or concentrated black watercolor
- Round watercolor brushes (size 8 or 10 for washes, size 2 for details)
- Masking tape
- Compass or circular object for tracing
- Clean water and paper towels
Step 1: Setting the Scene
-
Prepare your paper:
Tape down your watercolor paper to a board to prevent buckling. If you are using paper with a beautiful deckled edge like the example, tape it from the back or leave a border you don’t mind painting over. -
Sketch the sun:
Lightly use a compass or trace a circular object (like a jar lid) near the center of the paper to mark where the sun will be. Keep this pencil line very faint. -
Wet the sky area:
Using your large round brush and clean water, apply a wet glaze over the entire sky area, carefully painting around the circle of the sun so it stays dry for now. This wet-on-wet technique ensures smooth blending. -
Paint the violet sky:
Load your brush with a watered-down violet. Start at the very top of the paper and bring the color down about one-third of the way, letting it naturally bloom into the wet paper. -
Blend in the warmth:
Rinse your brush and pick up a soft peach or rose color. Apply this below the violet, blending the edges where they meet while the paint is still wet to create a seamless transition. -
Paint the lower sky:
Continue down toward the horizon with a very pale, warm yellow wash, fading it out as you reach the bottom third of the page.
Clean Lines Tip
If your hand shakes while drawing the tower lines, try exhaling slowly as you make each stroke. Alternatively, use a ruler for the main vertical lines but freehand the cross-hatching.
Step 2: The Glowing Sun
-
Fill the sun:
Once the surrounding sky is damp but not dripping, clean your brush and wet the inside of the sun circle. Drop in a bright warm yellow, concentrating the pigment in the center. -
Add dimension:
While the yellow is wet, touch the edges of the sun with a hint of orange paint. Let it bleed inward slightly to give the sun a spherical, glowing appearance. -
Dry completely:
This is crucial: allow the entire background to dry completely before moving on. Use a hairdryer on a low setting if you’re impatient; the paper must be bone-dry to prevent the black ink from bleeding.
Step 3: Drafting the Iron Lady
-
Sketch the symmetry line:
Using a ruler, lightly draw a vertical line straight down the center of your sun. This will be the central axis for the Eiffel Tower. -
Outline the tower:
Lightly sketch the triangular shape of the tower. Start with the narrow top spire, widen slightly for the middle deck, and sweep outwards for the wide base legs. Don’t worry about the intricate lattice details yet. -
Ink the main structure:
Switch to a 0.5mm pen or your fine detail brush with black gouache. Trace the main vertical outlines and the horizontal platforms of the tower. I prefer using a pen for these straight lines to keep them crisp.
Level Up: Salt Texture
While the violet sky wash is still wet, sprinkle a tiny pinch of table salt near the top corners using your fingertips. This creates beautiful, starry textures once dried and brushed off.
Step 4: Details & Silhouette
-
Add the lattice work:
Using a finer 0.1mm or 0.3mm pen, draw the inner ‘X’ patterns and cross-hatching inside the tower structure. Keep the lines dense to suggest the complicated ironwork. -
Paint the horizon:
Use black gouache or very dark watercolor to paint a low, uneven horizon line at the bottom. This grounds the tower and covers the bottom of the sketch. -
Add trees:
Paint silhouette trees on either side of the tower. Use the tip of your brush to tap in loose, leafy textures, keeping the trunks thin and dark. -
Finishing touches:
Draw small ‘v’ shapes or tiny distinct silhouettes for the birds flying near the sun. Add a final dark wash to the very bottom foreground to add depth. -
Final check:
erase any visible pencil lines carefully, ensuring the ink is totally dry, and define any last details on the tower spire.
Now step back and admire your romantic Parisian landscape


Seine River Reflections
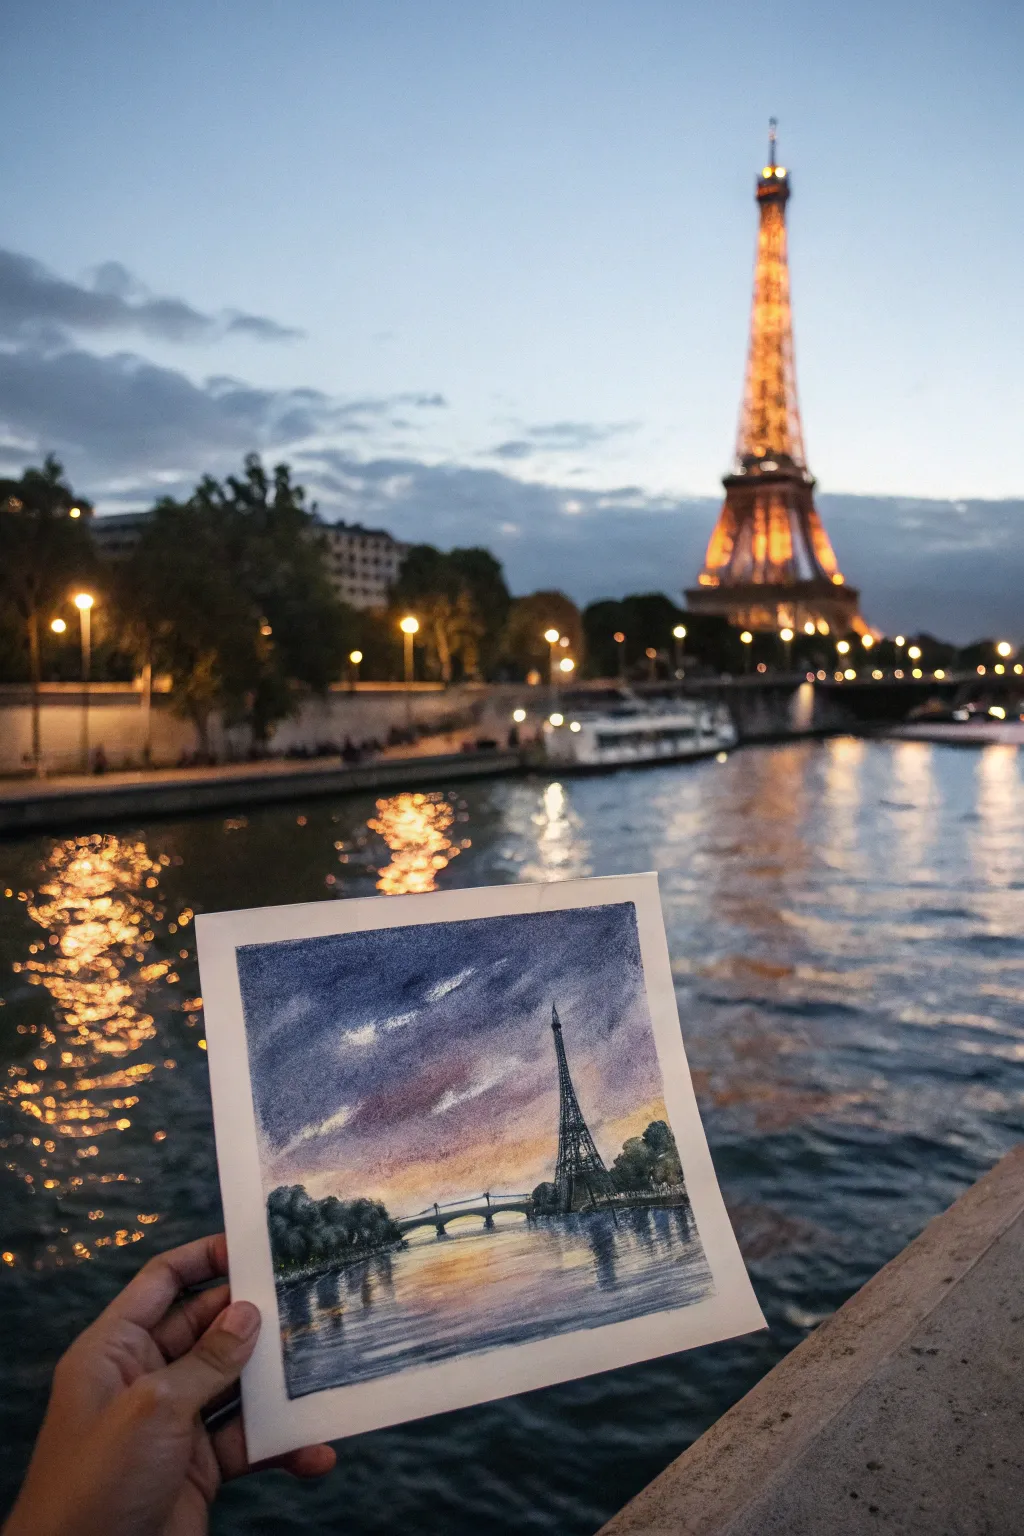
Capture the romantic atmosphere of Paris at dusk with this vibrant pastel drawing, focusing on the interplay between the purple sky and the warm lights reflecting on the river. The textured paper helps create soft, dreamy transitions perfect for a sunset scene.
Detailed Instructions
Materials
- Textured pastel paper or mixed media paper (square format)
- Soft pastels (stick form)
- Pastel pencils for details
- Paper stump or blending tool
- Fixative spray
- Masking tape
Step 1: Setting the Scene
-
Secure the paper:
Tape down all four edges of your square paper onto a board or table to create a clean white border and prevent slipping while you work. -
Light sketch:
Using a light grey pastel pencil, sketch the horizon line about one-third up from the bottom. Mark the vertical position of the Eiffel Tower slightly off-center to the right, and sketch the gentle curve of the bridge crossing the mid-ground.
Step 2: The Dramatic Sky
-
Deep blues:
Start at the very top of the sky with a deep indigo or navy blue soft pastel stick. Apply broad horizontal strokes, pressing firmly to get good pigment coverage. -
Purple transition:
Below the indigo, blend in a band of rich violet or purple. Allow this color to mix slightly with the blue above it, using your fingers or a paper stump to soften the edge where they meet. -
Sunset warmth:
As you move closer to the horizon line, introduce warm hues. Layer magenta and then a soft peach or orange. Keep the strokes horizontal and somewhat loose to mimic drifting clouds. -
Brightest point:
Right near the horizon, especially where the sun has just set, apply a bright golden yellow or pale orange to create a glow that will contrast with the silhouetted buildings later. -
Cloud details:
Take a white or very pale lavender pastel stick and scumble in a few diagonal, wispy clouds in the upper left corner to add movement to the sky.
Muddy colors?
If your sky colors turn brown or grey where they meet, you are over-blending complementary colors (like purple and yellow). Apply fixative between layers to keep them separate.
Step 3: Water and Reflections
-
Base water color:
Mirror the sky colors in the water section. Start with deep blue at the bottom corners and transition to purple and orange as you move toward the bridge line. -
Golden reflections:
In the center of the river, directly beneath the brightest part of the sky, apply vertical strokes of yellow and orange. These represent the light reflecting on the ripples. -
Blend horizontally:
Gently gently blend the water colors horizontally. Unlike the sky, you want to keep the texture slightly rougher here to suggest the movement of water.
Add sparkle
For a magical touch, use a metallic gold gel pen for the streetlights on the bridge and the brightest ripples in the water after the fixative has dried completely.
Step 4: Silhouettes and Structures
-
Tree lines:
Using a dark charcoal or black pastel stick, block in the masses of trees on the left and right banks. Use a circular, scrubbing motion to create a leafy texture. -
The Bridge:
Switch to a sharp black or dark grey pastel pencil. Draw the silhouette of the bridge with precision, including the arches and the small vertical posts of the railing. -
Eiffel Tower structure:
Draw the Eiffel Tower using the dark pastel pencil. Start with the main A-shape, then add the cross-hatching details. Keep the lines delicate near the top spire. -
Shadows on water:
Beneath the tree lines and the bridge, add dark vertical strokes into the water to create deep shadows and reflections. Blur these slightly downwards.
Step 5: Final Details
-
Highlighting lights:
Using a sharp white or lemon yellow pastel pencil, add tiny dots along the bridge and the riverbank to represent streetlamps. -
Sparkling water:
Add a few sharp, horizontal scribbles of white or light yellow over the orange reflection area in the water to make it look like shimmering ripples. -
Bridge highlights:
Add a very thin line of light grey or white along the top edge of the bridge railing to catch the imaginary moonlight or street lighting. -
Remove tape:
Once you are happy with the drawing, carefully peel away the masking tape at a 45-degree angle to reveal your crisp white border.
Now you have a stunning miniature glimpse of Paris to enjoy on your wall


Classic Paris Street Café Scene
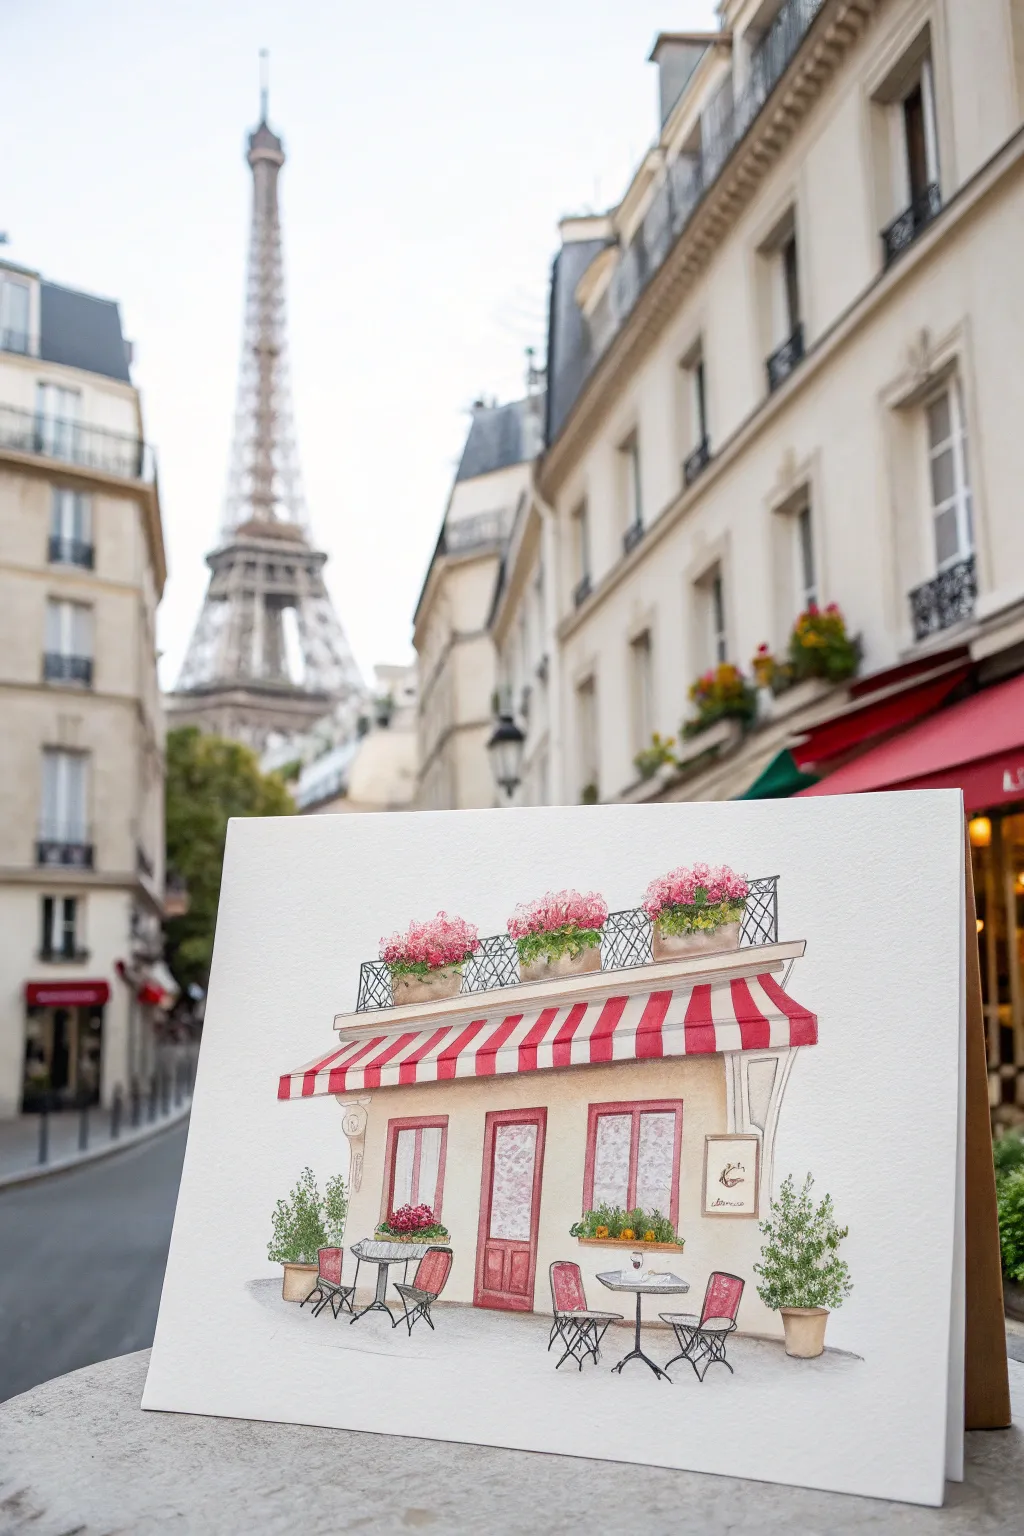
Capture the charm of a classic Parisian café with this delightful watercolor illustration, featuring a cheerful striped awning and blooming flower boxes. This project combines loose ink lines with soft washes of color to create a breezy, sophisticated piece of art perfect for framing or gifting.
Step-by-Step
Materials
- Cold press watercolor paper (300 gsm)
- Fine liner pen (waterproof, 0.1mm and 0.3mm)
- Watercolor paint set (essential colors: Alizarin Crimson, Burnt Sienna, Sap Green, Ultramarine, Yellow Ochre)
- Round watercolor brushes (size 4 and size 0/1 for details)
- H pencil and eraser
- Ruler
- Jar of water
- Paper towels
Step 1: Sketching the Structure
-
Establish the horizon and facade:
Begin with a light pencil sketch. Draw a horizontal line near the bottom for the sidewalk. Above this, sketch a large rectangle for the main café wall and a thinner horizontal rectangle above it for the balcony ledge. -
Outline the awning:
Draw the awning shape protruding from the building. It should look like a trapezoid extending downward. Use your ruler to lightly mark the vertical segments that will become the red and white stripes. -
Add architectural details:
Sketch the three windows/doors beneath the awning. Add the door in the center and a window on either side. Sketch the iron railing on the balcony above, keeping the lines delicate. -
Place the furniture and greenery:
Roughly oval shapes will serve for the flower pots on the balcony. Below, sketch simple wiry shapes for the bistro chairs and tables on the sidewalk. Don’t worry about perfect symmetry here; a little unevenness adds character.
Ink Confidence
Don’t try to draw straight lines perfectly. A slightly wobbly line adds ‘shabby chic’ charm. If a line goes astray, just thicken it slightly to hide the error.
Step 2: Inking the design
-
Define the main lines:
Switch to your waterproof 0.3mm fine liner. Go over the main structural lines of the building, the door frames, and the awning edges. Keep your hand relaxed to avoid lines that look too rigid. -
Detail the railing and furniture:
Use the finer 0.1mm pen for the intricate balcony railing (the ‘fer forgé’ style) and the thin legs of the bistro chairs. Add little scribbles inside the flower boxes to suggest foliage texture. -
Erase pencil marks:
Once you are absolutely certain the ink is dry, gently erase all underlying graphite sketches to leave a clean, crisp black-and-white drawing.
Step 3: Painting the Scene
-
Paint the awning stripes:
Mix a vibrant red using Alizarin Crimson. With your size 4 brush, carefully fill in every other stripe on the awning. The white of the paper will serve as the white stripes. -
Wash the walls:
Create a very dilute wash of Yellow Ochre with plenty of water. Paint the facade of the building, avoiding the windows and door frames. I find that leaving small gaps of white near the edges keeps the look airy and light. -
Color the woodwork:
Use a slightly watered-down red (perhaps mixed with a touch of brown to differentiate it from the awning) to paint the door and window frames. -
Add the greenery:
Mix Sap Green with a touch of Ultramarine for the potted plants. Dab the color onto the plants on the sidewalk and the balcony boxes using the tip of your brush to create a leafy texture. -
Bloom the flowers:
While the green is still slightly damp (or after it dries for a distinct look), dot in pink or red blooms on top of the greenery using the tip of your smallest brush. -
Paint the furniture:
Use a light grey wash for the tabletops. For the chairs, use the same red tone as the door for the seats and backs, or choose a classic wicker color like dilute Burnt Sienna. -
Ground the scene:
Mix a very light watery grey for the sidewalk. Paint a loose wash under the glowing furniture to anchor them to the ground, pulling the color slightly to the left to suggest soft shadows.
Make it Personal
Customize the café name on the sign to feature your own name or a favorite city, effectively turning this art piece into a personalized memory.
Step 4: Finishing Touches
-
Deepen shadows:
Mix a darker grey-purple tone. Add thin lines of shadow directly under the awning and under the balcony ledge to give the building dimension. -
Add menu details:
If you have a very steady hand, use your 0.1mm pen to suggest writing on the small menu board next to the door. -
Final highlights:
If needed, use a white gel pen to add tiny highlights on the chair backs or the window glass to bring back sparkle to the scene.
Once dry, you can mount your charming Parisian scene on a card backing or slip it into a frame to enjoy a daily view of France


Montmartre-Inspired Hill Streets
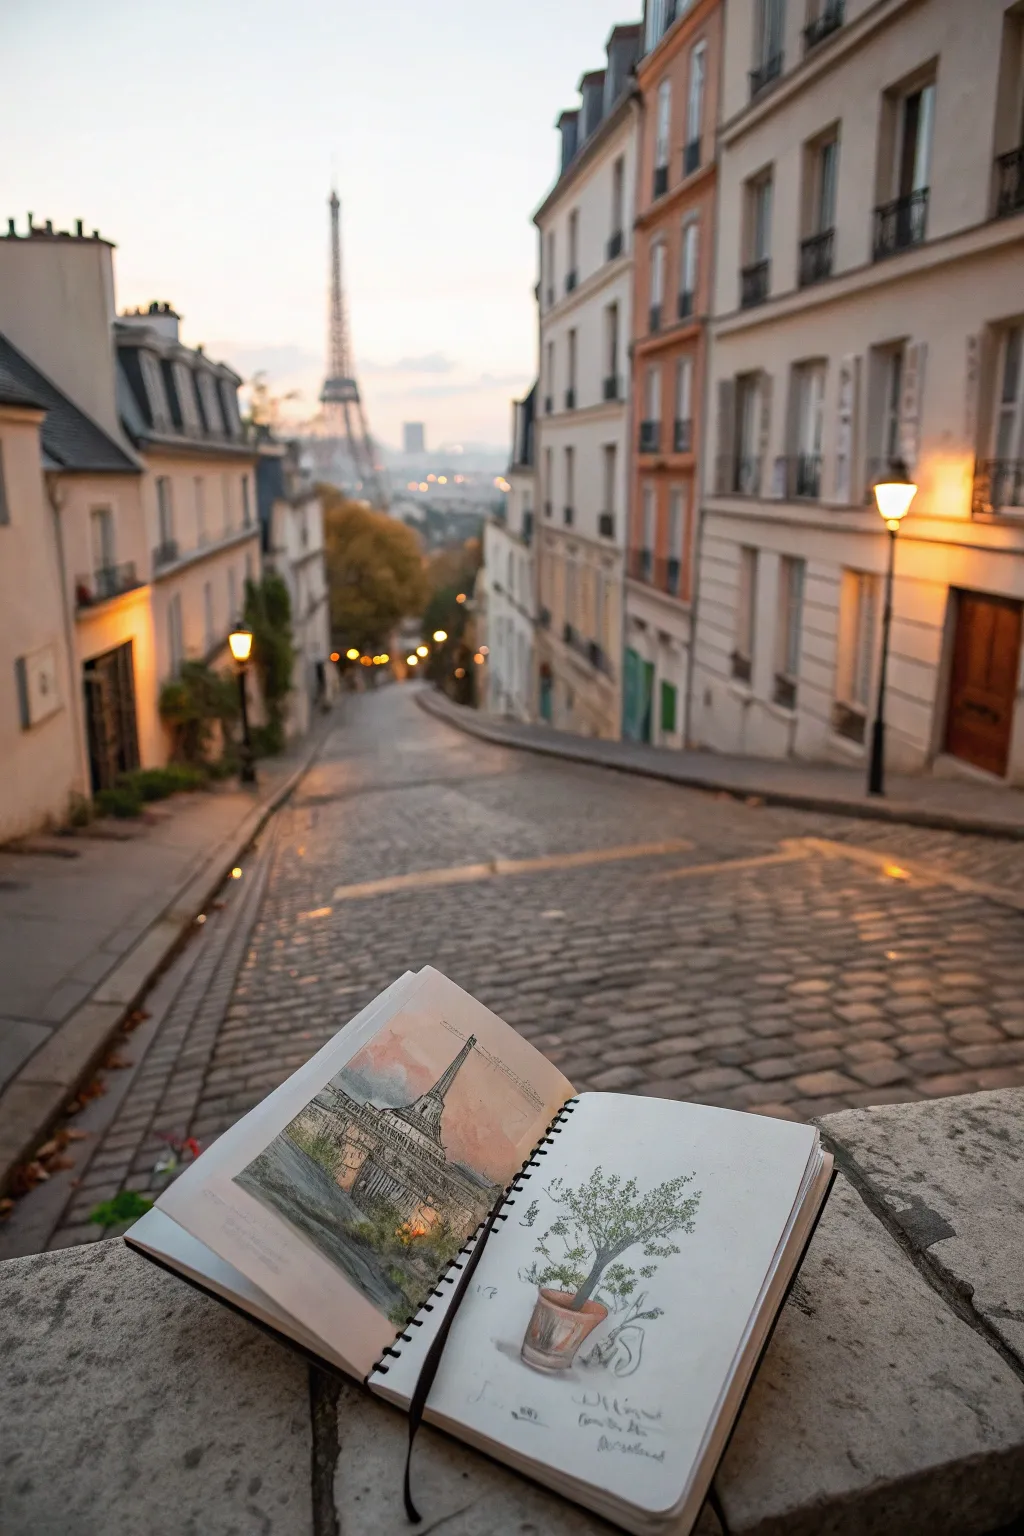
Capture the romance of a Parisian morning with this charming sketchbook spread featuring two distinct styles side-by-side. You will create a soft watercolor cityscape of the Eiffel Tower on the left and a crisp, botanical ink study on the right, mirroring the artistic variety found in Montmartre.
Step-by-Step Guide
Materials
- A5 Sketchbook (heavyweight mixed-media or watercolor paper)
- Watercolor paint set (travel pan set works best)
- Round watercolor brush (size 6)
- Detail watercolor brush (size 2)
- Graphite pencil (HB for sketching)
- Fine liner pen (0.3mm or 0.5mm, black, waterproof)
- Eraser (kneaded preferred)
- Cup of water
- Paper towel
Step 1: Planning the Spread
-
Establish the horizon:
Open your sketchbook flat. On the left page, lightly pencil a horizon line about one-third up from the bottom to ground your cityscape. -
Sketch the tower structure:
Draw the Eiffel Tower’s vertical axis in the center of the left page. Sketch its iconic A-shape, keeping the lines loose and faint. -
Outline the foreground buildings:
Add rough block shapes for the buildings at the base of the tower and the sloping street elements in the immediate foreground. -
Position the plant study:
On the right page, simple draw a cylinder shape near the bottom center for the pot and a vertical line for the main stem.
Muddy Watercolors?
If your grey buildings look brown, you’re over-mixing on the paper. Let layers dry completely between coats, or mix your shadows on the palette first, not the page.
Step 2: Left Page: Watercolor Atmosphere
-
Paint the sky wash:
Mix a very watery wash of pale blue and a touch of warm pink. Apply this to the sky area around the tower, keeping the edges soft. -
Add building base tones:
While the sky dries, mix a diluted slate cleaning blue-grey. Paint the silhouetted buildings in the middle ground, letting the color fade as it moves down. -
Detail the Eiffel Tower:
Using your smaller brush and a slightly darker grey-blue mix, carefully paint the lattice structure of the tower over your pencil lines. Keep the paint somewhat transparent. -
Warm up the foreground:
To suggest the streetlamps and warm evening glow seen in the photo, dab touches of yellow ochre or burnt sienna near the base of the buildings. -
Deepen the shadows:
Mix a dark Payne’s gray or neutral tint. Add contrast to the roofs and the base of the tower to anchor the structure. -
Suggest greenery:
Dab a mix of sap green and burnt umber on the left side of the composition to suggest the trees lining the Montmartre street.
Step 3: Right Page: Botanical Ink Study
-
Refine the pot sketch:
Using your pencil, refine the shape of the terracotta pot, adding the rim and the saucer underneath. -
Draw the foliage volume:
Lightly sketch the cloud-like shape of the leaves at the top of the stem. Don’t draw individual leaves yet; focus on the overall volume. -
Ink the main structure:
Switch to your fine liner pen. Trace the pot and the main trunk with confident, broken lines to suggest a rough texture. -
Stipple the leaves:
Instead of drawing leaf outlines, use stippling (dots) and tiny scribbles to create the texture of the dense foliage at the top. -
Shade the pot:
Use cross-hatching marks with the pen on the right side of the pot to show roundness and shadow. -
Add a wash of color:
I like to take a very diluted burnt sienna watercolor wash and paint just the pot, leaving the leaves black and white for contrast. -
Final notations:
Add some scribbled handwriting or a date at the bottom of the right page to give it that authentic travel diary feel.
Enhance the Binding
Draw the sketchbook’s spiral wire across the center fold with a thick black pen. It creates a cool trompe-l’œil effect that makes the drawing look 3D.
Close your book and enjoy knowing you’ve captured a perfect Parisian moment on paper
BRUSH GUIDE
The Right Brush for Every Stroke
From clean lines to bold texture — master brush choice, stroke control, and essential techniques.
Explore the Full Guide
Night Lights and Sparkle Highlights
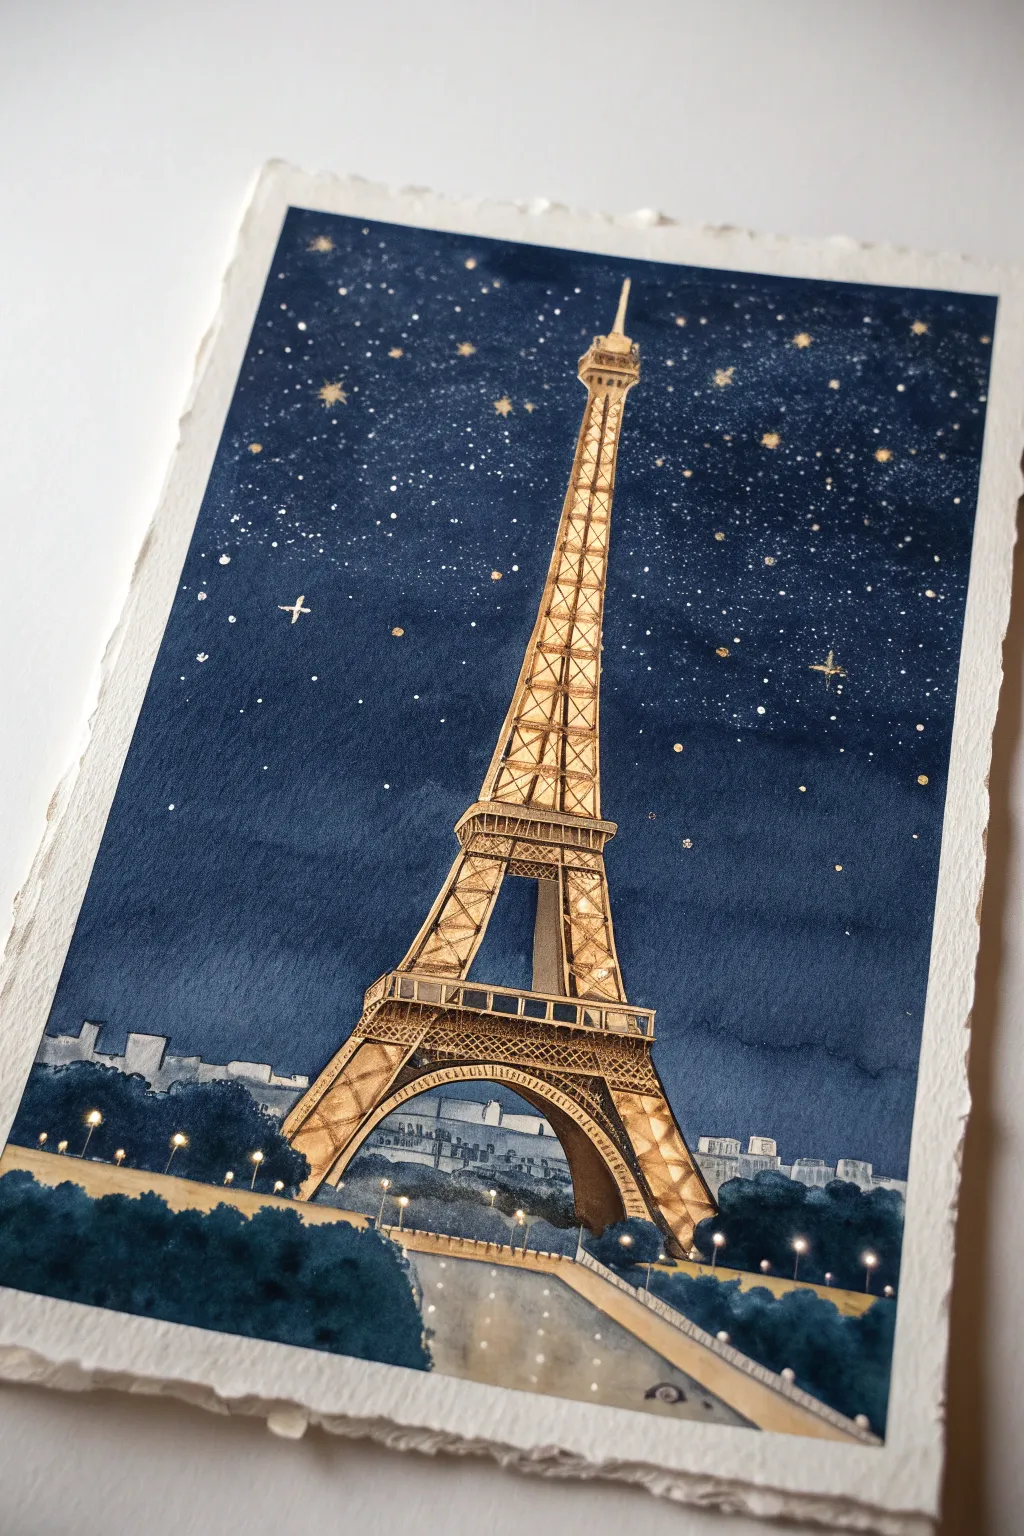
Capture the magic of Paris after dark with this luminous watercolor and metallic ink painting. The deep indigo sky contrasts beautifully with the warm, golden glow of the illuminated tower, all set on textured cotton rag paper for a vintage feel.
Step-by-Step
Materials
- Cold-pressed cotton rag watercolor paper (rough edge/deckled)
- Watercolor paints: Indigo, Payne’s Gray, Burnt Sienna, Yellow Ochre, Sepia
- Gold metallic watercolor or gouache
- Gold gel pen or paint marker (fine tip)
- White gouache or white gel pen
- Masking fluid (optional)
- Round brushes (sizes 2, 6, and 10)
- Rigger brush or fine liner brush
- Pencil and eraser
- Palette and water jars
Step 1: Planning and Sketching
-
Prepare the paper:
If your paper doesn’t already have deckled edges, you can carefully tear the edges against a ruler to create that soft, rustic look shown in the reference. Tape the paper down to your board to prevent buckling. -
Basic outline sketch:
Using a light pencil, sketch the main triangular shape of the Eiffel Tower. Don’t worry about every girder yet; just get the proportions right—wide base, tapering up to a sharp point. Add rough shapes for the bushes at the bottom and the faint skyline behind the tower legs. -
Detailed structure:
Refine the tower sketch by marking the three main platforms. Lightly draw the ‘X’ patterns of the ironwork, but keep lines faint so they don’t show through the gold paint later.
Step 2: Painting the Tower
-
Base wash for the tower:
Mix a warm, glowing color using Yellow Ochre and a touch of Burnt Sienna. Paint the entire shape of the Eiffel Tower. Keep this layer fairly translucent to mimic light. -
Adding shadows:
While the base layer is still slightly damp, drop in small amounts of Burnt Sienna or a light brown mixed with a tiny bit of red specifically on the undersides of the platforms and the right side of the legs to imply structural depth. -
Let it dry completely:
This is crucial. The tower needs to be bone dry before you attempt to paint the dark sky around it, or the colors will bleed into your light structure.
Bleeding Lines?
If your blue sky bleeds into the yellow tower, dampen a clear brush and establish a clean water barrier between the shapes before applying the dark paint. It acts as a invisible fence.
Step 3: The Night Sky
-
Mixing the night blue:
Create a rich, dark night sky color. I like to use a heavy saturation of Indigo mixed with a little Payne’s Gray. You want it dark enough to make the stars pop later. -
Painting the background wash:
Using your largest brush, carefully paint around the dried tower shape. Start from the top with the darkest pigment and add a tiny amount of water as you move down toward the horizon to create a subtle gradient. -
Horizon line blending:
Stop the blue wash just above the tree line. While the bottom edge of the sky is wet, soften it so it fades slightly into where the distant city buildings will be.
Pro Tip: Masking Fluid
Apply masking fluid over the tower shape before painting the sky. This lets you paint the dark blue wash freely and quickly without worrying about ruining the tower’s edges.
Step 4: Foreground and Details
-
Distant city skyline:
Mix a very watery, pale blue-grey. Paint simple geometric block shapes behind the tower’s legs to suggest distant Parisian buildings. This should look faint and atmospheric. -
Foreground foliage:
Mix a deep green-blue using Indigo and Sepia. Paint the bushes and trees in the foreground using a dabbing motion to create leafy texture. vary the height to frame the bottom of the composition. -
The pathway:
Paint the path or river Seine area at the very bottom with a wash of diluted Sepia and Payne’s Gray. Leave some vertical streaks lifted out or unpainted to suggest reflections on wet pavement or water. -
Tower latticework:
Once the tower base color is dry, use a fine liner brush and a mix of Sepia and brown to paint the truss work. Don’t trace every line; dashed lines and suggestions of ‘X’ shapes work best.
Step 5: Illumination and Sparkle
-
Gold highlights:
Load a small brush with metallic gold paint. Add strokes over the illuminated parts of the tower, particularly the cross-bracing and the platforms, to make it shimmer. -
Street lamps:
Use opaque white gouache or a gel pen to dot the street lights along the bottom. Once dry, wash over them with a tiny circle of translucent yellow to create a glowing halo effect. -
Creating stars:
Load a toothbrush or stiff brush with white gouache (consistency of thin cream). Flick the bristles to splatter stars across the dark sky. Repeat this process with the gold metallic paint for a magical mix of white and gold stars. -
Key stars:
Pick a few spots in the sky to add larger, hand-painted stars or ‘cross’ twinkles using a fine brush and gold paint. -
Final contrast check:
If the sky dried too light, you can carefully glaze another layer of Indigo over the dark areas, avoiding the stars, to deepen the night effect.
Frame your glittering Parisian night scene in a floating frame to show off those beautiful deckled edges
Cherry Blossoms Framing the Tower
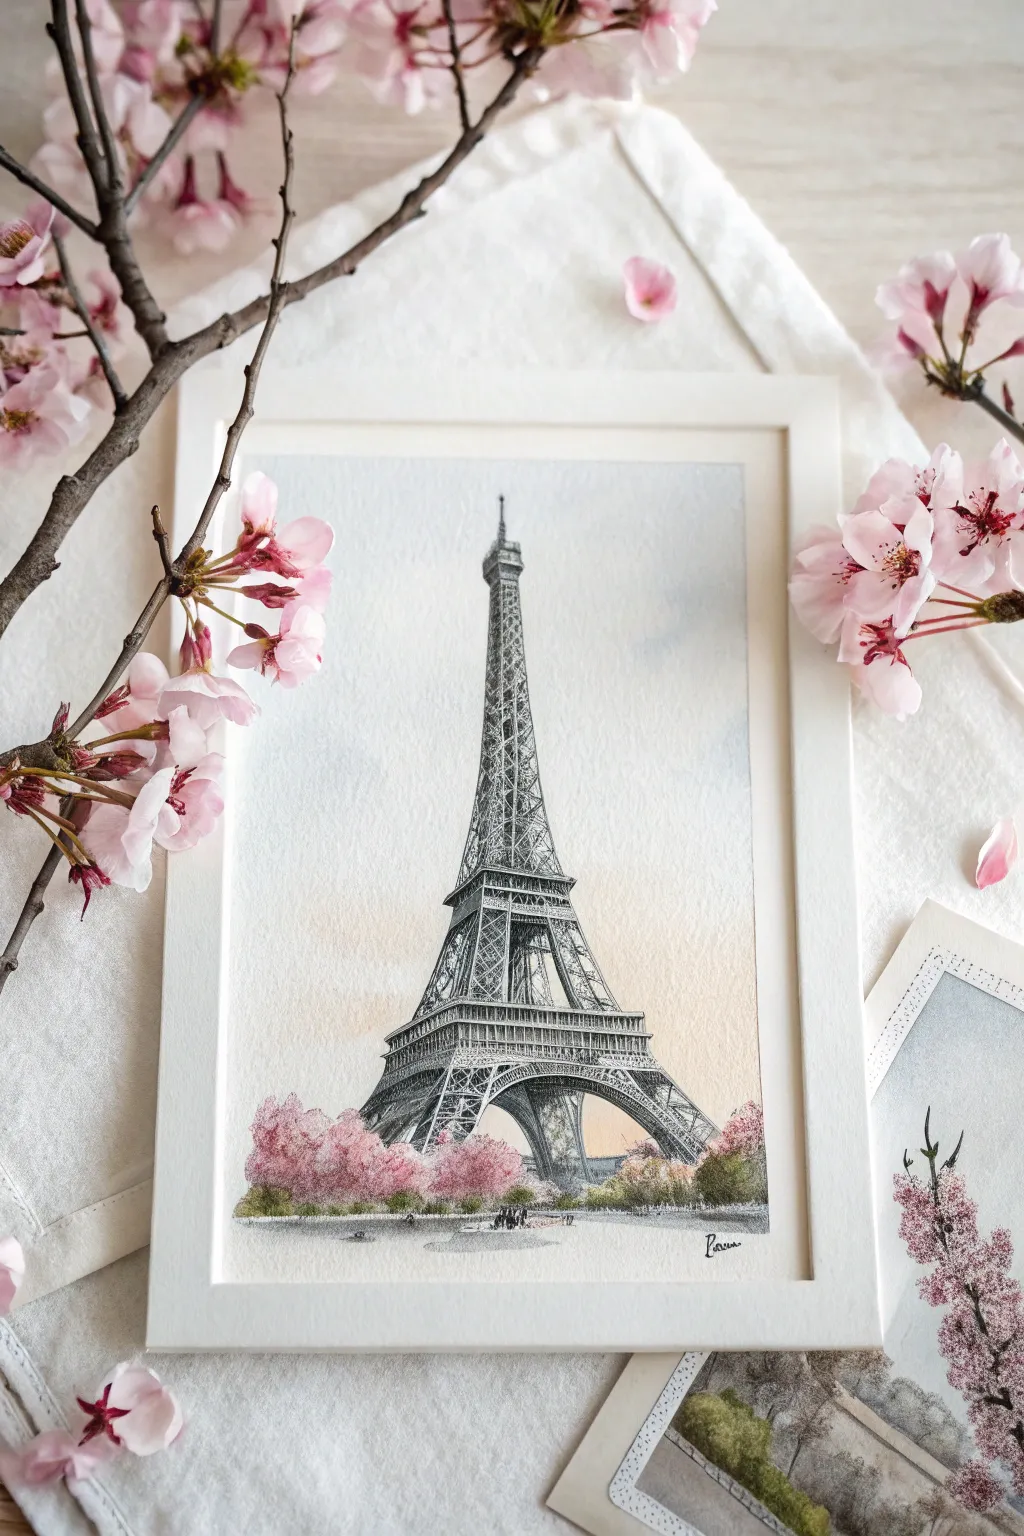
Capture the romance of Paris in springtime with this delicate watercolor and ink painting. This project combines intricate architectural lines with the soft, cloud-like wash of pink cherry blossoms for a balanced and beautiful composition.
Detailed Instructions
Materials
- Cold press watercolor paper (300 gsm)
- Fine liner pens (black, sizes 0.05, 0.1, and 0.3mm)
- Watercolor paints (Payne’s Grey, Alizarin Crimson, Sap Green, Yellow Ochre, Cerulean Blue)
- Round watercolor brushes (Size 2 for details, Size 6 for washes)
- Pencil (HB) and kneaded eraser
- Ruler
- Masking tape
- White picture frame
Step 1: Sketching the Foundation
-
Prepare the workspace:
Begin by taping down your watercolor paper to a board with clear masking tape. This prevents the paper from buckling when wet and leaves a crisp white border for that professional finish. -
Establish the horizon:
Use a ruler to lightly draw a horizon line about one-fifth of the way up from the bottom of the page. This is where the base of the tower and the trees will sit. -
Draft the tower’s silhouette:
Lightly sketch a central vertical line to keep the tower symmetrical. Draw the sweeping A-frame shape of the Eiffel Tower’s legs and the ascending tiers, ensuring the proportions narrow gracefully toward the top spire. -
Map the foliage:
Pencil in loose, cloud-like shapes around the base of the tower to represent the cherry blossom trees. Don’t worry about individual flowers yet; just focus on the overall placement of the pink masses.
Ink Confidence
Don’t try to draw every single beam perfectly straight. Broken, sketchy lines often look more artistic and lively than ruler-straight ink lines.
Step 2: Inking the Architecture
-
Outline the main structure:
Switch to your 0.1mm fine liner. Carefully trace over your pencil lines for the main structural beams of the Eiffel Tower. Use a steady hand, but remember that slight wobbles add character to hand-drawn architecture. -
Add the X-bracing details:
Using the 0.05mm pen, draw the intricate X-patterns and lattice work inside the main beams. This creates that iconic airy steel look without overpowering the drawing with heavy ink. -
Darken the platforms:
Use the 0.3mm pen to emphasize the three horizontal observation platforms. Drawing these slightly thicker provides visual weight and anchors the delicate lattice work. -
Suggest the crowd:
At the very base of the tower, draw tiny, indistinct vertical dashes to represent people walking under the tower. Keep them abstract to maintain scale. -
Erase pencil guides:
Once the ink is completely dry—I usually give it at least 15 minutes to be safe—gently erase the pencil sketches, leaving just the crisp ink lines.
Sparkle Effect
After the paint is dry, use a white gel pen to add tiny highlights to the sunny side of the tower or bright spots in the cherry blossoms.
Step 3: Painting the Atmosphere
-
Paint the sky gradient:
Wet the sky area with clean water, avoiding the tower shape. Drop in a very dilute wash of Cerulean Blue at the top, fading into a faint Yellow Ochre near the horizon to mimic a soft morning light. -
Base layer for blossoms:
Mix a watery puddle of Alizarin Crimson with a touch of white or just lots of water to get a pale pink. Dab this onto the tree shapes using the side of your Size 6 brush to create a fluffy texture. -
Add floral depth:
While the pink layer is still slightly damp, drop in concentrated dots of Alizarin Crimson and a tiny bit of purple into the shadow areas of the trees (usually the bottom and center of the clumps). -
Ground the scene:
Mix Sap Green with a little Payne’s Grey for an earthy tone. Paint the bushes and grass at the foot of the tower, letting the green bleed slightly into the bottom of the pink trees for a natural transition. -
Shadow the tower:
Using a very dilute Payne’s Grey, paint over the shadowed side of the tower (usually the right side) to give the flat drawing some form and dimension. -
Paint the reflections:
Create a watery, gray wash on the ground beneath the walking figures to suggest wet pavement or shadows, mirroring the shapes above loosely.
Step 4: Final Touches
-
Enhance texturing:
Once the tree paint is dry, use your 0.05 pen to add tiny dots or stippling on the darker parts of the pink blooms to suggest individual petals and leaves. -
Sign and frame:
Sign your name small in the corner with the fine liner. Remove the tape carefully and place the finished piece in a simple white frame to let the artwork breathe.
Hang your masterpiece near a window to let natural light enhance those gentle watercolor washes

PENCIL GUIDE
Understanding Pencil Grades from H to B
From first sketch to finished drawing — learn pencil grades, line control, and shading techniques.
Explore the Full Guide
Autumn Leaves and Paris Rooftops
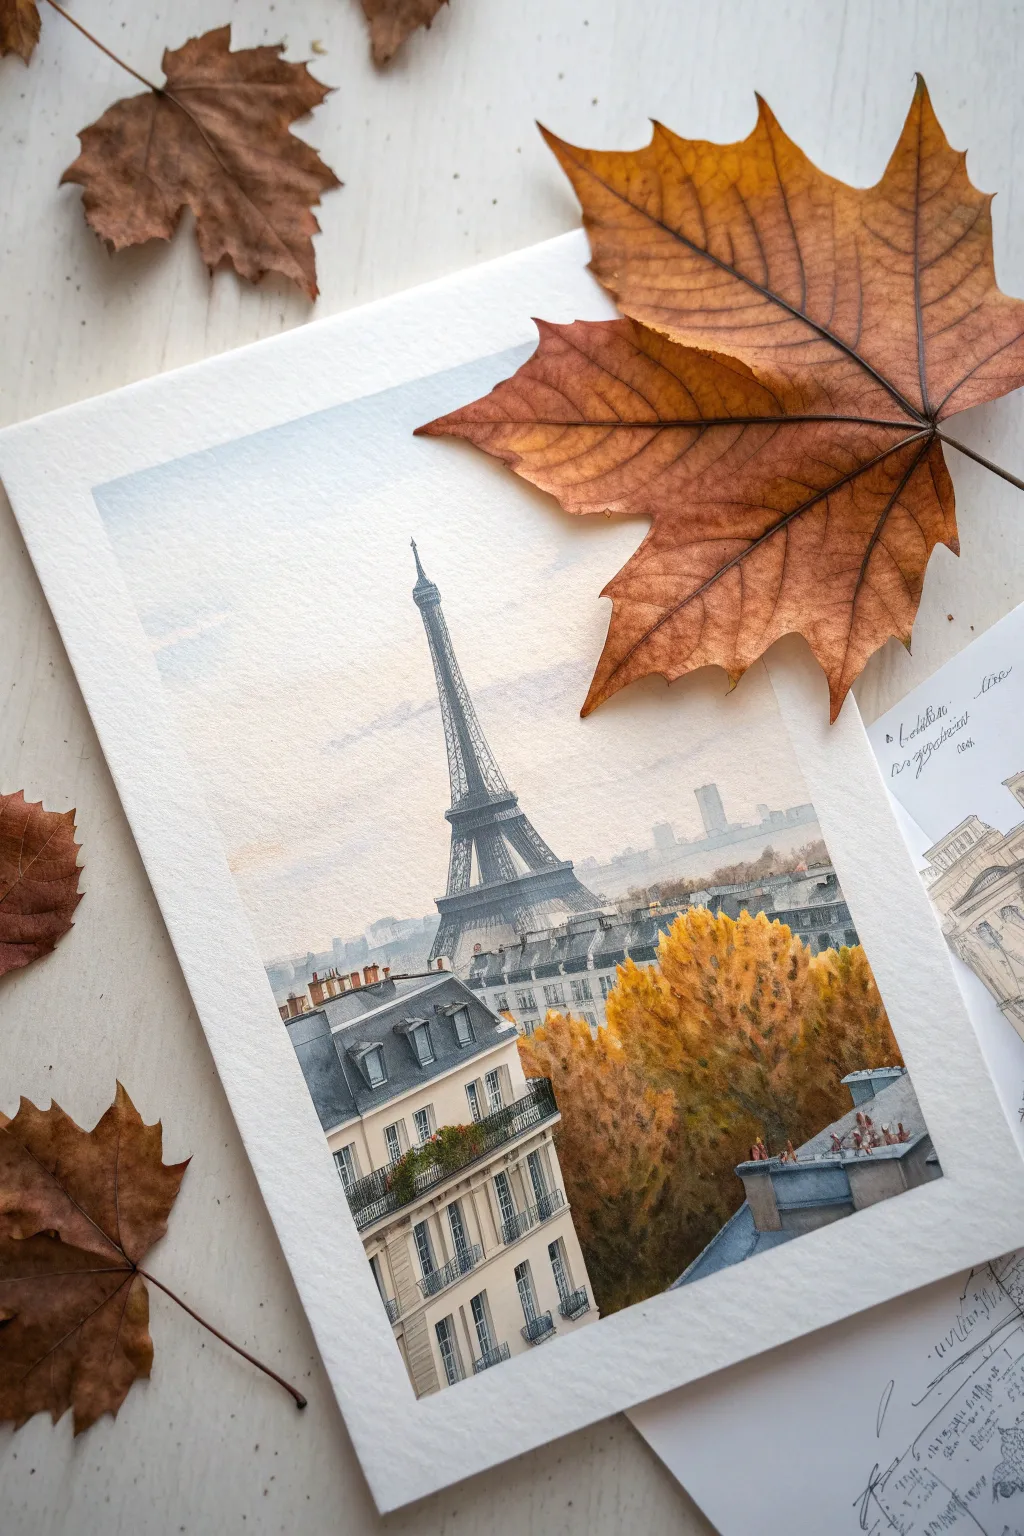
Capture the romance of Paris with this delicate watercolor painting featuring the iconic Eiffel Tower rising above Haussmann-style rooftops and golden autumn foliage. The soft, hazy atmosphere combined with crisp architectural details creates a balanced and serene composition perfect for framing.
Step-by-Step Tutorial
Materials
- Cold press watercolor paper (300 gsm)
- Pencil (HB or 2H) and kneaded eraser
- Watercolor paints (Ultramarine Blue, Burnt Sienna, Yellow Ochre, Cadmium Orange, Burnt Umber, Neutral Tint/Payne’s Gray)
- Round brushes (Size 8 for washes, Size 4 for shapes, Size 0 or 1 for details)
- Masking fluid (optional)
- Palette for mixing
- Two jars of water
- Paper towels
Step 1: Planning and Sketching
-
Establish the horizon:
Lightly draw a horizon line about one-third of the way up from the bottom of your paper. This will be where the distant city meets the sky. -
Outline the Eiffel Tower:
Sketch the Eiffel Tower centrally but slightly offset. Focus on the main structural lines—the wide base tapering up to the needle-like top. Keep your pencil marks very faint so they won’t show through the sky later. -
Sketch the foreground building:
In the bottom left corner, draw the angled roof and facade of a Parisian apartment building. Include the distinct mansard roof shape and rough indications of windows and balconies. -
Block in foliage:
Lightly outline the mass of trees in the bottom right foreground. Don’t draw individual leaves; just capture the overall organic shape that will balance the rigid architecture.
Don’t Overwork the Sky
Parisian skies are often soft and hazy. Keep your initial sky wash very watery and avoid going back into it once it starts drying to prevent ‘cauliflower’ blooms.
Step 2: Atmospheric Sky and Background
-
Wet-on-wet sky wash:
Wet the entire sky area with clean water, careful not to enter the building shapes. Mix a very dilute wash of Ultramarine Blue with a tiny touch of Burnt Sienna to gray it down. -
Create the gradient:
Apply the pale blue wash at the top, fading it out to almost clear water as you reach the horizon line to create a hazy, atmospheric perspective look. -
Paint the distant skyline:
While the sky is still slightly damp near the horizon, drop in a faint, cool gray mix for the distant city silhouette. This softness pushes the background away. -
Eiffel Tower base layer:
Once the sky is dry, paint the Eiffel Tower with a light wash of Neutral Tint or a blue-gray mix. Keep this layer flat and essentially a silhouette for now.
Level Up: Texture Trick
Sprinkle a tiny pinch of salt onto the wet paint of the autumn trees. As it dries, it pushes pigment away, creating incredible organic leaf textures effortlessly.
Step 3: Mid-Ground and Trees
-
Golden foliage base:
Mix Yellow Ochre and Cadmium Orange. Apply this to the tree area using a stippling motion with your size 8 brush to simulate leafy texture. -
Add depth to trees:
While the yellow layer is wet, drop in Burnt Sienna and Burnt Umber into the shadowed areas (bottom and center of the tree mass) to create volume. -
Mid-ground rooftops:
Paint the rows of roofs behind the main building using a cool gray. Use horizontal strokes to suggest the iconic Parisian slate rooflines. -
Tower definition:
Using a smaller brush (size 4), add a second, darker layer of gray to the shadowed side of the Eiffel Tower and the observation decks to give it form.
Step 4: Foreground Architecture
-
Roof color:
Paint the mansard roof of the main foreground building with a dark, cool gray mix (Ultramarine and Burnt Umber). Leave tiny white gaps for chimney pots or light hitting the slate. -
Facade warmth:
Wash the building’s facade with a very pale, creamy mix of Yellow Ochre and plenty of water to mimic limestone. -
Window details:
Use your smallest brush (size 0 or 1) to paint the windows. Don’t paint filled black rectangles; paint the shadows of the frames and the darkness inside the glass with a dark gray. -
Balconies and railings:
With the tip of your detail brush and thick paint (less water), draw the delicate iron railings on the balconies. A jittery hand actually helps these look more realistic.
Step 5: Final Details
-
Tower lattice work:
Go back to the Eiffel Tower. Suggest the intricate cross-bracing with very fine, broken lines using a pointed brush. You don’t need to draw every beam; the suggestion is enough. -
Chimney pots:
Add touches of Burnt Sienna to the chimney tops on the roofs. This small pop of warmth connects the architecture to the autumn trees. -
Small shadows:
Glaze a transparent cool violet or gray shadow under the balconies and eaves to ground the architectural elements.
Once dry, erase any visible pencil lines to reveal your crisp, autumnal Parisian scene
Couple Silhouette in the City of Love
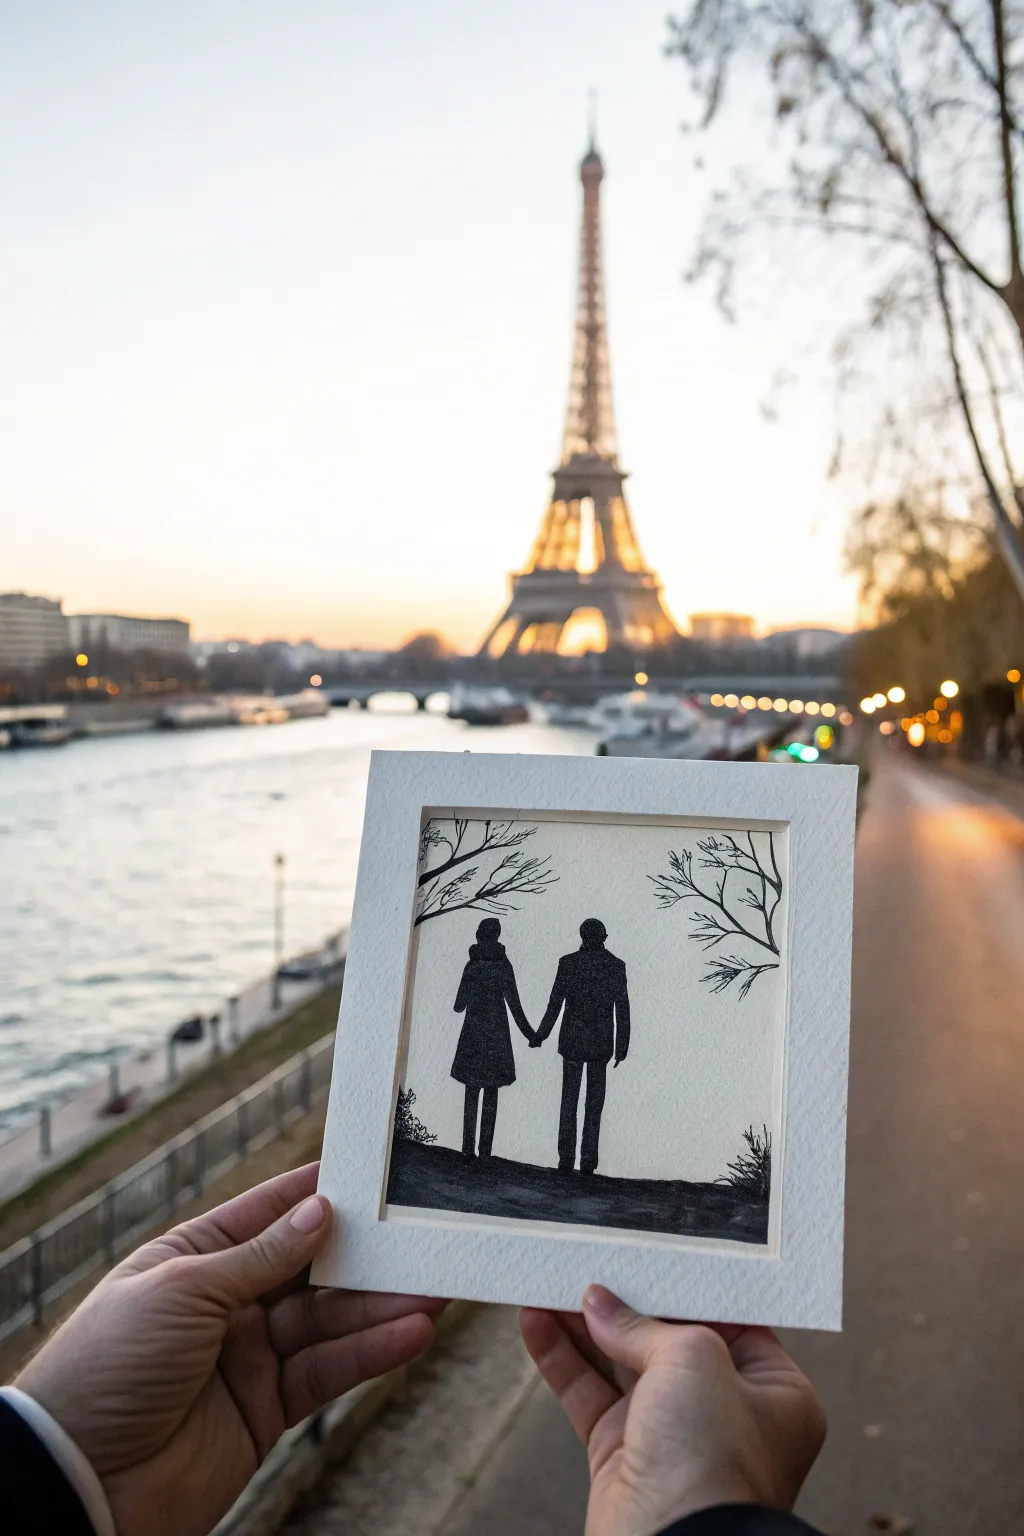
Capture the romance of Paris with this striking high-contrast silhouette artwork. Using simple black ink or paint on textured paper, you’ll create a timeless scene of a couple strolling hand-in-hand beneath winter branches.
Step-by-Step
Materials
- Heavyweight watercolor paper or cardstock (hot press preferred for smooth lines)
- Black India ink or high-quality black gouache paint
- Fine liner pens (sizes 005, 01, and 05)
- Small round synthetic brush (size 0 or 1)
- Pencil (HB) and soft eraser
- Ruler
- Paper framing mat (square aperture)
Step 1: Preparation and Sketching
-
Define the borders:
Begin by measuring your paper against your frame mat aperture. Using a ruler and pencil, lightly draw a square border that sits just slightly outside where the mat opening will be, ensuring your composition is centered. -
Establish the ground line:
Sketch a gentle, slightly uneven horizon line near the bottom third of the square. This will be the path your couple is walking on. -
Outline the figures:
Lightly sketch the outlines of the two figures in the center. Start with basic shapes: ovals for heads and rectangles for torsos to get the proportions right. The figure on the left is wearing a knee-length coat, while the figure on the right wears trousers and a jacket. -
Refine the pose:
Connect their inner arms so they appear to be holding hands. Focus on the negative space between their legs and bodies to ensure the silhouette reads clearly. -
Add nature elements:
Sketch branch structures entering from the top left and top right corners. Keep the lines organic and reaching toward the center. -
Detail the grass:
Add small, jagged tufts of grass or low shrubbery on the far left and right edges of horizontal ground line to frame the couple.
Uneven Coverage?
If your black fill looks streaky after drying, apply a second coat of ink perpendicular to the first layer. Gouache is more opaque and can hide streaks better than ink.
Step 2: Inking the Silhouette
-
Outline contrasting edges:
Using your 05 fine liner, carefully trace the final outline of the couple. Only trace the exterior lines; do not draw any interior details like pockets or collars, as this will be a solid fill. -
Fill the figures:
Switch to your small round brush and black India ink (or gouache). Carefully fill in the couple’s shapes. I prefer to work from the center outward to avoid smudging the wet ink with my hand. -
Paint the ground:
Fill in the ground area beneath their feet. Use slightly uneven brushstrokes here to suggest the texture of earth or pavement rather than a perfectly flat block of color. -
Dry check:
Let the large black areas dry completely. India ink can look shiny while wet, so wait until it has a matte finish to check for any missed spots or streaks.
Step 3: Detailed Line Work
-
Thicken main branches:
Use the brush or a thick pen to fill in the main trunks of the tree branches entering from the corners. They should be thickest at the edge of the paper and taper as they move inward. -
Add fine twigs:
Switch to your 01 and 005 pens. Draw smaller twigs branching off the main limbs. Use quick, confident flicks of the wrist to make the ends taper naturally. -
Create grass texture:
Using the 01 pen, add vertical hatch marks to the tufts of grass on the bottom corners. Vary the height and angle of the blades for realism. -
Clean up:
Once you are absolutely certain the ink is dry (give it an extra 10 minutes to be safe), gently erase any visible pencil marks.
Enhance the Edge
For a super crisp ‘papercut’ look, run a very fine white gel pen along the top shoulder line of the figures to mimic a highlight or rim light.
Step 4: Finishing and Framing
-
Double-check edges:
Examine the edges of your silhouette. If the paper has textured grain, you might need to use the 005 pen to fill tiny white gaps where the ink missed the valleys of the paper texture. -
Position the mat:
Place your paper mat over the artwork. Align it so the couple is perfectly centered and the tree branches frame them nicely. -
Secure the artwork:
Use acid-free artist tape to secure the back of the artwork to the mat board to prevent it from slipping over time.
Now you have a charming piece of minimalist art ready to display or gift to someone special


Abstract Color-Block Eiffel Tower
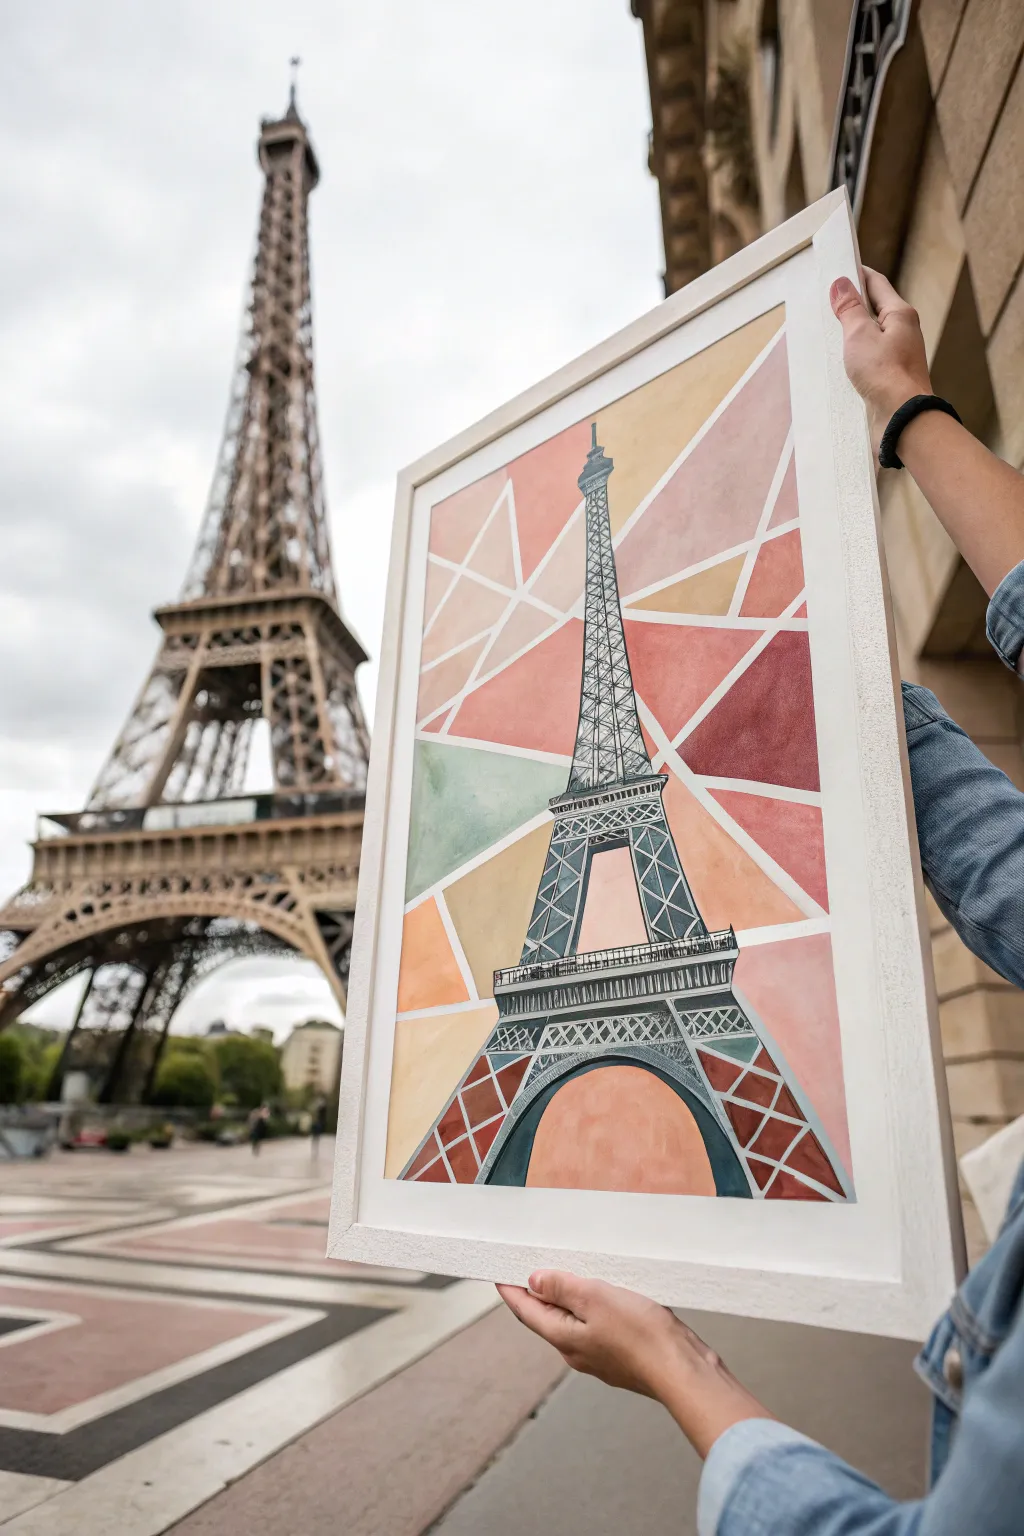
Capture the romance of Paris with a modern twist by creating this stained-glass style Eiffel Tower painting. Using simple masking techniques and watercolor washes, you’ll build a vibrant, fragmented background that makes the intricate black architectural details pop.
Step-by-Step Tutorial
Materials
- Thick watercolor paper (140lb/300gsm cold press recommended)
- Pencil (HB or H)
- Ruler
- Painter’s tape or masking tape (1/4 inch width is ideal)
- Watercolor paints (warm palette: reds, oranges, yellows, peaches, plus a muted teal)
- Round watercolor brushes (sizes 6 and 2)
- Fine-point black permanent marker or liner pen (0.5mm and 0.8mm)
- White or light wooden frame (optional)
Step 1: Drafting the Design
-
Sketch the silhouette:
Begin by lightly sketching the outline of the Eiffel Tower in the center of your paper. Focus only on the main structural shapes—the legs, the viewing platforms, and the spire—without drawing the latticework details yet. -
Plan the geometric background:
Using a ruler, draw straight lines radiating outward from behind the tower to the edges of the paper. Create random, angular shapes that look like shattered glass or sunrays. -
Mask the lines:
Apply thin painter’s tape (or masking tape cut into thin strips) over all your pencil lines for the background geometry. Press the edges down firmly so paint won’t seep underneath. -
Protect the tower:
If you are concerned about painting inside the tower shape, you can loosely mask off the main interior area of the tower silhouette, or just paint carefully around your initial sketch.
Step 2: Applying the Color
-
Prepare your palette:
Mix a variety of warm sunset tones. You’ll want a gradation from deep reds and burgundies to softer peaches, creamy yellows, and a touch of muted teal for contrast. -
Paint the first section:
Select one geometric section created by your tape. Wet the paper inside that shape with clean water first, then drop in your chosen color, letting it spread naturally for a soft, cloudy texture. -
Vary the tones:
Move to an adjacent section (not touching the wet one to avoid bleeding) and paint it a contrasting color. I like to place the teal section near the middle left to break up the warm colors. -
Fill the background:
Continue filling all the geometric shapes around the tower. Aim for a balance where darker reds sit near lighter yellows to create depth and visual interest. -
Paint the tower interior:
For the spaces ‘inside’ the tower’s legs and arches, continue the geometric color pattern so the structure feels transparent. Ensure the colors align logically with the background sections. -
Let it dry completely:
Wait until the paper is bone dry. This is crucial; if the paper is cool to the touch, it’s still damp. Patience here prevents the paper from tearing.
Bleeding Lines?
If paint seeps under your tape, use a stiff brush dampened with clean water to gently ‘scrub’ and lift the excess color while the paint is still semi-wet, or cover with white gouache later.
Step 3: Revealing and Detailing
-
Remove the tape:
Gently peel off the masking tape at a 45-degree angle. This reveals crisp white lines that define your geometric shards. -
Outline the structure:
Using your thicker black marker or pen (0.8mm), trace the main vertical lines and horizontal platforms of the Eiffel Tower over your painted background. -
Add the latticework:
Switch to a finer pen (0.5mm) to draw the distinctive ‘X’ patterns and cross-bracing inside the tower structure. Keep your hand steady but don’t worry about absolute perfection; a slight sketched look adds character. -
Darken key areas:
Go back over the main arches and the underside of the viewing platforms with the thicker pen to add visual weight and solidity to the ironwork. -
Refine the edges:
If any paint bled slightly under the tape, you can touch it up with a white gel pen or opaque white gouache to restore the crisp lines. -
Final assessment:
Step back and look at the painting. Add any final cross-hatching to the darkest parts of the tower to increase the contrast against the colorful sky.
Add Metallic Flair
Once the painting is dry, trace the fine white lines left by the masking tape with a gold or silver paint pen. This gives the artwork a stunning, cloisonné-enamel effect.
Now step back and admire how your modern, fractured sky creates the perfect backdrop for Paris’s most famous landmark


Have a question or want to share your own experience? I'd love to hear from you in the comments below!