A plain little stool is basically a tiny, functional canvas, and I love how fast it can turn into a real statement piece. Here are my favorite stool painting ideas—from classic, can’t-miss looks to the playful, artsy transformations that make people do a double-take.
Classic One-Color Stool Refresh
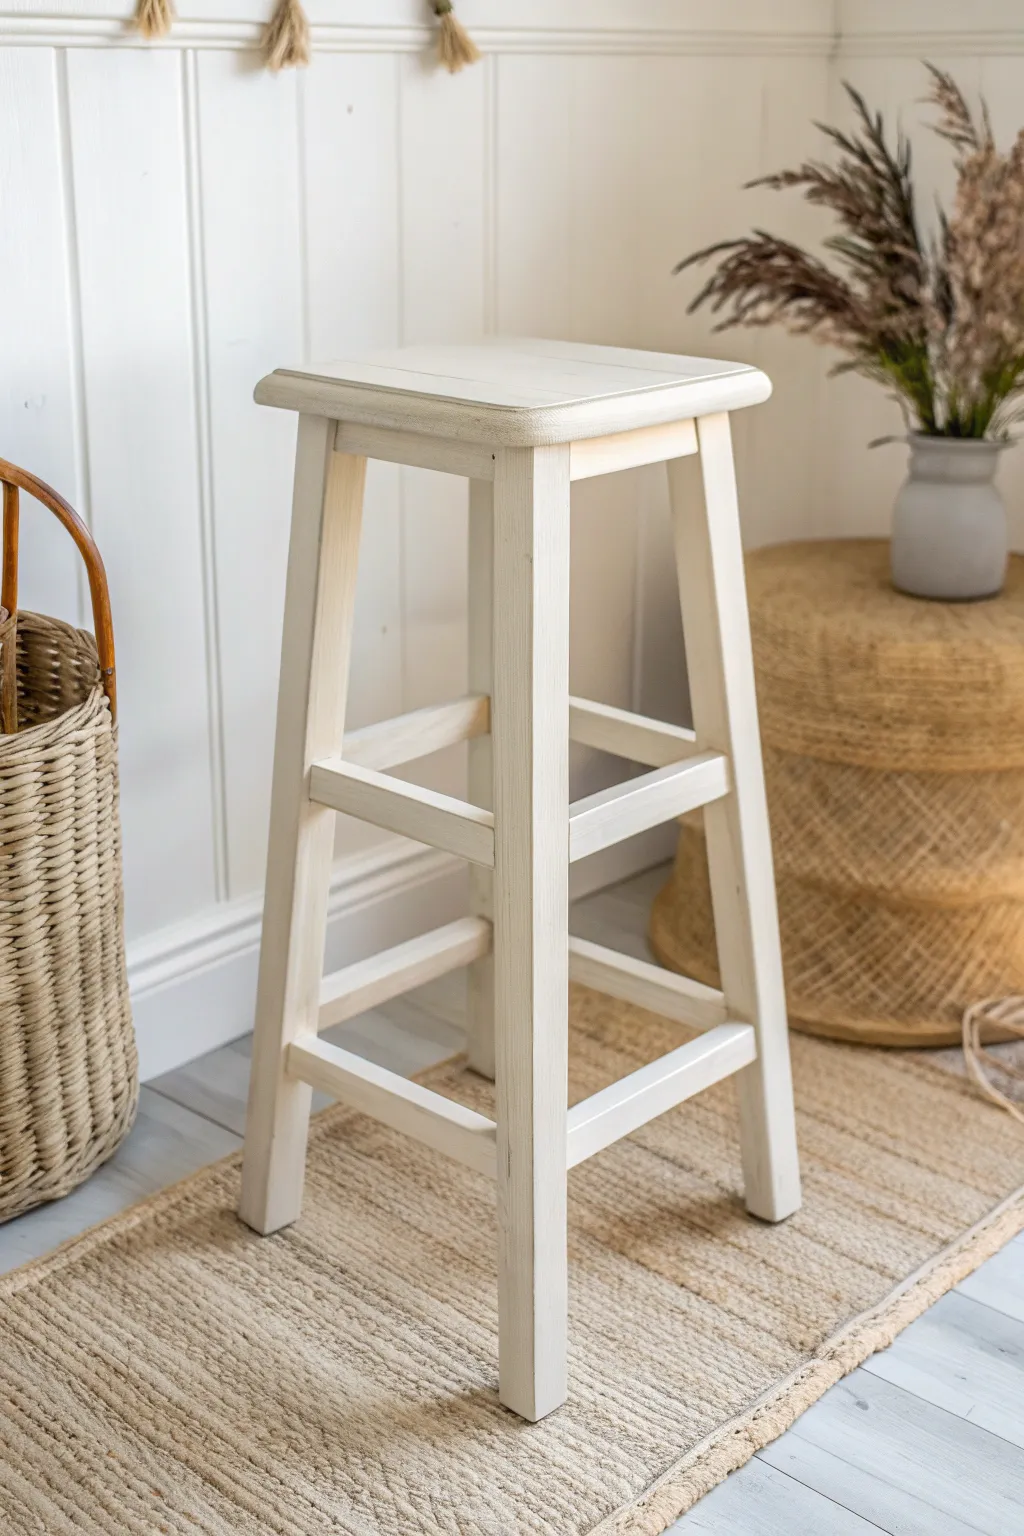
Sometimes the most striking update is simply stripping away the noise and embracing a clean, monochromatic look. This tutorial transforms a standard wooden bar stool into a serene, creamy white accent piece that feels both rustic and refined.
Step-by-Step
Materials
- Tall wooden bar stool (pre-owned or unfinished)
- Medium-grit sandpaper (120-grit)
- Fine-grit sandpaper (220-grit)
- Tack cloth or microfiber rags
- High-quality adhesion primer
- Chalk-style paint or matte furniture paint in Cream or Linen White
- 2-inch synthetic angled sash brush
- Small round craft brush (for corners)
- Matte clear topcoat or clear furniture wax
- Wax brush or lint-free cloth (if using wax)
- Drop cloth
- Mild degreaser or TSP substitute
Step 1: Preparation & Cleaning
-
Assess the surface:
Examine your stool for any loose joinery or rough splinters. If the legs are wobbly, tighten screws or add wood glue to the joints before you begin painting. -
Clean thoroughly:
Wipe down the entire stool with a mild degreaser or TSP substitute. Old furniture often has built-up oils or wax that can repel paint, so don’t skip this scrubbing step. -
Initial scuff sand:
Using 120-grit sandpaper, give the entire piece a vigorous sanding. You aren’t trying to remove all the old finish, but simply ‘scuffing’ it up to create a tooth for the primer to grip. -
Dust removal:
Vacuum up the sanding dust, then wipe the wood with a tack cloth to ensure the surface is completely debris-free.
Step 2: Priming for Adhesion
-
Flip securely:
I like to start painting furniture upside down. Place the stool seat-down on your drop cloth so the legs are sticking up in the air. -
Apply primer to legs:
Using your angled sash brush, apply a thin, even coat of adhesion primer to the legs and cross-braces. Watch for drips that might gather on the undersides of the rungs. -
Flip and finish priming:
Turn the stool right-side up and prime the seat and the upper edges of the legs. Let this coat dry completely according to the manufacturer’s instructions. -
Light sanding:
Once the primer is bone dry, run your 220-grit sandpaper lightly over the surfaces to knock down any raised grain or brush marks.
Smooth Operator
To get that ultra-smooth factory finish on the flat seat, lay the paint off by dragging the brush very lightly from edge to edge without stopping in the middle.
Step 3: Painting the Finish
-
First coat application:
Stir your Cream or Linen White paint thoroughly. Starting upside down again, brush on your first coat. Focus on smooth, long strokes along the grain of the wood. -
Hit the corners:
Use your small round craft brush to dab paint into tight corners where the rungs meet the legs, smoothing it out immediately so it doesn’t puddle. -
Finish the first coat:
Flip the stool over and paint the seat. Don’t worry if the coverage isn’t perfectly opaque yet; thin coats are better than thick ones. -
Dry and assess:
Allow the first coat to dry for at least 2-4 hours. If you see any rough spots, give them a quick pass with the fine sandpaper. -
Second coat application:
Apply your second coat of paint, repeating the upside-down-to-right-side-up process. This coat should provide full opacity and a rich, solid color. -
Check for imperfections:
While the paint is still wet, inspect the legs for drips. Smooth them out gently with the tip of your brush.
Rustic Texture
For a distressed vibe, gently sand the edges of the seat and rungs with 220-grit paper after the final paint coat dries but before you seal it.
Step 4: Sealing & Protection
-
Cure time:
Let the final coat of paint dry overnight to ensure it has hardened sufficiently before you seal it. -
Apply protection:
For a matte, farmhouse look similar to the image, apply a clear matte polycrylic or a clear furniture wax. If using polycrylic, use a clean synthetic brush. -
Waxing technique:
If using wax, massage it into the paint with a wax brush in circular motions, then use a lint-free cloth to wipe away excess wax, working in straight lines. -
Final buffing:
Wait for the wax or topcoat to dry completely, then buff the surface gently with a clean cloth to achieve a soft, subtle sheen.
Now you have a fresh, beautifully understated stool ready to brighten up your kitchen corner.
Two-Tone Seat and Legs Combo
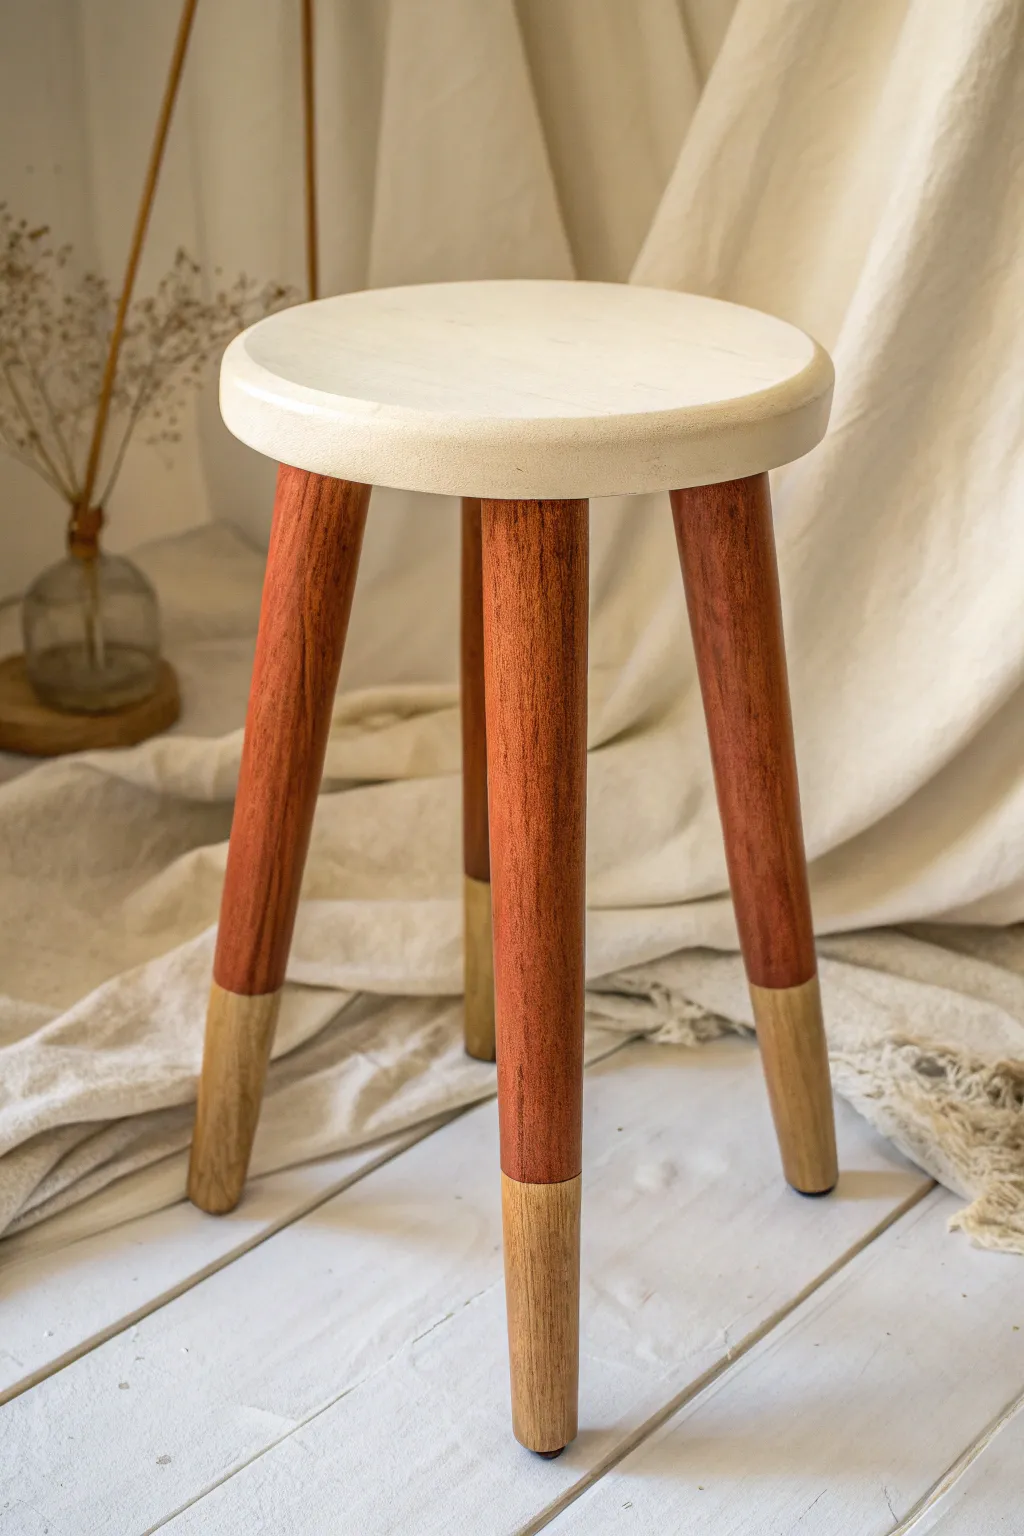
Transform a basic wooden seat into a modern statement piece with this elegant two-tone design. By combining a creamy painted top with rich, reddish-stained legs that feature a natural dipped look, you create a sophisticated balance of textures and tones.
Detailed Instructions
Materials
- Unfinished wooden stool (round seat)
- Sandpaper (120 and 220 grit)
- Painter’s tape (high quality)
- Cream or off-white chalk paint
- Red mahogany or cherry wood stain
- Clear matte polyurethane topcoat
- Clean lint-free rags
- Foam brushes
- Synthetic bristle paintbrush
- Drop cloth
- Tape measure
- Pencil
Step 1: Preparation & Sanding
-
Disassemble if possible:
If your stool is screw-assembled, unscrew the legs from the seat. Working on the pieces separately makes getting crisp lines much easier, though you can leave it assembled if glued. -
Sand the surfaces:
Give the entire stool a thorough sanding with 120-grit paper to remove any existing finish or rough spots. Follow up with 220-grit for a smooth, professional feel. -
Clean the dust:
Wipe every surface down with a tack cloth or a slightly damp rag to ensure no sawdust remains, as this will interfere with the stain absorption.
Bleeding Lines?
If stain bleeds under the tape, let it dry fully, then lightly sand the natural area with 220-grit paper. The sanding usually removes the surface bleed without ruining the shape.
Step 2: Staining the Legs
-
Measure the dip line:
Decide where you want the natural wood ‘dip’ to start. Measure up from the bottom of each leg (around 4-5 inches is standard visually) and mark heavily with a pencil. -
Apply tape barrier:
Wrap painter’s tape precisely around the leg at your mark. Ensure the tape edge is sealed tightly by pressing it down firmly with your thumbnail to prevent stain bleeding. -
Cover the feet:
I like to wrap extra tape or paper around the bottom section of the leg (the part staying natural) just to protect it from accidental drips. -
Apply the stain:
Using a foam brush or rag, apply the red mahogany stain to the upper portion of the legs. Work with the grain of the wood. -
Wipe excess stain:
After letting the stain sit for 5-10 minutes (check your can for specifics), wipe away the excess with a clean rag. For a deeper color, wait for it to dry and apply a second coat. -
Remove leg tape:
Carefully peel off the painter’s tape while the stain is still slightly tacky to avoid pulling up any dried finish.
Gold Accent
For a luxe touch, apply a thin strip of metallic gold leaf or gold paint exactly over the line where the stain meets the natural wood to create a gleaming transition.
Step 3: Painting the Seat
-
Mask the underside:
If you want a clean transition where the legs meet the seat (if assembled), tape off the very top of the stained legs. -
First coat of paint:
Apply your cream chalk paint to the seat top and sides. Use long, smooth strokes to minimize brush marks. -
Sand between coats:
Once the first coat is completely dry, lightly sand with fine-grit paper to knock down any raised grain or brush ridges. -
Second coat:
Apply a second coat of cream paint for full, opaque coverage. Let this dry fully, usually overnight.
Step 4: Sealing & Assembly
-
Seal the legs:
Using a clean foam brush, apply a matte polyurethane to the entire leg, covering both the stained and natural sections. This seals the wood and blends the sheen. -
Seal the seat:
Apply the same topcoat to the painted seat. Three thin coats are better than one thick one here, as the seat takes the most wear. -
Final assembly:
If you disassembled the stool, screw the legs back into the seat once all finishes are cured and hard to the touch. -
Add floor protectors:
Stick felt pads or rubber glides to the bottom of the raw wood feet to protect your floors and finish the look.
Place your newly finished stool in a cozy corner or use it as a plant stand to show off your handiwork


Striped Legs, Solid Seat
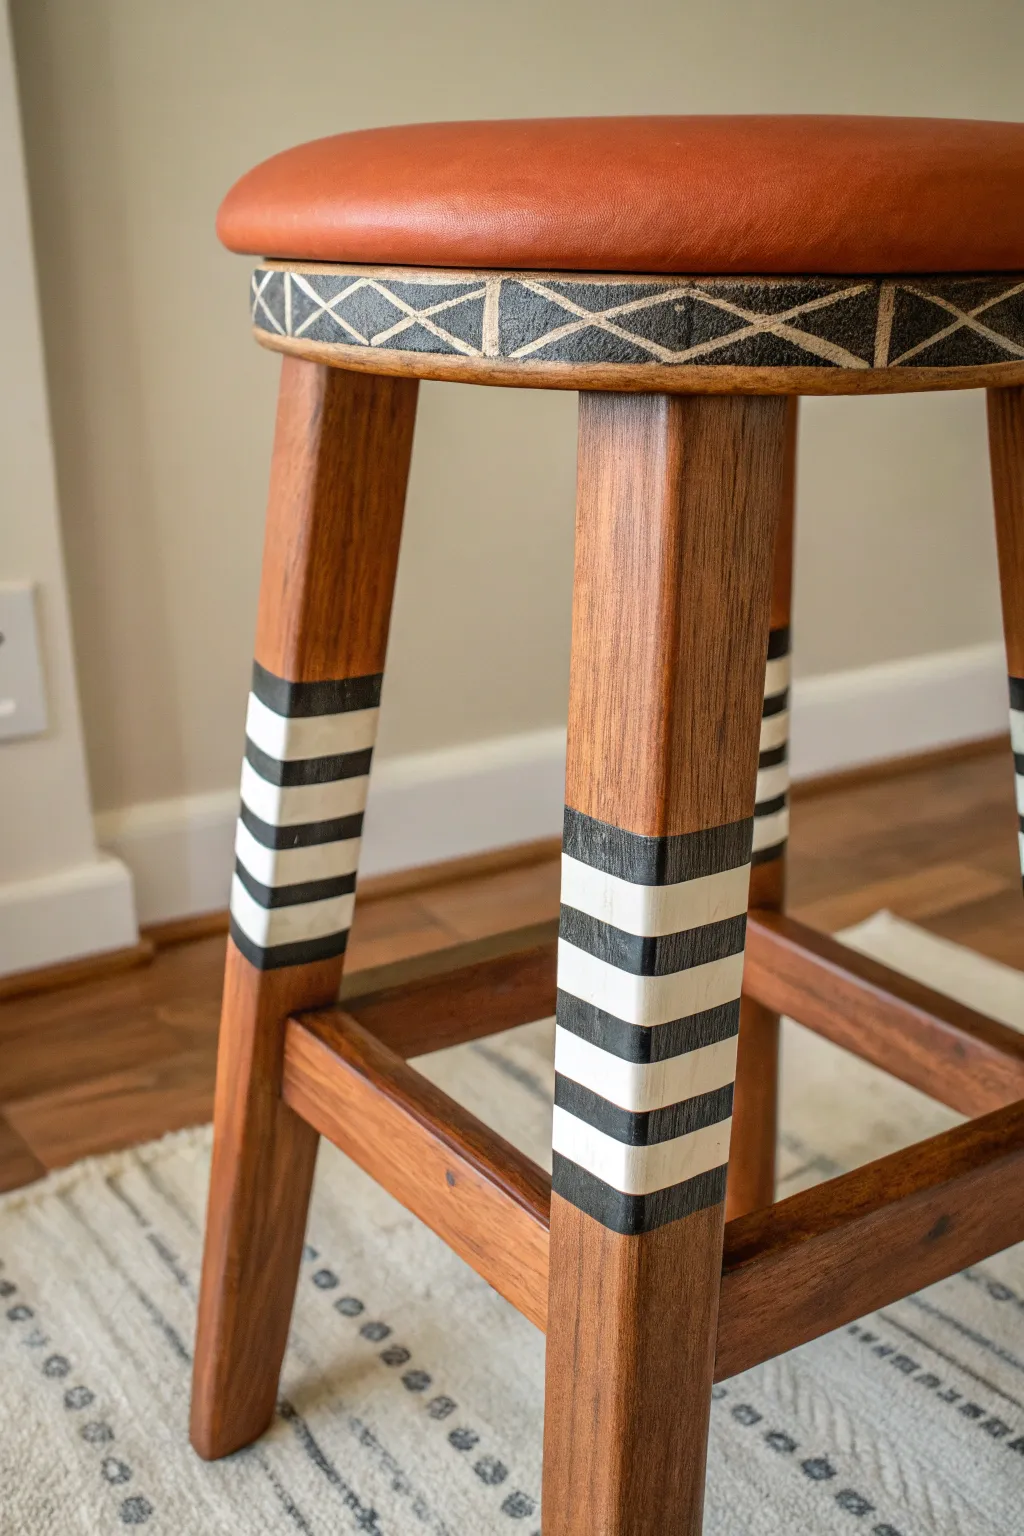
Transform a plain wooden bar stool into a statement piece with this bold, monochromatic design featuring crisp leg stripes and a geometric rim pattern. The contrast between the natural wood, black accents, and cream details creates a striking look that feels both modern and handcrafted.
Step-by-Step Tutorial
Materials
- Wooden bar stool with round seat
- Sandpaper (120 and 220 grit)
- Painter’s tape (1-inch width)
- Black acrylic or chalk paint
- Cream or off-white acrylic paint
- Small flat artist brush
- Medium flat brush
- Detail liner brush
- Clear matte polyurethane or wax
- Ruler or measuring tape
- Pencil
Step 1: Preparation & Base Work
-
Clean the surface:
Wipe down the entire stool with a damp cloth to remove dust and grease. Let it dry completely before starting any work. -
Light sanding:
Scuff sand the areas you plan to paint—specifically the rim under the seat and the middle sections of the legs—using 220-grit sandpaper. This helps the paint adhere better without stripping the original finish entirely. -
Measure the leg bands:
Decide where you want the striped sections to sit on the legs. Measure about 6-8 inches down from the seat and mark a top line. Then measure 4-5 inches down from that mark for the bottom line. -
Tape off the boundaries:
Wrap painter’s tape around the leg at your top and bottom marks to create a clean boundary for your painting area. Ensure the tape is level on all four legs.
Step 2: Creating the Striped Legs
-
Paint the background block:
Using your medium flat brush, paint the area between the tape lines solid black. Apply two thin coats for opaque coverage, letting the first coat dry for about 20 minutes before applying the second. -
Mark stripe placement:
Once the black block is fully dry, use a ruler and a white chalk pencil or light pencil mark to measure even intervals for your cream stripes. Spacing them about 1/2 inch apart works well. -
Paint the cream stripes:
Using a small flat artist brush, carefully paint horizontal cream bands over the black background at your marked intervals. I find steadying my hand against the leg helps keep these lines straight. -
Refine the edges:
Go over the cream stripes a second time to ensure the lighter color pops against the dark background. Use a liner brush to touch up any black areas if your cream paint drifted outside the lines. -
Remove tape:
Carefully peel away the boundary tape while the paint is still slightly tacky to prevent peeling up dried chips.
Straight Stripe Trick
For perfectly crisp stripes on round legs, use narrow automotive detailing tape (1/4 inch) instead of standard painter’s tape. It flexes better around curves.
Step 3: Designing the Geometric Rim
-
Base coat the rim:
Paint the circular wooden rim directly beneath the seat cushion with your black paint. Apply two coats for full coverage. -
Mark the diamond pattern:
Measure the circumference of the rim and divide it into equal sections. Mark these lightly with a pencil to determine the centers of your diamonds. -
Paint the X shapes:
Using your detail liner brush and cream paint, draw a continuous series of large ‘X’ shapes around the rim. The top and bottom points of neighboring X’s should meet to form diamonds. -
Fill the intersections:
Add vertical lines connecting the top and bottom meeting points of the diamonds. This creates the segmented tribal look seen in the photo. -
Distress (Optional):
If you prefer a worn look, lightly sand the painted rim with 220-grit paper to reveal bits of the black or wood underneath the cream lines.
Uneven Lines?
If your hand-painted lines look shaky, embrace it. The slight imperfections give this specific tribal pattern its authentic, handcrafted character.
Step 4: Finishing Touches
-
Check for consistency:
Step back and look at the stool from a distance. Touch up any stripes on the legs that look crooked or uneven. -
Let paint cure:
Allow all painted sections to dry overnight to ensure the paint has fully hardened. -
Apply sealant:
Brush on a coat of clear matte polyurethane or apply clear wax over the painted sections only. This protects the leg designs from scuffs and shoes. -
Clean the upholstery:
Give the leather or vinyl seat a final wipe with a conditioner or cleaner to make it shine and contrast beautifully with your new paint job.
Enjoy the rhythmic pattern and custom flair your updated stool brings to the room


Black-and-White Checkerboard Seat
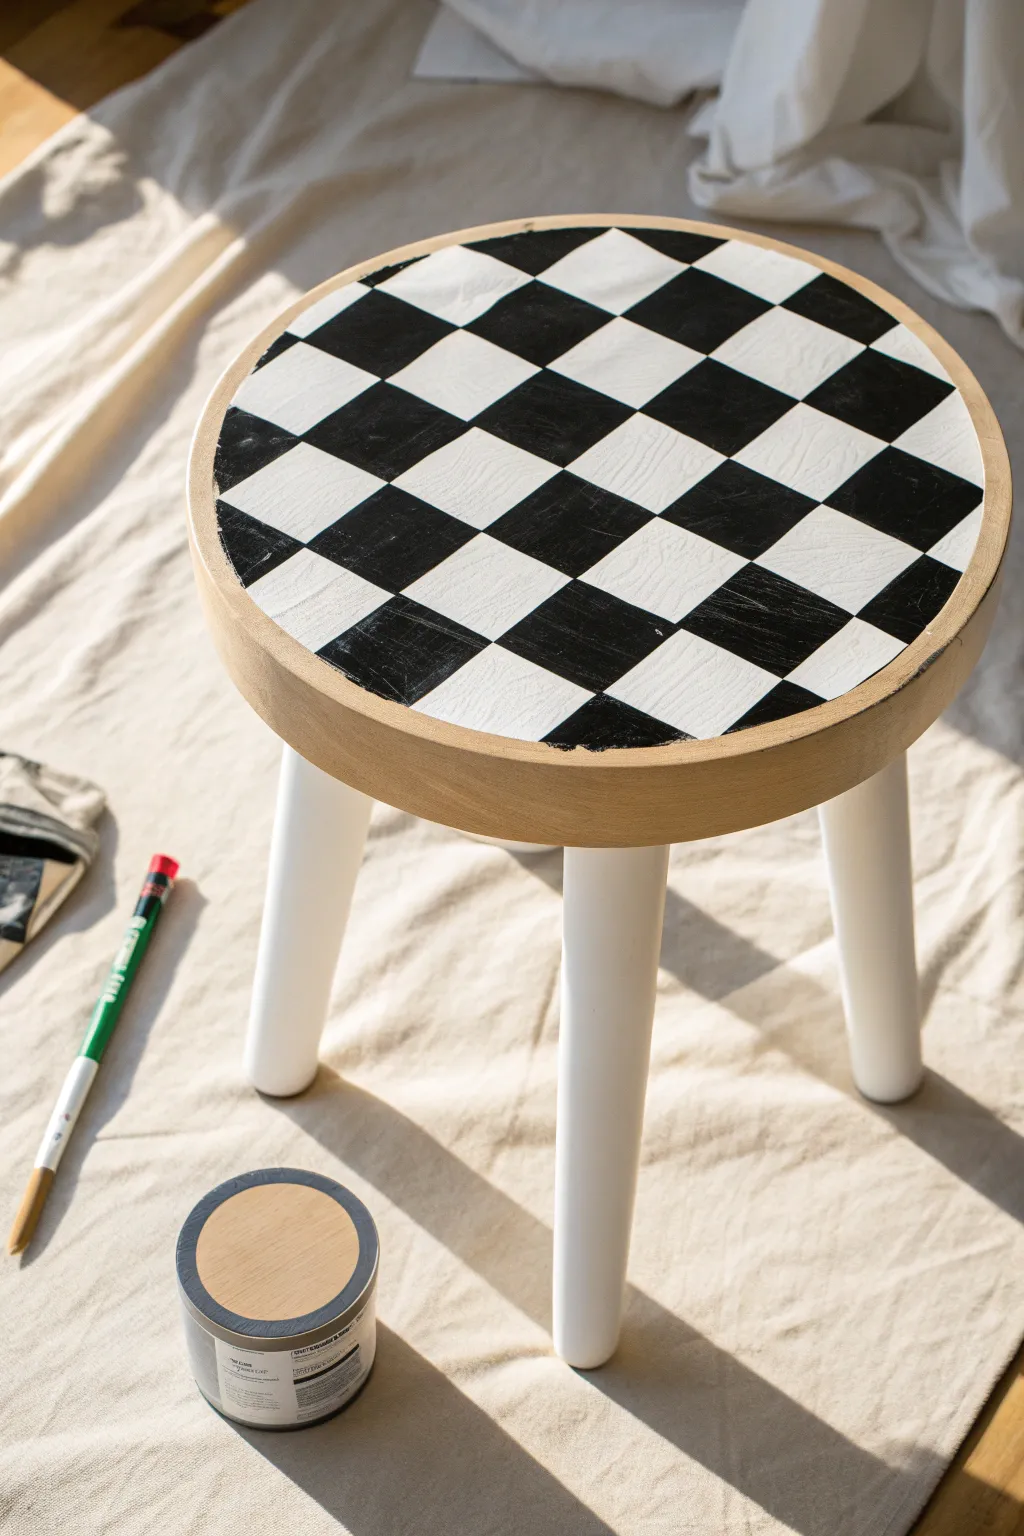
Transform a plain wooden stool into a statement piece with this classic black and white checkerboard design. The contrast between the crisp geometric pattern and the natural wood rim creates a modern yet timeless look perfect for any corner of your home.
How-To Guide
Materials
- Round wooden stool (unfinished or sanded)
- White acrylic or chalk paint
- Black acrylic or chalk paint
- Painter’s tape (1-inch width works well)
- Pencil
- Ruler or straight edge
- Medium flat paintbrush
- Small detail paintbrush
- Sandpaper (medium and fine grit)
- Clear matte or satin sealant (polycrylic)
- Drop cloth or old sheet
Step 1: Preparation & Base Coat
-
Prep the surface:
Begin by sanding the entire stool with medium-grit sandpaper to remove any existing finish or rough spots. Follow up with fine-grit sandpaper for a smooth painting surface. Wipe away all dust with a damp cloth. -
Protect the rim:
Since we want to keep that lovely natural wood edge around the seat, carefully apply painter’s tape around the vertical side of the seat rim. Press down firmly to prevent paint bleed. -
Paint the legs:
Turn the stool upside down or on its side. Apply a coat of white paint to the legs. Let this dry completely. -
Add a second coat:
Apply a second coat of white to the legs to ensure solid, opaque coverage. While you are at it, check for any drips and smooth them out. -
Base the seat:
Flip the stool upright. Paint the entire top surface of the seat white. Extend the paint just slightly over the edge to meet your tape line, ensuring no wood shows through on top. -
Allow to cure:
Let the white seat base dry thoroughly. I prefer to let this sit for at least a few hours or overnight, as hard paint is essential for the taping step.
Bleed-Through Blues?
If paint bleeds under the tape, wait for it to dry fully. Then, scrape the excess gently with a craft knife or use a tiny brush with the base color to square it off.
Step 2: Creating the Grid
-
Find the center:
Using your ruler, measure across the seat to find the exact center point. Mark it lightly with a pencil. -
Draw the grid lines:
Draw perpendicular lines through your center point to create a cross. Then, measure out evenly spaced parallel lines from that center cross to create a grid across the whole surface. A 2-inch square size is usually a good scale. -
Mark the black squares:
To avoid confusion later, lightly mark an ‘X’ or a small dot in every square that needs to be painted black. This simple step saves so much headache! -
Tape the first set:
Apply strips of painter’s tape along the OUTSIDE edges of your pencil lines for the first set of black squares. You can’t tape everything at once, so focus on alternating rows first. -
Seal the tape edges:
Brush a very thin layer of WHITE paint over the edges of your tape where the black paint will go. This seals the tape and prevents black paint from bleeding underneath.
Pro Sealing Tip
When applying the final clear coat, use a foam brush instead of bristles to minimize brush strokes on the smooth checkerboard surface.
Step 3: Applying the Pattern
-
Paint black squares:
Using your medium flat brush, fill in the exposed squares with black paint. Apply thin, even layers. -
Remove tape and repeat:
Carefully peel off the tape while the paint is still slightly tacky. Let the black paint dry completely, then re-tape to expose the remaining squares, repeat the white sealing trick, and paint them black. -
Touch ups:
Once all tape is removed and the grid is complete, use a small detail brush to fix any lines that aren’t perfectly crisp or spots where paint might have lifted. -
Clean the rim:
Remove the tape from the seat rim. If any paint seeped onto the wood edge, carefully sand it away with fine-grit sandpaper to restore the natural look. -
Seal the project:
Apply a clear polycrylic topcoat over the entire stool—seat and legs—to protect your hard work from scratches and wear.
Now you have a stylish, custom piece of furniture ready to add personality to your room.
BRUSH GUIDE
The Right Brush for Every Stroke
From clean lines to bold texture — master brush choice, stroke control, and essential techniques.
Explore the Full Guide
Geometric Tape Triangles on the Seat
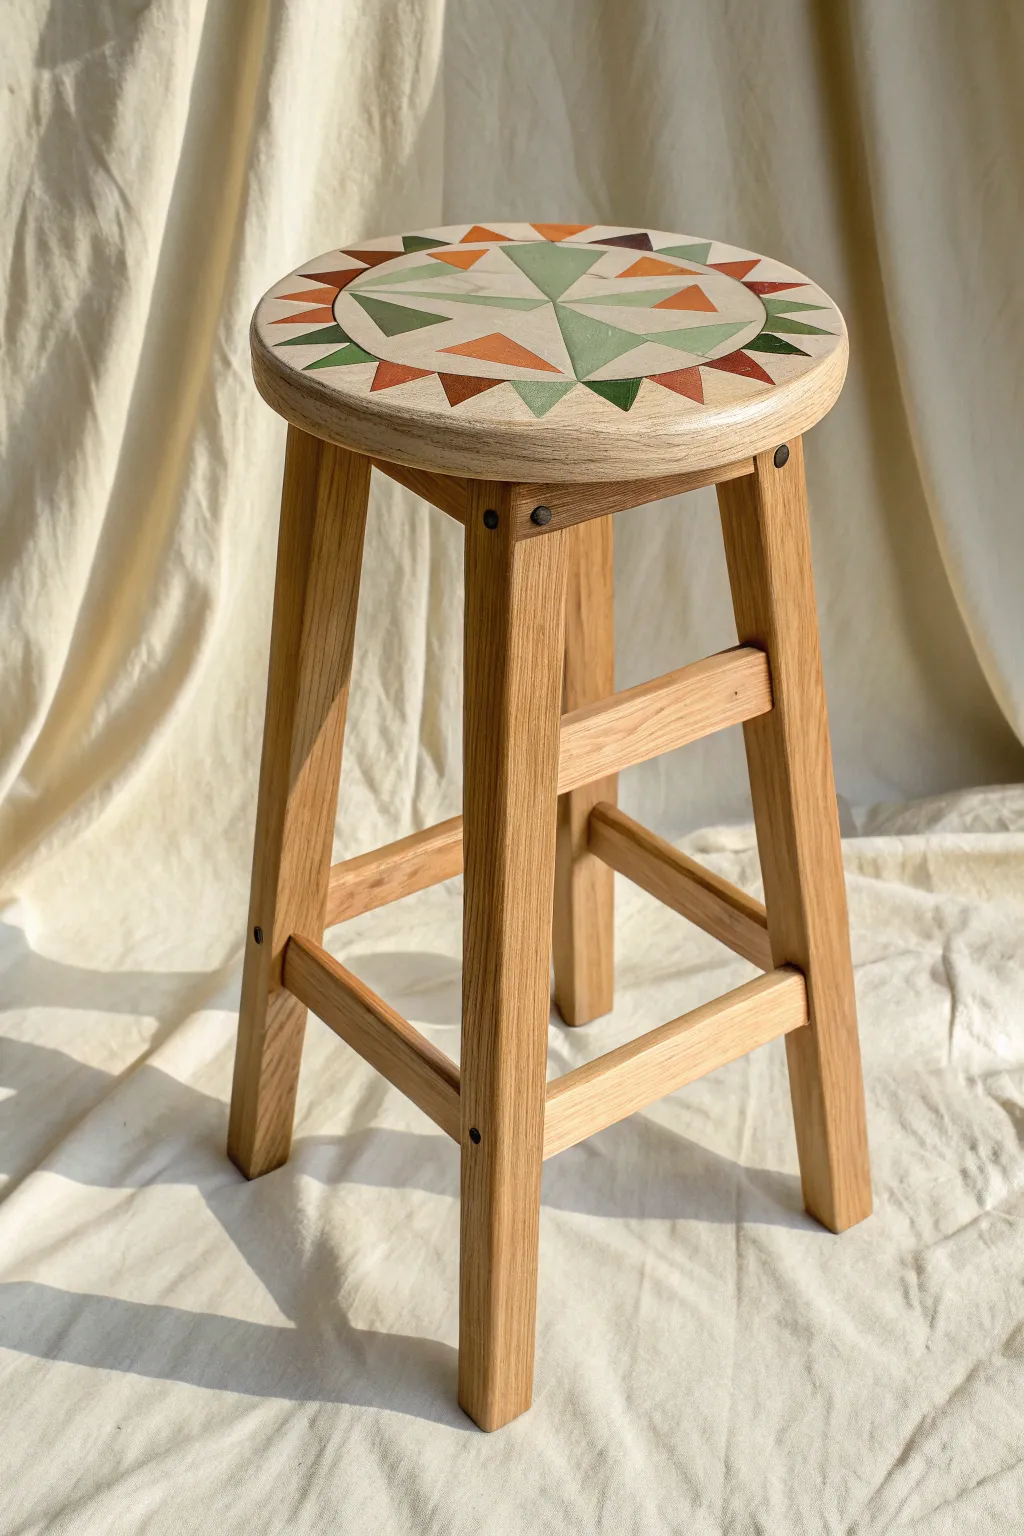
Transform a plain wooden stool into a stunning focal piece with this earthy, geometric compass design. Using masking tape to create crisp triangles, you’ll build a layered pattern that feels both modern and playfully rustic.
Step-by-Step Tutorial
Materials
- Round wooden stool (sanded)
- Painter’s tape or fine-line drafting tape (1/4 inch or similar)
- Acrylic paints (muted sage green, forest green, terracotta orange, deep brown, cream/off-white)
- Pencil and ruler
- Protractor or compass tool
- Medium flat synthetic brush
- Small detail brush
- Clear matte polyurethane or polycrylic sealer
- Sandpaper (220 grit)
- Damp cloth
Step 1: Prep and Mapping
-
Sand the surface:
Begin by sanding the top of the stool with 220-grit sandpaper to remove any old finish or rough spots. Wipe it down thoroughly with a damp cloth to ensure a dust-free surface. -
Prime the base:
Apply a base coat to the seat if you want the negative space to be painted rather than raw wood. For this specific look, you can leave the wood raw or apply a very diluted whitewash to keep the grain visible but light. -
Find the center point:
Use a ruler to measure across the diameter of the seat in two directions to locate the exact center point. Mark it lightly with your pencil. -
Draw the circles:
Using a drawing compass, sketch two concentric circles starting from the center point. The inner circle will house the central star, and the outer band will hold the border triangles. -
Segment the design:
Use a protractor to divide your circle into equal segments—for this design, 8 main sections work perfectly. Draw straight lines through the center to the edge to create your guide grid.
Tape Tip
For intricate geometric patterns like this, cut your tape into smaller, manageable strips rather than trying to lay down long continuous pieces.
Step 2: Taping and Painting
-
Tape the central star:
Apply painter’s tape along your pencil lines to mask off the four large central diamond shapes. Tape ‘outside’ the lines so the shapes stay true to size. -
Seal the tape edges:
I like to run a fingernail or a credit card firmly over the tape edges to prevent any paint bleed. A tiny dab of your base color along the tape edge creates a perfect seal. -
Paint the first layer:
Fill in the alternating segments of the central start with your muted sage green and cream colors. Apply two thin coats rather than one thick one for smoother coverage. -
Remove tape and dry:
Peel the tape away while the paint is still slightly tacky to keep lines sharp. Let this section dry completely before taping over it for the next round. -
Tape the secondary triangles:
Mask off the smaller triangular points that sit between the main star points. Ensure your tape crosses over the dry paint gently to protect it. -
Add accent colors:
Paint these secondary triangles using the terracotta orange and a deeper forest green to create contrast. -
Create the border:
Move to the outer circle. Tape off a series of small alternating triangles along the rim. This requires patience, as you may need to paint every other triangle first, let dry, and then tape and paint the remaining ones. -
Paint the border pattern:
Fill these border triangles with a repeating sequence of your palette colors—brown, orange, green, and cream—to frame the design.
Step 3: Finishing Touches
-
Clean up edges:
Once all tape is removed and paint is dry, inspect your lines. Use a small detail brush dipped in the appropriate color (or the base wood tone) to tidy up any bleeds or jagged edges. -
Lightly sand:
Very gently pass over the painted design with a high-grit sandpaper (300+) just to knock down any raised paint ridges, making the seat feel smooth to the touch. -
Apply sealer:
Finish with a coat of clear matte polycrylic. Use long, even strokes across the entire seat to protect your artwork from wear and tear. -
Second coat:
After the first coat of sealer dries according to the can’s instructions, apply a second coat for extra durability
Go Metallic
Swap the terracotta or brown paint for a copper or gold metallic acrylic to give the compass points a subtle shimmer that catches the light.
Now you have a custom piece suitable for extra seating or as a stylish plant stand
Polka Dots for a Playful Stool
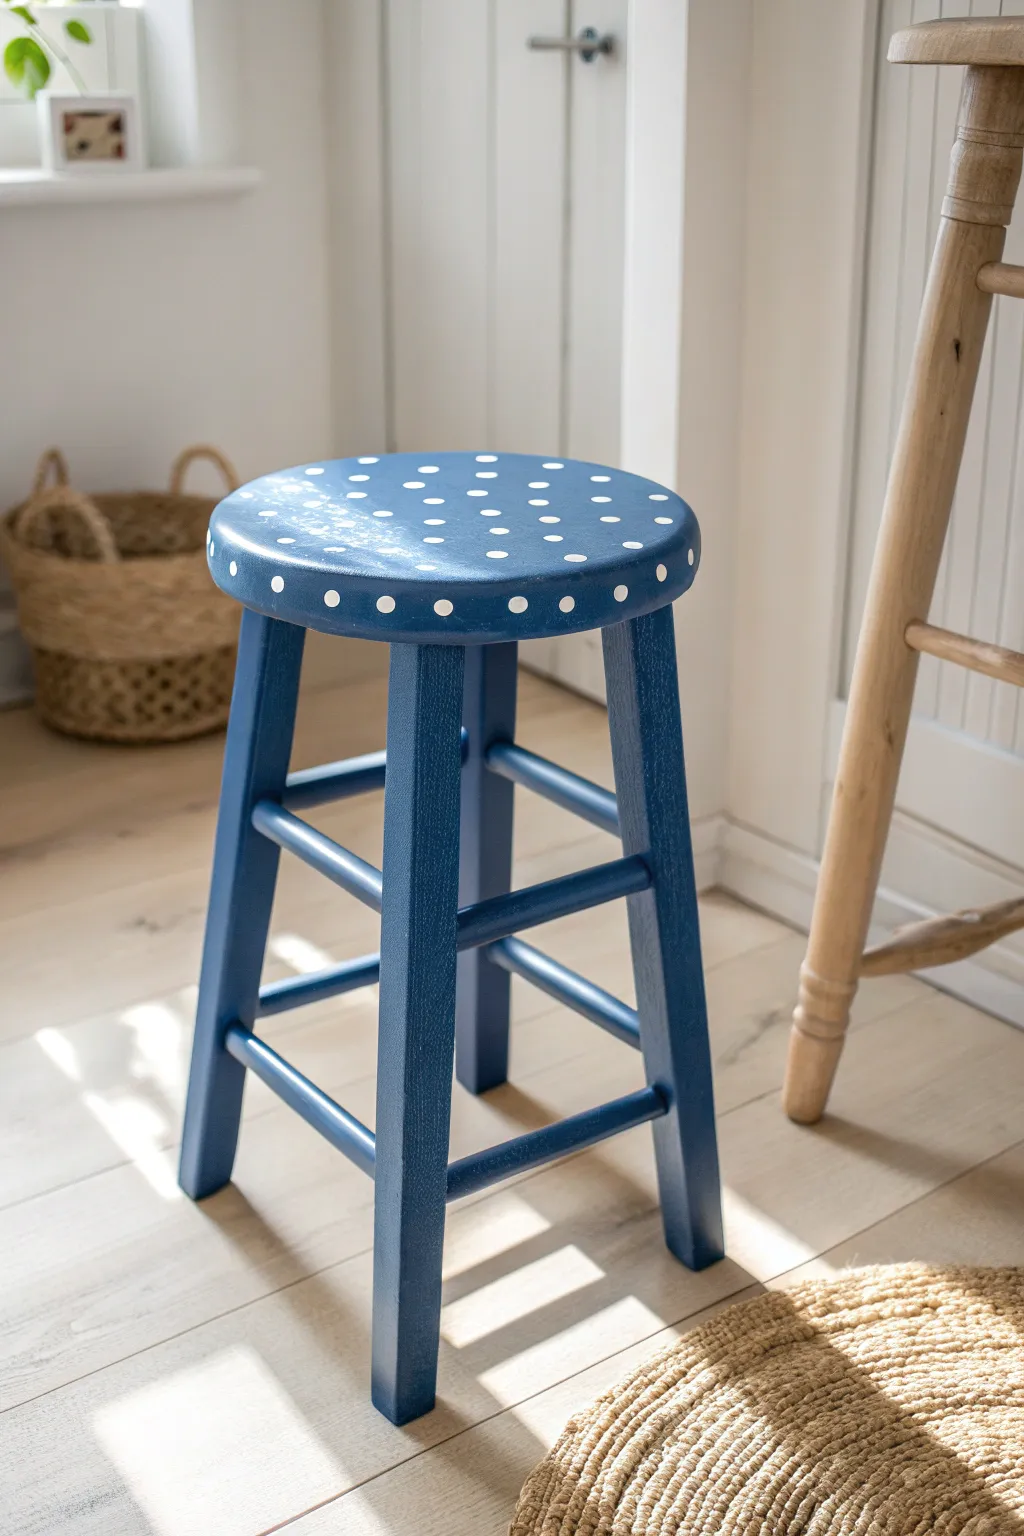
Transform a plain wooden stool into a charming accent piece with this classic polka dot design. Using a rich, deep blue base and crisp white accents, this project brings a playful yet sophisticated touch to any corner of your home, perfect for a kitchen nook or kid’s room.
Step-by-Step
Materials
- Wooden stool (unfinished)
- Medium-grit sandpaper (120-150 grit)
- Fine-grit sandpaper (220 grit)
- Tack cloth or damp rag
- Primer (suitable for wood)
- Deep denim blue acrylic paint or chalk paint
- White acrylic paint
- Medium flat synthetic paintbrush
- Small round paintbrush (for touch-ups)
- Foam pouncer or round sponge applicator (approx. 1/2 inch)
- Ruler or measuring tape
- Pencil or white chalk pencil
- Clear matte or satin polyurethane sealer
Step 1: Preparation & Base Coat
-
Prepare your workspace:
Set up in a well-ventilated area and lay down a drop cloth or old newspapers to protect your floor from paint drips and sanding dust. -
Sand the surfaces:
Using your medium-grit sandpaper, go over the entire stool to scuff up the surface. This is crucial whether the wood is raw or previously finished, as it gives the paint something to grip. -
Clean away debris:
Wipe down the entire stool thoroughly with a tack cloth or a slightly damp rag to remove all sanding dust. Ensure the surface is completely dry before moving on. -
Apply primer:
Brush on a thin, even coat of primer over the legs, rungs, and seat. This step ensures your deep blue color will look true and rich without soaking unevenly into the wood. -
Sand lightly between coats:
Once the primer is fully dry, give it a quick, gentle pass with fine-grit sandpaper to smooth out any brushstrokes or raised grain. -
Paint the first blue coat:
Using your medium flat brush and the deep denim blue paint, apply the first coat. Work in the direction of the wood grain, covering the legs and the underside of the seat first. -
Finish the base color:
Paint the top and edges of the seat last. Allow this first coat to dry completely according to the manufacturer’s instructions, then apply a second coat for full, opaque coverage.
Consistent Circles
Twist the foam pouncer slightly as you lift it off the wood. This breaks the paint suction and helps keep the center of the dot filled in solid rather than leaving a ring.
Step 2: Creating the Pattern
-
Plan your grid:
Using a ruler and a pencil (or white chalk pencil for better visibility on dark paint), lightly mark a grid on the seat top. I prefer spacing them about 1.5 to 2 inches apart to keep the look balanced. -
Prepare the pouncer:
Pour a small amount of white acrylic paint onto a paper plate or palette. Dip your foam pouncer into the paint, then dab it off slightly on a clean part of the plate to ensure it isn’t overloaded, which prevents globs. -
Stamp the top dots:
Press the foam pouncer straight down onto your marked grid points on the seat surface. Lift straight up to keep the circle crisp. Reload paint every 2-3 dots for consistency. -
Mark the side edge:
For the charming detail on the seat’s vertical edge, mark spacing that aligns with the gaps between the top dots, creating a staggered or offset look compared to the top surface. -
Stamp the side dots:
Carefully stamp your dots along the vertical edge of the seat. Hold the pouncer perpendicular to the curved surface to avoid smearing the circle into an oval shape. -
Touch up imperfections:
Once the white dots are dry, inspect them closely. If any edges look fuzzy, use a small round brush with a tiny bit of blue paint to tidy up the background, or add a second dab of white if the coverage looks thin. -
Let the pattern cure:
Allow the polka dots to dry thoroughly, ideally overnight, to ensure the distinct white paint doesn’t smear during the sealing process.
Ombré Effect
Mix varying amounts of blue into your white paint for each row of dots, creating a gradient that fades from bright white in the center to light blue at the edges.
Step 3: Sealing & Protection
-
Apply the first coat of sealer:
Stir your clear polyurethane well (don’t shake, bubbles are the enemy here). Apply a thin coat over the entire stool using a clean brush, starting from the bottom legs up to the seat. -
Sand for smoothness:
After the first coat of sealer is dry to the touch, very lightly sand with fine 220-grit sandpaper to knock down any dust nibs. -
Final seal:
Wipe away the dust again and apply a second, final coat of sealer. This provides durability against everyday use, especially on the seat where wear is most likely.
Now you have a delightfully dotted seat ready to add character to your space

PENCIL GUIDE
Understanding Pencil Grades from H to B
From first sketch to finished drawing — learn pencil grades, line control, and shading techniques.
Explore the Full Guide
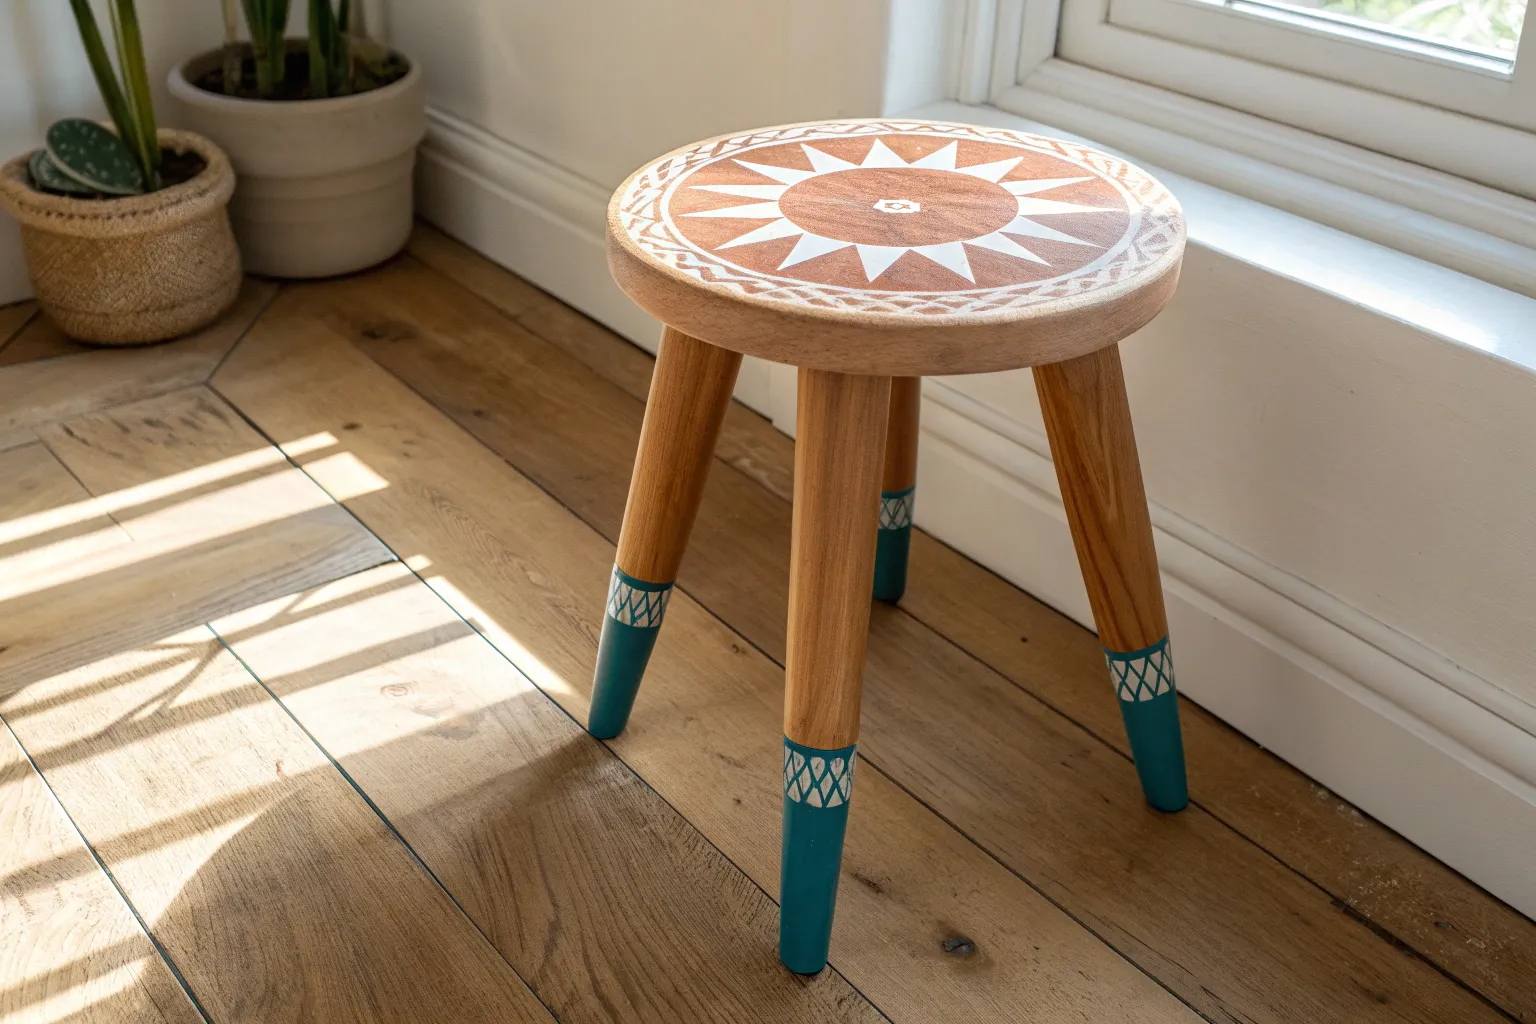
Mandalas and Dot Art on a Round Seat
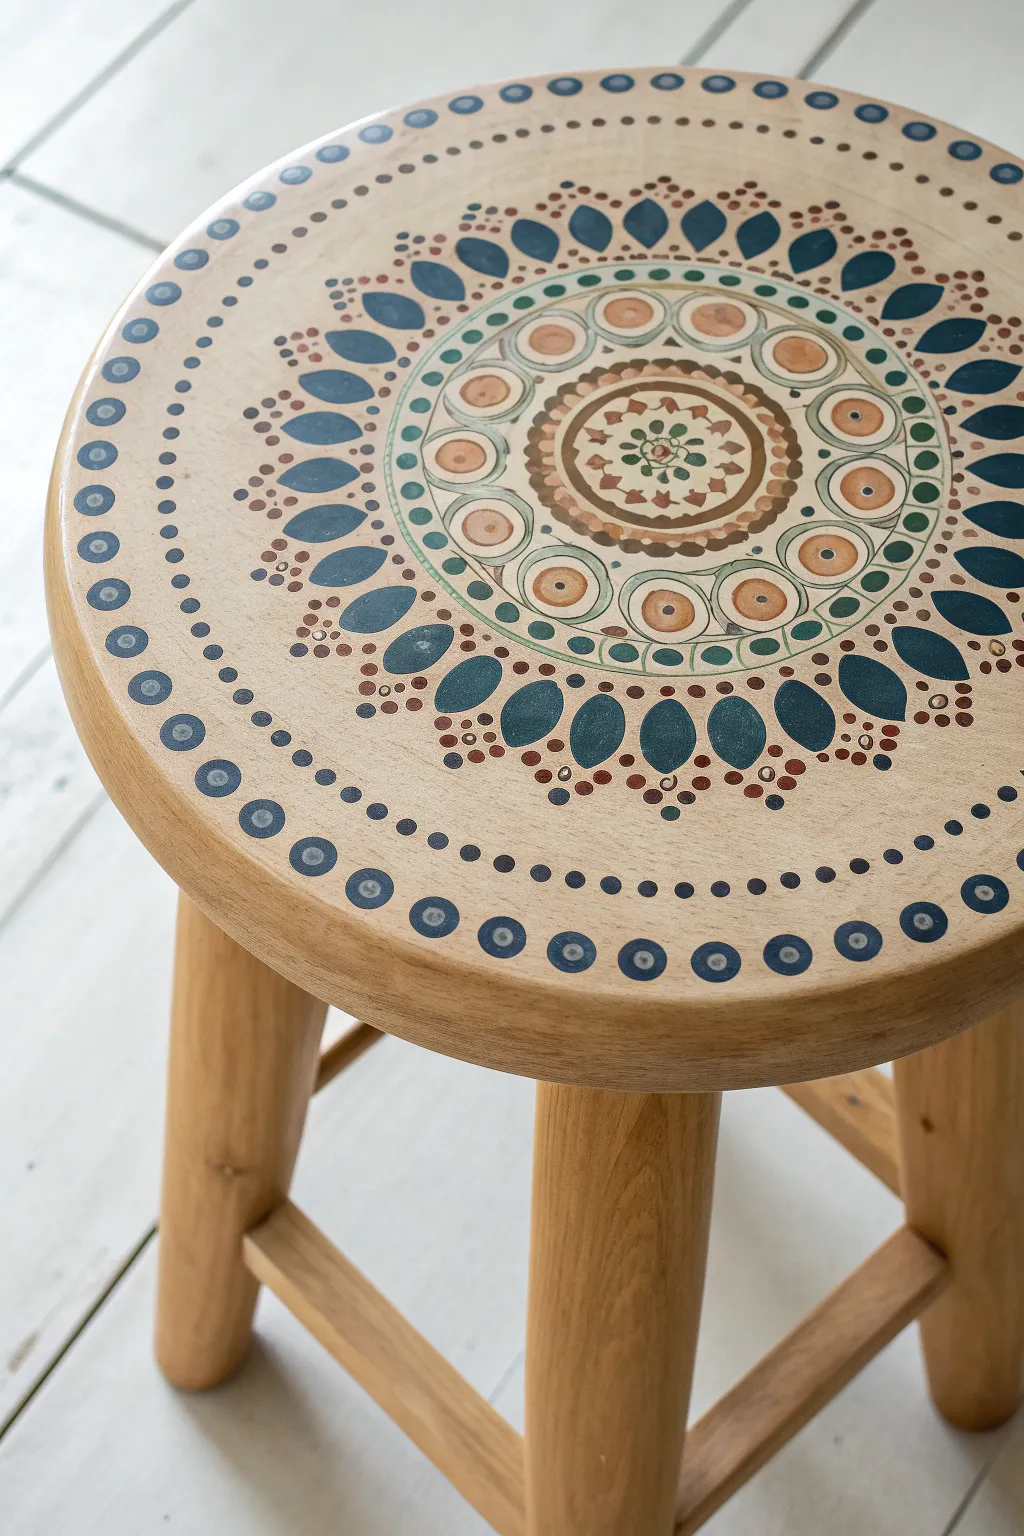
Transform a plain wooden stool into a stunning bohemian centerpiece with this intricate mandala design. Using a palette of soft teal, terracotta, and cream, this project combines traditional brushwork with satisfying dot art techniques for a harmonious, radiating pattern.
Step-by-Step Guide
Materials
- Round wooden stool (natural finish)
- Fine-grit sandpaper (220-grit)
- Acrylic paints: Teal/Dark Blue, Terracotta/Burnt Orange, Dark Brown, Cream/Off-White, Sage Green
- Chalk pencil or watercolor pencil (light color)
- Compass and ruler
- Round synthetic brushes (sizes 2, 4, and 6)
- Detail liner brush (size 0 or 00)
- Dotting tools (various sizes) or ends of brush handles
- Matte or satin clear wood varnish
Step 1: Preparation and Mapping
-
Prep the surface:
Begin by lightly sanding the top of the stool to ensure a smooth painting surface. Wipe away all dust with a damp cloth or tack cloth. -
Find the center:
Using a ruler, locate the exact center of the stool seat and mark it lightly with your chalk pencil. -
Draw concentric circles:
Set your compass to the center point. Draw a small circle (approx. 2 inches diameter) for the core, followed by a slightly larger ring (3 inches). Continue drawing concentric rings outward, spacing them about 1.5 to 2 inches apart, until you reach nearly the edge of the seat. -
Mark the outer rim:
Draw one final ring very close to the beveled edge of the stool to serve as a guide for the outer border dots.
Step 2: Painting the Core Mandala
-
Paint the center motif:
In the very center circle, use a small round brush to paint a cream background. Let it dry, then paint a small terracotta flower shape with a green center dot. -
Create the inner border:
Paint the ring immediately surrounding the center motif with a solid band of terracotta. While this dries, move to the next section to avoid smudging. -
Add the circle ring:
In the next concentric band (moving outward), paint a series of medium-sized cream circles. Fill the center of each cream circle with a smaller terracotta dot. -
Detail the circle ring:
Using your detail liner brush and dark brown paint, outline the terracotta band and the band containing the cream circles to sharpen the definition. -
Paint the green ring:
Paint a thin band of sage green around the circle layer. Once dry, use a small dotting tool to add tiny dark green or brown dots along this line. I find rotating the entire stool as I work helps keep the spacing consistent.
Clean Circles Hack
If your hand is shaky, rest your pinky finger on the dry wood surface to stabilize your brush hand while painting the fine circular outlines.
Step 3: The Petal Layer
-
Outline the main petals:
In the wide middle section of the seat, use a chalk pencil to sketch large, teardrop-shaped petals radiating outward. Aim for symmetry, fitting about 16-20 petals around the circle. -
Fill the petals:
Fill these teardrop shapes with your deep teal paint. Use a size 4 brush for the body of the petal and a smaller brush to get sharp points. -
Add petal details:
Once the teal is dry, use a dotting tool to place a tiny terracotta dot at the wide base of each petal. -
Fill the negative space:
In the spaces between the teal petals, near the center, create clusters of tiny brown and terracotta dots. This ‘stippling’ effect adds texture without overwhelming the design.
Uneven Dots?
If your paint dots have peaks or ‘Hershey Kiss’ tips, the paint is too thick. Thin it slightly with a drop of water or pouring medium for flatter, uniform dots.
Step 4: Outer Rim and Finishing
-
Create the border pattern:
Move to the outer edge of the stool. Using a large dotting tool or the back of a paintbrush, stamp large dark blue circles evenly spaced around the rim. -
Connect the border:
Using a smaller dotting tool, place a series of smaller dark blue dots between the large circles to create a connected chain effect. -
Detail the border dots:
Once the large blue border dots are fully dry, add a smaller grey or light blue dot in the center of each one to create a ‘bullseye’ look. -
Add final flourishes:
Look over your design. Use your smallest dotting tool to add tiny white highlight dots on the terracotta circles and the center flower. -
Erase guidelines:
Allow the paint to cure for at least 24 hours. Gently erase any visible chalk lines with a damp cotton swab or soft eraser. -
Seal the artwork:
Protect your work by applying two to three thin coats of matte or satin varnish. Allow ample drying time between coats to ensure a durable finish for sitting.
Place your newly painted stool in a sunny corner and enjoy the handcrafted warmth it brings to your room.
Folk Art Floral Wreath Seat Design
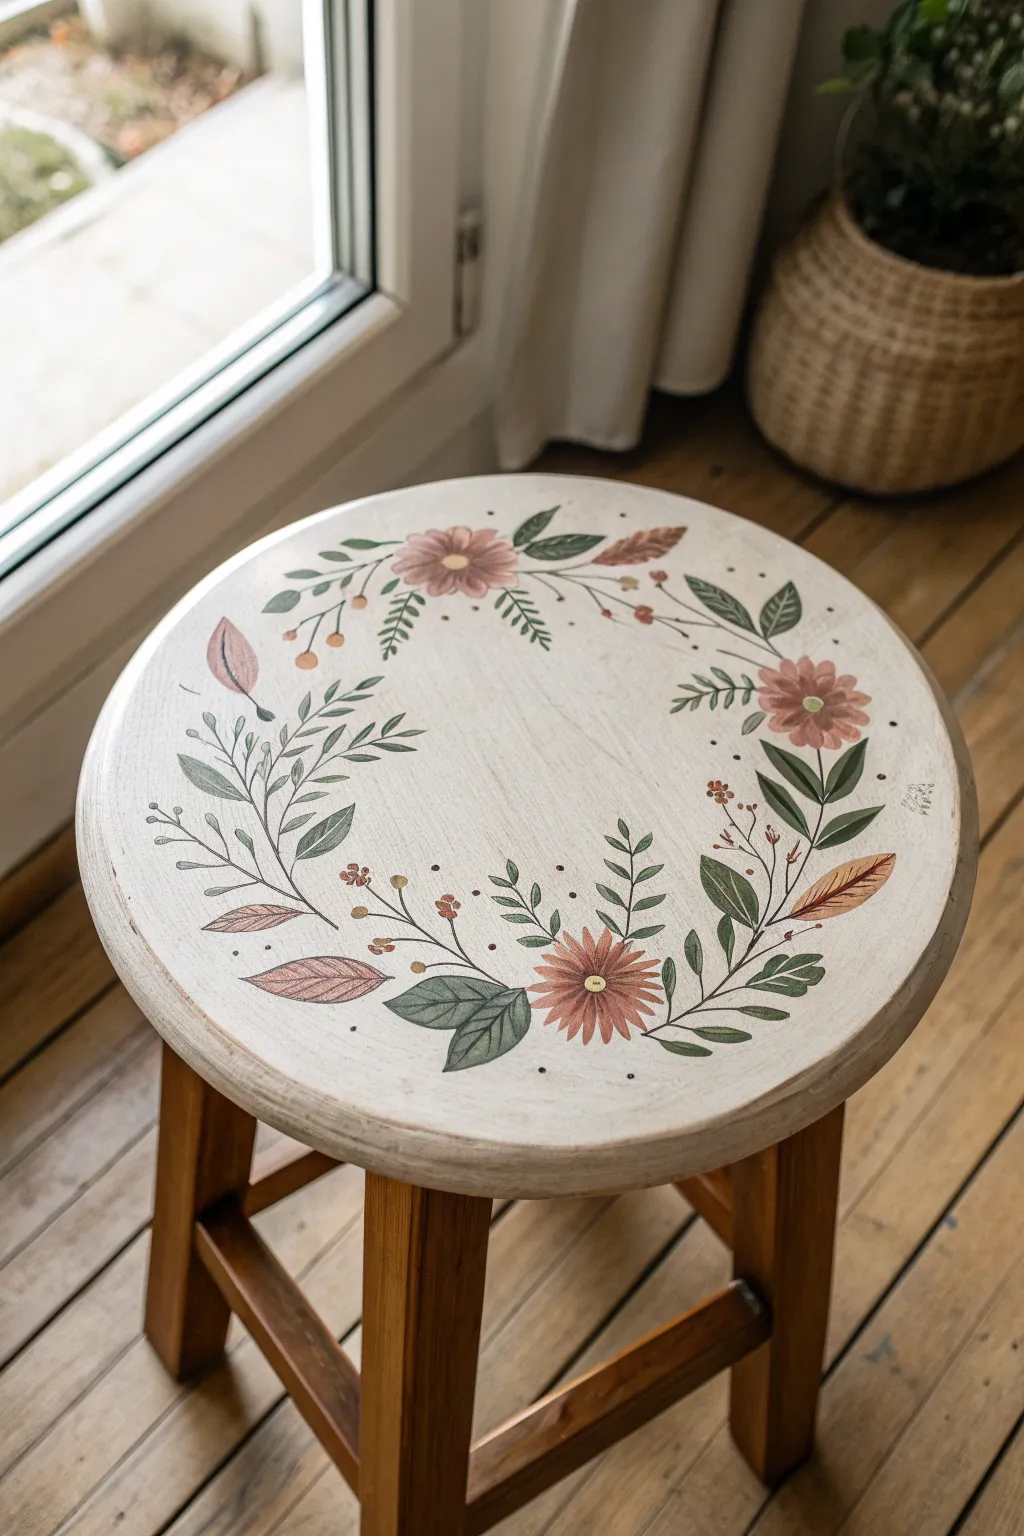
Transform a plain wooden stool into a charming piece of cottagecore décor with this delicate floral wreath design. Using a soft, whitewashed base allows the natural wood grain to peek through while providing a perfect canvas for muted pink blooms and sage greenery.
How-To Guide
Materials
- Wooden stool (unfinished/sanded)
- Chalk paint (cream or off-white)
- Acrylic craft paints (dusty rose, terracotta, sage green, forest green, deep brown)
- Medium flat brush
- Small #2 and #4 round brushes
- Fine liner brush
- Sandpaper (220-grit)
- Pencil (H or HB)
- Matte clear sealant spray
Step 1: Base Preparation
-
Surface Prep:
Begin by sanding the seat of your stool thoroughly with 220-grit sandpaper to ensure it is smooth and free of any previous varnish. Wipe away all dust with a damp cloth. -
Create the Wash:
Mix your cream chalk paint with a small amount of water (about a 2:1 ratio of paint to water) to create a semi-transparent wash. -
Apply Base Coat:
Using the medium flat brush, apply the wash evenly across the top of the seat. I find that brushing in the direction of the wood grain gives the most natural finish. -
Distress (Optional):
Once the paint is fully dry, lightly sand the edges of the seat again to reveal a bit of raw wood for a rustic, lived-in look.
Fixing Wobbly Lines
If your vine lines look shaky, thicken them slightly or add a leaf over the mistake. Nature isn’t perfect, so organic bumps often blend right in.
Step 2: Sketching the Wreath
-
Mark Guidelines:
To keep your wreath balanced, lightly mark a circle about 2 inches inward from the edge of the seat using your pencil. You can trace a dinner plate or bowl if you aren’t confident freehanding it. -
Placement of Main Blooms:
Sketch three simple circles unevenly spaced around your guideline to mark where the large hero flowers will go. -
Adding Leaf Flow:
Draw sweeping, curved lines connecting your flower placements to establish the ‘flow’ of the vines, ensuring all leaves point generally in a clockwise or counter-clockwise direction.
Add Antique Charm
Mix a tiny drop of brown paint with water and glaze over the dried design, focusing on the edges, to give the stool an aged, tea-stained patina.
Step 3: Painting the Foliage
-
Block in Main Stems:
Load your #4 round brush with forest green diluted slightly with water. Paint the main curved stems over your pencil lines with confident, fluid strokes. -
Leaf Silhouettes:
Switch to sage green. Using the simple press-and-lift technique, add almond-shaped leaves along the stems. Vary the pressure to make some leaves plump and others slender. -
Adding Contrast Leaves:
Interperse darker green leaves near the base of the flower clusters to add depth and visual weight to the arrangement. -
Painting Feathery Fronds:
Use the liner brush and forest green paint to create delicate, fern-like sprigs that extend outward from the main vine, keeping the strokes very light and feathery.
Step 4: Flowers and Details
-
Base Flower Petals:
Using the dusty rose paint and a #4 brush, paint the petals of the main flowers. Start from the center and pull outward, making each petal slightly distinct. -
Layering Petal Colors:
While the rose paint is still slightly tacky, streak in a tiny bit of terracotta or white on a few petals to create dimension and soft highlights. -
Painting Broad Leaves:
Mix a brownish-pink hue for the larger, singular decorative leaves (like the one at the bottom left) and paint them in, adding a central vein line once dry. -
Berry Sprigs:
With your fine liner brush and terracotta paint, draw tiny stems extending from the main vine, topping them with small dots for berries. -
Flower Centers:
Dip the tip of a brush handle or use the liner brush to place a yellow or ochre dot in the center of each main flower. -
Final Dots and Accents:
Sprinkle tiny dots of dark brown or black around the wreath using the tip of the liner brush to fill negative space and add texture. -
Sealing:
Allow the design to cure for at least 24 hours. Finish by spraying two light coats of matte clear sealant to protect your artwork from wear and tear.
Enjoy your beautiful, hand-painted seat as a cozy addition to any corner of your home


Blossom Branch Stencil Moment
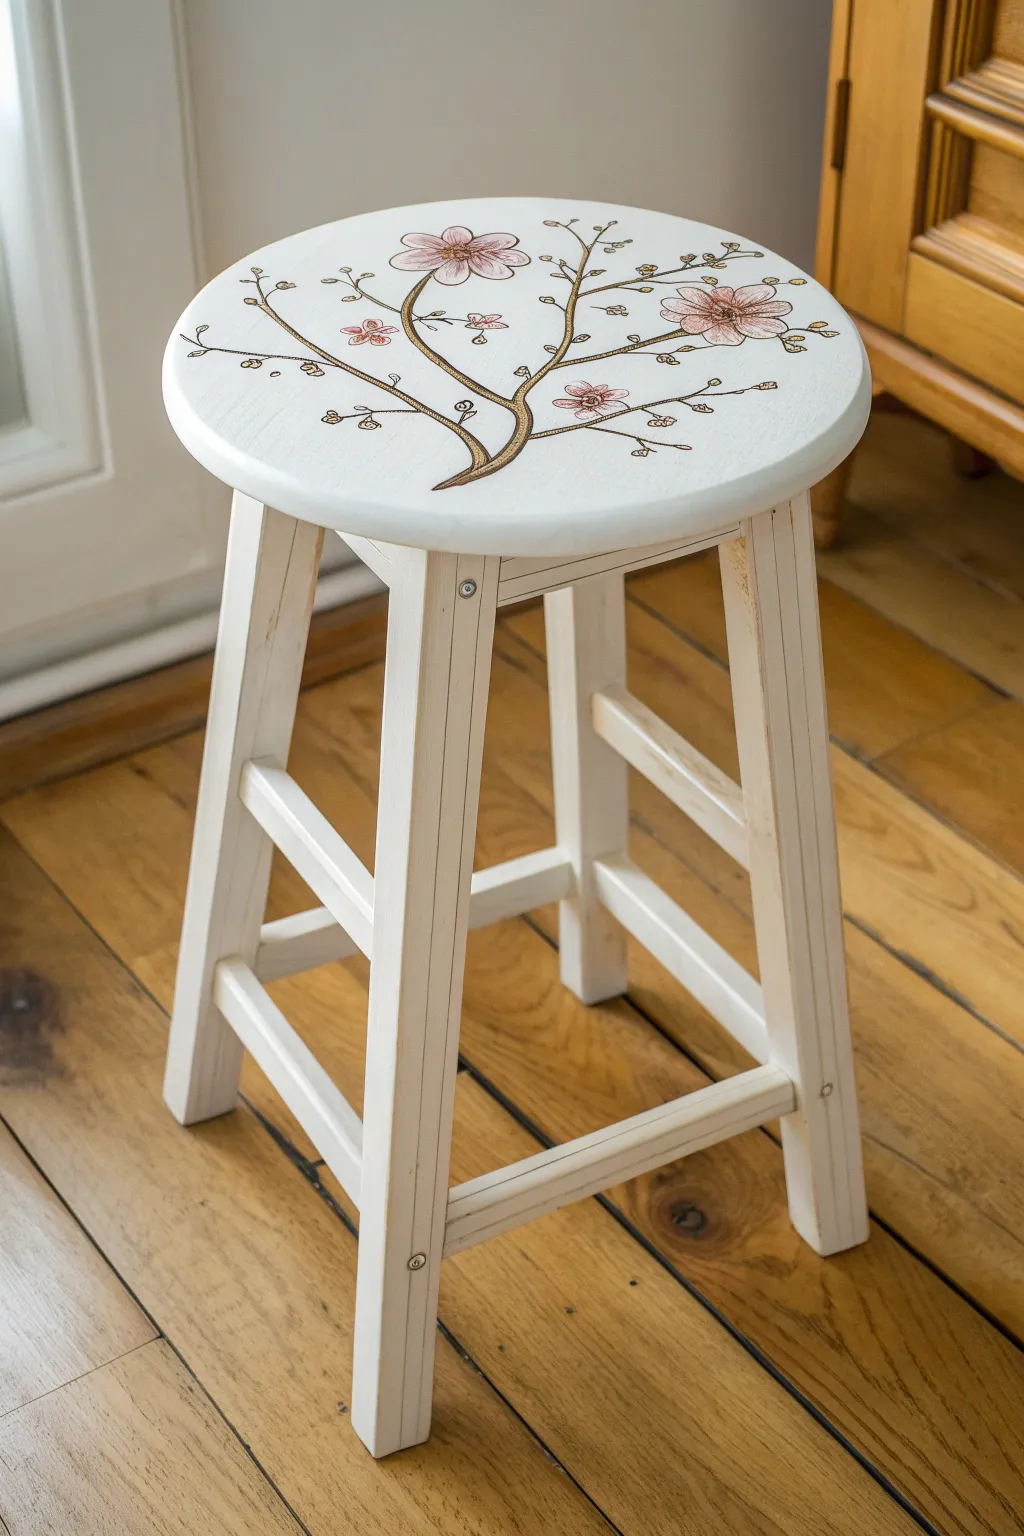
Transform a basic wooden seat into an elegant accent piece with this delicate cherry blossom motif. The combination of crisp white paint and soft pink florals creates a serene, nature-inspired look perfect for brightening any corner.
Detailed Instructions
Materials
- Wooden bar stool (round top)
- Sandpaper (120 and 220 grit)
- White chalk paint or acrylic furniture paint
- Clear matte varnish or polyurethane
- Fine detail paintbrush (size 0 or 1)
- Medium flat brush for base coating
- Pencil and eraser
- Acrylic paints: Dark brown/bronze, soft pink, darker mauve/rose
- Carbon paper (optional)
- Printed blossom branch pattern (optional)
Step 1: Preparation & Base Coat
-
Prepare the surface:
Begin by sanding the entire stool, focusing on the seat to create a smooth canvas. If the stool has a previous glossy finish, scuff it thoroughly with 120-grit sandpaper so the new paint adheres. -
Clean thoroughly:
Wipe the entire piece down with a damp tack cloth to remove every speck of dust. Any debris left behind will create bumps in your painted design later. -
Apply the first coat:
Using your medium flat brush, apply a coat of white chalk paint to the entire stool. Paint in the direction of the wood grain for the smoothest finish. -
Let it dry completely:
Allow the first coat to dry for at least 2 hours. Chalk paint dries quickly, but you want a solid foundation before adding the second layer. -
Add the second coat:
Apply a second layer of white paint to ensure full opacity. If you want a slightly distressed look on the legs like the photo, you can apply this layer a bit thinner in areas where wear would naturally occur.
Step 2: Creating the Design
-
Plan the placement:
Decide how the branch will flow across the seat. A slightly off-center composition, with the thickest part of the branch starting near the edge, often looks most dynamic. -
Sketch the branch:
Lightly sketch the main branch structure directly onto the dry white paint using a pencil. If you aren’t confident freehanding, print a design you like and use carbon paper to trace the outline onto the seat. -
Paint the main branch:
Mix a dark brown paint with a tiny drop of metallic bronze if you want a subtle shimmer. Using your fine detail brush, paint the main thick branches, tapering them as they extend outward. -
Add finer twigs:
Switch to the very tip of your smallest brush to paint the delicate offshoot twigs. These lines should be very thin and somewhat irregular to mimic nature. -
Fix imperfections:
If a line gets too thick, don’t panic. Let it dry, then touch it up with a bit of your white base paint to thin the branch back down.
Troubleshooting Shaky Lines
Rest your pinky finger on a dry part of the stool while painting to stabilize your hand. If paint creates ridges, lightly sand with 400-grit paper before sealing.
Step 3: Adding the Blooms
-
Block in flower shapes:
Dip your clean detail brush into the soft pink acrylic. Paint simple five-petal shapes at the ends of several twigs. Keep the paint somewhat translucent or watered down slightly for a watercolor effect. -
Add depth to petals:
While the pink is still slightly tacky, touch the center of each flower with a tiny amount of the darker mauve color. Blend it outward slightly to create a gradient. -
Outline the details:
Once the pink petals are fully dry, use your finest brush and the dark brown paint to outline the petals very consistently. This creates that illustrative, botanical drawing style seen in the project. -
Add the stamen:
Paint tiny lines radiating from the center of each flower using the dark brown, adding small dots at the ends for the pollen anthers. -
Scatter small buds:
To balance the design, add tiny pink dots or small teardrop shapes along the branches to represent unbloomed buds. Outline these simply with brown.
Add Metallic Flair
Use gold leaf or metallic gold paint for the flower centers (stamens) instead of brown. It catches the light beautifully and adds a high-end touch.
Step 4: Finishing Touches
-
Distress the legs (optional):
If you want the rustic look, take 220-grit sandpaper and gently sand the edges of the stool legs and rungs until the wood underneath barely peeks through. -
Seal the artwork:
Since a stool seat sees a lot of friction, apply at least three thin coats of clear matte polycrylic varnish. Let each coat dry for 2 hours before applying the next. -
Final cure:
Let the stool cure for at least 24-48 hours before sitting on it or placing objects on top to ensure the varnish has hardened completely.
Now you have a charming, custom piece of furniture that brings a permanent touch of spring into your home.
Ombre Fade Seat in Sunset Colors
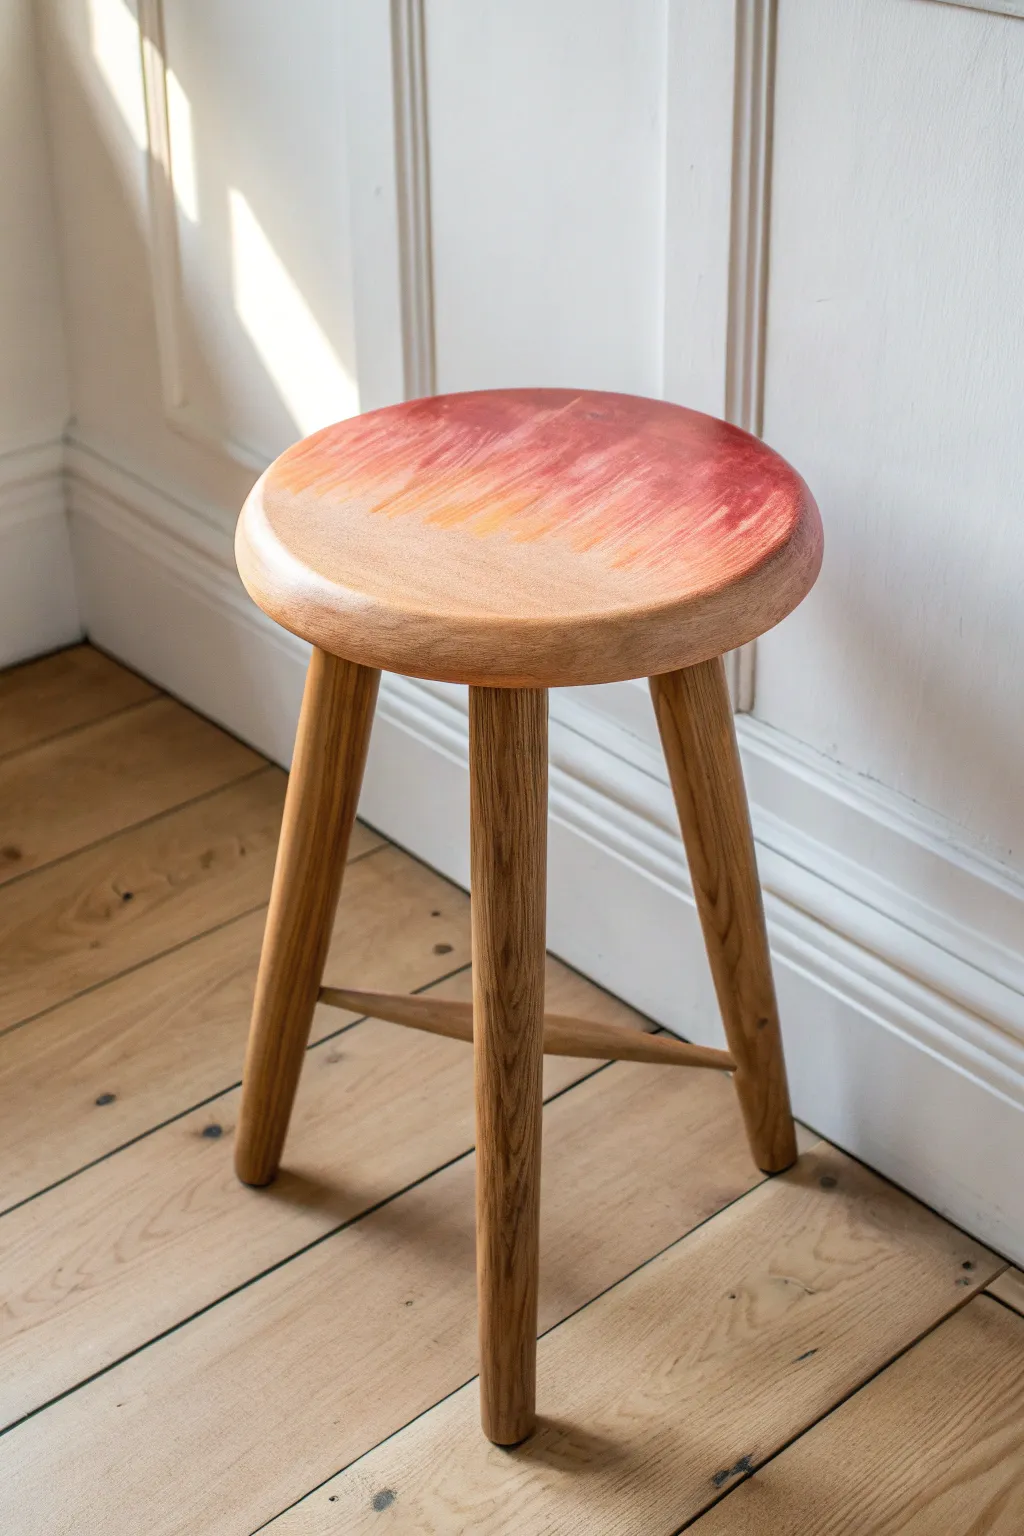
Bring the warmth of golden hour into your home with this stunning ombre stool project. By blending rich reds and oranges directly into the natural grain, you’ll create a sophisticated, dipped-dyed effect that feels both modern and organic.
Step-by-Step Tutorial
Materials
- Wooden stool (unfinished or sanded)
- Sandpaper (120, 220, and 400 grit)
- Tack cloth
- Water-based wood stain (Red/Berry)
- Water-based wood stain (Orange/Apricot)
- Clean cotton rags or staining pads
- Two foam brushes or small synthetic brushes
- Spray bottle with water (mister)
- Clear matte polyurethane or wax finish
Step 1: Preparation & Sanding
-
Assess the surface:
Begin by inspecting your stool. If it has an existing finish, you must sand it down completely to raw wood so the stain can soak in properly. -
Initial sanding:
Sand the entire seat surface with 120-grit sandpaper to remove any roughness or old varnish. Follow up with 220-grit for a smoother base. -
Clean the dust:
Wipe the stool down thoroughly with a tack cloth. Any leftover sawdust will create blotches in your gradient, so take your time here.
Fixing Hard Lines
If your gradient dried with a harsh line, lightly sand that specific boundary with 220-grit paper to soften it, then re-apply a tiny amount of diluted stain to blend.
Step 2: Creating the Sunset Gradient
-
Apply the darkest color:
Dip your foam brush into the red stain. Apply it generously to just one edge of the seat, covering about a quarter of the circle in a crescent moon shape. -
Feather the red edge:
While the red is still wet, use a clean rag to wipe the inner edge of the red section toward the center, feathering it out so there is no harsh line. -
Apply the orange tone:
Immediately apply the orange stain next to the feathered red edge. Overlap slightly with the fading red to encourage mixing. -
Blend the transition:
Using a fresh rag, rub the area where the red and orange meet. I find that using circular motions helps the pigments merge more naturally than straight wiping. -
Fade to natural wood:
Drag the inner edge of the orange stain out toward the clean wood using a slightly damp rag. You want the color to simply disappear into the grain. -
Dry brushing technique:
For a scratchier, artistic look like in the photo, take a nearly dry brush with a tiny amount of orange and lightly flick it from the painted area into the unpainted area. -
Mist for smoothness:
If the stain is drying too fast and creating hard lines, lightly mist the wood with your spray bottle to keep the gradient workable. -
Check the profile:
Don’t forget the side edge of the seat. Carry the gradient down the side so the design looks consistent from all angles. -
Evaluate and adjust:
Step back and look at the blend. If you want more intensity, let the first layer dry for 10 minutes and add a second coat just to the very outer rim. -
Let it cure:
Allow the stain to dry completely according to the manufacturer’s instructions. This usually takes at least 4-6 hours.
Add Texture
For a rustic look, use a coarse bristle brush instead of foam. The stiff bristles will leave subtle streak marks that enhance the ‘swept’ painted effect.
Step 3: Sealing & Finishing
-
Light sanding:
Once dry, very gently run 400-grit sandpaper over the stained area to knock down any raised grain. Do not sand hard or you will remove the color. -
Clean again:
Wipe away the fine dust with a tack cloth or a clean, lint-free rag. -
Seal the seat:
Apply a coat of clear matte polyurethane over the entire seat. The matte finish preserves the natural look of the wood while protecting the color. -
Protect the legs:
Since the legs are natural wood, you should apply the same clear sealer to them to prevent future staining or water damage. -
Final cure:
Let the topcoat cure for 24 hours before sitting on the stool or placing objects on it to ensure a durable finish.
Your new ombre stool is now ready to add a splash of artistic color to your room
Whimsical Mushroom Stool Transformation
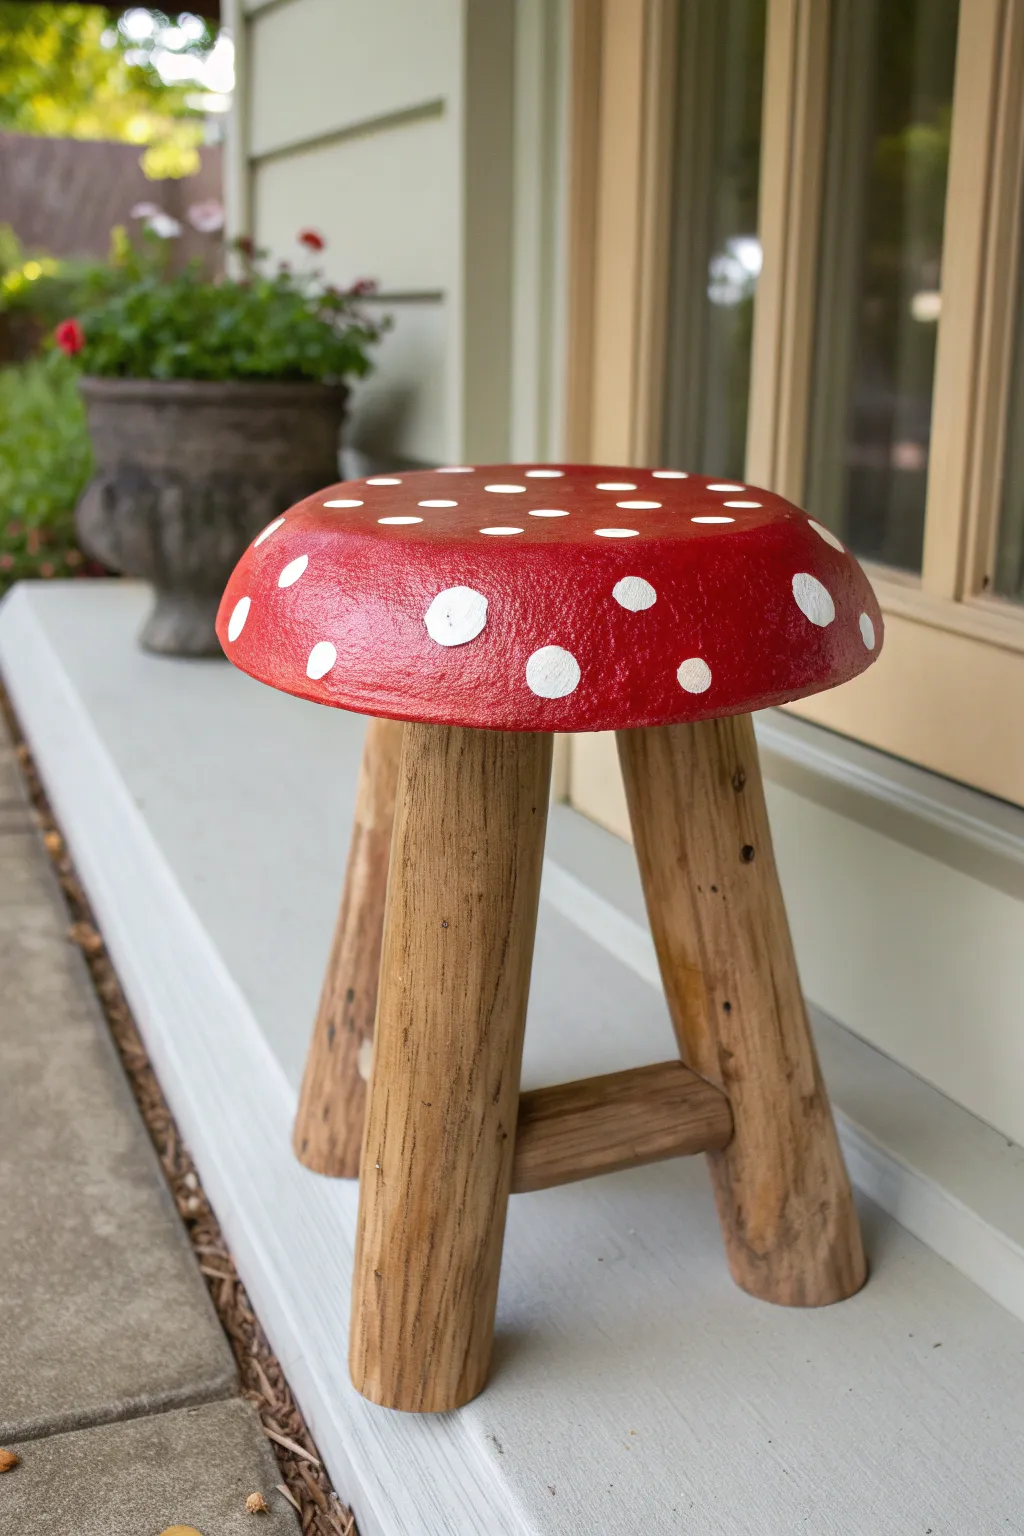
Turn a simple wooden stool into a charming piece of forest-floor decor with this playful mushroom makeover. The bright red cap and rustic wood legs create a perfect spot for little ones to perch or a unique plant stand for your porch.
How-To Guide
Materials
- Small wooden stool (round top)
- Sandpaper (120 and 220 grit)
- Tack cloth or damp rag
- Painter’s tape
- White primer (acrylic or latex based)
- Bright red acrylic paint (outdoor rated if for porch use)
- White acrylic paint
- Medium flat synthetic brush
- Small round detail brush
- Round foam pouncers (assorted sizes)
- Clear matte or satin polyurethane sealant
- Drop cloth
Step 1: Preparation and Priming
-
Surface Prep:
Begin by sanding the entire stool, paying special attention to the seat. If the wood is rough, start with 120 grit to smooth down bumps, then finish with 220 grit for a silky painting surface. -
Clean Up:
Wipe away all sanding dust thoroughly using a tack cloth or a slightly damp rag to ensure your paint adheres properly. -
Protect the Legs:
Since we want to keep the rustic, natural look of the legs shown in the photo, wrap the top portion of each leg with painter’s tape right where they meet the underside of the seat. -
Prime the Cap:
Apply a coat of white primer to the entire top and edges of the stool seat. This step ensures the red paint will look vibrant and not soak into the wood grain. -
Dry Time:
Let the primer cure according to the can’s instructions, usually about an hour.
Step 2: Creating the Mushroom Cap
-
Base Color Application:
Using a medium flat brush, apply your bright red acrylic paint to the top and sides of the seat. Work in long strokes to minimize brush marks. -
Second Coat:
Once the first layer is dry to the touch, apply a second coat of red. This builds up that rich, opaque color seen in nature. I find that two thin coats adhere better than one thick gob of paint. -
Check Edges:
Inspect the rounded edge of the seat; make sure the red coverage is solid all the way around, wrapping slightly underneath to create a clean line.
Uneven Spots?
If your foam pouncer leaves a bubbling texture, lightly sand the dry white spot with 220-grit paper and repaint it with a brush for a smoother finish.
Step 3: Adding the Spots
-
Planning the Pattern:
Visualize where your spots will go. The reference image uses a random, organic pattern rather than a perfect grid. -
Large Spots:
Dip a large round foam pouncer into white paint. Press straight down onto the red surface and lift straight up to create crisp circles. Place a few of these randomly. -
Medium and Small Spots:
Use smaller pouncers or the back end of a large paintbrush to add medium and tiny dots in the empty spaces. -
Hand-Painting Edges:
For spots that fall on the curved edge of the stool, you might need to use a small round brush to manually paint the circle so it doesn’t distort. -
Touch Ups:
If the white paint looks a bit transparent against the red, go back over the dry spots with a second layer of white for bright, crisp contrast.
Add Mossy Details
Glue preserved moss underneath the mushroom cap where the legs meet the seat for an authentic, straight-from-the-forest vibe.
Step 4: Finishing and Sealing
-
Remove Tape:
Carefully peel off the painter’s tape from the legs. If any red paint bled through, carefully scrape it away with a fingernail or light sandpaper. -
Seal the Legs:
Apply a coat of clear polyurethane to the unpainted wooden legs to protect them from moisture and enhance the grain. -
Seal the Cap:
Once the dots are completely dry, apply two coats of clear sealant over the red mushroom top. A satin finish works best to mimic the slight sheen of a real mushroom. -
Final Cure:
Allow the stool to cure for at least 24 hours before placing heavy objects on it or putting it outside.
Place your new toadstool in a cozy corner or garden spot and enjoy the touch of magic it brings to your space


Have a question or want to share your own experience? I'd love to hear from you in the comments below!