When I plan a girls’ night painting session, I always pick ideas that look cute fast and still leave room for chatting, snacking, and laughing. Here are my favorite girls’ night painting ideas—starting with the classics everyone loves, then drifting into the more playful, unexpected stuff.
Girls’ Night Sip-and-Paint Cocktail Glasses
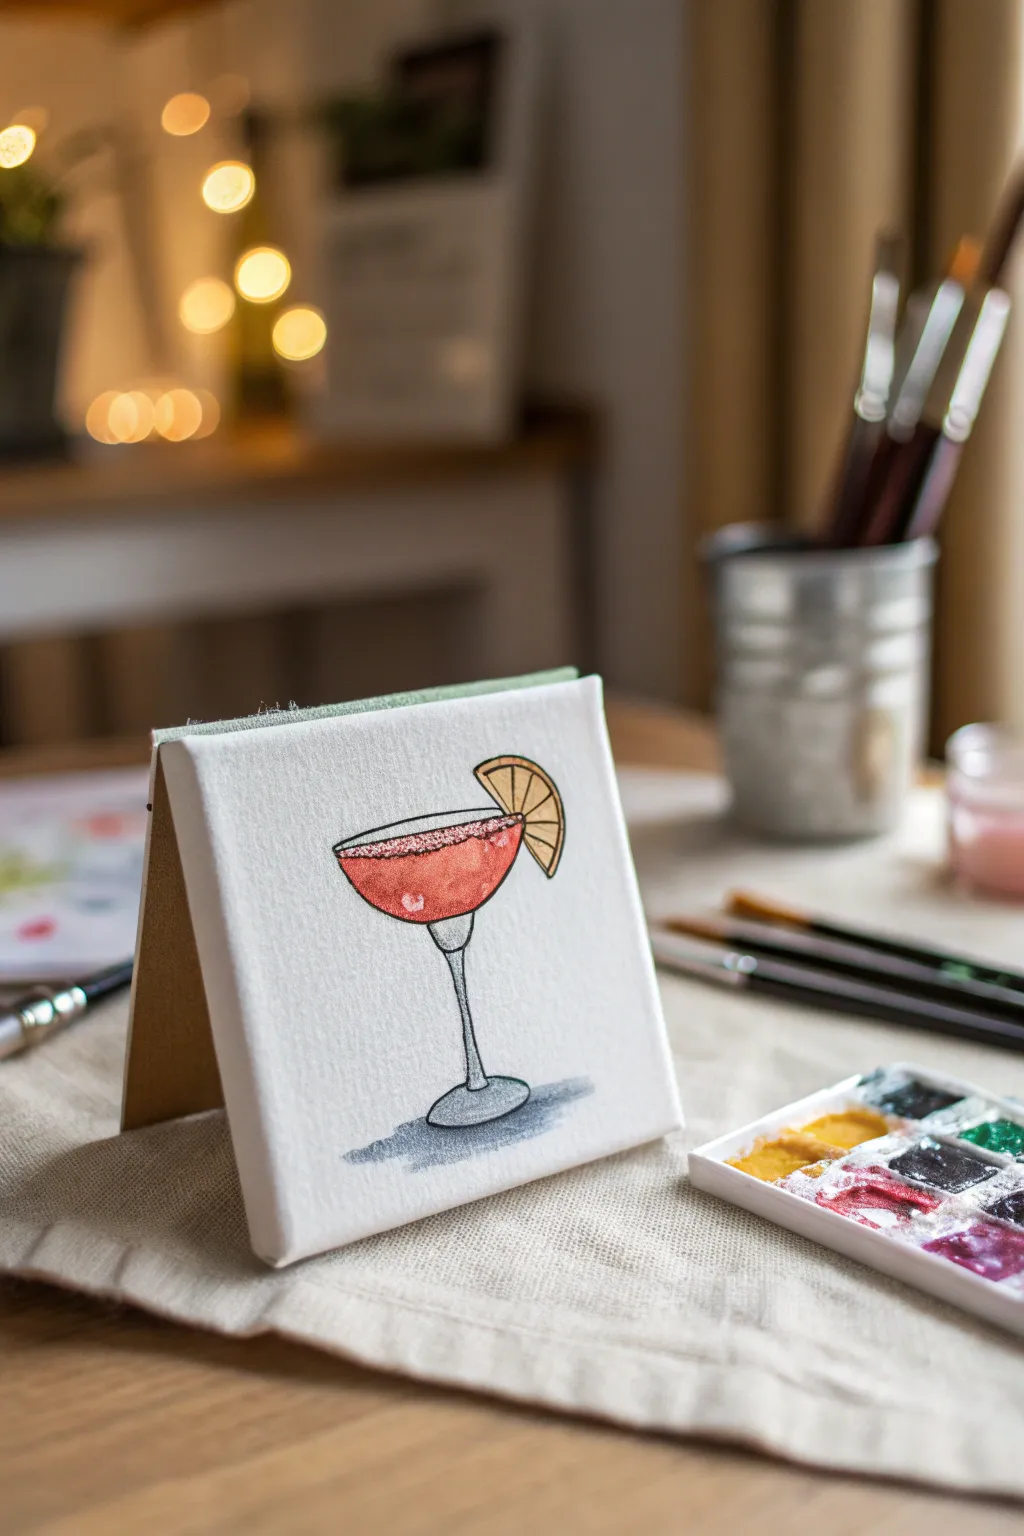
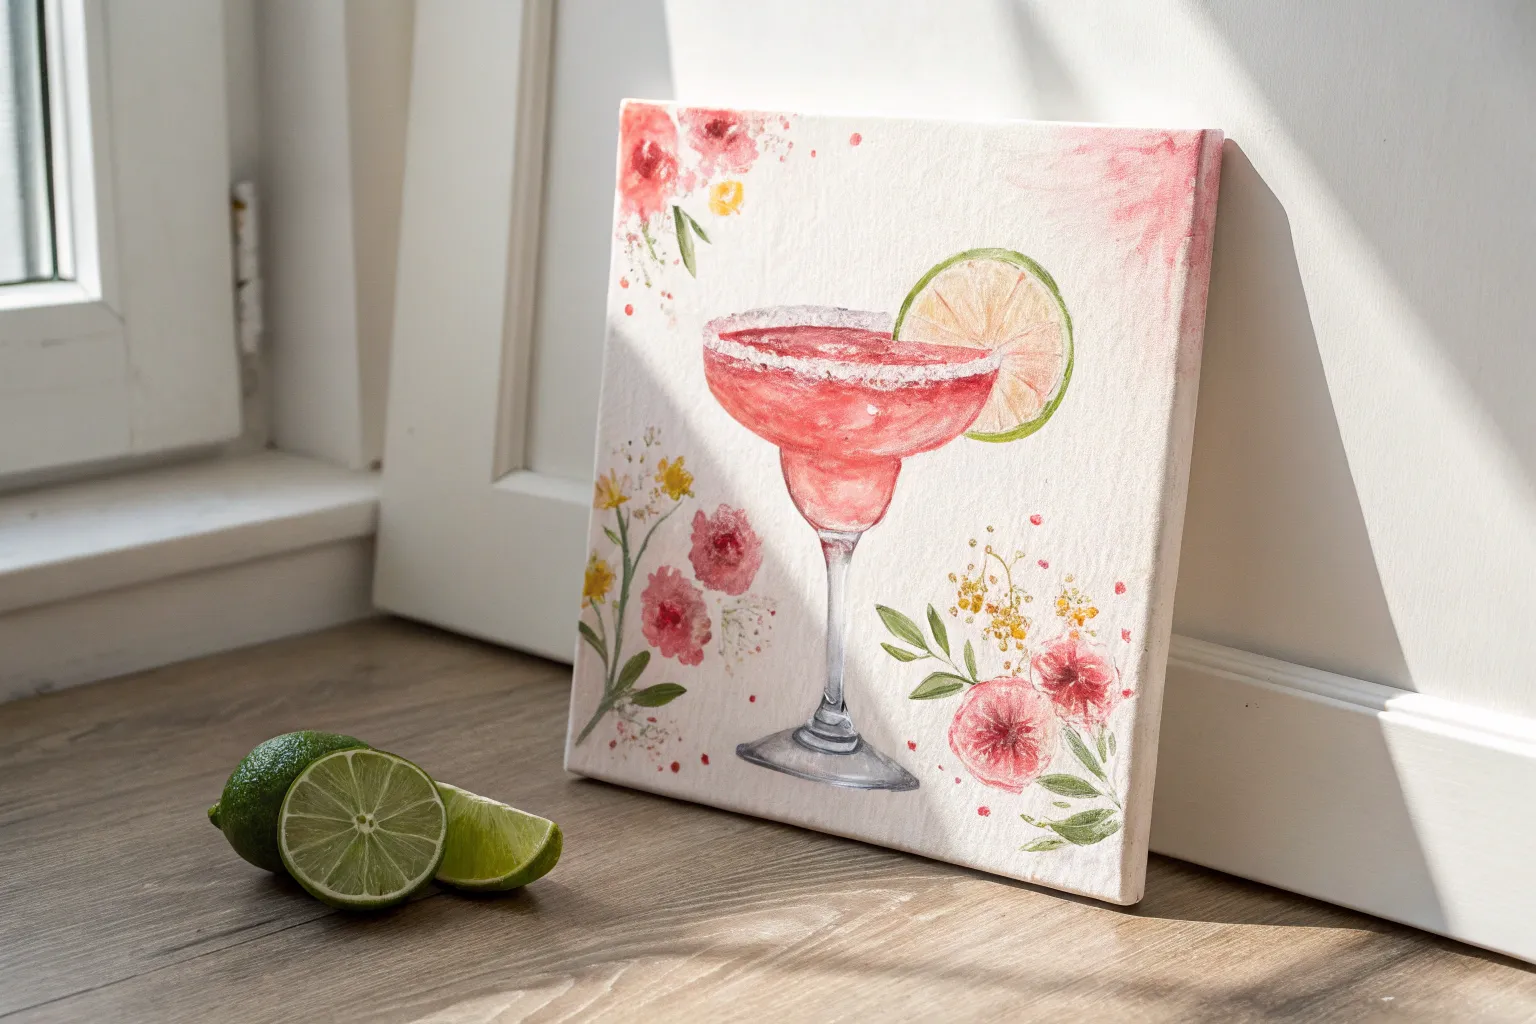
Capture the fun of happy hour with this charming miniature painting of a classic cocktail. Featuring crisp outlines and a vibrant splash of color, this small-scale artwork makes for a delightful and approachable project for your next girls’ night.
Step-by-Step Tutorial
Materials
- Small square canvas (4×4 or 5×5 inches)
- Mini wooden easel
- Watercolor paints or thinned acrylics (red, orange, yellow, blue, black)
- Fine liner brush (size 0 or 00)
- Small round brush (size 2 or 4)
- HB pencil and eraser
- Jar of water
- Paper towels
- Ruler (optional)
Step 1: Planning the Sketch
-
Center the glass:
Start by lightly drawing a vertical line down the center of your canvas with an HB pencil. This axis line will help keep your glass symmetrical. -
Draw the bowl:
Near the top-middle, sketch a wide, shallow oval for the rim of the glass. Below it, draw a curved semi-circle shape for the bowl, connecting it to the sides of the oval. -
Add the stem and base:
Draw the stem by adding two close vertical lines down from the bottom of the bowl, flaring them out slightly at the top. At the bottom, sketch a flattened oval for the glass base. -
Sketch the garnish:
On the top right rim of the glass, draw a semi-circle shape overlapping the edge. Add slice lines inside to resemble a wedge of lime or orange. -
Refine the liquid line:
Draw a slightly curved horizontal line inside the bowl, just below the rim, to indicate the surface of the drink.
Clean Lines Tip
Rest your pinky finger on a dry part of the canvas or the table while outlining. This stabilizes your hand and prevents shaky lines.
Step 2: Adding Color
-
Mix the cocktail color:
Create a watery wash of reddish-orange paint. If using acrylics, thin the paint significantly with water so the canvas texture shows through. -
Paint the drink:
Fill in the main bowl area with your cocktail color. Leave a tiny white gap or highlight near the left side to suggest the curve of the glass. -
Color the garnish:
Use a diluted yellow-orange mix to fill in the citrus wedge. Keep the paint transparent enough that your pencil lines are still faintly visible. -
Shadow the table:
Mix a very watery grey-blue. Paint a loose, jagged puddle shape underneath the base of the glass to ground it on the ‘table’. -
Let it dry completely:
Allow all paint layers to dry fully. Since we are outlining next, wet paint will cause the black lines to bleed and ruin the crisp effect.
Step 3: Defining Details
-
Prepare the liner brush:
Load your fine liner brush with black paint. I like to add a drop of water to the black paint to make it flow like ink for smoother lines. -
Outline the rim:
Carefully trace the top oval of the glass. Break the line slightly where the citrus garnish sits. -
Detail the garnish:
Outline the citrus wedge and add the interior segment lines. Keep your hand light rather than pressing down hard. -
Outline the glass body:
Trace the sides of the bowl, the stem, and the base. You don’t need a ruler-perfect line; a little wobble adds character to the illustration. -
Add the salted rim:
Using the tip of your brush, stipple tiny black dots along the top rim edge to simulate salt or sugar crystals. -
Create glass reflections:
Paint a very thin, partial outline on the left side of the liquid area inside the glass to enhance the illusion of volume. -
Final shadow touches:
If your shadow looks too light, add a second, smaller layer of darker grey-blue right near the base of the stem to deepen the contact point.
Add Some Sparkle
Once the painting is totally dry, apply a thin line of glitter glue or metallic silver paint specifically to the rim for extra ‘salt’ texture.
Place your finished mini canvas on its easel and enjoy your chic new art piece.


Girls’ Night Sunset Beach Silhouettes
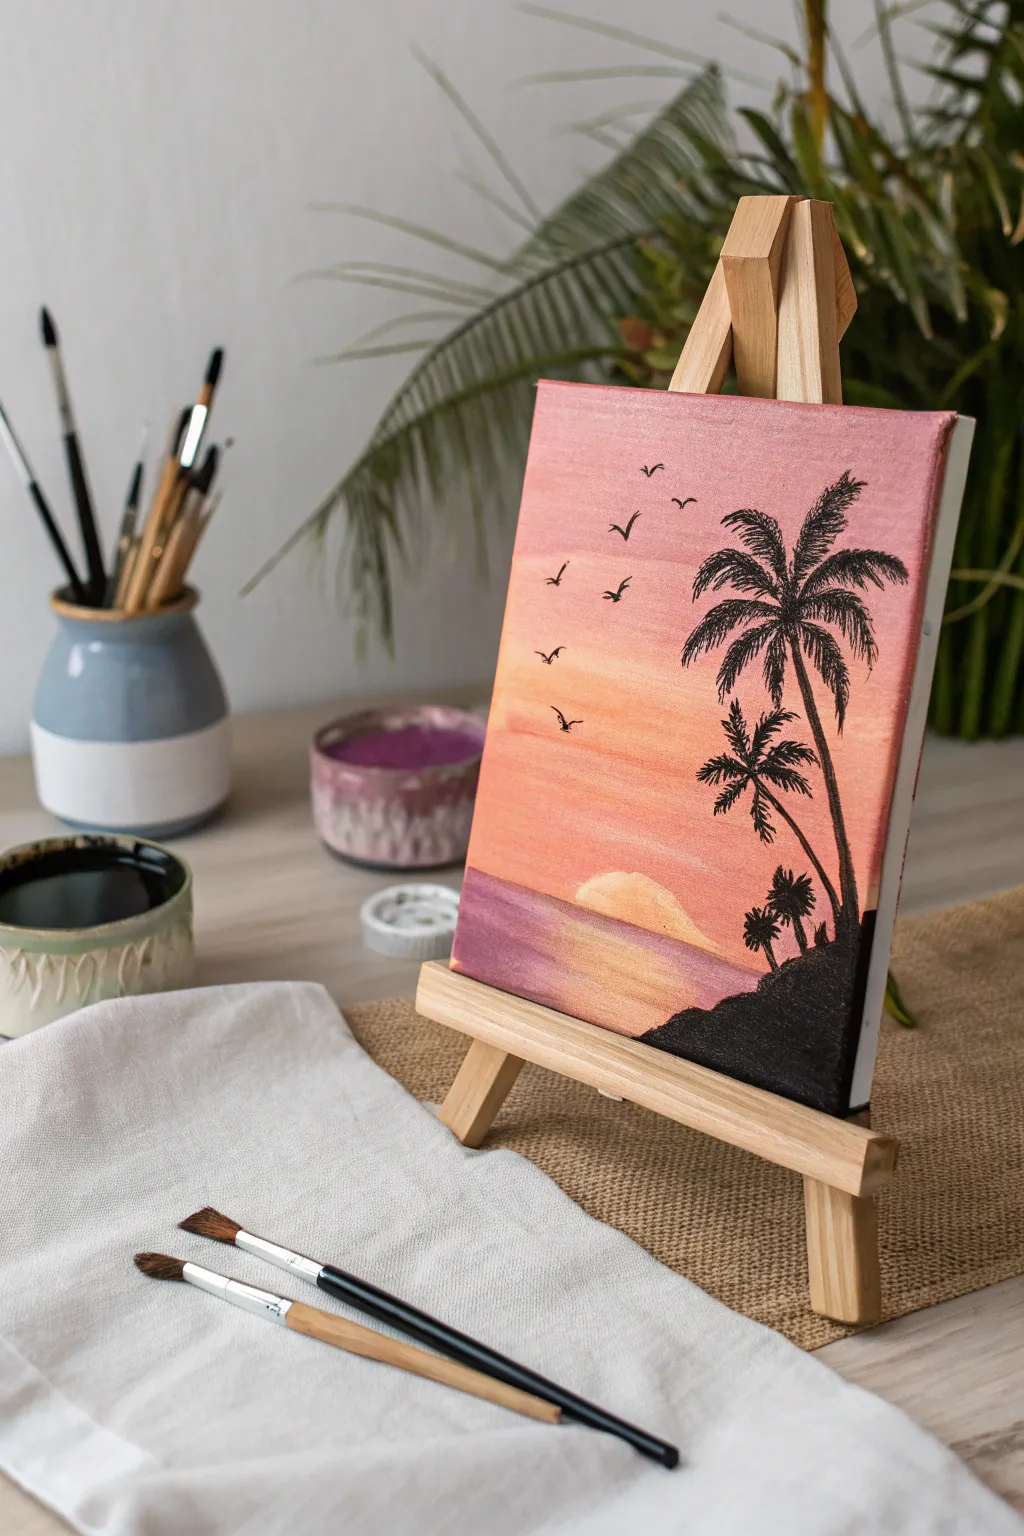
Capture the warmth of a tropical evening with this soothing gradient sunset featuring striking palm tree silhouettes. This beginner-friendly project uses smooth blending techniques to create a dreamy sky that pops against deep black details.
Detailed Instructions
Materials
- Small stretched canvas (easel optional)
- Acrylic paints: Titanium White, Magenta or Deep Pink, Orange, Yellow, Black
- Flat shader brush (medium size)
- Detailed liner brush or small round brush
- Cup of water and paper towels
- Palette or paper plate
Step 1: Creating the Sunset Sky
-
Prepare the Canvas:
Start with a clean, dry canvas. If you want the colors to be extra vibrant, you can apply a thin coat of white gesso first and let it dry, but plain canvas works well too. -
Mix the Sky Gradient:
On your palette, squeeze out your white, magenta, orange, and yellow. You’ll want to work somewhat quickly while the paint is wet to blending easier. -
Paint the Upper Sky:
Using your flat brush, pick up the magenta mixed with a tiny bit of white. Paint horizontal strokes across the top third of the canvas, ensuring even coverage. -
Transition to Orange:
Without fully cleaning your brush, pick up some orange paint. Apply this below the pink section, overlapping slightly with the pink while it’s still wet to create a soft, blurred transition. -
Add the Horizon Glow:
Mix yellow with a generous amount of white to create a pale peach-yellow. Paint the lower third of the sky, blending it upwards into the orange layer. -
Paint the Water Base:
For the water area at the very bottom, use a darker mix of purple (magenta + a tiny dot of black or blue) or just return to your original pink shade to distinguish the horizon line. Paint horizontal strokes to represent the sea. -
Create the Sun Reflection:
Before the water layer dries completely, take pure white or pale yellow on the corner of your brush. Create a semi-circle shape rising from the water, and add soft horizontal streaks in the water area to mimic reflection.
Step 2: Adding the Silhouettes
-
Dry the Background:
This is crucial: allow your background to dry completely. If you paint black over wet pink, it will turn muddy. A hair dryer can speed this up. -
Outline the Land:
Switch to black paint. Paint a sloping hill starting from the bottom right corner, rising slightly and extending about a third of the way across the bottom. -
Fill the Land:
Fill in the hill shape with solid black paint, ensuring it looks opaque and grounds the composition. -
Paint the Palm Trunks:
Using your liner brush or the edge of a small flat brush, paint thin, slightly curved lines extending upward from the black hill. Paint one tall trunk leaning left and a smaller companion trunk next to it. -
Start the Palm Fronds:
At the top of the trunks, paint 5-7 curved lines radiating outward like fireworks. These are the spines of the palm leaves. -
Detail the Leaves:
With the very tip of your small brush, make tiny, quick flickering strokes hanging down from each spine to create the feathery texture of the palm leaves. -
Add Distant Trees:
To add depth, paint tiny, simple tree shapes further down the slope near the water’s edge, using much simpler strokes to suggest distance. -
Paint the Birds:
Using the finest point of your liner brush, paint ‘V’ shapes in the sky. Vary their sizes, making some larger and some tiny dots, to create the illusion of a flock flying into the distance. -
Final Touches:
I like to check the opacity of the black paint once it’s dry; if it looks streaky, add a second coat to the silhouette areas for a crisp finish.
Muddy Skies?
If your sky colors are turning brown while mixing, stop blending immediately. Let the canvas dry, then apply a fresh layer of color on top. Clean your brush thoroughly between distinct color shifts.
Make It Sparkle
Once the painting is fully dry, add a thin layer of glitter varnish over just the water area. It mimics the glistening effect of sunlight hitting the ocean waves perfectly.
Sign your initials in the corner and display your tropical escape somewhere needed.


Girls’ Night Monstera Leaf Pop Art
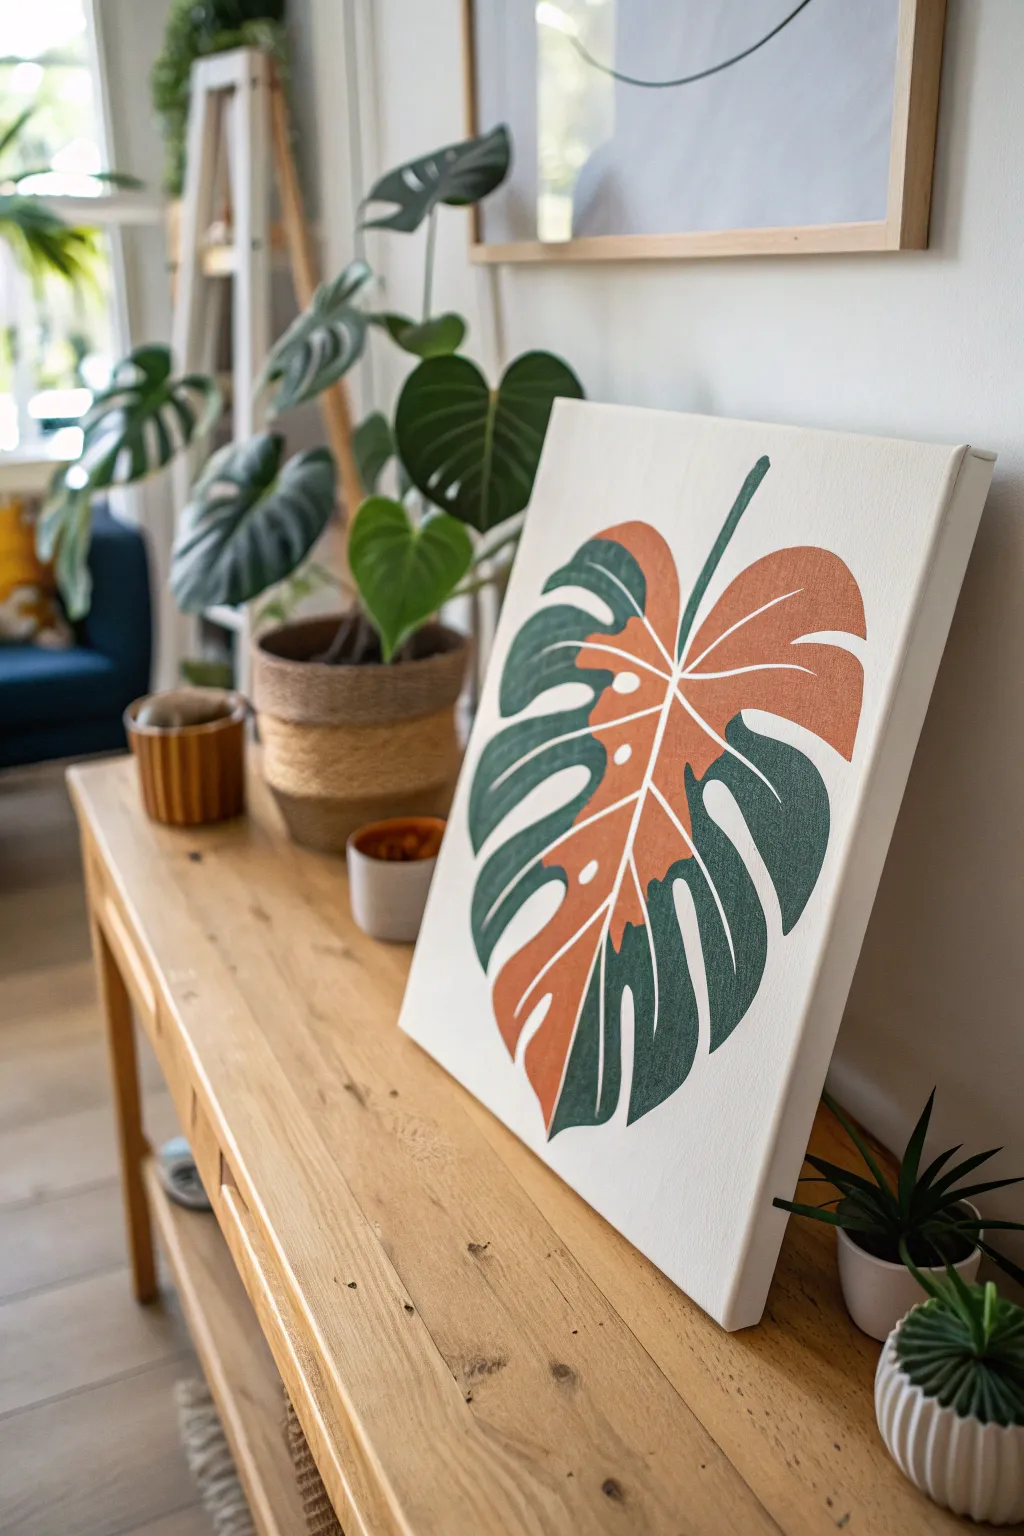
This trendy project merges pop art flair with a bohemian color palette, featuring a bold Monstera leaf divided into contrasting zones of deep teal and terracotta. It’s an approachable yet striking design perfect for a relaxed evening of creativity and conversation.
Detailed Instructions
Materials
- Rectangular stretched canvas (e.g., 11×14 or 16×20 inches)
- Acrylic paints: Deep teal (or emerald green + splash of black), Terracotta (or burnt orange + white), and Titanium White
- Lead pencil (HB or lighter)
- Eraser
- Flat synthetic brushes (medium size, approx. 1/2 inch)
- Round liner brush (small, for details)
- Ruler (optional, for finding the center)
- Cup of water and paper towels
- Paint palette or paper plate
Step 1: Drafting the Design
-
Establish the central vein:
Begin by lightly sketching a curved line that starts near the bottom center of the canvas and arches gently toward the top right corner. This will be the main stem or ‘spine’ of your leaf. -
Map the leaf shape:
Sketch a large, heart-shaped outline around your central vein. Keep it loose and organic—Monstera leaves are naturally imperfect. -
Add the fenestrations:
Along the edges of your heart shape, draw inward-curving notches to create the signature split-leaf look. These should look like deep ‘V’ or ‘U’ shapes cut out of the leaf margin. -
Refine the shape:
Erase the outer connecting lines of the original heart shape, leaving only the jagged, split edges. You should now have a floating, segmented leaf outline. -
Draw the internal holes:
Near the central vein, draw a few small oval or circular holes on the leaf blades themselves. These are the inner fenestrations typical of mature plants.
Step 2: Defining the Zones
-
Draw the split lines:
This is the ‘pop art’ twist. Using your pencil, draw sweeping, curved lines that cut across the entire leaf. Use the leaf veins as a guide; you want to create large, distinct sections. -
Plan your colors:
Decide which sections will be teal and which will be terracotta. Lightly adhere a tiny piece of painters tape or make a small ‘x’ in the zones you plan to paint orange so you don’t get confused later. -
Thicken the spine:
Go back to your central vein and thicken it slightly into a visible white stripe. This white gap will act as the boundary between your leaf sections.
Steady Hand Tip
When painting the thin white veins, rest your pinky finger on a dry part of the canvas to stabilize your hand. This anchors your movement for smoother lines.
Step 3: Blocking in Color
-
Mix your Terracotta:
On your palette, mix burnt orange with a touch of white to get a creamy, opaque terracotta shade. If it feels too bright, a tiny dot of brown will ground it. -
Paint the warm sections:
Using a flat brush, fill in the designated terracotta sections. Use smooth strokes following the direction of the leaf veins for a cleaner look. -
Mix your Deep Teal:
Combine emerald green with a hint of blue and a tiny touch of black. You want a sophisticated, dark moody green, not a bright primary color. -
Paint the cool sections:
Fill in the remaining leaf sections with your teal mixture. Be careful when painting near the terracotta zones; leave a thin hairline of white canvas between them if you want a crisp separation. -
Second coats:
Let the first layer dry for about 10-15 minutes. Apply a second coat to both colors to ensure solid opacity and rich saturation.
Uneven Coverage?
If your acrylics look streaky, don’t keep brushing wet paint. Let it dry completely, then add another thin layer. Two thin coats are always smoother than one thick glob.
Step 4: Refining Details
-
Clean up the veins:
Switch to your small liner brush and Titanium White paint. Carefully trace over the central vein and the smaller offshoot veins, ensuring the lines are crisp and bright white. -
Sharpen the edges:
Use the liner brush with the appropriate color (teal or terracotta) to tidy up any ragged edges around the outside of the leaf. -
Paint the background (optional):
If you smudged paint onto the background, use white paint to touch up the negative space around the leaf, making the silhouette pop. -
Final check:
Stand back and look for any transparent spots. I like to do one final pass on the white vein lines to make them really stand out against the dark colors.
Allow your modern botanical masterpiece to dry completely before displaying it on a shelf or hanging it up


Girls’ Night Moon and Stars Gradient Sky
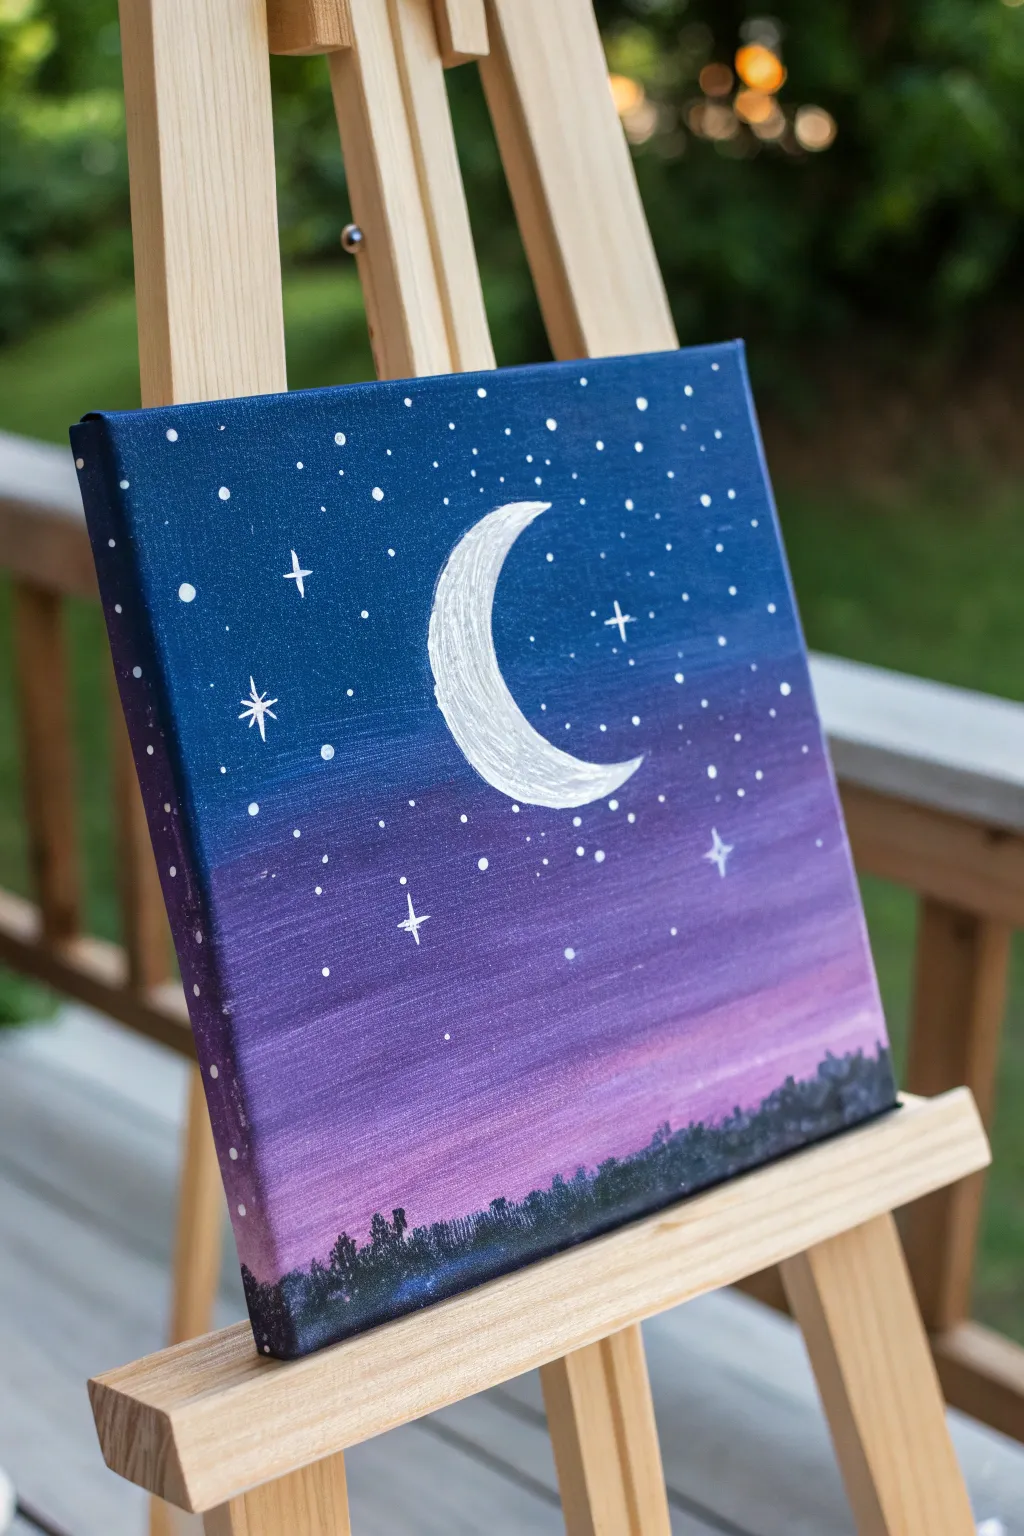
Create a soothing, celestial atmosphere with this beautiful gradient night sky painting. Perfect for a relaxing girls’ night, this project blends deep blues into soft purples, punctuated by a glowing crescent moon and a field of twinkling stars.
Step-by-Step Tutorial
Materials
- Small square canvas (e.g., 8×8 or 10×10 inches)
- Acrylic paints: Navy Blue, Phthalo Blue (or similar medium blue), Purple, Magenta, Titanium White, Black
- Flat shader brush (approx. 1 inch width)
- Small round detail brush (size 0 or 1)
- Painter’s tape or stencil (optional for moon)
- Cup of water
- Paper towels
- Palette or paper plate
- Easel (optional)
Step 1: Creating the Gradient Sky
-
Prepare the deep blue:
Start by squeezing a generous amount of Navy Blue paint onto your palette. Using your wide flat brush, paint a horizontal band across the top quarter of the canvas. Don’t forget to paint the top and side edges of the canvas for a finished look. -
Introduce the mid-tone:
Mix a little of your brighter medium blue into the Navy Blue. Paint the next section down, slightly overlapping the wet edge of the top band. Use long, horizontal strokes to blend the colors where they meet. -
Transition to purple:
Clean your brush thoroughly. Pick up your purple paint and begin applying it below the blue section. While the paint is still wet, gently stroke upward into the blue area to soften the line, creating a smooth transition from night sky to twilight. -
Add the horizon glow:
Mix a small amount of Magenta with Titanium White to create a soft, dusty pink. Apply this near the bottom of the canvas, blending it upwards into the purple layer. This creates that lovely glow just before the treeline. -
Final smooth:
While everything is still tacky but not dry, stick with long, horizontal strokes across the entire canvas to ensure the gradient looks flawless. Here I like to use a very slightly damp clean brush to feather out any harsh lines.
Step 2: Painting the Moon
-
Draft the shape:
Allow the background to dry completely—this is crucial so your white paint doesn’t turn light blue or pink. Using a small round brush or a white chalk pencil, lightly outline a ‘C’ shape in the upper center of the canvas. -
Fill the base:
Fill in the crescent shape with Titanium White. You will likely need two coats to make it opaque against the dark background. Let the first coat dry before adding the second. -
Add texture:
Once the base is solid white, mix a tiny dot of grey (white with a speck of black) and dab it gently along the inner curve of the moon to suggest craters and texture.
Gradient Not Blending?
If your acrylics are drying too fast to blend, keep a misting spray bottle handy. A very light mist over the canvas keeps the paint workable longer.
Step 3: Stars and Silhouette
-
Create background stars:
Thin down a small amount of white paint with water until it has an inky consistency. Dip your small round brush (or an old toothbrush) into it and flick the bristles to splatter tiny stars across the upper blue and purple sections. -
Paint larger stars:
Using your detail brush and pure white paint, manually dot specific points to create brighter, prominent stars. Focus these more in the darker blue areas near the top. -
Add twinkling stars:
Choose 3-5 of your larger manual dots and turn them into sparkles. Draw a simple cross or a four-pointed star shape over the dot using very light pressure with the tip of your detail brush. -
Start the treeline:
Mix Black with a touch of the dark purple you used earlier; pure black can look too harsh. Using a small brush, begin dappling paint along the very bottom edge of the canvas. -
Shape the trees:
Use an up-and-down tapping motion to create the uneven texture of treetops. Vary the heights, making some clusters taller than others to mimic a natural forest silhouette. -
Fill the bottom:
Once the tops of the trees are defined, fill in the rest of the bottom strip solid dark. Ensure you paint the bottom edge of the canvas as well.
Make it Shimmer
Mix a little iridescent medium or glitter glaze into your white paint for the moon to make it genuinely sparkle when the light hits it.
Now step back and admire your peaceful twilight creation
BRUSH GUIDE
The Right Brush for Every Stroke
From clean lines to bold texture — master brush choice, stroke control, and essential techniques.
Explore the Full Guide
Girls’ Night Cozy City Skyline Silhouette
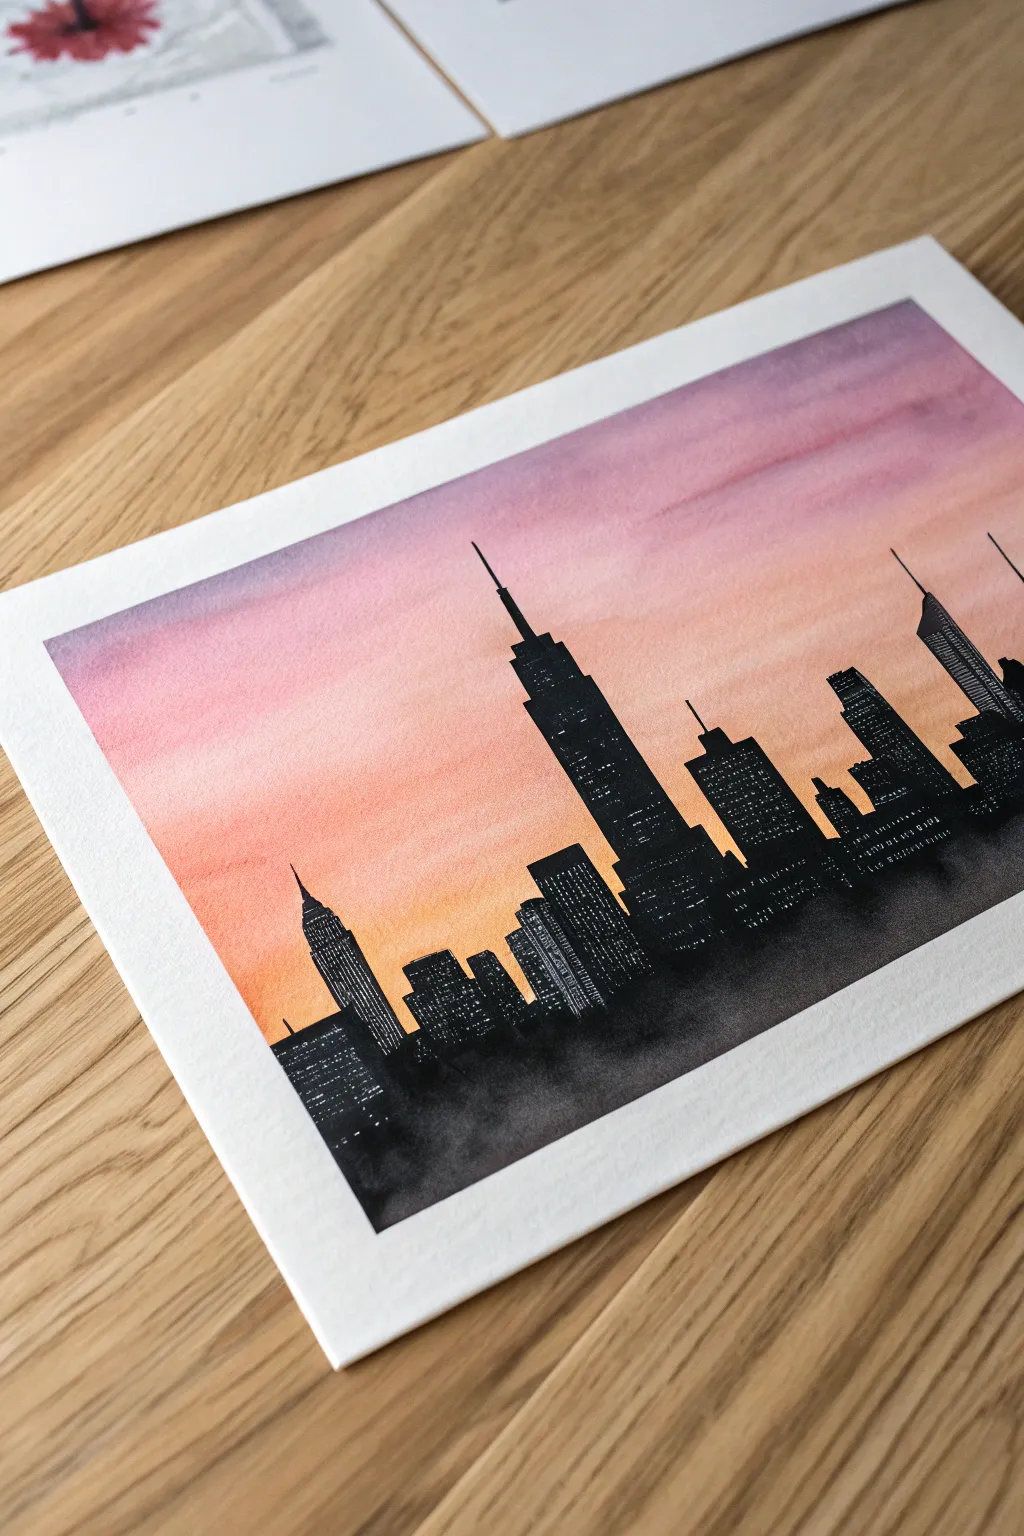
Capture the magic of twilight in the big city with this dreamy watercolor project. You’ll create a seamless gradient sky that fades from purple to warm orange, serving as the perfect backdrop for a crisp, striking city silhouette.
Detailed Instructions
Materials
- Cold press watercolor paper (300 gsm)
- Watercolor paints (Purple, Magenta, Orange, Yellow)
- Masking tape or painter’s tape
- Large flat wash brush
- Medium round brush
- Small liner or detail brush
- Black gouache, black watercolor, or black fineliner pens
- White gel pen (optional)
- Pencil and ruler
- Paper towels and two jars of water
Step 1: Setting the Sky Stage
-
Tape it down:
Begin by taping your watercolor paper securely to a board or table on all four sides. This creates that crisp white border you see in the final piece and keeps the paper from buckling when wet. -
Pre-wet the paper:
Using your large flat brush and clean water, apply a generous, even coat of water to the upper two-thirds of the paper where the sky will be. You want the surface to be glistening but not forming puddles. -
Apply the purple:
Load your brush with a soft purple or violet hue. Starting at the very top edge, sweep the color across horizontally. Let the water help the pigment drift downward slightly, but keep the strongest color at the top. -
Transition to pink:
While the purple is still wet, rinse your brush and pick up a magenta or rosy pink. Apply this directly below the purple, allowing the edges to touch and bleed into each other naturally for a soft gradient. -
Add the warmth:
Rinse again and switch to a warm orange. Paint this band below the pink, blending the seam gently. Finish the gradient with a touch of yellow near the horizon line to represent the setting sun. -
Let it glow:
As the wash dries, you might notice the colors softening. Avoid overworking the paper; if you need more vibrancy, wait for this first layer to dry completely before repeating the wash steps. -
Dry completely:
This is crucial: allow the sky to dry 100%. If the paper is cool to the touch, it’s still wet. Using a hair dryer on a low setting can speed this up.
Clean Lines Pro-Tip
For the sharpest building silhouettes, skip the paint brush and use a waterproof black archival ink pen. It gives you way more control over the tiny antennas and straight edges.
Step 2: Constructing the City
-
Sketch the horizon:
With a pencil, lightly draw a flat horizontal line across the bottom third of the paper. This will be the base for your buildings. -
Outline the shapes:
Lightly sketch the outlines of the skyscrapers. Focus on varying heights and widths to create visual interest. Include recognizable shapes like the stepped spire of the Empire State Building to give it character. -
Block in the black:
Using black gouache (which is more opaque) or very concentrated black watercolor, fill in the main bodies of the buildings. A medium round brush works best for these large rectangular shapes. -
Detail the spires:
Switch to your smallest liner brush for the delicate antennas and thin spires at the tops of the buildings. These fine lines are what make the silhouette look sharp and realistic. -
Add the shadows:
I find it helpful to soften the black paint slightly with water near the very bottom edge of the paper, creating a ‘foggy’ or shadowed effect at the street level rather than a hard line.
Step 3: Illuminating the Windows
-
Create window grids:
Once the black silhouette is bone dry, use a white gel pen or a tiny brush with white gouache to add the suggestion of windows. -
Vary the patterns:
Don’t draw perfect grids on every building. Use dots, dashes, and small clusters of light to mimic the chaotic energy of a city at night. -
Highlight the edges:
Add tiny touched of white to the edges of rooftops or spires to catch the ‘light’ from the sunset. -
Add texture:
For some buildings, you can use a scratching technique (sgraffito) if the paint is thick enough, or simply use tiny black dashes over the white windows to break them up. -
Reveal the border:
Once everything is perfectly dry, slowly peel away the masking tape at a 45-degree angle to reveal your clean, crisp white edges.
Level Up: Glitter Sky
Mix a tiny amount of iridescent medium or shimmer watercolor into your top purple layer. When dry, the night sky will have a subtle, magical sparkle.
Frame your masterpiece or gift it to a friend who loves the city life
Girls’ Night Cute Animal With Fancy Details
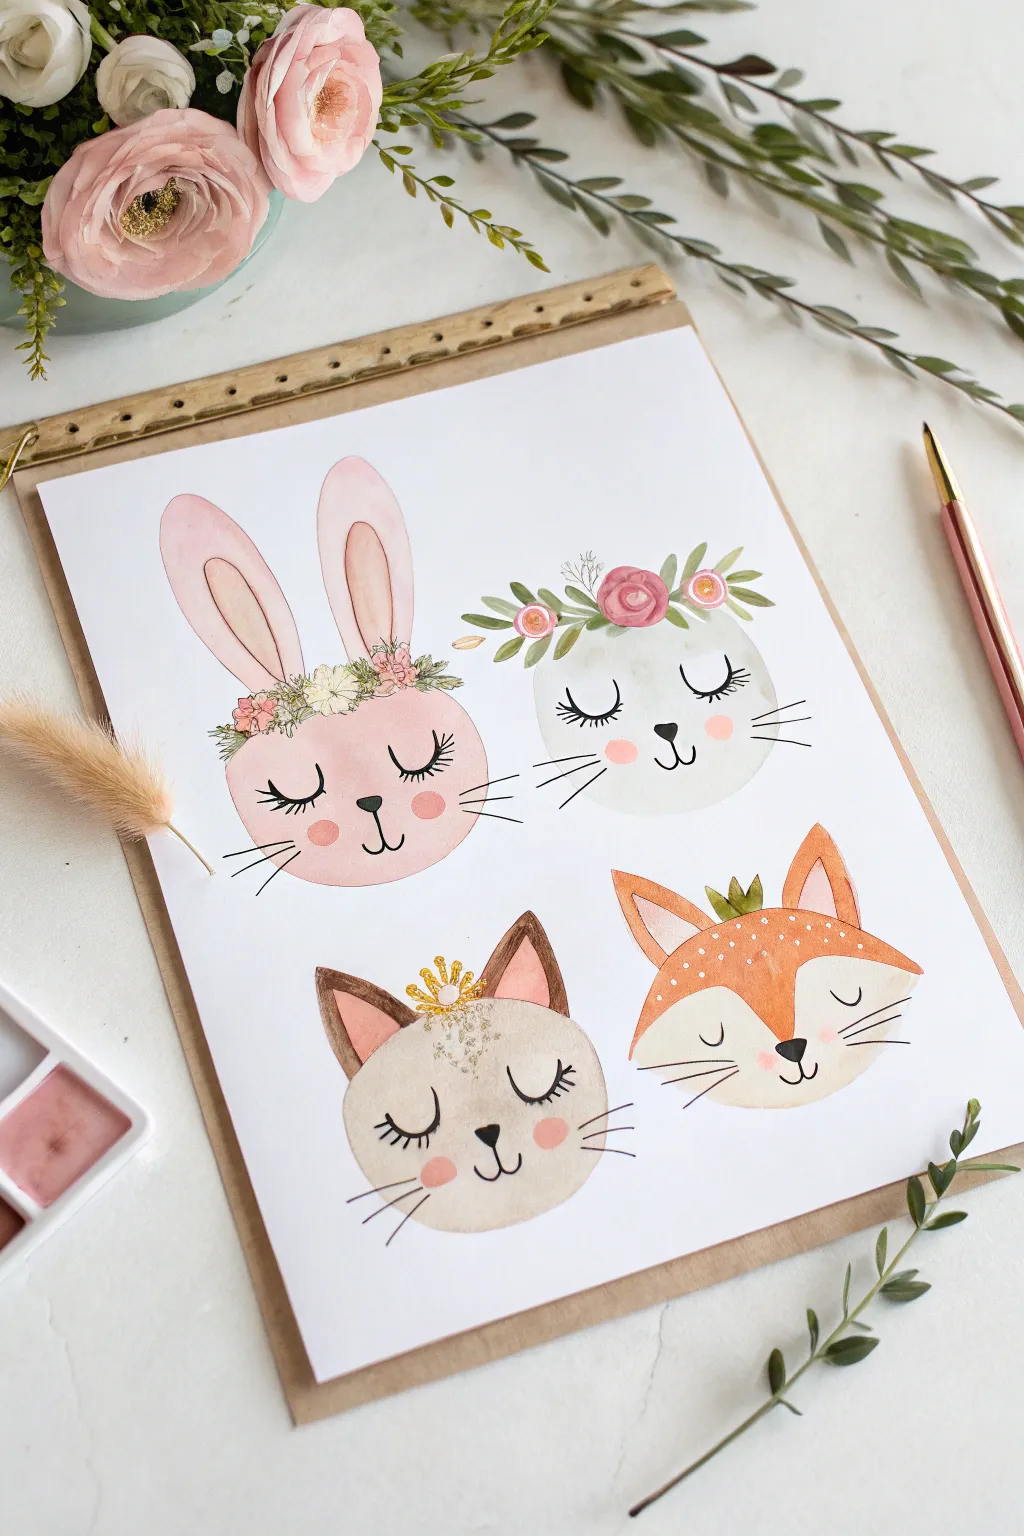
Create a charming collection of four distinct animal faces—a bunny, a mouse, a cat, and a fox—each adorned with sweet floral or crown details. This project combines soft watercolor washes with crisp ink lines for a modern, illustrative style that’s perfect for framing.
Step-by-Step Tutorial
Materials
- Cold press watercolor paper (A4 or 9×12 inch)
- Watercolor paint set (pinks, peaches, warm browns, greys, greens)
- Round watercolor brushes (size 6 for washes, size 2 for details)
- Fine liner pen (black, waterproof, size 0.3 or 0.5)
- Pencil (HB) and soft eraser
- Gold paint or metallic gel pen
- Clean water and paper towels
- Masking tape (optional, to secure paper)
Step 1: Sketching the Basics
-
Map out the composition:
Lightly visualize four quadrants on your paper. In the center of each, you’ll sketch the head shapes. Aim for soft, rounded ovals for the bunny and mouse, a slightly more tapered oval for the cat, and a wider, flatter shape for the fox. -
Add key features:
Sketch the bunny’s tall, upright ears in the top left. For the mouse (top right), keep the ears small and rounded. Give the cat (bottom left) pointed triangular ears, and outline the fox’s distinctive face mask and ears in the bottom right. -
Refine the details:
Very lightly pencil in where the floral crowns and accessories will sit. Indicate the closed eyelids with long lashes and small noses, but don’t press too hard as we want the pencil marks to be barely visible under the paint.
Step 2: Painting the Base Layers
-
Paint the Bunny:
Mix a diluted, watery pale pink. Using your size 6 brush, fill in the bunny’s head shape and ears. While the paint is still wet, drop a slightly darker pink into the inner ears to create a soft, gradient shadow. -
Paint the Mouse:
Create a very watery, pale grey wash. Paint the round face of the mouse, keeping the edges soft. If you want a bit of dimension, dab your paper towel to lift a little color from the center of the face for a highlight. -
Paint the Cat:
Use a warm beige or creamy light brown for the cat’s face. While the face is drying, mix a darker, cocoa brown and carefully paint the inside of the triangular ears and the top patch of fur on its forehead. -
Paint the Fox:
Mix a vibrant orange-red color. Paint the top half of the fox’s face and the outer ears, carefully avoiding the bottom half of the face which should remain white (the paper color). Use a clean, damp brush to soften the transition line between the orange and the white.
Bleeding Lines?
If your fine liner spiderwebs into the paint, your paper is still damp inside. Wait 10 more minutes or use a hair dryer on cool setting before inking.
Step 3: Adding Floral & Fancy Details
-
Bunny’s floral crown:
Once the pink head is dry, use your smaller brush to paint tiny flowers along the forehead. Use darker pinks and creams. Add tiny green leaves poking out from the flowers using short, quick strokes. -
Mouse’s headpiece:
Paint a larger pink rose on the mouse’s head with smaller buds on the sides. Extend long, thin green leaves curving outward to frame the top of the head elegantly. -
Cat’s tiara:
Using a gold metallic watercolor or a little yellow ochre mixed with brown, paint a small, three-point crown sitting right between the cat’s ears. Add little dots for jewels. -
Fox’s sprout:
Paint a small, simple green tuft or sprout shape centered at the top of the fox’s head for a playful touch.
Make It Personal
Instead of four different animals, try painting four versions of your friend’s pet with different seasonal crowns (holly for winter, flowers for spring).
Step 4: Inking and Final Touches
-
Draw the eyes:
Ensure all paint is completely dry. Take your black fine liner and draw the sweeping, U-shaped closed eyelids on all four animals. Add prominent, long lashes—three or four per eye works beautifully. -
Define noses and mouths:
Draw small, heart-shaped or triangular noses. I find a simple vertical line connecting to a small ‘w’ shape makes for the cutest smiling mouths. Add a few small dots on the cheeks for whisker pads. -
Whiskers and blushing:
Flick your pen quickly outward to create crisp, thin whiskers. Then, dilute a bit of pink paint heavily and dab perfectly round rosy cheeks onto each animal. -
Add texture and sparkle:
Use white gouache or a white gel pen to add tiny dots on the fox’s orange fur for a fawn-like texture. Add gold glitter accents to the cat’s crown or the flower centers if you like a bit of shimmer.
Now you have a gallery of sweet, sleepy creatures ready to brighten up your wall or be given as a gift

PENCIL GUIDE
Understanding Pencil Grades from H to B
From first sketch to finished drawing — learn pencil grades, line control, and shading techniques.
Explore the Full Guide
Girls’ Night Hearts and Xs Pattern Party
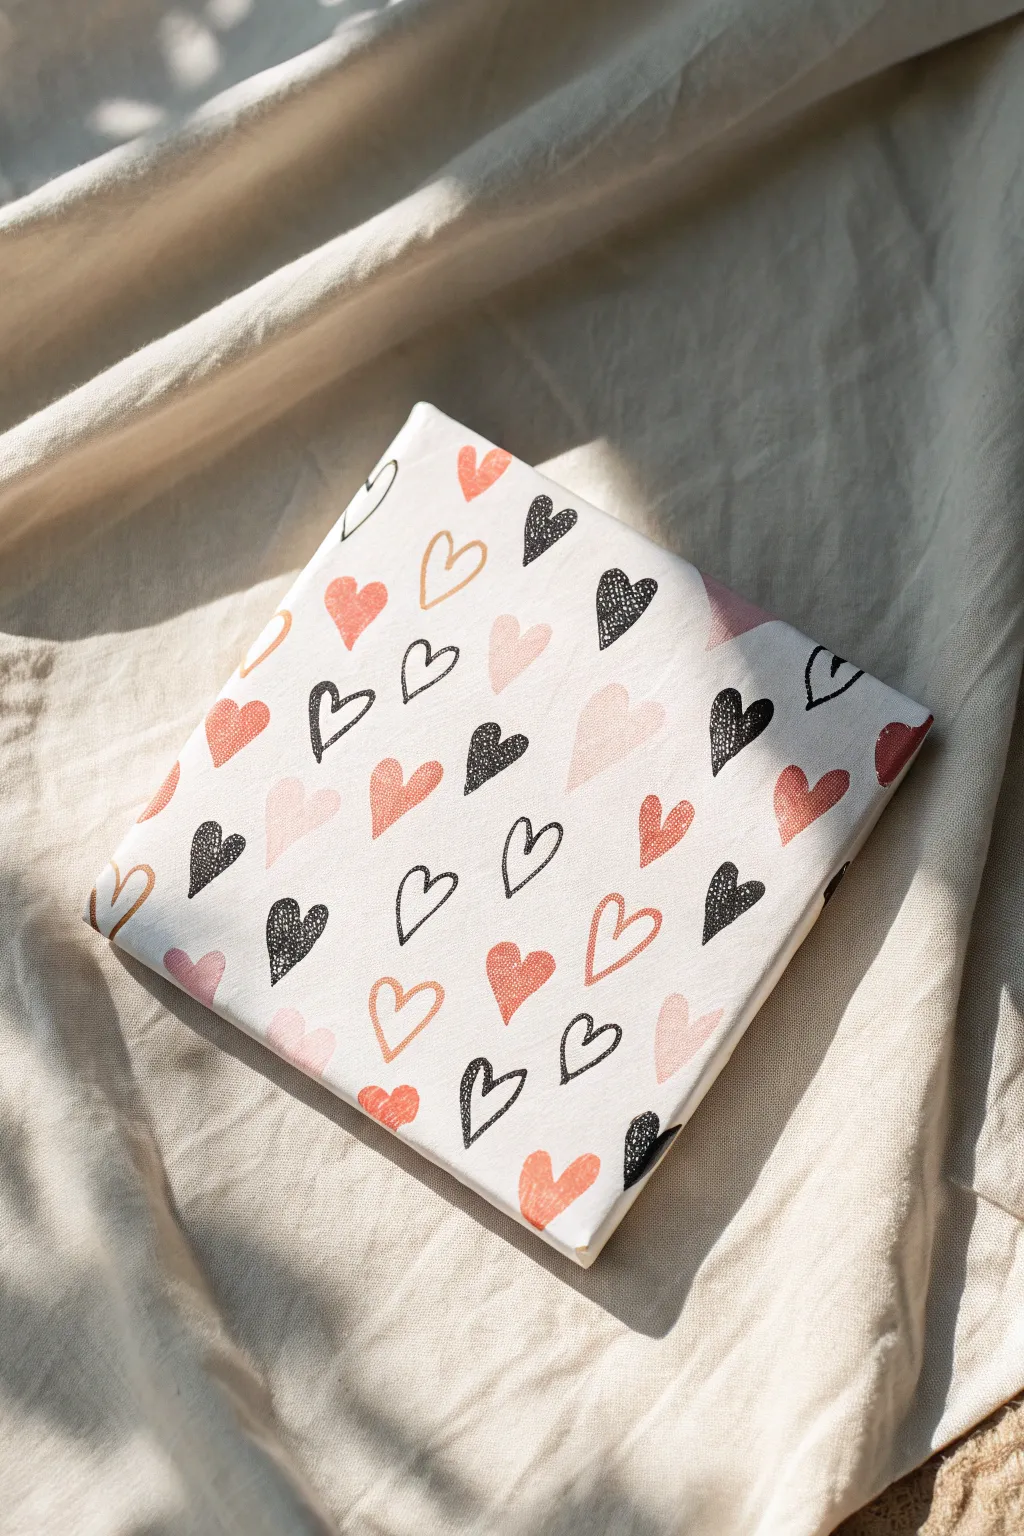
Create a charming, repeating pattern of hearts that balances structured design with hand-drawn whimsy. This project combines simple acrylic painting with marker work to achieve a modern, doodle-style aesthetic perfect for a cozy corner.
Step-by-Step
Materials
- Square stretched canvas (8×8 or 10×10 inches)
- Titanium White acrylic paint
- Unbleached Titanium or Cream acrylic paint
- Acrylic paints in warm tones: Coral, Dusty Pink, Terracotta, Black
- Flat brush (1/2 inch) for background
- Small round brush (size 2 or 4) for hearts
- Black acrylic paint marker or permanent marker (fine tip)
- Pencil and eraser
- Palette or paper plate
Step 1: Preparing the Base
-
Mix background color:
Start by creating a soft, off-white base color. Mix a large amount of Titanium White with a tiny touch of Unbleached Titanium or Cream to get a warm, paper-like tone. -
Paint the canvas:
Using your flat brush, coat the entire front of the canvas with this mixture. Ensure your strokes are smooth and even. -
Cover the edges:
Don’t forget to paint the sides of the canvas as well. This gives the piece a professional, finished look without needing a frame later. -
Let it dry:
Allow the base coat to dry completely. If the canvas texture still shows through too much for your liking, apply a second coat and let it dry again.
Fixing Smudges
If you smudge a black ink line, wait for it to dry completely. Then, paint over the mistake with your background color mixture. Let it dry, and redraw the line.
Step 2: Painting the Solid Hearts
-
Plan the spacing:
Lightly visualize a diagonal grid or simply eyeball the placement. The charm of this piece is that the hearts are somewhat random in rotation but evenly spaced. -
Paint coral hearts:
Load your small round brush with coral paint. Paint small, solid hearts scattered across the canvas. Leave plenty of empty space between them for other colors and the outlined hearts. -
Add pink hearts:
Rinse your brush and switch to the dusty pink shade. Fill in some of the gaps with pink hearts, keeping the size roughly consistent with the coral ones. -
Include terracotta accents:
Using the terracotta or a darker orange-red shade, paint a few more solid hearts. I try to make sure no two hearts of the same color are right next to each other. -
Paint black hearts:
Finally, add a few solid black hearts. These act as strong contrast points in the pattern. Use a steady hand to keep the edges crisp. -
Texture trick:
For a slightly distressed look like the photo, you can blot the fresh paint gently with a paper towel, or dry brush a little white over them once dry. -
Dry time:
Wait for all the painted hearts to be fully dry to the touch before moving on to the marker step.
Add Gold Shine
Use a gold leaf pen or metallic gold paint to fill in a few random hearts. The metallic shimmer will catch the light and add a chic, upscale vibe to your pattern.
Step 3: Drawing the Outlined Hearts
-
Test your marker:
Before drawing on the canvas, test your black paint marker or permanent pen on a scrap piece of paper to ensure the ink is flowing smoothly. -
Draw simple outlines:
In the remaining empty spaces, draw simple heart outlines. Keep the shape loose and hand-drawn rather than perfect. A slight asymmetry adds character. -
Vary the rotation:
Make sure to rotate these drawn hearts slightly. Some should tilt left, some right, and some straight up to create movement. -
Add double outlines:
Pick a few spots where the canvas looks empty and draw a ‘double heart’—one heart shape inside another—or a heart with a looped bottom for variety. -
Check the edges:
Draw partial hearts seemingly ‘falling off’ the edges of the canvas. This makes the pattern feel continuous, like fabric cut from a larger roll. -
Final touches:
Step back and look at the overall balance. If there’s a large gap, add a tiny drawn heart or a small dash to fill it without overcrowding.
Hang your finished canvas in a grid with other patterns or let it stand alone as a sweet statement piece
Girls’ Night Zodiac Constellation Canvases
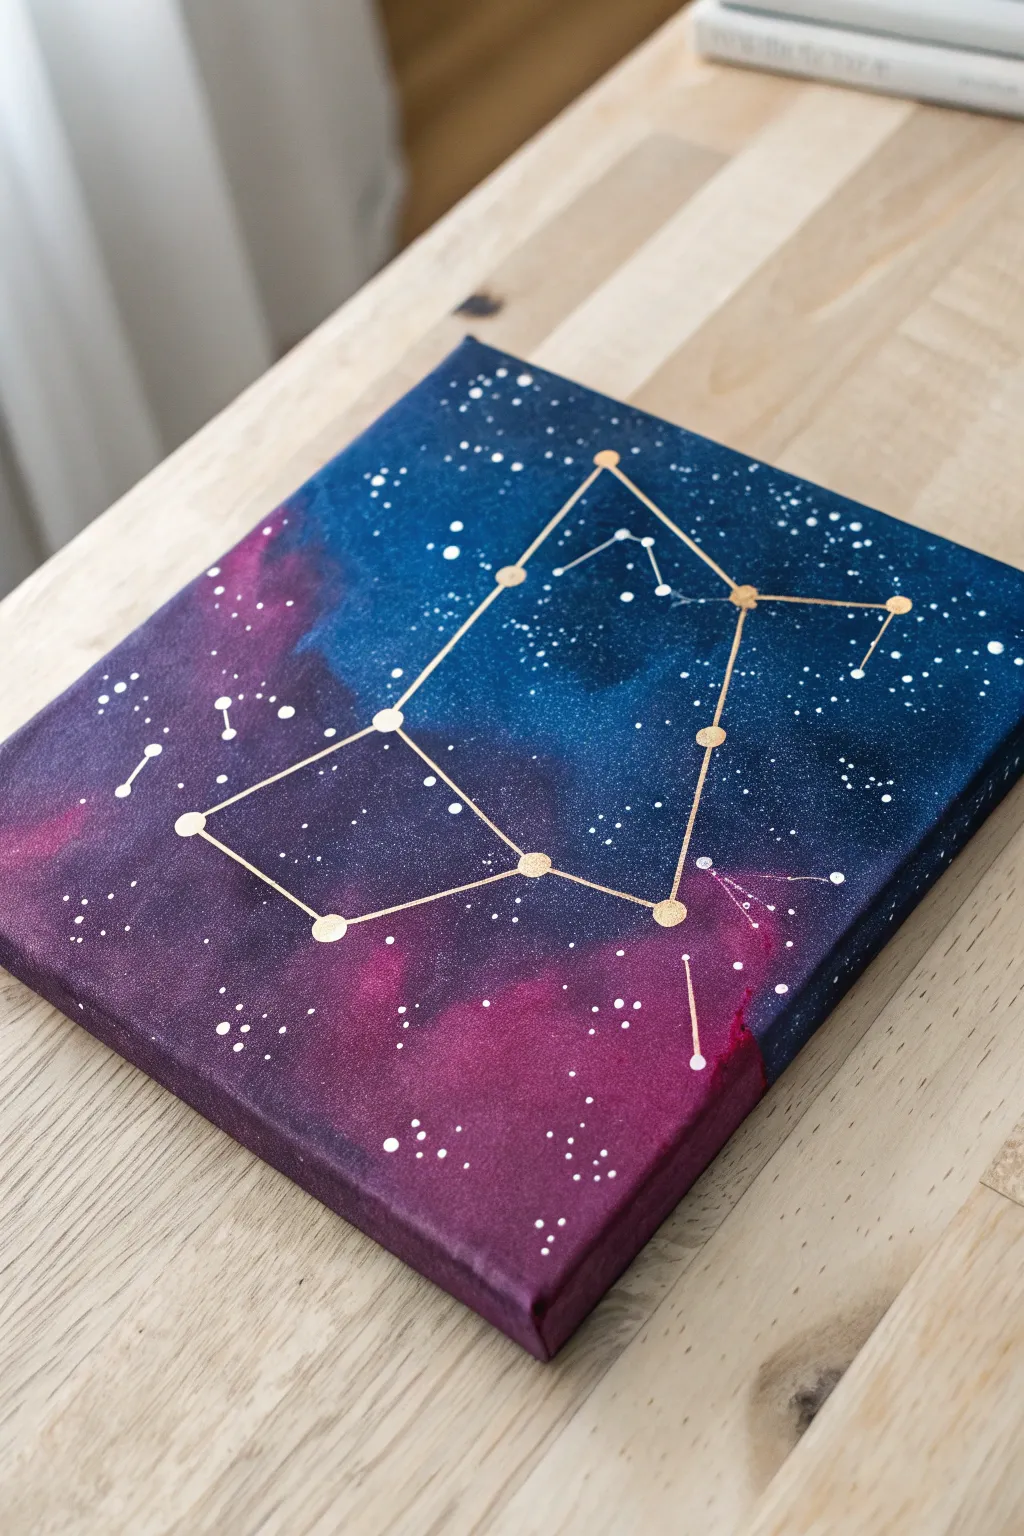
Capture the magic of the cosmos with this stunning galaxy painting featuring your personal zodiac sign. The blend of deep indigo and vibrant magenta creates a dreamy backdrop for the elegant gold constellation design.
Detailed Instructions
Materials
- Square stretched canvas (e.g., 8×8 or 10×10 inches)
- Acrylic paints: Navy blue, black, phthalocyanine blue, magenta (or violet), and white
- Gold metallic paint or gold paint pen
- Sponges (kitchen sponge cut into pieces works great)
- Stiff bristle brush or toothbrush (for stars)
- Detailed round brush or gold paint marker
- Ruler
- Pencil
- Water cup and palette (or paper plate)
Step 1: Creating the Galaxy Background
-
Prepare the Base:
Start by dampening your sponge slightly. Pick up some navy blue and black paint mixed together and dab it onto the corners and edges of the canvas. This creates the deep, dark outer space effect. -
Add the Mid-Tones:
While the edges are still wet, load a clean part of your sponge with a brighter blue (like phthalo blue). Dab this into the center and blend it outward into the darker edges using a pouncing motion. -
Introduce the Nebula Clouds:
Take a fresh piece of sponge and dip it into magenta or violet paint. Identify two or three distinct areas on the canvas where you want colorful nebula clouds and sponge the color on gently. -
Blend the Transitions:
To avoid harsh lines between the blue and magenta, create a soft transition by lightly dabbing over the meeting points with a slightly damp, clean sponge. The colors should look like they are melting into each other. -
Paint the Canvas Sides:
Don’t forget the edges! Wrap the sponge around the sides of the canvas to continue the color pattern, ensuring the artwork looks finished from every angle. -
Let it Dry Completely:
Allow the background layer to dry fully before moving on. This usually takes about 20-30 minutes, or you can speed it up with a hair dryer on a cool setting.
Muddied Colors?
If your blue and pink blend into a muddy grey, stop immediately. Let the first layer dry completely, then sponge the second color purely on top without wet blending.
Step 2: Adding Stars and Constellations
-
Create the Starfield:
Dilute a small amount of white acrylic paint with water until it has an ink-like consistency. -
Splatter the Stars:
Dip a stiff brush or old toothbrush into the watered-down white paint. Use your thumb to flick the bristles over the canvas, creating a spray of tiny white dots. Focus more density in the darker blue areas. -
Add Larger Stars:
Using the handle end of a paintbrush or a toothpick, dip it into undiluted white paint and dot a few larger, distinct stars throughout the galaxy for variety. -
Draft the Constellation:
Once the white stars are dry, lightly sketch your chosen zodiac constellation (like Virgo shown here) using a ruler and a pencil. Mark the position of the main stars first. -
Connect the Stars:
Use the ruler to lightly draw the connecting lines between your pencil marks, double-checking the pattern against a reference image of your zodiac sign. -
Paint the Gold Stars:
Using gold metallic paint and a small round brush (or a gold paint pen), paint filled circles over your pencil marks where the main stars locate. Make some slightly larger than others to represent brightness. -
Draw the Gold Lines:
Carefully trace over your pencil lines connecting the gold stars. If using a brush, keep your hand steady and use the ruler as a guide if needed; a paint pen makes this step significantly easier. -
Refine the Details:
Go back over the gold lines a second time if the coverage looks thin. I often find a second coat makes the metallic finish really pop against the dark background. -
Final Drying:
Let the gold paint cure completely. If you want extra protection, you can add a clear varnish coat, but the metallic shine is often prettiest left unvarnished.
Make It Sparkle
Mix a tiny pinch of fine iridescent glitter into your varnish or topcoat. Brush it primarily over the dark blue sections for a subtle, shimmering deep-space effect.
Enjoy the personalized starry night you’ve created just for your space


Girls’ Night Table-Runner Collaborative Painting
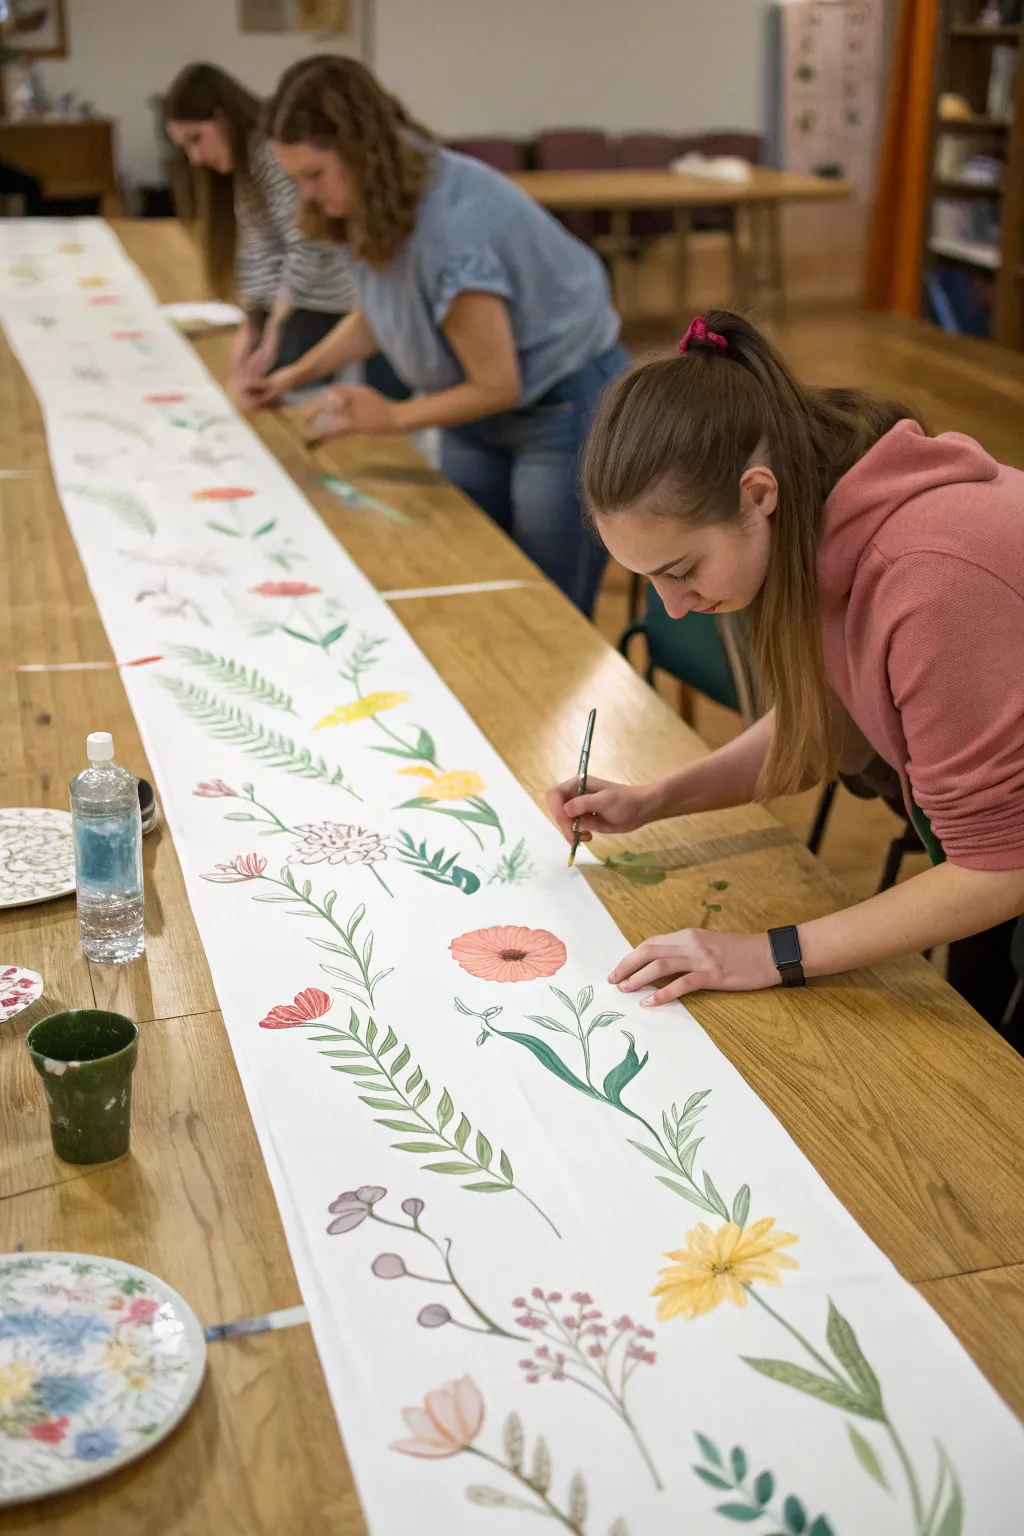
Gather your friends for a creative session to produce a stunning, continuous floral masterpiece that spans the length of your dining table. This project features delicate botanical illustrations like ferns, daisies, and poppies painted on a long roll of paper or fabric, perfect for creating a shared memory and a beautiful piece of decor.
Step-by-Step Guide
Materials
- Long roll of heavy-duty watercolor paper or white butcher paper
- Pencil and eraser
- Watercolor paint set or watered-down acrylics
- Assorted paintbrushes (medium rounds and fine liners)
- Water cups for rinsing
- Paper towels
- Painting palette or mixing plates
- Painter’s tape or masking tape
Step 1: Preparation and Setup
-
Prepare the Workspace:
Clear a long dining table or push several tables together to create an extended workspace. Ensure the surface is clean and dry. -
Secure the Canvas:
Unroll your paper down the center of the table. Use small pieces of painter’s tape at the corners and intervals to secure it to the table so it doesn’t slide around while you work. -
Station Setup:
Set up painting stations for each person along the table, ensuring everyone has easy access to water, brushes, and a palette.
Keep it fluid
Work with watery paint loads. If the paint is too thick, paper can buckle. A milky consistency allows for beautiful, transparent layering.
Step 2: Sketching the Design
-
Visualize the Flow:
Before putting pencil to paper, discuss a general ‘flow’ with your group. The stems should weave gently from one side of the runner to the other, creating a connected vine-like effect. -
Pencil the Main Stems:
Lightly sketch a central, wavy line down the length of the runner. This doesn’t need to be perfect; it just acts as a spine for your botanical elements. -
Draft the Flowers and Leaves:
Sketch individual flowers and leaves branching off the main stem. Vary the direction—some pointing left, some right—and mix up the types of plants, interlacing ferns with poppies and daisies. -
Review Composition:
Take a step back to look at the overall balance. Fill in any large empty gaps with smaller buds or extra leaves to ensure the design looks full.
Add some sparkle
Once the initial painting is dry, use a metallic gold pen or gold watercolor paint to outline key petals or add magical dots along the vine.
Step 3: Painting the Botanicals
-
Start with Greens:
Begin by painting the leaves and stems. Mix a few shades of green—try a muted olive for ferns and a brighter sap green for flower stems—to add depth and realism. -
Paint the Ferns:
For fern fronds, use a fine liner brush. Start at the base of the leaf and use quick, light strokes outward to create the feathery texture. -
Block in Flower Colors:
Move on to the blooms. Wash in the base colors for your flowers, such as pale pinks for poppies or yellows for daisies, keeping the paint relatively watery for a soft look. -
Layering Petals:
Once the initial wash is dry, go back in with a slightly more saturated version of the same color to define individual petals and add shadows. -
Detailing Centers:
Add the centers to your flowers. Use contrasting colors like dark browns or deep yellows for daisy centers, dabbing the brush to create texture. -
Refining Stems:
reconnect any floating flowers to the main vine. Use a steady hand to paint thin, elegant lines connecting your blooms to the main stem structure.
Step 4: Finishing Touches
-
Add Fine Details:
Use your smallest brush to add veins to the larger leaves and tiny accents like thorns or buds. -
Check for Consistency:
Look down the length of the runner. If one section looks too heavy or too light, balance it out by adding a few more leaves or a wash of color. -
Erase Pencil Lines:
Wait until the paint is completely bone-dry. Gently erase any visible pencil sketch lines to clean up the illustration. -
Allow to Cure:
Let the entire runner dry undisturbed for at least an hour before unclamping or moving it.
Now you have a gorgeous, collaborative work of long-format art ready to grace your next dinner party
Girls’ Night Blind Color-Swap Challenge
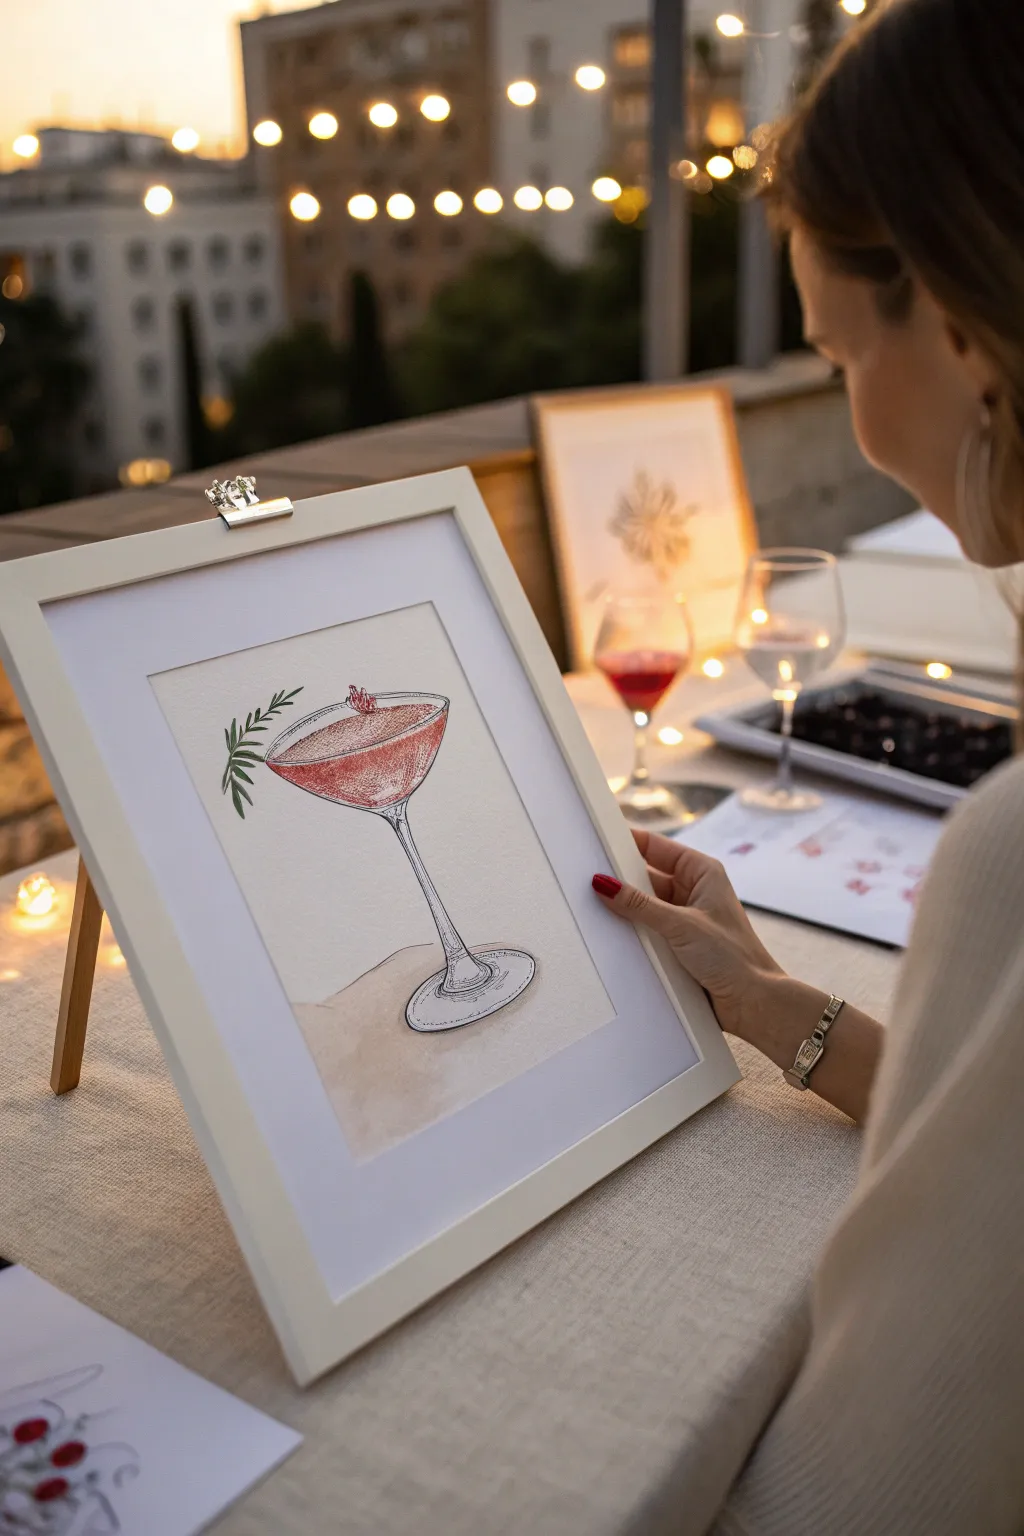
Capture the elegance of a perfect evening out with this sophisticated mixed-media cocktail illustration. Combining delicate watercolor washes with precise fineliner detailing creates a chic, modern art piece that looks like it belongs on a restaurant menu.
How-To Guide
Materials
- Cold press watercolor paper (A4 or 8×10)
- Watercolor paints (Alizarin Crimson, Burnt Sienna, Payne’s Gray)
- Round watercolor brushes (Size 4 and Size 8)
- Waterproof archival ink pen (0.3mm or 0.5mm, black)
- Pencil (HB) and eraser
- Paper towel
- Clean water jar
- Ruler (optional)
Step 1: Sketching the Coupe
-
Establish the symmetry:
Begin by lightly drawing a vertical centerline down the middle of your paper. This guide will ensure your glass stands straight and doesn’t lean. -
Mark major proportions:
Make small tick marks on your centerline to define the top of the glass, the bottom of the bowl, the stem length, and the base. The bowl of a coupe is typically shallow and wide. -
Draw the rim ellipse:
Sketch a flattened oval (ellipse) at the top tick mark. Keep this loose; you want to capture the feeling of the circular opening seen from a slight angle. -
Create the bowl shape:
Connect the sides of your ellipse down to the stem mark with gentle, curving lines that taper inward. It should look like a wide U-shape. -
Add stem and base:
Draw the stem as two parallel lines close together, flaring out slightly where it meets the bowl and the foot. Sketch another, smaller ellipse for the base of the glass. -
Outline the liquid and garnish:
Draw a line slightly below the rim to indicate the surface of the drink. Off to the left side, sketch a simple stem with needle-like leaves for the rosemary sprig.
Uneven Wash?
If your cocktail color dried with hard edges (blooms), don’t panic. Use a clean, slightly damp brush to gently scrub and soften those edges to blend them back in.
Step 2: Watercolor Application
-
Mix the cocktail hue:
Dilute Alizarin Crimson with plenty of water to create a soft, translucent pink. I like to add a tiny touch of Burnt Sienna to warm it up so it looks more like a drink and less like pure pigment. -
Paint the liquid:
Using your size 8 brush, fill in the liquid area. Keep the wash uneven—allow some pigment to pool at the bottom of the bowl for depth, and leave tiny white gaps near the surface for highlights. -
Add the shadow wash:
Mix a very watery wash of Burnt Sienna and Payne’s Gray to create a neutral beige shadow. Paint a loose, organic shape underneath the glass base to ground the object. -
Paint the garnish:
Using the tip of your size 4 brush, dab green paint onto the rosemary leaves. Don’t worry about staying perfectly inside the lines; a little looseness adds artistic flair. -
Let it dry completely:
Wait until the paper is bone dry. If the paint is even slightly damp, your ink pen will bleed and ruin the crisp effect.
Make it Sparkle
Once fully dry, use a white gel pen to add sharp, opaque highlights on the curve of the glass and the top of the liquid for a glistening effect.
Step 3: Inking details
-
Ink the main contours:
Using your waterproof pen, trace over your pencil lines for the glass rim and bowl. Use broken lines in some areas to suggest light reflection rather than a solid, heavy outline. -
Detail the liquid surface:
Draw the elliptical line for the top of the liquid. Add small stippling dots or tiny hatched lines just below the surface line to create a sense of froth or texture. -
Define the stem:
Ink the stem with confident, vertical strokes. Add slight curvature lines at the connection points to emphasize the rounded glass form. -
Texture the rosemary:
Outline the rosemary leaves with quick, flicking motions. Adding a few extra ink lines inside the leaves gives them dimension. -
Enhance the glass reflections:
Add vertical hatching lines on the glass bowl and the base. These lines mimic the way light wraps around curved glass surfaces. -
Erase pencil marks:
Once you are certain the ink is 100% dry, gently erase the original pencil sketch and the centerline to reveal the clean illustration.
Frame your cocktail creation in a simple white mat to let the delicate colors truly shine
Girls’ Night Neon Glow Paintings

Bring the glowing allure of a vintage cocktail lounge into your home with this striking neon-style painting. The stark contrast between the matte black background and the vibrant teal and pink lines creates a convincing illuminated effect that’s perfect for a party atmosphere.
How-To Guide
Materials
- Square stretched canvas (8×8 or 10×10 inches)
- Black acrylic paint (matte finish)
- White chalk or a white charcoal pencil
- Teal/Turquoise acrylic paint
- Hot pink acrylic paint
- White acrylic paint
- Flat brush (1-inch)
- Round liner brush (size 1 or 2)
- Small flat brush
Step 1: Setting the Stage
-
Prepare the Background:
Begin by painting your entire canvas with black acrylic paint. Use a wide flat brush to ensure smooth, even coverage. -
Paint the Edges:
Don’t forget to paint the sides of the canvas black as well to give your piece a finished, professional look without needing a frame. -
Let it Dry:
Allow the black base coat to dry completely. This is crucial because any moisture will cause your neon colors to mix with the black and become muddy.
Smooth Operator
For ultra-crisp lines that look like glass, mix a tiny drop of water into your paint. It helps the brush glide smoothly without leaving jagged, dry edges.
Step 2: Sketching the Design
-
Outline the Glass:
Using a white chalk pencil, lightly sketch a large inverted triangle shape in the center of the canvas. This will be the bowl of your martini glass. -
Add the Stem and Base:
Draw a straight vertical line down from the center of the triangle, stopping about an inch from the bottom. Add a smaller triangle at the bottom for the base of the glass. -
Sketch the Drink Line:
Inside the main triangle, draw a smaller triangle shape parallel to the top rim to represent the liquid in the glass. -
Draw the Garnish:
On the top right rim of the glass, sketch a five-pointed star shape. Extend a small stirrer stick line coming out from the top of the star. -
Plan Sparkles:
Mark a few spots around the glass where you want to add starbursts and dots for extra flair.
Step 3: Painting the Neon Lines
-
Base the Teal Lines:
Load your round liner brush with teal paint. Trace over the outer triangle of the glass, the stem, the base, and the star garnish. You may need two coats to get a solid opaque color. -
Base the Pink Lines:
Clean your brush and switch to hot pink. Paint the inner triangle ‘liquid’ line and the stirrer stick extending from the star. -
Add Pink Details:
Paint a few short, angled dash marks inside the liquid area to simulate reflection on the glass surface. -
Paint Background Sparkles:
Using the pink paint, create small four-pointed starbursts in the background. Simply paint a cross shape—one vertical line intersecting a horizontal one. -
Add Dots:
Use the back end of your paintbrush handle dipped in teal and pink paint to stamp perfect little circular dots scattered around the glass. -
Let Colors Dry:
Allow these colored layers to dry fully. If the black is showing through too much, apply a second coat of the colors now.
Glow Up
Use actual fluorescent or glow-in-the-dark acrylic paints for the colored layers. Under a blacklight, your painting will actually illuminate like a real neon sign.
Step 4: Creating the Glow Effect
-
Prepare Highlighting White:
To make the lines look like tubes of neon light, you need a bright white highlight. Thin your white acrylic paint slightly with water so it flows smoothly. -
Highlight the Teal:
Using your finest liner brush, paint a very thin white line down the center of all your teal shapes. Leave the teal visible on the edges to act as the ‘glow’. -
Highlight the Pink:
Repeat this process for the pink areas. Paint a thin white line in the center of the pink strokes, the liquid line, and the starbursts. -
Clean Up:
Once the paint is totally dry, use a damp cloth or a clean brush with water to gently wipe away any visible chalk sketch lines.
Hang this chic piece near your home bar or drink cart to set the mood for your next gathering


Have a question or want to share your own experience? I'd love to hear from you in the comments below!