
When you paint a media room, you’re really painting the experience—cozy, immersive, and easy on the eyes. The right dark, low-reflective palette can make your screen feel brighter, your blacks look deeper, and your whole space feel like a private cinema.
Matte Charcoal for a Modern Theater Feel
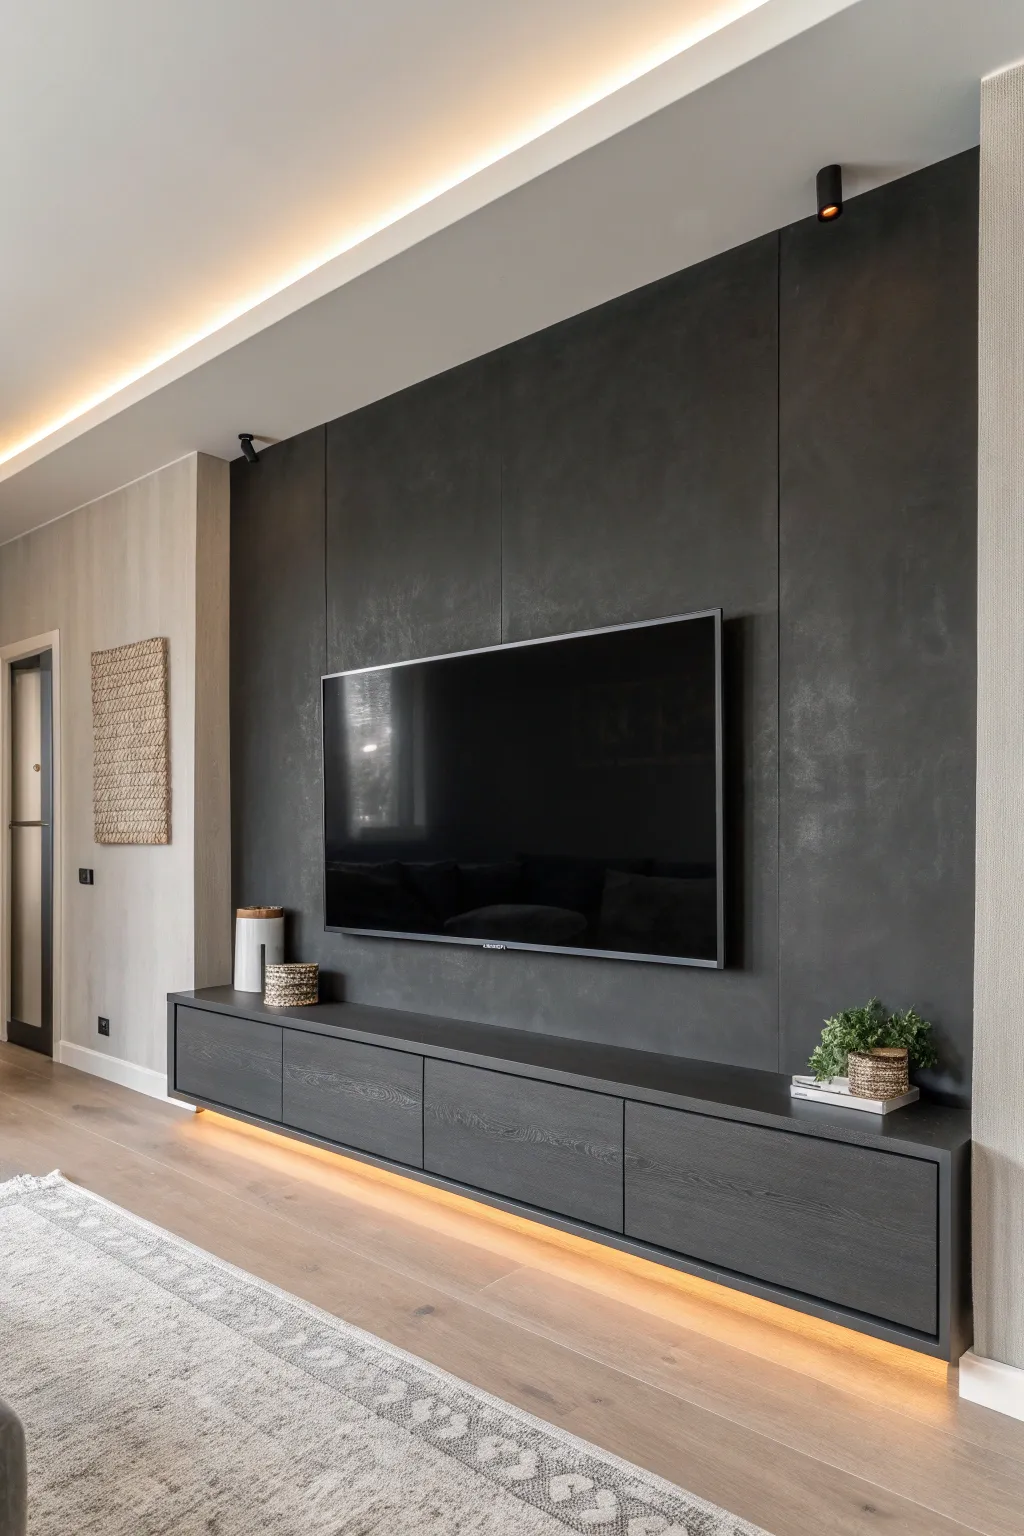
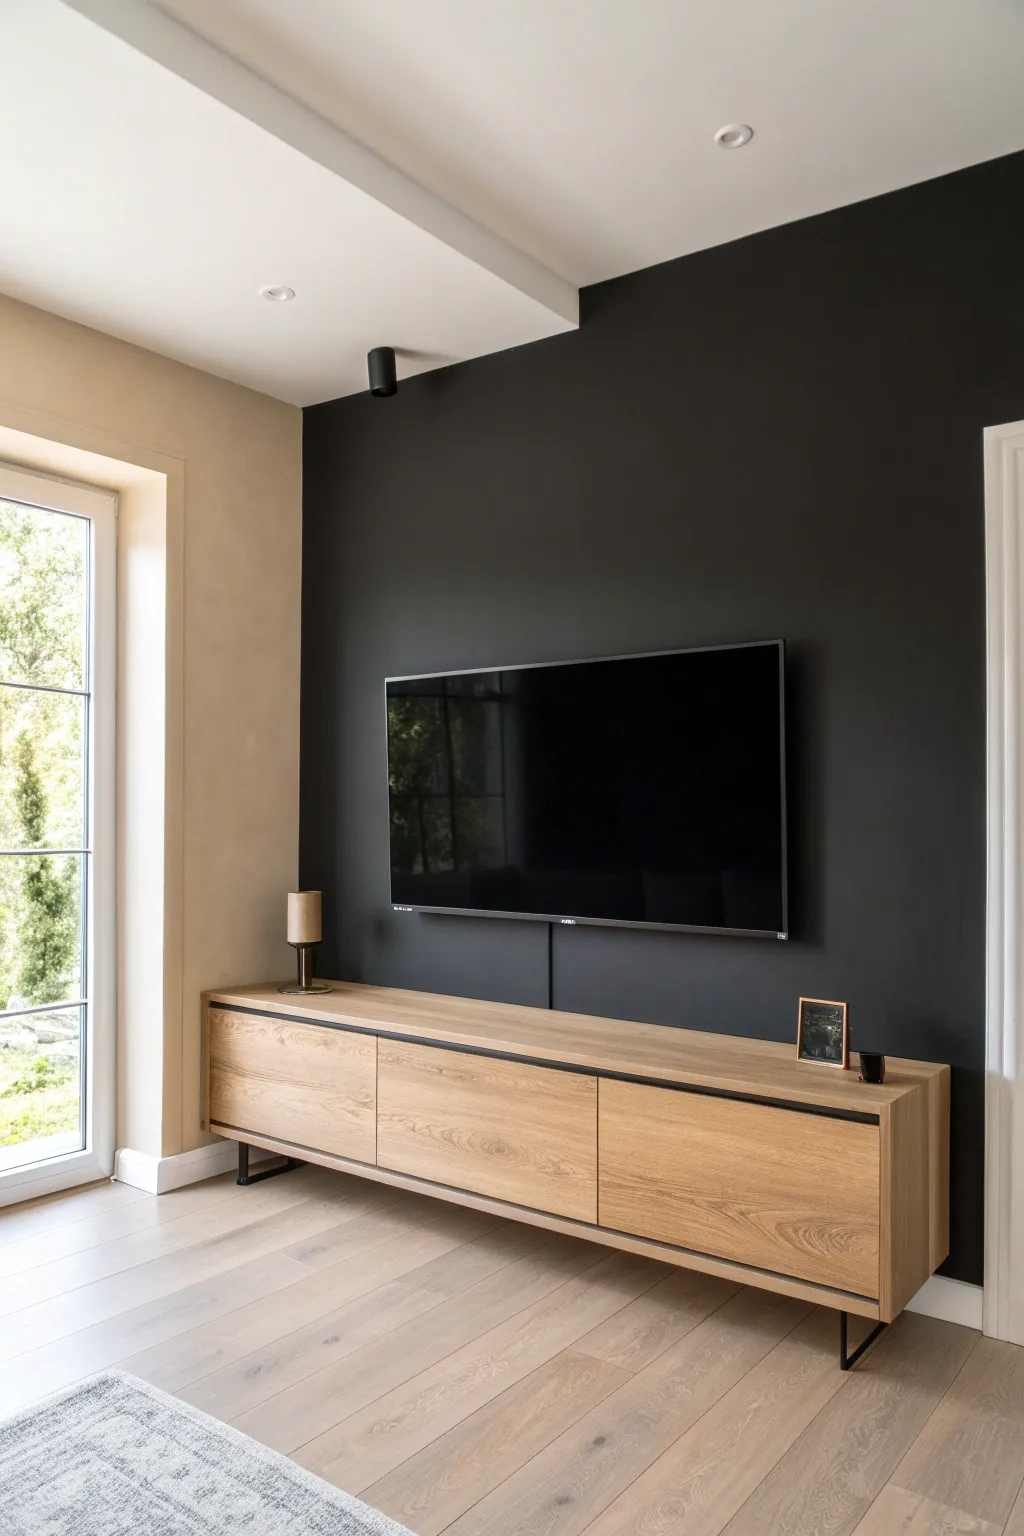
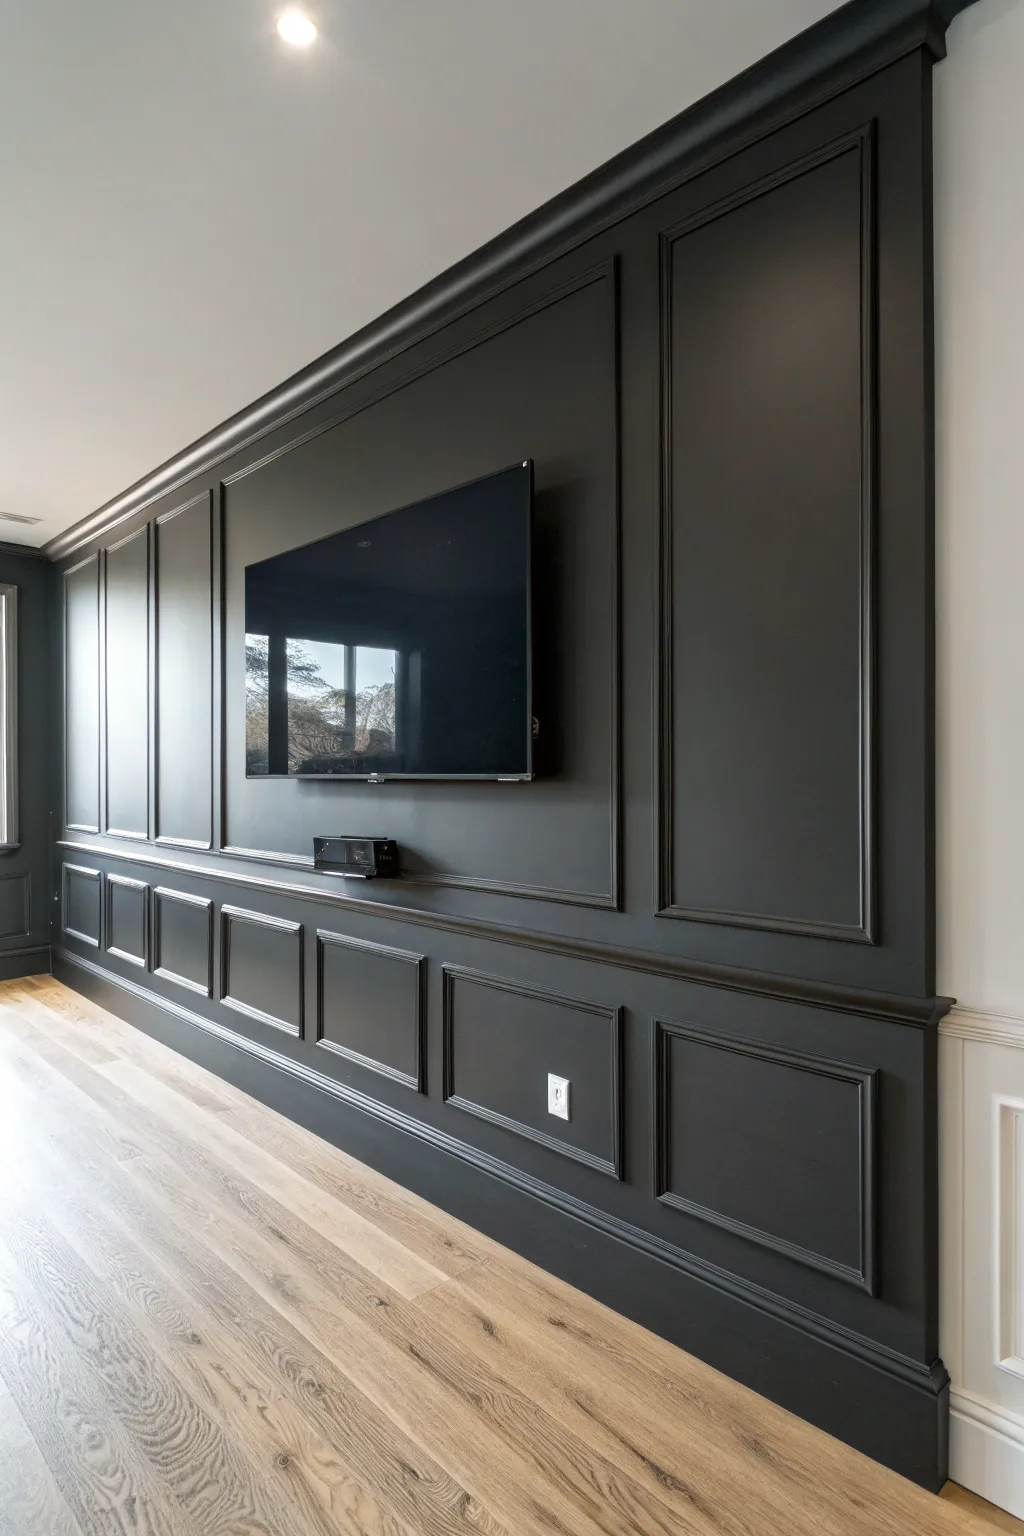
Transform your living space with this sleek, cinematic media wall featuring dramatic matte charcoal panels and a floating console. This project combines modern carpentry with atmospheric lighting to create a high-end theater feel right in your living room.
Step-by-Step Guide
Materials
- Large format MDF panels or drywall sheets
- Matte charcoal paint (e.g., specialized architectural coating)
- Floating media console cabinet (pre-made or flat-pack)
- Heavy-duty French cleat system or wall anchors
- LED strip lighting kit with diffuser channels
- Paint roller with microfiber nap
- Painter’s tape
- Sanding block (220-grit)
- Measuring tape and laser level
- Stud finder
- Cable management chases
- TV wall mount bracket
Step 1: Preparation & Wall Structure
-
Assess the space:
Begin by measuring your wall dimensions carefully. Decide on the width of the charcoal section; in the photo, it spans roughly 8-10 feet, creating a deliberate focal point rather than covering the entire room width. -
Mark the boundaries:
Use a laser level to mark vertical lines where the charcoal section will begin and end. This sharp definition is crucial for the modern look. -
Prepare the electrical:
Before any construction happens, plan your cable management. If you are adding new outlets or hiding HDMI cables, cut your chases into the drywall now so they will be hidden behind the dark panels. -
Install vertical seams (Optional):
The image shows subtle vertical seams dividing the charcoal area into three large panels. If you want this effect, you can install large MDF sheets with a slight gap (1/8 inch) between them, or simply score your existing drywall to mimic the panel look.
Uneven Sheen?
Matte dark paint can show ‘flashing’ where roller strokes overlap. To fix this, maintain a ‘wet edge’ while painting and do not back-roll over areas that have already started to dry.
Step 2: Painting the Charcoal Backdrop
-
Prime the surface:
Apply a high-quality dark-tinted primer to the designated area. Dark primer is essential to ensure the topcoat looks rich and opaque without requiring five or six coats. -
Cut in the edges:
Tape off the ceiling and adjacent lighter walls very precisely. Use an angled brush to ‘cut in’ the charcoal paint around the perimeter. Watch for drips, as they show up easily on matte finishes. -
Apply the first coat:
Roll on your first coat of matte charcoal paint. I like to use a ‘W’ pattern to distribute the paint evenly before smoothing it out with vertical strokes. -
Sand between coats:
Once dry, lightly sand the wall with a fine-grit sponge. This knocks down any roller texture, which is key to achieving that velvety, architectural finish seen in the photo. -
Final coat application:
Apply the second (and third, if necessary) coat. Ensure your roller is fully saturated to avoid streaks. Remove the painter’s tape while the final coat is still slightly tacky to get a crisp edge.
Step 3: Installing the Floating Console
-
Locate studs:
Use a stud finder to locate and mark every stud within the console’s footprint. A floating cabinet is heavy, so anchoring into studs is non-negotiable. -
Mount the cleat or bracket:
Install the French cleat or mounting rail that came with your cabinet. Use a long level to ensure it is perfectly horizontal; even a fraction of an inch off will be noticeable against the linear wall design. -
Prepare under-cabinet lighting:
Before hanging the cabinet, attach the LED strip channels to the underside. Ideally, set these back about 2 inches from the front edge so you see the glow, not the light source. -
Hang the cabinet:
Lift the cabinet onto the mounting rail. This is usually a two-person job. Secure it according to the manufacturer’s instructions, often involving locking screws from the inside. -
Door alignment:
Adjust the hinges on the cabinet doors. The gaps should be uniform and tight to maintain the minimal aesthetic.
Level Up: Texture
Instead of standard paint, use a Venetian plaster or a limewash in charcoal. This adds subtle depth and movement to the wall that catches the downlights beautifully.
Step 4: Lighting & Final Details
-
Install overhead tracks:
Mount small, directional track lights or puck lights at the ceiling line, aligned with the edges of your dark panel. These highlight the texture of the matte wall. -
Mount the TV:
Install your TV bracket in the center of the charcoal field. Hang the TV and route all cables through the pre-planned chases or behind the wall. -
Wire the LEDs:
Connect your under-cabinet LED strips to power. A warm white (2700K-3000K) is best for that cozy media room vibe shown in the example. -
Style the surface:
Less is more here. Add a simple textured vase or slight greenery on one side to break the symmetry without cluttering the view.
Now turn on the under-lighting and enjoy a movie night in your sophisticated new theater space


All-Black Color Drenching for Full Immersion

Transform an ordinary spare room into a high-end cinematic sanctuary using a sophisticated all-black color drenching technique. This project balances matte black finishes with strategic LED lighting to create a cozy, distraction-free environment perfect for movie marathons.
Detailed Instructions
Materials
- High-quality matte black interior latex paint
- Tinted grey or black primer
- Black acoustic felt panels or fabric-wrapped panels
- LED strip lighting kits with diffusing channels
- Recessed LED downlights
- Wall sconces (up/down light)
- Light-colored wood flooring (or vinyl luxury plank)
- Painter’s tape and drop cloths
- Projection screen (fixed frame)
- Paint rollers, extension poles, and angled sash brushes
- Spackling paste and sandpaper
Step 1: Room Preparation & Flooring
-
Clear and Clean:
Remove all furniture, switch plates, and existing fixtures from the room to ensure a completely blank canvas. -
Install Flooring:
Before painting dark colors, install your light wood-toned flooring; cover it completely with heavy-duty builder’s paper to protect it from dark paint splatters later. -
Surface Prep:
Patch any holes or imperfections in the drywall with spackling paste, sanding smooth once dry to ensure the matte paint looks flawless.
Step 2: Creating the Lighting Framework
-
Wiring Rough-in:
If adding new lighting, run wiring for the ceiling recessed lights and wall sconces now, before painting begins. -
Recessed Lighting Hardware:
Install the housings for your recessed ceiling lights, ensuring they follow a symmetrical grid pattern to keep the focus on the screen. -
LED Channel Installation:
Mount aluminum LED channels at the very top of the wall (where it meets the ceiling) and along the baseboard line; these will house the strip lights.
Uneven Sheen?
Matte black paint shows every touch-up. If you see shiny spots or ‘flashing’ after drying, you may need to repaint the entire wall section rather than spot-fixing.
Step 3: The Blackout Phase
-
Prime the Surfaces:
Apply a coat of tinted grey or black primer to the walls and ceiling, which helps the final black topcoat achieve true depth without needing endless layers. -
Ceiling First:
Using a roller on an extension pole, paint the entire ceiling with your matte black paint; working from the top down prevents drips on finished walls. -
Cut in the Edges:
Use an angled sash brush to carefully paint the corners and edges where the roller can’t reach, blending out the wet edge to avoid brush marks. -
Roll the Walls:
Apply the first coat of matte black to the walls, maintaining a ‘wet edge’ by rolling top to bottom in overlapping W-patterns. -
Second Coat Application:
Once the first coat is fully dry, apply a second coat to ensure total coverage and a velvet-like finish. -
Paint Trim and Doors:
Paint baseboards, door frames, and doors in the same black shade; you might choose a satin finish here for durability, though matte keeps the reflections down.
Smart Lighting
Connect your LED strips and recessed cans to a smart dimmer system. You can program a ‘Movie Time’ scene that dims the lights slowly when you hit play.
Step 4: Acoustic & Fabric Treatments
-
Mounting Wall Panels:
Install large, fabric-wrapped acoustic panels on the side walls; these add texture and absorb sound reflections, crucial for that ‘quiet’ theater feel. -
Panel Alignment:
Ensure the vertical seams of your panels are perfectly plumb, creating deliberate vertical lines along the length of the room.
Step 5: Final Fixtures & Detail
-
Install Strip Lighting:
Lay the LED strips into the pre-mounted channels at the floor and ceiling, then snap on the diffusing covers to create a soft, neon-like glow. -
Mount Wall Sconces:
Install the black vertical wall sconces between the fabric panel sections, creating pools of light that wash up and down the walls. -
Screen Installation:
Assemble and mount the fixed-frame projection screen, centering it perfectly on the front wall. -
Clean Up:
Remove the floor protection, dust off the new floors, and install black switch plates and outlet covers to blend them into the walls. -
Final Touches:
Place low-profile black audio equipment or a bench below the screen and roll out a textured grey rug to anchor the space.
With the lights dimmed and the screen glowing, you now have a professional-grade cinema space right at home


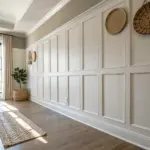
Deep Navy Walls That Still Feel Soft
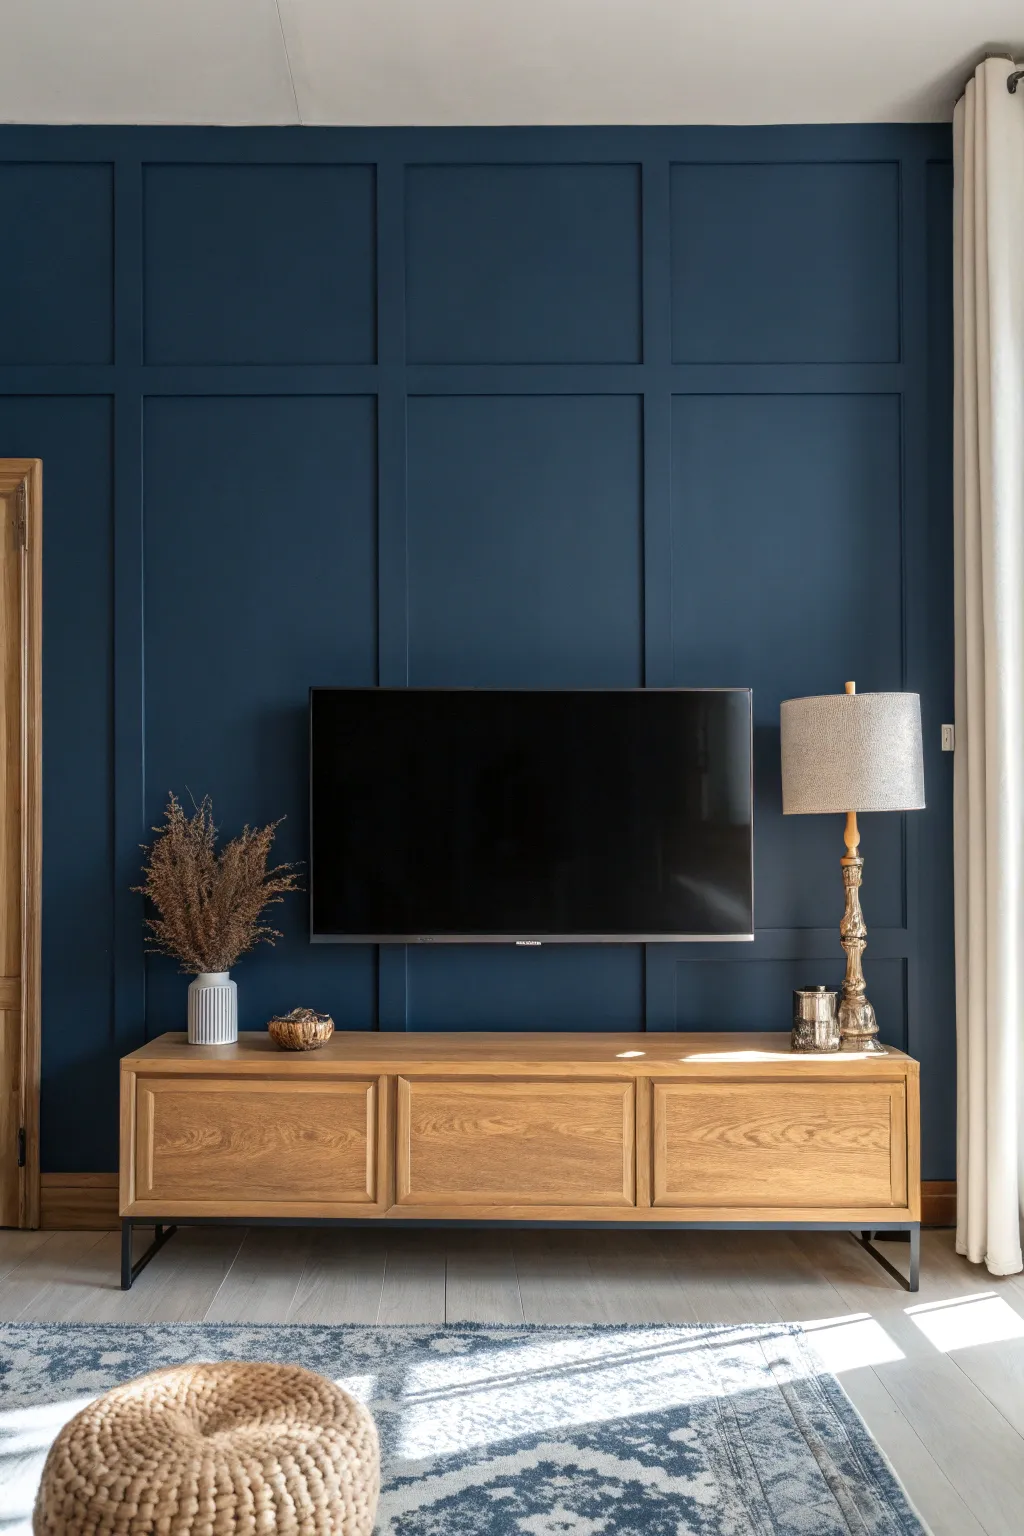
Transform a plain media room wall into a sophisticated focal point with this deep navy grid paneling project. This classic board and batten treatment adds instant architectural character and pairs perfectly with warm wood tones for a cozy yet modern feel.
Step-by-Step
Materials
- 1×3 primed MDF or pine boards
- 1×4 primed MDF or pine boards (for top rail)
- Construction adhesive (e.g., Liquid Nails)
- Brad nailer and 1.5 to 2-inch brad nails
- Laser level (or standard 4 ft level)
- Measuring tape
- Miter saw (or hand saw/circular saw)
- Spackle or wood filler
- Paintable caulk and caulk gun
- Fine-grit sandpaper (220 grit)
- Interior paint (Deep Navy, Satin or Matte finish)
- Paint roller (medium nap 3/8 inch)
- Angled sash brush (2 inch)
- Painter’s tape
- Drop cloths
Step 1: Planning and Preparation
-
Measure and Map:
Measure the total width and height of your wall. Sketch a grid layout on paper to determine spacing. Aim for squares or rectangles that are roughly equal in size; in this project, we are creating three large vertical sections and three horizontal rows. -
Calculate Spacing:
Subtract the total width of your vertical boards from the wall width, then divide the remaining number by the number of spaces to find your exact gap size. Double-check your math before buying lumber. -
Prep the Surface:
Remove any existing baseboards if you plan to replace them, or decide if your vertical battens will sit atop the existing baseboard. Lightly sand the wall if it has a high-gloss finish to help the new paint adhere.
Uneven Wall Woes?
If your wall bows and causes gaps behind the boards, don’t force the wood. Use extra adhesive and rely on a generous bead of caulk to visually fill the gap before painting.
Step 2: Installing the Framework
-
Install Frame Boards:
Start by framing the perimeter. Install a 1×3 board horizontally along the ceiling line and vertically along the adjacent walls. Use construction adhesive on the back and secure with brad nails into studs where possible. -
Add Baseboard:
Install your bottom baseboard. If you are keeping existing baseboards, ensure your vertical battens are cut precisely to rest on top of them. A flat 1×4 or 1×5 often looks best as the base anchor. -
Mark Vertical Positions:
Using your calculated measurements, mark the positions for the vertical battens on the wall. Use a laser level to project a line or draw faint pencil lines with a standard long level to ensure they are perfectly plumb.
Level Up: Hidden Tech
Before attaching the grid permanently, router a channel in the back of the central vertical batten to hide TV cables for a seamless, cord-free media setup.
Step 3: Placing the Battens
-
Attach Vertical Battens:
Cut your 1×3 vertical boards to length. Apply adhesive to the back of each board. Align them with your marked plumb lines and nail them into place. Don’t worry if you miss studs; the adhesive and cross-nailing (nailing at opposing angles) will hold them securely. -
Measure Horizontal Spans:
Measure the distance between each vertical batten individually for the horizontal rails. Walls are rarely perfectly straight, so cutting each piece to its specific spot is crucial for a tight gap-free fit. -
Install Horizontal Rails:
Cut the short horizontal 1×3 pieces. Use a predetermined spacer block (a scrap piece cut to your exact desired height) to help position these rails consistently. Glue and nail them between the vertical battens. -
Check Level:
Periodically place your level across the horizontal rails as you go. It’s easier to make micro-adjustments now than to fix a crooked grid later.
Step 4: Finishing and Painting
-
Fill Nail Holes:
Apply wood filler or spackle to every nail hole. Overfill slightly, as the compound will shrink when drying. Let it dry completely according to the manufacturer’s instructions. -
Caulk Seams:
Run a thin bead of paintable caulk along every seam where the wood meets the wall and where the boards meet each other. This step is the secret to making the grid look like a single, solid piece of millwork. -
Smooth the Joints:
Once the filler is dry, sand all filled holes flat with 220-grit sandpaper. Also lightly sand any rough edges on the wood to ensure a professional, smooth finish. -
Clean Up Dust:
Wipe down the entire wall and grid with a tack cloth or damp rag to remove sanding dust. Painting over dust will create a gritty texture that ruins the sleek look. -
Cut In Edges:
Using your 2-inch angled sash brush, ‘cut in’ the paint around the perimeter of every box, getting into the corners and coating the sides of the battens thoroughly. -
Roll the Surfaces:
Use a medium nap roller to paint the flat wall sections inside the grid and the faces of the battens. I find rolling in a ‘W’ pattern helps distribute the deep navy color evenly without leaving heavy lines. -
Apply Second Coat:
Allow the first coat to dry fully (usually 4 hours). Apply a second coat to ensure true depth of color, especially with dark hues like navy which can sometimes streak on the first pass.
Step back and admire the dramatic depth your new custom feature wall brings to the room.


Slate Gray for Easy-to-Style Contrast
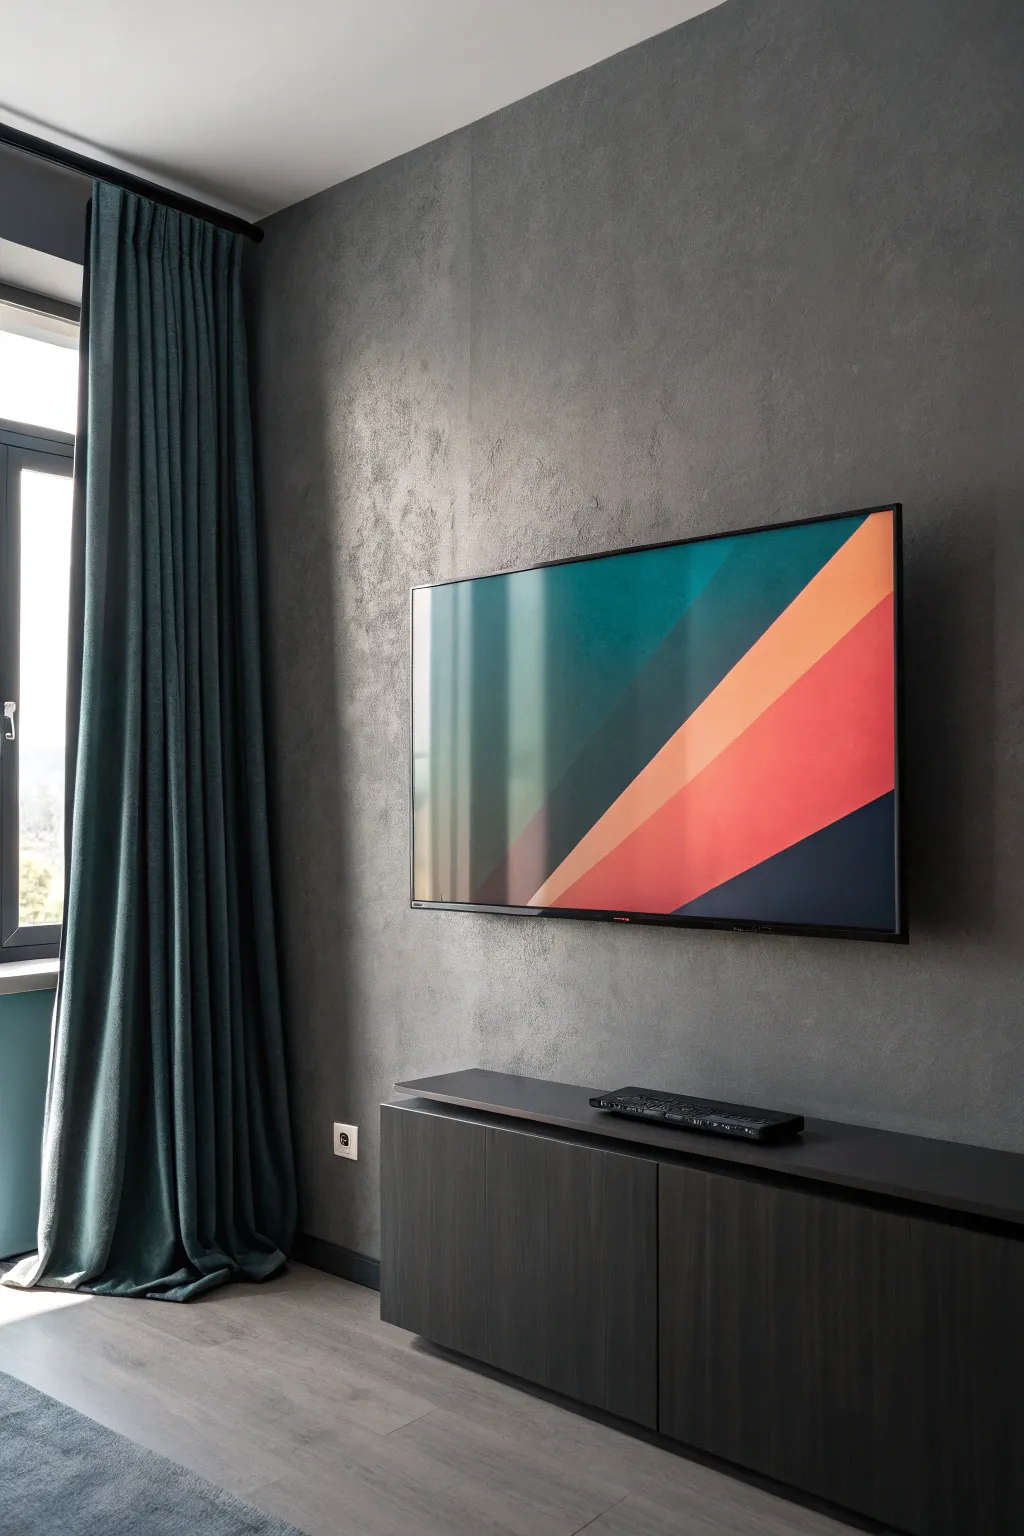
Transform a plain wall into a sophisticated, moody backdrop perfect for movie nights with this textured slate gray finish. This project combines deep, rich paint with a specialized application technique to create a surface that looks like high-end plaster or concrete.
Step-by-Step Guide
Materials
- High-quality interior latex paint (Slate Gray/Charcoal)
- Textured paint additive or suede-effect paint
- Painter’s tape
- Drop cloths
- Paint roller frame and extension pole
- Medium nap roller covers (3/8 or 1/2 inch)
- 4-inch angled sash brush
- Wide spatula or drywall knife (optional for more texture)
- Sanding block (fine grit)
- Primer (tinted gray recommended)
- Paint tray and liners
- Screwdriver (for removing outlet covers)
Step 1: Preparation & Priming
-
Clear the area:
Begin by removing all furniture, including the media console, away from the wall you intend to paint. If your TV is already mounted, carefully take it down and remove the mounting bracket if possible, or protect it thoroughly. -
Protect surfaces:
Lay down drop cloths to cover the flooring completely. Use painter’s tape to mask off the ceiling line, baseboards, and any adjacent walls you don’t want to get gray paint on. -
Remove hardware:
Unscrew and remove any outlet covers or light switch plates. Store the screws in a ziplock bag taped to the back of the plate so you don’t lose them. -
Clean the wall:
Wipe the wall down with a damp cloth or a mild TSP solution to remove dust and grease. This ensures the primer adheres properly. -
Prime the surface:
Apply a coat of primer. I recommend using a gray-tinted primer for this project; it helps the dark slate topcoat achieve full coverage faster and deepens the final color. -
Let it dry:
Allow the primer to dry completely according to the manufacturer’s instructions, usually about 2-4 hours.
Patchiness Problems?
If the finish looks too uneven after drying, your roller may have been too dry. Apply a third thin coat, ensuring you keep a ‘wet edge’ as you work across the wall.
Step 2: Creating the Texture
-
Mix the paint:
If you are using a standard latex paint with a separate texture additive, mix them together now in a large bucket. Stir thoroughly to ensure the texture is evenly distributed. If using a pre-mixed suede or stone effect paint, stir it gently but well. -
Cut in the edges:
Dip your 4-inch angled brush into the paint mixture. carefully ‘cut in’ a 3-inch border around the ceiling, corners, and baseboards where the roller won’t reach. -
Apply the first coat:
Load your roller with paint. Roll the paint onto the wall using a ‘W’ or ‘M’ motion to distribute it evenly. Don’t worry about perfect smoothness; the texture is the goal here. -
Cross-hatching technique:
For that subtle plaster-like look seen in the photo, roll over the wet paint in random, cross-hatching directions (X-patterns) rather than just straight up and down. This disrupts uniform roller marks and builds organic movement. -
Allow to dry:
Let this first coat dry for at least 4-6 hours. Dark colors and textured paints often take longer to cure than standard flat paint.
Add Ambient Light
Install LED bias lighting strips behind the TV or along the back of the media console. The glow will highlight the wall’s texture and reduce eye strain.
Step 3: Deepening the Effect
-
Check for consistency:
Inspect the dried wall. You will likely see some lighter spots or uneven texture. This is normal and will be fixed with the second layer. -
Apply the second coat:
Apply a second coat using the same cross-hatch rolling technique. This layer builds the opacity and enhances the depth of the slate color. -
Optional spatula finish:
For a more distinct ‘concrete’ feel, while the second coat is still tacky, you can lightly drag a wide drywall knife or spatula over random sections to knock down peaks and create flat, smooth patches. -
Final drying time:
Let the final coat dry for a full 24 hours. The color often darkens slightly as it fully cures. -
Reinstall fixtures:
Once the paint is fully hard and dry, screw the outlet covers back on. I like to paint the covers the same slate gray beforehand so they disappear against the wall. -
Clean up:
Remove the painter’s tape carefully. Pull the tape away from the paint edge at a 45-degree angle to prevent peeling. -
Reset the room:
Re-mount your TV bracket and hang the television. Slide your console back into place and hang your curtains to complete the moody, cinematic look.
Enjoy your new sophisticated media space that perfectly balances modern design with cozy textures.
BRUSH GUIDE
The Right Brush for Every Stroke
From clean lines to bold texture — master brush choice, stroke control, and essential techniques.
Explore the Full Guide
Dark Ceiling Paint to Kill Screen Glare
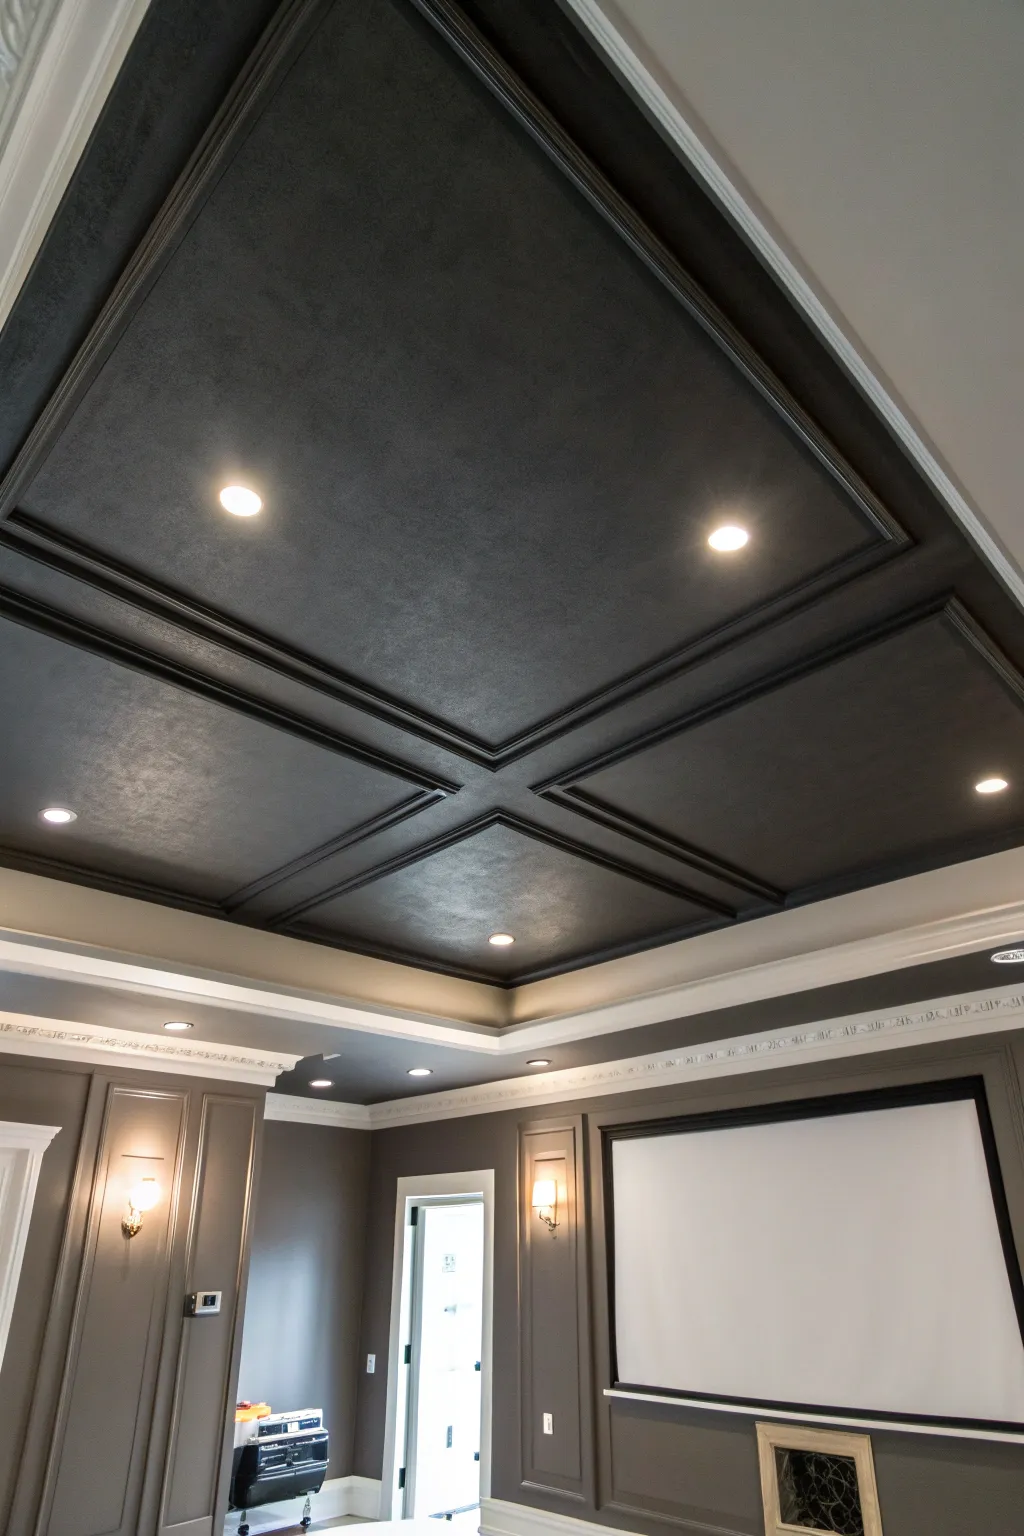
Transform your media room into a true cinema experience by painting your coffered ceiling a rich, matte black. This dramatic look not only adds architectural depth but also absorbs stray light to improve your screen’s picture quality.
Step-by-Step
Materials
- High-quality flat black or charcoal paint (latex)
- Medium gray wall paint (satin finish)
- Painter’s tape (1.5 – 2 inch width)
- Drop cloths and plastic sheeting
- Angled sash brush (2.5 inch)
- 9-inch paint roller with extension pole
- Microfiber roller covers (3/8 inch nap)
- Sanding sponge (fine grit)
- Spackle (if needed for repairs)
- Step ladder
- Screwdriver (for light fixture removal)
Step 1: Preparation & Masking
-
Clear and cover:
Remove all furniture from the room or push it to the center and cover completely with plastic sheeting. Lay drop cloths on the entire floor to protect against dark paint splatters. -
Remove hardware:
Carefully remove the recessed light trims from the ceiling. If you have smoke detectors or vents, take those covers down as well to ensure a clean edge. -
Prep the surface:
Inspect the ceiling coffers for any nail pops or cracks. Fill these spots with spackle, let it dry, and then sand smooth. I like to give the entire area a quick dusting to remove cobwebs. -
Tape the edges:
Apply painter’s tape along the bottom edge of the crown molding or wherever the ceiling paint will meet the wall color. Press the tape down firmly with a putty knife to prevent bleed-through.
Patchy Darkness?
If the black paint looks uneven or ‘flashing’ occurs, you likely rolled over partially dry paint. Apply another full coat, working quickly to keep a wet edge across the panel.
Step 2: Painting the Ceiling
-
Cut in the perimeter:
Start with your angled sash brush and the dark flat paint. Carefully paint into the corners of the coffers and along the edges of the molding where the roller won’t reach. -
Paint the molding profiles:
Continue using the brush to paint the detailed profiles of the crown molding and coffer beams. Work in sections to keep a wet edge. -
Roll the flat sections:
Switch to your roller with the extension pole. dip it into the dark paint and roll out the flat panels inside the coffers. Use a ‘W’ pattern to distribute paint evenly. -
Roll the beams:
Roll the undersides of the coffer beams. Ensure your roller isn’t overloaded to avoid drips on the edges you just brushed. -
Check for coverage:
Dark paint often requires two coats. Let the first coat dry for at least four hours. If you see streaks or light patches, repeat the cutting and rolling process.
Go Truly Flat
Use a specialized ‘ceiling flat’ paint rather than just a matte wall paint. Ceiling flats reflect almost zero light, hiding imperfections and maximizing the theater feel.
Step 3: Walls & Finishing Touches
-
Mask for wall paint:
Once the ceiling is fully dry (wait 24 hours to be safe), tape off the ceiling molding where it meets the wall if you haven’t already established a clean line. -
Cut in the walls:
Using the medium gray paint, cut in along the ceiling line, corners, and baseboards with a clean angled brush. -
Roll the walls:
Roll the walls with the gray satin paint. Work from top to bottom, blending your roller strokes with the wet cut-in lines. -
Reinstall lighting:
When all paint is completely dry, reinstall the recessed light trims. If the old trims are white, consider swapping them for black baffles to blend seamlessly. -
Clean up:
Remove all painter’s tape slowly at a 45-degree angle. Fold up your drop cloths carefully to trap any dust or dried paint flakes inside.
Enjoy your movie nights with a professional-grade, distraction-free ceiling overhead
Flat Finish Walls for a No-Glare Setup
Transform a plain wall into a sophisticated media focal point using picture-frame molding and a specialized flat finish paint. This technique creates architectural depth while eliminating distracting screen glare for the ultimate home theater experience.
Detailed Instructions
Materials
- Dark charcoal gray flat interior paint (e.g., Benjamin Moore Kendall Charcoal or similar)
- Using a high-quality flat enamel is crucial for durability
- Primer suitable for drywall and wood
- 1×4 inch trim boards (for baseboards and rails)
- Base cap molding (for inside the rails)
- Panel molding/picture frame trim
- Miter saw
- Brad nailer with 1.5-inch and 2-inch nails
- Caulk gun and paintable caulk
- Wood filler
- Sanding sponges (medium and fine grit)
- Painter’s tape
- Level and measuring tape
- Stud finder
- Paint roller (3/8 nap) and angled sash brush
- Drop cloths
Step 1: Planning and Layout
-
Assess the wall:
Begin by measuring your wall’s total width and height. Sketch out a grid design on paper, deciding how many vertical sections you want. For a balanced look, ensure the boxes are evenly spaced, usually leaving 3-5 inches between frames. -
Locate studs:
Use a stud finder to mark all vertical studs along the wall. This is critical for anchoring your horizontal rails and heavier trim pieces securely. -
Map the design on the wall:
Using a level and a pencil, draw the entire layout directly onto the drywall. I find this helps visualize the final look before distinct cuts are made, allowing for adjustments around outlets or TV mounts.
Fixing Gaps
If caulk shrinks or cracks after drying, don’t just paint over it. Apply a second thin layer of caulk and let it cure fully to ensure those seamless, built-in transitions.
Step 2: Installing the Grid
-
Install vertical stiles:
Cut your 1×4 flat stock lumber to length for the vertical vertical strips (stiles). Apply construction adhesive to the back and nail them into place along your marked lines using the brad nailer. -
Add horizontal rails:
Cut the horizontal pieces (rails) to fit snugly between the vertical stiles. Install these to create the top and bottom boundaries of your panel sections. -
Install the chair rail (optional):
If you are designing a two-tier look like the image, install a horizontal rail at chair-rail height (usually about 32-36 inches from the floor) running the full length of the wall.
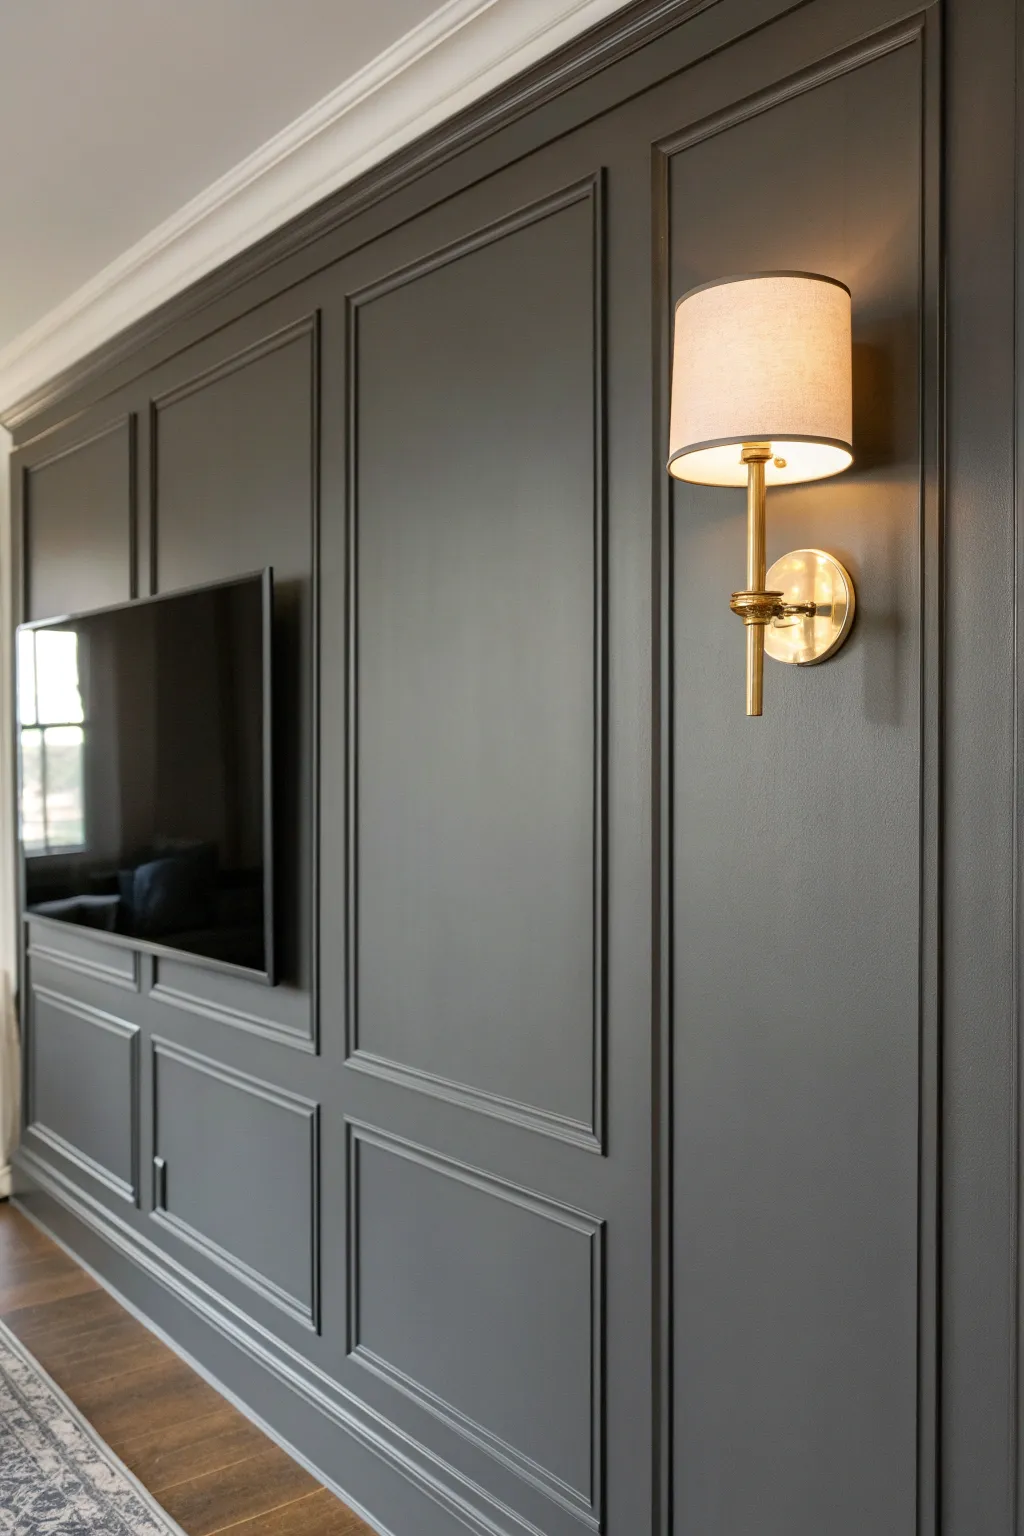
Add Sconces
Plan wiring for wall sconces inside upper panels before installing trim. Centering brass fixtures in the molding frames adds immense luxury to the finished wall.
Step 3: Adding Detail Molding
-
Cut panel molding:
Set your miter saw to a precise 45-degree angle. Measure the inside dimensions of your new grid boxes and cut the thinner picture molding to create frames that sit inside each box. -
Install the frames:
Glue and nail the picture molding inside each grid square. Depending on your design preference, you can space this molding inward by an inch or two, or flush it against the grid edges. -
Check fitment:
Ensure corners form tight 90-degree angles. If a corner is slightly open due to uneven walls, don’t panic; wood filler will handle small gaps later.
Step 4: Preparation for Paint
-
Fill nail holes:
Apply wood filler to every nail hole and any gaps in the mitered corners. Overfill slightly, as the compound shrinks when drying. -
Caulk the seams:
Run a bead of paintable caulk along every seam where the wood meets the wall and where molding pieces join. Smooth it instantly with a wet finger or rag for a seamless transition. -
Sand smooth:
Once the filler is completely dry, sand the wood patches flat with fine-grit sandpaper. Vacuum up all dust and wipe the wall down with a tack cloth.
Step 5: Painting
-
Prime the woodwork:
Apply a coat of primer to the raw wood and filler spots. If your wall color is drastic, consider tinting the primer gray to help with coverage. -
Cut in the edges:
Using an angled sash brush, paint the insides of the molding profiles and corners where the roller can’t reach. Brush carefully to avoid creating thick ridges of paint. -
Roll the first coat:
Use a 3/8-inch nap roller to apply the charcoal paint to the flat wall surfaces and the faces of the wider trim boards. Work in small sections to maintain a wet edge. -
Apply the final coat:
Once the first coat is dry, lightly sand any bumps if necessary, then apply a second coat. A flat finish is unforgiving of touch-ups later, so ensure this final layer is even and covers completely.
Enjoy the cinematic immersion of your new glare-free media room

PENCIL GUIDE
Understanding Pencil Grades from H to B
From first sketch to finished drawing — learn pencil grades, line control, and shading techniques.
Explore the Full Guide
Dark Screen Wall With Slightly Lighter Side Walls
Transform your media room by creating a dramatic focal point with a deep, matte black accent wall paired with soft beige surroundings. This high-contrast look anchors your television and creates a cinematic atmosphere right in your home.
How-To Guide
Materials
- Matte black interior latex paint (e.g., Tricorn Black or similar)
- Beige or oatmeal interior latex paint (eggshell finish)
- Painter’s tape (high quality)
- Drop cloths
- Spackling paste and putty knife
- Sandpaper (120 and 220 grit)
- Angled sash brush (2.5 inch)
- Microfiber paint roller covers (3/8 inch nap)
- Paint roller frame and extension pole
- Paint tray and liners
- Ladder
- Extension cord for lighting (if needed)
- Screwdriver (for outlet covers)
Step 1: Preparation & Repairs
-
Clear the area:
Begin by removing all furniture, the television, and the mount from the wall. If the TV mount is heavy, you might need a second person to help lift it down safely. -
Remove hardware:
Unscrew and remove all outlet covers, light switch plates, and any vent covers on both the feature wall and the adjacent side walls you plan to paint. Store the screws in a baggie taped to the plate so they don’t get lost. -
Inspect the surface:
Examine the walls for any nail holes, dents, or imperfections. Since black paint can highlight texture flaws, getting the wall smooth is crucial. -
Fill and sand:
Apply spackling paste to any holes or dents with your putty knife. Let it dry completely, then sand smooth with 120-grit paper. Wipe away the dust with a damp cloth. -
Protect the space:
Lay down drop cloths to cover the flooring entirely. Tape off baseboards, ceiling edges, and window trim with high-quality painter’s tape to ensure sharp lines.
Seamless Black Outlets
Can’t find black outlet covers? Buy cheap plastic ones and spray paint them with a matte black primer+paint combo before installing them on the dark wall.
Step 2: Painting the Lighter Walls
-
Cut in the edges:
Start with the side walls using your beige or oatmeal paint. Use the angled sash brush to cut in around the ceiling line, baseboards, corners, and window frames. -
Roll the walls:
Load your roller with the beige paint and apply it to the side walls in a ‘W’ or ‘M’ pattern. Overlap your strokes to ensure even coverage. -
Apply second coat:
Allow the first coat to dry according to the can’s instructions (usually 2-4 hours). Apply a second coat for a rich, true color finish. -
Tape the corner:
Once the beige walls are fully cured (I usually wait at least 24 hours for safety), apply a strip of painter’s tape on the beige side of the corner where it meets the future black wall. Press the edge down firmly to prevent bleed-through.
Hide Those Cords
Install an in-wall cable management kit behind the TV before painting. It hides HDMI and power cords inside the wall for that wireless, floating look.
Step 3: Creating the Dark Feature Wall
-
Cut in with black:
Open your matte black paint. Using a clean angled brush, carefully cut in around the perimeter of the feature wall, including the ceiling line, baseboards, and against the taped corner. -
Roll the first black coat:
Using a fresh microfiber roller cover, apply the black paint. Work in manageable vertical sections, maintaining a ‘wet edge’ to avoid roller marks, which show up easily on dark finishes. -
Check for holidays:
Let the first coat dry. Dark paint often looks patchy after one coat; these missed spots are often called ‘holidays.’ Don’t panic, the second coat will fix this. -
Apply the final coat:
Roll on the second coat of matte black. Roll slowly to avoid creating tiny paint splatters. Finish with long, vertical strokes from top to bottom to unify the texture. -
Remove tape:
While the paint is still slightly tacky (not fully dried), gently peel off the painter’s tape at a 45-degree angle. This prevents the dried paint from peeling off with the tape.
Step 4: Finishing Touches
-
Reinstall hardware:
Once the walls are completely dry, screw the outlet covers and switch plates back into place. If your old covers are white, consider swapping them for black ones on the dark wall for a seamless look. -
Mount the TV:
Reattach your TV mount bracket to the wall. Ensure it is level and centered before hanging the television back up. -
Style the console:
Place your wooden console beneath the TV. Add minimal decor like a small lamp or framed photo, keeping the focus on the sleek dark background.
Enjoy your new sophisticated media room that makes movie nights feel like a true theater experience
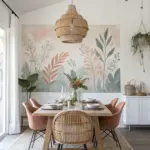
Moody Green for a Cozy Cave Vibe
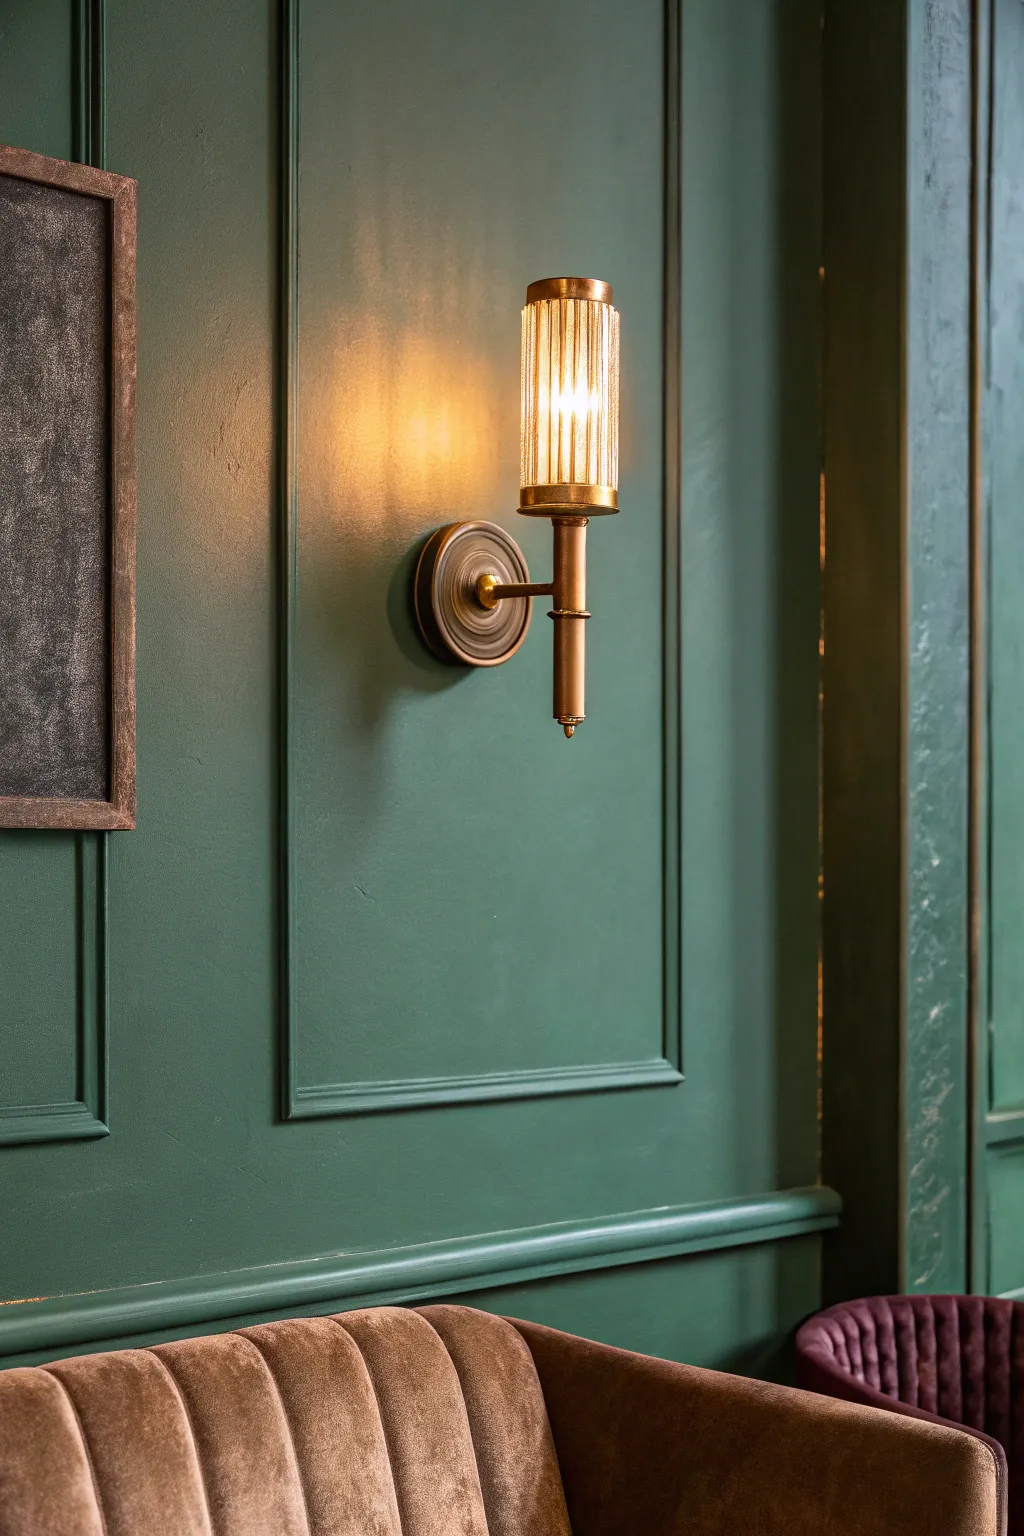
Transform a plain wall into a sophisticated focal point with deep moody green paint and classic picture frame molding. This project combines simple carpentry with a bold color choice to create a cozy, cave-like atmosphere perfect for a media room.
Step-by-Step Tutorial
Materials
- Dark forest green satin paint
- Primer (tinted dark gray recommended)
- Small molding trim (panel molding profile)
- Miter box and saw
- Measuring tape and pencil
- Level (2-foot or longer)
- Construction adhesive (or liquid nails)
- Painter’s tape
- Fine-grit sanding block
- Caulk and caulk gun
- Wood filler
- Paint rollers (microfiber)
- Angled sash brush
- Brad nailer (optional, adhesive works for light trim)
Step 1: Planning and Layout
-
Measure the wall:
Before buying materials, measure your wall’s total width and height. Sketch a rough layout to determine how many panel boxes you can fit comfortably, aiming for equal spacing between them. -
Mark the guide lines:
Using your level and pencil, lightly draw the rectangles directly onto the wall where your molding will go. A spacing of 3 to 4 inches between boxes and from the ceiling/floor usually provides a balanced look. -
Test the layout:
Step back and view your pencil marks. This is the time to adjust dimensions if the boxes look too wide or too narrow for the room’s scale.
Pro Tip: Tinted Primer
Ask the hardware store to tint your primer gray. Starting with a dark base makes achieving a deep, true forest green much easier and requires fewer top coats.
Step 2: Installing the Trim
-
Cut the molding:
place your molding into the miter box and cut 45-degree angles at the ends of each piece. Measure twice to ensure the inside edge corresponds to the dimensions of your pencil boxes. -
Dry fit the pieces:
Before gluing, hold the four pieces of a single box up to the wall to check that the corners meet perfectly. I like to tape them up temporarily just to be absolutely sure of the fit. -
Apply adhesive:
Apply a thin bead of construction adhesive to the back of the molding strips. If the trim is lightweight, this is often strong enough; otherwise, use a few brad nails for extra security. -
Secure to the wall:
Press the molding firmly onto your pencil lines. check for level one last time as you press, since the glue allows for a few moments of wiggle room. -
Repeat for all panels:
Continue this process until all your rectangular frames are installed on the wall.
Troubleshooting: Gaps
If your corner miters aren’t meeting perfectly, don’t panic. Use the rounded shaft of a screwdriver to burnish (rub) the wood fibers together, then fill the gap with wood filler.
Step 3: Prep for Paint
-
Fill the nail holes:
If you used nails, dab a tiny amount of wood filler into the holes. Overfill slightly as it shrinks when drying. -
Caulk the seams:
Run a thin bead of paintable caulk along the inside and outside edges of the molding where it meets the wall, and at the mitered corners. Smooth it with a wet finger for a seamless look. -
Sand for smoothness:
Once the filler and caulk are dry, lightly sand the wood filler spots smooth. Wipe away any dust with a damp cloth or tack cloth.
Step 4: Painting the Mood
-
Cut in the edges:
Use an angled sash brush to paint the molding trim first. Get into all the intricate curves of the profile and cut in around the ceiling and baseboards. -
Roll the first coat:
Using a microfiber roller, apply the dark green paint to the flat wall surfaces inside and outside the boxes. Work in ‘W’ shapes to distribute paint evenly. -
Let it dry:
Dark pigmented paints can look patchy while wet. Allow the first coat to dry completely according to the can’s instructions before judging coverage. -
Apply the second coat:
Roll on a second coat for deep, rich saturation. For very dark colors, a third coat might be necessary to achieve that velvety, absorbing depth seen in the photo. -
Finishing touches:
Inspect the wall with a flashlight to catch any missed spots or drips on the molding and touch them up with a small artist’s brush.
Now step back and enjoy the dramatic, cozy atmosphere your new paneled wall brings to the room


Burgundy Accents for Classic Cinema Drama
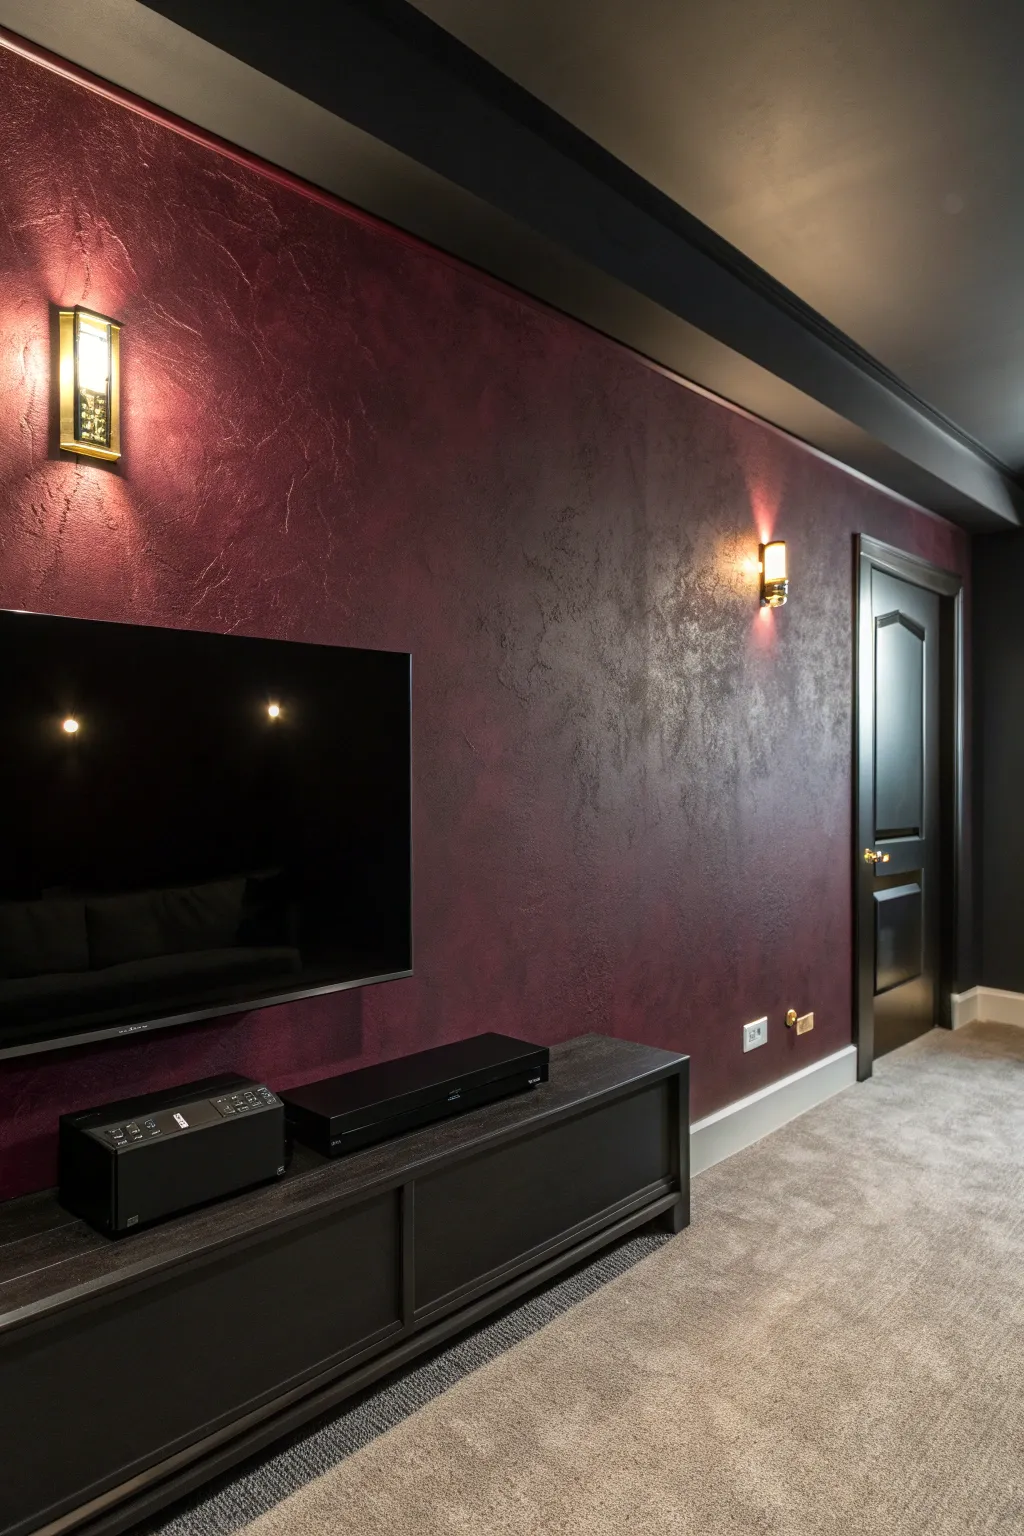
Transform your media room into a classic cinema with walls that mimic the lush look of velvet curtains. This technique uses a textured plaster or specialized suede paint to create depth, light play, and dramatic shadows perfect for movie nights.
How-To Guide
Materials
- Deep burgundy latex base coat (eggshell finish)
- Red-tinted Venetian plaster or suede-effect paint
- Tintable metallic glaze (copper or deep red)
- Painter’s tape (blue or green)
- Drop cloths
- 9-inch paint roller frame and covers (3/8 nap)
- Wide plastic putty knife or trowel
- Sea sponge or wool polishing mitt
- Sandpaper (220-grit)
- Paint tray and liners
- Angled sash brush (2.5 inch)
- Clean rags
Step 1: Preparation and Base Coat
-
Protect the perimeter:
Begin by taping off all trim, ceiling lines, door frames, and electrical outlets. Lay down drop cloths to protect your carpet or flooring, as texturing can get messy. -
Clean and prep walls:
Ensure the wall surface is clean, dry, and free of dust. If there are any holes, patch them now and sand smooth so you start with an even canvas. -
Cut in the edges:
Using your angled sash brush, paint a border of the deep burgundy base coat around the ceiling, baseboards, and corners. This ensures you won’t have to roll too close to the sensitive edges. -
Roll only the base layer:
Roll the burgundy base coat onto the entire wall. Don’t worry about texture yet; the goal here is solid, opaque coverage. Let this layer dry for at least 4-6 hours. -
Check for coverage:
Inspect the wall for any patchy spots. Since reds are notoriously translucent, I often find a second coat is necessary to get that truly deep, rich undertone.
Patchy Suede Fix
If you see distinct ‘blocks’ where sections dried too fast, lightly mist the dry edge with water before applying new plaster nearby to help blend them seamlessly.
Step 2: Creating the Texture
-
Prepare the texture mix:
If using Venetian plaster, tint it close to your base color. If using a suede paint, stir it thoroughly to distribute the texture granules evenly. -
Apply the first textured patches:
Work in small sections, about 3 feet by 3 feet. Apply the textured medium using a wide trowel or putty knife in random, crisscross strokes. Avoid uniform patterns. -
Build the movement:
Overlap your strokes to create ‘peaks and valleys’. The goal is to leave physical texture on the wall that will catch the light differently than smooth paint. -
Blend the sections:
As you move to the next 3×3 section, work quickly so the edges of the previous section don’t dry completely. Blend the wet edges together with irregular trowel movement. -
Let the texture cure:
Allow the textured layer to dry completely, usually overnight. It needs to be hard enough to withstand light sanding. -
Knock down the peaks:
Gently run 220-grit sandpaper over the dried wall. You aren’t trying to remove the texture, just smoothing down the sharpest peaks to create a soft, worn-leather feel. -
Wipe down dust:
Use a damp rag or tack cloth to remove all sanding dust from the wall. This is crucial for the final glaze step.
Step 3: Adding Depth and Sheen
-
Mix the glaze:
Mix a small amount of metallic copper or red glaze with a clear glazing liquid. The ratio depends on how subtle you want the shimmer; try 1 part paint to 4 parts glaze. -
Apply glaze with a sponge:
Dip a sea sponge into the glaze mixture and dab off the excess on cardboard. Lightly sponge the glaze onto the wall, focusing on the textured high points. -
Soften with a mitt:
While the glaze is still wet, use a clean wool polishing mitt to rub the wall in circular motions. This pushes the glaze into the low spots and polishes the high spots. -
Review contrast:
Step back to see how the light hits the wall. The texture should look darker in the recesses and lighter on the peaks, similar to crushed velvet. -
Final touch-ups:
If any areas look too uniform, dab a little more glaze on to break it up. Remove the tape carefully while the final layer is dry to the touch but not fully cured to prevent peeling.
Metallic Pop
For extra drama, mix a tiny amount of gold mica powder into your final glaze. It will catch the dim movie lights and create a luxurious, shimmering ‘star’ effect.
Now you have a stunning, cinematic backdrop ready for your favorite films
Warm Espresso Brown for Extra Comfort
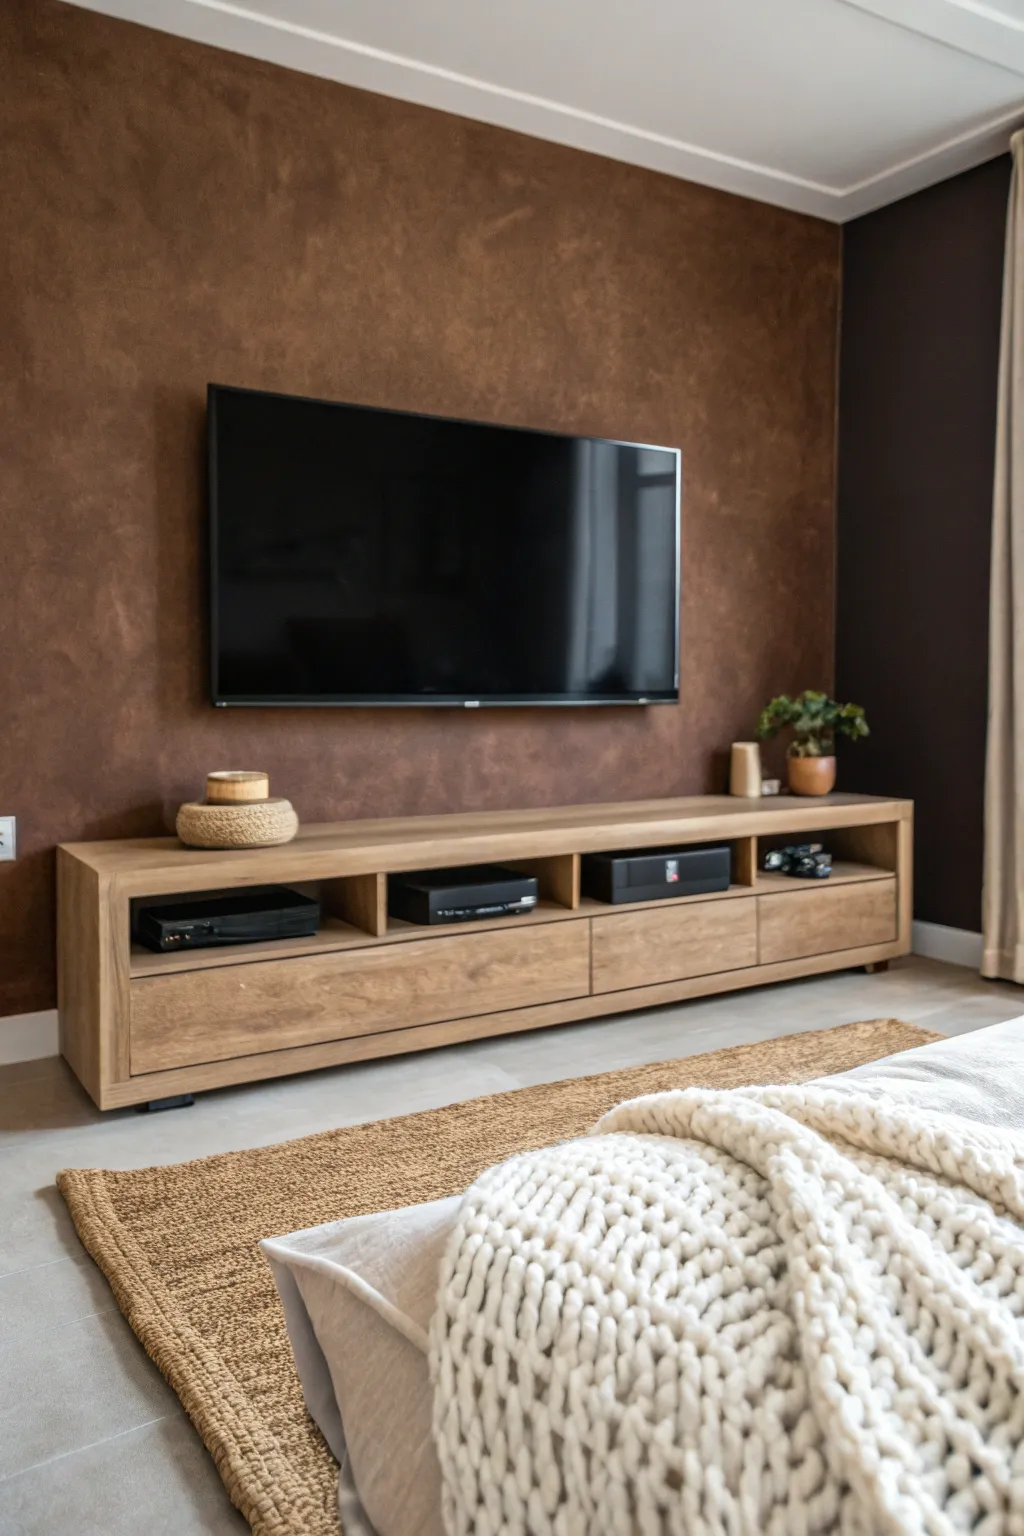
Transform a plain media room wall into a cozy focal point using a rich, textured painting technique known as color washing or sponging. The resulting espresso brown finish mimics the look of suede or aged plaster, adding immediate depth and warmth perfect for movie nights.
Step-by-Step
Materials
- Espresso brown latex paint (satin or eggshell finish)
- Glaze medium
- Painter’s tape
- Drop cloths
- Paint tray and liners
- Roller frame and commercial-grade roller covers (3/8 inch nap)
- Natural sea sponge or specialized texture sponge
- Clean lint-free rags
- Small angled sash brush for cutting in
- A clean bucket for mixing
- Stir sticks
Step 1: Preparation and Base Coat
-
Protect the perimeter:
Begin by thoroughly cleaning the wall surface to remove dust. Apply painter’s tape along the ceiling line, baseboards, and any adjacent walls you want to protect. Lay down drop cloths to catch splashes. -
Mix your base color:
Pour your espresso brown paint into the tray. If your wall is currently a very light color, you might need two coats, but for this textured effect, the base coat doesn’t need to be perfectly opaque. -
Cut in the edges:
Use the angled sash brush to paint a 2-3 inch border around the perimeter of the wall, cutting in carefully against the tape lines. -
Roll on the base:
While the cut-in strips are still wet, use the roller to apply the espresso paint to the main wall area. Use a ‘W’ pattern to distribute the paint evenly. -
Let it dry completely:
Allow this base coat to dry for at least 4-6 hours. It must be dry to the touch before you begin the texturing phase to prevent lifting.
Too patchy?
If the texture looks too distinct or spotty, use a dry softening brush to lightly whisk over the wet glaze. This blurs the sponge marks together for a softer, more velvet-like appearance.
Step 2: Creating the Glaze Mixture
-
Prepare the glaze:
In your clean bucket, mix 1 part of the original espresso paint with 4 parts glaze medium. This translucency is what creates the depth visible in the photo. -
Test the consistency:
I like to test a small amount on a piece of cardboard first. The mixture should be thin enough to stay wet longer but not so runny that it drips uncontrollably.
Pro Tip: Layer Up
For even more dimension, use two glaze colors. Do the first layer in your base espresso, then sponge a lighter mocha glaze sparingly over top once dry for a rich, multi-tonal leather look.
Step 3: Applying the Texture
-
Dampen the sponge:
Take your natural sea sponge and soak it in water, then wring it out thoroughly until it is just damp. This prevents the sponge from absorbing too much paint initially. -
Load the sponge:
Dip the sponge into your glaze mixture, blotting excess onto the ribbed part of the paint tray or a piece of cardboard. You want it loaded but not dripping. -
Start sponging:
Begin in a top corner of the wall. Press the sponge lightly against the wall and lift straight off. Do not drag it. -
Work in small sections:
Work in irregular 2×2 foot patches. Rotate your wrist constantly as you dab to prevent a repeating pattern from forming. -
Soften the look:
While the glaze is still wet on the wall, use a clean, dry lint-free rag to gently blot areas that look too heavy. This softens the hard edges of the sponge marks, creating that cloudy, suede-like effect. -
Blend the sections:
As you move to the next section, overlap the wet edge of the previous section randomly. Never stop in the middle of the wall; keep a ‘wet edge’ to avoid seam lines. -
Check your progress:
Step back frequently, about 5-6 feet, to look for areas that are too heavy or too sparse. Fix them while the glaze is still workable. -
Handle corners carefully:
For corners and edges where the big sponge won’t fit effectively, tear off a small piece of sponge to dab the glaze right up to the tape line.
Step 4: Finishing and Drying
-
Final inspection:
Once the entire wall is covered, do one last visual check. If you see spots that need more depth, you can lightly sponge a bit more glaze over them. -
Remove tape:
Carefully peel off the painter’s tape while the glaze is still slightly tacky. If you wait until it’s fully dry, you risk peeling off chunks of the finish. -
Extend drying time:
Allow the wall to cure for at least 24 hours before moving furniture back or mounting TVs, as the glaze takes longer to harden than standard paint.
Enjoy the cozy ambiance your new textured wall brings to your space
Painted Trim to Blend Everything Near the Screen
Transform a plain wall into a sophisticated, theatre-ready focal point by combining classic panel molding with a modern monochrome palette. This dark, rich finish minimizes screen glare and hides unsightly cords, creating an immersive viewing experience.
How-To Guide
Materials
- 1×4 or 1×6 MDF boards (for base/rails)
- Base cap molding
- Panel molding (picture frame trim)
- Crown molding
- Construction adhesive
- Brad nailer and 1-1/2 inch nails
- Wood filler
- Paintable caulk
- Fine-grit sandpaper (220-grit)
- Painter’s tape
- Dark charcoal or black latex paint (matte or eggshell finish)
- High-quality angled sash brush
- Microfiber paint roller and tray
- Laser level
Step 1: Planning and Layout
-
Measure and Sketch:
Begin by measuring the full height and width of your wall. Sketch out a grid design on paper, deciding on the number of panels you want. For this look, aim for a lower row of smaller wainscoting-style boxes and an upper row of large, elongated vertical rectangles. -
Mark the Studs:
Use a stud finder to locate and mark all wall studs. This ensures your heavier horizontal rails and vertical stiles will be securely anchored, which is crucial for mounting a TV later. -
Draw the Grid:
Using a laser level for precision, lightly draw your intended layout directly onto the wall with a pencil. Mark where the horizontal chair rail will separate the upper and lower sections.
Step 2: Installing the Framework
-
Install Baseboards:
Remove existing baseboards and install your new flat 1×6 or similar MDF board along the floor. Use a level to ensure it is perfectly straight, even if your floor isn’t. -
Attach Horizontal Rails:
Install the horizontal chair rail board at your marked height, typically about 30-36 inches from the floor. Use construction adhesive and your brad nailer to secure it into the studs. -
Mount Vertical Stiles:
Cut your vertical boards (stiles) to fit snugly between the baseboard and the chair rail, and then from the chair rail to the ceiling (or crown molding position). Space them according to your plan to create the ‘boxes’. -
Add Crown Molding:
Install crown molding at the ceiling line to cap off the wall. This integrates the built-in feel and adds a polished, high-end transition.
Miter Misery?
If your corner cuts aren’t perfectly square, use the ’round shank’ of a screwdriver to burnish (rub) the miter joint. This often closes small gaps without needing filler.
Step 3: Adding Detail Trim
-
Select Molding Profile:
Choose a base cap molding or a small ogee trim to sit inside your flat grid boxes. This step creates the ‘raised panel’ illusion seen in the photo. -
Miter the Corners:
Measure the inside dimensions of each rectangular box you created with the flat boards. Cut your detail molding at 45-degree angles to frame the inside perimeter of each box. -
Secure the Inner Trim:
Apply a thin bead of wood glue to each piece of detail molding and tack it into place with pin nails or shorter brads. I find it helpful to pin the corners first to keep the miters tight. -
Check for Gaps:
Inspect all your miter joints. If any are slightly open, don’t worry—wood filler will handle imperfections in the next phase.
Hidden Tech
Install a recessed outlet box behind where the TV mounts. Painting the outlet cover the same matte black as the wall makes it virtually invisible if exposed.
Step 4: Prep and Paint
-
Fill Nail Holes:
Go over every nail hole with wood filler. Overfill slightly to account for shrinkage, and let it dry completely. -
Caulk Seams:
Apply paintable caulk to every seam where wood meets wall and wood meets wood. Smooth it with a wet finger or a damp rag for a seamless, built-in appearance. -
Sand Smooth:
Once dry, sand the wood filler flush with the surface using 220-grit sandpaper. Wipe away all dust with a tack cloth or damp microfiber towel. -
Prime the Surface:
Apply a high-quality primer, especially if you are using raw wood or porous MDF. A tinted primer (grey) is excellent here since you will be top-coating with a very dark color. -
Cut In Edges:
Using your angled sash brush, ‘cut in’ the dark charcoal paint along the ceiling, baseboards, and inside all the intricate molding corners where a roller can’t reach. -
Roll the Flat Areas:
Use a microfiber roller to apply paint to the large flat centers of the panels and the wide stiles. The microfiber helps achieve a smooth, spray-like finish without texture. -
Apply Second Coat:
Allow the first coat to dry fully according to the can’s instructions. Apply a second coat to ensure deep, rich coverage and eliminate any streakiness.
Step back and dim the lights to enjoy the luxurious, cinematic depth this custom wall brings to your space
Built-In Shelving Painted to Disappear
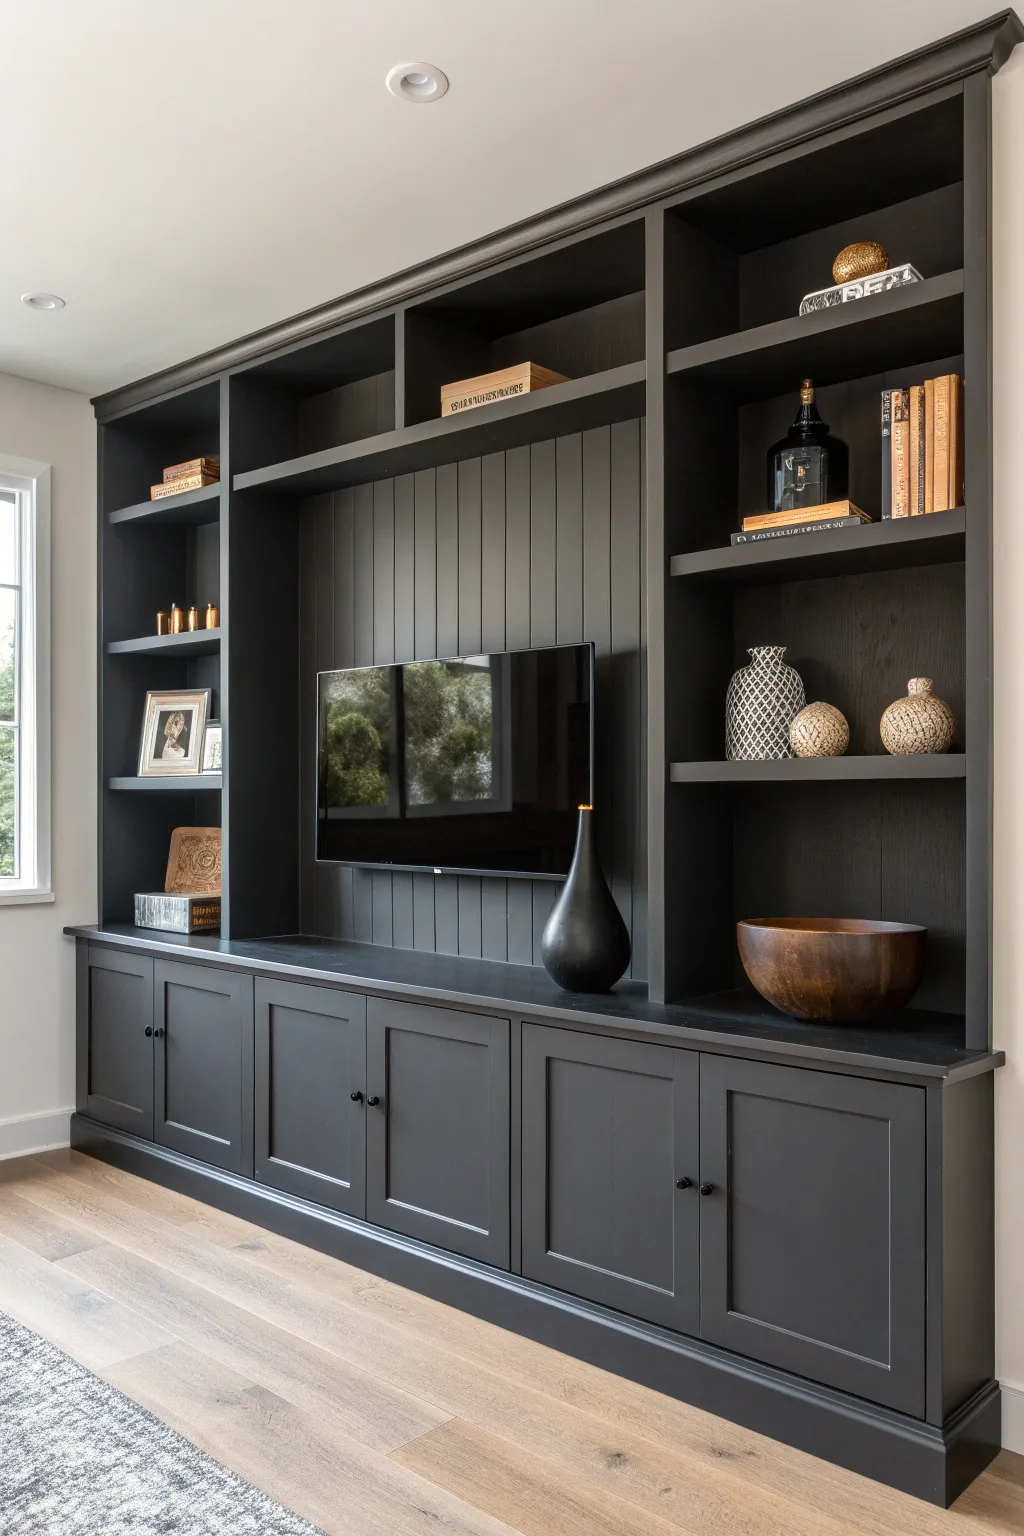
Transform a blank wall into a sophisticated focal point by constructing and painting this floor-to-ceiling built-in unit. The goal is a uniform, matte finish that allows the shelving structure to visually recede, letting your decor and TV take center stage.
Step-by-Step
Materials
- Pre-assembled base cabinets (shaker style)
- 3/4-inch plywood (stain-grade birch or maple)
- 1×2 poplar trim boards
- Beadboard paneling sheets
- Crown molding
- Baseboard molding
- Wood glue
- Pocket hole screws
- Brad nails (1.25 inch and 2 inch)
- Wood filler
- Caulk and caulk gun
- Primer (bonding primer recommended)
- High-quality cabinet paint (Matte Black or Charcoal)
- Floetrol (paint conditioner)
Step 1: Setting the Foundation
-
Prepare the workspace:
Remove existing baseboards from the wall where the unit will go. Locate and mark all wall studs using a stud finder. -
Install the base cabinets:
Position your pre-assembled base cabinets against the wall. Shim them until they are perfectly level and plumb, then screw them into the wall studs. -
Connect the cabinets:
Clamp the cabinet face frames together to ensure they are flush. Drill pilot holes and screw them together through the sides of the face frames for a seamless look. -
Add the countertop:
Cut a plywood top to fit over the cabinets, allowing for a slight overhang on the front and exposed sides. Secure it from underneath through the cabinet supports.
Step 2: Building the Upper Structure
-
Install the beadboard backing:
Cut beadboard panels to fit the width of the central TV section. Apply construction adhesive to the back and nail these directly to the drywall, ensuring the vertical lines are plumb. -
Construct vertical dividers:
Cut 3/4-inch plywood panels for the vertical bookshelf sides. I usually cut these about 12 inches deep. Drill pocket holes along the top and bottom edges. -
Secure the verticals:
Stand the plywood panels on the countertop. Screw them into the countertop using the pocket holes and secure the back edges to the wall studs using L-brackets for stability. -
Install fixed shelving:
Cut horizontal plywood shelves. Determine your shelf spacing—making sure to leave a large central void for the TV—and secure these shelves between the vertical panels using pocket screws or shelf pins for adjustability later. -
Add the header bridge:
Install a long plywood shelf across the very top, connecting all vertical sections. This ties the structure together and creates the top row of cubbies.
Sticky Situation?
If your painted shelves feel tacky even after drying, layers were likely applied too thick. Direct a fan at the unit for 24 hours to accelerate curing before styling.
Step 3: Trimming and Finishing
-
Apply face frame trim:
Nail 1×2 poplar trim over all exposed plywood edges (verticals and shelf fronts). This hides the raw plywood layers and gives the unit a chunky, solid furniture appearance. -
Install crown and base molding:
Wrap the bottom of the cabinets with baseboard that matches your room. Install crown molding along the very top edge where the unit meets the ceiling for a polished, built-in look. -
Fill and sand:
Fill all nail holes and seams with wood filler. Once dry, sand everything smooth with 220-grit sandpaper. This step is crucial for that seamless, professional finish. -
Caulk the seams:
Apply a thin bead of paintable caulk to every joint where wood meets wood or wood meets wall. Smooth it with a damp finger to erase gaps.
Level Up: Hidden Wires
Before installing the beadboard, cut a hole for a recessed outlet box behind the TV area. Route HDMI cables through the wall down to the base cabinets for a cord-free look.
Step 4: The Monochrome Paint Job
-
Prime the unit:
Apply a coat of high-quality bonding primer to the entire unit. If you’re going dark, ask the paint store to tint the primer gray to help with coverage. -
Sand the primer:
Lightly sand the primed surface with fine-grit sanding sponges to knock down any raised grain or brush marks. -
Paint the first coat:
Using a foam roller for smooth surfaces and an angled sash brush for corners, apply your matte charcoal paint. Don’t worry if coverage isn’t perfect yet. -
Apply final coats:
Apply a second (and potentially third) coat of paint. Add a splash of Floetrol to your paint to extend the drying time, which helps brush strokes level out and disappear. -
Let it cure:
Wait at least 48 to 72 hours before placing books or heavy objects on the shelves to prevent the paint from sticking to your decor.
Step back and admire how the dark, uniform color makes the structure melt away, highlighting only your favorite objects.
Two-Tone Wainscoting in Dark Neutrals

Transform a plain media room into a sophisticated retreat with this two-tone board and batten wainscoting project. By combining deep, grounding charcoal tones on the lower section with creamy whites above, you create a rich architectural detail that feels both modern and timeless.
Step-by-Step Tutorial
Materials
- 1×4 MDF or wood trim boards
- 1×6 MDF or wood trim boards (for baseboards and top rail)
- Small molding trim (cove or bed molding) for cap edge
- Construction adhesive
- Brad nailer and 2-inch brad nails
- Wood filler and putty knife
- Paintable caulk and caulk gun
- Fine-grit sandpaper (220 grit)
- Painter’s tape
- Level (4-foot or laser level recommended)
- Miter saw
- Tape measure
- Primer (if using bare wood)
- Dark charcoal paint (eggshell or satin finish)
- Creamy white paint (eggshell or satin finish)
- Paint rollers and angled sash brushes
Step 1: Planning and Layout
-
Determine Wainscoting Height:
Decide on the height for your lower wainscoting section. A classic look is often around 60-64 inches high, or roughly two-thirds up the wall, depending on your ceiling height. Mark a level horizontal line around the room at this height. -
Calculate Batten Spacing:
Measure the total length of your walls. Divide this length to find an odd number of spaces (for visual balance), aiming for roughly 16 to 24 inches between the vertical battens. Mark these stud locations or intended batten spots on the wall with a pencil.
Spacer Block Trick
Cut a scrap piece of wood to the exact width of your desired spacing. Use this block as a guide between battens to ensure perfectly consistent gaps without measuring every time.
Step 2: Installing the Framework
-
Install Baseboards:
Remove existing baseboards carefully. Install your new 1×6 trim as the baseboard along the floor, using construction adhesive and your brad nailer to secure it into studs. -
Attach the Horizontal Rail:
Install the horizontal 1×4 (or 1×6 for a chunkier look) rail along the level line you marked earlier. This rail separates the lower dark section from the upper light section. Use a long level frequently to ensure it stays perfectly straight. -
Add Vertical Battens:
Measure the distance between the top of the baseboard and the bottom of the horizontal rail individually for each spot. Cut your 1×4 vertical boards to length and adhere them to the wall at your marked intervals, nailing them securely. -
Create the Upper Grid:
For the upper section, install a horizontal top rail near the ceiling or crown molding. I find it easiest to measure and cut vertical stiles to fit between the middle rail and this top rail, aligning them directly above the lower battens for continuity.
Step 3: Finishing and Prep
-
Add Decorative Cap:
To give the wainscoting a finished furniture look, install a small piece of cove molding or a projecting cap piece on top of the middle horizontal rail. This small detail adds depth and shadow lines. -
Fill Nail Holes:
Go over every board with wood filler, pressing it firmly into all nail holes. Once dry, sand the filler smooth with fine-grit sandpaper until it’s flush with the board surface. -
Caulk Seams:
Run a bead of paintable caulk along every seam where wood meets wall and where boards meet each other. Wipe away excess with a damp finger or rag for a seamless transition.
Art Niche Effect
Design the upper squares specifically to frame your favorite artwork. Measure your frames first, then adjust the upper batten spacing to create perfectly centered ‘niches’ for them.
Step 4: Painting
-
Prime the Surface:
If you are using raw wood or MDF, apply a coat of high-quality primer to seal the material, ensuring the final paint coat looks even. -
Paint the Upper Section:
Start by painting the upper board and batten section with your creamy white paint. Use a brush for the corners and trim edges, then roll the flat wall sections. Two coats are usually necessary for full coverage. -
Mask Off the Divide:
Once the top paint is fully cured (give it at least 24 hours), apply painter’s tape along the underside of the separating rail or cap molding to protect your light paint. -
Paint the Lower Section:
Apply the dark charcoal paint to the lower section. Be meticulous with the brush work around the intricate corners of the battens before rolling the flat panels. Remove the tape while the final coat is still slightly tacky to prevent peeling.
Step back and admire how the dual tones instantly add height and drama to your media room
Textured Paint to Diffuse Light and Sound
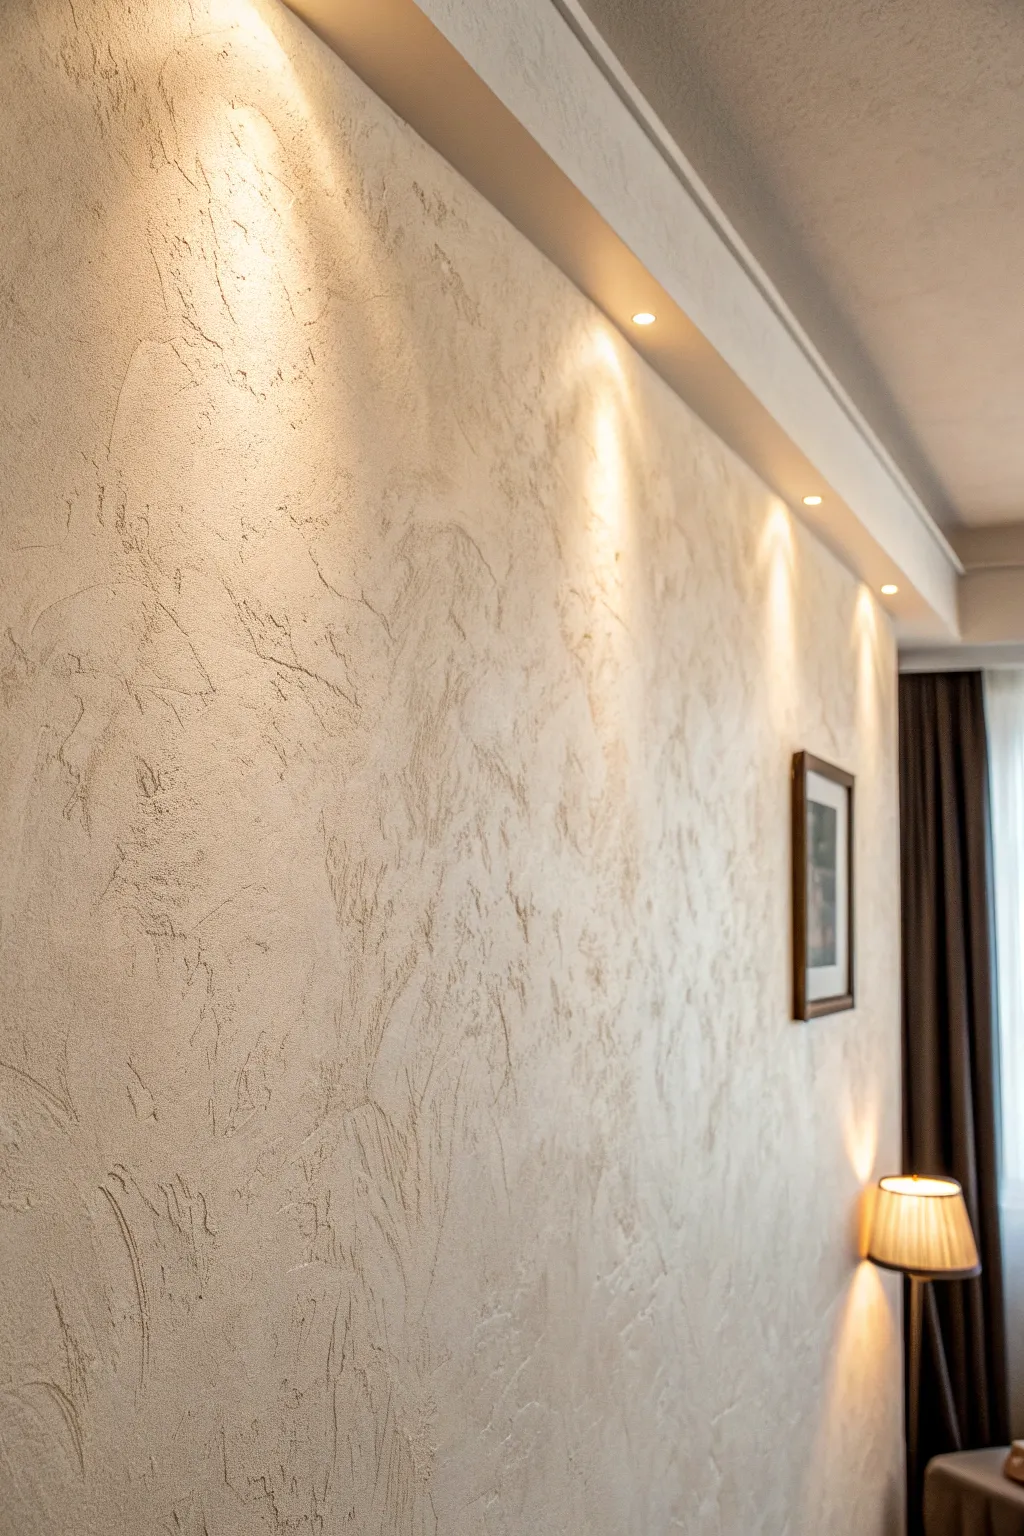
Transform a flat wall into a feature of depth and character with this specialized textured plaster technique. The rough, sweeping ridges not only add a rustic, organic aesthetic but also naturally diffuse light and sound, making it perfect for a cozy media room.
Step-by-Step
Materials
- High-quality interior primer
- Venetian plaster or textured wall compound
- Large steel trowel
- Medium putty knife (4-6 inch)
- Painter’s tape
- Drop cloths
- Tint (warm beige or cream)
- Sandpaper 120-grit
- Sponge or rag (for glazing option)
- Matte sealer or glaze (optional)
Step 1: Preparation and Priming
-
Protect the area:
Begin by masking off your ceiling line, baseboards, and any adjacent walls with painter’s tape. Lay down drop cloths to catch plaster spills, as this process can get messy. -
Surface check:
Ensure the wall is clean, dry, and free of any large holes. Patch any significant dents with standard spackle and sand smooth before beginning. -
Apply the primer:
Roll on a coat of high-quality gripping primer. This is crucial because heavy texture needs a strong surface to bond to; a standard paint surface might be too slick. -
Mix your medium:
If your plaster or texture compound isn’t pre-tinted, mix in your warm beige tint now. Aim for a consistency distinctively thicker than paint—like peanut butter—so it holds peaks.
Lighting Makes the Look
This texture relies heavily on shadows. Install cove lighting or directional track lights close to the wall (grazing angle) to exaggerate the 3D relief.
Step 2: Creating the Base Texture
-
Load the trowel:
Scoop a generous amount of plastered compound onto the center of your large steel trowel. -
Apply the first patch:
Starting at a top corner, apply the compound to the wall in a sweeping, chaotic motion. Don’t try to make it flat; you want varying thickness. -
The skip-trowel motion:
To get those deep grooves, hold the trowel at a shallow angle—about 30 degrees—and drag it across the wet compound. Let the trowel ‘skip’ over the surface to create alternating rough and smooth patches. -
Vary direction:
I prefer to constantly change my wrist angle here. Apply some strokes vertically, some diagonally, and some in sweeping arcs to avoid a repetitive pattern. -
Build the relief:
Work in small 3×3 foot sections. In areas that look too flat, dab the flat face of the trowel against the wall and pull straight back to create sharp peaks, then lightly knock them down with a gentle sweep. -
Check overlap:
As you move to the next section, carefully blend the wet edges into the previous patch so you don’t end up with visible grid lines.
Step 3: Refining and Finishing
-
Initial setting:
Let the wall sit until the plaster loses its wet sheen but isn’t fully hard—usually about 15-30 minutes depending on humidity. -
Knockdown pass:
Using a clean trowel, very lightly glide over the highest peaks of the texture to flatten them slightly. This creates the ‘plateau’ effect seen in the photo where light catches the flat tops. -
Dry completely:
Allow the wall to dry fully, likely overnight. The thickest areas must be hard to the touch. -
Spot sanding:
Run your hand over the surface to find any dangerously sharp burrs or spikes. Use 120-grit sandpaper to gently knock off just those sharpest points without sanding down the texture itself. -
Dusting off:
Vacuum the wall with a brush attachment or use a clean tack cloth to remove all sanding dust from the crevices. -
Optional glaze wash:
If you want more depth, mix a slightly darker paint color with 4 parts glaze. Sponge it over the wall and immediately wipe it off the high points with a rag, leaving color only in the deep crevices. -
Sealing:
Finish with a matte sealer or a clear dead-flat varnish to protect the plaster from chipping without adding unintentional gloss.
Add Organic Texture
Mix fine silica sand into your plaster compound before applying. This adds a gritty micro-texture to the large ridges for an authentic stone feel.
Once the lights are dimmed, the rich texture will create a warm, acoustic-friendly atmosphere perfectly suited for movie nights
Glow-in-the-Dark Details for Safe, Subtle Pathways
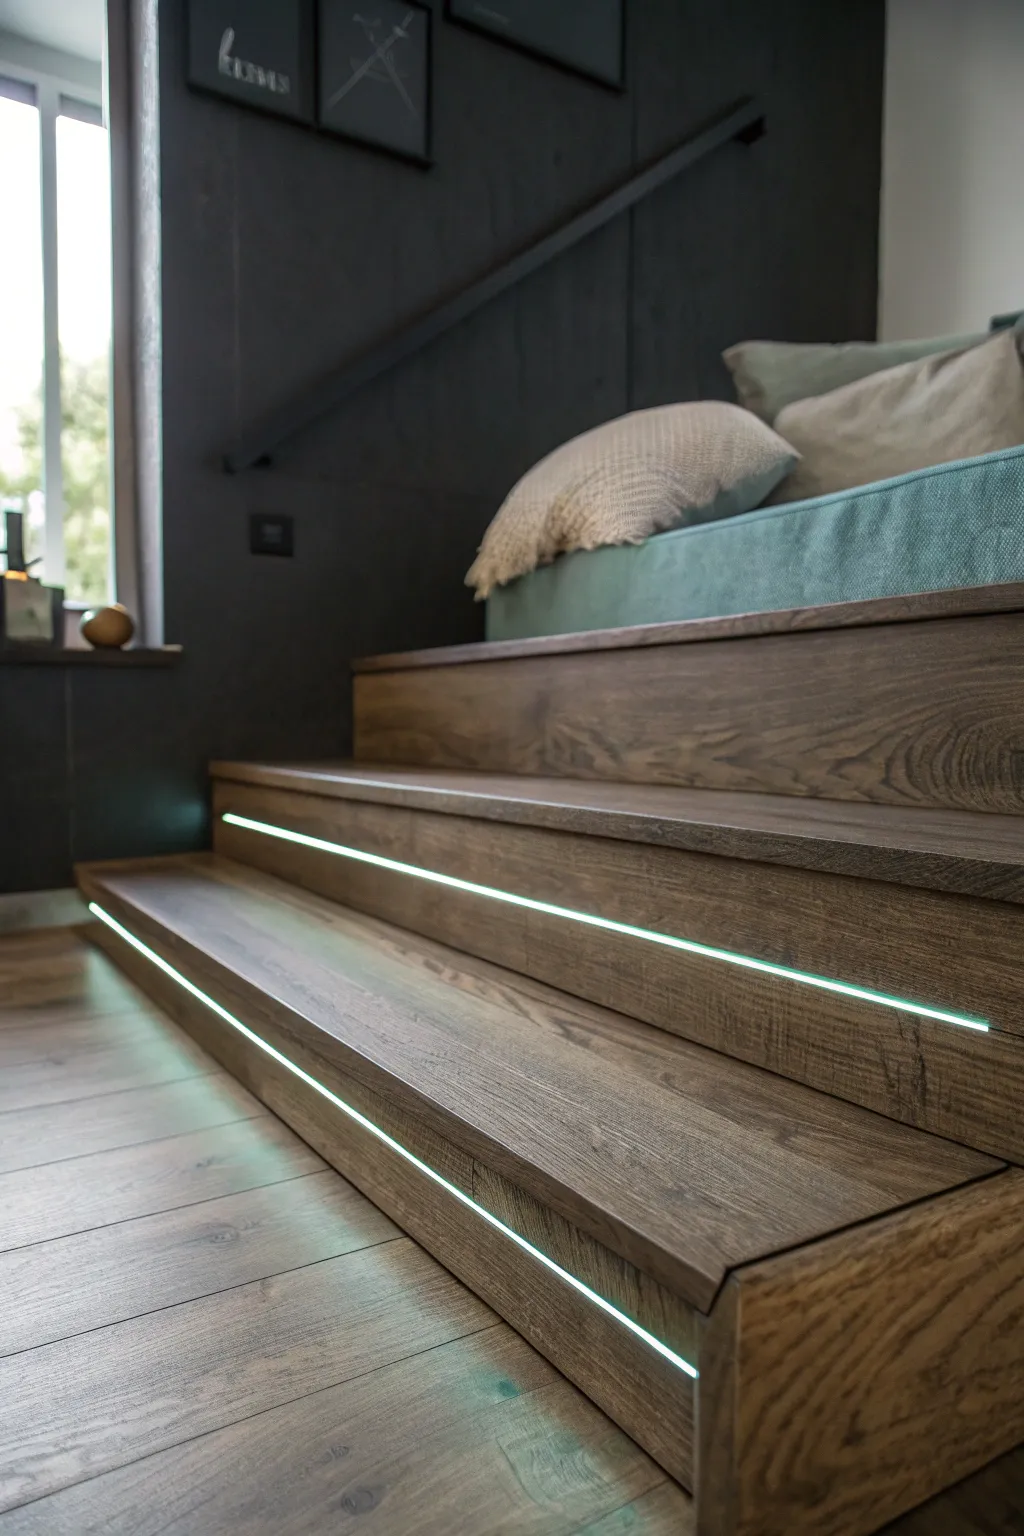
Transform a simple staircase or elevated platform into a cinematic focal point with integrated LED lighting. This project adds a safe, modern glow to your media room pathways, creating ambiance without disturbing the viewing experience.
Step-by-Step Guide
Materials
- Wooden stair nosing/treads with an overhang
- LED strip light kit (cuttable, with adhesive backing)
- Aluminum LED channel profiles with diffusers
- Power drill and bits
- Wood router (optional but recommended)
- Measuring tape
- Pencil
- Wire strippers and electrical tape
- Low voltage wire extension (if needed)
- Hot glue gun or mounting clips
- Power supply for LED strips
Step 1: Planning and Preparation
-
Measure the steps:
Begin by measuring the precise width of each stair tread where you intend to install the lights. You want the light strip to run almost the full length but stop about an inch from each edge to hide the wiring. -
Test the fit:
Hold your LED channel or strip up under the nosing (the part of the tread that hangs over the riser). Ensure there is enough overhang to conceal the hardware so the light source isn’t directly visible from above. -
Plan the power route:
Determine where your power source will come from. You’ll need to route wires from one side of the stairs to an outlet, likely hidden behind the wall or under the platform structure.
Diffusion is Key
For the smooth ‘neon’ look shown, use a deep aluminum channel and a milky white diffuser. Shallow channels often show individual LED dots.
Step 2: Creating the Channel
-
Mark the groove location:
If you want a flush finish like in the photo, mark a straight line centrally on the underside of the stair nosing overhang. This is where the LED channel will sit. -
Route the groove (Optional):
For a truly professional look, use a router to carve a shallow channel into the underside of the wood overhang. This allows the aluminum profile to sit flush with the wood surface. -
Clean the surface:
Whether routing or surface-mounting, thoroughly clean the underside of the wood with a tack cloth or rubbing alcohol to ensure adhesives bond permanently.
Smart Upgrade
Add a motion sensor at the bottom step so the lights gently fade on when you approach the stairs, then turn off automatically.
Step 3: Installation
-
Cut the channels:
Cut your aluminum LED channels and plastic diffusers to the lengths you measured earlier using a hacksaw. Sand down any sharp edges. -
Mount the channels:
Screw the aluminum channels into the routed groove or directly onto the underside of the nosing. I find pre-drilling pilot holes prevents the wood from splitting close to the edge. -
Cut LED strips:
Cut your LED strips to fit inside the channels. Only cut on the designated copper marks, usually spaced every few inches along the strip. -
Adhere the lights:
Peel back the adhesive backing on the LED strip and press it firmly into the aluminum channel. Run your finger along the entire length to secure it. -
Install the diffuser:
Snap the frosted plastic diffuser cover onto the aluminum channel. This is crucial for achieving that soft, continuous glow rather than seeing individual sharp points of light.
Step 4: Wiring and Finish
-
Drill wire pass-throughs:
Drill a small, discreet hole at the corner of the riser or under the overhang to feed the wires through to the back of the stairs. -
Connect the strips:
Connect the wires from each strip to your main power line running behind the structure. Use wire nuts or soldered connections wrapped in electrical tape for safety. -
Secure loose wires:
Use cable clips or hot glue to tuck any loose wires up under the structure so they aren’t visible from the front or side. -
Connect to power:
Plug the system into your power supply and test. If you are using a smart controller or dimmer, install that between the power source and the first strip. -
Final touches:
Wait until nightfall to do a final check. If you spot any light leaks coming from the sides, use a small piece of black electrical tape to block the ends of the channel.
Now your media room has a sleek, high-end feature that guides your way safely in the dark


Have a question or want to share your own experience? I'd love to hear from you in the comments below!