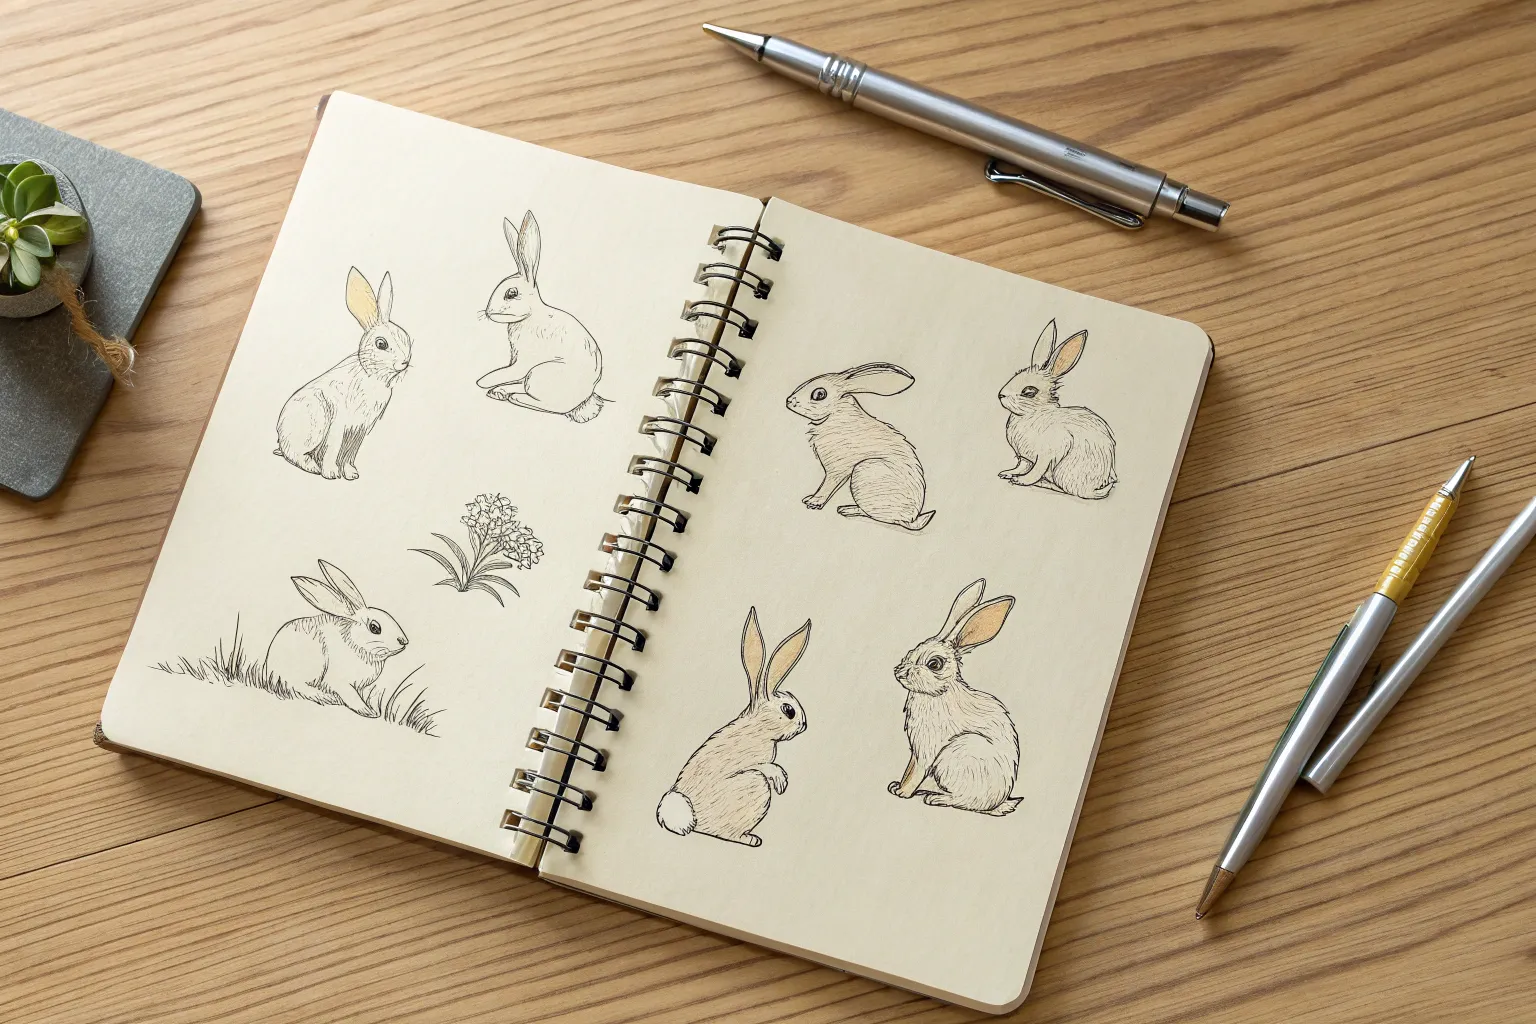
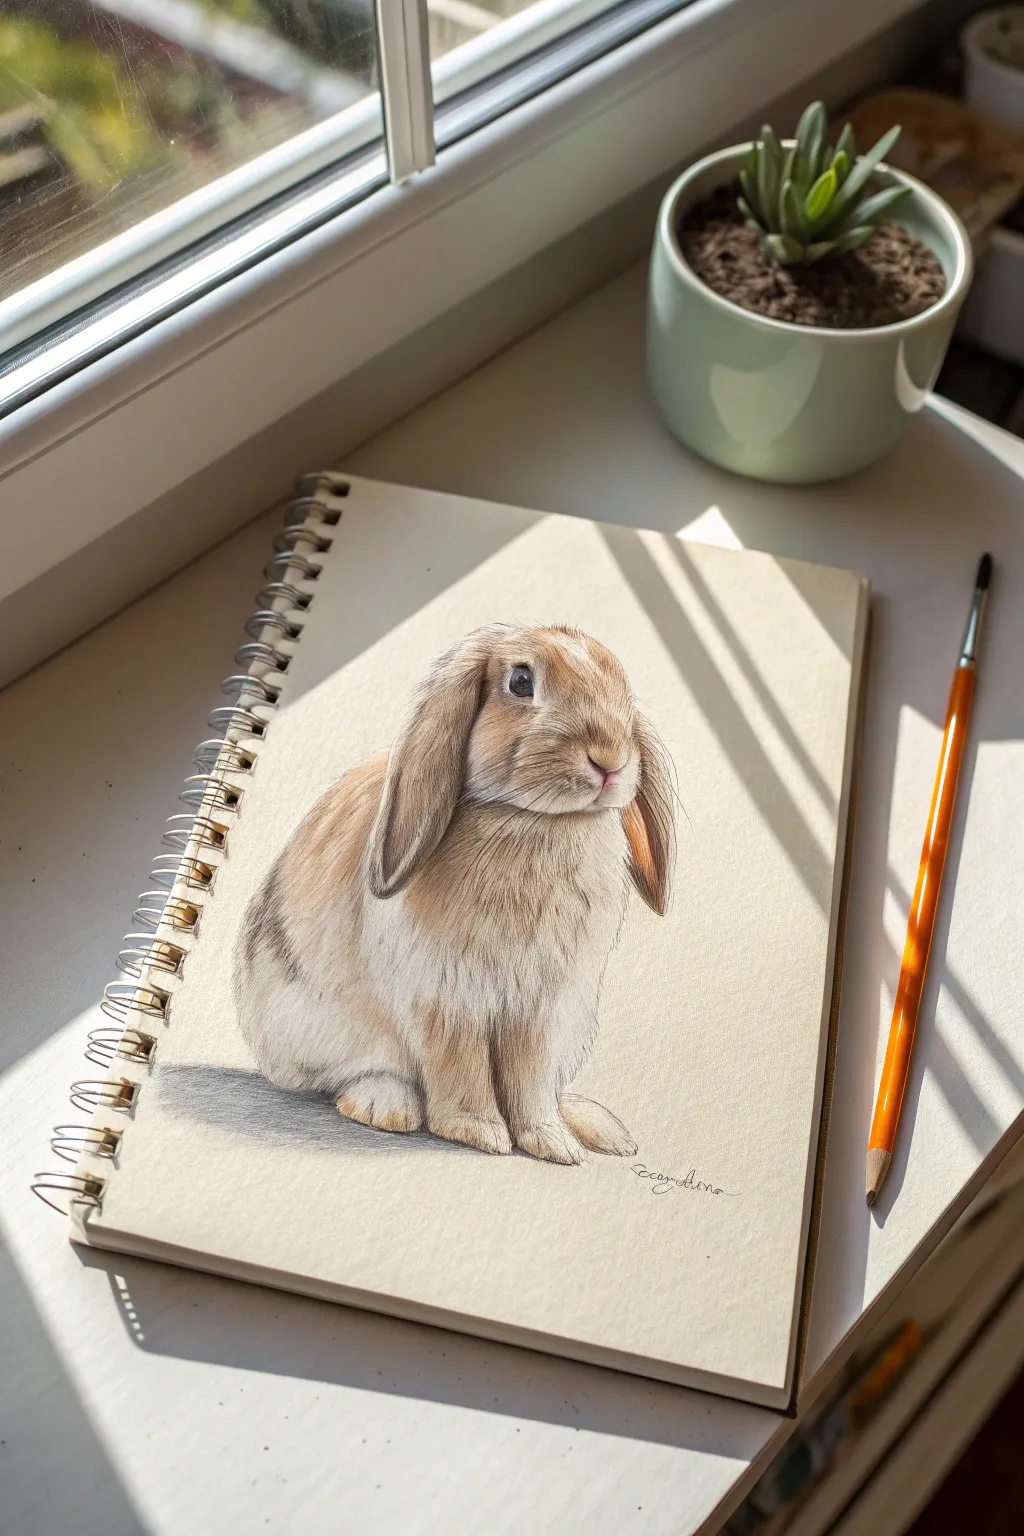
Rabbits are basically the perfect drawing subject: simple shapes, tons of personality, and endless ways to stylize them. Grab your sketchbook and let’s play with rabbit drawing ideas that go from classic-cute to delightfully unexpected.
Simple Bunny Built From Shapes
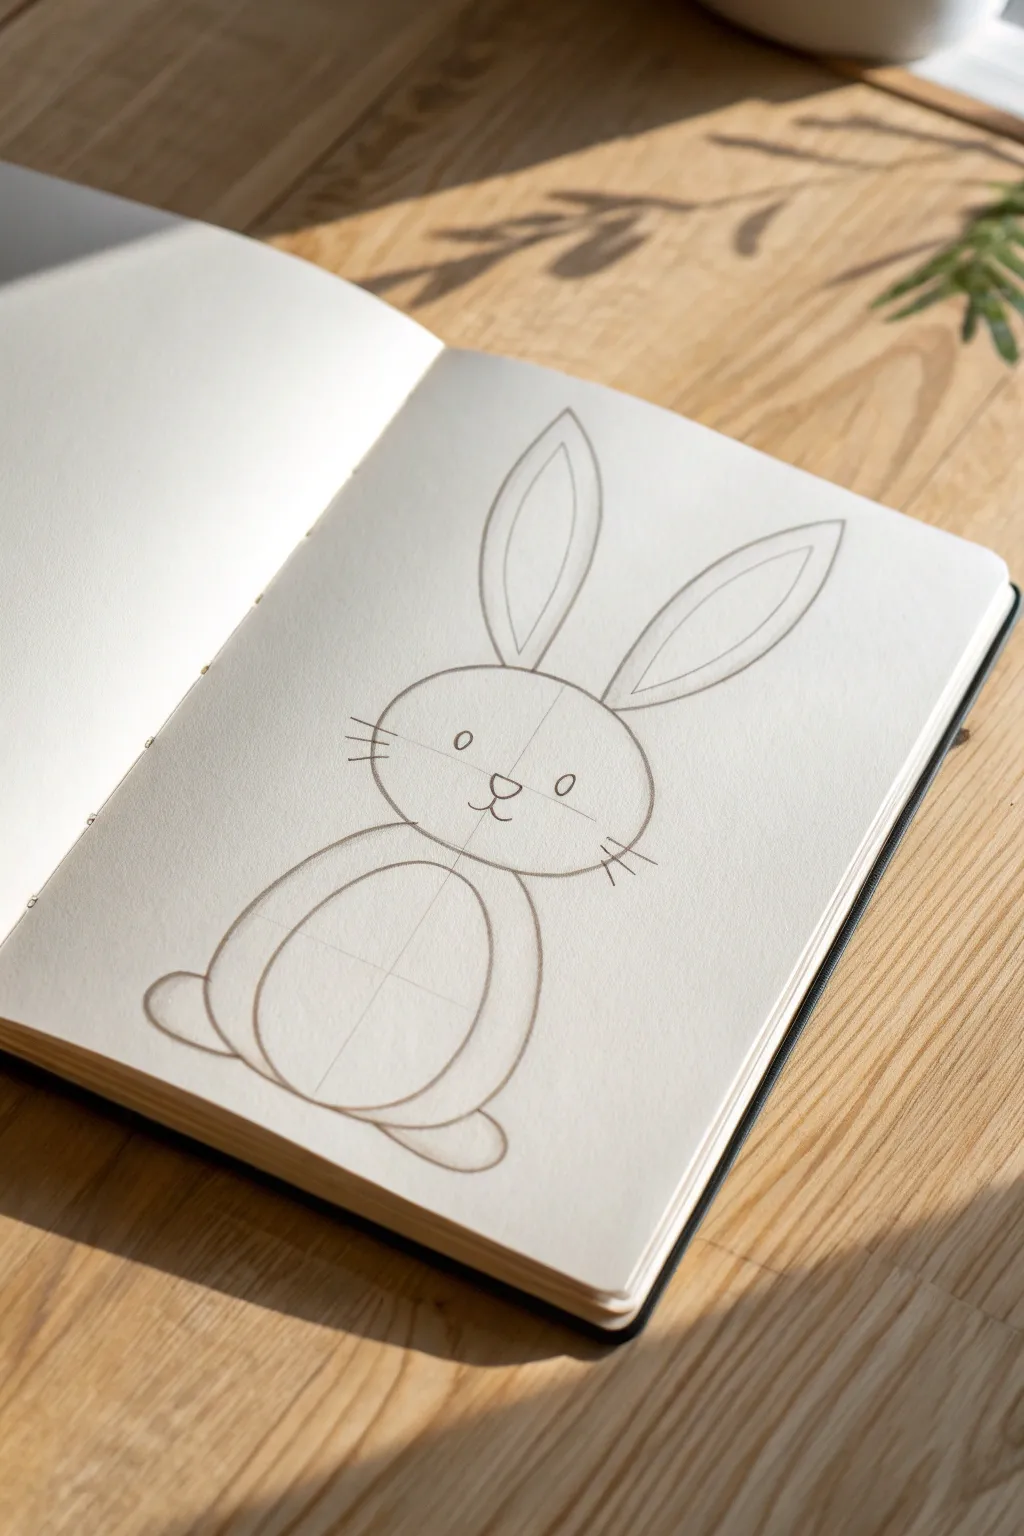
This charming rabbit drawing breaks down a complex subject into simple, manageable shapes like ovals and circles. Using light guidelines and confident strokes, you will build a cute character directly in your sketchbook.
Step-by-Step
Materials
- Sketchbook or drawing paper
- HB or 2B graphite pencil
- Eraser (kneaded preferred)
- Pencil sharpener
- Fine liner pen (optional, for inking)
Step 1: Setting the Foundations
-
Draw the head:
Start by drawing a horizontal oval in the middle of your page. Keep your pencil pressure very light, as you will need to erase parts of this later. -
Add the body shape:
Directly below the head, draw a larger, vertical oval for the body. The top of this body oval should slightly overlap with the bottom of the head oval. -
Mark the center lines:
Lightly sketch a vertical line going straight through the center of both ovals. Then, add a horizontal line across the middle of the head oval and another across the lower third of the body oval. These intersect lines help with symmetry.
Uneven Circles?
Can’t draw a perfect oval? Keep your wrist loose and draw distinct multiple light circles until the correct shape emerges, then darken the best line.
Step 2: Adding Features
-
Draft the ears:
Draw two long, pointed ovals extending from the top of the head. Position them slightly apart, tilting outward. Aim for a petal-like shape that tapers near the top. -
Detail the inner ears:
Inside each ear shape, draw a smaller, similar shape to represent the inner ear structure. Follow the curve of the outer ear line closely. -
Position the feet:
At the bottom of the large body oval, draw two smaller, horizontal ovals protruding outward to the left and right. These will become the bunny’s feet. -
Refine the body contour:
Connect the head to the body by smoothing out the neck area. Darken the side curves of the body oval to make the form look continuous rather than two separate stacked shapes. -
Refine the feet connection:
Blend the foot ovals into the base of the body so they look attached. You can slightly flatten the bottom of the feet to make the bunny look like it is sitting on a surface.
Add Personality
Give your bunny character by changing the ear position. Flop one ear down halfway for a playful look or make the eyes larger for extra cuteness.
Step 3: Face and Final Touches
-
Place the nose:
On the horizontal guideline of the face, right where it crosses the vertical center line, draw a small inverted triangle with rounded corners for the nose. -
Draw the mouth:
Extend a short vertical line down from the bottom of the nose. From that point, curve two lines outward—one to the left and one to the right—to create a distinct ‘W’ shape for the mouth. -
Add the eyes:
Draw two small vertical ovals for eyes on the horizontal guideline. Space them evenly on either side of the nose. Leave them as outlines for a cartoon look or fill them in, leaving a tiny white dot for a highlight. -
Sketch the whiskers:
Add three short, straight lines on each cheek, extending outward from the face. Vary the lengths slightly for a natural look. -
Strengthen the outlines:
Go over your main lines with a slightly harder pencil pressure to define the final shape. I like to make the outer contour lines slightly thicker than the inner details. -
Erase guidelines:
Carefully erase the initial vertical and horizontal guidelines you drew in the first phase. Also remove the line where the head oval originally overlapped the body oval. -
Clean up sketch:
Use your eraser to tidy up any smudges or stray marks around the drawing, leaving a clean, crisp illustration.
Now you have a structured, adorable bunny ready for coloring or shading


Cute Chibi Rabbit Character
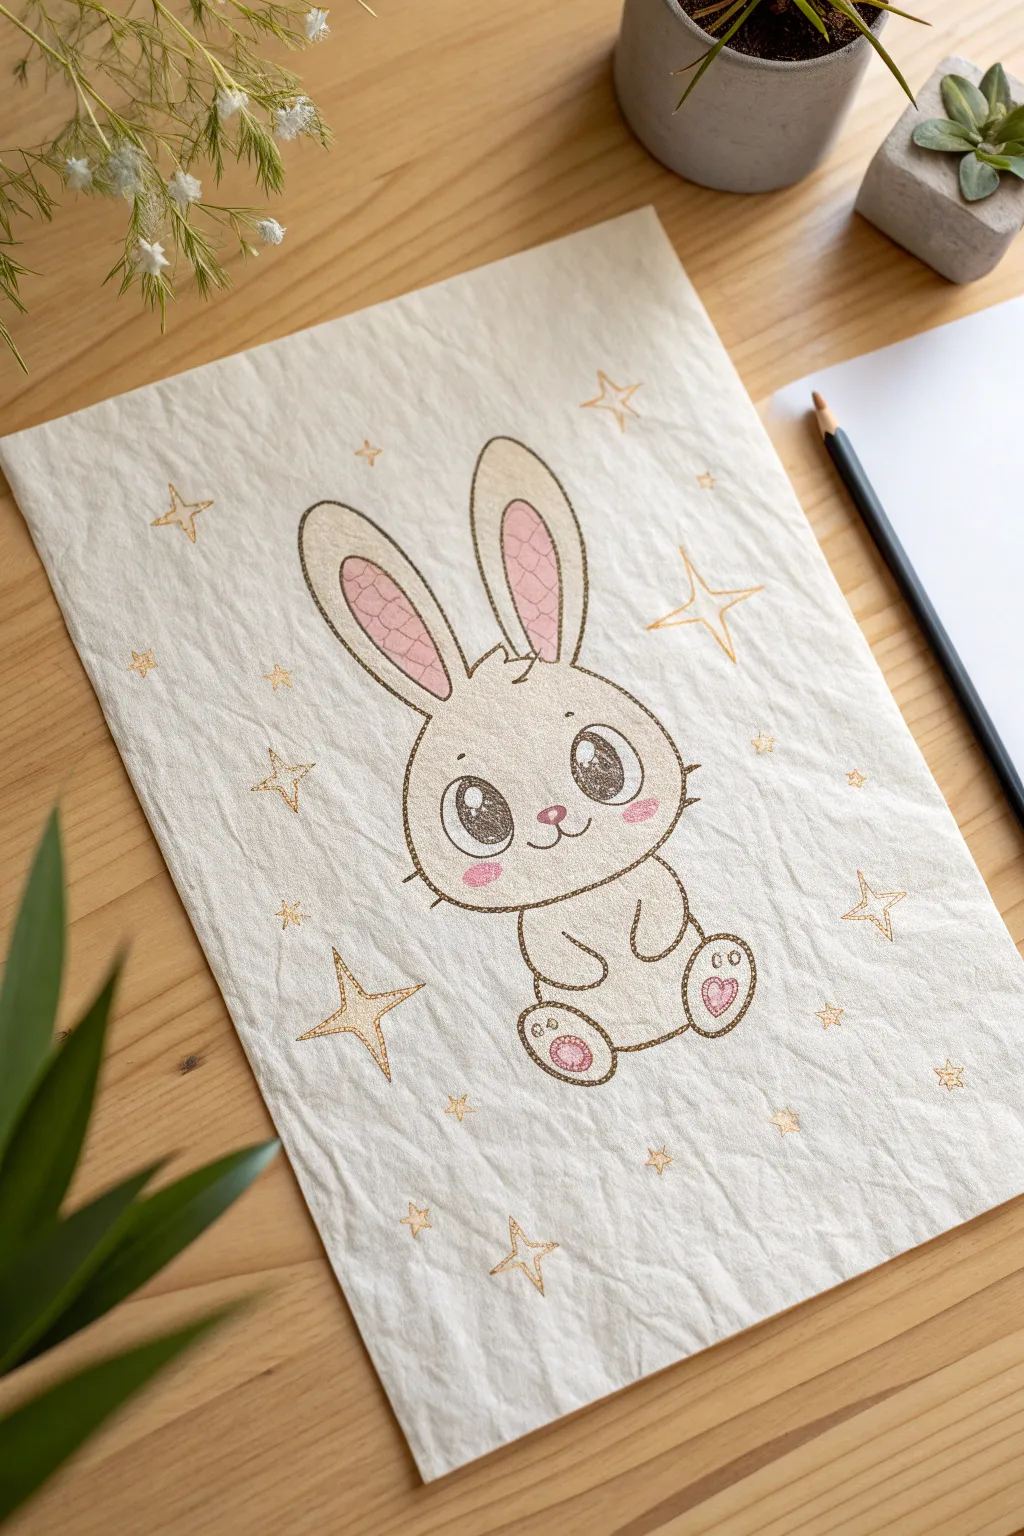
Create a heartwarming piece of art featuring an adorable chibi bunny surrounded by scattered stars. This project focuses on clean linework and soft, blushing details on a textured, cream-colored paper to capture a cozy, vintage storybook feel.
Detailed Instructions
Materials
- Textured cream or ivory paper (mixed media or heavy sketch)
- Black fine liner pens (0.3mm and 0.5mm)
- Colored pencils (soft pink, peach, warm brown)
- Pencil (HB for sketching)
- Kneaded eraser
- Gold metallic gel pen or paint pen (optional for stars)
Step 1: Drafting the Base Shapes
-
Head and Body Outline:
Start by lightly sketching a large, rounded oval for the bunny’s head. Unlike a perfect circle, let it be slightly wider at the bottom to give it chubby cheeks. -
Adding the Body:
Draw a smaller, pear-shaped oval directly beneath the head for the body. The head should be significantly larger than the body to achieve that classic ‘chibi’ proportion. -
Drafting the Ears:
Sketch two long, upright ears extending from the top of the head. Make them wide at the base and rounded at the tips, angling them slightly outward. -
Placing the Limbs:
Add two small, curved shapes near the top of the body for the front paws, tucked in close. Sketch rounded feet at the bottom, pointing slightly inward like a sitting toddler.
Step 2: Refining Features and Details
-
Facial Features Guide:
Lightly mark a horizontal line across the lower third of the face. This will help you place the eyes and nose symmetrically. -
Expressive Eyes:
Draw two large ovals for the eyes on your guide line. Inside each, sketch a large circle for the pupil and two smaller circles for the highlights—one large highlight at the top right, and a smaller one below. -
Nose and Mouth:
Place a small, rounded triangle for the nose right between the eyes. Draw two small curved lines extending downward from the nose to form a cute ‘w’ mouth shape. -
Inner Ears and Pads:
Sketch the inner contour of the ears, mimicking the outer shape but slightly smaller. Add heart shapes or ovals onto the bottom feet pads for extra cuteness. -
Adding Texture:
I like to add little tufts of fur at the top of the head between the ears and small whiskers on the cheeks to break up the smooth lines.
Wrinkle for Charm
To replicate the exact look in the photo, gently crumple your paper into a ball then smooth it flat *before* drawing. It creates an instant vintage texture.
Step 3: Inking the Illustration
-
Initial Outline:
Using your 0.5mm black fine liner, carefully trace over your pencil lines. Use a technique known as ‘broken lining’ for the fur areas—leaving tiny gaps in the line makes the character look softer. -
Building Line Weight:
Go back over the outer contour of the bunny with a slightly thicker stroke to make the character pop against the background. -
Eye Detail:
Switch to a 0.3mm pen for the intricate details inside the eyes. Fill in the pupils solid black, leaving the highlight circles crisp and white. -
Erase Sketches:
Wait until the ink is completely dry—give it a few minutes—then gently use a kneaded eraser to lift all the underlying graphite sketch marks.
Make it Sparkle
Use actual gold ink or metallic gel pen for the stars instead of yellow pencil. When the light hits the paper, the background magically shimmers.
Step 4: Coloring and Embellishing
-
Soft Blushing:
Take a soft pink colored pencil and gently shade the inner ears using a cross-hatching motion. Apply this same pink to the nose and the heart shapes on the feet. -
Cheeky Glow:
Lightly apply pink in circular motions right under the eyes for rosy cheeks. You can add diagonal ‘blush lines’ with a darker pink or red pencil for a stylized look. -
Bunny Coat:
Using a warm beige or very light brown pencil, add subtle shading to the edges of the bunny’s face and body to give it dimension without coloring the whole figure solid. -
Starry Background:
randomly place four-pointed and five-pointed stars around the bunny. Vary the sizes—some large, some tiny specks—to create a magical atmosphere. -
Gilding the Stars:
Outline these stars with a warm brown or gold pen. You can sketch a ‘shadow’ line inside the stars to make them look faceted or dimensional. -
Final Polish:
Add tiny groups of dots or ‘sparkles’ between the larger stars to fill any empty negative space and complete the composition.
You now have a charming little character ready to brighten up a greeting card or sketchbook page


Minimalist Rabbit Line Art
Capture the charm of simplicity with this minimalist rabbit line art, drawn on textured paper for an organic feel. The fine ink lines contrast beautifully with the rough, torn edges of the paper, creating a piece that feels both delicate and timeless.
Step-by-Step Guide
Materials
- Textured cream or off-white watercolor paper (cold press)
- Black fine liner pen (size 0.5 or 0.8)
- Pencil (HB or 2B)
- Kneaded eraser
- Ruler (for tearing paper)
- Water (optional creating deckled edge)
- Sketchbook or neutral background for display
Step 1: Preparing the Paper
-
Create the rough shape:
Begin by tearing a piece of watercolor paper into a rectangle, roughly A5 size or smaller. You want the edges to look rugged and handmade. -
Form the deckled edge:
To achieve that soft, fuzzy edge seen in the photo, dampen the crease line slightly with water before tearing. Pull the paper apart slowly to leave fibrous edges rather than a sharp cut. -
Flatten the surface:
If dampening caused any buckling, place the paper under a heavy book for a few minutes to ensure a flat drawing surface.
Pro Tip: Texture Magic
Drawing on cold-press paper can make lines jittery. Embrace this! The slight wobble adds character and mimics the look of a vintage etching.
Step 2: Sketching the Outline
-
Start with the body shape:
Using your pencil very lightly, draw a rounded oval shape for the rabbit’s body. It should sit slightly lower than the center of the paper. -
Add the head:
Attach a smaller, slightly elongated circle to the top left of the body oval to form the head. -
Position the ears:
Sketch two tall, narrow ovals extending upward from the head. Angle the left one slightly back and the right one straight up for alert expression. -
Refine the legs:
Draw the curve of the hind leg as a large ‘C’ shape inside the back of the body. Sketch small front paws tucked neatly under the chest. -
Draft the flower:
To the left of the rabbit, lightly sketch a simple stem with two leaves and a small circle for the flower center.
Troubleshooting: Smudges
If you accidentally smudge wet ink, turn it into a shadow or texture. Use stippling (dots) over the smudge to incorporate it into the design.
Step 3: Inking the Rabbit
-
Outline the ears:
Switch to your black fine liner. Trace the outer edges of the ears, adding a thin inner line on the right ear to show depth. -
Define the face:
Carefully ink the curve of the forehead down to the nose. Keep your hand steady to create a smooth, continuous line. -
Draw the eye:
Place a solid black oval for the eye just below the ear line. Leave a tiny speck of white paper visible for a highlight, giving the rabbit life. -
Add whiskers:
Flick your pen quickly outward from the nose area to create three or four short, varied whiskers. -
Complete the body curve:
Trace the back line, letting it flow down into the small, fluffy tail at the rear. -
Ink the legs:
Go over the hind leg curve, emphasizing the rounded thigh. Outline the paws resting on the ground, ensuring the line weight matches the body.
Step 4: Final Details
-
Ink the flower:
Trace the flower stem and leaves. Add small loops around the center circle for petals, keeping them simple and stylized. -
Erase pencil marks:
Wait until the ink is completely dry—I usually give it at least five minutes to be safe. Gently run your kneaded eraser over the entire drawing to lift the graphite. -
Check line weight:
Look over your drawing. If any lines look too thin against the textured paper, carefully go over them once more to bold them up slightly.
Place your finished drawing on a clean notebook page or frame it to enjoy your serene little artwork


Rabbit Face With Big Eyes
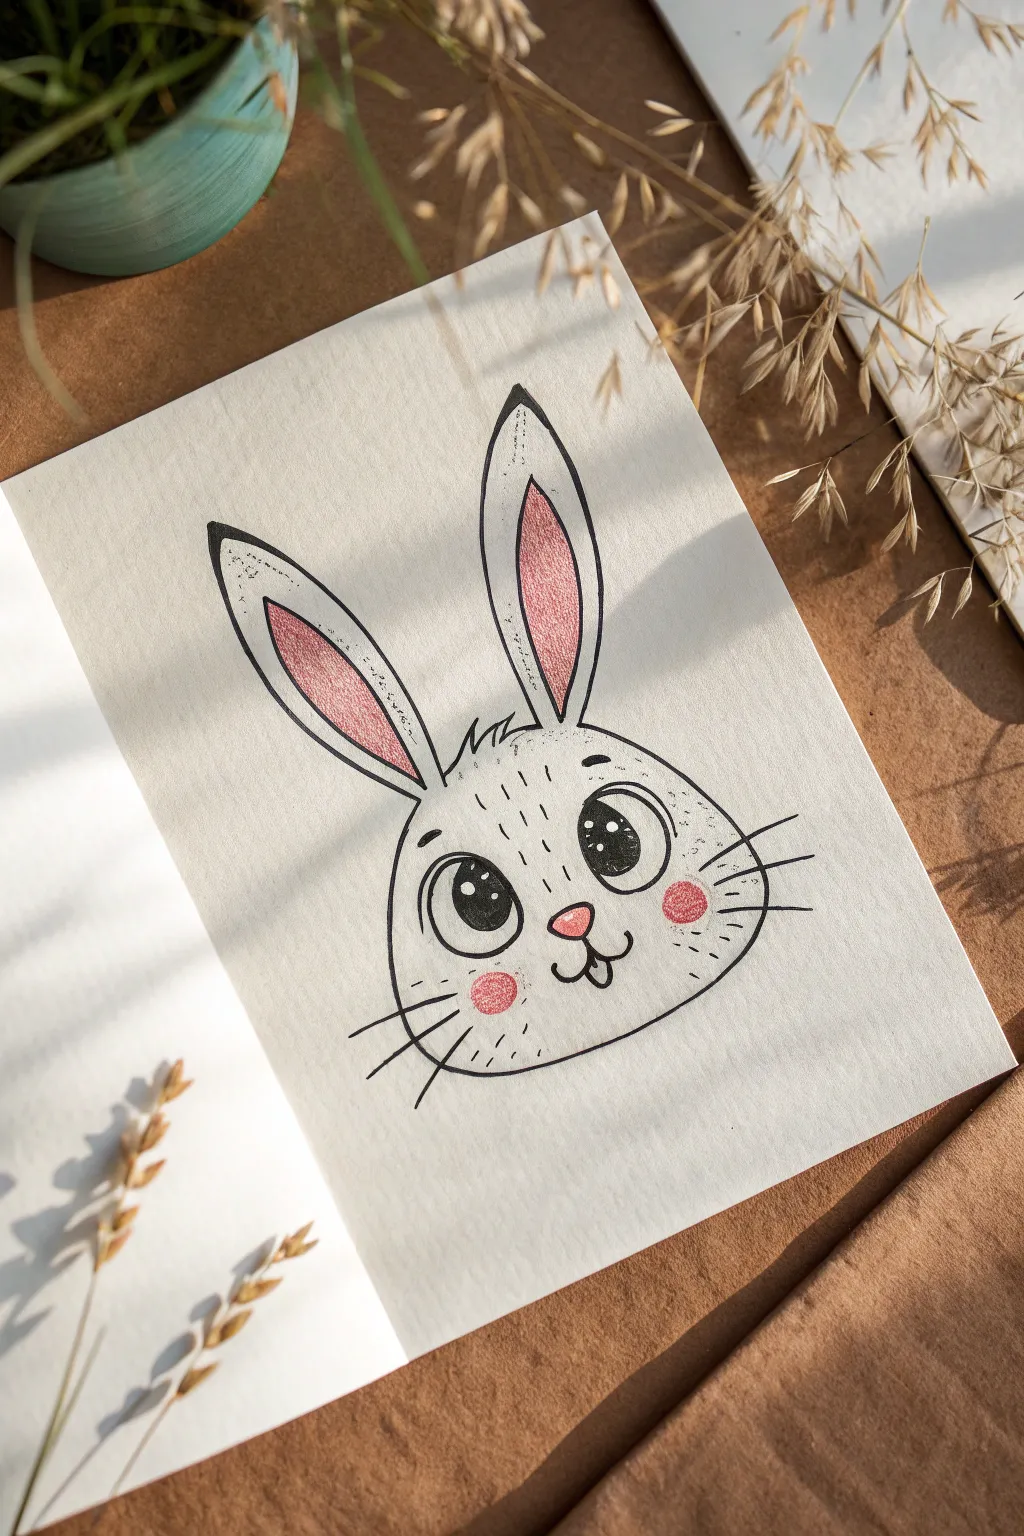
This adorable rabbit drawing captures a sweet and curious expression perfectly, focusing on oversized eyes and simple details. The sketch uses clean ink lines and soft touches of pink to bring the character to life without needing a full color palette.
How-To Guide
Materials
- Sketchbook paper or drawing cardstock
- Pencil (HB or H)
- Eraser
- Fine liner pen (black, size 0.5mm or 0.8mm)
- Black brush pen or marker (for filling eyes)
- Pink colored pencil or pastel pencil
- White gel pen (optional for highlights)
Step 1: Basic Sketching
-
Outline the head shape:
Begin by lightly sketching a wide oval shape for the rabbit’s head using your pencil. The bottom shouldn’t be perfectly round; flatten it slightly to soften the chin area so the face looks chubby and cute. -
Position the ears:
Draw two long, tall ear shapes extending from the top of the head. Make them slightly narrower at the base and pointed at the tips, curving the shapes gently so they don’t look stiff. -
Mark the inner ears:
Sketch smaller, similar shapes inside each ear to define the inner ear area. Leave a comfortable gap between this inner line and the outer edge. -
Draft the facial features:
Lightly mark two large circles for the eyes. They should take up a significant portion of the face. Below the eyes, sketch a small inverted triangle for the nose and a ‘W’ shape for the mouth. Add a tiny ‘U’ shape under the mouth for the tongue.
Step 2: Inking the Lines
-
Trace the main outline:
Using your fine liner pen, carefully go over your pencil lines for the head and ears. Instead of a single continuous line, try using slightly broken lines near the top of the head to suggest tufts of fur. -
Add fur texture:
On the forehead and cheeks, add tiny, short dashes. These shouldn’t connect but should flow in the direction the fur would grow, adding texture to the simple outline. -
Ink the eyes:
Trace the large circles for the eyes. Inside each eye, draw a large circle and a smaller circle for the light reflections (catchlights). Do not ink over these reflection spots. -
Fill the pupils:
Switch to a thicker marker or brush pen to fill in the pupils black, being extremely careful to leave the white reflection circles completely clean. -
Complete the face details:
Ink the nose, mouth, and tiny tongue. Add the whiskers—three long, straight lines extending from each cheek area. -
Erase pencil marks:
Once the ink is completely dry (wait at least a minute to prevent smudging), gently erase all underlying pencil sketches.
Smudge Alert
If your black ink smears when erasing pencil lines, your pen might not be instant-dry. Wait 5-10 minutes before erasing, or use a piece of scrap paper under your hand.
Step 3: Adding Color & Detail
-
Color the inner ears:
Take your pink colored pencil and fill in the inner ear shapes. Use a light, even pressure to create a soft, textured look rather than a solid block of color. -
Add rosy cheeks:
Draw small circles on the cheeks using the pink pencil. I like to color in a circular motion here to mimic a soft blush effect. -
Color the nose:
Fill in the small triangular nose with the same pink shade. -
Initial shading:
Use the pink pencil very lightly to add a tiny shadow inside the bottom loop of the mouth for depth. -
Adding texture to the ears:
Go back over the pink areas in the ears with a few tiny dots of black ink to simulate the texture of the paper or skin pores, giving it a stylized illustrative look. -
Review and refine:
Check your line weights. If the outer contour lines feel too thin compared to the bold eyes, go over them one more time to thicken them up slightly.
Make It Pop
Use a white gel pen to add extra glossy highlights to the nose or cheeks after coloring. You can also add tiny white hearts in the eyes instead of circles.
Now you have a charming bunny illustration ready to greet anyone who opens your sketchbook
BRUSH GUIDE
The Right Brush for Every Stroke
From clean lines to bold texture — master brush choice, stroke control, and essential techniques.
Explore the Full Guide
Rabbit Holding a Carrot
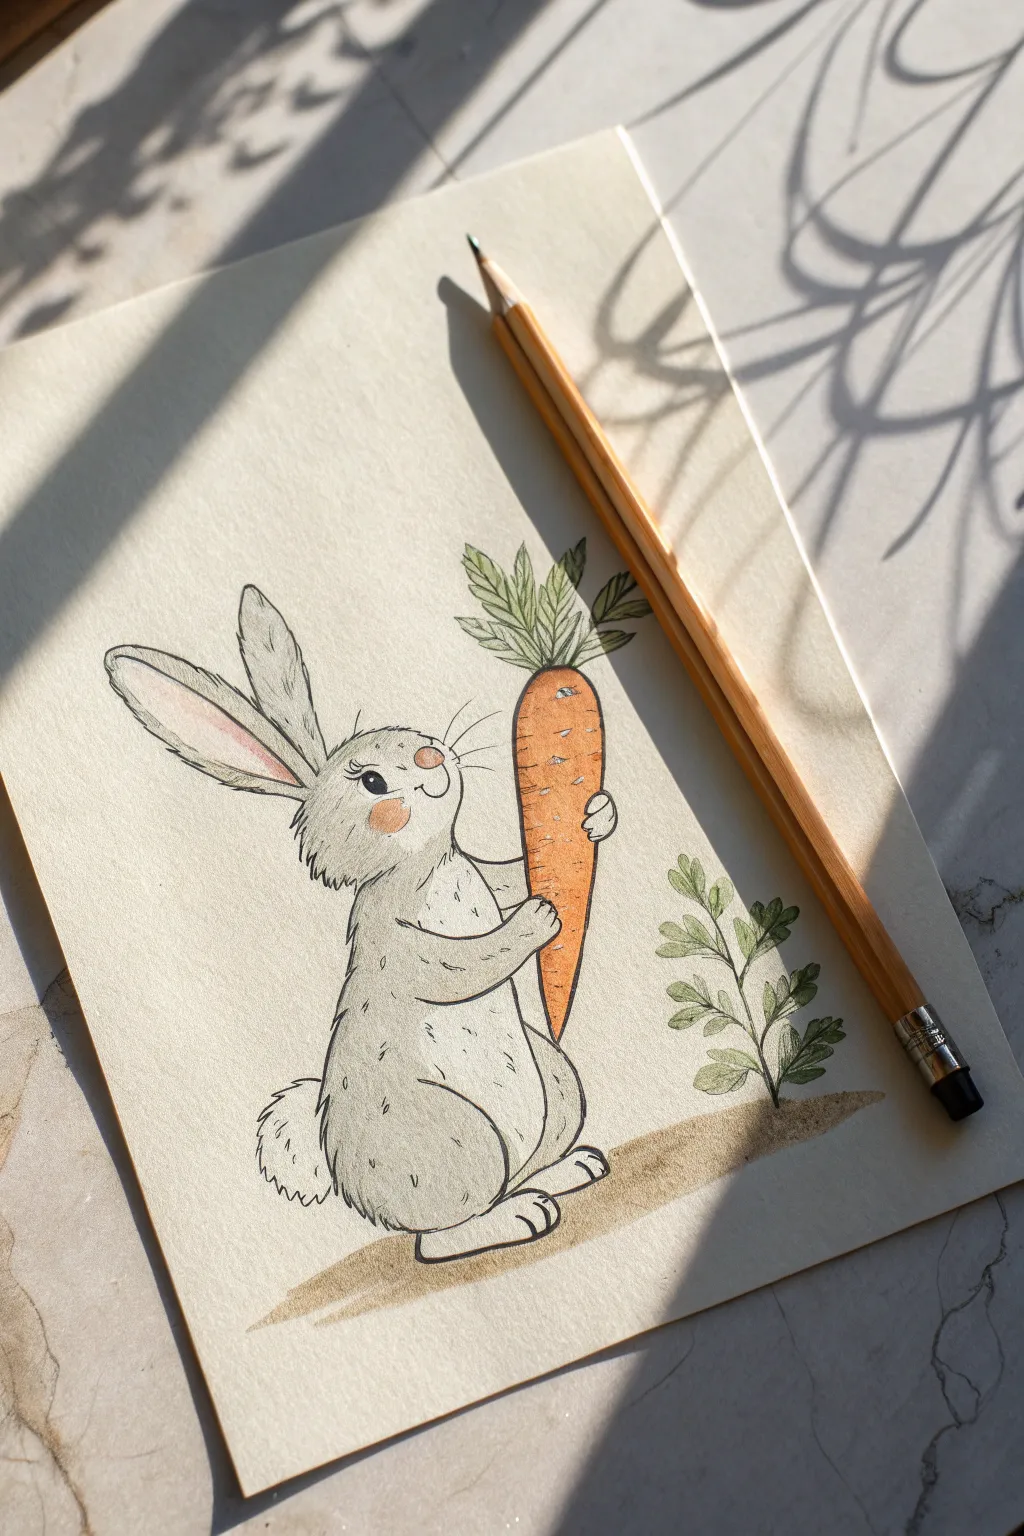
Capture the charm of a fluffy friend with this adorable illustration of a rabbit proudly holding its prize carrot. Using a blend of soft pencil shading and gentle watercolor or marker accents, you will create a piece full of personality and warmth.
Step-by-Step Tutorial
Materials
- Heavyweight drawing paper (smooth or light texture)
- Graphite pencils (HB and 2B)
- Fine liner pen (black, 0.3mm or 0.5mm)
- Colored pencils or alcohol markers (Orange, Green, Light Pink, Grey)
- Tortillon or blending stump (optional)
- Eraser
- Pencil sharpener
Step 1: Sketching the Foundation
-
Basic shapes:
Start lightly with your HB pencil. Draw a rounded oval for the head and a larger, slightly flatter bean shape below it for the body. Leave a small gap between them for the neck. -
Adding ears:
Sketch two long, elongated oval shapes extending upwards from the top left of the head. Make the left ear flop slightly backward and the right ear stand straighter for a lively expression. -
Positioning the limbs:
Draw small, curved sausage shapes for the arms. The right arm should be positioned higher to hold the carrot. Add rounded shapes at the bottom for the feet. -
The prize carrot:
Sketch a long, tapered cone shape standing vertically in the rabbit’s grasp. Add a tuft of leafy greens bursting from the top. -
Refining the face:
Lightly mark a horizontal line across the face for eye placement. Draw a small circle for the eye, a tiny triangle nose, and a curved line for the smiling cheek.
Fixing Wobbly Lines
Don’t worry if your ink lines aren’t perfect. Simply add a few more ‘fur’ dashes or ridges to the carrot over the mistake. Texture hides many errors
Step 2: Inking and Outline
-
Tracing the fur:
Switch to your fine liner pen. Instead of a solid line, use short, jagged strokes along the cheeks, chest, and tail to simulate fluffy fur texture. -
Defining the features:
Ink the eye carefully, leaving a small white circle for the highlight to bring it to life. Fill in the pupil with solid black. -
Carrot details:
Outline the carrot with a smoother, slightly wobbly line to show organic texture. Add little horizontal dashes across the vegetable for realistic ridges. -
Finishing the ink work:
Complete the outline for the ears, paws, and feet. Add a few small whiskers extending from the muzzle area. Once the ink is completely dry, gently erase your pencil guidelines.
Make it Pop
Use a white gel pen to add extra highlights on the carrot skin and the very tip of the nose after your colors have dried completely
Step 3: Adding Color and Depth
-
Coloring the carrot:
Using an orange pencil or marker, fill in the carrot body. Press harder near the edges to create a sense of roundness. -
Leafy greens:
Color the carrot top with a natural green. I like to add a second, smaller plant element next to the rabbit using the same green to balance the composition. -
Soft grey shading:
Take a grey pencil and very lightly shade the shadow areas of the rabbit: under the chin, along the back, and under the arms. Keep the belly and face mostly white. -
Blushing cheeks:
Apply a soft circle of pink on the rabbit’s cheek. You can also add a touch of pink to the inner part of the long ear. -
Fur texture:
Use your grey pencil to make small tick marks inside the body outline. These little dashes reinforce the look of fur without needing to color the whole animal. -
Grounding the scene:
Add a wash of light brown or beige under the rabbit’s feet and the plant to suggest the ground so your character isn’t floating in space. -
Final touches:
Deepen the blacks in the eye if needed and add any final stray hairs to the outline for extra fluffiness.
Now you have a charming woodland friend ready to hop off the page
Begging Bunny Pose
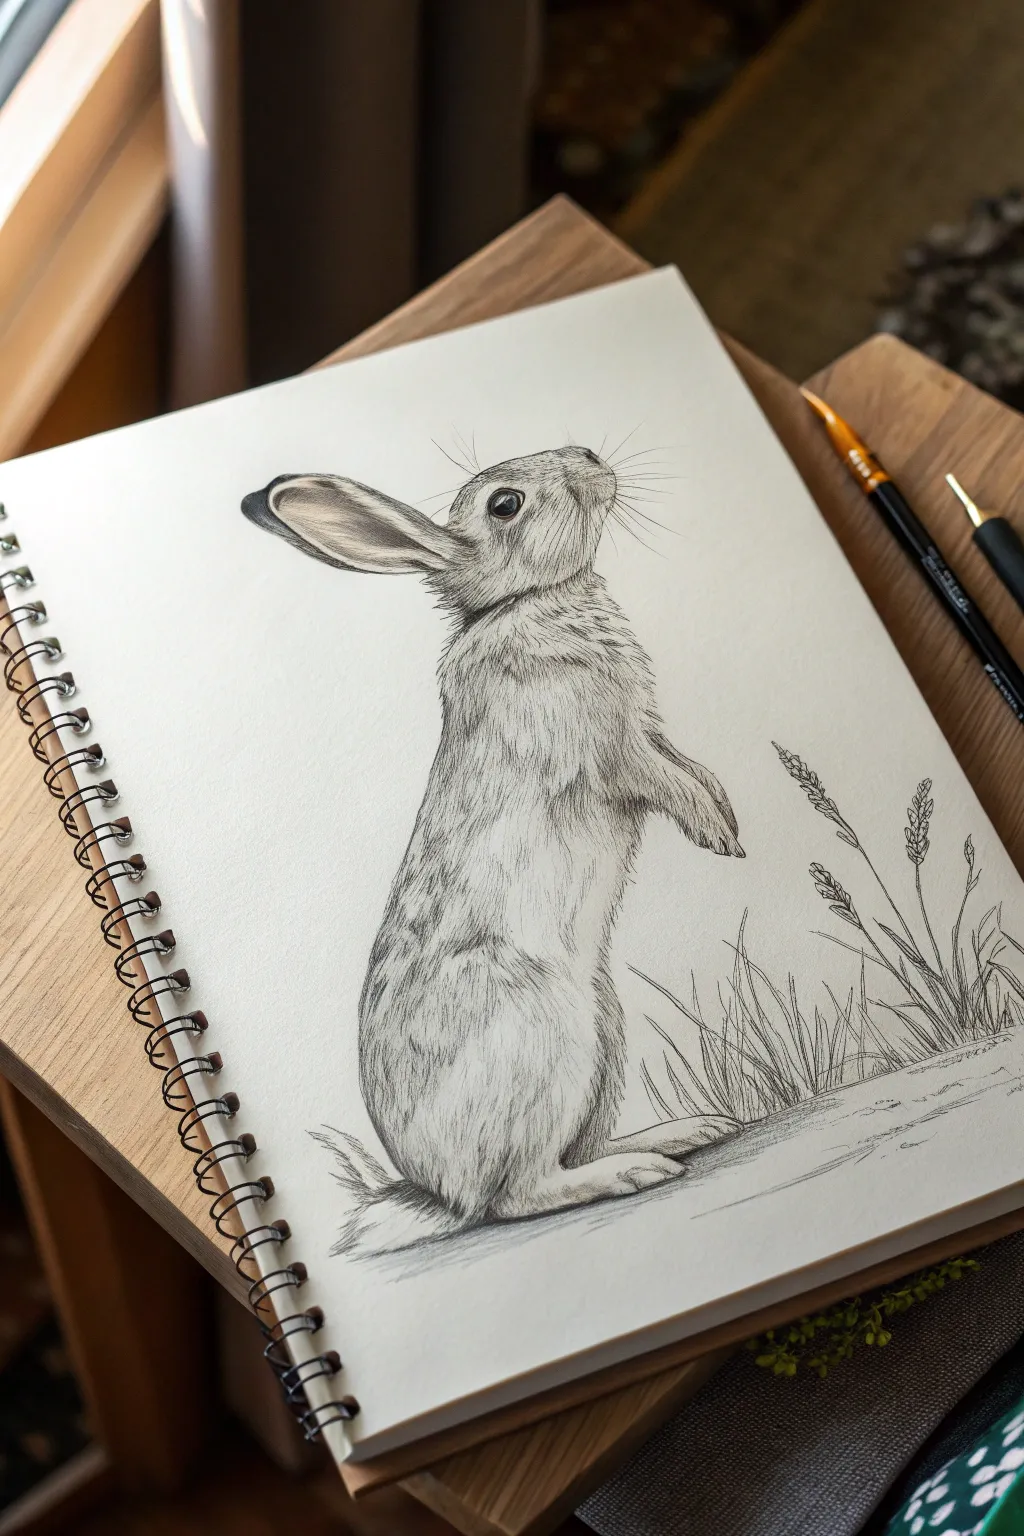
Capture the charm of a curious rabbit standing on its hind legs with this detailed graphite pencil study. By focusing on texture and pose, you’ll create a lifelike illustration that feels ready to hop right off the page.
How-To Guide
Materials
- Spiral-bound sketchbook (medium tooth paper)
- H or 2H pencil (for initial sketching)
- HB pencil (for general shading)
- 2B and 4B pencils (for darker fur details)
- Fine-point mechanical pencil (0.5mm)
- Kneadable eraser
- Blending stump or tortillon
Step 1: Planning the Posture
-
Establish the Line of Action:
Begin with a very faint, curved vertical line using your H pencil to map the spine’s curve as the rabbit stretches upward. -
Block in Main Shapes:
Draw an oval for the head at the top, tilting slightly upward. Below that, sketch a larger, elongated bean shape for the torso, ensuring the chest area puffs out slightly. -
Position the Limbs:
Sketch the large haunch at the base of the body as a rounded creative curve. Add the front paws tucked up near the chest—they should look relaxed and dangling. -
Ears and Eyes:
Add the long, spoon-shaped ear extending backward from the head. Place a small circle for the eye high on the side of the face, leaving a tiny white spot for the highlight.
Fur Texture Tip
Always lift your pencil at the end of each stroke. This creates a tapered line that mimics real hair, rather than blunt, unnatural marks.
Step 2: Building Form and Tone
-
Refine the Outline:
Go over your blocked shapes with an HB pencil, using short, broken strokes instead of a continuous line. This ‘furry’ line technique instantly suggests texture. -
Darken the Eye:
Fill in the eye with a 4B pencil, pressing firmly for a deep black, but carefully preserving that white catch-light to give the rabbit life. -
Initial Shading Pass:
Lightly shade the underside of the neck, the belly, and the shadowed area of the hind leg using the side of your HB pencil. -
Blend the Shadows:
Take a blending stump and gently soften your initial shading to create a smooth, gray base tone under where the fur details will go.
Make It Wintery
To create a snowshoe hare look, minimize shading on the body, outlining only with faint gray strokes, and darken just the ear tips and eyes.
Step 3: Detailing the Fur
-
Start Fur Direction:
Using a sharp mechanical pencil or 2B, start drawing fur texture. Pay attention to direction: strokes move up the neck, down the back, and wrap around the belly. -
Define the Face:
Use very short, delicate strokes around the eye and nose. I find that keeping these strokes tight and small helps the face look more refined than the body. -
Texture the Chest:
Layer longer pencil strokes on the chest area (the ‘bib’) to make it look fluffy. Leave some paper white here to show the lighter fur color. -
Deepen the Ears:
Shade the inside of the ear darker near the fold, fading out as you move up. Outline the rim of the ear with a distinct, sharp line. -
Leg and Tail Details:
Add heavier, directional strokes on the large hind leg to show muscle definition beneath the fur. Add a small, fluffy tail at the base.
Step 4: Atmosphere and Final Touches
-
Add Contrast:
Switch to your 4B pencil and deepen the darkest shadows: under the chin, where the front paws meet the chest, and strictly under the belly. -
Whisker Work:
With quick, confident flicks of a sharp pencil, draw the whiskers radiating from the muzzle. Vary their length and angle slightly. -
Ground the Subject:
Draw a faint horizontal shadow underneath the feet so the rabbit doesn’t look like it’s floating in space. -
Introduce Grass Elements:
Sketch a few simple blades of grass and seed heads to the right of the rabbit. Keep these looser and less detailed to ensure they don’t distract from the main subject. -
Cleanup:
Use your kneadable eraser to lift off any smudges around the drawing and brighten the highlights on the chest and cheek one last time.
Now you have a charming woodland creature captured in a moment of curiosity on your page

PENCIL GUIDE
Understanding Pencil Grades from H to B
From first sketch to finished drawing — learn pencil grades, line control, and shading techniques.
Explore the Full Guide
Sleeping Curled-Up Rabbit
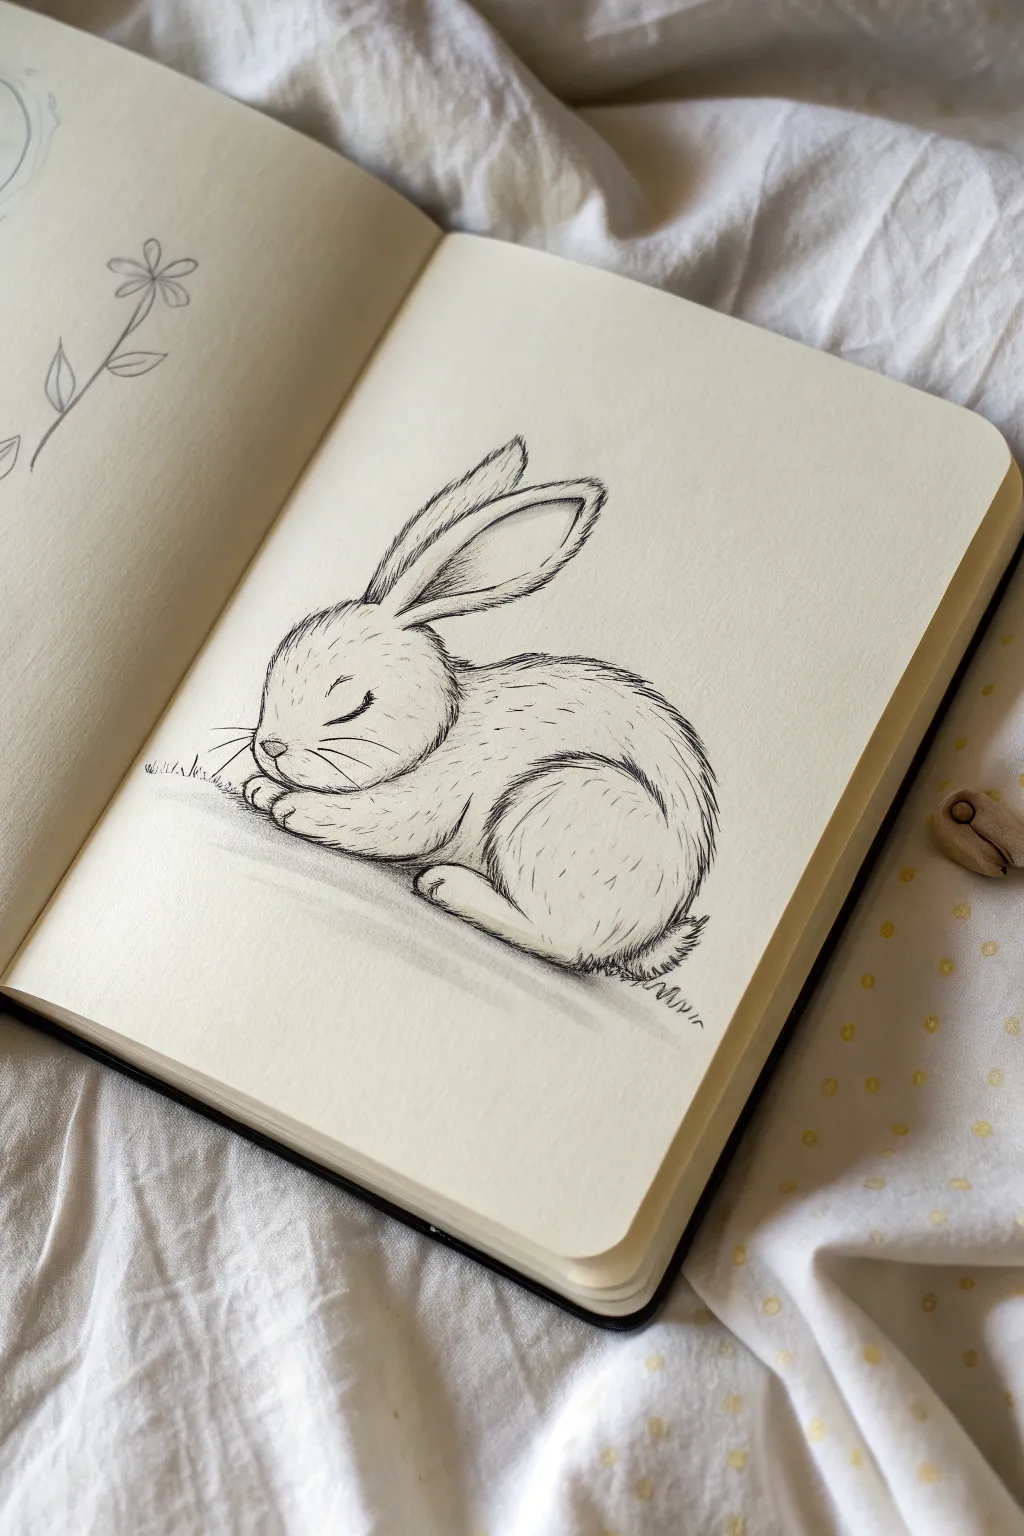
Capture the gentle innocence of a sleeping rabbit with this soft pencil sketch. This tutorial guides you through building the rounded forms and adding delicate fur textures to create a cozy, curled-up composition perfect for your sketchbook.
Step-by-Step
Materials
- Sketchbook with cream or off-white paper (medium tooth)
- H or HB pencil for initial sketching
- 2B or 4B pencil for shading and fur details
- Fine-point black pen (optional, for final definition)
- Kneaded eraser
- Blending stump or cotton swab
Step 1: Laying the Foundation
-
Start with the head:
Begin by drawing a soft circle for the head, placed slightly to the left side of your page. Don’t press too hard; these are just guide lines. -
Add the body mass:
Attach a larger, oval shape behind the head circle. Angle it slightly downward to mimic the hunched, curled-up posture of a sleeping bunny. -
Define the hind leg:
Within the back of the body oval, sketch a large, rounded thigh shape that curves inward. This is the prominent haunch that characterizes a sitting rabbit. -
Position the ears:
Draw two long, flame-like shapes extending back from the top of the head. Overlap them slightly so the one in the foreground feels closer to you. -
Sketch the face angle:
Draw a faint curved line down the center of the face circle to help position the features. Mark a small line for the nose and the sleeping eye.
Fixing Stiffness
If the bunny looks too stiff, use your eraser to soften the outline. Replace solid lines with jagged, loose fur strokes to make it look fluffier and more relaxed.
Step 2: Refining Shapes and Features
-
Outline the face profile:
Using a slightly darker stroke, trace the actual profile of the bunny. Give the nose a gentle slope and round out the cheeks. -
Detail the sleeping eye:
Draw a thick, dark curve for the closed eye. I like to taper the ends slightly to show the lashes resting against the cheek. -
Refine the ears:
Darken the outline of the ears. Add an inner line on the front ear to show the fold of the cartilage. -
Shape the paws:
Tuck the front paws under the chin. You only need to suggest them with small, rounded shapes peeking out from the chest fur. -
Define the tail:
Add a small, fluffy fluff-ball shape at the very back of the body.
Watercolor Wash
After sketching, lightly brush a pale brown or warm grey watercolor wash over the shadow areas. This adds a lovely mixed-media depth to the pencil work.
Step 3: Texturing and Shading
-
Start the fur texture:
Switch to your softer pencil (2B or 4B). Instead of a solid outline, go over your body lines with short, quick hatched strokes to simulate fur. -
Directional fur strokes:
Pay attention to the direction the fur grows. On the back, stroke downwards and backwards; on the face, use tiny, delicate strokes radiating from the nose. -
Shade the hind leg:
Deepen the shadows in the crease where the thigh meets the belly. This separation is crucial for defining the curled-up pose. -
Add deep contrast:
Darken the tips of the ears and the very bottom of the rabbit where it touches the ground to give the drawing weight. -
Create the whiskers:
With quick, confident flicks of your wrist, draw long whiskers extending from the muzzle. Keep them thin and varied in length. -
Ground the subject:
Add a soft cast shadow underneath the bunny using the side of your pencil lead. Blend this slightly with a stump or finger. -
Suggest the environment:
Draw a few jagged, grass-like strokes near the paws and belly to place the rabbit in a subtle natural setting. -
Final clean up:
Use your kneaded eraser to lift away any original guide lines that are still visible, leaving only the clean fur texture and shaded forms.
Now you have a quiet, cozy page in your sketchbook to enjoy
Jumping Rabbit Gesture Sketch
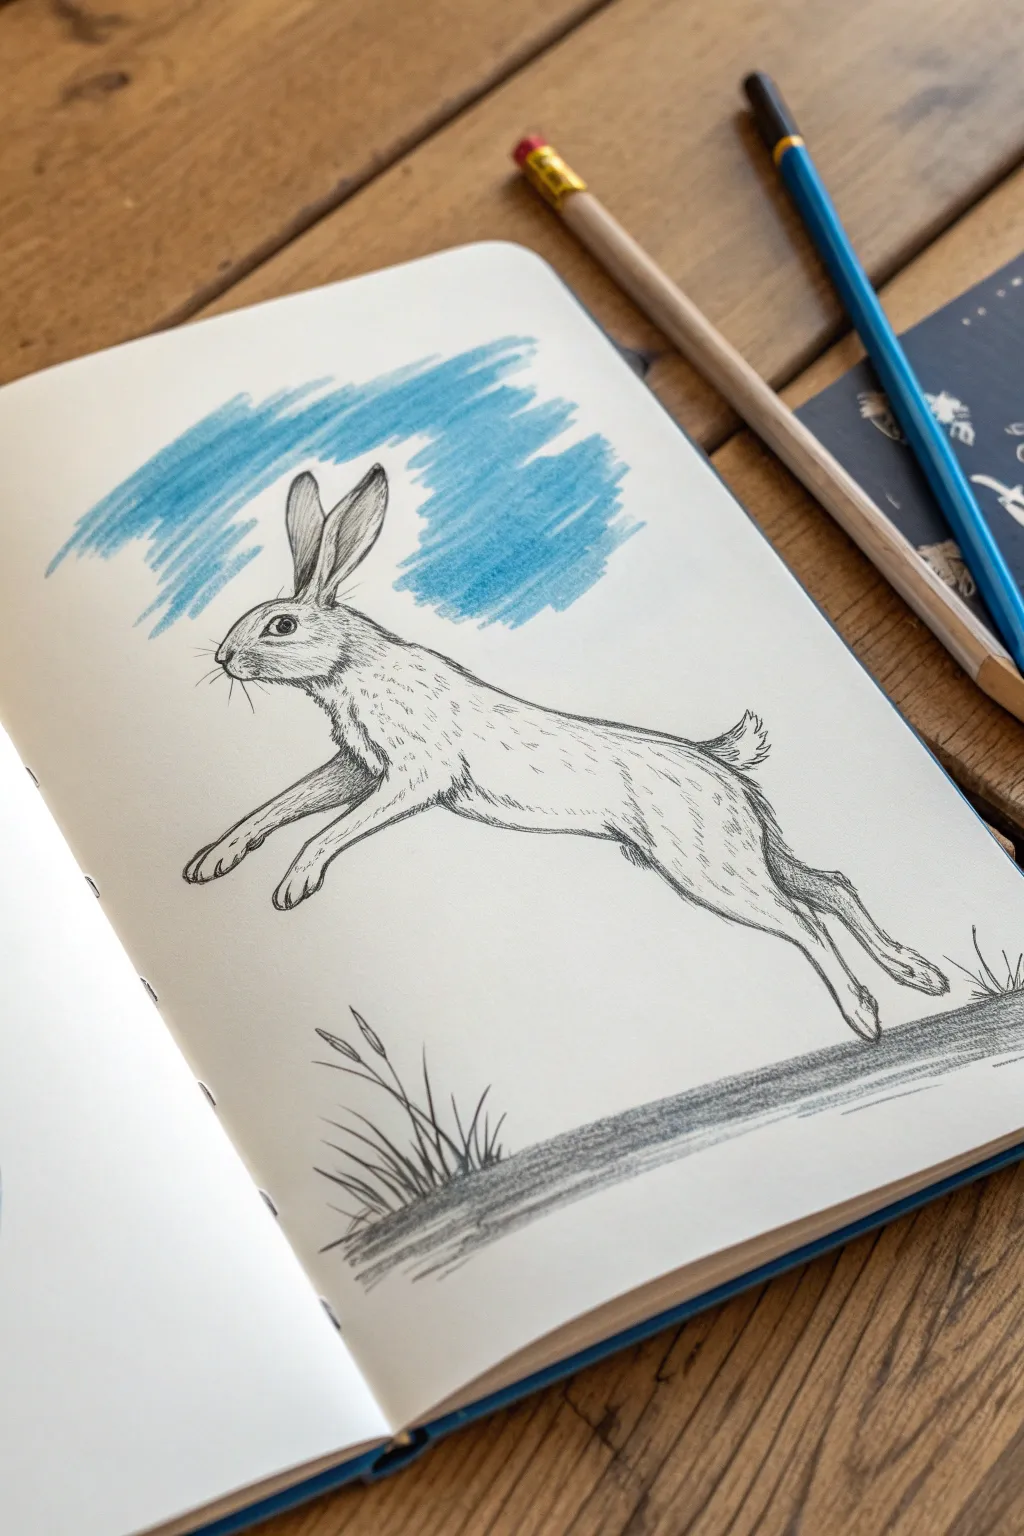
Capture the dynamic energy of a wild hare mid-leap with this lively sketchbook study. This project combines precise pencil line work to build fur texture with a loose, colored background for contrast.
Step-by-Step Tutorial
Materials
- Sketchbook with smooth or medium-tooth paper
- Graphite pencil (HB or B)
- Blue colored pencil (or pastel pencil)
- Eraser
Step 1: Establishing the Gesture
-
Sighting the angle:
Visualize a diagonal line stretching from the bottom left to the top right of your page. This imaginary axis will guide the entire upward leap of the hare’s body. -
Basic body shapes:
Sketch a long oval for the torso along that diagonal axis. Add a smaller circle for the head at the upper left end and a slightly larger oval for the haunches at the rear. -
Positioning the legs:
Draw simple stick lines to map out the limbs. The front legs should tuck underneath, reaching forward, while the powerful back legs should extend fully backwards to show the propulsion of the jump. -
Adding ears and tail:
Sketch two tall, elongated ovals for the ears, pointing them back slightly to suggest speed. Add a small, fluffy nub for the tail at the very back.
Step 2: Defining the Outline
-
Refining the head:
Carve out the details of the face. Draw the eye high on the side of the head, leaving a small white highlight. Define the nose and the curve of the jaw. -
Connecting the form:
Connect your initial shapes with confident lines. Smooth out the transition from the neck to the back, and define the muscular curve of the thigh connecting to the extended leg. -
Front paws:
Flesh out the front legs, drawing the paws hanging loosely. The paws should look relaxed, as they aren’t bearing weight during the leap. -
Back paws:
Detail the long back feet. These are the engines of the jump, so give them weight and length, ensuring the toes are clearly defined. -
Erasing guides:
Gently erase your initial construction lines (the ovals and sticks) until you have a clean outline of the rabbit.
Legs looking stiff?
Ensure the joints have sharp angles. A hare’s back leg folds like a ‘Z’ shape before extending. Exaggerating the stretch of the toes can also add a sense of speed.
Step 3: Adding Texture and Surroundings
-
Directional fur strokes:
Begin adding fur texture using short, quick pencil strokes. I find it crucial to follow the curve of the body—strokes should wrap around the ribs and flow down the legs. -
Building density:
Add denser hatching on the underside of the belly, under the chin, and along the back thigh to create shadow and volume. Keep the fur on the back lighter. -
Facial details:
Use very short, delicate strokes for the fur on the face. Add long, sweeping whiskers extending from the muzzle. -
Grounding the scene:
Draw a horizontal patch of scribbled graphite beneath the rabbit. This doesn’t need to be perfect; horizontal shading suggests the ground moving past quickly. -
Adding vegetation:
Draw three or four clumps of grass blades jutting out from your ground shadow. Make them angled slightly to match the energy of the movement. -
The sky patch:
Take your blue pencil and lay down a loose, scribbled patch of color behind and above the rabbit’s head. Don’t color inside the lines; this is an atmospheric backdrop to make the head pop.
Add watercolor
Instead of scribbling the blue sky, try a light wash of blue watercolor paint for a softer look. Just ensure your pencil sketch lines are dark enough to show through.
Now you have a dynamic sketch that looks ready to hop right off the page


Lop-Eared Bunny Study
Capture the soft texture and gentle expression of a lop-eared rabbit in this detailed colored pencil study. By layering warm browns and creams on toned paper, you will build up realistic fur that pops right off the page.
Step-by-Step
Materials
- Spiral-bound sketchbook with cream or toned paper
- Set of colored pencils (colors: dark umber, sienna, ochre, cream, white, cool grey, black)
- H or HB graphite pencil for outlining
- Kneaded eraser
- Fine-point mechanical pencil (optional for details)
- Pencil sharpener
Step 1: Sketching the Form
-
Outline the basic shapes:
Start by lightly sketching a large oval for the body and a smaller, rounded shape on top for the head. Keep your graphite pencil lines very faint so they won’t show through the lighter fur later. -
Define the lop ears:
Draw the signature drooping ears. The ear on the left should drape down the side of the face, while the right ear can be slightly tucked back or obscured. Notice how they frame the face like curtains. -
Add facial features:
Placement is key for that cute look. Mark a small Y-shape for the nose and mouth area. Place the large, dark eye on the left side of the face, leaving a tiny circle empty for the highlight. -
Refine the paws and tail:
Sketch the front paws planted firmly under the chest. Add the curve of the hind leg tucked underneath and a hint of a tail at the back. Once satisfied, dab the sketch with a kneaded eraser to lift excess graphite.
Pro Tip: Fur Direction
Always rotate your paper while drawing fur. Pulling strokes toward your body allows for more natural, tapered lines than pushing the pencil away.
Step 2: Layering the Base Colors
-
Apply the first layer of cream:
Using a cream or very light beige pencil, fill in the rabbit’s chest, belly, and the lower part of the face. Use light, circular motions to create a soft base without damaging the paper tooth. -
Establish the mid-tones:
Switch to an ochre or light brown pencil. Gently shade the top of the head, the ears, and the back. Follow the direction of the fur growth—short strokes on the nose, longer sweeping strokes down the back. -
Darken the eye:
Fill in the eye with a dark grey or black pencil, pressing firmly to get a deep contrast. Be careful to preserve that white highlight you marked earlier; it brings the bunny to life immediately. -
Shadow the ears:
Add a darker brown (sienna) to the inner folds of the ears and underneath the chin where shadows naturally fall. This begins to add dimension to the flat shapes.
Level Up: Whisker Magic
Instead of drawing whiskers with a dark pencil, use an indenting tool or empty mechanical pencil to press lines into the paper BEFORE shading. The fur color will skip over the dents, leaving bright white whiskers.
Step 3: Building Fur Texture
-
Create directional strokes:
Sharpen your pencils to a fine point. Starting on the forehead, use short, flicking strokes with your mid-brown pencil to mimic individual hairs. Always pull the pencil in the direction the fur grows. -
Deepen the coat pattern:
Layer a darker umber or chocolate brown over the back and ears to create the patches of color. Don’t cover everything; let some of the lighter ochre show through to suggest depth and thickness in the coat. -
Refine the face:
Use very short, delicate strokes around the nose and cheeks. I find that using a lighter touch here creates that velvety texture bunnies are known for. Add a tiny touch of pink to the nose. -
Brighten the chest:
Take a white charcoal or heavy white colored pencil and go over the cream chest area again. Press harder this time to create opaque white fur that stands out against the toned paper. -
Detail the paws:
Define the toes on the front paws with small visible lines. Add slight shading between the toes using a cool grey to separate them visually.
Step 4: Final Details and Grounding
-
Deepen the darkest shadows:
Use your darkest brown or black selectively. Add definition inside the ear, under the chin, and at the very base of the tail where the fur overlaps. -
Check the eye reflection:
Enhance the eye by adding a thin rim of lighter brown around the iris if visible, or just ensure the black is pitch dark against the white highlight paper reserve. -
Add whiskers:
With a very sharp dark pencil or a fine-liner pen, draw the whiskers. Use quick, confident flicks so the lines taper naturally at the ends. Add visible whisker pores on the snout with tiny dots. -
Cast a shadow:
To ground your bunny so it doesn’t look like it’s floating, use a cool grey pencil to draw a shadow underneath the body. Extend it slightly to the left, fading it out as it moves away from the rabbit. -
Final blending and review:
Step back and look at your drawing. If some fur areas look too scratchy, lightly go over them with a colorless blender or a light cream pencil to burnish and smooth the texture.
Now you have a charming, fluffy rabbit study that captures the gentle nature of these pets
Realistic Rabbit Head Shading
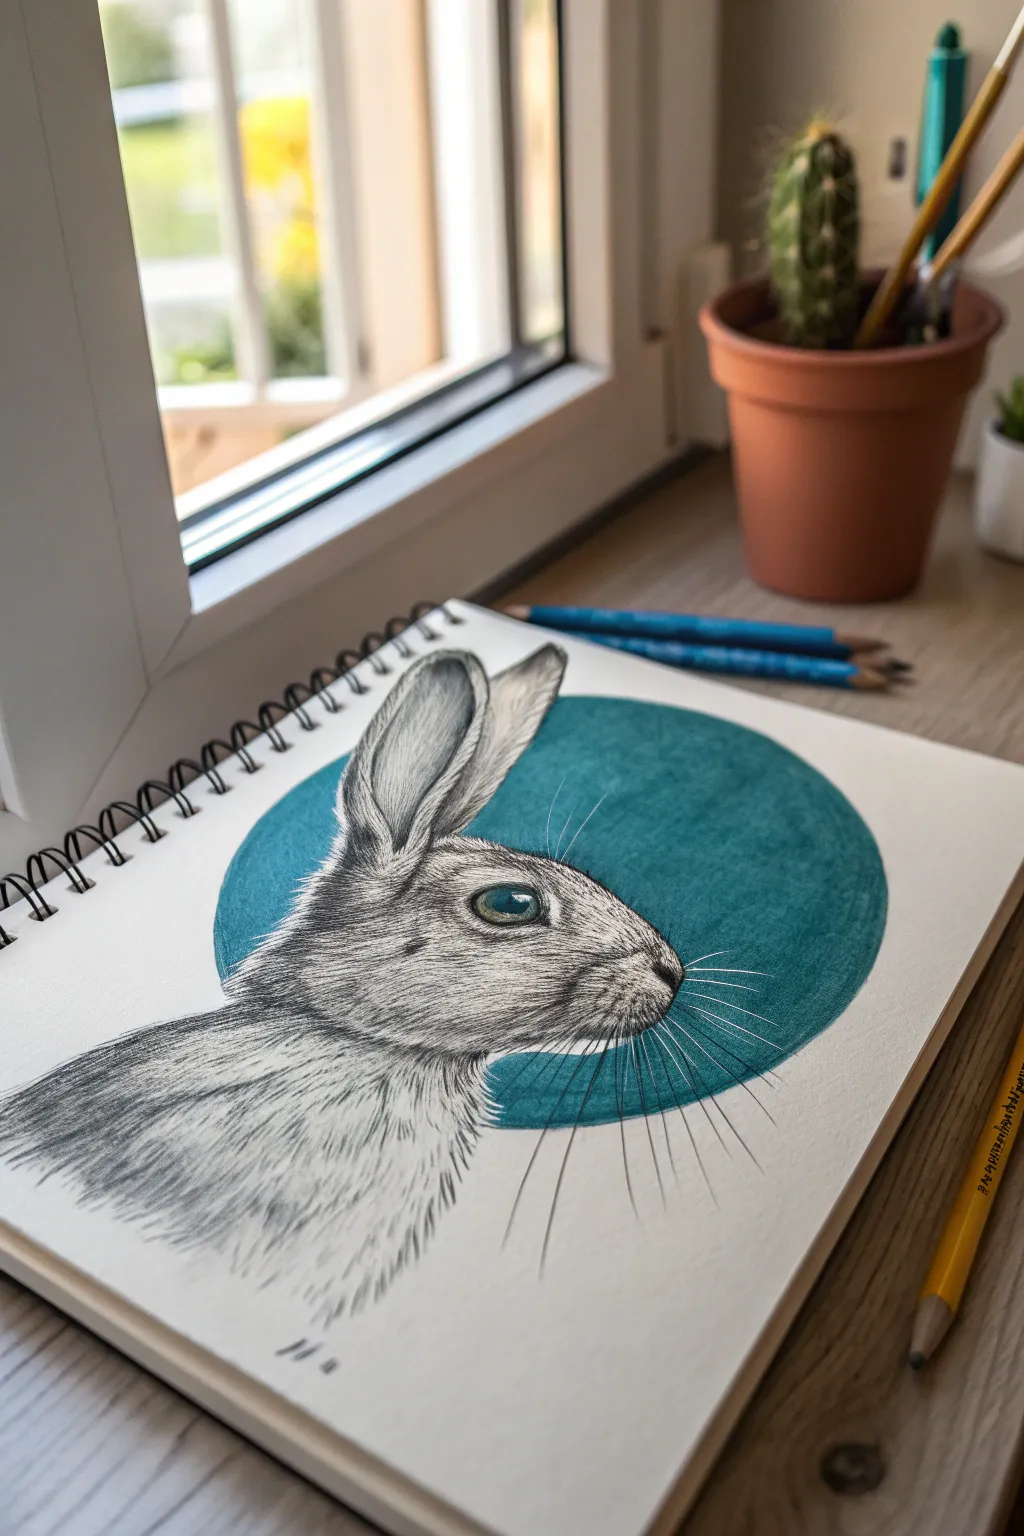
This striking project combines fine-line realism with a bold graphic element, contrasting detailed fur textures against a minimalist geometric shape. The cool teal circle frames the rabbit’s warm, earthy shading perfectly, creating a modern illustration style that pops off the page.
Step-by-Step Guide
Materials
- Heavyweight drawing paper or mixed media sketchbook
- Graphite pencils (HB, 2B, 4B)
- Fine liner pens (0.1mm, 0.3mm, 0.5mm) in black
- Teal or turquoise colored pencil (oil-based preferred for opacity)
- Blending stump or cotton swab
- Compass or circular object to trace
- Kneadsble eraser
- Ruler
Step 1: Planning and Structure
-
Establish the circle:
Begin by drawing a perfect circle in the center of your page using a compass or by tracing a round object like a bowl. Keep this line very faint using an HB pencil, as it acts as a boundary for your background element. -
Sketch the rabbit’s silhouette:
Lightly sketch the outline of the rabbit’s head and chest. Position the rabbit so the head overlaps the circle but the ears and nose extend slightly beyond or right up to the edge. The chest should flow downwards out of the circle. -
Refine features:
Map out the eye placement, the curve of the cheek, and the distinct V-shape of the ears. Ensure the perspective is a true profile view. Keep your pencil pressure light so you can erase guidelines easily later. -
Color the background:
Before doing detailed fur work, fill in the circle behind the rabbit sketch with your teal colored pencil. Work carefully around the rabbit’s outline. Apply firm pressure or multiple layers to get a solid, opaque circle of color.
Step 2: Fur Texture Foundation
-
Start the eye:
Using a sharp graphite pencil or fine liner, draw the dark pupil and iris. Leave a small, crisp white circle for the highlight to give the eye life. Shade the area around the eye darker to create depth. -
Map fur direction:
With an HB pencil, lightly draw arrows or faint lines indicating which way the fur grows. On the nose, it’s short and downward; on the cheeks, it sweeps back; and on the neck, it flows downwards. -
Initial hatching:
Using a 0.1mm fine liner or sharp pencil, start laying down short, quick strokes following your direction map. Keep these strokes separated for now; don’t aim for full density yet. -
Darken the shadows:
Identify the darkest areas: inside the ears, under the chin, and the crease of the neck. Build up density here using closely packed hatching lines to establish the form’s volume.
Uneven Background?
If your colored pencil circle looks scratchy, use a colorless blender pencil or a tiny amount of baby oil on a cotton swab to melt the wax and smooth the texture.
Step 3: Detailed Rendering
-
Texturing the ears:
The ears need a specific texture. Use very short, fine strokes for the velvet-like fur on the back of the ears. For the inner ear, use longer, sparse strokes and leave more white paper showing to imply thin skin. -
Building the cheek drawing:
Layer your fur strokes on the cheek. I find it helpful to start with longer strokes near the jawline and transition to tiny stippling or micro-dashes near the nose to show the change in fur length. -
Neck flourishes:
Allow your strokes to become longer and more expressive as you move down the neck and chest. Let the ends of the drawing fade out naturally at the bottom rather than creating a hard stop line. -
Refine the outline:
Go back over the outer contour of the rabbit. Instead of a solid line, use jagged, broken lines to simulate fur breaking the silhouette, especially where the fur is fluffiest on the neck. -
Deepen contrast:
Switch to a 2B or 4B pencil (or a 0.5mm pen) to deepen the darkest shadows under the jaw and inside the ear. This high contrast is what makes the drawing look realistic.
Make it Shine
Add gold leaf over the teal circle for a luxurious mixed-media twist, or use metallic watercolor paint for the background to catch the light.
Step 4: Final Touches
-
Add whiskers:
This is a crucial step. With a quick, confident hand, draw long, sweeping whiskers extending from the muzzle. Press harder at the root and flick the pen up so the line tapers off at the end. -
Connect the layers:
Look closely at where the rabbit overlaps the teal circle. If needed, darken the fur slightly right at that boundary to ensure the rabbit clearly sits ‘in front’ of the geometric shape. -
Eye reflection touch-up:
If the eye highlight got smudged, use a tiny dot of white gel pen or gouache to bring back that sharp, wet look. -
Body fade:
Soften the bottom edge of the drawing. Use a blending stump or lighter pencil strokes to make the rabbit’s chest fade gently into the white of the paper.
Now step back and admire how the clean geometry highlights the organic softness of your rabbit portrait
Rabbit From Behind With Cotton Tail
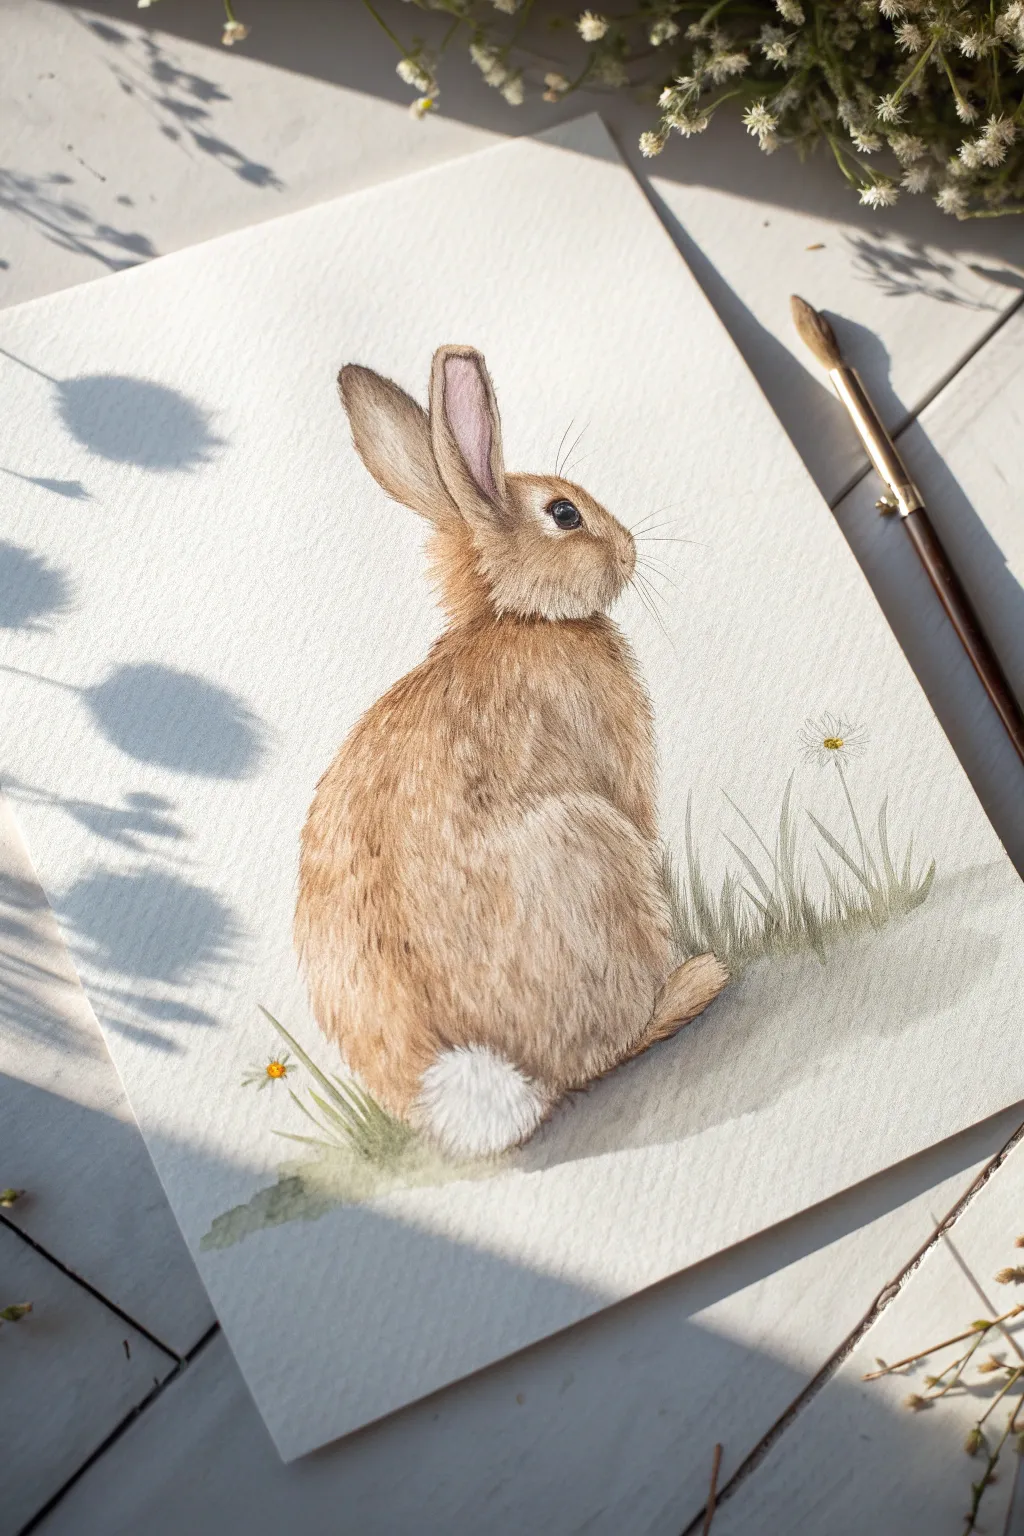
Capture the quiet charm of a rabbit pausing in a sunlit field with this detailed watercolor tutorial. You will learn how to build up realistic fur textures using overlaying strokes and create that signature fluffy cotton tail.
Step-by-Step Tutorial
Materials
- Cold press watercolor paper (300 gsm)
- Watercolor paints (Burnt Sienna, Yellow Ochre, Burnt Umber, Ivory Black, Sap Green)
- White gouache or white gel pen
- Round watercolor brushes (Size 4, Size 2, and Size 00 for details)
- HB pencil and kneaded eraser
- Jar of water and paper towels
Step 1: Sketch and Base Wash
-
Outline the rabbit form:
Begin with a very light pencil sketch. Draw two intersecting ovals—a smaller one for the head and a larger, more rounded one for the body. Add two long, spoon-shaped ears pointing upwards. -
Refine the silhouette:
Connect the ovals to form the neck and slope of the back. Sketch the rounded haunch at the bottom right and mark a small circle for the tail. -
Face and features:
Draw the profile of the face, adding a slight bump for the nose and a small curve for the mouth. Place the eye high on the head, near the base of the ears. -
Lighten the lines:
Roll your kneaded eraser gently over the entire sketch. You want the graphite lines to be barely visible so they don’t show through the transparent watercolor later. -
First color wash:
Mix a very watery wash of Yellow Ochre and a touch of Burnt Sienna. Apply this pale golden-brown to the entire rabbit body, avoiding the tail area and the inner ear, which should remain white for now. -
Pink ear flush:
While the head is still slightly damp (but not soaking), drop a tiny amount of diluted pink or reddish-brown into the inner part of the ear to create a soft, fleshy tone.
Step 2: Building Fur Texture
-
Establishing shadows:
Once the base layer is completely bone dry, mix a darker brown using Burnt Sienna and Burnt Umber. Using a Size 4 brush, paint the shadow areas underneath the chin, the base of the ears, and the lower curve of the back. -
First fur strokes:
Switch to a Size 2 brush. Using the same medium-brown mix, start making short, directional strokes that follow the curve of the rabbit’s body. I find it helpful to start at the neck and work downwards. -
Deepening the coat:
Mix Burnt Umber with a tiny bit of Ivory Black to create a cool, dark brown. Apply finer, denser fur strokes on the back and the haunch to suggest thickness. -
Detailing the face:
Use your smallest brush (Size 00) for the face. Paint short, tiny strokes radiating from the nose bridge. Carefully paint the eye solid black, leaving a tiny speck of white paper for the highlight. -
Defining the ears:
Add definition to the ears by outlining the rims with the dark brown mix. Add fine hairs inside the ears, letting the pink underlayer show through. -
The cotton tail:
The tail is mostly white, but it needs volume. Mix a very pale, watery grey (black + lots of water). Dab this gently at the bottom of the tail circle to create a spherical shadow.
Fixing Muddy Fur
If fur texture looks like a blob, you’re painting wet-on-wet too much. Let the paper dry completely between layering strokes to keep individual hairs crisp.
Step 3: Final Details and Surroundings
-
Whiskers and fine hairs:
Using your finest brush and a dark grey mix, pull quick, confident strokes outward from the muzzle to create whiskers. Keep them thin and tapering. -
Adding the grass:
Mix Sap Green with a little Grey or Brown to desaturate it. Paint quick, upward flicks of grass around the rabbit’s base, varying the height and opacity. -
Painting the daisies:
Paint thin green stems rising from the grass. At the top, use yellow for the center dots. You can use negative space for petals or add touches of white gouache later. -
Highlighting with gouache:
This is crucial for texture. Take white gouache on a fine brush and paint tiny, bright hairs over the brown fur, especially on the top of the head, the back, and the edges of the tail to make it look fluffy. -
Shadow grounding:
Finally, add a wash of soft greyish-green directly under the rabbit and the grass clumps to ground the figure so it doesn’t look like it’s floating.
Make It Golden
Add a ‘golden hour’ feel by glazing a very thin layer of watered-down yellow or orange over the top left of the rabbit once the painting is fully dry.
Step back and admire the soft texture you’ve created on your woodland friend
Rabbit Among Wildflowers
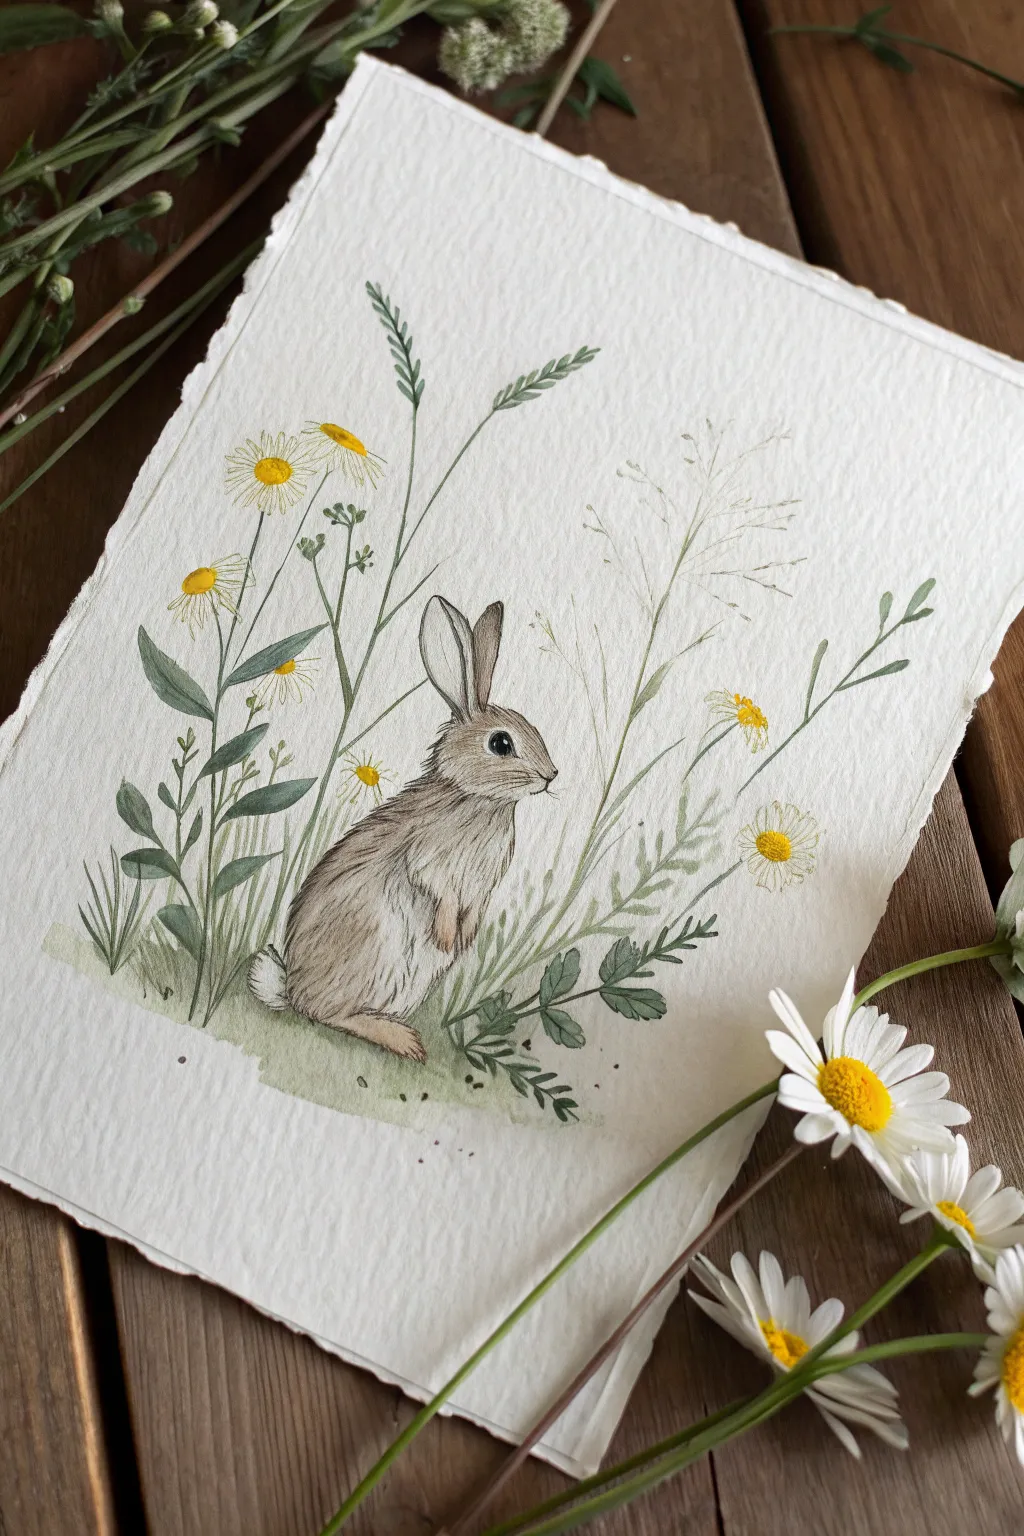
Capture the delicate beauty of a rabbit nestled in tall grass with this detailed mixed-media tutorial. You’ll combine soft watercolor washes with fine ink or colored pencil details to create a charming, vintage-style nature illustration.
Step-by-Step
Materials
- Cold press watercolor paper (deckled edge optional)
- H or HB graphite pencil for sketching
- Kneaded eraser
- Watercolors (Sepia, Yellow Ochre, Sap Green, Burnt Umber, Payne’s Grey)
- Fine liner pens (005 and 01 size) in warm grey or brown
- Small round brushes (size 0, 2, and 4)
- White gouache or gel pen for highlights
Step 1: Sketching the Composition
-
Paper Preparation:
Begin with a quality sheet of watercolor paper. If you want that rustic look shown in the example, gently tear the edges of your paper against a ruler instead of cutting them, creating a soft deckled edge. -
Basic Shapes:
Lightly sketch the rabbit using simple ovals. Draw a larger oval for the body and a smaller, slightly tilted oval for the head. Add two long, almond shapes for the ears, keeping them alert and upright. -
Refining the Silhouette:
Connect your shapes to form the rabbit’s neck and back. Sketch the visible front paws tucked slightly inward and hint at the large hind leg and fluffy tail. Keep your pencil pressure very light so lines disappear later. -
Placement of Flora:
Map out the surrounding wildflowers. Draw tall, sweeping lines for stems rising above the rabbit. Sketch the basic circles for daisy heads and feathery shapes for the grass stalks, ensuring they overlap the rabbit slightly to ground it in the scene.
Step 2: The First Watercolor Layers
-
Underpainting the Fur:
Mix a very watery wash of Burnt Umber and a touch of Yellow Ochre. Apply this pale beige tint to the rabbit’s body, leaving the chest, belly, and tail white. Let the color fade out softly at the edges. -
Adding Warmth:
While the first layer is barely damp, drop in a slightly more concentrated brown near the ears, the back of the neck, and the top of the head to start building volume. -
Greenery Base:
Using a size 4 brush and diluted Sap Green, paint the broad grassy patch at the bottom. Allow the paint to be uneven, suggesting the texture of earth and moss. -
Stem Structure:
Switch to a size 0 or 2 brush. With a mix of Sap Green and a tiny bit of Grey, carefully paint the thin stems of the wildflowers. Keep your hand loose to mimic the natural bend of wind-blown grass.
Muddy Fur?
If fur texture looks like a blob, you’re working too wet. Let the paper bone-dry completely before adding the next layer of hair strokes. Patience is key for crisp detail.
Step 3: Building Texture and Detail
-
Deepening the Fur:
Once the base is dry, use a small brush to apply short, directional strokes of Sepia on the rabbit. Follow the curve of the body to mimic fur texture, concentrating on shadow areas like under the chin and behind the legs. -
Defining the Face:
Very carefully paint the eye using a dark grey or black, leaving a tiny speck of white paper for the catchlight. This spark of life is crucial. Add a touch of pinkish-brown to the nose. -
Flower Centers:
Paint the centers of the daisies with a bright Yellow Ochre or deep yellow. Once dry, add a tiny crescent of orange on the bottom of each center for a 3D effect. -
Seed Heads and Leaves:
Paint the leaves using a dusty green mix. For the feathery seed stalks (the tall, thin plants), use barely-there strokes of pale grey-green to keep them looking airy and delicate.
Botanic Variety
Make the meadow unique by changing the flower species. Swap daisies for lavender sprigs or tiny poppies to match the season you want to evoke.
Step 4: Fine Lines and Finishing
-
Ink Outline (Option A):
If you prefer a crisp illustration style, use a 005 fine liner to gently outline the petals and stems. Keep the lines broken and organic, not continuous. -
Pencil Detail (Option B):
For a softer look, use a sharpened colored pencil to add the finest details. I often use a dark brown pencil to define the individual hairs on the rabbit’s back and whiskers. -
Ground Splatters:
Load a small brush with watery green or brown paint and tap the handle against your finger to fling tiny speckles around the base of the drawing. This adds an earthy, organic texture to the soil area. -
Whiskers and Highlights:
Using white gouache or a white gel pen, draw fine, sweeping whiskers on the muzzle. Add tiny white strokes to the tail and chest fur to bring back brightness if your watercolor got too dark. -
Final Contrast:
Assess the drawing. If the rabbit feels flat, deepen the shadows under the paws and belly with a glaze of Payne’s Grey to firmly plant the bunny on the ground.
Frame your delicate woodland friend in a float frame to show off those lovely deckled edges
Bunny With Glasses and Bow
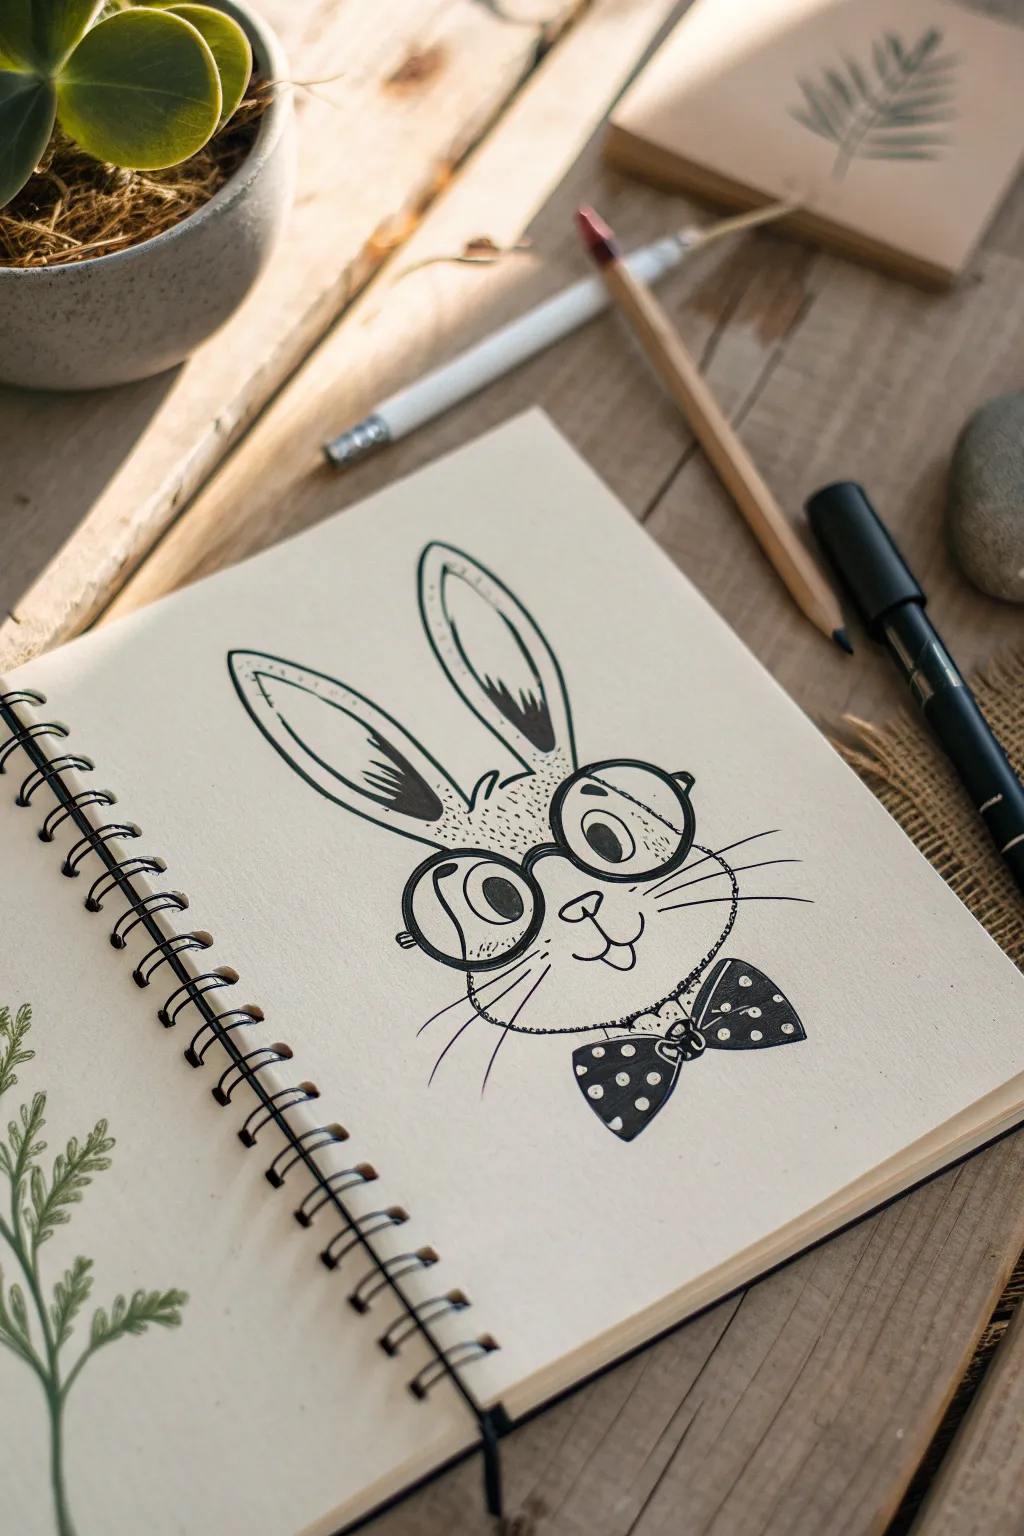
This charming, bespectacled bunny adds a touch of whimsy to any sketchbook page with its bold ink lines and studious expression. The drawing combines clean contour lines with subtle stippling textures to create a character that feels both classic and playful.
Step-by-Step Guide
Materials
- Sketchbook with smooth paper (medium weight)
- HB or 2B graphite pencil
- Kneaded eraser
- Fine liner pen (0.3mm or 0.5mm)
- Thicker marker pen or brush pen (for filling details)
- Ruler (optional, if you want perfectly straight whiskers)
Step 1: Pencil Under-drawing
-
Map out the head shape:
Start by lightly sketching a rounded, slightly flattened oval shape for the bunny’s head. Keep your pencil pressure very light so these lines can be erased later. -
Position the ears:
Draw two long, elongated oval shapes extending upward from the top of the head. Curve them slightly outward to give the bunny a relaxed, natural look rather than stiff, straight-up ears. -
Place the glasses:
Sketch two large, connected circles right in the center of the face. These should take up a significant portion of the face to achieve that oversized, ‘scholarly’ look. -
Define facial features:
Inside the glasses, draw two smaller ovals for eyes, looking off to the side. Below the glasses, add a small rounded triangle for the nose and a ‘w’ shape for the mouth. -
Add the bow tie:
Directly below the chin, sketch a simple bow tie shape—a central knot with two flaring triangles on either side.
Circle Mastery
Struggling with perfect circles for the glasses? Trace around a small coin, a glue stick cap, or a button to get perfectly round frames every time.
Step 2: Inking the Outlines
-
Trace the glasses:
Switch to your fine liner pen. Carefully ink the frames of the glasses first, making the lines slightly thicker than the rest to emphasize the eyewear. I find it helpful to rotate the paper as I draw the circles to keep the curve smooth. -
Outline the head and ears:
Ink the outer contour of the head and ears. When inking the cheeks, use slightly jagged or broken lines to suggest fur texture rather than a single smooth line. -
Define the inner ears:
Draw the inner ear shapes, following the curve of the outer ear but stopping before you reach the tip. -
Ink the face details:
Go over the eyes, nose, and mouth. Add small pupils inside the eyes, leaving a tiny white sparkle in each for life. -
Draw the bow tie:
Outline the bow tie shape with clean, confident strokes.
Step 3: Adding texture and Detail
-
Fill the dark areas:
Using a thicker marker or by building up your fine liner strokes, fill in the pupils (avoiding the highlights) and the inner shadows of the ears. Create a tapered, brush-like stroke inside the ears for depth. -
Thicken the glasses frames:
Go back over the glasses rims to give them significant weight. Add the bridge between the lenses and the small hinges on the sides. -
Stipple the texture:
This is the crucial step for character. Use your fine liner to tap tiny dots (stippling) on the forehead, the t-zone between the eyes, and lightly on the cheeks. This creates a fuzzy, fur-like texture without drawing individual hairs. -
Decorate the bow tie:
Fill in the background of the bow tie with black ink, leaving small circles white to create a polka-dot pattern. I like to vary the size of the dots slightly for a more organic feel. -
Add whiskers:
With quick, confident flicks of the wrist, draw three long whiskers extending from each cheek area. Quick strokes prevent shaky lines. -
Final clean up:
Wait at least five minutes for the ink to dry completely. Once safe, gently erase all the underlying pencil sketch lines with your kneaded eraser.
Oops, Smudged Ink?
If you accidentally smudge wet ink, turn it into a stylistic choice! Add a few more deliberate smudges or dots nearby to make it look like purposeful texture.
Now you have a sophisticated bunny character ready to govern your sketchbook pages
Funny Rabbit Expressions Sheet
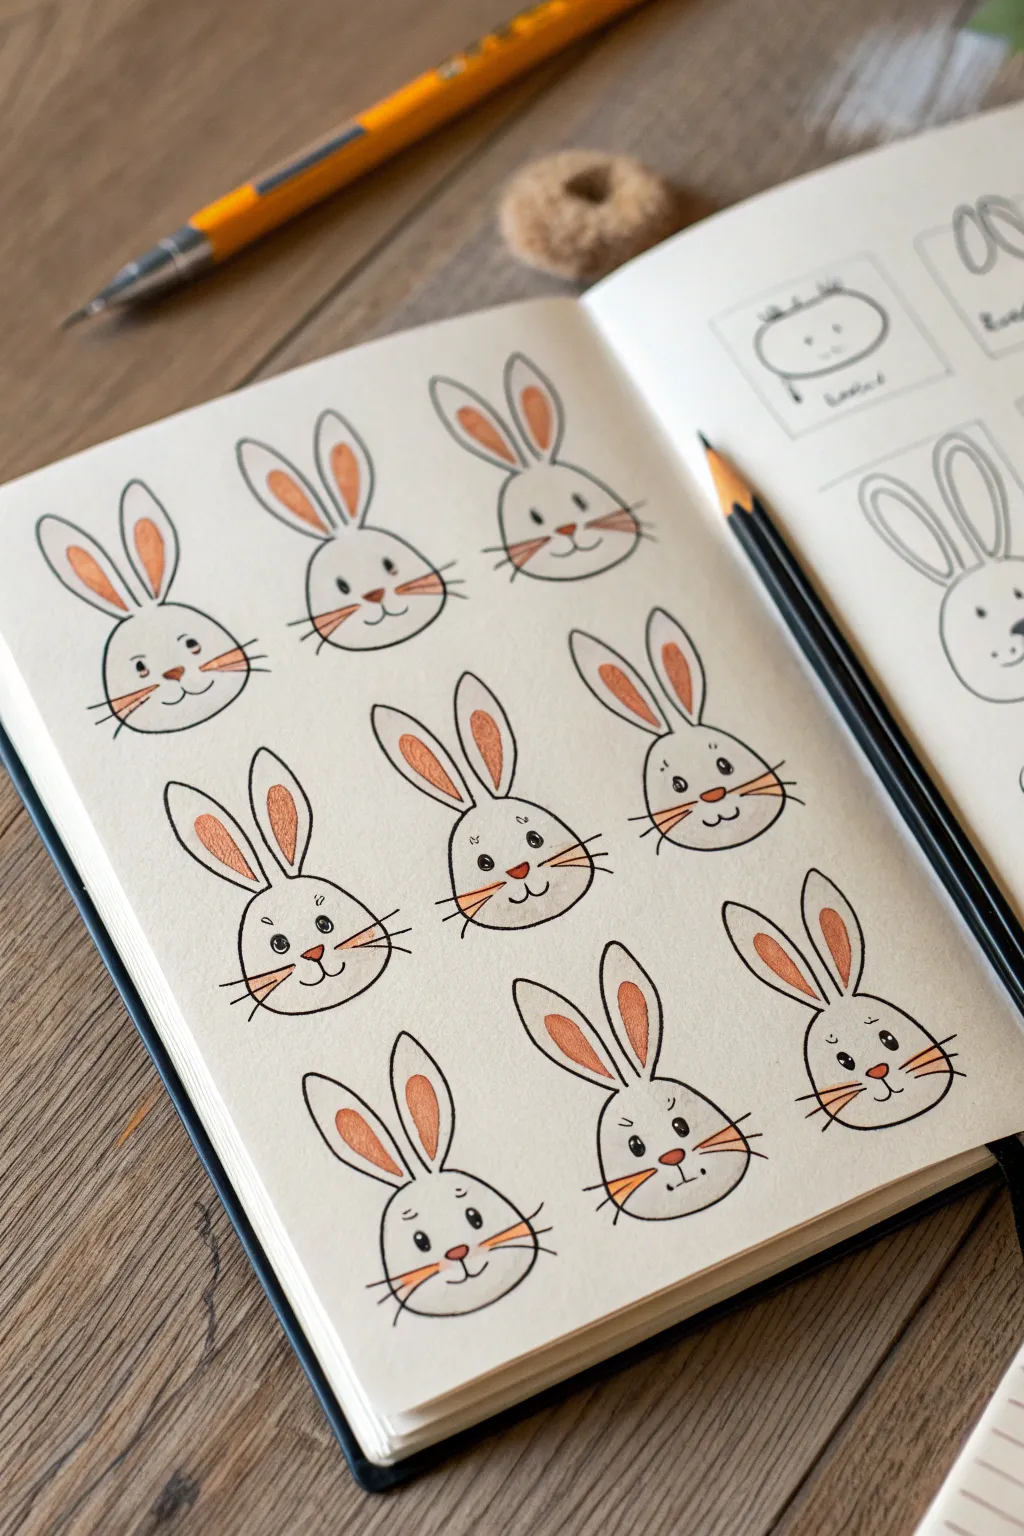
This charming sketchbook exercise explores a range of emotions through simple, cartoon rabbit faces. By varying eyebrows, mouth shapes, and ear positions, you’ll create a full sheet of distinct personalities using minimal strokes.
How-To Guide
Materials
- Sketchbook or drawing paper (smooth texture preferred)
- HB or 2B graphite pencil for initial sketching
- Fine liner pen (black, 0.3mm or 0.5mm)
- Colored pencils (specifically orange/peach tones)
- Eraser
Step 1: Setting the Foundations
-
Layout the heads:
Visualize a grid of nine spots on your page: three rows of three. In each spot, lightly sketch a rounded, squat oval shape for the rabbit’s head. Keep these loose and light. -
Add the ears:
Draw two long, looping ovals extending from the top of each head. Vary their angles slightly—some sticking straight up, others tilting outward—to suggest movement. -
Define the inner ears:
Inside each ear loop, sketch a smaller, similar shape to mark the inner ear area. This is where your color will eventually go.
Keep it Loose
Don’t aim for perfect circles. Slightly wonky or asymmetrical heads often make the characters look cuter and more organic.
Step 2: Inking the Forms
-
Trace the outlines:
Using your fine liner pen, carefully go over your pencil lines for the heads and ears. Focus on smooth, continuous strokes rather than sketchy dashes. -
Refine the jawline:
At the bottom of the head ovals, you can slightly flatten the curve or add tiny cheek fluffs if you want a softer look, though keeping them round works perfectly for this style. -
Erase guidelines:
Once the ink is completely dry (give it a minute to avoid smearing), gently erase all the underlying graphite sketch lines to leave a clean black-and-white base.
Step 3: Creating Personalities
-
Draw the noses:
In the center of the lower third of each face, draw a small, inverted triangle or a tiny oval. I like to fill these in with color later, so leave them open for now or ink the outline. -
Add the first row expressions:
For the top row, draw simple dot eyes. Add curved lines for eyebrows—raised for surprise or slanted down for determination. Use a small ‘w’ shape for the mouth attached to the nose. -
Add the second row expressions:
Try varying the eyes here. Maybe wide circles with pupils for an alert look. Make the mouths slightly different, perhaps a straight line or a tiny open ‘o’ for shock. -
Add the third row expressions:
Experiment with different eye shapes, like upside-down ‘u’s for a happy squint. Add little sweat drops or motion lines near the head for extra emotion. -
Sketch the whiskers:
On each cheek, draw two or three straight lines fanning outward. Keep them brisk and confident so they don’t look shaky.
Go Digital
Scan your finished sheet and crop out individual faces to create your own custom sticker pack for messaging apps.
Step 4: Adding Color Accents
-
Color the inner ears:
Take your orange or peach colored pencil and fill in the inner ear shapes. Use a soft, circular motion to get even coverage without harsh scribbles. -
Highlight the noses:
Using the same colored pencil or a slightly darker red-orange shade, fill in the small nose shapes to make them pop. -
Tint the whiskers:
Carefully trace over your black whisker lines with the orange pencil, or draw a second orange line right next to the black one for a stylish, two-tone effect. -
Add cheek flushes:
Lightly dust a tiny circle of orange under the eyes on a few rabbits to give them a blushing or shy appearance.
Now you have a lively reference sheet of bunny emotions ready for your next comic strip or greeting card project
Geometric Rabbit With Facets
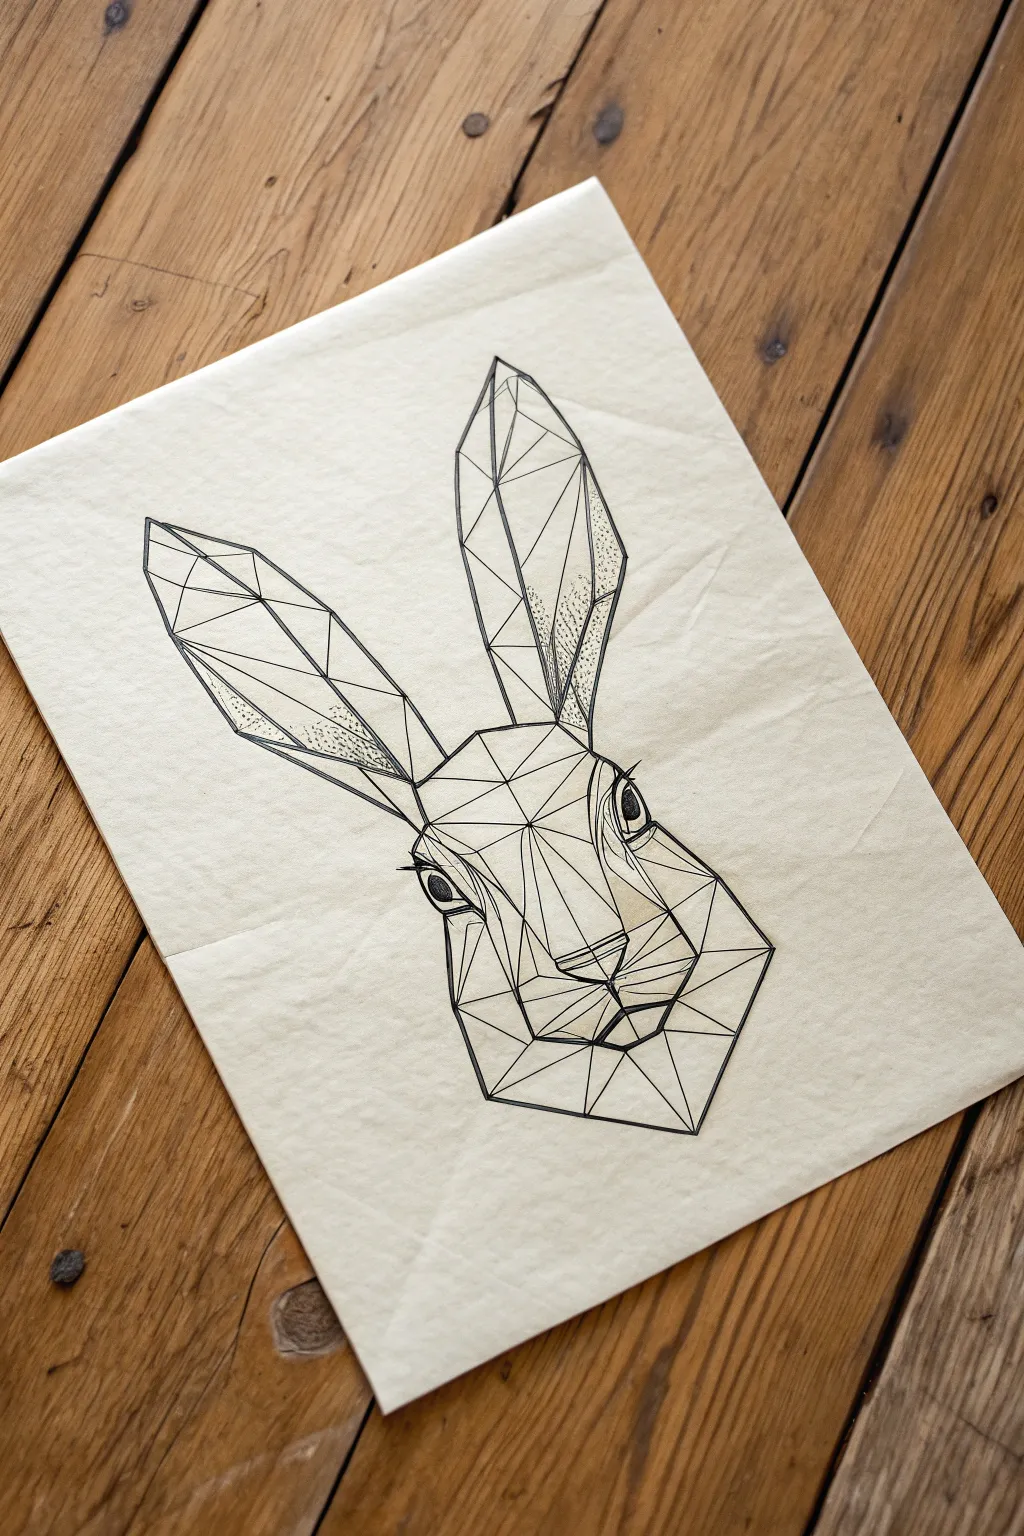
This striking geometric rabbit head combines the charm of low-poly art with traditional ink drawing techniques. By breaking down organic forms into sharp, angular facets, you’ll create a modern and sophisticated illustration perfect for wall art or tote bag designs.
Step-by-Step Tutorial
Materials
- Cream or off-white drawing paper (smooth bristol or mixed media)
- H or HB pencil for sketching
- Fine liner pens (sizes 0.1, 0.3, and 0.5)
- Ruler or straight edge
- Kneaded eraser
- Pencil sharpener
Step 1: Constructing the Framework
-
Establish the centerline:
Begin by lightly drawing a vertical centerline down the middle of your paper. This invisible anchor is crucial for keeping the rabbit’s features symmetrical. -
Map the basic proportions:
Mark the top and bottom limits of the head. Draw a simplified diamond or kite shape to represent the main mass of the head, and add two tall, elongated triangles extending upwards for the ears. -
Refine the ear shapes:
Within your ear triangles, sketch the actual outlines. Notice how the left ear angles outward slightly more than the right one. Keep your lines straight and angular rather than curved. -
Outline the face perimeter:
Using your ruler, define the outer edges of the cheeks and jaw. Instead of smooth curves, use short, straight line segments that connect to form the silhouette. -
Place the features:
Lightly sketch the position of the eyes and the nose. The eyes should sit roughly halfway down the main head shape, set wide apart near the outer edges.
Uneven Facets?
If your triangles look chaotic, try to make all lines meet at specific ‘hub’ points. Avoid having lines end in the middle of a plane; they should always connect corner-to-corner.
Step 2: Creating the Geometry
-
Subdivide the forehead:
Start connecting points between the ears and eyes. Draw triangles that radiate from the center of the forehead outward, visualizing the flatness of the skull. -
Facet the nose bridge:
Draw vertical lines coming down from the forehead towards the nose tip. Break the nose bridge into three or four distinct planes to give it a 3D, chiseled appearance. -
Build the cheek structure:
Connect the outer corner of the eye to the jawline with a large triangle. Then, subdivide this large shape into smaller triangles that suggest the slope of the cheekbones. -
Detail the muzzle:
Around the nose and mouth, create smaller, tighter geometric shapes. These should fan out like a muzzle, giving volume to the mouth area. -
Facet the ears:
Draw a central line up each ear. From this spine, draw angled lines out to the ear edges to create the impression of a fold or a concave shape.
Step 3: Inking and Definition
-
Ink the structural lines:
Switch to your 0.5 fine liner. Carefully go over the main structural lines of the design—the outline of the head, the ears, and the major internal divisions. Use a ruler if your hand isn’t perfectly steady. -
Add secondary lines:
With a 0.3 pen, ink the smaller internal facets, such as the details around the nose and the smaller connections on the cheeks. -
Deepen the eyes:
Draw the almond shapes of the eyes. Fill in the pupils solidly with black ink, leaving a tiny white fleck for a highlight to bring the rabbit to life. -
Stipple shading basics:
Grab your 0.1 pen. I prefer to start shading inside the ears first. Add tiny dots (stippling) near the base and inner folds of the ears to create depth without solid blocks of black. -
Add texture to the ears:
Continue stippling along the lower outer edges of the ears. Concentrate the dots heavily near the line art and let them fade out as they move inward. -
Shade the face facets:
Select specific facets that would be in shadow—usually those under the brow or near the jaw. Add light stippling or very fine hatching lines to these areas to differentiate the planes. -
Define the nose:
Add a few tiny dots on the nose planes to distinguish them from the white paper, but keep this very subtle.
Pro Tip: Line Weight
Use the thickest pen ONLY for the outermost silhouette and the main centerline. This forces the viewer’s eye to process the shape as a coherent volume rather than a flat spiderweb.
Step 4: Final Touches
-
Erase pencil marks:
Once you are absolutely certain the ink is dry, gently roll your kneaded eraser over the entire drawing to lift the graphite guidelines. -
Reinforce key intersections:
Look at where multiple lines meet (vertices). Use your 0.5 pen to slightly thicken these connection points, which makes the geometry feel more solid and structural. -
Final assessment:
Step back and check the balance. If one side feels too light, add a touch more stippling to balance the visual weight.
Now you have a sophisticated geometric hare illustration that looks impressively complex.
Rabbit Silhouette With Night Sky Fill
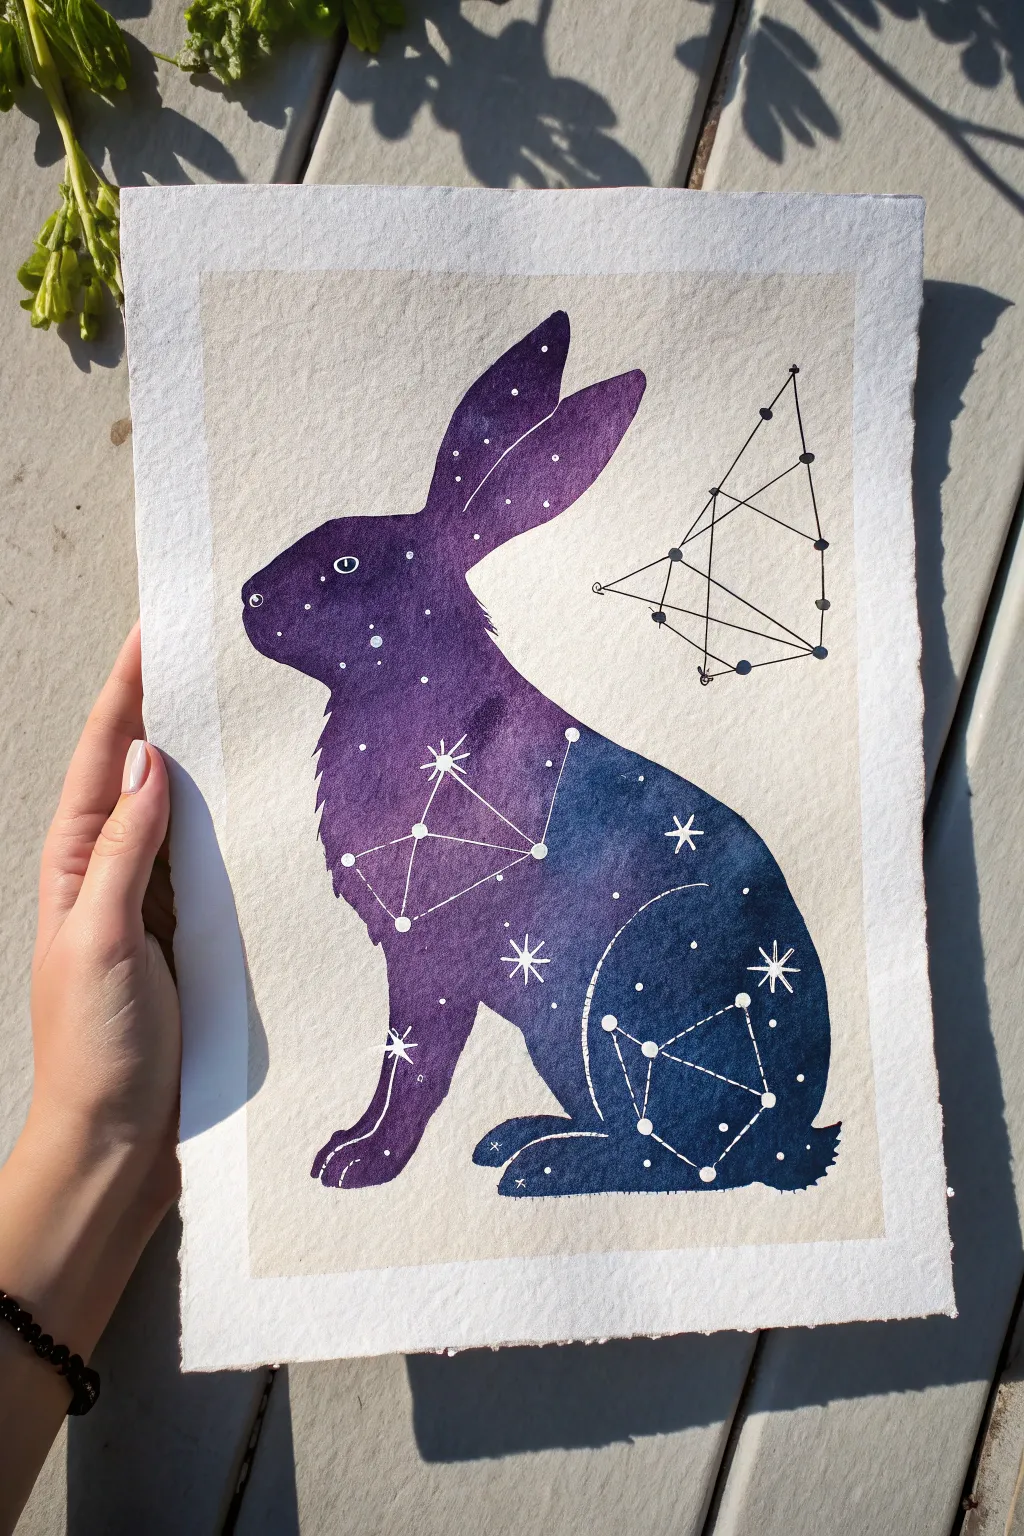
Capture the mystic beauty of the cosmos within a simple rabbit shape using watercolor wet-on-wet techniques. This project blends deep indigo and violet hues with delicate white ink details to create a starry night sky effect.
Step-by-Step
Materials
- Cold press watercolor paper (300 gsm)
- Watercolor paints (Indigo, Violet, Purple, Black)
- Pencil (HB or H)
- Kneaded eraser
- Masking tape
- Round watercolor brushes (Size 4 and 8)
- White gel pen or white gouache with a fine liner brush
- Paper towels
- Two jars of water
- Ruler (optional for constellations)
Step 1: Preparation and Sketching
-
Tape the edges:
Secure your watercolor paper to a board or table using masking tape along all four edges. This creates a clean white border and prevents buckling when the paper gets wet. -
Sketch the silhouette:
Lightly draw the outline of a sitting rabbit. Focus on the large ears pointing back and the curve of the back. Keep your pencil lines very faint so they won’t show through the darker paint later. -
Refine the shape:
Check the proportions of the paws and the tail. Use your kneaded eraser to lift any heavy graphite, leaving just a ghost of the outline to guide you.
Step 2: Painting the Galaxy Wash
-
Prepare your palette:
Mix puddles of your colors beforehand. You’ll need a vibrant purple, a deep violet, and a dark indigo blue. Make sure you have enough paint mixed to cover the whole shape without stopping. -
Wet the inside:
Using a clean brush and clear water, carefully paint the entire inside of the rabbit silhouette. The paper should be glistening but not forming puddles. Be very precise with the edges. -
Drop in the purple:
While the paper is still wet, load your brush with purple paint. Touch it to the head and ears of the rabbit, letting the color bloom naturally. -
Transition to blue:
Clean your brush slightly and pick up the indigo. Apply this to the lower body and back legs. Allow the blue to touch the purple edge so they bleed together softly. -
Deepen the shadows:
Drop darker pigment—maybe even a touch of black mixed with indigo—into the bottom curves of the rabbit and the tips of the ears to create depth and a ‘night sky’ feel. -
Refine the edges:
Before it dries, use a smaller damp brush to neaten the perimeter if paint has strayed, or to push paint right to your pencil line for a sharp silhouette. -
Let it dry completely:
Wait for the paint to become bone dry. The paper must be flat and cool to the touch. The ‘wet’ sheen should be totally gone.
Uneven Drying?
If you get ‘cauliflower’ blooms in the paint, don’t panic. These textures actually look like nebulas and enhance the galaxy effect perfectly.
Step 3: Adding Celestial Details
-
Map out constellations:
Using a white gel pen or fine brush with white gouache, draw small dots where the ‘stars’ of your constellations will be. I like to place a major constellation on the main body of the rabbit. -
Connect the stars:
Draw thin, straight lines connecting your main star dots to form geometric constellation patterns. A ruler can help if your hand isn’t steady. -
Add bright stars:
Draw a few larger 4-point or 8-point stars scattered in the darker areas of the paint to make them pop. -
Sprinkle distant stars:
Dot the rest of the rabbit’s body with tiny white specks. vary the density—some areas can be star-clusters, others can be sparse. -
Define the eye and ear:
Draw a simple almond shape for the eye and a tiny dot for the pupil. Add a few small dots inside the ear to suggest depth. -
Add external elements:
To balance the composition, draw a simple geometric constellation floating in the empty space outside the rabbit, using black fine liner ink. -
Reveal the border:
Once all ink is dry, slowly peel away the masking tape at a 45-degree angle to reveal your crisp white edges.
Level Up: Metallic Touch
Swap the white gel pen for metallic gold or silver ink for the constellation lines. It adds a magical shimmer when the light hits the artwork.
Now you have a stunning piece of cosmic art that brings a touch of magic to your wall


Have a question or want to share your own experience? I'd love to hear from you in the comments below!