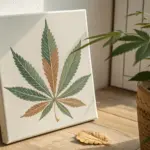
Palm trees are basically the perfect subject when you want something instantly recognizable and super satisfying to paint. Here are my favorite palm tree painting ideas—starting with the classics and easing into some playful, unexpected twists.
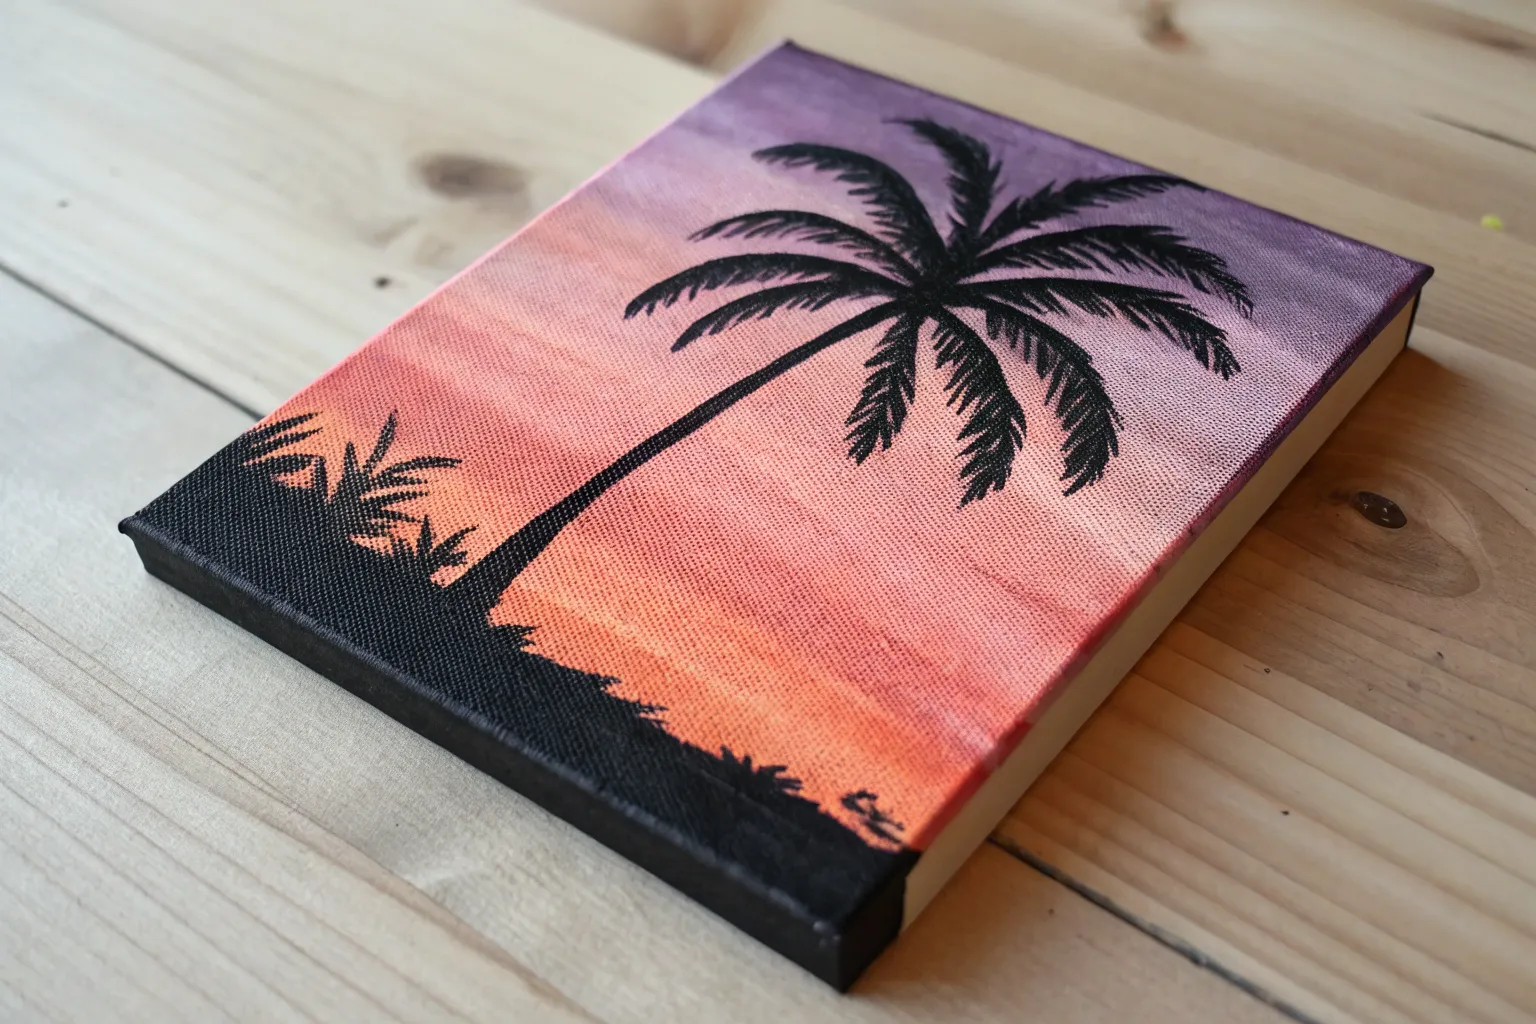
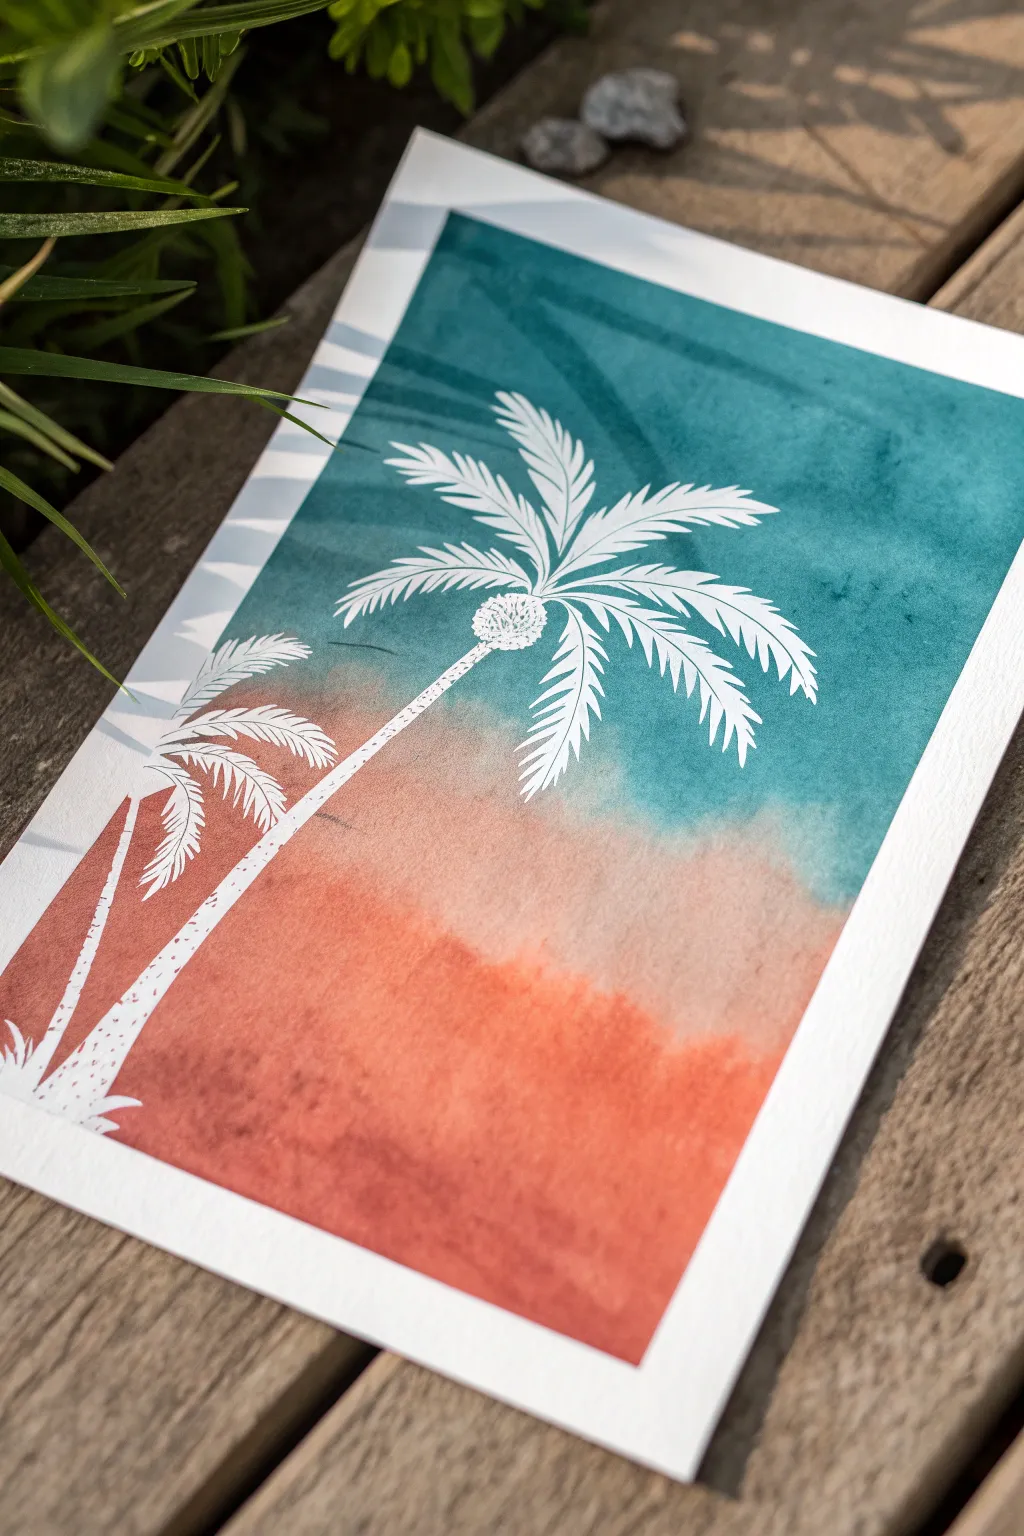
Sunset Silhouette Palm Tree
Capture the serene beauty of a tropical evening with this vibrant watercolor and ink artwork. Contrasting a blazing sunset gradient with the stark, intricate details of a palm silhouette creates a stunning depth that feels like a window to paradise.
How-To Guide
Materials
- Cold-press watercolor paper (300 gsm or heavier)
- Watercolor paints (Purple, Rose/Pink, Peach, Cadmium Orange, Yellow)
- Black waterproof fine liner pens (sizes 0.1, 0.3, and 0.5)
- Black India ink or black gouache
- Flat wash brush (1 inch)
- Round brushes (size 4 and size 0)
- Masking tape or board for securing paper
- Paper towels
- Jars of clean water
Step 1: Painting the Sunset Sky
-
Prepare the paper:
Begin by taping your watercolor paper down to a board if it isn’t in a block. This prevents buckling when we add water. Use a clean flat brush to evenly wet the entire paper surface with clean water for a wet-on-wet technique. -
Apply the top gradient:
While the paper is glistening but not puddling, load your brush with a dusty purple. Apply this to the top third of the paper, letting it diffuse downward naturally. -
Blend in warm tones:
Rinse your brush and pick up a vibrant rose or pink hue. Paint just below the purple, allowing the edges to softy merge on the wet paper. I find gently titling the board helps blend these transitions seamlessly. -
Create the horizon glow:
Move lower into peach and cadmium orange tones, intensifying the warmth as you go down. Finally, blend a bright yellow near the horizon line to simulate the setting sun’s last light. -
Lift out clouds:
Before the paint dries completely, use a slightly damp, clean brush or a twist of paper towel to gently lift pigment in horizontal streaks. This creates the soft, wispy clouds catching the light in the middle sky. -
Add reflection:
Paint a very faint wash of light blue-grey mixed with a touch of the orange at the very bottom for the water, leaving a few white specs for sparkle on the waves. -
Let it dry completely:
This is crucial. The paper must be bone-dry before you start the silhouette work to ensure crisp, sharp lines. You can use a hairdryer on a low setting to speed this up.
Bleeding Lines?
If your ink lines are feathering or spreading spider-web style, the paper isn’t dry enough. Stop immediately and wait another 10-15 minutes or use a hair dryer.
Step 2: Inking the Silhouette
-
Draft the trunk:
Lightly sketch the curve of the main palm trunk with a pencil if needed. Position it slightly off-center for a dynamic composition, having it lean slightly into the frame. -
Paint the trunk base:
Using black India ink or gouache and a small round brush, paint the trunk. Make the base wider and textured, gradually tapering as you go up. Use short, horizontal dabs to mimic the rough bark texture. -
Establish the frond structure:
Switch to your 0.5 pen or a very fine brush. Draw the central spines (rachis) of the palm fronds exploding outward from the top of the trunk in a starburst pattern. Curve them gracefully downward at the tips. -
Add the leaflets:
Using a 0.3 pen, draw the individual leaflets hanging from each spine. Use quick, flicking strokes that start at the spine and taper out. Ensure the leaflets on dominant fronds overlap the ones behind them. -
Detail the crown:
Darken the center where all fronds meet. Add a few short, messy strokes here to represent old, dead growth or seed pods typically found at the heart of the palm. -
Add distant palms:
On the right side near the horizon, paint tiny silhouettes of smaller palm trees using your smallest brush or 0.1 pen. Keep these extremely simple and much smaller than the main tree to create a sense of scale and distance. -
Ground the scene:
Paint a dark, uneven strip across the bottom right to represent the shoreline or grassy dune. Use a stippling motion to suggest sandy texture and vegetation. -
Final foliage details:
Use fine pen strokes to add spiky grass blades rising from the dark dune at the bottom. These should overlap the base of the main tree slightly to settle it into the landscape.
Sun-Kissed Effect
After the ink is dry, use a white gel pen to add tiny highlights on trailing palm leaves or water ripples, mimicking the last hit of sunlight.
Step back and enjoy the warmth of your personal sunset masterpiece


Classic Beach With Layered Bands
Capture the serenity of a quiet beach with this layered watercolor landscape featuring a prominent, leaning palm tree. By building up washes for the sky and sea before adding crisp details, you’ll create a sense of depth and gentle movement.
Detailed Instructions
Materials
- Cold press watercolor paper (140lb/300gsm)
- Watercolor paints (Turquoise, Cerulean Blue, Burnt Umber, Sap Green, Yellow Ochre, Burnt Sienna)
- Masking tape
- Pencil (HB or 2H)
- Round brushes (size 4, size 8, and a rigger/liner brush)
- Flat wash brush (3/4 inch)
- Clean water jars
- Paper towels
Step 1: Sketching and Sky
-
Tape your borders:
Begin by taping down all four edges of your watercolor paper to a board. This not only keeps the paper flat while wet but creates that crisp, professional white border seen in the final piece. -
Establish the horizon:
Lightly sketch a horizontal line about one-third up from the bottom for the horizon. Below this, draw a curved diagonal line sloping down from left to right to mark the beach’s edge. -
Sketch the main palm:
Draw the trunk of the main palm tree leaning significantly to the left. It should start in the foreground and extend well above the horizon. Sketch the radiating shapes of the fronds loosely—don’t worry about individual leaves yet. -
Add background elements:
On the far left, sketch two smaller, distant palm trees and some low shrubbery shapes along the shoreline. -
Wash the sky:
Using your flat brush and a diluted mix of Cerulean Blue, paint the upper sky. Leave irregular horizontal gaps of white paper to suggest soft, drifting clouds. Fade the color out as you approach the horizon line. -
Add subtle clouds:
While the sky is still slightly damp, drop in very faint horizontal streaks of watered-down Burnt Sienna or warm grey near the horizon and cloud bottoms to give them volume.
Fixing Muddy Colors
If your sand and water bleed together, stop immediately. Wait for the paper to be bone dry. Then, gently lift the error with a damp, clean brush or paint over it with opaque white gouache.
Step 2: Ocean and Sand
-
Paint the ocean gradient:
Mix a vibrant Turquoise. Start at the horizon line with a strong color and pull it downwards. As you get closer to the shore, water down the mix significantly to create a transparent, aquamarine shallow water effect. -
Create whitecaps:
Leave thin, unpainted white strips in the water near the shore. These negative spaces act as the foamy crests of the waves rolling onto the sand. -
Base layer for the sand:
Mix Yellow Ochre with a tiny touch of Burnt Sienna. Apply a light wash to the beach area. Let the color pool slightly darker near the bottom right to suggest shadow and variation in the terrain. -
Deepen the water:
Once the first water layer is dry, use a size 8 brush to add a second, deeper layer of Turquoise just under the white wave crests. This layering gives the water dimension and translucency.
Step 3: Foliage and Details
-
Textured foreground:
Mix Sap Green with a little Burnt Umber. Using a stippling motion (tapping the brush tip), paint the grassy shrubs at the base of the tree and along the left edge. Vary the green intensity to show light and shadow. -
Paint the trunk:
Use Burnt Umber for the main palm trunk. Instead of a solid line, paint horizontal, slightly curved strokes stacked on top of each other. This mimics the segmented texture of the bark. Darken the right side of the trunk for shadow. -
Detail the frond spines:
Switch to a smaller round brush. With dark Sap Green, paint the central spine of each palm frond, following your initial sketch lines. Make sure they curve gracefully under their own weight. -
Add the leaves:
Using a rigger or a fine-tipped round brush, flick quick strokes outward from each spine to create the individual leaflets. Ensure the paint is fairly dry so the strokes remain crisp and distinct. -
Vary the greens:
I like to layer a slightly browner or yellowish green over the top of some fronds to suggest sun-bleached or dried leaves mixed in with fresh growth. -
Background palms:
Paint the two smaller palms on the left using simplified shapes and lighter, more muted greens. This atmospheric perspective helps push them into the distance. -
Final shadows and roots:
Add a few small, dark strokes at the base of the main tree to suggest exposed roots. Add a small aloe vera-like plant in the immediate foreground with sharp, upward strokes of cool green.
Add Some Texture
Splatter clean water or salt onto the damp sand area while it’s drying. This creates natural blooms that look remarkably like textured sand and pebbles without needing to paint every grain.
Peel off the tape carefully to reveal your crisp edges and enjoy your slice of tropical paradise


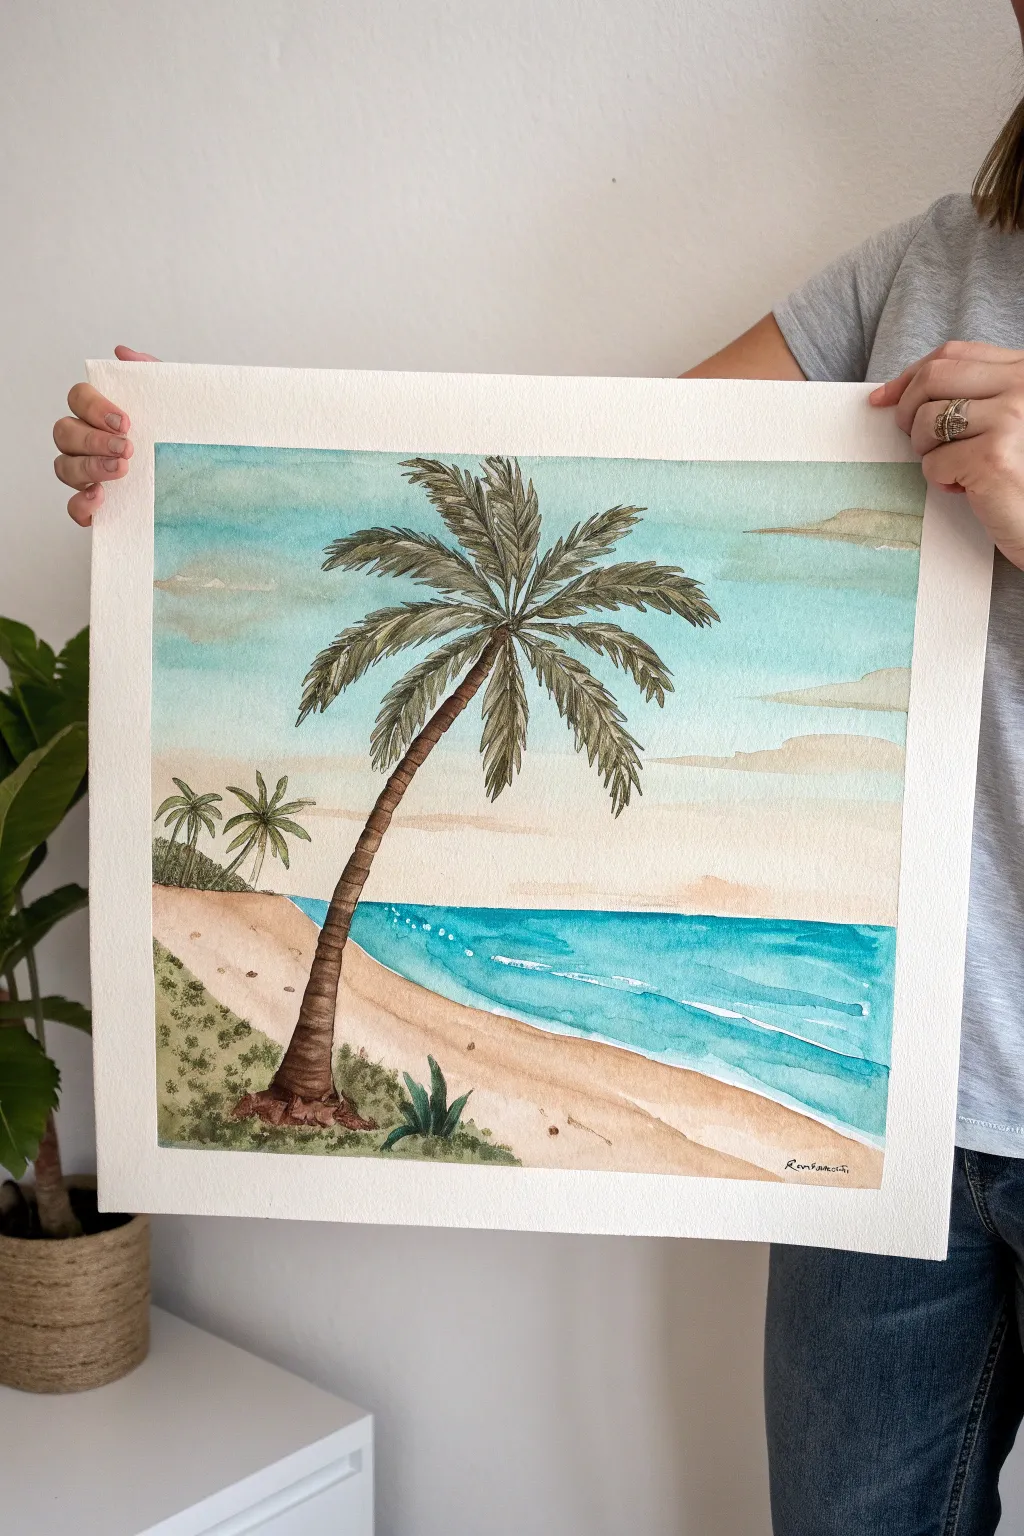
Palm Trees Framing the Ocean

Capture the serene beauty of a tropical shoreline with this delicate watercolor painting featuring two leaning palm trees. Using soft washes and textured paper, you’ll create a breezy, light-filled artwork that brings the ocean atmosphere right into your home.
Step-by-Step Tutorial
Materials
- Cold press watercolor paper (300 gsm)
- Watercolor paints (Cerulean Blue, Sap Green, Burnt Umber, Yellow Ochre, Paynes Gray)
- Round brushes (sizes 2, 4, and 8)
- Pencil (HB) and eraser
- Masking tape
- Drawing board
- Jar of clear water
- Paper towels
Step 1: Planning and Sky
-
Prepare the paper:
Begin by taping your watercolor paper securely to a board. This keeps the paper flat and creates a clean white border around your painting, similar to a mat. -
Sketch the composition:
With a gentle hand, lightly sketch the horizon line about one-third up from the bottom. Draw the trunks of two palm trees growing from the foreground, gently curving toward the right. -
Outline the foliage:
Lightly indicate the general shape of the palm fronds and the grassy dune where the trees are rooted. Keep these lines faint so they disappear under the paint later. -
Paint the sky:
Mix a very dilute wash of Cerulean Blue. Using your largest round brush, paint the sky area, leaving some white spaces for clouds. While the paint is still wet, you can lift out soft cloud shapes with a clean, damp tissue. -
Add distant clouds:
For the lower sky near the horizon, mix a faint purple-grey using a touch of Paynes Gray and blue. Dab this loosely along the horizon to suggest fluffy cumulus clouds rising above the water.
Natural Frond Movement
Don’t paint every frond perfectly straight. Let old fronds droop heavily downward and new ones point sharply up to mimic a palm’s natural growth cycle.
Step 2: Ocean and Sand
-
Identify the water line:
Wait for the sky to dry completely. Define the horizon line firmly with a straight mix of Cerulean Blue and a tiny touch of green for a turquoise tint. -
Wash the ocean:
Pull the turquoise color down towards the shore, diluting it with more water as you get closer to the sand to replicate the shallow water transparency. I like to leave thin strips of white paper unpainted to represent braking waves. -
Paint the sand:
Mix Yellow Ochre with a tiny bit of Burnt Umber for a warm sand color. Apply this wash to the beach area below the water, overlapping slightly with the dry blue edge to create a soft shoreline transition. -
Add shoreline shadows:
While the sand is slightly damp, drop in a slightly darker brown mix near the bottom right to suggest the shadow of the unseen dune or vegetation.
Step 3: Palms and Details
-
Base the trunks:
Using a size 4 brush and a watery mix of Burnt Umber, paint the long, curved trunks. Let the paint pool slightly in some segments to create natural variations. -
Texture the bark:
Once the trunks are dry, use a thicker mix of Burnt Umber and Paynes Gray. Paint small horizontal rings up the trunk to mimic the segmented bark of a coconut palm. -
Paint the fronds:
Switch to your size 2 brush. Mix Sap Green with a little brown for an earthy green. Starting from the center of the crown, flick the brush outwards to create the spine of each frond. -
Add leaves:
Along each spine, paint quick, short strokes to create the individual leaflets. Vary the color by adding more yellow for sunlit fronds and more blue-green for shaded ones. -
Foreground grasses:
At the base of the trees, use swift upward strokes with mixed greens to paint tufts of dune grass. This grounds the composition and adds depth. -
Final touches:
Add tiny details like coconuts under the fronds or distant landmasses on the horizon using a very faint grey-blue mix. -
Remove tape:
Wait until the painting is bone dry. Peel the masking tape away slowly at a 45-degree angle to reveal your crisp white edges.
Fixing Hard Edges
If your ocean horizon line looks too sharp or dark against the sky, soften it with a damp, clean brush while the paint is still slightly tacky to blend it out.
Frame your new seascape in a simple mount to emphasize the delicate colors and enjoy your view of paradise


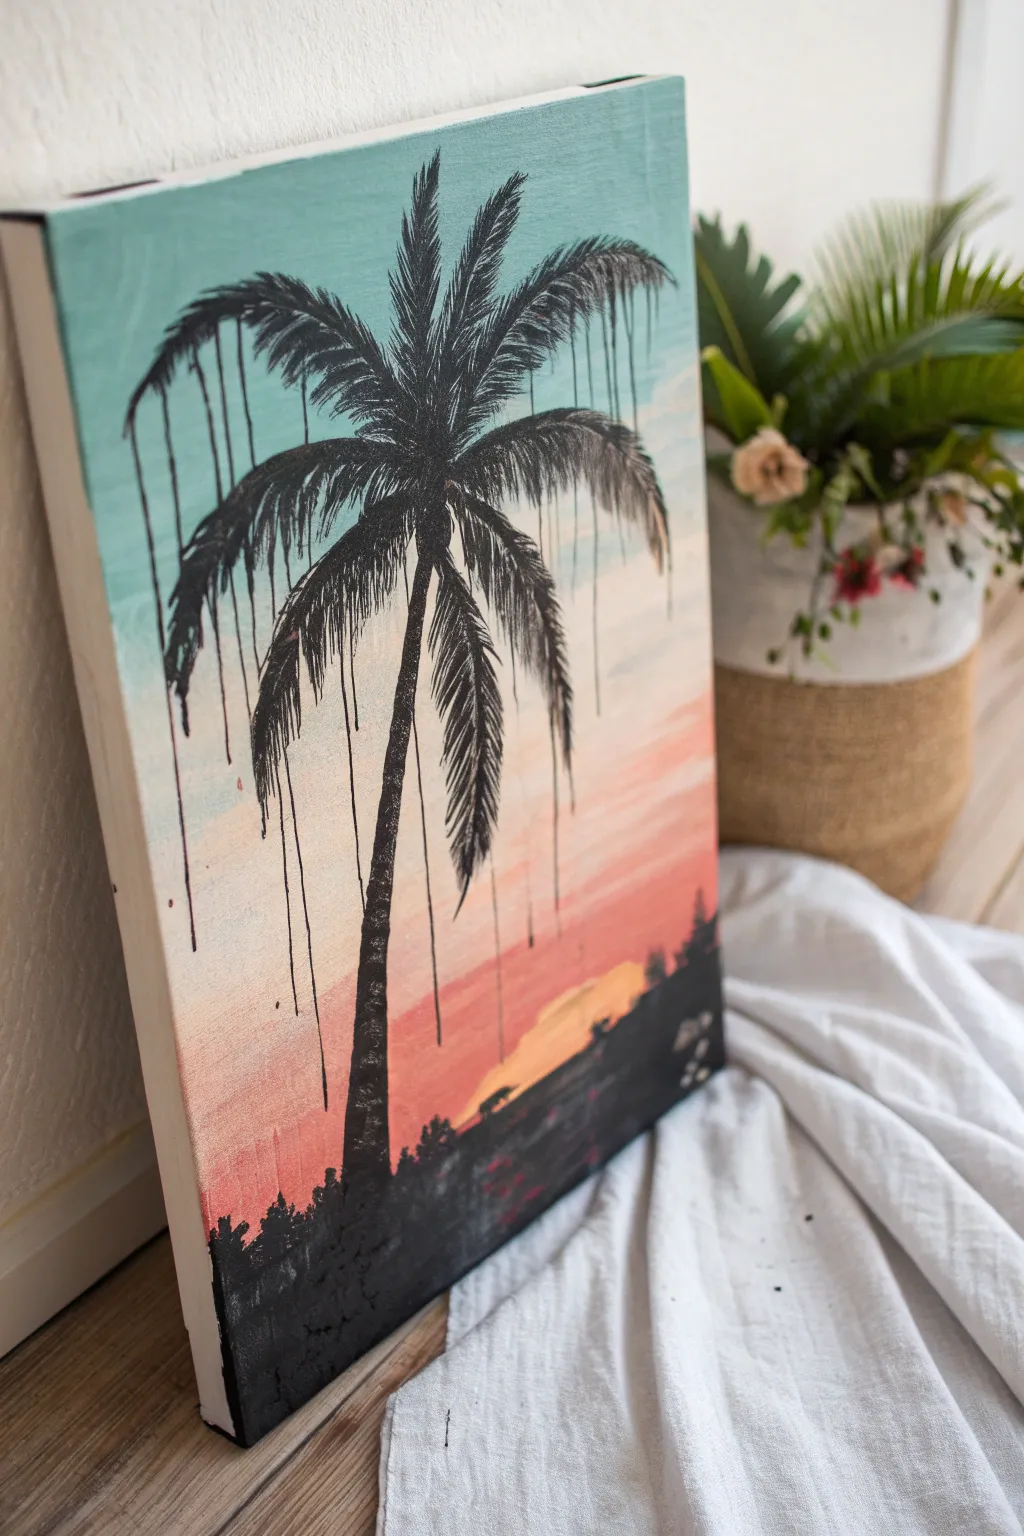
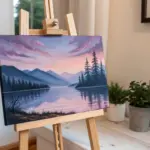
Moonlit Palm Reflection Scene
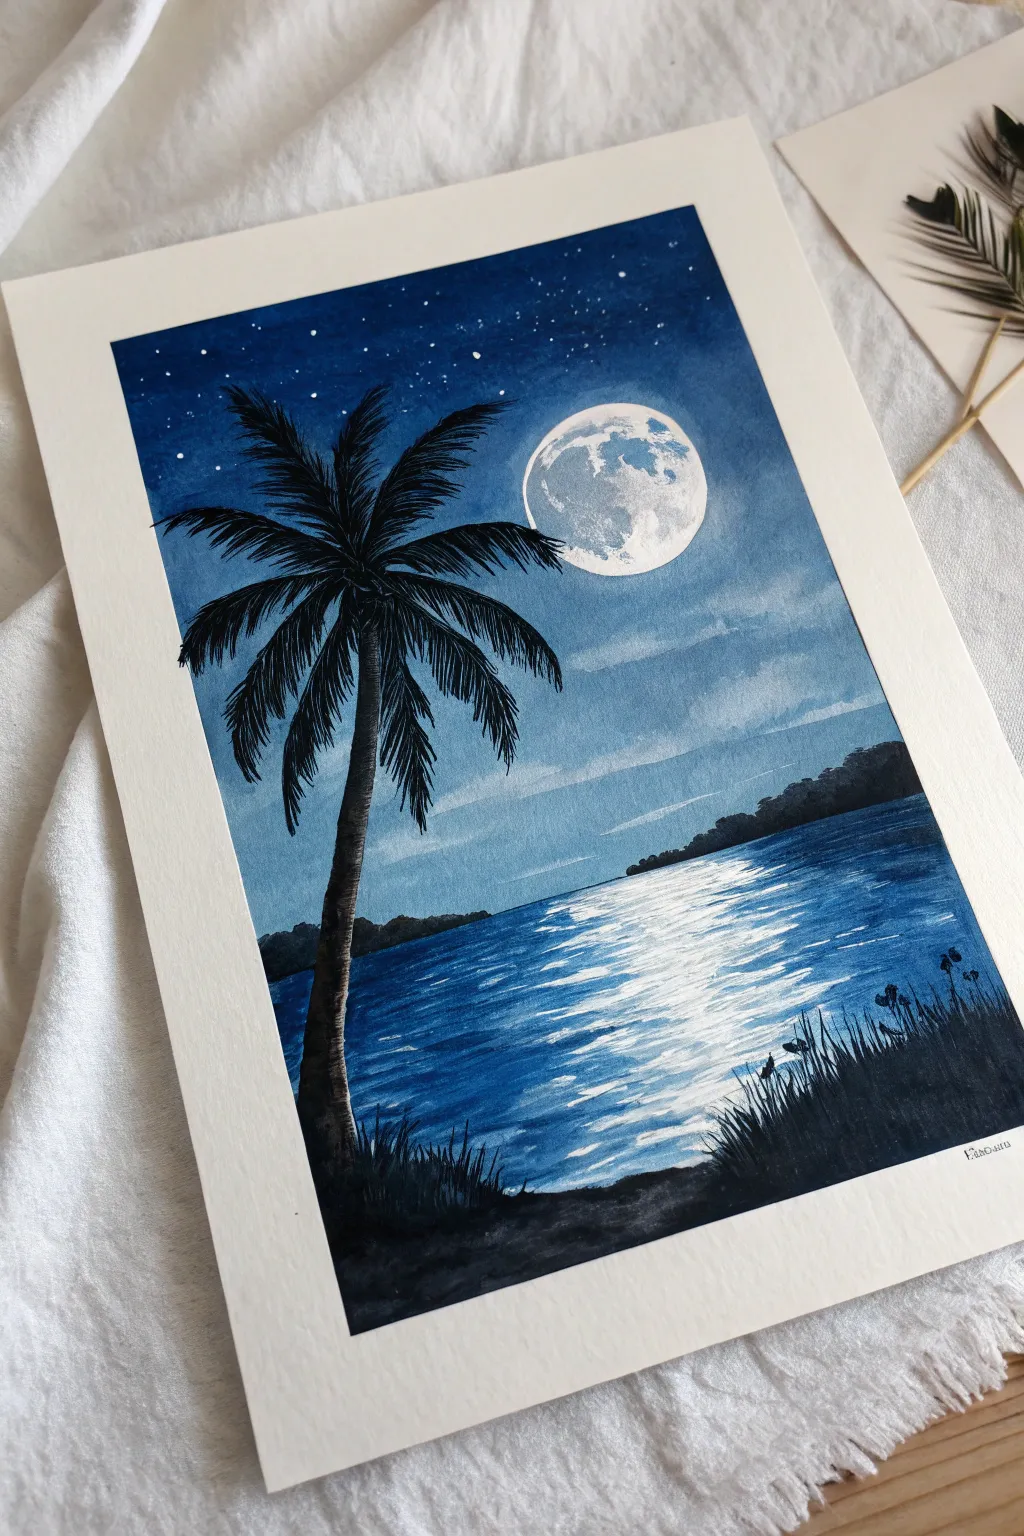
Capture the serene beauty of a tropical night with this moody watercolor painting. You’ll master smooth gradient washes for the sky and create striking contrast with a bold palm tree silhouette against a glowing moon.
Step-by-Step
Materials
- Cold Press Watercolor Paper (300gsm)
- Watercolor Paints (Indigo, Prussian Blue, Black, White Gouache or heavy body acrylic)
- Masking Tape
- Flat Wash Brush (3/4 inch)
- Round Brushes (Size 6 and Size 2 or 0 for details)
- Pencil and Eraser
- Paper Towels
- Main water jar and rinsing jar
Step 1: Preparation and Sketching
-
Secure the paper:
Tape down all four edges of your watercolor paper to a board using masking tape. This creates a clean white border and prevents buckling when the paper gets wet. -
Sketch the layout:
Lightly sketch the horizon line about one-third up from the bottom. Draw a circle for the moon in the upper right quadrant. Gently outline the trunk of the palm tree on the left side, curving slightly. -
Mask the moon:
Carefully paint around your moon circle with clear water or masking fluid if you have it. If using just water, be very mindful in the next steps not to let blue paint bleed into this dry circle.
Uneven Sky?
If your sky gradient looks streaky, re-wet the entire sky area gently with a clean, damp large brush and smooth it out. Do this before adding stars or the tree.
Step 2: Painting the Sky and Moon
-
Mix your blues:
Prepare a deep, saturated mix of Indigo and a touch of Black for the top of the sky. Prepare a lighter Prussian Blue for the mid-sky, and a very watery, pale blue for the horizon area. -
Apply the dark sky:
Start at the very top of the paper with your darkest Indigo mix. Use a flat wash brush and broad horizontal strokes. -
Create the gradient:
As you move down, switch to the Prussian Blue, blending it seamlessly into the dark top edge. Add water to your brush as you approach the horizon to fade the color out, keeping it very light near the distant hills. -
Paint the moon details:
Once the sky is dry, wet the moon circle slightly. drop in very faint grey-blue shadows to create craters and texture, leaving bright white spaces for the glow. -
Add stars:
Cover the bottom part of your painting with a scrap paper.Load a small brush with white gouache and tap it against another brush handle to splatter tiny stars across the dark upper sky.
Level Up
Use a toothbrush specifically for the stars step. The bristles create a much finer, more realistic ‘distant galaxy’ mist compared to tapping a regular paintbrush.
Step 3: The Ocean and Reflection
-
Establish the horizon line:
Using a horizontal stroke, paint the distant land silhouette on the horizon line using a mix of Indigo and a little Black. Keep the top edge slightly bumpy to suggest trees. -
Base layer for water:
Paint the water using horizontal strokes of Prussian Blue. Leave the center area under the moon almost white, dragging dry brush strokes of blue into it from the sides. -
Deepen the water:
Add darker Indigo strokes to the left and right corners of the water, creating depth. Keep the middle section bright. -
Paint the moon reflection:
Using thick white gouache and a small round brush, paint zig-zag horizontal lines down the center of the water. Make the strokes wider as they come closer to the foreground to mimic rippling light.
Step 4: Silhouettes and Foreground
-
Paint the palm trunk:
Using a concentrated Black watercolor (or black gouache for opacity), paint the trunk of the tree. Make it wider at the base and slightly thinner as it reaches the fronds, adding texture to the edges. -
Add the palm fronds:
Switch to your smallest liner or detail brush. From the center point of the tree top, paint long, arching lines outward. From these main spines, flick quick, feathery strokes downward to create the leaves. -
Create the foreground land:
Paint the bottom foreground area solid black. Use upward flicking motions with a small brush to create different heights of grass blades sticking up against the water. -
Detail the grass:
Add a few distinct, taller grass stalks on the right side, perhaps adding tiny seed heads for visual interest. -
Final touches:
Check your white reflection; if the blue has dulled it, add one final layer of crisp white highlights on the water’s surface. -
Remove the tape:
Wait until the painting is 100% dry. Peel the tape away slowly at a 45-degree angle to reveal your crisp white border.
Frame your tropical night scene and enjoy the calming atmosphere it brings to your space
BRUSH GUIDE
The Right Brush for Every Stroke
From clean lines to bold texture — master brush choice, stroke control, and essential techniques.
Explore the Full Guide
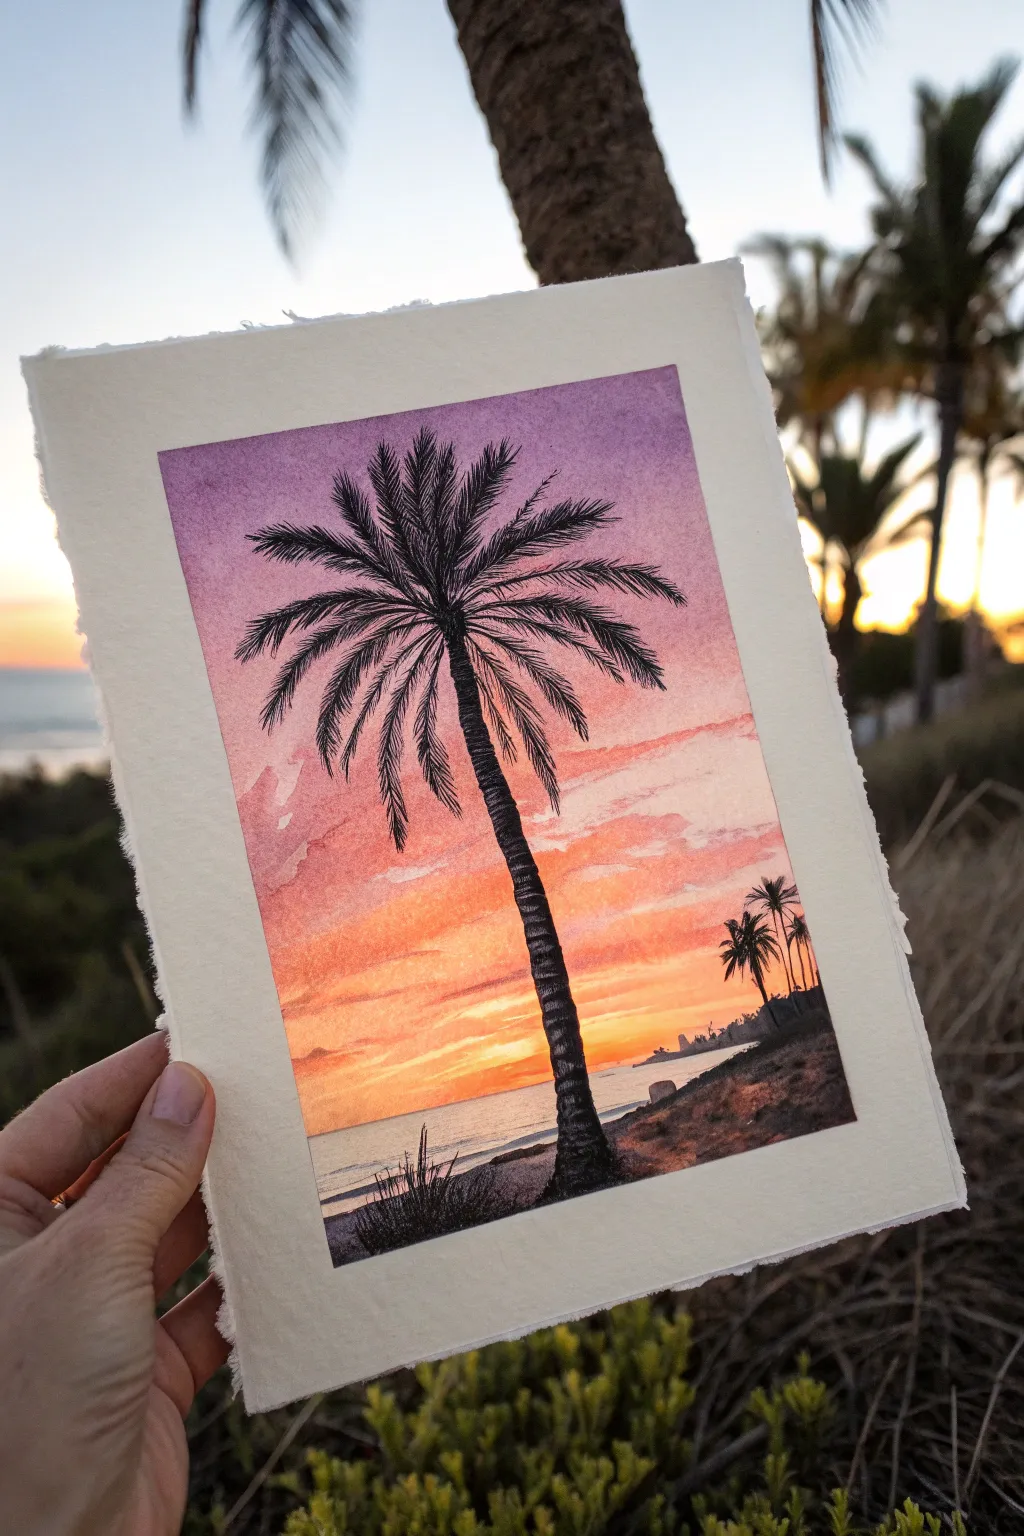
Cotton-Candy Sky Palm Tree
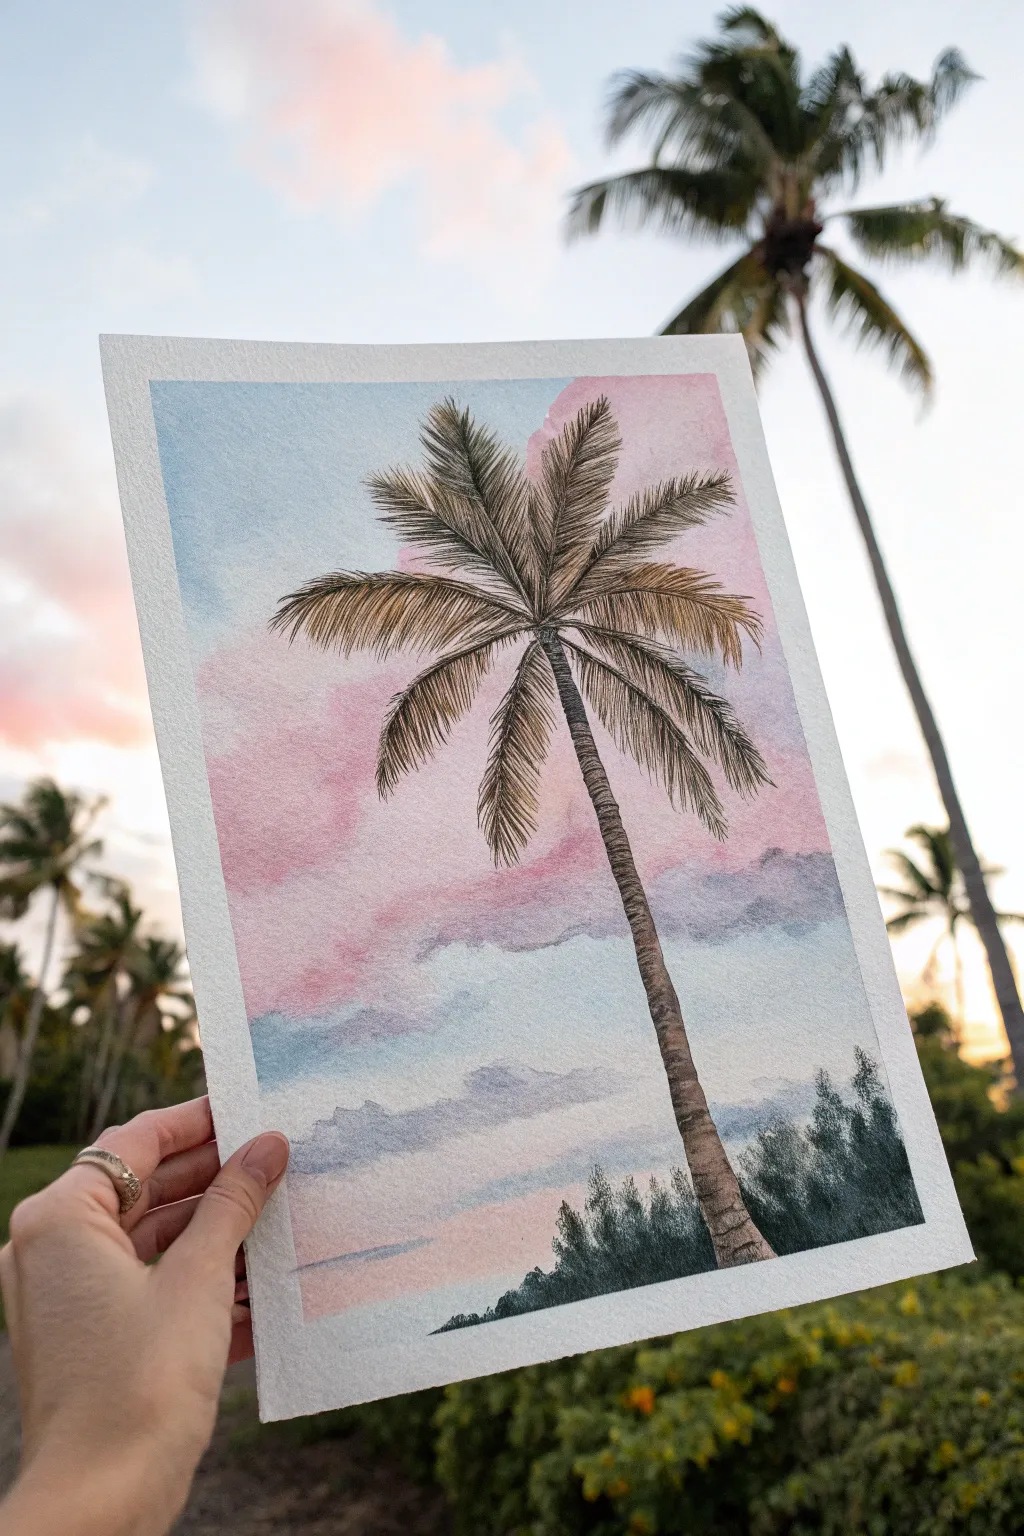
Capture the fleeting magic of a tropical sunset with this dreamy watercolor project. By blending soft pastel pinks and airy blues, you’ll create a glowing backdrop for a striking, detailed palm silhouette.
Step-by-Step Guide
Materials
- Cold press watercolor paper (140 lb/300 gsm)
- Painter’s tape or masking tape
- Watercolor paints (Alizarin Crimson, Cerulean Blue, Ultramarine Blue, Burnt Umber, Sap Green, Paynes Grey)
- Round watercolor brushes (Size 12 for wash, Size 6 for details, Size 0 or 00 for fine lines)
- Pencil (HB) and kneaded eraser
- Two jars of water
- Paper towels
- Micron pen or fine liner (optional, for extra texture)
Step 1: Setting the Scene
-
Secure your canvas:
Tape down all four edges of your watercolor paper to a hard board using painter’s tape. This creates that crisp, clean white border seen in the photo and prevents the paper from buckling under heavy washes. -
Sketch the silhouette:
Lightly sketch the placement of your main palm tree. Draw a slightly curved line for the trunk, extending about three-quarters up the page. Mark a small dot where the fronds will radiate from, but keep the pencil lines very faint so they do’t show through the sky. -
Prepare the palette:
Mix your sky colors before wetting the paper. You’ll need a watery Cerulean Blue and a soft, diluted mix of Alizarin Crimson to get that perfect cotton-candy pink. Keep them separate to avoid making purple just yet.
Step 2: Painting the Cotton-Candy Sky
-
Wet-on-wet technique:
Using your large size 12 brush, apply a clean layer of water across the entire sky area, stopping just above the bottom tree line area. The paper should glisten but not have puddles. -
Apply the blue:
Drop in the Cerulean Blue at the top left and bottom right corners. Let the paint bloom and spread organically. Use gentle strokes to pull the color lightly toward the center, leaving plenty of white space. -
Add the pink clouds:
While the paper is still damp, introduce your diluted pink into the white spaces and slightly overlapping the blue areas. Allow the colors to touch naturally; the water will do the blending work for you. -
Deepen the clouds:
Mix a tiny touch of Paynes Grey with your pink to create a muted lavender-grey. Dab this beneath the pink areas to imply shadow and volume in the clouds. Keep edges soft. -
Let it dry completely:
This is crucial. The paper must be bone dry before you start the palm tree, or the sharp lines will bleed into the sky. You can use a hairdryer on a low setting if you’re impatient.
Brush Control Pro-Tip
For realistic palm fronds, hold your brush near the end of the handle. This loosens your wrist and naturally creates those erratic, whisper-thin lines needed for the leaves.
Step 3: Detailing the Palm Tree
-
Paint the trunk foundation:
Mix Burnt Umber with a touch of Paynes Grey. Using the size 6 brush, paint the trunk following your pencil line. I like to lift my brush slightly as I move up to simulate the tapering width. -
Texture the bark:
Once the base trunk layer is tacky but not wet, use a darker concentration of the brown/grey mix. Paint small, horizontal curved lines along the trunk to create the segments and rough texture characteristic of palm bark. -
Structure the fronds:
Switch to a darker mix of Sap Green and Burnt Umber. Draw the main ‘spines’ of the palm fronds radiating from the center point. Make sure some curve upward and others droop heavily downward to look realistic. -
Add the leaflets:
This requires patience. Using your smallest detailing brush or a fine liner, paint the individual leaflets coming off the main spines. Use quick, flicking motions outward. -
Layering the foliage:
Vary your greens. Use a yellowish-green for the top fronds catching the light, and a deep, almost black-green for the lower, shadowed fronds. Overlap the strokes to build density.
Troubleshooting: Muddy Sky
If your pink and blue mix into a dull grey, your paper was likely too wet or you overworked the blend. Next time, place colors side-by-side and let water merge them, rather than scrubbing.
Step 4: Finishing Touches
-
Paint the lower tree line:
Mix a very dark green using Sap Green and Paynes Grey. Paint the distant tree line at the bottom of the paper. Use rough, vertical dabbing motions to suggest the jagged tops of trees. -
Blend the bottom:
While the bottom tree line is wet, soften the bottom edge slightly so it fades into the painting, grounding the scene without drawing too much attention away from the main palm. -
Final highlights:
If the trunk looks too flat, use a slightly damp, clean brush to lift a tiny line of paint on the left side of the trunk, suggesting reflected light. -
The reveal:
Wait for the entire painting to be completely dry to the touch. Carefully peel away the painter’s tape at a 45-degree angle, pulling away from the artwork to reveal your crisp borders.
Frame your tropical masterpiece or gift it to bring a slice of paradise to someone’s home.
Lonely Leaning Palm on One Side
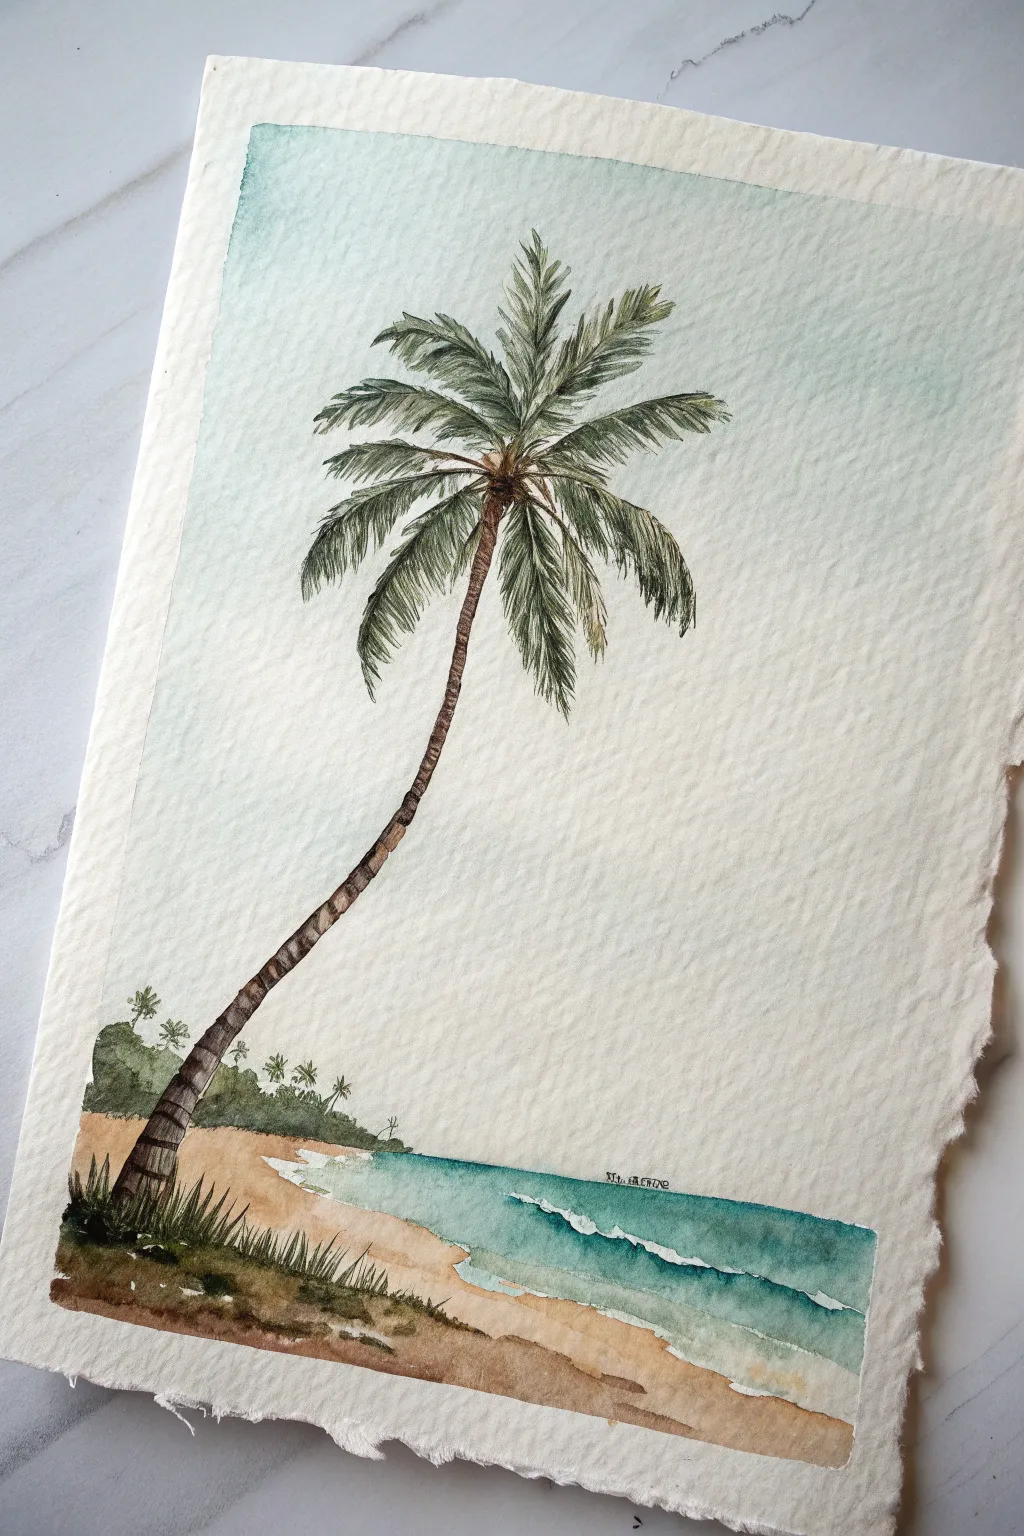
Capture the serenity of a tropical breeze with this watercolor project, featuring a characteristically leaning palm tree towering over a tranquil shoreline. Through careful layering and dry-brush techniques, you’ll create textured bark and gentle waves on high-quality paper.
Step-by-Step
Materials
- Cold press watercolor paper (deckled edge preferred for the aesthetic)
- Watercolor paints (Sap Green, Burnt Umber, Payne’s Grey, Turquoise, Yellow Ochre, Burnt Sienna)
- Masking tape
- Pencil (HB or H)
- Round brushes (sizes 2, 4, and 8)
- Rigger or liner brush (optional, for fine leaves)
- Paper towels
- clean water jars
Step 1: Sketch and Sky
-
Secure the paper:
Begin by taping down your watercolor paper to a board. If you want that crisp rectangular border shown in the intricate piece, place your tape carefully to act as a frame, leaving the rough edges of the paper exposed outside the tape. -
Lightly sketch the composition:
Using an HB pencil, draw a faint horizon line about a quarter of the way up the page. Sketch the curved trunk of the palm tree starting from the bottom left corner, arching gracefully toward the center top. Add rough guidelines for the fronds. -
Wet the sky area:
With a large clean brush, apply a thin layer of clean water to the sky area only, avoiding the palm tree sketch and the ocean area. -
Apply the sky wash:
While the paper is damp, drop in a very diluted wash of Turquoise mixed with a tiny touch of Payne’s Grey. Start at the top and let it fade out to almost clear water as you reach the horizon. This creates that soft, hazy atmosphere.
Muddy Greens?
If your palm leaves look flat or muddy, let the first layer of green dry completely before adding shadows. Wet-on-wet layering here can turn into a blob.
Step 2: Sand and Sea
-
Paint the sand base:
Mix Yellow Ochre with a dot of Burnt Sienna and plenty of water. Paint the beach area, keeping the strokes horizontal. Leave a jagged white ragged edge where the sand meets the water to represent sea foam. -
Create the turquoise water:
Mix a vibrant Turquoise. Paint the water area, starting with a stronger concentration at the horizon line and diluting it as you move toward the shore. -
Add gentle waves:
While the turquoise wash is still slightly wet but settling, lift out a few horizontal lines of pigment using a damp, clean brush or paper towel to suggest rolling waves near the shore. -
Deepen the horizon:
Once dry, run a thin line of darker Turquoise along the horizon line to clearly separate the sea from the pale sky.
Pro Tip: Dry Brush
For realistic bark texture, blot your brush on a towel until almost dry before painting the trunk details. This ‘skips’ over the paper tooth.
Step 3: The Leaning Palm
-
Base layer of the trunk:
Using a size 4 brush, paint the entire trunk with a light wash of Burnt Sienna. Follow the curve you sketched earlier. -
Build trunk texture:
While the base is drying, mix Burnt Umber with a little Payne’s Grey. Use the tip of your brush to paint small horizontal bands or ‘rings’ up the trunk. Make them closer together near the top and more spaced out toward the bottom. -
Refine the trunk shadow:
I like to add dimension here by painting a thin, dark line of the Umber mixture along the right side of the trunk, blending it slightly inward to create a rounded, cylindrical form. -
Paint the frond spines:
With your smallest brush or rigger, paint thin, arching lines for the central spines of the palm leaves using a mix of Sap Green and Burnt Umber. Radiate them outward from the central growth point. -
Add the palm leaves:
Using a Sap Green mix, use quick, flicking strokes to pull the individual leaflets away from the central spines. Keep your strokes loose and jagged. -
Deepen the foliage shadows:
Mix a darker green using Sap Green and Payne’s Grey. Go back into the center of the palm crown and the undersides of the fronds to add depth and shadow, leaving the top edges lighter.
Step 4: Foreground Details
-
Paint the distant island:
On the left side of the horizon, paint faint, small shapes of distant trees using a muted green-grey color. Keep them indefinite to show distance. -
Add foreground vegetation:
At the base of the palm tree (bottom left), paint spiky grasses and low shrubbery using deep greens and touches of brown. Use upward flicking motions to mimic grass blades. -
Enhance the shadows:
Add a cast shadow on the sand under the grass and the base of the tree using a diluted violet or grey wash. -
Final touches:
Evaluate your painting. If you lost the white sea foam, use a tiny bit of white gouache or a white gel pen to reclaim those sparkles on the water’s edge. -
Remove the tape:
Wait until the paper is completely bone-dry. Peel the tape away slowly and at a sharp angle to reveal your crisp borders against the deckled paper edge.
Frame this serene scene or gift it to a friend who loves the ocean to share a bit of tropical calm

PENCIL GUIDE
Understanding Pencil Grades from H to B
From first sketch to finished drawing — learn pencil grades, line control, and shading techniques.
Explore the Full Guide
Small Island Palm Tree Cluster
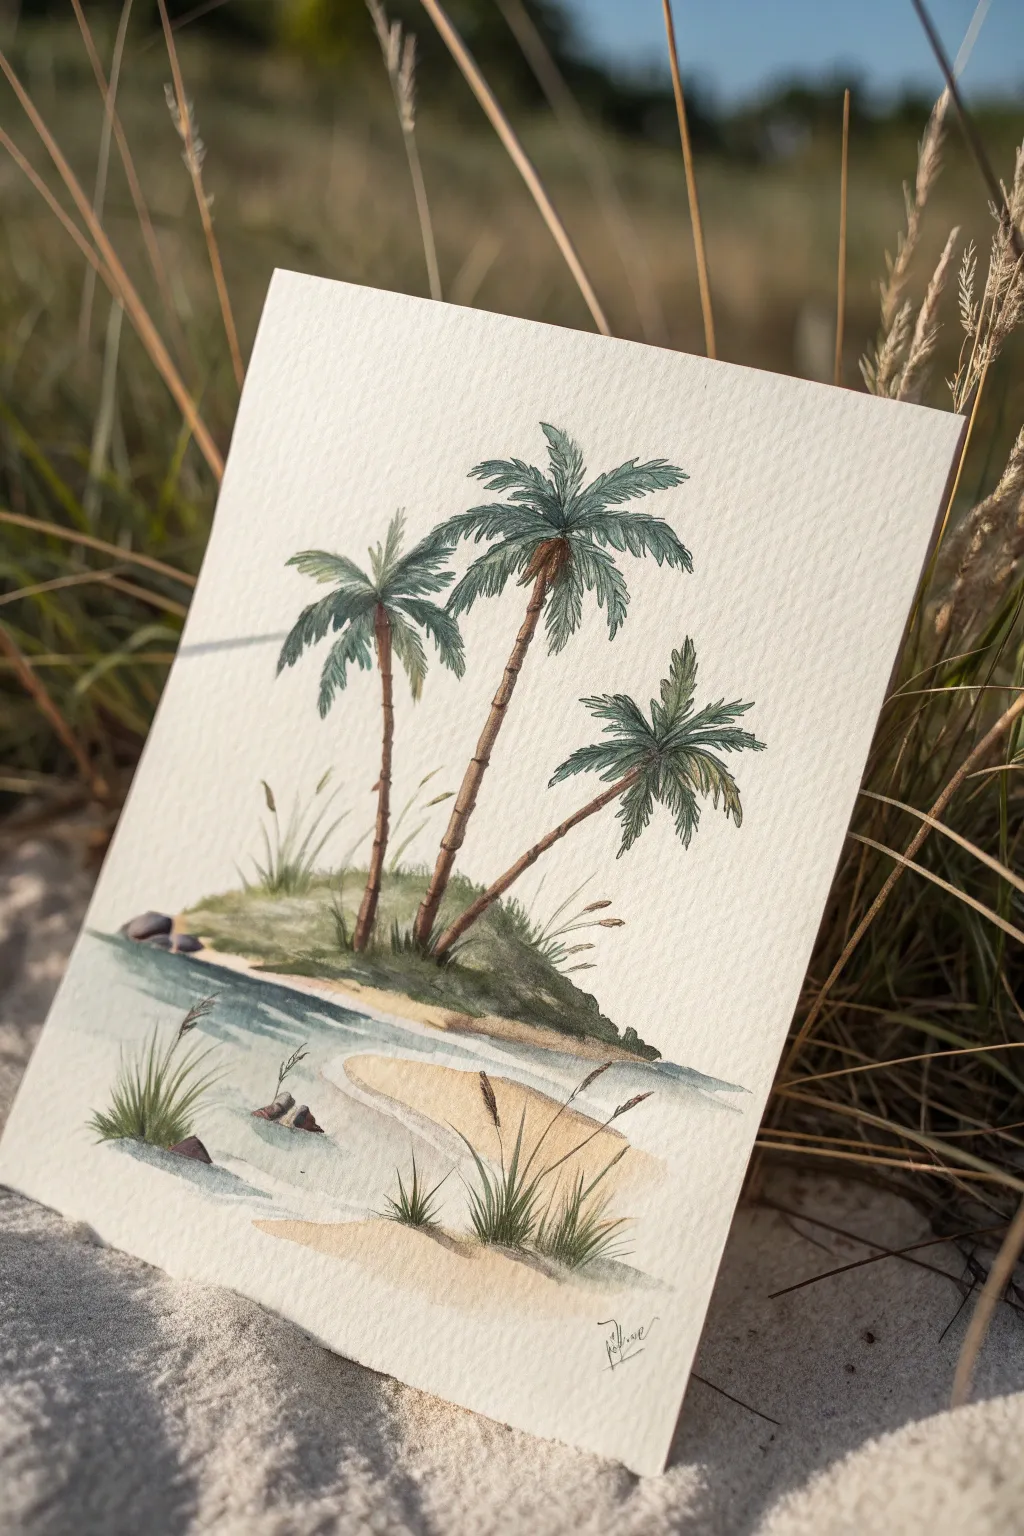
Capture the essence of a tranquil getaway with this delicate watercolor and ink painting. The textured paper and soft color palette create a nostalgic, vintage illustration feel perfect for bringing a bit of summer into your home.
Step-by-Step Guide
Materials
- Cold press watercolor paper (fine grain, at least 300gsm)
- Pencil (HB or 2H)
- Kneadable eraser
- Watercolor paints (Sap Green, Burnt Umber, Yellow Ochre, Paynes Grey, Indigo)
- Fine liner pen (brown or sepia, 0.1mm)
- Round watercolor brushes (size 4 and 0)
- Jar of clean water
- Paper towel
Step 1: Sketching the Composition
-
Layout the horizon:
Begin by lightly sketching a low horizon line about a quarter of the way up the page to establish where the water meets the sky. -
Outline the island:
Sketch a small, rounded mound for the island just above the water line, and define a curved sandy spit in the foreground. -
Position the trunks:
Draw three slender, slightly curved lines for the palm trunks. Place the tallest one in the center, flanked by two shorter trees leaning outward. -
Sketch the fronds:
Lightly indicate the general shape of the palm fronds bursting from the top of each trunk like fireworks. Keep these lines very faint as they are just guides.
Step 2: Painting the Foliage and Trunks
-
Base layer for trunks:
Mix a watery Burnt Umber and carefully paint the trunks. While wet, drop in a tiny bit of darker brown near the base for shadow. -
Mixing greens:
Create two pools of green: a bright, sunny Sap Green and a cooler, shadowed mix using Sap Green with a touch of Paynes Grey. -
Painting upper fronds:
Using your size 4 brush, paint the sun-hit fronds with the lighter green mixture. Use a flicking motion from the center outward to mimic the feathery texture. -
Adding depth to leaves:
Once the first layer is damp (not soaking), add the darker green mix to the underside of the fronds to create volume and shadow. -
Detailing the trunks:
Once the trunks are dry, I like to use a liner brush or the very tip of the size 0 brush with concentrated dark brown to add the horizontal rings and texture marks.
Dry Brush Technique
For realistic water ripples, drag a damp brush with thick pigment quickly across the paper grain. The texture catches the paint, leaving convincing white sparkles behind.
Step 3: Creating the Landscape
-
Island greenery:
Paint the grassy mound at the base of the trees using varying shades of green. Use upward, quick strokes to suggest grass blades sticking up. -
Sand washes:
Dilute Yellow Ochre with plenty of water until it’s a pale tea color. Wash this over the foreground sand spit and the base of the island. -
Water reflections:
Mix a very watery Indigo or blue-grey. Paint horizontal strokes to represent the water, leaving white paper gaps for sparkles. allow the color to pool slightly near the shoreline for depth. -
Foreground grasses:
With the size 0 brush and a dark green-brown mix, paint fine, spindly grasses in the immediate foreground on the sand spit. -
Adding rocks:
Paint small, rounded shapes near the water’s edge using a grey-brown mix. Keep the tops lighter to suggest sunlight hitting the stones.
Make it a Series
Paint two companion pieces on identical paper sized: one showing a close-up of a coconut cluster and another displaying a wide solitary wave.
Step 4: Inking and Final Touches
-
Defining outlines:
Allow the entire painting to dry completely. Take your fine liner pen and selectively outline the palm fronds to sharpen their edges. -
Texturing the bark:
Use the pen to add small scumble marks or hatched lines on the shady side of the tree trunks to enhance the rough bark texture. -
Enhancing the grass:
Add sharp, thin ink lines into the painted grass clumps on the island and foreground for crisp detail. -
Final shadows:
If needed, glaze a very transclucent purple-grey shadow on the sand directly beneath the grass tufts and rocks to ground them.
Sign your name in the corner with a fine pen and frame your tropical escape
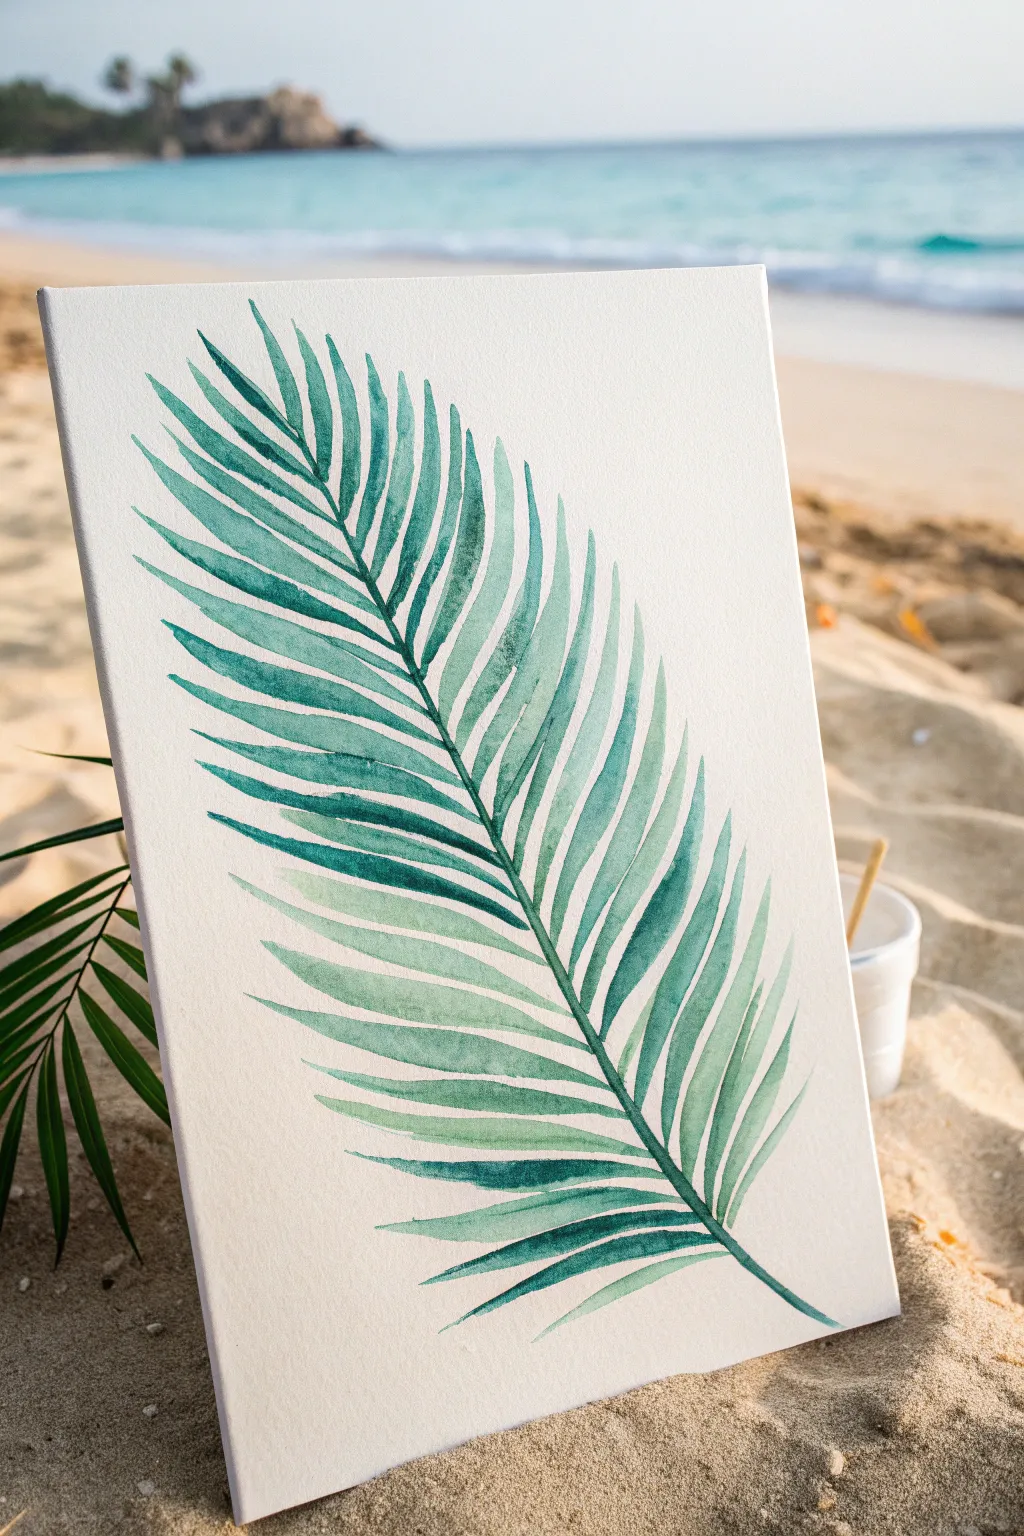
Close-Up Palm Frond Study
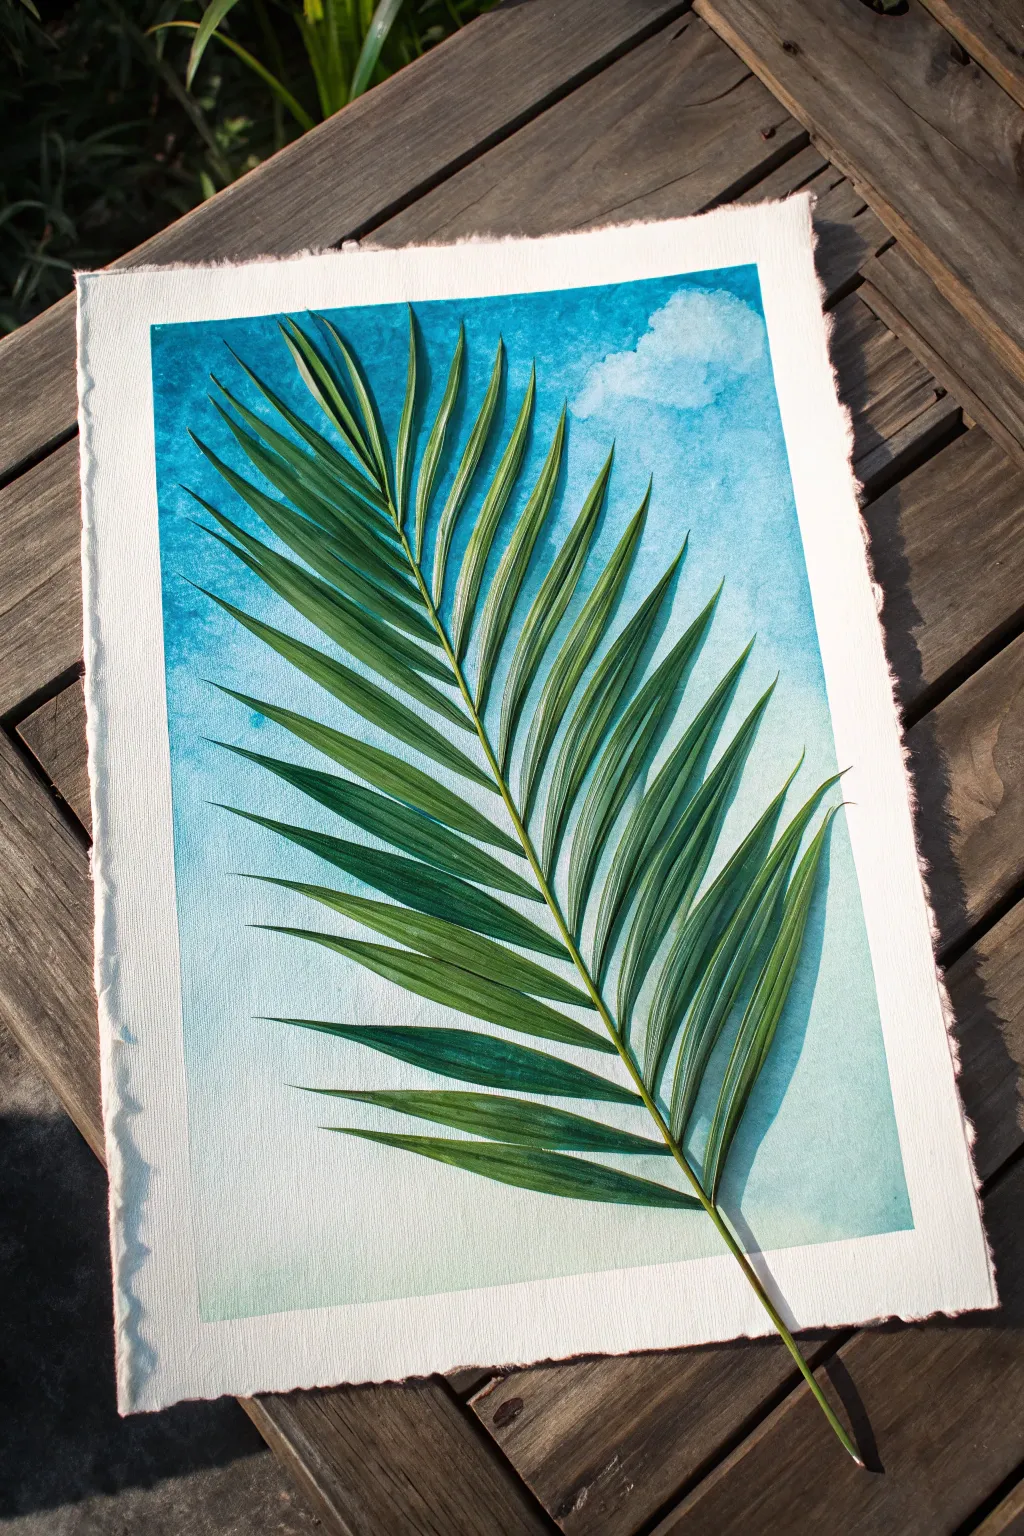
Capture the essence of a tropical breeze with this detailed study of a single palm frond set against a bright, airy sky. Using watercolor techniques, you will build up layers of lush greens to create depth and realism on textured paper, resulting in a piece that feels both organic and serene.
Step-by-Step Tutorial
Materials
- Cold press watercolor paper (300 gsm or heavier) with deckled edges
- Painter’s tape or masking tape
- Watercolor paints: Phthalo Blue, Cerulean Blue, Sap Green, Hooker’s Green, Burnt Umber, Lemon Yellow
- Large flat brush (1-inch width)
- Medium round brush (size 6 or 8)
- Fine liner brush (size 0 or 1)
- Graphite pencil (HB or H)
- Kneaded eraser
- Two jars of water
- Paper towels
- Palette for mixing
Step 1: Preparation and Sketching
-
Secure the paper:
Begin by taping down your watercolor paper to a board or table to prevent buckling. Place the tape carefully along the edges, leaving a clean, even white border about half an inch thick inside the deckled edge. -
Plot the stem:
Using your graphite pencil, lightly draw a curved line diagonally across the page. This will serve as the central spine (rachis) of your palm frond, starting from the bottom right and reaching toward the top left. -
Outline the leaflets:
Sketch the individual leaflets extending from the central spine. Keep your lines very faint so they won’t show through the paint later; verify the angle of the leaves changes naturally as they move up the stem. -
Refine the shape:
Go back over your sketch to add slight variety to the leaf widths and tips. Nature isn’t perfect, so allowing a few leaflets to overlap or twist slightly will add significant realism. -
Clean up:
Use a kneaded eraser to gently lift up any excess graphite dust, leaving only the faintest guide lines visible for you to follow.
Step 2: Painting the Sky
-
Prepare the wash:
Mix a generous amount of Phthalo Blue and Cerulean Blue with plenty of water. You want a very fluid consistency for the background wash. -
Wet the background:
With your large flat brush, wet the paper surface exclusively outside of your palm frond sketch with clean water. This wet-on-wet technique helps the sky look soft. -
Apply the gradient:
Start applying the blue mix at the top of the paper, letting the color be richest there. As you work your way down, add more water to your brush to create a gradient fading to nearly white at the bottom. -
Lift clouds:
While the paint is still damp, crumple a clean paper towel and gently dab lifting motions near the top right corner to create soft, white cloud shapes. -
Dry completely:
Allow the background to bone dry before proceeding. If you rush this step, the green of the leaves will bleed into the blue sky.
Bleeding Edges?
If green paint seeps into your sky, use a stiff, damp brush to gently scrub the error and blot with a tissue. This works best while the mistake is fresh.
Step 3: Painting the Frond
-
Base green layer:
Mix a light, yellow-green using Sap Green and Lemon Yellow. Using the medium round brush, fill in the leaf shapes with a light wash to establish the base color luminosity. -
Define the spine:
Mix a slightly darker shade by adding a touch of Burnt Umber to your green. Paint the central spine of the frond carefully, tapering it as it reaches the tip. -
Mid-tone shadows:
Once the initial lime-green layer is dry, mix Hooker’s Green with a little Sap Green. Paint stripes along individual leaflets, focusing on one side of each leaf to indicate a light source. -
Deepen the contrast:
I like to mix Hooker’s Green with a tiny bit of Phthalo Blue for the deepest shadows. Apply this darkness where the leaflets meet the central spine and on the undersides of any twisted or overlapping leaves. -
Detail work:
Switch to your fine liner brush. Add very thin, crisp lines running parallel down the length of the leaflets to mimic the natural veins. -
Edge refinement:
Use the liner brush and your darkest green mix to crispen up the edges of the leaves against the sky, ensuring the silhouette is sharp. -
Final dry and reveal:
Let the painting dry completely, ideally for a few hours. Then, slowly peel away the painter’s tape at a 45-degree angle to reveal the crisp white border.
Sun-Kissed Effect
Glaze a very watered-down yellow wash over the top-facing edges of the leaves after they dry. This makes the frond look like it’s glowing in sunlight.
Now you have a refreshing botanical study that brings a permanent piece of summer into your home


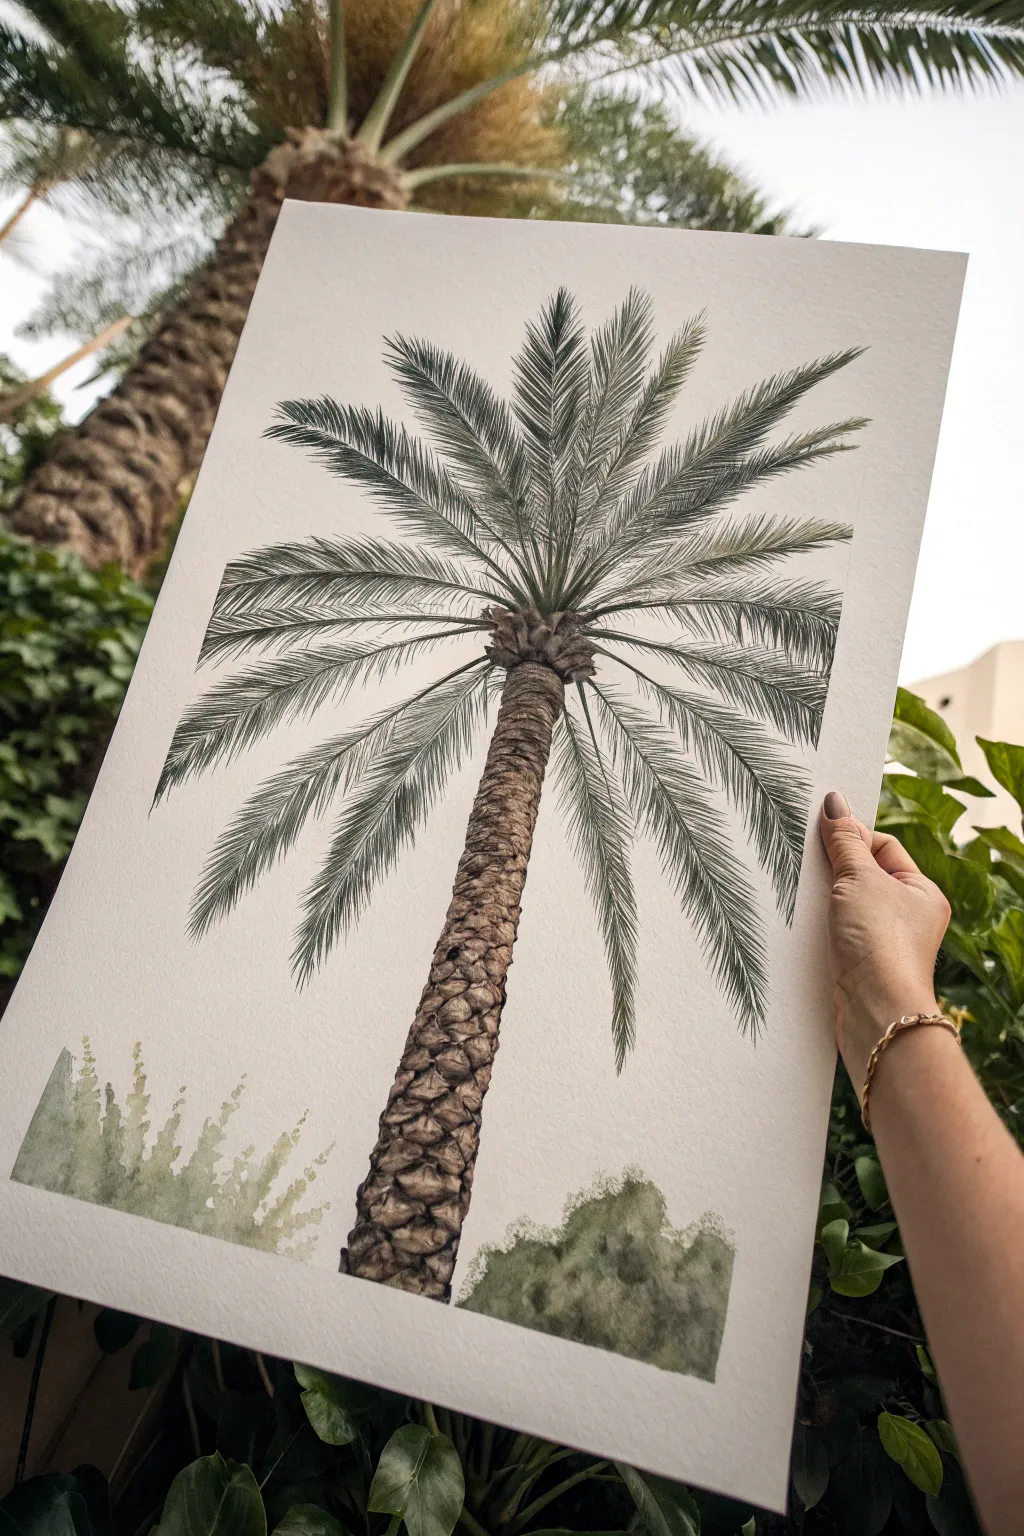
Loose Frond Feathering Practice
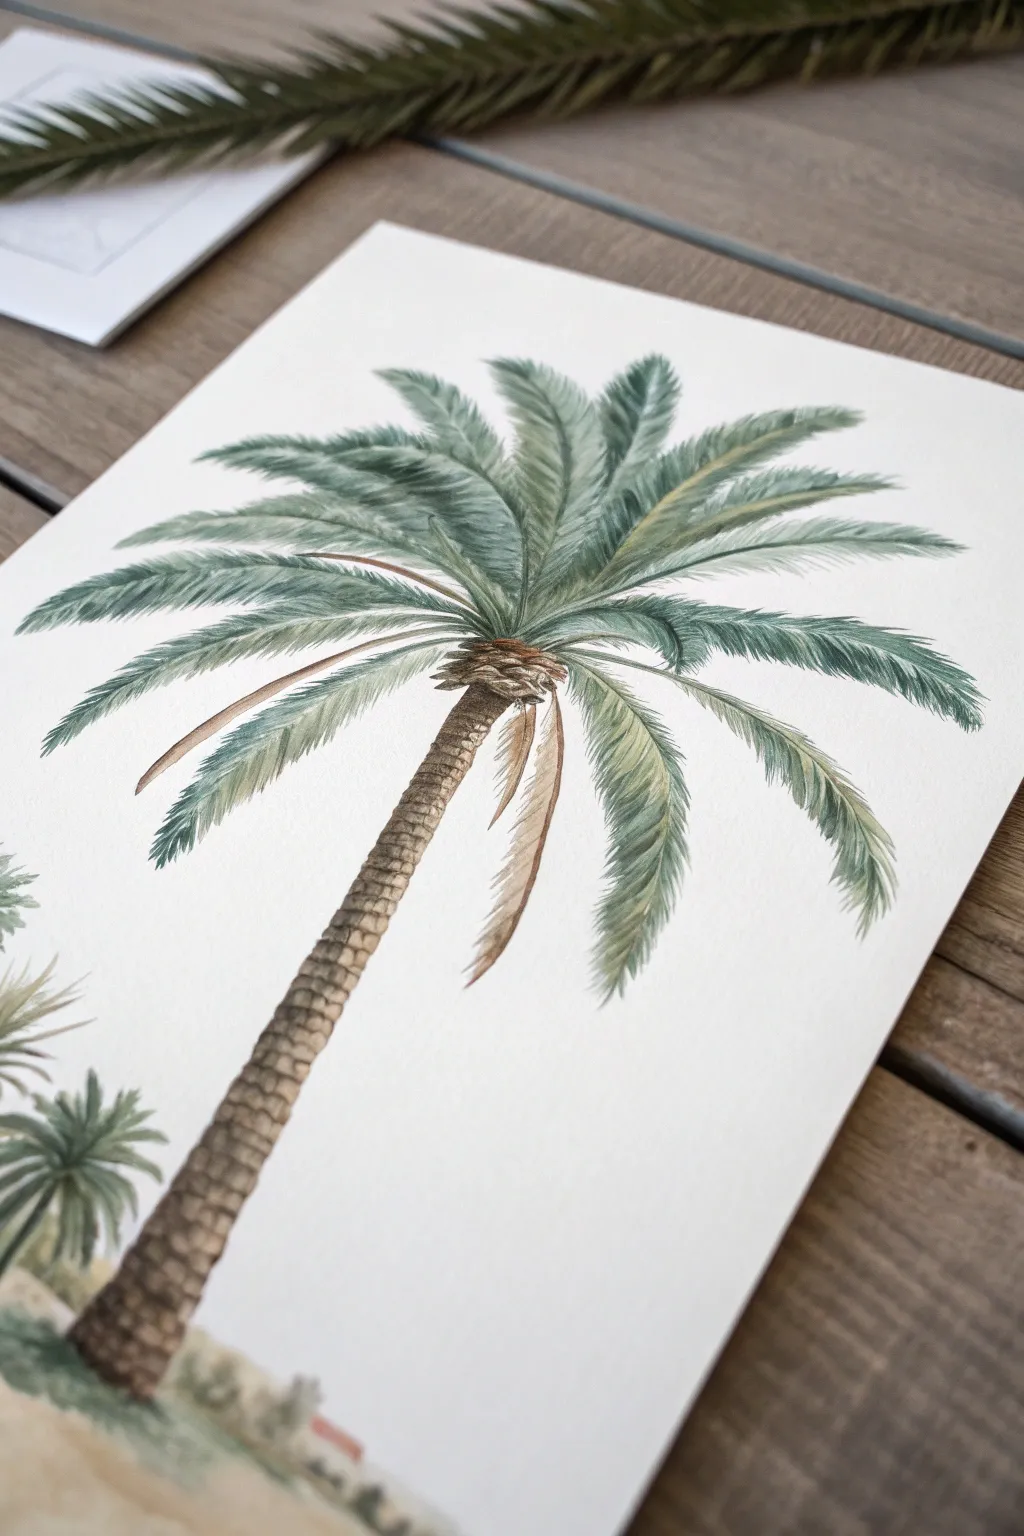
Capture the graceful elegance of a date palm with this detailed watercolor tutorial, focusing on realistic texture and light. You will build up the sturdy trunk with layered washes and master the sweeping motion needed for feathery, delicate leaves.
Detailed Instructions
Materials
- Hot press watercolor paper (300 gsm)
- Watercolor paints (Sap Green, Hooker’s Green, Burnt Umber, Yellow Ochre, Sepia)
- Round brushes (sizes 2, 4, and 8)
- Rigger or liner brush
- Pencil (HB or H)
- Kneaded eraser
- Paper towels
- Two jars of water
Step 1: Sketching and Trunk Foundation
-
Light Outline:
Begin by lightly sketching the central curve of the tree trunk. It should taper slightly as it goes up. Map out the crown of the tree by drawing faint, arching lines radiating from the center point where the fronds will emerge. -
Trunk Base Wash:
Mix a watery wash of Yellow Ochre with a touch of Burnt Umber. Using a size 8 round brush, paint the entire length of the trunk. Let the edges remain slightly rough to suggest bark texture. -
Adding Trunk Volume:
While the first layer is still damp (not soaking), drop in concentrated Burnt Umber along the shadowed side (usually the left or right edge, depending on your light source). Let the colors bleed naturally to create roundness. -
Creating Bark Segments:
Once the trunk is barely dry, use a size 4 brush with a mix of Sepia and Burnt Umber to paint small, overlapping horizontal diamond shapes. These represent the old leaf bases. Keep them tighter at the top and looser at the bottom. -
Deepening Shadows:
Glaze over the shadowed side of the trunk again with a translucent Sepia wash to unify the diamond patterns and emphasize the cylindrical form.
Muddy Greens?
If your fronds look like a solid blob, wait for layers to dry completely. Paint the lighter back leaves first, let dry, then paint the darker front leaves.
Step 2: Painting the Fronds
-
Stems First:
Using a thin rigger brush and a mix of Yellow Ochre and Sap Green, paint the central spine (rachis) of each frond along your pencil guides. Make these lines confident and sweeping. -
Base Green Mix:
Prepare a puddle of Sap Green mixed with a tiny bit of Burnt Umber to de-saturate it slightly. This will be your mid-tone for the leaves. -
Feathering Technique:
With a size 2 or 4 brush, paint the leaflets extending from the central spines. Use a flicking motion: start at the spine with more pressure and lift off quickly to create a sharp point. Paint the leaflets on the far side of the spine first. -
Adding Dimension:
For the leaflets closer to the viewer, mix a slightly darker green (add Hooker’s Green). Paint these overlapping the first layer slightly to create depth within the canopy. -
Brown Fronds:
Near the bottom of the crown, closest to the trunk, paint a few drooping, dried fronds using straight Burnt Umber and Yellow Ochre. These dead leaves are characteristic of palm trees. -
Highlighting:
If you wish to show sun hitting the top leaves, lift a little pigment from the upper curves of the fronds with a clean, damp brush, or mix a brighter yellow-green for the topmost tips.
Vintage Look
To mimic an old botanical plate, wash the entire paper with weak tea or coffee before painting to give it an aged, parchment-like background tone.
Step 3: Ground and Final Details
-
Ground Wash:
Wet the bottom area of the paper. Drop in distinct patches of Yellow Ochre and green to suggest sandy soil and grass. Keep this very loose and unfocused compared to the tree. -
Miniature Palms:
While the ground is settling, use your smallest brush to hint at a small baby palm or bush on the left side using the same greens as above, but with less detail. -
Trunk Texture:
Return to the main trunk with your driest, finest brush and pure Sepia. Add tiny cracks and definitive shadow lines between the bark segments for high contrast. -
The Crown Center:
Darken the center point where all fronds meet with a deep shadow mix. This anchors the leaves and hides the messy convergence points.
Step back and admire your botanical creation, noticing how the simple flicking motion created such complex texture
Fork-Textured Palm Leaves
Capture the breezy elegance of the tropics with this simple yet striking watercolor palm leaf study. The beautiful gradients of teal and forest green create a sense of depth and movement on the textured paper, perfect for bringing a beach vibe indoors.
Step-by-Step Tutorial
Materials
- Cold Press Watercolor Paper (140lb/300gsm) or Primed Canvas
- Watercolor Paints (Phthalo Green, Sap Green, Indigo, Lemon Yellow)
- Round Watercolor Brushes (Size 6 and 10)
- Pencil (HB or H)
- Kneaded Eraser
- Palette for mixing
- Cup of Water
- Paper Towels
Step 1: Planning the Structure
-
Mark the spine:
Begin by lightly sketching a single, long diagonal curve spanning from the bottom right corner toward the top left. This line represents the central spine (rachis) of your palm frond and dictates the overall flow. -
Define the outer shape:
Visualizing a large oval or tear-drop shape around that spine, lightly sketch the outer boundaries where the leaf tips will end. This helps ensure your painting stays centered and balanced on the page. -
Sketch the leaflets:
Using very faint strokes, draw individual leaflets extending from the spine outwards. They should be longer in the middle and shorter near the top and bottom, angling slightly upward toward the leaf tip. -
Refine the gaps:
Go back over your sketch and add slight variations in spacing. Palm leaves aren’t perfect combs; draw some leaflets closer together and leave wider V-shaped gaps between others for a natural look. -
Lighten the lines:
Before painting, take your kneaded eraser and gently roll it over the entire sketch. You want the graphite lines to be barely visible guides so they don’t show through the translucent watercolor later.
Bleeding Colors?
If your leaflet edges are blurring into each other uncontrollably, your paper is too wet. Let the first set of leaves dry fully before painting the adjacent ones to keep lines crisp.
Step 2: Painting the Foliage
-
Mix your base green:
On your palette, create a puddle of watery, light green by mixing Sap Green with a touch of Lemon Yellow and plenty of water. This will be the base color for the sunlit parts of the leaf. -
Paint the first leaflets:
Using the size 6 brush, load it with the light green mix. Start at the spine and paint a few random leaflets on the left side, using a single stroke that lifts at the end to create a tapered point. -
Introduce darker values:
While the first leaflets are still damp, mix Phthalo Green with a tiny bit of Indigo to create a cool, deep teal. Drop this darker pigment near the spine of the damp leaflets and let it bleed outward naturally. -
Work in sections:
Continue painting leaflets in small groups of three or four. I prefer to alternate between the left and right sides of the spine to keep the symmetry balanced as I work my way down. -
Vary the color intensity:
For some leaflets, use the darker teal mixture right from the start, especially for those ‘underneath’ or near the bottom of the frond. This variety suggests light filtering through the canopy. -
Create hard edges:
Let some leaflets dry completely before painting their neighbors. This allows you to overlap a new wet stroke over a dry one, creating crisp, hard edges that define the individual segments of the leaf. -
Add a wash to the spine:
Once the leaflets are mostly painted, run a very thin, pale line of green down the central spine. It should be barely there—just enough to connect the segments visually.
Add Gold Accents
Once the watercolor is bone dry, use a fine-liner brush and metallic gold watercolor paint to outline just the sun-drenched edges of the leaflets for a glamorous, modern finish.
Step 3: Detailing and Depth
-
Deepen the shadows:
Mix a concentrated amounts of Indigo and Phthalo Green with very little water. Use the tip of your smallest brush to paint thin, dark streaks right where the leaflets meet the spine. -
Add texture lines:
Paint faint, hair-thin lines running parallel inside the larger leaflets using a mid-tone green. This mimics the veining found in real palm texture and adds visual interest to larger flat areas. -
Soften harsh transitions:
If you spot a gradient that looks too choppy, use a clean, slightly damp brush to gently scrub the edge and soften the transition between the light and dark greens. -
Review the stem:
Strengthen the stem at the very bottom right. It should be the thickest part of the painting and can handle a darker, brownish-green mix to anchor the composition. -
Final assessment:
Step back and look for balance. If the leaf looks too pale, glaze a very watery layer of teal over the shadowed side to unify the colors without losing the underlying details.
Allow your painting to dry flat completely before framing it to ensure the paper doesn’t buckle
Coconuts and Tiny Details
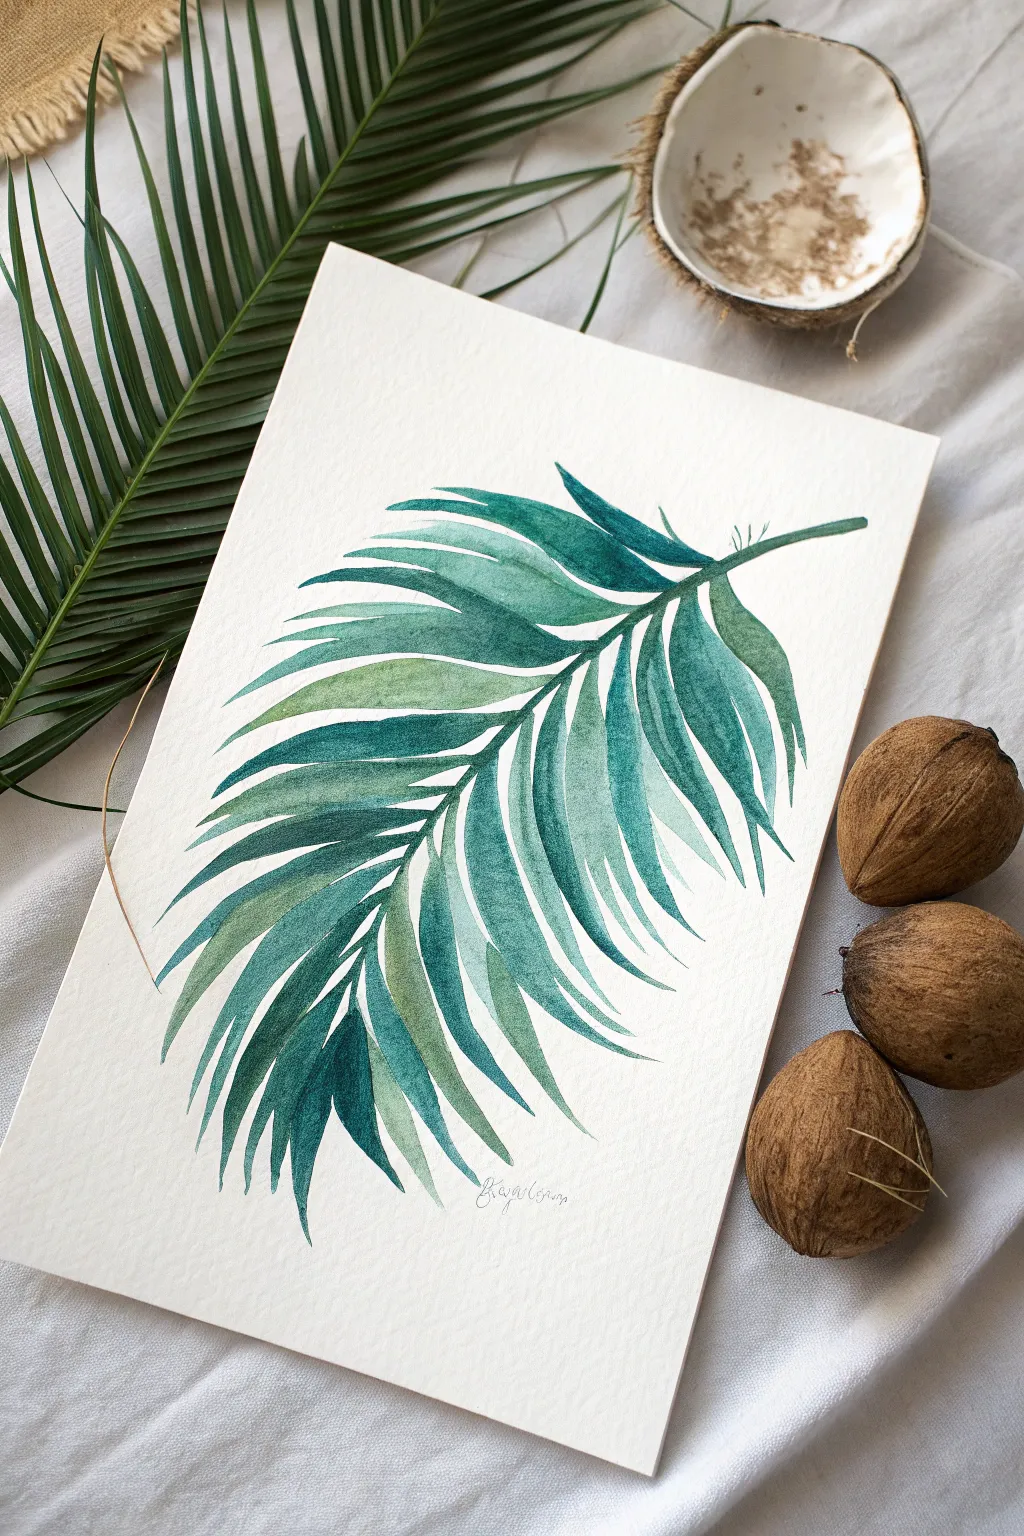
This project captures the delicate, sweeping nature of a palm frond using vibrant watercolor greens. By layering cool teals and warm olives, you’ll create a dimensional botanical illustration that feels fresh and breezy.
Step-by-Step Tutorial
Materials
- Cold press watercolor paper (300 gsm)
- Watercolor paints (Phthalo Green, Sap Green, Indigo, Lemon Yellow)
- Round brushes (size 4 and 8)
- Fine liner brush (size 0 or 1)
- Pencil (HB or 2H)
- Kneadable eraser
- Two jars of water
- Paper towel
Step 1: Sketching the Structure
-
Draw the spine:
Begin by drawing a gentle, sweeping curve with your pencil to represent the central spine (rachis) of the palm leaf. It should start from the bottom right and curve upwards toward the top left. -
Outline the leaflets:
Sketch the individual leaflets extending from the spine. Keep them long and tapered. Notice how the leaflets near the tip are shorter, while the ones in the middle are the longest. -
Refine the shapes:
Add slight curves to the edges of the leaflets to make them look uniform but organic. They shouldn’t be perfect rectangles; let them follow the flow of the main curve. -
Lighten the lines:
Use your kneadable eraser to gently lift the graphite until the sketch is barely visible. This prevents the pencil marks from showing through the transparent watercolor later.
Step 2: Painting the Base Layers
-
Mix your greens:
Create two main puddles of color on your palette: a cool ‘shadow’ green using Phthalo Green mixed with a touch of Indigo, and a warm ‘light’ green using Sap Green mixed with a bit of Lemon Yellow. -
Start the spine:
Using your size 4 brush and the cool green mix, paint a very thin line along the sketched spine. Allow this to dry completely so the leaflets don’t bleed into it. -
Paint the first leaflet:
Select a leaflet near the top. Load your brush with the cool green mixture. Start at the spine and pull the stroke outward toward the tip, lifting pressure at the end to create a point. -
Add variation:
While that first leaflet is still damp, drop a tiny amount of the warm yellow-green mix into the center or edge of the shape. Let the colors bleed naturally on the paper for a variegated look. -
Continue painting leaflets:
Move down the frond, painting alternating leaflets. Skip every other one for now. This technique prevents wet paint from one leaf merging into its neighbor.
Wet-on-Dry Precision
Work wet-on-dry for sharp edges. If your brush is too wet, the distinct leaflet shapes will bloom into blobs. Blot your brush on a towel often.
Step 3: Building Depth and Detail
-
Fill the gaps:
Once the first set of leaflets is dry to the touch, fill in the remaining empty spaces with new strokes. -
Vary tone intensity:
For leaflets that appear ‘behind’ others or near the bottom of the stem, add a bit more Indigo to your mix to darken the value. This deepens the shadows and adds dimension. -
Glaze overlapping areas:
I particularly enjoy this step: if you want a leaflet to look like it’s folding over, wait for the base layer to dry, then paint a second, transparent layer of cool green over just the shadowed section. -
Add texture lines:
Switch to your fine liner brush (size 0). Mix a concentrated, darker green. Paint extremely thin, faint lines running parallel to the length of a few leaflets to suggest veins. -
Refine the edges:
Check the tips of your leaves. If any look too blunt, use a slightly damp, clean brush to gently pull the pigment out into a sharper point. -
Final spine details:
Go back to the central spine. Strengthen the line with a bit more dark green where the leaflets attach, creating contrast at the junction points.
Make It a Set
Create a gallery wall by painting two more fronds: one depicting a dried brown fan palm and another showing a split-leaf philodendron.
This elegant botanical study brings a calming, organic touch to any room.
Desert Oasis Palm Tree Scene
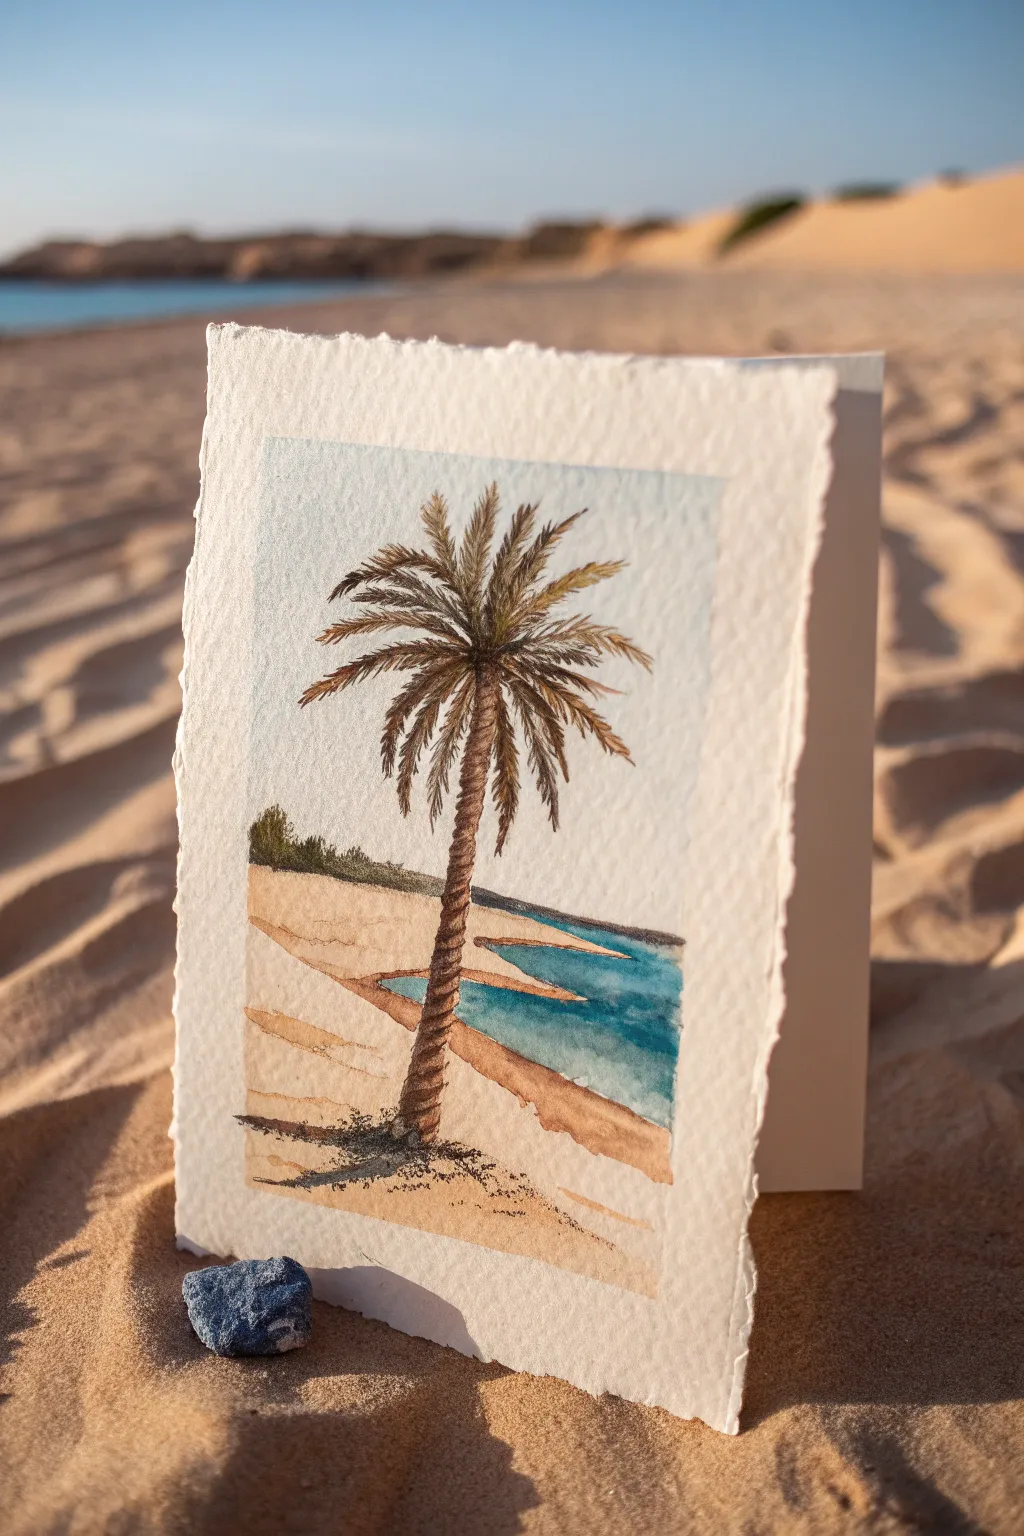
Capture the serenity of a quiet beach with this charming watercolor project featuring a single, sturdy palm tree against a soft coastal backdrop. The rough, deckle-edged paper adds an organic, handmade feel perfect for a unique greeting card or framed miniature.
Step-by-Step Guide
Materials
- Cold press watercolor paper (deckle edge preferred)
- Watercolor paints (Burnt Umber, Yellow Ochre, Ultramarine Blue, Sap Green, Burnt Sienna)
- Round brushes (flats for washes, small rounds #2 and #4 for details)
- Pencil (HB or lighter)
- Kneaded eraser
- Clean water and paper towels
- Fine liner or micron pen (optional for texture)
Step 1: Sketching and Sky
-
Prepare the paper:
If you don’t have pre-made deckle edge cards, you can tear the edges of a standard watercolor sheet against a ruler to create that beautiful, jagged texture. -
Draft the composition:
Lightly sketch a horizontal horizon line about one-third up from the bottom. Mark the jagged coastline where the water meets the sand. -
Position the palm:
Sketch a slightly curved vertical line for the trunk, placing it near the center but slightly offset. Add a faint oval shape at the top to guide your frond placement. -
Paint the sky:
Mix a very dilute wash of Ultramarine Blue. Wet the sky area with clean water first, then drop in the pigment for a soft, clouded look. Fade it out near the horizon.
Muddy colors?
If your sand and sea colors are bleeding together into a brown mess, ensure the first section is 100% bone dry before painting the neighboring wet section.
Step 2: Sand and Sea
-
Block in the sand:
Mix Yellow Ochre with a tiny touch of Burnt Sienna. Apply a light wash to the entire beach area, leaving the space for the water white for now. -
Define the water:
Load your brush with a stronger mix of Ultramarine Blue and a hint of green (teal). Paint the water section, carefully working around the jagged shoreline you sketched. -
Deepen the ocean:
While the blue paint is still damp, drop in a slightly darker blue near the shoreline to suggest depth and shadow where the water meets the sand. -
Add beach contours:
Once the base sand layer is dry, mix a slightly darker version of your sand color. Paint irregular horizontal stripes to mimic dunes and uneven terrain. -
Paint the distant land:
Using a mix of Sap Green and Burnt Umber, paint a very small, textured strip along the horizon line to suggest distant vegetation or a far-off shore.
Make it Real
Use a toothbrush to flick white gouache or acrylic onto the shoreline once dry. This creates the effect of sea foam crashing against the sand.
Step 3: The Palm Tree
-
Paint the trunk base:
Using Burnt Umber, paint the trunk. I like to paint small, overlapping horizontal dashes rather than a solid line to mimic the rough texture of the bark. -
Add trunk dimension:
While the trunk is damp, drop a darker brown (Burnt Umber mixed with blue) along the right side to create a cylindrical shadow effect. -
Start the fronds:
Using your #2 brush and a mix of Sap Green and Burnt Sienna, flick rapid strokes outward from the center top of the trunk. Let these initial strokes be loose. -
Layer the foliage:
Mix a darker olive green. Paint a second layer of fronds over the first, focusing on the underside of the leaves to create volume. -
Add dry fronds:
Mix a brownish-orange hue. Add a few drooping fronds near the bottom of the canopy to represent dried, older leaves hanging down.
Step 4: Final Details
-
Cast the shadow:
Mix a cool grey using blue and brown. Paint a distinctive shadow extending from the base of the tree to the left, mimicking the angle of the sun. -
Texture the sand:
Splatter tiny specks of brown paint near the base of the tree and in the foreground sand to create the look of grit and pebbles. -
Refine the trunk:
Once dry, use a very fine brush or a thin pen to enhance the cross-hatching texture on the trunk, sharpening the edges.
Prop your finished painting in some real sand or a simple frame to bring a permanent vacation vibe to your desk
Retro Color-Block Palm Poster
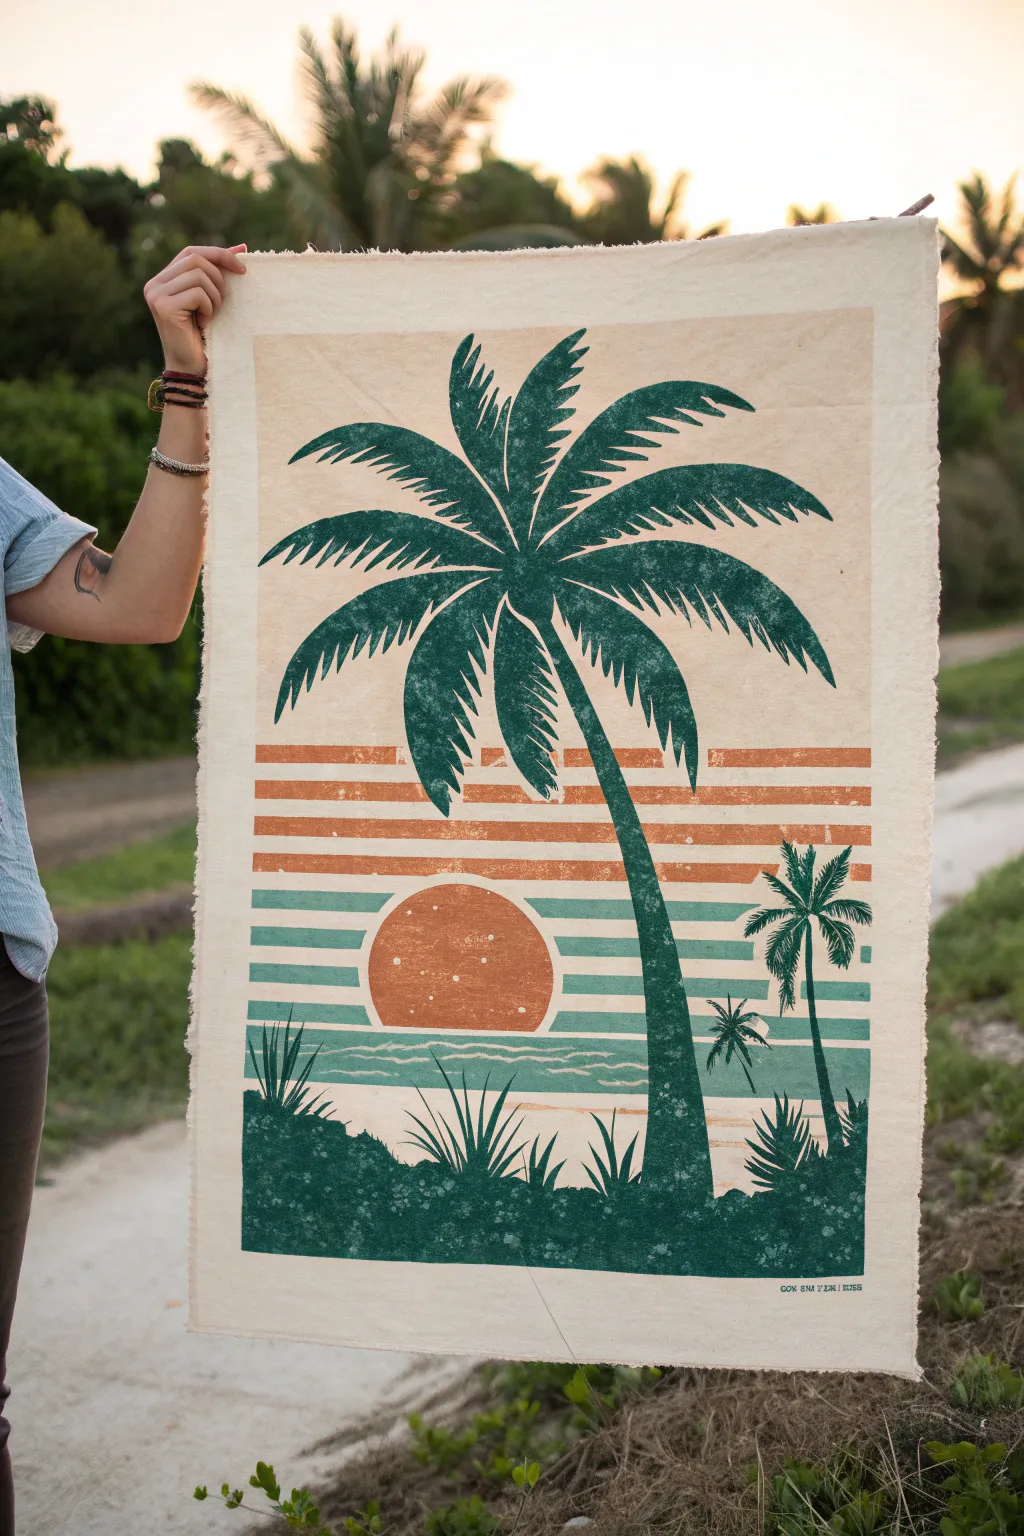
Channel vintage tropical vibes with this screen print-inspired poster, featuring bold horizontal stripes and a striking palm silhouette. The intentionally distressed texture and raw edges give it an authentic, well-traveled artistic feel perfect for boho decor.
Step-by-Step Tutorial
Materials
- Heavyweight canvas sheet or unprimed cotton muslin (roughly A3 or A2 size)
- Acrylic paints (dark teal/forest green, muted orange, cream/off-white, light teal)
- Fabric medium (optional, if using canvas for wall hanging)
- Painter’s tape (various widths)
- Stencil film or cardstock
- Craft knife and cutting mat
- Sponges or stencil brushes
- Fine grit sandpaper
- Pencil and eraser
- Ruler
Step 1: Preparing the Base
-
Prep the Canvas:
Cut your heavyweight canvas or fabric to your desired poster size. Don’t worry about perfect edges—leaving them raw or fraying them slightly adds to the rustic charm. -
Create the Border:
Using painter’s tape, mask off a rectangular border about 2 inches from the edge all around. This defines the artwork area while leaving a clean ‘frame’ of the natural fabric. -
Prime the Background:
Mix a small amount of warm cream or off-white paint with water to create a thin wash. Apply this inside the taped area to give the background a vintage, aged paper look rather than stark white. Let this dry completely.
Dry Brush Secret
Don’t wet your brush or sponge before picking up paint. A bone-dry tool creates that scratchy, imperfect texture that makes the print look vintage.
Step 2: Painting the Sunset Stripes
-
Measure the Stripes:
Use a ruler to lightly mark horizontal guide lines for your sunset. The stripes should be thicker at the top and get progressively thinner towards the horizon line. -
Mask the Orange Stripes:
Apply painter’s tape to block off the areas that will remain cream or become teal later. You want to expose only the bands that will be orange. -
Apply Orange Paint:
Sponge on a muted, retro orange paint. Dab the sponge lightly to create an uneven, texture-rich finish rather than a solid block of color. This mimics a worn screen print. -
Remove and Dry:
Peel the tape while the paint is still slightly tacky to ensure crisp edges, then let the orange stripes dry fast. -
Mask and Paint Teal Stripes:
Once the orange is dry, re-tape the canvas to expose the alternating stripes for the lower section. Apply a muted teal or sea-foam green using the same sponging technique. -
Add the Sun:
Cut a circle from a piece of paper to use as a reverse stencil. Place it near the horizon line over the stripes. Carefully paint this circle with a solid coat of the muted orange, possibly adding tiny white speckles for a distressed texture.
Step 3: Creating the Palm Silhouette
-
Draft the Palm Tree:
On a separate piece of cardstock or stencil film, sketch your main palm tree. Focus on a curved trunk and large, fanning fronds with jagged edges. -
Cut the Stencil:
Using a sharp craft knife, carefully cut out the palm tree shape. This negative space will be your stencil. -
Position the Stencil:
Lay your stencil over the dried striped background. Decide on the placement—having the trunk curve elegantly through the stripes creates great movement. -
Paint the Main Palm:
Secure the stencil with tape. Using a dark forest green or deep teal paint, stipple the paint through the stencil. Use an up-and-down pouncing motion to prevent paint bleeding under the edges. -
Add Smaller Palms:
If you want extra depth, create a smaller palm stencil and add one or two little trees in the mid-ground on the right side.
Natural Dye Hack
Instead of painting the background cream, soak the raw canvas in strong black tea for 10 minutes and let it dry for an authentic aged parchment tone.
Step 4: Detailing and Distressing
-
Paint the Foreground:
Freehand the bottom landscape using the dark green paint. Create a silhouette of grassy dunes and small bushes to anchor the tree. -
Add Texture Details:
Dip a dry stiff-bristled brush into the dark green paint, wipe most of it off, and lightly drag it upwards from the ‘ground’ to create wispy grass textures. -
Final Weathering:
Once everything is fully dry, take fine-grit sandpaper and very gently scuff specific areas of the print, particularly over the orange stripes and the palm trunk, to enhance the worn look. -
Reveal:
Remove the outer border tape to reveal the clean edge against the raw canvas. Fray the very edges of the canvas manually by pulling loose threads if desired.
Hang your new poster with simple wooden dowels or clips to complete the laid-back island aesthetic
Negative Space Palm Tree Design
This stunning negative space project captures the breezy elegance of a palm tree by using the white of the paper itself. By blending cool teals into warm terracotta tones around a masked silhouette, you create a vibrant sunset vibe that feels both modern and tropical.
How-To Guide
Materials
- High-quality watercolor paper (cold press, 300gsm)
- Pencil (HB or lighter)
- Masking fluid (drawing gum)
- Old synthetic brush or specialized masking fluid nib
- Watercolor paints (Teal/Turquoise, Burnt Sienna/Terracotta)
- Large round watercolor brush (size 10 or 12)
- Clean water jar
- Paper towels
- Eraser or rubber cement pickup tool
Step 1: Sketching and Masking
-
Lightly sketch the focal trunk:
Begin by drawing a gentle, curving line for the main palm tree trunk starting from the bottom left corner and arching toward the center. Don’t press hard; you want the graphite to be barely visible. -
Add the fronds:
Sketch the radiating palm fronds exploding from the top of the trunk. Draw the central spine of each leaf first, then indicate the feathery leaflets. -
Include a second, smaller tree:
Tuck a smaller palm tree peeking out from the lower left edge. This adds depth and framing to your composition. -
Prepare your masking fluid:
Open your drawing gum. If you are using a brush, coat the bristles in bar soap first—this trick protects them from being ruined by the sticky fluid. -
Mask the trunks:
Carefully paint the masking fluid over your pencil sketch of the trunks. I like to dab the fluid on to create a slightly textured, organic edge. -
Mask the fine details:
Switch to a fine-point tool or the very tip of your brush to mask the delicate palm fronds. Ensure each leaflet is crisp and sharp. -
Let it dry completely:
Walk away for at least 15-20 minutes. The masking fluid must be perfectly dry and rubbery to the touch before any paint touches the paper.
Sticky Situation?
Clean your brush immediately! If masking fluid dries in the bristles, the brush is ruined. Swish it in soapy water the second you finish applying.
Step 2: Creating the Wash
-
Prepare your palette:
Mix a generous amount of watery teal paint in one well and a watery terracotta or burnt sienna in another. You want juicy, fluid consistency. -
Start with the sky:
Using your large round brush, load up the teal color. Start painting horizontally across the top third of the paper, letting the color pool slightly. -
Begin the gradient:
As you move down the paper past the palm fronds, add a little more water to your brush to dilute the teal, making it lighter as it meets the middle section. -
Introduce the warmth:
Rinse your brush quickly and pick up the terracotta color. Start painting from the bottom of the page upward, applying full strength color at the base. -
Blend the meeting point:
Where the pale teal meets the rising terracotta in the middle, gently brush them together. Let them bleed naturally; don’t overwork this area or you might get mud. -
Add texture while wet:
While the wash is still wet, you can drop in slightly more concentrated pigment in the corners for drama. Let the watercolor do its work. -
Wait for the paint to dry:
This is crucial. The paper must be bone dry before the next step. If it feels cool to the touch, it’s still wet.
Sun-Bleached Effect
Sprinkle coarse salt onto the wet watercolor wash while it’s drying. Brush it off later for a bloomed, sandy texture perfect for beach scenes.
Step 3: The Big Reveal
-
Remove the masking fluid:
Gently rub your finger or a rubber cement pickup tool over the masked areas. The grey rubber drawing gum will ball up and peel away. -
Reveal the white:
Continue peeling until all the masking fluid is gone, revealing the pristine white paper underneath against your colorful background. -
Clean up stray lines:
If any pencil marks are still visible inside the white palm tree shapes, gently erase them now. -
Add final texture (optional):
If the white feels too stark, you can use a very dry brush with faint grey paint to add tiny dots or texture marks on the trunk for bark detail.
Step back and admire how the crisp white silhouette pops against that warm sunset gradient
Abstract Drip Palm Tree Experiment
This striking canvas project combines a classic sunset gradient with a moody, stylized silhouette of a palm tree. The unique twist comes from the dripping effect on the fronds, giving the piece an edgy, abstract feel that transforms a standard beach scene into modern art.
Step-by-Step Tutorial
Materials
- Stretched canvas (rectangular, portrait orientation)
- Acrylic paints: Teal/Turquoise, White, Peach/Salmon, Orange, Black
- Wide flat brush (1-2 inches) for blending
- Medium round brush
- Small detail brush (liner or rigger brush work best)
- Cup of water and paper towels
- Palette or paper plate
- Spray bottle with water (optional)
Step 1: Creating the Ombré Sky
-
Prime the top section:
Start by brushing a solid band of teal or turquoise paint across the top third of your canvas. Don’t worry about the bottom edge being perfect yet. -
Mix the transition color:
On your palette, mix a little white into your teal to create a softer, lighter blue. Apply this directly below the teal band while the paint is still wet. -
Blend downward:
Clean your wide brush. Use horizontal strokes to gently blend the boundary between the dark teal and the lighter blue so there is no harsh line. -
Introduce the warm tones:
Mix a pale peach or salmon color. Apply this to the middle section of the canvas, working it slightly upward into the pale blue to create a dreamy, purplish transition zone. -
Intensify the sunset:
Use a vibrant orange or coral color for the lower third of the sky. Blend this upward into the peach section using long, smooth horizontal strokes. -
Let it dry:
Allow the background gradient to dry completely before starting the silhouette. This prevents the black paint from turning muddy.
Drip Control
If a drip is moving too fast or going crooked, quickly guide it with a clean, damp brush. You can also stop a drip by blotting the end with a paper towel.
Step 2: Painting the Palm Silhouette
-
Establish the ground:
Using black paint and a medium brush, paint an uneven, rocky horizon line across the jagged bottom edge of the canvas. Tap the brush to create texture resembling foliage or rocks. -
Sketch the trunk:
With a slightly watered-down black paint, draw a long, slightly curved line for the trunk. Make it thicker at the base and taper it as it reaches the sky. -
Fill the trunk texture:
Go back over the trunk line with thicker black paint. Use small, horizontal dabbing motions to give the trunk its characteristic rough, segmented texture. -
Map out frond placement:
At the top of the trunk, paint 5-7 curved lines radiating outward like fireworks. These will serve as the spines for your palm leaves. -
Add the leaves:
Switch to a smaller brush. Using quick, flicking strokes, pull paint outward from each spine line. The strokes should be dense near the center and feathery at the tips. -
Detail the crown:
Add a few smaller, upright fronds at the very top center of the tree to give it dimension and fullness.
Metallic Magic
Once the black paint is fully dry, trace the spine of a few palm fronds with metallic gold or copper paint to make the sunset colors pop.
Step 3: The Drip Technique
-
Prepare the wash:
Mix a small amount of black paint with water until it reaches an ink-like consistency. It needs to be fluid enough to run, but opaque enough to show up. -
Load the brush:
Dip a detail brush or a rigger brush heavily into your watery black mixture. You want the brush to be dripping wet. -
Target the ends:
Press the loaded brush against the very tips of the lowest hanging palm fronds. Hold it there for a second to let a bead of paint form. -
Encourage the drip:
If gravity doesn’t pull the paint down immediately, tilt your canvas upright or tap the canvas gently. I sometimes use a spray bottle to mist just that spot lightly if the paint is too stubborn. -
Vary the lengths:
Create drips of varying lengths across several fronds. Some should go all the way to the horizon line, while others can stop midway. -
Add stray splashes:
Flick the bristles of your brush near the bottom corner to add a few tiny splatters, enhancing the abstract, messy look. -
Final dry:
Keep the canvas upright while the drips dry to ensure they don’t pool or smear sideways.
Hang your new artwork in a bright spot where the gradient can really shine and enjoy your slice of tropical paradise
Pattern-Filled Palm Fronds
Capture the intricate beauty of a date palm with this detailed watercolor tutorial. By combining precise brushwork for the fronds with textured washes for the trunk, you will create a piece that feels both botanical and artistic.
Step-by-Step Guide
Materials
- Cold press watercolor paper (300 gsm)
- Watercolor paints (Sap Green, Olive Green, Burnt Umber, Payne’s Grey, Yellow Ochre)
- Round brushes (sizes 2, 6, and 10)
- Fine liner brush (size 00 or 0)
- HB Pencil and kneaded eraser
- Jars of water
- Paper towels
- Masking tape
Step 1: Sketching the Structure
-
Paper preparation:
Begin by taping down your watercolor paper to a board to prevent buckling. Ensure the edges are sealed tight. -
Central line:
Use your HB pencil to draw a very faint vertical line slightly off-center for the trunk. This acts as your guide for symmetry. -
Frond layout:
Sketch the ‘crown’ of the palm. Start with a central point at the top of the trunk and draw curved spines radiating outward in a starburst pattern. Keep the upper lines straighter and the lower lines more drooping. -
Refining the sketch:
Lightly outline the thickness of the trunk, adding rough diamond shapes to indicate the bark texture. Sketch the general shape of the bushes at the bottom.
Muddy Greens?
If your greens look dull, avoid adding too much black. Instead, darken your greens by adding red or burnt sienna to neutralize them while keeping them rich.
Step 2: Painting the Fronds
-
Base green mixes:
Mix three puddles of green: a light yellow-green (Sap Green + Yellow Ochre), a mid-tone green (Olive Green), and a shadow green (Olive Green + touch of Payne’s Grey). -
Spine structure:
Using a size 2 brush and your mid-tone green, carefully paint the central spines (rachis) of each frond following your pencil lines. -
Leaflet direction:
Switch to your fine liner brush. Start painting the individual leaflets. These should grow out from the spine in a ‘V’ shape. Note that near the center, they point upward, and on the lower branches, they hang downward. -
Layering density:
Paint the leaflets with quick, flicking motions to get sharp tips. Don’t worry if they overlap; this adds realism. -
Adding depth:
Once the first layer is dry, come back with your shadow green. Paint fine lines near the spine where the leaflets originate to create depth and volume. -
Highlighting:
I like to use a very watery yellow-green mix on the topmost fronds to suggest sunlight hitting the canopy.
Step 3: Painting the Trunk
-
Base trunk wash:
Mix a watery Burnt Umber. With a size 6 brush, apply a light wash over the entire trunk area. -
Bark texture mapping:
While the wash is still slightly damp, drop in concentrated Burnt Umber into the diamond patterns you sketched earlier. Let the paint bloom slightly for soft edges. -
Defining the scales:
Once the previous layer is dry, mix Burnt Umber with Payne’s Grey for a dark brown. Outline the diamond-shaped leaf scars on the trunk. -
Deepening shadows:
Add shadows underneath each diamond ‘scale’ to give the trunk a 3D cylindrical form. Keep the center of the trunk slightly lighter.
Make it Pop
Use a white gel pen to add tiny highlights to the tips of the sunlit fronds or the edges of the trunk scales for extra dimension.
Step 4: Finishing Touches
-
The crown center:
Paint the area where the fronds meet the trunk with a mix of dark brown and green. Just dab the brush here to create a dense, textured look. -
Base foliage:
Wet the paper at the bottom corners with clean water. Drop in various shades of green using a size 10 brush, letting the colors bleed naturally to create soft, out-of-focus bushes. -
Contrast check:
Step back and assess your painting. If the fronds look flat, go back in with your darkest green mixture and add a few sharp, dark lines in the densest parts of the canopy.
Peel off the tape carefully to reveal a crisp border around your beautiful botanical study


Have a question or want to share your own experience? I'd love to hear from you in the comments below!