
Whenever I need a quick painting win, I reach for a sailboat—it’s basically an instant story floating on water. These sailboat painting ideas range from super simple silhouettes to juicy, textured seascapes you can really sink your brush into.
Sunset Sailboat Silhouette
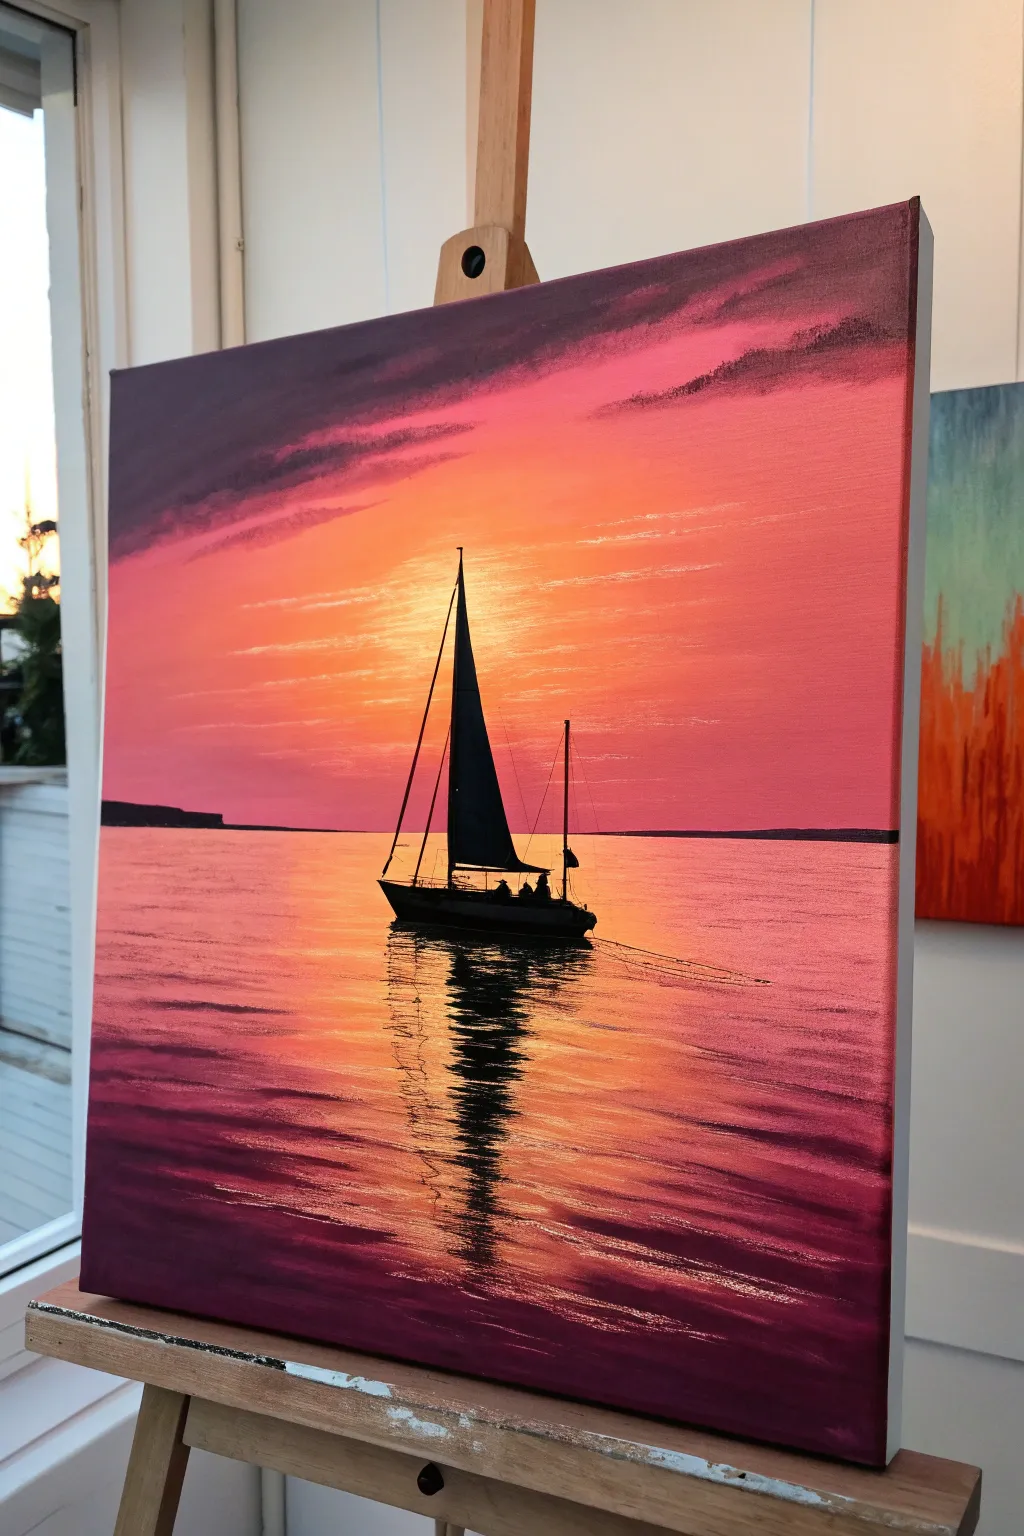
Capture the serene beauty of a sailboat drifting through a blaze of sunset colors with this striking acrylic painting. By mastering the gradient blend of warm oranges and cool purples, you will create a stunning backdrop for a crisp, black silhouette.
Detailed Instructions
Materials
- Stretched canvas (rectangular format)
- Acrylic paints: Titanium White, Cadmium Yellow, Cadmium Orange, Magenta (or Alizarin Crimson), Dioxazine Purple, Mars Black
- Large flat wash brush (for background)
- Medium filbert brush (for clouds and water)
- Small round brush (for details)
- Liner brush (for rigging)
- Palette knife (optional for texture)
- Water cup and paper towels
- Pencil for sketching
- Ruler
Step 1: Setting the Scene
-
Establish the horizon:
Position your canvas vertically on the easel. Use a ruler and a light pencil touch to draw a straight horizontal line about one-third of the way up from the bottom edge. This separates the sky from the water. -
Prime the sun area:
Mix a large amount of Titanium White with a tiny touch of Cadmium Yellow. Paint a circular glow in the center of the sky area, just above where the boat will eventually sit, blending outward to create a soft, radiant light source.
Smooth Gradients
Keep your brush slightly damp and use a ‘criss-cross’ stroke to blend transition zones (like orange to pink) while the paint is still wet for a seamless fade.
Step 2: Painting the Sky Gradient
-
Apply the orange band:
While the yellow center is still tacky, mix Cadmium Orange with a little yellow. Using a large flat brush, paint horizontal strokes around the sun area, blending inward so the orange melts softly into the bright yellow center. -
Introduce magenta:
Move further up the canvas and switch to pure Magenta. Paint horizontal bands above the orange, blending the wet edges where the colors meet. The sky should transition smoothly from the bright sun to orange, then to deep pink. -
Deepen the upper sky:
For the very top of the canvas, mix Dioxazine Purple with a little Magenta. Apply this dark mixture to the top corners and upper edge, blending it down into the pink area to create a dramatic, dusky frame. -
Add soft clouds:
Using a clean filbert brush and the purple-magenta mix, lightly scumble in some streak-like clouds across the upper sky. Keep the strokes loose and horizontal to mimic wind-swept clouds.
Make It Sparkle
Use a tiny dotting tool or the back of a brush to add a few pure white specular highlights on the water nearest the viewer for an extra glistening effect.
Step 3: Creating the Reflective Water
-
Mirror the colorful sky:
Recreate the sky’s gradient on the water surface, but in reverse. Start with the dark purple at the very bottom edge, moving up to magenta, then orange, and finally the bright yellow-white mix just below the horizon line. -
Blend the water hues:
Use horizontal, side-to-side sweeping strokes to blend the water colors. Unlike the smooth sky, allow slight brush texture here to suggest the movement of water. -
Define the horizon line:
Mix a dark purple-black shade. Carefully paint the distant landmass on the horizon line on the left side, keeping it low and flat. Let the entire background dry completely before moving to the next phase.
Step 4: The Sailboat Silhouette
-
Draft the boat shape:
Once the canvas is dry, use a pencil to lightly sketch the hull of the boat in the center foreground. Draw the tall vertical mast and the triangular shape of the main sail. -
Paint the hull:
Using Mars Black and a small round brush, fill in the shape of the boat’s hull. Ensure the bottom edge is slightly uneven to suggest it is sitting *in* the water, not just on top of it. -
Fill the sails:
Paint the main sail black. I find it helpful to use steady, long strokes for the straight edges of the sail to keep them sharp against the bright sunset background. -
Add rigging and details:
Switch to a liner brush with watered-down black paint (ink consistency). Paint the fine lines for the mast, the secondary mast, and the rigging ropes connecting them. Add small bumps on the deck for the passengers.
Step 5: Reflections and Highlights
-
Create the hull reflection:
Using black, paint horizontal zigzagging lines directly below the boat hull. Make the zigzags wider near the boat and narrower as they move down, mimicking the distortion of ripples. -
Add water ripples:
Mix a dark purple-magenta shade. Paint thin, horizontal lines across the water surface, breaking up the bright reflection path to show the texture of waves. -
Enhance the sun path:
Reload your small brush with the bright yellow-white mix. Add concentrated highlights in the center of the water, right around the dark reflection of the boat, to emphasize the sun’s glare hitting the waves. -
Refine the clouds:
If the sky looks too flat, add a subtle highlight to the bottom edges of the purple clouds using a touch of orange-pink, suggesting the sun is illuminating them from below. -
Final assessment:
Step back and check your contrast. If the silhouette isn’t dark enough, apply a second coat of black to make it truly opaque against the vibrant light.
Sign your name in the corner and enjoy the permanent sunset you’ve created

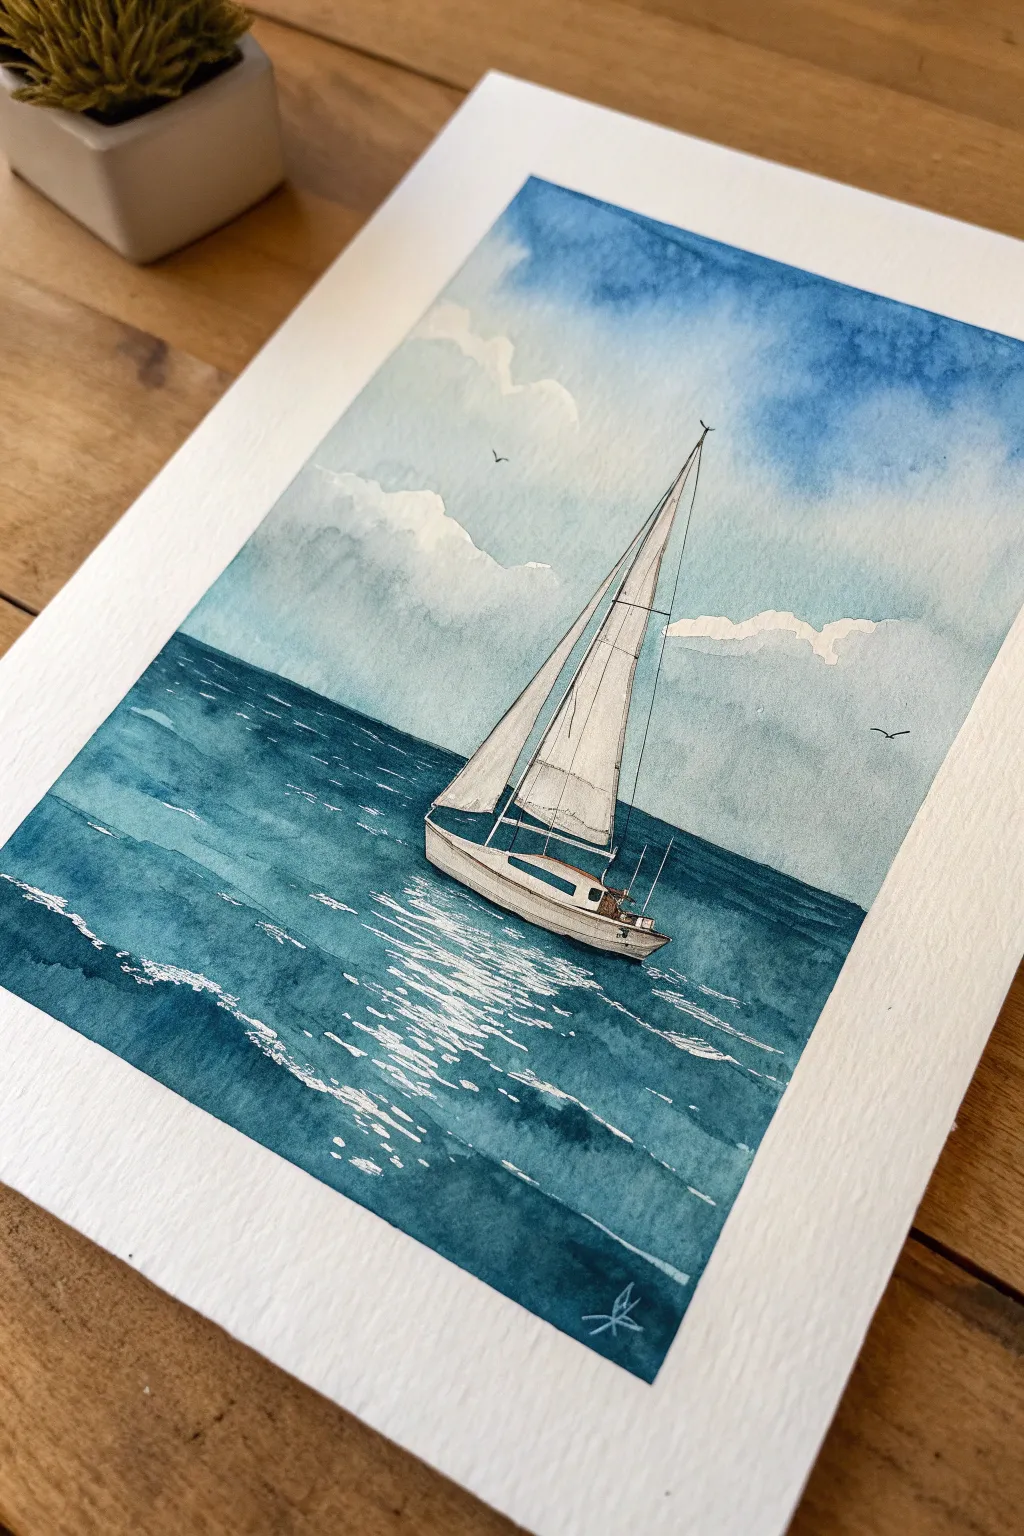
Sailboat on Open Ocean Horizon
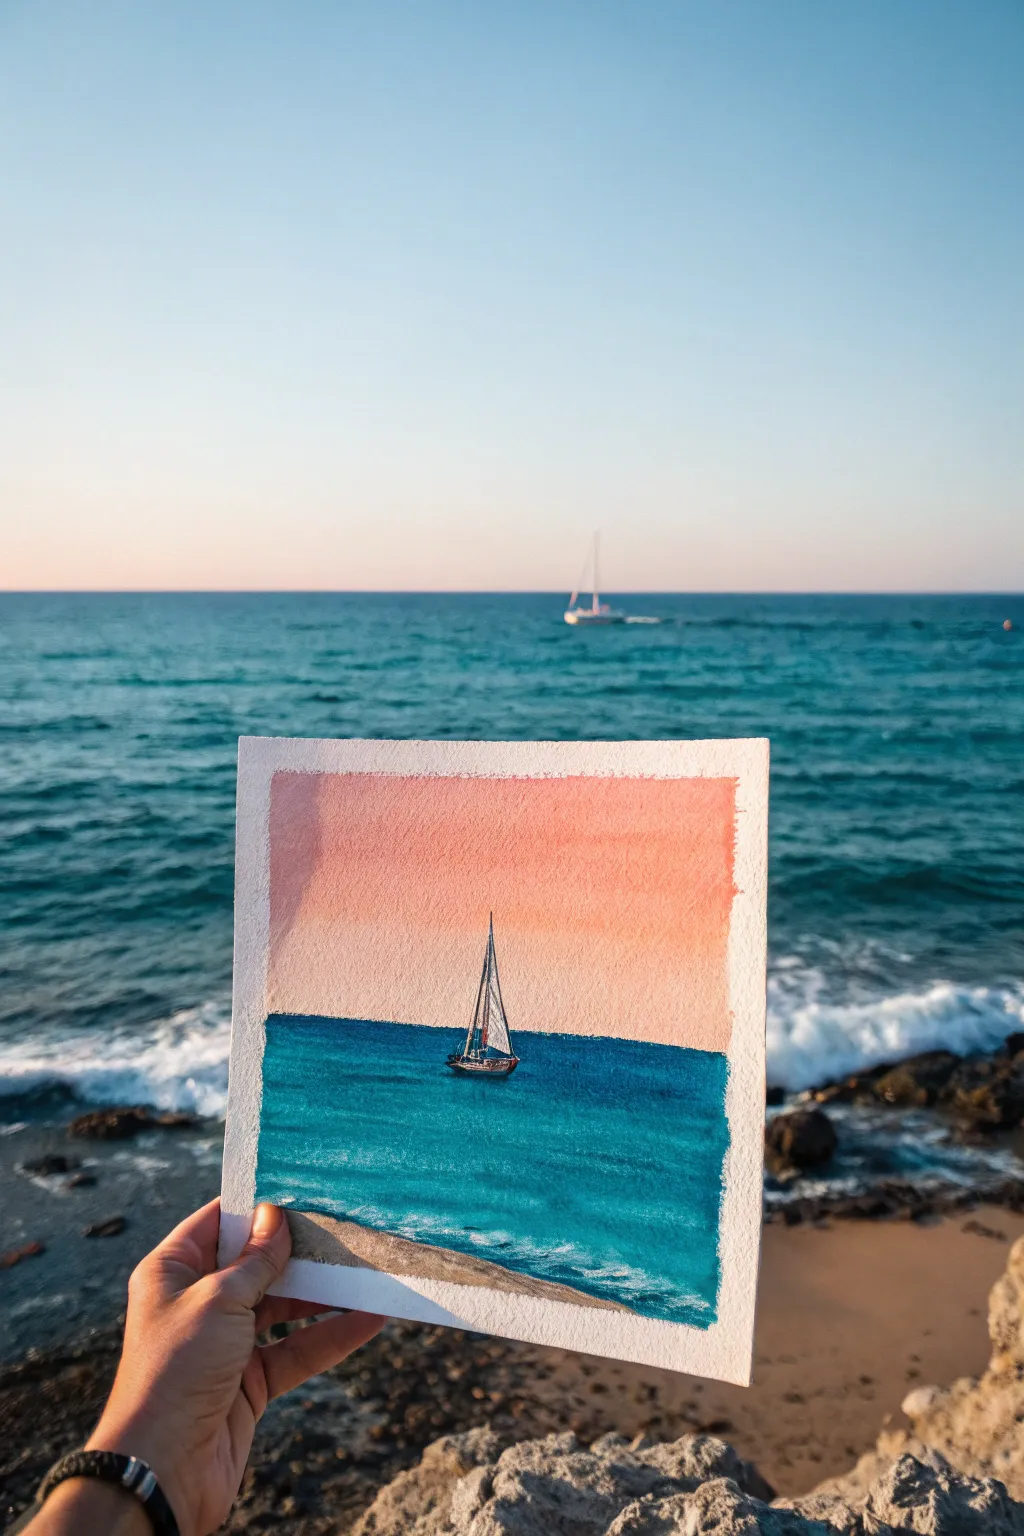
Capture the peaceful essence of a lone sailboat drifting on a vast ocean with this vibrant watercolor project. The composition relies on bold color blocking and wet-on-wet gradients to create a stunning contrast between the salmon-hued sky and deep turquoise waters.
Step-by-Step
Materials
- Cold press watercolor paper (300 gsm)
- Masking tape or artist tape
- Watercolor paints (Salmon Pink, Cobalt Blue, Phthalo Blue, Indigo, Burnt Sienna)
- Flat wash brush (3/4 inch)
- Round brushes (size 4 and size 0 for details)
- White gouache or white gel pen
- Jar of clean water
- Paper towels
- Pencil and eraser
Step 1: Preparation and Sketching
-
Tape the Edges:
Secure your watercolor paper to a hard board using masking tape. Cover about a quarter-inch on all four sides to create a crisp white border later. -
Establish the Horizon:
Using a ruler and a light pencil touch, draw a straight horizontal line across the paper. Place it slightly below the center marks to give the sky dominance. -
Sketch the Sailboat:
in the center of the horizon line, sketch a small, simple sailboat profile. Draw a vertical mast and two triangular sails, keeping the hull quite small to emphasize the scale of the ocean.
Bleeding Horizon?
If blue ocean paint bleeds into your pink sky, dab it immediately with a clean paper towel. Wait for it to dry fully, then gently re-paint the straight line with thick, opaque paint
Step 2: Painting the Sky
-
Pre-wet the Sky Area:
With your larger flat brush and clean water, gently wet the entire sky area above the horizon line. Avoid the sails if you can, but don’t worry too much as the boat will be painted darker later. -
Apply the Base Pink:
Load your brush with a watery mix of Salmon Pink. Start painting from the top of the sky downwards, using horizontal strokes. -
Create the Gradient:
As you move closer to the horizon line, dilute the paint on your brush with more water. This should create a soft fade from a rich pink at the top to a nearly white, pale wash at the horizon. -
Refine the Blend:
Clean and dry your brush slightly, then run it horizontally across the transition areas to smooth out any harsh lines while the paper is still damp. -
Let it Dry Completely:
Stop working on the sky and let the paper bone dry. If you paint the ocean too soon, the blue bleeding into the pink sky will ruin the horizon sharpness.
Step 3: Painting the Ocean
-
Define the Horizon Line:
Using a size 4 round brush loaded with a mix of Cobalt Blue and Phthalo Blue, carefully paint a sharp, straight line right along your pencil horizon mark. -
Fill the Upper Water:
Switch to the flat brush and fill the area just below the horizon with this deep blue mix. Use horizontal strokes to mimic distant waves. -
Transition to Turquoise:
As you move down the page, mix a little more water and perhaps a touch of green or turquoise into your blue. This suggests the clearer, shallower water often seen closer to shore. -
Add Texture While Wet:
While the blue wash is still shiny and wet, drop in tiny amounts of darker Indigo blue near the bottom corners to create depth and visual weight. -
Lift Highlights:
I find it effective to use a clean, thirsty brush (damp but not dripping) to lift out a few horizontal streaks in the foreground blue. This suggests the crests of rolling waves. -
Dry the Ocean Layer:
Allow the ocean section to dry completely before moving on to the final details.
Level Up: Sun Reflection
Before the ocean layer dries, scratch a few horizontal lines directly under the boat with a credit card edge or palette knife to create sparkling sunlight reflections on the water
Step 4: Sailboat and Final Details
-
Paint the Hull and Mast:
Using your smallest detail brush (size 0) and a thick mix of Indigo and Burnt Sienna, carefully paint the hull of the boat and the thin vertical line of the mast. -
Add the Sails:
Paint the sails white if you preserved the paper white, or use opaque white gouache to paint them over the background if needed. Add faint grey shadows to show the curve of the wind filling them. -
Create Sea Foam:
Take your white gouache or a white gel pen and add tiny horizontal dashes in the blue water, concentrating them in the foreground to look like sea foam or whitecaps. -
Paint a Distant Beach (Optional):
If you want the beach look from the reference, add a sliver of light tan (Burnt Sienna + water) at the very bottom right corner. -
The Reveal:
Once everything is perfectly dry, slowly peel away the masking tape at a 45-degree angle to reveal your clean white borders.
Now you have a serene seascape ready to display or gift to an ocean lover


Moonlit Sailboat Night Scene
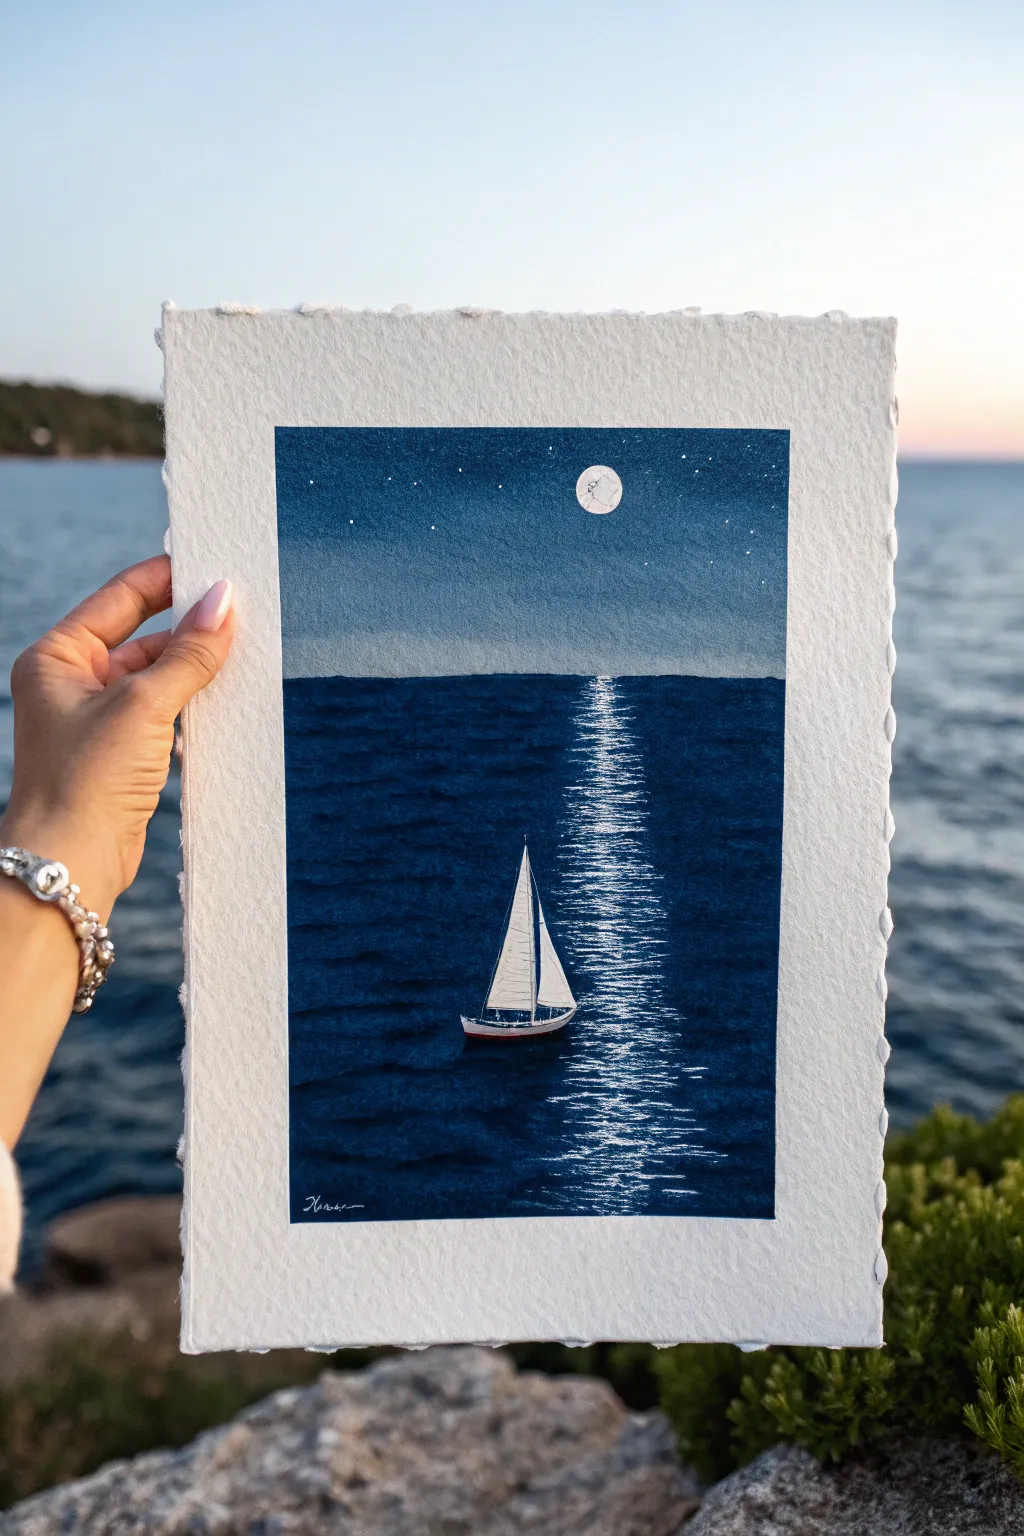
Capture the stillness of a midnight sail with this atmospheric painting that focuses on deep indigo tones and striking light contrasts. The magic of this piece lies in the sparkling reflection of the moon across the dark water, creating a stunning centerpiece for your artwork.
Step-by-Step
Materials
- Cold Press Watercolor Paper (300gsm/140lb)
- Masking Tape or Washi Tape
- Watercolor Paints (Indigo, Prussian Blue, Titanium White/Gouache)
- Flat Brush (3/4 inch)
- Round Brushes (Size 4 and Size 0/00 for details)
- Masking Fluid (optional but helpful)
- White Gel Pen or White Gouache
- Pencil and Eraser
- Paper Towels
- Two Jars of Water
Step 1: Preparation and Sketching
-
Secure the paper:
Begin by taping down all four edges of your watercolor paper to a board. Ensure the tape is pressed down firmly to create that crisp, clean white border seen in the final piece. -
Establish the horizon:
Pencil in a straight horizontal line slightly below the center of the paper. This will separate your sky from the ocean. -
Sketch the focal points:
Lightly draw a small circle in the upper center-right for the moon. Then, sketch the simple triangular shape of the sailboat sails and the hull in the lower center, positioning it slightly to the left of where the moon reflection will fall. -
Protect the white areas:
Apply masking fluid carefully over the moon circle and the entire sailboat shape. Allow this to dry completely. If you don’t have masking fluid, you will need to paint very carefully around these shapes.
Step 2: Painting the Night Sky
-
Mix the sky color:
Create a gradient wash mix using Indigo and a touch of Prussian Blue. You want a distinct transition from darker at the top to slightly lighter near the horizon. -
Apply the wash:
Using your flat brush, wet the sky area with clean water first (wet-on-wet technique). Load your brush with the dark blue mix and paint from the top edge down. -
Create the fade:
As you approach the horizon line, dilute your paint slightly with water or lift a little pigment to make the sky paler near the sea line. Let the sky dry completely. -
Paint the stars:
Once the sky is bone dry, load a stiff brush or toothbrush with white gouache. Flick the bristles to spatter tiny stars across the top portion of the sky.
Uneven Wash?
If your sky dries with “blooms” or watermarks, lightly glaze over the entire dry sky with a very diluted layer of the same blue. This unifies the texture and hides imperfections.
Step 3: Creating the Deep Ocean
-
Mix the ocean hue:
Prepare a very concentrated mix of Indigo. The water needs to look significantly darker and deeper than the sky to create contrast. -
Base layer for water:
Paint the entire ocean area below the horizon line with this dark Indigo mix. Ensure you get a crisp, straight line against the sky. -
Texture the water:
While the paint is still damp but not soaking wet, drop in even darker pigment (Indigo mixed with a tiny bit of Black) in horizontal streaks to suggest waves and depth. -
Dry completely:
Let this ocean layer dry thoroughly. If the paper feels cool to the touch, it’s still wet.
Sparkle Control
Use a dry brush technique for the moon reflection. Wipe most paint off your brush so it only catches the texture of the paper, creating natural-looking sparkles on the water.
Step 4: The Moonlit Path and Sailboat
-
Remove masking fluid:
Gently rub away the masking fluid from the moon and sailboat to reveal the stark white paper underneath. -
Paint the moon reflection:
I prefer using thick white gouache for this step. Using a size 0 detail brush, paint fine horizontal lines starting directly under the moon. Keep the lines short and broken, widening the path slightly as it moves toward the bottom of the page. -
Build the shimmer intensity:
Concentrate the white lines in the center of the reflection path, creating a solid core of light, and let the lines break up more at the edges to mimic light dancing on ripples. -
Detail the moon:
Add very subtle grey shadows to the moon circle to give it texture, rather than leaving it a flat white circle. -
Define the sailboat:
Outline the sails and hull very thinly with your dark Indigo mix. Paint the hull dark, leaving a tiny white rim at the top for definition. -
Add sail shadows:
Paint faint grey vertical lines or shadows on the sails to show their curvature and structure. -
Final reflection touch:
Add a few tiny white highlights on the water near the boat hull to ground it in the scene. -
The reveal:
Once everything is perfectly dry, slowly peel off the border tape at a 45-degree angle to reveal your clean edges.
Enjoy the peaceful atmosphere your new seascape brings to the room


Stormy Sailboat in High Wind
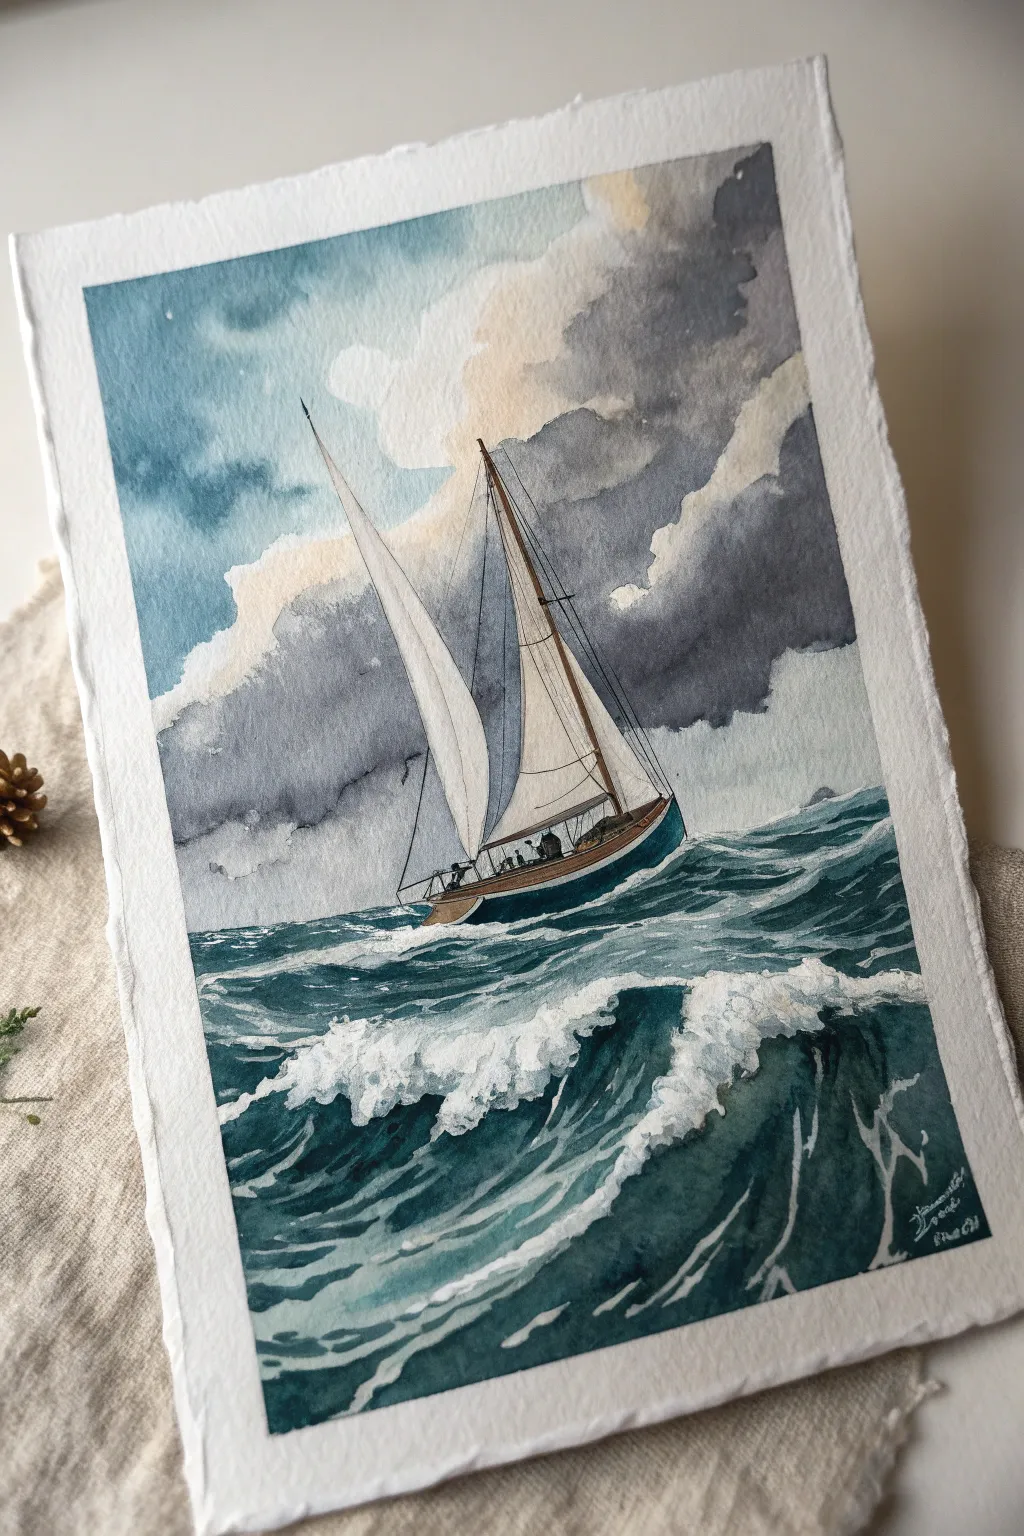
Capture the drama of the high seas with this moody watercolor painting featuring a steadfast sailboat cutting through choppy waves. You’ll layer stormy greys and deep teals to create contrast against the stark white sails and foaming spray.
How-To Guide
Materials
- Cold Press Watercolor Paper (300 gsm)
- Watercolor Paints (Payne’s Grey, Indigo, Phthalo Blue/Green, Burnt Sienna, Yellow Ochre)
- Round Brushes (Size 8 for washes, Size 2 for details)
- Masking Fluid (optional but helpful)
- Old toothbrush (for spray)
- White Gouache or White Gel Pen
- Pencil (HB) and Kneaded Eraser
- Painter’s Tape and Board
Step 1: Sketch and Sky
-
Tape and Trace:
Begin by taping your paper securely to a board to prevent warping. Lightly sketch the horizon line about one-third up from the bottom, then outline the tilted sailboat, ensuring the mast angles sharply to convey the wind’s force. -
Masking the Whites:
Apply masking fluid carefully to the sails, the white foam caps on the waves, and the boat’s rigging lines. Let this dry completely; this preserves the brilliant white of the paper against the dark colors coming next. -
Wet the Sky:
Using your large brush, wet the entire sky area with clean water. You want the paper glistening but not swimming in puddles. -
Initial Cloud Shapes:
Drop in a mix of Payne’s Grey and a touch of Burnt Sienna into the wet paper for the storm clouds. Let the colors bloom and spread naturally. -
Deepening the Storm:
While the paper is still damp, add concentrated Indigo or Phthalo Blue to the upper right corner to create the heavy, looming storm front. Leave some areas lighter near the boat to suggest breaking sunlight. -
Softening Edges:
Use a clean, damp brush to soften any hard edges in the clouds, blending the dark greys into the lighter blue sky patches on the left.
Don’t Overwork the Water
Ocean waves look best when painted with confident, single strokes. Resist going back in to ‘fix’ a wave once laid down, or you risk creating a muddy texture.
Step 2: The Turbulent Sea
-
Base Ocean Layer:
Mix a deep teal using Phthalo Green and Indigo. Paint the geometric shapes of the waves below the horizon, working around the masked foam areas initially. -
Building Wave Volume:
While the first layer is drying, mix a darker version of your teal. Paint the shadows under the cresting waves to give them form and dimension. -
Defining the Chop:
Switch to a smaller brush and use quick, jagged strokes to create the choppy water surface. Follow the curve of the waves to suggest movement. -
Darkest Depths:
Apply your darkest blue-black mix into the troughs of the foreground waves. This high contrast makes the white foam we’ll reveal later pop.
Vintage Storybook Look
For an illustration style, outline the main wave crests and the boat’s hull with a very fine waterproof ink pen after the paint dries completely.
Step 3: The Vessel and Details
-
Removing the Mask:
Once everything is bone dry, gently rub away the masking fluid to reveal the crisp white paper underneath. -
Painting the Hull:
Use a mix of Burnt Sienna and Indigo to paint the boat’s hull. Keep the top edge sharp, but let the bottom edge blur slightly where it meets the water. -
Sail Shadows:
The sails shouldn’t remain sheer white. Mix a very watery grey and paint subtle shadows along the curved edges to show they are billowing in the wind. -
Rigging Lines:
Take your smallest size 2 brush (or a fine liner) and carefully paint the mast and thin rigging lines with dark brown or black paint, keeping your hand steady. -
Adding Crew Figures:
Dab tiny, abstract shapes of dark paint on the deck to represent the crew huddled against the spray. They don’t need detail, just silhouettes.
Step 4: Atmosphere and Finish
-
Whitecaps and Foam:
Using opaque white gouache, paint over the masked foam areas to add texture. Dry brush the paint on the wave crests to look like breaking water. -
Sea Spray:
I like to load an old toothbrush with white gouache and flick it gently over the meeting point of the boat and water to create a misty spray effect. -
Final Contrast Check:
Step back and assess your values. If the storm clouds dried too light, glaze another layer of grey over them, being careful not to disturb the mast.
Remove the tape to reveal your crisp borders and admire the powerful storm you’ve captured on paper.
BRUSH GUIDE
The Right Brush for Every Stroke
From clean lines to bold texture — master brush choice, stroke control, and essential techniques.
Explore the Full Guide
Simple Line-and-Wash Sailboat
Capture the serenity of a day at sea with this delicate line-and-wash sailboat study. By combining precise ink lines with loose, watery washes of blue and gray, you’ll create a piece that feels both structured and breezy.
Step-by-Step Guide
Materials
- Cold press watercolor paper (approx. 5×7 inches)
- Waterproof fine liner pen (0.1 and 0.3mm, black)
- Watercolor paints (Indigo, Payne’s Gray, Cerulean Blue)
- Round watercolor brush (size 4 or 6)
- Pencil (HB) and kneaded eraser
- Jar of clean water
- Paper towel
Step 1: Penciling the Framework
-
Establish the horizon:
Begin by lightly drawing a horizon line across the bottom third of your paper using your HB pencil. This anchors the boat in the scene. -
Draft the hull:
Sketch a long, sleek curve for the bottom of the boat hull sitting just on top of your water line. Add a slightly straighter line for the deck, angling it upward toward the bow. -
Place the mast:
Draw a tall vertical line rising from the center of the deck. This is your main mast—keep it straight but don’t worry about using a ruler, a hand-drawn line adds character. -
Outline the sails:
Sketch two large triangles for the sails. The mainsail (behind the mast) should curve outwardly as if filled with wind, while the jib (front sail) creates a steeper triangle towards the bow. -
Add figures and details:
Lightly indicate small shapes on the deck to represent people. These don’t need to be detailed—just simple oval shapes for heads and torsos will suffice.
Ink Confidence
Don’t connect every single line perfectly. Leaving small gaps in your ink lines allows the eye to complete the shape and gives the drawing a relaxed, artistic feel.
Step 2: Inking the Details
-
Ink the structural lines:
Switch to your 0.3mm waterproof pen. Trace over the mast and the boom (the horizontal pole at the bottom of the mainsail) with confident strokes. -
Define the rigging:
Use the finer 0.1mm pen to draw the rigging lines. These are the thin ropes extending from the top of the mast to the front and back of the boat. Keep your hand loose to avoid shaky lines. -
Texture the sails:
With the 0.1mm pen, add vertical hatching lines inside the sails. These lines should curve slightly with the sail’s shape to suggest fullness and shadow. -
Detail the crew:
Ink the small figures on the deck. Fill them in loosely with the pen or use cross-hatching to make them appear as dark silhouettes against the white boat. -
Create the waterline:
Draw the bottom edge of the boat with a slightly broken line where it meets the water, suggesting movement. -
Erase pencil marks:
Once the ink is completely dry—I usually wait at least five minutes to be safe—gently embrace the page with your kneaded eraser to remove the graphite guides.
Step 3: Adding the Wash
-
Mix a cloud gray:
Dilute a small amount of Payne’s Gray with plenty of water to create a very faint, transparent wash. -
Paint the clouds:
Dab this pale gray onto the sky area using irregular, fluffy shapes. Keep the edges soft and leave plenty of white paper showing for bright highlights. -
Shadow the sails:
Using the same gray mix, add a touch of shadow to the bottom right corners of the sails to enhance their volume. -
Mix the ocean blue:
Prepare a mix of Indigo and a touch of Cerulean Blue. You want a deep, moody blue that contrasts well with the white hull. -
Paint the water base:
Apply a wash of the blue mix below the boat. Start with horizontal strokes that are darker near the hull and fade out as you move downward. -
Add reflection depth:
While the previous layer is still damp, drop in slightly more concentrated Indigo directly beneath the hull to ground the boat in the water. -
Create water texture:
Use a nearly dry brush with the blue mix to create a few horizontal, scribbly marks in the foreground water. This dry-brush technique mimics ripples and light reflection. -
Final touches:
If needed, reinforce the darkest shadows on the figures or the rigging with one last pass of your pen once the paint is bone dry.
Level Up: Salt Spray
While the blue water wash is still wet, sprinkle a tiny pinch of table salt into the paint. When it dries and you brush it off, it creates a bloom texture that looks like sea foam.
Now you have a charming maritime scene that perfectly balances structure and spontaneity
Bright Regatta of Tiny Sailboats
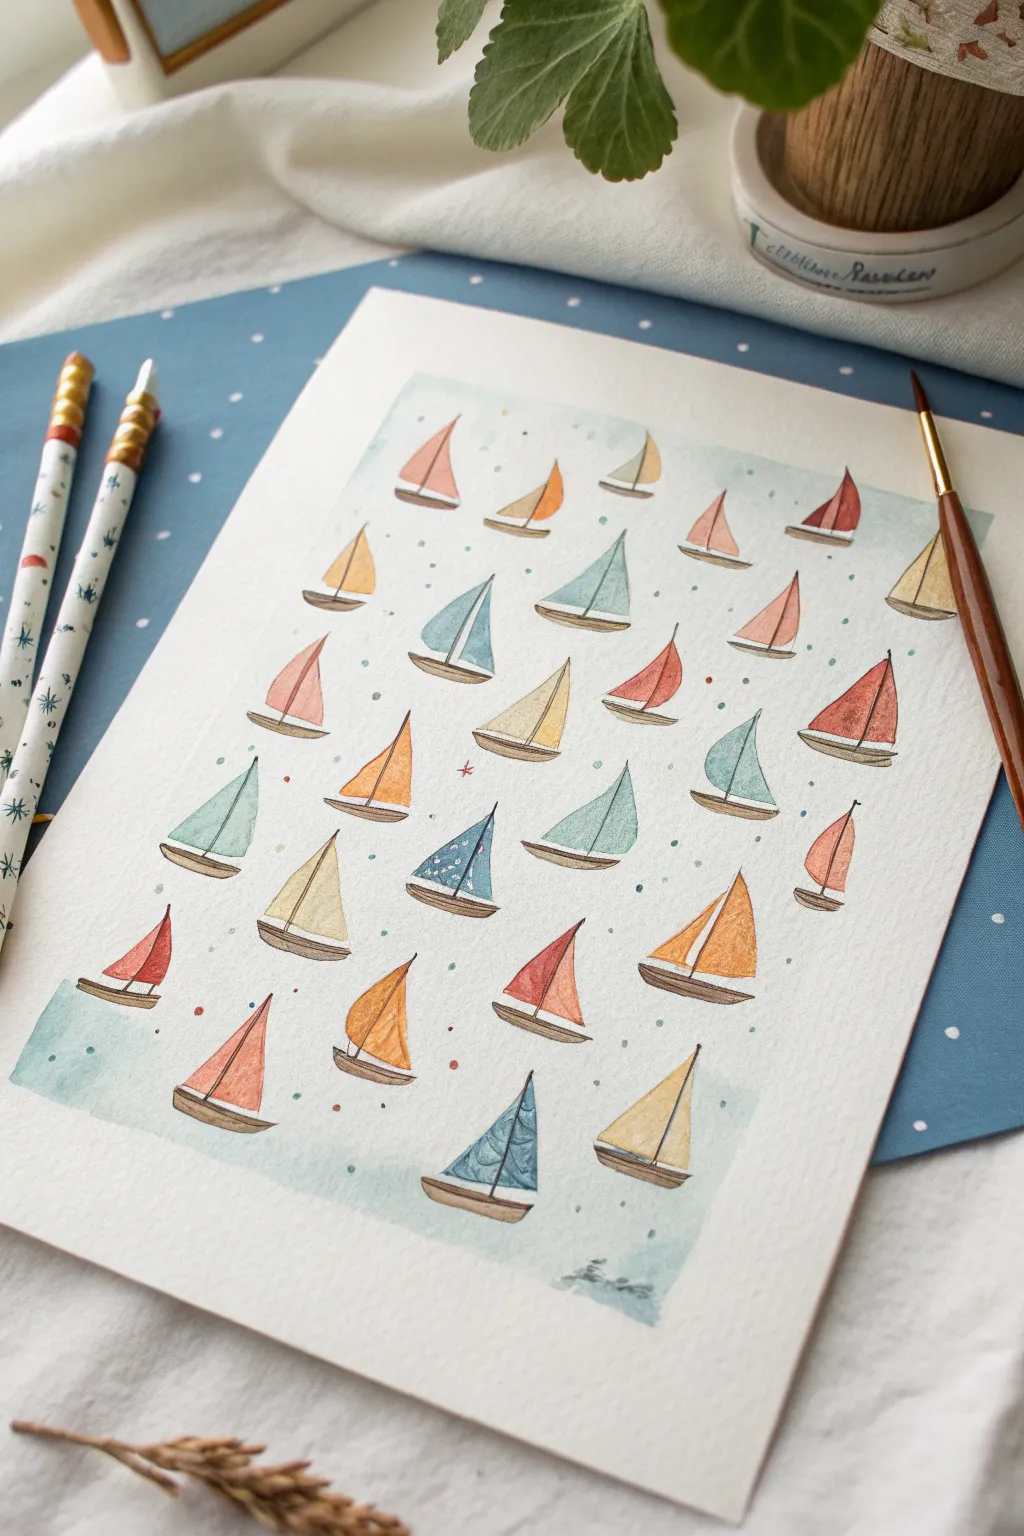
Capture the breezy joy of a summer day with this delightful pattern of miniature sailboats drifting across a sea of soft blue. This watercolor project relies on simple geometric shapes and a limited but warm color palette to create a cohesive and charming piece of wall art.
Detailed Instructions
Materials
- Cold press watercolor paper (A4 or roughly 9×12 inches)
- Watercolor paints (shades of ochre, terracotta, teal, slate blue, and charcoal)
- Small round watercolor brushes (size 2 and 4)
- Pencil (HB or 2H)
- Fine liner pen (brown or dark grey, waterproof) or a very sharp colored pencil
- Ruler (optional)
- Masking tape
- Jar of water
- Paper towels
Step 1: Preparation & Sketching
-
Paper prep:
Begin by taping down your watercolor paper to a hard board or your work surface. This prevents buckling when we add the background wash later and gives you a crisp white border. -
Drafting the grid:
Using a pencil, very lightly sketch a grid of small marks to guide where each boat will sit relative to the others. You don’t need full boxes, just a small dot for the center of each boat to keep the spacing even but organic. -
Sketching the hulls:
Draw the small, curved hulls for the boats first. Keep them simple—just a gentle curve for the bottom and a straighter line for the deck. Vary the angles slightly so they aren’t all perfectly horizontal. -
Adding sails:
Sketch triangular sails rising from each hull. Most boats should have a single large triangle, but feel free to give a few smaller boats a double sail or a different tilt to suggest movement in the wind.
Bleeding Colors?
If sail colors bleed into the background, your paint is too wet. Let the boats dry completely—test with a clean finger—before painting the blue water surrounding them.
Step 2: Painting the Fleet
-
Mixing your palette:
Prepare your colors on a palette. You’ll need a warm yellow ochre, a rusty terracotta red, a dusty pink, a muted teal, and a slate blue. Keep the mixes watery but pigmented enough to stand out. -
Painting warm sails:
Start by painting the sails of about a third of the boats using your warm colors (terracotta, pink, and ochre). Distribute these randomly across the paper so no two identical colors are right next to each other. -
Painting cool sails:
Fill in the remaining sails with your teal and slate blue shades. If you like, you can leave tiny slivers of white paper between the sail and the mast line for a highlight effect. -
Painting the hulls:
Using a diluted brown or a greyish-brown mix, carefully paint the hulls. A slightly darker tone at the very bottom of the hull can add a sense of weight and shadow. -
Adding patterns:
Once the base layers are completely dry, use a detail brush to add tiny polka dots or stripes to a few select sails. I find this creates a lovely patchwork quilt effect.
Make it Metallic
Swap one of the sail colors for gold watercolor paint or a gold ink pen. The metallic sheen will catch the light like sun reflecting on canvas sails.
Step 3: Atmosphere & Details
-
The watery background:
Mix a very distinct, pale watery blue wash. Carefully paint around the boats, filling the negative space. It doesn’t need to be perfectly solid; a little unevenness adds to the water texture. -
Adding confetti dots:
While the background is still slightly damp or just dry, dot in small specks of blue, teal, and rust around the boats. These represent distant buoys, sparkles on the water, or just whimsical decoration. -
Defining the masts:
Using a very sharp brown colored pencil or a fine liner pen, re-trace the mast lines. Make sure the paint is bone dry to avoid snagging the paper. -
Outlining details:
Gently outline the hulls and sails with your pencil or pen. Don’t make the line too rigid; a broken or light line looks more artistic and illustrative. -
Final textural touches:
Add a few darker scribbles of blue near the bottom corner to suggest a small wave or current, grounding the composition. Wait for everything to dry completely before removing the tape.
Peel back your tape to reveal a crisp edge and enjoy your fleet of cheerful little boats ready to brighten any room

PENCIL GUIDE
Understanding Pencil Grades from H to B
From first sketch to finished drawing — learn pencil grades, line control, and shading techniques.
Explore the Full Guide
Close-Up Cropped Sailboat Composition
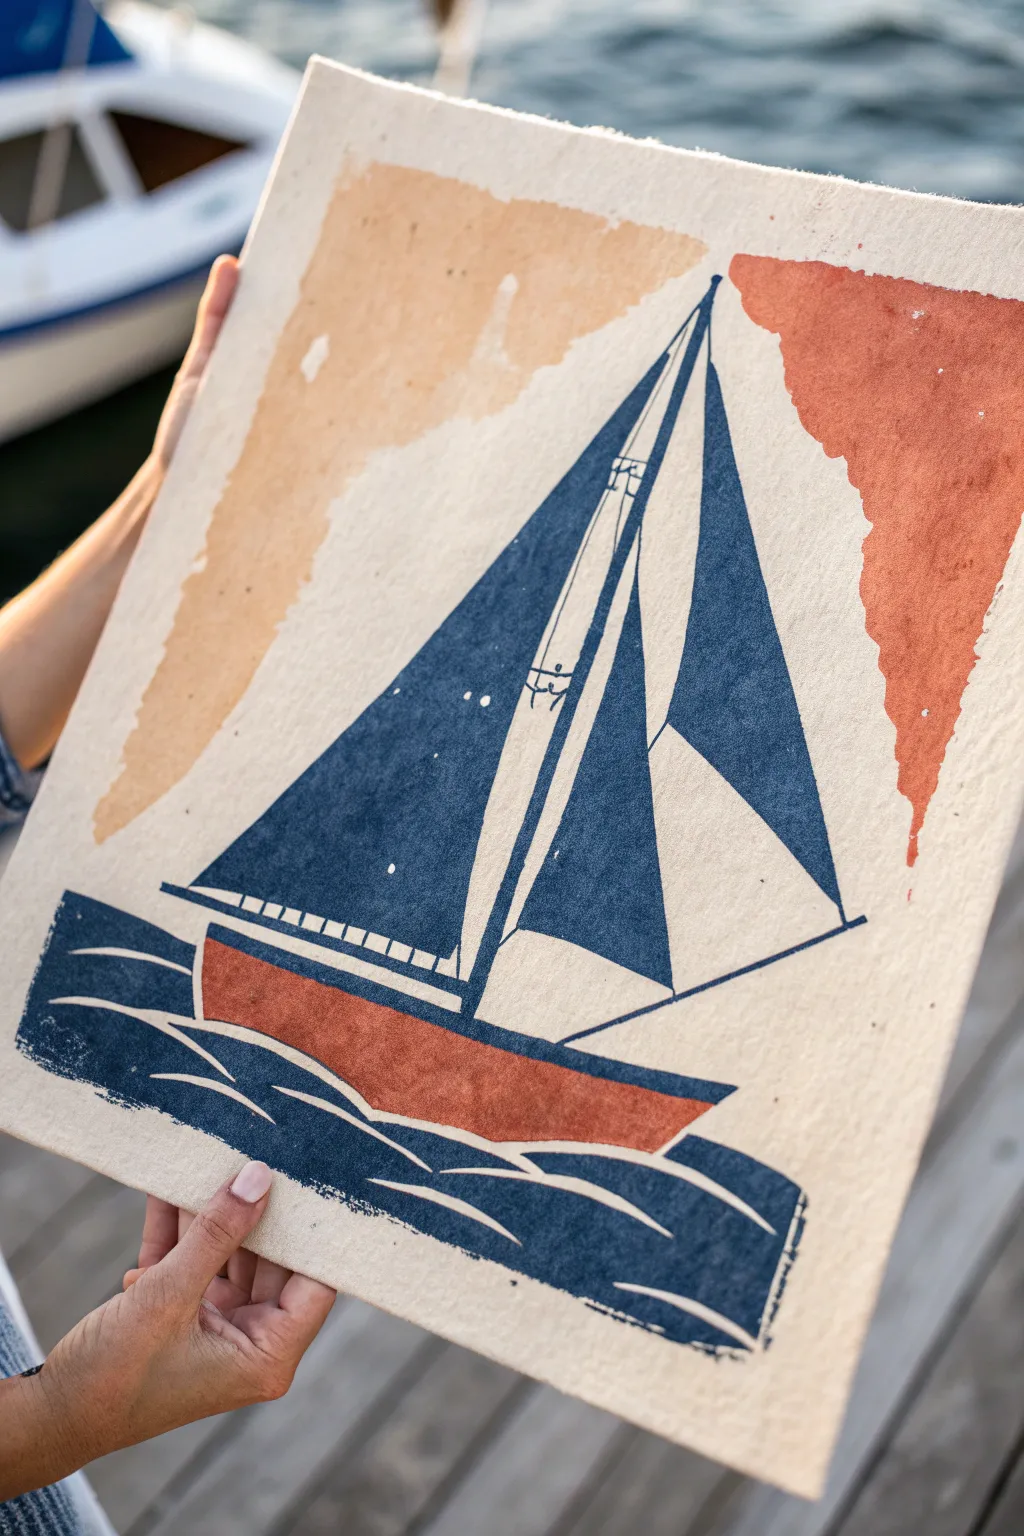
Capture the charm of nautical design with this bold, geometric sailboat artwork created through block printing techniques. The finished piece features a striking contrast of deep navy and rust on textured handmade paper, giving it an authentic, weathered feel.
Step-by-Step Tutorial
Materials
- Soft-cut linoleum block (approx. 8×10 inches)
- Linoleum carving tools (V-gouge and U-gouge)
- Block printing ink (Navy Blue, Rust Orange, Beige/Tan)
- Brayer (rubber roller)
- Handmade or heavy textured paper (cream or off-white)
- Tracing paper and soft pencil
- Baren or wooden spoon (for burnishing)
- Craft knife
- Glass palette or acrylic sheet for rolling ink
- Painters tape
Step 1: Design & Transfer
-
Draft the composition:
Begin by sketching your sailboat design on a piece of paper the same size as your block. Focus on strong geometric shapes—triangles for the sails and a simple curved trapezoid for the hull. -
Add stylized waves:
Below the hull, draw simplified, sweeping lines to represent waves. Keep these lines thick and bold, as they need to be carved out later. -
Transfer the image:
Place tracing paper over your sketch and trace the design with a soft pencil. Flip the tracing paper over onto the linoleum block (graphite side down) and rub the back firmly to transfer the image in reverse. -
Refine the lines:
Go over the faint graphite lines on the block with a permanent marker so you can see exactly where to carve. Mark areas that will be cut away versus areas that will be inked.
Patchy Ink?
If your print looks too salty or speckled, your ink might be too dry. Add a tiny drop of retarder to the ink or check that your paper has enough tooth to grab the pigment.
Step 2: Carving the Block
-
Outline the main shapes:
Using a fine V-gouge tool, carefully carve along the outlines of the sails, the hull, and the wave patterns. Always carve away from your body for safety. -
Clear negative space:
Switch to a wider U-gouge to clear away the large background areas around the boat. You don’t need to make this perfectly smooth; leaving some ridges adds to the handmade texture. -
Detail the sails:
Carve thin lines within the sails to suggest seams or fabric tension. Create the separation between the jib and the mainsail by carving a clear channel between them. -
Separate the colors:
Since this is a multi-color print, you have two options: use the reduction method (carving away more after each color) or, for beginners, physically cut the linoleum block into puzzle pieces—separating the sails from the hull and the background shapes.
Step 3: Inking & Printing
-
Prepare the paper:
Tear your handmade paper to the desired size. If the edges are too sharp, dampen them slightly and tear carefully to create a deckled edge. -
Ink the waves and sails:
Squeeze a small amount of Navy Blue ink onto your glass palette. Roll the brayer until it has a velvety texture, then roll it evenly over the wave section and the sail sections of your block. -
Ink the hull:
Clean your brayer or use a second one to apply Rust Orange ink to the hull section of the boat. -
Apply background accents:
For the abstract shapes in the corners (the rust triangle and beige wash), you can either ink separate block fragments or paint them directly onto the block with a brush if the ink is loose enough. -
Reassemble and register:
If you cut your block into pieces, fit them back together like a puzzle on a clean surface. Ensure they are tight against each other. -
Place the paper:
Carefully lower your handmade paper onto the inked blocks. Once the paper touches the ink, do not shift it. -
Burnish the print:
Using a baren or the back of a wooden spoon, rub the back of the paper in small circular motions. Apply firm, even pressure to transfer the ink from the block to the paper. -
Peel and reveal:
Slowly peel back one corner of the paper to check the ink coverage. If looks spotty, lay it back down and burnish more. When ready, pull the paper completely off the block. -
Finishing touches:
Let the print dry completely, which may take a day or two depending on the ink type. I usually place the print under a heavy book once dry to flatten any curling.
Collage It
Instead of printing the background colors, try printing the boat on a clean sheet first, then gluing torn pieces of colored tissue paper on top for a mixed-media effect.
Hang this striking piece in a simple frame to bring a touch of the seaside to your favorite room
Geometric Color-Block Sailboat
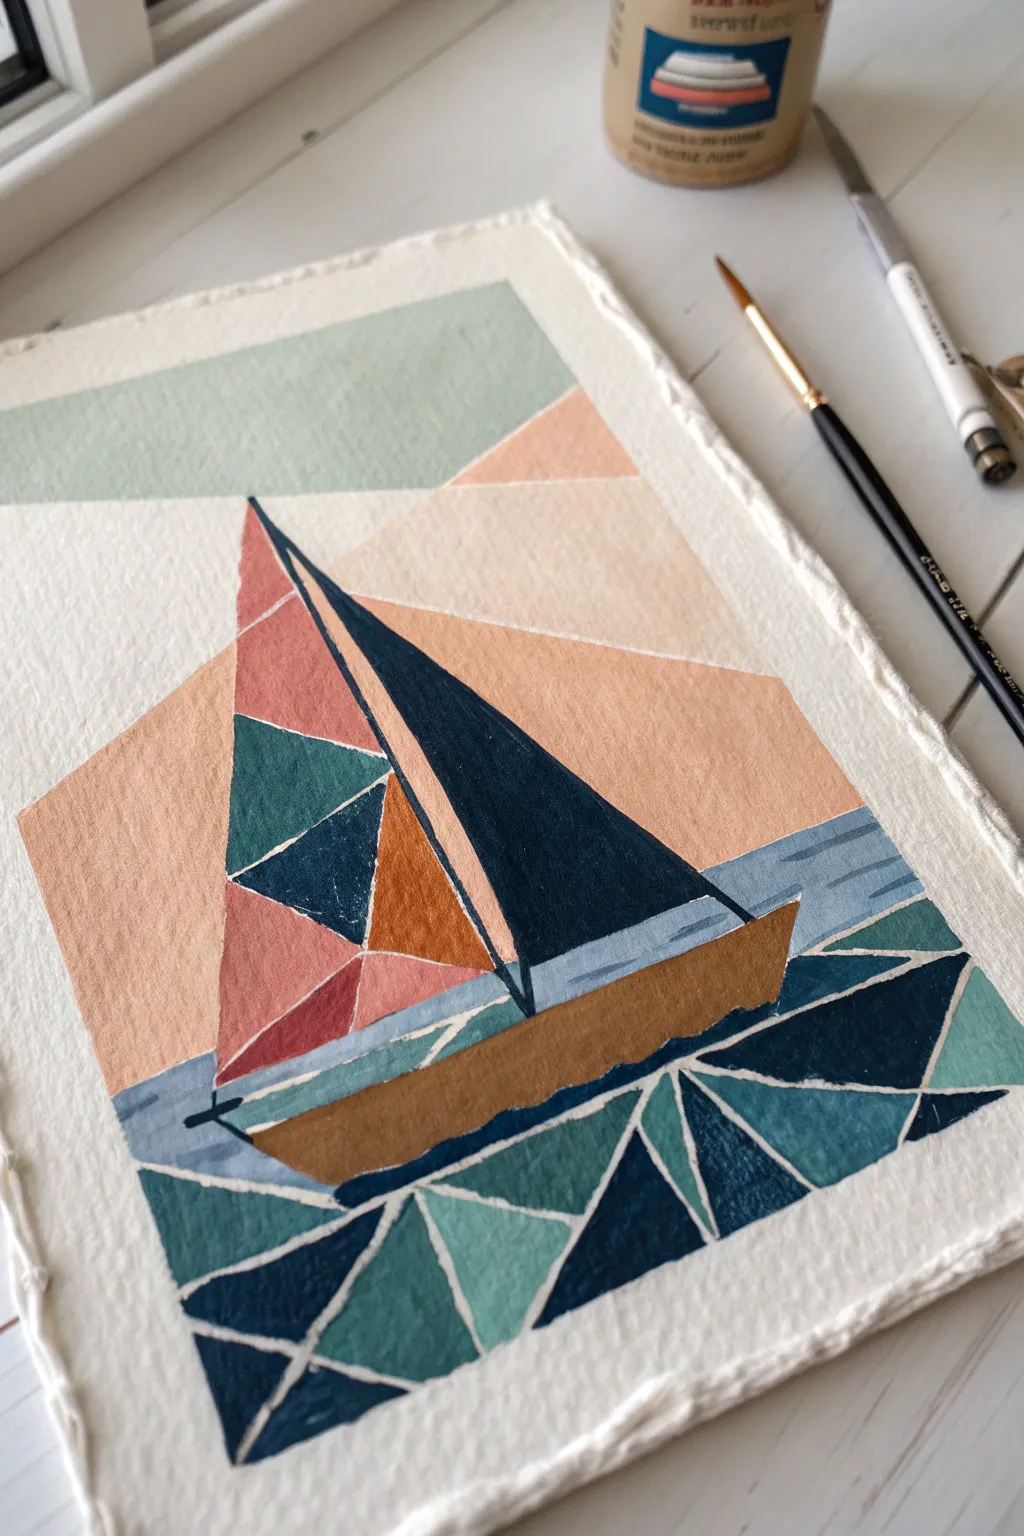
Capture the essence of sailing through sharp shapes and soothing hues with this geometric watercolor project. By leaving intentionally unpainted negative spaces as outlines, you create a modern, stained-glass effect that turns a simple boat into a piece of contemporary art.
How-To Guide
Materials
- Heavyweight cold-press watercolor paper (300gsm or higher)
- Gouache or opaque watercolor paints (Navy Blue, Teal, Peach, Terracotta, Ochre, White)
- Ruler and pencil (HB or lighter)
- Small round brush (size 2 or 4)
- Flat shader brush (size 6)
- Masking tape (optional, for borders)
- Water jar and paper towels
Step 1: Planning the Geometry
-
Analyze the composition:
Visualize the painting as a series of triangles and polygons rather than realistic curves. The sea is made of sharp triangular shards, and the sails are segmented into geometric patches. -
Sketch the hull and mast:
Using a ruler and a very light pencil touch, draw the basic shape of the boat hull near the bottom third of the paper. Add a tall, thin triangle for the main mast leaning slightly backward. -
Draft the sails:
Draw the large mainsail and the smaller jib sail. Instead of drawing them as single shapes, break them down into 3-4 smaller interlocking triangles or quadrilaterals. -
Map the water:
Below the hull, fill the space with random interlocking triangles of various sizes to represent choppy waves. Ensure you leave a small gap between every single line you draw; these gaps will remain unpainted to create the white ‘grout’ lines. -
Draft the background:
Draw a horizon line and abstract angles in the sky. Create a few large, angular sections behind the boat to suggest the sky and distant light.
Step 2: Painting the Sea and Hull
-
Mix your ocean palette:
Prepare three shades of blue: a deep navy (add a touch of black if needed), a medium teal, and a lighter grayish-blue. The gouache opacity is key here for that flat, matte look. -
Fill the water shapes:
Start painting the geometric shards in the water. Randomly alternate between your navy and teal mixtures. Use the round brush to carefully paint up to your pencil lines, leaving that crucial sliver of white paper between shapes. -
Paint the hull:
Mix a warm ochre or light brown shade. Fill in the hull shape. I find using the flat brush here helps keep the long top edge of the boat crisp and straight. -
Add hull shadows:
While the ochre is dry, add a darker brown strip along the bottom edge of the hull and a very thin dark line along the top gunwale to give it dimension.
Uneven White Lines?
If you struggle to keep the white gaps consistent while painting freehand, try using liquid masking fluid or thin graphic art tape over your pencil lines before you start painting.
Step 3: Sails and Sky
-
Color the front sail:
For the front jib sail (the smaller one), use your darkest navy blue. This creates a strong focal point and contrast against the lighter sky. -
Paint the patterned mainsail:
Treat the main sail like a patchwork quilt. Paint the individual geometric sections using terracotta (reddish-brown), peach, dark teal, and ochre. Remember to preserve the white gaps between these internal sections. -
Wash in the sky:
Dilute your peach and very light teal paints slightly more than the other colors. Fill the large background sky shapes. The peach should mimic a sunset glow behind the sails, while the pale teal serves as the upper sky. -
Create the horizon:
Paint the narrow strip of water directly behind the boat with a muted, medium-blue tone. This separates the chaotic foreground waves from the calm background sky.
Try a Night Scene
Swap the peach and terracotta palette for silvers, greys, and deep indigos. Use a bright yellow for a geometric moon in the sky to transform the scene into a night sail.
Step 4: Final Details
-
Clean up edges:
Once everything is fully dry, inspect your white lines. If any paint bridged a gap where it shouldn’t have, you can carefully scratch it away with an X-Acto knife or touch it up with opaque white gouache. -
Add subtle texture:
If desired, dry-brush a tiny amount of lighter pigment over the dark navy sail to suggest fabric texture, keeping it very subtle. -
Erase guidelines:
Gently erase any visible pencil marks remaining in the white negative spaces. Be sure the paint is bone dry to avoid smudging.
Now step back and admire how simple shapes have come together to form a dynamic seascape.


Negative-Space Sailboat Painting
Capture the serenity of the open sea with this striking watercolor composition that balances deep ocean blues against a soft, cloud-filled sky. This project focuses on mastering masking techniques to create sparkling water reflections and precise negative space.
Step-by-Step Tutorial
Materials
- Cold press watercolor paper (300 gsm or higher)
- Painter’s tape or masking tape
- Watercolor paints (phthalo blue, prussian blue, indigo, burnt sienna, cerulean blue)
- Masking fluid (drawing gum) and old brush or ruling pen
- Round watercolor brushes (size 4, 8, and 12)
- Fine liner brush or rigger brush
- Pencil (HB or H for light lines)
- Kneadable eraser
- Two jars of water
- Paper towels
Step 1: Preparation and Sketching
-
Secure the Paper:
Begin by taping down all four edges of your watercolor paper to a board. Use painter’s tape to create a crisp, clean white border, which frames the final piece beautifully. -
Draft the Horizon and Boat:
With a hard pencil (like an H), very lightly sketch the horizon line about one-third of the way up the paper. Sketch the sailboat hull and the tall triangular shapes of the sails, making sure the mast tilts slightly for a sense of movement. -
Apply Masking Fluid:
This step is crucial for the sparkling water effect. Using an old brush or a silicon applicator, apply masking fluid in horizontal, jagged dashes across the water area below the boat. Focus heavily on the reflection area directly under the hull. -
Mask the Boat:
Carefully paint masking fluid over the entire sailboat shape—hull, sails, and mast. This protects the boat so you can paint the sky and sea freely without worrying about edges.
Rub Polish
Rub a bar of dry soap on your masking fluid brush before dipping it. This coats the bristles and makes cleaning the sticky fluid off the brush significantly easier afterward.
Step 2: Painting the Sky and Clouds
-
Wet the Sky Area:
Once the masking fluid is bone dry, wet the entire paper above the horizon line with clean water using your largest brush. The paper should glisten but not have puddles. -
Drop in Sky Blue:
Load a size 12 brush with a mix of cerulean and a touch of phthalo blue. Start from the top right corner, dropping in pigment and letting it flow diagonally down. -
Lift Out Clouds:
While the sky wash is still damp, crumple a clean paper towel. Gently blot the paper surfaces to lift pigment away, creating soft, fluffy white cloud shapes near the center and left side. -
Soften the Horizon:
As you paint down toward the horizon, dilute your blue paint significantly, ensuring the sky is palest right where it meets the water line.
Glistening Waves
If the water highlights feel too harsh after removing mask, gently glaze over them with a very watery layer of bright turquoise to integrate them back into the sea.
Step 3: Creating the Deep Ocean
-
Base Ocean Layer:
Mix a medium-strength wash of phthalo blue and indigo. Paint the entire water section, going right over your masked ripples. Keep your strokes horizontal to mimic calm waves. -
Deepen the Tones:
While the first layer is still slightly wet, charge in a darker mix of indigo and prussian blue at the bottom corners and the foreground. This gradient adds depth and draws the eye inward. -
Add Wave Texture:
Let the ocean layer dry completely. Then, using a size 8 brush and a slightly darker blue mix, paint thin, horizontal lines to suggest swells and movement on the water surface.
Step 4: Refining the Sailboat
-
Remove the Masking:
Ensure the entire painting is completely dry to the touch. Gently rub away the masking fluid from the boat and the water ripples using your finger or a rubber cement pickup tool. -
Paint the Sails:
Using a very dilute, watery mix of burnt sienna and indigo (to make a warm grey), paint faint shadows on the sails. Leave plenty of white paper to suggest sunlight hitting the canvas cloth. -
Detail the Hull:
Paint the hull using a stronger mix of burnt sienna for the wood details and a neutral grey for the sides. Use a fine brush to define the cockpit windows and the connection between the mast and deck. -
Rigging and Final Touches:
Switch to your finest liner brush or even a waterproof ink pen. Draw the thin rigging lines extending from the mast. Keep your hand loose to avoid shaky lines. -
Add Birds:
To bring life to the scene, add two or three tiny, V-shaped silhouettes of seagulls in the distance using a dark grey mix. -
Sign and Reveal:
Sign your work in the bottom corner, possibly using a white gel pen or gouache if the water is very dark. Finally, carefully peel off the border tape at a 45-degree angle to reveal clear, crisp edges.
Step back and admire the crisp contrast between your detailed vessel and the expansive, deep blue ocean.
Bioluminescent Night Sailboat Fantasy
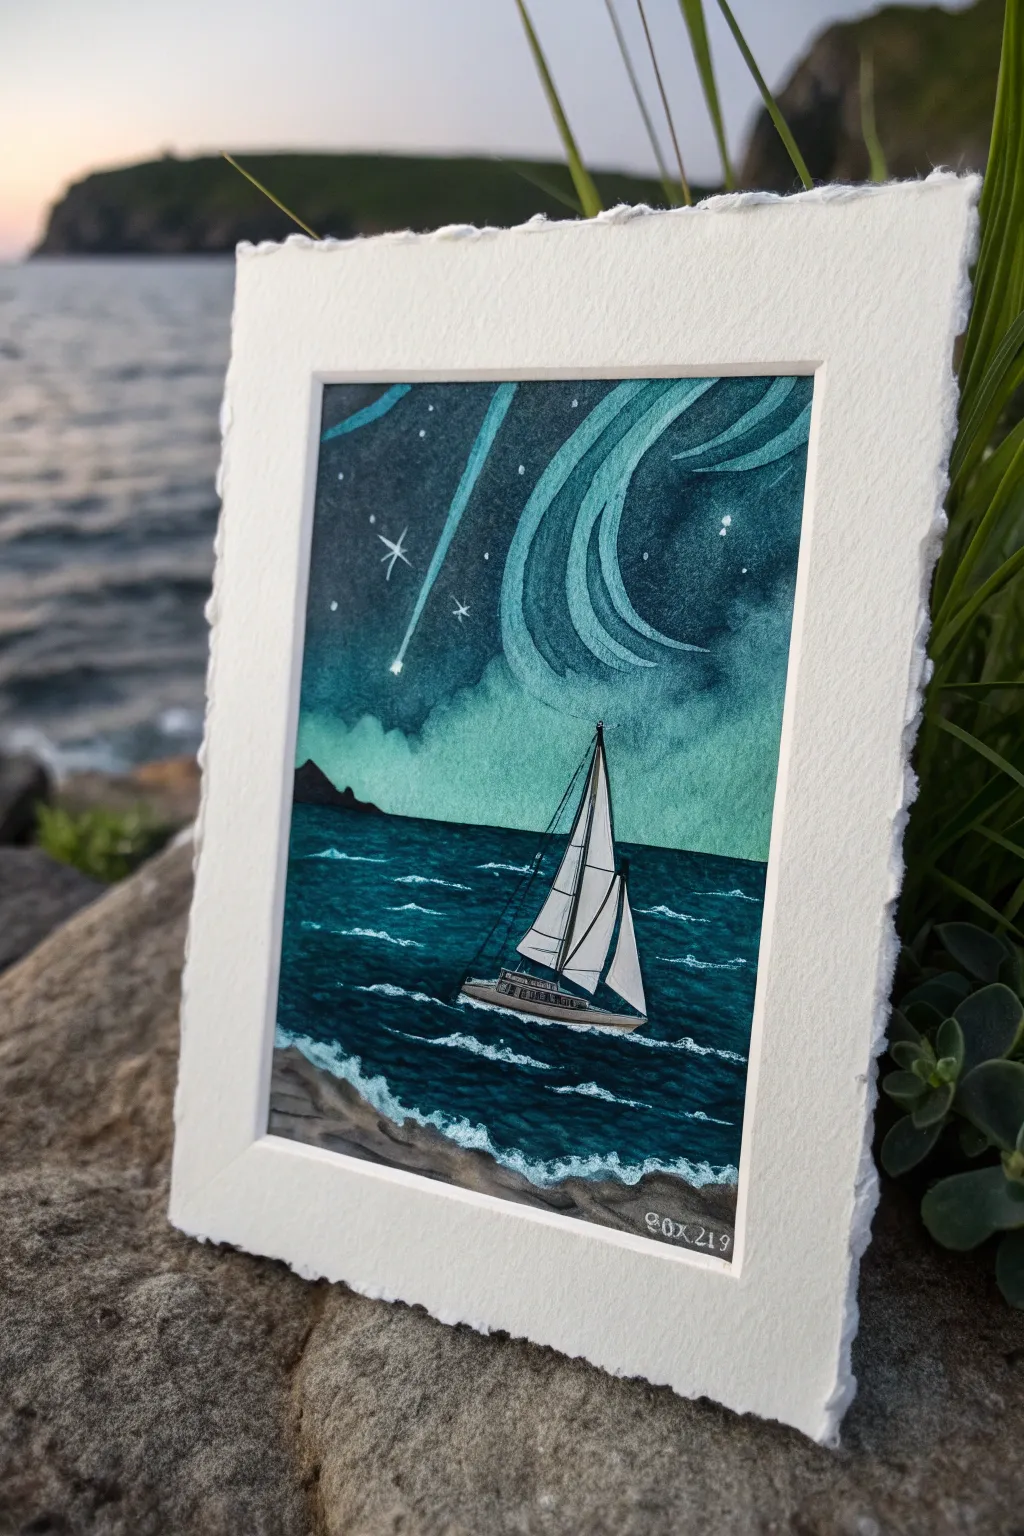
Capture the magic of a midnight voyage with this atmospheric painting that blends deep ocean blues with teal celestial swirls. This mixed-media piece uses watercolor for depth and opaque ink for crisp details, creating a dreamlike scene perfect for any nautical art collection.
Step-by-Step Guide
Materials
- Cold press watercolor paper (300gsm)
- Watercolor paints (Indigo, Phthalo Blue, Turquoise, Emerald Green)
- White Gouache or white acrylic ink
- Fine liner waterproof pens (Black, 0.1mm and 0.3mm)
- Round watercolor brushes (Size 2, 6, and 10)
- Masking tape
- Pencil and eraser
- White gel pen (optional)
- Deckle-edged mat board for framing
Step 1: Planning and Sketching
-
Tape the borders:
Begin by taping down your watercolor paper to a board. Use masking tape to create a clean, sharp rectangular border around your working area, ensuring the paper stays flat when wet. -
Block out the horizon:
Lightly draw a horizon line roughly one-third of the way up from the bottom. It doesn’t need to be perfectly straight; a slight organic curve adds character. -
Sketch the sailboat:
Draw the sailboat in the lower center. Keep the hull simple and geometric. Sketch a tall mast and two main triangular sails, adding a smaller jib near the front. Keep your pencil marks light so they won’t show through the paint. -
Map the sky and land:
Sketch a small, jagged silhouette of land on the far left horizon. In the sky, lightly outline the swooping shapes for the aurora borealis and the trajectory of the shooting star.
Step 2: Painting the Atmosphere
-
Lay the sky wash:
Wet the sky area with clean water first. Drop in a mix of Emerald Green and Turquoise near the horizon, letting it fade upward. While still wet, blend in deeper Indigos at the very top corners to create a night-sky gradient. -
Define the aurora:
While the sky is damp but not soaking, lift out pigment using a thirsty clean brush in the shape of the swooping aurora bands. This creates a soft, glowing base for later details. -
Paint the ocean base:
For the water, use a strong mix of Phthalo Blue and Indigo. Paint horizontal strokes, leaving small gaps of white paper occasionally to represent sea foam. Make the water darkest at the immediate foreground. -
Establish the shore:
Paint the rocky shoreline in the bottom foreground using a dilute mix of brown or grey. Keep it loose and textured to contrast with the smooth water. -
Let it dry completely:
This is crucial—wait until the entire paper is bone dry before moving to the next step to prevent colors from bleeding into your crisp lines.
Starry Night Textures
Sprinkle a tiny pinch of salt onto the wet sky wash before it dries. The salt pushes pigment away, creating unique, organic star-like blooms.
Step 3: Details and Definition
-
Outline with ink:
Using your fine waterproof pen, carefully outline the sailboat, the sails, and the rigging lines. Draw the silhouette of the distant land on the left in solid black. -
Paint the boat deck:
Fill in the hull of the boat with a warm brownish-grey watercolor, carefully painting around your ink lines. Add tiny squares for the cabin windows. -
Enhance the waves:
Use a smaller brush and dark Indigo to paint distinct wave shadows under the white gaps you left earlier. This creates dimension and movement in the water. -
Stipple the sky texture:
I like to take a nearly dry brush with dark blue paint and gently scumble texture around the aurora shapes to make the swirling bands pop out more against the background.
Muddy Water Fix
If your ocean blues look muddy, let the layer dry completely. Glaze over it with a transparent turquoise to bring back vibrancy and depth.
Step 4: Highlights and Magic
-
Add the stars:
Using white gouache or acrylic ink, flick tiny specks of paint across the upper sky for a starry effect. Paint larger, specific stars with a fine brush, adding cross-shapes for twinkling ones. -
Paint the shooting star:
Draw the shooting star with opaque white, dragging the tail downwards so it fades out. Add a few small dots around the ‘head’ of the comet for a sparkling trail. -
Highlight the aurora:
Dilute your white gouache slightly with turquoise and paint smooth, swooping lines over the lifted areas in the sky to define the aurora borealis ribbons. -
Sea foam details:
Use your white gel pen or a very fine brush with gouache to add crisp white crests to the waves and foam where the water meets the shore. -
Final assembly:
Once fully dry, remove the tape. Mount the finished piece inside a textured, deckle-edged mat to replicate the framed look shown in the example.
Place your framed masterpiece near a light source to let those white highlights truly shine


Have a question or want to share your own experience? I'd love to hear from you in the comments below!