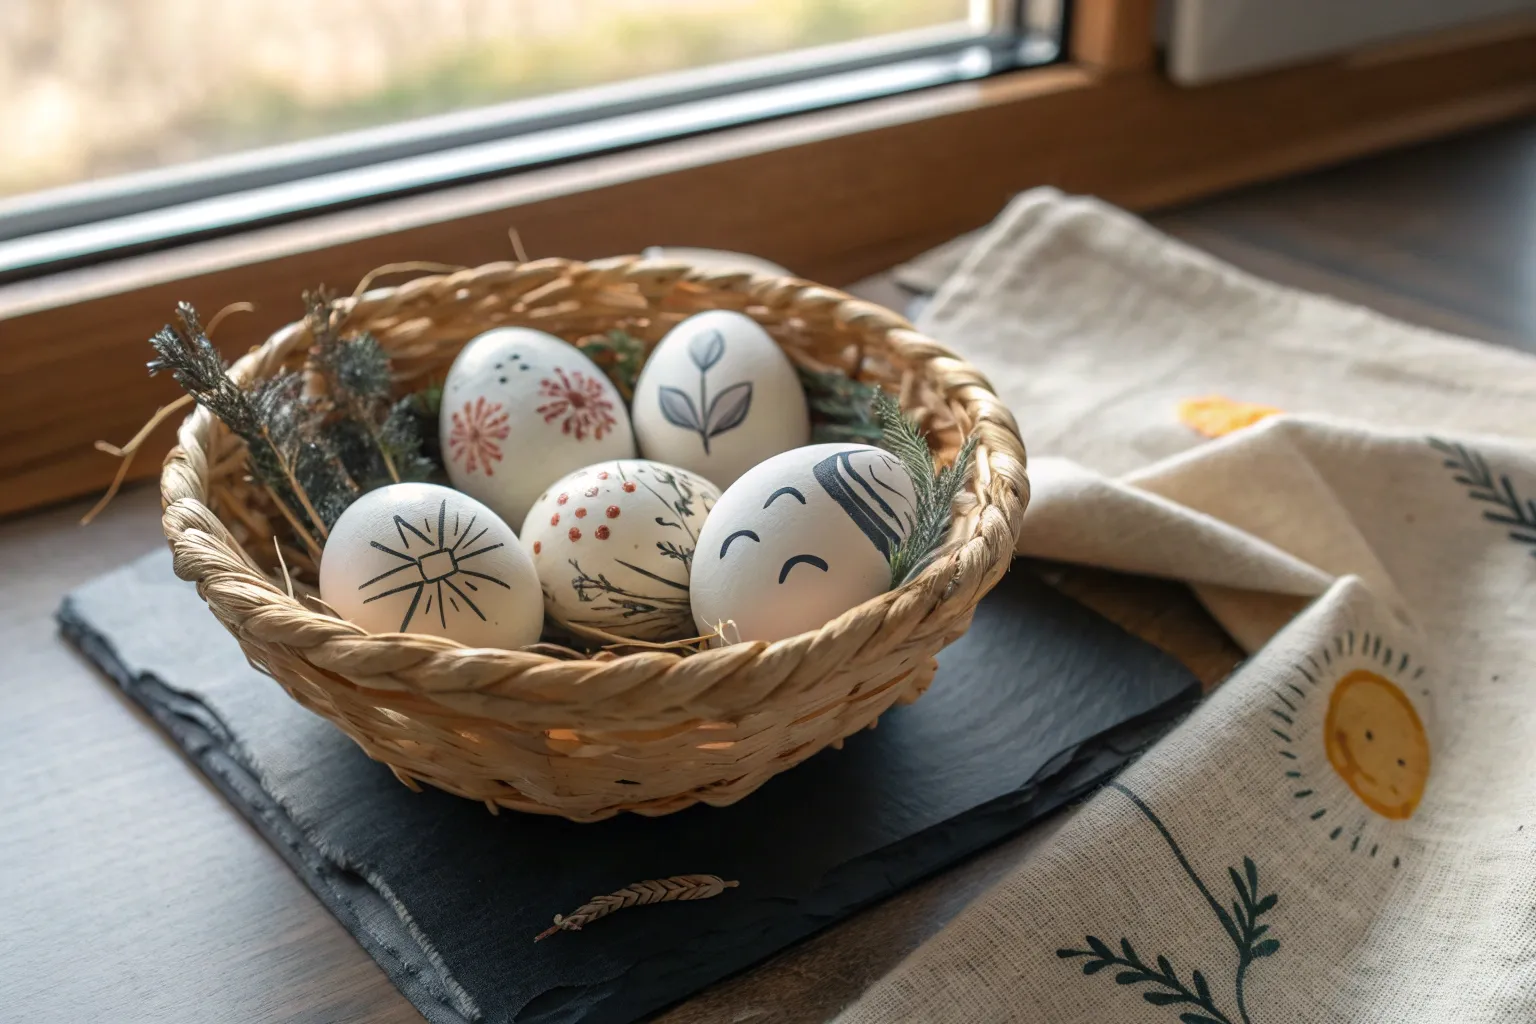
There’s something extra satisfying about egg shell painting—it’s like making miniature art on the most delicate, curved little canvas. Here are my favorite egg shell painting ideas that stay beginner-friendly at the start and get wonderfully weird (in the best way) as you go.
Classic Pastel Egg Shell Florals
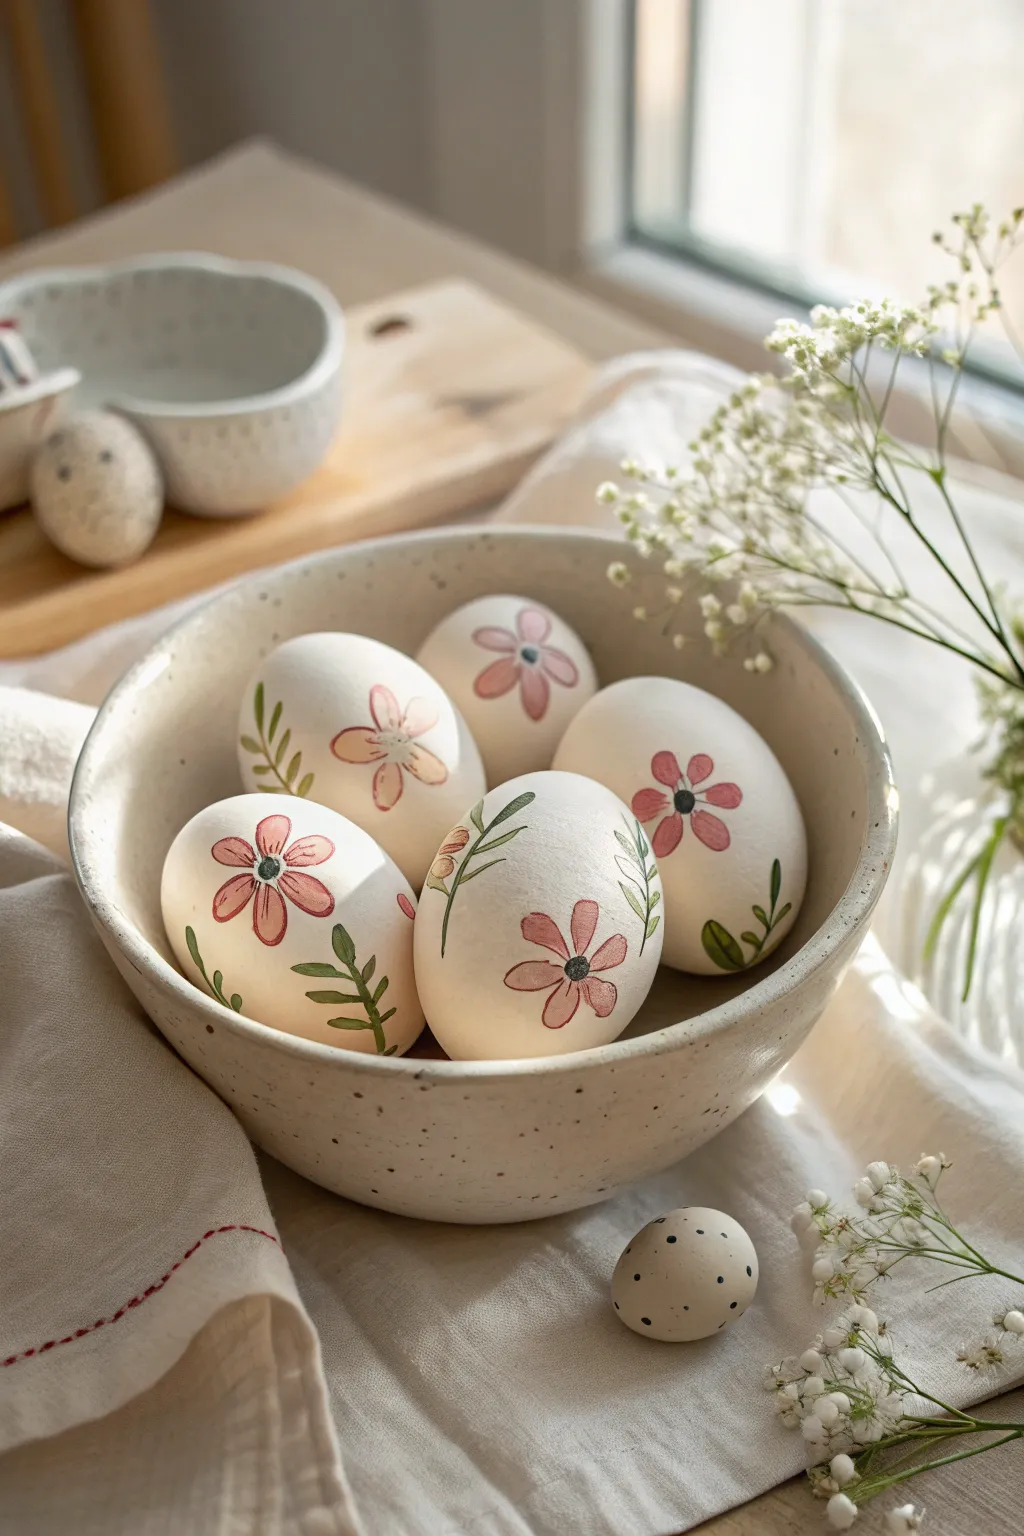
Embrace the softness of spring with these charming hand-painted eggs, featuring simple yet elegant floral motifs on pristine white shells. The design uses a gentle pink and slate green palette to create a vintage botanical look that feels both timeless and fresh.
Step-by-Step Tutorial
Materials
- White or cream-colored eggs (real blown-out shells, wood, or ceramic)
- Acrylic craft paints (dusty rose/warm pink, sage green, dark forest green, black)
- Fine detail paintbrushes (sizes 0 and 00)
- Small palette or ceramic dish for mixing
- Pencil (optional for sketching)
- Egg stand or drying rack (bottle caps work well)
- Matte spray varnish (optional)
Step 1: Preparation and Base Shapes
-
Surface Prep:
Ensure your eggs are clean and dry. If you are using real blown-out eggs, gently wipe them with a vinegar-dampened cloth to remove any oils, which helps the paint adhere better. -
Mixing the Pink:
Create your flower color. Mix a warm pink acrylic paint with a tiny dot of white or a touch of ochre to slightly desaturate it, aiming for a soft ‘dusty rose’ tone rather than a hot pink. -
Positioning the First Flower:
Select a focal point on the side of the egg. Using a size 0 brush, paint a small circle for the flower center—leave this unpainted or faint for now, just visualizing the placement. -
Painting Petals:
Load your brush with the dusty rose mix. Paint five simple, elongated teardrop shapes radiating from your center point. I like to start the stroke near the center and pull outward to get a naturally rounded petal tip. -
Adding Variation:
On some eggs, paint the flowers fully open with five petals. On others, try a side-profile flower by painting three petals fanned out in one direction, leaving space for a stem underneath. -
Drying Time:
Let the pink petals dry completely before moving to the next step. This is crucial to prevent the green stems from bleeding into the flower heads.
Fixing Shaky Lines
If your brushstrokes feel shaky, dilute your paint slightly with water to an ‘inky’ consistency. It flows smoother, giving you cleaner, more confident lines.
Step 2: Adding Greenery and Details
-
Mixing Greens:
Prepare a sage green for the stems. If you only have a bright green standard tube, mix it with a little brown and white to achieve that muted, natural botanical look. -
Drawing Stems:
Switch to your finest brush (size 00). Paint a thin, confident line extending from the base of your flowers. Let the line curve naturally; straight lines rarely look organic. -
Adding Leaves:
Along the stem, add small, alternating leaves. Use a ‘press and lift’ technique: touch the brush tip to the stem, press down slightly to widen the stroke, and lift as you pull away to create a tapered leaf point. -
Independent Ferns:
Fill empty white spaces on the shell with standalone sprigs or fern-like leaves. Paint a central curved stem, then add tiny, quick dashes on either side to create a fern texture. -
Layering Dark Green:
Once the sage green is dry, take a darker forest green and add very subtle accents to the base of the leaves or one side of the stem to add dimension.
Speckled Finish
For a rustic egg look, dip an old toothbrush in diluted brown paint and flick droplets over the finished dry floral design for a speckled eggshell effect.
Step 3: Final Touches
-
Flower Centers:
Dip the very tip of a clean brush or a toothpick into black or dark grey paint. Place a small dot in the exact center of each flower. -
Creating Stamens:
For extra detail, carefully paint tiny, radiating lines or dots around the central black dot to mimic pollen or stamens. -
Clean Up:
Check for any smudges. If you made a mistake on a white shell, you can often gently scrape it away with a damp toothpick while the paint is still tacky, or paint over it with white acrylic once dry. -
Sealing:
If these eggs will be handled frequently, finish them with a light mist of matte spray varnish. This protects the delicate paint work without adding an artificial glossy shine.
Arrange your finished eggs in a ceramic bowl or nestle them into napkins for a beautiful seasonal display


Modern Stripes and Color Blocking
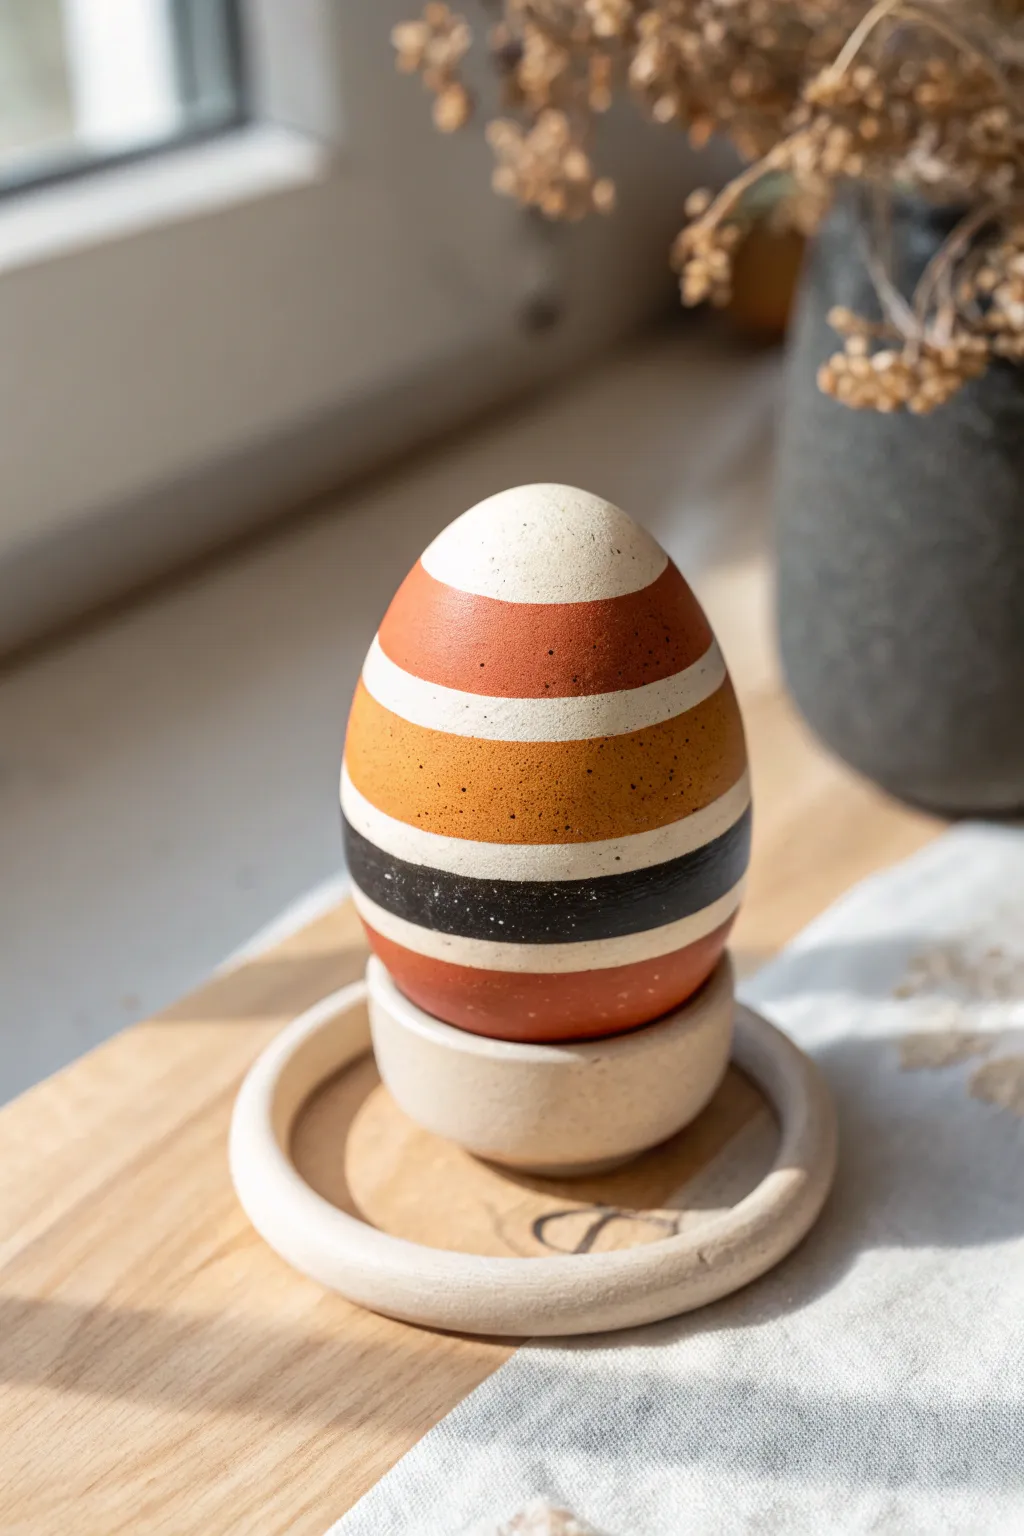
Embrace a modern, minimalist aesthetic with this striped egg design featuring a warm palette of terracotta, ochre, and charcoal. The clean horizontal bands create a striking graphic look that feels both contemporary and grounded.
Detailed Instructions
Materials
- Wooden or craft egg (smooth surface)
- Acrylic craft paints (creamy white, terracotta/rust, mustard yellow, charcoal black)
- Flat shader brushes (medium and small)
- Painter’s tape or washi tape (thin)
- Pencil
- Ruler or soft tape measure
- Matte sealant spray or matte varnish
- Egg holder or drying stand
- Fine-grit sandpaper (optional)
Step 1: Preparation and Base Coat
-
Prepare the surface:
If you are using a wooden egg, lightly sand it with fine-grit sandpaper to ensure a perfectly smooth finish. Wipe away any dust with a clean, dry cloth. -
Plan the stripes:
Using a pencil and a soft tape measure, lightly mark where your colored bands will go. This design features five distinct sections, so measure accordingly to keep them relatively even. -
Paint the top section:
Starting at the very top of the egg, paint the first section with creamy white acrylic paint. This creates a bright cap that contrasts well with the darker colors below. -
Feather the edge:
Don’t worry about a crisp line at the bottom of the white section yet; simply paint slightly past your pencil mark so the next color can overlap it neatly. -
Let it dry:
Allow the white cap to dry completely. Acrylics dry fast, but giving it an extra few minutes prevents smudging.
Seal Tape Edges
For ultra-crisp lines, paint a tiny amount of the *base* color over the tape edge first. This seals the gap so the new color won’t bleed underneath.
Step 2: Applying the Terracotta Stripes
-
Apply tape for the first band:
Once the white paint is bone dry, carefully apply a strip of painter’s tape or washi tape over the white edge to define a sharp line for the next color. -
Paint the upper terra cotta band:
Using a flat shader brush, apply the rust or terracotta paint below the taped line. Keep your brush strokes horizontal to match the direction of the stripe. -
Remove the tape:
Peel the tape off gently while the paint is still slightly wet to avoid pulling up dried acrylic skins. Let this orange band dry fully. -
Address the bottom stripe:
While you have the terracotta color out, you can paint the very bottom section of the egg. This anchors the design with a warm tone at the base. -
Paint the base:
Hold the egg carefully by the dry middle section and coat the bottom curve. I usually place it on a drying stand immediately after this step to protect the wet paint.
Step 3: Adding Contrast and Detail
-
Create the middle ochre band:
Once the top terracotta band is dry, use tape to mask off its bottom edge. Apply the mustard yellow or ochre paint in a wide band across the middle of the egg. -
Ensure opacity:
Yellow pigments can be translucent, so you might need a second thin coat of ochre to get that rich, solid coverage shown in the image. -
Define the charcoal stripe:
This is the thinnest accent stripe. Mask off the bottom of the yellow band and the top of the bottom terracotta band, leaving a narrow gap for the dark color. -
Paint the dark accent:
Fill this narrow gap with charcoal black or dark grey paint. Use a small flat brush for better control in this tight space. -
Reveal the lines:
Carefully remove all remaining tape. If any paint bled under the tape, use a tiny detailed brush with the background color to touch up the edges.
Speckled Finish
Mix a tiny bit of water with dark paint and flick it off a toothbrush onto the finished egg to create a trendy ceramic stoneware effect.
Step 4: Final Touches
-
Add a white separator:
To recreate the specific look in the photo, paint a thin creamy white stripe between the ochre band and the black band using your smallest brush or a steady hand. -
Check for consistency:
Rotate the egg to ensure the bands look continuous and connect cleanly on all sides. -
Seal the work:
Once all paint layers are fully cured, spray the egg with a clear matte sealant. This protects the finish without adding an unnatural shine, preserving that modern earthen look.
Display your striking new egg in a simple wooden cup to highlight its graphic lines and warm colors


Tiny Chick Portraits and Beaks
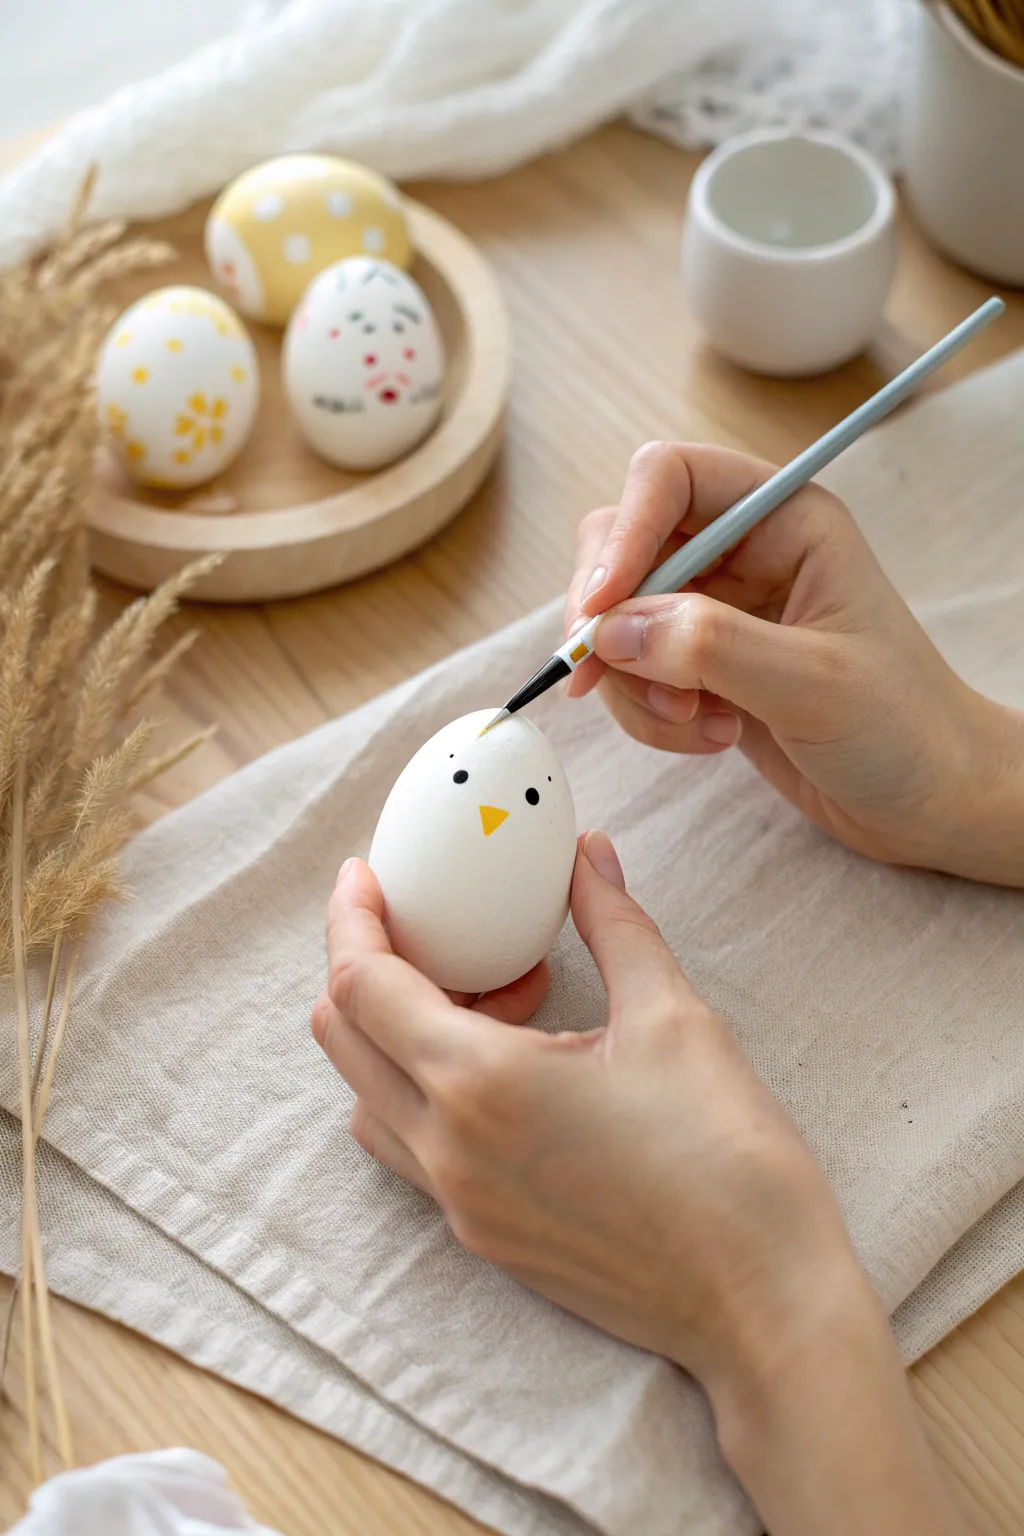
Transform a plain white egg into an adorable character with just a few deliberate brushstrokes. This design relies on negative space and precise placement to create a sweet, minimalist chick face.
Step-by-Step Guide
Materials
- White or light-colored eggs (blown out, hard-boiled, or ceramic)
- Fine-point detail paintbrush (round size 0 or 1)
- Yellow acrylic paint
- Black acrylic paint
- Small palette or mixing dish
- Paper towels for blotting
- Egg stand or carton for drying
- Clear matte sealer (optional)
Step 1: Preparation
-
Prepare the surface:
Ensure your egg is clean and completely dry. If using a real egg, wipe it down gently with vinegar water to remove any oils that might repel the paint. -
Load the yellow paint:
Squeeze a tiny dot of yellow acrylic paint onto your palette. Dip your fine brush in water, blot excess moisture on a paper towel, and pick up a moderate amount of yellow paint.
Step 2: Painting the Beak
-
Position the beak:
Locate the visual center of the egg’s face. You want the beak to be slightly lower than exactly middle to give the chick a cute, high-forehead look. -
Paint the triangle:
paint a small, inverted triangle. Start with the top horizontal line, then pull the sides down to meet brightly at a point. -
Refine the shape:
Fill in the triangle carefully. Keep the edges sharp. If the yellow is too translucent, let it dry briefly and apply a second coat for opacity. -
Clean the brush:
Thoroughly rinse your brush to remove all yellow pigment. Dry it well on a paper towel before switching colors.
Fixing Slips
If you smudge the black paint, wait for it to dry completely. Then, gently scratch the error away with a craft knife or paint over it with white.
Step 3: Adding the Eyes
-
Load black paint:
Pick up a small amount of black acrylic on the very tip of your brush. You don’t want a glob, just enough to make a precise mark. -
Mark the first eye:
Place the first eye to the left and slightly above the beak. Press the brush tip gently against the shell to make a small, solid circle. -
Mark the second eye:
Paint the second eye on the right side, mirroring the position of the first. Step back for a moment to check symmetry. -
Add eyebrows:
Using the absolute finest point of your brush with barely any pressure, paint two tiny, curved lines high above the eyes for eyebrows. -
Let it dry:
Allow the paint to dry completely. Because the details are small, this should only take a few minutes.
Adding Blush
Mix a tiny drop of red into white paint for a soft pink. Dab two faint circles on the cheeks using a cotton swab for a rosy glow.
Step 4: Finishing Touches
-
Check consistency:
Inspect the black paint coverage. If the eyes look streaky or gray, carefully dab a second layer of black directly over the dry first layer. -
Optional sealing:
If you want to preserve the egg for future seasons, you can lightly brush or spray a matte varnish over the face once the paint is fully cured.
Now you have a charming little character ready to brighten up your spring basket


Delicate Botanical Vines Around the Curve
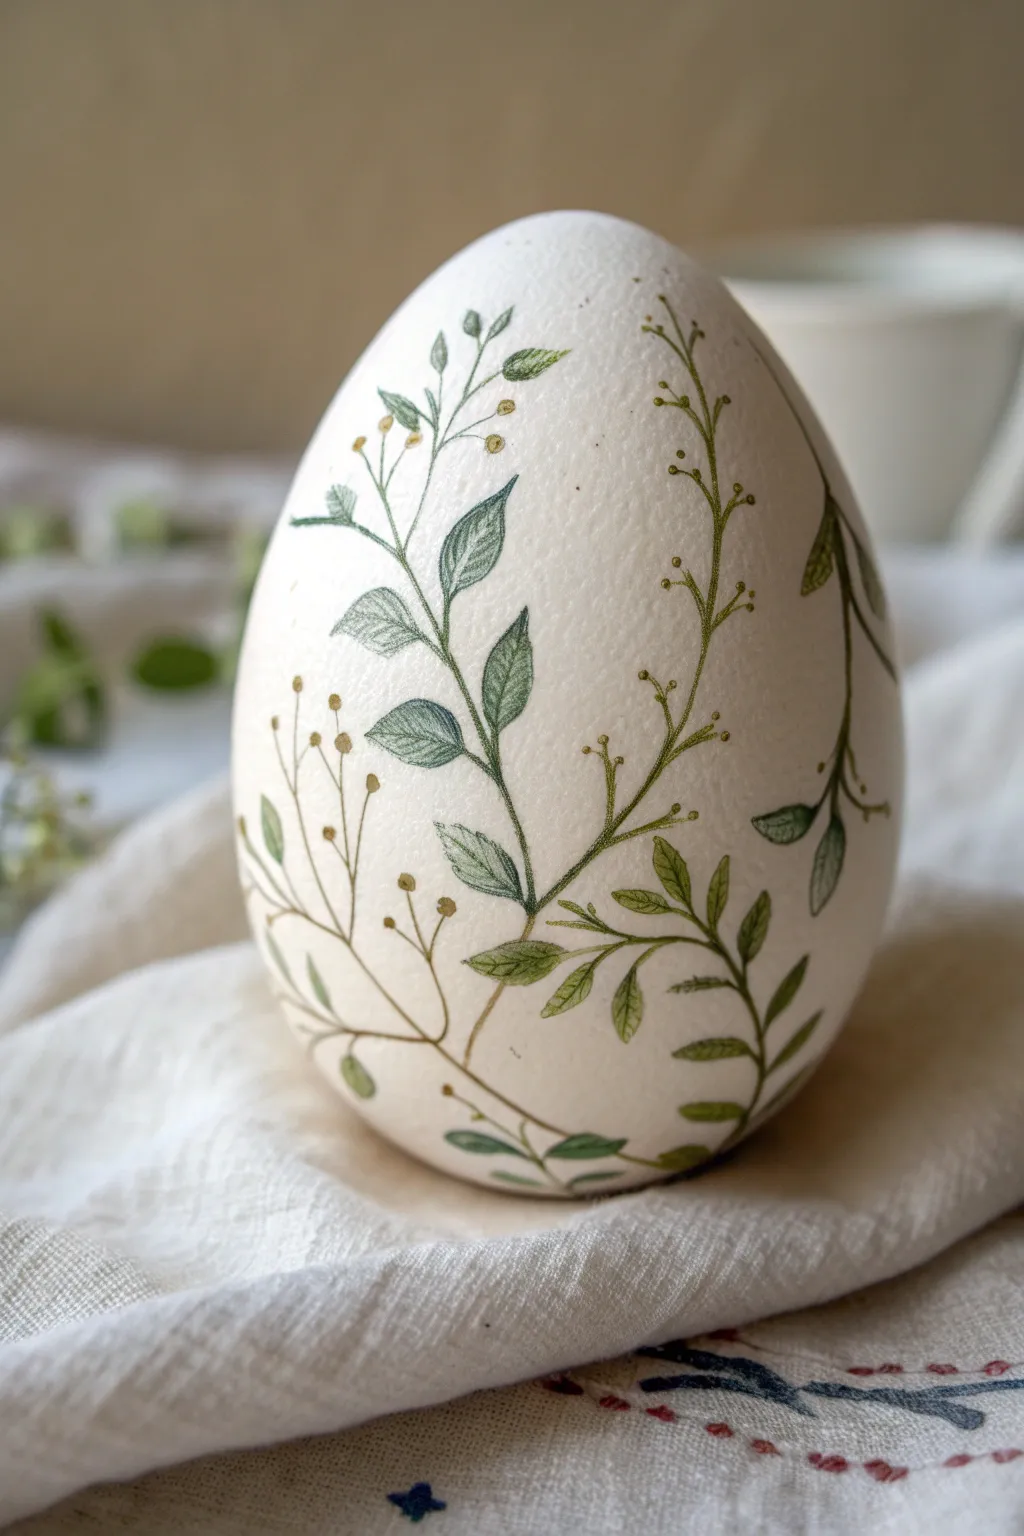
Transform a simple eggshell into a piece of natural art with this delicate botanical design. The result is an elegant interplay of hand-drawn vines and soft leaves that climb organically around the egg’s curve.
Detailed Instructions
Materials
- Large white egg (goose or duck preferred for surface area)
- Fine-grit sandpaper (400-600 grit)
- Pencil (HB or H, very sharp)
- Fine tip watercolor markers or artist pens (various greens, brown, yellow-ochre)
- Watercolor paints (optional alternate method)
- Very fine round brush (size 0 or 00, if using paint)
- Matte spray sealant or fixative
Step 1: Preparation & Mapping
-
Prep the canvas:
Begin by blowing out your egg if you wish to keep it permanently, then rinse and dry it thoroughly. Gently buff the surface with fine-grit sandpaper to give the shell a slight ‘tooth’, which helps the ink or paint grip better without beading. -
Plan the flow:
Lightly sketch a few main ‘spine’ lines for your vines using an H pencil. These guide lines should curve gently from the base upward, wrapping around the side of the egg rather than going straight up. -
Map the foliage:
Sketch tiny ovals along the spines to indicate where the larger leaves will sit. Keep the spacing irregular to mimic nature. -
Add delicate branches:
Draw faint, branching offshoots from the main vines that will hold the smaller buds or berries. These should look wispy and thin.
Don’t Smudge!
To avoid smearing your work as you rotate the egg, wear a single cotton glove on your holding hand, or rest the egg on a soft napkin while drawing.
Step 2: Drawing the Structure
-
Inking the stems:
Using a fine-tip artist pen or a brush with diluted brown-green watercolor, retrace your main vine lines. Keep the pressure light to maintain a thin, elegant line. -
Varying line weight:
Slightly thicken the lower parts of the main stems by going over them a second time, tapering off as you reach the tips. -
Drawing leaf outlines:
With a dark green fine liner, carefully outline the larger leaves you mapped earlier. Use a slightly jagged or serrated motion for leaves that require texture, similar to rose or mint leaves. -
Creating the secondary branches:
For the wispy offshoots, switch to a lighter brown or golden-green tone. Draw these lines with a quick, confident stroke to keep them looking organic.
Botanical Study
Look at vintage botanical illustrations for inspiration. Try mixing different leaf shapes—like fern fronds or rounded eucalyptus—on the same vine.
Step 3: Color & Texture
-
Base leaf color:
Fill in the sketched leaves using soft, hatched strokes with a medium green marker or pencil. Leave tiny slivers of white space to suggest light hitting the leaf surface. -
Layering darker tones:
I like to go back in with a darker forest green near the base of each leaf and along the central vein. This adds dimension and prevents the leaves from looking flat. -
Adding the berries:
Dot small circles of yellow-ochre or muted gold at the tips of the wispy branches. These little ‘buds’ add a lovely contrast to the heavy greens. -
Veining details:
Once the base color is dry, use your finest pen tip (black or dark green) to draw the central vein and side veins on the larger leaves. -
Softening edges:
If using watercolor pencils or water-based markers, you can barely dampen a brush and touch the leaves to slightly bleed the colors together for a softer, painterly look.
Step 4: Finishing Touches
-
Review and balance:
Rotate the egg and look for empty patches. Add small, floating leaves or tiny detached buds to fill significant gaps without overcrowding the design. -
Clean up:
Very gently erase any visible pencil sketch lines that weren’t covered by ink. Be extremely careful not to smudge your fresh artwork. -
Seal the art:
Place the egg on a stand or skewer. Apply a light, even coat of matte spray fixative. This is crucial as moisture from hands can easily smear water-based inks on eggshell.
Display your masterpiece in a ceramic egg cup or a nest of moss to highlight its natural elegance.
BRUSH GUIDE
The Right Brush for Every Stroke
From clean lines to bold texture — master brush choice, stroke control, and essential techniques.
Explore the Full Guide
Scandinavian-Inspired Folk Motifs
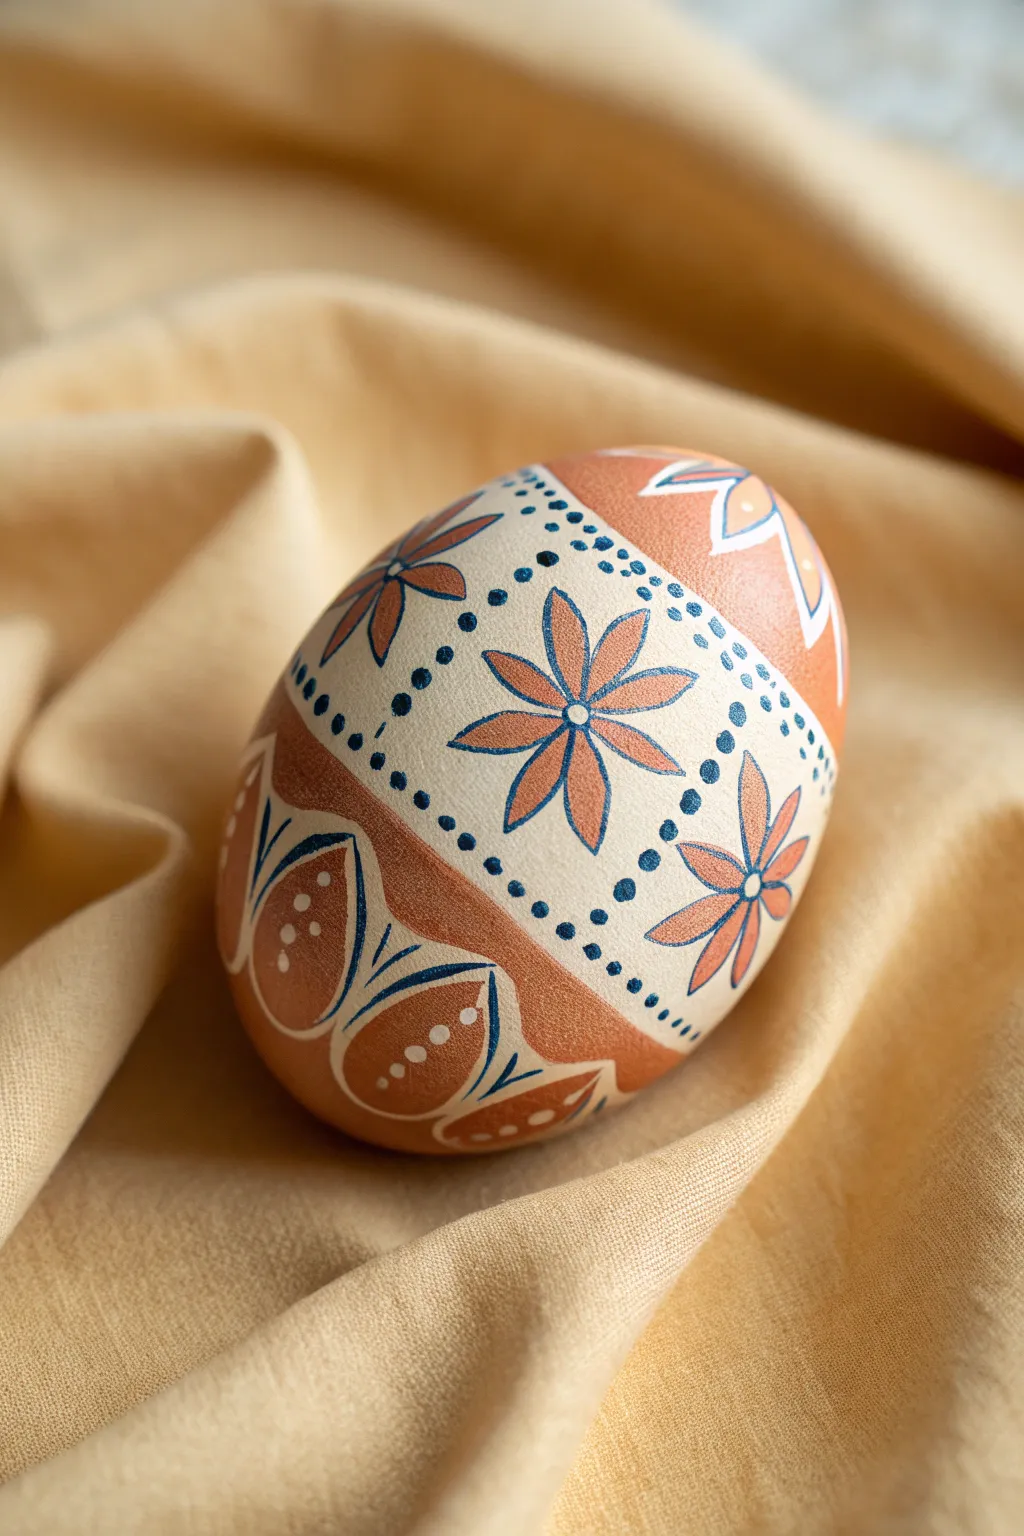
Bring the cozy charm of Scandinavian folk art to your spring décor with this elegantly patterned egg. Featuring a warm terracotta and cream palette accented with slate-blue details, this design relies on simple, repeated geometric floral motifs to create a stunning effect.
Step-by-Step
Materials
- White or cream chicken egg (blown out) or wooden egg
- Acrylic craft paints: Terracotta/Russet Orange, Cream/Off-White, Slate/Denim Blue
- Fine flat brush (size 2 or 4)
- Detail liner brush (size 00 or 000)
- Dotting tools (set of varying sizes) or toothpicks
- Pencil for sketching
- Eraser
- Matte varnish (optional)
Step 1: Base Blocking
-
Prepare the surface:
Ensure your egg is clean and dry. If using a wooden egg, give it a very light sanding. If using a blown egg, seal the holes with a tiny bit of wax or spackle if desired, though this is optional. -
Mark the bands:
Using a pencil, lightly sketch two horizontal rings around the egg to create a wide central band. This middle section will remain the natural cream color of the egg (or painted cream if you’re using a dark or wooden base). -
Paint the top and bottom:
Paint the top and bottom sections of the egg with the terracotta paint. Use a flat brush for smooth, even coverage. You may need two coats to get a solid, opaque finish. Let this dry completely before moving on. -
Refine the background:
If your egg needs it, paint the central band with your cream acrylic paint. I find this helps the upcoming blue details pop more than they would on a bare shell.
Step 2: Central Floral Motif
-
Space the flowers:
Lightly mark the center points for your flowers around the cream band. Aim for odd numbers like 3 or 5 depending on the egg’s size to keep the spacing natural. -
Paint flower petals:
Using the terracotta paint and a small round or liner brush, paint six pointed petals radiating from each center mark. Think of them as elongated teardrops that meet in the middle. -
Add petal outlines:
Once the orange petals are dry, switch to your slate blue paint. Use your finest liner brush to outline each petal. Keep the pressure light to maintain a thin, delicate line. -
Detail the flower centers:
Dip a small dotting tool into the slate blue paint and place a neat dot in the absolute center of each flower. -
Add interstitial details:
Between the main flowers, paint smaller, partial floral shapes or simple smaller petals if space allows, keeping the rhythm consistent around the band.
Wobbly Lines?
Rest your painting hand’s pinky finger on the dry part of the egg for stability. If lines are thick, thin your paint slightly with water for better flow.
Step 3: Border details
-
Create dotted borders:
Select a medium-sized dotting tool. Dip it in slate blue paint and create two rows of dots framing the central flower band—one row just above the bottom terracotta section, and one just below the top terracotta section. -
Refine the dot spacing:
Try to space these dots evenly. If you have gaps, you can go back with a smaller tool to fill in, but perfection isn’t necessary for folk art.
Make It a Set
Create a matching trio by inverting the colors on the next egg: a blue base with cream flowers and terracotta dots creates a stunning visual contrast.
Step 4: Terracotta Band Embellishments
-
Paint the teardrops:
On the bottom terracotta section, paint large, rounded teardrop shapes using the slate blue paint. These should point upwards toward the central band. -
Outline in cream:
Use your liner brush and cream paint to outline these blue teardrops. I like to double-load the brush slightly to get a crisp edge against the darker background. -
Add cream dots:
Using a small dotting tool and cream paint, add a line of tiny dots down the center of each blue teardrop shape. -
Decorate the top section:
Repeat a similar motif on the top terracotta section. You can use stylized petal shapes or triangles outlined in cream to mirror the bottom design.
Step 5: Finishing Touches
-
Clean up sketch lines:
Once the paint is absolutely bone dry, gently erase any visible pencil marks from your initial sketching. -
Seal the work:
Apply a coat of matte varnish to protect the paint. A matte finish looks most authentic for the Scandinavian style, avoiding a plastic-like shine.
Display your finished egg in a simple wooden cup or nestled in natural straw to let the intricate pattern shine
Black Silhouette Scenes at Sunset
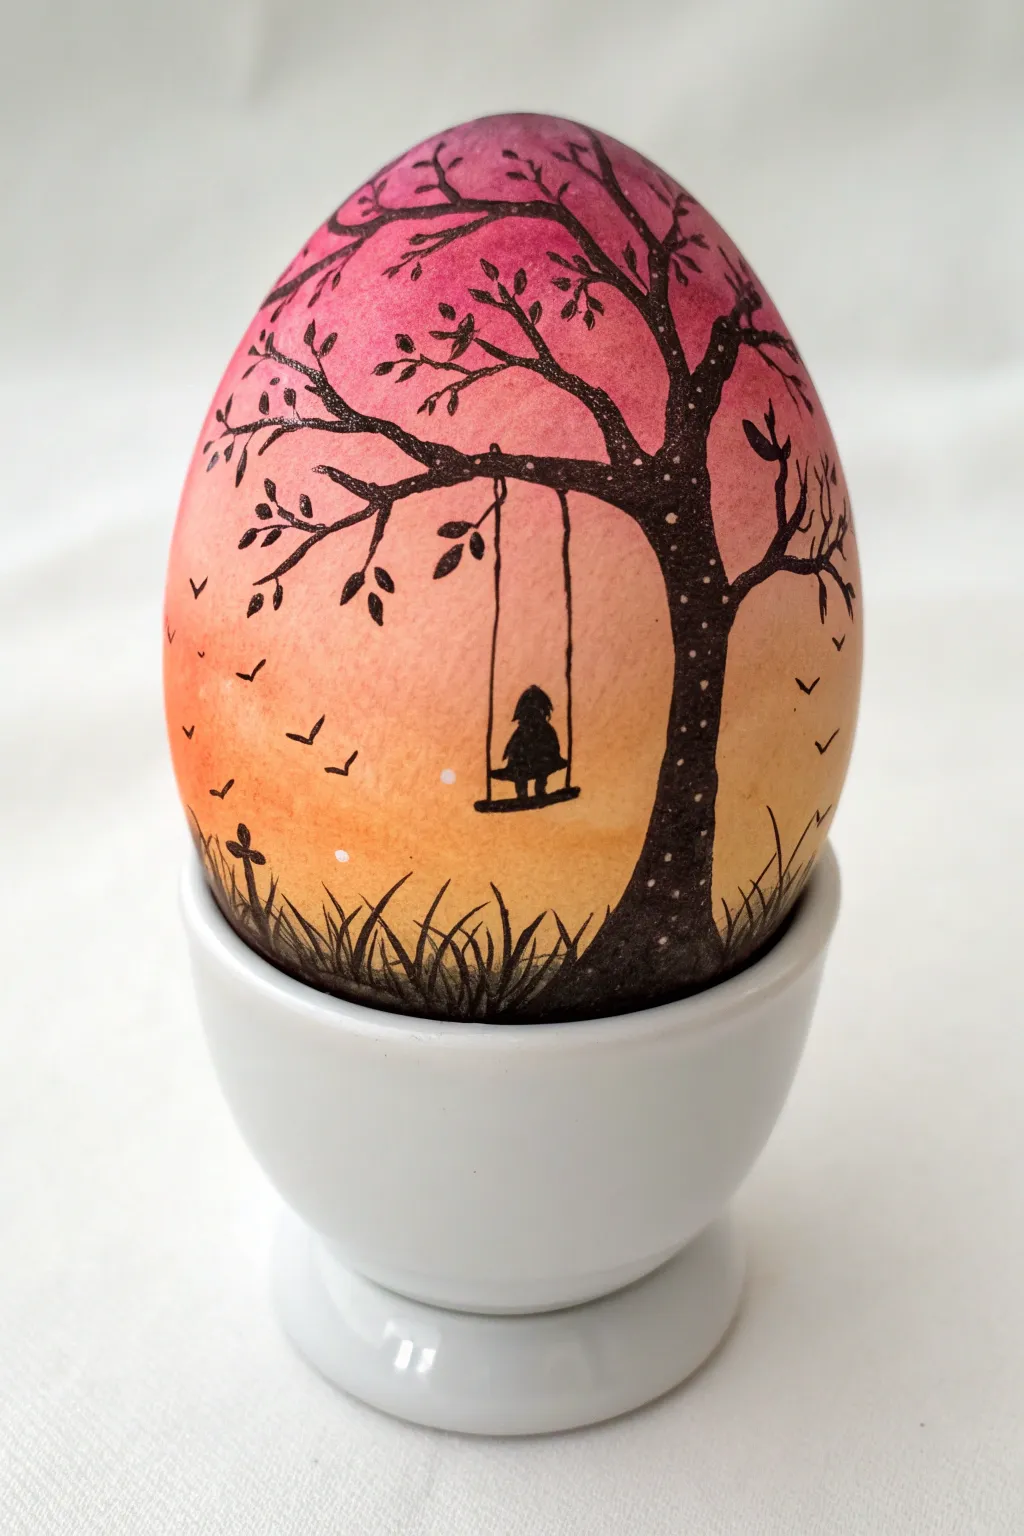
Capture the nostalgic beauty of a quiet evening with this stunning vibrant sunset design. The stark contrast between the warm, blended sky and the crisp black silhouette creates a miniature masterpiece right on an eggshell.
Step-by-Step Guide
Materials
- Clean, white eggshell (blown out) or wooden egg
- Acrylic paints (Magenta, Salmon/Coral, Golden Yellow, White, Black)
- Makeup sponge wedges or soft foam daubers
- Fine liner brush (size 0 or 00)
- Black ultra-fine tip permanent marker (optional, for details)
- Cup or egg stand for holding the egg
- Matte or satin varnish spray
Step 1: Creating the Sunset Gradient
-
Base Preparation:
Ensure your egg is clean and dry. If using a brown egg, apply a coat of white acrylic paint first to ensure the sunset colors pop. -
Top Color Application:
Squeeze a small amount of magenta paint onto a palette. Using a makeup sponge, dab the paint onto the top third of the egg, fading it out as you move downward. -
Middle Transition:
Take a fresh sponge or a clean side of the wedge. Load it with salmon or coral paint. Dab this into the middle section, overlapping slightly with the magenta to create a seamless blend. -
Bottom Glow:
Finish the gradient by sponging golden yellow onto the bottom third. Work the yellow up into the salmon color while the paint is still tacky to get a smooth, hazy transition. -
Verify the Blend:
Check your gradient. If the lines are too harsh, lightly tap over the transition areas with a slightly damp sponge to soften the edges. -
Let it Dry completely:
Allow the background gradient to dry fully. This is crucial; if the base is wet, your sharp black lines will bleed or smudge.
Sponge vs. Brush
Make-up sponges are superior to brushes for the sunset background. They create a soft, airbrushed texture without leaving bristle streaks.
Step 2: Painting the Silhouette
-
Grounding the Scene:
Using black acrylic paint and a small brush, paint a solid, uneven strip along the very bottom of the egg to represent the ground. -
Adding Grass Texture:
While the ground is wet, or using a fine liner brush afterwards, flick small, upward strokes from the ground line to create the look of tufty grass blades. -
The Tree Trunk:
Paint the main tree trunk starting from the right side of the egg. Make the base wider and taper it as it curves upward and inward toward the top center. -
Branching Out:
Extend a major branch horizontally across the upper third of the egg. Add smaller, jagged twigs branching off the main limb to create a natural, organic look. -
Adding Leaves:
Dip the very tip of your fine brush (or a toothpick) into black paint. Gently press small, leaf-shaped dabs along the twigs. Group them in clusters rather than spacing them evenly. -
Hanging the Swing:
Draw two vertical parallel lines dropping down from the main horizontal branch. Ensure they are straight, representing the ropes of the swing. -
The Seat and Figure:
Connect the ropes with a small horizontal line for the seat. Carefully paint a small, rounded triangular shape on top of the seat to form the silhouette of a person sitting.
Shaky Hands?
If painting the swing ropes is difficult, use a black ultra-fine tip permanent marker instead of paint for better control and straighter lines.
Step 3: Final Details
-
Distant Birds:
Using the very tip of your finest brush or a black micro-pen, add tiny ‘V’ shapes in the distance to represent birds flying in the sunset. -
Highlighting (Optional):
If you want extra depth, add a tiny dot of white paint to the tree trunk for texture, or near the horizon for a ‘sun’ effect, though plain black is striking on its own. -
Sealing the Work:
Once the black paint is bone dry, spray the entire egg with a light coat of matte varnish to protect your miniature landscape from chipping.
Now you have a serene little world captured on a delicate shell to enjoy for years to come

PENCIL GUIDE
Understanding Pencil Grades from H to B
From first sketch to finished drawing — learn pencil grades, line control, and shading techniques.
Explore the Full Guide
Mini Landscape Wraparound Painting
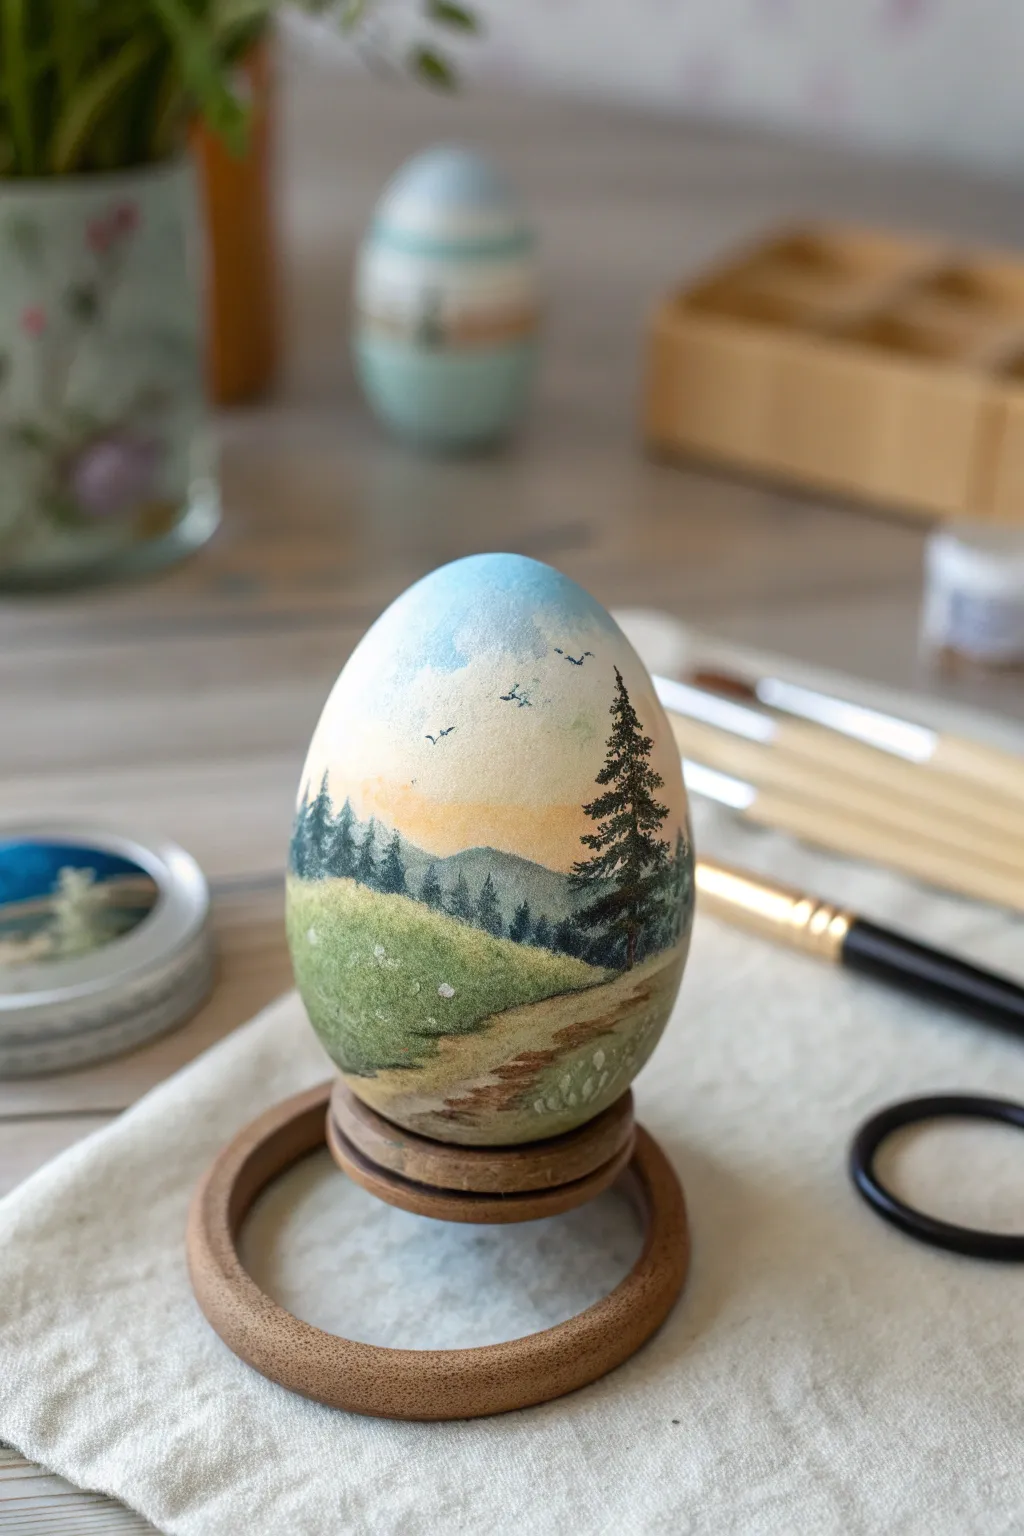
Transform a simple eggshell into a breathtaking miniature world with this wraparound landscape painting. Featuring a serene dirt path, majestic pine trees, and distant misty mountains, this project captures the beauty of nature on a delicate canvas.
Step-by-Step Tutorial
Materials
- Clean, blown-out eggshell (white)
- Acrylic paints (Titanium White, Burnt Umber, Yellow Ochre, Sap Green, Phthalo Blue, Black)
- Gesso (optional but recommended)
- Fine detail brushes (sizes 0, 00, and a small flat shader)
- Palette for mixing
- Wooden egg stand or makeshift drying rack (bottle cap)
- Cup of water and paper towels
- Matte varnish spray
Step 1: Preparation and Sky Layer
-
Prime the Surface:
Begin by ensuring your blown-out egg is clean and dry. Apply a thin layer of gesso or white acrylic paint over the entire shell to create a smooth, gripping surface for your colors, letting it dry completely. -
Paint the Upper Sky:
Mix a very pale shade of sky blue using plenty of Titanium White and a tiny dot of Phthalo Blue. With a small flat brush, paint the top third of the egg, feathering the edges downward. -
Create the Horizon Glow:
While the blue is still slightly tacky, mix a soft peach color using White and a touch of Yellow Ochre. Blend this into the lower part of the sky area, creating a gradient that looks like a sunset glow just above where the mountains will be. -
Add Subtle Clouds:
Using a dry brush technique with almost pure white paint, dab faint, wispy clouds into the blue area. Keep them soft and undefined to maintain a realistic atmospheric look.
Hold it Steady
Use a ball of poster putty or mounting tack on the bottom of the egg to stick it onto a bottle cap while painting. This keeps your hands free and prevents smudges.
Step 2: Painting the Background
-
Block in Distant Mountains:
Mix a muted grey-blue color. Paint a jagged, undulating line across the middle of the egg to represent the furthest mountain range. Let the color fade slightly as it moves downward. -
Add Mid-Ground Hills:
Create a darker, slightly greener shade by adding a touch of Sap Green to your mountain mix. Paint a second layer of hills overlapping the bottom of the blue mountains to create depth. -
Establish the Tree Line:
Using a size 0 brush and a dark forest green (Sap Green mixed with a little Black), stipple tiny vertical shapes along the ridge of the mid-ground hills. These suggest a distant forest.
Seasonal Shift
Change the season by swapping the green grass for white and blue shadows for snow, and adding white caps to the top of the pine tree branches.
Step 3: Foreground and Details
-
Paint the Grassy Area:
Mix a vibrant meadow green using Sap Green and Yellow Ochre. Fill in the lower section of the egg, curving the brushstrokes to mimic the shape of rolling hills. -
Create the Dirt Path:
Mix Burnt Umber with White to get a light tan. Paint a winding path starting wide at the bottom and narrowing as it curves up toward the hills. I like to keep the edges slightly uneven for a natural look. -
Texture the Grass:
With your smallest brush, use a lighter green shade to flick tiny upward strokes in the foreground grass area, adding texture and variation. -
Add Path Details:
Use diluted darker brown paint to add shadows and ruts to the dirt path, giving it a weathered, trodden appearance. -
Start the Main Pine Tree:
On the right side of the path, paint a thin, vertical dark brown line for the trunk of the prominent foreground tree. It should extend up past the horizon line. -
Foliage on the Main Tree:
Load a detail brush with dark green paint. Starting at the top of the trunk, use tiny tapping motions to create branches that flare out wider as you move down the tree. -
Highlight the Tree:
Mix a slightly lighter olive green and dab it on the top edges of the pine branches to suggest sunlight hitting the needles. -
Add Distant Birds:
Using the very tip of your 00 brush and black paint, add two or three tiny ‘v’ shapes in the sky to represent birds flying in the distance. -
Final Highlights:
Add tiny dots of white or light yellow in the foreground grass to suggest wildflowers. -
Seal the Work:
Once the paint is completely dry (wait at least an hour), take the egg outside and apply a light coat of matte varnish spray to protect your miniature landscape.
Place your finished masterpiece on a wooden ring stand to display your steady handiwork
Ombré Washes for Watercolor-Like Shells

This project captures the delicate transition of a morning sky on a natural eggshell canvas. By layering sheer washes of coral pink and dusky blue, you’ll create a soft, speckled ombré effect that looks like a beautiful watercolor painting.
Step-by-Step Guide
Materials
- White or light-colored eggs (boiled or blown)
- Watercolor paints (tube or pan) in Coral/Rust and Prussian Blue
- Small round synthetic watercolor brush (size 4 or 6)
- Small mixing palette or white plate
- Cup of clean water
- Paper towels
- Old toothbrush (optional for speckling)
- Egg cup or drying rack
Step 1: Preparation & Base Wash
-
Prepare your canvas:
Ensure your egg is clean and completely dry. If you are using a blown egg, cover the hole with a tiny piece of tape or wax so water doesn’t seep inside. -
Mix the coral tone:
On your palette, mix a rusty pink or coral shade with a generous amount of water. You want a very transparent, tea-like consistency rather than thick paint. -
Apply the top wash:
Hold the egg gently by the bottom. Paint the top half of the egg with your coral wash, letting the strokes be uneven and organic. -
Soften the edge:
Before the paint dries, dip your brush in clean water and lightly drag it along the bottom edge of the pink paint. This feathers the color downward and prevents a hard line from forming. -
Initial drying:
Place the egg in a holder or lean it gently to dry for about 10-15 minutes. The paint needs to be set but not bone dry before adding the second color.
Natural Texture Hack
Before painting, dab the egg with a sponge dipped in vinegar. This slightly etches the shell, helping the watercolor pigment grip the surface better and creating a deeper, more textured stain.
Step 2: Adding the Blue Gradient
-
Mix the blue tone:
Create a watery mix of Prussian Blue or a similar dusty deep blue. Just like the first layer, keep this very fluid to embrace the watercolor texture. -
Apply the bottom wash:
Turn the egg over or hold it securely. Paint the bottom half with the blue mixture, bringing the color up to meet the pink area. -
Create the blend:
Where the blue meets the pink, use a damp brush to gently nudge the blue pigment upward. Allow the two watery colors to touch and bleed into each other naturally. -
Encourage drips:
If you hold the egg vertically, gravity will help pull pigment down, creating subtle vertical streaks that add to the natural look shown in the image. -
Dab for texture:
If a pool of water sits too heavily in one spot, lightly touch the corner of a paper towel to it to lift the excess, leaving a clouded texture behind. -
Let it settle:
Allow this layer to dry completely. Watercolors lighten as they dry, so don’t worry if it looks dark while wet.
Metallic Accent
Mix a tiny amount of gold watercolor or metallic powder into your final speckling step. The subtle shimmer will catch the light and make the egg look like a precious stone artifact.
Step 3: Texture and Speckling
-
Deepen the saturation:
For a richer look, I like to add a second, selective layer. Add slightly more pigment to your brush and dab it onto the very top (pink) and bottom (blue) poles of the egg. -
Feather again:
Use your clean, damp brush to blend these darker poles toward the center again, reinforcing the gradient effect without covering the delicate middle section. -
Prepare speckle paint:
Mix a small amount of a darker, thicker version of your coral or blue paint. You want it fluid enough to flick, but pigmented enough to show up small. -
Flick the speckles:
Load an old toothbrush or a stiff brush with the paint. Use your thumb to flick the bristles, sending a fine mist of tiny dots onto the egg surface. -
Refine the speckles:
Focus the speckling on the transition zone where the colors meet to hide any imperfections in the blend and add that stony, natural texture. -
Final drying:
Set the egg aside in a safe spot to dry completely for at least an hour. Avoid touching the surface while damp, as fingerprints will lift the pigment. -
Seal (optional):
Once bone dry, you can lightly spray with a matte fixative if you want to protect the watercolor from future moisture, though the raw finish has a lovely dusty quality.
Display your finished ombré creation in a simple ceramic cup to highlight the subtle artistry of the blended colors


Metallic Splatter and Ink Flicks
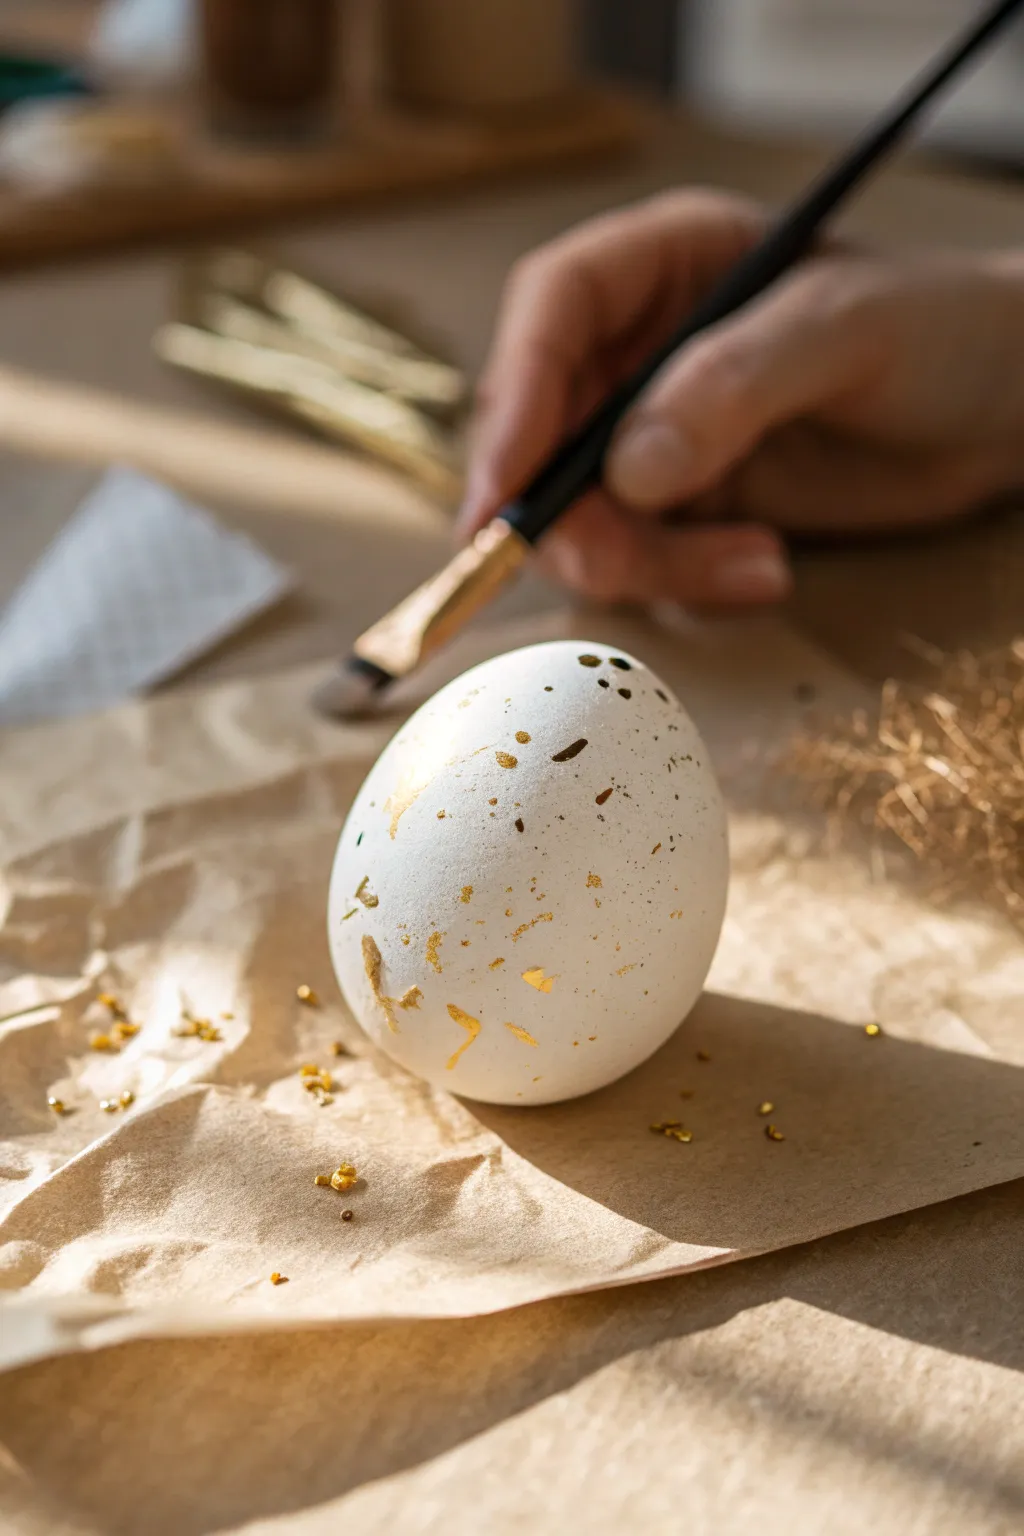
Transform a simple white egg into a sophisticated piece of decor using a combination of metallic gold paint and loose splatter techniques. This project captures the beauty of randomness, resulting in a unique, speckled pattern that catches the light beautifully.
Step-by-Step Tutorial
Materials
- White egg (hard-boiled or blown out)
- Metallic gold acrylic paint or liquid gilding
- Small round paintbrush (size 2 or 4)
- Stiff-bristled toothbrush or fan brush (for splattering)
- Small mixing palette or disposable plate
- Paper towels
- Brown craft paper or newspaper (to protect work surface)
- Water cup (for rinsing)
- Egg drying rack or simple bottle cap stand
Step 1: Preparation and Setup
-
Preparing the workspace:
Begin by covering your entire working area with brown craft paper or old newspaper. This technique involves flicking paint, which can easily travel beyond your immediate work zone, so creating a generous boundary is helpful. -
Cleaning the egg:
Ensure your white egg is perfectly clean and dry. Gently wipe the surface with a paper towel dampened with a little vinegar to remove any oils from your fingers, which helps the paint adhere better. -
Setting up the palette:
Squeeze a dime-sized amount of metallic gold acrylic paint or liquid gilding onto your palette. If you are using heavy body acrylics, thin the paint slightly with a drop or two of water until it reaches an ink-like consistency.
Paint Clumping?
If splatters are too large or runny, your paint is too thin. Add more acrylic to thicken it, or blot the brush on paper towel before flicking.
Step 2: Creating the Speckles
-
Testing consistency:
Before touching the egg, test your paint consistency on a scrap piece of paper. Dip your stiff brush or toothbrush into the gold mixture and run your thumb across the bristles to flick the paint. You want fine, distinct droplets, not large, runny globs. -
First splatter layer:
Hold the egg in one hand (or place it steady on a bottle cap) and use your other hand to flick the gold paint from about 6 to 8 inches away. Rotate the egg slowly to cover all sides with a fine mist of gold dots. -
Adjusting density:
Evaluate the coverage. If you want a denser look in certain areas, bring the brush closer to the surface—about 3 to 4 inches away—and flick more gently to concentrate the splatter. -
Adding larger droplets:
Switch to your small round paintbrush. Dip it generously into the gold paint and hold it over the egg. Tap the handle of the brush sharply against your finger or another brush handle to dislodge larger, heavier droplets that create contrast with the fine mist. -
Manual speckling:
For precise control, use the tip of the round brush to manually dot a few larger, irregular gold spots directly onto the shell. I like to cluster these slightly to create asymmetrical focal points. -
Partial drying:
Allow the first layers of splatter to dry for about 10-15 minutes. The metallic paint can smear easily if handled while wet, so patience here ensures a crisp finish.
Step 3: Detailing and Finishing
-
Creating the ‘leaf’ effect:
To mimic the look of gold leaf without the mess, use a fairly dry brush with undiluted, thick gold paint. Dab it onto the egg with a scumbling motion—pressing and lightly dragging—to create textured, irregular patches that catch the light. -
Checking for balance:
Take a step back and look at the egg as a whole. If one side looks too bare, add a few more manual flicks or dots to balance the composition. -
Softening edges:
If any manual dots look too perfectly round, use a clean, slightly damp brush to gently feather the edges before the paint dries completely, giving them a more organic, naturally weathered appearance. -
Reviewing the bottom:
Once the top and sides are dry to the touch, flip the egg carefully to check the very bottom where it was resting. Repeat the splatter process on this bald spot to ensure continuity. -
Final drying time:
Let the egg sit undisturbed for at least an hour. Thicker globs of metallic paint take longer to cure than thin washes, so give it ample time. -
Optional sealing:
If you plan to handle the decoration frequently, spray a light coat of matte clear fixative over the egg. This protects the metallic sheen from tarnishing or rubbing off over time.
Antique Texture
Mix a tiny drop of burnt umber into the gold for a vintage, aged brass look, or splatter with white first for a layered depth.
Display your shimmering creation in a nest of natural raffia or a simple ceramic bowl to highlight its delicate golden details
Hatching Crack-Line Illusions
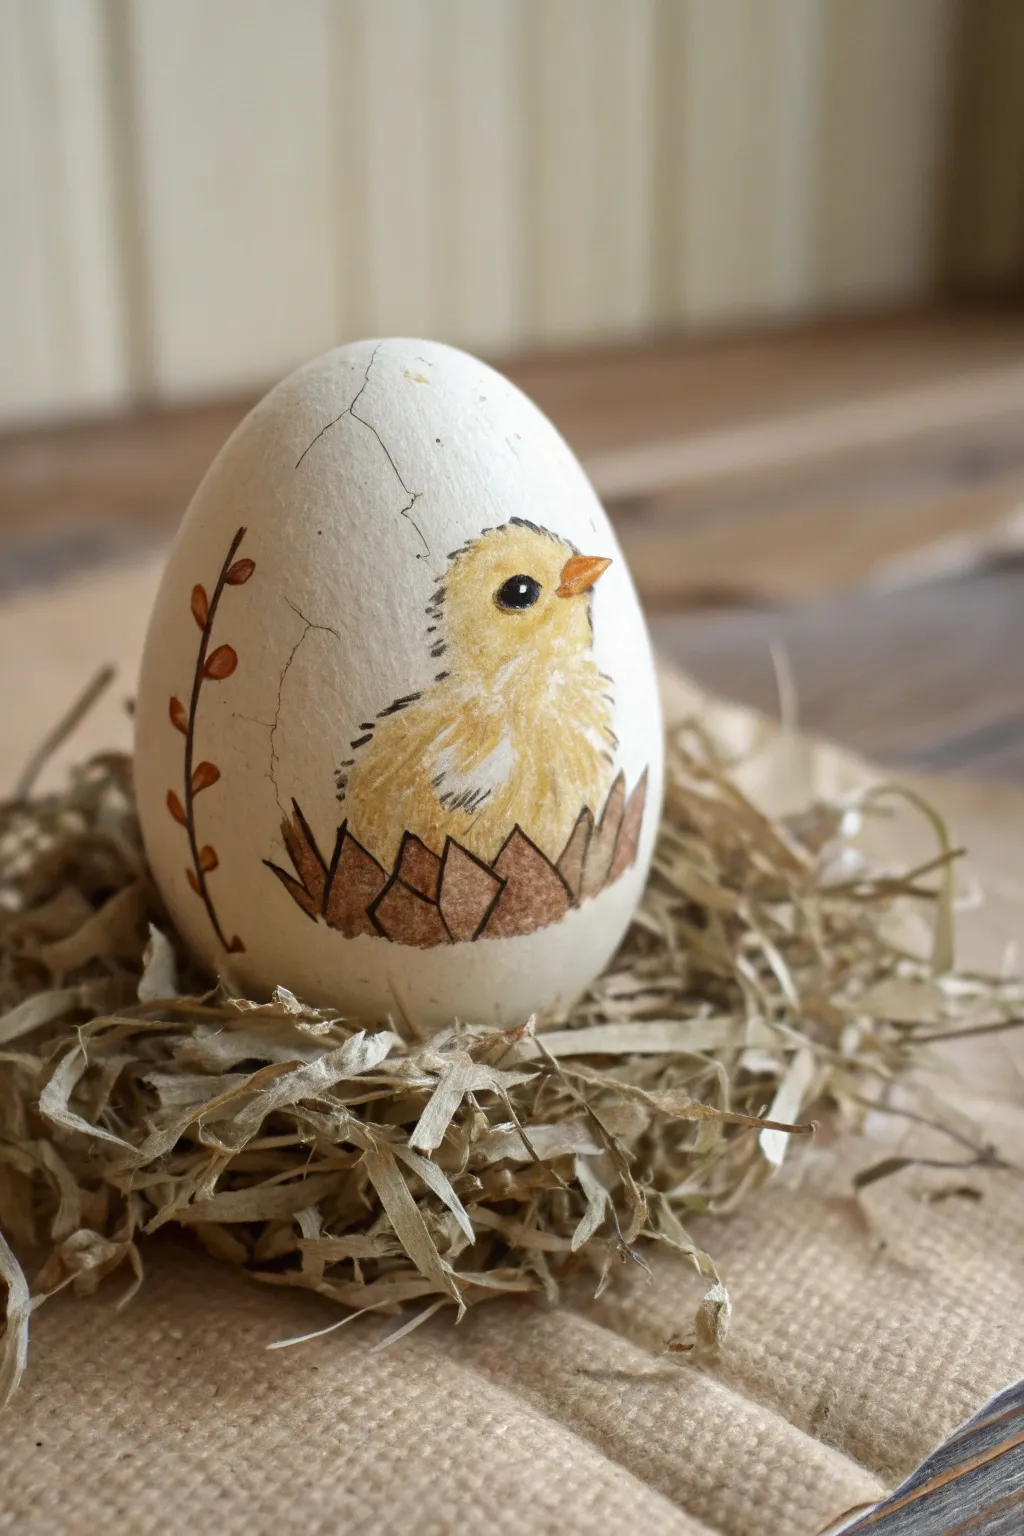
Transform a simple white egg into a charming scene of new life with this clever illustrative painting. Using delicate line work and soft acrylic washes, you’ll create the illusion of a fluffy chick breaking free from its shell, complete with a convincing faux crack.
Step-by-Step Tutorial
Materials
- White egg (blown out or wooden)
- Pencil (HB or similar)
- Eraser
- Fine liner pen (black, waterproof)
- Acrylic paints (Yellow, Ochre, Brown, Orange, White)
- Small fine-point paintbrush (size 0 or 00)
- Water cup
- Paper towel
- Clear matte varnish (optional)
Step 1: Sketching the Layout
-
Draw the shell fragments:
Start near the bottom third of the egg. Using your pencil, sketch a jagged, zig-zagging line that wraps halfway around the front. This will form the broken shell pieces the chick sits in. -
Outline the chick:
Lightly sketch the fluffy body of the chick rising out of these jagged pieces. Draw a simple rounded shape for the head and a slightly wider curve for the body. -
Add the main crack:
From the top of the chick’s head, draw a wandering, uneven line that travels up toward the top of the egg. Make it look fracture-like rather than straight. -
Sketch the vine detail:
To the left of the main crack, draw a simple vertical curved stem with small oval leaves attached. This adds a nice decorative balance to the composition. -
Refine facial features:
Place a small circle for the eye and a triangular beak on the chick’s face. Keep the pencil lines light so they don’t show through the yellow paint later.
Step 2: Applying Base Colors
-
Paint the chick’s body:
Load your brush with a bright, sunny yellow acrylic. Fill in the chick’s head and body shape. You may need two thin coats for opaque coverage. -
Block in the shell fragments:
Mix a medium brown shade. Carefully fill in the jagged shapes at the bottom. I find painting every other fragment first helps prevent wet paint from merging. -
Paint the beak:
Use a small dot of orange paint for the beak. A tiny brush tip is crucial here to stay within the lines. -
Color the vine:
Use a thinned brown or rust-orange color to paint the stem and leaves on the left side of the egg. -
Let it dry completely:
Wait for all the base layers to be fully dry to the touch before moving on to outlining. This prevents smudging your crisp colors.
Feathery Textures
For realistic fluff on the chick, flick your pen or brush outward quickly at the edges rather than drawing a solid contour line.
Step 3: Adding Detail and Texture
-
Outline the main crack:
Using your fine black liner pen, carefully trace over your pencil line for the long crack. Make the line shaky and varied in thickness to mimic a real fracture. -
Create the fluffy texture:
With the pen or a very dry brush with darker yellow ochre, add tiny, short dashes along the outline of the chick and inside the yellow area to simulate downy feathers. -
Detail the eye:
Fill in the eye with solid black, leaving a tiny speck of white (or painting it in later) for the highlight, which brings the character to life. -
Outline the shell pieces:
Trace the brown jagged shell fragments with your pen. Add a second inner line on some pieces to give them a sense of thickness or dimension. -
Add the wing detail:
Draw small, curved wing feathers on the side of the chick’s body using the fine liner. Keep the strokes loose and sketchy. -
Highlight the chick:
Mix a tiny bit of white into your yellow. Paint very subtle highlights on the top of the head and the chest to make the chick look rounder. -
Finish with the vine:
Outline the stem and leaves with the black pen if you want a consistent illustrative style, or leave them soft for contrast.
Paint Slipping?
If acrylics slide off the smooth shell surface, lightly sand the area with fine-grit sandpaper first to give the paint some tooth.
Place your finished egg in a small nest of dried grass or raffia to complete the natural, rustic look
Galaxy Night Skies on Egg Shells

Transform a simple egg into a breathtaking mesmerizing piece of the cosmos with this stunning galaxy painting technique. The rich blend of deep blacks, vibrant teals, and mystical purples creates a stellar backdrop for delicate, hand-painted constellations.
Step-by-Step Guide
Materials
- Wooden egg or blown chicken egg
- Gesso or white primer
- Acrylic paints: Carbon Black, Deep Violet/Magenta, Teal/Turquoise, Titanium White
- Makeup wedge sponge or small kitchen sponge
- Fine detail brush (size 0 or 00)
- Small flat brush
- Old toothbrush
- Wooden skewer (optional, for holding the egg)
- Matte or satin varnish
Step 1: Preparing the Void
-
Prime the surface:
Begin by cleaning your egg to remove any oils. Apply a thin, even coat of white gesso or primer. This ensures your galaxy colors will pop and the paint adheres smoothly. -
Base coat application:
Paint the entire egg with Carbon Black acrylic paint using a flat brush. You may need two coats to achieve a completely opaque, solid dark finish. Allow this to dry completely before moving on. -
Secure your canvas:
If you are finding it hard to hold, mount the egg on a wooden skewer with a bit of blu-tack or tape at the gathered bottom hole. This allows you to paint all sides without fingerprint smudges.
Step 2: Creating the Nebula
-
Sponge selection:
Tear off a small piece of a makeup sponge. The torn edge creates a more organic, cloud-like texture than a straight cut edge. -
First nebula layer:
Dip your sponge lightly into the Teal paint, dab off the excess on a paper towel, and gently stipple a diagonal cloud shape across the center of the egg. Keep the edges soft and hazy. -
Second nebula layer:
Using a fresh piece of sponge, pick up the Deep Violet or Magenta paint. Stipple this color right next to and slightly overlapping the teal section. I like to blend them slightly where they meet to create a deep indigo transition. -
Deepening the contrast:
Once the colors are dry to the touch, go back in with a tiny bit of black on a sponge and gently dab around the outer edges of your colored nebula. This pushes the colors back into the darkness and creates depth. -
Highlighting the cloud:
Mix a tiny amount of white into your violet and teal paints to create pastel versions. Lightly sponge these lighter shades into the very center of your color patches to make the nebula appear to glow.
Nebula Trouble?
If your sponge blending looks too harsh or ‘stamped,’ dab the area lightly with a clean, slightly damp sponge while the paint is still wet to soften the edges.
Step 3: Stars and Sparkles
-
Prepare the splatter:
Water down a small amount of Titanium White paint until it has the consistency of ink or heavy cream. -
Splatter the stars:
Dip an old toothbrush into the thinned white paint. Test it on paper first, then use your thumb to flick the bristles, spraying a fine mist of white dots over the egg to represent distant stars. -
Painting major stars:
Take your fine detail brush and dip it into undiluted white paint. Select a few spots in the galaxy clouds and paint small, solid dots to represent brighter, closer stars. -
Creating the starbursts:
Choose 3-5 of your larger white dots. Carefully paint a thin vertical line and a thin horizontal line crossing through the center of the dot to create a four-point star. -
Adding diagonal rays:
For the largest ‘hero’ stars, paint even shorter diagonal lines between the main cross points, creating an eight-point glint effect. -
Final adjustments:
Inspect the egg. If some areas look too empty, add a few more tiny dots with the tip of your brush, clustering them slightly around the nebula colors.
Starry Precision
For the thinnest starburst lines, thin your white paint with a drop of rubbing alcohol instead of water. It breaks the surface tension for smoother flow.
Step 4: Protecting the Galaxy
-
Drying time:
Let the egg sit undisturbed for at least an hour to ensure the thickest dots of white paint are fully hardened. -
Varnishing:
Apply a coat of matte or satin varnish to seal the paint. A glossy varnish can work too, but I find satin mimics the deep, velvety look of space best without too much glare.
Now you have a miniature universe captured on a shell, ready to display on a simple dark stand.
Framed Egg Shell Mini Collections
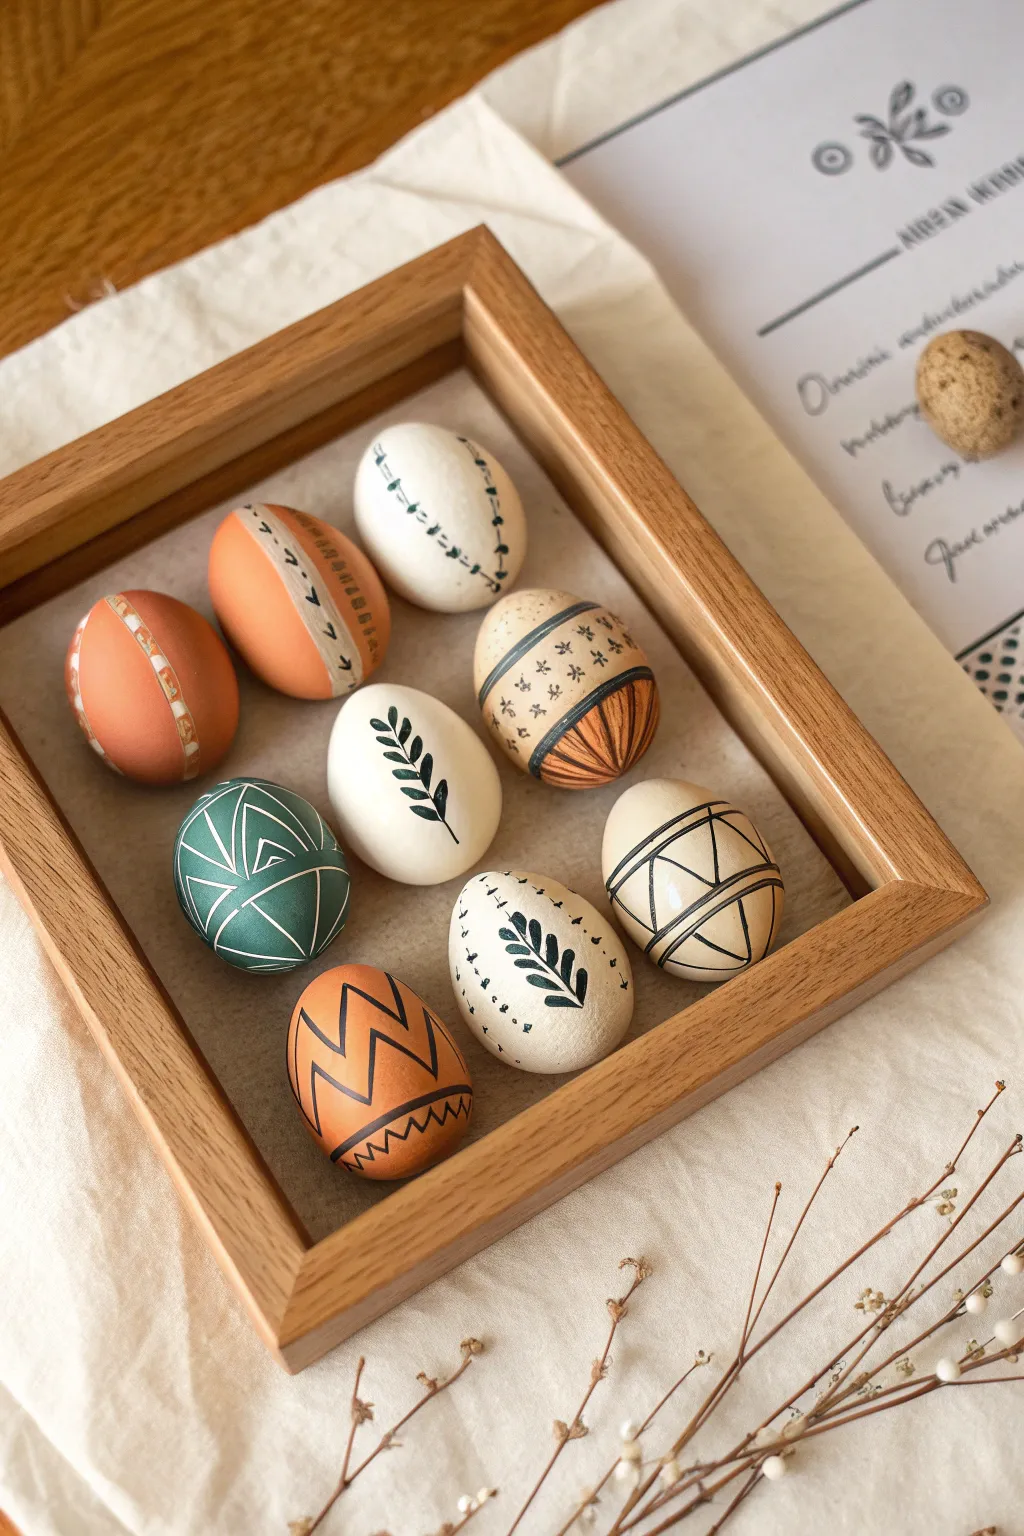
Transform simple eggshells into a striking gallery wall piece with this modern, earth-toned collection. Using a mix of geometric line work and botanical motifs, this project balances minimalist design with warm, folk-art charm to create a sophisticated piece of dimensional art.
Step-by-Step
Materials
- 9 white or cream hollowed chicken or craft eggs
- Acrylic paints (terracotta, deep teal or forest green, warm beige, black)
- Fine-point permanent marker or archival ink pen (black, 0.3mm and 0.5mm)
- Small flat synthetic brush (size 4 or 6)
- Detail liner brush (size 0 or 00)
- Wooden shadow box frame (approx. 8×8 or 9×9 inches)
- Cardstock or mat board (neutral beige/taupe) for backing
- Hot glue gun and glue sticks
- Pencil and eraser
- Matte spray varnish
Step 1: Base Coating and Preparation
-
Prepare the canvas:
Ensure your hollowed eggs are clean and completely dry. If using real eggs, gently wipe them with a vinegar solution to remove any oils that might resist the paint. -
Apply solid base colors:
Select three eggs to paint in a solid terracotta orange color. Use a flat synthetic brush for smooth coverage. You may need two coats for opacity, letting the paint dry fully between layers. -
Create the teal accent:
Paint one egg with your deep teal or forest green acrylic. This darker egg acts as a visual anchor in the final composition, so aim for a rich, solid finish without streaks. -
Leave neutrals bare:
Keep the remaining five eggs in their natural white or cream state. If they have blemishes, you can give them a quick coat of warm beige or off-white paint to unify the tone.
Smudge Prevention
Ink not drying on paint? Acrylic paint can form a plastic skin that repels ink. Lightly buff the painted area with fine sandpaper before drawing to give the ink some ‘tooth’ to grab onto.
Step 2: Geometric & Botanical Detailing
-
Sketch guides:
Lightly use a pencil to mark out the major division lines on your eggs. For the teal egg, sketch a random geometric triangulation pattern. -
Detail the teal egg:
Using a thin liner brush and white or very light cream paint, trace over your pencil lines on the teal egg. Add parallel lines within some triangles to create texture. -
Paint the bottom-dipped egg:
On one of the natural cream eggs, create a ‘dipped’ look by painting the bottom third in terracotta. Once dry, use your black pen to draw vertical lines radiating from the bottom center up to the paint line. -
Add bands to the dipped egg:
Above the terracotta section on the same egg, draw three horizontal bands with the black pen. Fill the middle band with small asterisk or flower patterns. -
Create the leaf motif:
Take a plain white egg and use the black permanent marker to draw a bold, stylized fern or leaf branch running vertically up the center. Fill in the leaves solidly with ink. -
Draw the black geometric egg:
On another white egg, draw thick black geometric triangle bands using the marker. Inside the triangles, add thinner lines parallel to one side to mimic the style of the teal egg. -
Decorate the dotted fern egg:
On a third white egg, paint a small black fern leaf in the center. Surround this central motif with delicate patterns of dots and tiny dashes using the finest tip of your pen. -
Detail the terracotta eggs:
For the solid orange eggs, use white paint or a white paint pen. Draw a vertical band on one, filling it with small geometric shapes. On another, draw bold black zigzag lines around the circumference using your marker. -
Add final stitch marks:
On the remaining white egg, draw two vertical lines of ‘stitch’ marks or dashes in green or black ink to create a subtle, minimal texture.
Add Natural Textures
Level up by gluing tiny dried flower sprigs or bits of twine onto one or two eggs instead of painting them. This adds 3D texture that looks incredible inside a shadow box.
Step 3: Assembly and Framing
-
Seal the artwork:
Once all ink and paint are perfectly dry, give each egg a light misting of matte spray varnish. This prevents the ink from smudging during handling. -
Prepare the frame backing:
Cut your neutral cardstock to fit the inside of your shadow box frame. Insert it into the frame to serve as a clean backdrop. -
Dry run the layout:
Arrange the 9 eggs on a table in a 3×3 grid. Play with the positioning to balance the colors—try not to put two terracotta eggs right next to each other. -
Glue the first row:
Apply a dime-sized dollop of hot glue to the back of the top-left egg and press it firmly against the backing board. Repeat for the top middle and top right. -
Finish the grid:
Continue gluing the second and third rows, ensuring equal spacing between the eggs. I usually eyeball this, but you can use a ruler for precision. -
Clean up:
Pick off any distinct hot glue strings that may be visible. Check that all eggs are secure before hanging the frame vertically.
Hang your framed collection in a spot with good lighting to let the subtle shadows and delicate details truly shine.


Have a question or want to share your own experience? I'd love to hear from you in the comments below!