If you’ve ever looked at a smooth stone and thought, “That could totally be a tiny home,” you’re in the right headspace. These rock painting ideas are all about turning natural shapes into charming miniature houses that feel like they belong in a storybook.
Classic Storybook Cottage
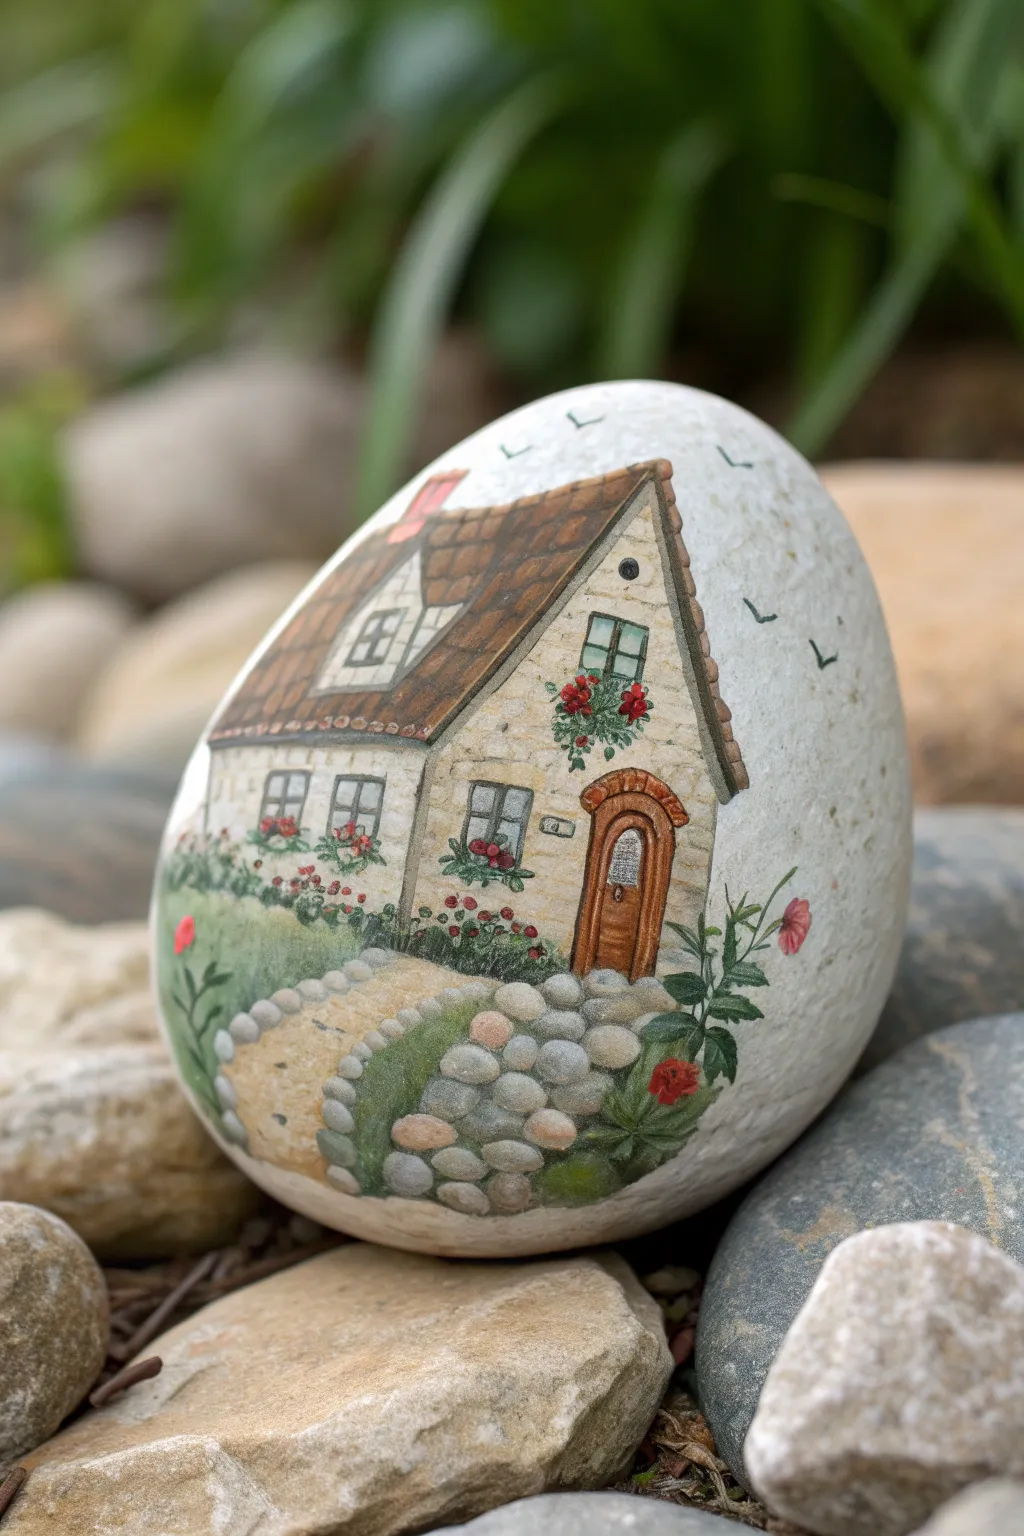
Transform a simple garden stone into a charming storybook home with this detailed painting project. The finished rock features a rustic peaked roof, climbing flowers, and a welcoming cobblestone path, perfect for tucking into a flower pot or fairy garden.
Detailed Instructions
Materials
- Smooth, egg-shaped river rock (cleaned and dried)
- White acrylic paint or gesso (for base coat)
- Acrylic paints (browns, creams, greys, greens, red, black)
- Fine liner brushes (00 or 000)
- Small flat brush and small round brush
- Pencil for sketching
- Matte or glossy sealer/varnish
- Palette and water cup
Step 1: Preparation and Base
-
Clean the stone:
Scrub your rock thoroughly with soap and water to remove any dirt or oils, then let it dry completely. A clean surface is crucial for paint adhesion. -
Prime the surface:
Apply two coats of white acrylic paint or gesso over the entire rock. Allow the first coat to dry fully before adding the second to ensure a smooth, opaque canvas. -
Sketch the outline:
Using a light pencil, sketch the basic shape of the house. Draw the triangular roofline, the main box of the house, the arched door, and the winding path leading to the bottom edge.
Clean Lines
If your window frames look messy, wait for the dark paint to dry, then use the wall color to ‘cut back’ into the lines, thinning them out.
Step 2: Blocking in Colors
-
Paint the walls:
Mix a warm cream color using white and a tiny dot of yellow ochre or brown. Fill in the exterior walls of the cottage, avoiding the windows and door area. -
Create the roof base:
Paint the roof area with a medium brown shade. Don’t worry about the shingles yet; just get a solid base color down. -
Define the door:
Fill in the arched door with a rich, reddish-brown. Paint the stone archway surrounding it with a lighter terracotta or beige tone. -
Lay the grass foundation:
Use a mossy green to paint the grass areas on either side of the path. I like to stipple this paint slightly to give it an instant grassy texture. -
Base the path:
Paint the path area with a sandy beige color. This will serve as the grout between your future cobblestones.
Step 3: Architectural Details
-
Add roof texture:
Switch to a fine liner brush. Use a dark brown to paint a grid pattern on the roof, then fill alternating squares or add quick diagonal strokes to mimic shingles or tiles. -
Detail the door:
Outline the door panels in dark brown. Add a tiny black dot for the doorknob and paint a small window near the top of the door if desired. -
Paint the windows:
Fill the window rectangles with a pale blue-grey. Once dry, use your finest brush and dark grey or black paint to carefully draw the window panes and frames. -
Outline the structure:
Use a diluted black or dark brown paint to create thin outlines around the house edges, roofline, and under the eaves to separate the house from the white background.
Fairy Chimney
Make the cottage cozy by adding a small red brick chimney to the roof and using a dry brush to create wispy grey smoke drifting up.
Step 4: Garden and Finishing Touches
-
Paint cobblestones:
Mix various shades of grey and beige. Paint rounded, irregular stone shapes along the path and darker grey stones along the bottom right edge. Leave small gaps to show the sandy base underneath. -
Highlight the stones:
Add a tiny dab of white to the top of each cobblestone to make them look rounded and 3D. -
Grow the garden:
Stipple dark green paint around the base of the house for bushes. Add climbing vines near the door and window boxes using short, comma-like strokes. -
Bloom flowers:
Dip the tip of a toothpick or fine brush into red paint. Dot flowers onto the window boxes, climbing vines, and taller stalks on the right side of the rock. -
Add birds:
Using the very tip of your liner brush and black paint, draw tiny ‘V’ shapes in the white sky area to represent birds flying in the distance. -
Seal the artwork:
Once the paint is completely cured (wait at least 24 hours), apply a clear weather-resistant sealer to protect your cottage from the elements.
Place your little stone cottage in a sunny spot to surprise your garden visitors


Mushroom Roof Fairy House
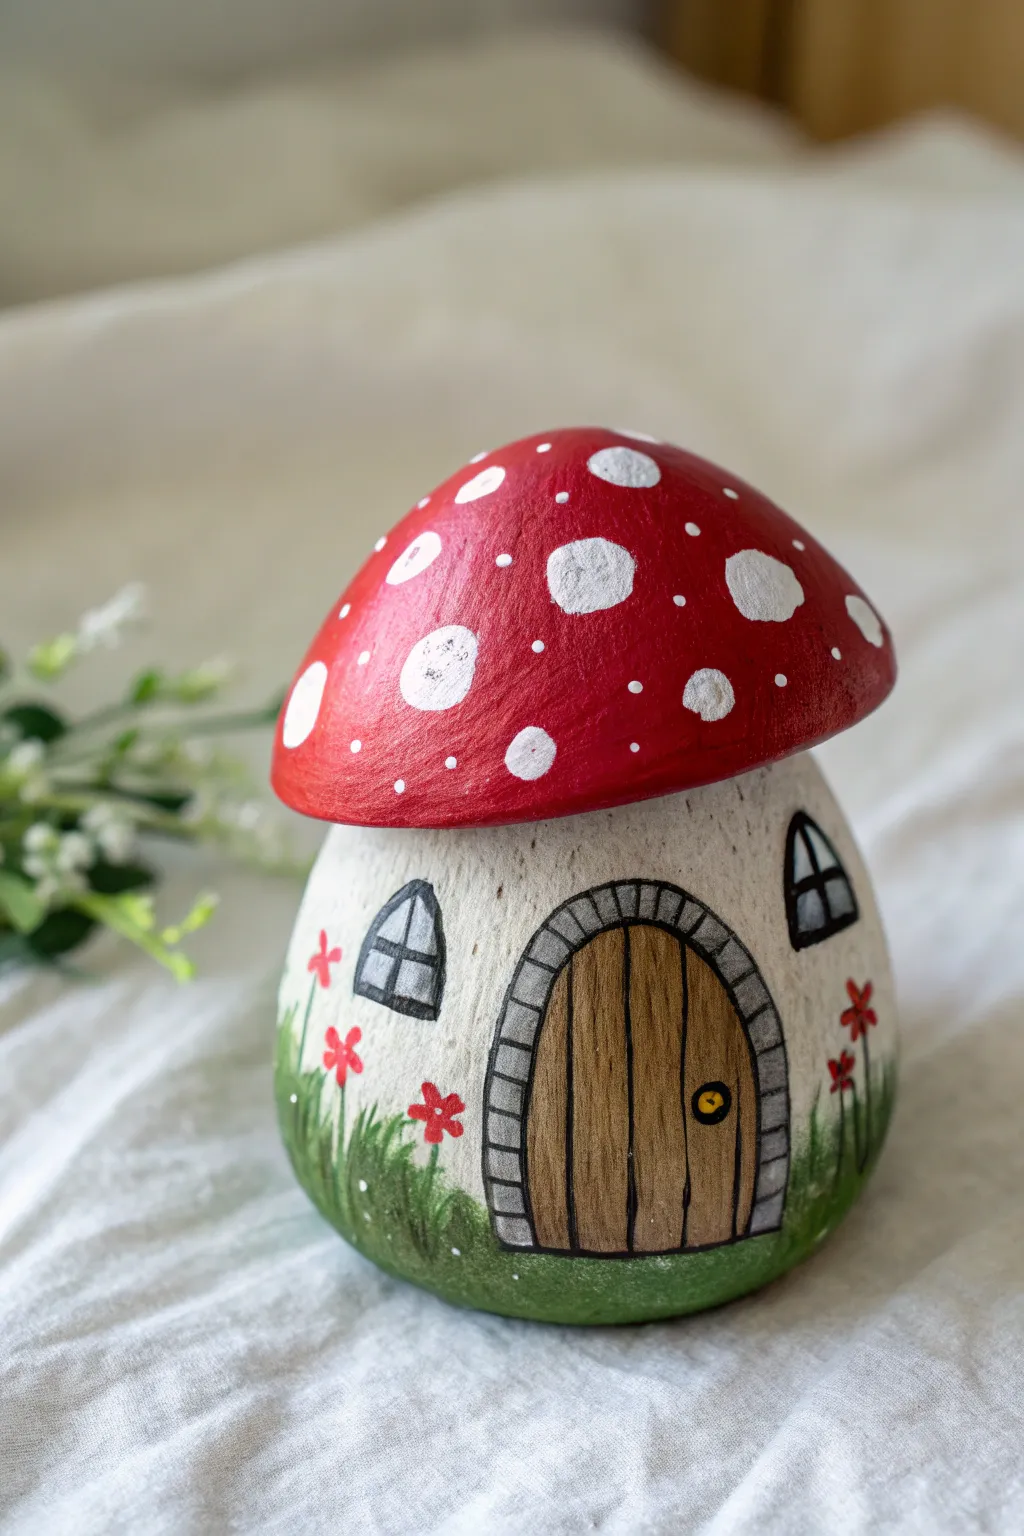
Transform a simple garden stone into an enchanting abode for tiny magical folk. This project features a classic red-and-white toadstool roof perched atop a charming white cottage, complete with an arched wooden door and wildflower details.
Step-by-Step Guide
Materials
- Smooth, rounded rock (somewhat egg-shaped or bottom-heavy)
- Acrylic paints (red, titanium white, black, brown, dark green, medium green, yellow, grey)
- Pencil for sketching
- Flat paintbrushes (medium and small)
- Fine detail brushes (liners or spotters)
- Outdoor craft varnish or sealant (clear satin or matte)
Step 1: Base Coating & Blocking Colors
-
Clean slates:
Before you begin, scrub your rock thoroughly with soap and water to remove any dirt or oils. Let it dry completely in the sun or use a hairdryer to speed things up. -
Define the roofline:
Visualize where the mushroom cap will sit. Use a pencil to lightly draw a wavering, horizontal line around the upper third of the rock. This line separates the red roof from the white house walls. -
Paint the cap:
Using a medium flat brush, paint the entire top section above your pencil line with bright red acrylic paint. You may need two coats for a solid, opaque finish. Let each coat dry fully. -
Whitewash the walls:
Paint the lower section of the rock with titanium white. I like to apply this in thin layers to avoid brush strokes, usually needing about two to three coats to cover the dark stone completely.
Step 2: Door & Windows
-
Sketch the features:
Once the white base is bone dry, lightly sketch an arched door in the center and two small arched windows on either side. Also, sketch the outline of the stone frame around the door. -
Paint the door:
Fill in the door shape with a medium brown paint. Don’t worry about wood grain details yet; just get a solid base color down. -
Lay the stonework:
Paint the arched frame around the door with a light grey paint. If you don’t have grey, mix a tiny dot of black into your white. Let this dry completely. -
Add window panes:
Fill the window arches with a darker grey or soft black to suggest depth inside the house. Alternatively, a pale blue can suggest glass reflecting the sky.
Clean Lines
If your hand shakes while doing the black outlines, use a black ultra-fine tip acrylic paint marker or permanent marker instead of a brush for easier control.
Step 3: Details & Decoration
-
Create the wood grain:
Mix a slightly darker brown or use thinned black paint. With a fine liner brush, paint vertical lines down the brown door to simulate wooden planks. Add a tiny yellow or gold dot for the doorknob. -
Outline the masonry:
Using your thinnest brush and black paint, carefully outline the grey door frame. Then, paint horizontal lines across the frame to create individual bricks or stones. -
Frame the windows:
Outline the windows in black and add a cross shape inside each to create the windowpanes. Keep a steady hand or brace your pinky on a dry part of the rock for stability. -
Foundation greenery:
Mix a dark green and dab it along the very bottom edge of the rock to create a grassy base. Use short, upward flicks of the brush to mimic blades of grass growing up the white walls. -
Plant the garden:
Dip a fine brush or a toothpick into red paint. Add clusters of small dots or 5-petal flower shapes amongst the grass blades on either side of the door. A tiny dot of yellow in the center of each flower adds a pop.
Glow Up
Paint the windows with glow-in-the-dark yellow paint so your little fairy house looks like someone is home when the sun goes down.
Step 4: The Mushroom Cap Finish
-
Add the spots:
Return to the red roof. Paint large, organic white circles scattered across the red surface. Make them different sizes—some large, some tiny dots—to make it look natural. -
Texture effect:
If you want a slightly weathered look like the image, you can gently sponge a tiny bit of darker red or mixed brown near the bottom edge of the red cap for shading before sealing. -
Seal the magic:
Once every detail is completely dry (give it at least 24 hours to cure best), apply a coat of outdoor varnish. This protects your fairy house from rain and sun if it lives in the garden.
Place your finished cottage near a tree root or flower pot to surprise visitors with a touch of hidden magic


Simple Colorful Village Row
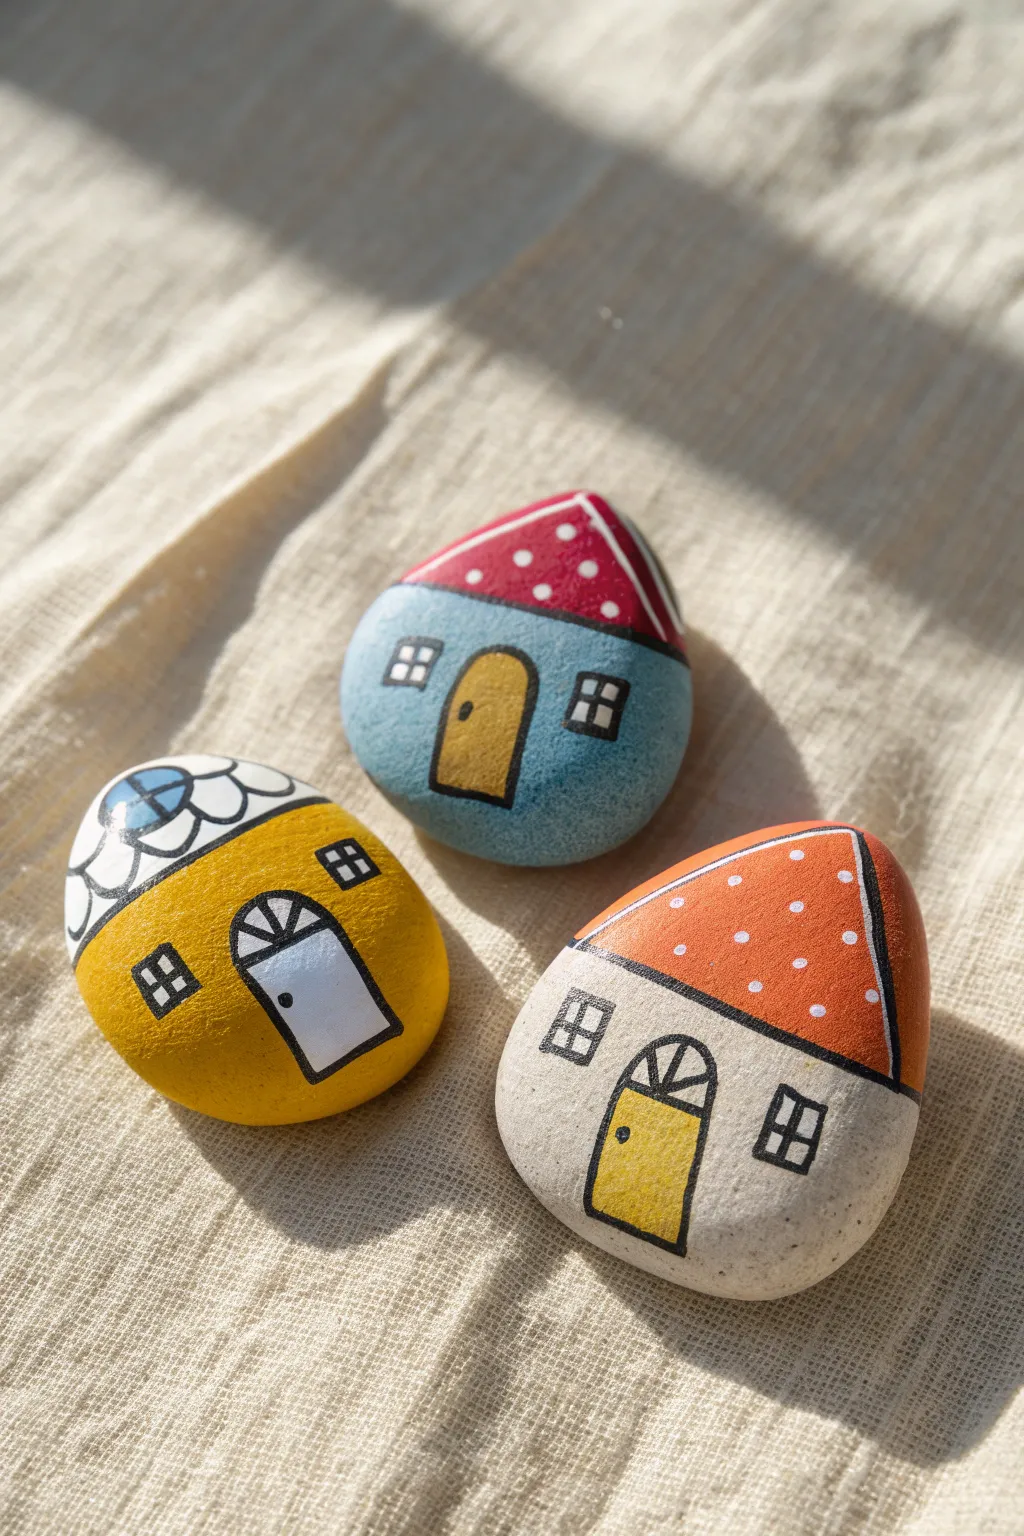
Transform smooth river rocks into a charming miniature village with just a few dabs of paint. These adorable stone cottages feature vibrant, solid colors and sweet dotted details that bring a cozy, folk-art feel to any garden or windowsill.
Detailed Instructions
Materials
- Smooth river stones (flat and oval shapes work best)
- Acrylic paints (primary colors plus black and white)
- Small flat brush
- Fine detail brush (liner brush)
- Pencil for sketching
- Posca paint pens (optional, for fine lines)
- Cup of water and paper towels
- Clear sealant (matte or glossy)
Step 1: Preparation and Base Shapes
-
Clean the canvas:
Start by scrubbing your stones with soap and water to remove any dirt or grit. Let them dry completely, as moisture trapped inside the stone can cause the paint to bubble later. -
Sketch the layout:
Using a pencil, lightly draw a horizontal line across the stone to separate the roof from the house body. For the rounded rock, you might curve this line to create a dome-like roof. -
Block in the house color:
Choose a main color for the bottom of the house. Paint the area below your pencil line solidly. For the blue house, use a sky blue; for the others, try a sunny yellow or soft cream. Allow this layer to dry. -
Paint the roof:
Select a contrasting color for the top section. Fill in the roof area completely, being careful to keep the edge where it meets the house color neat and clean. You may need two coats for full opacity.
Uneven Lines?
If your hand shakes while outlining, rest your pinky finger on the table or the dry part of the rock for stability. Using a paint marker instead of a brush offers much more control.
Step 2: Adding Architectural Details
-
Outline the separation:
Once your base colors are totally dry, use your fine detail brush and black paint (or a black paint pen) to draw a clean line separating the roof from the house body. -
Create the door shape:
Paint a small arch or rectangle in a contrasting color (like yellow or white) at the bottom center of the stone to serve as the door. I find doing this before the outline helps create a smoother shape. -
Outline the door:
Using your finest brush or pen, outline the painted door in black. Add a tiny dot for a doorknob and drawing a line down the middle or a grid for window panes if the door has glass. -
Draw the windows:
draw small squares or rectangles for windows using the black liner. Keep the lines thin. You can leave the inside stone-colored or paint them white first for a glowing effect. -
Add window panes:
Carefully paint a cross ‘t’ shape inside each window box to create the panes.
Step 3: Decorative Accents
-
Roof patterns: Polka dots:
For the red and orange roofs, dip the handle end of a paintbrush into white paint. Gently stamp dots onto the roof area in a random or grid pattern. -
Roof patterns: Scallops:
For the yellow house with the white roof, paint overlapping semi-circles or ‘clouds’ in white. Once dry, outline these scallops with thin black lines to define the shingles. -
Roof detail lines:
On the red-roofed house, you can add a vertical white stripe near the edge to suggest dimension or a chimney area. -
Highlighting the door:
If your door features a window (like the arched ones), paint the glass area white or light blue, then draw the black muntin bars over it once dry. -
Seal the artwork:
Allow the stones to dry at least overnight to ensure the paint has cured. Apply a coat of clear sealant to protect your village from scratches and weather.
Pro Tip: Opacity Hack
If painting light colors (like yellow) on dark grey stones, paint a layer of white first. This acts as a primer and makes the top color pop vividly without needing five coats.
Arrange your finished stones together to create a delightful little neighborhood scene unique to you


Glowing Window Night Cottage

Transform a smooth stone into a cozy nighttime scene featuring a silhouette cottage with warm, inviting windows. This beginner-friendly project uses contrast and simple shapes to create a wonderfully atmospheric piece of miniature art.
Step-by-Step Guide
Materials
- Smooth, oval river rock (palm-sized)
- Acrylic paints: Black, Dark Blue, Titanium White, Bright Orange, Yellow
- Posca paint pens (optional): Black (fine tip), White (extra fine)
- Flat brush (medium)
- Detail brushes (fine and liner)
- Pencil for sketching
- Matte or glossy sealant spray
Step 1: Setting the Night Sky
-
Clean your canvas:
Wash your rock thoroughly with soapy water and let it dry completely to ensure the paint adheres properly. -
Mix the night blue:
Mix a generous amount of dark blue acrylic with just a tiny drop of black to deepen it without losing the blue hue. -
Paint the background:
Cover the top two-thirds of the rock with your dark blue mixture. Use smooth, horizontal strokes to create a clean finish. -
Create the ground:
Paint the bottom third in a neutral grey or dark brownish-grey to establish the ground where the house will sit. Let this base layer dry completely before moving on.
Step 2: Building the Cottage
-
Sketch the outline:
Once the paint is dry, lightly use a pencil to sketch the simple silhouette of a house with a steep roof and a small chimney. -
Block in the house:
Fill in the house shape with solid black paint. I find distinct, careful strokes work best here to keep the roof angles sharp. Leave blank spaces where the windows and door will go if you want the colors to be brighter, or just paint it solid black if your yellow is opaque enough. -
Add the chimney:
Paint a small rectangle for the chimney on the right slope of the roof. Use a mix of orange and brown, then outline it in black once dry to define the bricks. -
Define the roofline:
Use a fine detail brush or a white paint pen to add tiny dots along the roof’s edge, mimicking snow or architectural detail.
Windows looking dull?
If the yellow paint looks muddy over the black background, paint the window shapes in white first. Let the white dry fully, then apply your yellow and orange on top for maximum vibrancy.
Step 3: Adding the Glow
-
Base the windows:
Paint arch-shaped windows using bright orange paint. You might need two coats to make them pop against the dark background. -
Add the yellow light:
Paint the center of each window with yellow, blending it slightly outward into the orange to create a heated, glowing effect. -
Window panes:
Using your thinnest liner brush or a fine black paint pen, carefully draw the grid lines (mullions) over the dry yellow and orange paint. -
Paint the door:
Fill in a small rectangle for the door with light grey or white paint. Add a tiny black dot for the doorknob.
Sharper Lines
For the window grids and fence posts, skip the brush! A fine-tip acrylic paint marker (like a Posca pen) gives you way more control than a brush for those tiny straight lines.
Step 4: Final Details
-
Adding stars:
Dip the tip of a toothpick or a dotting tool into white paint. scattered dots across the blue sky area. -
Drawing starbursts:
Select a few larger dots and use a very fine brush to pull small lines outward, creating twinkling cross-shaped stars. -
The fence line:
Paint a uneven horizontal black line extending from the sides of the house to the edge of the rock. Add short vertical strokes to create a picket fence silhouette. -
Walkway details:
Paint small grey or white rectangles leading from the door to the bottom edge of the rock to create a stepping stone path. -
Protect your work:
Allow the entire rock to dry for at least 24 hours, then apply a coat of sealant to protect the finish from chipping.
Place your finished moody cottage on a shelf or in a garden pot to enjoy a little starlight anytime
BRUSH GUIDE
The Right Brush for Every Stroke
From clean lines to bold texture — master brush choice, stroke control, and essential techniques.
Explore the Full Guide
A-Frame Cabin From a Pointy Rock
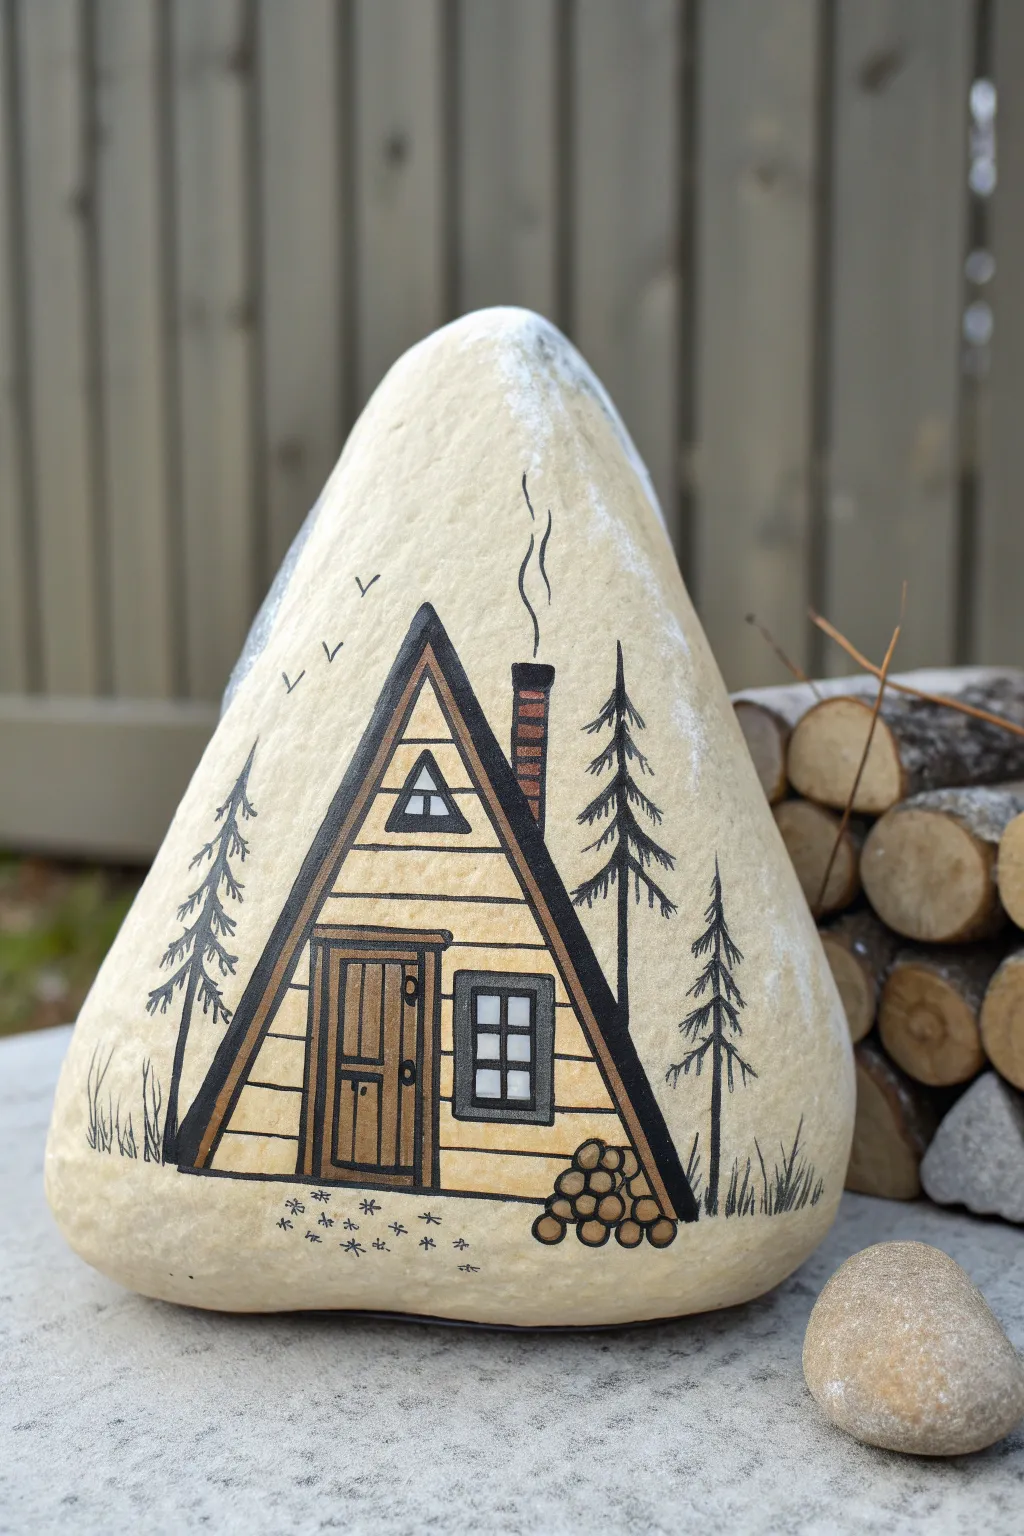
Transform a naturally triangular stone into a charming woodland retreat with this detailed A-frame cabin design. The stone’s shape perfectly mimics the steep rooflines, creating a whimsical piece of decor perfect for a garden or bookshelf.
How-To Guide
Materials
- Smooth, triangular-shaped river rock
- Acrylic paints (black, white, warm brown, light beige/cream, dark grey)
- Fine liner brushes (sizes 0 and 00)
- Flat shader brush (small)
- Pencil for sketching
- Matte finish spray sealant
- Paint palette
- Cup of water and paper towels
Step 1: Preparation & Base Painting
-
Clean the Stone:
Begin by thoroughly washing your stone with soapy water to remove any dirt or oils that might prevent paint adhesion. Let it dry completely. -
Prime the Surface:
Since the cabin relies on a clean, light look, paint the entire front face of the rock with a mix of white and a tiny drop of beige to create a smooth, creamy base coat. You may need two coats for full opacity. -
Sketch the Outline:
Once the base is dry, lightly pencil in the main A-frame triangle. Use the natural peak of the rock as the top point of your roof to integrate the stone’s shape into the design.
Step 2: Drawing the Structure
-
Paint the Roof Beams:
Using a small flat brush and black paint, create the thick, bold lines of the A-frame roof structure. Make the lines thick enough to stand out, tapering slightly at the top point. -
Fill the Walls:
Inside the black roof outline, paint the main triangular wall space with a warm, light beige color. This will represent the wooden siding of the cabin. -
Add Siding Lines:
With a very fine liner brush and thinned black paint or a black paint pen, draw horizontal lines across the beige section to create the look of clapboard siding. -
Block in the Door:
Near the bottom center, paint a vertical rectangle for the door using a medium brown shade. Outline it in black to define the frame. -
Add the Windows:
Paint a small square window beside the door and a small triangular window near the peak. Fill the panes with white or very light grey, then frame them with thick black lines.
Paint Pen Trick
For ultra-crisp lines on the siding and windows, swap your brush for a fine-tip black acrylic paint marker. It offers steadier control than bristles.
Step 3: Details & Atmosphere
-
Draw the Chimney:
On the right slope of the roof, paint a tall, slender rectangle for the chimney using a reddish-brown hue. Detail it with tiny horizontal brick lines in black. -
Smoke Signals:
With a fine liner brush and black paint, add two squiggly, vertical lines rising from the chimney to simulate gentle smoke drifting upward. -
Plant the Trees:
On either side of the cabin, paint stylised pine trees. Start with a vertical trunk line, then use quick, downward strokes to create wispy branches. I find varying their heights adds nice visual interest. -
Add the Log Pile:
At the bottom right corner of the cabin, paint a stack of small circles in light brown to represent firewood logs. Outline each circle in black for definition. -
Ground the Scene:
Paint subtle, sparse grass blades along the bottom edge of the rock to ‘ground’ the cabin. Add a few tiny footprints or snowflake asterisks in the foreground if you want a winter vibe. -
Snowy Roof Accent:
Dry brush a small amount of white paint at the very peak of the rock and lightly down the sides of the roof to suggest a dusting of snow.
Correcting Smudges
If you smudge a black line, don’t wipe it! Let it dry completely, then paint over the mistake with your cream base color before redrawing.
Step 4: Finishing Touches
-
Add Flying Birds:
Paint three tiny ‘v’ shapes high in the sky on the left side to represent birds flying in the distance. -
Refine Details:
Go back with your finest brush to sharpen any black outlines, add a doorknob, and ensure the window panes look crisp. -
Seal:
Once completely dry, spray the rock with a matte sealant to protect your artwork from chipping and fading.
Now you have a miniature cabin escape right in the palm of your hand
Tiny Brick House Illusion
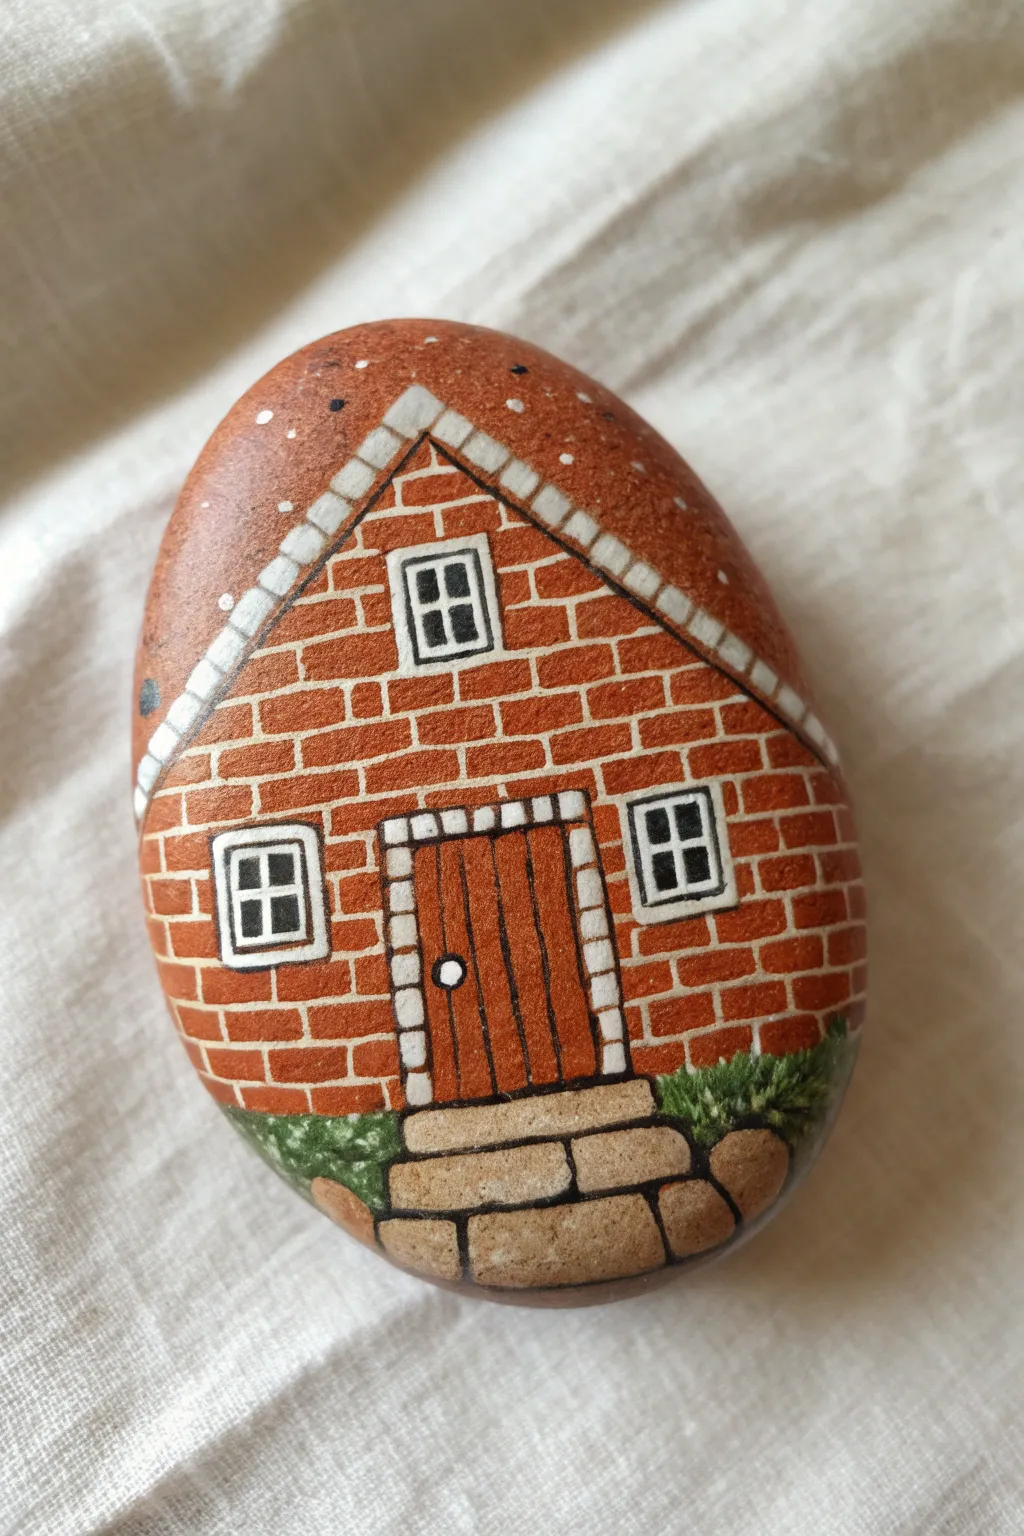
Turn a simple oval stone into a charming miniature residence with this brick house illusion. By carefully layering geometric shapes and fine details, you will create a rustic home complete with a wooden door, bright windows, and a paved walkway.
Detailed Instructions
Materials
- Smooth, oval-shaped river rock
- Acrylic paints (red-brown, white, black, dark brown, grey, green)
- Fine liner brushes (sizes 00 and 000)
- Small flat brush
- Pencil and eraser
- White or grey paint marker (optional but helpful)
- Matte or glossy varnish to seal
Step 1: Base and Sketching
-
Stone Prep:
Begin by washing your stone with warm soapy water and verifying it is completely dry before starting to paint. -
Sketch the Outline:
Using a pencil, lightly sketch the main triangle for the roofline. Below that, draw a rectangle for the door in the center and squares for the windows. -
Laying the Foundation:
Paint the entire face of the rock inside your house outline with a warm terracotta or red-brown acrylic paint. You may need two coats for solid coverage.
Steady Hand Trick
For the brick lines, anchor your pinky finger against the table or the dry part of the stone to stabilize your hand while painting fine details.
Step 2: Architectural Details
-
Roof Trim:
Paint a thick white strip along the top triangular edge of your red shape. This acts as the roof fascia or snow line. -
Roof Details:
Once the white strip is dry, use a very fine brush or pen to draw small vertical lines inside it to mimic shingles or wooden trim. -
Window Frames:
Paint the squares you sketched earlier for the windows. Start with a solid white square for the frame, let it dry, and then paint a slightly smaller black square inside. -
The Door:
Fill in the door rectangle with a medium brown tone. If you want a wood grain effect, mix a tiny bit of orange into your brown. -
Doorframe:
Outline the brown door with a thick white border, but add small tick marks to make it look like separate stone blocks surrounding the entrance.
Step 3: Brickwork
-
Horizontal Lines:
Using your finest liner brush and thinned white paint (or a white paint pen), draw horizontal lines across the entire red section of the house. Keep them parallel. -
Vertical Mortar:
Add small vertical ticks between the horizontal lines to create individual bricks. Remember to stagger them—like a real brick wall—so the vertical lines don’t stack directly on top of each other. -
Window Panes:
Go back to your dry black windows and carefully paint a white cross in the center of each to create the windowpanes.
Welcome Home
Personalize the house by adding a tiny house number on the door or painting a miniature wreath on the front for a seasonal touch.
Step 4: Finishing Touches
-
Wood Detailing:
On the brown door, use a dark brown or black liner to draw vertical planks. Add a small white dot for the doorknob. -
The Walkway:
At the very bottom center, paint irregular beige or grey shapes to form stone steps leading to the door. Outline them with thin black lines for separation. -
Landscaping:
Dab a stiff brush into green paint and stipple it around the base of the house and walkway to create the look of bushes or moss. -
Atmosphere:
I like to add tiny white dots near the roofline on the raw stone to suggest falling snow or stars in the background sky. -
Sealing:
Once absolutely everything is dry, apply a coat of varnish to protect your miniature architecture from chipping.
Now you have a quaint little cottage that fits right in the palm of your hand

PENCIL GUIDE
Understanding Pencil Grades from H to B
From first sketch to finished drawing — learn pencil grades, line control, and shading techniques.
Explore the Full Guide
Picket Fence Front Yard
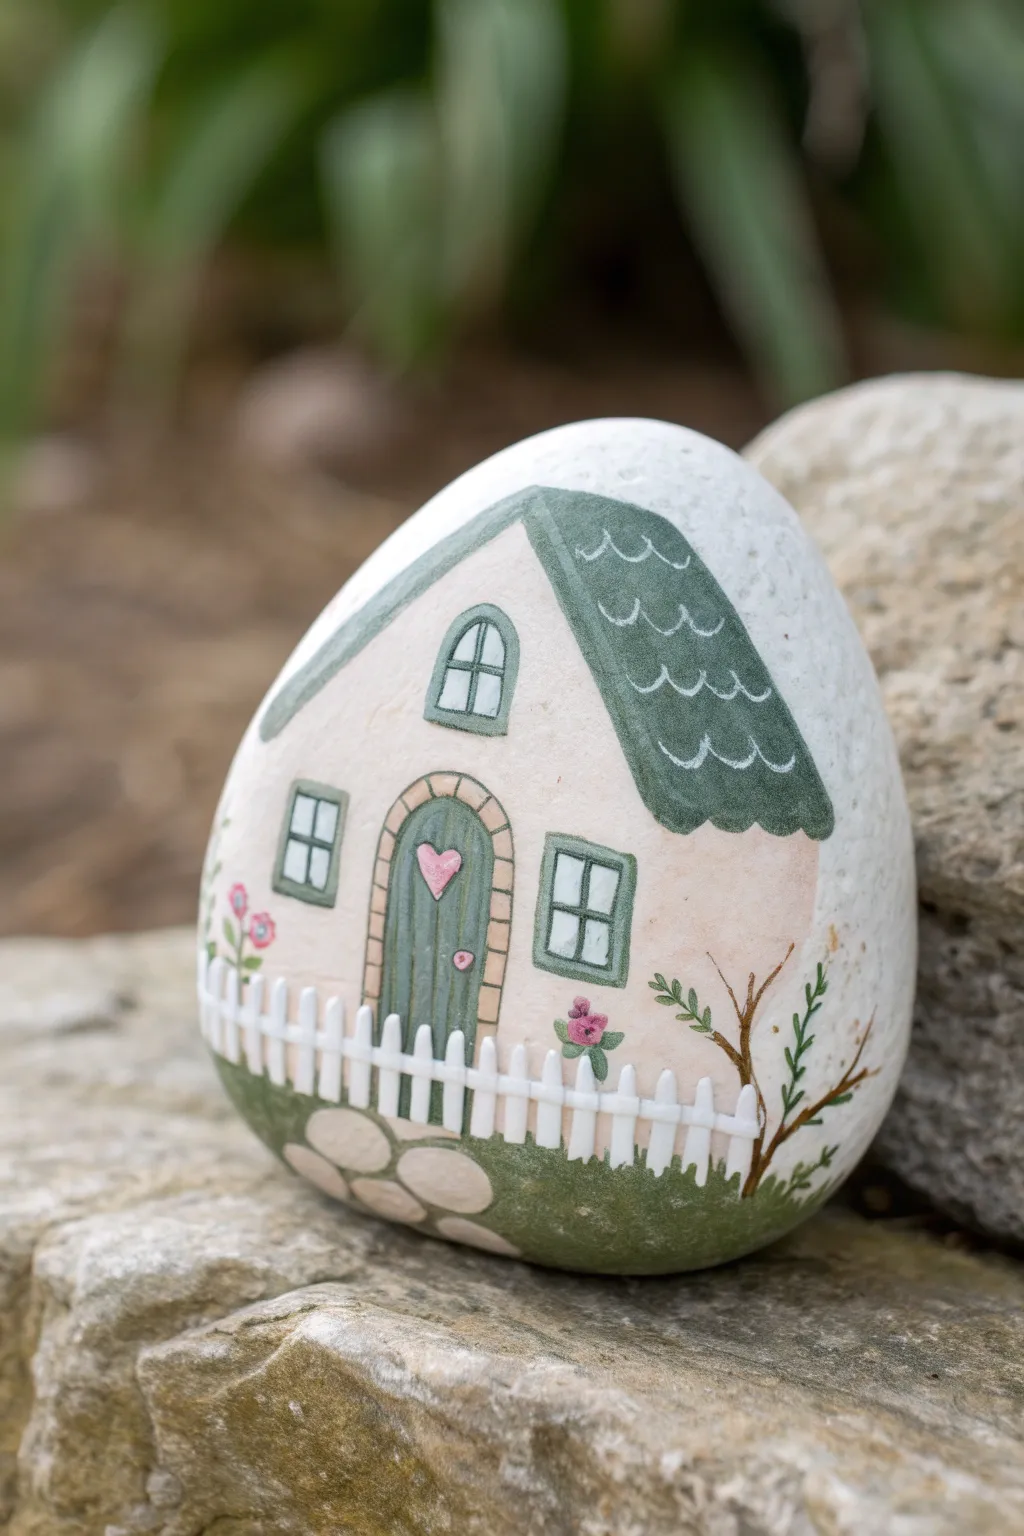
Transform a smooth, egg-shaped stone into a welcoming little cottage complete with a bubbly white picket fence and blooming garden. This project uses soft pastels and precise detailing to create a miniature home that radiates warmth and whimsy.
Step-by-Step Tutorial
Materials
- Smooth, egg-shaped river rock
- Acrylic paints (Titanium White, Pale Pink, Forest Green, Sage Green, Beige, Gray, Rose Pink)
- Fine detail brushes (sizes 0, 00, and 1)
- Small flat brush
- Pencil and eraser
- Paint pens (White, Black – ultra fine tip)
- Matte or satin spray sealer
Step 1: Preparation and Base Shapes
-
Clean the canvas:
Start by scrubbing your rock with soapy water and letting it dry completely to ensure the paint adheres properly. -
Prime the surface:
Paint the entire face of the rock with a solid coat of titanium white acrylic; this will make your pastel colors pop and cover the natural stone color. -
Sketch the outline:
Once the white base is dry, lightly use a pencil to map out the roofline, the sides of the house, and the curved horizon line where the grass meets the house. -
Block in the house color:
Using a flat brush, fill in the main house area with a pale pink or peach tone, being careful to stay within your pencil guidelines. -
Paint the roof:
Apply a forest green shade to the roof area, creating a scalloped bottom edge to suggest shingle shapes.
Step 2: Painting Architectural Details
-
Add the door:
Mix a sage green color and paint an arched door in the center of the house bottom. -
Create the windows:
Paint two rectangular shapes on either side of the door and a small arched window centered above the door using a very light blue or gray. -
Line the frames:
Using a fine liner brush and the forest green paint, carefully outline the door and the window frames, adding Muntin bars (the grid lines) inside the windows. -
Detail the door:
Add a small pink heart in the center of the door and outline the door arch with beige bricks. -
Roof texture:
With a thin white paint pen or a liner brush, draw scalloped ‘U’ shapes across the green roof to create the look of layered shingles.
Uneven Lines?
If your window frames look shaky, wait for the paint to dry completely. Then use the house body color (pale pink) to ‘cut back’ into the lines and straighten them out.
Step 3: The Garden and Fence
-
Lay the lawn:
Paint the bottom section of the rock with a mossy green color, curving it slightly upwards on the sides to frame the house. -
Construct the fence:
Using thick white paint or a bold white paint pen, draw vertical pickets along the horizon line where the house meets the grass. I find it easiest to paint the vertical posts first, then connect them with horizontal rails. -
Add the walkway:
Paint circular stepping stones leading up to the fence gate using a light beige or gray, clustering them near the bottom texture. -
Grow the garden:
Use a detail brush to paint thin brown branches growing on the right side, and adding green stems on the left. -
Bloom the flowers:
Dab small spots of rose pink paint onto the stems to create little flower buds and blossoms. -
Final leaf details:
Add tiny green leaves to your branches using the very tip of your 00 brush. -
Seal the artwork:
Once absolutely everything is dry, finish with a spray sealer to protect your miniature home from the elements.
Level Up It
Add depth to the white picket fence by painting a very thin, light grey line on the right side of each picket to create a 3D shadow effect.
Place your tiny cottage in a potted plant or on a windowsill for a touch of storybook magic
Beach Hut House on a Rock
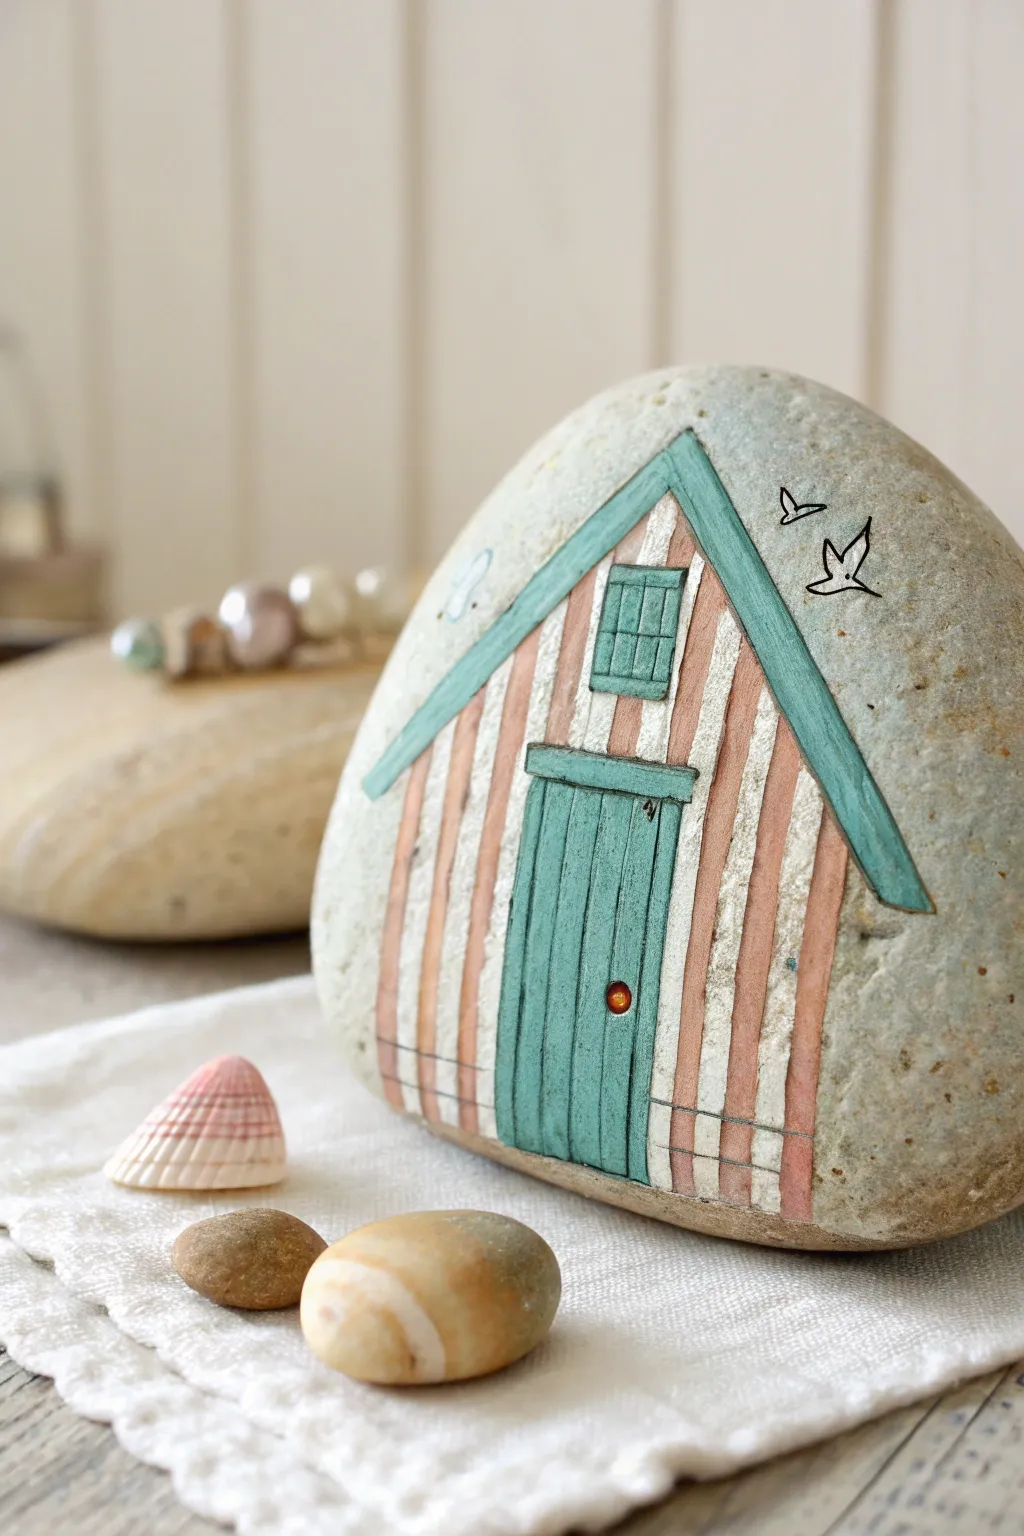
Capture the breezy feel of the seaside with this charming beach hut painted on a natural stone. The soft stripes, teal accents, and tiny bird silhouettes transform a simple rock into a delightful piece of nautical decor.
Step-by-Step
Materials
- Smooth, oval-shaped river rock (medium size)
- Acrylic paints: white, teal/aqua, soft coral/peach, black, gold/orange
- Fine-point black liner pen or very fine brush
- Flat shader brush (small)
- Round detail brush (size 0 or 00)
- Ruler or straight edge (optional)
- Pencil and eraser
- Matte or satin varnish
Step 1: Prepping and Sketching
-
Clean the canvas:
Begin by scrubbing your rock with warm, soapy water and letting it dry completely to ensure the paint adheres properly. -
Draft the roof:
Using a pencil, lightly draw a simple triangle shape near the top center of the rock; this will be the roofline. -
Outline the hut:
Extend vertical lines down from the wider base of your triangle to create the sides of the hut. -
Add architectural details:
Sketch a rectangular door in the center bottom and a small square window above it, tucked under the triangle limit. -
Mark stripe guides:
Use a ruler or steady hand to lightly pencil vertical lines across the front of the house for the striped siding.
Wobbly Lines?
If your painted stripes look shaky, wait for them to dry. Then, use your fine black liner pen to draw the dividing lines—it hides uneven edges instantly.
Step 2: Painting the Base Colors
-
Paint the white stripes:
Using a small flat brush and white acrylic paint, fill in every other vertical stripe on the house facade. -
Fill the coral stripes:
Mix a soft coral or peach tone and paint the remaining alternating stripes; you may need two coats for opacity. -
Create the teal accents:
Paint the roof trim, the door, and the window frame with a vibrant teal or aqua color. -
Paint the window pane:
Inside the teal window frame, paint the glass area with a very pale blue or leave it the natural stone color if lighter. -
Dry thoroughly:
Allow these base layers to dry completely before moving on to outlining; patience here prevents smudging.
Pro Tip: Rustic Look
Mix a tiny amount of water into your white paint for the stripes. This semi-transparent wash lets some stone texture show through for a weathered effect.
Step 3: Refining and Detailing
-
Outline the structure:
Using a fine-point black paint pen or a liner brush, carefully trace the outer edges of the roof, walls, and door frame. -
Define the wood planks:
Draw faint vertical lines onto the teal door to mimic wooden planks. -
Add the window grid:
Draw a cross inside the window square to create the four distinct glass panes. -
Sketch the doorknob:
Dip the tip of a toothpick or smallest brush into gold or orange paint and place a tiny dot on the door for a knob. -
Outline the knob:
Once the knob dot is dry, circle it very finely with your black liner for contrast. -
Add decorative lines:
Draw a horizontal line across the bottom of the house to suggest a foundation or deck railing. -
Include flying birds:
To the right of the roof, draw two simple ‘v’ shapes floating in the air to represent seagulls. -
Seal the artwork:
Finish by applying a coat of matte varnish to protect the paint without making the stone look plastic.
Place your finished beach hut on a shelf or windowsill to bring a little summer warmth into your home all year round


Winter Cabin With Snowy Roof
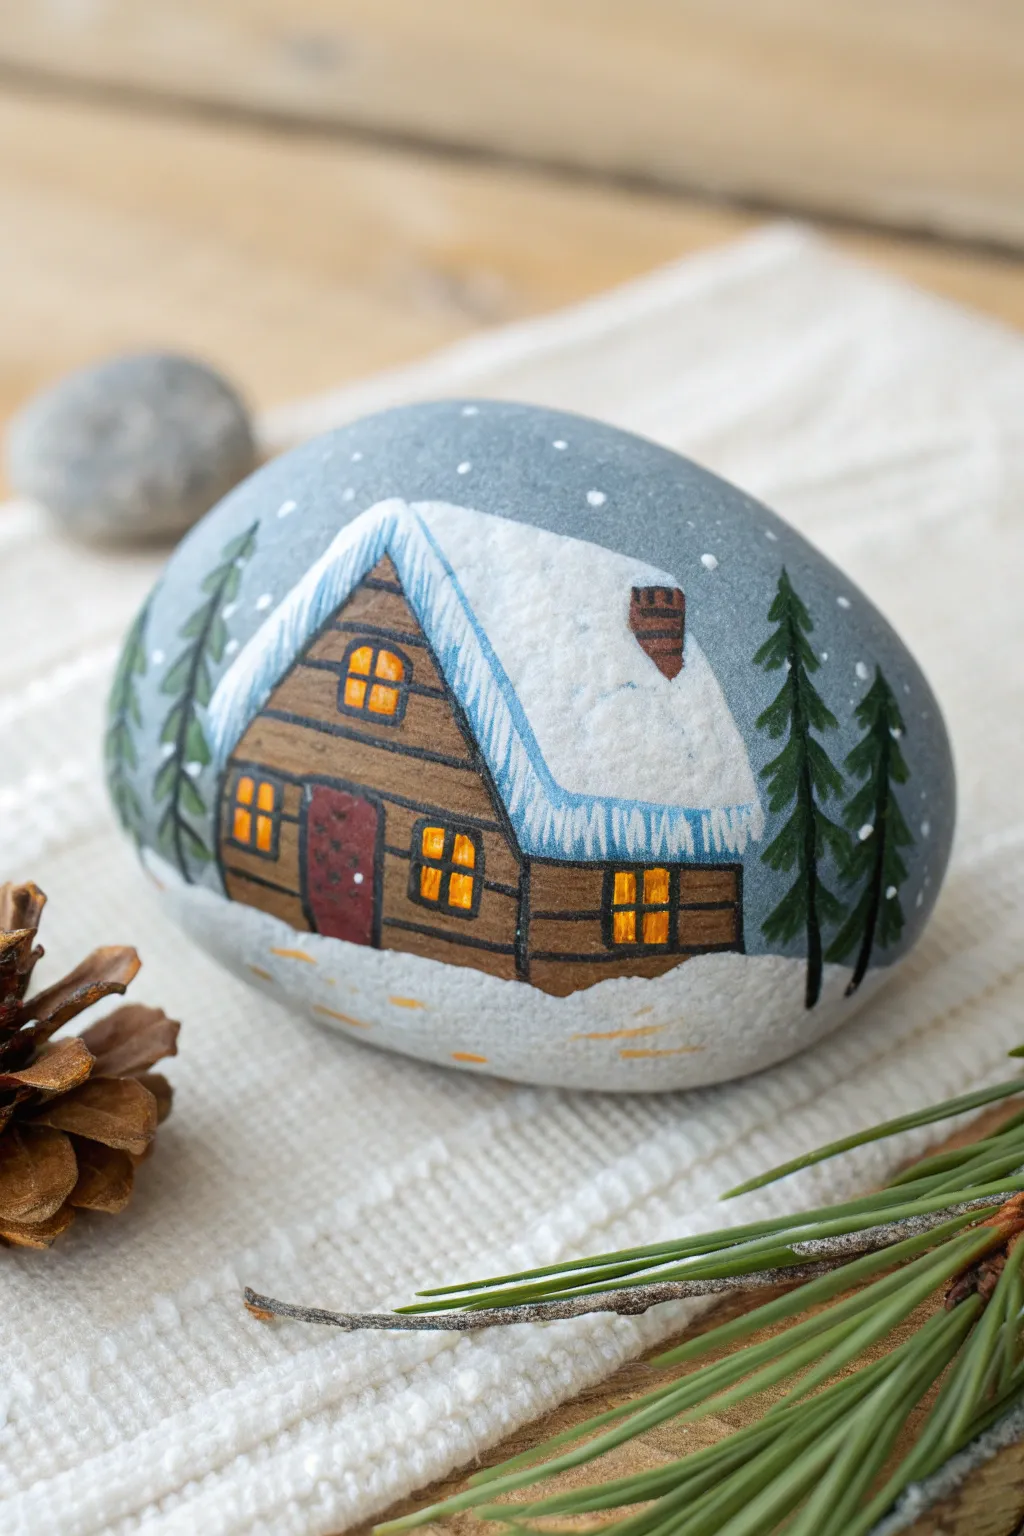
Transform a simple smooth stone into a warm, inviting winter retreat with just a few acrylic paints. This charming design features a glowing log cabin nestled in snow, perfect for seasonal decor or a thoughtful handmade gift.
How-To Guide
Materials
- Smooth, oval-shaped river rock (cleaned and dried)
- Acrylic paints: White, Black, Burnt Sienna (brown), Red Oxide (reddish-brown), Yellow Ochre or Cadmium Yellow, Dark Green
- Fine detail paintbrushes (sizes 0 and 00)
- Small flat brush (size 2 or 4)
- Pencil for sketching
- Palette or small plate
- Cup of water and paper towels
- Matte finish spray sealant
Step 1: Preparation and Sketching
-
Clean the canvas:
Begin by washing your stone thoroughly with soap and warm water to remove any dirt or oils that could prevent the paint from sticking. Let it dry completely before starting. -
Base coat (optional):
If your rock is naturally a nice grey color like the one in the photo, you can leave the background bare. Alternatively, paint the upper half a soft, storm-cloud grey to create a uniform sky. -
Sketch the outline:
Using a sharp pencil, lightly sketch the triangular shape of the cabin roof. Add the rectangular body of the house underneath and mark where the chimney and snow line will go.
Steadier Hands
Rest your pinky finger on a dry part of the rock while painting tiny details like window panes. This anchors your hand and stops shaking.
Step 2: Building the Cabin
-
Paint the woodwork:
Fill in the front triangle and the side rectangular wall of the cabin with Burnt Sienna or your chosen brown shade. Don’t worry about texture yet; just get solid coverage. -
Add the snowy ground:
Using white paint and a flat brush, create the snowdrift at the bottom of the rock. Paint a wavy line that slightly overlaps the bottom of the cabin to make it look nestled in the snow. -
Create the roof:
Fill in the roof area with pure white paint. You might need two layers here to ensure the dark rock color doesn’t show through the bright snow. -
Paint the chimney:
Add a small rectangular chimney near the peak of the roof using a reddish-brown shade. I find a tiny touch of black mixed into red creates a great brick color.
Add Sparkle
While the white paint on the roof or ground is still wet, sprinkle a tiny pinch of ultra-fine iridescent glitter for a magical frozen look.
Step 3: Details and Lights
-
Outline the logs:
Once the brown paint is dry, use your finest liner brush and black paint to draw thin horizontal lines across the cabin walls to mimic logs. -
Add the door:
Paint a small rectangle for the door on the front of the cabin using a deep red or maroon color. -
Light the windows:
Paint small yellow squares for the windows—one in the upper peak, two on the lower front, and one on the long side. This warm yellow glow is crucial for the cozy effect. -
Window frames:
Carefully outline the yellow windows with thin black lines, adding a cross in the center of each to create windowpanes.
Step 4: Winter Atmosphere
-
Shadowing the roof:
Mix a tiny drop of blue or black into your white to make a very pale grey-blue. Paint a thin strip along the left edge of the roof to give the snow dimension. -
Icicles and roof texture:
Using your smallest brush and slightly watered-down white paint, drag tiny vertical lines down from the edge of the roof to create icicles. Also, streak some very light blue on the main roof to suggest snow movement. -
Planting trees:
On the left and right sides of the cabin, paint simple pine trees using dark green. Use short, downward blotting strokes to create the needle texture. -
Falling snow:
Dip the non-brush end of your paintbrush into white paint and dot it randomly across the grey background sky to create snowfall. -
Snowy details:
Add tiny touched of white onto the green trees to show caught snow, and add a few horizontal dashes of grey or orange on the ground snow for texture. -
Seal:
Once fully dry, spray with a matte sealant to protect your miniature winter scene.
Now you have a little piece of winter wonder to brighten up your desk or garden area
Haunted Silhouette House Sunset
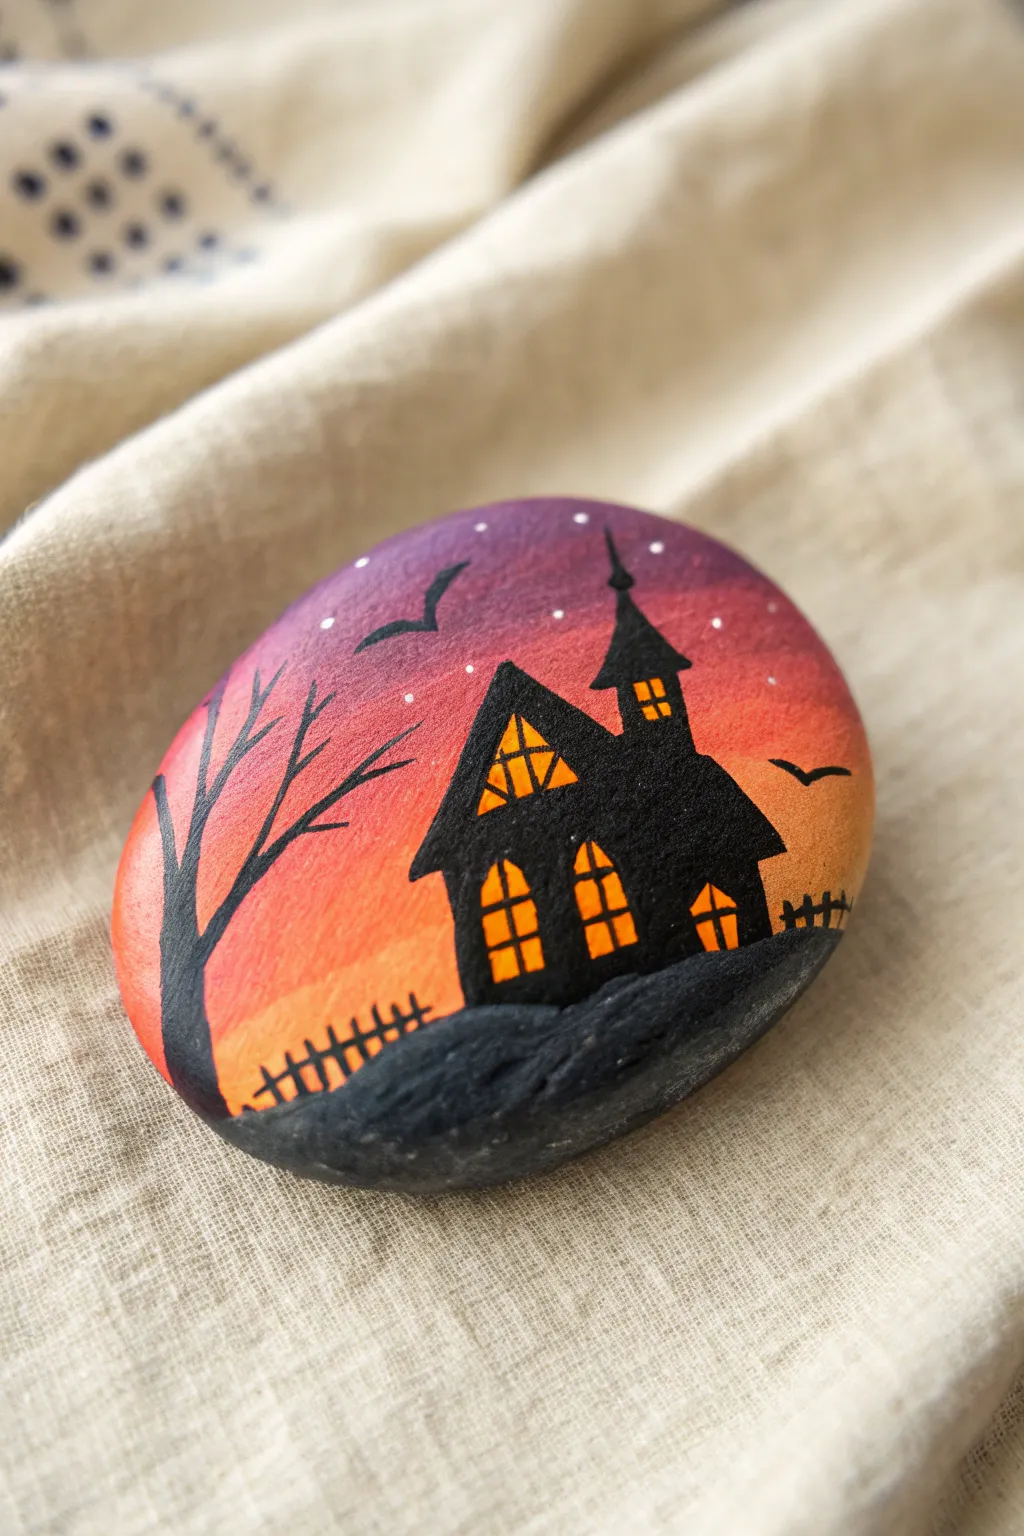
Capture the eerie beauty of Halloween night with this striking rock painting project featuring a glowing sunset gradient and a shadowy haunted manor. The high contrast between the vibrant sky and the black silhouette makes this design pop off the stone.
Step-by-Step Guide
Materials
- Smooth oval river rock (medium size)
- Acrylic paints (black, deep purple, magenta, orange, bright yellow, white)
- Flat paintbrushes (medium and small)
- Fine liner brush or detail brush
- Pencil (optional)
- Cup of water and paper towels
- Sealer (spray or brush-on varnish)
Step 1: Setting the Scene
-
Clean surface:
Begin by scrubbing your rock with soap and water to remove any dirt or oils, then let it dry completely to ensure the paint adheres properly. -
Base coat:
Apply a coat of white acrylic paint or gesso to the surface of the rock; this primes the stone and will make your sunset colors much more vibrant. -
Start the gradient:
Using a medium flat brush, paint a curved band of deep purple across the top third of the rock to start your night sky. -
Blend downward:
Without cleaning your brush thoroughly, pick up some magenta paint and blend it into the bottom edge of the purple, creating a mid-tone transition area. -
Add warmth:
Switch to orange paint and brush it below the magenta, blending the edges while the paint is still wet to create a smooth ombre effect. -
Finish the sky:
Paint the bottom section with a mix of orange and yellow, keeping the brightest yellow near the horizon line where the house will sit.
Uneven Gradient?
If your sky stripes look too blocky, lightly dampen a clean brush and run it rapidly back and forth over the line where two colors meet to soften the transition.
Step 2: Building the Silhouette
-
Outline the ground:
Once the background is fully dry, use black paint to create a rolling hill at the very bottom of the rock. -
Draft the house:
If you’re nervous about freehanding, lightly sketch the house shape with a pencil over the dried sunset background. -
Paint the main structure:
Using a small flat brush and black paint, block in the main triangular shape of the house and the attached tower. -
Add architectural details:
Paint the smaller details like the chimney and the pointed roof peaks, ensuring the edges are crisp and sharp. -
Create the tree:
On the left side, paint a thick, curved tree trunk rising from the ground, tapering it as you move upward. -
Branch out:
Switch to your finest liner brush to pull thin, jagged branches extending from the main tree trunk into the purple sky.
Make It Glow
For extra spooky windows, mix a tiny amount of glow-in-the-dark medium into your yellow paint. The house will light up when the lights go out.
Step 3: Finer Details
-
Paint the windows:
Mix a bright yellow with a tiny touch of orange. Carefully paint small window shapes—arches and squares—inside the black house silhouette. -
Define the panes:
I find it best to let the yellow dry completely, then use your ultra-fine liner brush with black paint to draw the cross-bars (muntins) over the yellow windows. -
Add the fence:
Using the tip of your liner brush, paint tiny vertical posts along the horizon line on either side of the house to create a spooky fence. -
Flying bats:
Add two or three simple ‘M’ shapes or curved silhouettes in the upper sky to represent bats flying against the sunset. -
Starry night:
Dip the tip of a toothpick or a detail brush into white paint and gently dot small stars into the purple section of the sky. -
Seal:
Allow the entire rock to cure for 24 hours before applying a clear sealer to protect your miniature spooky masterpiece.
Place this eerie decoration on your porch or hide it in the garden for someone to discover
Lighthouse Home by the Sea
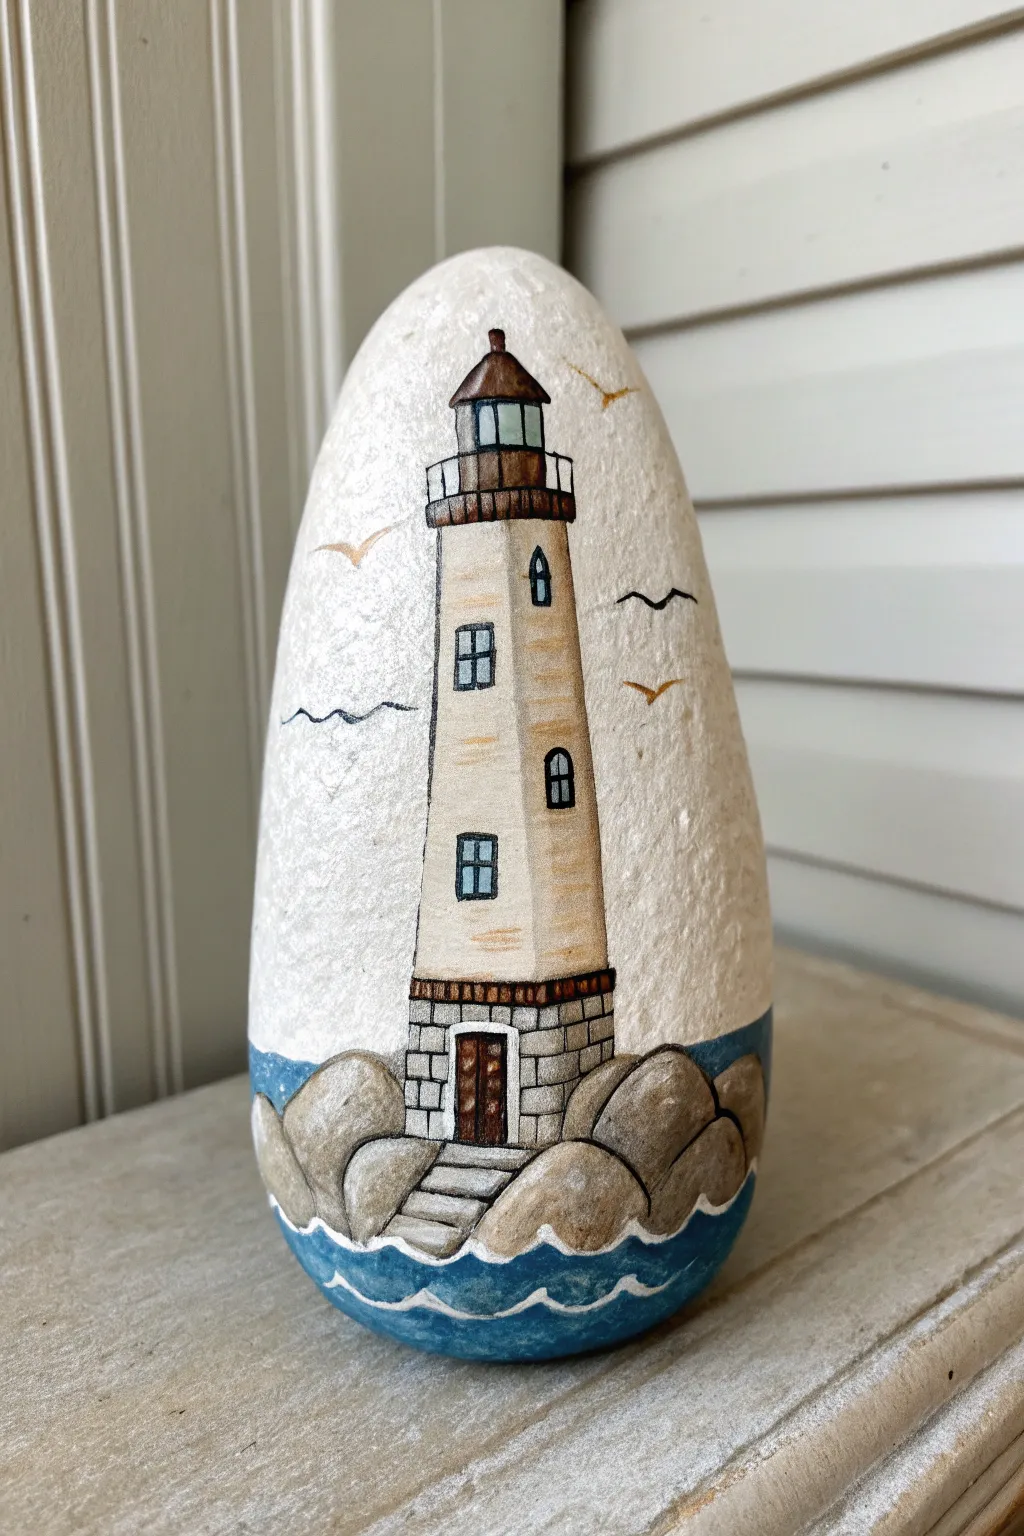
Capture the serenity of the seaside with this charming painted lighthouse rock, featuring rustic stone details and crashing waves. This elongated stone becomes the perfect canvas for a towering structure that adds a nautical touch to any shelf or garden.
Step-by-Step Tutorial
Materials
- Smooth, elongated river rock (flat bottom preferred)
- Acrylic paints: white, beige/sand, dark brown, light grey, dark grey, cerulean blue, teal, black
- Pencil for sketching
- Fine detail brushes (size 0 and 00)
- Flat shader brush (size 4 or 6)
- Black fine-liner paint pen or permanent marker
- Matte or satin clear sealant spray
Step 1: Preparation and Base
-
Clean the canvas:
Before starting, scrub your rock with soap and water to remove any dirt or oils, then let it dry completely to ensure the paint adheres properly. -
Prime the surface:
Using a flat brush, coat the entire front face of the rock with white acrylic paint. You may need two coats for full opacity, allowing the rocky texture to peek through slightly if you prefer a rustic look. -
Sketch the lighthouse:
With a pencil, lightly outline the lighthouse structure. Draw a tall, tapering rectangle for the tower, a small hut shape on top for the lantern room, and a collection of rounded shapes at the bottom for the rocky base. -
Mark the sections:
Lightly sketch the horizontal bands for the walkway balcony near the top and the stone foundation near the bottom. Add the outline of the door and windows.
Step 2: Painting the Structure
-
Base coat the tower:
Mix a sandy beige color and fill in the main body of the lighthouse tower. I like to keep this layer slightly uneven to mimic weathered stucco. -
Paint the foundation:
Use a light grey paint to fill in the blocky foundation at the base of the tower and the door frame area. -
Add the roof and trim:
Using dark brown paint and a small round brush, carefully fill in the conical roof on top and the railing band just below the lantern room. -
Detail the lantern room:
Paint the glass area of the lantern room (the very top section) with a very pale teal or light blue to simulate glass reflection. -
Create the front rocks:
Fill in the rounded rock shapes at the base with a medium tan-grey color. Vary the shades slightly between rocks to create depth. -
Paint the ocean:
Paint the area underneath the rocks with a deep blue, curving the top edge to look like rolling water meeting the shore.
Natural Texture
Don’t aim for a perfectly solid white background. Letting the natural grain of the stone show through the white primer creates a lovely ‘stucco’ texture for the background sky.
Step 3: Linework and Fine Details
-
Outline the structure:
Using your fine-liner pen or a very steady hand with black paint, outline the main vertical lines of the lighthouse and the roof. -
Define the masonry:
Draw a grid pattern over the grey foundation area to create the look of stone blocks. Do the same for the steps leading up to the door. -
Add windows and door:
Outline the windows and fill the panes with light blue. Paint the door dark brown and add vertical black lines to suggest wood planks. -
Detail the gallery railing:
Carefully draw vertical tick marks on the brown band near the top to create the safety railing around the lighthouse light. -
Outline the base rocks:
Use your black fine-liner to trace around the boulders at the bottom, adding small curved lines inside the shapes to give them volume and texture. -
Paint the waves:
Using a thin brush and pure white paint, add a wavy line bordering the blue water and the grey rocks. Add a second wavy line further down in the blue area to show water movement. -
Add the birds:
Paint small, simple ‘V’ shapes in the white sky area using brown or black paint to represent seagulls flying in the distance. -
Seal the artwork:
Once absolutely everything is dry, spray the rock with a matte or satin sealer to protect the paint from chipping and fading.
Uneven Lines?
If your fine liner pen skips over the rough rock surface, switch to a size 00 brush with slightly thinned black acrylic paint. It flows into the crevices much better than a marker tip.
Place your finished lighthouse near a window or potted plant to add a little coastal charm to your decor
Garden Greenhouse House
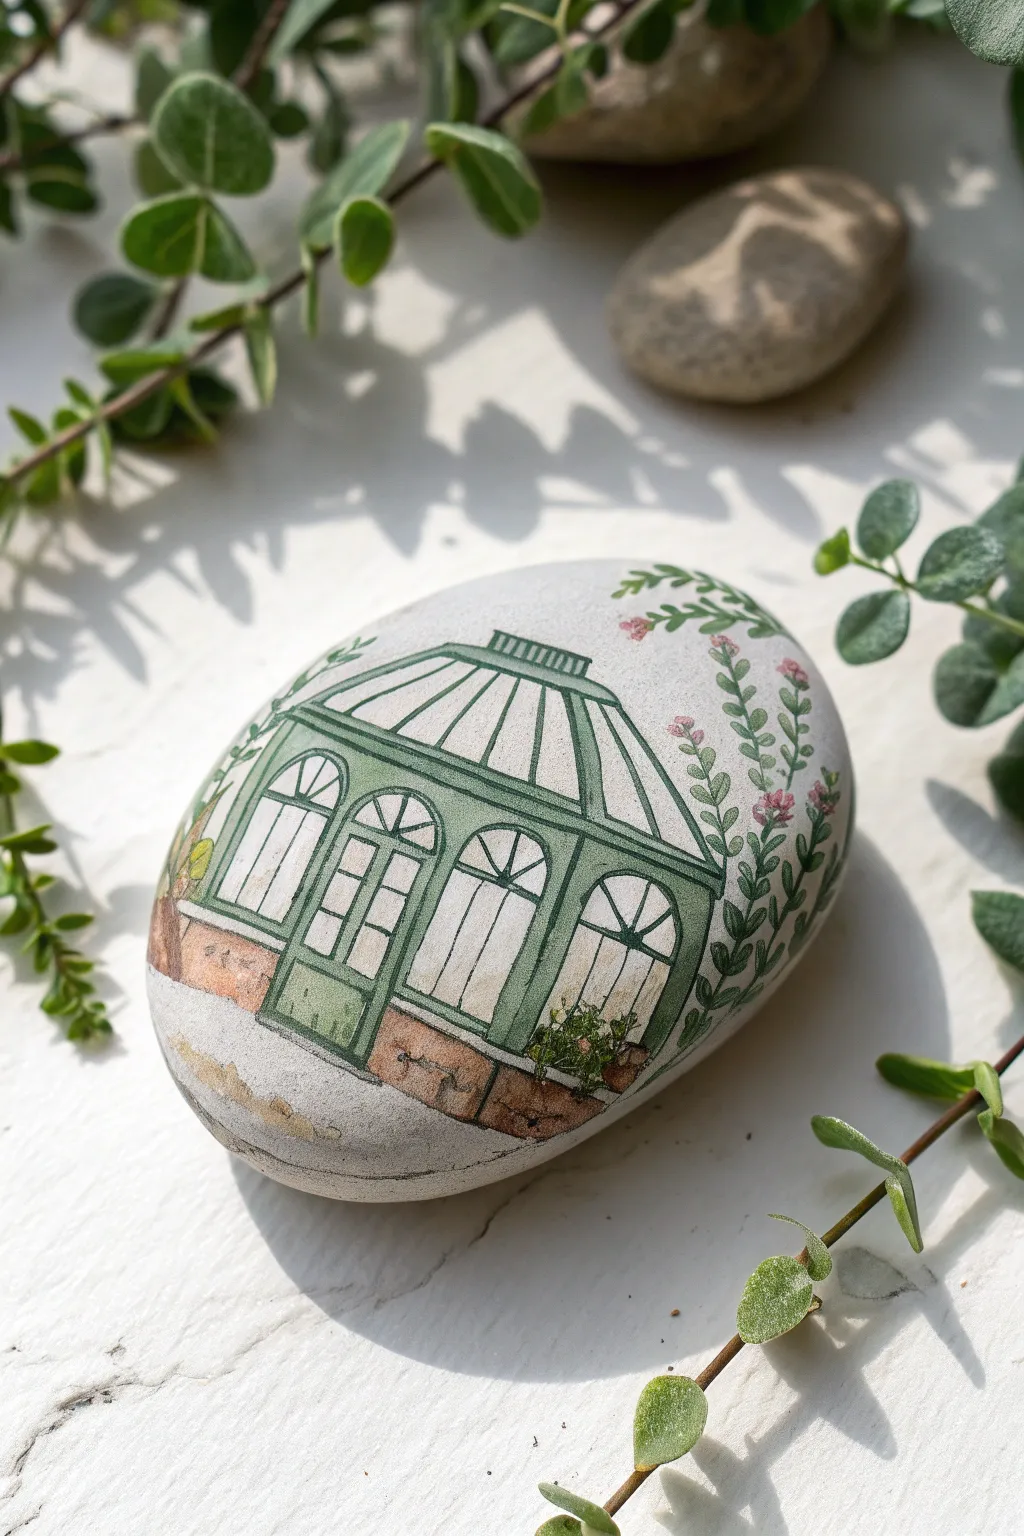
Transform a smooth river rock into a charming Victorian glasshouse with delicate vines and architectural details. The finish looks surprisingly like watercolor, achieving a soft, airy feel that perfectly captures the essence of a sunlit garden conservatory.
Step-by-Step Tutorial
Materials
- Smooth, oval river rock (light grey or white works best)
- Fine grit sandpaper (optional)
- Pencil (HB or lighter)
- Acrylic paints (Forest Green, White, Black, Terracotta, Sage Green, Pink)
- Glazing medium or water for thinning paints
- Fine liner brushes (00 and 0)
- Small flat brush
- Fine-point black permanent marker or micron pen (optional)
- Matte spray varnish
Step 1: Preparation and Sketching
-
Clean surface:
Begin by washing your stone thoroughly with warm soapy water to remove any dirt or oils that might repel paint. Let it dry completely. -
Smooth the canvas:
If your stone has rough patches, lightly sand the surface. This is crucial for achieving crisp, straight lines on the greenhouse windows later. -
Initial outline:
Using a light pencil, sketch the main rectangular body of the greenhouse in the center of the rock. Top it with a wide, angled roof that follows the curve of the stone. -
Architectural details:
Sketch the vertical structural beams. Draw three main arched sections on the front: a central doorway and two flanking windows. Add the roof rafters radiating from the top ridge.
Step 2: Painting the Structure
-
Mix the green:
Create a vintage greenhouse green by mixing Forest Green with a touch of White and a tiny drop of Black to desaturate it. You want a classic, slightly muted shade. -
Outline the frame:
With your 00 fine liner brush and the mixed green, carefully trace over your pencil lines for the main structural beams and the roof ridge. Keep your hand steady and your paint fluid. -
Thicken main pillars:
Go back over the vertical pillars between the windows to make them slightly thicker than the roof beams, giving the structure visual weight. -
Paint the arches:
Carefully paint the curved arches above the door and windows. Ensure the arches connect smoothly to the vertical pillars. -
Create the foundation:
Mix Terracotta with a little water to create a semi-transparent wash. Paint the brick foundation strip along the bottom of the greenhouse. I find thinning the paint helps the rock’s natural texture show through, looking like real brick. -
Add brick details:
Once the terracotta wash is dry, use a slightly darker brown mixed with a drop of black to paint thin, irregular lines simulating mortar and individual bricks.
Wobbly Lines?
If painting the window frames is too difficult with a brush, use a 0.05 fine tip waterproof black pen. Draw the lines first, then lightly glaze color over them once fully dry.
Step 3: Adding Light and Glazing
-
Window wash:
Mix a large amount of water or glazing medium with a tiny dot of white paint. You want a milky, translucent consistency. -
Glaze the glass:
Apply this glaze inside the window panels. This subtle haze suggests glass without blocking out the background rock color entirely. -
Define window panes:
Using your thinnest brush or a micron pen, draw the delicate grid lines inside the arched windows and the long vertical panes on the roof. -
Shadows:
Dilute a bit of black paint to create a grey wash. Add thin shadow lines under the roof eaves and along the left side of the building to create depth.
Level Up: Interior Life
Before painting the white glass glaze, paint tiny silhouettes of plants or hanging baskets inside the windows. The glaze over top will make them look like they are truly inside.
Step 4: Botanical Flourishes
-
Climbing vines:
Mix a fresh Sage Green. Paint a trailing vine coming down from the top right of the rock, overlapping the roof slightly, and another creeping up the right side of the greenhouse. -
Leaf details:
Add small, oval leaves along the vine stems. Vary the green shade slightly—some lighter, some darker—to add dimension to the foliage. -
Potted plants:
Paint a small terracotta pot near the bottom right corner of the entrance. Fill it with tiny dabs of green to represent a bushy shrub. -
Floral accents:
Dip the tip of a toothpick or fine brush into pink paint. Dot tiny flowers onto the climbing vines and the potted plant for a pop of color. -
Final seal:
Allow the paint to cure for at least 24 hours. Finish with a light coat of matte spray varnish to protect your miniature conservatory without making it too shiny.
Place your finished greenhouse rock in a sunny spot among your indoor plants to create a meta-garden display
Cutaway Interior Room House
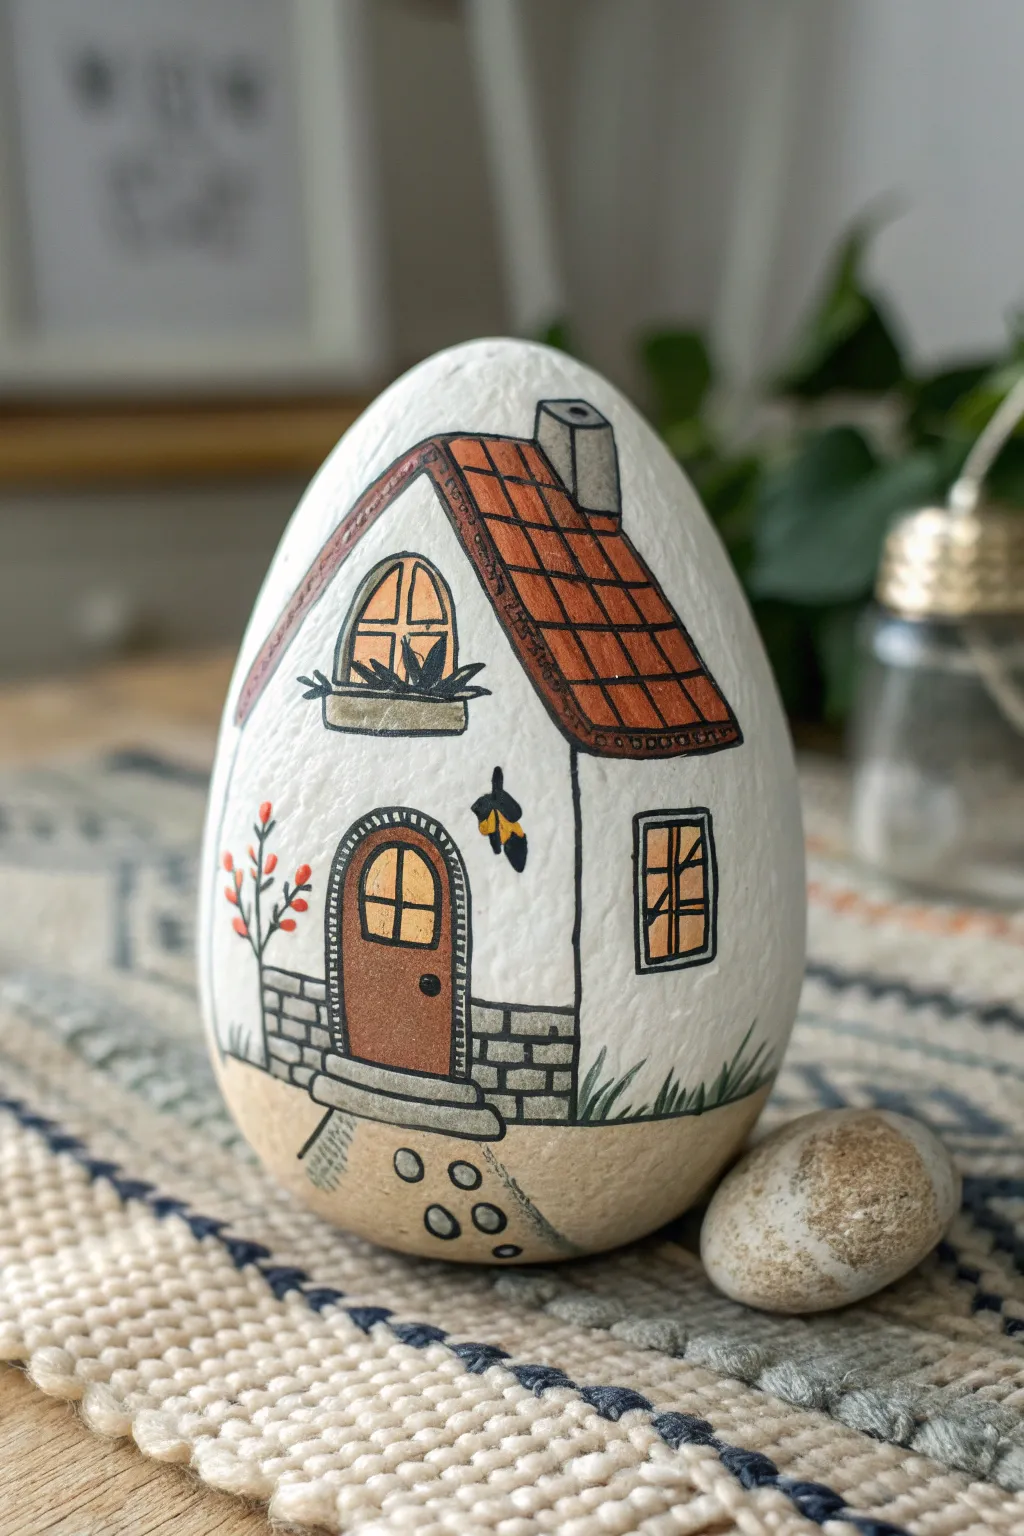
Transform a smooth garden stone into a charming storybook abode with this delightful painting project. The design features a cozy white cottage with a terracotta roof, arched windows, and whimsical details that evoke a warm, rustic feel.
How-To Guide
Materials
- Large, smooth, egg-shaped river rock
- White acrylic paint (matte finish)
- Pencil and eraser
- Fine-point black paint pen or liner marker
- Small flat brush
- Fine detail brush (size 0 or 00)
- Acrylic paints: terracotta orange, grey, warm brown, yellow-ochre, sage green
- Matte sealer or varnish
Step 1: Preparation & Base Coat
-
Clean the canvas:
Begin by scrubbing your rock with soap and water to remove any dirt or oils. Let it dry completely before starting, as moisture can trap bubbles under the paint. -
Prime with white:
Apply an initial coat of white acrylic paint over the entire front surface of the rock. This creates a bright background for your cottage walls. -
Apply second coat:
Once the first layer is dry, add a second or even third coat of white until the rock’s natural color is fully hidden and the surface looks opaque and smooth.
Step 2: Sketching the Elements
-
Outline the roof:
Using a pencil lightly, sketch the main triangle shape for the front gable and the slanted roof line extending to the right. -
Add architectural details:
Draw the chimney protruding from the roof, the arched doorway at the bottom, and the two windows—one arched window in the gable and a rectangular one on the side. -
Define the ground:
Sketch a gentle curve near the bottom of the rock to separate the cottage walls from the sandy ground.
Paint Pen Spitting?
If your black liner skips or blobs, scribble on a scrap paper first to get the ink flowing smoothly. Never shake the pen directly over your rock artwork.
Step 3: Adding Color
-
Paint the roof:
Fill in the roof area with a warm terracotta orange paint. You might need two thin coats to get a solid, vibrant color without brushstrokes. -
Color the door and trim:
Paint the arched door using a warm medium brown. Use the same brown or a darker shade for the window box under the top window. -
Fill the windows:
Mix a soft yellow-ochre color to paint the glass panes of the windows, giving the illusion of warm light glowing from inside. -
Paint the chimney and bricks:
Use a light grey paint for the chimney stack. Then, paint the brickwork foundation on either side of the door using the same grey shade. -
Ground and path:
Paint the bottom section of the rock with a sandy beige or light tan color to represent the earth.
Clean Lines Hack
To fix wobbly outlines, wait for the black ink to dry completely, then use a tiny brush with white paint to ‘erase’ or straighten the edges from the outside.
Step 4: Fine Lining & Details
-
Outline main structures:
Once all paint is perfectly dry, use a fine-point black paint pen to firmly outline the roof, the house walls, and the separation between wall and ground. -
Roof details:
Draw consistent grid lines across the orange roof to create the look of individual tiles. Add a double line along the roof edge for thickness. -
Door and brickwork:
Outline the door arch and draw a frame around it with short, dashed lines to mimic stones. Draw the horizontal and vertical mortar lines on the grey foundation bricks. -
Window panes:
Carefully draw the cross-bars (muntins) over the yellow window ovals. I find resting my pinky on the table helps steady my hand for these straight lines. -
Decorative nature elements:
Draw a small plant silhouette in the window box and a little butterfly or hanging plant near the door. Add simple vertical strokes near the base for grass blades. -
Final touches:
Add a tiny black dot for the doorknob and sketch a few circular stepping stones leading up to the front step. -
Seal the artwork:
Finish by applying a coat of matte varnish or sealer to protect your painting from chipping and UV fading.
Place your finished cottage rock on a bookshelf or in a plant pot for a tiny touch of architectural whimsy
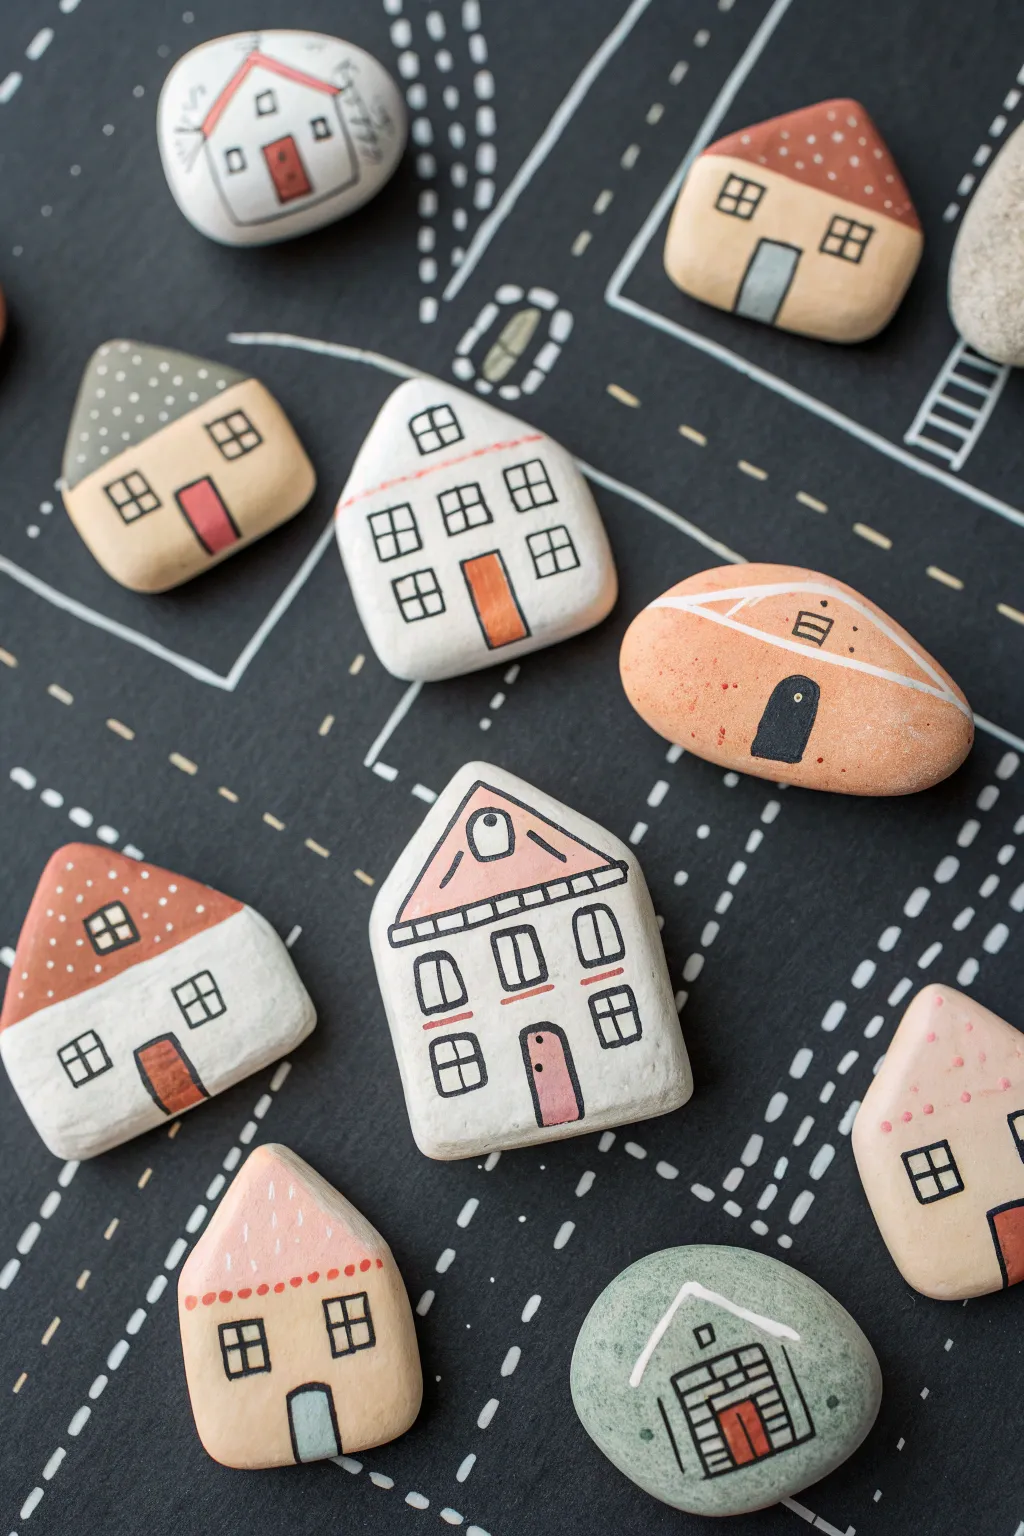
Mini Rock House Town With Roads

Transform smooth river rocks into an adorable miniature neighborhood complete with winding roads. This playful project combines simple rock painting with a customizable chalkboard-style map, perfect for hours of imaginative storytelling.
Step-by-Step
Materials
- Smooth river stones (various shapes and sizes)
- Acrylic paints (white, beige, terracotta/red-brown, grey, sage green, pastel pink)
- Fine-point black permanent marker or paint pen (0.5mm or 0.7mm)
- White paint pen or fine brush
- Large sheet of black cardstock or chalkboard paper
- White chalk marker or white crayon
- Paintbrushes (flat shader and fine liner)
- Matte spray varnish (optional)
Step 1: Preparing the Canvas
-
Stone Selection:
Choose stones with flat surfaces that naturally suggest different building shapes. Look for tall, narrow stones for townhouses and wider, shorter stones for cottages or bungalows. -
Cleaning:
Wash your stones thoroughly with soap and water to remove any dirt or oils. Let them dry completely, as moisture will prevent the paint from adhering properly.
Step 2: Architectural Painting
-
Base Coats:
Paint the main body of the houses. Use white for a classic stucco look on some rocks, and beige or light pink for others. You don’t need to paint the whole rock—just the front face works well. -
Adding Roofs:
Once the base is dry, paint the top portion of each stone to create roofs. Use terracotta for a traditional tile look, grey for slate, or sage green for a modern twist. -
Roof Details:
For triangular roofs, paint a distinct triangle shape. For flatter rocks, just paint a strip across the top. Let these dry completely before moving to outlining. -
Drawing Outlines:
Using your fine-point black marker or paint pen, draw the separation line between the roof and the house body. I find a steady hand and a quick pull of the pen creates the cleanest lines. -
Windows and Doors:
Draw simple rectangles or squares for windows. Add mullions (the crossbars) inside the windows. Draw doors at the bottom center or side of the house. -
Filling Details:
Carefully color in the doors with contrasting paint colors like dusty rose, blue-grey, or deep orange using a very fine brush. -
Roof Texture:
Add texture to the roofs using your white paint pen. Draw small dots for shingles, scallops for tiles, or straight lines for simple siding. -
Final Accents:
Add tiny details like attic windows, brick patterns next to doors, or decorative trim under the roofline using the black fine tip pen.
Ink Bleeding?
If your black marker bleeds into the paint, the paint isn’t dry enough. Wait longer, or switch to a high-quality acrylic paint marker instead of a standard permanent marker.
Step 3: Creating the Road Map
-
Laying the Foundation:
Lay out your black cardstock or chalkboard paper on a flat surface. This serves as the ‘ground’ for your village. -
Drafting Roads:
Place your finished rock houses on the paper to plan your layout. Visualize where the streets should run between them. -
Marking Lanes:
Remove the houses. Using a white chalk marker or crayon, draw dashed lines to create the center lane markers of your roads. Vary the pattern with some solid lines for intersections. -
Intersections and Features:
Draw simple features like a roundabout circle or a crosswalk ladder pattern to add realism to your town layout. -
Assembly:
Place your painted rocks back onto the map, arranging them along the streets you’ve created to complete your village scene.
Town Expansion
Paint smaller pebbles as bushes, cars, or even tiny pets to place around your houses. You can also use green cardstock cutouts for lawns.
Now you have a charming, moveable village that can be rearranged endlessly for new adventures


Have a question or want to share your own experience? I'd love to hear from you in the comments below!