I love how rock painting for kids turns an ordinary little stone into a tiny character, toy, or treasure in just a few minutes. If you’re craving simple designs that still look bold and adorable, these ideas will keep your table buzzing with creative energy.
Classic Ladybug Rocks
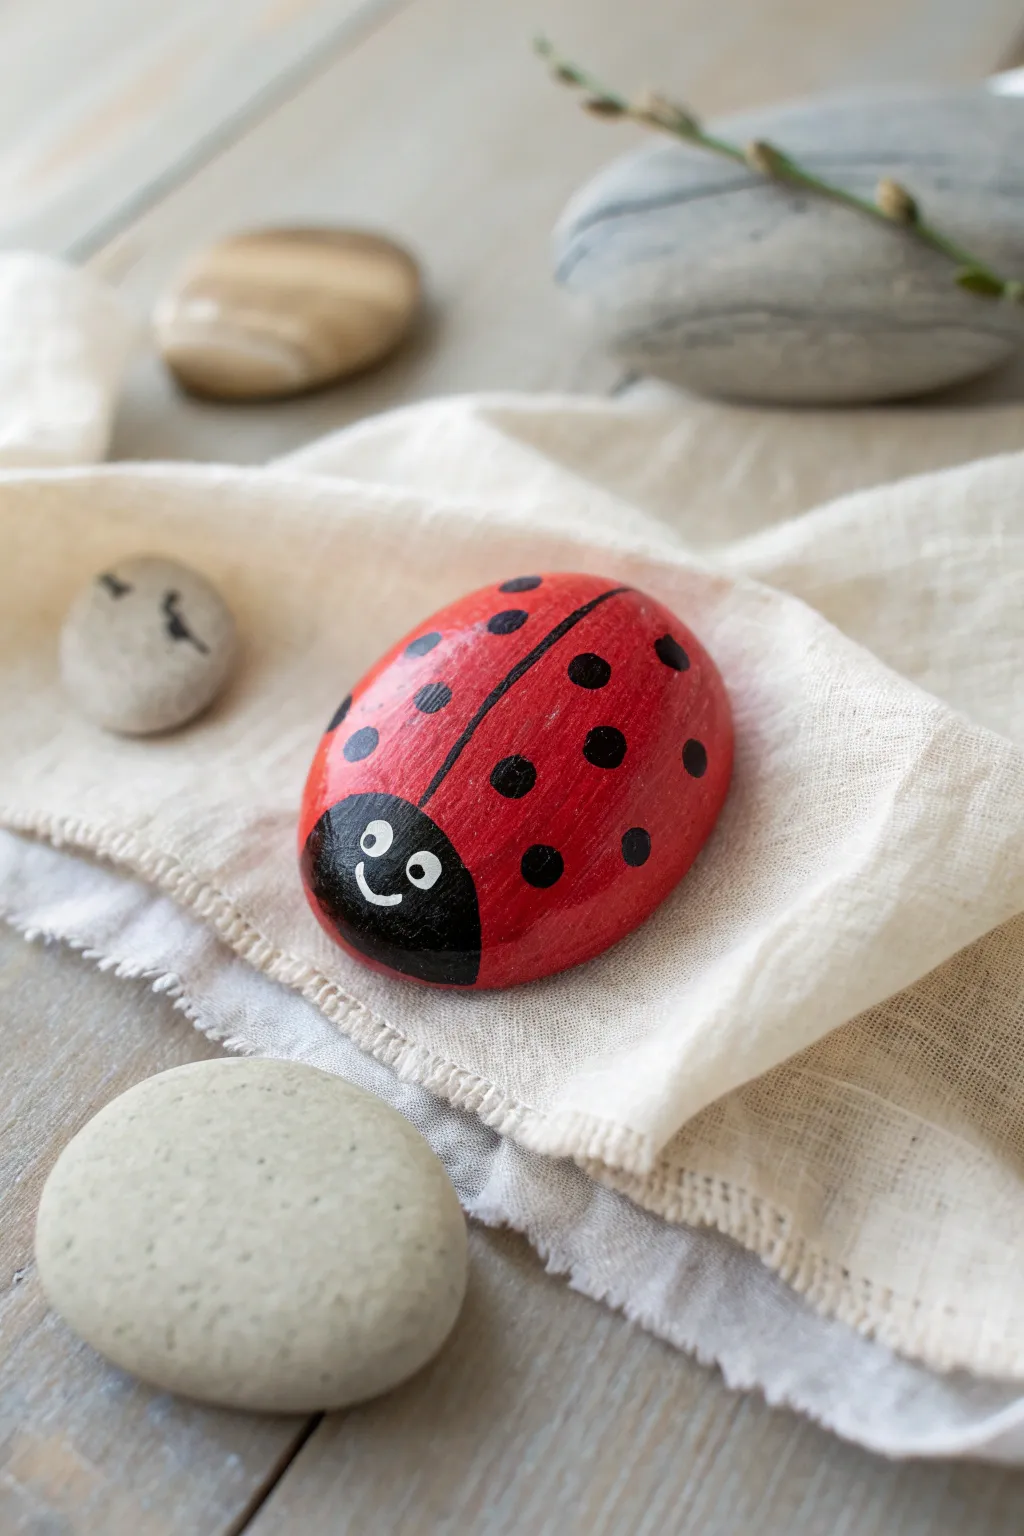
Transform an ordinary garden stone into a cheerful little beetle with this classic rock painting project. The bright red shell and friendly smiling face make this design a timeless favorite that instantly brightens up any windowsill or flower pot.
Step-by-Step Tutorial
Materials
- Smooth, oval-shaped river rock
- Red acrylic paint (glossy finish preferred)
- Black acrylic paint
- White acrylic paint
- Paintbrushes (flat brush for base, fine liner for details)
- Dotting tool or back of a paintbrush handle
- Pencil
- Water cup and paper towels
- Clear acrylic sealer (spray or brush-on)
Step 1: Preparing the Base
-
Clean your canvas:
Start by scrubbing your chosen rock with warm soapy water to remove any dirt or grit. Let it dry completely before you begin, or the paint won’t stick properly. -
Apply the red base:
Using a flat brush, paint the entire top surface of the rock with bright red acrylic paint. You want a really solid, opaque color, so don’t be afraid to be generous. -
Let it dry:
Allow the first coat of red to dry fully. If you can still see the grey stone underneath, apply a second coat for that vibrant, bug-shell look. -
Sketch the outline:
Once the red paint is bone dry, use a pencil to lightly sketch a curved line at the narrower end of the rock. This will separate the head from the wings. -
Draw the center line:
Lightly sketch a straight line running from the center of that curved head-line all the way down to the back of the rock to divide the wings.
Step 2: Adding the Details
-
Paint the head:
Dip a medium brush into black acrylic paint and fill in the semi-circle area you marked off for the head earlier. Keep your edge neat and rounded. -
Paint the wing divider:
Switch to a fine liner brush and carefully paint a thin black line over your pencil mark running down the center of the red body. -
Create the spots:
Dip a dotting tool or the handle end of a paintbrush into black paint to create the spots. -
Place the spots strategically:
Stamp the black dots onto the red wings. I like to stagger them slightly rather than making perfect rows, placing some near the edges and some near the center line. -
Fix any mistakes:
If a dot gets smudged, wait for it to dry completely, then dab a little red paint over the mistake before trying again.
Uneven Coverage?
If your red paint looks streaky, don’t keep brushing over wet paint. Let the first layer dry completely, then apply a second cross-hatch layer for smoothness.
Step 3: Bringing it to Life
-
Start the face:
Wait for the black head section to be completely dry. This is crucial so the white paint doesn’t turn grey. -
Paint the eyes:
Using a smaller dotting tool or a fine brush, place two solid white circles on the black head area for the eyes. -
Add a smile:
With your finest liner brush and white paint, carefully draw a small, U-shaped smile underneath the eyes. -
Add pupils:
Once the white eye circles are dry, add a tiny black dot inside each one. Placing them slightly off-center gives the ladybug a playful expression. -
Seal the deal:
After your artwork has cured for 24 hours, apply a clear acrylic sealer. This protects the paint from chipping and gives the shell a lovely shiny finish.
Make it Sparkle
Mix a tiny pinch of fine glitter into your clear sealer topcoat. This gives the ladybug wings a magical, shimmering effect in the sunlight.
Now you have a charming little garden friend to hide among your plants


Bright Rainbow Stripe Rocks
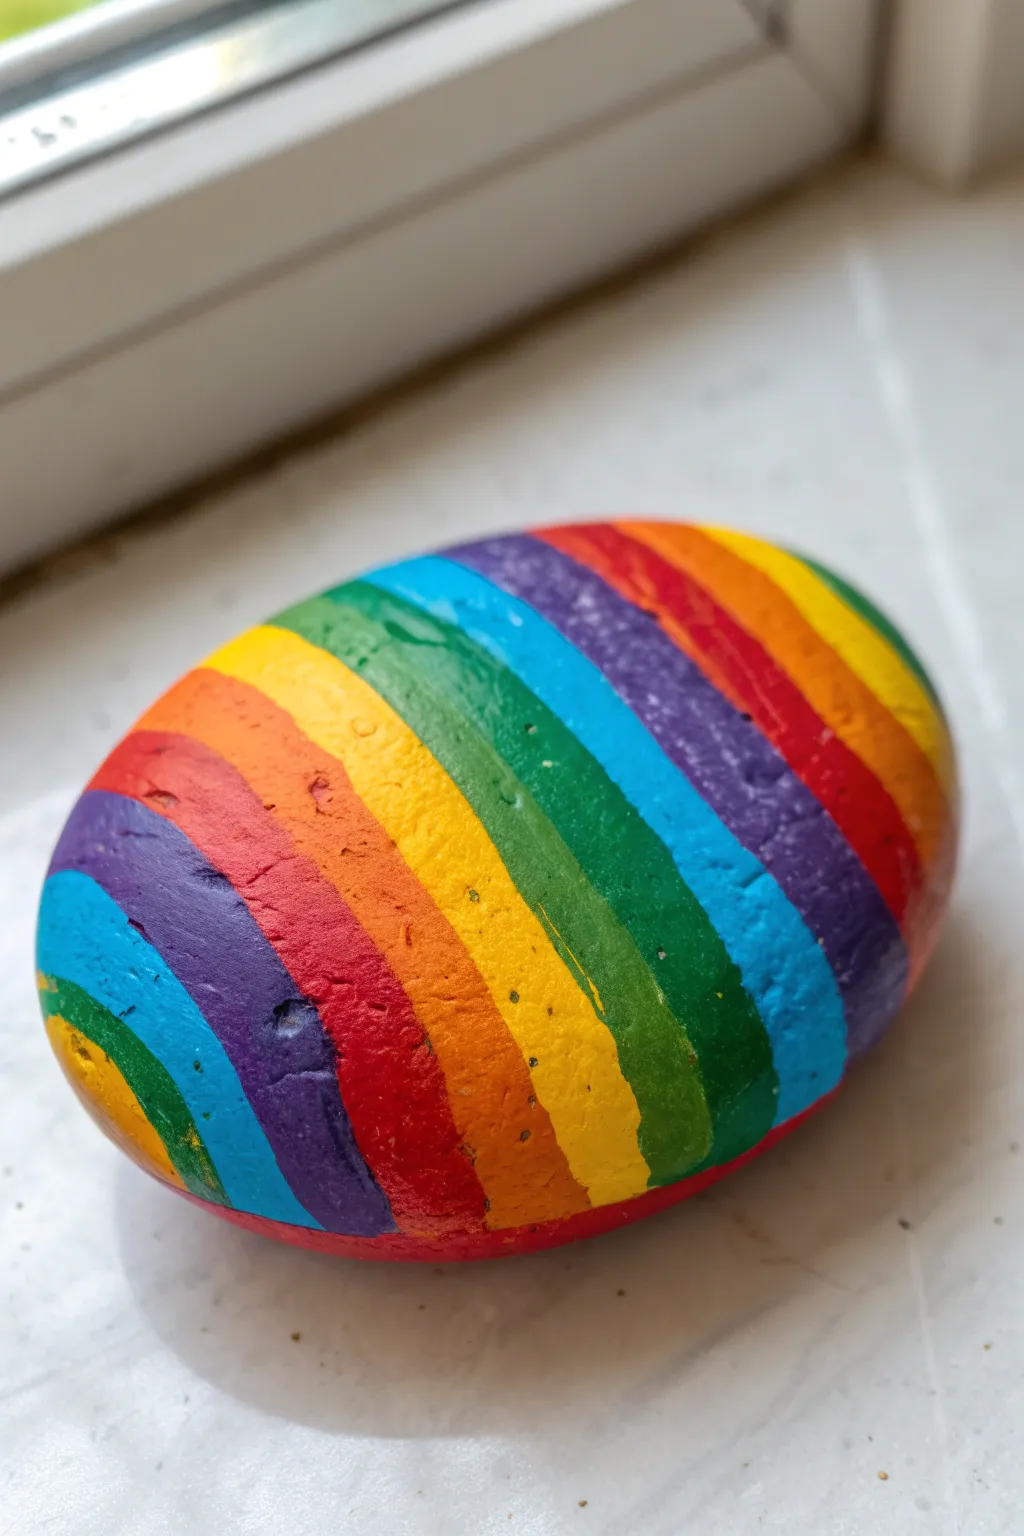
Transform a smooth, ordinary stone into a burst of color with this cheerful diagonally striped design. The bold bands of paint wrap seamlessly around the rock’s curves, creating a satisfying and eye-catching piece of pocket art.
Step-by-Step
Materials
- Smooth, oval river rock
- White gesso or primer
- Acrylic paints (Red, Orange, Yellow, Green, Blue, Purple)
- Flat shader brush (small to medium)
- Fine liner brush (optional, for edges)
- Pencil
- Palette or paper plate
- Water cup and paper towels
- Clear acrylic sealer (glossy)
Step 1: Preparation & Base Coat
-
Clean the surface:
Begin by washing your rock thoroughly with warm, soapy water to remove any dirt or oils. Use an old toothbrush to scrub into any tiny crevices if necessary, then let it dry completely. -
Prime with white:
Apply a coat of white gesso or white acrylic paint over the entire top surface of the rock. This crucial step ensures your rainbow colors will pop vibrantly rather than looking dull against the grey stone. -
Let it dry:
Wait for the base coat to dry fully. If the grey of the rock still shows through, apply a second thin coat of white for a solid opacity.
Clean Lines Hack
For super crisp edges between colors, place strips of thin washi tape or painter’s tape over the dry lines you aren’t painting. Peel off while wet for a sharp edge.
Step 2: Drafting the Design
-
Sketch the first line:
Using a pencil very lightly, draw a diagonal line across the center of the rock. This will serve as your anchor for the other stripes. -
Map out the bands:
Continue drawing parallel diagonal lines outward from your center line. Aim for bands that are roughly the same width, about a half-inch wide depending on your rock’s size. -
Curve the lines:
As you draw the lines near the edges of the rock, curve them slightly downwards to follow the stone’s 3D shape. This creates the illusion that the stripes are wrapping around.
Step 3: Painting the Rainbow
-
Start with red:
Load your flat brush with bright red acrylic paint. Choose one of your sketched bands to fill in first. Apply the paint smoothly, keeping your brush strokes following the direction of the stripe. -
Clean the brush:
Rinse your brush thoroughly in water and pat it dry on a paper towel. You don’t want any red mixing into your next color. -
Apply orange:
Paint the band directly adjacent to the red one with orange paint. Carefully push the paint right up to the line where it meets the red, but try not to overlap. -
Continue the spectrum:
Proceed with yellow, then green, blue, and finally purple. Follow the standard rainbow order (ROYGBIV) so the colors blend harmoniously if they accidentally touch. -
Repeat the pattern:
If you have more space left on your rock after purple, simply start the pattern over again with red or go backwards to blue depending on your preference. The example image shows the pattern repeating. -
Tidy the edges:
Use a damp brush or a fine liner brush to neaten up any ragged edges between the stripes. I like to do this while the paint is still slightly tacky but not wet.
Glittery Upgrade
Mix a tiny pinch of fine holographic glitter into your clear topcoat. It adds a subtle sparkle that catches the sunlight without overpowering the colors.
Step 4: Finishing Touches
-
Check opacity:
Once the first layer of colors is dry, examine the rock. Yellow and orange often need a second coat to look truly solid and opulent. -
Paint the sides:
Extend your stripes down the sides of the rock towards the bottom. You don’t need to paint the very bottom if it will just sit on a shelf, but painting the sides completes the look. -
Dry thoroughly:
Allow the rock to sit undisturbed for several hours or overnight to ensure the paint cures completely. -
Seal for shine:
Apply a coat of glossy clear acrylic sealer or Mod Podge. This not only protects the paint from chipping but gives the colors a ‘wet’ look that makes them incredibly vibrant.
Now you have a brilliantly colored keepsake that’s perfect for hiding in a park or brightening up a desk


Sweet Heart Pattern Rocks
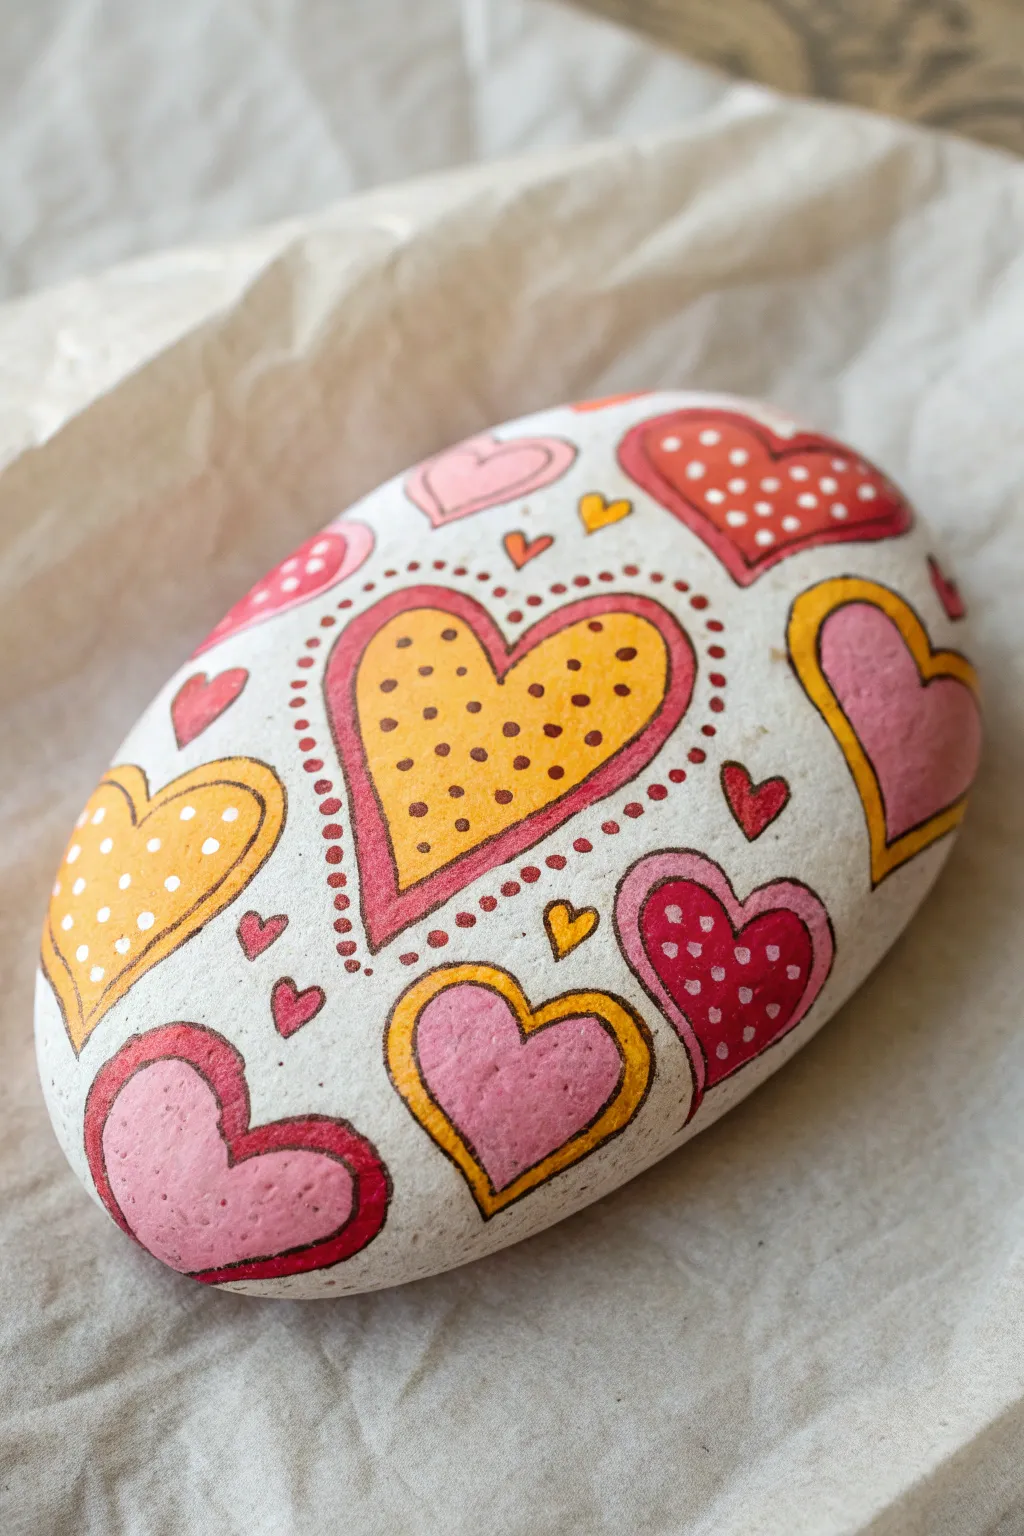
Transform a simple stone into a token of love with this vibrant heart pattern design. The cheerful mix of polka dots, overlapping shapes, and sunny colors makes this a perfect gift or a bright addition to any garden.
Detailed Instructions
Materials
- Smooth, oval-shaped river rock
- White acrylic paint (base coat)
- Acrylic paint markers (yellow, pink, red, orange)
- Fine-tip black or dark brown permanent marker (optional for outlining)
- Clear acrylic sealer (spray or brush-on)
- Pencil for sketching
Step 1: Preparation & Base
-
Clean Your Canvas:
Begin by washing your rock thoroughly with soap and water to remove any dirt or oils. Let it dry completely before starting. -
Apply the Base Coat:
Paint the entire surface of the rock with white acrylic paint. You will likely need two or three coats to get a solid, opaque coverage that hides the rock’s natural color. -
Let it Dry:
Allow the white base coat to dry fully. If the paint feels cool to the touch, it still holds moisture, so give it a little more time.
Uneven Dots?
Make your dots perfectly round by using the handle end of a paintbrush, a toothpick, or a dedicated dotting tool dipped in paint.
Step 2: Drafting the Design
-
Sketch the Central Heart:
Using a pencil very lightly, draw a medium-sized heart slightly off-center on the rock. This will be your focal point. -
Add Surrounding Hearts:
Sketch various sizes of hearts around the central one. Turn some sideways or upside down to create a dynamic, scattered pattern across the surface. -
Vary sizes:
Make sure to include some tiny ‘filler’ hearts in the empty spaces between the larger ones.
Glow Up
Trace the outer edge of just one or two hearts with metallic gold or silver paint pen for a subtle shimmer that catches the sunlight.
Step 3: Adding Color
-
Paint the Main Heart:
Fill in your central heart sketch with bright yellow paint. You may need a second coat for vibrancy. -
Color Block the Others:
Use your pink and red markers or paint to color in the surrounding hearts. Leave some hearts plain pink, some red, and maybe a few smaller ones in yellow or orange. -
Create Outlines:
Once the filled hearts are dry, outline the yellow central heart with a thick band of pink. Outline other hearts with contrasting colors—like a yellow outline on a pink heart. -
Outline Variation:
For a bold look, use a darker red or even a very fine black liner to define the outermost edges of your shapes.
Step 4: Details & Dots
-
Dot the Central Heart:
Using an orange paint pen or a fine brush, carefully place small dots inside the yellow field of your main heart. -
Add the Dotted Border:
Create a charming frame for the central heart by stippling a ring of small red dots around its outer edge. -
Decorate Red Hearts:
On the solid red hearts, add tiny white dots to create a classic polka-dot look. Wait for the red paint to be totally dry first so the white stays crisp. -
Decorate Yellow Hearts:
Add white dots to any other yellow hearts in your design, mirroring the texture of the other shapes. -
Fill the Gaps:
If you see any large white spaces that feel empty, add tiny free-floating hearts or single dots to balance the composition.
Step 5: Finishing
-
Check Your Work:
Look over the rock for any smudges or areas that need a touch-up. Clean up edges with a little white paint if needed. -
Seal the Deal:
Once absolutely everything is dry, apply a coat of clear acrylic sealer. This protects the paint from chipping and gives the rock a professional, glossy finish.
Place this cheerful rock on your desk or give it to a friend to brighten their day


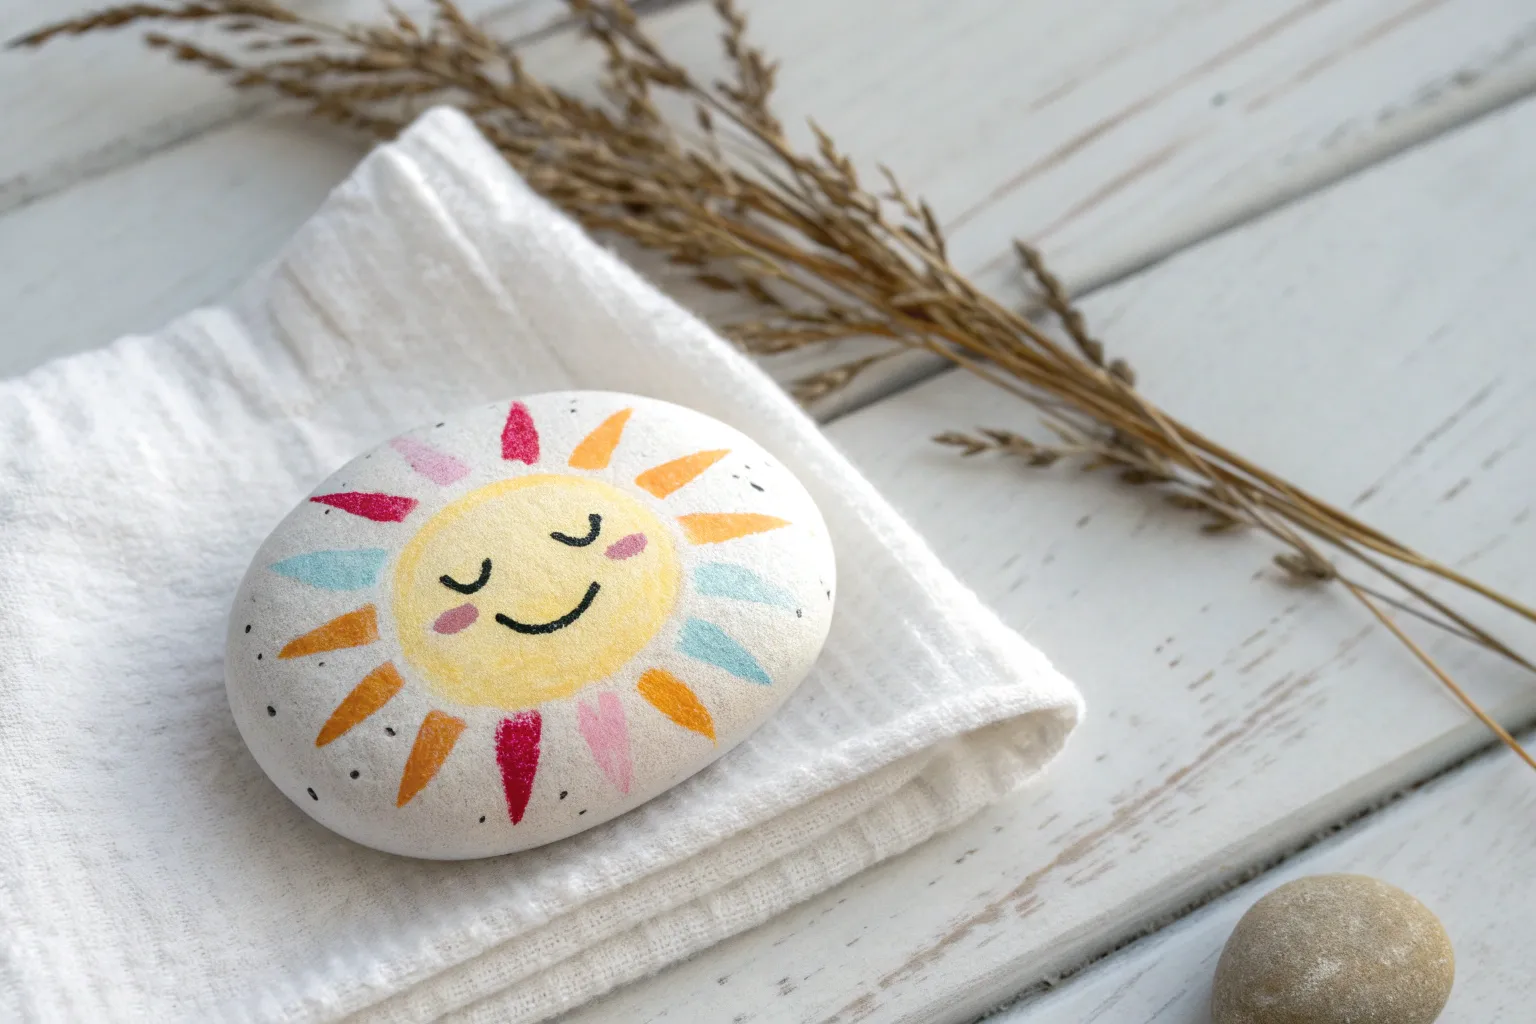
Happy Smiley Face Rocks
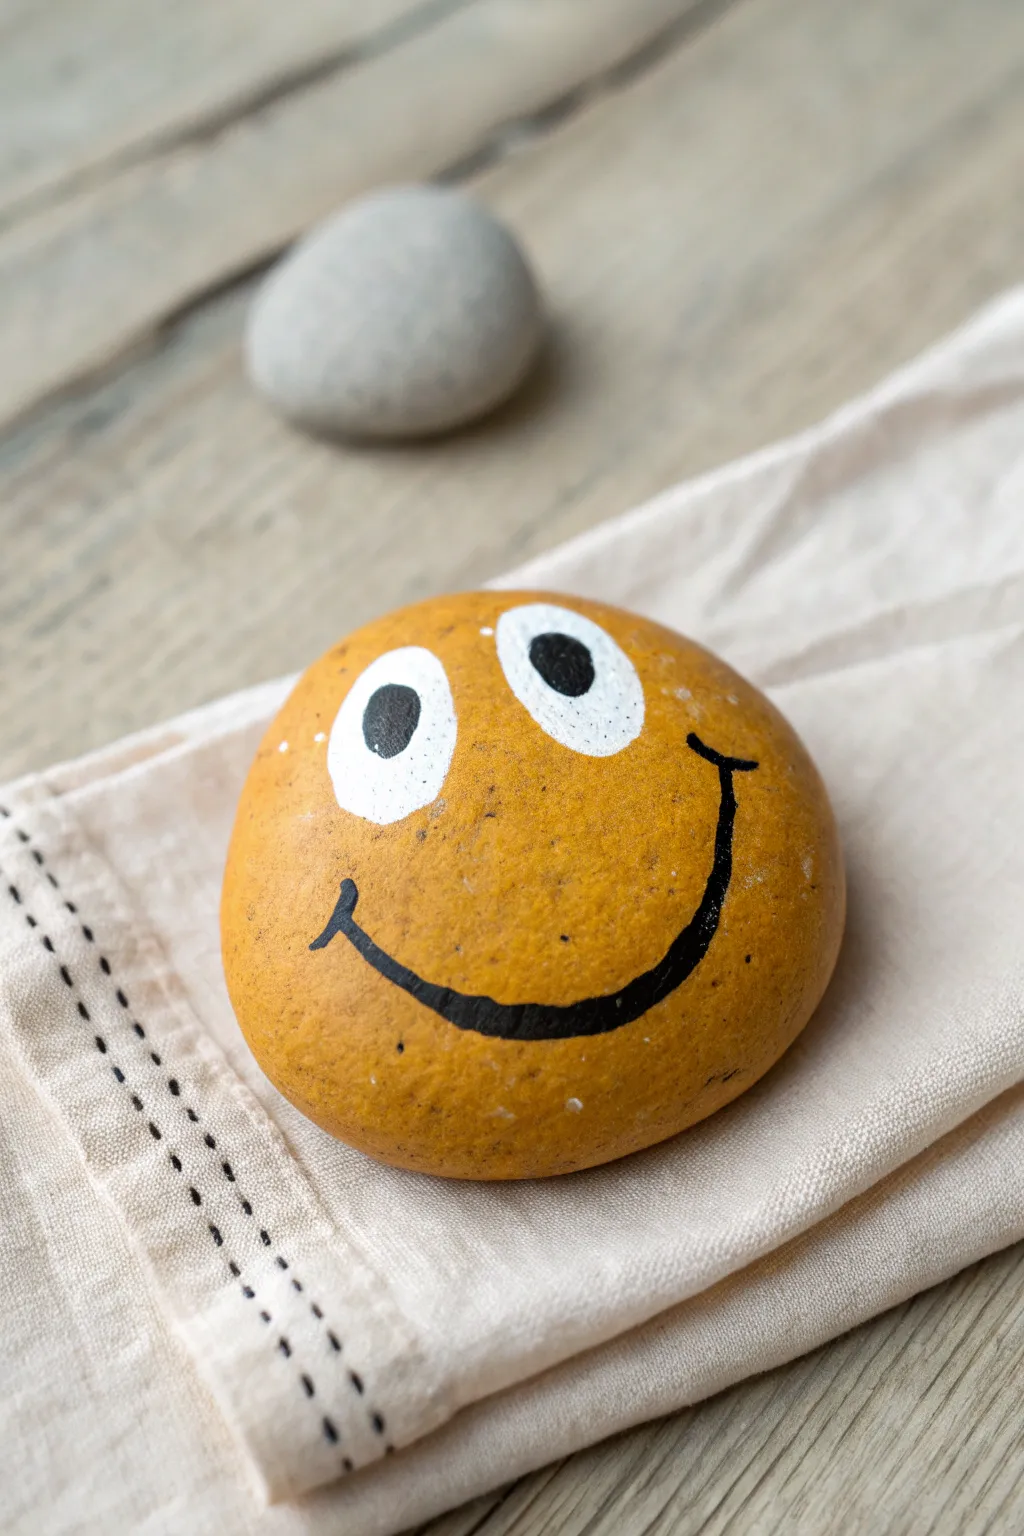
Brighten someone’s day with this cheerful, golden-yellow smiley face rock that radiates pure happiness. This simple yet effective design uses bold eyes and a wide grin to turn an ordinary stone into a pocket-sized friend.
How-To Guide
Materials
- Smooth, round river rock (palm-sized)
- Acrylic paint: Mustard Yellow or Goldenrod
- Acrylic paint: White
- Acrylic paint: Black
- Medium flat paintbrush
- Small round detail brush
- Posca paint pen (Black, fine tip) – optional but recommended
- Spray gloss varnish or Mod Podge sealer
- Water cup and paper towels
Step 1: Base Coat Preparation
-
Clean the canvas:
Begin by washing your rock thoroughly with warm, soapy water to remove any dirt or oils. Let it dry completely in the sun or use a hair dryer to speed things up. -
Apply the first yellow layer:
Using your medium flat brush, apply a generous coat of mustard yellow or goldenrod acrylic paint over the entire top surface of the rock. -
Smooth the strokes:
While the paint is wet, gently brush in one direction to minimize brushstrokes. Don’t worry if the rock’s natural color peeks through slightly; we will fix that next. -
Dry the first coat:
Allow this first layer to dry completely. Acrylics dry darker, so you’ll get a better sense of the true color once the moisture is gone. -
Add a second yellow layer:
Apply a second coat of yellow paint to ensure rich, opaque coverage. I like to dab the paint on slightly thicker here to create a smooth texture. -
Final base drying time:
Let the yellow base coat cure fully. It needs to be completely dry to the touch so the white eyes don’t blend and turn muddy.
Fixing Wobbly Lines
If your smile line gets shaky, wait for the black paint to dry completely. Then, use a small brush with the yellow base color to ‘erase’ the mistakes by painting over them.
Step 2: Creating the Face
-
Outline the eyes:
Load a small round brush with white acrylic paint. Visualize where the eyes should go—near the top center—and paint two distinct, vertical oval shapes. -
Fill the eyes:
Fill in these ovals with the white paint. You may need two coats of white to make sure the yellow doesn’t show through underneath. -
Allow eyes to set:
Wait for the white paint to dry completely. If you rush this step, the black pupils will bleed into the white. -
Paint the pupils:
Using a very small detail brush or the tip of a black paint pen, draw large black circles inside the white ovals. Position them slightly toward the center-right to give the rock a playful, looking-to-the-side expression. -
Draft the smile:
Before committing to paint, you can lightly sketch the curve of the smile with a pencil directly on the dry yellow paint to get the symmetry right. -
Paint the smile line:
Using your black paint pen or a fine liner brush with thinned black paint, carefully trace your smile line. Start from one cheek and sweep widely across the bottom. -
Thicken the grin:
Go back over the center of the smile line to make it slightly thicker than the ends, which adds character and visual weight to the expression. -
Add cheek creases:
Add small, subtle vertical tick marks at the very ends of the smile line to create ‘cheek creases’ for a genuine happy look.
Posca Pens for Precision
For the crispest lines on the smile and pupils, use acrylic paint markers (like Posca) instead of a brush. They offer control like a drawing pen but finish like permanent paint.
Step 3: Finishing Touches
-
Clean up edges:
Check the edges of your eyes. If they look a bit ragged, use a tiny bit of yellow paint to carefully tidy up the outline around the white. -
Let it cure:
Allow the entire face design to dry for at least an hour to ensure all layers are hardened. -
Seal the rock:
To protect your happy creation from weather or chipping, apply a coat of spray varnish or brush-on sealer. This will also make the colors pop and give it a finished shine.
Place this cheerful stone in a garden or on a desk to bring a smile to anyone who sees it
BRUSH GUIDE
The Right Brush for Every Stroke
From clean lines to bold texture — master brush choice, stroke control, and essential techniques.
Explore the Full Guide
Easy Daisy and Flower Rocks
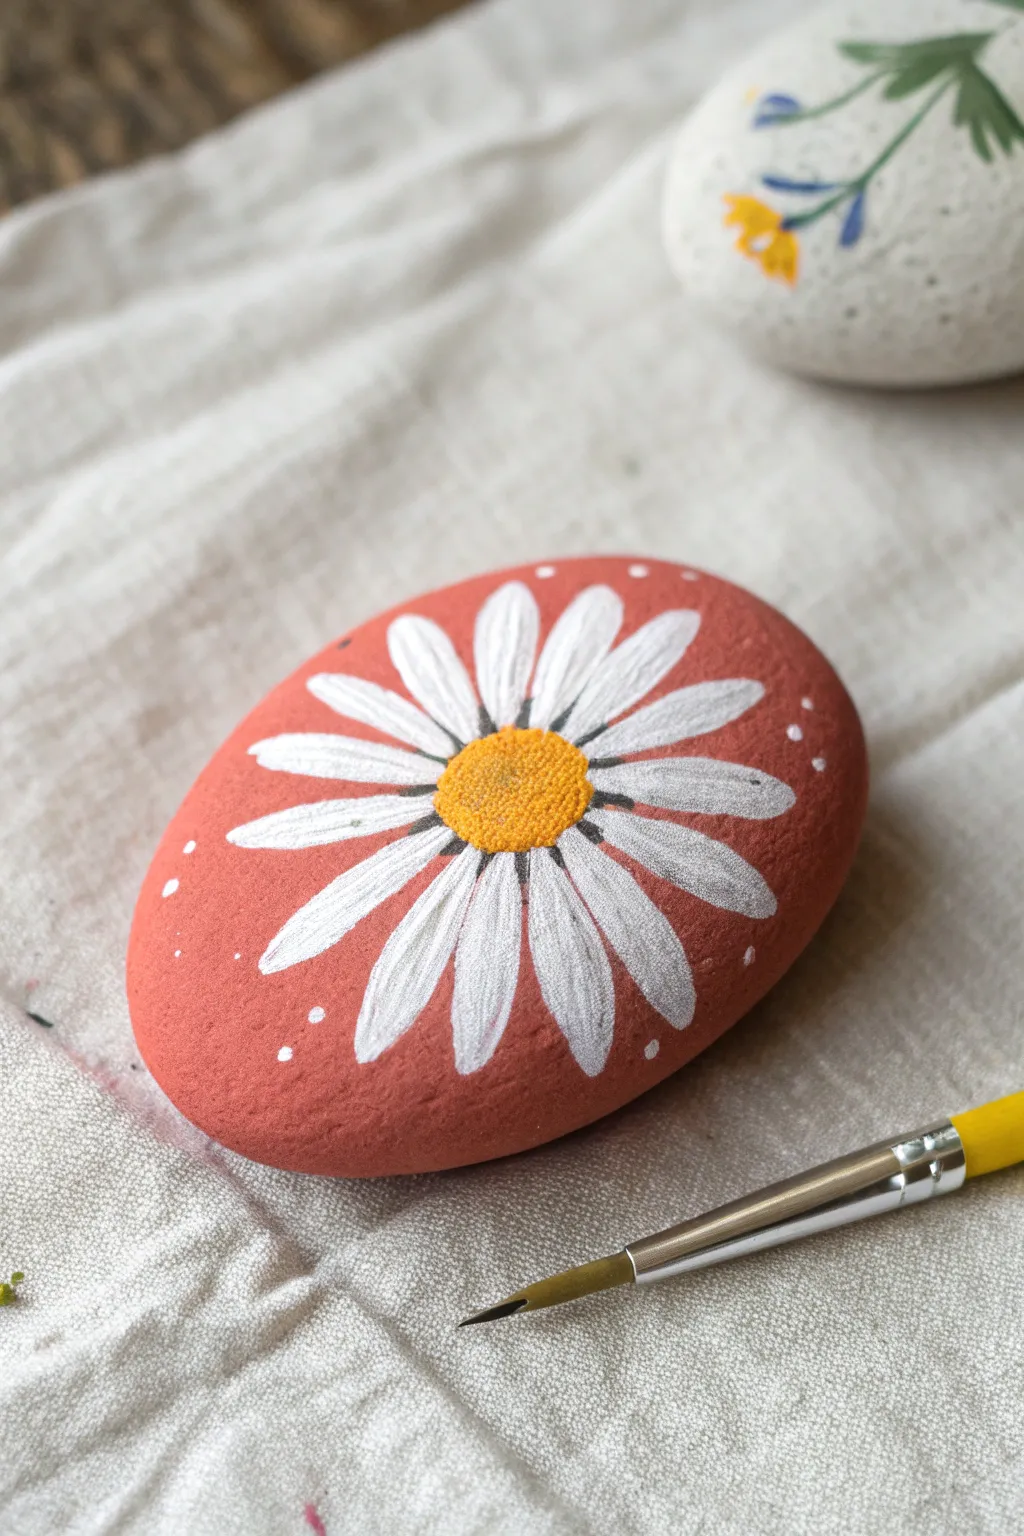
Transform a smooth river stone into a warm, rustic piece of art with this delightful daisy design. The contrast of the bright white petals against the matte terracotta background creates a lovely, welcoming feel.
Detailed Instructions
Materials
- Smooth, oval river rock
- Terracotta or warm reddish-brown acrylic paint
- White acrylic paint
- Yellow or goldenrod acrylic paint
- Black fine-liner paint pen or thin detail brush with black paint
- Medium flat brush
- Small round detail brush (size 0 or 1)
- Dotting tool or toothpick
- Matte spray sealer or varnish
Step 1: Preparing the Base
-
Clean the stone:
Begin by washing your stone with warm water and soap to remove any dirt or oils, then let it dry completely. -
Apply the base coat:
Using the medium flat brush, paint the entire top surface of the rock with your terracotta or warm reddish-brown acrylic paint. -
Let it dry:
Allow the first coat to dry fully; if the rock’s natural color shows through, apply a second thin coat for opaque coverage. -
Smooth the surface:
Check for any brush strokes or lumps in the base paint and smooth them out with one final, slightly watered-down layer if needed.
Step 2: Painting the Flower Center
-
Position the center:
Identify the visual center of your rock where you want the daisy to sit. -
Paint the yellow disk:
With a small round brush, paint a solid yellow circle about the size of a large coin in that spot. -
Add texture:
While the yellow paint is still slightly tacky, I like to stipple it gently with the tip of the brush to create a fuzzy texture. -
Shadow the center:
Mix a tiny dot of brown into your yellow and dab it lightly along the bottom edge of the circle to give it a 3D rounded appearance.
Uneven Petal Spacing?
Paint 12, 3, 6, and 9 o’clock petals first. Fill the gaps evenly. This ‘clock method’ prevents petals from getting bunched up on one side.
Step 3: Creating the Petals
-
Map out the petals:
Visualize the petals radiating outward like a clock face to ensure even spacing before you start painting. -
Paint the first layer:
Load your small round brush with white paint. Press down near the yellow center and pull outward, lifting pressure as you reach the tip to create a tapered petal shape. -
Complete the circle:
Continue painting petals all around the yellow center. Don’t worry if they are slightly transparent; we will fix that. -
Dry and repeat:
Let the white paint dry completely, then paint a second layer exactly over the first to make the white pop against the dark background. -
Add petal details:
For a realistic look, use your finest brush to paint very faint grey streaks (a mix of white and a tiny bit of black) down the center of a few petals. -
Outline the center:
Very lightly outline the base of the petals where they meet the yellow center with a subtle grey or diluted black line to separate the elements.
Level Up: Bee Friend
Paint a tiny bumblebee hovering near one of the petals using black and yellow ovals with translucent grey wings for a lively garden scene.
Step 4: Finishing Touches
-
Add decorative pollen:
Using a dotting tool or toothpick, add tiny yellow stippling dots onto the inner edges of the white petals where they touch the center. -
Create background accents:
Dip a toothpick into white paint and add small groups of three tiny dots around the empty red space for a whimsical effect. -
Intensify shadows:
Use a very fine touch of black paint or a black pen to add tiny tick marks between the petals near the center disk to deepen the contrast. -
Check your work:
Look over the rock for any accidental smudges or uneven edges and touch them up with the base terracotta color. -
Seal the artwork:
Once absolutely dry, apply a coat of matte spray varnish to protect the paint from chipping and to give it a uniform finish.
Place this cheerful rock in a potted plant or on a windowsill to brighten your day
Busy Bee and Bug Rocks

Transform a smooth garden stone into a cheerful, smiling bumblebee with this simple yet adorable painting project. This design uses the natural texture of the rock as a background while letting the bright yellow body pop, creating a cute keepsake for your garden or shelf.
Step-by-Step
Materials
- Smooth, oval-shaped river rock (preferably light grey or beige)
- Acrylic paint (yellow, black, white)
- Fine point detail brush
- Medium flat brush
- Dotting tool or toothpick
- Optional: Paint markers (black, white)
- Clear acrylic sealer (matte or glossy)
Step 1: Base and Body
-
Clean Your Canvas:
Begin by scrubbing your rock with soap and water to remove any dirt or grease. Let it dry completely in the sun or with a hair dryer, as paint won’t stick well to a damp surface. -
Outline the Oval:
Using a pencil or a very light touch with a fine brush and yellow paint, draw a large oval shape in the center of the rock. This will be the bee’s main body. -
Fill the Yellow:
Load your medium flat brush with bright yellow acrylic paint. Fill in the oval you just outlined. Depending on the opacity of your paint, you may need a second coat once the first one is dry to get a solid, vibrant color. -
Define the Outline:
Once the yellow paint is fully dry, use a fine detail brush and black paint (or a black paint marker) to verify the edge of the oval, creating a crisp outline around the entire yellow body.
Paint Slipping?
If your acrylics feel too slippery on the smooth rock surface, dab a tiny bit of white glue or matte medium onto the area first to create a ‘tooth’ for the paint to grab onto.
Step 2: Stripes and Wings
-
First Stripe:
Paint a curved black band across the middle of the yellow body. It should arc slightly downward to give the bee a round, 3D appearance. -
Second Stripe:
Add a second, parallel black band near the bottom of the yellow oval. This creates the classic bumblebee pattern. -
Stinger Tip:
Paint a small black triangle or curved section at the very bottom tip of the yellow oval to represent the bee’s tail end. -
Left Wing Base:
On the left side of the bee’s body, painting directly onto the unpainted rock surface, draw a semi-circle shape using white paint. Fill it in solidly. -
Right Wing Base:
Do the same on the right side, just below the middle stripe level. For a bit of whimsy like the example, I sometimes mix a tiny drop of red into the white to make a very pale pink wing. -
Wing Outlines:
After the wings are dry, outline them with your thin black brush or marker. Add a few internal lines to suggest wing veins.
Step 3: Face and Details
-
The Smile:
Using your finest brush or a black paint pen, draw a simple, U-shaped smile near the top third of the yellow area. -
The Nose:
Paint a small, soft triangular or oval nose right above the smile in black. -
Eye Whites:
Dip a larger dotting tool or the handle end of a paintbrush into white paint. Stamp two circles above the nose for the eyes. -
Pupils:
Once the white dots are dry, use a smaller dotting tool to add black pupils inside them, glancing to the side for a cute expression. -
Antennae:
Draw two thin, curly lines extending from the top of the head onto the unpainted stone background. Add tiny dots at the end of each line. -
Stripe Highlights:
Dip a toothpick into white paint and add tiny stippled dots along the black stripes. This adds texture and a bit of sparkle to the design. -
Seal It Up:
Allow the rock to cure for at least 24 hours. Finish by applying a coat of clear acrylic sealer to protect your buzzing friend from the elements.
Sparkle Wings
Mix a small amount of iridescent medium or fine silver glitter into the paint for the wings. It catches the sunlight beautifully when you place the rock outdoors.
Place your finished bee in a flower pot or give it to a friend to brighten their day

PENCIL GUIDE
Understanding Pencil Grades from H to B
From first sketch to finished drawing — learn pencil grades, line control, and shading techniques.
Explore the Full Guide
Silly Monster Face Rocks
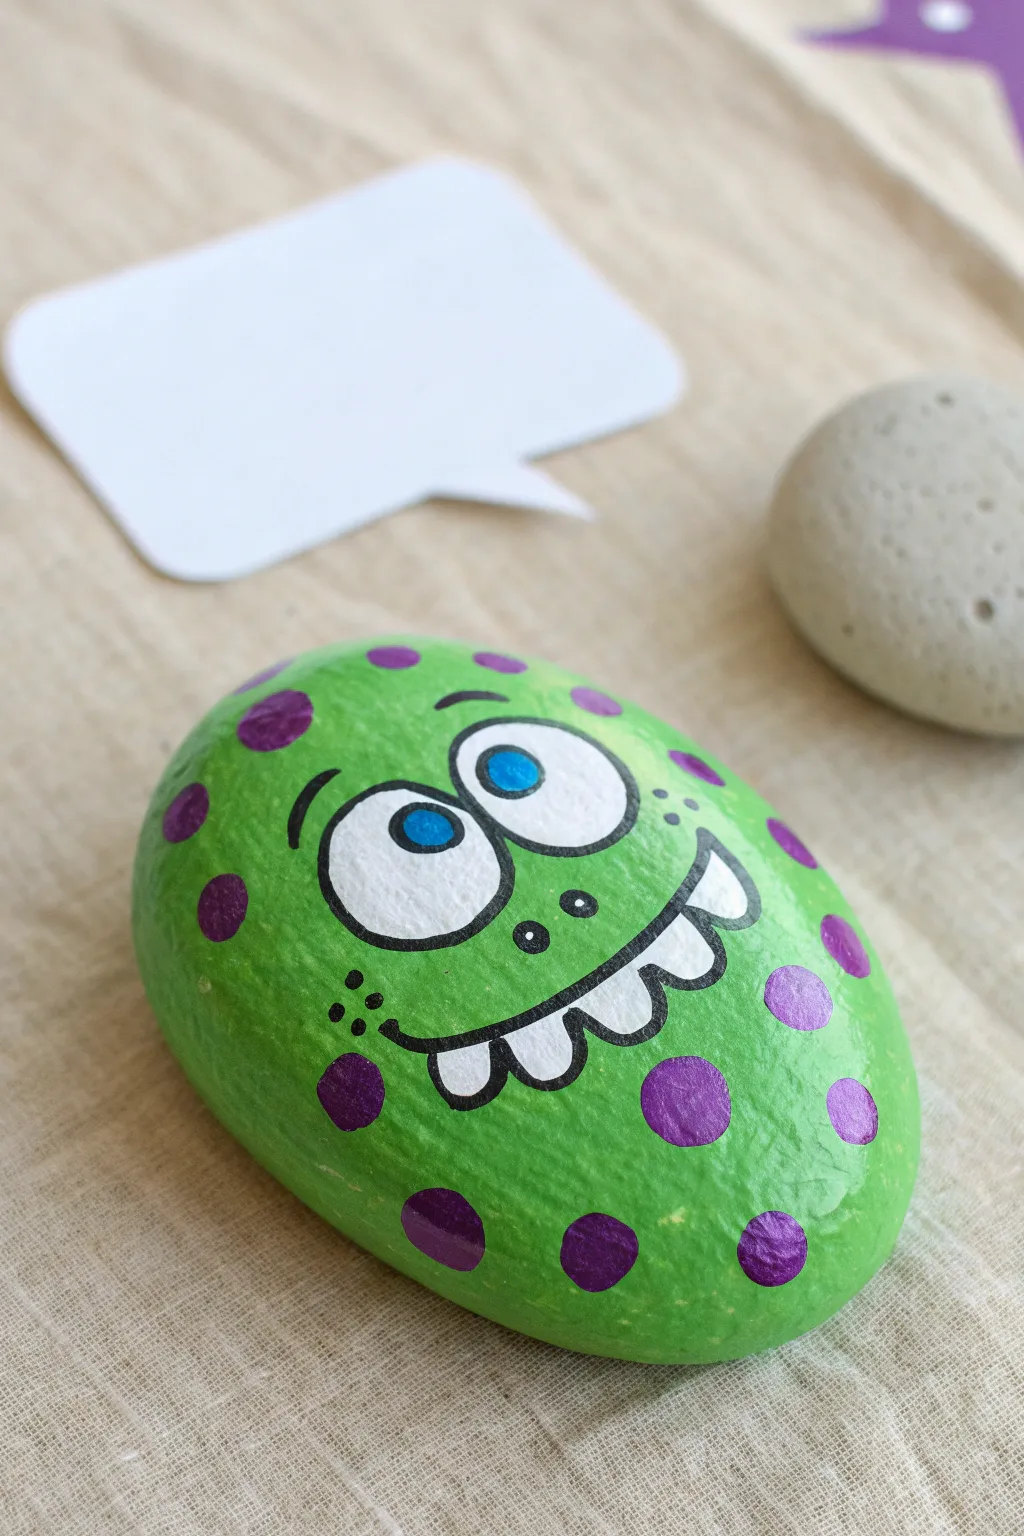
Transform a simple garden stone into a giggling green monster with this fun and easy painting project. With its bright purple spots and goofy toothy grin, this little character is perfect for hiding in parks or brightening up a desk.
How-To Guide
Materials
- Smooth, oval-shaped river rock
- Acrylic paint (bright lime green, purple, white, sky blue)
- Wide flat paintbrush
- Small round paintbrush
- Black fine-point paint pen (Posca or similar) or a very fine liner brush
- Clear acrylic sealer (spray or brush-on)
- Pencil (optional)
Step 1: Base Coat
-
Clean your canvas:
Start by washing your rock with soap and water to remove any dirt or grit. Let it dry completely in the sun or with a cloth. -
Apply the first green layer:
Using your wide flat brush, cover the top surface of the rock with bright lime green acrylic paint. Don’t worry if it looks streaky at first. -
Let it dry:
Allow the first coat to dry to the touch. This usually takes about 10-15 minutes depending on how thick standard acrylics are applied. -
Add a second coat:
Apply a second layer of green paint to ensure a solid, opaque cover so the natural rock color doesn’t peek through. Let this layer dry completely.
Clean Lines Hack
If you don’t have a steady hand for the purple spots, dip the eraser end of a pencil into the paint and stamp it onto the rock for perfect circles every time.
Step 2: Monster Features
-
Sketch the face (optional):
If you’re nervous about freehanding, use a pencil to lightly sketch two large circles for eyes and a wide U-shape for the mouth. -
Paint the eye whites:
Using a small round brush and white paint, fill in two large circles near the top center of the rock. Make the left one slightly larger than the right for extra goofiness. -
Add the teeth:
Paint a white curved strip below the eyes for the mouth area, scalloping the bottom edge to create the look of teeth. -
Paint the irises:
Once the white paint is fully dry, paint two smaller blue circles inside the eye whites. I like to have them looking slightly cross-eyed or in different directions. -
Create the polka dots:
Dip your small round brush or a dotting tool into purple paint. Add random spots all around the green skin, keeping them away from the face features.
Step 3: Outlining & Details
-
Outline the eyes:
Using a black paint pen, carefully trace around the white circles of the eyes. Add small curved eyebrows floating above them. -
Define the pupils:
Draw small black dots in the center of the blue irises. -
Outline the mouth:
Trace the upper curve of the mouth with the black pen. Draw a line along the bottom of the white shape to define the teeth. -
Add tooth separation:
Draw short vertical lines on the white mouth shape to separate the individual teeth. -
Add the nose:
Between the eyes and mouth, add two small dots for nostrils. -
Draw freckles:
Add three tiny dots on each cheek area near the corners of the mouth for a bit of texture. -
Seal the deal:
Once all paint and marker ink is absolutely dry, apply a coat of clear acrylic sealer to protect your monster from the elements.
Paint Pen Troubleshooting
If your black paint pen stops flowing over the textured acrylic, press the tip on a scrap piece of paper to get the ink moving again before returning to the rock.
Your silly green monster is now ready to bring a smile to anyone who spots him
Cute Turtle Shell Rocks
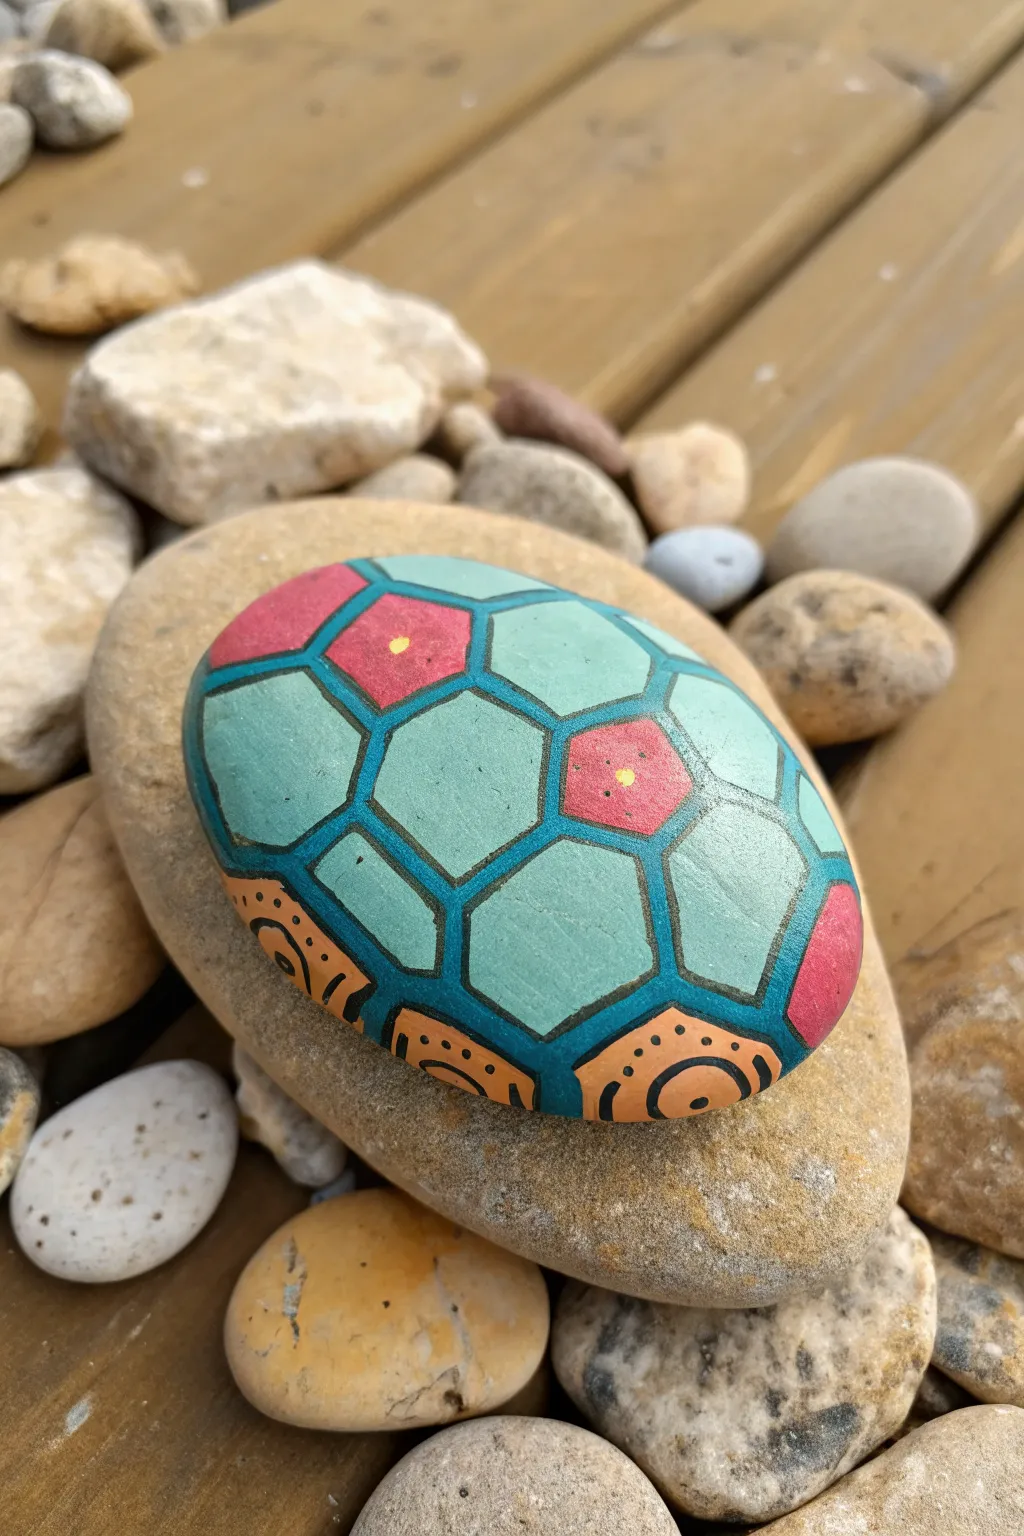
Transform a smooth river stone into a delightful turtle shell using bright geometric patterns. This project combines calming greens with pops of orange and pink for a cheerful garden decoration or a fun paperweight.
Detailed Instructions
Materials
- Smooth, oval-shaped river rock (palm-sized)
- Acrylic craft paints (teal/light blue, deep pink/red, bright orange, yellow)
- Black acrylic paint pen (fine or extra-fine tip)
- Pencil and eraser
- Paintbrushes (flat brush and fine liner brush)
- Water bonding primer (optional but recommended for outdoor rocks)
- Clear acrylic sealer (spray or brush-on)
- Water cup and paper towels
Step 1: Preparation & Base Coat
-
Clean the canvas:
Begin by thoroughly washing your rock with warm, soapy water to remove any dirt or oils. Let it dry completely in the sun or use a hairdryer to speed things up. -
Prime the surface:
If your rock is very dark or porous, applying a thin layer of white primer or white acrylic paint first helps the colors pop. -
Sketch the pattern:
Use a pencil to lightly sketch a hexagon shape in the very center of the rock. This will be the anchor for your turtle shell pattern. -
Add surrounding shapes:
Around the central hexagon, draw six more hexagon shapes encasing it. Don’t worry if they warp slightly as they wrap around the curved edges of the stone. -
Draw the rim:
Sketch a border around the bottom edge of the shell design using curved, semi-circle shapes. These will be the orange segments seen at the bottom of the design.
Uneven Hexagons?
If your hexagons look wonky, cut a small hexagon template from cardstock and trace it onto the rock. The flexible paper will curve with the stone’s surface.
Step 2: Adding Color
-
Paint the teal segments:
Using a small flat brush, fill in the central hexagon and alternating surrounding hexagons with a soft teal or light blue-green paint. Two thin coats are better than one thick one. -
Paint the accent segments:
Fill the remaining hexagonal spaces with a deep pink or reddish paint. In the reference image, these are spaced out to create a balanced pattern. -
Fill the rim:
Paint the semi-circle border shapes at the bottom edge with a bright orange color. This creates the classic turtle shell rim look. -
Let it dry:
Allow the paint to dry completely. If you try to add the outlines while the paint is wet, your marker tip might get clogged. -
Add highlights:
Dip the back end of a paintbrush into yellow paint. Carefully place a single dot in the center of each pink hexagon.
Clean Lines
Rest your wrist on a sturdy object (like a book) while drawing the black outlines. This stabilizes your hand for much crisper lines than hovering.
Step 3: Line Work & Details
-
Outline the shapes:
With your fine-tip black paint pen, trace over your pencil lines. Outline every hexagon and the border segments with a steady hand. -
Thicken the lines:
I find that going over the main connecting lines a second time to make them slightly bolder really helps the ‘shell’ look separate and distinct. -
Detail the orange rim:
Inside each orange semi-circle at the bottom, draw a smaller black arc or semi-circle. -
Add dots to the rim:
Using the very tip of your black paint pen or a toothpick, place a row of three or four tiny black dots above the black arc inside each orange section. -
Final touches:
Check for any uneven edges or spots where the paint pen skipped and touch them up. Wait at least 24 hours for the paint to fully cure. -
Seal the artwork:
Apply a coat of clear acrylic sealer to protect your turtle from the elements, especially if it will live in the garden.
Place your finished turtle shell in a flower pot or leave it on a park bench for someone to find


Fish and Scales Rocks
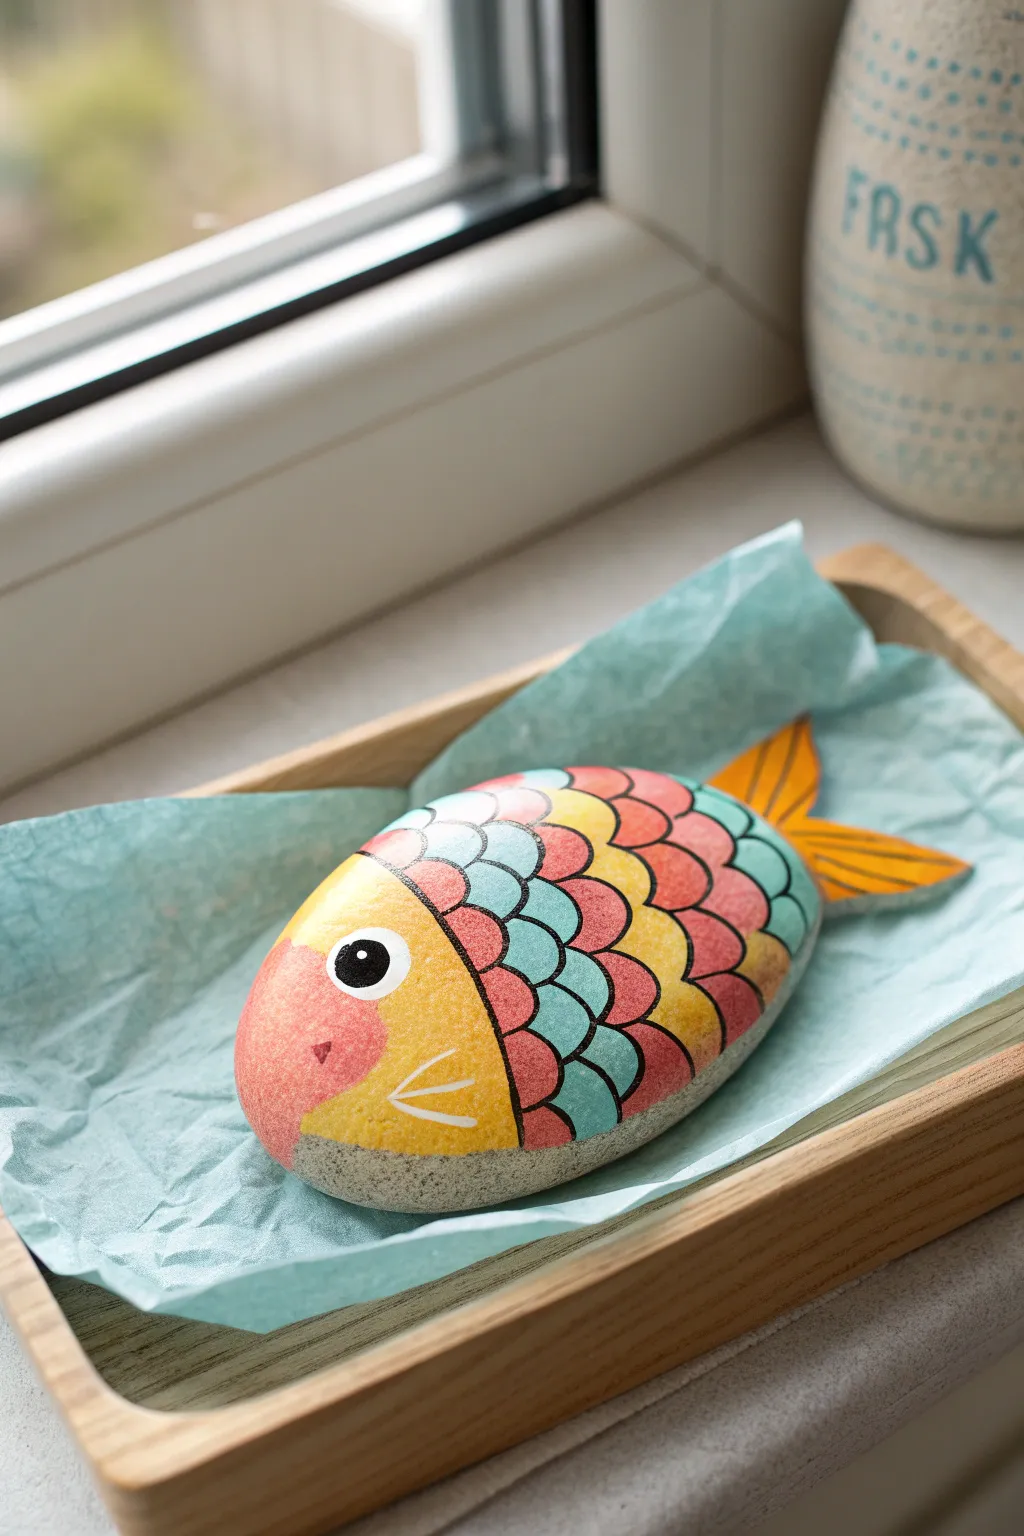
Transform a smooth, oval river rock into a vibrant underwater friend with just a few colors and a steady hand. This project uses bold outlines and alternating scale patterns to create a cheerful fish that looks like it swam right out of a storybook.
Step-by-Step Tutorial
Materials
- Smooth, oval-shaped river rock
- Acrylic paints (yellow, light blue, coral/red, pink, orange)
- Black fine-liner paint pen or permanent marker
- White paint pen or small detail brush
- Flat paintbrush (medium size)
- Small round detail paintbrush
- Small piece of heavy cardstock or wood (for the tail)
- Strong craft glue (E6000 or hot glue)
- Clear acrylic sealant (spray or brush-on)
Step 1: Planning and Base Colors
-
Choose your stone:
Begin by finding a rock that is naturally oval and smooth. Wash it thoroughly with soap and water and let it dry completely to ensure the paint adheres properly. -
Section off the head:
Visualize a curved line separating the front third of the rock from the rest. Paint this front section with bright yellow acrylic paint to form the fish’s head. You may need two coats for opaque coverage. -
Add the cheek blush:
While the yellow is dry, mix a soft pink or coral shade. Paint a rounded semi-circle at the very front tip of the ‘face’ area to give your fish a rosy cheek. -
Leave the belly bare:
Notice how the bottom curve of the rock remains unpainted grey stone? Keep this area clean to act as the fish’s natural belly, or paint it a neutral grey if you prefer full coverage.
Scale sizing tip
Make your scales larger near the head and slightly smaller near the tail to mimic the natural perspective and curvature of a real fish body.
Step 2: Drawing the Scales
-
Outline the head:
Once the base colors are totally dry, use your black paint pen to draw a thick, curved line separating the yellow head from the rest of the body. -
Draw the first row of scales:
Using the black pen, draw a column of connected semi-circles (scallops) right behind the head line. These should be vertically stacked like the letter ‘C’ repeated downwards. -
Continue the scale pattern:
Draw subsequent columns of scales behind the first one. Offset them slightly—so the peak of one scale sits in the valley of the two before it—until you reach the back of the rock. -
Define the face details:
Draw the circular eye outline on the upper part of the yellow section. Add a small ‘v’ shape for the mouth near the pink cheek area.
Step 3: Coloring the Body
-
Fill the blue scales:
Select random scales to fill with light blue paint. Use a small round brush to stay neatly inside your black outlines. -
Add the yellow scales:
Clean your brush and paint another set of scales with the same bright yellow used for the head, distributing them evenly across the body. -
Paint the red scales:
Fill the remaining empty scales with a coral or reddish-pink hue. I find that alternating these three colors creates the most pleasing mosaic effect. -
Touch up outlines:
If any paint went over the black lines, redraw those segments with your black pen once the paint is fully dry to keep everything crisp.
Make it swim
Glue a small magnet to the flat back of the rock to turn your fish into a fridge magnet, or place it in a blue-painted saucer for a ‘pond’ display.
Step 4: Finishing Details
-
Paint the eye:
Fill the eye circle with solid black paint. Let it dry, then add a small white dot near the top edge for a sparkle reflection. -
Add white highlights:
Use a white paint pen to draw a few thin lines on the yellow cheek area, resembling fins or gills. You can also add a tiny white triangle to the nose for dimension. -
Create the tail fin:
Cut a simple fish tail shape out of stiff cardstock or a thin wood chip. Paint it orange with darker orange stripes for texture. -
Attach the tail:
Glue the tail securely to the back end of the rock using strong craft glue. Hold it in place for a minute until it sets. -
Seal the artwork:
Finish by applying a coat of clear acrylic sealer over the entire rock and tail. This protects the paint from chipping and gives the fish a wet, shiny look.
Now you have a colorful, low-maintenance pet fish that will brighten up any shelf or windowsill
Penguins and Polar Animal Rocks
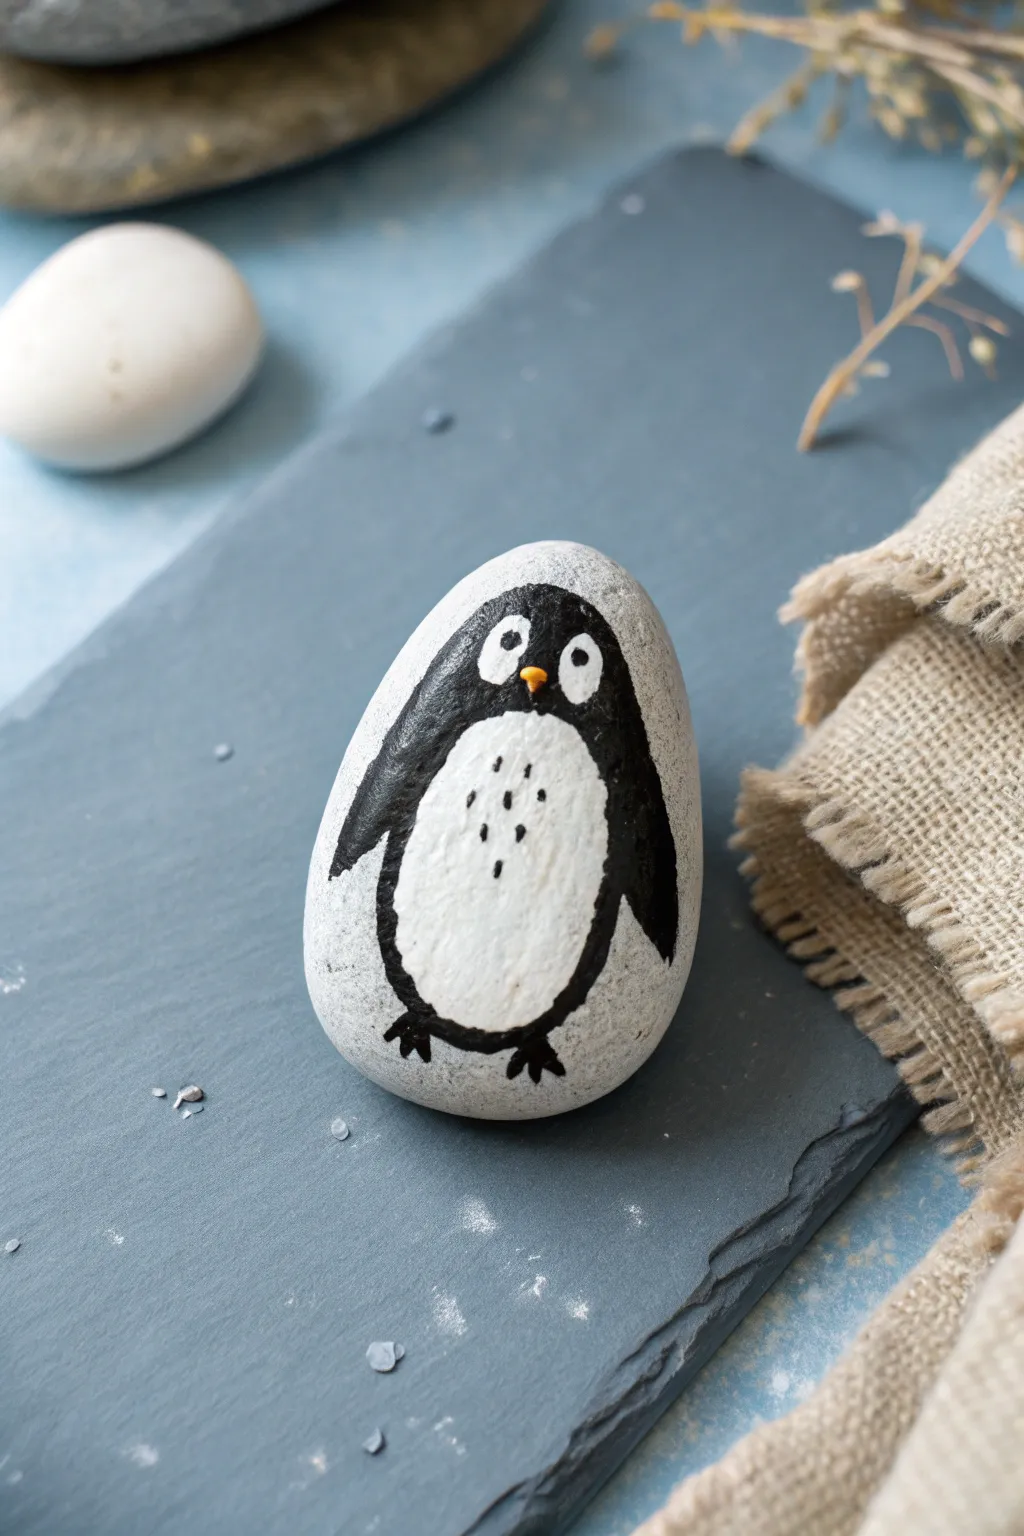
Transform a simple garden stone into an adorable, chilly friend with just a few strokes of paint. This project uses the natural shape of the rock to create a chubby penguin body that’s perfect for winter decor or playful storytelling.
How-To Guide
Materials
- Smooth, oval-shaped river rock (palm-sized is ideal)
- White acrylic paint or paint pen
- Black acrylic paint or paint pen
- Small yellow or orange paint pen (for the beak)
- Small flat paintbrush
- Fine detail paintbrush or dotting tool
- Matte or satin sealant spray (optional)
Step 1: Base Prep
-
Clean your canvas:
Before starting, scrub your rock with warm soapy water to remove any dirt or grit. Let it dry completely in the sun or with a hair dryer to ensure the paint adheres properly. -
Prime the surface:
Paint the entire top surface of the rock with a layer of white acrylic paint. This creates a bright base so your colors pop. Depending on the rock’s natural color, you might need two coats for full opacity.
Stone Selection Tip
Look for rocks that are naturally egg-shaped or slightly wider at the bottom. This tapered shape mimics a real penguin’s silhouette perfectly without extra effort.
Step 2: Painting the Body
-
Outline the tummy:
Using a pencil, lightly sketch a smaller oval shape inside the white area you just painted. This will be the penguin’s white tummy. -
Sketch the face guidelines:
Above the tummy oval, lightly draw two circles for eyes. Then, sketch the outline of the black ‘hood’ that will cover the rest of the head and body. -
Fill in the black coat:
With a steady hand and black acrylic paint, fill in the area around the tummy oval and eye circles. Use a small flat brush for larger areas and switch to a finer brush near the edges. -
Define the wings:
Extend the black paint slightly outward on the sides of the body to form two curved, flipper-like wings resting against the penguin’s sides. -
Paint the feet:
At the very bottom of the white tummy area, paint two small black webbed feet using a fine detail brush. Three little toes on each foot work perfectly.
Snowy Scenery
After sealing, glue the rock onto a flat slate tile or piece of wood painted ice-blue. Add cotton balls for snow drifts to create a permanent winter display.
Step 3: Adding Personality
-
Focus on the eyes:
Ensure the white circles for the eyes are clean and bright. If you accidentally got black paint in them, just touch them up with a dab of white. -
Add pupils:
Using a dotting tool or the back end of a paintbrush dipped in black paint, place a single dot in the center of each white eye circle. I like to make them slightly mismatched for a goofy look. -
Paint the beak:
Right between the eyes, use your yellow or orange paint pen to draw a small, inverted triangle for the beak. -
Add texture details:
Using a very fine black marker or the tip of your detail brush with mostly dry paint, add tiny vertical dashes on the white tummy to suggest fluffy feathers.
Step 4: Final Touches
-
Let it cure:
Allow your penguin to dry undisturbed for at least an hour. The thicker layers of light paint can take a little longer to set. -
Review and refine:
Check your black outlines. If any lines look shaky, you can clean them up with a white paint pen once the black is fully dry. -
Seal the deal:
outdoors or in a well-ventilated area, spray a light coat of clear matte sealant over the rock to protect your artwork from chipping and weather.
Now you have a charming little penguin pal ready to brave the cold or brighten up a shelf
Puppy and Kitty Pet Rocks
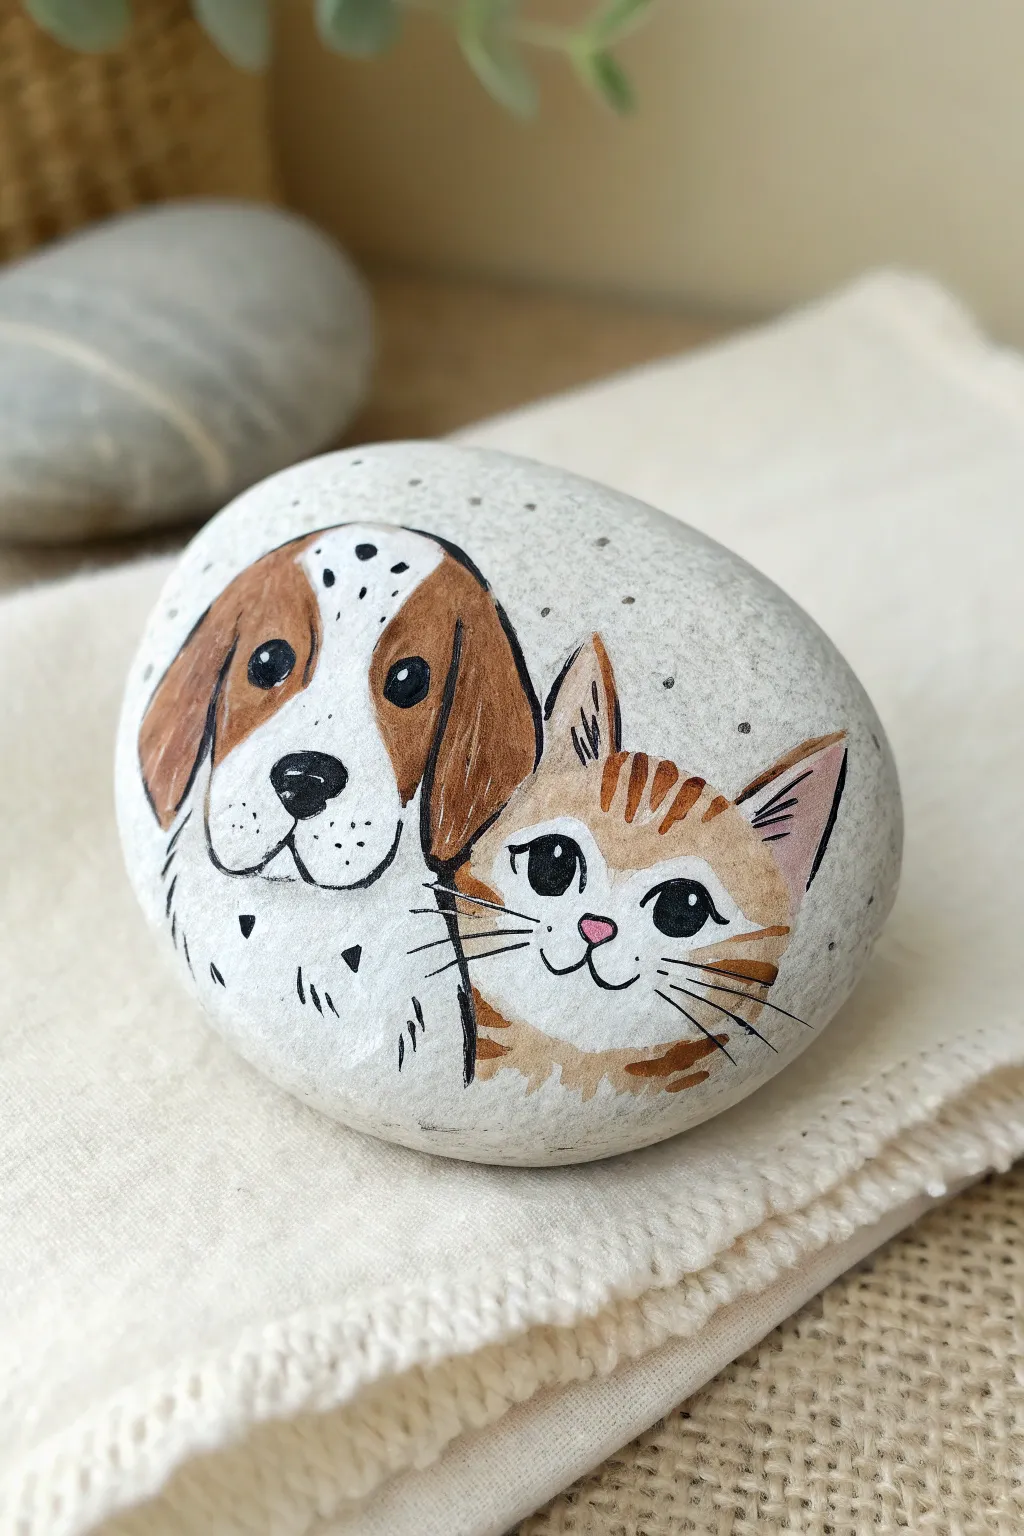
Immortalize the bond between cat and dog with this charming painted stone that features a snuggly beagle and a sweet orange tabby. The soft illustration style works beautifully on a smooth, rounded rock, making it a perfect keepsake or gift for pet lovers.
Step-by-Step
Materials
- Smooth, oval-shaped river rock (approx. 3-4 inches wide)
- White acrylic paint or gesso
- Acrylic paints (burnt sienna, ochre/orange, black, pink)
- Fine liner brushes (size 0 and 00)
- Small flat brush
- Black fine-point paint pen or permanent marker (0.5mm)
- Pencil and eraser
- Matte spray varnish
Step 1: Preparation & Sketching
-
Base Coat:
Begin by washing and thoroughly drying your rock to remove any dust. Using your flat brush, paint a solid oval shape in white acrylic along the top surface of the rock. This acts as a ‘canvas’ area for your painting. Let this dry completely, and add a second coat if the stone’s natural color shows through. -
Outline the Shapes:
With a light pencil, sketch two overlapping circles for the heads. The dog’s head should be on the left and slightly larger, while the cat’s head tucks in on the right, slightly lower. -
Draft the Features:
Sketch the dog’s floppy ears and snout shape. For the cat, draw pointed triangular ears and a smaller snout area. Lightly mark where the eyes and noses will sit to ensure they look like they are looking at the viewer.
Smudged Ink?
If your black outline smears when you apply varnish, you didn’t let it dry long enough. Paint pens need extra time. Wait 24 hours before sealing, or apply a gentle layer of Mod Podge first.
Step 2: Blocking in Color
-
Dog’s Ears and Markings:
Mix a warm brown using burnt sienna. Paint the dog’s floppy ears, leaving the center of the face white. I find it helps to use feathery strokes at the edges of the ears to suggest fur texture rather than a hard line. -
Cat’s Base Color:
Mix a soft orange-cream color by combining ochre, a tiny dot of burnt sienna, and plenty of white. Fill in the cat’s entire head shape with this pale base tone. -
Cat’s Stripes:
Using a slightly darker, more saturated orange, paint the tabby markings. Add three small stripes on the forehead, stripes on the cheeks, and color the insides of the ears, leaving the rims pale. -
Pink Details:
Mix a soft pink color. Paint the inside of the cat’s ears (the triangular inner section) and the cat’s small triangular nose. Let all paint layers dry completely before moving to the next step.
Step 3: Fine Details & Line Work
-
Dog’s Eyes:
Using black paint and a size 0 brush (or a paint pen), draw two oval eyes for the dog. Leave a tiny white spec in each, or add a dot of white paint later for the reflection. -
Dog’s Nose:
Paint a rounded triangular nose in black for the dog. Add a small vertical line coming down from the nose and curve it outward to form the mouth/muzzle shape. -
Cat’s Features:
Paint the cat’s large, almond-shaped eyes in black, adding the white reflection dots immediately. Outline the pink nose in black and draw the classic ‘W’ mouth shape. -
Outlining:
Switch to your ultra-fine black paint pen. Carefully outline the dog’s ears, head shape, and the cat’s ears and head. Keep the lines sketch-like and slightly broken in places to mimic the softness of fur. -
Fur Texture – Dog:
add small black dots (freckles) on the dog’s white muzzle. Add a few jagged, short lines on the neck area to suggest ruffled fur. -
Fur Texture – Cat:
Use the pen to draw thin whiskers coming from the cat’s snout. Add fine lines inside the cat’s ears for fluff. -
Background Accents:
To frame the portrait, add tiny grey or diluted black dots sporadically around the heads on the white background. This stippling effect adds a nice artistic finish. -
Sealing:
Once the ink is 100% dry (give it at least an hour to prevent smearing), spray the rock with a matte varnish to protect your artwork.
Eye Sparkle Tip
For the most lively eyes, place the white reflection dot in the same position for both animals (e.g., top right of the pupil). This makes them look like they are lit by the same light source.
Place your adorable pet rock on a shelf or near a potted plant to add a touch of friendly warmth to your room
Dinosaur Footprint Rocks
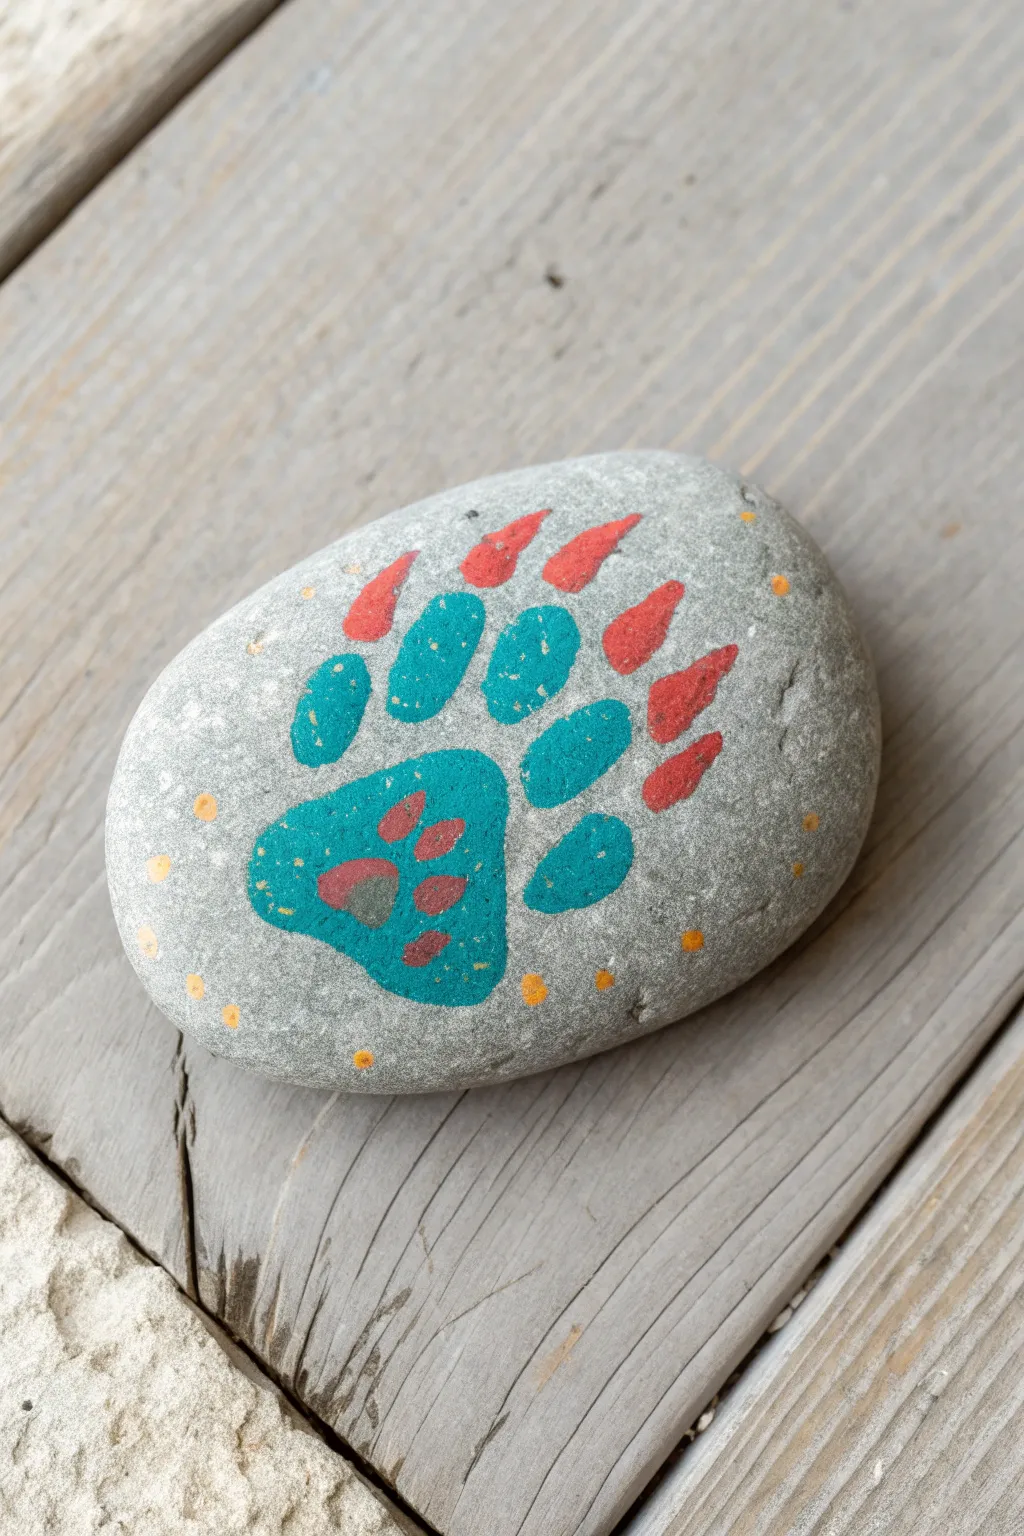
Transform a simple grey stone into a fossilized find with this colorful dinosaur footprint project. With bright teal pads and fierce red claws, this rock painting captures the excitement of a Jurassic adventure in a palm-sized art piece.
How-To Guide
Materials
- Smooth, flat grey river rock
- Acrylic paint (Teal/Turquoise, Bright Red, Brown, Yellow/Orange)
- Small flat paintbrush
- Extra-fine round paintbrush or liner brush
- Dotting tool or toothpick
- Pencil (optional)
- Clear acrylic sealer spray or mod podge
Step 1: Preparation & Mapping
-
Clean surface:
Begin by washing your rock with soap and water to remove any dirt or grease, then dry it completely so the paint adheres properly. -
Sketch the print:
Using a pencil, very lightly sketch the outline of the dinosaur foot. Draw a large, roughly triangular shape with rounded corners for the heel pad at the bottom center. -
Map the toes:
Above the heel pad, sketch four ovals for the toe pads, arranging them in a gentle arc. -
Mark the claws:
Just above each toe oval, draw a small, sharp triangular point to represent where the dinosaur’s claws will go.
Uneven Coverage?
If the grey rock creates shadows through the teal paint, paint the shape in white first. Let it dry, then paint the teal over it for immediate opacity.
Step 2: The Teal Layer
-
Paint the heel:
Load your small flat brush with teal paint and fill in the large heel pad shape. Use careful strokes to keep the edges smooth. -
Fill the toes:
Using the same teal color, paint in the four oval toe pads you sketched earlier. -
Add a second coat:
Acrylics can be translucent, especially on dark rocks. Once the first layer is touch-dry, apply a second coat of teal to make the color pop. -
Paint the fifth toe:
Notice the subtle, smaller teal oval on the far right side of the print in the reference image? Go ahead and paint that small side toe now.
Make It Fossilized
Instead of colorful paint, use black for the print and then dry-brush cream over the top to make it look like an authentic fossil embedded in stone.
Step 3: Adding Claws & Details
-
Paint the claws:
Switch to your bright red paint. Carefully fill in the triangular claw shapes at the top of each teal toe pad. You can extend the red slightly down the sides of the teal to blend them. -
Refine the points:
Use your finest brush to pull the red paint outward into a sharp point for a fierce look. -
Inner textures:
Mix a tiny drop of brown into your red paint to create a rusty color. Paint three small, irregular blotches inside the main teal heel pad for texture. -
Toe shading:
I like to add just a tiny dot of this rusty red mixture to the bottom of the toe pads as well, giving them a bit of dimension.
Step 4: Finishing Touches
-
Create background dots:
Dip a dotting tool or the back end of your paintbrush into yellow or orange paint. -
Distribute particles:
Stamp small dots randomly around the footprint on the bare grey rock to simulate dust or magical sparks. -
Add tiny speckles:
For variety, use the very tip of a toothpick to add even smaller micro-dots in between the larger yellow ones. -
Dry completely:
Allow the rock to sit undisturbed until all paint layers are fully dry to the touch. -
Seal the artwork:
Apply a coat of clear acrylic sealer or Mod Podge to protect your prehistoric creation from scratches and weather.
Place your newly hatched dinosaur footprint in the garden or hide it in the park for a lucky explorer to find
Mermaid Tails and Ocean Waves
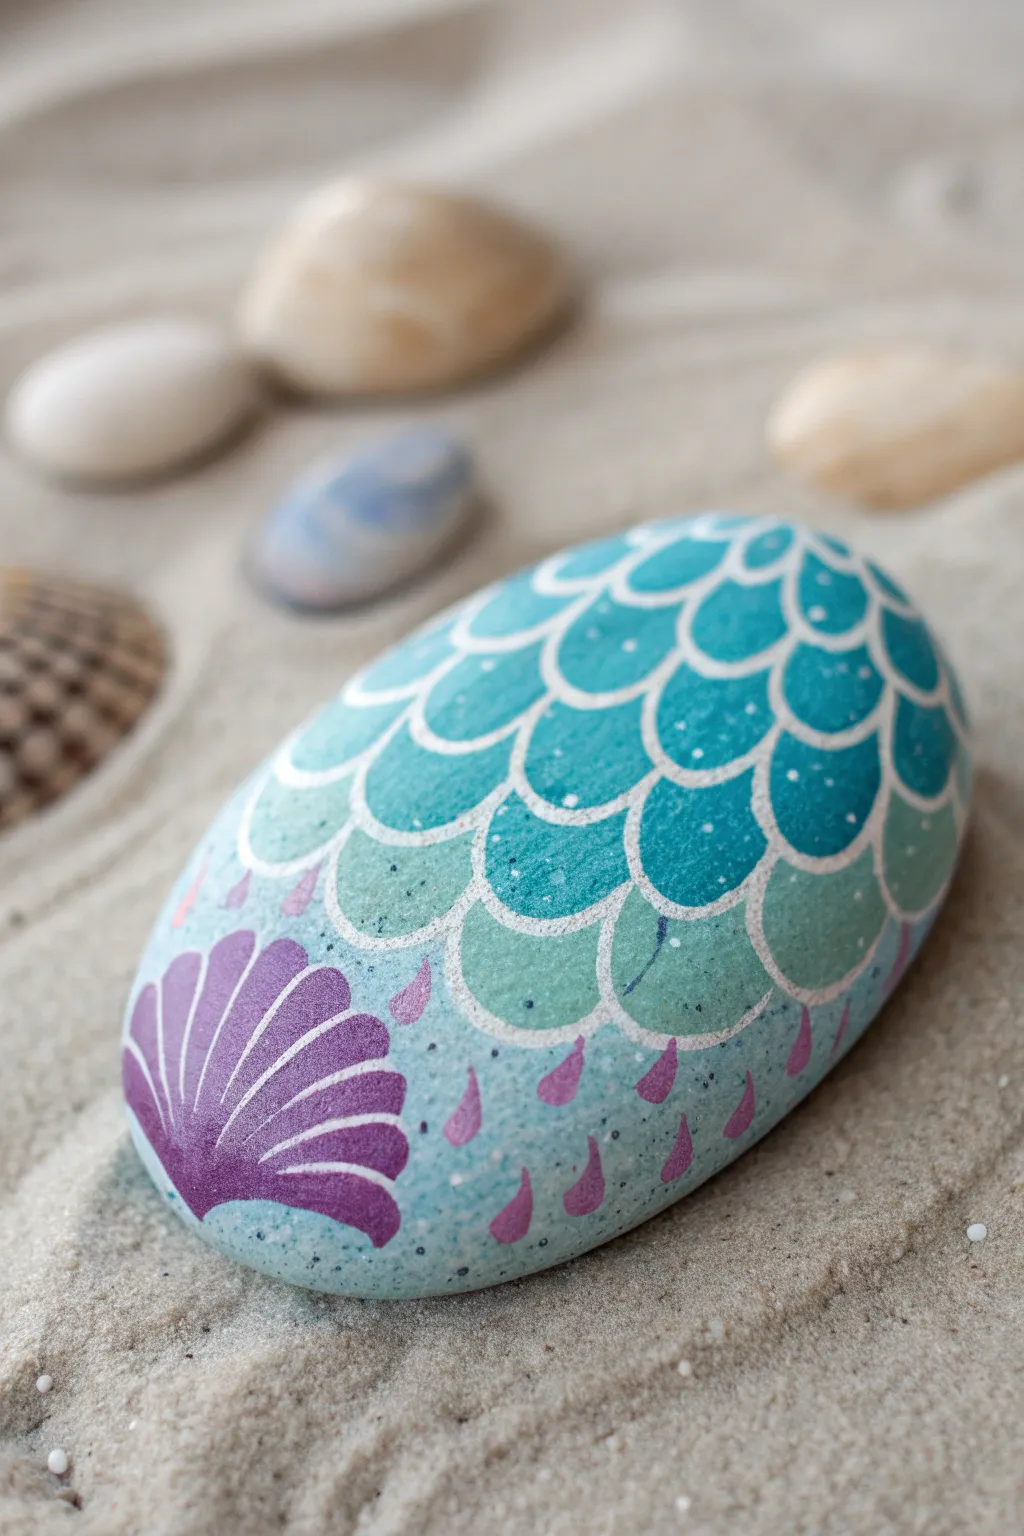
Transform a simple smooth rock into a magical artifact from the sea with this shimmering mermaid scale design. Using cool ocean blues and a pop of royal purple, you’ll layer dazzling scales that look like they belong on a mermaid’s tail.
Step-by-Step Guide
Materials
- Smooth, oval river rock (flat surface is best)
- Acrylic paints: teal, turquoise, aqua, white, royal purple
- Posca paint pens or fine liner brush: white (extra fine tip)
- Small flat brush
- Small round brush
- Dotting tool or toothpick
- Clear spray sealant (glossy finish recommended)
Step 1: Preparation & Base Coat
-
Clean your canvas:
Start by scrubbing your rock with warm soapy water and a brush to remove any dirt or oils. Let it dry completely in the sun or use a hairdryer to speed things up. -
Mix the perfect base color:
Create a light, misty aqua color by mixing a generous amount of white acrylic paint with a tiny drop of turquoise. This will serve as the background for the bottom section. -
Apply the bottom wash:
Paint the lower third of the rock with this light aqua mix. You can feather the edges upward slightly, as this area will eventually be covered by details, but a smooth base helps.
Scale Sizing
Make the scales smaller at the top and gradually larger as you move down. This creates a 3D perspective effect, making the rock look curved and dimensional.
Step 2: Painting the Scales
-
Plan the scale pattern:
Visualize the rock as having rows. The scales will start from the top right and cascade down towards the bottom left. I like to start at the top so my hand doesn’t smudge wet paint. -
Paint the top row (Dark Teal):
Using your darkest teal paint and a small round brush, paint the first row of semi-circles (scales) near the top edge. These should be rounded at the bottom and flat at the top. -
Paint the middle row (Turquoise):
Switch to a medium turquoise shade. Paint the next row of scales directly below the first, positioning each new scale in the ‘valley’ between the two scales above it, like bricks in a wall. -
Paint the lower row (Aqua):
Mix a lighter aqua shade. Continue the pattern downward, painting larger, more open scales. As you reach the lighter bottom section, let the paint become slightly more translucent or blended. -
Add variated hues:
While the scales are still slightly tacky, you can touch a tiny bit of a different blue into the wet center of a few scales to create depth and dimension. -
Let it dry completely:
This is crucial. Walk away for at least 15-20 minutes. If the blue paint is wet when we add the white lines, it will turn into a muddy mess.
Glitter Upgrade
Mix a tiny pinch of iridescent glitter into your final clear coat or use a glitter varnish. It will make the mermaid tail shimmer beautifully in the sunlight.
Step 3: Adding the Shell & Details
-
Paint the shell silhouette:
In the bottom left corner, using royal purple paint, create a scallop shell shape. It should look like a fan with a rounded top edge and a narrow base. -
Add purple droplets:
Using the tip of your small brush and the same purple paint, add scattered teardrop shapes falling from the bottom scales into the open space below. -
Outline the scales:
Once everything is dry to the touch, use an extra-fine white paint pen (or a liner brush with thinned white paint) to outline every single blue scale. -
Detail the shell:
Draw fine white lines radiating from the base of the purple shell outward to the edges to create the ridges. -
Add extra sparkle:
Using a dotting tool or toothpick dipped in white, add tiny speckles or ‘sand’ dots in the light blue space around the purple shell.
Step 4: Finishing Touches
-
Texture the scales:
If you want extra detail, add tiny white dots inside the darker teal scales near the top to mimic glistening water. -
Seal the deal:
Once the rock is fully cured (usually 24 hours is safest), spray it with a glossy clear sealant. This makes the colors pop and gives it that ‘wet look’ perfect for an ocean theme.
Place your shimmering creation in a garden pot or window sill to catch the light
Fruit Slice Snack Rocks
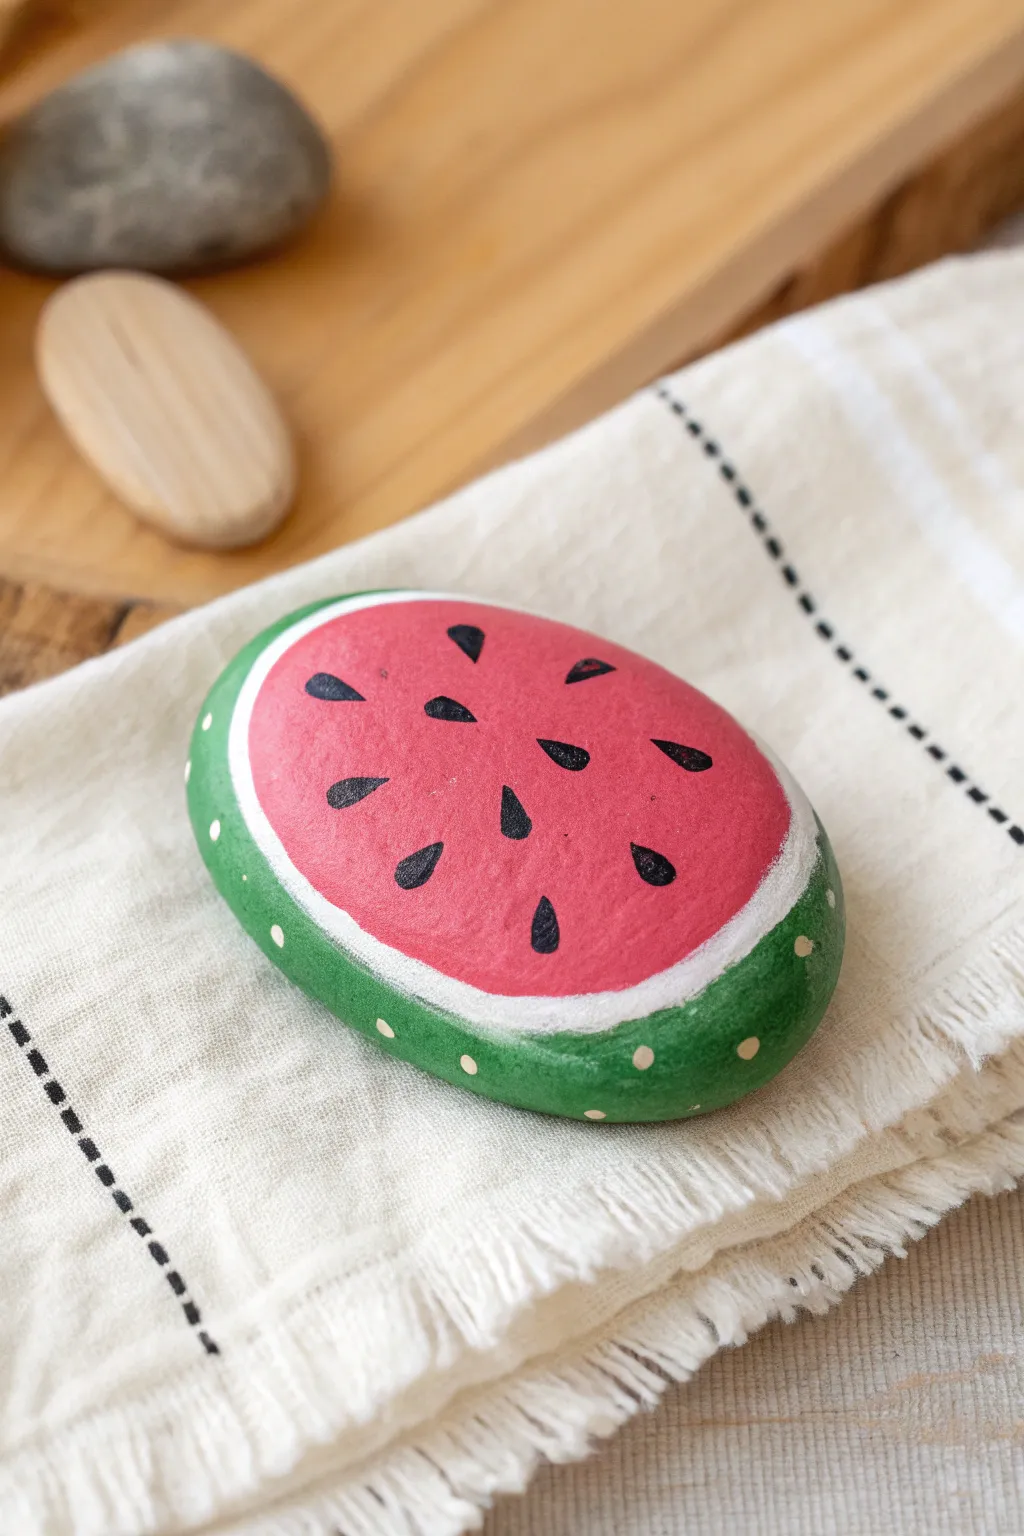
Transform an ordinary garden stone into a refreshing slice of summer with this delightful fruit snack rock. The vibrant pink center and striped green rind create a playful trompe l’oeil effect that looks good enough to eat.
How-To Guide
Materials
- Smooth, oval-shaped river rock
- Acrylic craft paints (bright pink, white, grass green, yellow-green, black)
- Medium flat paintbrush
- Small round detail brush
- Very fine liner brush or toothpick
- Water cup and paper towels
- Acrylic sealer (optional)
Step 1: Painting the Fruit Flesh
-
Clean your canvas:
Start by washing your rock with warm soapy water to remove any dirt or grit. Let it dry completely in the sun or with a towel so the paint adheres properly. -
Outline the center:
Using a pencil or a very faint wash of pink paint, sketch a large oval on the top surface of the rock. Leave a generous border around the edge for the rind. -
Fill the pink center:
Load your medium flat brush with bright pink acrylic paint. Fill in the center oval area you just marked out. -
Apply a second coat:
Let the first pink layer dry to the touch. Apply a second coat to ensure the color is solid and opaque, hiding the natural rock color underneath.
Uneven Coverage?
If your pink looks streaky, don’t keep brushing wet paint. Let it dry fully, then sponge on the next layer for a textured, realistic fruit flesh look.
Step 2: Adding the Rind
-
Paint the white pith:
Switch to a clean small round brush and white paint. Carefully paint a thick band outlining the pink center. -
Refine the white edge:
Go over the white band again if needed to make it bright and solid. This white ring acts as the barrier between the sweet fruit and the green skin. -
Paint the outer skin:
Using your grass green paint, fill in the remaining outer edge of the rock, painting right up to the white line you just created. -
Wrap the green around:
Continue painting the green color down the sides of the rock so it covers the entire visible perimeter, mimicking the outer skin of a watermelon. -
Dry completely:
Allow all the colored sections—pink, white, and green—to dry completely before moving on to the details. This prevents the colors from bleeding into each other.
Step 3: Seeds and Details
-
Create the seeds:
Using a fine liner brush or the tip of a small round brush dipped in black paint, dab small teardrop shapes onto the pink area. -
Vary seed placement:
Scatter the seeds randomly, pointing the pointed ends of the teardrops generally towards the center of the fruit for a realistic look. -
Add rind texture:
Dip the non-brush end of a paintbrush or a toothpick into a pale yellow or light green paint. -
Dot the rim:
Gently gently apply small dots along the green rind area. Space them out irregularly to give the skin a speckled, organic texture. -
Clean up edges:
If any black or green paint went where it shouldn’t, use a tiny bit of the background color to touch it up once the mistake is dry. -
Seal the artwork:
Once your watermelon rock is 100% dry, apply a clear acrylic sealer or varnish to protect the paint from chipping, especially if it will live in the garden.
Make it a Set
Paint different shaped rocks as other fruit slices—try a triangle rock for a pizza slice, a circle for an orange, or a crescent shape for a honeydew melon.
Place your juicy creation in a garden bed or on a kitchen windowsill for a permanent touch of summer sweetness.
Ice Cream and Treat Rocks

Transform a smooth garden stone into a delicious-looking summer treat that never melts. This project uses clean lines and soft pastel colors to create an adorable ice cream cone illustration perfect for play food or decoration.
Step-by-Step
Materials
- Smooth, oval-shaped river rock (cleaned and dried)
- White matte acrylic paint (for base coating)
- Fine-point black permanent marker or paint pen (0.5mm or 0.7mm)
- Acrylic paints: golden brown, light pink, mint green/light teal
- Small flat brush
- Fine liner brush
- Matte or glossy sealant spray
Step 1: Prepping the Canvas
-
Clean the stone:
Begin by thoroughly washing your rock with warm soapy water to remove any dirt or oil, then let it dry completely in the sun. -
Base coat application:
Apply a coat of white matte acrylic paint over the entire top surface of the rock. This creates a bright ‘canvas’ that makes your colors pop. -
Second coat:
Once the first layer is dry, add a second thin coat of white to ensure full opacity and hide the natural stone color.
Clean Lines Tip
Rest your painting hand on a stable surface or a dry part of the rock while outlining. This stabilizes your wrist for much smoother, shake-free lines.
Step 2: Sketching the Outline
-
Cone shape:
Using a pencil very lightly, draw an upside-down triangle shape on the bottom half of the rock to form the cone. -
Ice cream drift:
Above the cone, sketch a wide, wavy shape that overhangs the sides of the triangle slightly; this will be the bottom ruffle of the ice cream. -
The scoop:
Draw a large semi-circle dome sitting on top of that wavy layer to create the main scoop of ice cream. -
Topping detail:
Add a small, bumpy cluster at the very top for a raspberry or cherry garnish. -
Ink the outline:
Carefully trace over your pencil lines with a fine-point black paint pen or marker. Try to keep your hand steady for a crisp, illustrative look.
Flavor Variations
Switch up the colors to make different flavors! Try brown paint for chocolate, pale yellow for vanilla, or lavender for ube ice cream.
Step 3: Adding Color
-
Painting the cone:
Use a small brush to fill in the triangle area with golden brown paint. Stay inside your black lines. -
Painting the ruffle:
Fill the wavy section directly above the cone with a bright pink acrylic paint. -
Painting the scoop:
Paint the top dome section with a light mint green or pale teal color. -
Berry topping:
Use the same pink from the ruffle (or a slightly darker shade) to dab paint onto the berry cluster at the top. -
Let it dry:
Allow all paint layers to dry completely before moving on to the final details to prevent smearing.
Step 4: Details & Definition
-
Waffle pattern:
Take your black fine-point pen again and draw diagonal lines across the brown cone in one direction. -
Cross-hatching:
Draw diagonal lines in the opposite direction to create the classic waffle cone grid pattern. -
Sprinkles:
Dip the back end of a paintbrush into pink paint and dot it randomly over the mint green scoop to create perfect round sprinkles. -
Berry texture:
Use the black pen to draw tiny C-shapes or small circles inside the berry cluster to give it a bumpy raspberry texture. -
Re-outline:
If any paint covered your original black outlines, trace over the main exterior lines one last time to make them bold and crisp. -
Sealing:
Finish by spraying the rock with a clear sealant to protect the paint from chipping and scratching.
Now you have a sweet little piece of art that looks good enough to eat
Story Stones for Make-Believe Play
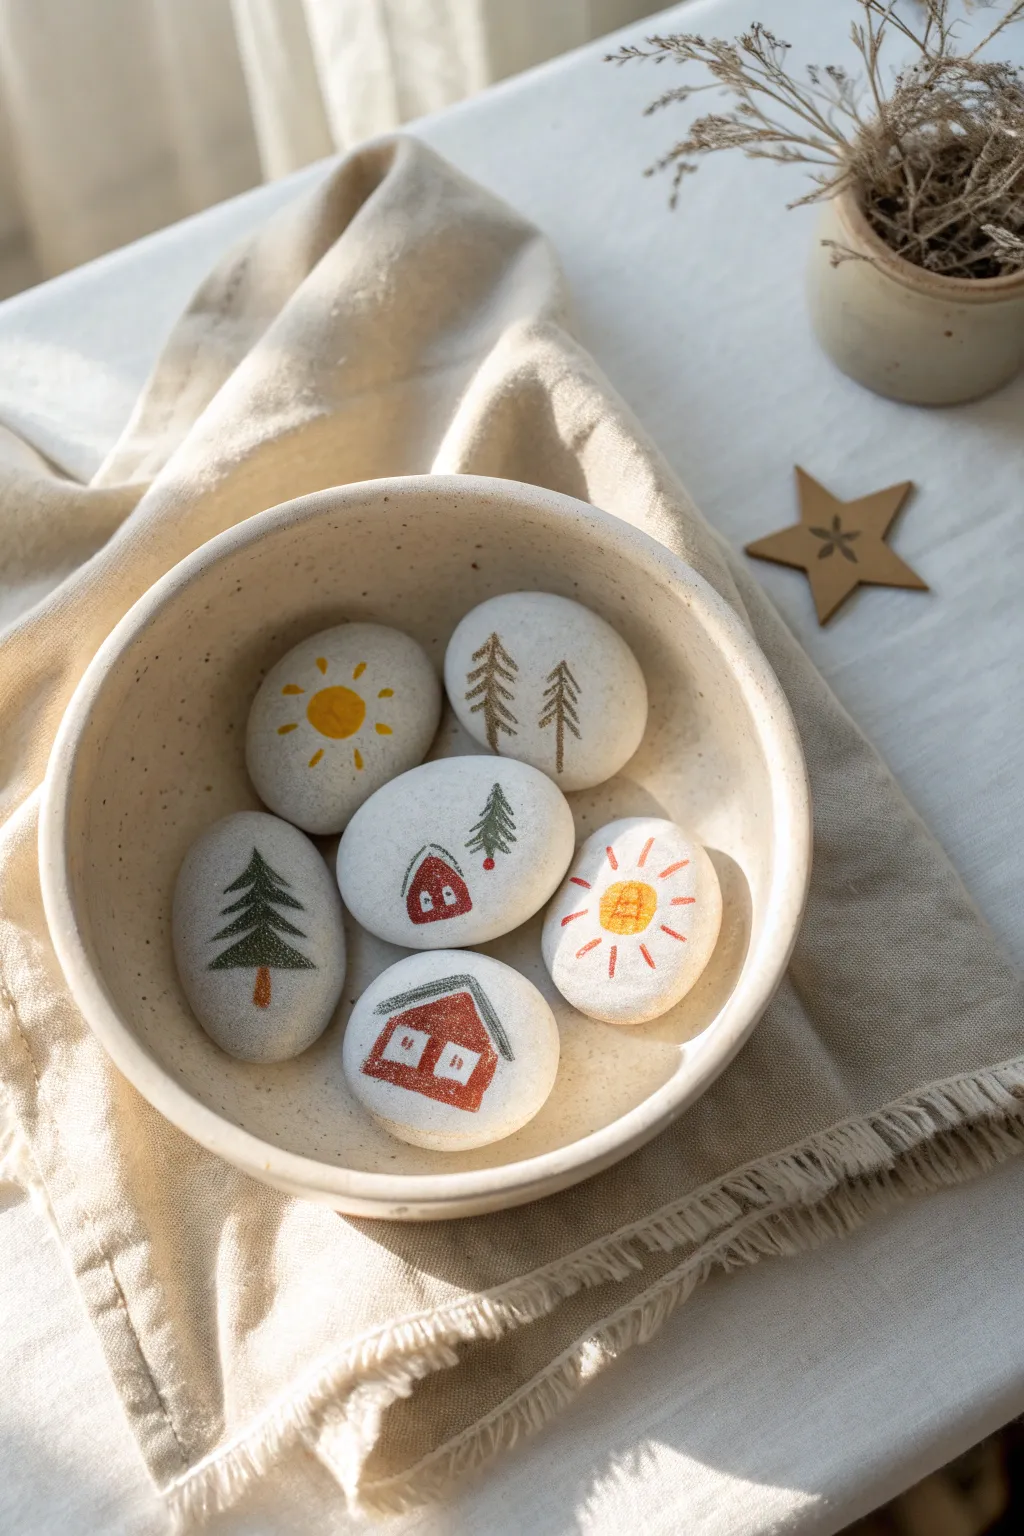
Create a charming set of narrative tools with these simple, rustic story stones that are perfect for sparking imagination. Their clean, Scandinavian-inspired illustrations of houses, trees, and suns invite endless storytelling possibilities for quiet afternoons.
Step-by-Step Guide
Materials
- Smooth white beach pebbles or river rocks (approx. 2-3 inches)
- Fine-point permanent markers or acrylic paint pens (red, forest green, yellow, brown/black)
- Clear matte varnish or sealant spray
- Pencil and eraser (optional for sketching)
- A soft cloth for cleaning stones
Step 1: Preparing the Canvas
-
Clean the surface:
Begin by thoroughly washing your white stones with soap and warm water to remove any dirt or oils. -
Dry completely:
Let the stones dry fully in the sun or use a cloth; any moisture trapped inside can ruin the ink application later. -
Select your shapes:
Sort through your collection and pick the smoothest, flattest stones for drawing. Rounder stones work well for suns, while oval ones are great for trees.
Ink Bleeding Prevention
If using permanent markers, mist your first coat of sealant very lightly. Heavy spraying can reactivate the ink and cause it to blur.
Step 2: Drawing the Elements
-
Sketch lightly:
If you’re unsure about freehanding, use a pencil to lightly sketch the outline of your simple shapes—houses, trees, or suns—onto the stone face. -
Outline the houses:
For the house stones, use a fine brown or black marker to draw a simple pentagon shape for the building or a square with a triangle roof. -
Fill the roofs:
Use a red paint pen or marker to color inside the roof area. For a textured look, I like to leave small streaks of white showing through rather than filling it solidly. -
Add windows:
Draw small squares for windows within the house body. You can leave them white or outline panes with your fine-point marker. -
Create the pine trees:
On separate stones, draw a vertical line for the trunk using brown. Then, switch to green and make quick, downward-slanting strokes on either side of the trunk to create branches. -
Vary the trees:
Make some trees singular and large to fill the whole stone, and on others, draw two thin, taller trees side-by-side for variety. -
Draw the suns:
For the sun stones, draw a circle in the center using yellow. Color it in solidly or with a rough, sketched texture. -
Add sun rays:
Draw short lines radiating outward from the yellow circle. You can alternate colors—try using orange or red for every other ray to add warmth. -
Detail work:
Go back over your drawings to sharpen any blurry edges, especially around the window frames and tree trunks.
Step 3: Finishing Touches
-
Let ink set:
Allow the stones to sit untouched for at least 30 minutes to ensure the ink or paint is completely cured. -
Apply sealant:
Take the stones to a well-ventilated area and apply a light coat of clear matte varnish spray. -
Second coat:
Once the first coat is dry to the touch, apply a second light coat to ensure the drawings won’t chip during play. -
Final cure:
Let the stones dry overnight before placing them in a bowl or bag for use.
Expand the Village
Create character stones with simple stick figures or animals like foxes and bears to introduce protagonists into your stone stories.
Gather your finished stones in a cozy bowl and watch as little storytellers build their own world piece by piece
Kind Words on Rocks
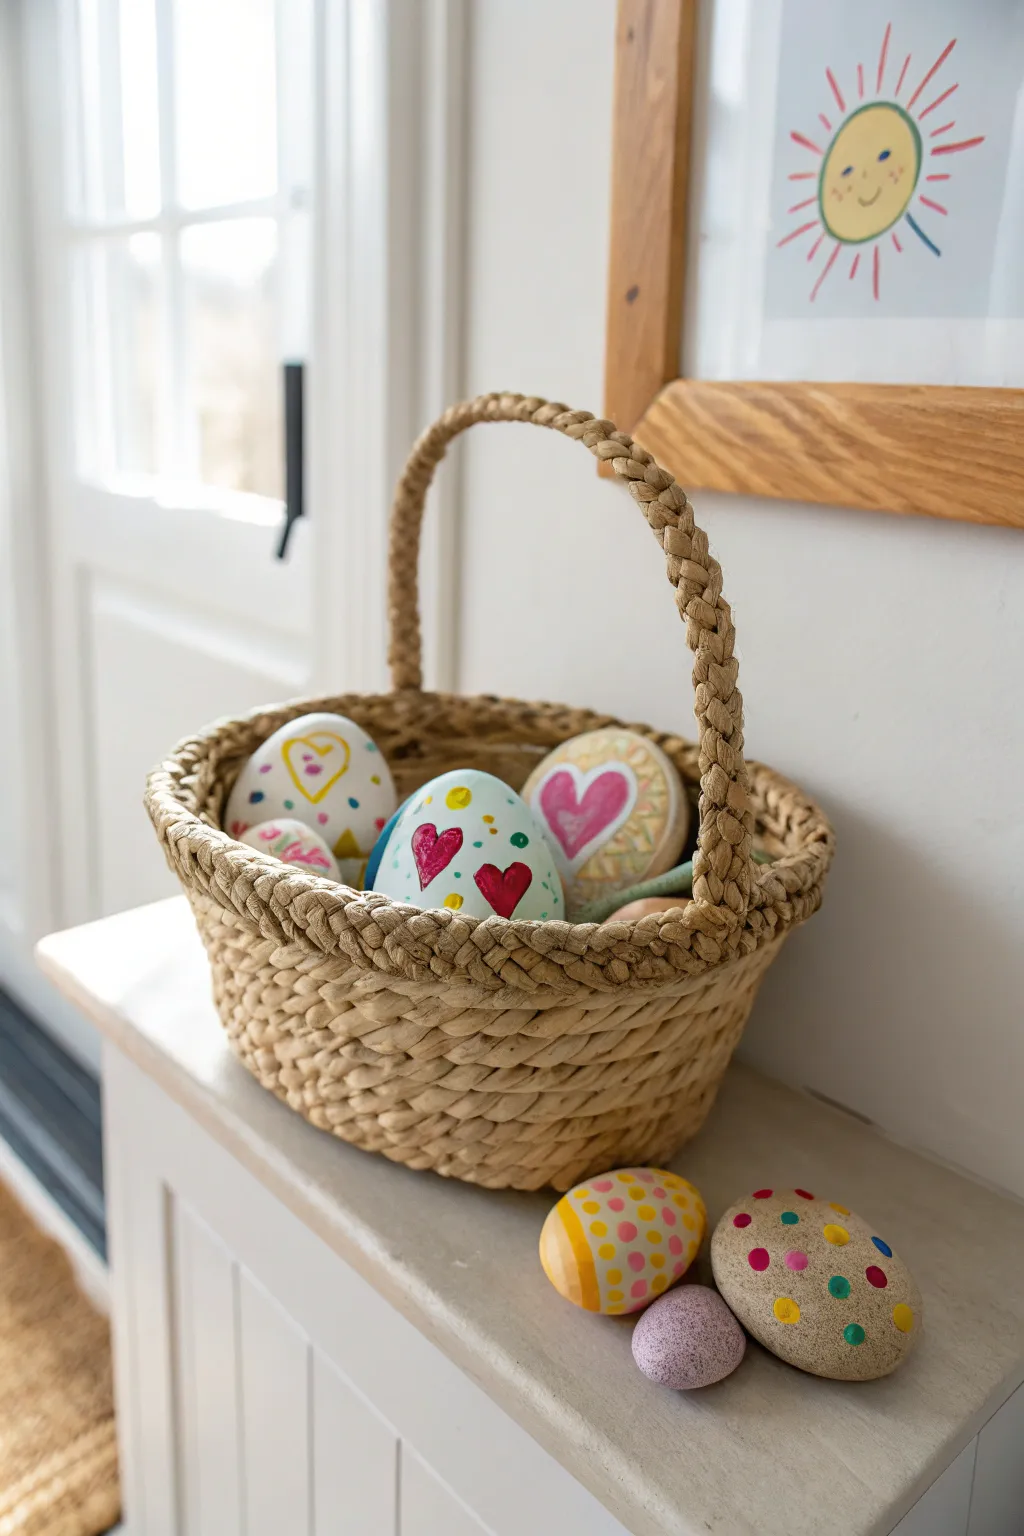
Transform ordinary garden stones into a charming collection of personalized tokens. This project combines simple geometric patterns, sweet hearts, and cheerful dots for a rustic yet colorful display perfect for gifting or decorating a sunny nook.
Step-by-Step
Materials
- Smooth, rounded river rocks (various sizes)
- Acrylic craft paints (white, pink, red, yellow, blue, purple)
- Assorted paintbrushes (medium flat brush, small detail round brush)
- Dotting tools (or cotton swabs/pencil erasers)
- Basin of water and soap
- Paper towels
- Sealant spray (clear acrylic, matte or glossy)
Step 1: Preparation and Base Coat
-
Clean the canvas:
Before painting, scrub your rocks thoroughly with warm soapy water to remove any dirt or oily residue. This ensures the paint adheres properly. -
Dry completely:
Let the stones dry fully in the sun or use a hairdryer to speed up the process. Even a little moisture can ruin your base coat. -
Prime the surface:
For the lighter-colored designs, paint a base coat of white acrylic paint over the entire rock. You might need two layers to get a solid, opaque coverage. -
Natural look option:
For the dotted rocks shown on the right, leave the stone unpainted to let its natural texture and color serve as the background.
Smooth Operator
Look for rocks with very flat surfaces. Bumps and pits make painting straight lines or perfect hearts much harder.
Step 2: Creating the Designs
-
Sketch the hearts:
On the white-primed rocks, lightly sketch heart shapes using a pencil. Aim for a mix of large central hearts and clusters of smaller ones. -
Painting the main hearts:
Fill in your pencil outlines with pink or red acrylic paint. Use a small flat brush for the broader areas and a detail brush for the curves. -
Adding outlines:
Once the heart fill color is dry, you can add a contrasting outline. For example, outline a pink heart with a thin stroke of white or metallic gold to make it pop. -
Simple dotting technique:
For the natural stone with dots, dip the end of a paintbrush handle or a dotting tool into paint. Press firmly onto the stone to create uniform circles in various colors like pink, blue, and yellow. -
Striped patterns:
Create the yellow-striped rock by painting a wide band of yellow around the circumference. I find it easiest to rotate the rock in my hand while holding the brush steady. -
Layering details:
Once the yellow stripe is dry, add rows of pink dots over the top using your dotting tool. -
Confetti accents:
Return to your heart-themed rocks. Fill the white negative space around the hearts with tiny dots or small triangles in yellow and blue to create a confetti effect. -
Hand-drawn hearts:
For a looser, sketch-style look like the rock on the far left, use a very fine brush or a paint pen to draw an open heart outline in yellow, rather than filling it in solid.
Step 3: Finishing and Sealing
-
Review and touch up:
Look over your collection. If any colors look streaky, dab on a second coat. Clean up any smudged edges with a bit of the base color. -
Full dry time:
Allow all rocks to sit undisturbed for at least 24 hours to ensure the paint cures completely. -
Seal the deal:
Spray the rocks with a clear acrylic sealant. This protects the paint from chipping and gives them a nice professional finish. -
Arrange your display:
Place your finished masterpieces in a woven basket or scatter them individually to spread a little joy.
Paint Won’t Stick?
If the paint slides off the rock, the surface might be too slick. Lightly sand the rock with fine-grit sandpaper to give it ‘tooth’.
Now you have a basket full of cheerful stones ready to brighten someone’s day
Dot Art Mini Mandala Rocks
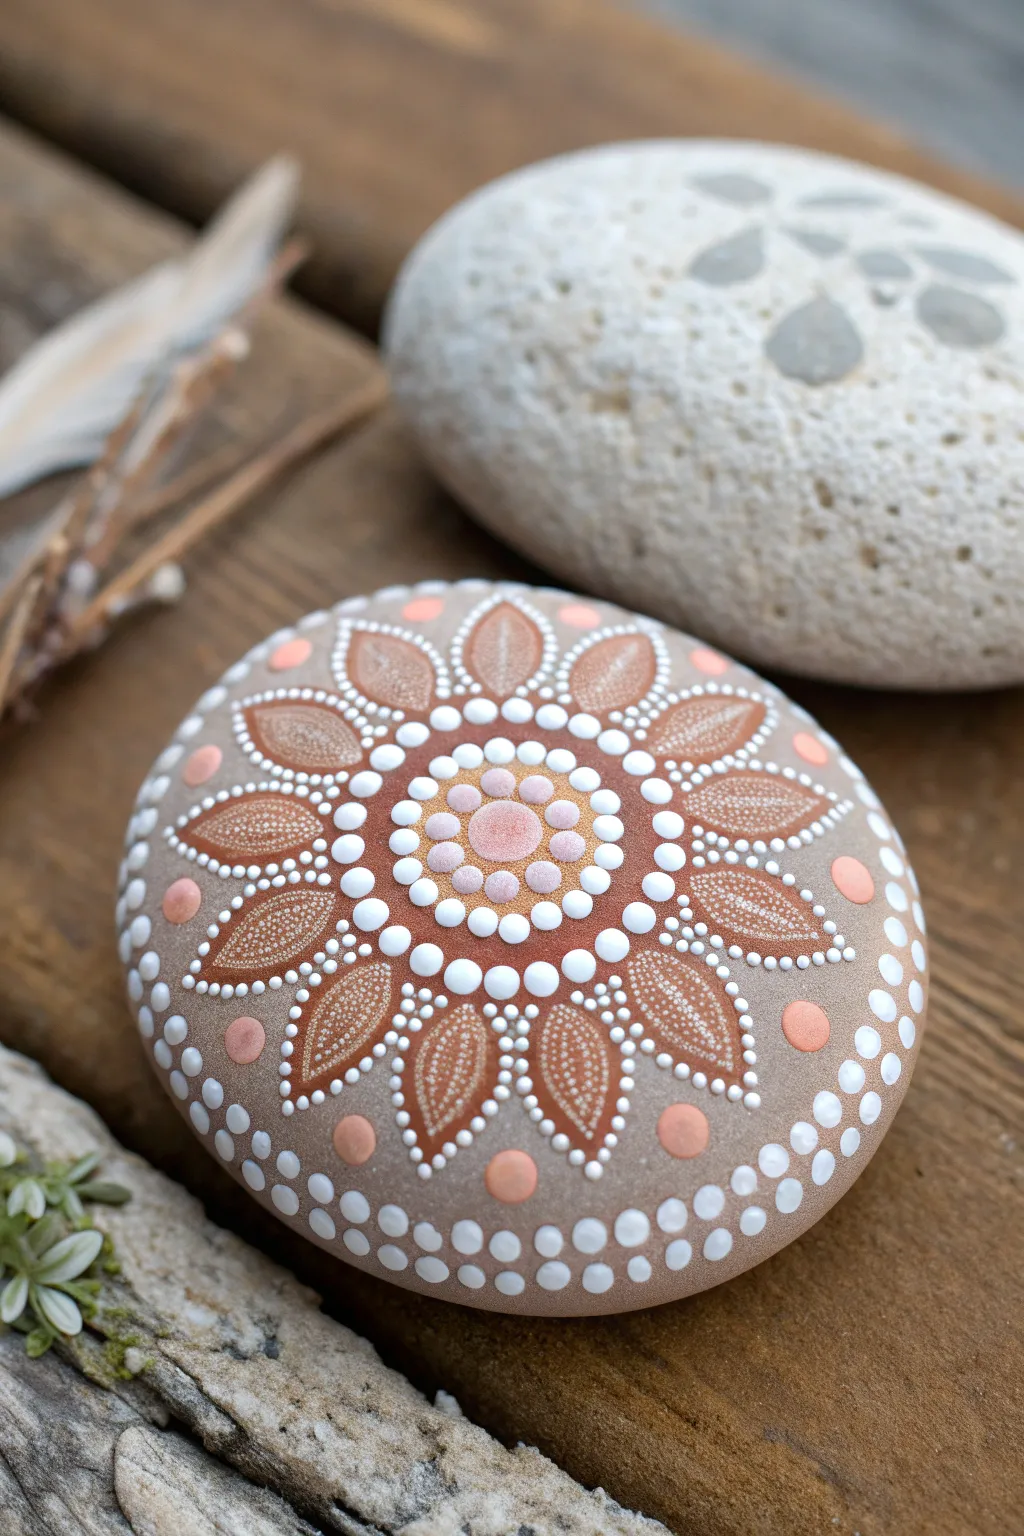
Create a soothing, symmetrical masterpiece with this earthy dot mandala design. Using warm terracotta and peach tones against a natural stone background, this project introduces the calming rhythm of radial dot painting.
How-To Guide
Materials
- Smooth, round river stone (palm-sized)
- Acrylic paints (matte finish): Rust/Terra cotta, White, Peach/Salmon, Soft Pink, Tan
- Dotting tools (various sizes, from fine stylus to large ball tone)
- Palette or small plate
- Damp paper towel for cleaning tools
- Clear acrylic sealer (matte or satin)
- Pencil (optional for guidelines)
Step 1: Base and Center
-
Prepare the stone:
Ensure your stone is clean, dry, and free of dust. If the natural color is uneven, you can paint a base coat of tan or light beige, though this specific design looks lovely on natural stone. -
Start the center:
Load a medium-sized dotting tool with soft pink paint. Place a single, perfect dot directly in the center of the stone. -
First ring:
Using a smaller tool and peach paint, place a ring of small dots around the central pink dot. Keep them evenly spaced and close to the center without touching it. -
Second ring:
Switch to white paint and a slightly larger tool. Create a second ring of dots outside the peach ring. Try to place these dots in the “valleys” between the previous row’s dots for a tight fit. -
Third ring:
Using the rust/terra cotta color, add a third concentric circle of dots. These should be slightly larger than the white layer. Let this center section dry completely before moving on.
Step 2: Petal Formation
-
Mark petal positions:
Visualize (or lightly mark with a pencil) 12 equidistant points around your central circle cluster. -
Paint petal base shapes:
Using the rust paint and a fine brush or a large dotting tool dragged into a point, create 12 teardrop or leaf shapes radiating outward. The pointed ends should face outward. -
Inner petal detailing:
Once the rust shapes are dry, take a very fine stylus tool dipped in white paint. Carefully dot the outline of each rust petal. -
Petal veins:
Still using the fine stylus and white paint, create a line of tiny, graduating dots running down the center of each rust petal to mimic a leaf vein. -
Spacing dots:
In the V-shaped gaps between the outer tips of the petals, place a medium-sized white dot to bridge the spaces.
Oops! Uneven Dots?
If a dot looks wonky or merges with another, let it dry slightly, then use a damp Q-tip to wipe it away cleanly. Wait for the spot to dry before retrying.
Step 3: Outer Borders
-
Large outer accents:
Between the petal tips, further out on the stone’s curve, place larger accent dots alternating between peach and soft pink. -
Small filler dots:
Using your smallest tool and white paint, add tiny ‘walking dots’ around these larger peach and pink accents to frame them. -
The border ring:
Create a final structural ring near the edge using medium white dots. I find creating a ‘North, South, East, West’ guide first helps keep the spacing even. -
Double row finish:
Add a second row of white dots right next to the previous one, following the curvature of the stone down the sides. -
Final drying and sealing:
Allow the stone to dry for at least 24 hours to ensure the thickest dots are solid. Apply a spray sealer to protect your artwork from scratches.
Pro Tip: Consistency
For uniform dots, re-dip your tool into the paint puddle for every single dot. The amount of paint on the tool determines the size, not just the tool itself.
Now you have a beautifully intricate mandala stone ready to decorate a garden pot or serve as a unique paperweight.
Night Sky Constellation Rocks
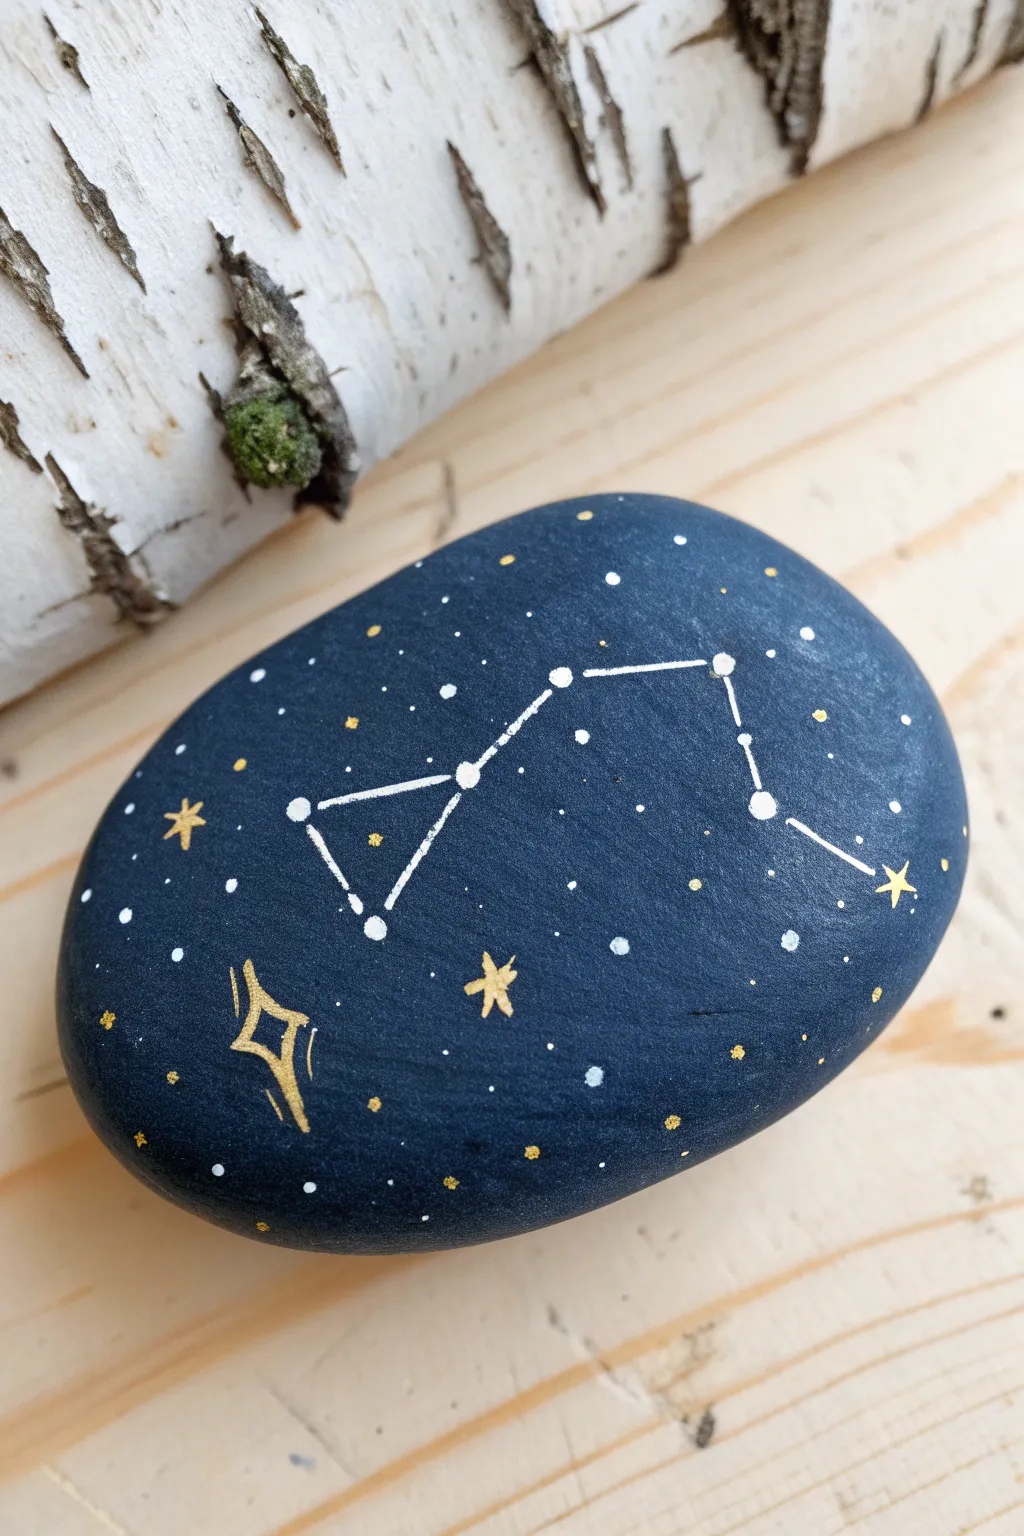
Capture the magic of a clear night sky on a smooth river rock. This project uses deep matte colors and delicate metallic accents to create a stunning, pocket-sized galaxy.
Detailed Instructions
Materials
- Smooth, flat oval rock
- Acrylic paint: Dark Navy Blue (or Midnight Blue), White, Metallic Gold
- Wide flat paintbrush
- Fine detail liner brush (size 0 or 00)
- Small dotting tool or toothpick
- Clear spray varnish or brush-on sealer
- Palette or paper plate
- Cup of water
Step 1: The Midnight Background
-
Clean and prep:
Begin by washing your stone with soapy water to remove any dirt or grease, then dry it completely with a towel. -
Mix your base color:
Squeeze out your dark navy blue paint. If standard blue is too bright, I like to mix in a tiny drop of black to get that deep, midnight tone. -
Apply the first coat:
Use the wide flat brush to paint the entire top surface of the rock. Don’t worry if it looks streaky yet. -
Let it dry:
Allow the first layer to dry to the touch, which usually takes about 10-15 minutes depending on how thick the paint is. -
Apply the second coat:
Paint a second layer of the navy blue to ensure full opacity and a rich, solid background. Let this dry completely before moving on.
Ink Flow Tip
To get crisp, thin lines for the constellation connectors, thin your white paint with a tiny drop of water until it has an inky consistency.
Step 2: Mapping the Constellation
-
Plot the main stars:
Dip your dotting tool (or the non-brush end of a paintbrush) into white paint. Place the main ‘anchor’ dots first to map out the shape. -
Create the shape:
Referencing the image, arrange your dots: create a triangle formation on the left, connected to a zig-zag line leading to the right. -
Connect the dots:
Switch to your fine liner brush. Carefully paint thin white lines connecting the dots you just made to form the constellation structure. -
Refine the stars:
If the lines painted over your initial dots too much, add a tiny drop of fresh white paint on top of each ‘star’ to make them pop again.
Step 3: Celestial Details
-
Add gold accent stars:
Using the liner brush and metallic gold paint, paint a few small five-point stars (or simple crisscross shapes) in the empty spaces around the constellation. -
Paint the decorative comet:
In the bottom left corner, use the gold paint to draw a hollow diamond shape with extended tails, creating a stylized star or comet effect. -
Add distant galaxies:
Using a toothpick dipped in gold, dot tiny specks randomly around the rock to represent distant stars. -
Layer in white specks:
Repeat the previous step with white paint, adding incredibly small dots to fill the remaining negative space without crowding the design. -
Vary the sizes:
Ensure some background dots are pin-prick small while others are slightly larger to create a sense of depth.
Level Up: Glow Time
Paint the main constellation structure using glow-in-the-dark acrylic paint so a hidden star map reveals itself after you turn off the lights.
Step 4: Finishing Touches
-
Dry thoroughly:
Allow the detailed artwork to dry for at least an hour. The metallic paint sometimes takes slightly longer to set. -
Seal the artwork:
Apply a coat of clear sealer. If brushing it on, be very gentle and quick to avoid smearing the delicate white lines.
Now you have a piece of the cosmos you can hold in the palm of your hand.


Have a question or want to share your own experience? I'd love to hear from you in the comments below!