
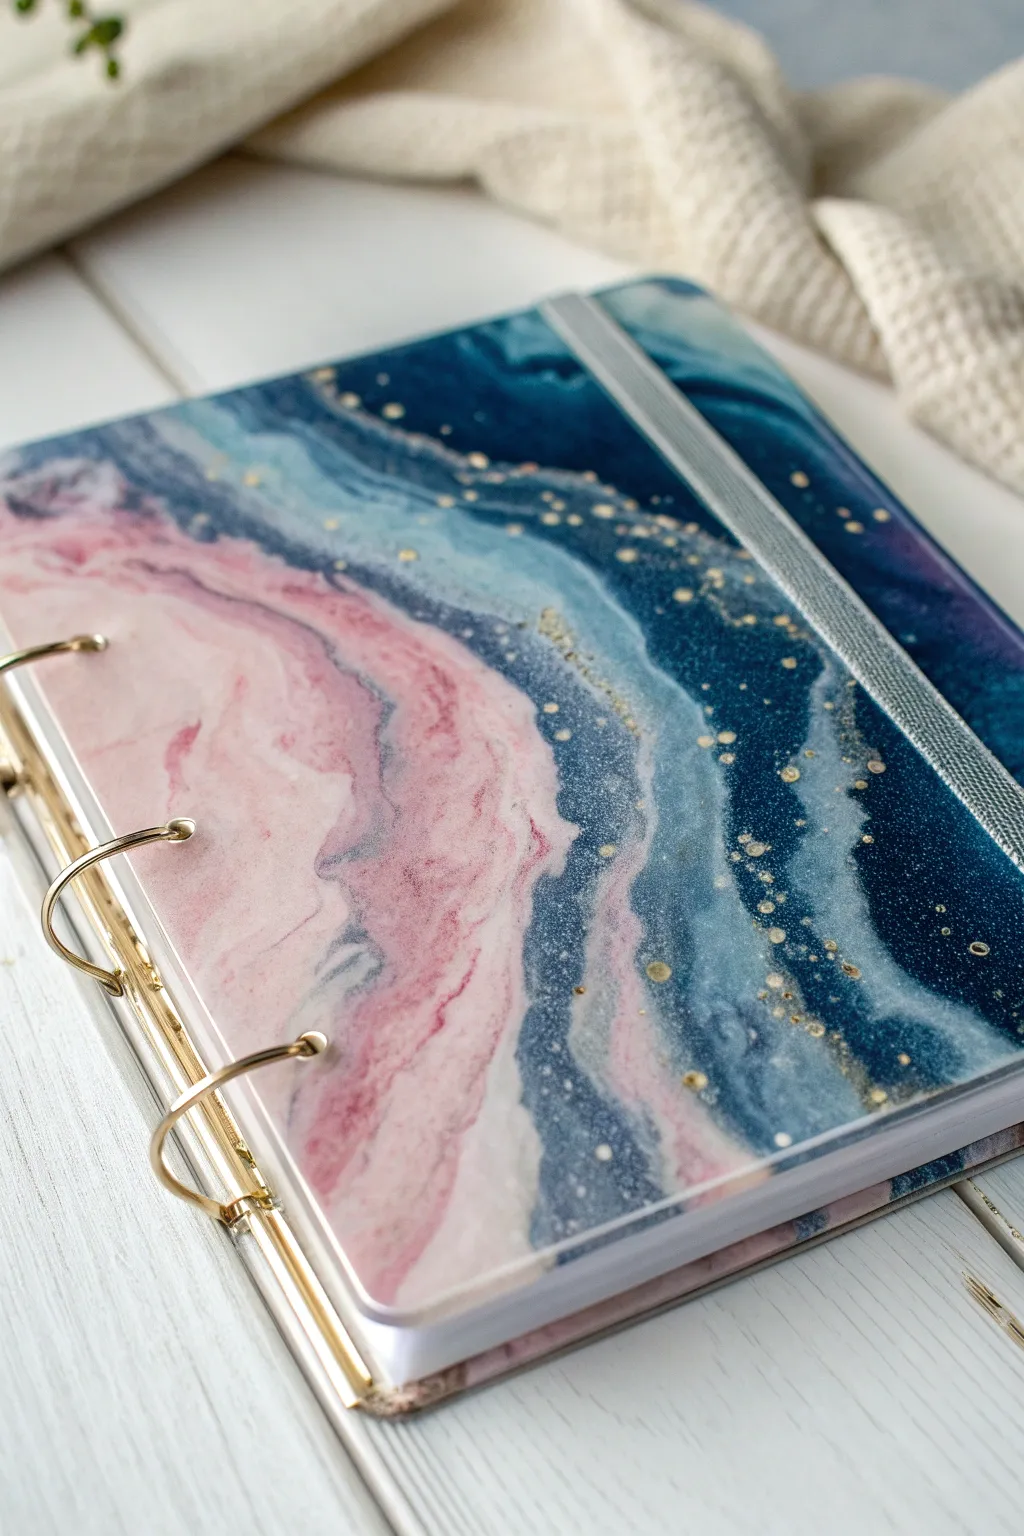
There’s something extra satisfying about turning a plain journal into a little piece of functional art with a resin notebook cover. Here are my favorite design directions—starting with the classics and easing into the spicy, show-offy ideas once you’re feeling brave.
Classic Clear Resin Notebook Cover With Glitter

Enhance your stationery collection with this shimmering, translucent notebook cover that catches the light like fresh snow. This project combines sleek clear resin with fine glitter for a minimalist yet magical aesthetic that durable enough for daily use.
How-To Guide
Materials
- Epoxy resin (jewelry or casting grade)
- Hardener part B
- Notebook cover silicone mold (A5 or A6 size)
- Fine holographic or iridescent glitter (silver/white)
- Measuring cups
- Stirring sticks
- Heat gun or lighter
- Metal spiral binding coils or loose leaf rings
- Binding machine (optional, or manual pliers)
- Paper inserts (lined or blank)
- Nitrile gloves
- Protective work mat
Step 1: Preparation & Mixing
-
Safety First:
Before beginning, ensure you are working in a well-ventilated area. Put on your nitrile gloves and lay down a protective mat to catch any accidental drips. -
Clean the Mold:
Inspect your silicone notebook mold for any dust or debris. Use a piece of masking tape to lift away stray lint, ensuring your final cover remains perfectly clear. -
Measure Resin:
Pour equal parts of resin (Part A) and hardener (Part B) into a measuring cup, following the specific volume ratio recommended by your brand’s manufacturer. -
Stir Slowly:
Mix the two components slowly and steadily for about 3-5 minutes. Scrape the sides and bottom of the cup often to ensure a complete chemical blend without whipping in too many air bubbles. -
Add the Sparkle:
Sprinkle a generous amount of fine holographic glitter into the clear mixture. I find that adding it gradually allows you to control the density; you want an even shimmer, not a solid block of color. -
Final Mix:
Gently stir the glitter until it is evenly suspended throughout the resin. Let the mixture sit for about 2 minutes to allow larger bubbles to rise to the surface.
Don’t Rush the Mix
Mix slowly to minimize bubbles. For crystal clarity, warm your resin bottles in a warm water bath for 10 minutes before mixing.
Step 2: Pouring & Curing
-
First Pour:
Slowly pour the resin into the center of the mold. Allow it to flow outward naturally toward the edges. -
Corner Work:
Use your stirring stick to gently guide the resin into the sharp corners of the mold and around the holes for the binding spine. Be careful not to overfill the holes. -
Surface Check:
Inspect the surface level. The resin should be slightly domed but not overflowing the mold’s edge. -
Remove Bubbles:
Pass a heat gun or lighter quickly over the surface of the wet resin. Keep it moving to pop surface bubbles without scorching the mold. -
Repeat for Back Cover:
If you have a second mold, repeat the process for the back cover. If not, wait for the front to cure before creating the second piece. -
Curing Time:
Cover the mold with a box to prevent dust from settling on the wet surface. Let it cure undisturbed for 24-48 hours, depending on your resin’s specifications.
Step 3: Assembly
-
Demolding:
Once fully hard, gently peel the silicone mold away from the resin. Start at the corners and work your way to the center to release the cover. -
Edge Cleanup:
If there are any sharp edges or resin burrs, especially near the binding holes, lightly sand them down with fine-grit sandpaper or trim with a precision knife. -
Stacking:
Sandwich your paper inserts between the two resin covers. Ensure all the binding holes line up perfectly. -
Binding Insertion:
Thread the metal spiral binding coil through the holes. You can twist it through manually. -
Secure the Coil:
Use pliers to crimp the ends of the wire coil inward so they don’t snag on clothing or slide out tailored to size.
Add a Personal Touch
Before the resin cures, float a small vinyl decal or sticker in the center for a personalized logo or monograph effect.
Now you have a stunning, durable notebook ready for your sketches and thoughts


Swirled Alcohol Ink Smoke Effect
Capture the fluid beauty of swirling smoke mixed with oceanic hues in this stunning resin notebook cover. With soft pinks drifting into deep teals and a scatter of gold stardust, this functional art piece makes writing feel like a luxury experience.
Step-by-Step Guide
Materials
- A5 or A6 silicone notebook mold set (front and back cover)
- Epoxy resin (2-part coating or casting resin)
- Alcohol inks: Magenta/Pink, Teal/Cyan, Navy Blue, and White Pinata ink (sinking white)
- Gold glitter dust or fine gold foil flakes
- Mixing cups and stir sticks
- Heat gun or lighter
- Gloves and respirator mask
- 6-ring binder mechanism (gold)
- Notebook paper refill
Step 1: Preparation & First Layer
-
Safety First:
Before opening any bottles, ensure your workspace is well-ventilated and you are wearing your respirator and gloves. Resin and alcohol inks release fumes that you want to avoid inhaling directly. -
Level Surface:
Place your silicone mold on a completely flat, level surface. Even a slight tilt can cause your colours to pool unevenly in one corner. -
Mix Clear Resin:
Measure and mix your resin according to the manufacturer’s ratio (usually 1:1 by volume). Stir slowly for at least 3-5 minutes to minimize bubbles. -
The Gold Dusting:
Sprinkle a pinch of fine gold glitter or foil flakes directly into the clear resin cup or scatter it sparingly into the empty mold for a more concentrated sparkle. -
Pouring the Base:
Pour the clear resin into the mold, filling it about halfway. You aren’t filling the mold completely yet; you just want a base layer for the inks to travel through. -
Pop Bubbles:
Briefly pass a heat gun or lighter over the surface to pop any air bubbles that have risen to the top.
Cloudy Resin?
If your transparent areas look foggy, humidity is the likely culprit. Only pour resin in a room with humidity below 50% to ensure crystal-clear curing.
Step 2: Creating the Smoke Effect
-
Planning the Flow:
Visualise a diagonal line across the cover. We will keep the darker blues on the upper right and the softer pinks on the lower left. -
Dropping the Blue:
Drop 3-4 drops of Navy Blue and Teal alcohol ink into the upper right section of the wet resin. Let them naturally spread outward. -
Adding the Pink:
Apply 3-4 drops of Magenta or Pink alcohol ink to the lower left section. Aim for the negative space so the pink and blue don’t immediately mix into purple mud. -
The White Smoke:
This is crucial: drop the sinking white alcohol ink directly on top of your colored drops. The white is heavier and will push the color down and outward, creating that wispy, smoke-like texture. -
Swirl Gently:
Wait about a minute for the inks to react. Then, take a clean stir stick or toothpick and very gently drag it through the transition zone where the colors meet to encourage a wavy, marble pattern. -
Top Up:
If the mold isn’t full, gently pour more clear resin over the entire piece to fill it to the brim. This helps encapsulate the ink layers. -
Final Torch:
Do one last quick pass with the lighter to remove surface bubbles, being careful not to scorch the silicone mold. -
Curing:
Cover the mold with a box to prevent dust from landing on it and let it cure fully for 24-48 hours.
Add a Shaker Pocket
Cast a second thin layer after the first cures, embedding a clear PVC sheet to create a pocket. Fill with sequins before sealing for a shakeable cover.
Step 3: Assembly & Finishing
-
Demolding:
Once hardened, gently peel the silicone mold away from the resin. Start at the corners and work slowly to avoid stressing the resin. -
Edge Cleanup:
Check the edges for any sharp bits or overflow. I usually sand these down lightly with fine-grit sandpaper or trim them with a deburring tool. -
Gilded Edges (Optional):
For an extra polished look, use a gold paint pen to color the very edge of the resin cover, matching the gold binder rings. -
Binding:
Align your front and back covers with the gold ring binder mechanism. Insert the mechanism’s prongs through the holes cast in the resin. -
Adding Paper:
Snap the binder rings open, insert your paper refill stack, and snap the rings shut to complete your custom notebook.
Now you have a shimmering, personalized journal ready to hold your brightest


Bold Mica Powder Galaxy Blend

Capture the magic of deep space with this stunning resin notebook cover, featuring swirling nebulas of midnight blue and copper. The rich mica powder blends create a mesmerizing depth that provides the perfect backdrop for sparkling star confetti.
Detailed Instructions
Materials
- A5 or A6 silicone notebook cover mold
- Two-part epoxy resin (casting resin)
- Black mica powder
- Dark navy or midnight blue mica powder
- Copper or bronze mica powder
- Fine gold glitter dust
- Star-shaped holographic confetti (gold or rose gold)
- Mixing cups and stir sticks
- Heat gun or lighter
- Notebook binding rings and filler paper
- Toothpicks
- Gloves and respirator mask
Step 1: Preparation and Mixing
-
Workspace Setup:
Prepare a clean, level surface covered with a silicone mat or wax paper. Put on your gloves and respirator mask, ensuring your workspace is well-ventilated. -
Clean the Mold:
Use a piece of masking tape to lift any dust or lint specs from your silicone mold. This step is crucial for a glass-like finish. -
Mix Base Resin:
Measure and mix your epoxy resin according to the manufacturer’s instructions (usually a 1:1 ratio). Stir slowly for 3-5 minutes to minimize bubbles.
Muddy Colors?
If your colors are turning grey instead of swirling, wait for the resin to thicken slightly (about 20 mins) before pouring. Thicker resin holds separation lines better.
Step 2: Creating the Galaxy Effect
-
Divide the Resin:
Pour the mixed resin into three separate small cups. Leave a tiny amount clear in the main cup for later adjustments. -
Color the Resin:
Mix the black mica powder into the first cup, the dark navy blue into the second, and the copper/bronze into the third. Stir until completely smooth and opaque. -
Initial Pour:
Start by pouring the black resin into the mold in random patches, focusing mostly on the corners and edges to anchor the dark background. -
Adding the Blue:
Pour the navy blue resin into the empty spaces and slightly over the edges of the black pools. Don’t worry about blending just yet. -
The Copper Veins:
Carefully drizzle thin lines of the copper resin through the dark pools. This will create the striking nebula ribbons seen in the design. -
Marble the Colors:
Using a heat gun on low, or a toothpick, gently swirl the colors together. I like to barely touch the surface to drag the copper through the black without turning it muddy. -
Surface Adjustment:
Briefly pass a heat gun or torch over the surface to pop any rising air bubbles. Do not overheat the silicone mold.
Step 3: Adding Stardust and Cure
-
Add Glitter Dust:
Sprinkle a pinch of fine gold glitter dust into the wet resin from a high distance to create a diffuse ‘stardust’ effect. -
Place the Stars:
Using tweezers, carefully place the star confetti pieces into the resin. Push them down slightly with a toothpick so they sink just below the surface level. -
Final Bubble Check:
Let the resin sit for 10-15 minutes, then check once more for bubbles, popping them carefully with a toothpick or lighter. -
Curing:
Cover the mold with a box to prevent dust from landing on it. Allow it to cure fully for 24-48 hours, depending on your resin brand.
Add Dimension
For a 3D effect, pour a clear layer of resin first, let it cure, and then paint the stars on top before pouring a final clear backing layer to seal them.
Step 4: Assembly
-
Demolding:
Gently peel the silicone mold away from the hardened resin cover. The edges should be sharp and clean. -
Clean the Holes:
If any tiny bits of resin leaked into the binding holes, use a small drill bit or craft knife to carefully clear them out. -
Binding:
Align your resin cover with filler paper and a back cover. Thread the wire binding rings through the holes and pinch them closed (or use a binding machine) to finish.
Once assembled, your celestial notebook is ready to hold your brightest ideas and stellar sketches


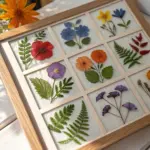
Pressed Flowers Encapsulated Like a Specimen
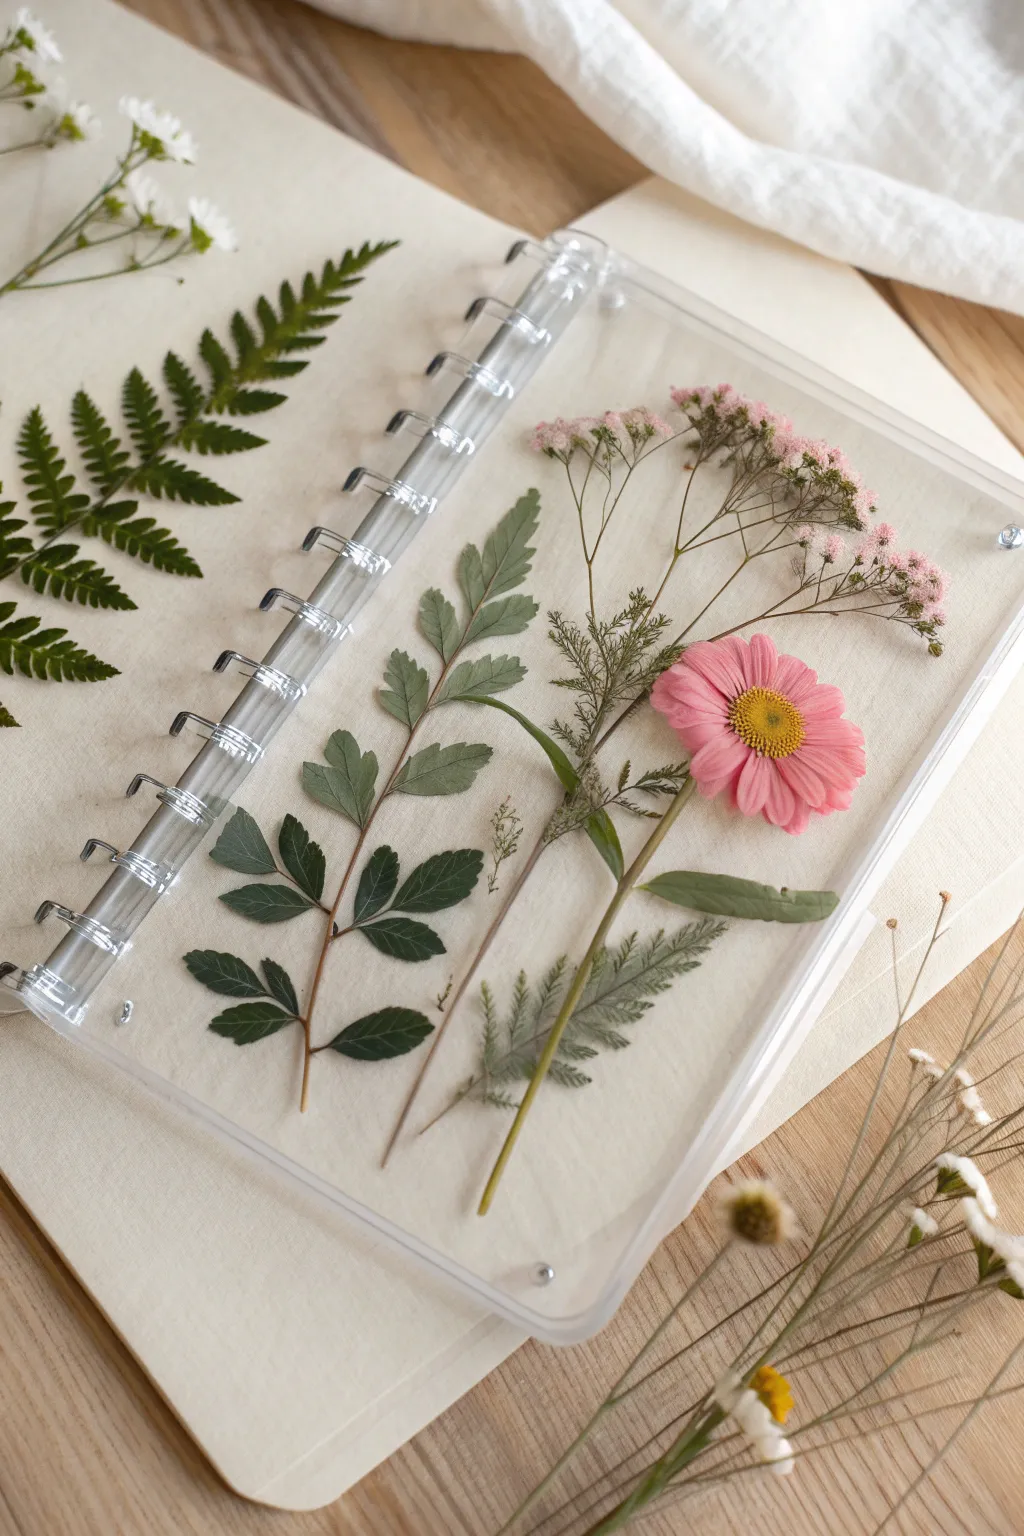
Capture the delicate beauty of a herbarium in a functional art piece with this clear resin notebook cover. By arranging pressed ferns and daisies in transparent epoxy, you create a floating, glass-like window into nature that protects your notes in style.
Step-by-Step
Materials
- A5 or A6 silicone notebook cover mold (with holes for binding rings)
- Two-part clear casting epoxy resin (look for UV resistant)
- Pressed dried flowers (pink daisy, baby’s breath/gypsophila)
- Pressed dried foliage (ferns, flat green leaves)
- Mixing cups and stir sticks
- Tweezers
- Heat gun or lighter
- Silicone work mat
- Binder rings or discs for assembly
- Paper insert for the notebook
Step 1: Preparation and Layout
-
Prepare your botanicals:
Ensure all your plant materials are completely dry and pressed flat. Moisture is the enemy of resin, so if you pressed these yourself, double-check they are crisp and papery to the touch. -
Clean the mold:
Wipe your silicone notebook mold with a piece of tape or a lint-free cloth to remove any dust particles. Even tiny specks will show up in the crystal-clear final piece. -
Dry fit the design:
Before mixing any resin, arrange your flowers and leaves inside the empty mold to plan your composition. I like to take a quick photo of the arrangement on my phone for reference, then set the flowers aside in that exact order.
Discolored Flowers?
If flowers turn brown or translucent in resin, they weren’t fully dry or the resin got too hot. Use silica gel for drying and pour resin in thin layers to control heat.
Step 2: Base Layer and Embedment
-
Mix the first batch of resin:
Measure and mix a small amount of clear epoxy resin according to the manufacturer’s ratio. Stir slowly for at least 3-5 minutes to minimize bubbles. -
Pour the base layer:
Pour a thin layer of resin into the mold—just enough to cover the bottom surface. You don’t want to fill it up yet; you just need a sticky base for the flowers. -
Pop surface bubbles:
Wait about 2-3 minutes for bubbles to rise, then quickly pass a heat gun or lighter over the surface to pop them. -
Place the foliage:
Using tweezers, carefully place your largest green elements first, like the fern and the leafy branch. Dip them into the resin gently to reduce trapped air underneath. -
Add the focal flowers:
Position your pink daisy and baby’s breath stems. Press them down gently so they make contact with the base layer of resin, ensuring they won’t float away later. -
Let it cure partially:
Allow this initial layer to cure until it reaches a tacky, gel-like state (usually 2-4 hours depending on your resin brand). This ‘sticky phase’ prevents the flowers from floating up when you pour the rest.
Make It Shimmer
Mix a tiny amount of iridescent mica powder or fine holographic glitter into the final top layer for a subtle, magical sparkle that catches the light.
Step 3: Final Pour and Finishing
-
Mix the top coat:
Mix a second, larger batch of clear resin. Stir extremely gently to keep this top layer crystal clear. -
Fill the mold:
Pour the resin over your tacky flower layer, filling the mold all the way to the rim. Ensure the resin flows around the hole pillars without overflowing them. -
Check for trapped pockets:
Look closely around the serrated edges of the ferns and the petals of the daisy. If you see air pockets, use a toothpick to gently nudge the bubble out to the surface. -
Final bubble removal:
Do one last pass with your heat gun to remove surface bubbles, then cover the mold with a box to protect it from dust. -
Demold the cover:
Wait the full cure time (usually 24-48 hours). Once hard, gently peel the silicone mold away from the resin to reveal your cover. -
Clean the edges:
If there are any sharp resin burrs on the edges or inside the binding holes, sand them lightly with fine-grit sandpaper or trim with a deburring tool. -
Assemble the notebook:
Align your new resin cover with your back cover and paper inserts, then snap the binder rings or discs through the molded holes to complete the book.
Now you have a stunning, transparent journal that preserves a piece of the garden forever
BRUSH GUIDE
The Right Brush for Every Stroke
From clean lines to bold texture — master brush choice, stroke control, and essential techniques.
Explore the Full Guide
Minimal Gold Leaf on Crystal Clear

This elegant notebook cover combines the ethereal beauty of translucent milky resin with the rustic charm of dried golden ferns. The result is a sophisticated botanical keepsake that feels both modern and timeless.
Step-by-Step Tutorial
Materials
- A5 notebook silicone mold (with holes for binding)
- Two-part epoxy resin and hardener
- White alcohol ink or white opaque resin pigment
- Dried pressed fern leaves (golden or brown)
- Dried baby’s breath or delicate twig pieces
- Gold foil flakes
- Tweezers
- Mixing cups and stir sticks
- Heat gun or torch
- Gold spiral binding wire or rings
- A5 paper refill pack
Step 1: Preparation & First Layer
-
Prepare your workspace:
Ensure your silicone mold is completely clean and dust-free. Use a piece of masking tape to lift away any tiny lint particles from the mold surface, as these will show in the clear resin. -
Mix the resin:
Measure equal parts of resin and hardener (or as per your specific brand’s ratio) into a mixing cup. Stir slowly and thoroughly for at least 3-5 minutes, scraping the sides and bottom to ensure a complete chemical blend. -
Let bubbles rise:
Allow the mixed resin to sit for about 5 minutes. This creates a degassing period where the larger air bubbles naturally rise to the surface and pop. -
Tint the resin:
Add a tiny drop of white alcohol ink or pigment to your clear resin. You want a ‘milky frost’ look, not opaque white, so go very easy. Stir gently. I prefer to dip a toothpick in the pigment and swirl it in rather than dropping it directly. -
Add clear texture (optional):
For that slightly crushed-ice texture seen in the background, you can mix in a small amount of fine clear glitter or crushed glass pieces, though the milky pigment often creates enough depth on its own.
Placement Pro Tip
Dip your dried flowers in a small amount of mixed resin before placing them in the mold. This ‘pre-sealing’ helps prevent microscopic bubbles from clinging to the texture of the leaves.
Step 2: Arrangement & Pouring
-
Pour the base layer:
Pour a thin layer of your milky resin into the mold, filling it about halfway. Spread it to the edges and corners using your stir stick. -
Remove bubbles:
Quickly pass a heat gun or torch over the surface to pop any remaining bubbles. Don’t hold it in one spot too long to avoid damaging the mold. -
Place the ferns:
Using tweezers, carefully place your largest dried fern leaves onto the wet resin. Position them slightly off-center or diagonally for a natural flow. Press them down gently so they soak up a little resin. -
Add delicate accents:
Arrange the smaller twigs or baby’s breath stems around the ferns to balance the composition. Look for negative space and fill it sparingly. -
Apply gold flakes:
Use tweezers to drop tiny specks of gold foil around the leaves. These should look like scattered dust rather than large chunks, adding a subtle shimmer. -
Check for floating:
Let this layer sit for roughly 30-40 minutes until it reaches a gel-like sticky state. This prevents your botanicals from floating to the very top when you pour the final layer.
Level Up: Elastic Closure
Before the final pour cures, embed two small flat magnets or a tiny metal loop into the edge of the resin. This allows you to add a custom elastic band closure later.
Step 3: Encapsulation & Finishing
-
Mix final batch:
Prepare a second, smaller batch of resin. You can keep this one crystal clear or add the tiniest hint of white to match the bottom, depending on how foggy you want the final look. -
Top off the mold:
Slowly pour the resin over your arranged flowers until the mold is filled to the brim. Pouring over a stir stick helps reduce bubble formation. -
Final heat pass:
Do one last check for bubbles, especially trapped under the fern leaves. Use a toothpick to guide stubborn bubbles out, then flash with heat. -
Cure completely:
Cover the mold with a box to prevent dust from landing on it and let it cure for 24-48 hours, or until fully hard. -
Demold:
Gently peel the silicone mold away from the hardened resin notebook cover. The edges might be sharp, so handle with care. -
Sand the edges:
If the edges feel rough, use a fine-grit sanding block or sandpaper wet-sand the perimeter until smooth. You can also paint the edges gold with a paint marker for an extra deluxe finish. -
Assemble the notebook:
Align your resin cover with the back cover (which you can make identically or leave plain) and the paper refill. Thread the gold spiral binding coils through the holes to complete the book.
Now you have a stunning, one-of-a-kind sketchbook ready to hold your thoughts and drawings
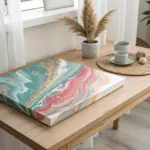
Marble Look With Soft White Veins
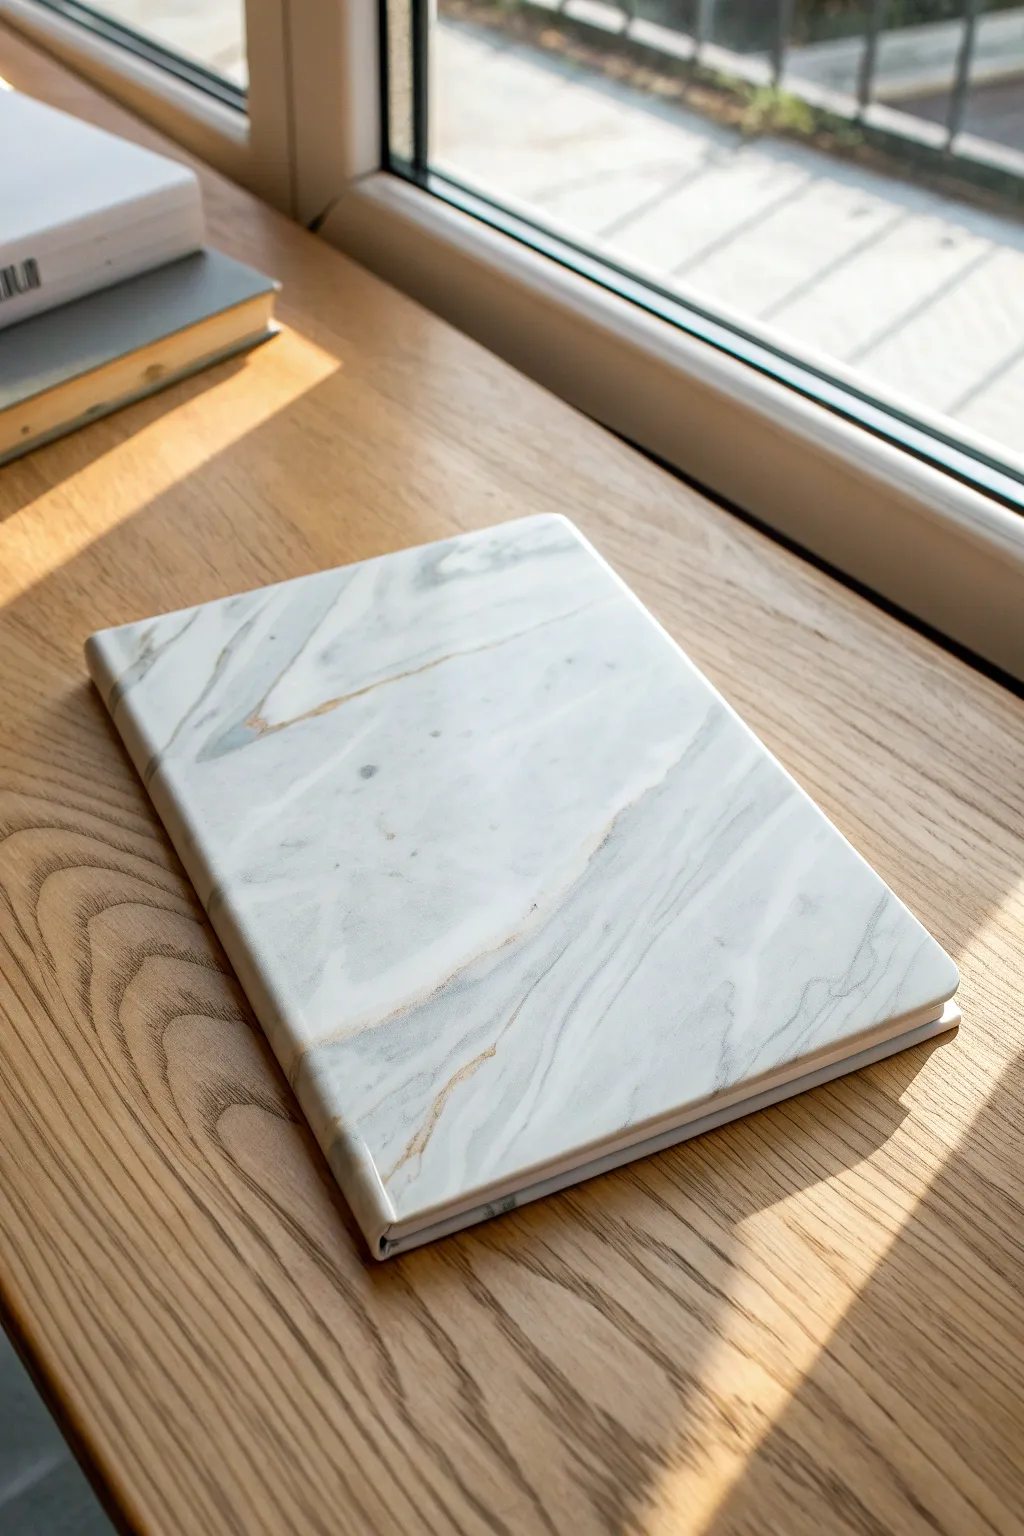
Bring the timeless elegance of Italian stone to your stationery collection with this faux-marble notebook cover. By layering semi-opaque white resin with delicate grey and gold veining, you can achieve a realistic, high-end finish that mimics the depth of natural Carrera marble.
Step-by-Step Guide
Materials
- A5 or A6 silicone notebook cover mold
- Two-part epoxy resin (low viscosity is ideal)
- White opacity pigment paste or high-flow acrylic ink
- Pearl grey mica powder or alcohol ink
- Metallic gold alcohol ink or fine gold pigment powder
- Heat gun or torch
- Mixing cups and stir sticks
- Toothpicks or fine detail tool
- Isopropyl alcohol in a spray bottle
- Notebook ring binding mechanism and paper refill
Step 1: Preparation and Base Mixing
-
Prepare your workspace:
Ensure your work surface is perfectly level using a spirit level, as resin will pool unevenly if slanted. Lay down a silicone mat or plastic sheet to catch drips, and clean your mold with masking tape to remove any dust particles. -
Mix the resin:
Measure and mix your two-part epoxy resin according to the manufacturer’s ratio instructions. Stir slowly for at least 3-5 minutes, scraping the sides and bottom of the cup to ensure a complete chemical blend. -
Create the marble base:
Pour about 80% of your mixed resin into a separate cup. Tint this larger portion with white pigment paste. Add the color gradually; you want a ‘milk-glass’ opacity rather than a solid, flat white to give the stone some visual depth. -
Prepare accent colors:
Divide the remaining clear resin into two small cups. Tint one with a tiny amount of pearl grey mica or ink, and leave the other clear or tint it very faintly with gold powder.
Veins too thick?
If your grey lines look like distinct stripes instead of natural veins, wait 20 minutes for the resin to thicken slightly, then drag a clean toothpick through them to break up the mass.
Step 2: Pouring and Veining
-
Pour the base layer:
Pour the white resin into your mold, ensuring it reaches all corners. Don’t fill it to the absolute brim yet; leaving a tiny bit of space helps prevent overflow when we add veins. -
Pop surface bubbles:
Pass a heat gun quickly over the surface of the white resin to pop any initial air bubbles. Keep the heat source moving to avoid scorching the mold. -
Draft the major veins:
Dip a stir stick into your grey resin mixture. Drizzle thin, wavy lines across the white base. Think diagonally—marble veins rarely run perfectly straight or horizontal. -
Soften the lines:
Using a heat gun on a low setting, gently blow the grey lines to disperse them slightly into the white. This creates that ‘smokey’ transition characteristic of real stone. -
Add depth details:
I like to take a toothpick dipped in the grey resin and drag it through the wider blurred areas to create sharper, thinner ‘fracture’ lines within the soft veins. -
Apply gold accents:
Drop small amounts of the metallic gold ink or resin along the edges of your grey veins. The goal is subtle highlights, not thick gold stripes, so use a very light hand. -
Manipulate the gold:
Use a clean toothpick to swirl the gold gently into the grey and white. If the lines look too harsh, spritz a tiny amount of isopropyl alcohol from a distance to help the distinct colors bloom and soften. -
Check edges:
Inspect the perimeter of the mold. Surface tension sometimes pulls resin away from the edges; use a tool to pull the pattern right to the border for a seamless look.
Step 3: Curing and Assembly
-
Let it rest:
Cover the mold with a larger box or dust cover to protect it while it cures. Leave it undisturbed for 24-48 hours, depending on your resin’s specific cure time. -
Demold gently:
Once fully hard, carefully peel the silicone mold away from the customized resin sheet. The edges might be sharp, so handle with care. -
Sand the edges:
If the edges feel rough or sharp, use fine-grit wet sandpaper (around 400-600 grit) to smooth them down. Wipe away any dust with a damp cloth. -
Optional top coat:
For extra shine and to cover any sanding marks, you can apply a very thin top coat of clear resin with a brush or gloved finger, then let it cure again. -
Assemble the notebook:
Align your new resin covers with your paper refill. Insert the ring binding mechanism through the holes cast in the resin and snap it shut to complete your book.
Pro Tip: Depth Perception
Pour a thin layer of clear resin first, let it get tacky, and THEN pour your white and marble pattern on top. This creates a ‘glassy’ surface that makes the stone look polished.
Now you have a sophisticated, stone-effect notebook that looks heavy but feels light and durable in your hands

PENCIL GUIDE
Understanding Pencil Grades from H to B
From first sketch to finished drawing — learn pencil grades, line control, and shading techniques.
Explore the Full Guide
Geode-Inspired Agate Rings With Metallic Edge
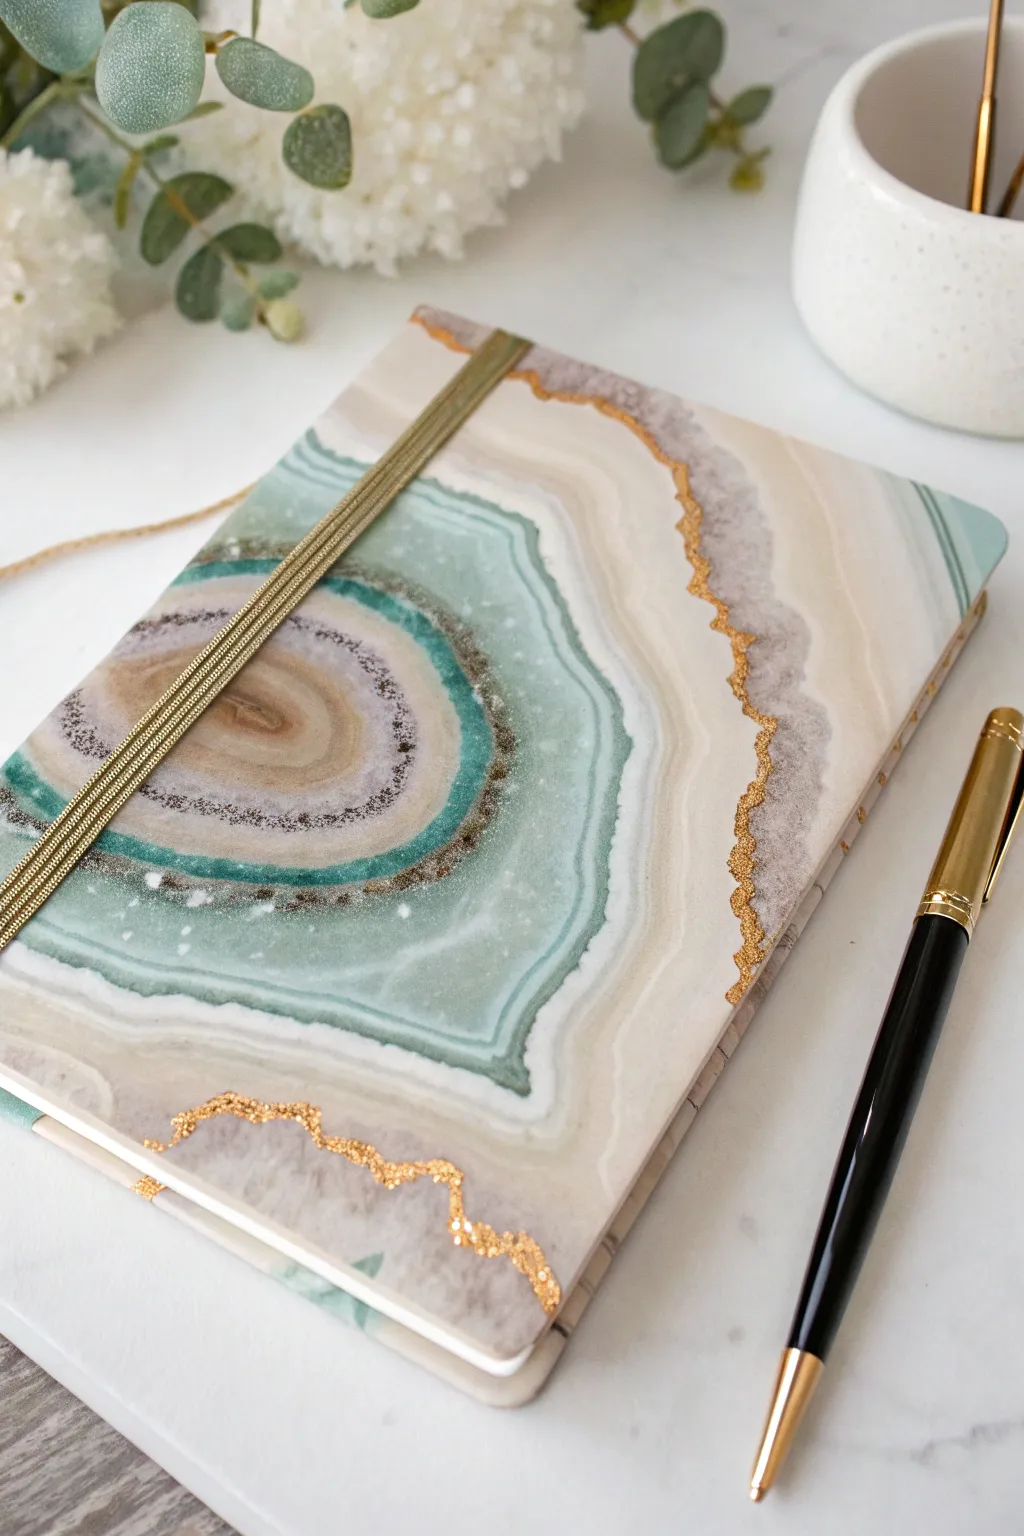
Transform a plain notebook into a luxurious stationery piece featuring swirling agate layers and striking metallic veins. This resin project mimics the organic beauty of sliced geodes with calming teal and neutral tones, accented by jagged gold edges for a high-end finish.
Step-by-Step Tutorial
Materials
- A5 Notebook silicone mold (front and back cover)
- Epoxy resin (two-part, approx. 150ml-200ml)
- Mica powders: Teal, Mint Green, White, Pearl Beige, Taupe/Grey
- Fine gold glitter
- Gold leafing pen or liquid gold leaf
- Gold acrylic paint
- Small paper cups and stir sticks
- Heat gun or kitchen torch
- Notebook binding rings and paper inserts (or coil binding kit)
- Gold elastic ribbon (optional)
Step 1: Preparation & Color Mixing
-
Prepare your workspace:
Ensure your silicone notebook mold is clean, dry, and free of dust. Place it on a leveled surface protected by a plastic sheet or silicone mat. -
Mix the resin base:
Combine your two-part epoxy resin according to the manufacturer’s instructions, stirring slowly to minimize bubbles. Let the mixture sit for a few minutes to degas. -
Divide the resin:
Pour small amounts of resin into five or six separate cups. Leave a larger portion for the dominant colors (white and beige) and smaller amounts for the accents. -
Tint the resin:
Mix your mica powders into the cups. You’ll want a deep teal, a soft mint, opaque white, pearl beige, and a deeper taupe. I like to add a pinch of fine gold glitter to the teal for subtle sparkle.
Separation Anxiety?
If your resin colors are running together too much and losing definition, let the mixed resin sit in the cups for 10-15 minutes to thicken slightly before pouring.
Step 2: Pouring the Agate Core
-
Start the center ring:
Pour a small puddle of the taupe or dark beige resin in the center area where you want the ‘heart’ of your geode to be. It doesn’t have to be perfectly round; organic shapes look better. -
Add the first halo:
Pour a thin ring of pearl beige around the center taupe puddle. Let the colors meet but try not to let them fully merge yet. -
Pour the teal bands:
Create the signature agate bands by pouring alternating rings of teal, mint green, and white around your central shape. Vary the thickness of these lines—some should be bold, others delicate. -
Blend the edges gently:
Use a toothpick or a clean tool to gently drag through the boundaries where the colors meet, promoting a little bit of marbling without muddying the distinct rings.
Step 3: Creating the Outer Stone
-
Fill the negative space:
Fill the remainder of the mold—the area outside your geode rings—with the pearl beige and white resin mixture. This acts as the ‘host rock’ for your agate slice. -
Create the jagged edge:
Using a toothpick dipped in gold acrylic paint (or highly concentrated gold mica resin), draw a jagged, irregular line separating the colored agate rings from the outer neutral section. -
Feather the resin:
If you want softer transitions, use your heat gun on a low setting to gently blow the resin layers outward. Be careful not to overheat the mold. -
Pop bubbles:
Pass the heat gun or torch quickly over the entire surface to remove any rising air bubbles. Cover the mold to protect it from dust and let it cure fully, usually 24-48 hours.
Level Up: Crystal Crust
Before the resin fully cures (at the tacky stage), sprinkle crushed glass or real crystal chips along the gold vein line for added 3D texture.
Step 4: Finishing Touches
-
Demold the cover:
Once fully cured and hard, carefully peel the silicone mold away from your resin cover. -
Define the gold connection:
Take your gold leafing pen or a fine brush with liquid gold leaf. Trace over that jagged line you created earlier between the agate and the neutral stone to make it shine brilliantly. -
Gild the edges:
Run the gold pen along the actual outer perimeter of the notebook cover to give it a finished, professional look. -
Assemble the notebook:
Thread your binding rings or coil through the pre-cast holes in the resin cover, adding your paper inserts. Finish by tying a gold elastic ribbon around the cover if desired.
Enjoy your stunning new planner that looks like it was carved straight from the earth.
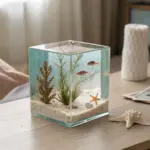
Ocean Wave Resin Notebook Cover Shoreline
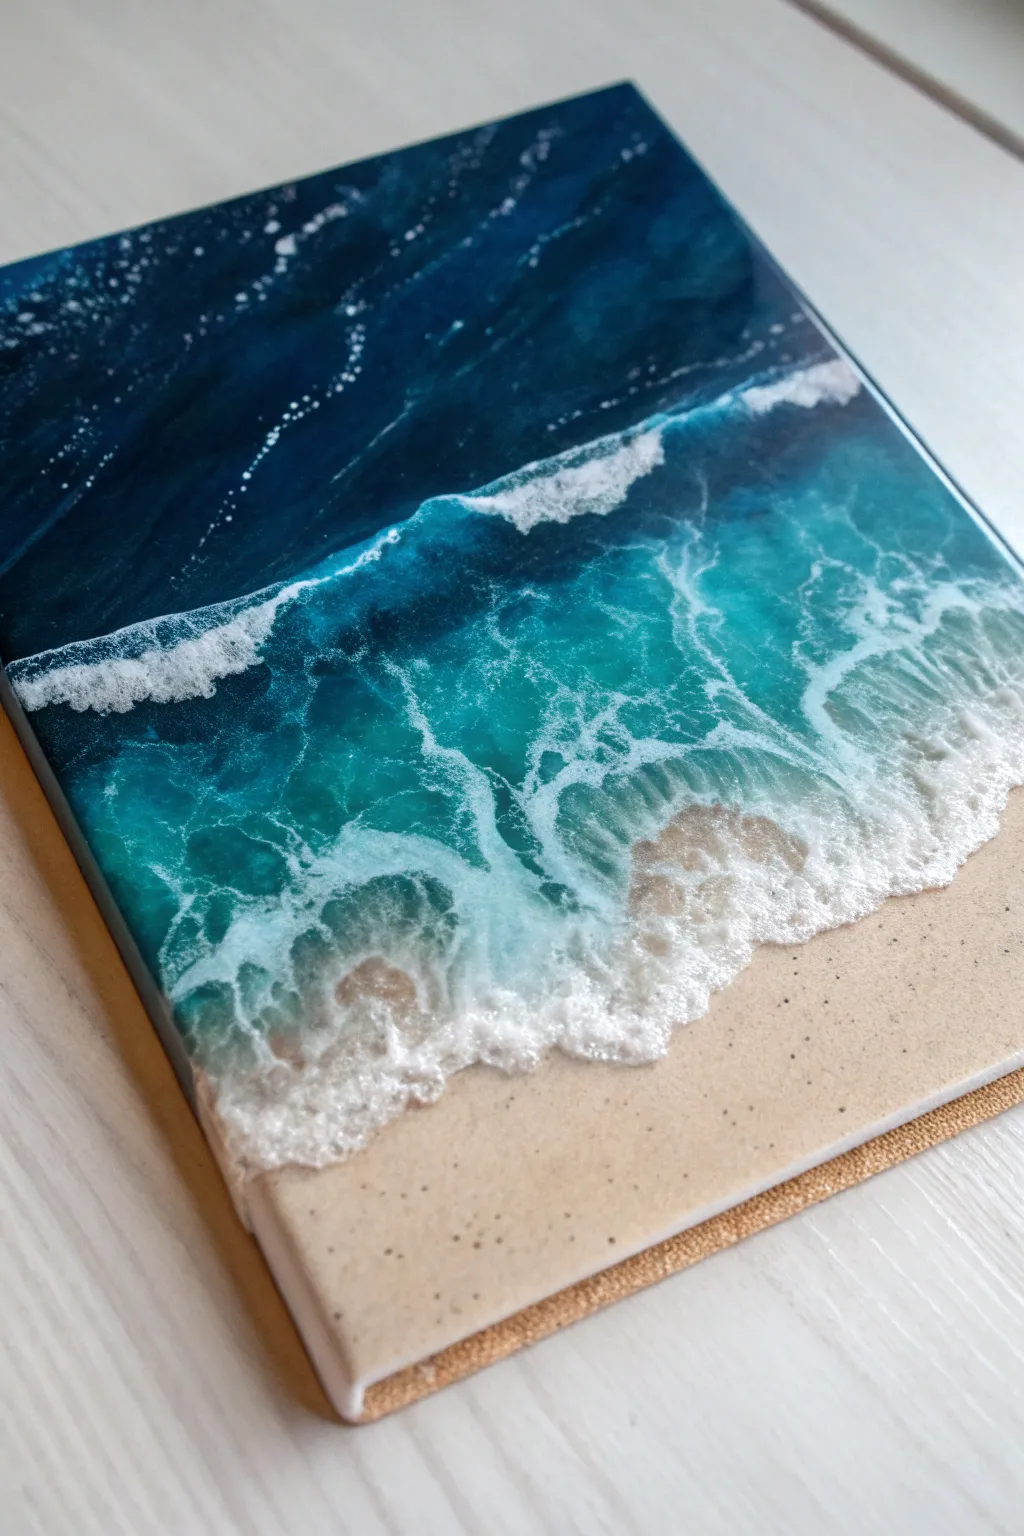
Transform a plain notebook into a stunning seascape using layers of tinted resin to mimic crashing waves. This project captures the depth of the ocean, from deep navy waters to frothy white foam on a sandy shore.
Detailed Instructions
Materials
- Hardcover notebook (preferably with a light-colored or kraft cover)
- Two-part epoxy resin (art resin viscosity)
- Mica powders or resin tints: Navy Blue, Turquoise/Teal, White
- Real sand (fine grain)
- White acrylic ink or pigment paste (specifically for the waves)
- Heat gun or embossing heater
- Isopropyl alcohol (91% or higher) in a spray bottle (optional)
- Mixing cups and stirring sticks
- Gloves and respirator mask
- Painter’s tape
- Plastic drop sheet or silicone mat
Step 1: Preparation & Base Layer
-
Protect the notebook:
Before mixing any resin, meticulously tape off the back cover, the spine, and the edges of the pages. You want the resin strictly on the front cover. Press the tape down firmly to prevent seepage. -
Prop it up:
Place your notebook on four cups or a raised platform over your plastic drop sheet. Ensure the cover is perfectly level; use a spirit level if necessary, as resin will pool to one side if it’s tilted. -
Mix the sand texture:
Mix a small amount of resin according to the manufacturer’s instructions. In a separate small cup, combine some of this clear resin with real sand until you have a wet, sludge-like consistency. -
Create the shoreline:
Spread your sand mixture across the bottom third of the notebook cover. Smooth it out with a stick, but leave some slight texture to mimic a real beach. This acts as a barrier resin won’t easily flow past.
Step 2: Pouring the Ocean
-
Mix colors:
Divide the remaining resin into three cups. Tint one cup deep Navy Blue, one cup vibrant Turquoise/Teal, and keep a smaller amount for the opaque White wave mix. -
Pour the deep water:
Pour the Navy Blue resin at the very top of the notebook cover. Spread it downwards to cover about the top third of the surface. -
Pour the shallow water:
Pour the Turquoise resin in the middle section, blending it slightly into the Navy Blue where they meet. Bring this teal color right down to meet the edge of your sand layer. -
Blend the gradient:
Use your gloved finger or a stir stick to gently gently merge the line between the Navy and Turquoise. You want a soft transition, not a hard stripe.
Making Lacing Pop
For better sea form cells, mix your white pigment paste with a tiny drop of silicone oil or use a specifically formulated ‘cell white’ pigment.
Step 3: Creating the Waves
-
Prepare the white:
Ensure your white resin is very opaque; pigment pastes work better than powders for this. It needs to be heavy enough to hold its shape. -
Lay the first wave:
Drizzle a thin line of white resin right over the transition area where the deep blue meets the teal. Drizzle a second line right where the teal meets the sand. -
The push technique:
Using your heat gun on a low setting, gently blow the white line backwards (towards the top of the notebook) and then quickly flatten it out. The goal is to thin the white resin so it spreads into a lacy foam. -
Creating cells:
If the white resin isn’t separating into ‘cells’ (those holes that look like foam), quickly swipe a torch lightly over it, or mist significantly diluted alcohol over the white areas from a distance. -
Detail work:
Use a toothpick or fine tool to swirl the foam slightly or drag small wisps of white back into the clear water for a more organic, flowing look. -
Pop bubbles:
Pass a torch or lighter quickly over the entire wet surface to pop any trapped air bubbles. Be careful not to scorch the resin or the notebook paper underneath.
Sticky Situation?
If your resin remains sticky after 48 hours, the ratios were likely off or it wasn’t mixed enough. Unfortunately, you’ll need to pour a fresh coat over it.
Step 4: Finishing Touches
-
Monitor the flow:
Resin moves as it settles. Watch the edges for the first 20-30 minutes. If drips form on the sides, wipe them away with a gloved finger or stick. -
Remove tape:
I usually prefer to peel the painter’s tape off when the resin is ‘tacky’ (about 12-24 hours later) rather than fully hard, as it comes off cleaner. If you pull it too early, resin will run; too late, and it’s cemented on. -
Final cure:
Let the notebook sit undisturbed in a dust-free environment for the full cure time recommended by your resin brand (usually 24-72 hours) before opening or using it.
Once fully cured, you’ll have a durable, glossy notebook that brings the calming energy of the ocean to your daily writing tasks


Sand and Tiny Shell Inclusions
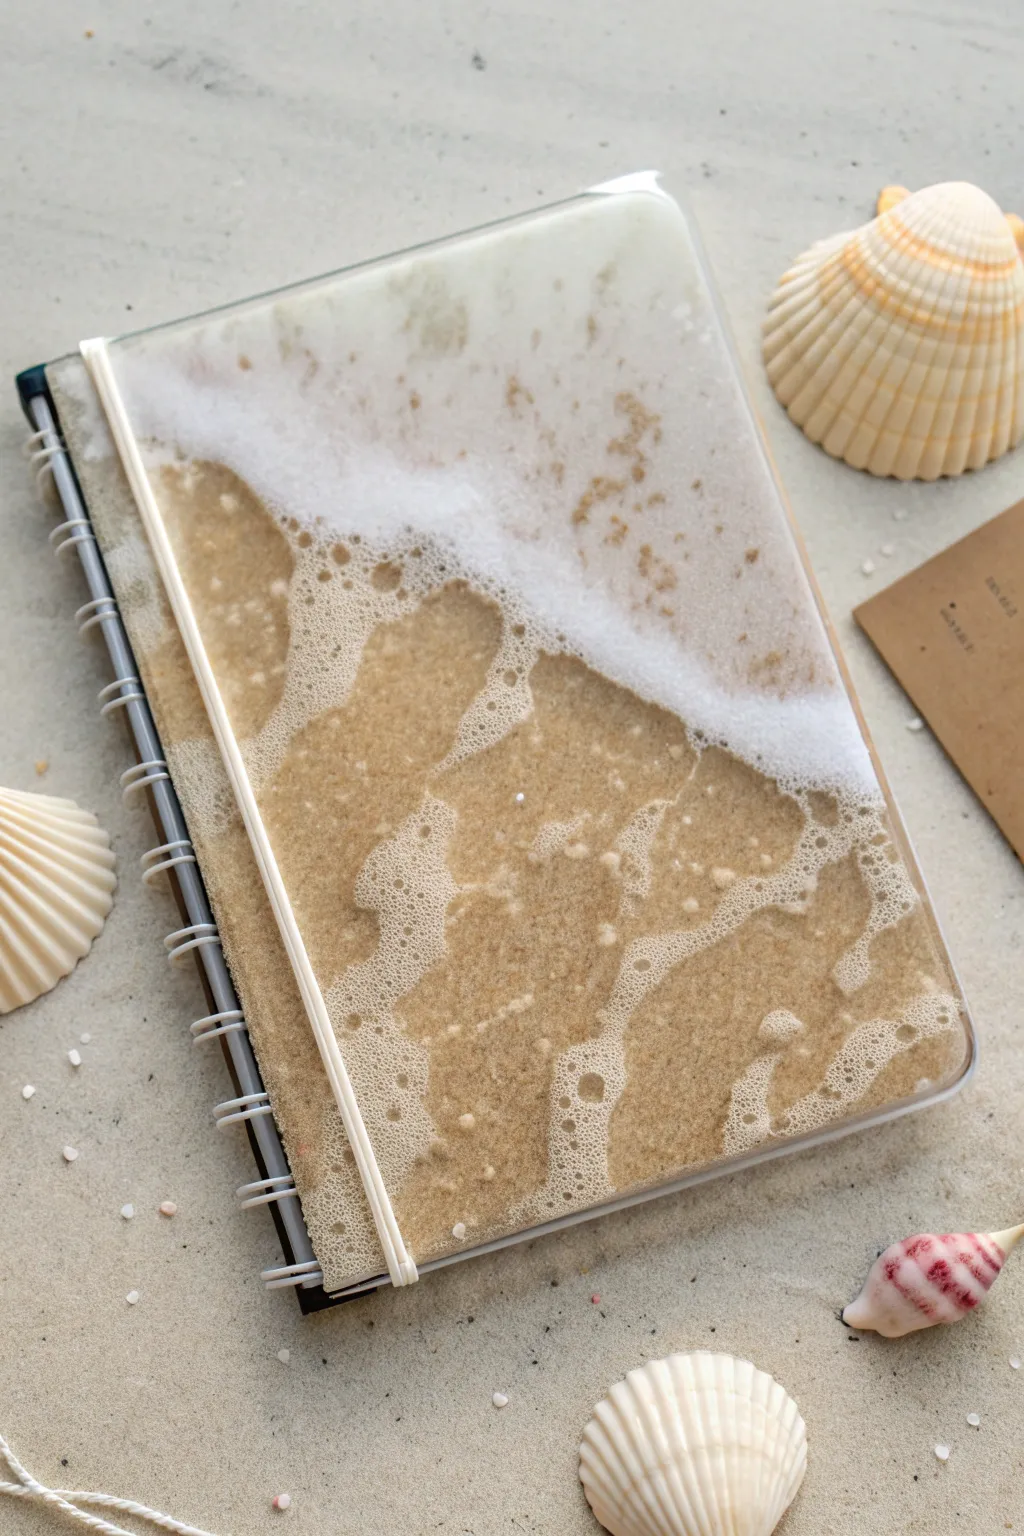
Capture the serenity of the shoreline with this stunning notebook cover that mimics the ebb and flow of ocean tides. By layering real sand with white resin waves, you can create a functional piece of art that brings beach vibes to your daily journaling.
Step-by-Step Guide
Materials
- A5 or A6 silicone notebook cover mold
- Two-part epoxy resin (low viscosity is best)
- Fine, clean beach sand
- White opacity pigment (alcohol ink or resin paste)
- Translucent blue or teal resin dye (optional, for subtle water tint)
- Heat gun or embossing tool
- Mixing cups and stir sticks
- Straw or airbrush for wave effects
- Notebook binder rings and paper refill
- Protective gloves and mask
Step 1: Base Layer Preparation
-
Mix the resin:
Start by mixing a moderate batch of two-part epoxy resin according to the manufacturer’s ratio instructions. Ensure you stir slowly for at least three minutes to minimize bubble formation. -
Create the sand mixture:
Pour a small portion of your mixed resin into a separate cup. Gradually add your fine beach sand until you achieve a sludge-like consistency—it should be wet enough to pour but thick enough to hold its shape. -
Pour the shoreline:
Carefully pour the sand-resin mixture into the bottom half or diagonal section of your silicone mold. Use a stir stick to flatten it out and push it into the corners, ensuring the binding holes are kept clear if the mold has them pre-formed. -
Add clear resin:
Pour clear mixed resin into the remaining empty space of the mold to create the ‘water’ area. Let the clear resin meet the sand edge naturally; slightly overlapping is fine as it simulates wet sand. -
Remove bubbles:
Pass a heat gun quickly over the surface to pop any rising air bubbles. Let this base layer sit for about 15-20 minutes until it thickens slightly to prevent your wave layers from sinking too deep.
Cloudy Waves?
If your white waves look muddy instead of crisp, wait longer before pouring the white lines. The base layer needs to be thicker (honey consistency) so the white floats on top rather than sinking.
Step 2: Creating the Waves
-
Prepare white resin:
In a small cup, take a tiny amount of fresh mixed resin and tint it with opaque white pigment. You want a solid, milky white color. -
Pour the wave line:
Drizzle a thin line of the white resin along the border where the clear resin meets the sand. You can add a second, fainter line further out into the ‘water’ section for depth. -
Blow the waves:
Using a straw or a heat gun on a low airflow setting, gently blow the white line towards the sand. I find using a straw gives me the most control to create those lacy, sea-foam cells. -
Refine the cells:
If the white resin isn’t separating into cells, you can gently drag a toothpick through it or apply a quick burst of concentrated heat to encourage the iconic lacing effect. -
Let it cure:
Allow the mold to sit undisturbed on a perfectly level surface for 24 hours (or the recommended cure time for your specific resin).
Step 3: Assembly
-
Demold carefully:
Once fully cured and hard, gently peel the silicone mold away from the resin cover. Be careful around the holes for the binding rings. -
Clean edges:
Inspect the edges for any sharp bits of resin or raised sand. Use a deburring tool or fine sandpaper to smooth them down if necessary. -
Assemble the book:
Align your new resin cover with a back cover and your paper refill. Thread the binder rings through the holes and snap them shut to complete your seaside notebook.
Pro Tip: Depth Effect
For a hyper-realistic wet sand look, mix a tiny drop of translucent amber or brown dye into the resin just before it hits the sand. This darkens the ‘shoreline’ where the water touches.
Enjoy writing your daily thoughts in a notebook that feels like a permanent vacation at the beach
Confetti Sprinkle Party Cover

Transform a plain notebook into a galaxy of fun with this confetti-filled resin cover. The clear resin encapsulates a playful mix of colorful and metallic stars, creating a durable and dazzling accessory for your daily notes.
How-To Guide
Materials
- A5 or A6 silicone notebook cover mold (with binder holes)
- Two-part epoxy resin (casting resin recommended)
- Star confetti mix (various sizes: gold, pink, blue, red)
- Holographic fine glitter (optional)
- Mixing cups and stir sticks
- Heat gun or torch
- Tweezers
- Disposable gloves and protective workspace mat
- Notebook binding rings or spiral coil
- Notebook filler paper
Step 1: Preparation and Mixing
-
Set the Stage:
Begin by cleaning your silicone mold thoroughly with masking tape or a lint roller to ensure there is no dust, which will show up clearly in the final transparent piece. -
Measure the Resin:
Put on your gloves and measure equal parts of resin and hardener (or according to your brand’s specific ratio) into a mixing cup. -
Mix Slowly:
Stir the mixture slowly and consistently for at least 3-5 minutes, scraping the sides and bottom. Stirring slowly helps minimize the introduction of air bubbles. -
Let it Rest:
Allow the mixed resin to sit for about 2-3 minutes. This degassing period lets larger bubbles rise to the surface and pop naturally before pouring.
Step 2: Pouring and Decorating
-
The Base Layer:
Pour a thin layer of clear resin into the mold, filling it just enough to coat the bottom surface. This acts as the adhesive for your confetti. -
Pop Bubbles:
Quickly pass a heat gun or torch over the surface to pop any bubbles that have appeared in this base layer. -
Scatter the Stars:
Take a pinch of your star confetti mix and sprinkle it generously over the wet resin. Aim for a random, organic distribution rather than perfect rows. -
Fill the Gaps:
Identify any large empty spaces. Use your tweezers to pick up individual stars and place them precisely to balance out the design. -
Add Dimension:
If you want extra sparkle, sprinkle a tiny pinch of fine holographic glitter between the stars. It catches the light beautifully without overpowering the main star shapes. -
Submerge Elements:
Gently press down on any floating stars with a clean stir stick to ensure they are fully coated and won’t protrude from the resin surface. -
Final Pour:
Pour the remaining clear resin over the decorations until the mold is filled to the brim. Pour slowly to avoid shifting your star arrangement. -
Final Bubble Check:
Do one last pass with your heat gun to eliminate surface bubbles. Be quick to avoid scorching the mold.
Clear Cast Tip
To keep stars from sinking to the very bottom, let the base layer of resin thicken for 20-30 minutes until it gets tacky before sprinkling the confetti.
Step 3: Curing and Assembly
-
The Waiting Game:
Cover the mold with a box or dust cover to protect it from falling particles. Let it cure undisturbed for 24-48 hours, depending on your resin’s instructions. -
Demold:
Once fully hard, gently peel the silicone mold away from the resin. Take your time around the binder hole tabs to avoid tearing the silicone. -
Clean Edges:
If there are any sharp or uneven edges, especially around the holes, use fine-grit sandpaper or a deburring tool to smooth them out. -
Repeat:
Repeat the entire process to create the back cover of the notebook, perhaps using fewer stars for a simpler look, or matching the front exactly. -
Assemble:
Align your front and back resin covers with your filler paper. Thread the spiral coil or binding rings through the holes to complete the book.
Make It Shaker
Create a matching bookmark or charm using leftover resin and stars to clip onto the spiral binding for a cohesive set.
Enjoy using your custom shimmering notebook for all your brightest ideas
Name or Initial With Vinyl Lettering

Create a sophisticated, personalized notebook cover featuring a soft, pearlescent pink finish and a crisp vinyl monogram. This resin project combines the durability of epoxy with delicate aesthetics, resulting in a planner or journal cover that feels both timeless and modern.
Step-by-Step
Materials
- A5 Notebook silicone mold (front and back cover)
- Two-part epoxy resin (casting resin recommended)
- Dusty rose or blush pink mica powder
- White alcohol ink (optional, for wisps)
- White or cream opaque resin pigment
- Permanent vinyl (White, matte or glossy)
- Transfer tape
- Cricut machine or similar vinyl cutter (or pre-cut initial)
- Mixing cups and stir sticks
- Heat gun or torch
- Beige or cream elastic ribbon (approx. 1/2 inch wide)
- A5 loose-leaf paper and binding rings (if assembling full notebook)
- UV Resin (optional, for sealing vinyl)
- UV Lamp (if using UV resin)
- Tweezers
Step 1: Preparing the Resin Mix
-
Measure and Mix:
Begin by measuring your two-part epoxy resin according to the manufacturer’s instructions, usually a 1:1 ratio by volume. Pour the hardener and resin into a mixing cup. -
Stir Slowly:
Stir the mixture slowly and steadily for at least 3-5 minutes. Scrape the sides and bottom of the cup frequently to ensure no unmixed resin remains, which can lead to sticky spots later. -
Let it Rest:
Allow the clear resin to sit for about 3-5 minutes. This helps any large air bubbles created during stirring to rise to the surface and pop naturally.
Step 2: Coloring and Casting
-
Add Base Color:
Add a small scoop of dusty rose mica powder to your mixed resin. Stir well until the powder is completely incorporated and no clumps remain. -
Create Depth:
To achieve that subtle cloudy look, add a tiny drop of white opaque pigment or a drop of white alcohol ink. Don’t overmix this step; just give it a swirl or two so the white streaks remain slightly visible. -
Pour the First Layer:
Carefully pour the colored resin into your silicone mold. Fill it almost to the top, but leave a very small margin (about 1-2mm) if you plan to dome it later, or fill fully if you want a flat finish. -
Pop Bubbles:
Pass a heat gun or torch quickly over the surface of the wet resin to burst any remaining surface bubbles. Be careful not to hold the heat in one spot too long, as this can damage the mold. -
Cure:
Cover the mold with a box to protect it from dust and let the resin cure fully. This usually takes 24-48 hours depending on your specific resin brand and room temperature.
Mix it Right
To avoid a bendy cover, ensure you measure your resin precisely. If your climate is cold, warm the resin bottles in a warm water bath before mixing.
Step 3: Vinyl Application
-
Prepare the Monogram:
While the resin cures, design your initial (like the ‘A’ shown) using your cutting machine software. Size it to fit centered on your A5 cover, roughly 2-3 inches tall. -
Cut and Weed:
Cut the design out of white permanent vinyl. Use a weeding tool to carefully remove the negative space around the letter and any inner parts. -
Demold:
Once the resin is rock hard, gently peel the silicone mold away from your new notebook cover. Place the cover on a flat, clean surface. -
Apply Transfer Tape:
Place a piece of transfer tape over your weeded vinyl decal. Burnish it with a scraper tool to ensure the vinyl sticks to the tape. -
Place the Decal:
Center the decal on the smooth, front side of your resin cover. Measure if necessary to ensure it’s perfectly aligned. Press down firmly. -
Remove Tape:
Slowly peel back the transfer tape at a sharp angle. If the vinyl lifts, press it back down and burnish again before trying to peel.
Level Up: Hardware
Add gold corner protectors to the edges of your resin cover. They clamp on easily with pliers and add a professional, high-end finish to the project.
Step 4: Sealing and Finishing
-
Seal the Vinyl (Optional):
To ensure the vinyl never peels, I prefer to apply a very thin layer of clear resin or UV resin over the decal area (or the whole cover). If using UV resin, spread it thin and cure under a UV lamp for 60 seconds. -
Clean Edges:
Inspect the edges of your notebook cover. If there are any sharp bits or over-pours, sand them gently with wet sandpaper or trim carefully with a deburring tool. -
Attach the Elastic:
Cut a length of beige elastic ribbon that comfortably wraps around the width of the notebook plus extra for tying. You can thread this through the binding rings or glue the midpoint to the back cover. -
Tie the Bow:
Wrap the elastic around the front and tie it into a neat, decorative bow. Adjust the loops so they sit flat and trim the ends at an angle to prevent fraying. -
Assembly:
Finally, align your front cover, paper sheets, and back cover. Insert binding rings or spiral binding coils through the pre-cast holes to complete your notebook.
This personalized cover makes writing down your daily thoughts feel like a luxurious ritual
Raised Title Using 3D Letter Inclusions
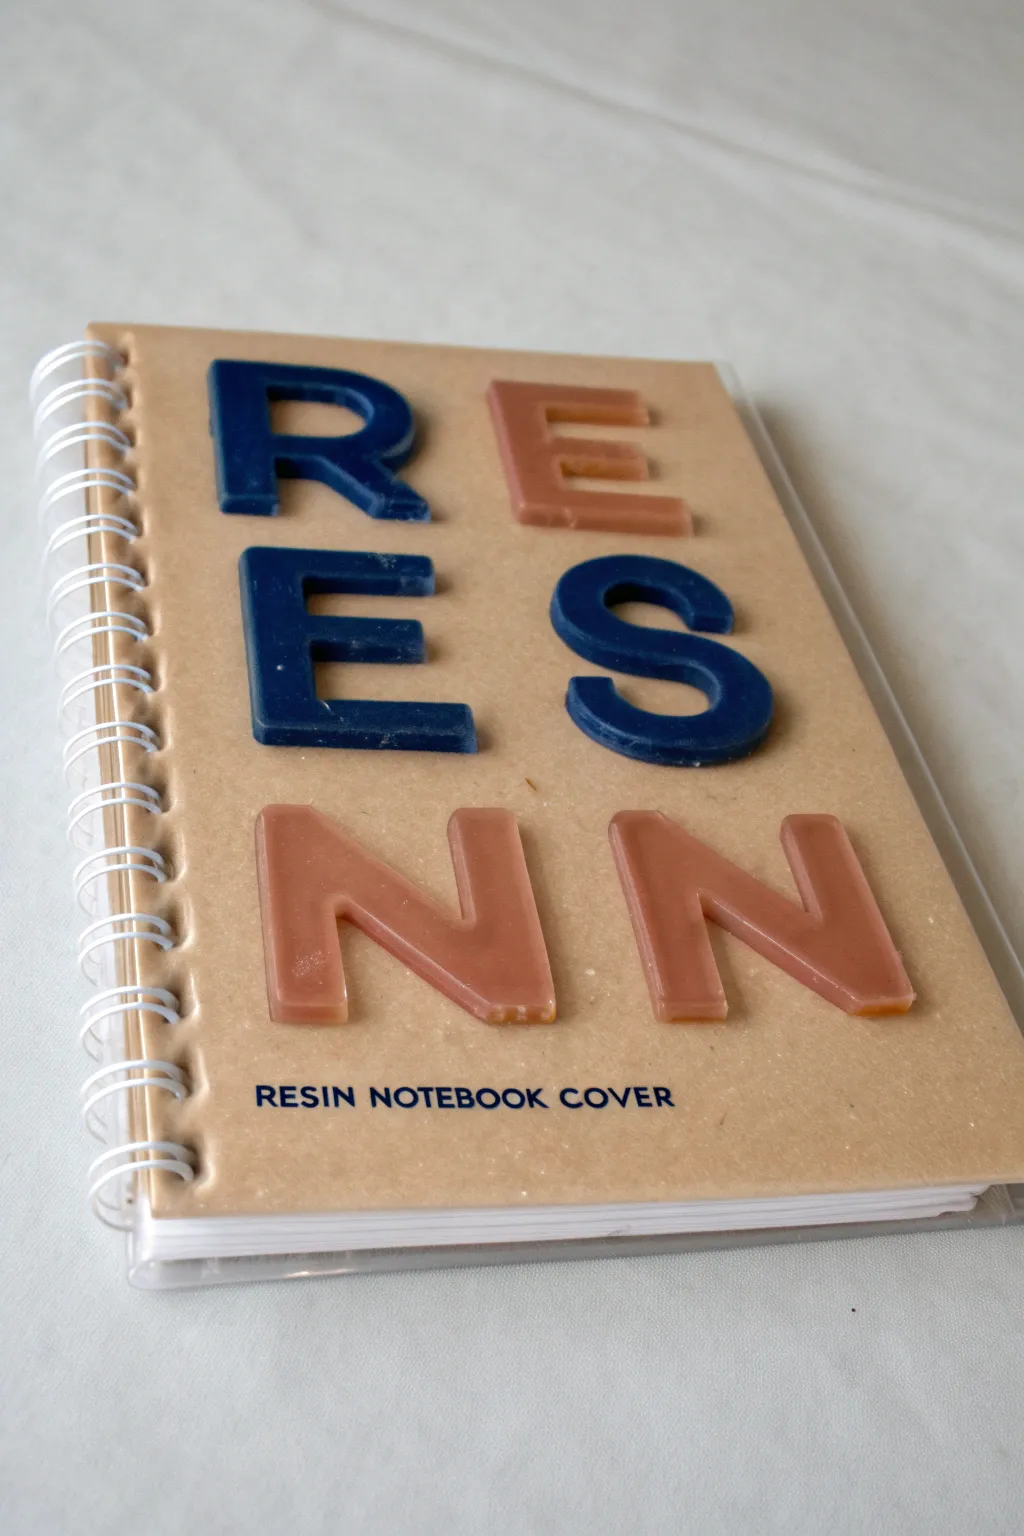
Elevate a simple notebook into a personalized statement piece using resin letter inclusions. This project creates a striking, tactile cover where raised glossy letters spell out your title against a smooth kraft paper backdrop.
Step-by-Step Tutorial
Materials
- A5 or B6 Spiral notebook with a clear, rigid plastic cover
- Two-part epoxy resin (coating or casting type)
- Alphabet silicone mold (medium size)
- Mica powder or resin pigment (Navy Blue and Burnt Orange/Copper)
- Mixing cups and stirring sticks
- Tweezers
- UV resin (optional, for quick adhesion)
- UV lamp (if using UV resin)
- Toothpicks
- Gloves and protective mat
Step 1: Casting the Letters
-
Mix the colored resin:
Start by mixing a small batch of epoxy resin according to the manufacturer’s package directions. Divide the mixture into two small cups. -
Tint the resin:
Add navy blue pigment to one cup and a copper or burnt orange pigment to the other. Stir thoroughly until the color is opaque and consistent. -
Fill the molds:
Carefully pour the colored resin into your silicone alphabet mold. For this design, you need the letters R, E, S, I, and N. Alternate colors: cast the R, E (second), and S in blue, and the E (first) and N’s in orange/copper. -
Pop bubbles:
Let the resin sit for a few minutes to allow bubbles to rise, then quickly pass a heat gun or torch over the surface to pop them. -
Cure completely:
Allow the letters to cure fully, usually 24 hours depending on your resin brand. They need to be hard enough to demold without warping.
Sticky Situation
If resin oozes out from under a letter, wait for it to get ‘taffy-like’ (about 4-6 hours) and use a toothpick to gently peel the excess away without smearing.
Step 2: Preparing the Cover
-
Remove the cover:
If your notebook has a coil binding, carefully unwind the coil just enough to remove the front transparent plastic cover and the kraft paper backing immediately behind it. This makes working on a flat surface much easier. -
Plan the layout:
Place the kraft paper sheet on your work surface. Arrange your cured resin letters on top to finalize the spacing. A grid layout like the 2-2-2 vertical stack creates a modern look. -
Mark positions:
Once happy with the arrangement, lightly mark the corners of where the letters should go with a pencil on the kraft paper, or take a quick photo for reference.
Level Up
Embed small dried flowers or gold leaf flakes into the resin letters during the casting phase for a more intricate, botanical aesthetic.
Step 3: Assembly and Finishing
-
Prepare adhesive:
Mix a very small amount of fresh epoxy resin to use as glue, or setup your UV resin station for faster results. -
Apply adhesive to letters:
Flip a letter over. Using a toothpick, apply a thin, even layer of resin to the back. Don’t overfill it, or it will squish out the sides. -
Place the letter:
Press the letter firmly onto the kraft paper in its designated spot. -
Cure the bond:
If using UV resin, shine the lamp over the letter for 60 seconds to freeze it in place. If using epoxy, repeat for all letters and then let it sit undisturbed for several hours. -
Add the text decal:
If you are adding a subtitle like ‘RESIN NOTEBOOK COVER’, print this on clear sticker paper or use vinyl lettering and apply it near the bottom edge. -
Final Encapsulation (Optional):
For extreme durability, you can pour a thin layer of clear resin over the entire kraft paper (avoiding the coil holes) to encase the letters, but leaving them raised offers a better tactile feel for this specific look. -
Reassemble:
Once everything is fully dry and secure, stack the kraft paper back under the plastic cover. I find the clear plastic cover protects the 3D letters from snagging in a bag. -
Re-bind the coil:
Thread the spiral coil back through the holes of the cover and paper, rotating it until the notebook is secure again.
Now you have a custom notebook that showcases your resin skills every time you take notes
Sticker Collage Sealed Under a Glossy Layer
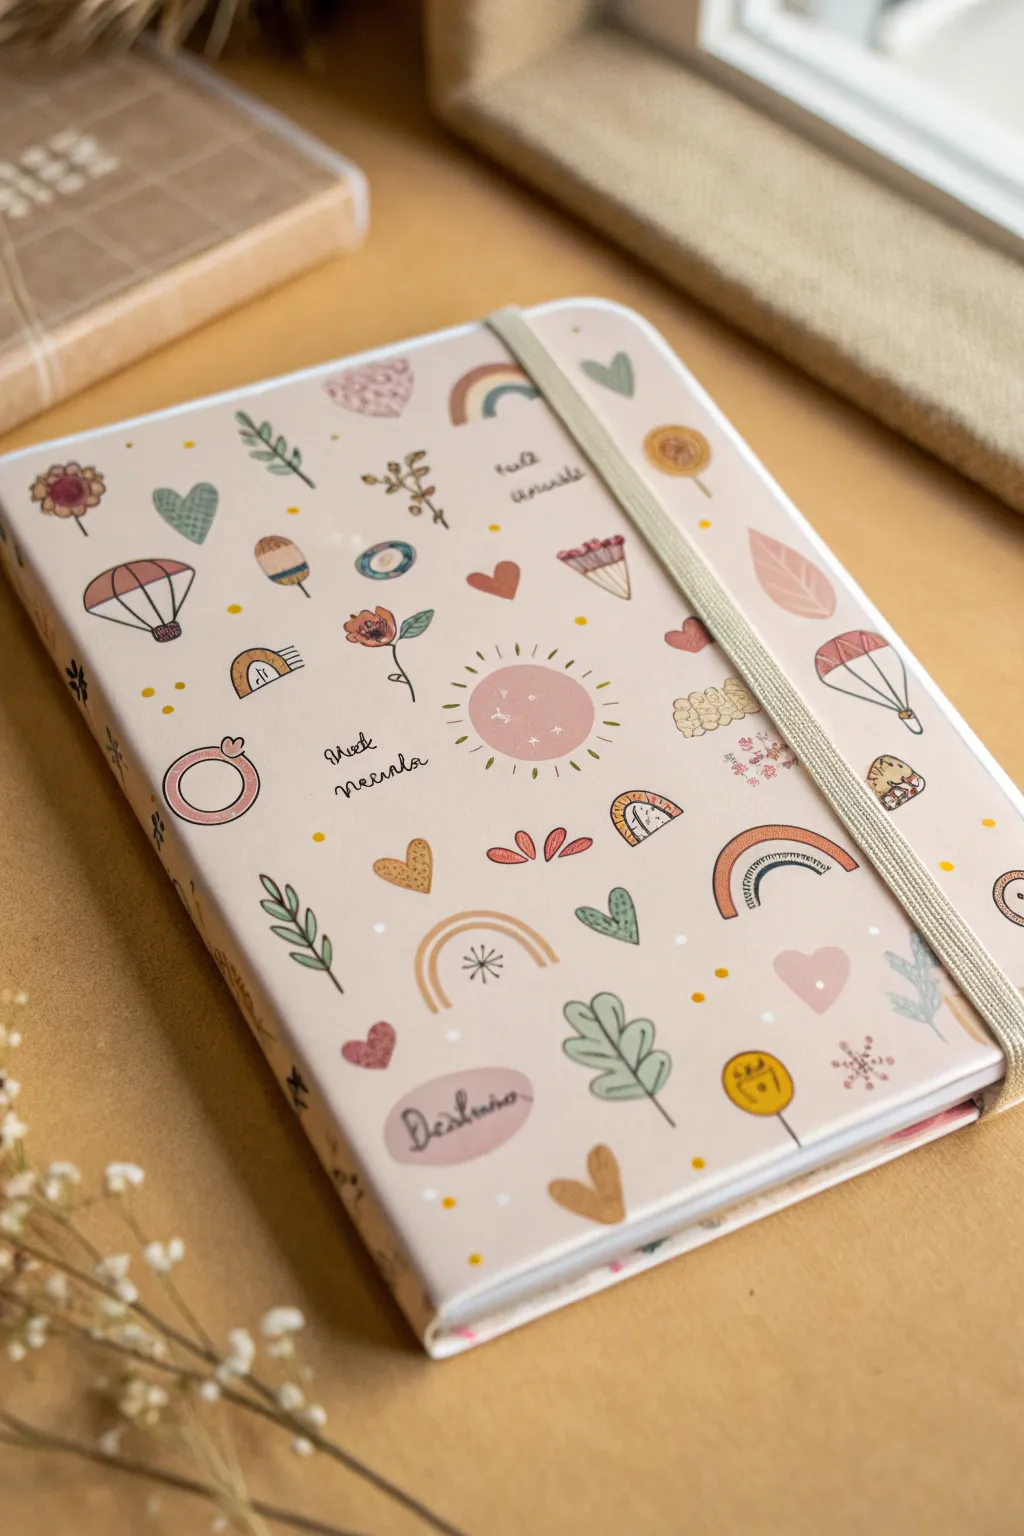
Transform a plain notebook into a whimsical keepsake with this resin-sealed sticker collage. The soft pink background and charming doodle motifs create a dreamy, durable cover that’s perfect for journaling or sketching.
How-To Guide
Materials
- Hardcover notebook (A5 size)
- White gesso or primer
- Pale pink acrylic paint (matte finish)
- Wide flat brush
- Assorted doodle stickers (rainbows, balloons, botanical)
- Rub-on transfers (optional, for text)
- Mod Podge or white craft glue
- Two-part epoxy resin (coating resin)
- Mixing cups and stir sticks
- Nitrile gloves
- Heat gun or lighter
- Painter’s tape
- Plastic drop cloth
- Sandpaper (fine grit)
Step 1: Preparation & Base Coat
-
Protect the pages:
Before doing anything wet, carefully tape off the text block (the pages) of your notebook. Open the cover and run masking tape along the very edge of the endpapers to prevent resin drips from sealing your book shut. -
Tape the elastic:
If your notebook has an elastic band like the one in the photo, pull it around to the back cover or inside front cover and tape it down securely so it doesn’t get painted or resin-coated. -
Prime the surface:
Lightly sand the existing cover to give it ‘tooth’, then apply a thin, even coat of white gesso. This ensures your pale pink color will pop and not look muddy against a dark original cover. -
Apply background color:
Once the primer is bone dry, paint the entire front cover with your pale pink acrylic paint. Use long, smooth strokes to minimize texture. Let dry completely. -
Add a second coat:
Apply a second layer of pink if the first looks streaky. You want a solid, opaque pastel base.
Step 2: Designing the Collage
-
Plan your layout:
Before peeling any backings, lay your stickers on the dry painted surface. Aim for a scattered ‘pattern’ look rather than a central clump. Distribute larger items like the sun and rainbows first. -
Fill the gaps:
Place medium-sized motifs like the hot air balloons and hearts in the open spaces. I like to rotate them slightly so everything isn’t perfectly vertical, giving it a playful feel. -
Add tiny details:
Use the smallest stickers—dots, tiny stars, or small leaves—to fill awkward empty voids. Keep items away from the very edge of the cover to ensure the resin seals properly over them. -
Adhere the stickers:
One by one, peel and stick your design elements down. Press firmly from the center outward to eliminate air bubbles. -
Add text elements:
If using rub-on transfers for words like ‘Meet’ or ‘Destino’, apply them now. Rub firmly with a wooden stick to ensure the transfer releases completely. -
Seal the paper:
Apply a thin layer of Mod Podge or white glue over the entire surface, covering the stickers. This is crucial—it prevents the resin from soaking into paper stickers and turning them translucent.
Sticky Situation?
If stickers lift after the glue seal dries, dab a tiny bit of superglue under the edge. They must be perfectly flat or they will poke through the resin surface.
Step 3: Resin Application
-
Prepare the workspace:
Set up in a well-ventilated, dust-free area. Lay down your plastic drop cloth and ensure your notebook is propped up level on four cups (one under each corner) so the cover is horizontal. -
Mix the resin:
Measure equal parts of resin and hardener (or follow your specific brand’s ratio). Stir slowly for at least 3 minutes, scraping sides and bottom, until crystal clear. -
Pour the coating:
Pour the mixed resin into the center of the cover. Use your stir stick or a gloved finger to gently guide the liquid toward the edges, stopping just before it spills over. -
Pop bubbles:
Wait about 5 minutes for bubbles to rise, then quickly pass a heat gun or lighter over the surface to pop them. Don’t hold the heat in one spot too long. -
Curing:
Cover the project with a clean box to protect from dust. Let it cure undisturbed for 24 hours until hard and glossy. -
Clean up:
Once fully cured, remove the masking tape carefully. Use a craft knife to trim any tiny resin drips on the underside of the cover edge if necessary.
Add Sparkle
Mix a tiny pinch of ultra-fine iridescent glitter or mica powder into your resin before pouring. It adds a magical shimmer that catches the light without obscuring the stickers.
Now you have a durable, custom-designed notebook ready to house your biggest dreams and daily thoughts
Handwritten Quote Embedded Like a Time Capsule
Transform a simple notebook into an artifact from another era by embedding aged paper and elegant script within crystal-clear resin. This project captures the romantic aesthetic of old letters, preserving them forever inside a durable, glassy shell.
Step-by-Step Tutorial
Materials
- A5 or A6 silicone notebook cover mold (front and back pieces)
- Clear epoxy resin (casting resin recommended for clarity)
- Hardener
- Cream or off-white paper (slightly heavier weight is better, like 100gsm)
- Black ink pen (fountain pen or fine liner) or a printer
- Coffee or strong black tea (brewed and cooled)
- Baking sheet
- Paper towels
- Mod Podge or clear craft sealer
- Paintbrush
- Mixing cups and stir sticks
- Heat gun or torch
- Notebook binding rings and paper refill blocks
- Elastic band for closure (brown or taupe)
Step 1: Preparing the Manuscript
-
Brew the staining liquid:
Brew a very strong cup of coffee or black tea. The stronger the brew, the darker and more antique your paper will look. Let it cool completely to room temperature. -
Distress the paper:
Take your cream paper and lightly crumple it, then smooth it back out. Place the paper onto a baking sheet. Using a sponge or large brush, saturate the paper with the coffee or tea. You can pool liquid in certain spots to create darker stains. -
Dry the paper:
Allow the paper to air dry completely, or place the baking sheet in an oven set to the lowest possible temperature (around 200°F/95°C) for 5-10 minutes. Watch closely to prevent burning. -
Add the script:
Once the paper is crisp and dry, write out your chosen quote, poem, or letter using a black ink pen. If your handwriting isn’t confident, you can print a cursive font onto the paper before staining, or trace a printed design using a light box. -
Format the size:
Measure your silicone mold carefully. Cut your handwritten paper so it is slightly smaller than the mold cavity, leaving about a 1/8-inch border of clear space around the edges so the resin can encapsulate it fully. -
Seal the paper:
This step is critical. Apply a thin, even coat of Mod Podge or clear sealer to both sides of the paper and the edges. Let it dry completely. This prevents the resin from soaking into the fibers and turning the paper translucent or splotchy.
Step 2: Casting the Cover
-
Mix the resin base:
Measure and mix a small amount of clear epoxy resin according to the manufacturer’s instructions. Stir slowly to minimize bubbles. -
Pour the base layer:
Pour a very thin layer of clear resin into the silicone mold—just enough to cover the bottom. Use a heat gun to pop any bubbles. -
Position the paper:
Gently slide your sealed manuscript paper into the mold, face down (since the bottom of the mold is usually the front of the notebook). Press it down gently to release trapped air bubbles from underneath. -
The initial cure:
Let this thin base layer cure for 4-6 hours until it reaches a ‘tacky’ or gel phase. This stops the paper from floating up during the final pour. -
Mix the top coat:
Mix a larger batch of clear resin, enough to fill the rest of the mold depth. -
Fill the mold:
Pour the resin over the paper, filling the mold to the brim. The resin should self-level, but you can guide it to the corners with a stir stick. -
Final bubble check:
Wait about ten minutes for bubbles to rise, then do a final pass with your heat gun or torch to foster a glass-like finish. -
Full cure:
Cover the mold with a box to protect it from dust and let it cure fully for 24-48 hours.
Sealant Savior
Why does the paper look wet and dark inside the resin? It likely wasn’t sealed enough. Apply two coats of sealer, letting each dry fully, to ensure the resin sits on top rather than soaking in.
Step 3: Assembly
-
Demold safely:
Gently peel the silicone mold away from the cured resin. Determine if any sharp edges need light sanding; if you sand, polish the edge back to clarity or add a tiny brush of resin to restore shine. -
Bind the notebook:
Align your front and back resin covers with your paper refill block. Insert the binding rings through the pre-cast holes. -
Attach the closure:
Thread a brown elastic band through the back cover holes (if your mold design includes them) or loop a separate band around the entire book to secure your vintage-style secrets.
Burnt Edges Effect
Before sealing, carefully burn the edges of your paper with a lighter for a few seconds. This charred, ragged edge adds incredible depth and realism to the ‘ancient artifact’ look.
Now you have a stunning, durable journal that looks like a museum piece ready for your daily notes
Transparent Tint With Ombré Fade
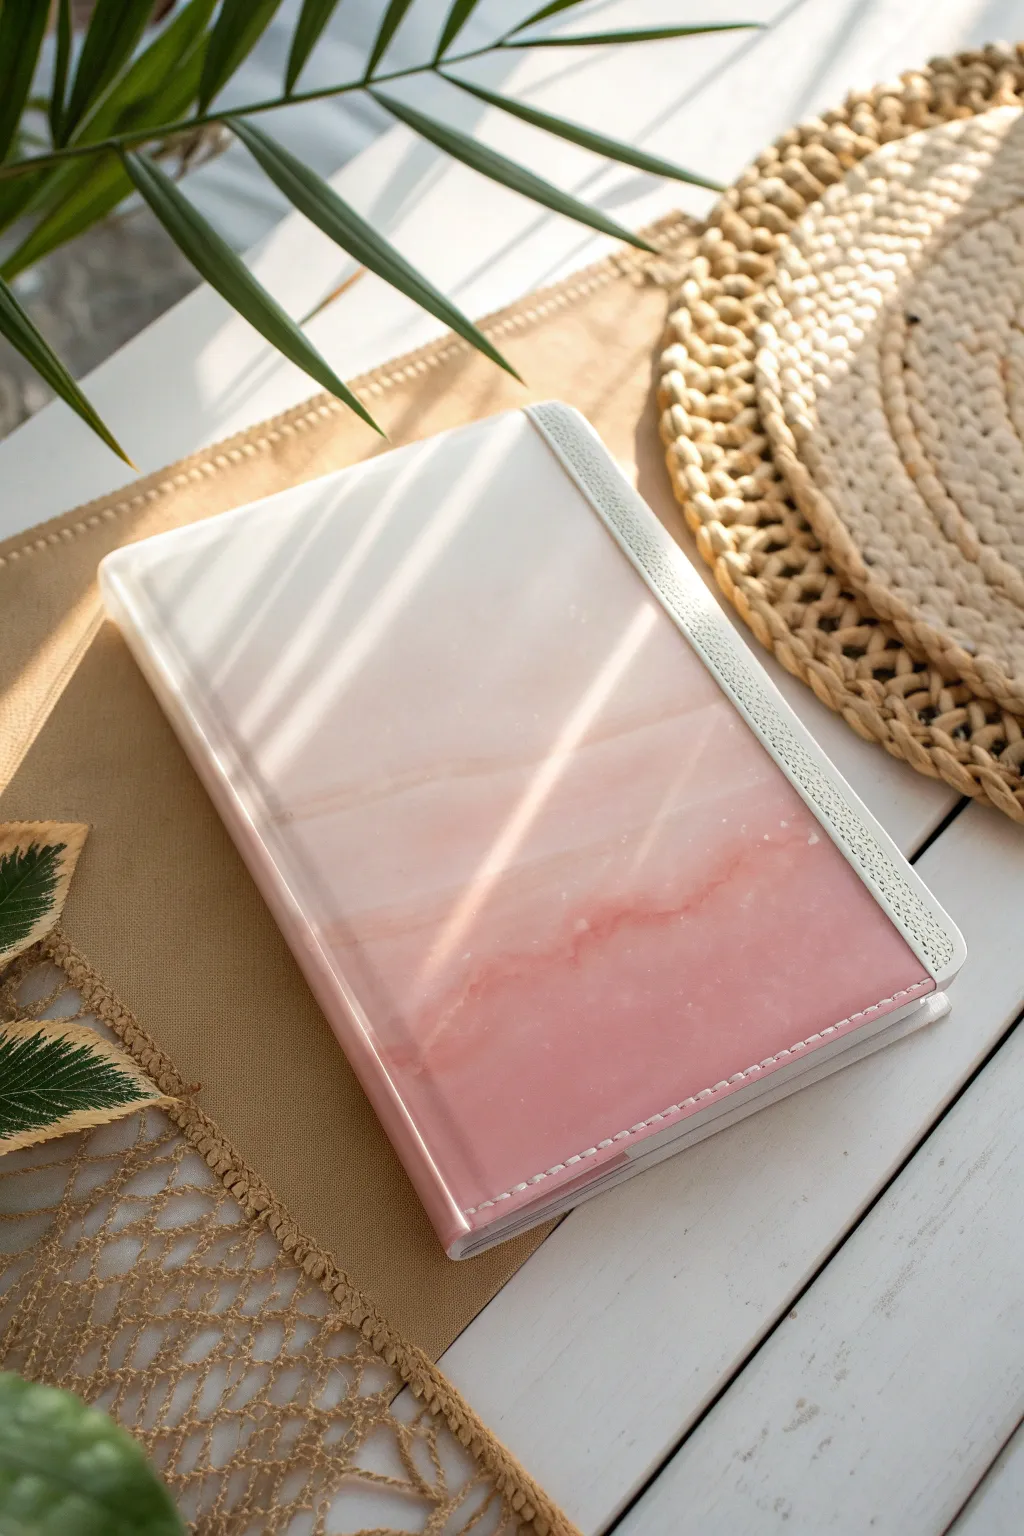
Transform a plain notebook into a stunning piece of faux-stone art with this delicate resin project. By blending opaque white into a soft, milky pink, you’ll create a dreamy, cloud-like gradient that mimics the look of polished rose quartz.
Detailed Instructions
Materials
- A5 silicone notebook cover mold (front and back pieces)
- Two-part epoxy resin (casting resin)
- White opacity pigment (or white alcohol ink)
- Soft pink mica powder or resin dye
- Mixing cups and stir sticks
- Heat gun or lighter
- Disposable gloves
- A5 notebook paper refill and binding rings
Step 1: Resin Preparation
-
Measure and Mix:
Start by measuring equal parts of your resin and hardener according to the manufacturer’s instructions. Stir slowly and consistently for at least 3-5 minutes to ensure a full chemical bond without whipping in too many air bubbles. -
Divide the Batch:
Split your mixed clear resin into two separate cups. You’ll need slightly more resin in the cup intended for the pink bottom section than the white top section. -
Whiten the Top:
In the smaller cup, add a few drops of white pigment paste or alcohol ink. Stir well until you have a solid, milky white color. -
Tint the Bottom:
In the larger cup, mix in a very small amount of pink mica powder or a drop of resin dye. You want a soft, pastel blush tone, not a hot pink, so start with less pigment than you think you need.
Step 2: creating the Ombré
-
Pour the White:
Gently pour the white resin into the top third of your silicone mold. Don’t worry about a perfectly straight line; an organic edge helps the blending process. -
Pour the Pink:
Pour the pink resin into the bottom two-thirds of the mold, filling the remaining space. Ensure the resin reaches all corners and edges. -
Initiate the Blend:
Where the white and pink meet, use a clean stir stick or a silicone spacing tool to gently drag the white down into the pink and the pink up into the white. -
Soften the Transition:
Pass a heat gun quickly over the distinct line between colors. The heat lowers the viscosity, encouraging the two colors to interact and create that foggy, natural stone gradient. -
Refining the Fade:
If the line looks too harsh, I like to gently tilt the mold slightly up and down to let gravity assist the mix. Be careful not to spill over the edges.
Sticky Curing?
If your resin is tacky after 48 hours, the ratio was likely off or it wasn’t stirred enough. You can’t fix the tacky layer, but you can pour a thin, fresh clear coat over it to seal it.
Step 3: Finishing Touches
-
Bubble Removal:
Let the resin sit for about 10 minutes so trapped bubbles can rise to the surface. Sweep your heat gun or lighter swiftly over the top to pop them. -
Curing:
Place a dust cover (like a large box) over your mold and allow it to cure undisturbed for 24-48 hours, depending on your resin brand. -
Demolding:
Once fully hard, carefully peel the silicone mold away from your resin cover. Work around the edges first to break the seal. -
Edge Cleanup:
Inspect the edges for any sharp bits or overpour. You can smooth these down with fine-grit wet sandpaper or simply trim soft overhangs with a deburring tool. -
Assembly:
Align your new resin covers with your paper refill and insert the binding rings or discs to complete your custom notebook.
Add Gold Veins
Once the base layer is tacky but not fully hard (about 4-6 hours in), try dragging a toothpick dipped in gold acrylic paint through the blend to create realistic marble veining.
Enjoy using your elegant, stone-inspired notebook for your daily journaling
Fabric or Lace Texture Encapsulated Flat
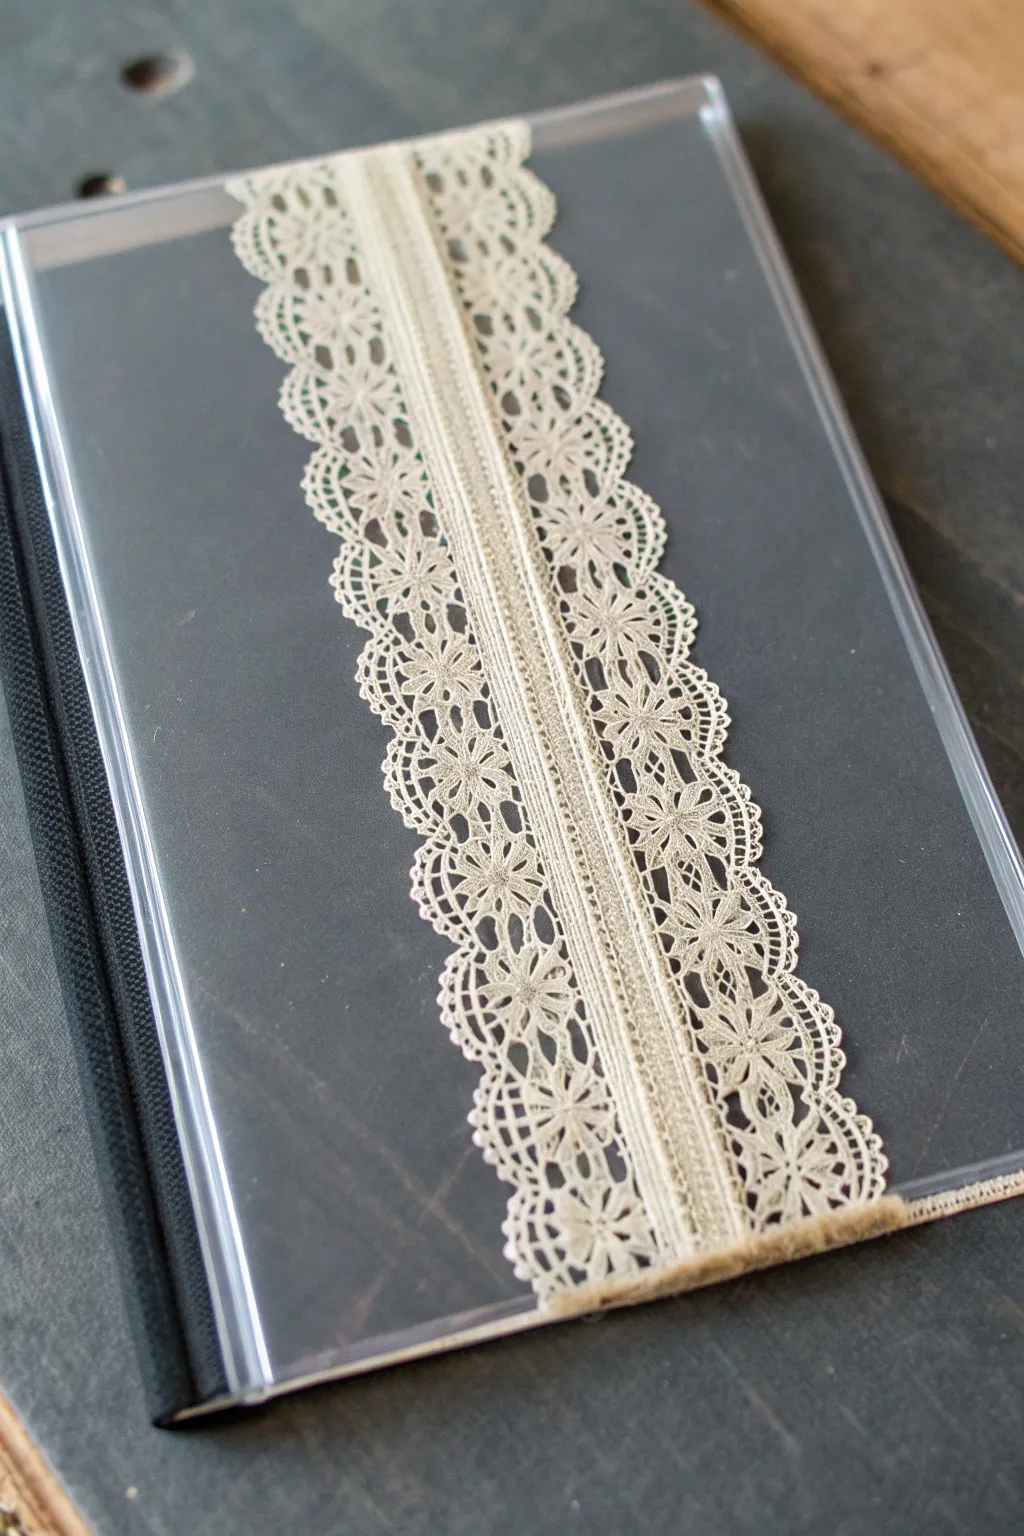
Capture the delicate beauty of vintage textiles forever by embedding a strip of intricate lace directly into a clear resin notebook cover. This project creates an elegant, floating effect where the fabric texture is preserved within a smooth, durable surface.
Step-by-Step Guide
Materials
- A5 or A6 silicone notebook cover mold (front and back)
- Clear epoxy resin (casting resin recommended)
- Hardener
- Strip of flat, intricate white or cream lace (approx. 2-3 inches wide)
- Fabric scissors
- Clear drying craft glue or UV resin (small amount)
- Mixing cups and stir sticks
- Tweezers
- Heat gun or lighter
- Nitrile gloves
- Respirator mask
- Dust cover or large box
Step 1: Preparation & Fabric Sizing
-
Clean the mold:
Begin by meticulously cleaning your silicone mold with tape or soapy water to remove any dust or lint; with a clear design like this, every speck will show. -
Measure the lace:
Lay your lace strip over the empty mold to determine the correct length. You want it to span the entire vertical height of the cover. -
Cut to size:
Trim the lace carefully. It should fit exactly within the mold cavity without bunching at the ends. If your lace has a scalloped edge, center the pattern so it looks symmetrical. -
Seal cut edges:
If your lace is prone to fraying, dab a tiny amount of clear drying glue on the cut ends and let it dry completely. This prevents loose threads from floating away in the resin later.
Invisible Bubbles
Lace loves to trap air. Before curing, dip the lace in a small cup of mixed resin first to ‘pre-wet’ it, ensuring all fibers are soaked before placing in the mold.
Step 2: Base Layer & Placement
-
Mix the resin:
Measure and mix your clear epoxy resin according to the manufacturer’s instructions. Stir slowly to minimize bubble formation, scraping the sides and bottom of the cup. -
Pour the base layer:
Pour a thin layer of clear resin into the mold. You don’t need to fill it to the top yet; you just need enough to coat the bottom and create a bed for the lace. -
Pop surface bubbles:
Wait a few minutes for bubbles to rise, then quickly pass a heat gun or lighter over the surface to pop them. -
Position the lace:
Using tweezers, gently lower the lace strip onto the wet resin. Aim for the exact center of the mold. The resin will start to soak into the fibers immediately. -
Press flat:
Use your stir stick or a silicone tool to gently press the lace down. You want to ensure it is fully saturated and lying perfectly flat against the bottom face of the mold. -
Check for trapped air:
Look closely at the intricate holes in the lace. If you see air bubbles stubbornly clinging to the fibers, gently nudge them out with a toothpick.
Vintage Patina
For an antique look, soak your white lace in tea or coffee and let it dry completely before embedding it. This gives the resin cover a warm, nostalgic heirloom vibe.
Step 3: Encapsulation & Curing
-
Wait for gel phase:
I prefer to let this initial layer sit for about 30-45 minutes until it gets tacky. This prevents the lace from floating up when you add the final pour. -
Top up the mold:
Mix a second batch of clear resin. Pour it slowly over the lace until the mold is filled to the brim, ensuring a level surface. -
Final bubble check:
Do one last pass with your heat gun to remove any new bubbles introduced during the second pour. -
Cover and cure:
Place a dust cover over your project to protect the glossy surface. Let it cure undisturbed for 24-48 hours, depending on your resin brand. -
Demold:
Once fully hard, gently peel the silicone mold away from the resin. The lace should now be perfectly suspended inside. -
Finishing touches:
If there are any sharp edges from the mold, sand them lightly with fine-grit sandpaper or use a deburring tool to smooth the perimeter.
Assemble your notebook by attaching the rings and paper, and enjoy your elegant, handcrafted stationery
Tiny Charm Cluster in One Corner

Capture the magic of the night sky with this ethereal resin notebook cover. Featuring floating gold charms, delicate chains, and a dusting of shimmer, this transparent cover turns a standard planner into a personal galaxy.
Detailed Instructions
Materials
- A5 or Personal size notebook cover silicone mold (with ring holes)
- Small gold star and moon charms (various sizes)
- Delicate gold jewelry chain (approx. 4-6 inches)
- Gold foil flakes
- Fine champagne or gold glitter dust
- Tiny metal plant/branch embellishments
- Clear epoxy resin (Part A and Part B)
- Silicone mixing cups and stir sticks
- Precision tweezers
- Heat gun or torch lighter
- Toothpicks
- Dust cover or large box
Step 1: Preparation and Layout
-
Clean the workspace:
Ensure your work surface is perfectly level and clean. Since we are making a transparent cover, any dust or cat hair will show, so wipe down your mold with isopropyl alcohol and a lint-free cloth. -
Plan your design:
Before mixing any resin, lay your charms and chain inside the dry mold to test the arrangement. Place bigger elements like the crescent moon first to establish focus. -
Drape the chain:
Arrange the gold chain so it snakes vertically down the cover, mimicking a hanging pendant. You can attach small star charms to the ends or middle of the chain loops for extra detail. -
Scatter the stars:
Distribute the star charms randomly around the central chain. Vary the spacing—some close together, some far apart—to create a natural, starry-sky effect. -
Take a reference photo:
Once you are happy with the layout, snap a quick picture on your phone. You’ll need to remove everything to pour the resin, and this photo will be your guide.
Step 2: Mixing and First Pour
-
Mix the resin:
Measure equal parts of resin and hardener (or according to your brand’s instructions) into a silicone cup. Stir strictly for 3-5 minutes, scraping the sides and bottom. -
Degas the mixture:
Let the mixed resin sit for about 5 minutes to allow large bubbles to rise to the surface before pouring, which is crucial for clear projects. -
Add subtle shimmer:
Sprinkle a tiny pinch of fine champagne glitter into the clear resin. You want a ‘stardust’ look, not a solid glitter block, so keep it barely visible. -
Pour the base layer:
Pour a thin layer of resin into the mold, filling it just under halfway. Use a stir stick to guide the resin into the ring-hole tabs carefully. -
Remove bubbles:
Quickly pass a heat gun or torch over the surface to pop any bubbles. Do this gently to avoid damaging the mold.
Cloudy Resin?
If your clear resin looks milky after curing, it’s usually due to moisture (high humidity) or micro-bubbles from vigorous mixing. Warm your resin bottles in water before mixing to help clarity.
Step 3: Embedding the Elements
-
Place the chain:
Using tweezers, gently lay the gold chain back into the wet resin, following your reference photo. Press it down slightly with a toothpick so it’s fully submerged. -
Position the charms:
Drop the moon and star charms into the resin one by one. I find it helpful to dip each charm in a little clear resin before placing it to prevent air bubbles from getting trapped underneath. -
Add gold foil accents:
Using two toothpicks, tear tiny pieces of gold foil and disperse them in the negative spaces. Tearing them makes the edges look more organic and cloudy. -
Incorporate botanical accents:
Place the metal branch embellishments near the bottom or side edges. Ensure they are flat against the mold bottom so they don’t poke out later. -
Check clearancet:
Look at the mold from the side level. Ensure no charms or chain links are floating above the resin level; push them down if needed. -
Let it cure partially:
Allow this layer to cure for 4-6 hours until it is tacky or ‘gel-like.’ This prevents the heavy metal charms from sinking all the way to the front face (which is currently the bottom).
Glow Up
Mix a tiny amount of phosphorescent powder into the white ‘stardust’ layer. By day it looks like glitter, but the stars and moon will glow faintly in the dark.
Step 4: Final Pour and Finish
-
Mix the second batch:
Prepare a second batch of clear resin just like the first. You can add another tiny pinch of dust glitter if you want more depth, or keep it crystal clear. -
Fill the mold:
Pour the resin over your tacky base layer until the mold is filled to the brim. Be careful not to overfill, as this creates a dome that makes the notebook hard to open. -
Final bubble check:
Checking periodically for the first 15 minutes is key; bubbles often get trapped in chain links and rise slowly. Pop them with a lighter or toothpick. -
Cover and cure:
Place a dust cover over the mold immediately. Let it cure fully for 24-48 hours depending on your resin brand specifications. -
Demold:
Once fully hard, gently peel the mold away from the corners first. The resin should release easily. -
Clean the edges:
If there are any sharp edges or overpour near the ring holes, use a deburring tool or fine-grit sandpaper to smooth them down.
Assemble your new cover onto a binder mechanism and fill it with your dreams and plans
Crayon and Color-Block Inclusions
Transform a standard spiral notebook into an artist’s palette with this vibrant resin cover project. By embedding colorful squares that mimic watercolor pans or crayon blocks, you create a functional piece of stationery that doubles as a celebration of color theory.
Step-by-Step Guide
Materials
- A5 or A6 silicone notebook cover mold (specifically with spiral binding holes)
- Epoxy resin (casting resin preferred for clarity and bubble release)
- Hardener
- Wax crayons or soft pastels (variety of colors)
- Small square silicone mold (for making the color blocks)
- X-Acto knife or craft blade
- Heat gun or lighter
- Mixing cups and stir sticks
- Tweezers
- Spiral binding coil and notebook paper
- Sandpaper (fine grit)
Step 1: Preparation of Inclusions
-
Select your palette:
Choose a gradient of crayon colors. You’ll need enough distinct shades to fill a grid pattern, typically ranging from yellows and oranges to greens, blues, and purples. -
Prepare the color blocks:
If you are using crayons, carefully chop them into small, consistent shavings. If you have a small square grid mold, melt the crayon bits into these tiny squares to create uniform ’tiles’. Let them cool completely. -
Alternative method:
For a more textured, raw look like the reference image, simply cut the crayons or pastels into uniform flat squares using a warm knife, rather than melting them down. This preserves the texture of the medium. -
Plan the layout:
On a piece of paper the same size as your notebook mold, arrange your color blocks to test the spacing. Aim for a pleasing gradient or rainbow transition from top to bottom.
Step 2: The Resin Pour
-
Clean the mold:
Ensure your main notebook cover mold is free of dust and lint. Use masking tape to lift off any stray particles. -
Mix the base layer:
Mix a small amount of clear epoxy resin according to the manufacturer’s ratio. Stir slowly to minimize bubbles. -
Pour the thin base:
Pour a very thin layer of clear resin into the mold. You only want enough to cover the bottom surface; this will hold the blocks in place. -
Remove bubbles:
Pass a heat gun quickly over the surface to pop any air bubbles. -
Place the blocks:
Using tweezers, carefully transfer your color blocks from your plan into the wet resin. Press them down gently to ensure they make contact with the bottom, but don’t submerge them yet. -
Secure the grid:
Check your alignment. The wet resin will act as glue. Let this layer cure until it reaches a ‘tacky’ gel state (usually 2-4 hours depending on your resin).
Seal Your Colours
Coat crayon blocks with Mod Podge before embedding. Waxy crayons can sometimes cloud the resin or create a milky halo if not sealed first.
Step 3: Encapsulation and Finish
-
Mix the top coat:
Once the blocks are stuck in place, mix a larger batch of clear, UV-resistant resin. -
Flood the mold:
Slowly pour the resin over the color blocks. Pour in a thin stream to avoid trapping air pockets under the edges of the squares. -
Fill to the brim:
Fill the mold until the resin is level with the top edge. Ensure the color blocks are completely encased. I like to look at the mold from the side at eye level to check the fullness. -
Final bubble check:
Wait about ten minutes for deep bubbles to rise, then use your heat gun or lighter one last time. -
Curing time:
Cover the mold with a box to prevent dust from landing on it and let it core fully for 24-48 hours. -
Demolding:
Gently peel the silicone mold away from the cured resin. The cover should be glossy and solid. -
Refining edges:
If there are any sharp edges or overpour near the binding holes, use fine-grit sandpaper or a craft knife to smooth them out. -
Assembly:
Align your new resin cover with your back cover and paper. Thread the spiral binding coil through the holes to complete the notebook.
Add Gold Accents
Mix gold leaf flakes or glitter into the final clear pour. The sparkles suspended above the color blocks add depth and a magical, elevated finish.
Now you have a stunning, personalized sketchbook that inspires creativity before you even open the first page
Glow-in-the-Dark Night Notes Cover

Capture the magic of a clear midnight sky with this deep blue, galaxy-inspired notebook cover that shimmers with celestial details. By layering resin with dark pigments and metallic accents, you’ll create a functional piece of art that looks like a window into the universe.
Step-by-Step
Materials
- A5 silicone notebook mold (front and back cover)
- Epoxy casting resin (2-part)
- Deep blue alcohol ink or mica powder
- Black alcohol ink (for depth)
- Fine silver glitter or holographic powder
- Gold or silver metallic foil flakes
- White acrylic paint or specialized resin paint pen
- Small fine-point liner brush or dotting tool
- Mixing cups and stir sticks
- Heat gun or torch
- Notebook binding rings and filler paper
- Optional: Glow-in-the-dark pigment powder
Step 1: Base Galaxy Layer
-
Prepare the workspace:
Ensure your silicone mold is clean, dry, and free of dust. Place it on a perfectly level surface to prevent the resin from pooling unevenly. -
Mix the resin:
Combine your two-part epoxy resin according to the manufacturer’s ratio instructions. Stir slowly for at least 3-4 minutes to minimize new bubbles, ensuring you scrape the sides and bottom. -
Create the midnight blue:
Pour about 80% of your mixed resin into a separate cup. Add deep blue mica powder or alcohol ink. I like to add a few drops of black ink here to really deepen the color and avoid a transparent ‘plastic’ look. -
Add subtle shimmer:
Mix a tiny pinch of fine holographic powder or glow-in-the-dark pigment into the dark blue resin. It should be barely visible now but will catch the light later. -
Pour the base:
Pour the dark blue resin into the mold. Use a stir stick to guide the resin into the corners and around any holes for the binding rings. -
Remove bubbles:
Let the resin sit for 5-10 minutes so bubbles rise to the surface. Pass a heat gun or torch quickly over the surface to pop them.
Sticky Situation?
If your resin remains tacky after 24 hours, the mixing ratio was likely off or the room is too cold. Try moving it to a warmer spot for another day, or replicate the process with careful measuring.
Step 2: Creating the Stars
-
Initial constellation placement:
While the resin is still wet but slightly tacky (usually 45-60 minutes in), carefully drop tiny pieces of gold or silver foil flakes onto the surface. These will be your larger ‘stars’. -
Let it cure:
Allow this base layer to cure completely, usually for 24 hours, until it is hard to the touch. -
Demold the covers:
Gently peel the silicone mold away from your hardened resin covers. Place them on a protective mat, shiny side up. -
Painting the details:
Using a fine-point liner brush and white acrylic paint (or a specialized resin paint pen), hand-paint tiny dots for distant stars directly onto the hardened resin surface. -
Adding starbursts:
Draw small crosses or four-pointed stars on top of a few of the painted dots to create a twinkling effect. Vary the sizes to create a sense of depth. -
Connecting constellations:
If you wish, draw very thin lines connecting a few stars to form constellations. Keep your hand light; faint lines look more realistic.
Cosmic Depth
For a 3D effect, paint some stars on the bottom of the mold before pouring, then add more on top after curing. This creates stars that look ‘further away’ inside the deep blue resin.
Step 3: Sealing and Assembly
-
Mix a clear coat:
Mix a small batch of clear, uncolored resin. This will serve as a topcoat to seal in your painted stars and create a smooth, glass-like finish. -
Apply the topcoat:
Pour a thin layer of clear resin over the painted surface. Use a spreader or gloved finger to push the resin all the way to the edges without spilling over. -
Final cure:
Cover the project with a box to prevent dust from settling on the wet surface and let it cure for another 24 hours. -
Clean the edges:
Once fully cured, check the edges for any sharp spots or drips. You can sand them down gently with fine-grit sandpaper if needed. -
Assemble the notebook:
Align your front and back covers with your paper filler. Insert the binding rings or spiral coil through the holes to complete your celestial journal.
Now you have a stunning, durable notebook that holds your thoughts among the stars
Negative Space Window With a Floating Focal Point
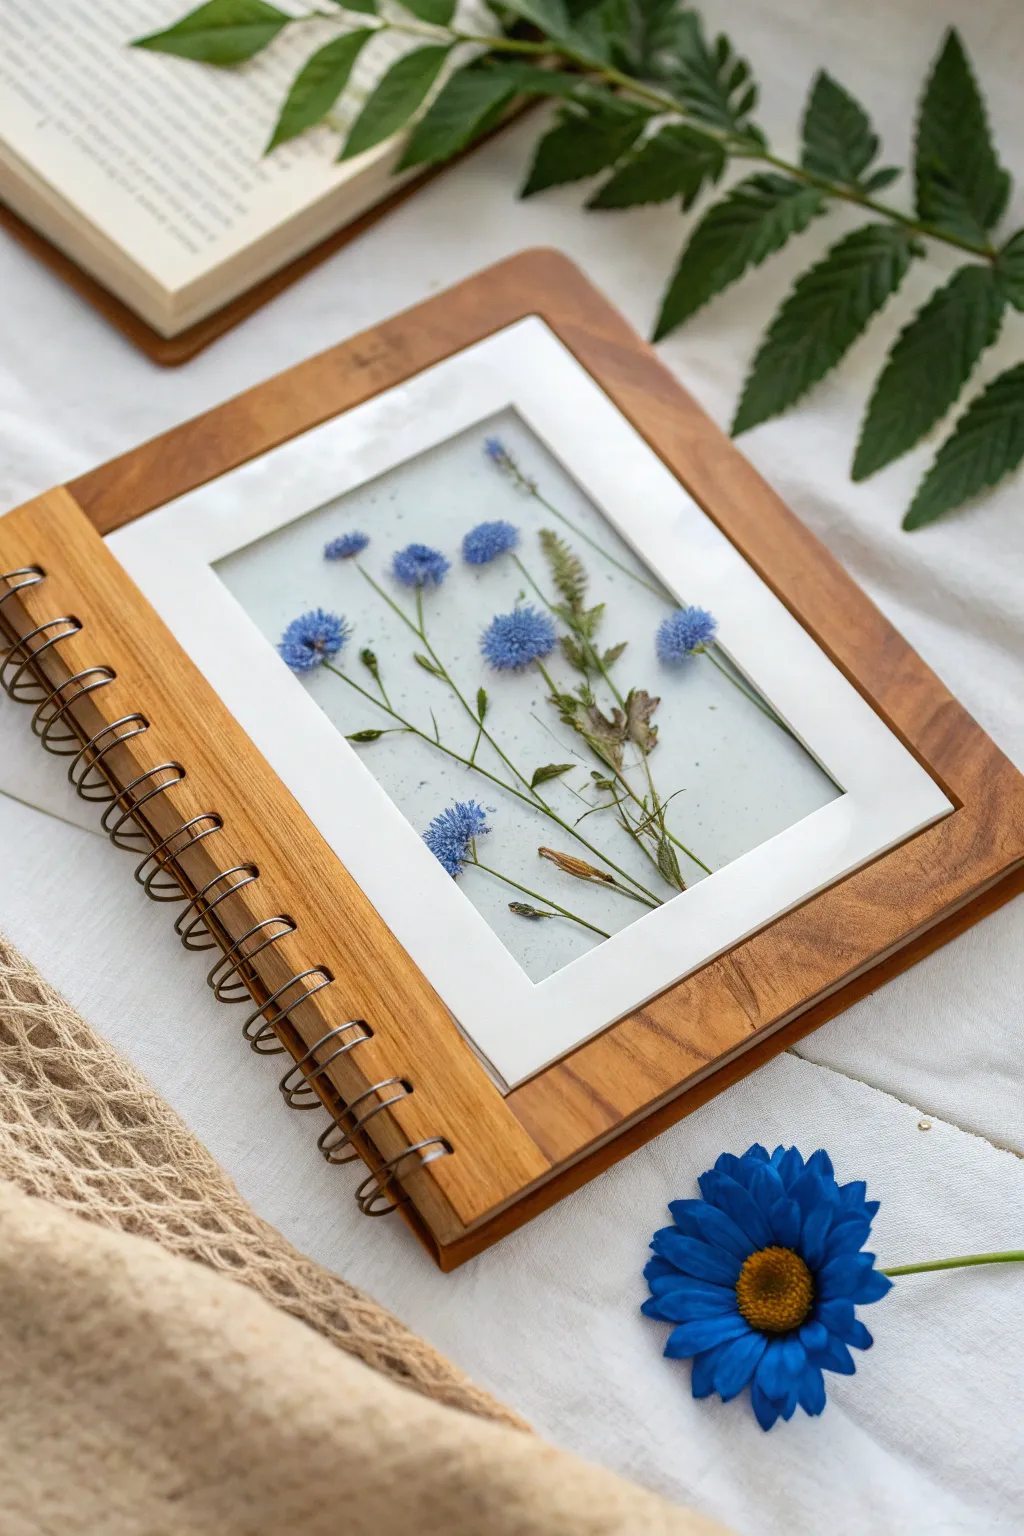
Capture the delicate beauty of pressed wildflowers in a notebook cover that acts as a literal window to nature. By combining a warm wood frame with crystal-clear resin, you create a captivating floating effect where the blooms seem suspended in mid-air.
Step-by-Step Guide
Materials
- A5 or A6 wooden notebook cover blank (with window cutout)
- Two-part epoxy resin (casting or deep pour)
- Dried pressed blue cornflowers and delicate grasses
- Packing tape or specialized resin tape
- Heat gun or lighter
- Mixing cups and stir sticks
- White or pearlescent alcohol ink (optional, for subtle background)
- Sandpaper (various grits from 200 to 1000)
- Polishing compound and microfiber cloth
- Spiral binding mechanism and notebook paper refill
Step 1: Preparation & First Layer
-
Tape the Frame:
First, take your wooden cover with the pre-cut rectangular window. Flip it over to the backside (the inside of the cover) and seal the window opening completely with wide packing tape or resin tape. Ensure the seal is burnished down tight against the wood edges to prevent leaks. -
Position the Wood:
Place the cover on a level surface, tape-side down. The empty window should now look like a shallow tray waiting to be filled. -
Mix the Base Layer:
Mix a small amount of clear epoxy resin according to the manufacturer’s ratio. Let it sit for a few minutes so bubbles can rise to the surface before pouring. -
Pour the Base:
Pour a thin layer of clear resin into the taped window opening. You only need about 2-3mm of depth here—just enough to act as a glue bed for your flowers. -
Pop Bubbles:
Quickly pass a heat gun or lighter over the surface to pop any air bubbles trapped in the corners or against the tape. Let this layer cure until it is tacky (usually 1-2 hours) but not fully hard.
Cloudy Resin Correction
If your resin looks cloudy after peeling the tape, don’t panic. Paint a thin layer of fresh resin or gloss varnish on the back to instantly restore transparency.
Step 2: Arranging the Botanicals
-
Select Your Stems:
Choose dried pressed flowers that fit nicely within the frame without touching the edges too much. I like to dry-fit them on a piece of paper first to finalize the layout. -
Place the Flowers:
Gently place your pressed cornflowers and grass stems onto the tacky resin layer. The tackiness will hold them in place so they don’t float away during the next pour. -
Seal the Petals:
Use a small brush or toothpick to dab a tiny bit of fresh mixed resin over the delicate petals. This helps wet them out and reduces the chance of silver air pockets forming later. -
Optional Background Tint:
If you want the subtle milky white background seen in some light, you can mix a tiny drop of white alcohol ink into your next batch of resin, but keeping it clear provides the true ‘floating’ effect against the white paper insert.
Layered Depth
Pour the resin in three distinct layers, placing different flower parts in each layer. This creates a shadow-box effect where some blooms appear closer than others.
Step 3: Final Pour & Finishing
-
Mix the Top Coat:
Mix a larger batch of clear resin, enough to fill the rest of the window flush with the wooden surface. -
Fill the Window:
Slowly pour the resin over your arranged flowers. Pour from a slight height in a thin stream to help break bubbles as they fall. -
Level and Cure:
Use a stir stick to guide resin into the corners if needed. Use heat to remove bubbles again, then cover with a dust protectant box and let it cure fully for 24-48 hours. -
Remove Tape:
Once fully hardened, peel the tape off the back. Don’t worry if the back surface looks slightly matte or has tape lines; we will fix that. -
Sanding the Edges:
If any resin spilled onto the wood face, carefully sand it away. You may also want to lightly sand the back of the resin window to diffuse the light, creating that frosted look. -
Polishing:
For a crystal-clear finish instead of frosted, sand the resin surface with increasingly fine grit sandpaper (up to 2000), then use a polishing compound and a microfiber cloth to buff it back to shine. -
Add the Paper Insert:
Cut a piece of high-quality white cardstock slightly larger than the window. Glue this to the *inside* back of the cover, behind the resin window. This creates the clean white background that makes the blue flowers pop. -
Assemble the Notebook:
Align your front cover, paper refill, and back cover. Thread the spiral binding through the pre-drilled holes in the wood to complete the book.
Now you have a stunning, nature-inspired journal ready to house your sketches and thoughts


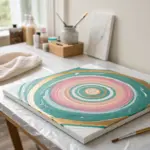
Have a question or want to share your own experience? I'd love to hear from you in the comments below!