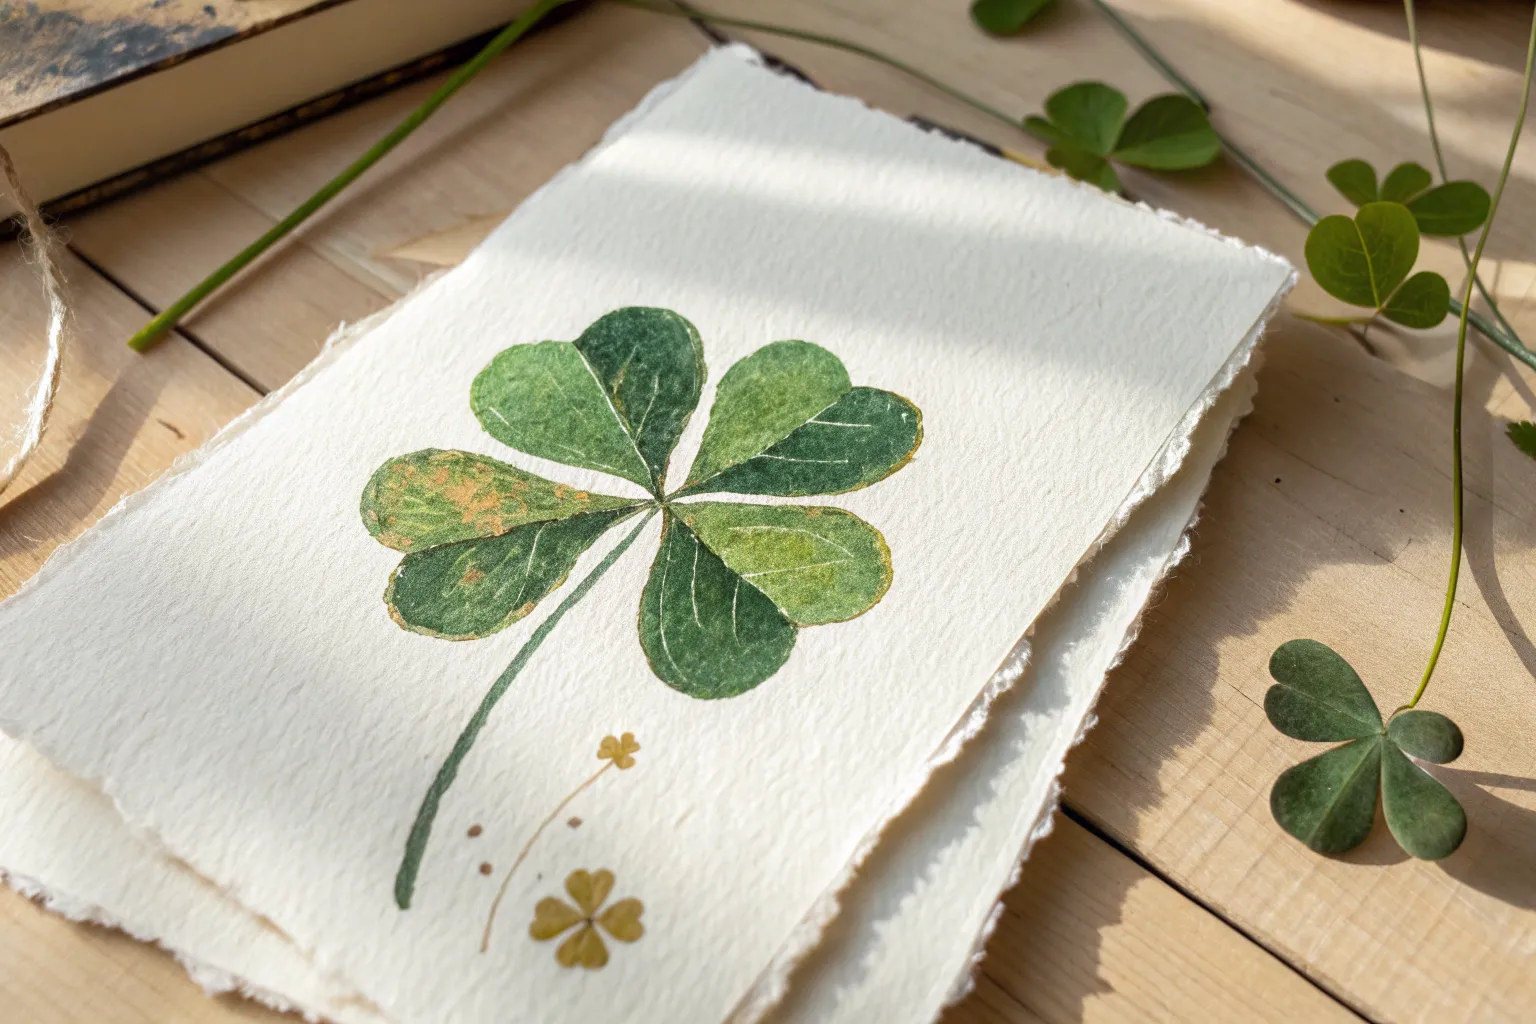
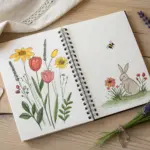
When I’m craving something cheerful and simple, I always come back to shamrock painting—it’s iconic, forgiving, and instantly festive. Here are my favorite shamrock painting ideas to take you from classic clover looks to more magical, artsy twists.
Classic Watercolor Shamrock Wash
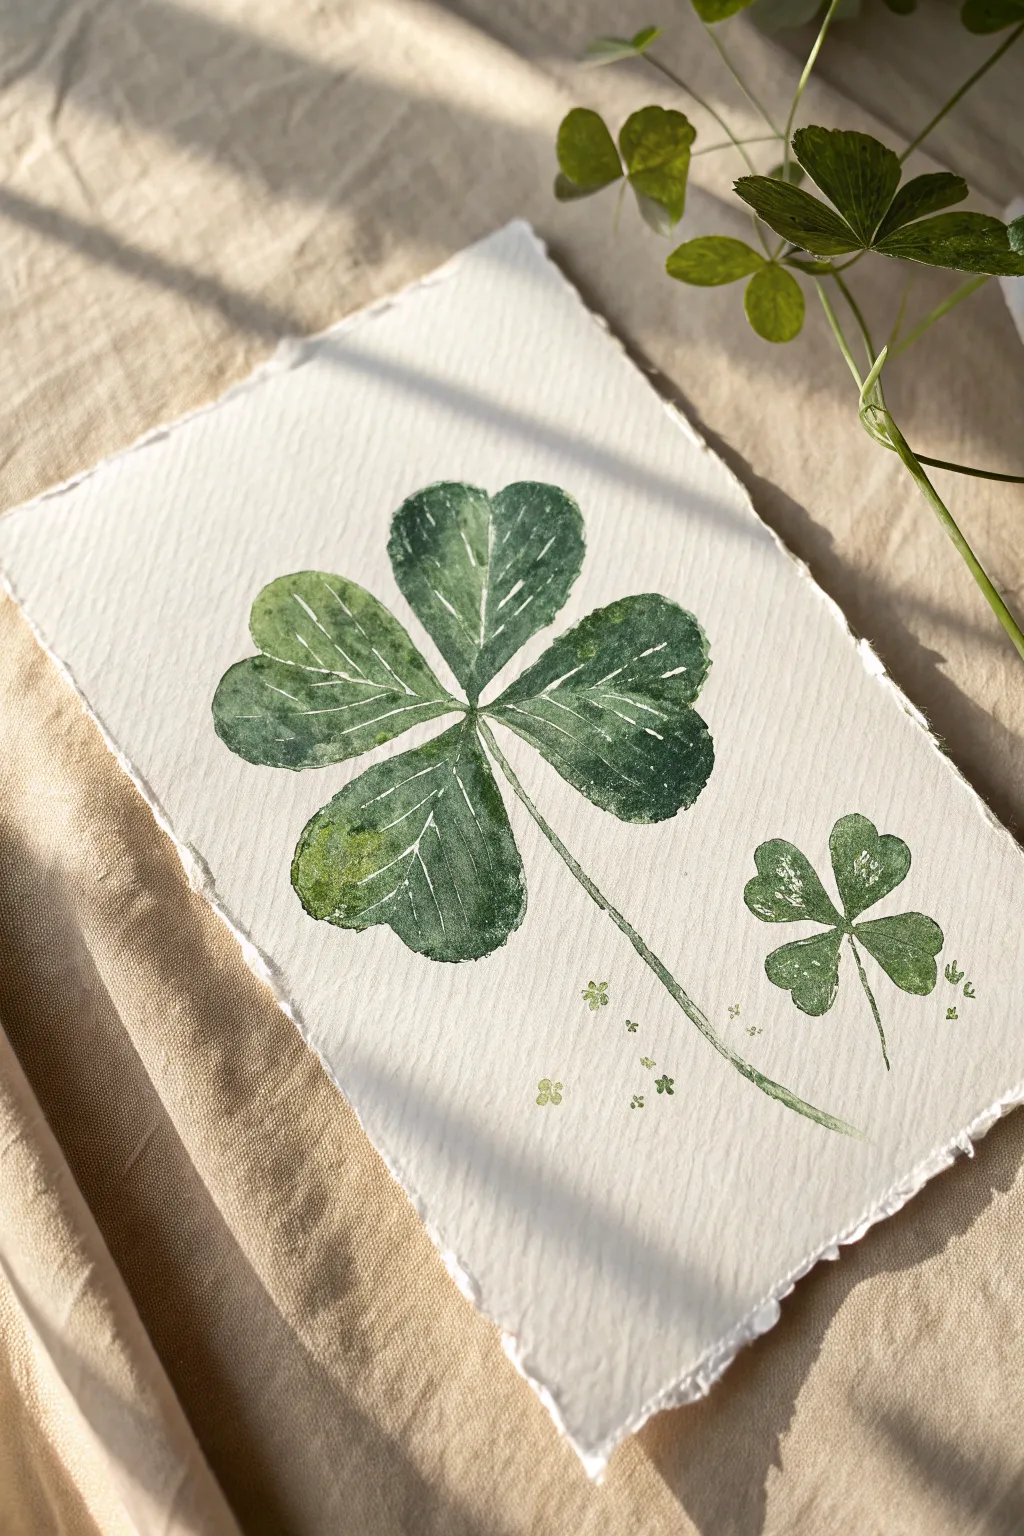
Capture the luck of the Irish with this loose and expressive four-leaf clover painting. The textured cold-press paper enhances the organic feel of the watercolor washes, while scattered splatters add a magical, finished touch.
Step-by-Step Tutorial
Materials
- Cold-press watercolor paper (300 gsm / 140 lb)
- Watercolor paints (Sap Green, Hooker’s Green, Burnt Umber)
- Round watercolor brushes (Size 4 and Size 8)
- White gouache or white ink
- Pencil (HB or similar)
- Kneaded eraser
- Clean water jar
- Paper towels
- Masking tape
Step 1: Sketching and Preparation
-
Secure the paper:
Tape your watercolor paper down to a hard board or table on all four sides. This prevents the paper from buckling when it gets wet and creates a clean border if you paint to the edge. -
Draw the center point:
Lightly mark a small dot in the center of your paper where the four leaves will meet. This anchor point helps keep your drawing symmetrical. -
Sketch the heart shapes:
Draw four heart shapes radiating outward from the center dot. Keep the lines very faint so they don’t show through the transparent paint later. I find a kneaded eraser is perfect for lifting excess graphite so only a ghost image remains. -
Add the stem:
From the bottom right crevice between two leaves, draw a slender, slightly curved stem extending off the page to the bottom right corner.
Bloom Control
To get those beautiful cauliflower-like textures, drop clean water into a drying (damp, not wet) wash. The water pushes pigment away, creating organic edges.
Step 2: First Wash: The Base Layer
-
Prepare your greens:
On your palette, mix a watery puddle of Sap Green (a yellow-green) and a separate puddle of a darker, cooler green like Hooker’s Green. -
Wet the first leaf:
Using your size 8 brush and clean water, paint the inside of just the top leaf. The paper should be glisten but not have standing puddles. -
Drop in color:
While the paper is still wet, touch your brush loaded with the lighter Sap Green to the edges of the leaf. Watch the pigment bloom inward naturally. -
Add depth immediately:
Before the first wash dries, drop a tiny amount of the darker green into the center of the leaf and near the vein line to suggest shadow and curvature. -
Repeat for all leaves:
Work one leaf at a time using the same wet-on-wet technique. Vary the intensity of green in each leaf to give the shamrock a natural, dappled look.
Step 3: Defining Details
-
Paint the stem:
Switch to your smaller size 4 brush. Load it with a mix of green and a touch of brown. Paint the stem with a single confident stroke, allowing the color to be slightly uneven for texture. -
Allow to dry:
Let the painting dry completely. If the paper is cool to the touch, it’s still wet inside. Patience here prevents muddy colors. -
Paint the veins:
With the size 4 brush and a darker, less watery green mix, paint fine lines down the center of each leaf. You can fracture the line slightly so it isn’t too rigid. -
Deepen the shadows:
Add a second glaze of dark green right at the center point where all leaves meet using a damp brush to soften the edges outward. -
Create hard edges:
If edges of the leaves look too fuzzy, use the tip of your small brush with concentrated paint to crisply redefine the outer heart shape outlines in a few selective spots.
Golden Luck
Mix metallic gold watercolor into your green splatters or use a gold gel pen for the veins to give the shamrock an elegant, shimmering St. Patrick’s Day vibe.
Step 4: Splatter and Sparkle
-
Green splatters:
Load a wet brush with green paint. Tap the handle against your finger over the paper to create fine green speckles around the shamrock. -
Prepare white medium:
Squeeze out a pea-sized amount of white gouache or ink. Mix it with a tiny drop of water until it has a milky consistency. -
Add white highlights:
Using the small brush, dab tiny clusters of white dots onto the darker areas of the leaves. This mimics light reflecting off the surface. -
Stamped clovers (optional):
If you have a tiny stamp, or just by using the brush tip, paint tiny miniature green clover shapes floating in the background for a whimsical touch. -
Final white splatter:
Finish by flicking a small amount of the white mixture over the entire piece. This ties the composition together and adds a magical, dusty texture.
Let your artwork dry completely before peeling off the tape to reveal your crisp, lucky masterpiece


Simple Acrylic Shamrock on a Bold Background
Bring a touch of luck into your home with this charmingly rustic shamrock painting featuring visible brushstrokes for an organic, hand-painted feel. The deep emerald greens contrast beautifully against a warm cream background, all housed in a shabby-chic white frame.
Detailed Instructions
Materials
- Small square canvas or textured art board (approx. 8×10 or 8×8)
- Wide, flat frame (wood)
- Acrylic paints: Hookers Green, Titanium White, Raw Umber, Yellow Ochre, Cream/Buff
- Medium flat brush
- Small round detail brush
- Fine-grit sandpaper
- Low-tack painter’s tape
- Pencil for sketching
- Palette for mixing
Step 1: Preparing the Surface
-
Prime the Background:
Mix a small amount of Yellow Ochre with plenty of Titanium White or use a pre-mixed Cream/Buff acrylic paint. Cover the entire canvas or art board with an even coat. I find that applying two thin coats gives a smoother finish than one thick one. -
Add Subtle Texture:
While the second coat of background paint is still slightly tacky, use a dry, clean brush to lightly drag across the surface vertically. This creates subtle striations that mimic the look of old paper or wood grain. -
Dry Completely:
Allow the background to dry fully before moving on. This prevents your green paint from muddying the crisp cream base.
Step 2: Painting the Shamrock
-
Sketch the Outline:
Lightly sketch a four-leaf clover shape in the center of your board using a pencil. Draw four heart-shaped leaves meeting at a central point, keeping the shapes slightly irregular for a natural look. -
Extend the Stem:
Draw a thin, slightly curved line extending downward from the center point to create the stem. Taper it slightly at the bottom. -
Mix Your Base Green:
Squeeze out your Hookers Green (or a similar deep forest green). You want this color to be rich and opaque. -
Block in the Leaves:
Using a medium flat brush, fill in the four leaves with the base green. Don’t worry about perfect coverage yet; visible brushstrokes following the curve of the leaf add character. -
Paint the Stem:
Switch to a small round brush. carefully paint the stem with the same base green, using a steady hand to keep the line relatively thin. -
Create Highlights:
Mix a tiny bit of White and Yellow Ochre into your green to create a lighter, grassy shade. Using a dry-brush technique, lightly sweep this lighter color along the outer curves of the leaves to suggest sunlight. -
Add Veining Detail:
Using the very tip of your small round brush and a darker mix (add a touch of Raw Umber to your green), paint very fine lines radiating from the center of each leaf outward. Keep these subtle. -
Refine the Edges:
Go back over the outer edges of the leaves if needed to crisp up the heart shapes. Imperfections here actually help it look like a real pressed plant.
Natural Texture
Don’t over-blend your green paint. Leaving visible streaks of lighter and darker green mimics the natural fibrous texture found in real clover leaves.
Step 3: Framing and Finishing
-
Paint the Frame Base:
If your wooden frame isn’t already white, paint it with a solid coat of white acrylic or chalk paint. Let it dry completely. -
Distress the Frame:
Take a piece of fine-grit sandpaper and gently sand the edges and raised areas of the frame. You want to reveal hints of the wood underneath to achieve that aged, farmhouse aesthetic. -
Add Inner Frame Detail:
Often frames have an inner lip or bead. Mix a watery wash of Raw Umber and carefully paint this inner edge. Before it dries, wipe most of it away with a paper towel, leaving just enough to look like accumulated age in the crevices. -
Assembly:
Once the painting is fully dry, place it into your distressed frame. Secure the back firmly. -
Sign Your Work:
Using a fine-point pen or the smallest brush, add your signature or initials vertically in the bottom right corner, keeping it small and unobtrusive.
Vintage Varnish
Applying a layer of matte varnish mixed with a tiny drop of brown paint over the finished piece can create an instant ‘tea-stained’ antique effect.
Place your new artwork near a window or alongside some potted plants to emphasize its botanical charm


“Lucky” Shamrock Sign Painting
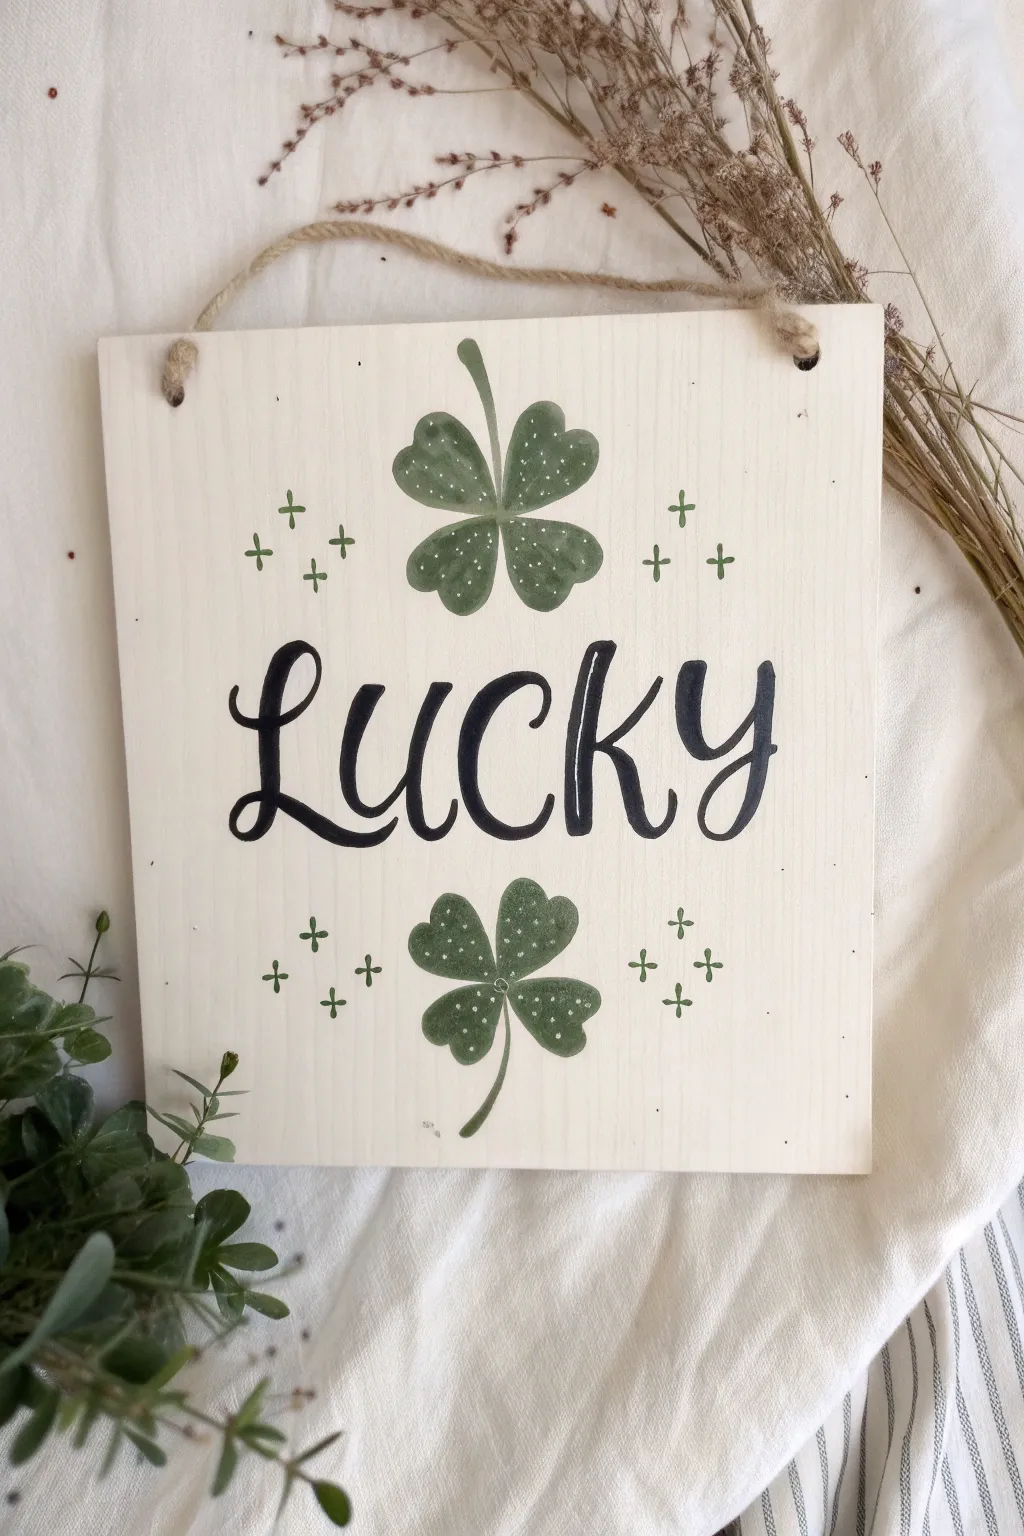
Bring a touch of charm to your home with this delightful wooden sign, featuring hand-painted shamrocks and elegant lettering. The soft green tones and speckled detailing give it a lovely vintage feel perfect for St. Patrick’s Day or year-round luck.
How-To Guide
Materials
- Square wooden plaque (approx. 8×8 or 10×10 inches)
- White or cream acrylic paint
- Sage green acrylic paint
- Black acrylic paint
- Large flat brush
- Small round detail brush
- Pencil
- Jute twine
- Toothbrush (for speckling)
- Drill (if wood isn’t pre-drilled)
- Fine-grit sandpaper
Step 1: Preparation and Base Coat
-
Prepare the wood surface:
Begin by lightly sanding your wooden plaque to ensure a smooth painting surface. If your wood doesn’t already have holes for hanging, drill two small holes in the top corners now before you start painting. -
Apply the base coat:
Load your large flat brush with white or cream acrylic paint. Apply an even layer across the entire front of the sign, following the grain of the wood. -
Let it dry completely:
Allow the first coat to dry fully. If the wood grain is showing through more than you’d like, apply a second coat for a more solid, opaque finish. -
Distress the edges (optional):
For a rustic look, you can lightly sand the edges of the dried paint to reveal a tiny bit of raw wood underneath.
Step 2: Sketching the Design
-
Mark the center:
Lightly mark the center of your board with a pencil. This will help you balance the text between the upper and lower shamrock motifs. -
Draft the lettering:
Using a pencil, lightly sketch the word ‘Lucky’ across the middle of the board in a cursive script. Aim for a bouncy, whimsical style where the ‘L’ and the ‘y’ have nice, looping tails. -
Outline the shamrocks:
Sketch a four-leaf clover centered above the text and another centered below it. For the four-leaf clover, draw four heart shapes meeting in the middle. Add a simple stem: one pointing up for the top clover, and one curving down for the bottom one. -
Add decorative crosses:
Sketch small ‘plus’ signs or crosses clustered to the left and right of both shamrocks. Varying the sizes slightly adds visual interest.
Pro Tip: Steady Hands
For smoother lettering, rest your pinky finger on the dry part of the board while painting. This stabilizes your hand and gives you better control over curves.
Step 3: Painting the Shamrocks
-
Block in the leaves:
Dip your small round brush into the sage green paint. Carefully fill in the four heart-shaped leaves of the top shamrock, keeping the edges soft and rounded. -
Paint the stems:
Using the very tip of your brush, paint the thin stems attached to the shamrocks. Remember, the top stem points toward the top edge, and the bottom one curves naturally downward. -
Paint the lower shamrock:
Repeat the painting process for the bottom shamrock, ensuring the green color remains consistent. -
Add the accent crosses:
With the same green paint, go over your pencil sketches for the small plus signs on either side of the clovers. -
Create the speckled texture:
This is a fun trick: dip an old toothbrush into white paint, then flick the bristles with your thumb to mist tiny white speckles over the green shamrocks. I find this gives the leaves a beautiful, textured depth.
Level Up: 3D Detail
Mix a tiny drop of white into your sage green and paint thin, curved highlight lines on one side of each shamrock leaf to make them look dimensional.
Step 4: Lettering and Final Touches
-
Outline the text:
Switch to your black acrylic paint and a fine liner brush. Carefully trace the outline of your ‘Lucky’ pencil sketch. -
Thicken the downstrokes:
To achieve that faux-calligraphy look, go back and thicken every stroke where your pencil moved downward. Keep the upstrokes thin and delicate. -
Fill in the letters:
Work slowly to fill in the thickened areas solid black, smoothing out any shaky lines as you go. -
Erase pencil marks:
Once the black paint is 100% dry, gently erase any visible pencil lines from your initial sketch. -
Thread the hanger:
Cut a length of jute twine. Thread the ends through the holes from the front to the back and tie sturdy knots on the back side to secure the hanger.
Hang your new sign on a door or entryway wall to welcome guests with a bit of handmade charm


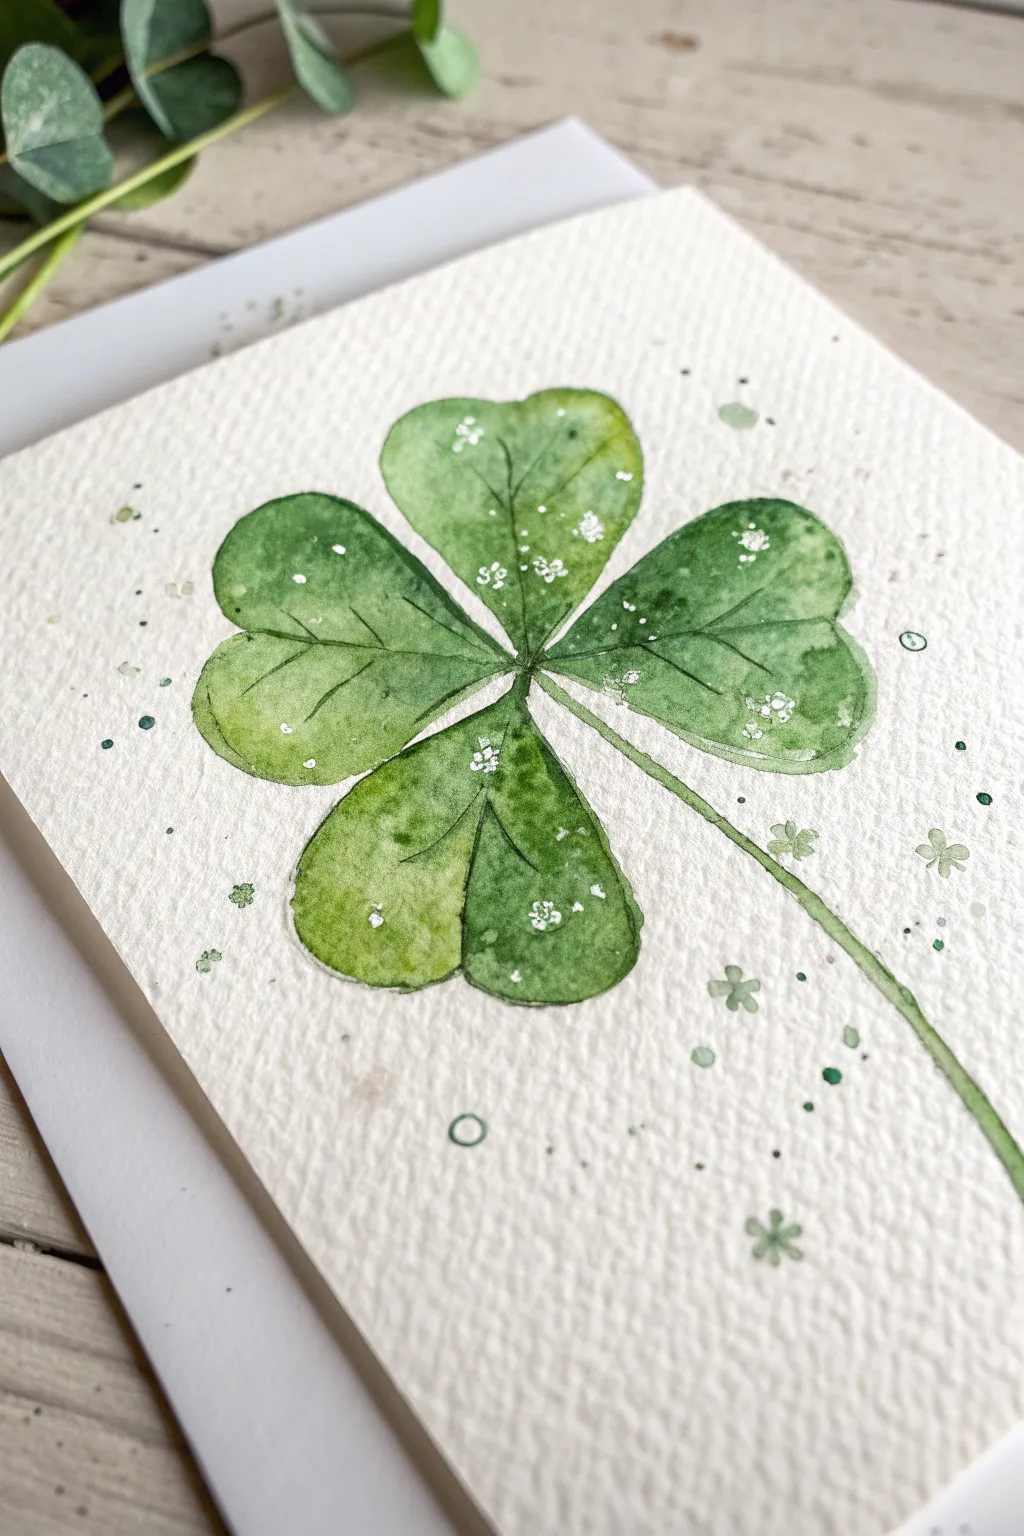
Shamrock Bouquet in a Mason Jar Look
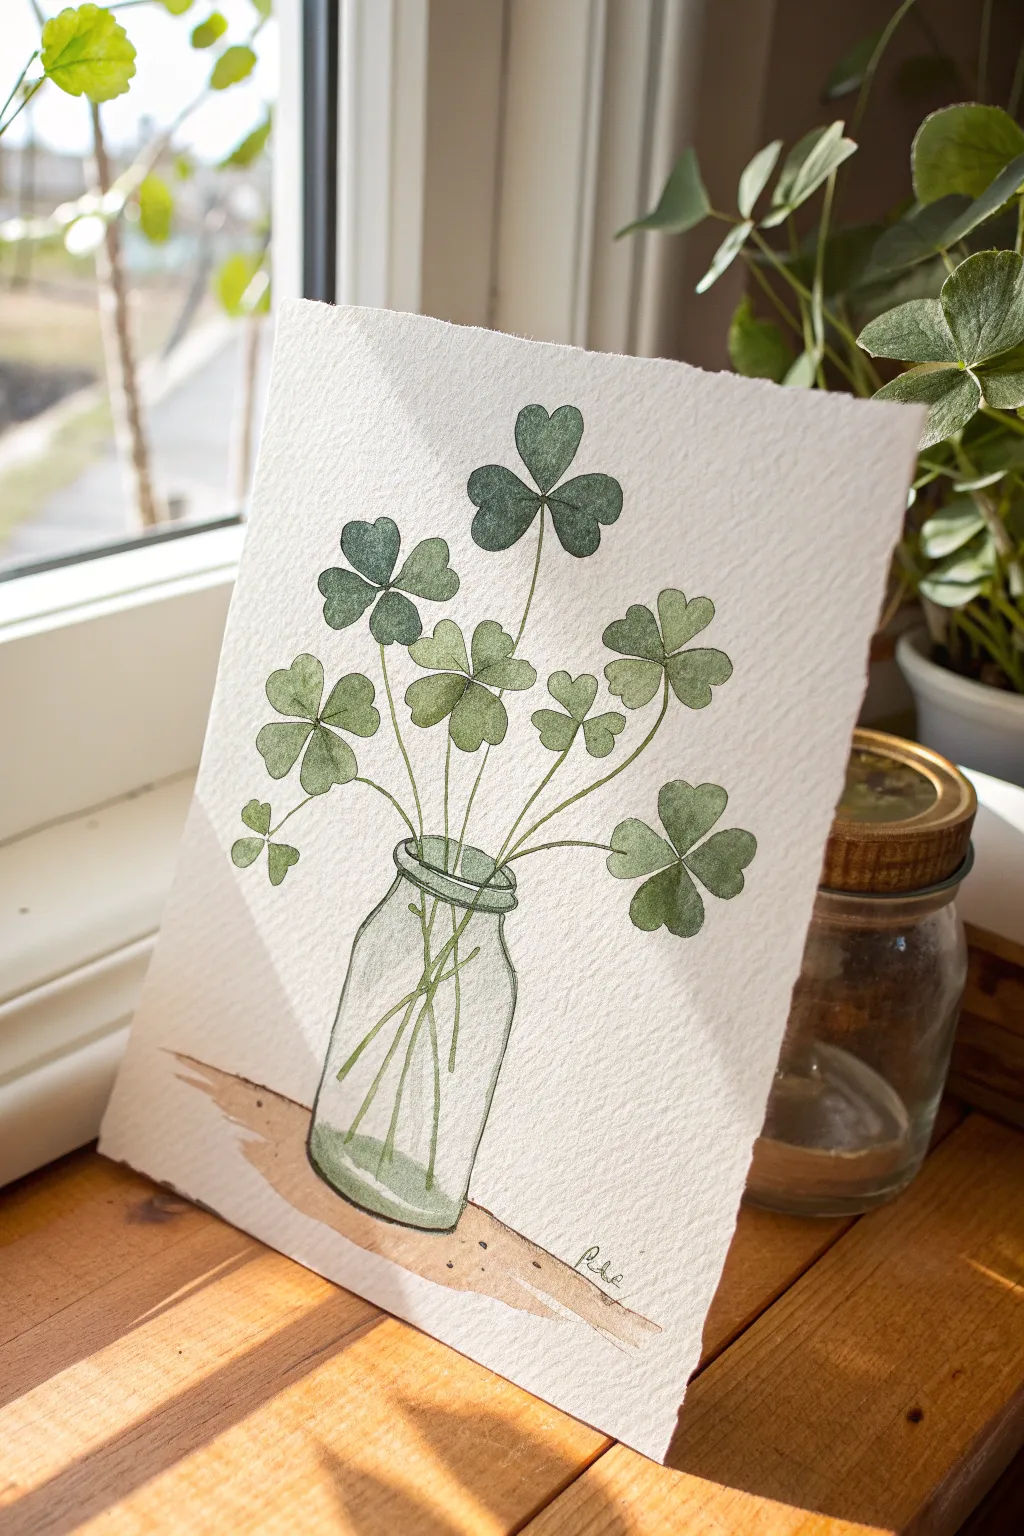
Capture the delicate charm of spring with this watercolor illustration featuring a bouquet of shamrocks in a simple glass jar. The varying shades of green created by layering washes give the leaves a lovely, translucent depth.
Step-by-Step Tutorial
Materials
- Cold press watercolor paper (300 gsm recommended for texture)
- Watercolor paints (Sap Green, Hooker’s Green, Yellow Ochre, Burnt Umber, Payne’s Grey)
- Round watercolor brushes (sizes 2 and 6)
- Fine liner pen (0.1 or 0.3mm, waterproof)
- Pencil (HB or H)
- Kneaded eraser
- Jar of water
- Paper towel
Step 1: Sketching the Composition
-
Outline the jar:
Begin by lightly sketching the outline of a simple glass jar near the bottom center of your paper. Keep the lines faint, as you want the watercolor to be the star. Draw the oval opening at the top and a slightly curved bottom line to suggest volume. -
Map out the stems:
Draw thin, curved lines radiating upwards from the jar’s opening. Vary their lengths and directions so the bouquet feels natural and not too stiff. Let a few stems cross over each other inside the jar area. -
Add the clover leaves:
At the end of each stem, sketch the shamrock heads. Most should be the classic three-leaf shape (heart-shaped leaflets), but you can add a four-leaf clover for luck. Vary the angles—some facing forward, some turning slightly away. -
Refine and erase:
Once you are happy with the arrangement, gently roll a kneaded eraser over the sketch to lift up excess graphite, leaving just a ghost of a guide for your painting.
Muddy Greens?
If your greens look dull, stop mixing too many colors. Stick to one blue and one yellow as a base, or use tube greens modified only slightly with yellow ochre.
Step 2: Painting the Shamrocks
-
Mix your greens:
Prepare a few puddles of green on your palette. Mix a bright, yellow-green for younger leaves and a deeper, blue-green for shadowed ones. I like to have a watery mix ready to keep the initial layers transparent. -
First wash on leaves:
Using your size 6 brush, paint the individual heart-shaped leaflets. Don’t worry about perfect blending yet; just drop in the base color. Use the lighter green for the top leaves and darker for lower ones. -
Create variation:
While the paint is still damp on some leaves, touch the tip of your brush with a darker green to the base where the leaflets meet. Let the pigment bleed naturally outward for a soft gradient. -
Paint the stems:
Switch to your size 2 brush. With a steady hand, paint the stems using a mix of green and a touch of brown. Make the lines thin and consistent, following your pencil guides down into the jar.
Pro Tip
Leave a tiny, unpainted white gap between the individual heart-shaped leaflets of each clover. It prevents the colors from bleeding together into a blob.
Step 3: Painting the Glass Jar
-
Wash the glass:
For the glass effect, make a very pale, watery mix of Payne’s Grey or blue-green. Paint the interior of the jar, carefully painting *around* the green stems you already placed inside, or glazing over them if they are dry. -
Add water level:
Paint a small horizontal ellipse near the bottom of the stems to indicate the water line. Darken the green of the stems below this line slightly to show refraction. -
Rim details:
Use a slightly stronger mix of the grey-green to paint the rim of the jar. Leave tiny slivers of white paper unpainted on the rim and the jar’s shoulder to act as highlights.
Step 4: Finishing Details
-
Ground the object:
Mix a watery brown using Burnt Umber and Yellow Ochre. Paint a loose, irregular patch underneath the jar to represent a wooden surface or shadow. Keep the edges ragged for an artistic look. -
Deepen shadows:
Once the first layer of leaves is bone dry, glaze a second distinct layer of darker green over parts of the leaves to create vein patterns or separation between overlapping leaflets. -
Ink outlining (optional):
If you want a sharper, illustrative style like the example, use a waterproof fine liner to loosely outline the leaves and the jar. Breaking the line occasionally adds character. -
Final highlights:
Evaluate your jar. If the glass looks too flat, you can lift a little color with a damp, clean brush or add a tiny stroke of white gouache for a sparkle.
Place your finished piece in a sunny spot to dry and enjoy the festive touch of green.
BRUSH GUIDE
The Right Brush for Every Stroke
From clean lines to bold texture — master brush choice, stroke control, and essential techniques.
Explore the Full Guide
All-Over Shamrock Pattern Background
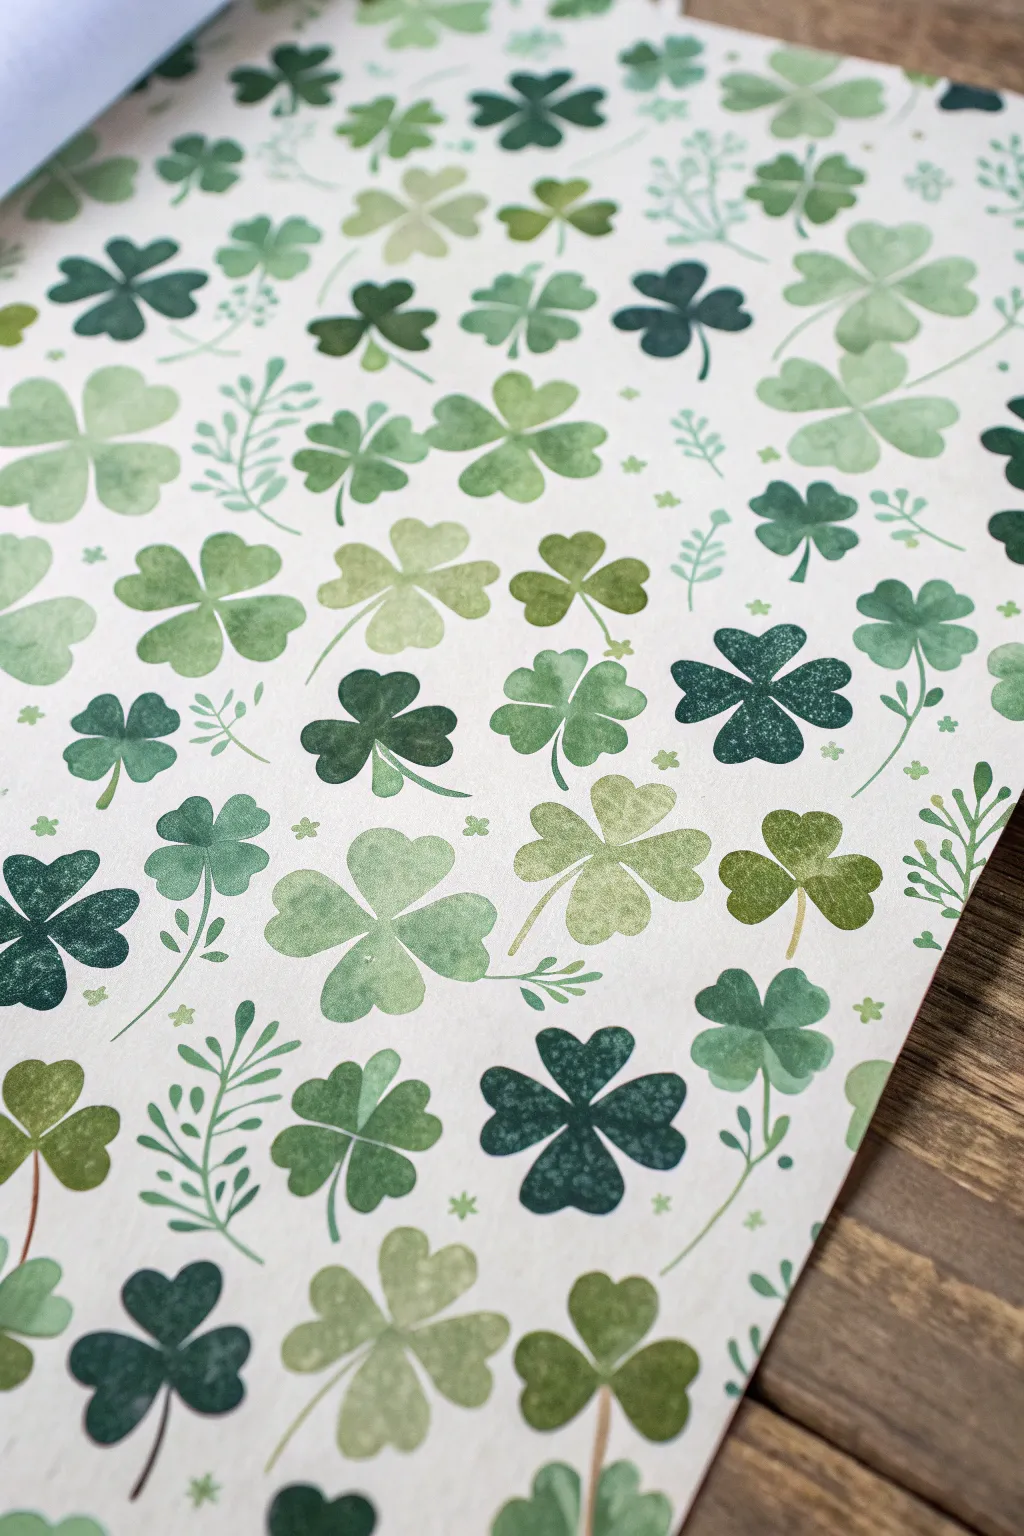
Create your own festive backing paper or art piece with this charming, all-over shamrock pattern. The project uses watercolor techniques to achieve a soft, translucent look with varied green hues that feel organic and fresh.
Detailed Instructions
Materials
- Hot press watercolor paper (smooth texture)
- Watercolor paints (Sap Green, Hooker’s Green, Yellow Ochre, Deep Green)
- Round watercolor brushes (sizes 2, 4, and 6)
- Pencil (light H grade)
- Eraser
- Paper towels
- Two water jars
Step 1: Planning and Sketching
-
Visualize the Layout:
Before putting brush to paper, look at your blank sheet. The goal is a random but balanced distribution. You want a mix of large four-leaf clovers and smaller three-leaf shamrocks, interspersed with tiny sprigs. -
Lightly Sketch Anchors:
Using your H pencil, very faintly sketch the positions of the largest clovers first. Don’t draw every detail; just mark a small ‘X’ or circle where the center of each main element will be to ensure even spacing. -
Fill the Gaps:
Mark spots for medium-sized shamrocks in the empty spaces between your anchors. Rotate the orientation of each mark so the stems will eventually point in different directions, creating a tossed effect.
Fixing Blobs
If leaves bleed together, wait for them to dry completely. Then, use a white gel pen to draw the separation lines back in over the dry paint.
Step 2: Painting the Base Shapes
-
Mix Your First Green:
Start with a light, fresh green mix. Combine Sap Green with plenty of water and a touch of Yellow Ochre. This will be for the largest, lightest clovers. -
Paint Heart Shapes:
For a four-leaf clover, paint four heart shapes that meet at a central point. Leave a tiny sliver of white space between the leaves to prevent them from bleeding into a blob. -
Vary the Leaf Styles:
Switch to a medium brush (size 4). Paint some three-leaf shamrocks using the same technique—three hearts meeting in the middle. I like to make these slightly more irregular for a natural look. -
Create Color Variation:
While the first batch is drying, mix a darker, cooler green using Hooker’s Green. Paint a new set of scattered clovers. The variety in color depth gives the pattern dimension. -
Add Dark Contrast:
Mix a very saturated Deep Green with less water. Use your smallest brush to paint tinier, solid shamrocks in the remaining significant gaps. These dark elements anchor the design visually.
Magic Metallic Pop
Mix a small amount of gold watercolor or ink and paint tiny dots or veins on the darker shamrocks for a subtle, shimmering St. Patrick’s flair.
Step 3: Adding Details and Stems
-
Paint Curved Stems:
Once the leaf heads are mostly dry, go back with your size 2 brush. Paint thin, curved stems attached to each clover. Vary the length and curve direction to enhance the playful, scattered feel. -
Adding Texture with Wet-on-Wet:
If any leaves are still slightly damp, drop a tiny dot of darker pigment near the center or base of the leaf. Let it bloom naturally to create that mottled, watercolor texture. -
Fill with Sprigs:
Look for empty white spaces. Using a diluted mid-green, paint delicate fern-like sprigs or tiny vines. These should be simple strokes—a central line with small dashes for distinct leaves. -
Scattered Dots:
For the tiniest gaps, add little asterisks or single dots using the tip of your brush. This mimics small buds or seeds and helps the pattern feel cohesive and full. -
Evaluate Balance:
Step back and squint at your paper. If any area looks too empty, add a small, faint shamrock or a simple leaf shape to balance the visual weight. -
Erase Guide Lines:
Wait until the painting is completely bone dry—this is crucial to avoid smudging. Gently erase any visible pencil marks from your initial planning phase.
Now you have a beautiful sheet of hand-painted pattern paper ready for card making or framing.
Crayon-Resist Shamrock With Doodle Fill
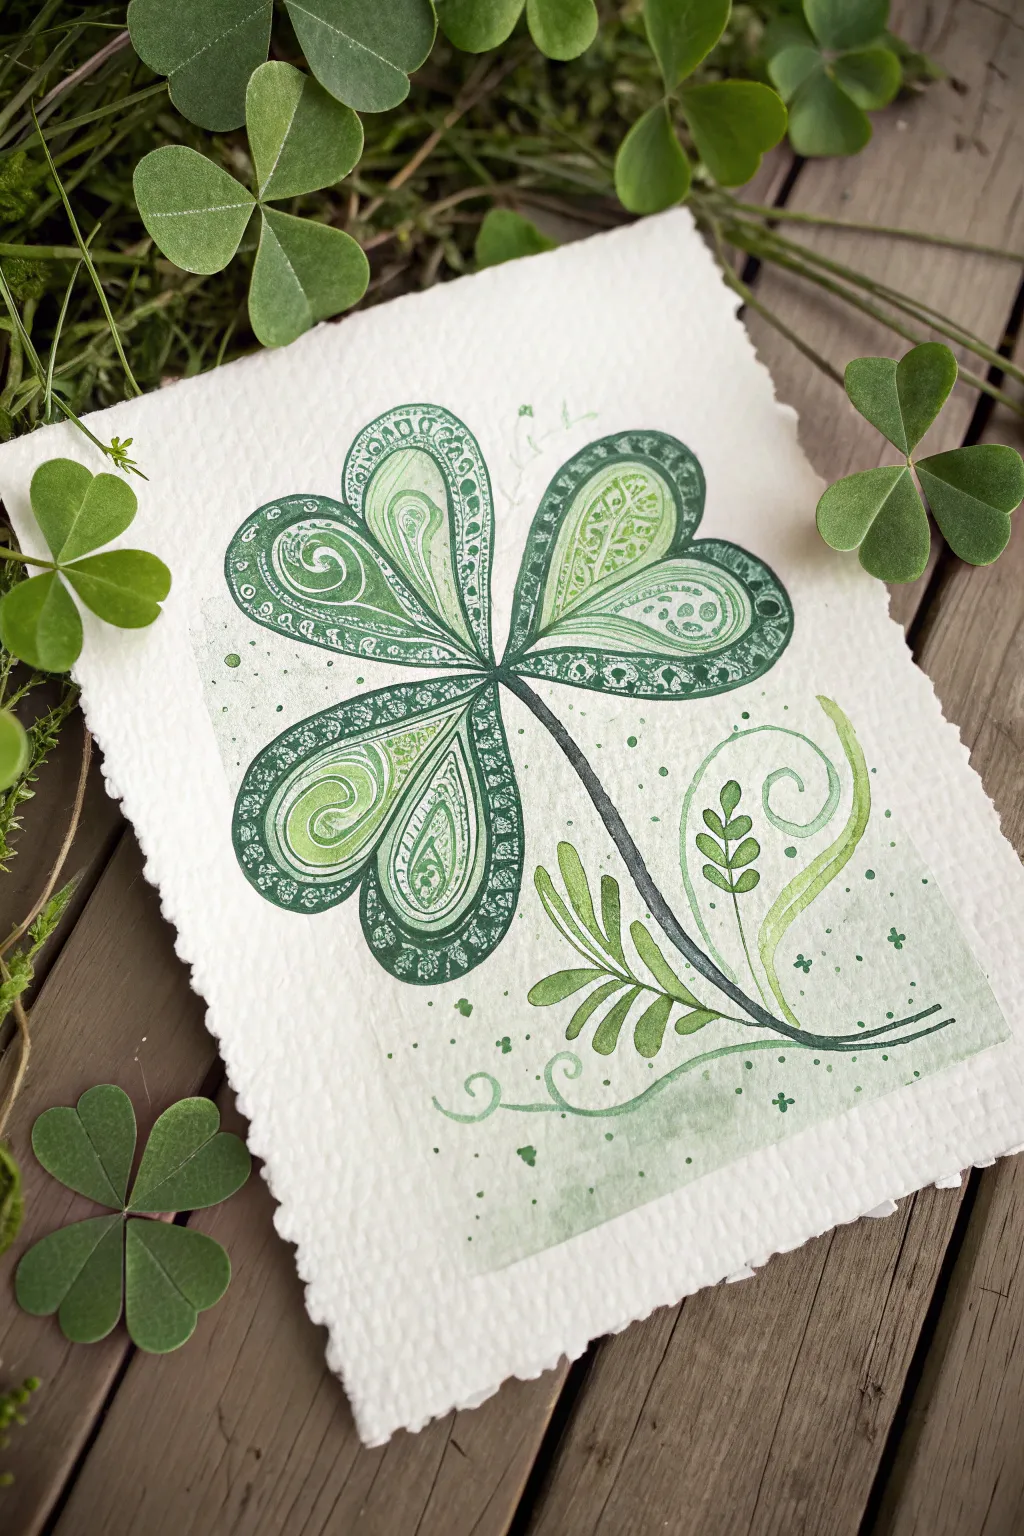
This elegant project combines the meditative patterns of doodling with the soft flows of watercolor to create a stylized clover. The distinct sections allow you to play with different monochromatic shades of green, resulting in a piece that feels both organic and structured.
Step-by-Step Guide
Materials
- Cold-press watercolor paper with deckled edges (approx. 5×7 inches)
- Pencil and eraser
- Fine-liner pens (dark green, waterproof ink)
- Watercolor paints (various shades of green: sap green, hooker’s green, viridian)
- Small round paintbrush (size 2 or 4)
- Clean water and paper towels
- White gel pen (optional for highlights)
Step 1: Planning the Layout
-
Sketch the outline:
Begin by lightly sketching a large three-leaf clover shape in the center of your paper using a pencil. Tilt the stem slightly to the right for a natural, drifting look. -
Divide the leaves:
Inside each of the three heart-shaped leaves, draw a central vein line that splits the leaf in half. Then, draw a smaller, inner heart shape within each leaf to create a border area. -
Add decorative flourishes:
Sketch a few swirling tendrils and small leaves emerging from the base of the stem to fill out the composition on the bottom right.
Smudge Prevention
If your ink smears when you paint over it, stop immediately. Your pen might not be waterproof. Switch to permanent markers or wait 24 hours for the ink to cure fully before painting.
Step 2: Inking the Details
-
Outline the main shape:
Using a dark green waterproof fine-liner, go over your pencil lines for the main clover leaves and the stem. Make the stem line slightly thicker to give it weight. -
Fill the borders:
In the outer border of each leaf (the space between your outer and inner heart shapes), draw intricate patterns. Tiny circles, dots, and simple lines work well here to create a lace-like effect. -
Create the inner patterns:
For the inner sections of the leaves, draw sweeping, curved lines that mimic the natural flow of veins. I like to add concentric swirls or teardrop shapes here to enhance the zentangle feel. -
Detail the flourishes:
Ink the swirling tendrils and small leaves at the bottom. Keep these lines delicate and fluid. -
Erase pencil marks:
Wait until the ink is completely dry to avoid smudging, then gently erase all visible pencil sketches.
Add Some sparkle
Once the watercolor is totally dry, use a metallic gold gel pen to trace over the inner swirls or add gold dots to the border. It adds a magical, Celtic feel to the clover.
Step 3: Painting with Watercolors
-
Paint the inner leaves:
Mix a light, watery sap green. Carefully paint the inner heart sections of the leaves. Let the paint pool slightly in the swirls to create natural gradients. -
Darken the borders:
Using a darker, more saturated green (like deep hooker’s green), paint the patterned border areas. The darker color will make your ink doodles pop beautifully. -
Shade the stem:
Paint the stem with a gradient, starting with dark green at the base and fading to a lighter green as it meets the leaves. -
Paint the bottom flourishes:
Use a medium green tone for the decorative leaves and swirls at the bottom, keeping the strokes light and varying the pressure on your brush. -
Create a background wash:
Dilute a very small amount of green paint with lots of water to create a faint wash. Paint a loose, rectangular shape behind the clover, intentionally leaving uneven edges. -
Splatter texture:
Load your brush with watery green paint and gently tap it over the paper to create small splatters around the main design, adding energy to the piece. -
Add tiny details:
Once the background wash is dry, use the tip of your brush to paint tiny dots, crosses, or plus signs floating in the background area.
Step 4: Final Touches
-
Intensify shadows:
If any areas look too flat, add a second layer of dark green glaze to the deepest parts of the patterned border or the underside of the stem. -
Review and dry:
Let the entire piece dry completely flat. If the paper buckles slightly, you can press it under a heavy book overnight once it is bone dry.
Display your finished botanical illustration in a floating frame to show off those beautiful deckled edges

PENCIL GUIDE
Understanding Pencil Grades from H to B
From first sketch to finished drawing — learn pencil grades, line control, and shading techniques.
Explore the Full Guide
Cotton Swab Dot Shamrock Pointillism

Using pointillism to create a shamrock adds a lovely sense of texture and depth that flat paint just can’t match. This project uses cotton swabs to build up layers of green dots, resulting in a charming, slightly rustic four-leaf clover on textured paper.
How-To Guide
Materials
- Thick watercolor paper or cold-press illustration board
- Cotton swabs (Q-tips)
- Small round paintbrush (size 2 or 4)
- Acrylic or tempera paint (dark forest green, medium grass green, light lime green)
- Pencil
- Eraser
- Paper plate or palette
- Water cup
Step 1: Preparation & Sketching
-
Prep your palette:
Squeeze out quarter-sized dollops of your three green shades onto your palette. If you don’t have three distinct greens, you can mix white into a standard green to create a lighter shade and a tiny touch of black or blue for a darker shade. -
Outline the shape:
Lightly sketch a large four-leaf clover in the center of your paper. Draw four heart shapes that meet in the middle at their points. Keep your pencil lines faint so they can be easily erased or covered later. -
Add the stem:
Draw a gently curved line extending from the center point downward for the stem. Make it slightly thicker at the bottom than at the top.
Fuzzy dots?
Cotton swabs can fray quickly. If your dots start looking blurry or hairy, swap to a fresh Q-tip immediately. Twist the cotton tight before dipping to keep shapes round.
Step 2: Creating the Solid Centers
-
Paint the inner hearts:
Before you start dotting, use your paintbrush to fill the center of each heart with your medium or light green paint. You don’t need to fill the entire shape; leave a generous border of empty paper around the edges for the dot work. -
Soften the edges:
While the paint is still wet, gently dab the edges of these painted centers to make them irregular. This helps transition smoothly into the dots later, rather than having a hard line. -
Create background shamrocks:
If you wish to include the smaller accent shamrocks shown in the example, sketch and lightly paint two small three-leaf shapes in the background using a lighter, watered-down wash of green.
Step 3: Dotting the Details
-
Prepare your swabs:
Dip a fresh cotton swab into the darkest forest green paint. Dab it once on a scrap paper to remove excess globs so your dots will be uniform. -
Outline the first leaf:
Starting with the top leaf, press the swab down firmly to create a row of dots along the outer pencil line. Keep the spacing consistent. -
Fill the perimeter:
Continue using the dark green to create 2-3 rows of dots moving inward from the outline toward the painted center. Stagger the dots slightly like bricks in a wall for better coverage. -
Repeat for all leaves:
Apply this dark green border technique to the remaining three leaves, ensuring the dots define the heart shapes clearly. -
Transitioning colors:
Switch to a clean cotton swab and your medium green paint. Add a row or two of medium dots just inside the dark green ones, overlapping slightly with the painted center to blend the textures. -
Dot the stem:
Using the dark green and a brush handle or a very lightly pressed swab, create a single line of small dots to form the stem. I find that tapering the size of the dots smaller near the top makes it look more elegant.
Level Up: Metallic Pop
Mix a tiny bit of gold metallic acrylic paint into your lightest green. When the light hits your artwork, the shamrock will have a subtle, magical shimmer.
Step 4: Finishing Touches
-
Add stray splashes:
Dip a toothbrush or a stiff brush into watery dark green paint and flick it lightly over the paper to create tiny speckles. This adds energy and texture to the white space. -
Define the small shamrocks:
Go back to your small background shamrocks. Use a fine-tip brush or a toothpick dipped in dark green to add tiny dots or outlines to one of them, giving it focus while leaving the other soft and faded. -
Highlight the texture:
Once the main shamrock is dry, take a very small amount of the lightest lime green on a swab and add just a few highlight dots on top of the dark sections to create dimension. -
Erase guidelines:
After ensuring the paint is completely bone-dry—give it extra time just to be safe—gently erase any visible pencil marks from your initial sketch.
Step back and admire the lovely texture you’ve built up with just a simple repetitive motion
Handprint Shamrock for Kid-Friendly Keepsakes
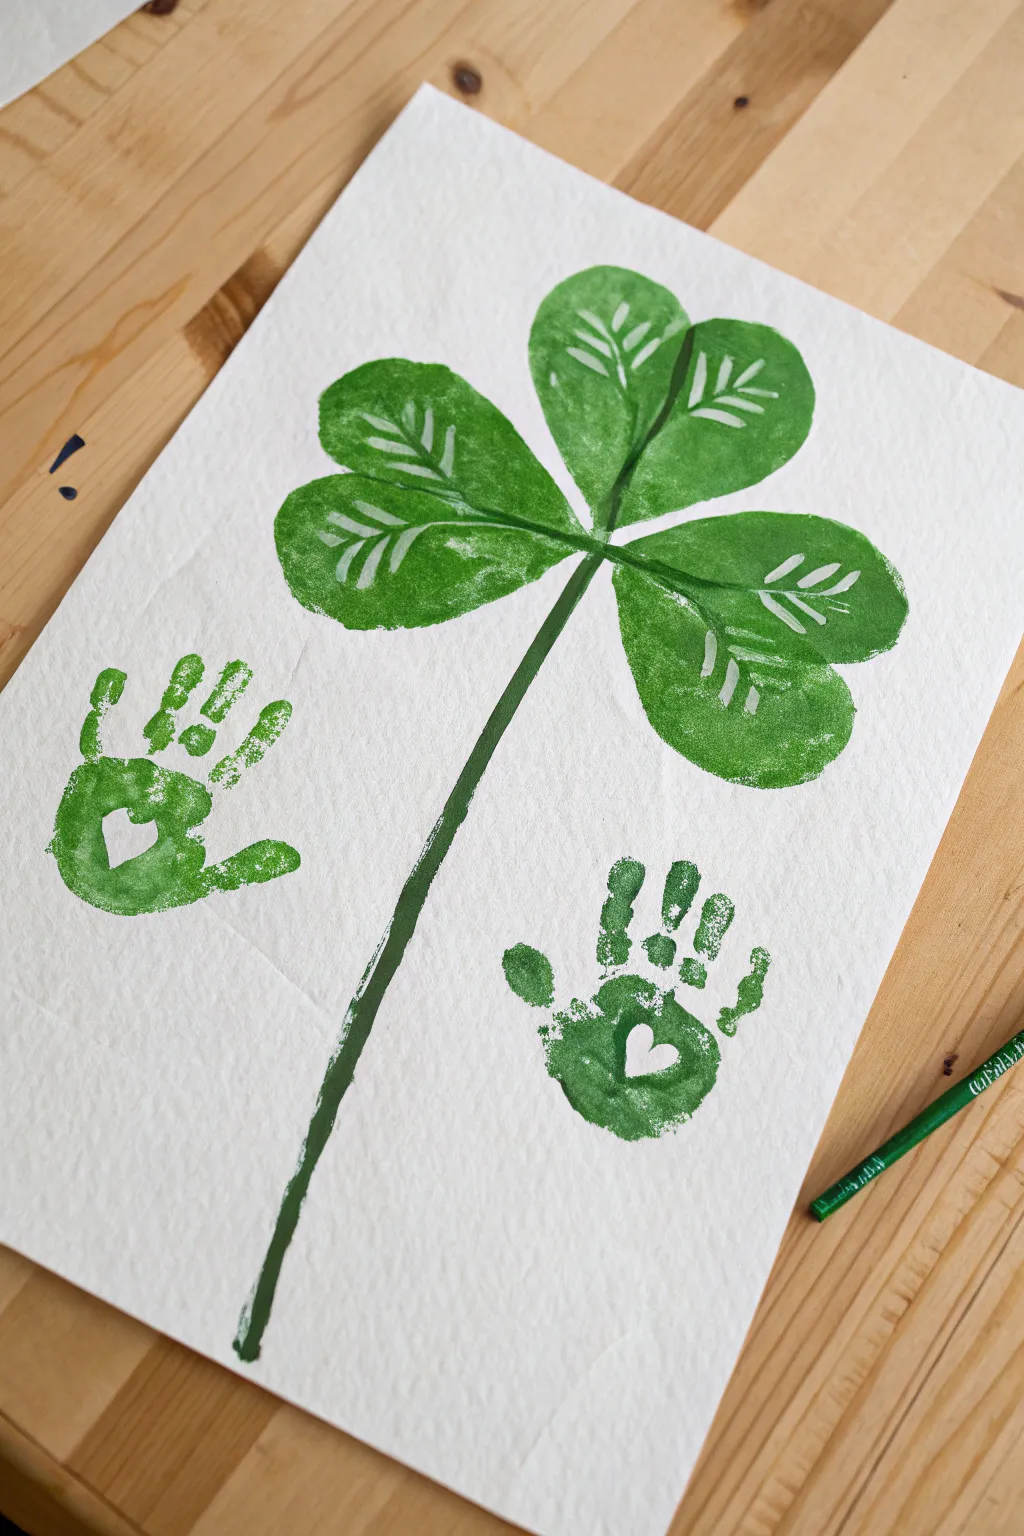
Capture a moment in time with this adorable painting that pairs a bold four-leaf clover with sweet little green handprints. Featuring a clever heart cutout detail in the palms, it’s a charming St. Patrick’s Day craft that doubles as a memory you’ll want to frame.
Step-by-Step Tutorial
Materials
- Heavyweight watercolor paper or textured cardstock (white)
- Green tempera or acrylic paint (washable for kids is best)
- Foam brush or large flat paintbrush
- Fine tip paintbrush (for the stem)
- Heart-shaped stickers or masking tape
- Paper plate or palette
- Green colored pencil or thin marker
Step 1: Creating the Big Clover
-
Prepare your paper:
Lay your textured watercolor paper on a flat surface. You might want to tape down the corners to keep it from shifting while you stamp. -
Load the paint:
Squeeze a generous amount of green paint onto a paper plate. Use a foam brush to spread it out slightly so it’s not a thick glob. -
Create the first leaf:
To make the four-leaf clover at the top, you’ll arguably get the best shape by using a stamp or even a skillfully painted potato stamp cut into a heart shape. Alternatively, paint a heart shape directly onto the paper using the foam brush. -
stamp the remaining leaves:
Repeat this process three more times, arranging the points of the hearts so they meet in the center. Allow a tiny bit of white space between them to define the individual leaves. -
Add texture details:
While the paint is still wet, use the back end of a paintbrush or a toothpick to scrape away paint in a vein pattern on each leaf. This ‘sgraffito’ technique reveals the white paper underneath. -
Paint the stem:
Dip a medium paintbrush into the green paint. Starting from the center where the leaves meet, pull a long, slightly curved line down toward the bottom of the page. -
Refine the stem shape:
Go back over the stem to thicken it slightly, making it look natural rather than perfectly straight. Let the main clover dry completely before moving on.
Clean Edges Trick
If you don’t have stickers, cut a heart from masking tape. Press it firmly onto the palm to ensure paint doesn’t bleed under the edges.
Step 2: Adding the Handprints
-
Prepare the hands:
Clean and dry your child’s hand. Place a small heart sticker right in the center of their palm. Press it down firmly so paint won’t seep underneath. -
Apply paint to the hand:
Using a foam brush, paint a generous, even layer of green paint over the entire hand, cover the sticker and fingers completely. -
First handprint:
Guide the hand to the left of the clover stem. Press the hand down firmly, ensuring the palm and each finger make contact with the textured paper. -
Lift carefully:
Lift the hand straight up to avoid smearing the print. Immediately use a pair of tweezers or your fingernail to carefully peel off the heart sticker from the painted palm to reveal the white heart. -
Repeat for the second print:
Clean the hand or use the other hand. Apply a fresh heart sticker to the palm. -
Paint and press:
Coat the hand with fresh green paint again. Position this print on the right side of the stem, slightly lower or higher than the first for a balanced look. -
Reveal the second heart:
Lift the hand straight up and peel away the second sticker while the paint is still wet to keep the edges crisp. -
Let it cure:
Set the artwork aside in a safe place to dry completely. The thicker parts of the handprints may take a little longer than the brushed paint. -
Optional finishing touch:
Once fully dry, you may want to sign the bottom corner with a green pencil or date the back of the paper to remember when those little hands were that size.
Make It 3D
Once the paint is dry, outline the clover leaves and the little hearts in the palms with gold glitter glue for extra sparkle.
Now you have a festive piece of art that freezes time in the sweetest way possible


Mirror-Print Shamrock Color Mixing Art
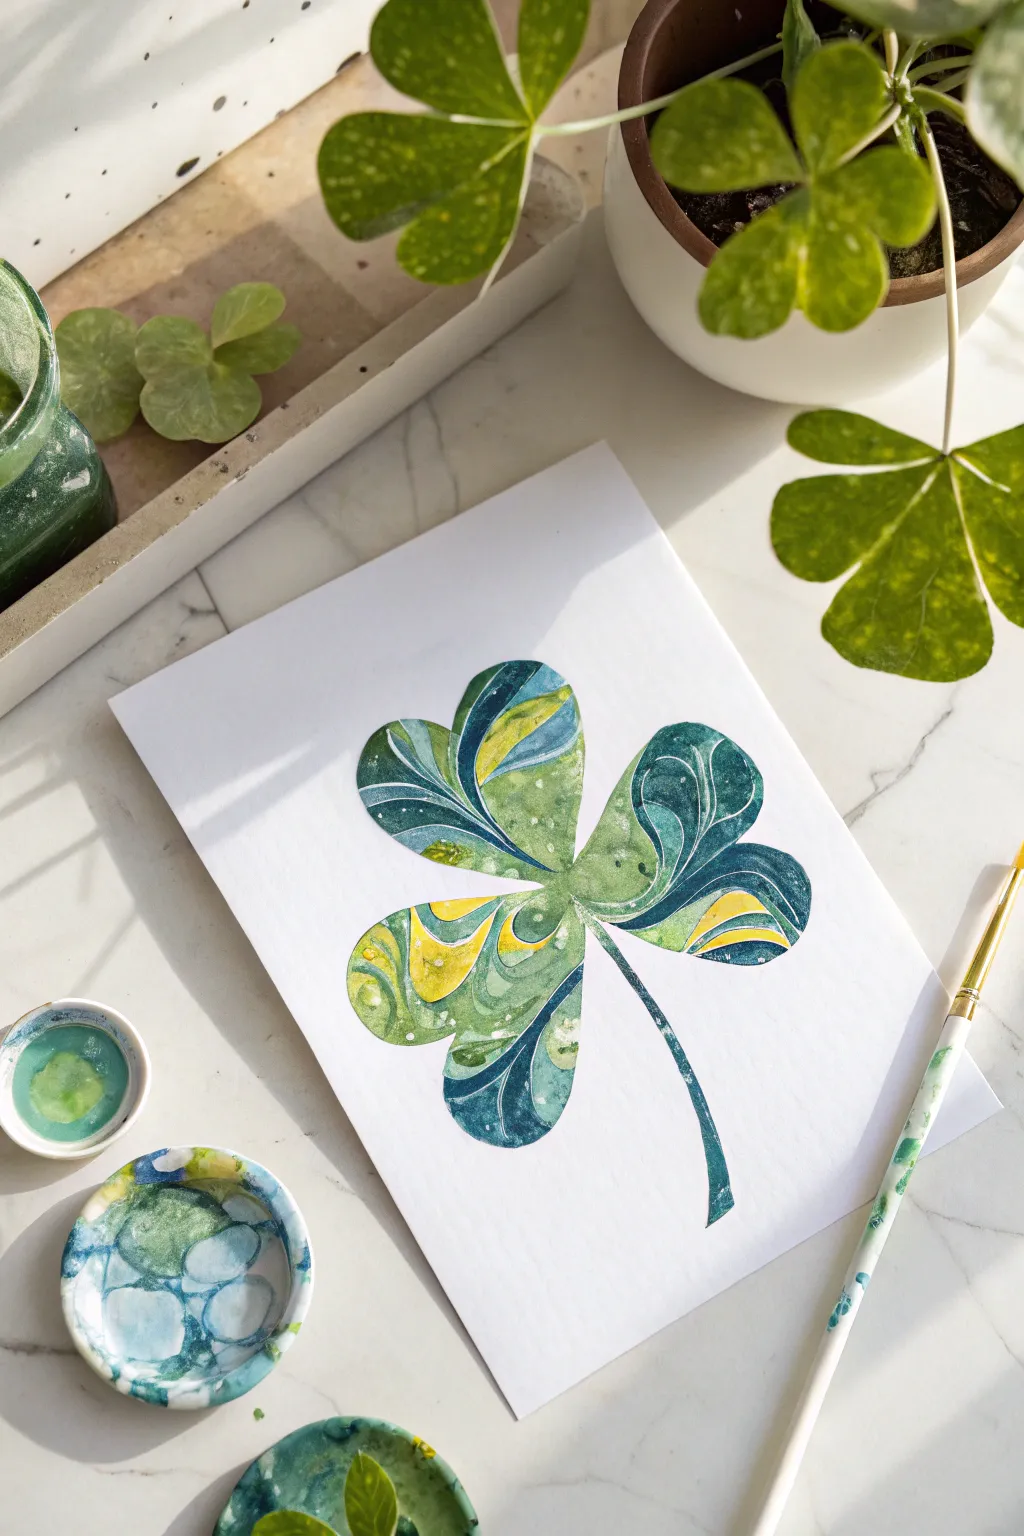
Capture the organic beauty of nature with this elegant four-leaf clover art project that mimics the look of polished malachite stone. By using a clever paper-pressing technique, you’ll create swirling patterns of emerald, teal, and gold that bring a sophisticated twist to traditional St. Patrick’s Day decor.
How-To Guide
Materials
- Heavyweight watercolor paper or mixed media paper
- Watercolors (tubes or liquid watercolors work best)
- Shallow dish or palette for mixing
- Paintbrushes (medium round and fine liner)
- Pencil
- Scissors
- Craft glue or glue stick
- Clean sheet or cardstock for the base
Step 1: Creating the Marbled Paper
-
Prepare your palette:
Squeeze out generous amounts of deep emerald green, teal blue, yellow ochre, and a bright leafy green onto your palette. You want the consistency to be fluid but pigmented. -
Apply paint generously:
On a scrap piece of watercolor paper, paint thick, wet blobs of your chosen colors close together. Don’t overthink the placement; let the colors touch and begin to pool. -
Fold and press:
While the paint is still very wet, fold the paper in half over the painted area, or press a second piece of paper directly on top. I like to firmly rub the back of the paper with my hand to squish the paint around. -
The reveal:
Carefully peel the papers apart. You will see beautiful, symmetrical Rorschach-style veins and organic marble patterns where the colors have mixed. -
Let it dry completely:
Set your marbled paper aside to dry flat. The paint needs to be fully set before we can cut it, otherwise it might tear.
Step 2: Shaping the Clover
-
Sketch the heart shapes:
Once dry, flip the marbled paper over to the blank side. Lightly draw four heart shapes. Vary the size slightly if you want a more natural look. -
Cut out the leaves:
Using sharp scissors, carefully cut out your four heart shapes. These will become the individual leaves of your shamrock. -
Arrange the composition:
Place your clean base sheet of paper on your workspace. Arrange the four hearts with their points meeting in the center to form the clover shape. Rotate them until you find the most pleasing balance of the marbled patterns. -
Glue the leaves:
Apply a thin layer of glue to the back of each heart and press them into place on the base sheet. Smooth them down gently from the center outward. -
Paint the stem:
Mix a deep teal-green color that matches the darkest tones in your leaves. Using a fine liner brush, paint a slender, slightly curved stem extending from the center of the clover downward.
Muddy Colors?
If your marble effect turns brown/gray, you’re over-mixing while pressing. Press once firmly and peel immediately without sliding the papers around.
Step 3: Refining Details
-
Enhance the veins:
Look closely at your marbled patterns. Use your fine liner brush with a dark green mix to gently accentuate existing swirls or add a central vein line to each leaf for definition. -
Add highlights:
If your pattern feels too dark, you can use a tiny bit of opaque white gouache or a gel pen to add small dots or highlights along the edges of the swirls. -
Clean up edges:
If any glue seeped out, carefully wipe it away. You can also re-outline the very edge of the leaves with a faint pencil line or paint if you want them to pop more against the white background. -
Final drying stage:
Allow the entire assembly to rest flat until the glue and stem paint are completely dry to prevent buckling.
Level Up: Gold Leaf
After the paint dries, apply small flecks of gold leaf along the darkest veins of the marble pattern. It adds a stunning, high-end mineral effect.
Frame your finished piece in a simple white frame or mat to let those intricate organic textures really shine
Ink Silhouette Shamrock Study
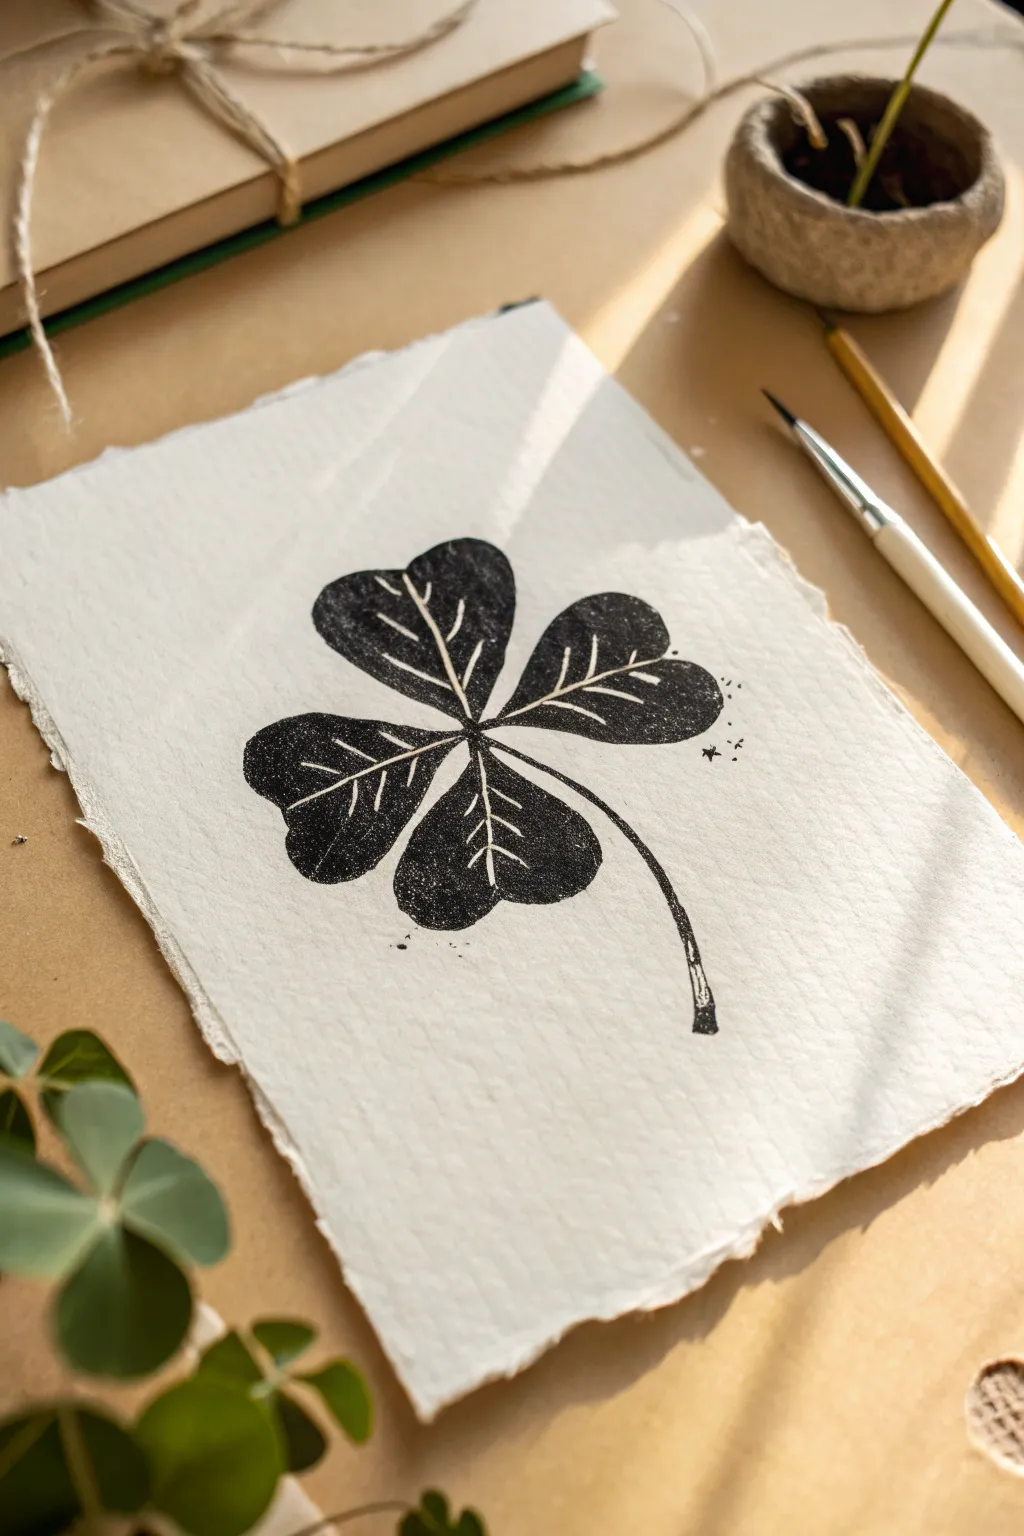
Capture the rustic charm of botanical illustrations with this faux-block print style shamrock study. Using rich black ink on textured paper creates a timeless, high-contrast look perfect for framing.
Step-by-Step Tutorial
Materials
- Heavyweight cold-press watercolor paper or handmade cotton rag paper (with deckled edges)
- Black India ink or high-flow black acrylic paint
- Round watercolor brush (size 4 or 6)
- Fine liner brush (size 0 or 1)
- Pencil (HB or H)
- Kneaded eraser
- Small palette or ceramic dish
- White gel pen (optional, for corrections)
Step 1: Preparation and Sketching
-
Prepare your paper:
Start by selecting a piece of heavy, textured paper. If your paper doesn’t have deckled edges, you can create them by carefully folding the paper and tearing it along the fold against a ruler’s edge for that raw, organic look found in the photo. -
Map out the stem:
Lightly sketch a curved line starting from the center and sweeping down to the right. This will be the spine of your stem, giving the clover a sense of movement. -
Outline the leaves:
Around the top of your stem line, sketch four heart shapes meeting at a central point. Keep them slightly irregular—nature isn’t perfectly symmetrical. The top and bottom leaves can be slightly larger than the side ones. -
Establish the veins:
Inside each heart-shaped leaf, draw a central vein line and smaller branching veins. These lines need to remain white, so draw them clearly enough to see, as you will be painting *around* them.
Dry Brush for Texture
When filling leaves, wipe your brush slightly on a paper towel first. Painting with a ‘dry brush’ leaves textured streaks that mimic wood grain.
Step 2: Inking the Silhouette
-
Load your brush:
Dip your round brush into the black India ink. You want the brush fully saturated but not dripping. If you’re using acrylics, thin them slightly with water to get an inky consistency. -
Start with the outline:
Carefully trace the outer edge of one leaf. Don’t worry if the line is slightly shaky; a bit of texture adds to the ‘woodblock print’ aesthetic we are aiming for. -
Fill the negative space:
Begin filling in the black area of the leaf, working from the outside edge inward. As you approach your pencil sketch of the veins, slow down. -
Define the veins:
Leave a thin sliver of white paper unpainted where your vein lines are. Use the tip of your brush to carefully navigate around these lines. -
Refine the gaps:
If the white vein lines look too thick, carefully gently use your fine liner brush to bring the black ink closer, narrowing the gap until it looks delicate. -
Repeat for all leaves:
Move clockwise to the next leaf. Rotate your paper as needed to keep your hand from smudging the wet ink you just laid down. -
Create texture:
To mimic the look of a stamp, allow the ink to be slightly sheer in some spots or leave tiny pin-prick specks of white paper showing through the solid black blocks. I find this prevents the image from looking too flat.
Step 3: Detailing and Finishing
-
Paint the stem:
Switch to your fine liner brush. Paint the stem with a single, confident stroke following your sketch. Thicken the line slightly near the base of the clover leaves. -
Add stem texture:
Just like the leaves, leave a hairline fracture of white space down the center or side of the stem to suggest a highlight or fibrous texture. -
Add stray ink marks:
To really sell the ‘print’ effect, add a few tiny, unintentional-looking black specks or dots around the outer edges of the leaves. This simulates the ink chatter found in real lino printing. -
Let it dry completely:
India ink can take a moment to set into cotton paper. Wait at least 15 minutes before touching the surface. -
Erase pencil lines:
Once the ink is bone dry, gently dab a kneaded eraser over the white vein areas to lift any visible graphite sketch lines without damaging the paper texture. -
Optional clean up:
If you accidentally covered a vein line, you can reclaim it using a white gel pen. Just draw the line back over the dried black ink.
Antique Wash
After the ink is totally waterproof-dry, brush a diluted tea or coffee wash over the entire paper for an aged, vintage parchment background.
Once dry, display your high-contrast botancial art in a floating frame to show off those beautiful rough edges
Glowing Firefly Shamrock Scene
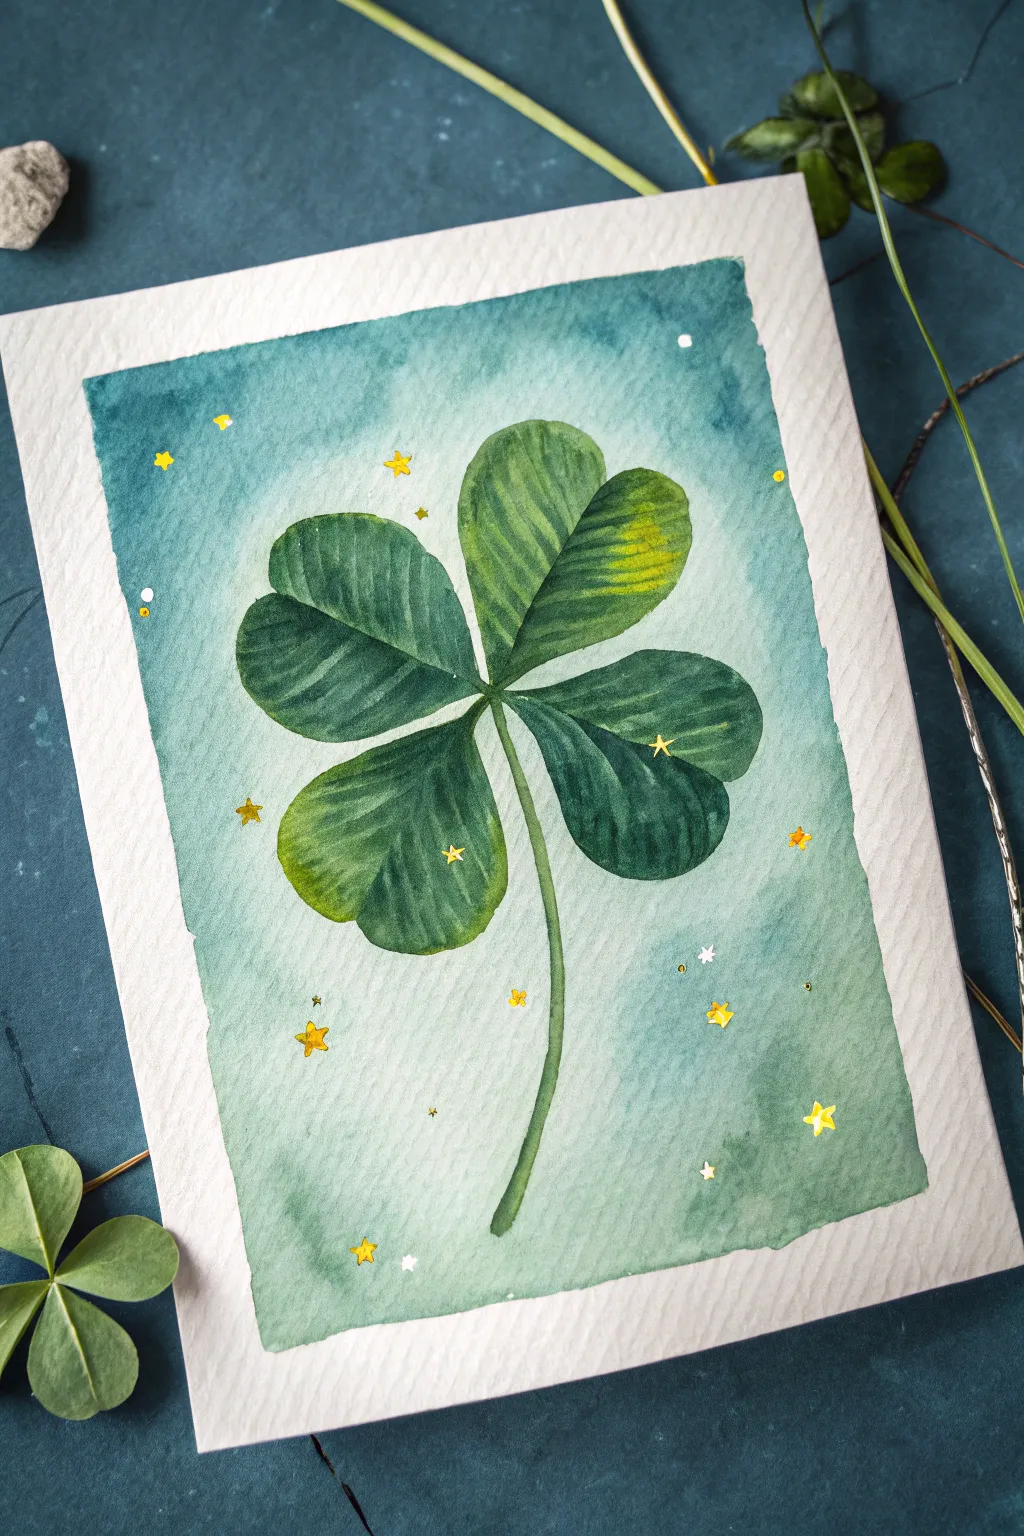
Capture the magic of luck with this enchanting watercolor project featuring a realistic four-leaf clover set against a dreamy, textured background. The addition of tiny, glowing stars transforms a botanical study into a fairytale scene perfect for St. Patrick’s Day greetings.
Detailed Instructions
Materials
- Cold press watercolor paper (300 gsm)
- Watercolor paints (Sap Green, Hooker’s Green, Prussian Blue, Lemon Yellow)
- White gouache or white gel pen
- Gold metallic watercolor paint or gold pen
- painter’s tape or masking tape
- Round watercolor brushes (size 6 and size 2)
- Pencil and eraser
- Jar of water and paper towels
Step 1: Preparation and Sketching
-
Tape the edges:
Begin by securing your watercolor paper to a board or table with painter’s tape. Create a border of about half an inch all around; this will give you that crisp, clean edge when you peel it off later. -
Sketch the shamrock:
Lightly sketch a four-leaf clover in the center of the page. Draw four heart-shaped leaves meeting in the middle, and add a simple curved stem trailing downwards. Keep your pencil lines very faint so they won’t show through the green paint.
Step 2: Painting the Background
-
Mix the background color:
Create a watery mix of Prussian Blue with a touch of Hooker’s Green to get a deep, moody teal color. You want plenty of water in this mix for a transparent wash. -
Apply the wash:
Using your larger size 6 brush, paint the area surrounding the clover sketch. Be careful to paint close to the pencil lines without going inside the leaves. -
Create a halo effect:
While the paint is still wet, lift a little pigment right around the leaves with a clean, damp brush, or simply add more water to your mix as you get closer to the shamrock. This creates a subtle glowing halo around the focal point. -
Let it dry completely:
Allow the background to dry fully before moving on. If you are impatient like me, you can use a hair dryer on a low, cool setting to speed this up.
Tape Technique
To prevent the tape from tearing your paper, stick it to your clothes (like your jeans) once or twice before applying it. This reduces the tackiness for a safer removal.
Step 3: Painting the Clover
-
Base layer for leaves:
Mix a fresh Sap Green. Paint each of the four leaves, keeping the color somewhat uneven to mimic nature. Drop a tiny bit of Lemon Yellow into the top right leaf while it’s wet to suggest a highlight or sun-bleached spot. -
Paint the stem:
Using the same green mix, paint the stem with a single, confident stroke. Make it slightly thicker at the top where it joins the leaves and taper it toward the bottom. -
Add leave veins:
Once the base green is dry, switch to your size 2 brush. Mix a darker green by adding a touch of blue to your existing green. Paint fine, curved lines radiating from the center of each leaf outward to represent the veins. -
Deepen the shadows:
Identify the center point where the leaves meet. Glaze a darker, more concentrated green here to create depth, making the leaves look like they are folding inward. -
Enhance texture:
Use a nearly dry brush with the dark green mix to add faint striations or texture along the outer edges of the leaves, following the curve of the leaf shape.
Level Up: 3D Sparkle
Instead of just painting the stars, use dabs of gold glitter glue or tiny adhesive rhinestones for the fireflies to add actual physical texture and shine.
Step 4: Adding the Magic
-
Paint golden stars:
Load your small brush with metallic gold paint (or use a gold pen). Draw various sizes of five-pointed stars scattered randomly across the background and even overlapping the leaves slightly. -
Add white accents:
Using white gouache or a gel pen, add tiny dots or smaller stars near the gold ones. This variance in size and color creates a shimmering, magical dust effect. -
Highlight the leaves:
Add extremely fine white or pale yellow lines along the very top ridges of a few veins to make the texture pop. -
Clean up borders:
Check the edges where the background meets the white border. If paint bled slightly under the tape, you can cover it with opaque white gouache later, but usually, a good burnish on the tape prevents this. -
Reveal the artwork:
Slowly peel away the painter’s tape at a 45-degree angle away from the painting. This ensures you don’t rip the paper and reveals those satisfying, professional white margins.
Step back and admire the soft glow of your lucky creation
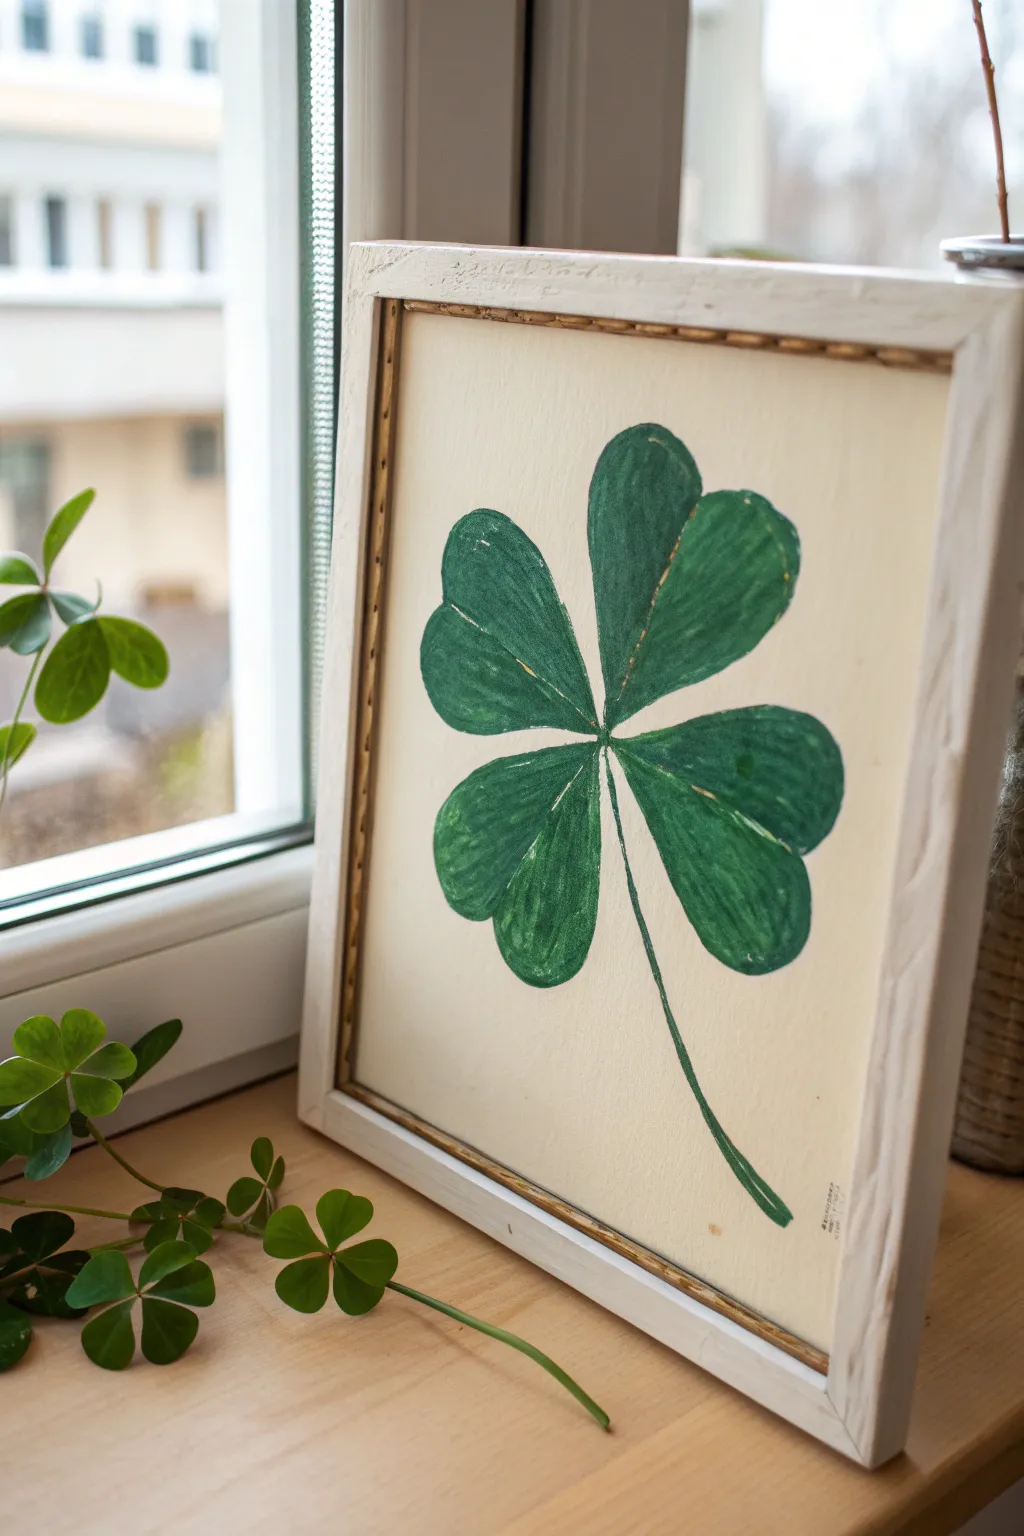
Faux Wood Grain Shamrock Sign
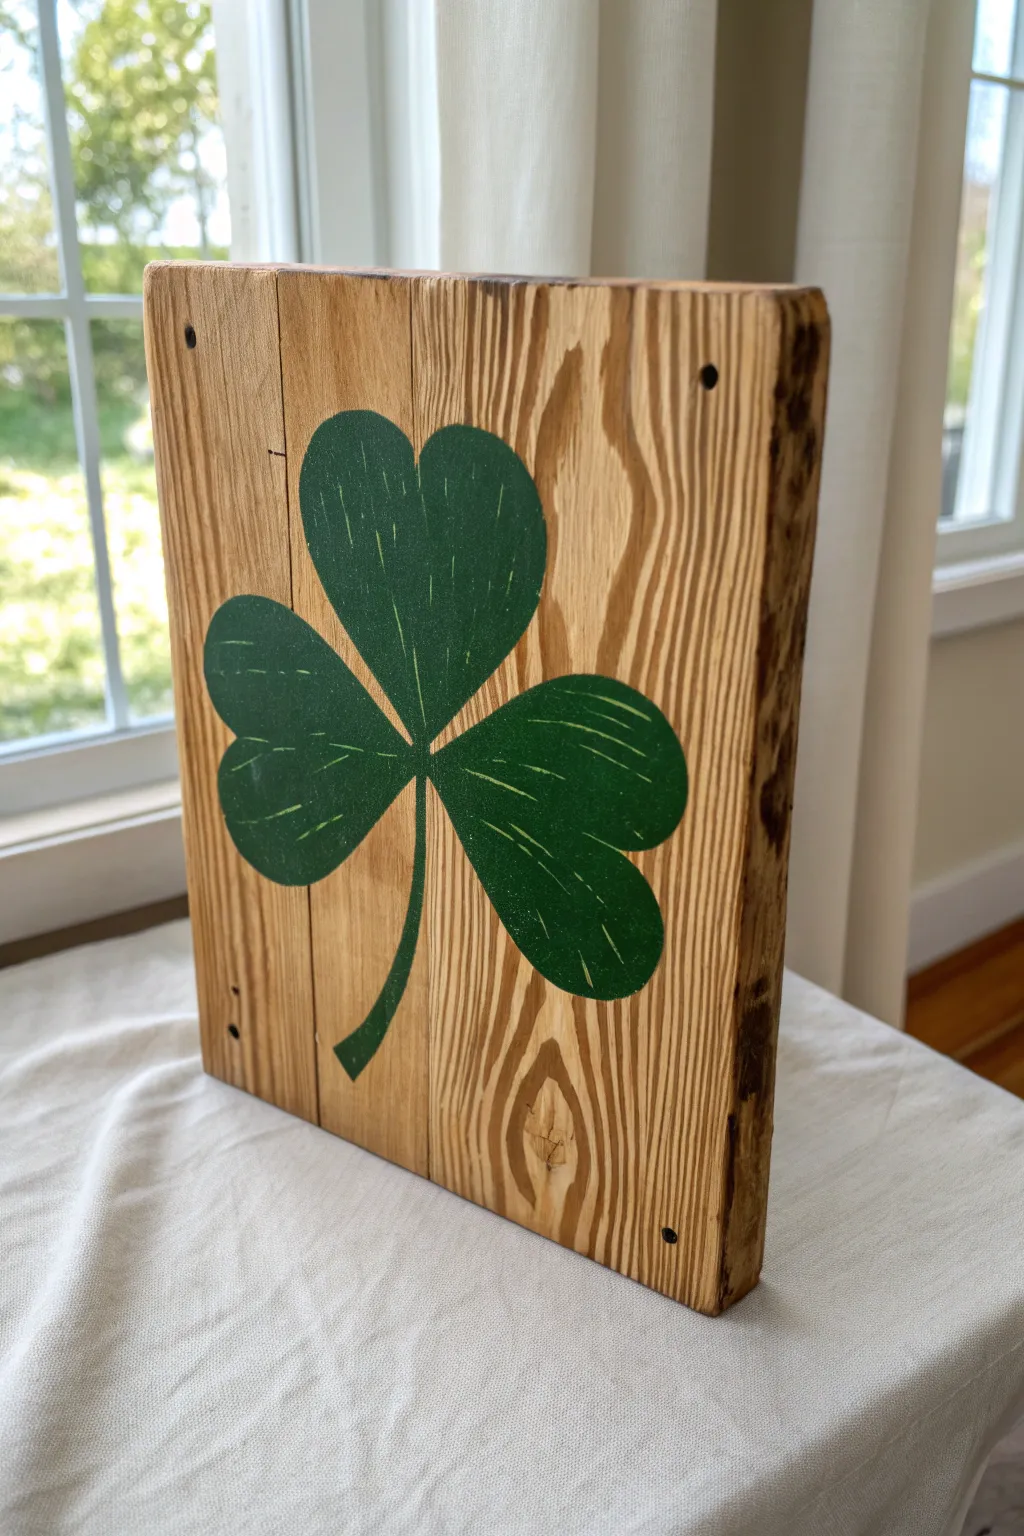
Bring a touch of farmhouse charm to your St. Patrick’s Day decor with this beautifully rustic wooden sign. The deep green shamrock contrasts perfectly against natural wood grain, creating a timeless piece that looks like reclaimed vintage lumber.
Step-by-Step Tutorial
Materials
- Unfinished wood plaque (approx. 8×10 inches)
- Dark walnut or provincial wood stain
- Lint-free staining cloths
- Acrylic paint (Deep Forest Green and Light Sage)
- Flat shader brush (size 10 or 12)
- Small round detail brush (size 2)
- Fine-grit sandpaper (220 grit)
- Pencil
- Paper shamrock template or stencil
- Matte clear sealant spray
Step 1: Preparing the Canvas
-
Sand the surface:
Begin by lightly sanding your wood plaque to remove any splinters or rough patches. Wipe away the sawdust with a clean, dry cloth to ensure a smooth base. -
Apply the first coat of stain:
Dip a lint-free cloth into your wood stain and rub it into the wood, going with the direction of the grain. This project looks best with a medium-to-dark tone to let the grain pop. -
Wipe off excess:
After letting the stain sit for about 2-3 minutes, wipe off any excess liquid with a fresh cloth. This prevents the wood from getting too dark and sticky. -
Dry completely:
Allow the wood to dry fully according to the can’s instructions, usually at least 4-6 hours. If the wood feels tacky, it needs more time.
Paint Bleeding?
If paint bleeds into the wood grain, let it dry, then gently scrape the excess away with an X-Acto knife or sand it off before re-staining that small spot.
Step 2: Designing the Shamrock
-
Position the template:
Cut out a paper shamrock shape that fits nicely in the center of your board. Center it on the dry wood, leaving equal space on the top and bottom margins. -
Trace the outline:
Using a pencil, very lightly trace around the shamrock template. Keep your lines faint so they are easier to cover with paint later. -
Outline in paint:
Load your flat shader brush with the Deep Forest Green acrylic paint. Carefully paint along the inside edge of your pencil line to establish a crisp border.
Step 3: Painting and Detailing
-
Fill the silhouette:
Use the same flat brush to fill in the rest of the distinct three-leaf shape. I prefer to use long, vertical strokes that mimic the direction of the wood grain underneath for a cohesive look. -
Check opacity:
Let the first coat dry for 20 minutes. If the wood grain shows through too much for your liking, apply a second thin coat of green. -
Paint the stem:
Switch to a smaller brush if necessary to paint the curved stem at the bottom, tapering it slightly as it ends. -
Add subtle texture:
To mimic the look of veins or slight weathering, take your detail brush with a tiny amount of Light Sage paint. Wipe most of it off on a paper towel (dry brush technique). -
Create faint scratches:
Gently flick the dry brush across the leaves in random, curved motions. These shouldn’t be solid lines, but rather faint, scratchy highlights that add depth. -
Distress the edges (optional):
Once the paint is fully dry, take your fine-grit sandpaper and lightly scuff the edges of the board and a few spots on the painted shamrock to enhance the rustic vibe. -
Clean up dust:
Wipe the entire piece down with a tack cloth or slightly damp rag to remove sanding dust before sealing. -
Seal the artwork:
Finish the project by spraying a thin, even coat of matte clear sealant over the entire front surface to protect the paint and wood.
Pro Tip: Custom Wood Grain
If using plain pine, drag a wire brush heavily over the wood before staining. This opens the grain and makes the stain settle darker in the grooves for more contrast.
Display your new sign on a mantel or hang it near the entryway to welcome guests with a bit of Irish luck
Metallic Gold Accent Shamrock Highlights
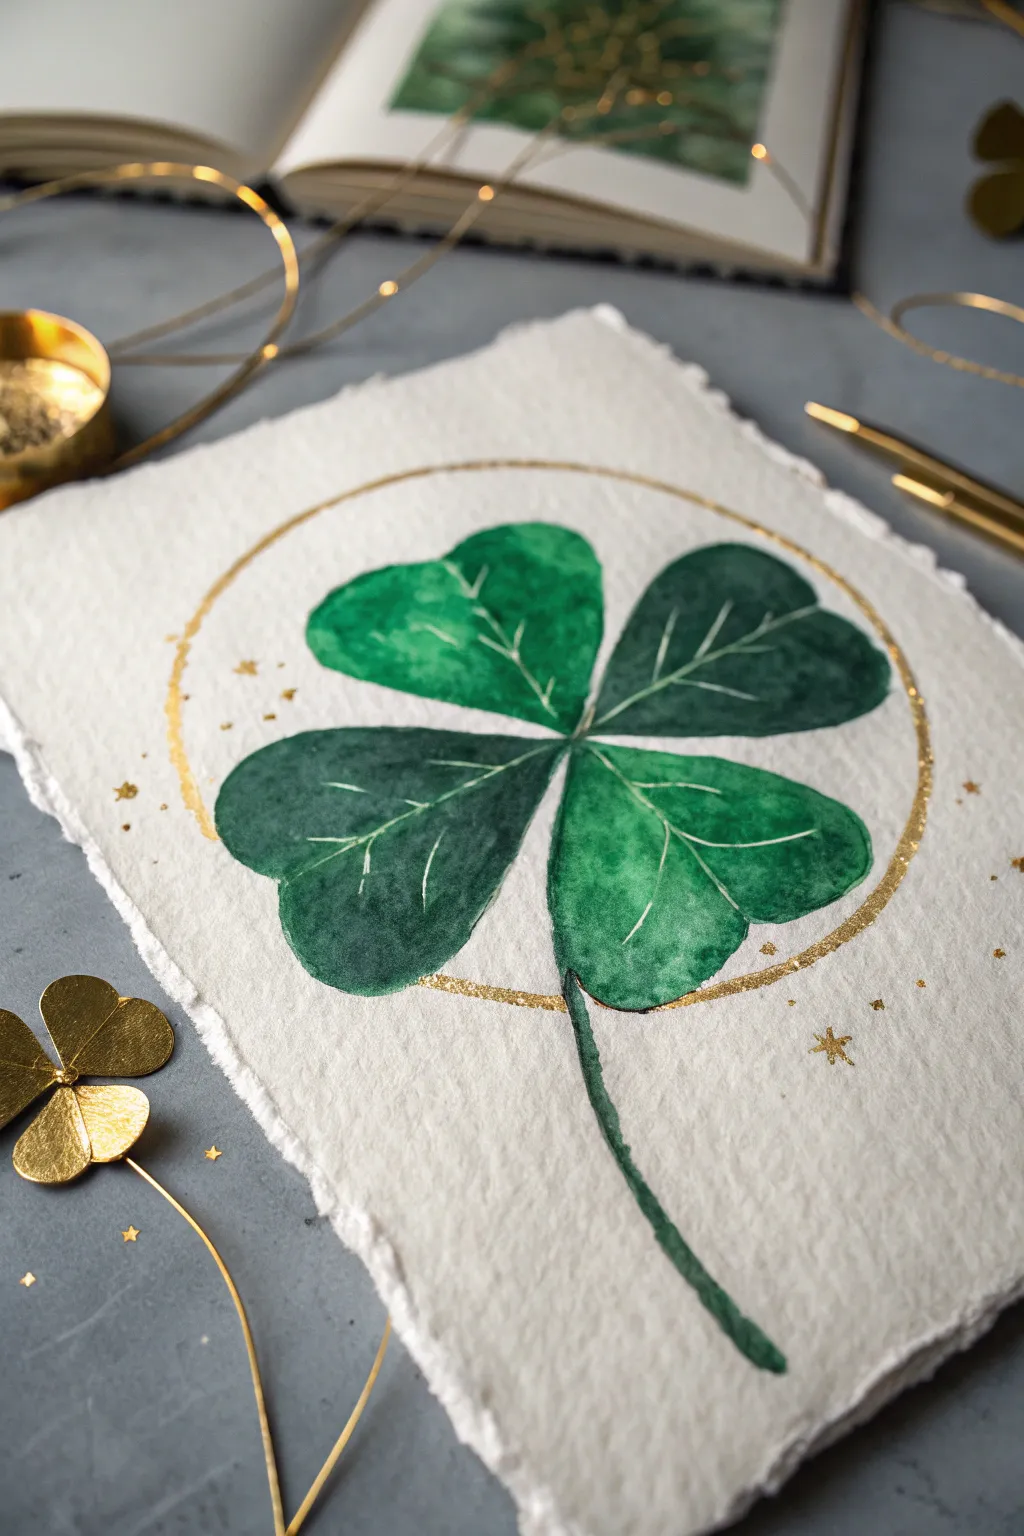
Capture the luck of the Irish with this sophisticated watercolor project that combines deep, moody greens with elegant metallic accents. The finished piece features a beautiful four-leaf clover framed by a delicate gold halo on textured, deckle-edge paper.
How-To Guide
Materials
- Cold press watercolor paper (deckle edge preferred)
- Watercolor paints (Sap Green, Hooker’s Green, Indigo)
- Metallic gold watercolor paint or gold ink
- Round watercolor brushes (sizes 6 and 2)
- White gel pen or gouache
- Pencil and eraser
- Jar of water
- Paper towel
- Compass or circular object for tracing
Step 1: Preparation & Sketching
-
Prepare the paper:
Begin by selecting a high-quality sheet of cold press watercolor paper. If you don’t have pre-made deckled edges, you can create a faux deckle by wetting a line with a brush and gently tearing the paper along that edge to create that torn, rustic look. -
Draft the circle:
Use a compass or trace a round object (like a bowl or large lid) lightly with a pencil to establish the circular frame. This circle should be large enough to encompass most of the clover leaves. -
Outline the clover:
Inside your circle, lightly sketch four heart-shaped leaves meeting at a central point. Allow the outer edges of the leaves to slightly overlap or touch the pencil circle. Sketch a long, slightly curved stem trailing downwards.
Clean Lines Pro-Tip
To keep the central vein crisp, lay down masking fluid in thin lines before painting. Rub it off after the paint dries to reveal the stark white paper underneath.
Step 2: Painting the Greens
-
Mix your palette:
Create a rich green mixture. I like to blend Sap Green with a touch of Indigo or Phthalo Blue to get that deep, cooling emerald tone seen in the reference image. Prepare a watery version and a more concentrated version of this color. -
The wet-on-wet layer:
Working one leaf at a time, brush clean water onto the leaf shape. Drop in your lighter green wash, letting it spread naturally to the edges. Leave a few tiny white gaps near the center for natural dimension. -
Deepening the shadows:
While the first layer is still damp (but not puddling), drop the concentrated dark green mixture into the center where the leaves meet and along the outer edges. This creates a natural gradient. -
Paint the remaining leaves:
Repeat the previous steps for the other three leaves. Be careful not to let wet leaves touch each other immediately, or the colors will bleed together; you can leave a hairline fracture of dry paper between them. -
Add the stem:
Using a thinner brush (size 2), paint the stem with your dark green mix. Start thick near the leaves and taper it off as it curves down, giving it an organic, trailing feel. -
Dry completely:
Let the painting dry fully. The paper must be bone-dry before adding the fine details, or the ink will feather.
Step 3: Golden Accents & Details
-
Paint the gold halo:
Using metallic gold paint or ink on a fine brush, trace over your initial pencil circle. Don’t worry about making it a perfect geometric line; a slightly broken, organic stroke adds character. -
Add gold splatters:
Load your brush with watery gold paint. Gently tap the handle against your finger over the paper to create fine gold speckles around the circle and leaves. -
Draw simple stars:
With the tip of your smallest brush or a gold pen, draw tiny 5-point stars or small ‘plus’ signs scattered near the gold halo for a magical effect. -
Add the veins:
Once the green paint is absolutely dry, use a fine white gel pen or a liner brush with white gouache to draw thin veins radiating from the center of each leaf outward. -
Final touches:
Erase any visible pencil lines that weren’t covered by paint, being careful not to rub off the gold.
Level Up: Texture
Sprinkle a pinch of table salt onto the wet green paint of one leaf. Let it dry completely and brush it off to create a unique, crystallized texture resembling frost.
Frame your gilded creation in a simple wood frame or gift it as a handmade token of good fortune
Abstract Brushstroke Shamrock Gesture Painting
Capture the delicate beauty of nature with this organic leaf printing project that preserves the intricate veins and textures of a shamrock. Using real foliage as a stamp creates a stunningly detailed, botanical artwork with a natural, rustic charm.
Step-by-Step Tutorial
Materials
- Heavyweight cold-press watercolor paper with deckled edges
- Large fresh shamrock or clover leaves (plus smaller ones for variety)
- Deep green watercolor paint or acrylic ink
- Medium flat brush (synthetic)
- Fine detail brush (size 0 or 1)
- Brayer or clean foam roller (optional)
- Scrap paper for testing
- Paper towel or tweezers
Step 1: Preparing Your Leaf Stamp
-
Select your specimens:
For the main subject, find a large, pristine four-leaf clover (or combine smaller leaves to simulate one). Look for leaves with prominent veins, as these will transfer the best detail. -
Flatten the foliage:
If your leaves are curled, press them between heavy books for about 30 minutes. You want them flat but still fresh and pliable, not dried and brittle. -
Mix your pigment:
Prepare a rich, deep green shade. If using watercolor, use less water than usual to create a highly concentrated, sticky mix that won’t bead up on the leaf’s waxy surface.
Smudged Prints?
If your print looks like a blob, you used too much paint. Blot the painted leaf on a paper towel once before pressing it to the final paper.
Step 2: Printing the Main Shamrock
-
Apply the paint:
Place your large leaf on a piece of scrap paper, vein-side up. Using the flat brush, paint an even layer of green over the surface. Ensure the edges are covered but avoid puddling paint in the crevices. -
Position the leaf:
Carefully pick up the leaf by its stem (tweezers can help keep things clean) and hover it over the center of your watercolor paper. Decide on the angle—tilting it slightly creates a natural, wind-blown look. -
Press and transfer:
Gently lay the painted side down onto the paper. Place a clean scrap of paper over it and rub firmly with your fingers or a brayer. Pay special attention to rubbing along the veins and the outer edges to get a crisp definition. -
Reveal the print:
Slowly peel the leaf away from the paper. You should see a beautiful, textured impression where the paint transferred, leaving white spaces where the veins masked the paper. -
Evaluating texture:
Don’t worry if the coverage isn’t perfectly solid; the mottled, grainy texture is exactly what gives this technique its charm.
Step 3: Adding the Stem
-
Paint the stem:
Using your fine detail brush, hand-paint a slender, curving stem extending from the center of your printed leaves. I like to let the paint fade slightly at the bottom for a softer end. -
Blend the connection:
Where the stem meets the leaves, add a tiny touch of darker green to simulate the shadow where the leaflets join.
Metallic Magic
Mix a tiny amount of gold gouache into your green paint before applying it to the leaf. The veins will catch the light beautifully when dry.
Step 4: Adding Supporting Details
-
Print the secondary clover:
Select a smaller three-leaf clover. Repeat the painting and pressing process, placing this smaller specimen to the lower right of the main subject for balance. -
Hand-paint the small stem:
Draw a thin, delicate stem for this smaller clover using the tip of your detail brush. -
Create tiny accents:
Dip the very tip of your smallest brush into the green paint. Gently dab tiny clusters of three or four dots around the bottom of the composition to suggest miniature sproutlings or falling seeds. -
Enhance with splatters (optional):
If you want a more organic feel, tap your brush against your finger to create microscopic flecks of green around the base of the stems.
Step 5: Finishing Touches
-
Let it dry completely:
Allow the paper to dry flat for at least an hour. The thick paint from the print needs more time than a standard wash. -
Refine the veins:
If any main veins didn’t show up clearly, you can use a fine white gel pen or a tiny brush with white gouache to subtly re-introduce those lines, keep it sparse to maintain the stamped look. -
Deckle the edges:
Create the rough, handmade paper look shown in the photo by manually tearing the edges of your paper against a ruler, rather than cutting them with scissors.
Display your botanical print in a floating frame to show off those beautiful torn edges.


Have a question or want to share your own experience? I'd love to hear from you in the comments below!