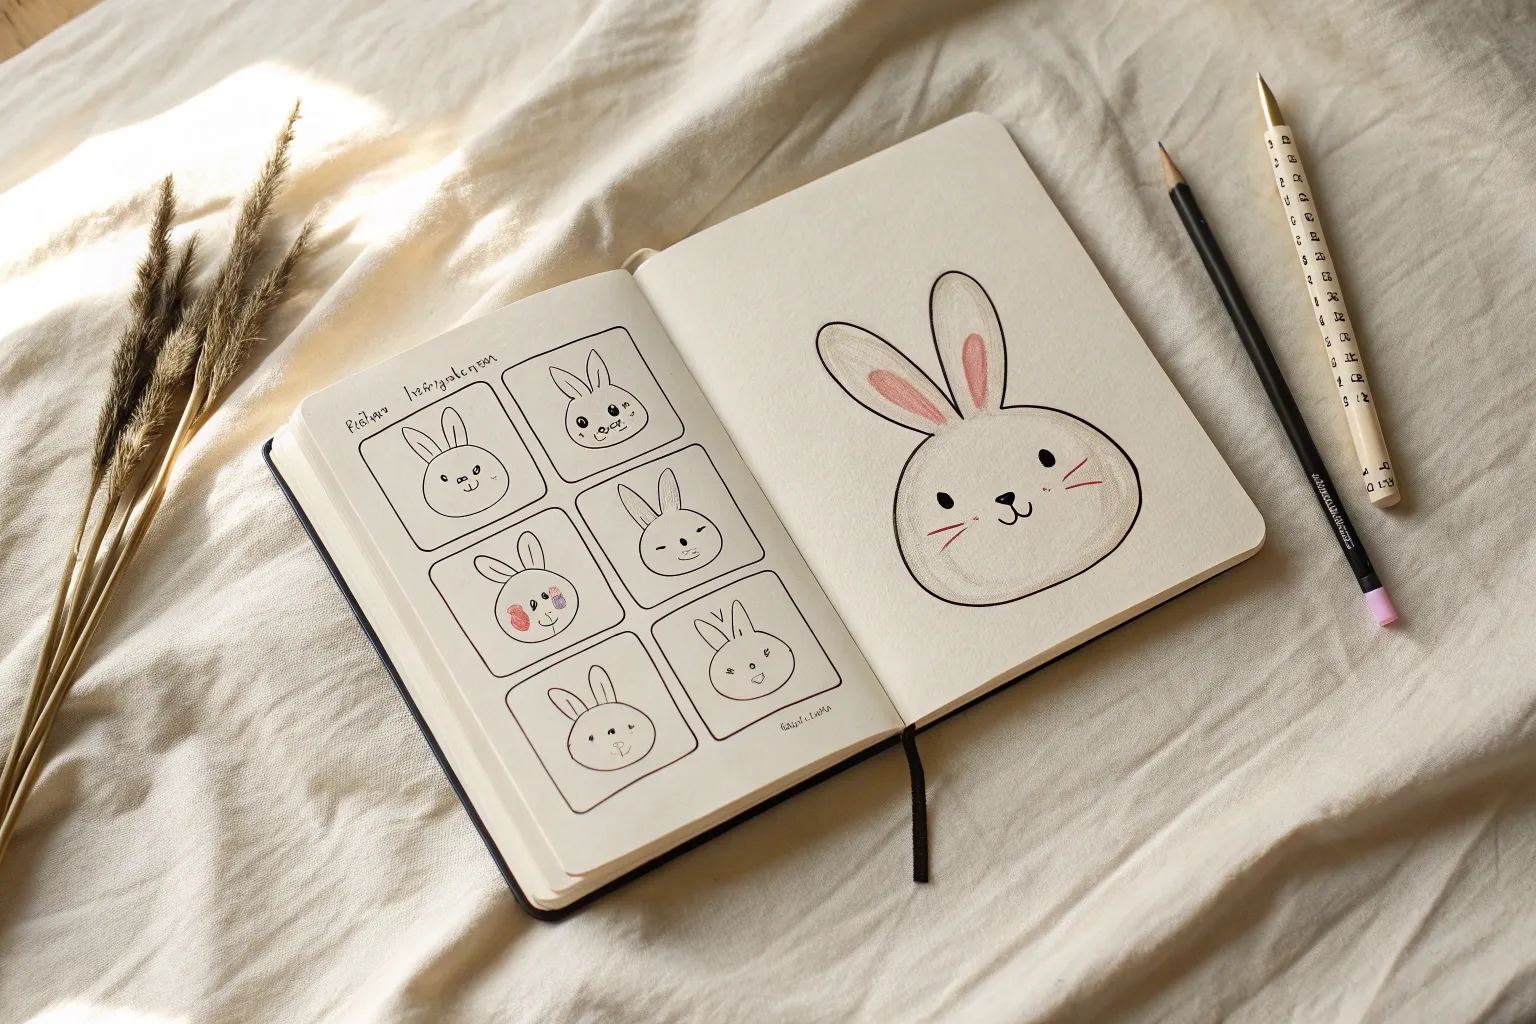
When you’re 11, you want easy drawing ideas that look cool fast, but still feel like you’re leveling up. In my studio, these are the go-to sketches that help 11-year-olds build confidence with simple shapes, fun details, and a little bit of style.
Cute Cat Face Doodle
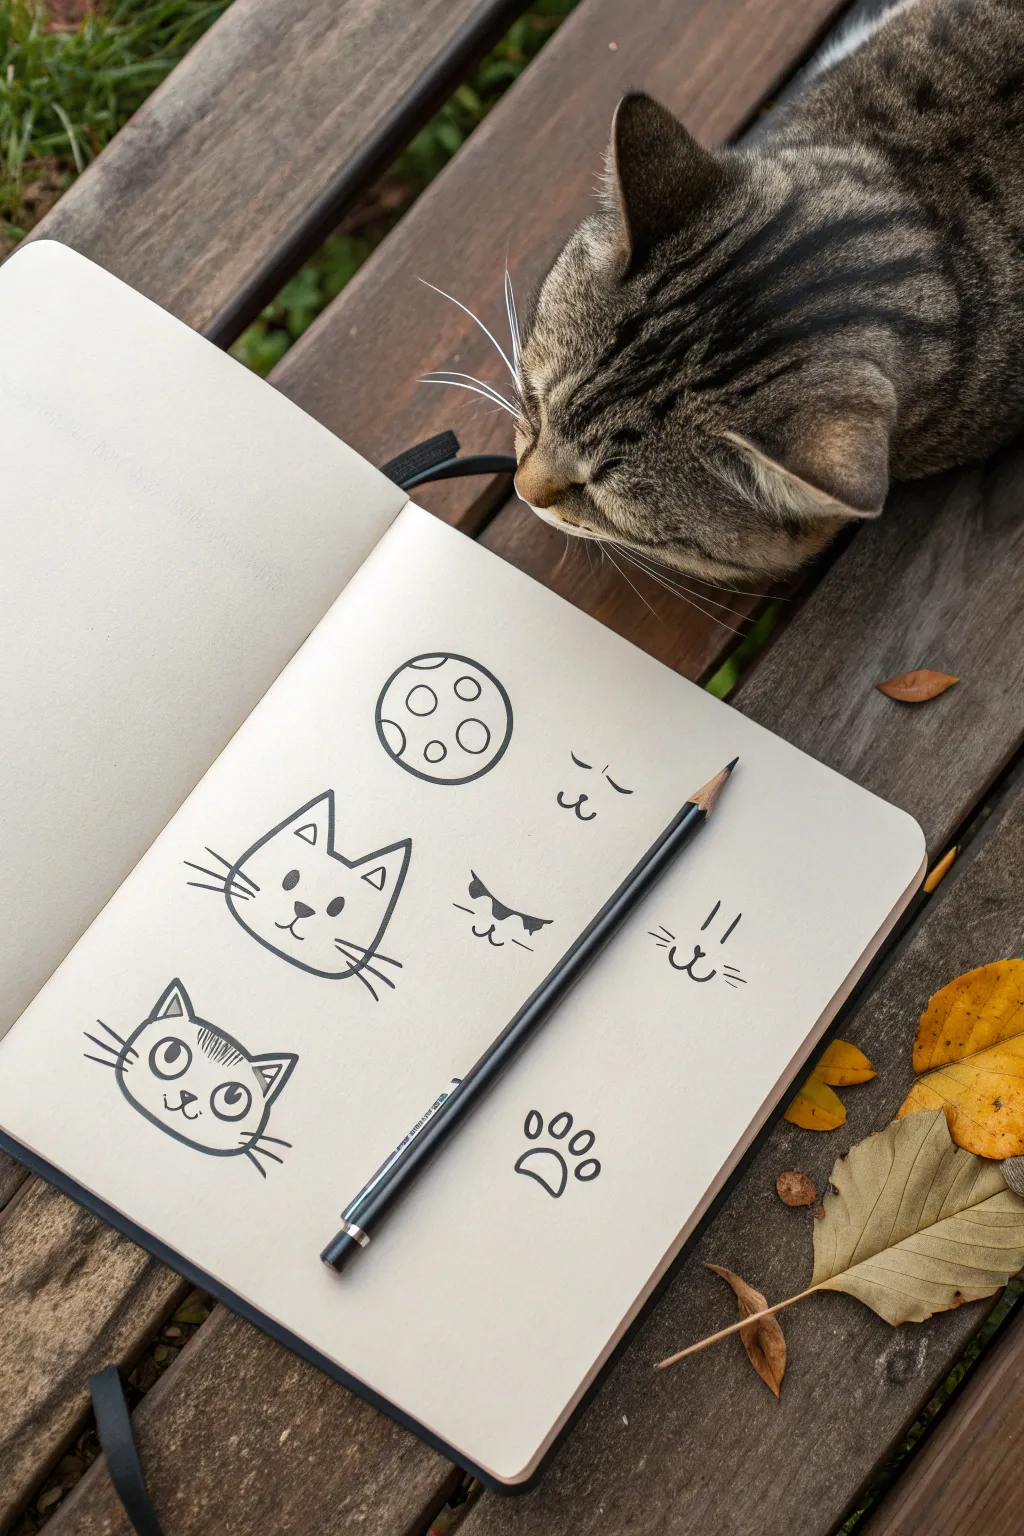
Learn to sketch a collection of charming, minimalist cat-themed doodles directly into your sketchbook. These simple line drawings capture playful feline expressions and symbols with just a few confident strokes of a pen or pencil.
Step-by-Step
Materials
- Sketchbook or drawing paper
- HB Pencil (optional for initial sketching)
- Fine-point black drawing pen or marker (0.5mm is ideal)
- Eraser
Step 1: Drawing the Basic Cat Faces
-
Begin the first face:
Start near the center-left of your page by drawing a wide, slightly curved U-shape for the bottom of the cat’s head. -
Add the ears:
From the ends of your U-shape, draw two triangles pointing upward to form the ears. Connect them at the top with a nearly flat line to close the head shape. -
Draw the inner ears:
Inside each ear triangle, draw a smaller triangle to give the ears some depth. -
Place the features:
In the middle of the face, add two solid black dots for eyes and a small inverted triangle for the nose. -
Draw the mouth:
From the bottom point of the nose, draw two small curves branching out to the left and right to form a classic ‘w’ mouth shape. -
Add whiskers:
Finish this first face by drawing three straight lines radiating outward from each cheek.
Ink Confidence
Draw quickly and confidently. Slow lines often wobble, while faster strokes look smoother and more professional.
Step 2: Creating the Detailed Portrait
-
Outline the head:
Lower down on the page, draw a similar head shape, but make the cheeks slightly rounder for a softer look. -
Draw large eyes:
Instead of dots, draw two large circles for eyes. Add a pupil in the center of each, leaving a tiny white spec for a highlight. -
Add forehead markings:
Sketch a few short, vertical strokes between the ears to represent playful tabby stripes. -
Finish the face details:
Add the nose, mouth, and whiskers just like the first cat, keeping the lines crisp and clean.
Add Personality
Give your cats accessories! Try drawing a tiny bow tie, a collar with a bell, or a party hat on one of the faces.
Step 3: Minimalist Symbols & Expressions
-
Draw the moon:
Near the top center, draw a perfect circle. Fill it with several smaller circles of varying sizes to look like craters. -
Sketch the ‘sleepy’ face:
To the right of the moon, draw two small, downward-curving arcs for closed eyes. Add a tiny ‘w’ mouth below them for a snoozing expression. -
Create the ‘cool’ cat:
Below the moon drawing, sketch two angled shapes that look like sunglasses. Add a small nose and mouth underneath to give it attitude. -
Draw the ‘abstract’ face:
Further right, use just two vertical lines for eyes and a nose-mouth combo with whiskers to create a super-simplified face. -
Add a paw print:
At the bottom right, draw an upside-down heart shape for the main pad. Add four small ovals floating above it for the toes. -
Finalize:
I like to let the ink dry completely for a minute, then gently erase any underlying pencil sketches to leave the artwork looking sharp.
Enjoy filling your page with these personality-packed feline doodles


Easy Dog With Floppy Ears
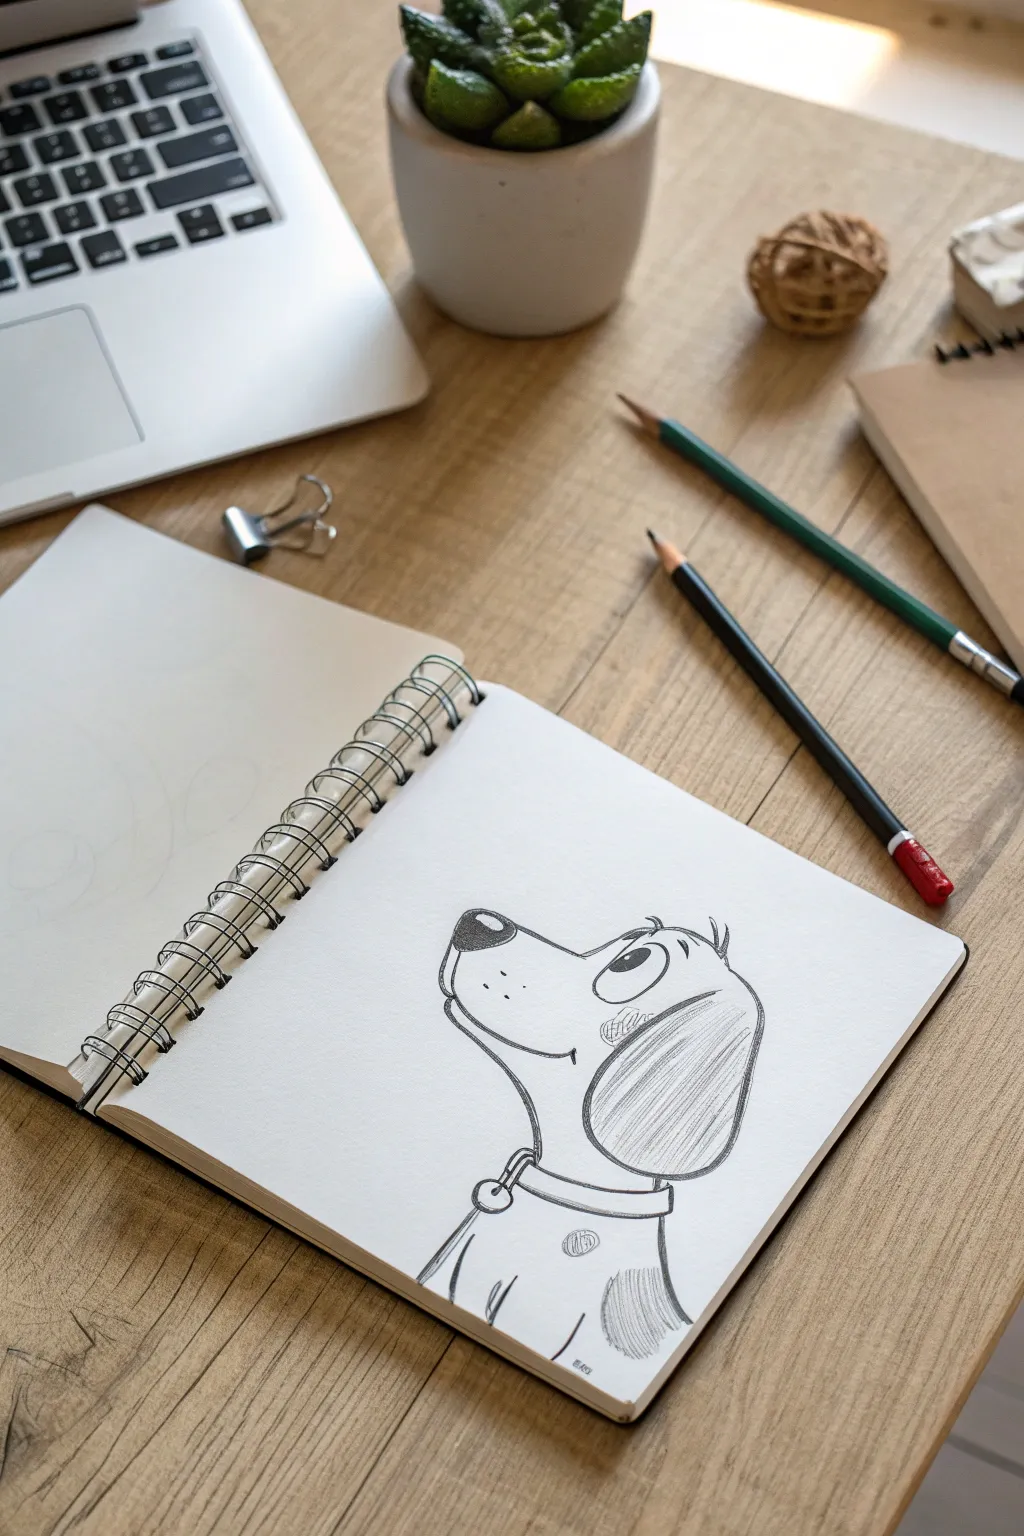
Learn to draw this cheerful cartoon dog with big, expressive eyes and soft, floppy ears. The clean lines and simple shading make this a perfect sketching project that captures a fun personality without needing complicated details.
Step-by-Step Tutorial
Materials
- Spiral sketchbook or drawing paper
- HB graphite pencil (standard school pencil)
- Black colored pencil or darker graphite pencil (2B or 4B) for bold lines
- Eraser
- Pencil sharpener
Step 1: Face Structure
-
Draw the muzzle:
Start near the center of your page by drawing a rounded, U-shaped curve that opens slightly to the right. This will be the bottom of the snout. -
Add the nose:
At the top left of that curve, draw a rounded triangle shape for the nose. Color it in dark, leaving a tiny white sliver at the top for a highlight. -
Shape the forehead:
From the top of the muzzle, draw a line curving slightly upward and then smoothing out to the right to create the bridge of the nose and the forehead area. -
Define the smile:
Extend the bottom muzzle line into a gentle upward curve. Add a tiny vertical tick mark at the very corner to give the dog a happy smile.
Step 2: Eyes and Ears
-
Place the eye:
Draw a large oval sitting right above the smile line. Inside, draw a smaller circle for the pupil, coloring it black but leaving a small white circle for a glint of light. -
Add an eyebrow:
Sketch a small, floating arch just above the eye. This simple line adds a lot of curious expression to the face. -
Outline the ear:
Starting from the top of the head, draw a large, teardrop shape that hangs down the side of the face. It should be wide at the bottom and narrower where it connects to the head. -
Detail the ear tufts:
At the very top of the head, draw two or three little overlapping curves to suggest tufts of fur sticking up.
Wobbly Lines?
If your curves feel shaky, try drawing them quickly from your elbow rather than your wrist. A fast, confident stroke often looks smoother than a slow, careful one
Step 3: Body and Collar
-
Draw the neck:
Extend a curved line down from the jawline, and another line down from the back of the ear to create a sturdy neck. -
Add the collar:
Draw two parallel curved lines across the base of the neck. Connect the ends to form the collar strap. -
Hang the tag:
Sketch a small circle hanging from a loop on the front of the collar. You can leave it blank or add a tiny initial later. -
Shape the chest:
Continue the front neck line downward, curving it slightly outward to form the dog’s chest. -
Design the back:
Extend the back line downwards, adding a soft curve near the bottom to suggest where the leg begins.
Make It Yours
Customize your pup by changing the ear shape! Try pointy triangular ears for a husky look, or smaller folded ears for a terrier style
Step 4: Shading and Details
-
Shade the ear:
Using light, diagonal pencil strokes, gently shade the entire ear. I usually keep the strokes going in the same direction to make it look smooth. -
Add spot details:
Draw a rounded shape on the dog’s lower back or shoulder area. Fill this spot with similar diagonal shading lines. -
Detail the neck shadow:
Add a little bit of cross-hatching or zigzag shading right under the chin and ear to create a shadow, making the head look like it’s in front of the neck. -
Whisker spots:
Add three tiny dots on the muzzle near the nose to represent whisker pores. -
Finalize lines:
Go over your main outline one last time with a slightly heavier hand or a darker pencil to make the drawing pop off the page.
Now you have a charming cartoon dog sketch ready to be named


Chibi Person With Big Hoodie
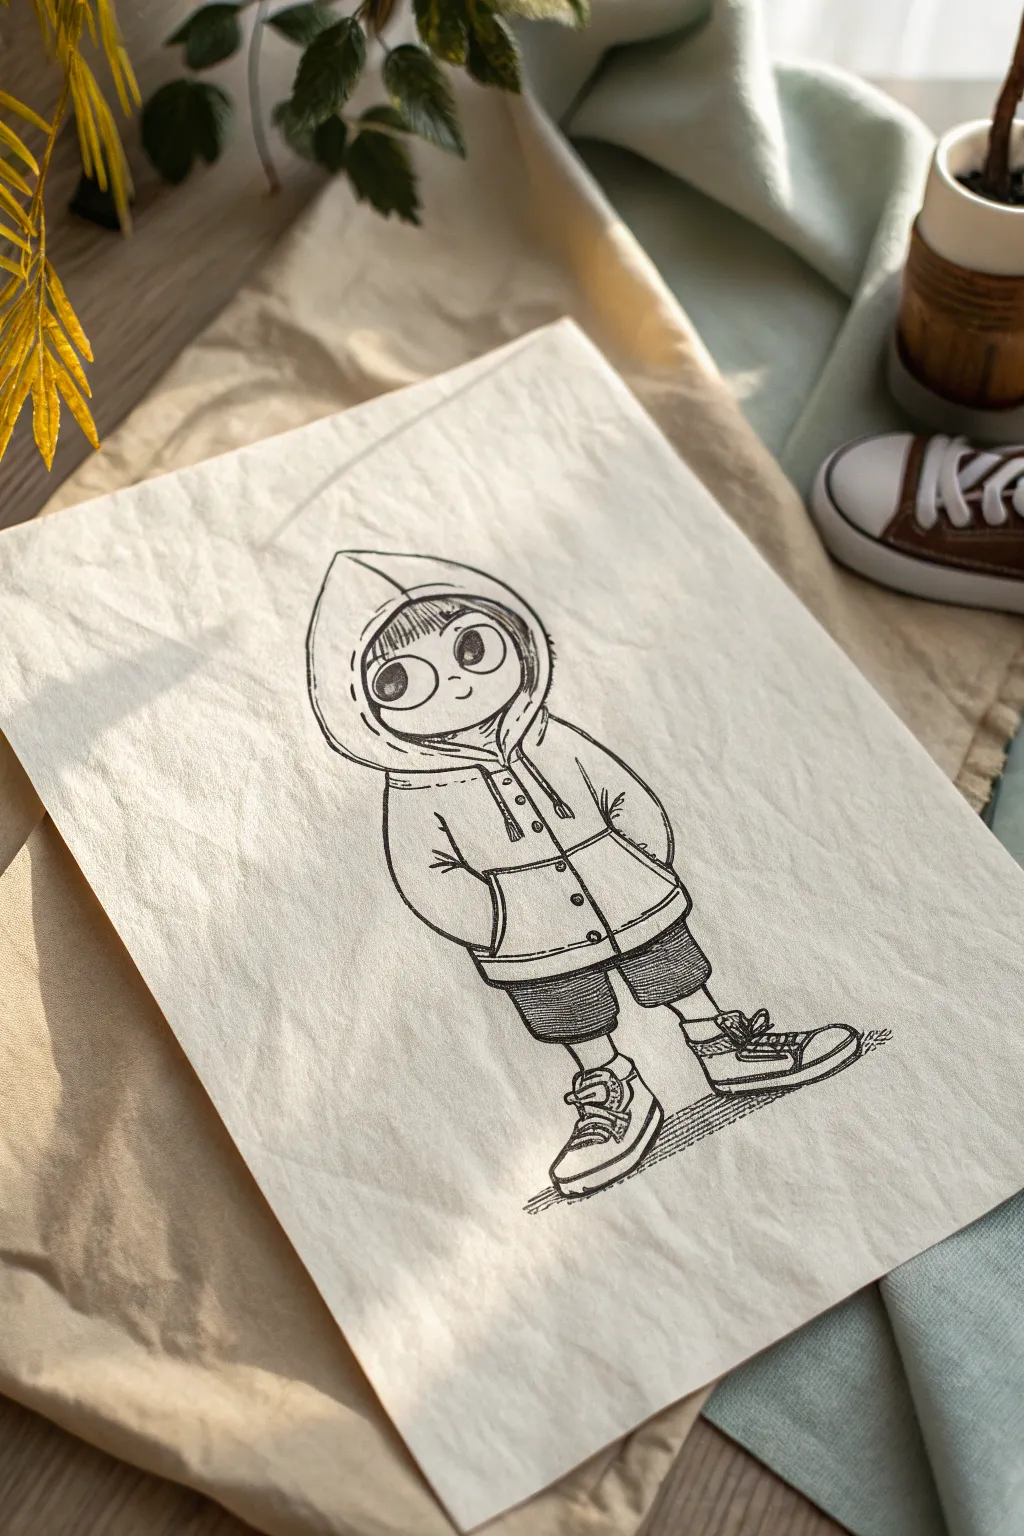
This adorable chibi character features oversized eyes and a cozy, oversized hoodie that makes them look extra cute. The style uses clean ink lines and simple shading techniques like hatching to bring the character to life on the page.
How-To Guide
Materials
- Heavyweight sketching paper or mixed media paper (off-white or cream)
- HB or 2H graphite pencil for sketching
- Soft eraser (kneaded eraser works best)
- Fine liner pens (0.1mm, 0.3mm, and 0.5mm)
- Ruler (optional)
Step 1: Basic Structure
-
Draw the head shape:
Start by drawing a large circle for the head in the upper center of your paper. Since this is a chibi style, the head should be quite large compared to the rest of the body. -
Map out the body lines:
Lightly sketch a curved line coming down from the head to represent the spine and posture. Add a small oval shape below the head for the torso, keeping it shorter than the head height for that cute proportion. -
Outline the limbs:
Position the legs using simple stick lines, ending with blocky shapes for the feet. The stance is casual, with feet slightly apart. Add oval shapes for the arms, which will be mostly hidden inside the jacket pockets.
Step 2: Adding the Hoodie & Features
-
Shape the hood:
Draw a large, pointed arch shape around the head circle. This is the hood. Inside the circle, draw the opening for the face, which looks a bit like an upside-down teardrop or a rounded pick shape. -
Sketch the face:
Place two large circles low on the face for they eyes. Add huge pupils inside them, leaving a small white circle for a highlight. Draw a tiny curved line between them for the nose and a small smile. -
Add hair details:
Sketch simple bangs coming down over the forehead, just under the hood’s rim. Keep the lines straight and slightly choppy. -
Draft the jacket body:
Define the jacket’s shape over the torso oval. Make it look puffy and oversized. Draw the bottom hemline straight across the hip area, and mark where the center opening will be.
Uneven Eyes?
If the eyes look lopsided, draw a very light horizontal guideline across the face first. Place both circles on this line to keep them level before inking.
Step 3: Clothing Details
-
Create the pockets:
Draw curved lines on either side of the jacket front to show hands tucked into pockets. This creates a relaxed, slouchy look for the sleeves. -
Add buttons and drawstrings:
Sketch a vertical line down the center of the jacket. Add three small circles for buttons. Draw two dangling strings coming from the neck area of the hood. -
Draw the shorts:
Below the jacket hem, draw two wide, rectangular shapes for the shorts. They should end just above the knees. -
Detail the sneakers:
Refine the blocky feet shapes into sneakers. Draw the rubber toe cap, the laces area, and the tongue. Make these shoes chunky to match the big head.
Line Weight Magic
Use a thicker pen for the outermost silhouette lines and a very thin pen for inside details like pockets or hair. This makes the drawing pop off the page.
Step 4: Inking & Texture
-
Outline main shapes:
Switch to your 0.5mm fine liner. Carefully go over the main outline of the hoodie, the head, and the shoes. Use confident strokes rather than sketchy ones. -
Refine the face:
Use a thinner 0.3mm pen for the facial features. Fill in the pupils with solid black, being very careful to preserve that white highlight circle. -
Ink the clothing details:
Trace the pockets, buttons, and drawstrings. I like to make the lines for the jacket wrinkles slightly thinner to show the fabric’s softness. -
Erase pencil guides:
Wait a few moments to ensure the ink is totally dry, then gently erase all your pencil sketches underneath. Your drawing will instantly look cleaner. -
Add shading to the shorts:
Using the 0.1mm pen, draw many horizontal lines closer together on the shorts. This ‘hatching’ technique makes them look darker than the jacket. -
Texturing the shoes:
Add small scribbles or lines on the shoe tongues to suggest texture. Outline the soles clearly. -
Ground the character:
Draw some quick, horizontal hatching lines directly under the shoes. This creates a shadow so your character isn’t floating in mid-air.
Now you have a cool, stylized character ready for their own comic strip adventure


Self-Portrait With 3 Expressions
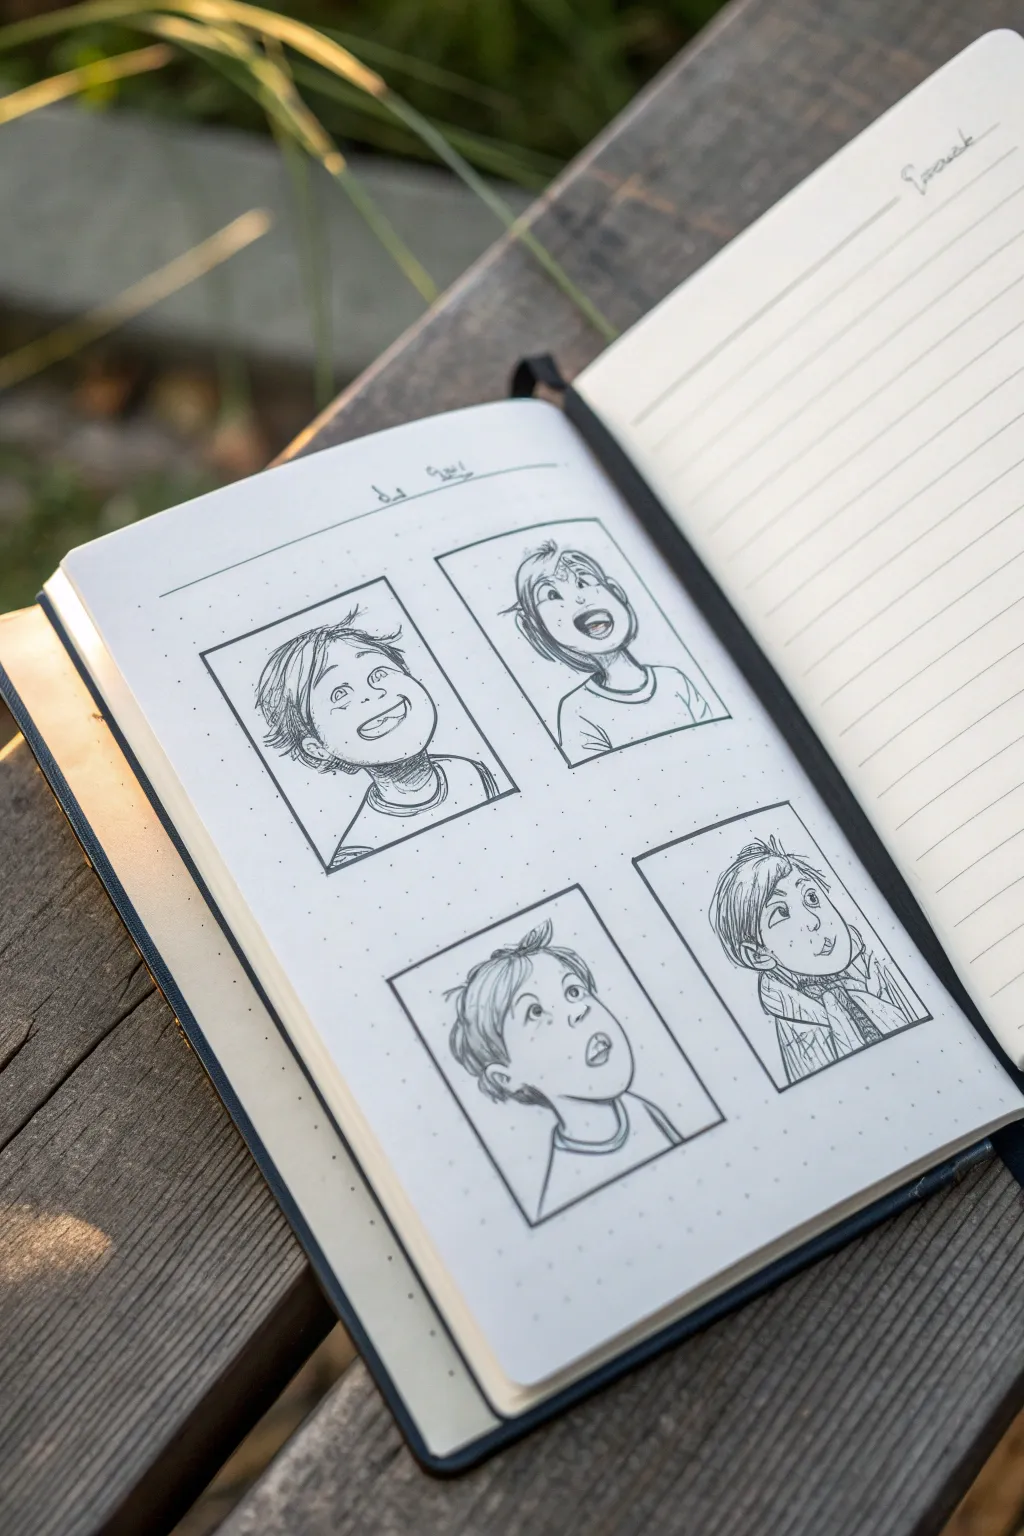
Capture the many sides of your personality with this fun four-panel character study. By sketching the same face with different emotions, you’ll learn how small changes to eyebrows and mouths can completely transform a drawing.
Step-by-Step
Materials
- A5 Dot grid notebook or sketchbook
- HB or 2B Graphite pencil (for initial sketching)
- Fine liner pen (0.3mm or 0.5mm, black)
- Ruler
- Eraser
Step 1: Setting the Stage
-
Prepare the grid:
Open your notebook to a fresh page. Using your ruler, lightly measure out four rectangular boxes of equal size. Arrange them in a 2×2 grid, leaving a comfortable gap between each box so they don’t feel crowded. -
Draw the frame borders:
Go over your pencil guide lines with your fine liner pen to create varied, slightly wobbly borders. Instead of perfect straight lines, allow your hand to be a bit loose or double up the lines in corners to give it a hand-drawn comic book feel. -
Erase guide lines:
Wait a moment for the ink to dry completely, then gently erase the pencil measurements inside and outside the boxes so you have four clean frames.
Step 2: Constructing the Base Head
-
Lightly sketch the head shape:
In the first box, use your pencil to draw a simple circle or oval for the head. Add a curved vertical line down the center to decide which way the character is looking. -
Add neck and shoulders:
Draw two lines down from the jaw for the neck, followed by the curve of the collar and shoulders. Keep the pose simple; the focus here is on the face. -
Repeat for all panels:
Repeat this basic head structure in the other three boxes. Vary the tilt of the head slightly in each one—maybe tilt one up, one down, and one sideways—to make the layout dynamic.
Oops, smudged ink?
If you smudge wet ink while erasing, turn it into a feature! Add cross-hatching to that area to turn the smudge into a deliberate shadow under the chin or hair.
Step 3: Adding Expressions
-
Sketch the ‘Happy’ face:
In the top-left box, draw arched eyebrows high on the forehead. Sketch wide, open eyes and use a curved ‘U’ shape for a smiling mouth. Mark the nose with a simple small curve. -
Sketch the ‘Surprised’ face:
For the top-right box, lift the chin up. Draw small, round pupils in tall oval eyes. Open the mouth into an ‘O’ shape to show shock or excitement. -
Sketch the ‘Curious’ face:
In the bottom-left box, tilt the head slightly. Draw the eyes looking upward and to the side. Keep the mouth small and neutral, perhaps just a tiny open circle or a straight line. -
Sketch the ‘Skeptical’ face:
In the final box (bottom-right), lower the eyebrows or make one higher than the other. Draw the eyes looking sideways and pull the mouth to one specific side to show doubt.
Add Color Pop
Use a single colored pencil or marker (like red for cheeks or blue for the shirt) to highlight one specific element in every frame. It ties the series together beautifully.
Step 4: Inking and Details
-
Definition with ink:
Switch back to your fine liner. Carefully trace over your pencil sketches. Start with the jawlines and ears to lock in the head shape. -
Ink the features:
Trace the eyes, nose, and mouth. I find that breaking the line of the mouth slightly in the corners makes it look more natural than one continuous hard line. -
Add the hair:
Draw the hair using quick, flicking strokes to suggest texture. Don’t outline the whole hair mass; instead, draw clumps or individual strands, especially near the bangs and crown. -
Detail the clothing:
Add the collar lines. Use simple parallel hatching lines (short, closely spaced strokes) on the shirt or scarf to indicate shadow or pattern. -
Add facial texture:
Add tiny details like freckles, creases in the eyelids, or small hatch marks under the chin for shadow. These small touches bring the character to life. -
Final clean up:
Once you are absolutely sure the ink is dry, erase all underlying pencil sketches to leave a crisp, clean comic strip.
Now you have a dynamic character sheet that shows just how expressive simple lines can be
BRUSH GUIDE
The Right Brush for Every Stroke
From clean lines to bold texture — master brush choice, stroke control, and essential techniques.
Explore the Full Guide
Bird on a Branch
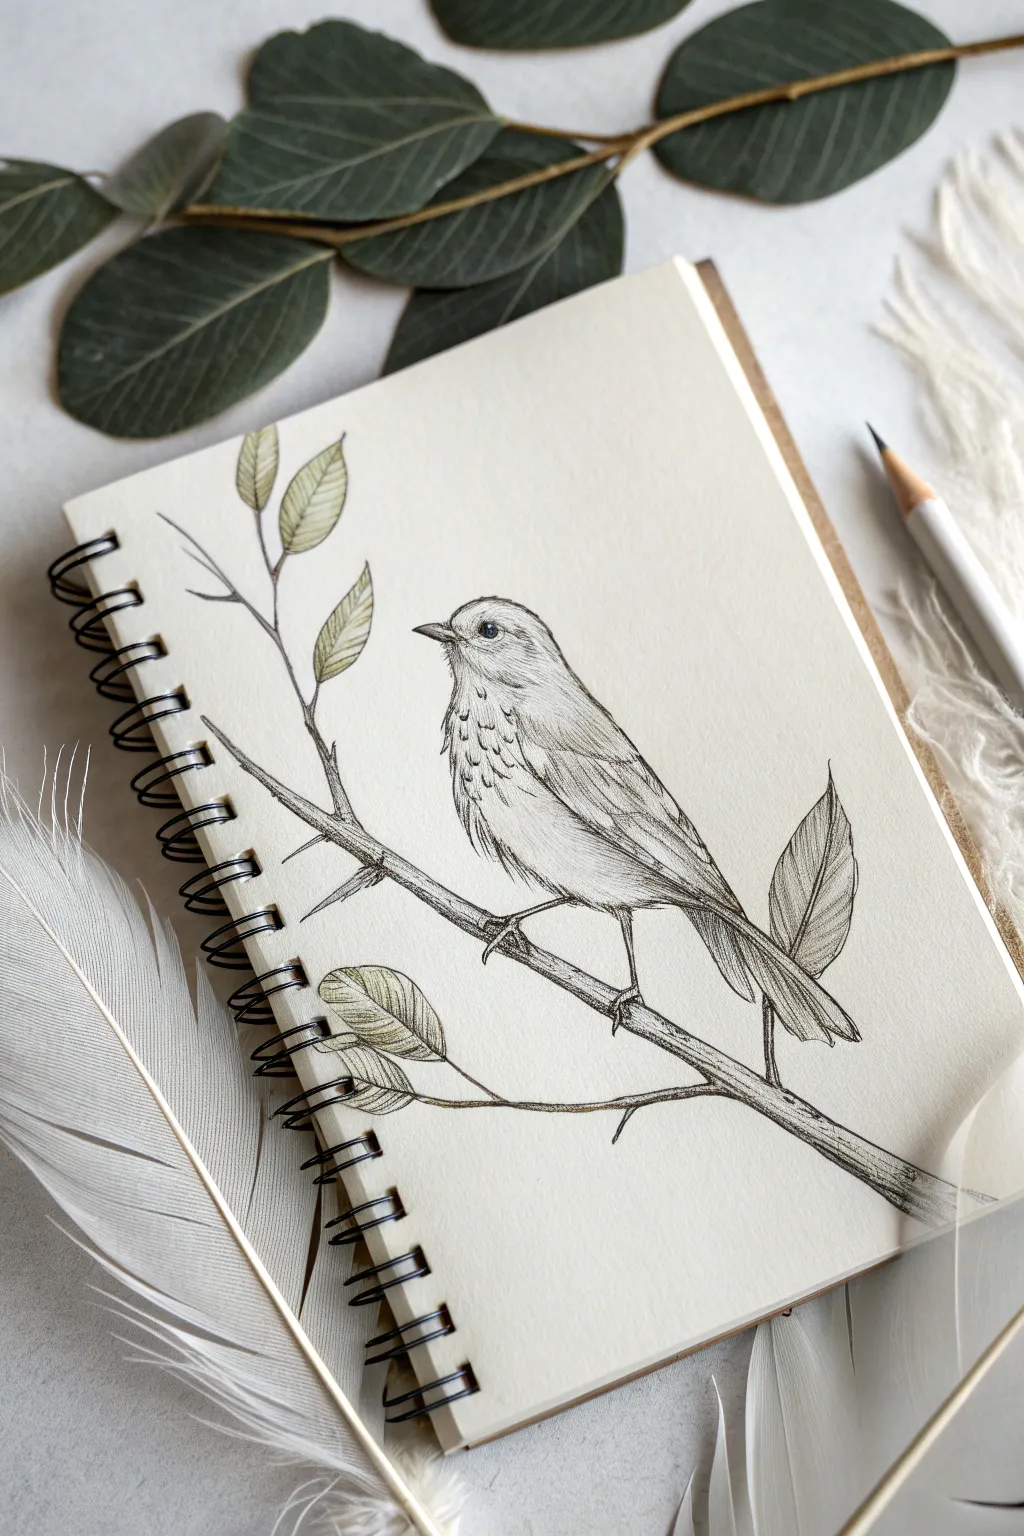
Capture the delicate beauty of nature with this charming sketchbook project. You’ll create a realistic bird perched on a branch using simple pencil shading techniques and soft touches of green for the leaves.
Step-by-Step Tutorial
Materials
- Spiral-bound sketchbook (smooth or mixed media paper)
- HB graphite pencil (for sketching)
- 2B or 4B graphite pencil (for shading)
- Fine-liner pen (black or dark grey, optional)
- Colored pencils (olive green, sage green)
- Kneaded eraser
- Pencil sharpener
Step 1: Basic Shapes & Layout
-
Branch Basics:
Start by drawing a diagonal line stretching from the bottom right corner up towards the middle left. Add a few smaller offshoot lines pointing upwards to create the twigs where leaves will grow. -
Body Oval:
Lightly sketch a medium-sized oval shape slightly above the main branch. This will be the main body of the bird. -
Head Circle:
Draw a smaller circle overlapping the top left of your oval. This forms the head. Connect the head to the body with two short, curved lines to create the neck. -
Tail and Wing:
Extend a long, thin rectangle shape downwards from the back of the body relative to the branch for the tail. Draw a teardrop shape inside the body oval to represent the folded wing.
Clean Edges
Place a scrap piece of plain paper under your drawing hand. This prevents your palm from smudging the pencil graphite while you work on different areas.
Step 2: Refining the Bird
-
Beak and Eye:
Draw a small triangle on the left side of the head for the beak, splitting it in the middle. Place a small circular eye near the center of the head, leaving a tiny white dot for the reflection. -
Feather Texture:
Erase your initial guide lines gently. Using short, flicking strokes, outline the bird’s body to make it look fluffy rather than smooth. Pay attention to the chest area where the feathers look softer. -
Wing Details:
Inside the wing shape, draw long, curved lines layered over each other to show the primary feathers. Make the tips of the wing feathers slightly pointed. -
Feet and Claws:
Draw thin lines extending from the bottom of the bird’s belly, wrapping around the branch. Add tiny curves for the claws gripping the wood.
Step 3: Branch and Leaves
-
Thickening the Branch:
Go back to your initial branch line and make it uneven and thicker. Add little knots or bumps to make the wood look natural and textured. -
Adding Leaves:
Sketch simple almond shapes at the ends of your twig offshoots. Group them in pairs or singles, varying their sizes slightly. -
Leaf Veins:
Draw a center line down each leaf, and add tiny diagonal veins branching out to the edges.
Creative Twist
Try changing the bird species! Make the beak shorter and thicker for a finch, or add a crest of feathers on the head to turn it into a cardinal.
Step 4: Shading & Color
-
Darker Values:
Switch to your 2B or 4B pencil. Darken the eye (keeping that white highlight!), the underside of the beak, and the shadowed area under the wing. -
Soft Shading:
Lightly shade the bird’s belly and the bottom of the branch to give them a rounded, 3D form. I find using the side of the pencil tip helps create smoother shadows here. -
Leaf Color:
Take your olive or sage green colored pencil and very lightly color the leaves. Keep the pressure low so the graphite lines still show through. -
Branch Detail:
Add a few scratchy, horizontal lines along the branch to simulate bark texture. -
Tail Feathers:
Darken the lines separating the tail feathers and add deeper shading where the tail meets the wings.
Now you have a serene nature sketch ready to be admired
Unicorn With Flowing Mane
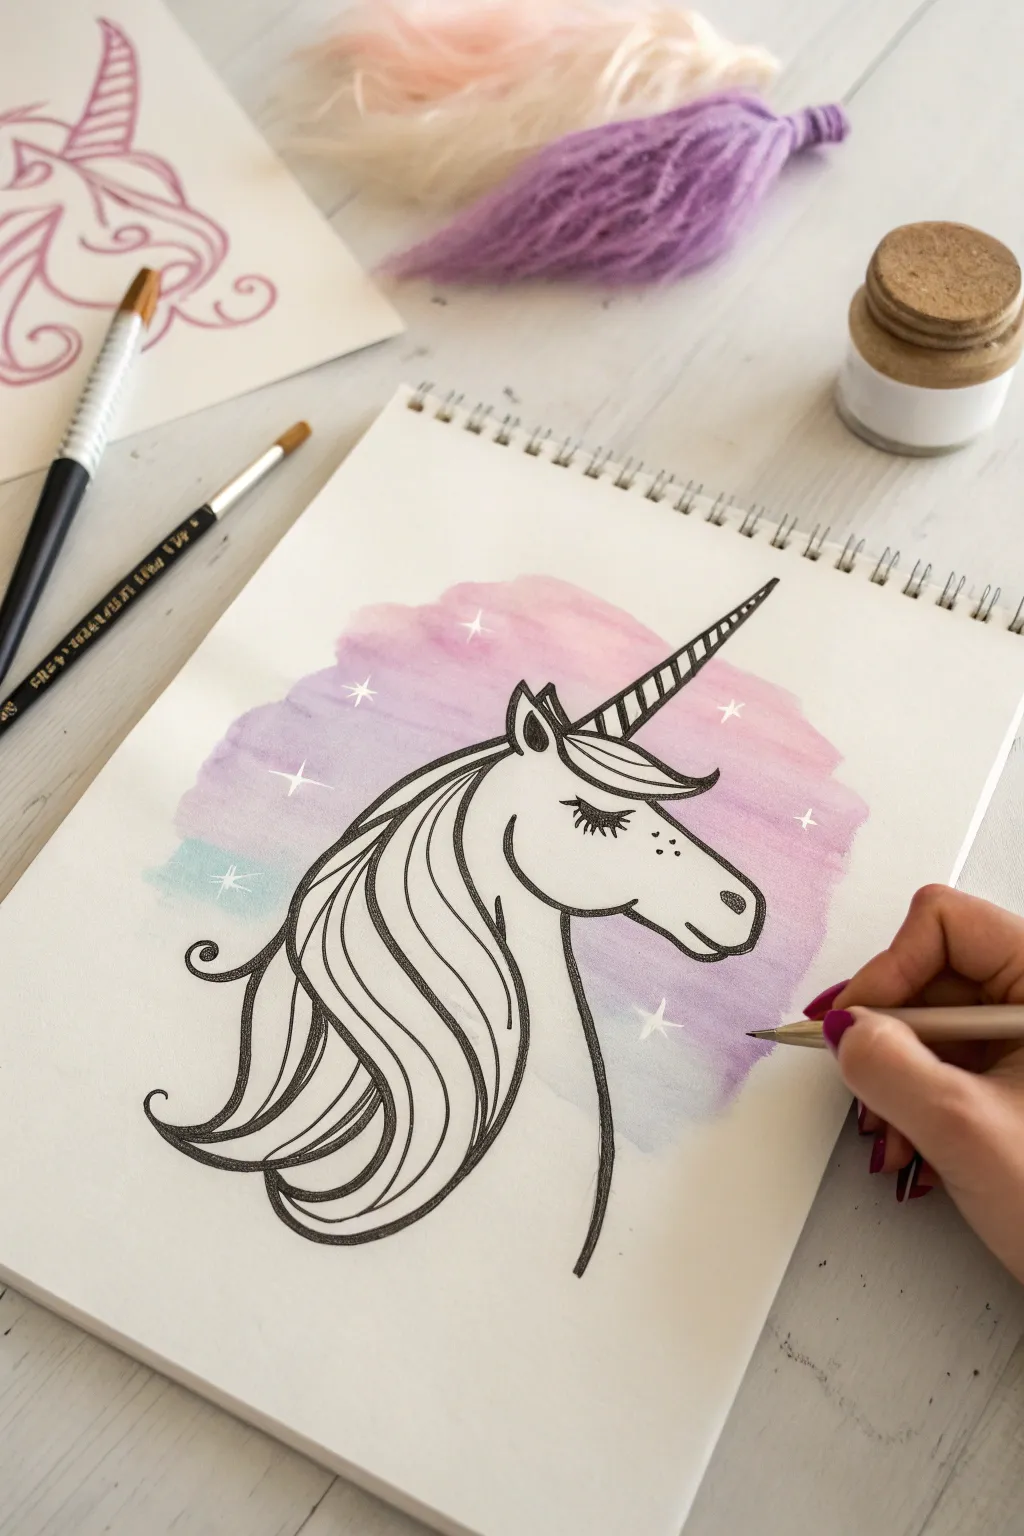
This magical project combines a loose watercolor background with crisp line work to create a dreamy unicorn portrait. The splash of pink and purple creates a celestial atmosphere perfect for the white stars to shine through.
How-To Guide
Materials
- Watercolor paper (spiral sketchbook preferred)
- Watercolor paints (pink, purple, blue)
- Soft round watercolor brush (size 6 or 8)
- Fine liner pen (black, waterproof)
- White gel pen
- Pencil and eraser
- Cup of water and paper towels
Step 1: The Celestial Background
-
Prepare the wash area:
Before drawing anything, lightly mark a general oval shape in the center of your page with a pencil. This is just a guide for where your paint will go, so keep it very faint. -
Apply the first color:
Load your wet brush with a soft pink watercolor. Paint a loose, cloud-like blob near the top of your oval guideline, letting the edges be irregular and natural. -
Blend in purple:
While the pink is still slightly damp, rinse your brush and pick up some purple paint. Add this to the middle and bottom sections of your shape, letting it touch the pink so the colors bleed together. -
Add a hint of blue:
For a bit of depth, drop a tiny amount of watered-down blue into the bottom left corner of the wash. This creates a cool shadow effect. -
Let it dry completely:
This is crucial. The paper must be bone dry before you start drawing the ink lines, or the ink will bleed. I usually wait about 15-20 minutes or use a hairdryer on a low setting.
Bleeding Lines?
If your black ink bleeds into the paper, the paint wasn’t fully dry. Let it sit longer, or test dryness by lightly touching the paper with the back of your hand—it should feel room temp, not cool.
Step 2: Drawing the Outline
-
Sketch the head shape:
Using a pencil, draw a long, slightly curved shape for the unicorn’s muzzle and head. Think of it like a smooth peanut shape, wider at the jaw and narrower at the nose. -
Add the details:
Sketch a pointed ear near the top of the head and a distinct horn jutting out from the forehead. Add a nostril curve and a smiling mouth line. -
Design the mane:
Draw sweeping, curvy lines flowing down from behind the ear. These should look like elegant waves, curving inward at the bottom to form separate locks of hair. -
Ink the main lines:
Once you are happy with your pencil sketch, trace over the main outline of the head and neck using your black waterproof fine liner pen. Use a confident, smooth stroke. -
Ink the mane’s flow:
Carefully ink the wavy lines of the mane. Try to vary your pressure slightly—pushing harder on the curves makes the hair look thicker and more voluminous. -
Stripe the horn:
Draw diagonal lines up the length of the horn to create that classic spiral texture. Keep the spacing consistent all the way to the tip.
Metallic Shine
Instead of black ink for the horn, try using a gold or silver metallic marker. It adds a magical element that catches the light and contrasts beautifully with the matte watercolor.
Step 3: Adding Magic
-
Draw the eye:
Place a closed, curved eyelid in the center of the face. Add several long, thick eyelashes sweeping downward for a gentle, sleeping expression. -
Add freckles:
Dot a few tiny specks of ink across the bridge of the nose or cheek area to give the unicorn a sweet character. -
Erase pencil marks:
Wait a moment for the ink to settle, then gently erase all your initial pencil sketches so only the clean black lines remain. -
Create stars:
Using a white gel pen, draw small four-pointed stars and tiny dots directly over the dried watercolor background. -
Highlight the mane:
If you want extra sparkle, add thin white lines following the curve of the mane hair to simulate glossy reflections.
You now have a dreamy piece of art worthy of framing on your wall

PENCIL GUIDE
Understanding Pencil Grades from H to B
From first sketch to finished drawing — learn pencil grades, line control, and shading techniques.
Explore the Full Guide
Friendly Dragon Side View
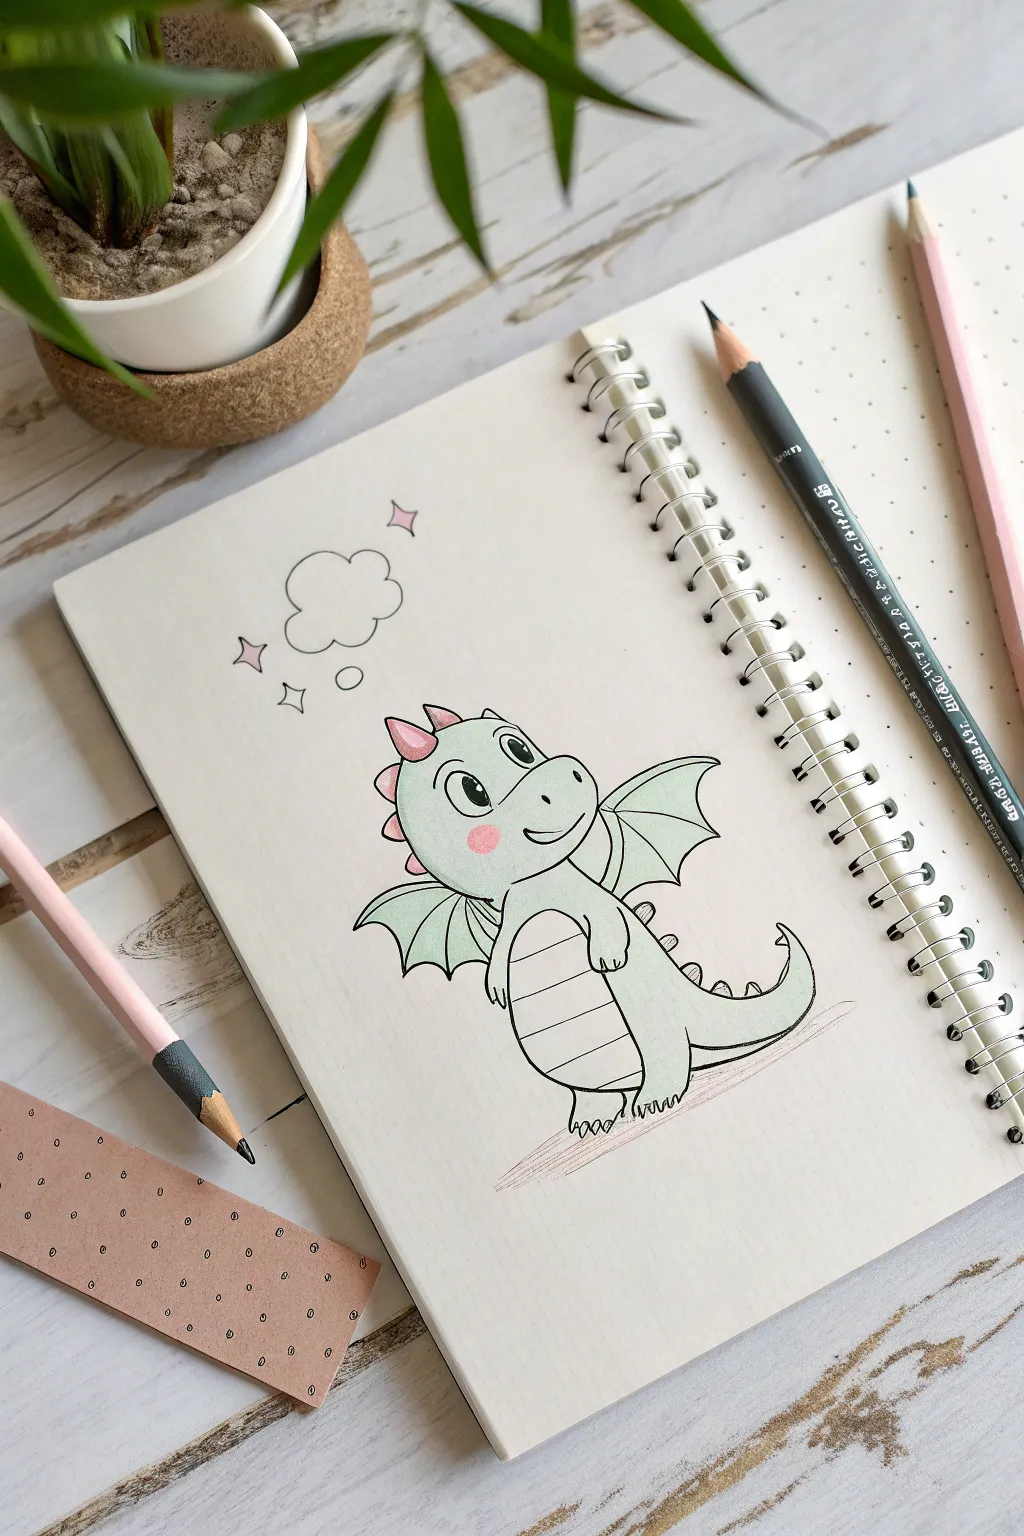
Create your own friendly fire-breather with this adorable cartoon dragon tutorial. This drawing features soft pastel colors and simple shapes, making it perfect for filling a sketchbook page with whimsical charm.
Step-by-Step
Materials
- Sketchbook or drawing paper (heavyweight preferred)
- HB Drawing pencil
- Fine liner pen (0.3mm or 0.5mm, black)
- Colored pencils (light green, dark green, pale pink)
- Eraser
- Pencil sharpener
Step 1: Planning the Head and Body
-
Head shape:
Start by drawing a rounded, slightly boxy oval for the dragon’s head. Imagine the shape of a large marshmallow. -
Body curve:
Beneath the head, draw a teardrop shape that curves slightly backward to form the dragon’s belly and back. The bottom should be wider than the top. -
Adding legs:
Sketch two short, stubby legs at the base of the body. Add three tiny triangles at the bottom of each foot for claws. -
Tiny arms:
Draw small, curved arms coming from the middle of the body. One arm can rest against the belly, while the other hangs slightly loose. -
Tail sketch:
Extend a thick, triangular tail from the lower back, curving it upward slightly at the tip.
Uneven Color?
If your colored pencil looks scratchy, try drawing in tiny circular motions rather than back-and-forth lines. This fills the paper’s texture better.
Step 2: Facial Features and Details
-
Dragon snout:
Add a small C-curve inside the head shape for the snout area. Place a tiny dot for the nostril and a curved line for a happy smile. -
Big eyes:
Draw a large oval for the eye. Inside, add a smaller circle for the pupil, leaving a tiny white spot for the highlight to make it look shiny. -
Belly scales:
Draw a curved line running down the front of the body to separate the belly. Add horizontal stripes across this section. -
Back spikes:
Draw a row of small triangles running from the top of the head all the way down the back and onto the tail. -
Wings:
Sketch two bat-like wings on the back. Start with a curved line extending out, then use scalloped lines to connect back to the body.
Step 3: Thinking Space
-
Thought bubble:
Above the dragon’s head, draw a fluffy cloud shape. Add three small circles leading from the dragon’s head to the cloud. -
Sparkles:
Add a few four-pointed stars or diamond shapes around the thought bubble to add some magic.
Dragon Personalities
Change the dragon’s mood by altering the thought bubble! While this one is dreaming, yours could be thinking about fire, food, or a castle.
Step 4: Inking and Coloring
-
Inking lines:
Carefully trace over your pencil lines with a black fine liner pen. I find it helpful to rotate the paper as I turn corners to keep the lines smooth. -
Erase guidelines:
Wait a moment for the ink to dry completely, then gently erase all the pencil sketches underneath. -
Base green:
Use a light green colored pencil to shade the head, body, arms, and legs. Keep the pressure light for an even texture. -
Pink accents:
Color the spikes, the inside of the wings, and a little circle on the cheek with a pale pink pencil. -
Grounding shadow:
Lightly scribble a faint pink or grey patch underneath the dragon’s feet so it doesn’t look like it’s floating in mid-air.
Now your sketchbook has a magical guardian to keep your ideas safe
Simple Dinosaur With Plates or Horns
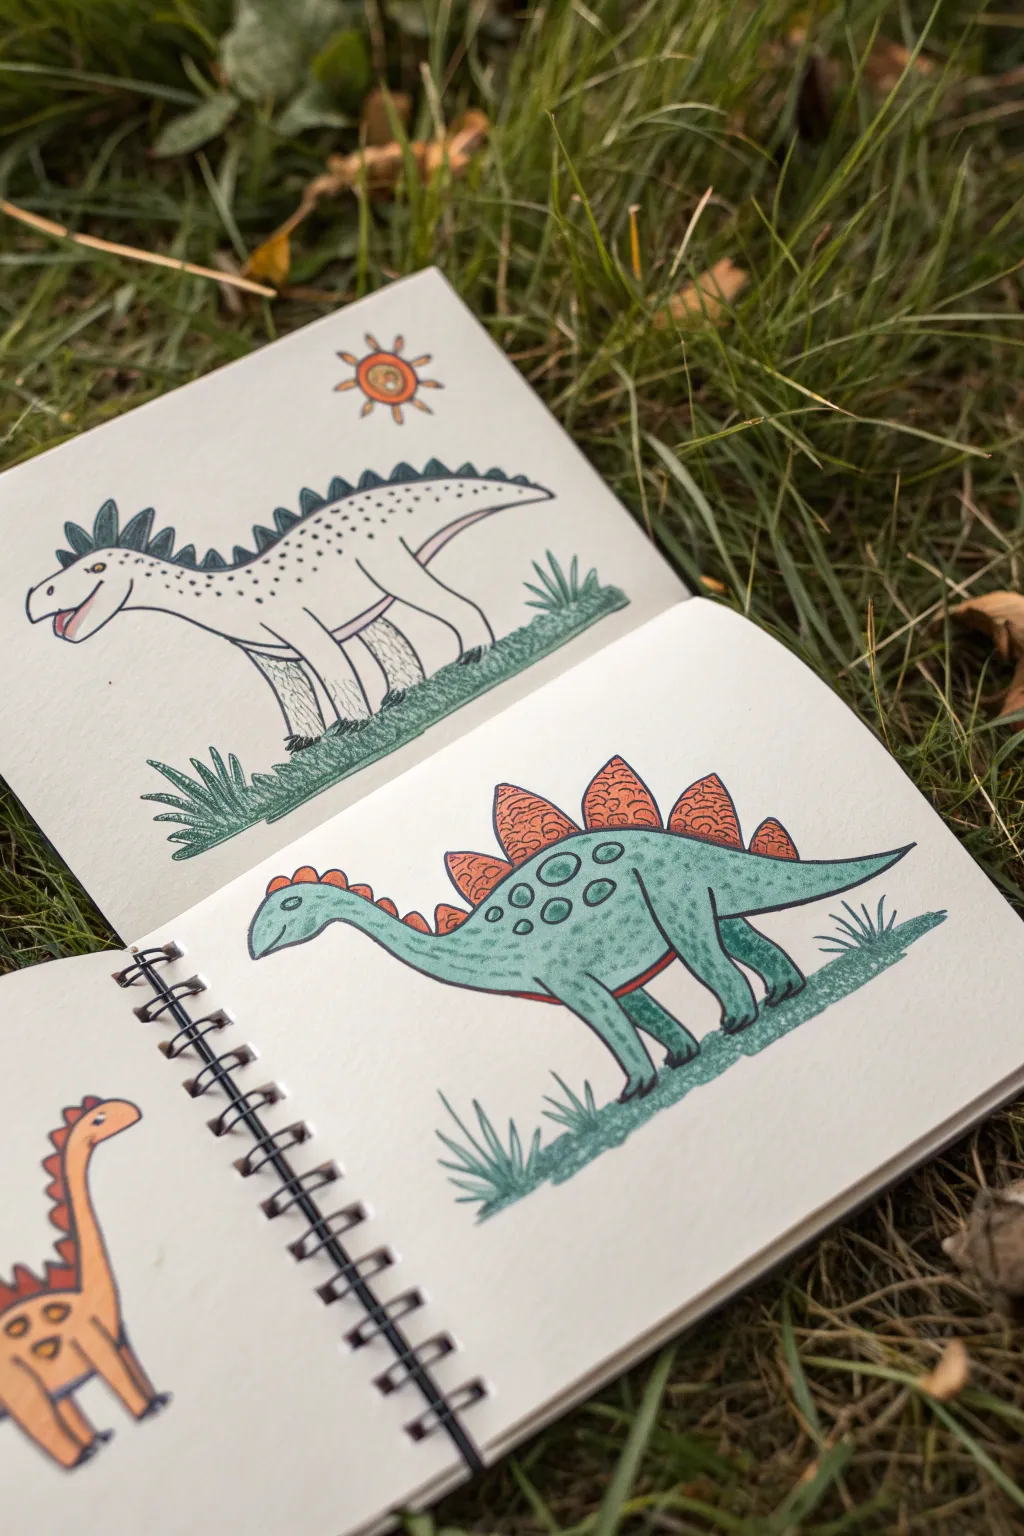
Create a charming, clean-line illustration of a Stegosaurus using simple shapes and bold coloring techniques. This project focuses on getting comfortable with ink outlines and adding texture with markers or pencils for a classic scientific illustration feel.
How-To Guide
Materials
- Spiral-bound sketchbook with thick paper
- Pencil (HB or 2H)
- Eraser
- Fine liner or drawing pen (black, size 0.3 or 0.5)
- Colored pencils or markers (teal green, orange/red, darker green)
- Ruler (optional for ground line)
Step 1: Sketching the Outline
-
Body shape:
Start lightly with your pencil. Draw a large oval shape for the main body of the dinosaur, slightly tilted upwards towards the right. -
Neck and tail:
Extend a curved, tapering neck from the left side of the oval for the head. From the right side, draw a long, pointed tail extending backwards. -
Legs:
Add four stout legs. The back legs should be slightly thicker and bent at the knee, while the front legs are a bit shorter and straighter. -
Refining the silhouette:
Connect your shapes to create a smooth outline. Make the head small and rounded with a slight beak-like shape at the snout.
Smudge Alert
If you are left-handed, place a scrap piece of paper under your hand while inking to prevent smearing the wet ink across your drawing.
Step 2: Adding Plates and Details
-
Dorsal plates:
Along the curve of the back, sketch a row of five or six large, pentagon or triangle-shaped plates. Start small near the neck, make them largest on the back, and smaller again on the tail. -
Neck details:
Add a row of tiny, scalloped bumps running down the top of the neck, leading up to the first big back plate. -
Facial features:
Draw a small circle for the eye near the top of the head and a simple curved line for the mouth/beak. -
Skin texture:
Lightly sketch some circles of varying sizes on the main body to represent scales or spots.
Step 3: Inking
-
Final outlines:
Take your black fine liner and carefully trace over your pencil lines. Try to use long, confident strokes rather than short, scratchy ones. -
Plate texture:
Inside the large back plates, draw some wiggly, organic lines that look like veins on a leaf or cracks in a rock. -
Clean up:
Once the ink is completely dry—I usually give it a full minute just to be safe—erase all your underlying pencil sketches for a crisp look.
Make it Ancient
Use a stippling technique (lots of tiny dots) with your pen on the underbelly or lower legs to create a cool, scaly texture.
Step 4: Coloring
-
Base body color:
Use a teal or sea-green colored pencil to gently shade the entire body, leaving the belly area slightly lighter if you want a 3D effect. -
Coloring the plates:
Fill in the back plates with a bright orange or reddish-brown color. Press a little harder near the base of each plate for shading. -
Adding definition:
Go back with your teal pencil and press firmly to outline the spots on the body, making them stand out against the lighter green skin. -
The ground:
Draw a thick, textured line of grass beneath the dinosaur’s feet using a darker green. Add simple, spikey grass tufts sticking up around the legs. -
Shadows:
Add a little bit of the dark green or a grey pencil directly under the belly and legs to anchor your dinosaur to the ground.
Now you have a prehistoric creature ready to roam the pages of your sketchbook


Stacked Ice Cream With Patterns
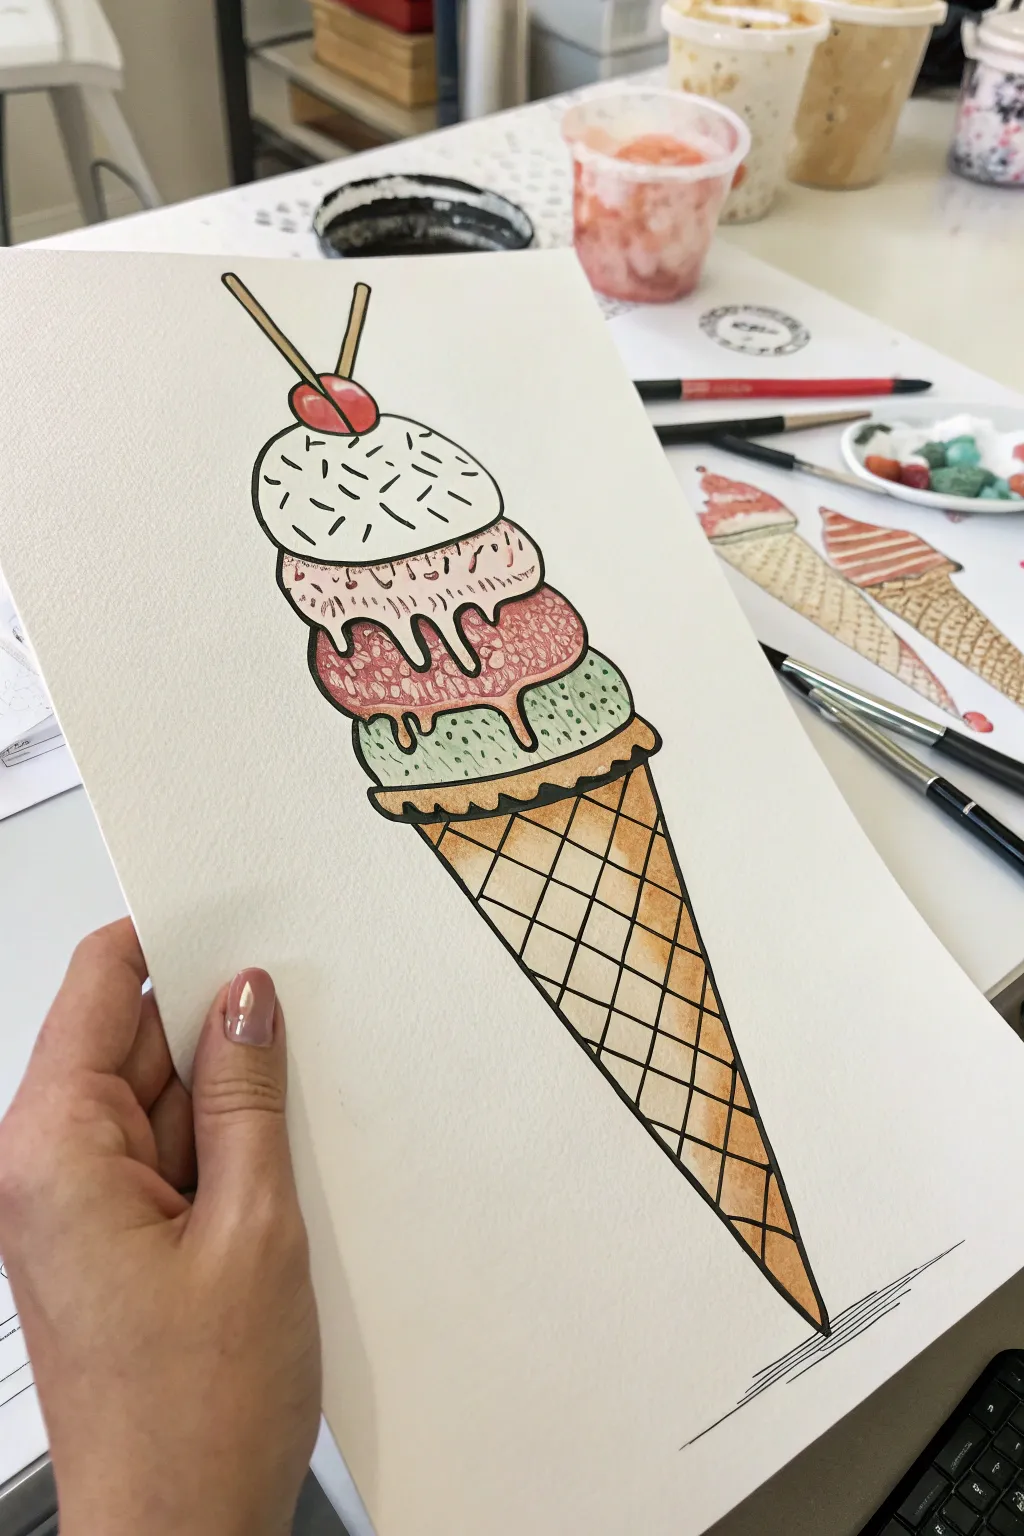
Create a mouth-watering masterpiece with this towering ice cream cone illustration that combines simple line work with gentle watercolor washes. The textured paper adds a lovely depth to the scoops, making them look almost fluffy and delicious.
Detailed Instructions
Materials
- Cold press watercolor paper (A4 or similar size)
- Pencil (HB or lighter) and eraser
- Waterproof fineliner pens (black, size 03 or 05)
- Watercolor paint set
- Round watercolor brushes (size 4 and size 8)
- Two jars of water
- Paper towels for blotting
Step 1: Sketching the Structure
-
Start with the cone:
Begin near the bottom of your page by drawing a long, upside-down triangle. This will be your waffle cone. Don’t close the top just yet—leave it open for the ice cream to sit inside. -
Add the first scoop:
Draw the bottom scoop sitting directly on top of the cone. Make it a wide, flattened oval shape, but allow the bottom edge to be wavy and uneven, like melting ice cream dripping over the sides of the cone. -
Stack the middle scoop:
Place a second scoop on top of the first. This one should be slightly smaller than the base scoop. Draw the bottom edge with deep, drippy curves that overlap the green scoop below it. -
Top with vanilla:
Add the third and final scoop on top. This one is a simpler dome shape. Since it’s the top scoop, it doesn’t need heavy drips, but keep the line work relaxed and organic. -
The cherry on top:
Right at the peak, draw a round cherry. Add two thin sticks poking out diagonally behind it—these can be cinnamon sticks, wafers, or decorative straws.
Clean Edges, Every Time
To keep colors from bleeding into each other (like green into pink), let one section dry completely before painting the neighbor. Use a hair dryer to speed this up.
Step 2: Inking the Details
-
Outline the main shapes:
Using your waterproof black fineliner, carefully trace over your pencil lines. I prefer to make the outer contour lines slightly thicker than the interior details to help the image pop off the page. -
Draw the waffle pattern:
Inside the cone triangle, draw diagonal lines going one way, then cross them with diagonal lines going the opposite way to create a classic diamond waffle grid. -
Add texture to the scoops:
For the top vanilla scoop, draw small dashes for sprinkles. On the middle pink scoop, add small scribbles and dots to suggest strawberry chunks. For the bottom mint scoop, add tiny specks for chocolate chips. -
Erase pencil marks:
Wait a moment for the ink to fully set, then gently erase all your pencil sketches to leave a clean, crisp drawing ready for color.
Step 3: Painting with Watercolor
-
Base wash for the cone:
Mix a light golden-brown or ochre color with plenty of water. Paint the entire cone area. The watercolor will naturally pool in some spots, creating a nice baked texture. -
Paint the mint scoop:
Using a very watery mix of sap green or mint, paint the bottom scoop. Keep the wash light so drawing details show through clearly. -
Paint the berry scoop:
Mix a soft pink or rose color for the middle scoop. Carefully paint around the drips from the scoop above it so colors don’t bleed into each other. -
Shading the vanilla:
Leave the top scoop mostly white paper. Mix a very faint grey-blue wash and only paint the left side and bottom edge to give it a rounded, 3D shadow effect. -
Color the cherry and sticks:
Use a vibrant red for the cherry, leaving a tiny white dot unpainted for a shine highlight. Paint the sticks a warm tan color. -
Add shadows:
Once the first layers are dry, mix slightly darker versions of your green and pink paints. Add a thin stroke of shadow right underneath the drips of the scoops to show volume.
Flavor Swap
Customize your cone! Change the colors to represent your favorite flavors—purple for berry, brown for chocolate, or yellow for lemon sorbet.
Once the paint is fully dry, sign your name next to the cone point for a gallery-ready finish
Cozy Room Corner in One-Point Perspective
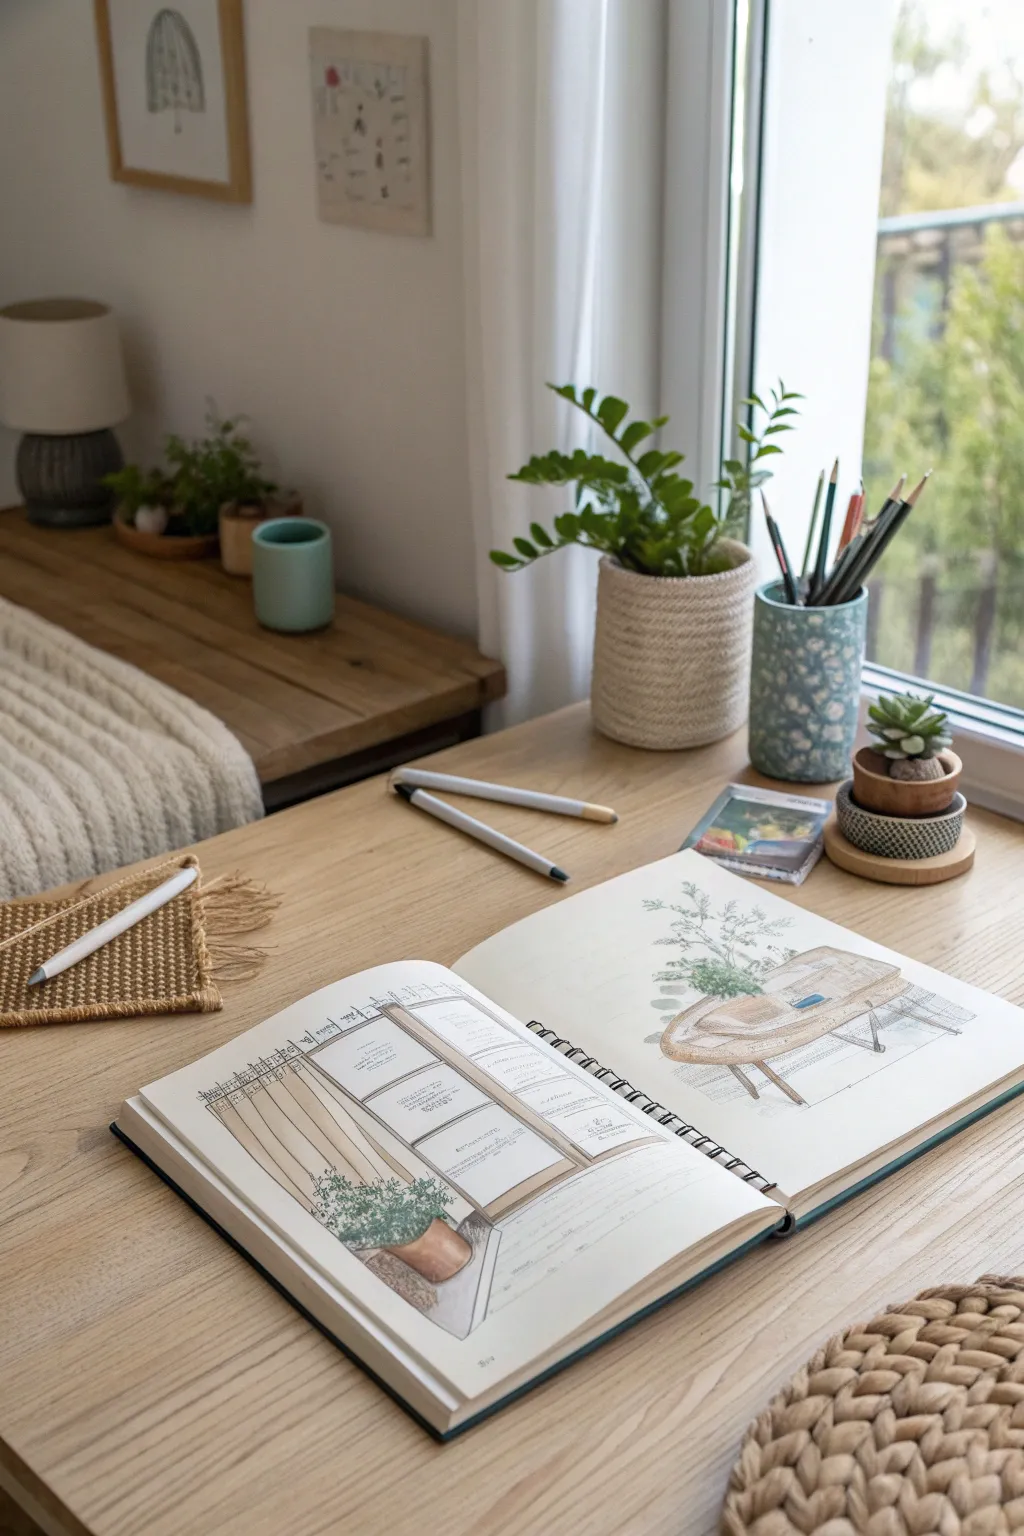
Capture the charm of a cozy interior with this double-page sketchbook spread, featuring detailed line work and soft shading. You’ll practice one-point perspective on the left page and loose, organic object sketching on the right to create a balanced composition.
How-To Guide
Materials
- Spiral-bound sketchbook (A4 or similar size)
- Fine liner pens (sizes 0.1, 0.3, and 0.5)
- Graphite pencils (HB and 2B)
- Ruler or straight edge
- Eraser (kneaded preferred)
- Colored pencils or light watercolor wash (optional for shading)
Step 1: Planning the Layout
-
Establish the horizon line:
Start with the left page. Using your HB pencil and ruler, lightly draw a horizontal line about one-third of the way up the page. This is your eye level. -
Locate the vanishing point:
Mark a small dot on the horizon line near the center of the page. All diagonal lines for the window depth will converge here. -
Draft the main window shape:
Draw a large rectangle centered on the page for the window frame. Use your ruler to keep the vertical and horizontal lines perfectly straight. -
Rough in the right page:
On the opposite page, lightly sketch the oval shape of the coffee table. Keep the sketching style looser here, as this page focuses on furniture rather than architecture.
Straight Line Struggles?
If your window frame looks crooked even with a ruler, align your ruler with the edge of the paper itself. This ensures your vertical lines are truly parallel to the page edge.
Step 2: Detailing the Window Scene
-
Add depth to the frame:
Draw diagonal lines from the corners of your window rectangle to the vanishing point. This creates the illusion of the window recess or deep sill. -
Divide the window panes:
Sketch the inner mullions (the bars separating the glass). Draw a vertical line down the center and two horizontal lines across to create a six-pane effect. -
Sketch the curtains:
Draw long, vertical flowing lines on either side of the window frame. Add slight waves at the bottom to suggest fabric gathering on the floor. -
Place the potted plant:
At the base of the window on the left, sketch a cylindrical pot shape. Add scribbly, cloud-like textures for the foliage spilling out. -
Refine with ink:
Switch to a 0.5 fine liner. Trace over your main pencil lines for the window frame and the pot. Use a ruler for the architectural lines to keep them crisp. -
Add finer details:
Switch to a 0.1 pen. Freely draw the leaves of the plant and the folds of the curtains. Broken, slightly shaky lines work well here to mimic fabric texture.
Add a Window View
Instead of leaving the window panes blank, lightly sketch a simple outdoor scene—like tree tops or distant buildings—fading into the distance.
Step 3: Illustrating the Furniture
-
Define the table structure:
On the right page, refine the oval table top. Draw the legs slanting outward slightly. Add thickness to the table edge. -
Add tabletop objects:
Sketch a small stack of books or a phone on the table surface. Add a tall, leafy plant in the background behind the table. -
Ink the furniture:
Go over the table and objects with the 0.3 pen. Keep the lines looser than the window drawing to distinguish the two styles. -
Erase pencil guides:
Once the ink is completely dry, gently erase all the underlying graphite marks on both pages.
Step 4: Shading and Finishing
-
Apply shading to the window:
Using a 2B pencil or a very light gray marker, add shading inside the window recess to show depth. Shade the side of the pot away from the light source. -
Texture the floor:
Draw light horizontal lines below the window to suggest floorboards or carpet texture. -
Add subtle color:
I like to use a very faint wash of brown or beige watercolor on the pot and table to warm up the sketch, but colored pencils work great too. -
Annotate the sketch:
Write small notes or dimensions near the window frame using your finest pen to give it that authentic ‘architectural study’ vibe.
Close your sketchbook with pride knowing you’ve mastered a beautiful piece of interior perspective drawing
Whimsical Landscape With Layered Hills

Capture the beauty of nature with this simple, stylized landscape drawing featuring gently rolling hills and a bright, happy sun. It is a relaxing way to fill a sketchbook page using clean lines and soft colors to create depth.
Detailed Instructions
Materials
- Sketchbook (lined or blank)
- Black fine-liner pen (0.5mm or 0.8mm)
- Colored pencils (teal, yellow, tan, brown)
- Pencil and eraser
Step 1: Drawing the Base Outline
-
Start the horizon:
Since we are working across two open pages, imagine a line connecting them. On the left page, draw a large, curved hill that starts high on the left side and dips down toward the center seam. -
Add middle hills:
Draw a second hill on the right page that starts low near the seam and curves upward, creating a valley effect where the pages meet. -
Create the foreground layers:
Below your first hills, draw wavy lines that span across the bottom of both pages. These will be your dusty fields and dirt paths. Make them uneven and sloping to look natural. -
Draw the sun:
On the top right page, use a compass or trace a small circular object to draw a perfect circle for the sun. -
Add sun rays:
Draw small dashes radiating outward from the sun circle. Keep the dashes loose and varied in length for a whimsical look. -
Sketch the clouds:
Draw two distinct cloud shapes. Place a bumpy, detailed cloud on the left page and two smaller, low-hanging clouds on the right page above the hills. -
Ink the lines:
Once you are happy with the sketch, trace over all your pencil lines with a black fine-liner pen. Erase the pencil marks after the ink is fully dry.
Step 2: Adding Details and Color
-
Detail the clouds:
Inside your cloud outlines, draw little swirls and extra bumps. This doodle style gives them a playful, storybook feeling. -
Decorate the path:
On the bottom-most layer that spans both pages, draw long, flowing lines that follow the curve of the hill. These lines mimic rows of crops or dirt tracks. -
Add tiny plants:
In the bottom left corner, draw a few simple stalks with tiny leaves or flower buds. On the bottom right, add a small, fern-like plant for variety. -
Color the hills:
Take a teal or blue-green colored pencil. Color the top-most hills heavily to make them dark and solid. I find pressing harder here makes the foreground pop later. -
Color the middle ground:
Use a golden-yellow or tan pencil for the middle section of hills. Add small dots or stippling on top of the color to give it a sandy texture. -
Color the foreground path:
Use a light brown or beige pencil for the striped path at the bottom. Color gently so you don’t obscure your black pen lines. -
Brighten the sun:
Fill the sun circle with a warm yellow. You can leave a tiny white circle inside for a highlight if you want it to look shiny. -
Final shading:
Go back over the very edges of your hills with a slightly darker shade of the same color to create a rounded, 3D effect.
Uneven Color?
If your colored pencil looks scratchy, try coloring in small, tight circles rather than back-and-forth strokes. This packs the pigment closer together for a smoother look.
Make It Pop
Use a white gel pen to add highlights on the top curves of the hills or the edges of the clouds. This adds a magical sparkle to your landscape.
Close your sketchbook and smile, knowing you’ve captured a perfect sunny day.
Underwater Scene With Bubbles and Fish
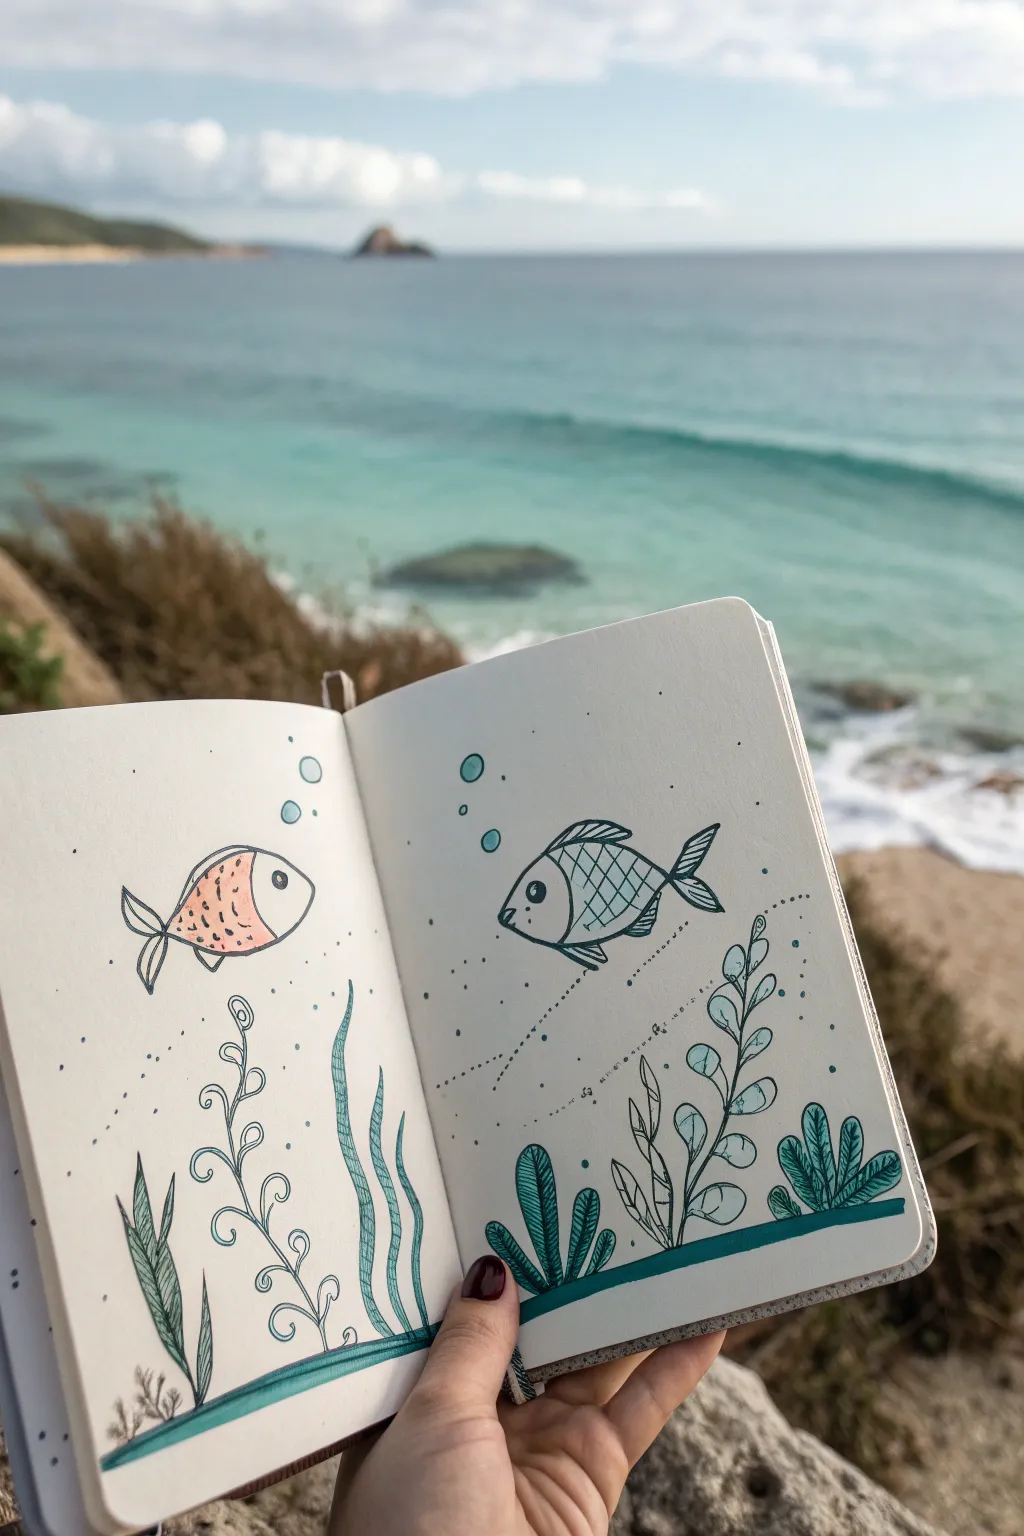
Capture the calm of the ocean with this simple yet charming two-page spread featuring stylized fish and swaying seaweed. Using clean lines and a limited color palette of teal ribbons and coral pinks creates a cohesive, modern look that’s perfect for beginners.
How-To Guide
Materials
- Sketchbook (blank pages)
- Fine-liner pen (black, 0.3mm or 0.5mm)
- Teal blue marker or colored pencil
- Coral/Salmon pink marker or colored pencil
- Pencil and eraser
Step 1: Setting the Scene
-
Draw the seabed:
Open your sketchbook to a fresh two-page spread. Near the bottom, draw a horizontal line that stretches across both pages to create the ocean floor. -
Add a border strip:
Draw a second line parallel to the first one, just slightly above it, creating a thin strip along the bottom. This grounds your drawing and gives you a space to color later. -
Outline the left fish:
On the left page, lightly sketch a simple fish shape in the upper middle area. Think of an oval body with a triangle for a tail. Draw a curved line near the front for the gill/head separation. -
Outline the right fish:
On the right page, draw a second, slightly larger fish facing the first one. Give this one a top fin and a bottom fin to make it distinct from its friend.
Step 2: Inking and Details
-
Ink the main outlines:
Using your black fine-liner, carefully trace over your pencil lines for the fish bodies and the ocean floor. Don’t worry if the lines aren’t perfectly straight; a little wobble adds character. -
Detail the left fish:
Add a round eye with a black pupil. Instead of scales, draw small, scattered specks or dashes on the body to give it texture. -
Detail the right fish:
Draw the eye on the second fish. For this one, draw a cross-hatch pattern (diagonal lines crossing each other) to create a diamond-scale effect on the body. -
Draw swirly seaweed:
On the left page, starting from your bottom strip, draw a tall, vine-like plant that curves upward. Add small curls or loops branching off the main stem. -
Sketch tall grass:
Next to the swirly plant on the left page, draw a few tall, wavy blades of sea grass rising up toward the fish. -
Create leafy plants:
On the right page, draw a plant with a central stem and small, oval-shaped leaves attached in pairs as it goes up. -
Add short bushes:
Fill in the remaining bottom space on the right page with shorter, rounded clumps of sea plants that look like small bushes. -
Erase pencil marks:
Once the ink is completely dry—I usually wait about a minute just to be safe—gently erase all your initial pencil sketches.
Smudge Alert
Work from top to bottom if you’re using inky pens. If you smudge, turn it into a bubble or a drifting piece of seaweed.
Step 3: Adding Color & Atmosphere
-
Color the left fish:
Take your coral or salmon pink marker and fill in the body of the left fish, leaving the head and tail white for contrast. -
Color the right fish:
Use your teal marker to lightly shade the right fish. You can color just the scales or the whole body, keeping the fins white or outlined. -
Fill the seaweed:
Using the teal marker, color in the leaves and blades of grass. For the thin, swirly plant, you might just trace the line with color to make it pop. -
Anchor the drawing:
Color in that thick strip at the very bottom of the pages with your teal marker to create a solid base for the scene. -
Add bubbles:
Draw a few small circles of varying sizes rising from the seaweed and above the fish to look like bubbles. You can tint the inside of these lightly with blue. -
Create current lines:
Finally, use your fine-liner to add tiny stippling dots or dashed lines flowing horizontally across the page. This subtle detail suggests the movement of water.
Scale It Up
Try varying your line weight. Go over the outer edges of the fish a second time to make the lines thicker and bolder than the inside details.
Now you have a peaceful underwater snapshot preserved in your sketchbook to enjoy anytime
Bubble Letters Name Logo
Learn how to transform plain handwriting into eye-catching 3D art with this fun bubble letter project. The design uses bold outlines, textured fills, and simple shadows to make the words jump right off the page.
How-To Guide
Materials
- Spiral sketchbook or white drawing paper
- Pencil (HB or 2B)
- Eraser
- Fine liner pen (black, 0.5mm or 0.8mm)
- Ruler
- Pink marker or colored pencil (optional for accents)
Step 1: Drafting the Layout
-
Set your guidelines:
Use a ruler and pencil to draw two light, horizontal lines across your paper where you want the word ‘BUBBLE’ to sit. Leave a gap, then draw two more lines below for the word ‘LETTER’. -
Sketch basic block letters:
Lightly sketch the skeleton of your letters within the guidelines. Keep them wide and evenly spaced so you have room to add volume later. -
Thicken the letters:
Go around your skeleton lines to create thick, blocky shapes. For this specific style, try to make the corners slightly rounded rather than super sharp squares to keep that friendly ‘bubble’ feel. -
Refine the shapes:
Check your spacing. If any letters are touching or overlapping uncomfortably, erase and adjust them now before you start inking.
Step 2: Inking and Detailing
-
Outline the main text:
Using your black fine liner, carefully trace the final outer shape of your letters. Do not trace the original skeleton lines inside the letters. -
Erase pencil marks:
Wait a moment for the ink to dry completely to avoid smudges, then gently erase all the pencil guidelines and sketches. -
Add the 3D drop shadow:
To make the letters pop, draw a shadow line on the bottom and right side of every single letter part. Imagine the light is coming from the top left. -
Fill the shadows:
For the bottom word ‘LETTER’, color in these shadow strips completely black for a solid, heavy look. For ‘BUBBLE’, draw diagonal hatching lines inside the shadow areas instead of solid black. -
Connect the corners:
Draw small diagonal lines connecting your main letter corners to the corresponding corners of your shadow shape. This creates the illusion of depth.
Shadow Secret
Confused about where shadows go? Just remember: only draw lines on the RIGHT and BOTTOM edges. Never on the top or left.
Step 3: Texture and Embellishments
-
Texture the top word:
For the word ‘BUBBLE’, create a shading effect by stippling. Add tiny dots concentrated at the bottom of each letter, fading out as you go up, leaving the top half white. -
Sketch decorations:
Around the words, lightly pencil in some various-sized circles and four-pointed stars (diamonds with curved sides). -
Ink the sparkles:
Trace over your stars and circles with the fine liner. Keep the lines clean and crisp. I find it helpful to rotate the notebook slightly when drawing the curved sides of the stars. -
Add color accents:
Pick a few of the circles and color them in with a soft pink marker or colored pencil to add a gentle splash of color. -
Final tiny details:
Scatter a few tiny, open black circles and single dots in the empty white spaces around the text to balance the composition. -
Final review:
Check your drop shadows one last time to ensure you didn’t miss any internal corners, like the inside of the ‘B’ or ‘R’.
Go Technicolor
Instead of black stippling inside the letters, recreate the dots using three different colors of gel pens for a confetti look.
Now you have a dynamic, professional-looking title page ready to show off
Exquisite Corpse Creature Mash-Up
This classic collaborative drawing game results in a hilarious and unexpected creature mash-up. By folding the paper, you hide your drawing from the next person, revealing a surprise masterpiece at the end.
Step-by-Step Guide
Materials
- A3 or A4 white paper
- Felt-tip markers (various colors)
- Black fine-liner pen (optional for outlines)
- A flat surface to draw on
Step 1: Preparation
-
Fold the Paper:
Start with a clean sheet of white paper. Fold it horizontally into three or four equal sections, creating a concertina or fan fold. -
Crease Firmly:
Run your fingernail along each fold to make sure the creases are sharp. This helps keep the sections hidden later. -
Orientation:
Open the paper slightly so you can work on the top section while the others remain folded underneath.
Fixing the Gap
If lines don’t meet perfectly when unfolded, just draw a thick decorative belt, scarf, or collar over the disjointed area to hide the gap.
Step 2: Drawing the Head
-
Start the Top Section:
In the first panel, draw the head of a creature. It could be a cat, a fish, a monster, or a human. -
Add Details:
Give your creature personality with eyes, ears, whiskers, or scales. Use bright colors like orange or teal to make it pop. -
Extend the Neck:
This is the most critical part: extend the neck lines slightly over the fold onto the top of the *second* section. These little marks tell the next artist where to start connecting the body. -
Hide the Artwork:
Fold the top section back so your drawing is hidden, leaving only those small neck guide marks visible on the blank second panel.
Step 3: Drawing the Body
-
Pass and Connect:
Pass the paper to a friend (or hide it from yourself if playing solo). The next artist uses the guide marks to start the body. -
Create the Torso:
Draw the middle section of a completely different animal. Maybe add scales, wings, or a furry chest. -
Pattern Work:
I love adding textures here, like the scalloped scales seen on the fish body in the example. -
Extend the Hips:
Just like before, draw the lines for the waist or hips slightly across the fold onto the final section. -
Fold Again:
Fold this middle section back so now both the head and body are hidden from the final artist.
Level Up: Texture Rubbing
Place textured items like leaves or coins under the paper and rub with crayons to add cool, effortless patterns to your creature’s skin.
Step 4: Legs and Reveal
-
Draw the Bottom:
Using the guide marks on the last panel, draw the legs, tail, or fins. Get creative—maybe a cat head needs a mermaid tail. -
Final Touches:
Color in this final section fully. Add claws, hooves, or flippers to ground the character. -
The Big Reveal:
Unfold the entire paper to reveal your Frankenstein-style creation. The disjointed connections are part of the charm. -
Repeat for a Gallery:
Use the reverse side or get fresh paper to make a whole grid of mismatched creatures, just like in the photo.
Enjoy the surprise of seeing what strange beast you have created together


Have a question or want to share your own experience? I'd love to hear from you in the comments below!