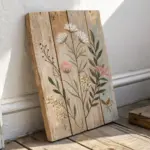
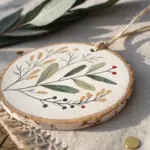
There’s something so satisfying about painting on a wood circle—the grain, the bark edge, and that tiny “mini masterpiece” feeling. If you’re craving quick, charming projects, these wood circle painting ideas will give you plenty to try without overthinking it.
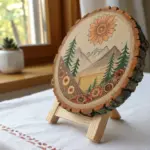
Sunset Mountain Silhouette
Capture the serene beauty of dusk with this layered wood slice painting that features a vibrant gradient sky and misty mountain ranges. The natural bark edge frames your landscape perfectly, turning a rustic piece of wood into a sophisticated piece of fine art.
Step-by-Step
Materials
- Large wood slice with bark edge (approx. 8-10 inches)
- Sandpaper (fine grit)
- Gesso or white acrylic primer
- Acrylic paints: Violet, magenta, orange, white, navy blue, black
- Flat shader brushes (wide and medium)
- Detail liner brush (size 0 or 00)
- Cup of water and paper towels
- Palette or paper plate
- Matte or satin varnish (optional)
Step 1: Preparation & Sky Gradient
-
Prepare the surface:
Start by lightly sanding the face of your wood slice to create a smooth canvas, wiping away any dust with a damp cloth. -
Prime the wood:
Apply a thin, even coat of white gesso to the center of the wood slice, stopping just short of the bark edge. This ensures your colors will pop against the warm wood tone. -
Mix the sky colors:
On your palette, set out your violet, magenta, orange, and plenty of white. You want to create a soft transition, so having pre-mixed interstitial shades (like a pale peach and a soft lavender) is helpful. -
Paint the upper sky:
Using a wide flat brush, paint the top third of the circle with your violet shade, curving your strokes slightly to match the wood’s round shape. -
Blend the middle transition:
While the violet is still wet, introduce the magenta below it. Use back-and-forth strokes where they meet to blur the line, creating a seamless ombre effect. -
Complete the sunset horizon:
Finish the bottom third of the sky with your orange mixture, blending it upward into the magenta. Add white to the bottom-most edge of the orange to simulate the glowing horizon line. -
Add stars:
Once the sky is fully dry, dip the tip of a detail brush or a toothpick into white paint and gently dot a few stars into the darker purple section at the top.
Step 2: Mountains & Atmospheric Perspective
-
Mix the distant mountain color:
Create a hazy blue-grey by mixing navy blue with a significant amount of white and a tiny touch of violet. It should look distant and faded. -
Paint the furthest range:
Paint the first mountain range silhouette about halfway down the wood slice. Keep the peaks jagged but soft, and fill in the color solidly down to the bottom of the painted area. -
Create the middle misty range:
Mix a dusty pink-purple shade using magenta, a little violet, and white. This layer represents mountains that are closer but still obscured by mist. -
Layer the second range:
Paint this second range slightly lower than the blue one, overlapping it. I like to dilute the acrylic slightly with water here to make it semi-transparent, enhancing the foggy look. -
Add a darker foothill layer:
Mix a deep purple (violet plus a tiny bit of black). Paint a third, lower layer of rolling hills at the very bottom, creating a dark base for your trees.
Wet-on-Wet Blending
For the smoothest sky gradient, keep your brush slightly damp. If the acrylic dries too fast to blend, a tiny spritz of water directly on the wood helps re-activate the paint.
Step 3: Foreground Silhouettes
-
Load the detail brush:
Switch to your smallest liner brush and load it with pure liquid black paint. Make sure the paint flows smoothly; add a drop of water if it connects clumpy. -
Establish tree trunks:
Paint vertical center lines for your pine trees on the right side of the composition. Make one tall and prominent, and a few shorter ones nearby. -
Stipple the pine branches:
Using a light stippling or tapping motion, add branches to the trunks. Start narrow at the top and widen the branches as you move down, leaving small gaps to keep them looking airy. -
Add distant trees:
On the left side and in the background valley, paint much smaller, simpler tree shapes. These don’t need detailed branches—just jagged triangular shapes will suggest a forest. -
Ground the composition:
Fill the very bottom curve of the wood slice with solid black to connect all the tree trunks and create a solid foreground earth line. -
Seal the artwork:
Allow the painting to cure for 24 hours, then brush on a coat of matte varnish to protect the paint and seal the wood.
Make It 3D
Add tiny rhinestones over the white star dots for sparkle, or use metallic gold paint for the very edge of the sunset horizon for a glowing effect.
Display your rustic masterpiece on a plate stand or attach a hook to hang it on the wall


Starry Night Galaxy Blend
Capture the magic of a clear winter night on a rustic wood slice canvas. This project blends deep indigo and soft violet acrylics to create a dreamy galaxy backdrop for delicate pine silhouettes.
Step-by-Step Guide
Materials
- Medium-sized wood slice (approx. 8-10 inches)
- Gesso or white acrylic paint (optional primer)
- Acrylic paints: Navy Blue, Black, Deep Violet, Magenta, White
- Large flat brush or sponge brush
- Medium soft round brush
- Fine detail brush (size 0 or 00)
- Toothbrush (optional for splatter)
- Cup of water and paper towels
- Palette or paper plate
Step 1: Preparing the Base
-
Surface Prep:
Ensure your wood slice is clean and free of loose dust. If the surface feels rough, give it a quick sanding with fine-grit sandpaper to prevent your brush from snagging later. -
Priming Layer:
Apply a base coat of gesso or white acrylic paint to the face of the wood slice, leaving the bark edge natural. This helps the galaxy colors pop, though you can skip this if you prefer the wood grain to show through the paint.
Step 2: Creating the Galaxy Gradient
-
Mixing Dark Blue:
Start by mixing a small amount of black into your navy blue to create a deep midnight shade. -
Upper Sky Application:
Using your large flat brush or sponge, paint the top two-thirds of the wood slice with this dark navy mixture. Use horizontal, slightly curved strokes to mimic the curvature of the sky. -
Adding the Violet Horizon:
While the blue paint is still wet, rinse your brush and pick up the deep violet paint. Apply this to the bottom third of the circle, overlapping slightly with the blue. -
Blending the Transition:
Use a clean, slightly damp brush to gently work the area where the blue and violet meet. Blend them back and forth until the hard line disappears into a soft, hazy transition. -
Magenta Highlights:
While the violet layer is still tacky, dab a tiny bit of magenta into the lowest section on the left side to create a glowing nebular effect. Blend this softly into the surrounding purple. -
Let it Dry:
Allow the entire background to dry completely. This is crucial before adding crisp details like stars and trees.
Blend Like a Pro
Work quickly while the acrylics are wet (wet-on-wet technique). If the paint dries too fast, mist it lightly with water to keep it workable for smoother gradients.
Step 3: Painting the Stars
-
Tiny Stars:
Dip your fine detail brush into white paint. Gently dot random stars across the blue and purple sections. Vary the pressure to create different sizes. -
Clusters and Constellations:
Group some dots closer together to form star clusters. I like to keep the density higher in the darker blue sections for contrast. -
Twinkling Stars:
Select a few larger dots and carefully paint small intersecting lines (a specific cross shape) over them to create twinkling ‘north star’ shapes. -
Splatter Technique (Optional):
For a denser field of distant stars, dilute a little white paint with water. Dip an old toothbrush in it and flick the bristles with your thumb over the wood slice.
Glow Up
Mix glow-in-the-dark medium with your white paint for the stars. By day it looks classic, but at night your galaxy will come alive
Step 4: Adding the Forest Silhouette
-
Mixing Shadow Color:
Mix black with a touch of purple to create a rich, dark shadow tone that isn’t quite flat black. -
Tree Trunks:
Using your fine detail brush, paint thin vertical lines starting from the very bottom edge, extending up into the violet haze. Make them varying heights for a natural look. -
Adding Branches:
Start at the top of a trunk line and dab small, downward-sloping strokes to create pine branches. Keep the top narrow and widen the tree as you move down. -
Filling the Base:
Continue adding branches until the bottom area is filled with a dense forest line. Ensure the bottom edge is solid dark paint to ground the scene. -
Final Touches:
Check for any gaps in the stars or trees. Once fully dry, you can seal the painting with a clear matte varnish to protect the wood.
Hang your celestial artwork on a wall or use a small easel to display your piece of the night sky
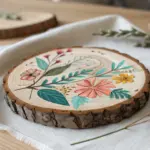

Rustic Monogram in a Floral Frame

Embrace woodland charm with this beautiful wood slice project, featuring a crisp monogram surrounded by a delicate painted floral wreath. This piece perfectly balances the rugged texture of natural bark with the elegance of botanical illustrations, making it a stunning addition to any rustic decor.
Step-by-Step
Materials
- Basswood country round (with bark edge)
- Fine-grit sandpaper (220 grit)
- Carbon transfer paper
- Pencil or stylus tool
- Acrylic craft paints (Deep navy, sage green, forest green, peach, blush pink, marigold yellow, deep red)
- Round synthetic brushes (sizes 0, 2, and 4)
- Black or navy fine-point paint marker (optional)
- Matte spray sealant
- Jute twine for hanging
Step 1: Preparation and Sketching
-
Sand the Surface:
Begin by sanding the face of your wood slice with 220-grit sandpaper. You want the surface to be exceptionally smooth so your paint lines stay crisp, but be careful not to damage the natural bark edges. -
Dust It Off:
Wipe the wood firmly with a clean, dry cloth or a tack cloth to remove every speck of sawdust. Any leftover dust will create bumps in your painting. -
Choose Your Monogram:
Print out your desired initial and the full name (or word ‘INITIAL’) in a serif font that mimics the reference. Ensure the size fits comfortably within the center of the wood slice. -
Design the Wreath:
Sketch a circular guide lightly with a pencil around the text area. You can freehand the floral elements or print a wreath design to trace. -
Transfer the Design:
Place a sheet of carbon paper dark-side down on the wood, then place your printed design on top. Trace over the letters and floral outlines firm pressure using a pencil or stylus.
Smoother Transfers
Tape your carbon paper and design template to the wood slice with painter’s tape so it doesn’t shift while you are tracing the intricate letters.
Step 2: Painting the Lettering
-
Outline the Text:
Using your smallest size 0 liner brush or a fine-point paint pen, carefully outline the large central initial ‘I’ and the smaller text below in deep navy blue. -
Fill the Initial:
Fill in the body of the letters with the same deep navy. It’s better to do two thin coats rather than one thick gloopy one to ensure a smooth, opaque finish. -
Clean Up Edges:
If your hand shakes slightly, don’t panic. You can gently scrape away wet acrylic with a toothpick or cover mistakes with a tiny dab of beige paint mixed to match the raw wood tone.
Step 3: Creating the Floral Wreath
-
Paint the Main Vines:
Mix a muted forest green and use a size 2 brush to paint the sweeping curved stems of the wreath. I find that quick, confident strokes create more natural-looking vines than slow, shaky ones. -
Add Greenery:
Using a sage green, add small, pointed leaves along the vines. Vary the pressure on your brush: press down for the belly of the leaf and lift up for the tip. -
Paint the Primary Flowers:
Focus on the bottom left cluster. Paint a simple five-petal flower shape using blush pink, and a smaller neighboring bloom in marigold yellow. -
Add Flower Details:
Once the flower base color is dry, add a dark navy center to the pink flower and small stamen details using your 0 brush. -
Create Berry Accents:
Dip the back end of your paintbrush handle into deep red paint and dot it onto the wood to create perfect little round berries scattered throughout the greenery. -
Feather in Details:
Add wispy details like the blue-grey feathers or fern sprigs near the main flower cluster to give the wreath texture and movement.
Paint Bleeding?
If paint bleeds into the wood grain, apply a thin layer of clear matte medium over your pencil sketch before painting to seal the wood fibers.
Step 4: Finishing Touches
-
Erase Guidelines:
Allow the paint to dry completely (at least an hour). Then, very gently erase any visible graphite lines from the transfer process. -
Drill a Hole:
If your wood slice didn’t come pre-drilled, select a drill bit slightly larger than your twine thickness and drill a hole centered at the top, about half an inch from the bark edge. -
Seal the Wood:
Spray the entire face of the project with a clear matte sealant. This protects the porous wood from humidity and keeps the colors vibrant. -
Attach the Hanger:
Thread a length of jute twine through the hole and tie a secure knot to create a loop for hanging.
Hang your personalized wood slice on a door or gallery wall to enjoy that custom woodland aesthetic

Mini Ocean Wave Scene

Capture the refreshing energy of crashing waves on a rustic wood slice canvas. This project uses acrylics to blend deep teal waters into frothy white foam, leaving natural wood exposed to represent a sandy beach.
Detailed Instructions
Materials
- Basswood country round (with bark edge)
- Acrylic paints: Phthalo Blue, Phthalo Green, Titanium White, Raw Sienna, Burnt Umber
- Gesso (optional but recommended)
- Flat shader brushes (medium and small)
- Fine liner brush
- Sea sponge or stiff bristle brush
- Palette knife
- Water cup and paper towels
- Sandpaper (fine grit)
Step 1: Preparation and Planning
-
Prepare the surface:
Begin by lightly sanding the face of your wood slice to ensure a smooth painting surface. Wipe away any dust with a damp cloth or tack cloth. -
Plan the horizon:
Visualize where your horizon line will sit. For this composition, place it just above the center line, leaving the top third of the wood unpainted to act as the sky. -
Masking (Optional):
If you want a perfectly crisp horizon line against the raw wood, apply a strip of painter’s tape across the slice where the water will end.
Foam Texture Tip
For realistic, bubbly sea foam, don’t use a brush. Instead, tap the white paint on with a small piece of natural sea sponge or a crumpled paper towel.
Step 2: Painting the Deep Ocean
-
Mix the deep teal:
Combine Phthalo Blue with a touch of Phthalo Green and a tiny dot of Burnt Umber. This creates a rich, deep ocean color for the water furthest from the shore. -
Apply the first layer:
Using a medium flat brush, paint the area just below your horizon line. Keep your strokes horizontal and smooth to mimic calm, distant water. -
Create a gradient:
While the paint is still wet, mix a lighter version of your teal by adding some Titanium White. Blend this downwards from the dark section to create the mid-ocean transition. -
Define the wave shape:
Extend the teal paint into a curved, jagged line where the wave will eventually crash. Leave the bottom portion of the wood bare for now.
Level Up: Resin Finish
Pour a layer of clear art resin over the painted water section only. It makes the ocean look permanently wet and glossy while keeping the sky matte.
Step 3: Creating the Sandy Shore
-
Mix the sand color:
Mix Raw Sienna with plenty of Titanium White. You want a beige that is slightly opaque but still allows some wood grain to peek through if possible. -
Paint the wet sand:
Apply this mixture along the bottom edge of your wave line. Darken it slightly with a touch of Burnt Umber right where the ‘water’ meets the ‘sand’ to simulate wet, soaked sand. -
Fade out:
Feather the sand color downwards, fading it out so the bottom-most section of the wood slice remains raw, acting as dry sand.
Step 4: Detailing the Waves
-
Paint the main wave structure:
Load a small flat brush with pure Titanium White. Paint a solid, uneven line right at the transition between the teal water and the wet sand. -
Add sea foam texture:
Switch to a sea sponge or an old, stiff brush. Dab white paint lightly over the teal sections to create the look of churned-up foam and spray. -
Create the wave crest:
At the top of your main wave curve, use the corner of your brush to pull small, curved strokes backwards into the deep water. -
Painting the webbing:
This is the crucial detail step. Take your fine liner brush and thin down some white paint with a drop of water. Ideally, it should be inky consistency. -
Draw the lacing:
Paint delicate, interconnecting diamond shapes on the teal water surface behind the main crash. These lines represent sea foam pattern. -
Highlight the shoreline:
Add a final, bright white line right at the very edge of the sand to show the frothy water rushing up the beach.
Step 5: Final Touches
-
Add a sailboat:
Using your finest brush and pure white paint, create a tiny triangle for a sail near the horizon line to give the scene scale. -
Hull detail:
Add a microscopic horizontal dash of dark grey or brown under the sail for the boat’s hull. -
Shadows:
Mix a watery dark teal glaze. Paint a very thin shadow underneath the white crest of the crashing wave to make it look 3D and lifted.
Hang your finished wood slice or display it on a tiny easel to bring a permanent summer vibe to your space
BRUSH GUIDE
The Right Brush for Every Stroke
From clean lines to bold texture — master brush choice, stroke control, and essential techniques.
Explore the Full Guide
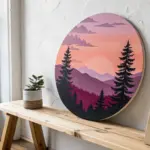
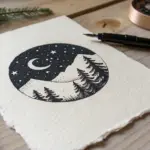
Pine Trees on a Misty Background
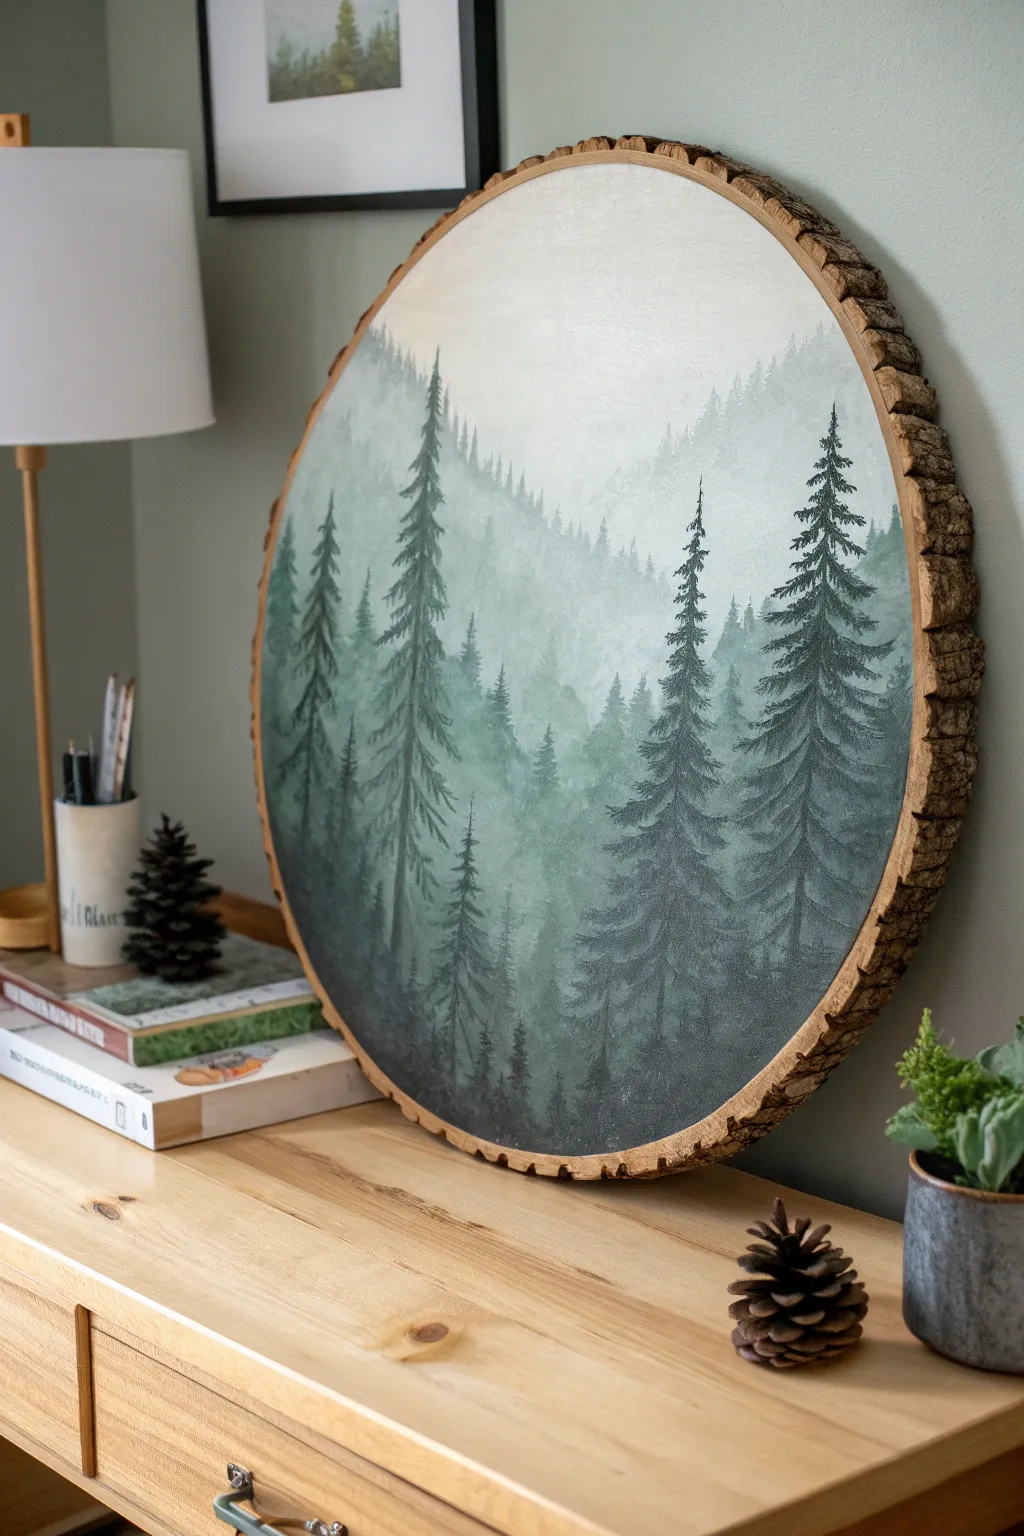
Bring the serene beauty of a foggy forest into your home with this atmospheric wood slice painting. Using layers of acrylics, you’ll create a sense of deep perspective, where towering pine trees fade softly into a misty white background.
How-To Guide
Materials
- Large wood circle slice with bark edge (approx. 18-24 inches)
- Acrylic paints: Titanium White, Mars Black, Sap Green, Hooker’s Green, Phthalo Green
- Gesso (white)
- Large flat brush (1-2 inch)
- Medium flat or angle shader brush
- Small round brushes or liner brushes (for details)
- Sea sponge or stipple sponge
- Palette
- Water cup and paper towels
- Clear matte varnish spray
Step 1: Preparing the Wood & Background
-
Prime the Surface:
Begin by applying a generous coat of white gesso to the face of the wood slice. Ensure you stay within the inner ring and avoid getting gesso on the rustic bark edge. Let this dry completely to create a smooth, non-absorbent base for your painting. -
Mix the Mist:
On your palette, mix a large amount of Titanium White with a tiny dot of Sap Green and a speck of Black. You want a very pale, almost white, minty grey color. -
Apply the Gradient Base:
Using your large flat brush, paint the entire surface with your pale mist mixture. While the paint is still wet, add pure white to the top third and blend it downwards to create a subtle gradient where the ‘sky’ is brightest. -
Create Distant Hills:
Mix a slightly darker shade of your grey-green by adding a bit more green and black to the mist color. With a torn piece of sea sponge or a stipple brush, lightly tap in a faint, hilly slope about halfway down the wood slice to suggest distant mountains. -
Soften the Horizon:
While the hill line is wet, use a clean, dry brush to gently sweep over the top edge of the paint. This blurs the line into the white background, enhancing the misty effect.
Master the Fog
For realistic fog, use a dry brush technique. Dip a dry brush in white paint, wipe almost all of it off on a paper towel, and gently haze over dry layers.
Step 2: Building the Middle Ground
-
Mix the Mid-Tone Green:
Create a medium forest green shade. Combine Sap Green, a touch of Phthalo Green for coolness, and enough white to make it look ‘hazy’ but clearly distinct from the background. -
Paint the Second Ridgeline:
Using your medium brush, paint a second layer of tree shapes lower down than your first ghost hills. I like to use quick, vertical dabbing motions here to suggest treetops without needing perfect detail. -
Add Atmospheric Depth:
Glaze over the bottom of this new tree line with a watered-down white wash. This pushes these trees back into the distance so they don’t compete with the foreground. -
Form the Third Layer:
Mix a darker, more saturated green using Hooker’s Green and a little black, with much less white. Paint a third distinct ridge of trees, starting closer to the bottom edge. These should look sharper and less blurry than the previous layers.
Step 3: The Foreground Pines
-
Prepare the Darkest Shade:
Mix your darkest value: Mars Black with Phthalo Green. It should look almost black but rich with green undertones. -
Establish Trunks:
Using a small liner brush and your dark mixture, paint thin vertical lines for the trunks of the largest foreground trees. Vary the heights, placing the tallest ones on the far right and left sides. -
Start the Canopies:
Switch to a small round brush. Starting at the top of a trunk, create the tree shape using a tapping or ‘scumbling’ motion. Keep the tops narrow and pointy. -
Widen the Branches:
As you work your way down the trunk, make your dabbing strokes wider and slightly swooping downwards to mimic the heavy branches of a pine tree. -
Texture the Foreground:
Fill the very bottom of the wood slice with the dark green mix, using upward flicking strokes to suggest diverse undergrowth and smaller saplings. -
Refine Highlights:
Mix a touch of white into your dark green and gently highlight the tips of the foreground branches on the side where your imaginary light source hits. -
Add Final Mist:
If the foreground looks too stark, lightly dry-brush some Titanium White mist between the large trees to integrate them back into the foggy scene. -
Seal:
Once the painting is totally dry (give it a few hours), spray the wood face with a matte clear coat to protect the paint without adding an unnatural shine.
Add a Little Sparkle
Before sealing, flick a stiff toothbrush dipped in watered-down white paint across the top to create very subtle, falling snow or morning dew.
Hang your misty forest artwork or display it on a mantel to add a calming, natural touch to your space
Bee and Honeycomb Pattern
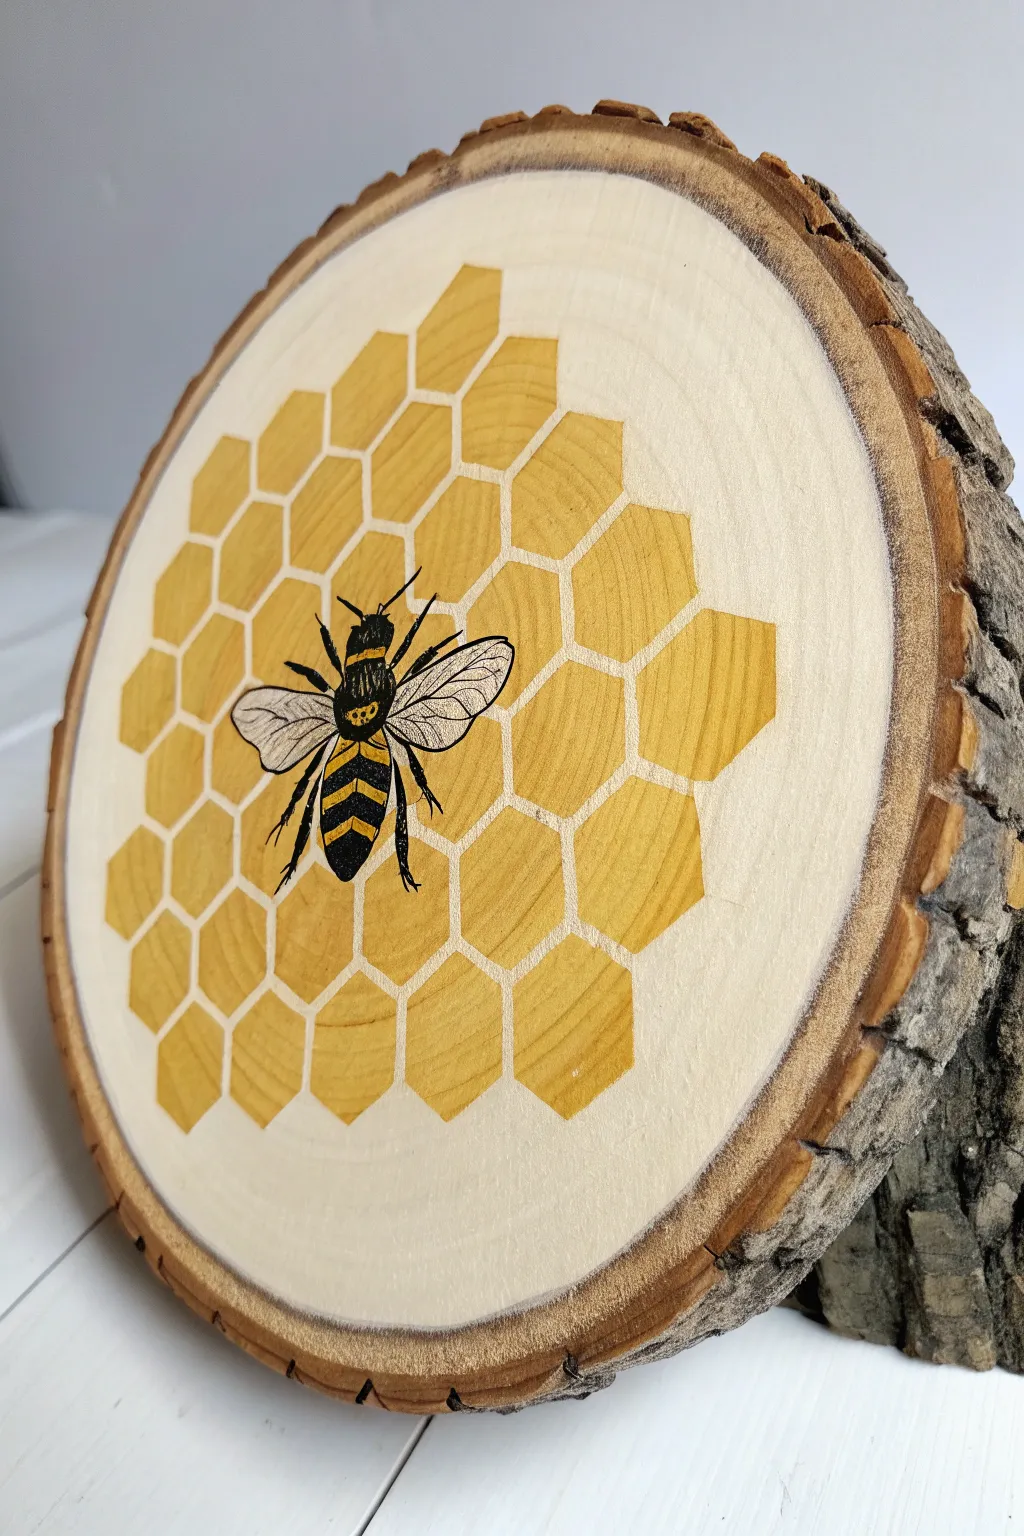
This charming project combines the rustic texture of a raw wood slice with the clean lines of geometric art and a detailed botanical illustration. The contrast between the crisp, yellow honeycomb and the raw wood grain creates a modern yet natural aesthetic perfect for cottage-core decor.
Step-by-Step Guide
Materials
- Large wood slice (basswood or birch, approx. 8-10 inches)
- Fine-grit sandpaper (220-320 grit)
- Pencil and eraser
- Ruler
- Painters tape or masking tape (thin width is best)
- Acrylic paint: Golden Yellow or Mustard
- Acrylic paint: Black
- Acrylic paint: White
- Small flat brush (size 4 or 6)
- Fine liner brush (size 0 or 00) or extra-fine paint pen (black)
- Matte finish sealer or varnish spray
- Carbon paper (optional for transfer)
Step 1: Preparation & Layout
-
Surface Prep:
Start by lightly sanding the face of your wood slice. Even if it came pre-sanded, a quick pass with 320-grit paper ensures the smoothest possible canvas for the fine ink details later. Wipe away all dust with a tack cloth or dry rag. -
Grid Planning:
Visualize where your honeycomb cluster will sit. It looks best slightly off-center or filling the majority of the slice but leaving a distinct wood border. I like to lightly mark the center point to anchor the design. -
Sketching Hexagons:
Using your pencil and ruler, draw a grid of hexagons. If freehanding isn’t your strength, create a hexagon stencil from cardstock (about 1-1.5 inches wide) and trace it repeatedly, ensuring equal spacing (about 1/8th inch gap) between each shape. -
Refining the Cluster:
Decide on the outer shape of the honeycomb cluster. Erase any partial hexagons on the edges to create an organic, uneven border that looks like a natural hive fragment rather than a perfect square.
Bleeding Lines?
If paint bleeds into the wood grain gaps, don’t wipe it! Let it dry, then gently scrape the excess away with an X-Acto knife or carefully sand just that spot with the edge of folded sandpaper.
Step 2: Painting the Honeycomb
-
Mixing the Gold:
Prepare your yellow acrylic paint. If the yellow is too bright and neon, mix in a tiny drop of brown or ochre to achieve that warm, rich honey tone. -
First Coat:
Using a small flat brush, carefully fill in the hexagon shapes. Work from the center outward to avoid dragging your hand through wet paint. Keep your edges as crisp as possible. -
Opacity Check:
Wood is thirsty and will absorb the first layer. Allow the yellow to dry completely (about 15-20 minutes), then apply a second coat for full, vibrant coverage that hides the wood grain inside the hexes. -
Clean Up:
Once the paint is bone dry, gently erase any visible pencil marks remaining in the gaps between the hexagons.
Step 3: The Bee Illustration
-
Transfer the Design:
Draw your bee outline lightly in the center of the honeycomb. You can sketch this freehand, looking at a reference photo, or print a bee silhouette and transfer it using carbon paper. -
Blocking in the Body:
With black paint and a detail brush, fill in the head, thorax, and the black sections of the abdomen. Be mindful of the fuzzy texture on the thorax; use tiny stippling motions to suggest fur. -
Painting the Stripes:
Paint the yellow stripes on the bee’s abdomen. You may need to mix a slightly brighter yellow than your honeycomb color so the bee stands out against the background. -
Wing Foundation:
Paint the wing shapes with a wash of white. Dilute your white acrylic with a little water to make it semi-transparent, allowing the yellow honeycomb behind it to show through faintly. -
Detailing the Wings:
Switch to your finest liner brush or an extra-fine black paint pen. Carefully draw the delicate vein structure inside the wings. A steady hand is key here—breathe out as you make the long strokes. -
Legs and Antennae:
Add the six legs and the antennae using black ink or paint. Note how the legs have jointed segments; varying the pressure on your brush can create thicker and thinner areas to mimic this anatomy. -
Final Highlights:
Add tiny dots of white on the black parts of the eyes and body to create a ‘shiny’ chitin effect. This small step brings the insect to life.
Add Dimension
Mix a tiny drop of orange into your yellow paint and add a subtle shadow to the bottom right of each hexagon. This trompe-l’œil effect makes the cells look like they are popping off the wood.
Step 4: Finishing Touches
-
Drying Time:
Let the entire piece sit for at least an hour to ensure the thickest parts of the paint are fully cured. -
Sealing:
Take the wood slice to a well-ventilated area. Apply a light coat of matte spray varnish. This protects the wood from humidity and prevents the paint from chipping over time without adding an artificial gloss.
Now you have a stunning, nature-inspired art piece ready to display on a shelf or hang on the wall

PENCIL GUIDE
Understanding Pencil Grades from H to B
From first sketch to finished drawing — learn pencil grades, line control, and shading techniques.
Explore the Full Guide
Mushrooms in a Forest Patch
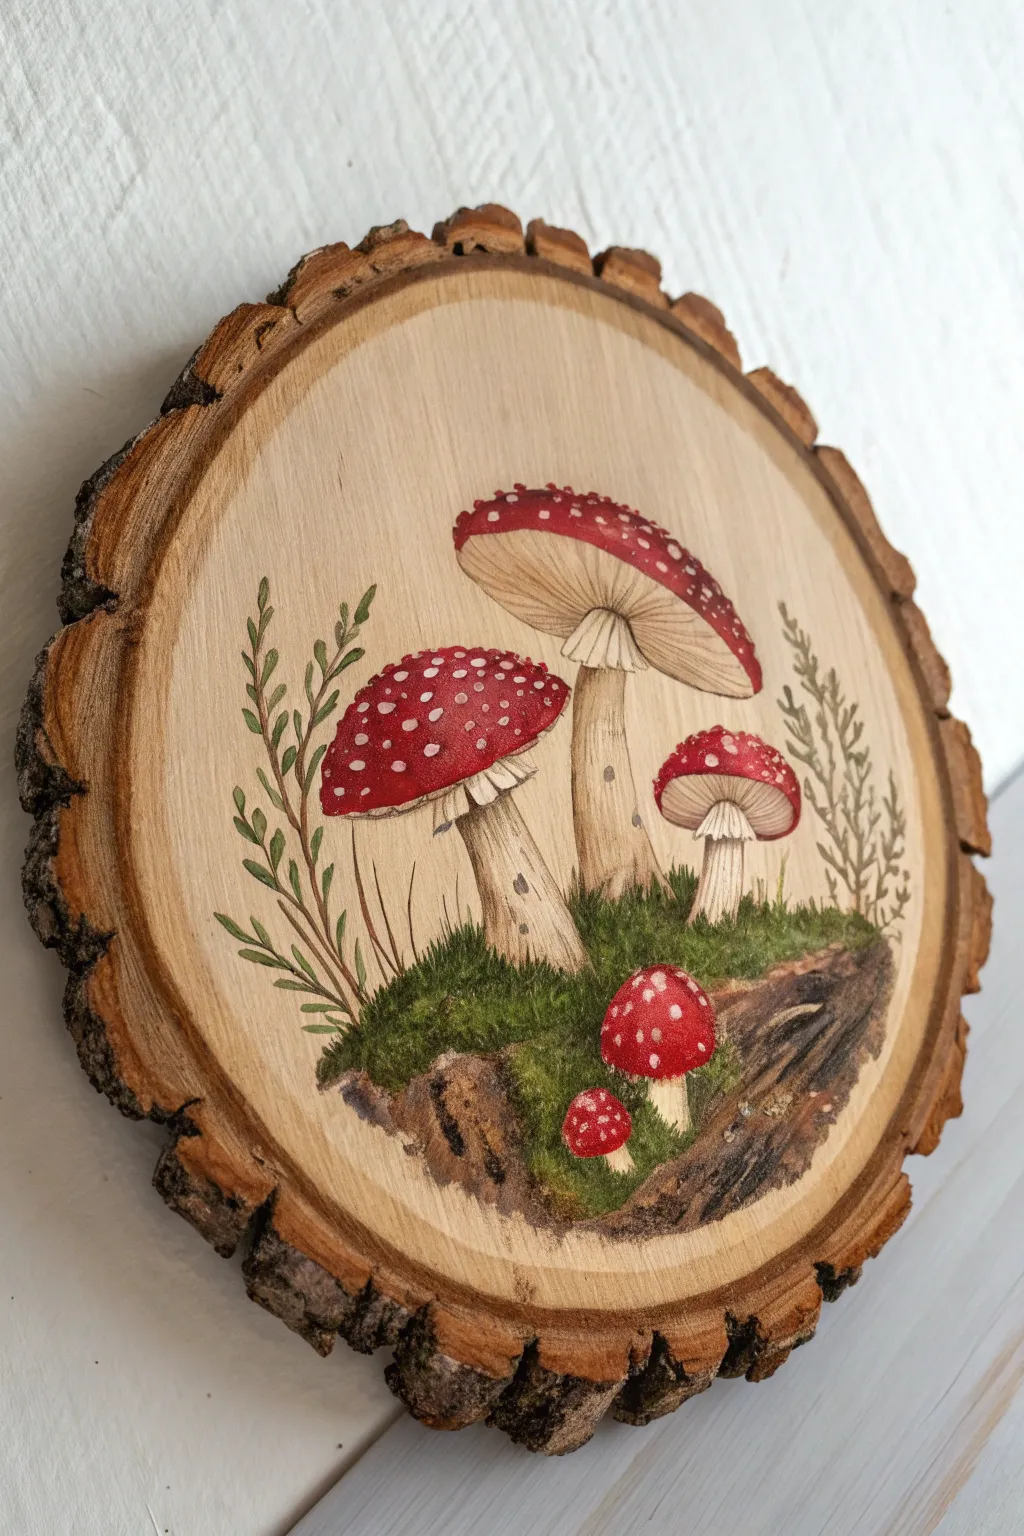
Bring a touch of forest whimsy into your home with this detailed wood slice painting. This project captures the iconic look of red spotted mushrooms nestled in a bed of moss, utilizing the natural grain of the wood as a rustic backdrop.
Detailed Instructions
Materials
- Wood slice (approx. 6-8 inches diameter, smooth sanded)
- Acrylic paints (primary red, cadmium yellow, titanium white, burnt umber, burnt sienna, sap green, hooker’s green, black)
- Pencil (HB or lighter) and eraser
- Synthetic brushes (medium flat, small round, fine liner)
- Matte varnish or sealant
- Palette and water cup
- Paper towels
Step 1: Preparation and Sketching
-
Prepare the surface:
Ensure your wood slice is clean and free of dust. If the surface feels rough, give it a quick sanding with fine-grit sandpaper to ensure your brushstrokes glide smoothly. -
Sketch the composition:
Lightly draw your design directly onto the wood. Start with the three main mushrooms: a large open cap in the upper right, a medium rounded cap on the left, and a smaller one tucked below the large one. Add two tiny button mushrooms near the bottom. -
Add environmental details:
Sketch a rough, uneven horizon line for the mossy mound beneath the mushrooms. Lightly indicate where the fern-like foliage will grow up the sides, curving naturally with the wood’s edge.
Uneven Paint Coverage?
If the wood absorbs too much paint, making colors look dull, apply a clear acrylic medium or gesso to the sketch area first to seal the pores before painting.
Step 2: Base Layers
-
Block in the stems:
Mix titanium white with a tiny dot of burnt umber to create a creamy off-white. Fill in all the mushroom stems and the gills under the caps. Keep the paint opaque to cover the wood grain. -
Paint the red caps:
Using primary red mixed with a touch of burnt sienna for depth, paint the tops of all the mushroom caps. Don’t worry about the white spots yet; focus on getting a rich, solid red color. -
Establish the mossy ground:
Mix sap green with a little black to create a dark base color for the ground. Stipple this color along the bottom mound, leaving the very bottom edge uneven to look like soil. -
Add the soil layer:
Below the green moss, paint the ‘dirt’ section using burnt umber mixed with black. Use rough, directional strokes that mimic the texture of an exposed earth bank.
Add a magical glow
Mix a tiny amount of iridescent medium into your white paint for the dots and stem highlights. It adds a subtle shimmer that catches the light beautifully.
Step 3: Shading and Texture
-
Shape the stems:
Using a diluted wash of burnt umber, add shadows to the sides of the stems and under the caps’ skirts (the ring on the stem) to make them look cylindrical. -
Detail the gills:
With a fine liner brush and light grey-brown paint, draw very thin, closely spaced lines radiating from the stem to the edge of the cap on the undersides of the open mushrooms. -
Highlight the caps:
Mix a little yellow and white into your red paint to create a highlight color. Apply this to the top-center of the rounded caps to simulate light hitting the curve. -
Texture the moss:
Switch to a lighter green (sap green + yellow). Use a stippling motion (tapping the brush tip) over the dark green base to create a fluffy moss texture. -
Define the earth:
Add dimension to the dirt section by dry-brushing lighter brown tones (burnt umber + white) over the ridges. This emphasizes the craggy texture of the soil.
Step 4: Fine Details
-
Paint the dots:
Using pure titanium white and a small round brush, dab the iconic spots onto the red caps. Vary the sizes, keeping them smaller near the edges of the caps and larger toward the center. -
Add delicate foliage:
Mix an olive green shade. Using your finest liner brush, paint delicate sprigs of greenery rising from the moss on the left and right sides. Keep your wrist loose to create natural curves. -
Refine the skirting:
Add white highlights to the edges of the mushroom skirts (the frilly part on the stem) to make them pop against the darker background. -
Deepen the shadows:
I find that adding a final glaze of dark brown right where the stems meet the moss really helps ‘plant’ the mushrooms so they don’t look like they are floating. -
Varnish and protect:
Once the paint is completely dry (give it at least an hour), apply a coat of matte varnish to seal the wood and protect your artwork from dust and moisture.
Hang your rustic masterpiece on the wall or display it on a stand to enjoy a permanent piece of the forest floor
Cozy Winter Snowy Cabin
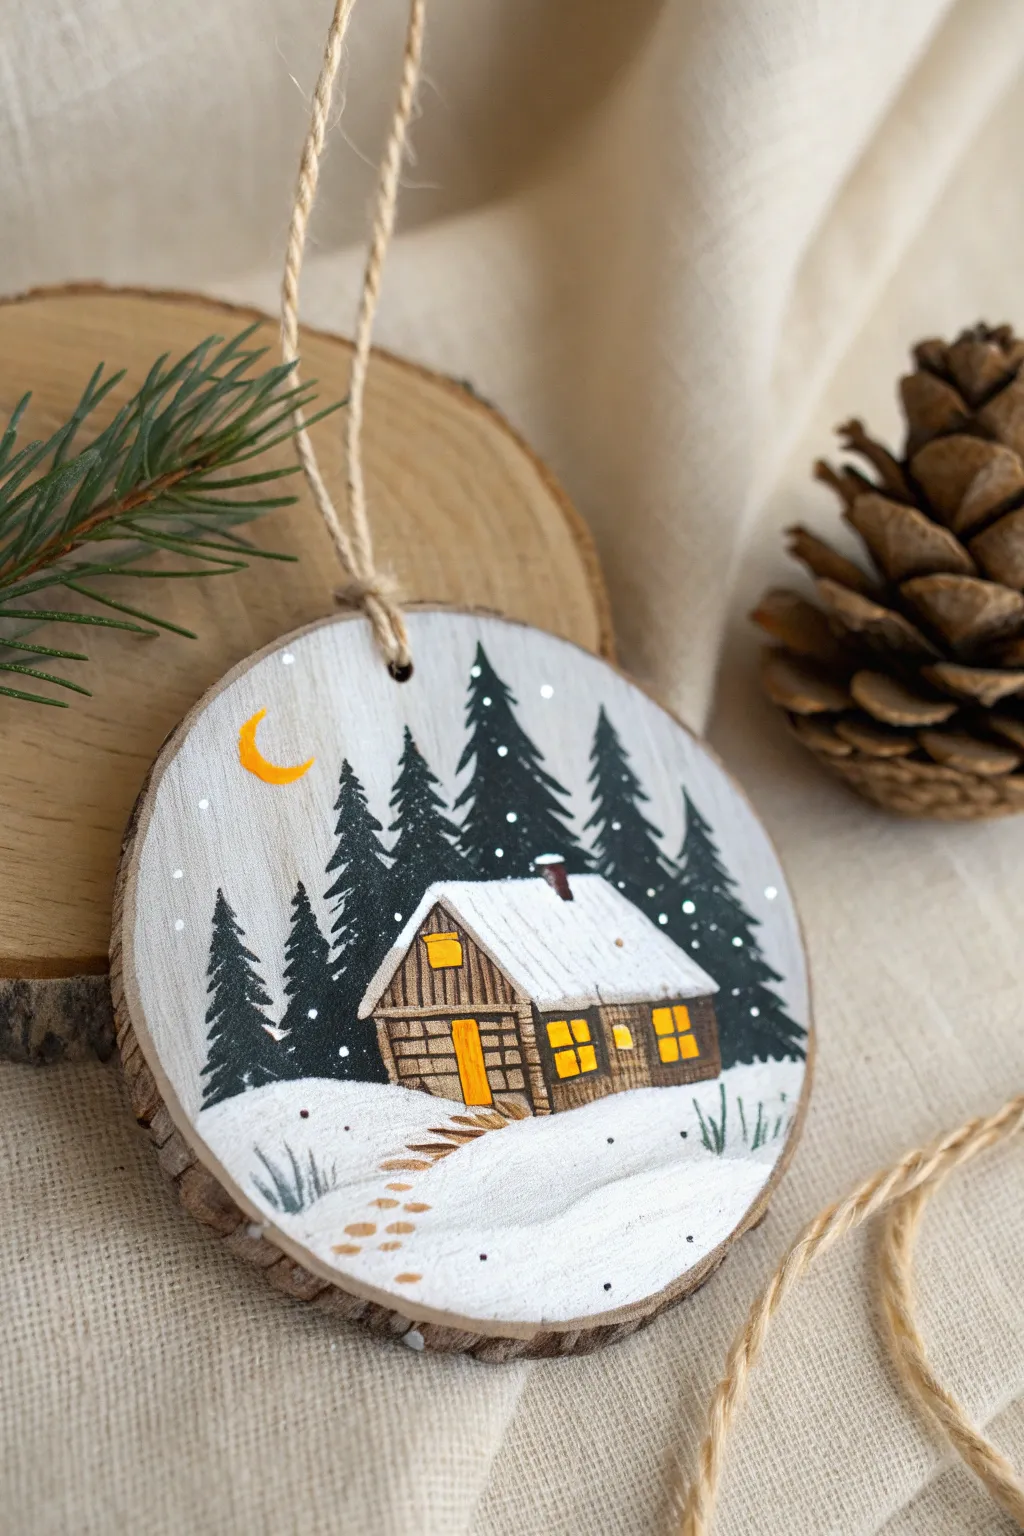
Capture the serene beauty of a snowy winter evening with this charming wood slice ornament. This project features a cozy cabin nestled among evergreen trees under a crescent moon, perfect for rustic holiday decor.
Step-by-Step Tutorial
Materials
- Wood slice with bark edge (pre-drilled)
- White acrylic paint (gesso optional)
- Dark green acrylic paint (forest green)
- Black acrylic paint
- Brown acrylic paint (burnt umber)
- Yellow/Orange acrylic paint
- Jute twine for hanging
- Flat paintbrushes (large and medium)
- Fine detail brush (liner or size 0)
- Pencil for sketching
- Cup of water and paper towels
- Matte varnish or sealant (optional)
Step 1: Preparation and Background
-
Prime the Surface:
Begin by cleaning your wood slice to remove loose dust. Paint the central wood area with a solid coat of white acrylic paint. You want a bright, clean base, so a second coat might be necessary once the first is dry. Leave the bark edge unpainted for rustic contrast. -
Establish the Sky and Snow Line:
Visualize a sloping line near the bottom third of the circle; this will be your snowy ground. Keep this area pure white. For the sky above, you can leave it white or add a very faint wash of super pale grey to distinguish it from the bright white snow, though the example uses a stark white background for a graphic look.
Uneven Wood Surface?
If the wood slice is too rough, sand the face lightly with fine-grit sandpaper before the first coat of white paint. This helps fine details like the windows look crisp.
Step 2: Painting the Cabin
-
Sketch the Outline:
Lightly sketch a small cabin shape on the right side of the snow slope using a pencil. Draw a simple rectangle for the front and a slanted roofline. -
Base Coat the Cabin:
Using a small flat brush, fill in the walls of the cabin with brown paint. Use horizontal strokes to mimic logs. -
Define the Roof:
Paint the roof area pure white to look like a thick layer of snow. Make sure the white paint slightly overhangs the brown walls to create dimension. -
Add Log Details:
Once the brown base is dry, take your fine detail brush and some black paint (or dark brown). Paint thin horizontal lines across the cabin walls to define the individual logs. Outline the cabin shape crisply to separate it from the background. -
Paint the Door and Windows:
Mix a warm yellow with a tiny touch of orange. Paint small rectangles for the windows and a vertical rectangle for the door to create a glowing light effect. -
Outline Architectural Features:
Carefully outline the windows and door with your fine liner brush and black paint. Add a small cross in the windows for panes.
Add Subtle Sparkle
While the white paint on the roof and snow banks is still wet, sprinkle a tiny pinch of extra-fine iridescent glitter over it to mimic the glisten of fresh frost.
Step 3: Adding the Landscape
-
Paint the Background Trees:
Mix dark green with a drop of black to get a deep forest green. Using the tip of a small brush, dab vertical, triangular shapes behind the cabin to form the evergreen trees. -
Add Texture to Trees:
Use short, downward strokes to create the jagged branches of the pines. Make the trees vary in height, with the tallest ones centered behind the roof. -
Create Foreground Trees:
Add a few smaller trees on the left side of the scene to balance the composition. Ensure the bottoms of the trees are hidden ‘behind’ snow mounds by painting a little fresh white over the base of the trunks if needed. -
Add Snow to Branches:
Dip your fine brush in white paint and gently dab small spots of snow onto the dark green branches of the pine trees. This really brings the winter scene to life.
Step 4: Final Details
-
Paint the Footprints:
Mix a light brown color. Use the very tip of your brush to make tiny oval dots leading from the bottom left edge up toward the cabin door, creating a path of footprints. -
Add Grass Tuits:
Using a watered-down black or dark grey, paint very faint, wispy lines poking out of the snow in the foreground to represent dry winter grass. -
Create the Moon:
In the upper left sky area, paint a small, sharp crescent moon using bright orange or yellow paint. -
Add Falling Snow:
Dip the handle end of a brush into white paint. Dot the sky and dark tree areas randomly to create falling snowflakes. Vary the pressure to make different sized dots. -
Add the Chimney with Smoke:
Paint a tiny brown rectangle on the roof for a chimney. If you like, add a tiny wisp of grey smoke curling up. -
Seal and Hang:
Once the paint is completely dry, apply a matte varnish to protect your work. Thread a piece of jute twine through the hole and tie a knot to finish the ornament.
Now you have a peaceful winter retreat hanging on your tree to enjoy all season long


Spring Cherry Blossom Branch
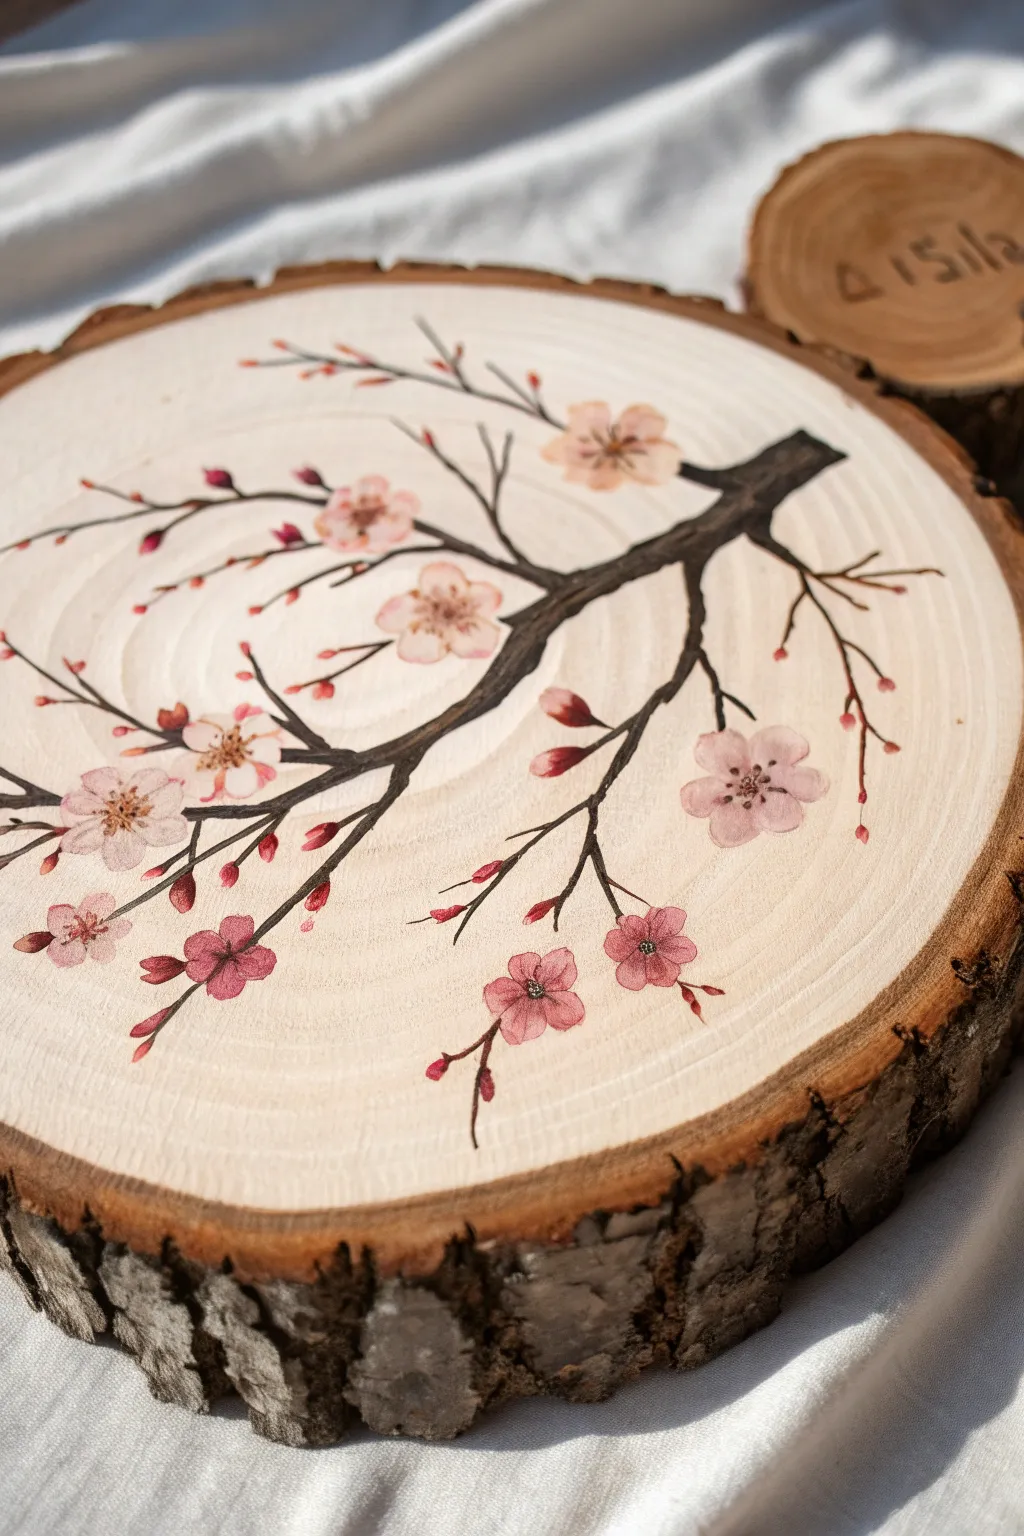
Capture the delicate beauty of spring with this elegant cherry blossom painting on a rustic wood slice. The natural grain of the wood provides a warm, organic background for the soft pink petals and dark, reaching branches.
Step-by-Step
Materials
- Large wood slice with bark edge (sanded smooth)
- Acrylic paints (dark brown, black, white, light pink, dark pink/magenta, leaf green)
- Small flat brush (size 4 or 6)
- Fine liner brush (size 0 or 00)
- Palette for mixing
- Pencil
- Cup of water
- Paper towels
- Clear matte or satin varnish (optional)
Step 1: Preparation & Sketching
-
Prepare the surface:
Ensure your wood slice is clean and dry. If the surface feels rough, give it a quick sanding with fine-grit sandpaper to create a smooth base for your brushwork. -
Map the main branch:
Using a pencil, very lightly sketch the main branch. Start from the right side, about a third of the way down, and curve it diagonally upwards towards the left center. -
Add secondary twigs:
Sketch smaller offshoot branches stemming from the main limb. Let them curve naturally, some reaching up and others dipping slightly down, to fill the composition without cluttering it. -
Mark flower placements:
Draw faint circles where you want your open blossoms to sit, and small tear-drop shapes for the buds. Vary their sizes to keep the composition looking natural.
Bleeding Paint?
If paint bleeds into the wood grain, apply a layer of clear acrylic medium or varnish to the raw wood first. This seals the pores, creating a sharp surface for painting.
Step 2: Painting the Structure
-
Mix the bark color:
On your palette, mix a dark brown with a tiny touch of black to create a deep, rich umber color. -
Paint the main branch:
Using your small flat brush turned on its edge (or a round brush), paint the thickest part of the branch. Apply slightly more pressure at the base on the right and lift off as you move left to taper the stroke. -
Add texture to the wood:
While the brown is still wet, you can streak in a tiny bit of lighter brown or heavily diluted black to suggest the rough texture of tree bark. -
Paint fine twigs:
Switch to your fine liner brush. With the same dark brown mixture, paint the delicate, spindly twigs extending from the main branch. Keep your hand loose and stick to the pencil lines you drew earlier. -
Refine the connections:
Add tiny triangular shapes where the smaller twigs meet the main branch to make the joints look sturdy and organic rather than stuck-on.
Step 3: Blossoms & Details
-
Base coat the flowers:
Mix a very pale pink using mostly white and a dot of red or magenta. Fill in your flower shapes with this base color. Don’t worry about transparency; you can add a second coat later if the wood grain shows through too much. -
Paint the buds:
For the closed buds, use a slightly darker, more saturated pink. Paint these at the tips of the finest twigs using short, tear-drop strokes. -
Add petal definition:
Once the base pink is dry, mix a deeper rose color. Use the tip of your liner brush to gently shade the center of each flower, feathering the color outward to separate the petals. -
Create flower centers:
With a very fine brush and dark magenta or reddish-brown, dab a cluster of tiny dots in the absolute center of each open blossom. -
Paint stamens:
Using your finest liner brush and a dark brown or black, draw extremely thin lines radiating from the flower centers. Top each line with a minuscule dot of yellow or gold paint for the pollen. -
Connect the buds:
go back to your branch color. Carefully paint the tiny ‘sepals’ (the green/brown base cup) at the bottom of each bud and connect them firmly to the twigs. -
Optional highlights:
If you want more dimension, add a tiny sliver of white to the very edges of some petals to make them look like they are catching the light.
Pro Tip: Branch Flow
When painting branches, I suggest rolling the brush slightly between your fingers as you pull the stroke. This creates natural undulations rather than perfectly straight lines.
Step 4: Finishing Touches
-
Check for gaps:
Look over the painting for any broken lines in the branches or areas where the paint looks too thin. Touch up as necessary. -
Erase pencil marks:
Once the paint is 100% dry, gently erase any visible pencil sketch lines that weren’t covered by paint. -
Seal the wood:
To protect your artwork and prevent the wood from absorbing moisture, brush on a layer of matte or satin varnish over the entire face of the wood slice.
Display your rustic masterpiece on a shelf or attach a hanger to bring a permanent touch of spring to your wall
Bold Geometric Color Blocks
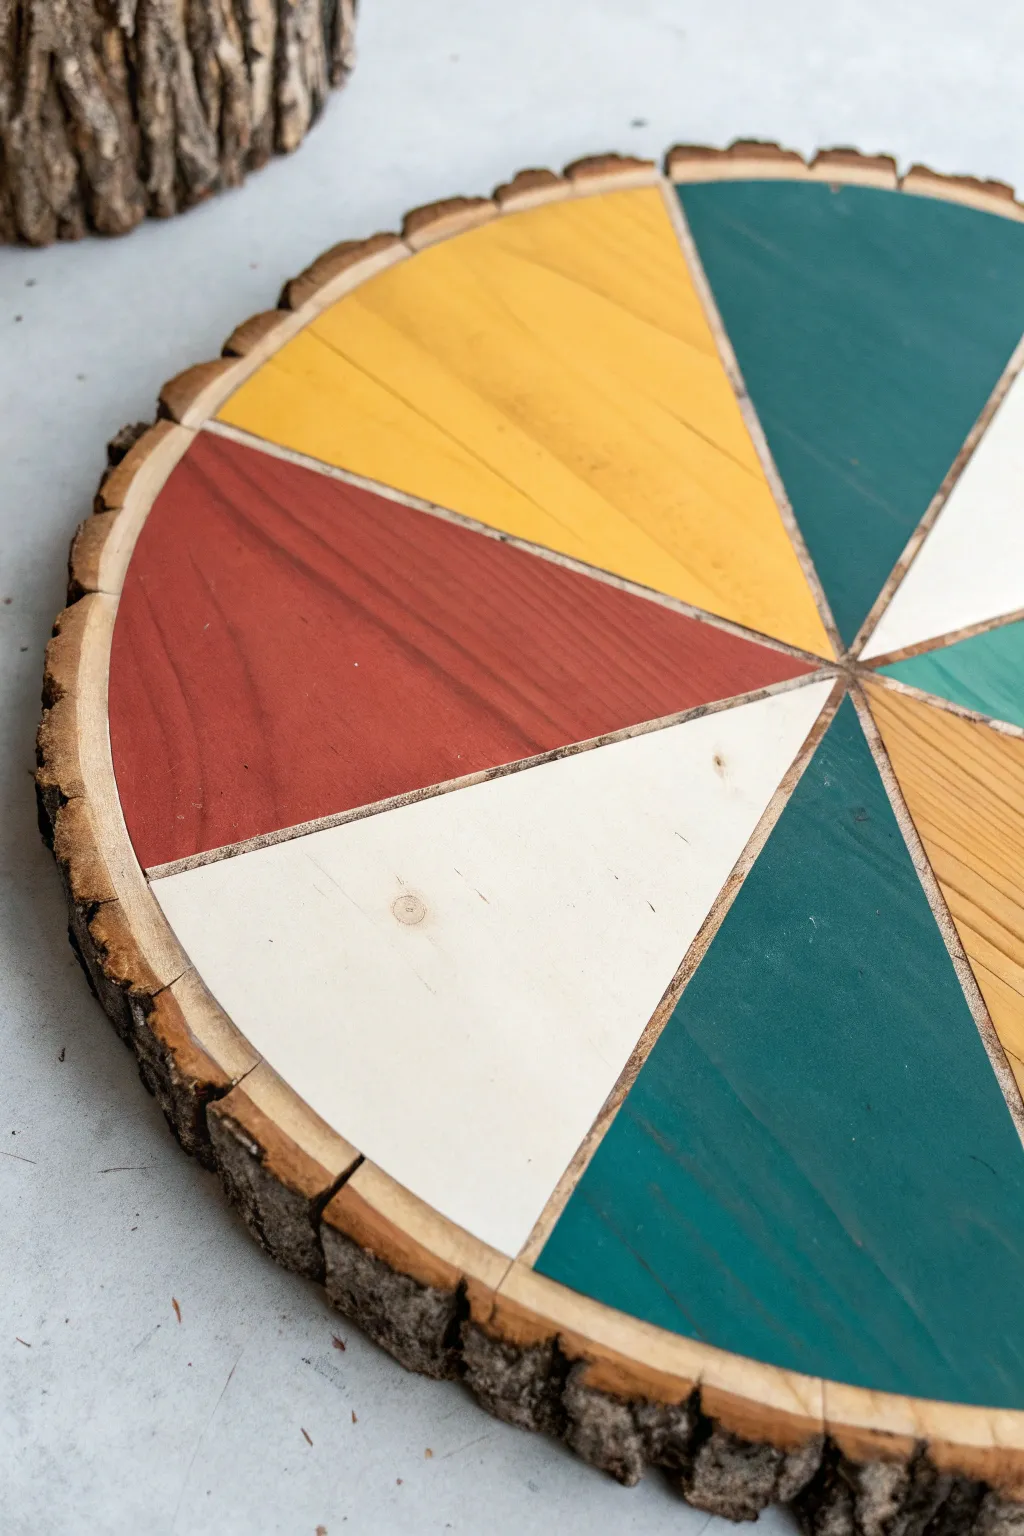
Transform a simple wood slice into a striking piece of geometric art with this segmented color-block design. The distinct carved lines add texture and depth, beautifully separating the bold, earthy tones from the natural wood grain.
Step-by-Step Tutorial
Materials
- Large wood slice with bark edge (basswood or birch)
- Pencil
- Ruler or straight edge
- V-gouge wood carving tool or linoleum cutter
- Acrylic paints (terracotta, mustard yellow, dark teal, cream)
- Water
- Small flat paintbrush
- Fine-grit sandpaper
- Clear matte sealer (spray or brush-on)
- Paper towels
Step 1: Design & Carving
-
Surface Preparation:
Begin by lightly sanding the face of your wood slice with fine-grit sandpaper. You want a smooth surface so the paint absorbs evenly, but be careful not to damage the rustic bark edge. -
Find the Center:
Use a ruler to measure across the slice in two directions to locate the approximate center point. Mark this spot lightly with your pencil. -
Draft the Spokes:
Draw straight lines extending from the center point out to the bark edge. Create roughly 8 to 10 equal sections, resembling a sliced pizza or a pinwheel. -
Carve the Lines:
Using a V-gouge carving tool or a linoleum cutter, carefully carve along your pencil lines. Apply steady, moderate pressure to create a shallow groove that separates each wedge. -
Clean the Grooves:
Go back over the carved lines to remove any splintered wood bits. A quick pass with folded sandpaper inside the grooves helps smooth them out. -
Dust Removal:
Wipe the entire wood slice with a clean, dry cloth or use a soft brush to remove all sawdust from the carving process before you start painting.
Clean Groove Trick
Don’t stress about perfect painting edges. Since you carve the lines first, the physical groove acts as a barrier that naturally stops your brush, keeping lines crisp.
Step 2: Painting & Finishing
-
Prepare Your Wash:
Mix a small amount of your terracotta acrylic paint with water. You are aiming for a 1:1 ratio to create a semi-translucent wash that lets some wood grain show through. -
First Color Application:
Paint one of the triangular wedges with the terracotta wash. Use your flat brush to carefully push the paint right up to the edge of the carved groove, but try not to let it pool inside. -
Skip and Repeat:
Skip two or three wedges and paint another section with the terracotta wash to balance the color distribution. -
Mustard Yellow Sections:
Clean your brush and prepare a wash with the mustard yellow paint. Fill in 1-2 selected wedges, again being mindful of the carved borders. -
Apply Teal Tones:
Mix your dark teal wash. I find this color often needs a little extra water to keep it from looking too opaque. Paint the largest remaining wedges with this deep, cool tone. -
The Cream Accent:
Use the cream or off-white paint for one or two focal wedges. This lighter color provides a crucial high-contrast break against the darker earthy tones. -
Leave Natural Spaces:
Select one or two wedges to leave completely unpainted. This raw wood element ties the painted design back to the natural material. -
Wiping Back:
If any paint section looks too solid and opaque, quickly wipe it gently with a dry paper towel while it’s still damp to reveal more wood grain. -
Clean the Lines:
Once dry, check your carved grooves. If paint spilled into them, use your carving tool to very lightly scrape them clean again, re-exposing the fresh wood color. -
Sealing the Piece:
Finish the project by applying a clear matte sealer over the entire face of the wood slice to protect the colors and enhance the wood’s richness.
Make It Functional
Turn this art piece into a lazy susan or a centerpiece tray by attaching low-profile handles on opposite sides and adding felt pads to the bottom.
Display your new geometric art piece on a shelf or use it as a striking base for a candle arrangement
Mandala Dot Painting
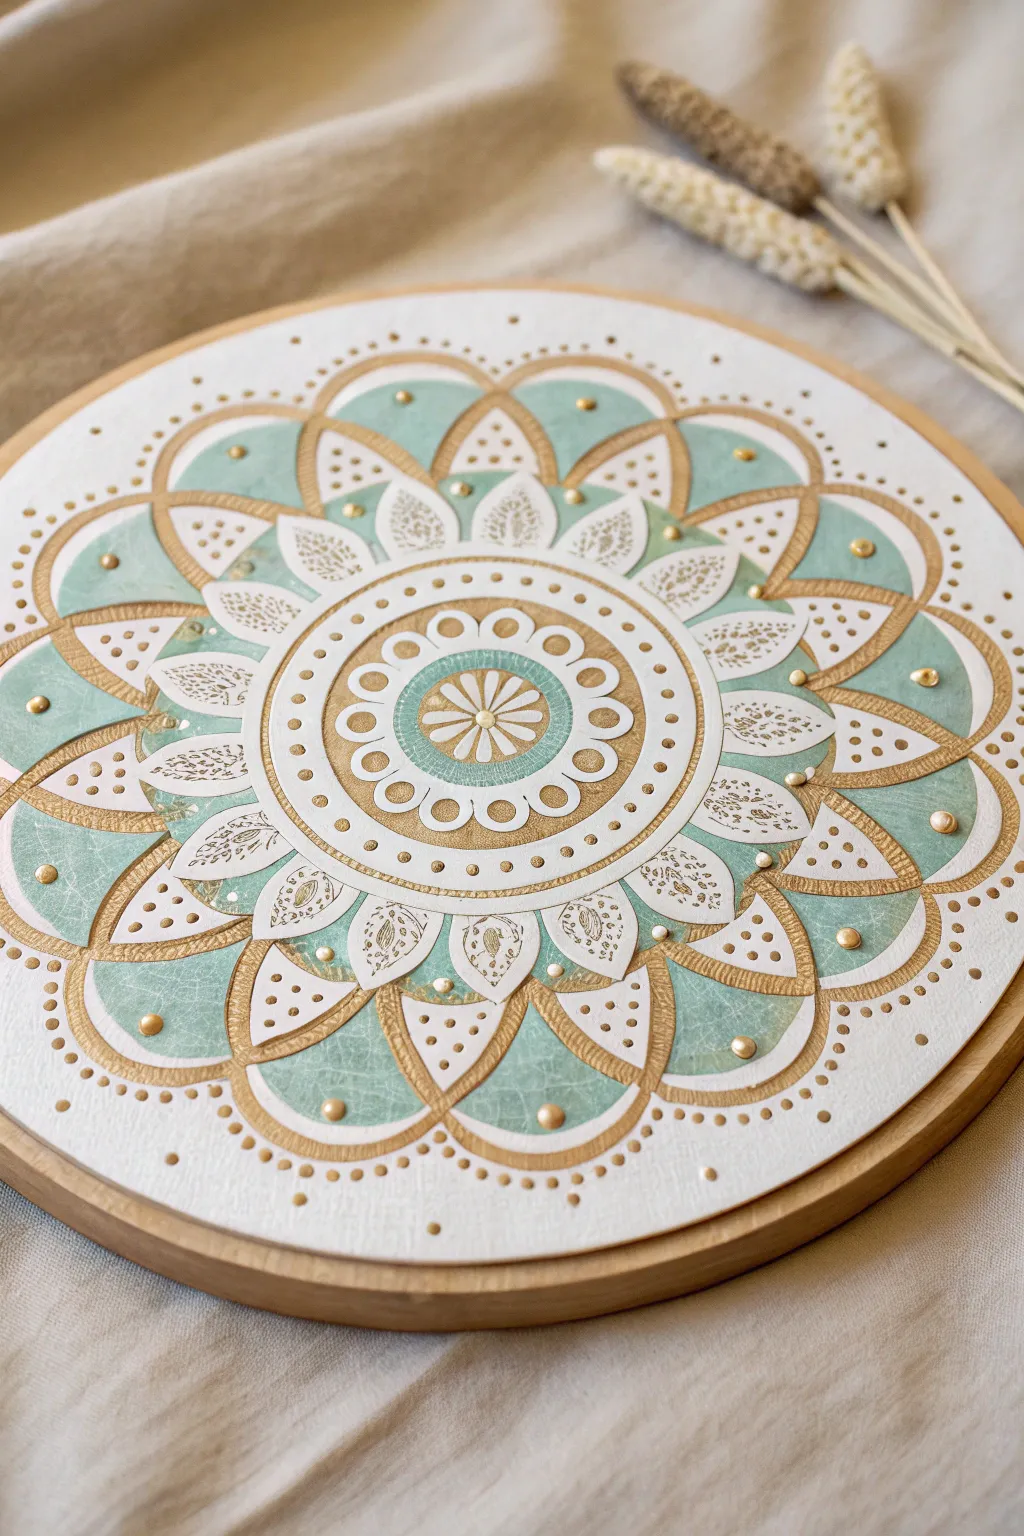
Create a serene and sophisticated piece of wall art using soft teal tones, crisp white lines, and luxurious gold accents. This mixed-media approach combines precise painting with dimensional dot details on a simple wooden round.
How-To Guide
Materials
- Round wooden panel/canvas (approx. 10-12 inches)
- White gesso or acrylic primer
- Soft teal or seafoam acrylic paint
- Metallic gold acrylic paint
- Posca paint pens (White: ultra-fine and fine tips)
- Posca paint pen (Gold: fine tip)
- Set of mandala dotting tools or stylus set
- Compass and ruler
- Pencil and eraser
- Half-pearl embellishments or dimensional fabric paint (Gold/Pearl)
- Matte finish spray varnish
Step 1: Preparation & Base Geometry
-
Prime the surface:
Begin by applying two smooth coats of white gesso to your wooden circle. Sand lightly between coats if the grain raises to ensure a porcelain-smooth surface. -
Find the center:
Use a ruler to locate the exact center of the circle and mark it lightly with a pencil. -
Draft the concentric guide rings:
Using your compass, draw a series of light concentric circles radiating from the center. You’ll need about 6-7 rings spaced out to define the different flower petal layers. -
Mark radial guidelines:
Divide your circle into equal segments like a pizza. For this specific twelve-petal design, you will need to mark off every 30 degrees using a protractor.
Clean Edges Pro-Tip
If your hand feels shaky drawing the curved ‘scallop’ lines, cut a template from cardstock to trace against. It ensures every curve is uniform.
Step 2: Painting the Teal Zones
-
Establish the teal center:
Paint the small inner circle (around the central flower motif) with your teal acrylic paint. Use a small flat brush to keep the edges crisp against the pencil lines. -
Paint the outer teal petals:
Moving to the largest outer ring, paint the alternating ‘petal’ shapes in teal. These shapes should look like curved triangles or shark fins. -
Create the textured teal ring:
Paint the second-to-last ring in teal. Once dry, you can sponge or dry-brush a tiny bit of white over it to create that subtle mottled texture seen in the reference.
Step 3: Gold Leaf & Linework
-
Paint the gold bands:
Using metallic gold paint, carefully fill in the structural bands that separate the teal sections. This includes the prominent scalloped arcs that frame the outer petals. -
Add the central flower:
With a white ultra-fine paint pen, draw the central flower petals directly over the teal center circle you painted earlier. -
Outline the gold scallops:
Use the white paint pen to outline the gold scalloped shapes. This high contrast makes the design pop instantly. -
Detail the inner white petals:
In the white ring surrounding the center, draw delicate petal shapes. These don’t need to be filled in yet; just focus on the outline.
Level Up: Texture
Mix a little modeling paste into your white paint for the central flower petals. When applied thickly, it creates a stunning raised relief effect.
Step 4: Detailed Embellishment
-
Add leaf patterns:
Inside the white petal shapes you just drew, use a fine gold pen or a very fine brush to create small, intricate leaf or vine patterns. -
Create the lace ring:
In the band surrounding the center flower, use your white pen to draw small circles (chain links). I like to make sure these touch slightly to mimic lace. -
Dot the outer rim:
Using a small dotting tool dipped in gold paint, press a series of dots around the very outer edge of the wood panel. -
Add interior gold dots:
Switch to a smaller dotting tool. Add tiny gold dots inside the white ‘negative space’ areas between the teal petal tips. -
Layer larger pearl accents:
For the largest raised dots seen on the gold scallops, use half-pearl stickers or large drops of dimensional gold fabric paint. Place one at the peak of each scallop.
Step 5: Final Touches
-
Refine white dots:
Using your smallest dotting tool or the tip of a toothpick, place tiny white dots on top of the teal sections for added texture. -
Clean up guidelines:
Once you are absolutely certain all paint is 100% dry, very gently erase any visible pencil guidelines. -
Seal the artwork:
Finish with a light coat of matte spray varnish to protect the paint without making the gold lose its shimmering contrast.
Hang your finished mandala in a well-lit spot to watch the gold accents catch the light throughout the day
Pet Portrait as a Tiny Badge
Capture the soulful eyes of a beloved pet on a rustic wood slice with this detailed miniature painting guide. The natural bark edge frames the crisp white background perfectly, making the golden-brown fur tones truly pop.
Step-by-Step Guide
Materials
- Small wood slice (2-3 inches diameter) with pre-drilled hole
- Jute twine
- Gesso or white acrylic paint
- Acrylic paints (Titanium White, Burnt Sienna, Yellow Ochre, Burnt Umber, Carbon Black)
- Fine detail brushes (sizes 000, 0, and 2)
- Pencil for sketching
- Matte finish sealant spray or varnish
- Palette for mixing
Step 1: Preparation and Base
-
Prepare the surface:
Ensure your wood slice is clean and free of loose dust. If the surface feels rough, give it a quick sanding with fine-grit sandpaper to create a smoother canvas for your detailed work. -
Prime the center:
Using a size 2 brush, paint the central area of the wood slice with gesso or white acrylic paint. Leave a clean margin of natural wood showing around the edges, about 1/4 inch wide. -
Build opacity:
Allow the first layer to dry completely. Apply a second or third coat of white until the wood grain is no longer visible through the paint. A solid, opaque white base is crucial for making the pet’s features stand out. -
Sketch the outline:
Once the white base is bone dry, lightly sketch the dog’s head using a regular pencil. Focus on the main shapes: the floppy ears, the rounded skull, and the snout area. Don’t press too hard to avoid indenting the paint.
Fur Texture Trick
When painting fur, don’t just use one color. Layering light strokes over dark strokes creates 3D depth. Flick your wrist at the end of each stroke for a tapered hair look.
Step 2: Blocking in Color
-
Mix the fur tones:
Create a warm golden-brown mix using Yellow Ochre and a touch of Burnt Sienna. I find mixing a little play area on the palette first helps get the shade just right. -
Base coat the ears:
Fill in the ear shapes with your golden-brown mix. Keep the paint relatively thin so you can build up texture later. Also, add the patch of color over the left eye. -
Define the shadows:
Mix a darker brown by adding Burnt Umber to your previous mix. Apply this to the underside of the ears where they fold, and slightly under the chin to create depth. -
Paint the nose and eyes:
Use a dark grey or soft black (mix Carbon Black with a tiny bit of white) to block in the nose shape and the iris of the eyes. Avoid pure black at this stage; it can look too harsh.
Step 3: Detailing and Refining
-
Add fur texture:
Switch to your 000 liner brush. Using the darker brown mix, paint tiny, short strokes over the golden areas to simulate fur direction. Pay attention to how fur flows down the ears and around the eyes. -
Deepen the eyes:
Outline the eyes carefully with black. Add the pupil in the center. Crucially, add a tiny dot of pure titanium white to each pupil to create that lifelike sparkle or ‘catchlight’. -
Refine the snout:
Using a very watery grey wash, add subtle shading around the muzzle to give it volume. Paint the nostrils with dark grey, then stipple tiny dots on the muzzle for whiskers. -
Defining the mouth:
Use a thin black line to define the separation of the lips and the jowls. The line should be broken and soft, not a solid cartoon outline. -
Final highlights:
Mix a creamy off-white and add highlights to the top of the nose leather and the brow ridge to make them look moist or illuminated.
Make It 3D
Before sealing, apply a tiny drop of clear 3D dimensional glaze or UV resin specifically over the eyes and nose. It creates a wet, realistic shine that looks incredibly professional.
Step 4: Finishing Touches
-
Add decorative accents:
If desired, add tiny decorative stars or abstract shapes near the shoulder area using orange or gold paint for a little whimsy. -
Seal the artwork:
Once the painting is fully cured (give it a few hours), spray or brush on a matte varnish to protect the surface from scratches and fading. -
Attach the hanger:
Cut a length of jute twine. Thread it through the pre-drilled hole at the top and tie a secure knot to create a loop for hanging your new ornament.
Now you have a charming, enduring keepsake that perfectly captures details of a furry friend.
Family Initials on Branch “Tree”
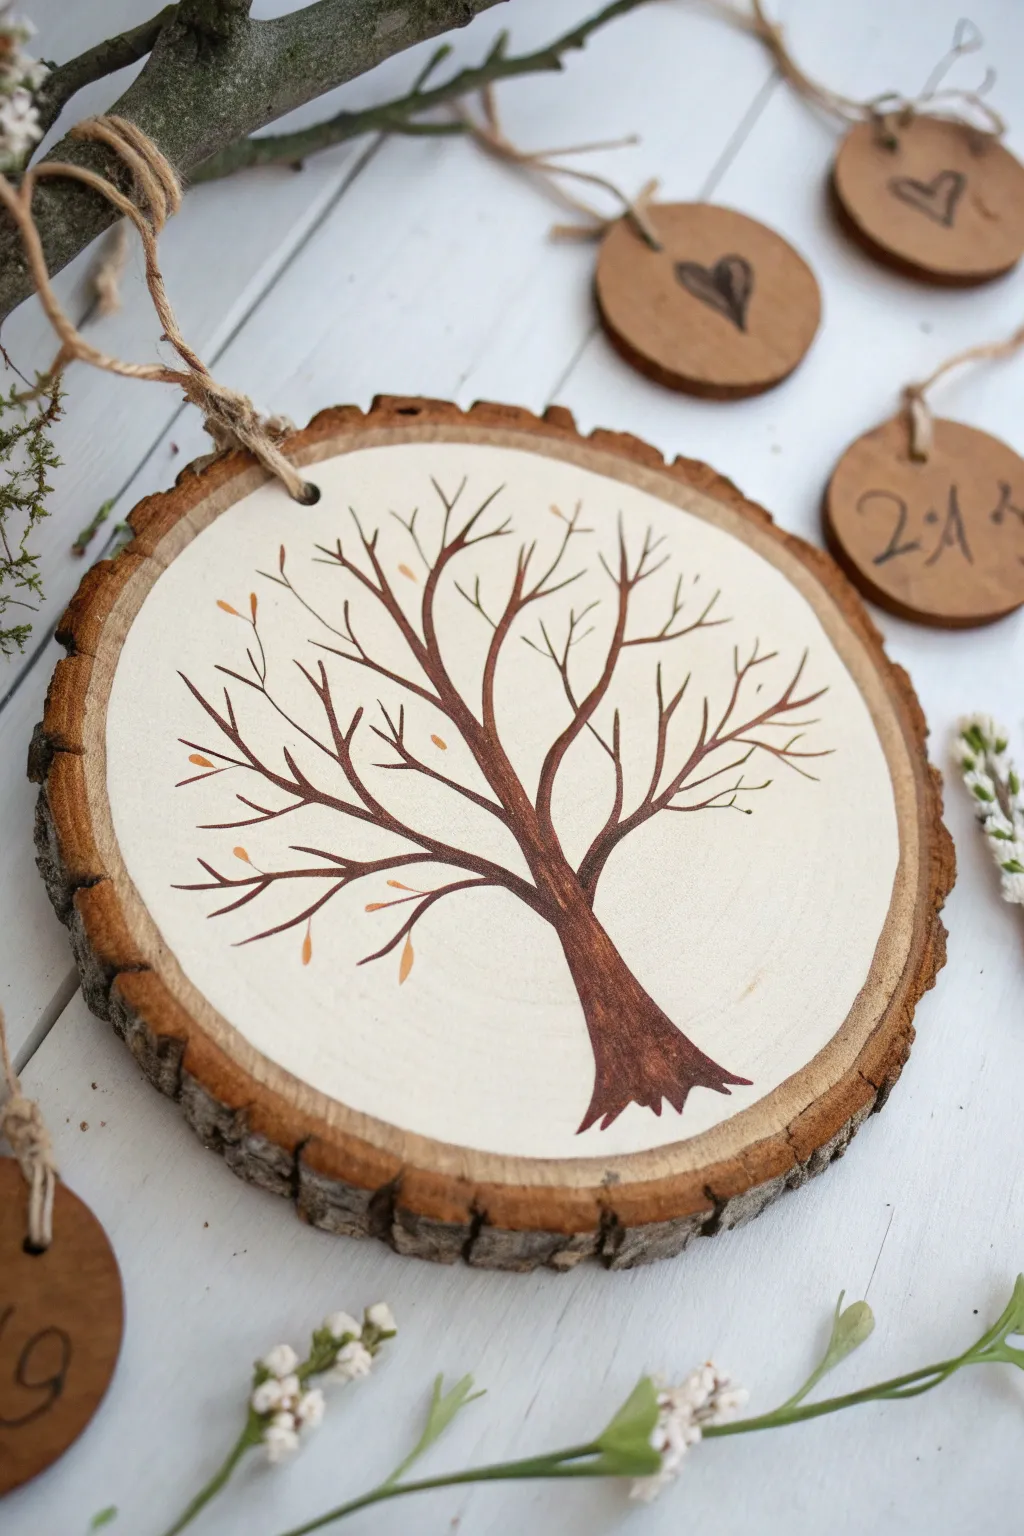
Capture the stark beauty of winter with this elegant wood slice ornament featuring a detailed, bare-branched tree. The creamy background allows the rich brown tones of the trunk to stand out, making it a perfect rustic decoration or gift tag.
How-To Guide
Materials
- Wood slice with bark edge (approx. 3-4 inches diameter)
- Cream or off-white acrylic paint
- Medium brown acrylic paint (burnt sienna or similar)
- Dark brown acrylic paint (burnt umber)
- Small flat paintbrush
- Fine liner brush (size 0 or 00)
- Jute twine for hanging
- Pencil (optional)
- Palette or small dish
- Water cup and paper towel
Step 1: Preparing the Canvas
-
Clean surface:
Ensure your wood slice is clean and free of loose sawdust. Wipe it gently with a dry cloth or stiff brush to remove any debris from the sanding process. -
Base coat:
Using a small flat brush, apply an even coat of cream or off-white acrylic paint to the face of the wood slice. Stay about 1/8th of an inch away from the bark edge to maintain that rustic border. -
Second layer:
Allow the first coat to dry completely. If the wood grain still shows through too much for your liking, apply a second thin coat to create a solid, opaque background. -
Smooth finish:
Inspect the painted surface once dry. If any wood fibers have raised up, you can very lightly sand it with fine-grit paper and do a quick touch-up coat.
Branch Flow
Paint branches growing ‘up and out.’ Avoid 90-degree angles; use soft V-shapes for splits to make the tree look natural and organic.
Step 2: Painting the Tree Structure
-
Mix your brown:
On your palette, mix a small amount of medium brown with a tiny touch of water. This improves the flow of the paint, which is crucial for painting smooth, tapered branches. -
Sketch placement:
If you’re nervous about freehanding, lightly sketch the main trunk and primary branches with a pencil. Position the base of the trunk near the bottom edge, slightly off-center if desired. -
Paint the trunk:
Using the tip of your flat brush or a larger round brush, paint the main trunk. Start at the bottom, making it wider at the base, and taper it as you move upward toward the center of the slice. -
Root details:
Add small, jagged points at the very bottom of the trunk to suggest roots gripping the ground, rather than a flat line cut-off.
Step 3: Branching Out
-
Primary branches:
Switch to your fine liner brush. Extend three to four main thick branches from the top of the trunk, reaching them outward toward the edges of the painted circle. -
Secondary branches:
From each main branch, paint smaller offshoot branches. Use a ‘Y’ shape technique where one branch splits into two smaller ones. -
Vary the pressure:
To get realistic tapered lines, press down slightly at the start of the branch and lift your brush gradually as you pull the stroke outward to create a fine tip. -
Fill the space:
Continue adding smaller twigs. Try to curve them slightly upward and outward, mimicking the natural growth of a deciduous tree seeking sunlight. -
Add dimension:
Mix a tiny bit of the darker brown paint into your original mix. Use this to add subtle shading to one side of the trunk and the undersides of the main branches for volume.
Shaky Lines?
If your lines are jittery, your paint is likely too thick. Add a drop of water to improve flow, and rest your pinky on the dry wood for stability.
Step 4: Detailing and Finish
-
Tiny twigs:
For the finest details, ensure your paint is quite fluid. Add the tiniest, thinnest twigs at the very ends of your branches using just the very tip of your liner brush. -
Leaf buds:
Dip just the tip of your smallest brush into a lighter brown or golden ochre color. Gently dab tiny spots on a few branch tips to represent emerging buds or dried leftover leaves. -
Dry time:
Let the painting dry completely for at least an hour. Acrylics dry fast, but thicker parts of the trunk might take longer. -
Clear coat (optional):
If this will be handled often, apply a clear matte sealer over the painted area to protect your artwork from scratches. -
Add the hanger:
Cut a length of jute twine. Thread it through the pre-drilled hole at the top of the wood slice. -
Tie it off:
Secure the twine with a simple overhand knot or a lark’s head knot, leaving a loop large enough to hang comfortably on a branch or hook.
Hang your new rustic ornament proudly or use the back to write a personalized message
Negative Space Line Art Face
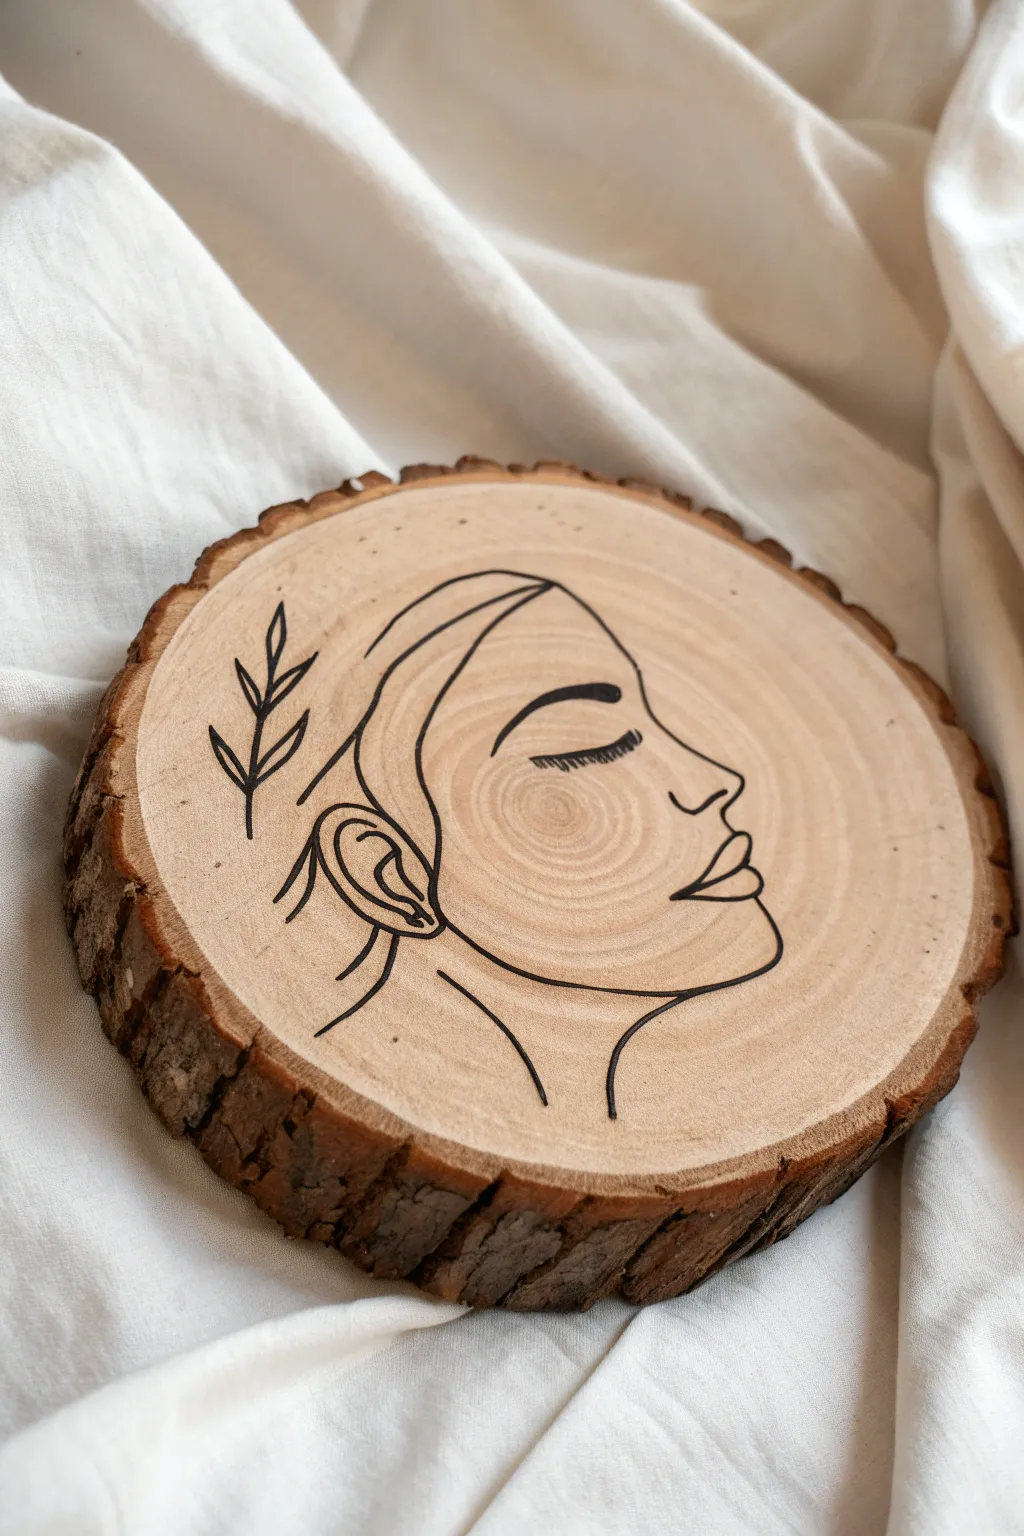
This elegant project combines the rustic texture of raw wood with the clean, modern aesthetic of continuous line art. By leaving the wood grain visible through negative space, you create a sophisticated piece that feels organic and grounding.
Detailed Instructions
Materials
- Wood slice (approx. 6-8 inches diameter) with bark edge
- Fine-grit sandpaper (220 grit)
- Pencil (HB or H)
- Black paint pen (fine tip) or fine liner marker
- Black acrylic paint (optional, for bolder lines)
- Fine detail paintbrush (size 0 or 00, only if using acrylics)
- Eraser
- Matte spray sealant or clear varnish
- Tracing paper (optional)
- Carbon paper (optional)
- Clean cloth or brush for dust
Step 1: Preparation
-
Examine the surface:
Inspect your wood slice for any rough patches or loose splinters on the face of the wood. The surface needs to be extremely smooth for the pen work to look crisp. -
Sand the face:
Using 220-grit sandpaper, gently sand the flat surface of the wood slice in a circular motion. Continue until the wood feels like heavy cardstock to the touch. -
Dust carefully:
Use a dry, clean cloth or a soft brush to sweep away every speck of sawdust. Any remaining dust can clog your paint pen or create bumps in your line work. -
Check the bark:
Look at the bark rim. If any pieces are very loose and about to fall off, gently remove them now so they don’t break later, or secure them with a tiny drop of wood glue.
Bleeding Ink?
If ink bleeds into the wood grain, the wood is too porous. Try sealing the raw wood with a clear matte varnish *before* you start drawing the final lines.
Step 2: Sketching the Design
-
Orient the wood:
Look at the natural grain rings. I generally like to position the center of the rings where the cheek or ear will be, creating a natural focal point for the face. -
Light blocking:
Using a light hand and your pencil, sketch the basic oval shape for the head first to ensure it fits well within the circle borders. -
Define the profile:
Refine the sketch to clearly define the forehead, nose, and chin. The nose should have a gentle slope, and the lips should be slightly parted or just touching. -
Add the eye:
Draw the closed eye. Place a simple curved line for the eyelid and adds short, downward-angled dashes for the eyelashes. -
Draw the hair outline:
Sketch a sweeping curve starting from the forehead and moving back over the ear area. Keep this line fluid to suggest hair pulled back. -
Detail the ear:
Add the ear shape just below the hair line. Use a few simple internal curves to suggest the cartilage without getting too hyper-realistic. -
Include botanical elements:
To the left of the head, lightly sketch a simple branch with leaves. This balances the composition and adds a touch of nature. -
Review and refine:
Step back and look at your pencil sketch. Erase any stray lines and make sure the proportions feel right before you commit with ink.
Step 3: Inking and Finishing
-
Test your pen:
On a scrap piece of paper or the back of the wood slice, test your paint pen to ensure the ink is flowing smoothly and not blobbing. -
Begin outlining:
Start with the main profile line (forehead to chin). Use a steady hand and pull the pen toward you for better control. -
Trace the hair and ear:
Go over the hair and ear lines. If your pen skips over the wood grain, pause, let it dry for a second, and carefully re-trace that spot. -
Ink the eye details:
Carefully ink the eyelid curve. For the eyelashes, use very light, quick flicks of the wrist to keep them delicate. -
Thicken key lines:
To add depth, go back over the underside of the jawline and the back of the neck to make those lines slightly thicker than the facial details. -
Blacken the botanical accent:
Trace the leaf branch. Ensure the stem line connects fluidly to the leaves. -
Let the ink cure:
Allow the ink to dry completely. This is crucial; if you erase pencil marks while the ink is wet, it will smear and ruin the clean look. -
Erase guidelines:
Once totally dry, gently run your eraser over the entire design to remove the initial pencil sketch, leaving only the crisp black lines. -
Seal the artwork:
Finish by applying a thin coat of matte spray sealant. Hold the can 12 inches away and use sweeping motions to avoid pooling.
Make it Pop
Add a single touch of color to the design, like painting the lips a soft pink or adding gold leaf to the botanical branch for a mixed-media look.
Hang your finished piece on a gallery wall or place it on a small easel for a modern, natural touch
Glow-in-the-Dark Moon Phase Set

Bring the magic of the night sky into your home with these enchanting moon-themed wood slices. The deep charcoal background makes the pearlescent craters and glow-in-the-dark stars truly pop, creating a mystical set perfect for any space enthusiast.
Step-by-Step Tutorial
Materials
- Unfinished wood circles (approx 4-5 inches)
- Black acrylic paint (matte finish)
- White acrylic paint
- Glow-in-the-dark acrylic paint (neutral/clear drying)
- Iridescent or metallic pearl medium (optional)
- Small flat shader brush
- Fine detail liner brush
- Small round brush
- Palette or paper plate
- Water cup and paper towels
- Matte spray varnish or sealant
Step 1: Setting the Night Sky
-
Prepare the circles:
Wipe down your wood circles with a dry cloth to remove any sawdust. If the surface feels rough, give it a quick pass with fine-grit sandpaper for a smoother painting surface. -
Base coat application:
Using a flat shader brush, apply an even coat of matte black acrylic paint to the entire top surface of the wood circle. -
Edge crispness:
Be careful near the edges; you want to leave the natural wood rim unpainted to create that beautiful framed look seen in the photo. Use the edge of your flat brush to create a clean horizon line. -
Second coat:
Once the first layer is dry to the touch, apply a second coat of black to ensure deep, opaque coverage. Let this dry completely before moving on.
Paint Bleeding?
If black paint bleeds into the wood grain, apply a clear matte sealer to the raw wood first. This fills the wood pores and creates a barrier for crisp lines.
Step 2: Orbiting Moons
-
Sketch placement:
Lightly trace two circles on each coaster using a pencil or white chalk. In the reference image, each coaster features a large full moon and a crescent moon nestled together. -
Base the full moon:
Mix a tiny drop of black into your white paint to create a very light grey. Use a round brush to fill in the large circle shape. Don’t worry about perfect coverage; some transparency adds texture. -
Base the crescent:
Paint the crescent shape using the same off-white mixture. Keep the inner curve sharp, but feel free to let the paint be slightly uneven to mimic lunar terrain. -
Adding texture:
While the base is still slightly tacky, dab pure white paint onto the center of the moons using a dry brush motion. This creates the bright highlands of the moon. -
Creating craters:
Mix a watered-down grey wash. Use your detail brush to dab irregular blotches and swirls onto the moons. I find that scumbling (scrubbing the brush in circles) creates the most realistic crater effects. -
Yellow tinting:
To get that warm, aged look, create a very thin wash of yellow-ochre or warm beige. Glaze this selectively over parts of the full moon, blending it out so it doesn’t look like a solid spot. -
Highlighting rims:
Use your finest brush and pure white paint to outline the outer arc of the crescent moon and the brightest edge of the full moon. This sharpens the shapes against the black background.
Add Dimension
Before painting, use texture paste and a stencil on the moon areas. Once dry, paint over it to create actual raised craters you can feel.
Step 3: Galactic Details
-
Star placement:
Dip the very tip of a detailing brush or a toothpick into white paint. Dot the black background randomly to create distant stars. Vary the pressure to create different star sizes. -
Tiny clusters:
Group two or three tiny dots together in some areas to suggest constellations or distant galaxies. -
Applying the glow:
Once your moon painting is fully dry, apply a layer of glow-in-the-dark paint over the white and grey areas of the moons. It will look milky when wet but clears as it dries. -
Glowing stars:
Don’t forget to dot a little glow paint over the larger stars you created. This ensures the galaxy shines even when the lights go out. -
Detail accent:
If you have iridescent medium, outline the inner curve of the crescent moon lightly. This adds that shimmering blue-ish halo effect seen in the reference photo. -
Final seal:
Protect your artwork with a spray matte varnish. This unifies the sheen of the paint and protects the wood from moisture if used as a coaster.
Turn off the lights and enjoy the soft lunar ambiance of your new handcrafted decor

Have a question or want to share your own experience? I'd love to hear from you in the comments below!