If you love the spooky-cute vibe of spiders but don’t want the mess of carving, painting pumpkins is the sweetest little shortcut. I’m sharing my favorite pumpkin painting ideas that turn any gourd into a webby, crawly showpiece—easy enough for a quick studio session, but still super eye-catching.
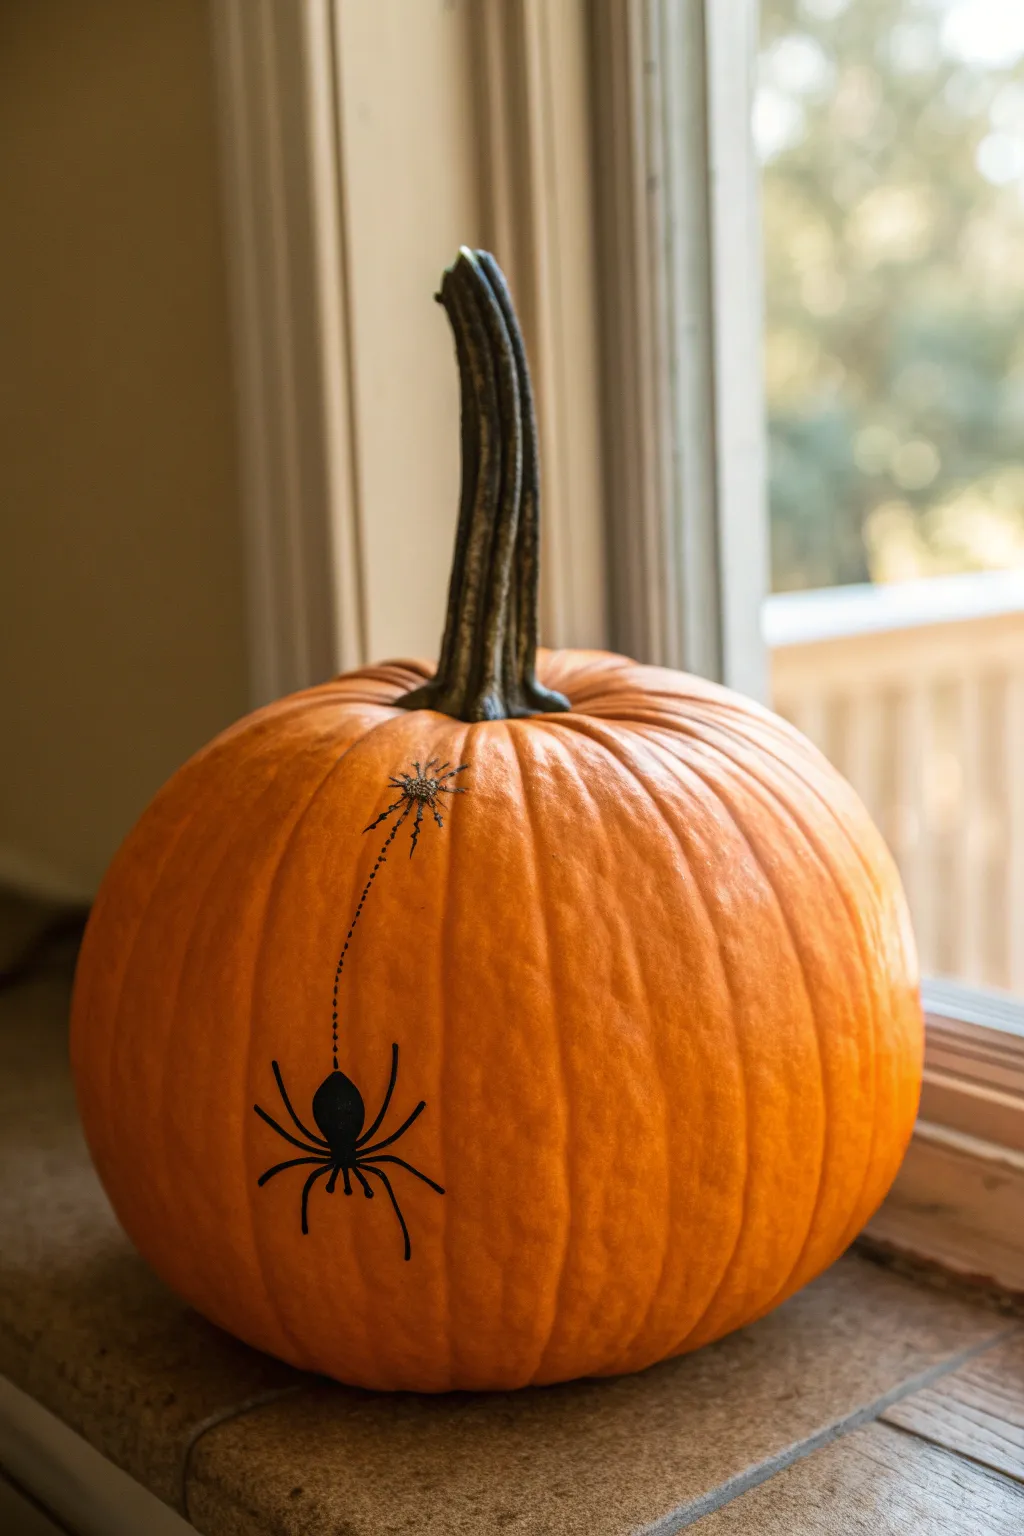
Classic Black Spider Silhouette
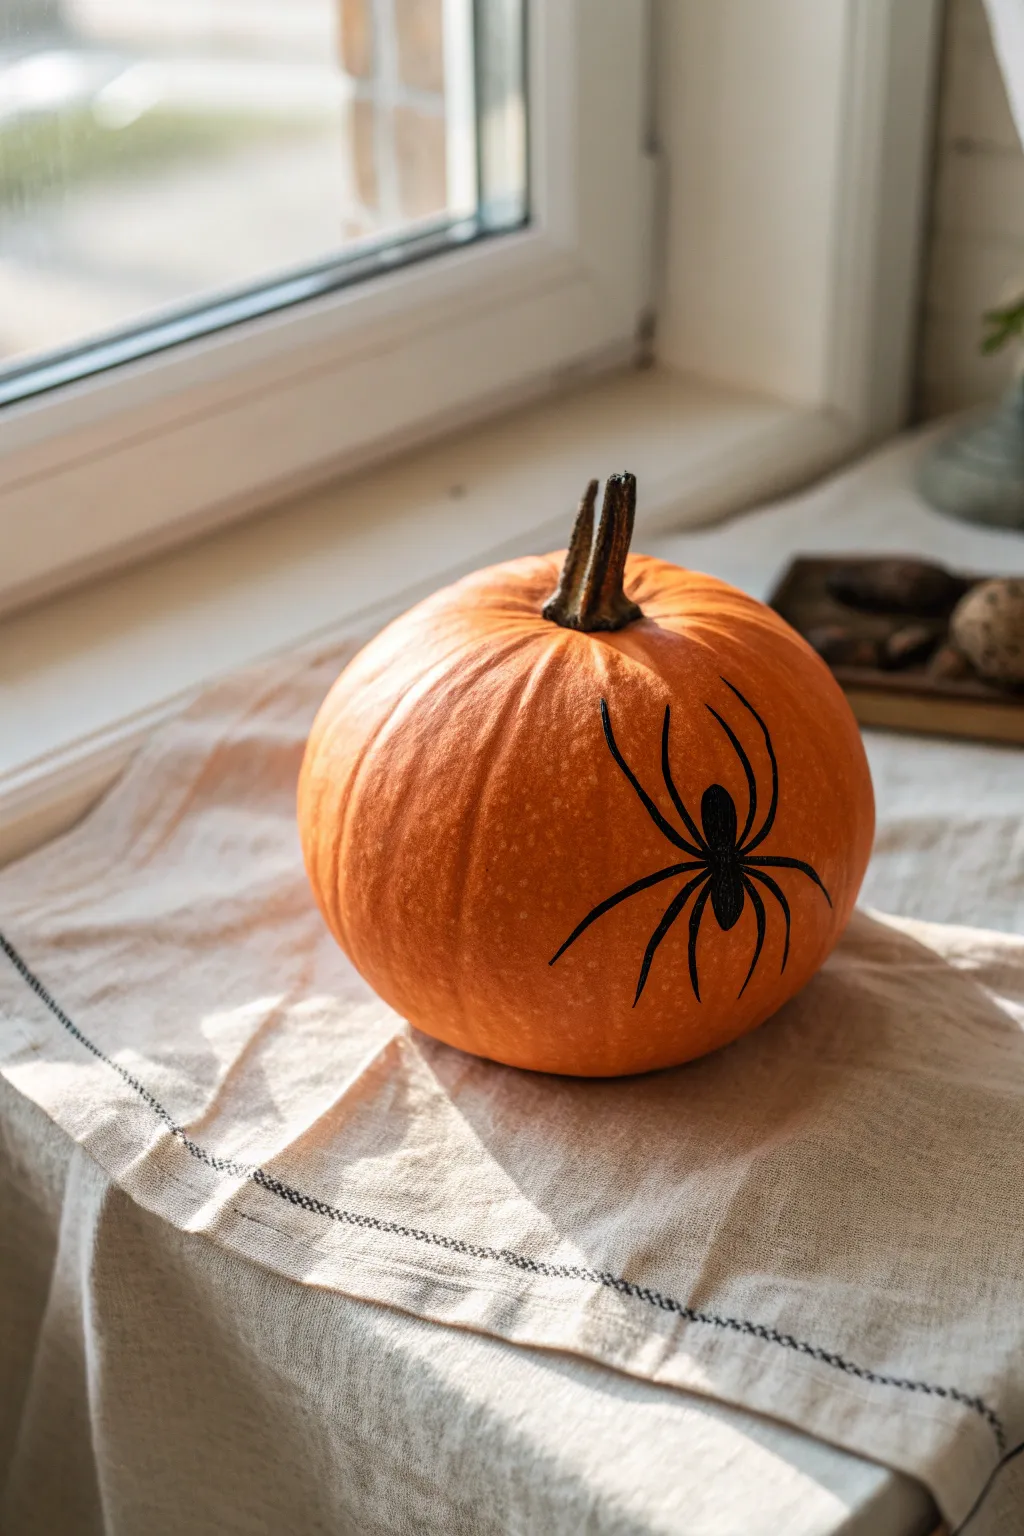
This minimalist pumpkin project features a sleek, realistic black spider silhouette crawling up a vibrant orange gourd. The look is achieved with simple but precise linework, creating a chic Halloween decoration that fits perfectly on a sunny windowsill.
Step-by-Step
Materials
- Medium-sized orange pumpkin (real or faux)
- Black acrylic paint pen (fine tip & medium tip)
- Pencil (HB or lighter)
- Eraser
- Damp cloth or paper towel
- Reference image of a spider (optional)
- Clear matte sealer spray (optional)
Step 1: Preparation & Planning
-
Clean the Surface:
Before you begin, wipe down your pumpkin with a damp cloth to remove any dirt, dust, or oils from the skin. Dry it thoroughly, as markers won’t adhere well to a damp surface. -
Choose the Position:
Decide where you want your spider to live. The example shows the spider positioned slightly off-center on the upper curve, which makes it look like it’s crawling toward the stem. -
Sketch the Body Segments:
Using a light pencil, lightly sketch two connected oval shapes. Make the rear oval (the abdomen) slightly larger and rounder than the front segment (the prosoma/head). -
Map Out the Leg Attachments:
Mark four small points on each side of the front body segment. This ensures your spider has eight legs properly attached to the center, rather than floating independently.
Ink Flow Secret
Store your acrylic markers tip-down for 15 minutes before starting. This saturates the felt tip for the darkest, most consistent black lines.
Step 2: Inking the Body
-
Outline the Shapes:
Take your medium-tip black paint pen and trace over your pencil lines for the two body segments. I like to keep a steady hand here to ensure the ovals are crisp. -
Fill in the Solid Black:
Color inside the lines completely with the paint pen. Work in small circular motions to get opaque coverage without streakiness. -
Let the Body Dry:
Allow the central body to dry for about 5-10 minutes. This prevents your hand from smudging the wet ink while you work on the legs.
Add Dimension
Use a white gel pen to add tiny reflection dots on the spider’s back and knee joints. This makes the ‘creature’ look shiny and 3D.
Step 3: Drawing the Legs
-
Start the Front Legs:
Switch to a fine-tip paint pen for better control. Draw the front two legs first, curving them sharply forward and slightly inward, like pincers. -
Draft the Rear Legs:
Draw the back pair of legs next. These should be long and curve backward initially, then hook slightly at the ends. -
Add the Middle Pairs:
Fill in the remaining two pairs of legs on each side. Angle them outward, creating a starburst pattern, but remember to give each leg a distinct joint or ‘knee’ bend. -
Thicken the Upper Joints:
Go back over the leg segments closest to the body. Thicken them slightly where they attach to the torso, tapering them to a fine point at the tips. -
Refine the Leg Arches:
Ensure the curves look natural. Spiders articulate their legs in arches, not straight lines, so emphasize the bend in the middle of each leg.
Step 4: Final Touches
-
Check for Opacity:
Look closely at your black fill. If the orange pumpkin skin is showing through, apply a second coat of black paint pen once the first layer is fully dry. -
Clean Up Edges:
If any pencil marks are still visible outside your ink lines, gently erase them. Be very careful not to scrub the paint itself. -
Seal (Optional):
If this pumpkin will be outside, give the drawn area a light misting of clear matte sealer to prevent rain from washing away your work.
Place your finished pumpkin near a window to cast spooky shadows as the sun sets


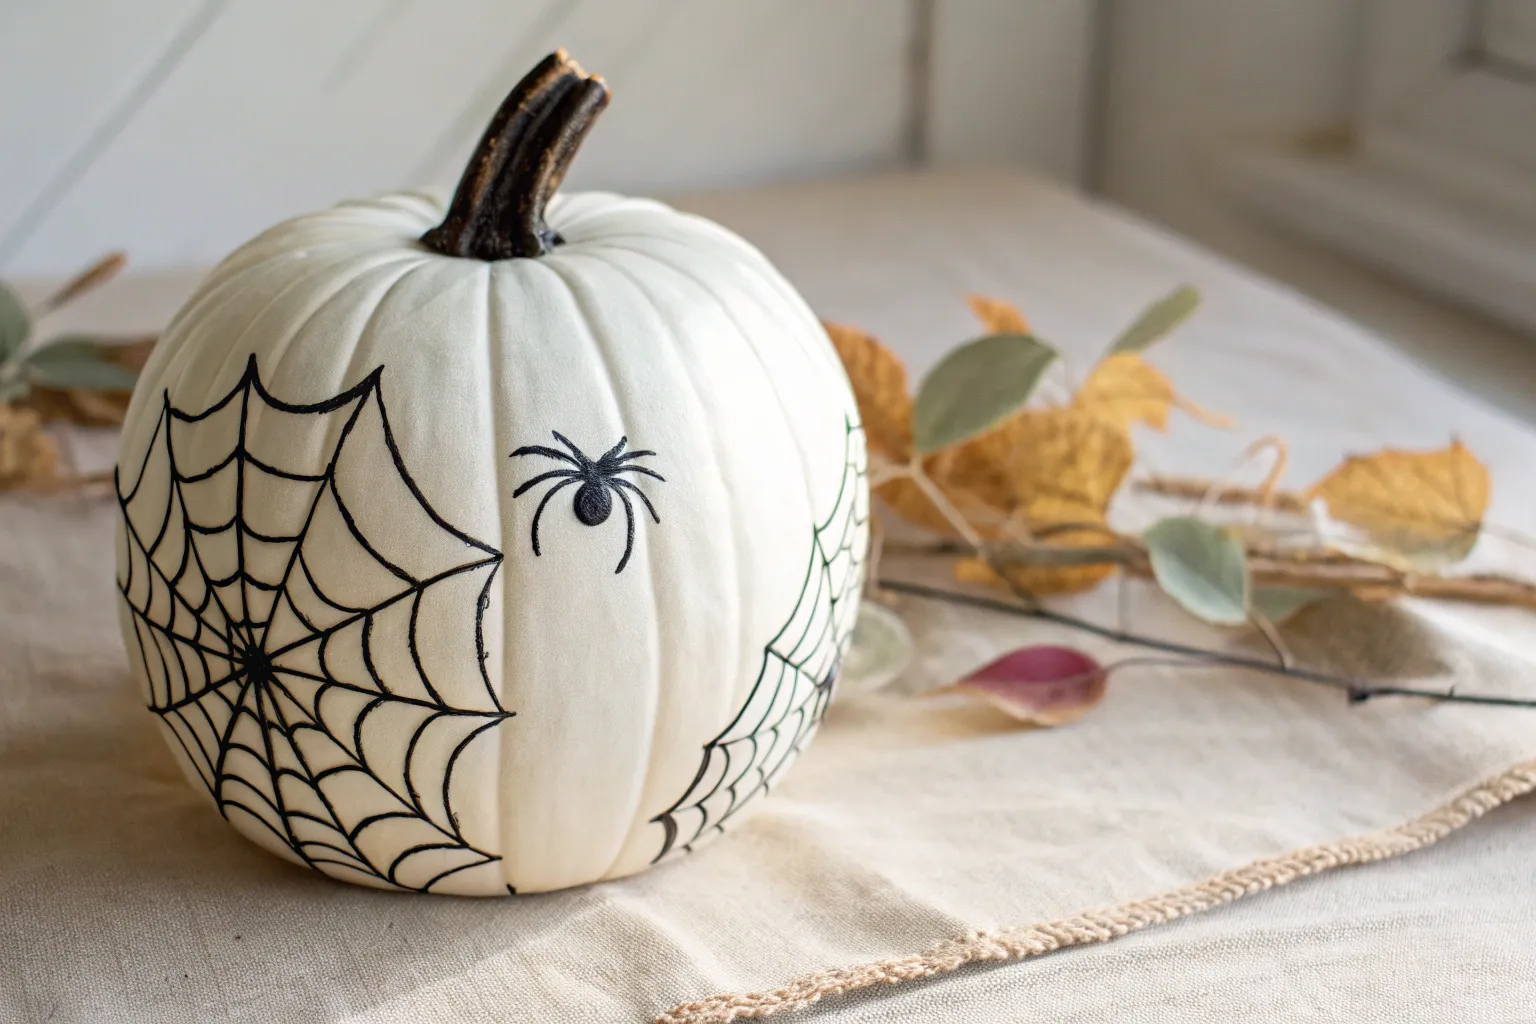
Spiderweb Centered on the Stem
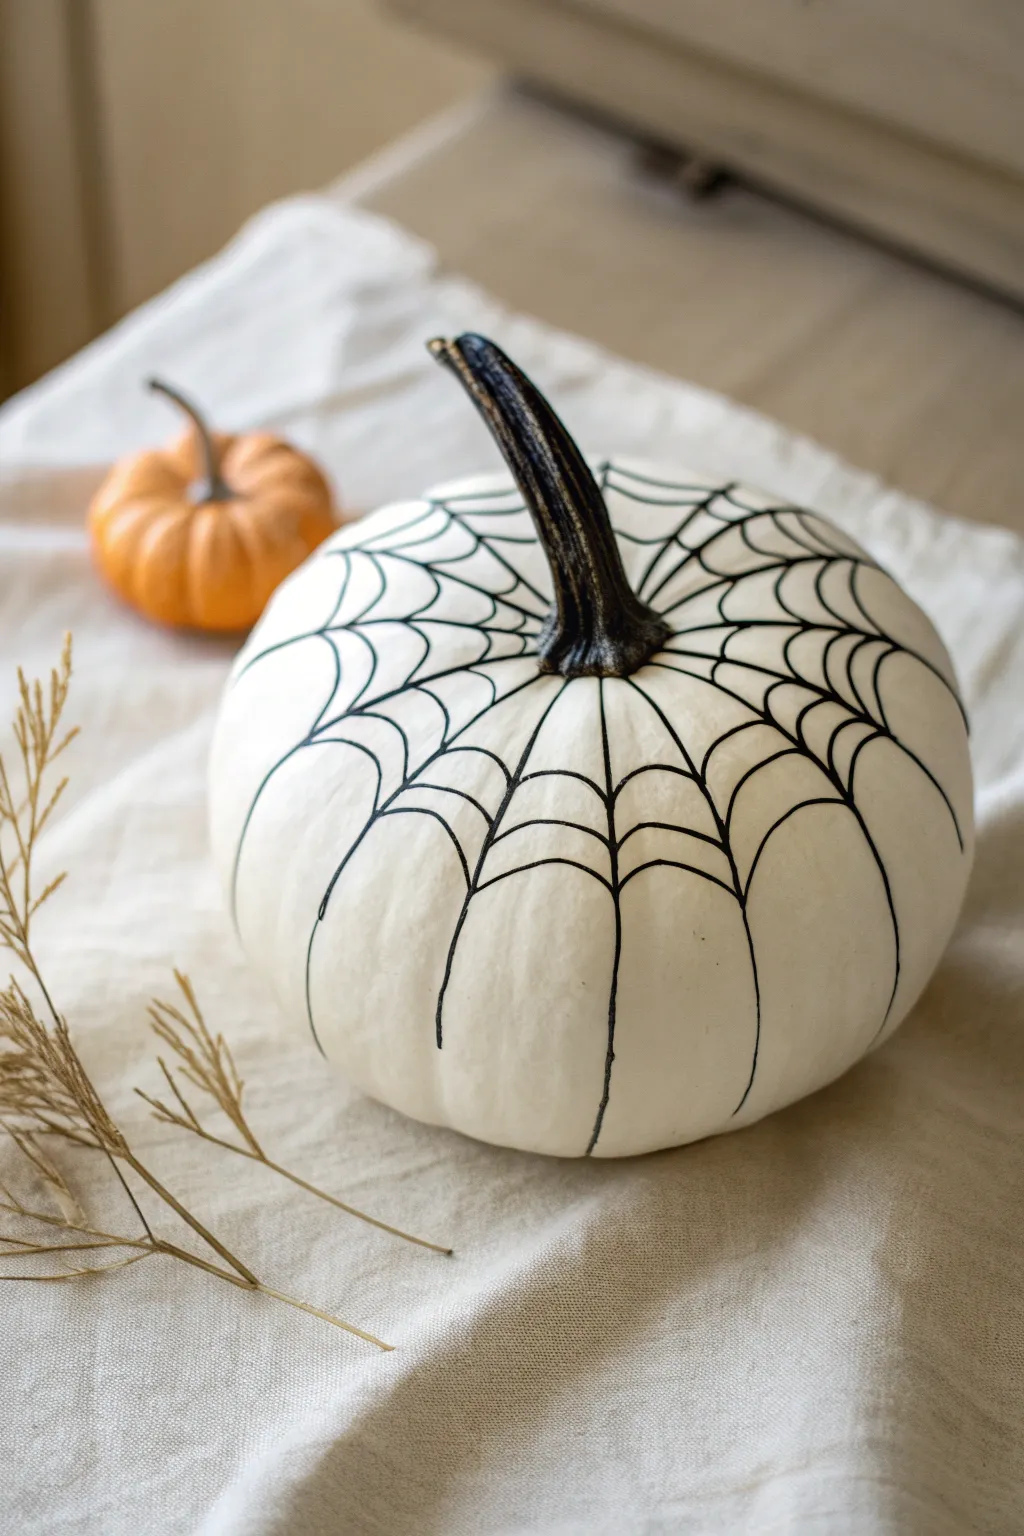
Transform a simple white pumpkin into a spooky centerpiece with this minimalist, high-contrast design. By centering the web directly on the stem, you create a natural geometric flow that looks intricate but is surprisingly simple to execute.
Step-by-Step Guide
Materials
- Medium-sized white faux or real pumpkin (smooth surface is best)
- Black acrylic paint pen (medium tip)
- Black acrylic paint pen (fine tip, optional for touch-ups)
- Pencil (HB or lighter)
- Damp paper towel or rag
- Rubbing alcohol (if using a faux pumpkin)
- Matte clear sealant spray (optional)
Step 1: Preparation & Planning
-
Clean the surface:
Begin by thoroughly wiping down your pumpkin. If you are using a faux pumpkin, give it a quick wipe with rubbing alcohol to remove any manufacturing oils; for a real pumpkin, just ensure it’s dry and free of dirt. -
Protect the stem:
Since the design radiates from the stem, you want to keep that area crisp. If you’re worried about accidental marks, apply a small ring of painter’s tape around the very base where the stem meets the skin. -
Plan your spokes:
Visualize the pumpkin’s natural ridges. I find that following these natural indented lines for the main ‘spokes’ of the web yields the most organic look.
Wobbly Lines?
Don’t panic! Simply thicken the line slightly to hide the wobble, or use a damp Q-tip to quickly wipe away fresh acrylic marker mistakes before they dry.
Step 2: Drafting the Design
-
Sketch the main lines:
Using a light pencil, lightly draw vertical lines radiating downward from the base of the stem. Aim for 8 to 10 lines evenly spaced around the pumpkin. -
Check the lengths:
Extend these vertical pencil lines down to about the midway point or slightly lower on the pumpkin side. They don’t need to be perfectly equal in length, as variation adds character. -
Mapping the webbing:
Starting near the top stem, lightly sketch curved horizontal lines connecting the vertical spokes. These should drape downward slightly in the center, like a smiley face, to mimic distinct silk threads. -
Continue the pattern:
Work your way down the pumpkin with your pencil, creating wider concentric rings of webbing. Leave more vertical space between the rings as you get further from the stem.
Add Some Life
Glue a small plastic spider onto one of the threads, or draw a tiny one dangling from a single line extending further down the pumpkin.
Step 3: Inking the Web
-
Trace the spokes first:
Shake your medium-tip black acrylic paint pen well. Carefully trace over your vertical pencil lines first, starting from the stem base and pulling the pen downward for a smooth stroke. -
Anchor the lines:
Ensure the lines at the top connect directly to the dark stem base, making it look as though the web is anchored there. -
Dry the verticals:
Let these vertical lines dry for a few minutes before crossing them to prevent smudging the wet ink. -
Begin the cross-webbing:
Starting at the top ring nearest the stem, trace the curved horizontal connecting lines. Using a confident, slightly quick stroke often results in smoother curves than moving too slowly. -
Work in sections:
Rotate the pumpkin carefully as you work your way around each ring. It’s best to complete one full ring around the circumference before moving down to the next level. -
Vary line weight:
As you move to the outer, larger rings, you can press slightly harder to make the webbing appear a bit bolder, giving the design depth. -
Manage the ends:
For the very bottom tips of the vertical lines, let them trail off naturally rather than ending in a blunt heavy dot.
Step 4: Refining & Finishing
-
Check for gaps:
Inspect the point where the web meets the stem. Use a fine-tip marker here if needed to get tight into the crevice without getting ink on the stem itself. -
Clean up sketch marks:
Once the paint is completely bone dry, gently erase any visible pencil marks. Be gentle so you don’t scrape off the acrylic paint. -
Fix uneven edges:
If any lines look shaky, go over them one last time to smooth out the edges, but don’t overwork it—spiders don’t spin perfect webs. -
Seal the artwork:
This is important if the pumpkin will be outside. Mist lightly with a matte clear spray sealant to waterproof your linework.
Place your sleek new decoration on a table runner or mantle for an instant touch of modern Halloween elegance


Creeping Spiders Around the Base
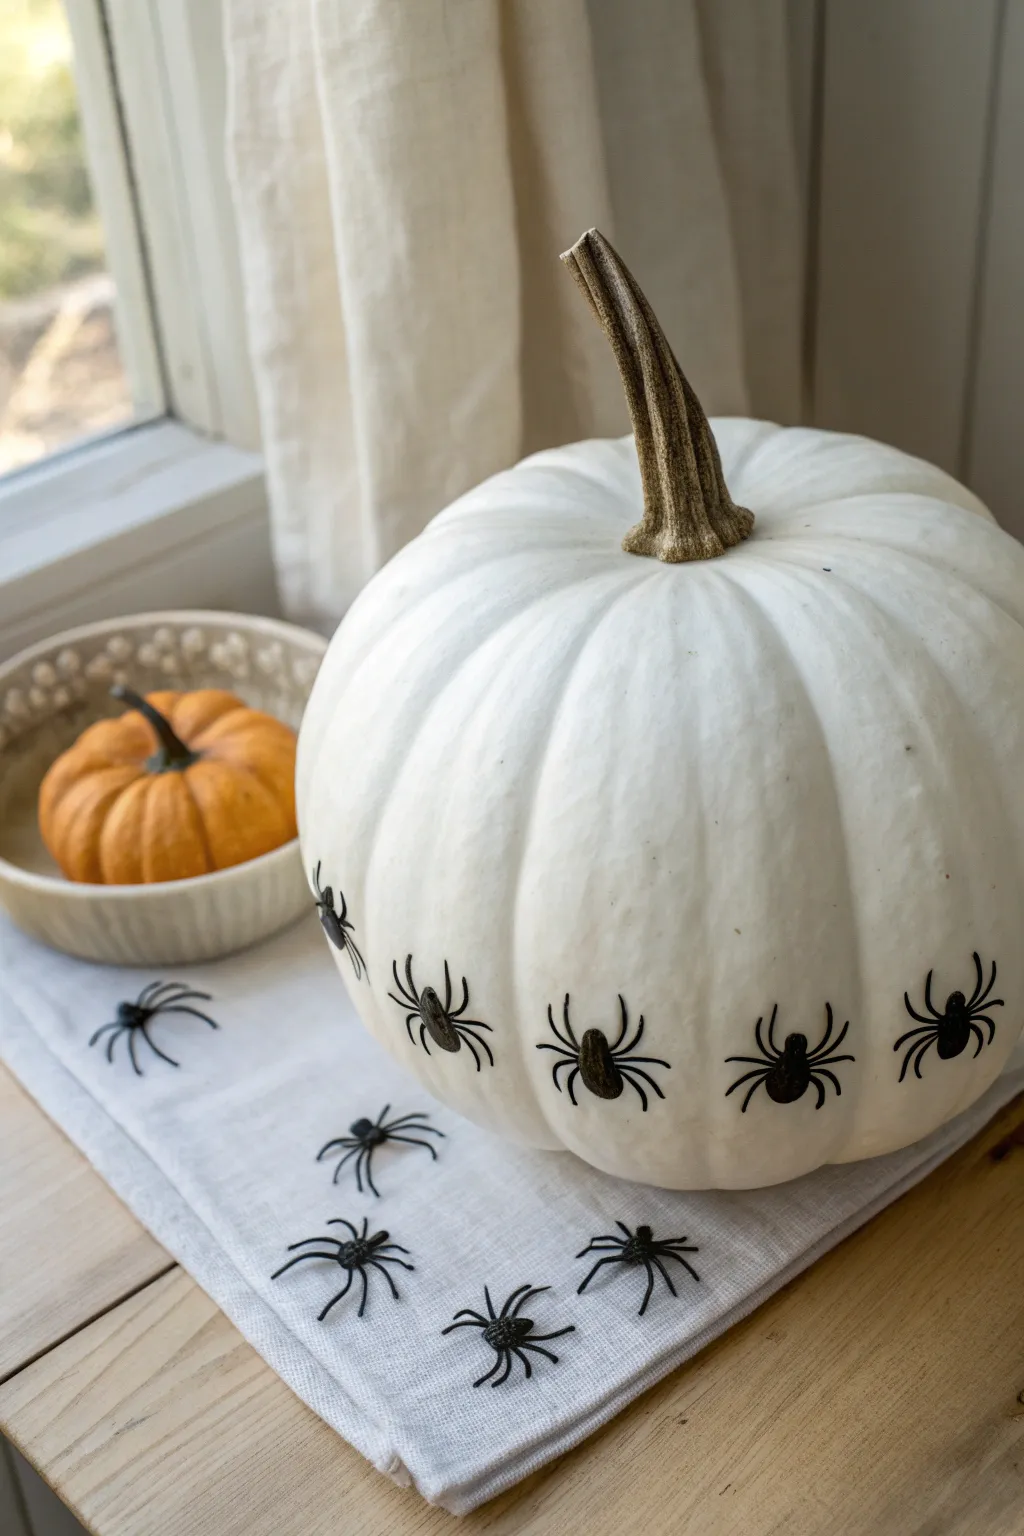
Transform a classic white pumpkin into a creepy-crawly centerpiece with this simple yet effective design. By creating a ring of spiders marching around the base, you achieve a minimalist Halloween look that feels both spooky and surprisingly chic.
Step-by-Step
Materials
- Large white pumpkin (real or faux)
- Small black plastic spiders (approx. 1-1.5 inches wide)
- Hot glue gun and clear glue sticks
- Rubbing alcohol
- Paper towel or cotton pad
- Pencil (optional)
- Measuring tape (optional)
Step 1: Preparation
-
Clean surface:
Begin by wiping down your pumpkin with a paper towel dampened with rubbing alcohol. This removes natural oils or dust, ensuring the adhesive bonds securely to the pumpkin skin. -
Sort spiders:
Pour out your bag of plastic spiders and select ones that are uniform in size and shape. Remove any that have bent legs or manufacturing defects to keep the ring looking neat. -
Test spacing:
Place the pumpkin on a flat surface and arrange a few loose spiders around the base without glue. This helps you visualize how high up the curve you want the ring to sit—aim for the lower third of the pumpkin.
Pro Tip: Leg Shadowing
Don’t glue the legs down! Leave them free-floating slightly off the surface. This casts realistic shadows on the white pumpkin, making the spiders look 3D and creepy.
Step 2: Creating the Guideline
-
Determine height:
Decide on the exact height for your spider ring. A good rule of thumb is about 2 to 3 inches from the bottom resting point, depending on the pumpkin’s curvature. -
Mark specific spots:
Using a pencil, make very faint marks around the circumference of the pumpkin where you want the center of each spider’s body to go. I find spacing them about 1.5 to 2 inches apart works well to create a continuous line. -
Check level:
Step back and look at your pencil marks to ensure they form a relatively straight horizontal line around the pumpkin, adjusting any marks that look too high or low.
Troubleshooting: Slipping Spiders
If spiders slide down before setting, use a tiny piece of painter’s tape to hold them in place while the glue dries, or switch to a high-temp glue for a faster instant tack.
Step 3: Attaching the Spiders
-
Heat the glue:
Plug in your hot glue gun and let it heat up fully. A low-temp setting is safer for your fingers and works perfectly fine for lightweight plastic spiders. -
Apply glue to first spider:
Pick up your first plastic spider and apply a small dot of hot glue to the underside of its main body. Avoid putting glue on the thin legs, as it can get messy. -
Secure the first spider:
Press the spider onto your first pencil mark, holding it in place for about 5-10 seconds until the glue sets. Orient the spider so it is facing upward, as if climbing the pumpkin. -
Continual attachment:
Move to the next pencil mark and repeat the process. Apply the glue to the spider body, press firmly, and hold. -
Mind the orientation:
Ensure every spider is facing the same direction (head up) to maintain the organized ‘marching’ effect. -
Complete the circle:
Continue working your way around the entire pumpkin until you meet back at the first spider. If the gap for the final spider is too small or large, slightly adjust the spacing of the last two or three spiders to hide the discrepancy.
Step 4: Finishing Touches
-
Clean up threads:
Once all spiders are attached and the glue is completely cool, inspect the pumpkin for those wispy strings of hot glue. -
Remove residue:
Gently pull away any glue strings with your fingers or a pair of tweezers to keep the white surface looking pristine. -
Set the scene:
Place your finished pumpkin on a table runner or cloth. Scatter the remaining loose plastic spiders on the fabric around the base to make it look like they are swarming toward the pumpkin.
Step back and admire your elegantly infested pumpkin display


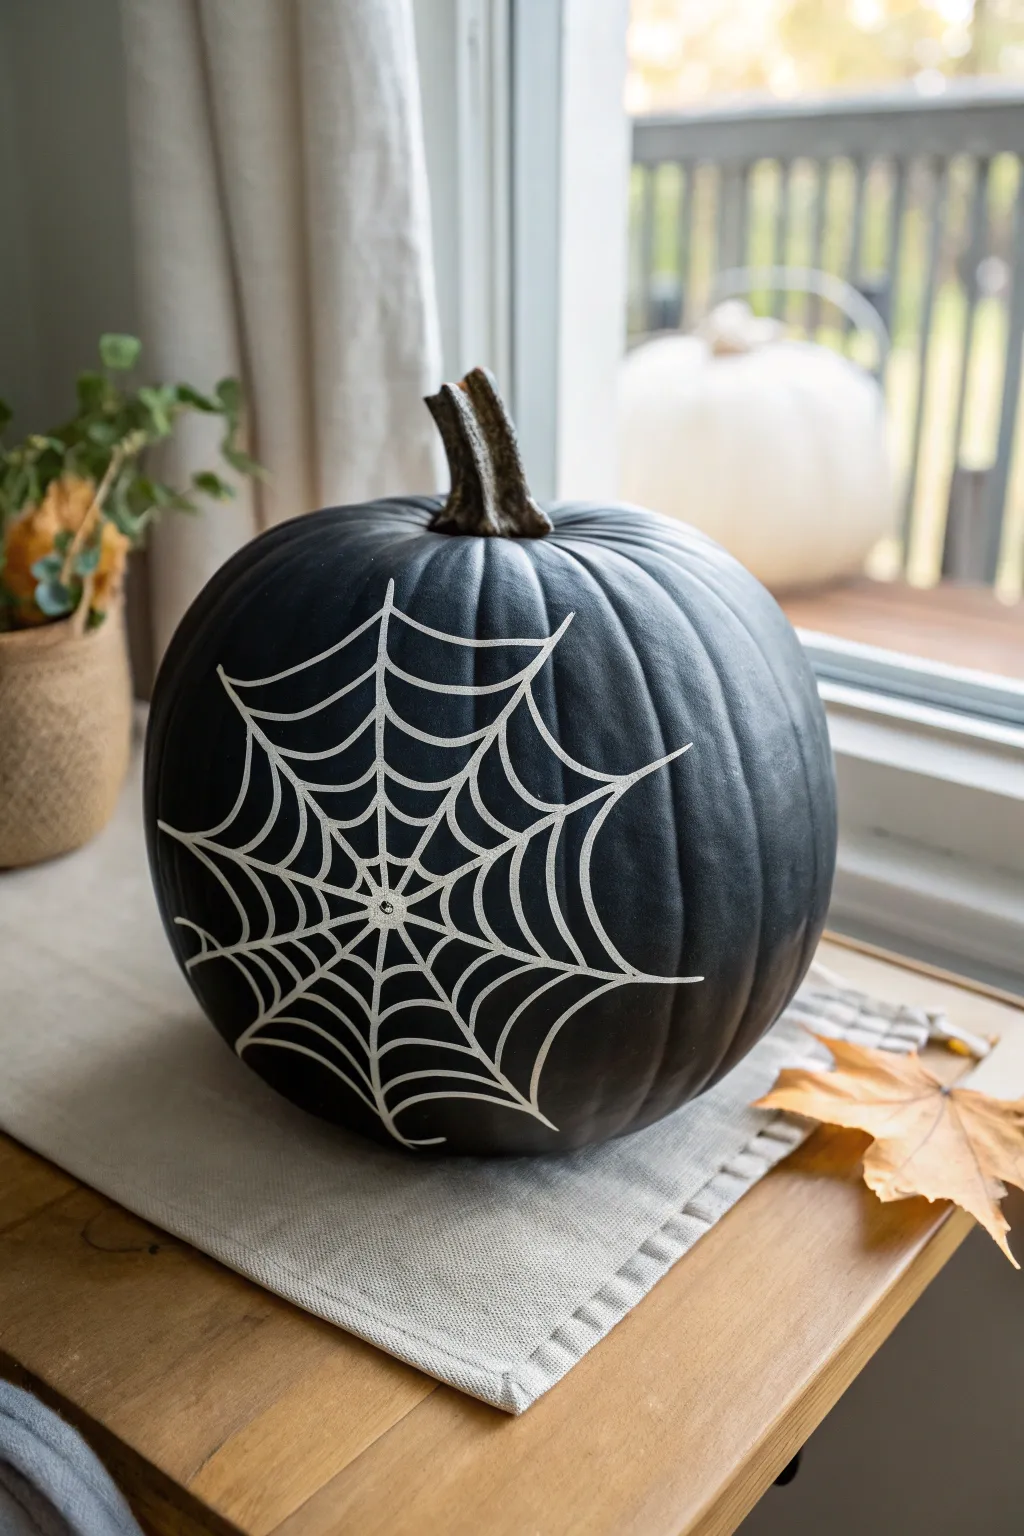
Black Pumpkin With White Web Lines
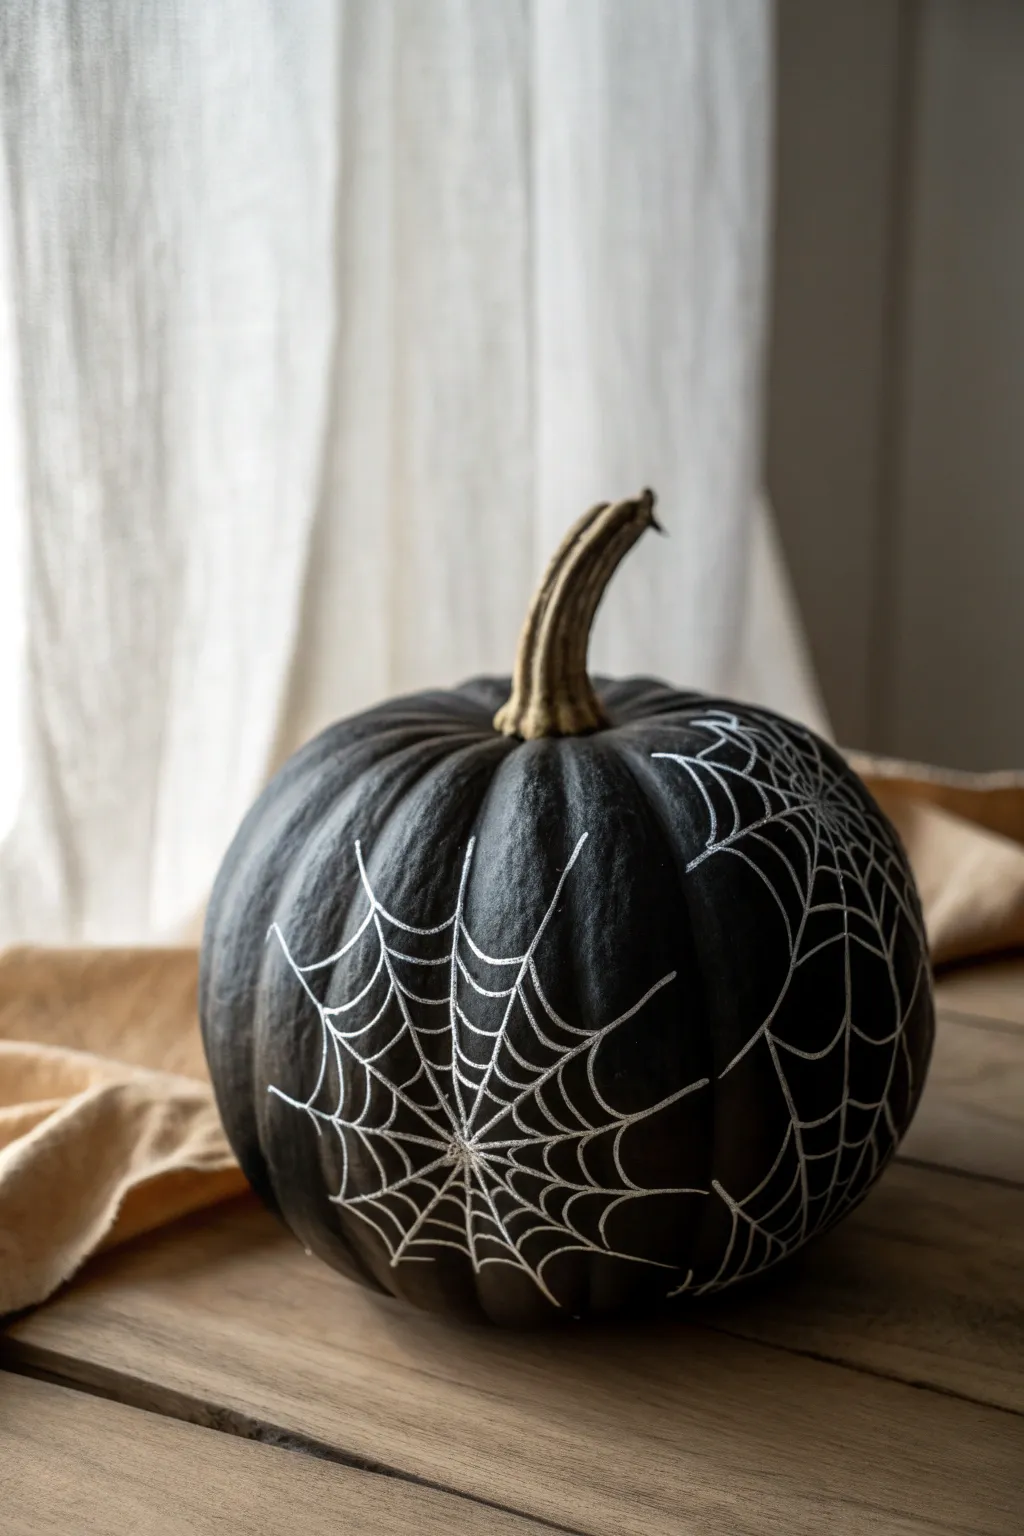
Transform an ordinary pumpkin into a gothic masterpiece with this striking high-contrast design. The matte black base makes the delicate white spiderwebs pop, creating an elegant yet spooky centerpiece perfect for your Halloween display.
Step-by-Step Guide
Materials
- Medium-sized pumpkin (real or faux)
- Matte black acrylic paint or spray paint
- White paint marker (fine point)
- White paint marker (extra fine point)
- Wide flat paintbrush (if using bottle paint)
- Painter’s tape based masking for the stem
- Pencil or white chalk pencil
- Clear matte sealant spray
Step 1: Preparing the Canvas
-
Clean surface:
Begin by thoroughly washing your pumpkin to remove any dirt or oils that might prevent the paint from adhering properly. Dry it completely with a towel. -
Protect the stem:
Carefully wrap the entire stem in painter’s tape. Since the stem adds a lovely natural contrast to the black body, we want to keep it paint-free. -
Base coat application:
Apply your matte black paint to the entire surface of the pumpkin. If you are brushing it on, clear the pumpkin’s ribs from top to bottom to minimize brush streaks. -
Second coat:
Once the first layer is dry to the touch, apply a second coat of black paint. This ensures full opacity and a rich, deep finish. -
Stem reveal:
Carefully peel away the painter’s tape from the stem while the second coat is still slightly tacky to avoid pulling up any dried paint chips later. -
Full drying time:
Let the pumpkin dry completely before moving on to the detail work. I like to leave it overnight just to be safe, as drawing on tacky paint will ruin your marker tips.
Step 2: Weaving the Web
-
Sketch placement:
Using a white chalk pencil, lightly mark the center point for your main spiderweb. Placing it slightly off-center on the upper curve creates a more dynamic look. -
Draw radial lines:
Take your fine point white paint marker and draw straight lines radiating outward from your center point, like the spokes of a wheel. -
Extend the spokes:
Continue these radial lines down the sides of the pumpkin. Don’t worry if they curve slightly with the pumpkin’s natural shape; this adds dimension. -
Start the inner spiral:
Starting near the center point, draw small, scalloped lines connecting the spokes. These curved lines should dip toward the center to create the classic web shape. -
Expand outward:
Continue drawing these connecting scalloped lines, moving further out. Space them slightly wider apart as you move away from the center. -
Vary the line weight:
For the outer edges of the main web, you can double-trace a few lines to make them slightly bolder, establishing visual hierarchy. -
Add a secondary web:
Move to the opposite visual side of the pumpkin and begin a second web structure, repeating the radial spoke process so the design feels balanced from all angles. -
Connect the webs:
Where the two webs meet, let the lines overlap or merge naturally. This makes the design look continuous rather like independent stickers.
Ink Flow Fix
If your paint marker skips over the pumpkin’s bumps, press the tip on a scrap paper to re-saturate it, then draw slowly to let the ink fill the texture.
Step 3: Refining Details
-
Sharpen intersections:
Switch to your extra-fine point white marker. rapid, crisp lines at the very center of the webs will make the detailed convergence point look intricate. -
Touch up lines:
Review your scalloped lines. If any paint marker strokes look thin or transparent, go over them again with a light hand to brighten the white. -
Clean up smudges:
If you accidentally smudged any white ink, touch it up with a small brush and a dot of your black base paint. -
Seal the art:
Once all white ink is fully cured, take the pumpkin to a ventilated area and spray a light coat of clear matte sealant to protect your work from moisture and handling.
Silver Shimmer
For a magical touch, trace over the main radial lines with a silver glitter pen. It catches the light beautifully when placed near candles.
Place your sleek new pumpkin near a window or on a porch step to show off its intricate webwork
BRUSH GUIDE
The Right Brush for Every Stroke
From clean lines to bold texture — master brush choice, stroke control, and essential techniques.
Explore the Full Guide
Hanging Spider From a Thread Line
This minimalist design features a spooky black spider descending from a delicate, glittering web anchor near the stem. It’s an elegant yet eerie addition to your windowsill décor that requires just a steady hand and a few simple supplies.
Step-by-Step
Materials
- Medium-sized orange pumpkin (real or artificial)
- Black acrylic paint or paint pen
- Silver metallic paint pen or fine brush with silver paint
- Fine-point paintbrush (if not using pens)
- Pencil for sketching
- Paper towel or cloth
- Clear acrylic sealer (optional)
Step 1: Preparation and Sketching
-
Clean the surface:
Begin by wiping down your pumpkin with a damp cloth to remove any dirt or oils that might prevent the paint from sticking. -
Dry thoroughly:
Ensure the pumpkin is completely dry so your sketched lines don’t smudge. -
Position the design:
Turn the pumpkin to find its best face, looking for a relatively smooth area without deep gouges. -
Sketch the anchor point:
Lightly sketch a small, starburst-like shape near the top of the pumpkin shoulder using your pencil. -
Mark the spider’s location:
Decide how far down the spider should hang and lightly draw an oval for the body. -
Connect the elements:
Draw a faint, curved line connecting the top starburst to the spider body to guide your thread.
Pro Tip: Steady Hands
Rest your pinky finger against the pumpkin surface while painting fine lines. It acts as a stabilizer and prevents shaky spider legs.
Step 2: Painting the Spider
-
Paint the body:
Using black acrylic paint or a paint pen, fill in the oval shape of the spider’s abdomen. -
Add the head:
Paint a smaller circle or semi-circle attached to the top of the oval for the spider’s head. -
Draft the legs:
I usually like to sketch the leg positions lightly with a pencil first to ensure symmetry before painting. -
Paint upward legs:
Draw four legs on each side, curving the top pair upwards distinctively. -
Paint downward legs:
Extend the remaining legs downwards and outwards, tapering the ends to sharp points. -
Refine the shape:
Go back over the spider body to ensure the black is opaque and solid.
Step 3: Adding Details
-
Create the thread:
Using a very fine black marker or brush tip, create a dotted line following your sketched curve from the spider’s spinneret up toward the anchor point. -
Paint the anchor web:
Switch to your silver metallic pen. Trace over the starburst sketch at the top. -
Add texture:
Make small, jagged strokes radiating outward with the silver to resemble a torn or attached bit of web. -
Add shimmer to the spider (optional):
You can add tiny dots of silver to the spider’s back or joints for a little extra dimension. -
Let it dry:
Allow the paint to dry completely, which should take about 15-20 minutes depending on paint thickness. -
Seal the work:
For longevity, spray a light coat of clear acrylic sealer over the design.
Level Up: 3D Texture
Use black puffy paint for the spider’s body instead of flat acrylic. It will dry raised, giving the creepy crawler a tactile, spherical look.
Place your completed pumpkin in a window where the light can catch the metallic accents
Cute Spider Face on the Front
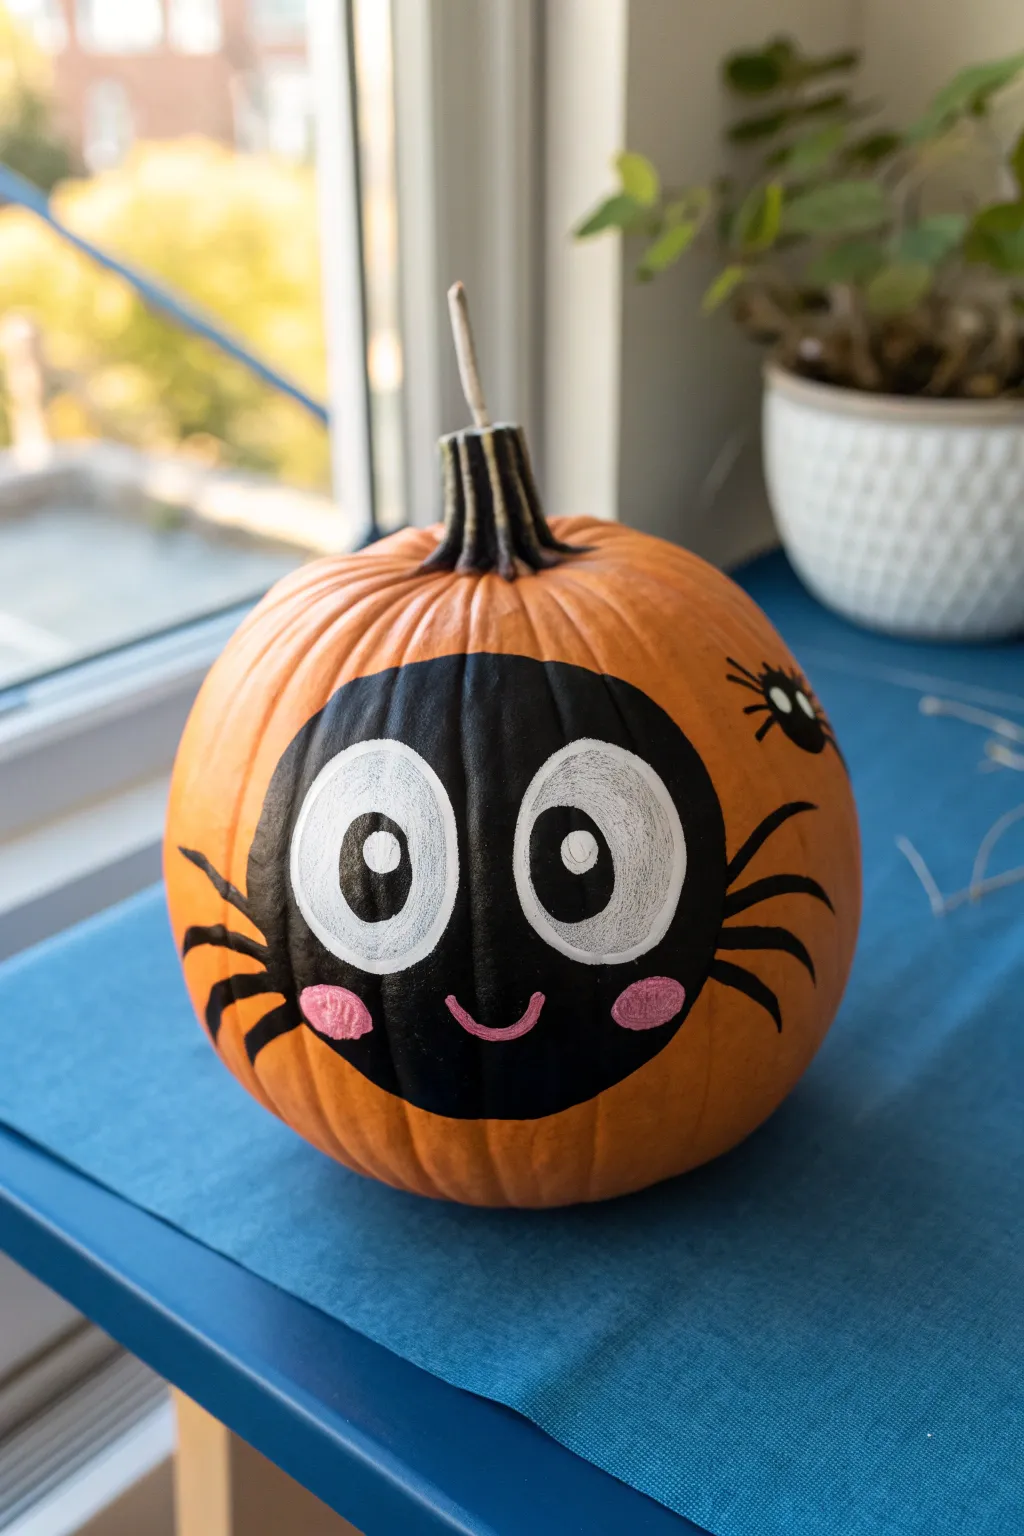
Transform an ordinary orange pumpkin into a friendly arachnid with this adorable spider face design. Featuring oversized anime-style eyes and blushing cheeks, this painted pumpkin is perfect for a cheerful, kid-friendly autumn decoration.
Step-by-Step Tutorial
Materials
- Medium-sized orange pumpkin
- Black acrylic paint
- White acrylic paint
- Pink acrylic paint
- Large round paintbrush
- Medium round paintbrush
- Fine detail brush
- Pencil or chalk (for sketching)
- Damp cloth
- Water cup for rinsing
- Paper towels
Step 1: Preparation and Base Shape
-
Clean surface:
Begin by wiping down your pumpkin with a damp cloth to remove any dirt or oils that might prevent the paint from sticking, then dry it thoroughly. -
Sketch the body:
Using a pencil or a piece of chalk, lightly sketch a large, wide oval shape in the center of the pumpkin’s face. This will be the main body of the spider. -
Outline the head:
With your medium round brush and black acrylic paint, carefully trace over your sketched oval line to define the boundary of the spider’s face. -
Fill in the black:
Switch to a larger brush to fill in the entire oval with black paint. Apply smooth, even strokes, following the curve of the pumpkin. -
Second coat:
Once the first layer is dry to the touch, apply a second coat of black paint to ensure full opacity so no orange shows through. Let this dry completely before moving on.
White Paint Transparency
If the white eyes look gray against the black, wait for the paint to dry fully and apply another coat. High pigment paint helps coverage.
Step 2: Creating the Face
-
Outline the eyes:
On the dried black surface, use a pencil or chalk to lightly sketch two large, vertical ovals for the eyes. Position them slightly apart. -
Paint the eye whites:
Using white acrylic paint and a medium brush, fill in the eye ovals. You may need 2-3 coats of white to get a bright, solid color over the dark black background. -
Add pupils:
Once the white is fully dry, paint a medium-sized black circle inside each white oval. Place them slightly inward toward the center to create a cute, cross-eyed look. -
Add highlights:
Dip the handle end of a brush or a fine detail brush into white paint and add a small ‘sparkle’ dot in the upper corner of each black pupil. -
Paint the cheeks:
Using pink paint, add two small, horizontal oval shapes just below the outer corners of the eyes for blushing cheeks. I find dabbing the paint creates a softer texture here. -
Draw the mouth:
With a fine detail brush and pink paint, carefully draw a small, U-shaped smile centered between the cheeks.
Sealing the Deal
To make your pumpkin weather-resistant for the porch, spray the finished dry artwork with a clear acrylic sealer or matte varnish.
Step 3: Legs and Details
-
Placement of legs:
Visualize where the legs should go. You want three or four curved lines extending outward from both the left and right sides of the main black body. -
Paint the legs:
Using a medium round brush and black paint, create the legs by starting at the edge of the body and sweeping outward with a curved stroke. Taper the ends to a point. -
Add a mini friend:
On the upper right shoulder of the pumpkin, paint a small black circle about the size of a quarter. -
Detail the mini spider:
Add tiny black legs coming off the small circle using your finest liner brush. -
Mini spider face:
Finish the small spider with two tiny white dots for eyes, giving your main character a little companion. -
Final touches:
Check over your work for any uneven edges or spots that need a touch-up, and let the entire project cure for several hours.
Now you have a charming, wide-eyed spider pumpkin ready to welcome guests with a smile

PENCIL GUIDE
Understanding Pencil Grades from H to B
From first sketch to finished drawing — learn pencil grades, line control, and shading techniques.
Explore the Full Guide
Scary Angular Spider Face
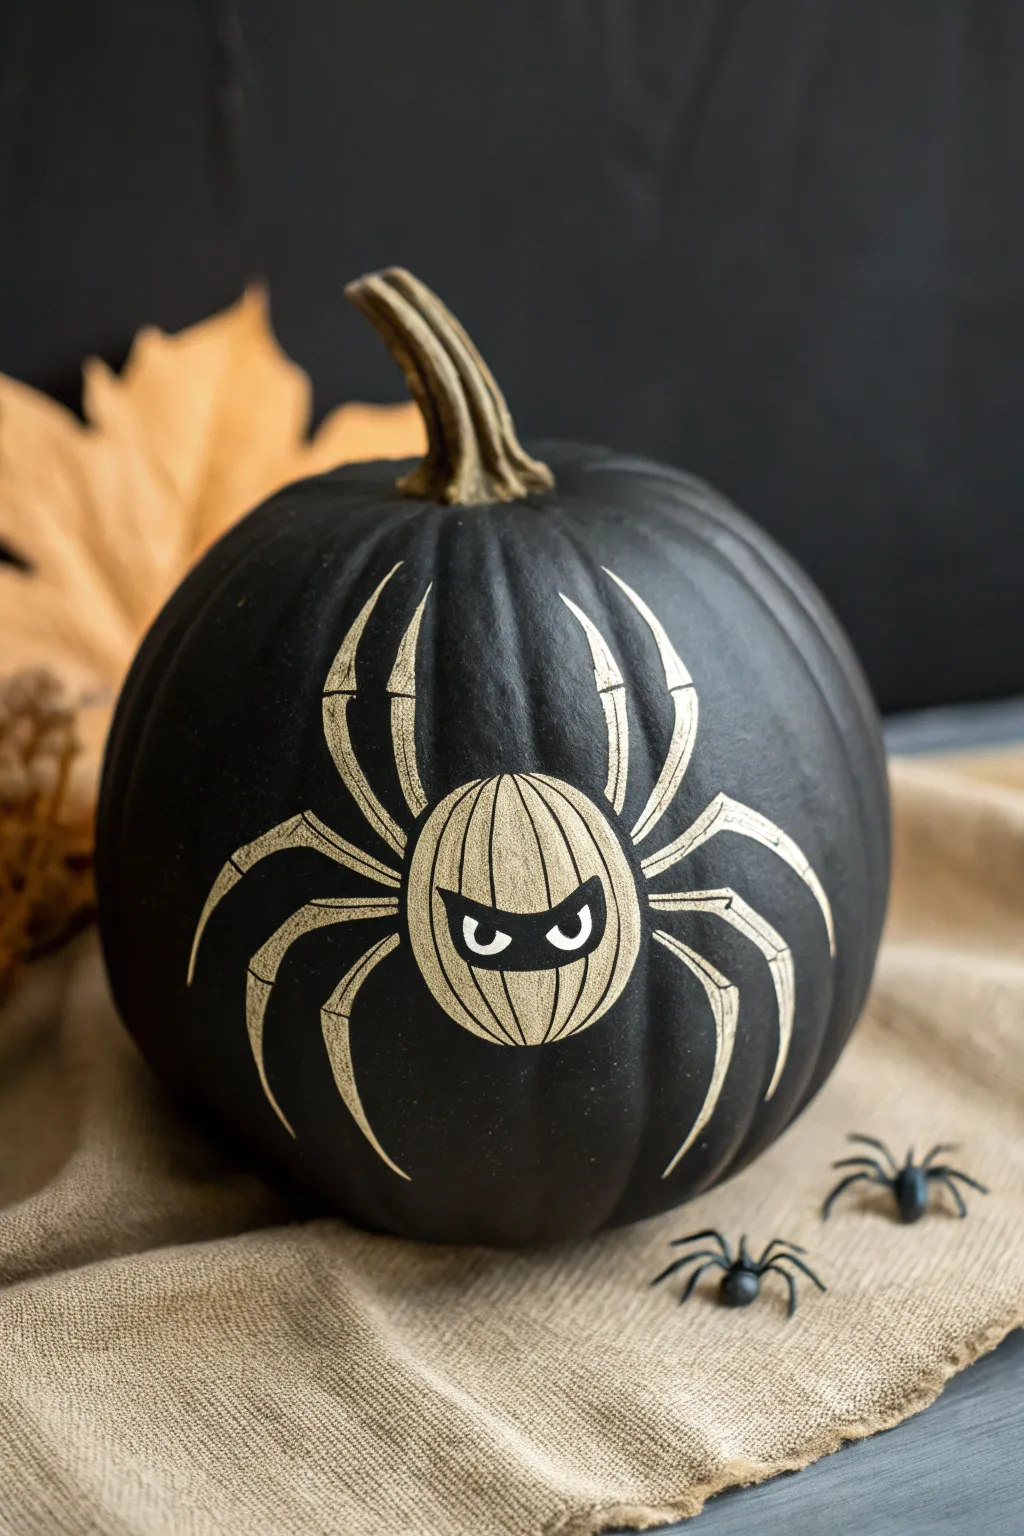
Transform a classic gourd into a spooky night crawler with this sleek black and gold painted pumpkin design. The angular spider features a masked bandit expression that adds personality and mischief to your Halloween decor.
Step-by-Step
Materials
- Medium round pumpkin
- Matte black acrylic craft paint
- Metallic beige or pale gold acrylic paint
- White acrylic paint
- Large flat paintbrush
- Medium round paintbrush
- Fine detail liner brush
- Pencil or white chalk/pastel pencil
- Paper towels
- Cup of water
- Matte sealant spray (optional)
Step 1: Setting the Stage
-
Prepare the Surface:
Begin by wiping down your pumpkin with a damp paper towel to remove any dirt or dust. Let it dry completely so the paint adheres properly. -
Base Coat Application:
Using the large flat brush, apply a generous coat of matte black acrylic paint over the entire pumpkin, excluding the stem. Work in sections to ensure even coverage. -
Second Coat:
Once the first layer is touch-dry, apply a second coat of black paint. Ensure you cover any orange spots peeking through, especially in the deep crevices of the pumpkin’s ribs. -
Preserve the Stem:
Leave the stem natural for contrast, or lightly brush it with a darker brown wash if it looks too fresh. -
Drying Time:
Allow the black base coat to dry fully for at least an hour. The surface needs to be completely non-tacky before sketching the design.
Coverage Check
If the metallic beige paint looks streaky over the black base, sponge it on lightly instead of brushing it. This builds opacity faster without brush strokes.
Step 2: Drafting the Design
-
Center the Body:
Using a white chalk pencil or very light regular pencil, lightly sketch a large oval shape in the center of the pumpkin’s face. This will be the spider’s body. -
Sketch the Legs:
Draw four legs extending from each side of the oval body. The legs should be angular, with sharp ‘knees’ pointing upwards before curving down. Make the top legs reach higher and the bottom legs curve downward. -
Add the Mask:
Inside the oval body, sketch a horizontal band shaped like an angry mask. It should dip slightly in the middle for a furrowed brow look.
Level Up: 3D Legs
For a mixed media twist, glue bent pipe cleaners over the painted legs to give the spider a fuzzy, tactile 3D effect that pops off the pumpkin.
Step 3: Painting the Spider
-
Fill the Body:
Load your medium round brush with the metallic beige or pale gold paint. Fill in the oval body shape carefully, painting around the mask area you sketched earlier. -
Painting the Legs:
Use the same beige/gold color to paint the legs. Start thick near the body and taper them to sharp points at the ends. -
Refining the Edges:
Go back over the legs with a second coat if the black background is showing through too much. Use a smaller brush to sharpen the points and joints. -
Adding Texture:
Mix a tiny drop of black into your beige paint to darken it slightly. Use a liner brush to paint vertical curved lines on the spider’s body, mimicking the texture of a pumpkin or abdomen segments. -
Defining the Joints:
With the liner brush, add very thin horizontal lines across the leg joints to suggest segmentation.
Step 4: The Angry Face
-
Painting the Mask:
If you painted over the mask sketch, re-establish it now with straight black paint. Fill in the band across the center of the beige body to create the bandit mask. -
Creating the Eyes:
Wait for the black mask paint to be completely dry. Then, using a clean liner brush and white paint, create two semi-circles for the eyes. -
The Iris:
Once the white is dry, add small black dots (pupils) in the center of the white semi-circles. I find placing them slightly cross-eyed or looking sideways adds a mischievous character. -
Final Cleanup:
Inspect your edges. If any beige paint went outside the lines, use a small brush with black paint to tidy up the silhouette against the background. -
Sealing:
For longevity, spray the entire painted area with a clear matte sealant once fully dry.
Place your menacing arachnid creation on a porch step or mantelpiece to keep watch over the ghostly festivities
Dripping Ink Web for a Grungy Look
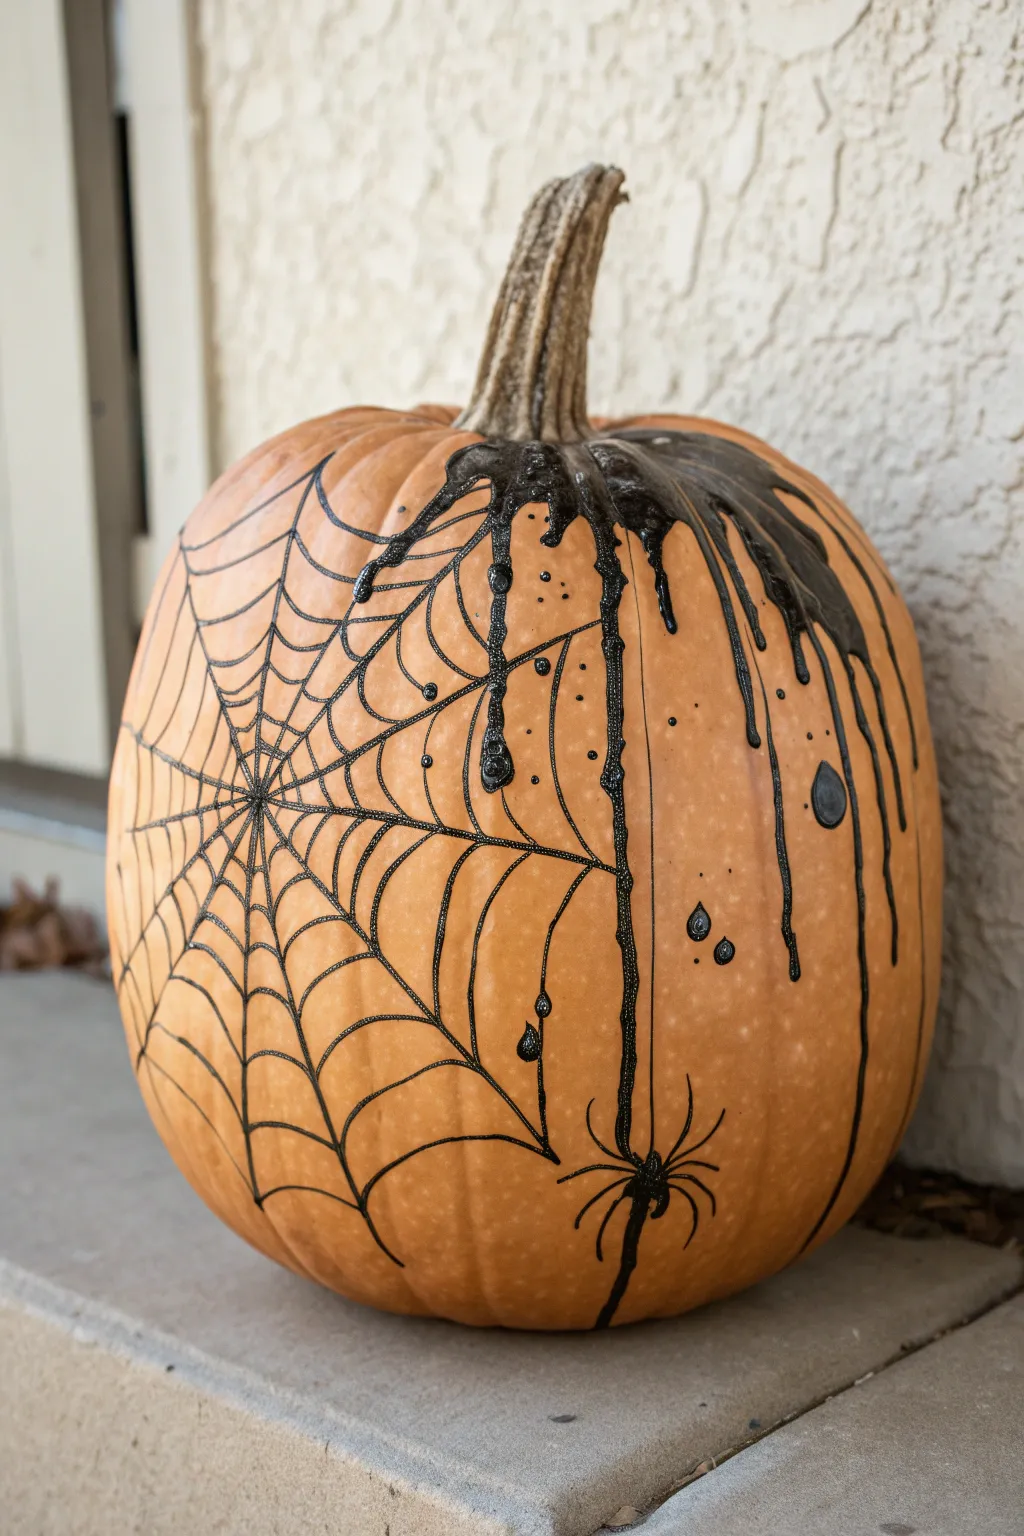
Embrace the spookier side of Halloween decor with this grungy, ink-splattered pumpkin design. The combination of a structured spiderweb and chaotic, dripping black paint creates a hauntingly artistic centerpiece for your porch.
Step-by-Step Guide
Materials
- Medium-sized orange pumpkin (real or faux)
- Black puff paint or dimensional fabric paint (squeeze bottle)
- Black acrylic paint
- Water
- Small cup for mixing
- Spoon or dropper
- Fine-tip black permanent marker or paint pen
- Paper towels
- Pencil (optional)
Step 1: Web Weaving
-
Clean surface:
Start by wiping down your pumpkin with a damp paper towel to remove any dirt or dust. A clean surface ensures the paint and marker adhere properly without skipping. -
Map the center:
Choose a focal point on the side of the pumpkin for the center of your web. This doesn’t need to be dead center; slightly off to the side often looks more dynamic. -
Draw radial lines:
Using your black puff paint directly from the bottle (or a maker first if you’re nervous), draw straight lines radiating outward from your chosen center point like slicing a pie. -
Extend the lines:
Continue these radial lines until they reach quite far across the pumpkin’s surface, curving naturally with the pumpkin’s shape. -
Connect with curves:
Starting near the center, draw scalloped, curved lines connecting the radial spokes. Think of them as little ‘U’ shapes bridging the gaps. -
Build the web:
Work your way outward, creating concentric rings of these connecting scalloped lines. Keep the spacing gradually getting wider as you move away from the center. -
Dry completely:
Allow the web lines to dry fully. Puff paint can take several hours to set, and you don’t want to smudge it during the next messy phase.
Drip Control
If the paint is too runny and transparent, let it sit for 5 minutes to thicken slightly, or add another dollop of heavy-body acrylic before pouring again.
Step 2: The Drip Effect
-
Prepare the drip mix:
In a small cup, mix black acrylic paint with a small amount of water. You want a consistency that is fluid enough to run but thick enough to stay opaque black. -
Apply to stem base:
Spoon or pour the thinned paint generously around the very base of the pumpkin stem. Let it pool slightly in the crevices where the stem meets the skin. -
Guide the drips:
Encourage the paint to run down the sides by tilting the pumpkin or using the tip of your spoon to push a bead of paint over the edge. -
Vary the lengths:
Let some drips run all the way down the side, while keeping others short near the top. This randomness creates that spooky, grungy aesthetic. -
Enhance texture:
Squeeze a little bit of the dimensional puff paint into the wet drips at the top. This adds a raised, bubbly texture that looks like thick goo once dry. -
Add stray droplets:
Using the puff paint bottle, add a few isolated heavy dots or tear-drop shapes separate from the main drips to simulate splatters.
Glitter Glam
While the heavy black ‘goo’ at the top is still wet, sprinkle fine black or charcoal glitter onto it for a glistening, venomous appearance.
Step 3: The Spider Detail
-
Select a spot:
Find an empty area on the lower half of the pumpkin, ideally near the end of one of your long drip lines or a web strand. -
Draw the body:
Using the puff paint, squeeze out two connected distinct sections: a smaller circle for the head and a larger oval for the abdomen. -
Add legs:
Carefully draw eight legs extending from the center section. Make the front two legs reach forward and the back legs trail behind for a realistic creeping look. -
Connect to the web:
Draw a single, slightly wavy vertical line connecting the spider’s abdomen up to one of the main drip lines or a web strand above it. -
Final dry:
Let the entire project sit undisturbed overnight. The thick pools of paint near the stem will take the longest to cure completely.
Once fully dry, place your dark creation on the porch to greet trick-or-treaters with its moody charm


Negative Space Web on a Painted Pumpkin
Transform an ordinary pumpkin into an elegant Halloween centerpiece with this striking monochrome design. The contrast of crisp white lines against a deep, matte black background creates a modern and spooky effect that fits perfectly on any windowsill.
Step-by-Step
Materials
- Medium to large pumpkin with a good stem
- Matte black acrylic paint or spray paint
- White acrylic paint or specialized white paint pen (fine and medium tip)
- Wide flat paintbrush (or spray can)
- Small fine-liner detail brush
- Pencil or white chalk pencil
- Damp cloth
- Clear matte sealer (optional)
Step 1: Base Coat Preparation
-
Clean surface:
Begin by thoroughly washing your pumpkin with mild soap and water to remove any dirt or field debris. -
Dry completely:
Use a clean towel to dry the pumpkin, ensuring no moisture remains in the crevices around the stem. -
Protect stem:
If you want to keep the natural look of the stem, carefully wrap it in painter’s tape to shield it from the black paint. -
First black coat:
Apply the first layer of matte black paint using a wide flat brush or spray paint, covering the entire surface evenly. -
Let it cure:
Allow this initial coat to dry completely for at least one hour; rushing this step can cause the paint to lift later. -
Second coat:
Apply a second layer of matte black paint to ensure full opacity, covering any orange spots that might be peeking through. -
Final dry:
Let the pumpkin sit until the black base is bone dry to the touch, creating a perfect canvas for your web.
Step 2: Drafting the Design
-
Center point:
Using a white chalk pencil, lightly mark a small dot where the center of your spiderweb will originate. -
Radial lines:
Draw 8 to 10 straight lines radiating outward from that center dot, like the spokes of a wheel, keeping them evenly spaced. -
Connecting curves:
sketch sweeping, concave curves connecting the spokes, starting near the center and working your way outward to form the web rings. -
Review shape:
Step back and look at your sketched web; wipe away any chalk lines you don’t like with a slightly damp cloth and redraw them.
Help! Shaky Lines?
Don’t panic. Wait for the white mistake to dry completely, paint over it with a bit of black paint, let that dry, and simply try again.
Step 3: Painting the Web
-
Load the brush:
Load a fine-liner brush with white acrylic paint, thinning the paint slightly with a drop of water if it feels too thick to glide smoothly. -
Paint center spokes:
Carefully trace over your radial chalk lines first, starting from the center and pulling the brush outward for a crisp stroke. -
Inner rings:
Begin painting the connecting web lines closest to the center hub, using a steady hand to follow the curve. -
Work outward:
Continue painting the web rings, moving gradually toward the outer edges of the design so you don’t smudge your previous work. -
Sharpen intersections:
Go back to where the curved lines meet the straight spokes and add a tiny dab of paint to make the connection points look sharp and clean. -
Clean up:
Once the white paint is fully dry, gently wipe away any remaining visible chalk marks with a soft, damp cloth/rag. -
Seal (optional):
To make your design weather-resistant, lightly mist the entire pumpkin with a clear matte sealer spray.
Make It Sparkle
While the white paint is still wet, sprinkle ultra-fine iridescent glitter onto the web lines to catch the light and add a magical touch.
Place your striking new creation on a mantle or porch to enjoy the spooky season style
Spiderweb Scene With a Shadowy Background
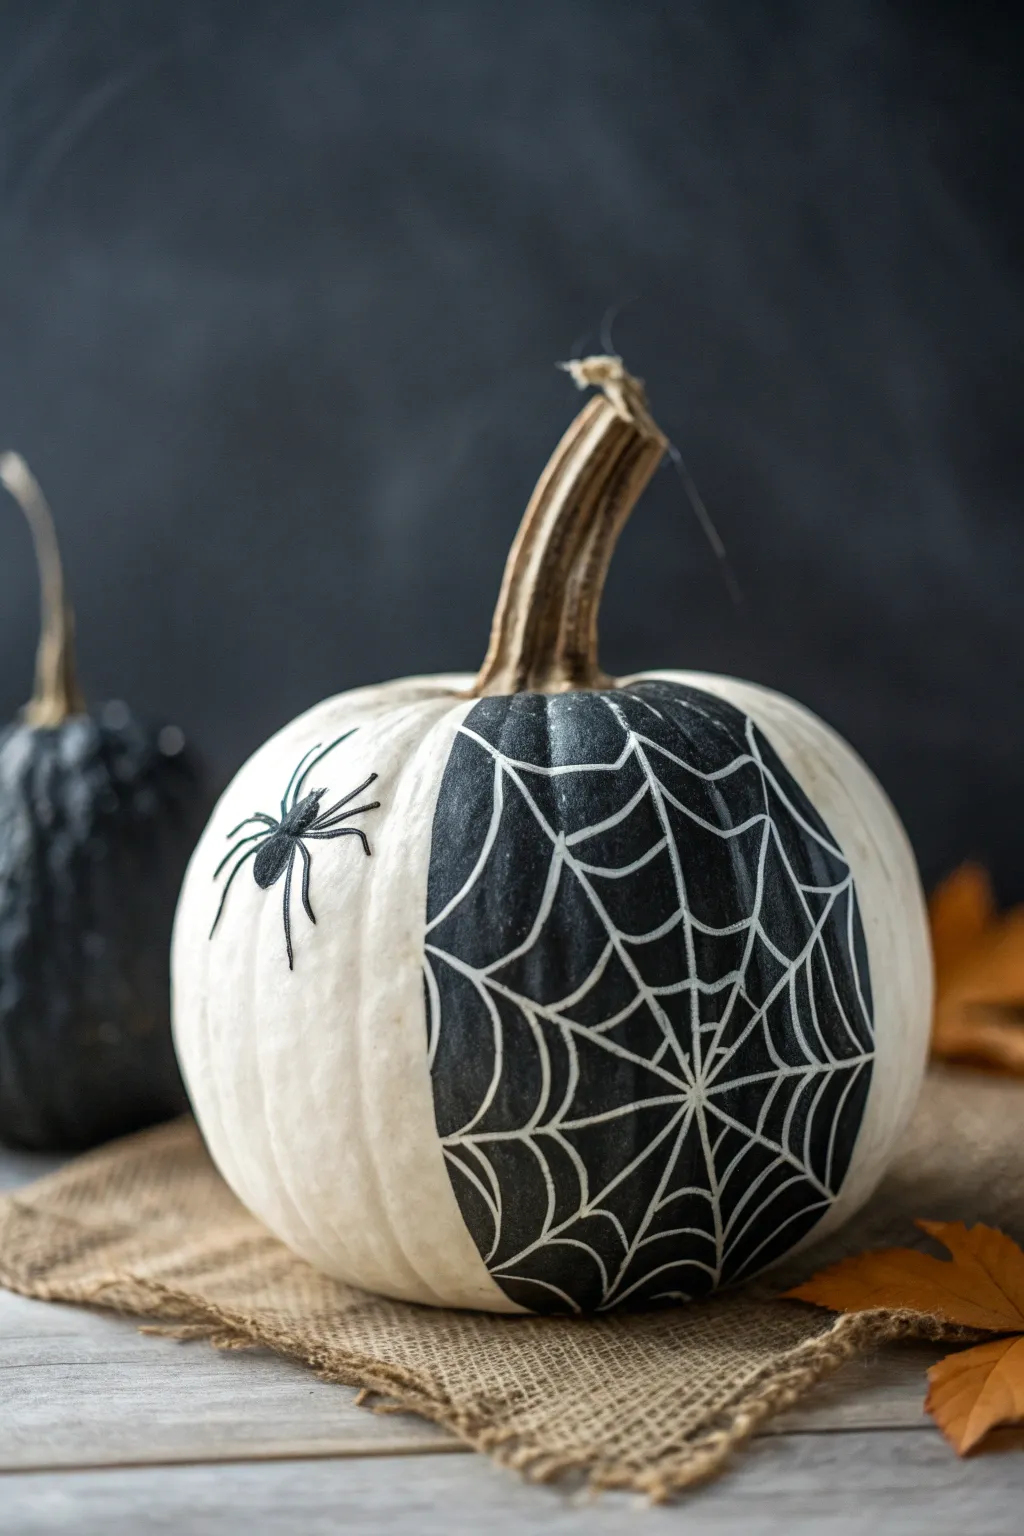
Contrast is king with this striking design, featuring a crisp white pumpkin adorned with a bold black portal into a spider’s lair. The stark geometry of the web against the matte black background creates a sophisticated yet spooky centerpiece.
How-To Guide
Materials
- Medium-sized white pumpkin (real or faux)
- Black acrylic paint (matte finish)
- White acrylic paint or a white paint pen (fine tip)
- Flat paintbrush (medium width)
- Fine detail paintbrush or liner brush
- Pencil
- Small plastic spider embellishment
- Strong craft glue or hot glue gun
- Palette for mixing/holding paint
- Paper towels and water cup
Step 1: Preparation & Planning
-
Clean surface:
Begin by wiping down your pumpkin with a damp cloth to remove any dirt or oils. If use a real pumpkin, ensure it is completely dry before applying any paint. -
Sketch the oval:
Using a pencil, lightly sketch a large, vertical oval shape on the front face of the pumpkin. This doesn’t need to be perfectly symmetrical, but it should be large enough to feature the web prominently. -
Refining the shape:
Look at the pumpkin from a few feet away. Adjust your pencil line if needed to ensure the oval follows the natural curve of the pumpkin ribs.
Step 2: Painting the Backdrop
-
Outline the oval:
Load your medium flat brush with matte black acrylic paint. Carefully paint along the inside edge of your pencil line to create a crisp border. -
Fill in the shape:
Fill the rest of the oval with the black paint. Use smooth strokes to minimize brush marks. -
Second coat:
Allow the first layer to dry completely. Apply a second coat of black paint if the white skin of the pumpkin is still showing through. Opacity is key here for high contrast. -
Touch-ups:
Check the edges of your oval. If any lines are ragged, clean them up with a steady hand and a little more paint.
Paint Pen Precision
For the crispest web lines without the stress of a brush, use a white oil-based paint marker. It flows smoothly over acrylic and is much easier to control.
Step 3: Weaving the Web
-
Mark the center:
Once the black paint is bone dry, lightly mark a center point for your web with a pencil. Locating it near the lower third usually creates a nice perspective. -
Paint the radial lines:
Using a fine detail brush and white paint (or a white paint pen), draw straight lines radiating outward from your center point like spokes on a wheel. Extend these lines all the way to the edge of the black oval. -
Start the webbing:
Beginning near the center point, paint curved lines that connect the spokes. These should scallop inward slightly towards the center. -
Expand outward:
Continue adding these connecting curved lines, moving further out with each row. Try to keep the spacing somewhat consistent, but natural variations add character. -
Edge details:
When you reach the edge of the black oval, let the web lines simply end abruptly at the border. This creates a cool ‘window’ effect. -
Sharpen the lines:
If I notice any lines looking a bit faint, I carefully retrace them to ensure the white pops against the dark background. Let the white paint dry fully.
Webs Won’t Show?
If your white paint looks gray or transparent against the black, don’t overwork wet paint. Let it dry completely, then simply retrace the lines to build opacity.
Step 4: The Final Creepy Polish
-
Prepare the spider:
Take your small plastic spider embellishment. Determine where it will sit; placing it on the white section of the pumpkin near the web gives it a sense of movement. -
Adhere the spider:
Apply a dab of strong craft glue or hot glue to the underside of the spider. Press it firmly onto the white pumpkin surface, holding it for a few seconds to set. -
Check for gaps:
Inspect the edge where the black oval meets the white pumpkin skin. Use a small brush with white paint to clean up the exterior if any black paint smudged outside the line. -
Protect the stem:
Leave the stem natural for a rustic contrast, or brush off any stray paint specks that might have landed on it during the process.
Place your striking monochrome creation on the porch or mantel for an elegant nod to the season
Mixed-Media Web With Raised Texture
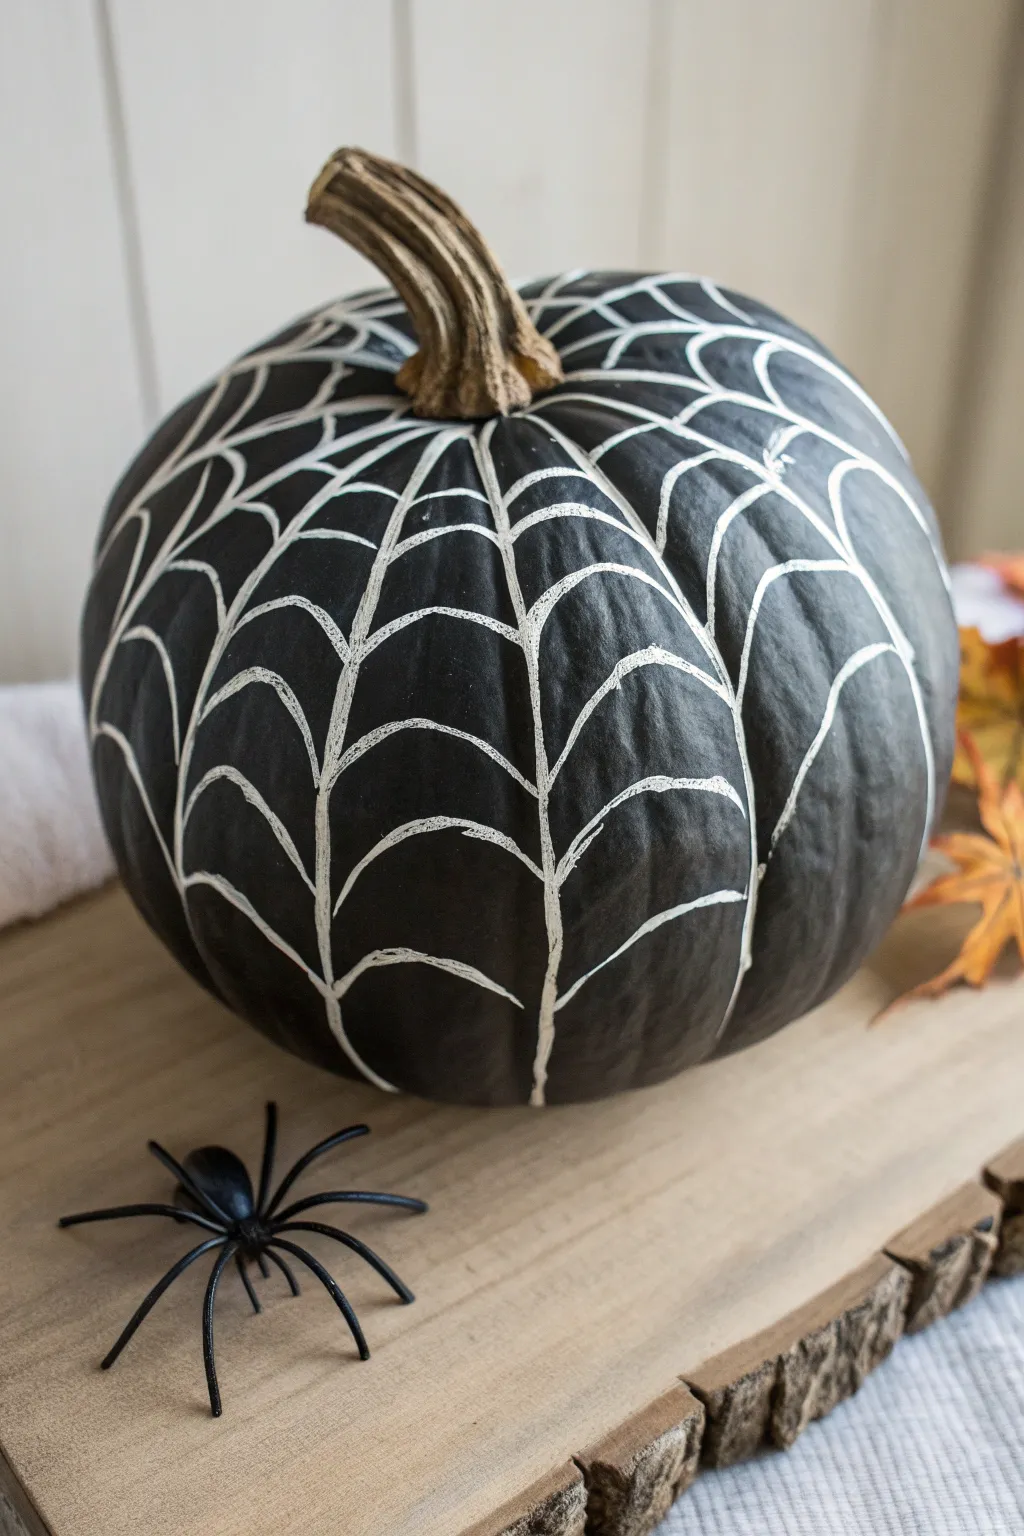
Transform a simple pumpkin into a spooky centerpiece with this high-contrast design featuring a stark black background and intricate white webbing. The matte finish gives it a trendy chalkboard aesthetic, while the hand-drawn web adds a charming, organic touch.
Step-by-Step Tutorial
Materials
- Faux or real pumpkin (medium size)
- Matte black acrylic paint or chalkboard paint
- Wide flat paintbrush (1-2 inch)
- White classic chalk marker or white paint pen (medium tip)
- Pencil (optional)
- Damp cloth or paper towel
- Matte spray sealant (optional)
- Plastic spider embellishment
Step 1: Preparing the Canvas
-
Clean surface:
Begin by wiping down your pumpkin with a damp cloth to remove any dust, dirt, or oils. If you are using a real pumpkin, ensure it is completely dry before proceeding. -
Protect stem:
If you want to keep the stem’s natural brown finish, carefully wrap painters tape around the base of the stem. Alternatively, you can just paint carefully around it with a smaller brush. -
Base coat application:
Using your wide flat brush, apply a generous coat of matte black paint or chalkboard paint over the entire surface of the pumpkin. Use long, vertical strokes following the natural ribs of the pumpkin for a smooth finish. -
Drying and second coat:
Let the first coat dry completely, usually about 20-30 minutes. Apply a second coat to ensure full opacity so no orange or original color peeks through. -
Final dry time:
Allow the black base to cure fully. This is crucial because if the paint is even slightly wet, your marker tip will get clogged and ruin the crisp white lines.
Smudged Lines?
If your chalk marker lines are smearing, the black base coat might be too slick. Lightly buff the dry black paint with fine-grit sandpaper to give the surface ‘tooth’ for the marker to grab.
Step 2: Designing the Web
-
Establish the center:
Locate the top center of the pumpkin, right where the stem meets the fruit. This will be the anchor point from which all your vertical web lines radiate. -
Vertical spokes:
Shake your white paint pen or chalk marker well to prime it. Draw long vertical lines starting from the base of the stem down to the bottom of the pumpkin. -
Spacing the spokes:
I find it helpful to follow the natural grooves of the pumpkin for these lines, as it gives the web a 3D, organic shape. Aim for 8-10 vertical lines spaced evenly around the pumpkin. -
Starting the cross-lines:
Begin adding the horizontal webbing near the top. Draw a scalloped or curved line connecting two adjacent vertical spokes. The curve should dip downward, like a microscopic smile. -
Working downward:
Continue drawing these curved connectors, moving down the length of that section. Space them about 1.5 to 2 inches apart, getting slightly wider as the pumpkin expands. -
Completing the circle:
Repeat this scalloped connection process for every section around the pumpkin. Try to keep the rows mostly aligned horizontally, but don’t worry about perfection; wobbles make it look spookier. -
Connecting the bottom:
Once you reach the bottom curve of the pumpkin, taper your web lines inward so they disappear naturally underneath the base.
Step 3: Finishing Touches
-
Retouching lines:
inspect your work. If some lines look faint or the black paint soaked up the white ink, retrace them gently to brighten the web. -
Cleaning up mistakes:
If you used a chalk marker and made a Slip-up, use a slightly damp Q-tip to erase the error. If using a paint pen, touch up mistakes with a dab of black paint. -
Sealing the design:
To make your design permanent, especially if using real chalk markers, lightly mist the pumpkin with a matte spray sealant. Keep the can 12 inches away to avoid drips. -
Add the creepy-crawly:
Place your plastic spider on the surface near the base or climbing up the side to complete the scene.
Glow in the Dark
Trace over your white web lines with a glow-in-the-dark paint pen or clear UV-reactive paint. Under a blacklight on your porch, the web will magically appear floating in the dark.
Now you have a striking, high-contrast decoration perfect for greeting trick-or-treaters


Have a question or want to share your own experience? I'd love to hear from you in the comments below!