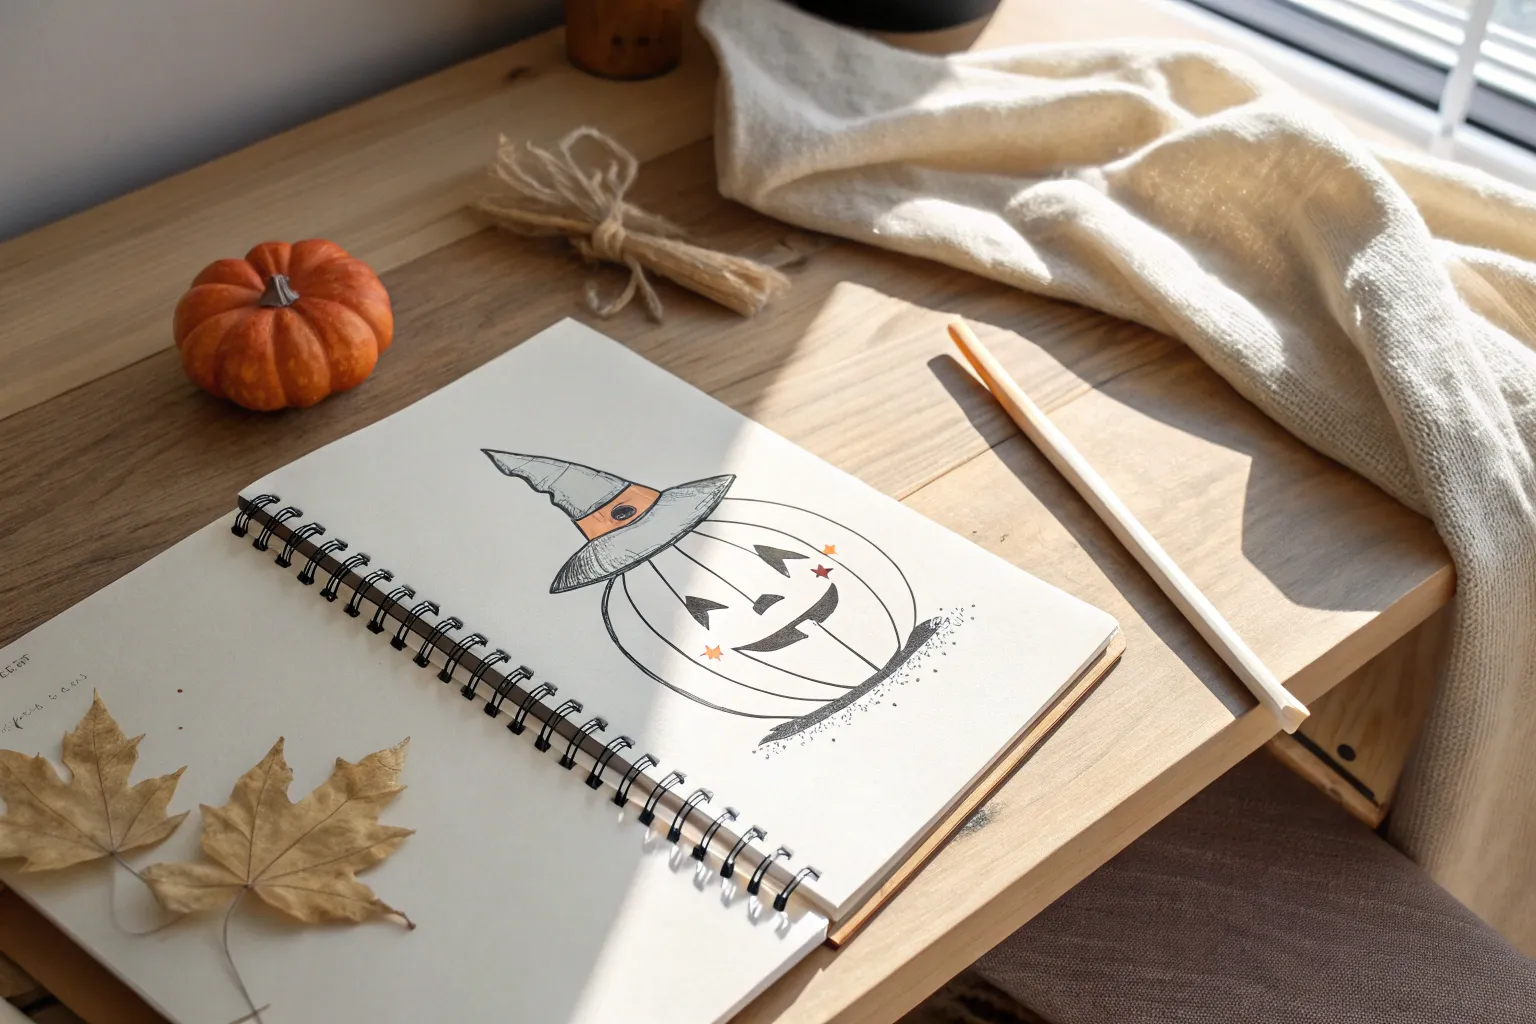
Whenever I want a quick seasonal sketch session, I reach for easy Halloween drawings that start from simple shapes and still look instantly recognizable. Here are my favorite low-pressure Halloween drawing ideas you can knock out fast for cards, notes, and cozy sketchbook pages.
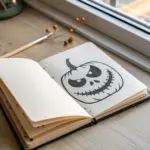
Simple Jack-o’-Lantern Face
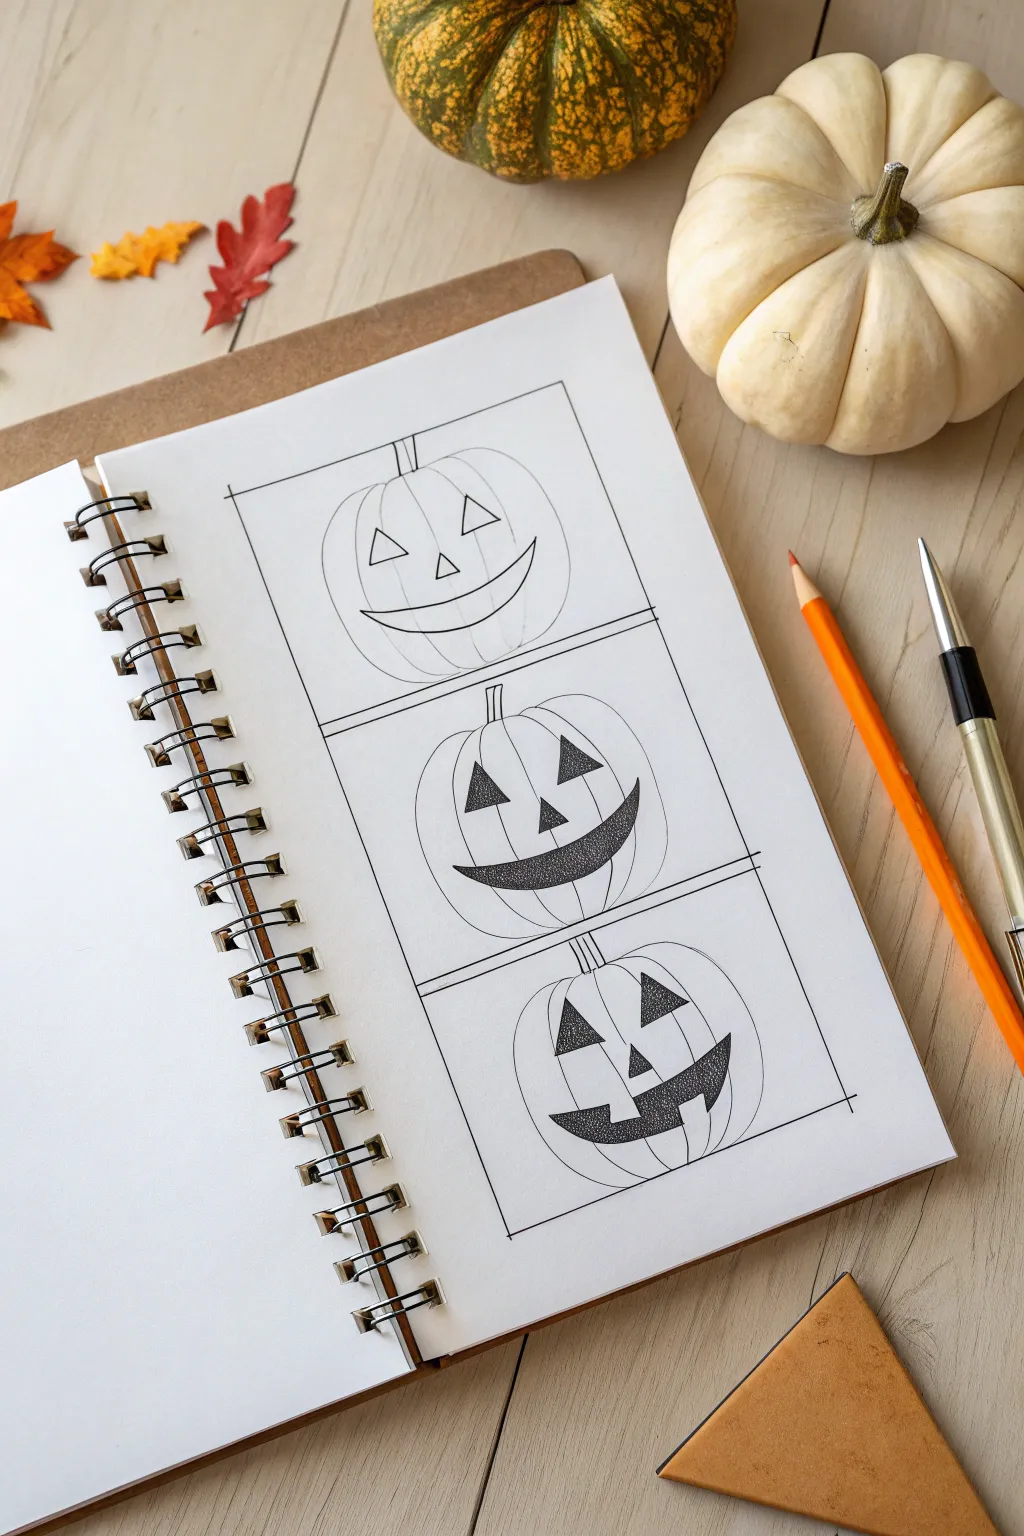
Learn the progression of bringing a classic Halloween pumpkin to life with this three-panel study. You will sketch a basic outline, fill in bold facial features, and finally add shading to create a finished, spooky expression.
How-To Guide
Materials
- Sketchbook or drawing paper
- Pencil (HB or 2B)
- Black fine-liner pen (0.3mm or 0.5mm)
- Black marker or brush pen (for filling)
- Ruler
- Eraser
Step 1: Setting the Composition
-
Draw the frame:
Use your ruler to draw a tall rectangular box on your paper. Divide this large rectangle into three equal square sections stacked vertically. These will house the three stages of the drawing. -
Extend the lines:
For a stylized sketchbook feel, let the horizontal dividing lines extend slightly past the right vertical border of the main frame.
Uneven Shapes?
Don’t aim for perfect symmetry. Pumpkins are organic vegetables, so lopsided curves and slightly mismatched eyes actually make the drawing look more realistic.
Step 2: Phase 1: The Basic Outline (Top Panel)
-
Sketch the pumpkin shape:
In the top square, lightly sketch a wide, slightly flattened oval. Refine the edges to look like curved segments (ribs) of a pumpkin rather than a perfect circle. -
Add the stem:
Draw a thin, rectangular stem emerging from the top center, slightly curved to one side. -
Outline the face:
Draw two triangles for eyes and a smaller triangle for the nose. Below that, sketch a wide, crescent-moon smile. -
Ink the lines:
Go over your pencil lines with a fine-liner pen. Keep the lines clean and thin, representing the initial ‘sketch’ phase of the pumpkin. Leave the facial features empty.
Step 3: Phase 2: Filling the Features (Middle Panel)
-
Repeat the pumpkin shape:
In the middle square, redraw the same pumpkin outline and stem you created in the first step. -
Draw the face again:
This time, when drawing the eyes and nose, make the triangles solid black. Use a marker or brush pen to fill them in completely. -
Fill the smile:
Outline the crescent smile again, but fill the interior with black ink. You can use a stippling technique (dots) or solid coloring for texture. -
Add rib lines:
Draw curved vertical lines running from the stem to the bottom of the pumpkin to emphasize the segmented shape.
Glow Effect
Use an orange colored pencil to lightly shade the rim of the pumpkin cutouts (eyes and mouth) to give the illusion of a candle burning inside.
Step 4: Phase 3: The Finished Look (Bottom Panel)
-
Draw the final pumpkin:
In the bottom square, draw your pumpkin outline one last time, keeping the proportions consistent with the previous panels. -
Modify the smile:
For this final version, draw the crescent mouth but add a square ‘tooth’ sticking up from the bottom lip. -
Fill features with texture:
I like to use a stippling technique here. Instead of solid black, fill the eyes, nose, and mouth with dense tiny dots. This gives the drawing a more textured, illustrative quality. -
Detail the stem:
Add vertical lines inside the stem to give it a woody, dried texture. -
Refine the ribs:
Strengthen the curved vertical lines on the pumpkin’s surface, making them slightly thicker near the bottom to suggest weight and shadow.
Step 5: Final Touches
-
Clean up sketch lines:
Once the ink is completely dry, use your eraser to gently remove any visible pencil marks from all three panels. -
Review contrast:
Check your black filled areas. If they look patchy, go over them with a second layer of ink to ensure deep, bold contrast.
You now have a clean, graphic sequence showing exactly how to build a charming Halloween illustration step by step.


Classic Sheet Ghost Doodle
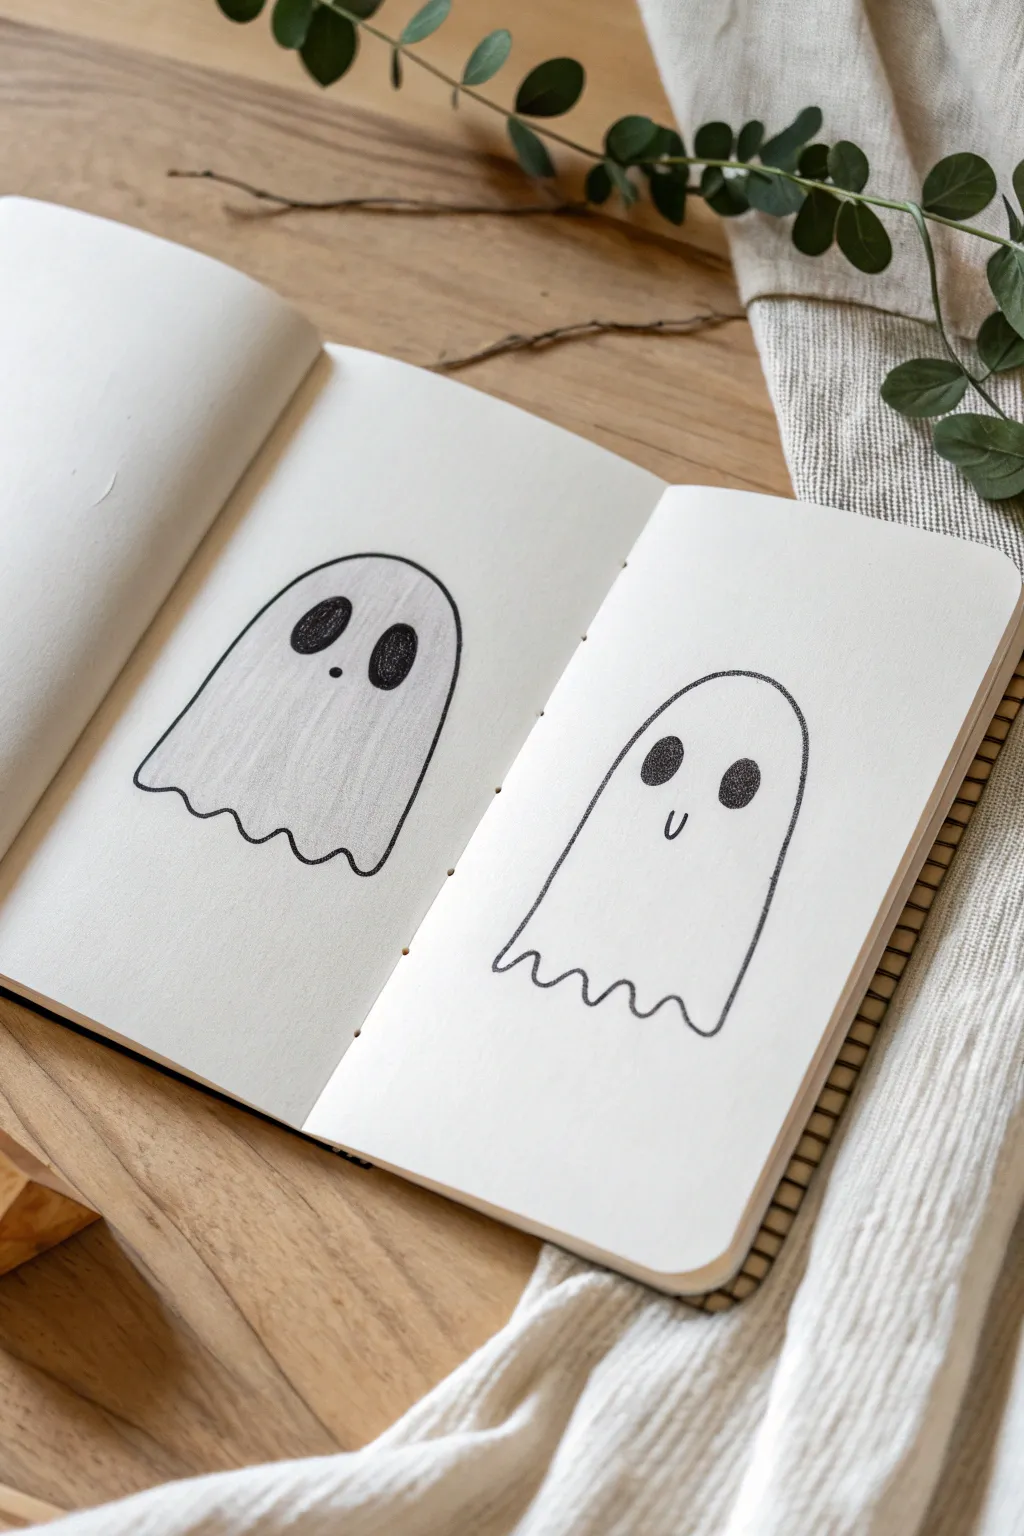
Capture the playful spirit of Halloween with this charming pair of sheet ghosts, one featuring soft shading and the other keeping things crisp and simple. This beginner-friendly spread is perfect for filling up empty journal pages with floating, friendly specters.
Step-by-Step
Materials
- Sketchbook or drawing paper (heavyweight preferred)
- HB or 2B pencil for sketching
- Fine liner pen (black, 0.5mm or 0.8mm)
- Graphite pencil for shading (4B or 6B)
- Blending stump or cotton swab
- Eraser
Step 1: Drafting the Shapes
-
Establish the curve:
Begin on the right page by lightly sketching a large, inverted U-shape. This will be the main body of your first ghost. Keep the top rounded and smooth. -
Slight taper:
As you bring the lines down for the sides, let them flare out ever so slightly towards the bottom to give the ghost that draped sheet appearance. -
Create the hem:
Connect the bottom edges with a wavy line. Aim for about four or five gentle scallops to simulate the fabric folding. -
Draft the left ghost:
Move to the left page and sketch a similar shape, but make this ghost slightly wider and shorter for variety. Add the scalloped hem at the bottom here as well.
Step 2: Inking the Outlines
-
Trace the right ghost:
Using your fine liner pen, carefully trace over your pencil sketch on the right page. Keep your line weight consistent and smooth. -
Trace the left ghost:
Repeat the inking process for the ghost on the left page. Ensure the scalloped bottom connects fluidly to the side lines. -
Let it set:
Allow the ink to dry completely for a minute or two to prevent smearing during the erasing phase. -
Clean up:
Gently erase all the visible pencil guidelines from underneath your ink work on both pages.
Uneven Scallops?
Don’t fret if your wavy bottom line isn’t perfect. Real fabric doesn’t hang symmetrically. Varied wave sizes actually make the sheet look more natural and drapey.
Step 3: Adding Personality
-
Right ghost face:
On the right ghost, draw two vertical ovals for eyes using the fine liner. Fill them in solid black. -
A little smile:
Place a small, U-shaped mouth right between and slightly below the eyes to give it a cheerful expression. -
Left ghost eyes:
For the left ghost, draw two larger, slightly tilted ovals for eyes. Positioning them closer to the top of the curve adds a cute clumsiness. -
Surprised mouth:
Instead of a smile, draw a very small, solid black dot for a mouth to create a surprised ‘O’ expression.
Enhance the Texture
For the shaded ghost, try turning your pencil on its side. This uses the broad edge of the lead for a grainier, softer texture that resembles heavy fabric.
Step 4: Shading the Left Ghost
-
Base graphite laydown:
Use your softer graphite pencil (4B or 6B) to lightly color the entire body of the left ghost. -
Directional strokes:
Keep your pencil strokes vertical to mimic the fall of the fabric. I like to keep the pressure light initially so it’s easier to blend later. -
Deepen the shadows:
Add a second layer of graphite near the bottom hem and along the side edges to create dimension. -
Smooth the texture:
Take a blending stump or cotton swab and gently rub the graphite. Circular motions work best to eliminate harsh pencil strokes and create that foggy, ethereal gray tone. -
Final highlight:
Use your eraser to lift just a tiny bit of graphite from the very top center of the head, creating a subtle highlight.
Now you have a charming pair of ghosts ready to haunt your sketchbook artfully


Cute Bat With Simple Wings
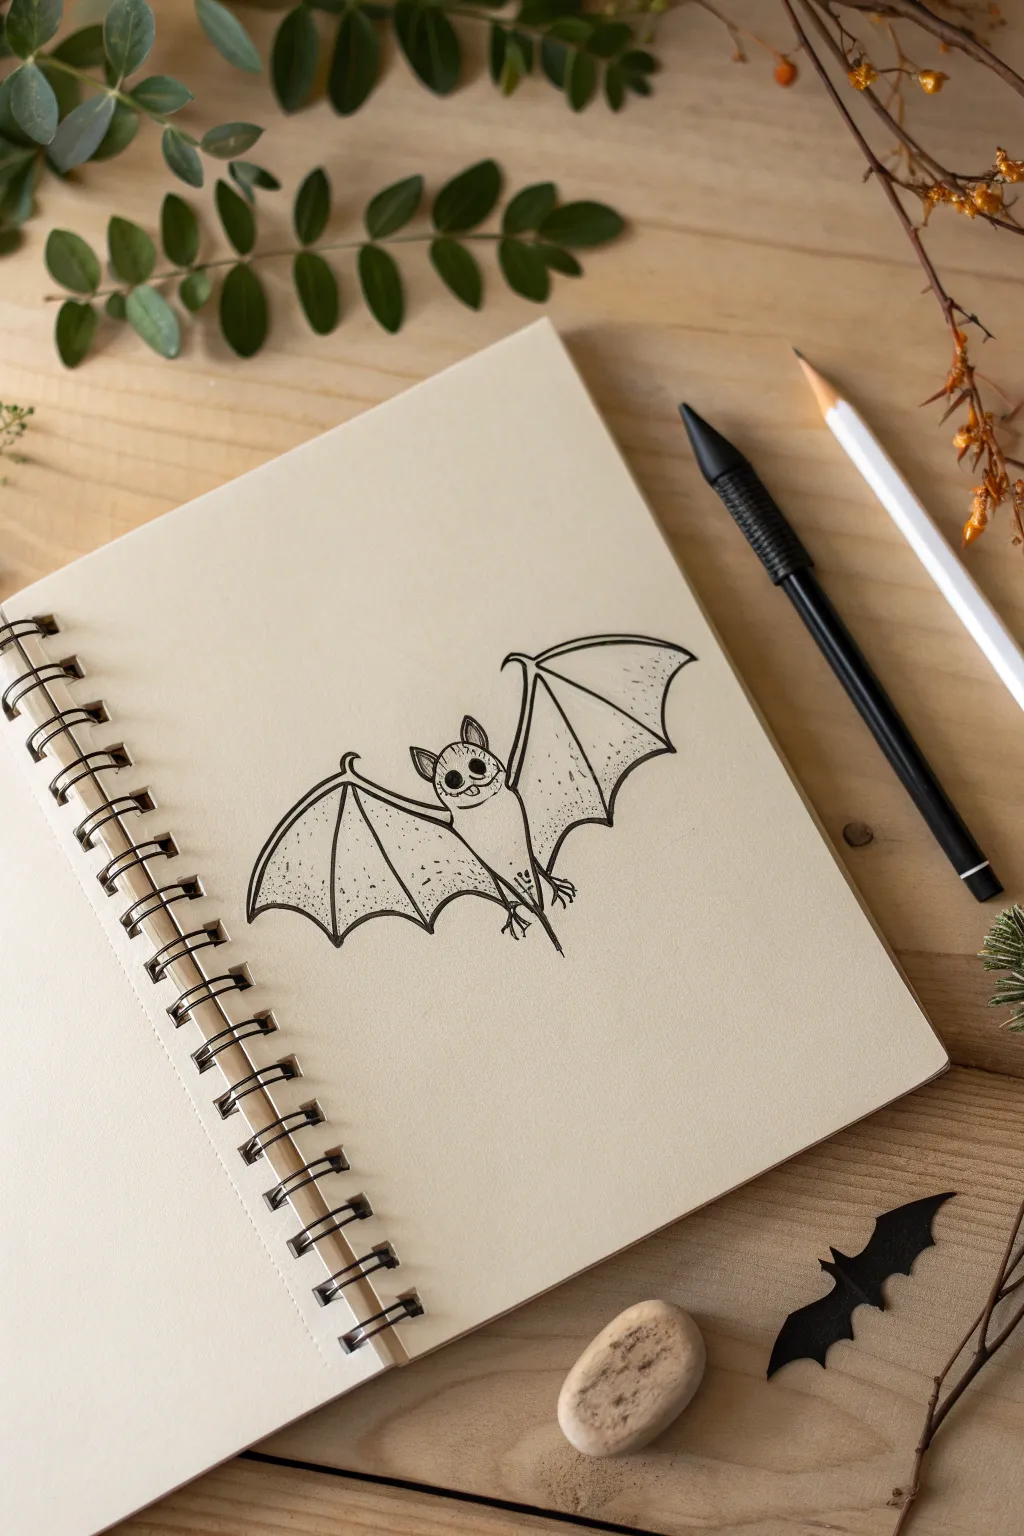
This charming little bat combines simple geometric shapes with delicate line work for a spooky yet sweet result. Using just a few basic lines, you will create a character full of personality that looks great in any sketchbook or Halloween card.
Step-by-Step Tutorial
Materials
- Sketchbook or drawing paper (smooth bristol is nice)
- Pencil (HB or 2B)
- Fine liner pen (black, 0.3mm or 0.5mm)
- Eraser
- Ruler (optional, for symmetry checks)
Step 1: Sketching the Framework
-
Start the body:
Begin by lightly sketching a narrow, elongated oval shape in the center of your page. This will be the main body of the bat. Taper it slightly at the bottom so it looks almost like a gentle teardrop. -
Add the head shape:
Draw a rounded shape sitting directly on top of your body oval. Give it wide, pointed ears that angle outward slightly, making sure the top of the head curves gently between them. -
Map out the wing arms:
From the ‘shoulders’ of your bat (where the head meets the body), sketch two long, arched lines curving upward and outward. These form the top rigid bone of the wings. Add a small hook or thumb claw at the very peak of each arch. -
Define the wing structure:
From that peak point, draw a vertical line angling down toward the bottom of the page. Repeat this twice more on each side, spacing them out fan-like, to create the ‘fingers’ of the bat wings.
Wobbly Lines?
If your long wing lines are shaky, try drawing from your shoulder rather than your wrist. Or, embrace the wobble—it adds a spooky, organic feel to the bat.
Step 2: Refining the Drawing
-
Connect the wing membranes:
Draw scalloped, curved lines connecting the tips of those wing fingers. The final curve should connect back to the bottom of the bat’s body, completing the classic bat-wing silhouette. -
Detail the face:
Inside the head shape, sketch two large circles for eyes. Add a tiny, cute nose just below them and a simple smiley mouth. Don’t forget to add inner lines to the ears to give them depth. -
Refine the legs:
At the very bottom of the body teardrop, sketch two tiny, thin legs hanging down with small clawed feet. They should look delicate compared to the large wings.
Pro Tip: Wing Depth
Make the dots denser near the top ‘fingers’ of the wings. This gradient stippling mimics shadow and makes the wings look translucent and papery.
Step 3: Inking and In-Filling
-
Outline the main shapes:
Switch to your fine liner pen. I find it easiest to embrace a slightly ‘sketchy’ style here, so don’t worry if your lines aren’t perfectly continuous. Outline the entire body and head first. -
Thicken the wing spines:
Go over the top arches of the wings again, making a double line to give them thickness. Do the same for the vertical ‘finger’ bones, tapering them as they reach the bottom edge. -
Ink the membranes:
Draw the scalloped bottom edges of the wings with a single, confident stroke. Ensure these lines connect cleanly to the tips of the wing bones you just thickened. -
Fill in the face:
Color in the pupils of the eyes solid black, leaving a tiny white dot for a highlight if you wish. Outline the nose and mouth cleanly. -
Add texture to the ears:
Inside the ears, draw several small, vertical hatch marks. This suggests fur or texture without having to draw every single hair. -
Create body texture:
Add tiny stippled dots or very short dashes along the sides of the bat’s body. This gives the impression of a fuzzy, soft tummy. -
Add wing details:
This is the secret to the look: use stippling (tiny dots) inside the wings. Concentrate the dots near the bone lines and let them fade out as you move toward the center of the membrane panels. -
Final clean up:
Once the ink is completely dry—give it a good minute—gently erase all your original pencil guidelines to reveal the crisp black and white illustration.
Now you have a delightfully spooky friend ready to fly off the page

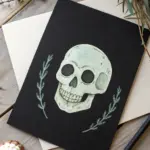
Black Cat Silhouette Pose
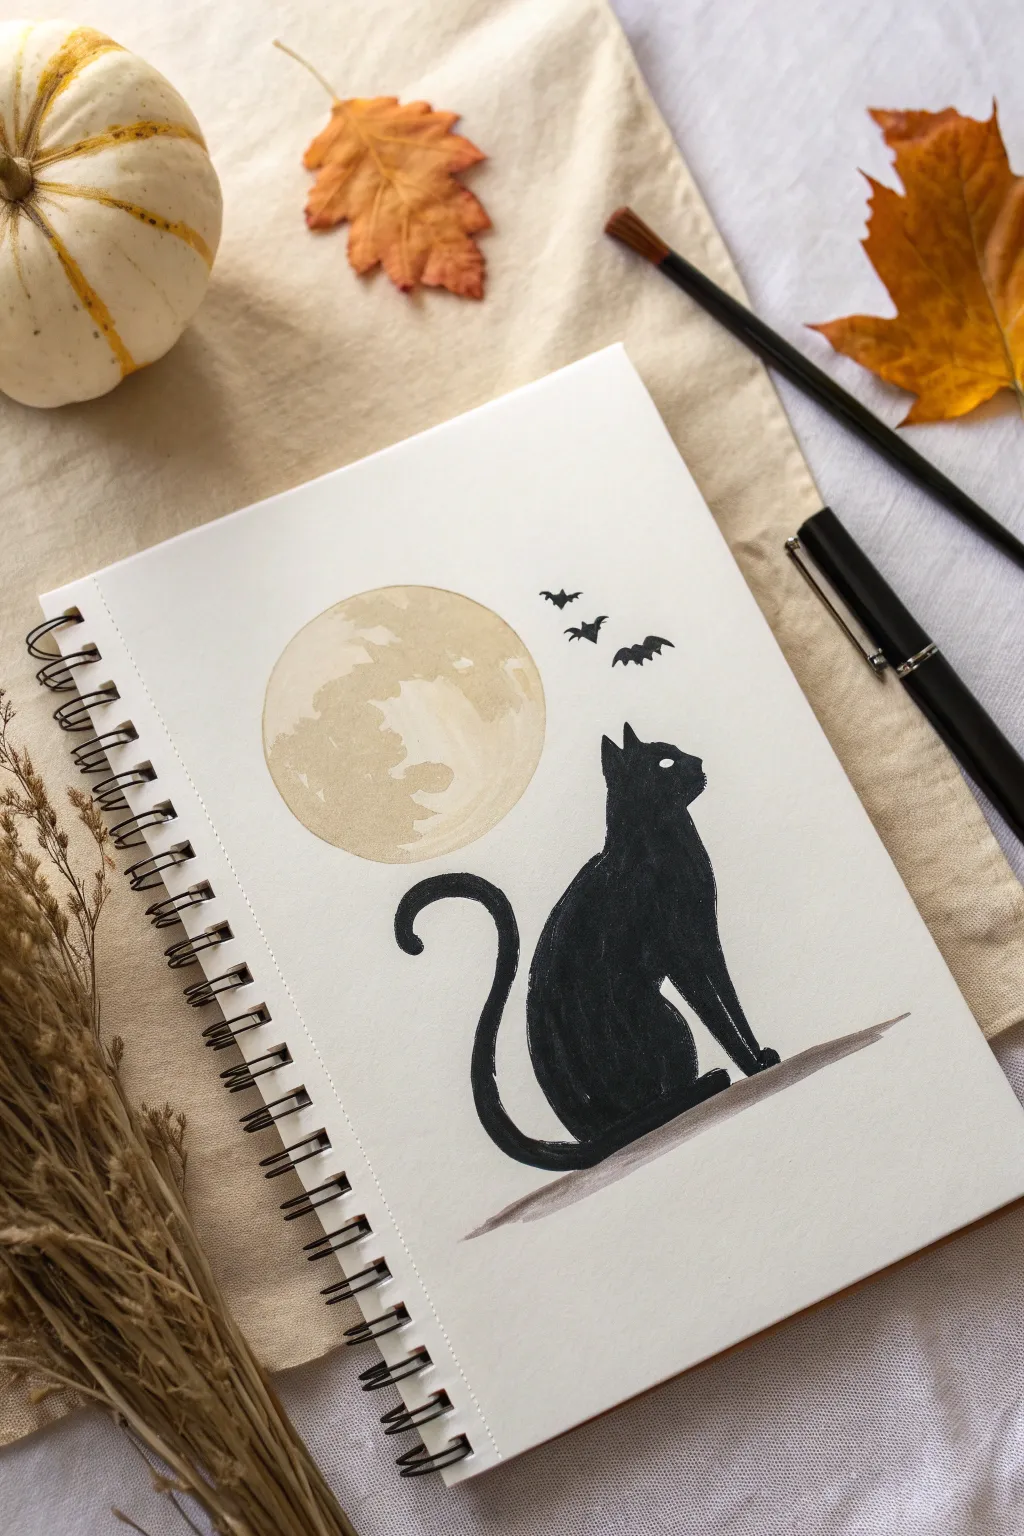
Capture the mystic charm of Halloween with this elegant black cat silhouette gazing up at a textured moon. This composition balances bold black shapes with soft, diluted washes, creating a striking yet simple piece perfect for your sketchbook.
Detailed Instructions
Materials
- Spiral-bound sketchbook creativity thick paper (mixed media or watercolor paper)
- Black drawing ink, black gouache, or a high-quality black brush marker
- Camel or beige watercolor paint (or highly diluted coffee!)
- Round watercolor brush (size 6 or 8)
- Fine detail brush (size 0 or 1)
- Pencil and eraser
- Circular object for tracing (like a jar lid or roll of tape)
Step 1: Setting the Scene
-
Outline the Moon:
Begin by placing your circular object in the upper-left quadrant of your page. Lightly trace around it with a pencil to define the shape of your full moon. -
Sketch the Cat:
Lightly sketch the outline of a cat sitting in profile. Start with a simple oval for the body and a smaller circle for the head, connecting them with a smooth neck line. The cat should be seated on the right side, looking up toward the moon. -
Refine the Silhouette:
Refine your pencil sketch, adding triangular ears (one slightly behind the other) and defining the curve of the chest. Ensure the back forms a gentle, elegant arch. -
Add the Tail:
Sketch a long, curving tail that starts low, sweeps underneath the body, and curls upward like a question mark. The tail helps balance the visual weight of the drawing. -
Ground the Figure:
Draw a faint, angled line beneath the cat to represent the surface it is sitting on. This doesn’t need to be perfectly straight; a slight organic slope looks natural.
Natural Crater Textures
Sprinkle a few grains of table salt onto the wet moon paint. Let it dry completely, then brush the salt away to reveal amazing crater-like speckles.
Step 2: Painting the Moon
-
Mix the Moon Color:
Prepare a very watery wash of beige or light ochre watercolor. You want this to be quite transparent to let the paper texture show through. -
Apply the Base Wash:
Fill in the circle you traced earlier with your beige mix. Work quickly to keep the edge wet, which prevents unwanted hard lines from forming inside the shape. -
Add Texture:
While the moon is still damp, dab in a slightly darker concentration of the same beige color in random spots. Let the paint bloom naturally to create those crater-like textures. -
Dry Completely:
Before moving on to the black ink, allow the moon to dry completely. If the paper is cool to the touch, it’s still wet.
Step 3: Inking the Silhouette
-
Outline the Cat:
Using your black ink or brush marker, carefully trace over the final pencil lines of your cat. Pay special attention to the ears and the curve of the spine. -
Fill the Shape:
Fill in the entire body of the cat with solid black. I find it safest to work from the center outward to avoid accidentally pushing ink outside your lines. -
Define the Eye:
Leave a tiny, angled almond shape unpainted for the eye, or if you’ve already painted it black, use a white gel pen or white gouache to add the eye detail after the black is dry. -
Ground the Cat:
Use a diluted grey wash (black ink mixed with water) to paint the ground line beneath the cat. Make a single, confident stroke that tapers off at the end.
Spooky Atmosphere
Use diluted white gouache to splatter tiny stars across the black sections or around the moon for a starry night effect.
Step 4: Final Details
-
Sketch the Bats:
Lightly pencil in three small bats flying in the space between the moon and the cat. Vary their sizes slightly to suggest depth. -
Ink the Bats:
Fill in the bat shapes with solid black ink. Use the very tip of your fine brush to create sharp, pointed wing tips. -
Erase Sketches:
Once you are absolutely certain all ink and paint is bone dry, gently erase any visible pencil marks.
Now you have a moody, atmospheric piece of Halloween art ready to display
BRUSH GUIDE
The Right Brush for Every Stroke
From clean lines to bold texture — master brush choice, stroke control, and essential techniques.
Explore the Full Guide
Easy Spider Web Corner
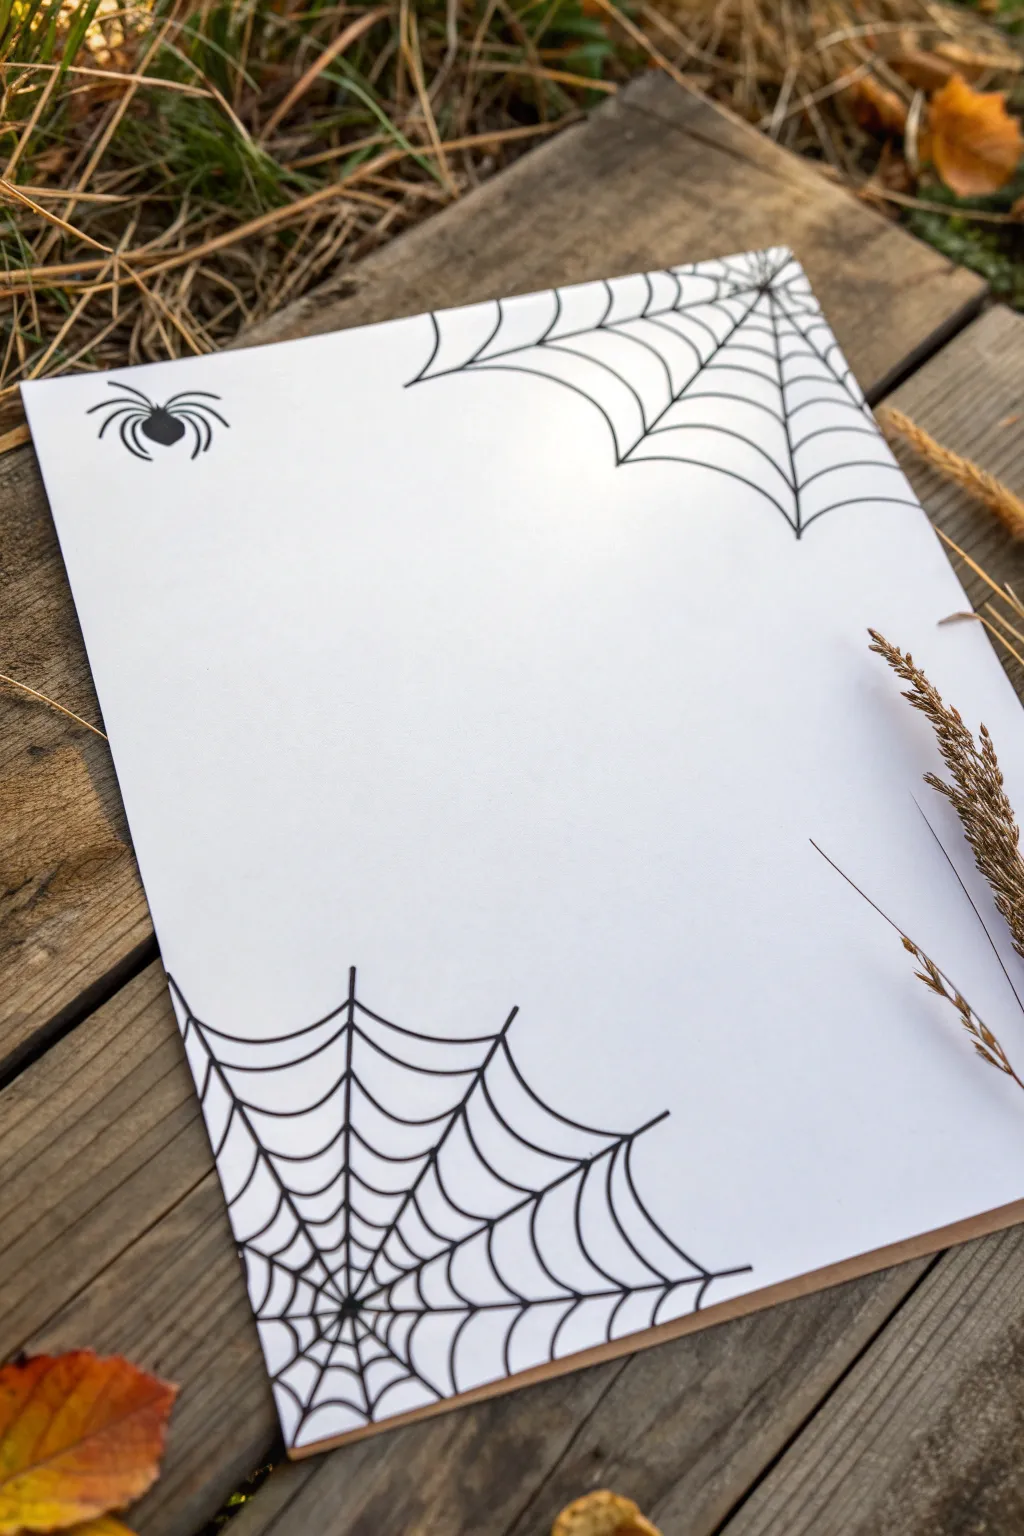
This minimalist project brings a spooky yet elegant touch to a blank page, perfect for custom Halloween stationery or party invites. By combining simple radial lines with gentle curves, you’ll create classic spider webs framing a small, wandering spider.
Step-by-Step
Materials
- White cardstock or heavy drawing paper
- Fine-point black marker or drawing pen (0.5mm)
- Pencil
- Eraser
- Ruler (optional)
Step 1: Setting the Foundations
-
Position the paper:
Place your paper on a flat surface. You can orient it vertically or horizontally, though the reference image uses a vertical orientation. -
Pencil the anchor lines:
Start in the bottom left corner. Using a pencil, lightly draw 5 to 7 straight lines radiating outward from the very corner tip, like rays of sunshine. -
Vary the lengths:
Make the lines different lengths for a natural look. The lines closer to the edges of the paper can be longer, while the middle rays can be slightly shorter. -
Repeat for the top corner:
Move to the top right corner and repeat the process, drawing faint radiating lines coming from the corner tip.
Step 2: Weaving the Webs
-
Trace the main rays:
Switch to your black fine-point pen. Carefully trace over your pencil anchor lines in the bottom left corner to make them permanent. -
Start the inner curves:
Begin near the very corner point. Draw a small, curved line connecting the first ray to the second ray. The curve should dip inward towards the corner, like a tiny letter ‘u’ or a hammock. -
Connect the rays:
Continue this pattern, connecting the second ray to the third, and so on, until you reach the edge of the paper. -
Add the second row:
Move about half an inch further out along the rays. Draw another row of curved lines connecting the rays, keeping that ‘U’ shape consistent. -
Complete the bottom web:
Keep adding rows of webbing, spacing them out wider as you move away from the corner. 3 to 5 rows usually looks best. -
Ink the top web:
Repeat the entire inking process for the top right corner. Trace the rays, then connect them with your curved ‘hammock’ lines. -
Check line weights:
I prefer to go back and slightly thicken the very tips where the web lines meet the paper edge, making them look firmly attached.
Uneven Webs?
Don’t worry if your curves aren’t perfectly symmetrical. Real spider webs are often messy; slight wobbles actually make the drawing look more organic and spooky.
Step 3: Drawing the Spider
-
Place the body:
In the open space of the top left corner, sketch a small, dark oval for the spider’s abdomen using your pen. -
Add the head:
Draw a smaller semi-circle attached to the front of the abdomen to form the head section. -
Draw the front legs:
Draw two legs coming from the head area on the left side, curving forward and out. Repeat on the right side. -
Add the back legs:
Draw two legs extending backward from the rear of the body on the left, and two on the right. -
Refine the legs:
Add tiny bends or ‘knees’ to the legs to make them look creepy and disjointed. -
Clean up:
Once the ink is completely dry, gently erase any visible pencil marks from your initial sketch.
Level Up: Spooky Details
Extend a single straight line down from the spider’s abdomen to make it look like it’s dangling, or add tiny dots of glue and glitter to the web strands for morning dew.
Now you have a perfectly haunted border ready for your Halloween messages
Tiny Spider With Eight Legs
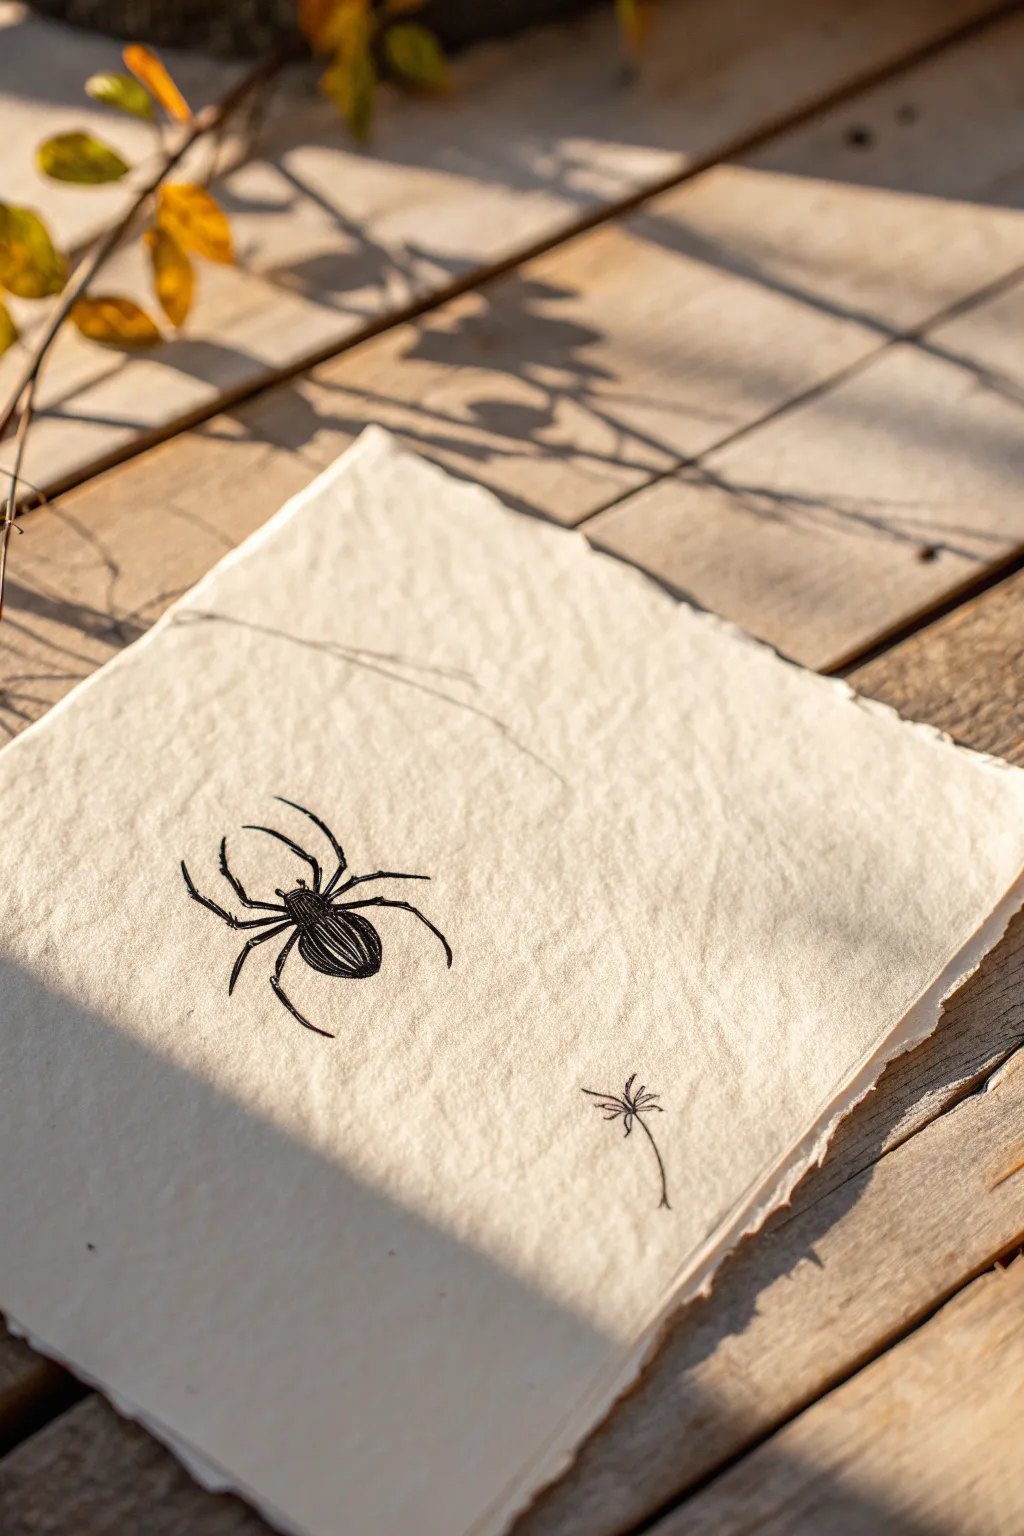
Capturing the delicate spooky season vibes, this tutorial guides you through sketching a realistic yet simple black spider on textured paper. The high contrast of the dark ink against the creamy paper creates a classic, vintage specimen look perfect for Halloween decor.
How-To Guide
Materials
- Textured cream or off-white drawing paper (deckle edge preferred)
- Fine liner pen (black, size 0.1 or 0.3)
- Medium liner pen (black, size 0.5 or 0.8)
- Pencil (HB or H for light sketching)
- Kneaded eraser
Step 1: Planning the Anatomy
-
Position your subject:
Visualize where your spider will sit on the page. Leave plenty of negative space around it to enhance that lonely, minimalist feel. Aim for the lower-left center. -
Draft the body segments:
Using your pencil very lightly, draw two main shapes: a smaller oval for the head (cephalothorax) and a larger, bulbous oval directly behind it for the abdomen. -
Map the leg joints:
Spiders have eight legs attached to the cephalothorax, not the abdomen. Lightly sketch lines indicating the direction of four legs on each side, marking the joints with tiny dots. -
Refine the leg shapes:
Flesh out your stick lines into actual leg shapes. The front two legs should reach forward, while the back legs curve backward. Keep the segments closest to the body slightly thicker.
Step 2: Inking the Spider
-
Outline the body:
Switch to your finer pen (0.1 or 0.3). Carefully trace the outline of the head and abdomen segments. Don’t make the line perfectly smooth; a tiny bit of jitter adds organic realism. -
Detail the abdomen:
Draw curved, vertical lines running down the length of the abdomen to create volume. These striations give the spider a rounded, 3D appearance. -
Fill the darks:
Use your thicker pen (0.5 or 0.8) to darken the head segment almost completely, leaving just tiny slivers of white to suggest a shiny carapace. -
Shade the abdomen:
Go back to the fine pen and add hatching between your curved lines on the abdomen. Leave the center slightly lighter to show where the light hits the ‘back’ of the spider. -
Ink the legs:
Trace your leg sketches with the medium pen. Ensure the joints are distinct. Taper the very ends of the legs into sharp, delicate points. -
Add hair texture:
With the finest pen, make tiny, quick flicks along the legs, especially near the joints. This creates that creepy, fuzzy spider texture without needing to draw every hair.
Ink Smearing?
If your ink smudges when erasing, switch to a waterproof pigment liner. Always wait at least 5-10 minutes before erasing pencil marks to be safe
Step 3: The Tiny Companion
-
Sketch the seed:
Down and to the right of the spider, lightly pencil a tiny dandelion seed or mosquito-like form. It needs a central point with spoke-like lines radiating out. -
Ink the seed head:
Using the finest pen possible, draw the radiating lines. Keep them very thin and wispy. -
Draw the stem:
Add a single, hair-thin curved line drifting downward from the seed head. -
Final clean up:
Once the ink is completely dry—give it a good few minutes—gently use the kneaded eraser to lift away all your graphite guidelines.
Vintage Look
Dip a tea bag in warm water and dab it lightly over the paper before drawing (let it dry fully!) to create an aged, parchment effect
Now you have a wonderfully creepy little specimen to display

PENCIL GUIDE
Understanding Pencil Grades from H to B
From first sketch to finished drawing — learn pencil grades, line control, and shading techniques.
Explore the Full Guide
Candy Corn in Three Bands
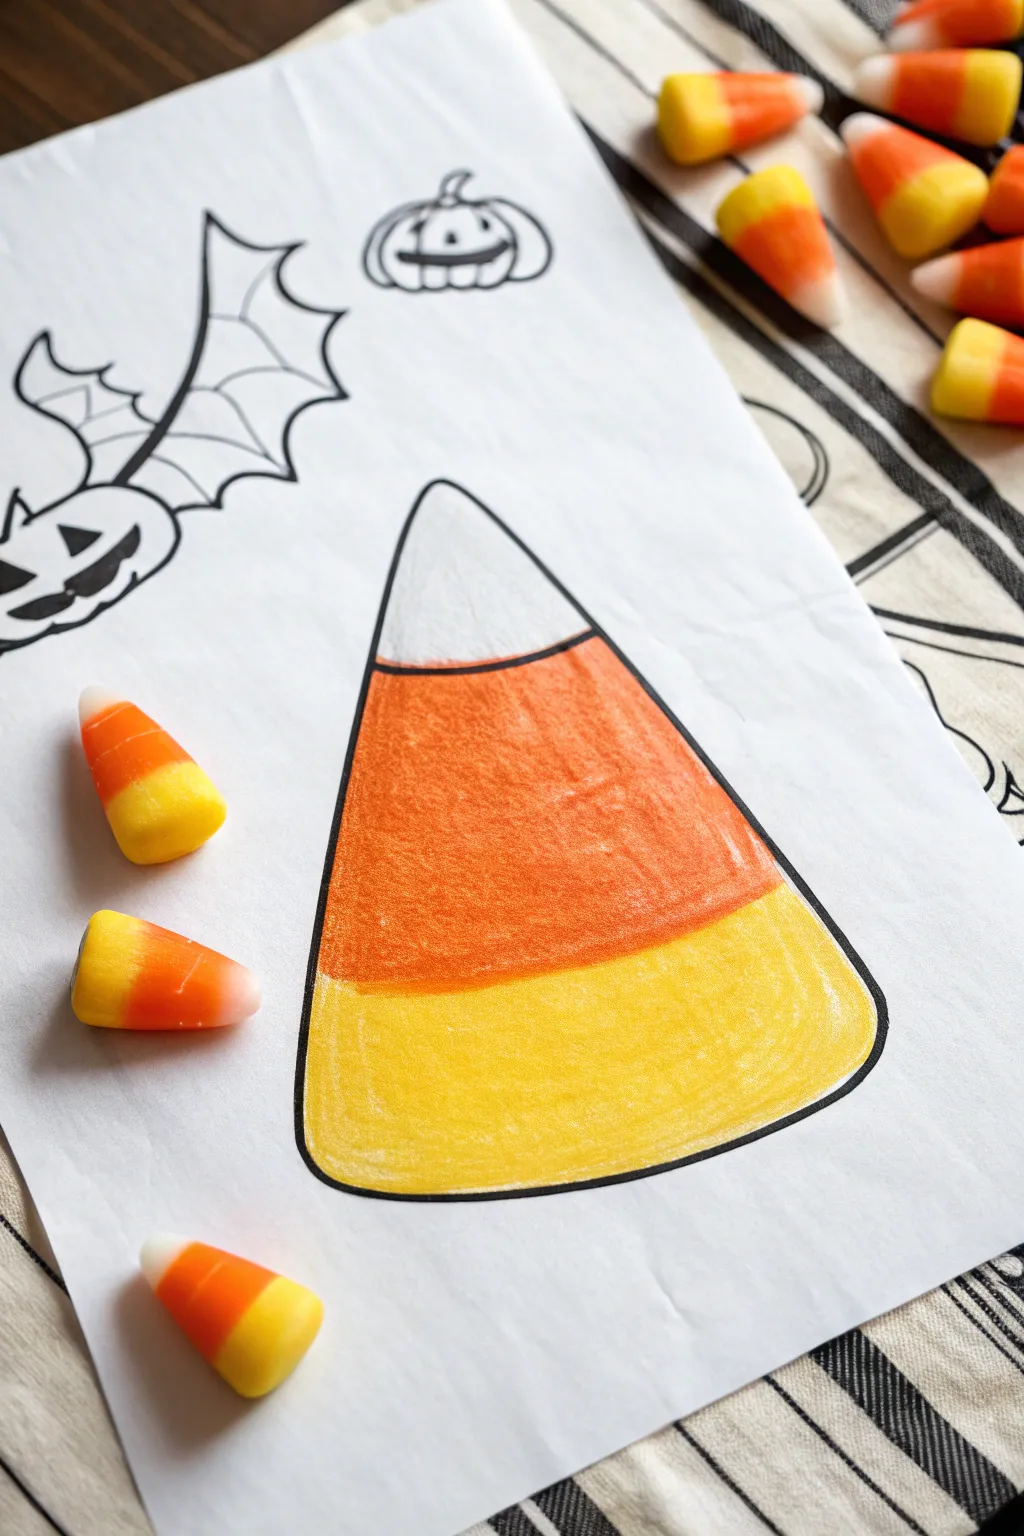
Bring the classic colors of Halloween to life with this simple yet striking candy corn drawing project. Using just a few crayons and a printable template or hand-drawn outline, you can create a festive piece of art that mimics the waxy texture of the real treat.
Step-by-Step Guide
Materials
- White printer paper or drawing paper
- Black fine-tip marker or pen
- Orange crayon
- Yellow crayon
- Real candy corn (for reference/snacking)
Step 1: Preparation & Outline
-
Establish the shape:
Begin by drawing a large, rounded triangle in the center of your paper. Make the bottom corners very soft and curved, rather than sharp points, to mimic the actual molded shape of the candy. -
Add the segments:
Divide your triangle into three distinct sections by drawing two slightly curved horizontal lines across the body of the shape. The top section should be the smallest (the tip), and the bottom section the largest (the base). -
Incorporate spooky friends:
To the upper left of your candy corn, sketch a bat with widespread, jagged wings. Add a simple smiling jack-o’-lantern face to its body. -
Add floating elements:
Draw a small pumpkin near the top right corner. Give it a classic stem and a happy, carved face to balance the composition. -
Finalize the lines:
Go over your pencil sketches with a black fine-tip marker or pen to create bold, coloring-book-style outlines. Erase any stray pencil marks once the ink is dry.
Step 2: Coloring the Candy
-
Start with the base:
Grab your yellow crayon and begin filling in the large bottom segment of the candy corn. Apply medium pressure to get a solid, cheerful yellow tone. -
Create texture:
As you color the yellow section, use small circular motions or short back-and-forth strokes. This technique helps replicate the slightly waxy, textured look of the real candy. -
Fill the center:
Switch to your orange crayon for the middle band. Carefully outline the inside edges of this section first to ensure you don’t stray into the other bands. -
Blend the transition:
Fill in the rest of the orange section. Where the orange meets the yellow line, I like to press just a tiny bit lighter to avoid a harsh, dark ridge, keeping the bands distinct but cohesive. -
Leave the top:
Leave the top triangle section completely uncolored to represent the white tip of the candy corn. The white of the paper serves as this color. -
Check for consistency:
Look over your coloring to see if there are any white specks showing through the wax in the yellow or orange areas. Go back over them with a second layer if you want a richer, deeper color saturation.
Uneven Color Coverage?
If the paper grain shows through too much, place a smooth placemat underneath your sheet. This provides a harder surface for the crayon to glide against.
Level Up The Spookiness
Use a white crayon or colorless blender on the white tip. It won’t add color, but it adds a matching waxy sheen so the texture is consistent across the whole candy.
Display your sweet artwork alongside a bowl of treats for the perfect festive touch
Wrapped Candy With Wavy Ends
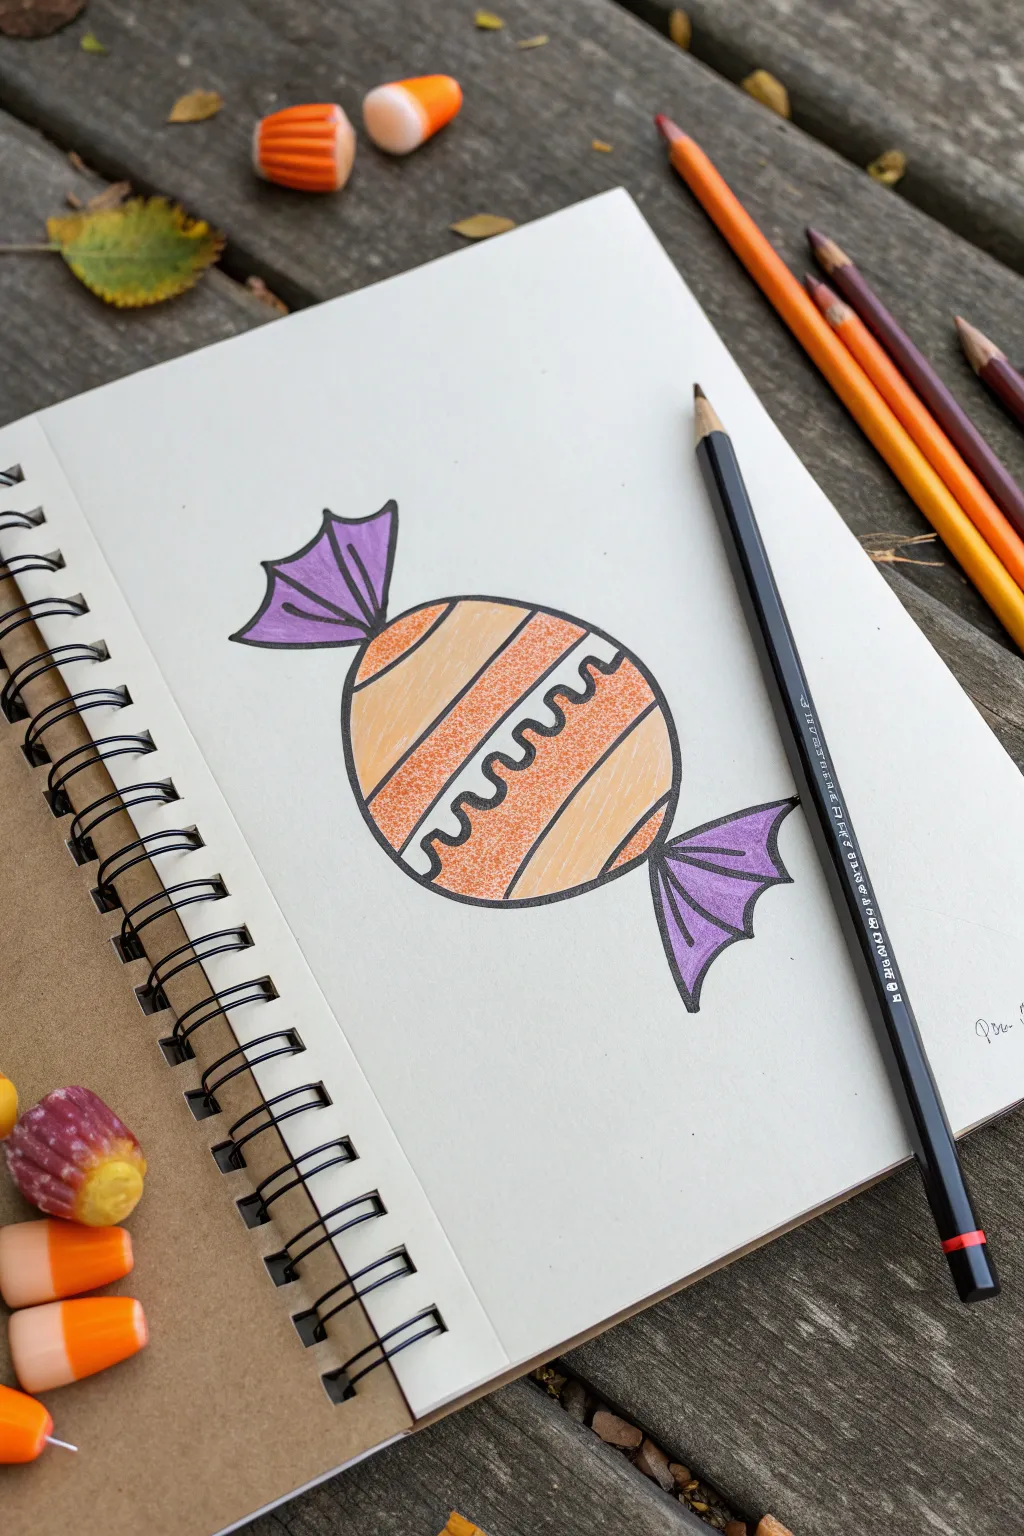
This charming little wrapped candy sketch captures the essence of Halloween treats with bold lines and a classic color palette. It features a round, striped body with crinkled wrapper ends, making it a perfect, quick doodle for your seasonal sketchbook.
Step-by-Step
Materials
- Spiral-bound sketchbook featuring smooth drawing paper
- Pencil (HB or 2B) for sketching
- Fine-point black drawing pen or marker (0.5mm or 0.8mm)
- Colored pencils (Orange, Tan/Light Peach, and Purple)
- Eraser
Step 1: Sketching the Outline
-
Draw the center circle:
Start by lightly sketching a large, perfect circle in the middle of your page with your pencil. This will form the main body of the candy piece. -
Add wrapper connection points:
On the left and right sides of the circle, draw small, slightly curved vertical lines where the wrapper ends will attach. Imagine where the paper would be twisted. -
Sketch the left wrapper fan:
From the left connection point, draw a fan shape expanding outward. The top and bottom lines should flare out, connected by a scalloped or wavy edge to mimic crinkled paper. -
Mirror the right wrapper fan:
Repeat the process on the right side, drawing a similar fan shape. Try to keep it roughly symmetrical to the left side, though organic variations make it look more natural. -
Draw internal wrapper folds:
Inside both fan shapes, sketch two straight lines radiating from the candy body to the outer wavy edge. These represent the folds in the wrapper.
Pro Tip: Rounded Forms
When drawing the stripes across the candy body, always curve your lines slightly outward. Straight lines will make the candy look flat like a disc, rather than round like a ball.
Step 2: Adding Stripe Details
-
Mark the stripe sections:
Divide the circle into four diagonal sections using three curved lines. These lines should bow slightly outward to give the candy a 3D, spherical appearance. -
Create the squiggly decoration:
Inside the second stripe from the left (one of the wider central sections), draw a bold, wavy line running down the center. This adds a nice decorative touch. -
Ink the main outlines:
Take your black fine-point pen and carefully trace over your pencil lines. Use a confident, consistent stroke for the outer circle and the wrapper shapes. -
Ink the details:
Continue inking the internal stripes, the folds in the wrapper ends, and that fun squiggly line. Let the ink dry completely for a minute. -
Erase pencil guides:
Once the ink is totally dry, gently use your eraser to remove all visible pencil marks, leaving a clean, crisp black-and-white drawing.
Level Up: Highlights
Leave a tiny sliver of white uncolored near the top curve of the candy body. This creates a ‘specular highlight’ effect, making the wrapper look shiny and tightly wrapped.
Step 3: Coloring
-
Color the purple ends:
Using your purple colored pencil, fill in both fan-shaped wrapper ends. Apply even pressure for a solid, vibrant look. -
Fill the first stripe:
For the candy body, color the first section on the far left with your tan or light peach pencil. Keep the strokes directional to follow the curve of the candy. -
Color the orange stripes:
Skip the second section (the one with the squiggle) for a moment. Color the third section with a bright orange pencil. This creates an alternating pattern. -
Shade the squiggly section:
Go back to that second section containing the squiggle. Color the background orange, but press slightly harder than before to create texture, careful not to color over the black squiggly line itself. -
Finish the last stripe:
Color the final section on the far right with the tan/light peach pencil to balance the pattern. -
Add subtle texture:
Take the orange pencil and lightly stipple (tap small dots) over the orange sections to give them a sugary, textured appearance.
Now you have a delightful piece of hand-drawn candy art to sweeten up your sketchbook pages


Witch Hat With Buckle
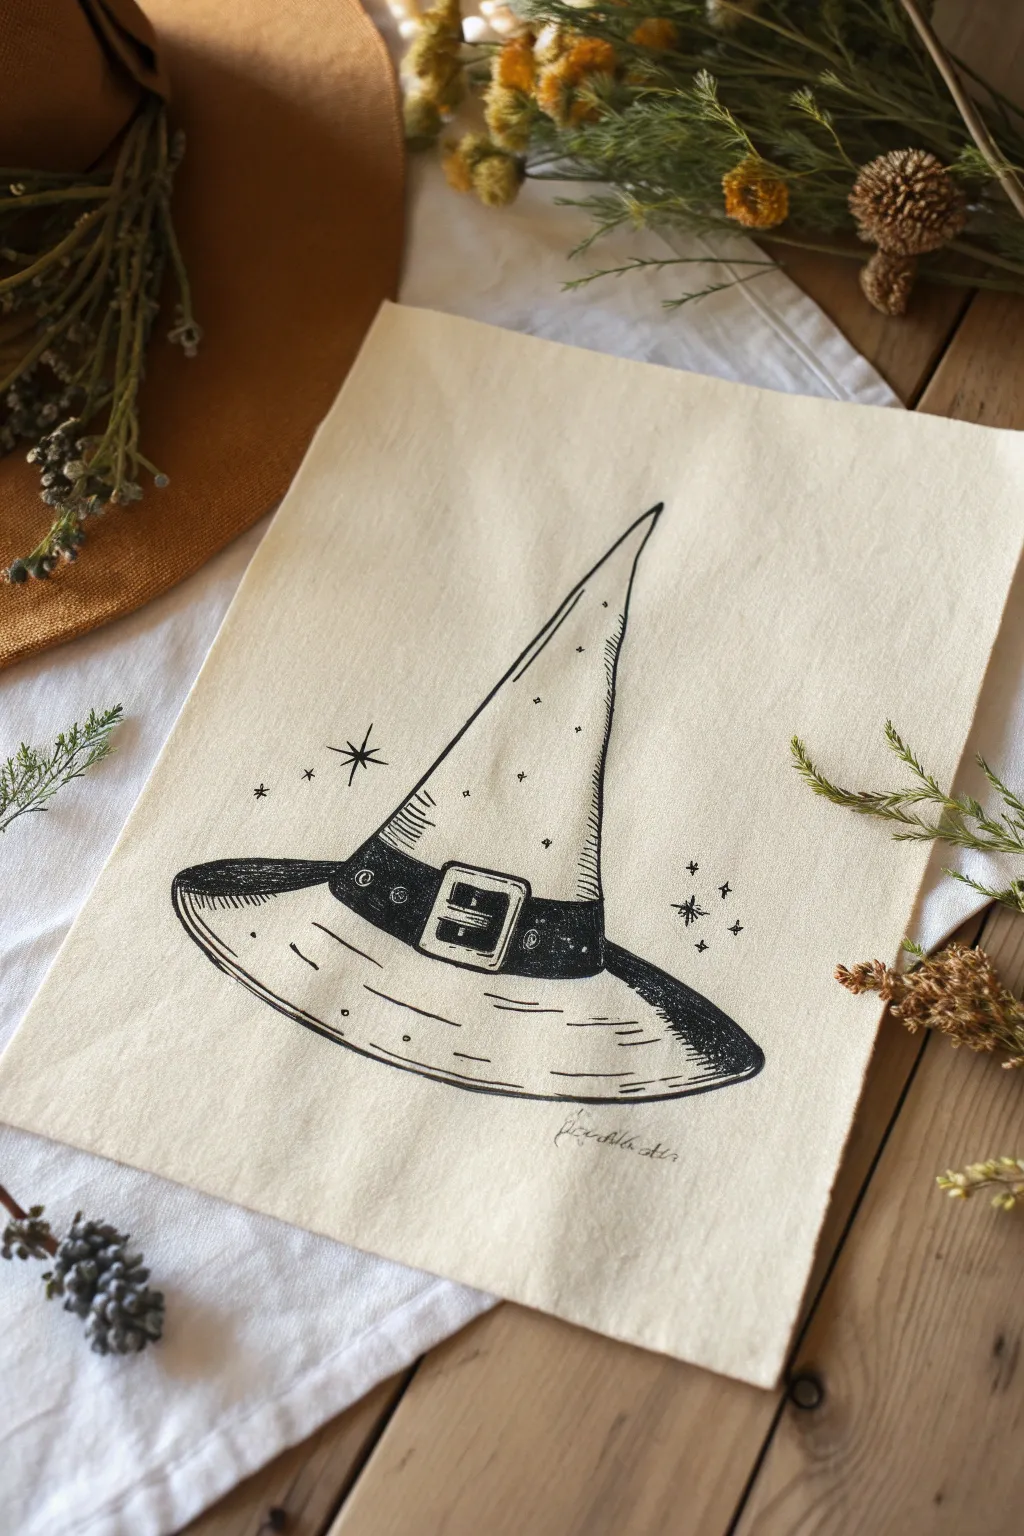
This charming project features a whimsical witch hat with a classic wide brim and a sturdy buckle, drawn in bold ink lines. The rustic style and twinkling stars make it a perfect, understated Halloween decoration for your wall or journal.
Step-by-Step Tutorial
Materials
- Cream or off-white textured paper (e.g., cold press watercolor paper or mixed media paper)
- Pencil (HB or 2B)
- Eraser (kneaded preferred)
- Fine liner pens (sizes 01, 03, and 05 or 08)
- Ruler (optional)
Step 1: Sketching the Outline
-
Draft the cone shape:
Start lightly with your pencil. Draw a tall, narrow triangle for the top of the hat, but give the sides a slight inward curve. Let the very tip bend slightly to the right for a worn, slouchy look. -
Add the brim structure:
At the base of your cone, draw a wide, flattened oval. This oval should extend significantly past the width of the cone on both sides. Imagine the cone is sitting right in the center of a dinner plate. -
Define the buckle band:
Draw a curved band wrapping around the base of the cone, just above where it meets the brim. Make it about an inch thick on your drawing. -
Sketch the buckle detail:
In the center of that band, sketch a square or rectangular buckle shape. Add a small inner rectangle to represent the prong and the hole it goes through. -
Refine the brim edge:
Soften your oval sketch. The brim should curve gently upward at the sides, revealing a bit of the underside of the hat on the left and right. Add a second line paralell to the front rim to show the thickness.
Ink Confidence
Don’t strive for perfectly straight lines. A little wobble adds character and makes the hat feel like worn, ancient fabric rather than rigid plastic.
Step 2: Inking the Lines
-
Ink the main contours:
Switch to your thickest pen (05 or 08). Trace the outer silhouette of the hat—the cone and the outer edge of the brim. Keep your hand relaxed to allow for slightly organic, shaky lines rather than perfect geometry. -
Outline the hat band:
Using the same pen, ink the top and bottom edges of the band. Include the square outline of the buckle. -
Fill the band:
Carefully color in the band with black ink, but leave the buckle itself and a few small circular ‘studs’ or holes on the band uncolored (white). This contrast makes the buckle pop. -
Add hatching to the band:
If you don’t want a solid black band, you can use very dense cross-hatching. However, for the bold look in the example, solid black works best. I prefer solid black here to anchor the drawing. -
Detail the buckle:
Switch to a finer pen (03). Add shading lines inside the buckle frame to show metallic sheen or depth. Draw the prong clearly.
Add a Color Wash
Wait for the ink to cure overnight, then add a light wash of purple or orange watercolor over the band for a splash of halloween color.
Step 3: Shading and Texture
-
Add cone texture:
Use your finest pen (01). Draw short, broken vertical lines up the side of the cone, particularly on the right side and near the base, to minimalistically suggest fabric folds. -
Shadow the brim:
Where the brim curves underneath, use dense hatching or solid black ink on the far left and right tips. This creates a deep shadow, making the brim look three-dimensional. -
Create surface wear:
Scatter a few tiny dots, dashes, and small horizontal lines across the brim and the main cone. These little imperfections give the hat a weathered, vintage felt texture. -
Add horizontal brim lines:
Draw thin, sweeping horizontal curves across the front of the brim. They shouldn’t touch the edges completely; they just suggest the roundness of the fabric.
Step 4: Finishing Touches
-
Draw magical sparkles:
Around the hat, draw several four-pointed stars and small cross shapes. Vary their sizes—some larger and bold, some tiny and distant. -
Incorporate stardust:
Add tiny dots in clusters near your stars to create a magical ‘dust’ effect surrounding the hat. -
Clean up:
Once the ink is completely dry—give it a good five minutes—gently erase all remaining pencil marks. Be careful over the heavily inked areas to avoid smudging. -
Sign your work:
Add your signature or initials near the bottom right in a small, cursive scrawl to complete the piece.
You now have a wonderfully witchy illustration ready to frame or display
Bubbling Cauldron Pot
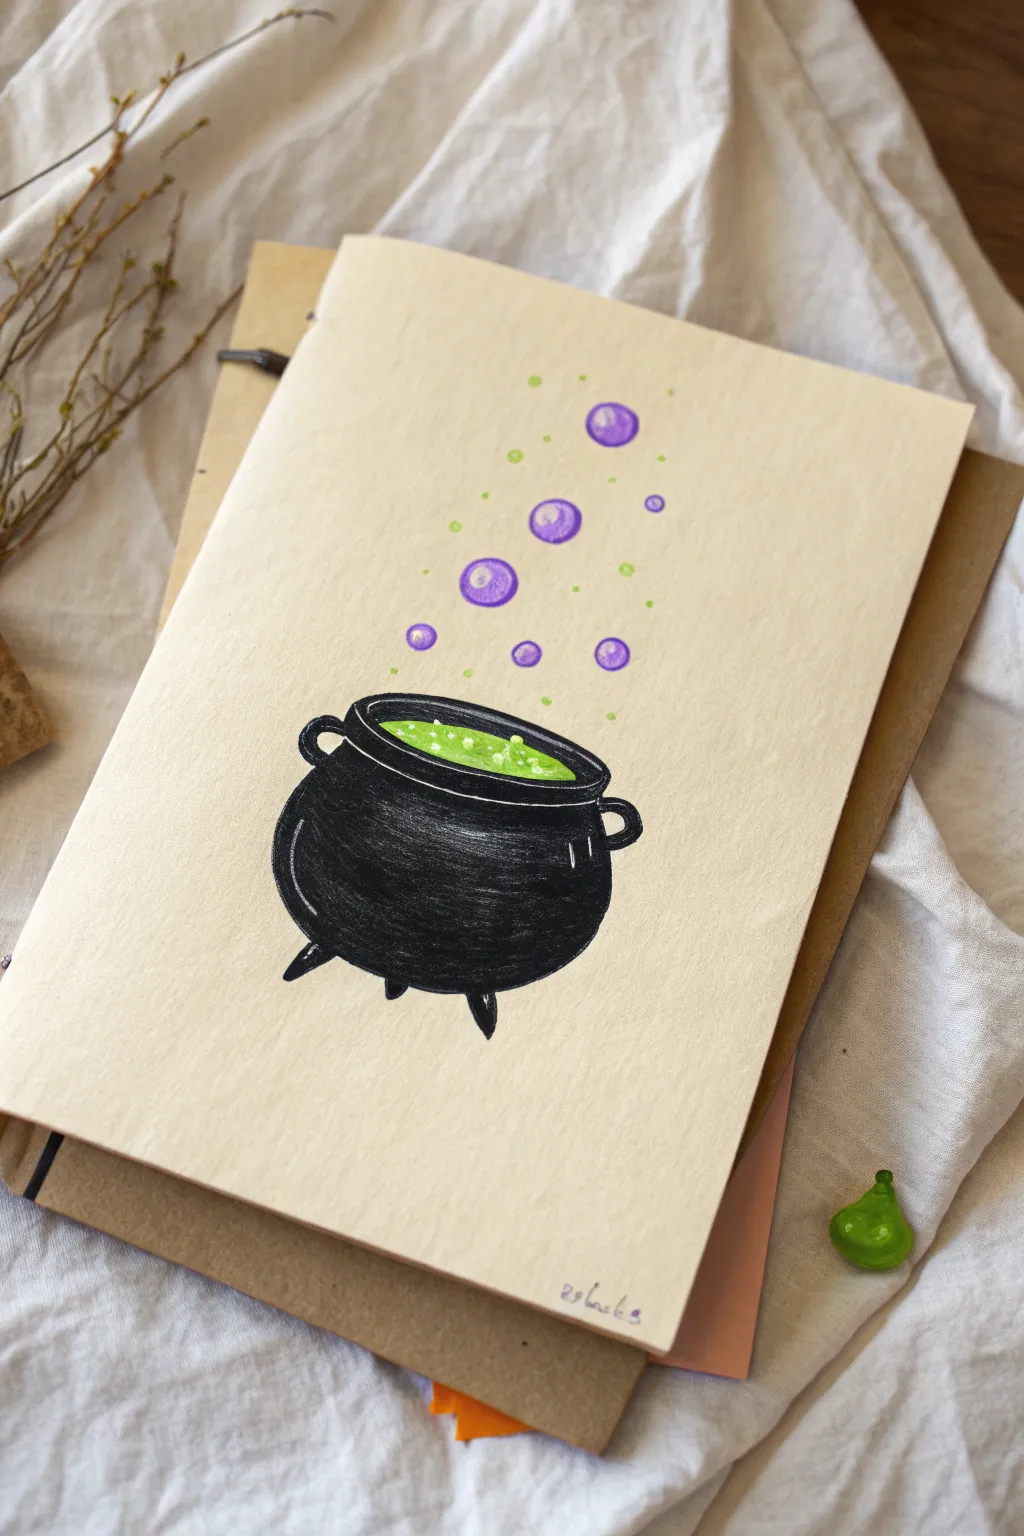
This bewitching cauldron illustration combines bold black ink with vibrant pops of neon green and purple to create a fun, magical vibe. The design is clean and illustrative, making it perfect for a handmade greeting card or a spooky sketchbook spread.
Step-by-Step Guide
Materials
- Cream or off-white cardstock paper
- Pencil (HB or 2B)
- Eraser
- Fine liner or black gel pen (0.5mm)
- Black brush pen or broad marker
- Neon green paint marker (like Posca) or gel pen
- Light green fine liner or colored pencil
- Purple marker or colored pencil
- White gel pen
Step 1: Sketching the Cauldron Shape
-
Draw the rim:
Start by lightly sketching a narrow horizontal oval near the bottom third of your paper. This will be the opening of the pot. Draw a second, slightly larger oval around the first one to create the thickness of the rim. -
Form the body:
From the sides of the outer oval, draw a large, rounded U-shape extending downward. Make the bottom fairly wide and rounded to give the cauldron a heavy, cast-iron look. -
Add handles and legs:
Sketch two small C-shaped loops on either side of the rim for handles. At the bottom of the pot, draw three small, pointed feet—two on the sides pointing outward slightly, and one in the center pointing down.
Uneven Ink?
If your black marker looks streaky on the large cauldron area, color in small circular motions rather than straight lines to blend the strokes better.
Step 2: Inking the Black Iron
-
Outline the pot:
Using your fine black pen, trace over your pencil lines for the cauldron’s body, rim, handles, and feet. Keep your hand steady for clean, crisp lines. -
Fill the body:
Switch to your black brush pen or broad marker to fill in the body of the cauldron. This is the most satisfying part, but apply the ink carefully near the edges to stay within your lines. -
Leave highlights:
While filling, you can leave tiny slivers of paper uncolored along the upper left curve or rim to suggest a metallic sheen, or just fill it solid black and add white details later. -
Add texture marks:
Use your white gel pen to add a few curved scratch marks or highlights on the right side of the pot and the handles. This gives the flat black shape some dimension and makes it look like shiny metal.
Step 3: Brewing the Potion
-
Fill the potion surface:
Inside the top oval rim, color the surface of the liquid with your neon green paint marker. Make it nice and opaque. -
Draw surface bubbles:
While the green is drying, use a lighter green shade or white gel pen to add tiny circles and dots floating on top of the potion to look like foam. -
Float the big bubbles:
Above the cauldron, draw several circles of varying sizes floating upward in an invisible column. These are your magic bubbles rising from the stew. -
Color the purple bubbles:
Fill these floating circles with your purple marker. Leave a tiny white spot uncolored in the upper left of each bubble for a natural highlight. -
Outline the bubbles:
Use a fine purple pen or a very light hand with your black pen to give the bubbles a thin outline so they stand out against the cream paper. -
Add the magic shimmer:
Add extra sparkle by drawing tiny solid green dots and speckles around the purple bubbles, flowing upward like magical dust.
Pro Tip
Use paint markers (like Posca) for the neon green potion. They sit on top of the paper rather than soaking in, making the color pop much more intensely.
Step 4: Final Touches
-
Highlight the bubbles:
Use your white gel pen to add a crisp white reflection dot on the top of each purple bubble and a small curved line on the bottom to simulate transparency. -
Refine the edges:
Check the black ink on the cauldron. If it looks patchy after drying, go over it with a second layer for a deep, solid black. -
Clean up:
Once you are absolutely sure all ink is dry, gently erase any visible pencil marks from your initial sketch.
Now you have a bubbling burst of magic ready to charm anyone who sees it
Simple Coffin With Cross Detail
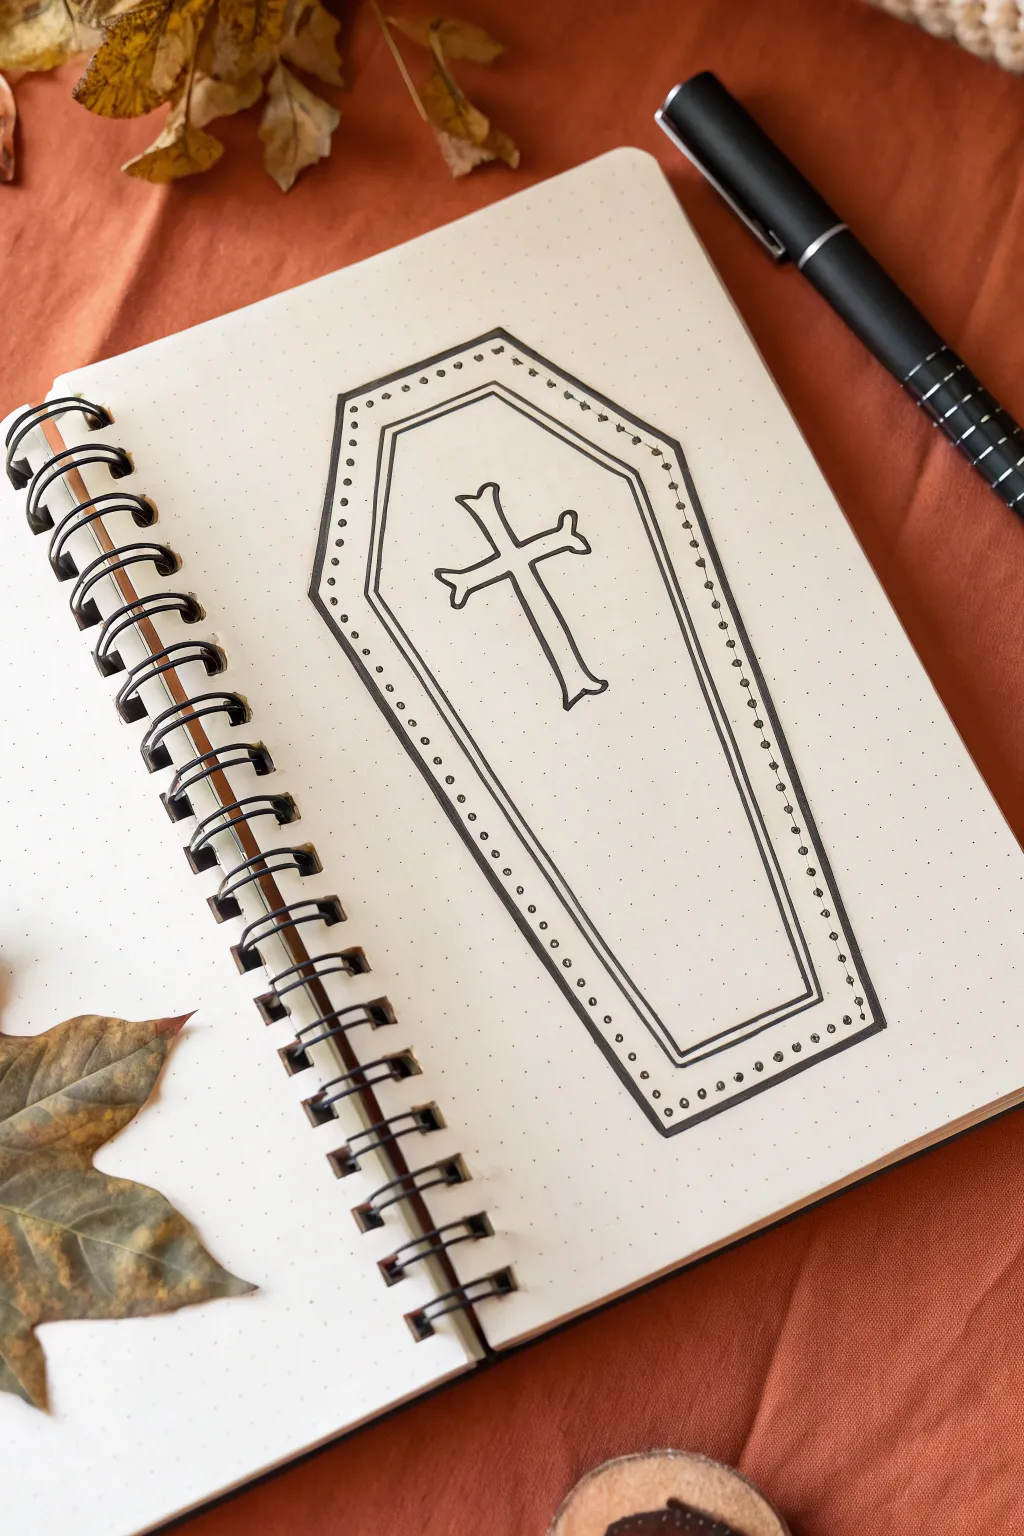
This minimalist coffin design captures the eerie essence of Halloween with clean lines and simple dot details. It is a perfect addition to your October bullet journal spread or a seasonal doodle page.
How-To Guide
Materials
- Dot grid notebook or paper
- Fine liner pen (black, size 03 or 05)
- Pencil
- Eraser
- Ruler (optional)
Step 1: Drafting the Coffin Shape
-
Mark the top and bottom:
Start by identifying the center vertical line of your coffin. Make a small mark or dot where you want the very top point and the very bottom point to be. The bottom point should be significantly lower to create an elongated shape. -
Define the width:
Visualize the ‘shoulders’ of the coffin. Move down from your top point about a quarter of the total length. Make marks to the left and right of your imaginary center line to set the widest part of the coffin. -
Connect the outer outline:
Using your pencil, lightly connect the top point to the two shoulder marks. Then, draw long, tapering lines from those shoulders down to the bottom center point. This is the classic hexagonal coffin shape. -
Create the inner border:
Sketch a second, smaller coffin shape inside the first one. Keep the spacing consistent, leaving a gap of about two grid squares between the outer and inner lines.
Wobbly Lines?
Don’t stress if your lines aren’t perfectly straight without a ruler. Slightly organic, wavering lines actually add to the spooky, old-fashioned aesthetic.
Step 2: Drawing the Cross
-
Position the cross:
Locate the upper-middle section of the inner coffin space. Sketch a vertical line for the main shaft of the cross. -
Add the horizontal bar:
Cross the vertical line with a shorter horizontal line about one-third of the way down from the top of the shaft. -
Thicken the cross shape:
Outline around your stick figure cross to give it thickness. Flare the ends of the arms slightly outward, creating a bone-like or decorative appearance.
Make It Pop
Use a light gray marker to add a shadow to the right side of the cross and the inner coffin rim for a simple 3D effect.
Step 3: Inking and Detailing
-
Ink the main outlines:
Take your black fine liner and carefully trace over the pencil lines for the inner and outer coffin shapes. -
Ink the cross:
Trace the outline of the cross in the center. I find it easier to rotate the notebook slightly to get smoother curves on the flared ends. -
Darken the borders:
Go over the inner and outer coffin lines a second time to thicken them up, making them stand out boldly against the paper. -
Add the dot pattern:
In the space between the outer and inner border, place small, evenly spaced dots. Follow the perimeter all the way around, placing a dot in the corners first to ensure alignment. -
Refine the dots:
If the dots look too faint, touch them up gently with the pen tip to ensure they are solid black circles rather than just specks. -
Let it dry:
Wait a few moments for the ink to set completely to avoid smudging your crisp lines. -
Erase pencil marks:
Gently erase all the underlying pencil sketches, leaving just the clean black ink on the page.
Your spooky coffin doodle is complete and ready to haunt your notebook pages
Gravestone Cluster Mini Scene
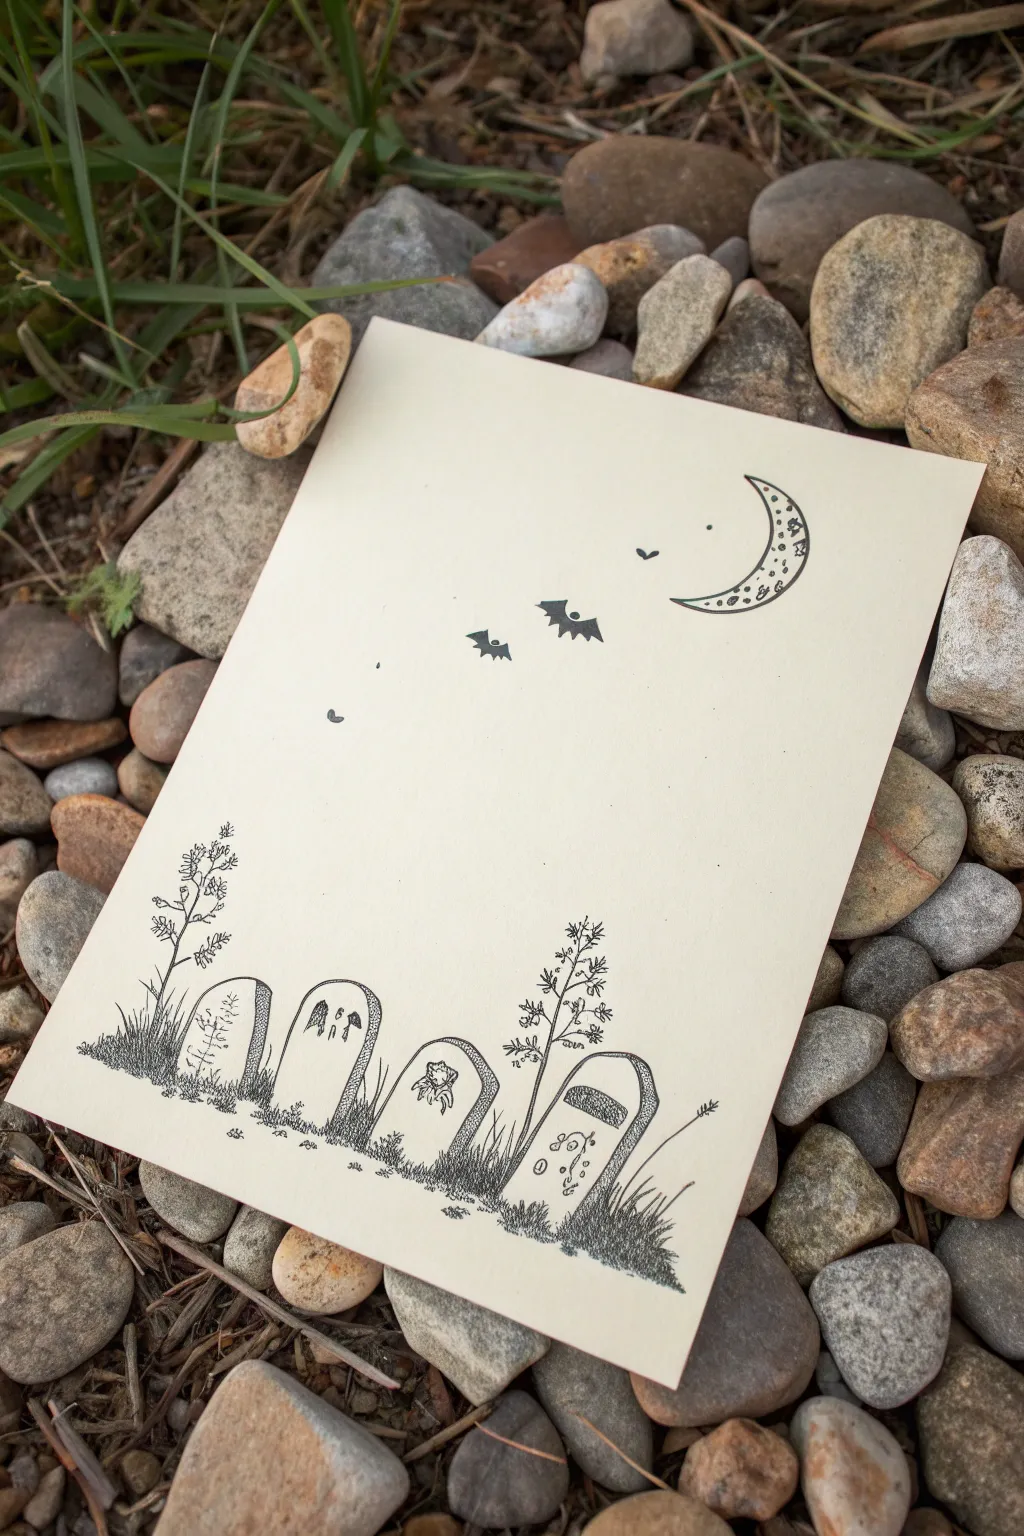
Capture the eerie stillness of a moonlit cemetery with this minimalist pen illustration. Using fine liners on cream cardstock, you’ll build a charmingly haunting scene featuring weathered tombstones and a starry night sky.
Step-by-Step Tutorial
Materials
- Cream or off-white cardstock (approx. A5 size)
- Fine liner pens (sizes 005, 01, and 03)
- Pencil (HB or H)
- Soft gum eraser
- Ruler (optional)
Step 1: Planning the Layout
-
Set the horizon:
Begin by lightly sketching a loose, uneven horizon line near the bottom third of your paper. Keep it slightly curved or bumpy to represent uneven ground rather than a perfectly straight line. -
Draft the tombstones:
Sketch four tombstone shapes along your horizon line. Vary the shapes slightly—make some rounded, some squared-off, or slightly tilted—to give them an aged, neglected appearance. -
Outline the sky elements:
In the upper right corner, sketch a crescent moon. Then, lightly mark the positions for two or three small bats flying diagonally across the center of the page.
Ink Smearing?
If you are left-handed or working quickly, place a piece of scrap paper under your drawing hand. This acts as a shield, preventing oils and friction from smudging your fresh ink lines.
Step 2: Inking the Foreground
-
Outline the stones:
Switch to your 03 pen to trace the main outlines of the tombstones. Use a slightly broken or shaky line quality here; this adds texture and makes the stone look weathered right away. -
Add dimension:
Draw thin secondary lines on the right side and top edge of each stone to create a 3D effect, suggesting depth and thickness. -
Draw the wild grass:
Using a 01 pen, flick short, quick upward strokes along the base of the stones. Group these strokes together in clumps to look like overgrown grass and weeds reclaiming the graveyard. -
Add tall weeds:
On the far left and between the rightmost stones, draw taller, spindly plant stems. Add tiny, erratic leaves or seed pods to the tops of these stems to create silhouette-style vegetation.
Step 3: Adding Details & Texture
-
Detail the headstones:
Use your 005 pen for delicate details inside the stones. Draw faint cracks, illegible squiggles for inscriptions, or simple motifs like a flower or skull on the faces of the stones. -
Stipple shading:
Create shadows using stippling (tiny dots). Concentrate dots heavily at the base of the stones where they meet the grass, and lightly fade them upward. This grounds the objects. -
Shadow the sides:
Fill the 3D side panels of the tombstones with dense hatching or tight stippling to make the front faces pop forward. -
Darken the ground:
Go back to the grass line with the 03 pen and add denser black areas at the very bottom roots of the grass clumps to add weight and contrast to the scene.
Pro Tip: Texture
Don’t connect every line on the tombstone cracks. Leaving small gaps in your ink lines makes the cracks look more natural and less like a cartoon outline.
Step 4: The Night Sky
-
Ink the moon:
Outline your crescent moon with the 01 pen. Instead of leaving it empty, fill the inside with tiny circles, varied dots, and small craters to give it a textured, cratered surface. -
Fill the bats:
carefuly outline and then color in your bat silhouettes with solid black ink. Make the wings jagged and sharp. -
Add distant birds:
Draw two tiny ‘v’ shapes near the moon to suggest distant birds or bats flying far in the background. -
Sprinkle stars:
Dot the sky randomly with your finest pen. Keep the dots sparse to maintain the minimalist feel, perhaps clustering a few near the moon. -
Clean up:
Wait at least 15 minutes for the ink to fully cure, then gently erase all your pencil guides to reveal the crisp black-and-cream contrast.
Now you have a perfect, eerie little art piece ready to display or gift to a spooky friend
Unraveling Mummy Character
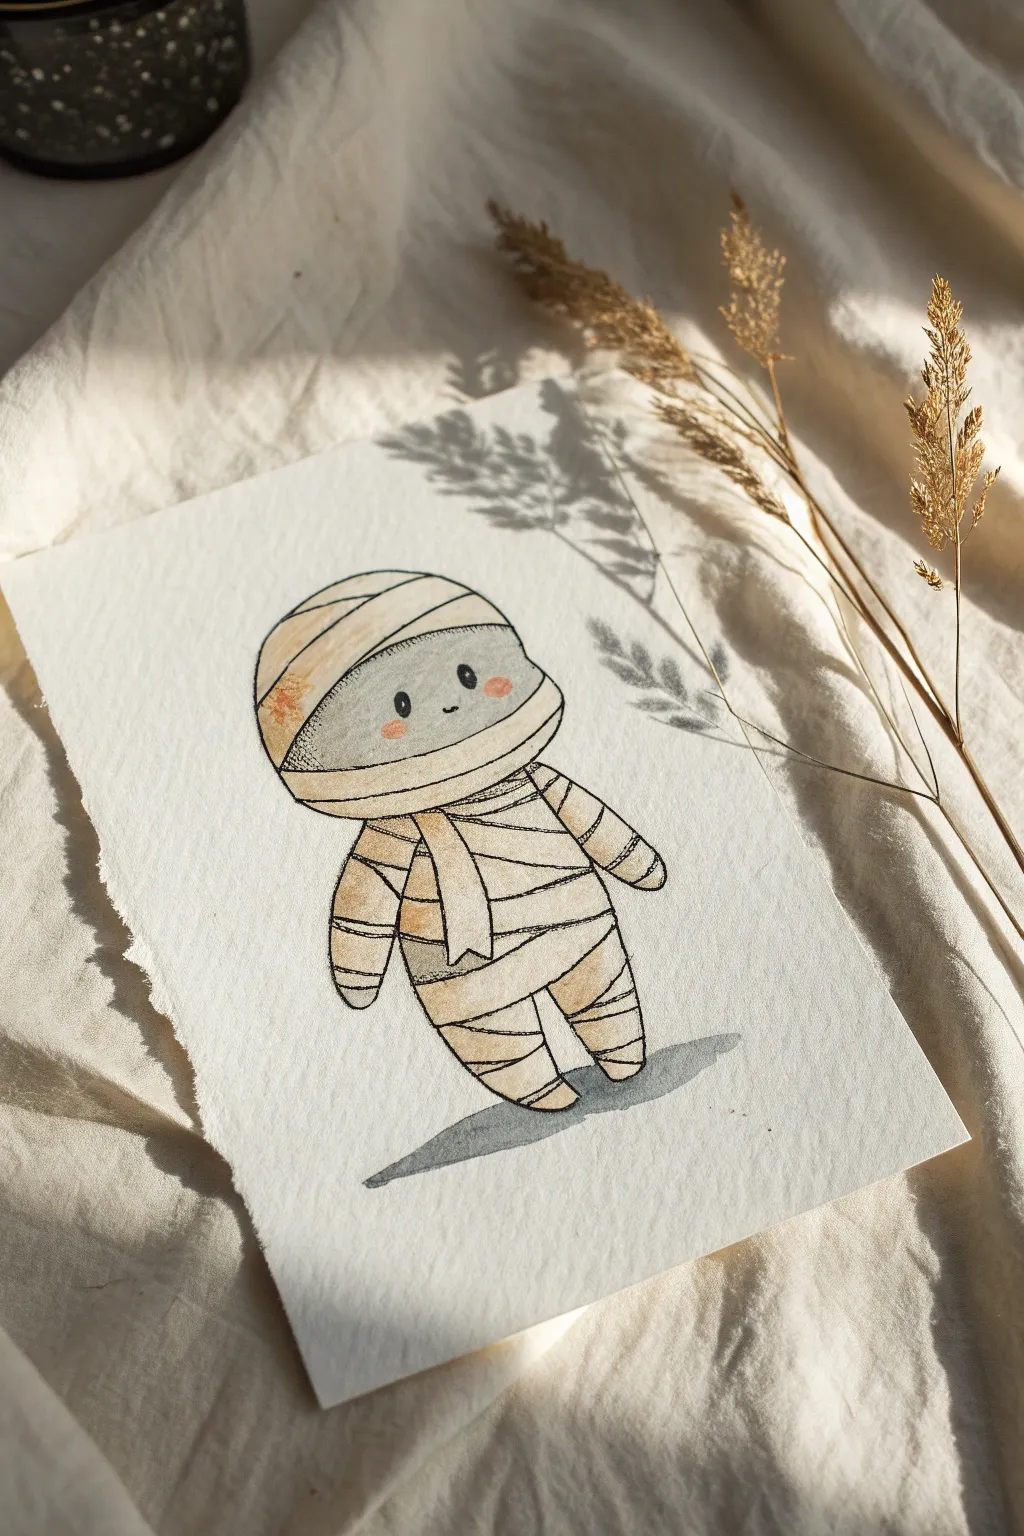
Create a charmingly spooky mummy character with simple lines and soft watercolor shading. This easy-to-follow doodle captures a vintage Halloween vibe, perfect for handmade cards or seasonal journal pages.
Step-by-Step Guide
Materials
- Cold press watercolor paper (A5 size)
- Pencil (HB or 2H)
- Kneaded eraser
- Fine liner pen (black, waterproof, 0.3mm or 0.5mm)
- Watercolor paints (Yellow Ochre, Burnt Sienna, Payne’s Grey, Blush/Pink)
- Round watercolor brush (size 4 or 6)
- Small detail brush (size 0 or 2)
- Jar of water
- Paper towel
Step 1: Sketching the Foundations
-
Head shape:
Start by lightly sketching a large, slightly squashed oval for the head. It should be wider than it is tall, like a rounded bean. -
Body outline:
Below the head, draw a smaller, rounded shape for the body. Imagine a potato shape that connects directly to the bottom of the head. -
Adding limbs:
Sketch simple, stubby arms hanging loosely at the sides. For the legs, draw two short, tapered shapes angling slightly inward at the feet. -
Defining the face:
Draw a horizontal curved line across the middle of the head oval. This creates the ‘opening’ where the face will peek out. -
Wrapping lines:
Begin sketching the bandage lines. Draw curved, slightly irregular horizontal lines across the forehead and chin area, making them look wrapped around the form. -
Body wrappings:
Continue the wrapping pattern onto the body, arms, and legs. Vary the angles slightly so it looks like strips of cloth rather than perfect stripes. -
Loose end detail:
Add a vertical strip of bandage hanging down from the neck area, giving the mummy a loose ‘scarf’ effect.
Step 2: Inking and Details
-
Face features:
Inside the facial opening, draw two small, widely spaced black ovals for eyes and a tiny ‘u’ shape for the mouth. -
Inking the outline:
Using your waterproof fine liner, trace over your main pencil lines. I like to make the outer contour slightly thicker than the inner bandage lines for emphasis. -
Refining bandages:
When inking the wrappings, let your hand wobble just a tiny bit. Perfect straight lines look too stiff; organic lines look like fabric. -
Erasing:
Wait for the ink to be completely dry to the touch, then gently erase all visible pencil marks with your kneaded eraser.
Smudgy Ink?
If your black pen bleeds when you paint, it wasn’t waterproof. If you don’t have waterproof ink, do the watercolor painting first, let it dry fully, and then draw the outlines on top.
Step 3: Watercolor Wash
-
Mixing the bandage color:
Mix a very watery wash of Yellow Ochre with a tiny touch of Burnt Sienna to get an aged, tea-stained color. -
Painting the wraps:
Apply this pale wash to the bandages. Don’t worry about filling every white space perfectly; leaving some white highlights adds texture. -
Adding shadows:
While the first layer is still slightly damp, drop a slightly more concentrated mix of the same brown into the crevices where the bandages overlap. -
Shadowing the sides:
Paint a darker stripe of brown along the left side of the mummy’s head and body to create a rounded, 3D effect. -
Face color:
Dilute Payne’s Grey heavily with water until it’s a soft, cool grey. Carefully paint the face area, avoiding the black eyes. -
Rosy cheeks:
Once the grey face is dry, use a detail brush to dab two small spots of diluted pink or blush color just below the eyes.
Ancient Artifact Look
Splatter tiny droplets of diluted brown paint across the paper using a stiff brush or toothbrush. This gives the drawing a weathered, vintage parchment appearance.
Step 4: Finishing Touches
-
Cast shadow:
Mix a darker grey wash. Paint a simple, flat oval shadow directly underneath the mummy’s feet, stretching slightly to the right. -
Texture details:
Once the paint is bone dry, you can use your pen to add tiny dots or hatch marks on the darker side of the bandages for extra texture.
Now your adorable little mummy is ready to haunt your sketchbook with its cuteness
Haunted House in Cartoon Shapes
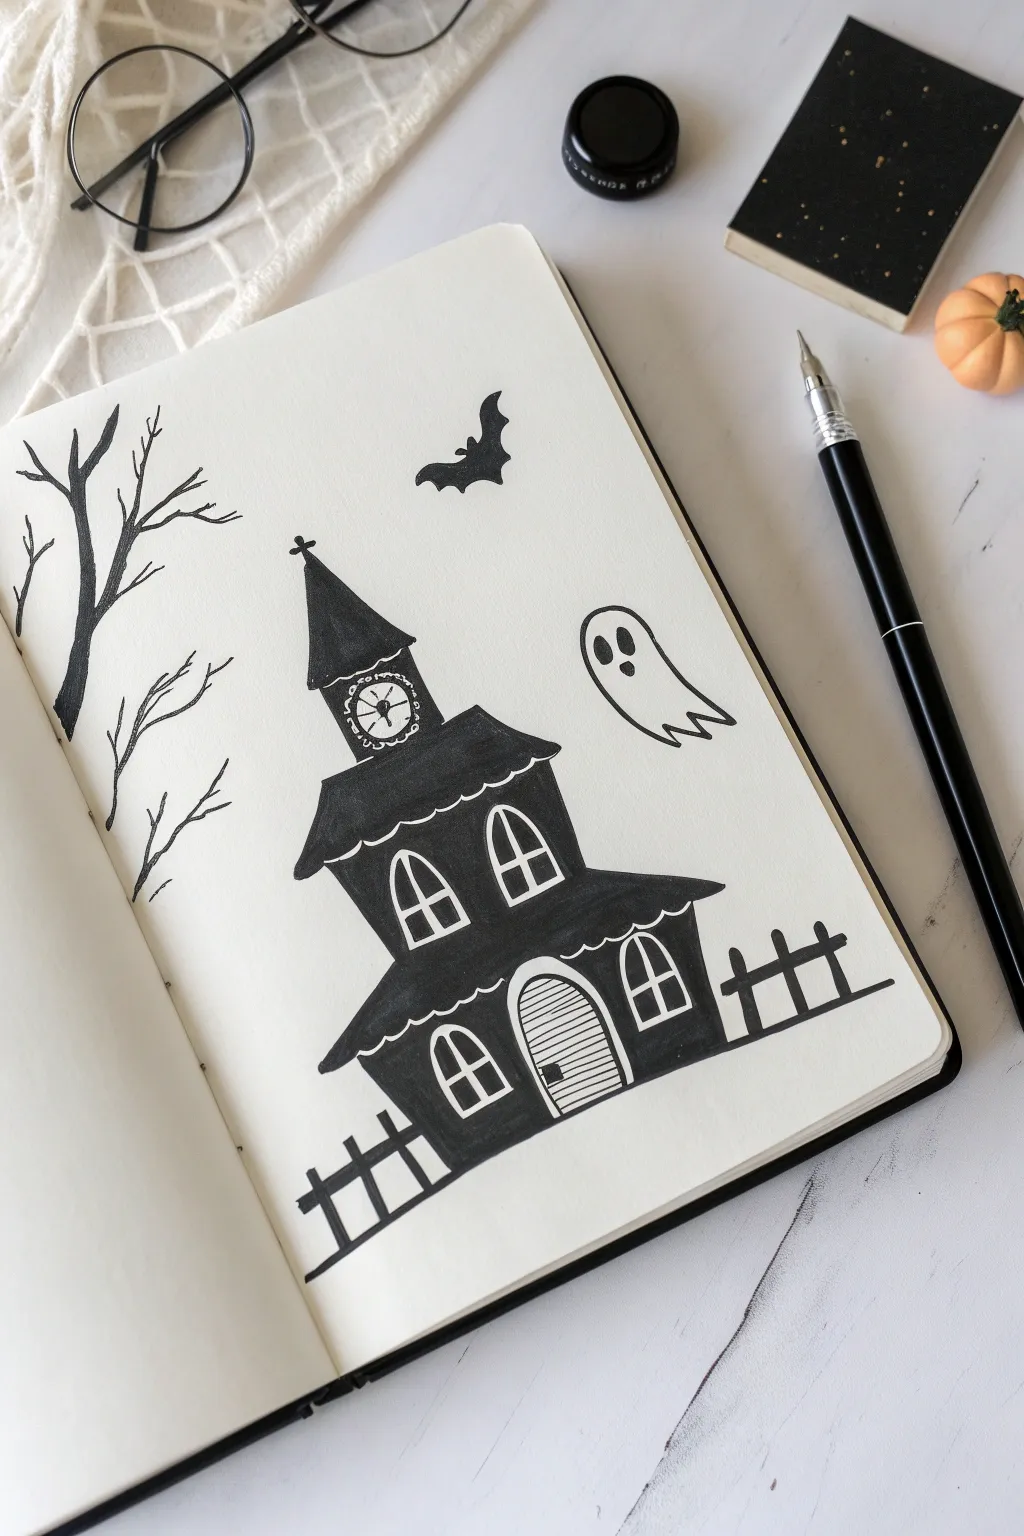
Get into the Halloween spirit with this charmingly spooky haunted house illustration. Using simple shapes and bold black ink, you’ll create a classic scene featuring a crooked manor, bare trees, and a floating ghost that’s more cute than scary.
Detailed Instructions
Materials
- A5 Dot grid or plain sketchbook
- Fine liner pen (0.3mm or 0.5mm)
- Black brush pen or broad marker
- Pencil for sketching
- Eraser
- Ruler (optional)
Step 1: Sketching the Foundation
-
Outline the main tower:
Start by drawing the central structure of the house using pencil. Sketch a tall, narrow rectangle for the top floor and a wider rectangle beneath it for the main floor. Don’t worry about straight lines—a little wobble adds character. -
Add the roofs:
Top the upper rectangle with a sharp triangular roof. For the lower section, draw a trapezoid shape overlapping the rectangle to create the main roof. Add scalloped edges along the eaves of both roofs to mimic fancy tiling. -
Draw the base floor:
Sketch a third, widest section at the bottom. Give it a slightly slanted trapezoidal shape so the house looks like it’s settling into the ground. Add a scalloped roof line here as well. -
Place windows and door:
Draw arched window shapes: one on the top tower, two on the middle floor, and two flanking the door on the bottom. In the center of the base, sketch a large arched double door. -
Add the clock and cross:
On the upper tower, just below the roof, draw a circle for a clock face. Top the very peak of the spire with a small cross.
Step 2: Inking the Structure
-
Outline the house:
Using your fine liner, trace over your pencil lines for the walls and roofs. Keep your hand relaxed; the lines don’t need to be perfect. -
Define the details:
Ink the window frames, leaving the panes white. For the main door, draw horizontal lines to suggest wood planks and a small rectangle for the handle. -
Fill the black areas:
Switch to your brush pen or broad marker. Carefully fill in the walls of the house, working around the white windows and the wooden door. I find it safest to outline the small white areas first before filling the large spaces. -
Darken the roofs:
Fill in the roof sections with solid black. Leave the scalloped edges clean if you can, or color right to the edge for a solid silhouette look. -
Detail the clock:
Using your fine liner again, draw the clock hands and simple tick marks inside the circle on the tower. Add a decorative ruffled edge around the clock face.
Smudged Ink?
If your heavy black ink smudges while erasing, you can cover small mistakes with a white gel pen or white gouache once everything is fully dry.
Step 3: Adding the Atmosphere
-
Draw the fence:
To the left and right of the house, draw simple fence posts. Create vertical rectangular bars and connect them with a horizontal rail. Fill them in solid black. -
Create the spooky tree:
On the left side of the page, draw a bare, twisting tree. Start with a thick trunk that tapers as it goes up, branching out into jagged, thin limbs. Fill this silhouette in solid black. -
Add floating branches:
Draw a smaller, disconnected branch section floating slightly lower to fill the negative space on the left. -
Add the bat:
Above the house, draw a small silhouette of a bat with spread wings. Make the edges sharp to suggest movement. -
Draw the ghost:
On the right side, draw a classic sheet ghost shape. Use a fluid, wavy line for the body and tail. Ink two dark ovals for eyes and a larger one for a mouth. -
Erase guidelines:
Once the ink is completely dry—give it a good few minutes to prevent smudging—gently erase all underlying pencil sketches.
Pro Tip: Depth Check
To fix patchy black areas, wait for the first layer of marker to dry completely before adding a second coat. This prevents the paper from pilling.
Now you have a striking, high-contrast Halloween scene perfect for your seasonal journal spread


Have a question or want to share your own experience? I'd love to hear from you in the comments below!