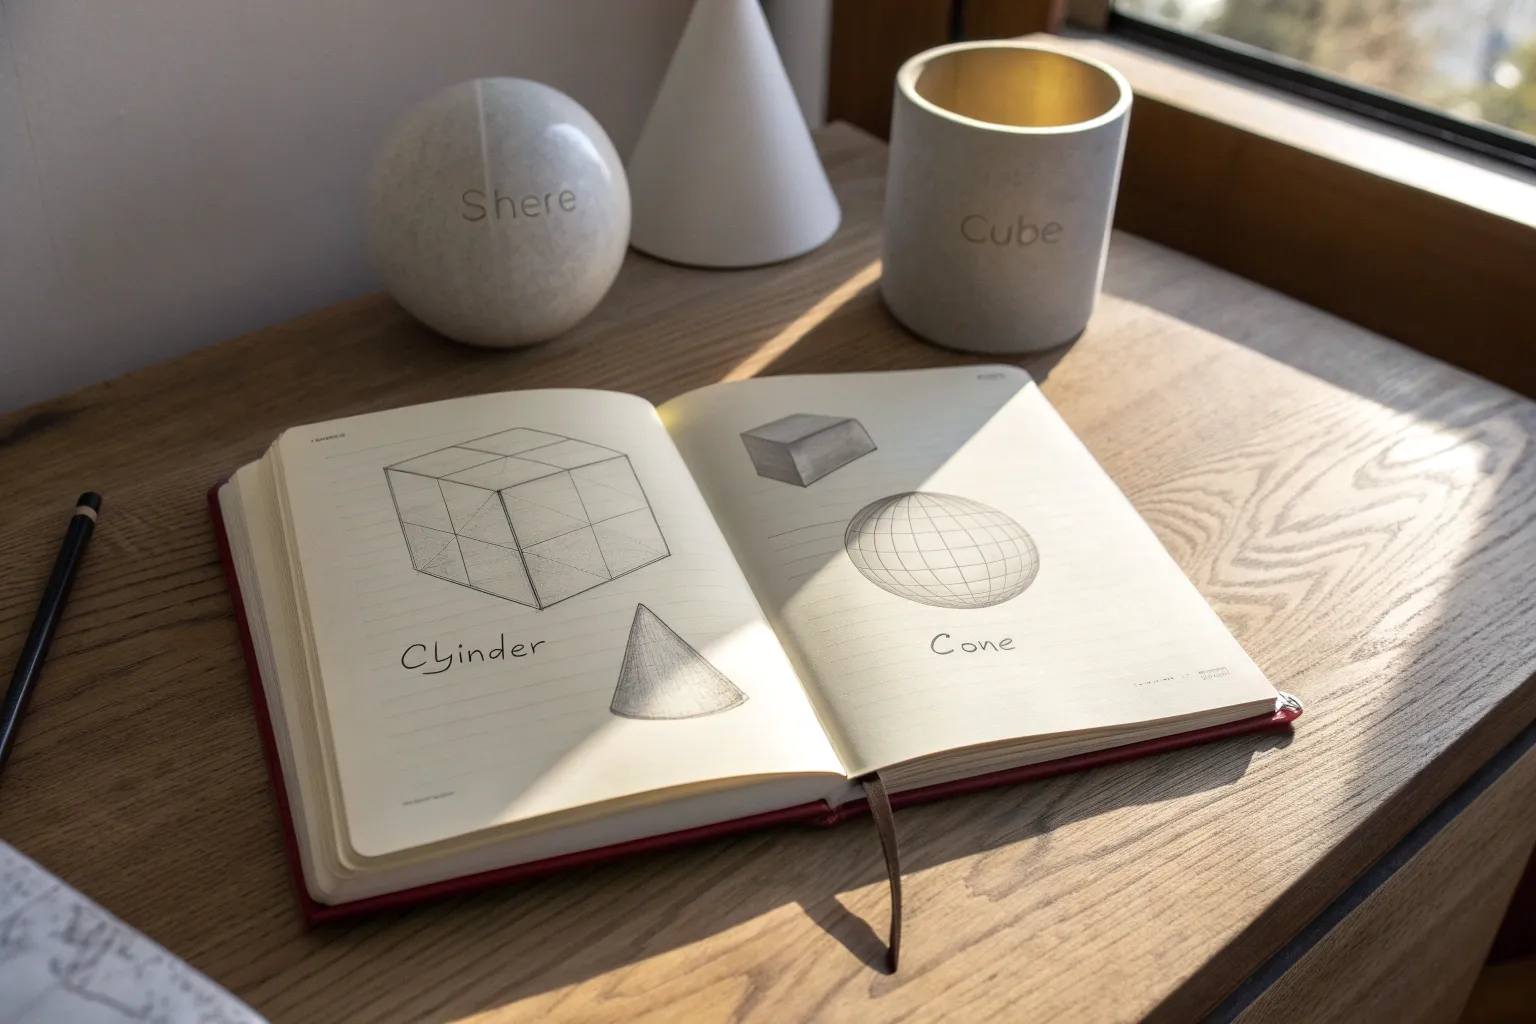
Whenever my drawings feel flat, I come back to form drawing—the simple (but seriously powerful) practice of turning basic shapes into believable 3D forms. Here are a bunch of go-to form drawing ideas I use with students (and myself) to build stronger structure, cleaner perspective, and more confident shading.
Six Basic Forms Cheat Sheet
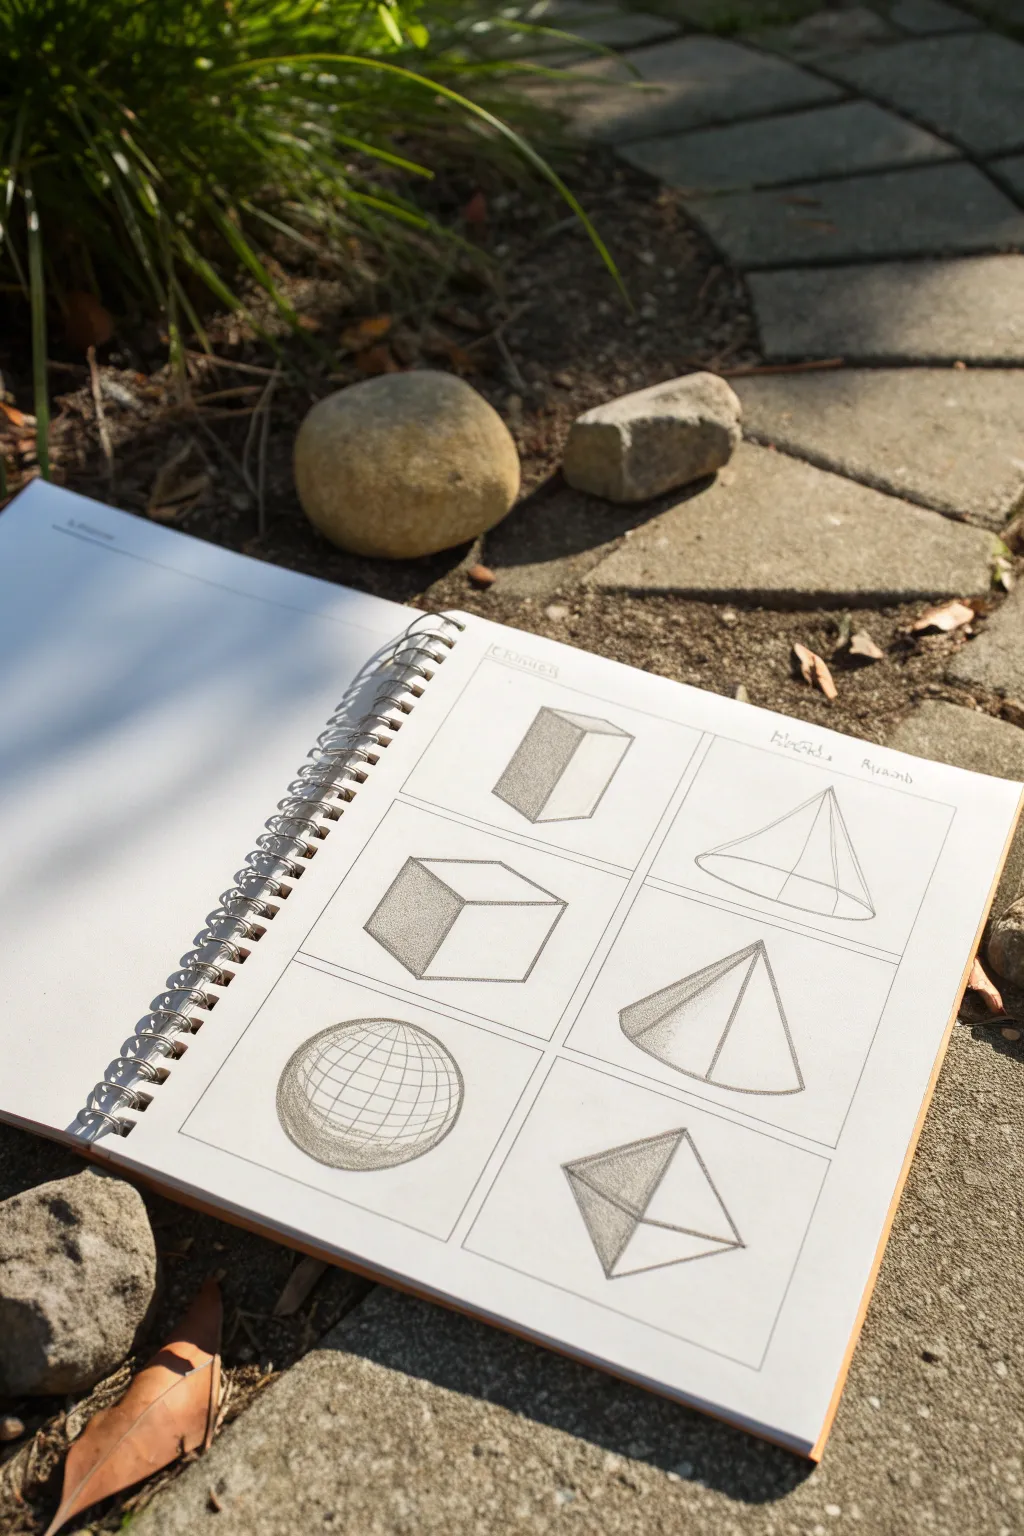
This fundamental exercise teaches you to transform flat 2D shapes into convincing three-dimensional forms using perspective and shading. By sketching these six essential solids—cubes, pyramids, spheres, and more—you’ll build the cornerstone skills needed for complex realistic drawing, all neatly arranged in a grid for easy reference.
Detailed Instructions
Materials
- Sketchbook (spiral bound suitable for graphite)
- HB or 2B graphite pencil
- Ruler or straight edge
- Eraser (kneaded or plastic)
- Pencil sharpener
Step 1: Setting the Stage
-
Create the framework:
Begin by using your ruler to draw a large rectangle on your sketchbook page. Divide this main rectangle into a grid of six equal boxes—two columns of three rows. -
Label the study:
At the top of the page, lightly write a title if desired, but keep the focus on the cleanliness of the grid lines as they will frame your artwork.
Uneven shapes?
If your ellipses (for cones or cylinders) look lopsided, draw a crosshair (+) first. Mark equal distances from the center on all four arms, then connect detailed curves through those marks.
Step 2: Constructing the Rectilinear Forms
-
Drafting the rectanglular prism:
In the top-left box, draw a vertical rectangle slightly angled. Add perspective lines receding to the left to create depth, making it look like a tall block leaning back slightly. -
Shading the prism:
Identify your light source (coming from the right). Shade the entire left-facing side of the prism with uniform vertical hatching to show it is in shadow. -
Building the cube:
In the middle-left box, draw a square face tilted slightly. Extend parallel diagonal lines from three corners to form the top and side planes. -
Shading the cube:
Apply heavy shading to the left-most vertical face. I find that leaving the top face completely white helps emphasize the light hitting it directly.
Step 3: Drawing the Pyramidal Shapes
-
Forming the cone:
In the top-right box, draw a thin ellipse for the base. From the outer edges of the ellipse, draw two straight lines meeting at a central apex point above. -
Adding dimension to the cone:
Draw a vertical line from the apex to the center of the base to help with symmetry, then erase it. Shade the left curve of the cone, getting lighter as you move toward the center. -
Sketching the triangular pyramid:
In the middle-right box, draw a flattened triangle for the base. Choose an apex point above and connect the base corners to it. -
Defining the pyramid’s volume:
Shade the left-hads face of the pyramid darkly. Keep the right-hand face light or white to clearly differentiate the planes.
Cast Shadows
To ground your objects, draw cast shadows on the floor plane opposite the light source. Match the shadow shape to the object (e.g., a triangular shadow for a pyramid).
Step 4: Drafting Complex Solids
-
Drawing the sphere:
In the bottom-left box, draw a perfect circle. Sketch an ellipse inside—like a belt/equator—to establish volume. -
Mapping the grid:
Draw curved longitude and latitude lines across the sphere’s surface. This wireframe effect demonstrates roundness without needing photorealistic shading. -
Shading the sphere:
Add a crescent of shadow on the bottom-left edge, blending it softly into the grid lines to give the ball weight. -
Constructing the octahedron:
In the final bottom-right box, draw a rhombus shape. Draw a vertical line through the center and a horizontal line crossing it. -
Connecting the vertices:
Connect the ends of your cross lines to the corners of the rhombus to create four distinct triangular faces meeting at a point. -
Final shading touches:
Shade the left-most triangular face darkly. Use a medium tone for the bottom face, and leave the right-facing planes lighter to define the multi-faceted gemstone shape.
Now you have a clean reference sheet for 3D forms that you can look back on whenever you start a complex drawing


Rotated Box Practice Grid
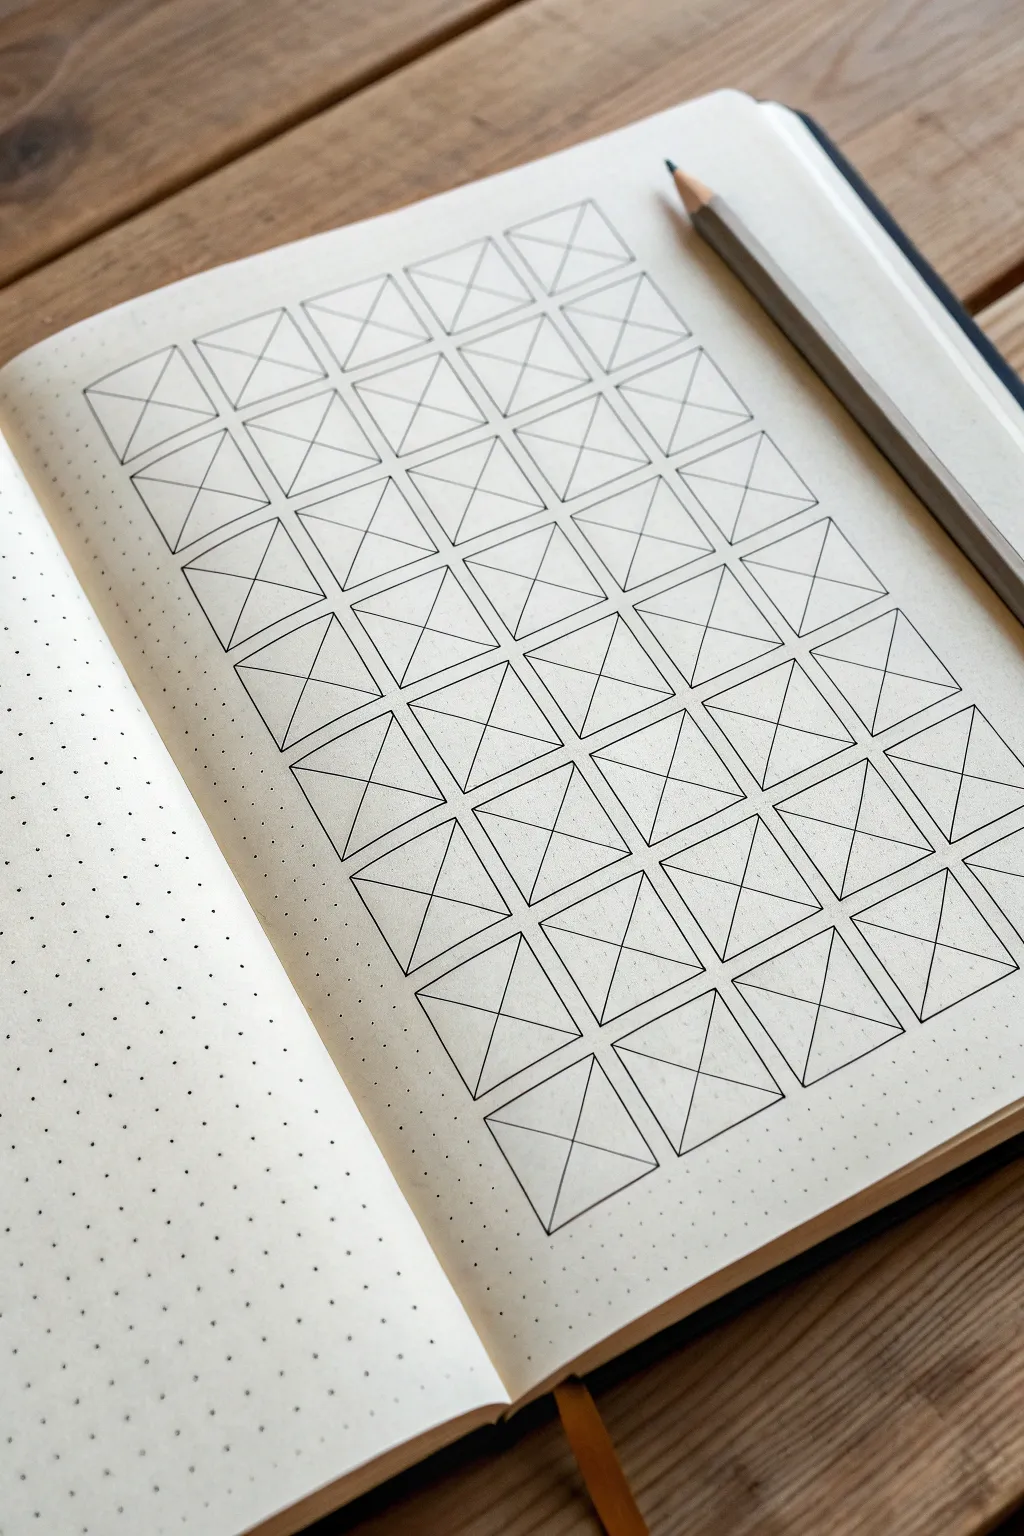
This satisfyingly structured exercise transforms a simple dot grid page into a precise lattice of crossed squares, perfect for practicing line control or tracking habits. The stark black lines against the cream paper create a clean, minimalist aesthetic that feels both organized and artistic.
Step-by-Step Guide
Materials
- A5 Dot Grid Notebook (cream paper recommended)
- Fine liner pen (black, size 0.3mm or 0.5mm)
- Ruler (clear plastic or metal)
- Pencil (HB or similar for drafting)
- Eraser
Step 1: Drafting the Grid
-
Define the margins:
Start by deciding on your layout’s placement. Count the dots to center your grid on the page, leaving a healthy margin of about 3-4 dot spaces at the top and bottom, and 2-3 on the sides. -
Mark the corners:
Using your pencil, lightly mark the four corner dots of your overall large rectangle. This boundary will contain all your individual boxes. -
Plot the columns:
Determine the width of your individual boxes. In this example, each box is likely 4 dot-spaces wide. Make small tick marks along the top edge of your boundary to indicate where each vertical line will fall. -
Plot the rows:
Similarly, determine the height of your boxes (usually equal to the width for perfect squares) and mark the intervals along the left vertical edge. -
Sketch the main grid:
Lightly draw the horizontal and vertical grid lines with your pencil and ruler to create the empty squares. Don’t press too hard, as these lines will need to be partially erased or inked over later.
Step 2: Inking the Structure
-
Draw vertical lines:
Grab your fineliner. Align your ruler with the first vertical pencil column and draw a crisp line from the top row to the bottom row. -
Complete the verticals:
Continue moving your ruler across the page, inking all vertical lines. I find it helpful to lift the pen slightly at the end of each stroke to keep the line weight consistent. -
ink horizontal lines:
Rotate your notebook if it’s more comfortable. Ink all the horizontal lines, crossing the verticals to form your clean grid of squares. -
Let it set:
Pause for a moment to let the ink dry completely before doing any erasing. This prevents smudging your crisp grid.
Grid Consistency
Count your dots twice before drawing! A single miscounted dot can throw off the entire symmetry of the page.
Step 3: Adding the Diagonals
-
Start the X pattern:
Position your ruler diagonally inside the top-left square, connecting the top-left corner to the bottom-right corner. -
Batch process diagonals:
Instead of doing one box at a time, align your ruler to cut through multiple boxes if they align diagonally across the page. Draw the first stroke of the ‘X’ for as many squares as your ruler covers. -
Complete the first direction:
Work your way across the entire grid, drawing all the diagonal lines that go from top-left to bottom-right. -
Cross the other way:
Now, align your ruler for the opposing diagonal (top-right to bottom-left). Draw these lines to complete the ‘X’ inside each square. -
Check for gaps:
Scan your grid. If any corners didn’t quite meet, carefully touch them up with the tip of your pen. -
Final clean up:
Once you are absolutely certain the ink is dry, take your eraser and gently remove any visible pencil guidelines.
Smudge Prevention
If your ruler drags ink, stick a few layers of masking tape on the underside of the ruler to lift it slightly off the paper.
Now you have a structured canvas ready to be filled with patterns or used for tracking projects


Ellipse Ladder for Cylinders
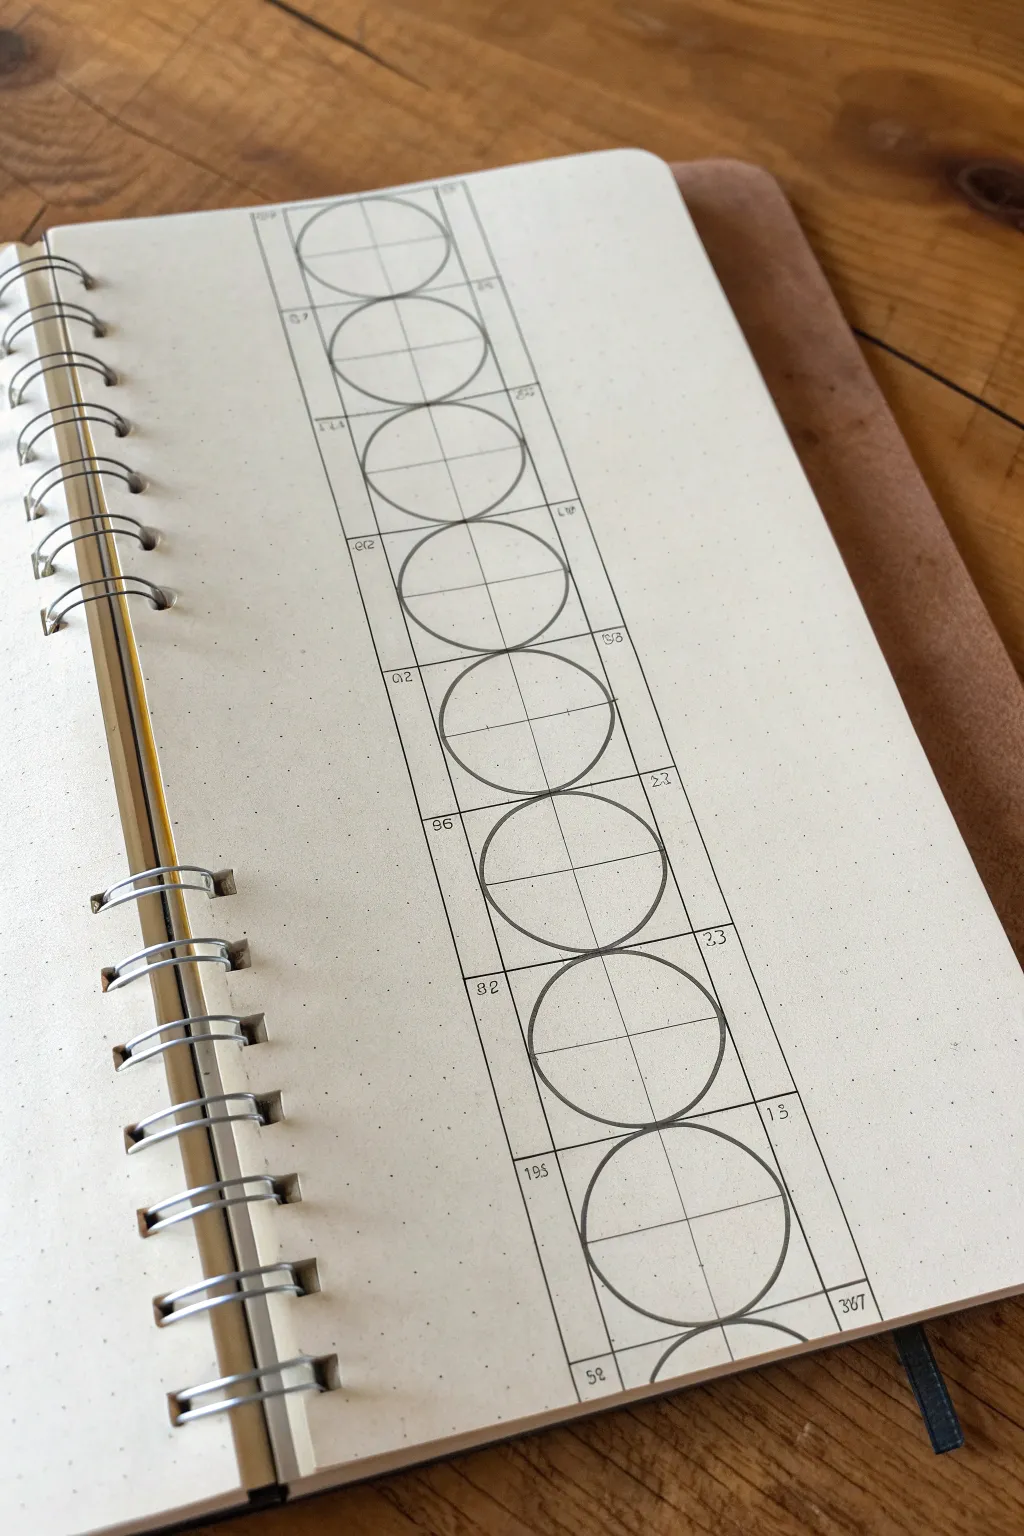
This precise technical drawing exercise helps you master the changing curvature of cylinders in perspective. By stacking these forms vertically, you create a satisfying, structured ladder that is excellent practice for architectural sketching and 3D modeling fundamentals.
Step-by-Step Tutorial
Materials
- A5 Dot grid or graph paper notebook
- Fountain pen or fine liner (0.3mm or 0.5mm)
- Straightedge or ruler
- Circle template (optional but helpful)
- Pencil (for initial layout)
- Eraser
Step 1: Setting the Framework
-
Establish the centerline:
Start by drawing a long vertical line down the center of your page using your ruler. This will serve as the spine of your entire drawing. -
Mark vertical increments:
Along this centerline, mark off equal segments. Based on the dot grid, I suggest marking every 4 grid squares to separate the circular units. -
Draw the boundary lines:
Draw two parallel vertical lines on either side of your centerline, spaced equally apart. If using a dot grid, go 2 or 3 squares out from the center on each side to create a long rectangular column. -
Close the boxes:
At each vertical mark you made in step 2, draw horizontal lines connecting the two outer boundaries. You should now have a vertical stack of uniform squares.
Wobbly Circles?
Ghost the motion first by hovering your hand over the paper in a circular motion 3-4 times before touching the pen to the page.
Step 2: Drafting the Geometry
-
Add cross-hairs:
Inside each square, you already have the vertical centerline. Now, ensure the horizontal dividers are clear. These cross-hairs divide every square into four equal quadrants. -
Sketch the circle bounds:
Lightly mark the midpoints of the four sides of your first square. These four points are where your circle must touch the square’s perimeter. -
Draw the first circle:
Starting at the top, carefully draw a circle inside the first square. It should touch the top, bottom, left, and right lines exactly at their center points. -
Check for symmetry:
Look closely at the negative space in the corners. The triangular gaps between the circle and the square corners should all look identical. -
Continue down the ladder:
Repeat this process for every square in the column. Focus on consistency; try to make the bottom circle look exactly identical to the top one.
Level Up: Into 3D
Turn these 2D circles into 3D cylinders by drawing short vertical lines connecting the widest points of adjacent ellipses.
Step 3: Inking and Numbering
-
Ink the main forms:
Once satisfied with your pencil sketch, trace over your circles and the outer rectangular grid with your pen. Use a confident, steady hand. -
Refine the centerline:
Draw the internal cross-hairs with a thinner line weight if possible, or use a lighter touch to differentiate them from the main shapes. -
Add numerical annotations:
In the small corner spaces left by the grid, add small numbers. You can sequence them 1, 2, 3… or use this space to log the specific diameter or grid unit count for future reference. -
Erase guidelines:
Wait for the ink to dry completely. Gently erase any stray pencil marks, leaving a crisp, clean technical drawing.
Now you have a perfect reference tool for understanding proportion and shape consistency


Cone Angles and Ellipse Bases
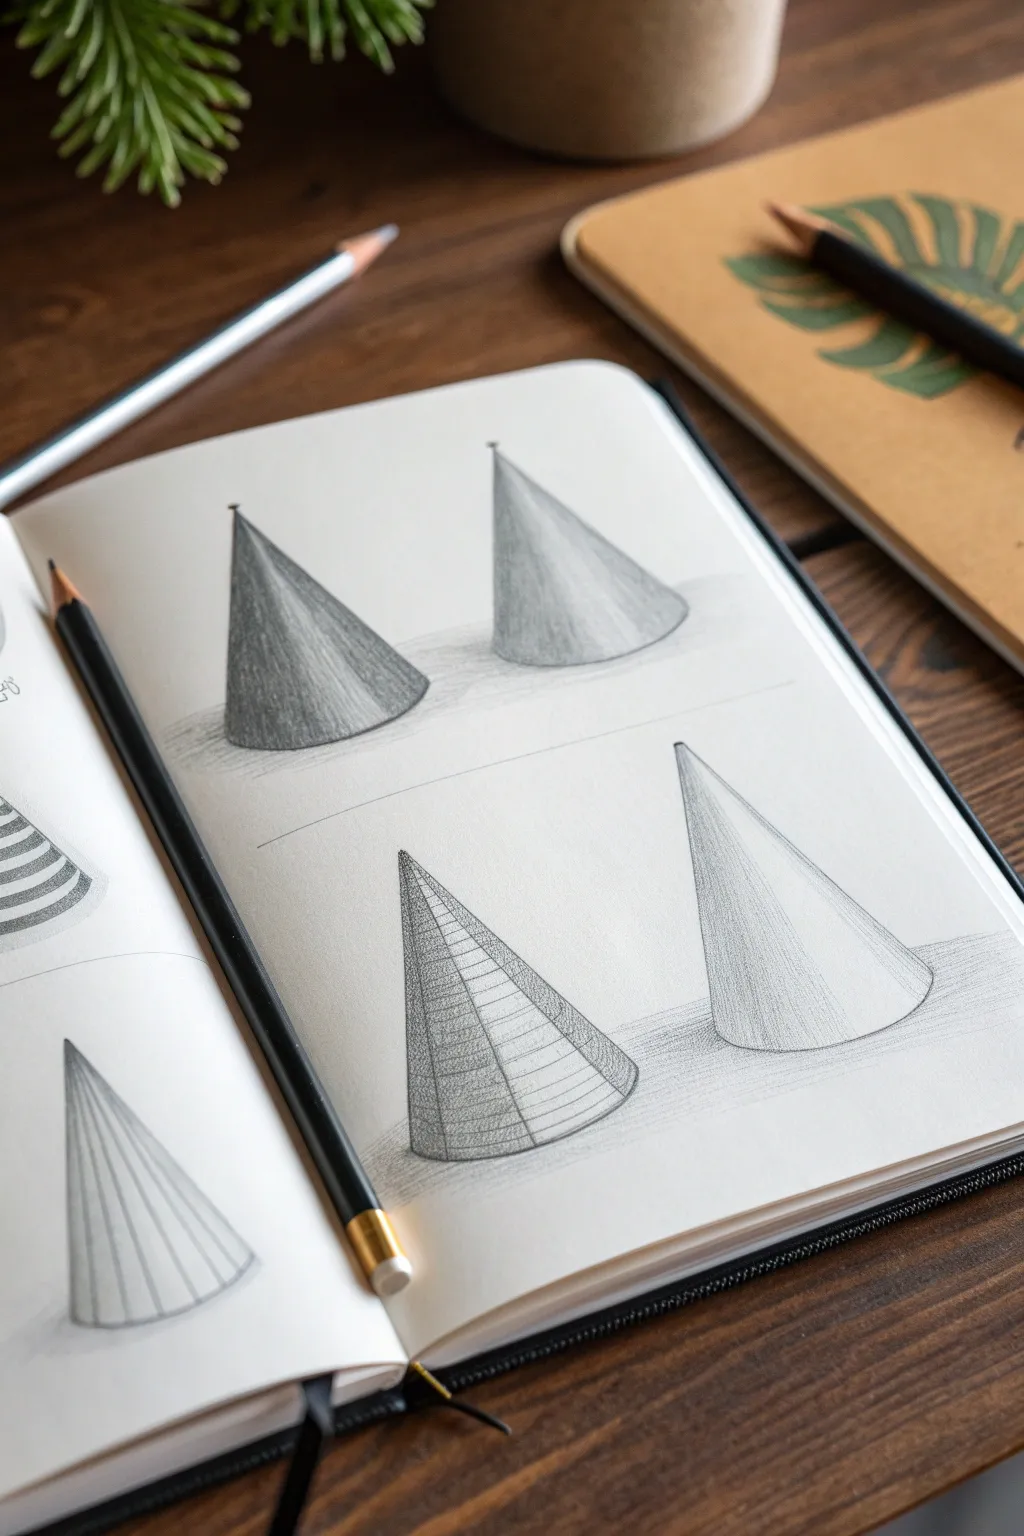
This tutorial guides you through sketching four geometric cones to practice form, shading, and perspective. The result is a clean, academic-style study page that demonstrates how changing the viewing angle affects the ellipse of the base.
Detailed Instructions
Materials
- Sketchbook or drawing paper (smooth bristol or mixed media)
- Graphite pencils (HB for sketching, 2B and 4B for shading)
- Pencil sharpener
- Eraser (kneaded or vinyl)
- Ruler (optional)
Step 1: Setting the Scene
-
Paper preparation:
Open your sketchbook to a fresh, blank page. Lightly divide the page in half horizontally with a very faint guideline if you want to ensure your two rows of cones remain separated, though eyeballing it works too. -
Establish the axis lines:
For the top two cones, draw two vertical lines spaced evenly apart. These will be the central axis for each cone, helping you keep them symmetrical. -
Determine the base width:
At the bottom of each vertical axis line, make two small marks equidistant from the center line to define the width of your cone bases. -
Sketch the top ellipses:
Draw the curvature of the bottom ellipses. For the top left cone, draw a tighter, flatter curve. For the top right cone, draw a slightly rounder, more open ellipse to simulate a higher viewing angle.
Step 2: Constructing the Forms
-
Connect the peaks:
Mark the top point (apex) of each cone on the central axis line. Draw straight lines connecting this apex down to the outer edges of your base ellipses. -
Repeat for the bottom row:
Move to the bottom half of the page. Draw two more cones using the same method: a central axis, base width marks, and connecting lines. Make the bottom-right cone noticeably taller and narrower. -
Define the bottom ellipses:
Sketch the full ellipses for the bottom row bases. The bottom-left cone should view the base from an angle that reveals a moderate curve, while the bottom-right cone should have a widely open, almost circular ellipse. -
Clean up guidelines:
Take your eraser and gently lift away the vertical axis lines and any parts of the ellipses that would be ‘hidden’ behind the cone’s body, unless you are drawing the transparent wireframe version.
Wobbly Ellipses?
Draw through the form! Sketch the entire oval of the base lightly, even the back part you won’t see. It’s easier to verify a correct oval shape than just a curved line.
Step 3: Shading and Texturing
-
Start the wireframe (bottom left):
On the bottom-left cone, draw a series of horizontal curved lines up the body of the cone, following the curvature of the base. These are contour lines. -
Add vertical contours:
Add vertical lines radiating from the apex down to the base on that same bottom-left cone, creating a grid-like wireframe effect that emphasizes the volume. -
Base tone for the top left:
Using the side of a 2B pencil, apply a smooth, even layer of graphite to the body of the top-left cone. Keep your strokes close together. -
Deepen the shadows:
Identify a light source (e.g., coming from the right). darken the left side of the top-left cone significantly with a 4B pencil to create a core shadow. -
Smooth gradient shading (top right):
For the top-right cone, use a lighter touch. Shade the left side but let it fade very gently into the white of the paper as you move right, creating a cylindrical volume illusion. -
Rendering the tall cone:
On the tall bottom-right cone, apply vertical hatching lines. Start dense on the shadowed side and space them out as you move toward the light source. -
Adding cast shadows:
Sketch horizontal cast shadows on the ground plane extending to the left of each cone. Keep these shadows blurry and soft compared to the sharp edges of the objects.
Try Ink Overlay
Once the pencil work is solid, go over just the wireframe cone with a fine-liner pen. This creates a striking contrast between the technical study and the shaded forms.
Step 4: Final Details
-
Refining edges:
Go back over the outer outlines of all four cones with a sharp HB pencil to crisp up the edges. A clean silhouette makes the form pop. -
Highlighting contrast:
I like to use my eraser to tap the highlighted side of the shaded cones, lifting just a bit of graphite to ensure the brightest spot is pure white. -
Grounding the objects:
Darken the small area right where the cone base touches the ground shadow. This ‘occlusion shadow’ adds weight and realism.
With these four studies complete, you have a solid reference page for geometric lighting and perspective.

PENCIL GUIDE
Understanding Pencil Grades from H to B
From first sketch to finished drawing — learn pencil grades, line control, and shading techniques.
Explore the Full Guide
Centerline and Axis Form Studies
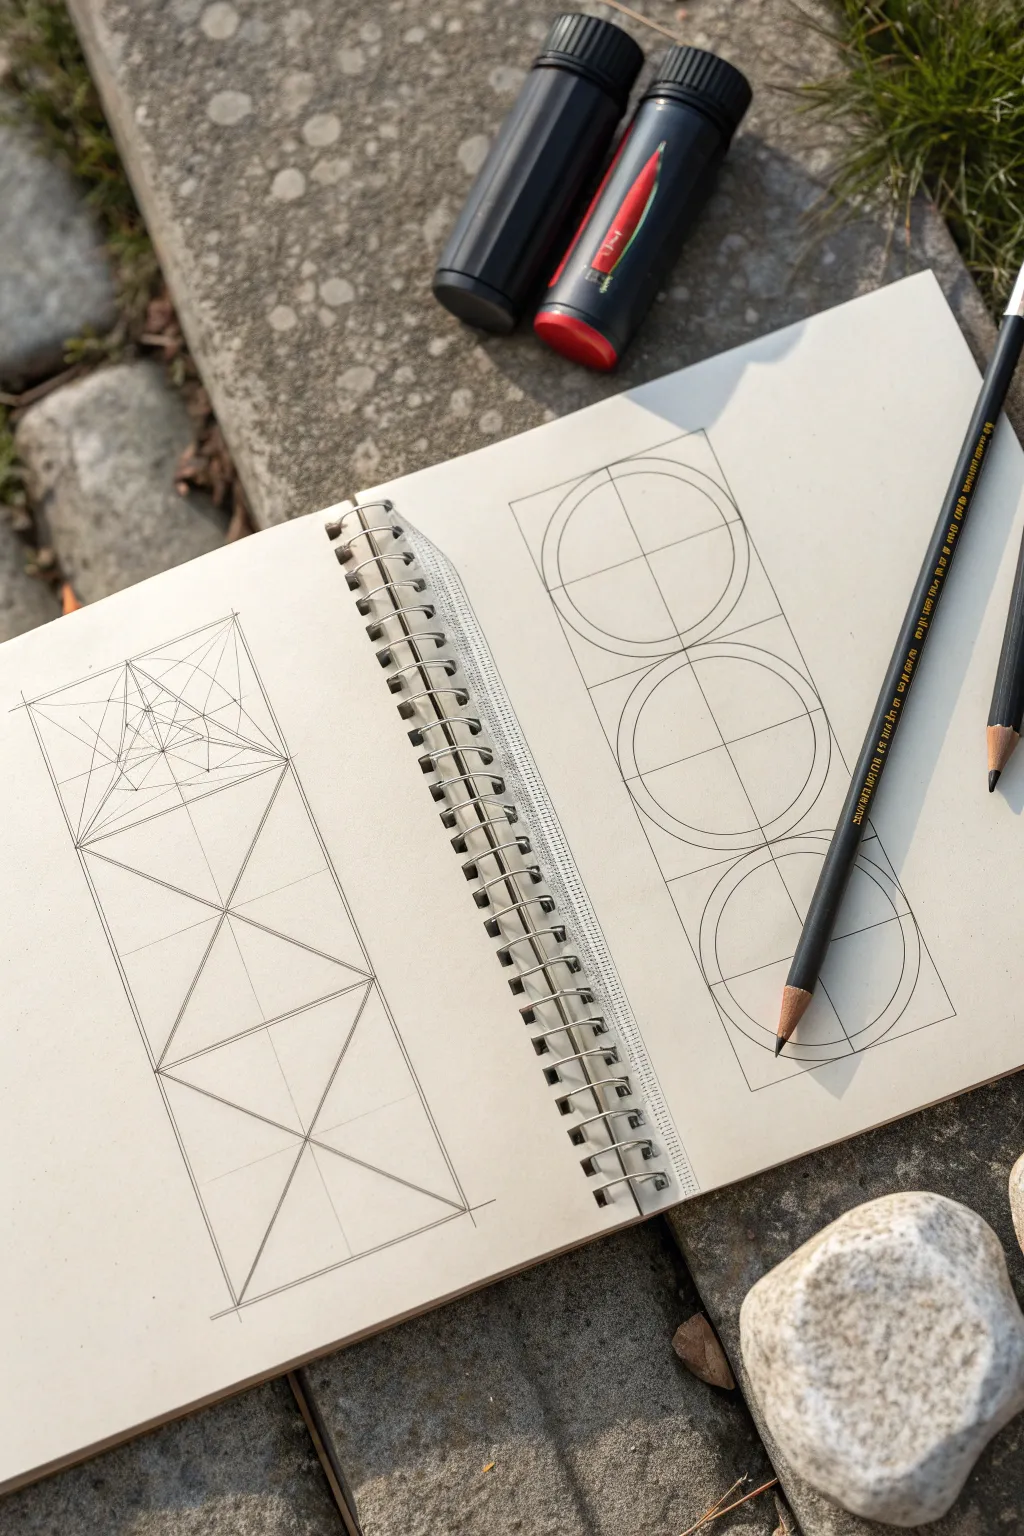
This rigorous drawing exercise explores the relationship between linear structure and curvature through side-by-side vertical studies. On the left, crisp lines create a perspective-like lattice, while the right page balances this with stacked circular forms anchored by a strong central axis.
How-To Guide
Materials
- A4 or Letter-sized sketchbook (spiral bound preferred)
- HB or 2B graphite pencil
- Straightedge or ruler
- Compass (optional but helpful for the right page)
- Black drawing pencil or charcoal pencil for final lines
- Eraser
Step 1: Setting the Stage
-
Define the boundaries:
Begin by opening your sketchbook to a fresh two-page spread. On each page, draw a tall, narrow vertical rectangle. Aim for the rectangles to be roughly the same width, approximately 2-3 inches wide, extending most of the page’s height. -
Establish the centerline:
Lightly draw a vertical axis line straight down the center of both rectangles. This line is crucial—it acts as the spine for both drawings, ensuring symmetry and balance. -
Divide into thirds:
Horizontal lines are next. Divide each vertical rectangle into three equal stacked squares. You should now have two tall towers, each composed of three stacked square boxes.
Step 2: Left Page: Linear Construction
-
Cross the diagonals:
Focusing on the left page first, draw diagonal lines connecting the corners of each square section. This creates an ‘X’ in each of the three stacked boxes. -
Reinforce the diamond:
In the middle and bottom squares, notice how the diagonals form a large diamond shape that spans across the sections. Darken the lines that form these diamond shapes to make the primary structure visible. -
Begin the top detail:
The top square is where the complexity increases. Lightly sketch a smaller square turned 45 degrees (a diamond) inside the top box, connecting the midpoints of the outer square’s sides. -
Create the inner perspective:
Inside that new diamond, draw another set of crossing diagonals. Where they meet, draw a small horizontal line. From the ends of this small line, draw lines converging towards the center point, creating a sense of receding depth. -
Refine the geometric web:
Continue adding smaller triangles within the central shape of the top square. Mirror every line across the vertical axis. It should look like a wireframe tunnel or a faceted gem when you are done.
Pro Tip: Pivot Point
When freehanding the circles, keep your wrist stiff and rotate from your elbow or shoulder. This acts like a natural compass for smoother curves.
Step 3: Right Page: Curvilinear Balance
-
Mark the circle centers:
Move to the right page. The intersection of your vertical centerline and the horizontal dividers marks the center point for each of the three circles. -
Draw the primary circles:
Using a compass or a steady freehand motion, draw a circle inside each of the three stacked squares. The edges of the circles should just touch the four sides of their containing square. -
Add the inner circles:
Inside each of the three main circles, draw a slightly smaller concentric circle. Keep the gap between the outer and inner rings consistent. -
Bisect the forms:
Strengthen the vertical centerline running through all three circles. Then, reinforce the horizontal lines that pass through the center of each circle. I find it helpful to rotate the book slightly to get the best angle for these straight cuts. -
Connect the tangents:
Lightly draw vertical lines connecting the widest points of the circles on the left and right sides. This boxes them in and visually links the three separate forms into one column.
Level Up: Color Coding
Use red or blue pencil for the internal construction lines and black ink for the final shapes. This highlights the geometry behind the art.
Step 4: Finalization
-
Clean up guidelines:
Take your eraser and gently lift away any construction lines that fall outside the main rectangles or distract from the primary shapes. -
Darken the profile:
Switch to your black drawing pencil. Go over the outer boundary lines of both rectangular columns to frame your work decisively. -
Emphasize key intersections:
On the left page, press harder on the pencil to darken the main structural triangles. On the right page, darken the outer rings of the circles. -
Final shading touches:
Add very subtle shading or line weight variation to the bottom of the circles and the converging points of the linear drawing to suggest a hint of three-dimensionality.
Now you have a striking study in contrasts—sharp angles versus smooth curves—ready to serve as a reference for more complex forms.
Cross-Contour “Wireframe” Forms
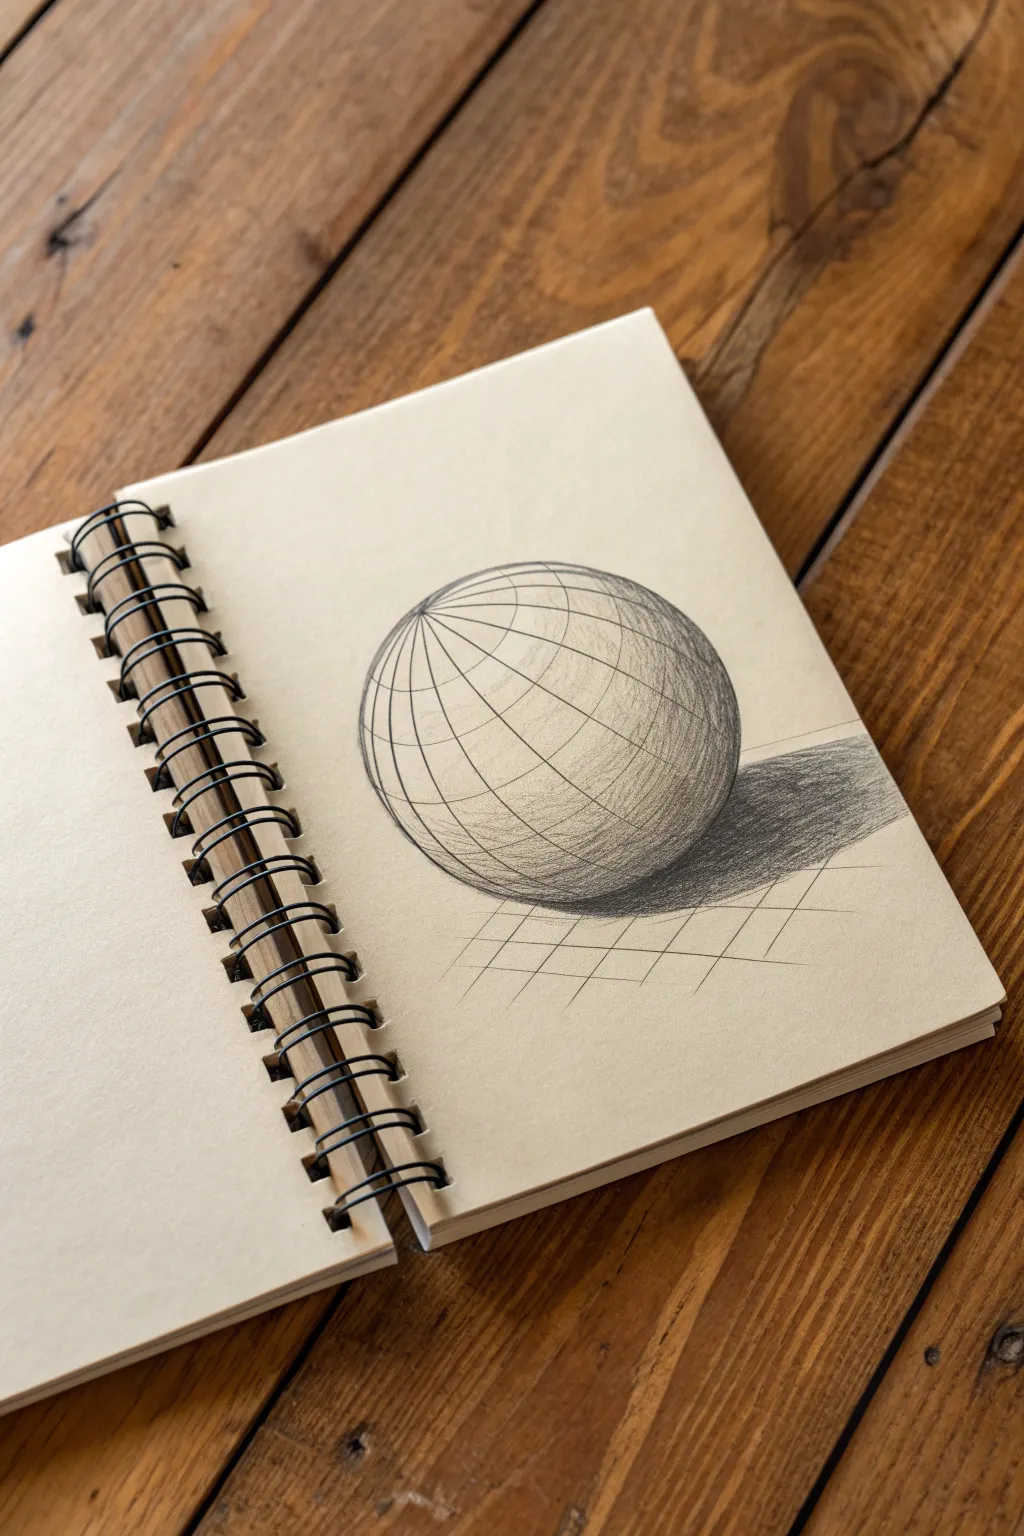
Master the illusion of three-dimensional volume on a flat page with this classic cross-contour exercise. By wrapping lines around a simple sphere and adding careful shading, you will create a convincing wireframe globe that seems to pop right off the sketchbook paper.
Step-by-Step Tutorial
Materials
- Sketchbook with cream or off-white paper
- HB Graphite pencil (for initial layout)
- 2B or 4B Graphite pencil (for shading)
- Ruler (optional)
- Kneaded eraser
- Compass or circular object to trace
Step 1: Constructing the Framework
-
Draw the main circle:
Start by drawing a perfect circle in the center of your page. You can freehand this for practice, but using a compass or tracing a round object like a cup rim will give you the cleanest foundation. -
Establish the axis:
Lightly sketch a tilted axis line cutting through the center of the sphere. Imagine this as the North and South poles of a globe; tilting it slightly makes the drawing look more dynamic than a straight-on view. -
Sketch the equator:
Draw an ellipse that wraps around the middle of the sphere perpendicular to your axis line. This represents the equator. The curve of this line determines the perspective, so ensure the front arc is visibly curved downwards. -
Add vertical longitude lines:
Begin drawing the vertical ‘longitude’ lines connecting your top and bottom poles. These should curve outward from the center axis, getting narrower as they approach the edges of the circle to mimic the curvature of a ball. -
Add horizontal latitude lines:
Sketch the horizontal ‘latitude’ rings parallel to your equator. As these rings move toward the top and bottom poles, the ellipses should become tighter and flatter. Keep your pencil pressure light during this wireframe stage. -
Clean up the lines:
Once you are happy with the grid spacing, go over your wireframe lines with confident, darker strokes. I find it helpful to rotate the sketchbook to get the best angle for these smooth curves.
Curve Continuity
When separating the grid lines, ensure the widest gaps are near the center ‘bulge’ of the sphere. Lines should compress as they near the edges.
Step 2: Shading and Depth
-
Identify the light source:
Decide where your light is coming from. In this example, the light originates from the top left, meaning the highlight will be on the upper left quadrant and the darkest shadows on the bottom right. -
Start the core shadow:
Using the side of your steeper pencil lead (like a 2B), gently shade the bottom right area of the sphere. Let the graphite texture interact with the paper grain. -
Deepen the shading:
Layer more graphite over the shadow area, getting darker as you move away from the light. Crucially, strictly follow the curve of your wireframe boxes while shading to reinforce the spherical form. -
Preserve the highlight:
Leave the top left area almost completely white. The contrast between the cream paper and the dark pencil lines is what creates the volume. -
Cast the shadow:
Draw an elongated oval shape stretching out to the right side of the sphere on the ground. Fill this in firmly with dark graphite strokes, making it darkest right underneath the sphere where it touches the ‘ground.’ -
Soften the edges:
The cast shadow should be crispest near the object and can slightly diffuse as it moves further away. You can use your finger or a blending stump if you want, but hatched pencil strokes create a nice texture. -
Add the ground grid:
To place the sphere in a specific space, lightly sketch a flat grid on the ‘floor’ beneath it. Draw diagonal lines that recede into the distance. -
Refine the ground perspective:
Cross those diagonals with horizontal lines. These horizontal lines should get closer together as they move ‘back’ in space behind the sphere. -
Final touches:
Use your kneaded eraser to pick up any stray smudges outside the main circle. Darken the wireframe lines on the shadow side of the sphere one last time to make the form feel solid and heavy.
Variation Idea
Try removing a ‘slice’ of the sphere like a cake wedge. Draw the interior cross-section to practice visualizing the inside structure.
You have constructed a geometric form that looks remarkably solid on the page.
BRUSH GUIDE
The Right Brush for Every Stroke
From clean lines to bold texture — master brush choice, stroke control, and essential techniques.
Explore the Full Guide
Light Direction and Value Map
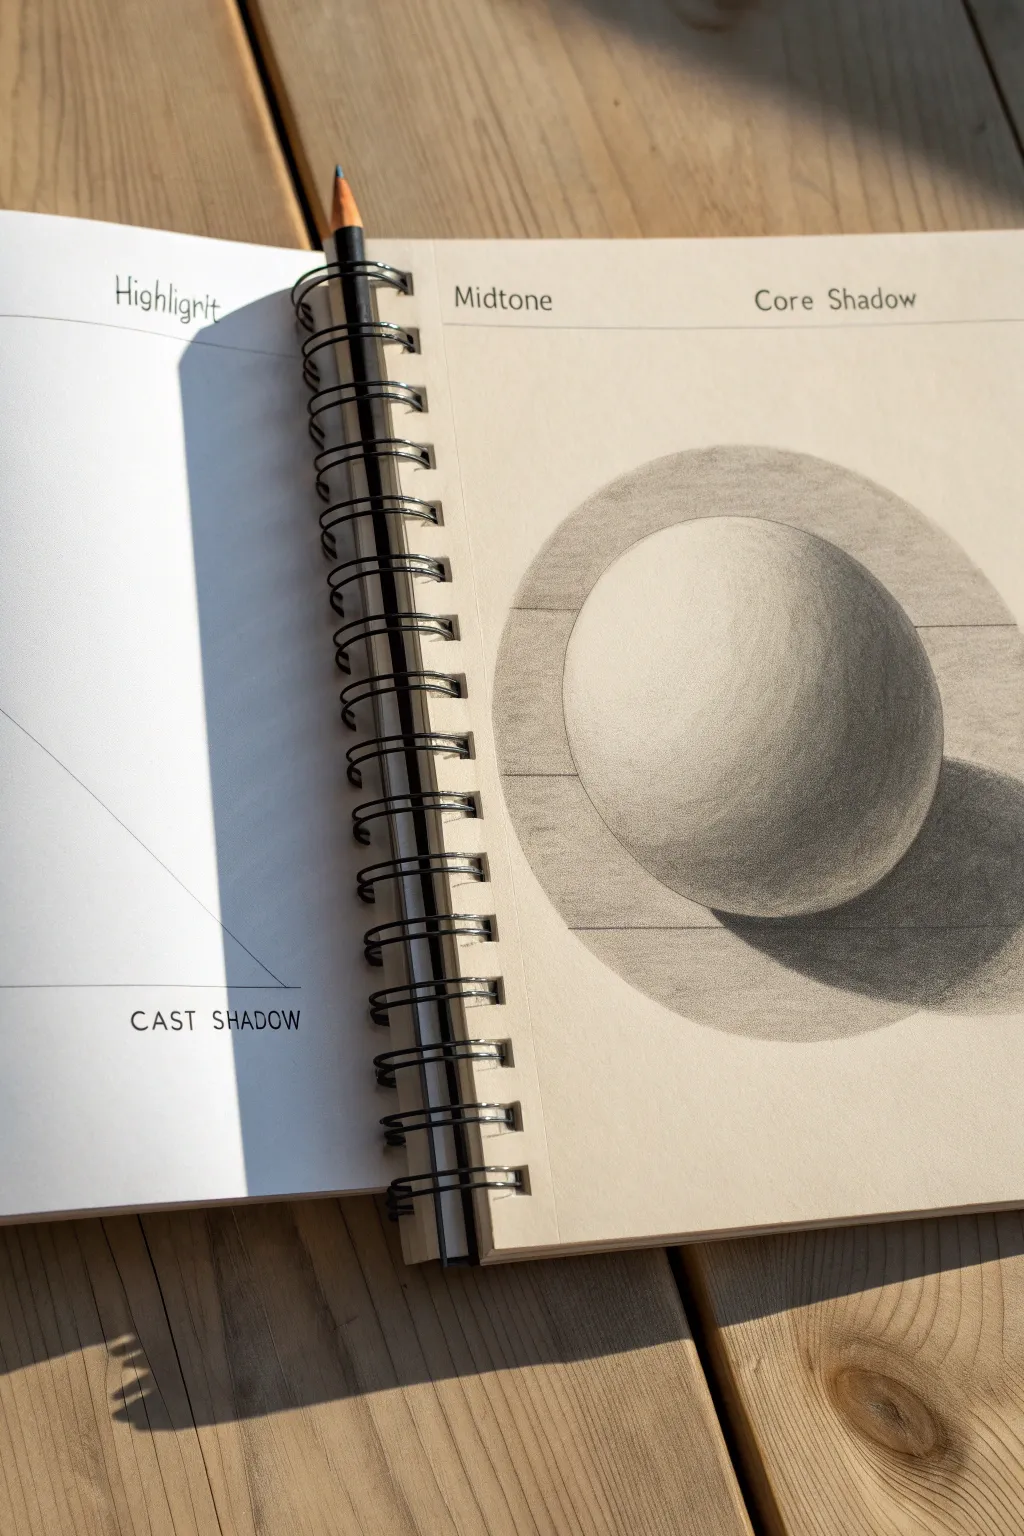
This classic exercise transforms a simple circle into a convincing 3D form through the careful application of value. By breaking down light and shadow into distinct zones like midtones and core shadows, you’ll create a realistic sphere that seems to lift right off the sketchbook page.
How-To Guide
Materials
- Spiral-bound sketchbook (heavyweight drawing paper)
- Graphite pencils (HB, 2B, 4B)
- Pencil sharpener
- Compass or circular object to trace
- Ruler or straight edge
- Kneaded eraser
- Blending stump (paper tortillon) or tissue
Step 1: Setting Up the Framework
-
Map out the page structure:
Begin by recreating the instructional layout seen in the image. Use a ruler to draw a horizontal line near the top of your page for your labels. Write ‘Highlight’ on the left page (if working across a spread) and ‘Midtone’ and ‘Core Shadow’ on the right page header. -
Draw the main circle:
In the center of the right-hand page, use a compass or trace a round object (like a roll of tape) to draw a perfect circle. Keep this outline incredibly faint; you want it to eventually disappear into your shading, not act as a cartoon outline. -
Establish the background ellipse:
Around your main sphere, lightly sketch a large, wide ellipse. This represents the ‘table’ or surface the sphere is sitting on. The back curve should disappear behind the sphere, while the front curve creates a foreground area. -
Mark the shadow boundaries:
Very lightly sketch a crescent shape on the bottom right of the sphere itself to mark where the core shadow will be. Then, sketch an elongated oval on the surface to the right of the sphere to map out the cast shadow.
Step 2: Building the Values
-
Apply the first layer of midtone:
Using an HB pencil held at a low angle, apply a very light, even layer of graphite over the entire sphere, avoiding only a small circular area on the upper left. This unshaded spot will be your ‘Highlight’. -
Define the background tone:
To make the light sphere pop, you need contrast. Shade the background area inside your large ellipse but outside the sphere. Keep this a flat, medium grey value so the bright top of the sphere stands out against it. -
Develop the form shadow:
Switch to a 2B pencil. Start shading the right side of the sphere, curving your pencil strokes to follow the roundness of the object. This helps reinforce the 3D volume rather than flattening it. -
Create the core shadow:
Focus on the crescent shape you marked earlier on the bottom right of the sphere. This area—the ‘Core Shadow’—should be the darkest part of the object itself. Press a bit harder here, building up a rich, dark grey tone. -
Establish the reflected light:
Crucially, leave a thin rim of lighter value at the very bottom right edge of the sphere, just below the core shadow. This ‘Reflected Light’ separates the dark object from the dark cast shadow. -
Fill in the cast shadow:
Using a 4B pencil, fill in the cast shadow on the table surface. This should be the darkest value in your entire drawing. Make it darkest right where the sphere touches the table (the occlusion shadow) and let it fade slightly as it stretches away.
Fixing Flatness
If your sphere looks like a flat disc, your gradients are likely too short. Extend the transition from midtone to shadow further across the face of the circle to create roundness.
Step 3: Refining and Blending
-
Smooth the transition:
I like to use a paper blending stump or a folded tissue here. Gently rub the graphite on the sphere, moving from the dark side toward the light side. This creates that smooth, seamless gradient characteristic of a polished sphere. -
Sharpen the edges:
Take your eraser and clean up the outside edge of the sphere on the upper left. A crisp, clean edge against the background is essential for the illusion of a solid form. -
Enhance the core shadow:
Blending often lifts some graphite, so go back in with your 4B pencil to re-darken the core shadow. Make sure the transition from core shadow to midtone is soft, not a hard line. -
Clean the highlight:
Use a kneaded eraser to tap the highlight area on the upper left again. Make sure it is pure white paper, the brightest spot on the page. -
Check the background values:
Review the background ellipse tone. Ensure it is dark enough to make the highlight side of the sphere look bright, but light enough that the shadow side of the sphere stands out against it. -
Final touches:
Add the ‘Cast Shadow’ text label at the bottom left if you are recreating the full layout. Give the entire drawing one last check for stray smudge marks and erase them.
Pro Tip: Directional Strokes
When applying graphite, always curve your pencil strokes to mimic the surface of the sphere (like lines of longitude on a globe). Straight, flat strokes will flatten the image instantly.
Enjoy the satisfaction of seeing a flat circle become a tangible object with just a few pencils.
Overlapping Forms for Depth
This tutorial guides you through creating a detailed graphite study of a sphere, focusing on volume and geometric structure. The result is a clean, academic-style drawing that emphasizes the interplay of light and shadow on a curved form.
Step-by-Step Guide
Materials
- High-quality drawing paper (smooth or medium tooth, roughly A3 size)
- Graphite pencils (HB, 2B, 4B)
- Ruler
- Compass (or a circular object to trace)
- Kneaded eraser
- Blending stump (optional)
- Drafting tape
Step 1: Setting the Structure
-
Prepare your workspace:
Taping down the corners of your paper can help keep it flat and secure while you work, especially near a window with changing light. -
Establish the frame:
Using your ruler and an HB pencil, draw a light rectangular border in the center of your page. This framing box will contain your sphere and its immediate background. -
Draw the main circle:
Place your compass point in the exact center of your framed area. Lightly draw a perfect circle. Keep your pressure very light so the outline doesn’t look like a heavy wire later. -
Add latitude lines:
Imagine the sphere is a globe tilted slightly away from you. Lightly sketch curved horizontal ellipses wrapping around the form to create latitude lines. -
Add longitude lines:
Draw curved vertical lines connecting the top and bottom poles. These lines help define the three-dimensional curvature of the object before you even start shading.
Wobbly Lines?
If your contour lines aren’t smooth, try drawing from your shoulder rather than your wrist. This larger range of motion creates naturally cleaner curves.
Step 2: Defining Volume with Tone
-
Identify the light source:
Observe where the light is coming from—in this case, the upper left. I like to mark a tiny arrow outside the frame as a reminder. -
Start the core shadow:
Using a 2B pencil, lightly block in the crescent-shaped shadow area on the lower right side of the sphere, opposite the light source. -
Develop the grid shading:
Begin darkening the individual segments created by your grid lines. Don’t shade flatly; follow the curve of the grid to enhance the illusion of roundness. -
Deepen the shadows:
Switch to a 4B pencil to deepen the darkest part of the shadow, known as the core shadow. This is usually not right at the edge, but slightly inward. -
Create reflected light:
Leave a sliver of lighter tone along the very bottom right edge of the sphere. This represents light bouncing off the table surface back onto the object.
Clean Edges
Place a piece of scrap paper under your hand while shading. This prevents the graphite from smudging onto the clean white border of your paper.
Step 3: Background and Finishes
-
Cast shadow placement:
Draw the cast shadow on the ground plane, extending to the right. It should be an elongated oval shape that fades as it moves away from the sphere. -
Fill the background plane:
Use broad, parallel hatching strokes to fill in the background inside your rectangular frame. Keep these lines diagonal and uniform regarding spacing. -
Differentiate the ground:
For the surface the sphere rests on, change the angle or density of your hatch marks slightly to separate the ‘floor’ from the ‘wall’. -
Refine the edges:
Clean up the edges of your rectangular frame with a ruler and eraser for a sharp look. Ensure the sphere’s outline is crisp against the background. -
Final contrast check:
Step back and squint at your drawing. Darken the core shadow one last time if the sphere looks too flat.
Once you lift the tape, you will have a striking geometric study that captures the essence of form and light


Form Intersections (One Shape Through Another)
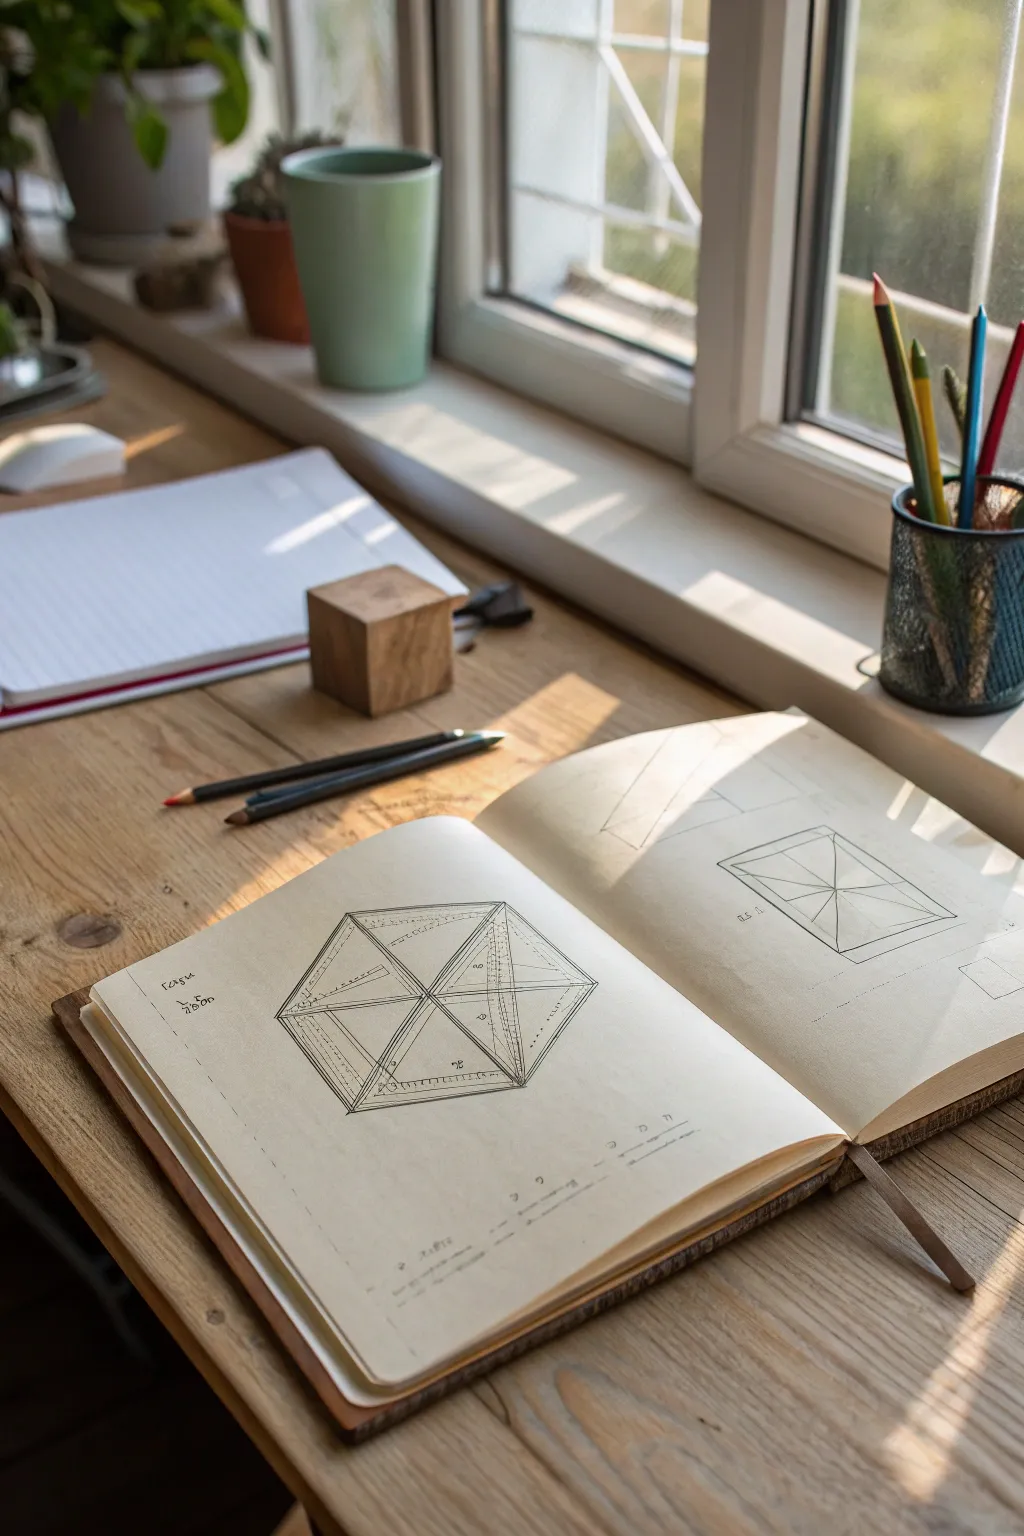
This project explores the fascinating world of geometric construction by focusing on a complex hexagonal prism shape. With precise lines and careful shading, you’ll create a technical-style drawing that feels both archaic and architectural.
Detailed Instructions
Materials
- High-quality sketchbook (smooth or vellum finish)
- HB graphite pencil (for initial layout)
- Fine liner pens (0.1mm, 0.3mm, 0.5mm – black)
- Ruler or straight edge
- Compass (optional but helpful for spacing)
- Eraser (kneaded preferred)
Step 1: Laying the Framework
-
Establish the centerline:
Begin by lightly drawing a vertical centerline on your page using an HB pencil. This will serve as the spine for your hexagonal prism, ensuring symmetry from top to bottom. -
Define the outer hexagon:
Draw the six points of a hexagon. Since this is an isometric-style view, the top and bottom edges should be horizontal, while the side edges slant inward. Connect these points lightly to form the outer boundary. -
Create the internal divisions:
From the center of the hexagon, draw lines extending out to each of the six corners. This divides your shape into six equal triangles meeting in the middle, creating the ‘spokes’ of the wheel. -
Add depth lines:
To give the form three-dimensional volume, draw a smaller, inner hexagon parallel to the outer one. Connect the corners of the inner hexagon to the outer corners, creating a beveled frame effect. -
Refine the perspective:
Check your angles. The beauty of this form relies on the lines radiating from the center looking consistent. Adjust any vertices that look uneven before committing to ink.
Uneven Angles?
If your hexagon looks lopsided, draw a circle with a compass first. Mark six equidistant points along the circumference to use as your vertex guides before drawing straight lines.
Step 2: Inking and Detailing
-
Outline the main structure:
Switch to a 0.5mm fineliner. Carefully trace over your main structural lines—the outer perimeter and the primary dividing lines—using your straight edge to keep everything crisp. -
Add secondary weights:
Use a slightly thinner pen, like a 0.3mm, to outline the inner hexagon and the connecting bevel lines. This hierarchy of line weight helps the viewer understand which parts are structural and which are surface details. -
Drafting the internal texture:
On the triangular facets of the prism, use a 0.1mm pen to add faint, dashed lines or very light solid lines running parallel to the edges. This mimics technical drafting conventions and adds visual interest. -
Hatching for dimension:
Identify a light source (usually coming from the top left). On the facets opposite the light, apply very fine, closely spaced parallel hatching lines. I find it helpful to rotate the sketchbook so my hand moves naturally. -
Cross-hatching darker zones:
For the deepest shadows, particularly near the converging center point or bottom edges, add a second layer of hatching perpendicular to the first. This cross-hatching emphasizes the recessed nature of the form.
Step 3: Annotations and Final Touches
-
Add technical notations:
To enhance the ‘blueprints’ aesthetic, scribble small, illegible notes or symbols near specific vertices. Use a very light touch with the 0.1mm pen or even switch back to a sharp pencil for variety. -
Include measurement lines:
Draw thin extension lines (witness lines) extending off the main shape, capped with tiny arrows or tick marks. These don’t need to measure anything real; they just add to the technical feel. -
Erase guidelines:
Once the ink is completely dry—give it a few minutes to be safe—gently erase the initial graphite sketch. Be careful not to smudge the fainter pencil notations if you added any. -
Sketch a secondary view:
On the facing page, sketch a fainter, simplified version of a related shape, perhaps a square prism or a different angle of the hexagon. Leave this primarily in pencil or light ink to show ‘process’ work. -
Final weathering:
If you want the drawing to look like an old field study, you can smudge a tiny bit of graphite around the corners of the page or lightly rub the edge of the paper to soften the stark white.
Keep Rulers Clean
Wipe the edge of your ruler after every few ink lines. Ink can build up on the plastic edge and cause sudden, heartbreaking smudges when you slide the tool across the paper.
With your technical drawing complete, you have a piece that captures the elegance of mathematical precision
Planes Study on Boxes and Wedges

This fundamental drawing exercise focuses on understanding structure and space by constructing a series of identical geometric frames. The clean, repetitive layout on dot grid paper creates a satisfying and disciplined study page.
Step-by-Step
Materials
- A5 Dot grid notebook (e.g., Leuchtturm1917 or similar)
- Mechanical pencil (0.5mm HB or F lead)
- Clear plastic ruler (6-12 inch)
- Fine liner pen (0.1mm or 0.2mm, black)
- Kneaded eraser
Step 1: Planning dimensions
-
Count your grid:
Before putting pencil to paper, count the available dots on your open page. You want to fit six squares total: two columns of three squares each. -
Calculate margins:
Determine the spacing between the boxes. A standard gap of 2-4 grid dots works well to keep the layout breathable but cohesive. -
Mark corner points:
Lightly mark the four corner dots for your first square with your pencil. Make each square roughly 8×8 dots or 10×10 dots depending on your notebook size.
Step 2: Constructing the frames
-
Draw the first outer square:
Using your ruler and pencil, connect the marked corner points to create the first perfect square. Keep your pressure light so mistakes are easily erased. -
Add the inner square:
Measure inward about 2-3mm (or half a grid unit) from your outer line. Draw a second, smaller square inside the first one to create a ‘frame’ effect. -
Connect the corners:
Draw short diagonal lines connecting the corners of the inner square to the corresponding corners of the outer square. This creates the beveled ‘picture frame’ look. -
Repeat the process:
Move to the next position in your layout. I usually like to draw the horizontal neighbor first to ensure alignment, then move down the page. -
Complete the grid:
Continue until you have all six identical frames drafted in pencil across the page.
Straight Edge Secret
Wipe the edge of your ruler with a tissue after every few lines. Graphite buildup on the plastic can smudge onto the paper and ruin clean pages.
Step 3: Adding the interior planes
-
Mark the centers:
For each box, locate the visual center. Since we are doing a ‘crossed’ plane study, drawing an X from corner to corner is the goal. -
Draw the primary diagonals:
Place your ruler from the top-left inner corner to the bottom-right inner corner. Draw a straight line. -
Complete the X:
Draw the second diagonal from top-right to bottom-left. Repeat this ‘X’ structure inside every single frame on the page. -
Review consistency:
Step back and check that all your diagonals intersect precisely in the middle of each box.
Dimensional Shift
Instead of centering the ‘X’ perfectly, offset the center point slightly. This changes the ‘plane’ into a 3D pyramid viewed from different angles.
Step 4: Refining and inking
-
Begin inking outlines:
Switch to your fine liner pen. Carefully trace over your graphite lines, starting with the outermost squares. -
Ink the inner details:
Proceed to ink the inner squares and the connecting diagonals. Use a ruler here for crispness, or freehand it if you want an organic look. -
Let ink set:
Allow the ink to dry completely for at least five minutes to prevent smudging. -
Erase pencil guides:
Gently rub the kneaded eraser over the entire page to lift the graphite, leaving only the sharp ink lines behind. -
Add shading (optional):
If desired, use your pencil to add glorious, subtle linear shading to one side of the internal ‘X’ planes to suggest depth.
Now you have a structured reference page ready for further form studies
Sliced, Cut, and Carved Forms

This technical drawing exercise explores the manipulation of a simple square form through geometric subdivision and perspective. The result is a clean, architectural study that transforms flat shapes into objects with perceived depth through precise linear work.
Detailed Instructions
Materials
- Large sheet of cream drawing paper (18×24 or A2)
- HB graphite pencil (sharp point)
- Ruler (preferably 12-inch or longer)
- T-square or straight edge
- Eraser
- Drafting compass (optional but helpful)
Step 1: Planning the Layout
-
Establish the grid:
Begin by lightly penciling a horizontal centerline and a vertical centerline on your paper to divide the space into quadrants. Use your T-square to ensure these guide lines are perfectly perpendicular. -
Define the outer boundaries:
In the center of the paper, draw a large rectangle that encompasses the four smaller squares you will be working on. Leave a generous margin around the paper’s edge for a professional look. -
Create the four frames:
Divide your large central rectangle into four equal boxes. These will be the housing for each stage of your form drawing. Keep your pencil pressure very light here, as some of these lines are just guides.
Smudge Patrol
Graphite smears easily on cream paper. Place a scrap sheet of paper under your drawing hand while working to keep oils and friction from muddying your crisp lines.
Step 2: Drafting the Top Row
-
Draw the base square:
In the top-left quadrant, draw a simple, clean square based on the center of the box. This serves as the ‘control’ or the uncut form. Ensure the lines are crisp and dark enough to stand out. -
Begin the pyramid cut:
Moving to the top-right quadrant, draw an identical square. Find the exact center by lightly drawing intersecting diagonal lines from corner to corner. -
Add textural hatching:
From the center point of the top-right square, draw lines to the midpoints of each side. Fill the resulting triangular sections with uniform vertical hatching lines to suggest disparate planes or facets.
Isometric Variant
Instead of a flat top-down view, try drawing these same sliced forms on an isometric grid. This adds a 3D quality, showing the depth of the cuts and holes.
Step 3: Drafting the Bottom Row
-
The star cut outline:
In the bottom-left quadrant, draw your third square. Draw diagonal lines connecting opposite corners to find the center again. -
Define the inner slicing:
Draw a smaller square in the center, rotated 45 degrees (like a diamond). Connect the corners of this inner diamond to the corners of the outer square to create a star-like, faceted appearance. -
Detailing the star:
Add a small circle in the very center. Fill the negative space around the ‘star’ shape with stippling (small dots) or light dashed lines to differentiate the surfaces. -
The circular cutout:
For the final bottom-right quadrant, draw the fourth square. Draw large ‘X’ diagonals from corner to corner to locate the center. -
Draft the circle:
Using a compass or a steady hand, draw a perfect circle in the center. Its diameter should be about one-third the width of the square. -
Finalizing geometry:
Darken the diagonal lines, but stop them when they touch the circle’s perimeter. This creates the illusion of a flat plane with a circular hole or depression in the center.
Step 4: Refinement
-
Clean up guidelines:
Take your eraser and carefully remove any initial construction lines that extend beyond the main squares. I like to use a brush to sweep away crumbs so I don’t smudge the graphite. -
Darken structural lines:
Go back over the main outlines of your four squares with slightly more pressure to unify the composition and make the forms pop against the paper. -
Add annotations (optional):
If you wish to mimic the technical drawing style, add tiny, neat numbers or measurements along the bottom edges of the grid lines using a very sharp pencil point.
Now you have a precise set of geometric studies that demonstrate how simple lines can alter the perception of a flat surface
Exploded Views of Simple Form Builds
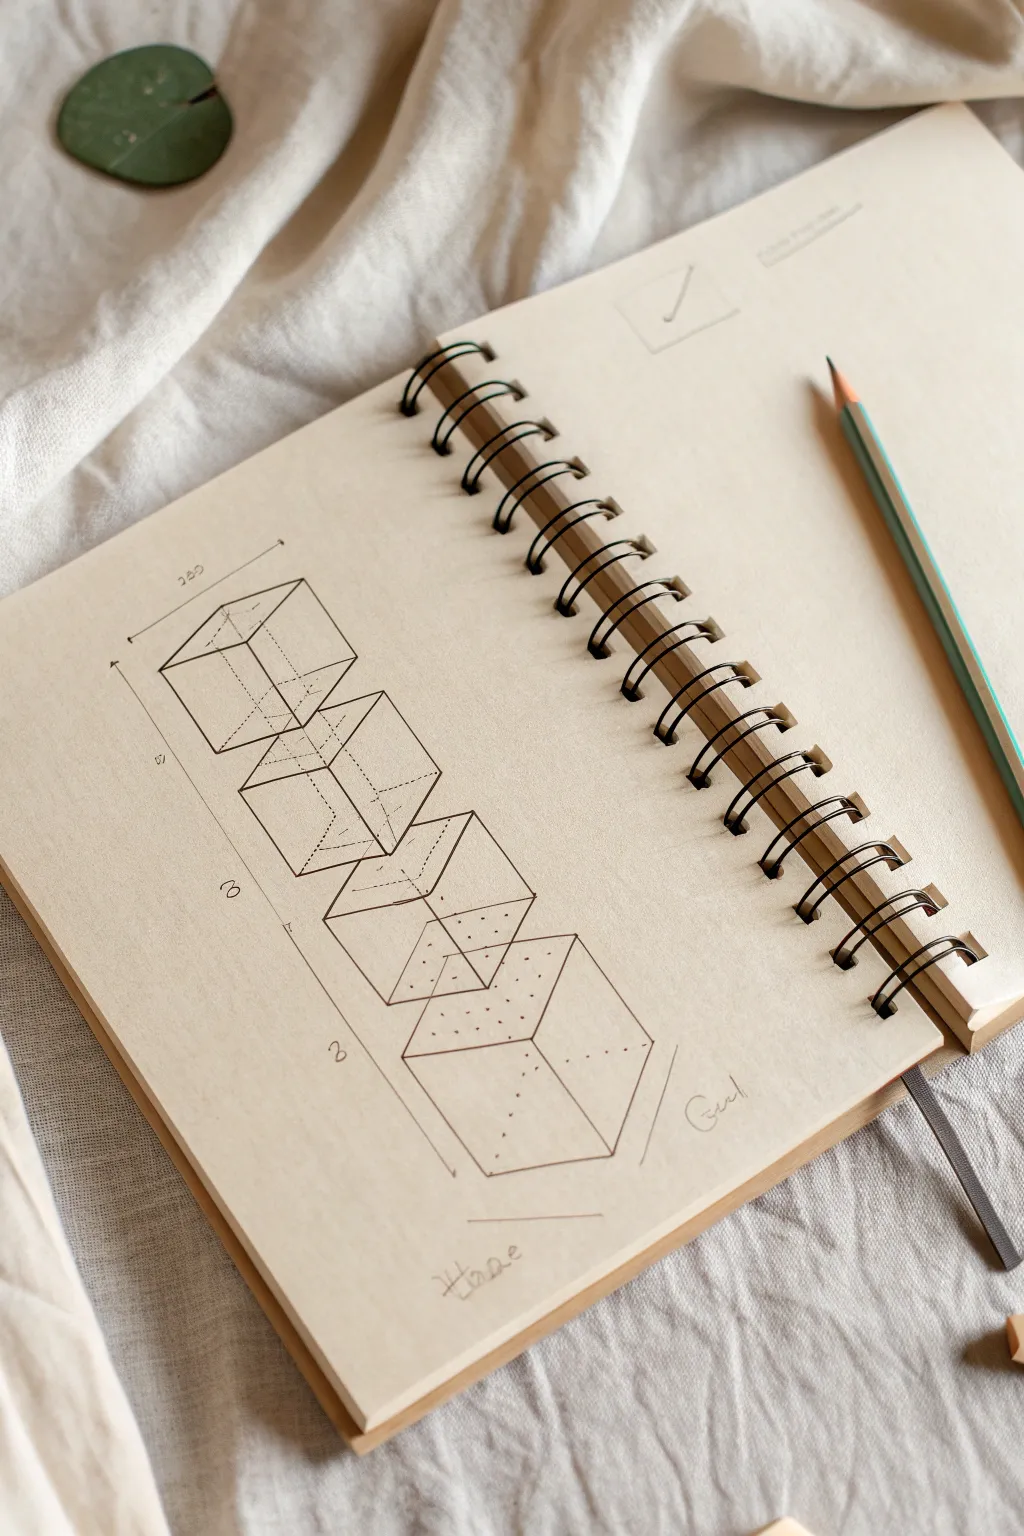
This technical sketch breaks down complex forms into a distinct vertical progression of cubes, creating a pleasingly organized and architectural aesthetic. The clean lines and exploded perspective offer a perfect exercise for practicing spatial visualization and precision drafting.
Step-by-Step
Materials
- Spiral-bound sketchbook with off-white or cream paper
- HB or 2H graphite pencil (for guidelines)
- Fine-point black drawing pen (0.3mm or 0.5mm)
- Ruler or straightedge
- Technical eraser
- Protractor (optional, for checking angles)
Step 1: Setting the Framework
-
Establish the Axis:
Begin by using your ruler to draw a very light vertical centerline down the middle of your page with a pencil. This will serve as the spine for your stacked cubes. -
Mark Cube Spacing:
Along this centerline, mark four evenly spaced points. Leave a small gap between where each cube will sit so they don’t overlap, creating that floating, exploded effect. -
Draft the Top Cube:
For the top cube, lightly sketch a square turned at a 45-degree angle (a rhombus shape) centered on your first mark. This forms the top face. -
Extrude Downwards:
Draw vertical lines down from the three visible corners of your top face. Connect the bottom limits to mirror the top shape, completing the wireframe of the first cube. -
Repeat the Structure:
Using the ruler, repeat this process for the remaining three cubes below. Ensure all vertical lines are parallel to the page edge and all angled lines are parallel to each other.
Wobbly Lines?
If your straight lines wobble, don’t worry. Keep your eye on the end point where you want the line to finish, rather than watching the pen tip move.
Step 2: Hidden Geometry and Details
-
Sketch Hidden Lines:
Inside each cube, lightly pencil in the ‘hidden’ back lines. Seeing the full transparent shape helps ensure your perspective is accurate before committing to ink. -
Add Dimension Lines:
To the left of your stack, draw a long vertical dimension line running the full height. Add horizontal tick marks extending towards the cubes to indicate sections. -
Detail the Numbers:
Write small perspective numbers (1, 2, 3) or measurements along the dimension line. Keep the handwriting small and technical. -
Central Axis Line:
Draw a distinct dashed line running through the center of all cubes, connecting the center point of the top faces to the bottom faces. This emphasizes the vertical alignment. -
Inner Dotted Details:
On the bottom two cubes, add patterns of small dots on the top faces. I find this creates a nice texture contrast against the stark lines.
Step 3: Inking and Finishing
-
Ink the Visible Edges:
Switch to your fine-point black pen. Carefully trace over the outer, visible edges of the cubes with a solid, confident line. Use a ruler if your hand is shaky. -
Ink the Hidden Edges:
For the measurement lines and the straight-through center axis, use a lighter touch or a thinner pen size if you have one available. -
Stipple the Details:
Ink the dotted patterns on the lower cube faces. Keep the dot spacing consistent to maintain that professional architectural look. -
Add Dotted Hidden Lines:
If you want to show the transparency, ink the back ‘hidden’ lines of the cubes using a dashed or dotted line style so they recede visually. -
Labeling:
Hand-letter the words ‘Home’ and ‘Goal’ near the bottom measurement lines in a loose cursive script to contrast with the rigid geometric shapes. -
Erase Guidelines:
Wait for the ink to be completely dry—give it a few minutes. Then, gently erase the underlying graphite construction lines, leaving a crisp black diagram.
Pro Tip: Line Weight
Use a thicker pen (0.5mm) for the outer silhouette of the cubes and a thinner one (0.1mm) for internal lines. This adds instance depth.
The result is a clean, structural study that looks satisfyingly precise on the page
Form Metamorphosis (Cube to Sphere)
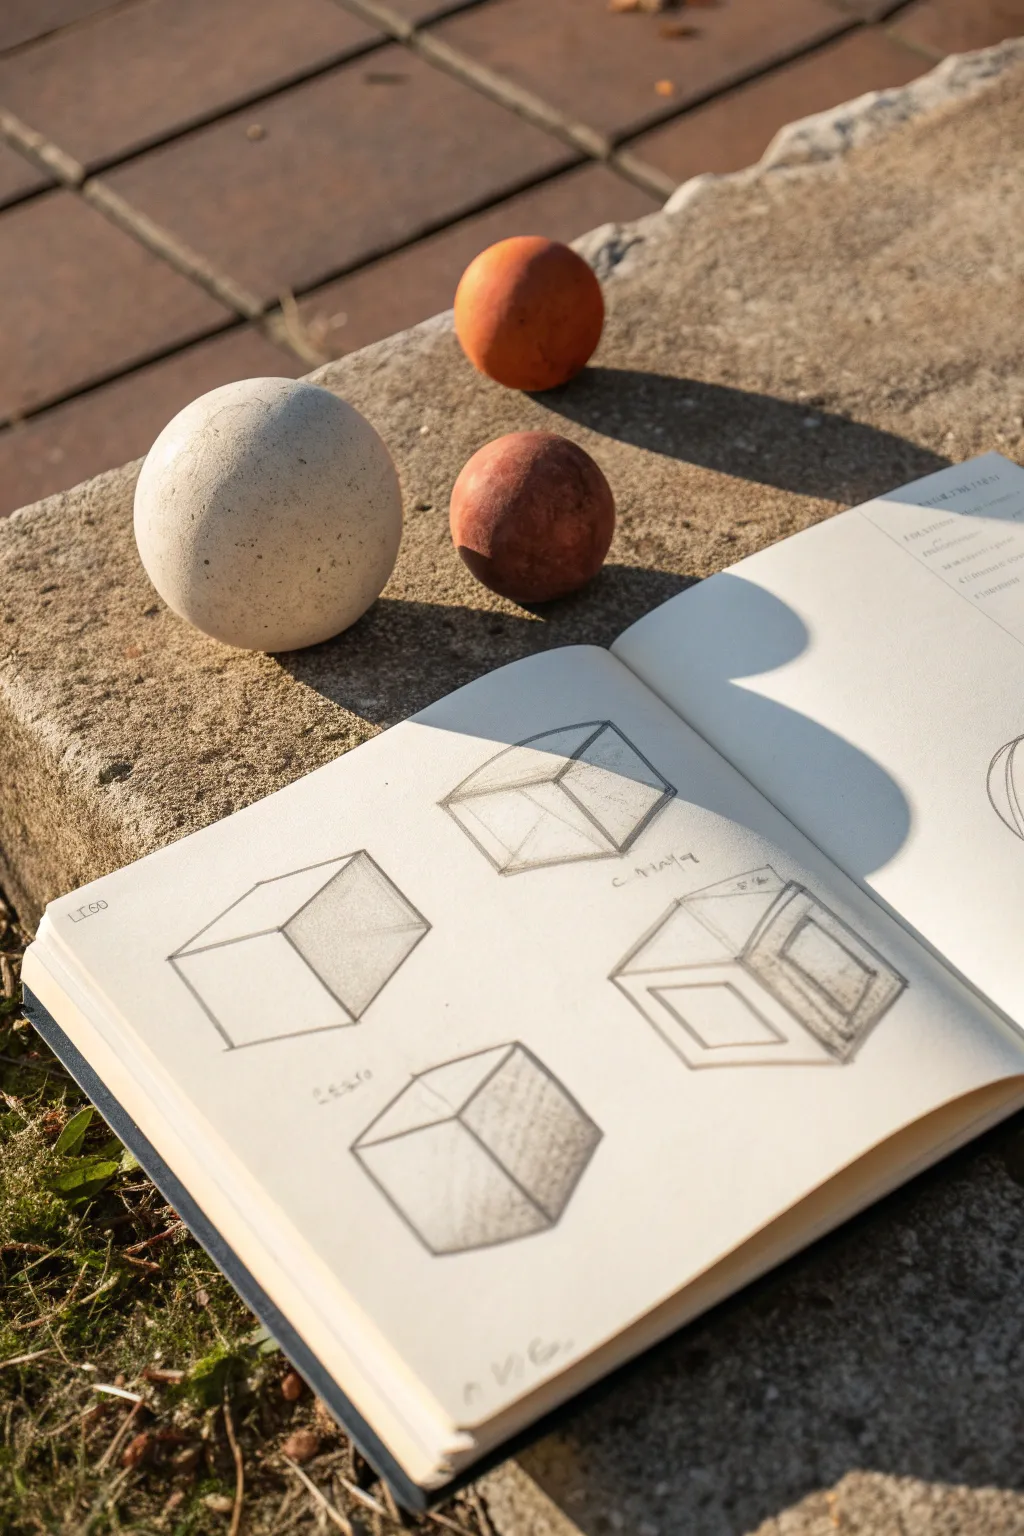
This study focuses on capturing the foundational geometry of cubes through linear perspective and shading, a perfect exercise for understanding three-dimensional form. You will create a series of cubic studies that explore transparency, solid form, and spatial depth using simple graphite tools.
Detailed Instructions
Materials
- Sketchbook with smooth, off-white paper (approx. A5 size)
- Graphite pencils (HB for outlines, 2B and 4B for shading)
- Kneaded eraser
- Ruler (clear plastic is best)
- Pencil sharpener
Step 1: Setting the Foundations
-
Prepare the page:
Open your sketchbook to a fresh spread. Ensure your pencil is sharpened to a fine point, as clean lines are crucial for geometric drawings. -
Visualize the layout:
Plan to draw four distinct cubes on the left page. Mentally divide the page into quadrants so each cube has enough breathing room. -
Draft the first cube’s Y-axis:
Start with the top-left cube. Draw a vertical line for the front corner, then two angled lines receding upwards to the left and right to establish the top plane’s front edges. -
Complete the first wireframe:
Finish the top-left cube as a transparent ‘wireframe.’ Draw the back vertical line and the connecting rear edges. Keep your pressure light so you can erase mistakes easily. -
Start the second cube:
Move to the top-right quadrant. Draw another cube, but this time rotate it slightly so you see more of the top face. Focus on keeping parallel lines consistent. -
Add internal geometry:
For this top-right cube, lightly draw an ‘X’ across the top face connecting opposite corners to find the geometric center. This helps with perspective accuracy.
Wonky Lines?
If your cubes look distorted, check your parallel lines. In isometric drawing, vertical lines stay vertical, but receding lines must remain strictly parallel to each other.
Step 2: Developing Form and Perspective
-
Outline the third cube:
In the bottom-left quadrant, draw a solid cube. Unlike the first two, focus only on the visible outer edges, pressing slightly harder with an HB pencil to define the silhouette. -
Draft the complex fourth cube:
For the bottom-right drawing, sketch a larger cube. Inside the front face, draw a smaller square to create a ‘frame’ or window effect, showing thickness. -
Create the inner depth:
From the corners of that inner square on the fourth cube, draw short diagonal lines receding into the box to show the interior depth of the frame.
Step 3: Shading and Definition
-
Identify the light source:
Decide on a single light source direction. Consistent with the reference, imagine light coming from the upper left, meaning shadows will fall on the right and bottom planes. -
Shade the first cube:
On the top-left cube, apply a light, even tone of shading to the right-hand face using the side of your 2B pencil. -
Enhance the solid cube:
Move to the bottom-left cube. Shade the right face remarkably darker here. I like to layer the graphite in two passes to get a solid, metallic look. -
Add cast shadows:
Sketch faint cast shadows extending from the base of the solid cubes to the right side, anchoring them to the imaginary ground. -
Detail the complex cube:
On the bottom-right ‘frame’ cube, shade the receding interior planes darker than the exterior face to exaggerate the feeling of depth. -
Add labels:
Using your sharpest pencil or a fine mechanical pencil, write small notes or labels near the corners (like ‘C 1904’ or measurements) to give it an architectural sketchbook aesthetic. -
Final clean up:
Use your kneaded eraser to lift away any stray smudges around the borders of your cubes, keeping the background pristine.
Level Up: Real Models
Place real geometric objects (like the spheres and cubes shown in the photo) next to your page. Draw the sphere casting a shadow onto your drawn cubes.
Now you have a study page that beautifully demonstrates weight and three-dimensional space


Have a question or want to share your own experience? I'd love to hear from you in the comments below!