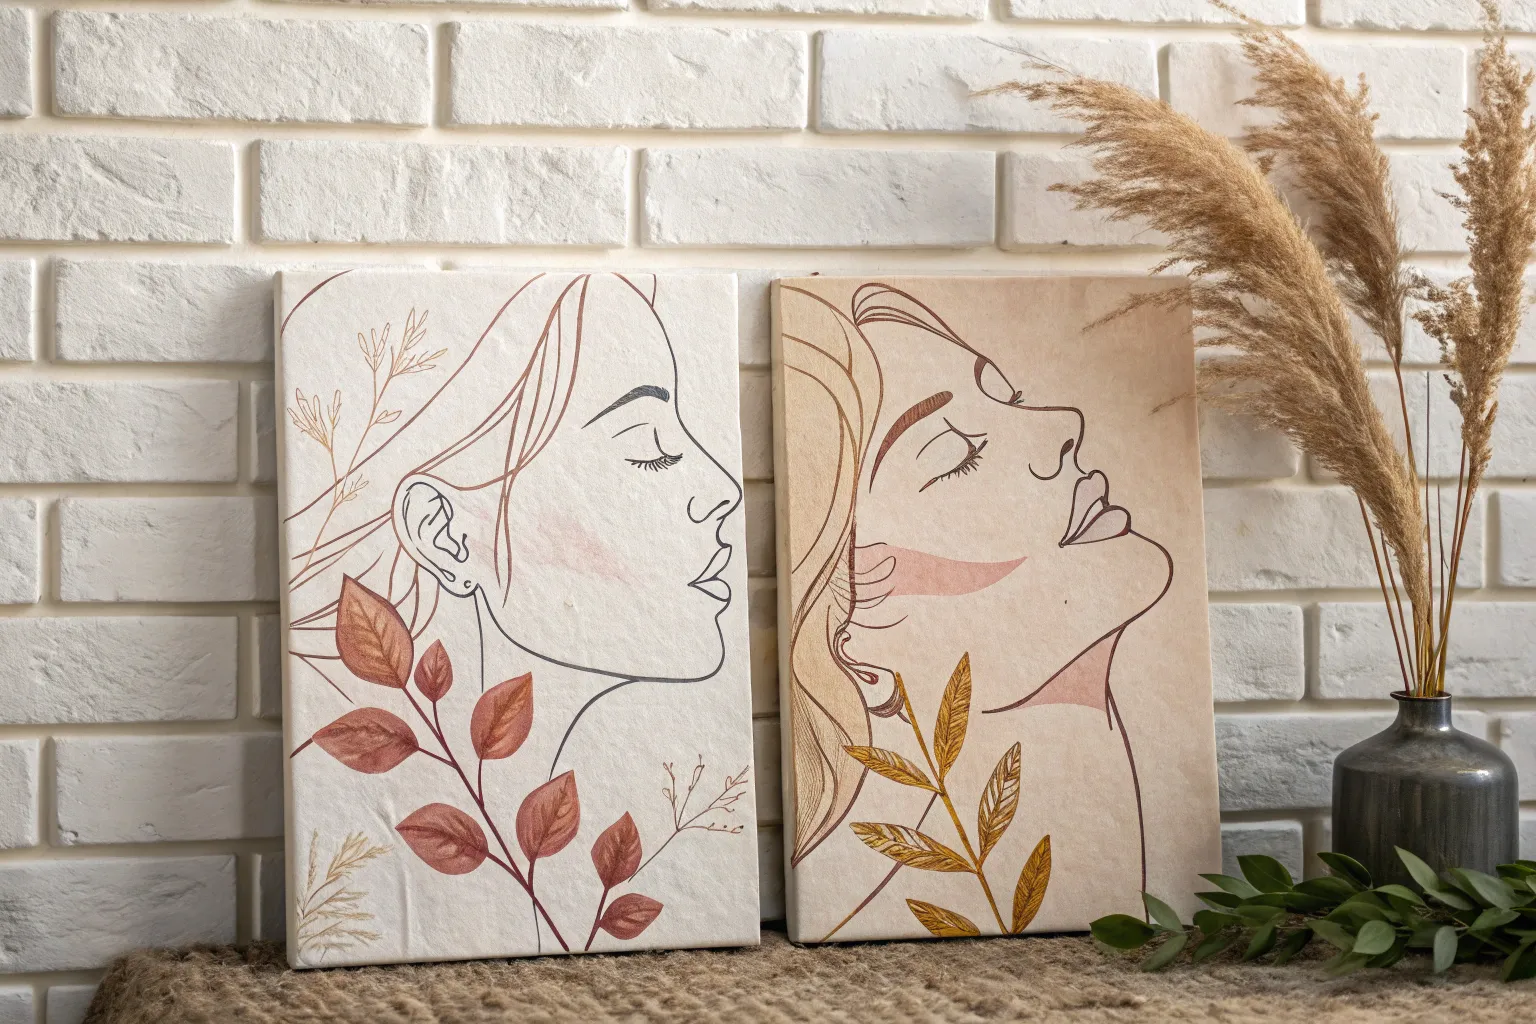
If you’re craving a cute creative project that feels like the two of you made it together, his and her paintings are such a satisfying win. I love them because you each get your own canvas, but the magic happens when they meet in the middle as one shared story.
Split Sunset Diptych
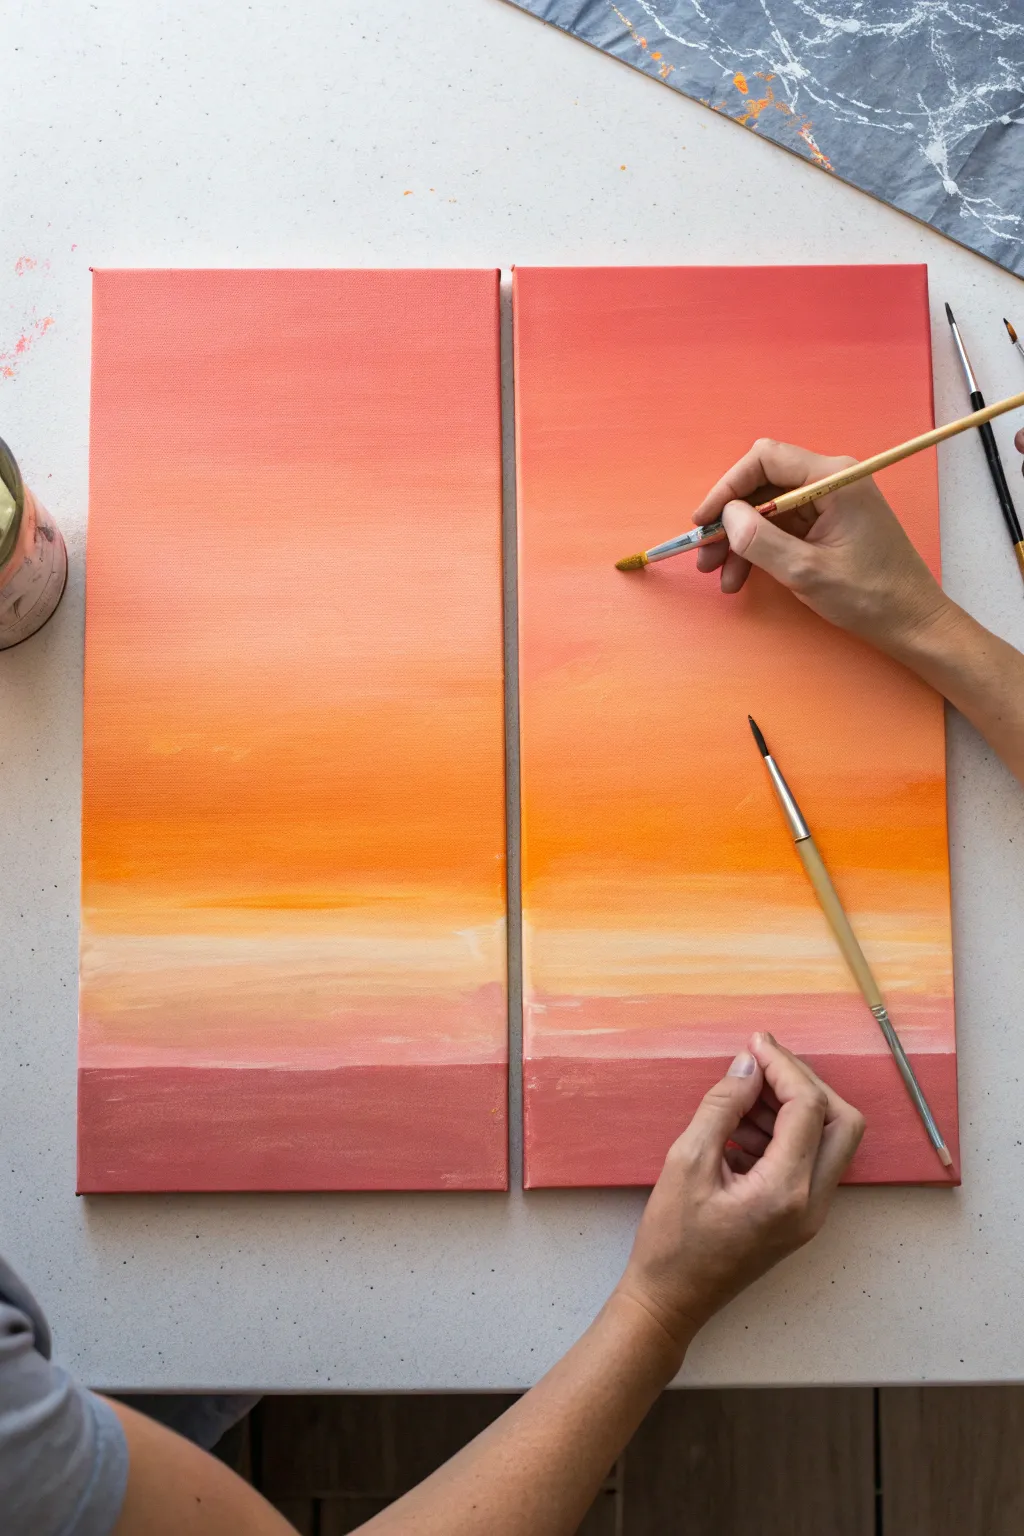
Create a unified masterpiece by painting across two separate canvases, perfect for a collaborative date night. This diptych captures a serene, gradient sunset with soft transitions from coral pink to warm yellow and deep rose.
Step-by-Step Tutorial
Materials
- Two 10×20 inch stretched canvases
- Acrylic paints (Titanium White, Cadmium Yellow, Orange, Alizarin Crimson, Burnt Sienna)
- Wide flat synthetic brushes (1-2 inch) for blending
- Round synthetic brushes (sizes 6-8) for details
- Water cups and paper towels
- Palette or paper plate
- Easels (optional) or a flat protected work surface
Step 1: Setting the Sky Gradient
-
Prepare the workspace:
Place both canvases side-by-side on your work surface or easels. Ensure they are touching or very close together so you can visualize the painting as a single continuous image. -
Mix the top color:
Create a soft coral-pink shade by mixing Titanium White with a small amount of Alizarin Crimson and a touch of Orange. You want a creamy, opaque consistency. -
Apply the upper sky:
Paint the top third of both canvases with this coral mixture. Use long, horizontal strokes that span across both canvases if possible to ensure the color matches perfectly on both sides. -
Mix the transition color:
Add more Orange and a little Cadmium Yellow to your coral mix to create a warmer, peachier tone for the middle section. -
Blend the mid-sky:
Apply this peach tone below the coral section. While both paint sections are still wet, use a clean, slightly damp wide brush to blend the boundary where they meet, working back and forth horizontally to create a smooth gradient.
Step 2: Creating the Horizon Glow
-
Mix the horizon yellow:
Clean your brush thoroughly. Mix Cadmium Yellow with a tiny amount of White and a speck of Orange to create a bright, glowing sun color. -
Paint the horizon line:
Apply a strip of this yellow paint about two-thirds of the way down the canvas. This will simulate the sun just dipping below the horizon. -
Blend upward:
Blend the top edge of this yellow strip into the peach section above. Keep your brush strokes horizontal and light. I find that wiping the brush on a paper towel frequently helps keep the yellow pure during blending. -
Add soft clouds:
Using a smaller flat brush and a mix of White with a faint touch of yellow, streak in some very subtle, flat clouds right above the horizon line to add texture.
Uneven Gradients?
If acrylics dry too fast to blend, add a retarder medium or dip your brush in a tiny bit of water. Don’t overwork it—stop when it looks smooth.
Step 3: Painting the Water and Reflections
-
Establish the water base:
Mix a pale, milky pink using White and Alizarin Crimson. Paint the area immediately below the bright yellow horizon line. -
Add reflection movement:
While the pale pink is wet, streak in horizontal lines of the bright horizon yellow to mimic sunlight reflecting on the water. -
Darken the water:
As you move lower on the canvas, darken your pink mixture by adding more Alizarin Crimson and a tiny touch of Burnt Sienna to ground the color. -
Blend the water gradient:
Paint the bottom section of the water with this darker rose tone, blending it upward into the pale pink area. Ensure the transition is seamless across the gap between the two canvases.
Pro Tip: Side-by-Side
Keep the canvases pushed together while painting the horizon line to ensure it matches perfectly, then separate them to paint the wrapped edges later.
Step 4: Grounding the Foreground
-
Mix the shoreline color:
Create a deep, dusty rose or mauve color by mixing Alizarin Crimson, Burnt Sienna, and a small amount of White. It should be significantly darker than the sky. -
Paint the bottom section:
Fill in the bottom one-fifth of the canvas with this solid, dark color. This acts as the shoreline or deep foreground water. -
Straighten the horizon:
Use a piece of painter’s tape or a steady hand to ensure the top line of this dark section is perfectly straight across both canvases. -
Add surface texture:
Using a dry flat brush, lightly drag a tiny bit of the lighter pink water color over the top edge of the dark section to soften the line slightly. -
Final touches:
Step back and look at both canvases together. Touch up any areas where the gradient doesn’t flow naturally from one canvas to the other.
Once dry, hang your canvases with a small gap between them to complete the look


Moonlit Couple Silhouette
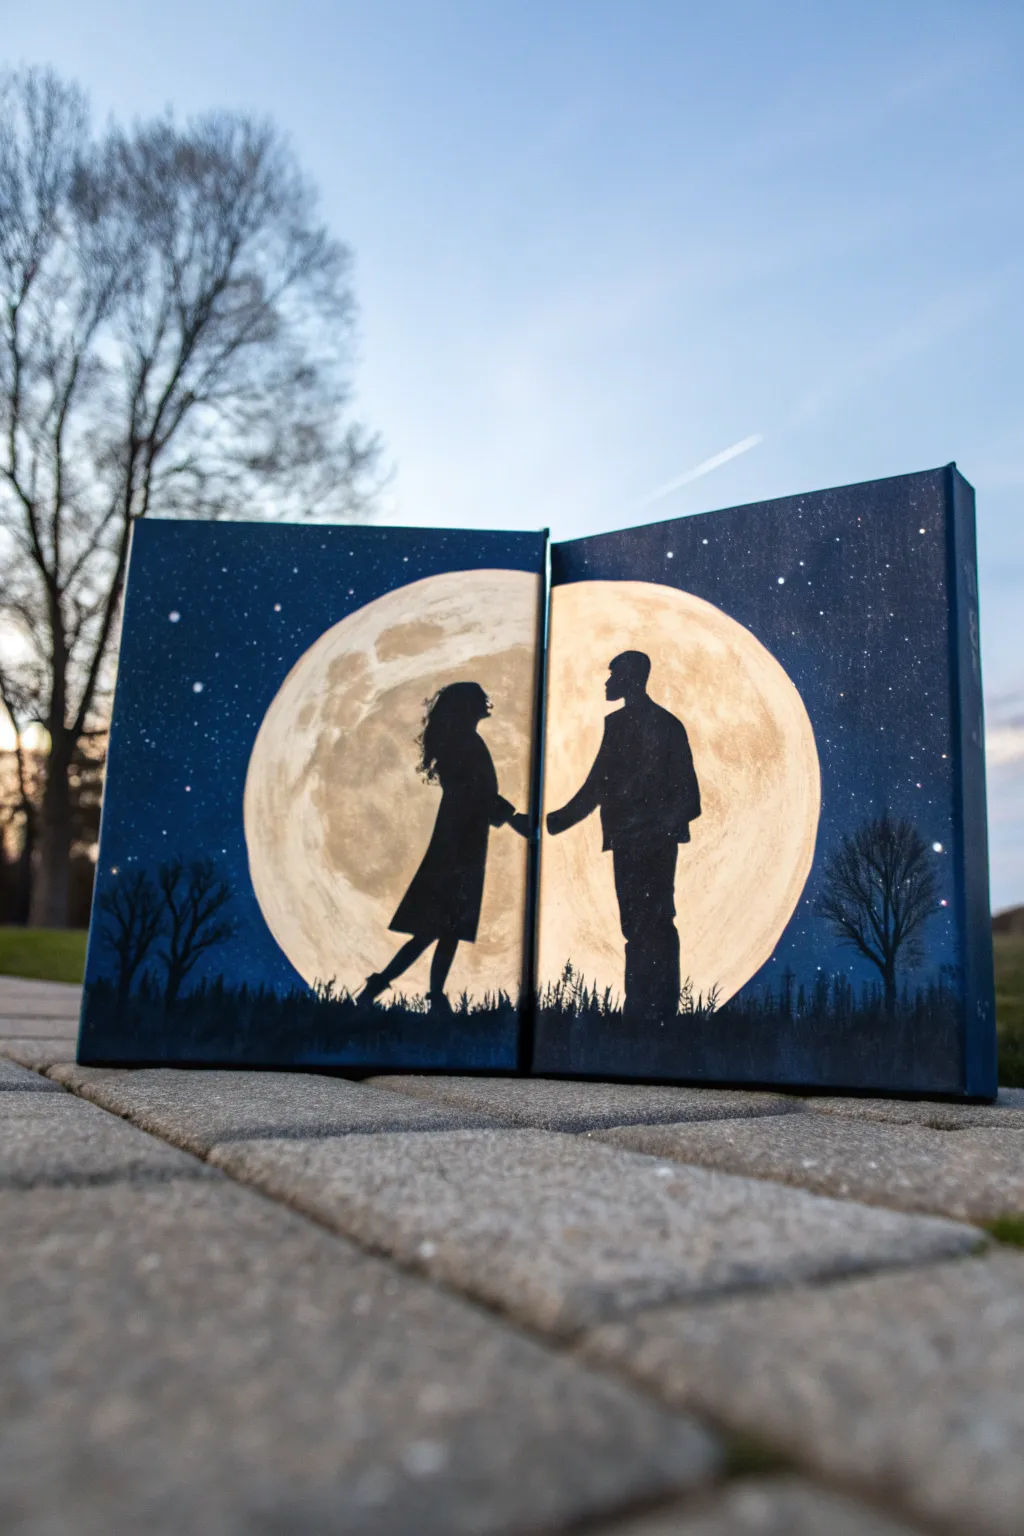
This romantic two-canvas set creates a stunning unified image when placed together, featuring a couple’s silhouette against a massive, glowing moon. The deep blue starry background contrasts beautifully with the warm lunar textures, making it a perfect project for a date night or anniversary gift.
Step-by-Step Guide
Materials
- Two 8×10 or 11×14 inch stretched canvases
- Acrylic paints: Mars Black, Titanium White, Phthalo Blue (or Prussian Blue), Yellow Ochre, Raw Umber
- Large flat brush (1-inch)
- Medium flat brush
- Small round detail brush
- Compass or large circular object (like a dinner plate)
- Pencil
- Palette for mixing
- Water cup and paper towels
- Old toothbrush (optional for stars)
Step 1: Setting the Scene
-
Prepare the Canvases:
Place your two canvases side-by-side so their inner edges touch. They need to stay in this position for the initial sketching to ensure the image aligns perfectly. If needed, you can use a small piece of masking tape on the back to hold them temporarily together. -
Sketch the Moon:
Place your large circular object or use a compass to draw a large circle right in the middle of the two canvases. The circle should be split evenly between the left and right canvas. This will be your glowing moon. -
Outline the Couple:
Lightly sketch the silhouette of the couple inside the moon circle. Draw the female figure on the left canvas and the male figure on the right, positioning their hands so they appear to be reaching for each other across the gap. Keep the details simple since we will fill them in with solid black later. -
Sketch the Horizon:
Draw a low, uneven horizon line near the bottom of both canvases to represent the grassy ground. Add sketched outlines for small trees or bushes on the far left and right edges to frame the scene.
Alignment Pro Tip
When painting the moon near the inner edges, wrap the paint around the sides of the canvas. This ensures the circle looks continuous even if the canvases are hung with a tiny gap between them.
Step 2: Painting the Background
-
Mix the Night Sky Color:
On your palette, mix a deep midnight blue using Phthalo Blue and a touch of Mars Black. You want a rich, dark color that isn’t quite pure black but suggests a deep night sky. -
Paint the Sky:
Using your large flat brush, paint the area outside the moon circle with your dark blue mix. Be careful to cut in neatly around the edge of the circle so the moon stays clean canvas white for now. Paint the edges of the canvas too for a finished look. -
Add the Stars:
Once the blue background is dry, dilute a little Titanium White paint with water until it’s inky. Load an old toothbrush or a stiff brush, and flick the bristles with your thumb to spray tiny white specks across the blue sky areas. I personally love adding one or two slightly larger dots with a detail brush to represent planets.
Step 3: Creating the Moon
-
Base Coat the Moon:
Mix Titanium White with a very small amount of Yellow Ochre to create a pale, creamy off-white. Apply this color to the entire moon circle, painting right over your pencil sketches of the couple (you should still be able to see the faint graphite lines through the paint). -
Add Lunar Texture:
While the base coat is still slightly wet, mix a little Raw Umber with White to make a light beige. Use a scrunched-up paper towel or a dry brush to sponge or dab this color onto the moon in random patches. This creates the cratered rendering. -
Highlight the Moon:
Add a few touches of pure Titanium White to the brightest parts of the moon texture to give it a glowing dimension. Soften any harsh edges with a clean, dry brush.
Troubleshooting: Shapes
If you struggle with drawing people, print a silhouette of a couple from the internet, cut it out, and trace it onto the canvas with a pencil before painting to get accurate proportions.
Step 4: Silhouettes and Details
-
Paint the Ground:
Load your medium flat brush with pure Mars Black. Paint the ground area at the bottom of the canvas solid black, covering the horizon line you sketched earlier. -
Add Grassy Textures:
Switch to your small detail brush. Using the black paint, flick small, upward strokes along the top edge of the black ground to create the look of grass blades sticking up against the moon and sky. -
Fill in the Figures:
Carefully paint the silhouettes of the couple using Mars Black and your small round brush. Start by outlining precisely, then fill in the centers. Take your time with the profiles of the faces and the hands reaching toward the center gap. -
Paint the Trees:
On the far left and right sides, paint the bare winter trees in black. Use the tip of your smallest brush to drag out thin, delicate branches that extend up into the starry sky and slightly over the moon’s edge. -
Refine the Connection:
Place the canvases side-by-side again. Check the alignment of the hands. If the fingers don’t quite line up visually, use a tiny bit of black paint to extend them slightly toward the edge of the canvas so the gesture reads clearly across the gap. -
Final Touches:
Once everything is dry, assess the moon’s edge. If the blue sky looks a bit messy against the moon, carefully re-outline the circle with your pale moon color or dark blue to make it crisp.
Hang your masterpieces close together and enjoy the romantic atmosphere they bring to your space
Two Hands Making a Heart
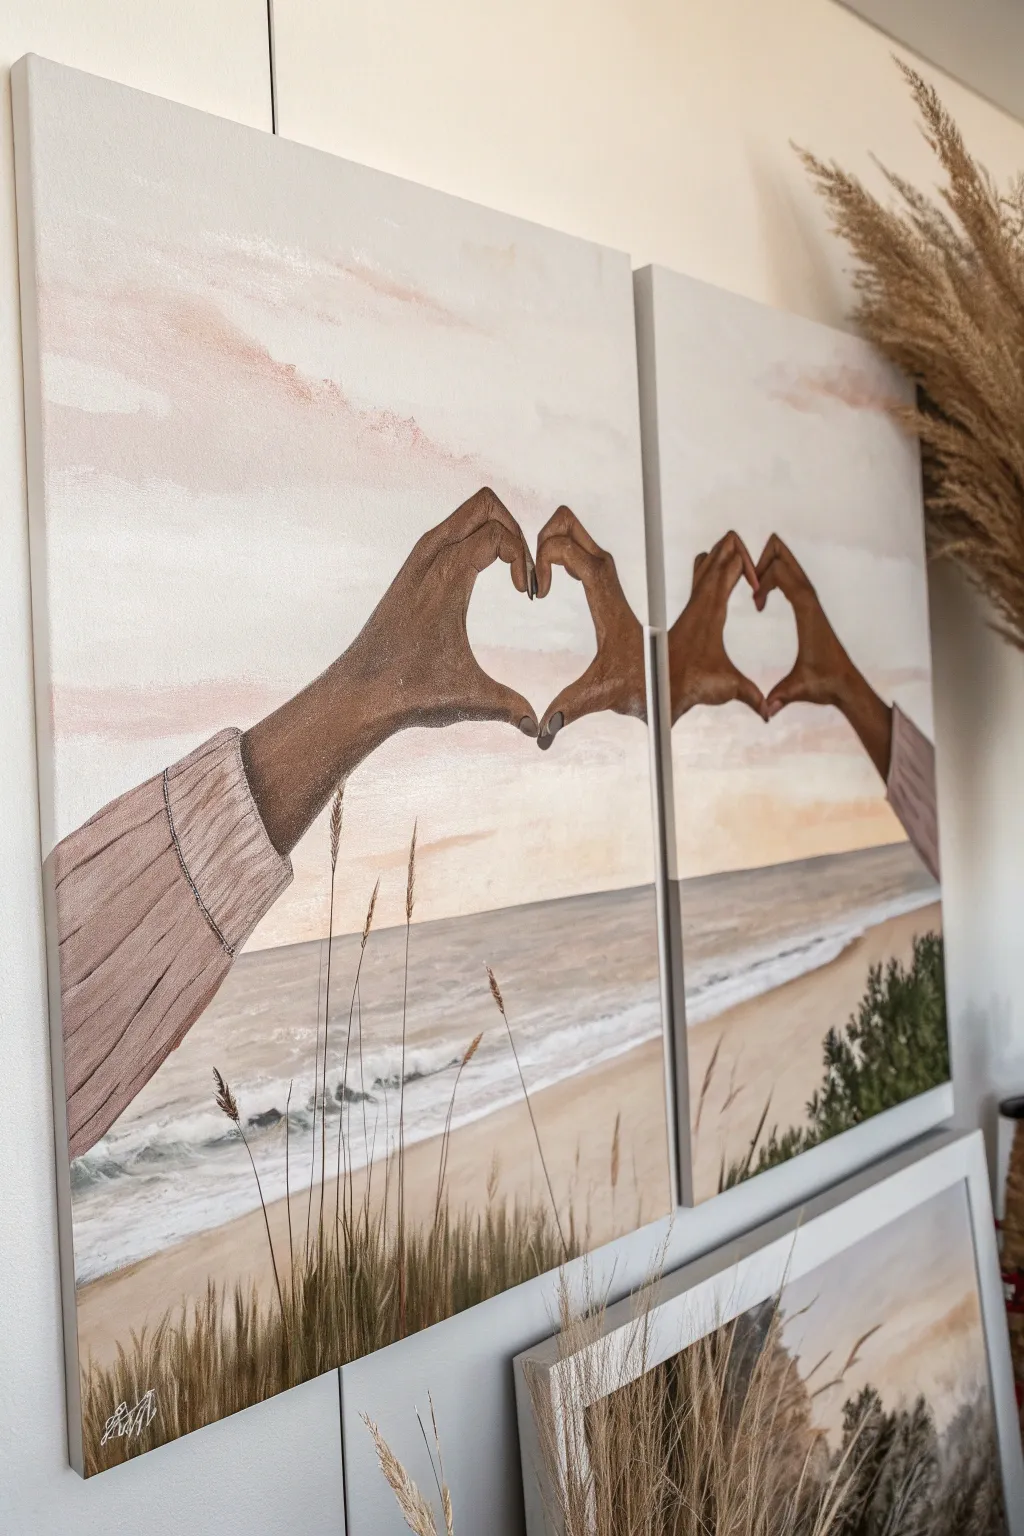
Celebrate connection with this beautiful two-canvas painting that captures a shared moment of affection against a serene beach backdrop. The soft sunset colors and realistic hand details create a cohesive piece that spans across the gap, symbolizing unity.
Detailed Instructions
Materials
- Two rectangular stretched canvases (same size)
- Acrylic paints: Titanium White, Burnt Umber, Burnt Sienna, Yellow Ochre, Ultramarine Blue, Alizarin Crimson, Unbleached Titanium
- Large flat brush (for sky wash)
- Medium filbert brush (for water and sand)
- Small round brushes (sizes 2 and 4 for details)
- Fine liner brush (for grass highlights)
- Pencil and eraser
- Palette and water cup
- Painters tape (optional)
- Reference photo of hands forming a heart
Step 1: Planning and Sketching
-
Prepare the workspace:
Place your two canvases side-by-side on your easel or work surface. There should be a small gap between them, mimicking how they will hang on the wall, so you can visualize the continuous line. -
Establish the horizon:
Use a pencil to lightly draw a straight horizon line across both canvases. Position it a bit below the vertical center, roughly 1/3 from the bottom, to leave plenty of room for the sky and hands. -
Sketch the hands:
Lightly sketch the arms entering from the outer edges. The left arm will angle up from the bottom left, and the right arm from the middle right. Draw the hands meeting in the center to form the heart shape. Crucially, ensure the wrists and fingers align visually across the gap between the canvases.
Uneven Horizon Line?
If the water line doesn’t match up perfectly between canvases, place a strip of painters tape across BOTH canvases at once. Paint the horizon against the tape edge for perfect alignment.
Step 2: Painting the Background
-
Create the sky gradient:
Mix a large amount of Titanium White with a tiny touch of Alizarin Crimson and Yellow Ochre for a pale, dusky pink. Using a large flat brush, paint the upper sky, fading into a warmer cream color (Unbleached Titanium) as you approach the horizon. -
Add cloud textures:
While the sky is still slightly damp, mix a slightly darker pinkish-grey. Use a scumbling technique with a dry brush to create soft, horizontal cloud streaks across the top section. -
Paint the ocean:
Mix Ultramarine Blue, a touch of Burnt Umber, and White to get a muted grey-blue. Paint the water section horizontally below the horizon line. I find adding a little more white near the shore helps transition into the foam later. -
Lay in the sand:
Mix Yellow Ochre, White, and a tiny bit of Burnt Sienna. Paint the beach area, angling it upwards from left to right to create perspective. Keep the brushstrokes horizontal to mimic the flatness of the sand.
Step 3: Painting the Hands
-
Base coat the skin:
Mix your base skin tone using Burnt Umber, Burnt Sienna, and White. Paint the silhouette of the hands and wrists, avoiding the sleeve area on the left arm. It doesn’t need to be perfect yet; just get solid coverage. -
Add shadows:
Mix a darker version of your skin tone by adding more Burnt Umber. With a medium round brush, paint the shadowed areas: between the fingers, under the palms, and along the bottom edges of the arms to create roundness. -
Add highlights:
Mix a lighter skin tone with more White and a touch of Yellow Ochre. Apply highlights to the top knuckles, the back of the hand, and the fingertips where the ‘sun’ would catch the skin. -
Paint the sleeve:
For the left arm, paint the sleeve using a mix of White and Alizarin Crimson for a dusty rose color. Paint linear strokes that follow the curve of the arm to represent the fabric’s ribbing texture. -
Detail the sleeve fabric:
Use a smaller brush and a darker pink-brown mix to paint thin, darker lines between the ribs of the sweater fabric, giving it depth and dimension.
Pro Tip: Soft Blending
To get that dreamy sky look, use a clean, dry makeup sponge or a mop brush to gently tap over the transition areas while the paint is wet. This eliminates harsh brushstrokes.
Step 4: Foreground Details
-
Paint the waves:
Using pure Titanium White on a small brush, paint the crashing waves where the water meets the sand. Stipple the paint slightly to create the look of foam. -
Add grassy textures:
Mix a deep green-brown for the dune grass base. Using a fine liner brush, flick upward strokes from the bottom edge of the canvas. Vary the length and direction slightly to look natural. -
Highlight the grass:
Mix a lighter, sandy-yellow color. Add highlights to the tips and right-side edges of the grass blades, assuming the light source is coming from the sunset above. -
Final touches:
Use your finest brush to refine the fingernails with a pale grey-pink, and check the alignment of the horizon line across the two canvases one last time.
Enjoy the warmth and connection this personalized artwork brings to your space


Lovebirds on a Shared Branch
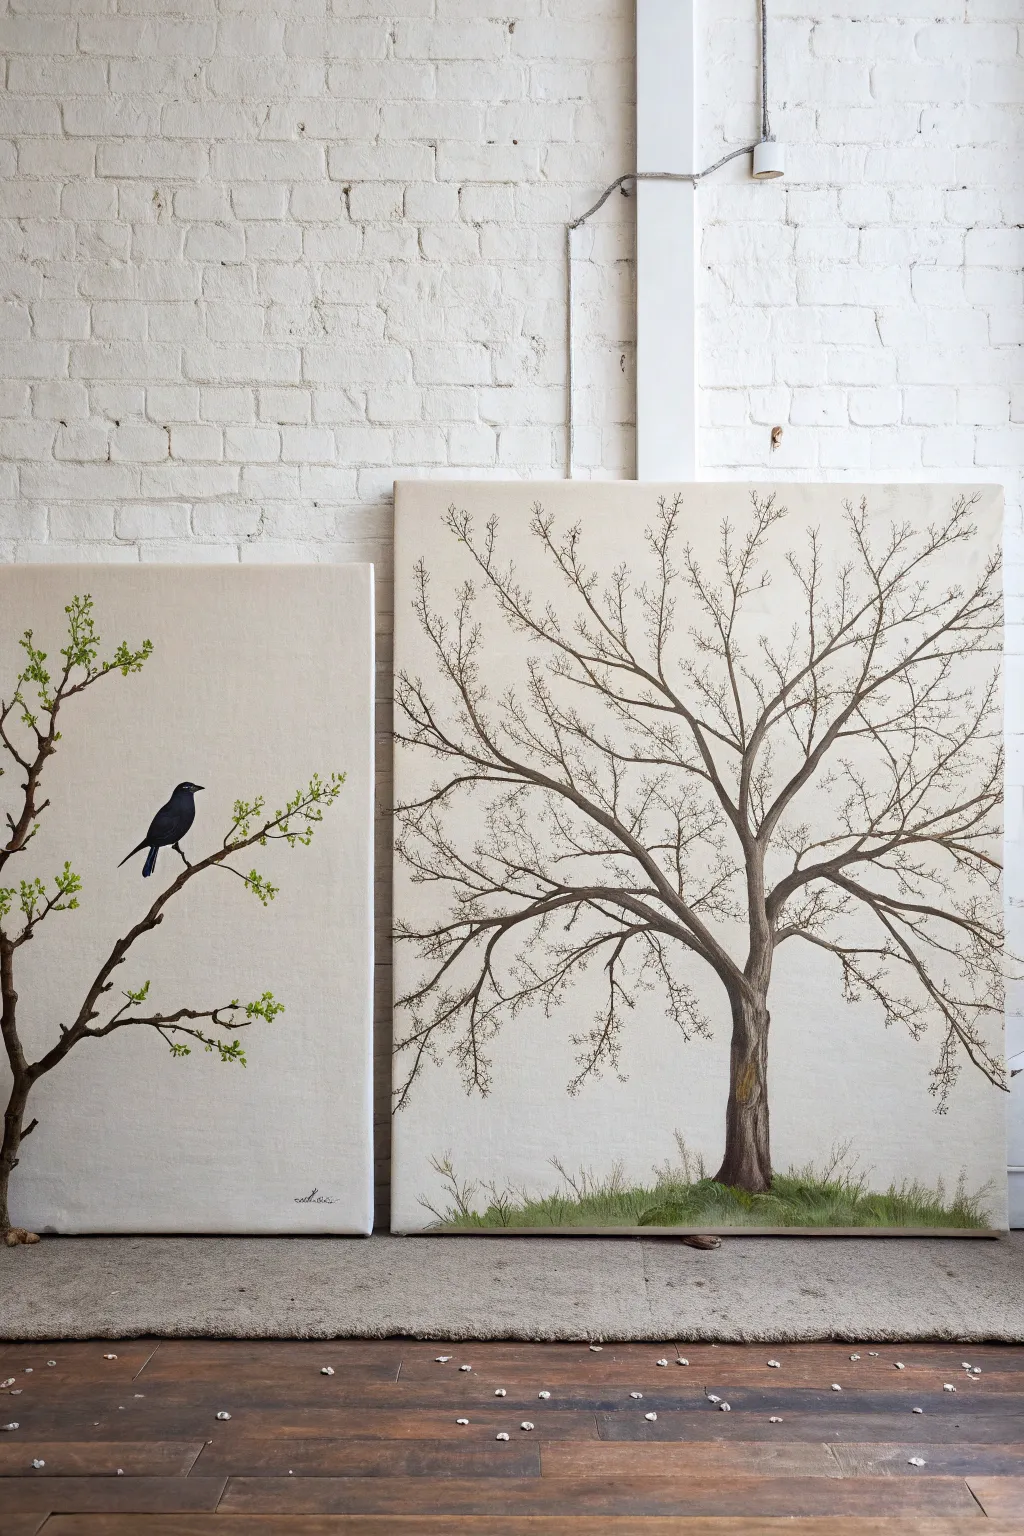
This elegant two-part project creates a visual dialogue between a solitary bird perched on a budding branch and a majestic, sprawling tree. Designed to hang side-by-side or slightly apart, the neutral beige backgrounds unify the intricate botanical details for a serene, organic aesthetic.
Step-by-Step
Materials
- Two stretched canvases (one medium rectangular, one large square/rectangular)
- Acrylic paints: Titanium White, Raw Umber, Burnt Bellows, Mars Black, Sap Green, Yellow Ochre
- House paint sample or large tube acrylic (Beige/Cream) for background
- Wide flat brush (2-3 inch) for background
- Round brushes (sizes 2, 4, and 6)
- Fine liner brush (size 0 or 00)
- Pencil and eraser
- Palette
- Water container and paper towels
Step 1: Setting the Stage
-
Prime the Background:
Mix a large amount of beige or cream paint. Use the wide flat brush to coat both canvases entirely, ensuring the edges are covered for a finished look. Apply two coats if necessary for full opacity, allowing complete drying between layers. -
Plan the Composition:
Visualize how the paintings relate. The left canvas will feature a zoomed-in branch entering from the left side. The right canvas will center a full tree. Lightly sketch the main trunk lines on both canvases with a pencil, keeping the pressure very light to avoid indenting the paint. -
Texture the Ground:
On the larger canvas, lightly sketch a horizon line near the bottom. This will eventually become the grassy knoll, but for now, just mark the placement.
Step 2: The Majestic Tree (Right Canvas)
-
Establish the Trunk:
Mix Raw Umber with a touch of Mars Black to create a dark brown. Using a size 6 round brush, paint the main trunk of the central tree, starting wider at the base and tapering upward. -
Branch Out:
Switch to a size 4 brush. Extend the main branches outward from the trunk. Focus on creating ‘Y’ shapes, where one branch splits into two smaller ones, maintaining organic, slightly jagged lines rather than perfect curves. -
Fine Twigs:
Dilute your brown paint slightly with water to make it flow like ink. Using the fine liner brush, add the smallest geometric twigs at the very ends of the branches. This extensive network is what gives the tree its delicate, wintry feel. -
Add Trunk Texture:
Mix a lighter brown using Raw Umber and White. With a fairly dry brush, streak vertical highlights down the trunk to simulate bark texture. -
Painting the Grass:
Mix Sap Green with a little Raw Umber for a natural, earthy green. Using upward, flicking strokes with a size 4 brush, create the grassy base around the tree roots. -
Grassy Layers:
Add Yellow Ochre to your green mix. Layer lighter, smaller grass blades over the dark base to create depth and volume at the foot of the tree. -
Root Details:
Blend the bottom of the trunk into the grass with a few dark brown strokes, making the tree look firmly planted rather than floating.
Ink Flow Technique
For the finest twigs, mix a flow improver or a few drops of water into your paint. It should be the consistency of heavy cream to drag long, unbroken lines.
Step 3: The Perched Bird (Left Canvas)
-
Paint the Main Branch:
Using the dark brown mix and a size 4 brush, paint the thick branch extending from the left edge. Ensure the angle complements the flow of the tree on the other canvas, though it doesn’t need to match perfectly. -
Silhouette the Bird:
With Mars Black and a size 2 brush, carefully paint the silhouette of the bird. Start with an oval for the body and a circle for the head, then refine the shape, adding the tail pointing down and the beak. -
Highlight the Feathers:
Mix a tiny dot of White into the Black to make a dark grey. Add a subtle sheen to the top of the bird’s head and wing to give it dimension, so it isn’t just a flat hole in the canvas. -
Add Life with Leaves:
Mix Sap Green and Yellow Ochre for a vibrant spring green. Using the tip of a size 2 brush, dab small, clustered leaves along the branch. -
Varying the Greenery:
I like to add a touch of white to the green mix for the topmost leaves. Apply these lighter green dabs on top of the previous ones to suggest sunlight hitting the budding foliage. -
Connect the Feet:
Use the liner brush and black paint to draw tiny legs gripping the branch. The bird should look weighty and settled. -
Final Bark Details:
Just like the big tree, use the lighter brown mix to add small texture lines to the branch on the left canvas, ensuring the style matches the larger painting.
Seasonal Shift
Change the season by altering the foliage. Stipple pinks and whites for cherry blossoms, or use burnt oranges and reds for a warm autumn variation.
Step back and admire how the stillness of the bird complements the complexity of the tree.
BRUSH GUIDE
The Right Brush for Every Stroke
From clean lines to bold texture — master brush choice, stroke control, and essential techniques.
Explore the Full Guide
Two Trees Forming a Heart
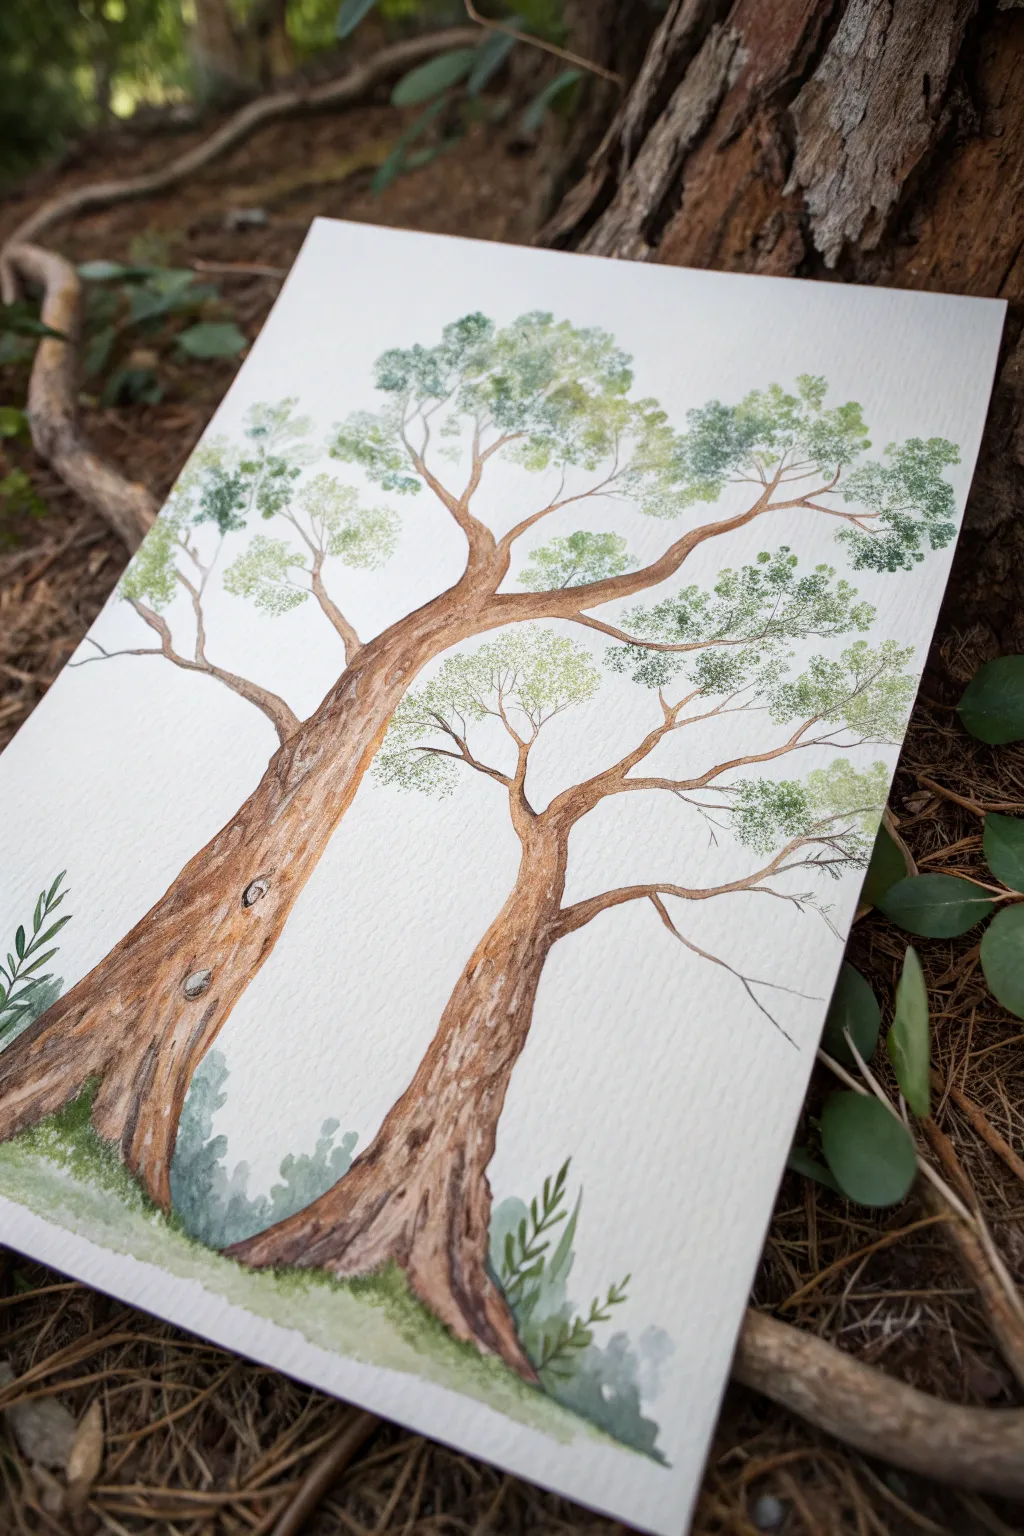
Create a subtle nod to romance with this delicate watercolor study of two eucalyptus-style trees leaning toward one another. The composition uses negative space to hint at a heart shape between the canopies while maintaining a natural, organic look.
Step-by-Step Guide
Materials
- Cold press watercolor paper (140 lb/300 gsm)
- Watercolor paints (Burnt Sienna, Burnt Umber, Sap Green, Hooker’s Green, Indigo)
- Round brushes (sizes 2, 6, and 8)
- Pencil (HB or 2H)
- Kneaded eraser
- Two cups of water
- Paper towels
Step 1: Sketching the Framework
-
Draft the trunks:
Begin by lightly sketching the two main tree trunks. Start the left trunk thick at the bottom and curve it gently rightwards. Draw the right trunk slightly thinner, curving leftwards so they lean toward each other without touching. -
Map the branches:
Extend the main branches from the top of the trunks. Draw them reaching outward and inward, visualizing a loose heart shape in the negative space between the upper canopy areas. -
Outline foliage zones:
Very faintly sketch the general cloud-like shapes where the leaves will go. Don’t draw individual leaves yet; just mark the boundaries of the canopy masses.
Dry Brush For Bark
Wipe your brush on a paper towel before picking up the brown paint. Dragging this ‘thirsty’ brush quickly over the paper creates natural, rugged wood textures effortlessly.
Step 2: Painting the Trunks
-
Base wash:
Mix a watery wash of Burnt Sienna. Using a size 6 brush, fill in both tree trunks. While wet, drop in hints of Burnt Umber along the shadowed sides (usually the outer edges) to create instant volume. -
Adding texture:
Once the base layer is damp but not soaking, use a size 2 brush with a thicker mix of Burnt Umber to paint vertical, wiggly lines. This mimics the rough, stringy bark texture common with gum trees or pines. -
Creating knotholes:
While working on the texture, identify a few spots on the trunk to create ‘eyes’ or knots. painting a dark oval and lifting out the center with a thirsty clean brush creates a realistic wood knot. -
Deepening shadows:
Mix a touch of Indigo into your brown to create a cool, dark shadow color. Apply this sparingly at the very base of the trees and under the main branch splits to anchor the structure.
Step 3: Creating the Canopy
-
Prepare the greens:
On your palette, mix three distinct puddles of green: a light yellow-green (Sap Green + water), a mid-tone green (Sap Green + Hooker’s Green), and a deep cool green (Hooker’s Green + Indigo). -
Stippling technique:
Using a mostly dry size 6 or 8 brush, splay the bristles slightly. Dip into the lightest green and use a dabbing or stippling motion to create the airy clusters of leaves at the top edges of your branches. -
Building density:
Switch to your mid-tone green. Dab this into the lower sections of the leaf clusters you just painted, blending wet-into-wet slightly but leaving plenty of white paper showing for airiness. -
Connecting branches:
Use your size 0 or 2 brush with a thinned brown mix to draw fine twigs connecting the main branches to your floating leaf clusters. I find this connects the composition visually without making it look heavy.
Make It Personal
Carve lightly drawn initials into the trunk paint while it’s still slightly damp using a clean, stiff brush or a toothpick for a subtle ‘carved tree’ effect.
Step 4: Ground and Details
-
Anchoring the scene:
Wet the bottom inch of the paper with clean water. Drop in your mid-tone green around the base of the trunks, letting it bleed outward softly to create a grassy foundation. -
Adding undergrowth:
Once the grass wash is dry, use the size 2 brush to paint simple, upward fern-like strokes or small leafy sprigs at the base of the trees using a darker green. -
Final bark details:
Assess the trunks. If they look too flat, use a dry brush with very dark brown paint to drag rough texture over the raised areas of the bark. -
Leaf layering:
Go back to the canopy with your darkest cool green. Add tiny, precise dots in the deepest parts of the leaf clusters to suggest shadow and depth within the foliage.
Now you have a serene, sentimental landscape that celebrates connection through nature.
Day and Night Horizon Pair
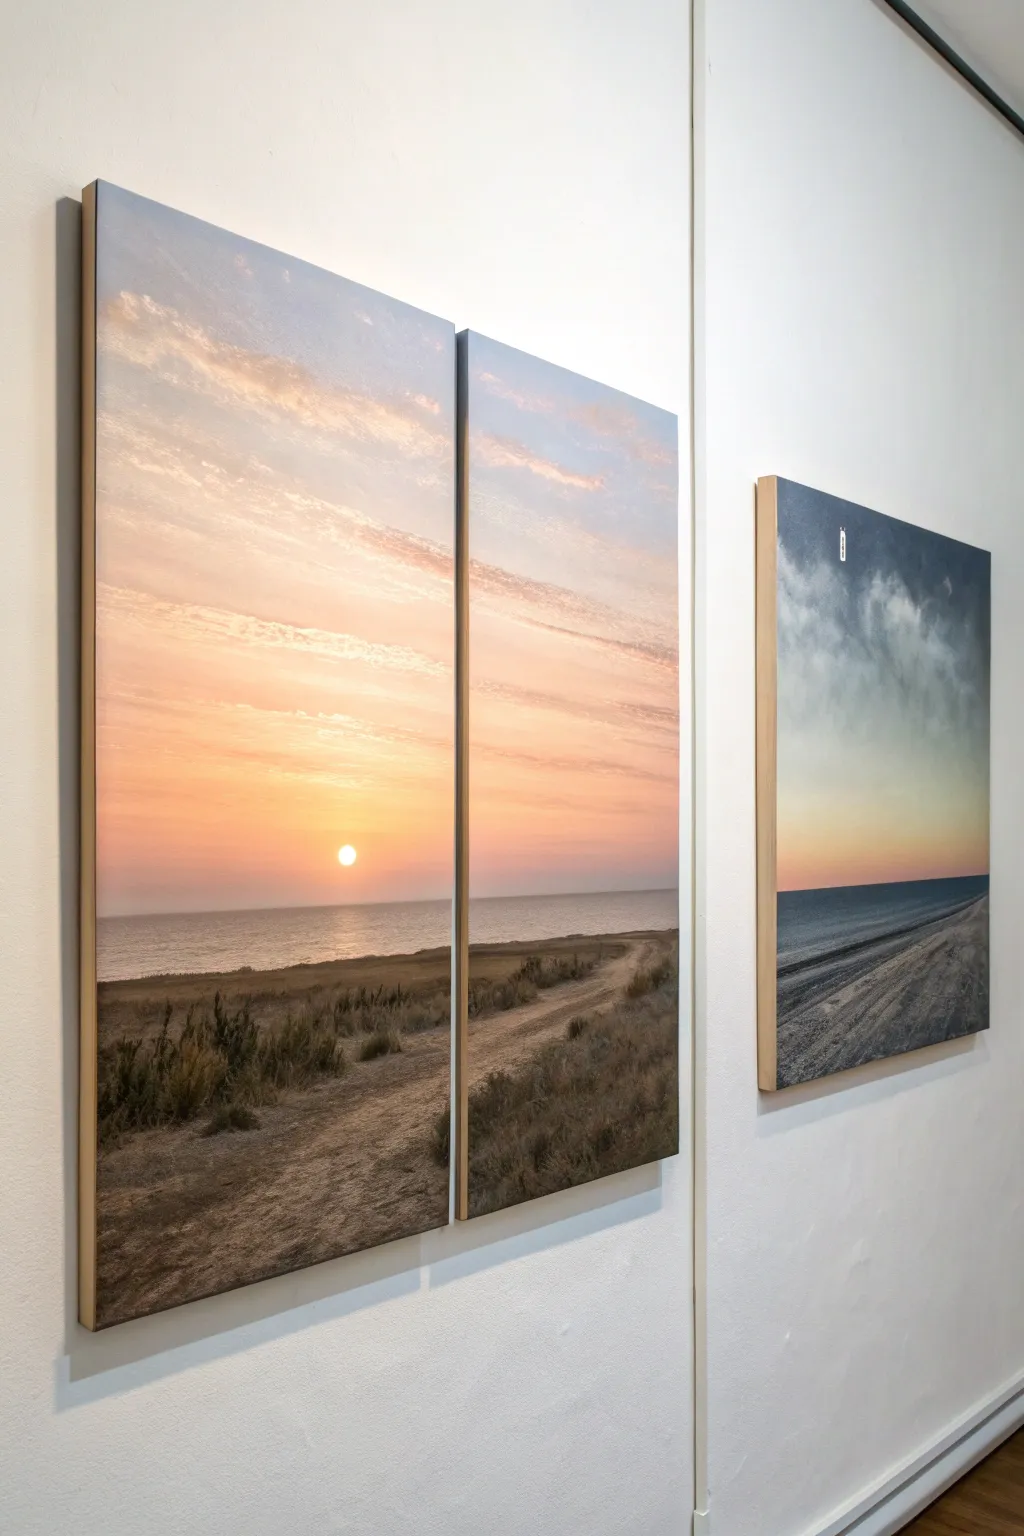
Capture the passing of time with this clever ‘his and hers’ diptych concept, where one partner paints the waking day and the other the settling dusk. Using stretched canvases and acrylics, you’ll create a cohesive horizon line that connects two distinct moods—a warm, golden sunrise and a cool, blue-grey evening.
Step-by-Step
Materials
- Three stretched canvases (two of equal size for the left, one larger for the right)
- Acrylic paints (Titanium White, Cadmium Yellow, Orange, Alizarin Crimson, Phthalo Blue, Burnt Umber, Black)
- Large flat brushes (2-inch)
- Medium filbert brushes
- Small round detail brushes
- Painter’s tape or masking tape
- Pencil and ruler
- Palette and water cup
- Easel or flat workspace
Step 1: Preparation & Sketching
-
Align the canvases:
Lay your three canvases side-by-side on a flat surface. Place the two smaller canvases together on the left (touching) and the third separate one on the right. It is crucial to decide now where your horizon line will sit so it flows continuously across all panels. -
Mark the horizon:
Use a ruler and pencil to draw a straight horizontal line across all three canvases about one-third of the way up from the bottom. This ensures the ocean meets the sky at the exact same level. -
Sketch the path:
On the left set of canvases (the ‘Day’ side), lightly sketch a dirt path winding from the bottom right corner of the second panel into the first panel. On the right canvas (the ‘Night’ side), sketch a simpler shoreline angle. -
Tape the edges:
Apply painter’s tape to the sides of each canvas (the depth edges). This keeps the wooden sides clean for that modern, exposed-wood look seen in the photo, or protects them if you plan to paint the edges a solid color later.
Sticky Situation
Use a T-square ruler when drawing your initial horizon line across the multiple canvases. A crooked horizon instantly destroys the illusion of a continuous landscape.
Step 2: Painting the Sky
-
Mix the sunrise gradient:
For the left panels, prepare a gradient on your palette. Start with white mixed with a touch of yellow for the horizon, transitioning into oranges and soft purples as you move upward. I like to keep the paint fairly wet here to help the blending. -
Apply the warm sky:
Using a large flat brush, paint horizontal strokes across the top two-thirds of the left panels. Keep the brightest, lightest yellow right above the horizon line where the sun will be. -
Mix the evening gradient:
For the right panel, mix Phthalo Blue with Titanium White and a tiny dot of black for a moody grey-blue. Keep the horizon slightly lighter but much cooler than the sunrise side. -
Apply the cool sky:
Paint the sky on the right panel using broad sweeps. You can add more texture here to mimic moody evening clouds using a dry-brush technique with darker grey-blues. -
Add cloud details:
Switch to a filbert brush. On the sunrise side, streak in thin, horizontal clouds using a soft pink-orange mix. On the evening side, dab in fluffier, darker cumulus clouds near the top.
Step 3: Painting the Water
-
Block in the ocean:
Mix a deep blue-grey for the water. Apply this to the middle section of all canvases, right up to the horizon line. Ensure the line is crisp and straight. -
Add reflection highlights:
On the left panels, beneath where your sun will be, drag a little bit of the yellow-orange sky color vertically down into the water to create the sun’s reflection.
Make It 3D
Instead of leaving the sides plain wood, wrap your painting around the edges. Continue the horizon line and ground onto the sides for a gallery-quality finish.
Step 4: Foreground & Details
-
Paint the ground base:
Mix Burnt Umber with a little yellow and white for a sandy dirt color. Fill in the bottom land area on the left panels, following your path sketch. Use a darker grey-brown for the shore on the right panel. -
Define the path:
Lighten your dirt color with more white and paint the winding path on the left panels. Use horizontal strokes to suggest the flatness of the road. -
Add vegetation texture:
Using an old, splayed brush or a fan brush, tap in grasses along the sides of the path. Use dark greens and browns for the base, and highlight the tips with yellow-ochre to catch the ‘light’. -
Paint the sun:
With a small round brush and pure Titanium White mixed with a speck of yellow, paint a small, clean circle just above the horizon on the left panel. Soften the edges slightly so it glows. -
Refine the evening shore:
On the right canvas, add texture to the beach using dragging strokes of grey and white to simulate sand and pebbles in low light. -
Final touches:
Check the horizon continuity one last time. If the line jumps between canvases, correct it now. Remove the tape from the edges carefully once the paint is tacky but not fully hard.
Hang your panels with a slight gap between them to let the scene breathe and enjoy your synchronized sunset.

PENCIL GUIDE
Understanding Pencil Grades from H to B
From first sketch to finished drawing — learn pencil grades, line control, and shading techniques.
Explore the Full Guide
Mountain Range That Meets in the Middle
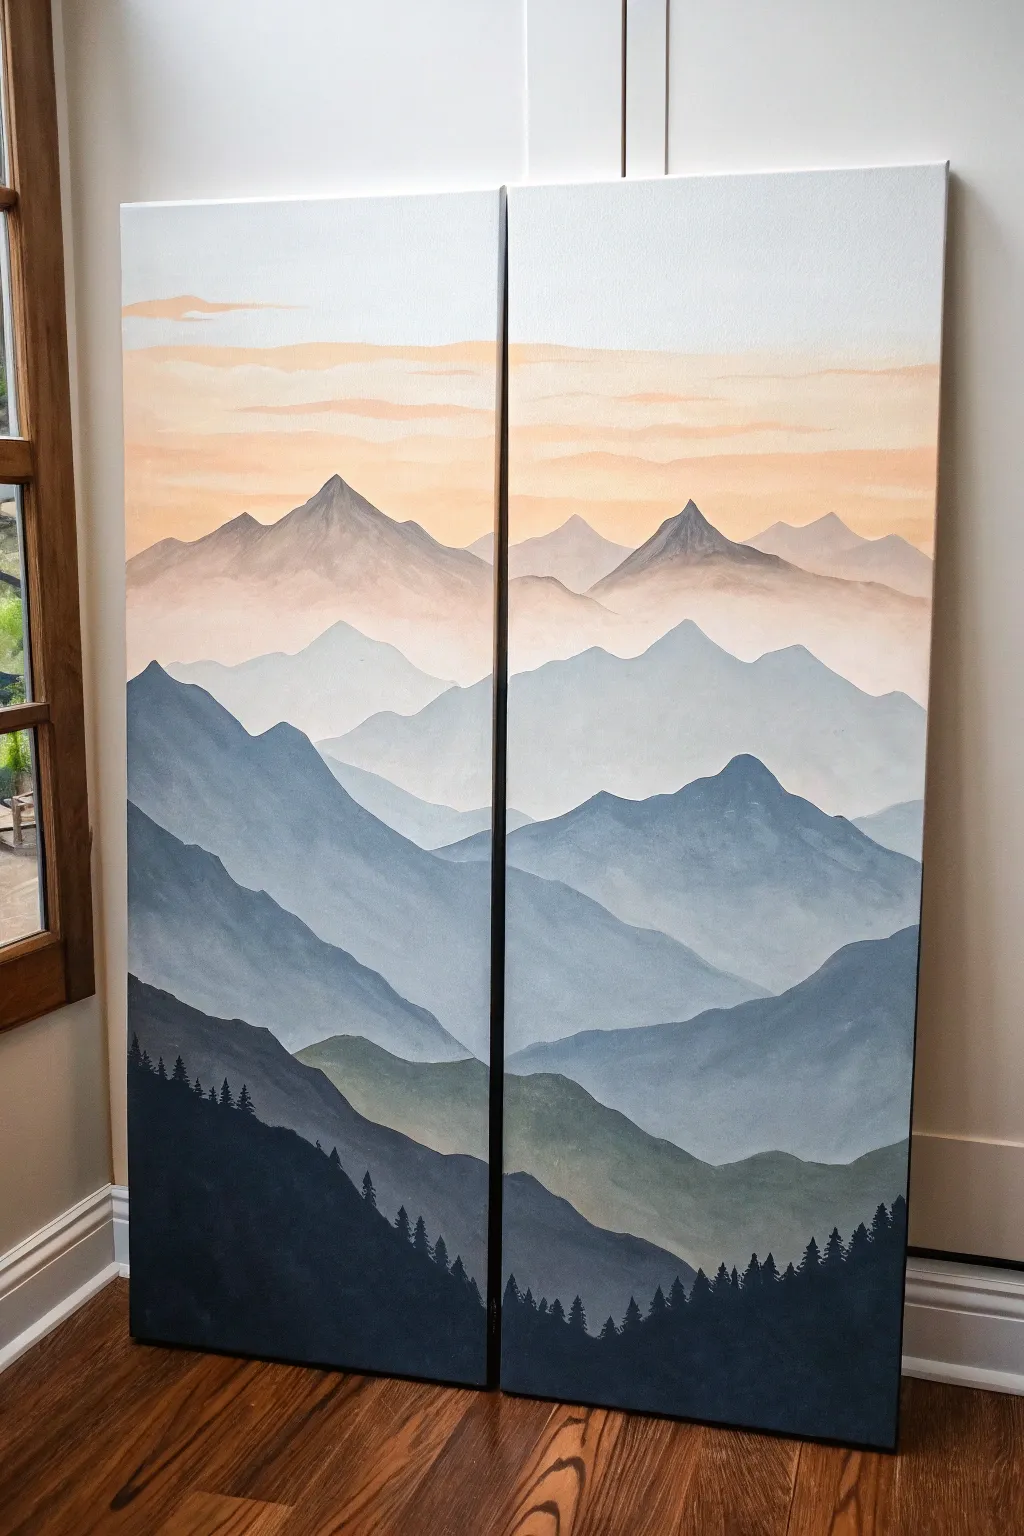
This collaborative diptych project transforms two separate canvases into a single, breathtaking mountain landscape that connects perfectly in the middle. The serene composition relies on atmospheric perspective, fading from deep navy silhouettes in the foreground to soft peach and cream peaks in the distance.
How-To Guide
Materials
- Two large rectangular stretched canvases (same size)
- Acrylic paints: Titanium White, Ultramarine Blue, Mars Black, Burnt Umber, Hooker’s Green, Peach or Light Orange
- Large flat brushes (1-2 inch) for blending
- Medium round brushes and small detail brushes
- Palette or paper plates
- Water cups and paper towels
- Easel or large flat table surface
- Pencil and eraser
Step 1: Preparation and Sketching
-
Set up your workspace:
Place your two canvases side-by-side on your easel or work surface. They should be touching directly, with almost no gap between them, to ensure your drawing flows seamlessly across the divide. -
Sketch the horizon line:
Using a pencil, lightly draw a horizon line about one-third of the way down from the top. This doesn’t need to be straight; make it bumpy to suggest distant mountain ranges. -
Outline the mountain layers:
Below your horizon, draw 3-5 distinct wavy lines that zigzag across both canvases. These will become your mountain ridges. Ensure the lines visibly connect from the left canvas to the right canvas so the image is continuous. -
Mark the tree line:
Sketch a large, sloping line starting near the bottom corner of each outer edge and dipping toward the center. This will be your darkest foreground layer.
Seamless Transitions
Work on the sky and mountain layers on both canvases simultaneously while the paint is wet to ensure identical color matching and blending.
Step 2: Painting the Sky
-
Mix the sky colors:
Prepare a gradient palette: a pure white, a very pale creamy yellow, and a soft peach or light orange. You want these colors to be pastel and airy. -
Apply the top sky layer:
Start at the very top of both canvases with your white paint. Brush horizontally, bringing the white down about 2-3 inches. -
Blend the sunset hues:
While the white is still wet, introduce your pale peach color. Blend it upwards into the white using long, horizontal strokes to create a soft, cloudy transition. -
Add cloud details:
Using a slightly smaller flat brush, dab uneven streaks of slightly darker peach or orange near the horizon line to simulate low-hanging sunset clouds.
Color Value Fix
If a mountain layer looks too dark compared to the one behind it, wait for it to dry and apply a thin glaze of white mixed with water to push it back.
Step 3: Layering the Mountains
-
Paint the furthest peaks:
Mix a tiny dot of blue and brown into a large amount of white. Paint the most distant mountain range (the top sketch line). The color should be extremely faint and misty. -
Create the second range:
Add a little more blue to your mix for a slightly darker grey-blue value. Paint the next range down, overlapping the bottom edge of the previous distant mountains. -
Deepen the mid-ground tones:
As you move down the canvas, continue adding more blue and a touch of black to your mix. Each mountain layer should be visibly darker and more saturated than the one behind it. -
Add atmospheric mist:
I like to take a dry brush with a tiny bit of white paint and lightly scumble (rub) the bottom edge of the mid-ground mountains while they are drying. This creates a foggy effect in the valleys. -
Paint the green foothills:
For the layer just before the bottom, mix Hooker’s Green with a bit of blue and white. This introduces an earthier tone before the deep foreground. -
Fill the silhouette layer:
Mix a very dark navy using Ultramarine Blue and black. Fill in the large bottom foreground shapes completely solid.
Step 4: Detailing and Finishing
-
Paint the tiny trees:
Using your smallest detail brush and the dark navy mix, paint tiny vertical lines along the top ridge of your foreground silhouette. Add little jagged branches to turn these lines into pine trees. -
Vary tree sizes:
Make the trees near the bottom outer edges slightly larger and the ones near the center smaller to enhance the feeling of depth. -
Refine the edges:
Separate the canvases slightly and paint the inner edges (the sides of the canvas depth) to match the front painting. This ensures the image looks complete from all angles. -
Final continuity check:
Push the canvases back together one last time. Touch up any mountain lines or tree branches that don’t perfectly align across the gap.
Hang your masterpieces a few inches apart to let the negative space become part of the shared view
Ocean Wave Across Two Canvases
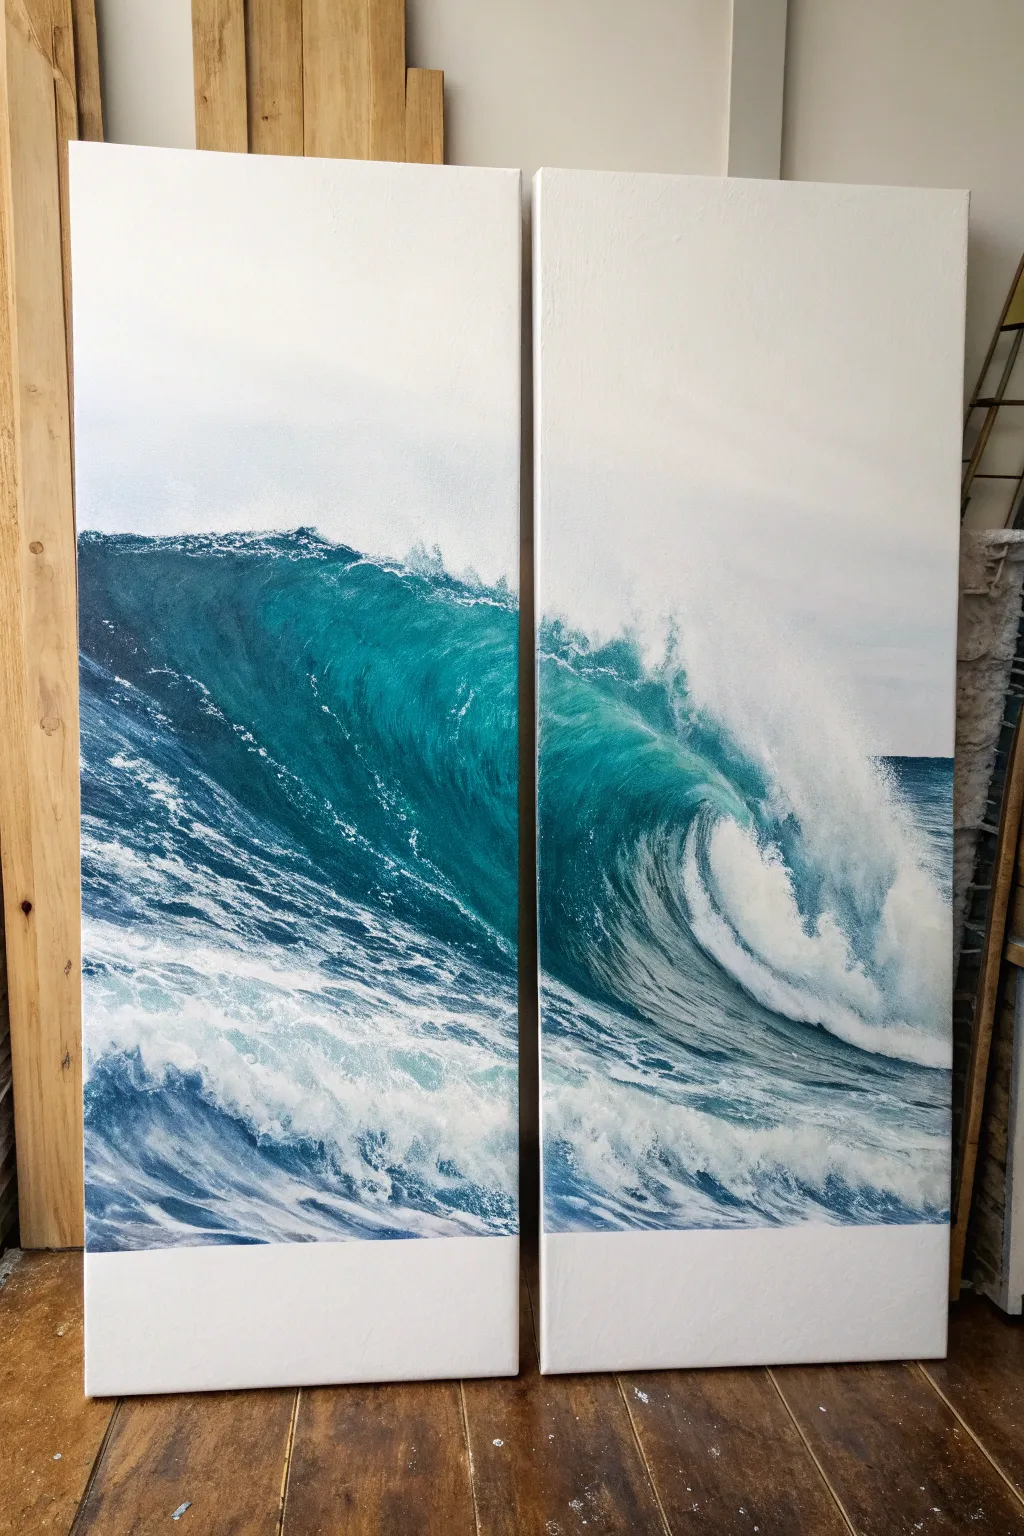
Transform two separate canvases into a powerful, unified seascape by painting a single, dramatic wave that crashes across the gap. This project creates a stunning focal point and is a perfect collaborative painting exercise to tackle side-by-side.
Step-by-Step Tutorial
Materials
- Two tall, rectangular canvases (e.g., 12×36 inches)
- Acrylic paints: Phthalo Blue, Phthalo Green, Titanium White, Ultramarine Blue, Mars Black
- Large flat brushes (2-inch)
- Medium filbert brushes
- Fan brush
- Palette knife
- Water container and paper towels
- Reference photo of a wave
- Easel or wall space to hang canvases side-by-side
Step 1: Preparation and Sky
-
Align the canvases:
Place your two canvases directly next to each other on your workspace or easel, leaving a tiny gap between them. Treat them as one giant surface for the initial sketching. -
Map the wave:
Using a small brush and watery light blue paint, lightly sketch the outline of the wave. Draw a diagonal line rising from the left canvas and cresting on the right canvas, ensuring the line connects visually across the gap. -
Paint the sky base:
Mix a very pale grey-blue using Titanium White and a dot of Ultramarine. Paint the upper third of both canvases freely. -
Blend the horizon:
While the sky paint is wet, blend it downwards into where the water line will be. Keep the horizon line soft and hazy to create atmospheric depth, rather than a sharp line.
Tape Trick
Tape the back of the two canvases together temporarily while painting the initial layout. This keeps them from shifting and ensures your horizon line stays perfectly straight across both panels.
Step 2: The Deep Water
-
Mix the deep teal:
Combine Phthalo Blue with Phthalo Green and a touch of black to create a dark, rich teal color. This will be the shadow of the wave. -
Block in the wave face:
Fill in the main body of the rising wave on the left canvas and the curling underside on the right canvas with your dark teal mix. Apply the paint in the direction the water is moving—curving upwards and over. -
Create the mid-tones:
Add a little white to your teal mixture. Paint streaks into the face of the wave where the light partially hits it, blending wet-into-wet with the darker base to create volume. -
Establish the foreground water:
At the bottom of both canvases, use a mix of Ultramarine Blue and white to paint choppy, horizontal strokes. This represents the churning water in front of the wave.
Gloss Finish
Once fully dry, apply a high-gloss varnish to just the ‘wet’ parts of the wave, leaving the misty spray matte. This contrast makes the water look genuinely wet and shimmering.
Step 3: Crashing Foam and Details
-
Detail the crest:
On the right canvas where the wave curls over, use pure Titanium White. Use a fan brush or an old, frayed brush to stipple paint onto the breaking lip, creating a fluffy, spraying texture. -
Connect the mist:
Allow the spray from the crash on the right canvas to drift slightly onto the edge of the left canvas. I find this creates the most convincing illusion that the two panels are connected. -
Add veining:
Mix a watery light teal-white. Using a fine liner brush, paint delicate, spiderweb-like foam patterns on the dark face of the wave on the left canvas, following the curve of the water. -
Create splashing foam:
In the foreground water (bottom third), use a palette knife or a loaded coarse brush to dab heavy impasto white paint, mimicking the chaotic foam left behind by previous crashing waves. -
Refine the transparency:
At the very top edge of the wave on the left canvas—just before it breaks—glaze a thin layer of bright yellowish-green. This ‘eye’ of the wave shows sunlight shining through the translucent water. -
Soften the transition:
Where the heavy white foam meets the blue water, lightly dry brush the edges to create a misty transition, so the foam doesn’t look like a solid sticker. -
Final highlights:
Add the brightest brights. Use pure white to hit the very top edge of the splashing water and the most intense part of the churned-up foreground. -
Paint the wrapped edges:
Crucial step: continue your painting around the sides of the canvases. When hung with a gap, seeing the image continue around the bend enhances the 3D effect.
Hang your masterpieces with a two-inch gap between them to let the viewer’s eye complete the motion of the wave


City Skylines as a Matched Set
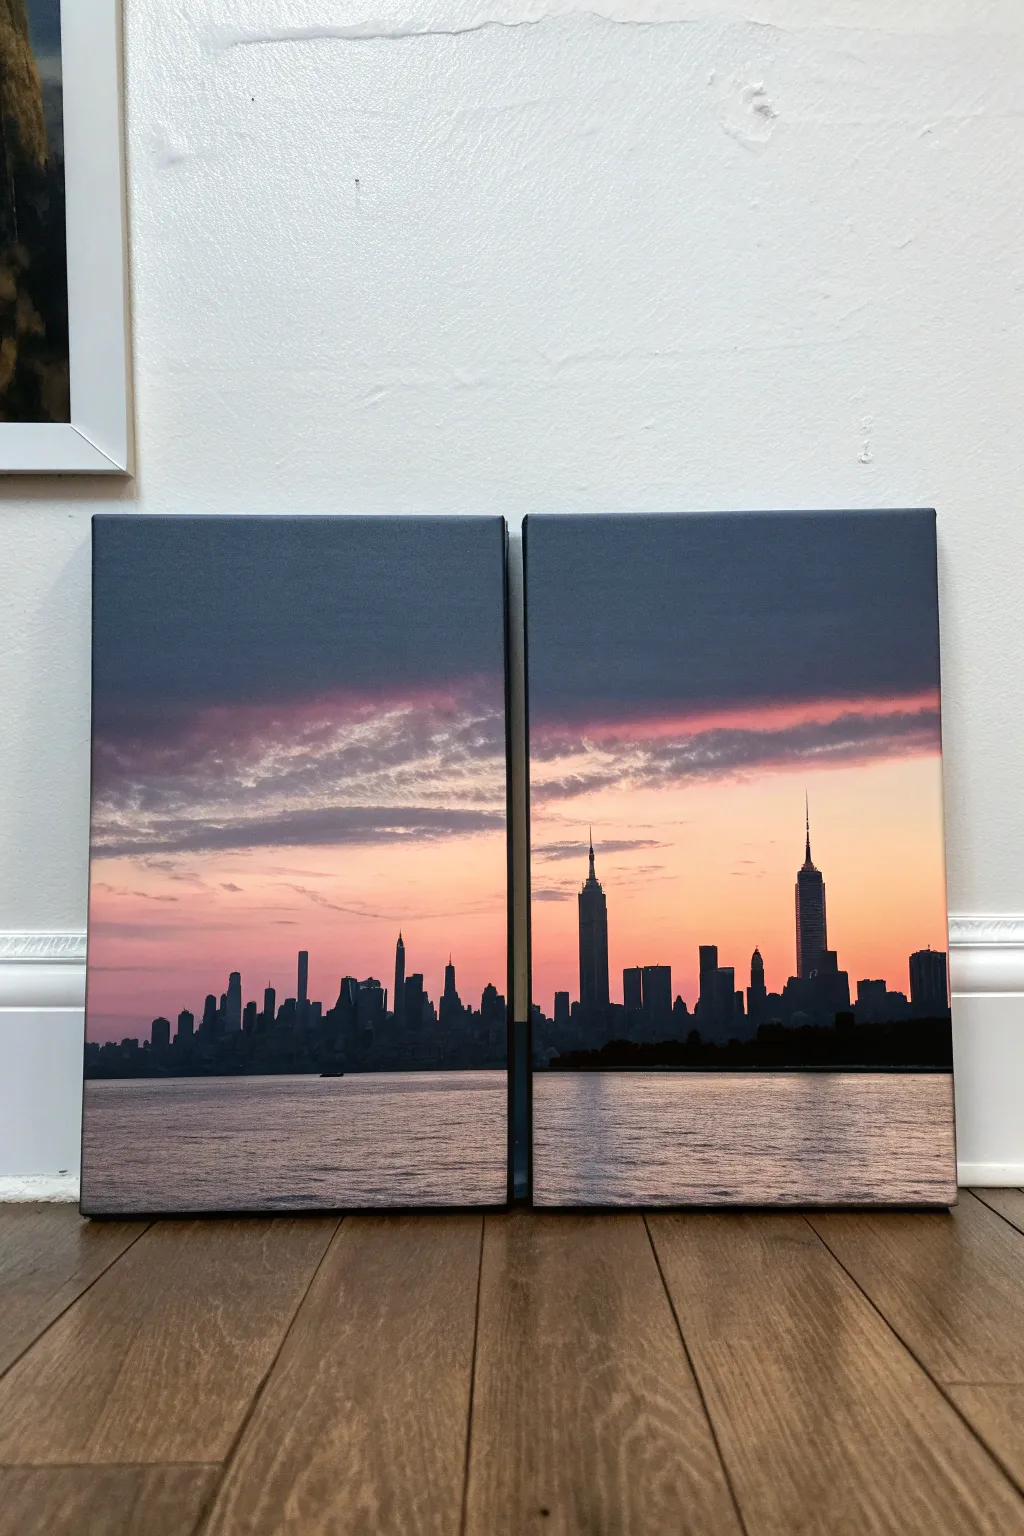
Capture the romance of a metropolitian sunset with this split-canvas project that creates a stunning panoramic view. By painting across two canvases at once, you’ll achieve a seamless horizon line and a beautifully cohesive sky perfect for a shared space.
Step-by-Step Guide
Materials
- Two 12×16 inch stretched canvases (or similar size)
- Acrylic paints (Titanium White, Mars Black, Ultramarine Blue, Dioxazine Purple, Cadmium Red, Cadmium Orange)
- Wide flat brush (2-inch)
- Medium flat brush (1-inch)
- Small round detail brush (size 0 or 1)
- Painter’s tape or masking tape
- Palette or paper plate
- Cup of water and paper towels
- Pencil
- Reference photo of a city skyline
Step 1: Setting the Stage
-
Join the canvases:
Place your two canvases side-by-side on a flat surface. Use a piece of painter’s tape on the back to temporarily hold them together so they don’t shift while you paint the sky. -
Establish the horizon:
Using a pencil and a ruler or straight edge, lightly draw a single horizontal line across both canvases about one-third of the way up from the bottom. This separates your water from your sky.
Paint the Sides
Don’t stop at the edge! Wrap your painting around the sides of the canvas. Continue the sky gradient and black water lines onto the sides for a professional, frameless 3D look.
Step 2: Painting the Sky Gradient
-
Mix the darkest blue:
On your palette, mix Ultramarine Blue with a touch of Mars Black and a tiny bit of Purple. This will be the deep night sky at the very top. -
Apply the top layer:
Using your wide 2-inch brush, paint the top quarter of both canvases with this dark mixture. Ensure your strokes go all the way across the seam where the canvases meet. -
Create the transition color:
Clean your brush slightly. Mix a dark purple using Dioxazine Purple, a little Blue, and a touch of Cadmium Red. Apply this below the dark blue band. -
Blend the upper sky:
While both paint bands are still wet, use horizontal strokes to blend the dark blue into the purple creates a soft, cloudy transition. I like to keep a slightly damp brush for easier blending. -
Add the sunset glow:
Mix Cadmium Orange with a little Cadmium Red and Titanium White to make a vibrant salmon pink. Paint this band just above your horizon line. -
Bridge the gap:
Between the purple mid-sky and the pink horizon, introduce a soft lavender tone (Purple + White). Blend it upwards into the dark purple and downwards into the pink to create that twilight gradient. -
Add cloud texture:
Using a smaller dry brush with a bit of dark grey-purple, scumble in some wispy horizontal clouds across the transition zone to add depth.
Add City Lights
For a magical touch, use a pin or a very fine dotting tool with watered-down white or yellow paint to add tiny windows and streetlights to the black silhouette.
Step 3: Creating the Reflection
-
Base coat waters:
For the water section below the horizon line, mix a muted version of your sky colors. Use a lavender-grey (Purple, Blue, White, Black) as the base. -
Add reflected light:
While the water base is wet, streak in horizontal lines of the salmon pink color right below where the horizon line is, mimicking the sunset’s reflection. -
Disturb the surface:
Take a dry brush and very lightly drag it horizontally across the water area to soften the reflection lines, making it look like gently rippling water. -
Let it dry completely:
Before moving to the city silhouette, ensure the background is completely dry to prevent muddying the sharp black lines.
Step 4: The City Silhouette
-
Outline the buildings:
With a pencil, sketch the outline of buildings directly over the dry background paint. Make sure some buildings span across the gap between the two canvases for continuity. -
Fill in the skyline:
Using pure Mars Black and a medium flat brush, fill in the bulk of the building shapes. Ensure the paint is opaque; you may need a second coat after the first dries. -
Detail the iconic towers:
Switch to your small round detail brush. Create the antennas, spires, and intricate roof shapes that give the skyline character, like the Empire State Building’s needle. -
Ground the city:
Paint a solid black strip along the horizon line beneath the buildings to represent the darker shoreline or docks. -
Refine the edges:
Check the seam between the canvases. You might need to paint the inner edges of the canvas wrap (the sides that touch) black so no white canvas shows through the gap when hung. -
Final varnish:
Once fully dry (give it 24 hours), apply a satin or gloss varnish to protect the paint and unify the sheen across both panels.
Hang your masterpieces close together to reveal the sweeping view you’ve created.
Coordinates and Constellations Pair
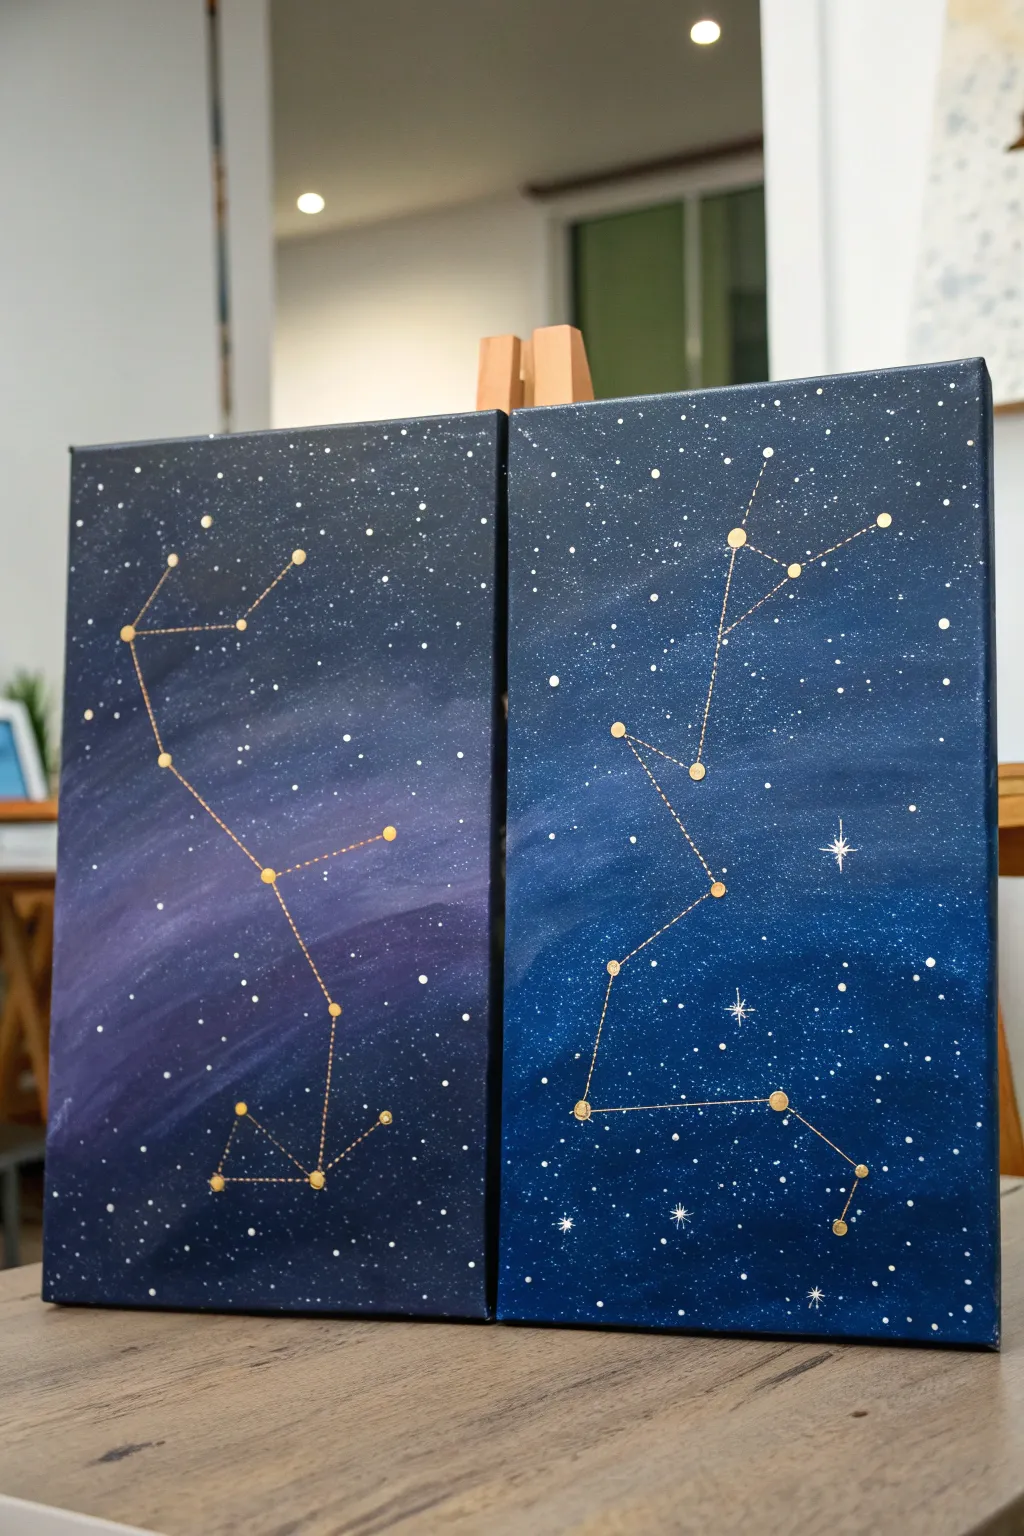
Celebrate your unique bond by painting two connecting star charts that honor your zodiac signs or favorite constellations. These canvases feature deep, dreamy galaxy backgrounds with constellations picked out in striking metallic gold, creating a personalized diptych perfect for a shared space.
Detailed Instructions
Materials
- Two rectangular stretched canvases (approx. 10×20 inches or similar)
- Acrylic paints: Black, Phthalo Blue, Dioxazine Purple, Titanium White
- Metallic gold acrylic paint or gold paint pen
- Large flat brush (1-2 inch) for background blending
- Medium round brush for nebula clouds
- Old toothbrush or stiff bristle brush for splatter
- Fine detail brush or liner brush (if not use paint pen)
- Ruler
- Pencil or white chalk pencil
- Reference images of desired constellations
- Cup of water and paper towels
Step 1: Setting the Stage
-
Base coat:
Begin by painting the entire surface of both canvases with a solid coat of black acrylic paint. Don’t forget to paint the sides for a finished gallery look. Let this dry completely before moving on. -
Map your galaxy:
Decide where you want the lighter ‘nebula’ clouds to appear. On the left canvas shown, the purple cloud sweeps diagonally upward; on the right, the blue cloud is more central. You can mirror these shapes or keep them distinct.
Starry Pro Tip
Practice your splatter technique on a piece of scrap cardboard first. The distance you hold the brush from the canvas changes the density of the star field.
Step 2: Creating the Galaxy Background
-
Deep blue gradient:
Mix a small amount of black into your Phthalo Blue to create a midnight navy. Using your large flat brush, apply this color in patches over the black base, blending the edges out with a dry brush so they fade into the darkness. -
Purple haze:
On the left canvas specifically (or whichever one you choose), introduce Dioxazine Purple. Apply it wet-on-wet into the navy sections, using circular scrubbing motions to create soft, cloud-like transitions. -
Adding depth:
While the paint is still slightly tacky, I like to take a clean, slightly damp brush and lift a tiny bit of pigment in the center of the nebula clouds. This reveals lighter values underneath and adds instant dimension. -
Brightening the clouds:
Mix a tiny drop of Titanium White into the purple and blue separately. Lightly dry-brush these lighter shades into the very centers of your color patches. Keep this subtle; you want a glow, not a white stripe. -
Seamless blending:
Use a soft, dry brush to feather out any harsh lines where the colors meet the black background. The transition from color to black needs to be almost invisible for a realistic space effect. Let the background dry fully.
Step 3: Stars and Sparkle
-
Mixing the splatter:
Dilute a small value of Titanium White paint with water until it reaches the consistency of heavy cream or ink. It needs to be fluid enough to fly off bristles but opaque enough to show up. -
The toothbrush technique:
Dip an old toothbrush into the thinned white paint. Point the bristles toward the canvas and run your thumb across them to flick a fine mist of ‘stars’ across the entire surface. -
Varying star sizes:
For larger stars, load a round brush with the thinned white paint and tap the handle against a stick or another brush over the canvas. This creates bigger, more distinct droplets. -
Detailed glimmers:
Once the splatter is dry, use your finest brush to manually add a few larger ‘hero’ stars. Paint small cross shapes or four-pointed sparkles in random spots to make the galaxy twinkle.
Level Up: Hidden details
Add personal dates or coordinates in tiny, subtle text along one of the constellation lines using a fine-tip gold gel pen.
Step 4: Mapping the Constellations
-
Sketching the layout:
Using a white chalk pencil (which wipes off easily) or a very light graphite touch, mark the positions of the main stars for your chosen constellations. Use a ruler to ensure the spacing looks proportional to your reference image. -
Painting the major stars:
Dip the handle end of a medium paintbrush into metallic gold paint. Dot this onto your marked star locations to create perfect, uniform circles. For larger stars, just use a larger brush handle. -
Connecting the dots:
Using a ruler and a fine liner brush (or gold paint pen), draw straight lines connecting the star dots. Instead of solid lines, paint short dashes to mimic the look of a star chart or scientific diagram. -
Adding satellite stars:
Place a few random, smaller gold dots around the main constellation lines to integrate the design with the background. This adds depth so the gold doesn’t look like it’s just ‘floating’ on top. -
Final touches:
Check your connections. If any gold dots look transparent, carefully add a second drop of gold paint on top for maximum shine. Allow the gold to cure completely before handling.
Hang your cosmic masterpieces side by side to display your stellar connection

Have a question or want to share your own experience? I'd love to hear from you in the comments below!