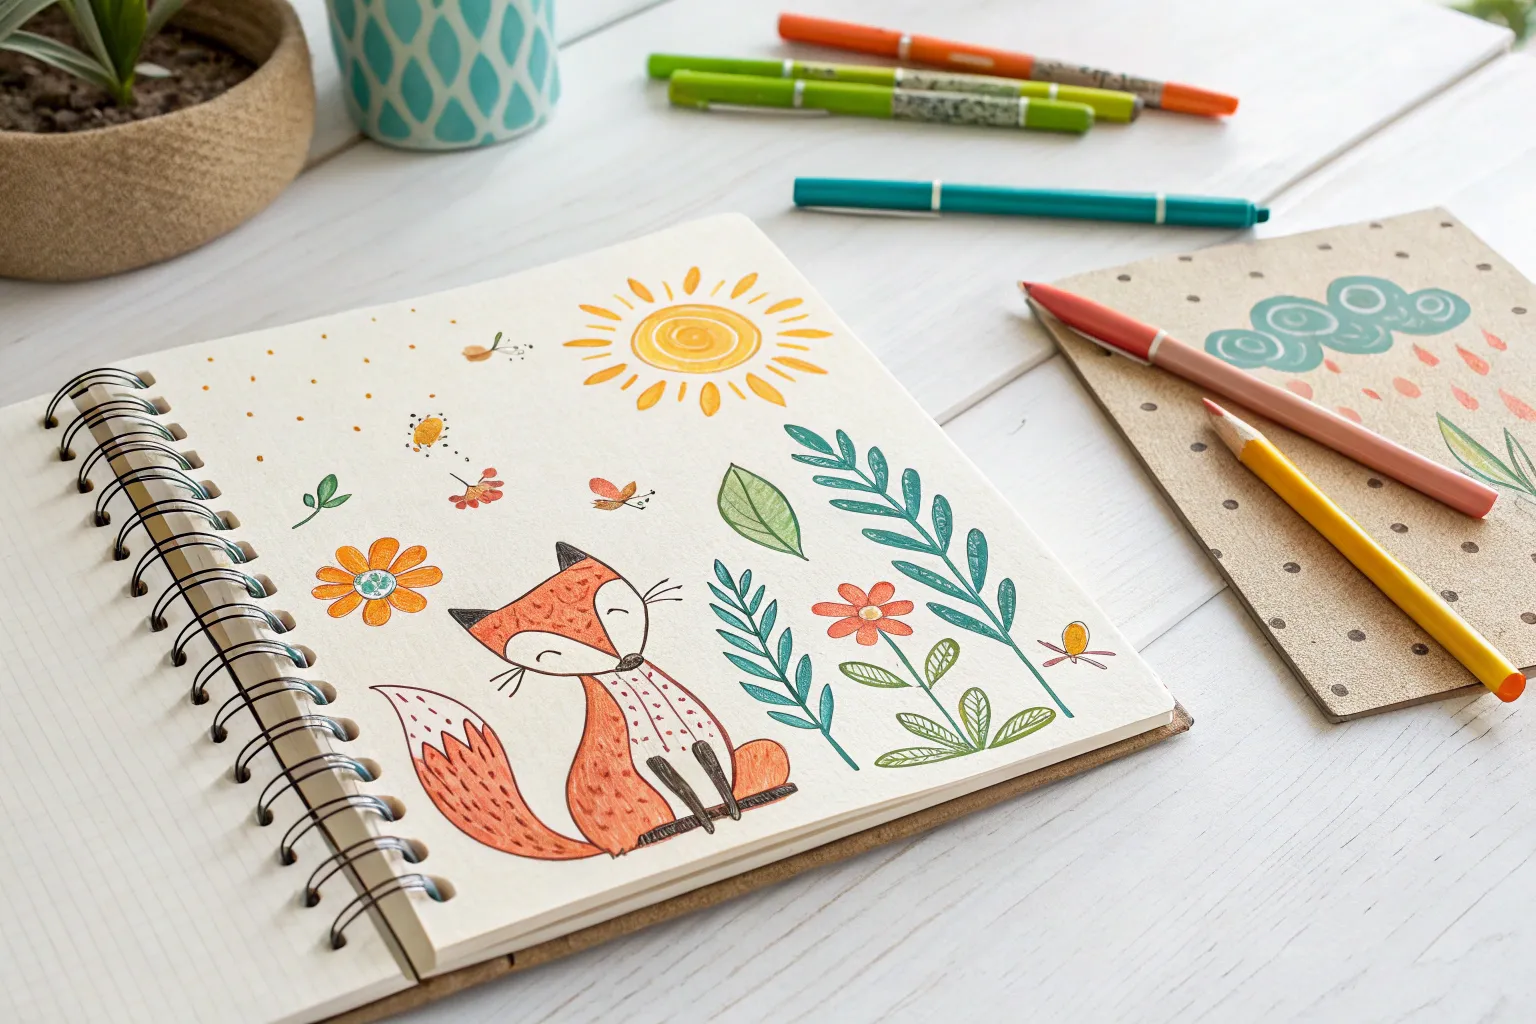
When I’m drawing with 10-year-olds, the best projects are the ones that feel instantly fun but still a little “wow, I made that.” Here are my favorite creative drawing ideas that build confidence fast and keep your pages buzzing with new characters, scenes, and styles.
Favorite Wild Animal Close-Up
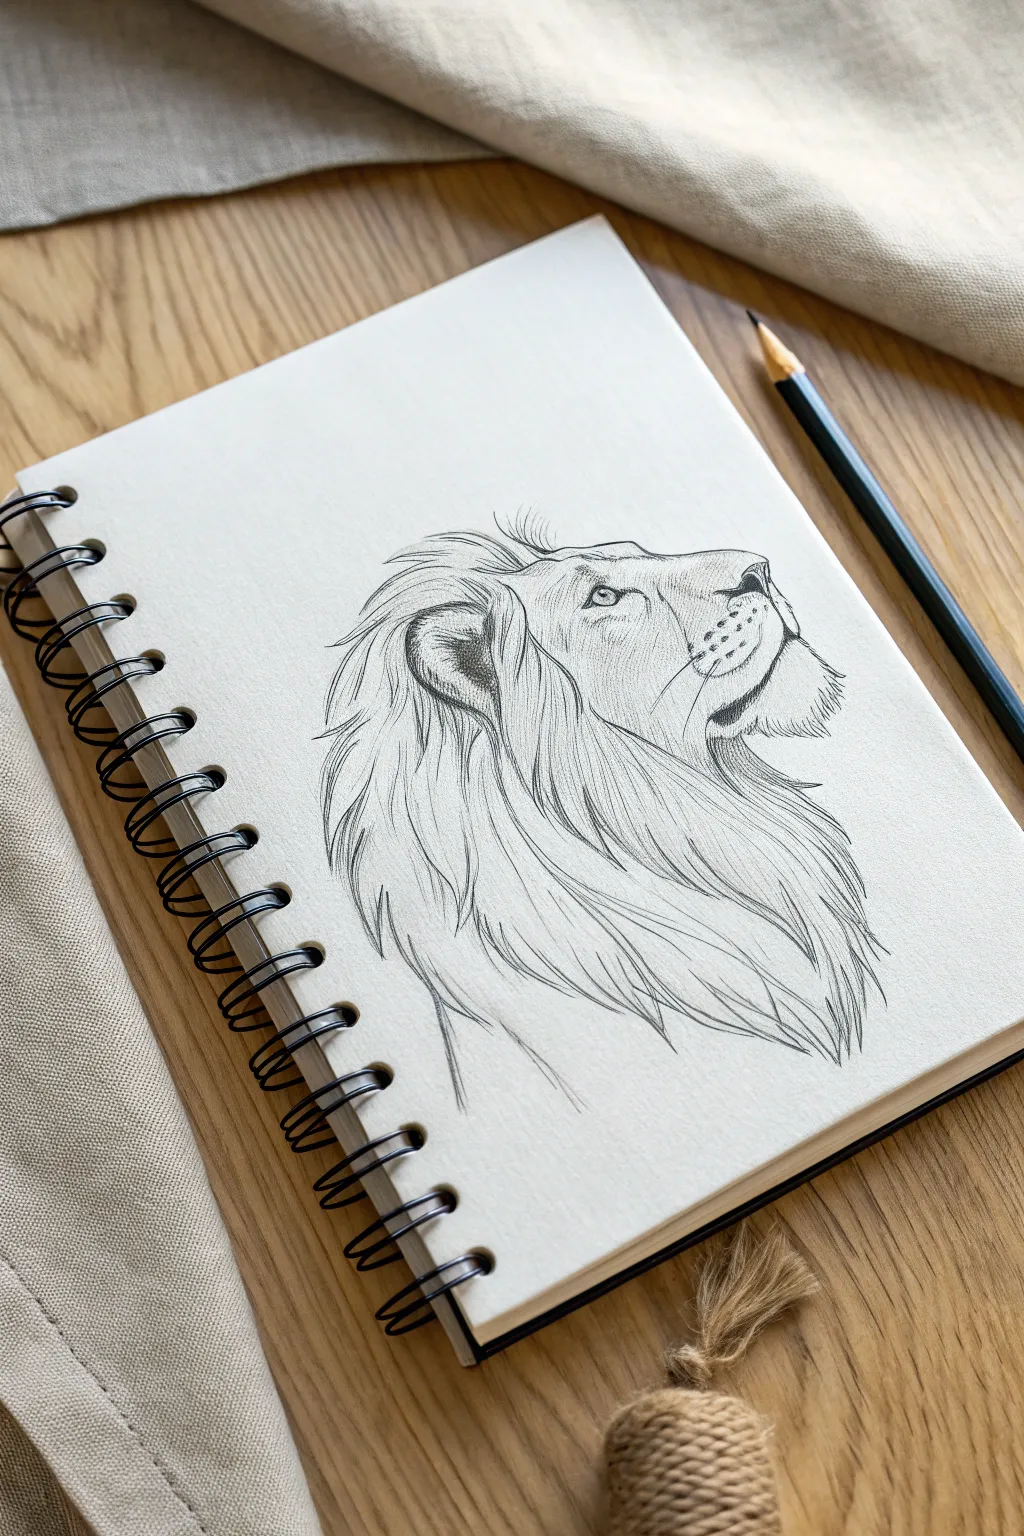
Capture the majestic spirit of the jungle with this detailed pencil study of a lion looking toward the horizon. This project focuses on building realistic fur textures and capturing a proud expression using simple graphite shading techniques.
How-To Guide
Materials
- Spiral-bound sketchbook or drawing paper
- HB pencil for sketching
- 2B or 4B pencil for shading and darker details
- Eraser (kneaded eraser preferred)
- Pencil sharpener
Step 1: Basic Structure
-
Establish the head shape:
Start lightly with your HB pencil. Draw a rounded, slightly boxy shape for the main part of the head. Imagine a circle for the cheek/jaw area and extend a rectangular snout forward. -
Add the neck line:
Draw a gently sloping line extending down from the back of the head to indicating the thick, muscular neck hidden beneath the mane. -
Position the features:
Lightly mark guidelines for where the eye, ear, and nose will go. The eye should be roughly halfway down the head shape, and the ear sits further back, near the top corner of the skull.
Natural Fur Tip
Always lift your pencil at the end of each stroke when drawing fur. This creates a tapered line that looks like a real hair tip rather than a blunt wire.
Step 2: Refined Outline
-
Define the profile:
Trace over your snout guidelines with a more confident line. Create the bridge of the nose, dipping slightly before the forehead. Add the distinct shape of the nose tip. -
Draw the mouth and chin:
Sketch the mouth line curving slightly upward, giving him a regal look. Just below, define the heavy chin and the jawline, keeping the lines loose to suggest fur. -
Shape the ear:
Draw a rounded, C-shape for the visible ear. Add the inner curve to give it depth, making sure it looks cupped forward. -
Add the eye:
Place the eye carefully. It’s relatively small and almond-shaped. Draw the pupil and leave a tiny white spec for a highlight to bring it to life.
Step 3: Creating the Mane
-
Map the flow:
Before drawing individual hairs, lightly sketch the direction the mane flows. It should sweep back from the forehead and cascade heavily down the neck, like a cape. -
Layer the forehead fur:
Start at the top of the head. Use short, flicking strokes that curve backward to create the tuft of hair between the ears. -
Build the neck mane:
Switch to longer, sweeping strokes for the main body of the mane. Let your pencil flow down and back. Vary the length of your lines to avoid it looking too uniform. -
Add texture behind the ear:
Draw darker, denser strokes right behind and below the ear to suggest shadow and depth where the mane is thickest. -
Define the chest fur:
Continue the long strokes down to the chest area. These lines should curve slightly inward at the bottom, framing the neck.
Level Up: Color Accent
Use a golden-yellow colored pencil just for the lion’s eye. This tiny splash of color against the grey graphite makes the drawing incredibly striking.
Step 4: Shading and Details
-
Darken the facial features:
Switch to your 2B or 4B pencil. Darken the pupil, the line of the mouth, and the nostrils. Retrace the upper eyelid heavily to create a sense of weight. -
Shade the face:
Lightly shade the bridge of the nose and the cheek area using hatching—closely spaced parallel lines. Keep this lighter than the features. -
Deepen the ear shadows:
Fill the inside of the ear with dark shading, leaving the rim light to show its thickness. -
Add whisker spots:
Draw several rows of small dots on the muzzle area. I usually vary the pressure here so they aren’t perfectly identical. -
Draw whiskers:
With quick, confident flicks, add long whiskers extending from the muzzle. Don’t overthink these; quick strokes look more natural. -
Enhance mane contrast:
Go back into the mane with your softer pencil. Add darker lines in the deeper layers of fur to create volume, making the lighter top layers pop.
Your lion is now ready to rule the sketchbook page.


Bird With Fancy Feather Patterns
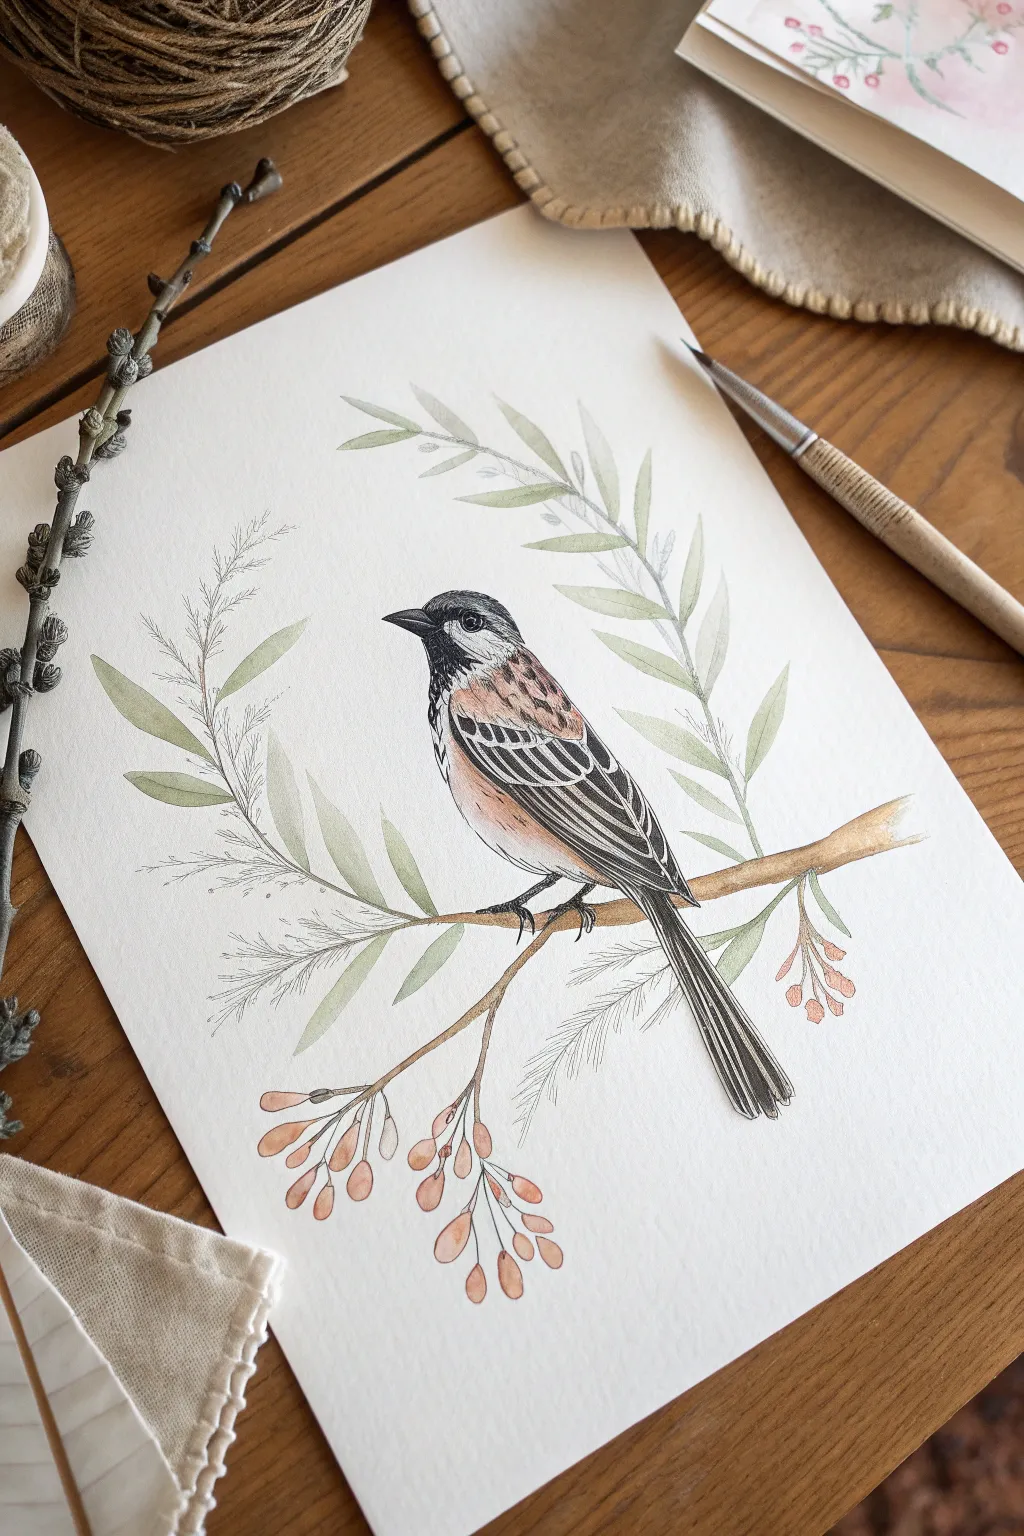
This delicate mixed-media project combines soft watercolor washes with crisp pen lines to create a beautiful, perched bird illustration. By layering precise details over a gentle background, you’ll capture the contrast between the fluffy feathers and the structured branches.
Step-by-Step Guide
Materials
- Heavyweight watercolor paper (hot press preferred for smoother drawing)
- Pencil (HB or H)
- Kneadable eraser
- Fine liner pens (sizes 0.1 and 0.3, black)
- Watercolor paints (pans or tubes)
- Small round brushes (sizes 2 and 4)
- Jar of clean water
- Paper towel
Step 1: Sketching the Composition
-
Outline the bird’s body:
Start with a light pencil sketch. Draw a sloping oval for the body and a smaller circle for the head. Connect them with a gentle neck curve. -
Add the tail and beak:
Extend a long, straight rectangle shape downwards for the tail feathers. Add a small, triangular beak pointing to the left. -
Position the wing:
Sketch a teardrop shape on the side of the body for the folded wing. This is where most of our fancy pattern work will happen later. -
Draw the branch:
Draw a diagonal line crossing under the bird’s feet. Thicken it unevenly to look like natural wood, adding a few smaller twigs branching off. -
Sketch foliage frame:
Lightly sketch long, sweeping stems curving around the bird. Add almond-shaped leaves and small circular berries near the bottom clusters.
Smudged Ink?
If your pen lines smear when painting, your pen might not be waterproof. Always test your pen on a scrap paper with water before starting lightly on your real artwork.
Step 2: Inking the Details
-
Outline the eye and beak:
Using the 0.1 fine liner, carefully ink the eye, leaving a tiny white highlight. Outline the beak, shading the darker parts. -
Create head feathers:
Switch to short, flicking strokes to create the texture of feathers on the head. Keep the top dark and the cheeks lighter. -
Detail the wing patterns:
Draw the main wing feathers with longer lines. Add decorative stripes or checks on the upper wing area to create the ‘fancy’ pattern mentioned in the title. -
Texture the tail:
Use long, straight lines running down the length of the tail. Keep your lines close together to suggest multiple rigid feathers. -
Outline delicate foliage:
Very gently ink the leaves and berries. I prefer to use broken or very thin lines here so the plants look softer than the bird. -
Erase pencil marks:
Wait until the ink is completely dry—give it a few minutes—then gently erase all your initial pencil guides.
Soft Feathers
For fluffier looking feathers, lift your pen quickly at the end of each stroke. This tapers the line, making it look like delicate hair or down rather than a wire.
Step 3: Adding Watercolor Washes
-
Paint the bird’s chest:
Dilute a peach or soft orange watercolor. Apply a light wash to the bird’s chest and belly, letting it fade to white near the bottom. -
Color the wings:
Use a light brown or rusty color for the upper wing patches. Let the black ink show through; the paint is just a tint. -
Paint the leaves:
Mix a very watery sap green. Paint the leaves loosely; it’s okay if the color doesn’t perfectly fill the lines, as it adds artistic charm. -
Add berry accents:
Dip a small brush into diluted red or terracotta paint. Dab color onto the berry clusters at the bottom of the branch. -
Paint the branch:
Use a golden-brown mix for the main branch. Add a slightly darker brown on the underside of the wood to create simple shadow. -
Final touches:
Once the first layers are dry, you can add tiny second layers of darker color to the wing tips or the center of the berries for depth.
Now you have a charming bird portrait ready to be framed or gifted to a nature lover


Unicorn With a Rainbow Mane
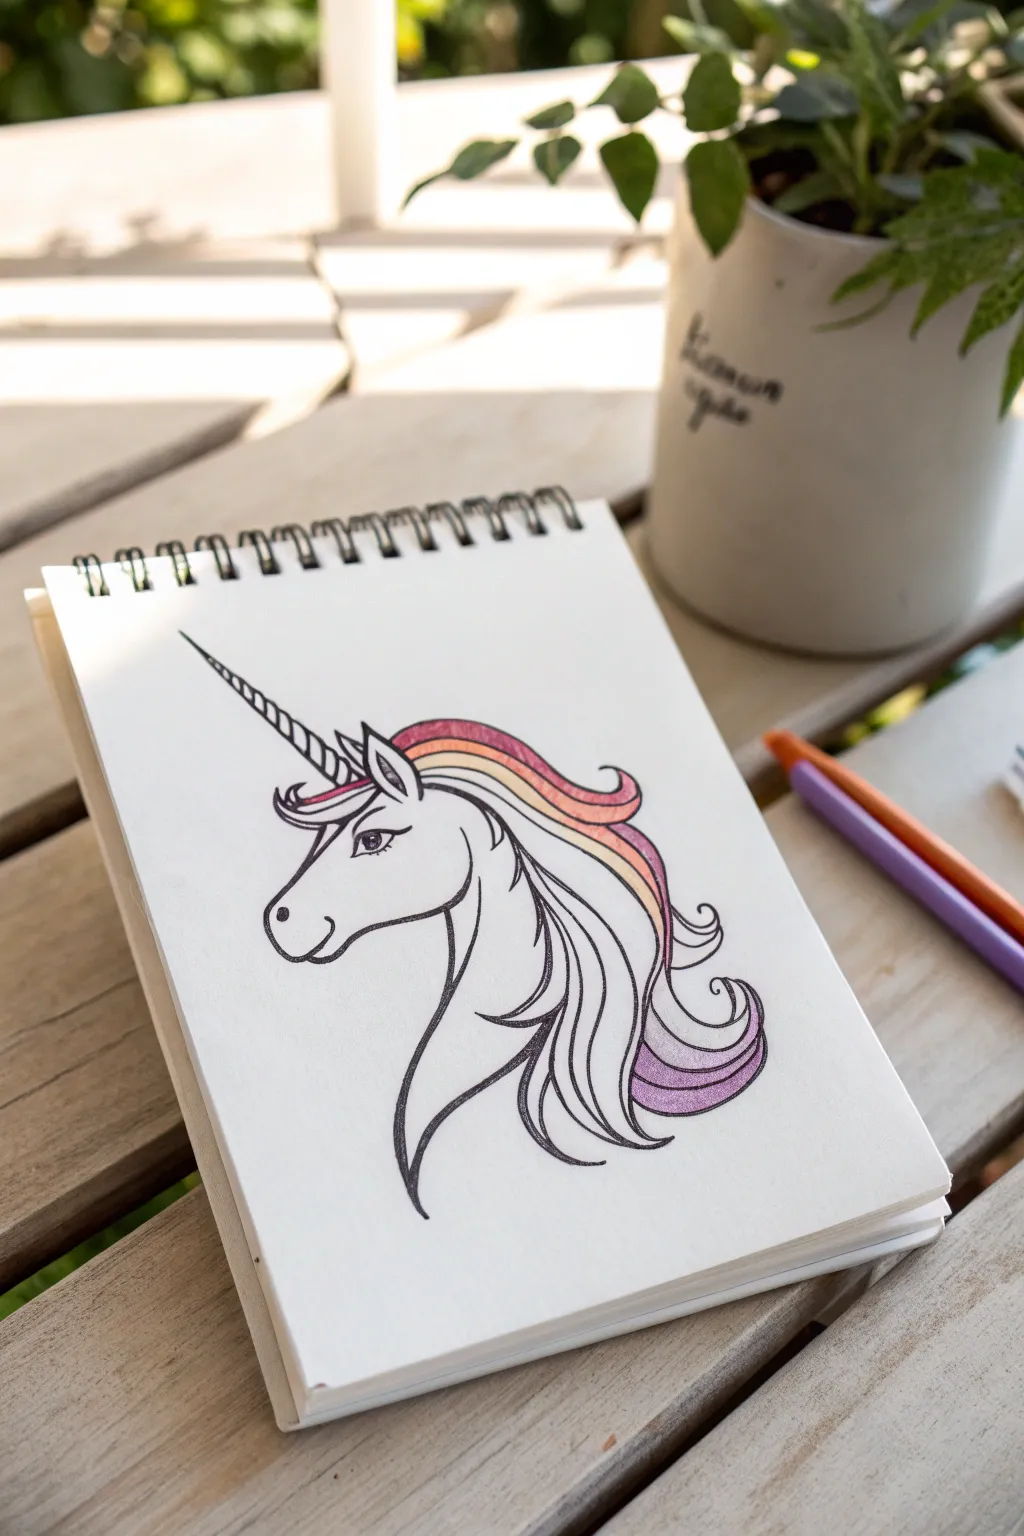
Capture the magic of mythical creatures with this elegant unicorn profile featuring a flowing, multi-colored mane. The clean black lines contrast beautifully with the soft gradient of warm colors, making the artwork pop right off the page.
Step-by-Step Tutorial
Materials
- Spiral-bound sketchbook or heavy drawing paper
- Fine-point black fineliner pen (0.5mm or 0.8mm)
- Pencil (HB or similar)
- Eraser
- Colored pencils (purple, pink, orange, yellow)
- Pencil sharpener
Step 1: Drafting the Outline
-
Basic head shape:
Start lightly with your pencil. Draw a gentle, curved line for the forehead that dips down into a rounded muzzle shape. It should look a bit like a sturdy letter ‘J’ turned on its side. -
Jaw and neck:
From the bottom of the muzzle, curve a line backward to form the jawline. Continue this line downward and gently outward to create the elegant curve of the unicorn’s neck. -
Adding the ear:
Draw a pointed, leaf-shaped ear near the top of the head. Add a smaller curved line inside it to give the ear some depth and dimension. -
The mystical horn:
Projecting from the forehead, sketch a long, narrow triangle pointing straight up and slightly forward. Divide the horn into segments with small, diagonal lines to create that classic spiral effect. -
Facial features:
Place a large, almond-shaped eye below the ear, giving it a thick upper lash line. Add a small nostril near the tip of the muzzle and a tiny curve for a smiling mouth.
Gradient Master
To get a smooth blend between colors, use tiny circular motions with your pencil instead of back-and-forth strokes. This hides pencil lines.
Step 2: Designing the Mane
-
Top mane flow:
Sketch the hair starting from behind the horn. Let it flow over the top of the neck and tumble downward in thick, wavy sections. -
Neck mane layers:
Draw longer locks of hair flowing down the back of the neck. Create swooping, curved lines that end in pointed tips, making sure the hair looks voluminous and swept by the wind. -
Refining the curves:
Add extra internal lines within the mane sections to suggest separate strands of hair. This will make coloring much easier later on.
Step 3: Inking the Lines
-
Tracing the outline:
Take your black fineliner and carefully trace over your best pencil lines. I prefer to use confident, smooth strokes rather than short, scratchy ones for a cleaner look. -
Adding weight:
Go back over the main outer lines of the mane and the neck to make them slightly thicker. This line variance adds character to the drawing. -
Eye details:
Fill in the pupil of the eye with solid black, leaving a tiny white circle for a highlight sparkle. -
Clean up:
Wait about a minute for the ink to dry completely, then erase all the underlying pencil sketches so only the crisp black ink remains.
Make It Sparkle
Use a glitter gel pen to trace over the segments of the horn or add tiny stars around the unicorn for extra magical flair.
Step 4: Coloring the Gradient
-
Choosing the palette:
Select your warm-toned colored pencils: purple, pink, orange, and a touch of yellow. We want to create a sunset gradient effect. -
Base layer – Purple:
Start at the very tips of the mane and the lower sections. Color gently with purple, pressing lightly to keep the texture soft. -
Middle layer – Pink:
Blend pink into the purple areas, moving slightly further up the hair strands. Overlap the colors slightly so there isn’t a hard line between them. -
Top layer – Orange and Yellow:
Finish the top curves of the mane (near the head) with orange, fading into a little yellow where the light acts as a highlight. -
Blending pass:
Go back over the colored areas with slightly more pressure to deepen the saturation and smooth out the transition between the colors. -
Final touches:
Leave the unicorn’s face and body white for a high-contrast look, or add the tiniest bit of grey shading under the jaw if you want more dimension.
Now you have a stunning, colorful creature ready to gallop through your sketchbook


Friendly Dragon With Scales
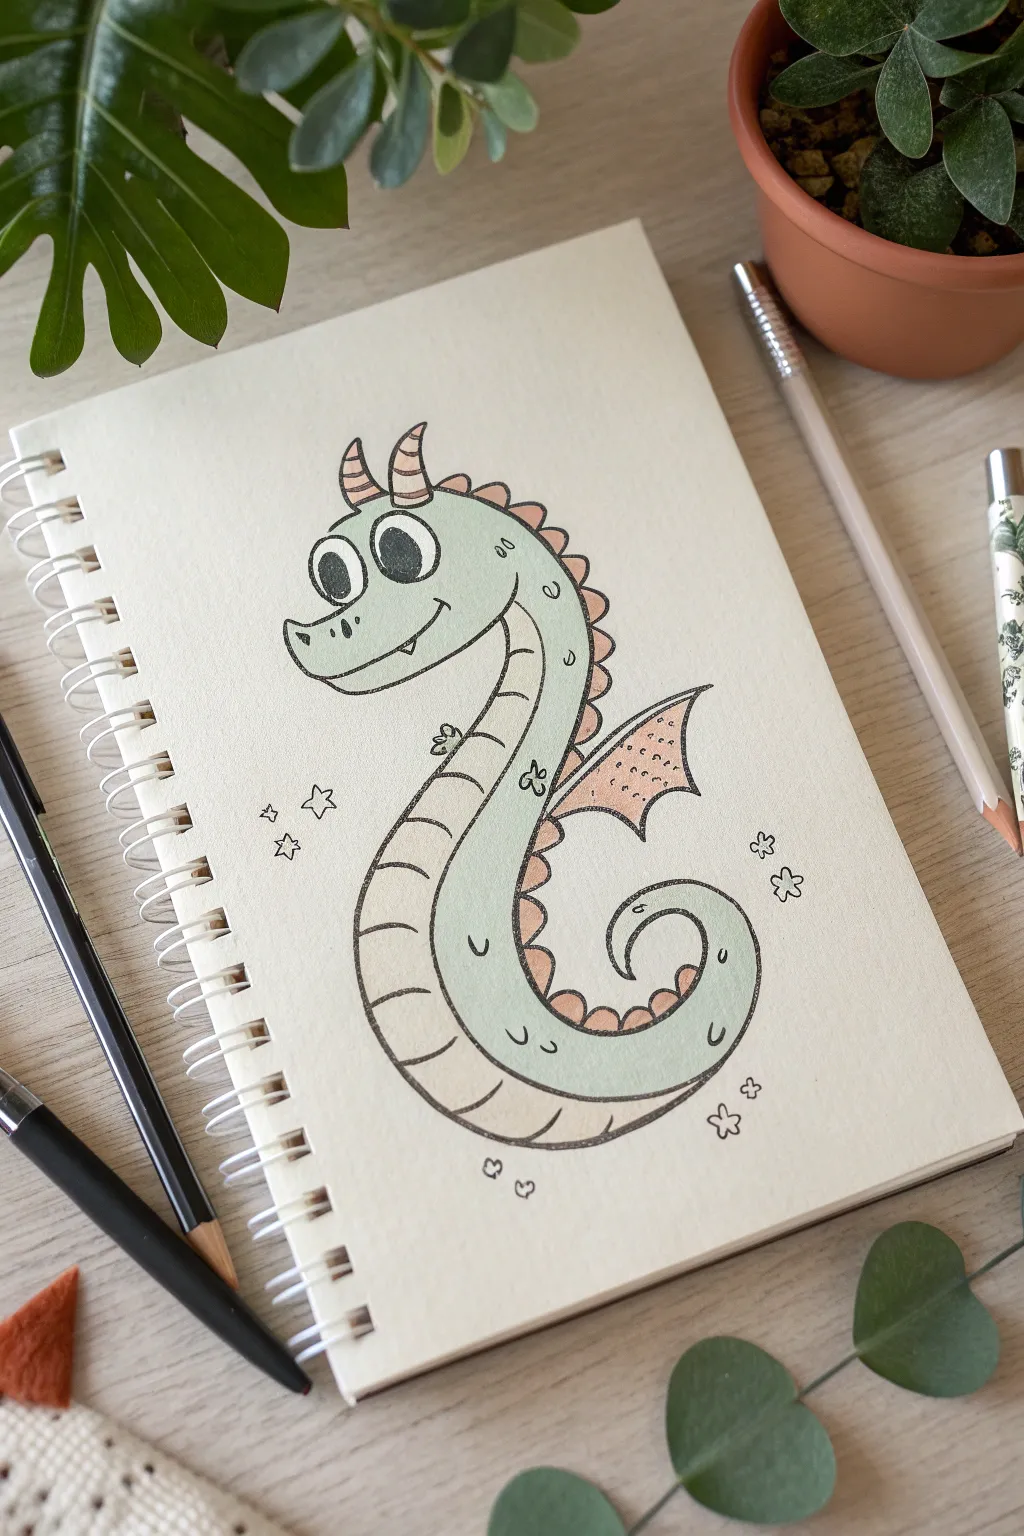
Draw a charming, curvy dragon with a playful twist on the classic fantasy creature. This friendly character features soft pastel colors, bold black outlines, and a unique looped tail shape that makes it look like it’s ready to jump off the page.
How-To Guide
Materials
- Spiral-bound sketchbook or drawing paper
- Pencil (HB or 2B)
- Eraser
- Fine-liner pen (black, 0.5mm or 0.8mm)
- Colored pencils (light mint green, peach/soft orange)
- White gel pen (optional for highlights)
Step 1: Sketching the Shape
-
Start the head:
Begin near the top left of your page by drawing a rounded U-shape on its side for the snout. Extend the top line up and around to form a dome for the head. -
Outline the body curve:
From the bottom of the head, draw a long, sweeping ‘S’ curve. This line should loop around at the bottom, creating a large spiral shape for the tail. -
Complete the body thickness:
To make the dragon’s neck and body, draw a second line parallel to your first curve. Start skinny at the neck, get wider at the belly, and taper down to a point at the tail tip. -
Add the belly detail:
Draw another curve running down the center of the body, separating the smooth back from the segmented belly. Add short horizontal lines across the belly section to create the ‘ladder’ look. -
Place the eyes:
Draw two large ovals sitting right on top of the snout. Make the one in the foreground slightly larger. Add pupils looking backward or sideways for a goofy expression.
Smoother Curves
Draw the long ‘S’ shape of the body using your whole arm, not just your wrist. This helps keep the line flowing smoothly instead of wobbling.
Step 2: Adding Character Details
-
Draw the wing:
On the back of the curve, sketch a triangle shape with a scalloped bottom edge. This will be the dragon’s little wing. -
Create the spikes:
Running all the way from the back of the head down to the loop of the tail, draw a series of small, rounded bumps for the dorsal spikes. -
Horn and facial features:
Add two small curved horns on top of the head behind the eyes. Draw a simple smile line under the nose and a tiny nostril dot. -
Decorative doodles:
Scatter a few tiny stars, flowers, and hearts around your dragon to fill the empty space on the page.
Scale It Up
Try changing the dragon’s element by swapping the rounded spikes for jagged lightning bolts (electric) or wavy flames (fire dragon).
Step 3: Inking and Coloring
-
Outline with ink:
Take your black fine-liner and carefully trace over all your pencil lines. I prefer using a slightly thicker pen for the main body outline to make it pop. -
Fill in the blacks:
Color in the pupils of the eyes solid black, leaving a tiny white circle in each for a sparkle of light. -
Erase pencil marks:
Wait a moment for the ink to dry completely, then gently erase all the underlying pencil sketches so the drawing looks clean. -
Color the body:
Use a light mint green colored pencil to shade the main part of the body and head. Keep the pressure light and even for a smooth look. -
Shade the accents:
Switch to a peach or soft orange pencil. Color in the belly segments, the wing, the back spikes, and the striped horns. -
Add texture:
With the black pen, add tiny ‘u’ shapes on the green part of the body to suggest scales. Add little dots on the wing for texture. -
Final touches:
If you have a white gel pen, add extra highlights to the eyes or the tops of the scales for a shiny finish.
Now you have a friendly dragon companion guarding your sketchbook pages
BRUSH GUIDE
The Right Brush for Every Stroke
From clean lines to bold texture — master brush choice, stroke control, and essential techniques.
Explore the Full Guide
Underwater Creature Scene
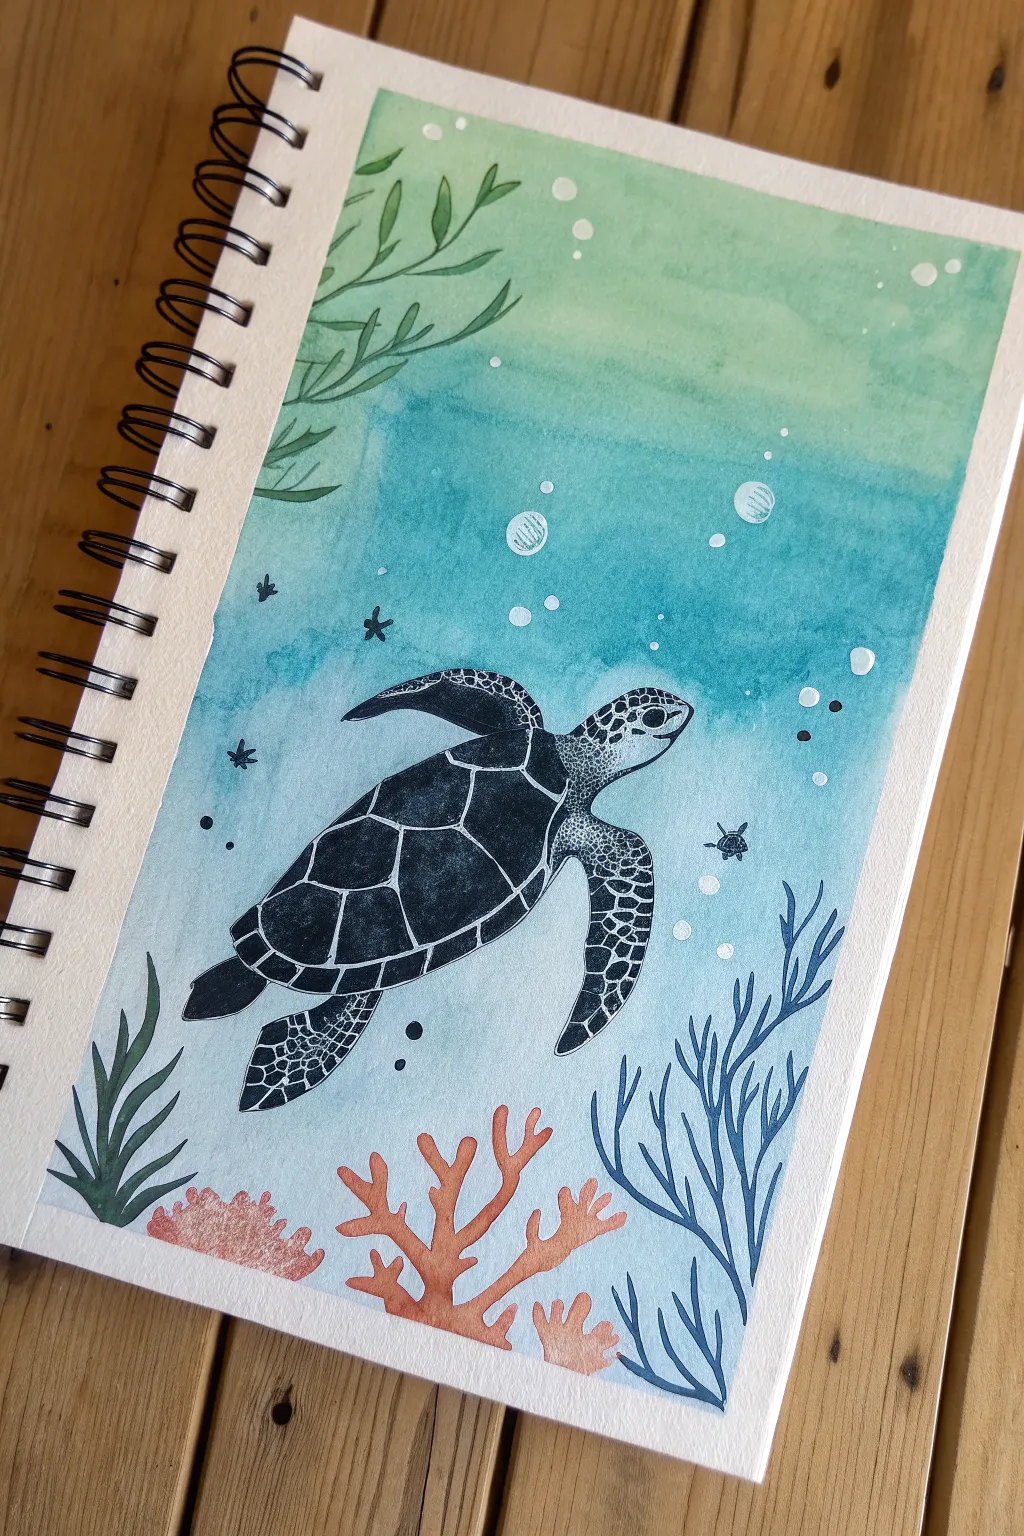
Dive into creativity with this serene underwater scene featuring a beautifully detailed sea turtle gliding through ocean currents. By combining a layered watercolor background with precise pen or fine brush details, you’ll capture the magic of the deep sea.
Step-by-Step Guide
Materials
- Watercolor paper sketchbook (mixed media paper also works)
- Watercolor paints (teal, green, blue, coral colors)
- Wide flat brush for washes
- Fine round brush (size 0 or 1)
- Black fineliner fan or black gel pen (waterproof)
- White gel pen or white acrylic marker
- Pencil and eraser
- Masking tape (optional for clean edges)
- Paper towels and water cup
Step 1: Setting the Scene
-
Sketch the layout:
Start by lightly sketching the outline of your large sea turtle in the center of the page. Add the shapes of coral and seaweed at the bottom corners and the floating seaweed at the top left. -
Prepare the wash:
Mix a watery light green color on your palette. Using your wide flat brush, paint a broad horizontal stripe across the top third of your page, letting the water do the work to keep it smooth. -
Deepen the blue:
While the green layer is still slightly damp, mix a teal or turquoise shade. Paint the middle section of the page, blending it gently upwards where it meets the green to create a soft gradient. -
Finish the water:
For the bottom section, dilute your blue paint heavily with water until it’s very pale baby blue. Paint the bottom area around your coral sketches, blending it into the darker teal above. -
Let it dry completely:
This is crucial! Wait until the paper is bone dry. If you paint on wet paper now, your details will bleed. You can use a hairdryer on a low setting to speed this up.
Step 2: Bringing the Turtle to Life
-
Fill the turtle shell:
Using a dark grey or black watercolor mix (or black ink), carefully fill in the shell of your turtle. Leave thin white lines between the shell plates to define the pattern, or paint it solid and add white lines later. -
Paint the flippers:
Fill in the flippers and head with the same dark shade. Don’t worry about the tiny scales yet; we will add those white details later for a crisp look. -
Add floating plants:
Mix a muted green tone and paint the waving seagrass in the top left corner. Use the tip of your round brush to keep the leaves pointy and elegant. -
Paint the bottom flora:
Using the same dark green, paint the tall seaweed on the bottom left. For the coral on the right, mix a dark blue, and use a coral/orange shade for the bushy shapes in the center bottom.
Smooth Gradients
To get that seamless blend between the green and blue water, wet the paper slightly with clean water before applying your colored paint.
Step 3: Details & Bubbles
-
Define the face:
Once the black paint is dry, use your white gel pen to draw the eye, mouth line, and the small facial scales on the turtle’s head. -
Scale texture:
Continue with the white gel pen to draw circular or mosaic patterns on the flippers. This creates that realistic reptilian texture against the dark silhouette. -
Shell highlights:
If you painted the shell solid black earlier, use the white pen to draw the geometric lines separating the shell plates now. -
Tiny companion:
Draw the tiny baby turtle silhouette in the distance using a black pen or fine brush. It adds a wonderful sense of scale to the ocean. -
Adding bubbles:
Use your white pen or a dot of thick white gouache/acrylic to add circles for bubbles rising from the turtle. Fill a few in slightly or leave them as open rings. -
Final flourish:
Add a few tiny black stars or plus signs scattered in the water for texture, and ink outline the blue coral on the bottom right if you want extra definition.
Clogged Pens?
If your white gel pen stops working over the paint, scribble it on your thumb or a scrap piece of paper to clear the tip, or wait for the paint to dry longer.
Now you have a peaceful ocean snapshot to remind you of the wonders under the sea
Dessert Doodle Party
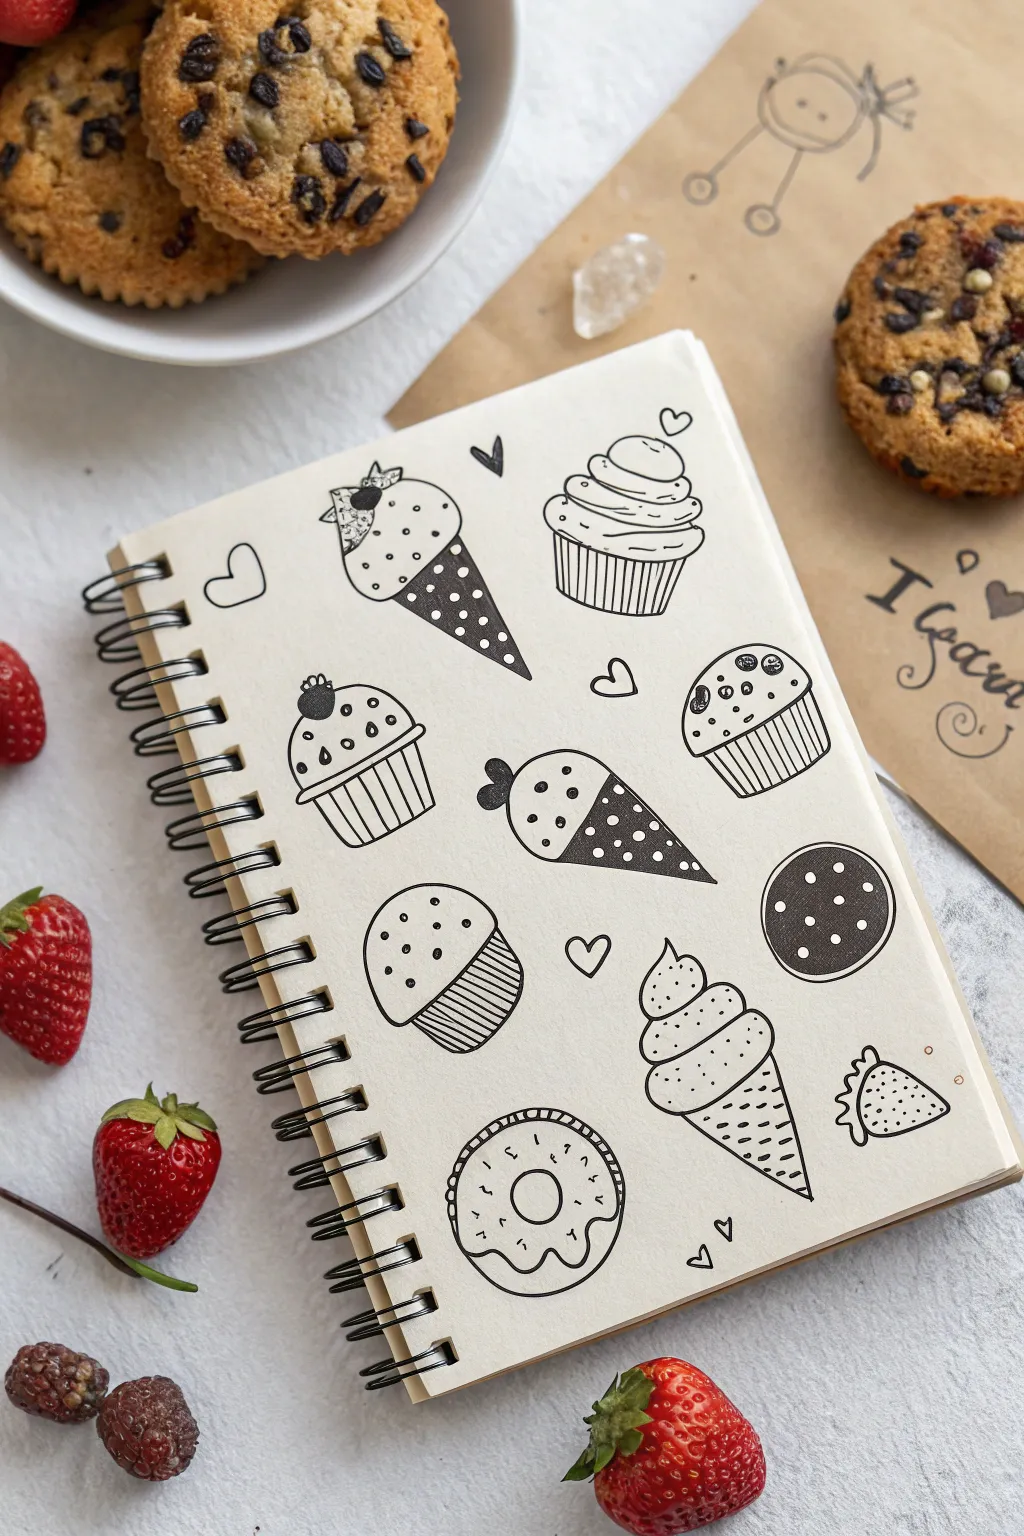
Transform a blank sketchbook page into a delicious menu of hand-drawn treats. This line-art project focuses on simple shapes and bold outlines to create a bakery full of cupcakes, ice creams, and sweets.
Detailed Instructions
Materials
- Spiral-bound sketchbook or mixed media paper
- Fine-tip black drawing pen (0.5mm or 0.8mm)
- Pencil for sketching
- Eraser
Step 1: Ice Cream & Cone Foundations
-
Cone shapes:
Begin by sketching three upside-down triangle shapes scattered around your page. Make one tall and skinny for a classic cone, and another slightly wider. -
Soft serve swirls:
On top of your first cone, draw a fluffy cloud shape that tapers to a point at the top. Add curved horizontal lines across the cloud to make it look like swirled soft serve. -
Scooped treat:
For the second cone, draw a simple semi-circle resting on the flat top. Add a little ruffle or ‘skirt’ where the ice cream meets the cone. -
Sideways surprise:
Draw one cone lying on its side. Create a rounded scoop shape emerging from the wide end, like it’s just been served.
Smudge Alert
Drawing pens can smear if gum erasers are used too quickly. Wait at least 60 seconds after your last ink line before erasing any pencil marks.
Step 2: Cupcake Collection
-
Cupcake liners:
Sketch three trapezoid shapes (wider at the top, narrower at the bottom) in the empty spaces. These will become your cupcake wrappers. -
Frosting mound:
Top one liner with a tall, tiered swirl, getting smaller as it goes up, similar to a snowman. -
Muffin top:
Top another liner with a broad, mushroom-cap shape for a classic muffin look. I like to add a tiny cherry circle right on the peak. -
Simple dome:
For the last cupcake, simply draw a smooth semi-circle dome on top of the liner.
Color Pop
Use colored pencils to fill in just one element on each dessert—like a red cherry or pink frosting—to make the black lines stand out more.
Step 3: Sweet Details & Inking
-
Cookie and donut:
Fill a large gap with a perfect circle. Inside, draw a smaller concentric circle for a donut, or leave it solid for a cookie. -
Strawberry slice:
In a smaller gap, draw a triangular shape with rounded corners to make a strawberry. -
Start inking outlines:
Take your black pen and trace over your main pencil outlines. Use a steady hand, but don’t worry if lines act a little wobbly—it adds character. -
Liner ridges:
Draw vertical lines inside your cupcake wrappers to create the folded paper texture. Vary them slightly or curve the bottoms for a 3D effect. -
Cone patterns:
On your ice cream cones, draw a grid pattern or small polka dots. Solid black triangles can make a fun, modern cone pattern too. -
Cookie crumbs:
If you drew a cookie, add small circles inside and color them black for chocolate chips. For the donut, add sprinkles or a wavy frosting line. -
Sprinkle shower:
Add tiny details to your frosting: small dots, little circles, or tiny dashed lines to look like sprinkles. -
Floating hearts:
Sketch small, simple hearts in the empty background spaces between your desserts to tie the whole composition together. -
Final clean up:
Once the ink is completely dry, gently erase all your pencil sketches to reveal the crisp black and white drawings.
Your sketchbook now looks good enough to eat with all your custom baked goods displayed together

PENCIL GUIDE
Understanding Pencil Grades from H to B
From first sketch to finished drawing — learn pencil grades, line control, and shading techniques.
Explore the Full Guide
Boat on Patterned Waves
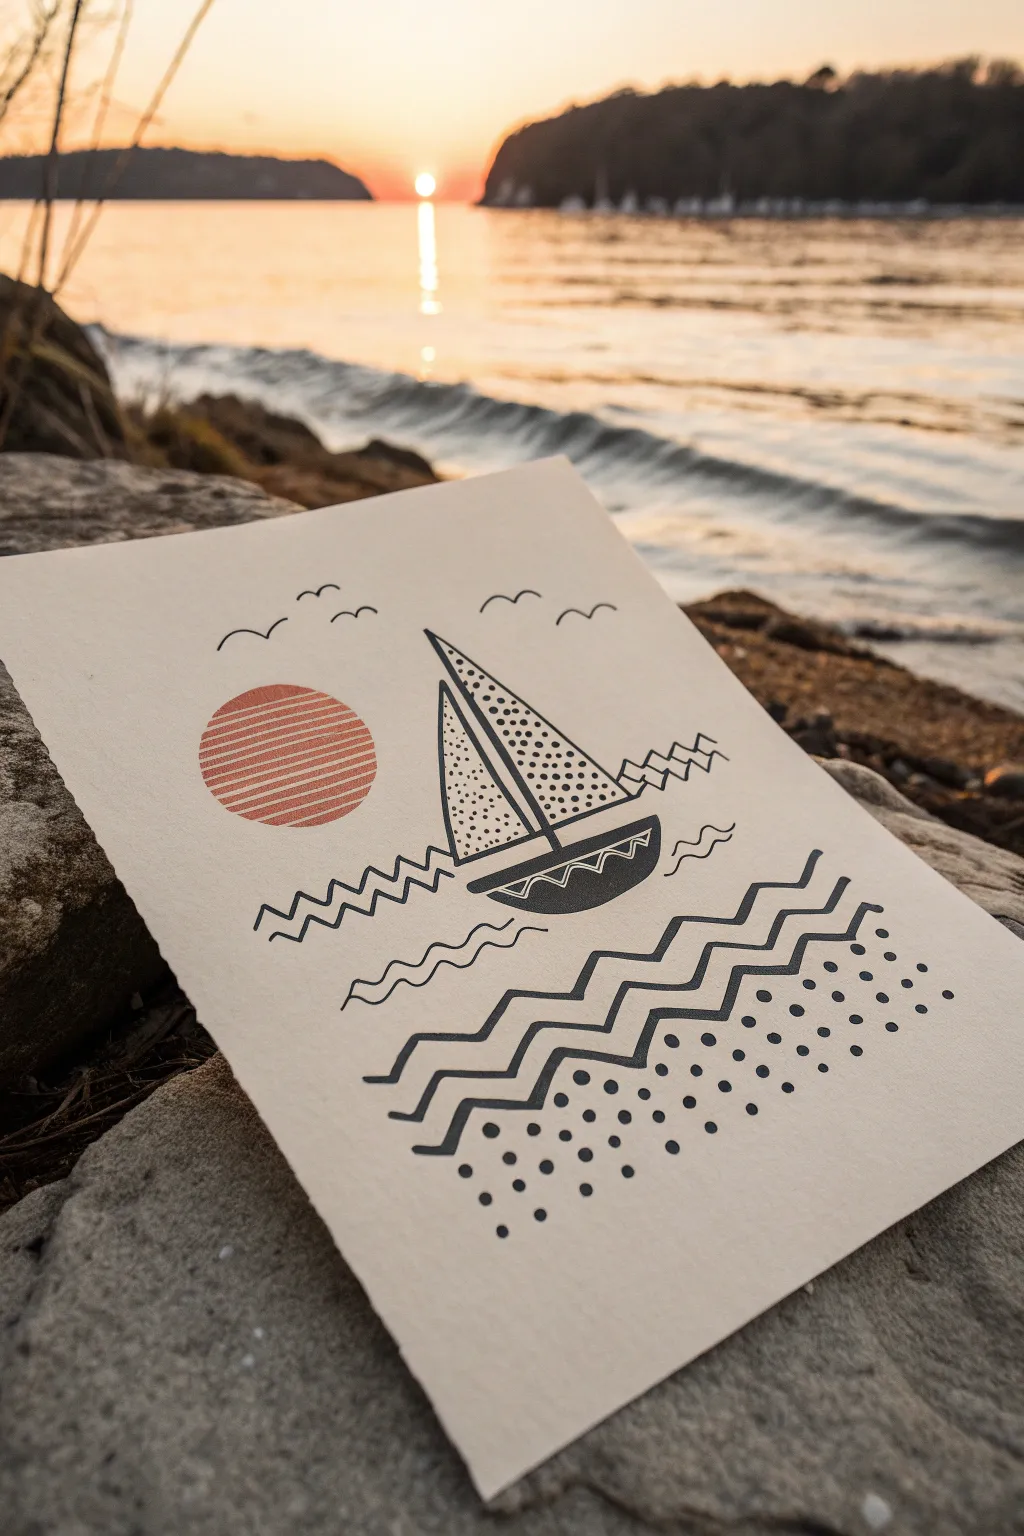
Create a striking piece of art that looks professionally printed using simple materials. This project combines bold lines and repeating patterns to make a stylized sailboat scene that’s perfect for framing or turning into a greeting card.
Detailed Instructions
Materials
- Soft-cut lino block or thick carving rubber
- Linoleum cutter tool with V and U gouges
- Pencil and eraser
- Tracing paper (optional)
- Black block printing ink
- Rust-orange block printing ink
- Rubber brayer (roller)
- Flat piece of glass or acrylic (for rolling ink)
- Heavyweight cream or off-white cardstock
- Wooden spoon or baren
- Fine-point black marker (optional for touch-ups)
Step 1: Designing and Carving
-
Draft your design:
Start by sketching your sailboat scene on a piece of paper the same size as your carving block. Draw a simple hull, two triangular sails, a round sun, and waves. -
Reverse the image:
block printing reverses your image, so if you care about the boat’s direction, flip your sketch over. Trace the reversed lines onto your soft-cut block using a soft pencil. -
Outlining the boat:
Insert the fine V-shaped gouge into your cutter handle. Carefully carve along the pencil lines of the boat’s hull and sails. Use slow, steady pressure to remove a thin strip of rubber. -
Detailing the sails:
Inside the sails, switch to a U-shaped gouge or keep using the V-gouge to create texture. Carve small dots or stipples into the rubber to create the ‘shaded’ look shown in the sails without removing all the material. -
Carving the sun:
Outline your circle for the sun. To create the striped effect, carve horizontal lines across the circle, leaving raised strips in between. This is the only part intended for orange ink, so you might want to carve this on a separate small scrap of rubber if you want to print colors easily. -
Creating the waves:
Carve the zigzag patterns for the waves. For the thick, bold waves at the bottom, carve away the negative space around the zigzags so the lines themselves stand up in relief. -
Adding atmospheric dots:
Use the tip of your tool to poke or twist out small bits of rubber in the bottom right corner. These removed specks will remain white, while the surrounding area will hold ink, creating the bubbly texture. -
Clearing the background:
Once your main design elements are carved, use a wide U-gouge to clear away all the large background areas of rubber that you don’t want to print.
Don’t Cut Yourself!
Always carve away from your body and keep your non-carving hand behind the blade path. Since lino tools are sharp, using a bench hook to hold the block steady is a huge safety help.
Step 2: Inking and Printing
-
Prepare the black ink:
Squeeze a small amount of black block printing ink onto your glass or acrylic sheet. Roll the brayer back and forth until the ink sounds ‘sticky’ like velcro. -
Ink the main block:
Roll the inked brayer over your carving. Ensure the raised surfaces of the boat and waves are evenly coated in black, but be careful not to flood the fine carved lines. -
Position the paper:
Place your cream cardstock gently on top of the inked block. Do not wiggle it once it makes contact. -
Transfer the image:
Using a wooden spoon or a baron, rub the back of the paper firmly in circular motions. Press down on every part of the design to transfer the ink. -
Reveal the print:
Peel one corner of the paper up slowly to check the transfer. If it looks good, pull the whole paper off and let the black ink dry completely. -
Adding the sun:
If you carved the sun on a separate block, clean your brayer and roll out the rust-orange ink. Ink the sun block and carefully stamp it onto your dried black print. -
Drawing final details:
If carving the tiny birds is too difficult, wait for the ink to dry and simply draw the ‘v’ shapes in the sky with a fine-point black marker.
Patchy Prints?
If your print looks spotty or faint, you either need slightly more ink on the brayer or more pressure when rubbing. The paper should start to look slightly embossed from the back.
Now you have a stunning nautical print that captures the calm of the ocean
Bumblebee in a Flower Garden
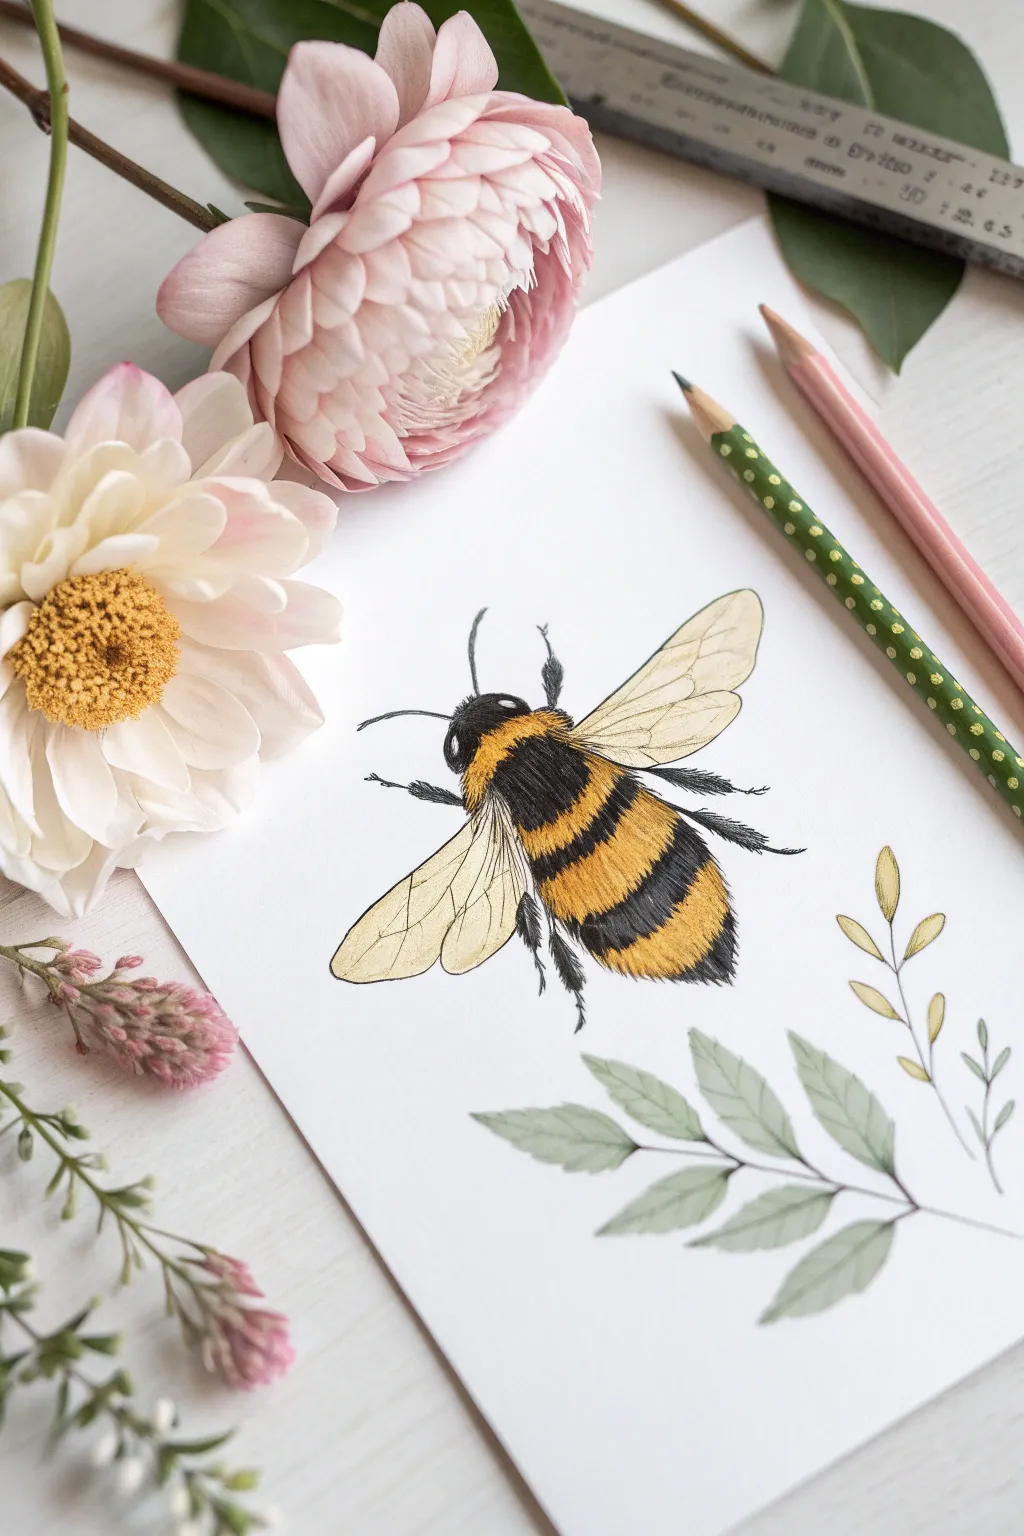
This charming project captures the fuzzy texture of a bumblebee using colored pencils to create bold black and yellow stripes. You’ll complete the look with delicate, transparent wings and soft leafy branches for a lovely garden scene.
Step-by-Step Tutorial
Materials
- White drawing paper or sketchbook
- HB pencil for sketching
- Eraser
- Colored pencils (Yellow, Golden/Orange, Black, Light Grey, Green, Olive Green)
- Fine-liner pen (black, optional for crisp details)
- Pencil sharpener
Step 1: Sketching the Bee
-
Basic Shapes:
Start near the center of your paper. Draw a small oval for the head, a slightly larger round section for the thorax (middle), and a larger oval pointing downwards for the abdomen. -
Adding Wings:
Lightly sketch two long, tear-drop shaped wings extending from the upper back. Make sure the wing closer to you overlaps the body slightly, while the further wing peeks out from behind. -
Legs and Antennae:
Draw the antennae curving out from the head. Sketch six legs: two pointing forward, two in the middle, and two extending backward. Keep these lines light so you can adjust them. -
Marking the Stripes:
On the main body, draw faint curved lines to separate where the black fur will go and where the yellow stripes will be.
Step 2: Coloring the Fur
-
First Yellow Layer:
Take your yellow pencil and fill in the striped areas. Use short, quick strokes that go in the direction the fur would grow, rather than coloring in solid blocks. -
Deepening the Gold:
Layer a golden or orange pencil lightly over the bottom edges of the yellow stripes. This creates a shadow effect and makes the bee look round and fluffy. -
Base Black Layer:
Using your black pencil, start filling in the head and the black stripes. Just like with the yellow, use short, flicking strokes to mimic hair texture. -
Building Contrast:
Go back over the black areas with more pressure to make them dark and rich. Leave the very edges slightly jagged so the bee looks fuzzy against the white paper. -
Leg Details:
Color the legs black. You can add tiny little hairs to the back legs to make them look like they are ready to collect pollen.
Make It Fuzzy
Don’t color in smooth blocks! Always use short, quick pencil flicks that overlap. This texture is the secret to making your bumblebee look soft and real.
Step 3: Wings and Final Touches
-
Wing Veins:
Using a very sharp grey or black pencil, draw delicate lines inside the wings. These should branch out like a tree. -
Wing Transparency:
Lightly color the wings with a very pale yellow or cream, but keep it transparent so you can still see the white paper through it. -
Adding Leaves:
Below the bee, sketch a simple branch with oval-shaped leaves. I like to vary the size of the leaves to make the branch look more natural. -
Coloring Greenery:
Color the leaves with a soft green. Use an olive green for the stem and the veins in the center of each leaf. -
Extra Sprigs:
Draw a second, thinner sprig to the right with smaller bud-like shapes. Add touches of yellow or brown to these tips for variety. -
Cleanup:
Erase any stray graphite sketch lines that are still visible around your colored drawing to keep the background crisp and clean.
Pencil Tip Snap?
If your pencil lead keeps breaking while shading the dark black areas, you are pressing too hard. Build up layers of color gently instead of pressing down all at once.
Now you have a beautiful, fuzzy garden friend buzzing across your page


Circle Landscape Adventure
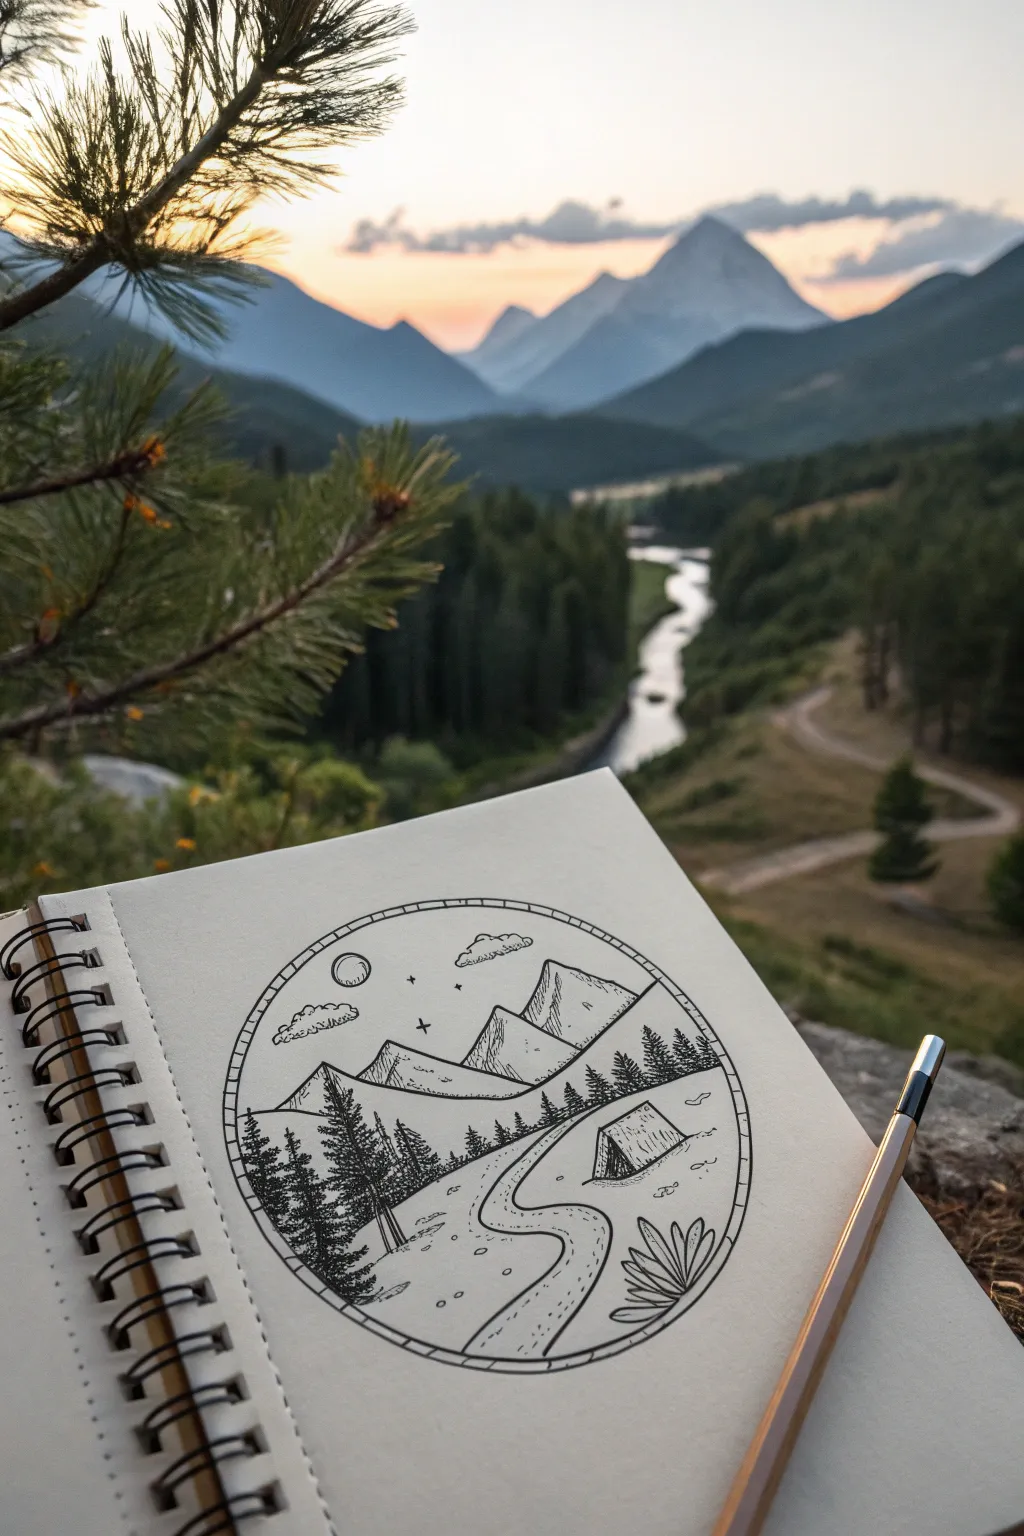
Capture the beauty of the great outdoors inside a perfect circle with this simple yet stunning pen and ink drawing. The clean lines and minimal shading create a crisp, graphical look that turns mountains and pine trees into a cool badge-style design.
Detailed Instructions
Materials
- Sketchbook with smooth, heavy paper
- Pencil (HB or H)
- Black fine liner pen (0.3 or 0.5mm tip)
- Black brush pen or marker (for thicker lines)
- Compass or a round object (like a roll of tape) to trace
- Eraser
- Ruler
Step 1: Setting the Scene
-
Draw the border:
Start by lightly drawing a perfect circle in the center of your page using a compass or by tracing a round object. Draw a second, slightly smaller circle inside it to create a thin double border. -
Divide the space:
Lightly sketch a horizontal line across the middle, slightly dipping it in the center to suggest valley ground. This separates your sky from the earth. -
Sketch the mountains:
Above your horizon line, draw three triangular peaks. Make the central one the largest and the side ones slightly smaller, ensuring they overlap naturally.
Wobbly Lines?
If your circle isn’t perfect, don’t worry. Go over the outline again with a thicker marker to thicken the border. It hides mistakes and makes the frame pop.
Step 2: Adding Details
-
Map the path:
From the bottom right edge of your circle, sketch a winding S-shaped path that narrows as it moves toward the center, leading the eye into the mountains. -
Place the tent:
To the right of the path, draw a simple triangular prism shape for a classic tent. Keep it small to make the mountains look massive in comparison. -
Draft the trees:
Sketch vertical lines to mark where your pine trees will go. Put smaller trees near the mountains and larger, taller ones in the foreground on the left side. -
Sky elements:
Add a small circle for the moon in the upper left and a few fluffy, flat-bottomed clouds floating near the peaks.
Make It a Sticker
Color your drawing with markers, cut out the circle carefully, and put a piece of clear packing tape over it to turn your landscape into a custom laptop sticker.
Step 3: Inking the Outlines
-
Trace the border:
Switch to your fine liner pen. Carefully trace the double circle border first so you have a crisp frame to work within. -
Ink the main shapes:
Go over your pencil lines for the mountains, the path, and the tent. Use confident, steady strokes. -
Detail the border:
Inside the thin double border, draw small tick marks evenly spaced all the way around to give it a stitched or compass-like appearance.
Step 4: Texture and Shading
-
Create the trees:
For the pine trees, start at the top of your vertical guide lines. Use short, downward Scribble strokes that get wider as you go down to create jagged, realistic branches. -
Texturing the tent:
Add vertical lines on the side of the tent for shading, and little details like the tent poles/stakes. -
Shading the mountains:
On the right side of each mountain peak, draw closely spaced diagonal lines (hatching). This makes the sun look like it’s hitting the left side. -
Ground details:
Add tiny dashes and small rocks (little circles) around the path and in the foreground to show the ground isn’t perfectly smooth. -
The winding path:
Draw small dashed lines down the center of your winding road to make it look like a trail. -
Plant life:
In the bottom right corner, draw a stylized plant with long, pointed leaves to balance the composition against the heavy trees on the left. -
Final sky touches:
Ink the clouds with bumpy tops and flat bottoms. Add small ‘x’ shapes or dots in the sky to represent distant stars. -
Clean up:
Once the ink is completely dry—I usually wait at least five minutes to be safe—gently erase all your pencil sketches to reveal the clean black and white art.
Now you have a miniature world captured perfectly in your sketchbook
Three-Panel Seasons Tree

Capture the changing beauty of nature with this simple yet striking tree study project. By repeating the same basic tree structure across three panels, you’ll create a lovely visual narrative of the seasons using just colored pencils and markers.
Step-by-Step
Materials
- Spiral-bound sketchbook or drawing paper
- Fine-liner pen (black or dark brown)
- Graphite pencil (HB) and eraser
- Colored pencils (brown, grey, pink, light green, light blue)
- Ruler (optional)
- Loose sheet of paper (for the third panel)
Step 1: Planning the Layout
-
Prepare your canvas:
Open your sketchbook to a fresh spread. You will be using the left page for spring and the right page for summer. Place a separate loose sheet under the right page or beside it for the winter panel. -
Sketch the trunks:
Using a light graphite pencil, sketch a central tree trunk on each of the three pages. Keep them relatively centered and roughly the same width for consistency. -
Add main branches:
Draw three to four main branches splitting off from the top of the trunk. Let them reach upward and outward like a V-shape. -
Draw finer twigs:
Add smaller twigs branching off the main limes. Aim for a natural, organic look where branches get thinner as they move away from the trunk.
Branch Continuity
To make the series look cohesive, trace your first tree onto tracing paper and transfer the basic outline to the other pages.
Step 2: Inking and Coloring the Trees
-
Outline the structure:
Go over your pencil sketches with a black or dark brown fine-liner pen. Use short, disjointed strokes to mimic the texture of rough bark. -
Erase pencil lines:
Once the blending ink is completely dry, gently erase all the underlying graphite guidelines to keep the drawing clean. -
Color the bark:
Take a brown colored pencil and shade in the trunks and branches. Press harder on the left side of the trunk to create a shadow, giving the tree dimension. -
Add texture:
Layer a bit of grey pencil over the brown in vertical strokes to desaturate the color and make it look more like realistic wood. -
Ground the trees:
Add a few small, scribbly lines or dots at the base of each trunk to suggest soil or grass, so the trees aren’t floating in space.
Ink Smearing?
If your fine-liner smears when you color over it, let it dry for at least 15 minutes or switch to coloring first and outlining last.
Step 3: Creating the Seasons
-
Pink spring blossoms:
On the left page, use a pink colored pencil or marker to draw small circles clustered around the branch tips. Vary the pressure to create different shades of pink. -
Falling petals:
Scatter a few pink dots lower down near the bottom of the page to represent petals falling to the ground. -
Summer leaves:
On the right page (middle panel), switch to a light green pencil. Draw small, stippled dots around the branches to suggest fresh, dusty green foliage. -
Add summer rain:
Beneath the green canopy, draw small, light blue triangles pointing upward. Spaced them out evenly to look like stylised raindrops falling. -
Winter atmosphere:
On the separate loose sheet, leave the branches bare. Instead, focus on the background. -
Winter shading:
Lightly shade the background of the loose sheet with a pale blue pencil to suggest a cold, winter sky, leaving the tree stark against it. -
Final touches:
Review all three trees. If any branches look too thin, thicken them slightly with the brown pencil to match the others.
Now you have a beautiful seasonal triptych to display or gift
Mystery Creature Mash-Up Challenge
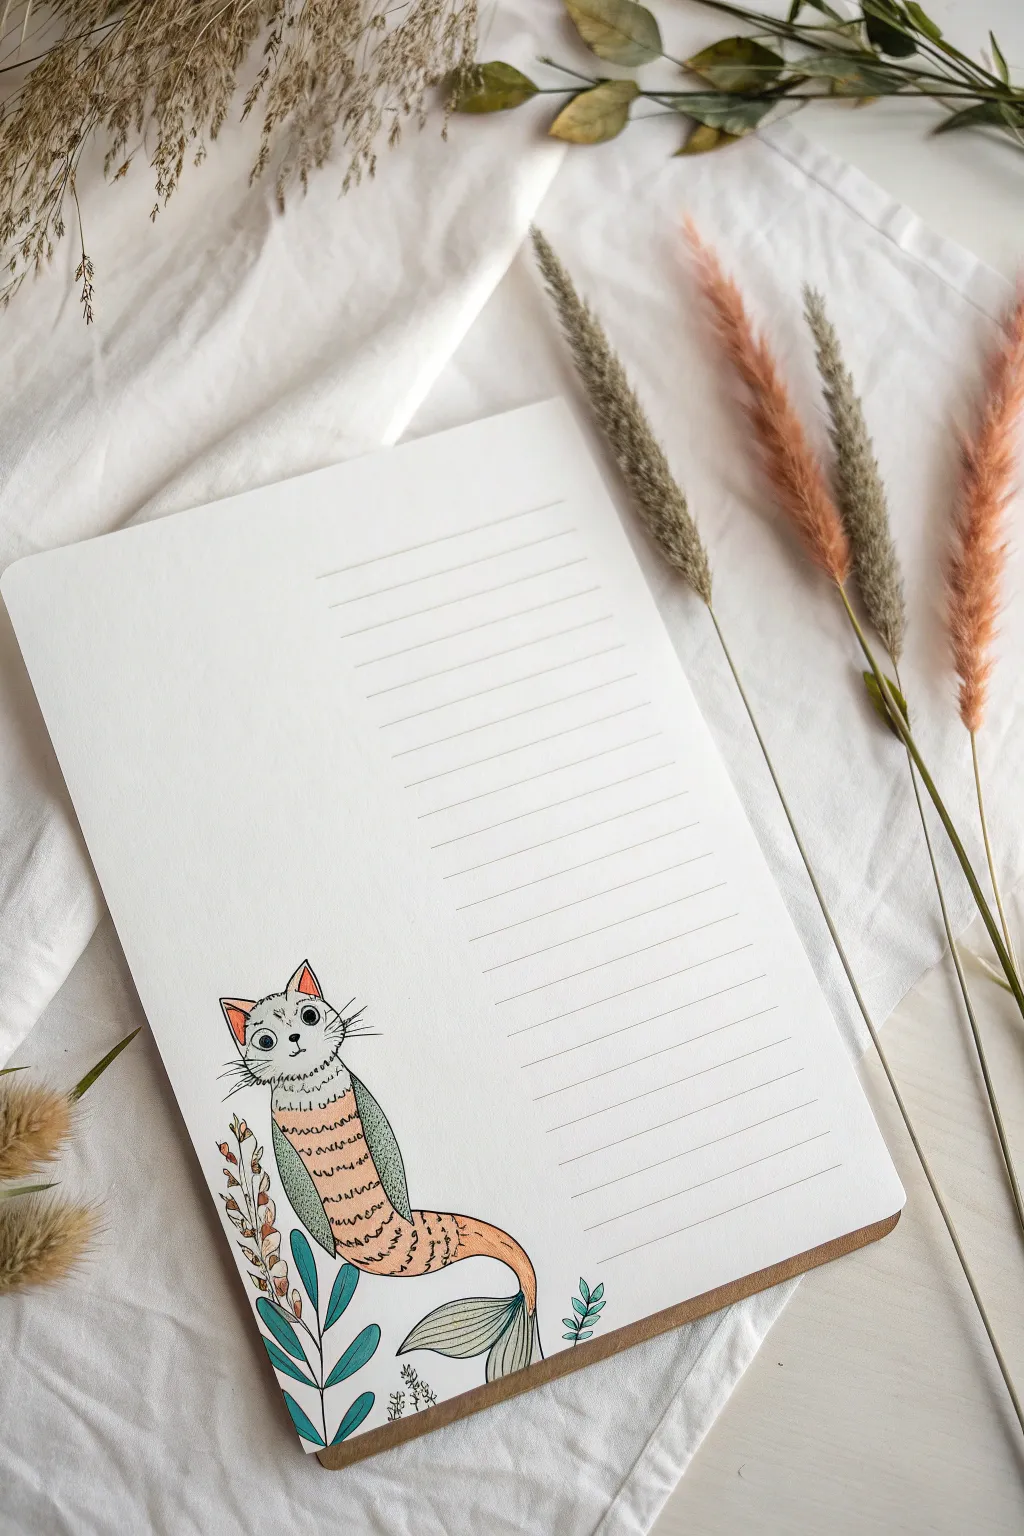
Imagine combining your favorite pet with a magical sea creature to create a one-of-a-kind stationery sheet. This project guides you through illustrating a delightful ‘purr-maid’—half cat, half mermaid—on lined paper, perfect for writing secret notes or doodle lists.
Step-by-Step
Materials
- Heavyweight drawing paper or cardstock (white)
- Ruler
- Fine-liner pen (black, 0.3mm or 0.5mm)
- Colored pencils (teal, orange/peach, grey, green)
- Pencil for sketching
- Eraser
Step 1: Setting the Stage
-
Prepare your canvas:
Start with a clean sheet of heavy drawing paper. Position it vertically. Using your ruler and a very light pencil touch, mark out a series of horizontal lines on the right side of the page to create the writing area. -
Ink the lines:
Once you are happy with the spacing, use a ruler and a grey colored pencil (or a very thin grey pen) to draw the final lines. Keep them faint so they don’t overpower your drawing later on.
Smudge Alert
If your fine-liner smears when you erase pencil lines, wait at least 5 minutes before erasing. Test the ink on a scrap paper first to see how fast it dries.
Step 2: Sketching the Creature
-
Head shape:
In the bottom left corner, lightly sketch a rounded circle for the cat’s head. Add two triangular ears on top. The head should be looking slightly upward and to the right. -
Body curve:
Draw a curved line extending down from the neck, bending right like a ‘J’ shape. This will form the spine of your mermaid tail. -
Outline the tail:
Flesh out the body by drawing the sides of the tail, following that curved spine. Taper it slightly as it reaches the fin area. The connection point between the cat head and fish body should look smooth, like a continuous creature. -
Add the fin:
At the very end of the tail, sketch a fan-shaped fin. I like to make the edges slightly wavy to suggest movement in water. -
Facial features:
Draw two large, round eyes, a small triangular nose, and a cute ‘W’ mouth. Don’t forget the long whiskers extending from the cheeks. -
Decorative details:
Sketch small ‘sca-le’ patterns across the mid-section of the body. Draw stripes on the tail section to give it texture. -
Seaweed accents:
Around the base of the tail, lightly sketch some simple leafy shapes and tall seaweed strands to frame the creature and ground it in the scene.
Make it 3D
Use a white gel pen to add tiny highlights to the cat’s eyes and the shiny scales on any darker colored areas. It makes the creature pop off the page.
Step 3: Inking and Coloring
-
Outline in ink:
Take your black fine-liner and carefully trace over your pencil sketch. Use short, flicking motions for the fur on the cat’s cheeks to make it look fluffy. -
Erase guidelines:
Wait a moment for the ink to dry completely, then gently erase all the underlying pencil marks so the page looks crisp. -
Color the face:
Use a light grey pencil to gently shade the top of the cat’s head. Add a pop of peach or orange to the insides of the ears and the nose. -
Color the body:
For the upper torso, color the scales with a soft green or teal. Press lightly to keep the look delicate. -
Stripe the tail:
Alternate between peach/orange and the white of the paper for the tail stripes. This creates a fun ‘tabby cat’ pattern on the fish tail. -
Fin finishing touches:
Color the tail fin in a soft teal or grey-green. Draw thin lines through the fin with your pen to add structure. -
Plant life:
Color the surrounding seaweed leaves with a mix of teal and darker green. Varying the pressure on the pencil adds depth to these small plants.
Now you have a charming piece of custom stationery ready for your most imaginative stories

Have a question or want to share your own experience? I'd love to hear from you in the comments below!