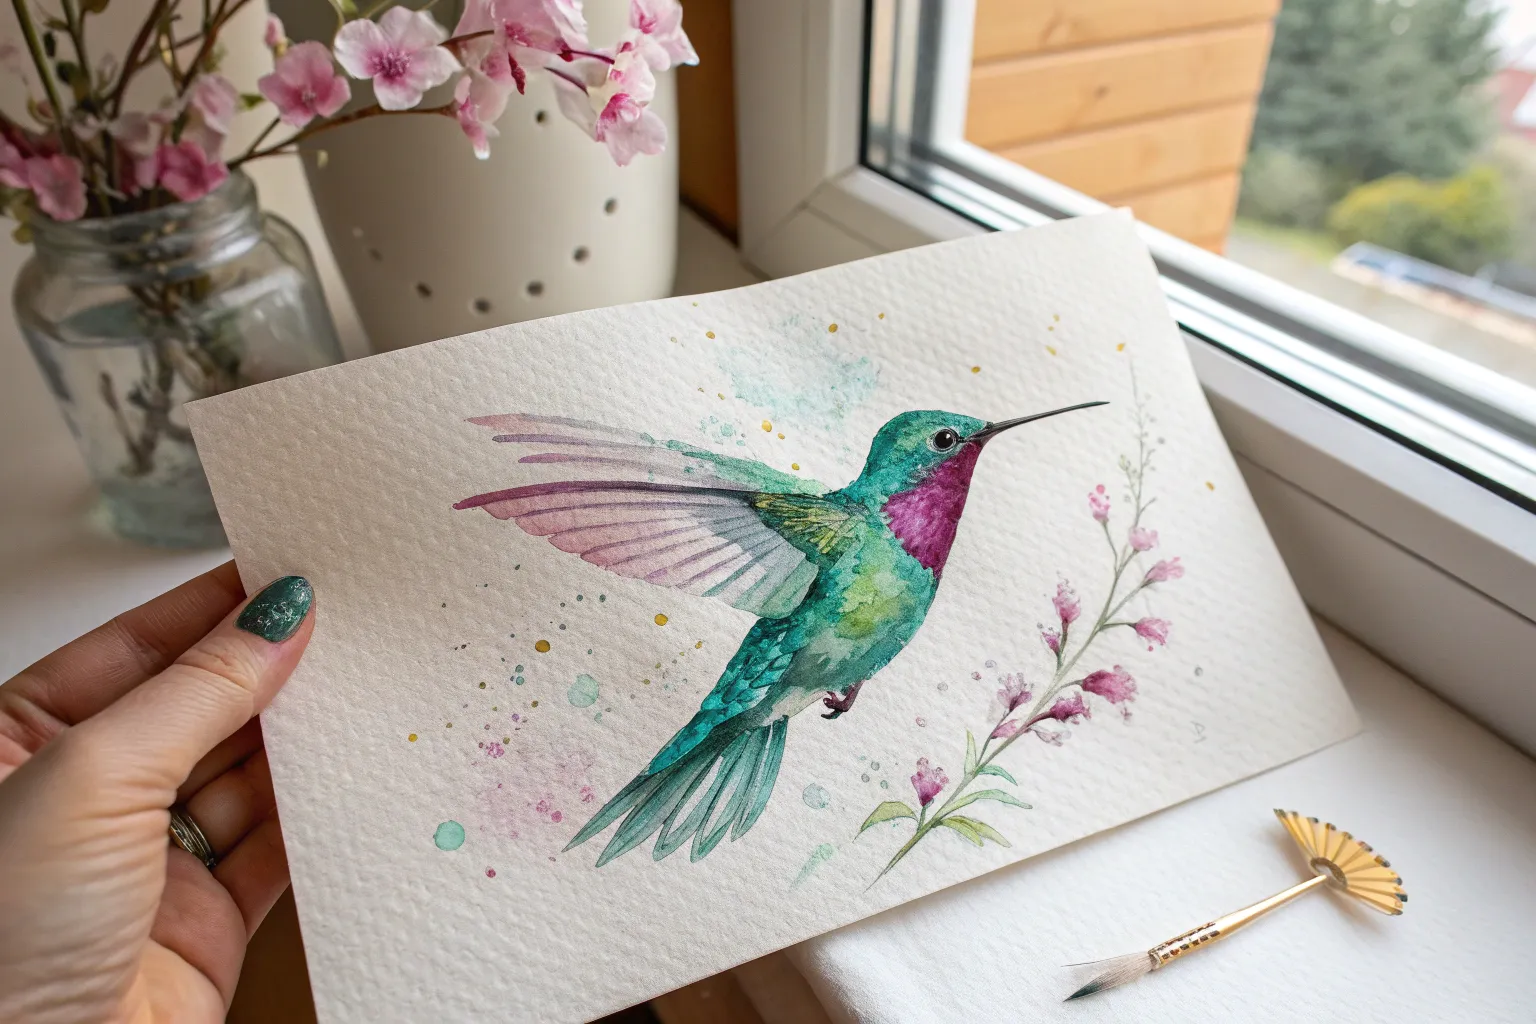
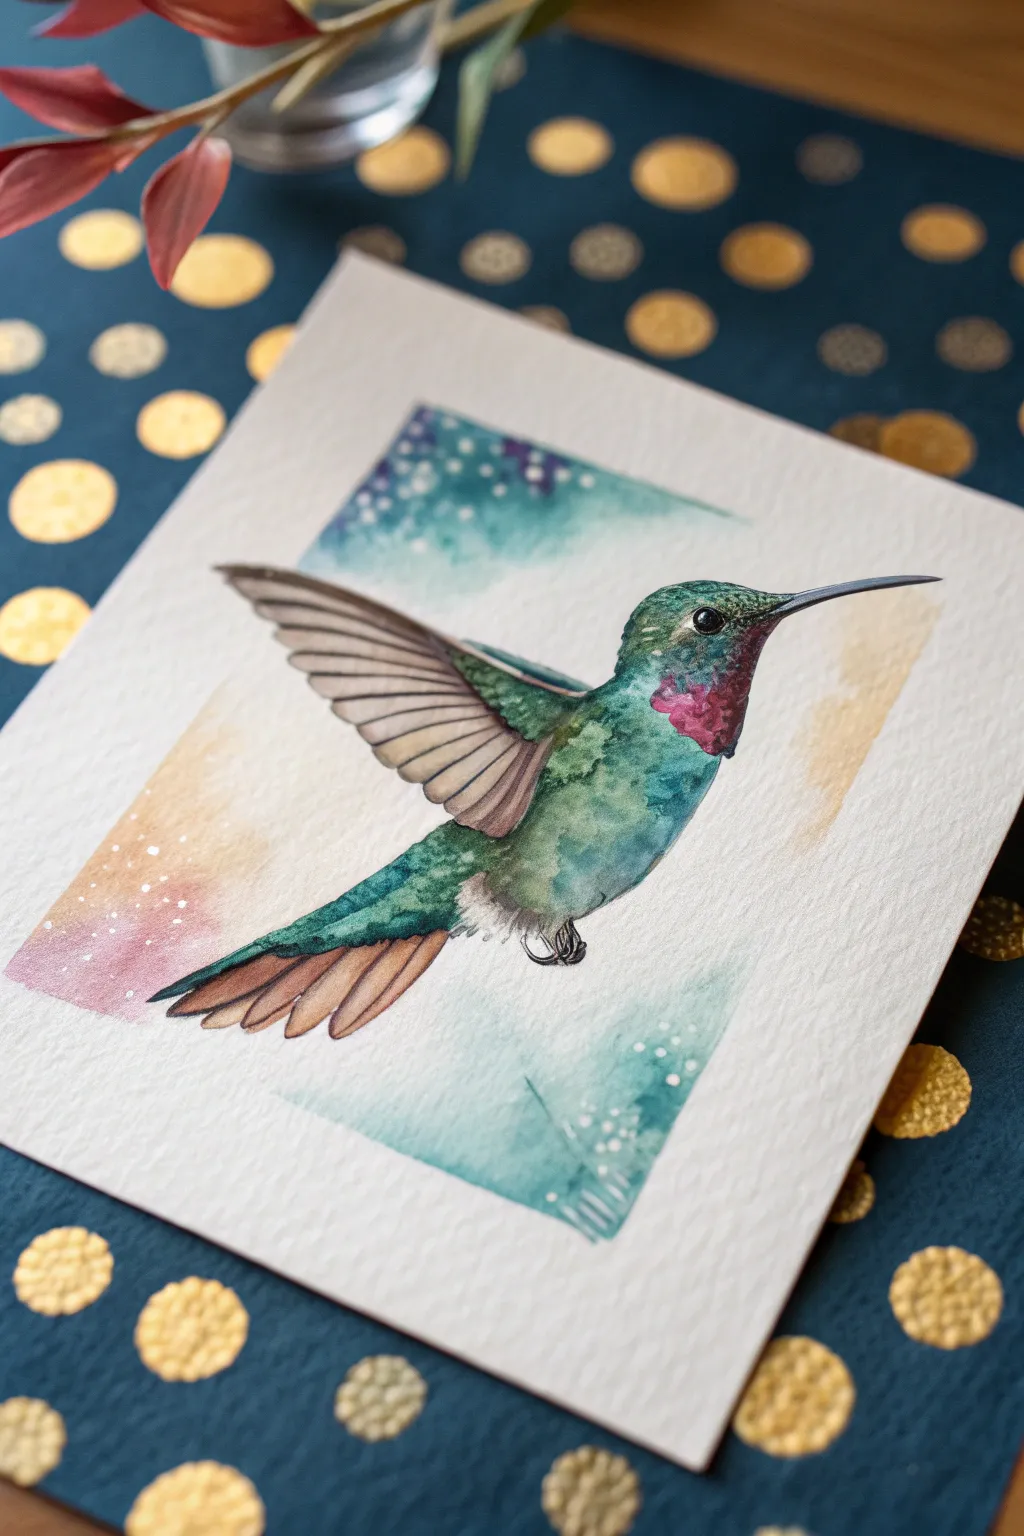
Whenever I need a subject that feels both delicate and electric, I reach for a hummingbird—it’s basically a tiny burst of motion and color. Here are my favorite hummingbird painting ideas that range from classic flower-feeding scenes to playful, experimental approaches you can make totally your own.
Hovering at a Trumpet Flower
Capture the delicate flutter of a hummingbird as it sips from a vibrant trumpet vine in this classic watercolor composition. The soft, botanical illustration style emphasizes the graceful interaction between the bird and the bold, coral-hued blooms.
Step-by-Step Tutorial
Materials
- Hot press watercolor paper (300 gsm)
- Watercolor paints (Sap Green, Alizarin Crimson, Burnt Sienna, Payne’s Gray, Lemon Yellow, Hooker’s Green)
- Round brushes (sizes 2, 4, and 00 for details)
- Pencil (HB or 2H)
- Kneaded eraser
- Masking fluid (optional)
- Clean water and paper towels
- Mixing palette
Step 1: Sketching the Composition
-
Establish the Stem Structure:
Begin by lightly sketching the central stem of the trumpet vine. Draw a gentle curve rising from the bottom center, splitting off into smaller stems for the leaves and flower buds. -
Outline the Flowers:
Sketch two main trumpet flowers: one fully open facing upwards and another slightly below it facing left. Add a tight, unopened bud on the left side to create visual balance. -
Position the Hummingbird:
To the right of the flowers, sketch the hummingbird’s body shape, angling it slightly upward as if hovering. Ensure the beak points directly toward the open flower’s nectar source. -
Detail the Wings and Leaves:
Add the wing outlines in an upward sweep to suggest motion. Sketch the serrated, teardrop-shaped leaves along the stem, keeping your pencil lines faint so they won’t show through the paint.
Step 2: Painting the Trumpet Vine
-
Base Leaf Layer:
Mix a light wash of Sap Green and a touch of Lemon Yellow. Fill in the leaves with this pale green, leaving tiny white gaps along the central veins for natural highlights. -
First Flower Wash:
Dilute Alizarin Crimson with plenty of water to create a soft coral pink. Apply this wash to the trumpet flowers, letting the paint fade to almost white near the base of the petals. -
Adding Leaf Depth:
Once the first green layer is dry, mix a darker green using Hooker’s Green and a little Burnt Sienna. Paint the shadowed sides of the leaves and define the veins, softening the edges with a clean, damp brush. -
Deepening the Blooms:
Strengthen your red mix with a bit of Burnt Sienna for an earthy orange-red tone. Paint the trumpet tubes and the outer edges of the petals, using a wet-on-dry technique to build rich color saturation. -
Stem and Sepals:
Paint the main stem and the sepals (the small leafy parts holding the flowers) with an olive green mix. Add thin, darker lines on one side of the stem to indicate roundness and shadow.
Keep it Light
Work from light to dark, especially on the bird’s throat. It’s easier to darken the ruby feathers later than to try and lift color back to a bright highlight.
Step 3: Painting the Hummingbird
-
Underbelly Wash:
Start with a very watery, pale gray mix for the bird’s belly and chest. Allow this to dry completely before adding texture. -
Green Back and Head:
Paint the head and back with a shimmering green mix (Sap Green plus a tiny dot of blue). Use short, small brushstrokes to mimic the texture of feathers rather than a flat wash. -
The Ruby Throat:
For the signature throat patch, stipple dots of Alizarin Crimson mixed with a tiny bit of purple. Keep the dots distinct to suggest individual iridescent feathers catching the light. -
Wing Transparency:
Mix a sheer wash of Payne’s Gray. Paint the wings carefully, keeping the color translucent to suggest movement. I like to lift a little pigment out with a dry brush to show the light passing through the feathers. -
Defining Flight Feathers:
Using your size 00 brush and a darker gray, draw very fine lines to separate the long flight feathers on the wings and the tail.
Wing Movement
To make the wings look like they are buzzing, soften the outer edges of the wing tips with clean water so they blur slightly into the background paper.
Step 4: Final Details
-
The Eye and Beak:
Use concentrated Payne’s Gray or black for the eye, leaving a tiny pinprick of white paper for the catchlight. Paint the long, slender beak with a steady hand. -
Fine Tuning Shadows:
Look at the junction where leaves meet stems and add tiny pockets of dark green shadow. This increases the contrast and makes the plant look three-dimensional. -
Texture Enhancements:
Add very faint, swift strokes on the bird’s gray belly to suggest fluffiness. If the flower petals look too flat, add gentle streaks of darker orange following the curve of the bloom. -
Sign and Frame:
Once fully dry, erase any visible pencil marks with the kneaded eraser. Sign your work lightly at the bottom and place it in a simple white frame or mat.
Hang your finished piece in a sunlit room to let those transparent botanical colors truly shine


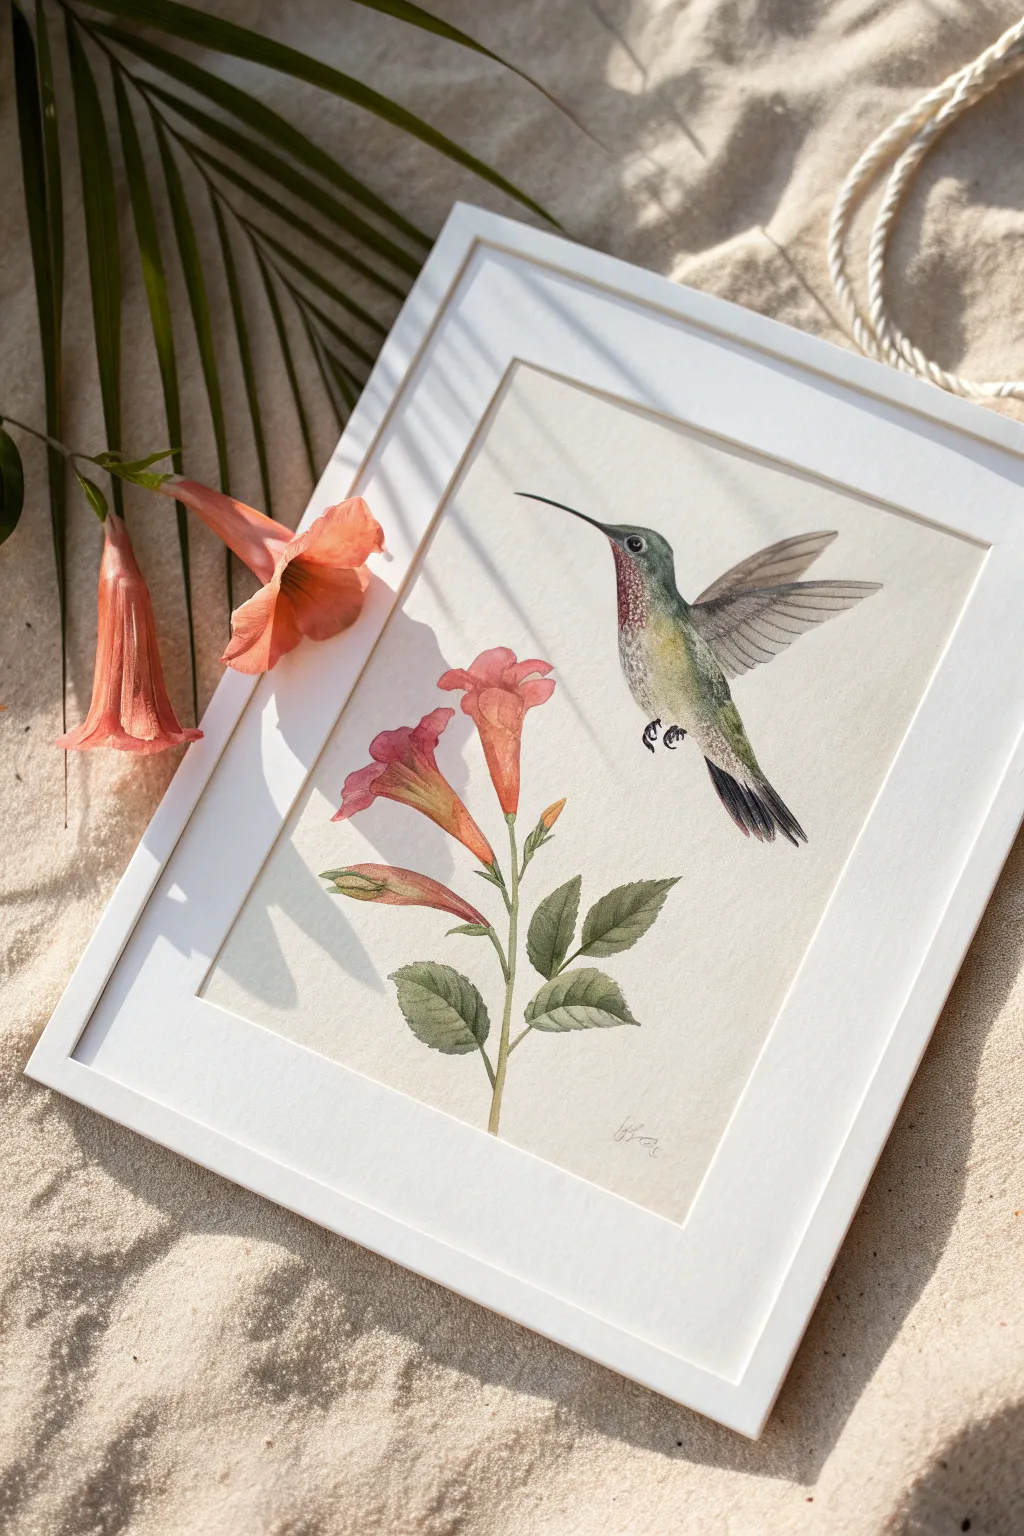
Classic Side-Profile Nectar Sip
Capture the delicate beauty of a hummingbird in mid-flight as it visits vibrant orange blooms with this detailed watercolor tutorial. The result is a clean, classic botanical illustration style that focuses on precision and graceful color transitions.
Detailed Instructions
Materials
- Hot press watercolor paper (smooth texture is key for detail)
- H or HB pencil for light sketching
- Kneaded eraser
- Watercolor paints: Sap Green, Hooker’s Green, Cobalt Teal (or Turquoise), Burnt Umber, Lamp Black, Cadmium Orange, Burnt Sienna, Yellow Ochre
- Round brushes: Sizes 6, 2, and 00 (for fine details)
- Two jars of water
- Paper towels
Step 1: Sketching and Composition
-
Map out the composition:
Begin by lightly marking the main stem of the aloe flower on the right side of your paper. It should curve gently upward. Then, position an oval shape for the hummingbird’s body on the left, ensuring the beak aligns perfectly with one of the open flower trumpets. -
Refine the flower shapes:
Draw the individual tubular flowers branching off the main stem. Some should be fully open trumpets pointing down or sideways, while the ones at the very top should be tighter, bud-like clusters. Keep your pencil pressure very light so graphite doesn’t show later. -
Detail the hummingbird outline:
Flesh out the bird’s form. Add the sharp, narrow beak, the curve of the head, and the extended wings. Observe how the wings in the reference are swept back and slightly blurred in motion—skech individual flight feathers but keep the edges soft.
Step 2: Painting the Flora
-
Base wash for the stem:
Mix a light, watery Sap Green with a touch of Yellow Ochre. Using your size 6 brush, paint the main stem. While it’s still damp, drop in a slightly darker green near the base of the stem to create roundness and volume. -
First layer of the flowers:
Mix a vibrant Cadmium Orange. Paint the tubular petals of the flowers. For the top buds, mix in a little green to show they aren’t fully ripe yet. Leave tiny slivers of white paper where the light hits the curve of the petals. -
Deepening floral shadows:
Once the orange base is dry, mix Burnt Sienna with your orange to create a shadow tone. Paint this along the undersides of the tubes and where the petals overlap. This gives the flowers a 3D cylindrical look.
Muddy Colors?
If your green throat feathers are looking dull, stop layering immediately. Let the paper dry completely, then add a single glaze of pure turquoise to bring back the vibrancy.
Step 3: Painting the Hummingbird
-
The iridescent throat:
The throat (gorget) is the jewel of the bird. Wet the throat area with clean water first, then drop in clear Cobalt Teal or Turquoise. Let the pigment bloom naturally. As it dries, dab in tiny dots of darker green to suggest feathers. -
Body feathers base:
For the upper back and head, use a mix of Sap Green and Hooker’s Green. Paint using short, directional strokes that mimic the growth pattern of feathers. I like to leave the belly area very pale, almost white, with just a hint of grey-brown shadow. -
Wing transparency:
The wings should look delicate and translucent. Use a very watery grey wash (black diluted heavily). Paint the long flight feathers, letting the color fade out at the tips to suggest movement. -
Defining the flight feathers:
Once the first wing wash is dry, use a size 2 brush with a darker grey to paint the shafts and separating lines between the feathers. Don’t outline every feather completely; broken lines look more natural. -
The tail feathers:
Paint the tail feathers using a dark grey-brown mixture (Burnt Umber + Black). These should be sharper and more defined than the wings. Add the small feet tucked under the belly using this same dark mixture.
Pro Tip: Texture
For realistic feather texture on the bird’s white belly, don’t paint grey lines. Instead, create texture by ‘lifting’ dry paint gently with a damp, clean brush.
Step 4: Final Details
-
The eye and beak:
Switch to your 00 brush. Paint the eye using pure Lamp Black, leaving a tiny pinprick of white paper for the highlight—this brings the bird to life. Carefully paint the long, needle-like beak black. -
Stamen details:
Go back to the flowers. Use a fine brush with dark orange or red-brown to paint the thin stamens extending from the open flowers, tipping them with tiny dots for pollen. -
Final contrast check:
Step back and assess your values. If the bird’s green back looks too flat, add small strokes of deep green mixed with blue. Ensure the connection point where the beak meets the flower is precise.
Sign your botanical study with a fine pencil near the stem base and prepare it for framing.


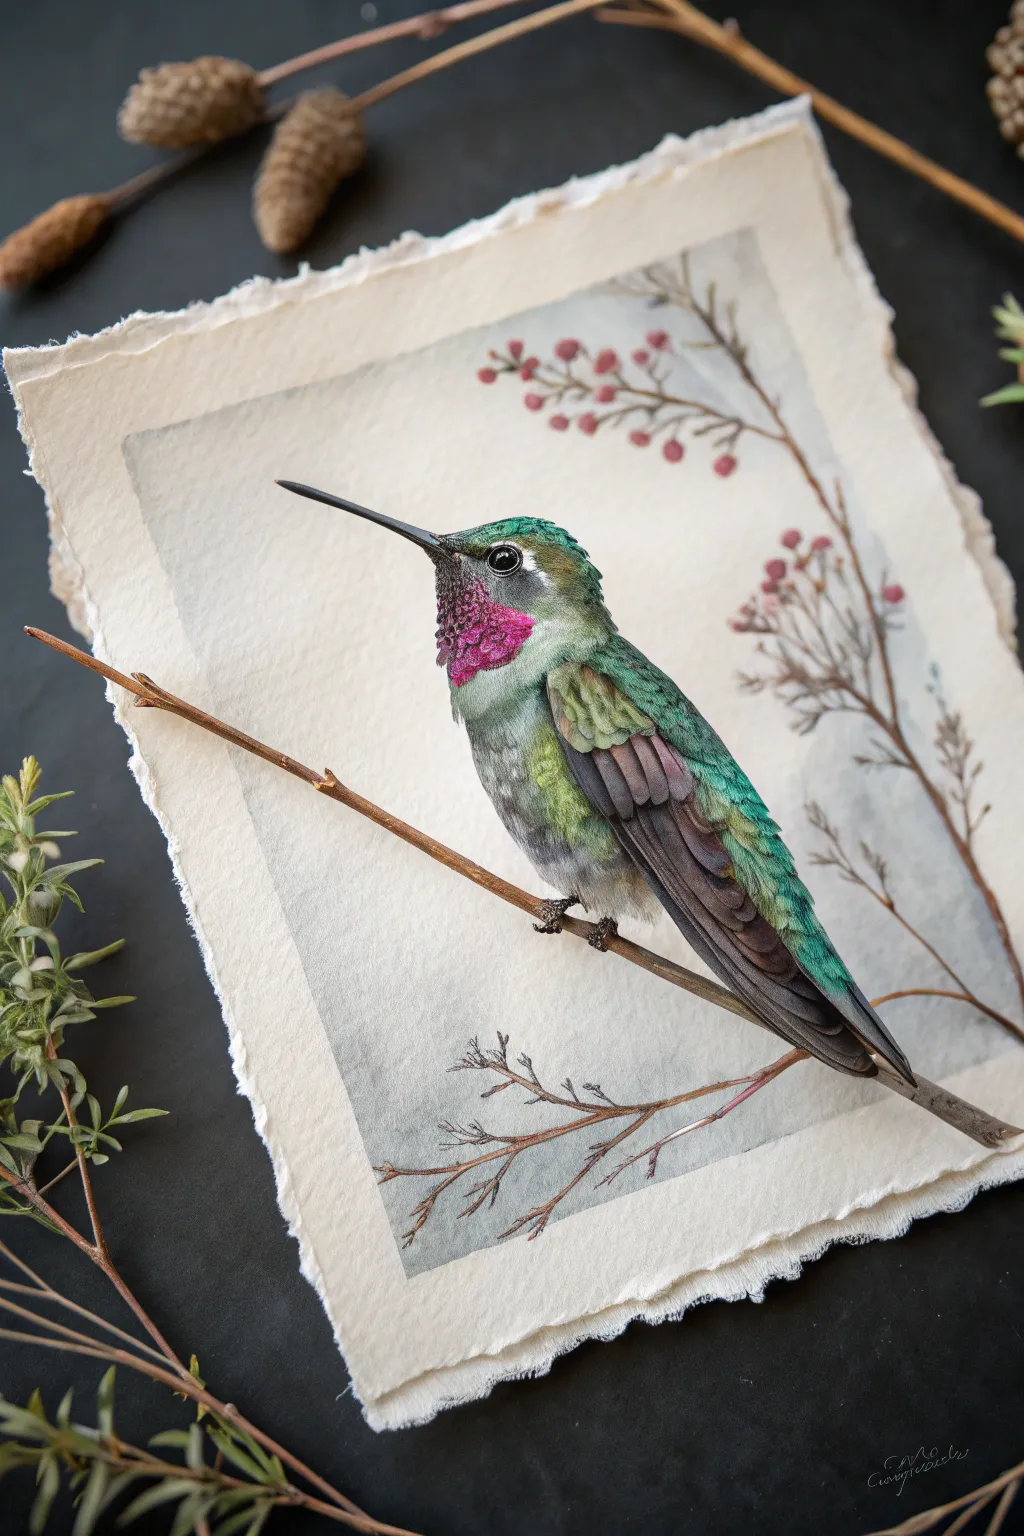
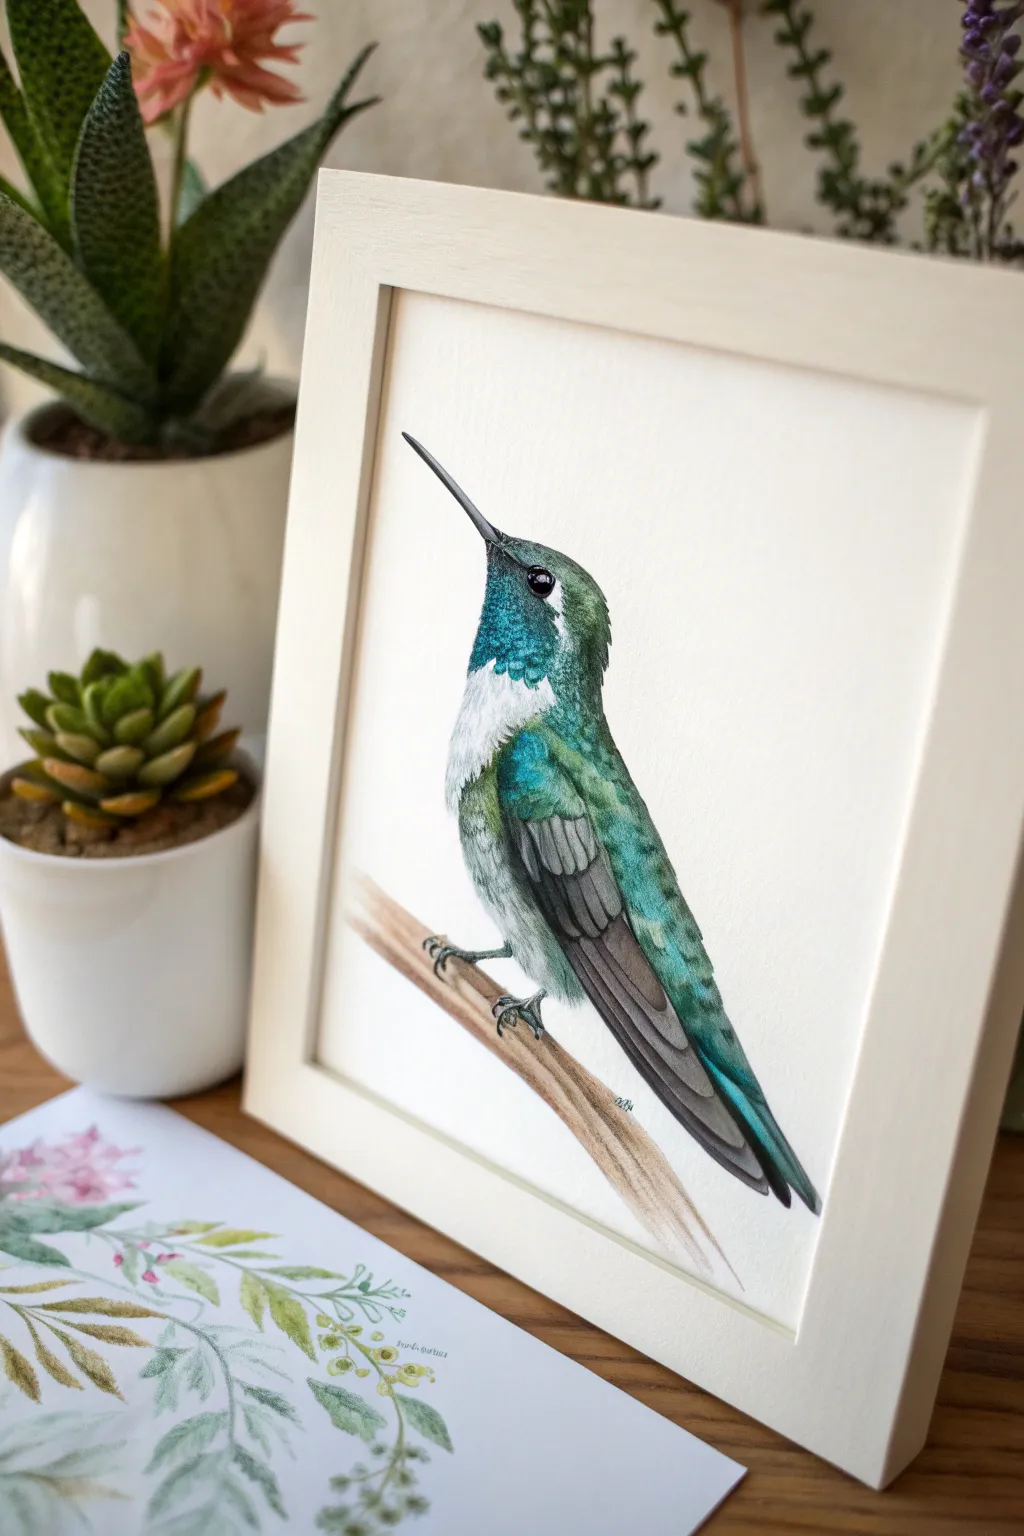
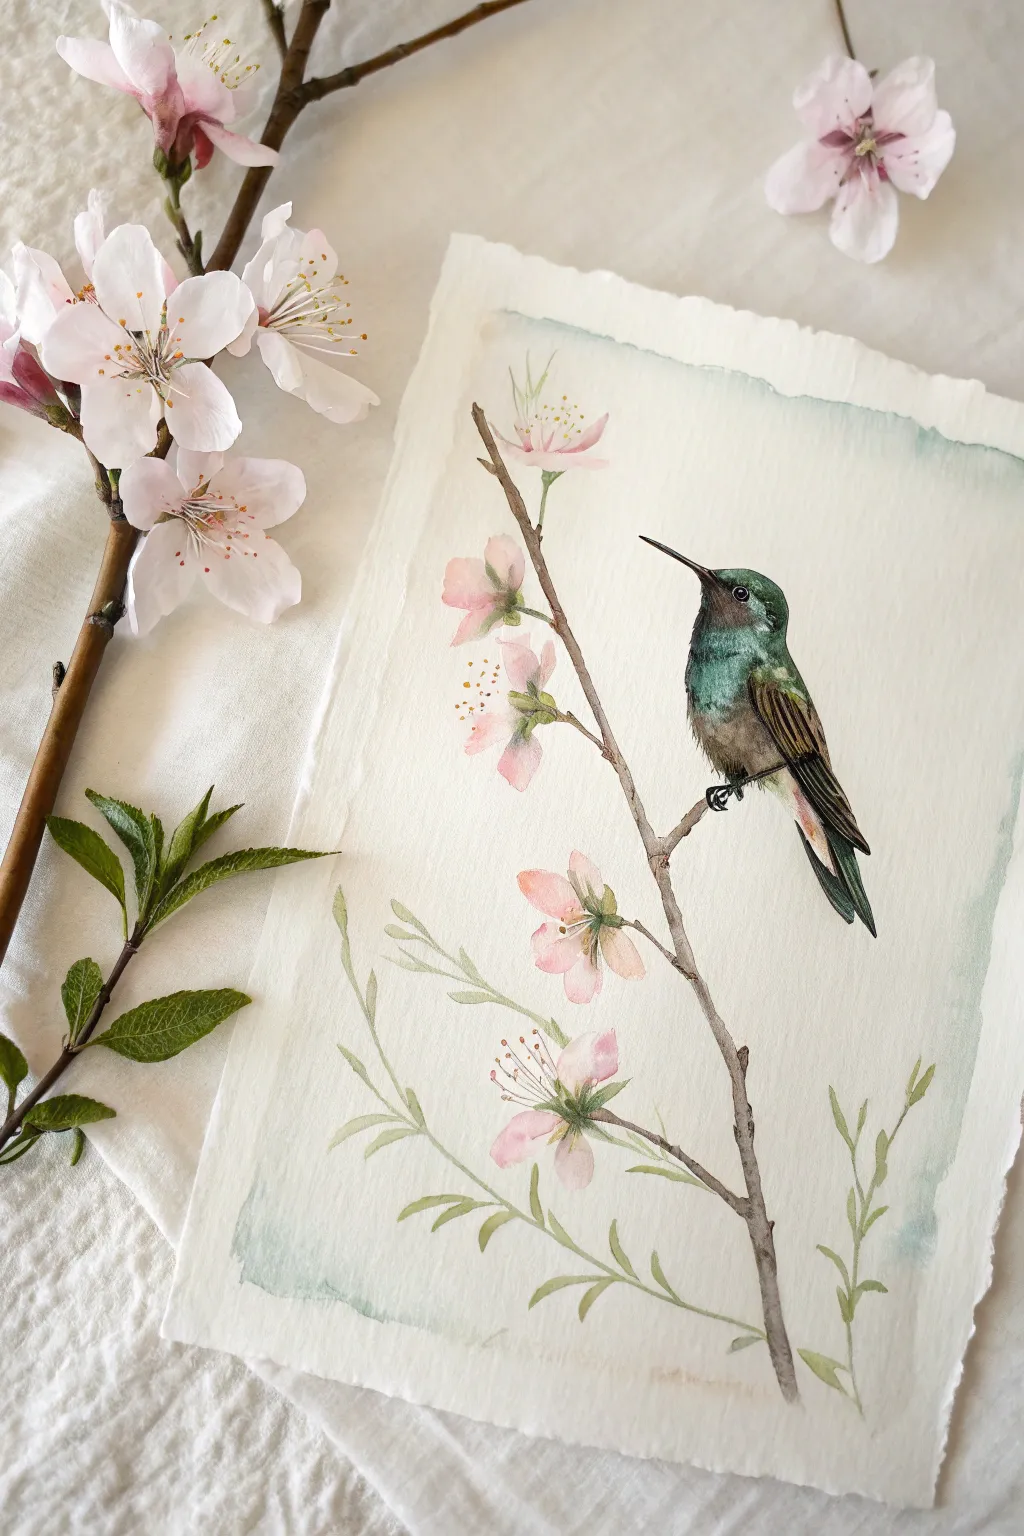
Perched on a Twigy Branch
Capture the delicate iridescence of a perched hummingbird with this detailed watercolor tutorial. The soft, diffuse background leaves contrast beautifully with the crisp, hyper-realistic details of the bird’s feathers and the textured branch.
Step-by-Step
Materials
- Cold press watercolor paper (300 gsm)
- Watercolor paints (Sap Green, Burnt Umber, Payne’s Grey, Alizarin Crimson, Cobalt Blue, Yellow Ochre)
- Round brushes (Size 6 for washes, Size 0 or 00 for details)
- Pencil (HB or H)
- Kneaded eraser
- Masking fluid (optional)
- Clean water and paper towels
- Palette for mixing
Step 1: Planning and Sketching
-
Light Outline:
Begin with a very faint pencil sketch. Draw the main diagonal branch stretching from the bottom left to the center right. Place the oval shape of the hummingbird’s body perched centrally on this branch. -
Refining the Form:
Refine the bird’s silhouette, marking the long beak, the distinct gorget (throat patch), and the folded wings. Sketch the smaller background twigs lightly, ensuring they curve naturally. -
Gentle Erasing:
Use a kneaded eraser to lift excess graphite. You want
Step 2: Soft Background Elements
-
Mixing Greens:
Mix a very watery wash of Sap Green with a touch of Payne’s Grey to desaturate it. You want a pale, muted olive tone for the background leaves. -
Painting Distant Leaves:
Using the size 6 brush, paint the leafy sprigs in the background. Keep the edges soft and the pigment sheer to create depth; these should look out of focus compared to the bird. -
Adding Warmth:
While the paper is still slightly damp in area, drop in faint touches of watered-down Yellow Ochre or a very pale brown around the lower section to simulate diffuse light or out-of-focus foliage.
Muddied Colors?
If your greens look dull, you likely mixed too many colors or didn’t let layers dry. Let the paper dry completely, then glaze a pure, transparent yellow or blue over the top to revive vibrancy.
Step 3: The Hummingbird’s Body
-
The Throat Patch:
For the vibrant gorget, mix a bright turquoise using Sap Green and Cobalt Blue. Apply this to the throat area using stippling motions with a small brush to mimic scale-like feathers. -
Body Undertones:
Paint the chest and belly with a very diluted wash of greyish-brown. Leave plenty of white paper showing to represent the fluffiest white feathers on the chest. -
Wing Feathers:
Mix Burnt Umber with a little Payne’s Grey for the wings. Paint the primary flight feathers with long, thin strokes, darkening the color as you move toward the tips of the wings. -
Head and Crown:
Use a warm brown (Burnt Umber + Yellow Ochre) for the top of the head. Use short, directional distinct strokes to simulate tiny feathers layering over the crown.
Add Realism
For the ‘gorget’ (throat feathers), mix a tiny amount of iridescent medium into your green paint. It will give the finished piece a subtle shimmer that mimics actual hummingbird feathers.
Step 4: The Branch and Fine Details
-
Branch Base Layer:
Paint the main branch with a wash of Yellow Ochre and Burnt Umber. Let the paint pool slightly at the knots and joints of the twig. -
Details in the Dark:
Once the bird’s head is dry, use your smallest brush and almost pure black (or concentrated Payne’s Grey) to paint the eye, leaving a tiny pinprick of white paper for the highlight. -
Beak Precision:
Paint the long, needle-like beak with a dark grey mix. Ensure the line is crisp and sharp against the background. -
wood Texture:
Return to the branch with a drier brush and darker brown paint. Add fine lines to show wood grain, and darken the underside of the perched area to ground the bird. -
Feet Anchors:
Carefully paint the tiny claws wrapping over the branch using a dark grey. This crucial step visually connects the bird to its perch. -
Final Highlights:
I like to use a tiny bit of white gouache or a gel pen at the very end to sharpen the eye highlight or add a stray feather detail if the watercolor coverage got too heavy.
Step back and admire how the sharp details of the bird pop against the softness of the painted foliage


Close-Up Head and Beak Study
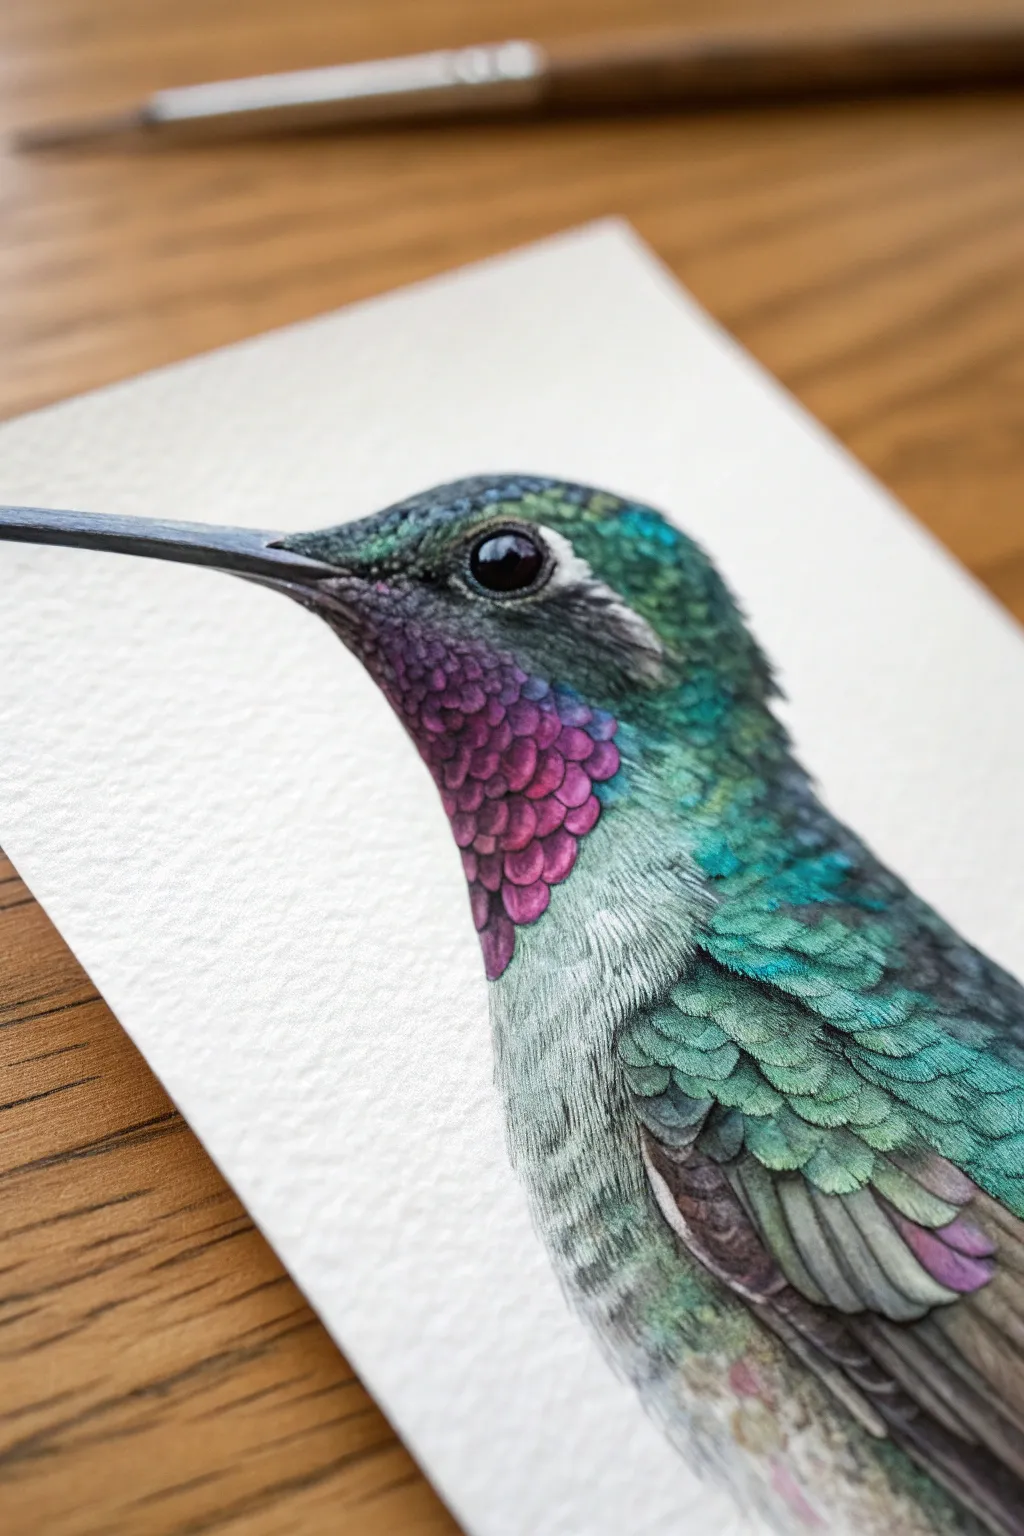
Capture the stunning iridescence of a hummingbird’s gorget and the delicate texture of feathers in this detailed watercolor study. By focusing closely on the head and beak, you will learn to layer vibrant jewel tones against soft, neutral greys to create a lifelike, three-dimensional effect.
How-To Guide
Materials
- Hot press watercolor paper (300 gsm)
- HB or H graphite pencil
- Kneaded eraser
- Watercolor paints (Phthalo Green, Viridian, Quinacridone Magenta, Dioxazine Purple, Indigo, Payne’s Grey, Burnt Umber, Sepia)
- White Gouache or opaque white watercolor
- Round brushes (labeled sizes 0, 2, and 4)
- Clean water jar
- Paper towels
Step 1: Initial Sketch and Base Washes
-
Light Outline:
Begin with a very faint sketch of the hummingbird’s profile using an H or HB pencil. Focus on the curvature of the beak and the distinct separation between the throat feathers (gorget) and the head. Keep lines minimal as watercolor is transparent. -
Masking the Eye:
Leave the highlight inside the eye completely white. You can carefully paint around it or use a tiny dot of masking fluid if you have a steady hand. -
First Green Wash:
Mix a watery wash of Phthalo Green and a touch of Cerulean. Apply this loosely to the top of the head and the back, avoiding the throat area. Let the pigment settle into the paper’s texture. -
Initial Throat Color:
While the green dries, mix a very pale wash of Quinacridone Magenta. Apply this to the throat area to map out where the vibrant purple-pink scales will eventually go. -
Grey Underbelly:
For the chest and lower neck, use a diluted mix of Payne’s Grey. Use directional strokes that mimic the growth of feathers, pulling the brush downward to create a soft, furry texture.
Step 2: Building the Jewel Tones
-
Painting the Eye:
Using a size 0 brush and a concentrated mix of Sepia and Indigo (almost black), carefully paint the eye, preserving that tiny white highlight. Add a touch of warm brown near the bottom rim for depth. -
Defining the Beak:
Paint the beak with a gradient of Payne’s Grey. The tip should be darkest, fading slightly toward the face. Leave a hairline highlight along the top ridge of the upper mandible to show its cylindrical shape. -
The Gorget Scales:
Now for the fun part: the throat scales. Mix a saturated Dioxazine Purple and Quinacridone Magenta. Using the tip of your size 2 brush, paint small, scallop-shaped marks, starting from the bottom of the throat and working up. -
Garget Variation:
As you move up the throat, transition your color mix. Add a little more purple to the shadowy areas and more pink to the lighted areas. Leave tiny gaps between scales to suggest separation. -
Green Feather Layers:
Return to the head with a darker mix of Viridian and Indigo. Paint small, short strokes to suggest individual feathers, layering them over your initial wash to build density. -
Wing Coverts:
On the shoulder area, outline broader, scale-like feathers using a teal mix (Phthalo Green + Blue). Shade the bottom edge of each feather scale to make them look like they overlap.
Muddy Colors?
Work in distinct layers and let each color dry completely before adding the next. If the purple throat bleeds into the green neck, wait for it to dry, then gently lift the mistake with a stiff, damp brush.
Step 3: Fine Details and Texture
-
Beak Texture:
Once the initial beak layer is dry, use a very dry brush with dark grey to add subtle striations along the length of the beak. -
White Feather Detailing:
Around the eye and where the beak meets the face using a size 0 brush, paint tiny, hair-like strokes. If you lost your whites, use a tiny amount of opaque white gouache here. -
Chest Fluff:
Enhance the chest texture by using a relatively dry brush with pale grey. Flick the brush quickly to create the look of soft, downy feathers rather than hard scales. -
Deepening Shadows:
I like to take a step back here and assess contrast. Glaze a transparent layer of Indigo under the wing feathers and beneath the jawline to pop the bright colors forward. -
Iridescent Highlights:
Mix a small amount of white gouache with your teal and magenta paints. Add tiny, controlled dots or lines to the very center of the brightest scales to mimic the shimmer of iridescence. -
Wing Feathers:
For the lower flight feathers, use long, smooth strokes of Sepia and Payne’s gray. Keep the edges crisp to differentiate them from the soft body feathers. -
Final Cleanup:
Erase any remaining visible graphite lines around the outer edges. If the beak edge looks fuzzy, sharpen it with a steady line of your darkest black-brown mix.
Pro Tip: Hot Press Paper
For this level of detail, use hot press paper. Its smooth surface allows the paint to sit on top rather than sinking into texture, keeping your tiny feather strokes crisp and distinct.
Enjoy the process of watching your bird come to life as you add those final glittering details
BRUSH GUIDE
The Right Brush for Every Stroke
From clean lines to bold texture — master brush choice, stroke control, and essential techniques.
Explore the Full Guide
Jewel-Tone Throat Glow
Capture the breathtaking iridescence of a hummingbird’s gorget in this mixed-media project that combines watercolor softness with hyper-realistic paper layering. The result is a dimensional, jewel-like bird that appears to be resting right on top of the textured paper surface.
Step-by-Step
Materials
- Heavyweight, handmade cotton watercolor paper (rough texture)
- Watercolor paints (Payne’s Grey, Sap Green, Alizarin Crimson, Sepia, Burnt Sienna)
- White gouache or white acrylic ink
- Fine liner brushes (sizes 000, 0, and 1)
- Thick archival cardstock or Bristol board
- Precision craft knife and self-healing mat
- Small fine-point scissors
- Clear matte varnish or gel medium
- Iridescent medium or metallic watercolor (magenta/pink)
- Fine tweezers
- Paper glue or PVA adhesive
Step 1: Setting the Scene
-
Prepare the background paper:
Begin by tearing the edges of your handmade watercolor paper to create a soft, deckled border. Tape it down to your work surface. -
Wash the background:
Mix a very dilute wash of Payne’s Grey and Sepia. Apply a faint, rectangular wash in the center of the paper, leaving wide margins. Keep this loose and uneven to simulate an old botanical plate background. -
Paint the background flora:
Using a size 1 brush and diluted Burnt Sienna and Alizarin Crimson, paint the faint, out-of-focus branches and berries in the background. Keep edges soft; I like to dab them with a clean, damp brush to blur them slightly.
Pro Tip: Tiny texture
For ultra-realistic texture on the green back feathers, scratch into the wet paint gently with a dry needle to reveal the white base layer underneath.
Step 2: Sculpting the Bird Base
-
Sketch the silhouette:
On a separate piece of heavy cardstock, draw the precise outline of the hummingbird, including the beak and tail feathers. -
Cut the form:
Carefully cut out this silhouette using your craft knife. This piece will serve as the raised foundation for your bird. -
Add dimension:
Build up slight volume on the bird’s body by gluing smaller, oval-shaped pieces of cardstock onto the main silhouette—one for the chest, one for the head. Sand the edges down so the transition is smooth.
Troubleshooting: Flat feathers
If the feathers look too flat, add a tiny line of white or light grey to the tip of each flight feather to separate them visually and simulate light hitting the edge.
Step 3: Layering Feathers & Color
-
Base coat the bird:
Paint the cardstock bird with a base of white gouache mixed with a touch of grey. This vibrancy ensures the subsequent colors pop. -
Start with the green plumage:
Using your smallest brush and Sap Green mixed with a little Sepia, paint short, directional strokes to mimic back feathers. Start from the tail and move upward toward the neck. -
Detail the wings:
Switch to a darker mix of Payne’s Grey and Sepia. Paint the long primary flight feathers on the wing, ensuring sharp, crisp edges. Add a sheer glaze of brown over the upper wing coverts for warmth. -
Create the grey underbelly:
Mix a soft, warm grey using gouache. Stipple the paint onto the belly area to create a fluffy, downy texture rather than smooth strokes.
Step 4: The Jewel Throat & Finish
-
Paint the gorget base:
Paint the throat area with a deep Alizarin Crimson. Let it dry completely. -
Add the iridescence:
Mix your metallic pink medium or iridescent watercolor with a tiny amount of white gouache. Dot this mixture onto the crimson base using the tip of a 000 brush to create individual sparkling scale-feathers. -
Define the eye and beak:
Use straight black ink or concentrated Payne’s Grey for the eye, leaving a tiny speck of white paper or adding a dot of white gouache for the highlight. Paint the beak a smooth, matte black. -
Mount the bird:
Apply glue to the back of your painted cardstock bird and adhere it to the background paper, positioning it so it looks perched on the painted branch. -
Add the physical branch:
To enhance the 3D effect, glue a real, very thin twig or a piece of painted wire directly over the background branch line, tucking it under the bird’s feet. -
Paint the feet:
Using thick grey paint, carefully paint the tiny claws directly over the physical branch/wire to make the bird appear to be gripping it. -
Final shadows:
Mix a watery grey wash and paint a very subtle drop shadow on the background paper underneath the tail and belly. This grounds the cutout and enhances the illusion of depth.
Step back and admire how the light catches the throat of your creation, bringing the hummingbird to life
Iridescent Feather Layering
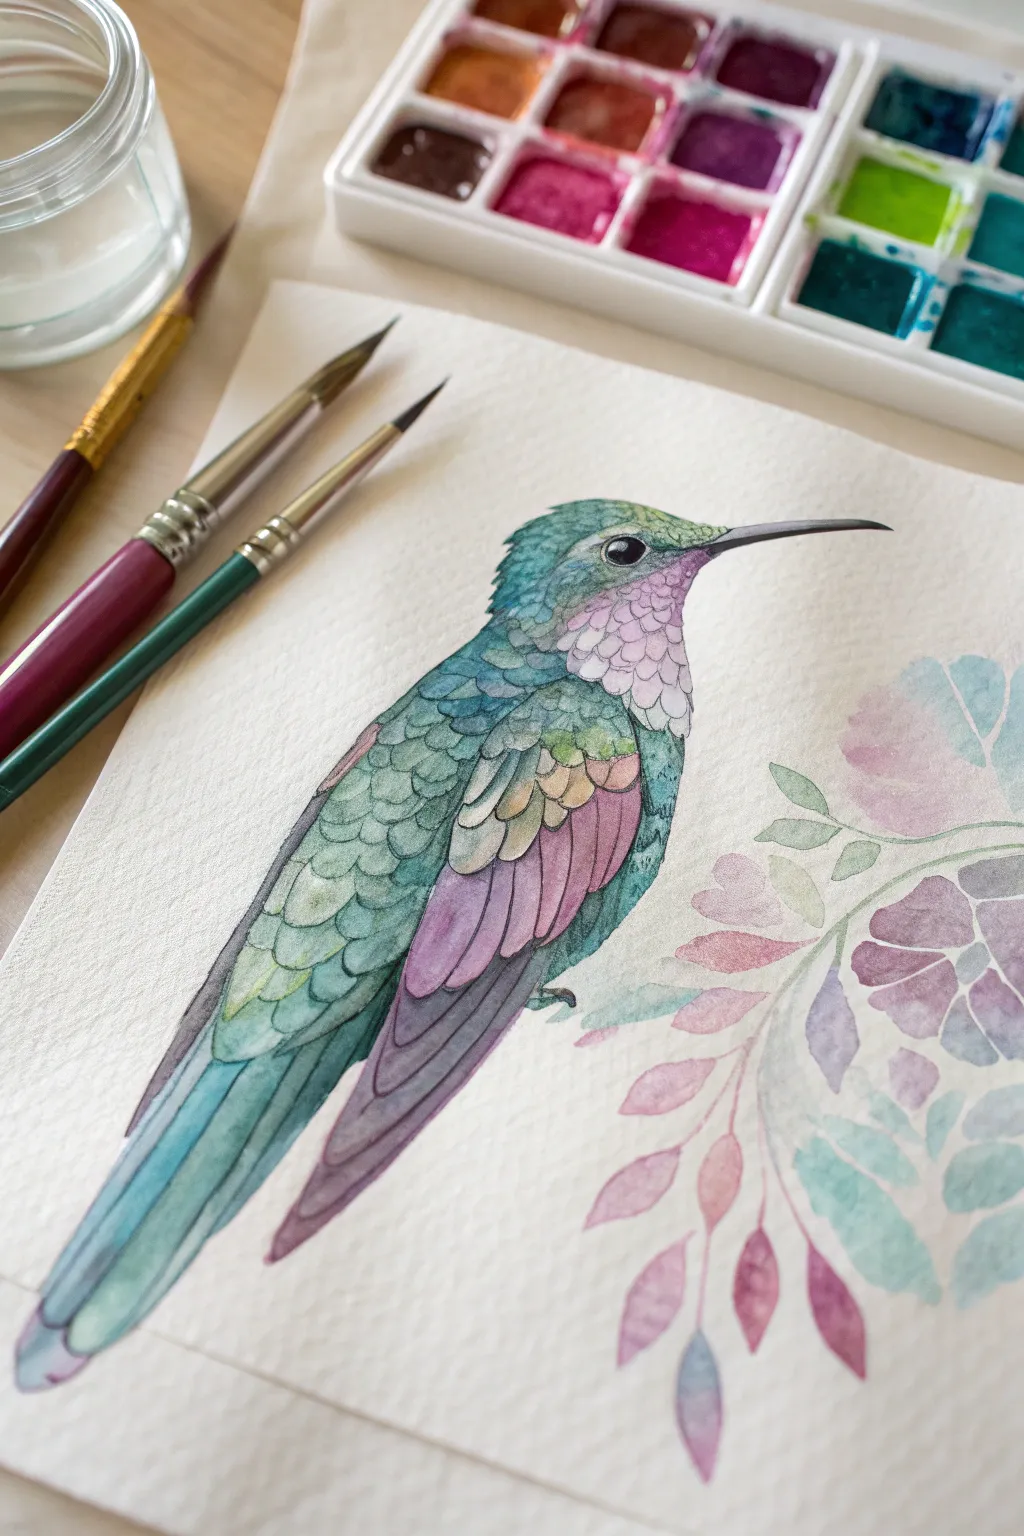
Capture the gem-like shimmer of a hummingbird with this detailed watercolor study, focusing on building individual scales to create a textured, iridescent effect. This project balances precise line work with soft color bleeds to bring the bird’s plumage to life.
Detailed Instructions
Materials
- Cold press watercolor paper (300 gsm)
- HB pencil and kneaded eraser
- Watercolors: Phthalo Green, Turquoise, Magenta, Indigo, Yellow Ochre
- Round brushes: Size 4 (for washes) and Size 0 or 00 (for details)
- Two jars of water
- Palette for mixing
Step 1: Sketching the Framework
-
Outline the silhouette:
Begin with a very faint pencil sketch of the hummingbird’s silhouette. Focus on the posture—an elongated oval for the body, a rounded head, and the distinct, slightly curved beak. -
Map the feather groups:
Lightly draw the guide lines for where the different feather groups sit. Mark the throat patch (gorget), the wing coverts, and the long tail feathers. -
Detail the scales:
This is the most crucial sketching step. Carefully draw the scallop shapes for the individual body feathers, starting small near the head and getting larger towards the belly. Keep your pencil pressure incredibly light so the graphite doesn’t smear later.
Highlight Preservation
For the tiny highlights on the scales, if you accidentally paint over the white paper, just tap it gently with a clean, damp brush and blot with a tissue to lift the pigment back out.
Step 2: Painting the Head & Throat
-
Initial wash:
Mix a watery turquoise. Using your size 4 brush, lay down a very pale wash over the head, avoiding the eye and the throat patch. -
Throat scales:
Switch to the detail brush. Mix a soft magenta with plenty of water. Paint each individual scale on the throat patch, leaving a tiny sliver of white paper at the top curve of each scale to act as a highlight. -
Deepen the throat color:
While the magenta is semi-dry, drop a slightly more saturated purple into the bottom curve of each throat scale to create volume. -
The eye:
Use a concentrated mix of Indigo and Phthalo Green (almost black) to fill in the eye, leaving a distinct white circle for the reflection.
Step 3: Building the Body Plumage
-
Green layering:
Starting at the neck, paint the body feathers using Phthalo Green mixed with a touch of Turquoise. Work scale by scale. -
Wet-on-dry technique:
Ensure the first scale is dry before painting its neighbor to keep the crisp edges. I like to work in diagonal rows to allow drying time between adjacent feathers. -
Adding iridescence:
Vary your green mixture slightly for every few feathers. Add a dot of yellow ochre to some, and more blue to others, simulating how light hits iridescent feathers differently. -
Wing coverts:
Transition into the wing area using a mix of ochre, soft pink, and pale green for the upper wing coverts, keeping these washes much more transparent than the body.
Metallic Magic
Mix a tiny amount of iridescent watercolor medium or metallic silver gouache into your green paint for the final layer of scales to create a literal shimmer on the paper.
Step 4: Wings and Tail
-
Flight feathers:
Mix a strong purple-grey using Magenta and Indigo. Paint the long primary flight feathers in long, sweeping strokes. -
Tail gradients:
For the tail feathers, start with a teal mix at the top and blend it down into a purple-grey at the tips. Let the colors bleed into each other on the wet paper. -
Beak definition:
Paint the upper beak with a dark grey-black. For the lower beak, use a slightly lighter grey to show dimension.
Step 5: Final Details & Background
-
Deepening shadows:
Once the body feathers are fully dry, glaze a very watery indigo shadow under the wing and belly to give the bird roundness. -
Refining edges:
Use your smallest brush to sharpen the edges of any feathers that look too soft. You can outline the bottom of select scales with a darker green for extra pop. -
Floral elements:
Paint the surrounding leaves and petals loosely. Use very watery washes of the same colors used on the bird (pink, purple, teal) to create a cohesive ‘ghost’ floral arrangement that doesn’t compete with the main subject.
Step back and admire how the individual scales come together to build a glowing, jewel-like creature

PENCIL GUIDE
Understanding Pencil Grades from H to B
From first sketch to finished drawing — learn pencil grades, line control, and shading techniques.
Explore the Full Guide
Soft Motion-Blur Wings
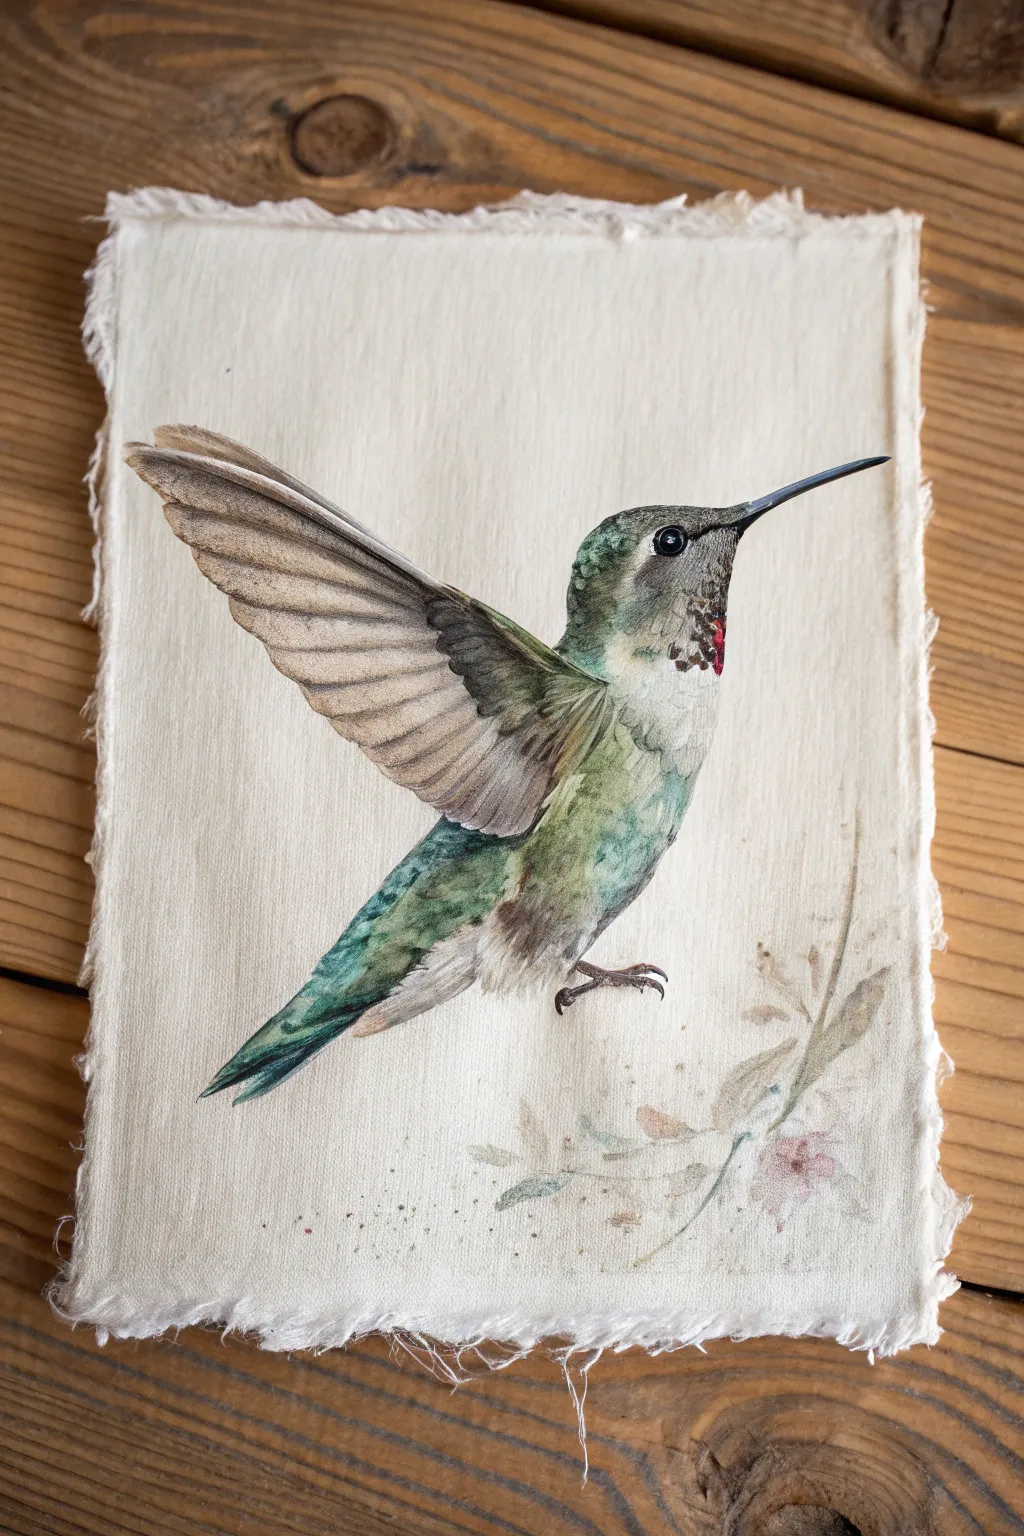
This captivating project captures the iridescent beauty of a hummingbird painted directly onto textured, unbleached fabric. The result is a rustic yet elegant piece of art where natural linen hues complement the bird’s vibrant greens and subtle reds.
Step-by-Step Tutorial
Materials
- Piece of unbleached cotton or linen fabric (approx. 8×10 inches)
- Watercolor paints (Sap Green, Hooker’s Green, Burnt Umber, Payne’s Gray, Alizarin Crimson)
- White gouache or white acrylic ink (for opaque highlights)
- Fabric medium (optional, mixed with watercolors for durability)
- Round synthetic brushes (Size 4 for body, Size 0 or 00 for fine details)
- Pency (HB or 2H) for light sketching
- Mixing palette
- Paper towels
- Clean water jar
- Cardboard or stiff board for backing while painting
- Masking tape
Step 1: Preparation & Sketching
-
Prepare the Canvas:
Begin by tearing your fabric to the desired size rather than cutting it with scissors. This creates the soft, frayed edges seen in the reference. Tape the fabric taut onto a piece of cardboard or a drawing board to prevent it from buckling when wet. -
Light Outline:
Using an HB pencil, very lightly sketch the hummingbird’s outline. Focus on the triangular shape of the spread wings and the gentle curve of the body. Keep your lines incredibly faint, as graphite is hard to erase from fabric. -
Define the Features:
Mark the position of the eye, the long beak, and the separation between the white belly and the green back. Sketch the faint suggestion of a branch below, but keep it minimal.
Step 2: Base Layers
-
Mix Your Greens:
Create a watery mix of Sap Green with a touch of Payne’s Gray to dull it down. If you are using fabric medium, mix a drop in now. -
Wash the Body:
Apply a light, uneven wash to the upper back and head using your size 4 brush. Allow the fabric texture to show through slightly; don’t aim for perfect, solid coverage. -
Wing Foundation:
Mix a very diluted Burnt Umber. Paint the general shape of the wings, keeping the stroke direction outward from the body to mimic feathers. This layer should be pale and transparent. -
Belly Shadowing:
For the white belly area, don’t use white paint yet. Instead, use improved plain water to dampen the area, then drop in a tiny amount of diluted Payne’s Gray or faint brown to create soft shadows where the legs meet the body.
Bleeding Control
Fabric absorbs water faster than paper. Use less water on your brush (a “dry brush” technique) for fine details like the beak and eyes to prevent the paint from spider-webbing.
Step 3: Building Texture & Depth
-
Deepen the Greens:
Load your brush with a more concentrated Hooker’s Green. Use small, short strokes—almost like stippling—on the back and head to simulate iridescent feathers. -
The Gorget (Throat):
Mix Alizarin Crimson with a speck of brown. Dab this color onto the throat area in small spots. Don’t paint a solid red block; leave some gaps for the sparkly effect of the gorget feathers. -
Wing Definition:
Switch to your smaller brush. Using a mix of Burnt Umber and Payne’s Gray, paint the individual flight feathers. Start from the ‘arm’ of the wing and sweep outward. Keep the edges of these strokes slightly crisp near the top and softer near the tips. -
Tail Feathers:
Paint the tail feathers using a dark teal mix (Green + Blue + Gray). These should be sharp and pointed, angling downwards. -
The Eye:
Using thick Payne’s Gray or Black, paint the eye, leaving a tiny pinprick of white fabric (or use white gouache later) for the highlight. This brings the bird to life instantly. -
Beak Precision:
Carefully paint the beak with a dark gray mix. Ensure the line is straight and tapers to a fine point. I find resting my hand on a clean paper towel helps steady the brush for this delicate line.
Muddy Colors?
If your greens look dull, stop layering while wet. Let the fabric dry completely before adding darkness. Wet-on-wet fabric painting blends colors very aggressively.
Step 4: Final Details
-
Highlighting:
Use white gouache or acrylic ink on the Size 0 brush to add tiny, sharp highlights to the shoulder of the wing and the edge of the beak. You can also add a few tiny white dots on the green back to suggest shimmer. -
Feet and Claws:
With a fine liner brush and dark brown paint, sketch the small curled claws. They should look delicate, as if just about to grasp a perch. -
Soft Floral Elements:
Mix a very watery, ‘dirty’ pink and brown. Loosely paint the suggestion of leaves and petals at the bottom right. Keep this purely atmospheric—very watery and undefined compared to the bird. -
Splatter Effect:
Load a brush with watery brown or gray paint. Tap the handle against another brush to splatter tiny speckles around the bottom floral area. This adds to the organic, worn vintage look. -
Drying and Setting:
Allow the piece to dry completely for at least 24 hours. If you used fabric medium, follow the bottle’s instructions for heat setting with an iron (usually on the reverse side) to make it permanent.
Display your beautiful fabric painting in a float frame to show off those lovely frayed edges
Watercolor Wash With Salt Texture
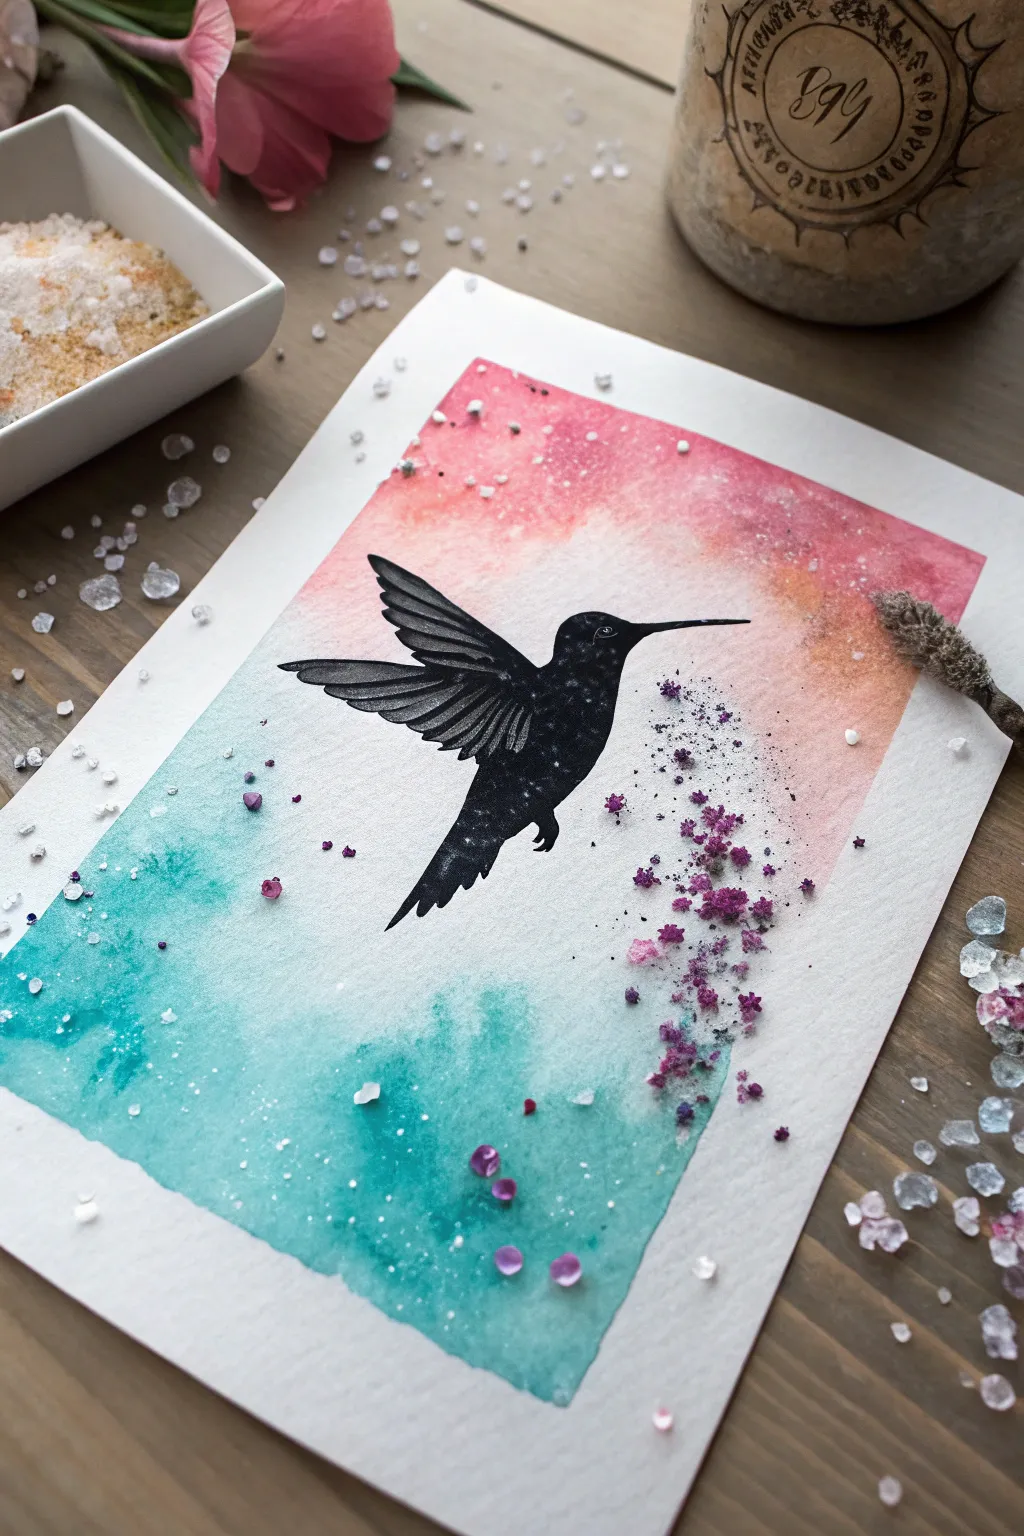
Capture the delicate beauty of a hummingbird in flight with this striking silhouette project. By combining a vibrant wet-on-wet watercolor background with the reactant properties of salt, you will create a dreamy, textured atmosphere for your subject.
How-To Guide
Materials
- Cold press watercolor paper (140lb/300gsm)
- Watercolor paints: Teal/Turquoise, Rose/Magenta, Orange
- Black ink or black gouache
- Coarse sea salt or rock salt
- Flat wash brush (3/4 inch)
- Round detail brush (size 0 or 1)
- Painters tape
- Paper towels
- Small dried purple flowers or crushed flower petals (optional)
- Purple/Pink glitter or sequins (optional)
Step 1: Preparing the Wash
-
Tape your borders:
Begin by taping down your watercolor paper to a hard board or table on all four sides. This creates that crisp, clean white edge you see in the final piece and prevents the paper from buckling when it gets wet. -
Wet the paper:
Using a clean flat brush and plain water, wet the rectangular area inside your tape. You want the paper to be glossy and damp, but not so soaked that puddles form. -
Apply the warm tones:
Load your brush with a mix of rose and a touch of orange. Starting from the top right corner, drop this color onto the wet paper, letting it bloom and spread naturally downward about halfway. -
Apply the cool tones:
Clean your brush and pick up your teal or turquoise paint. Apply this to the bottom left section, brushing upward to meet the pink. Where they touch, let them blend slightly to create a soft transition, but avoid observing overworking it or it may turn muddy.
Salt Not Blooming?
If the salt isn’t creating texture, your paint was likely too dry when you sprinkled it. The paper needs to be visibly glossy wet for the salt to pull the pigment properly.
Step 2: Creating Texture
-
Sprinkle the salt:
While the paint is still very wet—this timing is crucial—sprinkle coarse sea salt generously over the painted areas. Focus on the transition zones and corners where you want the most starry, speckled texture. -
Wait for the reaction:
Let the painting sit completely undisturbed. As the paint dries, the salt crystals will absorb the pigment and water, creating beautiful snowflake-like blooms. -
Dry completely:
Wait until the paper is bone dry. If the paper feels cool to the touch, it is still damp. Once dry, gently rub the salt off with your fingers or a clean, dry brush.
Make it Sparkle
Mix a tiny amount of iridescent medium or shimmer watercolor into your background wash for a subtle glitter effect that only shows when the light hits the paper.
Step 3: The Hummingbird Silhouette
-
Outline the shape:
Using a pencil very lightly, sketch the outline of the hummingbird in the center of the card. A simple search for ‘hummingbird silhouette’ online can give you a good reference shape. -
Fill with black:
Switch to your small round detail brush and black ink (or opaque gouache). Carefully fill in the silhouette, keeping your edges sharp. Start with the body before moving to the delicate wings. -
Detail the feathers:
For the wings, leave extremely thin lines of negative space (unpainted paper) between the flight feathers to define them, or paint lighter grey strokes over the black once dry to suggest separation. -
Add the eye:
Leave a tiny pinprick of white paper for the eye, or if you accidentally paint over it, use a dot of white gel pen or white gouache to bring the bird to life. -
Paint the beak:
With the very tip of your smallest brush, paint the beak as a fine, straight line extending outward.
Step 4: Finishing Touches
-
Create the magic dust:
Mix a small amount of purple watercolor. Use a stiff brush or toothbrush to gently flick a concentrated spray of tiny droplets near the beak and tail, mimicking magic dust or pollen. -
Add dimensional elements:
While the splatter is wet, or using a tiny dab of glue, place crushed dried flower petals or purple glitter in the splatter path coming from the beak. This adds a tangible texture that complements the visual texture of the salt. -
Reveal the border:
Once you are absolutely certain everything is dry, slowly peel off the painter’s tape at a 45-degree angle away from the painting to reveal crisp white edges.
Frame your piece or gift it to a bird lover to enjoy the ethereal atmosphere you created


Wax-Resist Feather Highlights
Capture the delicate shimmer of a hummingbird’s plumage using watercolor and a hidden wax-resist technique for brilliant white highlights. The finished piece creates a stunning focal point with deep teal and emerald hues contrasting against crisp, preserved white areas.
Step-by-Step Guide
Materials
- Cold press watercolor paper (300gsm)
- White crayon or colorless wax pastel (for resist)
- Watercolor paints (Phthalo Blue, Sap Green, Burnt Umber, Payne’s Grey, Alizarin Crimson)
- Round watercolor brushes (Size 2, 4, 0)
- HB Pencil and kneaded eraser
- Mixing palette
- Two jars of water
- Masking tape
Step 1: Sketching and Resist
-
Outline the form:
Begin by lightly sketching the hummingbird’s distinctive shape. Capture the long, slender beak pointing upward, the rounded belly, and the layered wing feathers. Keep your pencil pressure very light so the graphite doesn’t smudge later. -
Map crucial details:
Refine the eye placement and the distinct line separating the white chest from the colored throat. Sketch the branch at a slight diagonal to ground the bird. -
Apply wax resist:
This is the magic step. Take your sharpened white wax crayon or colorless pastel and firmly draw short, flicking strokes on the throat patch and belly where you want the purest white feathers to remain. The wax will repel the water-based paint you apply later. -
Highlight the eye:
Carefully place a tiny dot of wax resist in the upper right quadrant of the eye circle. This ensures that the reflective ‘catchlight’ stays perfectly white without needing white gouache later.
Invisible Wax Trouble?
It’s hard to see white wax on white paper! Tilt your paper against a light source to catch the sheen on the texture, ensuring you haven’t missed a spot before painting.
Step 2: Layering Color
-
Mix your greens:
Create a vibrant teal-green mix using Phthalo Blue and Sap Green. You’ll want a watery consistency for the initial wash but enough pigment to show color. -
Paint the head and back:
Using a size 4 brush, wash the green mixture over the head and back. Watch how the paint glides over your wax marks, instantly creating feather texture on the lower throat area. -
Add depth while wet:
While the first layer is still damp, drop in a slightly more concentrated Phthalo Blue near the neck area to suggest shadow and iridescence. Let the colors bleed naturally. -
Base layer for wings:
Mix a diluted grey using Payne’s Grey and a touch of Burnt Umber. Apply a flat, pale wash to the long wing feathers, leaving the tips slightly lighter. -
The branch wash:
Paint the branch with a light wash of Burnt Umber. Keep the edges soft by running a clean, damp brush along the bottom edge of the wet paint to create a rounded effect.
Step 3: Refining Details
-
Darken the eye:
Once dry, switch to your size 0 or 2 brush. Fill the eye with concentrated Payne’s Grey or Black, painting carefully around that preserved white highlight dot. -
Define wing feathers:
Mix a darker, thicker grey-brown. Paint the individual primary feathers, leaving thin gaps between them to suggest separation. The tips should be sharp and tapered. -
Enhance the green scales:
Using the tip of your size 2 brush and a concentrated green mix, paint tiny ‘u’ shapes or scallops on the back and head. This mimics the scale-like quality of hummingbird feathers. -
Deepen shadows:
Add a mix of Indigo or dark blue to the green feathers just under the wing and behind the eye. This high contrast makes the bird look three-dimensional. -
Texture the white belly:
Mix a very watery, pale grey-blue. Add extremely faint, short strokes to the white belly area (the parts focusing away from your wax resist) to suggest fluffiness without darkening the area too much. -
Detail the branch:
Use a thicker Burnt Umber mix to add wood grain lines and knot details to the branch. Add a darker shadow directly under the bird’s feet to plant it firmly. -
Paint the feet:
With your smallest brush and dark grey paint, carefully render the tiny claws gripping the branch. Keep the strokes distinct and sharp. -
Finish the beak:
Paint the beak with a dark grey, almost black line. Ensure the top line is straight and sharp, tapering to a needle-point at the end.
Sharpen Your Resist
Use a craft knife or sandblock to sharpen your wax crayon into a chisel tip. A blunt crayon creates blobby highlights, while a sharp edge mimics fine feather barbs perfectly.
Once the paint is completely dry, frame your artwork with plenty of white space to let the colors shine
Ink Outline With Watercolor Fill
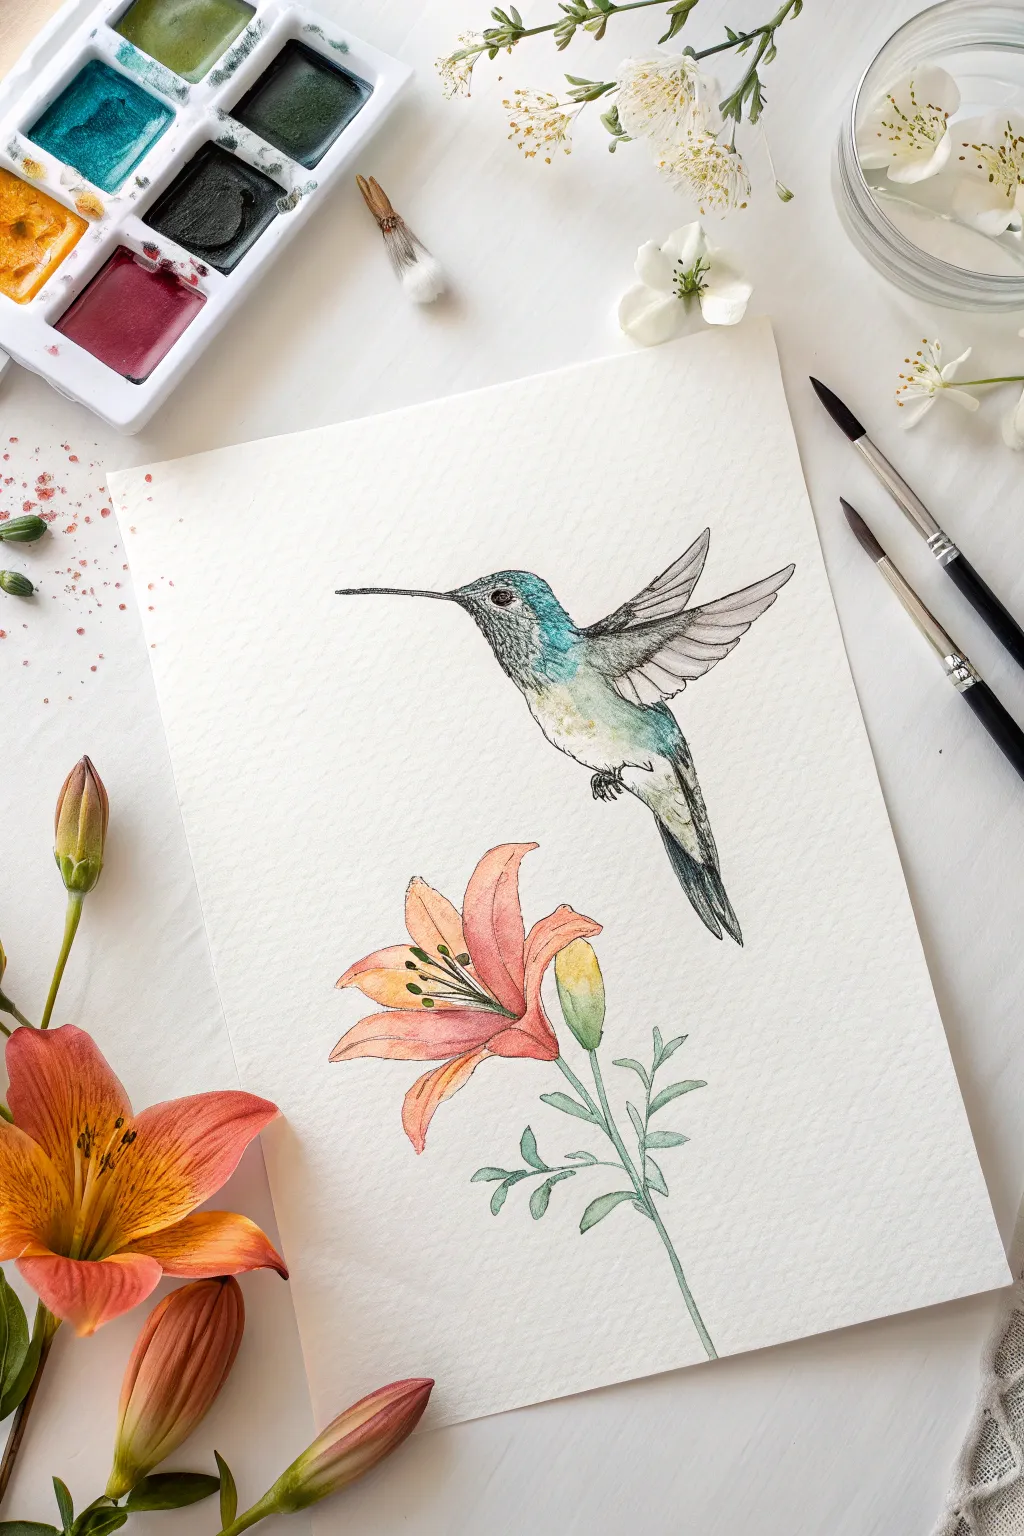
Capture the delicate beauty of a hummingbird in flight combined with the vibrant warmth of an orange lily using this classic ink and wash technique. This project balances precise pen work with loose, transparent watercolor layers for a fresh, botanical illustration style.
Step-by-Step Tutorial
Materials
- Cold press watercolor paper (300 gsm)
- Fine liner waterproof pens (0.1mm and 0.3mm, black)
- Watercolor paints (Turquoise, Sap Green, Burnt Umber, Orange, Cadmium Yellow, Alizarin Crimson)
- Round watercolor brushes (Size 2 and Size 6)
- HB Pencil and kneaded eraser
- Clean water jar
- Paper towels
Step 1: Drafting the Composition
-
Sketch the bird’s posture:
Begin with a light HB pencil sketch. Draw a small oval for the hummingbird’s head and a longer, tapered oval for the body. Angle the body diagonally upwards to suggest hovering. -
Add wings and beak:
Sketch the long, needle-like beak extending straight from the head. Draw the wings swept back and slightly up; keep the shapes simple and wedge-like at this stage. -
Position the flower:
Below the bird, lightly sketch the trumpet shape of the lily. Ensure the opening of the flower faces somewhat towards the bird, creating a connection between the two subjects. -
Refine the details:
Lightly detail the individual petals of the lily, curving them backward. Sketch the stem and small leaves. On the bird, indicate the eye placement and the jagged edge of the tail feathers.
Step 2: Applying the Ink Outline
-
Outline the hummingbird:
Using a 0.1mm waterproof pen, carefully trace your pencil lines. Use short, broken strokes on the bird’s chest and belly to mimic soft feathers rather than a solid line. -
Define the wings:
Draw the main flight feathers on the wings. Keep lines thinner at the tips of the feathers to maintain a sense of lightness. -
Ink the floral elements:
Switch to a slightly bolder 0.3mm pen for the flower outline if desired, or stick to the 0.1mm for delicacy. Outline the petals, adding a few internal lines to show the curve and vein texture. -
Erase pencil marks:
Once the ink is completely dry—be patient here to avoid smudging—gently erase the faint graphite sketches underneath with a kneaded eraser.
Ink Confidence
Don’t try to make perfectly continuous lines. Broken lines (skipping small sections) actually make organic subjects like feathers and petals look more natural and breathable.
Step 3: Watercolor Washes
-
Paint the hummingbird’s head:
Using a size 2 brush, mix a watery Turquoise. Apply this to the top of the head and throat area. While wet, drop in a tiny hint of Green to create iridescence. -
Wash the body:
Dilute the paint significantly for a very pale grey-green wash on the bird’s belly. The paper white should shine through to keep the bird looking light. -
Detail the wings:
Mix a light wash of Burnt Umber and Grey. Paint the wings, leaving thin white gaps between the feathers to separate them visually. -
Base layer for the lily:
Load your size 6 brush with a light wash of Orange. Paint the petals, starting from the center and pulling the color outward. Leave the tips slightly lighter. -
Add depth to the flower:
While the first layer is damp, drop concentrated Red-Orange into the center of the lily where the petals meet. Let this bleed naturally outward for a gradient effect. -
Paint the stem and bud:
Mix Sap Green with a touch of Turquoise. Paint the stem and leaves. Paint the closed bud, adding a touch of yellow at the very top for variation.
Scale Up The Scene
Turn this single study into a composition by painting three different hummingbirds around the flower, each in a different position of flight—hovering, diving, and feeding.
Step 4: Final Textures
-
Deepen the bird features:
Use a nearly dry brush with dark grey or black watercolor to carefully darken the hummingbird’s eye, leaving a tiny white highlight. Darken the beak similarly. -
Feather texture:
Once the body paint is dry, use your finest pen again to add controlled stippling (dots) or tiny hatching lines on the throat and back to intensify the feathered texture. -
Flower stamens:
Draw the stamens extending from the lily center with pen. Add small dots of dark brown paint or ink to the tips to represent pollen. -
Final shading:
Add a final, very transparent layer of shadow under the wing and on the underside of the flower petals to give the illustration three-dimensional volume.
Allow the painting to dry fully before framing to ensure the delicate ink lines remain crisp and distinct
Bokeh Dots Behind a Hummingbird
Capture the delicate beauty of a hummingbird frozen in flight against a dreamy, soft-focus background. This project combines precise watercolor detailing with loose, wet-on-wet techniques to create a magical atmosphere.
Detailed Instructions
Materials
- Cold press watercolor paper (300 gsm)
- Watercolor paints (Emerald Green, Sap Green, Alizarin Crimson, Burnt Sienna, Payne’s Gray, Indigo, Turquoise)
- White gouache or white gel pen
- Round watercolor brushes (Size 2, 6, and 10)
- Masking fluid (optional)
- Pencil (HB) and kneaded eraser
- Clean water jars
- Paper towels
Step 1: Planning and Sketching
-
Light Sketching:
Begin by lightly sketching the outline of the hummingbird on your watercolor paper. Focus on the graceful curve of the back and the angle of the wings. Keep your pencil lines very faint so they won’t show through the transparent watercolor layers later. -
Defining Features:
Add subtle details for the eye placement, the separation of the throat patch (gorget), and the primary feather groups on the wings. Don’t worry about drawing every single feather; just indicate the general direction and shape.
Wet-on-Wet Mastery
Work quickly on the background. If the paper starts to dry, stop adding paint, or you’ll get ‘cauliflower’ blooms instead of soft bokeh transitions.
Step 2: Painting the Hummingbird
-
Base Green Layer:
Mix a light wash of Emerald Green and Sap Green. Using your size 6 brush, apply this to the head and back of the bird. Drop in a tiny touch of Turquoise while the paint is still wet to create subtle color variation in the plumage. -
The Ruby Throat:
While the green dries, mix a vibrant Alizarin Crimson. Paint the throat area with small, dabbling strokes to mimic the texture of feathers. Let some white paper show through for sparkle, or lift a few highlights with a damp brush. -
Wing Foundation:
For the wings, create a diluted mix of Payne’s Gray and Burnt Sienna. Paint the upper wing area, keeping the wash transparent. As you move toward the tips, darken the mix slightly to show the structure of the flight feathers. -
Tail Feathers:
Paint the tail feathers using a warmer Burnt Sienna mix. Use long, confident strokes that taper at the end. I usually add a hint of the green mix from step 3 where the tail meets the body to blend the sections seamlessly. -
Building Depth:
Once the initial green layer is bone dry, mix a darker shading color using Sap Green and a touch of Indigo. Glaze this under the wing, along the belly, and under the tail to give the bird a round, three-dimensional form. -
Feather Texture:
Switch to your size 2 brush. Using the darker green mix, paint tiny, short strokes on the head and body to suggest individual feathers. Keep these loose and suggestive rather than rigid. -
The Eye:
With a concentrated mix of Payne’s Gray and Indigo (almost black), carefully paint the eye, leaving a tiny speck of white paper for the highlight. This spark of life is crucial. -
Beak Detail:
Paint the long, slender beak using a dark grey. Ensure the line is crisp and sharp, contrasting with the fluffier texture of the feathers.
Step 3: Creating the Background
-
Wetting the Paper:
Clean your water and brushes. Use clean water to wet the area around the hummingbird, being very careful not to reactivate or touch the dry bird painting. You want a rectangular or organic shape framing the bird. -
Teal Wash:
Drop in a wash of Turquoise and Emerald Green into the wet paper. Let the colors bleed and bloom naturally. Keep the color stronger near the bird and let it fade out toward the edges of your background shape. -
Warm Accents:
While the background is still damp, drop in hints of diluted Burnt Sienna or Ochre in the lower corners or behind the wings to echo the warmth of the tail feathers. -
Lifting for Bokeh:
Before the background dries completely, use a clean, thirsty brush or the corner of a paper towel to gently lift out soft circles of paint. These soft white spots create the distant ‘bokeh’ light effect. -
Drying:
Let the entire piece dry completely. Do not touch it, as the background needs to settle to avoid harsh watermarks.
Metallic Magic
Mix a tiny amount of iridescent medium or gold watercolor into the throat feathers to make the ruby gorget truly shimmer when it catches the light.
Step 4: Final Touches
-
Adding Sparkle:
Use white gouache or a gel pen to add tiny, opaque white dots over the background wash, clustering them slightly to look like sparkling light or distant flowers. -
Refining Edges:
Check the edges of the hummingbird. If any background paint has bled onto the bird, gently lift it or cover it with opaque white. Add a few tiny white strokes to the belly feathers for extra fluffiness.
Frame your tiny jewel of a painting and enjoy the vibrant energy it brings to the room
Cherry Blossom Branch Landing
Capture the delicate beauty of spring with this soft watercolor illustration featuring an emerald hummingbird perched on a flowering cherry branch. Using a mix of wet-on-wet techniques for the background and fine detailing for the feathers, you will create a piece that feels both realistic and dreamily artistic.
How-To Guide
Materials
- Cold press watercolor paper (deckle edge optional)
- Watercolor paints (Emerald Green, Sap Green, Burnt Umber, Alizarin Crimson, Rose Madder, Indigo, Payne’s Grey)
- Round brushes (sizes 2, 4, and 0 for details)
- Painter’s tape or masking fluid (optional)
- Pencil (HB or H)
- Kneaded eraser
- Palette for mixing
- Two jars of water
- Paper towels
Step 1: Sketching and Preparation
-
Prepare your paper:
If your paper doesn’t have a natural deckled edge, you can tear the edges carefully against a ruler to mimic the rustic look shown in the reference photo. Secure the paper to your board if needed, though leaving it loose adds to the organic feel. -
Outline the composition:
Using a hard pencil like an H or HB, lightly sketch the diagonal branch rising from the bottom right. Add small offshoot twigs for the leaves and blossoms. -
Sketch the hummingbird:
Place the bird on the upper third of the main branch. Start with an oval for the body and a smaller circle for the head, connecting them with smooth lines along the neck. -
Refine the details:
Draw the long, needle-like beak pointing slightly upward. Sketch the wing shape tucked against the side and the tail feathers extending down. Lightly mark the positions of the cherry blossoms. -
Lighten the guidelines:
Gently roll a kneaded eraser over your sketch to lift up excess graphite. You want the lines to be barely visible so they don’t show through the transparent watercolor layers.
Wing Texture Tip
Don’t overmix your wing colors on the palette. Let the brown and blue mix partially on the wet paper to create natural color variation in the feathers.
Step 2: Painting the Flora
-
Wash the background:
Mix a very dilute wash of watered-down Indigo or Turquoise. Paint loosely around the edges of the composition to create a soft, atmospheric vignette, letting the color fade into the white of the paper. -
Paint the main branch:
Mix Burnt Umber with a touch of Payne’s Grey. using a size 4 brush, paint the branch with a broken, organic line. Vary the pressure to create thick and thin sections, mimicking natural wood texture. -
Add branch details:
While the branch is damp, drop in concentrated dark brown at the joints and knots for shadow. Let this dry completely before moving to the flowers. -
Create the blossoms:
Dilute Rose Madder or Alizarin Crimson to a very pale pink. Paint the five petals of each flower loosely, leaving tiny gaps of white paper between petals to define them. -
Deepen the floral centers:
While the pink petals are still slightly wet but not soaking, touch the center of each flower with a slightly more saturated pink mixture to let the color bleed outward softly. -
Paint the leaves:
Mix Sap Green with a little yellow for a fresh spring color. Paint the slender leaves near the bottom using a single stroke method: press down the belly of the brush and lift to a fine point. -
Add stamina details:
Once the flowers are bone dry, use your size 0 brush and a mix of brown and yellow to paint fine, thread-like stamens radiating from the flower centers.
Step 3: Bring the Hummingbird to Life
-
Base layer for the bird:
I prefer to start with a light wash of Emerald Green on the head and back. Use a pale brownish-grey wash for the belly and underwing area. -
Build iridescence:
Once dry, layer a more saturated Emerald Green mixed with a touch of Turquoise on the head and throat area. Use short, dabbing strokes to suggest the texture of iridescent feathers. -
Define the wings:
Mix Burnt Umber with Indigo to get a warm black. Using the size 2 brush, paint the flight feathers with long, distinct strokes, leaving thin lines of the underpainting showing to separate the feathers. -
Detail the tail:
Use the same dark mixture for the tail feathers, ensuring sharp, pointed tips. Add a little rust or reddish-brown to the edges of the tail feathers for warmth. -
Focus on the eye:
With the 0 brush and almost pure black paint, carefully fill in the eye, leaving a tiny speck of white paper for the highlight. This spark of life is crucial. -
Finalize the beak and feet:
Paint the beak with a dark grey-black mix, keeping the line extremely thin and sharp. Add the tiny feet gripping the branch using the same dark tone. -
Final touches:
Review the painting for contrast. If the bird needs more definition, add a few tiny strokes of dark green or indigo under the wing and chin to deepen the shadows.
Level Up: Shimmer
Once the green head area is dry, lightly glaze a tiny amount of iridescent watercolor medium or metallic paint over it to mimic real hummingbird feathers.
Frame this delicate piece in a floating frame to show off those beautiful deckled edges you preserved.
Sunset Silhouette Hummingbird
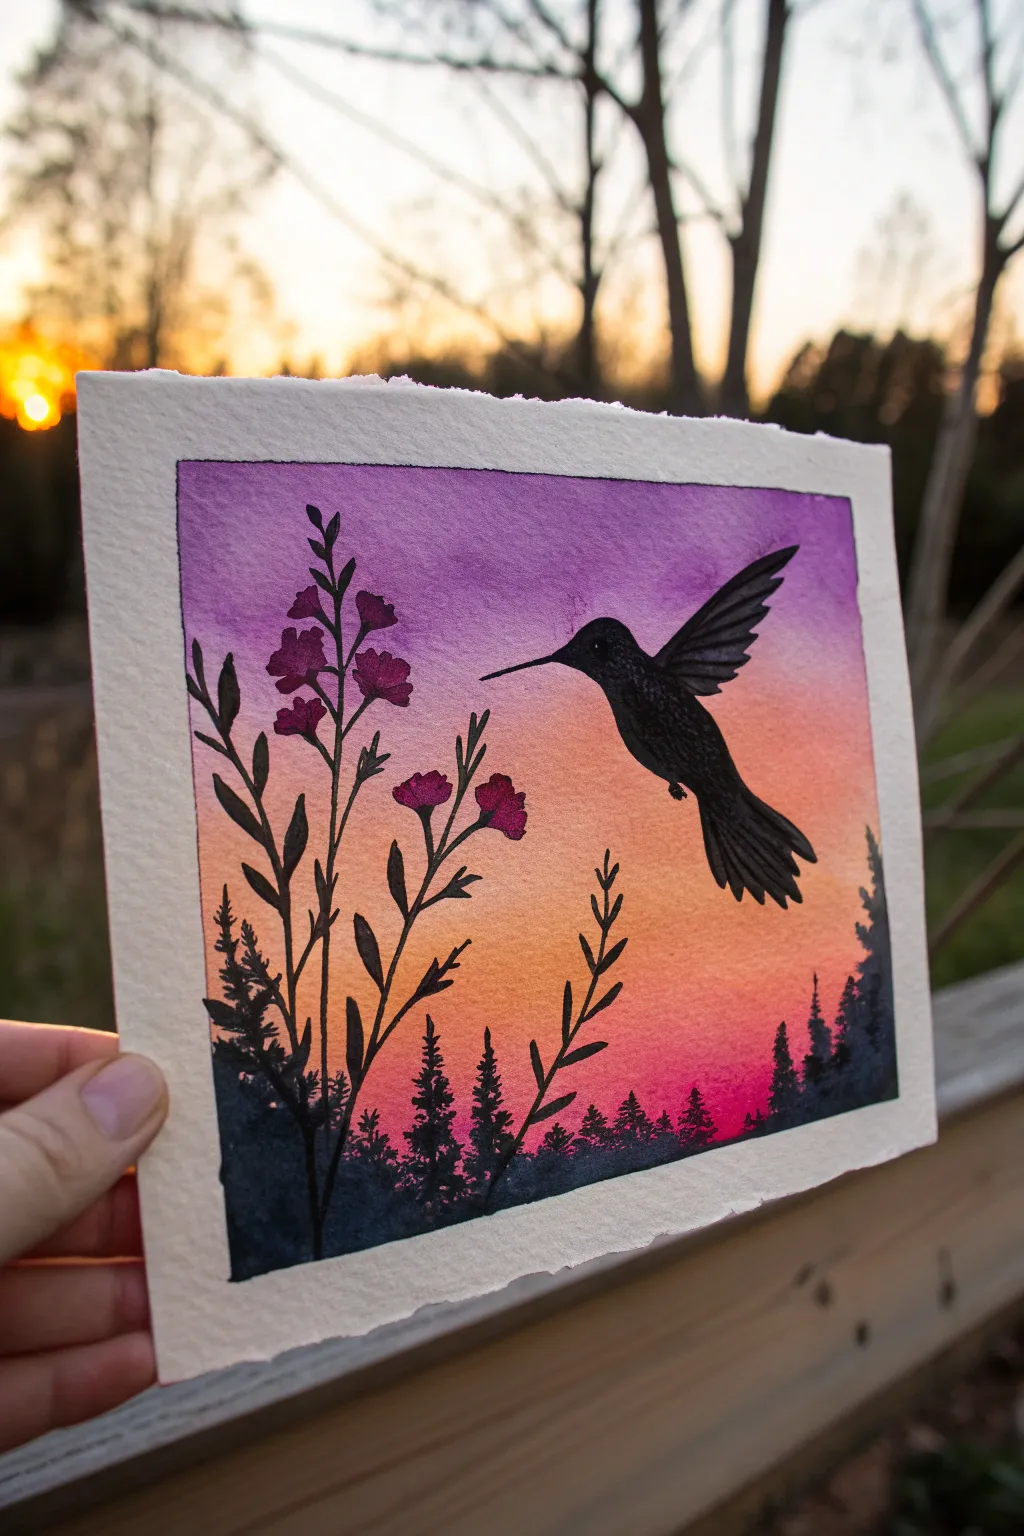
Capture the fleeting beauty of twilight with this vibrant watercolor project that contrasts a bold black silhouette against a soft, glowing gradient. The warm oranges and purples create a stunning backdrop for the delicate details of the hummingbird in flight.
Step-by-Step Guide
Materials
- Cold press watercolor paper (with deckled edge optional)
- Masking tape or painter’s tape
- Watercolor paints: Purple, Magenta/Rose, Orange, Yellow
- Black gouache or waterproof black ink
- Flat wash brush (3/4 inch or 1 inch)
- Round brushes (sizes 2 and 6)
- Small detail brush (size 0 or 00)
- Pencil and eraser
- Jar of clean water
- Paper towels
Step 1: Creating the Sunset Gradient
-
Tape edges:
Begin by taping down all four sides of your watercolor paper to a board or table. This creates receiving a clean white border and prevents buckling. If you want the deckled edge look shown in the photo, you can float your wash inside a pencil border instead of taping directly over the paper edge. -
Pre-wet the paper:
Using your large flat wash brush, apply a clean coat of water to the entire sky area. You want the paper to be shiny and damp, but not dripping wet with puddles. -
Apply the purple sky:
Load your brush with a rich purple watercolor. Paint a horizontal strip across the top third of the paper. Use long, smooth strokes from left to right. -
Transition to magenta:
Clean your brush slightly and pick up a bright magenta or rose color. Paint directly below the purple, letting the two colors touch and bleed together naturally on the wet paper. -
Add the sunset glow:
Switch to a warm orange, painting below the magenta. Finally, blend a little yellow at the very bottom horizon line to create the brightest point of the sunset. -
Smooth the blend:
With a clean, slightly damp brush, gently run back and forth over the transition lines between colors if they look too distinct. I like to tilt the board slightly to help gravity blend the gradient downward. -
Let it dry completely:
This is crucial—wait until the paper is bone dry and flat before moving on. If the paper is cool to the touch, it’s still damp. Using a hairdryer on a low setting can speed this up.
Pro Tip: Blackest Black
Watercolors dry lighter. For a true, deep silhouette, use black gouache or waterproof India ink instead of watercolor. It sits on top of the paper for maximum contrast.
Step 2: Painting the Foreground Silhouettes
-
Sketch the layout:
Lightly sketch the general placement of the hummingbird and the main flower stalks with a pencil. Keep the lines faint so they don’t show through the final paint. -
Paint the treeline:
Using black gouache and a size 6 round brush, paint an uneven, jagged horizon line at the very bottom. Use light, vertical dabbing textures to simulate the tops of distant pine trees. -
Draw the flower stems:
Switch to a smaller round brush (size 2). Pull long, slender lines upward from the treeline on the left side to create the plant stems. Vary the heights and curvature for a natural look. -
Add leaves and buds:
Paint small, oval-shaped leaves along the stems. Add clusters of small flower shapes near the tops using the same black gouache. The opacity of gouache works better here than watercolor for a true silhouette.
Step 3: Detailing the Hummingbird
-
Outline the bird:
Using your smallest detail brush and black gouache, carefully outline the hummingbird’s body shape based on your sketch. Pay attention to the sharp beak and the angle of the wings. -
Fill the body:
Fill in the body of the bird with solid black. Ensure the paint is thick enough to completely cover the colorful background without streaking. -
Feather the wings and tail:
For the wings and tail feathers, use quick, flicking strokes outward. You want the ends of the feathers to look separated and delicate, not like a solid block. -
Define the eye:
While the silhouette is solid black, you can leave a tiny pin-prick of the colorful background unpainted for the eye, or paint it solid first and add a tiny dot of white gel pen later to bring the bird to life. -
Final touches:
Check your edges. If any lines look shaky, smooth them out with the detail brush. Add tiny stray leaves or grass blades at the bottom to balance the composition.
Level Up: Salt texture
Sprinkle a pinch of table salt onto the purple sky area while it is still wet. When it dries and you brush the salt away, it creates stunning starry textures.
Peeling off the tape to reveal those crisp edges is the most satisfying way to finish this glowing masterpiece
Geometric Faceted Hummingbird
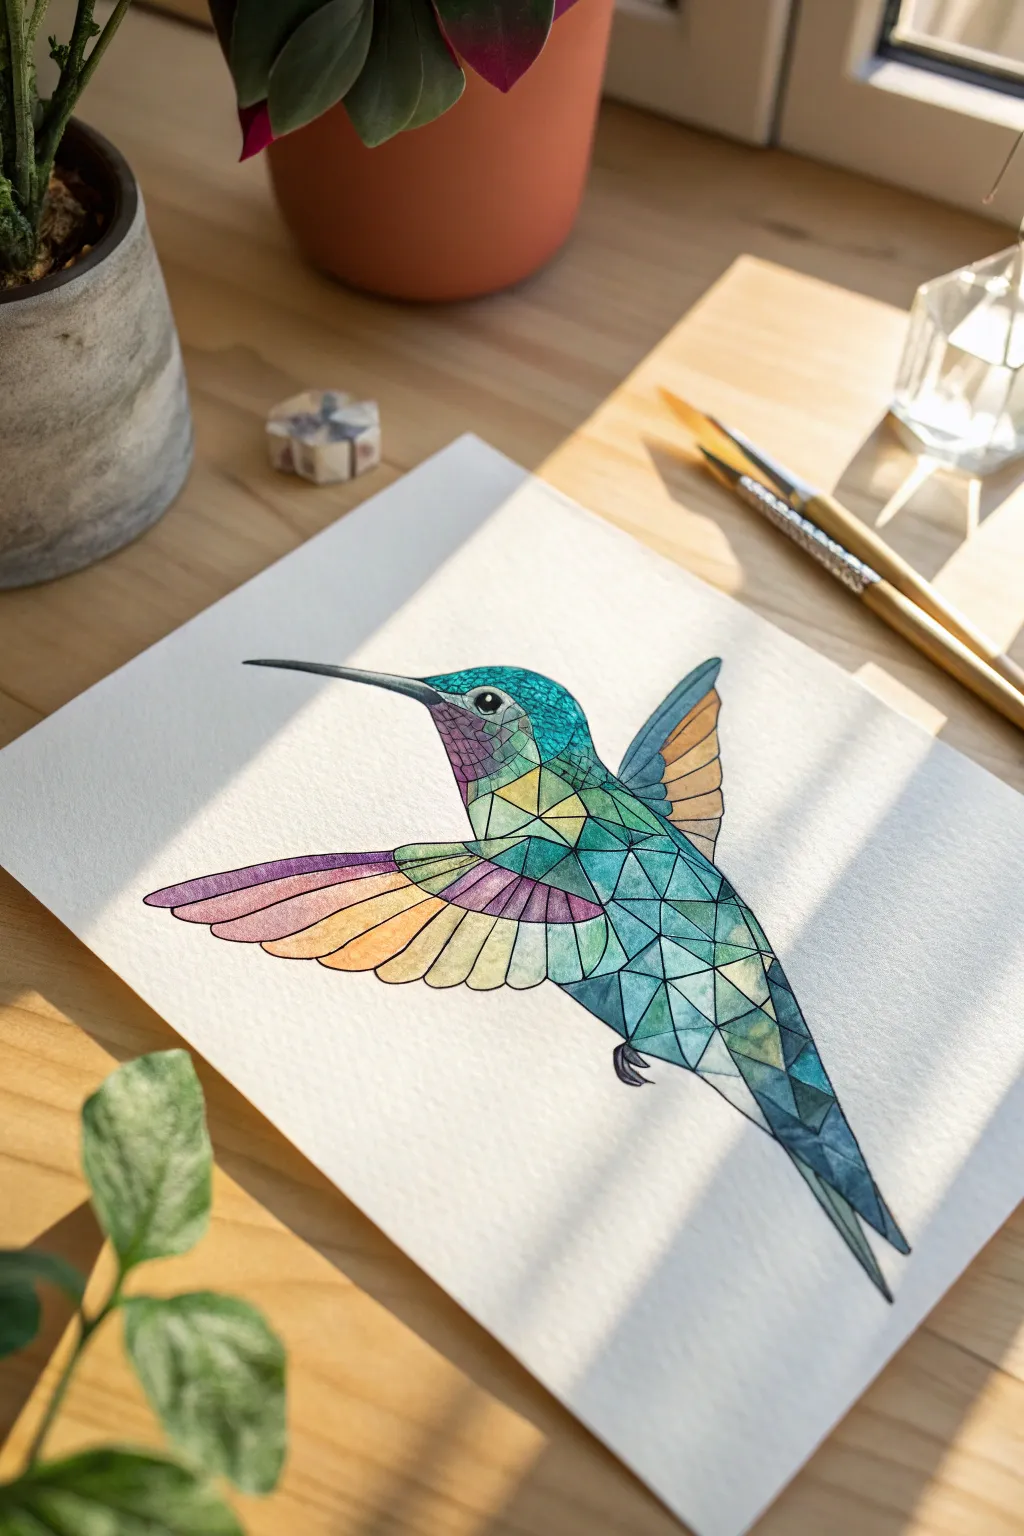
Transform the organic beauty of a hummingbird into a modern masterpiece with this geometric watercolor project. The faceted design mimics the look of stained glass or a low-poly illustration, using triangles and polygons to build form and capture light.
Step-by-Step Tutorial
Materials
- Hot press watercolor paper (smooth texture is key for sharp lines)
- Pencil (HB or H)
- Ruler or straight edge
- Fine liner pen (0.1mm or 0.3mm, waterproof, black)
- Watercolor paints (teal, turquoise, purple, yellow ochre, sap green, indigo)
- Small round brushes (size 0 and 2)
- Palette for mixing
- Water cups and paper towels
- Kneaded eraser
Step 1: Drafting the Design
-
Sketch the silhouette:
Start by lightly sketching the general outline of the hummingbird. Focus on the main shapes: the curve of the head, the long needle-like beak, the outstretched wings, and the tapered tail. Keep your pencil pressure very light so lines can be erased later. -
Map the eye and beak:
Place the eye clearly within the head shape. Draw a designated circle for the highlight within the eye now, so you don’t accidentally paint over it later. Refine the beak shape to be sharp and confident. -
Create the geometric mesh:
Using a ruler, begin breaking the organic shape of the bird into geometric shards. Start with the body, drawing triangles and irregular quadrilaterals that follow the curve of the bird’s form. -
Facet the wings:
Move to the wings, creating longer, sweeping geometric sections that fan out like feathers. The shapes should radiate from the shoulder of the wing outward toward the tips. -
Finalize the grid:
Complete the geometric mesh on the tail and head. Ensure every part of the bird is enclosed in a shape; try to vary the sizes, keeping smaller, denser shapes near the face and neck, and larger shapes on the wings and tail.
Step 2: Applying Color
-
Prepare your palette:
Mix puddles of your main colors: a vibrant turquoise, a deep teal, a soft purple for the throat area, and warm yellow-orange tones for the underwing highlights. -
Paint the first facet:
Choose a triangle on the bird’s back and fill it with turquoise. I prefer to use the ‘wet-on-dry’ technique here to keep the edges crisp and prevent color bleeding between the shapes. -
Vary the values:
Continue painting adjacent shapes, but slightly alter the water-to-paint ratio for each one. Make one facet dark and saturated, and the one next to it pale and watery. This value contrast creates the shimmering, faceted effect. -
Add warmth to the wings:
For the lower wing feathers, switch to your yellow ochre and warm purple mixes. Let these colors blend slightly within a single geometric shape if you like, creating a gradient within the hard edges. -
Detail the head and throat:
Use your smallest brush to carefully fill the tiny facets around the eye and beak. Introduce hints of purple and indigo here to suggest iridescence and shadow. -
Paint the eye:
Fill the eye with solid black or very dark indigo, leaving that tiny white circle you sketched earlier completely dry for the highlight. -
Complete the body:
Work your way down the tail feathers with cool greens and blues. Ensure every geometric shape is filled, leaving no white gaps unless intended for high-contrast sparkle. -
Let it dry completely:
Allow the entire painting to dry thoroughly. The paper must be bone dry before the next step to prevent ink bleeding.
Bleeding Lines?
If colors bleed across lines, you’re painting adjacent shapes too quickly. Paint non-touching shapes first (like a checkerboard) and let them dry before filling the gaps.
Step 3: Inking and Definition
-
Outline the main silhouette:
Take your waterproof fine liner and carefully trace the outer perimeter of the hummingbird. Use a steady hand to make this line consistently crisp. -
Trace the facets:
Go over all your internal pencil lines with the pen. You can use your ruler for absolute precision, or freehand it for a slightly more organic feel. This ‘leading’ separates the colors like stained glass. -
Clean up:
Once the ink is fully set, gently run a kneaded eraser over the entire drawing to lift any visible graphite pencil lines that sit underneath the watercolor transparency.
Make It Shimmer
For a magical finish, mix a tiny amount of iridescent medium or metallic watercolor (gold or silver) into a few random facets to catch the light when viewed from an angle.
Step back and admire how simple geometric shapes have come together to capture the vibrant energy of a hummingbird in flight
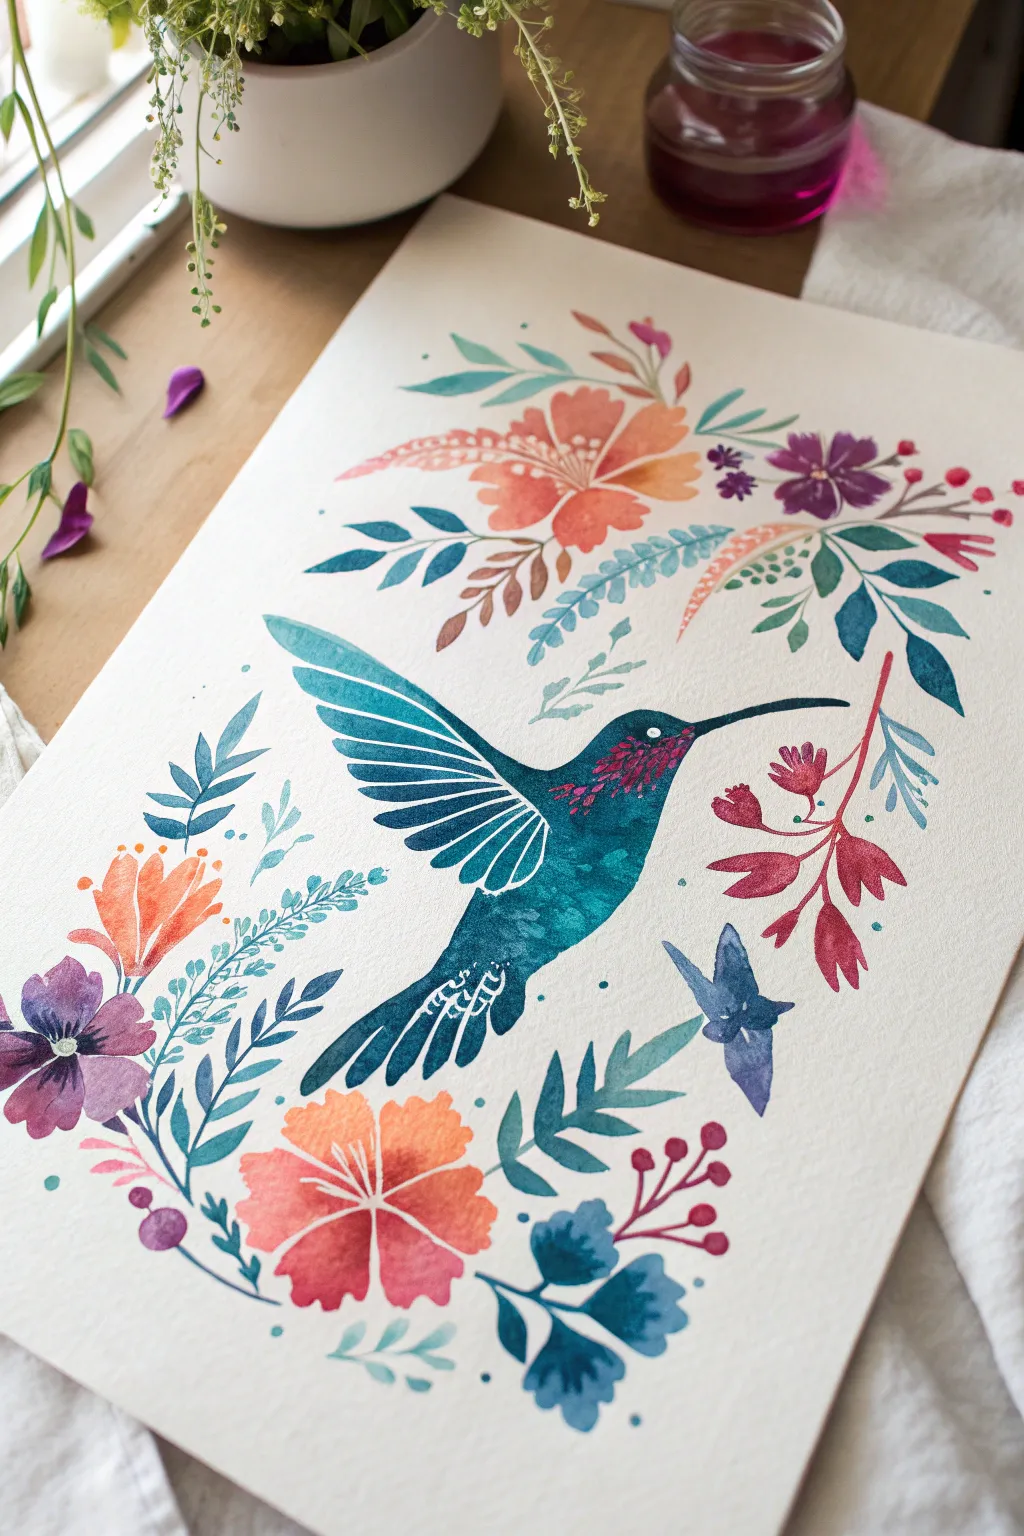
Botanical Wreath With Hummingbird Center

Capture the delicate beauty of a hummingbird in flight, framed by a soft, botanical watercolor wreath. This project combines loose floral techniques with detailed bird illustration for a balanced and elegant composition.
How-To Guide
Materials
- Cold press watercolor paper (300 gsm)
- Watercolor paints (Veridian Green, Sap Green, Alizarin Crimson, Indigo, Burnt Umber)
- Round brushes (sizes 2, 4, and 0 for details)
- Pencil (HB or H)
- Kneaded eraser
- Compass or large circular object for tracing
- Clean water
Step 1: Planning and Sketching
-
Trace the foundation:
Begin by lightly tracing a large circle in the center of your paper using a compass or a bowl. This will serve as the guide for your wreath shape. -
Sketch the hummingbird:
In the exact center of the circle, sketch the hummingbird. Draw a small oval for the body and a smaller circle for the head. Add the long, thin beak pointing left and sketch the wings angled upwards in a V-shape. -
Map the foliage:
Lightly sketch the main branches of the wreath flowing along the circular guide. Mark the positions of four main flower clusters—top left, top right, bottom right, and bottom left—to ensure balanced spacing. -
Add leave details:
Flesh out the wreath sketch by drawing individual leaves stemming from the main branches. Vary the sizes, with larger leaves anchoring the bottom curves and wispy sprigs near the top.
Pro Tip: Eye Sparkle
If you accidentally paint over the white highlight in the bird’s eye, use a tiny dot of white gouache or a white gel pen to bring the life back into it.
Step 2: Painting the Wreath
-
Base layer for leaves:
Mix a watery Sap Green with a touch of Indigo for a muted look. Using a size 4 brush, paint the larger leaves, keeping the edges soft. Let the watercolor pool slightly at the base of each leaf for natural shading. -
Add delicate sprigs:
Switch to a lighter mix of Veridian Green and plenty of water. Paint the smaller, feathery sprigs that poke out between the main leaves, using the tip of the brush for fine lines. -
Paint the flowers:
Mix a diluted Alizarin Crimson to get a soft pink. Paint the four main flower heads using quick, outward strokes to mimic petals. Concentrate the color at the base of the flower and let it fade toward the tips. -
Deepen the floral contrast:
While the pink layer is still slightly damp, drop a tiny amount of concentrated crimson into the base of each flower where it meets the stem. This creates depth without hard edges. -
Insert berries and buds:
Using a size 2 brush and a reddish-pink mix, dot small berries along the outer edges of the wreath. Connect them to the main branch with very thin brown stems. -
Connect the wreath:
Use a mix of Burnt Umber and green to paint the main woody stems connecting all your elements. I like to keep these lines broken and organic rather than one continuous heavy line.
Step 3: Painting the Hummingbird
-
Base color for the bird:
Mix a bright teal using Veridian Green and a touch of blue. Paint the head and back of the hummingbird, carefully avoiding the throat area. -
The ruby throat:
The throat is a focal point. Use Alizarin Crimson to paint a patch on the throat. Once dry, add tiny dots of darker red to suggest the iridescence of feathers. -
Wing transparency:
For the wings, use a very watery gray mix. Paint the overall wing shape, then lift out a little color between the feathers with a thirsty brush to create a translucent effect. -
Define the feathers:
Using your smallest size 0 brush and a dark teal-indigo mix, paint fine, short distinct lines on the wings and tail to define individual flight feathers. -
Final bird details:
Paint the beak with a dark grey or black mix. Add the eye as a small black dot, leaving a tiny speck of white paper for the highlight. -
Erase guidelines:
Once the painting is completely bone-dry, gently erase any visible pencil marks from your initial circle guide.
Level Up: Metallic Touch
Add gold watercolor paint to the tips of the green leaves or the stamens of the pink flowers for a shimmering, high-end finish.
Frame your botanical masterpiece to bring a touch of nature indoors
Surreal Double-Exposure Bird and Blooms
Capture the magic of flight with this vibrant watercolor illustration, featuring a stylized hummingbird encircled by loose, colorful blooms. The piece combines wet-on-wet gradients with crisp floral motifs, creating a delightful balance between structure and spontaneity.
Step-by-Step
Materials
- Cold press watercolor paper (140lb/300gsm)
- Watercolor paints (teal, turquoise, magenta, orange, purple, deep blue)
- Round brushes (size 2, 4, and 6)
- Pencil (HB or H)
- Kneaded eraser
- White gel pen or gouache (for details)
- Palette for mixing
- Two jars of water
- Paper towels
Step 1: Drafting the Composition
-
Sketch the layout:
Begin by lightly sketching the central hummingbird profile with your H pencil. Position the bird in the center, angling the beak slightly upward to the right. Keep your lines faint so they don’t show through the transparent paint later. -
Map the floral frame:
Draw an oval guideline surrounding the bird to define the wreath shape. Roughly sketch in the large anchor flowers first—one at the top center, one bottom left, and one bottom center—before filling the gaps with smaller leaves and berries. -
Refine the details:
Clean up your sketch with a kneaded eraser, lightening the graphite until it is barely visible. This is crucial for maintaining the delicate look of the final piece.
Muddy Centers?
If your flower centers look brown or muddy, let the first petal layer dry completely before adding the darker center color. This prevents opposing colors from mixing too much.
Step 2: Painting the Hummingbird
-
Base wash for the body:
Using a size 4 brush, load teal paint and apply it to the bird’s head and back. While the paint is still wet, drop in a deeper turquoise or cool blue near the tail and wing edges to create a natural shadow effect. -
Add the throat patch:
While the teal is damp (but not soaking), carefully touch the throat area with a concentrated magenta or ruby red. Let the colors bleed slightly into the teal for a soft transition, or paint it wet-on-dry later for a sharper edge. -
Define the wings:
Paint the wing shape with a solid teal-blue mix, leaving thin negative space lines between the feathers if you have a steady hand. Alternatively, paint the wing solid and save the white detailing for the final step. -
The beak and eye:
Switch to your size 2 brush and use a dark indigo or black mix to paint the long, slender beak and the small round eye. Leave a tiny speck of white paper in the eye for a highlight.
Level Up: Metallic Pop
Swap the white gel pen for metallic gold ink for the final details. The gold will shimmer against the matte watercolor, mimicking the iridescence of real hummingbird feathers.
Step 3: Creating the Floral Wreath
-
Paint the main blooms:
Mix a warm orange-red and paint the large bottom flower. While wet, drop a little deep red into the center to create depth. Repeat this gradient technique for the top flower, perhaps shifting to a coral hue. -
Add purple accents:
Using a violet mix, paint the smaller, five-petaled flowers on the left and top right. I like to keep these shapes simple and flat to contrast with the gradient in the main flowers. -
Paint the foliage:
Use a mix of turquoise and green for the leaves. Vary your strokes—press down and lift up to create teardrop leaf shapes, and use the tip of the brush for delicate fern-like stems. -
Fill with berries and buds:
Dot in small berries using magenta and deep red. Connect them to the main vine with very thin, sweeping lines using your smallest brush. -
Layering leaves:
Once your first layer of leaves is dry, verify the balance of the wreath. If there are empty spots, paint a second layer of lighter, translucent blue leaves behind the first set to add volume.
Step 4: Final Details
-
Add white embellishments:
Ensure the painting is completely bone-dry. Using a white gel pen or fine brush with white gouache, draw the vein details on the hummingbird’s wings and tail if you didn’t leave negative space earlier. -
Detail the throat:
Add tiny white dots or scallops over the magenta throat patch to simulate iridescent feathers. -
Floral veins:
Use the white pen to draw simple centering lines and veins on the orange and purple flowers. This unifies the style between the bird and the botanicals. -
Final assessment:
Step back and look for balance. If the composition feels heavy on one side, add a few floating petals or small dots of color to even it out.
Now you have a charming nature illustration ready to frame or gift to a bird lover


Have a question or want to share your own experience? I'd love to hear from you in the comments below!