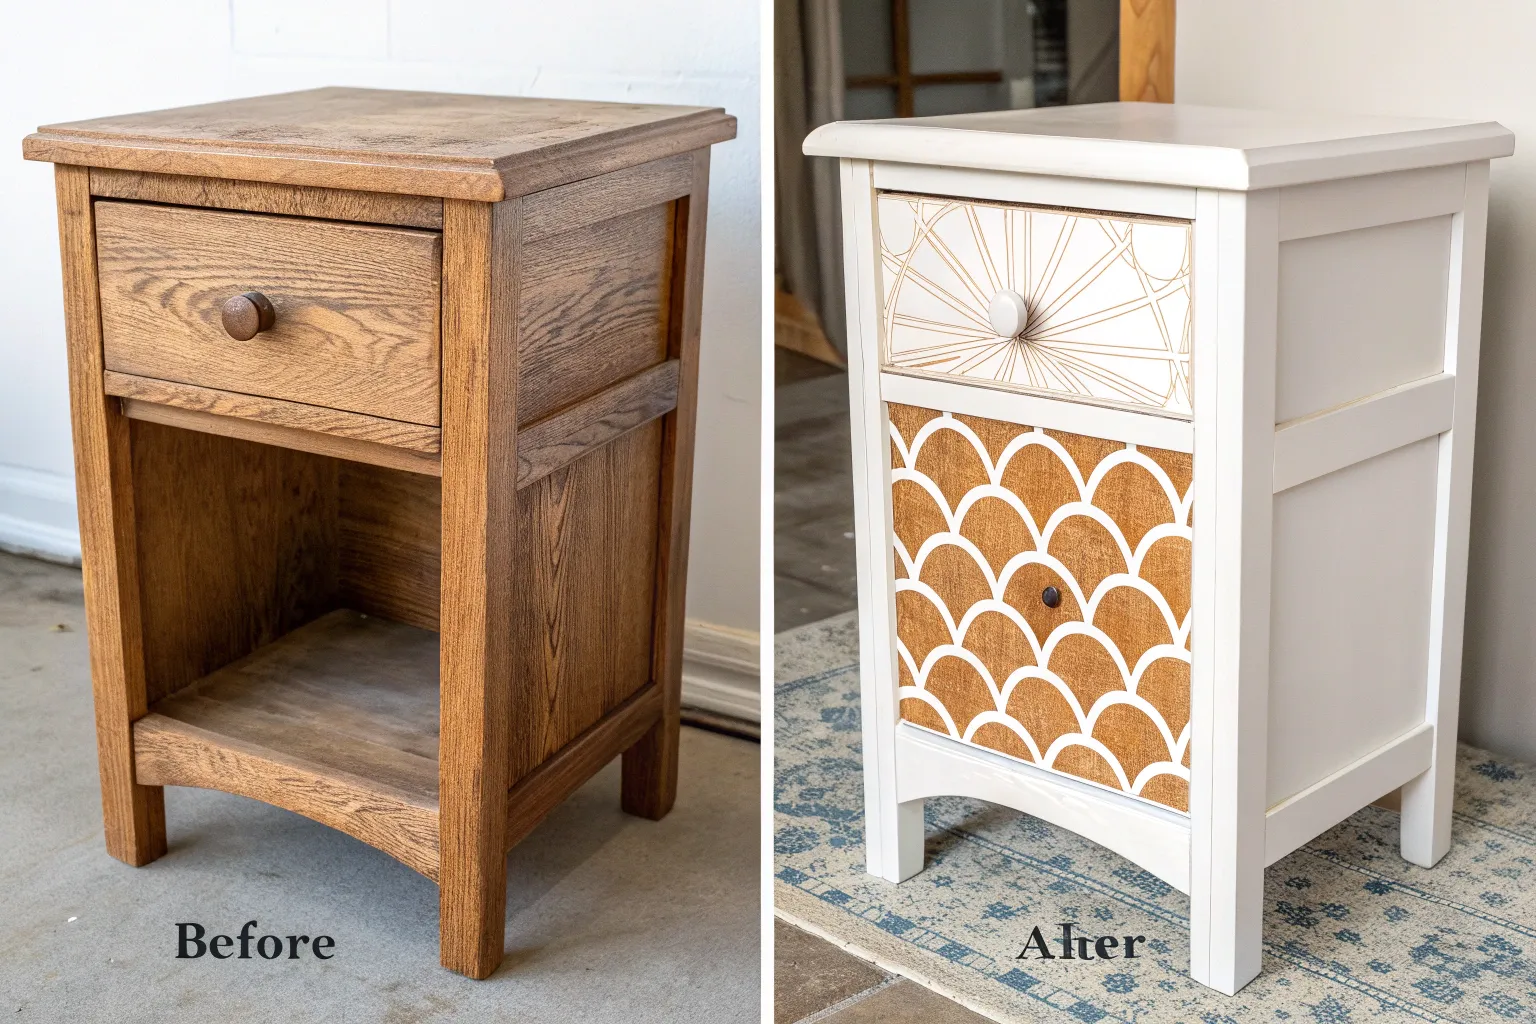
If you’ve got a tired piece of wood furniture sitting around, paint is honestly the fastest way to give it a whole new life. In my studio, I’m always chasing that satisfying before-and-after moment—here are my favorite makeover ideas you can steal for your own wooden pieces.
Soft Greige and Modern Neutrals
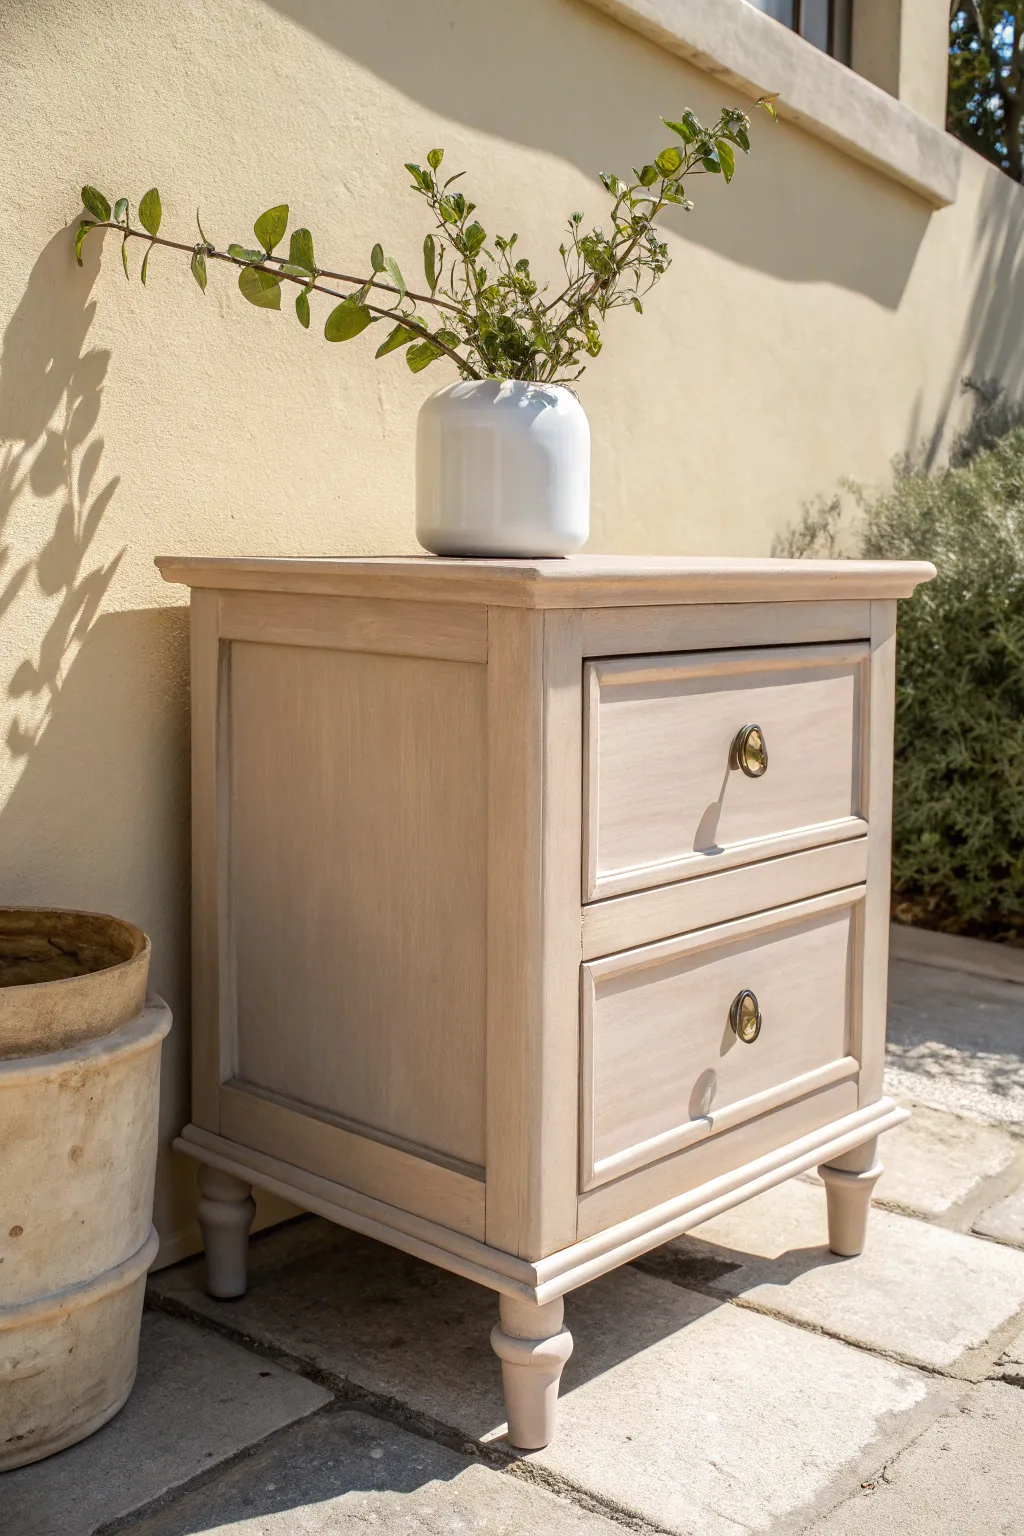
Give any old wooden nightstand a breath of fresh air with this sophisticated, muted finish. By layering a warm gray-beige paint with a subtle wash technique, you can achieve a modern neutral look that feels both grounded and airy.
Detailed Instructions
Materials
- Wooden nightstand (vintage or thrifted)
- Medium-grit sandpaper (120-grit)
- Fine-grit sandpaper (220-grit)
- Tack cloth or microfiber rag
- Primer (stain-blocking)
- Chalk-style paint in ‘Soft Greige’ or ‘Warm Putty’
- Water for diluting paint
- Synthetic oval brush
- Small lint-free cotton rags
- Matte clear topcoat or furniture wax
- Detail brush
- Antique brass hardware (optional)
- Screwdriver
Step 1: Preparation and Cleaning
-
Remove hardware:
Begin by unscrewing any existing knobs or pulls from the drawers. Store them safely in a baggie if you plan to reuse them. -
Clean the surface:
Wipe down the entire piece with a mild degreaser or TSP substitute to remove oils and dirt. A clean surface is crucial for paint adhesion. -
Sand the finish:
Use 120-grit sandpaper to scuff the entire surface. You don’t need to strip it to bare wood, just remove the shine so the new paint has something to grip. -
Remove dust:
Vacuum up the sanding dust, then go over the nightstand with a tack cloth to pick up the finest particles.
Uneven Coverage?
If the darker wood shows through patchily after the wash coat, don’t panic. Apply one more very thin, diluted coat just to those areas and feather the edges.
Step 2: Priming and Base Coat
-
Apply primer:
If your wood is dark or red-toned, apply a coat of stain-blocking primer. This prevents tannins from bleeding through your light greige color later. -
First paint layer:
Stir your chalk-style paint thoroughly. Apply an even base coat using the oval brush, working in long strokes with the grain of the wood. -
Work the crevices:
Use the tip of your brush to push paint into the routed details around the drawer fronts and the turns of the legs. -
Let it dry:
Allow this first coat to dry completely according to the manufacturer’s instructions, usually about 1-2 hours. -
Light sanding:
Run a 220-grit sandpaper very lightly over the dried paint to knock down any brush strokes or raised grain.
Smooth Operator
Between every single coat of primer, paint, or sealer, sand extremely lightly with a high-grit sanding sponge. It makes the final finish feel like factory quality.
Step 3: Creating the Wash Effect
-
Mix a wash:
In a separate container, dilute a small amount of your paint with water (about 70% paint to 30% water) to create a thinner consistency. -
Apply the second coat:
Brush this thinned mixture over the piece. The thinner paint settles nicely into the wood texture and creates a softer, less plastic-like finish. -
Feather out:
Before the paint dries, use a clean, dry brush to lightly ‘feather’ or whisk over the surface. This removes excess paint and eliminates hard stop-and-start marks. -
Check for drips:
inspect the turned legs and deep corners for paint pooling. Use a detail brush to smooth these out immediately. -
Full dry time:
Let this final coat dry overnight if possible. I find that giving it extra time creates a harder shell before sealing.
Step 4: Sealing and Finishing
-
Apply protective topcoat:
Brush on a clear matte polyacrylic or apply clear furniture wax with a lint-free cloth. Work in small sections. -
Buff the wax:
If using wax, let it haze over slightly, then buff it vigorously with a clean cotton rag to create a subtle, silky sheen. -
Install hardware:
Reattach your original hardware, or install new antique brass pulls like the ones in the image for a classic touch. -
Final wipe down:
Give the piece one last wipe to remove any fingerprints from the hardware installation.
Enjoy styling your refreshed nightstand with varying textures and greenery for a serene bedroom corner


Moody Black for Instant Drama
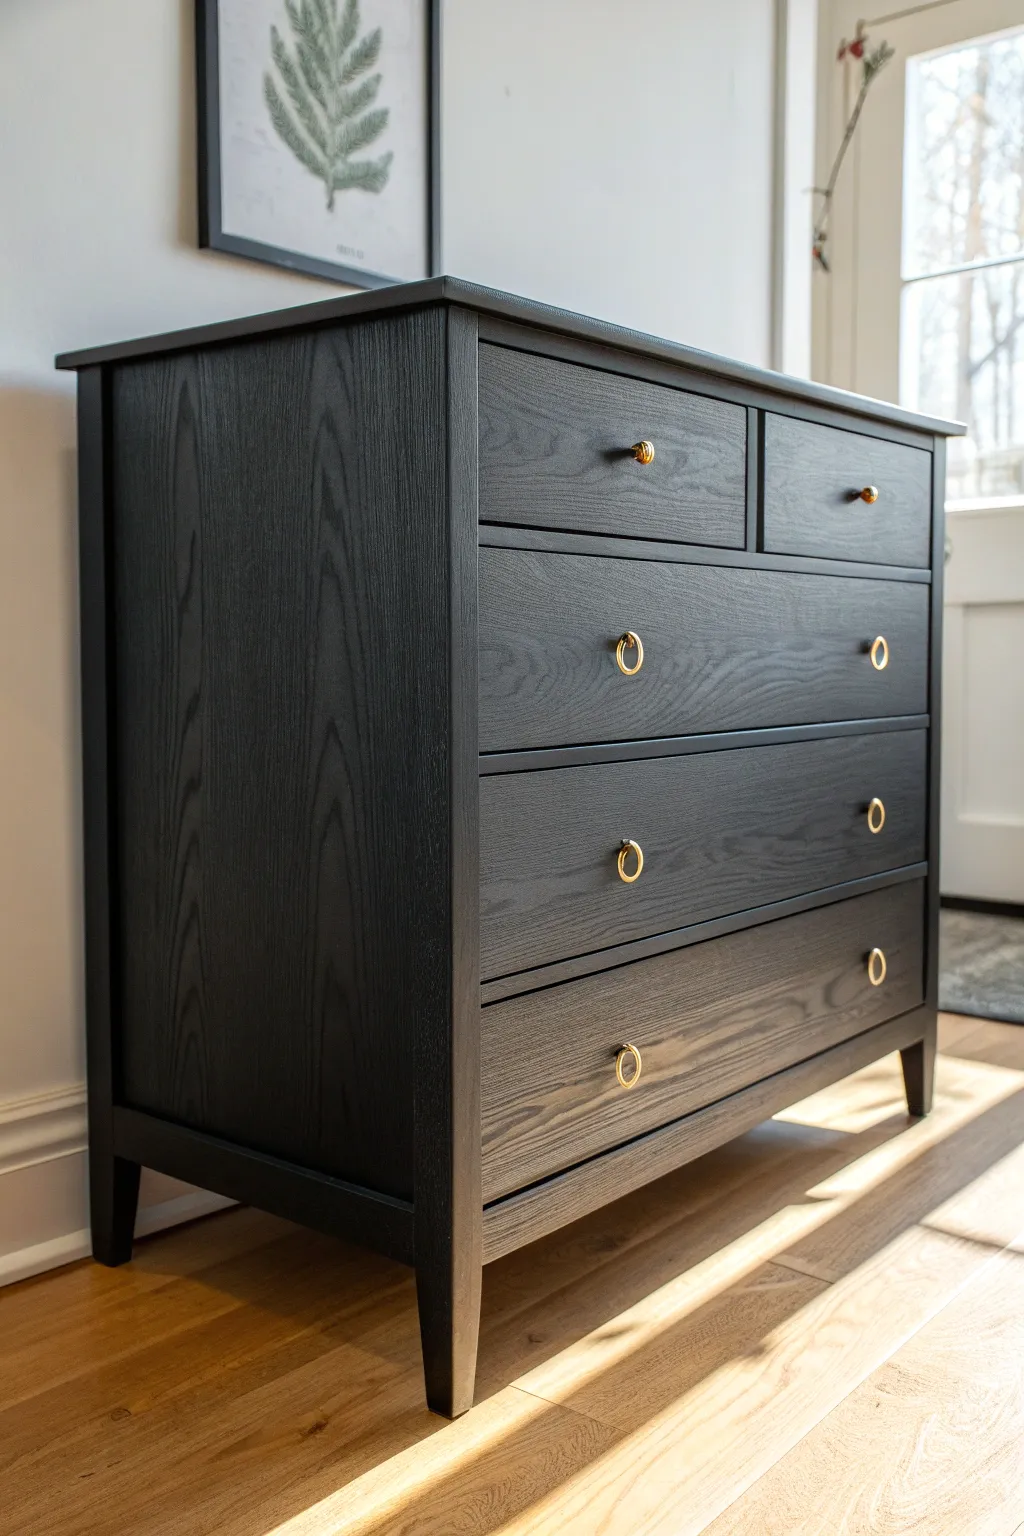
Transform a plain wooden dresser into a statement piece by embracing the sophisticated look of moody black while preserving the natural beauty of the wood grain. This technique uses a semi-transparent approach that adds depth and richness, perfectly accented by elegant gold hardware.
How-To Guide
Materials
- Unfinished or stripped wooden dresser (oak or ash works best for visible grain)
- Black wood stain or penetrating dye
- Matte or satin polyurethane topcoat (water-based recommended)
- Sandpaper (120, 180, and 220 grit)
- Tack cloth
- Lint-free staining rags
- Foam brushes or staining sponges
- Synthetic bristle brush for topcoat
- Gold ring pulls and knobs
- Screwdriver
- Drop cloth
- Painter’s tape
Step 1: Preparation & Sanding
-
Remove hardware and drawers:
Begin by taking all the drawers out of the dresser frame. Use your screwdriver to carefully remove the existing knobs or pulls, setting the screws aside if you plan to reuse the holes. -
Initial coarse sanding:
Since we want the grain to remain visible, you need raw wood. If the piece has an old finish, sand it down completely with 120-grit sandpaper until all old varnish or paint is gone. -
Refine the surface:
Switch to 180-grit sandpaper for a smoother pass. Sand specifically in the direction of the wood grain to avoid rogue scratches that will show up brilliantly once the dark stain is applied. -
Final smoothing:
Do a final light pass with 220-grit sandpaper. This ensures the wood is incredibly smooth to the touch but the grain pores remain open enough to accept the pigment. -
Clean strictly:
Vacuum up the bulk of the sawdust from the piece and the drawers. Follow this by wiping everything down thoroughly with a tack cloth to capture even the finest dust particles.
Grain Talk
For this specific look, Oak or Ash wood is ideal. Their deep, open grain patterns absorb stain heavily, creating that beautiful texture you see in the photo.
Step 2: Staining for Drama
-
Test your color:
Before committing to the front, apply a small patch of your black stain on the back or bottom of a drawer. This helps you gauge how quickly the wood absorbs the dark pigment. -
Apply the first coat:
Using a lint-free rag or foam brush, apply a generous coat of black stain to the wood, working in manageable sections. I prefer to start with the dresser frame before moving to the drawer fronts. -
Wipe back:
Let the stain sit for about 3-5 minutes (check the can’s recommendation), then wipe away the excess with a clean rag. Wipe firmly in the direction of the grain to reveal that beautiful texture. -
Assess and deepen:
Allow the first coat to dry completely. If you want a deeper ‘midnight’ black rather than a charcoal tone, apply a second coat using the same wipe-on, wipe-off method. -
Dry thoroughly:
Let the stained wood dry for at least 24 hours. This is crucial because trapping moisture under the sealer can cause cloudiness later.
Too Opaque?
If the black looks too solid like paint, you haven’t wiped enough off. While the stain is wet, use a clean rag soaked in mineral spirits to lift more pigment.
Step 3: Sealing & Assembly
-
Apply first sealer coat:
Stir your matte polyurethane gently (don’t shake, or you’ll get bubbles). Apply a thin, even coat with a synthetic bristle brush, following the long lines of the grain. -
Sand between coats:
Once dry, very lightly hand-sand the surface with 220-grit sandpaper or fine steel wool. This knocks down any raised grain and ensures a professional, silky feel. -
Final coat:
Clean off the sanding dust and apply a second coat of polyurethane. For high-traffic surfaces like the top of the dresser, I sometimes add a third coat for extra durability. -
Hardware installation:
Once the sealer has cured fully (usually 48 hours for light use), install the gold ring pulls on the lower drawers and coordinates knobs on the top drawers. -
Reassemble:
Slide the drawers back into their tracks, ensuring they sit flush, and admire the contrast between the matte black wood and the gleaming metallic hardware.
Enjoy the sophisticated ambiance this moody, modern piece brings to your space


Two-Tone With a Natural Wood Top
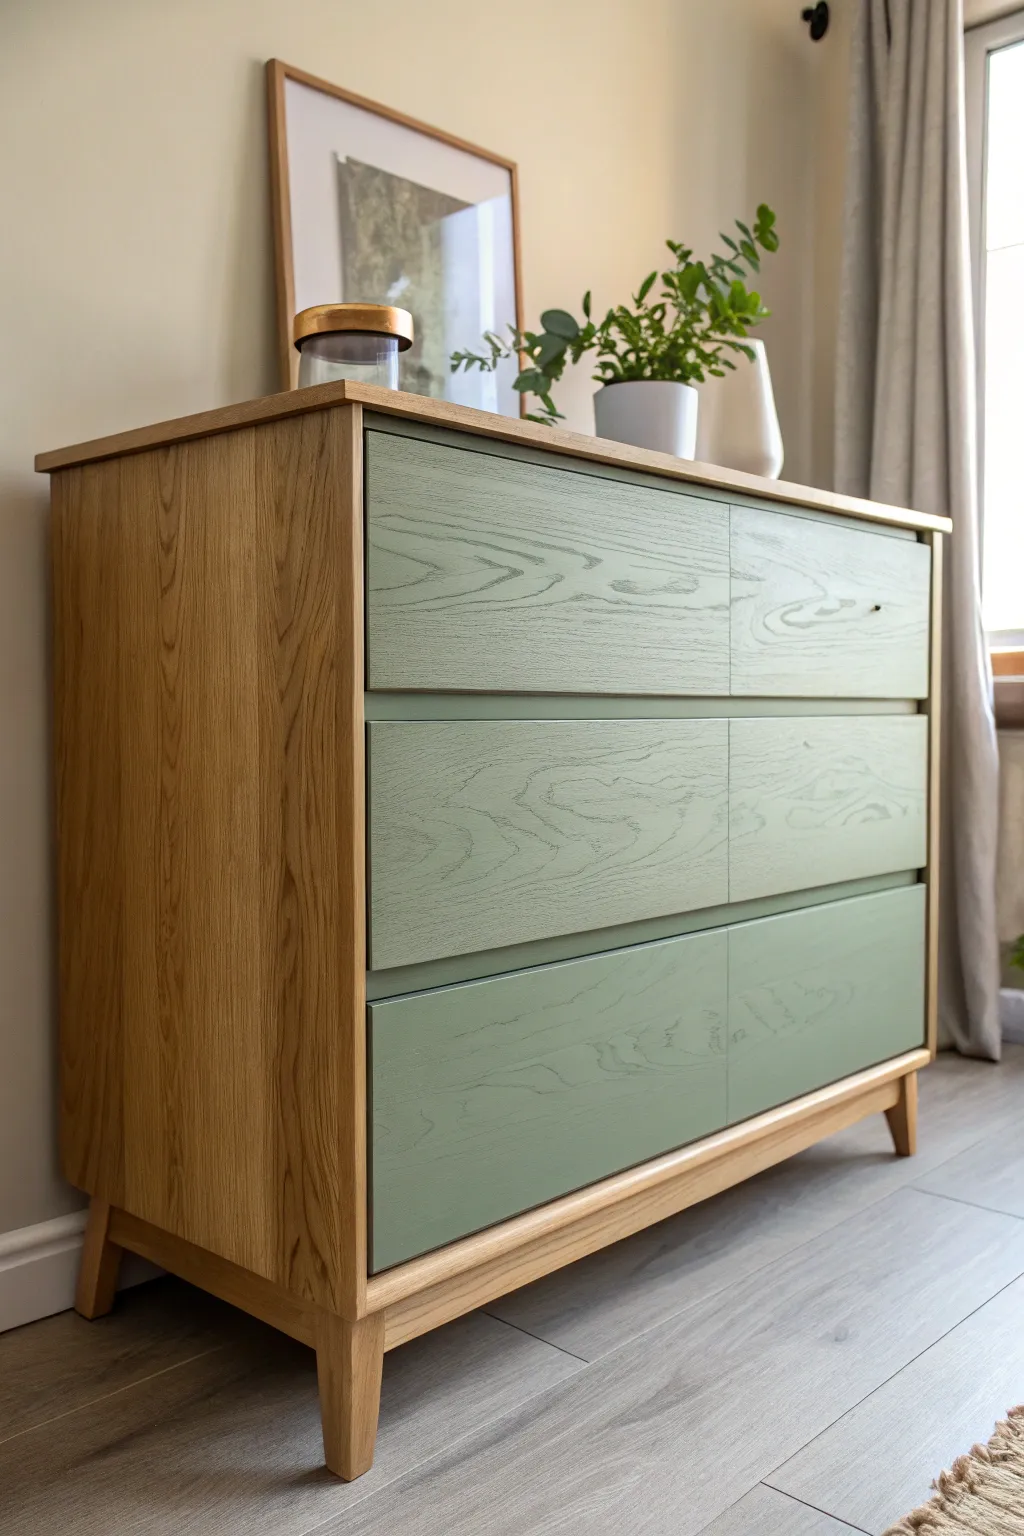
This elegant update combines the warmth of natural oak with the calming presence of sage green, creating a piece that feels both grounded and contemporary. By maintaining the wood grain texture through the paint, you achieve a sophisticated, factory-finish look that highlights the furniture’s original character.
Step-by-Step Tutorial
Materials
- Solid wood dresser (oak or pine veneer preferred)
- Orbital sander with 80, 120, and 220 grit discs
- Painter’s tape (high quality)
- Sage green furniture paint (chalk or mineral based)
- Clear matte polyurethane or wax
- Wood stain (optional, to match tone)
- Cleaning degreaser or TSP
- Lint-free rags
- Small foam roller
- High-quality synthetic angled brush
- Screwdriver for hardware removal
- Drop cloth
Step 1: Preparation & Stripping
-
Disassemble the piece:
Begin by removing all drawers from the dresser carcass. Use your screwdriver to take off any handles or knobs, keeping them in a labeled bag if you plan to reuse them. -
Clean thoroughly:
Wipe down the entire dresser with a degreaser or TSP alternative to remove built-up oils, wax, and dust. This ensures your sanding will be effective and not just push grime into the wood. -
Sand the frame (Start gentle):
For the outer casing—the top, sides, and legs—which will remain natural, start with 120-grit sandpaper on your orbital sander to remove the old finish without gouging the wood. -
Refine the natural wood:
Switch to 220-grit paper for a final pass on the frame. Run your hand over the surface; it should feel as smooth as glass. Wipe away all dust with a tack cloth or damp rag. -
Sand the drawer fronts:
Depending on the existing finish, scuff sand the drawer fronts with 120-grit paper. The goal here isn’t to strip them completely to bare wood, but to create a ‘tooth’ for the paint to grip.
Step 2: Painting the Drawers
-
Tape off edges:
If your drawers have any side edges or internal lips you want to keep natural, apply painter’s tape carefully. Press down firmly on the tape edges to prevent bleed-through. -
Apply the first coat:
Using a small foam roller, apply a thin, even coat of sage green paint to the drawer fronts. I like to roll in the direction of the wood grain to maintain that texture visible in the photo. -
Smooth the finish:
While the paint is still wet, lightly drag a clean, dry synthetic brush from end to end (a technique called ‘laying off’) to remove roller stipple and mimic a sprayed finish. -
Let it dry properly:
Allow this first coat to dry completely according to manufacturer instructions. Don’t rush this stage, or the next layer might pull up the first. -
Light sanding between coats:
Once dry, very lightly sand the painted surface with a superfine sanding sponge or 400-grit paper to knock down any nibs. Wipe away the dust. -
Build the color:
Apply a second coat using the same roll-and-brush method. This coat should provide full opacity while still allowing the beautiful wood grain texture to subtly show through.
Grain Game
To keep the wood grain texture visible through the paint, thin your first coat of paint with 10% water. This acts like a wash, sinking into the grooves rather than filling them.
Step 3: Sealing & Assembly
-
Seal the natural wood frame:
Apply a water-based matte polyurethane to the exposed wood frame. Use a high-quality brush and long, even strokes. This protects the wood without altering its pale, natural tone like oil-based products would. -
Seal the painted drawers:
Once the paint is fully cured, apply the same matte topcoat over the green drawers. This unifies the sheen across the whole piece and adds durability. -
Apply a second topcoat:
After the first layer of poly is dry, lightly sand with 220-grit paper and apply a final coat to both the frame and drawers for maximum protection. -
Reassemble:
Once everything is dry to the touch (ideally curing for 24 hours), slide the drawers back into their tracks. -
The invisible touch:
Notice the image has no visible hardware on the front surfaces. If your dresser requires pulls, consider installing discrete finger-pulls on the top edge of the drawers, or use a ‘push-to-open’ mechanism for this ultra-clean look.
Minimalist Edge
Create a ‘shadow gap’ effect by painting the horizontal dividers between drawers a dark charcoal grey. This makes the green drawers visually pop and look like floating panels.
Enjoy the serenity this custom piece brings to your space


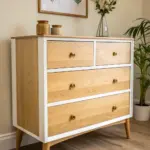

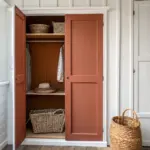
Distressed Edges for Vintage Charm
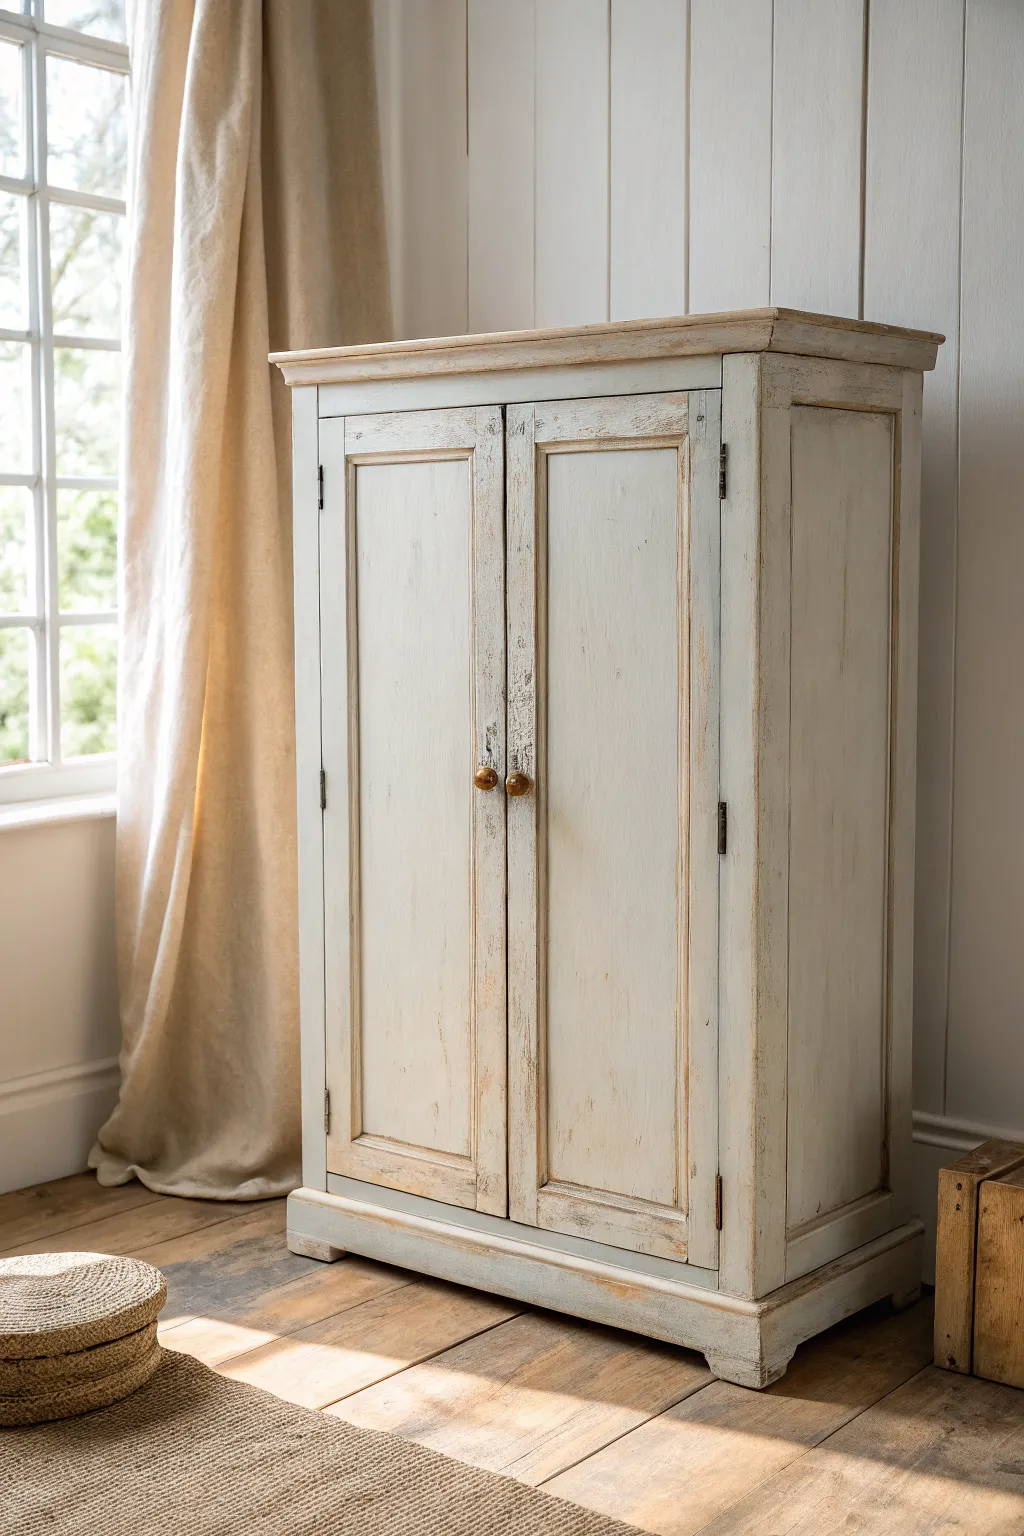
Transform a plain wooden wardrobe into a charming, antique-inspired piece using simple distressing techniques. The result is a soft, putty-colored finish with intentionally worn edges that reveal the warm wood beneath, perfect for adding instant history to any room.
Step-by-Step
Materials
- Unfinished wooden cabinet or wardrobe
- Medium-grit sandpaper (120-grit)
- Fine-grit sandpaper (220-grit)
- Clean tack cloths
- Chalk-style paint (Putty or Light Greige)
- Chalk-style paint (Cream or Off-White for layering)
- Medium-sized synthetic oval brush
- Clear furniture wax
- Dark antique wax
- Wax brush or lint-free cotton rags
- Small screwdriver (for hardware removal)
- Drop cloth
Step 1: Preparation & Base Coat
-
Clear the area:
Begin by laying down a drop cloth in a well-ventilated area to protect your floor from sanding dust and paint drips. -
Remove hardware:
Use a small screwdriver to carefully remove all knobs, hinges, and handles. Store them in a marked bag so you don’t lose any screws. -
Clean surface:
Wipe down the entire cabinet with a damp cloth to remove any dust or grease. Let it dry completely. -
Initial scuff sand:
Lightly sand the entire piece with 120-grit sandpaper. You aren’t trying to strip it bare, just creating a ‘tooth’ for the paint to grip. -
Remove dust:
Use a tack cloth to thoroughly wipe away all sanding dust. This is crucial for a smooth finish. -
First coat application:
Apply your first coat of the putty-colored chalk paint using the oval brush. Paint in the direction of the wood grain. -
Dry time:
Allow the first coat to dry fully, usually about 1-2 hours depending on humidity.
Wet Distressing Trick
For a softer, less scratched look, wet a kitchen sponge and scrub the edges before the paint fully cures instead of using sandpaper.
Step 2: Layering & Distressing
-
Second coat:
Apply a second coat of paint. For depth, you can mix a little of the cream paint into your putty color, creating a subtle variation. -
Full cure:
Let the paint dry completely, ideally overnight, to ensure it doesn’t peel during the distressing phase. -
Edge distressing:
Take your 120-grit sandpaper and focus on the natural wear points: corners, raised moldings, and edges of the doors. -
Reveal the wood:
Sand firmly until the raw wood peeks through. I like to vary the pressure here—some spots should be heavily worn, others barely touched. -
Surface smoothing:
Switch to fine 220-grit sandpaper and lightly run it over the flat surfaces to smooth out brush strokes. -
Clean up:
Wipe the cabinet down with a fresh tack cloth to remove all fine paint dust.
Step 3: Sealing & Finishing
-
Clear wax application:
Apply a thin layer of clear furniture wax over the entire piece using a wax brush or clean rag. Work in small sections. -
Dark wax accents:
Dip a small brush into dark antique wax and dab it strictly into crevices, corners, and carved details. -
Blend the waxes:
Immediately wipe back excess dark wax with a clear-waxed cloth to blend it, creating a soft, aged shadow rather than a dirty look. -
Buff to sheen:
Wait 20 minutes for the wax to harden slightly, then buff vigorously with a clean cotton cloth to achieve a soft satin sheen. -
Reattach hardware:
Once the wax feels dry to the touch, screw the knobs and hinges back into place to complete the transformation.
Add Texture
Before painting, lightly hit random spots on the wood with a heavy chain or hammer to create dents that will catch the dark wax later.
Step back and admire the authentic, time-worn character you’ve just added to your home
BRUSH GUIDE
The Right Brush for Every Stroke
From clean lines to bold texture — master brush choice, stroke control, and essential techniques.
Explore the Full Guide
Simple Stencil Pattern on Drawer Fronts
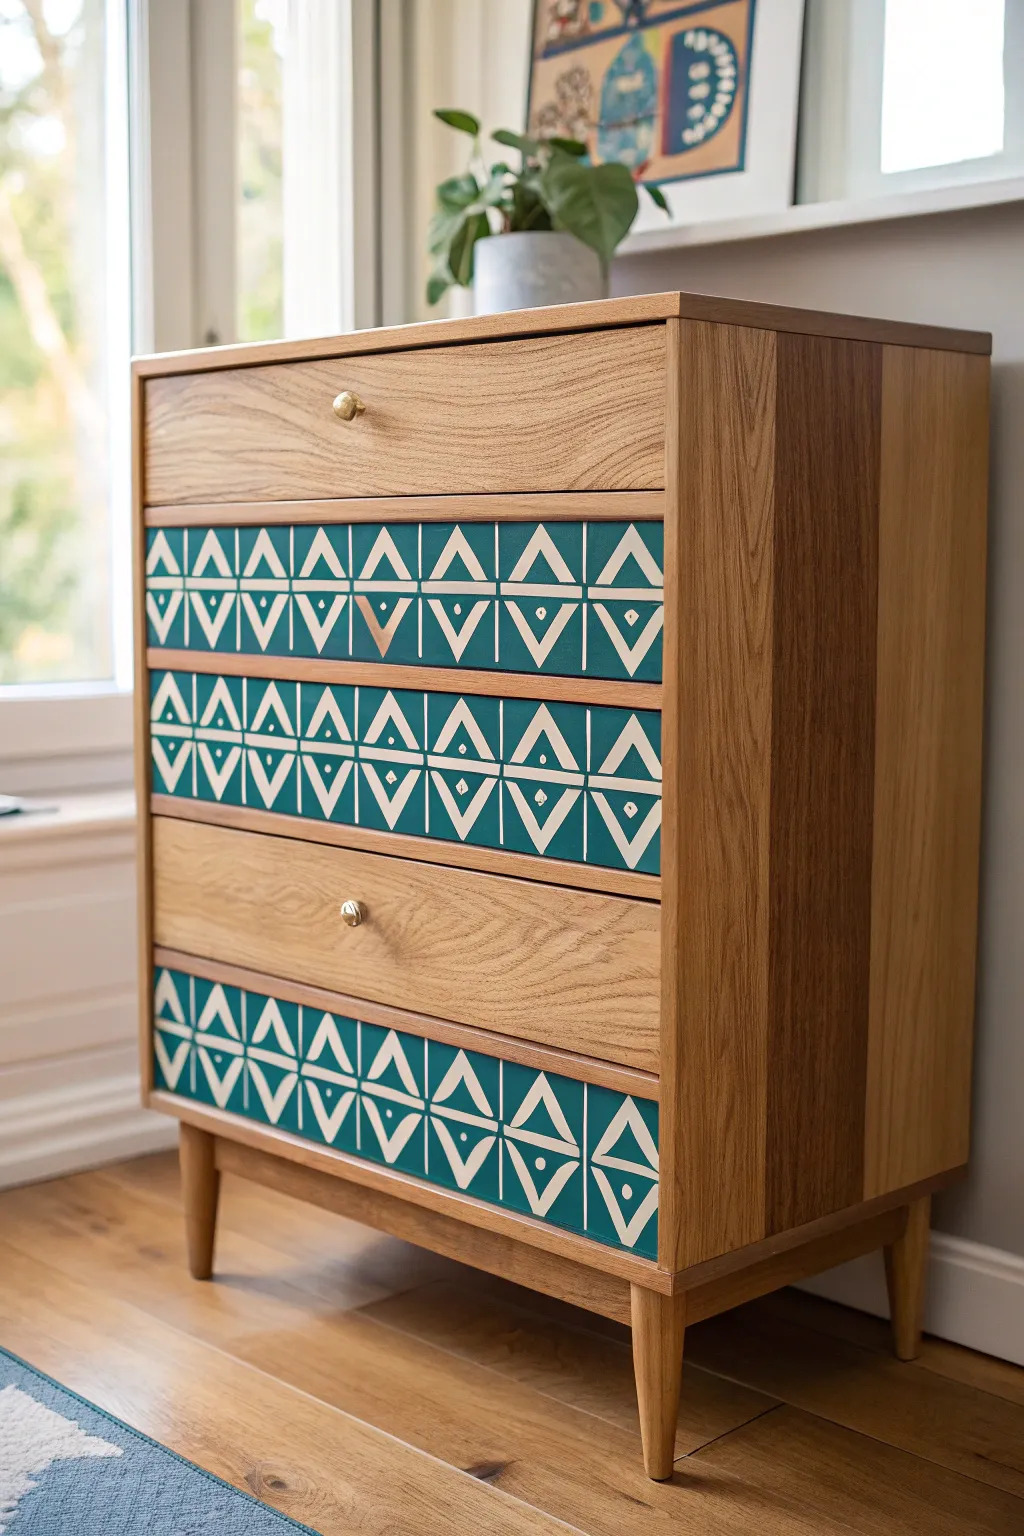
Transform a plain wooden dresser into a mid-century modern statement piece with this bold geometric upgrade. By alternating natural wood grain with striking teal-and-cream patterned drawers, you create a sophisticated balance of texture and color.
Step-by-Step Tutorial
Materials
- Wooden dresser (raw or to be sanded)
- Sandpaper (120 and 220 grit)
- Painter’s tape
- Deep teal chalk or mineral paint
- Cream or off-white acrylic paint
- Geometric triangle stencil
- Stencil brush or high-density foam roller
- Small artist’s brush
- Clear matte polyurethane topcoat
- Gold or brass drawer knobs
- Wood stain (optional, to match existing tone)
- Lint-free cloths
Step 1: Preparation and Base Work
-
Remove hardware:
Begin by unscrewing all knobs and pulls from the drawer fronts. Store them safely if you plan to reuse them, though upgrading to brass knobs really elevates this look. -
Clean and sand:
Wipe down the entire dresser to remove dust and grime. Sand all surfaces with 120-grit sandpaper to remove old varnish, following the wood grain. -
Smooth the surface:
Switch to 220-grit sandpaper for a final pass. This ensures a buttery smooth surface for both the stained wood and the painted sections. -
Select your pattern drawers:
Decide which drawers will receive the design. For this look, we are painting the second, fourth, and bottom drawers, leaving the top and middle ones as natural wood. -
Stain or seal natural wood:
If you want to deepen the wood tone, apply a stain to the frame and the ‘natural’ drawers now. Wipe away excess and let it dry completely.
Fixing Paint Bleed
If paint seeps under the stencil, don’t wipe it while wet! Let it dry completely, then use a tiny detail brush and the background color to ‘erase’ the mistake.
Step 2: Applying the Background Color
-
Tape off edges:
On the drawers designated for the pattern, use painter’s tape to mask off the side edges so you don’t get paint on the sliding mechanism. Mask the inner wood frame if needed. -
Apply the teal base:
Paint the fronts of your chosen drawers with the deep teal chalk paint. Use long, even strokes to minimize brush marks. -
Let it dry and repeat:
Allow the first coat to dry fully according to the manufacturer’s instructions. Apply a second coat for rich, opaque coverage. -
Check for smoothness:
Once the base coat is bone dry, run your hand over it. If there are any bumps, lightly sand with a very fine grit paper and wipe clean.
Step 3: Stenciling the Design
-
Position the stencil:
Place your geometric stencil on the first teal drawer. I find it best to start from the center and work outward to ensure the pattern is symmetrical. -
Secure the stencil:
Use small pieces of painter’s tape or a spray adhesive to hold the stencil firmly in place preventing any shifting. -
Off-load paint:
Dip your stencil brush or roller into the cream paint, then off-load almost all of it onto a paper towel. The brush should feel nearly dry. -
Apply the pattern:
Lightly dab or roll over the stencil using a vertical motion. Do not press hard, or paint will bleed underneath the plastic. -
Shift and repeat:
Carefully lift the stencil and move it to the next section, matching up the registration marks or the edge of the previous design. -
Touch up details:
Once the stenciling is done and the plastic removed, use a small artist’s brush and your teal background paint to correct any minor bleed-through.
Adding Metallic Flair
For a luxe touch, mix a small amount of gold metallic paint into your cream stencil color, or hand-paint a single triangle gold as a hidden accent.
Step 4: Finishing Touches
-
Seal the piece:
Protect your hard work by applying a clear matte polyurethane topcoat over the entire dresser, including the painted drawers. Two to three thin coats are ideal. -
Install hardware:
Once the topcoat has cured for at least 24 hours, attach your brass knobs to the center of the clean wood drawers. -
Reassemble:
Slide the drawers back into their tracks, checking the pattern alignment one last time as you step back to admire the result.
Now step back and enjoy how this simple pattern completely revitalizes the character of your room
Color-Blocked Drawer Faces
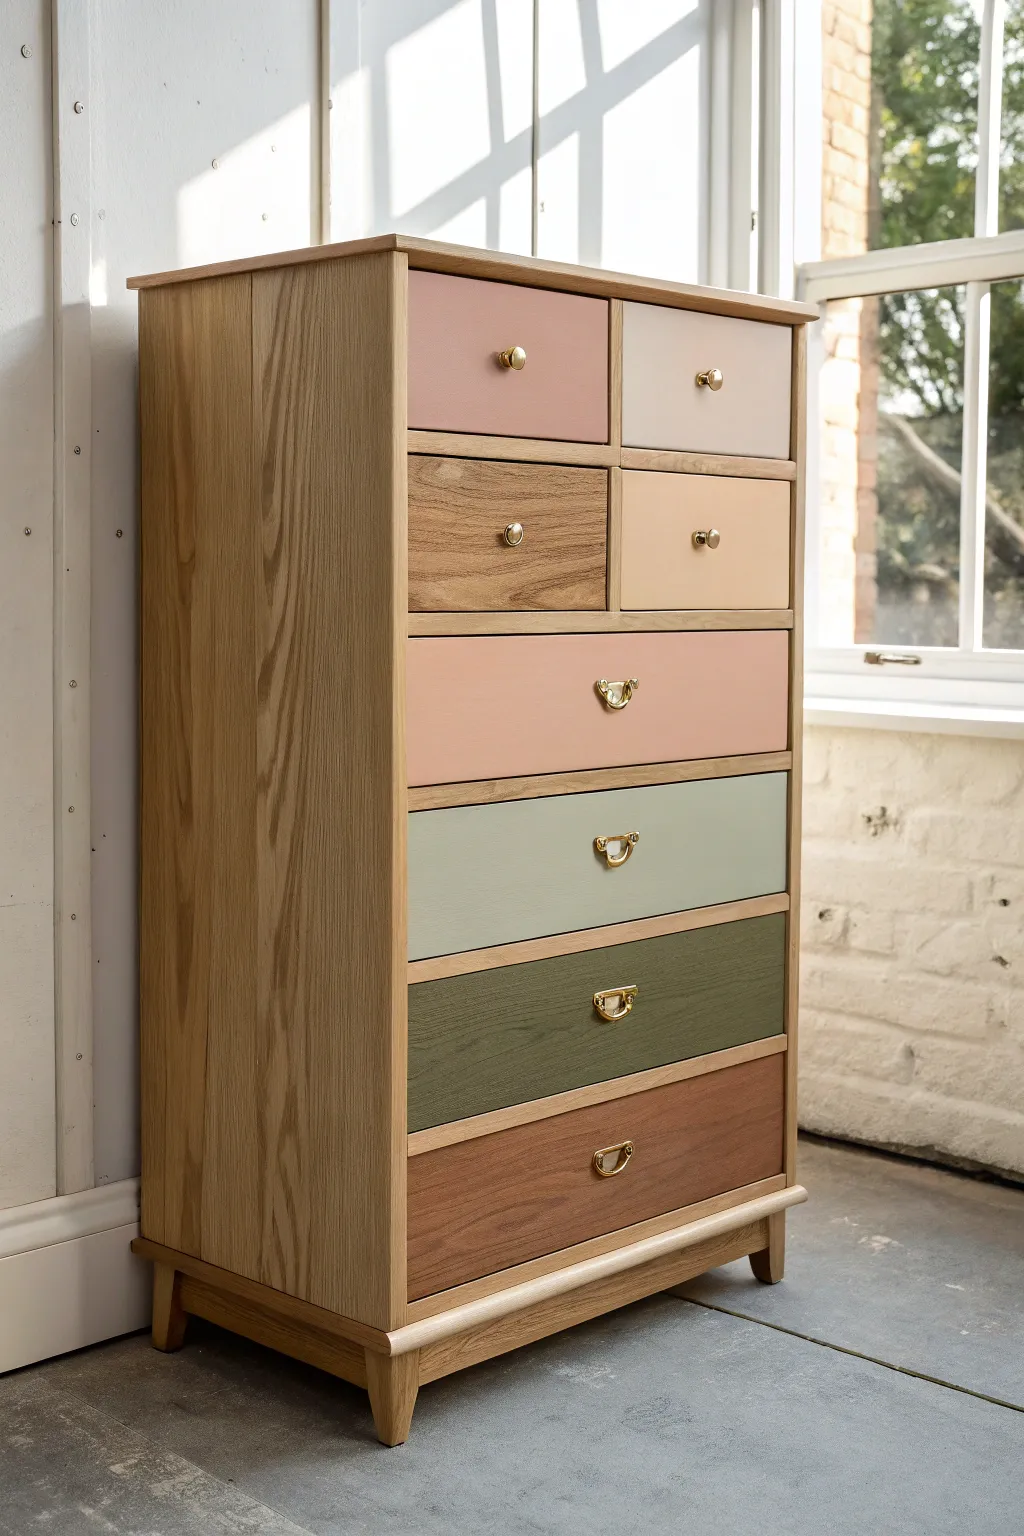
Bring a fresh, modern twist to a classic piece with this color-blocking technique that balances natural wood grain with soft, earthy pastels. By painting just the drawer fronts in a curated palette, you create a playful yet sophisticated focal point for any room.
Step-by-Step Guide
Materials
- Wooden chest of drawers (unfinished or previously finished)
- Sandpaper (120 and 220 grit)
- Orbital sander (optional, for larger areas)
- Painter’s tape (high quality)
- Primer (stain-blocking)
- Furniture paint in 5-6 colors (e.g., dusty rose, taupe, sage green, olive green, terracotta, cream)
- Clear matte or satin polyurethane topcoat
- Screwdriver
- Small foam rollers and tray
- Synthetic angled sash brush
- Tack cloth
- Gold or brass hardware (knobs and cup pulls)
Step 1: Preparation & Disassembly
-
Remove hardware:
Begin by removing all drawers from the chest. Use your screwdriver to take off all knobs and pulls. Label the hardware and screws in small bags if you plan to reuse them, though fresh brass hardware really elevates this look. -
Clean surfaces:
Wipe down the entire piece, especially the drawer fronts, with a degreasing cleaner or a mix of warm water and mild dish soap to remove years of oils or dust. -
Sand the finish:
Scuff sand all surfaces you intend to paint using 120-grit sandpaper. You don’t need to strip it to bare wood unless the previous finish is peeling, but you do need to remove the shine so the paint adheres. -
Sand the frame:
Since the frame remains natural in this project, sand the main body of the chest down to raw wood using an orbital sander or sanding block with 120-grit, followed by 220-grit for a smooth finish. -
Remove dust:
Vacuum up the sanding dust and wipe everything down thoroughly with a tack cloth. Any remaining dust will create a gritty texture in your final paint job.
Swatch Testing
Paint colors dry darker than they look wet. Test your 5-color palette on a piece of scrap cardboard first to ensure the tones harmonize before committing to the furniture.
Step 2: Painting the Gradient
-
Protect the sides:
Apply painter’s tape along the side edges of the drawer fronts if you want to keep the dovetail joints or side wood natural. This crisp line is a hallmark of high-quality furniture making. -
Prime the fronts:
Apply a coat of stain-blocking primer to the face of each drawer. I find using a small foam roller gives the smoothest base without brush marks. Let this dry completely according to the can’s instructions. -
Plan your palette:
Arrange your paint pots in the order they will appear on the dresser. For this look, mix warm tones on top (creams, muted pinks) transitioning into cooler greens and grounding terracottas at the bottom. -
Paint first coats:
Using a fresh foam roller or a clean brush for each color, apply the first coat of paint to the drawer fronts. Don’t worry if coverage isn’t perfect yet; thin coats are better than thick ones. -
Sand between coats:
Once the first coat is fully dry, very lightly hand-sand with 220-grit paper to knock down any raised grain or fuzz. Wipe away the dust. -
Apply second coats:
Apply your second coat of color. This should provide full opacity. If you are using very light colors like the cream top drawer, a third coat might be necessary.
Step 3: Finishing & Assembly
-
Seal the frame:
While the drawers dry, apply a clear matte polyurethane to the main wooden frame. This protects the raw wood while keeping that natural, organic look. -
Seal the drawers:
Once the paint has cured (usually 24 hours), apply the same clear topcoat over the painted fronts. This adds durability against scratches and fingerprints. -
Install top hardware:
For the smaller top drawers, install simple round brass knobs. Center them perfectly; a measuring tape is your best friend here. -
Install lower hardware:
For the wider lower drawers, install brass cup pulls or bail pulls. These usually require two screws, so use a template to ensure your drill holes are level. -
Reassemble:
Slide the drawers back into their tracks, stepping back to admire how the different colors interact with the natural wood grain of the frame.
Sticky Drawers?
If paint builds up on the drawer edges, they might stick. Sand the edges down to bare wood and rub a mesmerizing white candle along the runners for smooth gliding.
Now you have a completely unique statement piece that brings a customized pop of color to your space

PENCIL GUIDE
Understanding Pencil Grades from H to B
From first sketch to finished drawing — learn pencil grades, line control, and shading techniques.
Explore the Full Guide
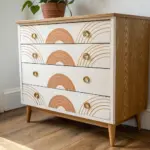
Ombre Gradient Down the Drawers
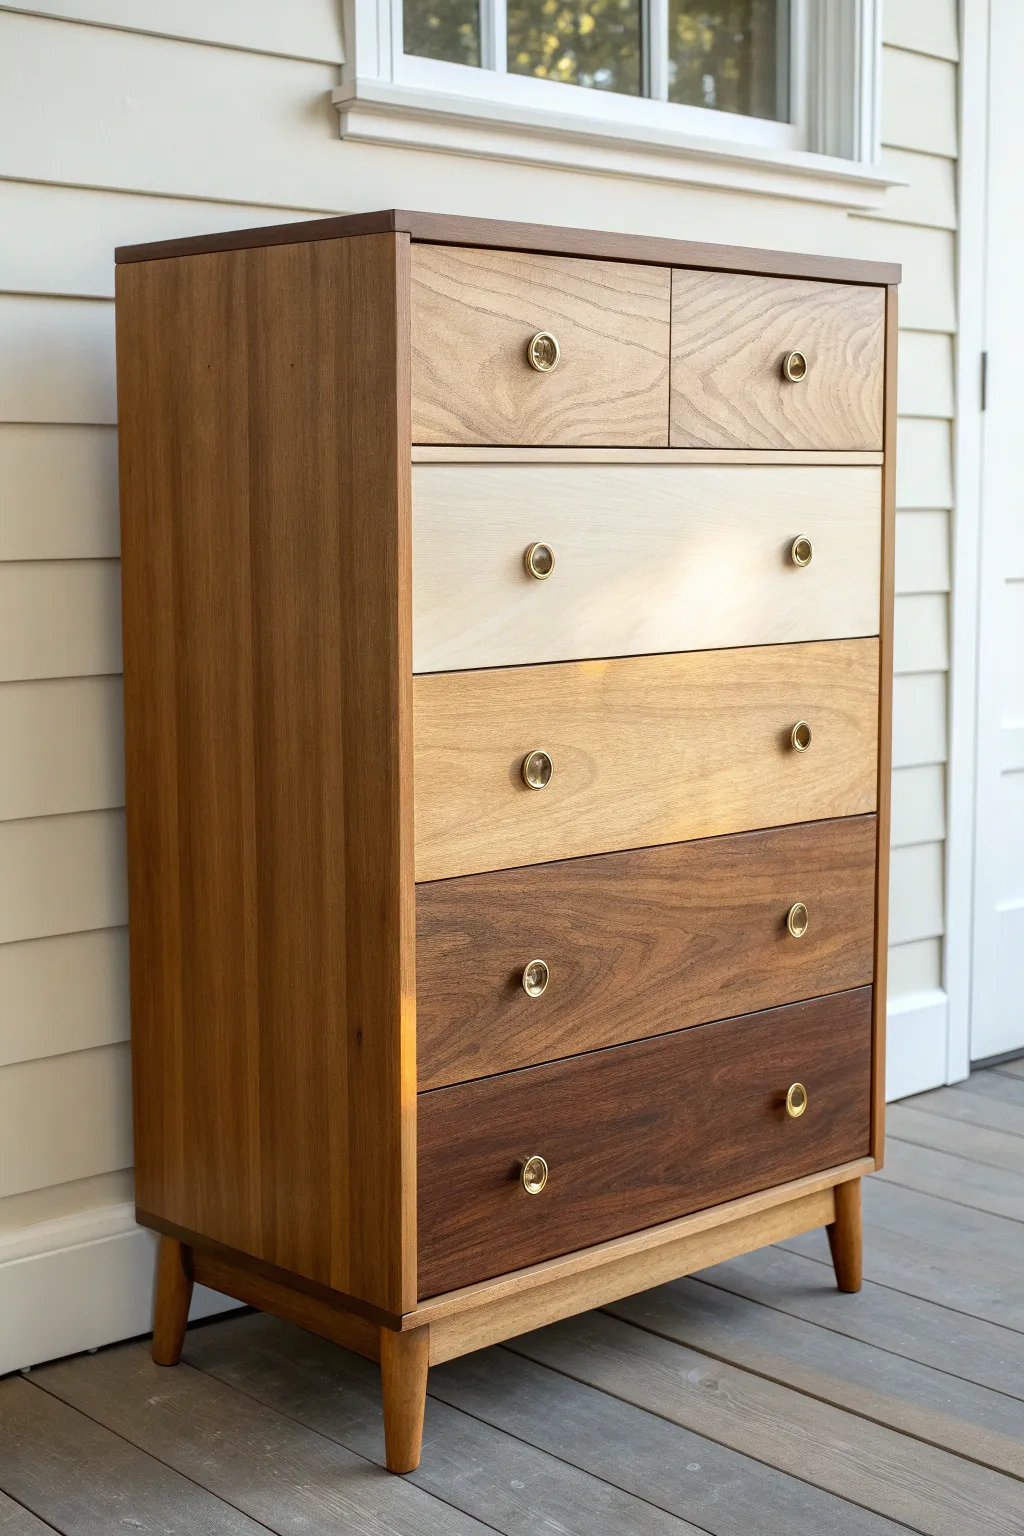
Transform a plain wooden dresser into a stunning statement piece with this sophisticated gradient effect. By using varying shades of wood stain rather than opaque paint, you preserve the beautiful natural grain while creating a seamless transitions from light to dark.
How-To Guide
Materials
- Unfinished wooden dresser (or stripped vintage piece)
- Orbital sander with 120 and 220 grit discs
- Tack cloth
- Pre-stain wood conditioner
- Water or oil-based wood stain in 3-4 distinct shades (e.g., Natural, Golden Oak, Walnut, Espresso)
- Clean cotton rags or staining pads
- Disposable gloves
- Painter’s tape
- Polyurethane topcoat (satin finish)
- High-quality synthetic bristle brush
- Fine grit sandpaper (320 grit)
- New hardware (gold/brass knobs)
Step 1: Preparation and Sanding
-
Remove hardware and disassemble:
Begin by removing all existing knobs or handles from the drawer fronts. Pull out every drawer and set the main carcass aside. -
Initial coarse sanding:
Using an orbital sander with 120-grit paper, sand down all drawer fronts and the main body of the dresser. If you are refinishing an old piece, ensure all old varnish or paint is completely removed to expose the raw wood. -
Smooth finish sanding:
Switch to 220-grit sandpaper and go over every surface again. This step is crucial for ensuring the stain absorbs evenly without showcasing scratch marks. -
Clean the surface:
Wipe away all sanding dust thoroughly. I recommend following up with a tack cloth to pick up the finest particles that a regular rag might miss. -
Apply wood conditioner:
Brush a layer of pre-stain wood conditioner onto all surfaces you plan to stain. This prevents blotchiness, especially on soft woods like pine, and ensures your gradient looks intentional.
Too dark too fast?
If a drawer absorbs too much color, lightly dampen a rag with mineral spirits and scrub the wood while the stain is still wet to lift some pigment out.
Step 2: Creating the Ombre Effect
-
Plan your gradient:
Arrange your stain cans from lightest to darkest. You want the top drawers to be the lightest tone (or even natural wood) and the bottom drawer to be the darkest. -
Stain the top drawers:
For the top row, apply your lightest shade (or a clear coat if you want natural wood). Use a clean rag to wipe the stain on, let it sit for a minute, and wipe off the excess in the direction of the grain. -
Stain the middle drawers:
Move to the second row using your medium-light stain (like a Golden Oak). Apply carefully, ensuring you don’t drip onto the drawers below. -
Stain the lower-middle drawers:
For the third row, use your medium-dark stain (like a Walnut). If the jump in color feels too abrupt, you can mix a small amount of the previous stain with this one to create a custom bridge color. -
Stain the bottom drawer:
Apply the darkest stain (like Espresso or Dark Walnut) to the bottom drawer. This visual weight anchors the piece beautifully. -
Stain the frame and legs:
Decide on a shade for the main dresser body. In this project, a medium tone that matches the middle drawers ties everything together. Stain the top, sides, and legs uniformly. -
Dry and assess:
Allow the stain to dry completely according to the manufacturer’s instructions. Once dry, place the drawers back in to check the gradient. If a drawer looks too light, apply a second coat of stain to deepen the tone.
Bleached Effect
For a higher contrast look, use a wood bleach on the top drawers before sealing. This creates an even lighter, Scandinavian-style starting point for the gradient.
Step 3: Sealing and Assembly
-
Apply the first topcoat:
Using a high-quality synthetic brush, apply a thin, even layer of satin polyurethane to all stained surfaces. Watch for drips along the edges. -
Sand between coats:
Once the first coat is fully dry, lightly hand-sand with 320-grit sandpaper. This knocks down any raised grain and ensures a professional, smooth feel. -
Apply final protection:
Wipe off the white sanding dust and apply a second (and optionally third) coat of polyurethane for durability. -
Install hardware:
Once the finish has cured for at least 24 hours, attach your new gold or brass hardware. The metallic sheen contrasts perfectly against the warm wood tones. -
Final assembly:
Slide the drawers back into their tracks, ensuring they follow the light-to-dark pattern you created.
Enjoy the warmth and custom flair this unique piece brings to your bedroom or living area
Geometric Shapes With Painter’s Tape

Transform a plain wooden wardrobe into a striking statement piece with this retro-inspired geometric design. By combining natural wood tones with crisp angular shapes in cream, rust, and teal, you’ll create a dynamic pattern that feels both modern and timeless.
Step-by-Step Guide
Materials
- Wooden wardrobe or cabinet (unfinished or sanded)
- Painter’s tape (high quality, various widths)
- Chalk paint or satin furniture paint (Cream/Off-white)
- Chalk paint or satin furniture paint (Rust/Terracotta)
- Chalk paint or satin furniture paint (Deep Teal/Green)
- Medium-grit sandpaper (120-150 grit)
- Fine-grit sandpaper (220 grit)
- Tack cloth
- Small foam roller
- Angled sash brush (1.5 – 2 inch)
- Ruler or straight edge
- Pencil
- Clear furniture wax or matte polyurethane topcoat
- Screwdriver (for removing hardware)
Step 1: Preparation
-
Remove hardware:
Begin by unscrewing any knobs, handles, or hinges if possible. Store them in a marked bag so you don’t lose any small screws. -
Clean surface:
Wipe down the entire door surface with a damp cloth and mild soap to remove dust, grease, or old polish. Let it dry completely. -
Sand the wood:
Scuff sand the entire door area you plan to paint using 120-grit sandpaper. This helps the paint adhere properly, especially if the wood has a previous finish. -
Remove dust:
Wipe away all sanding residue thoroughly with a tack cloth so your painted lines stay crisp.
Bleeding Lines?
If paint seeps under the tape, wait until it’s barely dry, then gently scrape the excess away with a craft knife or the edge of a credit card for a clean fix.
Step 2: Mapping the Design
-
Establish the focal point:
Decide on your central point. In this design, the ‘rays’ originate from the middle of the left vertical edge of the door panel. -
Mark the lines:
Using a ruler and pencil, lightly draw lines radiating from that central point outward to the right edge and corners, creating large triangular sections. -
Apply initial tape:
Apply painter’s tape firmly along the outside of your pencil lines for the first set of shapes you want to paint. I find it helpful to press the edges down with a credit card to seal them tight. -
Protect the frame:
Tape off the surrounding door frame and the non-painted natural wood sections to protect them from accidental brush strokes.
Go Metallic
For a glamorous touch, paint a thin gold or copper line between the color blocks and the natural wood using a fine liner brush or metallic tape.
Step 3: Painting
-
Seal the tape edges:
Lightly brush a tiny amount of your base color (or clear matte medium) over the tape edge. This creates a barrier that prevents the colored paint from bleeding under the tape. -
Paint the cream sections:
Start with the lightest color. Apply the cream paint to the designated triangles using a small foam roller or brush. Apply two thin coats rather than one thick one. -
Allow to dry:
Let the cream paint dry completely to the touch before moving to the next step. -
Paint the rust sections:
Apply the rust/terracotta color to the adjacent triangles. Be mindful of where your tape is placed; you may need to wait for neighboring sections to dry and re-tape if the shapes share a border. -
Paint the teal section:
Finally, paint the large opposing triangle in the deep teal color. Ensure even coverage, checking for any translucent spots. -
Remove tape:
Carefully peel off the painter’s tape while the final coat is still slightly tacky. Pull at a 45-degree angle away from the paint to ensure a sharp, clean line.
Step 4: Finishing Touches
-
Touch ups:
Inspect your lines. If any paint bled led through, use a small artist’s brush or a razor blade to gently tidy up the edges once the paint is fully hard. -
Light sanding:
Once fully dry, very lightly run 220-grit sandpaper over the painted areas if you want a buttery smooth finish, but be careful not to distress the edges unless that’s the look you want. -
Seal the piece:
Apply a coat of clear furniture wax or matte polyurethane over the entire door—both painted and unpainted sections—to unify the sheen and protect the wood. -
Reattach hardware:
Screw the knob back into place. Now is a great time to upgrade to a new handle if you want to modernize the look further.
Step back and admire how a simple geometric pattern has completely revitalized the character of your room.


Matte Metallic Accents on Legs and Trim
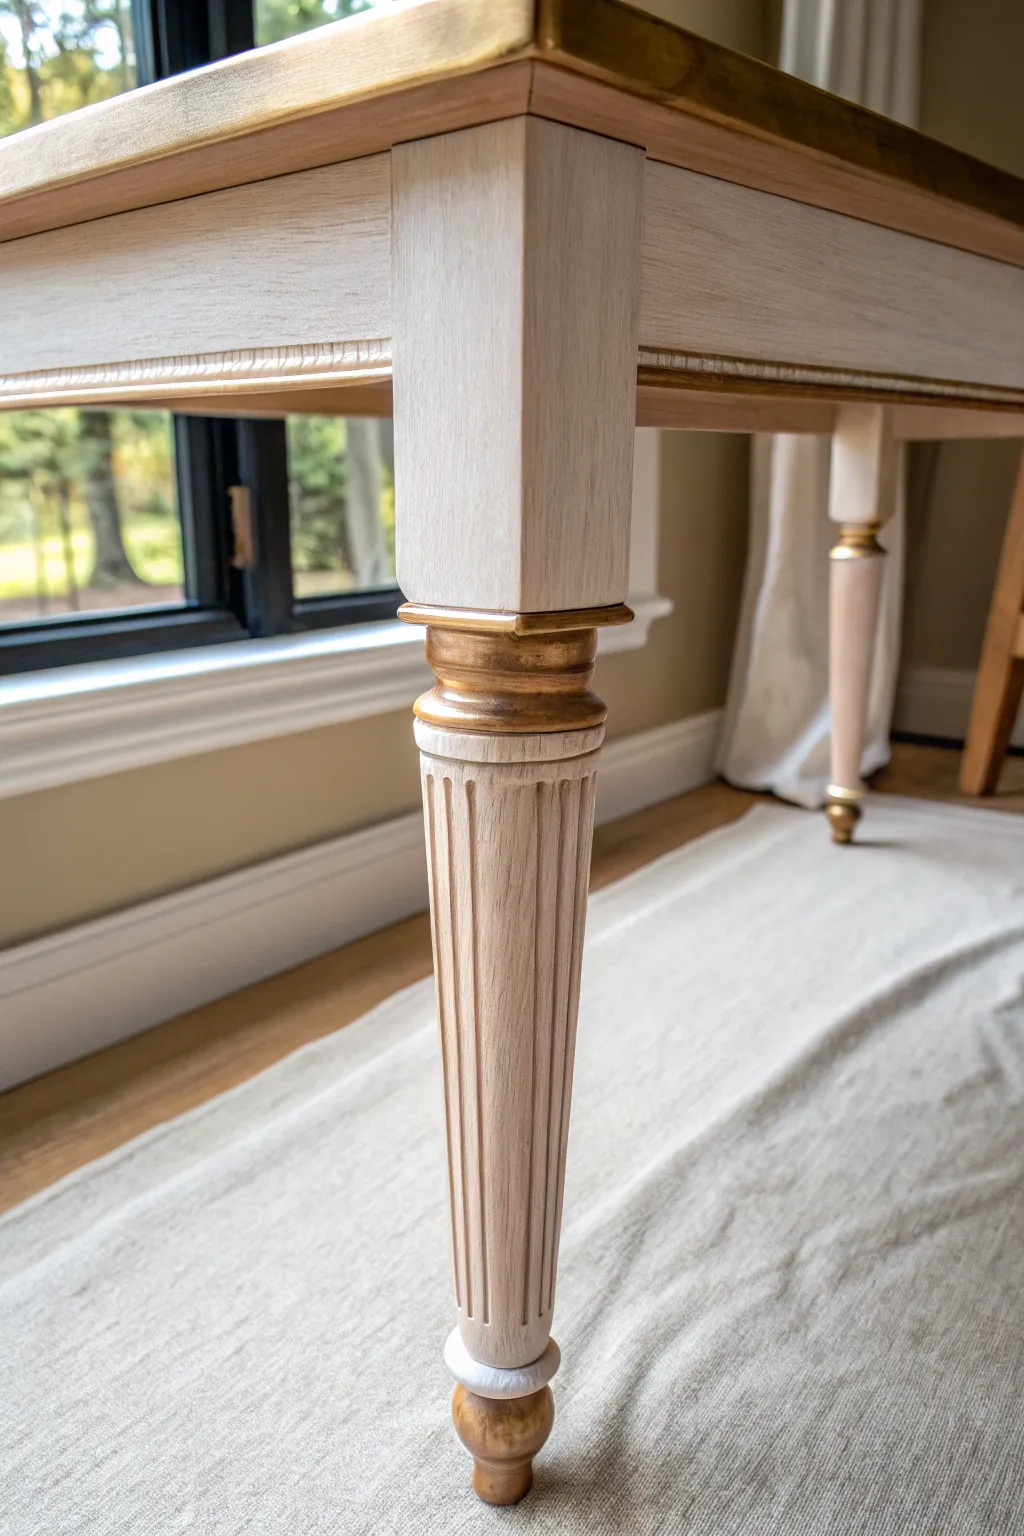
Transform an ordinary wooden table into a statement piece with this sophisticated dual-finish technique. By combining a cerused white grain effect with matte metallic gold accents, you create a look that feels both antique and refreshingly modern.
Step-by-Step Tutorial
Materials
- Wooden table (unfinished or stripped)
- White liming wax or diluted white chalk paint
- Clear furniture wax
- Matte metallic gold paint
- Small artist brushes (flat and round)
- Lint-free rags or cheesecloth
- Sandpaper (120 and 220 grit)
- Wire brush (optional, for opening grain)
- Painter’s tape (delicate surface)
- Tack cloth
Step 1: Preparation and Grain Enhancement
-
Surface Prep:
Begin by ensuring your table leg is completely stripped of old varnish or paint. Sand the entire surface with 120-grit sandpaper to remove imperfections, then switch to 220-grit for a smooth touch. -
Open the Grain:
If your wood is tight-grained (like maple), you might skip this, but for oak or ash, briskly run a wire brush along the direction of the wood grain. This deepens the grooves where our white wax will eventually sit. -
Clean Up:
Wipe away every speck of sanding dust using a tack cloth. Any leftover dust will clump up your wax later, so be thorough here.
Step 2: Creating the Cerused Look
-
Apply Liming Medium:
Dip a rag into your white liming wax or diluted white chalk paint. Rub it vigorously into the wood, moving against the grain first to force the pigment into the pores, then with the grain to smooth it out. -
Wipe Back:
Wait about 5-10 minutes for the product to set slightly. Then, take a clean, dry lint-free cloth and wipe off the excess from the surface. You want the white to remain only in the wood grain grooves, leaving the main surface natural. -
Repeat if Necessary:
Inspect the finish. If you want a whiter, frostier look, apply a second coat using the same method once the first has dried completely. -
Seal the Wood:
Once the white grain filler is fully dry (check manufacturer times), apply a thin layer of clear furniture wax over the entire leg to seal the wood and provide a smooth base for the next steps.
Clean Lines Pro Tip
Make sure to burnish (rub down) the edges of your painter’s tape with a fingernail or credit card. This prevents the gold paint from bleeding under the tape.
Step 3: Adding the Gold Accents
-
Tape Off Areas:
Identify the raised rings and the bottom foot of the table leg. Use delicate surface painter’s tape to mask off the wood areas immediately adjacent to where the gold will go to ensure crisp lines. -
Base Coat of Gold:
Using a small flat artist brush, apply your first coat of matte metallic gold paint to the turned rings and the ball foot. Apply thin coats to avoid drips. -
Refining edges:
For the fluted grooves or intricate trim where tape won’t fit, use a steady hand and a fine point round brush. I find resting my pinky on a dry part of the leg helps stabilize my hand for these details. -
Build Opacity:
Allow the first coat of gold to dry. Apply a second or third coat until you achieve a solid, rich metallic look without brushstrokes. -
Trim Detailing:
Don’t forget the apron of the table. Apply a thin line of gold to the bottom edge of the table skirt or any decorative beading to tie the design together. -
Remove Tape:
Carefully peel away the painter’s tape while the final coat of gold is still slightly tacky; this prevents the paint from peeling up with the tape.
Level Up: Antique Gold
After the bright gold dries, lightly dry-brush a tiny amount of dark brown glaze over the metallic areas to settle into crevices, giving it an aged, vintage bronze look.
Step 4: Final Protection
-
Cure Time:
Let the metallic paint cure for at least 24 hours before handling heavily. -
Final Buff:
Take a clean soft cloth and gently buff the waxed wood areas one last time to bring out a soft, satin sheen that contrasts beautifully with the matte gold.
Now step back and admire how the subtle grain texture perfectly balances the luxurious gold trim.
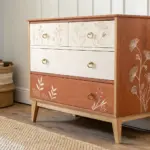
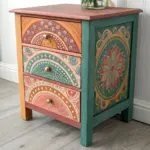
Hand-Painted Mini Mural or Botanical Motif
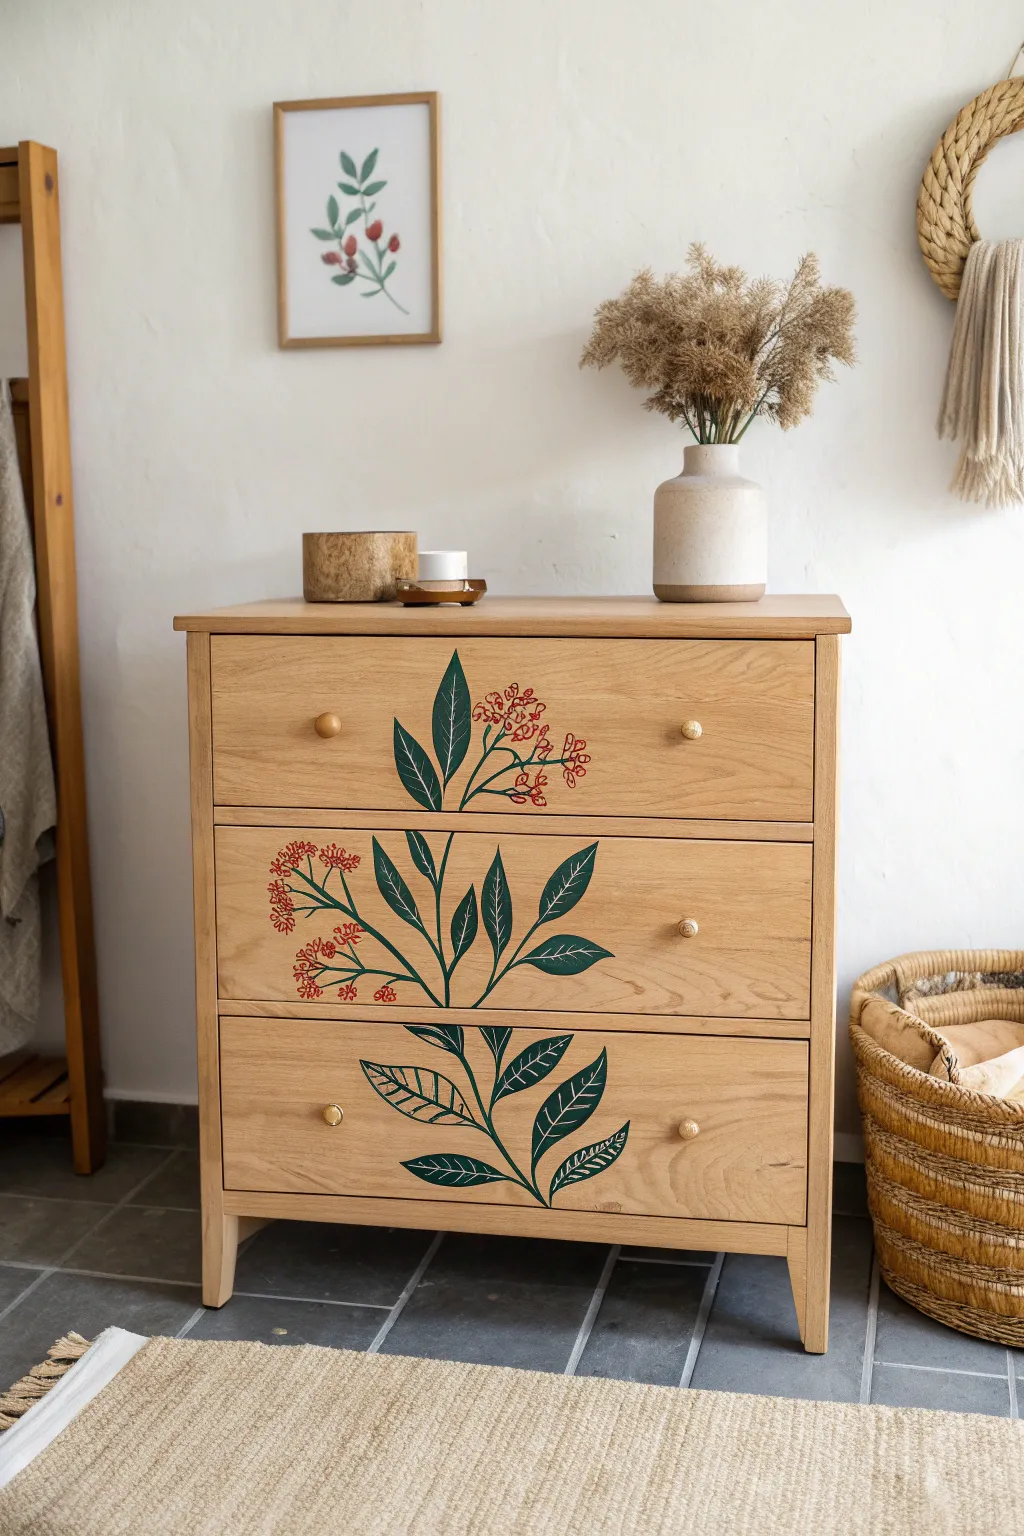
Transform a plain wooden dresser into a nature-inspired statement piece with this elegant climbing vine motif. This project blends deep green foliage with delicate rusty-red floral clusters that flow seamlessly across the drawer fronts for a cohesive, hand-painted look.
Step-by-Step Tutorial
Materials
- Unfinished or sanded wooden dresser (3-drawer)
- Medium-grit sandpaper (180-220 grit)
- Tack cloth
- Pencil
- Transfer paper (optional)
- Acrylic craft paints: Deep Hunter Green, Olive Green, Rust Red/Terracotta
- Fine liner brush (size 0 or 1)
- Small round brush (size 2 or 4)
- Clear matte or satin polycrylic sealer
- Reference image of botanical vine
Step 1: Preparation & Layout
-
Clean the surface:
Before you begin, remove the drawer knobs to create a flat canvas. Wipe down the dresser fronts thoroughly with a tack cloth to remove any dust or debris from previous sanding. -
Plan the flow:
Visualize the vine growing upward from the bottom drawer. You want the main stem to meander continuously across the gaps between drawers, so lightly mark the top and bottom edges of each drawer where the stem will connect to ensure alignment. -
Sketch the vine:
Using a light pencil touch, draw the main stem starting at the bottom center and curving gently upward toward the top left. Add major offshoots for leaves, keeping the composition balanced but asymmetrical. -
Place the leaves:
Sketch the outline of the large, lance-shaped leaves. Vary their direction; some should point up, others droop slightly. Ensure the leaves cross over the drawer gaps conceptually, but stop your drawing at the edge of each drawer front. -
Add floral clusters:
Mark positions for the berry or flower clusters. I like to place these near the top and middle sections to add visual weight and color balance against the heavy greenery at the bottom.
Paint bleeding into grain?
If the wood grain is very deep, paint might bleed. Combat this by applying a thin layer of clear matte medium over your pencil sketch first to seal the fibers before adding color.
Step 2: Painting the Foliage
-
Base coat the stems:
Load a liner brush with Deep Hunter Green. Carefully paint the main central stem and the smaller leaf stems. Keep the pressure consistent for a smooth, flowing line. -
Fill in the leaves:
Switch to a small round brush. Fill in the leaf shapes with the same Deep Hunter Green. Don’t worry about perfect opacity yet; a slightly translucent look can mimic nature, or you can add a second coat later. -
Paint lower leaves:
For the bottom drawer, paint the large leaves with the same green. Notice in the design how the lowest leaves have intricate white veining patterns—paint the solid green backdrop first and let it dry completely. -
Detailing the veins:
Once the green is dry, use your finest liner brush. For the top leaves, you might use a slightly lighter Olive Green to paint simple central veins. For the bottom leaves, mix a tiny bit of cream into your green or use a white paint to create the stylized ‘skeleton’ leaf effect shown in the image. -
Refine edges:
Go back with your liner brush and neaten any leaf edges that look ragged. Crisp edges are key to making this look like a professional illustration rather than a sketch.
Step 3: Adding Florals & Finishing
-
Paint the berry stems:
Using the Rust Red paint and a clean liner brush, draw the delicate, branching stems for the floral clusters. These should look like tiny antlers or coral shapes extending from the main green stems. -
Add the berries:
Dip the tip of a small round brush or even the handle end of a brush into the Rust Red. Dot small circles at the ends of the red branching lines to create the clusters of berries or buds. -
Check continuity:
Step back and look at the dresser as a whole. Ensure the green stems appear to connect visually from one drawer to the next. If a line looks broken, extend the paint slightly over the edge of the drawer face (not the top lip) to bridge the gap. -
Let it cure:
Allow the acrylic paint to dry fully, ideally overnight. Acrylics dry to the touch quickly but need time to harden before sealing. -
Seal the work:
Apply a clear polycrylic topcoat over the entire drawer front (not just the painted parts) to protect the wood and your artwork. Use smooth, long strokes to avoid brush marks. -
Reassemble:
Once the sealer is cured, reattach your wooden knobs. The natural wood tone of the knobs complements the organic vibe of the painting perfectly.
Practice your stroke
Practice painting the leaves on paper first. Press the brush down to widen the stroke for the leaf belly, then lift up as you drag to create a sharp, tapered point.
Enjoy the calming atmosphere your new botanical focal point brings to the room


Have a question or want to share your own experience? I'd love to hear from you in the comments below!