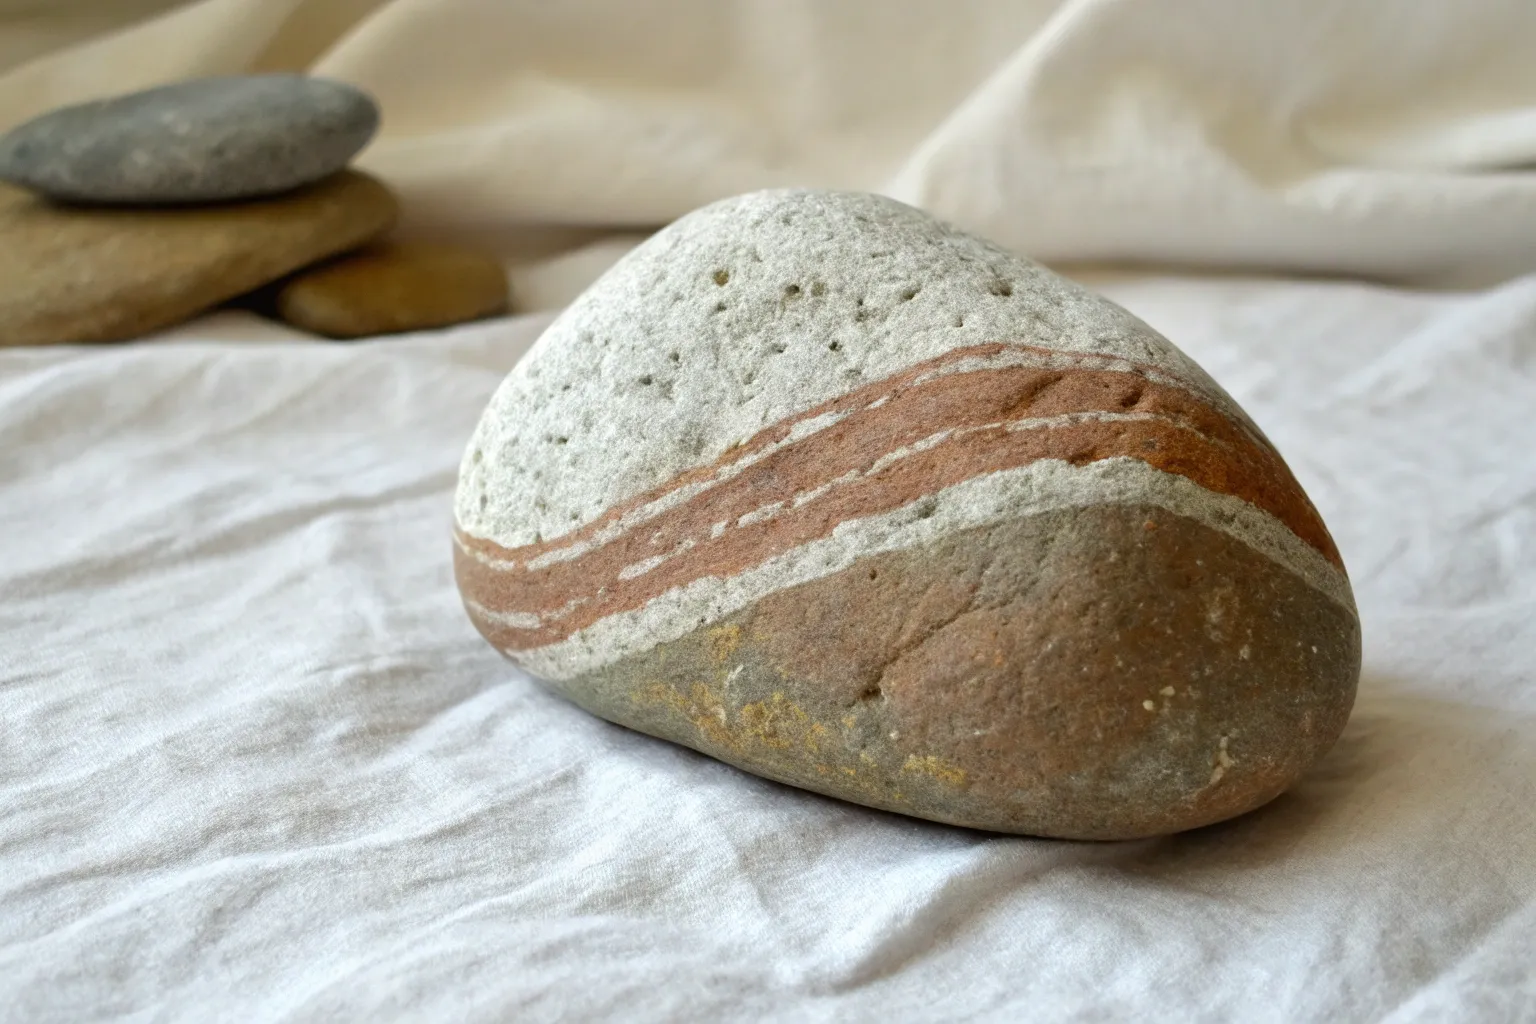
Odd-shaped rocks are my favorite kind because they basically hand you a design if you just listen to the bumps, ridges, and weird little angles. Instead of fighting for a perfect smooth oval, you get to let the stone’s natural silhouette lead the art.
Mini Cottages That Use Natural “Roof” Angles
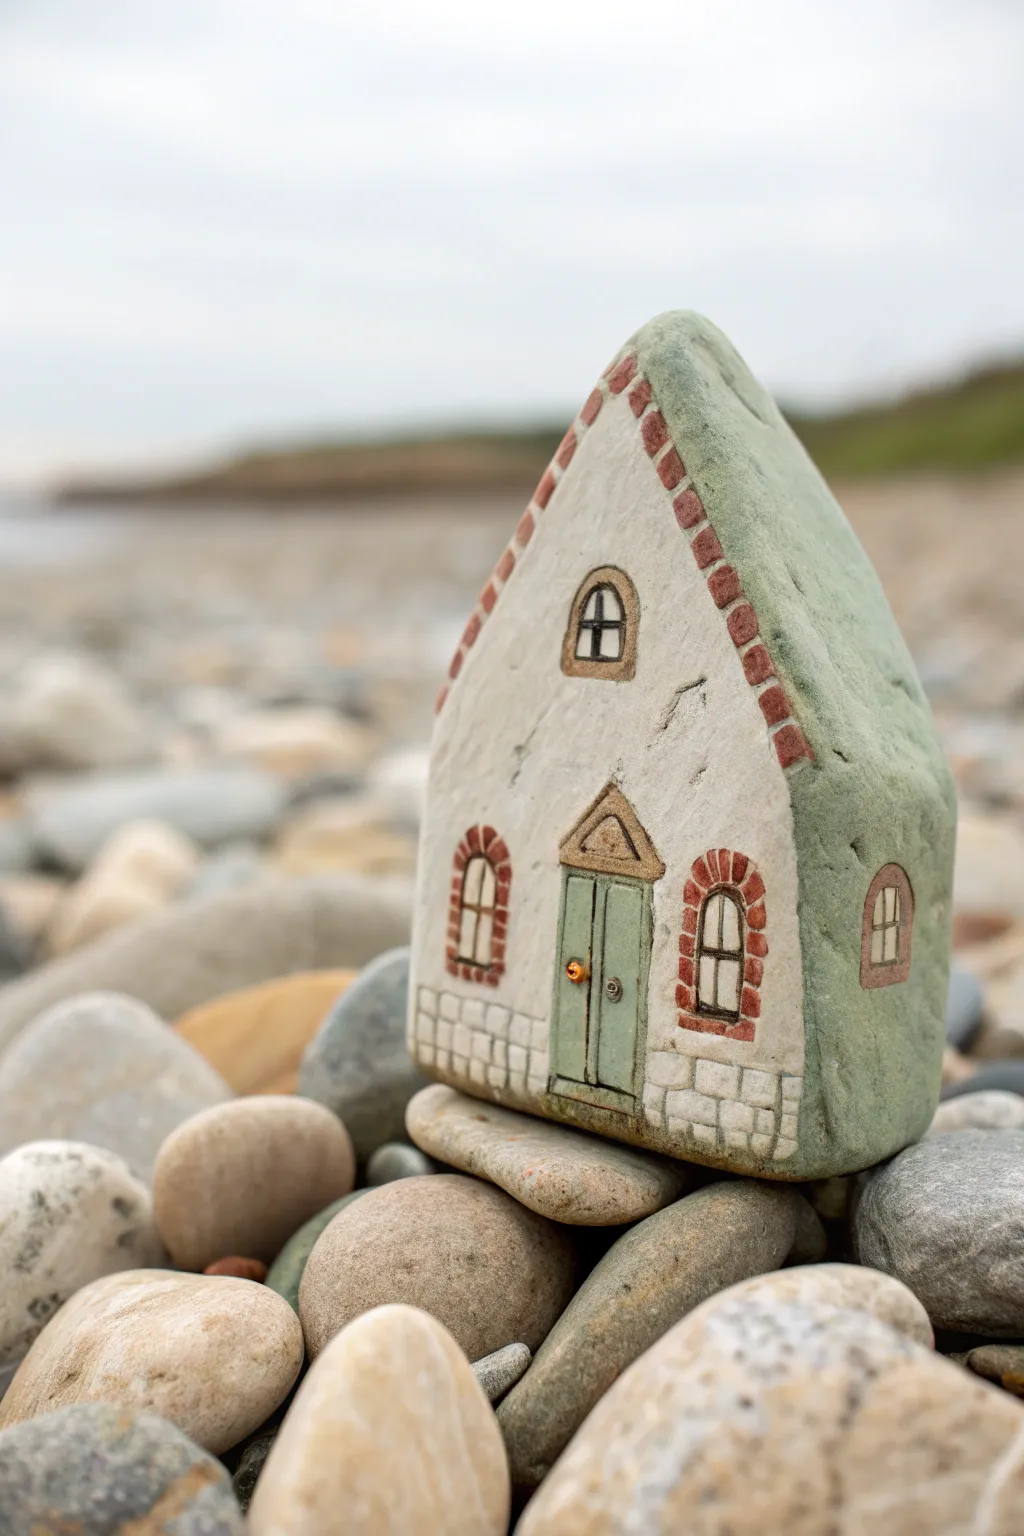
Transform a naturally angled rock into a charming miniature home with this detailed painting guide. By following the stone’s existing shape, you’ll create a cozy cottage that feels like it grew right out of the landscape.
Detailed Instructions
Materials
- Rock with a triangular ‘roof’ peak
- Acrylic paints: Titanium White, Unbleached Titanium (or Beige), Burnt Sienna (red-brown), Sage Green, Black, Raw Umber
- Flat brush (medium)
- Small round brush (size 1)
- Fine liner brush (size 00 or 000)
- Pencil
- Matte spray varnish
- Palette or small plate
- Water cup and paper towels
Step 1: Planning and Base Coats
-
Select and clean your rock:
Find a rock with a distinct point at the top and a somewhat flat bottom edge. Scrub it thoroughly with soapy water and a stiff brush to remove dirt, letting it dry completely before starting. -
Sketch the main features:
Using a pencil, lightly outline the separation between the ‘roof’ and the ‘walls’. The roofline should follow the natural angle of the stone’s peak. Sketch a central door, a small window above it, two side windows, and a smaller window on the side face of the rock. -
Paint the walls:
Mix a creamy off-white using Titanium White and a touch of Unbleached Titanium. Apply this to the main body of the house, carefully painting around your sketched windows and door. You might need two coats for opaque coverage. -
Paint the roof:
Apply a soft Sage Green to the entire roof area, covering the top and sloping sides. Extend this color slightly over the edge to create an eave line later. -
Block in the door:
Use the same Sage Green (or lighten it slightly with white for contrast) to fill in the rectangular door shape in the center.
Uneven Texture?
If your rock is very pitted, don’t fight it. Use a slightly thicker base coat of heavy body acrylics to fill small holes, or let the texture show for an aged stucco effect.
Step 2: Architectural Details
-
Create the roof trim:
Using Burnt Sienna, paint a dashed line along the very edge where the white wall meets the green roof. These small rectangular dashes mimic exposed brickwork or decorative tiling along the gable. -
Outline the arched windows:
With a fine round brush and Burnt Sienna, paint the arched brick frames around the two ground-floor windows. Imagine small bricks curving over the top and straight down the sides. -
Add the door pediment:
Above the green door, paint a small triangular pediment using a mix of Unbleached Titanium and a tiny bit of Raw Umber for a stony look. Outline it thinly in brown. -
Detail the upper window:
For the attic window, paint a simple arched frame using Raw Umber. Keep the line steady but don’t worry about perfection; rustic is better. -
Paint the foundation stones:
Along the very bottom edge of the white walls, paint a horizontal band of irregular rectangular shapes using light grey or diluted Raw Umber to suggest a stone foundation.
Steady Hands
For the tiny window panes, rest your painting hand’s wrist gently on the table or even on the rock itself to stabilize your liner brush strokes.
Step 3: Fine Lines and Finishing
-
Paint the window panes:
Fill the inside of the window arches with plain white. Once dry, use your thinnest liner brush and thinned black paint to draw the cross-bars (muntins) on the windows. -
Detail the door:
Outline the door panels and the central vertical line with a very thin mix of dark green or black. Add a dot of bright orange or gold for the doorknob to make it pop. -
Weather the walls:
I like to create a slightly aged look by dry-brushing a tiny amount of grey or diluted brown unpredictably over the white walls. This adds texture and prevents the house from looking too ‘plastic’. -
Add side details:
Don’t forget the side of the rock. Paint the small side window frame in brown and add cross-bars. Verify the green roof paint meets the wall cleanly on this side as well. -
Refine the brickwork:
Go back over your red brick details (roof trim and window arches) to neaten edges if needed. Add tiny lighter highlights to individual bricks to give them dimension. -
Seal the artwork:
Once the paint is bone dry (give it at least an hour), take the rock outside and spray it with a matte varnish. This protects the paint from chipping and unifies the sheen.
Now you have a delightful stone abode ready to tuck into a garden corner or display on a shelf


Funny Faces Built From Bumps and Noses
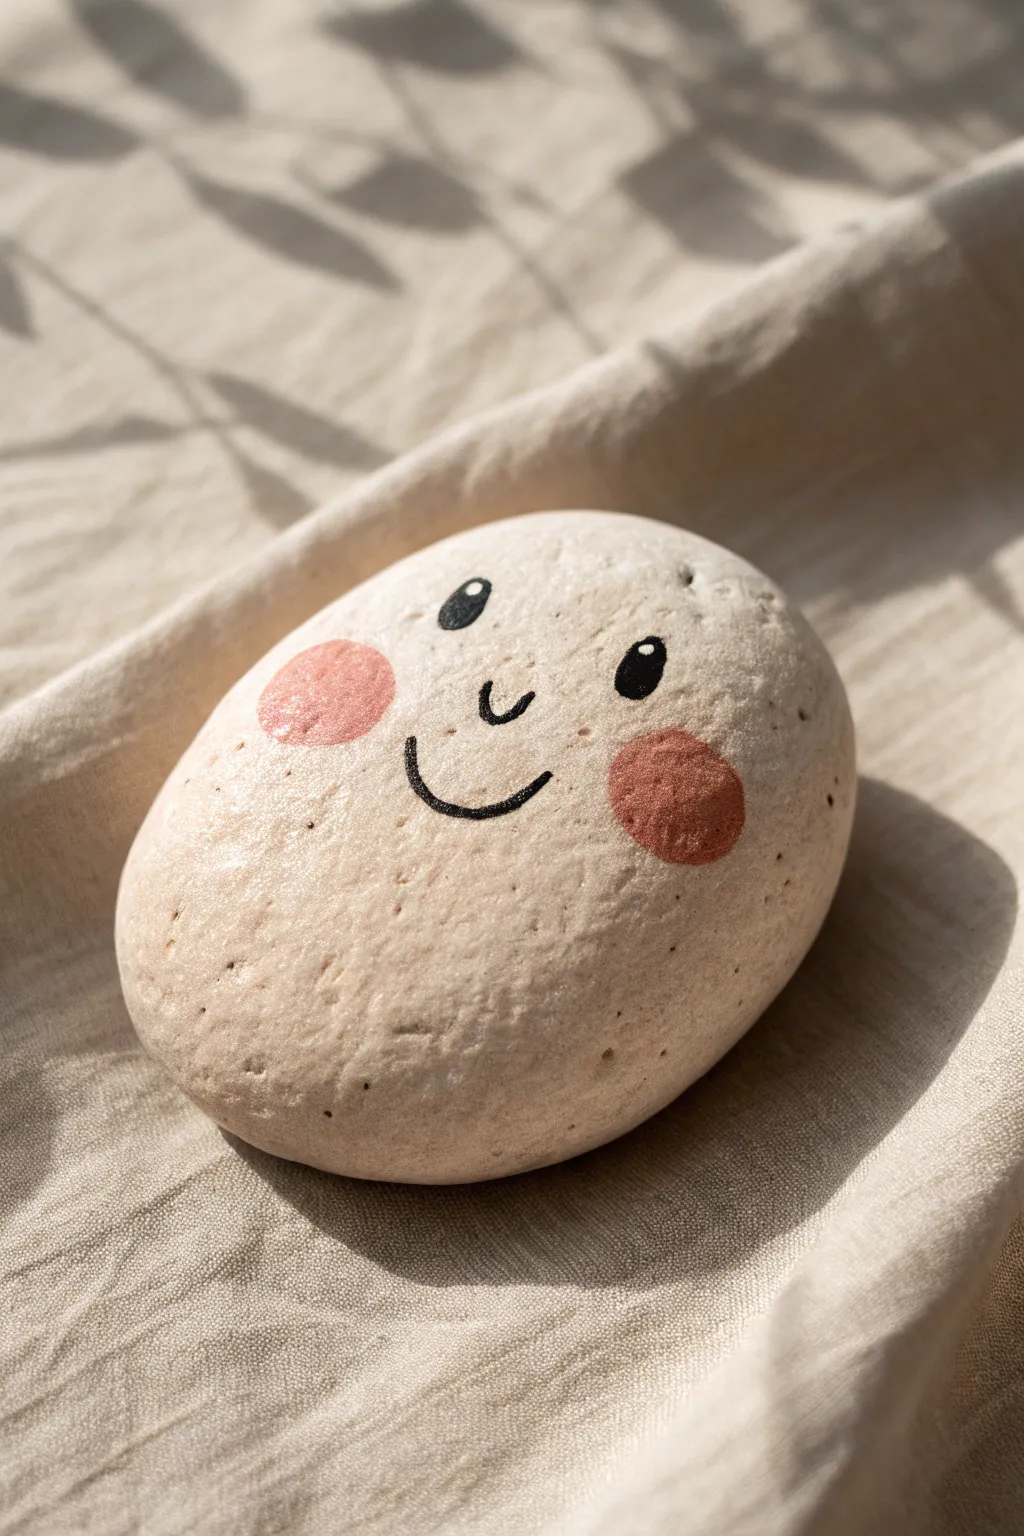
Transform a simple river stone into an adorable, blushing companion with just a few strokes of paint. This minimalist design embraces the rock’s natural texture, using its beige hue as skin tone for a sweet, simple face that’s sure to make you smile.
Step-by-Step Guide
Materials
- Smooth, beige or light-colored river rock (oval or rounded shape)
- Black acrylic paint or extra-fine Posca paint pen (Black)
- White acrylic paint or extra-fine Posca paint pen (White)
- Terracotta or muted pink acrylic paint
- Small round paintbrush (size 1 or 0)
- Medium round paintbrush (size 4)
- Matte spray varnish or sealant
- Water cup and paper towels
Step 1: Preparation and Planning
-
Stone Selection:
Choose a rock that is relatively smooth but has character. A beige or light grey stone works best as a natural skin tone base, so you don’t have to paint the background. Look for an oval shape that mimics a head. -
Cleaning:
Wash your chosen stone thoroughly with warm soapy water to remove any dirt or oils. Scrub well with an old toothbrush if needed to get into the tiny pores. -
Drying Time:
Allow the rock to dry completely, preferably in the sun. A warm rock holds paint well, but it must be bone dry or the paint will peel later. -
Orientation:
Hold the rock in your hand to find its most stable resting position. You want the face to look up at you naturally without the rock wobbling over.
Bleeding Lines?
If the porous rock sucks the paint in and causes tiny spiderweb lines, prime the area with clear matte playful varnish before painting the face details.
Step 2: Painting the Features
-
Mapping the Cheeks:
Using your medium round brush (size 4) and the terracotta or muted pink paint, gently dab two circles for the cheeks. Place them slightly lower than the center line, spaced wide apart. -
Refining the Cheeks:
The cheeks don’t need to be perfect circles; a slightly organic, dabbed edge looks sweeter. If the paint is too opaque, water it down slightly for a softer, blushed look. -
Drying the Blush:
Wait for the pink paint to dry completely. Since we are working directly on the porous rock surface, this should happen fairly quickly. -
Drafting the Eyes:
Using the black acrylic paint on a fine brush (or a black Posca pen), draw two solid black ovals for eyes. Position them above the cheeks, ensuring enough space between them for the nose. -
Creating the Nose:
Paint a very small, cute ‘u’ shape directly in the center of the face, slightly below the eye line. Keep this line thin and delicate. -
Drawing the Smile:
Paint a wide, gentle curve for the mouth below the nose. Connect the smile into the space between the cheeks. I like to make the line slightly thicker in the middle and tapered at the ends. -
Adding Highlights:
Once the black eye paint is fully dry, take your white paint and a very fine tool (like a toothpick or size 0 brush). Add a tiny dot of white to the upper right corner of each eye. This ‘catchlight’ brings the character to life.
Add Personality
Give your rock friend eyebrows for expression! Raised brows look surprised, while slanted ones look mischievous. A tiny red tongue adds extra cuteness.
Step 3: Finishing Touches
-
Clean Up:
Check the edges of your lines. If any black lines look shaky, you can carefully scratch away excess paint with a toothpick while it’s still semi-fresh, or wait for it to dry and gently scrape it off the bare rock. -
Final Drying:
Let the entire face sit undisturbed for at least an hour to ensure the thickest parts of the black paint are cured. -
Sealing the Rock:
To protect your new friend from the elements, apply a coat of matte spray varnish. Hold the can about 12 inches away and do light, even mists. -
Why Matte?:
A glossy finish would make the rock look wet and artificial. Using a matte sealer preserves the natural stony texture and the soft look of the face.
Now you have a charming little stone face to hide in the garden or brighten up your desk space


Owl Rocks That Wrap Around Chunky Sides
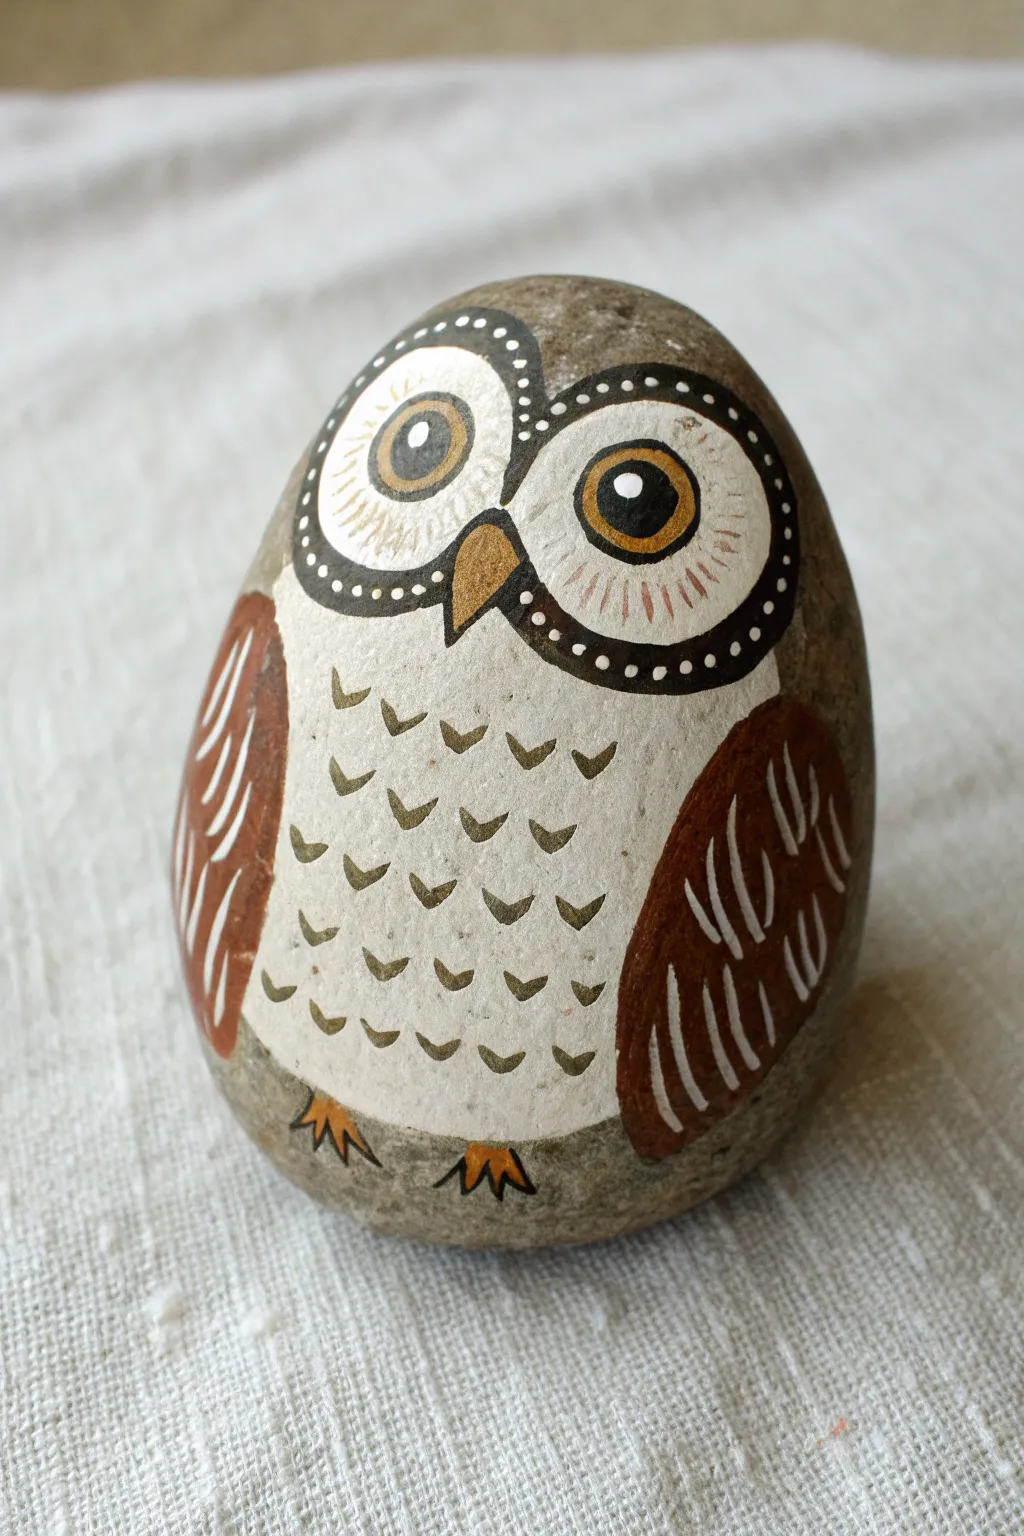
Transform a simple, rounded stone into a charming woodland creature with earthy tones and Folk Art flair. This project uses the rock’s natural egg shape to create a seated owl that looks perfect nestled on a shelf or hidden in a garden pot.
How-To Guide
Materials
- Smooth, egg-shaped rock (washed and dried)
- Acrylic paints: White, Dark Brown, Light Brown/Terracotta, Black, Golden Ochre, Beige
- Paintbrushes: Flat shader brush, small round brush, fine liner brush
- Dotting tool or toothpick
- Pencil and eraser
- Matte or satin sealant spray/varnish
- Palette or paper plate
- Water cup and paper towels
Step 1: Planning and Base Work
-
Map out the shape:
Begin by sketching the main owl features lightly with a pencil directly onto the clean stone. Draw a large oval for the belly area, flanked by two curved wings on the sides. Above the belly, sketch a large figure-eight shape for the eye mask area. -
Paint the belly:
Using a flat shader brush, fill in the large central belly oval with beige or off-white paint. You may need two coats to get solid coverage, letting the first coat dry completely before adding the second. -
Fill the eye mask:
Paint the large figure-eight shape around the eyes plain white. This brightness creates a strong contrast for the eyes later. Ensure the edges meet the beige belly section cleanly. -
Block in the wings:
Load your brush with a warm reddish-brown or terracotta color. Paint the curved wing shapes on either side of the body, sweeping the brush downwards to mimic the curve of folded wings.
Step 2: Facial Features
-
Outline the eyes:
Once the white mask is fully dry, mix a dark grey or black paint. Us a small round brush to paint a thick, dark outline around the entire white figure-eight shape. -
Add decorative dots:
Dip a dotting tool or the non-brush end of a paintbrush into white paint. Carefully place small, evenly spaced dots all along the dark grey outline you just painted. This gives it a beaded, decorative look. -
Create the irises:
Paint two large circles inside the white mask using golden ochre paint. Try to keep them centered within each loop of the figure-eight. -
Define the pupils:
Inside the gold circles, paint smaller black circles for the pupils. Add a tiny white reflection dot in the upper right corner of each pupil to bring the owl to life. -
Paint the beak:
right between the eyes at the bottom of the mask, paint a small, downward-pointing triangle in golden ochre. Outline it with a very fine black line to make it pop.
Pro Tip: Symmetry Hack
Use a small paper template for the eye ‘mask’ shape. Trace it onto the rock to ensure both eyes are exactly the same size before you start painting.
Step 3: Texture and Details
-
Feather the wings:
Switch to a fine liner brush and white paint. Add long, curved strokes down the length of the brown wings to represent flight feathers. Vary the length slightly for a natural look. -
Create breast feathers:
On the beige belly section, paint small ‘V’ shapes using a muted olive or grey-brown color. Arrange these in staggered rows, starting just below the neck and working down to the bottom. -
Detail the eye mask:
Using a very diluted light brown or tan paint, add tiny hatched lines radiating outward inside the white eye mask area. This subtle detail mimics fine facial feathers. -
Add the feet:
At the very bottom of the rock, overlapping the belly slightly, paint two small claw shapes using the golden ochre paint. Outline these with a fine black line so they stand out against the stone. -
Final Cleanup:
Inspect your lines. If any edges look messy, use your fine brush to neaten them up. I like to re-black the main outlines around the eyes if they got smudged during the detailing phase. -
Seal the rock:
Allow the paint to cure for at least 24 hours. Once fully dry, apply a coat of spray sealer to protect your artwork from chipping, especially if it will live outdoors.
Troubleshooting: Shaky Lines?
If your fine lines are jittery, thin your acrylic paint slightly with water until it has an inky consistency. This helps the paint flow smoothly off the liner brush.
Once sealed, find a cozy spot for your new stone friend to watch over your home


Turtles That Turn Domes Into Shells
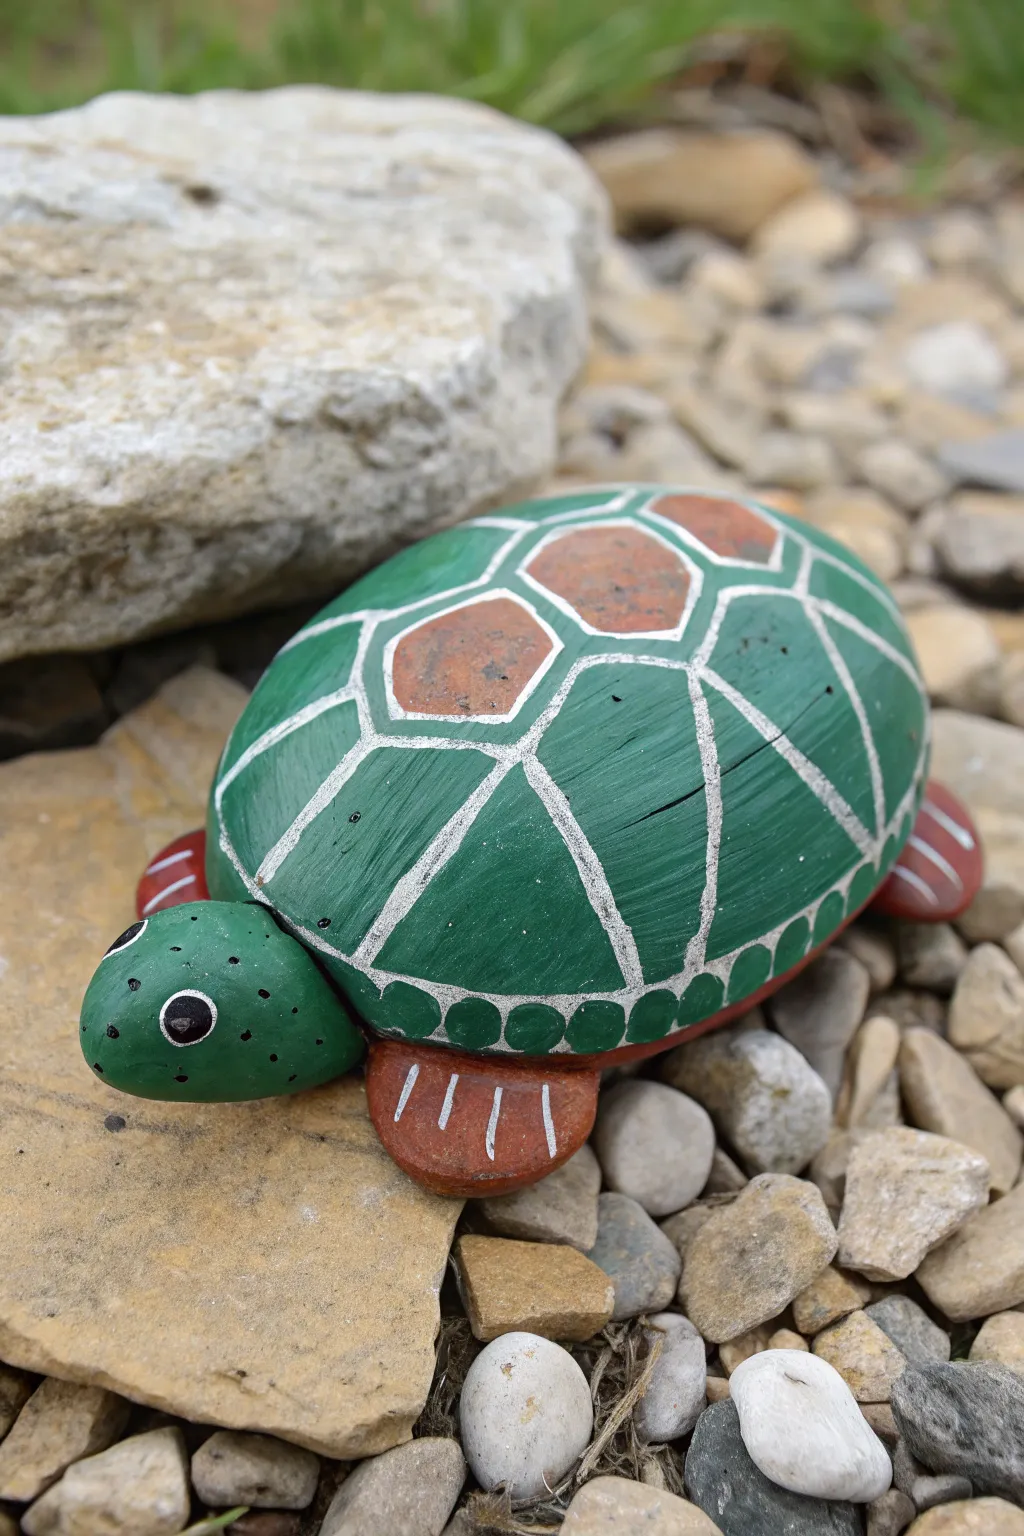
Transform a naturally rounded stone into a charming garden turtle with this clever painting project. By using the rock’s own shape as the shell, you can create a surprisingly realistic 3D effect that looks right at home among your outdoor pebbles.
Step-by-Step
Materials
- One medium-sized, oval river rock (smooth and dome-shaped)
- One smaller, round pebble (for the head)
- Four small, flat oval pebbles (optional, for feet)
- Acrylic paint (Emerald/Hunter Green, White, Terracotta/Brown, Black)
- Fine detail brushes (sizes 0 and 00)
- Medium flat brush
- Outdoor varnish or sealant (spray or brush-on)
- Strong craft glue (e.g., E6000) or stone glue
- Pencil or chalk for sketching
Step 1: Base Coating
-
Clean and Prep:
Begin by scrubbing your chosen rocks with water and a stiff brush to remove any dirt or moss. Allow them to dry completely in the sun, as moisture will prevent the paint from adhering properly. -
Base Green Layer:
Using your medium flat brush, coat the main ‘shell’ rock entirely in a deep emerald green. You may need two coats for full coverage; let the first coat dry for about 15 minutes before applying the second. -
Painting the Head and Limbs:
While the shell dries, paint your smaller head pebble and the four optional feet pebbles (if using physical stones for feet) with a slightly lighter shade of green to distinguish them from the shell. -
Side Detail Base:
Around the lower rim of the main shell rock, paint a thin band of terracotta brown. This will represent the plastron (underside) peeking out.
Step 2: Designing the Shell
-
Sketch the Scutes:
Once the green base is bone dry, lightly sketch a pattern of hexagons and pentagons on the top of the shell using a pencil or white chalk. Start with a central row and work outward. -
Painting Scute Centers:
Fill the centers of the central top shapes with the terracotta brown paint. You don’t need to cover the whole shape; leave a generous green border around each brown patch. -
Adding Texture:
While the brown paint is still slightly wet, I like to dab it gently with a dry brush or sponge to give it a mottled, natural shell texture rather than a flat block of color. -
Outlining the Pattern:
Using your finest liner brush and white paint, carefully trace over your pencil lines. These white lines should separate the green segments from each other, creating the distinct shell pattern. -
The Rim Pattern:
Along the lower edge of the shell (just above the brown rim you painted earlier), paint small semi-circles in white to create a scalloped edge pattern.
Uneven Lines?
If your white outline lines are too thick or shaky, wait for them to dry, then come back with the green base color to ‘cut in’ and thin them down again.
Step 3: Details and Assembly
-
Defining the Head:
On your small head pebble, use the handle end of a paintbrush dipped in black paint to stamp two small dots for the eyes. Once dry, add a tiny white highlight dot to each. -
Freckles:
Add tiny black speckles across the top of the head using the very tip of your smallest brush for realistic detailing. -
Painting the Feet:
If you aren’t gluing on separate stone feet, you can paint the feet directly onto the bottom edge of the shell. Paint reddish-brown semi-circles sticking out from the bottom rim. -
Claws:
On the reddish-brown feet areas (whether painted on or separate stones), paint three or four thin white stripes to represent claws. -
Secure the Head:
Apply a dab of strong adhesive (like E6000) to the flattest side of the head pebble and press it firmly against the front of the shell rock. Hold it in place for a minute until it sets. -
Attach the Feet:
If using separate stones for legs, glue them to the underside or sides of the main rock now, ensuring the turtle sits stable on a flat surface. -
Final Seal:
Once all paint and glue is fully cured (give it 24 hours to be safe), coat the entire turtle with an outdoor-grade varnish to protect your work from the elements.
Natural Texture Hack
Mix a tiny pinch of sand into your brown paint before applying it to the shell scutes. This creates a gritty, realistic texture that looks great.
Place your finished creation near some leafy plants and enjoy seeing your garden visitors do a double-take at your remarkably realistic stone pet
BRUSH GUIDE
The Right Brush for Every Stroke
From clean lines to bold texture — master brush choice, stroke control, and essential techniques.
Explore the Full Guide
Fish and Sea Creatures on Pointy Pebbles
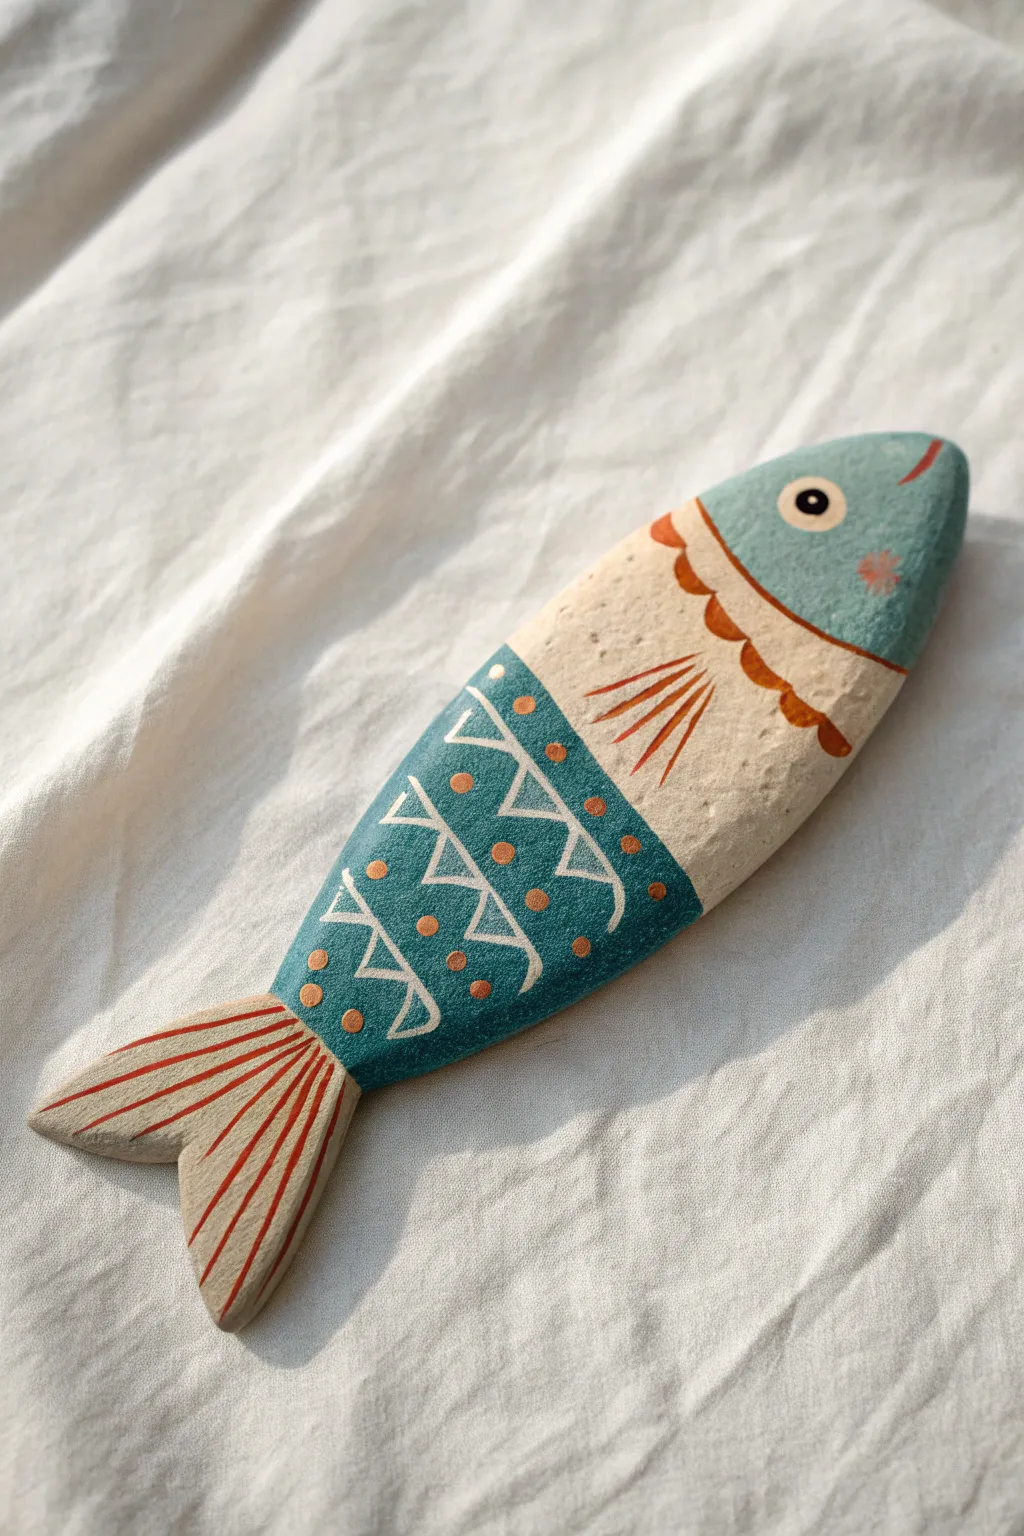
Transform an elongated, pointy rock into a charming aquatic friend with this folksy fish design. The natural shape of the stone perfectly mimics a swimming fish, while the muted color palette gives it a lovely, handcrafted feel.
Step-by-Step Guide
Materials
- Elongated, pointy rock (washed and dried)
- Acrylic paints: teal blue, creamy beige (or off-white), burnt orange/terracotta, black, white, soft pink
- Flat paintbrush (medium size)
- Fine liner paintbrush (size 0 or 00)
- Dotting tool or toothpick
- Pencil
- Water cup and palette
- Matte varnish (optional)
Step 1: Base Blocking
-
Select your stone:
Choose a rock that is long and tapers at one or both ends. The pointy end will naturally become the tail or the nose; for this project, the sharper point works best as the tail. -
Visual division:
Imagine your rock divided into three sections: the head, the body, and the tail. Lightly sketch a curved line separating the head from the body, and a straight line where the tail fin begins. -
Paint the middle sections:
Using your flat brush, paint the ‘head’ area with a nice, solid coat of teal blue. Paint the section just behind the head with your creamy beige color. -
Body blocking:
Paint the rear body section (before the tail) with that same teal blue. Don’t worry about the patterns yet; just get a smooth, opaque foundation down. -
Expose the stone:
Leave the tail section unpainted for now if your rock has a nice natural color, or paint it a light beige if you prefer a solid base. Let all base coats dry completely.
Uneven Texture?
Rocks can be bumpy! If your brush skips over pits in the stone, water down your paint slightly to help it flow into crevices during the base coat stage.
Step 2: Fins and Details
-
Define the gills:
Mix a scalloped line where the head meets the beige body. Using the burnt orange paint and a fine brush, outline a scalloped edge along the back of the head as if they are scales or gills. -
Fill the scallops:
Fill in the small gap between the teal head and your new orange scallop line with more burnt orange paint to create a thick, decorative border. -
Side fin:
On the beige section of the body, use the fine liner brush and burnt orange paint to draw three or four lines angling backward to create a pectoral fin. -
Tail definition:
Move to the tail end. Use the burnt orange paint to draw lines fanning out from the body to the tip of the tail, mimicking the ribs of a fin. -
The eye:
Dip a dotting tool or the handle end of a brush into creamy beige paint and place a large circle on the head. Once dry, add a smaller black dot in the center for the pupil. -
Cheeky detail:
Mix a tiny bit of pink or diluted orange and paint a soft, starfish-like smudge on the cheek area for a bit of blush. -
Mouth line:
Add a tiny stroke of red or orange at the very tip of the nose to suggest a mouth.
Make a Shoal
Paint different patterns on the rear body section—try zig-zags, swirls, or stripes—to create a whole unique school of fish for your garden.
Step 3: Pattern Work
-
Blue section triangles:
On the rear teal section of the body, use your finest brush and creamy beige paint to draw a series of interconnected triangles. Think of them as bunting flags hanging vertically. -
Add separation lines:
Draw thin vertical lines between your triangle columns to separate the patterns. I find resting my pinky on the table helps keep these lines steady. -
Polka dot accents:
Using your smallest dotting tool (or a toothpick), dip into the orange paint and careful place a dot inside each triangle. -
Extra dots:
Add smaller orange dots in the negative spaces outside the triangles to fill the pattern visually. -
Highlighting:
Add a tiny white gleam to the black pupil of the eye to bring the fish to life. -
Final outline:
If you want extra definition, run a very faint line of white or beige along the separation between the blue body and the tail section. -
Sealing:
Wait at least 24 hours for the paint to cure fully, then brush on a coat of matte varnish to protect your fish without making it too shiny.
Now you have a durable little sea creature ready to swim through your garden beds or decorate a windowsill
Mushrooms That Use a Flat Base for Stems
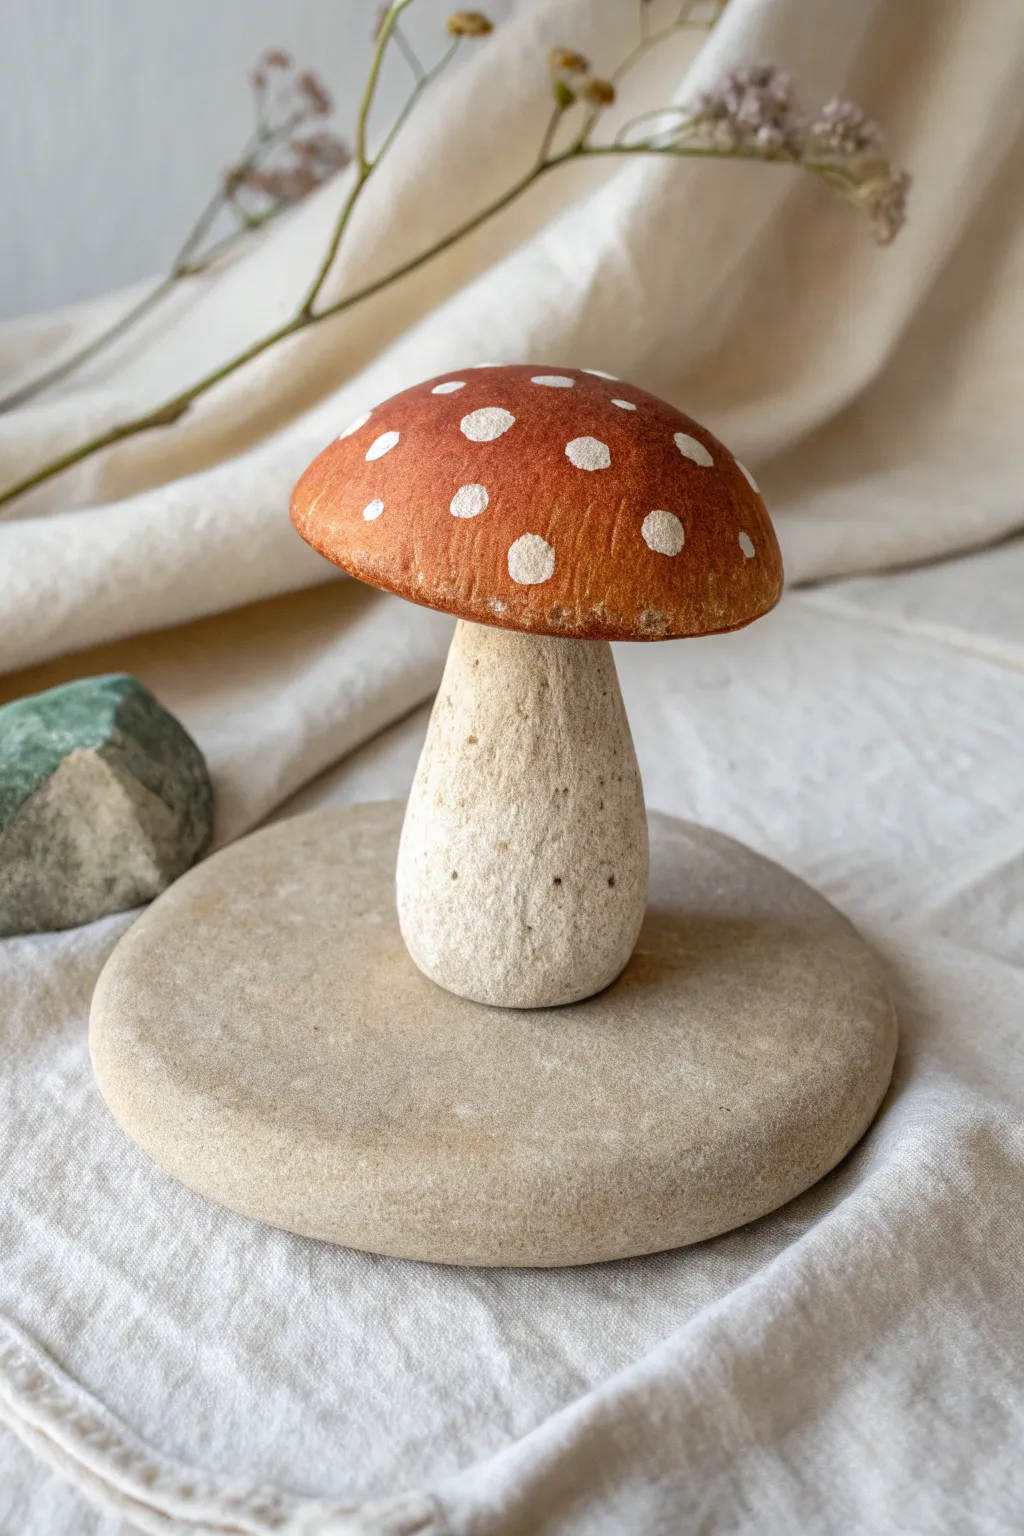
Transform ordinary beach pebbles into a charming woodland mushroom with this clever stacking project. By utilizing naturally shaped stones for the base and stem, you create a realistic and stable foundation that lets your painted cap steal the show.
Step-by-Step
Materials
- One flat, round stone (base)
- One oblong, cylindrical stone (stem)
- One dome-shaped stone (cap)
- Heavy-body acrylic paint (rust orange, burnt sienna, titanium white)
- Small flat paintbrush
- Fine detail paintbrush or dotting tool
- Strong craft adhesive (E6000 or similar)
- Sandpaper (optional)
- Matte spray varnish
Step 1: Stone Selection & Prep
-
Find your stones:
The success of this project relies heavily on finding the right shapes. Look for a large, flat disc for the bottom, a finger-shaped stone for the stem that has at least one flat end, and a cap-shaped stone that is wider than your stem. -
Test the balance:
Before painting or gluing, dry-stack your stones to ensure they balance naturally. If the stem wobbles on the base, use a bit of sandpaper to flatten the contact point on the bottom of the stem stone. -
Clean the surfaces:
Wash all three stones with soapy water and a scrub brush to remove dirt, moss, or oils. Let them dry completely, or the glue and paint won’t adhere properly.
Natural Texture
Use a dry sponge instead of a brush for the red cap. Dabbing the paint creates a pitted texture that looks more like a real organic mushroom skin.
Step 2: Painting the Cap
-
Mottle the base coat:
Mix rust orange with a tiny touch of burnt sienna to get a natural, earthy mushroom red. Apply this to the top of the cap stone using a flat brush. -
Add texture while wet:
Instead of painting a solid block of color, dab the paint on (stippling) to create a slightly textured, porous look. I like to leave the very bottom rim of the stone unpainted where the ‘gills’ would naturally be. -
Create color depth:
While the base coat is still tacky, mix a slightly lighter orange shade and dab it near the center of the cap. This creates a subtle highlight that makes the mushroom look three-dimensional. -
Let it dry completely:
Allow the base color to dry fully. Since rock is porous, it might soak up the first layer; apply a second coat if the stone’s natural color is showing through too much. -
Paint the dots:
Using titanium white and a fine detail brush, paint irregular spots across the red surface. Make them distinct but not perfectly circular—real fungi have imperfect, organic markings. -
Vary dot sizes:
Paint a few larger spots near the top center and smaller spots toward the edges. This perspective trick helps reinforce the domed shape of the mushroom cap. -
Seal the paint:
Once the paint is bone dry, spray the cap with a matte varnish. This protects the acrylic work without adding an unnatural glossy shine.
Mossy Details
Glue small bits of dried moss or lichen around the base where the stem meets the flat stone to hide any visible glue and add a forest floor vibe.
Step 3: Assembly & Finishing
-
Glue stem to base:
Apply a generous dab of strong adhesive to the center of your flat base stone. Press the bottom of the stem stone firmly into the glue. -
Secure the joint:
Hold the stem in place for a minute or two until the glue grabs. Let this section cure for at least an hour before adding the heavy cap. -
Attach the cap:
Apply adhesive to the top of the stem. Carefully center the painted cap stone on top, ensuring the painted side faces upward. -
Check detailed balance:
Look at the mushroom from all angles to make sure the cap isn’t leaning too far to one side before the glue sets. -
Final cure:
Let the entire sculpture sit undisturbed for 24 hours to ensure a permanent bond.
Place your stone mushroom on a shelf or in a planter for a touch of fairy garden magic

PENCIL GUIDE
Understanding Pencil Grades from H to B
From first sketch to finished drawing — learn pencil grades, line control, and shading techniques.
Explore the Full Guide
Cacti That Love Jagged Silhouettes
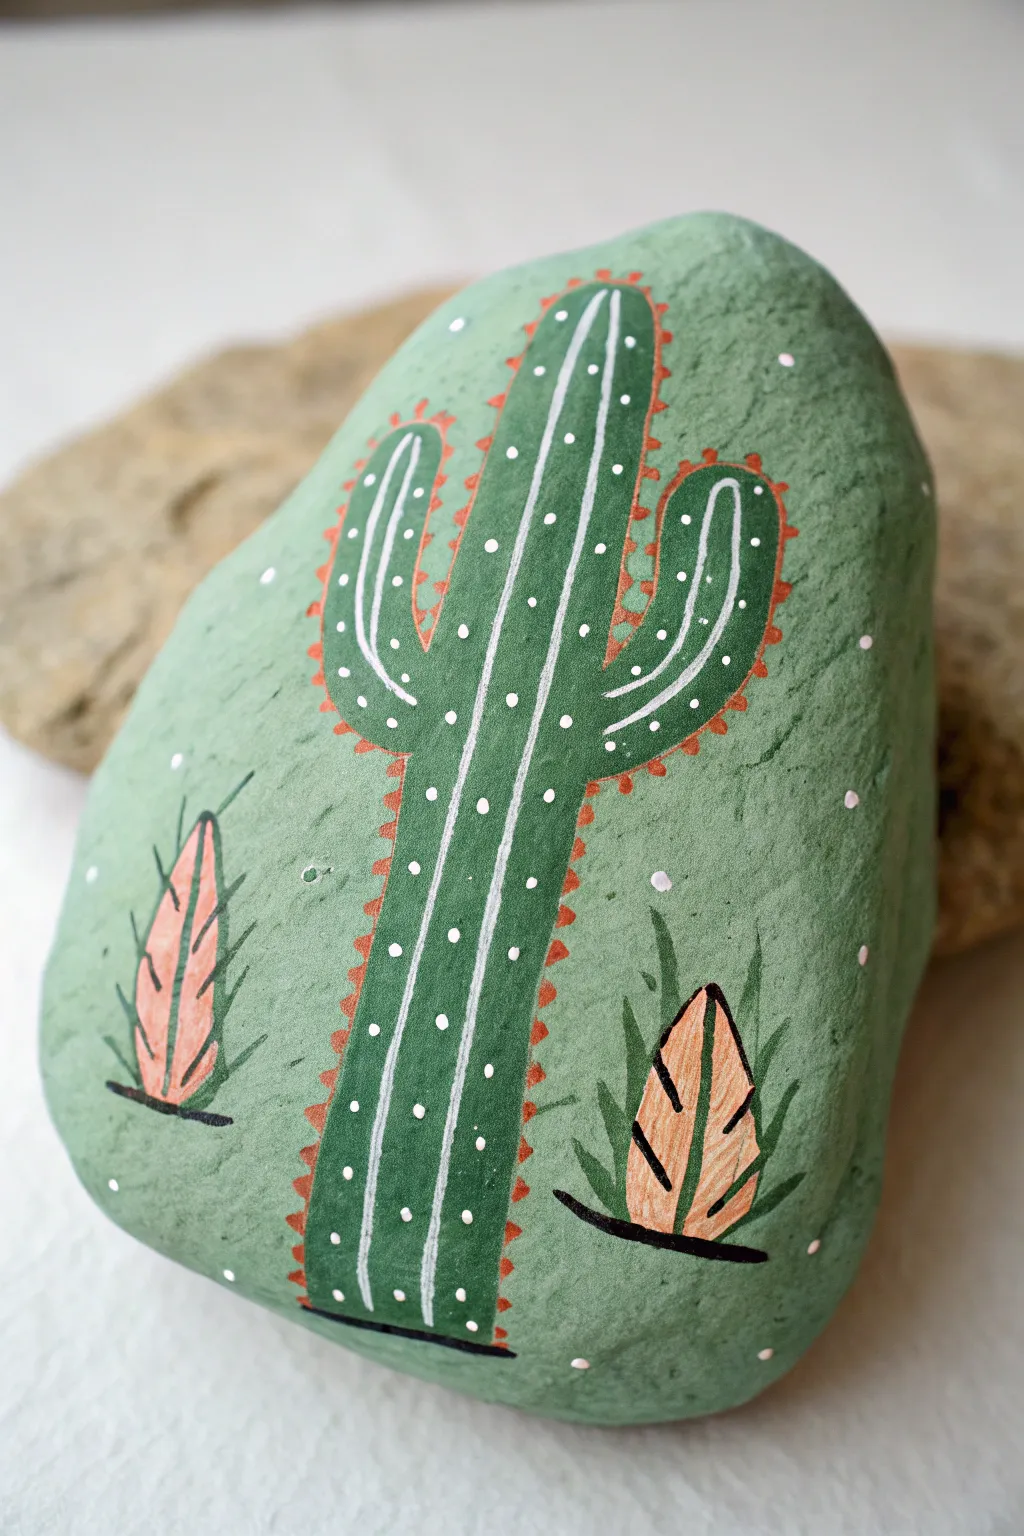
Transform an ordinary, rugged stone into a charming desert scene with this whimsical cactus painting. The project uses the rock’s natural, jagged shape to frame a bold Saguaro cactus surrounded by smaller desert flora.
Detailed Instructions
Materials
- Medium-sized, jagged or irregular rock (clean and dry)
- Acrylic paints: Sage Green (light), Forest Green (dark), Peach/Light Orange, White, Black
- Flat paintbrush (medium width)
- Fine liner or detail paintbrush
- Pencil (optional for sketching)
- Mod Podge or spray sealer (matte or gloss)
- Palette or paper plate
- Cup of water and paper towels
Step 1: Base and Background
-
Prep the surface:
Begin by ensuring your rock is thoroughly washed and dried. Dirt or dust will prevent the paint from adhering properly. -
Apply the base coat:
Using your medium flat brush, cover the entire front surface of the rock with a smooth layer of Sage Green acrylic paint. This creates a soft, misty background. -
Ensure full coverage:
You might need a second coat of Sage Green to get a solid, opaque finish. Let this dry completely before moving on.
Uneven Surface?
If the rock is too pitted for clean lines, apply a layer of white gesso or heavy body acrylics first to fill in small holes and create a smoother canvas.
Step 2: Main Cactus Shape
-
Outline the Saguaro:
With the darker Forest Green paint and a smaller brush, paint the central shape of a Saguaro cactus. Create a tall central column with two curved arms reaching upward on either side. -
Fill in the cactus:
Fill in the outline solid with the Forest Green paint. Don’t worry about details yet; just focus on getting a nice, solid silhouette against the lighter green background. -
Add vertical ribs:
Once the dark green is dry to the touch, use a very fine liner brush and white paint to draw thin, vertical lines running up the trunk and the arms. These represent the ribs of the cactus. -
Curve the lines:
When drawing the white lines on the arms, curve them slightly to follow the shape of the cactus, giving it a sense of volume and roundness.
Step 3: Thorny Details
-
Paint the spines:
Using the Peach or Light Orange paint and your finest brush, carefully dab small, triangular prickly spines along the outer edges of the cactus silhouette. Space them evenly for a neat look. -
Create texture dots:
Switch back to white paint. Add tiny white dots along the white vertical lines you painted earlier. This adds that classic bumpy cactus texture. -
Scatter background dots:
For a whimsical touch, dip the end of a paintbrush handle or a toothpick into white paint and scatter random dots around the background area to mimic stars or pollen.
Steady Hand Tip
For the tiny white dots and spines, use a toothpick or the very tip of a dedicated lining tool instead of a brush for perfect uniform circles.
Step 4: Lower Flora and Finish
-
Paint the bottom plants:
At the bottom left and right of the main cactus, paint two small, teardrop or flame-shaped plants using the Peach/Light Orange color. -
Add plant striations:
Once the orange shapes are dry, use black paint or a black paint pen to draw vertical lines through them, creating leaf segments. -
Detail the spikes:
Use the Forest Green paint and a fine brush to flick quick, thin lines upward from the base of the orange plants. These act as sharp, grassy leaves surrounding the succulents. -
Ground the scene:
Paint a thin black horizontal line underneath the main cactus and the two smaller plants to ground them, so they aren’t floating in space. -
Seal the artwork:
Allow the entire rock to cure for at least 24 hours. Coat with a clear sealer to protect your painting from chipping and fading.
Now showcase your resilient little garden on a desk or shelf for a touch of desert warmth
Mountain Landscapes That Follow Ridges

This project transforms a naturally ridged stone into a stunning miniature mountain range, mirroring the layered beauty of distant peaks. By using the rock’s own contours to guide your painting, you create a seamless blend of nature and art.
Step-by-Step Guide
Materials
- A clean, dry rock with a somewhat triangular or pyramidal shape
- Acrylic paints (Teal, Navy Blue, Purple, White, Forest Green, Black)
- Set of paintbrushes (flat shader brush, small round brush, fine liner brush)
- Palette or paper plate for mixing
- Cup of water and paper towels
- Clear sealant (spray or brush-on matte varnish)
Step 1: Preparation and Sky
-
Clean Your Canvas:
Begin by scrubbing your rock thoroughly with soap and water to remove any dirt or moss. Allow it to dry completely, as trapped moisture can cause the paint to peel later. -
Base Coat (Optional):
If your stone is very dark, apply a thin coat of white paint to the upper two-thirds where the lighter colors will go. This helps the sky colors pop. -
Mixing the Sky Blue:
Mix a generous amount of white with a tiny drop of teal to create a very pale, icy blue. You want this to look like the hazy upper atmosphere. -
Painting the Sky:
Using a flat shader brush, paint the top third of the rock with your pale blue mixture. Cover the very peak and brush downwards, letting the bottom edge remain uneven. -
Adding Cloud Wisps:
While the sky is still slightly damp, wipe your brush distinctively clean and pick up a tiny bit of pure white. dragging it horizontally across the sky area to create soft, faint cloud layers.
Uneven Coverage?
If the rock’s texture is too pockmarked, paint thinned white gesso or a distinct primer layer first to fill the tiny holes.
Step 2: Painting the Distance
-
The Purple Peak:
Mix purple with a little white to create a soft lavender shade. Paint a rounded mountain shape right in the center, overlapping the bottom of your sky section. -
Background Ridge:
On either side of your purple mountain, paint lower, rolling hills using a mix of teal and gray. These represent the furthest mountains fading into the distance. -
Creating Depth:
To make the purple mountain recede, I like to lightly dry-brush a little of the sky color over its peak, making it look like it’s covered in mist or snow. -
Mid-Ground Teal Mountains:
Mix a vibrant teal with a touch of green. Paint a jagged, triangular mountain range below your purple and gray layer. This layer should take up the middle section of the stone. -
Defining the Edges:
Use a small round brush and a slightly darker version of your teal mix to outline the top ridges of this middle layer. This neat trick helps separate the mountains from the background.
Step 3: Foreground and Details
-
Mixing Deep Navy:
Combine navy blue, forest green, and a drop of black to create a very dark, rich shadow color for the closest range. -
Painting the Foreground:
Apply this dark mixture to the bottom third of the rock. Let the top edge of this shape be jagged and uneven to mimic a tree line. -
Adding Tree Silhouettes:
Switch to your fine liner brush. Using the dark mixture, paint tiny vertical lines extending upward from the foreground mass. Add small dabs on either side of the lines to form pine tree shapes. -
Adding Highlights:
Mix a lighter green—forest green with a touch of white. Carefully dab this onto the right side of a few foreground trees to suggest sunlight hitting the forest. -
Final Touches:
Check for any gaps in coverage. If you see the bare stone peeking through where layers meet, use your liner brush to smooth the transition. -
Sealing the Artwork:
Once the paint is completely dry (give it at least an hour), apply a coat of matte spray varnish or brush-on sealer. This protects your landscape from chipping and weather if placed outdoors.
Go 3D
Use the rock’s natural bumps! If there is a protrusion, paint the purple peak directly on it to physically lift the mountain out of the scene.
Now you have a permanent mountain vista that captures the serene feeling of high-altitude peaks, ready to display on a desk or in a garden


Crashing Waves Painted on Broken Edges
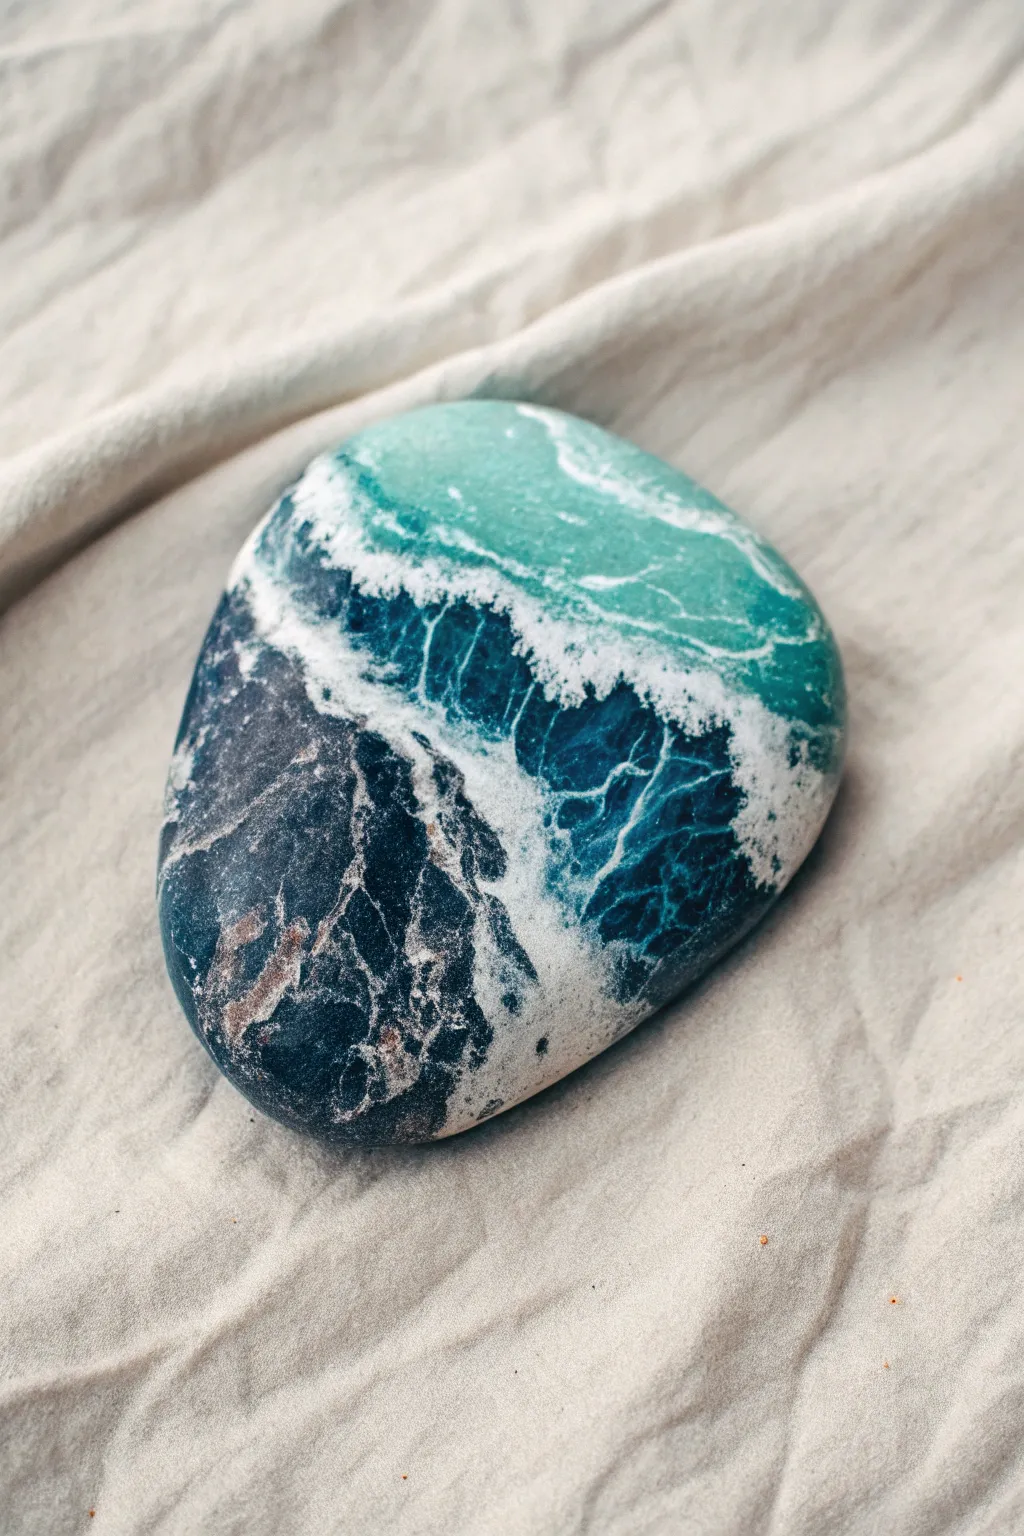
Transform a simple smooth stone into a mesmerizing seascape with this layered painting technique that captures the power of the ocean. The design uses the rock’s natural curves to enhance the movement of crashing waves, creating a stunning piece of decor.
Step-by-Step
Materials
- Smooth river rock or beach stone (palm-sized)
- Acrylic paints: Navy blue, phthalocyanine blue, teal, turquoise, titanium white, and black
- Flat shader brushes (small and medium)
- Fine liner brush or detail brush (0 or 00 size)
- Palette or paper plate for mixing
- Cup of water and paper towels
- Matte or satin varnish (optional spray or brush-on type)
Step 1: Base Layers & Gradient
-
Clean surface:
Begin by washing your stone thoroughly with soap and water to remove any dirt or oils. Let it dry completely before starting. -
Mixing the deep ocean:
On your palette, mix navy blue with a tiny touch of black to create a very deep, midnight blue. Paint the bottom left third of the rock with this dark shade. -
Mid-water transition:
While the dark blue is still slightly wet, mix a teal or turquoise shade. Apply this to the middle section of the rock, blending the edge slightly where it meets the dark blue to avoid a harsh line. -
Shallow water highlights:
For the top right section, mix titanium white with your turquoise to make a light, seafoam green. Paint the remaining top portion of the rock. -
Smooth the blend:
Use a damp, clean brush to feather the transitions between the three color zones. You want a gradient effect that moves from deep abyss to shallow tropical waters. -
Initial drying:
Allow this base layer to dry completely. Acrylics dry darker, so you may want to apply a second coat if the stone’s natural color shows through.
Step 2: Creating the Waves
-
Mapping the wave crest:
Load a small flat brush with pure titanium white. Dab a diagonal line of white paint roughly where the dark blue meets the teal, creating the main breaking wave line. -
Stippling texture:
Using a stippling motion (tapping the brush tip up and down), fluff out the white line. This mimics sea spray and foam. Don’t be too neat; chaotic texture looks more realistic. -
Secondary waves:
Add smaller, thinner lines of white in the lighter top section to suggest distant ripples or shallower waves rolling in. -
Adding depth to foam:
Mix a very watery wash of light blue. Carefully glaze underneath the main white wave foam to give it shadow and volume, making the white pop more.
Wet-on-Wet Magic
To get a truly soft sea foam look, try sponging the white paint on while the underlying blue layer is still slightly tacky. It creates a natural blur.
Step 3: Webbing & Fine Details
-
Mixing fluid white:
Thin down your white paint with a few drops of water until it has an ink-like consistency. This is crucial for painting fine lines. -
Painting the sea foam webbing:
Switch to your fine liner brush. In the dark blue section, paint delicate, shaky lines that form a web-like pattern, resembling foam retreating on the water’s surface. -
Connecting the pattern:
Ensure these web lines connect back to the main crashing wave. I find it helpful to pull the brush stroke from the wave outward into the deep blue area. -
Variegated lines:
Vary the pressure on your brush. Some lines should be faint and others brighter white to show depth in the water. -
Highlighting the crest:
Go back to the main foam area and add pure, thick white dots and dashes to the very brightest parts of the splash for extra emphasis. -
Final dry:
Let all the paint fully cure for at least an hour. The thickest parts of the white foam will take the longest to dry. -
Seal the artwork:
Apply a coat of varnish to protect your painting. A satin finish works beautifully to mimic the wet look of water without being overly glossy.
Chunky Texture?
If your fine lines look too thick or chunky, your paint is likely too thick. Add water drop by drop until it flows smoothly from the liner brush.
Place your finished ocean stone on a desk or shelf as a calming reminder of the seaside
Firefly Jar Scenes That Use Depth Like Glow
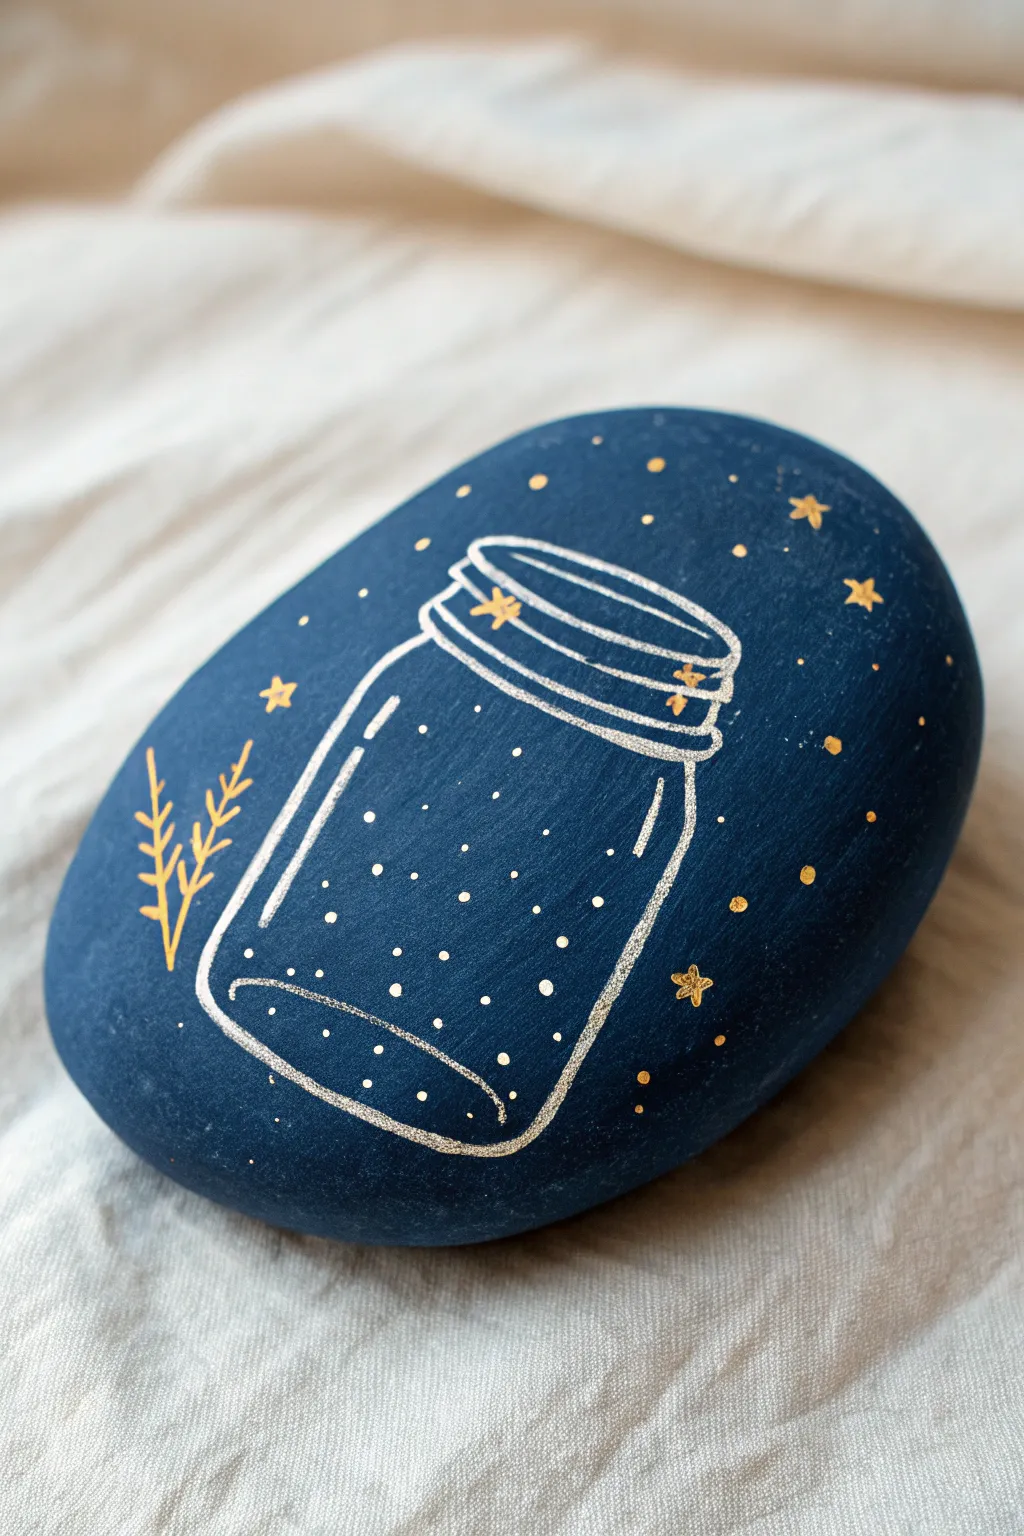
Transform a smooth stone into a dreamy night scene featuring a delicate mason jar capturing starlight. The deep navy background contrasts beautifully with crisp metallic lines, creating a magical keepsake that feels like holding a piece of the midnight sky.
How-To Guide
Materials
- Smooth, oval-shaped river rock
- Acrylic paint (Deep Navy Blue)
- Fine point paint pen (Metallic Silver or White)
- Fine point paint pen (Metallic Gold)
- Wide flat paintbrush
- Matte sealer or varnish
- Pencil (optional)
Step 1: Setting the Night Sky
-
Clean the Stone:
Begin by thoroughly washing your rock with soap and water to remove any dirt or oils. Let it dry completely, as moisture will prevent the base coat from adhering properly. -
Apply the Base Coat:
Using a wide flat brush, paint the entire top surface of the rock with deep navy blue acrylic paint. Make sure to carry the color down over the sides for a finished look. -
Dry and Repeat:
Allow the first coat to dry fully. If the color looks streaky or the rock’s natural color shows through, apply a second coat for a solid, opaque matte finish.
Pro Tip: Pen Flow
Before drawing on the rock, press the tip of your paint pen on a scrap piece of paper to get the ink flowing smoothly. This prevents sudden blobs of paint ruining your sky.
Step 2: Drafting the Design
-
Outline the Jar Shape:
Using your silver or white paint pen, draw two slightly curved vertical lines for the sides of the jar. They should be roughly parallel but curve inward slightly at the top to form the neck. -
Create the Jar Base:
Connect the bottom of the two vertical lines with a gentle U-curve. Draw a second, parallel curve just above it to give the glass bottom some dimension. -
Form the Rim:
At the top of the neck, draw a narrow oval for the opening of the jar. Add a few stacked, curved lines below this oval to represent the threaded screw-top part of the mason jar. -
Add Glass Reflections:
To make the jar look like glass, add a few disconnected highlight lines. Draw a long, thin streak down the left side and a shorter curve on the right shoulder of the jar.
Step 3: Capturing the Fireflies
-
Dot the Interior:
Take your silver or white pen again and gently tap the tip against the rock inside the jar outline. Create a random array of tiny dots to represent captured fireflies or stars. -
Vary the Sizes:
For a sense of depth, make some dots slightly larger than others by pressing just a fraction harder. Keep the density somewhat even, but random. -
Fill the Sky:
Extend the dotting pattern outside the jar into the navy background. These dots represent distant stars in the night sky. -
Paint Gold Stars:
Switch to your metallic gold paint pen. Draw small five-pointed stars scattered around the jar, and perhaps one or two overlapping the jar rim for a whimsical touch. -
Add Gold Accents:
Add tiny gold dots interspersed among the silver ones in the background to add warmth to the color palette.
Level Up: Glow Effect
Use glow-in-the-dark paint for the dots inside the jar. During the day it looks white, but at night your fireflies will actually light up.
Step 4: Finishing Touches
-
Draw Botanical Sprigs:
On the left side of the jar, use the gold pen to draw two simple, thin stems rising upward. Add quick, short dashes along the stems to create leaves or pine needles. -
Refine the Lines:
Check your jar outline. If any lines look too faint, retrace them carefully with the silver pen to ensure the ‘glass’ pops against the dark blue. -
Let it Cure:
Allow all the paint pen work to dry completely. Since paint pens can smear easily if wet, I like to give this a good 30 minutes just to be safe. -
Seal the Rock:
Apply a coat of matte spray sealer or brush-on varnish. This protects the paint from chipping and keeps the metallic ink from tarnishing over time.
Now you have a peaceful night scene captured on stone to decorate your desk or garden path
Snail Shell Spirals on Naturally Swirly Rocks
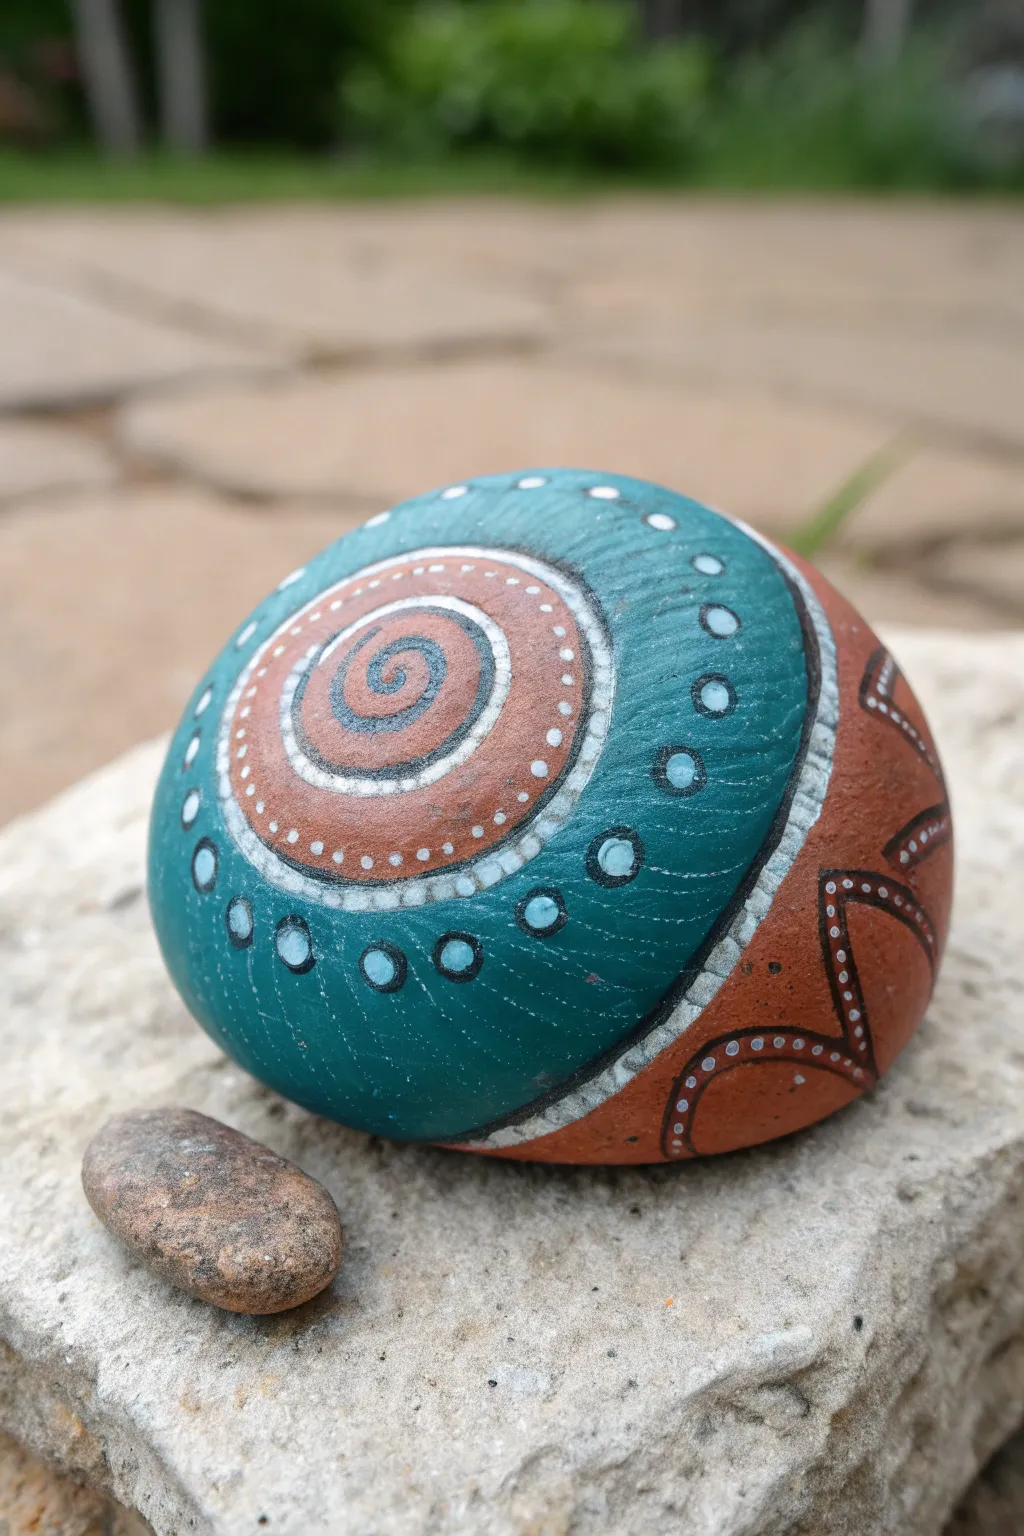
Transform a smooth, round stone into a mesmerizing snail shell design using earthy terracotta and deep teal acrylics. This relaxing project combines simple concentric circles with delicate dot work for a beautifully patterned finish that feels both modern and primal.
Step-by-Step
Materials
- Smooth, round river rock (roughly palm-sized)
- Acrylic paints: Teal/Turquoise, Terracotta/Burnt Sienna, White, and Black
- Paintbrushes: Medium flat brush and fine detail liner brush
- Dotting tools (or makeshift tools like toothpicks/brush handles)
- Pencil and eraser
- Palette or small plate
- Clear acrylic sealer (spray or brush-on)
- Cup of water and paper towels
Step 1: Base Blocking
-
Clean Your Stone:
Before starting, ensure your rock is scrubbed clean with soapy water and completely dry to help the paint adhere properly. -
Map the Design:
Lightly sketch a large spiral shape onto the stone with a pencil. Don’t worry about perfection; this is just a guide for your color zones. -
Paint the Terracotta Center:
Using a medium brush, paint a large circle in the center with terracotta paint. This will be the heart of your spiral. It might need two coats for full opacity. -
Add the Teal Band:
Paint a wide band of teal around the terracotta circle. Curve the band so it sweeps down and around one side, creating that snail-shell shape against the natural stone or a continued terracotta section at the bottom. -
Fill the Bottom Section:
Paint the remaining bottom curve or side section with terracotta, so the teal band is sandwiched between two earthy sections. -
Establish Dividers:
Once the base colors are dry to the touch, use a liner brush and black paint to draw thick lines separating the color zones. Paint a spiral starting from the very center of the terracotta circle, winding outward.
Uneven Circles?
If your painted circles look wobbly, don’t stress. Thickening the black divider lines between the colored zones can hide uneven edges and instantly smooth out the shape.
Step 2: Border Details
-
Whiten the Borders:
Create contrast by painting a thin white line directly top of your black divider lines, or right next to them. This makes the colors pop. -
Add Small Dots:
Dip a small dotting tool or toothpick into white paint. Carefully place tiny dots along the white border lines you just painted, spacing them evenly. -
Create the Central Spiral:
Go back to the very center of the terracotta circle. Using black paint and a fine liner brush, refine the central spiral line so it is crisp and dark against the earthy background.
Metallic Magic
Swap the plain terracotta paint for a metallic copper or bronze acrylic. The shimmer will give the snail illustration a fossilized, ancient treasure appearance.
Step 3: Decorative Dot Work
-
Large Teal Dots:
Using a larger dotting tool or the back end of a paintbrush, dip into teal paint. Press a series of dots into the center terracotta spiral, following the curve. -
Highlight the Teal Dots:
When the large teal dots are dry, add a tiny white dot in the center of each one to create a ‘bullseye’ effect. -
Decorate the Teal Band:
Moving to the wide teal band, add medium-sized white dots spaced about a half-inch apart down the center of the strip. -
Outline the White Dots:
Use a fine brush with black paint to carefully circle each of these medium white dots. This mimics the look of suction cups or shell patterns. -
Add Tiny Filler Dots:
Fills the empty space in the terracotta sections with rows of extremely small white dots. I like to follow the curve of the main black lines to keep the flow consistent. -
Final White Accents:
Add a final ring of tiny white dots on the outermost black border where the paint meets the raw stone.
Step 4: Finishing Up
-
Check for Touch-ups:
Look over your rock for any smudges. Use a damp Q-tip to clean up mistakes or a tiny brush to re-apply base colors if needed. -
Seal the Stone:
Allow the rock to dry overnight. Once fully cured, apply a coat of clear acrylic sealer to protect your artwork from chipping and UV fading.
Place your finished spiral stone in a garden pot or on a windowsill to enjoy its calming, symmetrical beauty
Stacked Rock Totems With Matching Patterns
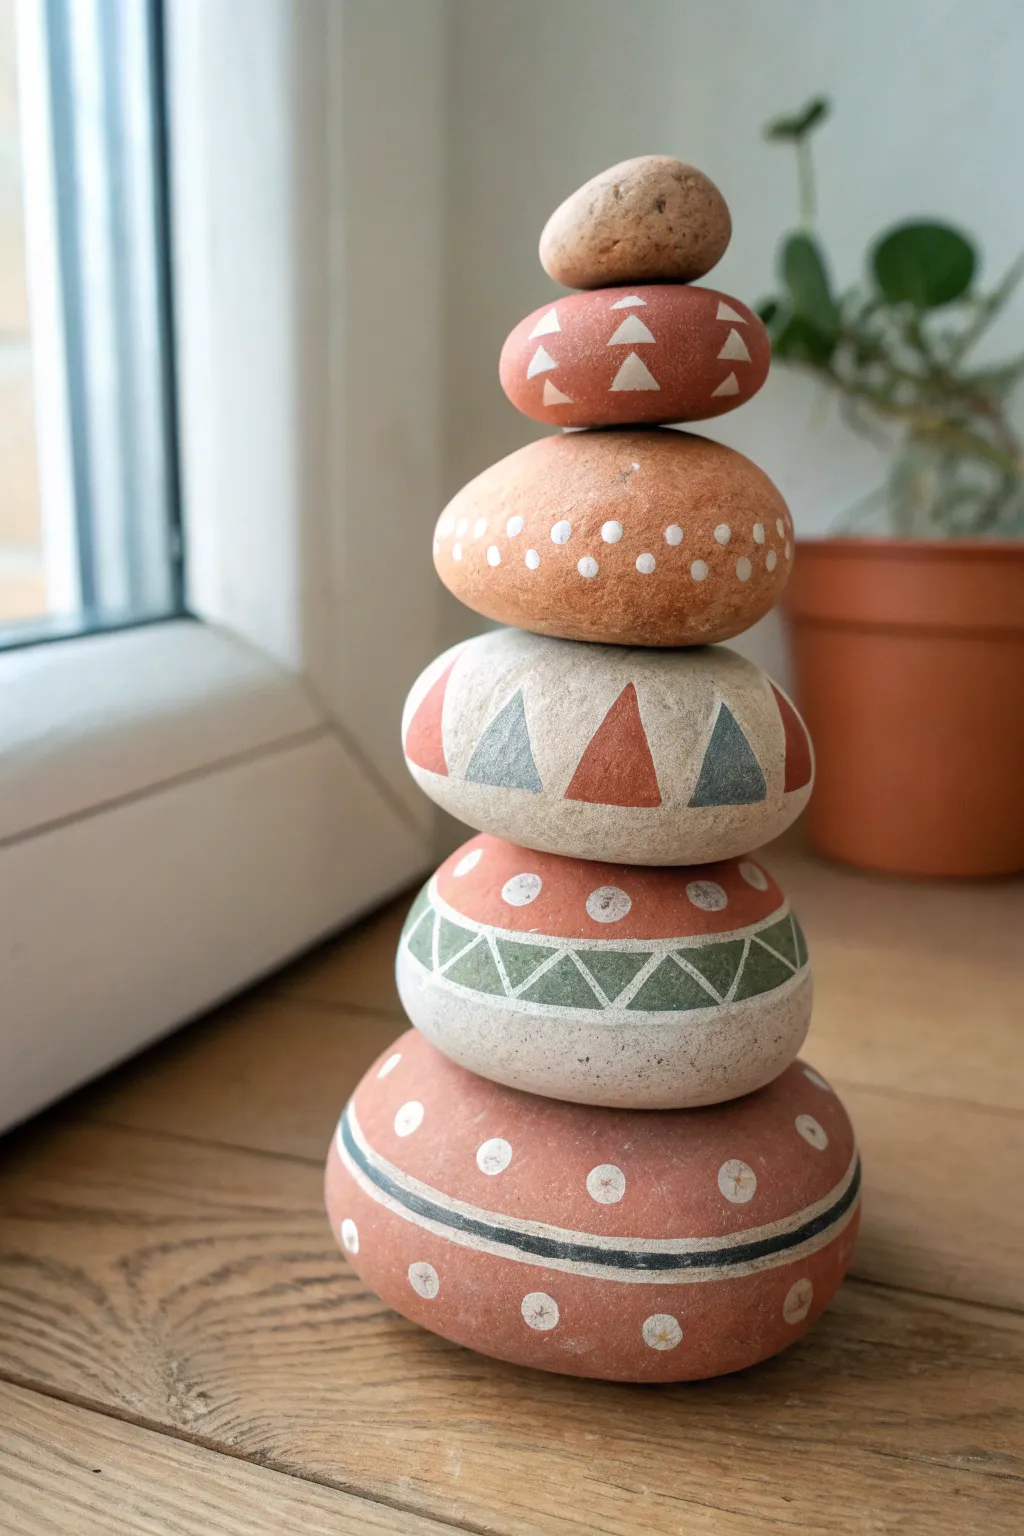
Transform ordinary garden stones into a striking piece of decor with this stacked totem project. Featuring geometric patterns in earthy tones of terracotta, sage, and cream, this balanced sculpture adds a peaceful, artistic touch to any windowsill or shelf.
How-To Guide
Materials
- 6 smooth river rocks of graduated sizes (large to small)
- Acrylic craft paints (terracotta, cream/off-white, sage green, slate blue)
- Fine detail paintbrushes (sizes 0 and 1)
- Flat shader brush (size 4 or 6)
- Strong adhesive (E6000 or heavy-duty construction adhesive)
- Pencil for sketching
- Matte spray sealant (optional)
- Small dotting tool or toothpick
Step 1: Preparation & Base Layers
-
Select and clean your stones:
Choose six stones that stack well naturally. Look for flatter surfaces to ensure stability. Scrub them thoroughly with warm soapy water to remove any dirt or oils, then let them dry completely. -
Dry stack test:
Before painting, stack your stones to finalize the order. Ensure the largest stone is at the base and they decrease in size as you go up. This helps visual balance and stability. -
Paint the base stone:
Take the largest bottom stone. Using the flat shader brush, paint the entire surface with a warm terracotta color. Depending on the rock’s original color, you may need two coats for opaque coverage. -
Paint the second stone:
For the second largest stone (the striped one), paint the top half in a creamy off-white and the bottom half in terracotta, or leave parts unpainted if the natural stone color fits your palette. -
Base coat the middle stone:
Paint the third largest stone (the one with large triangles) completely in a cream or light beige tone to serve as a neutral canvas for the geometric shapes. -
Prepare the upper stones:
Paint the fourth stone a solid orange-brown. Paint the fifth stone (second from top) a deep reddish-terracotta. Leave the smallest, topmost pebble unpainted to showcase its natural texture.
Step 2: Geometric Details
-
Decorate the base stone:
On the largest terracotta stone, use a fine brush or white paint pen to draw a thin horizontal black or dark grey stripe around the middle. Allow it to dry. -
Add dots to the base:
Using a dotting tool or the back of a brush handle dipped in white paint, creation evenly spaced dots above and below the dark stripe on the base stone. I like to let these dry briefly before handling the stone again. -
Pattern the second stone:
On the second stone, paint a band of sage green triangles around the middle. Outline this band with thin white lines on top and bottom. Inside the green band, use a fine brush to add white zigzag lines connecting the triangle peaks. -
Add upper dots to second stone:
Add large white dots to the terracotta section on the upper curve of this second stone. -
Paint large triangles on the third stone:
On the cream-colored middle stone, paint large, bold triangles using your terracotta and slate blue paints. Alternate the colors so a red triangle is next to a blue one. -
Detail the fourth stone:
For the orange-brown stone, use your dotting tool to create a simple row of white dots around the center circumference. Keep them small and delicate. -
Decorate the fifth stone:
On the reddish stone near the top, use a very fine brush to paint small, solid white triangles in a repeating pattern across the face of the rock.
Wobbly Stack?
If your stones aren’t sitting flat, use small balls of epoxy putty between layers instead of liquid glue. The putty fills gaps and creates a custom-fit seat for each rock.
Step 3: Assembly & Finish
-
Seal the paint:
Once all paint is completely dry, spray each stone with a matte sealant. This protects the design from chipping during the stacking process. -
Begin gluing:
Apply a dab of strong adhesive to the center of the base stone. Press the second stone firmly onto it. Hold for 30-60 seconds to ensure initial tackiness. -
Continue the stack:
Repeat the gluing process, moving upward one stone at a time. Rotate the stones slightly as you place them to find the most stable ‘seated’ position. -
Place the final stone:
Glue the small, unpainted pebble at the very top. Wipe away any excess glue that might have squeezed out between the layers immediately with a damp cloth. -
Full cure time:
Let the sculpture sit undisturbed for at least 24 hours (or as recommended by your glue manufacturer) before moving it to its final display spot.
Make It Glossy
Swap the matte sealant for a high-gloss varnish to make the stones look perpetually wet, mimicking the look of river rocks fresh out of the water.
Place your finished totem near a window where the light can highlight the smooth curves and geometric patterns
Story Stone Sets Made From “Reject” Shapes
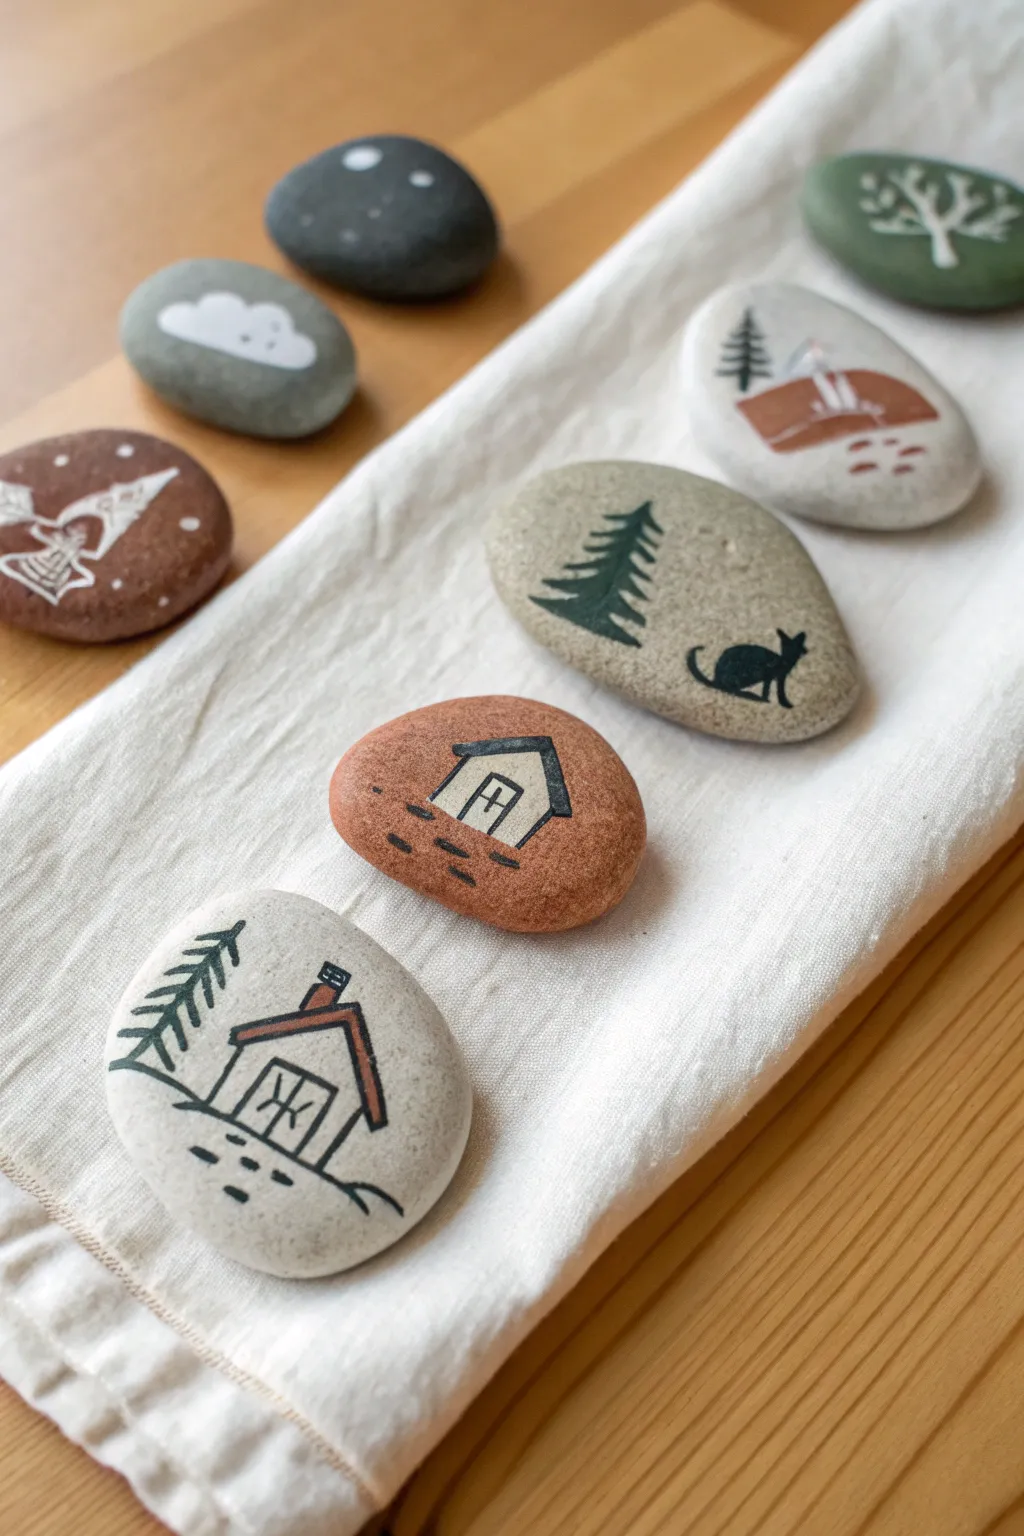
Transform humble, irregularly shaped rocks into a charming narrative set featuring rustic cabins, pine trees, and woodland motifs. This project embraces the natural imperfections of stone to create miniature, handheld scenes with a distinct Scandinavian folk art vibe.
Step-by-Step Tutorial
Materials
- Various smooth river rocks (flat, irregular shapes preferably)
- Acrylic paints (terracotta/rust, dark green, slate grey, cream/white, black)
- Fine liner brushes (sizes 0 and 00)
- Small flat shader brush
- Posca paint pens (extra fine tip: black and white) – optional but helpful for details
- Matte sealer or varnish
- Pencil for sketching
- Palette for mixing
Step 1: Preparation and Planning
-
Clean Your Canvas:
Begin by thoroughly washing your rocks with warm, soapy water to remove any dirt or grit. Let them dry completely, preferably in the sun, to ensure the paint adheres properly. -
Arrange Your Composition:
Lay out your stones and decide which motif fits best on each shape. Use elongated stones for tall trees and rounder ones for cabins or scenic vignettes. -
Light Sketching:
Using a pencil, very lightly sketch the main elements onto the stone. Keep it simple—just outline where a cabin roof, a tree line, or a sleeping cat will go. Don’t worry about tiny details yet.
Stone Selection Tip
Don’t discard chipped rocks! A chip on the edge can be painted into the design as a sloping hill or a rugged cliffside.
Step 2: Color Blocking
-
Painting the Base Shapes:
Identify the solid color areas of your design. For the cabins, use a flat shader brush to paint the geometric shape of the house structure in a warm cream or light grey. -
Adding Roofs and Grounds:
Mix a rusty terracotta color for roofs or ground patches. Carefully paint the triangular roof shapes or sweeping curves of the earth. You may need two thin coats for opaque coverage. -
Painting Foliage:
Switch to a dark forest green. On separate stones or around your cabins, paint the basic triangular foundations for pine trees. Keep the edges relatively loose as we’ll refine them later. -
Let It Dry:
Allow these base layers to dry completely. If the stone feels cool to the touch, it’s likely still damp. Patience here prevents muddy colors later.
Step 3: Line Work and Details
-
Outlining Structures:
Using a fine liner brush with black paint (or a black extra-fine paint pen), carefully outline your painted shapes. Give the cabins crisp edges and define the rooflines. -
Defining Trees:
For the pine trees, draw a central vertical line, then add horizontal, slightly downward-curving branches. Use quick, short strokes to mimic needles and create texture. -
Adding Windows:
Paint small squares or rectangles inside the house shapes for windows. Once the black outline is dry, you can add a simple cross or grid pattern inside for window panes. -
Chimneys and Smoke:
Add tiny rectangular chimneys to your roofs. For a cozy touch, paint a wispy white line curling up from a chimney to represent smoke.
Fixing Smudged Lines
If a paint pen line bleeds, wait for it to dry fully, then gently scrape the excess off with a toothpick before re-painting.
Step 4: Decorative Accents
-
Character Details:
If you have a wider, flatter stone, paint a silhouette of a black cat sitting near a tree. Keep the shape graphic—a simple oval body, round head, and pointed ears works perfectly. -
Ground Texture:
Add small black dashes or dots under the houses and trees to represent grass, pebbles, or uneven ground. This grounds your illustrations so they don’t look like they are floating. -
White Highlights:
Use white paint or a white pen to add contrast. Draw simple white markings on dark rocks, like the veins on a leaf or the outline of a cloud on a grey stone. -
Final Cleanup:
Check your lines. If any black lines look too shaky, you can tidy them up by carefully painting over the error with the background stone color or the design color.
Step 5: Finishing Touches
-
Sealing the Art:
Once everything is absolutely dry—I like to wait overnight just to be safe—apply a thin layer of matte sealer. A matte finish keeps the natural look of the stone better than a glossy one. -
Second Coat:
Apply a second thin coat of sealer for durability, especially if these will be played with as story stones.
Arrange your finished stones on a cloth or tray to admire your miniature village
Optical Illusions That Turn Lumps Into 3D Objects
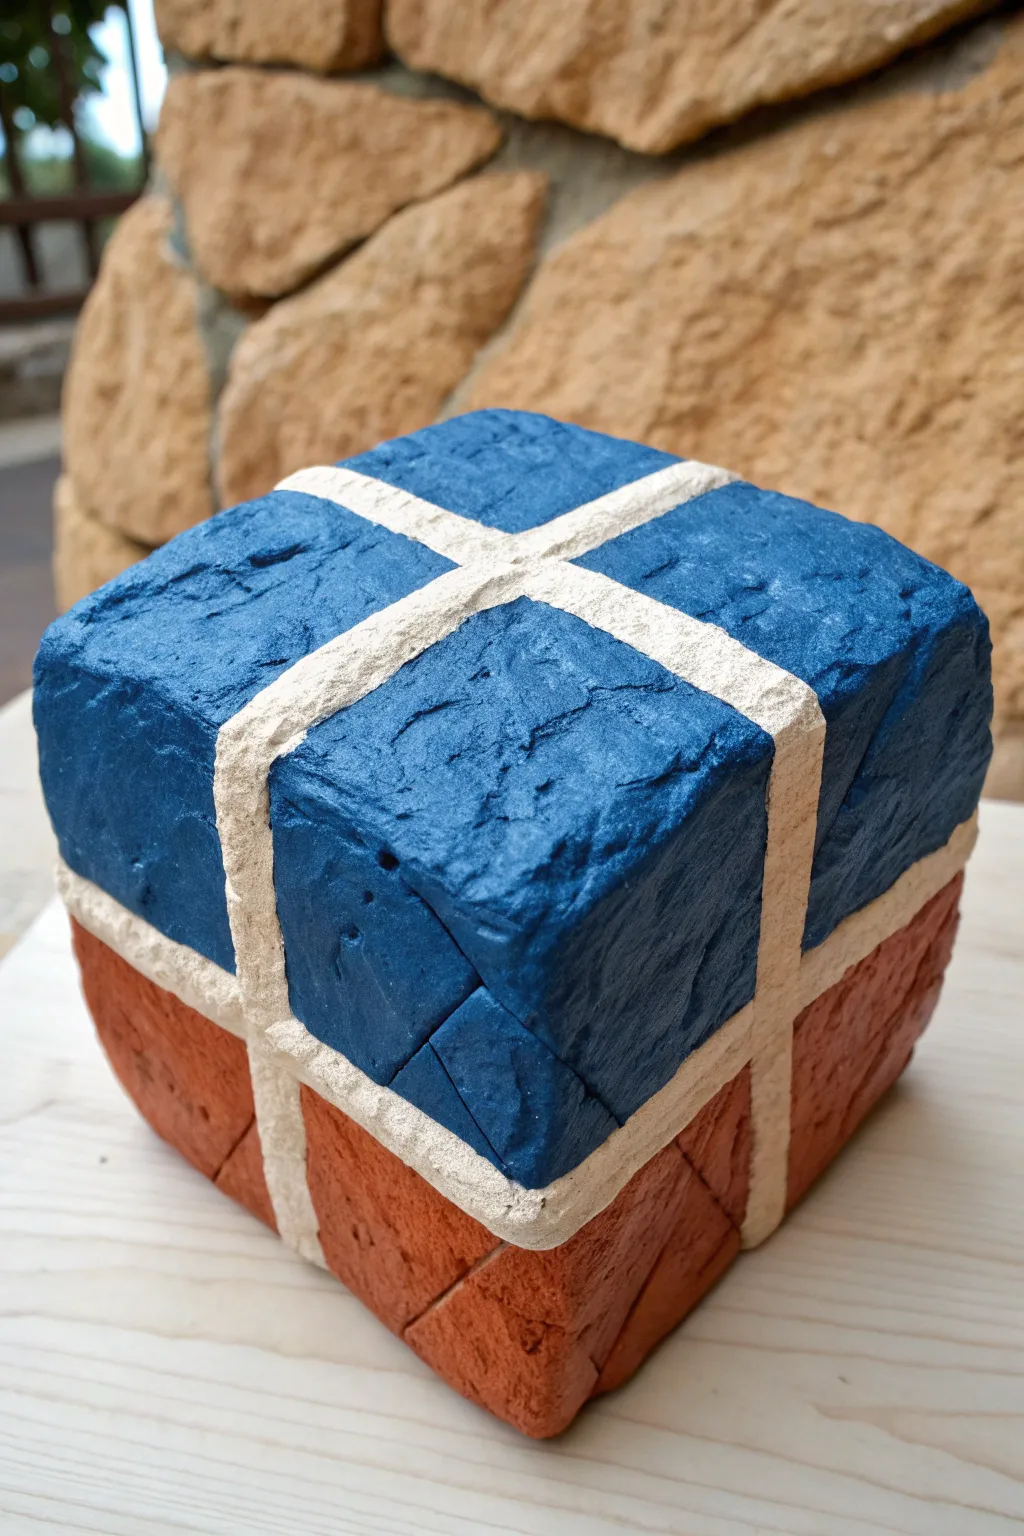
Transform a simple cubic rock into a striking optical illusion that looks like a compressed package or a stone puzzle box. By using distinct color blocking and thick, textured lines, you’ll turn a lumpy surface into a structured, three-dimensional geometric wonder.
Step-by-Step
Materials
- A roughly cube-shaped rock (smooth or slightly textured)
- Acrylic paints: Navy Blue, Terracotta/Rust Red, Cream/Off-White
- Flat paintbrushes (medium and small)
- Detail liner brush
- Pencil or white chalk pencil
- Ruler or straight edge (flexible tape measure works best)
- Matte varnish or sealant
Step 1: Preparation and Mapping
-
Clean the canvas:
Begin by scrubbing your rock thoroughly with soap and water to remove any dirt or moss that might interfere with paint adhesion. Let it dry completely in the sun. -
Visualize the perspective:
Place your rock on a flat surface and identify the most ‘flat’ side to serve as the top face. This orientation determines the whole illusion. -
Draw the grid lines:
Using a ruler and a pencil (or white chalk for dark rocks), lightly draw a dividing line horizontally around the entire middle of the rock. This will separate the top color from the bottom color. -
Cross the top:
Draw two perpendicular lines across the top face to create a cross shape. Extend these vertical lines down the sides to meet the horizontal line you just drew. -
Extend to the bottom:
Continue these vertical lines down the bottom half of the rock. The goal is to make it look like a ribbon or strap is wrapping around the entire object. -
Thicken the bands:
Go back over your pencil lines and convert them into bands about a quarter-inch wide. These will become the cream-colored separators.
Wobbly Lines?
If your hand is shaking or the rock is too bumpy for straight lines, use narrow masking tape or washi tape to block out the cream bands before painting the blue and red sections.
Step 2: Color Blocking
-
Paint the top sections:
Load a medium flat brush with Navy Blue acrylic. Carefully fill in the four quadrants on the top face, staying outside your penciled band lines. I find dabbing the paint into the rock’s pits helps cover textured surfaces better than sweeping strokes. -
Continue blue down the sides:
Paint the upper sections of the side faces blue as well, stopping exactly at the horizontal band line. This creates the ‘lid’ effect. -
Paint the bottom sections:
Switch to your Terracotta or Rust Red paint. Fill in the remaining rectangular sections on the bottom half of the rock, again being careful to preserve the blank bands. -
Second coat:
Stone often absorbs the first layer of acrylic. Apply a second coat of both blue and red once the first is dry to ensure opaque, solid color saturation.
Step 3: Creating the Illusion
-
Fill the bands:
Using a clean, smaller flat brush, paint the reserved bands with Cream or Off-White paint. You want this to look like thick grout or fabric tape, so don’t worry if the texture looks a bit rough. -
Refine the edges:
Use a liner brush to tidy up where the colors meet the cream bands. Crisp, straight lines are essential for the 3D box effect to work convincingly. -
Add subtle depth:
Mix a tiny drop of brown into your cream paint. lightly paint a very thin shadow line along the bottom edge of the horizontal cream band on the sides. This makes the upper blue section look like it’s slightly overhanging. -
Highlighting corners:
Mix a lighter version of your blue (add a touch of white) and dry-brush just the very corners and sharpest edges of the blue squares. This emphasizes the cubic geometry. -
Seal the work:
Once everything is fully cured, apply a coat of matte varnish. A glossy finish might ruin the stone effect, so matte is best to keep it looking like a surreal artifact.
Add Texture
Mix a little baking soda into your cream paint before applying it to the bands. This creates a gritty, raised mortar-like texture that makes the ‘straps’ physically stand out from the smooth stone.
Place your finished geometric rock in the garden and watch visitors do a double-take at this impossible object


Have a question or want to share your own experience? I'd love to hear from you in the comments below!