Tessellations are one of my favorite ways to mix pattern and play—it’s basically drawing a shape that repeats forever with zero gaps and zero overlaps. If you’ve ever wanted that satisfying “everything clicks” feeling on paper, these tessellation ideas will keep you happily busy.
Classic Square Slide Tessellation
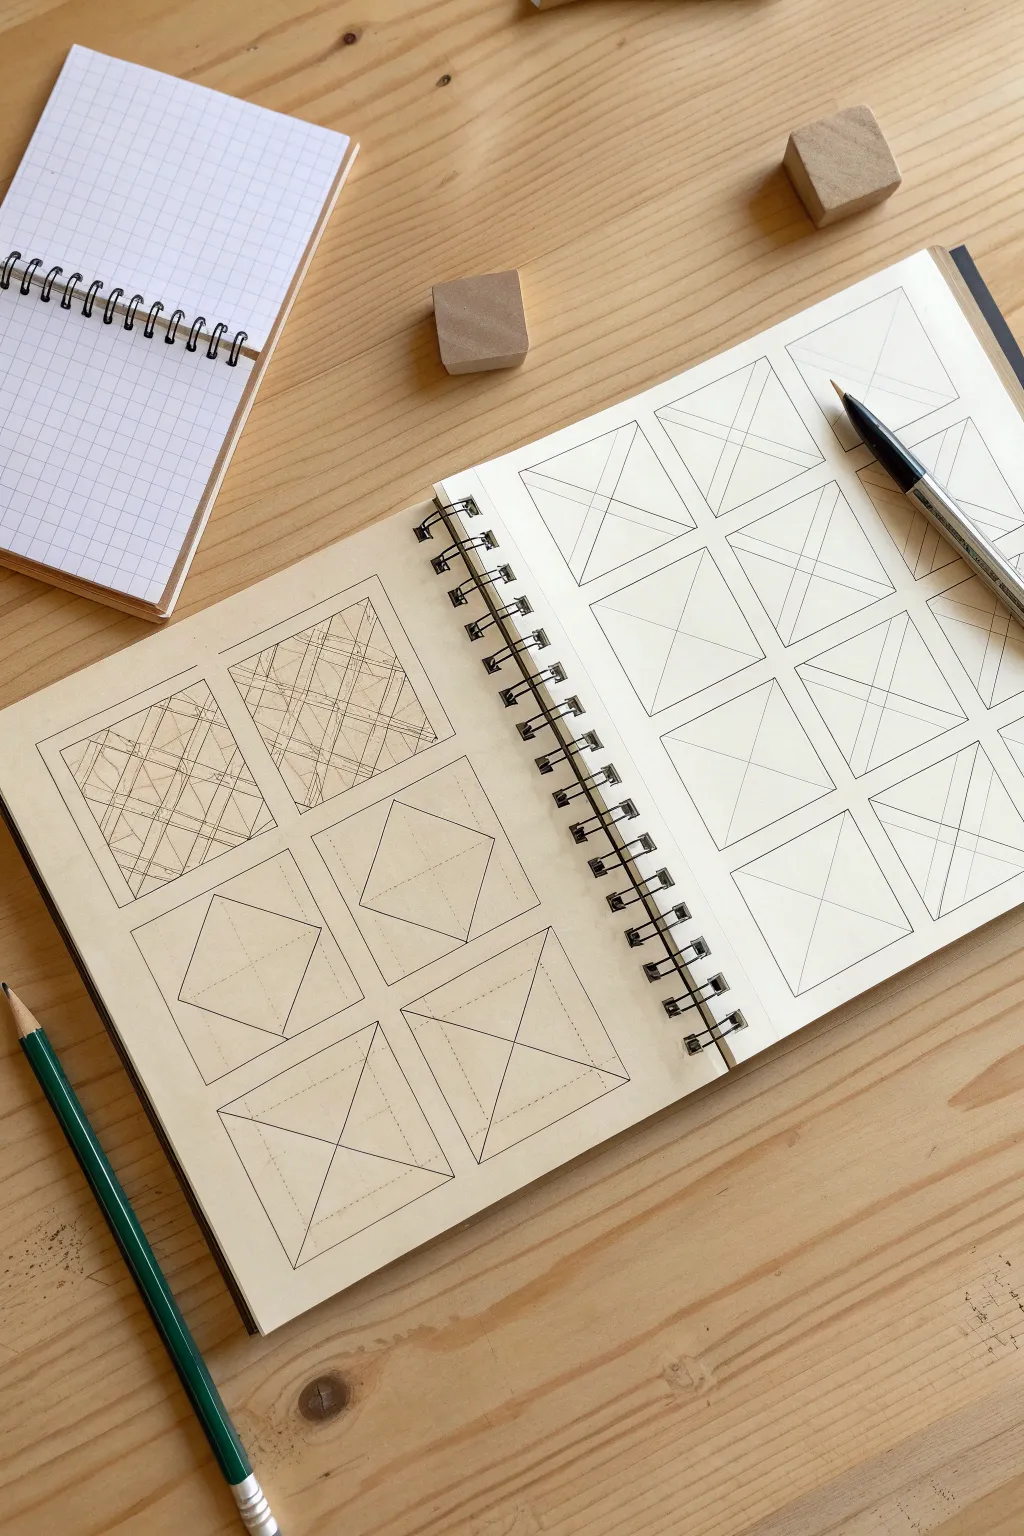
Master the art of geometric construction with this precise pencil study, breaking down the fundamental grid structures needed for more complex tessellations. You’ll create a progression of patterns, moving from basic X-grids to intricate, hatched designs, all on classic cream drawing paper.
Detailed Instructions
Materials
- Spiral-bound sketchbook with cream or off-white paper
- HB or 2B graphite pencil (sharpened to a fine point)
- Black fine-liner pen (0.3mm or 0.5mm)
- Clear plastic ruler
- Eraser (kneaded eraser preferred for lifting faint lines)
- Compass or divider (optional, for precise measurements)
- Small grid notebook (for reference sketches)
Step 1: Setting the Grid
-
Define the perimeter:
Begin on the right-hand page of your sketchbook. Using your ruler and pencil, lightly draw a large rectangular variety of 2×3 squares. Ensure the squares are uniform in size, roughly 2 inches by 2 inches each. -
Add diagonals:
Inside each of these six pencil squares, draw diagonal lines connecting opposite corners to form a large ‘X’. Keep your pressure very light, as these are guidelines. -
Ink the structure:
Switch to your black fine-liner pen. Carefully trace over the outer square borders and the internal ‘X’ diagonals for the entire 2×3 grid on the right page. This creates your crisp, finished template. -
Mirror on the left:
Repeat the initial pencil grid setup on the left-hand page. Draw the same 2×3 arrangement of squares. Do not ink these yet; this page will serve as your ‘drafting’ or ‘process’ page showing different stages of complexity.
Step 2: Building the Slide Pattern
-
Bottom row geometry:
Focus on the bottom two squares of the left page. Draw the standard ‘X’ diagonals in pencil. -
Internal markings:
Measure halfway from the center intersection to each corner along the diagonal lines. Mark these points lightly. Connect these points to form a faint diamond shape sitting inside the ‘X’. -
Middle row development:
Moving to the middle row, draw the same structure but darken the internal diamond shape using your ruler. This emphasizes the ‘slide’ effect where the shape is rotated 45 degrees. -
Refine the diamond:
Erase the internal ‘X’ lines inside the diamonds on this middle row, leaving only the outer square frame and the clear, rotated square in the center. -
Top row complexity:
For the top two squares, we will create the dense hatched effect. Start with the basic square frame.
Straighten Up
If your diagonals aren’t meeting perfectly in the center, check your square corners with a protractor or set square. Even a millimeter off-square throws off the center ‘X’.
Step 3: Detailed Hatching
-
Establish primary bands:
On the top-left square, draw a band of three parallel diagonal lines running from the top-left to bottom-right corners. Replicate this band in the opposite direction. -
Layering the weave:
Add parallel lines next to your central bands, spacing them about 2-3mm apart. Continue until the square is filled with an intersecting lattice. -
Hatching text:
Inside the spaces created by your lattice, add very fine diagonal hatching markings. I find it helpful to rotate the book slightly to get the most comfortable angle for these repetitive strokes. -
Varying line weight:
Go back over the primary ‘skeleton’ lines of the weave in the top-left square with slightly more pressure to distinguish them from the background hatching. -
Second variation:
On the top-right square, try a slightly different pattern density. Make the lattice tighter by spacing your parallel lines closer together. -
Final clean up:
Once all pencil work is complete, gently run your kneaded eraser over the page to lift any graphite smudges or construction lines that strayed outside the boxes.
Add Dimension
Use a softer pencil (4B) to shade underneath the overlapping bands in the top row. This creates a woven visual illusion, making the strips look like ribbons.
Now you have a study sheet demonstrating the evolution from simple geometry to complex woven patterns.


Triangle Grid Tile Pattern
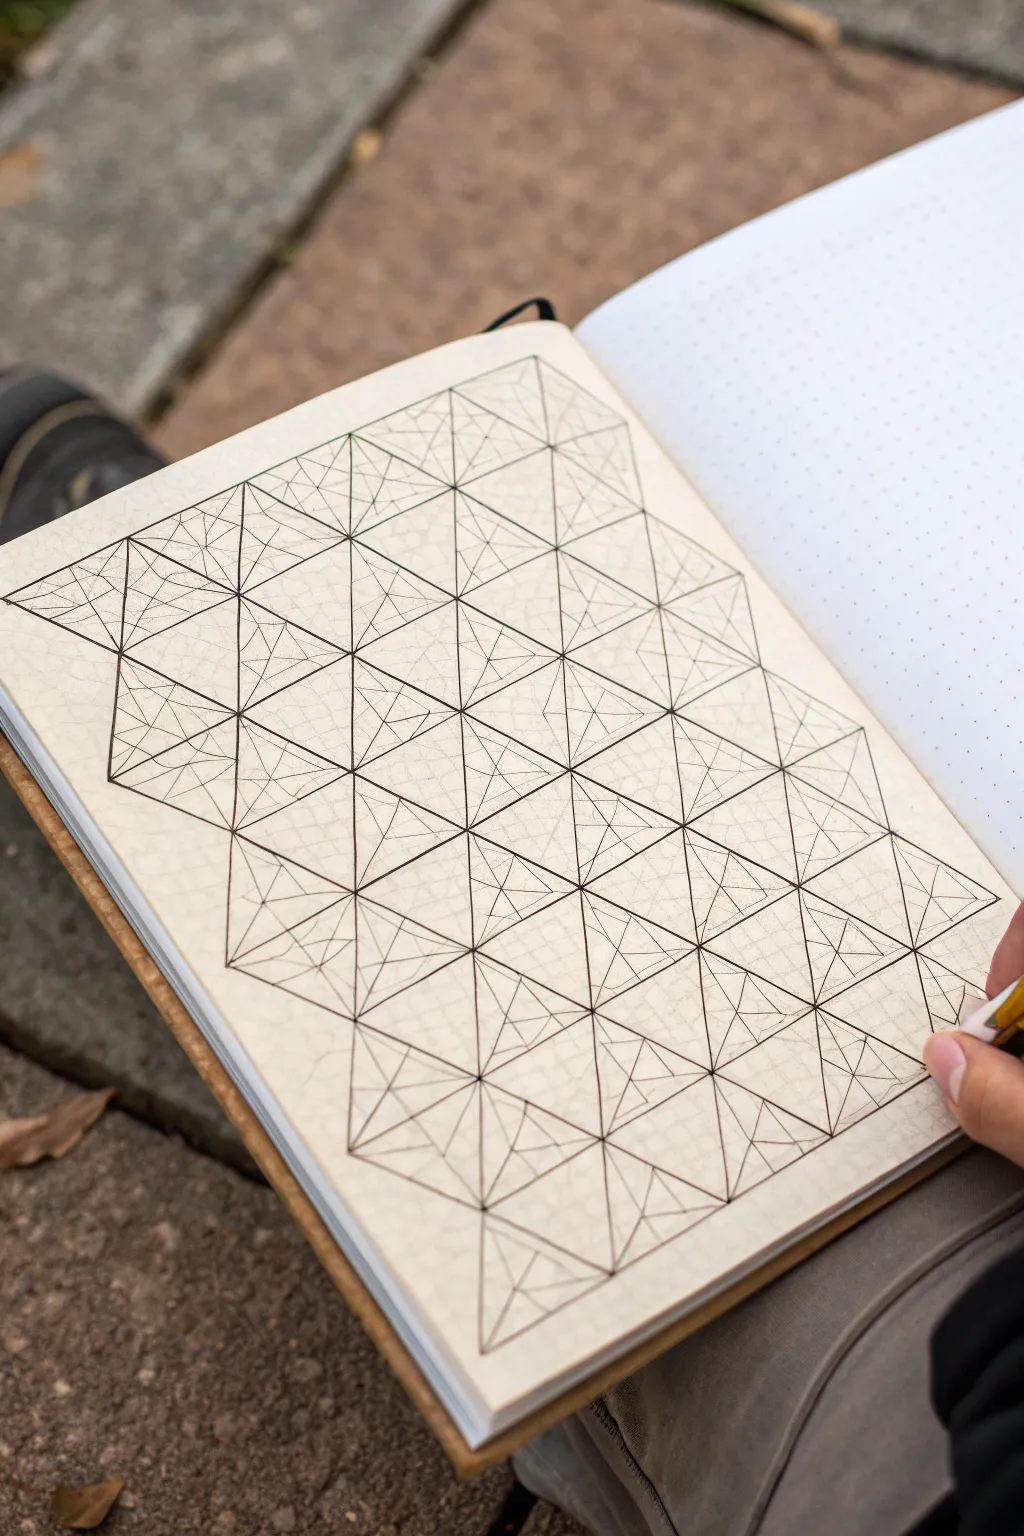
This intricate design transforms a simple triangle grid into a mesmerizing, layered latticework pattern that plays with perception. By subdividing basic equilateral triangles, you create a complex web of lines that looks far more difficult than it actually is.
Step-by-Step Guide
Materials
- Dot grid notebook or graph paper
- Ruler or straight edge
- Drafting pencil (HB or H)
- Eraser
- Fine liner pen (0.3mm or 0.5mm, black)
Step 1: Drafting the Base Grid
-
Establish the baseline:
Begin near the bottom of your page. Using the dot grid as a guide, draw a horizontal line connecting a series of dots. This will be the base for your first row of triangles. -
Create the primary triangles:
Mark out equal intervals along your baseline (e.g., every 4 or 6 dots). Complete the equilateral triangles by drawing diagonal lines up to a pinnacle dot centered above each interval. Repeat this across the row. -
Stack the rows:
Continue building rows of identical equilateral triangles layered on top of each other until you have filled your desired page area. This creates a honeycomb-like structure of upward-pointing and downward-pointing triangles.
Smudge Prevention
Place a scrap piece of paper under your drawing hand while you work. This prevents oils from your skin from warping the paper and stops you from dragging wet ink across the page.
Step 2: Subdividing the Shapes
-
Find the centers:
Lightly mark the exact center point of each large triangle. Since you are using a dot grid, this central point should land cleanly on a dot or halfway between existing grid lines depending on your scale. -
Draw internal bisectors:
From each of the three corners of a large triangle, draw a straight line to the midpoint of the opposite side. These lines will all intersect at your center point, dividing the large triangle into six smaller, right-angled triangles. -
Repeat across the grid:
Apply stick-to-itiveness here and repeat this subdivision process for every single large triangle in your grid. The pattern will start to look like a dense field of ‘star’ bursts.
Creative Variation
Try shading specific sub-triangles with stippling or hatching to create a 3D relief effect. Alternating shading directions can make the pattern appear to pop out or recede.
Step 3: Inking the Final Pattern
-
Trace the main grid:
Switch to your fine liner pen. Carefully trace over the outlines of all the large, primary triangles first. Using a ruler is crucial here to keep the lines crisp and mechanical. -
Ink the internal structure:
Go back in and ink the internal bisecting lines you drew in pencil. Be precise where lines meet at the center points so ink doesn’t pool into a messy blob. -
Connect midpoints:
This is the ‘secret’ step that adds depth. Inside each large triangle, draw a new, smaller triangle by connecting the midpoints of the three main sides. This creates a ‘triangle within a triangle’ look. -
Add detail lines:
Finally, draw lines from the center point of the large triangle out to the midpoints of the newly created inner triangle sides. This creates the illusion of faceted gems or 3D pyramids. -
Erase guidelines:
Wait for the ink to dry completely to avoid smudging. I usually give it at least 15 minutes. Then, gently erase any visible pencil marks underneath your ink lines.
Step back and admire the complex geometry you built from simple lines


Hexagon Honeycomb Tessellation
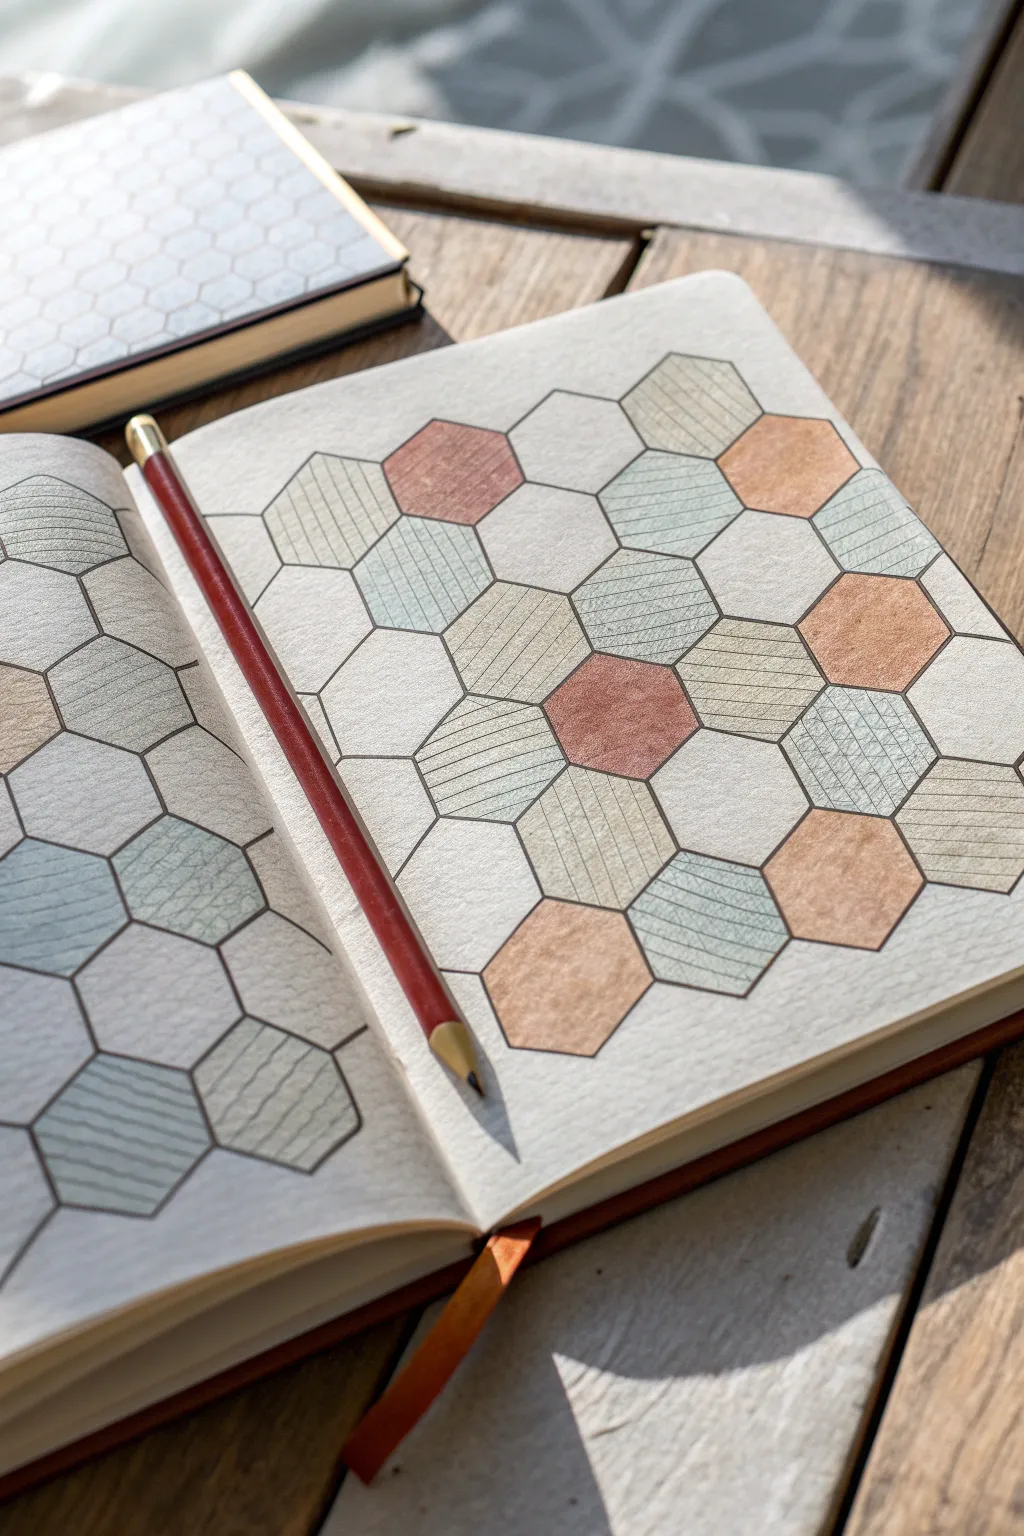
This relaxing journaling project transforms a simple hexagonal grid into a patchwork of muted colors and subtle textures. With its soothing palette of sage, terra cotta, and slate blue, it evokes a calm, organic feeling perfect for mindful doodling.
How-To Guide
Materials
- Dotted or grid notebook (A5 size recommended)
- Ruler or straight edge
- HB pencil
- Fine-liner pen (0.3mm or 0.5mm, black or dark grey)
- Set of colored pencils (muted earth tones: rust, sage, olive, slate)
- Eraser
Step 1: Drafting the Grid
-
Establish the baseline:
Start by drawing a faint horizontal line across the middle of your page with your HB pencil to serve as an anchor for your pattern. -
Mark hexagon widths:
Along this line, mark dots at equal intervals (e.g., every 2cm or 0.75 inches) to define the width of your hexagons. -
Construct the first row:
Using a 60-degree angle if you have a protractor, or simply eyeballing the geometry based on the dots, sketch the angled sides of your first row of hexagons lightly in pencil. -
Expand the honeycomb:
Build outwards from that central row, interlocking each new hexagon into the V-shape created by the two below it until the page is filled with a light pencil grid. -
Refine the lines:
Once satisfied with the pencil layout, trace over the hexagon outlines with a fine-liner pen. Keep your hand steady but don’t worry about perfection; a little wobble adds character. -
Clean it up:
Wait a few minutes for the ink to dry completely, then gently erase all visible pencil guidelines to leave a crisp, clean grid.
Step 2: Planning the Pattern
-
Visualize the clusters:
Look at your grid and identify small clusters of three or four hexagons where you want to focus your color. -
Select your palette:
Choose 3-4 colored pencils that harmonize well. I like to test them on a scrap piece of paper first to ensure the ‘temperature’ of the colors works together. -
Mark color placement:
Put a tiny, faint dot of the intended color in the specific hexagons you plan to fill, ensuring you leave plenty of white space between colored cells for balance.
Hexagon Hack
Don’t want to draw the grid? Buy a hexagon stencil or print a faint hex grid on your paper first to skip the geometry work and get straight to coloring.
Step 3: Coloring and Texturing
-
Apply base color:
Starting with your terra cotta or rust pencil, fill in your designated hexagons. Use a light touch to create a soft, washed-out look rather than a heavy, waxy finish. -
Add diagonal hatching:
On a few of the colored hexagons, draw fine, parallel diagonal lines over the base color to add visual interest and texture. -
Introduce cool tones:
Pick up your sage green or pale olive pencil. Fill in adjacent grouping, again keeping the pressure light and even. -
Create variation:
For the blue/slate hexagons, vary your stroke direction. If you colored the red ones vertically, try coloring these horizontally to distinguish the shapes. -
Layer textures:
Go back over random colored cells with slightly darker pencil strokes, creating simple patterns like vertical stripes or faint cross-hatching. -
Leave breathing room:
Ensure about 50% of the hexagons remain completely white. This negative space is crucial for the ‘airiness’ of the design. -
Final definition:
If any pencil lines were obscured by the coloring, carefully re-trace those specific hexagon edges with your fine-liner to make the shapes pop again.
Level Up: Metallic Pop
Use a gold or copper gel pen to trace just one side of every colored hexagon. It creates a subtle faux-shadow effect that catches the light beautifully.
Close your sketchbook knowing you’ve created a moment of organized calm.


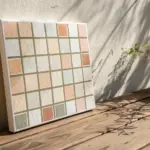
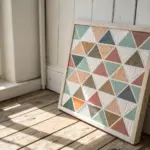
Simple Diamond Rhombus Repeat
Embrace the soothing precision of geometry with this rhombus tessellation art piece. By combining earthy tones like mustard, teal, and terracotta in a classic harlequin pattern, you can create a striking wall hanging that mimics the warmth of a patchwork quilt.
Step-by-Step Guide
Materials
- High-quality cardstock in four colors (mustard yellow, teal/slate blue, terracotta, brown)
- White backing paper (heavyweight, like mixed media paper or Bristol board)
- Pencil
- Metal ruler
- Craft knife or scalpel (X-Acto)
- Self-healing cutting mat
- Glue stick (archival quality) or liquid craft glue with a fine tip applicator
- Eraser
- Protractor or 60-degree triangle template
Step 1: Creating the Grid
-
Determine dimensions:
Decide on the final size of your artwork. A standard 8×10 inch or A4 size works well for beginners. -
Design the rhombus:
The core shape here is a 60-degree rhombus (two equilateral triangles joined at the base). Decide on a side length for your diamonds, such as 1.5 inches. -
Draft the template:
On a scrap piece of heavy cardstock, draw your rhombus using a pencil, ruler, and protractor to ensure the angles are precise. Accurately measure all four sides to be equal. -
Cut the template:
Carefully cut out your master template using your metal ruler and craft knife. This piece will determine the accuracy of every other shape, so take your time.
Uneven Gaps?
If gaps look inconsistent, cut a small shim from cardboard (the thickness of your desired gap). Use this spacer between every single tile as you glue to force perfect spacing.
Step 2: Cutting the Tiles
-
Trace shapes:
Using your master template, trace the rhombus shape onto your four colored cardstock sheets. You will need roughly 10-15 of each color, depending on your final grid size. -
Slice strips first:
To speed up the process, I find it easier to cut long strips of paper the exact width of the rhombus height first, then slice the angled cuts. -
Cut individual tiles:
Using the metal ruler as a guide, cut out all your colored diamonds. Keep the blade fresh to avoid ragged edges on the paper. -
Organize by color:
Sort your cut pieces into separate piles by color to strictly manage your pattern during the assembly phase.
Add Dimension
Instead of gluing the tiles completely flat, use thin foam adhesive squares or score the diamonds down the center and slightly fold them for a subtle 3D relief effect.
Step 3: Layout and Assembly
-
Mark the center:
Lightly find the vertical center of your white backing paper. Draw a faint guide line down the middle to help you keep the pattern straight. -
Plan the spacing:
This design relies on ‘negative space’ or grout lines. You want a consistent gap of about 1-2mm between every tile. -
Dry run:
Lay out your tiles on the paper without glue first to finalize your color pattern. Shuffle them until the distribution of colors feels balanced. -
Glue the first column:
Start gluing the central column of diamonds along your pencil guide line. Apply glue to the back of the paper tile, not the background, to prevent oozing. -
Align the points:
Ensure the top and bottom points of the diamonds align perfectly vertically. This central spine anchors the whole tessellation. -
Extend outwards:
Begin adding diamonds to the left and right of your central column. Match the angled sides, maintaining that consistent 1-2mm white gap. -
Check alignment constantly:
Step back frequently to ensure your rows aren’t drifting upwards or downwards. Adjust while the glue is still tacky if necessary. -
Form the border:
As you reach the edges of your backing paper, you may need to trim overhanging diamonds flush with the paper’s edge, or you can create a specific rectangular boundary as seen in the example. -
Create a visual frame:
For the framed look shown, cut a slightly larger piece of beige or kraft colored cardstock and mount your white tessellated on top of it, leaving a small border. -
Final press:
Place a clean sheet of scrap paper over the finished artwork and weigh it down with heavy books for an hour to ensure everything dries flat. -
Clean up:
Once dry, use a gentle eraser to remove any visible pencil guide lines from the white gaps.
Hang your new geometric masterpiece in a spot with good lighting to highlight the precision of your work
BRUSH GUIDE
The Right Brush for Every Stroke
From clean lines to bold texture — master brush choice, stroke control, and essential techniques.
Explore the Full Guide
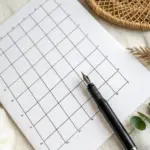
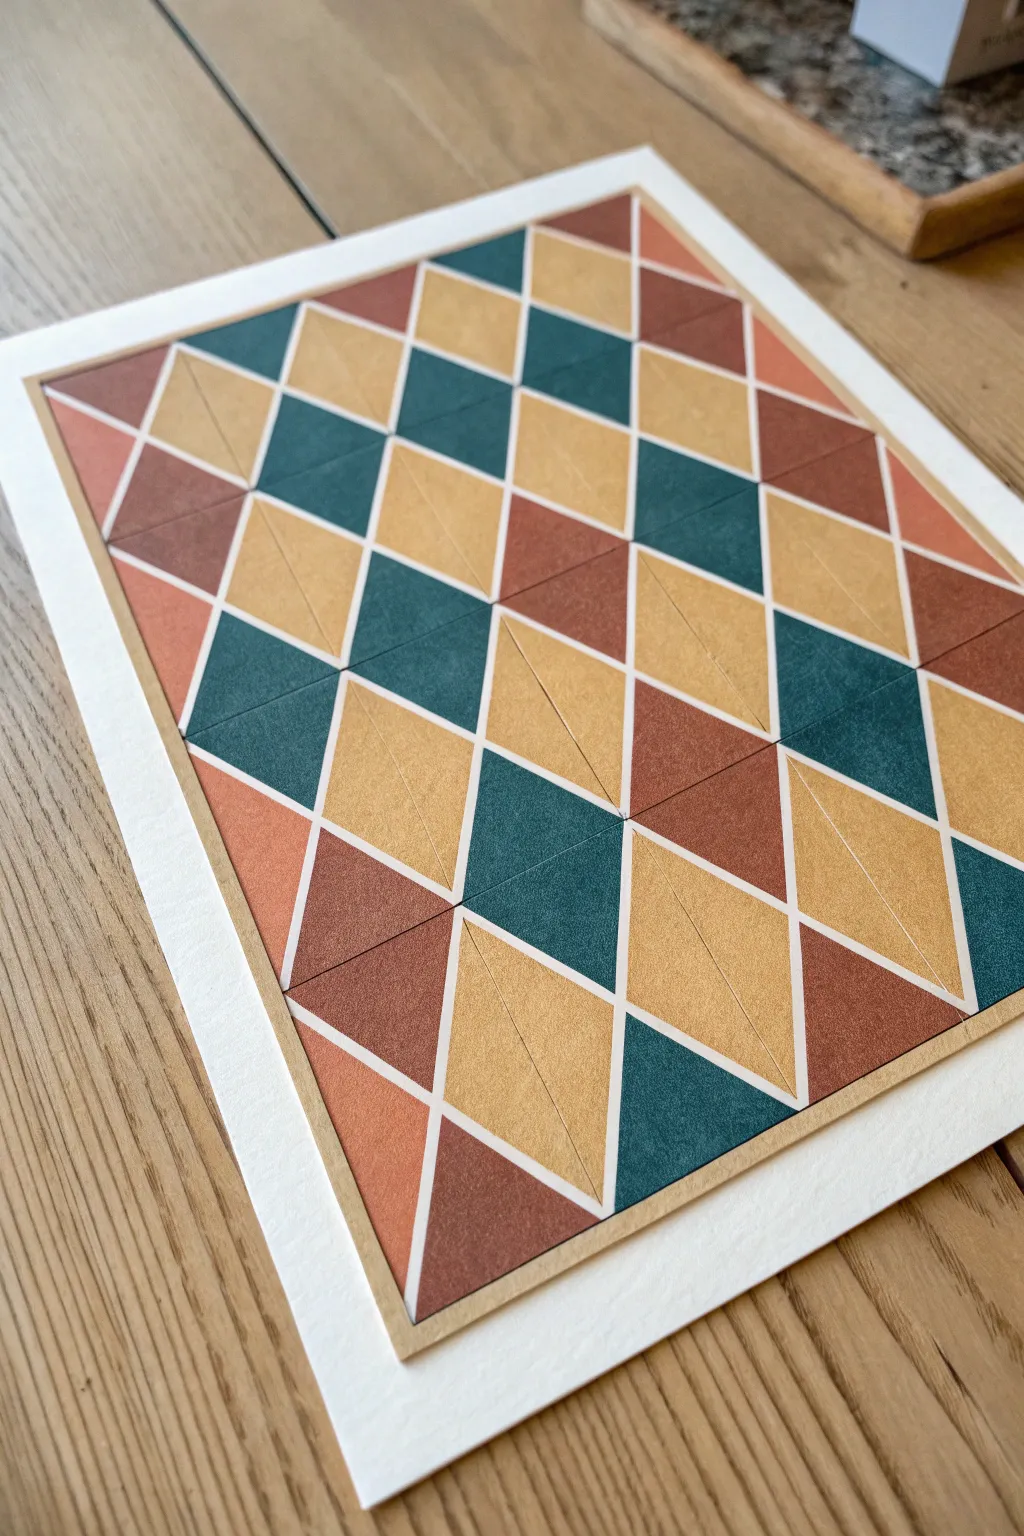
Checkerboard With Internal Designs
Explore the calming repetition of geometric drawing with this elegant checkerboard design. By combining simple dotted grid lines with alternating internal textures, you create a finished piece that feels both structured and organic.
How-To Guide
Materials
- Cream or off-white cardstock (approx. 5×7 inches)
- Fine liner pen (black, 0.3mm or 0.5mm)
- Ruler
- Pencil (HB or H for light lines)
- Eraser (kneaded eraser preferred)
Step 1: Setting the Structure
-
Measure the grid:
Begin by lightly marking out a 4×5 square grid on your paper using a pencil and ruler. Each square should be roughly 1 to 1.5 inches wide, leaving an even border around the edges of the cardstock. -
Draft the grid lines:
Use your ruler to draw faint vertical and horizontal lines connecting your marks. These pencil lines will serve as the guide for your ink work later, so keep them light enough to erase easily. -
Test your pen:
Before touching the final paper, test your fine liner on a scrap piece to ensure the ink is flowing smoothly and isn’t prone to smudging. -
Ink the dotted lines:
Place your ruler back over the first vertical pencil line. Instead of drawing a solid line, tap the pen tip rhythmically against the ruler’s edge to create a straight line of evenly spaced dots. -
Complete the vertical ink:
Repeat this dotting process for all vertical grid lines. Try to maintain consistent spacing between the dots for a cohesive look. -
Ink the horizontal lines:
Rotate your paper and repeat the dotting technique for all horizontal lines. Where lines intersect, place a dot right at the cross-point to anchor the grid visually. -
Erase the guides:
Allow the ink to dry completely to prevent smearing. I usually wait at least five minutes before gently erasing all the pencil guidelines with a kneaded eraser.
Ink Control
Lift the pen straight up after each dot. Dragging it slightly can create tiny tails that ruin the clean, perforated look.
Step 2: Filing the Patterns
-
Plan the checkerboard:
Visualize a checkerboard pattern. You will be filling alternating squares, leaving every other square completely blank to create negative space. -
Start the diagonal stripes:
On the top-left filled square, use your ruler to draw diagonal lines from corner to corner. Keep the lines parallel and fairly thick. -
Refine the stripes:
Go back over the stripes to thicken them if needed, ensuring the black ink is solid and opaque. The contrast between heavy stripes and delicate dots is key. -
Create the stipple texture:
Move to the next ‘filled’ square in the pattern (skipping one). Fill this square with a light stippling effect—tiny, scattered dots that are less dense than the grid lines. -
Vary the density:
For the subsequent filled squares, you can alternate between the heavy diagonal stripes and the lighter stippling. You might notice the image uses faint diagonal lines in some squares; feel free to add very light, thin dashes in these areas. -
Add heavy accent squares:
Identify a square near the bottom corner to mirror the heavy diagonal stripes from the top. Draw these bold, thick lines carefully with your ruler. -
Introduce medium density:
In the remaining designated squares, add patterns of medium-sized dots. These should be larger than the stippling but smaller than filled circles, arranged in a loose grid pattern. -
Review the balance:
Step back and look at your composition. You should have a mix of heavy stripes, light stippling, medium dots, and empty white space. -
Final touches:
Check for any gaps in your bold stripes or unevenness in the grid dots and touch them up gently with the tip of your pen.
Pattern Switch
Swap the diagonal stripes for a cross-hatch or a herringbone pattern to drastically change the mood while keeping the same grid layout.
Once the ink is fully set, you have a minimalist piece of geometric art ready to display
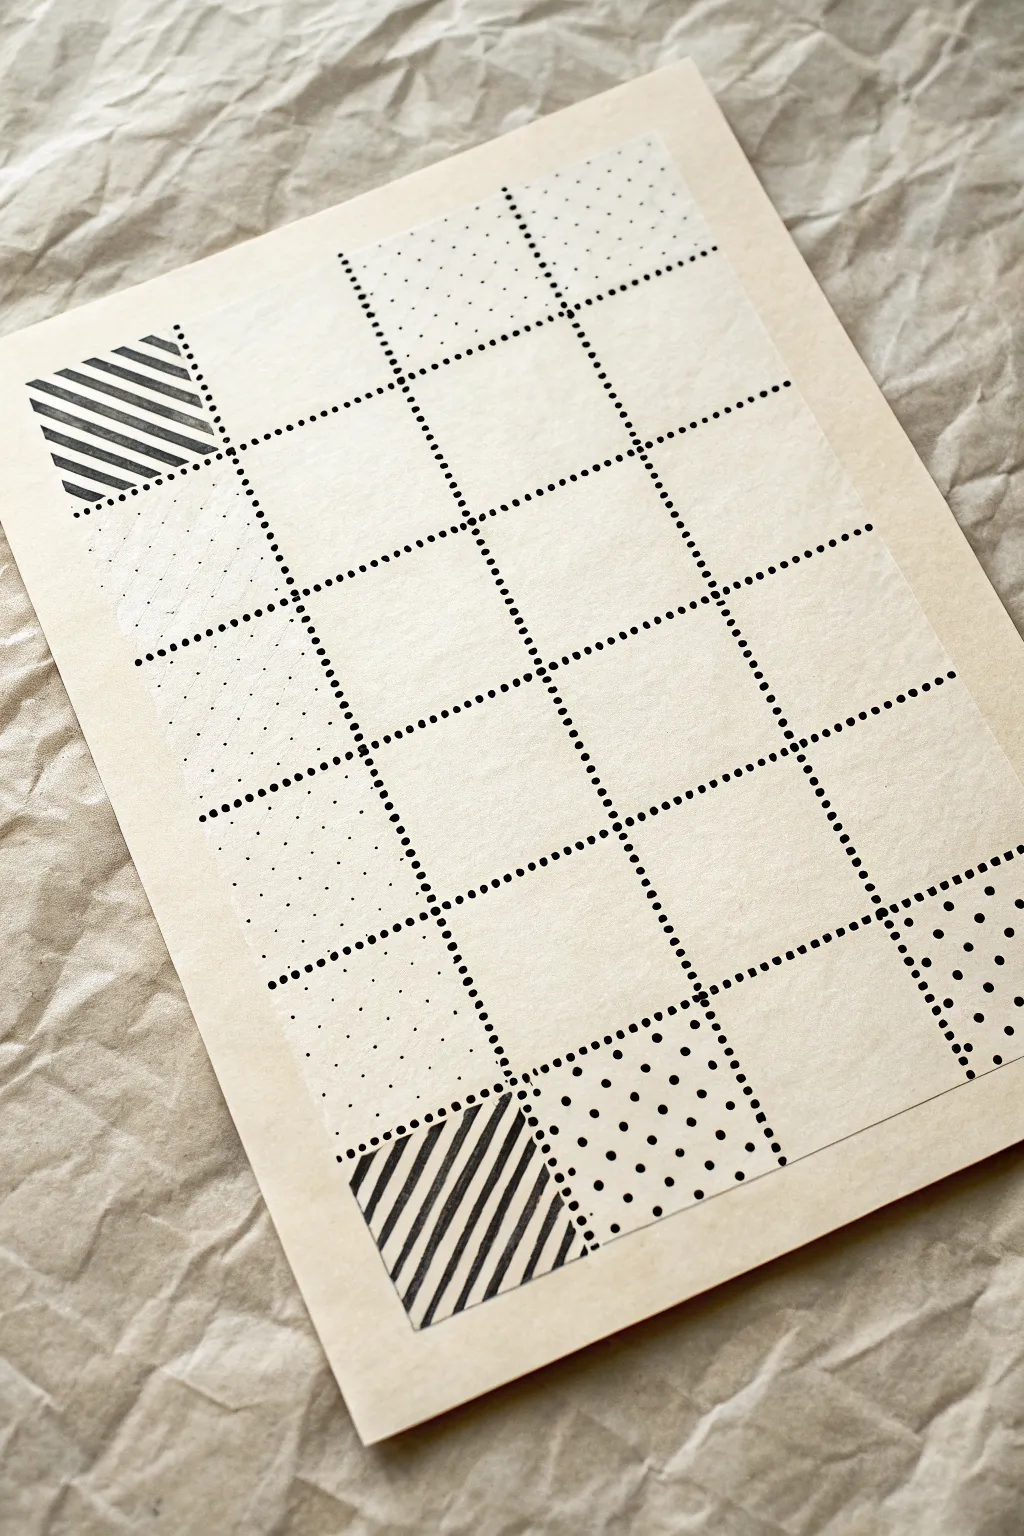
Interlocking Puzzle-Piece Tiles
Capture the satisfying click of a finished puzzle with this soothing, hand-drawn tessellation project. Using soft, earthy tones and crisp line work, you’ll transform a simple notebook page into an intricate interlocking design.
Step-by-Step Tutorial
Materials
- Spiral-bound sketchbook or heavy mixed-media paper
- Graph paper (optional, for drafting)
- Pencil (HB or lighter)
- Fine-liner pen (black, archival ink, 0.5mm or 0.8mm)
- Colored pencils or alcohol markers (Sage Green, Cream/Beige, Terracotta/Rust)
- Ruler
- Eraser (kneaded preferred)
- Circle template or compass
Step 1: Drafting the Grid Structure
-
Establish the base grid:
Start by lightly drawing a grid of squares on your paper using a pencil and ruler. For a standard notebook size, 1.5-inch or 2-inch squares work well. -
Mark the connection points:
Find the center point of each side of every square. Mark these spots lightly; these will be the anchors for your interlocking knobs and sockets. -
Determine the orientation:
Decide which sides of your squares will have outward knobs and which will have inward sockets. Typically, you want to alternate sides to ensure they lock together correctly.
Wobbly circles?
If freehand circles are tricky, trace a small button or coin for the puzzle knobs. This guarantees perfect uniformity for every interlocking piece.
Step 2: Sketching the Shapes
-
Draw the circular knobs:
Using a circle template or compass, draw a circle at the varying center marks you made. Ensure the circle size is proportional to the square—usually about 1/3 the width of your square’s side. -
Connect the curves:
Sketch the neck of the puzzle piece connecting the circle to the main body of the square. Use curved lines that flow outward from the square’s edge to meet the circle’s perimeter smoothly. -
Form the interior sockets:
For the inward-facing sides, simply trace the same knob shape but indented into the square’s body. I find tracing a coin or button helps keep these consistent. -
Refine the outline:
Go over your sketch to finalize the classic puzzle shape, erasing the straight grid lines that cut through the knobs or sockets so a single continuous perimeter remains for each piece.
Add Dimension
Use a light gray marker to add a drop shadow on the bottom and right side of each piece. It instantly makes the puzzle look 3D and lifted off the page.
Step 3: Inking the Design
-
Trace with ink:
Take your black fine-liner pen and carefully trace over the final pencil lines. Start from the top left and work your way down to avoid smudging. -
Vary line weight (optional):
If you want the pieces to pop, you can thicken the outer boundary lines slightly while keeping internal details thin, or stick to a uniform mono-weight line for a clean look. -
Erase pencil marks:
Allow the ink to dry completely—give it at least five minutes to be safe. Then, gently erase all underlying pencil grids and construction marks with a kneaded eraser.
Step 4: Adding Color and Texture
-
Plan the color distribution:
Look at your grid and plan a random but balanced distribution of your three colors: Sage Green, Cream, and Terracotta. Try not to have two of the same color touching. -
Apply the first color:
Start with the Sage Green pieces. Use soft, circular strokes if using colored pencils to build up an even, slightly textured layer without harsh directional lines. -
Fill the Terracotta accents:
Color in the Terracotta/Rust pieces next. This darker color anchors the design, so ensure the coverage is solid and consistent. -
Complete with Cream:
Fill the remaining pieces with the Cream or Beige tone. If using white paper, you can leave these blank, but adding a faint cream layer adds warmth and cohesiveness. -
Add subtle texture:
To mimic the recycled paper look often found in puzzles, lightly stipple tiny dots of a slightly darker shade over the colored areas. -
Final inspection:
Check for any gaps near the black ink lines and fill them in carefully so the color meets the border perfectly.
Now you have a beautifully intricate page that looks ready to be taken apart and put back together

PENCIL GUIDE
Understanding Pencil Grades from H to B
From first sketch to finished drawing — learn pencil grades, line control, and shading techniques.
Explore the Full Guide
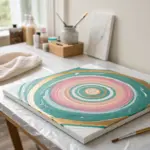
Flower Petal Ring Tessellation
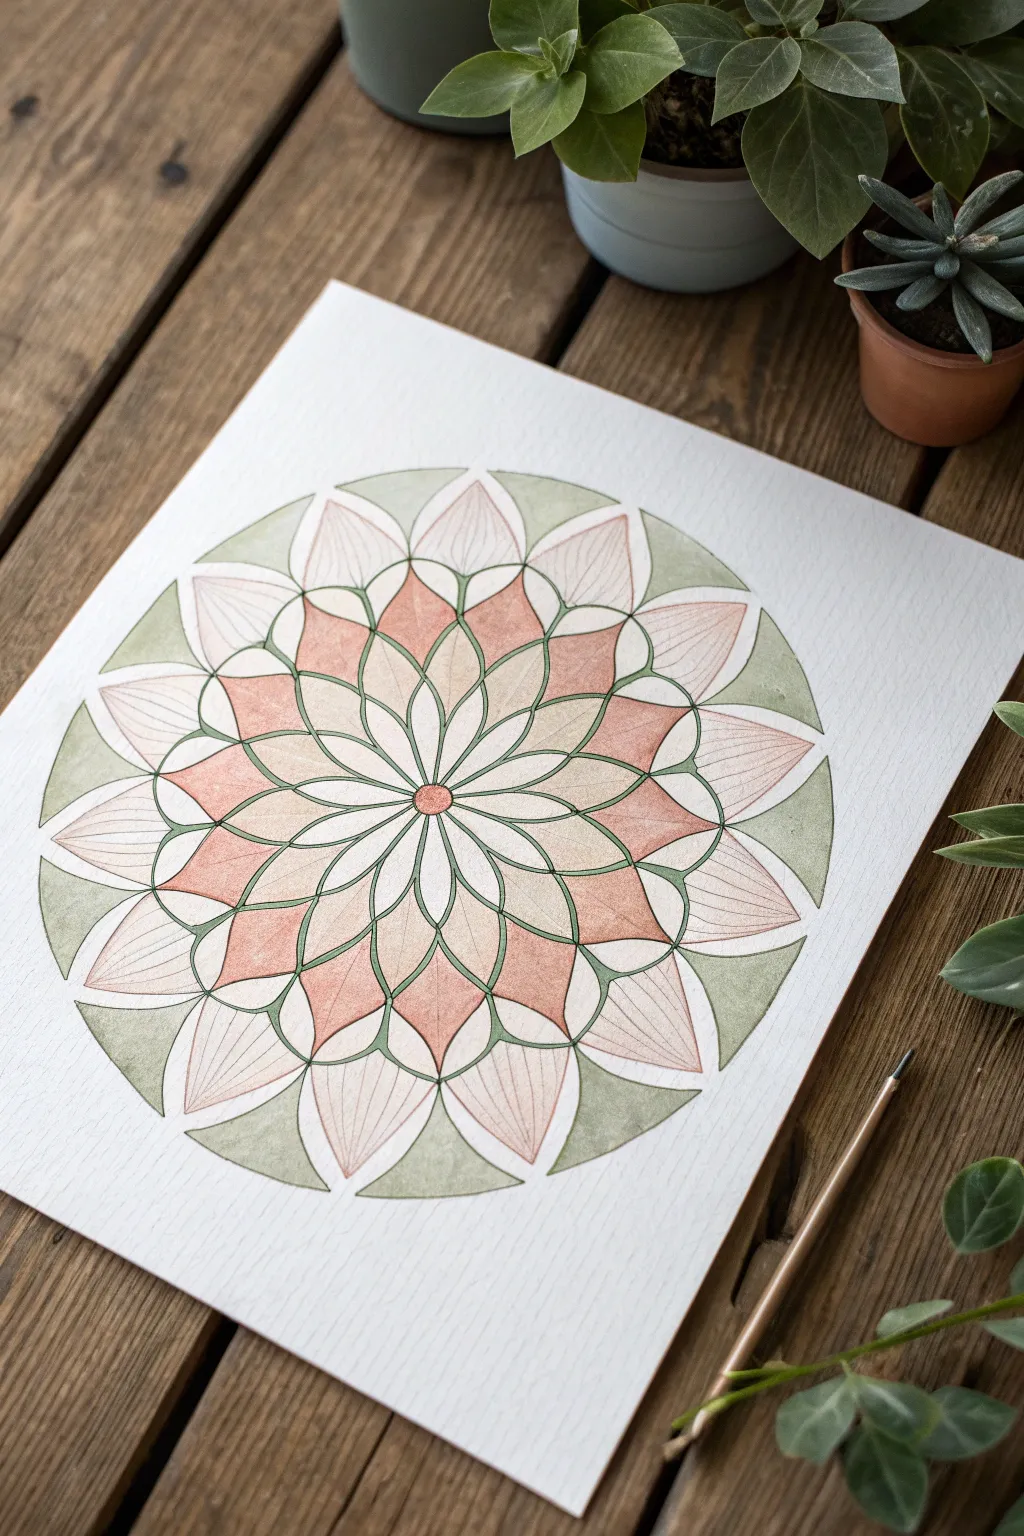
This soothing geometric project combines the structured precision of radial symmetry with the organic softness of watercolor washes. The design features interlacing petal tiers in warm terracotta and cool sage green, creating a harmonious, calming focal point for any room.
Step-by-Step Tutorial
Materials
- Cold-pressed watercolor paper (heavyweight, textured)
- Compass with a pencil holder
- Protractor
- HB pencil
- Fine liner pen (dark green or sepia, waterproof, 0.3mm)
- Watercolor paints (Terracotta/Salmon, Sage Green)
- Round watercolor brushes (sizes 2 and 4)
- Clean water jar
- Paper towel
- Eraser (kneaded preferred)
Step 1: Drafting the Geometry
-
Establish the center:
Locate the exact center of your watercolor paper. Mark it lightly with your pencil. Open your compass to a small radius (about 0.5 inches) and draw the central circle. -
Draw concentric guides:
Keep the compass point in the center and draw three increasingly larger circles. These will serve as the boundaries for each tier of petals. Space them out by about 1.5 to 2 inches each. -
Divide the circle:
Using a protractor, divide your circle into 16 equal sections (22.5 degrees each). Draw light straight lines from the center point extending all the way to the outermost circle to create radial guides. -
Sketch the inner petals:
In the first ring around the center, sketch petal shapes that widen and meet at the first guide circle. Use the radial lines to keep each petal centered and symmetrical. -
Develop middle tiers:
Sketch the next two layers of petals. These should be ‘interlocked’ or offset, meaning the tip of a new petal aligns with the valley between the two petals below it. The radial lines will help verify your alignment. -
Finalize the outer ring:
For the largest ring, draw wider, slightly flatter petals that touch the edge of your outermost guide circle. I find it helpful to curve these lines gently to mimic a blooming flower.
Bleeding Lines?
If ink bleeds when painting, your pen isn’t truly waterproof or wasn’t dry. Switch to a micron pen and test on scrap paper first. Let ink cure for 1 hour before painting.
Step 2: Inking & Base Colors
-
Outline the structure:
Take your waterproof fine liner (a dark green or earthy sepia works beautifully here) and carefully trace over your pencil lines. Ensure your strokes are confident and smooth. -
Erase guidelines:
Wait for the ink to become completely bone-dry. Gently erase all visible pencil marks, being careful not to abrade the paper surface. -
Mix your palette:
Prepare two dilute puddles of paint: a warm, soft terracotta (mix orange with a touch of brown and white) and a muted sage green. -
Paint the central ring:
Color the innermost circle with the terracotta mix. Use the size 2 brush for precision. While it’s wet, you can drop in a tiny bit of darker pigment at the edge for depth. -
Fill the primary petals:
Paint the second tier of petals (the pointed ones) using the sage green. Keep the wash even and light, allowing the paper’s texture to show through. -
Apply the contrasting tier:
Move to the next ring of petals. Fill these with the terracotta wash. Paint every other petal first, letting them dry before painting their neighbors, to prevent colors from bleeding into each other.
Step 3: Detailing & Texture
-
Paint the outer details:
For the outermost ring, leave the petals themselves white or a very pale tint of peach. Paint the negative space triangles between them with the sage green to frame the design. -
Add petal venation:
Once the paint is fully dry, dilute your terracotta paint heavily until it is very transparent. Using your finest brush, draw delicate, curved lines inside the large white/pale petals to suggest veins. -
Deepen the intersections:
Mix slightly darker versions of your green and terracotta. Carefully paint into the tight corners where petals overlap to create shadow and dimension. -
Refine the lines:
If any paint crossed over your initial ink lines, or if the lines look faint against the color, go over key structural outlines again with your pen to make the geometry pop.
Clean Edges Pro-Tip
Don’t paint adjacent petals while wet! Work in a ‘star’ pattern painting every third petal, then circle back once the first set is dry. This keeps colors crisp and separated.
Step back and admire how the simple repetition of shapes has bloomed into a complex and serene artwork
Fish Silhouette Tessellation
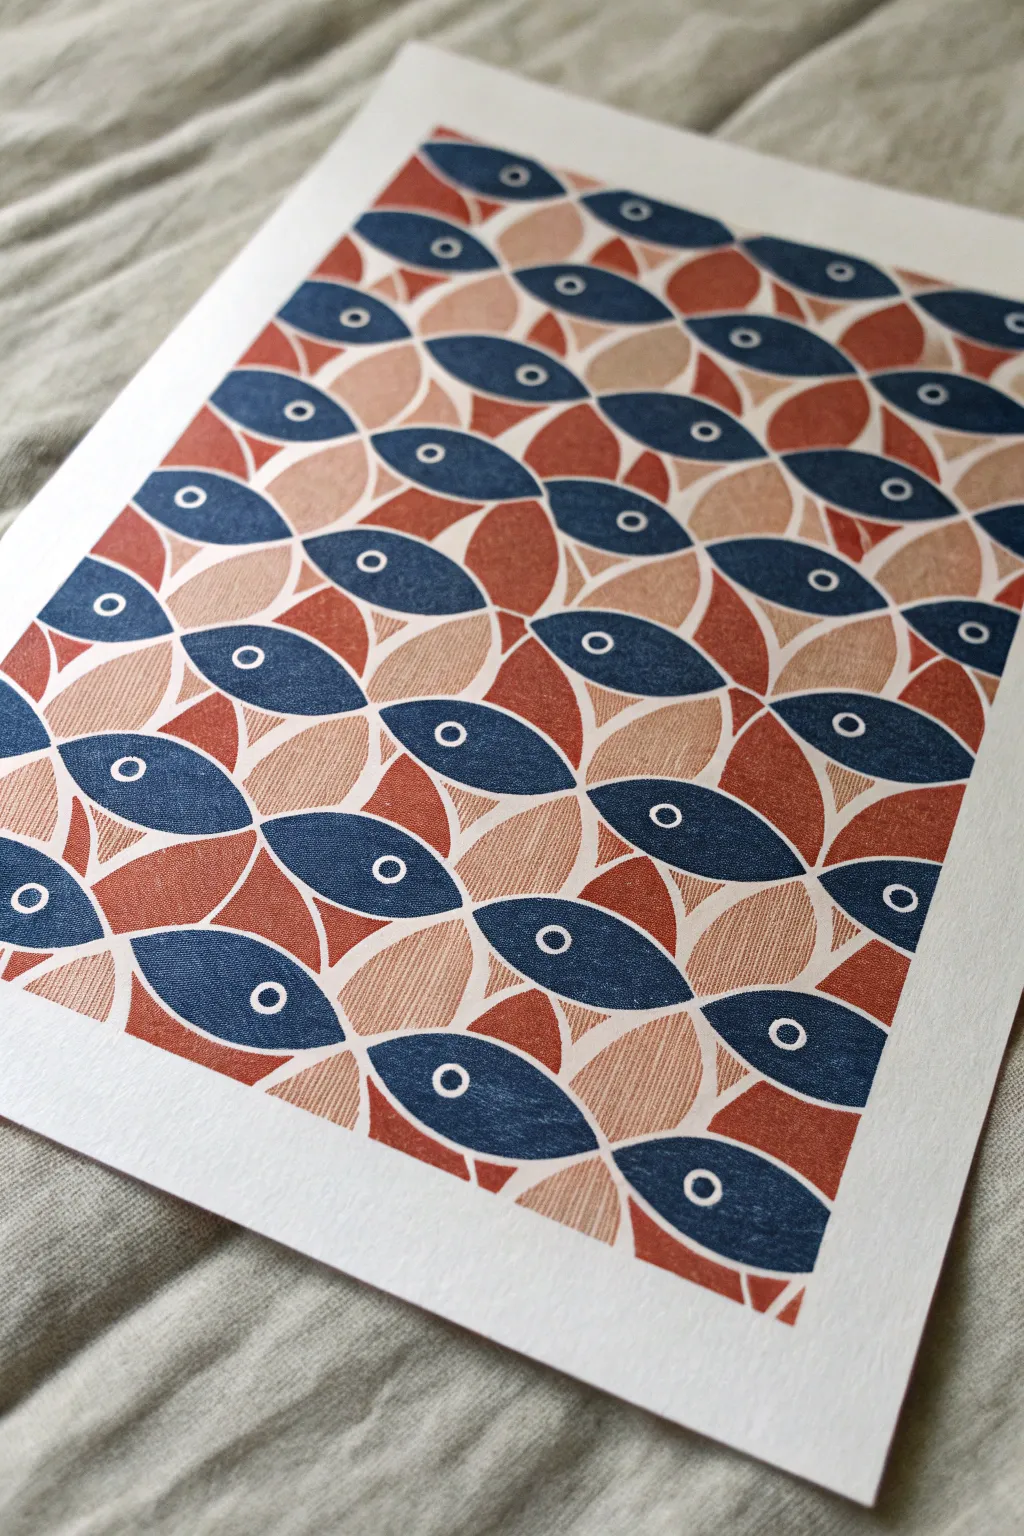
Dive into printmaking with this geometric fish tessellation that balances structure with organic texture. The interlocking design uses a simple repeated motif to create a complex, vibrant school of fish in deep blues and warm rust tones.
How-To Guide
Materials
- Soft-cut linoleum block (4×6 inch or similar)
- Linocut carving tools (V-gouge and U-gouge)
- Block printing ink (Navy Blue, Rust/Burnt Orange, Beige/Tan)
- Brayer (rubber roller)
- Glass or acrylic sheet for rolling ink
- Heavyweight printmaking paper (white or off-white)
- Pencil and eraser
- Tracing paper
- Barren or wooden spoon
Step 1: Designing the Master Block
-
Draft the fish shape:
Sketch a simple almond or ‘vesica piscis’ shape on a piece of scrap paper. This pointed oval will serve as the body of your fish. Aim for a shape that is symmetrical along its long axis. -
Test the tessellation:
Trace your fish shape repeatedly on paper to ensure they nestle together well. The tail of one fish should curve naturally against the head or side of its neighbors. Adjust the curve until the shapes lock together with minimal gaps. -
Transfer to linoleum:
Once satisfied with the single fish shape, redraw or transfer it onto your soft-cut linoleum block. You will need three separate fish blocks if you want to print all three colors easily, or you can carve one block and clean it between color changes. -
Add the eye detail:
Draw a small circle near the front (tapered end) of the fish shape on your block. This will remain white in the final print.
Registration Pro-Tip
Cut your linoleum block to the EXACT edge of the design. This lets you align the physical edge of the stamp with previous prints for perfect spacing.
Step 2: Carving the Stamp
-
Outline the shape:
Using a fine V-gouge, carefully carve around the exterior outline of your fish shape. Keep the tool angled away from the line to ensure a clean edge. -
Carve the eye:
Switch to a small U-gouge or stamp carving tool to scoop out the center of the eye circle. Be careful not to go too deep; you just need to remove the surface layer so it doesn’t pick up ink. -
Clear the background:
Remove the excess linoleum from around the fish shape. You can cut the linoleum block down to the exact shape of the fish to make positioning easier, which is what I usually prefer for tessellations.
Step 3: Printing the Pattern
-
Prepare the workspace:
Squeeze out small amounts of Navy Blue, Rust, and Beige ink onto your glass palette. Roll each out with a brayer until you hear a sticky, sizzling sound, indicating the ink layer is even. -
Establish the grid:
Lightly mark a grid or guide lines on your printmaking paper with a pencil to help keep your rows straight, though a little irregularity adds charm. -
Print the first color (Navy):
Ink your block with the Navy Blue. Press it firmly onto the paper, starting in a specific spot (like the top left) based on your tessellation plan. -
Repeat the Navy fish:
Continue stamping the blue fish, leaving specific gaps where the other colored fish will fit. Use a baren or the back of a spoon to apply even pressure if your stamp is large. -
Print the second color (Rust):
Clean your block thoroughly (or switch to your second block). Ink it with the Rust/Burnt Orange color and stamp these fish securely into the gaps left by the blue ones, oriented in the opposing direction if your pattern dictates. -
Print the third color (Beige):
Finally, ink up with the Beige/Tan ink. Fill the remaining spaces in the pattern. This lighter color helps tie the darker tones together without overwhelming the eye. -
Let it dry:
Block printing ink can take a while to dry completely. Set the print aside in a safe, flat place for at least 24 hours.
Troubleshooting Blotchy Ink
If your print looks salty or speckled, you likely don’t have enough ink. Roll more onto the brayer until it sounds like hook-and-loop fastener separating.
Once dry, frame your tessellated artwork to showcase the rhythmic movement of your handmade school of fish


Black-and-White Positive-Negative Tiles

This striking optical illusion relies on the high contrast between deep black ink and textured cream paper. By repeating a simple geometric motif, you create a sophisticated interlocking pattern that plays with positive and negative space.
Step-by-Step Guide
Materials
- High-quality cold press watercolor paper (cream or off-white)
- Graphite pencil (HB or H)
- Ruler
- Protractor or 60-degree triangle
- Compass (optional)
- Black drawing ink or high-pigment acrylic marker
- Fine liner pen (black)
- Soft eraser
- Masking tape (for securing paper)
- Small round synthetic brush (size 2 or 4)
Step 1: Grid Preparation
-
Secure the paper:
Tape your watercolor paper down to a flat surface using masking tape on all four sides. This prevents the paper from buckling when you apply the ink later and creates a clean border. -
Determine the grid scale:
Decide on the size of your repeating unit. For the scale shown in the reference, a grid spacing of about 1.5 to 2 inches works well. -
Draw horizontal guidelines:
Using your ruler and H pencil, draw a series of light, parallel horizontal lines across the paper spaced evenly according to your chosen measurement. -
Establish diagonal guidelines:
Using a protractor or a 60-degree triangle, draw diagonal lines intersecting your horizontal lines at a 60-degree angle. Repeat this in the opposite direction to create a grid of equilateral triangles. This isometric grid is the foundation for the star pattern.
Clean Lines Pro-Tip
If you struggle with shaky hands while inking straight lines, use your ruler as a guide, but stick a few layers of tape under it to raise the edge. This prevents ink from bleeding under the ruler.
Step 2: Sketching the Motif
-
Identify the star centers:
Look at the hexagonal shapes formed where six triangles meet. These hexagons will become the centers of your stars or the negative spaces between them. -
Draw the ‘pinwheel’ arms:
From the center point of a chosen hexagon, draw lines extending out to the midpoints of the triangle edges. You want to create a shape that looks like a spin-top or a three-pointed star. -
Define the interlocking shape:
Connect the tips of your three-pointed star to the corresponding points on adjacent stars. The pattern consists of a repeating ‘Y’ shape that has been thickened. It’s helpful to pencil in the outline of one complete black shape first before repeating it. -
Repeat the pattern:
Systematically replicate this outline across the entire grid. I find it easiest to work row by row to ensure the tessellation locks together correctly without gaps. -
Refine the edges:
Go back over your pencil lines to crisp up the corners. The optical illusion works best when the points are sharp and the lines are straight. -
Check the negative space:
Before adding ink, look at the un-drawn spaces (the future white areas). They should look exactly like the shapes you just drew, just rotated. If they don’t transform into the same shape, check your grid alignment.
Step 3: Inking the Design
-
Outline with fine liner:
Trace over your final pencil outlines with a black fine liner pen. This creates a barrier that helps prevent the ink or paint from bleeding into the negative space. -
Erase guidelines:
Once the fine liner ink is completely dry, gently erase the visible grid lines and construction marks. Be careful not to abrade the paper surface too much. -
Prepare the fill medium:
If using bottle ink or acrylic, pour a small amount onto a palette. If you are using a marker, ensure it is fully primed and flowing smoothly. -
Fill the corners first:
Using your small brush or marker, fill in the tight corners and points of the black shapes first. This precision work ensures sharp tips on your stars. -
Fill the centers:
Fill in the remaining central bodies of the black shapes. I prefer using a brush for this step as it saturates the textured watercolor paper more distinctively than a marker. -
Maintain consistency:
Work across the page, being mindful not to smudge wet ink with your hand. You might want to place a clean sheet of scrap paper under your drawing hand. -
Second coat:
If your black looks patchy or greyish once dry, apply a second layer of ink. You want a solid, void-less black to maximize contrast.
Level Up: Texture Play
Instead of solid flat black, try filling the dark shapes with dense hatching or stippling. This adds value while retaining a hand-drawn, architectural feel.
Step 4: Final Touches
-
Clean up edges:
Inspect the edges where black meets white. If any lines are wobbly, carefully smooth them out with the fine liner. -
Remove tape:
Slowly peel away the masking tape at a 45-degree angle away from the artwork to reveal your crisp, clean border.
Step back and let your eyes adjust to the rhythm of your completed tessellation
Gradient Color-Wash Tessellation
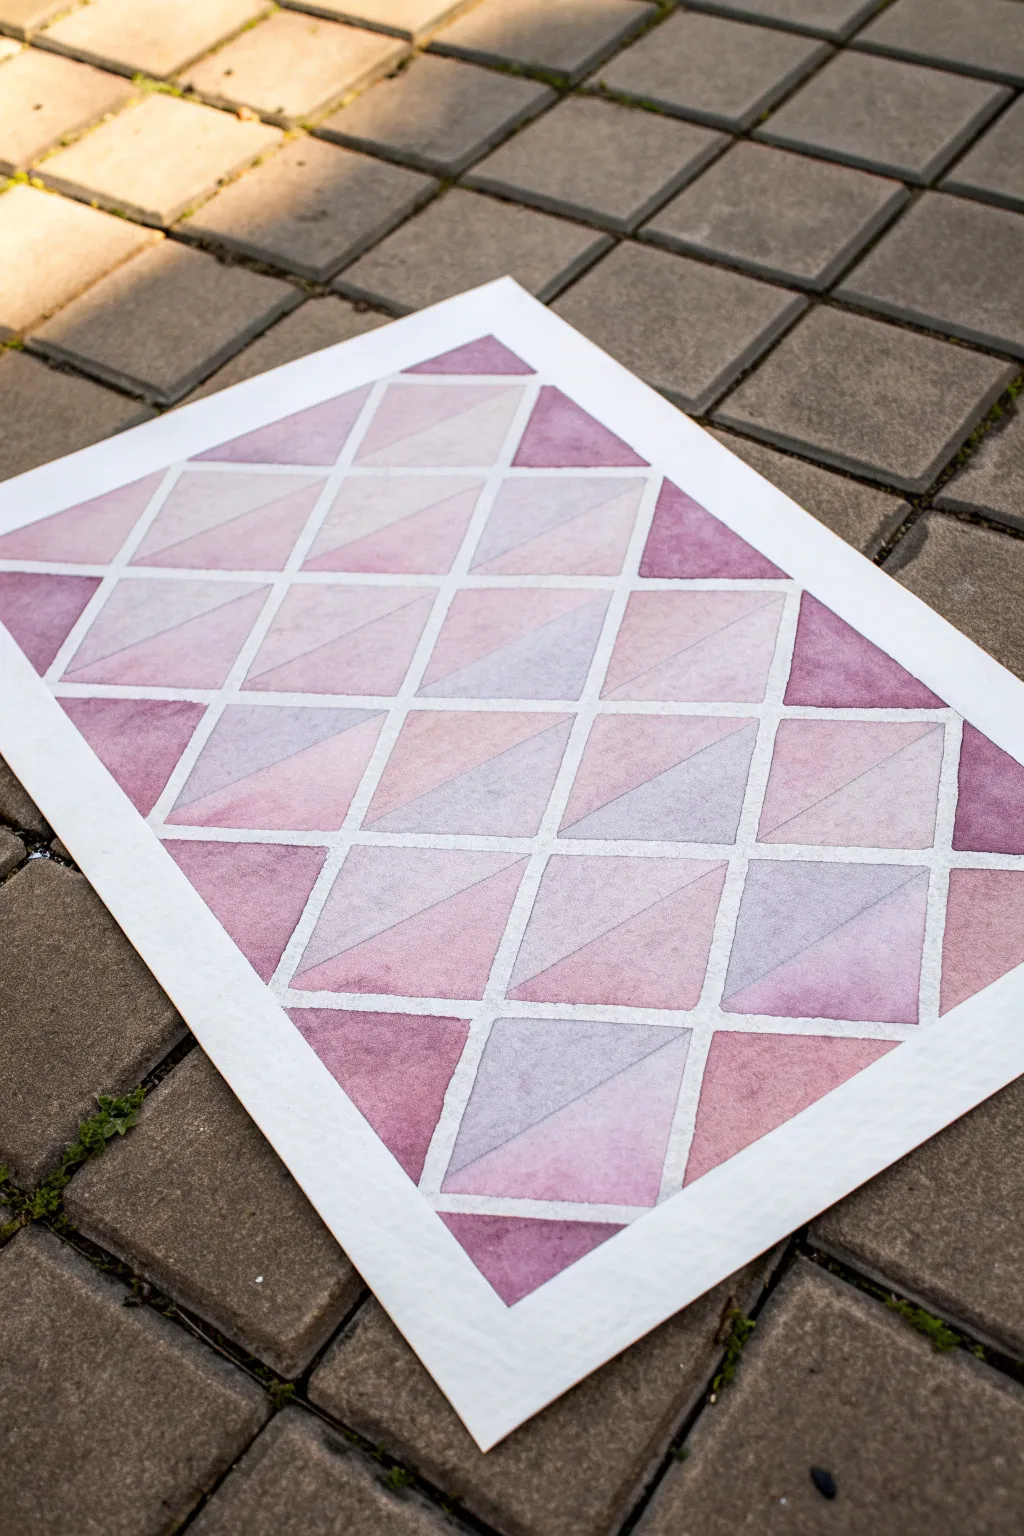
This elegant watercolor project transforms simple geometric shapes into a sophisticated gradient study. By carefully layering washes of purple, violet, and dusty rose, you’ll create a tessellation that feels both structured and beautifully organic.
Detailed Instructions
Materials
- High-quality watercolor paper (140lb/300gsm, cold press recommended)
- Painter’s tape or masking tape (1/4 inch width)
- Watercolor paints (Purple, Violet, Alizarin Crimson, Ultramarine Blue)
- Palette for mixing
- Flat shader brush (size 6 or 8)
- Round brush (size 4)
- Pencil (HB or H)
- Ruler
- Large drawing board or flat surface
- Two jars of water
- Paper towels
Step 1: Grid Preparation
-
Tape the edges:
Secure your watercolor paper to your board by taping down all four edges. This creates that crisp white border seen in the final piece and prevents the paper from buckling when wet. -
Mark vertical guides:
Using your ruler and pencil, lightly mark even intervals along the top and bottom edges of your paper. For the scale shown, spacing them about 2 inches apart works well, but adjust based on your paper size. -
Draw diagonal lines:
Connect your marks diagonally to create a grid of large diamonds (rhombuses). Draw extremely lightly; you want these guides to disappear under the paint or be erased easily later. -
Divide the diamonds:
Draw a horizontal line through the center of each row of diamonds. This splits every large diamond into two triangles, creating the specific tessellation pattern seen in the example. -
Apply the masking grid:
carefully lay down your thin 1/4 inch painter’s tape over your pencil lines. The tape will preserve the white ‘grout’ lines between the colorful shapes. Run your fingernail over the edges of the tape to ensure a tight seal.
Tape Sealing Trick
Before painting, brush a tiny amount of clear water or white acrylic medium over the tape edges. This seals the tape and prevents colored paint from bleeding underneath.
Step 2: Mixing and Washing
-
Prepare your palette:
Mix a substantial puddle of your main violet hue. To achieve the variation seen in the image, prepare three separate pools: a reddish-purple, a deep violet, and a cooler, blue-leaning lavender. -
Start with the darkest triangles:
Select random triangles scattered across the grid to fill with your most saturated, darkest violet mix. I find it helpful to squint at the reference image to see where the density of color is heaviest. -
Paint the mid-tones:
Dilute your violet mix with a little water to create a mid-tone. Fill in approximately half of the remaining white spaces, ensuring you switch between the reddish and bluish distinct mixes for subtle variety. -
Fill the lightest areas:
Water down your paint significantly until it is a very pale wash. Fill in the remaining empty triangles. These pale sections give the piece a sense of light and transparency. -
Create gradients within shapes:
While some triangles are still damp, drop a tiny amount of clean water or a different pigment tone into one corner of a shape. Tilt the board slightly to let the color bleed naturally, creating those soft internal gradients.
Bleeding Lines?
If paint bled under the tape, wait until completely dry. Use a small, stiff brush slightly dampened with clean water to gently scrub and lift the unwanted paint.
Step 3: Finishing Touches
-
Allow thorough drying:
Let the painting dry completely. If the paper feels cold to the touch, it is still damp. Patience is key here to avoid ruining the crisp lines. -
Review contrast:
Look for any triangles that dried too light. You can apply a second glaze of color over them now to deepen the saturation and add dimension. -
Remove the masking tape:
Slowly peel away the thin tape grid. Pull the tape away from the paper at a 45-degree angle to minimize the risk of tearing the surface. -
Remove the border tape:
Finally, remove the outer border tape to reveal the clean white frame surrounding your geometric pattern. -
Cleanup:
Gently erase any visible pencil marks that might still show in the white channels between the painted shapes.
Step back and admire how the simple repetition of triangles creates such a complex and calming visual rhythm.
Aperiodic-Look Two-Tile Tessellation

This elegant watercolor study combines the mathematical precision of geometric tessellation with the soft, organic flow of botanical motifs. By layering translucent washes of sage green and terracotta, you’ll create a soothing, repeating pattern that feels both structured and dreamlike.
Step-by-Step Tutorial
Materials
- Cold press watercolor paper (140lb/300gsm or heavier)
- Compass with a pencil holder
- HB pencil and clean eraser
- Watercolor paints (Sage Green, Terra Cotta, Burnt Sienna)
- Round watercolor brushes (Size 4 and Size 0 or 1 for details)
- Ruler
- Palette for mixing
- Jar of clean water
- Paper towels
Step 1: Drafting the Geometry
-
Establish the grid:
Begin by lightly drawing a square grid on your paper using a ruler and HB pencil. The spacing of your grid lines will determine the diameter of your circles, so choose a size that feels comfortable—about 2 to 3 inches is usually a good starting point. -
Set the compass:
Adjust your compass so the radius matches exactly half the distance of your grid squares. This ensures your circles will touch perfectly at the tangents without awkward gaps. -
Draw primary circles:
Place the needle of your compass at an intersection point on your grid and draw a full circle. Move to the next intersection and repeat. Continue this across the page until you have filled the space with touching circles. -
Create the heavy outlines:
To achieve the thick, interwoven bands seen in the reference, you need double lines. Widen your compass radius very slightly (by about 2-3mm) and redraw every circle concentric to the first ones. -
Erase guidelines:
Once your circular bands are drawn, carefully erase the underlying straight grid lines. You want only the curving geometric web to remain visible for painting.
Clean Intersections
When painting the thin bands where circles overlap, switch to a rigger brush or a liner brush. The long bristles hold more paint and allow for smoother continuous curves than a standard round brush.
Step 2: Applying the Washes
-
Mix your palette:
Prepare two main puddles of paint: a watery, desaturated Sage Green and a pale, warm Terra Cotta. Test the transparency on a scrap piece of paper; you want the pencil lines to be subtly visible through the paint. -
Paint the green fields:
Identify the four-pointed star shapes formed between the circles. Using your Size 4 brush, fill alternating ‘star’ shapes with the Sage Green wash. Work delicately into the corners to keep the edges crisp against the pencil bands. -
Wash the background shapes:
For the remaining enclosed shapes (the ones that will hold the flowers), apply a very light wash of your Terra Cotta mix. Keep this layer quite pale, as it serves as a background for the redder details later. -
Define the bands:
Now, tackle the thin channels created by your double pencil lines. Using the fine tip of your brush, carefully fill these channels with a slightly more concentrated Sage Green to create a structural ‘frame’ for the pattern. -
Let it dry completely:
Pause here. It is crucial that the base washes are bone dry before adding the floral details, otherwise the red pigment will bleed into the background.
Step 3: Floral Details & Finishing
-
Mix the floral color:
Create a stronger, more saturated mix of Terra Cotta, perhaps adding a touch of Burnt Sienna or Red to deepen it. This needs to stand out against the pale background wash. -
Outline the petals:
In the center of the peach-colored sections, use your smallest brush (Size 0 or 1) to paint four diamond-shaped petals. I find it helpful to paint the four tips pointing outward first to ensure symmetry. -
Fill the flowers:
Gently fill in the petals with the same mixture, leaving a tiny pinprick of negative space in the very center where the petals meet. This adds a delicate touch. -
Add separation lines:
For a stylized look, leave a microscopic hairline of unpainted paper between the petals if possible, or drag a clean, damp brush through the wet paint to lift a highlight line down the center of each petal. -
Refine edges:
Inspect your green bands. if the wash looks uneven, you can glaze a second, very transparent layer over the dried paint to unify the color and sharpen the boundaries. -
Final assessment:
Step back and check the overall balance. If the pencil lines feel too heavy, gently dab them with a kneadable eraser to lighten them, letting the watercolor shapes define the boundaries instead.
Level Up: Metallic Accents
Swap the darker sage green outline for gold gouache or metallic watercolor. The shimmer on the structural bands gives the piece a stunning ‘stained glass’ effect.
Allow your beautiful geometric garden to dry flat before displaying or framing.
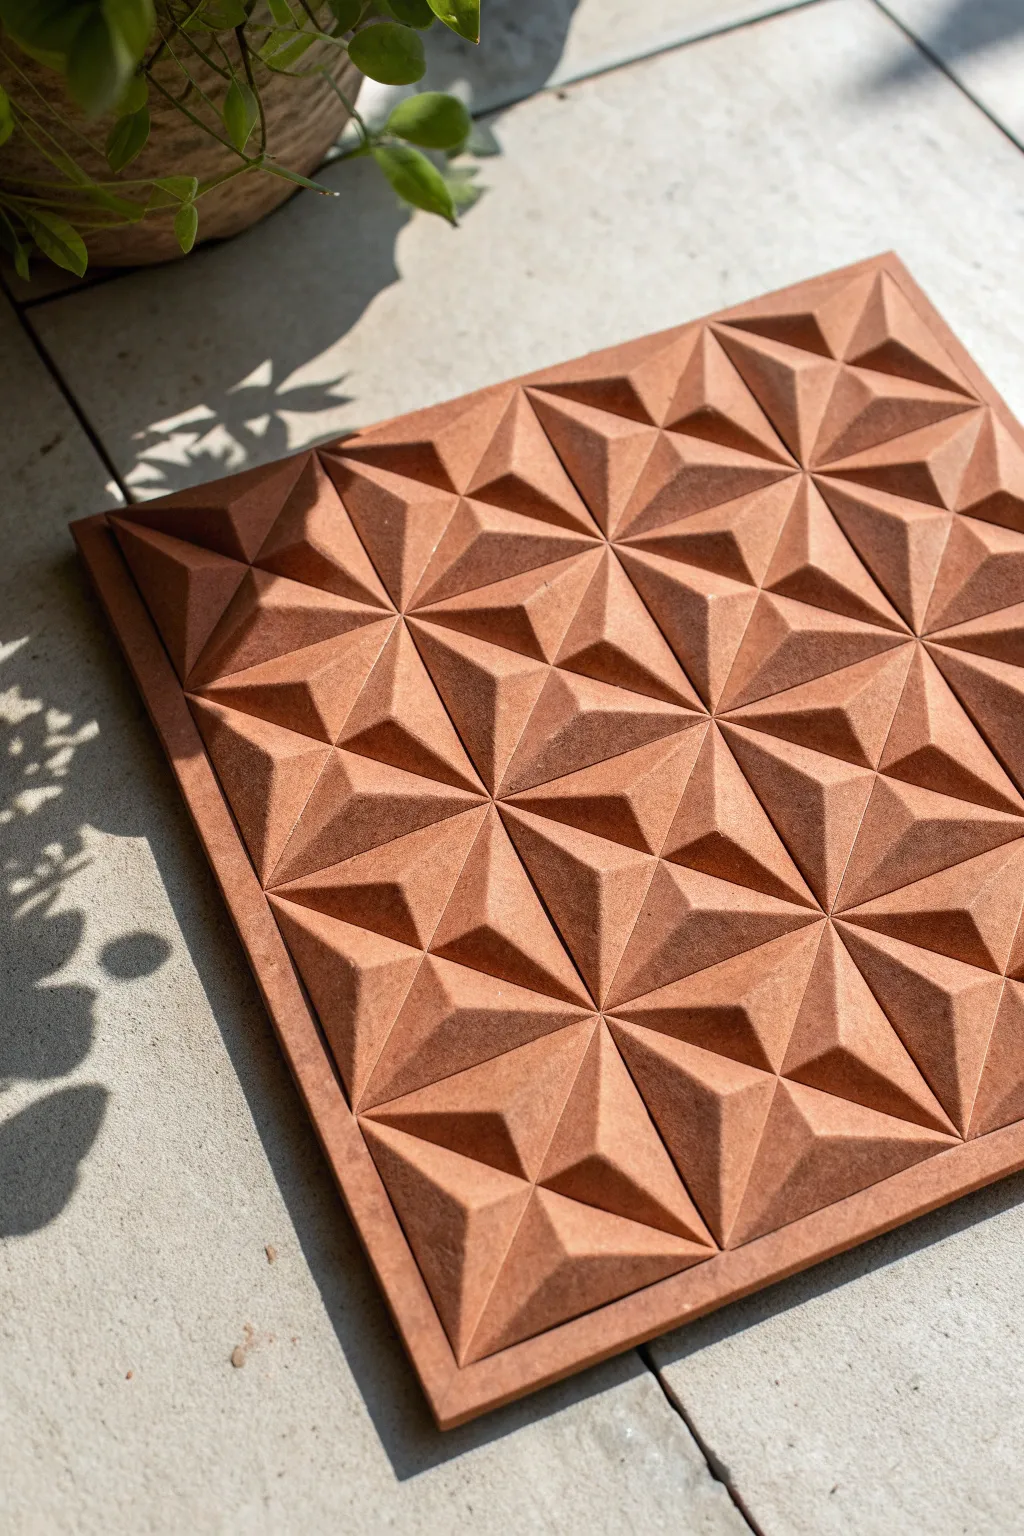
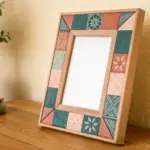
Folded Paper Relief Tessellation

Create a stunning 3D architectural accent that mimics the warmth of carved stone or fired clay using simple materials. This project relies on precise cutting and layering of MDF or heavy cardstock to build a tessellated relief pattern full of depth and shadow.
How-To Guide
Materials
- 3mm MDF sheet or heavy mount board (approx. A3 size)
- Craft knife or scalpel with fresh blades
- Metal ruler and cutting mat
- PVA based wood glue or tacky craft glue
- Fine grit sandpaper (220-300 grit)
- Terracotta colored spray paint or acrylic paint
- Stone texture spray (optional)
- Matte spray varnish
- Pencil and eraser
- Protractor or set square
Step 1: Planning and Cutting the Base
-
Prepare the substrate:
Begin by cutting a perfect square from your MDF or mount board to serve as the backing panel. A size of 30x30cm works well for a manageable wall piece. -
Mark the grid:
Using a pencil and metal ruler, lightly draw a 3×3 or 4×4 grid across your base panel. Precision is key here; these lines will guide the placement of every subsequent piece. -
Draft the template:
On a separate piece of scrap card, draw a square matching one cell of your grid. Divide it diagonally from corner to corner to create four triangles. This is the blueprint for your ‘pyramid’ blocks.
Step 2: Creating the Pyramidal Forms
-
Cut the triangles:
Using your template, cut out a large quantity of triangular pieces from your main material. You will need four triangles for every square unit in your grid. For a 4×4 grid, that’s 64 triangles. -
Bevel the edges:
This step is the secret to the seamless look. Use sandpaper to gently angle the long edge (hypotenuse) of each triangle so they will nestle together cleanly without large gaps. -
Assemble the first pyramid:
Take four triangles and arrange them inside one of your grid squares on the base. The 90-degree corners should meet in the center of the square, but we want to create volume. -
Create elevation:
To make them 3D, cut small squares of scrap material to act as risers. Glue a small stack in the center of a grid square on the base board. -
Glue the facets:
Apply glue to the outer edges of the grid square and the top of your central riser. Place the four triangles so their outer corners touch the base and their inner corners rest on the riser, forming a low pyramid.
Clean Cuts Matter
Change your blade frequently when cutting card or MDF. A dull blade drags and tears the material, creating fuzzy edges that ruin the sharp geometric illusion.
Step 3: Assembly and Refining
-
Repeat the pattern:
Continue this process for every square in your grid. Ensure the peaks of all pyramids are at a consistent height. -
Creating the negative space:
Depending on your specific tessellation preference, you can alternate the orientation. However, for the star pattern seen here, simply placing identical pyramids side-by-side creates the ‘valley’ shapes automatically where the corners meet. -
Fill the gaps:
Once the glue is dry, use a small amount of wood filter or modelling paste to fill any noticeable seams between the triangular facets if you want a solid, cast look. I find smoothing this with a wet finger works best. -
Sand for stone effect:
Gently sand the entire surface. Don’t worry about being too smooth; a little texture adds to the terracotta aesthetic. -
Add a frame:
Cut four strips of MDF to frame the outer edge of your panel. This hides the layered construction and gives the piece a finished, professional weight.
Metallic Twist
Instead of terracotta, paint the finished piece in dark navy or charcoal, then highlight the ridges with gold rub-n-buff wax for an Art Deco metal panel look.
Step 4: Painting and Finishing
-
Prime the surface:
Apply a coat of primer. If you used MDF, this is crucial to seal the absorbent edges. Let it dry completely. -
Add texture:
Lightly mist the piece with a stone-texture spray paint if desired. This adds a subtle grain that catches the light beautifully. -
Apply base color:
Spray or brush on your main terracotta color. Several light coats are better than one heavy one to avoid drips pooling in the valleys of the design. -
Dry brushing:
To enhance the 3D effect, take a slightly lighter shade of paint on a dry brush and gently sweep it over the peaks and ridges. This highlights the geometry. -
Seal:
Finish with a matte varnish to protect the surface and eliminate any artificial plastic sheen from the paint.
Hang your relief panel near a window where the shifting sunlight will animate the shadows throughout the day.


Have a question or want to share your own experience? I'd love to hear from you in the comments below!