If you’ve ever wanted your drawings to look like they’re bending, popping, or spinning right off the page, illusion art is the most satisfying rabbit hole to dive into. I’m sharing a mix of classic optical illusion favorites and a few weirder studio experiments you can try with simple lines, shading, and patience.
3D Hand Pop-Out Lines
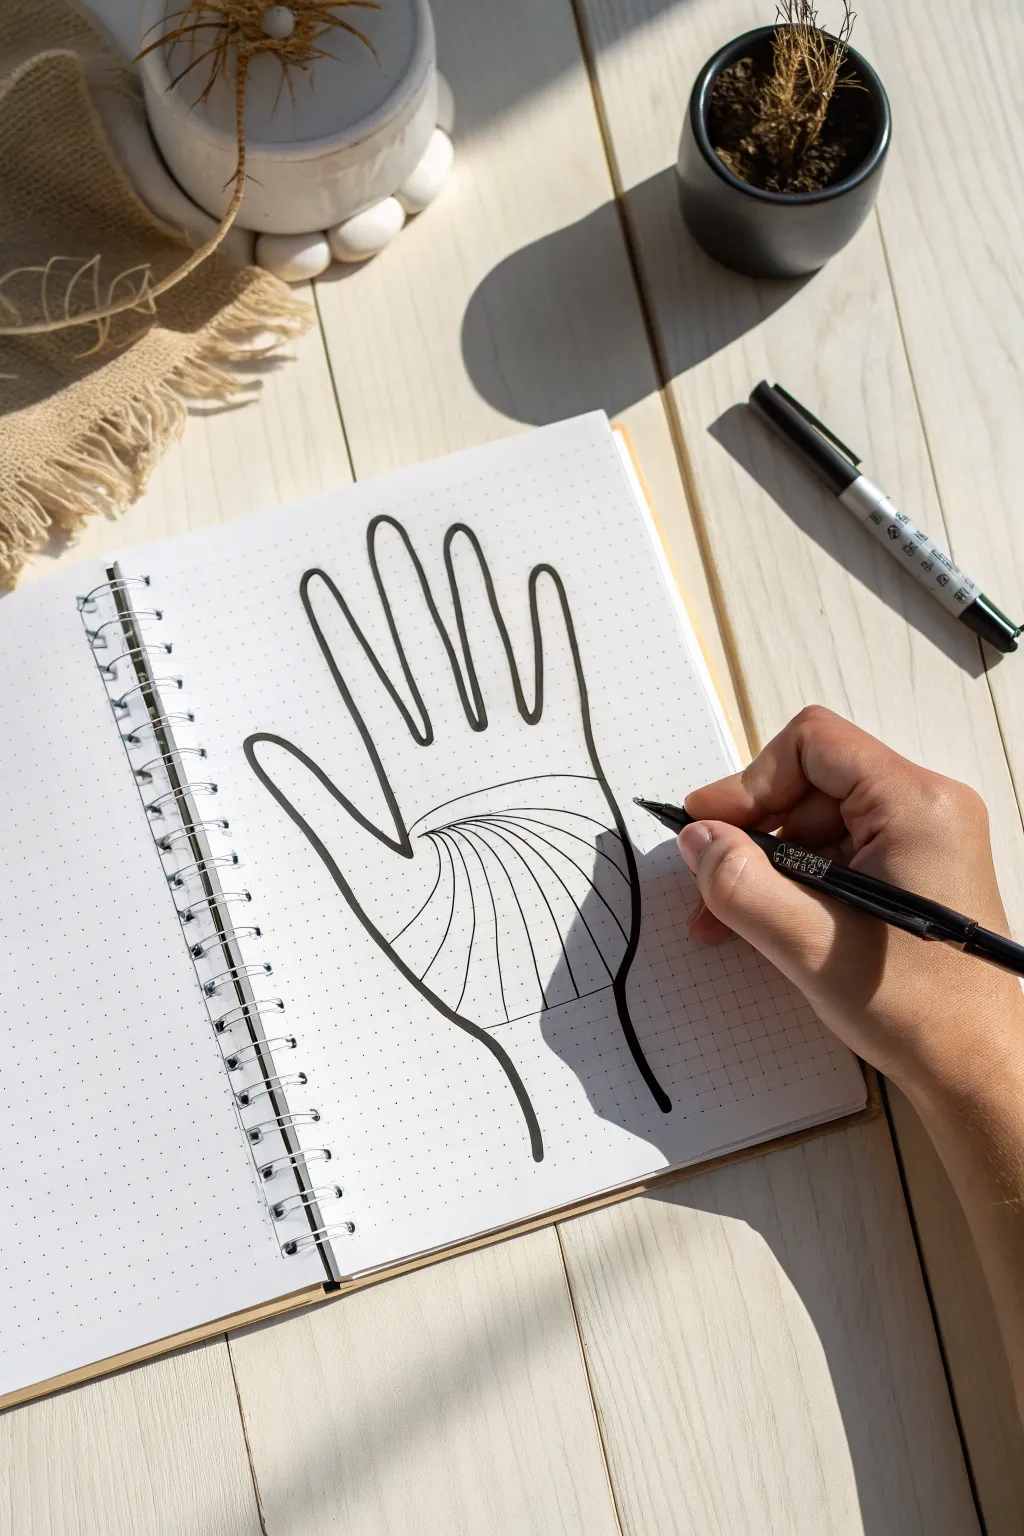
Transform a flat sheet of paper into a dimensional masterpiece with this classic optical illusion. By simply manipulating straight and curved lines, you’ll make a hand appear to rise right off the page.
Step-by-Step Tutorial
Materials
- Dotted or lined notebook (dotted preferred)
- Pencil
- Eraser
- Thick black marker or felt-tip pen
- Thinner black fineliner pen
- Your own hand
Step 1: Tracing the Foundation
-
Position your hand:
Open a fresh page in your dotted notebook. Place your non-dominant hand flat against the center of the paper, spreading your fingers slightly apart so there’s clear space between each one. -
Trace the outline:
Using a pencil, lightly trace roughly around your fingers and palm. Keep the pencil vertical to get an accurate silhouette, but don’t worry about capturing every wrinkle or fingernail; a smooth outline is better. -
Close the wrist:
Remove your hand. Connect the two lines at the bottom of the wrist with a gentle curve if they aren’t already connected, completing the hand shape. -
Ink the outline:
Take your thicker black marker and carefully go over your pencil line. I like to do this slowly to ensure a consistent, bold line weight that defines the boundary clearly. -
Clean up:
Once the marker ink is completely dry, gently erase any visible pencil marks underneath so you have a clean, crisp black shape.
Flat looking hand?
If the effect isn’t popping, your curves might be too flat. Make the arches significantly taller and rounder—like a rainbow—to simulate a higher volume.
Step 2: Creating the Illusion
-
Mark your starting points:
Starting near the wrist, visualize horizontal lines running across the paper. You can use the faint dots of the notebook as a guide. Mark small ticks on the outside edges of the hand outline where these lines will intersect. -
Draw the background:
Switch to your thinner black pen. On the background (the paper outside the hand), draw straight horizontal lines along the rows of dots. Stop exactly when you hit the thick black outline of the hand. -
Skip the inside:
Lift your pen when you reach the hand’s edge, skip over the hand entirely, and resume the straight line on the other side. Do this for the entire page, leaving the inside of the hand blank for now. -
Begin the curves:
Now, return to the bottom of the hand (the wrist area). Connect the straight line on the left to the straight line on the right with an upward-arching curve inside the hand outline. -
Maintain the arch:
Continue moving up the palm, connecting each pair of background lines with a matching curve. I try to keep the height of each arch consistent to make the volume look uniform. -
Navigate the thumb:
When you reach the thumb, treat it as its own cylinder. The lines will curve strictly over the thumb’s width, separate from the palm section. -
Tackle the fingers:
As you move up to the fingers, the clear background space between them means you will draw short, straight lines in the gaps, and high arches over each individual finger. -
Watch the spacing:
Ensure the lines on the fingers align with the lines on the background. It should look like a single string passing through the paper, curving up over the finger, and going back down flat. -
Cap the fingertips:
Near the very tips of the fingers, the curves might become tighter. Just ensure they still distinctively arch upwards to maintain the rounded 3D effect. -
Review and refine:
Check for any gaps where your thin lines meet the thick outline. If needed, touch up the connections with the thin pen so the flow looks unbroken.
Pro Tip: Shadowing
Add subtle shading with a grey marker or soft pencil along the inner edges of the hand outline. This creates a cast shadow effect that boosts the 3D realism.
Step back and admire how a few simple curves have tricked your eye into seeing volume on a flat page


Trippy Tunnel Spiral
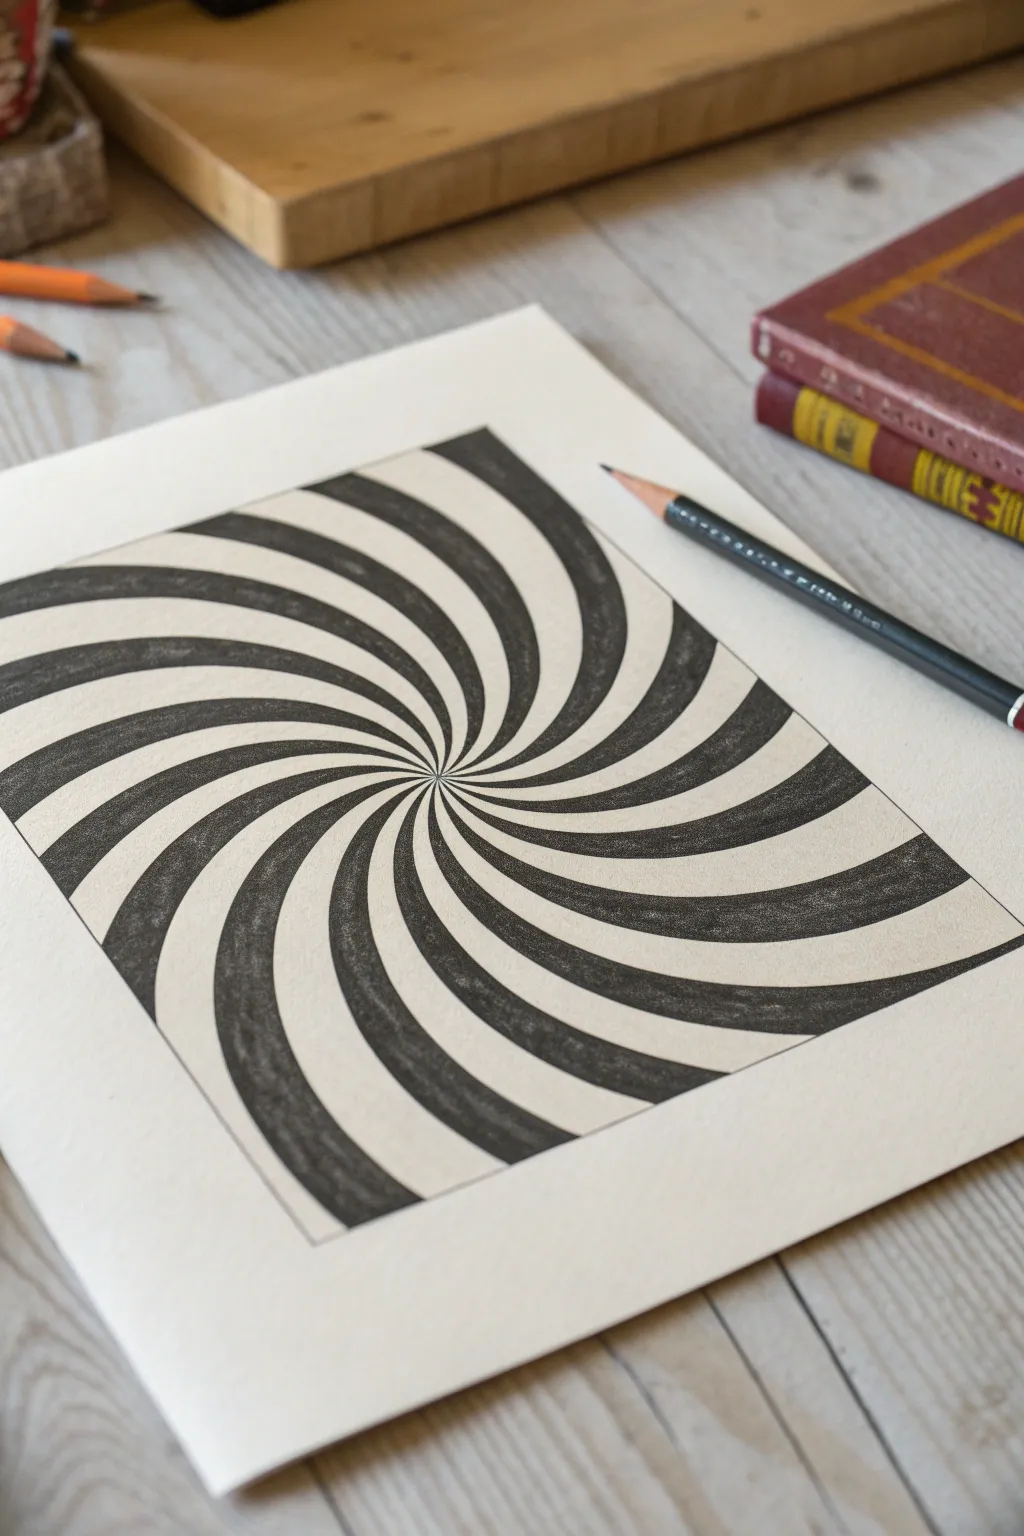
This mesmerizing tunnel spiral creates a powerful sense of depth using nothing but high-contrast shading and rhythmic curves. It’s a classic optical illusion that pops off the page, drawing the viewer’s eye straight into the infinite center.
Step-by-Step
Materials
- High-quality white drawing paper (heavyweight is best)
- Graphite pencils (HB for sketching, 4B or 6B for shading)
- Ruler
- Compass (optional but helpful)
- Eraser (kneaded eraser preferred)
- Fine-point black marker or pen (optional for outlining)
- Blending stump or tissue
Step 1: Setting the Framework
-
Draw the boundary:
Start by using your ruler to draw a perfect square in the center of your paper. This frame will contain the energy of the spiral and make the illusion more effective. -
Locate the center:
Find the exact center of your square. You can do this by lightly drawing diagonal lines from corner to corner; the point where they cross is your center. Erase the diagonal guides afterward. -
Map the cardinal points:
Make small tick marks at the center of each of the four sides of your square. These will act as anchors for your curves later.
Keep it Clean
Place a scrap sheet of paper under your drawing hand. This prevents your palm from smudging the graphite into the white areas as you work across the page.
Step 2: Drafting the Curves
-
Start the first curve:
Place your pencil at the center point. Draw a smooth, expanding curve that arcs outward and hits one of your edge tick marks. Think of it like a pinwheel blade catching the wind. -
Mirror the motion:
Rotate your paper slightly and draw another curve starting from the center, arcing in the same direction, but spacing it evenly from your first line. I find rotating the paper helps keep my hand motion consistent. -
Fill the circle:
Continue drawing these radiating curves from the center all the way around 360 degrees. Aim for an even number of sections—usually around 16 to 24 creates a nice density. -
Check the spacing:
The sections should naturally get wider as they reach the outer edge of the square. If some look too narrow or wide, lightly adjust them now before darkening.
Step 3: Defining Contrast
-
Mark your blacks:
To avoid confusion later, place a tiny dot inside every other section. These dotted sections will be the ones you fill in with black. -
Outline the sections:
Go over your pencil curves with a darker line to clearly define the separation between the black and white bands. A sharp HB pencil or fine liner works well here. -
Begin filling:
Start shading the dotted sections at the outer edge first. Use a soft pencil (like a 4B) to lay down a solid, dark tone creates richness. -
Refine the edges:
As you fill, make sure the edges remain crisp. A fuzzy edge ruins the sharpness required for the optical illusion effect.
Wobbly Lines?
If your curves feel shaky, try drawing them faster. A quick, confident stroke is often smoother than a slow, hesitant one. You can correct the path later.
Step 4: Creating Depth
-
Tighten the center:
As you approach the tiny center point, switch to a very sharp pencil. The bands get extremely narrow here, so precision is key to avoid a muddy blob. -
Deepen the blacks:
Go back over your dark sections with a second layer of graphite to eliminate any white paper specks. The darker the black, the brighter the white will appear. -
Clean the whites:
Use your eraser to lift any graphite smudges from the white sections. Keeping them pristine is crucial for contrast. -
Final border check:
Re-trace the original square border to give the drawing a finished, contained look. Ensure the spiral lines stop cleanly at this border.
Step back and watch your static drawing appear to twist and move on the paper


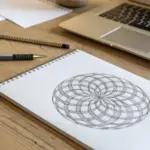
Warped Grid Bulge
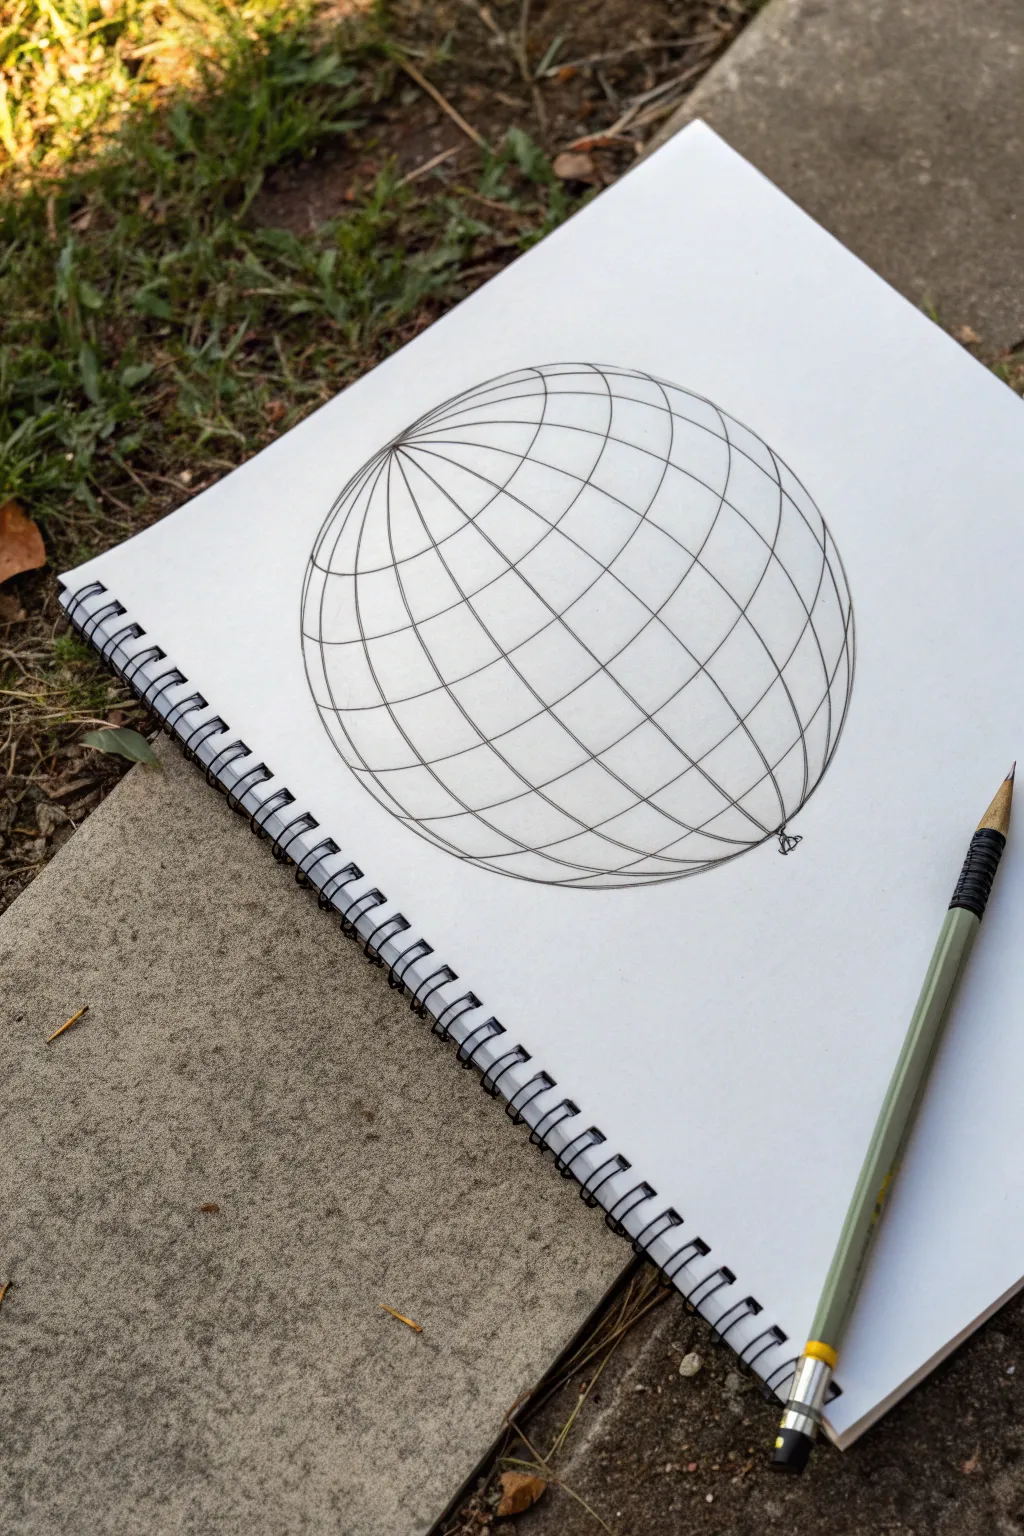
Learn to transform a flat circle into a popping three-dimensional orb using nothing but curved lines. This classic optical illusion relies on perspective warping to trick the eye into seeing volume where there is none.
Step-by-Step Tutorial
Materials
- White sketchbook paper or drawing pad
- Compass (or a round object to trace)
- Graphite pencil (HB or 2B)
- Fine-liner pen or black marker (optional for final lines)
- Eraser
- Ruler (optional)
Step 1: Setting the Foundation
-
Draw the boundary:
Start by lightly sketching a perfect circle in the center of your page. Using a compass is best for precision, but tracing a bowl or large lid works just as well if you don’t have drafting tools handy. -
Mark the axis points:
Visualize where the ‘poles’ of your sphere will be. Pick a point on the top left edge of the circle and a corresponding point directly opposite on the bottom right edge. These will act as the convergence points for your vertical grid lines. -
Draw the central curve:
Connect your two axis points with a single, gentle curve that bends slightly outward. This acts as the ‘equator’ line for one direction of your grid. -
Add vertical longitude lines:
Drawing from the top pole to the bottom pole, add curved lines on either side of your central curve. The lines should be widest apart in the middle of the sphere and converge tightly at the poles. -
Refine the curve spacing:
As you move closer to the outer edges of the circle, make your curves tighter and closer together. This compression is crucial for creating the illusion of a round surface turning away from the viewer.
Flat sphere fix
If your sphere looks flat, your curves are likely too straight. Erase the inner lines and redraw them with a more exaggerated arch to mimic the surface of a ball.
Step 2: Building the Latitude
-
Establish the cross-contours:
Now you need to draw the lines going the other direction. Imagine slicing the sphere horizontally. Draw curved lines that run perpendicular to your first set of lines. -
Determine the curvature direction:
Pay close attention to how these lines bend. Lines in the upper half should curve upwards (like a smile), while lines in the lower half should curve downwards (like a frown). The middle line can be nearly straight. -
Space the parallel curves:
Just like the first set, the spacing matters. I find it helpful to keep lines closer together near the top and bottom edges of the circle, and wider apart in the center, to emphasize the spherical bulge. -
Check the intersections:
Look at where your vertical and horizontal lines meet. They shouldn’t cross at perfect 90-degree angles everywhere; the angles should distort as they get closer to the edge of the circle.
Step 3: Finalizing the Illusion
-
Darken the main lines:
Go over your final grid lines with a firmer pencil stroke or a fine-liner pen. Keep the pressure consistent so the grid looks like a solid wireframe structure. -
Add a small detail:
Notice the tiny loop at the bottom pole in the reference image? You can add a small squiggly loop or knot at one of the poles to make it look like a balloon tie or a wire twist. -
Clean up the edges:
Carefully erase any stray sketch marks or the original circle outline if it doesn’t align perfectly with your outer grid lines. The outer edge holds the shape together. -
Optional shading:
To enhance the depth, you can lightly shade inside the grid squares. Focus the shading around the edges of the sphere to make the center look highlighted and protruding. -
Review and refine:
Step back and look at your drawing. If any area looks flat, you might need to curve a line slightly more. Adjust the line weights if needed to make the form pop.
Checkerboard Twist
Turn this into an Op-Art piece by coloring the grid in a checkered pattern. Alternating black and white squares dramatically increases the 3D effect.
With your grid complete, you have a simple yet effective optical illusion ready to display on your desk


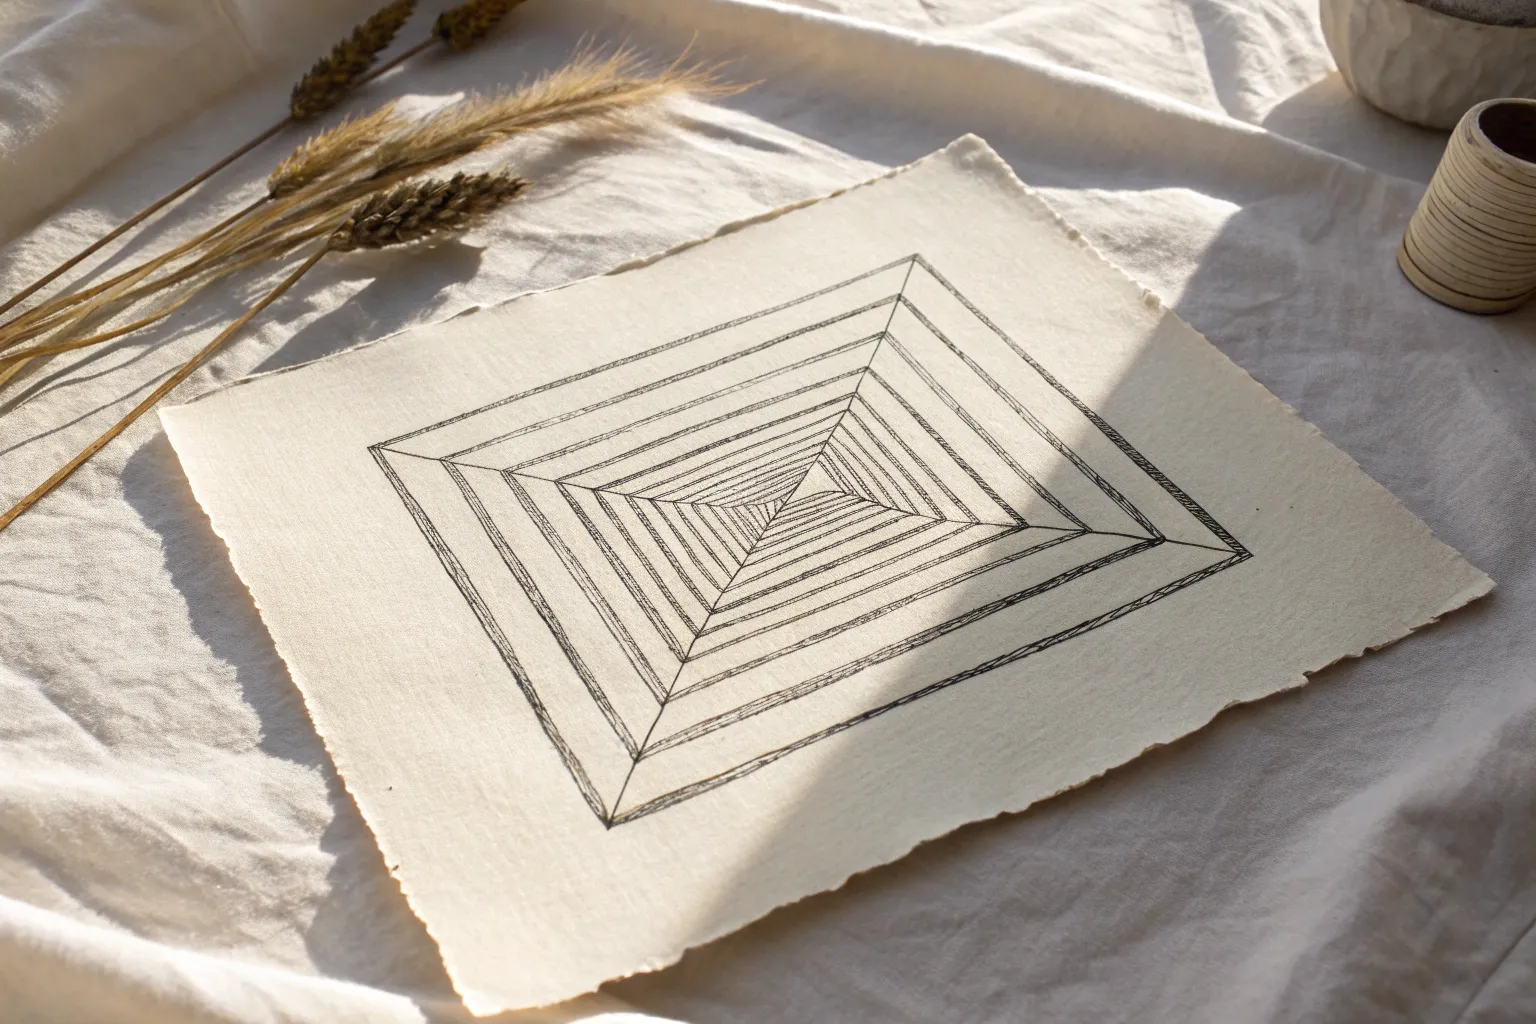
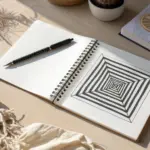
Impossible Box Illusion
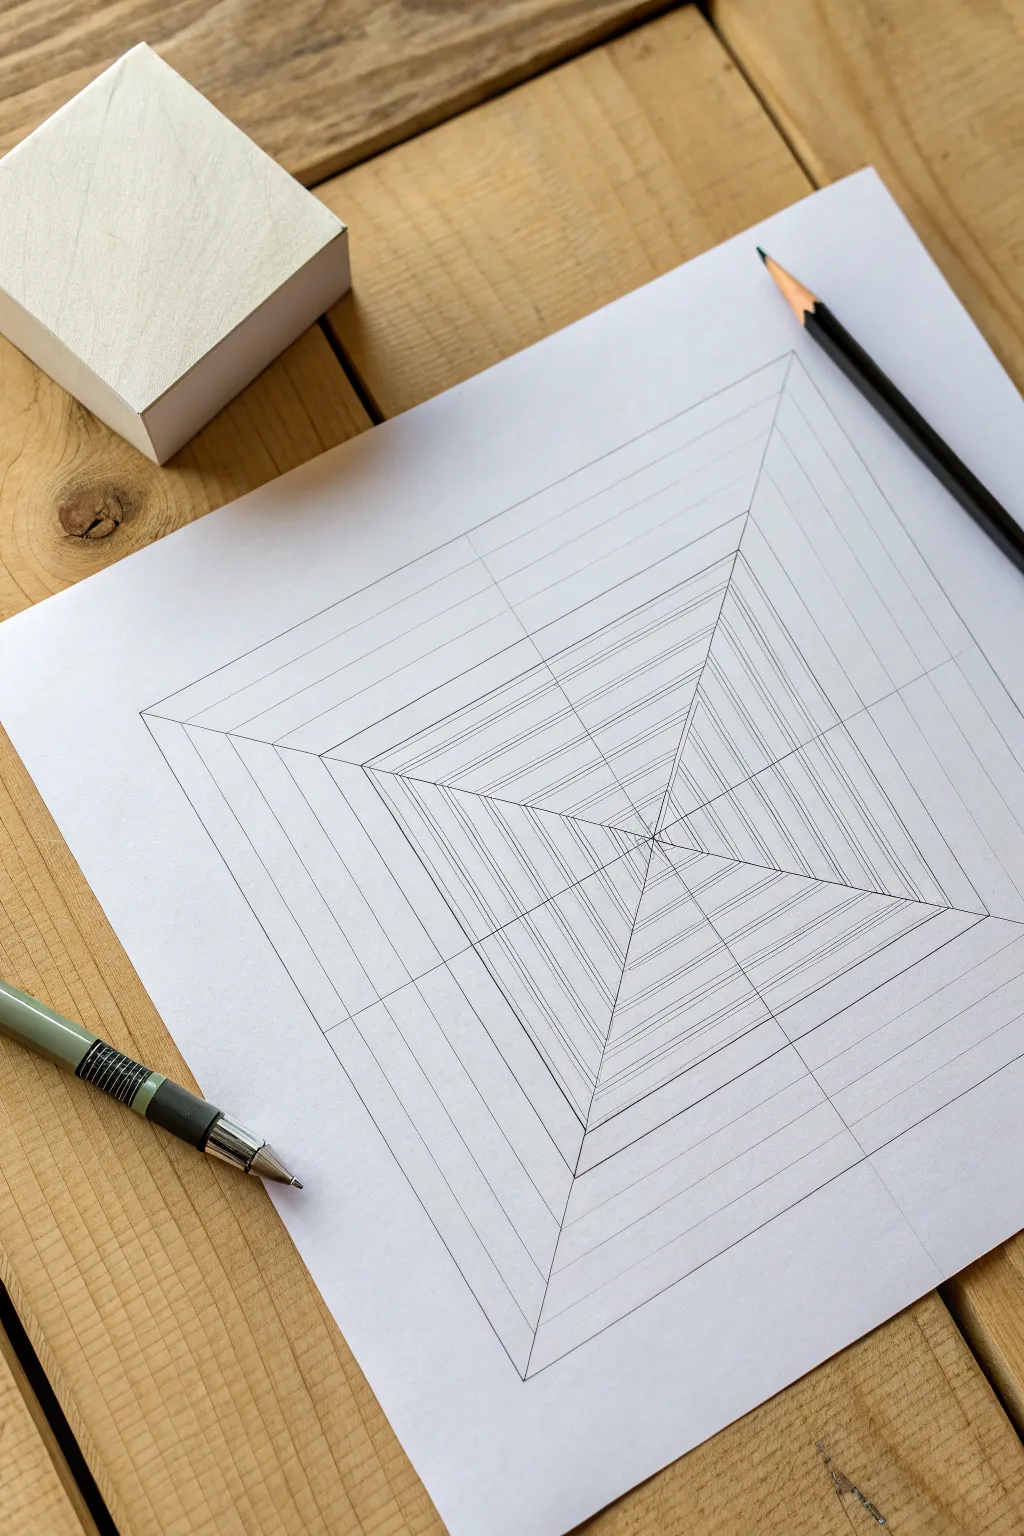
This seemingly simple line drawing creates a mesmerizing effect of an infinite tunnel or pyramid viewed from the top down. By strictly adhering to a grid and systematically increasing line density, you’ll build a geometric structure that seems to sink deep into the paper.
How-To Guide
Materials
- White drawing paper (A4 or Letter size)
- Ruler (preferably clear plastic)
- Black fine-liner pen (0.3mm or 0.5mm)
- Graphite pencil (HB or 2H for light drafting)
- Eraser
Step 1: Setting the Grid
-
Establish the boundaries:
Begin by drawing a large, perfect square in the center of your paper using your pencil. Measure carefully so all sides are equal length. -
Find the center:
Use your ruler to draw diagonal lines from the top-left corner to bottom-right, and top-right to bottom-left. The point where they cross is your exact center. -
Divide the space:
Draw a vertical line and a horizontal line through that center point, dividing your large square into four smaller, equal quadrants. -
Create the X frame:
Double-check your initial diagonal lines. In the final drawing, these diagonals will form the distinct ‘spines’ of the tunnel, so ensure they are straight and meet perfectly in the middle.
Smudge Prevention
When using a ruler with ink, stick a few layers of tape on the underside of the ruler. This lifts the edge off the paper, preventing ink from capillary-actioning underneath and smearing.
Step 2: Drafting the Squares
-
Start from the outside:
Measure a set distance (e.g., 1.5 cm) inward from your outer square boundary. Mark this distance on the diagonal lines. -
Connect the first layer:
Connect these marks to form a slightly smaller square inside the first one. It should look like a frame. -
Continue inward:
Repeat this process, marking regular intervals along the diagonals and connecting them to form a series of nested squares. Stop when you are about halfway to the center. -
Change the spacing:
As you get closer to the center point, make the gap between your squares smaller. This change in spacing is crucial for the depth illusion—things look closer together when they are farther away. -
Reach the core:
Continue drawing concentric squares until you reach the highly dense center point, where the lines should be very close together.
Step 3: Inking the Illusion
-
Tracing the spines:
Switch to your fine-liner pen. Carefully trace over the two main diagonal lines (the X shape) first. These serve as the anchor for the rest of the inking. -
Ink the outer squares:
Trace the outer, widely spaced squares. Keep your ruler firm against the paper to prevent the ink from bleeding under the edge. -
Adding density detail:
Now, here is the trick for the ‘tunnel’ look visible in the reference. In the inner sections, you need to draw *more* lines than you originally penciled. -
Subdividing the center:
Between your penciled guide squares near the center, use your pen to draw 2 or 3 extra concentric squares. I verify the spacing by eye here rather than measuring, as it adds organic vibration. -
Refining the line weight:
Focus on the innermost 2 inches of the drawing. Add very fine, closely packed square lines. The darker and denser this center area is, the deeper the hole will appear. -
Clean up:
Once the ink is completely dry—give it a few minutes to be safe—gently erase all the underlying pencil marks to reveal the crisp geometric form.
Pro Tip: Depth Boost
To maximize the 3D effect, make your pen lines slightly thicker on the outer squares and switch to a mega-fine tip (0.1mm) for the densely detailed center.
Step back and watch your flat paper transform into a deep geometric corridor.
BRUSH GUIDE
The Right Brush for Every Stroke
From clean lines to bold texture — master brush choice, stroke control, and essential techniques.
Explore the Full Guide
Deep Hallway Vanishing Point
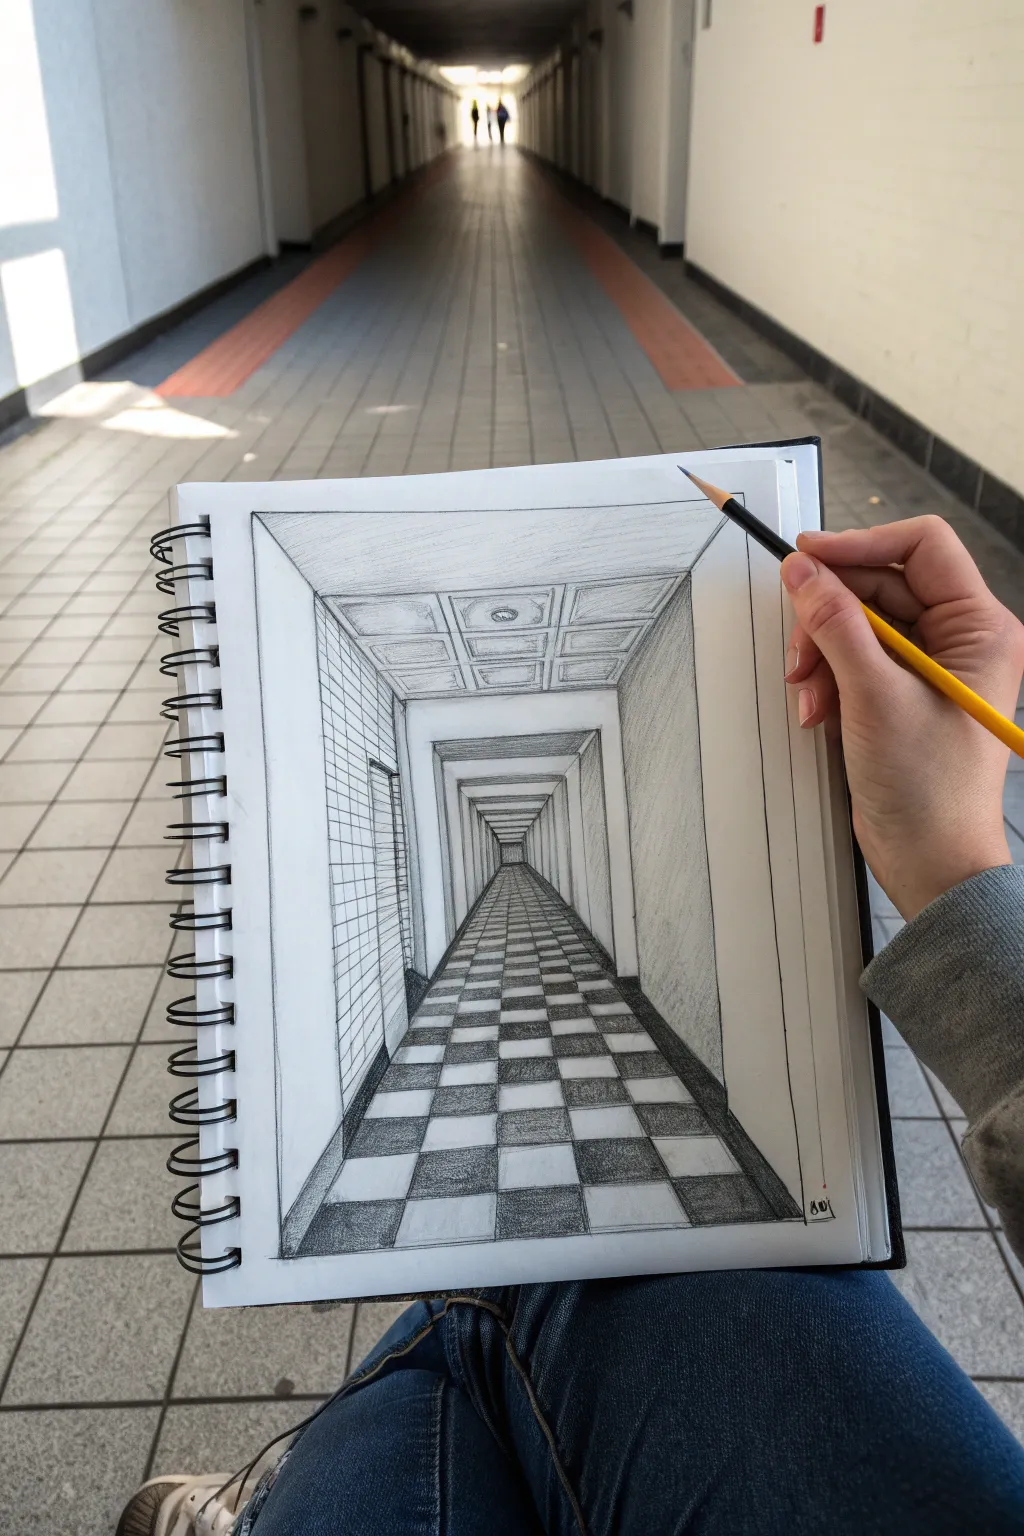
Master the art of one-point perspective with this mesmerizing deep hallway drawing. Using simple graphite shading and geometric precision, you’ll create an illusion of endless depth right in your sketchbook.
Detailed Instructions
Materials
- Spiral-bound sketchbook (heavyweight paper suitable for graphite)
- Set of graphite pencils (HB, 2B, 4B, 6B)
- Clear plastic ruler (12-inch)
- Vinyl eraser or kneaded eraser
- Pencil sharpener
- Blending stump or tissue
- Fine-liner pen (optional, for final outlines)
Step 1: Setting the Scene
-
Find the center:
Begin by lightly marking a small dot in the exact visual center of your page. This vanishing point is the most crucial element, as every major line will radiate from or recede toward this single spot. -
Draw the back wall:
Draw a small square around your central dot. This represents the furthest visible wall at the end of the hallway. Keep your lines light so they can be adjusted later if needed. -
Create the main corridor:
Using your ruler, draw diagonal lines extending from each corner of your central square out to the edges of the paper. These lines create the floor, ceiling, and side walls of your tunnel.
Fixing Wonky Angles
If the perspective looks off, check your ruler alignment. Every single diagonal line must point directly to that central dot. Even a millimeter off can skew the depth.
Step 2: Structure and Geometry
-
Frame the entrance:
Draw a large rectangle near the outer edges of the paper to frame the composition, creating a ‘portal’ effect. -
Add receding arches:
Inside the main corridor, draw a series of progressively smaller squares receding toward the center. Space them closer together as they get deeper into the tunnel to exaggerate the feeling of distance. -
Construct the floor grid:
For the checkered floor, draw lines from the vanishing point along the floor section, fanning out toward the bottom edge. Then, add horizontal lines across these floor rays. Remember: horizontal lines must get closer together as they approach the center. -
Detail the ceiling:
Mirror the floor’s grid structure on the ceiling, or create recessed panels. I find drawing simple squares within the ceiling grid sections adds a convincing architectural coffers look. -
Side wall features:
On the left wall, sketch vertical lines to suggest doorways or tiled sections. Ensure the tops and bottoms of these vertical lines angled accurately toward the vanishing point.
Make It Infinite
Instead of a back wall, leave the center pitch black and fade the floor checks into the darkness. It makes the hallway look like it goes on forever.
Step 3: Shading and Depth
-
Fill the checkerboard:
Select alternating squares on your floor grid and fill them in. Use a softer pencil like a 4B for a rich, dark tone, pressing firmly to create high contrast against the white squares. -
Shade the depth:
Apply a gradient of shading to the walls. Start darker near the distant center square and lighten your pressure as you move outward toward the viewer. This atmospheric perspective boosts the illusion of depth. -
Define the far end:
Deepen the shading inside the very center square (the ‘end’ of the hall) to make it look like a dark, mysterious destination. -
Add corner shadows:
Use a 2B pencil to add shadows where walls meet the floor and ceiling. Smudge these lines slightly with a blending stump to soften the architectural edges. -
Texture the walls:
Lightly cross-hatch the side walls to give them a concrete or plaster texture, distinct from the smooth floor tiles. -
Refine the lines:
Retrace your main structural lines with a sharpened HB pencil or a fine-liner to make the geometry pop. Clean, sharp edges are essential for convincing perspective. -
Final clean-up:
Use your vinyl eraser to remove any stray guide lines or smudges from the white floor tiles to ensure maximum contrast.
Step back and enjoy the vertigo-inducing depth you have created on a flat sheet of paper
Wavy Checkerboard Wave
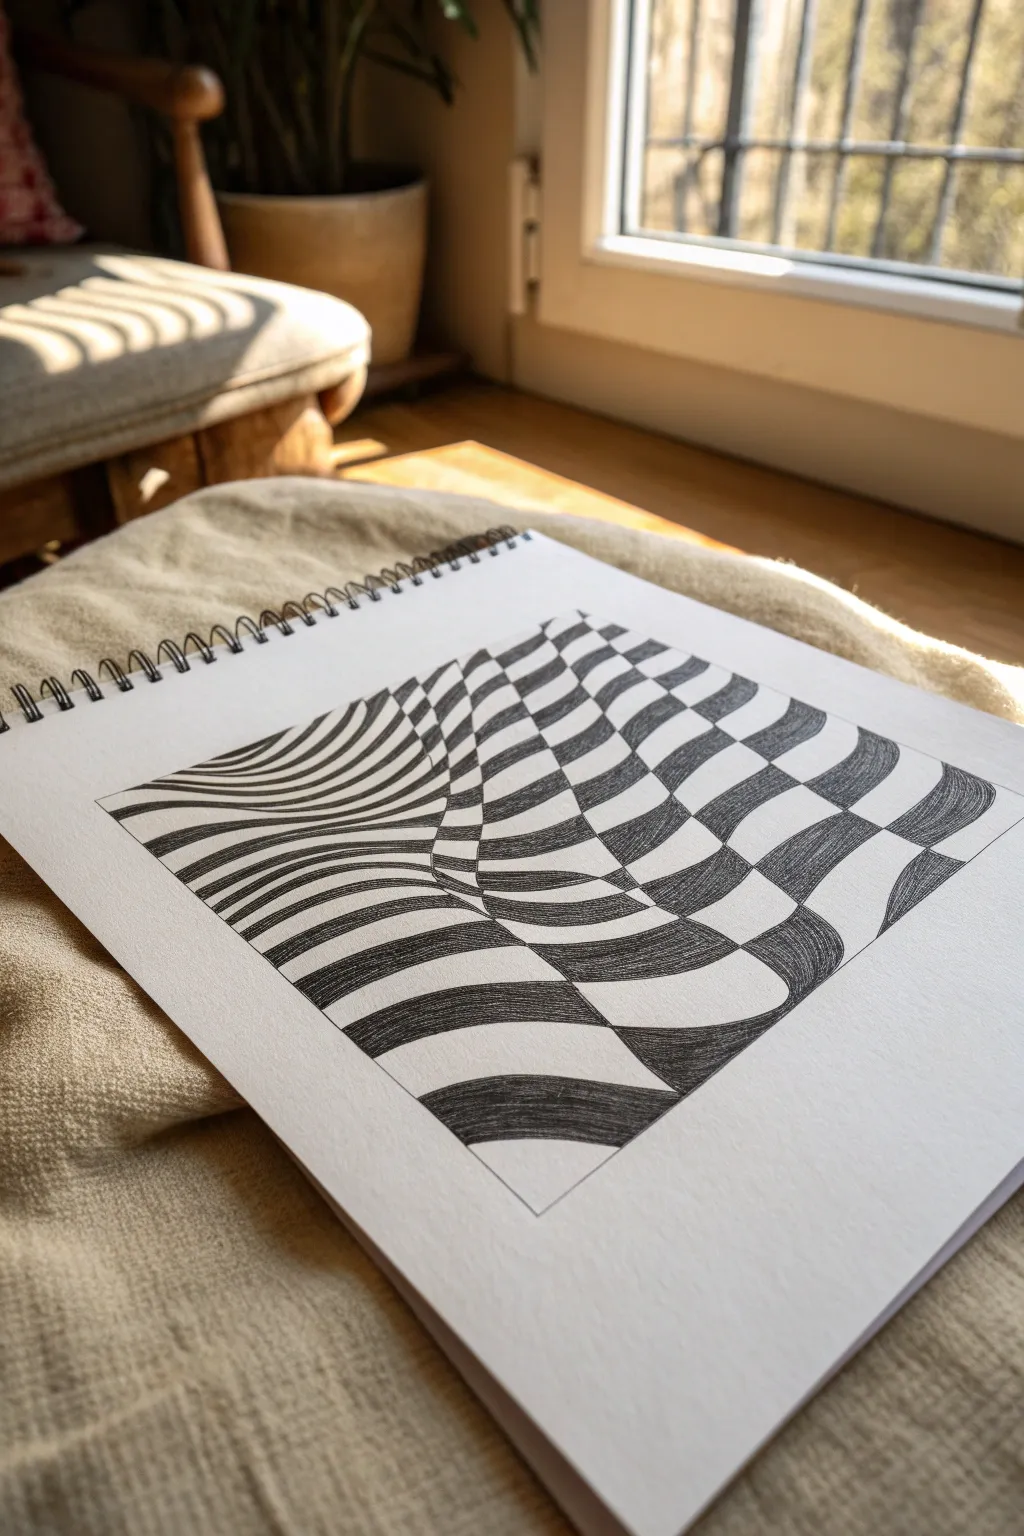
This project creates a mesmerizing 3D effect on a 2D surface, transforming a simple grid into a fluid, rippling landscape. By carefully manipulating lines and contrasting heavy shading with stark white paper, you’ll produce a checkerboard pattern that appears to swell and recede right off the page.
Step-by-Step Guide
Materials
- White sketchbook paper (smooth bristol or mixed media)
- Pencil (HB or 2H for sketching)
- Fine liner pen (0.3mm or 0.5mm, black)
- Ruler
- Eraser
- Ballpoint pen or heavy marker (for filling)
Step 1: Setting the Framework
-
Define the boundary:
Start by drawing a perfect square in the center of your page using a ruler and a light pencil. This bounding box contains the illusion and makes the edge distortion more powerful by contrast. -
Plot the vertical waves:
Lightly sketch vertical lines across the square. Instead of straight ruled lines, draw them as gentle S-curves. Space them evenly at the top and bottom edges, but allow them to pinch closer together in the middle right and flare out in the top left to establish the ripple. -
Plot the horizontal waves:
Sketch the horizontal lines crossing the vertical ones. These should also be wavy, but curve them to interact with your verticals. Where the vertical lines pinch, dip the horizontal lines downward to create a ‘valley’ or hole effect. -
Refine the grid:
Review your pencil grid. You should now have a distorted checkerboard mesh. Adjust any lines that look jagged; the key to this illusion is smooth, fluid intersections.
Curve Consistency
When shading, curve your pen strokes to match the distortion of that specific box. It reinforces the flowing 3D shape.
Step 2: Inking the Structure
-
Outline the waves:
Take your fine liner pen and carefully trace over your final pencil grid lines. Keep your hand steady and maintain a consistent line weight. -
Trace the border:
Ink the outer square border. Use your ruler for this step to ensure crisp, straight edges that contrast with the organic wavy lines inside. -
Erase guidelines:
Wait a moment for the ink to dry completely to avoid smudging. Then, gently erase all the underlying pencil graphite so only the clean ink structure remains.
Step 3: Shading for Depth
-
Identify the pattern:
Mark the squares you will fill with a tiny dot. This follows a standard checkerboard pattern (every other square). It is crucial to get this right before you start coloring to avoid ruining the pattern. -
Start filling rectangles:
Begin filling in the marked shapes with black ink. I prefer using a slightly thicker pen or multiple passes with a ballpoint to build up a rich, dark tone. -
Directional shading technique:
Instead of coloring randomly, use consistent hatching strokes that follow the curve of the specific square you are filling. If the square curves downward, curve your shading lines downward too. -
Deepen the ‘hole’:
As you approach the pinched area where the lines converge (the ‘valley’), ensure your black fill is solid and dense. High contrast in the deepest part of the wave enhances the 3D depth. -
Refine the edges:
Go back over the edges of your filled black squares. Make sure the corners are sharp and touch the corners of the adjacent black squares perfectly diagonally. -
Clean up:
Check for any white specks inside your black areas and fill them in for a solid look. Use a white gel pen if you accidentally went outside the lines to tidy up the white squares.
Color Pop
Swap the black ink for a vibrant color like electric blue or deep red, or alternate colors for a psychedelic 60s Op Art look.
Step back and enjoy the way your flat drawing now looks like a warping, twisting surface

PENCIL GUIDE
Understanding Pencil Grades from H to B
From first sketch to finished drawing — learn pencil grades, line control, and shading techniques.
Explore the Full Guide
Cut-and-Fold Pop Depth Illusion
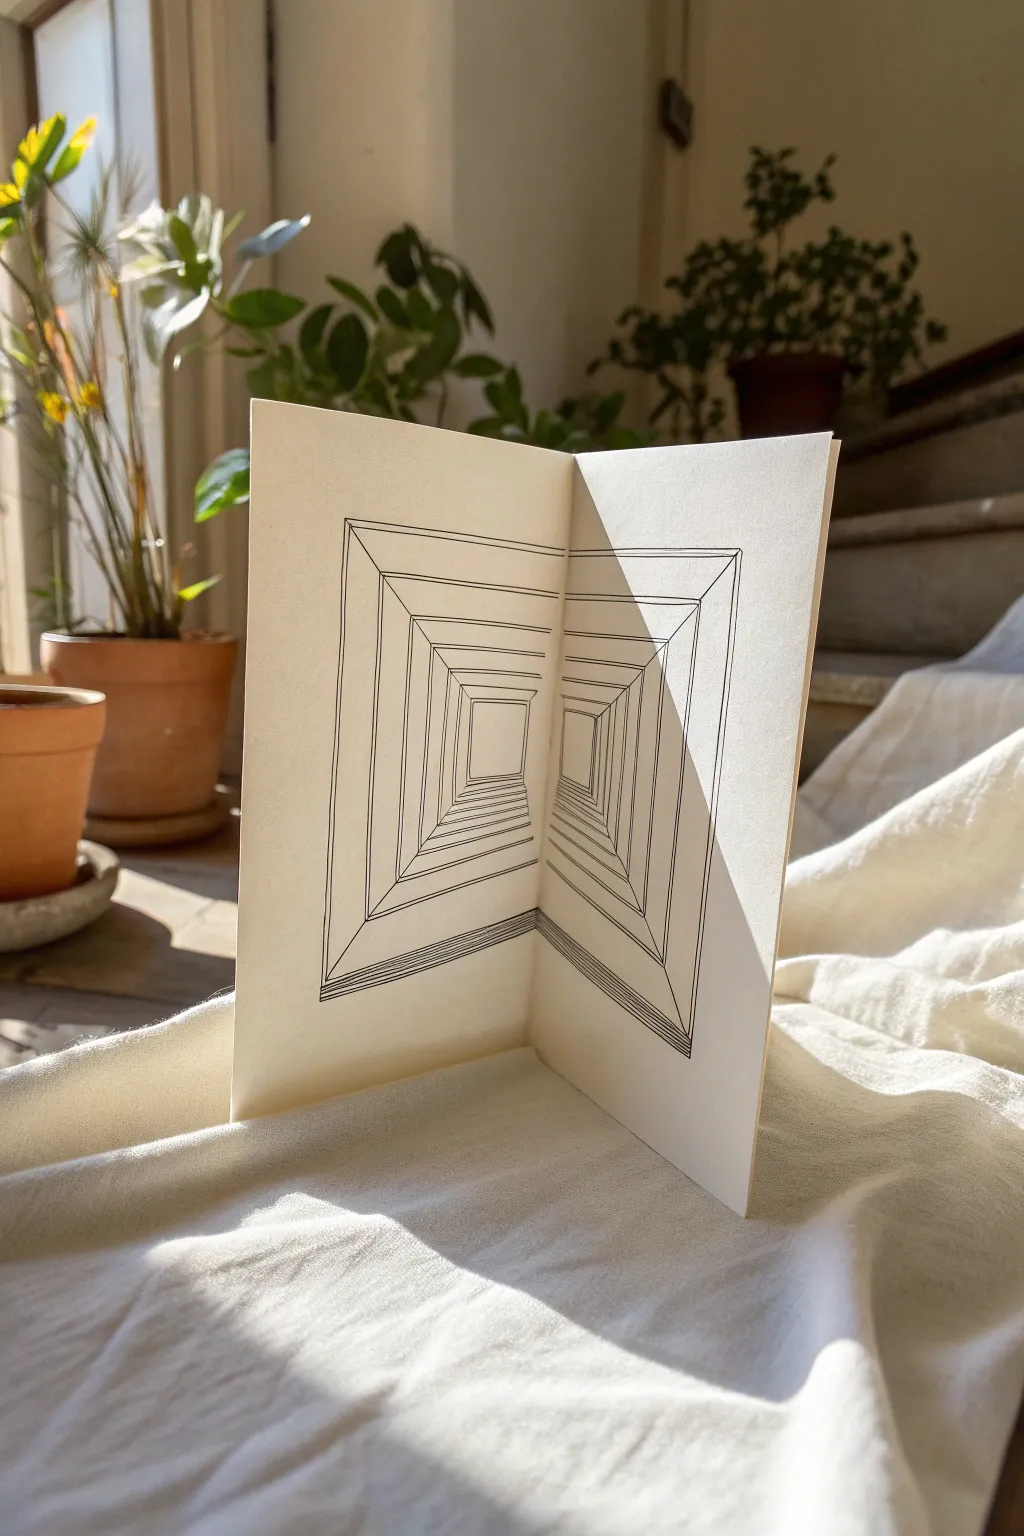
This clever optical illusion transforms a simple folded card into a seemingly endless tunnel using nothing but perspective lines. By carefully drawing nested rectangles across the crease of a card, you can create a striking 3D geometric void that looks like it’s receding deep into the paper.
How-To Guide
Materials
- Heavyweight drawing paper or cardstock (white or cream)
- Fine-point black fineliner pen (0.3mm or 0.5mm)
- Ruler or straightedge
- Pencil (HB or H)
- Bone folder
- Eraser
Step 1: Preparation and Layout
-
Prepare the paper:
Cut your paper to your desired size (A5 or 5×7 inches works well) and fold it sharply in half. Use a bone folder along the crease to ensure the paper stands open at a precise 90-degree angle without springing back. -
Open and secure:
Partially flatten the card on your work surface so you can draw across the spine, but be aware of where the fold lies. You can tape the corners down lightly if the paper keeps moving. -
Establish the horizon:
Using your pencil and ruler, lightly mark a horizontal line across the center of the spread. This serves as your horizon line and ensures your perspective remains consistent on both the left and right panels. -
Mark the vanishing point:
Place a small dot on the horizon line directly in the center of the fold. This vanishing point is crucial, as all your depth lines will converge toward this single spot. -
Draw the outer boundary:
Sketch a large rectangle that spans across both pages, leaving about an inch of margin on all sides. This frame defines the opening of your tunnel.
Step 2: Constructing the Tunnel
-
Create concentric layers:
Lightly pencil in a series of progressively smaller nested rectangles inside your main frame. Space them somewhat evenly, though they can get closer together as they approach the center to enhance the depth effect. -
Connect the corners:
Draw diagonal lines connecting the corresponding corners of each rectangle. These should all align perfectly toward your central vanishing point on the crease. -
Adjusting the perspective:
Review your pencil sketch. The rectangles should look like ‘steps’ going into the page. If the angle looks off, check that your diagonals are truly straight lines pointing to the center fold. -
Inking vertical lines:
Switch to your fineliner pen. Carefully trace over the vertical sides of your rectangles first. Keep a steady hand and ensure the ruler doesn’t slip. -
Inking horizontal lines:
Ink the top and bottom horizontal lines of each rectangle layer. Be careful when crossing the central paper fold; I like to lift the pen slightly and restart on the other side to avoid ink bleeding into the paper fibers. -
Inking diagonals:
Trace the diagonal connecting lines that create the ‘walls’ of the tunnel. Precision here is key to the illusion.
Keep it Sharp
For the crispest lines near the fold, don’t draw directly in the crevice. Stop your pen 1mm before the fold and restart 1mm after. The eye fills the gap.
Step 3: Shading and Final Details
-
Add floor texture:
To enhance the 3D effect, add linear texture to the ‘floor’ segments of the tunnel (the bottom trapezoids). Draw closely spaced horizontal lines within each bottom section. -
Refine floor density:
As the tunnel sections get deeper (closer to the center fold), make your floor texture lines closer together. This density mimics how details compress in the distance. -
Add ceiling texture:
Repeat the linear texture process on the ‘ceiling’ (top trapezoids) if desired, or leave it blank for contrast. The example image uses texture solely on the bottom and sides for a specific lighting effect. -
Texturing the walls:
Add vertical hatching lines on the side walls. Similar to the floor, start with wider spacing on the outer rings and tighten the spacing as you move inward toward the center. -
Clean up:
Wait at least 10-15 minutes for the ink to dry completely. Once safe, gently erase all underlying pencil marks, brushing the eraser crumbs away from the center fold to avoid trapping them. -
Final stance:
Stand the card up on a table at a 90-degree angle. Adjust the viewing angle until the lines align visually and the tunnel appears to recede straight back.
Uneven Perspective?
If the tunnel looks twisted, your central vanishing point likely drifted. Always keep your ruler aligned to that single dot on the fold for every diagonal line.
Place your finished piece near a window to let natural shadows interplay with your drawn illusion


Have a question or want to share your own experience? I'd love to hear from you in the comments below!