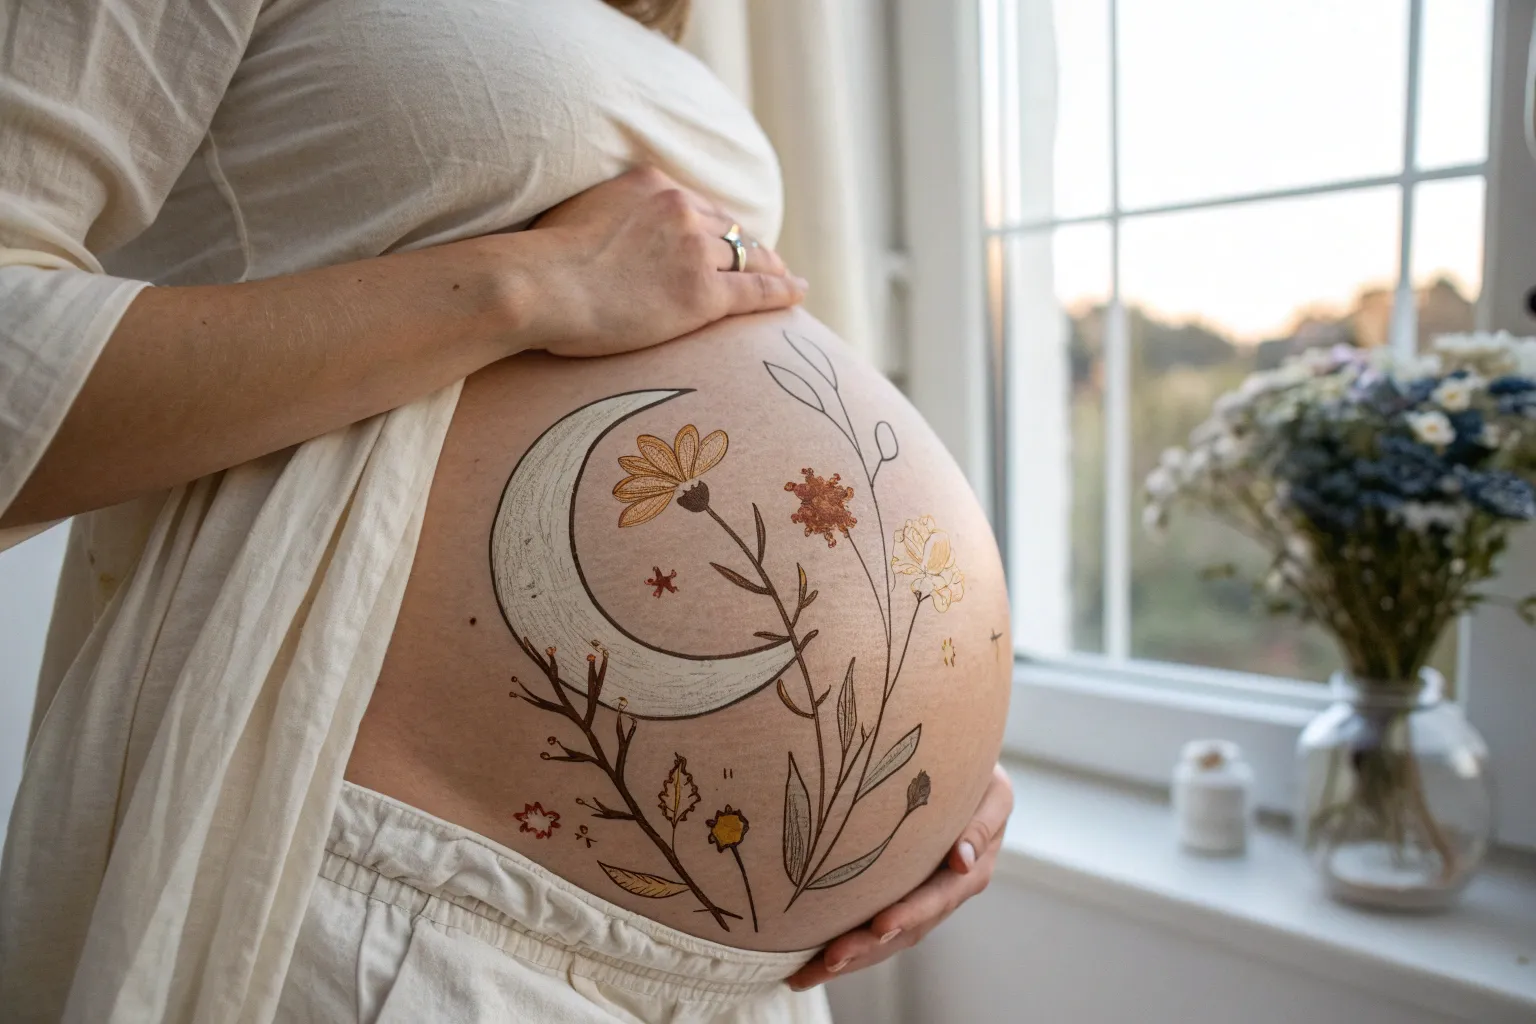
I love how belly painting turns a baby bump into the sweetest little round canvas—instant art, instant memories. Here are some of my go-to belly painting ideas (from classic to wildly creative) that really use the belly’s curve to make the design feel alive.
Baby Animal Curled Up on the Bump
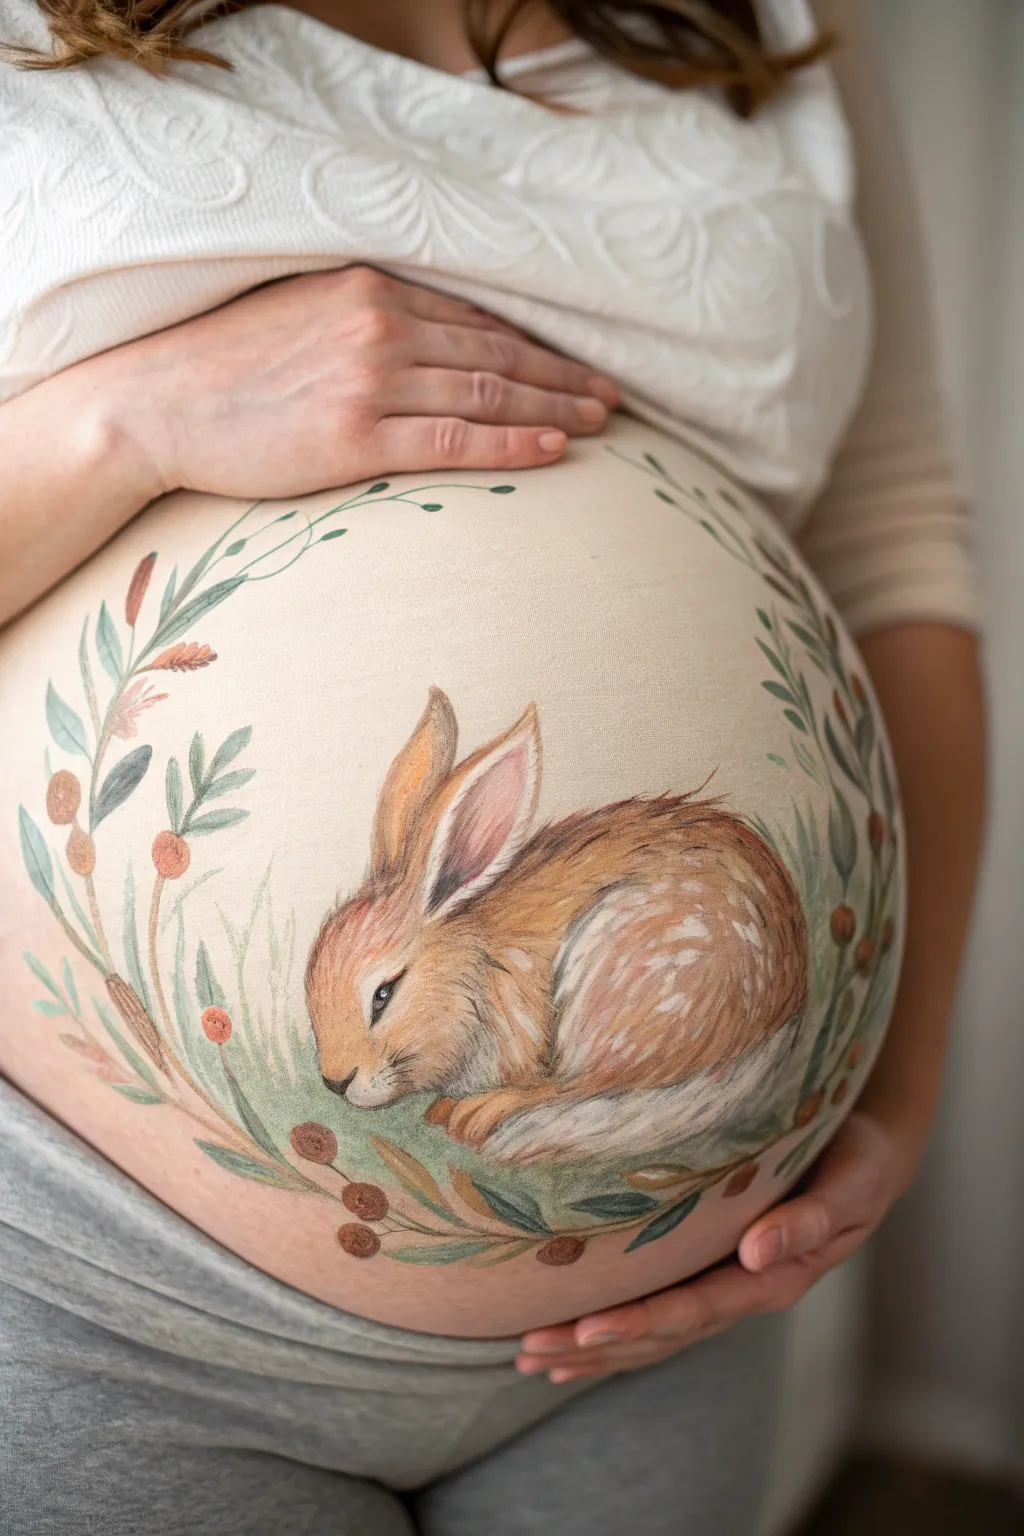
Capture the sweetness of anticipation with this gentle, woodland-inspired design featuring a baby rabbit curled up in slumber. The soft texture and muted earth tones create a peaceful scene that perfectly contours the natural curve of the bump.
Step-by-Step Guide
Materials
- FDA-approved water-based face/body paints (brown, white, cream, peach, sage green, forest green, muted orange)
- High-density sponges (petal shape and round)
- Round brushes (sizes #2, #4, and #6)
- Flat brush or filbert brush (medium size)
- Fine liner brush (size #0 or #1)
- Water spray bottle
- Water container and paper towels
- Setting spray (optional)
Step 1: Planning and Background
-
Clean the canvas:
Begin with clean, dry skin free of oils or lotions to ensure the paint adheres properly and lasts longer without smudging. -
Visualize the placement:
Imagine the center of the bump as the nesting spot for the bunny. The curve of the belly naturally lends itself to the curled-up posture of the animal. -
Create the base shape:
Using a slightly damp sponge loaded with a mix of cream and very pale brown, gently dab a large oval shape in the center of the belly. This doesn’t need to be solid; a soft, misty edge is perfect for this style.
Fur Texture Tip
For realistic fur, use a ‘dry brush’ technique. Wipe most paint off your brush so the bristles separate slightly, creating multiple fine hair lines with a single stroke.
Step 2: Painting the Bunny
-
Outline the bunny form:
With a #4 round brush and watered-down light brown paint, sketch the basic outline of the rabbit: a large curved back, the tucked-in back leg, and the head resting on the front paws. -
Fill the body color:
Using a medium filbert brush, fill in the rabbit’s body with a warm, medium brown tone. Use sweeping strokes that follow the direction of the fur growth. -
Add the inner ear:
Mix a soft pinkish-peach color and paint the inside of the tall, alert ears. Keep the edges soft where the pink meets the brown fur. -
Create the ‘fawn’ spots:
While the brown base is still slightly tacky, use a small sponge or a stippling brush with white paint to dab gentle spots onto the rabbit’s hindquarters, giving it that baby animal appearance. -
Define the face:
Switch to a #2 round brush and a darker brown. carefully paint the closed eyelid with a sweeping downward curve, the small nose, and the separation of the paws.
Step 3: Adding Texture and Detail
-
Layering fur texture:
Using a fine liner brush and a mix of white and cream paint, add tiny, quick strokes over the brown base coat to simulate soft fur. Focus on the chest, the tummy, and the edges of the ears. -
Deepening shadows:
Mix a dark chocolate brown and use it sparingly in the deepest creases—under the chin, behind the front leg, and where the back leg tucks into the belly—to create dimension. -
Whiskers and fine hairs:
With the finest liner brush and thinned white paint, add long, delicate whiskers near the nose and wispy hairs inside the ears. -
Grounding shadow:
I like to sweep a very sheer wash of sage green or grey under the bunny to ground it, so it looks like it’s resting on grass rather than floating.
Make it Magical
Add a tiny touch of cosmetic-grade biodegradable glitter to the white fur spots or the berries to make the design shimmer slightly when it catches the light.
Step 4: The Botanical Border
-
Drafting the vines:
Load a #6 round brush with sage green. Starting from the bottom center, pull long, sweeping vine lines that curve upward around the sides of the belly, framing the rabbit. -
Adding leaves:
Using a ‘press and lift’ technique with the round brush, add leaves along the vines. Vary the shades of green between sage and forest green for visual interest. -
Painting cattails/wheat:
Paint slender brown ovals on thin stalks interspersed among the greenery to resemble cattails or dried wheat, enhancing the woodland theme. -
Adding berries:
use the back end of a brush handle or a round sponge to dot small clusters of muted orange or rust-colored berries along the vines. -
Final integration:
Add a few blades of grass overlapping the bottom of the bunny to make it look nestled into the nest.
Step back and admire your gentle woodland masterpiece, ready for a cozy photoshoot


Underwater Bubble World
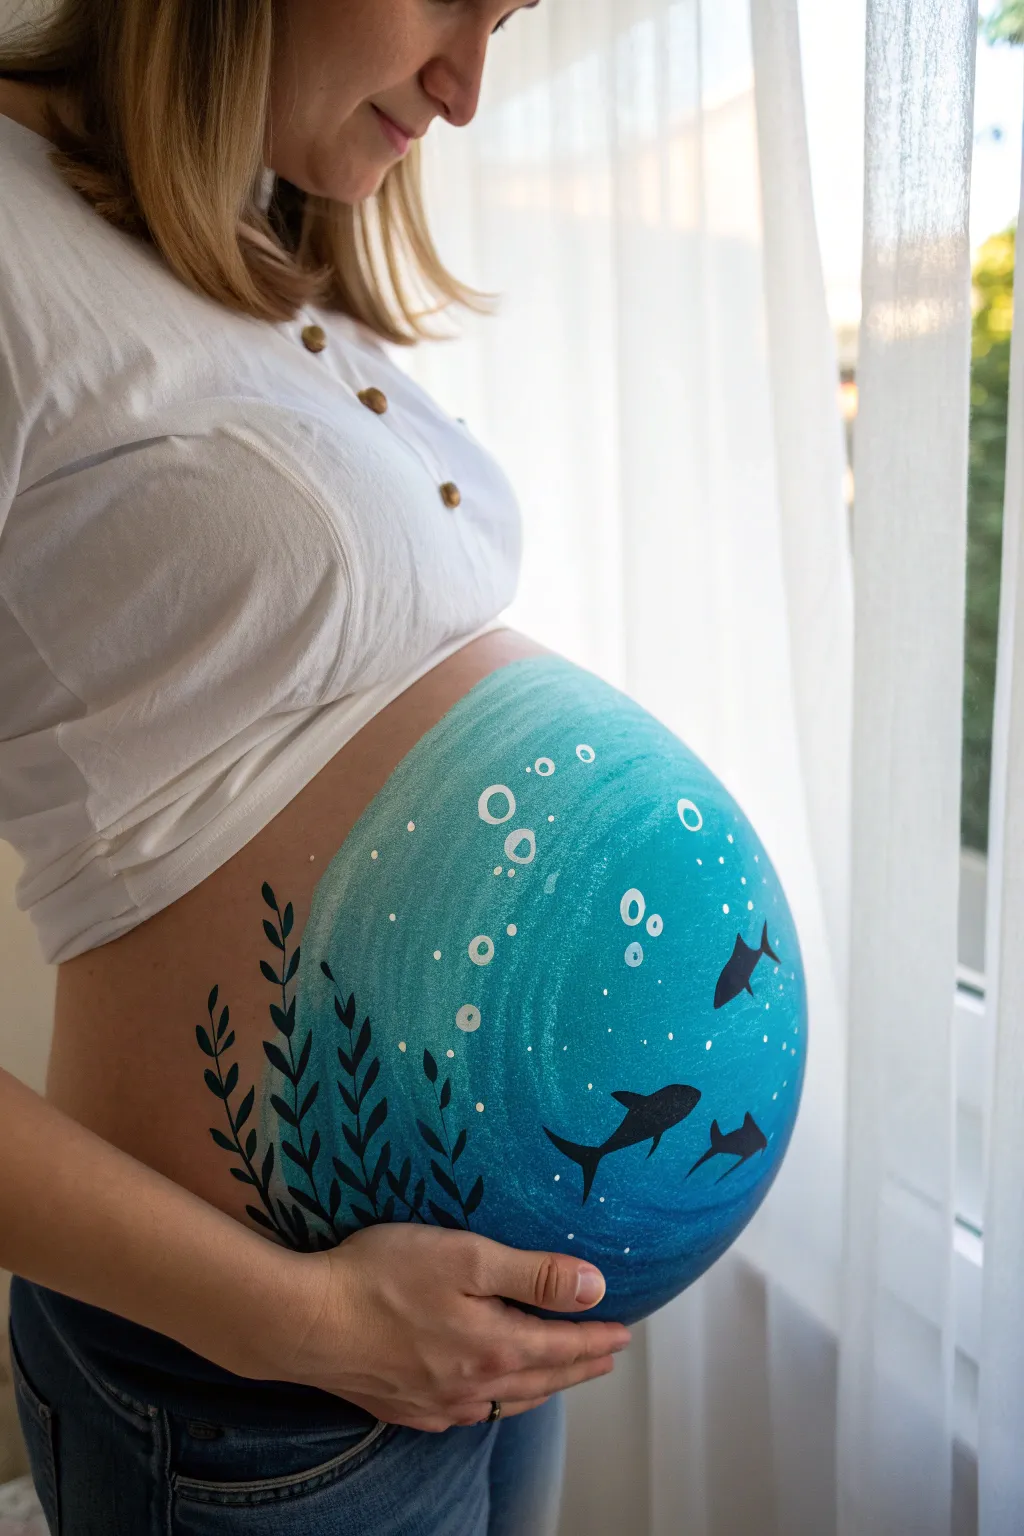
Transform your baby bump into a serene underwater globe with this striking shark silhouette design. This look combines a beautiful teal-to-blue gradient with bold, high-contrast sea life for a truly artistic maternity memory.
Step-by-Step Tutorial
Materials
- Face/Body paints (teal, medium blue, dark blue, white, black)
- Clean water in a cup
- Large flat brush or body painting sponge
- Medium round brush
- Fine detail brush (liner brush)
- Baby wipes or damp cloth
- Setting spray (optional)
Step 1: Creating the Ocean Base
-
Outline the globe:
Begin by envisioning a large circle that covers the majority of the belly. Using a medium round brush and a light wash of teal paint, faintly sketch the circular perimeter to establish your boundaries. -
Map out the gradient:
The background relies on a smooth transition of color. Visualize the circle in diagonal bands: the top/left area will be the lightest teal, transitioning to medium blue in the center, and ending with dark blue at the bottom right. -
Apply the teal highlight:
Load a sponge or large flat brush with your lightest teal mixed with a touch of white. sponge this onto the upper left curve of your circle, tapping gently to get an even coat. -
Blend the mid-tones:
Without cleaning your sponge completely, pick up the medium blue paint. Start applying it in the center of the belly, overlapping slightly with the teal edge. Use a soft dabbing motion to blur the line where the colors meet. -
Deepen the depths:
Load the dark blue paint onto your sponge. Apply this to the bottom right section of the circle to create the deep ocean effect. As you work upward, blend it into the medium blue section while the paint is still slightly tacky. -
Clean the edges:
Take a damp wipe or a clean brush with water and tidy up the outer perimeter of your circle. Ideally, you want a crisp, round edge that separates the painting from the skin.
Step 2: Painting the Sea Life
-
Sketch the seaweed stalks:
Switch to a medium round brush loaded with black paint. On the bottom left side, paint several wavy vertical lines of varying heights rising from the base of the circle. -
Add the leaves:
Along each black stalk, paint small, almond-shaped leaves. You can achieve this by pressing the belly of the brush down and lifting up quickly. Angle them upwards to mimic floating underwater plants. -
Outline the sharks:
Using a smaller round brush and black paint, carefully outline three shark shapes on the right side of the belly. Place the largest one near the bottom center and two smaller ones slightly behind and above it. -
Fill the silhouettes:
Fill in the shark outlines solidly with black paint. Ensure their fins are sharp and distinct—the dorsal fin on top and the tail fin are key to making them recognizable. -
Refine the tails:
I like to use a liner brush here to make the very tips of the shark tails and fins extra sharp and pointy, which adds a lot of dynamic movement to the silhouettes.
Patchy Background?
If the blue gradient looks streaky, wait for it to dry completely, then sponge a second thin layer over the top. Don’t drag the sponge; dab up and down.
Step 3: Bubbles and Final Details
-
Paint large bubbles:
Clean your medium round brush thoroughly and load it with white paint. Paint open circles (rings) of various sizes scattered throughout the water, focusing usually on the area above the seaweed. -
Add medium bubbles:
Paint smaller, solid white dots interspersed among the larger rings. Try to keep them random rather than in a straight line for a natural look. -
Create micro-bubbles:
Dip a stiff-bristled brush or a toothbrush into watery white paint. Aim it at the belly and run your thumb across the bristles to flick a subtle spray of tiny speckles across the blue gradient. -
Highlight the bubbles:
Go back to your large open bubble rings. Add a tiny dot of white on the ‘rim’ of a few rings to make them look glossy and dimensional. -
Final clean up:
Check the very edges of your main circle one last time. If any black paint smeared or the circle looks wonky, use a cotton swab with water to perfect the curve.
Shark Tip
Paint the sharks swimming in the same direction for a cohesive school look. Use a reference photo of a shark silhouette to get the fin angles right.
Now you have a stunning, deep-sea masterpiece ready for your photoshoot


Mandala Radiating From Center
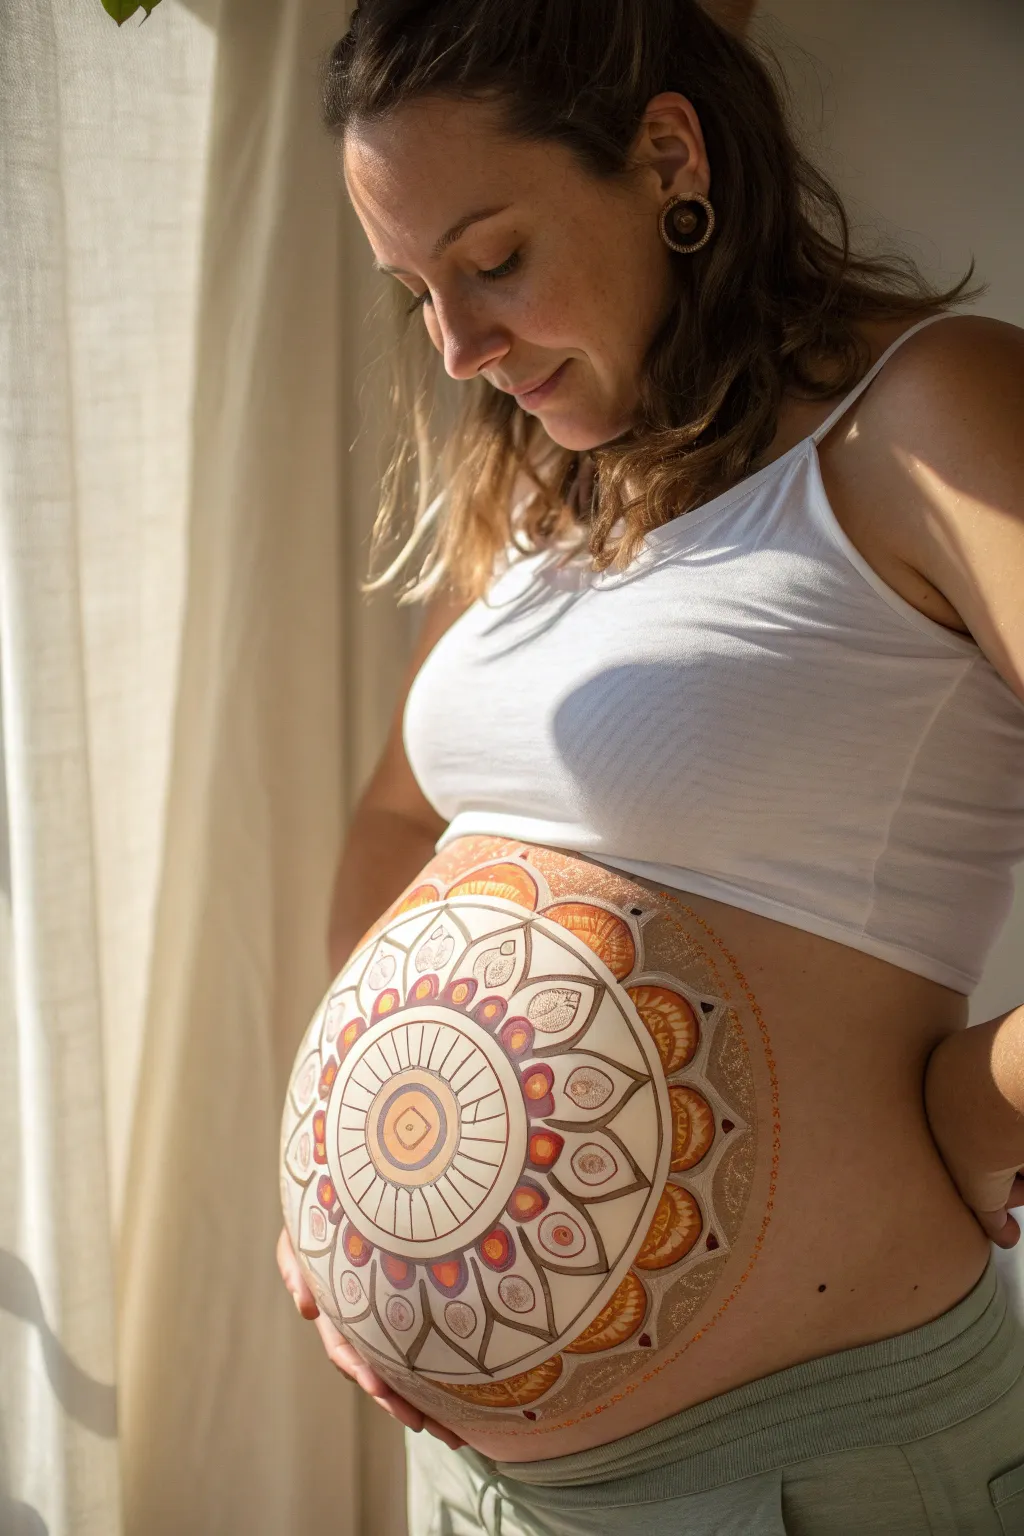
Embrace the natural curves of pregnancy with this soothing mandala design featuring warm ochres, terra cottas, and crisp white linework. The circular motif radiates directly from the belly button, creating a harmonious and centering piece of living art.
Step-by-Step Guide
Materials
- Water-activated body paints (white, ochre/yellow-orange, rust/terra cotta, dark brown)
- Small round synthetic brushes (size 2 and 4)
- Medium filbert brush (size 6)
- Cup of clean water
- Paper towels
- Spray bottle (optional, to moisten paints)
- Soft cosmetic sponge (optional, for blending)
Step 1: Establishing the Core
-
Find the Center:
Begin by identifying the belly button as your absolute center point. Take your rust or terra cotta paint and a round brush to draw a small, solid circle directly over the navel. -
Create the First Ring:
Using the same rust color, carefully outline this central circle to ensure it is neat and round. -
Add the Inner Halo:
Switch to an ochre or golden yellow-orange paint. Paint a slightly wider ring surrounding the rust center, leaving a tiny gap between the two colors if possible, or blending them slightly at the edge. -
Outline in White:
Load a size 2 round brush with creamy white paint. Draw a thin, precise ring around the central rust circle, separating it from the ochre halo. -
Define the Petals:
Using dark brown paint and a fine brush, draw a circle of elongated, thin U-shapes or ‘spokes’ radiating outward from the ochre ring, creating a wheel-like structure.
Step 2: Building the Middle Layers
-
Connect the Spokes:
Close off the wheel by painting a thin brown circle that connects the tips of all your spokes. -
Paint First Petal Tier:
Inside the brown ring you just made, use white paint to fill in the spaces between the spokes, but stay toward the outer edge, leaving the inner part of the spokes clear or lightly tinted. -
Draw Large Petal Outlines:
Using the dark brown paint again, draw a layer of large, pointed petal shapes (like lotus petals) radiating outward from the main wheel. -
Add Inner Teardrops:
Inside the base of each new brown petal, paint a small, solid teardrop using your rust/terra cotta color. -
Highlight with Yellow:
Above each rust teardrop, add a small dot or dash of yellow paint to bring brightness to the center of the petals. -
Fill the Petal Tips:
Use a light wash of white or very pale beige to fill the upper portion of these large petals. I find dragging the brush from the tip downward creates a nice fading effect.
Wobbly Lines?
Rest your painting hand’s pinky finger gently on the skin to stabilize your strokes. If a line goes astray, quickly wipe it with a damp Q-tip before it dries.
Step 3: Expanding and Detailing
-
Create the Outer Scallops:
Draw a series of wide, scalloped semi-circles between the points of your main petals using the dark brown liner. -
Fill the Scallops:
Fill these scallops with a gradient of orange to rust. You can use a filbert brush here to sweep the color into the curve. -
Detail the Orange Zones:
Once the orange paint is dry (it happens fast!), use white paint to add delicate interior details like tiny veins or dots inside these orange scallops. -
Add the Outer Halo:
Mix a sheer, watery brown or gold. Paint a wide, transparent band around the entire design to act as a background for final details. -
Dotwork Decoration:
Dip the handle end of a brush into orange or rust paint. Stamp small dots along the very outer edge of the design for a festive border. -
Refining Lines:
Go back over your main structural lines with the dark brown or black paint to re-establish crisp boundaries where colors may have overlapped. -
Final Highlights:
Take your starkest white paint and add final tiny highlights—a dot in the center of the navel and small accents on the petal tips—to make the design pop.
Add Some Shimmer
For a magical finish, lightly dust cosmetic-grade gold mica powder or biodegradable glitter over the still-damp orange sections to catch the light.
Now you have a stunning, centered mandala that beautifully celebrates the life growing within.


Heart-and-Vines Belly Wrap
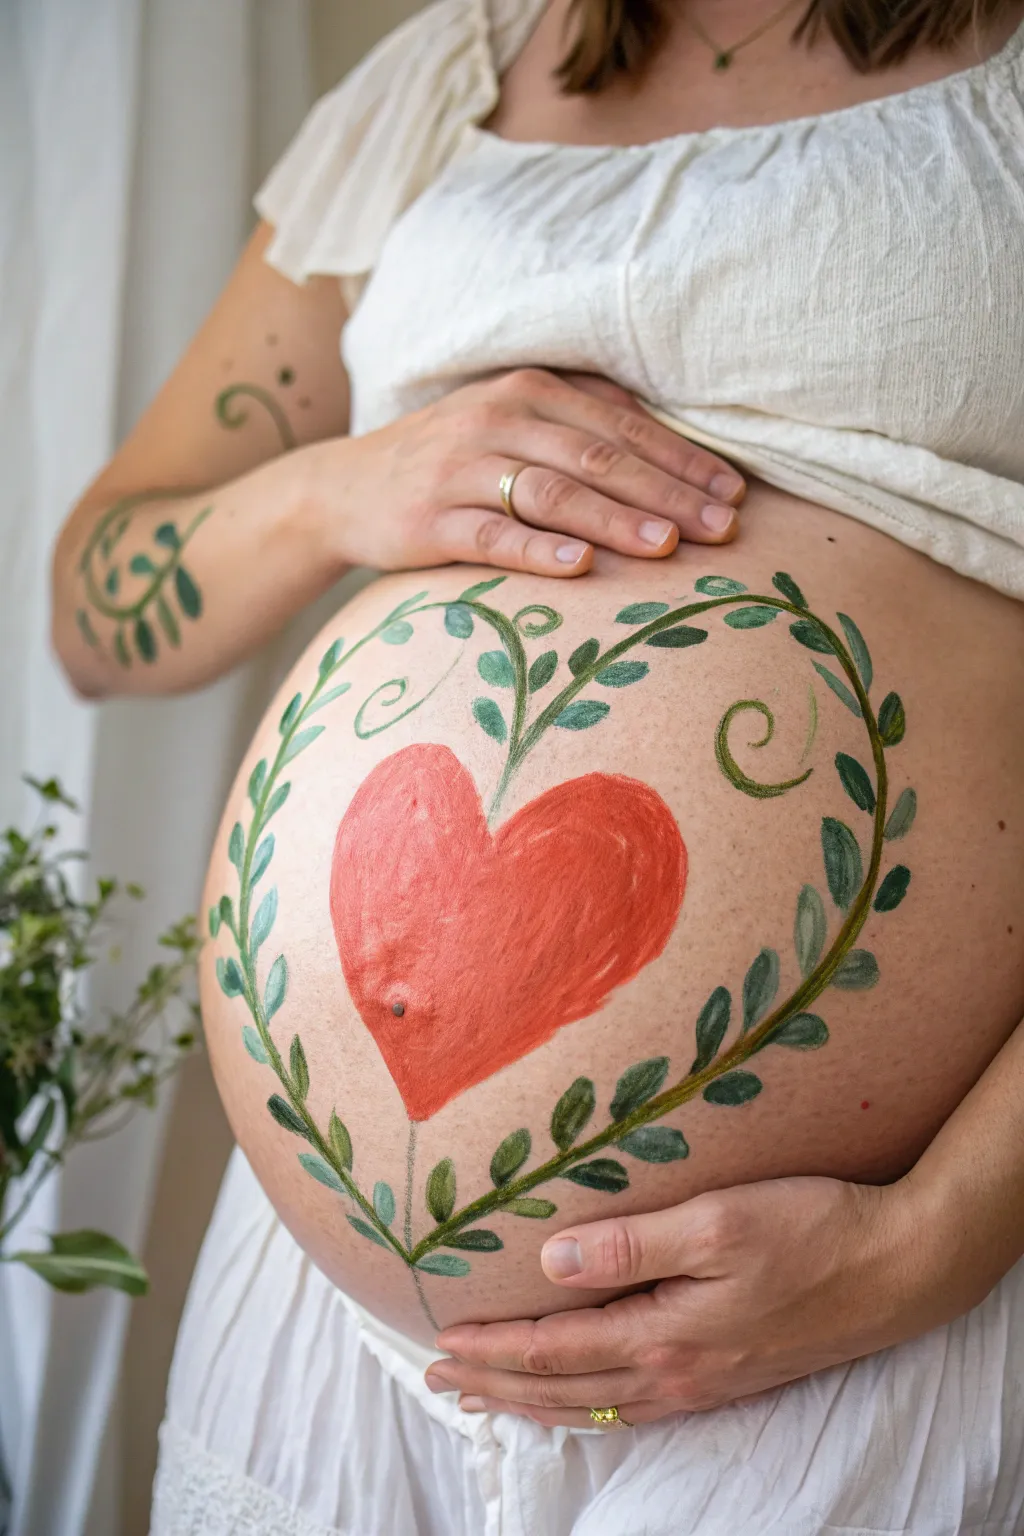
Celebrate the life blooming within by painting a vibrant, classic red heart cradled in elegant greenery. This design extends onto the arms for a cohesive, nature-inspired look that beautifully frames the bump.
Detailed Instructions
Materials
- Water-based body paints (Bright Red, Deep Green, lighter Sage Green, Yellow)
- Wide flat brush (approx. 1 inch)
- Medium round brush (size 6 or 8)
- Fine liner brush (size 1 or 2)
- Cup of water
- Paper towels or soft cloth
- Makeup sponge (optional but helpful for the heart)
- Setting spray (optional)
Step 1: Painting the Central Heart
-
Clean the canvas:
Before picking up a brush, ensure the skin on the belly is clean, dry, and free of heavy lotions or oils so the paint adheres smoothly. -
Outline the shape:
Using a medium round brush and a very light wash of red paint, sketch the outline of a large, traditional heart right in the center of the belly. Keep it symmetrical. -
Fill the base color:
Load a wide flat brush or a damp makeup sponge with bright red body paint. Fill in the heart shape completely, using smooth strokes to avoid streakiness. -
Add dimension:
While the red is still slightly damp, take a touch of darker red or mix a tiny bit of green into your red to create a shadow on the lower right curve. Blend gently. -
Highlight the curve:
Clean your brush and pick up a tiny bit of white or very light pink. Add a soft highlight on the upper left lobe of the heart to give it a rounded, 3D appearance.
Comfort is Key
Have the mom-to-be sit in a comfortable chair, possibly reclined. Painting can take time, and standing too long can be tiring for her.
Step 2: Creating the Vine Framework
-
Anchor the vines:
Switch to your medium round brush and load it with deep green paint. Start at the bottom point of the heart and draw a stem extending downward, then splitting into two main branches. -
Shape the outer heart:
Guide these two branches upward, curving them around the red heart to form a larger, loose heart shape made of stems. Stop just before they meet at the top to keep the design open. -
Add inner flourishes:
Paint a central stem rising from the top ‘dip’ of the red heart, branching out slightly. Add a few decorative swirls near the top of the belly using the fine liner brush for delicate curls. -
Paint the leaves:
Using the medium round brush, press down and lift up to create teardrop-shaped leaves along the main vine stems. Alternate the angle of the leaves for a natural look. -
Layer the greens:
Once the dark green leaves look set, I like to mix a lighter sage green. Add smaller leaves or highlights on top of the darker ones to create depth and lushness.
Cracking Paint?
If the paint cracks when drying, you’re likely using too much water. Try a creamier consistency that feels like soft butter on the brush.
Step 3: Arm Details & Finishing
-
Extend to the arms:
To tie the look together, paint similar vine motifs on the forearms or biceps. Start with a curving deep green stem that wraps slightly around the arm. -
Add arm leaves:
Add the same press-and-lift teardrop leaves to the arm vines, keeping the style consistent with the belly design. -
Incorporate swirls:
Use your fine liner brush to add small, whimsical swirls and dots in empty spaces around the vines on both the belly and arms, using a mix of green and perhaps a dull yellow. -
Refine the edges:
Check the edges of the red heart. If the green painting caused any smudges, clean them up carefully with a damp Q-tip and re-apply red if needed for a crisp line. -
Set the design:
Allow the paint to dry completely (about 5-10 minutes). If you have a makeup setting spray, give it a light mist to help the design last through a photoshoot.
Step back and admire how the natural motfis perfectly embrace the bump
BRUSH GUIDE
The Right Brush for Every Stroke
From clean lines to bold texture — master brush choice, stroke control, and essential techniques.
Explore the Full Guide
Lace-Inspired Belly Painting
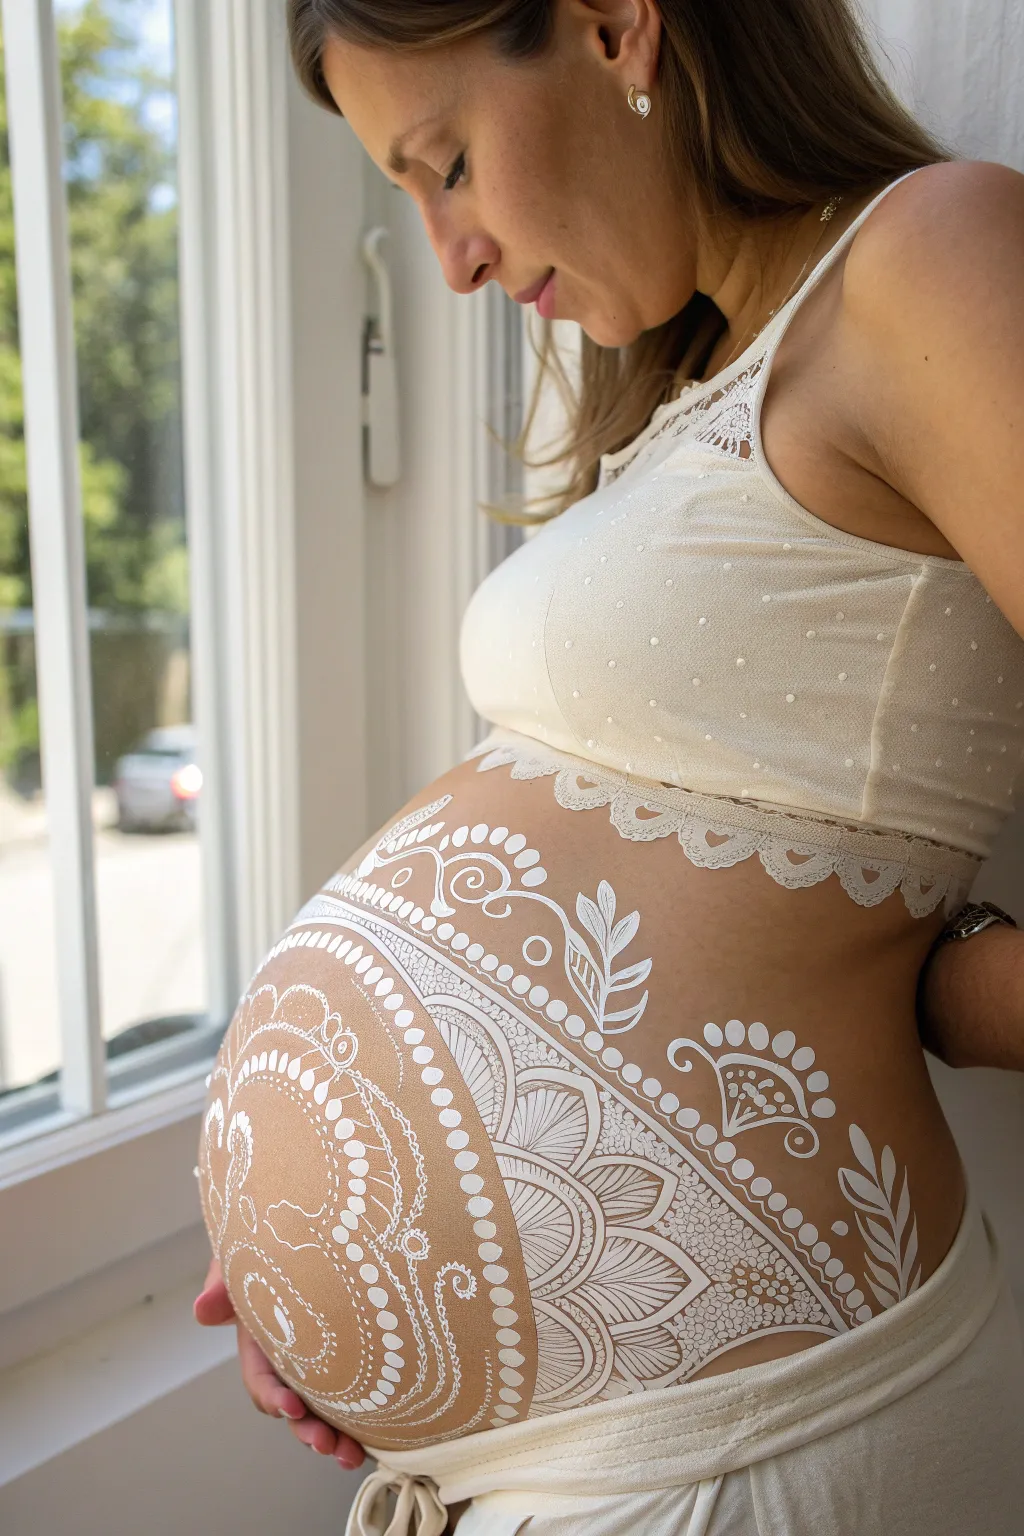
Transform a baby bump into a stunning work of art with this intricate, lace-inspired design. Utilizing white body paint to mimic fine lace or henna, this project creates a serene and celebratory look perfect for maternity photoshoots.
Step-by-Step
Materials
- White face/body paint (water-activated or cream)
- Fine liner brush (size 0 or 00)
- Round brush (size 2 or 3)
- Small sponge (optional for base prepping)
- Cup of water
- Paper towels
- Setting spray (skin safe)
Step 1: Planning and Centerpiece
-
Find the center:
Visualize the center point of the belly, right around the navel area. This design radiates outward, so establishing this focal point first helps keep everything symmetrical. -
Paint the central mandala:
Using your round brush loaded with white paint, create a small circle around the navel. Surround this with small petal shapes to form a central flower motif. -
Add the first scalloped ring:
Draw larger, scalloped semi-circles (humps) around your central flower. These serve as the foundation for the larger lace pattern. -
Detail the inner ring:
Switch to your fine liner brush. Inside each scalloped hump, draw thin lines radiating from the center outward, resembling the veins of a leaf or the structure of a fan.
Step 2: Expanding the Pattern
-
Create the main border:
Draw a bold, curved line that swoops across the lower belly, framing the central mandala. This diagonal line acts as a boundary for the main lace section. -
Add the secondary arches:
Along the top edge of your bold curved line, paint a series of smaller arches or humps to create a decorative border. -
Fill with intricate mesh:
Within the larger sections of the design, specifically to the right of the center, paint a fine cross-hatch or mesh pattern. This mimics the texture of real lace fabric. -
Layering the fan shapes:
On the outer edge of the main design, paint large, distinctive fan shapes. Fill these with very fine lines, similar to the inner ring, to maintain consistency. -
Connect with dots:
Using the tip of your round brush or the back of a brush handle, place a series of dots along the major curved lines. I find distinct dots really sell the ‘lace’ effect.
Clean Lines Pro Tip
Load your brush with paint to a creamy, milk-like consistency. If it’s too watery, it will drip; too thick, and lines will break.
Step 3: Flourishes and Accents
-
Add floating swirls:
Extend the design upwards and outwards by painting free-flowing swirls and paisleys that drift away from the central mass. -
Paint delicate leaves:
In the open spaces on the upper belly and side, paint small, simple leaf shapes attached to thin vines. These soften the geometric look of the mandala. -
Create distinct flower motifs:
Add standalone floral elements—like the stylized tulip shape seen on the right—using teardrop shapes and dots. -
Embellish with micro-dots:
Go back over the entire design with your finest brush. Add tiny dots at the tips of leaves, inside petals, and along the spine of the vines for extra detail. -
Refine the lines:
Check for any uneven edges. If a line looks too thin or shaky, carefully retrace it to thicken it slightly, ensuring the white is opaque and bright. -
Set the design:
Once the paint is fully dry to the touch, lightly mist the belly with a skin-safe setting spray to prevent cracking or smudging during movement.
Level Up: Sparkle
While the paint is still slightly tacky, gently press cosmetic-grade glitter or small adhesive rhinestones into the center of the mandala flowers.
Now you have a breathtaking, custom piece of art celebrating this special journey
Stork Delivery Silhouette Scene
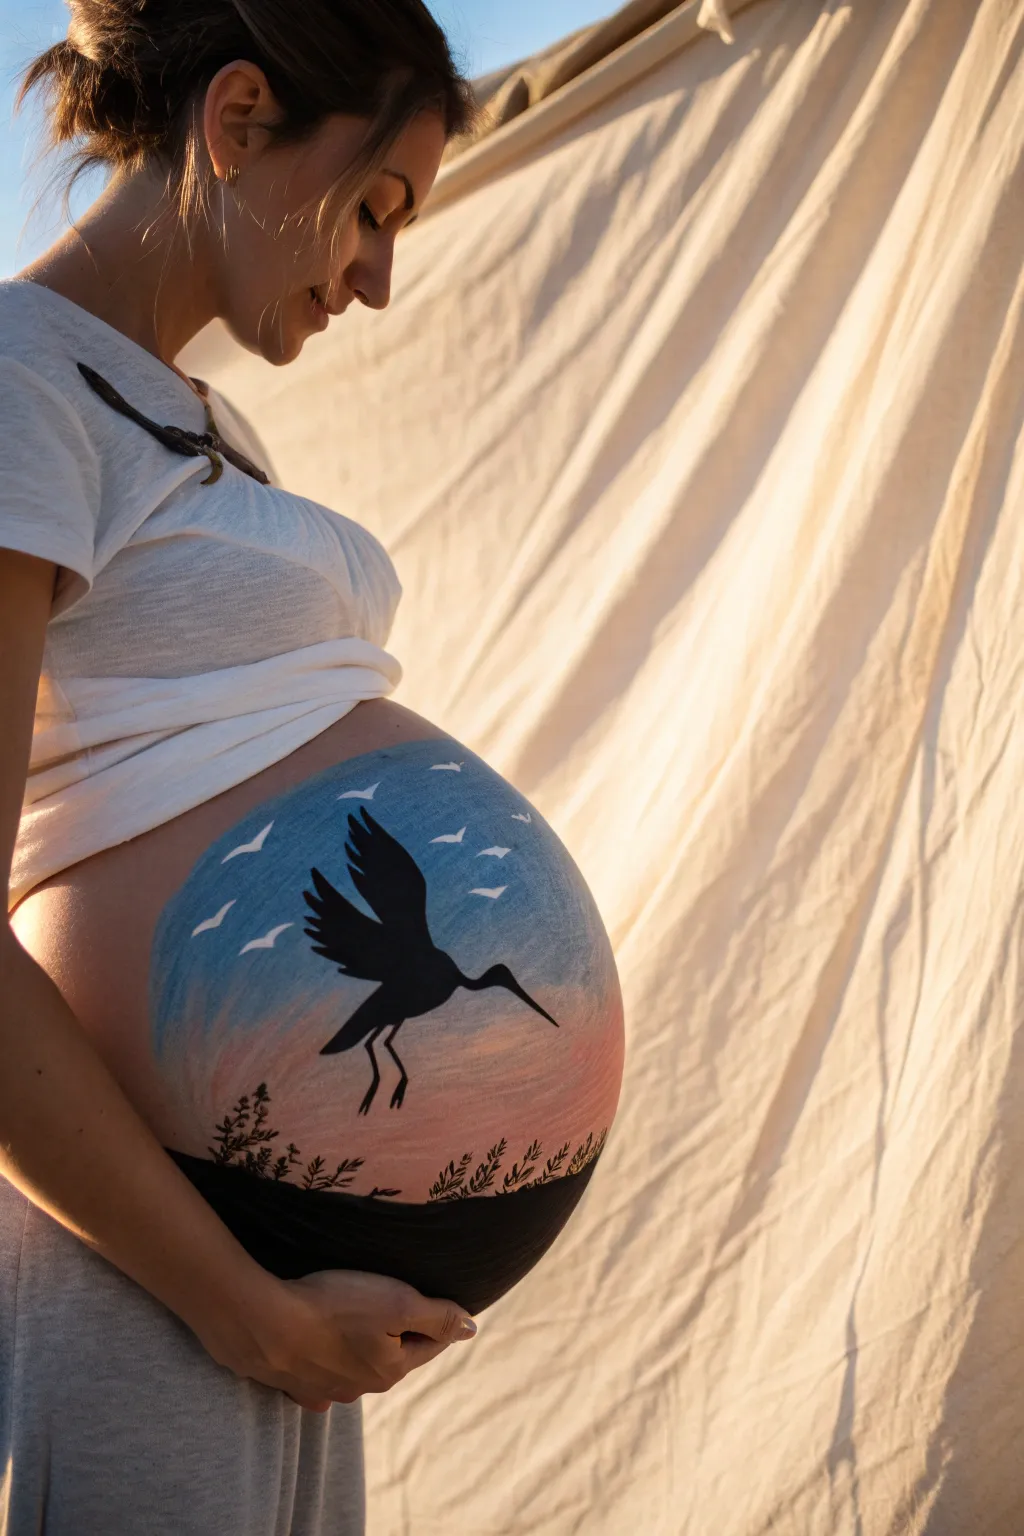
Capture the anticipation of arrival with this serene belly painting featuring a majestic stork gliding through a pastel sunset sky. The gradient background sets a peaceful mood, while the crisp black silhouettes create a striking and classic storybook aesthetic.
How-To Guide
Materials
- Professional face/body paints (Black, White, Light Blue, Light Pink/Peach)
- Medium flat brush (approx. 1 inch)
- Small round brush (size 1 or 2)
- Fine liner brush (size 0 or 00)
- Large sponge or kabuki brush for blending
- Cup of water
- Paper towels
- Baby wipes (for cleanup)
- Setting spray (optional)
Step 1: Setting the Sky
-
Prepare the area:
Ensure the belly is clean and dry; avoid applying lotion right before painting as it can make the paint slide. Have the expectant mother sit comfortably, perhaps with pillows for back support. -
Start the sunset base:
Using a slightly damp sponge or large kabuki brush, load up a soft pink or peach color. Dab this across the lower-middle section of the belly, creating a horizontal band just above where the darkened ground will eventually be. -
Add the blue sky:
Rinse your sponge or switch tools, then load a light sky blue paint. Apply this to the top half of the belly, curving it downward to meet the pink layer. -
Blend the gradient:
While the paints are still slightly tacky, gently dab over the area where the blue meets the pink to create a soft, seamless transition. If the line is too harsh, I like to use a barely damp, clean sponge to soften the edges. -
Define the circle:
If you want a contained circular design like the photo, use a flat brush with blue paint to neaten the outer edges of the sky, creating a smooth arc shape on the upper belly.
Step 2: Painting the Stork
-
Outline the body:
Switch to your small round brush and black face paint. Identify the center of the design and lightly sketch the oval shape of the stork’s body, angling it slightly upward. -
Add the wing structure:
Extend a large, sweeping shape upward from the body for the main wing. The top edge should curve gently, while the trailing edge should have jagged, feather-like points. -
Extend the neck and beak:
Draw a slender, curved line extending forward from the body for the neck, culminating in a small head and a long, sharp beak pointing towards the right side of the belly. -
Draw the legs:
Using the fine liner brush, paint two long, thin legs hanging down from the body. Angle the knees slightly backward to capture the motion of flight. -
Fill the silhouette:
Once you are happy with the outline, use the round brush to fill in the entire stork shape with solid black paint. Ensure opacity is high so no background color shows through.
Pro Tip: Consistency Key
Keep your black paint creamy, like melted chocolate. If it’s too watery, it will bleed into the sunset background; too dry, and the lines will crack.
Step 3: Grounding and Details
-
Create the horizon line:
Using the medium flat brush and black paint, create a solid dark mass at the very bottom of the painted area. Following the natural curve of the lower belly works best here. -
Paint tall grasses:
With the small round brush, pull quick, upward strokes from the black horizon line. Make these strokes varied in height and verify they curve slightly to look organic. -
Add floral details:
Switch to your fine liner brush. Add tiny dot clusters or small branching lines to the tips of some grass blades to mimic wildflowers or seed heads in silhouette. -
Add distant birds:
Clean your fine liner brush thoroughly and load it with white paint. Paint small ‘V’ shapes in the upper blue section of the sky, varying their sizes to suggest a flock flying in the distance. -
Highlight the wings:
For a subtle touch of depth, paint faint white ‘V’ accents on the trailing edges of the larger white birds to give them movement. -
Final touches:
Check the edges of your main circle and the density of the black paint. Touch up any patchy areas with a second coat of black if necessary.
Troubleshooting: Shaky Hands
If you struggle with steady lines for the small birds, rest your pinky finger gently against a dry part of the belly to stabilize your hand while painting.
Allow the paint to fully dry for a few minutes before taking photos to capture this beautiful moment.

PENCIL GUIDE
Understanding Pencil Grades from H to B
From first sketch to finished drawing — learn pencil grades, line control, and shading techniques.
Explore the Full Guide
Globe Belly for Little World Traveler
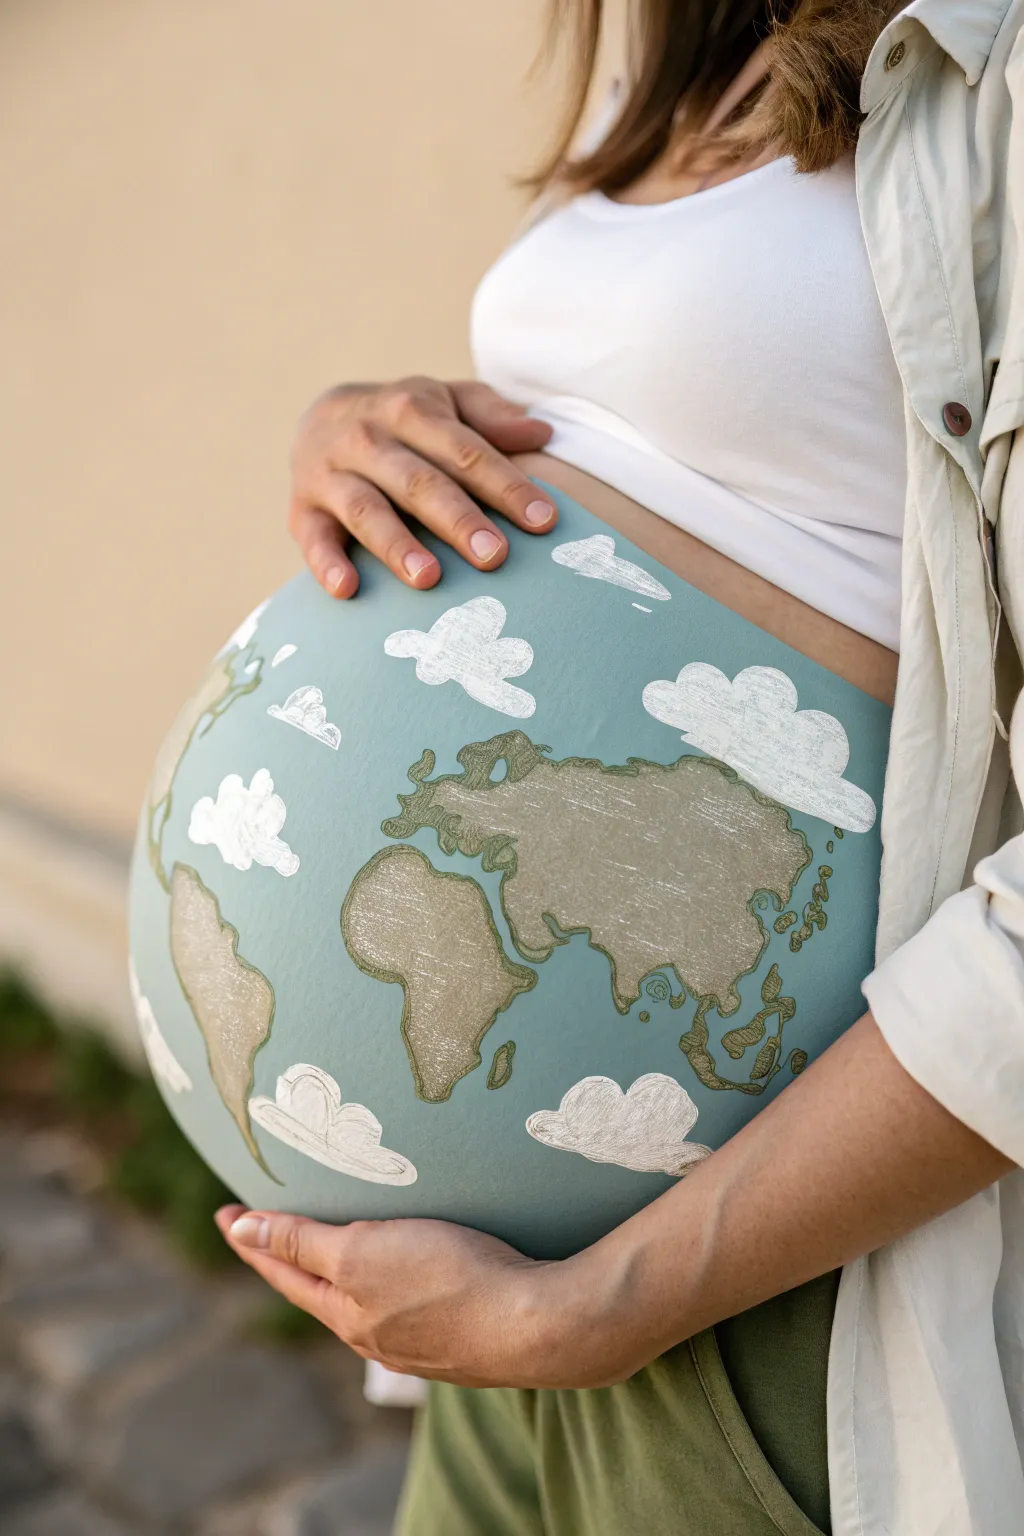
Transform your baby bump into a beautiful, stylized world map with this creative belly painting concept. Featuring soft slate blues, warm earthy continents, and fluffy white clouds, it is a perfect way to celebrate your future little traveler.
Step-by-Step Tutorial
Materials
- Water-activated face/body paint (slate blue or teal)
- Water-activated face/body paint (warm beige or light brown)
- Water-activated face/body paint (bright white)
- Water-activated face/body paint (dark brown or olive for outlines)
- Large flat body painting brush or kabuki sponge
- Medium round brush
- Fine liner brush
- Water cup
- Spray bottle with water
- Skin-safe setting spray (optional)
- Soft towel for cleanup
Step 1: Setting the Stage
-
Prep the canvas:
Ensure the belly skin is clean, dry, and free of any thick lotions or oils, as these can make the paint streak or not adhere properly. -
Mix the ocean base:
Activate your slate blue or muted teal body paint with a little water. You want a creamy consistency that isn’t too drippy but covers opaque. -
Apply the background:
Using a large flat brush or a dampened sponge, cover the entire rounded surface of the belly with the blue paint. Work in gentle, curving strokes to follow the shape of the bump. -
Even out the coverage:
Look for any streaks or thin spots. Gently stipple or dab over them with your sponge to create a smooth, mostly matte finish. Let this base layer dry completely before moving on.
Reference Trick
Print a simple map outline and tape it to a mirror in front of you (or hold it nearby) so you don’t have to visualize the continents from memory.
Step 2: Mapping the World
-
Outline the continents:
With a thin liner brush and a diluted light brown paint, very lightly sketch the basic shapes of the continents. Don’t worry about perfect geographical accuracy; focus on the recognizable clusters like Africa, Europe, and Asia. -
Fill in the landmasses:
Switch to a medium round brush loaded with your warm beige or light brown paint. Fill in the continent shapes you just outlined. -
Create texture:
I like to leave the fill slightly uneven or scratchy rather than perfectly solid. This mimics the textured look seen in the photo, almost like a vintage map. -
Refine the edges:
Go back over the edges of your continents to neaten them up, ensuring the brown stands out clearly against the blue background.
Step 3: Adding Definition
-
Outline with darker tone:
Load your fine liner brush with a darker brown or olive green paint. This needs to be a thinner consistency for crisp lines. -
Trace the coastlines:
carefully trace the perimeter of your landmasses. Use shaky, jagged strokes to mimic natural coastlines rather than smooth, straight lines. -
Add internal details:
Sketch a few small lines inside the larger landmasses to suggest terrain or borders, reinforcing that hand-drawn map aesthetic. -
Detail the islands:
Don’t forget the Southeast Asian islands or parts of the UK. Use tiny dots or small scribbles with the liner brush to represent these archipelagoes.
Compass Detail
Add a vintage-style compass rose in a large open ocean area, or paint a tiny dashed line with a plane to show where family lives.
Step 4: Forecast: Cloudy
-
Load the white paint:
Clean your medium round brush thoroughly and load it with bright white paint. The consistency should be fairly thick to ensure opacity over the blue. -
Paint cloud shapes:
Paint puffy cumulus cloud shapes scattered around the open ‘ocean’ areas. Keep the bottoms of the clouds somewhat flat and the tops rounded. -
Add interior shading:
While the white is still slightly damp, dry your brush and drag it lightly through the white paint to create wispy textures inside the clouds. -
Highlight the form:
Add a second coat of intense white just on the very top curves of the clouds to make them pop and look dimensional. -
Final dry:
Allow the entire design to dry completely. If you have a setting spray, lightly mist it over the belly to prevent smudging against clothes.
Enjoy capturing photos of your little voyager’s first map right on your tummy
Constellation Night Sky on the Bump

Transform your baby bump into a stunning window to the universe with this constellation-themed design. While it looks like intricate body art, this clever project uses a soft, deep blue fabric cover painted with fabric-safe ink for a reusable keepsake.
Detailed Instructions
Materials
- Deep blue or denim-colored cotton jersey fabric (stretchy)
- White fabric paint (soft-body or screen printing ink)
- Fine-point detail paintbrush (size 0 or 1)
- Small round paintbrush (size 2 or 3)
- White tailor’s chalk or a white charcoal pencil
- Measuring tape
- Cardboard or mannequin form (for stretching fabric)
- Star stencil (optional but helpful)
- Iron (for heat setting)
- Sewing machine or needle/thread (for hemming)
Step 1: Preparing the Canvas
-
Measure and cut:
Measure around the widest part of the bump and subtract 2 inches to account for stretch. Cut a wide band (approx. 10-14 inches tall) of your deep blue jersey fabric to these dimensions, adding a seam allowance. -
Sew the cylinder:
Fold the fabric right-sides together and sew the short ends to create a tube. Try it on briefly to ensure a snug but comfortable fit over the belly. -
Stretch the fabric:
To paint accurately, the fabric needs to be slightly stretched, mimicking how it sits on the bump. Slide the fabric tube over a rounded object like a cushion, large bowl, or a DIY cardboard form.
Step 2: Mapping the Cosmos
-
Choose your constellation:
Select a constellation that holds personal meaning, perhaps the baby’s due date zodiac sign or a parent’s sign. Print out a reference image to keep nearby. -
Sketch the main stars:
Using white tailor’s chalk, lightly mark the positions of the primary stars. Don’t worry about perfection; chalk wipes away easily if you need to reposition a star. -
Connect the dots:
Lightly sketch the connecting lines between your main stars with the chalk to visualize the full constellation shape before committing to paint.
Paint cracking?
If paint cracks when stretched, you applied it too thick. Mix a tiny drop of fabric medium or water into your paint next time to keep it flexible with the jersey knit.
Step 3: Painting the Constellation
-
Paint the major stars:
Dip your fine-point brush into the white fabric paint. Create the main stars by painting small, solid circles or 4-point starburst shapes at your chalk marks. -
Draw the connection lines:
Reload your brush with a small amount of paint. With a steady hand, paint thin, consistent lines connecting the starbursts, following your chalk guide. -
Add prominent starbursts:
Identify the brightest stars in the constellation. Use the larger round brush to pull paint outward from the center, creating elongated 4-point or 8-point glimmers for dramatic effect. -
Sprinkle the background:
I like to create depth by adding tiny, random dots around the main design. Dip the tip of a toothpick or the very end of a brush handle into paint and dot it gently onto the blue void.
Glow Up
Mix glow-in-the-dark powder into your white fabric paint. The constellation will look classic by day but reveal a glowing galaxy when the lights go down.
Step 4: Finishing Touches
-
Create distant stars:
For a faint, distant star look, dilute a tiny drop of white paint with water. Use an old toothbrush to lightly flick a very fine mist of specks across open areas of the fabric. -
Dry completely:
Let the paint dry undisturbed for at least 24 hours. The fabric paint needs to cure fully to remain flexible. -
Heat set the design:
Once dry, place a pressing cloth over the painted design and iron on a medium heat setting (no steam) for 3-5 minutes. This locks the design into the fibers. -
Hem the edges:
Turn the top and bottom raw edges of the fabric inward by half an inch and stitch them down with a stretch stitch (zigzag or twin needle) for a polished, durable finish.
Wear your celestial creation with pride for a beautiful photoshoot or just a cozy evening at home


Have a question or want to share your own experience? I'd love to hear from you in the comments below!