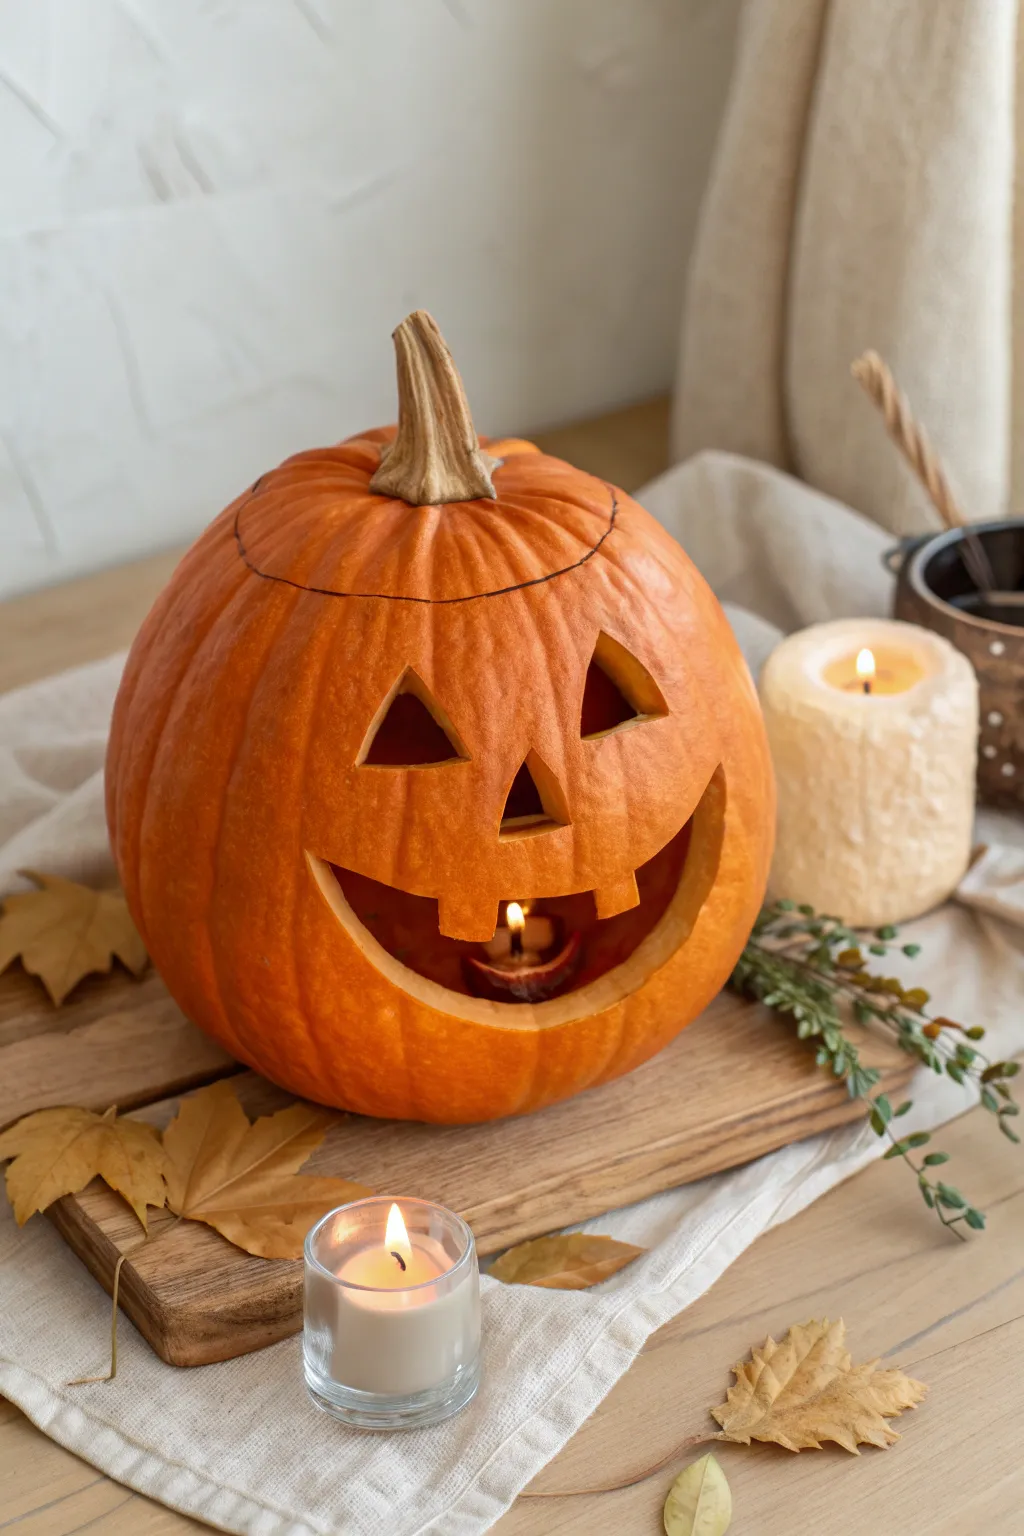
If you’re staring at a plain pumpkin and waiting for inspiration to strike, I’ve got you. Here are my favorite pumpkin carving ideas—from classic crowd-pleasers to artsy, “how did you DO that?” designs you can totally pull off.
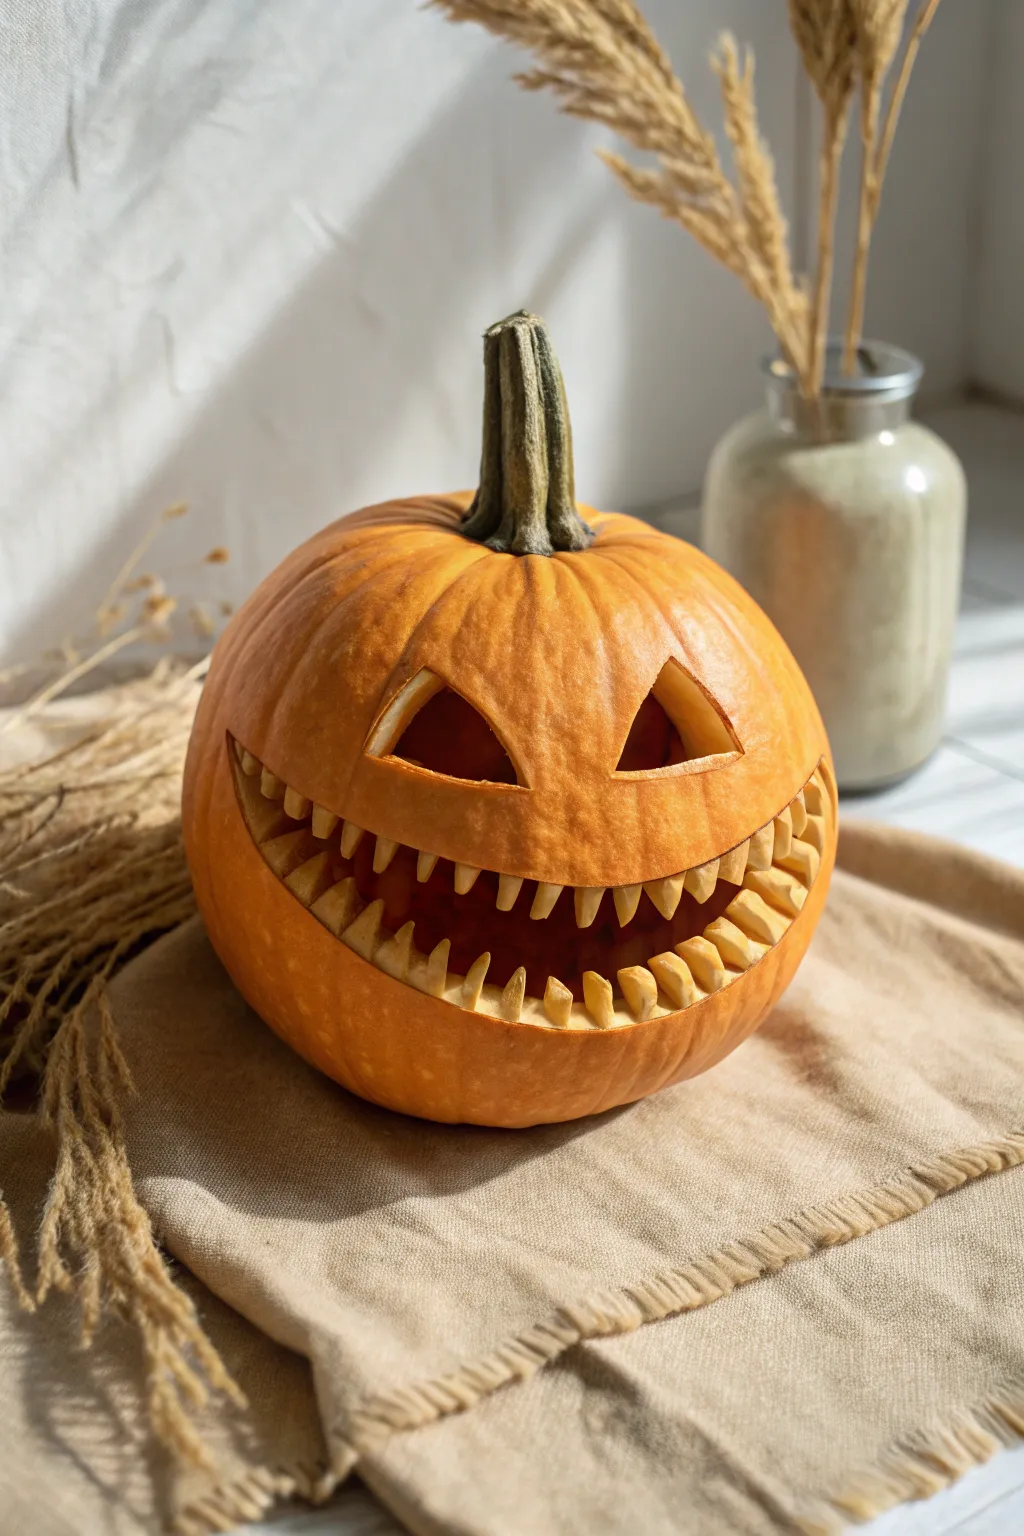
Classic Scary Jack-o’-Lantern Face
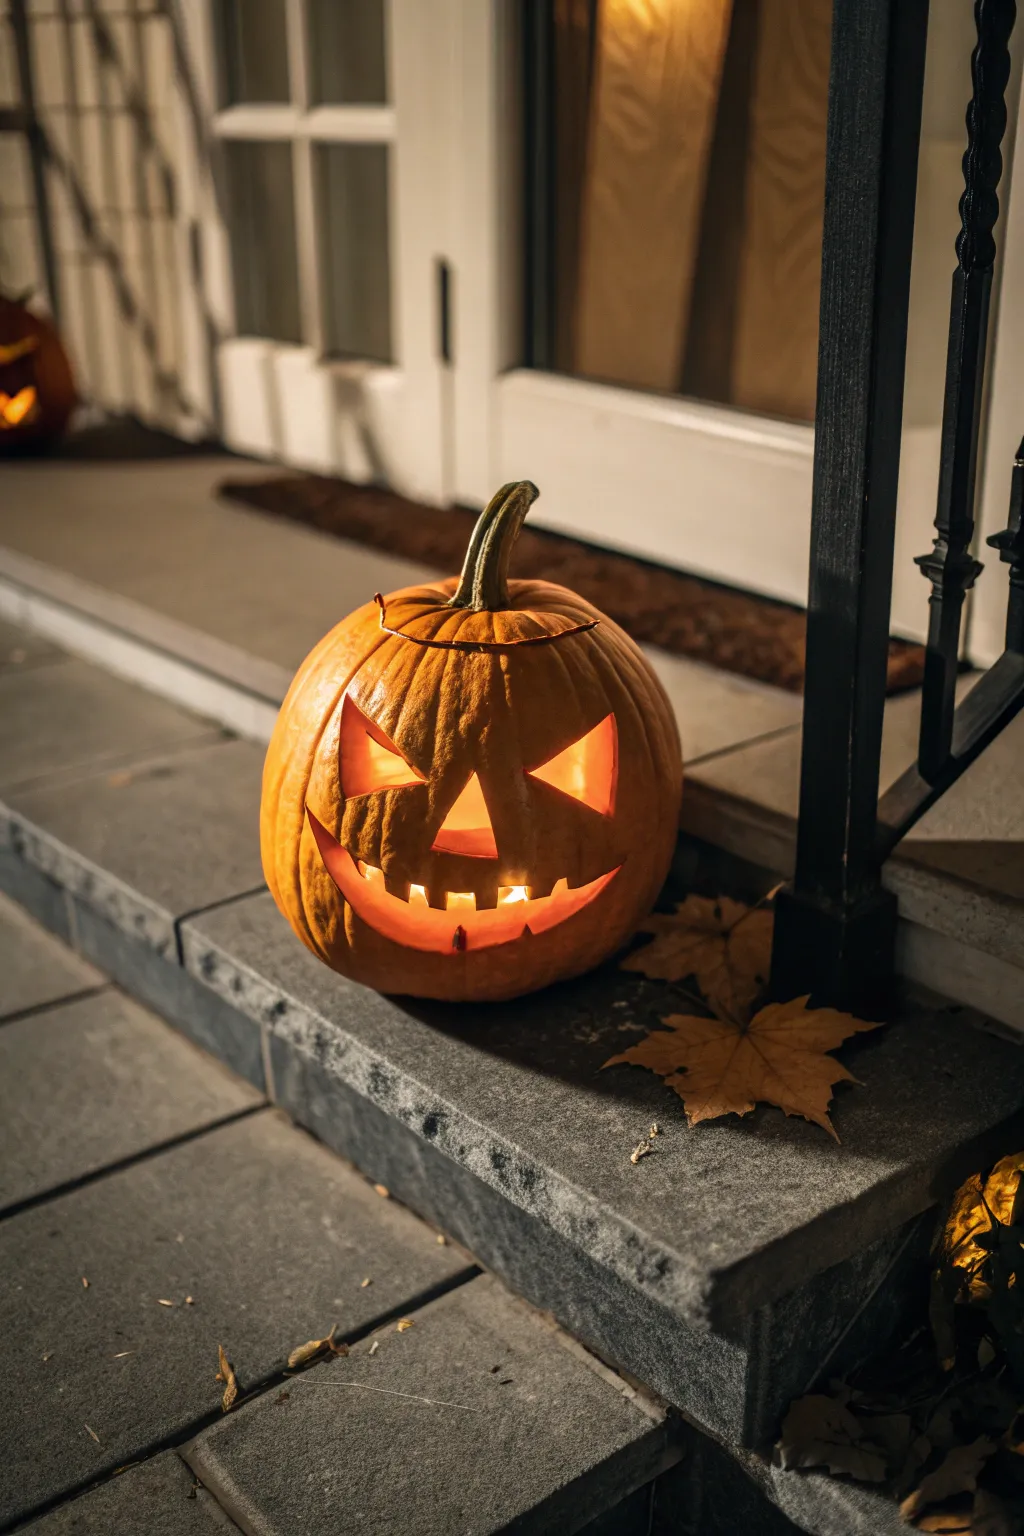
Embrace the Halloween spirit with this timeless design featuring sharp, angular features and a menacing, toothy smile that glows warmly against the night. This project captures the classic Jack-o’-Lantern aesthetic perfect for guarding your front steps.
Step-by-Step
Materials
- Medium-sized, symmetrical pumpkin
- Large metal spoon or pumpkin scraper
- Serrated pumpkin craving saw (finetooth)
- Small poking tool or awl
- Water-based marker or pencil
- Printed template (optional)
- Tea light or LED candle
- Bowl for seeds
Step 1: Preparation and Gutting
-
Open the lid:
Cut a circular lid around the stem. Angle your knife inward at 45 degrees so the lid sits on a ledge rather than falling inside. -
Remove the notch:
Cut a small notch or ‘key’ into the lid circle so you can easily orient it when closing the pumpkin later. -
Scoop the seeds:
Using your hands or a large spoon, remove the loose seeds and stringy pulp from the center. -
Thin the wall:
Scrape the inside wall where the face will be carved. I like to thin this area to about one inch thick to make sawing easier and let light shine through better. -
Clean the surface:
Wipe down the exterior of the pumpkin with a damp cloth to remove any dirt or residue, providing a clean canvas for your design.
Step 2: Drafting the Face
-
Mark the eye placement:
Using a water-based marker, draw two large, equilateral triangles for eyes. Position them high on the pumpkin face, slightly angled inward to create an angry brow look. -
Draw the nose:
Center a smaller triangle directly below the eyes for the nose. Keep the proportions balanced relative to the eyes. -
Sketch the mouth curve:
Draw a wide, U-shaped curve spanning nearly the full width of the pumpkin face. This serves as the guideline for the mouth. -
Add the teeth:
Modify your mouth guideline by drawing large, blocky teeth. Create three square teeth on the bottom and two square teeth on the top, ensuring the corners are sharp. -
Refine the grin:
Extend the corners of the mouth upwards slightly past the teeth to exaggerate the sinister smile.
Angle Your Cuts
When carving the features, angle your blade slightly inward. This creates a wider opening on the inside, allowing more candlelight to spill outward.
Step 3: Carving the Features
-
Cut the eyes:
Insert your serrated saw perpendicular to the pumpkin surface. Use a steady up-and-down sawing motion to cut out the triangular eyes first. -
Handle corners carefully:
When you reach a sharp corner, remove the saw, re-insert it at the new angle, and continue cutting rather than trying to twist the blade. -
Pop out the pieces:
Push the cut eye pieces gently from the inside of the pumpkin to pop them out cleanly. -
Carve the nose:
Cut out the nose triangle just like the eyes. This central anchor point helps stabilize the pumpkin face before tackling the large mouth. -
Start the mouth center:
Begin carving the mouth at the center teeth. Removing these smaller sections first prevents the pumpkin wall from becoming too flimsy. -
Finish the grin:
Work your way outward toward the cheeks, carefully sawing around the square teeth. Support the pumpkin wall with your hand from the inside as you saw.
Broken Tooth Repair
If a tooth snaps off while carving, don’t panic. Use a sturdy toothpick inserted into the broken piece to pin it securely back onto the pumpkin floor or roof.
Step 4: Finishing Touches
-
Clean the edges:
Use a small knife or tool to clean up any straggling pumpkin fibers or jagged bits around the cut edges for a crisp look. -
Preserve the cuts:
Rub a thin layer of petroleum jelly on the exposed cut edges. This helps lock in moisture and keeps the face looking fresh longer. -
Light it up:
Place your candle or LED light inside. Place the lid back on, matching your notch, and admire the glow.
Step back and enjoy the classic, spooky glow of your traditional Jack-o’-Lantern on a crisp autumn evening


Goofy Grin With Big Buck Teeth
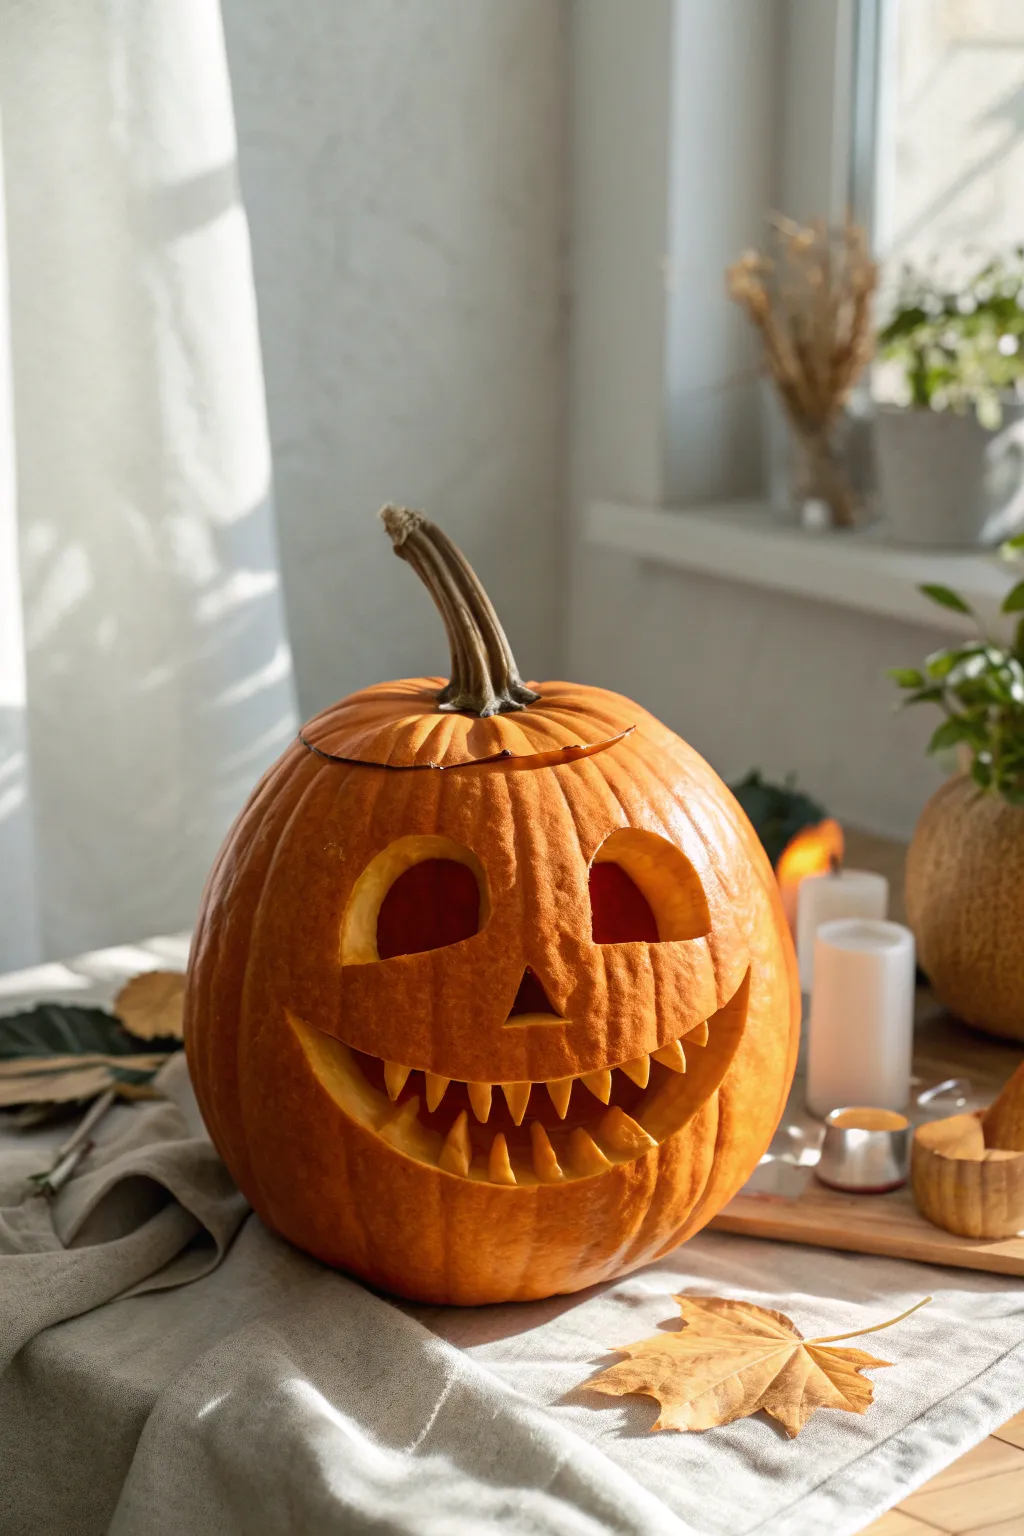
Capture the classic spirit of Halloween with this expressive pumpkin design featuring deep triangular eyes and a wide, menacingly happy grin packed with jagged teeth. The charm lies in the irregular, handcrafted feel of the smile, making it a perfect project for carvers of all skill levels.
Step-by-Step Guide
Materials
- One medium-to-large round pumpkin
- Serrated pumpkin carving saw (or drywall saw)
- Large metal spoon or pumpkin scraper
- Water-soluble marker or grease pencil
- Sharp paring knife
- Old newspapers or drop cloth
- Bowl for seeds
- Tea light candle or LED puck light
Step 1: Setting the Stage
-
Prep your workspace:
Lay down your newspapers or drop cloth on a sturdy table. This gets messy quickly, so having a designated ‘splash zone’ is essential before you start cutting. -
Draft the lid:
Draw a circle around the stem, about 2-3 inches out from the base of the stem. Include a small ‘notch’ or registration mark in your circle so you can easily realign the lid later. -
Open the pumpkin:
Using your serrated saw, cut along the line you drew. Angle the blade inward (toward the center of the pumpkin) at about 45 degrees. This creates a shelf so the lid won’t fall inside. -
Scoop and scrape:
Remove the lid and cut away the fibrous strands attached to it. Then, reach in with your large spoon or scraper. Remove all seeds and stringy pulp. -
Thin the face wall:
Identify the smoothest side of the pumpkin for the face. Scrape the inside wall of this area until it is roughly 1 inch thick, which makes detailed carving much easier.
Stay Fresh Longer
Rub a thin layer of petroleum jelly on all cut edges immediately after carving. This seals in moisture and prevents the pumpkin from shriveling quickly.
Step 2: Designing the Visage
-
Sketch the eyes:
Using your wash-off marker, draw two soft triangles for eyes. Place them fairly high up on the pumpkin. The inner corners should angle slightly downward to create a focused expression. -
Add the nose:
Draw a small, simple triangle for the nose, positioned centrally below the eyes but closer to the eye line than the mouth line. -
Draft the smile outline:
Draw a wide, crescent-shaped smile that stretches almost as wide as the pumpkin itself. The curve should be deep and generous to maximize the grin effect. -
Detail the teeth:
Inside the mouth outline, sketch jagged triangles for teeth. Draw them sticking up from the bottom lip and hanging down from the top lip. Leave small gaps between them for the ‘gums’.
Step 3: Carving the Features
-
Cut the nose first:
Start with the smallest opening to maintain structural integrity. Insert your serrated saw perpendicular to the pumpkin skin and saw with gentle up-and-down strokes to remove the nose triangle. -
Carve the eyes:
Working carefully, saw along your eye lines. Use your finger to gently push the cut pieces inward to pop them out, then discard them. -
Start the mouth:
Begin carving the mouth by cutting the long outer curves of the smile first. Do not cut the individual teeth yet; just establish the upper and lower boundaries of the grin. -
Define the teeth:
Now, careful work around the tooth outlines. Use a smaller saw or the tip of your paring knife for tight corners. I find it helpful to remove the negative space between the teeth in small sections rather than all at once. -
Refine the edges:
Once the main mouth block is removed, go back in with a paring knife to clean up any ragged pumpkin guts or uneven edges around the teeth points.
Spooky Shadows
Place the candle slightly closer to the back wall rather than the center. This casts deeper shadows through the teeth, making the grin look more dramatic.
Step 4: Lighting and Finishing
-
Clean everything up:
Wipe away any remaining marker lines with a damp paper towel. Check the inside floor of the pumpkin to ensure it is flat for the candle. -
Ventilation check:
If using a real candle, check if the lid has enough gap. If the flame flickers and dies, you may need to cut a small ‘chimney’ hole in the back of the lid for airflow. -
Light it up:
Place your tea light or LED puck inside. Replace the lid using your registration notch.
Set your creation on the porch and watch the flickering light bring that mischievous grin to life in the dark


Simple Screaming Face Cutouts

Capture the essence of Halloween surprise with this timeless design featuring wide, uneven eyes and a jagged, toothy grin. This approachable carving project relies on simple shapes to create an expressive face that glows warmly on any porch.
Detailed Instructions
Materials
- Medium-sized pumpkin with strong stem
- Serrated pumpkin carving saw (or drywall saw)
- Large metal spoon or pumpkin scraper
- Water-soluble marker or grease pencil
- Carving poker tool or awl
- Newspaper or drop cloth
- Bowl for seeds
- Tea light or LED candle
Step 1: Preparation & Gutting
-
Prepare your workspace:
Lay down newspaper or a drop cloth on a sturdy table to catch all the pumpkin guts and making cleanup easier later. -
Clean the exterior:
giving the pumpkin a quick wipe with a damp cloth to remove any dirt or field dust, ensuring your marker lines will stick properly. -
Cut the lid:
Using your serrated saw, cut a circle around the stem. Angle the knife inward at 45 degrees so the lid sits on a ledge and doesn’t fall inside. -
Reveal the interior:
Lift the lid off by the stem and trim away the fibrous strands hanging from the bottom of the lid piece. -
Scoop out the seeds:
Use the large metal spoon to scrape the interior walls. Remove all seeds and stringy pulp until the inside creates a smooth, clean surface. -
Thin the face wall:
Scrape the side of the pumpkin where you plan to carve the face a bit more aggressively. Aim for a wall thickness of about 1 inch to make sawing easier.
Step 2: Design & Transfer
-
Draft the eyes:
With your marker, draw two large, slightly mismatched oval shapes high on the pumpkin for the eyes. Angling them slightly outward adds to the ‘startled’ look. -
Draft the nose:
Draw a small, roughly equilateral triangle in the center of the face, slightly below the eyes. -
Draft the mouth outline:
Sketch a wide U-shape for the mouth, stretching it almost as wide as the outer edges of the eyes. -
Add the teeth:
Draw square, blocky teeth along the top and bottom edges of your mouth outline. Include gaps between them to create that jagged, spooky grin.
Preserve the Shriveled Look
Rub a thin layer of petroleum jelly on all exposed cut edges immediately after carving. This seals in moisture and prevents the face from shriveling too quickly.
Step 3: Carving the Features
-
Cut the nose first:
Insert your serrated saw straight into the pumpkin wall at a 90-degree angle. Use a gentle sawing motion to cut along the triangle lines. -
Remove the nose piece:
Push the cut triangle piece gently from the inside out to pop it loose without breaking the surrounding flesh. -
Carve the eyes:
Follow your marker lines for the oval eyes. Cutting the smaller, tighter curves requires shorter saw strokes and rotating the saw handle slightly as you move. -
Start the mouth:
Begin carving the mouth at the center point and work your way outward toward the corners. This helps maintain symmetry. -
Detail the teeth:
Take your time sawing around the square teeth. I find it helpful to cut the vertical lines of the teeth first, then connect them with the horizontal cuts. -
Remove mouth sections:
Don’t try to remove the entire mouth piece at once. Cut it into smaller sections if needed, pushing them out gently from the inside. -
Clean up edges:
Go back over your cut lines with the saw or a small knife to shave off any ragged bits of pumpkin flesh for a clean silhouette. -
Erase guidelines:
Wipe away any remaining marker lines with a damp paper towel so the face looks pristine. -
Add illumination:
Place a tea light or LED candle inside the pumpkin base, light it, and replace the lid to see your spooky face come to life.
Make it Scarier
Shave the skin off the pumpkin around the eyes (without cutting through) to create a glowing ‘bruised’ effect around the sockets for extra spookiness.
Now step back and admire the classic, glowing grin of your new Halloween masterpiece


Winky Face With Chunky Eyebrow

Adding a playful twist to your Halloween decor, this winky face pumpkin features a sculptural, chunky eyebrow and a mischievous grin full of character. The design balances bold, expressive lines with delicate details like thin, crooked teeth for a uniquely charming jack-o’-lantern.
Step-by-Step Guide
Materials
- Medium-sized orange pumpkin
- Serrated carving saw (pumpkin safety saw)
- Sharp paring knife
- Large metal spoon or pumpkin scraper
- Dry-erase marker or washable pen (red or orange)
- Linoleum cutter or clay loop tool (optional, for shading)
- Toothpicks (optional, for tooth repair)
Step 1: Preparation and Gutting
-
Create the Lid:
Begin by cutting a circular lid around the stem. Angle your serrated saw inward at 45 degrees so the lid sits reliably on top without falling through later. -
Scoop the Interior:
Remove the lid and use your large spoon or scraper to hollow out the insides. I like to scrape the wall where the face will be until it’s about an inch thick, which makes intricate carving much easier.
Pupil Protection
When carving the eye with the pupil, leave the interior wall slightly thicker (1.5 inches). This provides a stronger anchor for that floating pupil piece so it doesn’t snap off.
Step 2: Drafting the Design
-
Sketch the Winky Eye:
Using a dry-erase marker, draw a large crescent shape on the left side for the winking eye, angling the sharp points toward the nose area. -
Draw the Open Eye:
On the right, draw a slightly larger, almond-shaped eye opening. Inside this, sketch a circle for the pupil which will remain solid pumpkin. -
Outline the Chunky Eyebrow:
Above the open eye, draw a sharp, heavy eyebrow that cuts downward toward the nose. This needs to be thick so it reads clearly when carved. -
Map the Grin:
Sketch a wide, U-shaped mouth. Don’t worry about drawing individual teeth yet; just define the upper and lower lip lines. -
Mark the Nose:
Place a small, triangular nose slightly off-center to match the quirky expression.
Step 3: Carving the Features
-
Cut the Winking Eye:
Use your small serrated saw to cut out the crescent shape of the winking on the left. Remove this piece entirely. -
Carve the Open Eye Outline:
Carefully cut around the outline of the right eye, but STOP before you cut through the pupil area. You are only defining the outer shape. -
Detail the Pupil:
Switch to a paring knife for precision. Cut the negative space around the pupil circle, leaving that round chunk of pumpkin floating in the center, attached by a hidden anchor at the back. -
Refine the Pupil Depth:
If the pupil feels too heavy, shave a bit off the front surface of that circle to set it back slightly, giving the eye more dimension. -
Carve the Eyebrow:
Cut the slanted line for the eyebrow. This is a thin, clean slice that separates the brow area from the eye socket below, emphasizing the frown. -
Open the Nose:
Cut out the small triangle nose completely.
Glow Up
For a spooky effect, rub a little cinnamon inside the lid. When the candle heats the pumpkin, your mischievous face will smell like pumpkin pie.
Step 4: Sculpting the Smile
-
Main Mouth Cut:
Carve the main crescent shape of the mouth, but leave a strip of pumpkin flesh in the middle where the teeth will be. Basically, cut a thin strip for the top lip and separate strip for the bottom lip. -
Isolate the Teeth:
Instead of removing a big block for the mouth, careful cut out the gaps *between* the teeth. This leaves behind thin, vertical jagged pillars of pumpkin flesh. -
Thin the Teeth:
Use the tip of your paring knife to carefully whittle these ‘pillars’ into sharp points. They should be irregular sizes for a goofy look. -
Clean Up Edges:
Go back over the lips and eye edges with your small knife to scrape away any dangly pumpkin strings or jagged saw marks. -
Wipe Down:
Use a damp paper towel to wipe away any remaining marker lines from your initial sketch.
Place a flickering LED candle inside to watch your winking masterpiece come to life
BRUSH GUIDE
The Right Brush for Every Stroke
From clean lines to bold texture — master brush choice, stroke control, and essential techniques.
Explore the Full Guide
Cross-Eyed Silly Expression
Bring some lighthearted charm to your porch with this classic yet comical pumpkin design. Featuring slightly crossed eyes and a warm, toothy grin, this lantern glows with a friendly personality that delights rather than frightens.
Detailed Instructions
Materials
- One medium-sized orange pumpkin
- Serrated pumpkin carving saw (or drywall saw)
- Large metal spoon or pumpkin scraper
- Water-based marker or poking tool
- Paper template (optional)
- Tea light or LED candle
- Bowl for waste
- Kitchen towel
Step 1: Preparation and Gutting
-
Create the lid:
Begin by cutting a circular lid around the pumpkin’s stem. Angle your serrated knife inward toward the center of the pumpkin as you saw; this creates a ledge so the lid won’t fall inside later. -
Open it up:
Gently pry the lid off by pulling up on the stem. Trim off the fibrous strands hanging from the bottom of the lid so it is clean. -
Scoop the seeds:
Reach in with your hand to pull out the bulk of the seeds and stringy pulp. Place these into your waste bowl (or save the seeds for roasting). -
Scrape the walls:
Use a large metal spoon or a specialized scraper tool to thin the inner walls. I find that scraping until the wall is about an inch thick makes carving much easier and helps the light shine through better. -
Clean the surface:
Wipe the exterior of the pumpkin with a damp kitchen towel to remove any dirt or pumpkin residue before you start designing.
Step 2: Drafting the Face
-
Mark the eyes:
Using a water-based marker, draw two triangles for the eyes. Position them somewhat high on the face. To achieve the ‘cross-eyed’ look, draw small half-circle pupils on the inner bottom corners of each triangle, pointing toward the nose. -
Outline the nose:
Draw a small, simple triangle for the nose right in the center, slightly below the eyes. -
Sketch the mouth:
Sketch a wide, U-shaped smile. Keep the ends of the mouth curved upward to ensure a happy expression. -
Add teeth:
Along the bottom and top edges of your mouth outline, draw two square teeth on the bottom and one prominent tooth on the top. Make them slightly blocky for a playful effect.
Preserve the Perishables
Rub a thin layer of petroleum jelly on all cut edges (eyes, nose, mouth) immediately after carving. This seals in moisture and keeps the face from shriveling too quickly.
Step 3: Carving and Finishing
-
Carve the pupils first:
This is the trickiest part. Carefully carve out the triangle shape of the eye, but leave the small semi-circle pupils intact. Cut around the pupil shape, removing only the empty space of the triangle. -
Refine the eyes:
Go back and gently trim the edges of the pupils to make them round and distinct against the light. -
Cut the nose:
Insert your saw perpendicular to the pumpkin surface and saw out the small nose triangle. Push the piece out from the inside. -
Start the mouth:
Begin carving the mouth by cutting along the main curve of the smile. Use a slow, sawing motion rather than trying to slice through in one go. -
Define the teeth:
carefully maneuver the saw around the square outlines of the teeth. Take your time comfortably turning the saw to handle the corners without snapping the tooth off. -
Remove mouth sections:
It is often easier to remove the mouth pieces in sections—cut the empty spaces between the teeth first and pop them out. -
Clean up edges:
Inspect your cuts. If there are any jagged bits of flesh hanging in the openings, shave them off with a small knife to ensure clean lines. -
Wipe away marks:
Use a damp cloth to wipe away any remaining marker lines on the pumpkin’s skin. -
Check the airflow:
If you plan to use a real candle, cut a very small notch in the back of the lid (chimney hole) to let smoke escape and keep the oxygen flowing. -
Light it up:
Place your tea light or LED candle inside, replace the lid, and turn off the room lights to test the glow.
Cinnamon Spark
Sprinkle ground cinnamon or pumpkin spice inside the lid before lighting a real candle. As the pumpkin warms up, it will act like a diffuser and smell warm and spicy.
Set your jaunty new creation on the doorstep and watch it bring smiles to the neighborhood
Stitched Mouth Monster
This classic jack-o’-lantern features a menacing, extra-wide grin packed with sharp, jagged teeth that really stand out. By carefully sculpting the teeth from the pumpkin flesh itself rather than cutting them out completely, you create a dramatic, shadowed effect perfect for spooky season.
Step-by-Step Guide
Materials
- Medium-sized orange pumpkin
- Serrated pumpkin carving saw
- Small paring knife or X-Acto knife
- Large metal spoon or scraping tool
- Dry erase marker or grease pencil
- Bowl for seeds/pulp
- Tea light or LED candle
Step 1: Preparation
-
Select your canvas:
Choose a pumpkin with a relatively flat, smooth side for the face. Ensure the stem is sturdy, as it adds character to the final look. -
Open the top:
Using your serrated saw, cut a circular lid around the stem. Angle your blade inward at 45 degrees so the lid sits securely on top without falling in later. -
Clean the interior:
Remove the lid and use a large metal spoon to scrape out all the seeds and stringy pulp. I like to scrape the interior wall behind the face area a bit thinner (about 1 inch thick) to make carving easier.
Step 2: Drafting the Face
-
Sketch the eyes:
Use a dry erase marker to draw two sharp, triangular eyes high on the pumpkin’s face. Space them widely apart to create a menacing glare. -
Outline the mouth:
Draw an extremely wide, crescent-shaped smile that stretches almost ear-to-ear. The top line should be relatively straight or slightly curved up, while the bottom creates a deep U-shape. -
Detail the teeth:
Inside your mouth outline, sketch a zigzag pattern for two rows of sharp, interlocking teeth. Don’t worry about being perfect; irregular sizes make it look creepier.
Tooth Trouble?
If a tooth breaks off while carving, stick it back in place using a wooden toothpick broken in half. It’s an invisible fix that holds firmly.
Step 3: Carving features
-
Cut the eye holes:
Insert your serrated saw perpendicular to the pumpkin surface and cut out the triangular eye shapes completely. Push the pieces out from the inside. -
Initial mouth cut:
This is the crucial part: Use your saw to cut along the *outer* outline of the mouth (the lips), removing the large crescent shape of skin entirely, but keep the block of flesh inside intact for now if you want to sculpt teeth, or cut all the way through carefully following your zigzag line. -
Refining the cut:
For the look in the image, carefully cut strictly along the zigzag line you drew for the teeth. Use a slow, sawing motion to navigate the sharp peaks and valleys of the teeth. -
Remove the mouth block:
Once the entire zigzag line is cut, push the top and bottom sections of the mouth waste gently into the pumpkin or pull them out. You should now have a gaping maw with jagged teeth.
Level Up: Spooky Smoke
Place a small chunk of dry ice inside a cup of water inside the pumpkin to make fog drift out through the jagged grin for an extra eerie effect.
Step 4: Sculpting the Details
-
Sharpen the teeth:
Switch to your small paring knife. Carefully shave the edges of each tooth to make them pointier and more separated. Remove any fuzz or hanging bits of pumpkin flesh. -
Bevel the inner edges:
I find that thinly slicing a 45-degree angle on the *inside* edge of the pumpkin skin around the eyes and gums allows more light to escape and creates crisp shadows. -
Clean up lines:
Wipe away any remaining marker lines with a damp paper towel. If dry erase doesn’t come off easily, a little rubbing alcohol does the trick. -
Check the thickness:
Reach inside and feel behind the teeth. If the wall is too thick, carefully scrape away more flesh from the inside to let the candlelight shine through the gaps more effectively.
Step 5: Finishing Touches
-
Preserve the cut edges:
Rub a thin layer of petroleum jelly on the cut surfaces of the pumpkin (eyes, teeth, lid). This helps seal in moisture and prevents shriveling. -
Ventilation:
Cut a small, hidden notch in the back of the lid to act as a chimney, allowing heat to escape so your pumpkin doesn’t cook from the inside. -
Lighting up:
Place a tea light or LED candle inside. Replace the lid and dim the lights to check your work.
Step back and enjoy the grim glow of your handcrafted monster as it guards your porch this Halloween

PENCIL GUIDE
Understanding Pencil Grades from H to B
From first sketch to finished drawing — learn pencil grades, line control, and shading techniques.
Explore the Full Guide
Creepy Skull Lantern
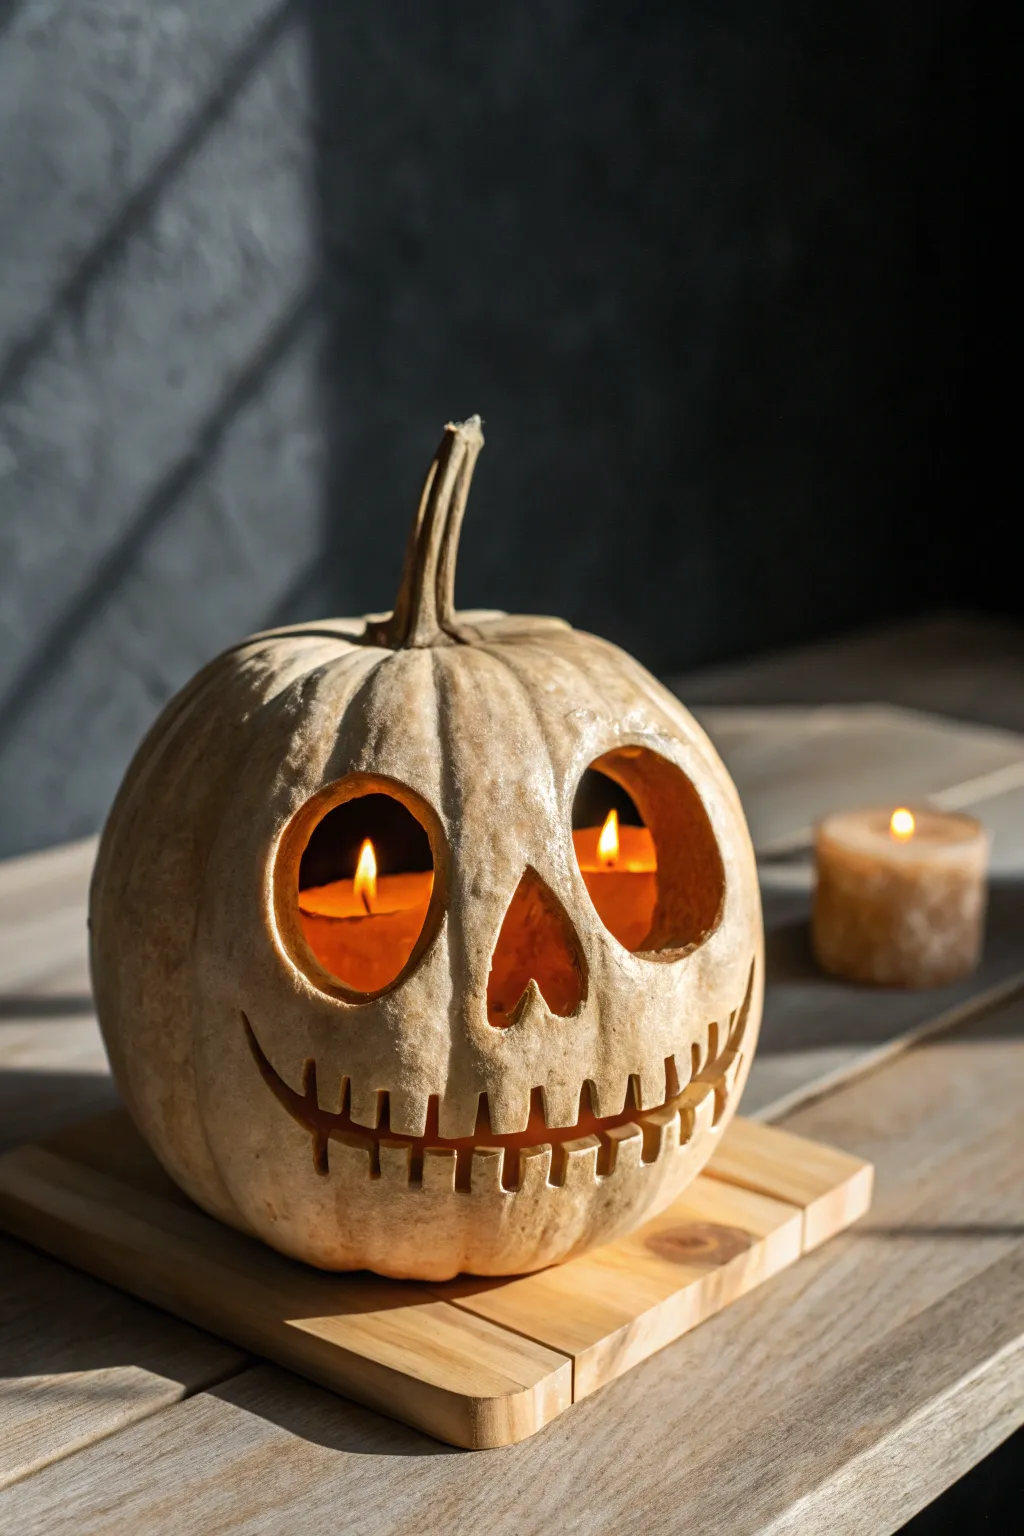
Move away from traditional orange gourds with this hauntingly realistic skull design carved into a pale, bone-colored pumpkin. The textured, faux-aged finish and wide, hollow eyes create a somber yet striking centerpiece perfect for a sophisticated Halloween aesthetic.
Detailed Instructions
Materials
- Medium-sized pale pumpkin (white ‘Moon Doll’ or faux foam pumpkin)
- Serrated carving saw
- finer detail saw or linoleum cutter
- scooping tool
- Dry erase marker or pencil
- Sandpaper (medium grit)
- Brown antique wax or diluted brown acrylic paint
- Paper towels or rag
- Two tealight candles
Step 1: Preparation and Mapping
-
Select the right canvas:
Choose a pumpkin that is naturally white or pale grey. If using a real pumpkin, look for varieties like ‘Lumina’ or ‘Jarrahdale’. If using a foam pumpkin, ensure it has a matte, bone-like finish rather than shiny plastic. -
Open the lid:
Carve a circular opening around the stem at the top. Angle your blade inward slightly so the lid won’t fall through later. Remove the lid and set aside. -
Clean the interior:
Thoroughly scoop out all seeds and stringy pulp. Scrape the inner walls until they are smooth and about 1 inch thick to allow light to filter through nicely. -
Draft the skull face:
Using a dry erase marker or light pencil, sketch two large, slightly teardrop-shaped eye sockets. They should be positioned relatively high on the pumpkin face. -
Add the nose cavity:
Draw an inverted heart or triangular shape for the nose, placing it centrally between and slightly below the eyes. -
Outline the skeletal grin:
Sketch a very wide, U-shaped mouth line that curves up towards the ‘cheeks’. Draw vertical tick marks across this line to represent teeth, keeping them long and narrow.
Fragile Teeth Fix
If a thin tooth snaps while carving, don’t panic. Insert a toothpick into the broken piece and the gumline to pin it back in place invisibly.
Step 2: Carving the Features
-
Carve the eyes:
Using a standard serrated carving saw, carefully cut out the large eye sockets. Use slow, sawing motions to keep the edges relatively clean. -
Cut the nose:
Remove the nose piece next. Because this shape is smaller, you might need a finer blade to navigate the sharp corners of the inverted heart shape. -
Create the mouth separation:
Instead of removing the entire mouth area, just cut the thin line separating the top and bottom jaw first. -
Detail the teeth:
Using a smaller detail saw, widen the gaps between the teeth. You aren’t cutting individual teeth out, but rather cutting the negative space *between* them to define the shape. -
Refine the edges:
Take a minute to gently shave away any hanging pumpkin bits or rough jagged edges inside the eye and nose holes for a cleaner look.
Step 3: Texturing and Finishing
-
Distress the surface:
To mimic an old bone texture, lightly scuff the surface of the pumpkin with medium-grit sandpaper. Focus on the ridges and around the cut openings. -
Apply the aging wash:
Dip a rag into a small amount of brown antique wax or watered-down brown acrylic paint. I find that a little goes a long way here. -
Rub into the grooves:
Rub the brown mixture over the entire pumpkin, ensuring it settles into the natural vertical ribs and the sanding scratches you just created. -
Wipe back the excess:
Immediately wipe the high points of the pumpkin with a clean cloth. This leaves the dark color in the crevices, highlighting the texture and giving it a dirty, excavated bone appearance. -
Darken the cut edges:
Dab a little extra dark wax or paint onto the raw cut edges of the eyes, nose, and teeth. This adds depth and makes the pumpkin flesh look less fresh and more skeletal. -
Light it up:
Place two tealight candles inside the pumpkin. Position them slightly back so the flame flickers visibly through the large eye sockets, creating that eerie inner glow.
Eerie Eye Glow
Place a second candle on a small riser inside the pumpkin to lift the flame directly behind the eye sockets for a brighter, more menacing gaze.
Step back and enjoy the chilling, ancient vibe your skeletal lantern brings to the room
Friendly Cat Silhouette
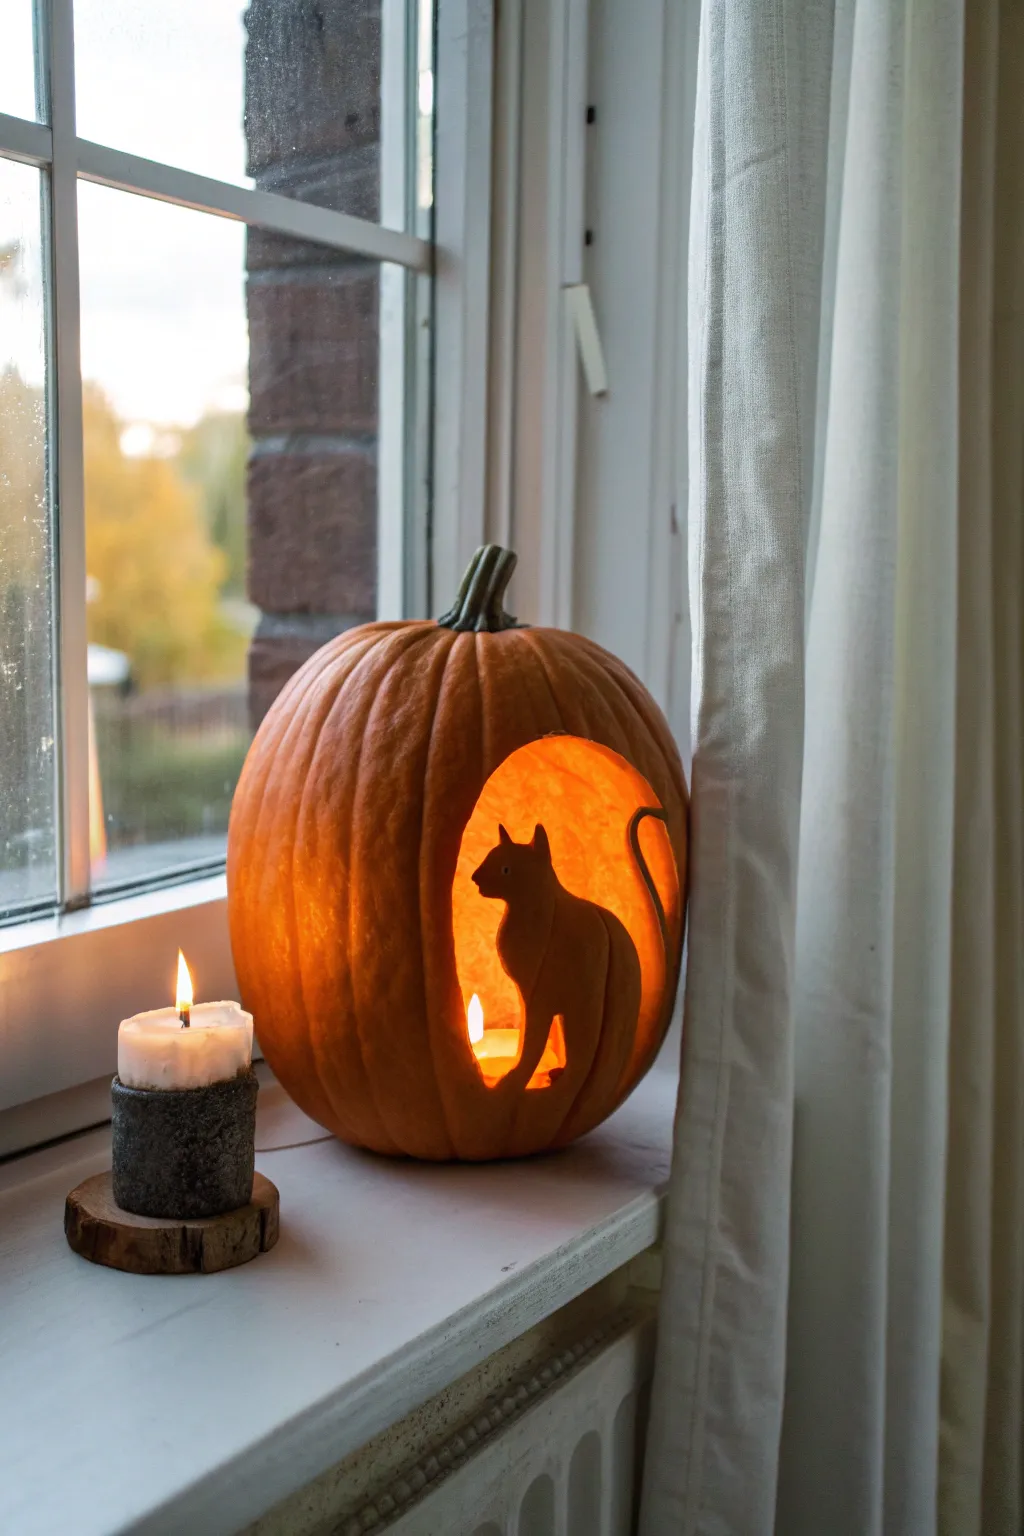
Illuminate your window with this warm and inviting pumpkin carving that uses negative space to great effect. Instead of cutting all the way through, this design relies on shaving away the background to create a glowing amber backdrop for a shadowy cat silhouette.
Step-by-Step Guide
Materials
- Medium-sized pumpkin (smooth surface is best)
- Pencil or dry-erase marker
- Large pumpkin scraping spoon
- Linoleum cutter or clay loop tools
- Small serrated pumpkin saw or X-Acto knife
- Printed cat silhouette template
- Masking tape
- Push pin
- Tea light or LED candle
Step 1: Preparation & Planning
-
Clean and gut:
Start by cutting a lid in the top of your pumpkin and removing all the seeds and strings. Scrape the inside wall where you plan to carve until it is about 1 inch thick or slightly less. -
Prepare the surface:
Wipe down the exterior of the pumpkin with a damp cloth to remove any dirt or residue, ensuring a clean surface for your stencil. -
Design orientation:
Decide on the placement of your oval window. It should be large enough to frame the cat comfortably. -
Shape the window:
Draw a large, smooth oval shape on the face of the pumpkin using a dry-erase marker. This defines the boundaries of the carved area.
Step 2: Transferring the Design
-
Position the cat:
Tape your printed cat silhouette template inside the oval outline you just drew. Make sure the cat’s feet connect firmly to the bottom edge of the oval. -
Trace the silhouette:
Using a push pin or needle tool, poke holes along the outline of the cat through the paper and into the pumpkin skin. Space the dots about 1/8 inch apart. -
Remove the template:
Peel off the paper and tape. You should now see a dotted outline of the cat sitting inside your drawn oval. -
Connect the dots:
Lightly re-draw the cat’s outline using the pin pricks as a guide, ensuring you don’t lose the shape during the carving process.
Uneven Glow?
If the background light looks blotchy, the inner wall thickness varies. Use a spoon to scrape the interior wall specifically behind the dark spots to even it out.
Step 3: Carving & Shaving
-
Score the outline:
Use an X-Acto knife or a very small saw to cut specifically along the outline of the cat and the outer oval border. Do not cut all the way through; slice just deep enough to break the skin. -
Start shaving:
Using a linoleum cutter or a clay loop tool, begin removing the pumpkin skin *between* the cat and the outer oval border. -
Deepen the background:
Continue shaving away layers of flesh in the background area. The deeper you go, the brighter the light will shine through. -
Smooth the texture:
I prefer to use a wider loop tool here to scrape the background smooth, creating a uniform thickness so the light diffuses evenly. -
Detail the tail:
Carefully shave around the thin curve of the tail. This is delicate, so remove small chips of pumpkin skin at a time.
Loop Tool Logic
Use a linoleum cutter (found in art stores) rather than a knife for the background. It peels the skin away in controlled ribbons, leaving a much smoother finish.
Step 4: Refining & Lighting
-
Thin from the inside:
If the background isn’t glowing brightly enough, go back inside the pumpkin and scrape the wall behind the design to make it thinner. -
Clean the edges:
Use your X-Acto knife to tidy up any ragged edges around the cat’s ears and the oval frame for a crisp silhouette. -
Preserve the pumpkin:
Rub a thin layer of petroleum jelly on the shaved areas. This helps prevent the exposed flesh from drying out and shriveling too quickly. -
Final wipe:
Remove any remaining marker lines with a damp paper towel. -
Light it up:
Place a tea light or LED candle inside. Step back and check if any areas of the background need a bit more scraping to even out the glow.
Place your masterpiece on the windowsill to welcome visitors with a warm, feline glow


Witch Profile With Pointy Hat
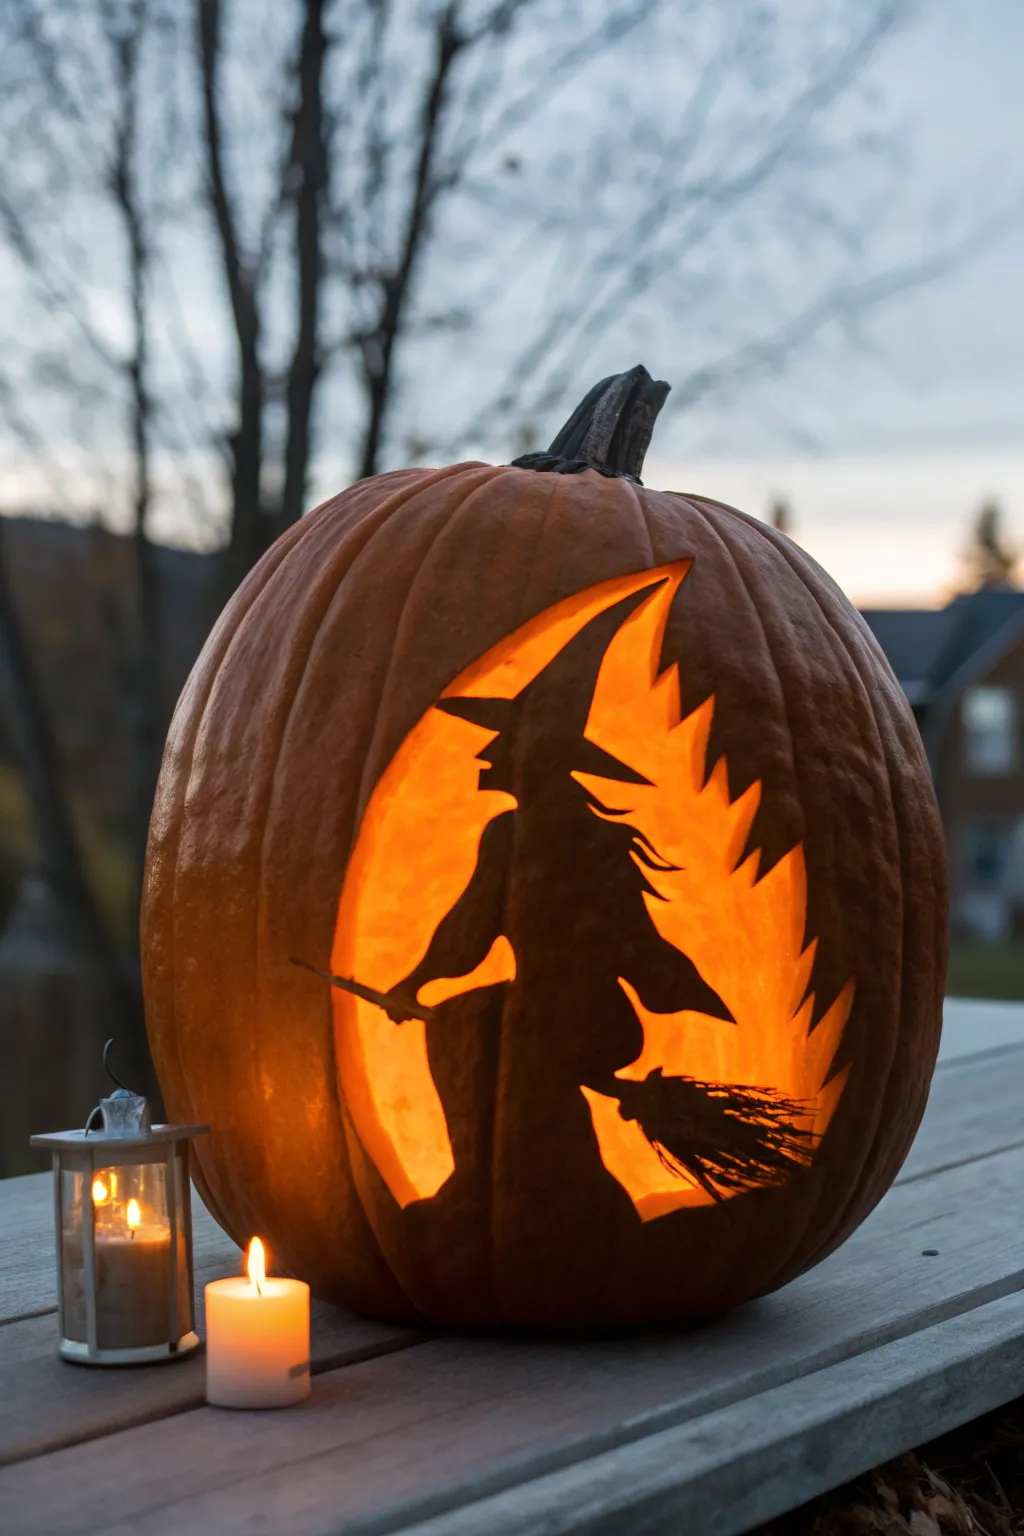
Capture the magic of Halloween night with this striking silhouette design, featuring a classic witch profile against a glowing, carved moon. This project uses negative space techniques to create a dramatic contrast that looks incredible when lit from within.
Step-by-Step Guide
Materials
- Large, smooth-faced pumpkin
- Serrated pumpkin carving knife (drywall saw style)
- Small detail saw or linoleum cutter
- Clay loop tool or wood gauge (optional, for shading)
- Transfer paper or poking tool
- Masking tape
- Printed witch profile pattern
- Black marker
- Scooping spoon
- Tea lights or LED pumpkin lights
Step 1: Preparation and Transfer
-
Prepare the canvas:
Begin by wiping down your pumpkin with a damp cloth to remove any dirt or debris. Cut a lid around the stem at a 45-degree angle, or cut a hole in the bottom if you prefer easier lighting access later. -
Gut the pumpkin:
Use your scooping spoon to scrape out all the seeds and pulp. Scrape the inner wall where you plan to carve until it is about 1 inch thick; this makes the carving process significantly smoother and allows more light to pass through. -
Apply the pattern:
Print your witch silhouette pattern. Tape it securely to the smoothest side of the pumpkin. Because the pumpkin is round, you may need to make small snips in the corners of the paper to get it to lay flat against the curve. -
Transfer the design:
Using a poking tool, awl, or even a pushpin, poke shallow holes along every black line of your design. Keep the dots about 1/8 inch apart. Be meticulous around the witch’s nose, chin, and broom bristles. -
Reveal the guide:
Remove the paper pattern. To maximize visibility, I like to gently rub a little flour or cornstarch over the holes to make the dotted lines pop, then connect them lightly with a marker if needed.
Broken Witch Piece?
If a delicate piece like the nose or hat tip snaps off, don’t panic. Use a straight pin or a toothpick broken in half to impale the piece and reattach it. It becomes invisible once the lights are down.
Step 2: Carving the Silhouette
-
Identify the negative space:
Before cutting, double-check your plan. The witch and the outer pumpkin skin will remain dark; you are carving out the ‘moon’ shape behind her and the jagged edges surrounding the scene. -
Start with the tight spots:
Using your smallest detail saw, begin carving the most intricate areas first, such as the sharp angle under the witch’s chin, the curve of the hat, and the space between the broomstick and her dress. -
Carve the hair details:
Carefully cut the jagged, flowing lines of the witch’s hair. These are fragile peninsulas of pumpkin flesh, so direct your saw blade away from the hair strands and into the empty space to avoid snapping them off. -
Outline the broom bristles:
Work on the back of the broom. Instead of cutting one large hole, consider feathering the edge of the pumpkin skin to create a sense of motion, or cut jagged zigzag lines to simulate the straw texture. -
Remove larger sections:
Switch to your standard serrated saw to cut out the larger chunks of the glowing ‘moon’ area in front of the witch. Remove these pieces gently by pushing them from the inside out. -
Refine the edges:
Go back over your cut lines. Clean up any hanging pumpkin strings or jagged bits of flesh that interrupt the smooth curve of the crescent shape.
Level Up: Smoke Effect
Place a small cup of water with dry ice inside carefully, alongside your lights. As the fog rolls out through the carved moon shape, your witch will look like she is flying through actual clouds.
Step 3: Texture and Lighting
-
Bevel the inner walls:
For a brighter glow, take a knife and shave away extra flesh from the *inside* of the pumpkin around the cutouts. By angling the inner wall back, you allow the candlelight to reach the front face without being blocked by thick walls. -
Add etched details:
If you want to add distinct texture to the broom bristles without cutting all the way through, use a linoleum cutter or clay loop tool to scrape away just the orange skin on the tail of the broom. -
Clean the surface:
Wipe the outside of the pumpkin with a clean, slightly damp cloth to remove any marker residue or flour from the transfer step. -
Preserve the pumpkin:
To keep the shriveled edges at bay for a few extra days, rub a thin layer of petroleum jelly along all the cut edges. -
Light it up:
Place two or three tea lights or a bright LED puck inside. Position them slightly behind the solid witch silhouette to enhance the contrast and make the negative space glow brightly.
Step back and admire the spooky atmosphere your silhouette casts across the porch
Pumpkin With Swirly Eyes
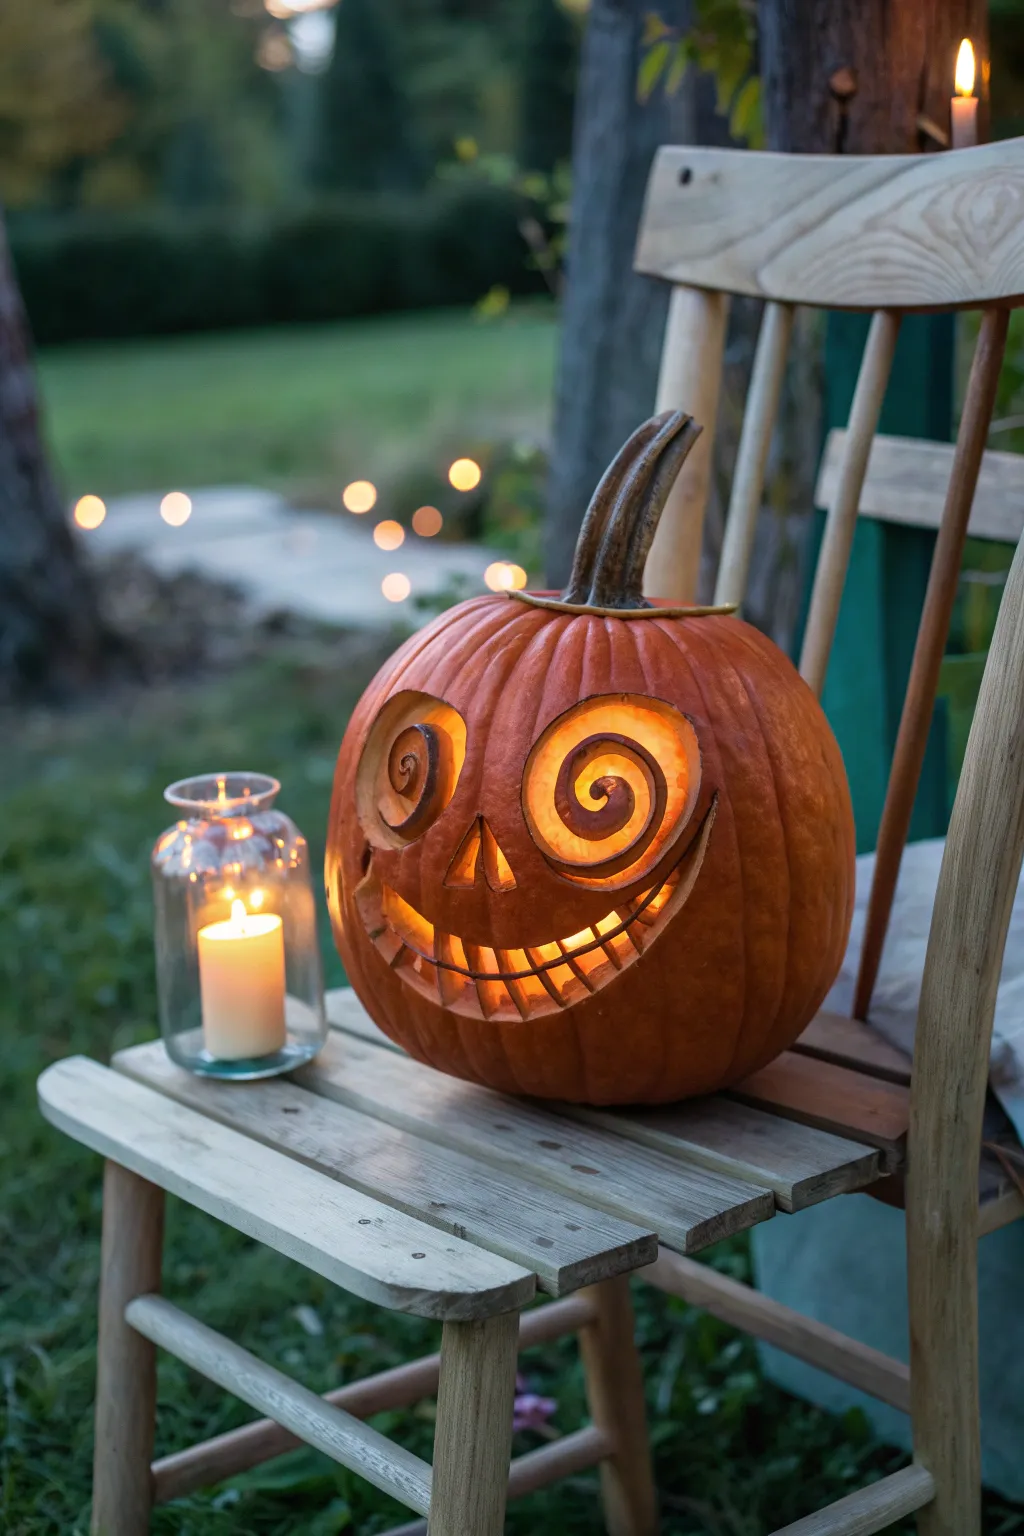
Mesmerize your trick-or-treaters with this delightfully dizzy jack-o’-lantern design featuring spiraling eyes and a goofy, toothy grin. The wide, manic smile paired with the hypnotic gaze creates a character that feels both playful and just a little bit spooky.
Step-by-Step Tutorial
Materials
- Medium-sized, round pumpkin
- Serrated pumpkin carving saw (small and large sizes)
- Pin or piercing tool for pattern transfer
- Scoop or large spoon
- Dry-erase marker or grease pencil
- Printed template (optional)
- Petroleum jelly (optional for preservation)
- Tea lights or battery-operated candles
Step 1: Preparation & Layout
-
Open the lid:
Cut a circle around the stem at a slight inward angle so the lid won’t fall in later. Remove the top carefully. -
Scoop the interior:
Thoroughly scrape out all the seeds and stringy pulp. I find that thinning the wall of the ‘face’ side to about 1 inch thickness makes carving intricate swirls much easier. -
Plan the eyes:
Using a dry-erase marker, draw two large circles for the eyes. Inside each, sketch a single spiral line starting from the center and winding outward to the edge. -
Sketch the nose and mouth:
Draw a small triangle for the nose just below the eyes. Then, sketch a wide, U-shaped mouth that stretches almost as wide as the eyes. -
Detail the teeth:
Add vertical lines across the mouth opening to represent teeth. Alternating the spacing slightly gives it a more whimsical, imperfect look.
Step 2: Carving the Features
-
Start with the spiral eyes:
This is the most delicate part. Use your smallest serrated saw to cut along the spiral line you drew. Go slowly to avoid snapping the thin strip of pumpkin flesh. -
Widen the spiral gap:
Once the initial cut is made, go back and carefully shave away a small strip of flesh along the cut line to create a visible gap, approximately 1/4 inch wide, allowing light to shine through the spiral. -
Cut the nose:
Switch to a slightly larger saw if preferred and cut out the simple triangle nose completely. Pop the piece out from the inside. -
Carve the mouth outline:
Saw along the top and bottom curves of the smile first, but do not cut through the vertical tooth lines yet. -
Create the teeth gaps:
Carefully cut out the rectangular negative spaces between the teeth. Remove these chunks one by one, leaving the vertical ‘tooth’ bars intact.
Oops! Snapped a swirl?
If a thin spiral arm breaks, don’t panic. Use a toothpick to pin the broken piece back into the wall of the pumpkin. The break will be nearly invisible in the dark.
Step 3: Refining & Lighting
-
Clean up edges:
Use a small knife or the tip of your saw to scrape away any ragged bits of pumpkin flesh from the eye swirls and tooth gaps for a sharp silhouette. -
Preserve the cut:
Rub a thin layer of petroleum jelly on the cut edges to seal in moisture and prevent the thin spiral pieces from shriveling too quickly. -
Place the light:
Insert your light source. For this design, a flickering LED candle works great to enhance the motion effect of the swirls. -
Replace the lid:
Put the stem top back on, aligning it with the distinct notch you cut earlier.
Make it Hypnotic
Place a color-changing LED strobe light inside instead of a regular candle. The shifting colors will make the spiral eyes look like they are actually spinning
Set your goofy masterpiece on the porch and watch the neighbors get mesmerized by that dizzy stare
Starry Night Stencil Panel

Bring the magic of a clear night sky to your porch with this dreamy celestial design. By combining traditional cutouts with drilled pinpoints of light, you can create a constellation effect that truly glows from within.
Step-by-Step
Materials
- Medium-sized pumpkin
- Pumpkin carving saw or serrated knife
- Flesh scraping spoon or scoop
- Power drill with various drill bit sizes (1/8″, 3/16″, 1/4″)
- Star-shaped cookie cutters (small and medium)
- Rubber mallet
- Masking tape
- Washable marker or grease pencil
- Needle tool or push pin
- Battery-operated LED candle or tea light
Step 1: Preparation and Gutting
-
Open the lid:
Cut a circle around the pumpkin stem at a 45-degree angle pointing inward. This angled cut creates a shelf so the lid won’t fall inside once the pumpkin shrinks. -
Clear the interior:
Remove the lid and scoop out the seeds and stringy pulp. I like to scrape the interior wall where the design will go a bit thinner—about 1 inch thick—to make carving easier. -
Clean the surface:
Wipe down the exterior of the pumpkin with a damp cloth to remove any dirt or residue, ensuring a clean surface for marking your design.
Step 2: Designing the Constellations
-
Map out major stars:
Visualize where you want your largest stars to sit. Place your star-shaped cookie cutters against the pumpkin surface to test the arrangement. -
Mark the cutouts:
Once you like the placement, press the cookie cutters firmly into the pumpkin skin just enough to leave an impression, or trace around them with a washable marker. -
Add a moon or planet:
Draw a small circle (about the size of a quarter or half-dollar) near the center or upper quadrant to represent a moon or planet among the stars. -
Plan the stardust:
Using your marker, dot patterns of ‘galactic dust’ swirling between the larger stars. These clusters should be denser in the middle and fade out toward the edges.
Star Power Tip
If you don’t have cookie cutters, print star shapes on paper, tape them to the pumpkin, and transfer the design by poking holes along the lines with a push pin.
Step 3: Carving the Features
-
Cut the planet:
Using a small serrated saw, carefully cut out the circular moon/planet shape first. Push the piece out from the inside to keep the edges clean. -
Punch the stars:
For the cleanest star shapes, position a metal cookie cutter over your outline and gently tap it with a rubber mallet until it pierces through the wall. -
Remove star cutouts:
If the cutter doesn’t go all the way through, pull it out and finish the cut with your serrated knife, following the deep indentation. Push the pieces out. -
Clean the edges:
Check the interior edges of your star cutouts and trim away any hanging flesh that might block the light. -
Save the scraps:
Don’t throw away the star cutouts immediately; you can use them as decorative elements around the base of the pumpkin later.
Drill Slip Grip
If the drill bit slips on the slick pumpkin skin, place a piece of masking tape over the area where you want to drill. It gives the bit traction to start the hole.
Step 4: Drilling the Milky Way
-
Select your smallest bit:
Insert a 1/8″ drill bit into your power drill. This will be used for the finest stardust particles. -
Drill the fine mist:
Gently drill holes into the pumpkin following your marked ‘dust’ trails. Use a slow speed to prevent the pumpkin skin from tearing. -
Switch to medium bits:
Change to a slightly larger bit (3/16″) and drill random holes interspersed within the fine mist to add variety and depth to the galaxy. -
Add feature stars:
Use your largest drill bit (1/4″) to create singular, bright points of light around the perimeter of the design. -
Clear debris:
Drilling creates a lot of pumpkin debris inside and out. Reach inside and scoop out the new shavings to ensure the holes are unobstructed. -
Wipe clean:
Use a damp paper towel to wipe off any remaining marker lines or pumpkin dust from the exterior skin.
Step 5: Final Illumination
-
Preserve the cut edges:
Rub a thin layer of petroleum jelly onto the cut edges of the stars and holes. This helps lock in moisture and keeps the design looking fresh longer. -
Light it up:
Place a bright LED candle inside. I find LEDs work better for this design as they don’t flicker as much, keeping the starry effect steady.
Step back and enjoy the warm, magical glow of your personal galaxy on a chilly autumn evening
Peekaboo Pumpkin House Windows
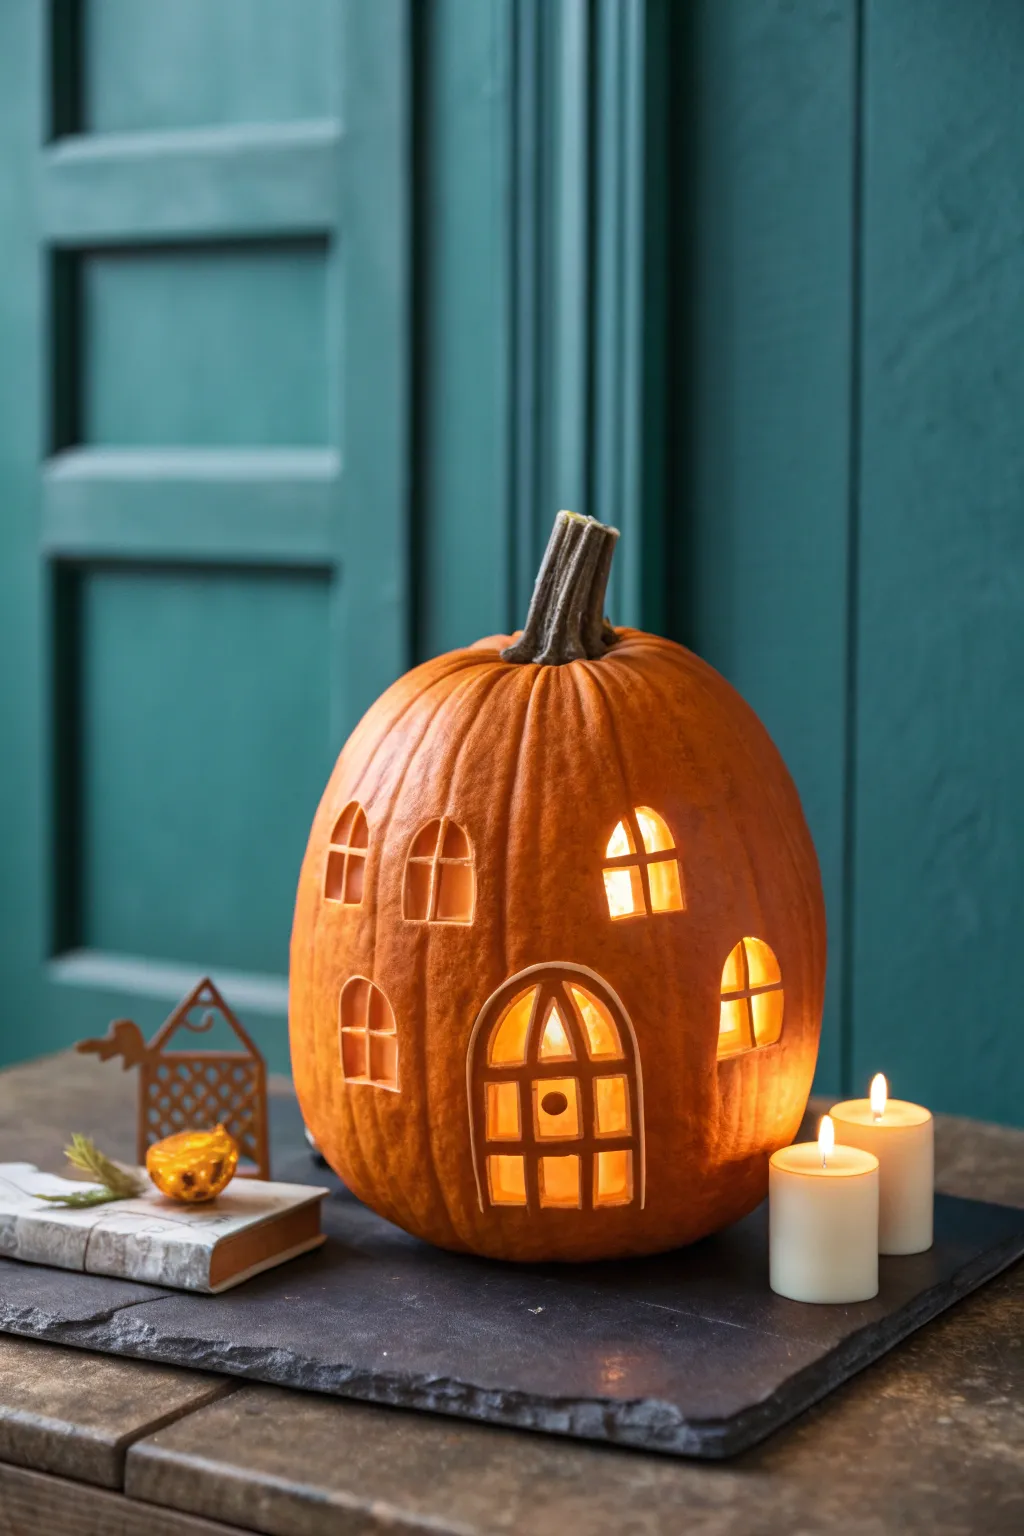
Transform a tall, classic orange pumpkin into a cozy fairytale dwelling with this charming architectural carving project. The warm glow emanating through the paned windows and arched doorway creates an inviting, magical atmosphere perfect for any porch or mantle.
Detailed Instructions
Materials
- Tall, symmetrical orange pumpkin
- Pumpkin carving saw (serrated)
- Linoleum cutter or clay loop tool (for shaving)
- Transfer paper or printed stencil (optional)
- Masking tape
- Pumpkin scooping spoon
- Thumbtack or poking tool
- Exacto knife or fine detail craft knife
- Fine-point permanent marker
- Battery-operated LED pillar candle
Step 1: Preparation and Design
-
Select the right canvas:
Choose a pumpkin that is taller than it is wide to mimic the verticality of a cottage or tower. Look for a relatively smooth surface area for the main face of the house. -
Open the pumpkin:
Cut a circle around the stem at the top, angling your knife inward to create a lid that won’t fall through later. Remove the lid. -
Clean the interior:
Using a scraping spoon, vigorously scoop out all the seeds and stringy pulp. Scrape the inner wall behind the intended ‘face’ of the house until it is roughly 3/4-inch thick to make carving easier. -
Draft the architectural features:
Draw your design directly onto the pumpkin skin with a marker. Sketch a large central arched doorway at the bottom center. -
Add window placements:
Draw smaller arched windows scattered around the upper half of the pumpkin. Vary their heights slightly for a whimsical, storybook feel.
Step 2: Carving the Framework
-
Outline the door trim:
Instead of cutting all the way through immediately, use a linoleum cutter or clay loop tool to shave off just the orange skin in a thick band around your drawn door arch. This creates a lighter ‘frame’ effect. -
Create the window frames:
Repeat the shaving technique around each small window. Removing just the skin allows light to glow through the rind without being fully open, adding depth to the structure. -
Score the grid lines:
Using your fine craft knife, carefully score the vertical and horizontal lines that will form the window panes and door panels. Don’t cut through yet; just mark your path.
Clean Corner Cuts
When cutting square window panes, push the knife in at the corner and cut outward rather than dragging a blade into a corner. This prevents over-cutting and keeps 90-degree angles sharp.
Step 3: Detailing and Illumination
-
Carve the window panes:
With a small, sharp carving saw or detail knife, cut out the small rectangular glass sections within your windows. Leave the vertical and horizontal ‘muntins’ (the crossbars) intact. -
Carve the door panels:
Carefully cut out the spaces between the grid lines on the main door. This is delicate work, so take your time to avoid snapping the grid bars. -
Clean up edges:
Use the Exacto knife to gently slice away any ragged pumpkin flesh or skin tags from the corners of your window panes for a crisp, clean look. -
Add the door knob:
For the door detailing, you can leave a small circle of pumpkin skin intact in the center pane, or pin a small separated piece of pumpkin back onto the grid with a toothpick to serve as a doorknob. -
Check the thickness:
If the light isn’t shining brightly enough through the shaved frame areas, scrape a bit more pulp away from the *inside* of the pumpkin behind those specific spots. -
Preserve the pumpkin:
Rub a thin layer of petroleum jelly on all cut edges to seal in moisture and prevent the delicate window grids from shriveling prematurely. -
Light it up:
Place a bright LED pillar candle inside. I find that elevating the light on a small block inside the pumpkin helps illuminate the upper windows more effectively.
Adding Cottage Charm
Use a V-gouge tool to etch shallow lines resembling wood planks on the door frame or bricks around the base of the house for added texture without cutting through.
Now step back and enjoy the warm, welcoming glow of your handcrafted pumpkin cottage this autumn evening
Pumpkin Eating a Mini Gourd
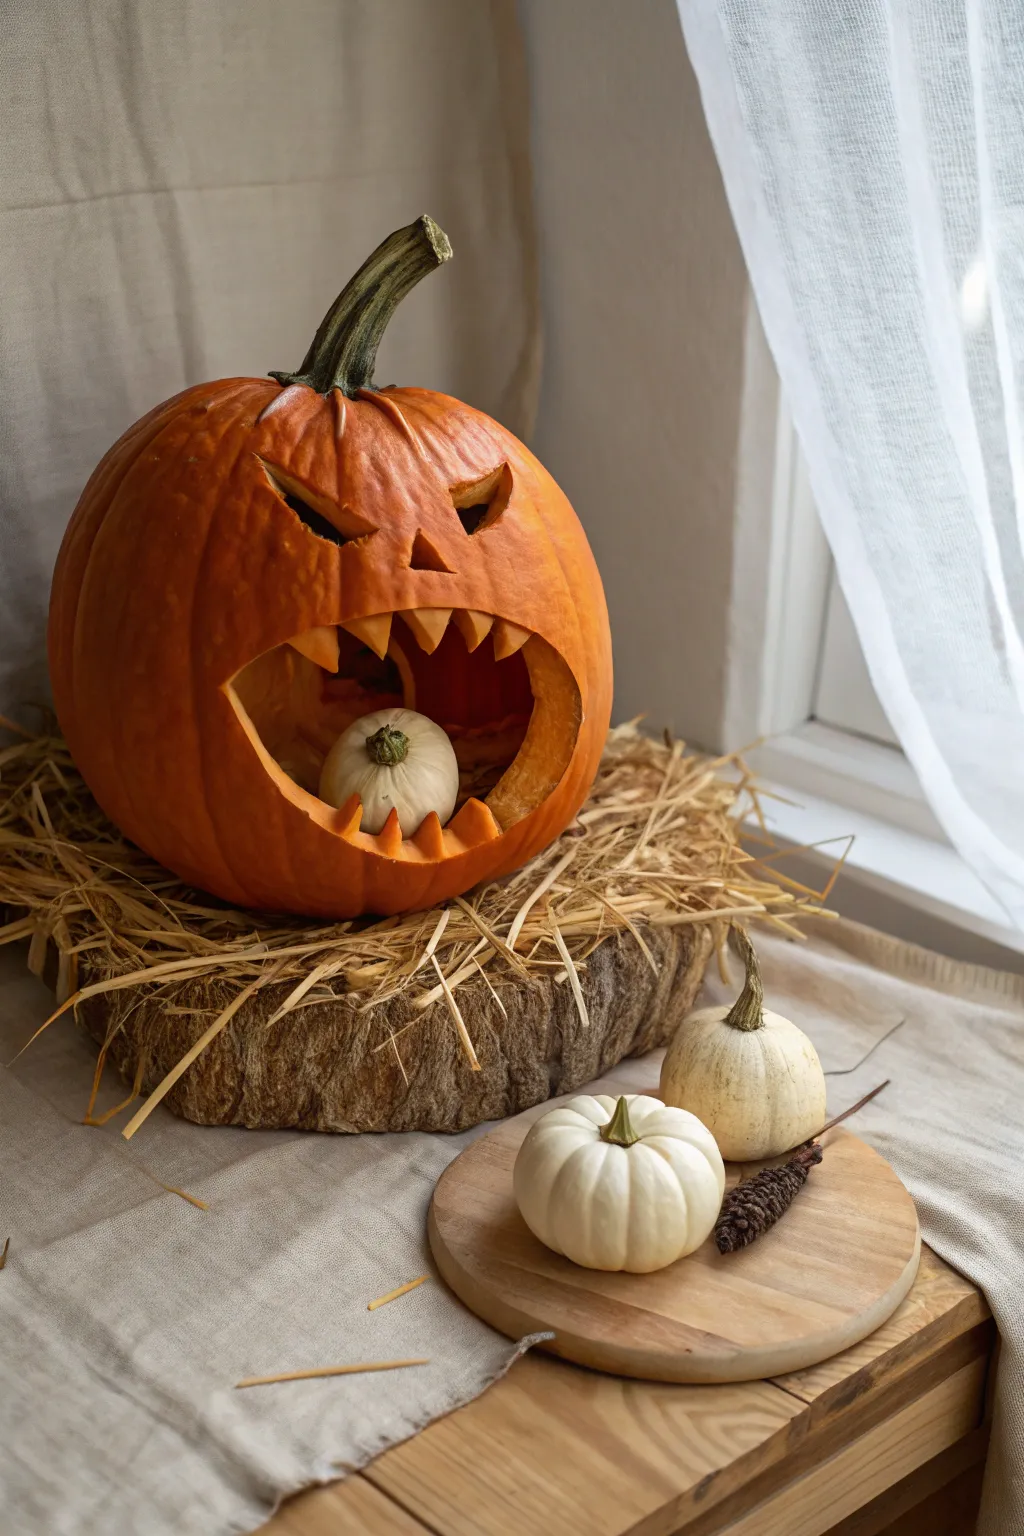
Capture a humorous and slightly scary scene with this clever design featuring a large jack-o’-lantern devouring a smaller victim. The wide, gaping mouth creates the perfect stage for a mini white pumpkin, adding depth and storytelling to your Halloween display.
How-To Guide
Materials
- One large, round orange pumpkin
- One small white mini-pumpkin (Baby Boo variety)
- Sharp serrated carving knife or pumpkin saw
- Large spoon or pumpkin scraper
- Dry-erase marker or grease pencil
- Newspaper or drop cloth
- Bowl for seeds
Step 1: Preparation and Gutting
-
Select your pumpkins:
Choose a large pumpkin that sits upright securely. Ensure your mini-pumpkin fits easily within the approximate area where you plan to carve the mouth. -
Cut the lid:
Using your serrated knife, cut a circle around the stem of the large pumpkin. Angle the knife inward toward the center of the pumpkin to create a ledge that prevents the lid from falling in later. -
Remove the lid:
Gently pry the lid off by the stem and trim away any hanging strings or flesh from the underside. -
Scoop the insides:
Use the scraper or a large metal spoon to hollow out the pumpkin. Remove all seeds and stringy pulp, scraping the inner walls until they are clean and about one inch thick.
Step 2: Drafting the Face
-
Sketch the eyes:
With a dry-erase marker, draw two angled, triangular eyes near the top third of the pumpkin. Make the inner corners dip downward sharply to create a menacing frown. -
Add the nose:
Draw a small, simple triangle for the nose centered beneath the eyes. -
Outline the mouth shape:
Sketch a very wide, open mouth shape. The bottom lip should swoop low to make room for the mini-pumpkin, while the top lip arches high. -
Detail the teeth:
Inside the mouth outline, draw large, jagged triangular teeth hanging from the top and jutting up from the bottom. Leave a wide gap in the center of the lower teeth specifically to cradle the small pumpkin.
Preserve the Bite
Rub a thin layer of petroleum jelly or vegetable oil on all cut edges. This seals moisture in and prevents the shriveling that happens quickly with large open cuts.
Step 3: Carving the Features
-
Carve the eyes and nose:
Insert your saw or knife perpendicular to the pumpkin surface. Cut along your marker lines for the eyes and nose first, gently popping the pieces out from the inside. -
Cut the mouth opening:
Carefully carve along the outline of the mouth, navigating around the jagged teeth. I find it easier to cut the teeth out one by one rather than trying to do the whole mouth in a single pass. -
Refine the edges:
Go back over your cut lines to clean up any ragged bits of pumpkin flesh or skin, ensuring the teeth look sharp and distinct. -
Clean off markings:
Wipe away any remaining marker lines with a damp paper towel to leave a clean orange surface.
Make It Scarier
Carve a terrified face into the small white pumpkin using a fine linoleum cutter or X-Acto knife to give the victim distinct personality.
Step 4: Final Assembly
-
Prepare the victim:
Take your white mini-pumpkin and wipe it clean. There is no need to carve this one; it looks best whole. -
Insert the mini-pumpkin:
Place the white pumpkin inside the large mouth. Position it so it rests on the bottom lip, slightly behind the lower teeth but clearly visible. -
Adjust the bite:
If the mini-pumpkin wobbles, you can shave a tiny bit of flesh off the floor of the large pumpkin’s mouth to create a flat divot for stability. -
Replace the lid:
Place the pumpkin lid back on top, rotating it until it fits snugly into the notch you created during the first step.
Set your carnivorous creation on a bed of straw to complete this playful horror scene
Jail Cell Face Illusion
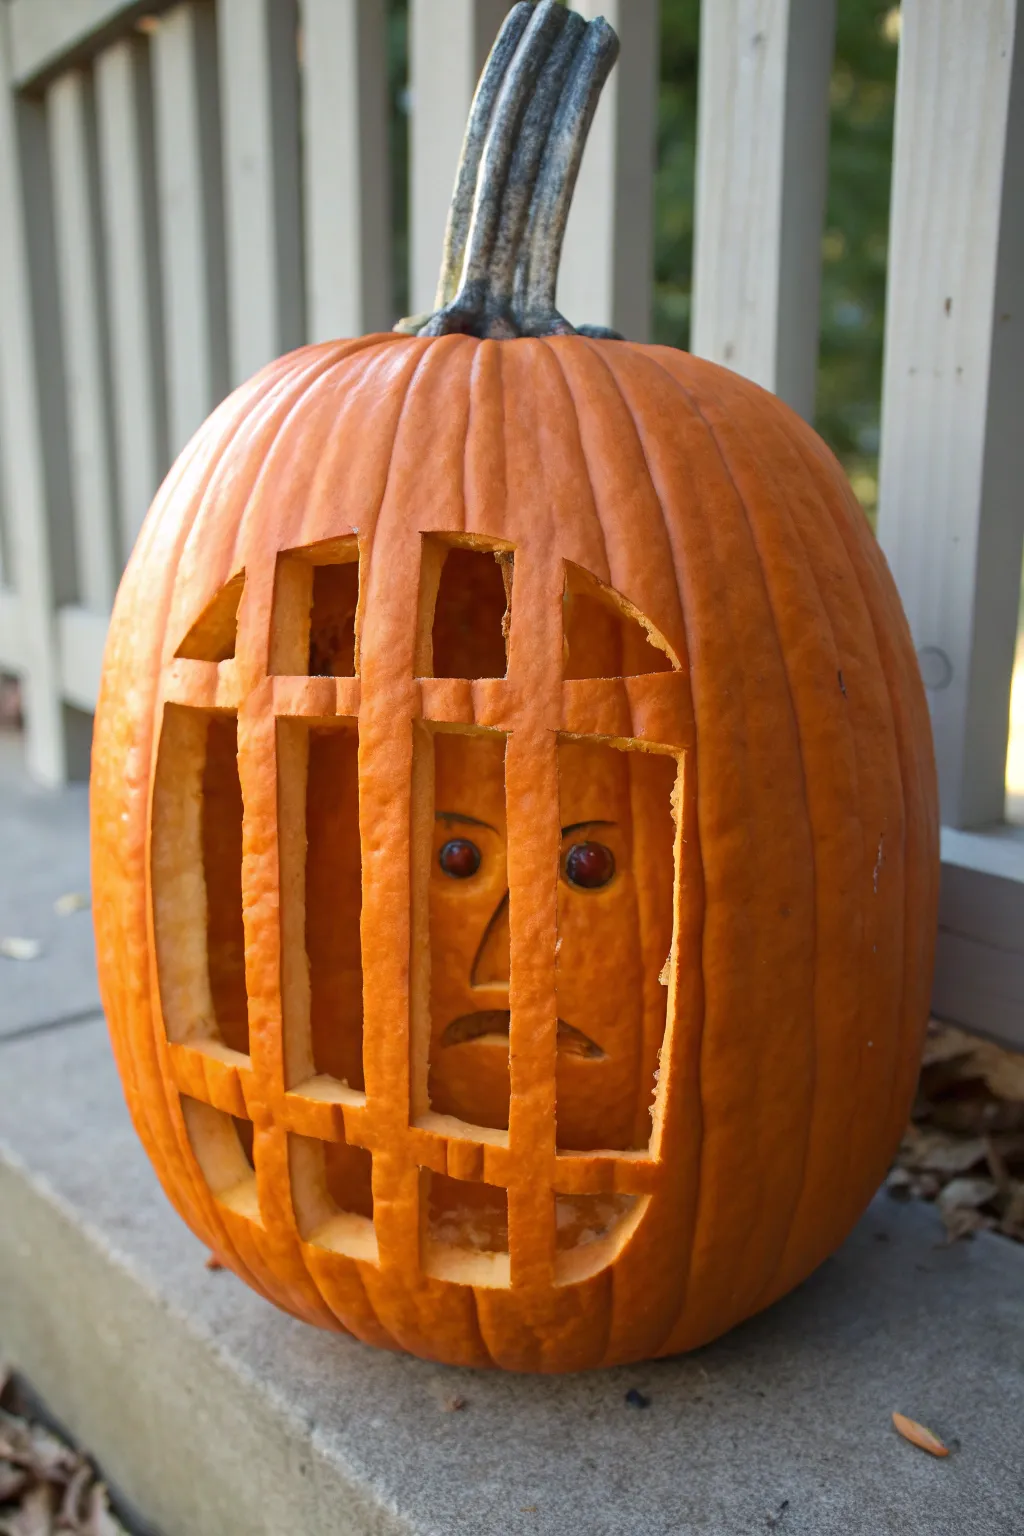
This clever carving creates a spooky 3D illusion by placing a sculpted face deep inside the pumpkin behind a set of carved jail bars. It creates a sense of depth and mystery that sets it apart from standard jack-o’-lanterns.
Step-by-Step Guide
Materials
- Large, tall pumpkin (gives more room for the face)
- Pumpkin carving saw (serrated)
- Linoleum cutter or clay loops (for sculpting)
- Large metal spoon or scraper
- Dry-erase marker
- Two red berries, beads, or push-pins (for eyes)
- Masking tape (optional)
- X-Acto knife
Step 1: Preparation and Planning
-
Select the right canvas:
Choose a pumpkin that is fairly tall and upright. This vertical space is crucial for creating realistic-looking jail bars and fitting a properly proportioned face inside. -
Open the top:
Cut a lid around the stem using your serrated pumpkin saw. Angle the knife inward so the lid won’t fall through later. -
Gut the pumpkin:
While cleaning out the seeds and strings, pay special attention to the side opposite where you plan to carve the bars. Scrape that back interior wall until it is smooth and free of loose fibers, as this will be your sculpting surface. -
Map the jail cell:
On the flattest exterior side, use a dry-erase marker to draw your grid. Sketch a large rectangle, then divide it into vertical bars and horizontal cross-beams. Don’t make the bars too thin, or they might snap.
Broken Bar Rescue
If a pumpkin bar snaps during carving, don’t panic. Use a toothpick inserted into both broken ends to bridge the gap, essentially acting as rebar to hold it together invisible.
Step 2: Carving the Cage
-
Initial cuts:
Using a smaller serrated saw, begin cutting out the negative space between your drawn bars. I prefer to cut the center sections first to maintain structural integrity while I work. -
Refine the edges:
Once the main chunks are removed, use an X-Acto knife or sharp paring knife to clean up the edges of the bars, making them look square and iron-like. -
Check visibility:
Look through your new jail bars to identify exactly where the back wall is visible. This is your framing for the face.
Step 3: Sculpting the Prisoner
-
Outline the face:
Reach inside the pumpkin (or work from the back if you cut a rear access door, though working through the top preserves the illusion best) and lightly scratch the outline of a simple oval face on the back wall. -
Skin removal:
Using a linoleum cutter or a clay loop tool, gently scrape away the top layer of the pumpkin flesh inside your face outline to distinguish it from the background wall. -
Define the nose:
Carve deep grooves on either side of a central triangle shape to create a raised nose. The deeper you carve around it, the more the nose will project forward. -
Carve the brow:
Gouge out two horizontal depressions just above where the eyes will go. This creates a brow ridge, giving the face a moody or angry expression. -
Shape the mouth:
Carve a downturned crescent shape for the mouth. Be careful not to cut all the way through the rind; you are just shaving away layers to create shadow. -
Smoothing:
Use your thumb or a rounded spoon to smooth out the tool marks on the cheeks and forehead, making the face look more skin-like.
Hand Detail
Carve small, knuckle-like ridges on two of the vertical bars to make it look like the prisoner is gripping the bars from the inside for extra realism.
Step 4: Bringing it to Life
-
Eye sockets:
Use a small drill bit or the tip of a knife to make two small pilot holes deep in the eye sockets. -
Insert the eyes:
Press two red berries or beads into the pilot holes. If they are loose, use a small dab of superglue or a toothpick to secure them. -
Lighting test:
Place a candle or LED light inside. You want the light to sit slightly behind the bars but in front of the face to cast shadows that define the sculpted features. -
Final clean-up:
Wipe away any remaining marker lines on the exterior bars with a damp paper towel.
Now watch as your neighbors do a double-take when they notice the little face staring back at them
Stacked Pumpkin Totem Trio
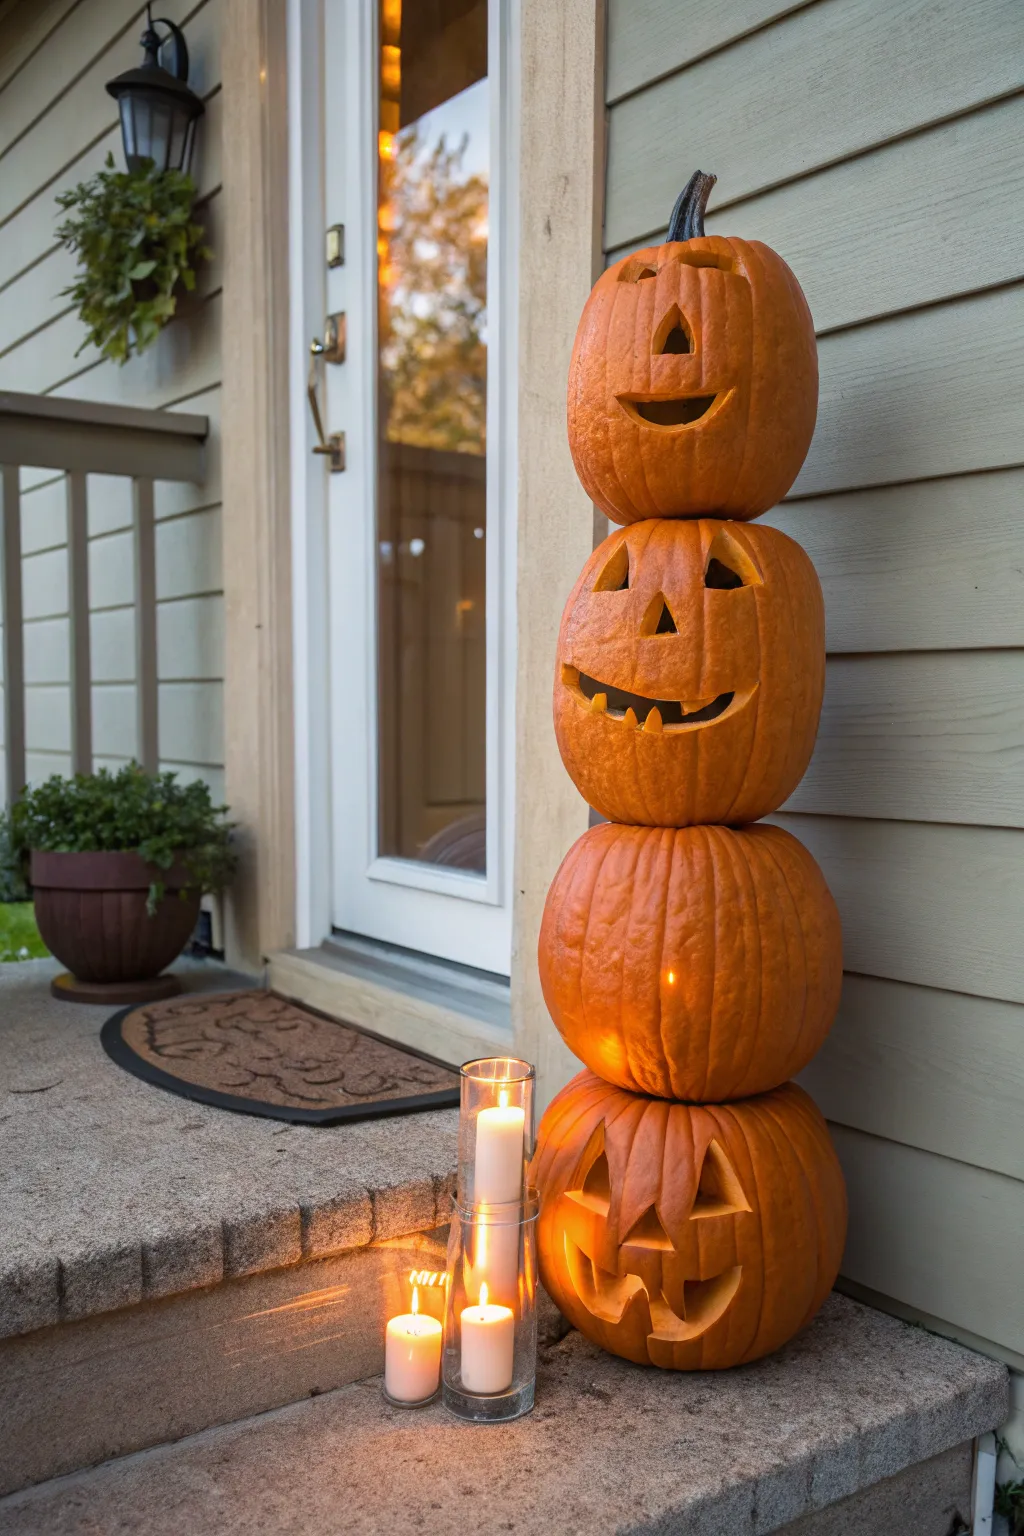
Welcome guests with this cheerful vertical display that transforms four pumpkins into a towering sentry for your porch. By alternating carved and uncarved gourds, you create structural stability while showcasing a range of classic Halloween expressions.
How-To Guide
Materials
- 4 pumpkins of graduating sizes (small to large)
- Serrated carving knife or pumpkin saw
- Large metal serving spoon or scraping tool
- Dry-erase marker or grease pencil
- Wooden dowel or metal rebar (approx. 4-5 feet)
- Power drill with wide spade bit
- Newspaper or drop cloth
- LED puck lights or battery-operated candles
Step 1: Planning and Preparation
-
Select your stack:
Choose four pumpkins that graduate in size. The bottom pumpkin needs to be heavy and wide to anchor the tower, while the top one should be the smallest and lightest. Look for pumpkins with flatter tops and bottoms for easier stacking. -
Clean and prep:
Wipe down the exteriors of all pumpkins to remove dirt. Remove the stems from the bottom three pumpkins using a heavy knife or saw, cutting them flush to the pumpkin’s surface so the one above it can sit flat. -
Gut the pumpkins:
Cut a hole in the bottom of each pumpkin rather than the top. This preserves the structural integrity of the ‘shoulders’ where the next pumpkin will rest. Scoop out all seeds and pulp thoroughly.
Stay Fresh Longer
Rub petroleum jelly or vegetable oil on all cut edges immediately after carving. This seals in moisture and prevents the shriveling look.
Step 2: Carving the Faces
-
Draft the bottom design:
On the largest pumpkin (the anchor), use a dry-erase marker to sketch a wide, jolly face. Draw large triangular eyes and a broad mouth with two square teeth jutting up from the bottom lip. -
Carve the bottom pumpkin:
Using your serrated saw, carefully cut out the features of your bottom design. I prefer to start with the center features like the nose and work outward to avoid putting pressure on thin walls. -
Leave the middle blank:
The second pumpkin in the stack (second from bottom) will remain uncarved. This acts as a visual break and adds structural strength to the middle of the totem. -
Draft the upper-middle design:
Take the third pumpkin (second from top) and sketch a classic face. Give this one angular eyes, a small triangular nose, and a goofy, slightly lopsided grin with a few snaggle teeth. -
Carve the upper-middle face:
Carve out the features on this third pumpkin. Since this gourd is smaller, use a finer saw blade if available for cleaner corners on the eyes. -
Draft the top design:
On your smallest pumpkin, draw a simple, happy face. High-arched eyebrows and a smooth curved mouth work well here. Leave the stem intact on this one. -
Carve the topper:
Cut out the final face. Be gentle, as the walls of small pumpkins can be thinner and more prone to cracking.
Step 3: Assembly and Stability
-
Drill alignment holes:
Drill a hole through the center of the top and bottom of every pumpkin (except the very top of the smallest one). The hole diameter should match your dowel or rebar. -
Position the anchor:
Place the largest carved pumpkin on your porch step or desired location. Insert your dowel or rebar through the holes, pushing it down until it hits the ground. -
Stack the layers:
Thread the uncarved pumpkin onto the rod, followed by the second carved pumpkin. Determine the best rotational angle for each so the stack feels balanced. -
Add the topper:
Place the smallest pumpkin on top. The rod should go into its bottom hole but stop before hitting the stem. If the rod is too long, trim it now. -
Clean up interior details:
Wipe away remaining marker lines and ensure no stray pumpkin strings are hanging in the eye holes. -
Lighting setup:
Since you cut holes in the bottoms, you can’t use traditional candles easily. Insert LED puck lights or battery-operated candles into the carved pumpkins before final stacking, or cut discreet access panels in the back.
Wobbly Stack?
If pumpkins aren’t sitting flat, use shims made from leftover pumpkin rind pieces to level them out between layers before sliding onto the rod.
Step back and admire how your friendly pumpkin family brightens up the entryway with its towering charm
Cutout Tongue That Pops Out
Create a classic and cheerful Halloween atmosphere with this approachable pumpkin design. Featuring wide triangle eyes and a toothy grin, this project is perfect for beginners looking for a timeless holiday look that glows warmly from within.
Detailed Instructions
Materials
- Medium-sized orange pumpkin
- Serrated pumpkin carving knife or saw
- Large metal spoon or pumpkin scraper
- Dry erase marker or grease pencil (black)
- Small carving tool for details
- Tea light or votive candle
- Lighter or matches
- Bowl for seeds and guts
Step 1: Preparation and Gutting
-
Clean surface:
Begin by wiping down the exterior of your pumpkin with a damp cloth to remove any dirt or field debris, ensuring a clean surface for drawing your design. -
Draft the lid:
Using your marker, draw a circle around the stem at the top of the pumpkin. I like to add a small notch or ‘key’ in the circle design so it’s easy to line the lid back up later. -
Carve the opening:
Insert your serrated knife into the lid guideline at a 45-degree angle inward. This angle is crucial as it creates a shelf that prevents the lid from falling inside the pumpkin once it shrinks. -
Remove the lid:
Gently pry the lid off by pulling on the stem. Use the knife to trim off the fibrous strands hanging from the bottom of the lid piece. -
Scoop the interior:
Use the large metal spoon to scrape the inside walls. Focus on the side where you plan to carve the face, thinning the wall to about one inch for easier cutting. -
Clean the bottom:
Scrape the bottom of the pumpkin specifically to create a flat, level surface for your candle to sit safely.
Step 2: Design and Carving
-
Map the face:
Draw the face directly onto the pumpkin skin. Start with two equilateral triangles for the eyes, positioned slightly apart. -
Add the nose:
Draw a smaller triangle in the center, just below the eyes, for the nose. -
Sketch the smile:
Draw a wide, U-shaped mouth. Add two rectangular shapes hanging down from the top lip to represent teeth. -
Carve the eyes:
Start carving with the eyes first. Use a gentle sawing motion with your serrated tool, cutting straight through the pumpkin wall along your marker lines. -
Pop out pieces:
Once an eye shape is fully cut, push the piece gently from the inside out to pop it loose without damaging the surrounding wall. -
Carve the nose:
Carefully saw out the small nose triangle. Since this is a smaller shape, go slowly and support the pumpkin wall with your other hand. -
Outline the mouth:
Begin sawing the long curve of the mouth. Start with the bottom curve, moving from one corner to the other. -
Detail the teeth:
Switch to a smaller tool if available to navigate the corners around the teeth. Cut vertically down the sides of the teeth, then connect the lines. -
Clear debris:
Remove the large mouth cutout section. Use your finger or a small tool to clear out any loose pumpkin bits or strings from the carved openings.
Fixing Broken Teeth
If a tooth snaps off while carving, don’t panic. Use a sturdy toothpick inserted into the bottom of the tooth and the top of the gum line to pin it invisibly back in place.
Step 3: Finishing Touches
-
Clean lines:
Wipe away any remaining marker lines with a damp cloth or paper towel. -
Preserve the edges:
Rub a thin layer of petroleum jelly on the cut edges of the face to help seal in moisture and prevent premature shriveling. -
Insert light:
Place your tea light or votive candle securely on the flat spot inside the pumpkin. -
Light it up:
Light the candle and place the lid back on, aligning your notch to ensure a perfect fit.
Glow Up
Sprinkle a dash of cinnamon or pumpkin spice on the inside of the lid. When the candle heats up the pumpkin, it will act as a natural air freshener for the room.
Step back and enjoy the classic, heartwarming glow of your traditional Jack-o’-lantern
Geometric Glow Grid Pattern
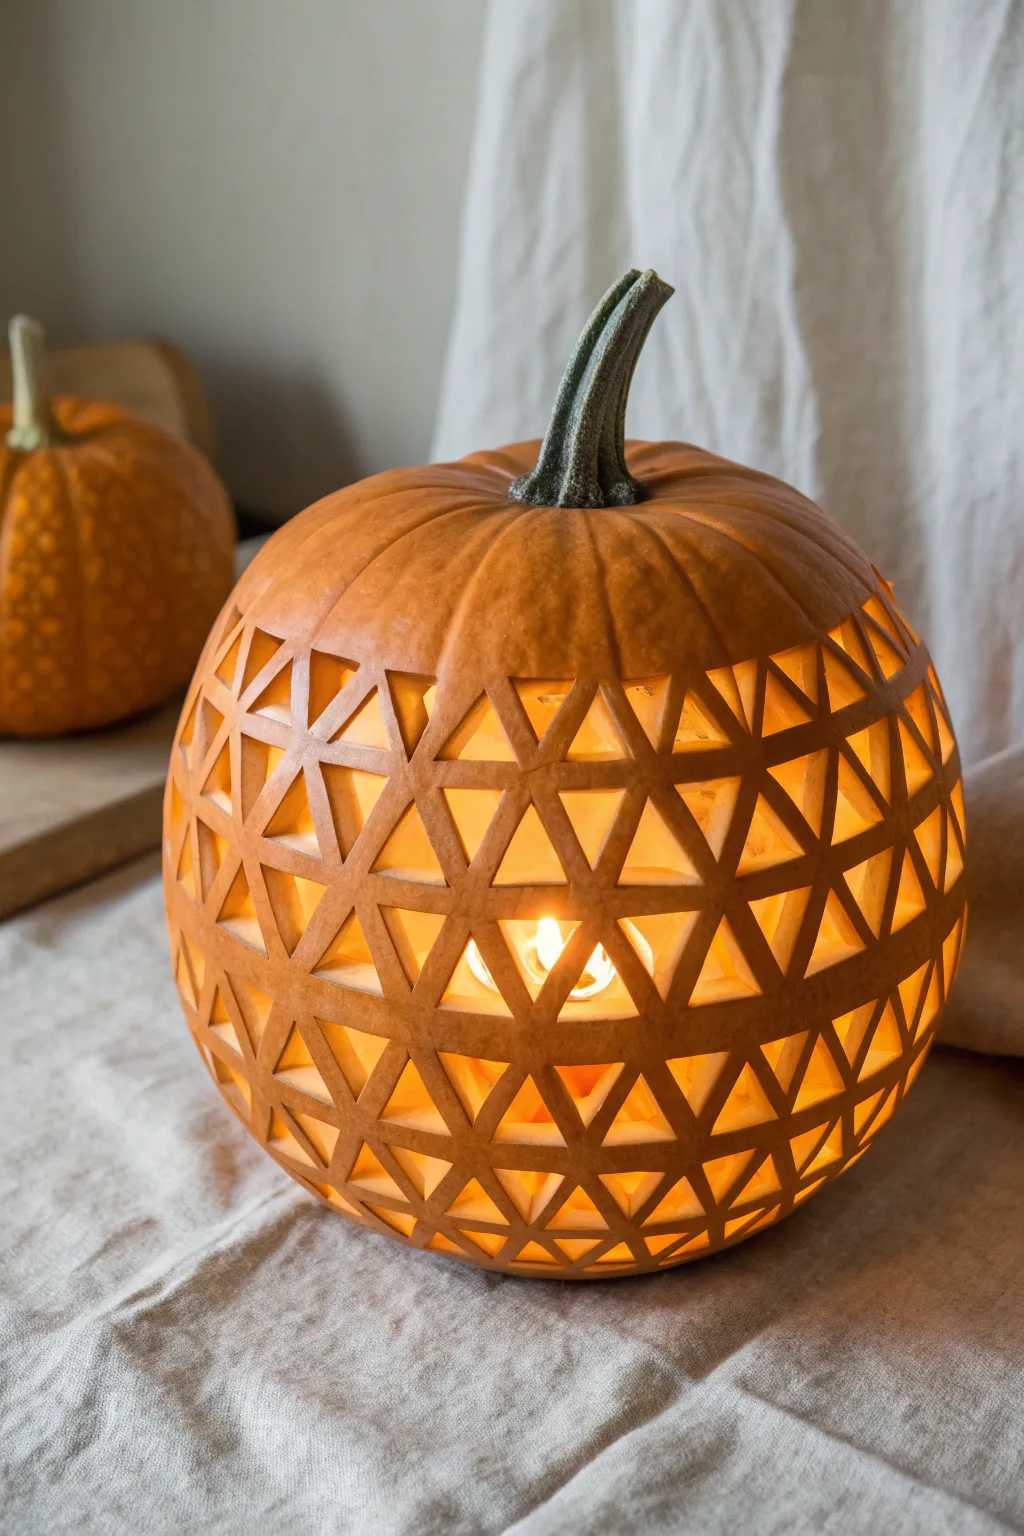
Transform a standard pumpkin into a modern lantern with this precise, tessellated triangle design. The repeating geometric cutouts create a stunning lattice effect that casts intricate shadows when lit from within.
Step-by-Step Tutorial
Materials
- Medium-sized round pumpkin
- Pumpkin carving saw or serrated knife
- Fleshing tool or large spoon
- Dry-erase marker or washable sewing pencil
- Flexible measuring tape
- X-acto knife or precision craft knife
- Ruler or straight edge
- Graph paper (optional)
- Small LED candle or tealight
Step 1: Preparation & Mapping
-
Clean and gut:
Begin by cutting a lid around the stem or a hole in the bottom of your pumpkin. Remove all seeds and stringy pulp, scraping the inner walls until they are about 1 inch thick to allow light to filter through nicely. -
Thin the wall:
For this specific geometric design, having a uniform wall thickness is crucial. Spend extra time scraping the side where you plan to carve so the detailed cuts are easier to manage later. -
Establish the horizon line:
Decide how high up the pattern will go. Using your flexible measuring tape, draw a straight horizontal line around the circumference of the pumpkin, leaving the top third uncarved acting as a solid ‘cap’. -
Draw horizontal guides:
Measure down from your first horizon line in equal increments (about 1 to 1.5 inches apart) and draw parallel horizontal rings all the way down to the base. These rings will define the height of your triangle rows. -
Mark vertical intervals:
Along the top horizontal line, use your measuring tape to make tick marks at equal intervals. I find spacing them about 1.5 inches apart works well for a medium pumpkin.
Grid Master Tip
Use a flexible sewing measuring tape to ensure your horizontal guide rings are perfectly parallel. Even slight wobbles can make the geometric pattern look distorted.
Step 2: Drafting the Design
-
Create the zigzag:
Connect your tick marks diagonally to the horizontal line below them to create a zigzag pattern. Repeat this process for every row, alternating the direction of the diagonals to form a grid of diamonds and triangles. -
Define the cutouts:
Inside each resulting diamond or large triangle shape, draw a slightly smaller triangle. This inner shape is what you will actually cut out, leaving a thick grid or ‘lattice’ of pumpkin flesh between them. -
Check spacing:
Step back and look at your grid. The strips of pumpkin skin remaining between the cutouts should be at least a quarter-inch wide to maintain structural integrity.
Step 3: Carving the Lattice
-
Score the skin:
Before doing any deep cutting, use your X-acto knife to lightly score the outline of every triangle you plan to remove. This breaks the skin surface and prevents tearing during the deeper cuts. -
Start the cuts:
Using a small, sharp serrated saw or precision knife, begin cutting out the triangles. Insert the blade perpendicular to the pumpkin surface and use a gentle sawing motion. -
Work centrally:
I recommend starting with a row in the middle of the design and working outward. This keeps the pumpkin structurally sound for as long as possible while you apply pressure. -
Corner precision:
Pay distinct attention to the corners of the triangles. Overcutting here can sever the delicate lattice connectors, so stop your cut just shy of the corner and carefully nip the remaining bit. -
Pop out pieces:
Once a triangle is fully cut, push the piece gently into the pumpkin rather than pulling it out. This reduces the risk of pulling the skin off the delicate bridges. -
Clean the edges:
After all major pieces are removed, go back with your small craft knife and carefully shave away any ragged pulp or hanging strings from inside the cutouts for a crisp look.
Make It Sparkle
For a magical finish, drill tiny holes into the solid intersections of the grid. When lit, these pinpricks of light will look like twinkling stars amidst the larger geometric glow.
Step 4: Finishing Touches
-
Remove markings:
Wipe away any remaining dry-erase marker lines with a damp paper towel. If you used a permanent marker, a little rubbing alcohol usually takes it right off. -
Preserve the cut:
Rub a thin layer of petroleum jelly on the cut edges of the design. This seals in moisture and prevents the thin lattice strips from shriveling too quickly. -
Light it up:
Place your LED candle inside. Because of the many openings, a brighter light source works best to really define the grid structure against the dark pumpkin skin.
Step back and admire how this intricate lattice design turns a simple gourd into a sophisticated piece of autumn decor


Have a question or want to share your own experience? I'd love to hear from you in the comments below!