When you’re craving cute OC ideas, it helps to start with simple, lovable vibes and then layer in a few memorable details. Here are my favorite character sparks that make designing an adorable original character feel easy and super fun.
Cozy Oversized Sweater Sweetheart
Capture the essence of comfort with this charming illustration of a character bundled up in an oversized knit. Using soft markers and fine liners, you’ll create a cozy texture that looks as warm as it feels.
Step-by-Step Tutorial
Materials
- Heavyweight mixed-media or marker paper
- HB pencil and eraser
- Fine liner pens (0.1mm and 0.3mm, black)
- Alcohol-based markers (Light Pink, Dusty Rose, Cool Grey, Skin Tone)
- White gel pen
Step 1: Sketching the Pose
-
Basic Shapes:
Start with a light pencil sketch to establish the seated posture. Draw an oval for the head and a large, rounded bean shape for the torso to represent the oversized sweater. -
Leg Placement:
Sketch the legs tucked up toward the chest. One knee should be higher, close to the chin, while the other rests slightly lower. Indicate the feet as simple blocky shapes for the boots. -
Defining the Head:
Refine the head shape. Sketch a short bob haircut that frames the face, adding a slight fringe. Keep the facial features minimal—just a nose, mouth, and eyes looking off to the side. -
Sweater Volume:
Draw the voluminous sleeves. The arm closest to the viewer should wrap around the knees, creating deep folds near the elbow and armpit. Exaggerate the size of the turtle neck collar.
Fixing Bleeds
If your marker bleeds outside the lines, don’t panic. Use a colorless blender pen to ‘push’ the ink back toward the line while it’s still wet, or cover the mistake with white gel pen later.
Step 2: Inking the Outline
-
Initial Inking:
Use a 0.3mm fine liner to trace your pencil lines. Focus on the outer silhouette of the sweater and boots first. Keep your hand relaxed to avoid shaky lines. -
Adding Details:
Switch to a 0.1mm pen for delicate areas like the facial features and hair strands. Don’t close every line in the hair; leave gaps for highlights. -
Erase:
Wait a moment for the ink to settle, then gently erase all underlying pencil marks to reveal a clean line art base.
Pattern Play
Instead of a solid pink sweater, try drawing a Fair Isle pattern across the chest using geometric shapes before adding the texture lines. It adds a festive winter touch.
Step 3: Adding Color
-
Skin Tones:
Apply a base skin tone marker to the face and any visible ear parts. Add a tiny dot of pink to the cheeks for a flushed, cold-weather look. -
Sweater Base:
Color the entire sweater with a light pink marker. Use broadly sweeping strokes to ensure even coverage, moving quickly to prevent streakiness. -
Shadowing the Knits:
Once the base is dry, use a slightly darker dusty rose marker to add shadows. Focus on the areas under the arms, beneath the collar, and where the sweater folds around the knees. -
Boots & Pants:
Color the boots with a solid pink that complements the sweater. Use a very light cool grey for the pants to distinguish them from the white background without being too dark. -
Hair Color:
Fill in the hair using a sandy or light brown marker. Leave a small strip uncolored near the crown for a natural shine, or color solid and add white later.
Step 4: Texture and Finishing
-
Knit Texture:
This is the crucial step: Take your 0.1mm black pen again. Draw vertical dashed lines down the length of the sweater to mimic the ribbing of the knit. -
Cross-Hatching:
Add small, horizontal tick marks across the vertical lines in a random pattern. This creates that classic ‘cable knit’ visual texture without drawing every single thread. -
Boot Definition:
Outline the sole of the boot firmly. Add a small curve on the boot shaft to show where the material creases at the ankle. -
Grounding Shadow:
Sketch a very simple, thin oval outline underneath the figure using a light grey marker or fine liner. This ‘grounding line’ stops the figure from looking like it’s floating. -
Atmosphere:
Draw tiny circles scattered around the figure to represent falling snow. Keep them sparse and delicate. -
White Highlights:
Finally, use a white gel pen to add small highlights to the eyes, the tip of the nose, and the rubber soles of the boots.
Now you have a sweet, cozy character illustration perfect for the winter season


Chibi Bubble Tea Bestie
Capture the sweetness of bubble tea culture with this adorable chibi character illustration. Featuring soft pastel markers and clean ink lines, this project is perfect for practicing cute facial proportions and beverage textures.
Step-by-Step
Materials
- Spiral-bound sketchbook (mixed media or bristol paper preferred)
- Pencil (HB or H for light sketching)
- Kneadable eraser
- Fine liner pens (Black, 0.1mm and 0.5mm)
- Alcohol-based markers (Skin tones, pale pink, peach, grey, red)
- White gel pen for highlights
Step 1: Sketching the Base
-
Head Shape:
Start by drawing a large, rounded rectangle that tapers slightly at the bottom for the head. Add a vertical center line and a low horizontal line to help place the facial features later. -
Body Framework:
Below the head, sketch a tiny, narrow neck leading into a small triangular torso. Keep the body significantly smaller than the head to achieve that classic chibi proportion. -
Drafting the Legs:
Draw two simple legs tapering downwards. Position the feet to point slightly inward, giving the character a shy, cute stance. -
Adding Hair Volumes:
Sketch the hair shape. Create a curved fringe that sweeps across the forehead and two large, round buns (odango style) on either side of the head. Add cherry-like hair accessories on the buns. -
The Bubble Tea:
Draw a large cup shape being held in front of the torso. It should be almost as big as her body. Sketch the lid dome, the straw poking out, and the hands gripping the sides.
Smooth Blends
Work quickly with alcohol markers! The ink needs to be wet to blend seamlessly. Coloring in small circular motions prevents streakiness.
Step 2: Refining Features & Inking
-
Face Details:
Draw two very large circles for eyes on the horizontal guide line. Inside, add large pupils and iris details. Sketch a small, curved mouth and tiny eyebrows above the eyes. -
Outfit Construction:
Detail her outfit with a sailor-style collar, short puffed sleeves, and a pleated skirt. Don’t forget the tiny socks with frilled tops near the ankles. -
Initial Inking:
Using your 0.1mm fine liner, carefully trace over your pencil sketch. Use smooth, continuous strokes for the hair and long curves of the cup to keep the line art clean. -
Line Weight Variation:
Switch to a 0.5mm pen to thicken the outer contour lines of the character and the main shape of the cup. This helps pop the character off the page. -
Erase Sketches:
Wait until the ink is completely dry to avoid smudging, then gently erase all underlying pencil marks with a kneadable eraser.
Step 3: Coloring
-
Skin Tones:
Apply a base layer of pale skin tone marker to the face, neck, and legs. While the ink is wet, add a slightly darker peach shade under the hair fringe and neck for shadow. -
Hair Color:
Color the hair with a soft beige or light brown marker. Leave a small, uncolored band across the bangs to act as a natural highlight, or color it solid and add white later. -
Blushing Cheeks:
Using a soft pink marker, dab wide oval blushes onto the cheeks just under the eyes for a flushed, healthy look. -
Outfit Hues:
Color the skirt and socks with a cool grey marker. Use a warm brown for her shirt and red for the straw and hair accessories. -
Beverage Gradient:
For the tea, start with a light pink at the top of the liquid level and blend into a slightly darker peach at the bottom. Color the individual boba pearls a dark reddish-brown.
Flavor Swap
Change the liquid color to purple for taro milk tea or bright green for matcha. Match her hair accessories to the new ‘flavor’ theme.
Step 4: Final Polishing
-
Eye Depth:
Fill the pupils with black ink, leaving large white circles for reflections. Add grey shading to the top of the whites of the eyes to create depth. -
Highlights:
Take your white gel pen and add crisp highlights to the hair buns, the curve of the plastic cup lid, and the boba pearls to make them look wet and shiny. -
Background Elements:
Draw simple star outlines and a few cherries on the ground near her feet using your fine liner, then color them lightly with pink and red markers. -
Soft Background Wash:
I like to add a very faint wash of watered-down pink marker or watercolor around the feet to ground the character so she isn’t floating in space.
Now you have a sweet, boba-sipping companion right in your sketchbook


Bunny Hoodie Hopster
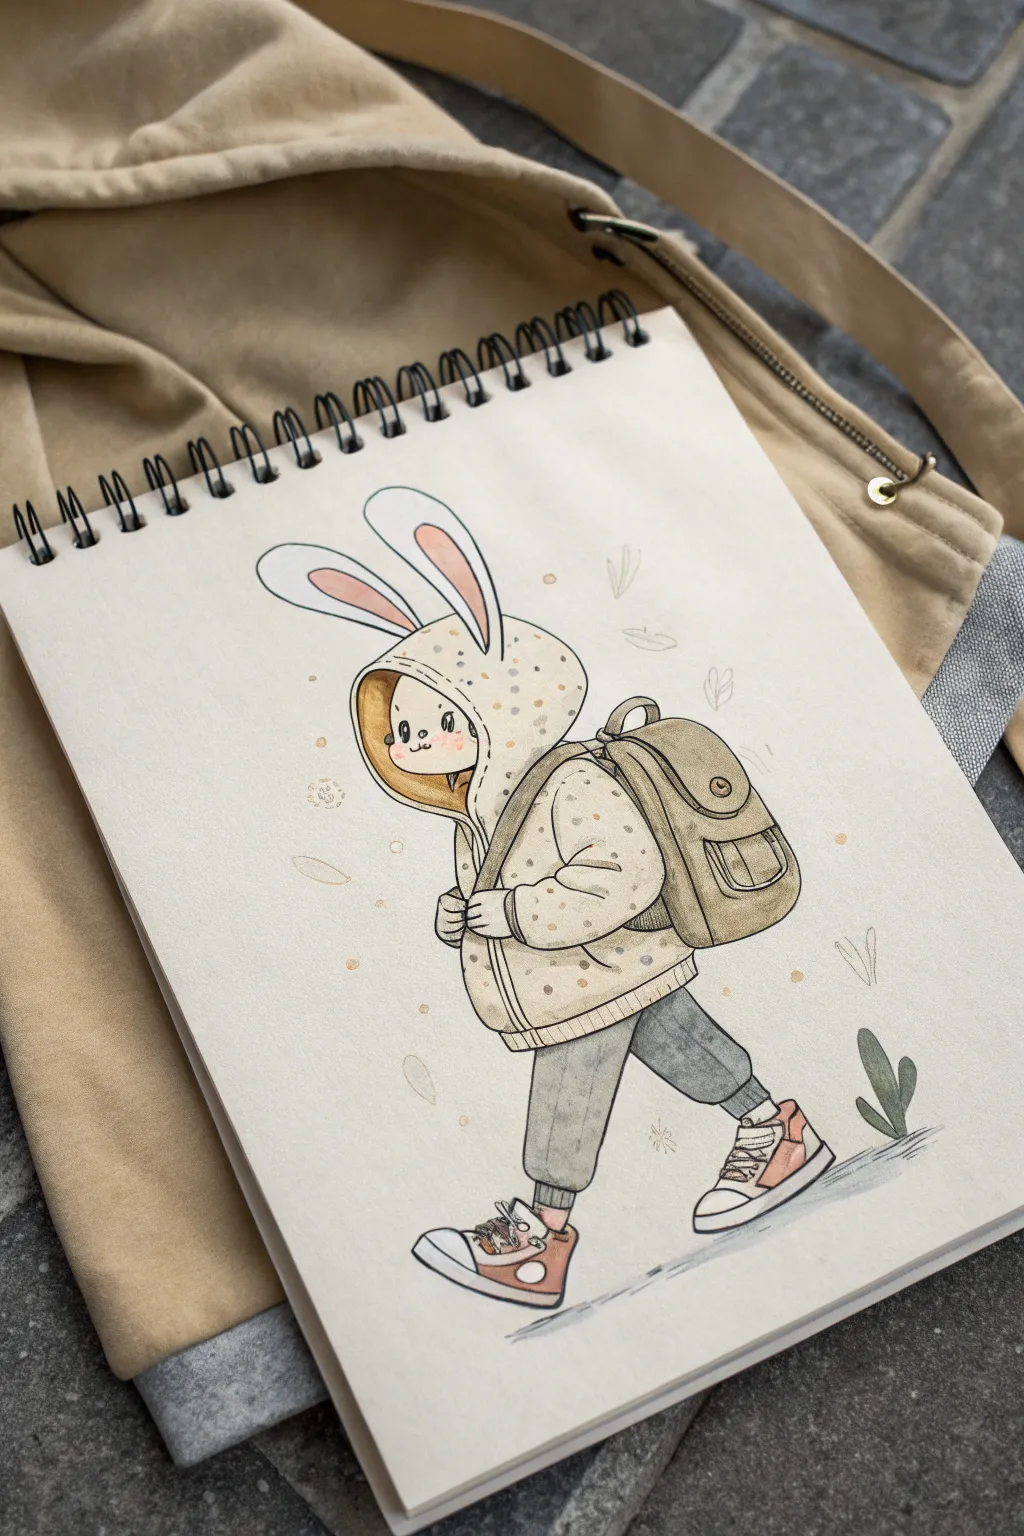
Capture the charm of a gentle stroll with this mixed-media character illustration. Using a combination of fine-liners and soft coloring mediums like markers or watercolor, we will create a cozy, whimsical bunny-eared adventurer.
Step-by-Step Guide
Materials
- Sketchbook with mixed media paper
- HB pencil and eraser
- Fine liner pens (sizes 0.1 and 0.3, black)
- Alcohol markers or watercolors (cream, beige, tan, olive green, warm grey, light pink)
- White gel pen for highlights
- Colored pencils (optional, for texture)
Step 1: Sketching the Framework
-
Basic Shapes:
Start loosely with an HB pencil. Draw a large circle for the head (hoodie area) and a smaller, slightly curved bean shape below it for the body. -
Adding Limbs:
Sketch simple stick lines for the legs to establish the walking pose. The front leg should be straight down, and the back leg bent slightly as if pushing off the ground. -
Hoodie Definition:
Refine the head circle into a hoodie shape. Draw the opening around the face—it should be an oval shape slightly off-center to the left. Don’t forget the two long bunny ears flopping slightly backward from the top. -
Bag & Volume:
Flesh out the jacket sleeves; make them puffy and oversized. Sketch a rounded backpack shape resting on the character’s back, adding straps that disappear under the arms.
Keeping it Cozy
For the hoodie pattern, vary the size of your dots slightly. Mixing tiny pin-prick dots with larger circles creates a more natural, fabric-like texture.
Step 2: Refining the Details
-
Face Features:
Inside the hood opening, draw the character’s face. Place two small dots for eyes, a tiny ‘Y’ shape for the nose and mouth, and cute circular blush marks on the cheeks. -
Clothing Details:
Add the ribbed cuffs on the sleeves and the bottom hem of the jacket. Draw the pockets on the backpack and the laces on the high-top sneakers. -
Inking the Lines:
Using a 0.3 fine liner, outline the main shapes of the character. Use a steady hand but keep the lines slightly loose for an organic feel. -
Finer Details:
Switch to a 0.1 pen for delicate areas like the facial features, shoelaces, and the stitching details on the backpack pockets. Erase all pencil marks once the ink is totally dry.
Step 3: Adding Color & Depth
-
Skin Tones:
Color the face with a very pale cream or peach tone. Add a soft pink to the inside of the bunny ears and the cheek blush. -
The Hoodie:
Fill in the jacket with a warm cream or light beige color. I sometimes like to leave tiny white gaps near the edges to suggest rounded highlights. -
Pants and Bag:
Use a muted grey-green or warm grey for the pants. Color the backpack a distinct olive or tan shade to separate it visually from the jacket. -
Distinctive Shoes:
Color the high-tops with a mix of terracotta or rust orange and cream accents to make them pop against the muted outfit. -
Pattern Work:
Once the jacket base color is dry, use a slightly darker beige or light brown marker to dot a simple confetti pattern all over the hoodie.
Smudge Alert
If your fine liner smears when you color over it, switch the order: lay down your marker or watercolor base first, let it dry completely, and then do your inking on top.
Step 4: Finishing Touches
-
Shadows:
Add subtle shading where the backpack straps hit the shoulders and under the chin using a cool grey marker or colored pencil. -
Grounding:
Swipe a quick, horizontal patch of light grey or blueish-grey beneath the feet to create a shadow, grounding the character so they aren’t floating. -
Environmental Elements:
Draw faint, small leaves or petals floating around the character with a fine liner or pale colored pencil to enhance the feeling of movement.
Now you have a charming little explorer ready to hop off the page


Shy Library Witch-in-Training

Capture the cozy charm of autumn with this watercolor illustration of a studious young witch. This project combines delicate ink linework with soft washes to create a character full of personality and warmth.
Step-by-Step Tutorial
Materials
- Cold-press watercolor paper (300 gsm)
- Pencil (HB or similar) and eraser
- Waterproof fine liner pens (0.1 and 0.3mm)
- Watercolor paints (pans or tubes)
- Round watercolor brushes (size 2, 4, and 6)
- Clean water jar and paper towels
- White gel pen or gouache for highlights
Step 1: Sketching the Character
-
Basic Shapes:
Start lightly with a pencil. Draw a large circle for the head and a rectangular shape below it for the coat. Sketch a large triangular shape on top for the quintessential witch’s hat. -
Refining the Face:
Position the round glasses slightly low on the face. Add two small arcs for closed, smiling eyes behind the lenses and a tiny nose. Sketch the hair with short, bouncy curves framing the face. -
Adding the Books:
Sketch a stack of three thick books in her arms. Ensure the books are angled slightly differently to look natural, and draw her small hands gripping the bottom book and side. -
Costume Details:
Add the long scarf wrapped loosely around her neck with hanging tassels. Draw the coat’s buttons and hemline, and finish with little boots at the bottom. -
Surrounding Elements:
Lightly sketch a small, bare branch on the right side and a twig on the left to ground the character in a setting.
Step 2: Inking the Outline
-
Main Lines:
Using a 0.3mm waterproof pen, carefully trace over your pencil lines. Use broken or lighter lines for texture on the scarf and hair to keep them looking soft. -
Fine Details:
Switch to a 0.1mm pen for delicate areas like the facial features, the pages of the books, and the texture on the twigs. -
Clean Up:
Once the ink is completely dry—give it a few minutes to be safe—erase all the underlying pencil sketches to leave a clean drawing surface.
Wet-on-Dry Control
For this illustrative style, paint ‘wet-on-dry’ (wet paint on dry paper). It prevents colors from bleeding into each other, keeping your character crisp.
Step 3: Applying Watercolor
-
Skin Tones:
Mix a very dilute wash of peach or light ochre. Paint the face and hands, adding a slightly pinker tone to the cheeks and nose while the first layer is still damp for a natural blush. -
The Coat and Hat:
Use a dark charcoal or Payne’s Grey for the hat and coat. Keep the wash uneven to suggest texture, letting the pigment pool slightly at the bottom edges. -
Hair and Scarf:
Paint the hair in a warm brown. For the scarf, use a golden yellow or mustard tone. I like to drop in a touch of burnt sienna while the yellow is wet to create shadow depth in the folds. -
Coloring the Books:
Choose muted, cozy colors for the book covers—terracker red, soft uneven blue, and brown. Paint the page edges in a very pale warm off-white. -
Ground and Plants:
Paint a loose, irregular patch of pale yellow-green under her feet. Use brown for the twigs and add small red dots for berries.
Muddy Colors?
If your grey coat looks muddy against the scarf, ensure the yellow paint is 100% dry before painting the dark grey nearby to prevent accidental mixing.
Step 4: Finishing Touches
-
Deepening Shadows:
Once existing layers are dry, mix slightly darker versions of your base colors. Apply these to the undersides of the hat brim, under the scarf, and where the coat overlaps the boots. -
Adding Highlights:
Use a white gel pen to add small reflections on the round glasses, a tiny dot on the nose, and highlights on the berries. -
Deckled Edge Effect:
To mimic the photo’s vintage paper look, carefully tear the edges of your watercolor paper against a ruler or just by hand for a rough, organic border.
Now you have a charming little witch ready to add magic to your sketchbook

PENCIL GUIDE
Understanding Pencil Grades from H to B
From first sketch to finished drawing — learn pencil grades, line control, and shading techniques.
Explore the Full Guide
Sun and Moon OC Duo
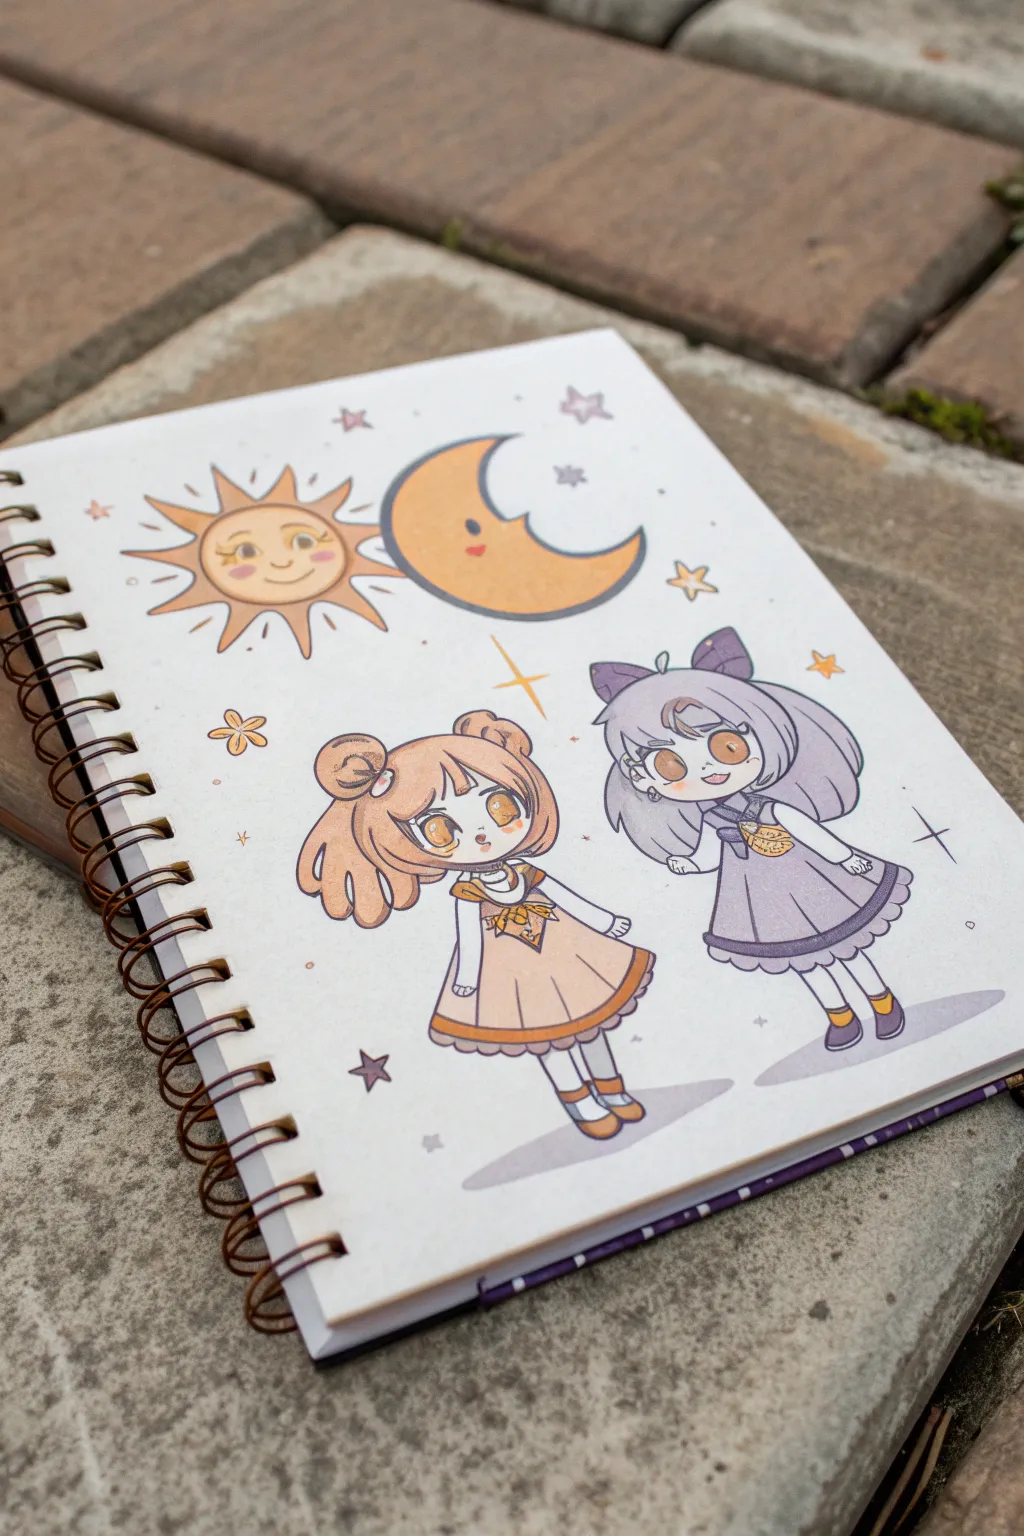
Create a charming duo of celestial-themed characters with this clean, marker-style illustration guide. This project features warm and cool tones to represent the sun and moon, rendered in an adorable chibi style right in your sketchbook.
Step-by-Step
Materials
- Spiral-bound mixed media sketchbook
- HB pencil
- Kneaded eraser
- Fine liner pens (0.1mm, 0.3mm, 0.5mm) in black or dark brown
- Alcohol-based markers (yellows, oranges, lavenders, grays, pale skin tones)
- White gel pen
Step 1: Planning and Sketching
-
Lay out the composition:
Start by lightly marking the positions for your two characters. Place the ‘Sun’ character on the left and the ‘Moon’ character on the right, leaving enough space above their heads for the celestial symbols. -
Draft the celestial symbols:
Above the left figure, sketch a circle for the sun face. Draw triangles radiating outward for rays. Above the right figure, sketch a large crescent moon shape facing inward. -
Sketch the character bases:
Draw two large circles for the heads. Add small, simplified bodies below using stick-figure guidelines to establish the pose; make the Moon character slightly lean in towards the Sun character. -
Define the Sun character:
Give the left character a rounded bob hairstyle with odango (buns) on top to mimic a round sun shape. Sketch a simple sailor-style school uniform with a pleated skirt. -
Define the Moon character:
Draw the right character with longer, flowing hair and cat-ear-like ribbons or tufts. Dress her in a pinafore-style dress over a collared shirt. -
Add facial features:
Sketch large, expressive eyes for both. Give the Sun character a surprised ‘o’ mouth and the Moon character a gentle smile. Don’t forget the sleepy faces on the celestial sun and moon above them.
Step 2: Inking
-
Outline the main figures:
Using a 0.3mm fine liner, carefully trace over your pencil lines. I prefer using a dark brown liner for a softer, warmer look than harsh black, but either works well. -
Add line weight variance:
Go back over outer edges and areas where shadows would fall (like under the chin or skirt hem) with a 0.5mm pen to thicken the lines and add depth. -
Detail the faces:
Switch to a delicate 0.1mm pen to ink the eyes, eyelashes, and small details on the clothing ribbons. -
Erase guidelines:
Wait until the ink is completely dry to prevent smudging, then gently erase all pencil sketches with a kneaded eraser.
Soft Shading Secret
When using alcohol markers, work quickly while the ink is wet to blend skin tones seamlessly. Let layers dry fully before adding sharp shadows.
Step 3: Coloring
-
Color the skin:
Apply a pale skin tone marker to the faces, necks, and legs. Let it dry, then add a slightly darker shade under the hair bangs and necks for shadow. -
Fill in the Sun character:
Use a warm apricot or light orange for her hair. Color her dress using a soft peach or beige, using a darker orange for the skirt hem and ribbon. -
Fill in the Moon character:
Select a dusty lavender or cool gray for her hair. Use a deeper purple for her dress and a light gray for the blouse underneath. -
Color the celestial icons:
Color the sun emblem with a golden yellow and the crescent moon with the same apricot orange used on the Sun character’s hair to tie the color palette together. -
Add playful blush:
Using a pink marker or a little colored pencil, add circular blush marks to the characters’ cheeks and the cheeks of the sun and moon overhead. -
Cast shadows:
Take a light cool gray marker and draw simple oval shadows on the ground beneath their feet to ground them in space.
Make It Sparkle
Add metallic gold or silver ink to the sun rays, moon crescent, and buttons on the outfits. It catches the light beautifully when you turn the page.
Step 4: Finishing Touches
-
Add decorative elements:
Scatter small stars, sparkles, and flower shapes around the characters using yellow and lavender markers to fill the negative space. -
Apply highlights:
Use a white gel pen to add small dots on the eyes, cheeks, and hair for that signature shiny anime look.
Now you have a perfectly matched pair of celestial OCs ready to brighten up your sketchbook
Candy Color Decora Maximalist
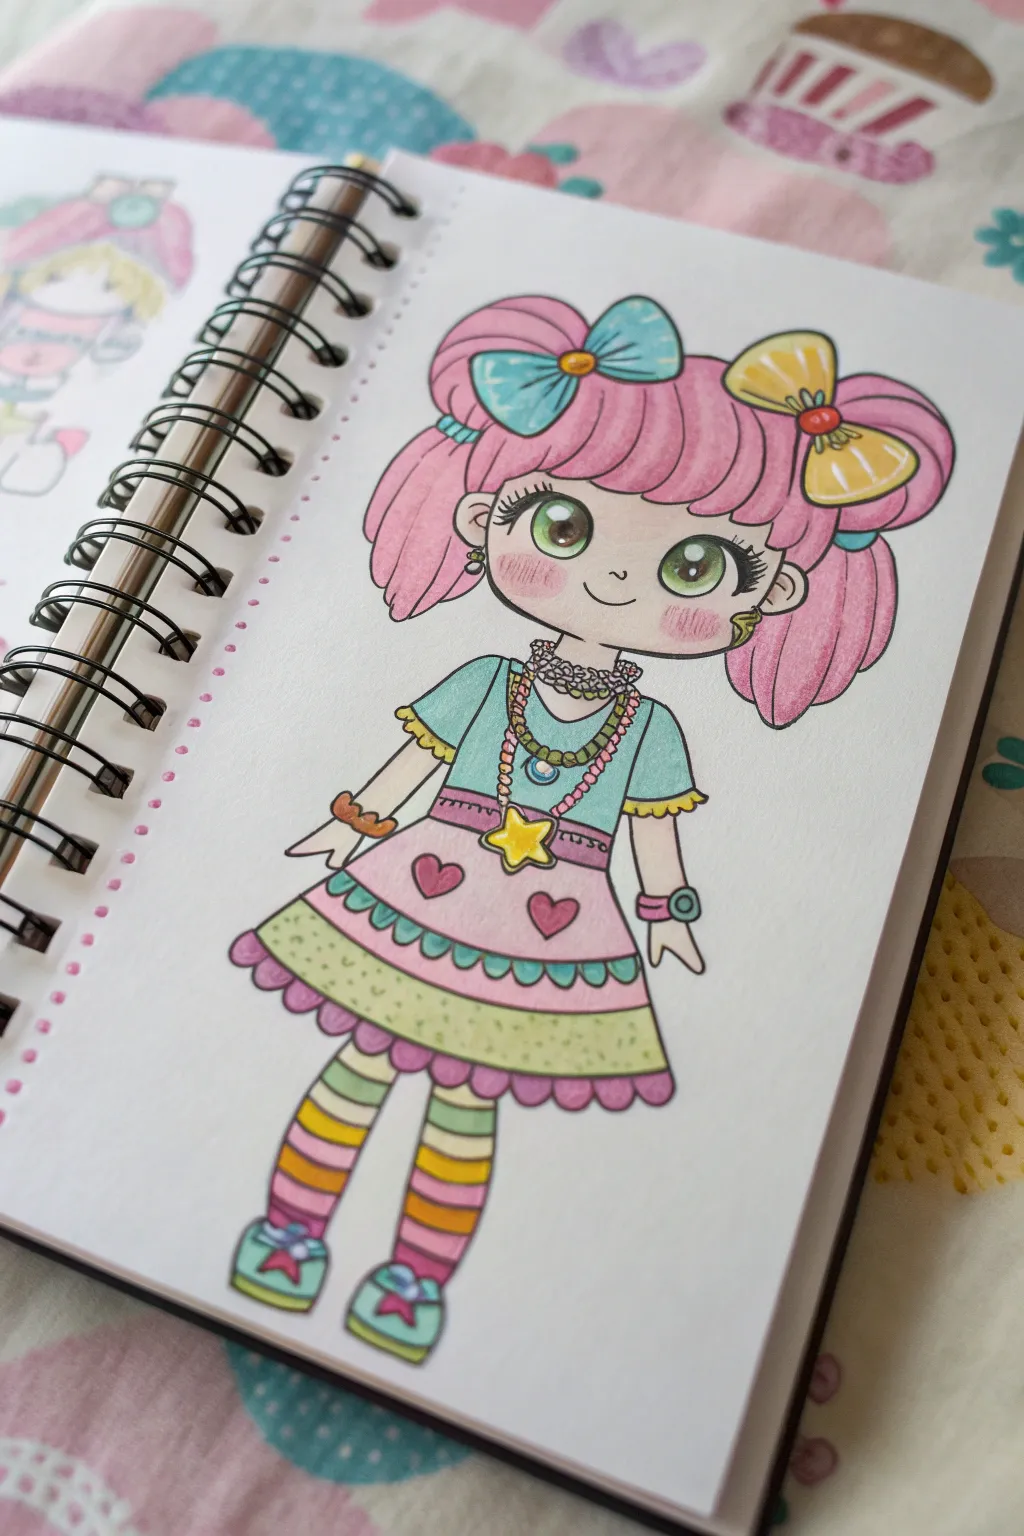
Dive into the vibrant world of kawaii fashion with this step-by-step marker and ink tutorial. You will create a candy-colored character bursting with accessories, bold patterns, and oversized eyes that capture the essence of Decora style.
Step-by-Step Tutorial
Materials
- Sketchbook or Illustration Board (heavyweight paper)
- HB Pencil and Eraser
- Fine Liner Pens (black, 0.1mm to 0.5mm)
- Alcohol-based Markers (pinks, teal, yellow, green)
- White Gel Pen
Step 1: Drafting the Character
-
Head and Body Shape:
Start by sketching a large, rounded rectangle for the head, keeping the chin soft and flat. Draw a small, simple trapezoid for the upper body and attach thin, noodle-like limbs for a classic chibi proportion. -
Blocking the Hair:
Frame the face with chunky bangs that curve slightly inward. Add huge pigtails on either side, making them voluminous and round like cotton candy puffs. -
Drawing the Decora Details:
This style is about excess, so add two large bows on the hair—one on each side. Sketch in layers of necklaces, chunky bracelets, and a star pendant. -
Designing the Outfit:
Draw a short, A-line dress with ruffled sleeves. Divide the skirt into three horizontal tiers: a top panel with hearts, a middle striped ruffle, and a polka-dot hem. -
Adding Facial Features:
Place two large circles for the eyes low on the face for cuteness. Add long, sweeping lashes at the corners and a tiny, curved smile centered between them.
Ink Confidence
If your hand shakes while inking long lines like the hair, try moving your entire arm from the shoulder, not just your wrist.
Step 2: Inking the Lines
-
Primary Outline:
Using a 0.3mm or 0.5mm fine liner, carefully trace over your pencil lines. Intentionally thicken the lines around the outer silhouette of the hair and the main dress shape to make the character pop. -
Fine Details:
Switch to a thinner 0.1mm pen for delicate areas like the eyelashes, the jewelry beads, and the tiny ruffles on the dress. -
Hair Texture:
Add separation lines inside the bangs and pigtails to suggest locks of hair, but keep them smooth and stylized rather than realistic. -
Clean Up:
Wait at least five minutes for the ink to fully set, then gently erase all visible pencil marks to leave a clean, crisp line art base.
Decora Stickers
Add real, tiny stickers or adhesive gems to the drawing’s face or hair bows for an authentic 3D mixed-media Decora effect.
Step 3: Vibrant Coloring
-
Skin Tone Base:
Apply a pale, warm beige marker to the face, neck, arms, and legs. While the ink is wet, add a second layer under the hairline and chin for subtle shading. -
Candy Pink Hair:
Color the entire hair mass with a bubblegum pink marker. I like to leave small, white slivers near the part of the bangs for natural highlights. -
Accessories and Outfit:
Use a teal marker for the shirt, one hair bow, and the shoe details. Contrast this with bright yellow for the other bow, star necklace, and striped socks. -
Patterned Skirt:
Color the top skirt tier pink to match the hair, the middle tier light green, and leave the ruffles varied. Markers bleed, so use a light touch near the line art. -
Eye Detail:
Color the irises with an olive green marker, darkening the top half for depth. Leave a large white circle untouched for the pupil highlight.
Step 4: Finishing Touches
-
Adding Blush:
Take a colored pencil in a darker pink or red shade and gently scribble distinct oval blush marks on the cheeks. -
Deepening Shadows:
Use a darker pink marker or pencil to shade the underside of the pigtails and the folds of the skirt. -
Highlighting:
With a white gel pen, add tiny dots to the eyes, the shine on the plastic jewelry, and little sparkles on the dress.
Your finished page should look like a sweet, colorful sticker ready to jump off the paper
BRUSH GUIDE
The Right Brush for Every Stroke
From clean lines to bold texture — master brush choice, stroke control, and essential techniques.
Explore the Full Guide
Tiny Horns, Big Heart Demon
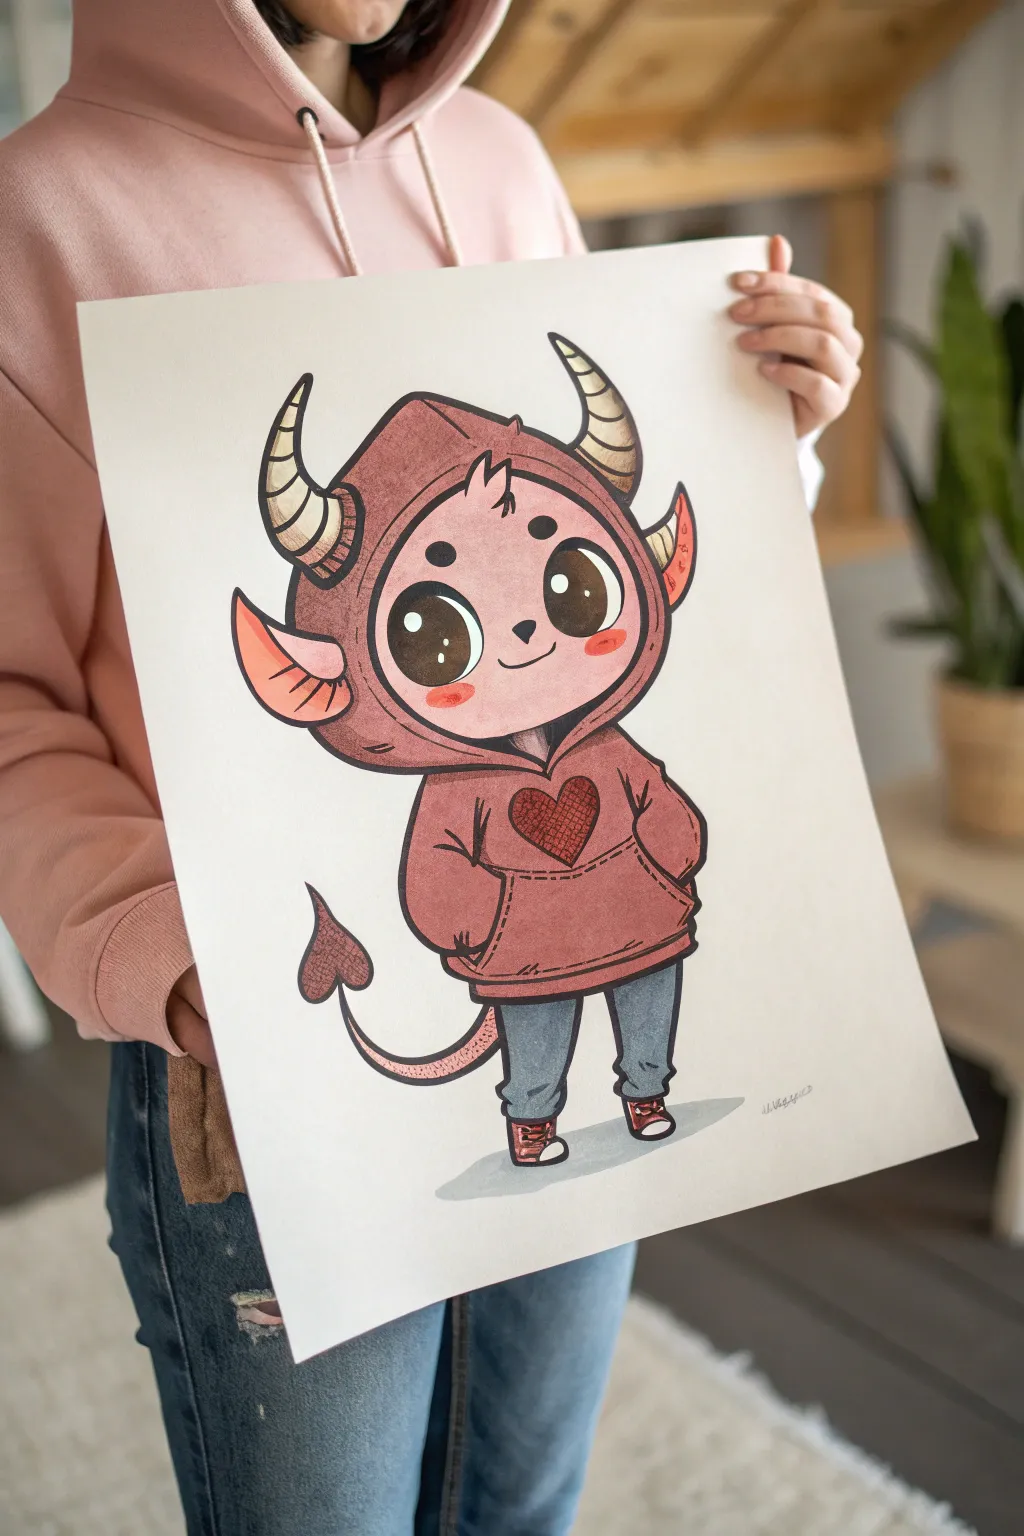
Bring this adorable little devil to life with a mix of bold linework and soft, warm coloring. The character features oversized eyes, a cozy hoodie, and cute little horns, making for an irresistibly sweet illustration perfect for stickers or character cards.
How-To Guide
Materials
- Heavyweight drawing paper or Bristol board (A3 or A4)
- H or HB pencil for sketching
- Kneaded eraser
- Fine liner pens (0.3mm, 0.5mm, and 0.8mm black)
- Alcohol-based markers (muted pink, dusty rose, warm grey, slate blue)
- White gel pen for highlights
- Colored pencils for shading (optional)
Step 1: Sketching the Foundation
-
Basic Shapes:
Start by lightly sketching a large circle for the head and a smaller, slightly squashed oval below it for the body. Keep your pencil pressure very light so you can erase easily later. -
Defining the Hoodie:
Draw the outline of the hood around the head circle, adding a slight peak at the top center. Shape the oval body into a comfy sweatshirt silhouette, making the bottom hem slightly curved. -
Facial Guidelines:
Mark a vertical center line and a horizontal eye line on the face. Place two large circles for the eyes, spacing them widely apart to maximize the cuteness factor. -
Adding Horns and Ears:
Sketch two curved, triangular shapes emerging from the hood for the horns. Below the ear, draw two wide, pointed ears sticking out horizontally. -
Limbs and Tail:
Draw short, simple tubes for the legs and small oval shapes for the shoes. Add the tail swooping out from the back, ending in a classic spade or heart shape. -
Details and Refining:
Add the kangaroo pocket on the front of the hoodie and sketch a heart shape in the center. Refine the horn segments and add a little tuft of hair peeking out from under the hood.
Eye Sparkle Tip
Keep the white highlights in the eyes large and positioned at the top right of the pupil. This specific placement is key for that innocent ‘puppy dog’ look.
Step 2: Inking the Lines
-
Main Outlines:
The line weight is crucial here. Use a 0.8mm fine liner for the main outer contours of the character to give it a sticker-like boldness. -
Inner Details:
Switch to a 0.5mm pen for the inner details like the pocket, ear folds, and shoe laces. Use a 0.3mm pen for delicate areas like the horn ridges. -
The Eyes:
Carefully outline the large eyes. Draw two inner circles for the highlights—one large and one small—before filling the rest of the pupil in solid black. -
Cleanup:
Once the ink is completely dry, gently erase all your pencil sketches with the kneaded eraser. I like to double-check that the ink hasn’t smeared before this step.
Step 3: Coloring and Shading
-
Base Skin Tone:
Use a pale, warm pink marker to fill in the face. Apply the color quickly and evenly to avoid streak marks. -
Hoodie Base:
Color the entire hoodie and tail tip with a dusty rose or muted red marker. Leave the heart shape for a slightly darker shade or texture later. -
Pants and Horns:
Fill the pants with a slate blue or heavy grey. For the horns, use a light cream or warm beige tone. -
Adding Shadows:
Using a slightly darker shade of your base colors (or a warm grey marker), add shadows under the hood rim, under the chin, and inside the ears to create depth. -
Texture Work:
For the heart patch on the chest, use a fine liner to create a cross-hatch texture, mimicking fabric stitches. This adds a lovely handmade feel. -
Blushing Cheeks:
Add two soft oval shapes of coral pink or red under the eyes for flush marks. Soften the edges if possible. -
Deepening Values:
Enhance the darkest shadow areas—like under the arms and where the pants meet the boots—with a second layer of marker or a dark colored pencil. -
Final Highlights:
Take your white gel pen and add tiny dots of shine to the nose, the tips of the horns, and the rubber on the shoes to make the character pop. -
Grounding Shadow:
Use a light grey marker to draw a simple oval shadow on the ground beneath the feet so the character doesn’t look like it’s floating.
Uneven Marker Ink?
If your markers look streaky on large areas like the hoodie, try coloring in small circular motions rather than straight lines to blend the ink while it is wet.
Now you have a charming little demon companion ready to display
Cloud Hair Daydreamer
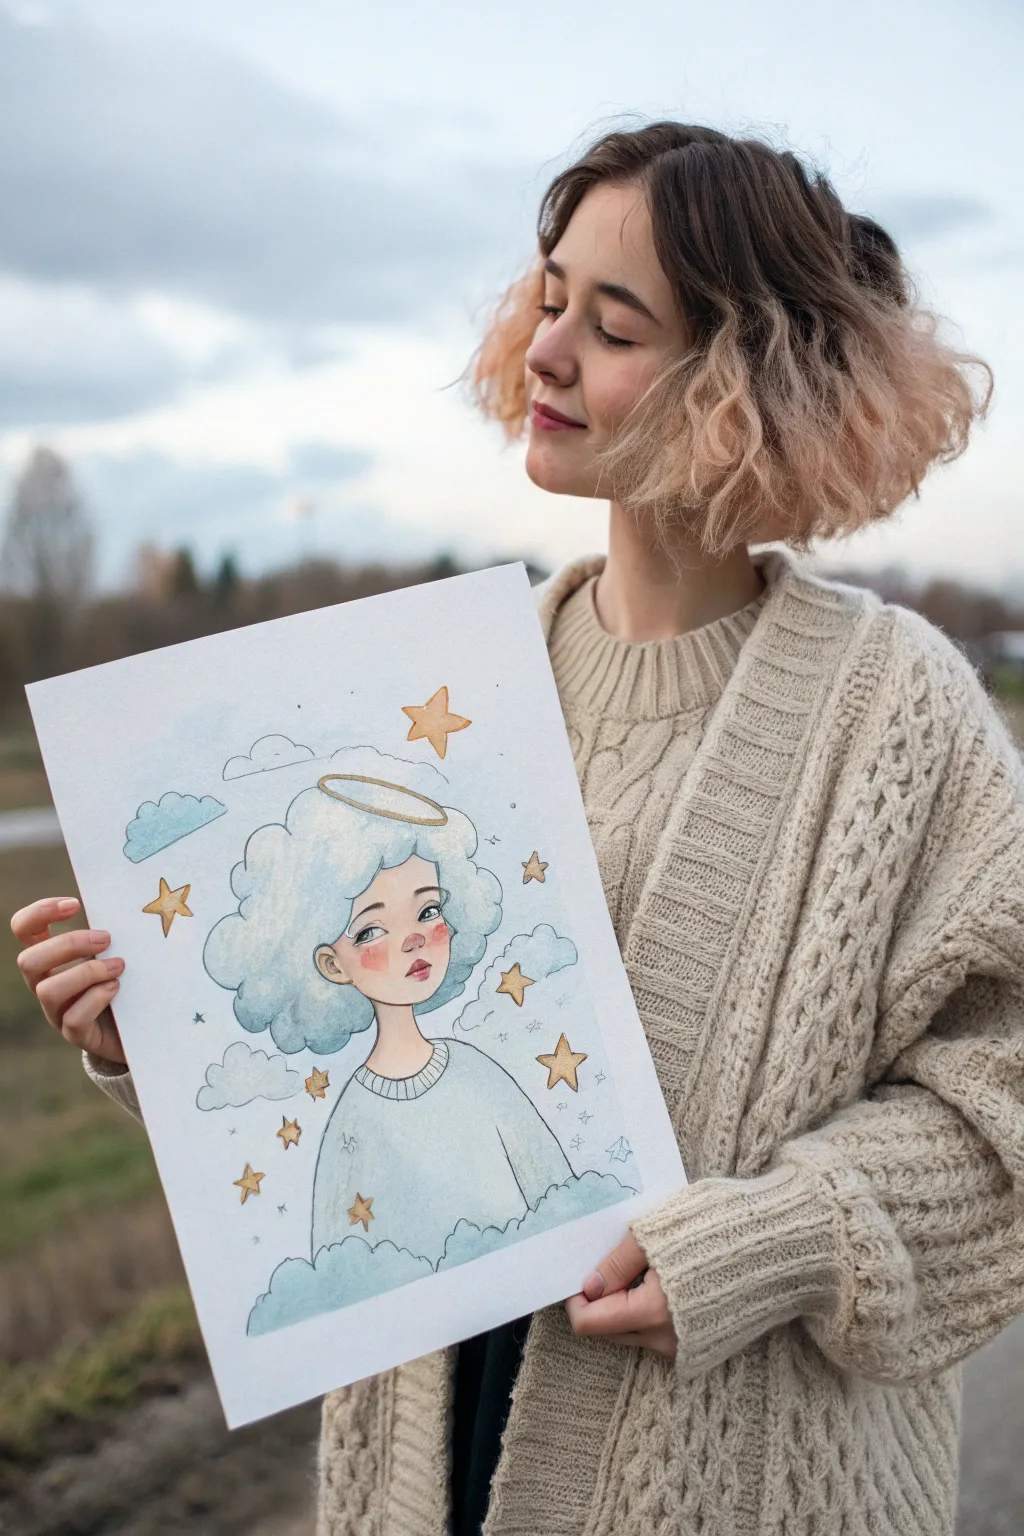
Capture the whimsy of a celestial character with this dreamy watercolor and ink illustration. The soft, billowy cloud hair and scattering of golden stars create a gentle, magical atmosphere perfect for character design portfolios.
How-To Guide
Materials
- Hot press watercolor paper (A4 or similar)
- HB pencil and good quality eraser
- Waterproof fineliner pens (sizes 0.1 and 0.3, black or dark grey)
- Watercolor paints (Cerulean Blue, Payne’s Grey, Yellow Ochre, Alizarin Crimson, Burnt Sienna)
- White gouache or white gel pen
- Gold metallic watercolor or gold ink
- Round watercolor brushes (size 4 and 0 or 1 for details)
- Palette and two jars of water
Step 1: Sketching the Concept
-
Draft the face shape:
Start lightly with your HB pencil, drawing an oval for the head. Keep the chin slightly pointed but rounded for a youthful look. Position the neck stemming centrally from the bottom of the oval. -
Map facial features:
Draw faint guidelines for the eyes about halfway down the face. Sketch large, wide-set almond eyes looking slightly upward. Add a small button nose and full, slightly parted lips just below. -
Form the cloud hair:
Instead of normal hair strands, draw large, billowy cloud shapes surrounding the head. Let the shapes be irregular and bubbly, framing the face closely. Don’t worry about symmetry; clouds are organic. -
Add floating elements:
Sketch a simple oval halo tilting above the cloud hair. Scatter five-pointed stars of varying sizes around the background and near the shoulders. Add a few extra small clouds in the background for depth. -
Detail the outfit:
Draw a simple crew-neck sweater on the figure. Add a ribbed texture to the collar and keep the shoulders relaxed. Let the bottom of the sweater fade into another bank of clouds at the base of the drawing.
Uneven Washes?
If your blue washes look streaky, wet the paper slightly with clean water before applying paint. This ‘wet-on-wet’ technique helps the pigment spread smoothly for soft clouds.
Step 2: Inking the Lines
-
Outline the main features:
Using a 0.3 waterproof fineliner, carefully trace your pencil lines. For the cloud hair, use a slightly broken or lighter touch to keep it looking soft, rather than a rigid heavy outline. -
Refine the face:
Switch to a 0.1 fineliner for facial features. Detail the eyelashes, pupils, and the delicate curve of the nose. Keep the lip outline very thin or broken, focusing on the center line of the mouth. -
Clean up:
Once you are certain the ink is completely dry—I usually give it a full five minutes just to be safe—erase all the graphite pencil marks gently to reveal a clean line drawing.
Step 3: Watercolor Washes
-
Skin tones:
Mix a very watery wash of Burnt Sienna with a tiny touch of Alizarin Crimson. Paint the face and neck, leaving small white gaps in the eyes. While the cheeks are damp, drop in a bit more Crimson for a blush effect. -
Painting the cloud hair:
Prepare a mix of Cerulean Blue and a hint of Payne’s Grey. Apply this as a wash to the hair. While wet, lift some pigment out with a thirsty brush to create white highlights on the ‘puffs’ of the clouds. -
Sweater color:
Use a slightly more saturated version of your blue-grey mix for the sweater. Paint vertical strokes to suggest the knit texture, but keep the overall wash light and airy. -
Background sky:
Paint the background clouds with a very pale blue wash. Leave the space around the stars white for now so their color will pop later. -
Deepening shadows:
Once the first layers are dry, mix a slightly darker blue-grey. Paint shadows under the hair tufts, under the chin, and in the folds of the sweater to give the figure dimension.
Pro Tip: Colored Lines
Try using a slate blue or grey fineliner instead of pure black for the cloud outlines. This makes the hair look softer and less cartoon-like compared to the face.
Step 4: Magical Details
-
Gilding the stars:
Using your gold metallic paint or Yellow Ochre, carefully fill in the stars and the halo. If using metallic paint, you might need two coats for opaque coverage. -
Adding sparkle:
Take your white gel pen or gouache on a fine brush. add tiny dots in the eyes for catchlights, and draw small sparkles or ‘plus signs’ in the background space. -
Final definition:
Use the white pen to outline the top edge of the cloud hair where the light hits it, reinforcing that fluffy, voluminous texture. Add small white squiggles on the sweater for extra knit detail.
Now your dreamy character is ready to float right off the page


Mint Chocolate Chip Personified
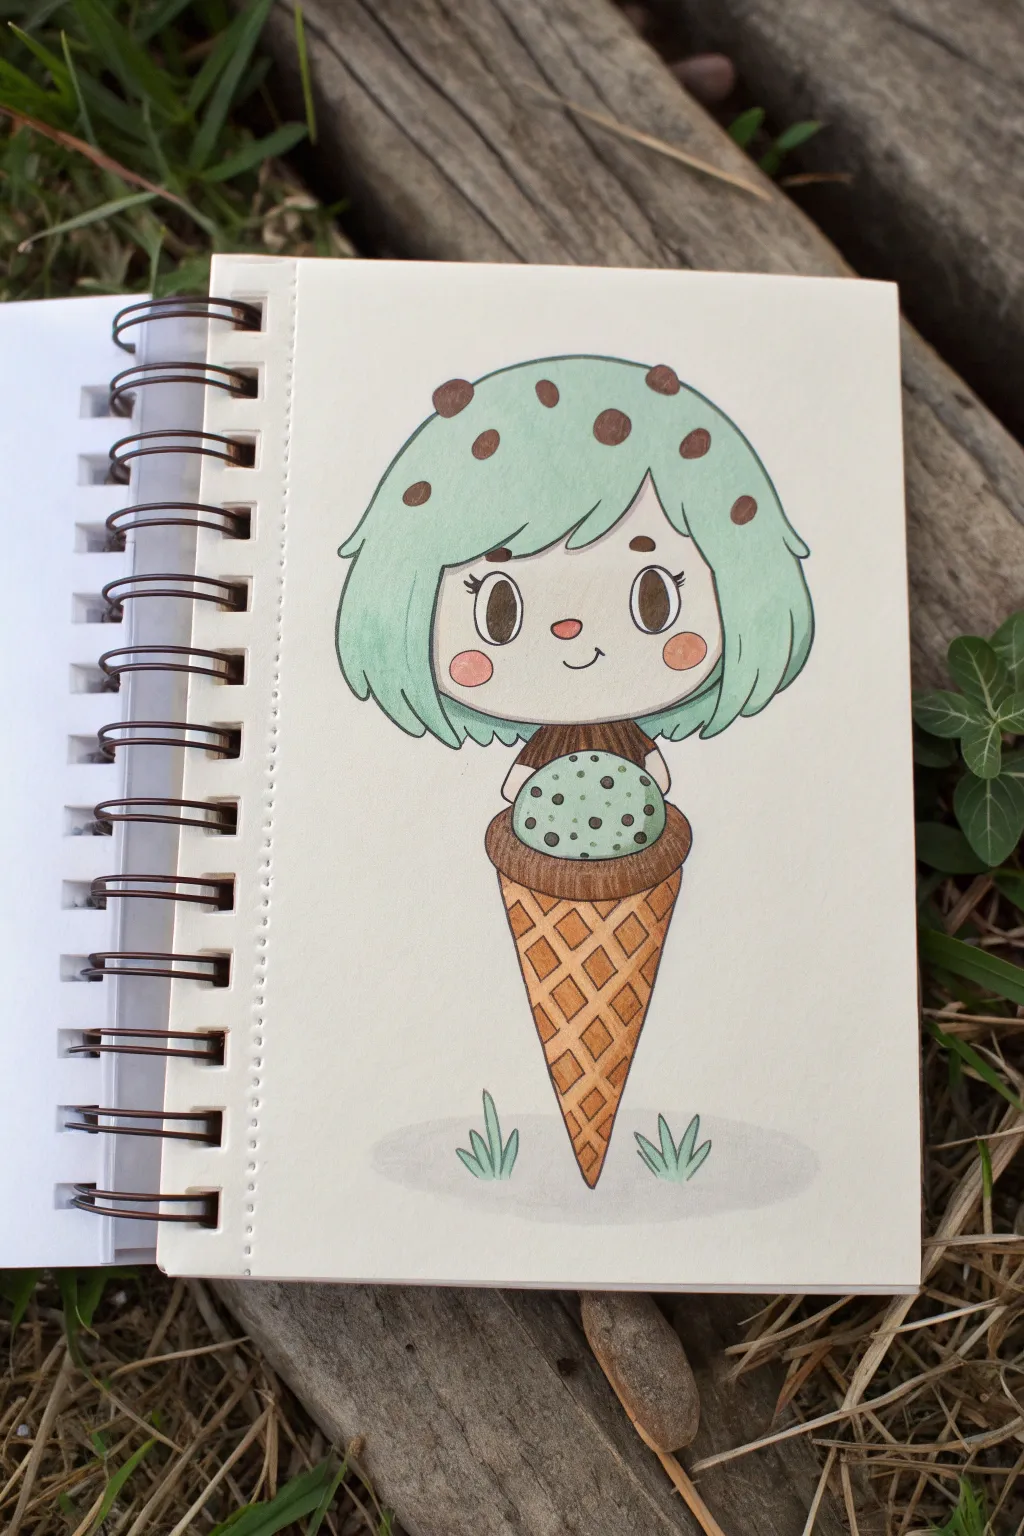
This adorable character design sweetens any sketchbook page by personifying the classic ice cream flavor. Using soft alcohol markers and fine liners, you’ll create a chibi-style figure that blends dessert textures with cute character features.
Step-by-Step
Materials
- Mixed media or marker paper sketchbook
- HB pencil for sketching
- Eraser (kneaded preferred)
- Fine liner pens (black, 0.1mm and 0.3mm)
- Alcohol markers (Mint Green, Chocolate Brown, Tan/Beige, Pale Peach, Light Gray)
- White gel pen
Step 1: Sketching the Sweets
-
Draw the Head Shape:
Begin with a soft, rounded rectangle for the face. Keep the jawline very curved and the cheeks slightly puffed out to create that classic chibi look. -
Hair Outline:
Sketch a fluffy, bob-style haircut that frames the face. The hair should look voluminous, like a scoop of ice cream, so use curved lines for the bangs and the outer tips. -
Add Facial Features:
Place two large ovals for eyes wide apart on the face. Add a small ‘u’ shape for the nose and a gentle curve for the smile just below it. -
Body and Cone:
Instead of legs, draw a classic waffle cone shape tapering down to a sharp point. Connect the head to the cone with a tiny torso area. -
The Ice Cream Prop:
Draw a perfect circle right in front of the torso to represent the scoop of ice cream the character is holding. Add tiny hands gripping the sides of it. -
Detailing the Chips:
Lightly sketch irregular circles and ovals scattered across the hair and the ice cream scoop. These will be your chocolate chips.
Step 2: Inking the Lines
-
Refine the Outlines:
Using your 0.3mm fine liner, trace over your pencil lines. Keeps the lines smooth and continuous, especially on the long curves of the hair. -
Face Details:
Switch to a thinner 0.1mm pen for the delicate facial features. Draw the eyelashes carefully at the outer corners of the eyes. -
Erase Pencil Marks:
Wait until the ink is completely dry to avoid smudging, then gently erase all the underlying pencil lines.
Marker Blending Trick
For softer cheeks, apply the blush color while the skin base is still wet. The colors will bleed together slightly for a natural gradient.
Step 3: Coloring and Shading
-
Skin Tone Base:
Color the face and hands with your Pale Peach marker. Apply a second layer to the cheeks for a rosy blush effect. -
Minty Fresh Hair:
Fill in the hair and the ice cream scoop with a soft Mint Green marker. Work quickly to ensure an even, streak-free coat. -
Chocolate Chips:
Use a deep Chocolate Brown marker to fill in the spots on the hair and the scoop. Also, color the character’s shirt dark brown to match. -
Waffle Cone Base:
Color the cone shape with a Tan or light Beige marker. Let this layer dry completely before moving to the next step. -
Cone Texture:
With a slightly darker shade of tan or light orange, draw diagonal crisscross lines on the cone to create the waffle pattern. Fill in alternating diamonds slightly darker for depth. -
Chocolate Rim:
Add a thick band of Chocolate Brown right where the ice cream scoop sits in the cone, creating a rim of fudge or chocolate. -
Eye Coloring:
Fill the eyes with brown, leaving small white circles for highlights. If you accidentally color over them, use your white gel pen later. -
Grounding Shadow:
Use a very Light Gray marker to add a simple oval shadow beneath the cone point to ground the character. -
Grass Accents:
Draw a few jagged tufts of grass near the shadow using the Mint Green marker, outlining them with fine liner. -
Final Highlights:
Use a white gel pen to add tiny dots of shine to the chocolate chips, the cheeks, and the eyes to make everything look glossy and sweet.
Make it a Sundae
Add a cherry on top of the character’s head or draw sprinkles on her cheeks instead of blush for extra sweetness.
See how combining simple shapes and a cohesive color palette brings this sweet treat to life
Strawberry Patch Gardener Sprite
Bring this charming strawberry gardener to life using soft watercolors and delicate ink lines. This illustration captures the cozy cottagecore aesthetic perfectly with its warm tones and textured paper.
Step-by-Step Tutorial
Materials
- Cold-pressed watercolor paper (300gsm)
- Waterproof fine liner pen (0.1mm and 0.3mm, brown or sepia)
- Watercolor paints (Vermilion, Sap Green, Yellow Ochre, Burnt Sienna, Rose Madder)
- Round watercolor brushes (size 2 and 4)
- Pencil (HB) and kneadable eraser
- Two jars of water
- Paper towel
Step 1: Sketching the Character
-
Basic Shapes:
Start by lightly sketching a large circle for the head and a gentle trapezoid shape for the dress. Keep your pencil pressure very light so the graphite doesn’t show through the paint later. -
Adding Features:
Position the eyes wide apart on the face for that cute, innocent look. Draw the simple curved smile and rosy cheek circles. Sketch the large, floppy hat brim sitting low on the forehead. -
Strawberry Details:
Draw the strawberry clusters on top of the hat. Create rounded triangular shapes for the berries and jagged, leafy shapes for the greens. Don’t worry about perfection; organic shapes look best. -
Outfitting the Sprite:
Refine the dress shape, adding puff sleeves and a scalloped hem at the bottom. Sketch the striped stockings and simple rounded shoes. -
Props and Environment:
Thicken the arm extending out and draw the watering can handle within her grip. Sketch the can itself with a long spout, and add tiny heart shapes dripping from it onto a small patch of grass.
Step 2: Inking the Outline
-
Tracing the Lines:
Using your waterproof sepia or brown fineliner, carefully trace over your pencil sketch. The brown ink gives a softer, warmer look than black, matching the earthy palette. -
Varying Line Weight:
I like to use a slightly thicker line (0.3mm) for the outer contours of the hair and dress, and a finer tip (0.1mm) for delicate details like the strawberry seeds on the dress and the facial features. -
Erasing:
Wait until the ink is completely dry—give it a few minutes to be safe—then gently erase all pencil marks with a kneadable eraser to keep the paper texture intact.
Muddy Colors?
If colors bleed into each other, let layers dry fully before painting adjacent areas. Use a hair dryer on low heat to speed this up.
Step 3: Painting with Watercolors
-
Skin Tones:
Mix a very dilute wash of Vermilion and Yellow Ochre. Paint the face, arms, and legs. While the face is still slightly damp, drop a tiny bit of concentrated pink onto the cheeks for a soft blush effect. -
Vibrant Hair:
Mix Burnt Sienna with a touch of orange. Paint the hair in sections, leaving small white gaps near the crown to suggest shine and volume. -
The Green Dress:
Apply a pale wash of Sap Green to the dress. Let it dry completely, then use a more saturated mix of the same green to paint the puff sleeves and the folded collar. -
Strawberry Accents:
Paint the watering can and the strawberries on the hat with a soft red or rose color. For the dress pattern, carefully dab small red dots, ensuring they are spaced randomly. -
Hat Texture:
Use a diluted Yellow Ochre or light brown for the straw hat. Once the base layer is dry, you can add tiny hatched lines with a slightly darker brown to mimic woven straw texture. -
Grounding the Scene:
Wet the area under the sprite’s feet with clean water first, then drop in green paint. Taper the edges outward for a soft, dreamy vignette effect rather than a hard line.
Add Some Sparkle
Mix a tiny bit of shimmer powder or iridescent medium into the water used for the watering can droplets for a magical effect.
Step 4: Final Touches
-
Shadows and Depth:
Mix a light purple-grey transparent wash. Apply this under the hat brim (casting a shadow on the hair), under the chin, and beneath the hem of the dress to give the character dimension. -
Striped Stockings:
Carefully paint the green stripes on the stockings, using the very tip of your size 2 brush to stay inside the lines. -
Highlights:
If you lost any highlights, use a tiny amount of white gouache or a white gel pen to add a sparkle to the eyes and the top of the strawberries. -
Heart Droplets:
Paint the tiny hearts pouring from the watering can with a distinct pink, making sure they look like they are floating gently down to the strawberries.
Sign your artwork near the bottom and enjoy your adorable new garden friend.
Koi Fish Streetwear Hybrid
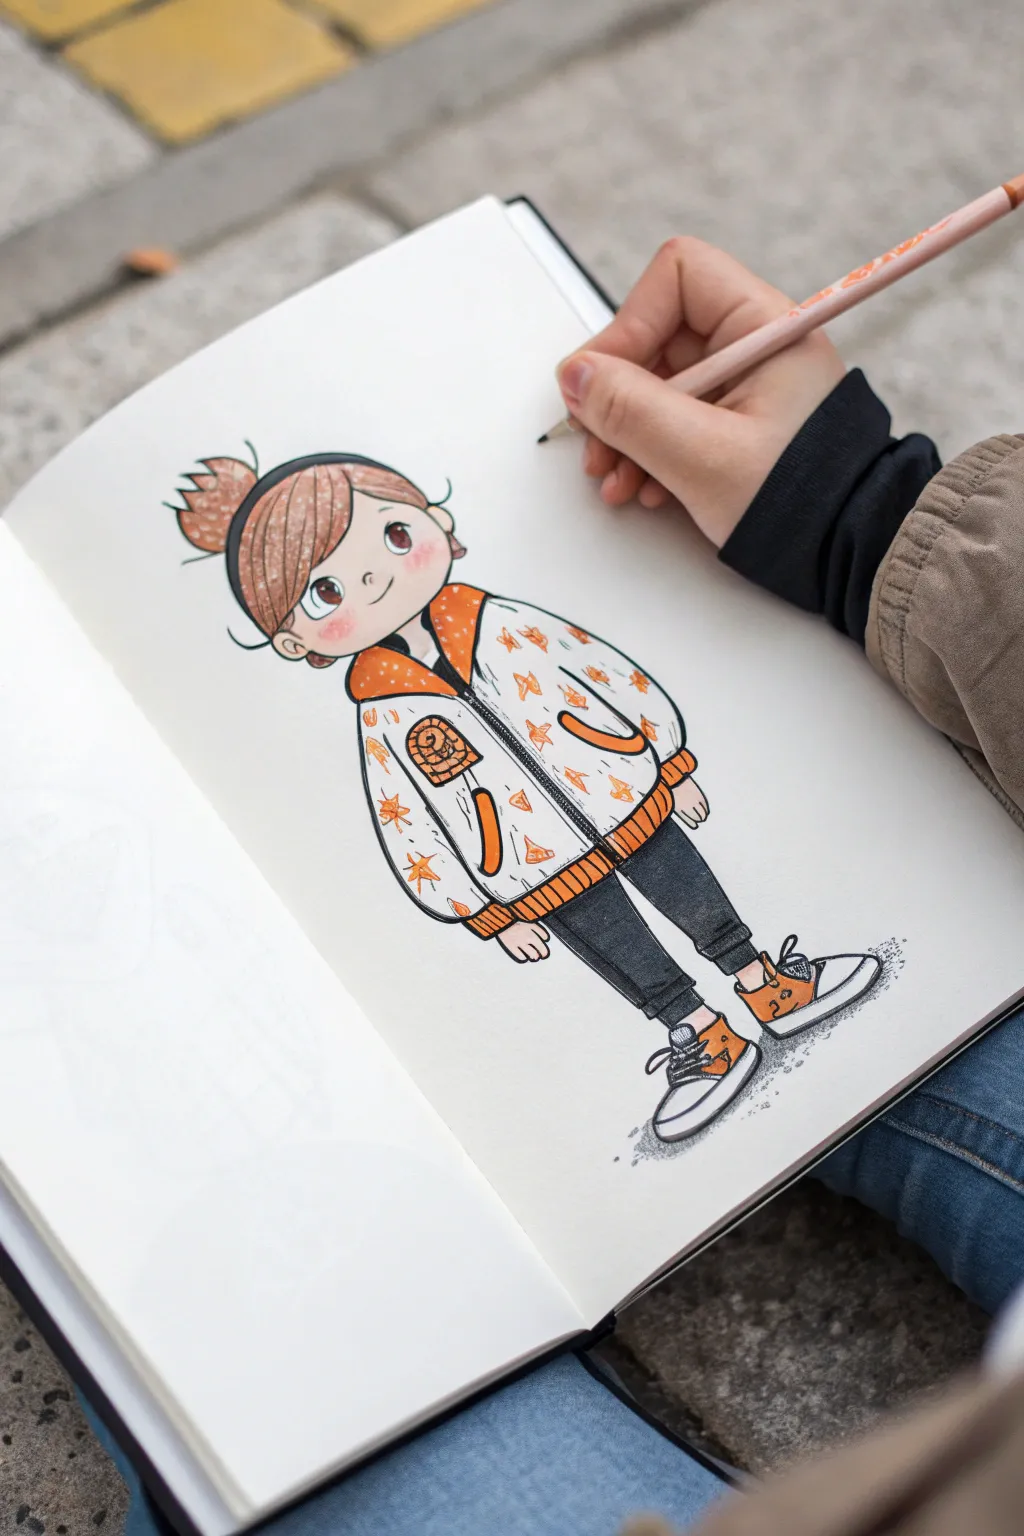
Blend traditional Japanese motifs with modern fashion in this playful character illustration. Using a mix of fine liners and vibrant markers, you’ll bring this spirited street-style character to life on paper.
Detailed Instructions
Materials
- Sketchbook or Illustration Paper (smooth surface)
- H or HB Graphite Pencil
- Kneadable Eraser
- Fine Liner Pen (Black, 0.3mm and 0.5mm)
- Alcohol-based Markers (Warm Gray, Pumpkin Orange, Peach/Skin Tone, Red)
- Colored Pencil (White and Warm Brown)
- White Gel Pen
Step 1: Drafting the Pose
-
Head and Body Structure:
Begin with a very light circle for the head. Add a curved vertical line for the center of the face to help with orientation. Sketch a simple trapezoid below it for the torso, keeping the shoulders slightly slumped for a relaxed, oversized clothing fit. -
Facial Guidelines:
Draw a horizontal line across the lower half of the face circle. This is where the large, expressive eyes will sit. Mark small ticks for the nose and mouth placement just below the midway point. -
Limbs and Extremities:
Sketch stick-figure lines for the arms and legs to determine length. Flesh them out with cylinders; the legs should be tapered towards the ankles, while the sleeves obscure the arms almost entirely.
Ink Confidence
Don’t connect every single line perfectly. Leaving tiny gaps where clothing folds meet or at hair tips can make the drawing feel more breathable and less rigid.
Step 2: Refining the Sketch
-
Drawing the Hair:
Sketch a thick headband across the top of the forehead. Add sweeping bangs coming down the left side and draw a messy bun peeking out behind the head. Keep the lines loose to suggest movement. -
Defining the Jacket:
Draw the oversized bomber jacket. Emphasize the collar, the elastic cuffs, and the bottom hem. Make the collar stand up slightly around the neck and draw the central zipper line slightly off-center to match her stance. -
Legs and Shoes:
Outline the fitted leggings or joggers, adding small wrinkles near the ankles where the fabric gathers. Sketch chunky high-top sneakers with simple laces and thick soles. -
Adding Details:
Draw the facial features now: large oval eyes, a small C-shaped nose, and a simple smile. Add the pockets on the jacket—one standard side pocket and a unique vertical zip pocket on the chest.
Step 3: Inking
-
Main Outline:
Switch to your 0.5mm black fine liner. Carefully go over the main contours of the character. Use confident, continuous strokes for the jacket edges to keep them looking crisp. -
Face and Hair Details:
Use the finer 0.3mm pen for facial features and individual strands of hair. I prefer to leave small gaps in the eyelash lines to keep the expression soft. -
Pockets and Seams:
Ink the zipper teeth, the pocket details, and the elastic ribbing on the collar and cuffs. Don’t worry about the patterns on the jacket yet; we’ll add those with color. -
Clean Up:
Once the ink is completely dry (give it a full minute), gently erase all your graphite pencil guidelines with a kneadable eraser.
Scale Up The Design
Try drawing the back view of the character next to this one, featuring a large, detailed singular Koi fish illustration across the entire back of the jacket.
Step 4: Coloring
-
Skin Tones:
Start with a pale peach alcohol marker for the skin. Apply an even layer, then add a second pass of the same color or a slightly darker shade under the bangs and chin for shadow. -
Blushing Cheeks:
While the skin base is fresh, dab a small amount of pale pink or utilize a red colored pencil lightly on the cheeks to create a soft, flushed look. -
Hair Color:
Color the hair with a warm brown. Leave a jagged white highlight band across the bangs if you want a shiny anime-hair effect, or color it solid and add white gel pen later. -
Essential Orange Accents:
Use a vibrant pumpkin orange marker to fill in the jacket collar, the cuffs, the bottom hem, and the shoe details. This color anchors the ‘Koi’ theme. -
Pattern Work:
With the same orange marker or a fine orange pen, draw freehand koi fish silhouettes and small maple leaf shapes directly onto the white space of the jacket. Keep them random and scattered. -
Legs and Contrast:
Fill in the leggings with a dark warm gray or black marker. Leave a tiny sliver of white along the top of the shoes to separate the shapes visually.
Step 5: Final Touches
-
Shadows:
Use a light gray marker to add shadows to the white jacket. Focus on the areas under the arms, beneath the collar, and along the zipper line to give the fabric volume. -
Grounding Shadow:
Add a scribbly, textured pool of gray shadow beneath her feet. This helps the character feel like she’s standing in a real space rather than floating. -
Gel Pen Highlights:
Take a white gel pen and add tiny dots to the eyes for life. Add stitch marks to the jacket pockets or highlights on the shoes if needed to make them pop.
Now you have a stylish, streetwear-ready character jumping right off the page
Sleepy Pajama Party Ghost

Bring this adorable sleepy ghost to life with a mix of delicate line work and soft watercolor washes. This project creates a comforting, whimsical piece perfect for a nursery or a cozy bedroom corner.
Step-by-Step
Materials
- Cold press watercolor paper (300 gsm)
- Pencil (HB or H for light sketching)
- Kneaded eraser
- Waterproof fineliner pens (black, sizes 01 and 03)
- Watercolor paints (Sage Green, Payne’s Grey, Yellow Ochre, Crimson Red, Warm Orange)
- Round watercolor brushes (size 4 for washes, size 0 or 1 for details)
- White gel pen
- Masking tape
- Jar of water & paper towel
Step 1: Sketching and Inking
-
Sketch the ghost’s body:
Start by lightly drawing a tall, rounded bean shape in the center of your paper. Make sure the head is nice and round, and the legs are short and stubby. -
Add the face and arms:
Draw two U-shaped curves for closed, sleepy eyes and a tiny ‘u’ for a smile. Add two short arms curbing inward towards the chest, holding a simple heart shape. -
Draw the pajamas detail:
Lightly sketch a horizontal line across the ‘chest’ area to define the start of the onesie. I like to add tiny circles all over the body area below this line for the polka-dot pattern. -
Sketch background elements:
To the left of the ghost, draw a crescent moon. Scattered around the head, add three simple five-pointed stars. Near the feet, sketch two small sprigs of leaves rising from the ground. -
Refine the circle:
Very faintly trace a large circle around the entire composition to guide where your background wash will go. This doesn’t need to be perfect; organic shapes actially look better. -
Ink the main lines:
Using your size 03 waterproof fineliner, trace the outline of the ghost, the moon, the stars, and the plants. Use a size 01 pen for the delicate eyes, mouth, and the polka dots on the pajamas. -
Erase pencil marks:
Once the ink is completely dry—wait at least 5 minutes to be safe—gently erase all the pencil lines with your kneaded eraser so the paper is clean.
Clean Edges Pro Tip
Keep a clean paper towel in your non-painting hand. If a wash starts to pool too much at the edges, quickly dab your brush on the towel and lift the excess paint off the paper.
Step 2: Painting
-
Paint the Pajama base:
Mix a very watery, pale grey wash (using a tiny dot of Payne’s Grey). Paint the entire body of the pajama suit, avoiding the polka dots if you can, though painting over them is fine too since we’ll color them later. -
Add the background wash:
Dilute your Sage Green to a very transparent consistency. Carefully paint the circular background area, working around the moon, stars, and ghost. Keep the edges soft and slightly uneven for a dreamy look. -
Color the moon and stars:
Using Yellow Ochre, paint the crescent moon and the three stars. Keep the color slightly translucent so the texture of the paper shows through. -
Fill the heart and cheeks:
Mix a soft Crimson Red or pink shade. Paint the heart held in the ghost’s hands. Use a more watered-down version of this same color (or a Warm Orange) to dab two round rosy cheeks on the ghost’s face. -
Paint the pajama dots:
Using a small size 0 brush and a slightly more concentrated red or orange, carefully fill in the tiny polka dots on the pajamas. -
Detail the plants:
Use a darker mixture of your Sage Green or mix in a little grey to paint the leaves of the plant sprigs at the bottom. -
Create shadows:
Once the main grey layer on the ghost is dry, use a slightly darker grey mix to add shadows under the arms, under the heart, and along the inner curves of the legs to give the character dimension.
Step 3: Finishing Touches
-
Add white highlights:
Take your white gel pen and add tiny dots or lines to the cheeks, the heart, and maybe a sparkle on the moon to make it pop. -
Include atmospheric dots:
Using the white gel pen, add tiny distinct dots into the green background wash to look like distant stars or snow. -
Final ink inspection:
If any black lines got faded by the watercolor, gently go over them again with your fineliner to crisp up the edges.
Level Up: Texture
While the green background wash works is still wet, sprinkle a tiny pinch of salt on it. Let it dry completely, then brush it off for a starry, textured galaxy effect.
Now you have a charming little ghost ready to haunt your wall with coziness


Have a question or want to share your own experience? I'd love to hear from you in the comments below!