
When I’m stuck on what to paint, a forest landscape always saves the day—there’s instant mood, texture, and depth. Here are my favorite forest landscape ideas, starting with the classics and drifting into more playful, unexpected directions.
Misty Pine Trail Into the Trees
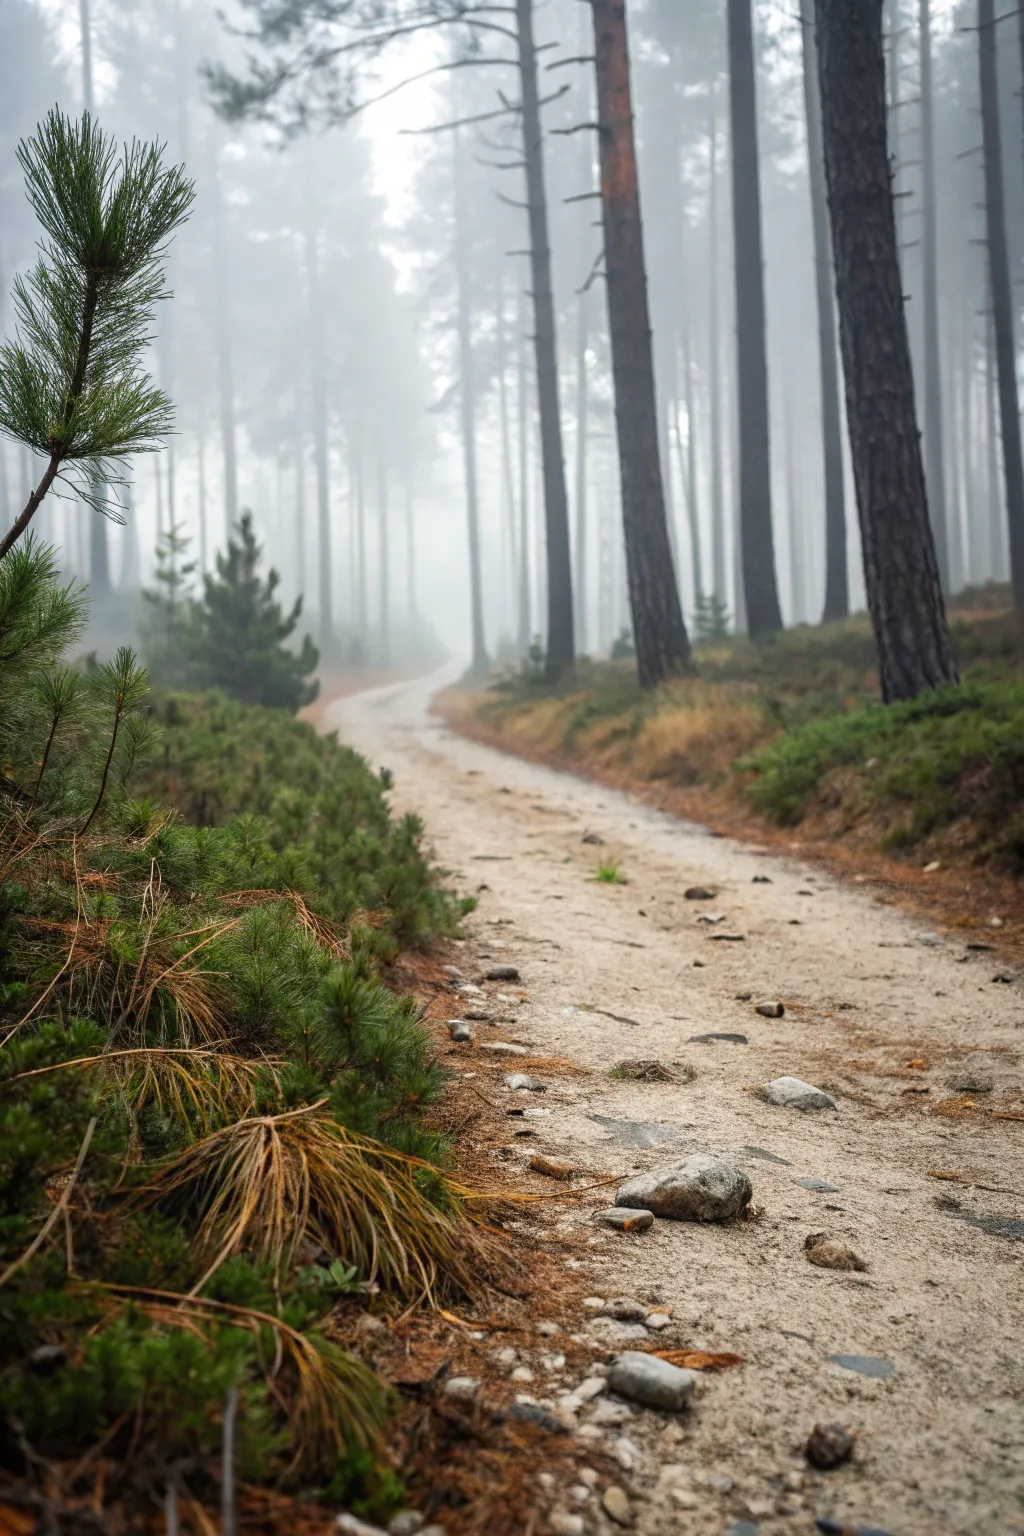
Capture the serene solitude of a foggy forest morning with this acrylic landscape tutorial. By layering soft mists behind textured pine bark and detailed scrub, you will create a scene that feels both vast and intimate.
Step-by-Step Tutorial
Materials
- Stretched canvas (16×24 inches or vertical format)
- Acrylic paints: Titanium White, Mars Black, Burnt Umber, Raw Sienna, Sap Green, Phthalo Green, Yellow Ochre, Payne’s Gray
- Large flat wash brush
- Medium filbert brush
- Small round detail brush (size 1)
- Fan brush (optional)
- Palette knife
- Water container and paper towels
- Mixing palette
- Acrylic retarder or slow-drying medium
Step 1: Establishing the Atmosphere
-
Prime with Mist:
Start by mixing a large amount of Titanium White with a tiny touch of Payne’s Gray to create a very pale, cool fog color. Cover the entire upper two-thirds of the canvas with this mix using your large flat brush. -
Fade the Horizon:
While the paint is still wet, blend in slightly darker gray-green vertical strokes (mix White + Payne’s Gray + pinch of Sap Green) in the mid-ground area where the horizon would be. This implies distant trees hidden in the fog. -
Draft the Path:
Using Raw Sienna mixed with lots of White, sketch the S-curve of the path starting wide at the bottom right and narrowing as it disappears into the mist on the left. Keep the edges soft. -
Background Trees:
Mix a very watery, transparent gray (Payne’s Gray + water). Paint faint, vertical lines for the furthest trees. They should look like ghosts—barely there against the white background.
Step 2: Building the Forests Depth
-
Mid-ground Pines:
Create a darker gray-brown (Burnt Umber + Payne’s Gray + White). Paint slightly thicker vertical trunks closer to the viewer. These should have defined edges but no bark texture yet. -
Foreground Giants:
For the main trees on the right, use pure Burnt Umber mixed with a touch of Black. Use the flat edge of your brush to pull straight, confident lines from top to bottom. -
Bark Texture:
Once the dark trunks are dry, I like to use a palette knife to lightly scrape Raw Sienna and Burnt Umber down the right side of the trunks, suggesting rough bark catching the diffused light. -
Upper Branches:
Switch to your small round brush. Add jagged, horizontal branches high up on the trunks. Keep them sparse and mostly silhouette-like against the bright fog. -
Branch Highlights:
Add faint highlights to the top edges of these branches using a light gray, reinforcing the direction of the light.
Fog Trouble?
If your fog looks too flat, don’t overblend. Scumble a dry brush with barely any white paint over dry darker trees to push them ‘back’ into the mist.
Step 3: The Forest Floor
-
Path Base Layer:
Paint the path area with a mix of Titanium White, Raw Sienna, and a speck of Burnt Umber to get a sandy beige. Apply paint horizontally to mimic the ground plane. -
Path Variations:
While the path works, streak in uneven patches of darker brown and gray to create the look of dirt tracks and uneven terrain. -
Scrub Underpainting:
Block in the foreground vegetation on the left and right banks using dark Sap Green mixed with Burnt Umber. Don’t worry about details; just establishing the dark mass is key here. -
Pine Needles:
Using a fan brush or a rough bristle brush, tap Sap Green mixed with Yellow Ochre over the dark underpainting to create the spiky texture of pine shrubs. -
Adding Brown Grasses:
With a liner brush, pull long, thin strokes of Raw Sienna and bright Yellow Ochre up from the bottom left corner. These dead grasses add warmth to the cool scene. -
Foreground Pine Branch:
On the far left, paint a distinct, sharp pine branch entering the frame. Use Phthalo Green and Black for the needles, keeping them sharp and crisp to show proximity.
Level Up: Dew Drops
Use a tiny dot of unthinned white paint followed by a tiny black shadow underneath on the closest pine needles to create morning dew drops.
Step 4: Details and Stones
-
Placing Stones:
Paint variously sized oval shapes on the path using gray and brown. Place larger ones in the immediate foreground and tiny dots further back to enhance perspective. -
Stone Shadows:
Under each stone, paint a thin sliver of dark brown/black. This grounds the rocks so they don’t look like they are floating. -
Stone Highlights:
Add a touch of pure white to the top surface of the foreground rocks to make them look wet or smooth. -
Final Mist Glaze:
Mix a very watery glaze of white and glazing medium. Lightly brush over the point where the path disappears into the trees to soften the transition one last time.
Step back and admire how the depth of the mist draws the eye down your quiet forest path


Dappled Light on a Woodland Edge
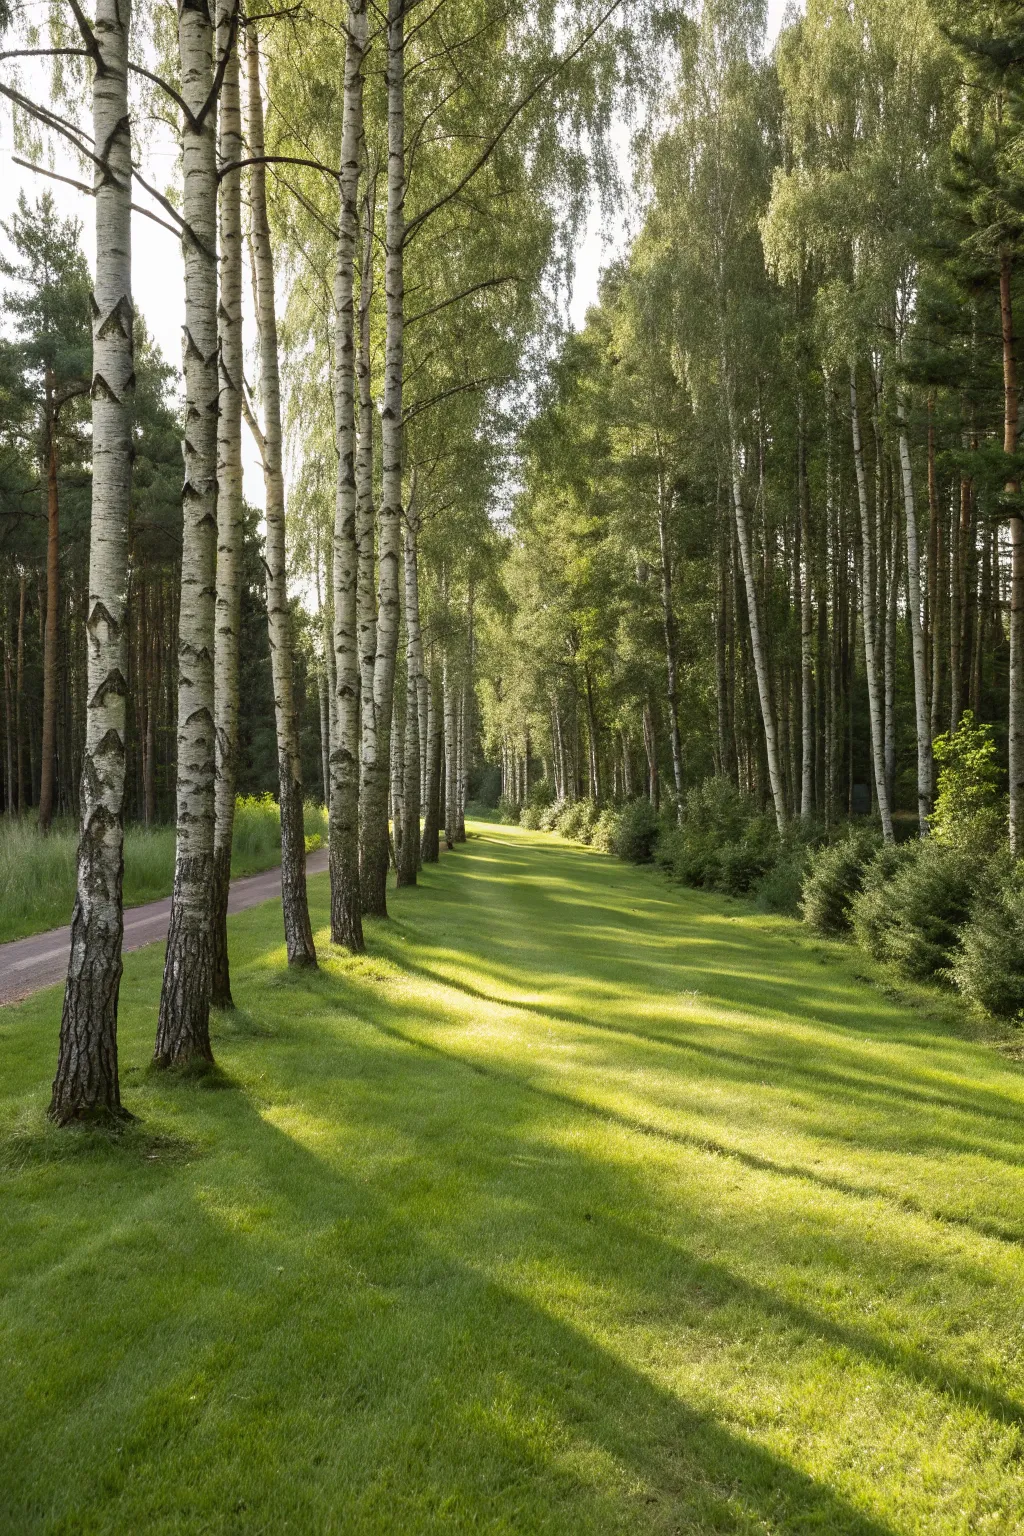
Capture the serene beauty of a manicured birch forest bathed in late afternoon sun with this acrylic landscape tutorial. You will learn to balance the crisp vertical lines of birch bark against the soft, sweeping horizontal shadows that stretch across the vibrant green grass.
How-To Guide
Materials
- Canvas board or stretched canvas (12×16 inches recommended)
- Acrylic paints: Titanium White, Mars Black, Sap Green, Hooker’s Green, Cadmium Yellow Medium, Burnt Umber, Yellow Ochre, Ultramarine Blue
- Flat brushes (1-inch, 1/2-inch)
- Round brushes (size 4 and 0 for details)
- Small palette knife or rigger brush
- Water cup and paper towels
- Mixing palette
Step 1: Setting the Scene
-
Prime the background:
Begin by blocking in the background colors. Mix Titanium White with a touch of Ultramarine Blue for the slivers of sky peeking through the canopy. Paint this lightly at the top third of the canvas. -
Establish the distant woods:
Mix Hooker’s Green with a little Mars Black to create a deep, shadowy forest green. Using a large flat brush, paint the dense background foliage behind where your birch trees will stand, keeping the edges soft. -
Lay the grassy foundation:
For the ground, mix Sap Green with Cadmium Yellow for a bright, sunlit base. Cover the entire bottom two-thirds of the canvas with this vibrant green, brushing horizontally to suggest the lay of the land. -
Mark the path:
On the left side, sketch a narrow, receding pathway using a mix of Burnt Umber and White to create a muted dusty rose or grey-brown color. Taper it as it moves deeper into the background to establish perspective.
Straight Line Struggles?
If painting straight trunks freehand is tough, use masking tape. Stick it to the dry canvas, paint the grey trunk between the tape strips, and peel it off for crisp edges.
Step 2: Planting the Birches
-
Block in vertical trunks:
Mix a light grey using White and a tiny dot of Black. Using a flat brush turned sideways or a palette knife, pull straight vertical lines down the canvas to create the main birch trunks. Make the ones in the foreground thicker and the distant ones thinner. -
Add trunk variety:
Ensure the trees aren’t perfectly straight soldiers; give them slight leans and natural curves. I like to group a few close together to mimic how they grow in nature. -
Create the signature bark:
Once the grey trunks are dry, take your size 0 round brush or a palette knife with pure Mars Black. Paint horizontal dashes, eye-shaped knots, and ragged patches on the trunks, concentrating more darkness at the base of the trees. -
Highlight the bark:
Apply pure Titanium White to the sun-facing (right) side of the trunks. This high contrast against the black markings is what gives birch trees their distinctive paper-like appearance.
Step 3: Light and Shadow
-
Mix the shadow color:
Create a transparent shadow glaze by mixing Sap Green, a touch of Ultramarine Blue, and water or glazing medium. It should be darker and cooler than your base grass color. -
Cast the long shadows:
Starting from the base of each tree, paint long, diagonal bands of shadow stretching across the grass toward the bottom right. These shadows are crucial for anchoring the trees and defining the time of day. -
Enhance the sunlit zones:
Mix Cadmium Yellow with a lot of Lemon Yellow or White. Paint the strips of grass *between* the shadows, making them glow. Use short, upward flicking strokes to simulate blades of grass catching the light. -
Refining the background foliage:
With a round brush, dab lighter greens (Sap Green + Yellow) onto the dark background foliage to suggest distant leaves catching the filtered sun.
Add Seasonal Flavor
Change the season by swapping the leaf colors. Use bright oranges and yellows for the canopy and scatter fallen leaves on the grass for an autumn version.
Step 4: Final Details
-
Connect the canopy:
Using a rigger brush or fine round brush, paint thin, spindly branches extending from the top of the birch trunks. Overlap them slightly to create a dense canopy effect. -
Dapple the leaves:
Stipple small clusters of leaves hanging from these branches using a mix of greens. Keep the leave clusters airy so the sky and background still show through. -
Soften the path edges:
Blend the edges of the dirt path into the grass using short strokes so it looks overgrown and natural, rather than like a paved road. -
Final highlights:
Add the brightest highlights now—pure white on the edge of the closest birch bark and bright yellow-white on the tips of the grass in the immediate foreground.
Step back and enjoy the tranquil woodland atmosphere you have brought to life on your canvas


Rocky Forest Creek With Reflections
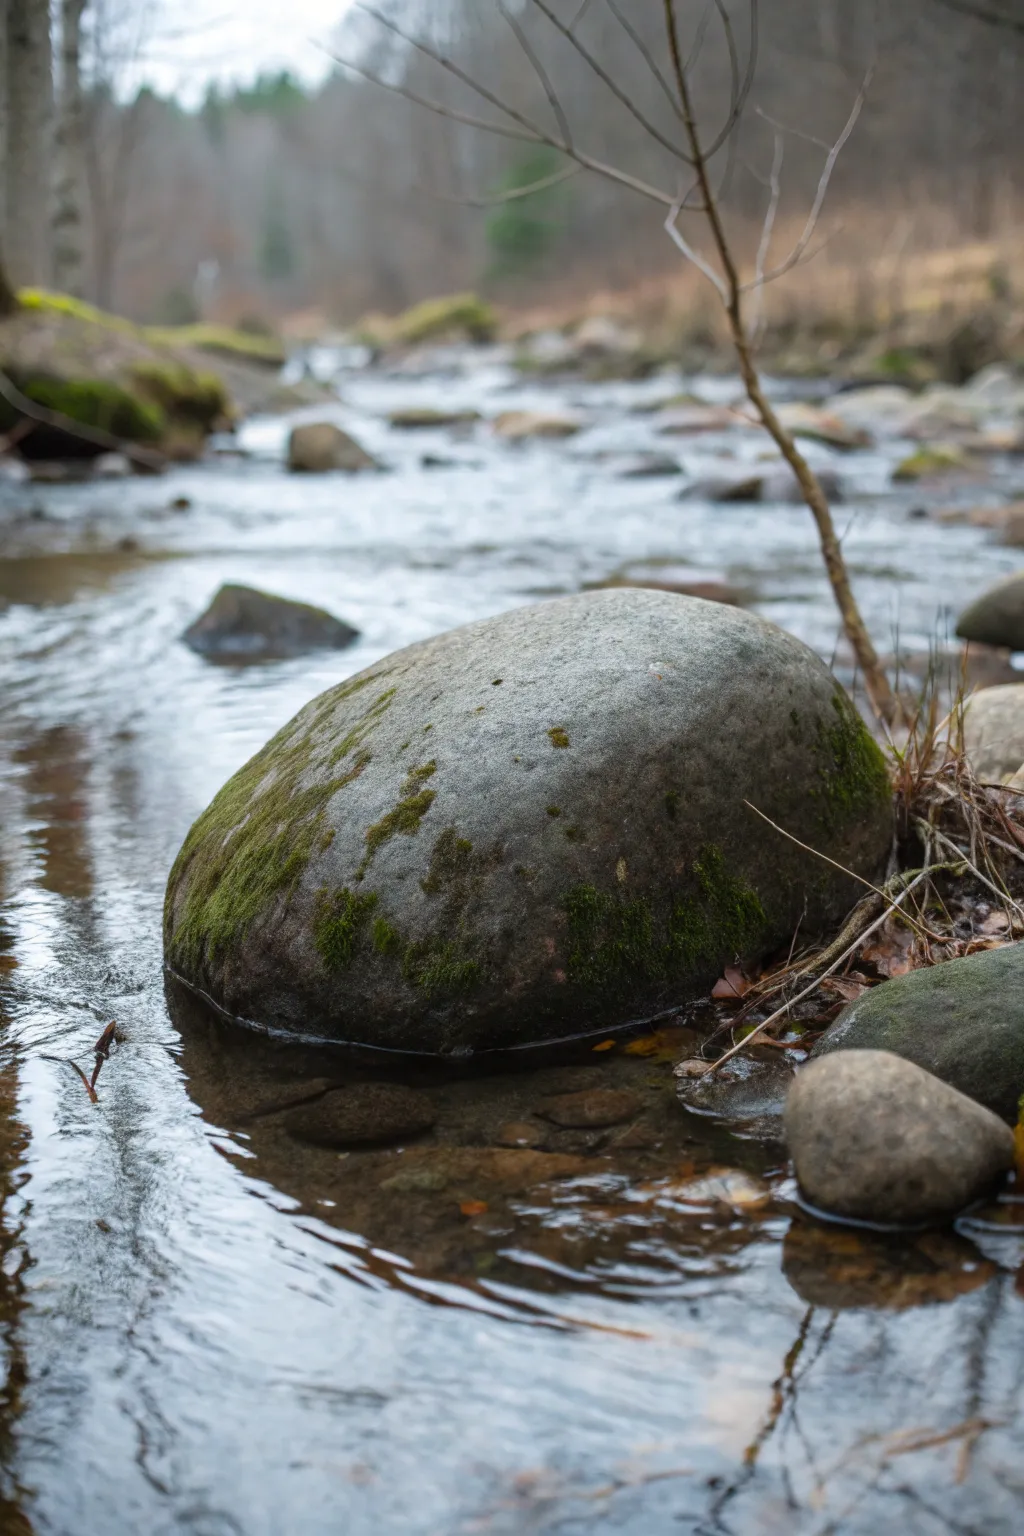
Capture the serene beauty of a forest creek with this detailed acrylic landscape study, focusing on the texture of wet stone and flowing water. You will build up layers of realism, from the soft bokeh background to the crisp, moss-covered focal point.
Detailed Instructions
Materials
- Heavyweight acrylic paper or canvas board (11×14 inch)
- Acrylic paints: Titanium White, Mars Black, Burnt Umber, Raw Sienna, Sap Green, Phthalo Blue, Ultramarine Blue, Yellow Ochre
- Flat brushes (1-inch, 1/2-inch)
- Filbert brushes (various sizes)
- Round detail brush (size 0 or 1)
- Old toothbrush (for spatter texture)
- Palette knife
- Water container and paper towels
- Slow-drying medium (optional)
Step 1: Planning and Background
-
Sketch the composition:
Lightly sketch the main shapes using a diluted Burnt Umber mix. Place the large foreground rock off-center to the right, define the water line, and roughly map out the smaller rocks and background trees. -
Block in the blurred background:
Mix a muted grey-brown using White, touches of Black, and Burnt Umber. Using a large flat brush, apply this to the upper third of the canvas. Keep strokes soft and unfocused to simulate depth of field. -
Add distant foliage:
While the background is still tacky, blend in hints of dull green and cool blue-grey to suggest distant trees and atmosphere. The key here is soft edges—avoid sharp lines. -
Paint the creek bed base:
For the water area, lay down a base of cool, light grey mixed with a touch of Phthalo Blue. Paint horizontally to mimic the flow of water, darkening the tone slightly as you move toward the bottom corners.
Muddy colors?
If your grey rocks look too brown or muddy, let the paint dry completely before adding new layers. Acrylics are transparent; mixing wet-on-wet can sometimes dull your crisp greys.
Step 2: The Main Rock Structure
-
Base coat the main rock:
Mix a solid mid-tone grey using Black, White, and a tiny bit of Raw Sienna for warmth. Paint the entire shape of the large rock, ensuring solid coverage. -
Define the form with shadows:
While the base is drying, mix a darker grey-brown. Apply this to the bottom edge of the rock where it meets the water, and curve it upwards around the sides to give the stone volume and weight. -
Add surface texture:
I like to use a natural sea sponge or a scrunched paper towel here. Dip it into a slightly lighter grey and gently dab it over the top facing surfaces of the rock to create a pitted, stony texture. -
Establish the smaller rocks:
Paint the smaller rocks in the foreground and mid-ground using similar grey and brown mixtures. Keep the mid-ground rocks slightly less detailed than the main foreground stone.
Step 3: Water and Reflections
-
Darken the reflections:
Beneath the main rock, glaze a heavy mixture of Burnt Umber and Black. This shadow should be dark and indistinct, mirroring the shape of the rock above but rippled. -
Paint the water ripples:
Using a small flat brush and a mix of White and Ultramarine Blue, paint horizontal, wavy lines around the base of the rock. Let these lines break and curve to show the water flowing around the obstacle. -
Add movement to the stream:
In the background stream area, use thinner washes of white and light grey to suggest rapid water movement over the distant riverbed. Keep these strokes loose and horizontal.
Add autumn vibes
To change the season, glaze thin washes of burnt orange and gold over the background foliage and scatter painted ‘leaves’ in the water eddies using touches of cadmium orange.
Step 4: Details and Moss
-
Layer the moss base:
Mix Sap Green with a little Raw Sienna. Using an old, stiff brush or a stippling motion, blotches of green are applied to the sides and top of the main rock. -
Highlight the moss:
Add Yellow Ochre to your green mix. Lightly stipple this brighter green onto the top edges of the moss patches where the sunlight would hit, creating a fuzzy, organic 3D texture. -
Deepen moss shadows:
Mix a dark green with a touch of Burnt Umber. Stipple this at the bottom edges of the moss patches to anchor them to the rock surface. -
Insert the twig and debris:
With a fine liner brush and thinned brown paint, draw the thin, angled branch sticking up near the rock. Add reflected lines in the water directly beneath it. -
Create rock speckling:
Dilute some black paint until it is inky. Run your thumb over the bristles of a toothbrush to flick tiny specks onto the rock surface for hyper-realistic grit.
Step 5: Final Highlights and Adjustments
-
Brighten water highlights:
Use pure Titanium White on your smallest round brush to add sharp, crisp highlights on the water ripples right next to the rock. This makes the water look wet and moving. -
Enhance the wet rock look:
Glaze a very thin layer of gloss medium or watered-down white over the very top of the rock to make it appear damp from the mist. -
Final contrast check:
Step back and assess your values. Darken the crevice between the rock and the water if needed to ensure the rock feels firmly planted in the stream.
Now stepping back, you can hear the gentle babble of the creek in your finished masterpiece.


Quiet Pond Tucked Under the Canopy
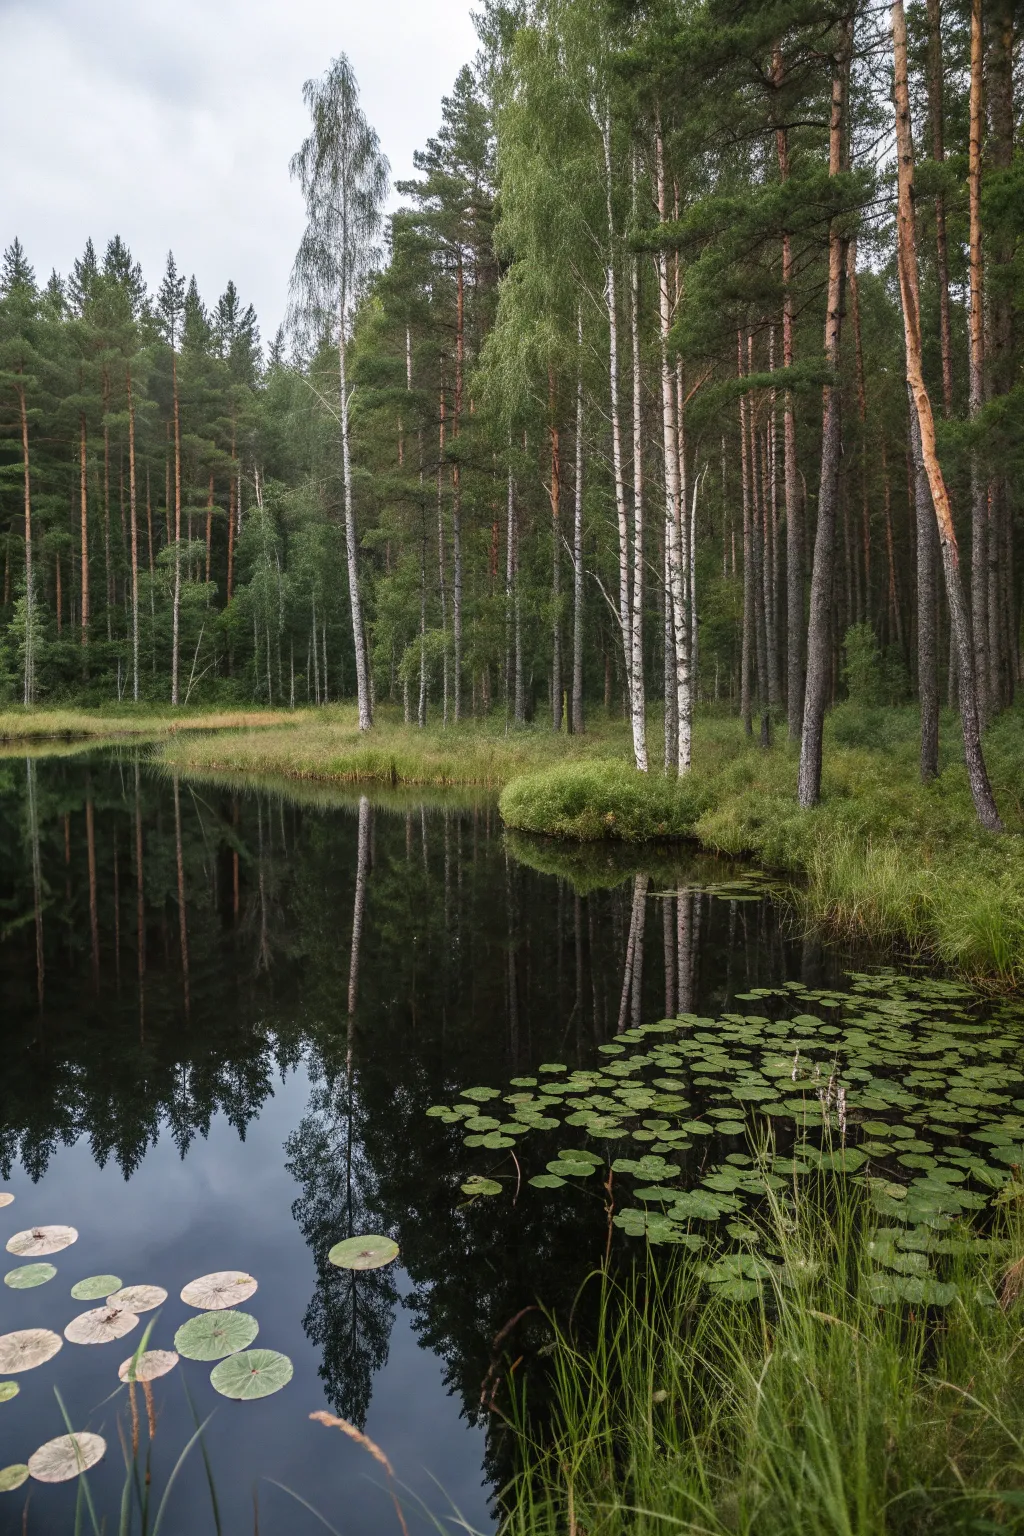
Capture the serenity of a quiet woodland pond with this detailed acrylic painting project. You will recreate the striking vertical rhythm of birch and pine trunks mirrored in deep, calm waters, complete with floating lily pads.
Step-by-Step Tutorial
Materials
- Canvas board or stretched canvas (11×14 or similar)
- Acrylic paints: Phthalo Blue, Burnt Umber, Hooker’s Green, Titanium White, Mars Black, Yellow Ochre, Cadmium Yellow Medium
- Large flat brush (1 inch)
- Medium filbert brush
- Small round detail brush (size 0 or 1)
- Palette knife
- Container of water
- Paper towels
- Palette or mixing plate
Step 1: Setting the Scene
-
Sketch the Horizon:
Begin by lightly sketching your horizon line using a pencil or diluted Burnt Umber. Place it slightly below the center of the canvas to allow plenty of room for the tall trees. -
Block in the Sky:
Mix Titanium White with a tiny touch of Burnt Umber and Phthalo Blue to create a soft, overcast grey-white. Paint the upper left corner, blending it downwards towards the horizon. -
Establish the Lake Base:
For the water, mix a deep, dark tone using Phthalo Blue, Burnt Umber, and Mars Black. Paint the entire bottom half of the canvas with horizontal strokes, keeping the darkest values near the bottom edge. -
Paint the Background Trees:
Using a dry brush technique with Hooker’s Green and a little Black, stipple the distant treeline horizontally across the middle of the canvas. Keep the edges soft to suggest depth.
Step 2: Creating the Vertical Rhythm
-
Mix Dark Trunk Colors:
Combine Burnt Umber and Black for the pine trees. Use a medium flat brush turned on its edge to pull straight, vertical lines from the top of the canvas down to the water’s edge. -
Add Birch Trunks:
Switch to a clean brush and mix Titanium White with a speck of Grey. Paint slender, slightly curved vertical lines for the birch trees, focusing on the right side of the composition. -
Reflect the Trunks:
Before the paint dries completely on your brush, pull those same trunk colors straight down into the water area. Use a loose hand here; reflection lines should be wavy and less distinct than the real trees. -
Texture the Pines:
Return to the dark pine trunks and add texture. Use a rigger brush or small round brush to dab dark green foliage in irregular clusters near the tops of the trees. -
Detail the Birches:
Using your smallest detail brush and thinned Black paint, add horizontal lenticels (the small black markings) to the white birch trunks. I like to stagger these markings so they don’t look like a ladder.
Muddy Reflections?
If your water reflections look too muddy, let the initial dark layer dry completely before painting the vertical reflection lines on top.
Step 3: Reflections and Water
-
Soften the Reflections:
Clean your large flat brush and slightly dampen it. Very gently drag it horizontally across the painted reflections in the water to blur the edges and create a liquid appearance. -
Add Sky Reflection:
Mix a diluted version of your sky color (pale grey-blue). Glaze this into the bottom left corner of the water where the sky would reflect, weaving it between the dark tree reflections. -
Define the Shoreline:
Mix Yellow Ochre, Hooker’s Green, and White to make a grassy reed color. Dab this along the waterline where the trees meet the lake to create a grassy bank.
Use a Maukstick
To keep your hand steady while painting the long, thin tree trunks, rest your painting hand on a clean stick or ruler bridged across the canvas.
Step 4: The Foreground Details
-
Paint Grass Texture:
Using a fan brush or an old, splayed bristle brush, tap in taller grasses on the right foreground bank using varied shades of light green and ochre. -
Place Lily Pavs:
Mix a muted olive green using Yellow Ochre and a touch of Black. Paint flat ovals in clusters on the water’s surface, mostly in the lower right corner. -
Add Pad Highlights:
To make the lily pads look flat, add a subtle stroke of lighter green on the top edge of each oval. -
Paint Water Reeds:
With your finest liner brush and a mix of White and Green, paint long, sweeping lines coming up from the bottom right corner to represent reeds overlapping the dark water. -
Final Highlights:
Add tiny touches of pure White to the tips of the reeds and the brightest spots on the birch bark to bring the scene into focus.
Step back and enjoy the peaceful atmosphere you’ve created with your brushwork.
BRUSH GUIDE
The Right Brush for Every Stroke
From clean lines to bold texture — master brush choice, stroke control, and essential techniques.
Explore the Full Guide
Rustic Cabin Clearing in the Woods
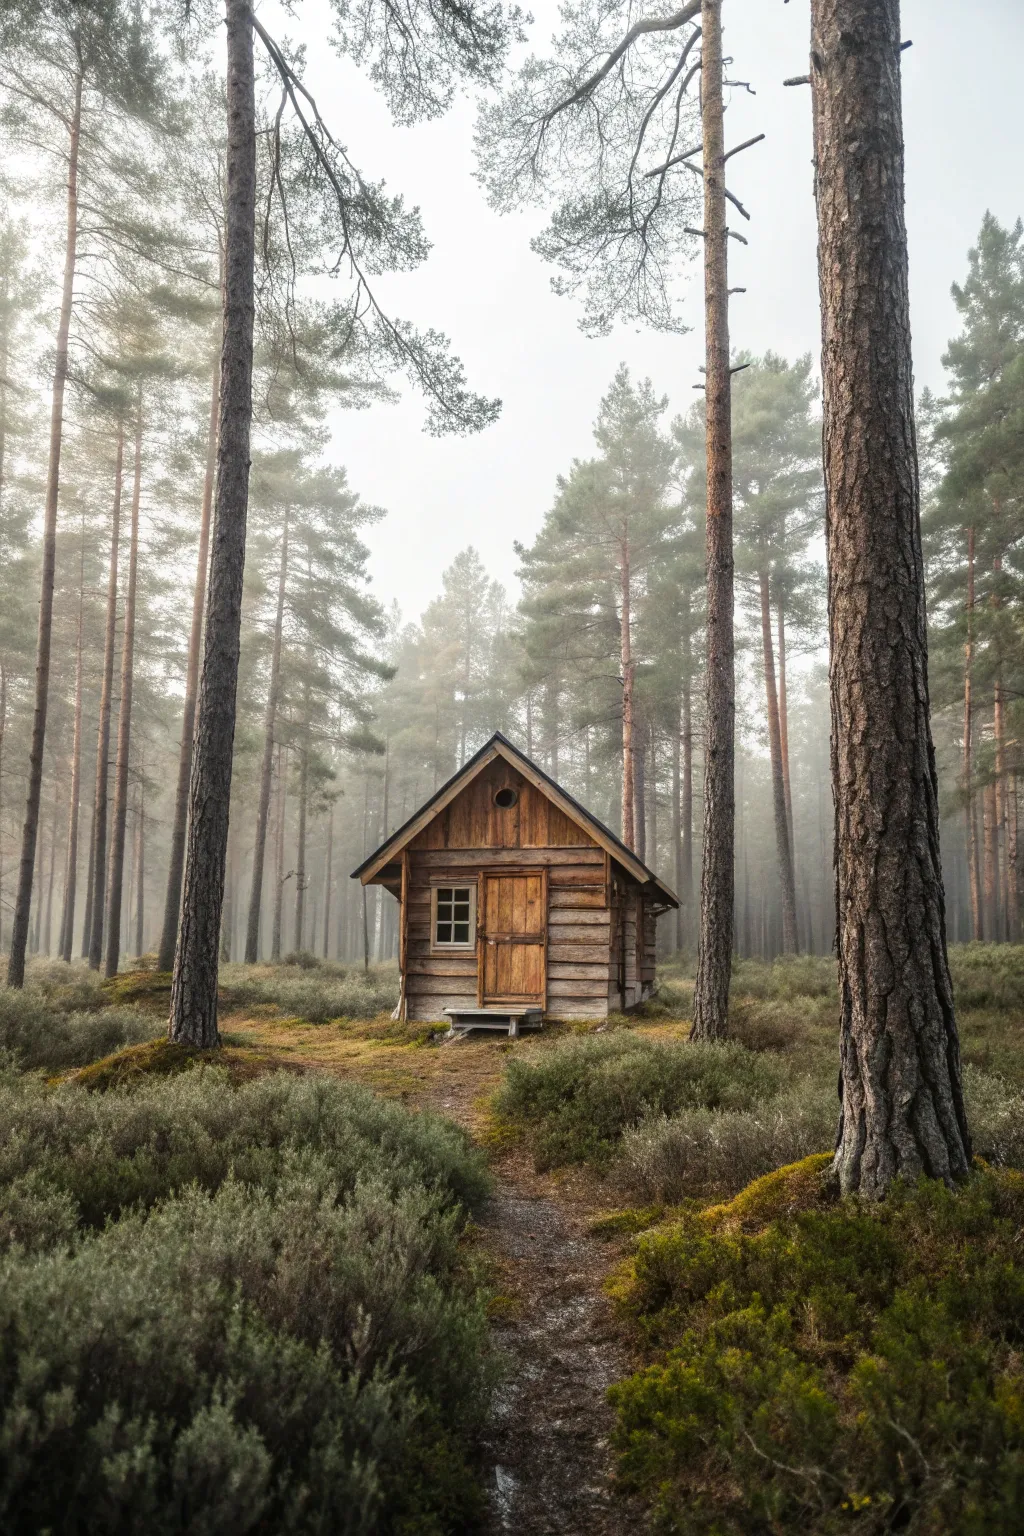
Capture the serene solitude of a rustic cabin nestled in a foggy pine forest with this detailed acrylic painting tutorial. You will learn to build depth using atmospheric perspective, creating a soft, misty background that contrasts beautifully with a detailed, textured foreground.
How-To Guide
Materials
- stretched canvas (16×20 inches or similar)
- acrylic paints: titanium white, mars black, burnt umber, raw sienna, yellow ochre, sap green, hooker’s green, payne’s gray
- gesso (white)
- large flat brush (1-2 inch)
- medium filbert brush
- small round brush (size 2 or 4)
- fine liner brush
- palette knife
- water container and paper towels
- spray bottle for misting
Step 1: Atmospheric Foundation
-
Prime the Surface:
Apply a coat of white gesso to your canvas to ensure a smooth painting surface. Let it dry completely. -
Establish the Foggy Backdrop:
Mix a large amount of Titanium White with a tiny touch of Payne’s Gray and Sap Green to create a very pale, misty gray-green. Using a large flat brush, cover the entire upper two-thirds of the canvas, using horizontal strokes to simulate fog. -
Paint Distant Ghost Trees:
While the background is still slightly damp, mix a slightly darker value of that gray-green. Use a medium filbert brush to vertically dry-brush faint, vertical lines for the furthest trees, letting them fade into the white mist at the bottom to suggest distance. -
Add Mid-Ground Depth:
Create a darker gray-green mix by adding more Hooker’s Green and Payne’s Gray. Paint a second layer of trees slightly larger than the first set, overlapping them here and there. Keep edges soft to maintain the misty effect.
Master the Mist
Keep a spray bottle handy. A light mist of water over wet acrylics helps blend colors directly on the canvas, creating that perfect, soft foggy look without harsh lines.
Step 2: Constructing the Cabin
-
Sketch the Cabin Outline:
Once the background is dry, use a small round brush with watered-down Burnt Umber to lightly sketch the cabin’s placement in the lower center. Focus on the triangular roofline and the boxy main structure. -
Block in Wood Tones:
Mix Burnt Umber with Yellow Ochre to create a warm, medium brown. Fill in the cabin walls and door, ensuring you paint smoothly around the window frame. -
Detail the Planks:
Use Burnt Umber straight from the tube with a fine liner brush to draw horizontal lines across the cabin walls, mimicking log construction. Vary the line thickness to suggest rough-hewn timber. -
Paint the Roof and Shadows:
Mix Payne’s Gray with a touch of Black. Paint the roof panels, darker under the eaves to create a shadow cast by the overhang. Add deep shadows inside the open door frame or window pane if desired. -
Highlight the Wood Grain:
Mix a light tint using White and Raw Sienna. Drag this color lightly over the log centers with a dry brush to bring out the roundness and texture of the wood.
Make it Yours
Add personal touches like a tiny column of smoke rising from a chimney, a lantern by the door, or wildflowers in the foreground shrubs for a pop of color.
Step 3: Foreground and Details
-
Establish the Forest Floor:
Mix Sap Green, Burnt Umber, and a bit of Black. Use a medium brush to scumble this dark mixture across the bottom third of the canvas, creating an uneven, organic texture for the ground. -
Paint the Main Foreground Trees:
For the prominent foreground trees (like the large one on the right), mix Burnt Umber and Black. Paint thick, bold vertical trunks that extend off the top of the canvas, anchoring the composition. -
Texture the Bark:
I like to use a palette knife here for rough texture. Mix White with a little Burnt Umber and scrape it vertically down the sides of the dark trunks to create realistic, peeling bark patterns. -
Create Low Shrubs:
Switch to an old, splayed bristle brush or a fan brush. Load it with Sap Green and tap it vigorously over the dark forest floor to create bushy textures representing heather or low shrubs. -
Refine the Path:
Mix Burnt Umber with White to make a dusty path color. Scumble this lightly leading from the foreground up to the cabin door, narrowing as it recedes to enhance perspective. -
Add Final Highlights:
Mix a bright yellow-green using Yellow Ochre and Sap Green. Lightly tap this onto the tops of the shrubbery and moss patches where sunlight might filter through the mist. -
Soften the Atmosphere:
If the transition between the cabin and the background trees feels too sharp, use a clean, dry soft brush to lightly glaze a very watered-down white over the connection points, pushing the background further back.
Step back and admire how a simple palette and careful layering can create such a moody and inviting woodland scene
Natural Stone Patio at the Forest Line
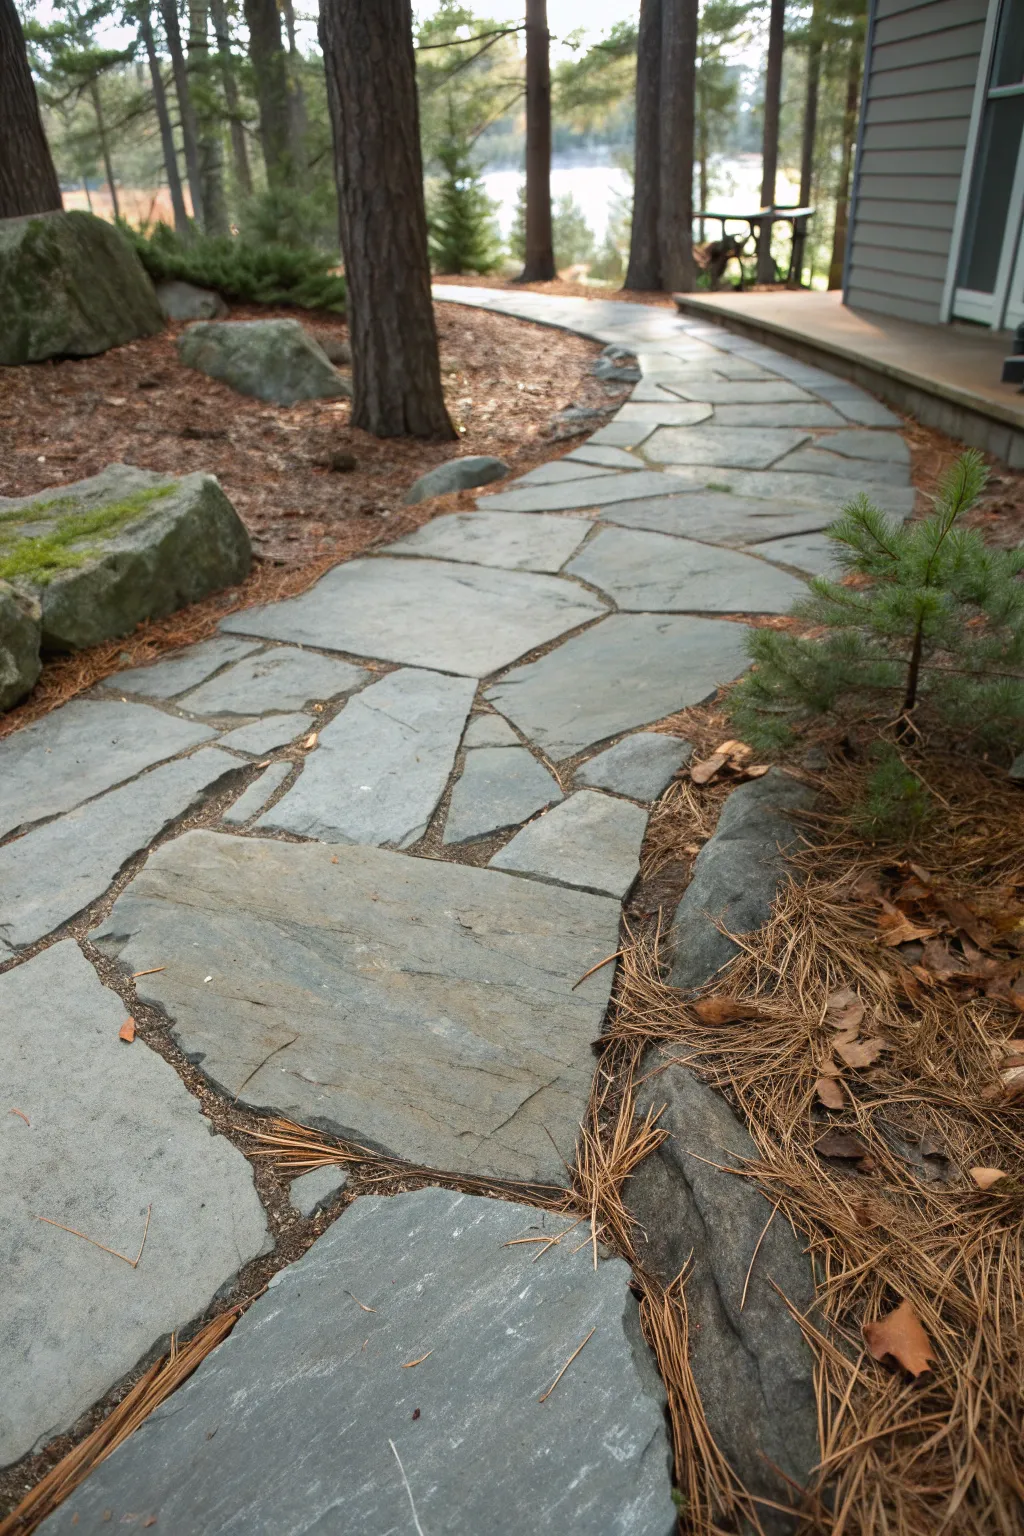
This project creates a serene, meandering walkway that blends seamlessly with a wooded landscape, using large, irregular flagstones dry-laid for an organic feel. The path curves gently past mature trees and mossy boulders, inviting exploration while keeping feet dry and preserving the natural forest floor.
Step-by-Step
Materials
- Large, irregular flagstones (bluestone or slate)
- Crushed stone base (3/4-inch minus)
- Stone dust or fine gravel (for bedding)
- Marking paint or hose
- Spade and flat shovel
- Rubber mallet
- Bubble level
- Tamper or plate compactor
- Garden rake
- Wheelbarrow
Step 1: Preparation & Excavation
-
Define the Path’s Shape:
Use a garden hose or marking paint to outline the path’s curves directly on the ground. Aim for gentle, sweeping bends that navigate around existing trees and large rocks rather than forcing a straight line. -
Excavate the Area:
Dig out the soil between your marked lines to a depth of roughly 6 to 8 inches. This depth allows for the base material and the thickness of the stone, ensuring the finished surface sits slightly above the surrounding grade. -
Compact the Subsoil:
Once excavated, tamp down the native soil firmly. If the soil is particularly loose or sandy, wetting it slightly before tamping can help achieve better compaction.
Step 2: Building the Foundation
-
Add Base Layer:
Fill the excavated trench with about 4 inches of crushed stone. Spread it evenly with a rake to create a solid, draining foundation for your walkway. -
Compact the Base:
Firmly compact this crushed stone layer. A plate compactor works best for larger paths, but a hand tamper is sufficient for smaller garden walkways. The surface should be hard enough to walk on without sinking. -
Add Bedding Layer:
Spread a 1- to 2-inch layer of stone dust or sand over the compacted base. This softer layer allows you to level the uneven bottoms of the flagstones easily. -
Smooth the Bedding:
Using the back of a rake or a straight board, screed the stone dust so it is relatively flat, following the intended slope of the path for water runoff.
Wobbly Stones?
If a stone won’t stop rocking, lift it and check the underside. Often a single high point on the stone needs chipping off, or a void in the bedding needs extra sand.
Step 3: Laying the Stones
-
Select Key Stones:
Begin by placing your largest, most attractive flagstones first. Position them at the edges and in the center of key curves to anchor the design visually. -
Piece the Puzzle:
Fit smaller stones around the large anchor stones. Try to maintain consistent gap widths—usually about 1 to 2 inches—between the stones for a cohesive look. -
Level Individual Stones:
As you place each stone, wiggle it into the stone dust bedding. Use a rubber mallet to tap it down firmly. Check frequently with a level to ensure no stone is a tripping hazard compared to its neighbor. -
Adjust Bedding Height:
I find I often need to lift a stone and add or remove a handful of stone dust underneath to stop it from rocking. Stability is key for a safe walkway.
Pro Tip: Mossy Joints
To encourage moss growth between stones for an aged look, mix buttermilk and moss spores into the soil you use to fill the joints.
Step 4: Finishing Touches
-
Fill the Joints:
Sweep stone dust, sand, or a mixture of native soil into the gaps between the stones. This locks the flags in place and prevents shifting. -
Soak the Joints:
Gently spray the path with a hose to settle the joint material. Add more material to any low spots that appear after the water soaks in. -
Landscape the Edges:
Backfill along the edges of the path with native soil or mulch. For this forest look, scatter pine needles or plant small ground covers like moss near the edges to integrate the stonework with the woods.
Now you have a durable, natural path that invites you to wander through the trees

PENCIL GUIDE
Understanding Pencil Grades from H to B
From first sketch to finished drawing — learn pencil grades, line control, and shading techniques.
Explore the Full Guide
Fire Pit Circle in a Shaded Grove
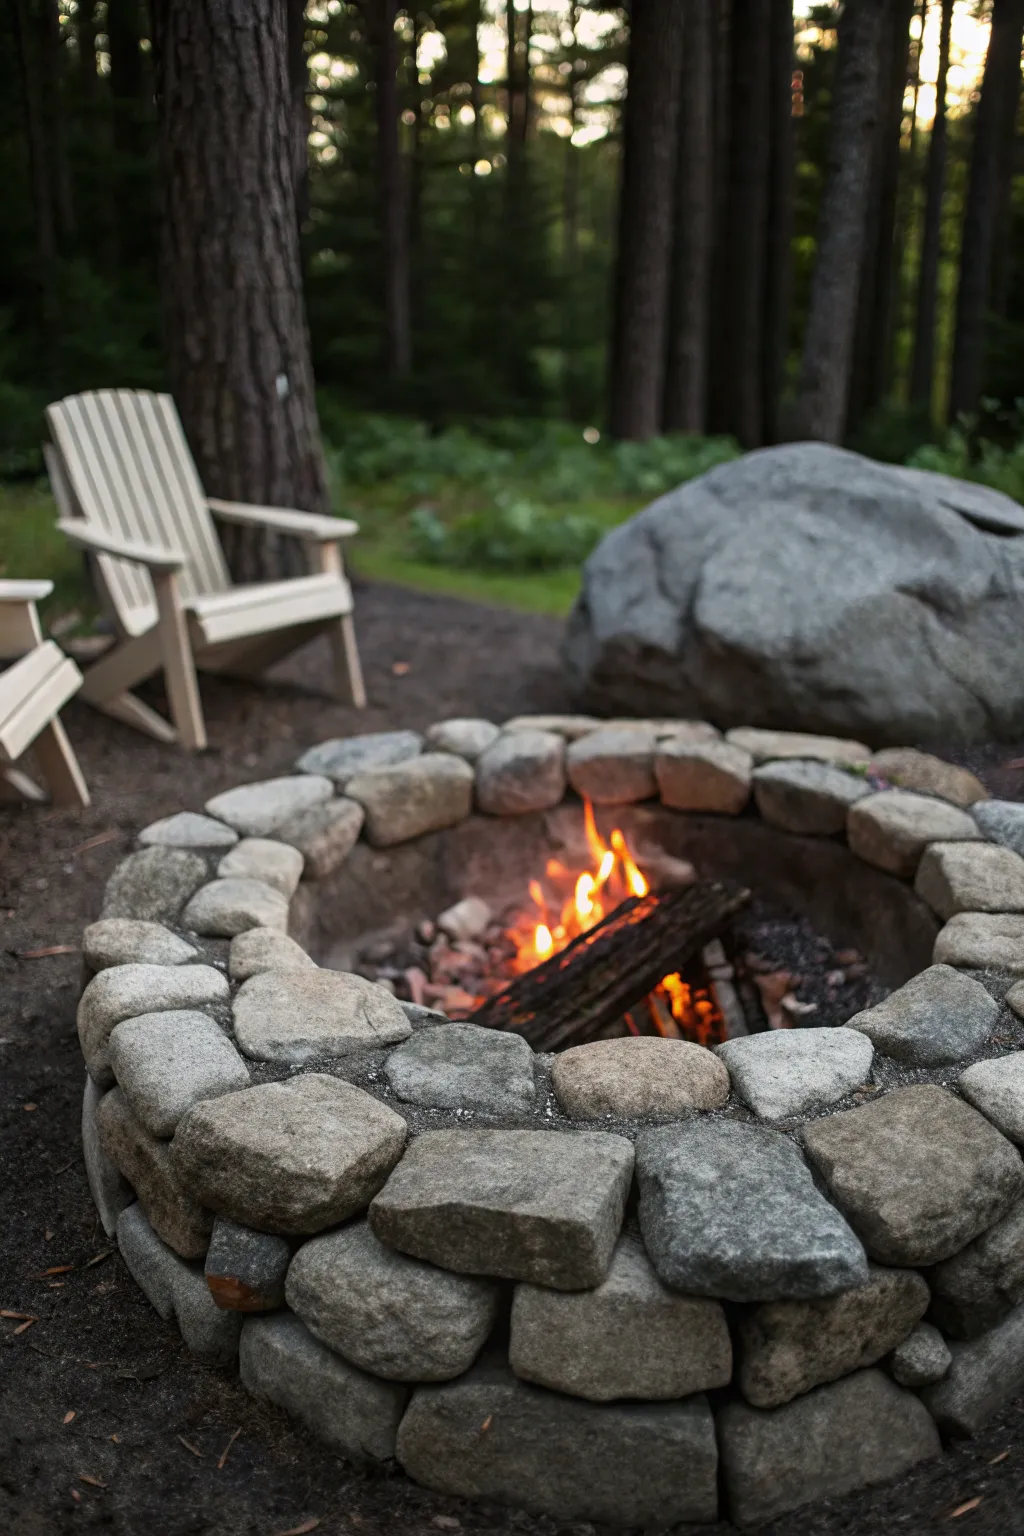
Transform a shady corner of your backyard into a cozy gathering spot with this rustic, circular stone fire pit. The design relies on natural, tumbled stones stacked to create a sturdy and timeless focal point that blends seamlessly with a wooded landscape.
How-To Guide
Materials
- Fieldstone or tumbled granite wall stones (assorted sizes)
- Fire-rated mortar or landscape adhesive
- Gravel or crushed stone (for base)
- Shovel and spade
- Bubble level
- Rubber mallet
- Spray paint (for marking)
- Measurement tape
- Long stake and string (for compass)
- Safety glasses and heavy gloves
Step 1: Preparation & Foundation
-
Mark the circle:
Choose a level spot clear of low-hanging branches. Drive a stake into the center of your desired location, tie a string to it cut to the radius of your pit (usually 18-24 inches from center to edge), and use spray paint to mark a perfect circle on the ground. -
Excavate the site:
Dig out the marked circle to a depth of about 6 to 8 inches. You want a solid, non-combustible base, so creating a trench slightly wider than your stones will help with stability. -
Add drainage:
Fill the excavated area with about 4 inches of crushed stone or gravel. Hand-tamp this layer firmly to ensure it’s compact and level, which prevents the stones from shifting later during freeze-thaw cycles. -
Sort your stones:
Lay out your fieldstone nearby. Group them by size and thickness; separate the largest, flattest stones for the base layer and capstones, and keep smaller ones for the middle courses.
Step 2: Building the Wall
-
Lay the first course:
Place your largest, heaviest stones into the trench on top of the gravel base. Ensure they touch tightly and check each one with a level front-to-back and side-to-side. -
Secure the base:
If any base stones wobble, shim them with small gravel chips or tap them down deeper with your rubber mallet until they sit dead flat. -
Start the second layer:
Begin stacking the second row, staggering the joints so that each new stone rests over the seam of two stones below it. This ‘one over two’ technique is crucial for structural integrity. -
Apply adhesive:
For a permanent bond, apply a bead of fire-rated landscape adhesive or a small dollop of mortar between the layers. I prefer to keep this invisible by placing it toward the back-center of the stone. -
Build upward:
Continue stacking until you reach your desired height, typically 12 to 18 inches. Keep checking the circle’s shape to ensure the walls aren’t leaning inward or outward. -
Fill the gaps:
As you build, small gaps will naturally appear between the irregular fieldstones. Fill these voids from the inside with smaller stone chips and mortar to lock everything tight without ruining the exterior aesthetic.
Stone Sorting Secret
Don’t skip the sorting phase! Laying out all stones beforehand lets you ‘read’ their shapes. Save flat-faced stones for the exterior visual side and wedge-shaped ones for curves.
Step 3: Finishing and Setting
-
Select capstones:
Choose your flattest, most attractive stones for the final top layer. Dry fit them first to find the best puzzle-piece arrangement that creates a relatively smooth rim for resting feet or tools. -
Secure the cap:
Generously apply adhesive or mortar under the capstones and press them firmly into place. Use the rubber mallet to gently tap them level with one another. -
Interior cleanup:
If you used mortar, smooth out any excess on the inside of the ring with a jointing tool or a gloved finger before it hardens completely. -
Cure the structure:
Let the adhesive or mortar cure for at least 24 to 48 hours before lighting your first fire; heat can compromise the bond if it hasn’t fully set. -
Final landscaping:
Backfill any dirt around the exterior base to hide the trench line. Add mulch or forest duff around the perimeter to blend the new stone construction into the surrounding grove.
Wobbly Wall Fix
If a stone creates a wobble, don’t use excessive mortar to fix it. Instead, use a ‘shim’—a thin sliver of stone or slate—wedged underneath to stabilize it before gluing.
Once the adhesive has cured, you can gather your chairs and enjoy the warmth of your new custom retreat
Meandering Gravel Path With Curved Borders
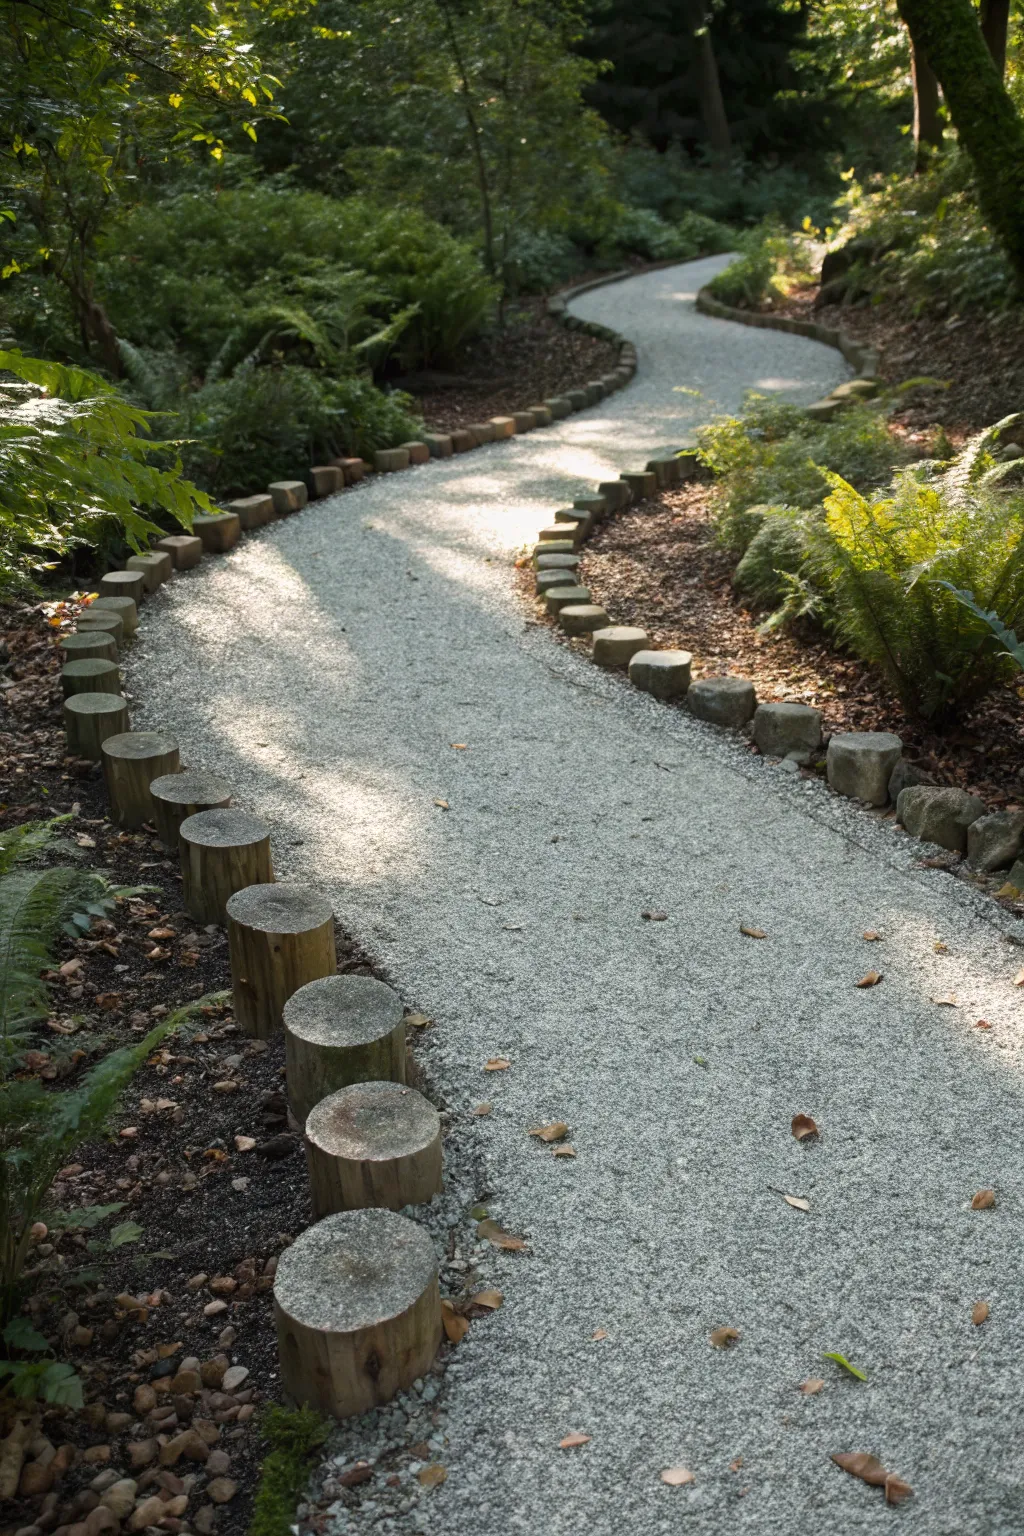
Transform a shady woodland corner into an inviting journey with this meandering gravel path lined by rustic log rounds. The contrast between the bright, crushed stone and the dark, organic border creates a structured yet natural flow through your garden.
Step-by-Step
Materials
- Crushed gravel (1/4 inch minus or similar pathway mix)
- Landscape fabric (weed barrier)
- Wood log rounds or sturdy timber edging (approx. 4-6 inches diameter)
- Shovel and spade
- Tamping tool or plate compactor
- Rubber mallet
- Metal rake
- Spray paint (for marking)
- Sand or crushed stone dust (for leveling logs)
Step 1: Preparation & Layout
-
Mark the curve:
Visualize the flow of your path by walking the route first. Use marking spray paint to outline both sides of the path directly on the ground, creating gentle, serpentine S-curves rather than straight lines. -
Excavate the bed:
Dig out the soil between your painted lines to a depth of about 3 to 4 inches. Keep the bottom of the trench relatively flat and smooth to ensure an even final surface. -
Install weed barrier:
Roll out landscape fabric along the entire length of the excavated path. This crucial layer prevents weeds from growing up through your gravel and keeps the stones from sinking into the mud over time.
Wood Selection Tip
Use naturally rot-resistant wood like cedar, locust, or pressure-treated rounds. Untreated pine will rot quickly in contact with damp soil.
Step 2: Installing the Log Border
-
Prepare the edge trench:
Along the very edges of your excavated path, dig a slightly deeper narrow trench where the log rounds will sit. You want them buried securely, typically about one-third to half of their height. -
Set the first logs:
Identify your starting point and place the first few log rounds vertically into the trench. I find it helpful to vary the heights slightly for a more organic, less rigid appearance. -
Level and secure:
Add a small amount of sand or stone dust under each log if needed to adjust the height. Use your rubber mallet to tap them firmly into place, ensuring they stand upright and snug against one another. -
Follow the curve:
Continue placing logs along the marked border. As you navigate the curves, rotate the logs slightly so their faces sit flush against their neighbors, eliminating large gaps. -
Backfill behind logs:
Pack soil tightly against the outside (garden side) of the logs to lock them in position. This provides the necessary resistance when you fill the path with gravel later.
Step 3: Creating the Path Surface
-
Base layer gravel:
Pour your gravel into the path area, filling it about halfway initially. Use a metal rake to spread it evenly, ensuring it reaches all the way to the log borders. -
Tamp it down:
Compact this first layer thoroughly using a hand tamper or plate compactor. A solid base prevents the path from feeling ‘mushy’ underfoot when you walk. -
Top layer application:
Add the remaining gravel until the level is just slightly below the tops of your shortest log rounds. Rake it smooth once more to create a uniform surface. -
Final compaction:
Tamp the surface one last time. For the best finish, lightly mist the gravel with a hose before tamping to help the fines lock the stones together. -
Clean up borders:
Brush off any gravel dust or stray stones from the tops of your log rounds. If the surrounding soil was disturbed, smooth it out and consider adding mulch or planting ferns right up to the log edge.
Loose Logs?
If a log feels wobbly, don’t just push dirt around it. Lift it out, add a handful of crushed stone dust to the hole, re-seat the log, and mallet it down.
Now you have a serene, durable path that invites guests to explore your garden mysteries


Terraced Hillside With Stone Steps
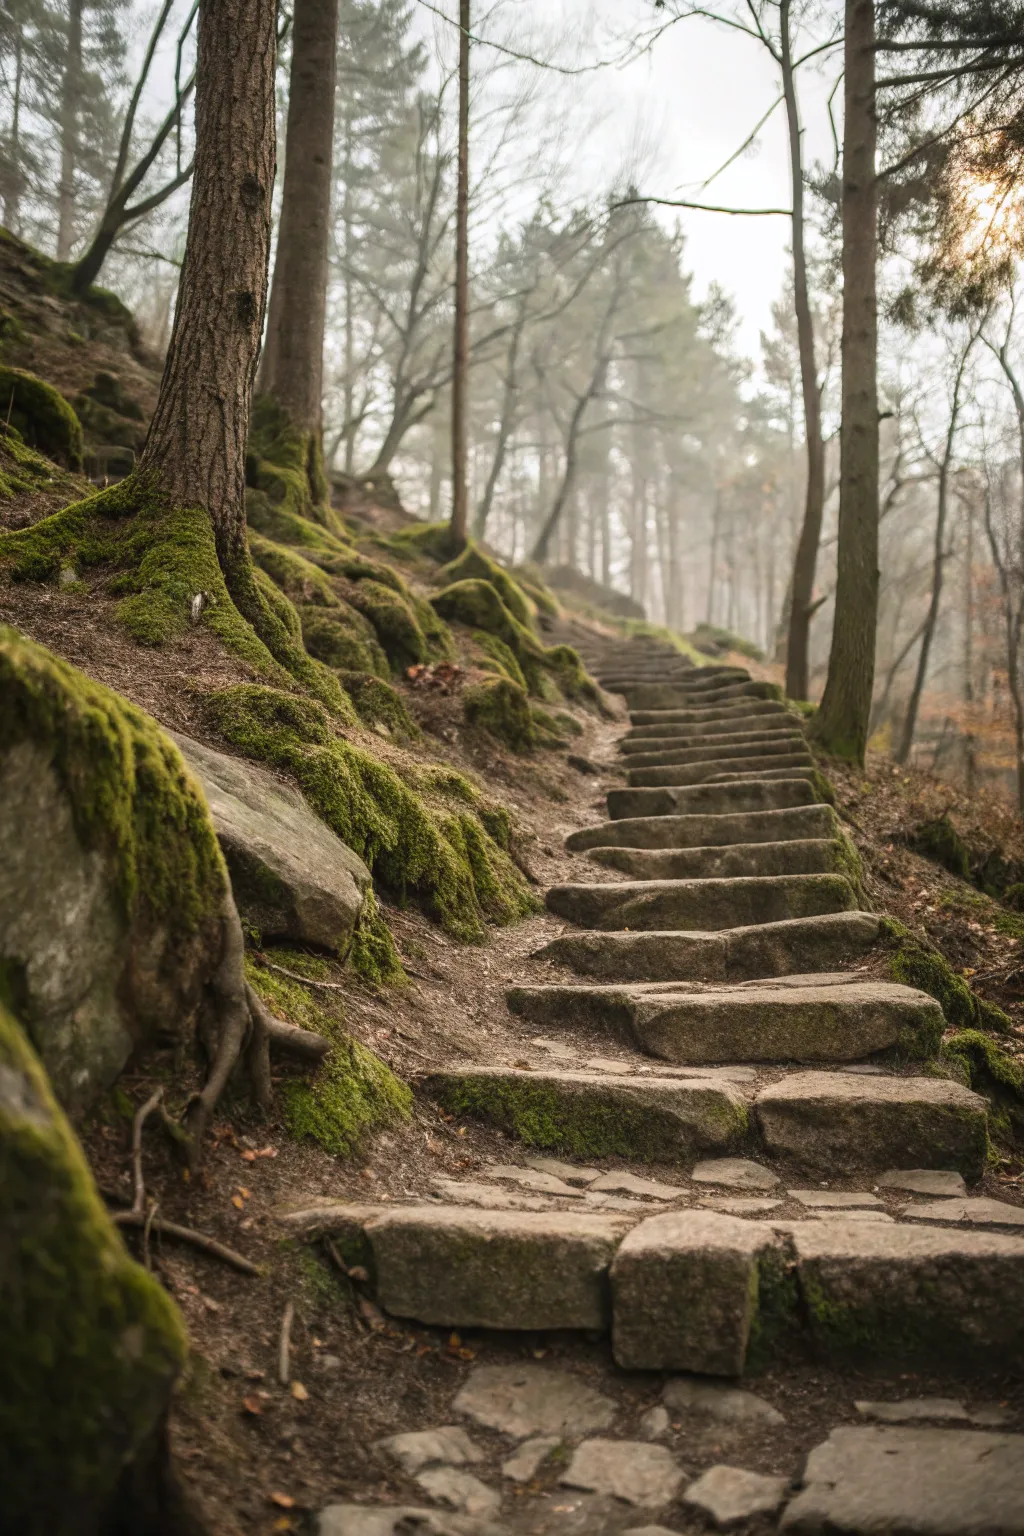
Capture the serene mystery of a winding stone staircase in a foggy forest with this acrylic landscape tutorial. You’ll master texturing ancient mossy stones and creating depth through atmospheric perspective.
Step-by-Step Guide
Materials
- Canvas or primed panel (11×14 or similar)
- Acrylic paints: Burnt Umber, Raw Sienna, Sap Green, Hooker’s Green, Yellow Ochre, Titanium White, Mars Black, Unbleached Titanium
- Gesso (optional for extra texture)
- Brushes: Large flat brush (1 inch), medium filbert (size 6), small round synthetics (size 2), old rigger brush
- Natural sea sponge
- Palette knife
- Water container and paper towels
- Matte medium or glazing liquid
Step 1: Setting the Atmosphere
-
Prime with warmth:
Begin by covering your entire canvas with a thin wash of Burnt Umber and a touch of Water. This underpainting removes the stark white and provides an earthy base that will peek through the greens later. -
Sketch the path:
Using a small round brush and diluted Burnt Umber, sketch the curving staircase. Start wider at the bottom right and narrow it significantly as it winds upward to the left and back to the center to establishing perspective. -
Block in the background mist:
Mix Titanium White with a tiny speck of Burnt Umber and maybe a hint of green to create a pale, warm grey. Paint the upper third of the canvas, ensuring the edges are soft and diffused. This is your foggy distance. -
Place the distant trees:
While the sky is still tacky, mix a slightly darker grey-brown. Paint the faint, vertical lines of the distant background trees. Keep them ghostly and low-contrast to push them back into the mist.
Step 2: Constructing the Stonework
-
Establish the step shapes:
Mix Mars Black, Burnt Umber, and White to make a medium stone grey. Block in the tops and fronts of the stone steps. Don’t worry about perfect rectangles; rough, uneven edges look more natural. -
Add shadows:
Deepen your grey mix with more Black and Burnt Umber. Paint the vertical ‘risers’ of the stairs and the deep crevices between stones. This immediately gives the staircase dimension. -
Texture the stone:
Dip a small piece of natural sea sponge into a mix of Unbleached Titanium and grey. Lightly dab the tops of the steps to create the pitted, rough texture of weathered granite. -
Cut in the large rocks:
On the left side, block in large, irregular boulder shapes using a palette knife and dark grey-brown paint. The knife creates crisp, rocky edges that contrast with the softness of the moss we’ll add later.
Muddy Greens?
If your moss looks muddy, let the dark layer dry completely before adding lighter greens. Wet-on-wet blending can turn greens into brown sludge quickly.
Step 3: Creating the Forest Floor
-
Basecoat the ground:
Mix Burnt Umber and Raw Sienna. Fill in the earth areas on either side of the steps, scrubbing the paint in diverse directions to simulate uneven terrain covered in pine needles. -
Layering the moss base:
Combine Sap Green with a little Black for a deep, dark forest green. Stipple this color heavily over the boulders on the left and along the edges of the steps where moss would naturally gather. -
Mid-tone moss application:
Mix Sap Green and Yellow Ochre. Using an old, splayed brush or sponge, tab over the dark green areas, leaving some of the dark underlayer visible for depth.
Magical Glow
Add a translucent glaze of Zinc White and yellow over the top right corner to simulate the sun breaking through the canopy mist.
Step 4: Refining Details and Light
-
Tree trunks:
Paint the main foreground trees using dark Burnt Umber and Black. The tree on the left should be thickest and darkest. Make sure they stand straight vertically, anchoring the composition. -
Highlighting the moss:
Mix Hooker’s Green with a generous amount of Yellow Ochre and a touch of White. Stipple bright highlights on the top surfaces of the mossy rocks where the diffused sunlight hits. -
Defining the steps:
Take your lightest stone color (nearly white grey) and use the edge of the palette knife to add thin, broken lines on the very edge of each step. This separates them clearly. -
Root systems:
Using a rigger brush and thinned brown-black paint, drag wandering root shapes over the boulders on the bottom left. Let them twist and turn naturally over the stone. -
Scattering debris:
Flick a toothbrush dipped in reddish-brown paint softly over the steps and dirt areas to simulate fallen pine needles and organic grit. -
Atmospheric glazing:
Mix a very watery glaze of Titanium White and glazing liquid. Lightly brush over the background trees and the top of the stairs once dry to enhance the misty effect.
Step back and admire your peaceful forest path, inviting the viewer to take a walk into the unknown


Have a question or want to share your own experience? I'd love to hear from you in the comments below!