When you want free choice drawing ideas, the hardest part is usually just picking a starting point. Here are 21 go-to prompts I use (and love) to kick your brain into motion—ranging from classic sketchbook staples to playful, imagination-first twists.
Quick Gesture Figure Studies
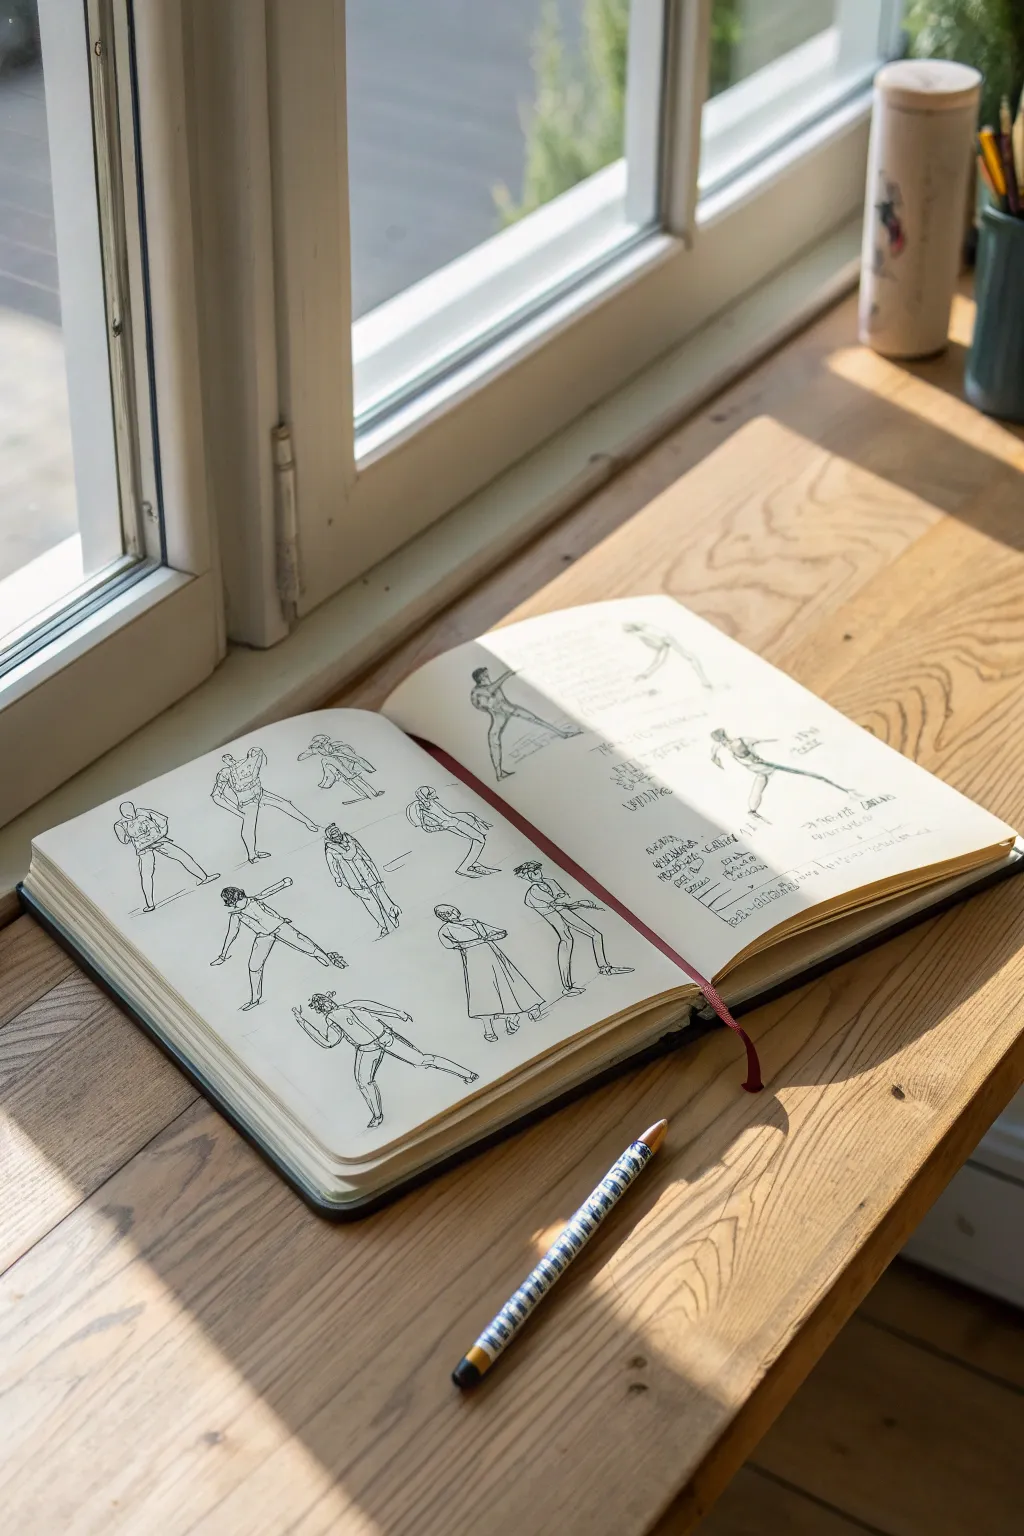
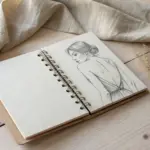
Capture the dynamic energy of the human form with this series of quick, ink-based gesture drawings. The focus here is not on anatomical perfection, but on fluidity, movement, and capturing the essence of a pose in just a few confident strokes.
Step-by-Step Guide
Materials
- Hardbound sketchbook (A4 or similar size)
- Fine liner pen (0.5mm or 0.8mm, black)
- Reference photos of people in motion (sports, dance, or everyday action)
- Pencil (optional, for initial guidelines)
- Eraser (optional)
Step 1: Preparation & Warm-up
-
Set the Mood:
Find a comfortable, well-lit workspace. Natural light, like window side-lighting, is ideal for seeing your lines clearly without harsh shadows. -
Study Your References:
Before putting pen to paper, spend a few minutes just looking at your reference images. Identify the ‘line of action’—the main curve that runs through the spine and limbs of the figure. -
Loose Warm-up Lines:
On a scrap piece of paper, make some loose S-curves and C-curves with your pen to get your wrist moving freely. Stiffness is the enemy of gesture drawing.
Stiff Poses?
If figures look robotic, stop drawing straight lines. Exaggerate the curve of the spine more than you see in reality to force a sense of flow.
Step 2: Constructing the Figures
-
Establish the Spine:
Start your first figure on the left page. Draw a single, sweeping line to represent the spine and the main angle of the torso. This anchor point determines the figure’s balance. -
Shoulders and Hips:
Add angled lines for the shoulder girdle and the pelvis. Notice how these often tilt in opposite directions when a person is in motion (contrapposto). -
Sketching Limbs:
Extend lines for the arms and legs. Keep these simple—think of them as flowing wires rather than detailed muscles. Focus on the joints (knees and elbows) as simple pivot points. -
Adding Volume:
Instead of outlining muscles perfectly, use quick, cylindrical shapes or simple contours to imply clothing and body mass. For trousers or sleeves, a few jagged lines suggest folds. -
The Head and Orientation:
Draw an oval for the head. Add a cross-contour line or a simple nose indication to show which way the figure is facing. Avoid drawing facial features; keep it anonymous.
Step 3: Building the Composition
-
Spacing the Crowd:
Move to the next figure. Leave enough white space so they don’t overlap chaotically, but keep them close enough to feel like a collection of studies. -
Varying Poses:
I try to alternate between standing, lunging, and twisting poses. If your first figure was static, make the next one extremely active, perhaps kicking or reaching. -
Adding Clothing Details:
For figures with coats or dresses, outline the large shapes of the fabric first. Let the hem flowing outward emphasize the direction of movement. -
Cross-Hatching Shadows:
Identify where the light would hit your figures. Add very minimal diagonal hatching on the shadowed side of limbs or under the chin to give the sketches 3D weight. -
Grounding the Figures:
Add small, quick scribbles or horizontal dashes beneath the feet. This hints at a shadow and prevents the figures from looking like they are floating in space.
Timed Challenge
Set a timer for 30 seconds per figure. Speed forces you to ignore details like buttons or fingers and focus purely on the overall gesture.
Step 4: Refining and Reviewing
-
Reinforcing Key Lines:
Go back over your initial rapid lines. If a leg needs to look stronger, add a slightly heavier line weight to the outer edge. -
Correcting without Erasing:
If a proportion looks off, don’t erase it. Simply draw the correct line over it. These multiple lines add a sense of vibration and energy to the drawing. -
Adding Notes:
On the right-hand page or in the margins, you can add small handwritten notes about the movement or anatomy, just like in the example image. It adds a studious, journaling aesthetic. -
Final Scan:
Look at the spread as a whole. If one area feels too empty, add a small partial figure or a detail study of a hand or foot to balance the composition.
Now you have a lively spread of figures that captures the fleeting nature of human movement


Mirror Self-Portrait
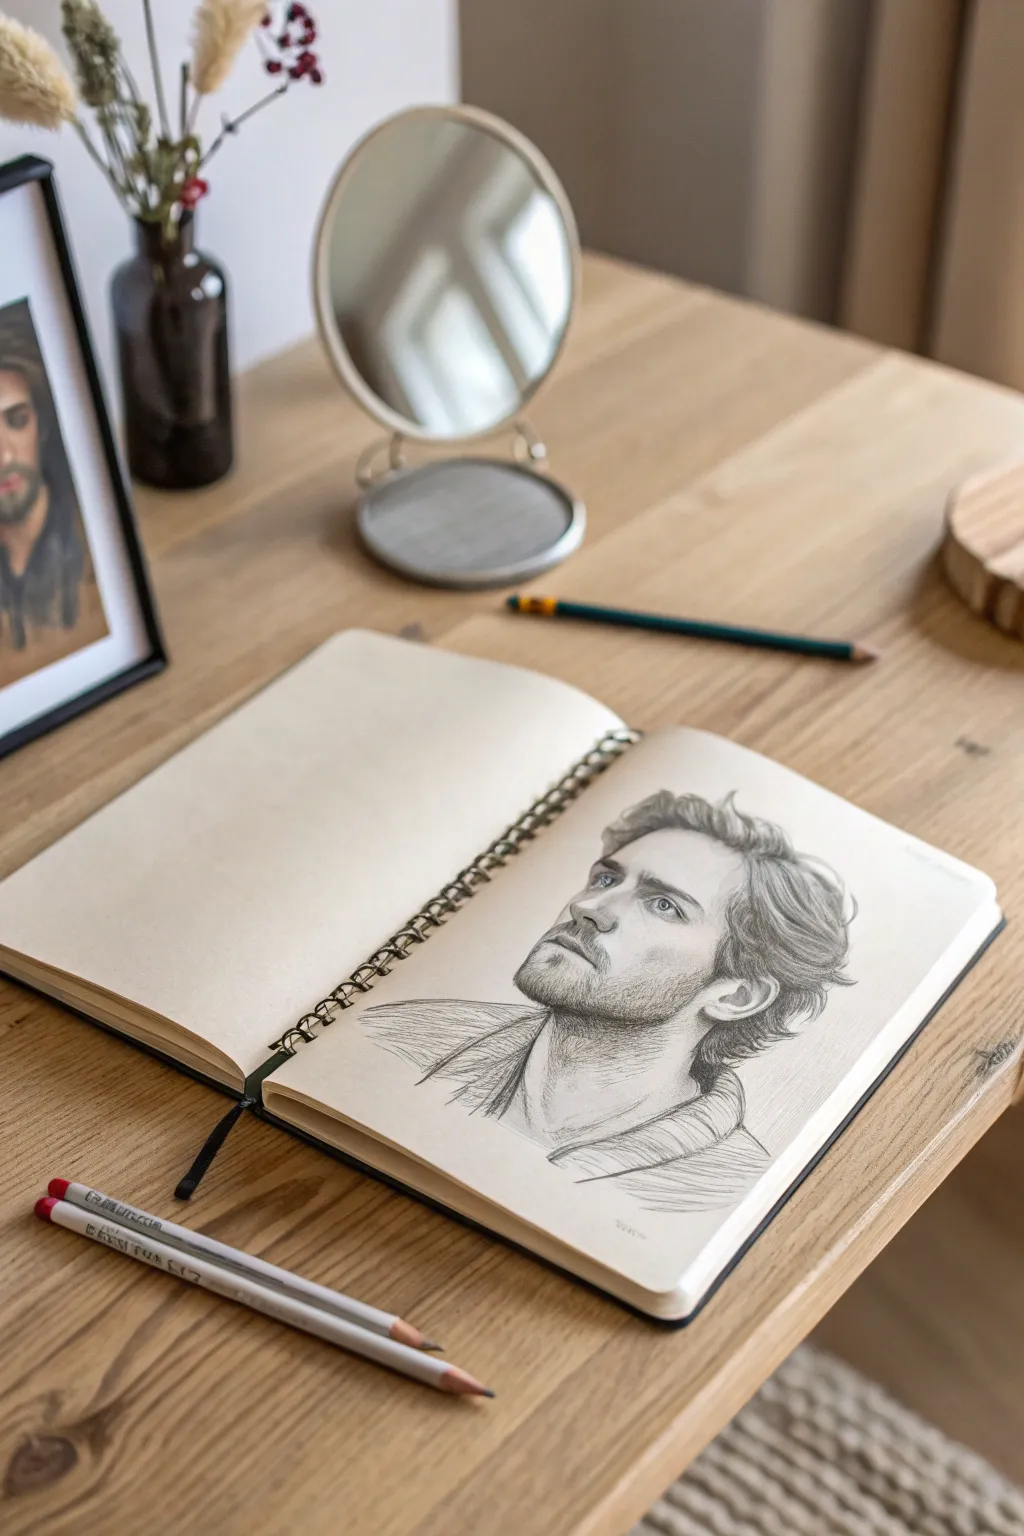
Capture the thoughtful expression of a self-portrait using graphite pencils and delicate shading techniques. This project focuses on achieving realistic facial proportions and textured hair through careful observation of your own reflection.
How-To Guide
Materials
- Sketchbook with smooth, off-white paper
- Set of graphite pencils (HB, 2B, 4B, 6B)
- Kneaded eraser
- Blending stump (optional)
- Small round mirror on a stand
- Pencil sharpener
Step 1: Setting Up and Initial Sketch
-
Position your setup:
Place your mirror at a slightly elevated angle on your desk so you are looking up and to the side, just like the subject in the reference. Ensure your light source is constant, preferably coming from one side to create distinct shadows. -
Map the head shape:
Using a sharp HB pencil and very light pressure, draw a loose oval for the head. Add a vertical centerline that curves with the angle of the face, and horizontal guidelines for the eyes, nose, and mouth. -
Place the features:
Lightly mark the position of the eyes, the base of the nose, and the line of the mouth. Pay attention to the three-quarter angle; the eye further away from you will appear slightly smaller and more foreshortened. -
Outline the jaw and neck:
Sketch the strong jawline, noting how the beard eventually softens this edge. extend the neck lines down into the collar of the shirt, keeping the shoulders relaxed and sloping. -
Refine the eyes:
Draw the almond shapes of the eyes, adding the iris and pupil. Leave a tiny white circle in each pupil for the catchlight—this brings life to the drawing immediately.
Hatching Direction
When shading skin, try to curve your hatching lines slightly to wrap around the form of the face. This makes cheeks look round rather than flat.
Step 2: Shading and Definition
-
Establish core shadows:
Switch to a 2B pencil. Lightly shade the side of the face away from the light source, the hollows of the eyes, and under the chin. Use diagonal hatching lines for a classic sketched look. -
Sculpt the nose:
Instead of drawing hard lines for the nose, use shading to define its shape. Darken the nostril and the shadow cast by the nose, keeping the bridge lighter. -
Define the lips and mouth:
Shade the upper lip darker than the bottom lip. Add the darker accents for the corners of the mouth, but don’t outline the lips completely. -
Build the beard texture:
Using the 2B and 4B pencils, start indicating the beard. Don’t draw every hair; instead, use short, directional strokes that follow the growth pattern on the jaw and chin. -
Darken the beard shadows:
Layer darker 4B strokes in the denser areas of the beard, specifically under the jawline, to create volume and separate the face from the neck. -
Render the hair:
Outline the main clumps of hair. Use long, flowing strokes with the 2B pencil to establish the waves. I like to start at the root, lift pressure in the middle for a highlight, and press down again at the end.
Muddy Shading?
If shadows look like a gray smudge, you’re over-blending. Switch back to a sharp pencil and add crisp hatching lines on top to restore texture.
Step 3: Final Details and Clothing
-
Deepen the contrast:
Take your 6B pencil and revisit the darkest areas: the pupils, the nostrils, and the deepest shadows in the hair and beard. This high contrast makes the drawing pop. -
Refine the eyebrows:
Use short, sharp strokes to fill in the eyebrows. Make sure they follow the brow bone structure and aren’t just stuck on top of the skin. -
Sketch the clothing:
Keep the clothing loose and sketchy to maintain focus on the face. Use broad, quick strokes to suggest the collar and folds of the fabric. -
Add neck shading:
Add cross-hatching on the neck, focusing on the shadow cast by the chin. This helps push the head forward in space. -
Clean up highlights:
Use your kneaded eraser to tap and lift graphite from the highlights on the forehead, the bridge of the nose, and the cheekbone to enhance the three-dimensional form.
Close your sketchbook knowing you’ve captured a moment of quiet reflection through careful observation


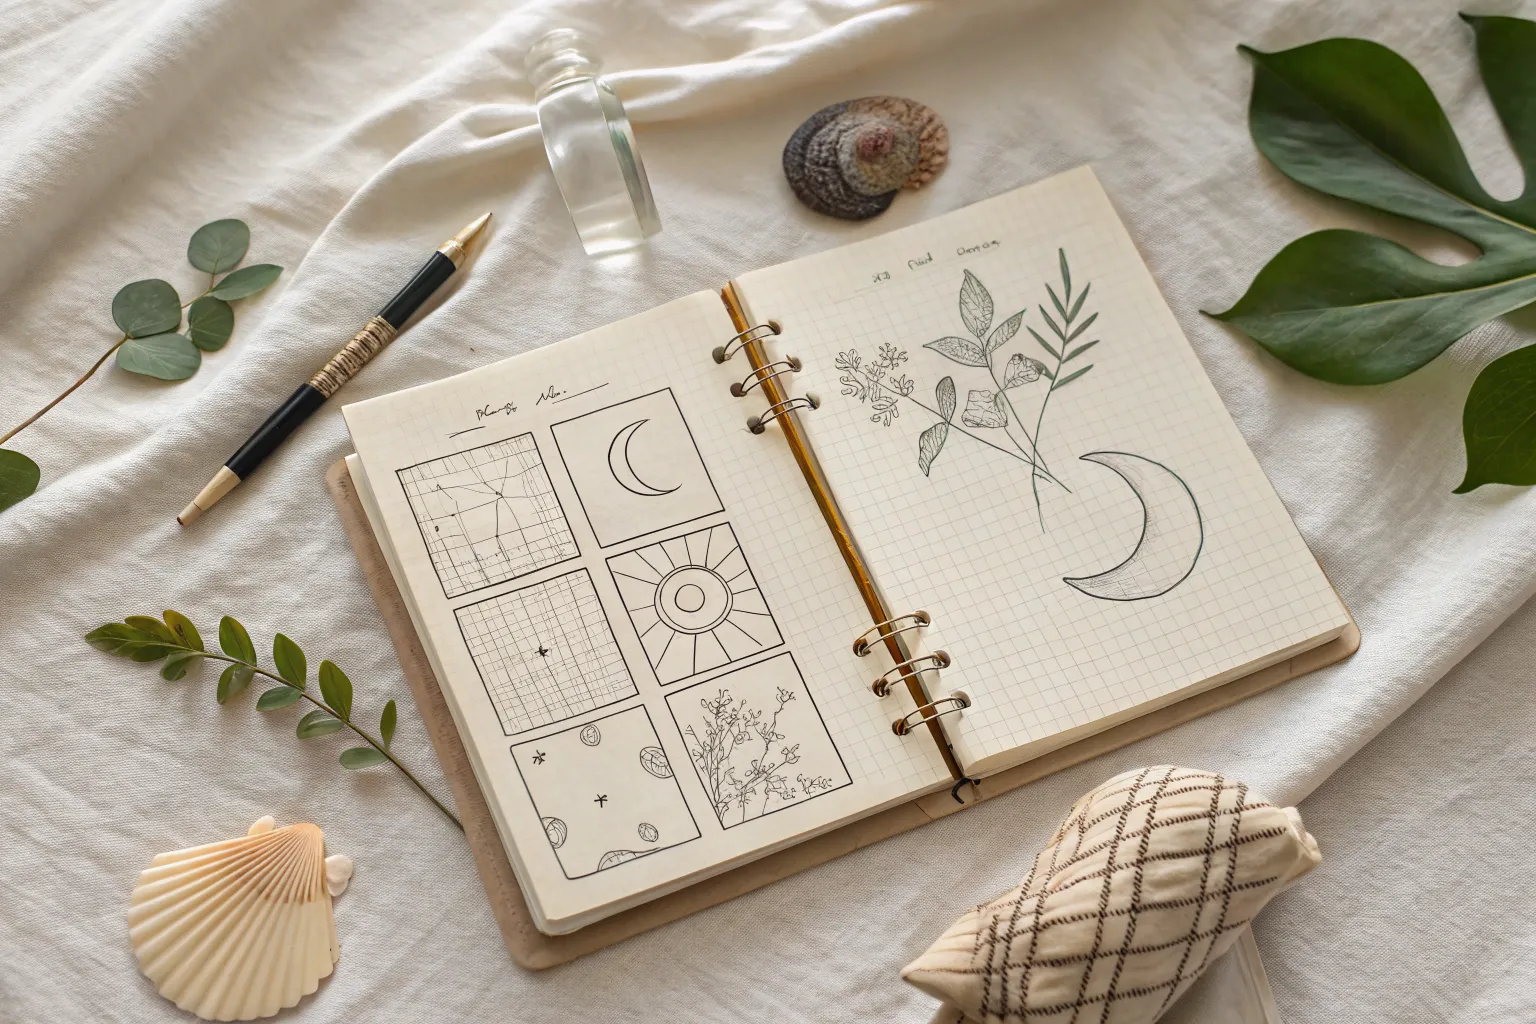
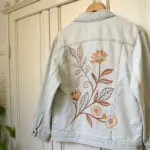
Leaf or Flower Study
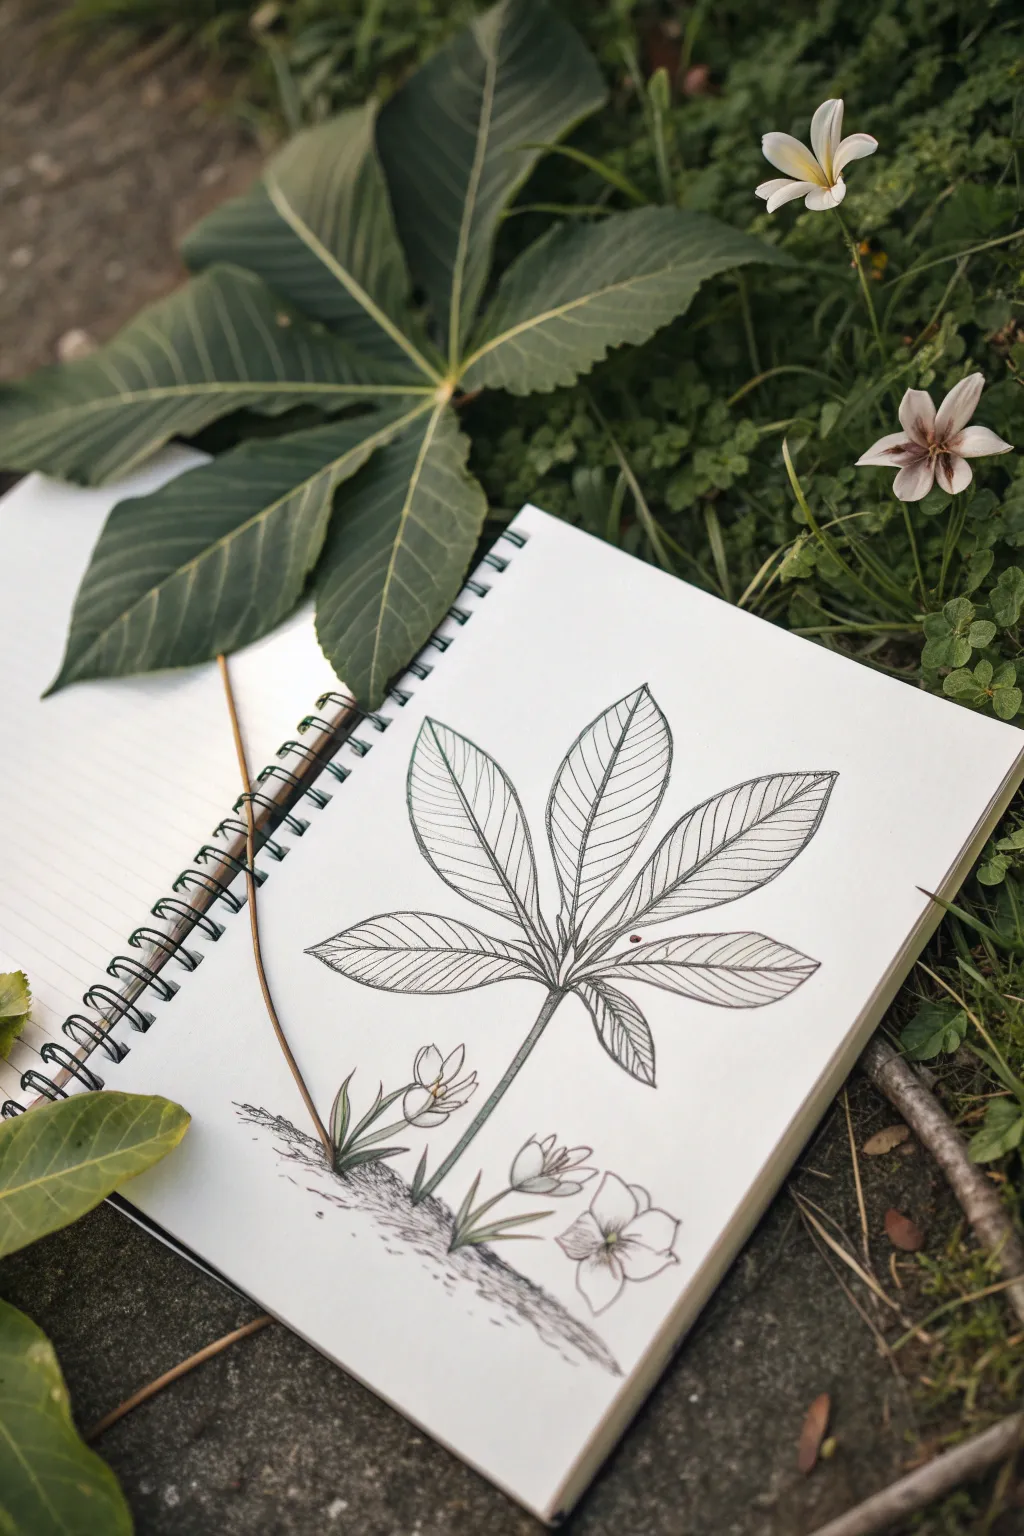
This project captures the delicate structure of a palmate leaf alongside small wildflowers, all grounded in a simple earthy base. The drawing relies on fine line work and careful observation of vein patterns to create a realistic, nature-inspired illustration.
Step-by-Step Tutorial
Materials
- Sketchbook with smooth heavyweight paper
- HB or 2B graphite pencil for initial sketching
- Fine liner pens (0.1mm and 0.3mm)
- Eraser
- Optional: Real leaf for reference (like a Horse Chestnut leaf)
Step 1: Drafting the Basic Structure
-
Map the central point:
Begin by marking a small, faint dot near the center of your page. This will be the junction point where all the leaf stems meet the main stalk. -
Draw the main stem:
From your junction point, draw a vertical line extending downward. Give it a very slight curve to the right to make it feel organic rather than rigid. -
Outline the leaf spokes:
Sketch five lines radiating outward from the junction point like the spokes of a wheel. Place one going straight up, two angled to the sides, and two lower ones drooping slightly downwards. -
Form the leaf shapes:
Using the spokes as center guides, lightly sketch an elongated oval or lance-shape around each line. The leaves should be widest in the middle and taper to a sharp point at the tip.
Step 2: Refining the Leaf Details
-
Define the edges:
Before inking, refine your pencil sketch by adding slight serrations or waves to the edges of each leaf blade so they don’t look perfectly smooth and manufactured. -
Ink the outlines:
Using a 0.3mm fine liner, trace over your refined leaf shapes and the main stem. I find that lifting the pen occasionally creates a more natural, broken line quality. -
Add the central veins:
Draw the central vein (midrib) for each leaf blade with the pen, ensuring it connects cleanly to the central junction point. -
Sketch the lateral veins:
Switch to a finer 0.1mm pen. Draw thin, parallel lines branching off the midribs. These veins should angle upward toward the leaf tip, creating a ‘herringbone’ pattern. -
Create shading with lines:
To give the leaves dimension, add more closely spaced hatching lines near the central veins and the bottom of the leaves, suggesting curvature.
Natural Imperfections
Don’t make your leaves symmetrical. Adding a small notch or insect bite mark to one edge adds realism and character instantly.
Step 3: Grounding the Composition
-
Draft the wildflowers:
At the base of the stem, lightly pencil in three small flowers. One should be a closed bud on the left, one semi-open, and one fully open blossom on the right. -
Add blades of grass:
Sketch a few short, vertical strokes clustering around the base of the stem and flowers to represent grass blades. -
Ink the floral elements:
Go over the flowers with your fine liner. Keep the lines delicate for the petals, using simple curved shapes. -
Draw the soil line:
Create an uneven, textured horizon line beneath the plants. Use short, horizontal scribbles and dots to mimic the texture of dirt. -
Apply ground shading:
Darken the area directly under the main stem and flowers with denser scribbling. This anchors the drawing and prevents the plants from looking like they are floating.
Color Wash
Use diluted watercolor to add a pale green wash over the leaves, letting the paint pool slightly at the veins for natural shading.
Step 4: Final Touches
-
Erase pencil marks:
Wait until the ink is completely dry to avoid smudging, then gently erase all the underlying graphite sketch lines. -
Review contrast:
Look at the junction point where the leaves meet. Deepen the shadows here with the 0.1mm pen to emphasize overlap and depth.
Now you have a permanent record of nature’s design in your sketchbook, ready for your next outdoor adventure


Cozy Room Corner Perspective
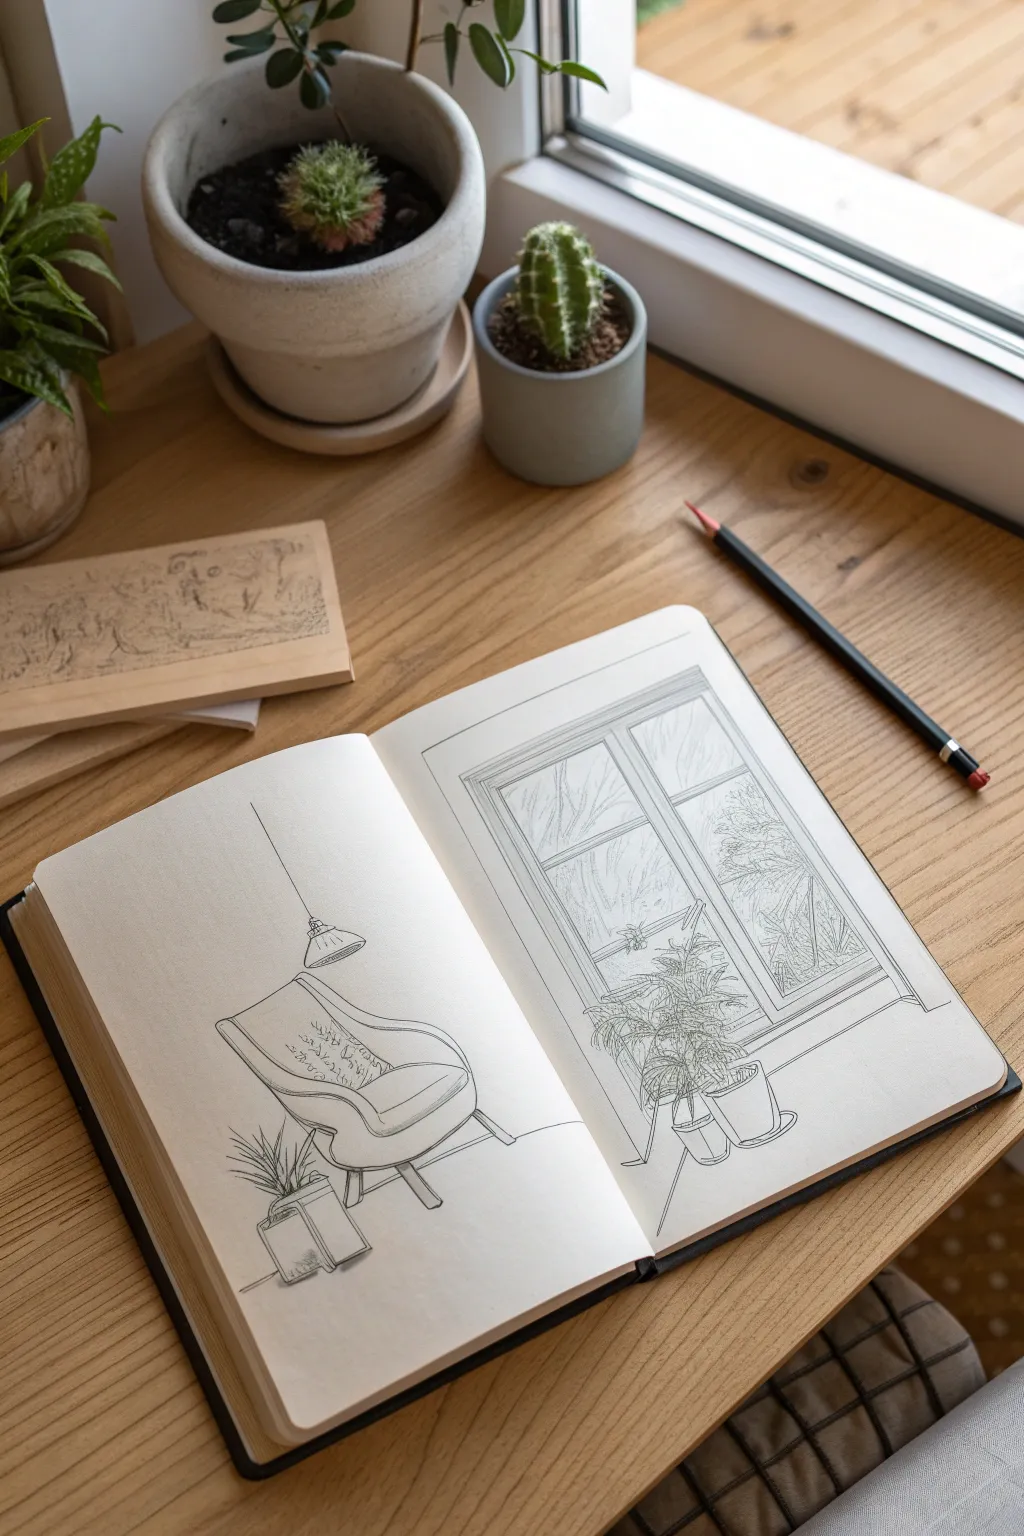
This charming sketchbook spread captures the serenity of a quiet indoor corner, featuring a comfy armchair on one page and a sunlit window filled with greenery on the other. Using clean linework and subtle texturing, you’ll create a cohesive diptych that feels inviting and peaceful.
Step-by-Step Guide
Materials
- Sketchbook with smooth, heavy paper (A5 or similar size)
- Graphite pencils (HB for outlines, 2B for shading)
- Fine liner pens (0.1mm, 0.3mm, 0.5mm) in black
- Eraser (kneaded preferred)
- Ruler or straight edge
- Blending stump (tortillon) – optional
Step 1: Page 1: The Armchair Construction
-
Establish the ground line:
Begin on the left page by drawing a very faint horizontal line near the bottom to represent the floor. This anchors your chair so it isn’t floating in space. -
Outline the chair shape:
Sketch the basic ‘egg’ shape of the mid-century modern armchair. Draw a large, curved U-shape for the seat and back, tilting it slightly backward for a relaxed posture. -
Refine the chair details:
Add thickness to the chair’s outline to suggest the upholstery. Draw the inner curve for the seat cushion and add the short, angled wooden legs extending downward. -
Add the hanging lamp:
Draw a long, thin vertical line descending from the top of the page. At the end, sketch a simple dome or cone shape for the lampshade hanging directly over the chair. -
Sketch the floor plant:
To the left of the chair, draw a simple cylindrical pot or box. Add spiky leaves bursting upward to ground the composition. -
Ink the outlines:
Using a 0.3mm fine liner, carefully trace over your pencil lines. Use confident, single strokes rather than scratchy ones for a clean look. -
Add texture and shadow:
With a 0.1mm pen, add light hatching lines on the shadowed side of the chair and under the cushion. I like to add tiny squiggles on the backrest to suggest fabric texture.
Clean Lines Pro Tip
Don’t connect every single line perfectly. Leaving tiny gaps where lines intersect (like window corners) keeps the drawing feeling airy and less rigid.
Step 2: Page 2: The Window View
-
Frame the window:
On the right page, use a ruler to draw a large rectangle that fills most of the page. Inside this, draw a slightly smaller rectangle to create the window frame thickness. -
Divide the panes:
Draw a vertical line down the center and a horizontal line across the upper third to create the classic windowpane structure. Keep your lines parallel for perspective accuracy. -
Sketch the plants on the sill:
Lightly pencil in the shapes of two or three pots sitting on the windowsill. One should be larger with overflowing foliage, and another smaller one beside it. -
Draw the foliage:
Fill the pots with detailed leaves. For the main plant, use leafy, jagged shapes; for the background view through the window, sketch faint, scratchy vertical lines to suggest bare trees outside. -
Ink the window structure:
Switch to a 0.5mm pen for the main window frame to make it stand out. Use the 0.3mm pen for the inner panes and the pots. -
Detail the leaves:
Use your finest 0.1mm pen to add veins to the indoor plant leaves. This contrast in line weight pushes the window frame forward and keeps the leaves looking delicate. -
Create depth with hatching:
Add vertical hatching lines on the window glass area to suggest reflection and separation from the interior. Shade the side of the pots to give them volume.
Level Up: Watercolor
Use a light watercolor wash in earthy greens and browns over the ink. Ensure your ink is waterproof first so lines don’t bleed or smudge.
Step 3: Final Touches
-
Erase pencil marks:
Once the ink is completely dry, gently erase all underlying pencil sketches. Be thorough to leave the page looking crisp. -
Connect the pages:
Check the balance between the two pages. If one side feels too light, add a few more hatching lines to shadows to match the tonal value of the other side.
Your finished spread now invites the viewer into a perfectly peaceful, illustrated moment
BRUSH GUIDE
The Right Brush for Every Stroke
From clean lines to bold texture — master brush choice, stroke control, and essential techniques.
Explore the Full Guide
Realistic Eye With Reflections
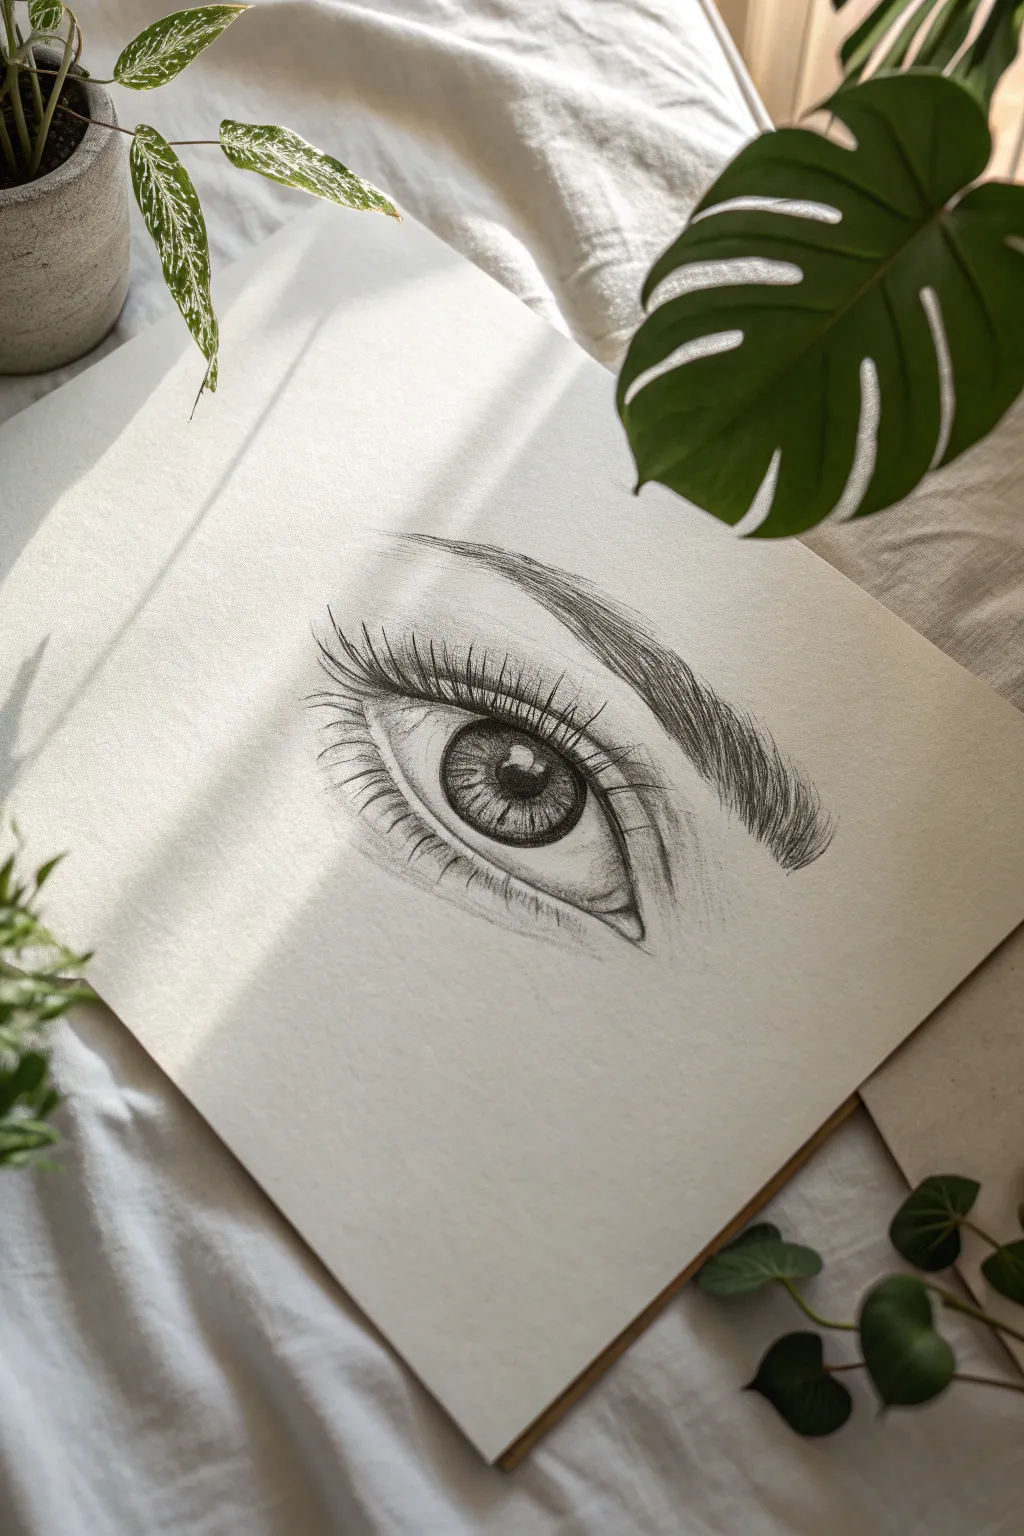
Capture the depth and emotion of the human eye with this detailed pencil study. By focusing on tonal values, delicate shading, and sharp highlights, you can transform simple graphite marks into a striking, realistic gaze.
Step-by-Step Tutorial
Materials
- Smooth bristol or drawing paper (heavyweight used here)
- Graphite pencils (HB as a base, 2B/4B for shading, 6B for darkest blacks)
- Kneaded eraser (for lifting highlights)
- Fine-point mechanical pencil (0.5mm, HB)
- Blending stump or tortillon
- Soft tissue or cotton swab
Step 1: Shaping the Foundation
-
Outline the almond shape:
Start with a light HB pencil to sketch the basic almond shape of the eye. Don’t close the inner corner completely yet; leave space for the tear duct. -
Place the iris and pupil:
Draw a large circle for the iris, making sure the top part is slightly cut off by the upper eyelid to create a relaxed look. Place a smaller, perfect circle in the center for the pupil. -
Mark the highlight:
Before doing any shading, lightly outline a small, irregular window-like shape overlapping both the pupil and iris. This reserve of white paper is crucial for the glossy reflection effect. -
Define the lids:
Sketch the crease of the upper eyelid, mirroring the curve of the lash line but slightly higher. Add a faint line for the lower lid’s thickness, often called the waterline.
Smudgy paper?
Place a scrap piece of paper under your drawing hand. This acts as a shield, preventing oils from your skin and friction from smearing your delicate pencil work.
Step 2: Developing the Iris
-
Darken the pupil:
Using a 4B or 6B pencil, fill in the pupil with a solid, rich black, being extremely careful not to smudge into your reserved highlight area. -
Radiating lines:
Switch to a sharp 2B pencil. Draw lines radiating outward from the pupil like bicycle spokes. Vary their length and darkness to mimic the fibrous texture of the iris. -
Outer rim shading:
Darken the outer edge of the iris circle (the limbal ring). Softly shade inward from this ring to blend with your radiating lines. -
Under-lid shadow:
Shade the top portion of the iris (just under the upper eyelid) quite darkly. The eyelid casts a shadow here, which adds immense depth. -
Refining the reflection:
I like to gently draw the reflection of eyelashes inside the white highlight box using a very sharp HB pencil for subtle realism.
Step 3: Lashes and Textures
-
Draft the eyebrow shape:
Lightly outline the eyebrow arch above the eye. Don’t fill it in yet; just establish the boundaries where the hairs will flow. -
Shade the eyeball:
The ‘white’ of the eye isn’t pure white. Use a dirty blending stump or a very light HB layer to shade the corners of the eyeball, leaving the center bright to make it look spherical. -
Draw the upper lashes:
Using a sharp mechanical pencil or 4B, draw the upper lashes in curved, sweeping motions. Start at the lash line and flick upward. Ensure the lashes clump slightly rather than looking like uniform picket fences. -
Add lower lashes:
Draw the lower lashes, curving them downward. These should be shorter, sparser, and slightly lighter than the upper set. -
Refine the waterline:
Darken the edge below the waterline to make the rim of the lower lid pop out. Add tiny highlights on the moist waterline with an eraser if needed.
Level Up: Reflection
Instead of a simple white square, draw a tiny landscape or window pane inside the pupil’s highlight. It implies a specific environment the eye is looking at.
Step 4: Final Details
-
Layering the eyebrow:
Fill in the eyebrow with short, quick strokes that follow the direction of hair growth. Start lighter near the nose and get denser toward the arch. -
Deepen the shadows:
Go back with your 6B pencil and re-darken the pupil, the shadow under the upper lid, and the thickest parts of the eyelashes to increase contrast. -
Adding skin texture:
Lightly sketch fine creases under the eye and small wrinkles on the upper lid. Smudge these gently so they don’t look like scars. -
Final highlights:
Use a kneaded eraser to lift pigment from the center of the lower lid and the brow bone for final illumination.
Step back and admire the piercing realism of your drawing, proof that a few graphite tones can create a whole world of expression
Draped Fabric Folds
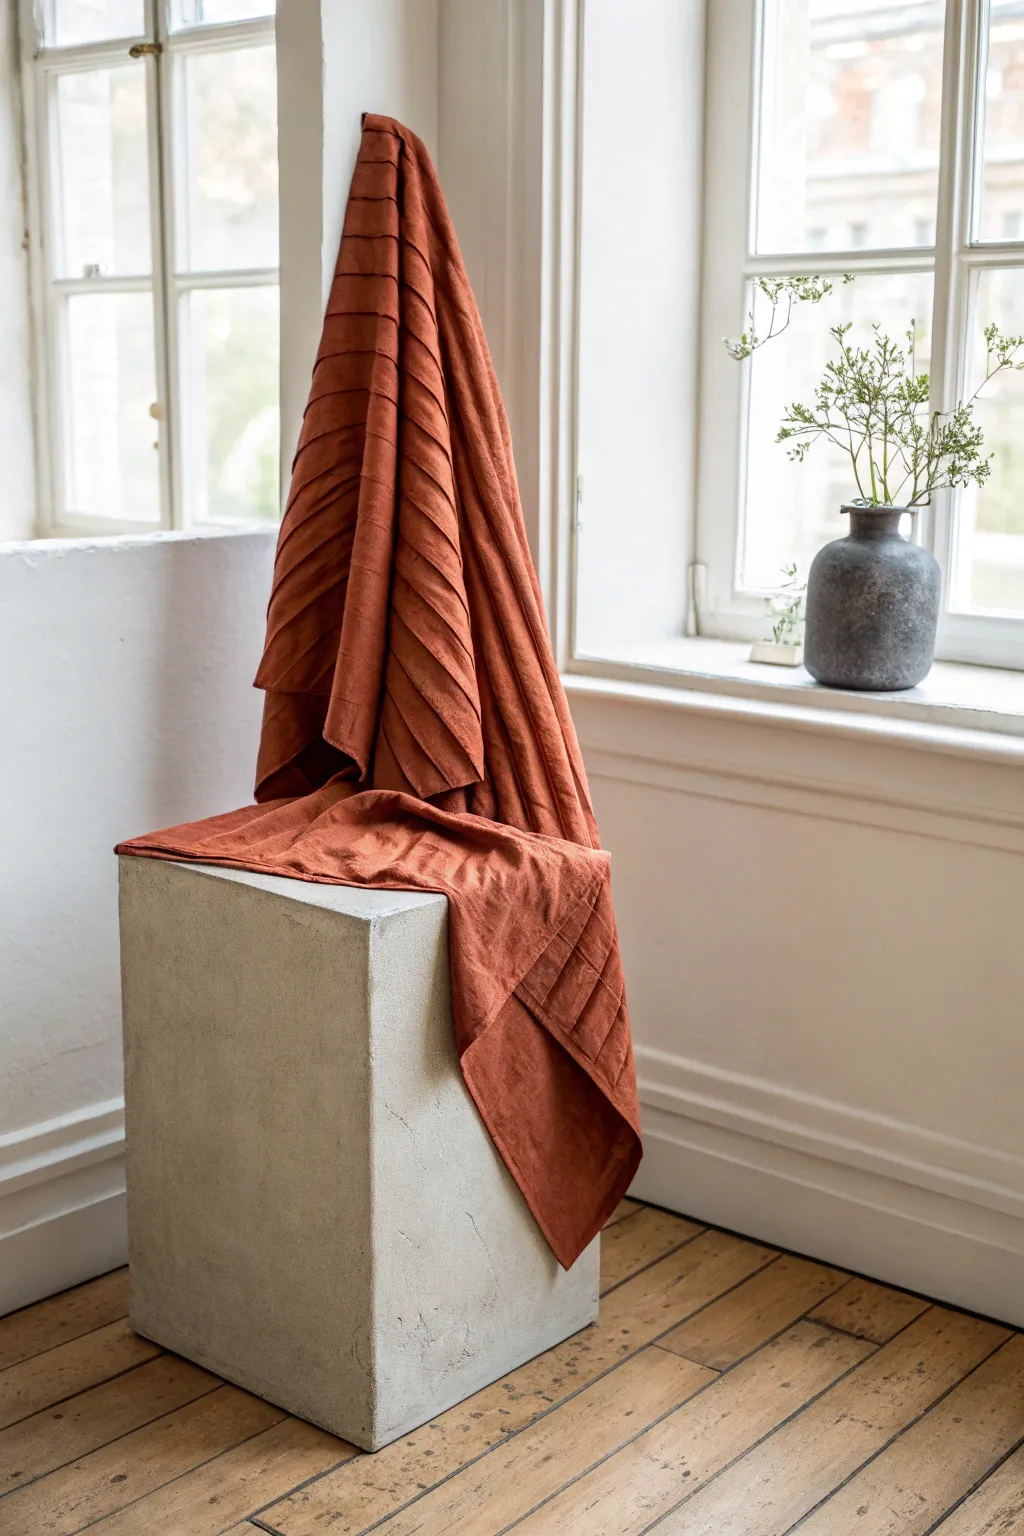
This study captures the heavy, cascading weight of a rust-colored pleated throw draped over a stark geometric form. By focusing on the interplay of deep shadows and soft highlights, you will learn to render the complex architecture of fabric folds with realism and depth.
How-To Guide
Materials
- Toned sketching paper (grey or tan)
- Vine charcoal (soft)
- Compressed charcoal sticks (medium and hard)
- White pastel or white charcoal pencil
- Kneaded eraser
- Blending stump (tortillon)
- Paper towels or chamois cloth
- Fixative spray
Step 1: Structural Layout
-
Establish the pedestal:
Begin by lightly sketching the rectangular prism of the concrete pedestal using a vine charcoal stick. Ensure your perspective lines converge correctly, keeping the vertical lines straight and true. -
Map the fabric gesture:
Using long, sweeping gesture lines with the vine charcoal, map out the general triangular shape of the fabric hanging from the wall and the pool of material resting on the box. Don’t worry about details yet; just capture the flow. -
Define major folds:
Look for the biggest landmarks—the sharp vertical drop on the left, the diagonal sweep of the pleats, and the heavy overhang on the pedestal’s edge. Mark these major divisions lightly.
Muddy Shadows?
If shadows look muddy or gray, you may be over-blending. Re-apply compressed charcoal directly to the darkest areas and leave it unblended for a crisp, deep value.
Step 2: Modeling Form and Value
-
Block in shadow shapes:
Switch to a piece of compressed charcoal. Squint your eyes to simplify the scene into light and dark, then boldly block in the deepest shadows within the recessed pleats and the area where the fabric meets the wall. -
Establish the mid-tones:
Use the side of your vine charcoal to lay down a gentle, uniform tone over the entire fabric area. This creates a base color that distinguishes the cloth from the lighter background. -
Blend for softness:
Take a chamois cloth or paper towel and gently rub the charcoal areas. This pushes the dust into the paper’s tooth and creates that soft, fluid look essential for fabric texture. -
Carve out the pleats:
Now, focus on the rhythmic, repeating lines of the pleats. Use a sharpened charcoal stick to draw the dark crevices between the folds, tapering your lines as the tension releases. -
Pedestal texture:
Lightly shade the side of the concrete block. I like to use a dabbing motion with a dirty blending stump here to mimic the porous, imperfect texture of concrete without drawing every pit.
Level Up: Color Accents
Introduce a burnt sienna or sanguine Conté crayon during the mid-tone phase. Layering this warm earth tone over the charcoal base creates a rich, realistic rust color.
Step 3: Refining Details and Lighting
-
Deepen the contrast:
Go back into the darkest crevices—specifically the ‘V’ shapes where folds originate—with hard compressed charcoal to create anchor points of pure black. -
Lift out highlights:
Take your kneaded eraser and mold it into a wedge. ‘Draw’ with the eraser by lifting charcoal off the peaks of the folds where the light hits the fabric most directly. -
Add bright accents:
Using the white pastel or charcoal pencil, apply distinct highlights to the very tops of the pleats and the upper surface of the pedestal. Keep these marks sharp to suggest the texture of the weave. -
Refine the edges:
Check the silhouette of the fabric against the background. Use the white pencil to clean up the negative space around the fabric, making the cloth pop forward. -
Background suggestion:
Lightly sketch the vertical lines of the window frames and wall molding in the background using vine charcoal, keeping them faint and slightly out of focus to maintain depth of field. -
Cast shadows:
Add the subtle cast shadow of the fabric onto the pedestal and floor. Keep edges soft here, as diffused window light creates gradual transitions rather than harsh outlines. -
Final texture check:
Lightly drag a textured paper towel over the fabric area one last time if it looks too slick; you want to retain a sense of the fabric’s rough, linen-like surface.
Step back and admire how the interplay of simple lines creates the illusion of complex, heavy fabric volume

PENCIL GUIDE
Understanding Pencil Grades from H to B
From first sketch to finished drawing — learn pencil grades, line control, and shading techniques.
Explore the Full Guide
One Continuous Line Drawing

Capture the sharp elegance of everyday tools with this clean, graphic line drawing of open scissors. Using consistent line weights and bold outlines, you’ll create a satisfyingly structured illustration that pops off the page.
Detailed Instructions
Materials
- Spiral-bound sketchbook (heavyweight paper preferred)
- Pencil (HB or 2B for sketching)
- Eraser
- Fine liner pen (0.5mm or 0.8mm, black)
- Ruler (optional)
Step 1: Planning and Foundation
-
Establish the angle:
Visualize a diagonal line running from the bottom left to the top right of your page. This will be the general axis for the open scissors. -
Sketch the pivot point:
Lightly draw a small circle near the center of your page with your pencil. This represents the screw or pivot point where the two blades cross. -
Draft the handle shapes:
Below the pivot point, lightly sketch two oval shapes for the finger holes. The left handle should curve outward slightly more, while the right handle drops a bit lower. -
Outline the blades:
From the pivot point, extend two long, tapering triangles upwards and outwards. The left blade should point almost straight up, while the right blade angles sharply to the right.
Wobbly Lines?
If your long straight lines for the blades look shaky, it’s okay to use a ruler for the initial inking, then go over it freehand to soften the look.
Step 2: Refining the Form
-
Connect handles to pivot:
Draw the ‘shanks’ (the metal necks) connecting your oval handles to the central pivot area. These should be sturdy but narrower than the blades. -
Detail the blade edge:
Inside the right-hand blade shape, draw a second line parallel to the inner edge. This indicates the cutting bevel of the scissor blade. -
Define the pivot screw:
Refine the central circle. Draw a slightly larger circle around your original pivot dot to create the washer or screw head. -
Double the handle lines:
Inside your finger hole ovals, draw a parallel inner oval. This gives the plastic or metal handles thickness and dimension. -
Check proportions:
Pause here to look at your pencil sketch. Ensure the blades look long enough to balance the weight of the handles.
Pro Tip: Line Weight
Make the outer silhouette line twice as thick as the interior detail lines (like the blade bevel). This adds instant professional depth.
Step 3: Inking and Finalizing
-
Begin inking the pivot:
Switch to your black fine liner. Start by carefully tracing the central screw circle and the small dot in its center. -
Trace the right blade:
Ink the outer lines of the right-hand blade. Keep your hand steady and try to make long, confident strokes rather than short, scratchy ones. -
Ink the left blade:
Outline the left blade, ensuring it connects cleanly behind the right blade near the pivot point. -
Outline the handles:
Trace the outer perimeter of the handles. When I navigate curves, I turn the sketchbook to find the most comfortable hand angle. -
Ink the inner loops:
Carefully trace the inner ovals of the finger holes. Maintain an even distance from the outer line to keep the handle thickness consistent. -
Add key details:
Ink the bevel line on the blade and the small section where the handles join beneath the pivot. -
Thicken the outline:
Go over the outermost perimeter line one more time to thicken it slightly. This makes the drawing stand out boldly against the paper. -
Erase guidelines:
Wait at least five minutes for the ink to fully dry. Gently erase all visible pencil marks underneath your ink.
Enjoy the satisfying simplicity of your new graphic illustration
Mandala or Zentangle Flow
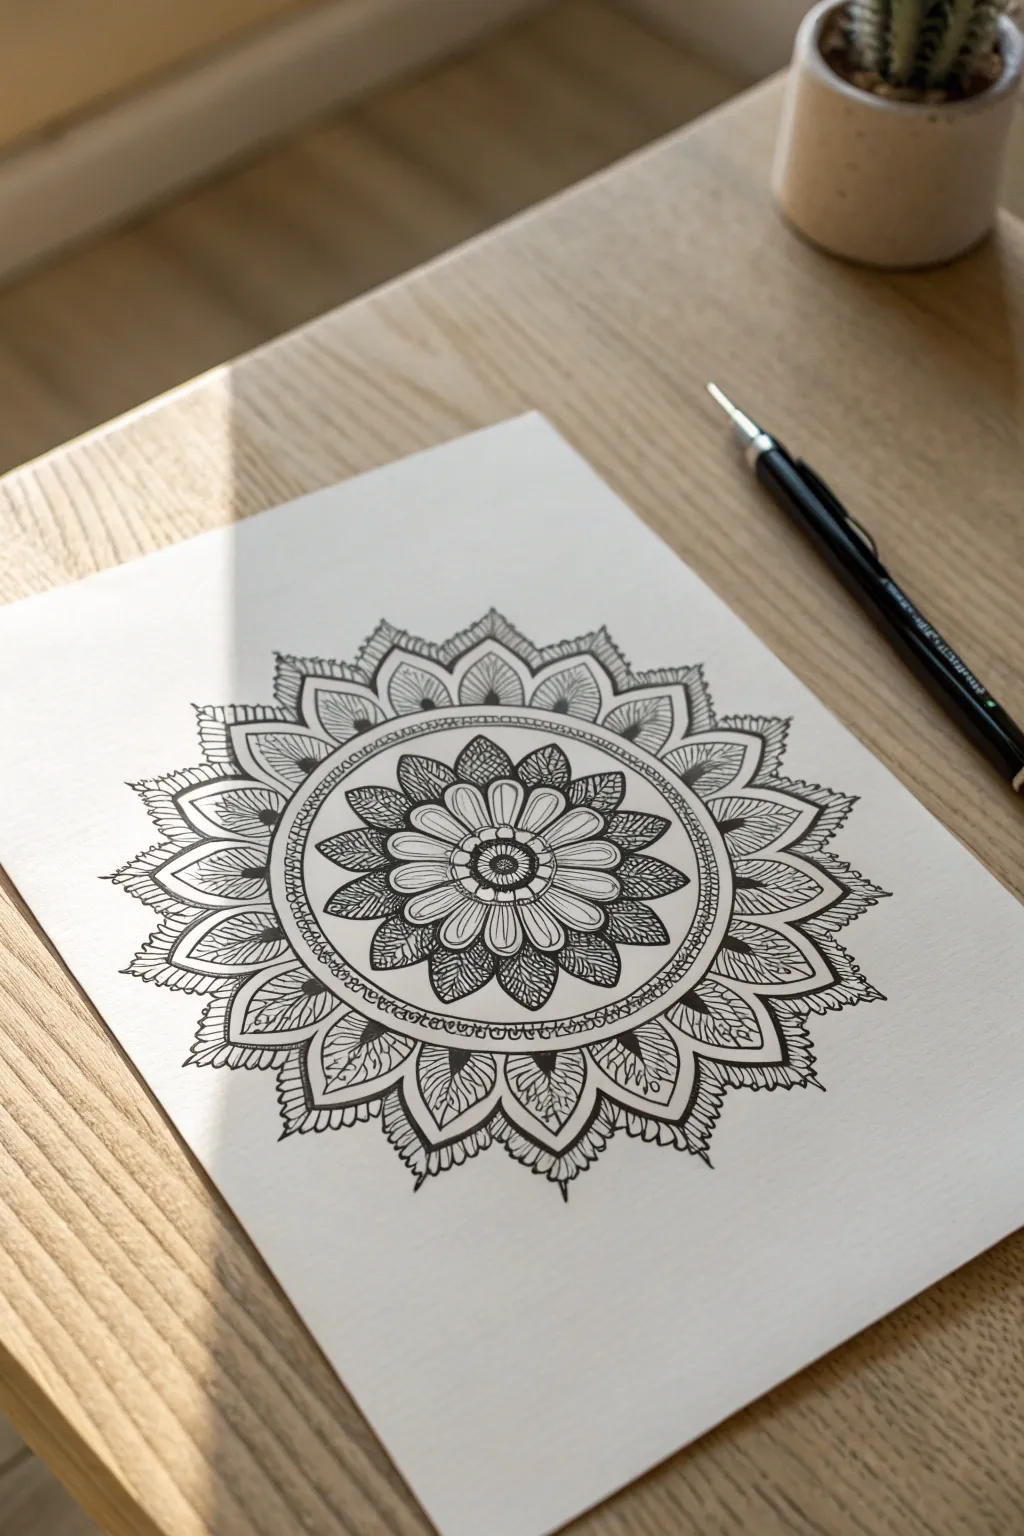
This intricate mandala captures a sense of calm with its repetitive, petal-like layers radiating from a central floral point. The high-contrast black ink on white paper creates a striking, detailed piece that looks far more complex than it actually is when broken down.
How-To Guide
Materials
- High-quality white drawing paper or cardstock
- Pencil (HB or H for light lines)
- Compass or circular objects to trace
- Ruler
- Eraser
- Black fineliner pens (various sizes, e.g., 0.1mm, 0.3mm, 0.5mm)
Step 1: Setting the Radial Grid
-
Establish the Center:
Find the exact center of your paper and mark it lightly with a pencil. -
Draw Guide Circles:
Using your compass, draw a series of concentric circles radiating from the center point. You will need about five distinct rings: a small center, a gap for the first petals, a larger ring for the secondary petals, a distinct band ring, and the outermost perimeter. -
Mark Radial Lines:
Use your ruler to draw light intersecting lines through the center, dividing your circle into 8 or 16 equal pie-shaped segments. These will ensure your pattern stays symmetrical.
Ink Smudging?
Mandala drawing involves lots of hand rotation. Place a scrap piece of paper under your drawing hand to act as a shield, preventing oils or hand movement from smearing wet ink.
Step 2: Core Floral Motif
-
Center seed:
Switch to a medium-nib fineliner (0.3mm). Draw a small circle in the very center, followed by a slightly larger ring around it. Fill the space between these two rings with tiny stippled dots or small lines for texture. -
First Petal Layer:
Draw eight rounded, elongated petals extending from the center ring. They should meet at the base but flare out slightly before rounding off. -
Inner Detailing:
Inside each of these first eight petals, draw a smaller, matching petal shape. Leave the space empty for now to keep it clean. -
Secondary Pointed Petals:
Behind and between the first rounded petals, draw a layer of pointed, leaf-shaped petals that extend out to the next guide circle. Fill these pointed shapes with dense, dark cross-hatching or tight squiggles to create deep contrast against the white rounded petals.
Uneven Petals
If your symmetry drifts, don’t erase! Simply thicken the outline of the thinner petal to match the wider one. The eye is forgiving with radial patterns.
Step 3: The Decorative Band
-
Outer Ring Border:
Draw a firm ink circle connecting the tips of your dark, pointed petals. Draw a second circle about 5-8mm further out to create a distinct band. -
Filling the Band:
Inside this narrow band, draw a repetitive pattern. Small, continuous semi-circles or tiny loops work perfectly here to separate the inner flower from the outer layers.
Step 4: Expanding the design
-
Large Outer Petals:
From the decorative band, draw the largest layer of petals. These should be broad, leaf-shaped arches that extend almost to your final guide circle. Aim for about 16 large petals around the circumference. -
Layered Lines:
Inside each large petal, create a ‘rainbow’ effect by drawing 2 or 3 smaller outline shapes inside the main border. This adds depth without shading. -
Vein texture:
I like to switch to my thinnest 0.1mm pen here. In the innermost section of these large petals, draw fine, feathery lines that curve outward from the center vein, mimicking a leaf texture.
Step 5: Final Flourishes
-
Spiky Fringe:
To finish the edge, draw small, serrated or spiky triangles along the outer curve of each large petal. This gives the mandala a lace-like or saw-toothed perimeter. -
Darken Accents:
Review your drawing and spot any areas that need contrast. Thicken the main outlines of the primary petals to make them pop. -
Erase Guides:
Wait at least 15 minutes to ensure the ink is completely dry. Gently erase all your pencil grid lines and guide circles to reveal the crisp black and white design.
Once the pencil lines are gone, you have a mesmerizing, crisp design ready to be framed or colored.

Have a question or want to share your own experience? I'd love to hear from you in the comments below!