Halloween chalk art is my favorite kind of “quick wow” project—big impact, low pressure, and you can change it up whenever the mood strikes. Below are my go-to halloween chalk art ideas that mix spooky motifs with fun lettering so you can make something that feels totally you.
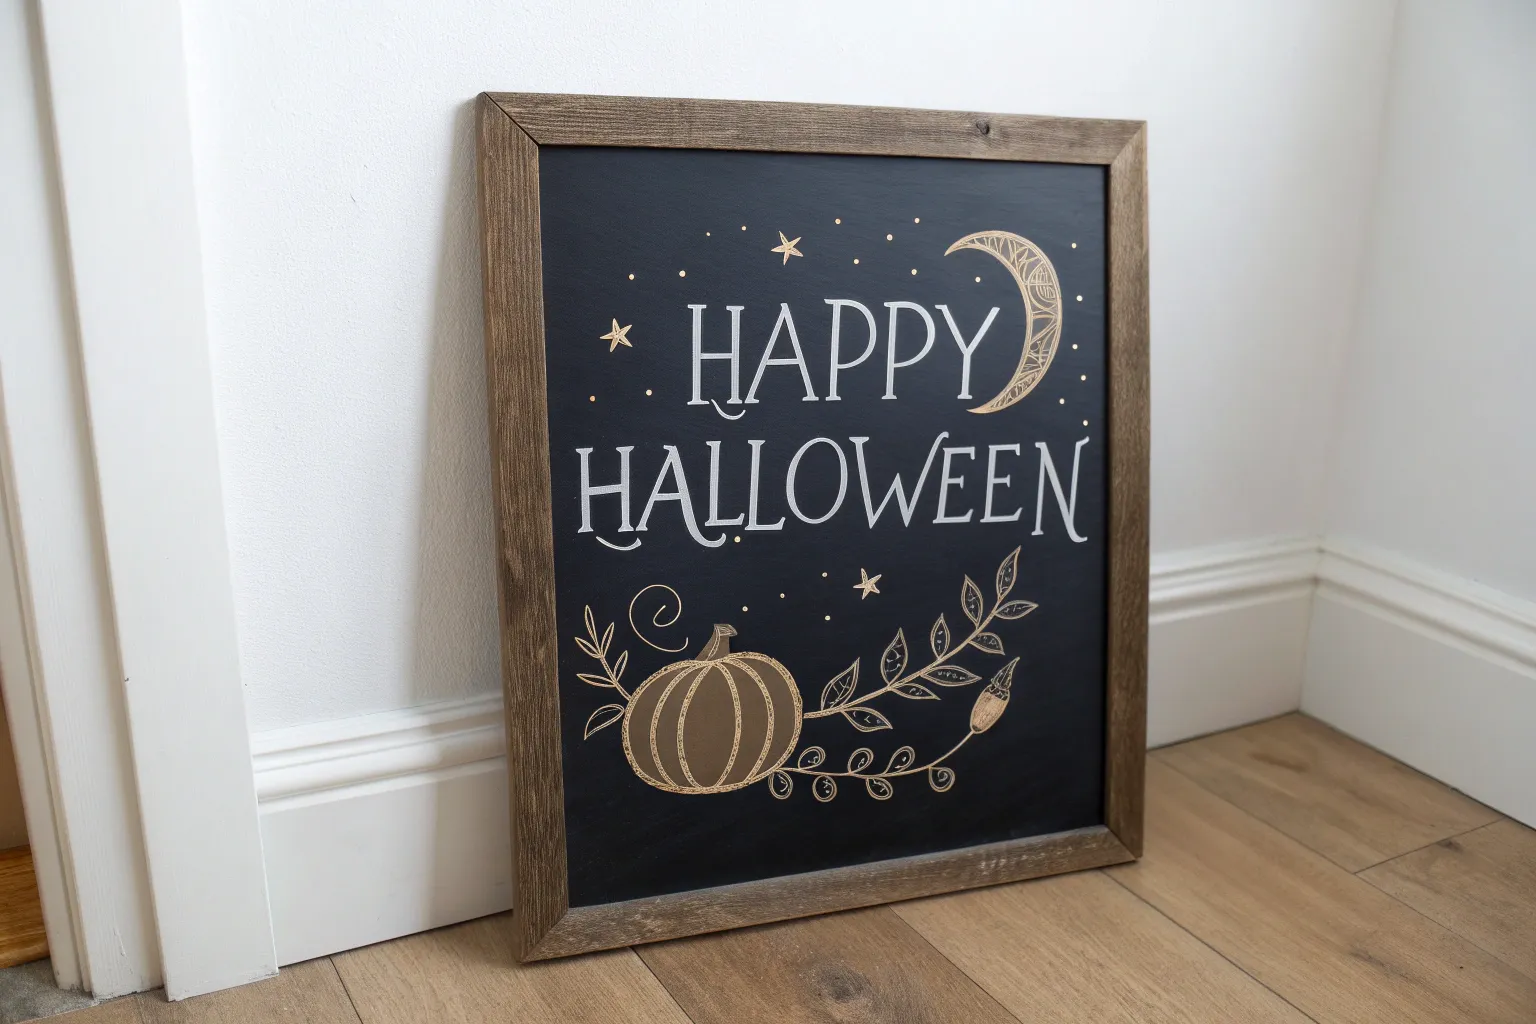
Classic Happy Halloween Lettering
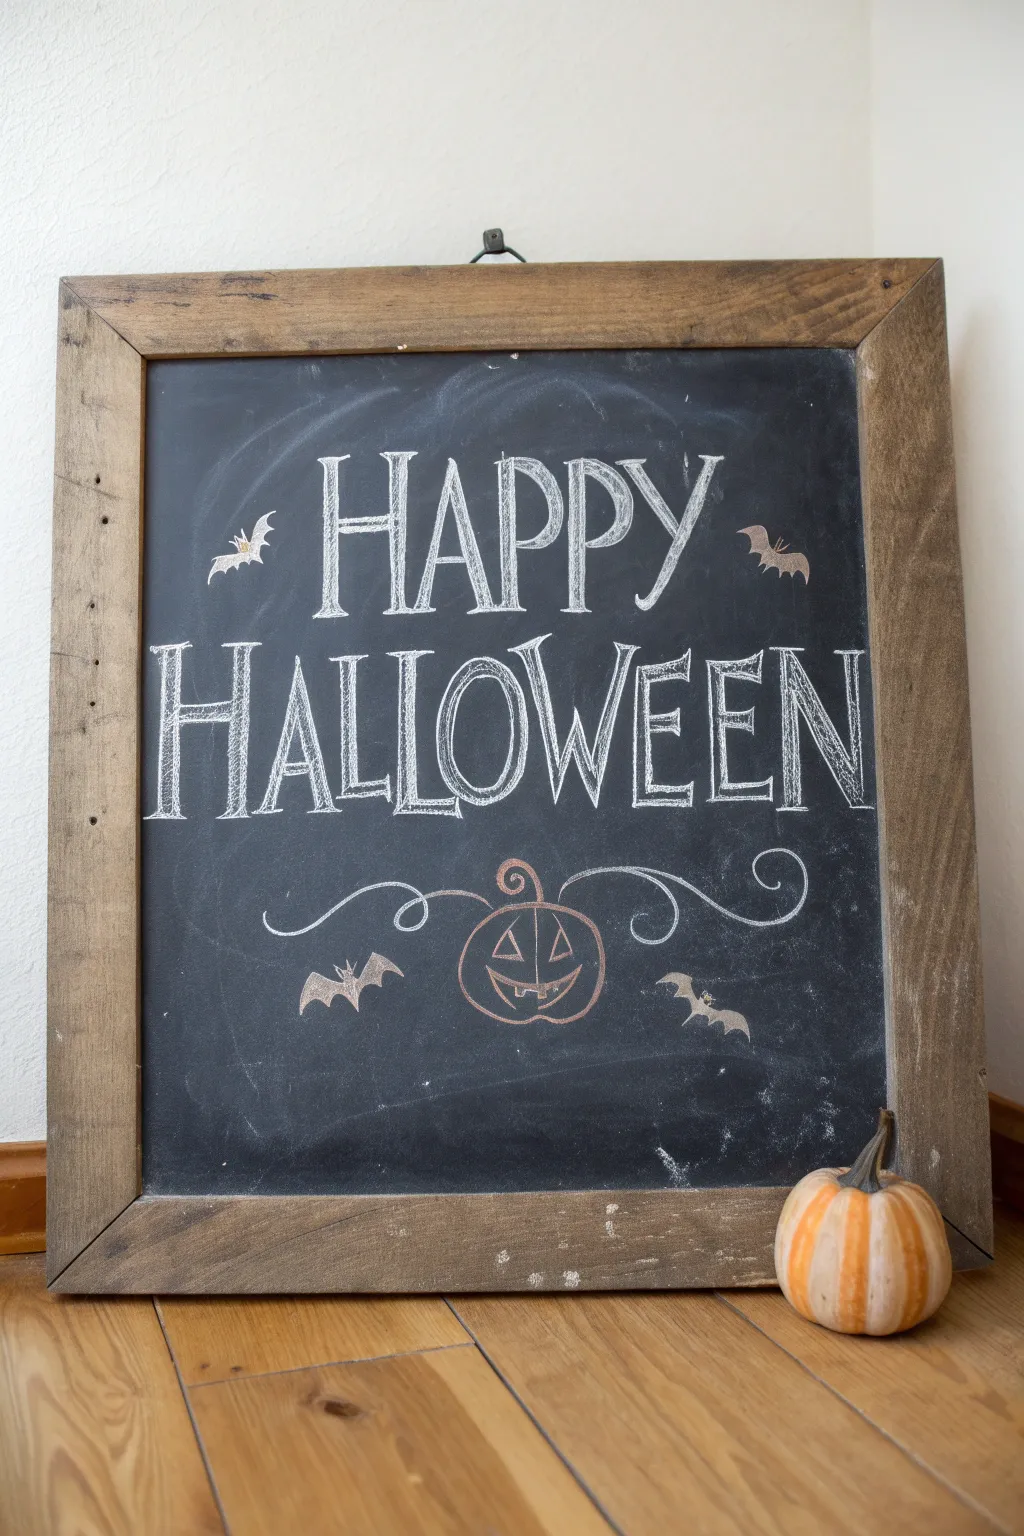
Bring a touch of spooky elegance to your home with this classic chalkboard design featuring elongated, serif-style lettering. The combination of spindly fonts and simple hand-drawn icons creates a charmingly rustic display that feels both festive and sophisticated.
Step-by-Step Guide
Materials
- Large wooden framed chalkboard
- White creativity chalk or chalk marker (fine and medium tip)
- Orange chalk (optional for pumpkin)
- Damp microfiber cloth
- Cotton swabs (Q-tips)
- Ruler or straight edge
- Pencil sharpener (for stick chalk)
Step 1: Planning and Layout
-
Season the board:
Before starting, if your chalkboard is new, rub the side of a piece of white chalk over the entire surface and wipe it off with a dry cloth. This creates a dusty, authentic texture and prevents ‘ghosting’ later. -
Mark your baselines:
Using a ruler and a very light touch with your chalk, draw two horizontal guidelines across the upper third and middle of the board. These will serve as the baselines for ‘HAPPY’ and ‘HALLOWEEN’. -
Establish the height:
Draw faint top lines to define how tall your letters will be. For this design, give ‘HALLOWEEN’ slightly more vertical space than ‘HAPPY’ to create that dramatic, elongated look. -
Space the letters:
Lightly sketch the skeleton of each letter to ensure they fit. Start by centering the double ‘L’ in Halloween or the ‘PP’ in Happy to keep things symmetrical.
Step 2: Lettering the Main Text
-
Draw the ‘HAPPY’:
Begin filling in the word ‘HAPPY’ on the top line. Keep the vertical strokes very straight and tall, and place the crossbars (the horizontal lines of the H and A) slightly higher than the midpoint for a stylized effect. -
Add serifs:
Add small, horizontal ticks at the ends of your main strokes. These little ‘feet’ give the font its classic serif appearance. -
Thicken vertical strokes:
Go back over the vertical lines of each letter, pressing slightly harder to thicken them. This creates a ‘double stroke’ look where you desire more weight, leaving the horizontal lines thinner. -
Draft ‘HALLOWEEN’:
Move to the second line. Draw these letters even taller than the first word. Pay attention to the ‘O’ and ‘W’—keep them condensed and narrow so the long word doesn’t run off the edge. -
Detail the second word:
Apply the same serif details to ‘HALLOWEEN’. I find it helpful to sharpen my chalk stick frequently here to keep the inner lines of the ‘W’ and ‘M’ crisp. -
Refine edges:
Use a damp cotton swab to clean up any smudges or wobbly lines around the letters, sharpening the corners of your serifs.
Smudge Fixer
If you make a mistake, don’t use a wet cloth immediately! It makes a muddy mess. Let the chalk dry/set, dab it off with a piece of sticky tack or masking tape, then wipe clean.
Step 3: Illustrative Details
-
Sketch the jack-o’-lantern:
In the open space below the text, center a simple pumpkin shape. Draw a flattened circle, then add vertical curved lines to suggest the segments of the pumpkin. -
Add the face:
Draw three triangles for the eyes and nose, and a curved, toothy grin. If you have orange chalk, highlight the outline, or just stick to white for a classic monochrome look. -
Draw decorative swirls:
Extend a curly vine from the top of the pumpkin stem out to the left and right. Make these lines fluid and whimsical, ending in loose spirals. -
Add flying bats:
Draw small bat silhouettes in the empty spaces—one or two near the top corners and a couple flanking the pumpkin. Keep the shapes simple with pointed wings. -
Highlight the bats:
Lightly shade in the bat wings, but perhaps leave the bodies or edges sketchy to maintain that hand-drawn chalkboard texture.
Add Dimension
To make the letters pop, add a thin shadow to the right of each vertical stroke using a grey pastel or by lightly rubbing traced charcoal lines with your finger.
Step 4: Final Touches
-
Erase guidelines:
Once the main art is set and dry (if using markers), carefully use a dry Q-tip or a very slightly damp cloth corner to remove the horizontal guidelines you drew in step 2. -
Create dust effects:
Take a dry paper towel with a tiny bit of chalk dust on it and swirl it softly around the empty black spaces. This softens the stark back background and makes the artwork feel unified. -
Final clean up:
Do one last pass with a wet Q-tip to sharpen the very edges of the letters if any dust has settled on them.
Step back and admire your spooky hand-lettered masterpiece, ready to greet trick-or-treaters


Jack-o’-Lantern Face Sampler
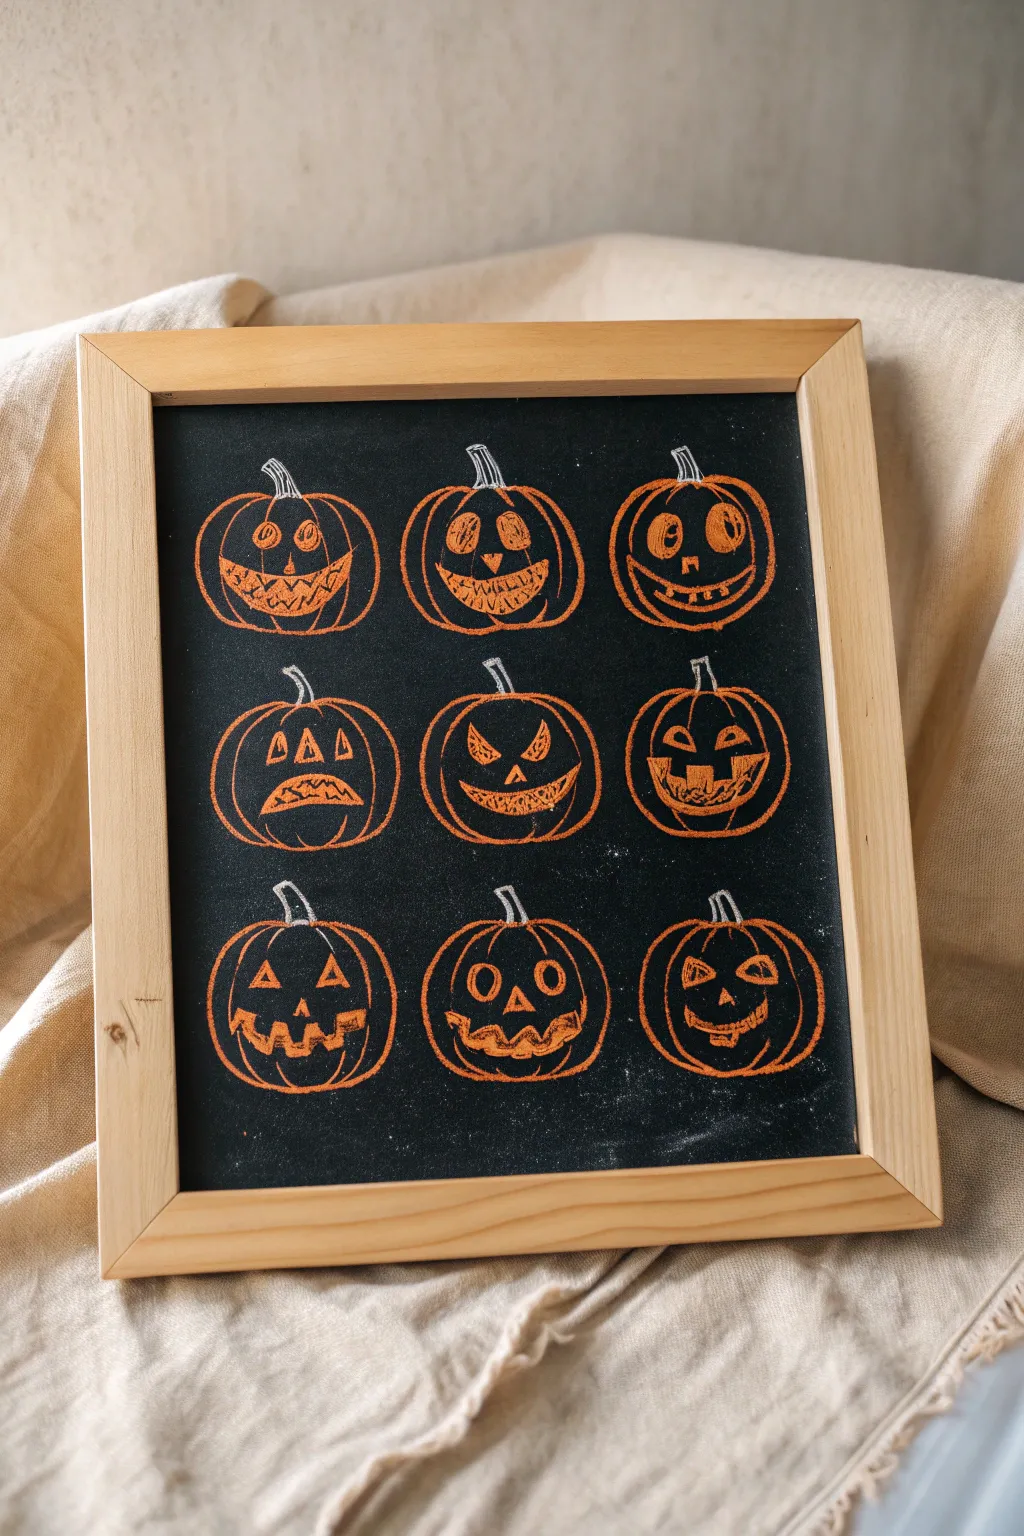
Celebrate the delightful variety of pumpkin carving with this charming chalkboard grid. This project features nine unique jack-o’-lantern expressions, ranging from spooky to silly, created with simple orange and white chalk strokes for a rustic, hand-drawn feel.
Detailed Instructions
Materials
- Small rectangular chalkboard (approx. 11×14 inches)
- Light wood frame (optional, if chalkboard isn’t already framed)
- Orange chalk stick or chalk marker
- White classic chalk stick or chalk pencil
- Ruler
- Pencil (very light graphite)
- Damp cloth or cotton swabs
- Chalk fixative spray (optional)
Step 1: Preparation & Layout
-
Surface Prep:
Begin by ensuring your chalkboard is clean and completely dry. If it’s a brand new board, season it first by rubbing the side of a white chalk stick over the entire surface and erasing it; this prevents ‘ghosting’ later. -
Grid Planning:
Using a ruler, lightly mark out a 3×3 grid on the board. You don’t need to draw heavy lines, just small tick marks at the edges to help you visualize where the nine pumpkins will sit. -
Spacing Check:
Visualize the center point of each grid square. You need comfortable negative space between each pumpkin so they don’t look crowded. I often place a tiny dot in the center of each imaginary square to serve as an anchor.
Step 2: Drawing the Base Shapes
-
First Row Outlines:
Starting with the top left, draw a rounded, slightly flattened circle for your first pumpkin using the orange chalk. Keep the lines sketchy and loose – pumpkins aren’t perfect spheres. -
Adding Ribs:
Draw curved vertical lines inside the outline to create the segments (ribs) of the pumpkin. These lines should curve outward, following the shape of the vegetable. -
Repeat the Shapes:
Continue this process for the remaining eight spots. Vary the shapes slightly; make some taller and narrower, others wider and squatter to add character. -
Refining the Orange:
Go back over your outlines to thicken the orange lines. The texture of the chalk against the board gives it that nice rustic look, so don’t worry about filling them in solid.
Dust Patrol
Is chalk dust muddying your black background? A folded piece of masking tape works perfectly to lift stray dust particles without smearing the design.
Step 3: Adding Personality
-
The Classic Grin (Top Left):
For the first face, draw two triangle eyes and a wide, crescent moon smile filled with jagged teeth. Use the sharp edge of the chalk for crisp corners. -
The Goofy Face (Top Middle):
Create large, uneven circular eyes and a small triangle nose. Give this one a wide, toothy grin that stretches almost ear-to-ear. -
The Surprised Look (Top Right):
Draw two large ovals for eyes with pupils inside them (just small dots). Add a small square nose and a curved mouth with a few square teeth. -
The Sad Pumpkin (Middle Left):
Use three triangles for the eyes and nose. Draw a downturned mouth shape, emphasizing the frown to make him look suitably gloomy. -
The Evil Eye (Middle Center):
Draw angled, aggressive triangular eyes that slant inward. Add a sharp, jagged mouth that looks menacing. -
The One-Tooth Wonder (Middle Right):
Create a face with one squinty eye and one open eye. Draw a lopsided mouth with a single prominent tooth sticking up or down. -
Row Three Variations:
For the bottom row, mix and match features. Try a jagged zigzag mouth for the bottom left, round shocked eyes for the center, and a simple happy face for the bottom right.
Sharper Lines
For crisp details like the teeth, break your chalk stick in half to create a fresh, sharp edge, or sharpen the tip of a chalk stick with a large pencil sharpener.
Step 4: Finishing Touches
-
The Stems:
Switch to your white chalk. Draw a curved stem emerging from the top center of each pumpkin. Vary the direction they curve to add movement to the composition. -
Highlighting:
Add tiny little white accent lines on the top curves of the pumpkins, just near the stems, to suggest light reflecting off the skin or depth in the ridges. -
Cleanup:
Use a damp cotton swab (Q-tip) to carefully erase any distinct smudge marks or chalk dust that fell into the black negative space. -
Setting the Art:
If you want this to last through the season without smudging, give the board a light misting of workable fixative spray in a well-ventilated area.
Hang your spooky sampler in the hallway or prop it on a mantel to greet guests with a grid of ghoulish grins


Friendly Ghost Parade Border
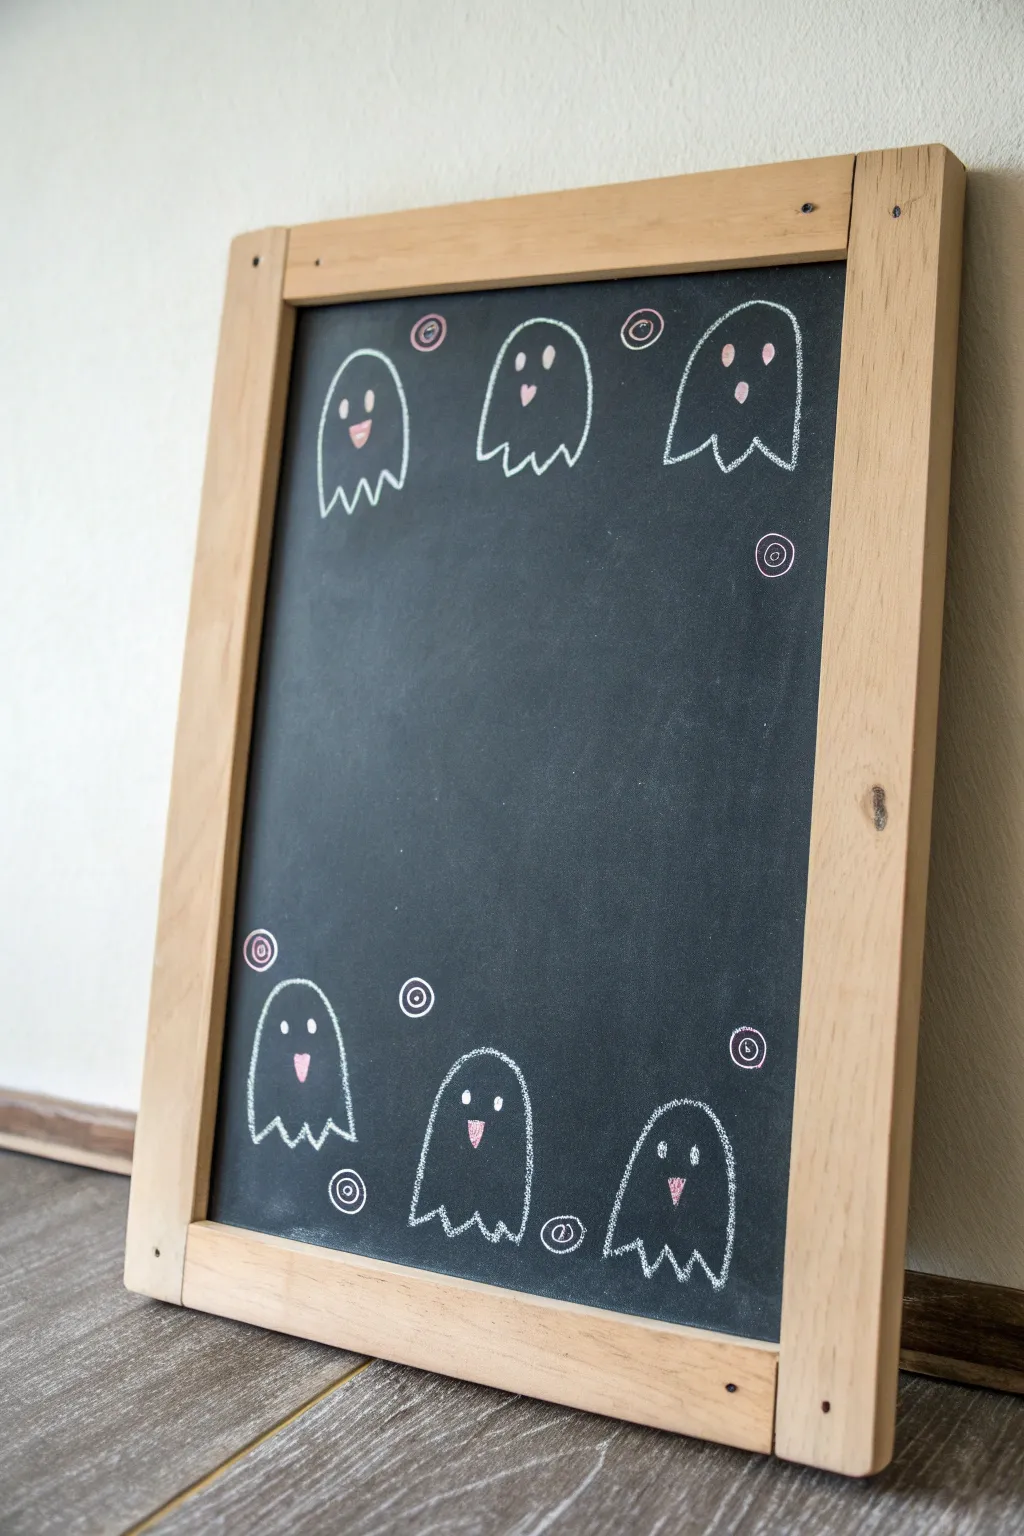
Transform a simple chalkboard into a festive Halloween display with this adorable border of smiling spirits. The minimalist white outlines paired with soft pink accents create a charming rather than spooky vibe, perfect for kid-friendly decor.
Step-by-Step Tutorial
Materials
- Clean chalkboard or slate
- White chalk marker or standard chalk stick (sharpened)
- Pink or light red chalk/pastel
- Soft cloth or chalkboard eraser
- Cotton swab (optional for blending)
- Ruler (optional for spacing)
Step 1: Planning and Spacing
-
Clean surface:
Begin with a completely clean slate. Wipe down your chalkboard with a damp cloth to remove any old dust or ghost images, ensuring a dark, high-contrast background for your white chalk. -
Visualize placement:
Look at the top and bottom borders of your board. You will be placing three ghosts along the top edge and three along the bottom edge, leaving the center completely open for messages. -
Mark positioning:
Lightly mark six small dots where the center of each ghost’s head will be to ensure they are evenly spaced. The top three should hang down from the frame, while the bottom three should rise up from the bottom ledge.
Step 2: Drawing the Ghost Bodies
-
Draw top arches:
Start with the top row. For each ghost, draw a smooth, upside-down ‘U’ shape. These should be roughly the same size, about 2-3 inches tall depending on your board size. -
Add wavy bottoms:
Connect the open ends of your ‘U’ shape with a jagged, wavy line to distinctively form the ‘sheet’ bottom of the ghost. Three or four little points usually look best. -
Repeat for bottom row:
Move to the bottom edge and repeat the process. Draw three upright ‘U’ shapes, ensuring they look like they are standing on the frame’s edge. -
Complete the outlines:
Close off these bottom shapes with the same wavy line pattern near their base. I like to vary the height of the waves slightly so no two ghosts look identical. -
Thicken the lines:
Go over your white outlines a second time. Apply a bit more pressure to make the white pop against the black background, smoothing out any shaky initial strokes.
Keep it Sharp
If using traditional chalk, sharpen it frequently for crisp outlines. If using a chalk marker, verify the tip is saturated before starting the curves.
Step 3: Adding Expressions and Details
-
Create eyes:
Using your white chalk, draw two small ovals for eyes on each ghost. Place them somewhat wide apart to boost the cute factor. -
Fill in the eyes:
Color in the eye ovals completely white so they stand out clearly. -
Add cheek color:
Switch to your pink or light red chalk. Draw small inverted triangles or circles just below the eyes for blushing cheeks or happy open mouths. -
Vary the faces:
Give each ghost a slightly different expression. Make some mouths circular, some triangular, and use the pink chalk to add tiny pupils inside the white eyes on a few of them for variety. -
Blend accents:
If the pink chalk looks too harsh, gently tap it with your finger or a cotton swab to soften the color into the board slightly.
Glow Effect
Use a dry finger to lightly smudge the outside of the white lines outward. This creates a faint, ghostly ‘glow’ around each figure.
Step 4: Decorative Flourishes
-
Draw swirl circles:
In the empty spaces between the ghosts, draw small, loose spirals using your white chalk. Keep them small, about the size of a coin. -
Add color rings:
Take your pink chalk and trace over some of the spirals, or draw a second pink ring around the white ones to tie the color scheme together. -
Check balance:
Step back and look at the composition. If there are any large gaps between the ghosts, add a tiny dot or extra spiral to balance the visual weight. -
Clean up edges:
Use a slightly damp cotton swab or the corner of a cloth to wipe away any chalk dust that fell onto the main writing area or smudged outside your ghost lines.
Now you have a spirited frame ready to host your spooky daily menu or a trick-or-treat welcome message


Corner Cobwebs With a Hanging Spider
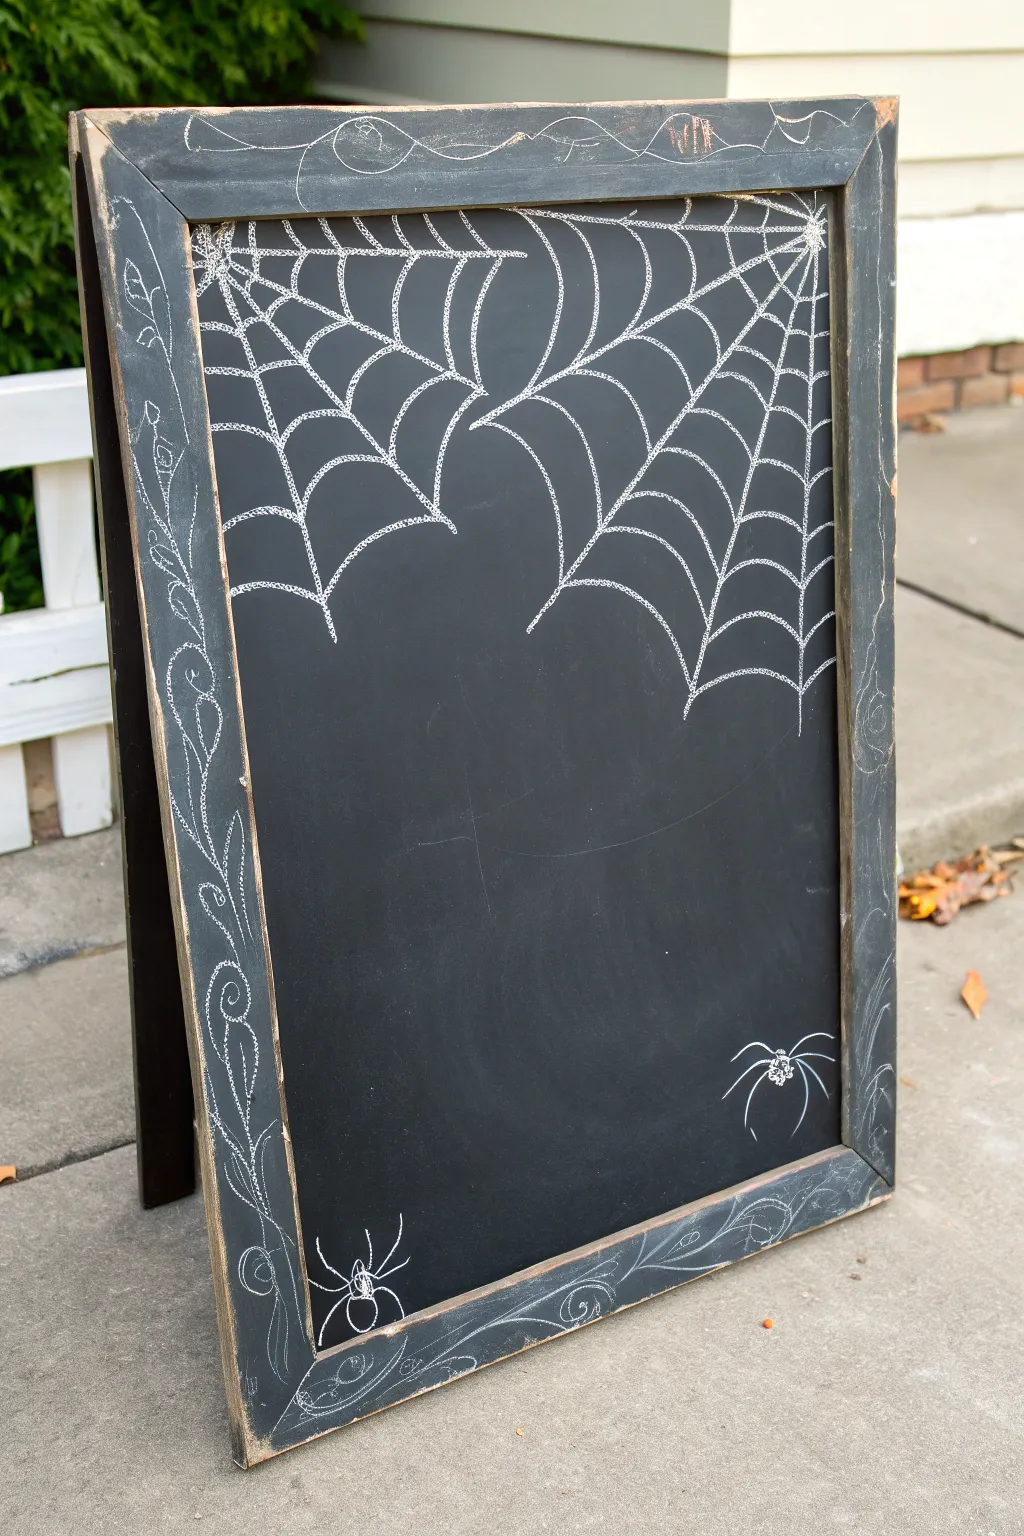
Transform a plain folding chalkboard into a festive Halloween decoration with just a few strokes of white chalk. This design features intricate corner webs and creepy-crawly spiders, perfect for greeting trick-or-treaters or party guests.
Step-by-Step Guide
Materials
- A-frame chalkboard easel
- White stick chalk (or chalk marker for cleaner lines)
- Damp cloth or sponge
- Cotton swabs (optional for smudging)
- Pencil sharpener (if using stick chalk)
Step 1: Planning and Frame Decoration
-
Clean the surface:
Begin by wiping down the entire chalkboard surface with a damp cloth to remove any old dust or ghosting. Let it dry completely so your new lines are crisp and bright. -
Outline the top frame:
Start decorating the wooden frame itself to add extra flair. Along the top horizontal bar of the frame, draw loose, swirling lines that mimic vines or blowing wind, adding small curls here and there. -
Detail the side frame:
Moving down the left vertical side of the frame, draw a long, continuous vine pattern. Add small, leaf-like loops and spirals that twist downward, connecting them with a delicate central line. -
Finish the frame border:
Repeat a similar swirling vine pattern along the bottom edge of the frame. Don’t worry about perfect symmetry; the organic, hand-drawn look adds to the charm.
Sharpen Up
If you are using standard stick chalk, use a large pencil sharpener (the kind for crayons) to get a fine point. This makes drawing spindly spider legs much easier.
Step 2: Drawing the Upper Webs
-
Establish the anchor points:
For the main focal point, you’ll draw two webs descending from the top corners. Start in the top right corner by drawing 5-6 long, straight lines radiating outward from a single point, like slices of a pie. -
Extend the right web:
Ensure the longest lines of the right web reach down about a third of the way into the board, creating a large, dramatic shape. -
Anchor the left web:
In the top left corner, repeat the process but make this web slightly smaller. draw 4-5 radiating lines coming from the corner point. -
Connect the webbing:
Starting near the center point of the right web, draw curved, concave lines connecting the straight ‘spokes.’ Think of these as little smiley faces or scallops connecting one line to the next. -
Build outward:
Continue adding rows of these curved connecting lines, moving further away from the corner. Space them out slightly more as you get toward the ends of the spokes to create perspective. -
Complete the left web:
Perform the same scalloping technique on the left-side web. I find it helpful to vary the spacing slightly so the two webs look distinct and not like carbon copies. -
Add overlap details:
Where the two webs meet near the top center, allow the ends of the ‘spokes’ to hang loose or crisscross slightly, giving the impression of an old, abandoned attic.
Make it Glow
For a ghostly effect, lightly smudge the white chalk lines with your finger, then re-draw a thin, sharp line directly over the smudge to create a glowing halo.
Step 3: Adding the Spiders
-
Position the bottom spiders:
Navigate to the bottom corners of the blackboard surface. You will be drawing two spiders, one on the bottom left and one on the bottom right. -
Draw the bodies:
Draw a small oval for the head and a slightly larger, rounder circle attached to it for the abdomen. Do this for both spiders. -
Detail the legs:
For the spider on the right, draw eight legs arching upward and then down, making it look like it is scuttling across the board. Keep the lines thin and spindly. -
Create a hanging spider:
For the spider on the left, draw the legs slightly more splayed out. You can also add a faint vertical line going up from its body to imply it is dangling from a thread. -
Add texture:
Use the very tip of your chalk or a sharpened edge to add a few scribbles inside the spider bodies to give them a fuzzy, textured appearance. -
Final clean up:
Step back and look for any smudges. Use a slightly damp cotton swab to erase accidental fingerprints or to sharpen the points of your web lines.
Now you have a delightfully eerie entrance sign ready for the holiday season
BRUSH GUIDE
The Right Brush for Every Stroke
From clean lines to bold texture — master brush choice, stroke control, and essential techniques.
Explore the Full Guide
Witch Hat and Broom Typography
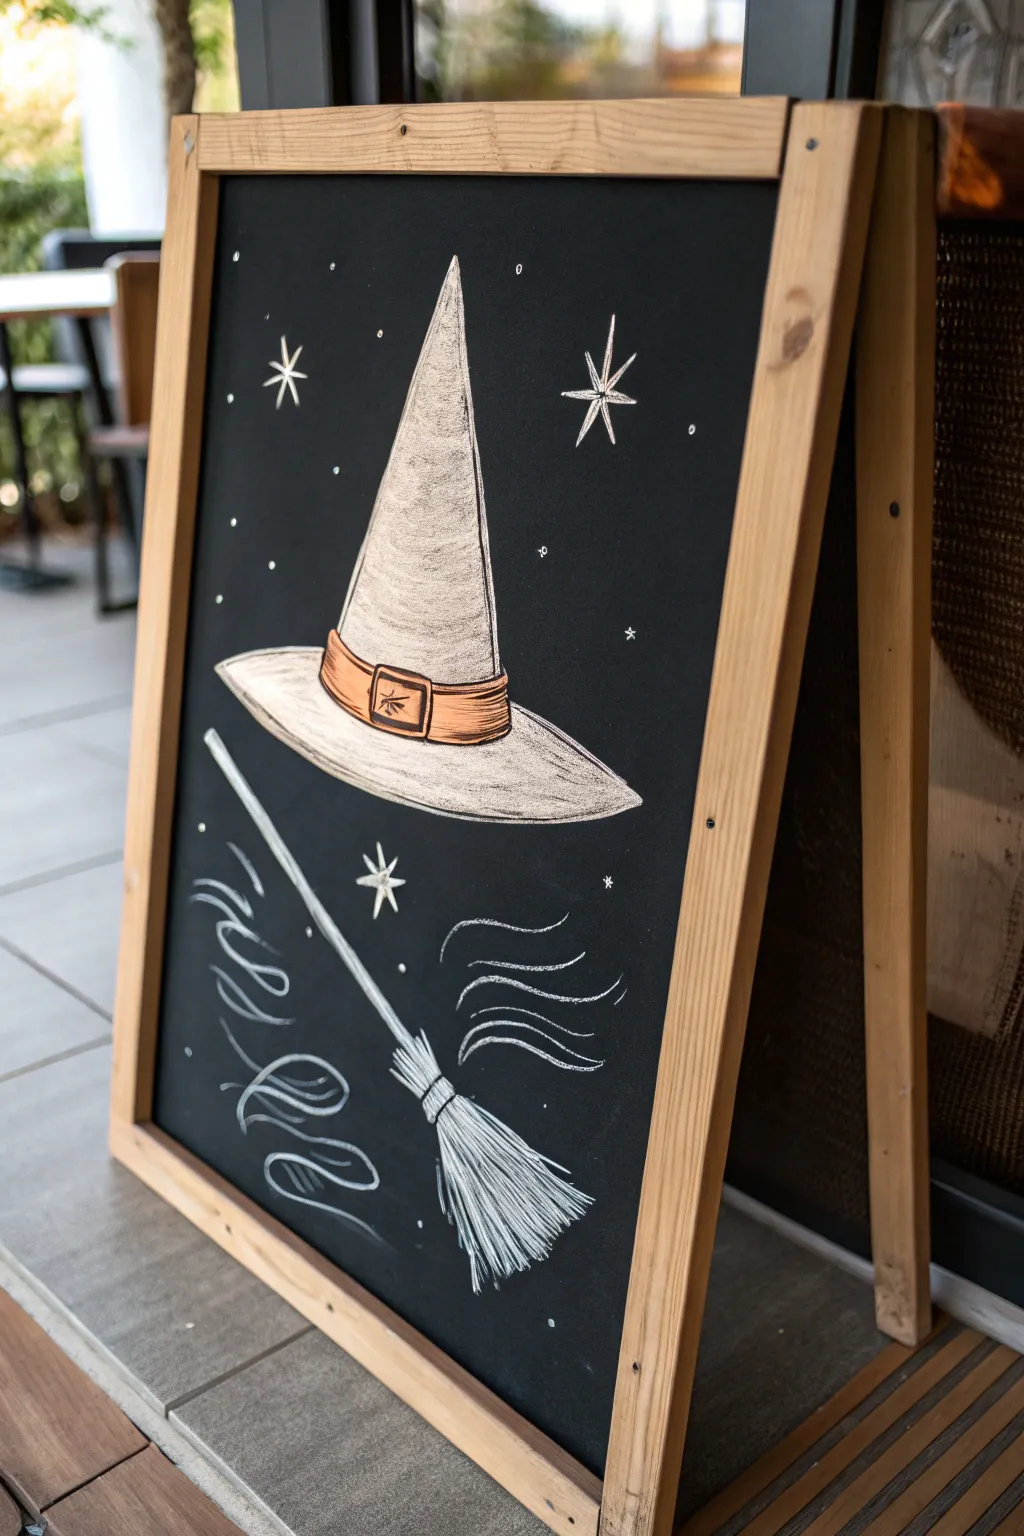
Capture the essence of magic with this minimalist yet striking chalkboard design featuring a floating witches hat and a sweeping broom. The white chalk creates a wonderful texture against the black background, while the single pop of orange adds just enough focal interest.
Step-by-Step
Materials
- A-frame chalkboard or standard blackboard
- White chalk marker (medium tip)
- White chalk pastel or regular stick chalk
- Orange chalk marker or pastel crayon (burnt orange tone)
- Brown chalk marker (for outline detail)
- Damp cloth or sponge
- Cotton swabs
- Ruler (optional)
Step 1: Drafting the Shapes
-
Clean the Surface:
Begin by wiping down your chalkboard surface completely with a damp cloth to remove any dust or old designs. Let it dry fully so your lines remain crisp. -
Outline the Hat Triangle:
Using a light hand and regular stick chalk, sketch a tall, narrow isosceles triangle in the upper center of the board. This will be the peak of the witch’s hat. -
Sketch the Brim:
Draw a wide, flattened oval shape at the base of your triangle. Make sure the oval extends past the triangle on both sides and curves slightly upward at the tips. -
Position the Broom:
Diagonally below the hat, sketch a long, straight line for the broom handle. Add a fan shape at the bottom end for the bristles.
Sharpen That Stick
Don’t have chalk markers? Use a standard pencil sharpener on regular stick chalk to get a fine point for those delicate starbursts and broom bristles.
Step 2: Building the Hat
-
Define the Hat Cone:
Trace over your triangle sketch with the white chalk marker or a sharpened stick of chalk. Instead of straight ruler lines, give the sides a slightly concave curve to make the hat look worn and fabric-like. -
Add Texture to the Cone:
Fill in the cone shape using the side of a stick of chalk. Apply varied pressure to create a patchy, textural fill rather than a solid block of white. This gives it a vintage, dusty look. -
Draw the Hat Band:
Measure a section just above the brim and draw two parallel curved lines for the hat band. Leave the buckle area empty for now. -
Color the Band:
Fill in the band area with your orange chalk marker or pastel. I like to layer this twice to make the color pop against the black background. -
Detail the Buckle:
Outline a small square in the center of the band with brown chalk or a fine point marker, adding a small prong inside for the buckle detail. -
Revisit the Brim:
Thicken the outline of the brim. Shade the underside of the back brim heavily, and keep the top of the front brim lighter to create a sense of three-dimensional depth.
Level Up: Glow Effect
Rub a tiny bit of white chalk dust around the stars with your finger to create a soft, glowing halo effect in the night sky.
Step 3: Creating the Broom
-
Draw the Handle:
Trace your diagonal handle line with the white chalk marker. Make it slightly thicker at the top end and tapering slightly toward the bristle end. -
Start the Bristles:
At the base of the handle, draw a small band or knot where the bristles attach. Then, draw long, sweeping strokes outward from this point. -
Layering Bristle Variance:
Mix thick and thin lines for the bristles. Some should be straight, while others at the edges should fray out slightly to look realistic. -
Swoops and Motion:
To the left and right of the broom, draw stylized wind gusts. Use three to four curved, parallel lines that taper at the ends to suggest movement. -
Adding the Sparkle:
Around the hat, draw several star shapes. Start with a vertical cross, then add a smaller diagonal cross through the center. -
Tiny Details:
Scatter small dots specifically around the hat peak and the broom bristles to mimic magic dust or stars in the night sky. -
Smudging for Effect:
Use a cotton swab to gently smudge the bottom edges of the ‘wind’ lines and the tips of the broom bristles to soften the look. -
Final Cleanup:
Take a slightly damp cotton swab or the corner of a cloth and erase any stray draft lines or chalk dust that fell outside your main design areas.
Step back and admire your spooky creation, perfect for welcoming guests this season
Black Cat Silhouette With Glowing Eyes
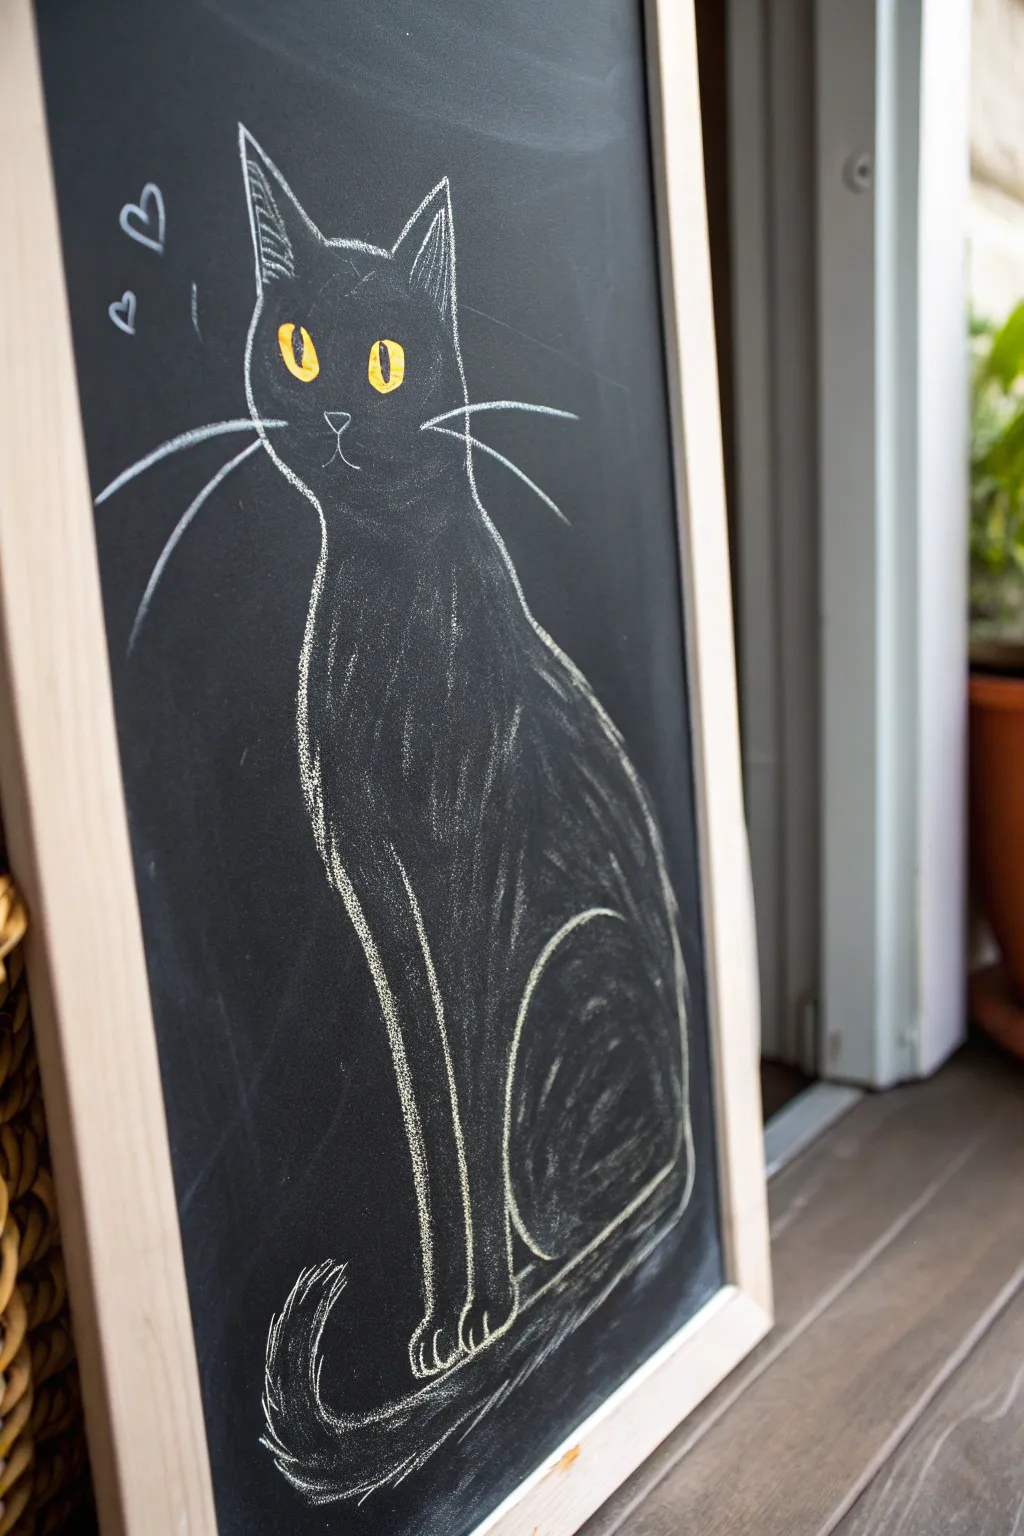
This elegant black cat silhouette makes striking use of negative space, letting the black chalkboard act as the cat’s body while simple white outlines define its form. The addition of glowing yellow eyes brings the mysterious feline to life without needing heavy shading.
Detailed Instructions
Materials
- Framed chalkboard easel
- White chalk stick (or chalk marker for cleaner lines)
- Bright yellow chalk stick
- Damp cloth or sponge
- Dry microfiber cloth
- Cotton swabs (optional, for blending)
Step 1: Preparation & Outline
-
Clean the slate:
Start with a perfectly clean surface. Wipe down your chalkboard with a damp cloth to remove any ghosting from previous drawings, then dry it completely with a microfiber cloth so your new lines are crisp. -
Visualize the shapes:
Before drawing, picture the cat’s posture. It is a long, tall oval for the body with a smaller circle on top for the head, sitting proudly upright. -
Sketch the ears:
Begin near the top center of the board. Draw two tall, triangular shapes for the ears. Make the outer lines slightly curved and the inner lines straighter to give them dimension. -
Define the head:
Connect the ears with a curved line for the top of the head. Draw a contour line down from the left ear to form the cheek, stopping where the neck begins.
Step 2: Drawing the Body
-
Create the neck and chest:
From the bottom of the head, draw a long, sweeping curve downwards to the left. This line defines the cat’s elegant neck and chest. -
Extend the front leg:
Continue that chest line straight down to create the front leg. It should be long and slender, ending in small, rounded toes for the paw. -
Draw the back curve:
Go back to the right ear. Draw a faint, long curve downward to suggest the cat’s back. In this style, we often leave parts of the back open or imply them rather than drawing a solid heavy line. -
Form the haunch:
Near the bottom right, draw a large C-shape curve. This represents the cat’s folded back leg (the thigh) where it sits. -
Add the tail:
At the base of the cat, draw a sweeping tail that wraps around toward the front paws. Use quick, feathery strokes at the tip to suggest fur texture. -
Detail the paws:
Draw small vertical lines at the bottom of the front leg and the base of the haunch to separate the toes.
Smudge Control
Work from top to bottom! If you draw the paws first, your hand will smear them while you work on the head. If mistakes happen, a damp Q-tip is a precise eraser.
Step 3: Adding Texture & Features
-
Feather the outlines:
Go over your main white lines again, but this time use short, diagonal scratching motions. This creates the illusion of fur texture rather than a solid, cartoonish outline. -
Suggest inner ear details:
Inside the ear triangles, add a few light, scribbled lines to show depth and the tufts of fur found inside a cat’s ears. -
Draw the nose and mouth:
Ideally placed in the lower center of the face, draw a tiny ‘Y’ shape for the nose and mouth cleft. Keep it small and delicate. -
Add whiskers:
Using the sharp edge of your white chalk, draw three long, confident swoops outward from each side of the muzzle. Fast strokes make for the smoothest whiskers. -
Draw the eyes:
Switch to your yellow chalk. Draw two almond shapes in the middle of the face. Angle them slightly downwards toward the nose for that classic feline look. -
Fill the eyes:
Color in the almond shapes solidly with the yellow chalk. Press firmly so the color pops against the black background. -
Add pupils:
Take a piece of black charcoal or just rub away a thin vertical slit in the center of the yellow eyes to create the pupils. -
Final touches:
Draw two small heart shapes floating above the cat’s head to add a touch of whimsy to the composition.
Make It Glow
For extra spooky eyes, dampen the tip of your yellow chalk before drawing. This creates a paint-like paste that dries much brighter and more opaque than dry chalk.
Step back and admire your spooky yet sweet chalkboard friend

PENCIL GUIDE
Understanding Pencil Grades from H to B
From first sketch to finished drawing — learn pencil grades, line control, and shading techniques.
Explore the Full Guide
Bat Swarm Around a Moon
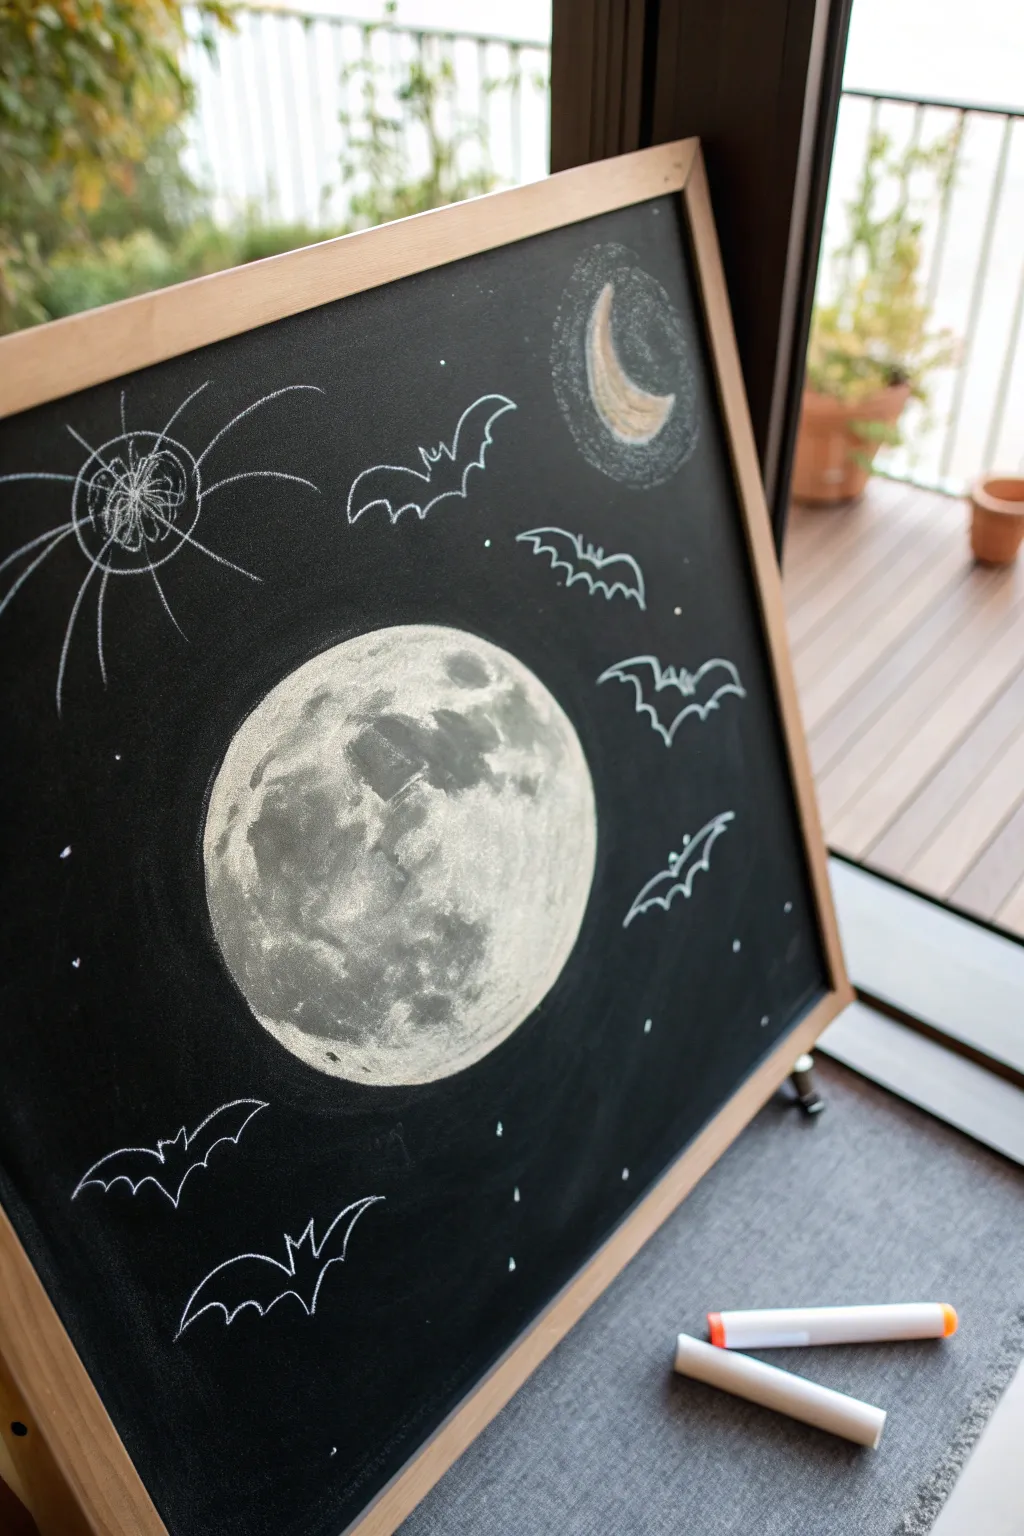
Transform a simple chalkboard into a spooky night sky with this atmospheric chalk drawing. The centerpiece represents a highly detailed, textured moon surrounded by fluttering bats and whimsical celestial doodles.
Step-by-Step Tutorial
Materials
- A standard chalkboard (framed or sticker)
- White stick chalk (standard classroom style)
- White charcoal pencil (optional, for finer bat details)
- Soft white pastel (for the bright moon filling)
- Paper towel or tissue (for blending)
- A damp cloth (for corrections)
- Chalk eraser or sponge
Step 1: Setting the Scene
-
Prepare the surface:
Begin by ensuring your chalkboard is clean and dry. If it’s a brand new board, you might want to ‘season’ it first by rubbing the side of a piece of chalk over the whole surface and erasing it, which prevents ghosting later. -
Outline the main moon:
Locate the center of your board, slightly offset to the bottom. Draw a large, perfect circle roughly six to eight inches in diameter. You can trace around a bowl or plate if you aren’t confident drawing a freehand circle. -
Fill the base layer:
Using the side of your chalk or a soft white pastel, color in the entire moon circle. Don’t press too hard yet; you just want a solid, cloudy white base to work on. -
Smudge the surface:
Take a paper towel or your finger and gently rub the chalk inside the circle. This smooths out the stroke marks and creates a glowing, ethereal surface for the moon.
Chalk Too Dusty?
If your chalk is creating too much dust and blurring your sharp lines, dip the tip of the chalk in water for 2-3 seconds before drawing for a paint-like effect.
Step 2: Texturing the Moon
-
Map out the craters:
Look at the reference photo to see the dark patches on the moon. Using a clean finger or a slightly damp Q-tip, lift off some of the white chalk in irregular, blotchy shapes to reveal the black board underneath. -
Deepen the shadows:
Focus on the left side and the upper middle area. Identify the largest ‘seas’ or dark spots and gently erase more chalk there to create contrast. -
Add highlights:
Take a sharper piece of chalk or a pastel and add bright white strokes specifically on the right edge of the moon and around the craters. This creates a 3D spherical effect. -
Blend the transitions:
Lightly tap the edges between your bright white highlights and the dark erased spots with a fingertip. This softens the craters so they look natural rather than harsh outlines. -
Refine the edge:
Go around the outer circumference of the moon one last time with a crisp line to make sure it pops against the dark background.
Make It Glow
Use a dry paintbrush to gently sweep chalk dust outward from the moon’s edge. This creates a realistic hazy glow or ‘halo’ effect around the sphere.
Step 3: Adding Celestial Elements
-
Draw the crescent moon:
In the upper right corner, draw a smaller crescent moon shape. Fill it in lightly with chalk. -
Texture the crescent:
Unlike the main moon, keep this one a bit sketchier. Draw a faint halo or circle around it to suggest a glowing aura. -
Create the scratchy spider-sun:
On the upper left side, draw a loose, scribbly circle. Don’t color it in; instead, use rapid circular motions to create a tangled web-like center. -
Add radiating legs:
Extend long, curved lines outward from the scribbly center. These spindly legs should reach out in all directions, resembling a creepy spider or a chaotic star.
Step 4: The Bat Swarm
-
Start the bat outlines:
Begin drawing simple ‘M’ shapes scattered around the large moon. Vary their sizes to create depth—some large ones close up and smaller ones further away. -
Form the wings:
For each bat, extend the outer points of the ‘M’ down and curve them back up toward the center body. Use scalloped lines for the bottom of the wings to give them that classic bat shape. -
Clean up the lines:
I find using the sharp corner of a chalk stick or a chalk pencil works best here. Retrace the bats to make the white lines crisp and distinct. -
Add subtle faces:
On the larger bats, add two tiny dots for ears at the very top center point of the silhouette. -
Sprinkle the stars:
Finish the piece by tapping the tip of your chalk randomly across the empty black spaces. These tiny dots act as distant stars and tie the whole composition together.
Step back and admire your spooky night sky, which is now ready to greet trick-or-treaters
Trick-or-Treat Candy Scatter
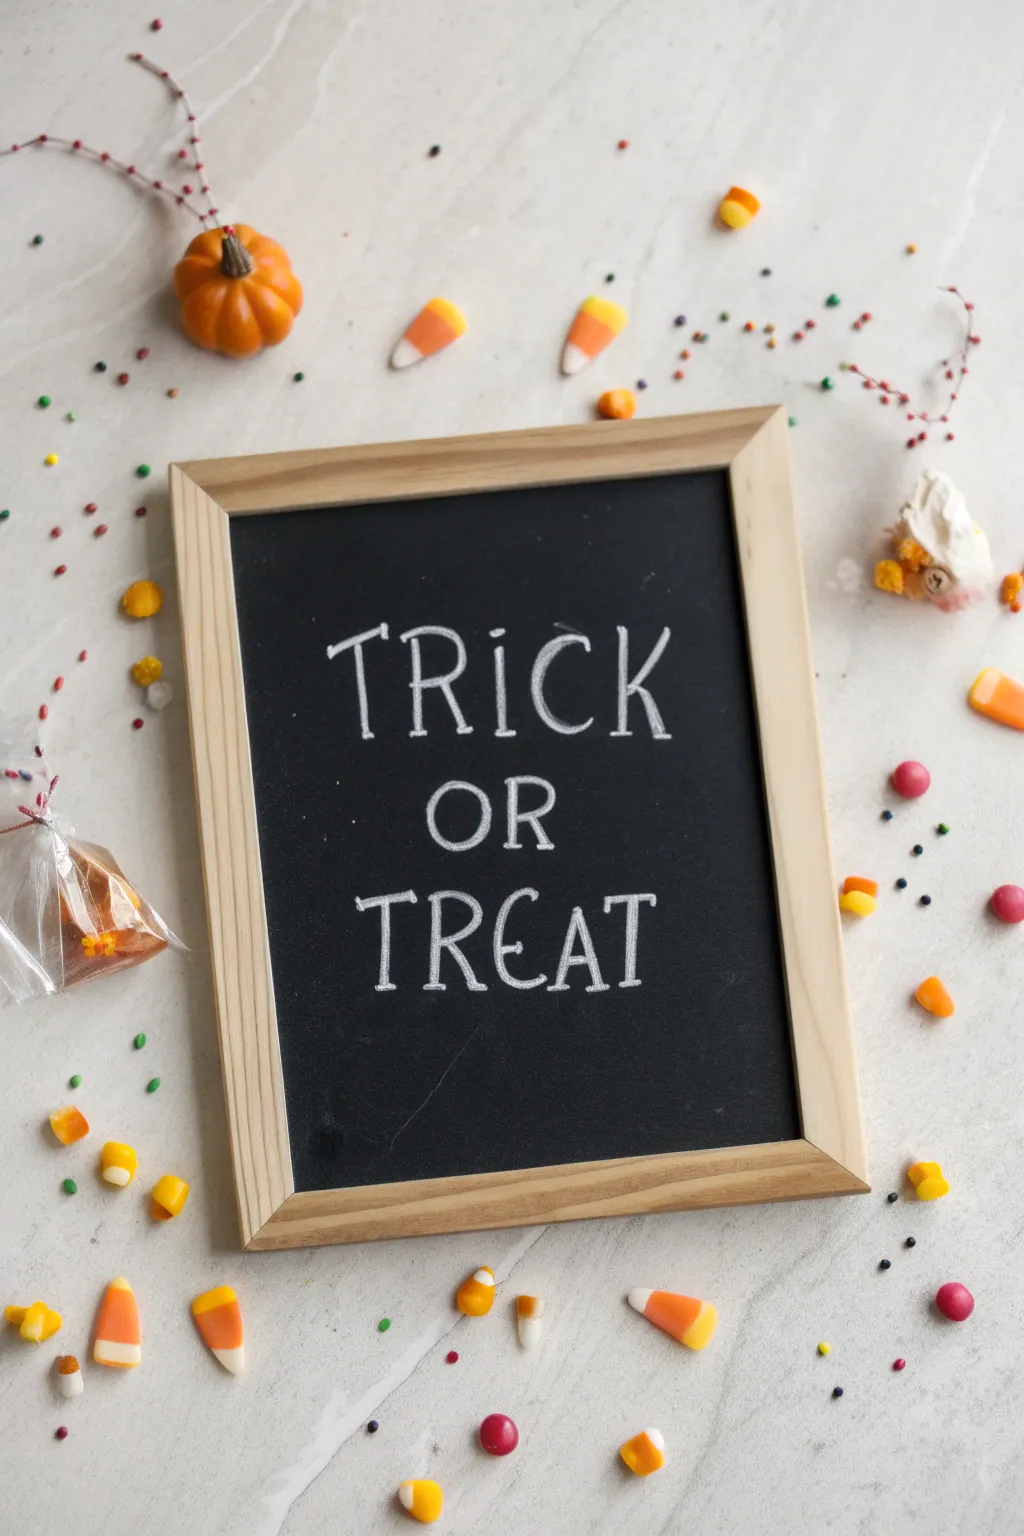
Create a festive focal point for your Halloween decor with this charming and simple chalkboard display. The clean, serif lettering creates a wonderful center around which you can scatter vibrant seasonal candies for a playful tableau.
Step-by-Step
Materials
- Small wood-framed chalkboard (approx. 8×10 or 11×14)
- White chalkboard marker or sharpened stick of white chalk
- Pencil
- Ruler
- Cotton swabs (Q-tips)
- Small cup of water
- Microfiber cloth
- Bag of candy corn
- Assorted Halloween sprinkles (orange, black, yellow)
- Small plastic pumpkin decoration
- Small cellophane treat bag
Step 1: Preparation and Layout
-
Clean the surface:
Begin with a completely clean slate. Wipe down your chalkboard surface with a damp microfiber cloth to remove any dust or oils, ensuring the black background is deep and uniform. -
Establish the centerline:
Using a ruler, lightly find the vertical center of the board. You don’t need to draw a full line, just make a tiny tick mark at the top and bottom with your pencil to help you center the text later. -
Mark text baselines:
Measure out three horizontal spaces for your words. Lightly draw three horizontal guidelines using a pencil. Leave slightly more space between the lines than the height of the letters themselves to keep the design airy. -
Draft the lettering:
Lightly sketch the words ‘TRICK’, ‘OR’, and ‘TREAT’ onto your guidelines using the pencil. Using a pencil on a chalkboard is great because the graphite reflects differently than the black surface, letting you see the guide without leaving a permanent mark.
Season’s Chalk
Before beginning, rub the side of a chalk stick over the whole board and erase it. This ‘seasons’ the surface so ghost images don’t get stuck later.
Step 2: Lettering Application
-
Trace the main strokes:
Take your chalk marker or sharpened chalk stick and carefully trace over your pencil letters. Focus on single, smooth strokes for the straight lines of the ‘T’, ‘I’, and ‘K’. -
Form the curves:
For the ‘R’, ‘C’, and ‘O’, work slowly to keep the curves rounded and consistent. If using a marker, apply even pressure to avoid puddling ink at the bottom of the curves. -
Add serifs:
Once the main letters are drawn, go back and add small horizontal ticks (serifs) to the ends of the letters. Keep these short and uniform—this gives the text that classic storybook look seen in the photo. -
Thicken the downstrokes:
To give the letters more weight, go over the vertical lines (downstrokes) one more time. This subtle variation in thickness makes the lettering pop against the dark background. -
Let it sparkle:
I like to let the chalk marker dry completely for about 10 minutes. If you touch it while it’s damp, you risk smudging your crisp lines.
Step 3: Refining and Styling
-
Clean up edges:
Dip a cotton swab in a little water and squeeze out the excess. Use this as an eraser to sharpen any edges of your letters or to wipe away any visible pencil guidelines. -
Dry buff:
Once the cleanup is dry, gently run a dry microfiber cloth over the open black spaces to ensure there is no chalk dust haze remaining. -
Position the board:
Place the board flat on your surface. If you want a slight angle for photography, prop the top edge up with a small book or block hidden underneath. -
Place anchor items:
Position your largest props first. Place the small plastic pumpkin near the top left corner and a small bag of treats or a pile of candy near the bottom or side to balance the frame. -
Scatter the candy corn:
Take a handful of candy corn and let them fall naturally around the frame. Then, manually adjust a few so they point in different directions, ensuring some are close to the frame edge. -
Add texture with sprinkles:
Pinch small amounts of the halloween sprinkles and drop them into the empty spaces between the candy corn. The tiny spherical shapes contrast nicely with the triangular candy corn. -
Final adjustment:
Step back and look at the composition. If a spot looks too empty, add a single candy piece. Move any candies that are obscuring the wood frame too much.
Uneven Ink Flow?
If your chalk marker creates streaks, press the tip on a piece of scrap paper to pump fresh ink into the nib before returning to the board.
Now you have a sweet and spooky centerpiece ready to greet your guests


Haunted House on a Hill
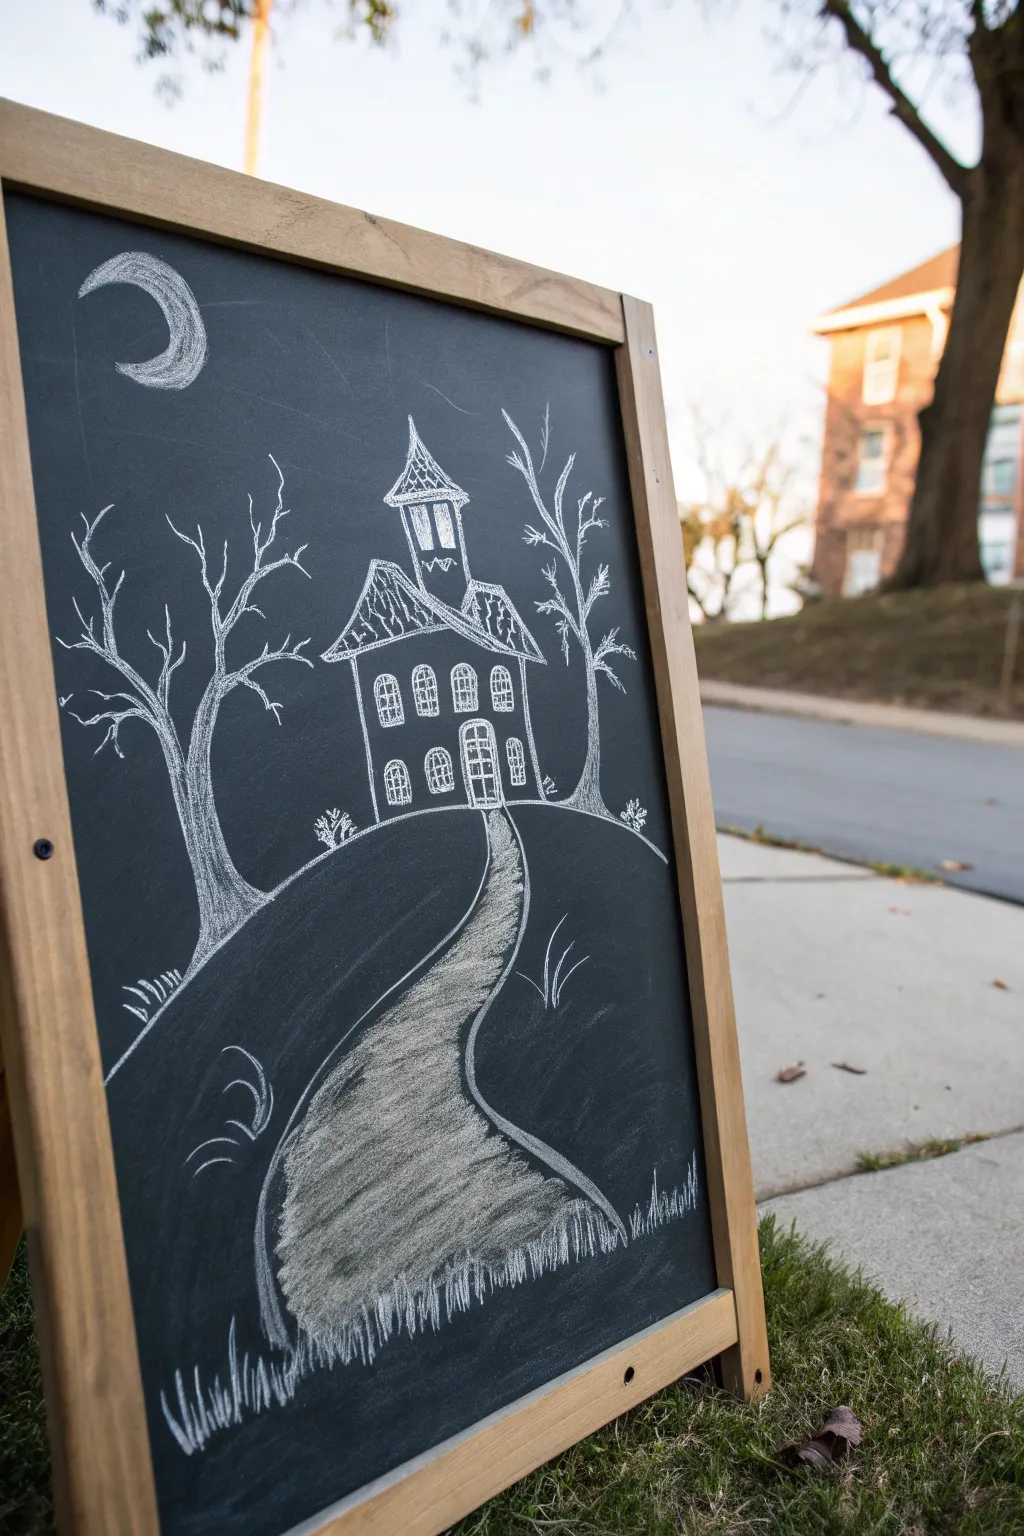
Transform a simple chalkboard into a hauntingly charming scene perfect for greeting trick-or-treaters. This monochromatic design uses simple white chalk to create high-contrast silhouettes and glowing details that really pop against the dark background.
Detailed Instructions
Materials
- Large chalkboard (A-frame or standing)
- White tapered chalk sticks (sharpened)
- White chalk marker (optional, for finer details)
- Damp cloth or sponge
- Cotton swabs or blending stump
- Pencil sharpener (for the chalk)
Step 1: Setting the Scene
-
Clean the surface:
Begin with a completely clean slate. Wipe down your chalkboard with a damp cloth to remove any old dust or ghosting, ensuring the black background is deep and rich. Let it dry completely. -
Outline the hill:
Start near the bottom third of the board. Draw a large, curved arch that spans the width of the board to establish the hilltop where your haunted house will sit. -
Draft the winding path:
From the bottom center edge of the board, draw two curving lines that snake upward, narrowing as they reach the top of the hill. This perspective trick leads the eye straight to the front door. -
Fill the path foundation:
Turn a piece of chalk on its side and lightly scumble the area inside the path lines. You want a textured, uneven fill rather than a solid white block to mimic a dirt or gravel road. -
Define the path edges:
Go back over the outer edges of your path with firm pressure to create a crisp border. While I’m here, I sketch in some vertical grass strokes along the very bottom edge of the board.
Dust Control
If you make a mistake, don’t use a wet cloth immediately, as it creates white mud. Dab drawing mistakes with a piece of sticky tack or kneaded eraser to lift the dust cleanly.
Step 2: Constructing the Haunted House
-
Block in the main shape:
At the peak of your hill, draw a slightly wonky rectangle for the main body of the house. Imperfect, slanted lines actually help the “spooky” aesthetic here. -
Add the roof and tower:
Draw a steep triangular roof on the left side. On the right, extend a tower upward, capping it with a smaller, pointed witch’s hat roof. -
Detail the shingles:
Using the sharp edge of your chalk, sketch jagged patterns on the roof sections. Use zig-zag motions to create the look of old, dilapidated shingles. -
Draw the windows:
Add arched windows across the facade—three on the top floor and two on the bottom. Divide them with simple grid lines to create panes. -
Create the entrance:
Draw a large double door right where your path meets the house. Add an arched frame around it to match the window style.
Step 3: Atmospheric Details
-
Sketch the left tree:
On the left slope of the hill, draw a thick, gnarled tree trunk. Branch it out into jagged, heavy limbs that reach toward the sky, focusing on sharp angles rather than smooth curves. -
Sketch the right tree:
Add a slightly thinner, taller tree heavily branching out on the right side of the house to frame the structure. -
Refine the branches:
Extend tiny, delicate twigs off the main branches using the sharpest point of your chalk or a chalk marker for precision. -
Texture the trunks:
Lightly shade the interior of the tree trunks with vertical strokes, leaving some black showing through for the appearance of rough bark. -
Add the moon:
In the top left corner, draw a crescent moon shape. Fill it in solidly with bright white chalk for a glowing effect. -
Ground the scene:
Add clusters of small grass tufts along the curve of the hill and near the tree roots to anchor them to the ground. -
Brighten highlights:
Go back over the moon, the window frames, and the edges of the path with heavy pressure to create the brightest white points in your composition. -
Soft blending:
Use your finger or a cotton swab to gently smudge the fill on the path, softening the texture slightly while keeping the edges sharp. -
Final cleanup:
Use a slightly damp cotton swab to erase any stray chalk dust or accidental smudges in the black sky area, keeping the night pristine.
Glow Effect
Rub a tiny bit of yellow chalk dust into the windows and smudge it with your finger to make it look like someone is home with the lights on.
Step back and admire your handiwork, ready to welcome guests to your haunted home
Tombstone and Creepy Garden Scene
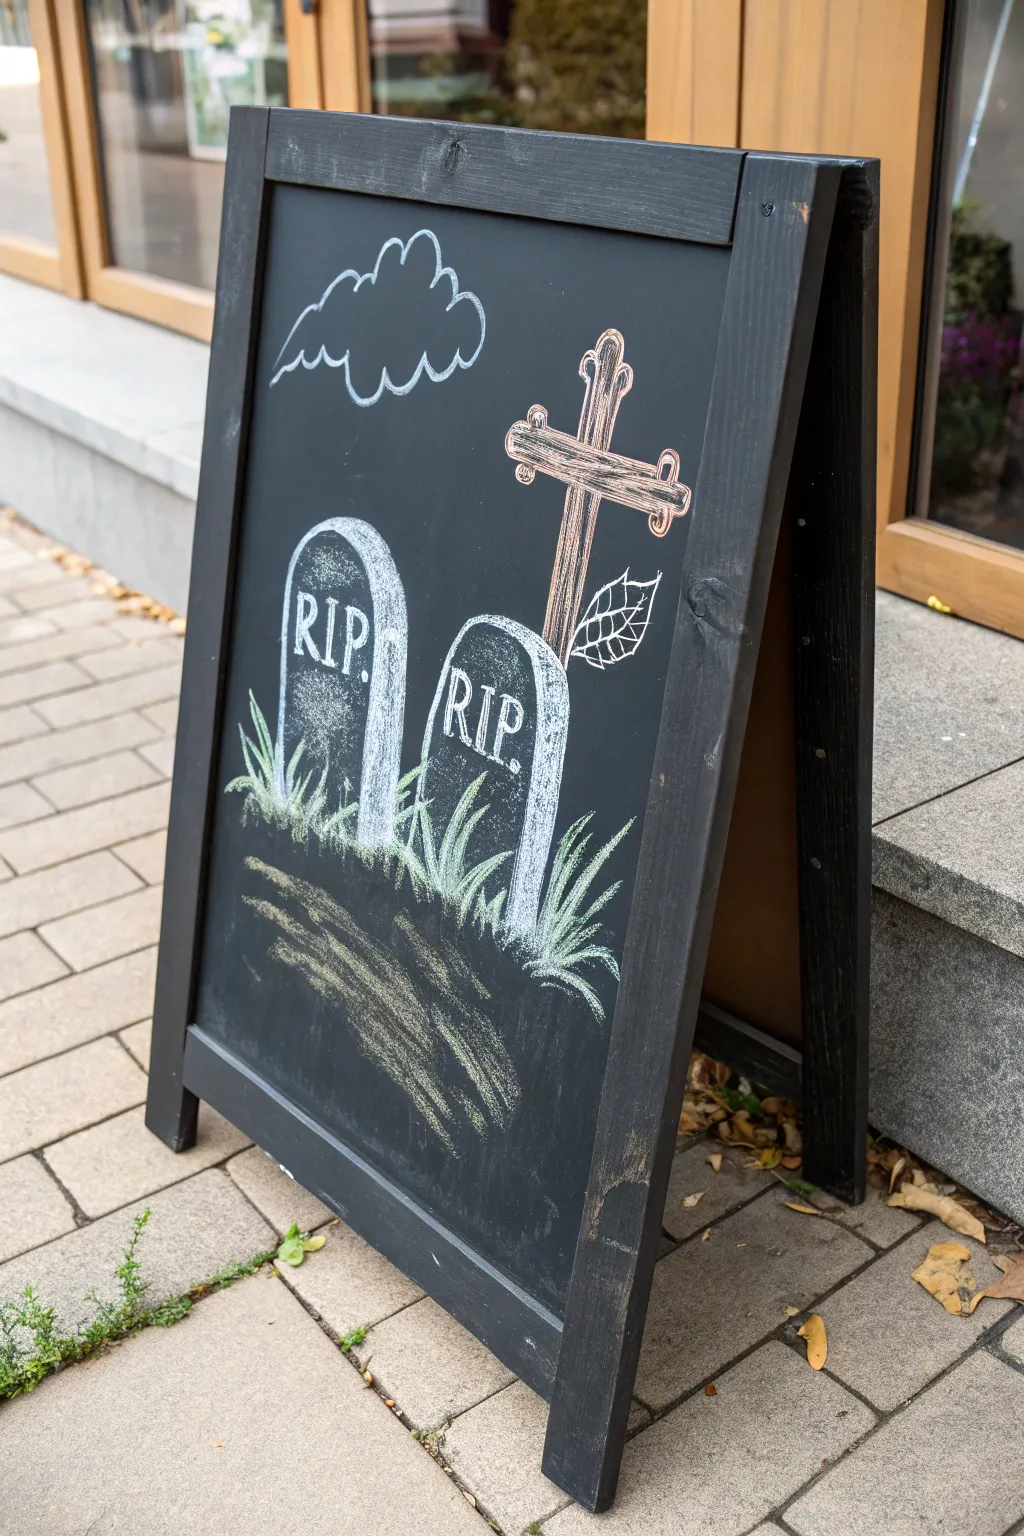
Transform a plain chalkboard into a haunting graveyard scene with just a few colors. This design features weathered tombstones, a wooden cross, and windswept grass, perfect for welcoming trick-or-treaters or setting a somber autumn mood.
Step-by-Step Guide
Materials
- Large A-frame chalkboard or wall-mounted slate
- White chalk stick (standard)
- White chalk marker (for brighter highlights)
- Green chalk stick (muted or olive tone)
- Brown/tan chalk stick
- Damp microfiber cloth
- Cotton swabs (Q-tips) for smudging
- Ruler (optional)
Step 1: Setting the Scene
-
Clean the Surface:
Start with a freshly cleaned chalkboard. Wipe it down with a damp microfiber cloth to remove old ghosting or dust, as this helps the new chalk grip better. Let it dry completely. -
Outline the Tombstones:
Using your white chalk stick, sketch two rounded tombstone shapes near the bottom center. Make the left one slightly taller and wider, and overlap the right one slightly behind it for depth. -
Add 3D Thickness:
To give the stones weight, draw a second curved line parallel to the right side and top of each tombstone. This creates the illusion of a thick slab of stone. -
Draft the Cross:
To the right of the tombstones, sketch a tall, thin cross using your brown or tan chalk. Don’t worry about perfect straight lines; a little wobble makes the wood look old.
Chalk Marker Pop
Use a liquid chalk marker only for the ‘RIP’ text. The ink is much brighter than stick chalk, ensuring the message is readable even from a distance.
Step 2: Building Texture and Detail
-
Fill the Stone Faces:
Lightly shade the front face of the tombstones with white chalk using the side of the stick. Use your finger to smudge this layer, creating a cloudy, gray base texture. -
Highlight the Edges:
Press harder with the tip of the white chalk along the top curves and the right-side thickness edges. This stark white line defines the shape against the dark board. -
Lettering the Rest:
Inside each tombstone, write ‘RIP’ in bold capital letters. I usually thicken the downstrokes of the letters to make them stand out against the gray background. -
Detailing the Cross:
Go back to the brown cross and add small horizontal ticks at the ends of the beams. Draw a few grain lines down the center to emphasize the wooden texture. -
Adding Dimension to Wood:
Outline the cross with a very thin line of white or light tan to make it pop. You can add a small decorative leaf shape attached to the vertical beam for extra flair.
Step 3: Grounding the Scene
-
Sketch the Grass:
Using green chalk, draw quick, upward strokes around the base of the tombstones. Flick your wrist at the end of each stroke to taper the grass blades. -
Layering the Greenery:
Add a second layer of grass strokes, some crossing over others. Vary the height so it looks like an unkempt, overgrown graveyard. -
Creating the Dirt Mound:
Below the grass, sketch rough, horizontal scribbles with brown or muted yellow chalk to represent the disturbed earth of a fresh grave. -
Blending the Ground:
Lightly smudge the dirt area with your finger or a cloth to soften it, making it look like a shadowy mound rather than distinct lines.
Why isn’t it shading?
If your chalk isn’t blending well, the board might be too smooth or oily. Try rubbing the whole surface with the side of a chalk stick and erasing it to ‘season’ the board first.
Step 4: Sky and Final Touches
-
Drawing Clouds:
In the upper left corner, draw a simple, bumpy cloud outline with white chalk. Keep the line weight fairly thin so it doesn’t distract from the graves. -
Softening the Sky:
Use a clean finger to gently smudge the bottom edges of the cloud, giving it a wispy, drifting appearance. -
Leaf Veins:
Return to the leaf on the cross and draw a central line with angled veins using your sharpest white chalk or chalk marker. -
Final Cleanup:
Use a damp cotton swab to erase any smudge marks or stray dust around your main shapes. This sharpens the contrast and makes the drawing look professional.
With your graveyard complete, step back and admire how a few simple strokes can create such a moody atmosphere
Skeleton Hands Reaching In

Embrace the eerie season with these striking skeletal hands reaching out from opposite corners of a simple chalkboard. The contrast of bright white chalk against a dark slate creates a classic, spooky look perfect for a mantel or entryway.
Detailed Instructions
Materials
- Small framed chalkboard (approx. 10″ x 16″)
- White pastel chalk or chalk marker (fine tip)
- Sharpening tool (for standard chalk)
- Damp microfiber cloth
- Cotton swabs (Q-tips)
- Ruler or straight edge
- Pencil and paper (for sketching beforehand)
Step 1: Preparation & Layout
-
Clean the surface:
Begin by wiping down your chalkboard with a damp microfiber cloth to remove any dust or grease. Let it dry completely to ensure your chalk lines are crisp. -
Plan the composition:
Visualize the placement: one hand will enter from the bottom-left corner reaching up, and the other from the top-right corner reaching down. The fingers should point toward each other but not touch. -
Sketch the basic shapes:
Lightly sketch the palms first using very faint chalk lines. Draw a rough square shape near the bottom-left wrist area and another near the top-right wrist area to act as anchors. -
Map the finger direction:
Draw five faint lines radiating from each palm block to represent the fingers. I find it helpful to vary the spacing slightly to make the hands look more natural and less stiff.
Step 2: Drawing the Carpals & Metacarpals
-
Outline the wrist bones:
Starting with the bottom-left hand, draw a cluster of small, irregular shapes at the base of the palm to represent the carpal bones. Keep these loose and organic. -
Draw the palm bones:
Extend five longer bones (metacarpals) from the wrist cluster. These should be wider at the ends (the knuckles) and slightly thinner in the middle. -
Add bone details:
Thicken the ends of these bones to create the knuckles. Use short, curved strokes to show the rounded tops of the bones where they connect. -
Repeat for the top hand:
Do the same for the top-right hand, ensuring the wrist bones fade off the edge of the frame to give the illusion that the arm continues outside the board.
Chalk Maintenance
Keep a sharpener handy! A fine point is crucial for drawing the gaps between finger joints accurately without smudging.
Step 3: Detailing the Fingers
-
Segment the fingers:
Along your guide lines, draw the finger bones (phalanges). Remember that the thumb has two segments, while the other fingers have three distinct segments. -
Shape the joints:
Leave a tiny gap between the segments to represent the joints. Draw the ends of each bone slightly flared, like the shape of a dog bone. -
Refine the fingertips:
Taper the very last segment of each finger slightly. You can add a small triangular suggestion of a fingernail bed at the very tips for extra realism. -
Add dimension:
Go back over one side of each bone with slightly heavier pressure. This simple shading technique gives the bones a bit of roundness and 3D volume.
Glow in the Dark
Trace over your white lines with clear glow-in-the-dark paint for a surprise effect when the lights go out.
Step 4: Cleanup & Final Touches
-
Erase guide lines:
Use a cotton swab to carefully rub away any initial sketch lines that are still visible between the bones. -
Clean up edges:
If your chalk lines became too thick or fuzzy, dampen a cotton swab slightly and trace along the outside of the bones to sharpen the edges. -
Add movement lines (optional):
Include two small, sharp L-shaped brackets near the wrist of the bottom hand to frame the artwork slightly, or add tiny motion lines for effect. -
Set the chalk:
Once you are happy with the drawing, blow away any loose dust. Avoid touching the surface as you place it on display.
Place your finished chalkboard near a window or candle to let the shadows play across your skeletal masterpiece
Potion Bottle Labels and Bubbles
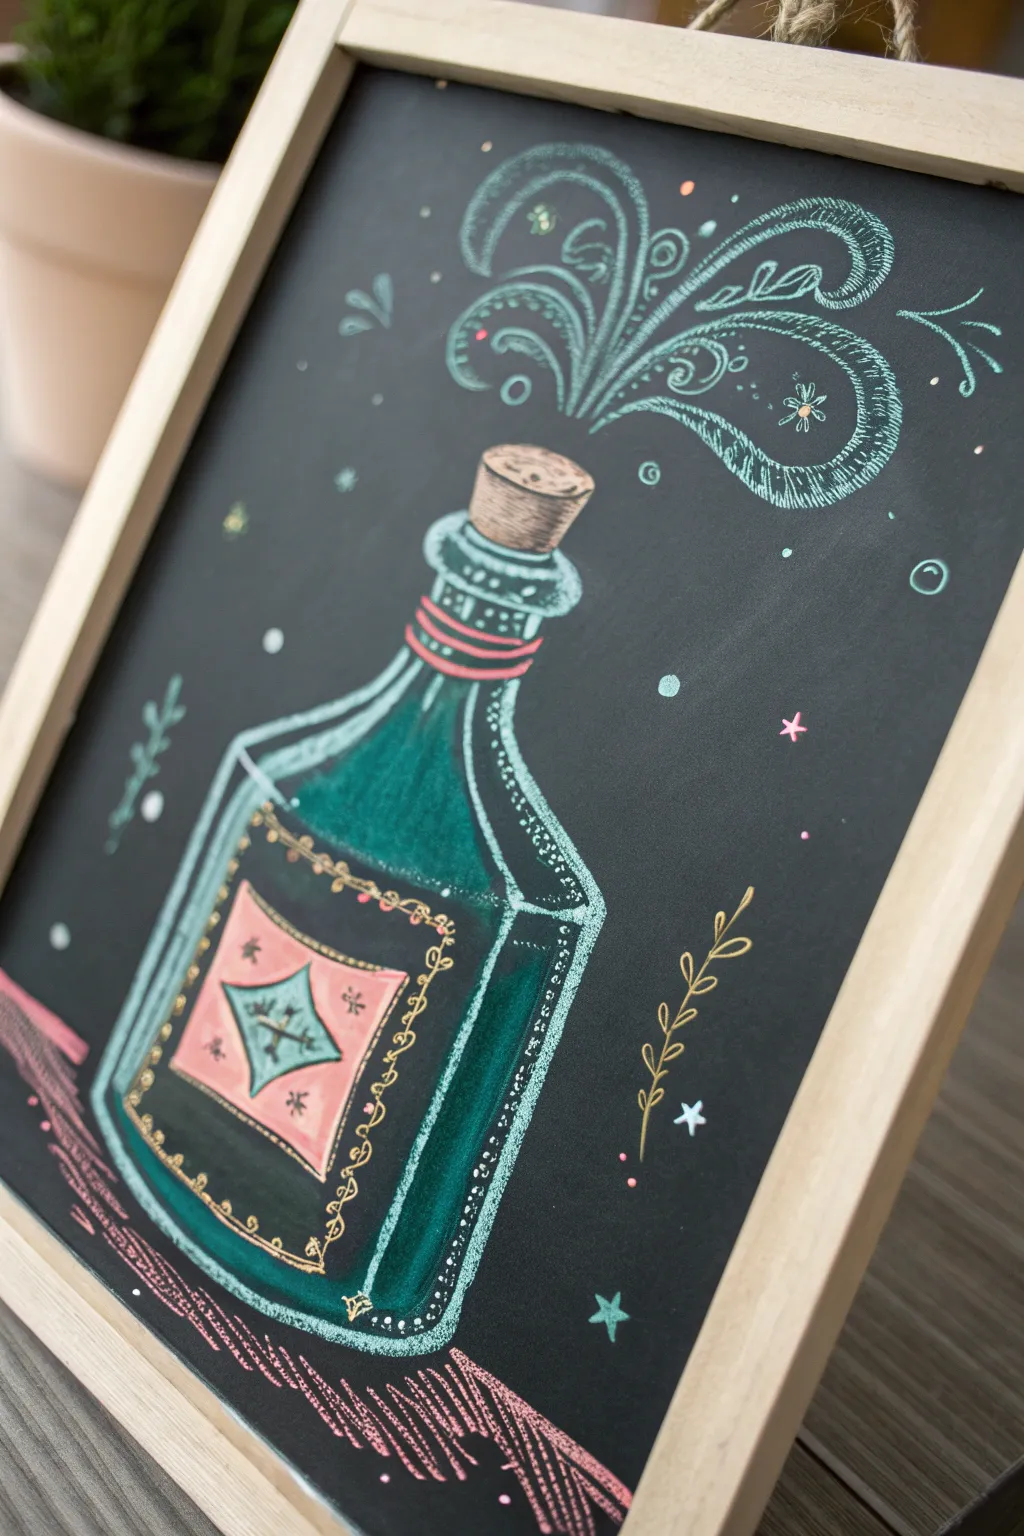
Cast a spell on your Halloween decor with this whimsical potion bottle illustration. Perfect for beginners, this chalkboard art features vibrant liquid effects, magical swirls, and charming vintage details.
Step-by-Step Guide
Materials
- Small framed chalkboard
- Chalk markers (white, teal/emerald green, pink, gold/yellow, coral)
- Standard stick chalk (white – for sketching)
- Damp cloth or cotton swabs
- Pencil sharpener (optional, for sharpening chalk)
Step 1: Sketching the Bottle Structure
-
Map out the shape:
Start by lightly sketching the bottle’s outline with a piece of sharpened white stick chalk. Draw a square base that tapers slightly inward as it goes up, leading into a narrow neck. -
Add dimension:
To give the bottle a 3D glass look, draw a second, slightly smaller outline inside the first one. Connect the corners with diagonal lines to suggest the thickness of the glass, creating a prism-like effect. -
Top it off:
Sketch a rounded rim at the top of the neck and add a trapezoid shape sitting inside it for the cork stopper. -
Trace with marker:
Once satisfied with your sketch, go over the main outline with a white chalk marker or a very light teal. Use steady, confident strokes, but keep the lines somewhat sketchy for a hand-drawn feel.
Smudge-Free Lines
Work from the top down or rest your hand on a piece of paper to avoid smearing fresh chalk marker ink.
Step 2: Filling with Potions
-
Color the liquid:
Using a teal or emerald green chalk marker, color in the main body of the bottle. Leave some areas—specifically near the edges and corners—slightly darker or uncolored to mimic light refraction through glass. -
Create the label shape:
Before the green ink sets fully, define a large rectangular area on the front face of the bottle for the label. Outline this area in gold or yellow. -
Fill the label background:
Color the label rectangle with a soft pink or coral chalk marker. Let this layer dry completely before adding details on top to prevent smudging. -
Detail the label:
Draw a diamond shape in the center of the pink label using a teal marker. Inside the diamond, add a simple cross or starburst symbol. -
Add decorative borders:
With a fine-tip gold or yellow marker, draw small scallops or loops along the inner edge of the label’s border for a vintage apothecary vibe.
Step 3: Magic, Stoppers, and Shadows
-
Texture the cork:
Color the cork stopper with a beige or brown marker. Add small dots and short dashes to simulate the porous texture of cork. -
Draw the neck rings:
Wrap a pink or coral ribbon detail around the neck of the bottle by drawing two or three horizontal lines. -
Ground the bottle:
Using a pink chalk marker, scribble a messy, textured shadow underneath the bottle. Sketch rough diagonal lines to suggest a wooden table surface. -
Highlight the glass:
Add white highlights to the bottle’s shoulders and corners. A few crisp white lines along the bottle’s edges will make the glass look shiny and reflective.
Glow Effect
Use a dry cotton swab to lightly smudge the ink around the magic swirls for a hazy, glowing aura.
Step 4: Unleashing the Magic
-
Draft the fumes:
From the cork, sketch three main plumes of smoke or magic billowing upward and outward. Make them curvy and organic. -
Detail the swirls:
Go over your smoke outlines with a teal or light blue marker. Instead of solid lines, use short, repetitive hatch marks perpendicular to the flow of the smoke to create a feathery texture. -
Add internal swirls:
Inside the smoke plumes, draw delicate spirals and curls with a fine lighter color (white or pale blue) to emphasize movement. -
Sprinkle magic dust:
Scatter small dots, circles, and tiny star shapes around the bottle and fumes using white, pink, and teal markers. Vary the sizes for depth. -
Final flourish:
Draw a small floral sprig or vine to the right of the bottle in gold to balance the composition, and perhaps a smaller one on the left.
Step back and admire your bewitching creation, ready to enchant any room
Halloween Doodle Practice Sheet
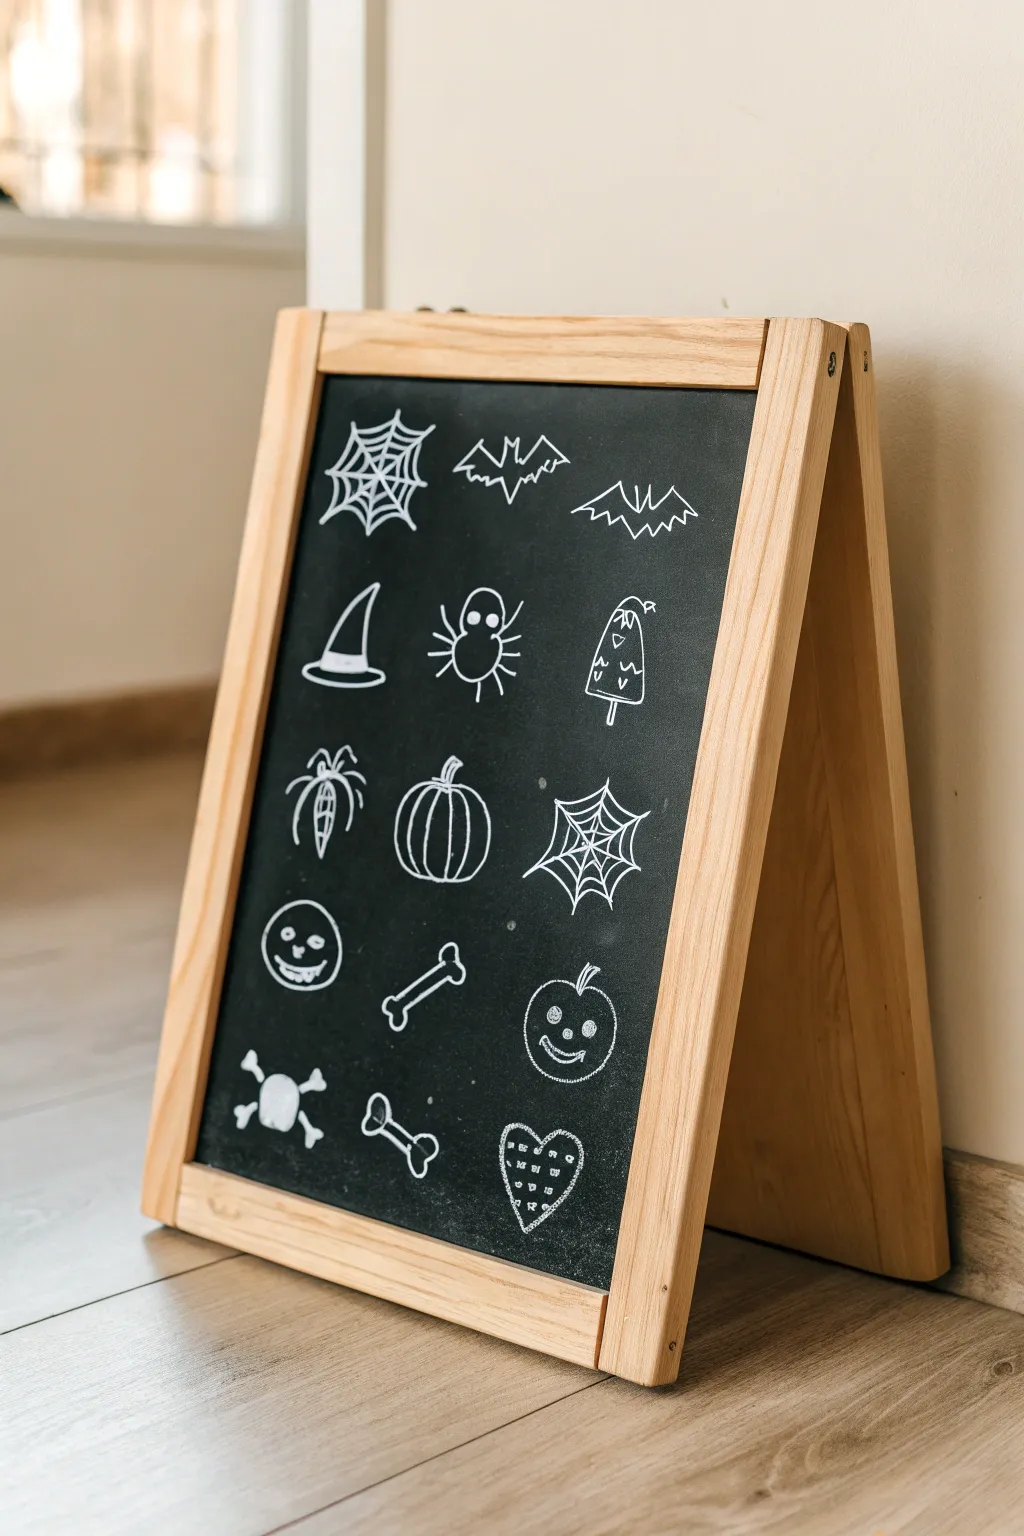
Transform a simple chalkboard into a festive gallery of iconic Halloween symbols with these easy-to-follow doodle instructions. This project serves as excellent practice for line work and creates a charming, minimalist holiday display.
Step-by-Step Guide
Materials
- A-frame wooden chalkboard (standing easel style)
- White creativity chalk or chalk marker (fine to medium tip)
- Damp microfiber cloth for erasing
- Dry cloth for buffing
- Ruler (optional, for spacing)
Step 1: Preparation & Layout
-
Clean surface:
Begin by wiping down your chalkboard surface with a damp cloth to remove any dust or old chalk residue. -
Dry completely:
Buff the board with a dry cloth to ensure no moisture remains. Chalk markers can bleed on damp surfaces, and standard chalk won’t lay down crisply. -
Plan the grid:
Visualize a grid of four rows and three columns. You can lightly mark small dots as placeholders for where each doodle will go to keep the spacing even.
Chalk Marker Precision
Store your chalk markers tip-down for 15 minutes before starting. This ensures the ink flows smoothly for crisp, consistent white lines.
Step 2: Top Row: Webs & Bats
-
Draw the spiderweb:
In the top left spot, draw a central point. Radiate six straight lines outward like spokes on a wheel, then connect them with scalloped, curved lines to form the webbing. -
Create the center bat:
For the top middle spot, draw two small triangular ears. Extend curved lines out for the top of the wings, dip down for the wing tips, and scallop the bottom edge back toward the center. -
Add the flying bat:
In the top right, draw a wider bat silhouette. Focus on sharp angles for the wings to make it look like it is mid-flight.
Step 3: Second Row: Hats & Creepy Crawlies
-
Sketch the witch’s hat:
On the left, draw a wide, flat oval for the brim. Add a tall, slightly crooked triangle on top for the hat’s cone. -
Draw the spider:
In the center, draw a round body with two large circles for eyes. Add four L-shaped legs bending upwards on each side. -
Doodle the ghost:
On the right, draw an upside-down U shape. Add a wavy line at the bottom and draw small ‘v’ shapes on the body for texture or a pattern.
Add Some Dimension
To make your doodles pop, lightly smudge one side of your solid shapes (like the skull or pumpkin) with your finger to create a soft shadow effect.
Step 4: Third Row: Pumpkins & Webs
-
Draw the dangling spider:
On the left, draw a straight line dropping down. At the end, sketch a small oval body with legs extending outward, looking like it’s hanging from a thread. -
Create the pumpkin:
In the middle, draw a wide oval. Add curved lines inside to follow the contour of the pumpkin, giving it a ribbed appearance, and top it with a small stem. -
Add a corner web:
On the right, draw a spiderweb similar to the first one, but shape it slightly differently to show variety in your designs.
Step 5: Bottom Rows: Skulls & Bones
-
Sketch the grinning face:
Draw a circle on the left. deeply set oval eyes, a triangle nose, and a wide, toothy grin. -
Draw the bone:
In the center, draw a diagonal line. Add heart-like shapes at both ends to create the knobs of a bone. -
Create the Jack-o’-lantern face:
On the right, outline a pumpkin shape but focus on the face: round eyes, a triangle nose, and a simple stitched smiley mouth. -
Add the skull and crossbones:
In the very bottom left corner, draw a rounded skull shape. Add two crossed bones underneath it. -
Finish with details:
Fill the remaining bottom space with another small bone and a decorative heart shape featuring stitch marks inside.
Enjoy displaying your hand-drawn Halloween collection on your counter or front porch


Have a question or want to share your own experience? I'd love to hear from you in the comments below!