
A blue sky can be the easiest part of a painting—or the thing that makes everything else suddenly click. Here are my favorite blue sky painting ideas to help you capture everything from crisp midday calm to dramatic weather and playful, unexpected twists.
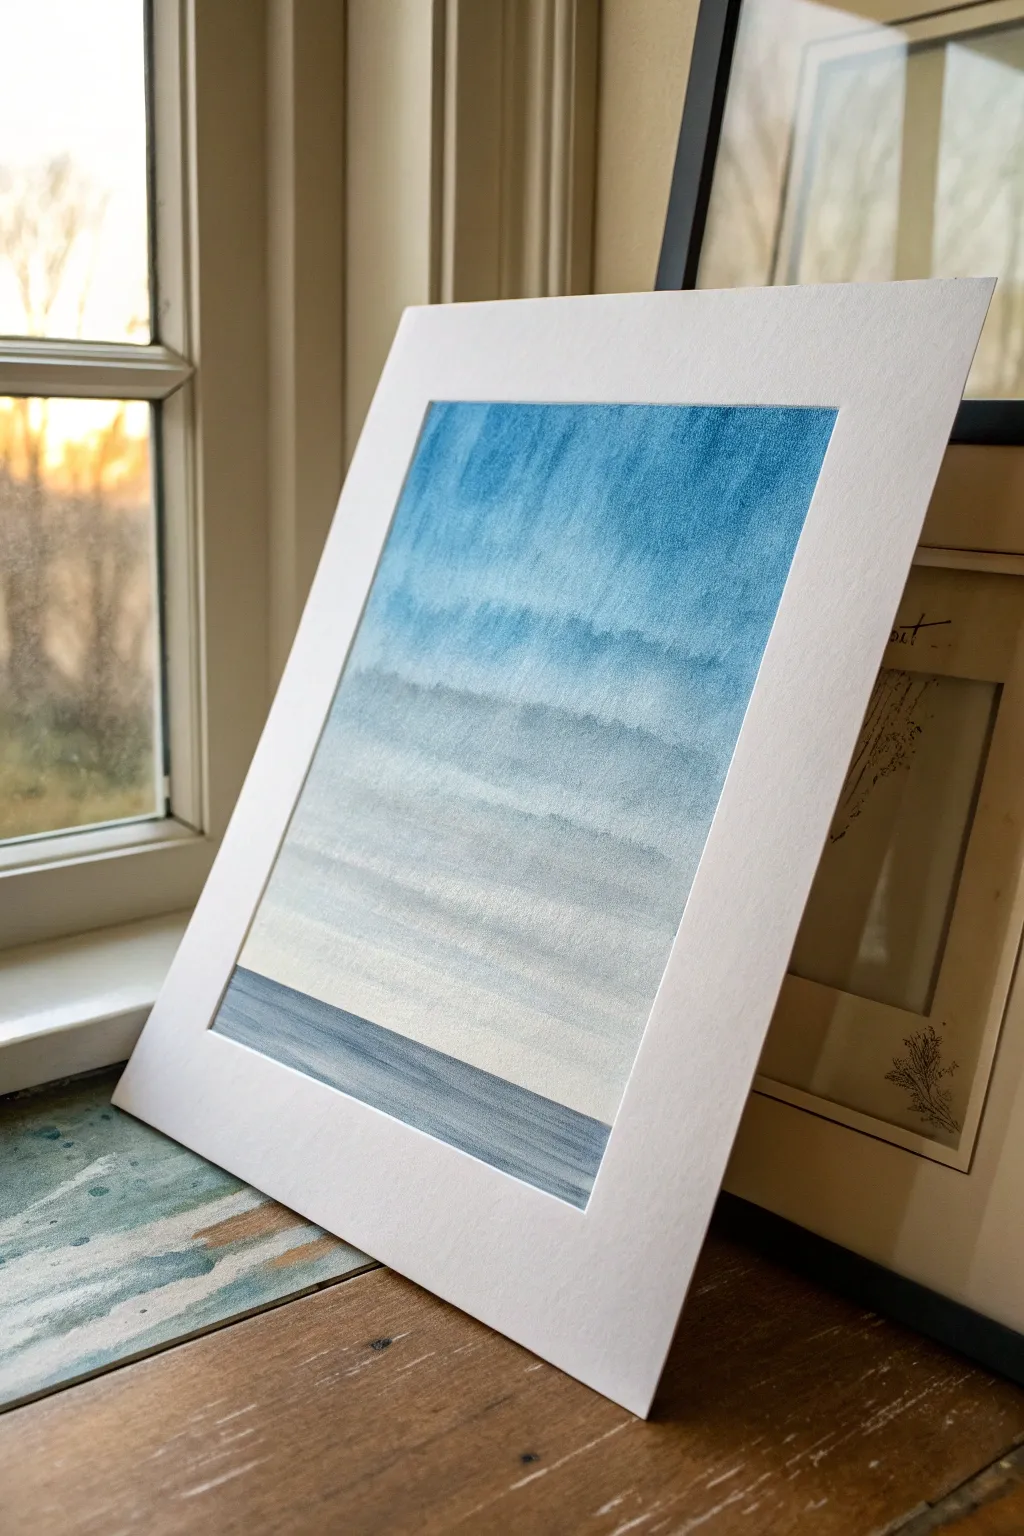
Classic Smooth Blue Sky Gradient
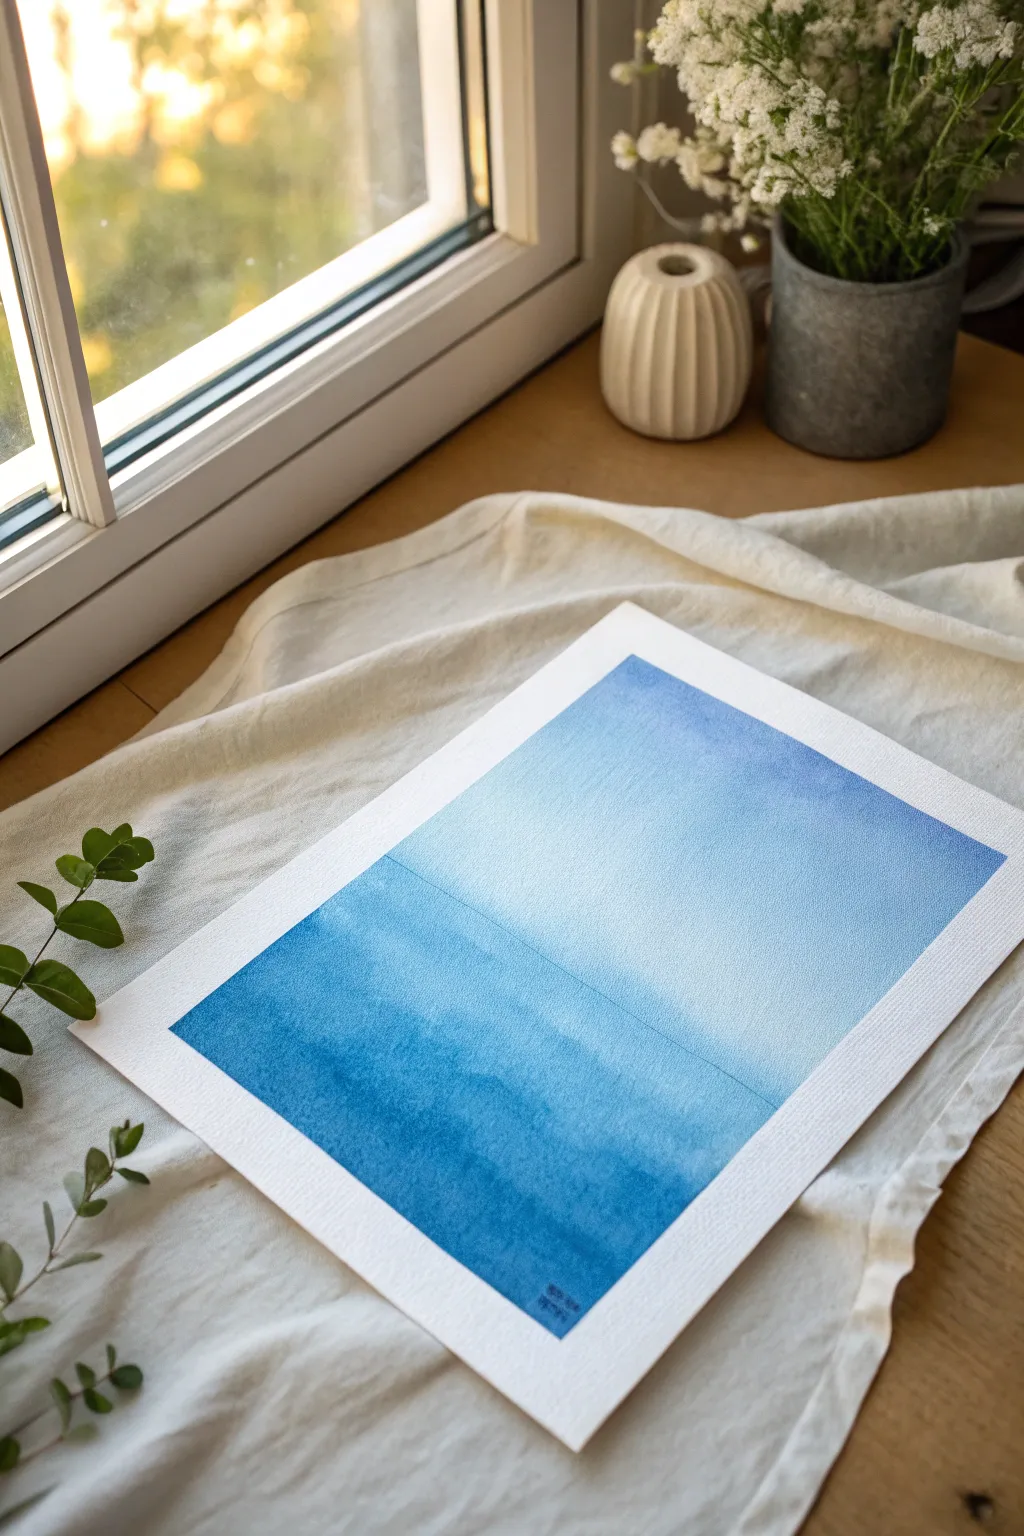
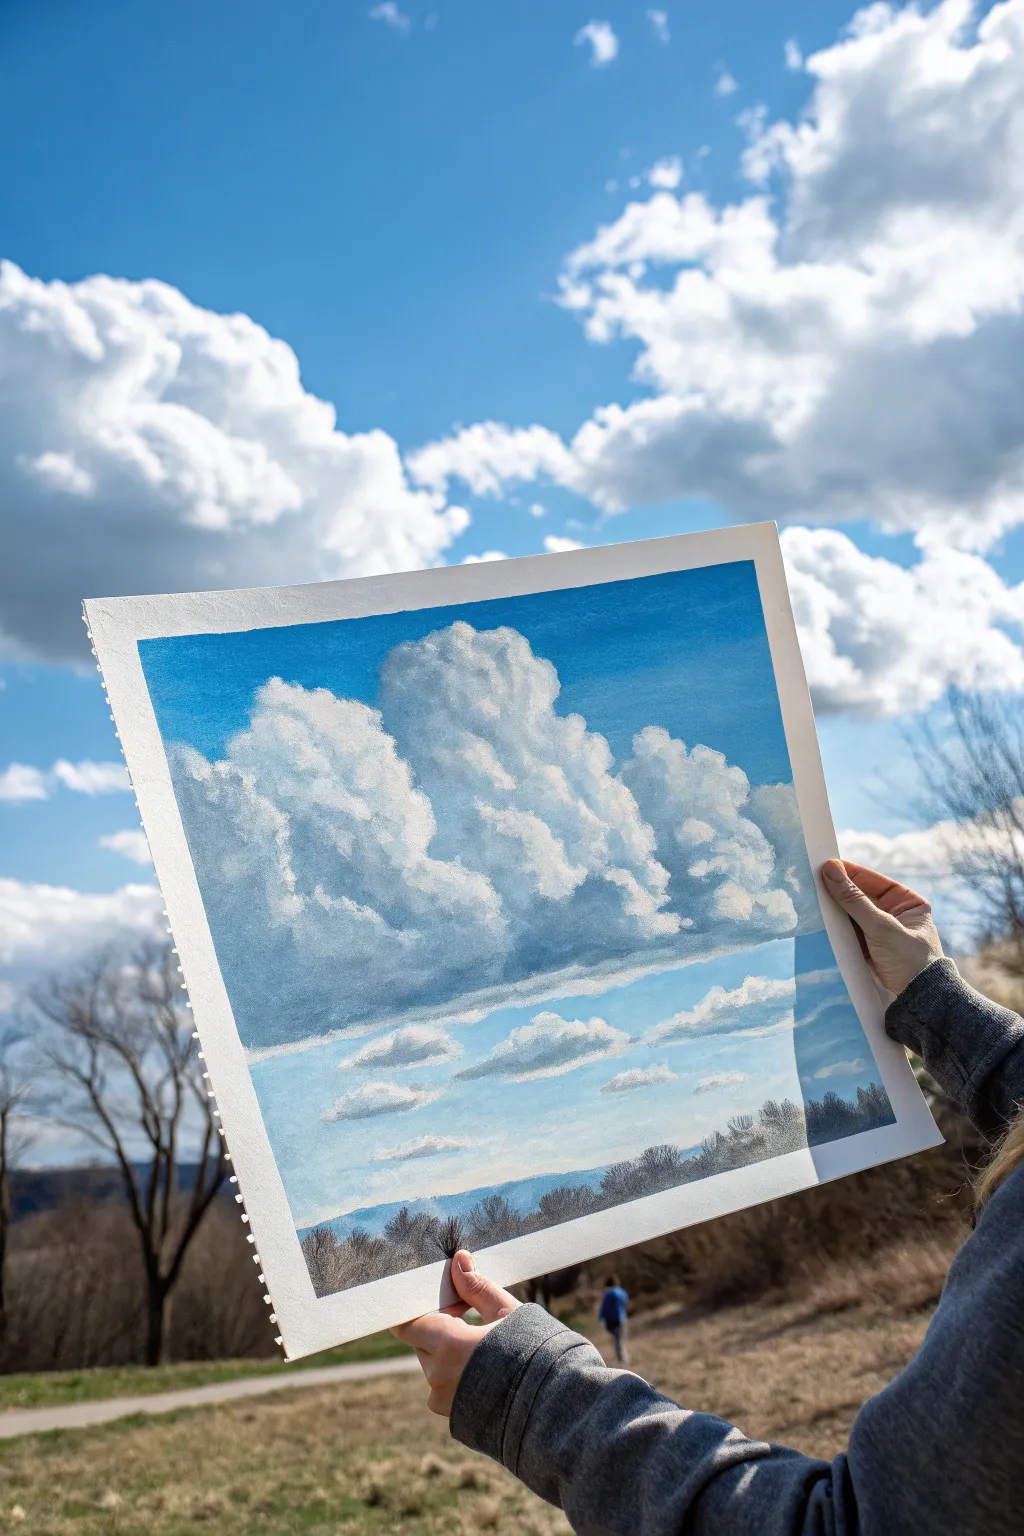
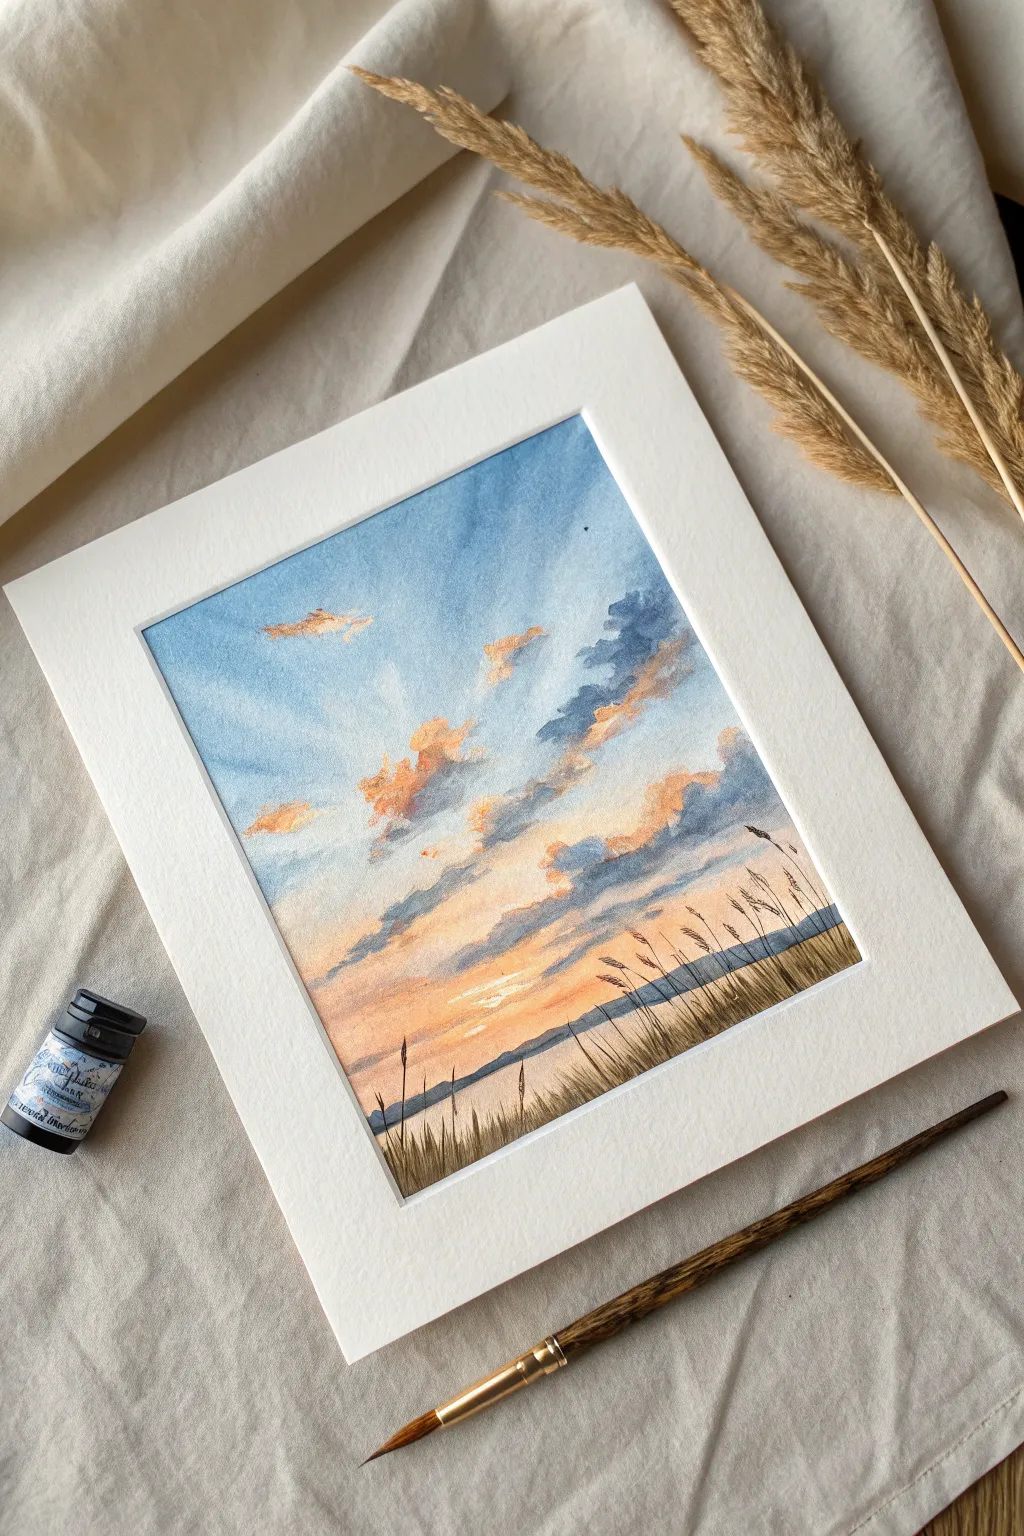
Capture the calm stillness of a clear day where the sky meets the sea with this minimalist watercolor gradient. Using a wet-on-wet technique, you will blend soft cerulean tones into deep indigo to create a seamless transition that evokes pure tranquility.
Step-by-Step Guide
Materials
- Cold press watercolor paper (300 gsm)
- Painter’s tape or masking tape
- Watercolor paints (Cerulean Blue, Prussian Blue, Indigo)
- Large flat wash brush (1 inch or larger)
- Medium round brush (size 8 or 10)
- Two jars of water (one for rinsing, one for clean water)
- Paper towels
- Drawing board or hard surface
Step 1: Preparation and Base Layer
-
Secure the paper:
Tape your watercolor paper down firmly onto your board on all four sides. This prevents the paper from buckling when we add lots of water and creates that crisp white border seen in the final piece. -
Prepare the horizon line:
Calculate where you want your horizon line to be. For this composition, aim slightly below the center. Place a strip of painter’s tape horizontally across the paper to mask off the bottom ocean section, pressing the edge down firmly to stop leaks. -
Wet the sky area:
Dip your large clean wash brush into clean water. Apply a generous, even coat of water to the entire upper section of the paper above the tape. The paper should glisten but not have standing puddles. -
First sky wash:
Load your brush with a very diluted, watery mix of Cerulean Blue. Starting at the top edge, sweep the color across the page, bringing it down towards the tape. Let the water help the pigment spread naturally. -
Deepening the gradient:
While the paper is still wet, pick up a slightly more saturated mix of the same blue. Apply this only to the top third of the sky and gently tilt your board to help the darker pigment drift downward, fading out before it reaches the horizon tape. -
Let it dry completely:
Allow this sky section to dry thoroughly. The paper must be bone dry before you remove the tape, or you risk tearing the surface or smudging the crisp line.
Pro Tip: Seamless Gradients
For the smoothest sky transition, slightly elevate the top of your drawing board. Gravity will naturally pull the pigment down, doing the blending work for you.
Step 2: Painting the Ocean Depths
-
Remove the masking:
Carefully peel away the horizontal tape strip. You should see a sharp, clean line separating your sky from the blank white bottom section. -
Mask the sky:
Now, place a new piece of tape precisely along the bottom edge of your painted sky to protect it while we work on the water. Align it perfectly with your existing horizon line. -
Wet the ocean area:
Re-wet the bottom white section of paper with clean water using your flat brush, just as you did for the sky. -
Apply base ocean color:
Mix a medium-strength wash of Cerulean Blue mixed with a tiny touch of Prussian Blue. Apply this across the entire wet bottom section to establish the base water color. -
Introduce depth:
While the base is wet, mix a stronger concentration of Prussian Blue and Indigo. This creates a deep, heavy oceanic blue. Start dropping this color in from the bottom edge of the paper, brushing upwards. -
Create texture:
Instead of blending perfectly smooth like the sky, use horizontal strokes with your round brush to push the darker pigment around. This mimics the subtle movement of waves and deep water currents. -
Darken the foreground:
Add a final layer of thick, pigment-rich Indigo right at the very bottom edge of the paper. I like to tilt the board upwards slightly here, so the color doesn’t run up towards the horizon, keeping the deepest values in the foreground. -
Dry the artwork:
Allow the entire painting to dry completely. Wait until the paper is no longer cool to the touch.
Step 3: Finishing Touches
-
Reveal the painting:
Very slowly peel off the central horizon tape first, pulling at a 45-degree angle away from the painted area. Then, remove the border tape to reveal your clean white edges. -
Sign the work:
Using a small detail brush or a fine-tip pen, sign your name discreetly in the bottom right corner within the darkest blue section.
Level Up: Salt Texture
While the bottom ocean layer is still wet, sprinkle a few grains of coarse sea salt into the dark blue paint. Once dry, brush it off to create starlike textures resembling sea foam.
Now you have a peaceful, minimalist seascape ready to frame and bring a sense of calm to any room.


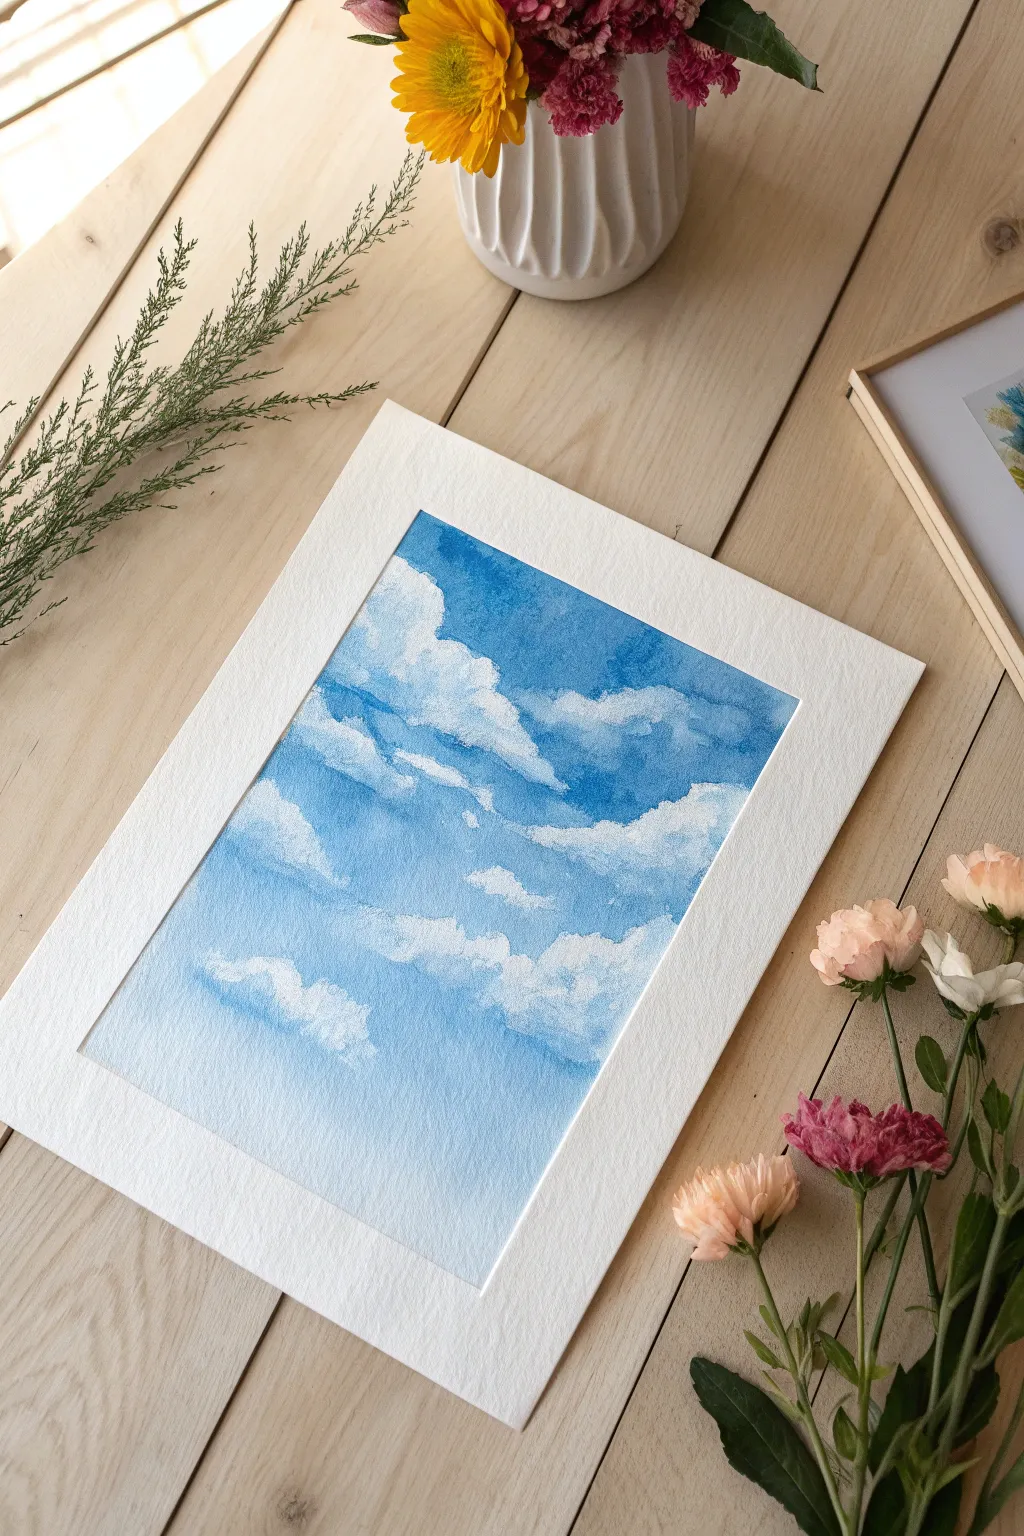
Fluffy Cumulus Cloud Practice Sheet

This structured practice sheet offers a beautiful way to explore different cloud formations and lighting effects within a consistent grid layout. The repetition allows you to refine your technique, creating a cohesive collection of miniature skyscapes that looks stunning as a finished piece.
How-To Guide
Materials
- Cold press watercolor paper (minimum 140lb/300gsm)
- Masking tape or painter’s tape (low tack)
- Ruler
- Pencil (HB or H)
- Watercolor paints: Ultramarine Blue, Cobalt Blue, Cerulean Blue, Indigo
- Gouache paint: White (Titanium)
- Round brushes: size 4 and size 8
- Flat brush: 1/2 inch (optional for larger sky areas)
- Jar of clean water
- Paper towels
Step 1: Preparation & Layout
-
Tape down your paper:
Secure your watercolor paper to a flat, hard board using masking tape on all four sides. This prevents buckling when the paper gets wet. -
Measure the grid:
Using your ruler and pencil, lightly draw a grid of twelve squares. A 3×4 layout works perfectly, leaving even spacing between each box—about 1/4 to 1/2 inch for borders. -
Mask the borders:
Carefully apply masking tape over the grid lines you just drew. Ensure the tape is pressed down firmly, especially at the intersections, to prevent paint from bleeding into the divides. You want twelve clean, isolated squares of exposed paper.
Bleeding Lines?
If paint bleeds under the tape, don’t panic. Wait for it to dry completely, then use a small stiff brush with a tiny bit of water to lift the pigment, or cover it with opaque white gouache.
Step 2: Painting the Sky Gradients
-
Mix your blues:
Prepare a few puddles of blue paint on your palette. I like to keep a pure Cobalt for midday skies, a mix of Ultramarine with a touch of Indigo for stormier squares, and a watered-down Cerulean for lighter days. -
Apply the first wash:
Working one square at a time, wet the paper slightly with clean water. Load your brush with blue and paint the sky area, leaving irregular white shapes of dry paper where you want the brightest white clouds to be. -
Soften the edges:
While the paint is still damp, use a clean, slightly damp brush to soften the hard edges of the blue paint that touches the white ‘cloud’ areas. This creates a fluffy, diffused look rather than a sharp cutout. -
Vary the gradients:
For some squares, make the blue darker at the top and fade it out as you go down. For others, keep the color flat or introduce a hint of purple-grey near the bottom for variety. -
Repeat for all squares:
Continue this process for all twelve squares. Don’t worry about identical clouds; try making some large and singular, and others small and scattered. -
Let it dry completely:
Allow the blue layer to dry fully. The paper should be cool to the touch but dry before moving on to avoid muddying the whites.
Step 3: Adding Fluff & Volume
-
Introduce white gouache:
Squeeze out a small amount of white gouache. Gouache is opaque, which allows us to reclaim bright whites and add texture over the dried watercolor. -
dab the cloud tops:
Using a smaller round brush (size 4), dab thick white gouache onto the upper curves of your cloud shapes. Use a stippling motion to mimic the bubbly texture of cumulus clouds. -
Create shadows:
Mix a tiny amount of blue or purple into your white gouache to make a pale shadow grey. Apply this to the bottom edges of the clouds to give them volume and weight. -
Blend the transition:
Where the bright white meets the shadow grey within the cloud, use a damp brush to blend them slightly so the transition feels soft and billowy. -
Add wispy details:
For a few squares, use a fairly dry brush with white gouache to drag wispy streaks leading away from the main cloud body, suggesting wind or movement.
Sunset Variation
Try a second grid using warm colors. Swap the blues for gradients of peach, pink, and violet, painting the underbellies of the clouds with warm purples to mimic a sunset glow.
Step 4: Finishing Touches
-
Review contrast:
Step back and look at the grid as a whole. If any clouds look too flat, add a touch more pure white to the highlights to make them pop against the blue sky. -
Peel the tape:
This is the most satisfying part. Once the paint is bone dry, slowly peel off the masking tape at a 45-degree angle, pulling away from the painted areas to ensure crisp, clean lines. -
Erase pencil guides:
If any faint pencil marks remain in the white gutters between the paintings, gently erase them with a gum eraser.
Frame your grid behind a mat to elevate these simple studies into a gallery-worthy piece of art

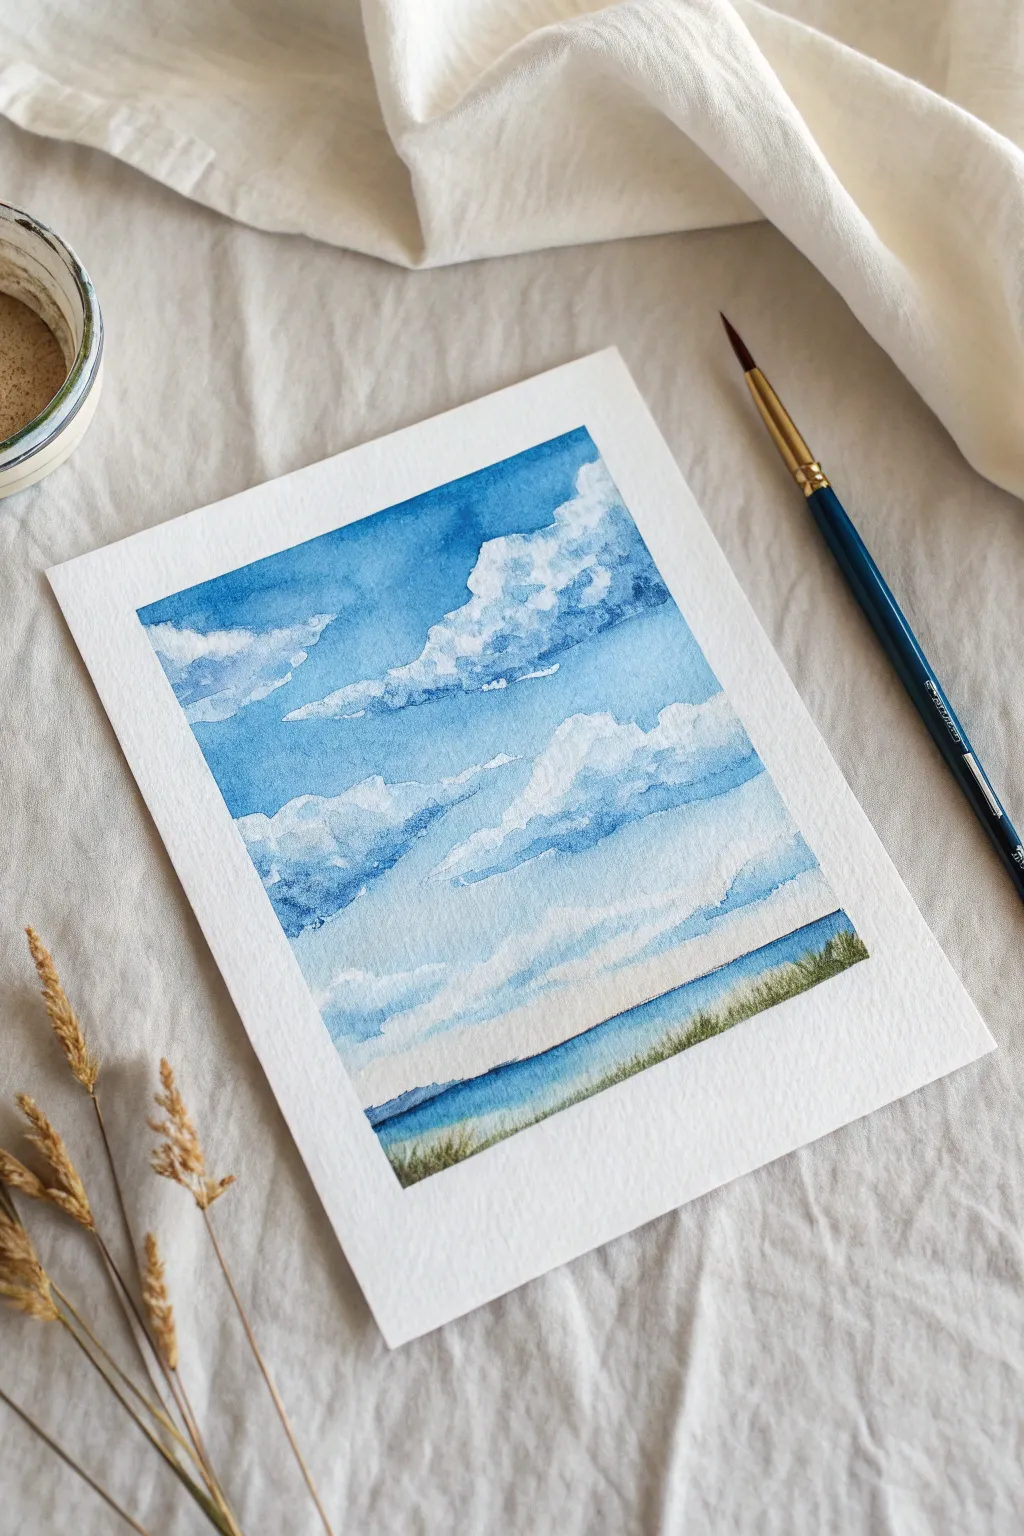
Blue Sky Over a Calm Ocean Horizon
Capture the peaceful meeting point of sky and sea with this airy watercolor landscape. This project focuses on soft, wet-on-wet cloud formations and creating the gentle rhythm of rolling waves approaching a sandy shore.
Detailed Instructions
Materials
- Cold press watercolor paper (140lb/300gsm)
- Watercolor paints: Cerulean Blue, Ultramarine Blue, Burnt Sienna, Yellow Ochre
- Large wash brush (flat or round size 10-12)
- Medium round brush (size 6-8)
- Masking fluid (optional) or white gouache
- Clean water jars
- Paper towels
- Painter’s tape and board
Step 1: Preparation and Sky
-
Secure the paper:
Tape your watercolor paper down to a board on all four sides. This ensures a clean white border later and prevents the paper from buckling when we apply heavy water washes. -
Establish the horizon:
Using a pencil, very lightly draw a straight horizontal line across the lower third of the paper. This separates your expansive sky from the ocean below. -
Wet the sky area:
With your large clean brush, apply a generous layer of clear water to the entire sky area, stopping right at the horizon line. The paper should glisten but not have puddles. -
Paint the upper sky:
Load your brush with a watery mix of Cerulean Blue. Start at the very top of the paper, using sweeping horizontal strokes. As you move down, let the paint naturally diffuse into the wet paper. -
Create cloud forms:
While the blue wash is still wet, lift out pigment using a thirsty (damp but clean) brush or a crumpled paper towel. blotting gently to create fluffy white cloud shapes. -
Add cloud shadows:
Mix a tiny touch of Burnt Sienna into your blue to make a soft grey. While the paper is still damp, dab this shadow color specifically along the bottom edges of your lifted white clouds for volume. -
Let it dry:
Allow the sky section to dry completely. If the paper feels cool to the touch, it’s still wet. Patience here prevents the ocean color from bleeding upward.
Step 2: Ocean and Shoreline
-
Define the horizon line:
Switch to a medium round brush with a stronger mix of Cerulean and Ultramarine Blue. carefully paint a crisp, straight line right against your dried sky. This creates the distant edge of the ocean. -
Wash in the water:
Pull that blue color downward, diluting it with more water as you approach the foreground. Leave random horizontal streaks of white paper unpainted to suggest light reflecting on distant waves. -
Form the crashing wave:
Near the bottom third, use a concentrated Ultramarine mix to paint the dark underside of a breaking wave. Use a jagged, rolling motion to mimic the water’s movement. -
Paint the wet sand:
Mix Yellow Ochre with a tiny bit of Burnt Sienna and plenty of water. Paint the bottom strip of the paper (the beach), allowing it to touch the wet blue edge of the ocean slightly for a soft transition. -
Detail the wave crest:
Once the ocean layer is dry, use opaque white gouache (or remove masking fluid if you applied it earlier) to stipple the frothy white foam along the top of the crashing wave. -
Add texture to the foam:
Using a nearly dry brush with a very pale blue-grey, add tiny shadows within the white foam to give it dimension and fluffiness, so it doesn’t look flat. -
Darken the shoreline:
Run a thin line of darker sandy brown right where the white foam meets the beach. This ‘wet sand’ effect grounds the wave and shows where the water has just receded. -
Final adjustments:
Step back and assess your painting. If the horizon looks uneven, straighten it with a steady hand. Add a few more dry-brush sparkles on the water if needed. -
Remove tape:
Once the painting is bone dry, peel the tape away slowly at a 45-degree angle to reveal your crisp, professional white border.
Pro Tip: Soft Clouds
Work quickly while the paper is wet! If the paper starts drying, cloud lifting won’t work well and will leave hard edges known as ‘blooms’ or cauliflower marks.
Level Up: Birds in Flight
Once fully dry, use a rigger brush or fine liner pen to add two or three tiny, distant seagulls. Keep them simple ‘m’ shapes to maintain the serene scale.
Place your finished seascape in a simple light wood frame to echo the natural tones of the sand and driftwood


Sunny Sky With Soft Haze Near the Horizon
Capture the serenity of a perfect summer day with this watercolor study of tiered cumulus clouds fading into a hazy horizon. The soft gradients and layered whites create a sense of vast distance and calm atmosphere.
Step-by-Step
Materials
- Cold-pressed watercolor paper (140lb/300gsm)
- Masking tape (low tack)
- Watercolor paints: Cerulean Blue, Ultramarine Blue, Hooker’s Green (or Indigo)
- Round paintbrushes (size 8 or 10 for washes, size 4 for details)
- Clean water jar
- Paper towels or cloth
- Pencil (HB) for very light sketching
Step 1: Preparation & Sky Gradient
-
Secure the paper:
Begin by taping down all four edges of your watercolor paper to a board using masking tape. This creates that crisp white border seen in the final piece and prevents the paper from buckling during heavy washes. -
Sketch cloudy outlines:
Using an HB pencil, very lightly sketch the irregular, puffy shapes of the main cloud banks. Don’t press hard; you want these lines to disappear later. Leave a clear horizontal line near the bottom fourth of the page for the water’s edge. -
Mix the sky blue:
Prepare a generous puddle of blue on your palette. I tend to mix Cerulean Blue with a touch of Ultramarine for a vibrant, summer-sky hue. Dilute it with water until it flows easily but still holds strong pigment. -
Paint the upper sky:
Use your larger round brush to apply the blue wash to the top section of the paper, working wet-on-dry. Carefully paint *around* the tops of your highest pencil-sketched clouds, preserving the brilliant white of the paper for their sunlit edges. -
Soften the edges:
While the blue paint is still wet, rinse your brush and use clean water to soften some of the hard edges underneath the clouds, dragging the blue pigment slightly downward to create soft shadows.
Step 2: Layering the Clouds
-
Define the middle layer:
Move to the section of sky beneath the first bank of clouds. Re-wet your blue mix, perhaps adding slightly more water for a paler tone. Paint the sky area here, again negatively painting around the distinct, fluffy tops of the middle cloud layer. -
Create cloud shadows:
Mix a very dilute, grayish-purple using a tiny bit of Ultramarine and a speck of orange or red to neutralize it. While the clouds are dry, paint light, messy shadows on their undersides to give them volume. Keep these edges soft. -
Fade toward the horizon:
As you work your way down the paper, dilute your blue wash significantly. The sky should become very pale, almost white, as it meets the horizon line. This atmospheric perspective creates the illusion of deep distance. -
Blend the haze:
Use a clean, damp brush to horizontally sweep the lowest part of the sky area, ensuring a smooth, seamless transition from the pale blue mid-sky to the near-white horizon. -
Dry thoroughly:
Let the entire sky section bone dry. If the paper feels cool to the touch, it’s still wet. Patience here prevents the horizon line from bleeding upwards.
Softening Edges
Work quickly! If a hard edge forms where you don’t want it, scrub it gently with a damp, clean brush (the ‘thirsty brush’ technique) to lift pigment and soften.
Step 3: Water & Foreground Details
-
Paint the distant water:
Mix a stronger, deeper blue—perhaps pure Ultramarine with a touch of Indigo. Paint a thin, straight horizontal strip just below the sky haze. This represents the distant water line. -
Soften the water:
Quickly rinse your brush and pull the color from that dark water line downwards, fading it out as it approaches the very bottom edge of the paper. -
Add grassy texture:
Mix a muted green using your blue and a touch of yellow or raw sienna. Switch to your smaller brush (size 4). Using quick, upward flicking motions, paint tufts of dune grass rising from the bottom edge into the lower sky/water area. -
Vary the grass tones:
While the grass layer is damp, drop in slightly darker green or brownish pigments at the very base of the clumps to add depth and grounding. -
Final touches:
Assess the painting. If the cloud shadows dried too light, glaze a second, very transparent layer of violet-grey over the bottom edges of the largest clouds to boost the contrast. -
The reveal:
Once the paper is completely 100% dry, slowly peel away the masking tape at a 45-degree angle to reveal your crisp, clean borders.
Make It Yours
Add a tiny, distant sailboat on the horizon line using a fine liner brush and opaque white gouache for a focal point that emphasizes the scale of the sky.
Enjoy the peaceful atmosphere your new landscape brings to the room
BRUSH GUIDE
The Right Brush for Every Stroke
From clean lines to bold texture — master brush choice, stroke control, and essential techniques.
Explore the Full Guide
Wispy Cirrus Streaks in a Deep Blue
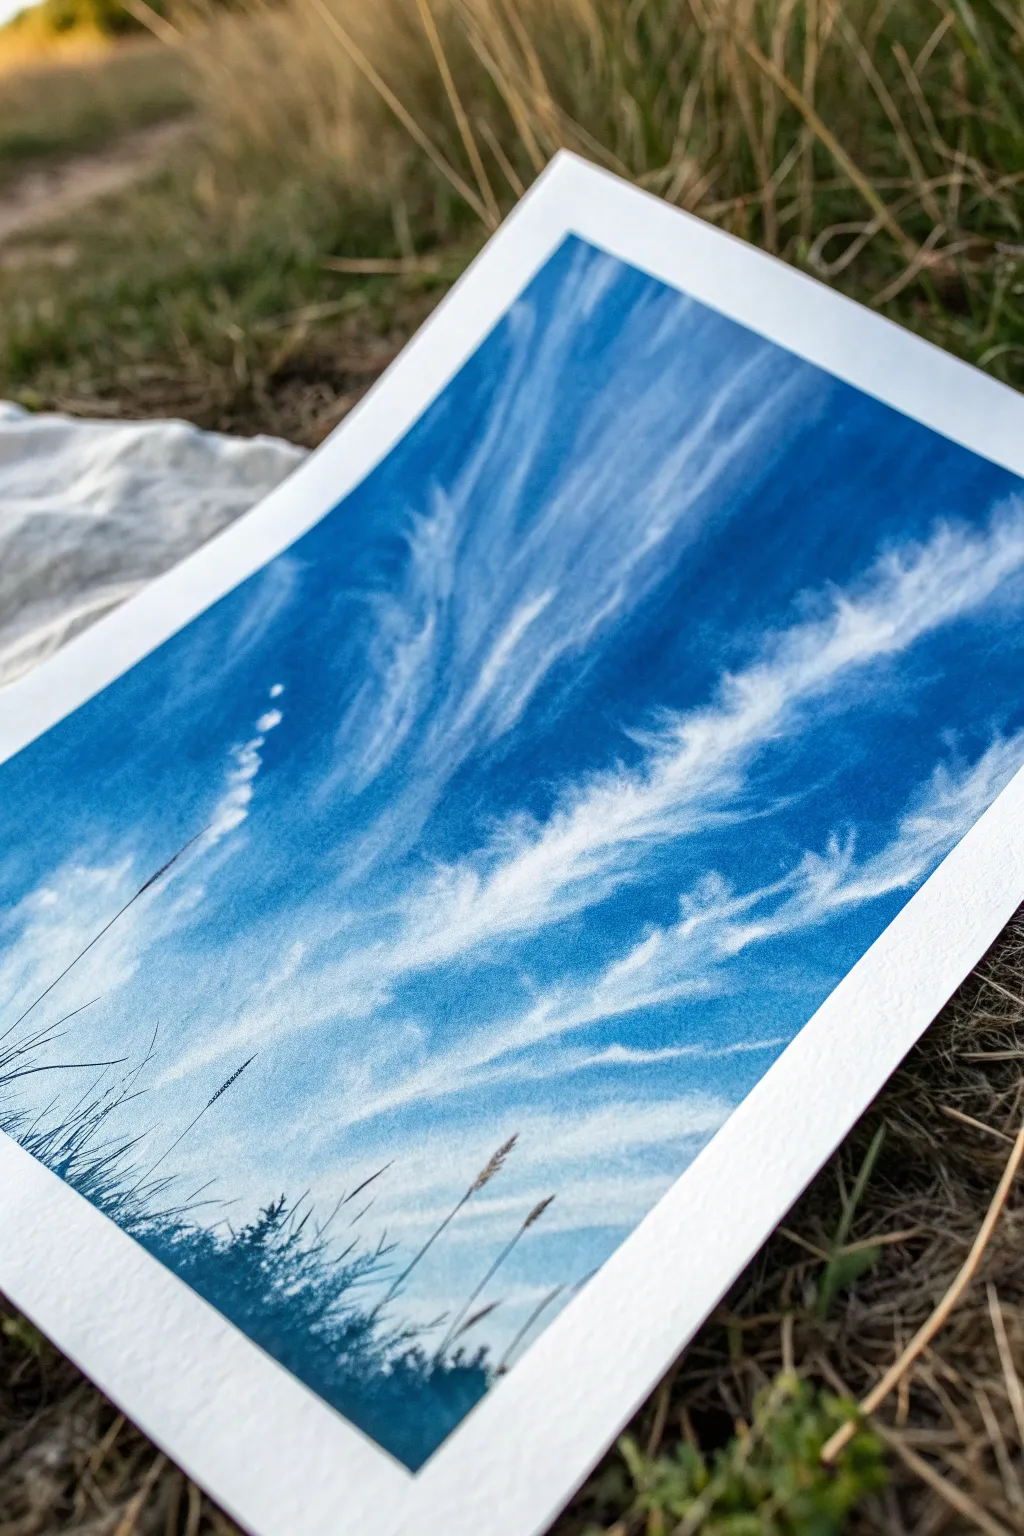
Using the magic of sun printing, this project creates a stunning deep blue image featuring delicate, wispy cirrus clouds and sharp botanical silhouettes. The cyanotype process transforms sunlight and chemistry into a rich, monochrome masterpiece that perfectly mimics the depth of the atmosphere.
How-To Guide
Materials
- Heavyweight watercolor paper (300gsm, cold press)
- Cyanotype sensitizer kit (Part A and Part B)
- Wide foam brush or hake brush
- Digital negative transparency or translucent vellum drawing
- Piece of clear glass or acrylic sheet (same size as paper)
- Backing board (cardboard or MDF)
- Large tray or tub for rinsing
- Hydrogen peroxide (optional, for intensifying)
- Clips or clamps
Step 1: Preparation and Coating
-
Mix the Chemistry:
In a dim room away from direct sunlight, mix equal parts of Solution A (Ferric Ammonium Citrate) and Solution B (Potassium Ferricyanide) into a small plastic cup. Only mix as much as you need for this session, as the combined solution has a short shelf life. -
Coat the Paper:
Lay your watercolor paper on a protected surface. Dip your foam brush into the sensitized solution and apply it to the paper using smooth, horizontal strokes. I find that going over it once vertically afterward ensures an even, streak-free coating. -
Create a Border (Optional):
The example image shows a clean white border. You can achieve this by masking the edges with opaque tape before coating, or simply by carefully painting a rectangle in the center, leaving raw paper edges visible. -
Dry in the Dark:
Place the coated paper in a completely dark place, such as a closet or drawer, to dry. It must be bone dry before you proceed to the exposure step. This usually takes about 30 to 60 minutes.
Step 2: Creating the Cloud Negative
-
Source the Image:
Since cyanotype is a contact printing process, you need a negative that is the same size as your final print. Choose a photo of wispy clouds. In photo editing software, invert the image so the sky is white and the clouds are dark. -
Add the Grasses:
To replicate the bottom details, you can either include the grass silhouettes in your digital negative or plan to lay real pressed grasses directly on the paper later. For this specific look, digital inclusion often provides sharper control. -
Print the Transparency:
Print your inverted image onto inkjet transparency film. The ‘dark’ parts of your negative (the clouds) will block the sun, leaving the paper white, while the clear parts (the inverted sky) will let UV light through to turn the paper blue.
Cloud Control
If your clouds look muddy, your negative wasn’t dense enough. Print two copies of the transparency and stack them to block more light.
Step 3: Exposure and Development
-
Build the Sandwich:
Assemble your exposure frame in a dim room. Place the backing board down first, then your dry sensitized paper (yellow-green side up), followed by your transparency negative. -
Secure the Layers:
Place the glass sheet on top to press the negative firmly against the paper. Use clamps or clips around the edges to ensure tight contact; any gap will result in blurry clouds. -
Expose to Sunlight:
Take your sandwich outside into direct sunlight. The chemicals will change color as they react to UV light. Watch for the exposed areas to turn from yellow-green to a metallic bronze-grey color. This usually takes 5-15 minutes depending on the sun’s intensity. -
Stop and Rinse:
Bring the print back indoors and immediately disassemble the frame. Submerge the paper in a tray of cool running water. You will see the yellow unexposed chemicals washing away. -
Wash Thoroughly:
Continue rinsing for at least 5 minutes until the highlights (the clouds) are bright white and the water runs clear. Agitate the tray gently to help lift the chemicals from the paper fibers. -
Intensify the Blue:
Drizzle a capful of hydrogen peroxide into the wash water. You’ll see the blue deepen instantly to that richer Prussian blue tone seen in the reference photo. This creates a striking contrast against the white clouds. -
Final Dry:
Hang the print on a line or lay it flat on a clean towel to dry. The paper will relax as it dries, leaving you with a crisp, high-contrast sky image.
Double Exposure
Expose the clouds first, then rinse and dry. Recoat the bottom area and expose again with real pressed plants for true texture depth.
Now you have a piece of sky captured permanently in Prussian blue to hang on your wall
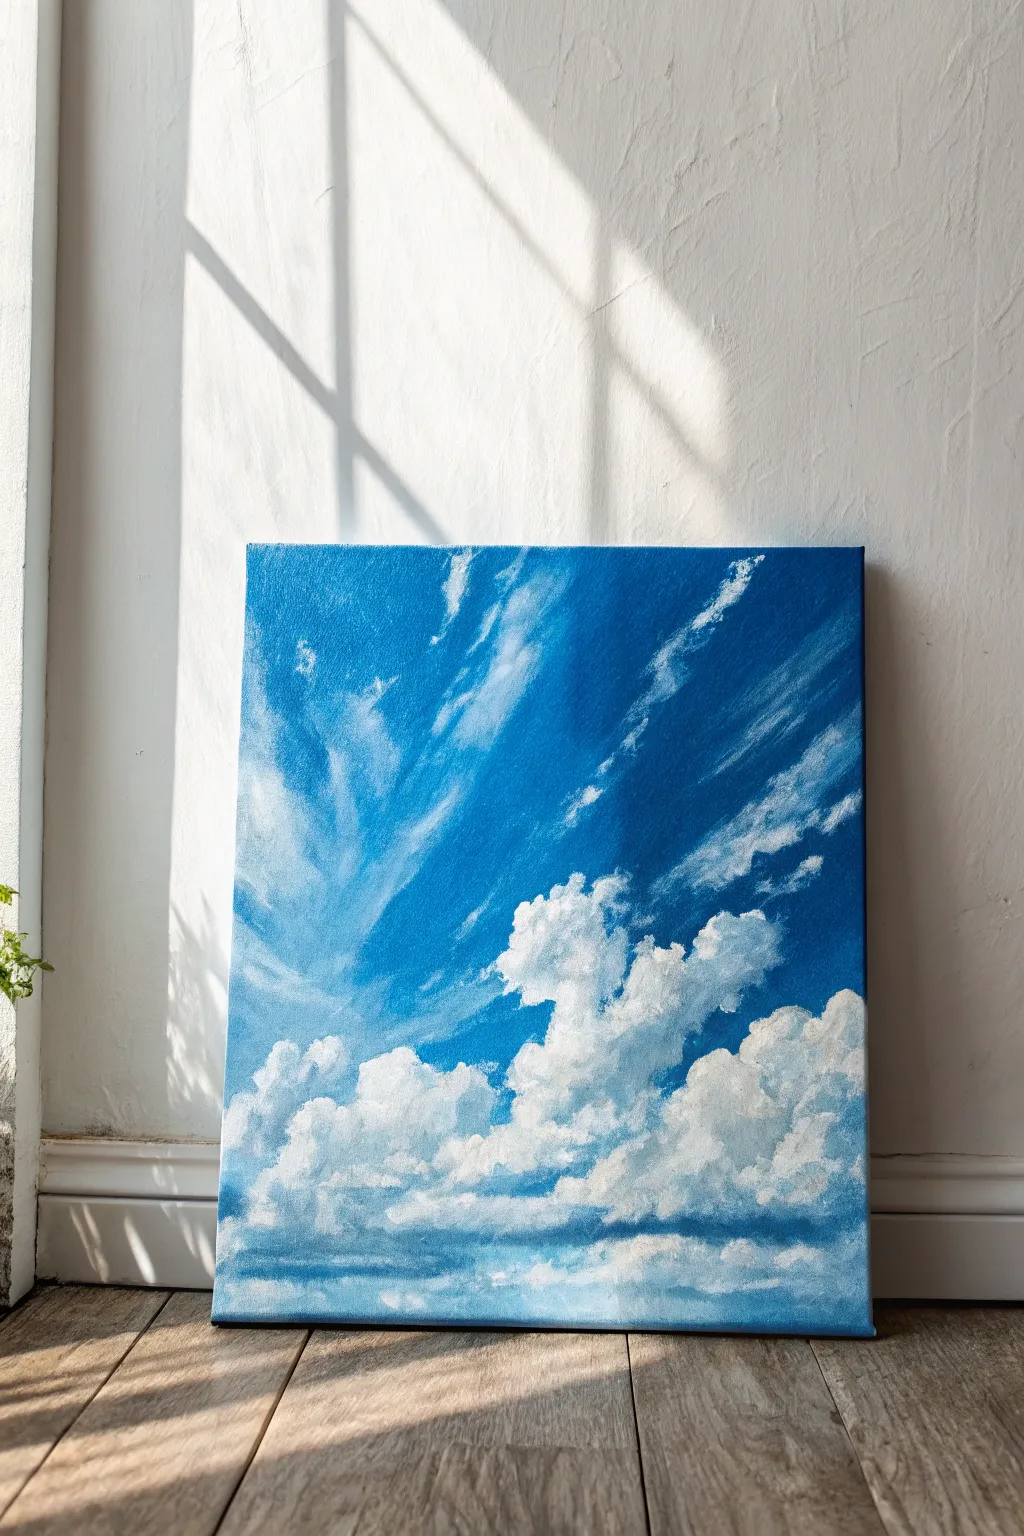
Big Sky With One Hero Cloud
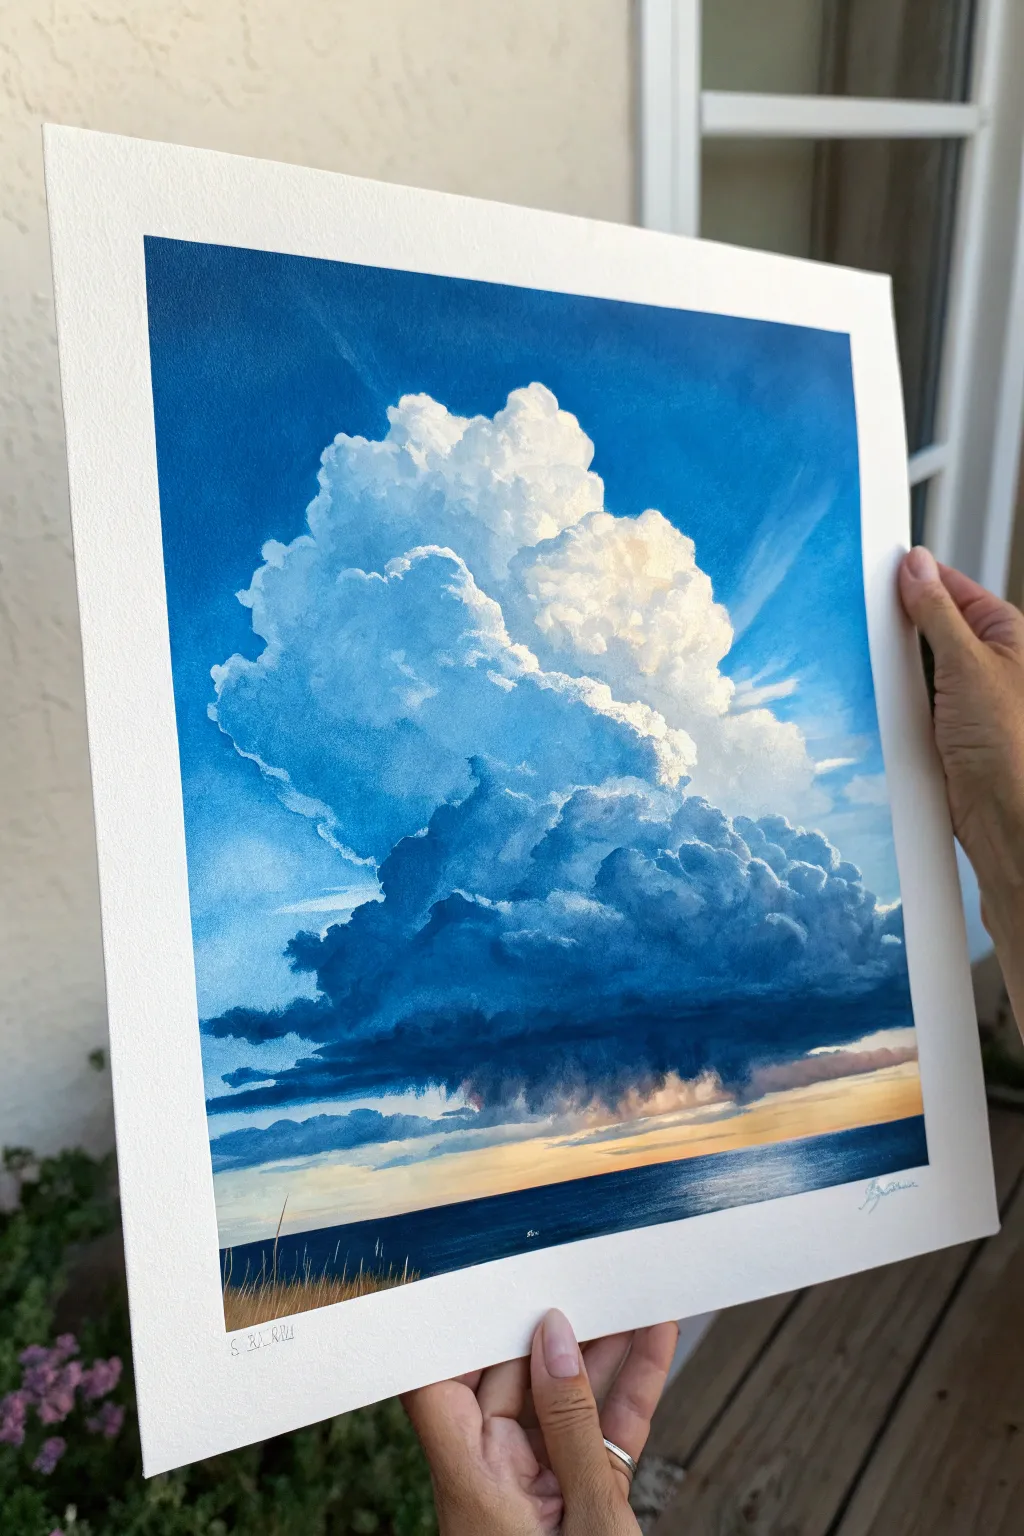
Capture the awe-inspiring scale of a summer storm cloud rising over the ocean in this vertical painting. This project focuses on building dramatic contrasts between deep shadows and sunlit highlights to create three-dimensional volume in your skies.
Detailed Instructions
Materials
- Heavyweight cold-press watercolor paper (300gsm or higher)
- Painter’s tape and a rigid board
- Watercolors or fluid acrylics
- Paint colors: Cerulean Blue, Ultramarine Blue, Indigo, Burnt Sienna, Titanium White (gouache or opaque watercolor), Yellow Ochre
- Large flat wash brush (1 inch)
- Round brushes (sizes 8 and 4)
- Clean water jars and paper towels
- Pencil for light sketching
Step 1: Preparation and Base
-
Tape and Prep:
Secure your paper to a board using painter’s tape on all four sides. This creates that crisp white border seen in the final piece and prevents the paper from buckling under heavy washes. -
Horizon Line:
Lightly sketch a straight horizon line near the bottom quarter of the paper. Keep it low to emphasize the vastness of the sky above. -
Cloud Outline:
Sketch the general silhouette of the main cumulus cloud. Don’t worry about every bump; focus on the large shapes – the billowing top and the flatter, wider base. -
Sky Gradient:
Mix a wash of Cerulean Blue. Start painting at the very top of the paper, using horizontal strokes. As you move down towards the cloud, dilute the paint slightly with water to create a subtle gradient. -
Cutting Around:
Carefully paint around the white shape of your cloud sketch. While the blue is still damp, you can lift out faint streaks with a semi-dry brush to suggest high-altitude cirrus clouds.
Edge Control
Keep the top edges of the cloud crisp against the blue sky, but keep the internal shadows soft. Hard edges flatten a cloud; soft edges give it volume.
Step 2: Building the Cloud Form
-
Identifying Light:
Determine your light source—in this case, it’s coming from the upper right, hitting the top of the cloud. Leave these areas pure white paper. -
First Shadow Layer:
Mix a light grey-blue using Ultramarine and a touch of Burnt Sienna. Apply this to the shadowed side (left) and the underside of the cloud tufts. -
Softening Edges:
While the shadow paint is wet, use a clean, damp brush to soften the edges where the shadow meets the white highlight. This creates the rounded, fluffy appearance of the cloud. -
Deepening Values:
Mix a stronger, darker blue-grey using Indigo and Burnt Sienna. Apply this into the deeper recesses of the cloud formation to create separation between the billowing masses. -
The Storm Base:
For the flat bottom of the cloud, use a concentrated Indigo mix. Paint a heavy, dark horizontal shape that anchors the cloud. -
Rain Curtains:
While the dark base is wet, drag slightly watered-down pigment vertically downwards. This ‘wet-into-wet’ technique mimics distant rain falling over the ocean.
Step 3: Ocean and Details
-
Sunset Glow:
Near the horizon line, just under the rain curtains, paint a streak of pale Yellow Ochre mixed with white. This suggests that low, golden hour light peeking through. -
Sea Layers:
Paint the ocean using a deep mixture of Indigo and Ultramarine. Ensure the horizon line is perfectly straight. -
Water Highlights:
Leave a few tiny slivers of white paper or lift paint horizontally on the water surface to reflect the light. I find dry-brushing here works well for texture. -
Foreground Grasses:
Once the sky and sea are fully dry, use a small round brush (size 4) with Burnt Sienna and Ochre. Paint fine, vertical strokes at the very bottom edge to suggest dune grasses. -
Final Highlights:
If you lost any bright whites on the cloud tops, use a touch of opaque Titanium White gouache to re-establish the brightest sunlit edges.
Scale It Up
Make the cloud look even bigger by painting the horizon even lower and making the dune grasses tinier. This cheats the perspective for a grander feel.
Remove the tape slowly at an angle to reveal your crisp borders and admire your majestic sky

PENCIL GUIDE
Understanding Pencil Grades from H to B
From first sketch to finished drawing — learn pencil grades, line control, and shading techniques.
Explore the Full Guide
Blue Sky With Sunlit Cloud Shadows
Capture the drama of a bright afternoon with this gouache study of monolithic cumulus clouds. This project focuses on building distinct cloud volumes through soft gradients and sharp, sunlit edges against a vibrant blue gradient.
Step-by-Step Guide
Materials
- Gouache paint (Cerulean Blue, Ultramarine Blue, Titanium White, Burnt Umber, Jet Black)
- Heavyweight cold-press watercolor paper (300 gsm)
- Painter’s tape or masking tape
- Large flat wash brush (3/4 inch)
- Medium round brush (size 6)
- Small detail brush (size 0 or 2)
- Mixing palette
- Two water containers
Step 1: Setting the Sky Gradient
-
Prepare your surface:
Tape down all four edges of your watercolor paper to a sturdy backing board. This creates the crisp white border seen in the reference and prevents buckling when the paper gets wet. -
Mix the sky blues:
Create a gradient mixture for the open sky. On your palette, mix a generous amount of Cerulean Blue with a touch of Ultramarine for the top of the canvas. For the lower sky, mix Titanium White with just a hint of Cerulean. -
Paint the upper gradient:
Using the large flat wash brush, apply the darker blue mix across the top third of the paper. Use horizontal strokes to ensure even coverage. -
Blend downward:
While the top paint is still damp, gradually mix in your lighter blue shade as you work your way down the paper. Stop about two-thirds of the way down, leaving the bottom section white for the cloud highlights and landscape. -
Define cloud shapes:
Before the blue wash dries completely, use a clean, damp brush to lift out paint where the tops of the large cumulus clouds will be. Alternatively, carefully paint the blue *around* the intended white cloud shapes if you prefer a sharper edge immediately.
Softening Edges
If your cloud shadows look too harsh, use a secondary darker blue glaze over the dry shadow areas. This unifies the tones without muddying the white highlights.
Step 2: Sculpting the Cloud Volumes
-
Establish pure whites:
Once the sky is dry, load your medium round brush with thick, creamy Titanium White. Paint the rounded, cauliflower-like tops of the main cloud mass, letting the texture of the brush create fluffy edges. -
Mix shadow tones:
Mix a soft grey using Titanium White, a tiny dot of Ultramarine Blue, and a microscopic amount of Burnt Umber. This creates a cool, atmospheric shadow color rather than a flat grey. -
Apply main shadows:
Paint the undersides of the large cloud mass with your grey mix. I find it helpful to use a rolling motion with the brush to mimic the tumbling nature of the vapor. -
Blend the transition:
With a slightly damp, clean brush, soften the boundary between the bright white tops and the grey bottoms. You want a seamless gradient within the cloud itself to show volume. -
Add secondary clouds:
Below the main cloud mass, paint smaller, flatter cloud formations using the same white and grey pairing. These should look more stretched out, indicating distance. -
Deepen the contrast:
Mix a slightly darker, blue-grey tone. Apply this to the deepest crevices of the large cloud and the flat bottoms of the lower clouds to simulate heavy moisture and density.
Step 3: Landscape and Final Details
-
Mix the treeline color:
Combine Jet Black with Burnt Umber and a touch of Ultramarine Blue to create a deep, cool charcoal color. It shouldn’t be pure black, as atmospheric perspective softens it. -
Paint the distant hills:
Using a watered-down version of your dark mix (making it a mid-grey), paint a faint silhouette of distant hills or a lower treeline just above the bottom edge. -
Paint the foreground trees:
Load the small detail brush with the concentrated dark mix. Stipple the brush along the bottom edge to create the texture of treetops. Vary the height to make the treeline look natural. -
Refine cloud edges:
Check the tops of your clouds against the blue sky. If the white has faded, add a final layer of thick, opaque white to the very brightest peaks to make them pop. -
Add atmospheric haze:
Use a very watery white wash (glaze) horizontally between the lowest clouds and the treeline to push the horizon back and create depth. -
Remove tape:
Wait until the painting is 100% bone dry. Peel the tape away slowly at a 45-degree angle to reveal your crisp edges.
Textural Depth
Try dry-brushing the very tops of the clouds. Use thick paint on a dry brush to drag pigment across the paper’s tooth, creating a broken, misty edge effect.
Take your finished painting outside and see how your captured atmosphere compares to the real sky above
Looking Up Through Tree Tops Into Blue Sky
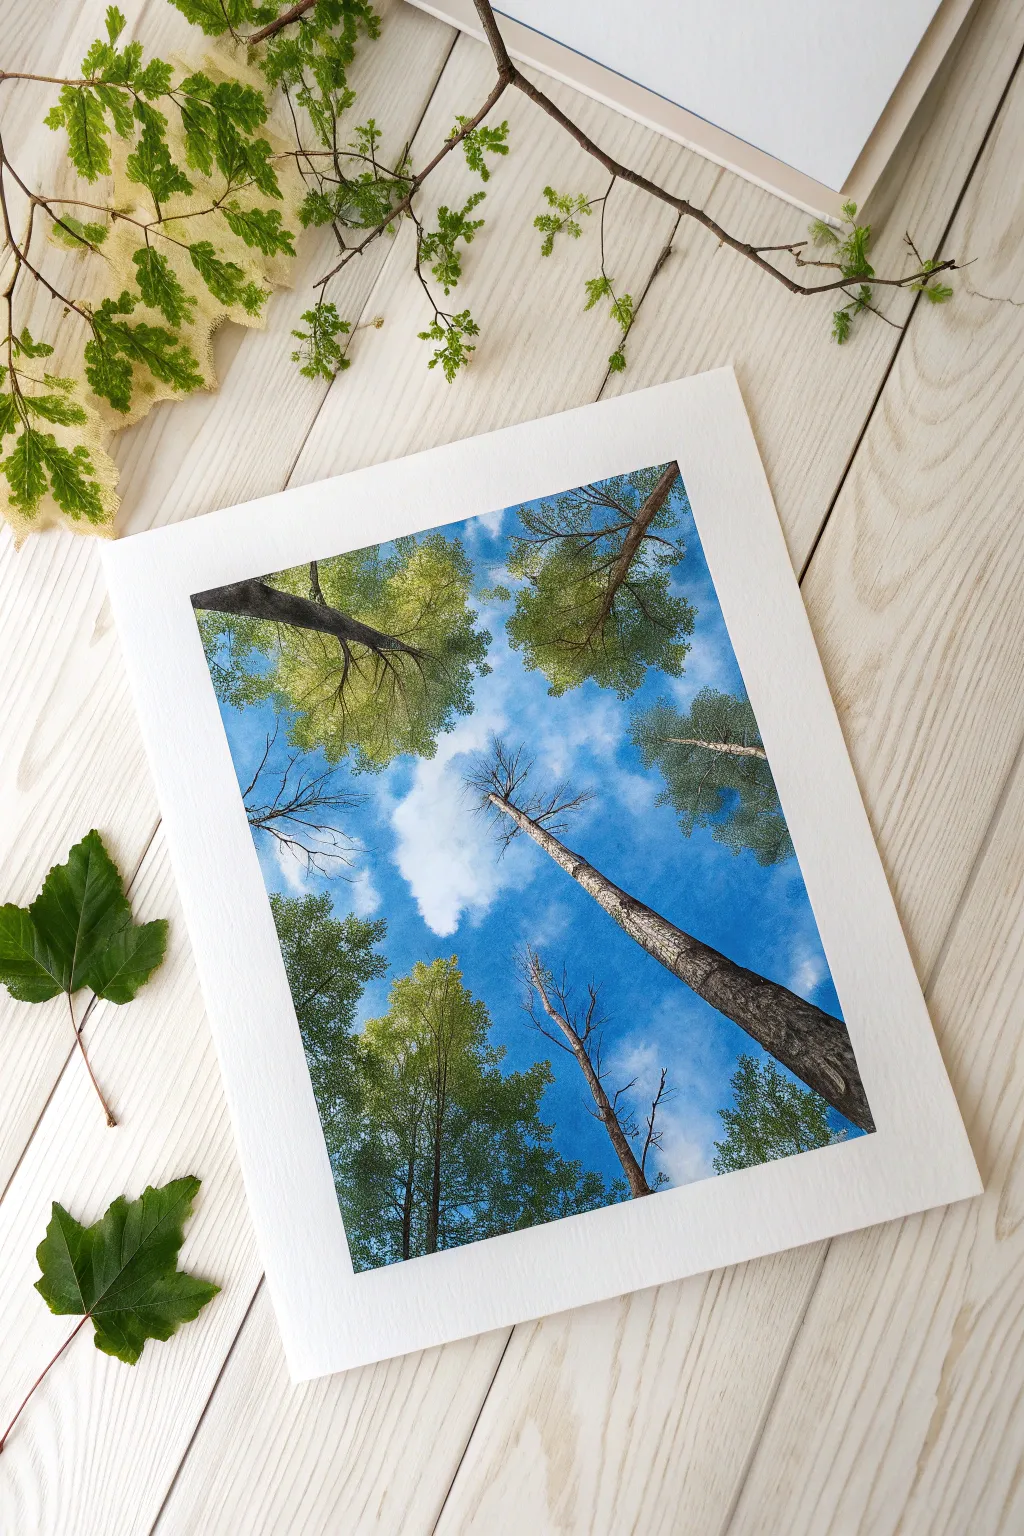
Capture the dizzying beauty of looking straight up into the summer sky with this vibrant watercolor project. This piece focuses on mastering the wet-on-wet technique for soft clouds and precise brushwork for towering tree trunks.
Step-by-Step
Materials
- Cold press watercolor paper (140lb/300gsm)
- Watercolor paints (Cerulean Blue, Ultramarine, Sap Green, Burnt Sienna, Payne’s Grey, Burnt Umber)
- Masking tape
- Large wash brush (flat)
- Medium round brush (size 6 or 8)
- Fine liner brush (size 0 or 1)
- Clean water jar
- Paper towels
- Pencil for sketching
Step 1: Preparation and Sky Layer
-
Secure the paper:
Tape down your watercolor paper to a board on all four sides. This prevents buckling and creates that crisp white border seen in the final piece. -
Map out the composition:
Lightly sketch the main tree trunks converging towards the center. You don’t need to draw every branch, just the main directional lines to establish the perspective. -
Wet the sky area:
With your large flat brush, apply clean water to the entire sky area, avoiding the thickest sketched trunks if possible, though watercolor is transparent enough that painting over them is fine too. -
Paint the blue gradient:
Load your brush with Cerulean Blue. Start painting from the outer edges inwards. Use a slightly darker Ultramarine mix near the corners to create a vignette effect, drawing the eye toward the center. -
Lift out the clouds:
While the blue paint is still wet, wad up a clean paper towel and gently blot areas to lift the pigment. This creates soft, fluffy white clouds floating in your blue sky. -
Let it dry completely:
Allow the sky layer to dry thoroughly. The paper must be bone dry before you start the sharp details of the trees, or the lines will bleed.
Step 2: Painting the Foliage
-
Mix your greens:
Prepare two puddles of green: one bright, yellowish-green (Sap Green mixed with Lemon or Yellow Ochre) for sunlit leaves, and a deeper, cooler green for shadowed areas. -
Stipple the canopy:
Using the medium round brush, use a stippling motion (tapping the tip) to create clusters of leaves. Keep these clusters loose and airy; avoid painting solid blocks of green. -
Vary the leaf density:
Concentrate denser pockets of leaves towards the edges of the paper and leave lighter, sparser touches of green towards the center to enhance the feeling of height and light. -
Add shadow depth:
While the green is still slightly damp, drop darker green pigment into the bottom portions of the leaf clusters. This gives the foliage volume and 3D form. -
Preserve sky gaps:
Be careful to leave plenty of blue sky showing through the leaves. These ‘sky holes’ are crucial for making the tree canopy look realistic.
Cloud Control
Don’t over-blot your clouds! A few strategic lifts with a tissue look natural. Too many dabs can make the sky look textural and messy rather than airy.
Step 3: Trunks and Fine Details
-
Paint the main trunks:
Mix Burnt Umber with a touch of Payne’s Grey. Using the tip of your round brush or a smaller brush, paint the long, slender trunks. Make them wider at the bottom (edges of paper) and thinner as they reach the center. -
Add texture to the bark:
Once the base trunk layer is dry, dry-brush some darker brown or black texture onto the bark to suggest roughness and ridges. -
Branching out:
Switch to your fine liner brush. Extend thin, spindly branches out from the main trunks into the foliage areas. Remember that branches get thinner the further they grow. -
Include distinct dead trees:
For the prominent bare tree in the center, use a lighter grey-brown wash initially. This makes it look sun-bleached. Add sharper, darker cracks and shadows on one side to indicate the light source. -
Final touches:
Step back and assess. You might want to strengthen a few shadows in the canopy or deepen the blue in the corners with a very light glaze if it dried too pale. -
Reveal the border:
Once absolutely everything is dry, slowly peel away the masking tape at a 45-degree angle to reveal your clean, professional edge.
Sunlight Dapples
After drying, flick a tiny amount of white gouache or masking fluid onto the leaves to mimic bright sunlight catching individual fluttering leaves.
Looking at your finished piece gives you that wonderful feeling of laying on the forest floor on a perfect afternoon


Blue Sky With Silhouetted Birds
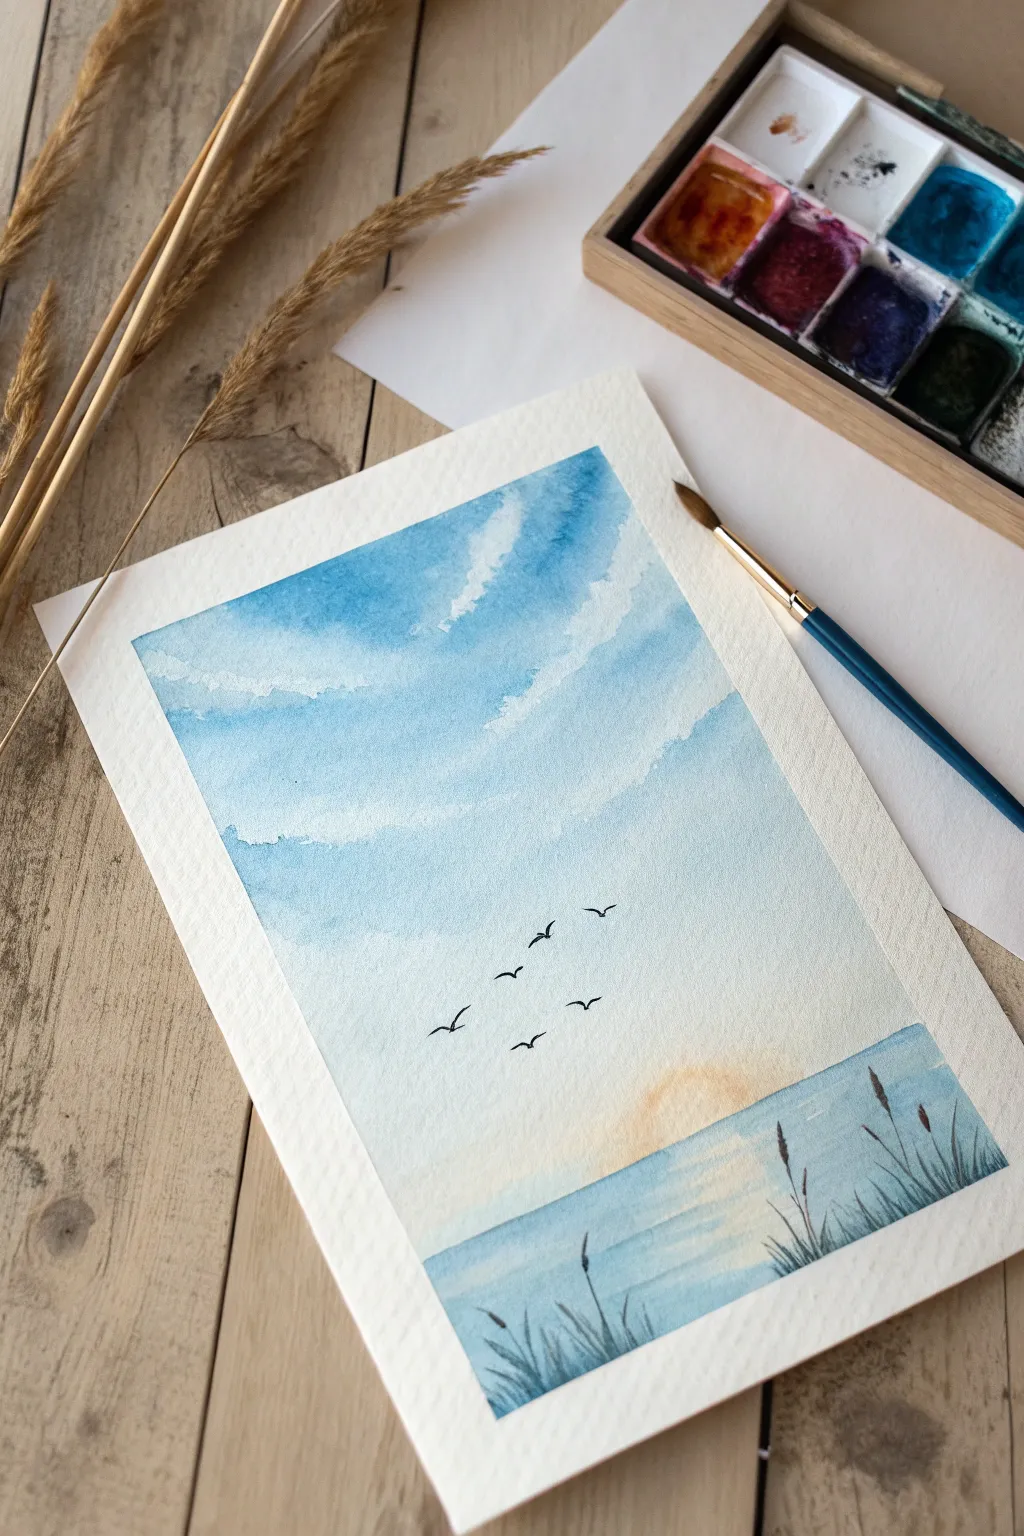
Capture the serenity of a gentle sunrise with this soft, layered watercolor piece. The transition from a pale sun to a vast blue sky creates a peaceful atmosphere, punctuated by the simple silhouettes of soaring birds.
Detailed Instructions
Materials
- Cold pressed watercolor paper (tape down the edges to prevent buckling)
- Watercolor paints (Cerulean Blue, Ultramarine, Yellow Ochre or Naples Yellow, Indigo or Black)
- Round watercolor brushes (size 8 or 10 for washes, size 0 or 1 for details)
- Jar of clean water
- Paper towel
- Masking tape
Step 1: The Sky Gradient
-
Prepare the paper:
Begin by taping down all four edges of your watercolor paper to a board or table. This creates that clean, crisp border you see in the final piece and keeps the paper flat. -
Wet the sky area:
Using your largest clean brush, apply a layer of clear water to the top two-thirds of the paper. You want the paper to be glistening but not forming puddles. -
Mix your blues:
Prepare a watery mix of Cerulean Blue. For the upper corners, mix a slightly stronger concentration, perhaps touching in a tiny bit of Ultramarine for depth. -
Paint the upper sky:
Start applying the blue paint at the very top of the paper. Use broad, horizontal strokes. Let the wet-on-wet technique do the work; the pigment will naturally bloom and soften. -
Create cloud forms:
As you move down the paper, leave irregular patches of white paper untouched. These negative spaces will become your soft, white clouds. -
Soften the edges:
Rinse your brush and use just damp bristles to gently feather the edges of your blue paint into the white spaces, ensuring there are no hard lines in the sky yet. -
Fade to white:
Stop painting the blue about two-thirds of the way down the sky area, fading it out completely so the paper remains white near the horizon line.
Fixing Hard Edges
If your clouds have harsh outlines, scrub the dry edge gently with a wet, stiff brush (dampened, not dripping) to reactivate and soften the paint.
Step 2: Sun and Horizon
-
Paint the sun:
Clean your brush thoroughly. Mix a very pale, watery wash of Yellow Ochre or Naples Yellow. Paint a semicircle rising from the horizon line in the clear patch below your blue sky. -
Blend the glow:
Immediately use clean water to soften the upper edge of the yellow semicircle, letting a faint glow drift upward into the white space between the sun and the blue sky. -
Define the horizon:
Mix a light wash of blue with a tiny touch of grey. Paint a straight horizontal line right across the sun and sky to establish the water level. -
Paint the water:
Fill the bottom section with this light blue-grey wash. I like to leave a few horizontal slivers of white paper showing through to suggest sunlight reflecting on gentle waves. -
Reflect the sun:
While the water area is still damp, drop in a small amount of your pale yellow paint directly below the sun to create a reflection on the water. -
Dry completely:
Stop and let the entire painting dry completely. The paper must be bone-dry before adding the sharp details in the next phase.
Golden Hour Glow
Swap the pale yellow sun for a vibrant orange/pink gradient. Use Alizarin Crimson and Cadmium Orange near the horizon for a dramatic sunset effect.
Step 3: Silhouettes and Details
-
Mix dark pigment:
Create a concentrated dark mix for the silhouettes. You can use Indigo mixed with a little dark brown, or a watercolor black. It needs to be fairly thick, like cream. -
Paint the birds:
Using your smallest detail brush (size 0 or 1), paint the V-shapes of the birds. Vary their sizes and wing angles—some gliding flat, others banking—to create movement and depth. -
Start the reeds:
For the foreground, use the same dark mixture. Start at the bottom edge and flick your brush upward with quick, confident strokes to create thin grass blades. -
Stagger the height:
Make sure your grass blades are different lengths and curve in slightly different directions. Nature is rarely perfectly uniform. -
Add seed heads:
On the taller stalks, dab the tip of the brush to create slightly thicker, fuzzy tops, mimicking the look of cattails or wetland reeds. -
Final reveal:
Once the black paint is fully dry, carefully peel away the masking tape at a 45-degree angle to reveal your clean white borders.
Now you have a tranquil skyscape that perfectly balances soft washes with crisp details
Rolling Hills Under a Fresh Blue Sky
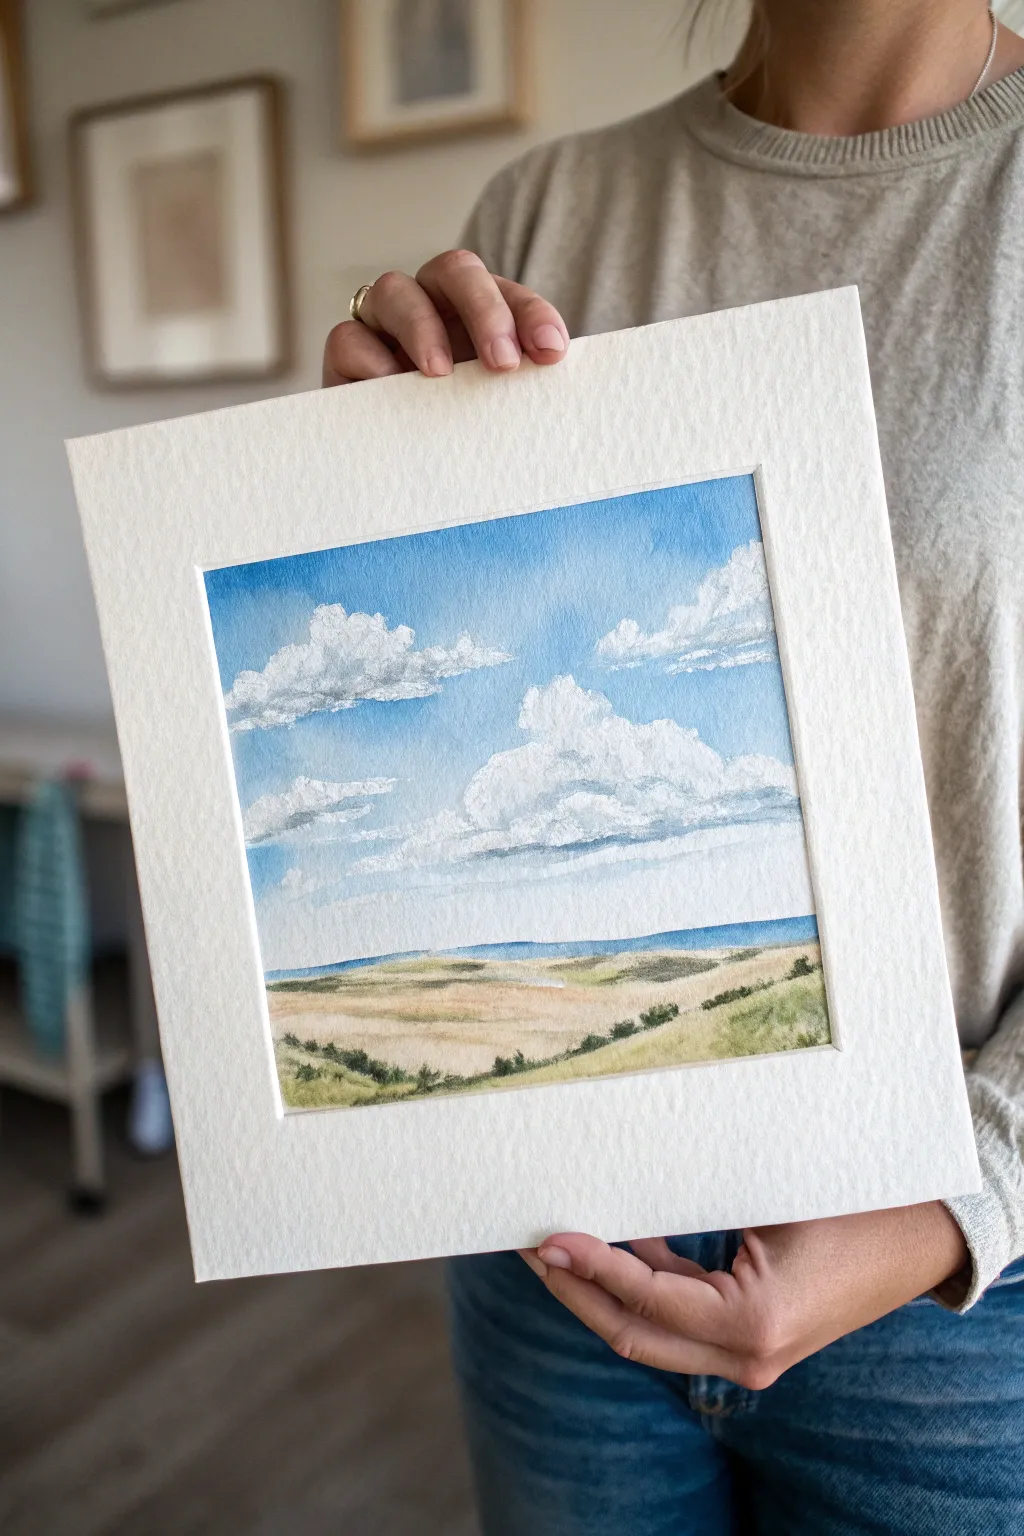
Capture the breezy serenity of open fields with this watercolor landscape, featuring a vast, cloud-filled sky over gentle, rolling terrain. The soft transitions and bright palette create a sense of fresh air and distance that feels like a window to the countryside.
Step-by-Step Guide
Materials
- Cold press watercolor paper (140lb/300gsm)
- Watercolor paints (Cerulean Blue, Cobalt Blue, Yellow Ochre, Burnt Sienna, Sap Green, Olive Green)
- Round brushes (large size 10-12 for washes, medium size 6 for shapes, small size 2 for details)
- Masking fluid (optional, but recommended for clouds)
- Masking tape or painter’s tape
- Clean water container
- Paper towels
- Pre-cut mat board
Step 1: Setting the Scene
-
Tape down your paper:
Begin by taping your watercolor paper securely to a board or table on all four sides. This creates a crisp white border and prevents buckling when the paper gets wet. -
Light pencil sketch:
Visualize the composition. Lightly sketch a low horizon line about one-third of the way up the page. Draw gentle, curving lines for the rolling hills, making the foreground hills slightly larger. -
Outline the clouds:
Sketch the rough shapes of your clouds in the upper two-thirds. Keep the tops fluffy and rounded, but flatten the bottoms slightly to give them perspective and weight. You don’t need excessive detail here, just placement guides.
Cloud Control
To fix ‘hard’ edges on clouds, re-wet the area with clean water and gently scrub with a stiff brush, then dab with a tissue to lift pigment.
Step 2: Painting the Sky
-
Preserve the whites:
If you are comfortable painting around white spaces, you can skip this. However, to keep those bright white cloud tops pristine, paint a thin layer of masking fluid over the cloud shapes. Let it dry completely before moving on. -
Wet-on-wet sky wash:
Using your largest brush, wet the sky area with clean water. The paper should be glisten but not have standing puddles. -
Adding the blue gradient:
Load your brush with a mix of Cerulean and Cobalt Blue. Start painting at the very top of the sky, where the blue should be deepest. As you work your way down toward the horizon, dilute the paint with more water to create a natural atmospheric fade. -
Softening edges:
If you didn’t use masking fluid, carefully paint around your cloud shapes. Use a clean, damp brush to soften the edges of the blue paint as it meets the white paper of the clouds, creating a soft, misty transition rather than a hard cutout line. -
Cloud shadows:
While the paper is still slightly damp, mix a very pale grey-violet (a tiny touch of Burnt Sienna with Cobalt Blue works well). Gently dab this into the bottom edges of the clouds to give them volume. I prefer to keep this extremely subtle so the clouds remain bright.
Add Movement
Use a rigger brush to flick a few extremely thin, faint lines of white gouache in the foreground to create swaying grass stalks.
Step 3: Cultivating the Landscape
-
Drying time:
Ensure the sky is completely bone-dry. If you used masking fluid, carefully rub it away now to reveal the white paper underneath. -
Distant hills:
Paint the furthest hill, right at the horizon line, with a cool, bluish-green tone. Mixing a little of your sky blue into the green pushes this hill into the distance atmospherically. -
Golden fields wash:
For the middle and foreground hills, mix a watery wash of Yellow Ochre with a hint of Burnt Sienna. Apply this loosely over the land area, leaving a few tiny slivers of white paper for sparkle. -
Layering warmth:
While that base wash is still damp, drop in slightly stronger concentrations of Yellow Ochre in the dips of the hills to suggest undulating terrain. -
Adding texture:
Let the golden layer dry. Now, take a dry brush technique—using a brush with pigment but very little water—and lightly drag it horizontally across the foreground. This mimics the texture of dry grass.
Step 4: Refining Details
-
The green ridge:
Mix a darker, earthy green using Sap Green and a touch of Burnt Sienna. Paint the prominent ridge line running diagonally across the lower section. -
Suggesting vegetation:
Switch to your smallest brush. Along that green ridge and in the immediate foreground, dab in small, irregular shapes to suggest bushes and scrub. Vary the height and spacing so it looks organic, not like a planted hedge. -
Darkest accents:
Mix your darkest green (Olive Green with a drop of blue or brown). Add tiny dots of this color at the base of the bushes you just painted to ground them and create deep shadows. -
Final assessment:
Step back. If the foreground feels too light, add another glaze of light green or ochre to deepen the values. Check that your horizon line is straight and distinct. -
Remove tape and mat:
Once the painting is 100% dry, carefully peel off the tape at a 45-degree angle away from the painting. Place your finished work behind the white mat board to instantly frame the scene professionally.
Step back and admire how a few simple washes can create such a convincing sense of open space and fresh air
Blue Sky With Light Rays Breaking Through
Capture the serene beauty of a perfect summer day with this fluffy cloud watercolor study. Using graduated washes and negative space, you will create depth and softness that makes these clouds look ready to drift right off the page.
Step-by-Step
Materials
- Cold Press Watercolor paper (140lb/300gsm), taped down
- Watercolor paints (Cerulean Blue, Cobalt Blue, Ultramarine)
- Clean water jar and waste water jar
- Large round brush (Size 10 or 12)
- Medium round brush (Size 6 or 8)
- Paper towel or clean cloth
- Masking tape
- Painting board or clipboard
Step 1: Preparation and Sketching
-
Secure your surface:
Begin by taping your watercolor paper firmly to a board using masking tape. Ensure the tape creates a crisp border, as this clean edge adds a professional finish to the final piece. -
Plan the composition:
Lightly sketch the general shapes of your clouds with a pencil. Keep the lines incredibly faint so they don’t show through the final paint; you just need a rough guide of where the white areas will remain.
Step 2: First Wash: The Upper Sky
-
Mix your deepest blue:
Prepare a generous puddle of your darkest blue mix on the palette. I like to mix Ultramarine with a touch of Cobalt for a rich, deep sky tone. -
Wet the paper:
Before applying pigment, wet top third of the paper with clean water, carefully painting *around* the shapes of the topmost clouds. This wet-on-wet technique will help the color spread smoothly. -
Apply the top gradient:
Load your large brush and drop the dark blue paint into the wet area at the very top of the page. Let the water carry the pigment, softening the edges as you move downward. -
Define the cloud edges:
Use the tip of your medium brush to carefully guide the paint along the top contours of your cloud shapes. Keep these edges somewhat crisp to define the cloud tops.
Edge Control
Clouds have hard tops and soft bottoms. Keep the upper edge of your blue sky crisp against the white paper, but use water to feather the blue paint out at the bottom of the cloud shapes.
Step 3: Middle Layers: Creating Depth
-
Dilute the mixture:
Add water to your original blue mix to create a mid-tone. As we move down the sky, the blue should naturally become lighter to mimic atmospheric perspective. -
Paint the middle sky:
Apply this mid-tone blue between the lower cloud shapes. Soften the bottom edges of the upper clouds with a damp, clean brush to make them look fluffy rather than rigid. -
Lifting technique:
If paint creeps too far into a white cloud area, quickly blot it with a clean, dry paper towel to lift the color back out and restore the bright white.
Sunbeam Magic
While the paint is damp, drag a clean,
slightly damp flat brush diagonally
through the blue sky sections to lift
out pigment, creating subtle rays of
light breaking through.
Step 4: Lower Sky and Softening
-
Prepare a very pale wash:
Water down your blue paint significantly until it is very transparent, almost like tinted water. -
Fill the bottom section:
Paint the lowest section of the sky with this pale wash. The goal is for the sky to fade into the white of the paper near the horizon line. -
Soften cloud bottoms:
Using a clean, damp brush, gently scrub the bottom edges of the painted blue areas where they meet the white clouds. This blurs the line, creating that misty, vaporous look characteristic of cumulus clouds.
Step 5: Final Details and Adjustments
-
Add cloud shadows:
Mix a very watery, pale grey-purple (using blue and a tiny dot of red or orange). Very sparingly paint shadow shapes on the underside of the largest white clouds to give them volume. -
Refining edges:
Look for any hard edges that look unnatural. Soften them with a damp brush while the paint is still slightly workable. -
Let it dry completely:
Allow the painting to dry fully. The paper must be bone dry before you attempt to remove the tape to avoid tearing. -
The reveal:
Slowly peel away the masking tape at a 45-degree angle, revealing the crisp white border that frames your sky study.
This simple yet effective study results in a peaceful piece of art that brings a breath of fresh air into any room
Windy Blue Sky With Diagonal Cloud Movement
This project captures the energy of a windy day with a stunning contrast between deep, saturated blues and brilliant white clouds. By mastering the diagonal movement of wispy cirrus clouds against grounded, fluffy cumulus formations, you’ll create a painting that feels expansive and alive.
Detailed Instructions
Materials
- Rectangular canvas (vertical orientation)
- Acrylic paints: Ultramarine Blue, Phthalo Blue, Titanium White, and a tiny touch of Burnt Umber (for shadows)
- Large flat brush (1-2 inch)
- Medium filbert brush
- Small round brush for details
- Old stiff bristle brush or fan brush
- Palette knife (optional for mixing)
- Water container and paper towels
Step 1: Laying the Azure Foundation
-
Mix your base gradient:
Prepare three shades of blue on your palette. Start with pure Ultramarine mixed with a little Phthalo Blue for the darkest zenith. Mix a mid-tone by adding a small amount of white to your blue base, and finally, a pale sky blue for the horizon line. -
Apply the darkest blue:
Using your large flat brush, paint the top third of the canvas with your darkest blue mixture. Use horizontal strokes initially to get full coverage, but don’t worry about perfect smoothness yet. -
Blend downward:
While the top paint is still wet, pick up your mid-tone blue and paint the middle section. Blend the edge where it meets the dark top section using long, sweeping strokes to create a seamless transition. -
Fade to the horizon:
Finish the bottom third with your palest blue mixture. Blend this upward into the mid-tone. The goal is a rich gradient that gets lighter as it approaches the bottom. -
Add diagonal motion:
Clean your large brush and dry it well. While the background is tacky but not fully dry, lightly drag the dry bristles diagonally from the bottom-left toward the top-right. This subtle texture will guide the viewer’s eye and suggest wind direction.
Dry Brush Mastery
For the wispies, less is more. If your brush has too much paint, you’ll get stripes instead of mist. Test the dryness of your brush on the back of your hand before touching the canvas.
Step 2: Creating the Wispy Cirrus Clouds
-
Prepare a dry brush:
Load a stiff bristle brush or an old, worn-out brush with a very small amount of Titanium White. Wipe most of the paint off onto a paper towel until the brush is almost dry. -
Streak the upper sky:
Starting from the mid-left side, sweep the brush diagonally upward toward the top right corner. Use quick, feathery motions. The dry brush technique creates the transparent look of high-altitude clouds. -
Build density selectively:
Go back over a few select areas of these streaks with slightly more white paint to create brighter ‘heads’ to the wind streams, letting them fade out into transparency as they stretch upward. -
Create scattering:
Add smaller, detached wisps in the upper right corner, following that same diagonal angle. These should be very faint, barely disturbing the deep blue background.
Step 3: Building the Cumulus Base
-
Map the cloud shapes:
Switch to a medium filbert brush loaded with pure Titanium White. Roughly dab in the shapes of the billowy clouds in the lower third of the canvas. Group them in an uneven, organic cluster rather than a straight line. -
Scumble the edges:
Use a circular scumbling motion (tiny circles) to soften the edges of these white shapes. The tops should be defined and crisp, while the bottoms can remain a bit fuzzy for now. -
Mix a shadow tone:
Create a soft grey-blue by mixing a large amount of white with a touch of your original blue mix and the tiniest speck of Burnt Umber or grey. This will dirty the colour just enough for shadowing. -
Apply shadows:
Paint this shadow tone into the bottom and left sides of the cloud clumps. This establishes the light source coming from the top right. -
Blend the internal forms:
Wipe your brush clean and gently blend the transition between the bright white tops and the shadowed bottoms. You want to keep the contrast but lose any harsh lines.
Going Golden
For a warmer, late-afternoon feel, mix a tiny dot of Napthol Red or adjust the white highlights on the right side of the clouds with a glaze of very pale yellow.
Step 4: Highlighting and Refining
-
Brightest highlights:
Load a small round brush with thick, pure Titanium White. Retouch the very tops of the cumulus clouds where the sunlight hits most directly. I prefer to dab the paint on thickly here to build actual texture. -
Connect the layers:
Add a few smaller, floating pieces of cloud that bridge the gap between the heavy bottom clouds and the wispy upper clouds. This integrates the two distinct weather patterns. -
Soften the horizon:
Use a clean, slightly damp brush to glaze over the very bottom edge of your painting with a watery white wash. This atmospheric perspective pushes the lowest clouds further into the distance. -
Final dynamic check:
Step back and look at the flow. If the movement feels stagnant, add one or two more very thin, sharp diagonal streaks in the upper left connecting to the cloud mass. -
Varnish (optional):
Once fully dry (give it 24 hours), apply a gloss varnish to make the deep blues pop and protect the texture of the white highlights.
Hang your finished piece in a well-lit spot where the diagonal lines can lead the eye upward and energize the room
Driving Rain Slashes Across a Blue Sky
Capture the moody elegance of a stormy sky clearing into calm with this atmospheric watercolor project. The technique relies on controlled wet-on-wet washes to create soft, horizontal bands that mimic the look of distant rain veils drifting across the horizon.
Step-by-Step
Materials
- Cold press watercolor paper (minimum 140lb/300gsm)
- Watercolor paints: Indigo, Prussian Blue, Payne’s Grey
- Flat wash brush (1 inch)
- Round brush (size 6 or 8)
- Masking tape
- Painting board
- Two jars of water (clean and rinse)
- Paper towels
- Hairdryer (optional, for speeding up layers)
Step 1: Preparation and Sky Base
-
Secure the paper:
Begin by taping down all four edges of your watercolor paper to a sturdy board. This prevents the paper from buckling when wet and creates that crisp white border seen in the final piece. -
Mix your blues:
Prepare a generous puddle of Prussian Blue on your palette for the sky. You want this wash to be fairly watery but still vibrant. In a separate well, mix a darker, deeper blue using Indigo mixed with a touch of the Prussian Blue. -
Pre-wet the sky area:
Using your clean flat wash brush, apply clear water to the top three-quarters of the paper. You want an even sheen, not a soaking puddle. Stop about two inches from where you want your horizon line to be. -
Apply the first sky wash:
Load the flat brush with your Prussian Blue mix. Starting at the very top edge, drag the brush horizontally across the paper. The paint will naturally bleed down into the wet paper. -
Create the gradient effect:
Reload the brush with slightly more water and make the next horizontal stroke just below the first, overlapping slightly. Continue this process, adding more water to the brush as you move down, so the blue fades gently toward white. -
Soften the transition:
As you reach the dry area near the horizon, clean your brush and dry it slightly on a paper towel. Gently run the damp brush along the bottom edge of your lowest blue stroke to feather it out into the white paper seamlessly.
Preventing Blooms
Work quickly! If you add wetter paint into a drying area, you’ll get cauliflower blooms. Keep the moisture level consistent across the whole wash.
Step 2: Adding Texture and Layers
-
Begin the second layer:
Wait until the first layer is completely bone dry. To create the ‘driving rain’ or cloud strata effect, remix your Prussian Blue, making it slightly more saturated this time. -
Paint atmospheric bands:
Using the flat brush turned sideways (or a large round brush), paint loose horizontal bands across the sky area. Don’t make them perfect straight lines; let them undulate slightly. -
Soften the edges:
Immediately after painting a band, use a clean, damp brush to soften just the bottom edge of that stroke. This leaves a hard edge on the top and a soft, misty edge on the bottom, mimicking rain sheets. -
Build darker values:
While the paper is still slightly damp from the previous step, pick up your darker Indigo mix. Drop this darker pigment into the upper sections of the sky to deepen the storminess. -
Layer the lower sky:
Move lower down the paper with very dilute, watery blue. Create faint, ghostly horizontal strokes that barely show up against the white background. These subtle layers add immense depth to the atmospheric perspective. -
Dry thoroughly:
Let this entire sky section dry completely. I sometimes use a hairdryer on a low, cool setting here to ensure there is absolutely no moisture left before tackling the horizon.
Softening Edges
Keep a “thirsty brush” ready—a clean brush blotted on a towel. Run it along harsh edges while wet to blend them instantly into the background.
Step 3: The Sea and Finishing Touches
-
Define the horizon line:
Mix a strong, dark color using Payne’s Grey and a little Indigo. It should be creamy in consistency, not too watery. Using the round brush, carefully paint a straight horizontal line across the bottom of the paper. -
Paint the ocean body:
Fill in the area below the horizon line with this dark grey-blue mix. While the paint is wet, pull horizontal strokes across it to simulate the texture of waves or water movement. -
Add distant whitecaps:
While the ocean area is drying but still satin-wet, lift out tiny horizontal slivers of color using a clean, -
Let it settle:
Allow the dark ocean strip to dry naturally so the pigments settle into the paper’s texture. -
The reveal:
Once the painting is 100% dry to the touch, slowly peel away the masking tape. Pull the tape away from the painting at a 45-degree angle to ensure a perfect, crisp white border.
Finish by placing your work in a simple mat frame to highlight the clean edges and serene gradient
Storm Clearing Into Blue Patches
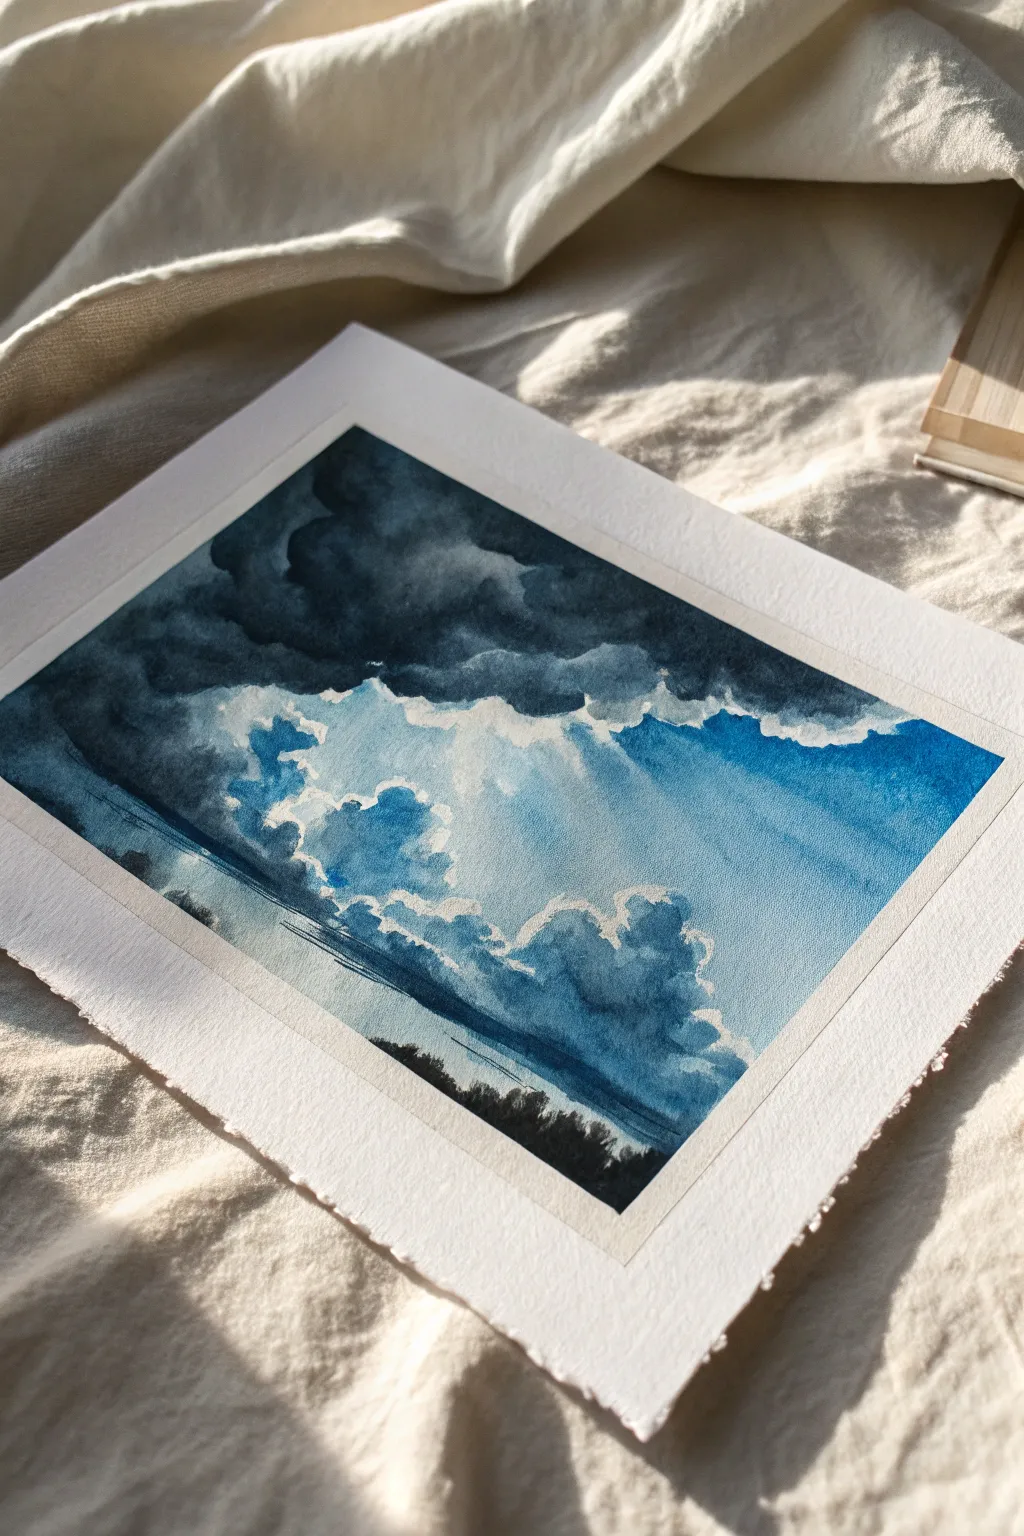
Capture the breathtaking moment when heavy storm clouds break to reveal a brilliant blue sky. This watercolor project uses wet-on-wet techniques to create soft, ethereal cloud formations contrasted against dark, moody shadows.
Step-by-Step Tutorial
Materials
- Cold press watercolor paper (300 gsm or heavier)
- Masking tape
- Plywood or plastic drawing board
- Watercolor paints: Indigo, Prussian Blue, Cerulean Blue, Burnt Umber or Payne’s Grey
- Large round brush (size 10 or 12)
- Medium round brush (size 6 or 8)
- Fine liner brush
- Two jars of water
- Paper towels or cotton rag
- Hairdryer (optional)
Step 1: Preparation and Base Sky
-
Secure your paper:
Tape your watercolor paper down firmly to your board on all four sides. This creates that crisp white collection border shown in the image and prevents the paper from buckling under a heavy wash. -
Wet the sky area:
Using your large round brush and clean water, thoroughly wet the upper two-thirds of the paper where the sky will be. The paper should glisten but not have standing puddles. -
Apply the light blue:
Mix a watery wash of Cerulean Blue. Drop this color into the wet paper, focusing on the right side and lower central area where the sky is clearing. Leave some areas totally white to represent the brightest highlights. -
Add depth to the blue:
While the paper is still wet, mix a slightly stronger Prussian Blue. Add this into the wet Cerulean areas to create variation within the clear sky patches, letting the colors bleed naturally. -
Initial cloud shapes:
Clean your brush and blot it until it’s just damp. Gently lift out pigment in rounded shapes to define the fluffy white tops of the cumulus clouds in the lower section.
Muddy Clouds?
If your white cloud tops look grey, you likely painted over them too much. Use ‘negative painting’—paint around the white shapes rather than trying to add white paint later.
Step 2: Storm Clouds and Shadows
-
Mix the storm grey:
Create a rich, dark mixture using Indigo and a touch of Burnt Umber or Payne’s Grey to neutralize the blue. You want a heavy, moody dark blue-grey. -
Paint the upper storm:
With the paper still slightly damp (or re-wet carefully if dry), apply this dark mixture to the top left corner, sweeping diagonally across the top. Let it bleed downwards but control the edge to keep a distinct dark mass. -
Building cloud volume:
Use a thirsty, semi-dry brush to soften the bottom edges of this dark mass, blending it into the lighter sky below to suggest rain or distant mist. -
Layering the middle clouds:
I like to wait for the first layer to dry just a bit—about halfway—before adding the mid-tone clouds. Mix a medium-strength Indigo and paint the shadowed undersides of the white cumulus clouds in the center. -
Define the edges:
Use the tip of your medium brush to paint darker, crisper edges around the white cloud tops. This negative painting technique makes the white paper pop forward as bright cloud highlights. -
Adding rays of light:
If you want the subtle effect of sun rays, use a clean, damp flat brush to gently lift pigment in diagonal lines from the white cloud gaps down toward the horizon.
Step 3: Horizon and Foreground
-
Establish the horizon line:
Mix a dark, cool blue using Prussian Blue and Indigo. With a steady hand or a ruler as a guide, paint a thin, straight horizon line across the bottom third of the paper. -
Water reflections:
Below the horizon, add horizontal streaks of the sky colors—Cerulean and Indigo—to imply water. Keep these strokes minimal and horizontal to suggest calmness under the storm. -
Paint the distant land:
Mix your darkest value yet: Indigo with very little water. Paint a silhouette of land along the horizon line, varying the width to suggest distant hills. -
Foreground silhouette:
Using the dark mixture and the medium brush, stipple vertically along the very bottom edge to create the silhouette of trees or bushes in the immediate foreground. -
Final drying:
Allow the painting to dry completely. If the paper feels cold to the touch, it is still damp deep down, so give it extra time. -
The reveal:
Carefully peel away the masking tape at a 45-degree angle, pulling away from the artwork to ensure you don’t tear the paper surface.
Add Texture
While the dark cloud paint is still wet, sprinkle a tiny pinch of table salt into the darkest area. Brush it off when dry for a starry, textured rain effect in the storm.
This framing of dark shadows against a hopeful blue sky creates a powerful mood piece for your collection
Golden Hour Blue Sky With Warm Edges
Capture the fleeting beauty of golden hour with this soft yet vibrant watercolor painting. This piece focuses on the dramatic interplay of light rays breaking through clouds, setting a serene blue sky on fire with warm oranges and peaches.
How-To Guide
Materials
- Cold Press watercolor paper (300 gsm)
- Watercolor paints (Cerulean Blue, Indigo, Yellow Ochre, Cadmium Orange, Alizarin Crimson, Burnt Umber)
- Masking fluid (optional, but helpful for crisp rays)
- Flat wash brush (1 inch)
- Round brush (size 6 or 8)
- Fine liner brush (size 0 or 1)
- Clean water jar
- Paper towels
- Masking tape
- Drawing board
Step 1: Preparation and The Wash
-
Secure your paper:
Tape your watercolor paper down firmly to a board on all four sides. This prevents buckling when the paper gets wet and creates that crisp white border you see in the final piece. -
Sketch the horizon:
Using a very light pencil touch, draw a low horizon line about one-fifth of the way up from the bottom. Sketch faint, irregular shapes for the distant mountains. -
Pre-wet the paper:
Brush clean water over the entire sky area, stopping just at the horizon line. You want the paper to be glistening but not forming puddles. -
Paint the upper sky:
Load your flat brush with a diluted Cerulean Blue. Start at the very top and paint downwards using horizontal strokes. As you move lower, dilute the paint further with water so the blue fades almost to white near the middle of the sky. -
Create the warm glow:
While the paper is still damp, pick up a mix of Yellow Ochre and a tiny touch of Cadmium Orange. Paint horizontal strokes starting at the horizon and blending upwards into the fading blue to create a soft transition.
Step 2: Creating Rays and Clouds
-
Lift out the rays:
While the sky wash is still damp (crucial timing here), use a clean, slightly damp brush to ‘lift’ paint away in diagonal streaks radiating from the left side. This negative space creates the sunbeams. -
Deepen the ray shadows:
To emphasize the beams, mix a very watery Indigo with your sky blue. Paint the spaces *between* the lifted light rays to darken the sky slightly, reinforcing the angle of the light. -
Paint cloud bases:
Mix a soft grey-purple using Indigo and a touch of Alizarin Crimson. With your round brush, dab in the shadow sides of the clouds, keeping the edges soft. -
Add golden highlights:
I like to immediately drop pure Cadmium Orange or Yellow Ochre onto the top edges of those wet purple clouds. Let the colors bleed slightly to mimic sunlight catching the cloud structures. -
Refine distinct clouds:
Once the background is semi-dry, use a drier mixture of blue-grey to paint the smaller, more defined clouds mid-sky. Keep your brush marks loose and organic.
Muddy Colors?
If blue sky meets orange glow and turns green or brown, let the blue layer dry completely first. Then glaze the orange over it gently rather than mixing wet-in-wet.
Step 3: Foreground and Details
-
Paint the distant mountains:
Mix a watery grey-blue. Paint the distant mountain range along the horizon line. Ensure the bottom edge of the mountains is straight to suggest a water line or flat plain. -
Darken the immediate foreground:
For the closest landmass at the very bottom, use a darker mix of Burnt Umber and Indigo. Create a rough, textured strip at the bottom of the paper. -
Start the grasses:
Switch to your fine liner brush. Using the dark mix from the foreground, flick very thin lines upward to represent tall grasses. -
Vary the grass direction:
Ensure the grasses don’t look like a picket fence. Angle them slightly differently—some crossing over each other—to create a natural, windswept look. -
Add seed heads:
At the tips of select grass stalks, gently press the side of your small brush to create the seed heads or wheat tops. Vary the pressure to make them look fluffy. -
Final touches:
If you want a few grasses to catch the light, you can use opaque white gouache mixed with a little ochre to paint a few highlighted stems among the dark ones. -
Reveal the border:
Allow the painting to dry completely—if you touch it while it’s cold or damp, it might smudge. Slowly peel off the masking tape at an angle to reveal the clean edges.
Sunbeam Secret
Use the edge of a paper towel or a dry flat brush to wipe away paint for rays. Do this while the paper is still damp but the sheen has just started to dull.
Now step back and admire how a few simple layers of color have brought a peaceful evening moment to life on your paper
Graphic, Minimal Blue Sky With Bold Shapes
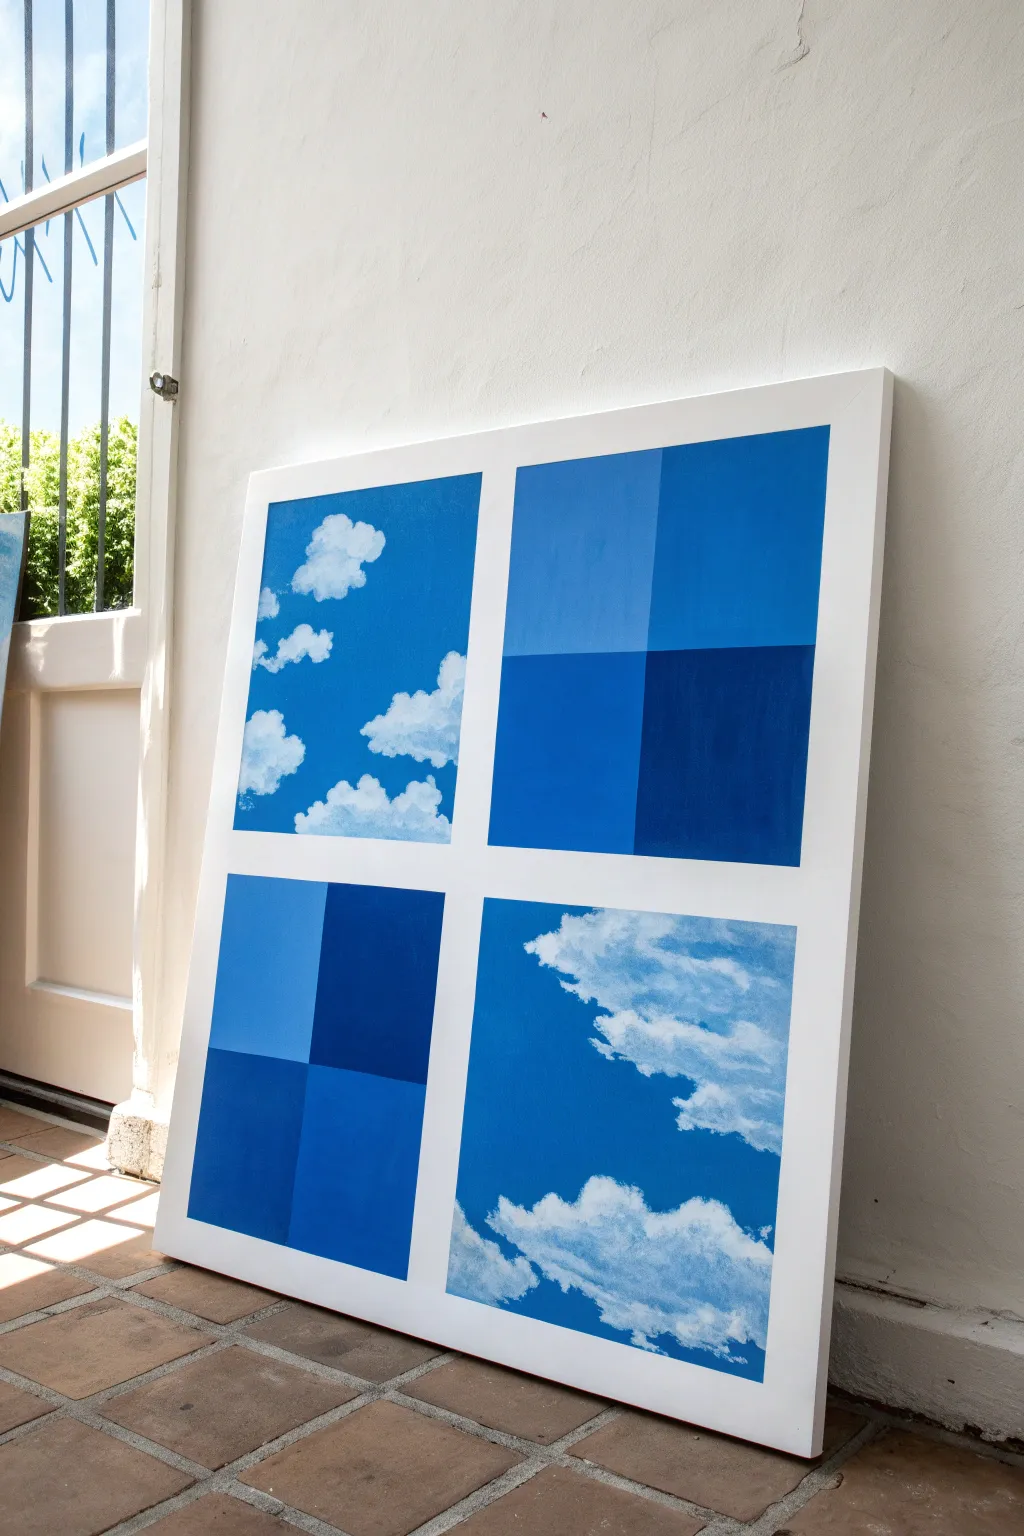
This striking acrylic painting plays with perception by juxtaposing realistic fluffy clouds against hard-edged geometric abstractions of the same blue tones. It creates a modern, window-pane effect that explores the deconstruction of a summer sky into pure color and shape.
Step-by-Step Tutorial
Materials
- Large square canvas (approx. 36×36 inches)
- White Gesso (optional, for priming)
- Acrylic paints: Titanium White, Phthalo Blue, Ultramarine Blue, Cerulean Blue
- Painter’s tape (1-inch width)
- Large flat brush (2-inch)
- Medium filbert brush
- Small round brush for details
- T-square or long ruler
- Pencil
- Palette knife (for mixing)
- Palette or mixing tray
Step 1: Preparation and Grid Layout
-
Prime the canvas:
Start with a clean, white surface. If your canvas isn’t pre-primed, apply two coats of white gesso and let it dry completely to ensure a bright base for your blues. -
Create the window frame:
Using your T-square and pencil, find the exact center of the canvas. Lightly draw a vertical line and a horizontal line crossing in the middle. -
Tape the structure:
Apply painter’s tape directly over your pencil lines. Depending on how thick you want the white divide to be, you can use a single strip of 1-inch tape or two strips side-by-side. Press the edges down firmly to prevent paint bleed. -
Subdivide the geometric quadrants:
The Top-Right and Bottom-Left panels are geometric. In these two quadrants only, measure and draw a light pencil cross to divide them into four smaller, equal squares.
Step 2: Painting the Geometric Sections
-
Mix your palette:
Prepare four distinct shades of blue. Use your Phthalo and Ultramarine blues mixed with varying amounts of Titanium White to create a gradient from deep navy to a light sky blue. -
Tape the internal squares:
Working in the Top-Right quadrant first, tape off two diagonal sub-squares (e.g., top-left and bottom-right of that quadrant). Taping allows you to get razor-sharp edges. -
Apply the first colors:
Paint these masked squares with two of your prepared blue shades. Use a flat brush and apply the paint smoothly to avoid texture marks. -
Complete the quadrant:
Once the first squares are dry to the touch, carefully remove the tape and mask off the remaining two squares. Paint them with your other two blue shades. -
Repeat for the diagonal:
Move to the Bottom-Left quadrant and repeat the taping and painting process. I like to rearrange the color placement here compared to the top right—put the darkest blue in a different corner to keep the eye moving.
Seal the Tape
Before painting the blue, brush a thin layer of white acrylic or matte medium over the edge of your painter’s tape. This seals the gap and ensures your lines are razor sharp upon removal.
Step 3: Painting the Realistic Clouds
-
Base coat the sky:
In the Top-Left and Bottom-Right quadrants, apply a smooth gradient of blue. Start with a deeper blue at the top of the quadrant fading to a lighter blue at the bottom. Let this dry completely. -
Drafting cloud shapes:
Load a filbert brush with pure Titanium White. Gently dab basic cloud shapes onto the blue background. Don’t worry about details yet; just focus on the overall composition and placement. -
Building fluffiness:
Using a ‘scumbling’ technique (rubbing a brush with very little paint in a circular motion), soften the edges of your white shapes. This creates that misty, atmospheric look. -
Adding dimension:
Mix a tiny touch of grey or light purple using your blues and a drop of red or black (if available) with white. Apply this shadow color to the bottom underside of the clouds to give them volume. -
Highlighter highlights:
Go back in with pure, thick Titanium White on the top edges of the cloud formations where the ‘sun’ would be hitting them. This creates the crisp contrast seen in the reference.
Fixing Bleeds
If blue paint bleeds onto your white divide, don’t wipe it while wet! Let it dry completely, then gently scrape the excess with a blade or paint over it with opaque titanium white.
Step 4: Final Reveal
-
Remove the main tape:
Once all paint is bone dry, slowly peel off the central cross of painter’s tape. Pull the tape away at a 45-degree angle to get the cleanest line. -
Touch ups:
Check the white lines. If any blue paint bled under the tape, use a small flat brush and white paint to tidy up the edges and make the grid crisp. -
Edge check:
Paint the outer edges of the canvas white (or frame it) to complete the polished, window-like appearance.
Hang your new artwork and enjoy a view of the perfect summer sky, rain or shine
Surreal Blue Sky With Floating Objects
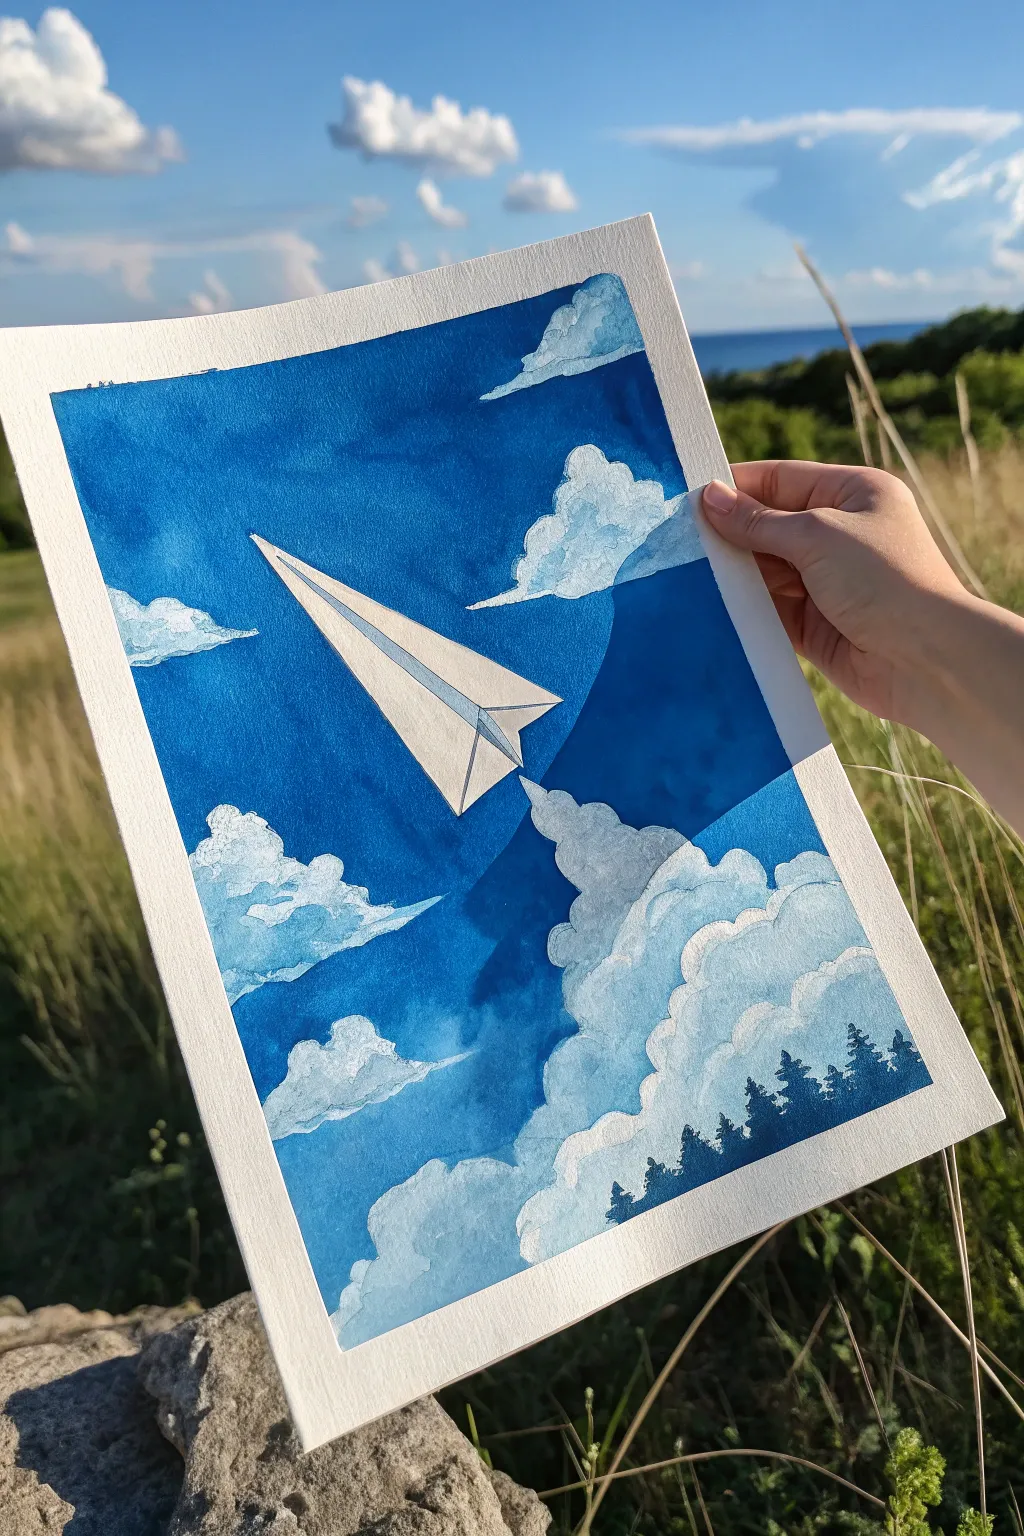
This whimsical watercolor painting captures the freedom of a paper airplane soaring through a deep blue sky above fluffy, dreamlike clouds. The contrast between the crisp geometric plane and the soft organic clouds creates a simple yet striking surreal atmosphere.
Step-by-Step
Materials
- Cold press watercolor paper (300 gsm)
- Painter’s tape or masking fluid
- Watercolor paints (Ultramarine Blue, Prussian Blue, Indigo, Payne’s Grey)
- White gouache (optional, for highlights)
- Flat wash brush (1-inch)
- Round brushes (size 4 and 8)
- Small detail brush (size 0 or 1)
- Pencil and eraser
- Two jars of water
- Paper towels
Step 1: Sketching and Masking
-
Prepare the paper:
Begin by taping down all four edges of your watercolor paper to a board. This prevents buckling and creates that satisfying crisp white border when you’re finished. -
Draft the composition:
Lightly sketch the paper airplane in the upper center of the page. It should be ascending diagonally. Keep your pencil lines very faint so they don’t show through the final paint. -
Establish the cloud shapes:
Sketch the outlines of the large, billowing cloud formation rising from the bottom right corner. Add a few smaller floating clouds on the left and upper right for balance. -
Protect the white areas:
Carefully apply masking fluid over the entire paper airplane shape. Let it dry completely. This allows you to paint the blue sky freely without worrying about preserving the plane’s sharp edges.
Step 2: Painting the Sky
-
Mix your blues:
Prepare a large puddle of intense blue. Combine Ultra Marine and Prussian Blue to get that deep, vibrant midday sky color. You want a high pigment-to-water ratio. -
Start the wet-on-dry wash:
Using your flat brush, load it with the blue mix and start painting from the top left corner. Paint around the cloud shapes carefully, but you can brush right over the masked plane. -
Create depth:
As you move down the paper, slightly alter the blue saturation. Some areas can be a deeper Indigo, especially near the cloud edges, to make the white pop. -
Refine cloud edges:
While the sky is still wet, you can use a clean, damp brush to soften just a few edges of the clouds for a wispy look, but keep most edges crisp for that illustrative style seen in the reference. -
Let it dry:
Allow the sky layer to dry completely. The paper should be flat and room temperature to the touch before moving on.
Uneven Blue Sky?
Work quickly with a large brush to avoid ‘backruns’ or blooms. If streaks appear, embrace them as wind currents, or do a second light glaze of blue once fully dry.
Step 3: Adding Cloud Volume
-
Mix a shadow color:
Create a very dilute mix of Payne’s Grey and a touch of Ultramarine Blue. This will be your shadow color for the white clouds. -
Paint cloud shadows:
Using a round brush, paint the bottom and left sides of the cloud ‘puffs.’ Keep the tops white to suggest sunlight hitting them from above. -
Blend the shadows:
Immediately after placing a shadow, rinse your brush and use clear water to fade the grey edge into the white paper. This creates the rounded, fluffy volume of the cumulus clouds. -
Add detail to small clouds:
I like to repeat this process on the smaller floating clouds, ensuring the light source remains consistent (coming from the top right).
Level Up: Trailing Smoke
Use a dry-brush technique with white gouache behind the plane to create a subtle jet stream or ‘motion lines’ cutting through the blue sky.
Step 4: The Airplane and Foreground
-
Remove the mask:
Once the sky is bone dry, gently rub away the masking fluid to reveal the stark white paper airplane. -
Detail the plane:
Use a very pale grey wash to define the fold lines of the paper plane. Add a subtle shadow on the underside wing to give it three-dimensionality. -
Paint the tree line:
Mix a very dark, concentrated Indigo or Payne’s Grey. Using your smallest detail brush, paint tiny pine tree silhouettes along the bottom right curve of the largest cloud bank. -
Vary the trees:
Make sure your trees vary slightly in height and width to look natural. The dark silhouette anchors the painting and pushes the clouds into the distance. -
Final touches:
If any cloud edges got lost, you can use a tiny bit of white gouache to reclaim the highlights or clean up the rim of the paper airplane. -
The reveal:
Wait for everything to dry fully, then slowly peel off the painter’s tape at a 45-degree angle to reveal your crisp white border.
Frame this piece simply to let the dreamlike blue tones take center stage in your space


Have a question or want to share your own experience? I'd love to hear from you in the comments below!