
If you’ve been craving that relaxed, collected look, a boho wall mural is one of my favorite ways to shift the whole mood of a room fast. I’m sharing my go-to boho wall mural ideas, from classic earthy shapes to a few playful, unexpected twists.
Terracotta Arch Feature Wall
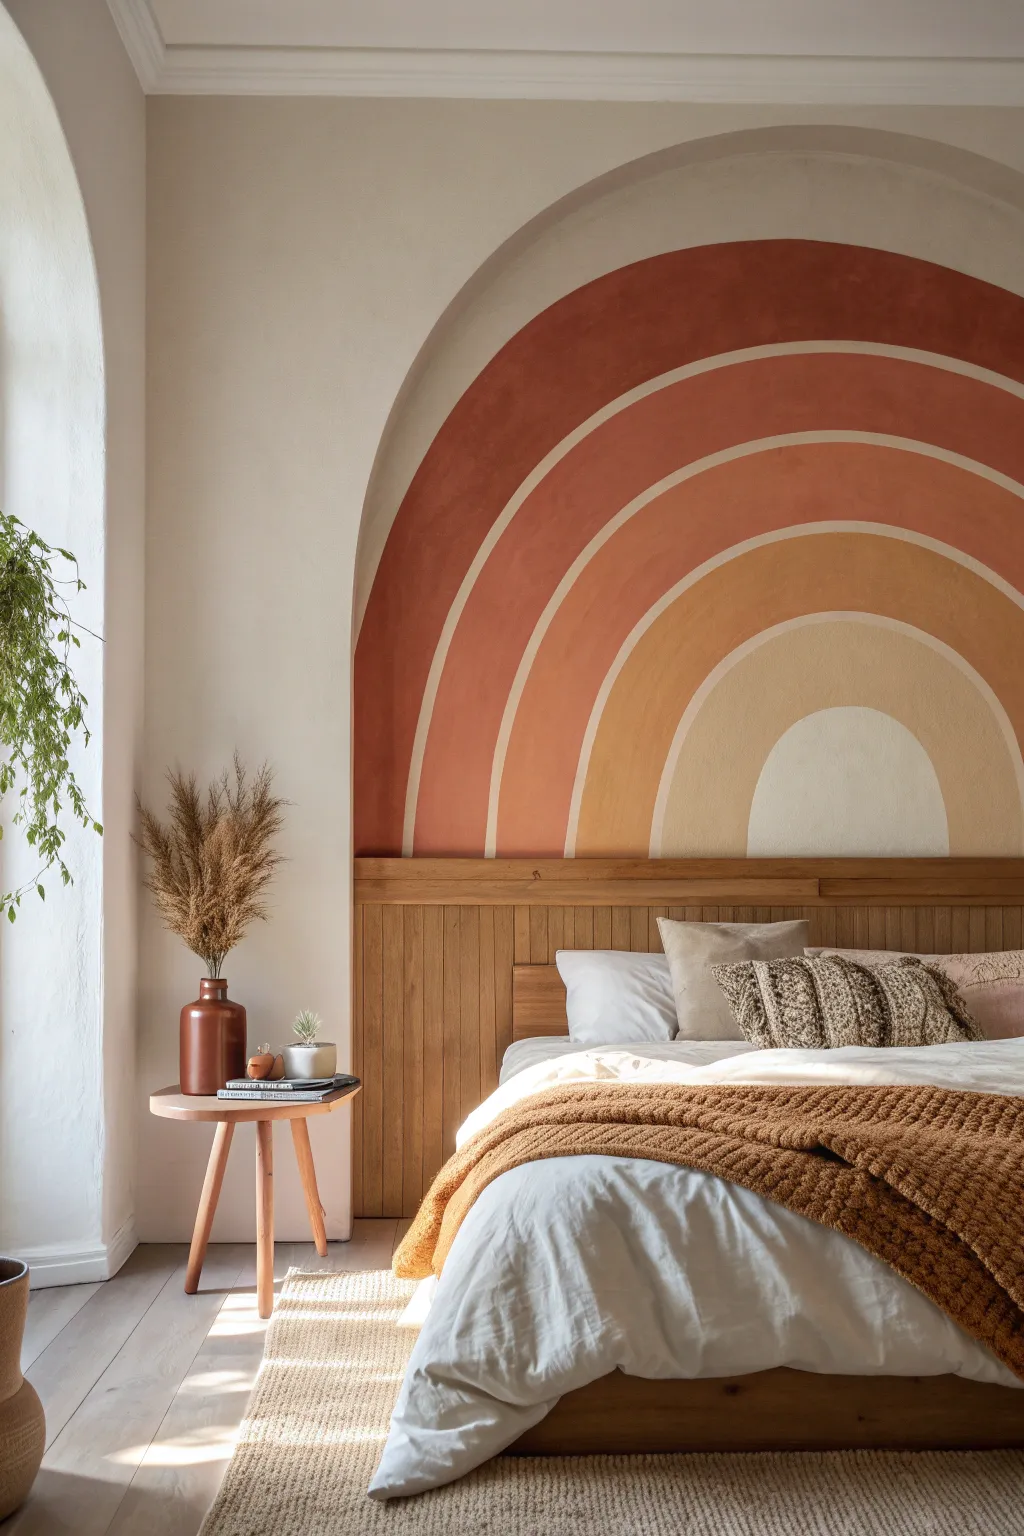
Transform a plain bedroom wall into a warm, bohemian focal point with this large-scale painted mural. The earthy gradient of rust, clay, and sand tones creates a soothing optical illusion that adds architectural interest without any construction.
Step-by-Step
Materials
- Interior latex paint (Deep Rust/Terracotta)
- Interior latex paint (Muted Coral)
- Interior latex paint (Warm Ochre/Mustard)
- Interior latex paint (Soft Beige/Sand)
- Interior latex paint (Cream/Off-white)
- Interior latex paint (Base wall color, likely cream)
- Pencil
- String/twine (non-stretchy)
- Thumbtack or small nail
- Measuring tape
- Large level (24-inch or longer)
- Artist’s brush (1-inch angle sash)
- Small foam roller & tray
- Painter’s tape (delicate surface recommended)
- Drop cloth
- Ladder
Step 1: Preparation & Measuring
-
Clear and Prep:
Move the bed and furniture away from the wall to give yourself ample working space. Lay down a drop cloth to protect your flooring from drips. -
Find the Center:
Measure the width of your wall or the intended area for the mural. Mark the exact center point near the floor or just above the headboard line; this center mark is crucial for the symmetry of your arch. -
Establish the Baseline:
Use your level to draw a faint, straight horizontal line across the wall where you want the arches to begin curving upward. Everything below this line will be painted straight down.
Uneven Arches?
If your string slips, creating a wobble, switch to the ‘cardboard strip’ method. Poke a hole for a pivot pin and holes for your pencil at exact intervals on a strip of cardboard for a rigid compass.
Step 2: Sketching the Arches
-
Create a Compass Tool:
Tie a piece of non-stretchy string to a pencil. Place a thumbtack or nail at your center mark on the baseline. -
Determine Arch Spacing:
Decide on the width of your stripes—about 6 to 8 inches looks balanced for a mural of this scale. Mark these intervals outward from the center point along your horizontal baseline. -
Draw the Outermost Arch:
Secure the string to the center tack. Extend the string to your widest mark, keeping it taut, and lightly draw a semi-circle up and over to the opposite side. -
Draw the Inner Arches:
The string acts as your radius guide. Shorten the string to match each subsequent measurement mark and draw the concentric semi-circles until you reach the smallest, central arch. -
Extend the Lines Down:
Using your long level or a straight edge, draw straight plumb lines extending down from the ends of each semi-circle to the floor or wainscoting.
Step 3: Painting the Bands
-
Tape the Spacers:
To achieve the clean white separation lines shown in the image, carefully apply painter’s tape along your pencil lines. Ensure you tape on the *outside* of the paint area if you want thinner separation lines, or over the line itself for standard spacing. -
Seal the Tape Edges:
I always press the tape edges down firmly with a credit card or fingernail. Then, lightly brush a tiny amount of your base wall color over the tape edge to seal it and prevent the colored paint from bleeding under. -
Paint the Outer Band:
Start with your darkest color (Deep Rust). Use the angled sash brush to carefully cut in near the tape or ceiling definition layer, then fill the rest of the band with a roller for a smooth finish. -
Paint the Second Band:
Moving inward, apply the Muted Coral shade. Two thin coats are usually better than one thick coat to ensure opaque, even coverage. -
Paint the Third Band:
Apply the Warm Ochre paint to the middle band. Be careful where the wet paint edges align if you aren’t using tape for separation gaps (for a more organic hand-painted look). -
Paint the Fourth Band:
Fill the next section with the Soft Beige tone. Use your artists’ brush to navigate the tighter curve at the top of the arch. -
Paint the Center Arch:
Finish with the Cream or Off-white color in the smallest central arch. This color should mimic the brightest spot, creating a sense of depth and light.
Level Up: Texture
Mix a Texture Additive or baking soda into the rust and terracotta paints before applying. This mimics the raw, plaster-like look of real earthenware pottery.
Step 4: Finishing Touches
-
Remove Tape:
Remove the painter’s tape while the final coat of paint is still slightly tacky—pulling at a 45-degree angle ensures a crisp line without peeling dried paint. -
Touch Up:
Inspect your lines closely. Use a tiny detail brush and your base wall color to clean up any small bleeds or uneven spots. -
Final Cure:
Allow the full mural to cure for at least 24 hours before pushing the bed or furniture back against the wall.
Step back and enjoy the warmth and depth your new architectural mural brings to the room


Sunburst Halo Behind the Sofa
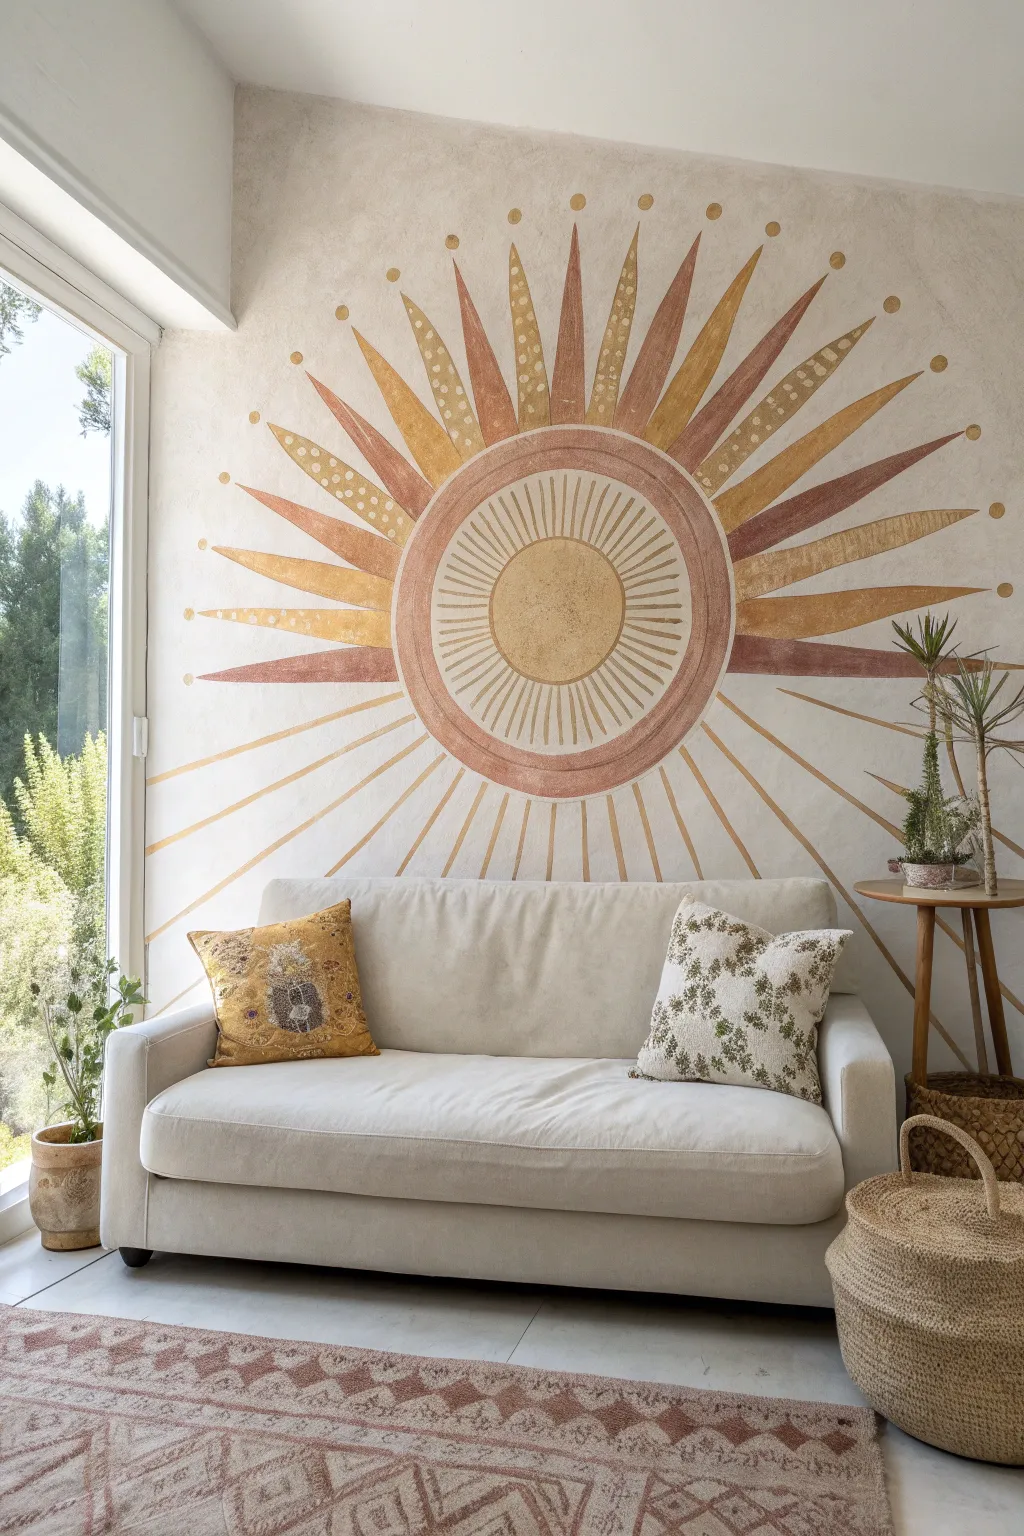
Transform a plain wall into a warm, bohemian focal point with this large-scale sunburst mural. Using a palette of terracotta and mustard tones, this project combines bold geometric shapes with delicate stippled details for a textured, artisanal look.
Step-by-Step Guide
Materials
- Interior latex paint (base wall color, off-white or cream)
- Acrylic or latex sample paints (terracotta, mustard yellow, deep rust, pale beige)
- Pencil and eraser
- String and pushpin (or a large compass tool)
- Yardstick or long straight edge
- Painter’s tape (optional, for crisp lines)
- Assorted paintbrushes (2-inch flat brush, 1-inch angled sash brush, fine liner brush)
- Small round sponge dabber or stencil brush
- Drop cloth
- Ladder or step stool
Step 1: Planning and Sketching
-
Prepare the canvas:
Begin by ensuring your wall is clean and painted with your desired base color. An off-white or warm cream works best to let the mural colors pop without feeling too stark. -
Measure the center point:
Determine exactly where you want the sun to sit. Since this design radiates outward, centering it behind your sofa—or slightly higher to account for the furniture height—is crucial for balance. -
Draw the central circles:
Create a makeshift compass by tying a string to a pencil. Pin the string at your center mark and draw three concentric (though not perfectly spaced) circles: a small inner core, a larger surrounding ring, and the outermost boundary for the sun’s body. -
Mark the rays:
Using your yardstick, lightly sketch the large, triangular rays extending from the outermost circle. Alternate their lengths and widths to mimic the organic, slightly imperfect style seen in the reference image. -
Add lower linear rays:
For the bottom half of the mural, sketch simple, straight lines radiating downward instead of full triangular shapes. This creates a grounded effect that disappears visually behind the sofa.
Uneven Circles?
Don’t stress if your compass slip-ups occur. Slight wobbles add to the organic, boho charm. You can correct major errors by cutting in with the base wall color.
Step 2: Painting the Core
-
Paint the inner sun:
Fill in the smallest central circle with a mustard yellow paint. Use a steady hand and a 1-inch brush to follow the curve carefully. -
Create the halo ring:
Paint the wide ring surrounding the center in a muted terracotta or pink-clay shade. I find that applying two thin coats here ensures solid coverage without brushstrokes showing too heavily. -
Detail the inner rays:
Once the central yellow circle is dry, mix a pale beige paint. use a fine liner brush to paint thin, radiating lines inside the space between the yellow core and the terracotta ring.
Step 3: Painting the Texture and Rays
-
Fill the primary rays:
Start painting the large triangular rays. Alternate your colors between the deep rust, mustard yellow, and terracotta. Leave a small gap of negative space between the base of each ray and the central circular body. -
Add the stippled texture:
Select specific rays (usually the lighter yellow ones) to add texture. Dip a small stencil brush or sponge dabber into a lighter cream paint and press gently to create rows of dots or a stippled fading effect inside the ray. -
Paint the decorative dots:
Using the tip of a round brush or your dabber, add a single solid dot floating just above the tip of each triangular ray. Keep these aligned with the point of the triangle. -
Execute the lower lines:
Paint the thin, straight lines radiating from the bottom half of the circle using a mix of your mustard and beige tones. These should look like simple sunbeams reaching toward the floor. -
Soften edges:
If any edges look too sharp or manufactured, use a nearly dry brush with a tiny amount of the wall color to feather the edges slightly, giving it that hand-plastered fresco vibe. -
Erase guidelines:
Once the paint is thoroughly dry (give it at least 24 hours to be safe), use a clean white eraser to gently remove any visible pencil marks remaining in the negative spaces.
Texture Pro Tip
Mix a small amount of baking soda or plaster powder into your acrylic paint for the rays. This physically builds texture, mimicking an old fresco look.
Step back and admire how this warm, radiant art piece completely changes the energy of your living space


Oversized Mandala Centerpiece

Transform your bedroom into a serene sanctuary with this breathtaking oversized mandala mural that acts as a visual headboard. Using warm earth tones and intricate linework, this hand-painted feature wall brings instant bohemian soul to any space.
How-To Guide
Materials
- Interior latex paint (Beige/Cream base)
- Acrylic craft paints (Terracotta, Burnt Sienna, Dark Charcoal/Black, Deep Beige)
- Wall painting stencil (Oversized mandala quarter or half stencil)
- Painter’s tape
- Pencil and eraser
- String and pushpin (for measuring center)
- Level
- Large stencil brush or sponge roller
- Assorted small detail brushes (round sizes 2, 4, 6)
- Fine liner brush (size 0 or 00)
- Paper towels
- Step ladder
Step 1: Preparation and Mapping
-
Prepare the workspace:
Clear furniture away from the wall to give yourself plenty of room to maneuver the ladder. Wipe the wall down with a damp cloth to remove dust, ensuring a clean surface for the paint to adhere to. -
Find your center point:
Measure the width of the wall or the width of your bed to determine the exact center line. Mark a small ‘X’ at the height where you want the mandala’s center to be; typically, eye level when sitting up in bed works well. -
Create a visual guide:
Using a string tied to a pencil and pinned to your center point, lightly sketch a large circle to define the outermost boundary of your mandala. This ensures your final design stays symmetrical and perfectly confined. -
Section the circle:
Use a level and a long straight edge to lightly draw a vertical line and a horizontal line through your center point, dividing your circle into perfect quadrants. These guide lines are crucial for stencil placement.
Step 2: Building the Terracotta Base Layers
-
Stencil the outer ring:
Begin with the outermost decorative ring. Align your stencil quadrant with the guide lines. Load your sponge or stencil brush with a mix of terracotta and burnt sienna paint. Offload excess paint onto a paper towel until the brush is almost dry. -
Apply the first layer:
Dab the paint gently through the stencil using a perpendicular motion to prevent bleed-under. Work your way around the circle, moving the stencil and re-aligning it with your quadrant marks as you go. -
Create the inner petals:
Move inward to the next major ring—the large floral petals. Switch to a slightly lighter terracotta shade by mixing in some beige. Stencil these large shapes carefully, ensuring the spacing between petal tips remains consistent around the circle. -
Fill the center core:
For the solid center circle and the immediate surrounding rings, you might want to freehand or use a circular object to trace. Paint the innermost circle a solid, warm terracotta tone and let it dry completely. -
Add connecting arches:
Even if your stencil doesn’t have them, consider adding connecting arches between the major petal layers using a lighter beige tone to create a cohesive flow between the separated rings.
Dry Brushing Secret
Always offload 90% of your paint onto a paper towel before hitting the wall. A ‘dry brush’ ensures crisp stencil edges and creates that textured, stamped look.
Step 3: Detailed Linework and Definition
-
Outline the center:
Switch to your fine liner brush and the dark charcoal paint. Start at the very center, outlining the core circle and drawing the delicate internal geometric patterns. I find creating these fine lines requires a steady hand and very little pressure. -
Detail the middle petals:
Move to the large middle petals. Use the charcoal paint to outline the terracotta shapes you stenciled earlier. Add intricate internal vein lines or smaller floral motifs inside each petal to mimic the look of a pen drawing. -
Incorporate geometric fills:
In the negative space between the terracotta rings, hand-paint geometric patterns like triangles, dots, or cross-hatching using the dark charcoal. This high-contrast linework gives the mural that distinct ‘tapestry’ feel. -
Enhance the outer ring:
Go back to the outermost ring. Use a small round brush to add darker accents to the tips of the design, intensifying the border so it frames the whole piece effectively. -
Add ‘faded’ effects:
To give the mural an aged, vintage look, take a dry brush with a tiny amount of your wall base color (cream/white) and lightly scuff over sections of the charcoal lines once they are fully dry. This simulates the texture of worn fabric. -
Clean up edges:
Step back and inspect your symmetry. If any stencil edges look messy, use your small brush and the wall’s base color to crisp them up. -
Erase guide lines:
Once the paint has cured for at least 24 hours, gently erase any visible pencil marks from your initial mapping phase.
Add Metallic Flair
For a magical touch, overlay select lines with gold leaf paint or a metallic copper pen. It will catch the sunlight and add dimension to the flat mural.
Step back and admire how this singular piece of art completely anchors your room with warmth and intricate beauty


Minimal Botanical Line Art Mural
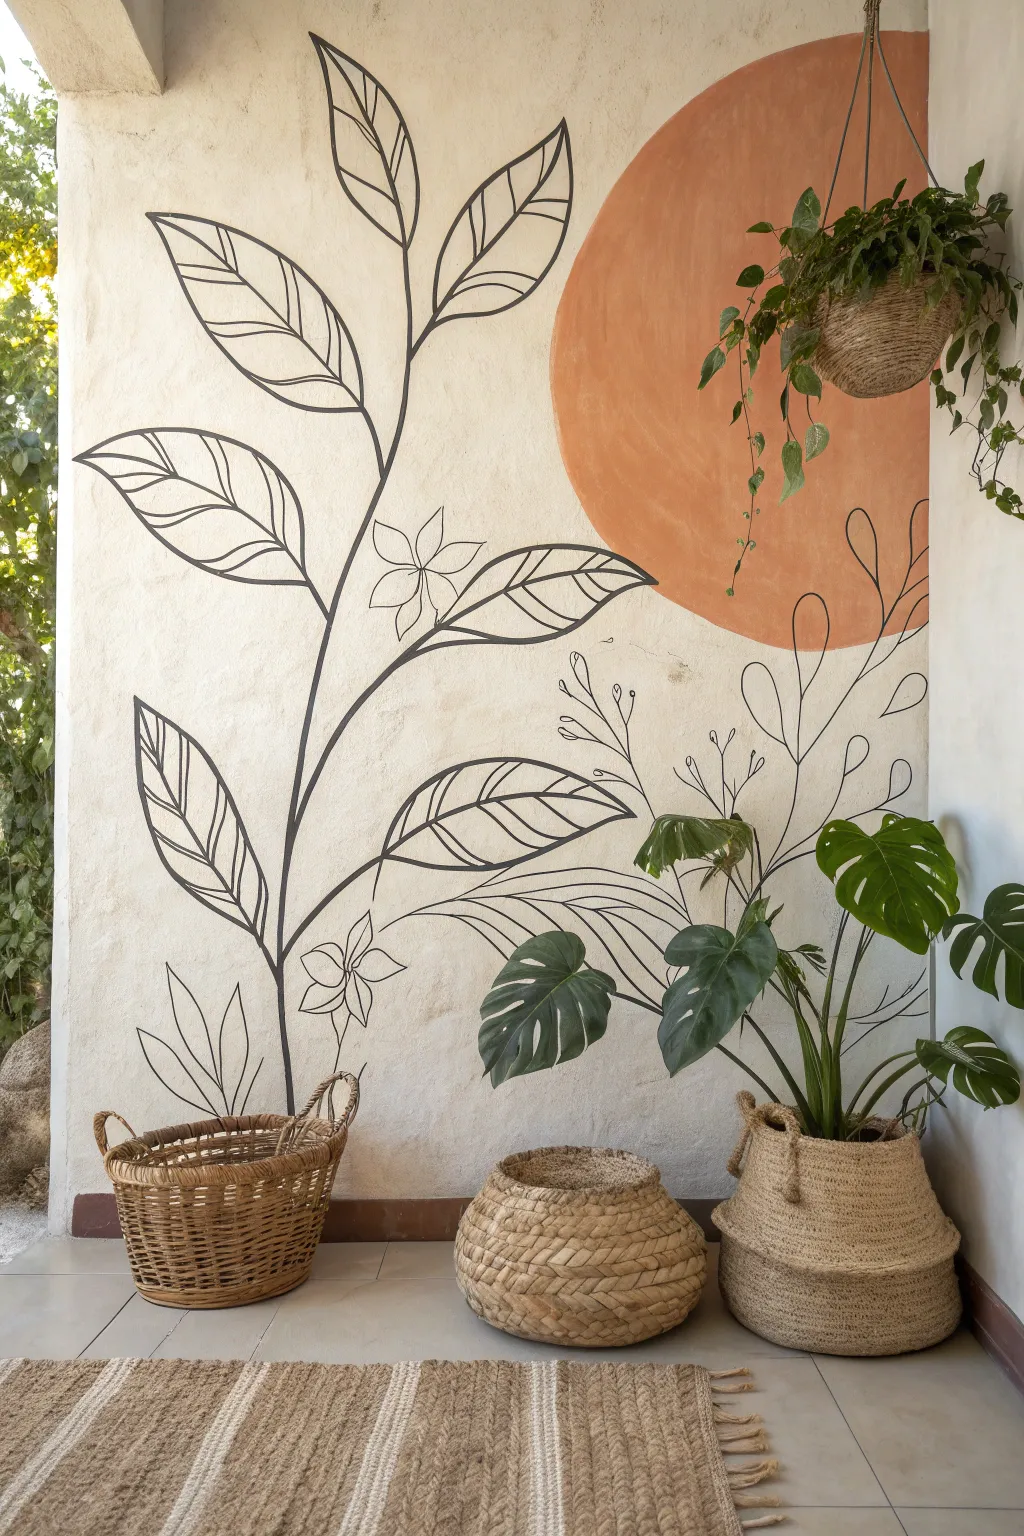
Transform a plain wall into a warm, artistic statement with this minimalistic mural that combines organic line work with bold geometric shapes. The earthy terracotta circle provides a stunning backdrop for the delicate, hand-painted botanical silhouettes, creating a cozy and inviting corner.
Step-by-Step Guide
Materials
- Interior latex paint (terracotta/burnt orange)
- Black acrylic paint or black interior paint
- Pencil
- Eraser
- String and thumb tack (or nail)
- Round artist brushes (sizes 2, 4, and 6)
- Angled sash brush (2-inch)
- Drop cloth
- Painter’s tape
- Step ladder (if needed)
Step 1: Preparation & The Sun
-
Prep the space:
Clear the area of furniture and lay down a drop cloth to protect your flooring. Wipe the wall down with a damp cloth to remove dust, ensuring a clean surface for the paint to adhere to. -
Determine the circle’s position:
Decide where you want your large terracotta circle. Located in the upper right quadrant creates a nice asymmetry. Mark the center point of your circle lightly with a pencil. -
Create a compass:
Cut a piece of string to the length of your desired radius (half the width of the circle). Tie one end to a pencil and the other to a thumb tack or small nail. -
Draw the circle:
Secure the tack at your center mark. Pull the string taut and carefully swing the pencil around to draw a perfect circle guideline on the wall. -
Outline the edge:
Using a small angled brush or a larger round brush, carefully paint the outline of the circle with your terracotta paint. Focus on keeping a crisp, smooth edge along the pencil line. -
Fill the shape:
Switch to your 2-inch angled sash brush to fill in the rest of the circle. Use distinct, somewhat multidirectional strokes if you want to mimic the textured, plaster-like look in the photo, rather than rolling it perfectly smooth. -
Let it dry completely:
Allow the terracotta paint to dry for at least 4-6 hours. If the coverage looks patchy, apply a second coat and let it dry overnight before starting the line work.
Clean Edges
Painting over a textured wall can lead to fuzzy lines. If your black lines bleed, wait for them to dry, then use a tiny brush with your original wall color to touch up and sharpen the edges.
Step 2: Drawing the Botanicals
-
Sketch the main stem:
Using a pencil, lightly sketch the primary S-curve of the main plant stem. Start low on the left and curve it upwards, letting the top branches reach towards the terracotta sun. -
Add leaf placement:
Sketch the outlines of the large leaves. Keep the shapes simple—almond-like forms with pointed tips. Draw a few leaves overlapping the terracotta circle to create depth. -
Detail the veins:
Draw the center vein lines for each leaf. Add the smaller, angled lines for the leaf texture, keeping the spacing somewhat loose and organic. -
Add floral elements:
Sketch a few small, five-petaled flowers near the base of the stems or tucked between leaves to break up the foliage. -
Include secondary stems:
On the right side, beneath the sun, sketch thinner, more upright stems with smaller, simpler leaves or buds to balance the composition. -
Check your composition:
Step back and look at the entire wall. Make sure the large leaves on the left balance the circle on the right. Erase and adjust any lines that feel crowded.
Texture Play
To mimic the limewash look in the photo, mix a little baking soda or plaster of paris into your terracotta paint. This adds grit and dimension to the sun shape.
Step 3: Painting the Lines
-
Prepare black paint:
Pour some black paint into a small cup. If the paint is very thick, I like to thin it slightly with a drop of water to help the brush glide more smoothly for long lines. -
Paint the main stems:
Load a size 4 or 6 round brush and paint the main stems first. Use long, confident strokes. Apply more pressure at the base of the stem for thickness and lift off as you reach the tips. -
Outline leaves:
Switch to a size 4 brush to trace the outer perimeter of the leaves. Try to vary the line weight slightly—thicker in some spots, thinner in others—to keep it looking hand-drawn. -
Add fine details:
Using a size 2 brush, paint the delicate internal veins of the leaves and the small flower petals. Use a very light touch here; these lines should be finer than the stems. -
Paint the background stems:
Paint the whimsical, thinner stems on the right side using the size 2 brush. These should feel lighter and airier than the main plant. -
Final touches:
Once dry, gently erase any visible pencil marks. Step back and thicken any lines that feel too faint to ensure they stand out against the wall texture.
Now you have a stunning, oversized piece of art that brings a desert-chic vibe to your room
BRUSH GUIDE
The Right Brush for Every Stroke
From clean lines to bold texture — master brush choice, stroke control, and essential techniques.
Explore the Full Guide
Lush Jungle Leaves Corner Wrap
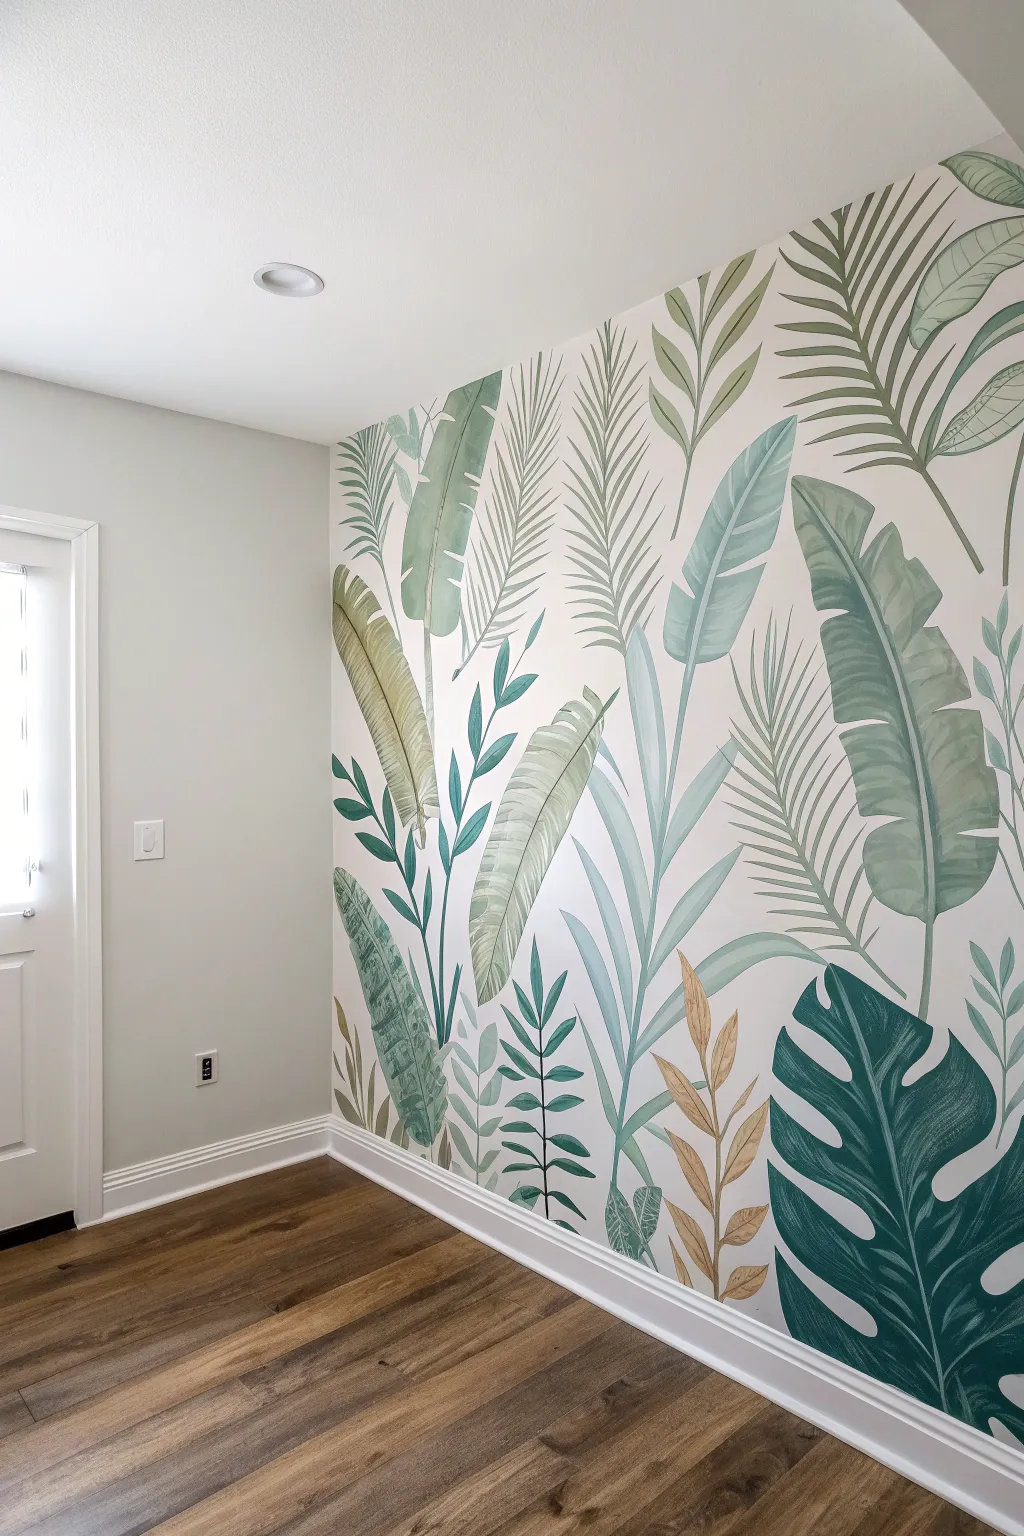
Transform a plain white wall into a lush, illustrated conservatory with this large-scale leaf mural. Using a mix of specific greens and flowing brushstrokes creates a breezy, bohemian atmosphere that feels organic rather than rigid.
Step-by-Step Tutorial
Materials
- Interior latex paint (matte or eggshell base in white/light grey)
- Acrylic paints (Forest Green, Teal, Sage, Olive, Raw Sienna/Gold)
- Glazing medium
- Pencil and large eraser
- Assorted brushes (2-inch flat, 1-inch angle, round sizes 4 and 8)
- Step ladder
- Projector (optional but recommended)
- Painter’s tape and drop cloth
- Mixing cups or palette
Step 1: Preparation & Sketching
-
Prep the space:
Clear the corner area completely and lay down your drop cloth to protect the flooring. If your base wall color isn’t already a crisp, clean tone, apply a fresh coat of light grey or off-white interior latex paint and let it cure for at least 24 hours. -
Map out the composition:
Stand back and visualize where your largest leaves will go. You want the design to feel like it’s growing up from the floor, so anchor your biggest shapes—like the large monstera and banana leaves—near the bottom right and middle sections. -
Draft the outlines:
Using a projector will save you a lot of headache here; project a botanical line art pattern onto the wall and lightly trace it with a pencil. If drawing freehand, start with the central veins (the ‘spines’) of the leaves first to establish direction and flow before adding the outer leaf shapes. -
Refine the sketch:
Step back frequently to check the balance. You want varied heights—some leaves reaching the ceiling, others filling the mid-wall. Lighten your pencil lines with an eraser so they don’t show through lighter paint colors later.
Step 2: Blocking in Color
-
Mix your palette:
Prepare several shades of green in separate cups. Mix your acrylics with a bit of glazing medium—this is crucial for achieving that semi-transparent, watercolor-look seen in the reference image. I like to keep a pure white handy to create instant tints. -
Paint the large Monstera:
Start with the darkest focal point, the large leaf in the bottom right. Use a deep teal-green mix. Fill the shape using the 1-inch angle brush, keeping your strokes following the direction of the veins. -
Add mid-tone leaves:
Move to the banana leaves and fan palm shapes. Use a sage green and a muted olive for these. Apply the paint somewhat thinly; it’s okay if the wall texture shows through slightly, as it adds to the illustrated vibe. -
Incorporate accent colors:
Locate the smaller, fern-like sprigs near the bottom. Paint these in a raw sienna or brownish-gold tone to break up the sea of green and add warmth to the composition. -
Address the heights:
Use your lightest, minty-green mix for the tallest leaves reaching toward the ceiling. Lighter colors at the top help the ceiling feel higher and the room airier.
Don’t Panic If You Drip
Keep a damp rag and a small cup of your base wall color nearby. If you drip or make a mistake, wipe it immediately or let it dry and paint over it with the wall color—it acts like a real-life eraser.
Step 3: Detailing & Veining
-
Begin vein work:
Once the base layers are dry to the touch, switch to your round brushes. Mix a slightly darker version of each base color (add a touch of blue or brown) to paint the central stems. -
add textural lines:
For the large banana leaves, use a fine liner brush to create thin, closely spaced lines radiating from the center vein to the edge. This mimics the natural texture of the leaf. -
Layering transparent washes:
Creating depth is key. Mix a very watery, transparent glaze of a darker green and apply it to one half of a leaf (taping off the center line if you need a crisp edge). This makes the leaf look folded and dimensional. -
Define the edges:
Go around the outer edges of your main leaves with a crisp line to clean up any fuzzy brushstrokes. This makes the illustration look polished and graphic. -
Fill the gaps:
Step back and look for empty white spaces that feel unbalanced. Add simple, single-stroke stems or small floating leaves in light sage to connect the larger elements. -
Final touches:
Check the bottom near the baseboard. Ensure your stems look like they disappear naturally behind furniture or the floor trim, rather than floating awkwardly in mid-air.
Add Metallic Shimmer
For a luxe boho twist, trace the central veins of the gold/brown leaves with a metallic gold paint pen. It catches the sunlight beautifully during the day.
Enjoy the calm atmosphere your new indoor jungle brings to the room
Soft Desert Dunes Panorama
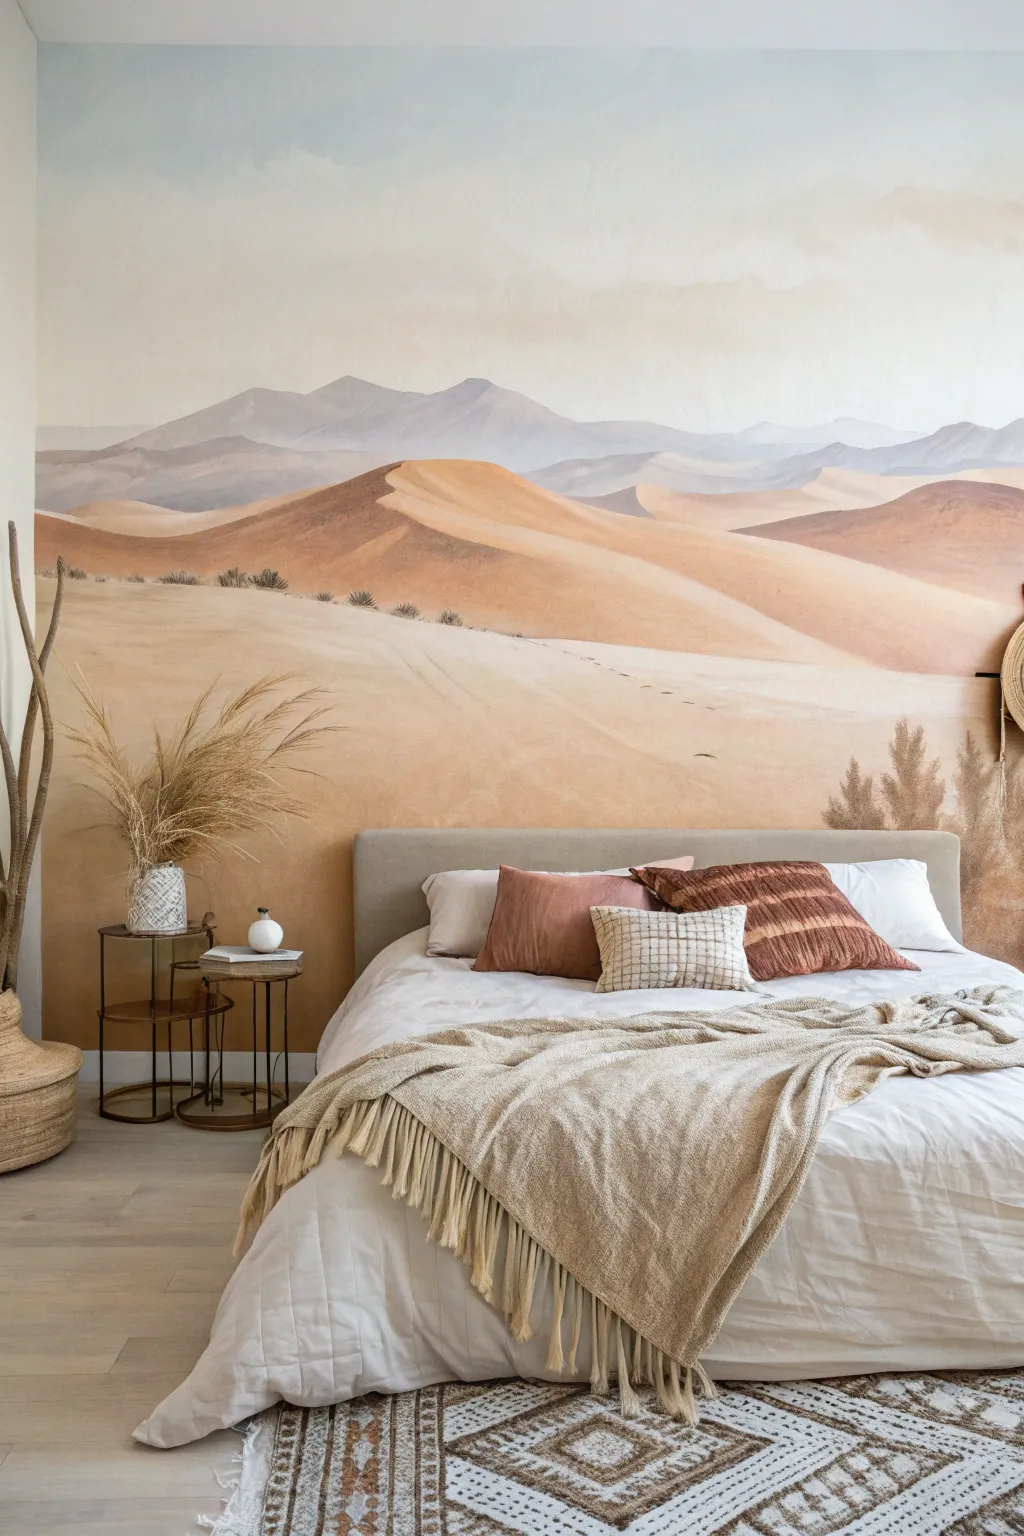
Transform a plain wall into a serene desert oasis using this soft-focus mural technique that captures the warmth of shifting sand and distant mountains. The result is a dreamy, large-scale watercolor effect that anchors the room in earthy tranquility.
Step-by-Step
Materials
- Matte interior latex paint (White for base)
- Acrylic or latex sample pots (Terracotta, Sandy Beige, Taupe, Cool Grey, Deep Brown)
- Glazing medium
- Large paintbrush (4-inch synthetic)
- Medium paintbrush (2-inch synthetic)
- Wide sea sponge or rag
- Painter’s tape
- Drop cloth
- Mixing buckets or trays
- Water spray bottle
- Ladder
Step 1: Preparation and Sky
-
Prepare the canvas:
Begin by clearing the wall area and laying down your drop cloth. If the existing wall color isn’t already a bright, neutral white, apply a fresh coat of matte white base paint to ensure your translucent layers will show through true to color. -
Plan the horizon:
Step back and visualize where your horizon line will sit. Lightly sketch a faint, undulating line with a pencil about one-third of the way up the wall to mark where the sand meets the mountains. -
Mix the sky glaze:
In a mixing bucket, combine a very small amount of Cool Grey paint with a generous amount of glazing medium and a splash of water. You want a mixture that is milky and translucent, not solid. -
Wash the sky:
Starting from the top of the wall, use the large 4-inch brush to apply the grey glaze in sweeping, horizontal motions. As you work your way down toward the horizon line, add more water to your brush to fade the color out, leaving the area just above the mountains nearly white.
Glaze Drying Too Fast?
If your paint is tacking up before you can blend it, add a retarder medium to your acrylic mix. This extends working time, allowing for those perfect, smoky transitions between sand and shadow.
Step 2: Mountain Layers
-
Sketch the peaks:
Once the sky is dry to the touch, sketch the outlines of your distant mountain range. Create overlapping shapes of varying heights, keeping the lines soft and organic rather than jagged. -
Mix mountain colors:
Create three shades of grey-purple by mixing Cool Grey with a touch of Taupe and varying amounts of white. You need a dark, medium, and light tone to create atmospheric perspective. -
Paint the furthest range:
Paint the most distant mountain peaks using your lightest grey-purple mix. Keep the edges soft; I find using a damp sponge to blur the top edge slightly helps it recede into the mist. -
Layer the middle mountains:
Move to the next range of mountains slightly lower on the wall, using the medium-tone mix. Overlap the bottom of the first range to create depth. -
Define the foreground mountains:
Paint the largest, closest mountain shapes with the darkest of your three grey-purple mixes. Ensure the bottom of this layer transitions smoothly into where your sand dunes will begin.
Pro Tip: Depth of Field
Keep the foreground detailed and warm (redder/darker), and make the background cooler (bluer/lighter) and blurrier. This atmospheric perspective trick makes the room feel huge.
Step 3: Sculpting the Dunes
-
Block in base sand colors:
Mix a large batch of Sandy Beige with glazing medium. Apply this as a wash over the entire bottom third of the wall, sweeping in long, curved strokes that mimic the shape of rolling hills. -
Establish the main dune:
Identify the primary focal point—the large swooping dune in the center. Use the Terracotta paint mixed with glaze to paint the shadowed side of the dune. -
Blend the ridge line:
While the paint is still wet, use a clean, damp brush to soften the transition between the Terracotta shadow and the Sandy Beige light side. The goal is a soft gradient, not a harsh line. -
Add secondary dunes:
Paint smaller, receding dune shapes in the background using a lighter mix of Terracotta and Beige. Make these shapes less defined and hazier than the main foreground dune. -
Mist and soften:
Stand back frequently. If any area looks too sharp or paint-by-numbers, mist it lightly with your spray bottle and use a dry brush to feather the edges together.
Step 4: Final Details
-
Paint foreground texture:
Mix a diluted Deep Brown wash. Using a smaller brush, lightly drag paint horizontally across the very bottom of the wall to suggest flat ground and texture near the viewer. -
Add distant vegetation:
Using a small, round brush and the Deep Brown paint (undiluted), dab in tiny, irregular clusters along the ridge lines of the dunes to represent sparse desert shrubs. -
Create ghost trees:
On the far right or left edges, paint faint vertical shapes representing trees or tall scrub. Use a very watery brown-grey mix so they appear to be fading into the peripheral vision. -
Highlight the crests:
Mix a creamy off-white. Carefully run a thin line of this color along the very sharpest top edge of your main dune to catch the imaginary sunlight. -
Final blending check:
Walk to the far side of the room. Look for any distraction or hard edges and soften them with a final, very lighter glaze of water and beige if necessary.
Step back and enjoy the expansive, calming atmosphere your hand-painted desert landscape now brings to your space

PENCIL GUIDE
Understanding Pencil Grades from H to B
From first sketch to finished drawing — learn pencil grades, line control, and shading techniques.
Explore the Full Guide
Boho Moon Phases Row
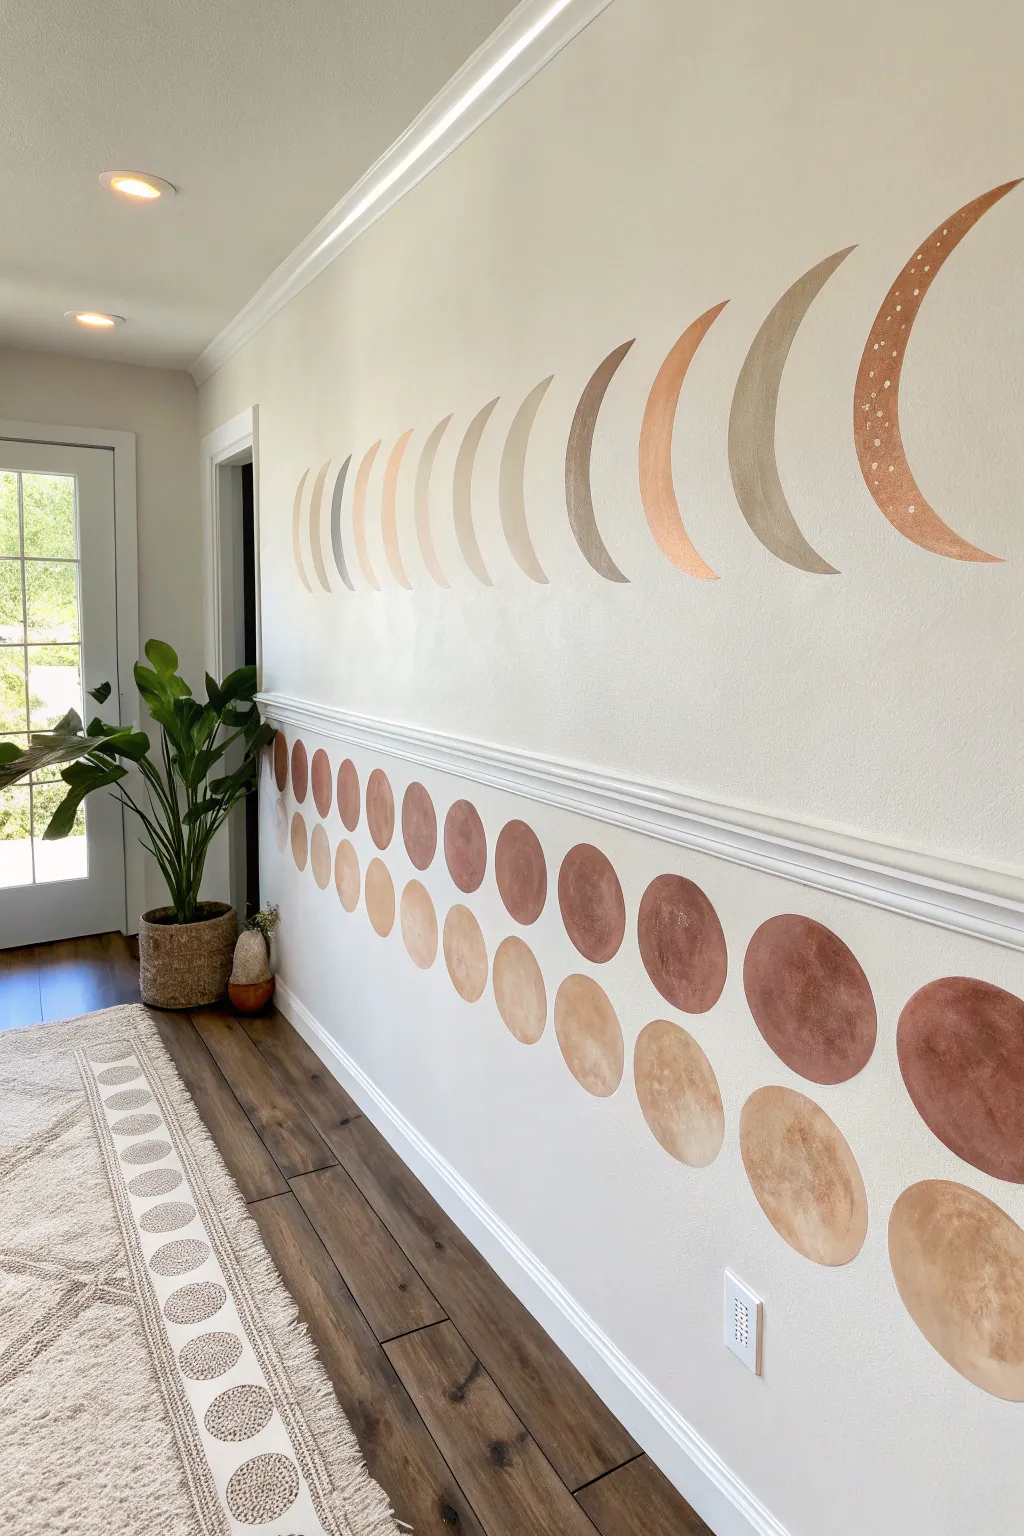
Transform a plain hallway or bedroom wall into a celestial feature with this deceptively simple hand-painted mural. Featuring earthy terracotta and beige tones, the dual-design layout combines a sweeping moon phase arc with a structured, rhythmic pattern of full moons below the chair rail.
Detailed Instructions
Materials
- Latex wall paint (terracotta, beige, blush pink, metallic gold)
- Pencil
- String and push pin (or circle stencils)
- Small angled sash brush (1.5 inch)
- Round watercolor brushes (various sizes)
- Painter’s tape
- Level
- Extender or glaze medium (optional for transparency)
- Paper plate or palette
- Eraser
- Chair rail molding (optional existing element)
Step 1: Preparation & Planning
-
Prep the surface:
Begin by ensuring your wall is clean and dust-free so your paint adheres smoothly. If you have an existing chair rail, use painter’s tape to protect the top edge where it meets the wall. -
Establish the horizon line:
For the upper moon phases, use a level and a pencil to very lightly mark a straight horizontal guideline across the wall where you want the center of your moons to sit. -
Mark the spacing:
Decide how wide your moon cycle will be. I like to mark the center point on the guideline, then measure equal distances outward to the left and right for each subsequent phase.
Step 2: Drafting the Shapes
-
Sketch the upper crescent moons:
Starting from the outside right, draw a large crescent shape. You can use two different sized bowls or circle templates to create the inner and outer curves, or freehand it for a more organic boho look. -
Progress the phases:
Move inward to the left, drawing the next moon slightly wider (more ‘waxing’). Continue this until you reach the center, ensuring the curves differ slightly to represent the changing lunation. -
Draft the lower full moons:
Below the chair rail (or a painted line), use a compass or a string tied to a pencil to draw two staggered rows of perfect circles. Keep the spacing consistent between them.
Clean Curves Cheat
If freehanding curves is tough, cut your moon shapes out of contact paper first. Stick them to the wall as stencils to sponge paint inside for crisp edges.
Step 3: Painting the Upper Moons
-
Outline the edges:
Using a small angled brush and your darkest terracotta or metallic copper paint, carefully cut in the sharp points and curves of the largest right-side crescent. -
Fill the shape:
Fill in the body of the crescent. For that textured, watercolor-like appearance seen in the photo, don’t aim for solid opacity; let some brushstrokes show or slightly water down your paint. -
Add detailing:
While the paint is wet, dab a slightly lighter beige color onto the crescent to add dimension. On the far right moon, use a fine tip brush to add tiny white or gold speckles for a cosmic dust effect. -
Paint the gradient:
As you move to the moons on the left, gradually switch your paint color to lighter beige and grey tones. Mixing your paints on a paper plate helps create a seamless transition from dark copper to pale taupe.
Metallic Magic
Mix a clear glazing medium with gold mica powder and lightly dry-brush it over the dried terracotta moons for a subtle shimmer that catches the light.
Step 4: Painting the Lower Pattern
-
Outline the circles:
Switch to the area below the moulding. Using your angled brush, carefully outline the pencil circles. This requires a steady hand, so brace your pinky finger against the wall for stability. -
Create texture:
Fill the circles using a mix of terracotta and warm beige. Instead of brushing flat, use a dabbing or swirling motion to mimic the surface of a planet or moon. -
Layering colors:
While the base coat is tacky, introduce a second color—perhaps a deeper brown or lighter cream—into the wet paint to create a marbled, organic look. -
Refining edges:
Once the main shapes are dry, go back with a small detail brush and touch up any wobbly edges to ensure the circles look crisp against the white background.
Step 5: Finishing Touches
-
Erase guidelines:
Wait until the paint is completely cured (at least 24 hours) before gently erasing any visible pencil marks. Be careful not to scrub the paint itself. -
Clean up:
Remove the painter’s tape from the chair rail slowly, pulling it at a 45-degree angle away from the wet edge to ensure a sharp line.
Step back and admire the peaceful rhythm your new lunar artwork brings to the space
Muted Rainbow Arc Mural
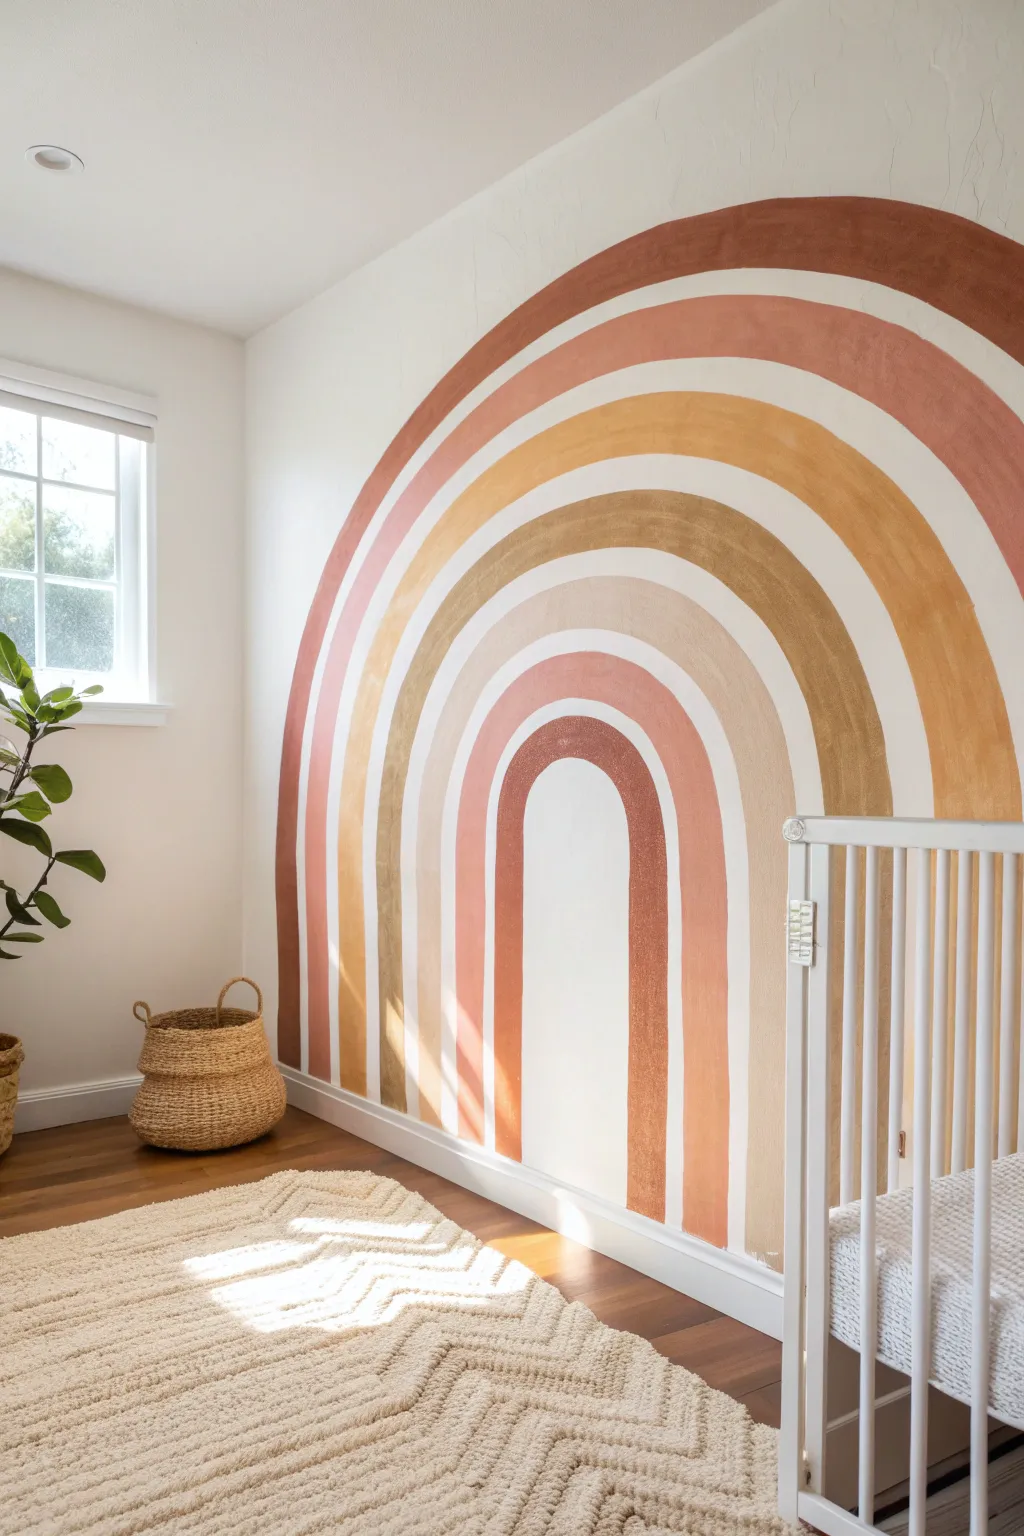
Transform a blank wall into a warm, bohemian focal point with this large-scale painted arch. Featuring a palette of terra cotta, ochre, and sand, this mural brings a soft, organic feel to any nursery or bedroom space.
Step-by-Step Guide
Materials
- Interior latex paint (sample pots work perfectly) in 5-6 distinct earthy colors: deep rust, clay pink, mustard yellow, tan, beige, and light peach
- Painter’s tape or chalk/pencil
- String and a thumb tack (for the compass method)
- Small angled sash brush (1.5 to 2 inch)
- Medium flat brush (for filling in)
- Drop cloth
- Ladder or sturdy step stool
- Damp rag for quick cleanups
Step 1: Preparation & Mapping
-
Prepare the wall:
Start by cleaning the wall surface with a damp cloth to remove any dust or oils. If your base wall color is dark, consider priming the area white first so the muted colors pop true to tone. -
Establish the center point:
Determine the exact center of where you want your rainbow to sit. Since this rainbow starts from the floor, measure along the baseboard to find the middle and mark this spot with a pencil just above the trim. -
Create a string compass:
Tie a piece of non-stretchy string to a pencil. Tach or tape the other end of the string to your center mark at the floor level. The length of the string will determine the size of your outermost arch. -
Draw the guide arcs:
Hold the string taut and lightly sketch the largest distinct semicircle on the wall. Shorten the string by about 4–6 inches (depending on how thick you want your stripes) and draw the next inner line. Repeat this process until you have guidelines for all your color bands. -
Review the layout:
Step back and look at your pencil or chalk lines. The beauty of this mural is its hand-painted feel, so don’t worry if the spacing varies slightly, but ensure the overall shape feels balanced.
Step 2: Painting the Arcs
-
Start with the outermost color:
Begin with your darker, rust-colored paint for the top outer band. Using your angled sash brush, carefully cut in the top edge of the arc, following your pencil line smoothly. -
Fill the first band:
Once the edge is defined, fill in the rest of the band width. I prefer to paint in sections, working from one side of the arc to the other to keep a wet edge. -
Move to the second color:
Select a lighter, terra cotta pink for the second band. Leave a small gap (about 1/2 inch) of white wall showing between this stripe and the first one to create that distinct separated look. -
Paint the middle bands:
Continue working inward with your ochre/mustard yellow and tan colors. Focus on maintaining a consistent white gap between each color stripe as you go. -
Paint the inner arches:
Finish with the smallest, innermost arches using your beige and lightest peach tones. The smallest arch is often the trickiest angle, so take your time with the brush strokes here. -
Double check opacity:
Some lighter colors, especially yellows and tans, might look streaky with just one coat. Let the first layer dry completely (check your paint can, usually 1-2 hours) before assessing if a second coat is needed. -
Apply second coats:
If needed, apply a second coat to any bands that look uneven. This creates that rich, velvety finish seen in boho murals.
Wobbly Lines?
Embrace the imperfection! If your hand is unsteady, broaden the white gaps between arches. The extra negative space makes small wobbles much less noticeable to the eye.
Step 3: Finishing Touches
-
Refine the edges:
Inspect the edges of your painted bands. If any lines look too wobbly, use a small artist’s brush with the wall’s base color to “erase” or tidy up the mistakes. -
Clean the baseboard:
If you didn’t tape off the baseboard perfectly, check for any drips at the bottom and wipe them away or touch up with trim paint. -
Allow full cure:
Let the mural dry for at least 24 hours before placing furniture, like a crib or dresser, up against it to prevent scuffing the fresh latex.
Texture Tip
For an old-world fresco look, mix a tiny bit of baking soda into your paint cups. It adds a subtle gritty texture that makes the mural feel like plaster rather than flat paint.
Step back and admire how these warm, earthy arches completely change the feeling of the room, adding height and coziness all at once


Earthy Geometric Color Blocks
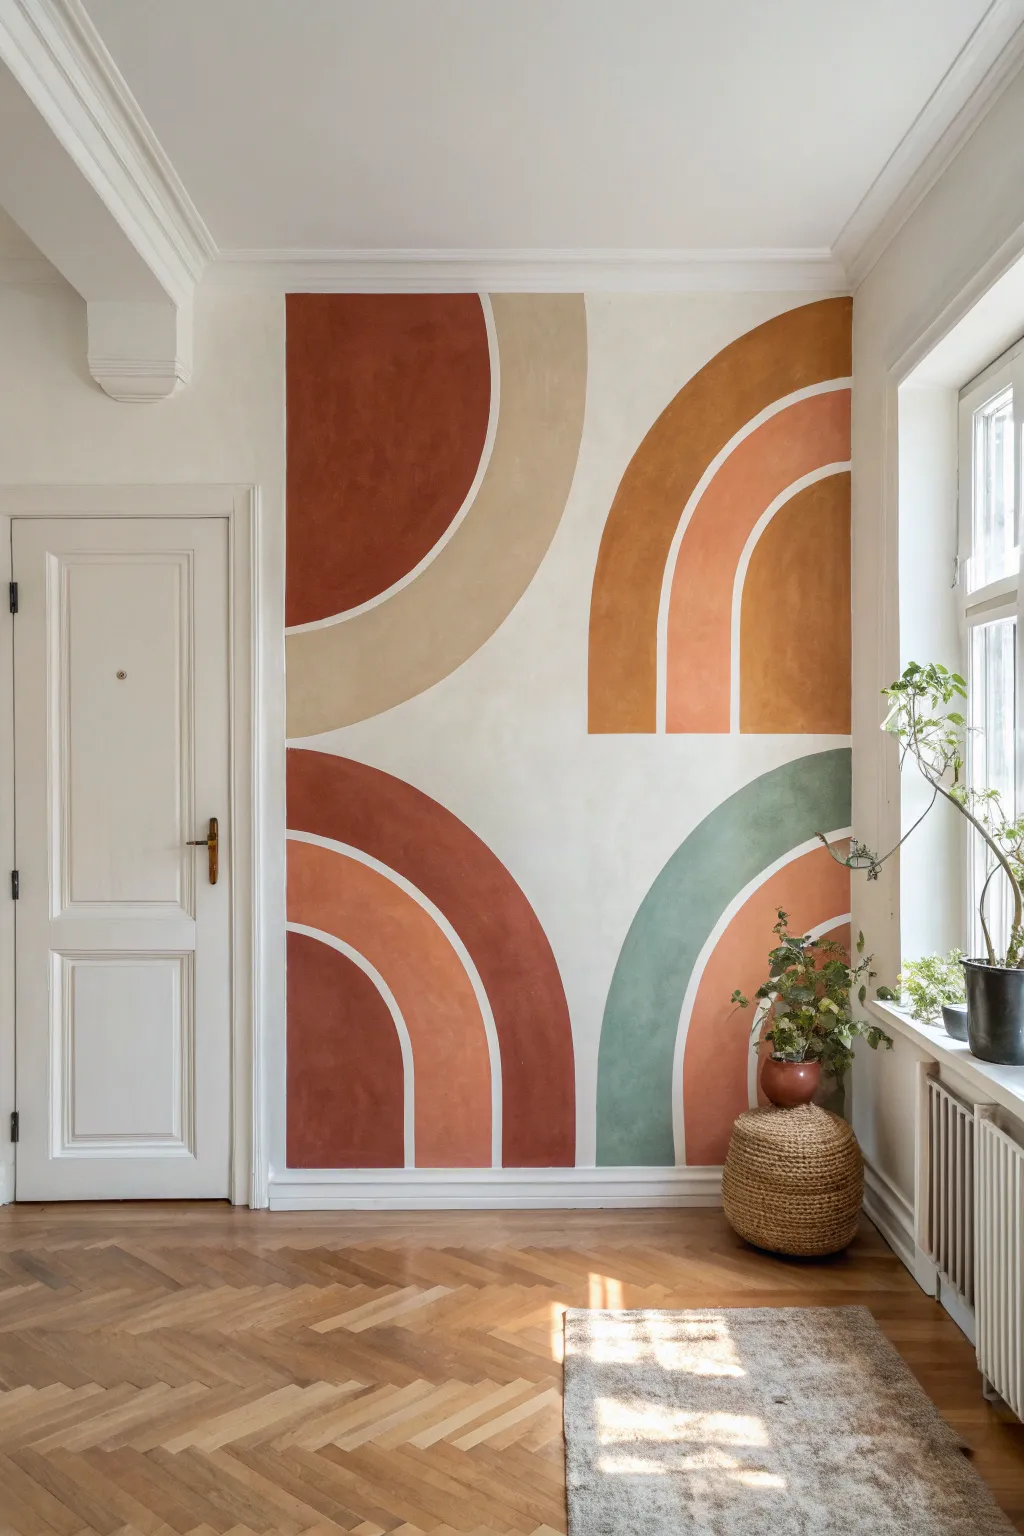
Transform a plain white wall into a statement piece with this earthy, geometric mural featuring sweeping arches and bold color blocks. The warm terracotta, rust, sage, and sand tones bring a cozy, grounded feel to any room while maintaining a modern aesthetic.
Detailed Instructions
Materials
- Interior latex paint (Eggshell or Matte finish) in 5 colors: Burnt Orange, Terracotta, Sand/Beige, Mustard Yellow, Sage Green
- Painter’s tape (various widths)
- Pencil
- String or twine
- Push pin or nail
- Small angled paintbrush (1.5 – 2 inch)
- Small foam roller and tray
- Artist’s brush (for touch-ups)
- Drop cloth
- Eraser
- Tape measure
- Level
Step 1: Preparation & Mapping
-
Clear and Prep:
Start by clearing the wall area completely. Remove any outlet covers or nails, patch holes if necessary, and wipe the wall down with a damp cloth to remove dust. Lay down your drop cloth to protect those beautiful herringbone floors. -
Establish the Grid:
Visualize the wall as a quadrant. Use a tape measure to find the center point of your wall both vertically and horizontally. Lightly mark this center point with a pencil; this will be the anchor for your four main sections. -
Drafting the Upper Left Curve:
For the top-left quarter, measure the radius for the large semi-circle. Attach a string to a pencil and pin the other end at the vertical center line. Swing the pencil to draw a large, smooth arc that creates the boundary between the rust color and the sand color. -
Adding Concentric Bands:
Using the same center point, shorten your string to outline the inner rust-colored semi-circle. This creates the ‘rainbow’ effect where the sand color acts as a thick band hugging the inner shape. -
Drafting the Upper Right Arches:
Move to the top-right quadrant. This section features three concentric arches originating from the bottom line of the quadrant. Pin your string at the bottom center of this section and draw three concentric arches of varying widths for the mustard and terracotta bands. -
Drafting Lower Sections:
Repeat the string-compass method for the bottom two quadrants. The bottom-left mirrors the top-right’s concentric style but uses rust tones, while the bottom-right features a large sage green arch with a smaller terracotta inner arch. -
Refine Lines:
Step back and look at your pencil marks. Use a level to ensure the vertical and horizontal gaps between the quadrants are straight and even, creating a distinct white cross-shaped negative space in the middle.
Step 2: Painting
-
Tape the White Space:
Apply painter’s tape along the straight edges of your quadrants to preserve the white ‘cross’ background and the borders. Press the edges down firmly to prevent bleed-through. -
Cutting In Curves:
For the curved edges, you have two options: carefully freehand with an angled sash brush, or use flexible painter’s tape designed for curves. I usually prefer to freehand slowly for a more organic, hand-painted look. -
Painting the Darkest Tones:
Start with the darkest color, the deep burnt orange in the top left and bottom left. Outline the shape first with your angled brush, cutting in the edges cleanly. -
Filling the Dark Sections:
Once the outline is wet, use a small foam roller to fill in the large areas of burnt orange. This ensures a smooth texture without brush strokes. Let this coat dry. -
Painting Medium Tones:
Switch to your Terracotta and Mustard colors. Apply these to the specific bands in the top-right and bottom-left arches. Use a fresh brush or wash yours thoroughly between colors to avoid muddying the tones. -
Applying the Sage Green:
Move to the bottom-right quadrant and paint the large outer arch in Sage Green. This cool tone balances the warmth of the other sections. Be patient around the curves. -
Applying the Sand Beiges:
Finally, paint the large beige band in the top-left section. This lighter color might need an extra coat to ensure full coverage over the white wall. -
Second Coats:
Allow the first layer of all colors to dry for at least 2-4 hours. Apply a second coat to any areas that look patchy or uneven to get that rich, matte pigmentation seen in the photo.
Clean Curve Secret
To seal your tape edges on textured walls, paint a thin layer of the base wall color (white) over the tape edge first. This fills gaps so your colored paint sits perfectly on top.
Step 3: Finishing Touches
-
Remove Tape:
While the second coat is still slightly tacky (not fully dry), carefully peel off the painter’s tape at a 45-degree angle. This prevents the dried paint from peeling off with the tape. -
Touch Ups:
Inspect your edges. Use a tiny artist’s brush and a bit of the white wall paint to sharpen straight lines or fix any accidental drips that crossed into the negative space. -
Erase Marks:
Once the paint is fully cured (give it 24 hours), gently erase any visible pencil marks remaining in the unpainted white areas.
Shaky Hands?
If freehanding curves is difficult, use a specifically designed flexible curving tape. Stretch it as you apply to create smooth arcs without the need for steady brushwork.
Step back and admire how these warm, organic shapes completely redefine the energy of your space
Dreamy Watercolor Wash Clouds
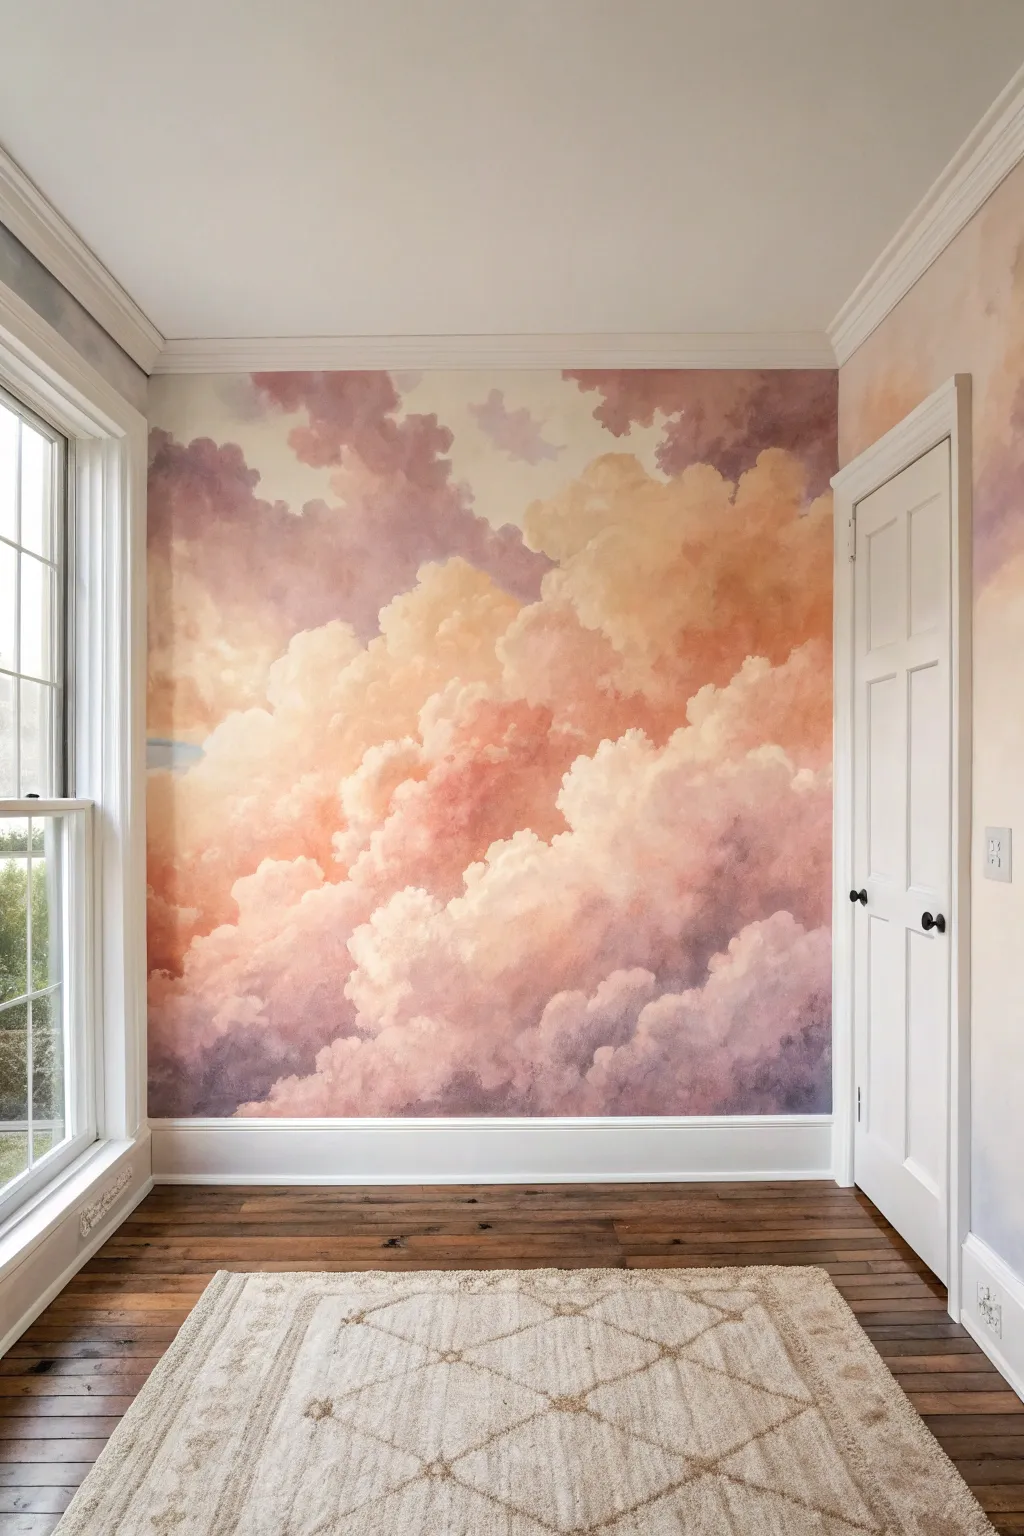
Transform a plain white wall into a breathtaking skyscape filled with voluminous, cotton-candy clouds. This mural uses soft blending techniques to capture the ethereal glow of a sunset in tones of violet, peach, and cream.
Step-by-Step Tutorial
Materials
- Interior latex or acrylic wall paint (white, cream, mauve, deep purple, peach, orange)
- Glazing medium (slow-drying)
- Large blending brushes (4-inch)
- Medium round brushes
- Sea sponge or synthetic painting sponge
- Painter’s tape
- Drop cloths
- Water spray bottle
- Mixing trays or disposable plates
- Paint rollers and tray (for base coat)
- Rags or paper towels
Step 1: Preparation & Base Coat
-
Prepare the workspace:
Clear the room of furniture or move it to the center. Lay down drop cloths to protect the wood flooring. Apply painter’s tape to the trim, ceiling line, and door frames to ensure crisp edges. -
Apply the base color:
Roll on a coat of your lightest background color, likely a very pale cream or off-white. This acts as the light behind the clouds. Let this layer dry completely, usually for about 4–6 hours. -
Mix your palette:
Pour your paint colors onto separate trays. Mix a generous amount of glazing medium into each color (roughly a 1:1 ratio, but check the product label). This transparency is key to the watercolor look.
Cloud Control
If a cloud looks too heavy or dark, let it dry completely, then ‘erase’ it by scumbling a thin layer of white over it. You can rebuild the shape softly.
Step 2: Blocking the Cloud Shapes
-
Map the darks:
Starting with the deep purple and mauve mixed with glaze, use a large brush to loosely block in the shadowed areas of the sky. Focus these darker tones near the corners and the bottom third of the wall. -
Add the mid-tones:
While the purple is still tacky or wet, introduce the peach and orange tones. Apply these loosely in the center and upper-middle sections where the ‘sun’ would be hitting the clouds. -
Blend the transition:
Use a clean, damp large brush or a sponge to soften the edges where the purple meets the peach. The goal isn’t perfect blending yet, just removing harsh lines.
Step 3: Building Fluff & Volume
-
sponge technique for texture:
Dip a dampened sea sponge into your creamy white paint. Dab it lightly over the transition areas to start forming the fluffy tops of the clouds. -
Defining the cloud tops:
Load a medium round brush with opaque white (less glaze this time). Outline the upper, billowy edges of the main cloud formations, creating rounded, organic humps. -
Scumbling the body:
Using a dry brush technique (scumbling), scrub the white paint downwards into the peach and purple areas. This fades the brightness of the cloud top into the shadow of the cloud bottom. -
Layering shadows:
Go back in with your mauve glaze. tucked right underneath the white billows. This emphasizes the 3D volume, making the white pop forward and the purple recede. -
Mist for softness:
I find a light misting of water from a spray bottle helps keep the paint workable. Spray the wall lightly if blending becomes difficult or the paint feels too sticky.
Gilded Lining
Once fully dry, mix gold mica powder with clear glazing medium and brush it solely on the brightest white peaks for a literal silver (or gold) lining effect.
Step 4: Detailing & Refining
-
Highlight the peaks:
With a smaller brush and pure white paint, hit the very tops of the clouds where the light is strongest. These highlights should be opaque and bold. -
Soften edges with a rag:
Take a lint-free rag and gently dab any areas that look too ‘brushy.’ The texture should feel puffy and airy, not like distinct brushstrokes. -
Adding atmospheric perspective:
Mix a very watery wash of the background cream color. Lightly glaze over distant clouds (usually near the edges) to push them back visually. -
Check balance:
Step back to the other side of the room. Look for areas that are too dark or too empty. Add small drift clouds to break up large empty spaces if needed. -
Final smooth out:
Use a large, dry blending brush to sweep very lightly over the entire surface in different directions. This creates facing soft-focus effect essentially melting colors together.
Step 5: Cleanup
-
Remove tape:
Carefully peel off the painter’s tape while the paint is roughly 90% dry to prevent peeling. Pull the tape away from the painted edge at a 45-degree angle. -
Touch ups:
Use a small artist brush to fix any bleed-through on the trim or ceiling lines.
Step back and enjoy the tranquil, sun-kissed atmosphere you have brought into your home
Wildflower Meadow Border Mural
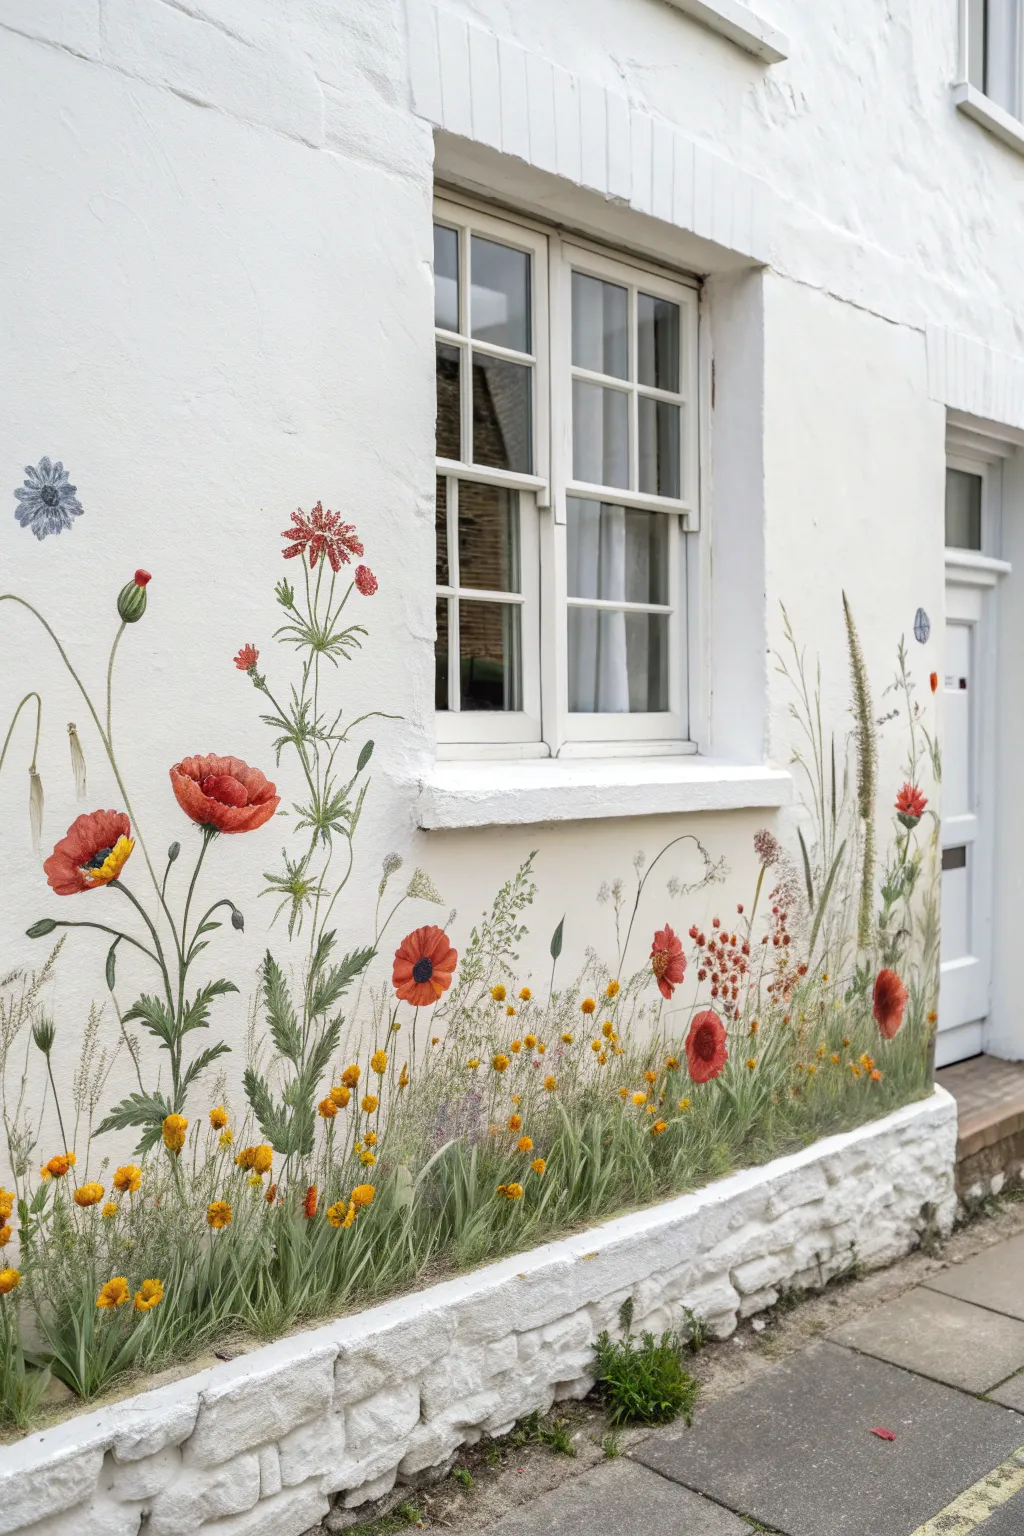
Transform a plain white exterior wall into an everlasting garden with this delicate botanical mural. By layering acrylics directly onto stucco or masonry, you can create the illusion of wild poppies and grasses growing right out of your home’s foundation.
Step-by-Step Guide
Materials
- Exterior masonry paint (white for base coat)
- Exterior acrylic paints (red, orange, yellow, greens, blue, brown)
- Set of paintbrush sizes (2-inch flat, filbert, round brushes, fine liner)
- Chalk or pastel pencil (light grey or white)
- Painter’s tape
- Mixing palette or plastic plates
- Water container and rags
- Clear outdoor varnish (matte or satin)
Step 1: Preparation and Background
-
Clean the surface:
Begin by thoroughly cleaning the exterior wall surface. Use a stiff brush and water to remove any dirt, moss, or loose flaking paint, ensuring you have a solid substrate to work on. -
Define the mural area:
Decide how high your ‘meadow’ will reach. The example keeps the tallest flowers just below window-sill height, with grasses fading out around waist height. -
Refresh the base:
If your existing wall is dirty or discolored, apply a fresh coat of white masonry paint to the mural area. This provides a bright, clean canvas that will make your flower colors pop. -
Sketch the composition:
Using a light grey pastel pencil or chalk, lightly sketch the main stems of your tallest flowers first. Place the large poppies and significant greens sporadically to balance the layout, but keep it loose and organic.
Flick of the Wrist
For realistic grass, load your brush and plant the bristles at the bottom, then pull up and release pressure quickly. This creates a tapered tip just like a real blade of grass.
Step 2: Painting the Greenery
-
Mix your greens:
Prepare a variety of green shades on your palette. You’ll need a deep olive for shadows, a vibrant grass green for mid-tones, and a pale yellow-green for highlights. -
Lay down the base grass:
Using a filbert brush, paint the dense collection of short grasses near the bottom. Use upward, flicking strokes to mimic natural growth, layering different greens to create depth. -
Paint structural stems:
Switch to a round brush to paint the long, winding stems of the poppies and taller plants. Don’t make them perfectly straight; introduce gentle curves and bends as if they are swaying in a breeze. -
Add feathery textures:
For plants like the tall grasses or cow parsley, use a drier brush technique. Lightly drag the brush to create soft, fuzzy textures that contrast with the solid stems. -
Detail the leaves:
Paint the specific leaf shapes for each plant type—jagged, deeply lobed leaves for the poppies and long, slender blades for the grasses. Vary the green tones here to distinguish individual plants.
Step 3: Adding the Blooms
-
Block in the poppies:
Mix a vibrant red-orange. Paint the main shapes of the poppy petals, keeping edges slightly ruffled. Don’t worry about perfect coverage yet; a little transparency can look lovely. -
Add poppy details:
Once the red base is tacky, mix a darker crimson to paint shadows near the center of the flowers, and a bright orange-yellow for the sunlit edges of the petals. -
Paint the centers:
Use a small brush with black or dark brown paint to dot the centers of the open poppies. I like to add tiny specks of yellow pollen around these dark centers for realism. -
Create the yellow wildflowers:
Using a small round brush, dab clusters of yellow and orange dots to create the smaller wildflower heads. Vary the size of the dots to suggest depth and volume. -
Include subtle blues:
Paint the small blue cornflowers or stylized floral motifs floating higher up on the wall. These act as accents and draw the eye upward. -
Add buds and pods:
Don’t forget the unbloomed life. painting tight green poppy pods on curved stems adds great visual interest and tells the story of a growing garden.
Local Flora
Make the mural feel native to your home by researching wildflowers that actually grow in your region and incorporating those specific leaf shapes and colors into the design.
Step 4: Finishing Touches
-
Refine with a liner brush:
Use your finest liner brush to add very thin stems, veins on leaves, or delicate tendrils that weave through the denser foliage. -
Paint the stone border:
If you don’t have a physical planter base, you can paint one. Use shades of white and light grey to paint a faux-stone effect at the very bottom, grounding the mural. -
Add shadows:
Mix a very watery grey wash. lightly glaze it under the faux stone or behind the densest grass clumps to anchor the artwork to the ground. -
Seal the work:
Once completely dry (usually 24-48 hours), apply two coats of clear, outdoor-rated varnish to protect your masterpiece from rain and UV fading.
Step back and enjoy the everlasting beauty of your new, maintenance-free garden wall
Abstract Feminine Faces and Florals
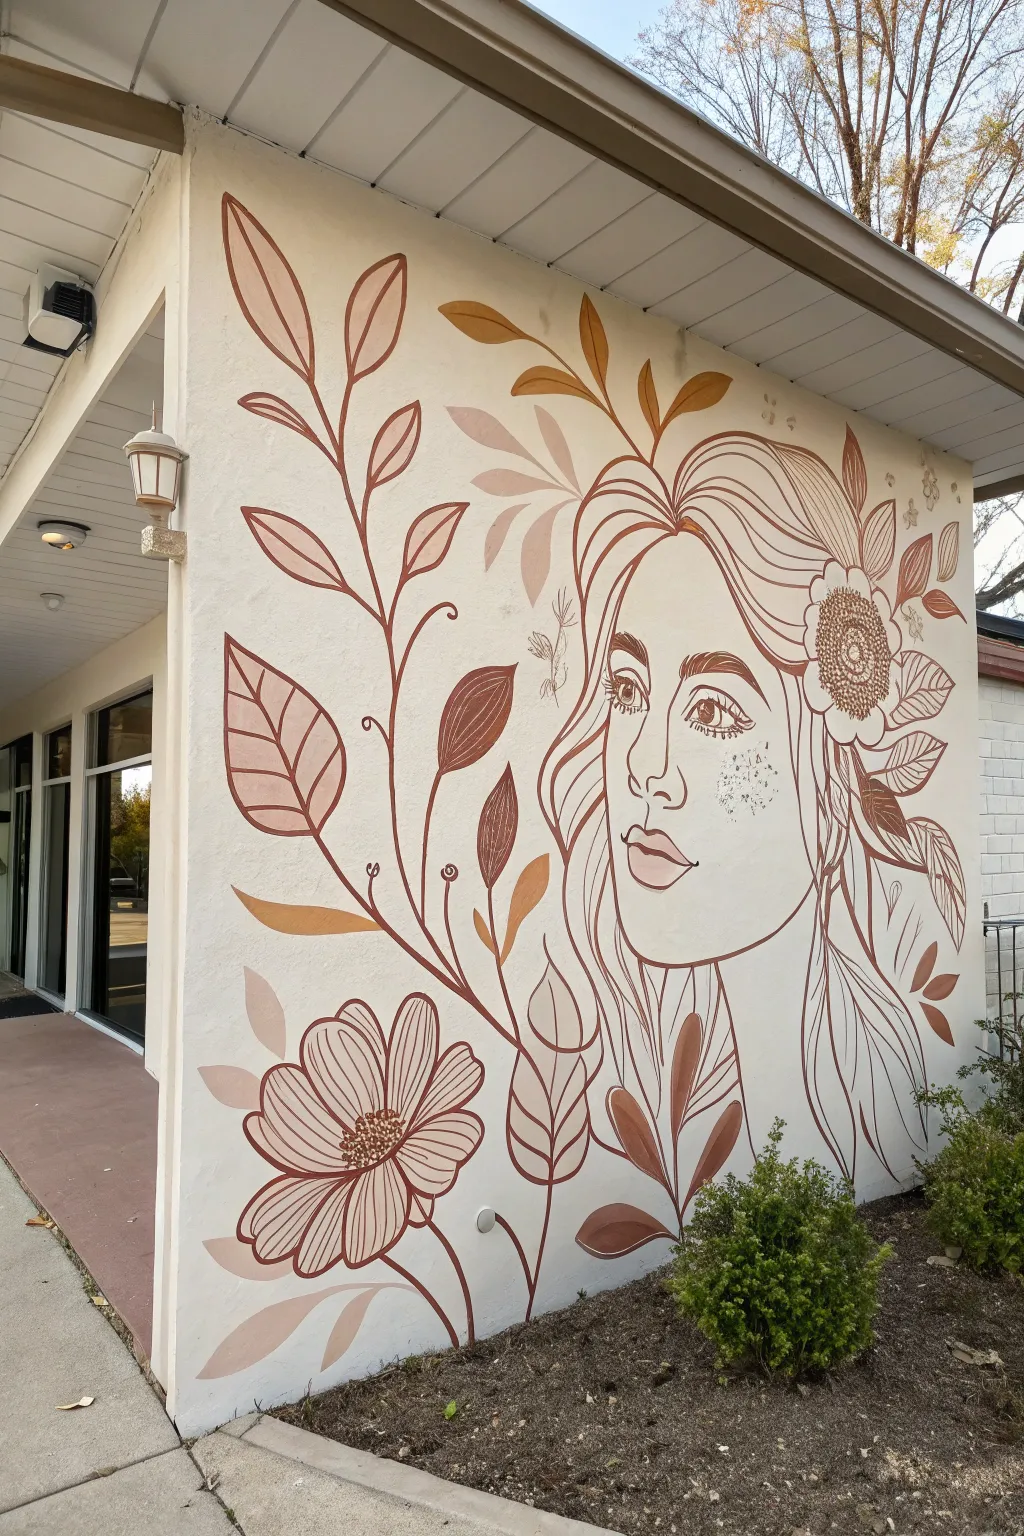
Transform a plain exterior or interior wall into a stunning piece of art with this earthy, bohemian mural. Featuring a stylized feminine profile interlaced with flowing organic botanicals, this project uses a warm, neutral palette to create a soothing yet striking focal point.
Detailed Instructions
Materials
- Exterior masonry primer (white or off-white)
- Exterior latex paints (terracotta, mocha brown, cream, peach, tan)
- Assorted paintbrushes (2-inch sash brush for fills, varied round brushes for lines)
- Painter’s tape
- Drop cloth
- Chalk or a light charcoal pencil
- Ladder or step stool
- Projector (optional but recommended for scale)
- Small plastic cups or palette for mixing
- Rags for cleanup
- Clear exterior sealant (matte finish)
Step 1: Preparation and Base Coat
-
Clean the surface:
Begin by thoroughly cleaning the wall surface to remove dust, cobwebs, or mildew. If working on exterior stucco or brick, a gentle pressure wash might be necessary; let it dry completely before proceeding. -
Protect the area:
Lay down your drop cloth along the base of the wall to catch drips. Use painter’s tape to mask off any adjacent trim, windows, or light fixtures like the sconce shown in the photo. -
Prime the wall:
Apply a coat of high-quality masonry primer. This ensures your mural colors appear true and adhere properly to the texture. For this look, tint the primer to a warm cream or off-white to serve as your background color.
Textured Wall Tip
On rough stucco, slightly dilute your paint with water (about 10%). This helps the paint flow into the crevices better than thick paint, creating sharper lines.
Step 2: Sketching the Design
-
Establish the composition:
Decide on the placement of the face. In this design, the figure is positioned on the right side, facing left, allowing the botanicals to flow upward and outward across the larger negative space. -
Transfer the outline:
For the most accurate proportions, project the image onto the wall at night and trace the lines with chalk. If freehanding, start by lightly sketching the oval of the face and the curve of the hair before detailing the eyes and lips. -
Draft the botanicals:
Sketch the large stems extending from the bottom and sides. Don’t worry about perfection; draw flowing, curved lines that mimic natural growth, adding large leaf shapes and the prominent daisy-like flowers.
Drip Control
If paint drips down the vertical wall, don’t wipe it immediately. Wait for it to dry slightly, scrape it off, and touch up with the background color.
Step 3: Painting the Line Work
-
Prepare your liner color:
Mix a deep mocha or terracotta brown paint. You want this color to be strong enough to define the illustration but softer than harsh black. -
Outline the face:
Using a medium round brush (size 6 or 8 works well for textured walls), carefully paint over your chalk lines for the facial profile. Keep your hand steady and maintain a consistent line width for that illustrative look. -
Detail facial features:
Switch to a smaller round brush for delicate areas like the eyelashes, iris details, and the curve of the lips. I find that painting the eyes first helps bring the character to life immediately. -
Define the hair:
Paint long, sweeping lines to suggest hair strands. Allow these lines to weave comfortably around the ear and intertwine with the floral elements.
Step 4: Adding Color and Fills
-
Fill the large leaves:
Select your palette of terracotta, peach, and tan. Paint the interior of the large leaves, alternating colors to create rhythm. Leave the outlines crisp. -
Paint the flowers:
For the large flower at the bottom and the one in the hair, use a lighter peach or cream tone for the petals. Once dry, go back in with your darker line color to add the petal definitions and the textured center. -
Add floating leaves:
Identify the floating, lighter-colored leaves in the background (the pale tan/beige ones). Paint these as solid shapes without heavy outlines to give them a sense of depth and softness behind the main stems. -
Apply cheek accents:
Using a very dry brush with a small amount of terracotta paint, lightly stipple or dab freckles across the nose and cheek area for a whimsical touch.
Step 5: Refining and Sealing
-
Review line weights:
Step back about ten feet to view the whole mural. If some lines disappear into the texture of the stucco, thicken them slightly with your dark brown paint. -
Clean up edges:
Use your background cream color to cut back into any lines that became too thick or wobbly, sharpening the shapes of the lips and eyes. -
Remove guidemarks:
Once the paint is fully dry to the touch, gently wipe away any visible chalk lines with a damp microfiber cloth. -
Protect the art:
Apply a clear, matte exterior masonry sealer over the entire mural. This is crucial for protecting the colors from UV fading and weather damage.
Step back and admire how this elegant, earth-toned mural brings a sophisticated and artistic spirit to your space
Mountain Silhouettes at Sunset
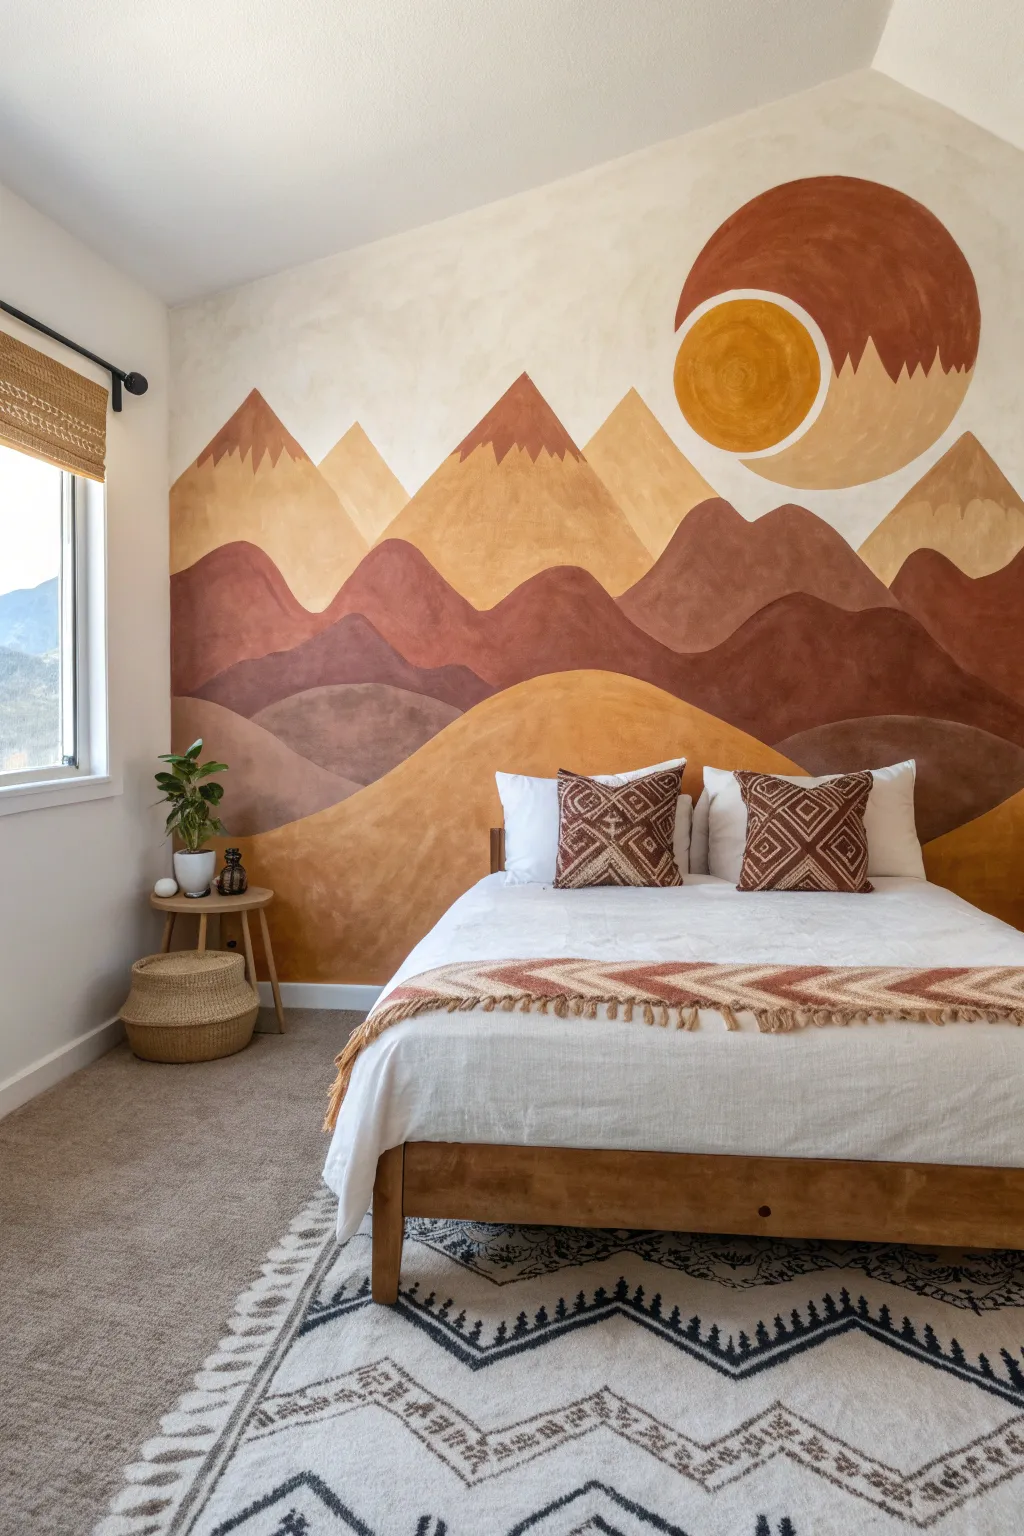
Bring the warmth of a desert sunset into your bedroom with this expansive, landscape-inspired mural featuring rolling peaks and a geometric sun graphic. The earthy palette of rusts, ochers, and creams creates a calming, warm atmosphere perfect for a restful space.
How-To Guide
Materials
- Interior latex wall paint (4-5 shades: cream/beige base, mustard yellow, terracotta, deep rust, chocolate brown)
- Painter’s tape
- Pencil and eraser
- Chalk (optional for sketching)
- Small angled sash brush (1.5 – 2 inch)
- Small foam roller set (4 inch)
- Paint tray and liners
- Drop cloths
- Ladder or step stool
- A makeshift compass (string and a thumbtack) or a large round object for tracing
Step 1: Preparation and Base Layer
-
Prepare the canvas:
Start by clearing the wall completely. Remove any outlet covers, fill nail holes with spackle, and sand them smooth once dry. Wipe the wall down with a damp cloth to remove dust and ensure good paint adhesion. -
Protect the perimeter:
Apply painter’s tape to the baseboards, ceiling line, window trim, and adjacent walls. Lay down drop cloths to protect your carpet or flooring from varying paint drips. -
Apply the background color:
Paint the entire wall with your lightest background color—likely a creamy off-white or very pale beige. This acts as the ‘sky’ and ensures the upper portion of the mural looks finished. Let this coat dry completely, ideally overnight.
Step 2: Sketching the Design
-
Outline the largest shapes:
Using a pencil or white chalk, lightly sketch the flowing lines of the mountain ranges. Start with the foreground hills at the bottom, which are wider and flatter, then layer the steeper peaks behind them. -
Map out the peaks:
Draw the sharp peaks of the furthest mountains near the top third of the wall. Don’t worry about perfect symmetry; organic, slightly irregular lines feel more natural for this boho style. -
Draw the sun graphic:
Decide on the placement for your sun feature. To get a perfect circle, use the string method: tape a piece of string to the center point, tie a pencil to the other end at your desired radius, and swing it around to mark the circle. -
Add the sun details:
Sketch the ‘eclipse’ or crescent shape overlapping the main sun circle if you are replicating the exact graphic element shown in the inspiration image.
Uneven Edges?
If your painted mountain lines feel too jittery, don’t panic. Use a small artist’s flat brush to smooth out the curve. A slightly thicker line can hide many tremors.
Step 3: Painting the Landscape
-
Start from the top down:
Begin painting with the mountain range furthest back. These are often lighter or muted tones to suggest atmospheric perspective, but in this stylized version, just pick your desired color for the highest peaks. -
Cut in the edges:
Use your angled sash brush to carefully paint along the pencil lines of your first mountain layer. This gives you a crisp, clean edge against the sky background. -
Fill the shapes:
Once the edges are cut in, use a small 4-inch foam roller to fill in the body of the mountain shape. The foam roller helps minimize texture and brush strokes for a smoother finish. -
Move to the middle layers:
When the top layer is dry to the touch, move to the middle mountain ranges using a darker or contrasting shade like deep terracotta or rust. Paint over the bottom edge of the previous layer slightly to ensure no gaps. -
Paint the foreground:
Apply the darkest or most grounded color (like the deep brown or ochre) to the rolling hills at the very bottom. Watch your footing on the ladder as you switch between high and low sections. -
Create the snow caps:
If you want the subtle ‘snow cap’ effect seen on the highest peaks, define a zig-zag line near the mountain top. Paint the tip in a slightly different shade or leave the background color showing through if you planned for it.
Paint-by-Number Trick
Before painting, label each sketched section with a number corresponding to your paint cans (1, 2, 3, etc.). This prevents accidental mix-ups once you’re in the painting zone.
Step 4: Detailing the Celestial Elements
-
Paint the sun circle:
Using a steady hand and a small brush, carefully fill in the circular sun shape with your mustard yellow paint. Start from the center and spiral outward toward your pencil line. -
Fill the crescent shape:
Paint the larger, darker crescent shape that cups the sun. I find that holding your breath while outlining the curve helps keep the brush steady. -
Add texture (optional):
For an authentic, hand-painted look, you can dry-brush a little bit of layer variety onto the mountains or sun, creating subtle streaks that mimic watercolor or plaster texture.
Step 5: Finishing Touches
-
Check for gaps:
Step back and inspect the mural. Look for any spots where the original wall color peeks through between mountain layers and touch them up with a small brush. -
Apply a second coat:
Depending on the coverage of your paint, some colors (especially yellows and reds) may need a second coat to look solid and rich. -
Remove tape and clean up:
Once the paint is tacky but not fully cured, slowly peel off the painter’s tape at a 45-degree angle to reveal crisp straight lines at the ceiling and baseboards.
Step back and admire how your new mural completely transforms the room into a warm, artistic sanctuary.
Layered Stencil and Freehand Mix

This warm, inviting project combines the structure of geometric arches with the organic feel of botanical details, creating a stunning accent wall full of bohemian charm. By mixing crisp stenciled elements with softer, hand-painted touches, you achieve a professional look that still feels uniquely handmade.
Detailed Instructions
Materials
- Interior latex paint (terracotta, peach, beige, cream)
- White base wall paint
- Large half-circle wall stencils (various sizes)
- Botanical motif stencils (leaf sprigs, floral bursts)
- Painter’s tape
- Pencil
- Level and measuring tape
- Small foam roller
- Stencil brushes (various sizes)
- Fine detail artist brushes (angled and round)
- Paper towels
Step 1: Planning and Base Work
-
Prep the canvas:
Ensure your wall is clean, dry, and painted with a crisp white or cream base coat to make the warm tones pop. -
Map out the grid:
Determine the width of your largest arch stencil. Using a pencil, level, and measuring tape, lightly mark vertical center lines for each column of arches, staggering the rows so the peaks of the bottom row nestle between the arches of the top row. -
Secure the primary stencil:
Starting at the top of the wall, tape your largest half-circle multi-ring stencil in place, ensuring the bottom edge is perfectly level.
Bleed Prevention
Always offload your stencil brush or roller onto paper towels first. Only ‘dry’ paint makes crisp lines.
Step 2: Block Painting the Arches
-
Load the roller:
Pour your terracotta paint into a tray. Load a small foam roller lightly, then offload excess paint onto a paper towel until the roller feels almost dry to prevent bleed-under. -
Roll the first layer:
Gently roll over the stencil using light to medium pressure. I find it helpful to roll from the outside edges inward to keep the stencil flat against the wall. -
Rotate your palette:
Repeat this process across the top row, alternating between terracotta and a lighter peach tone for different arches to create depth. -
Create the staggered row:
Move down to the next row. Position your stencils in the gaps of the first row (the ‘bricklay’ pattern). Use a softer beige or cream tone for some of these lower arches to keep the mural from feeling too heavy. -
Freehand the solid arches:
For the solid semi-circles that don’t have etched rings, use a pencil to trace the outer curve of your stencil or a round object. Fill these shapes in manually with a flat brush for a smooth, solid block of color.
Step 3: Detailing and Botanicals
-
Add freehand lines:
Once the main stencil work is dry, take a fine liner brush and your darkest terracotta paint. Carefully paint thin, freehand curves echoing the arch shapes above solid blocks. -
Insert botanical stenciling:
Place your smaller floral or leaf ‘sprig’ stencils centered within the open spaces of the arches or at the top of vertical lines. Use a small stencil brush with a dry-brush technique (very little paint) to stipple these details. -
Create the rising stems:
Use a thin artist brush and a straight edge (or just a steady hand) to paint vertical lines rising from the center of the lower arches, connecting them to the floral bursts above. -
Add pattern variety:
If your stencil includes small decorative dots or triangles within the arch bands, ensure you fill these with a high-contrast color like white or dark brown to make the pattern readable. -
Paint the final top touches:
For the very top edge near the ceiling, use small leaf stencils in an olive green tone to act as a crown for the mural, filling any awkward gaps near the molding. -
Touch up edges:
Inspect the mural for any paint bleed. Use a small brush with your white base wall paint to carefully clean up any fuzzy edges or smudges. -
Erase guidelines:
Once the paint is completely cured (wait at least a few hours), gently erase any visible pencil marks from your initial grid mapping.
Texture Play
Mix a little plaster or baking soda into the paint for the solid arches to add a tactile, earthy texture.
Step back and enjoy the warm, rhythmic flow your new feature wall brings to the space
Gold Accents on Matte Earth Tones
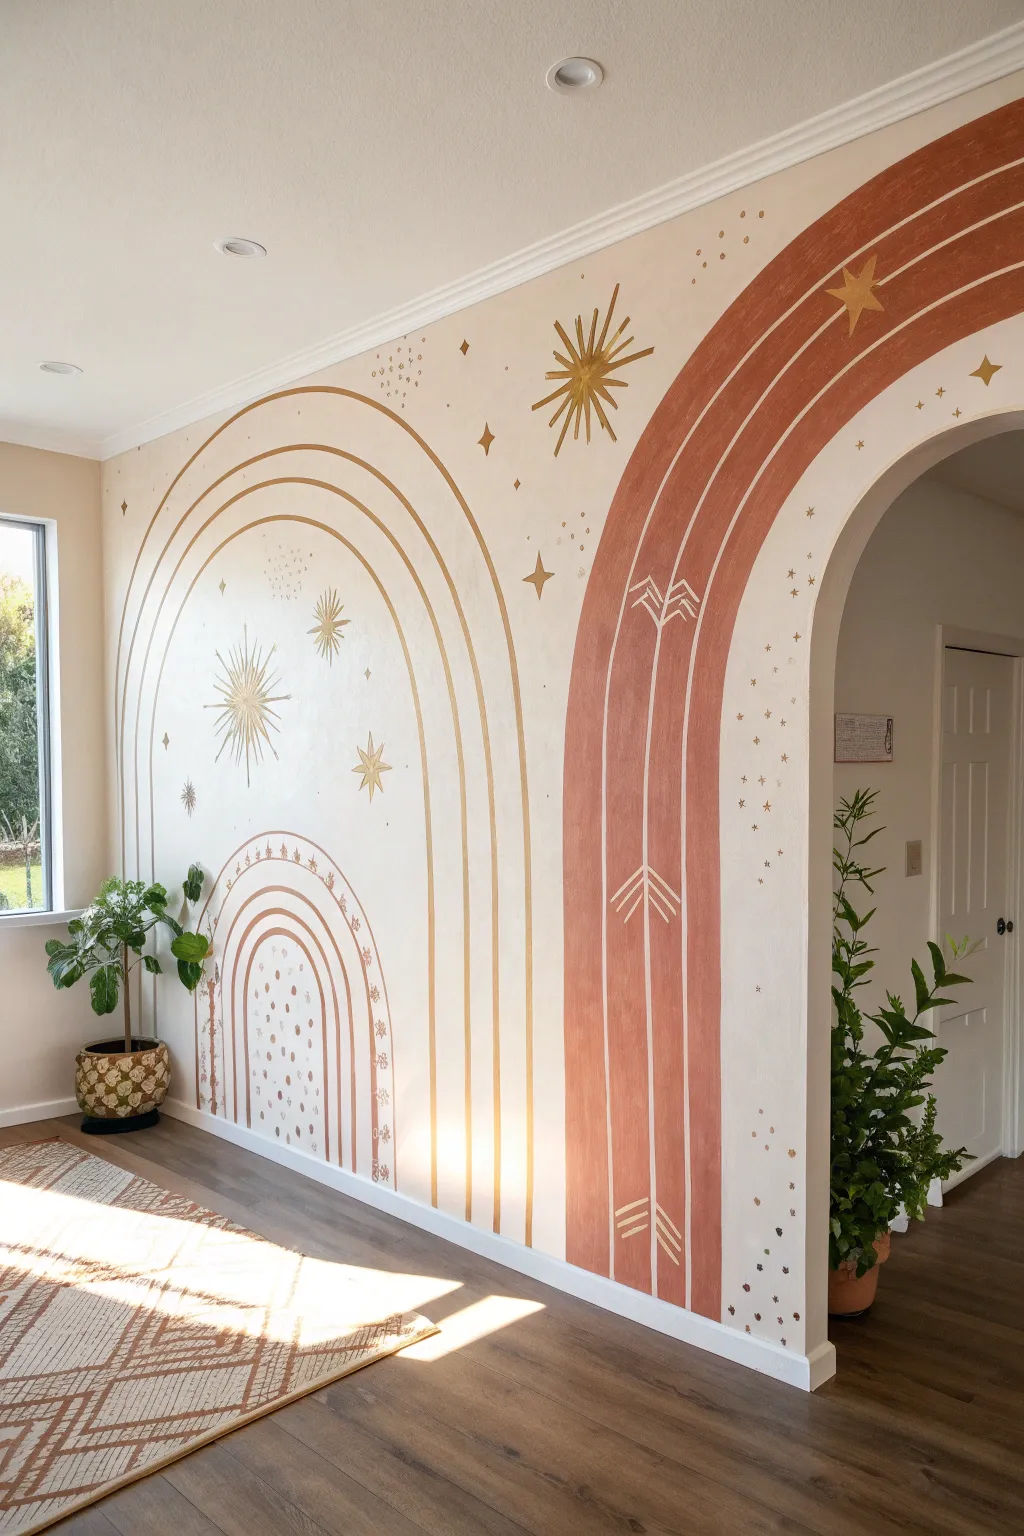
Transform a plain wall into a mystical focal point by combining matte terracotta arches with shimmering gold celestial details. This large-scale mural uses simple geometric shapes and metallic accents to create a warm, inviting boho atmosphere.
Step-by-Step Guide
Materials
- Interior latex paint (cream or off-white base)
- Interior latex paint (terracotta or rust color)
- Metallic gold paint suitable for walls
- Pencil
- String and thumb tack (or large compass tool)
- Painter’s tape (various widths)
- Sash brush (2-inch)
- Small round detail brushes (sizes 2 and 4)
- Flat artist brush (1/2 inch)
- Drop cloth
- Level
- Eraser
Step 1: Preparation & Base shapes
-
Prepare the canvas:
Clear the area and lay down your drop cloth. If your current wall color isn’t the desired cream background, roll on two coats of your base cream latex paint and allow it to dry completely for at least 24 hours to prevent tape peeling later. -
Mark the center points:
Decide where you want your two main arches. The large terracotta arch creates a frame around a doorway, while the gold line arch sits on the main wall. Mark the bottom center point for each arch on the baseboard or just above the floor. -
Draw the terracotta arch guide:
Tie a string to a pencil. Secure the other end of the string to your center point at the floor line using a thumb tack or tape. Extend the string to the desired height of the terracotta arch (the one framing the door) and lightly draw the outer curve. -
Define the arch width:
Shorten the string by about 12-16 inches (depending on how thick you want the band) and draw the inner curve from the same center point. This creates the outline for the solid rust-colored rainbow. -
Sketch the line-work arch:
Move to the second focal point on the main wall. Using the same string method, draw multiple concentric arches. You’ll need three distinct sets of lines: the large outer set, and a smaller, nested set at the bottom representing a smaller rainbow.
Clean Curves Secret
If steady hands are a struggle, use flexible 1/4 inch masking tape to create guides for your gold lines. Seal the tape edges with the base wall color first.
Step 2: Painting the Structure
-
Paint the solid arch:
Using the 2-inch sash brush, carefully cut in the edges of the large terracotta arch you outlined. Fill in the center with the terracotta paint. I find distinct brush strokes in the direction of the arch add a nice texture here. -
Apply second coat:
Once the first coat is dry to the touch, apply a second coat of terracotta to ensure rich, opaque coverage. Let this dry fully. -
Paint the gold lines:
Switch to your metallic gold paint and a flat artist brush. Carefully trace over the pencil lines for the large arch on the left. You want these lines to feel hand-painted, so don’t worry if they aren’t machine-perfect. -
Detail the inner rainbow:
Paint the smaller, nested rainbow at the bottom left. Alternate between solid gold lines and lines made of small dots or dashes to add visual interest.
Step 3: Celestial Details
-
Draft the stars:
Lightly sketch start bursts and diamonds with a pencil. Place a large starburst near the top of the line-work arch and another spanning across the terracotta arch. -
Paint the starbursts:
Using the small round detail brush and gold paint, fill in the stars. For the bursts, start from the center and flick the brush outward to create sharp, tapering points. -
Add geometric overlay:
On top of the dry terracotta arch, use the cream base paint (or gold, if you prefer high contrast) to paint geometric arrows and mountain shapes directly over the rust color. -
Sprinkle the stardust:
Dip a small brush in gold paint and gently dot random clusters of ‘stardust’ around the larger shapes. Vary the pressure to create dots of different sizes. -
Add final sparkle:
Paint small distinct four-point stars and diamond shapes in the negative spaces to balance the composition. Step back frequently to ensure the spacing feels random but balanced. -
Clean up:
Once the paint is fully cured (usually 24 hours), gently erase any visible pencil marks with a clean white eraser.
Add Dimension
Mix a tiny drop of clear glazing medium into your gold paint. This makes it slightly translucent, allowing the light to catch the metallic flecks better.
Step back and admire how the light catches the gold accents throughout the day, bringing a magical warmth to your space
Night-Sky Constellation With Warm Neutrals
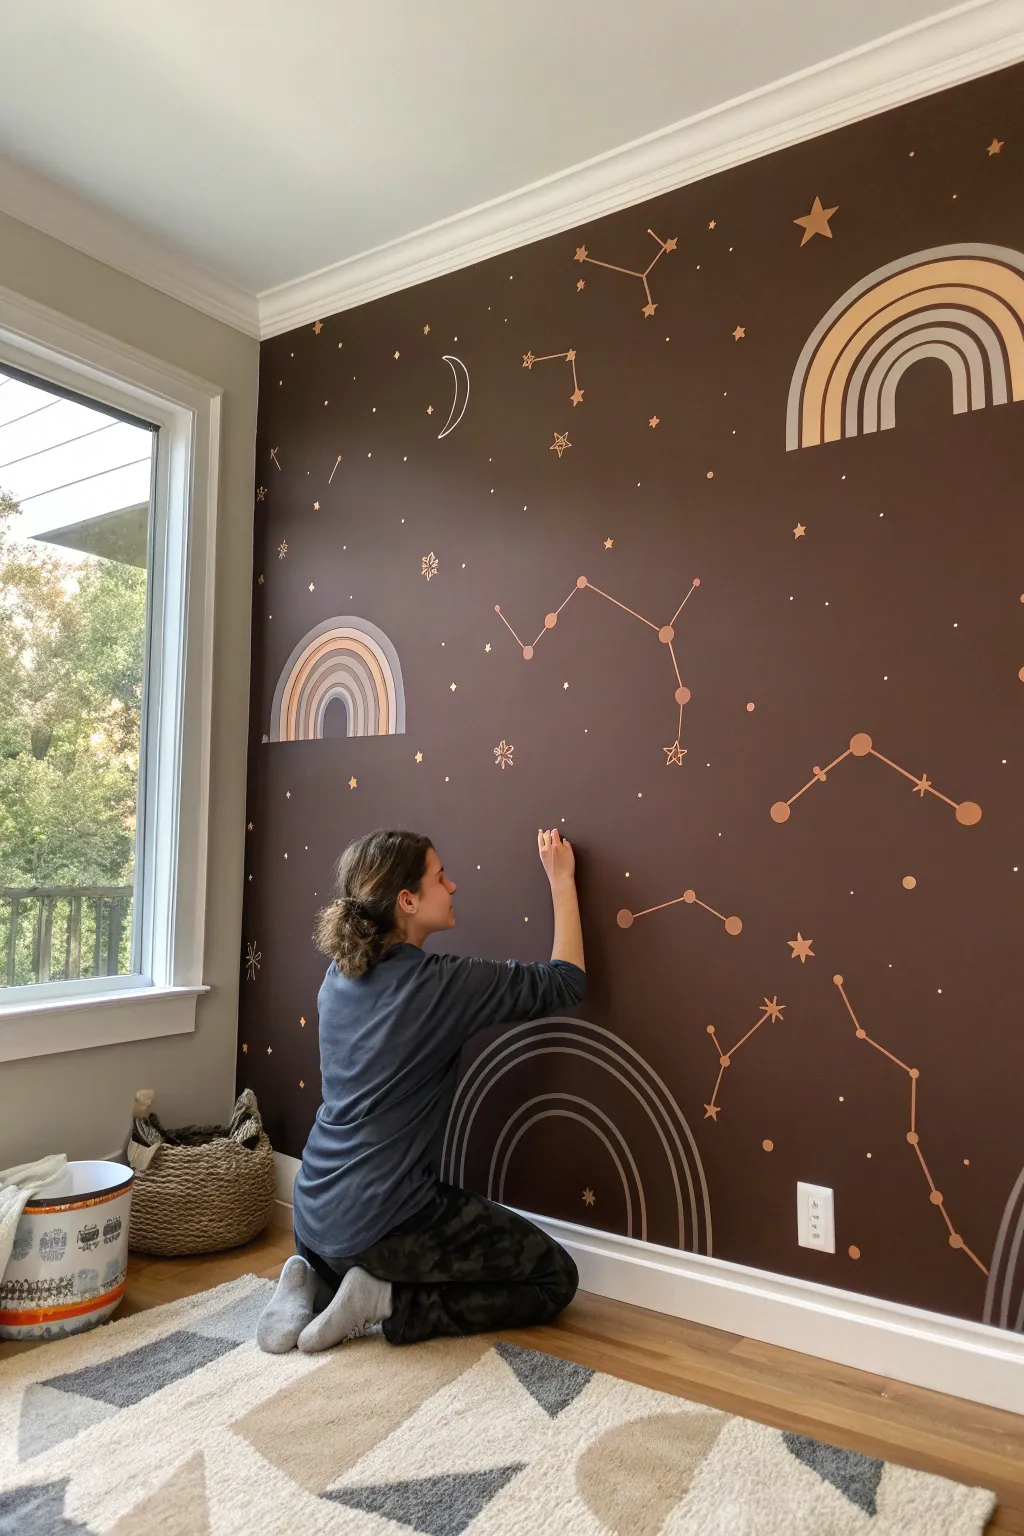
Transform a plain wall into a starry night sky with this warm, bohemian-inspired mural that balances deep, moody tones with soft neutrals. The chocolate brown backdrop makes the copper and beige constellations pop, creating a cozy and imaginative space perfect for nurseries or bedrooms.
Detailed Instructions
Materials
- Deep chocolate brown latex wall paint (matte or eggshell finish)
- Beige/tan acrylic paint or latex sample pot
- Light grey or white acrylic paint
- Metallic copper or gold paint pen (medium tip)
- Small round detail brush (size 2 or 4)
- Flat angled brush (1 inch)
- Chalk or watercolor pencil (white)
- Painter’s tape
- Drop cloth
- Ladder or step stool
- Ruler or straight edge
- Reference images of constellations
Step 1: Preparation & Base Coat
-
Prepare the space:
Clear the area near the wall to give yourself plenty of room to move around. Lay down a drop cloth to protect your flooring and tape off the skirting boards, ceiling line, and adjacent walls with painter’s tape. -
Apply the base color:
Roll on the deep chocolate brown paint. This rich, dark color is the foundation of the look, so ensure you get solid coverage. You will likely need two coats to avoid any patchiness. Let the wall dry fully, preferably overnight, before starting any detail work.
Oops! Chalk won’t come off?
If a damp cloth smears the chalk into the matte paint, try a clean, white eraser. Gently rub the chalk marks; they usually lift right off without damaging the finish.
Step 2: Drafting the Layout
-
Plan your placement:
Step back and look at the whole wall. Identify where you want your largest elements—the rainbows and the major constellations—to go. You want a balanced composition without clutter. -
Sketch lightly with chalk:
Using white chalk or a watercolor pencil, lightly sketch the outlines of the rainbows and the main star points for your constellations. Don’t press too hard; you just need a faint guide that can be wiped away later. -
Draft the constellation lines:
For the constellations, mark dots for the stars first, then use a ruler to lightly draw the connecting lines between them. Vary the sizes of the constellations to keep the sky looking natural.
Step 3: Painting the Rainbows
-
Paint the outer arches:
Starting with your beige or tan paint and the angled brush, carefully paint the outer arches of your rainbows. Keep your hand steady and rely on your shoulder movement rather than your wrist for smoother curves. -
Fill the inner arches:
Switch to a slightly lighter grey or mix a little white into your beige to create a variation for the inner arches. Follow the curve of the outer arch closely, leaving a very small gap of the brown background showing between stripes for definition. -
Add line details:
For the rainbows that are just outlines (like the one near the floor), use a smaller round brush with your lightest color to paint thin, concentric arches.
Make It Glow
Mix glow-in-the-dark medium into your white paint for the smallest stars. In daylight, it looks normal, but at night, the constellation points will softly glow.
Step 4: Creating the Stars
-
Paint major star points:
Dip your small round brush into the beige paint. Go over the chalk marks for the main stars in your constellations, painting small solid circles. I like to make some slightly larger than others to represent different star magnitudes. -
Connect the dots:
Using a very fine brush or even a paint pen for better control, draw the lines connecting your star points. Keep these lines thin and consistent. -
Add decorative stars:
Scatter different star shapes around the open spaces. Paint simple five-point stars, four-point glimmer shapes, and tiny dots to fill the ‘voids’ of the sky.
Step 5: Finishing Touches
-
Incorporate the moon:
Find a spot near the top third of the wall for a crescent moon. Paint a thin, delicate outline of the crescent shape using white or light beige. -
Add metallic accents:
Take your metallic copper or gold paint pen and trace over select lines or add tiny dots inside the star clusters. This adds a subtle shimmer when the light hits the wall. -
Step back and review:
Walk to the other side of the room to view the mural as a whole. Look for any large empty patches that might need a small dot or tiny star to balance the composition. -
Clean up:
Once the paint is completely dry to the touch, use a damp cloth to gently wipe away any visible chalk lines. Remove the painter’s tape slowly at a 45-degree angle to reveal your crisp edges.
Enjoy the peaceful atmosphere of your new personalized night sky


Have a question or want to share your own experience? I'd love to hear from you in the comments below!