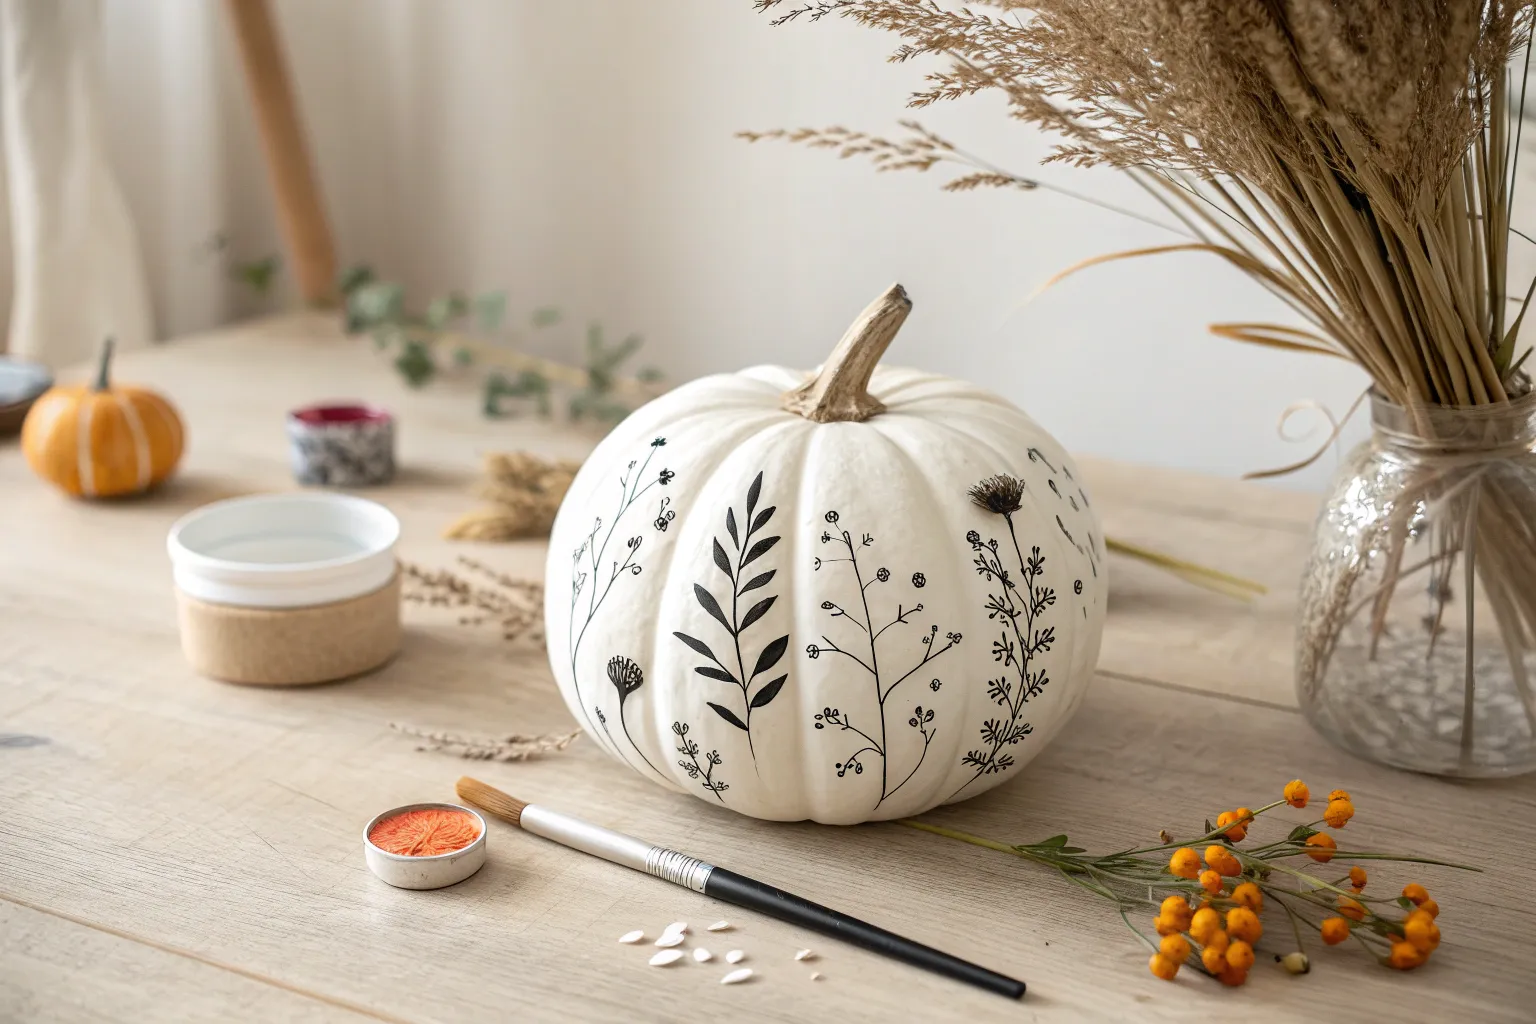
When I want fall decor without the mess, I always reach for painted pumpkins—they’re basically little round canvases. Here are my favorite calabazas pintadas ideas, starting with the classics and ending with the fun, unexpected stuff.
Classic Jack-o’-Lantern Face
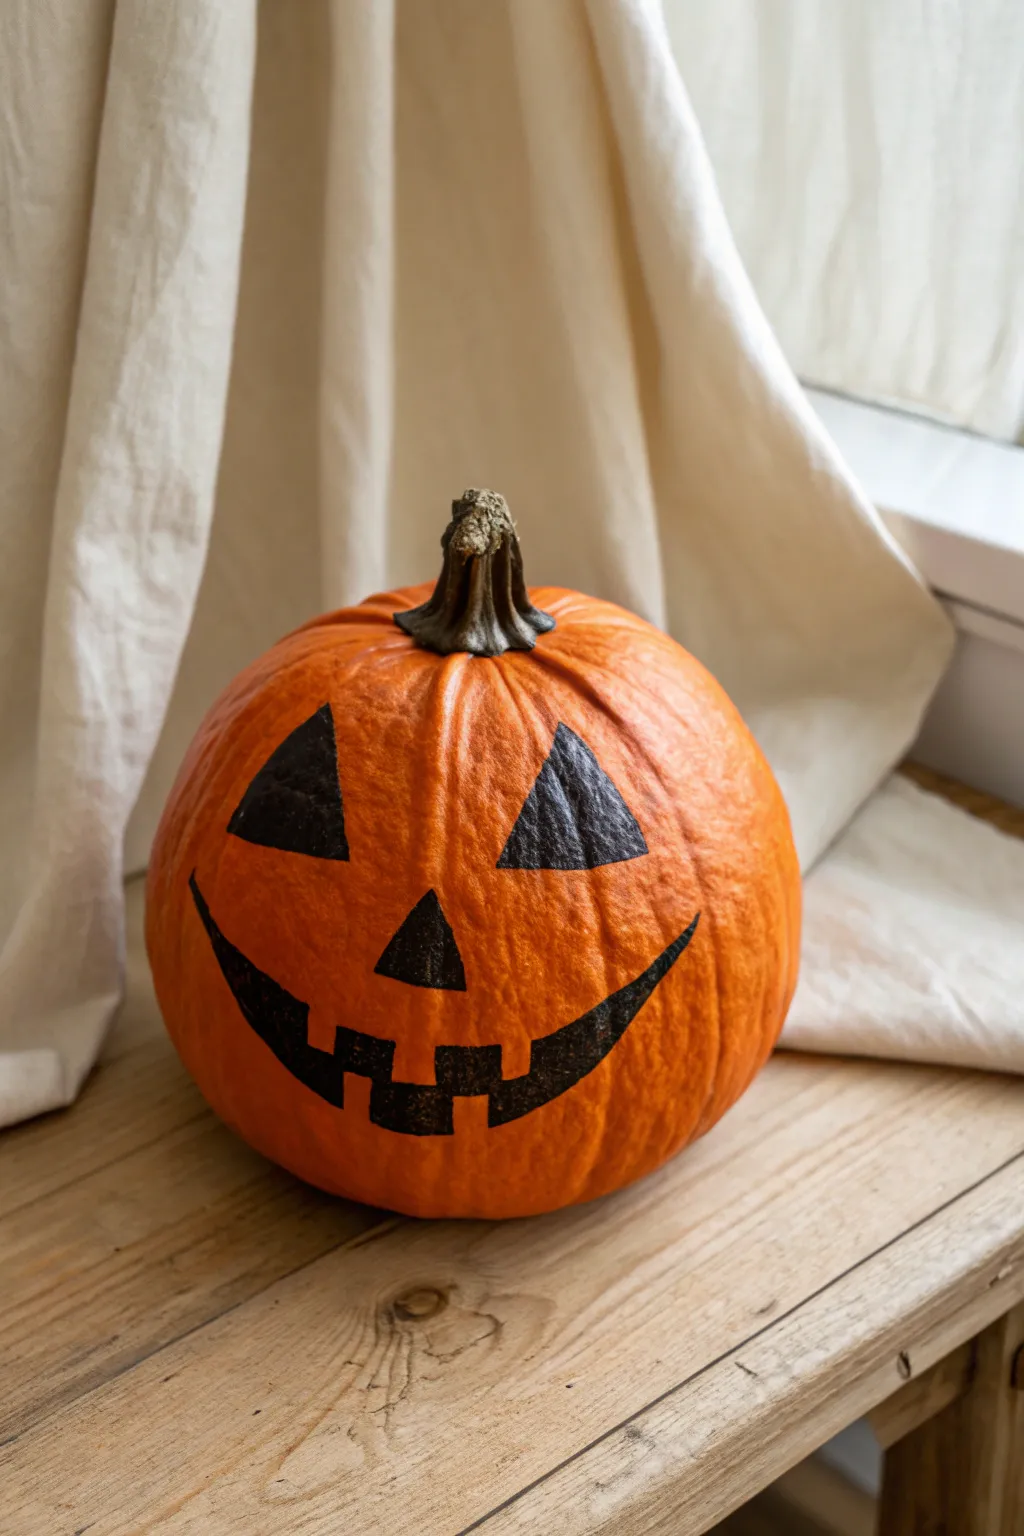
Revisit the timeless charm of Halloween with this no-carve project that captures the iconic Jack-o’-Lantern spirit. By painting instead of cutting, your pumpkin stays fresh longer while sporting that wonderfully wicked grin.
How-To Guide
Materials
- Medium-sized round pumpkin with a good stem
- Soft cloth for cleaning
- Rubbing alcohol
- Pencil or chalk
- Black acrylic paint (outdoor or multi-surface preferred)
- Medium-sized flat paintbrush
- Fine-point detail brush
- Paper towels
- Paint palette or paper plate
Step 1: Preparation & Planning
-
Clean surface:
Begin by wiping down your pumpkin with a soft cloth to remove any loose dirt or field dust. -
Degrease with alcohol:
Dampen a paper towel with rubbing alcohol and gently rub the area where the face will go. This removes natural oils and ensures the paint adheres perfectly without peeling later. -
Visualize the face:
Decide on the best side of the pumpkin. Look for a relatively smooth patch without deep blemishes, though natural ridges add character to the design. -
Sketch the eyes:
Using a pencil or a piece of chalk, lightly sketch two large triangles for eyes. Place them fairly high up on the pumpkin to leave room for the smile. -
Add the nose:
Draw a smaller triangle centered below the eyes for the nose. I like to keep this slightly smaller than the eyes to balance the face.
Use Tape for Sharper Lines
For perfectly crisp triangle eyes, apply masking tape or painter’s tape to outline the shape before painting. Peel it off while the paint is still slightly wet.
Step 2: Drawing the Smile
-
Map the mouth curve:
Sketch a wide, sweeping U-shape starting below the nose. Extend the corners up toward the outer edges of the eyes for a happy grin. -
Outline the top lip:
Draw the top line of the mouth, adding two small downward notches or squares to represent the top teeth. -
Define the bottom teeth:
Complete the mouth outline by drawing the bottom edge, adding upward notches for the bottom teeth. Stagger them slightly from the top teeth for that classic jagged look.
Make it Glow
Mix glow-in-the-dark medium into your black paint or outline the finished features with glow paint for a surprise effect when the lights go out.
Step 3: Painting the Features
-
Fill the eyes:
Load your medium flat brush with black acrylic paint. Carefully fill in the triangle outlines for the eyes. Use the edge of the brush to keep the lines sharp. -
Paint the nose:
Fill in the nose triangle just like the eyes. Ensure the coverage is opaque; if the orange shows through, let it dry for a few minutes before adding a second coat. -
Outline the mouth:
Switch to your fine-point detail brush. Carefully trace the outer perimeter of the mouth sketch, including the jagged teeth shapes. -
Fill the corners:
Using the detail brush, fill in the tight corners of the mouth and the spaces between the teeth first. This prevents accidentally painting over your careful tooth outlines. -
Fill the main smile:
Switch back to the medium brush to fill in the larger central areas of the mouth quickly. Ensure the paint is applied evenly.
Step 4: Refining & Finishing
-
Check for gaps:
Look closely at the surface texture. Pumpkins have bumps, so double-check that paint has filled the tiny crevices in the skin. -
Clean up edges:
If any lines look wobbly, use the fine brush with a tiny bit more black paint to straighten them out. -
Erase guidelines:
Once the paint is completely dry to the touch, gently wipe away any visible pencil or chalk marks with a damp cloth or cotton swab.
Place your finished pumpkin near a window or on the porch to greet visitors with its classic charm


Funny Cartoon Expressions
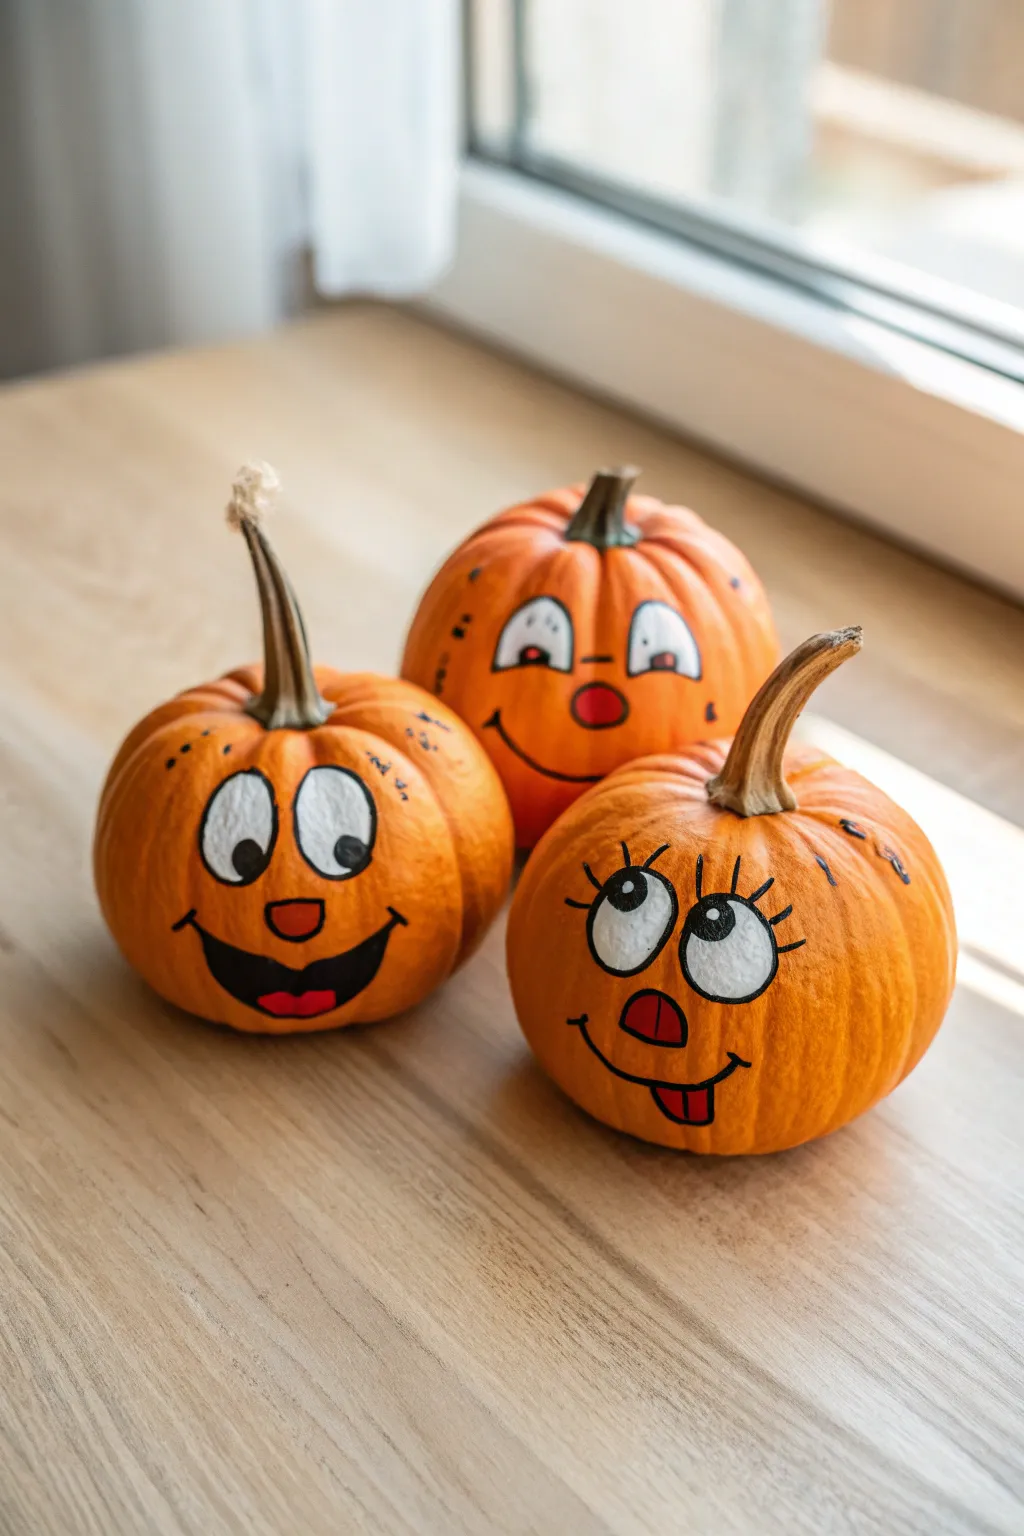
Bring your Halloween decor to life with this trio of delightfully silly painted pumpkins featuring distinct cartoon personalities. These vibrant orange gourds trade spooky carvings for cheerful, hand-painted expressions that are perfect for a family-friendly display.
Step-by-Step
Materials
- Three small, round pie pumpkins (clean and dry)
- White acrylic paint
- Red acrylic paint
- Black acrylic paint or a broad black paint marker
- Fine-point black permanent marker or detail brush
- Medium round paintbrush
- Small detail paintbrush
- Pencil
- Damp cloth or paper towel
- Clear spray sealant (optional)
Step 1: Planning and Base Work
-
Clean the surface:
Before starting, ensure your pumpkins are completely free of dirt and wax. Wipe them down with a damp cloth and dry them thoroughly so the paint adheres properly to the skin. -
Sketch the faces:
Using a pencil, lightly sketch the outlines of the faces onto each pumpkin. For the first pumpkin, draw large oval eyes and a wide, grinning mouth. For the second, draw eyes looking upward and a simple smile. For the third, add eyelashes and a silly tongue sticking out. -
Refine the composition:
Step back and look at your pencil sketches. Make sure the features sit nicely on the pumpkin’s curve and aren’t too low or too high.
Smooth Operator
If your pumpkin skin is very bumpy, use a paint marker instead of a brush for the black outlines. The felt tip maneuvers over ridges much easier than bristles.
Step 2: Painting the Features
-
Fill the eyes:
Using your medium round brush and white acrylic paint, fill in the sketched eye shapes. You’ll likely need two or three coats to get a solid, opaque white against the orange skin. -
Let the white dry completely:
Wait for the white paint to be fully dry to the touch. If you paint over it while wet, the colors will mud together. -
Paint the red accents:
Switch to your red acrylic paint. Paint a small oval nose on the first pumpkin, a round clown nose on the middle one, and a squarish nose plus a tongue shape on the third pumpkin. -
Add the mouth detail:
On the first grinning pumpkin, paint the inside of the open mouth black, leaving space for a small red tongue at the bottom if desired, or paint the tongue red now. -
Dry check:
Ensure all the colored fill layers—white eyes, red noses, and mouth interiors—are completely dry before moving to outlining.
Hatted Heroes
Give your trio even more character by gluing on mini straw hats, yarn wigs for hair, or tying colorful ribbon bows around the stems.
Step 3: Outlining and Detailing
-
Outline the eyes:
Using a black paint marker or a very fine brush with black paint, carefully trace the outer edge of the white eye shapes to define them. -
Add pupils:
Paint the black pupils inside the white eyes. Vary the direction of the gaze—have one looking left, one looking up, and one looking cross-eyed or silly to give them distinct personalities. -
Highlight the eyes:
I like to add a tiny dot of white paint inside each black pupil once dry; this ‘catchlight’ brings the character to life instantly. -
Draw the mouths:
Use your black marker or liner brush to draw the simple line smiles on the second and third pumpkins. Add small ‘cheek’ lines at the ends of the smiles for extra cuteness. -
Define the noses:
Outline the red nose shapes with a thin black line to make them pop against the orange background. -
Add quirky details:
Draw three distinct eyelashes on each eye for the third pumpkin. Add small eyebrows or freckles on the others if you want to fill empty space. -
Final clean up:
Check for any smudges or uneven lines. You can gently scratch away stray dried paint with a fingernail or touch up with a bit of orange paint if necessary.
Arranged together on a windowsill or porch, these goofy characters are sure to greet


Black Cat Silhouette Pumpkin
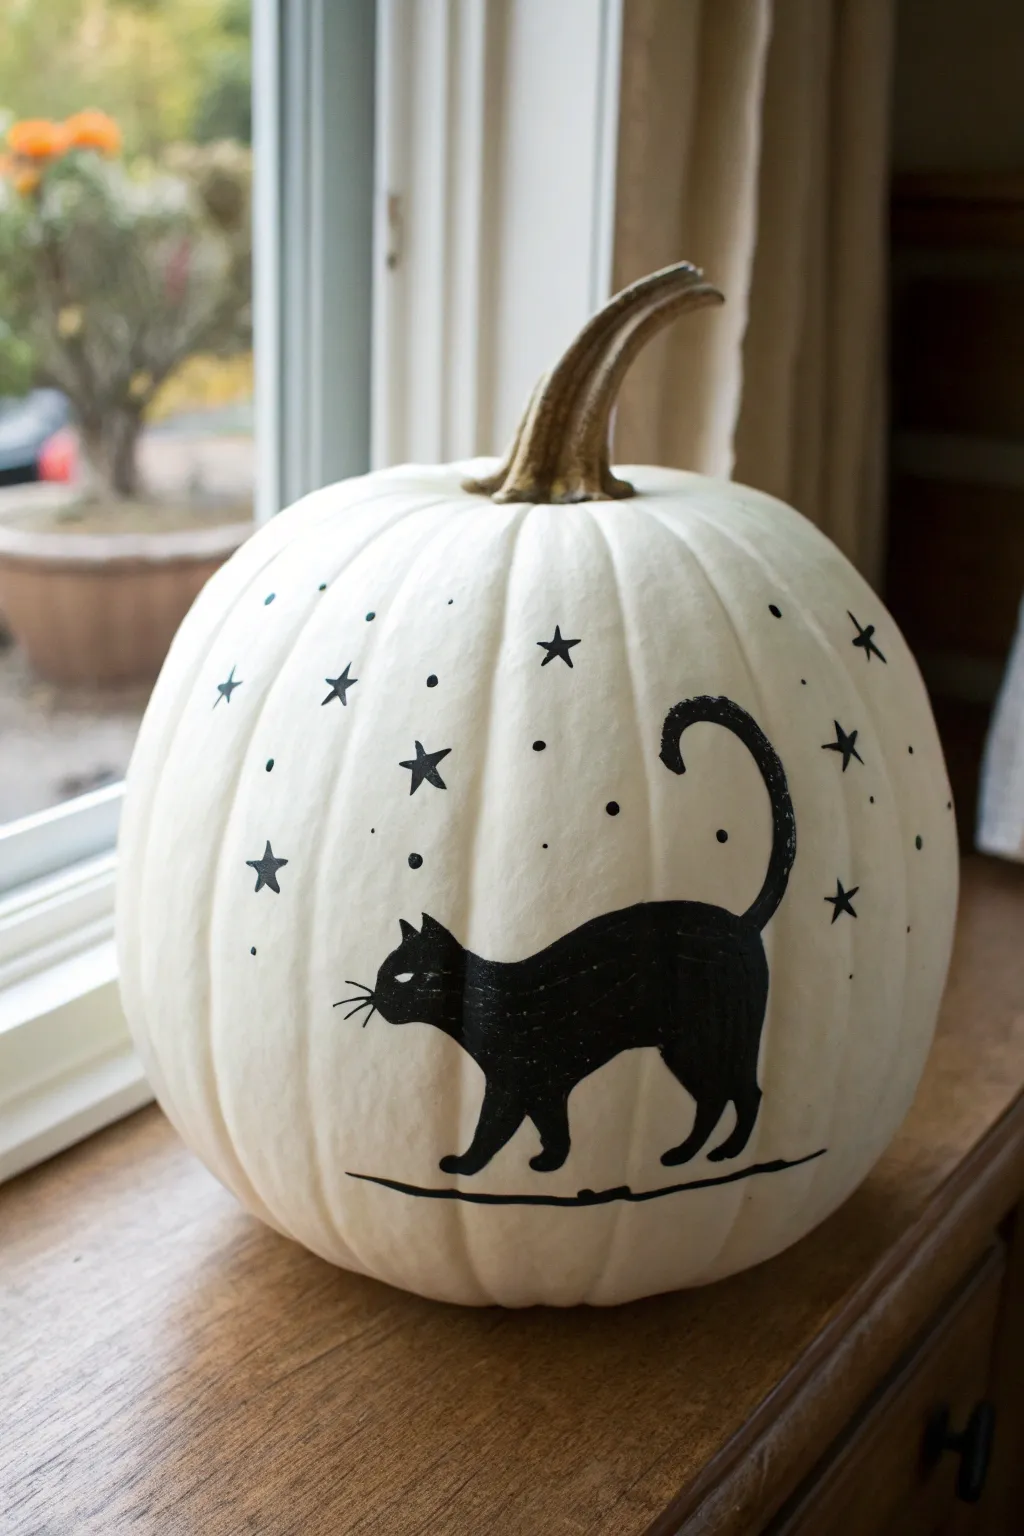
Transform a simple white pumpkin into a charming Halloween centerpiece featuring a classic black cat silhouette standing beneath a starry sky. This high-contrast design looks sophisticated but is surprisingly easy to achieve with just a few basic supplies.
Step-by-Step Tutorial
Materials
- White craft pumpkin (or a real white pumpkin, cleaned and dried)
- Black acrylic paint
- Fine-point black permanent marker or paint pen
- Medium round paintbrush
- Small detail paintbrush
- Pencil
- Eraser
- Paper plate or palette
- Water cup and paper towels
Step 1: Preparation and Sketching
-
Clean the surface:
Wipe down your pumpkin with a slightly damp cloth to remove any dust or oils that might prevent the paint from adhering properly. Dry it completely. -
Find the center:
Identify the smoothest side of your pumpkin to serve as the ‘face’ of your project. This is where your cat will live. -
Sketch the body oval:
Using a pencil very lightly, draw a horizontal oval shape near the bottom third of the pumpkin. This will form the main body of the cat. -
Add the head:
Draw a smaller circle slightly overlapping the left side of the body oval. Position it a bit higher than the body line to give the cat an alert posture. -
Draft the legs:
Sketch four simple legs extending down from the body. Make the paws slightly wider at the bottom and create a gentle curve in the back leg for a natural stance. -
Outline the tail:
Draw a long, curving tail extending from the right side of the body. Curve it upward and hook the tip inward like a question mark. -
Refine the outline:
Connect your shapes to create a smooth continuous outline. Add two small triangles on top of the head for ears and erase the internal intersecting lines.
Step 2: Painting the Silhouette
-
Outline with paint:
Dip your small detail brush into black acrylic paint. carefully trace over your final pencil outline to create a crisp edge. -
Fill the body:
Switch to your medium round brush to fill in the larger areas of the cat’s body. Use smooth, even strokes to avoid visible ridges in the paint. -
Refine the tail:
Go back to the detail brush to fill in the tail. Since the tail is thin, take your time here to keep the width consistent as it curves upward. -
Second coat:
Let the first layer dry for about 10-15 minutes. Apply a second coat of black paint to ensure the silhouette is completely opaque and solid. -
Add the ground line:
Using the detail brush, paint a thin, slightly uneven horizontal line underneath the cat’s paws so it isn’t floating in space.
Fixing Paint Smudges
If you smudge black paint on the white skin, don’t wipe it! Let it dry completely, then gently scrape it off with a craft knife or paint over it with white.
Step 3: Adding Details
-
Paint the stars:
Using your smallest brush or a paint pen, draw several five-pointed stars scattered around the upper half of the pumpkin. Vary their sizes slightly for interest. -
Add floating dots:
Dip the non-brush end (the handle) of a paintbrush into black paint. Gently dot it onto the pumpkin surface to create perfect circles between the stars. -
Create the whiskers:
Use a fine-point black marker or a very steady hand with the detail brush to flick three thin lines extending from the cat’s muzzle. -
Define the eye:
Once the black head paint is 100% dry, use a tiny dot of white paint or simply leave a negative space if you haven’t painted it yet to create the slanted cat eye. -
Clean up sketch lines:
After ensuring all paint is completely dry to the touch, gently erase any visible pencil marks that might still be showing around the edges.
Add Some Magic
Make the design pop by using glow-in-the-dark paint for the stars and the cat’s eyes. It will look like a normal silhouette by day and spooky art by night.
Now you have a stylish, custom-painted pumpkin ready to greet your Halloween guests
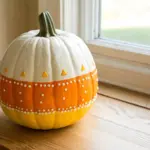

Candy Corn Color-Block Pumpkin
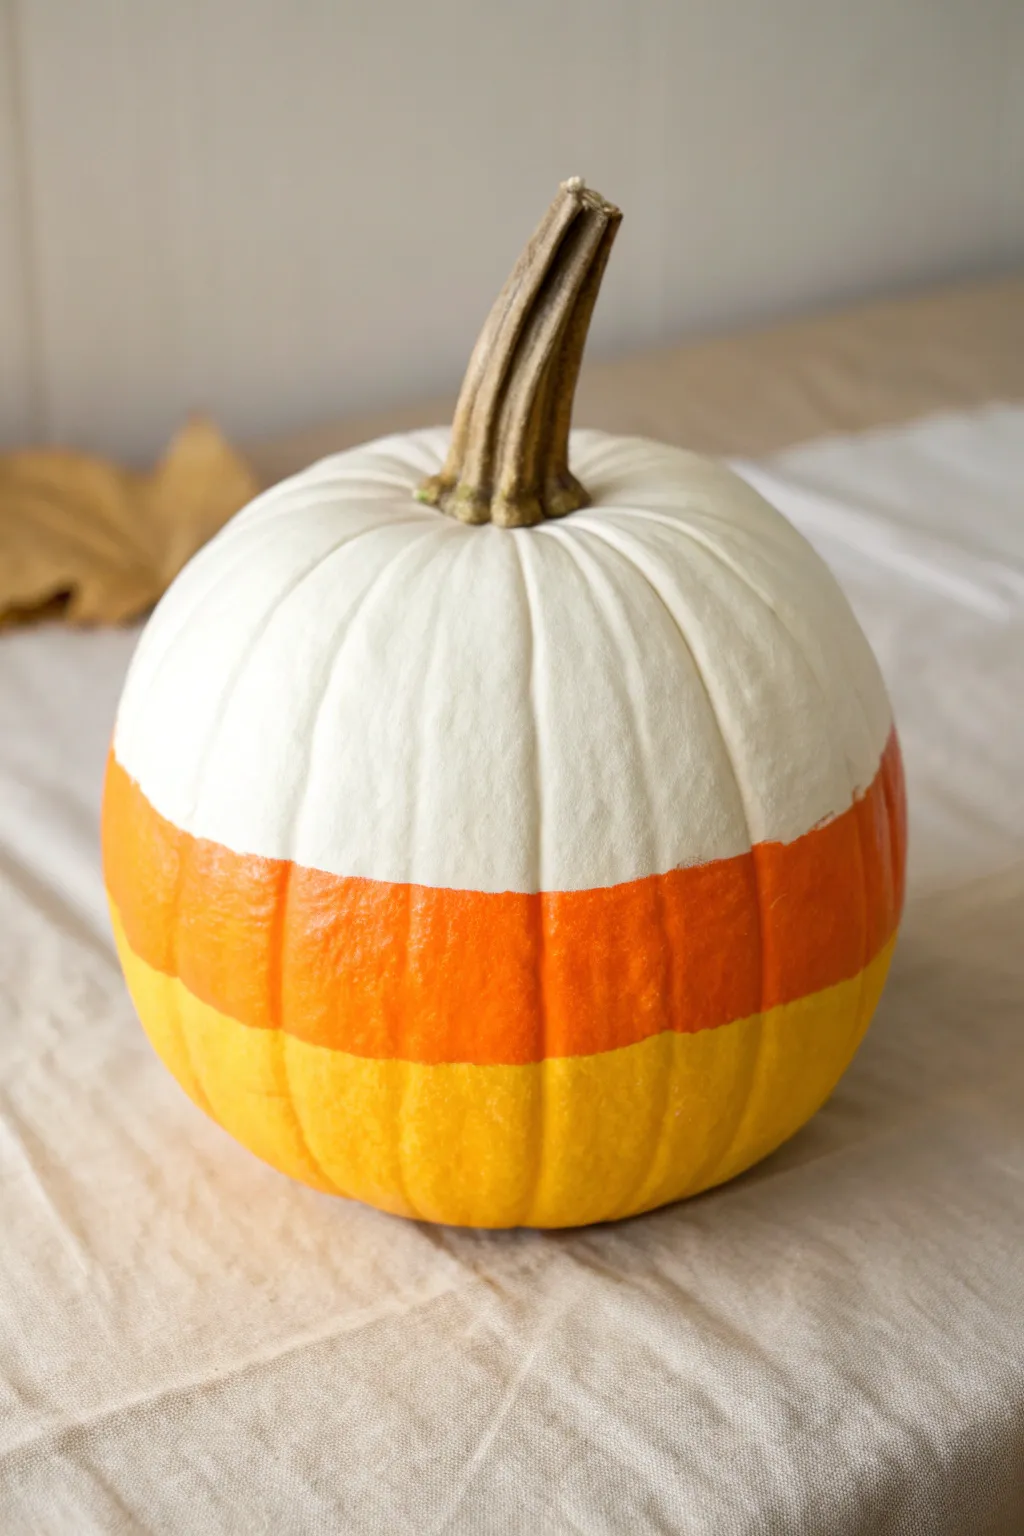
Transform a simple gourd into a sweet seasonal treat with this bold, color-blocked candy corn design. The crisp horizontal stripes of white, orange, and yellow create a playful yet modern look that instantly brightens up any autumn table setting.
Step-by-Step Tutorial
Materials
- Medium-sized pumpkin (real or faux)
- White acrylic paint (matte finish)
- Bright orange acrylic paint
- Yellow acrylic paint
- Painter’s tape or masking tape (optional)
- Medium flat brush (3/4 inch or 1 inch)
- Small angled brush for touch-ups
- Pencil (light)
- Paper plate or palette
- Damp cloth for clean up
Step 1: Preparation and Base Coat
-
Clean the surface:
Before you begin, wipe down your pumpkin thoroughly with a damp cloth to remove any dirt or surface oils. Let it dry completely to ensure the paint adheres smoothly. -
Apply the first white coat:
Using your medium flat brush, paint the entire pumpkin white. This acts as a primer, neutralizing the natural orange or green skin color so your yellow and orange stripes will pop vividly later. -
Let it dry completely:
Allow the base coat to dry for at least 30 minutes. If the underlying pumpkin color is still showing through significantly, apply a second coat of white and let it dry again. -
Mark the sections:
Visualize your pumpkin in thirds. Lightly sketch two horizontal lines around the circumference of the pumpkin with a pencil to divide it into top, middle, and bottom sections. I find it helpful to spin the pumpkin slowly on a table while holding the pencil steady at the right height.
Step 2: Painting the Color Bands
-
Paint the bottom yellow:
Flip the pumpkin or tilt it comfortably to access the bottom third. Load your brush with yellow paint and fill in the bottom section, painting right up to your lower pencil line. -
Work into the crevices:
Ensure you push the bristles of your brush into the vertical grooves of the pumpkin so no white shows through in the deep ridges of the yellow section. -
Smooth the edges:
Create a clean top edge for the yellow band. Do not worry if it isn’t laser-straight; a slightly organic line looks more natural on a bumpy pumpkin surface. -
Dry the yellow layer:
Set the pumpkin down carefully or prop it up so the wet yellow paint doesn’t smudge. Let this layer dry to the touch before moving to the next color. -
Start the orange band:
Clean your brush thoroughly or switch to a fresh one. Load it with bright orange paint and begin filling the middle section, starting from the center of the band and working outward. -
Meeting the yellow line:
Carefully paint downward to meet the yellow section. You want the orange to just touch or slightly overlap the yellow line to close the gap without blending the colors into a muddy mess. -
Define the top edge:
Paint upward to your top pencil mark. This line defines where the white ‘cap’ begins, so try to keep this transition relatively consistent around the pumpkin. -
Double check coverage:
Inspect the orange band for streaks. Acrylics can be translucent, so applying a second thin coat of orange often makes the color look much more solid and vibrant.
Clean Lines Hack
If you have a very smooth faux pumpkin, use painter’s tape to mark your thirds. Press the edges down firmly to prevent bleed-through for super crisp lines.
Step 3: Finishing Touches
-
Refresh the white top:
Since you already base-coated the pumpkin white, the top third is mostly done. However, adding a fresh final coat of white to the top section makes it look crisp and intentional against the fresh orange paint. -
Refine the transition:
Use a small angled brush with white paint to clean up the line where the white meets the orange, correcting any accidental orange smudges that went too high. -
Clean the stem:
If you accidentally got paint on the stem, wipe it off now with a damp cloth or paint over it carefully with a brown or green shade to restore its natural look. -
Final cure:
Let the entire pumpkin sit undisturbed for several hours or overnight to ensure the paint layers fully cure and harden.
Level Up: Glitter Dipped
For extra sparkle, brush Mod Podge over the finished white top section and sprinkle on iridescent white glitter to make the ‘sugar’ tip look realistic.
Place your finished candy corn pumpkin on a mantle or table runner to enjoy the sweetest look of the season
BRUSH GUIDE
The Right Brush for Every Stroke
From clean lines to bold texture — master brush choice, stroke control, and essential techniques.
Explore the Full Guide
Polka Dot Confetti Pumpkin
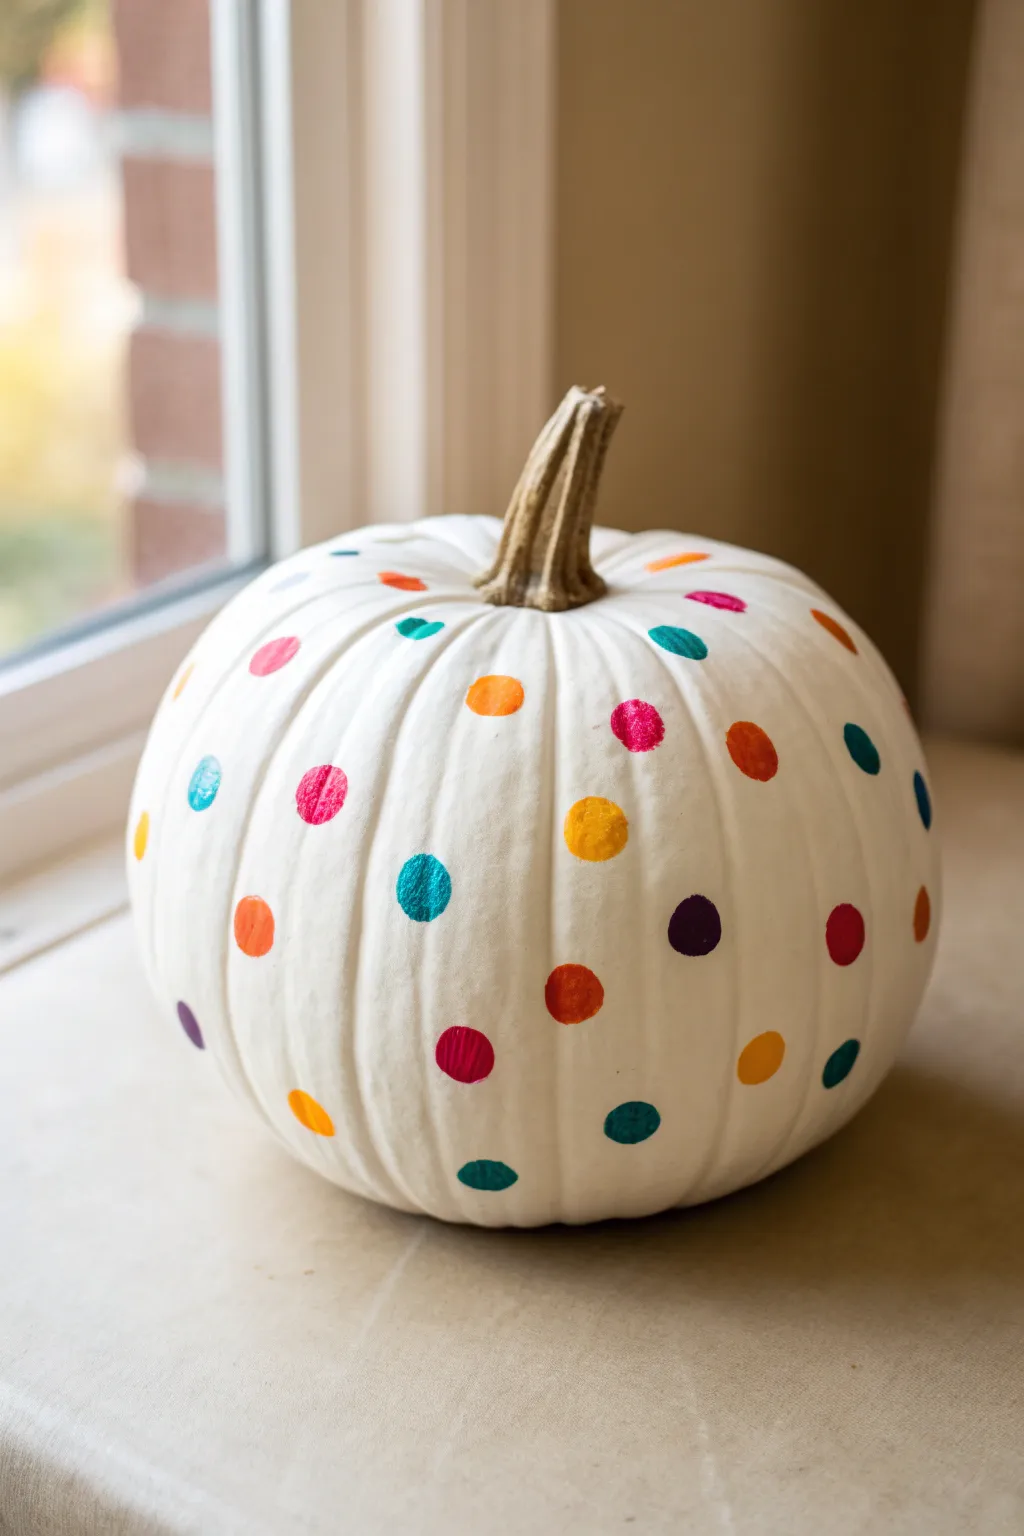
Transform a plain pumpkin into a celebration of color with this vibrant confetti design. By starting with a crisp white base, the rainbow of festive polka dots pops with energy, creating a modern and cheerful centerpiece perfect for any fall gathering.
Detailed Instructions
Materials
- Pumpkin (real or faux)
- White acrylic paint or chalk paint
- Assorted vibrant acrylic craft paints (pink, orange, teal, purple, yellow, red, dark blue)
- Foam pouncers (round sponge brushes) in various sizes
- Small flat paintbrush (for touch-ups)
- Paper plate or palette
- Damp cloth or paper towels
- Clear spray sealer (optional)
Step 1: Prepping the Canvas
-
Clean the surface:
Before adding any color, ensure your pumpkin is completely clean. Wipe down the entire surface with a damp cloth to remove any dirt or oils that might prevent the paint from adhering properly. -
Protect the stem:
If you want to keep the natural look of the stem, carefully wrap it with painter’s tape. Alternatively, just be very mindful when painting near the top. -
Apply the base coat:
Using a wide brush or sponge, cover the entire pumpkin with your white acrylic or chalk paint. Work in smooth, vertical strokes following the pumpkin’s ribs. -
Let it dry completely:
Allow the first coat to dry for at least 30 minutes. If the orange skin of the pumpkin is still showing through, apply a second coat for a solid, opaque finish and let that dry fully.
Slippery Stamps?
If your foam pouncer slides when you press down, you likely have too much paint loaded. Dab the excess onto a paper towel before stamping the pumpkin.
Step 2: Adding the Confetti Colors
-
Prepare your palette:
Squeeze small, dime-sized amounts of your colorful acrylic paints onto a paper plate. Space them out so the colors don’t accidentally mix. -
Load the pouncer:
Select a medium-sized round foam pouncer. Dip the flat face of the sponge directly into your first color—let’s start with a bright pink or teal—ensuring the entire circle is evenly coated with paint. -
Test the stamp:
Do a quick test stamp on a scrap piece of paper to make sure you don’t have too much excess paint, which can cause slippery edges. -
Apply the first dots:
Press the pouncer straight down onto the pumpkin surface and lift it straight off to create a perfect circle. Scatter a few dots of this first color randomly around the pumpkin. -
Wipe and switch:
Clean your pouncer thoroughly with water and dry it on a paper towel, or switch to a clean pouncer for your next color. -
Layer in the second color:
Load up a contrasting color, like orange or yellow. Stamp these dots into the empty spaces, keeping them spaced out nicely from the first set. -
Vary the placement:
As you add more colors (purple, red, blue), make sure to place some dots higher near the stem and some lower near the base so the pattern looks organic and flowing. -
Mind the ribs:
When stamping over the pumpkin’s deep ribs or grooves, you may need to rock the pouncer gently side-to-side to ensure the paint reaches into the crease without smudging the circle shape. -
Fill the gaps:
Continue adding colors one by one. Step back occasionally to look for large white spaces that need a pop of color. -
Add detail dots:
If you want variation, use a smaller pouncer or the handle end of a paintbrush to add tiny confetti dots in between the larger ones for extra texture. -
Touch up edges:
Once the dots are semi-dry, use a small detail brush to fix any edges where the sponge might have missed or slipped, especially inside the pumpkin grooves.
Perfect Circles Pro Tip
Twist the foam pouncer slightly (just a quarter turn) as you lift it off the pumpkin surface. This helps break the suction and leaves a crisper, rounder edge.
Step 3: Final Touches
-
Reference the look:
Check your work against the inspiration. The goal is a balanced, random distribution where no two identical colors are right next to each other. -
Dry thoroughly:
Let the polka dots dry completely, which may take an hour or more depending on how thick the paint application was. -
Remove tape:
If you taped the stem earlier, gently peel it off now to reveal the natural wood contrast against the white pumpkin. -
Clean the stem:
If any white paint accidentally got onto the stem, use a damp cloth or a craft knife to gently scrape it away for a clean finish. -
Seal (Optional):
If this pumpkin will be displayed outdoors, apply a coat of clear spray sealer to protect your festive polka dots from the elements.
Now you have a playful, modern decoration that adds immediate joy to your seasonal display
Bold Stripes and Chevron
Transform a plain pumpkin into a modern statement piece with this high-contrast design featuring alternating bold stripes and delicate chevron patterns. This graphic black and white look is perfect for adding a touch of sophisticated style to your seasonal decor without the mess of carving.
Step-by-Step
Materials
- Medium to large pumpkin (real or faux)
- White acrylic paint (matte or satin finish)
- Black acrylic paint
- Wide flat paintbrush (1-inch width)
- Small fine-tip paintbrush or paint pen (black)
- Pencil for sketching
- Painter’s tape (optional)
- Clear sealant spray (optional)
Step 1: Base Preparation
-
Clean surface:
Begin by wiping down your pumpkin thoroughly with a damp cloth to remove any dirt or oils, then dry it completely so the paint adheres properly. -
Apply base coat:
Using your wide flat brush, paint the entire pumpkin with white acrylic paint. You will likely need 2-3 coats for full opacity, allowing 15-20 minutes of drying time between each layer. -
Dry completely:
Let the final coat of white paint dry fully, preferably for an hour or more, to ensure you have a hard surface for the detailed work.
Step 2: Mapping the Design
-
Identify natural lines:
Locate the natural vertical ribs or indentations on the pumpkin. These will serve as your guides for where the stripes should be placed. -
Sketch vertical stripes:
Lightly pencil in the boundaries for your thick black stripes. Aim to follow every other rib section, leaving alternating white spaces for the chevron pattern. -
Sketch chevron guides:
In the empty white sections between your penciled stripes, lightly sketch a vertical centerline. This helps ensure your ‘V’ shapes are centered. -
Draw chevrons:
Pencil in the chevron stack. Start from the bottom and draw inverted ‘V’ shapes stacked on top of each other, keeping heavier spacing at the bottom and lighter spacing near the stem if the pumpkin tapers.
Clean Lines Hack
Struggling with straight lines on a curved surface? Use flexible electrical tape instead of stiff painter’s tape to mask off your curves perfectly.
Step 3: Painting the Stripes
-
Outline stripes:
Using a smaller brush loaded with black paint, carefully outline the edges of the bold vertical stripes you sketched earlier to create crisp borders. -
Fill the stripes:
Switch back to a medium flat brush to fill in the outlined stripes with black paint. Apply long, smooth vertical strokes to minimize brush textures. -
Refine edges:
Go back over the edges of the black stripes to ensure they are solid and opaque. I prefer to do this while the first coat is tacky but not fully dry to blend layers. -
Paint around stem:
Carefully paint up to the base of the stem, tapering the stripes slightly if the pumpkin shape demands it. -
Let black dry:
Allow the heavy black stripes to dry completely before starting the delicate chevron work to avoid accidentally smudging wet paint.
Make It Glam
For a luxe twist, swap the black paint for metallic gold on the chevron details, or add a thin line of gold glitter glue alongside the black stripes.
Step 4: Adding Chevron Details
-
Load fine brush:
Load your finest detail brush with black paint, but don’t overload it. Alternatively, a black paint pen works wonder here for control. -
Paint first leg:
Start painting the chevrons in the white sections. Paint the left downward stroke of the ‘V’ first on all designs in a single column to maintain a consistent angle. -
Complete V shape:
Go back up the column and paint the matching right downward stroke to complete the chevron ‘V’ shape. -
Check consistency:
Step back and look at the pattern from a distance. If any lines look too thin compared to the bold stripes, thicken them slightly. -
Clean up errors:
If you make a mistake or a line wobbles, wait for the black paint to dry, then gently touch it up with a tiny dab of white paint.
Step 5: Finishing Touches
-
Paint the stem:
For a polished look, you can leave the stem natural or dry-brush it with a metallic antique gold or silver to complement the modern design. -
Seal the work:
Once fully cured (overnight is best), spray the pumpkin with a clear acrylic sealer to protect the paint from chipping or fading.
Place your striking geometric pumpkin on a console table or front porch to enjoy your handiwork.

PENCIL GUIDE
Understanding Pencil Grades from H to B
From first sketch to finished drawing — learn pencil grades, line control, and shading techniques.
Explore the Full Guide
Ombre Sunset Gradient with Bats
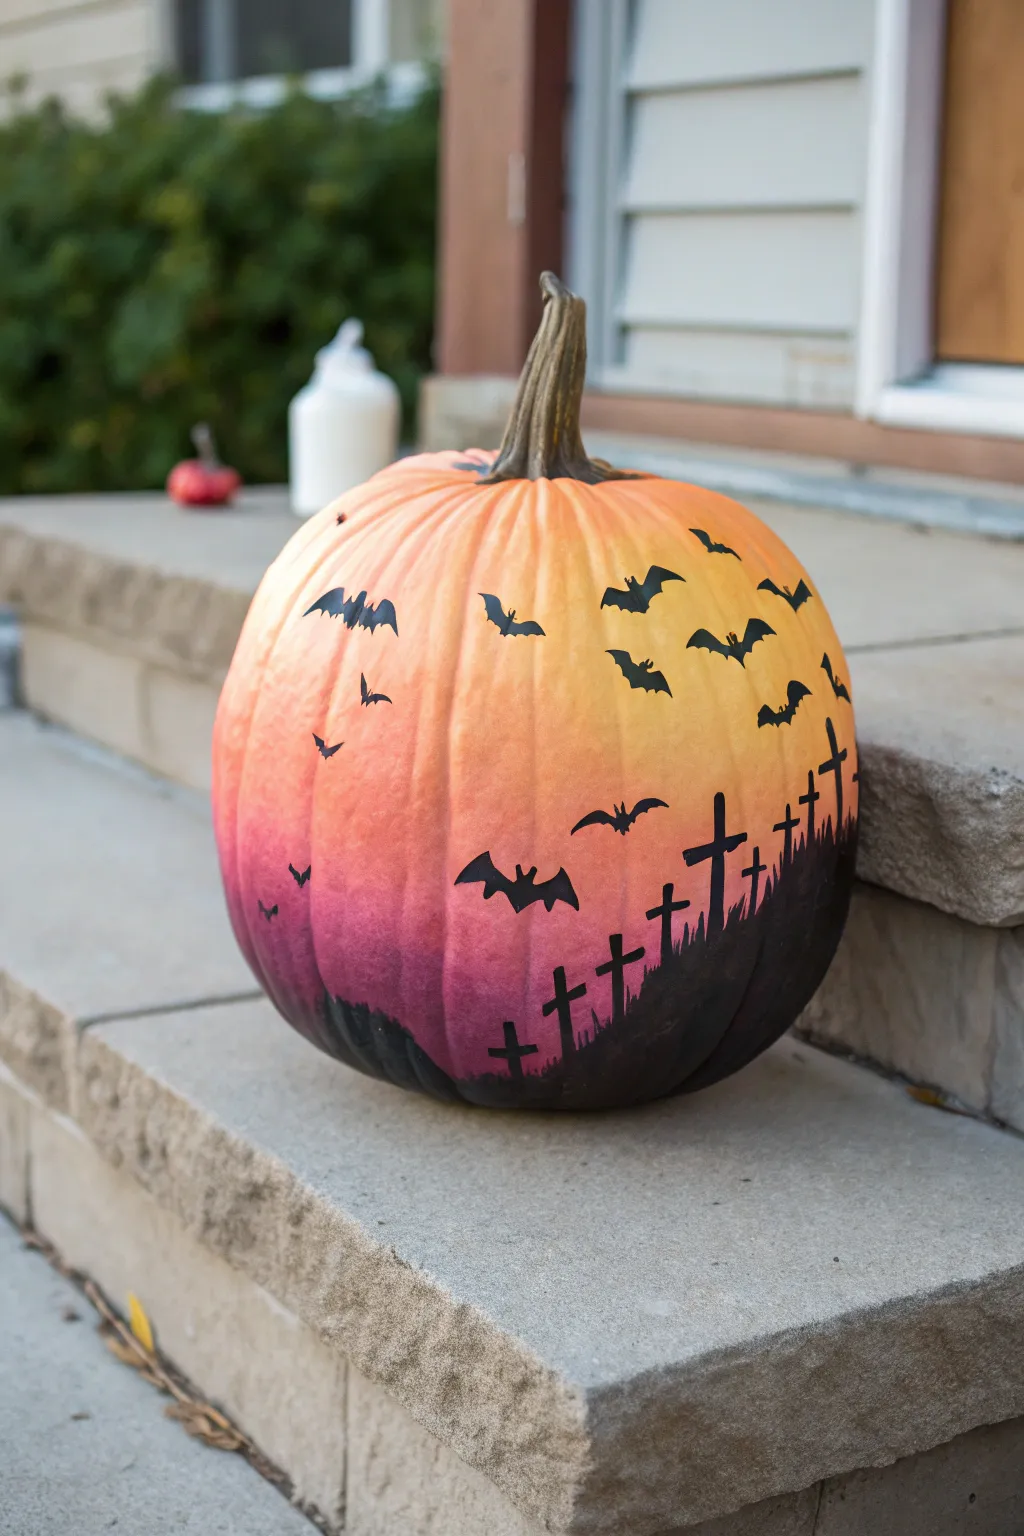
Transform a simple pumpkin into a haunting landscape with this striking gradient effect. This project combines a nostalgic ombre sunset with stark black silhouettes for a decoration that captures the eerie beauty of twilight.
Step-by-Step Tutorial
Materials
- Large pumpkin (real or faux)
- White acrylic paint (primer)
- Yellow acrylic paint
- Orange acrylic paint
- Magenta or deep pink acrylic paint
- Black acrylic paint
- Makeup sponges or painting sponges
- Small round detail brush
- Medium flat brush
- Paper towels
- Pencil (optional)
Step 1: Creating the Sky
-
Prime the surface:
Begin by wiping down your pumpkin to remove any dirt or oils. Apply a thin, even coat of white acrylic paint over the entire surface. This priming step ensures your sunset colors will pop and look true to tone rather than muddy against the pumpkin’s orange skin. -
Start with yellow:
Once the white primer is dry, squirt some yellow paint onto your palette. Using a makeup sponge, dab the yellow paint onto the top third of the pumpkin, focusing especially around the stem area. -
Add the orange layer:
Load a fresh sponge with orange paint. Apply this color to the middle section of the pumpkin, bringing it up slightly to meet the yellow. -
Blend the transition:
While both paint layers are still slightly wet, use the sponge to dab gently where the yellow and orange meet. I find that a light tapping motion blends the colors seamlessly without creating harsh lines. -
Introduce the magenta:
Apply the magenta or deep pink paint to the bottom third of the pumpkin using a new sponge. This color will serve as the darkening horizon line. -
Final gradient blend:
Work the magenta paint upwards into the orange section, dabbing repeatedly to soften the transition. You want a smooth fade from yellow at the top, through orange, down to deep pink at the base. Let the gradient dry completely before moving on.
Smooth Gradients
Keep your sponges damp (not soaking wet) with water before loading paint. A slightly damp sponge helps acrylics blend much smoother and prevents dry, scratchy textures on the pumpkin skin.
Step 2: Painting the Landscape
-
Establish the ground:
Load a medium flat brush with black acrylic paint. Paint an uneven, wavy horizon line near the very bottom of the pumpkin, covering the base in solid black to represent the graveyard ground. -
Sketch the crosses:
If you are nervous about freehanding, lightly sketch vertical lines for the crosses using a pencil directly onto the dry gradient paint. Vary the heights and angles slightly to give the graveyard an old, neglected look. -
Paint the vertical posts:
Using your small detail brush and black paint, go over your sketch lines or freehand the vertical posts of the crosses. Make some taller and some shorter for visual interest. -
Add the crossbars:
Paint shorter horizontal lines across the vertical posts to complete the cross shapes. Don’t worry about them being perfectly straight; a little wobble adds to the spooky character. -
Connect to the ground:
Thicken the bottom of the cross posts slightly where they meet the black ground to make them look firmly planted in the earth. -
Add grass texture:
Use the very tip of your detail brush to flick tiny, upward strokes from the black ground around the base of the crosses. This creates the illusion of overgrown grass in the cemetery.
Glow in the Dark
Mix a clear glow-in-the-dark medium into your yellow paint for the top section. When the lights go out, the ‘moonlight’ part of your sky will actually glow eerie green!
Step 3: Adding the Bats
-
Plan bat placement:
Look at the upper yellow and orange sections of your pumpkin. Visualize where you want your bats to fly, aiming for a diagonal flow across the ‘sky’ rather than a straight line. -
Paint the first wing:
With the small detail brush and black paint, create a small ‘V’ shape or an arc for the first wing of a bat. -
Complete the shape:
Paint a mirrored wing on the other side and fill in a tiny body in the center. Vary the wing shapes—some arched high, some flattened—to show movement. -
Vary the sizes:
Paint a mix of bat sizes. Make the ones near the top or ‘front’ larger and more detailed, and paint tiny, simple ‘m’ shapes in the distance to create depth. -
Final touches:
Step back and look at the composition. If a spot looks too empty, add a small distant bat or a tiny cross to balance the scene.
Set your masterpiece on the porch and watch the sunset colors glow all season long
Witch Silhouette Night Scene
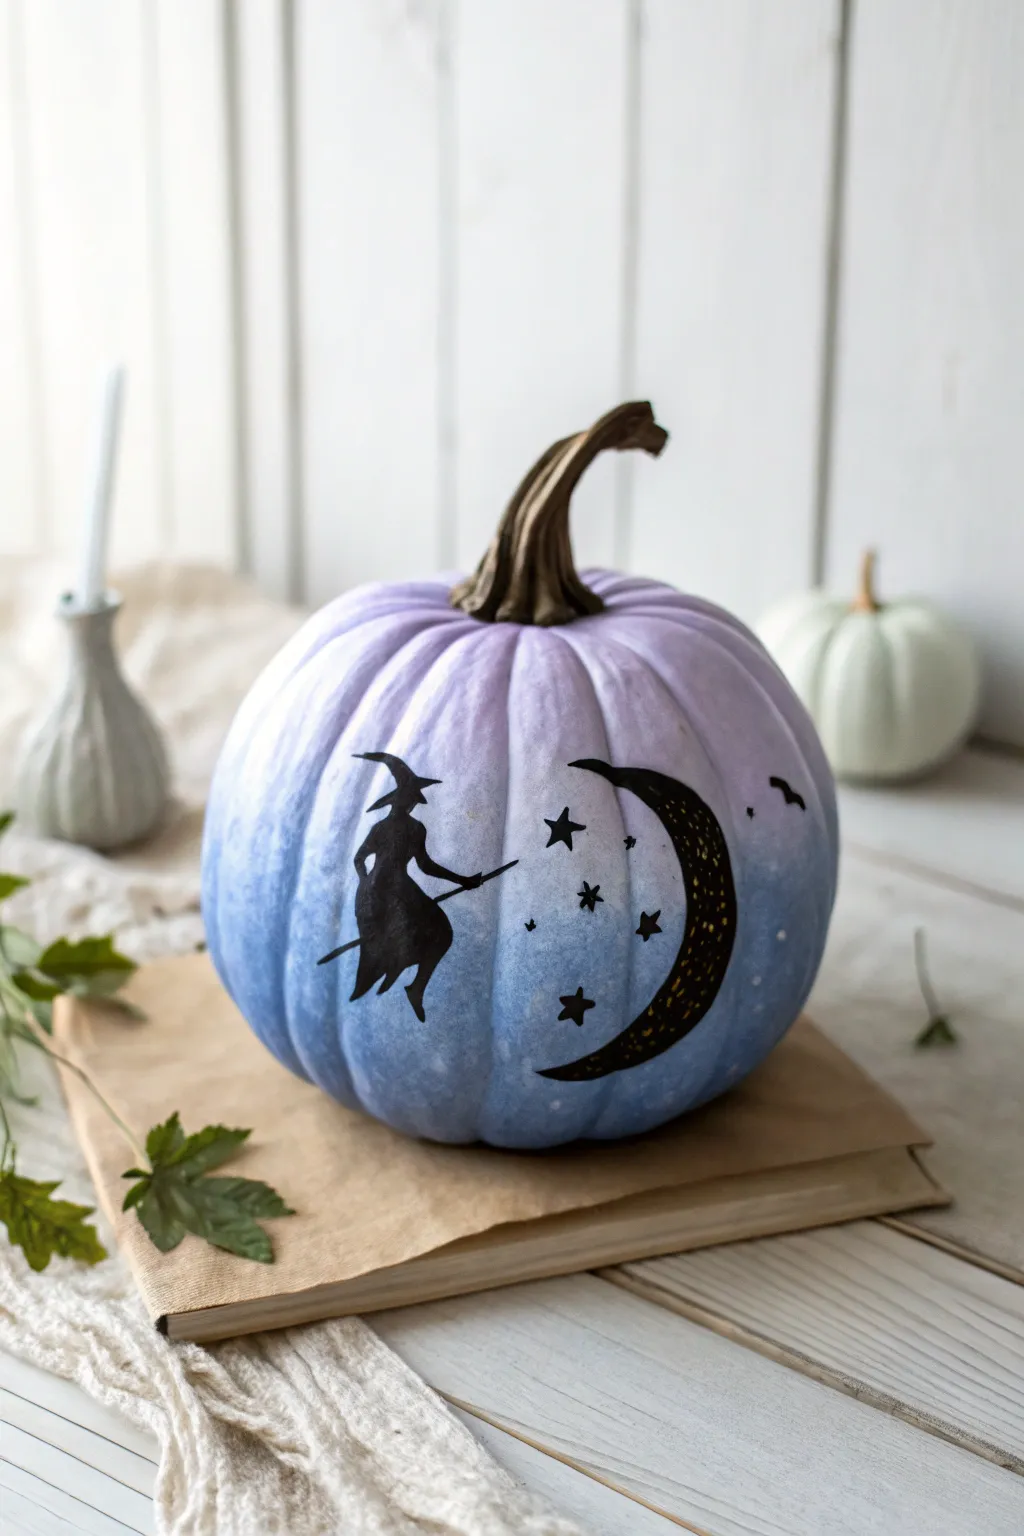
Transform a simple faux pumpkin into a twilight masterpiece with this dreamy, gradient-painted scene. The soft blend of lilac into deep blue creates the perfect backdrop for a classic witch silhouette flying past the moon.
How-To Guide
Materials
- Medium-sized craft pumpkin (white or cream)
- Acrylic paints: Lilac/Light Purple, Light Blue, Deep Midnight Blue, Black, Yellow, White
- Pencil
- Fine-grit sandpaper (optional)
- Make-up sponge wedges or soft blending sponge
- Fine detail brush (liner brush)
- Small flat brush
- Old toothbrush (for stars)
- Matte sealant spray
Step 1: Creating the Twilight Gradient
-
Prep surface:
If your pumpkin is very shiny or slick, give it a quick, gentle buff with fine-grit sandpaper to help the paint adhere better. Wipe away any dust with a damp cloth. -
Base coat:
Apply a coat of white acrylic paint if the pumpkin isn’t already white. This ensures your pastel colors will pop and look true to tone. Let this dry completely. -
Apply lilac top:
Squeeze some lilac paint onto your palette. Using a makeup sponge, dab the paint onto the top third of the pumpkin, working from the stem downwards. Dabbing creates a smoother, airbrushed texture than brushing. -
Add blue middle:
While the lilac is still slightly tacky, apply light blue paint to the middle section of the pumpkin using a fresh sponge. Bring the blue up to meet the lilac edge. -
Blend the transition:
Use the sponge to gently tap over the line where the lilac and blue meet. This blurs the boundary, creating a seamless ombre transition. I find using a very slightly damp sponge helps move the acrylics together. -
Deepen the base:
Apply your midnight blue paint to the bottom third of the pumpkin. Blend this dark blue up into the light blue section just as you did before, ensuring there are no harsh lines. -
Dry thoroughly:
Let the gradient background dry completely. This is crucial—if the base is wet, your silhouette lines will bleed. A hair dryer on a cool setting can speed this up.
Sponge Tactics
Don’t drag the sponge when creating the gradient. Use a bouncing ‘up and down’ motion to simulate an airbrushed look without streaks.
Step 2: Painting the Silhouette Scene
-
Sketch lightly:
Using a pencil, very lightly sketch the outline of a crescent moon on the right side and a witch on a broomstick on the left. Keep the pencil pressure extremely light so you don’t dent the paint. -
Paint the moon shape:
Use your flat brush and black paint to fill in the crescent moon shape first. Use smooth, confident strokes to get a sharp edge on the curve. -
Detail the moon:
Once the black moon base is dry, take a fine brush with yellow paint. Add small dots, stippling, and tiny distressed marks inside the black crescent to give it texture and a magical glow. -
Outline the witch:
Switch to your finest detail liner brush and black paint. Carefully trace the outline of the witch’s hat, cape, and broomstick. Creating the sharp points of the hat and boots requires a steady hand. -
Fill the silhouette:
Fill in the witch’s body with solid black. Ensure the paint is opaque; if you can see the blue background through it, apply a second coat after the first dries. -
Add flying bats:
Paint two or three tiny ‘m’ shapes or simple bird-like silhouettes near the moon to represent bats flying in the distance.
Blobs happen
If you drip black paint on the gradient, don’t wipe it! Let it dry, then paint over the mistake with the background color to erase it.
Step 3: Stars and Details
-
Paint larger stars:
Using the detail brush and black paint, draw a few five-pointed stars scattered between the witch and the moon. Vary their sizes for visual interest. -
Add star shimmer:
Place a tiny dot of white or yellow paint in the center of the black stars to make them twinkle. -
Splatter stars:
Dip an old toothbrush into thinned white paint. Test it on a paper towel first, then gently flick the bristles with your thumb to mist tiny white specks across the pumpkin for a distant galaxy effect. -
Paint the stem:
Paint the pumpkin stem a dark, realistic brownish-green. Adding a touch of copper or gold dry-brushing on the ridges of the stem adds a nice touch of elegance. -
Seal the work:
once everything is bone dry, spray the entire pumpkin with a matte clear sealant. This protects the paint from scratching and unifies the sheen of the different specific colors.
Place your mystical pumpkin near a candle or lantern to let the silhouette come alive in the shadows


White Pumpkin Mandala Lines
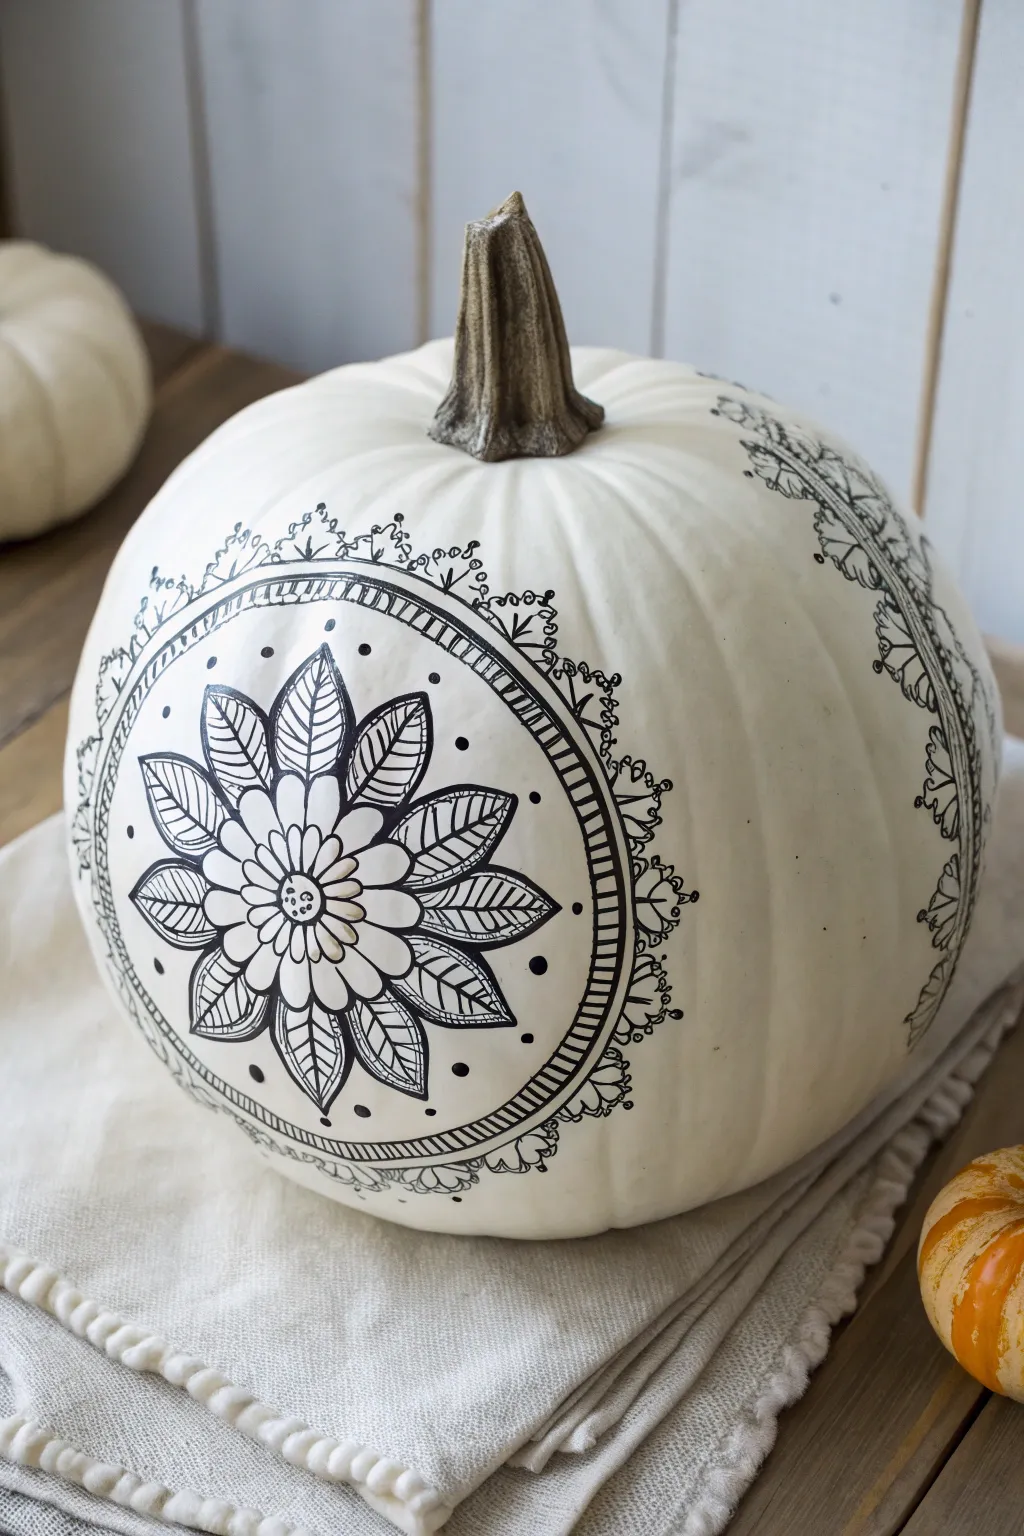
Transform a simple white pumpkin into an elegant autumn centerpiece with intricate black linework. This project mimics the delicate look of hennas or lace, creating a stunning monochrome contrast that fits perfectly with neutral décor.
Step-by-Step
Materials
- White craft pumpkin (artificial is best for longevity) or a real white pumpkin
- Fine-point black permanent marker or paint pen (0.5mm – 1mm)
- Medium-point black permanent marker (2mm)
- Pencil (HB or lighter)
- Soft eraser
- Flexible sewing measuring tape
- Drafting compass (optional but helpful)
- Damp cloth
- Clear matte sealant spray (optional)
Step 1: Preparation and Mapping
-
Clean surface:
Begin by wiping down your pumpkin with a damp cloth to remove any dust or oils. If you are using a real pumpkin, ensure it is completely dry before starting. A clean surface is crucial for crisp ink lines. -
Find the center:
Choose the smoothest side of your pumpkin to feature the main design. Use your measuring tape to visually locate the vertical center of this face. -
Draft the central point:
With your pencil, lightly mark a small dot where the center of your flower mandala will be. This anchor point ensures your pattern radiates outward symmetrically. -
Sketch concentric circles:
Using the compass or sketching freehand with a light touch, draw three lightly penciled circles around your center dot. The first should be about 1 inch wide for the flower center, the second about 3 inches for the petals, and the third roughly 5 inches for the border frame.
Ink Smudge Savior
Work from the top of the design downward if you are right-handed (or vice versa) to prevent your hand from dragging through fresh ink as you draw.
Step 2: Drawing the Core Flower
-
Ink the center:
Switch to your fine-point marker. Draw a small circle over your center pencil dot. Inside usually looks best with a few tiny clustered circles or seeds to mimic a flower’s pistil. -
Create the inner ring:
Draw the first layer of petals. These should be small, rounded loops touching the center circle, resembling a simple daisy shape. -
Outline main petals:
Using the second pencil guide circle as your limit, draw larger, pointed leaf-shaped petals radiating from the inner flower. Try to keep them evenly spaced. -
Fill petal details:
Add texture to these large petals by drawing a central vein line down the middle of each. Then, add small diagonal hatch marks on one side of the vein to create shading and visual interest. -
Add secondary petals:
In the V-shaped gaps between the main pointed petals, draw smaller, darker shapes or simple triangles to fill the negative space and add density to the core design.
Step 3: Creating the Border Ring
-
Define the boundary:
Take your medium-point marker and trace over your largest pencil circle to create a bold, solid ring enclosing the flower. -
Add the inner frame:
Draw a second circle just inside the bold one you just made, leaving about a quarter-inch gap. Fill this gap with small, evenly spaced perpendicular lines (hatching) to create a ‘ladder’ effect. -
Place decorative dots:
In the open white space between the flower tips and the ladder ring, place bold black dots. I find that spacing them between the petal tips creates a balanced rhythm. -
Create the focal points:
Select four equidistant points on the outer edge of your ladder ring (top, bottom, left, right). At these points, draw a small floral flourish or a stacked leaf design extending outward.
Metallic Touch
Once the black ink is dry, trace inside the petals with a fine-tip gold or copper or paint pen to add a subtle, glamorous shimmer.
Step 4: The Lace Extension
-
Connect the flourishes:
Between your four main flourishes, draw delicate scallops or swags connecting them along the outer perimeter of the circle. -
Add micro-details:
Switch back to the ultra-fine marker. Add tiny loops, dots, or ‘berries’ to the tips of the scallops to give it that intricate lace-like quality. -
Expand the design (optional):
If you have more space, replicate the scalloped border pattern on other sides of the pumpkin, like the side quadrants, so the design wraps around the curve. -
Erase guidelines:
Allow the ink to dry completely for at least 30 minutes. Gently erase any visible pencil marks, being careful not to rub precisely over the ink if it looks shiny or wet. -
Seal the art:
To protect your work, lightly mist the pumpkin with a clear matte sealant spray. Do this in a well-ventilated area and let it dry overnight.
Display your intricately detailed pumpkin on a mantel or porch for a sophisticated touch of seasonal style.
Chalkboard-Style Art on Black Pumpkin
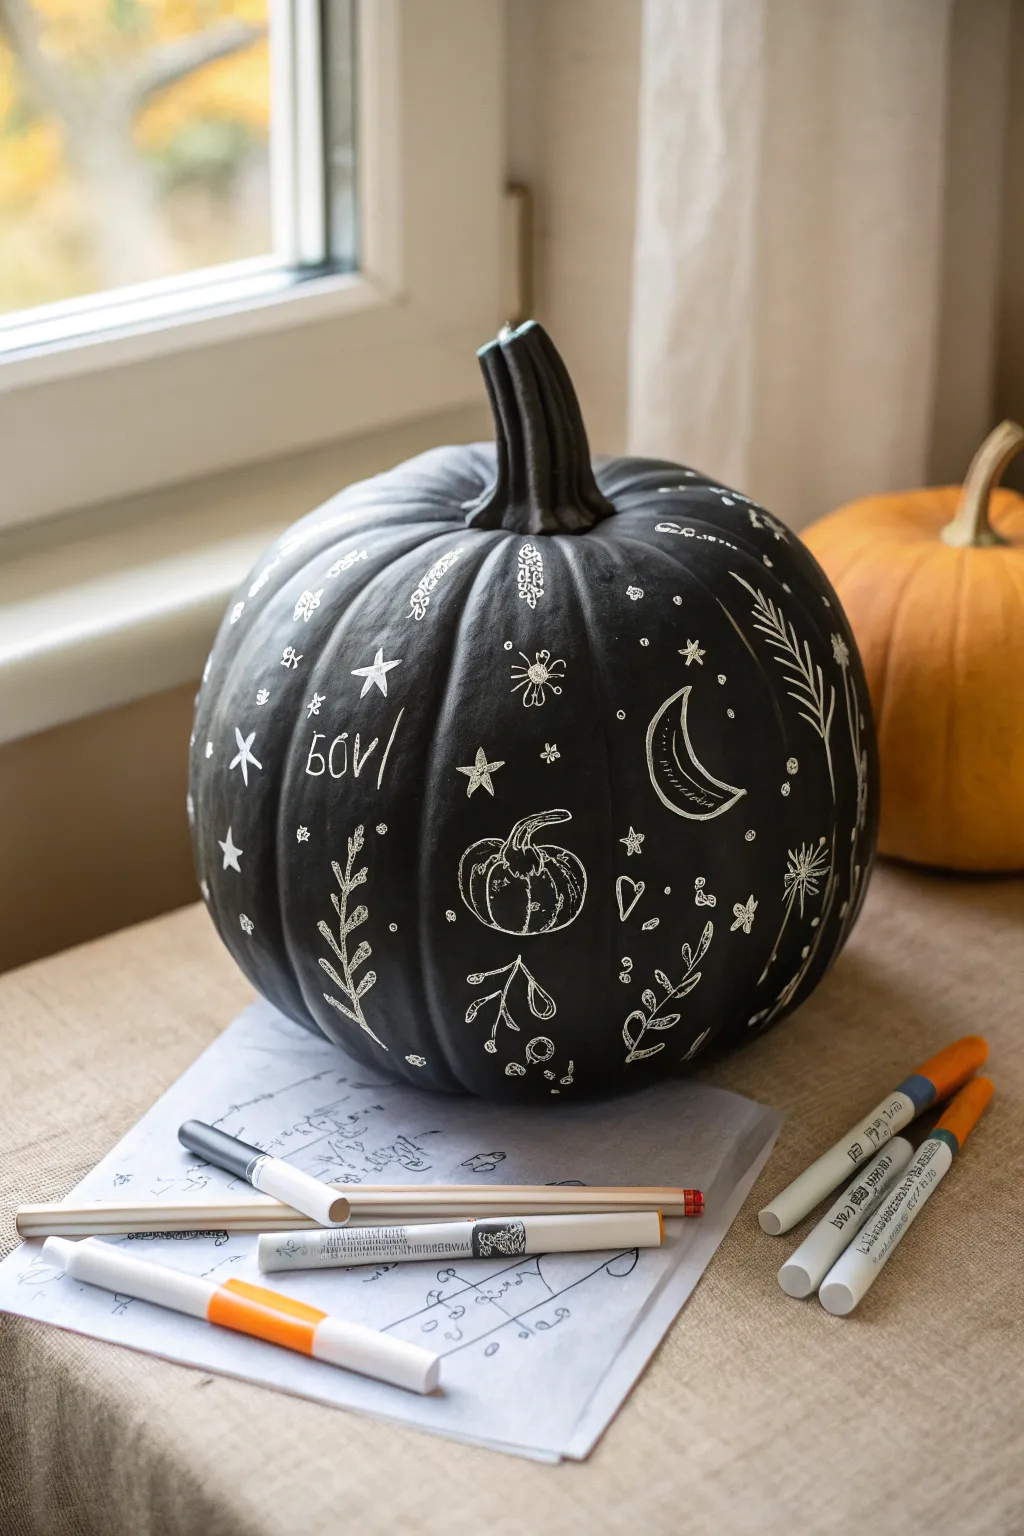
Transform a simple pumpkin into a mystical centerpiece with this chalkboard-inspired design. By combining a matte black base with delicate white line art, you’ll create a striking contrast that features celestial motifs and botanical doodles.
Detailed Instructions
Materials
- Medium-sized pumpkin (real or faux)
- Matte black acrylic paint or chalkboard spray paint
- Wide flat paintbrush (if using liquid paint)
- White paint pens (fine point and extra-fine point)
- Pencil and scrap paper for sketching
- Damp cloth or baby wipes
- Clear sealant spray (matte finish)
Step 1: Base Preparation
-
Clean surface:
Begin by thoroughly washing your pumpkin to remove any dirt or oils. Dry it completely with a towel to ensure the paint adheres properly. -
Protect the stem:
If you want to keep the stem natural, tape it off with painter’s tape. However, for the monochromatic look in the photo, you can leave it exposed to be painted black. -
Apply base coat:
Coat the entire pumpkin with matte black acrylic paint. Use long, vertical strokes following the pumpkin’s ribs for a smooth finish. -
Allow to dry:
Let the first coat dry completely. This usually takes about 20-30 minutes, depending on the thickness of the paint. -
Add second coat:
Apply a second layer of black paint to ensure full opacity and hide any orange spots still peeking through. Let this layer cure fully, ideally for an hour or more, to prevent the paint pens from scratching it later.
Step 2: Planning the Design
-
Sketch ideas:
Grab a sheet of paper and a pencil to practice your doodles. Mock up simple shapes like crescents, stars, twigs, and mini pumpkins to get comfortable with the forms. -
Map contrast points:
Look at your pumpkin and mentally divide it into sections. I like to identify a few ‘hero’ spots for larger icons like the moon or the central pumpkin drawing. -
Test the pen:
Press the nib of your white paint pen on a scrap piece of paper to get the ink flowing smoothly before touching the pumpkin.
Ink Flow Issues?
If the white pen stops flowing, don’t press harder on the pumpkin. Press the tip repeatedly on scrap paper to pump more ink into the nib.
Step 3: Drawing the Motifs
-
Draw the main icons:
Start with the largest elements to anchor your design. Draw a crescent moon on the right side and a small outlined pumpkin near the center using the fine point pen. -
Add botanical elements:
Sketch long, sweeping fern leaves or wheat stalks vertically. Let the curve of the leaves follow the natural curve of the pumpkin’s ribs for a harmonious look. -
Create mid-size fillers:
Fill the medium-sized gaps with simpler botanical sprigs, small leafy branches, and floating hearts. -
Detail the icons:
Go back into your main shapes and add texture. Put lines inside the crescent moon and vertical stripes on the mini pumpkin drawing to give them dimension. -
Scatter stars:
Draw various styles of stars throughout the empty spaces. Mix classic five-point stars with simple four-stroke sparkles and tiny dots. -
Incorporate text:
If desired, add a short word or phrase like ‘BOO!’ in a loose, handwritten style. Keep the lettering thin and casual to match the doodle aesthetic. -
Refine lines:
Switch to your extra-fine point pen to add tiny details, faint sparkles, or to sharpen the tips of your leaves. -
Correct mistakes:
If you slip up, quickly wipe the wet paint pen ink away with a damp cloth or cotton swab. If it has dried, simply touch it up with a distinct dab of black paint.
Create Depth
Vary your line weight. Press down slightly harder for main outlines and use a feather-light touch for interior details like star rays.
Step 4: Finishing Touches
-
Check density:
Step back and look at the overall balance. Add tiny dots or small circles to fill any areas that look too empty. -
Dry paint:
Allow the white ink to dry completely to avoid smudging. -
Seal result:
Lightly mist the pumpkin with a matte clear sealant spray to protect your artwork from chipping, especially if it will be displayed outdoors.
Place your mystical creation near a window or on a porch to enjoy the high-contrast charm all season long
Pastel Ghosts and Tiny Stars
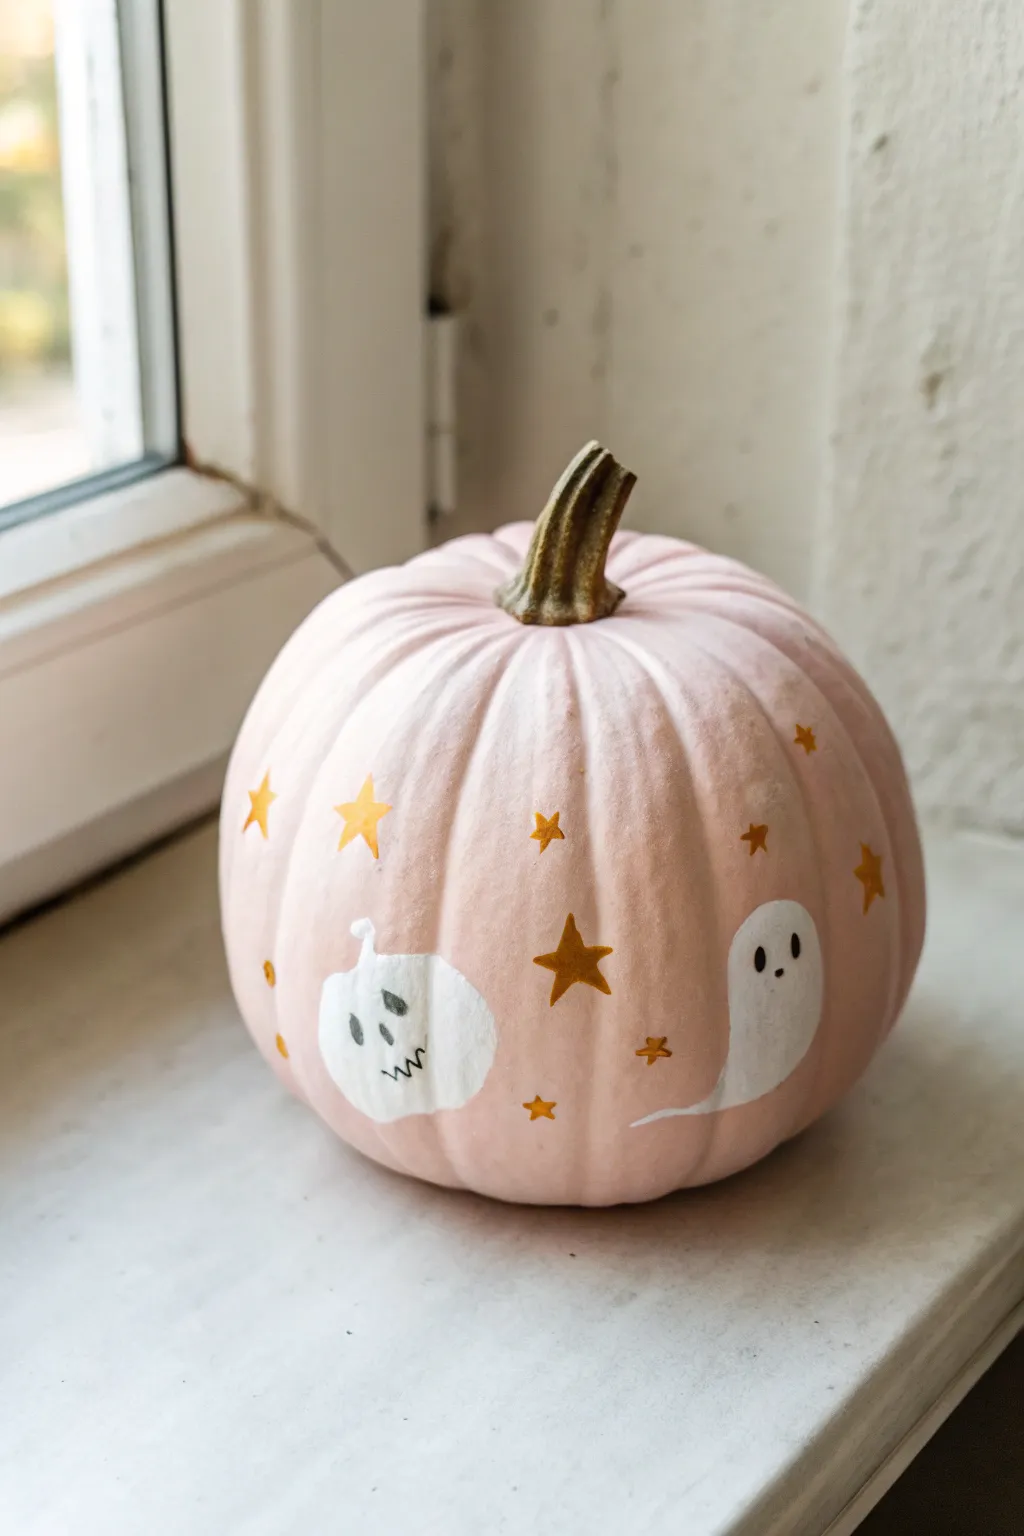
Transform a classic autumn gourd into a dreamy piece of decor with soft blush pinks and whimsical characters. This project combines a modern pastel aesthetic with classic Halloween motifs for a look that is sweet rather than scary.
Step-by-Step
Materials
- Small to medium round pumpkin (real or faux)
- Pale pink acrylic paint (matte finish)
- White acrylic paint
- Gold acrylic paint or gold paint pen
- Fine detail paintbrush
- Medium flat paintbrush
- Black fine-tip permanent marker or paint pen
- Pencil for sketching
- Painters tape (optional for protecting the stem)
- Matte sealant spray (optional)
Step 1: Base Coating
-
Clean surface:
Begin by wiping down your pumpkin with a damp cloth to remove any dirt or oils. If using a real pumpkin, ensure it is completely dry before proceeding. -
Protect stem:
Carefully wrap the stem with painter’s tape if you want to keep its natural brown color pristine. I prefer to do this to maintain that nice organic contrast. -
First coat:
Using your medium flat brush, apply the first layer of pale pink acrylic paint over the entire pumpkin surface. Don’t worry if it looks streaky at first. -
Dry and repeat:
Allow the first coat to dry for about 20 minutes. Apply a second or third coat until you have an opaque, smooth pastel pink finish. -
Remove tape:
Once the final pink coat is tacky but not fully dry, gently peel off the painter’s tape to reveal the clean stem.
Pro Tip: Opacity Hack
Does the pink show through your white ghost? Paint a layer of light grey first, let it dry, then paint the white on top. It acts as a primer and boosts brightness.
Step 2: Planning the Design
-
Light sketch:
Using a pencil very lightly, sketch the placement of your main figures. Draw a round pumpkin shape on the left and a classic ghost shape on the right. -
Star plotting:
Mark small ‘x’ spots or faint dots where you want your scattered stars to go. Aim for random spacing to keep it looking playful.
Step 3: Painting Motifs
-
Ghost body:
Load a small round brush with white acrylic paint. Fill in the ghost shape, extending a small curved tail at the bottom for movement. -
Pumpkin figure:
Paint the small pumpkin shape in white as well. You will likely need two coats of white to ensure the pink background doesn’t show through. -
Let it set:
Allow these white shapes to dry completely. If the paint is wet, your black details in the next phase will bleed. -
Star outlines:
While the white shapes dry, switch to your gold paint or gold pen. Draw five-pointed stars over your plotted marks. -
Filling stars:
Fill in the stars with solid gold. Vary the sizes slightly—make some larger and some like tiny specks for a twinkling effect.
Level Up: 3D Sparkle
Before the gold paint on the stars dries, gently press a tiny gold sequin or a pinch of loose biodegradable glitter into the center of the larger stars.
Step 4: Fine Details
-
Ghost face:
Using a black paint pen or a very fine brush with black paint, add two small dots for eyes on the ghost. -
Pumpkin face:
Draw a face on the white pumpkin character. Add oval eyes, a small triangular nose, and a jagged ‘stitched’ mouth for a spooky touch. -
Character stems:
Add a tiny curlicue stem to the top of the white painted pumpkin using white paint or a fine white pen. -
Clean up:
Check for any smudges or uneven edges. You can use the base pink color to touch up the edges of your white figures if needed. -
Sealing:
Once absolutely everything is dry (give it an hour or so), lightly mist with a matte sealant spray to protect your artwork.
Now you have a charming, customized pumpkin that brings a soft glow to your autumn display
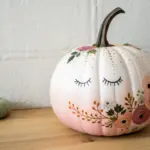
Elegant Floral Vine Pumpkin

Transform a simple white pumpkin into an elegant piece of fall decor inspired by vintage botanical illustrations. The delicate stems and wildflowers create an organic, airy look that feels both sophisticated and natural.
Step-by-Step Tutorial
Materials
- Faux white pumpkin (or a real ‘Casper’ variety)
- Fine liner brushes (sizes 0 and 00)
- Acrylic paints (olive green, forest green, muted slightly-brownish orange, burnt sienna)
- Pencil for light sketching
- Matte finish spray sealant
- Paper plate or palette
- Cup of water and paper towels
Step 1: Planning and Preparation
-
Clean surface:
Ensure your pumpkin is completely clean and dry. If using a real pumpkin, wash it gently with mild soap to remove dirt or oils that might repel paint. -
Visualize the flow:
Observe the pumpkin’s natural ribs. You want your vines to grow vertically, following these curves from the bottom up toward the stem. -
Sketch the primary stems:
Using a pencil very lightly, draw thin, wavy lines starting from the base. Let them meander naturally, stopping about two-thirds of the way up the pumpkin.
Step 2: Painting Greenery
-
Mix green tones:
Create two shades of green on your palette: a deeper forest green for shadows and older leaves, and a lighter olive green for fresh growth. -
Practice your strokes:
Before touching the pumpkin, practice creating thin lines on scrap paper with your liner brush. The key is using the very tip of the brush with thinned paint. -
Paint main stems:
Go over your pencil sketches with the olive green paint. Keep the pressure light to maintain a delicate, thread-like appearance. -
Add side branches:
Paint tiny offshoot branches coming from the main stems. Vary the angles—some pointing up, some slightly curved down. -
Paint broad leaves:
For the larger leaves shown near the bottom, paint an oval outline first, then fill it in with a wash of watered-down olive green to mimic a watercolor effect. -
Add leaf details:
Once the broad leaves are dry, use your finest brush and the darker forest green to add a central vein and delicate outlining. -
Paint fern-like sprigs:
On different stems, create feathery foliage by making tiny, quick dashes outward from the stem, resembling dill or fennel leaves.
Clean Lines Only
If your lines look shaky or thick, your paint is likely too heavy. Thin acrylics with a drop of water until they have an ink-like consistency for smoother flow.
Step 3: Adding Floral Accents
-
Mix floral colors:
Combine your orange and burnt sienna to get a rustic, dried-flower color. It shouldn’t be too bright; think ‘autumn spice’ rather than ‘traffic cone orange.’ -
Dot the blossoms:
At the ends of your finer branches, dab tiny clusters of dots. Keep these irregular to look like wild seeded clusters. -
Create structured flowers:
For the more defined flowers, paint small, three-petaled shapes or tiny trumpet shapes hanging from the stems. -
Add stem connections:
Use the green liner brush to connect these floating orange blossoms back to the main vine with microscopically thin lines.
Antique Effect
Mix a tiny amount of brown paint with water to create a glaze. Lightly brush this over the pumpkin’s grooves before sealing to give it an aged, vintage parchment look.
Step 4: Finishing Touches
-
Refine the lines:
Step back and look for any gaps. Add stray leaves or tiny buds to balance the composition. -
Erase guidelines:
If any pencil marks are still visible and the paint is fully dry, gently erase them. -
Seal the work:
In a well-ventilated area, spray a light coat of matte sealant over the pumpkin to protect your delicate painting from scratching or fading.
Place your botanical masterpiece on a linen runner for a sophisticated seasonal display
Metallic Accents on Neutral Pumpkins
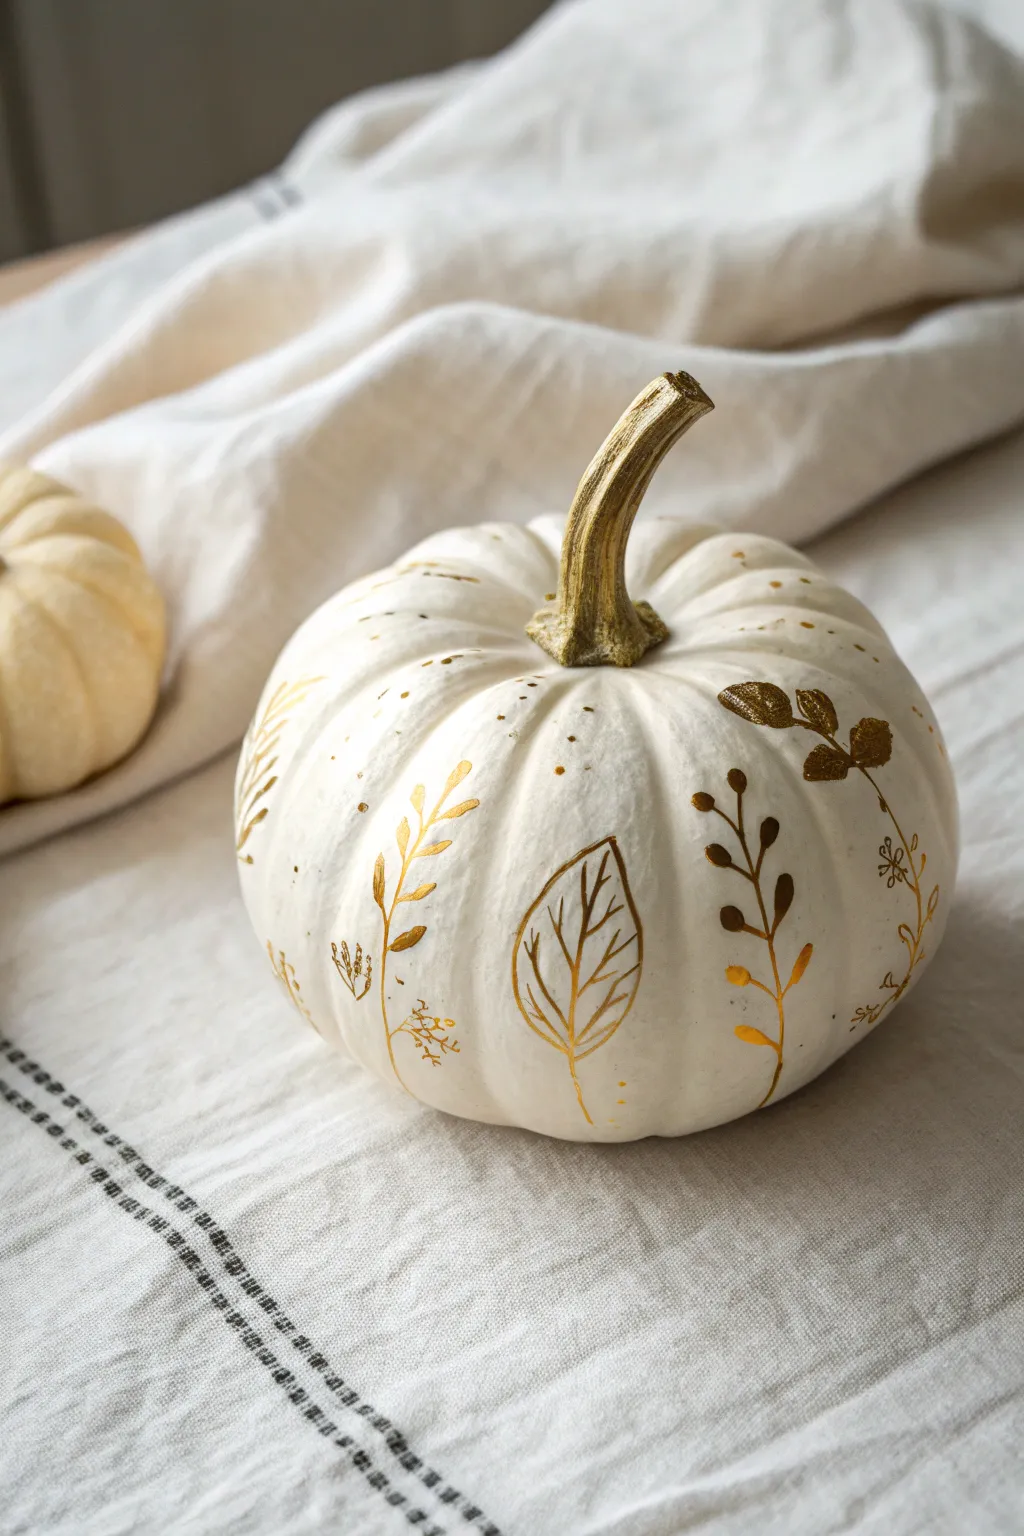
Elevate your autumn display with this sophisticated white pumpkin featuring delicate, hand-painted metallic foliage. The contrast between the matte white skin and the shimmering gold accents creates a graceful centerpiece that feels elegant without being overstated.
Step-by-Step Guide
Materials
- Small to medium white pumpkin (real or faux)
- White matte acrylic paint (if using a faux pumpkin or need to brighten a real one)
- Gold metallic paint pen (fine tip)
- Gold metallic paint pen (medium tip)
- Gold leaf paint or liquid gilding (optional for stem)
- Small paintbrush
- Pencil (optional)
- Clear matte sealant spray
- Soft cloth
- Rubbing alcohol
Step 1: Preparation
-
Clean the surface:
Before adding any paint, wipe the entire surface of your pumpkin with a soft cloth dampened with rubbing alcohol. This removes oils and dirt, ensuring the metallic ink adheres properly. -
Assess the color:
If your pumpkin is a natural off-white or has blemishes you want to hide, apply a base coat of matte white acrylic paint using a sponge brush for an even finish. -
Dry completely:
Allow the pumpkin to dry fully if you applied a base coat. It should be dry to the touch and not tacky before you begin the design phase.
Ink Flow Tip
Store your gold paint pens tip-down for 15 minutes before starting. Shake vigorously and test the flow on a scrap piece of paper to ensure the metallic pigment is fully mixed.
Step 2: Stem Detailing
-
Isolate the stem area:
Clean around the base of the stem carefully to ensure you have a neat starting point for your painting. -
Base coat the stem:
Using a small brush, apply a light coat of gold metallic paint or liquid gilding to the entire stem. Start from the very tip and work your way down to the base. -
Feather the base:
Where the stem meets the pumpkin skin, feather the gold paint slightly outward onto the top of the pumpkin ridges. This creates a natural, intentional transition rather than a stark line. -
Enhance the texture:
While the paint is wet, you can dab a dry brush over the stem to highlight the natural grooves and ridges, giving it an organic, aged metal look. -
Let the stem set:
Allow the gilded stem to dry completely. Since liquid gilding can be potent, I prefer to do this in a well-ventilated area.
Step 3: Designing the Foliage
-
Plan your placement:
Visualize three to five main focal points around the pumpkin’s circumference. You want the designs to follow the natural vertical ribs of the pumpkin. -
Sketch lightly:
If you aren’t confident freehanding, use a pencil to very lightly sketch the main stems of your botanical designs. Keep the lines faint so they don’t show through the gold. -
Draw main stems:
Using the medium-tip gold paint pen, draw the primary vertical stems. Follow the curve of the pumpkin, allowing the line to wave naturally rather than being perfectly straight. -
Add leave outlines:
Switch to the fine-tip pen to draw the outlines of the leaves. Vary the shapes using simple ovals, teardrops, and lance shapes to create visual interest. -
Draw internal veins:
Inside the larger leaf outlines, use your finest tip to sketch delicate veins. A single center line with angled offshoots adds realistic detail. -
Create solid leaves:
For contrast, fill in some of the smaller leaves completely with the gold ink. This mix of outline-only and solid shapes gives the design depth. -
Add berry accents:
Draw small clusters of dots or circles near the tops of some stems to represent berries or flower buds. Vary the size of the dots for a more organic feel. -
Include dainty filler:
interspersed between the main branches, draw tiny sprigs or single fern-like lines to fill negative space without cluttering the design. -
Refine the gold:
Go back over any lines that look too thin or translucent. A second pass with the paint pen often makes the metallic finish pop much more vibrantly.
Level Up: Texture
For a 3D effect, use a dimensional fabric paint or “puff paint” in gold for the berries, or apply small dabs of craft glue and sprinkle fine gold glitter over wet ink areas.
Step 4: Finishing Touches
-
Check for smudges:
Inspect the pumpkin for any accidental hand prints or smudged ink. You can often gently scrape away small mistakes with a craft knife once the ink is dry. -
Seal the work:
To protect your design, lightly mist the pumpkin with a clear matte sealant spray. Do this from a distance to avoid soaking the delicate ink.
Place your gilded creation on a linen runner or a wooden tray to let the metallic details catch the light beautifully
Splatter Paint Party Pumpkin
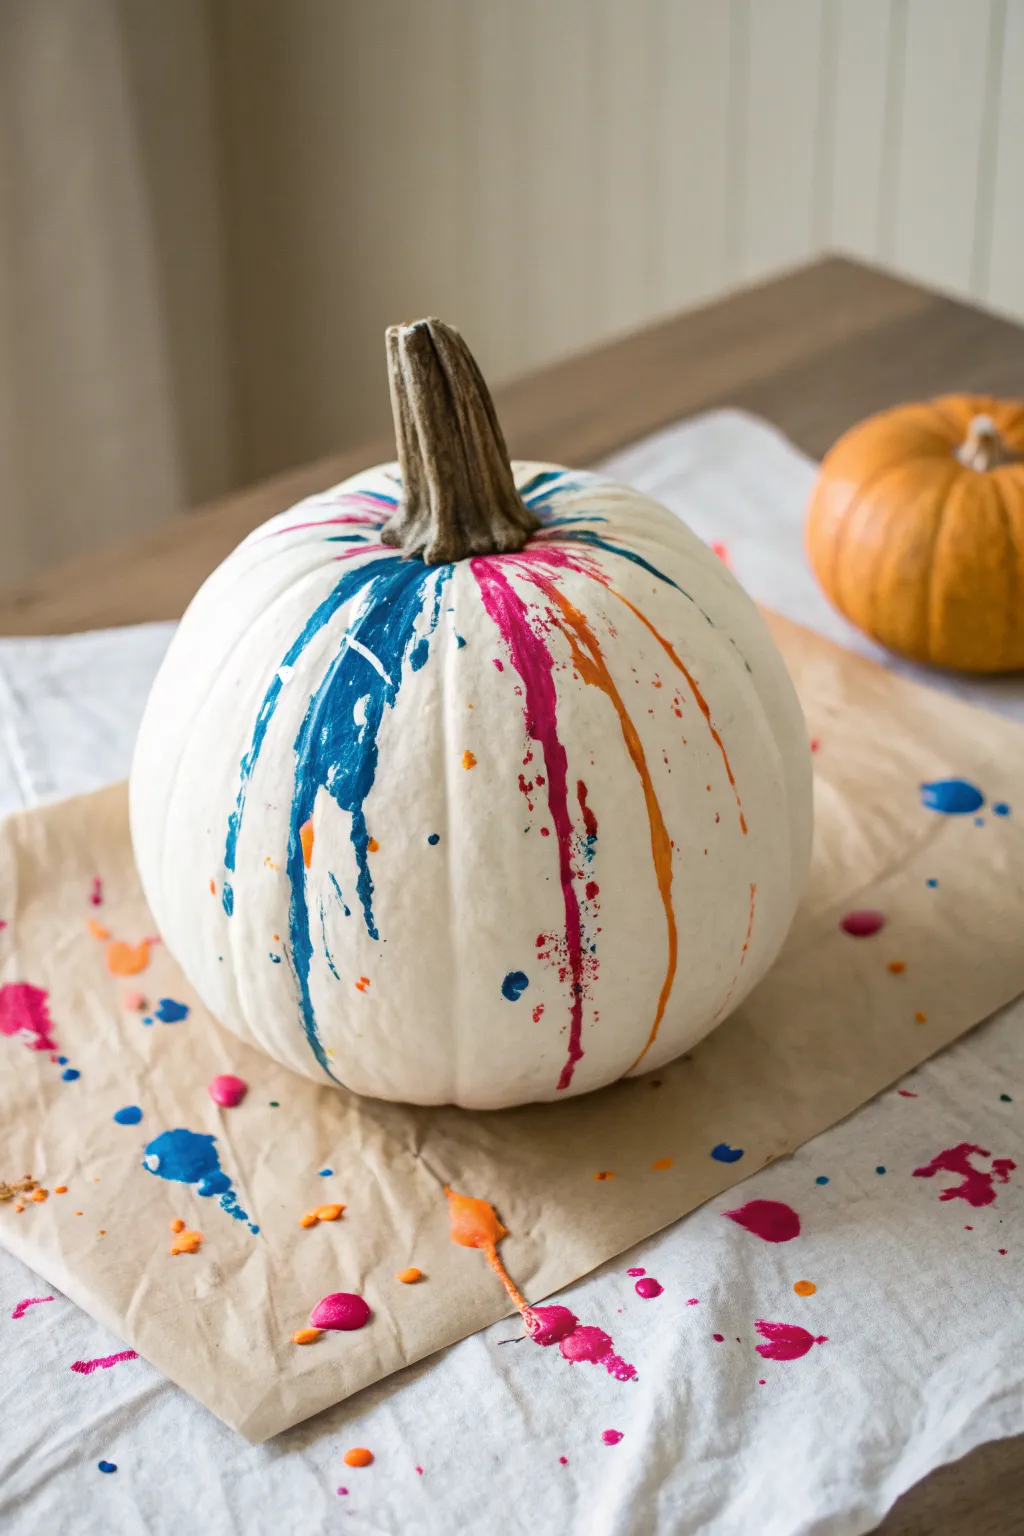
Bring an artistic explosion of color to your fall decor with this vibrant splatter paint pumpkin. The contrast of bold blue, hot pink, and orange drips against a crisp white background makes for a modern and playful centerpiece.
Step-by-Step
Materials
- Medium-sized pumpkin
- Matte white acrylic craft paint
- Blue acrylic paint (bright cobalt)
- Pink acrylic paint (magenta/fuchsia)
- Orange acrylic paint (bright tangerine)
- Wide foam brush or large flat paintbrush
- Small round paintbrush
- Water cups
- Butcher paper or newspaper (for surface protection)
- Disposable plate or palette
- Painter’s tape (optional)
Step 1: Preparation and Base Coat
-
Clean the surface:
Begin by wiping down your pumpkin with a damp cloth to remove any dirt or oils. Dry it thoroughly with a paper towel to ensure the paint adheres properly. -
Protect your stem:
If you want to keep the natural look of the stem like in the image, carefully wrap it with painter’s tape. I find this much easier than trying to paint around it later. -
Prepare your workspace:
This project gets messy by design. Lay down a generous sheet of butcher paper or newspaper to catch stray drips and splatters. -
Apply the first white coat:
Using a wide foam brush or large flat brush, apply a coat of matte white acrylic paint over the entire pumpkin. -
Let it dry completely:
Allow the first coat to dry for at least 30 minutes. The paint should feel dry to the touch before proceeding. -
Add a second coat:
For a truly opaque, solid white base, apply a second layer of white paint. Brush in the direction of the pumpkin’s ribs for a smoother finish. -
Remove tape:
Once the white base is fully dry, carefully peel off the painter’s tape from the stem.
Step 2: Creating the Drips and Splatters
-
Mix the blue paint:
Squeeze a dollop of cobalt blue paint onto your palette. Add a very small amount of water to thin it slightly; you want a consistency like heavy cream so it drips naturally. -
Apply the blue drips:
Load a small round brush with the thinned blue paint. Press the brush heavily at the top of the pumpkin, right near the stem base, and let gravity pull the paint down a groove. -
Control the flow:
If the paint isn’t running enough, gently guide it down the side with the tip of your brush, mimicking a natural drip. -
Mix the pink paint:
Clean your brush thoroughly and repeat the mixing process with your magenta pink paint, thinning it just slightly with water. -
Position the pink drips:
Apply the pink paint near the stem, choosing a spot adjacent to the blue but leaving some white space between them so the colors don’t muddy. -
Add the orange accents:
Prepare the orange paint similarly. Place these drips on the opposite side or in remaining gaps to balance the color distribution around the pumpkin. -
Create the splatter effect:
Dip your brush back into one of your colors. Hold the brush about 6 inches from the pumpkin surface. -
Flick the paint:
Use your finger to firmly flick the bristles toward the pumpkin creates tiny, random speckles. -
Repeat with all colors:
Alternate colors and flick from different angles. Focus some splatters low on the pumpkin and some high near the drips for a cohesive look. -
Inspect the paper:
Notice the colorful mess on your butcher paper? That’s half the fun. You can leave the pumpkin sitting on this splatter-filled paper for a styled display. -
Final drying time:
Because the drip sections are thicker than standard paint, allow the finished pumpkin to dry overnight in a safe place where it won’t be bumped.
Gravity Guide
If your drips are moving too slowly, gently tap the pumpkin on the table. The subtle vibration helps the paint slide down the curves naturally without brush marks.
Glow Up
Mix a tiny amount of glow-in-the-dark medium into your colored paints. Under a blacklight, your modern art pumpkin will transform into a spooky neon centerpiece.
Place your masterpiece on a table or porch to add a modern, artistic twist to the season
Melting Drip Paint Pumpkin

Transform a standard pumpkin into a striking piece of modern fall decor with this high-contrast drip technique. The bold black base creates a dramatic backdrop for creamy paint that appears to be slowly melting from the stem, evoking a spooky yet sophisticated vibe.
Step-by-Step Tutorial
Materials
- Medium-sized pumpkin (real or faux)
- Matte black acrylic paint
- Cream or off-white acrylic paint (slightly fluid consistency)
- Wide foam brush or flat paintbrush
- Small round paintbrush
- Spoon or squeeze bottle (for dripping)
- Painter’s tape (optional, for stem protection)
- Newspaper or drop cloth
- Clear sealant spray (matte finish)
Step 1: Setting the Stage
-
Clean the Surface:
Begin by wiping down your pumpkin with a damp cloth to remove any dirt or oils. If you are using a real pumpkin, ensure it is completely dry before moving on to painting. -
Protect the Stem:
If you want to keep the stem’s natural brown weathered look, carefully wrap it with painter’s tape. If you prefer a painted stem, you can skip this step, but the natural wood tone adds a nice third color element. -
Base Coat Application:
Squeeze out a generous amount of matte black acrylic paint. Using your wide foam brush, apply a smooth, even coat over the entire surface of the pumpkin. -
Fill the Crevices:
Pay special attention to the deep grooves and the underside. You may need to use the smaller brush to dab paint into textured spots so the original orange doesn’t peek through. -
Let it Dry:
Allow the first coat to dry completely. This usually takes about 20-30 minutes depending on your paint thickness. Apply a second coat if the coverage looks patchy.
Paint Consistency Pro-Tip
Mix 1 part pouring medium with 2 parts paint for the cream layer. This creates smoother, more elastic drips that won’t crack when they dry thick.
Step 2: The Melting Effect
-
Prepare the Drip Paint:
Mix your cream or off-white acrylic paint. I find that thinning it slightly with a few drops of water helps it flow better, but don’t make it too runny or it won’t hold the shape. -
Apply the Top Layer:
Using a spoon or a squeeze bottle, pour a puddle of the cream paint directly around the base of the stem. -
Initiate the Drips:
Gently push the paint over the ‘shoulders’ of the pumpkin using your spoon. Encourage it to flow down into the vertical grooves of the pumpkin. -
Control the Flow:
Some drips should be long, reaching near the bottom, while others should stop halfway. You can tilt the pumpkin slightly to help gravity guide the longer drips. -
Refine the Edges:
If the paint pools too much at the top, use a small brush to drag more of it down. The goal is an organic, irregular dripped look rather than perfect stripes. -
Add Splatter Details:
Dip a small brush in the cream paint and tap it lightly over the black areas to create tiny splatters or isolated droplets, adding to the messy, melting aesthetic. -
Dry Flat:
Let the pumpkin sit undisturbed on a flat, protected surface. Because the drip layer is thick, this stage will take significantly longer to dry—potentially overnight.
Step 3: Finishing Touches
-
Reveal the Stem:
Once the paint is fully dry to the touch, carefully peel away the painter’s tape from the stem. -
Touch Polish:
Inspect the stem area where the tape met the paint. If the line is too stark, use a small brush to touch up the cream paint right up to the stem base for a cleaner transition. -
Seal the Work:
Take the pumpkin outside or to a well-ventilated area. Spray a light, even coat of matte clear sealant over the entire project to protect the paint from chipping.
Level Up: Glow Effect
Mix glow-in-the-dark powder into your cream paint before dripping. In daylight it looks white, but at night the ‘melting’ sludge glows eerily green.
Now you have a beautifully eerie centerpiece ready to display on your porch or mantle
Galaxy Night-Sky Pumpkin
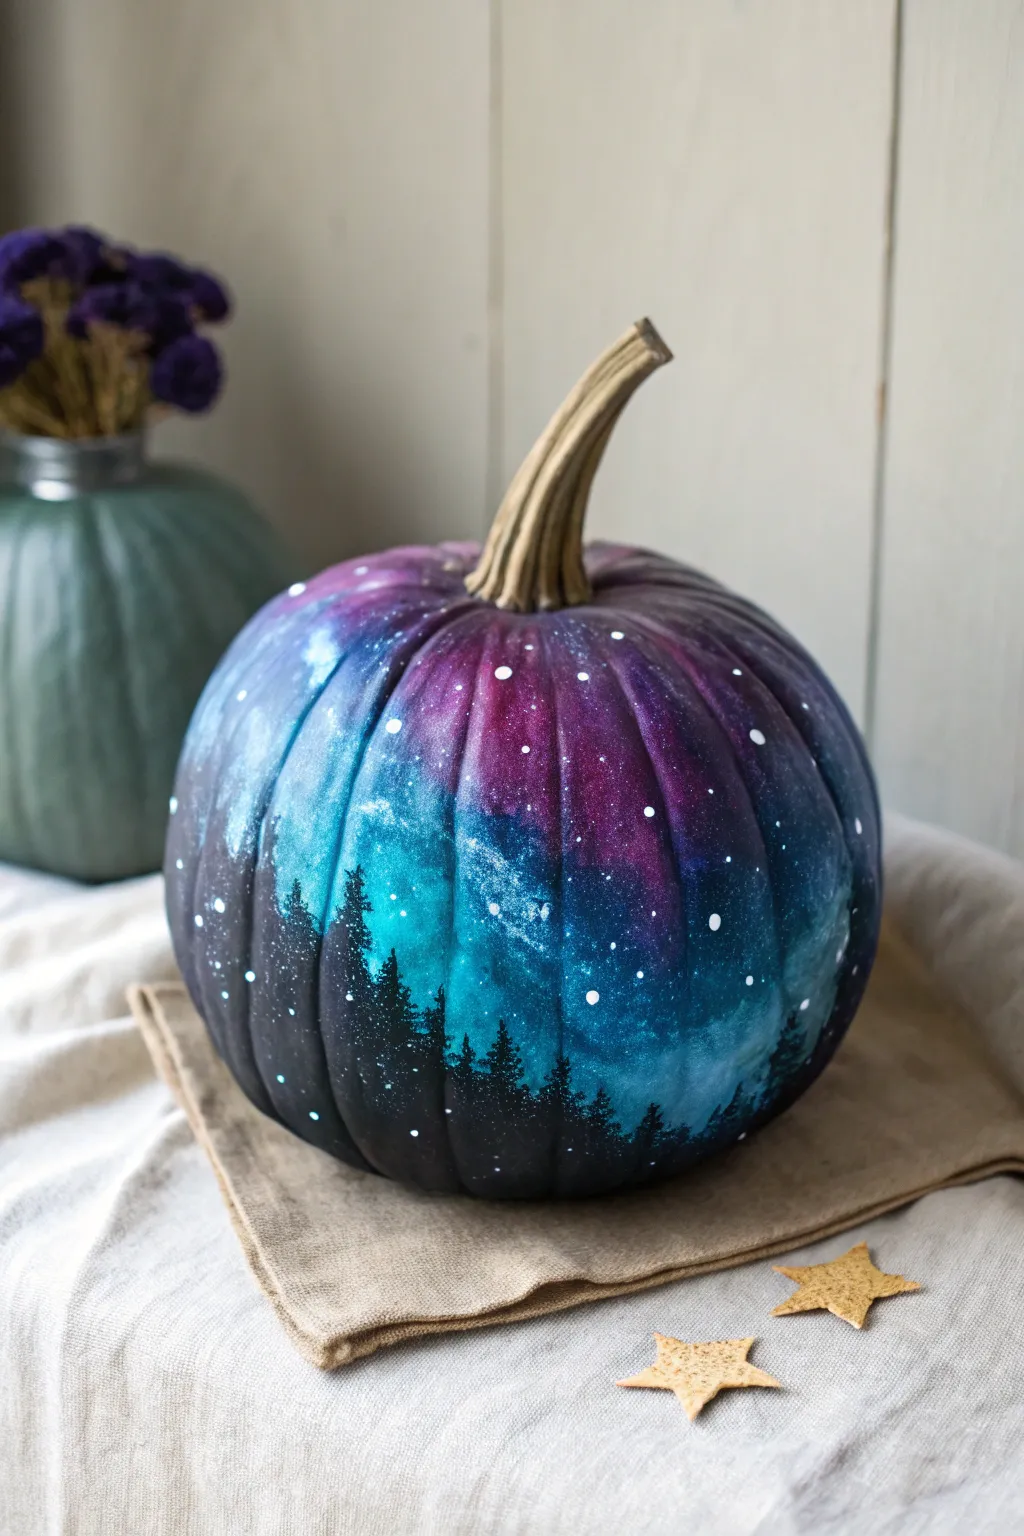
Transform an ordinary pumpkin into a window to the universe with this mesmerizing galaxy painting technique. By blending deep blues and purples with silhouette trees, you’ll create a dreamy, starry night scene that looks far more complex than it actually is.
How-To Guide
Materials
- Medium-sized pumpkin (real or faux)
- Black acrylic paint (matte)
- Dark blue, teal, purple, and magenta acrylic paints
- Titanium white acrylic paint
- Sponge applicators (makeup sponges or kitchen sponge pieces)
- Flat paintbrush (medium width)
- Fine detail paintbrush (liner brush)
- Old toothbrush or stiff bristle brush
- Cup of water and paper towels
- Newspaper or drop cloth
Step 1: Base and Background
-
Clean surface:
Begin by wiping down your pumpkin with a damp cloth to remove any dirt or oils. If you are using a real pumpkin, ensure it is completely dry before painting. -
Apply black base:
Coat the entire pumpkin with matte black acrylic paint using your flat brush. You want a solid, opaque foundation, so let the first coat dry and apply a second coat if the orange skin is still peeking through. -
Prepare sponge colors:
Squeeze out small amounts of dark blue, teal, purple, and magenta paint onto your palette. Dampen your sponge slightly—you want it moist but not dripping. -
Start the nebula:
Dip the sponge into the dark blue paint and dab it onto the pumpkin in random, cloud-like patches. Keep the edges soft and feathery rather than creating solid blocks of color. -
Blend purple hues:
Pick up some purple paint with a clean part of the sponge (or a new sponge) and dab it gently over parts of the blue and into new black areas. Overlap the colors while they are wet to create a seamless gradient. -
Add teal highlights:
Using the teal or lighter blue paint, sponge smaller, brighter sections in the center of your existing blue clouds. This adds depth and creates the glowing ‘heart’ of the galaxy effect. -
Intensify with magenta:
Spot-dab small touches of magenta near the purple areas for variety. Don’t cover too much of the black background; leaving negative space is crucial for the galaxy to look realistic. -
Soften harsh lines:
If any edges look too sharp, take a slightly damp, clean sponge and gently blur the transitions between the colors and the black base coat.
Muddy colors?
If your galaxy colors turn gray or muddy, you are blending too much while the paint is wet. Let the layers dry slightly between sponging different colors to keep them vibrant.
Step 2: Stars and Silhouette
-
Create distant stars:
Thin down a small amount of white paint with water until it has an inky consistency. Dip an old toothbrush into this mixture. -
Splatter technique:
Hold the toothbrush a few inches from the pumpkin and run your thumb across the bristles to flick tiny specks of white paint over the galaxy areas. Test this on paper first to control the spray. -
Paint larger stars:
Use the fine detail brush or the handle end of a paintbrush dipped in undiluted white paint to add distinct, larger stars. Place these sporadically, focusing on the brighter galaxy clusters. -
Start the forest:
Switch back to black paint. Using a small brush, paint an uneven, jagged horizon line around the bottom third of the pumpkin. This establishes the ground level for your forest. -
Paint tree trunks:
Pull thin vertical lines upward from your black horizon line. Vary the heights, making some taller to reach up into the ‘sky’ portion of the design. -
Add pine branches:
Starting at the top of a trunk line, use a stippling motion with your small brush to tap tiny, downward-angled branches. Widen your tapping motion as you move down the trunk to create a conical pine tree shape. -
Fill the forest:
Repeat the tree process around the entire base. I like to overlap trees slightly to make the forest look dense and realistic. -
Final touches:
Once the trees are dry, inspect your galaxy. If you lost too many stars behind the trees, you can carefully add a few more white dots peeking through the branches.
Glow Up
Mix a tiny bit of glow-in-the-dark medium into your white star paint. Your galaxy will look great during the day, but will truly come alive and shine once the lights go out.
Display your finished masterpiece in a spot with low light to really let those galaxy colors pop


Have a question or want to share your own experience? I'd love to hear from you in the comments below!